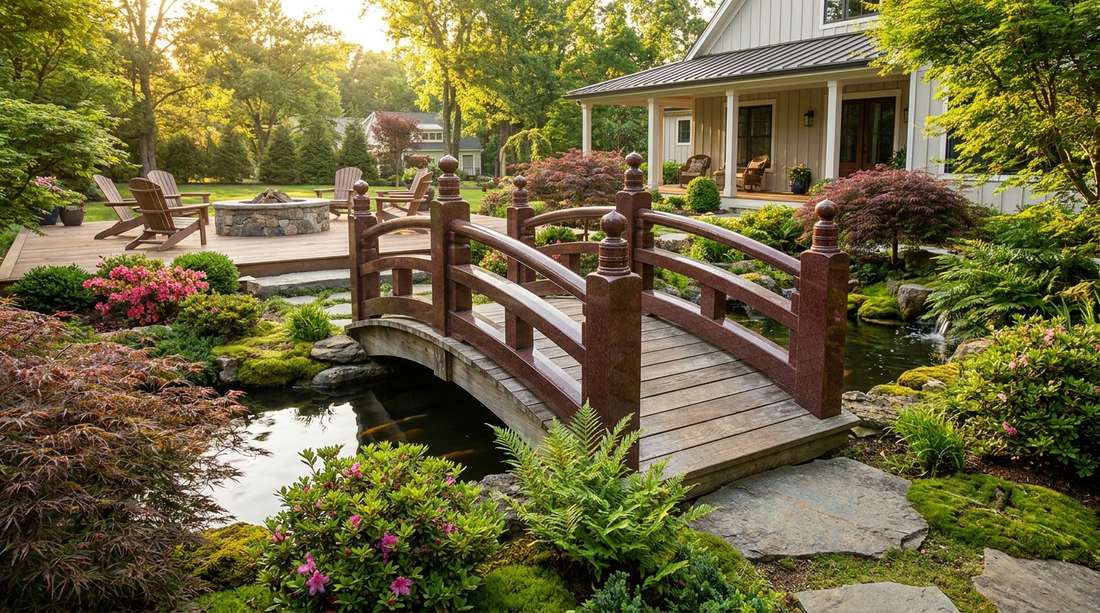
A properly placed japanese garden bridge instantly elevates ordinary backyards into premium Zen retreats. Discover exact material breakdowns and budget-friendly sourcing tricks for a flawless finish. Stop wasting money on weak materials and build something timeless.
Design Snapshot: Key Principles
- Symbolic Journey: Bridges represent transition from the mundane world to sacred spaces, encouraging mindfulness with each step
- Material Harmony: Wood, stone, and earth-covered bridges each bring distinct textures that dialogue with surrounding plantings
- Intentional Curvature: Arched profiles ward off negative energy while flat spans create horizontal calm across water features
- Color as Language: Red hues signal protection and wisdom, while natural wood tones emphasize unity with the landscape
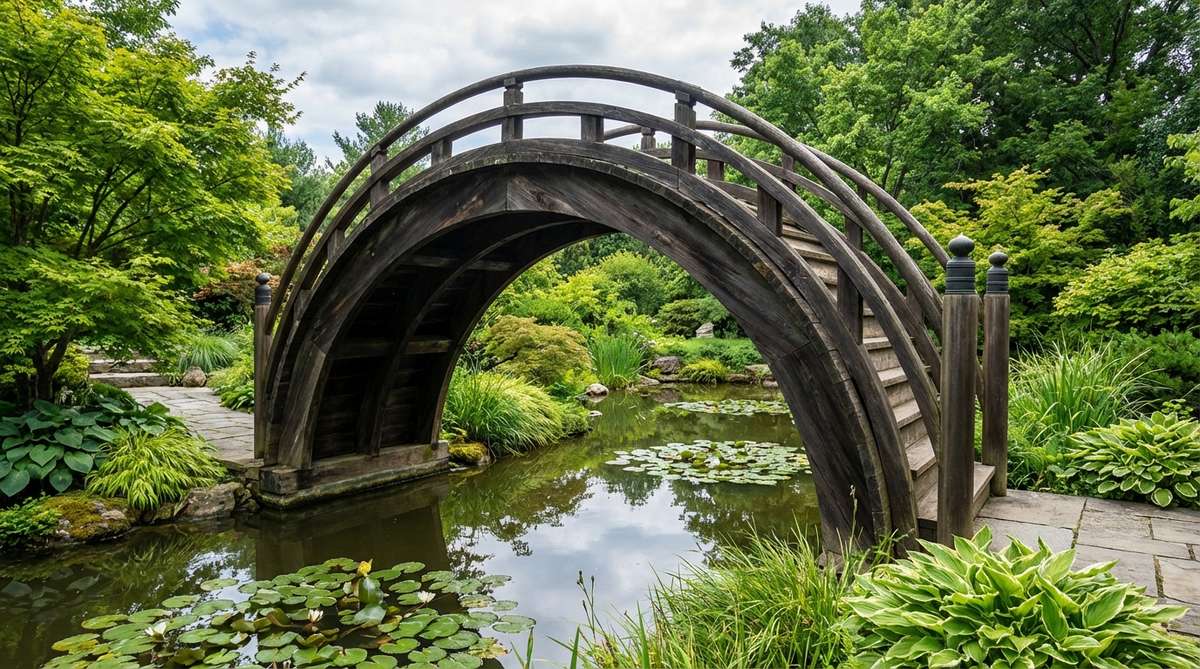
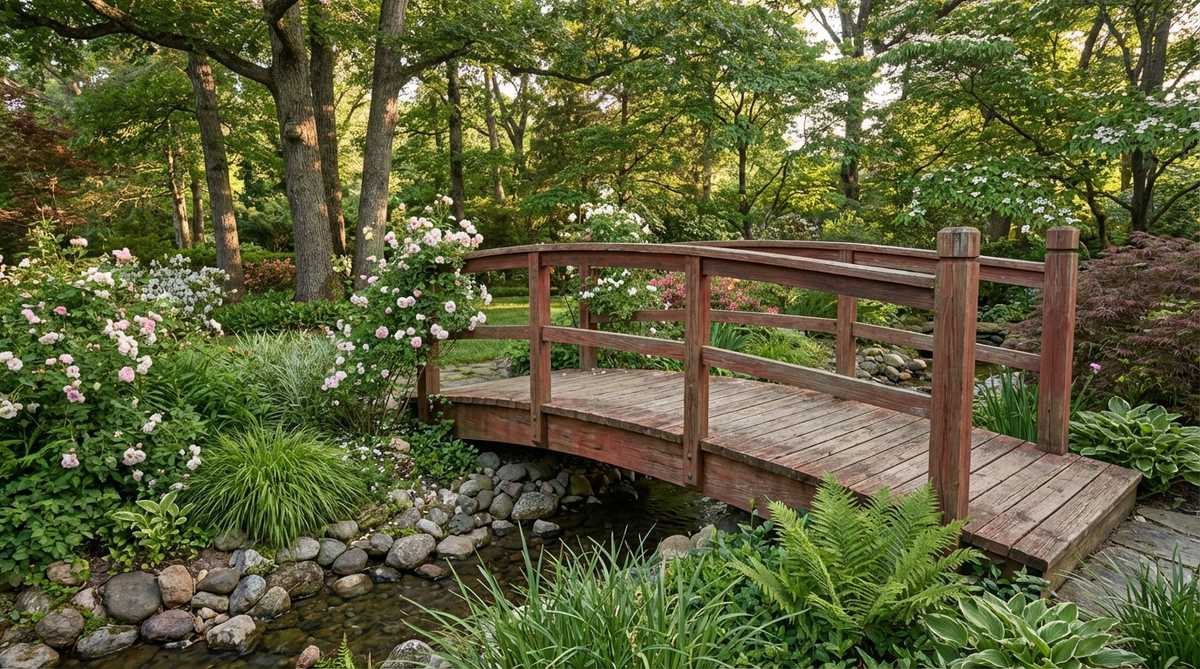
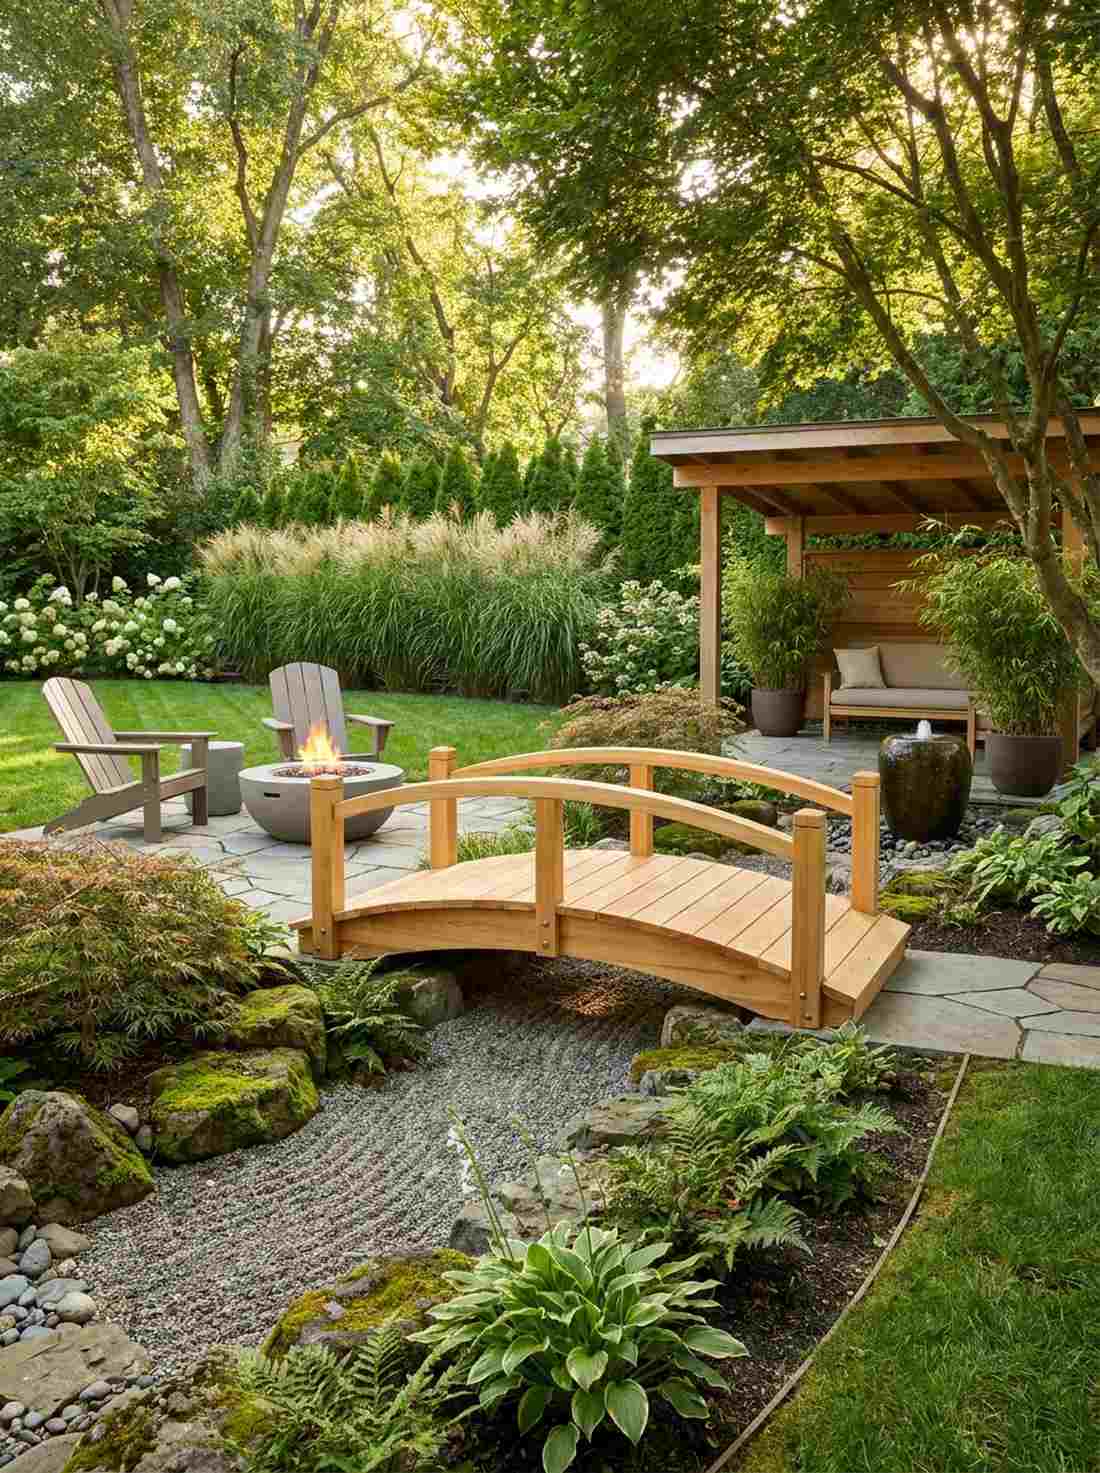
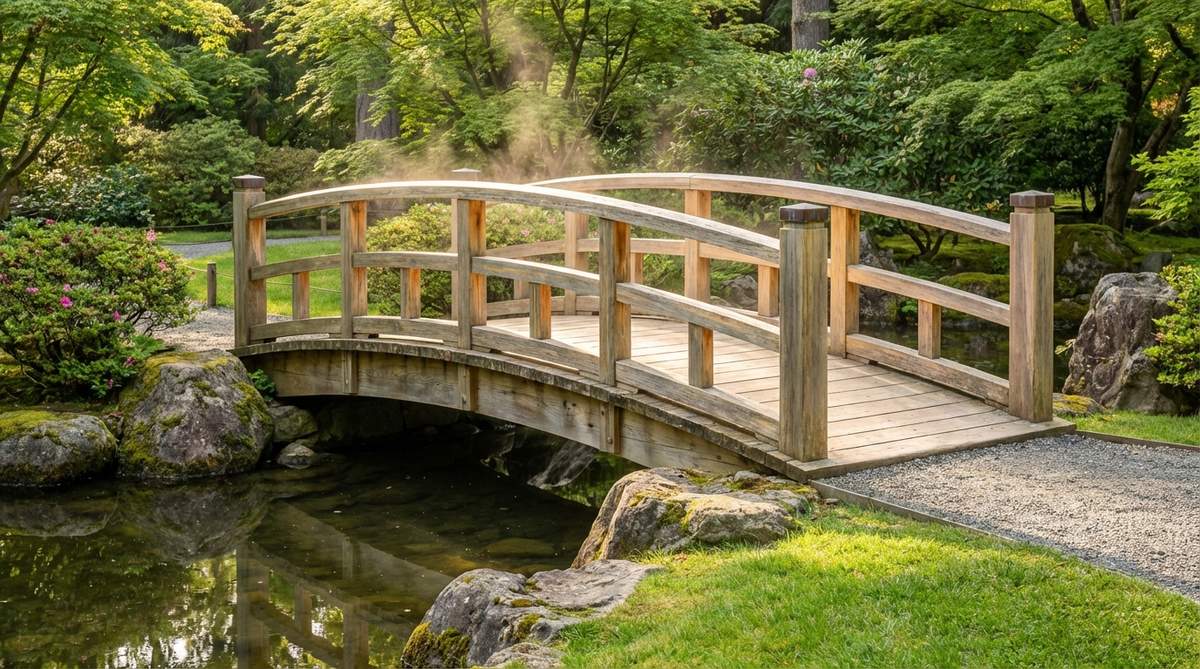
Classic Arched Structures
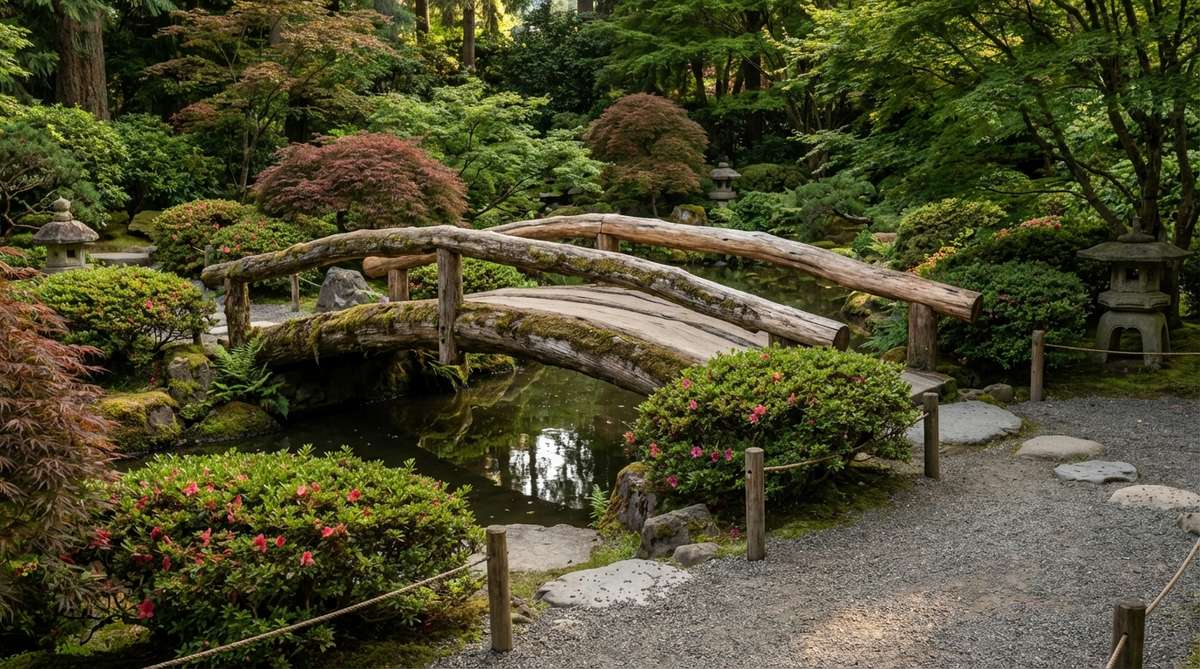
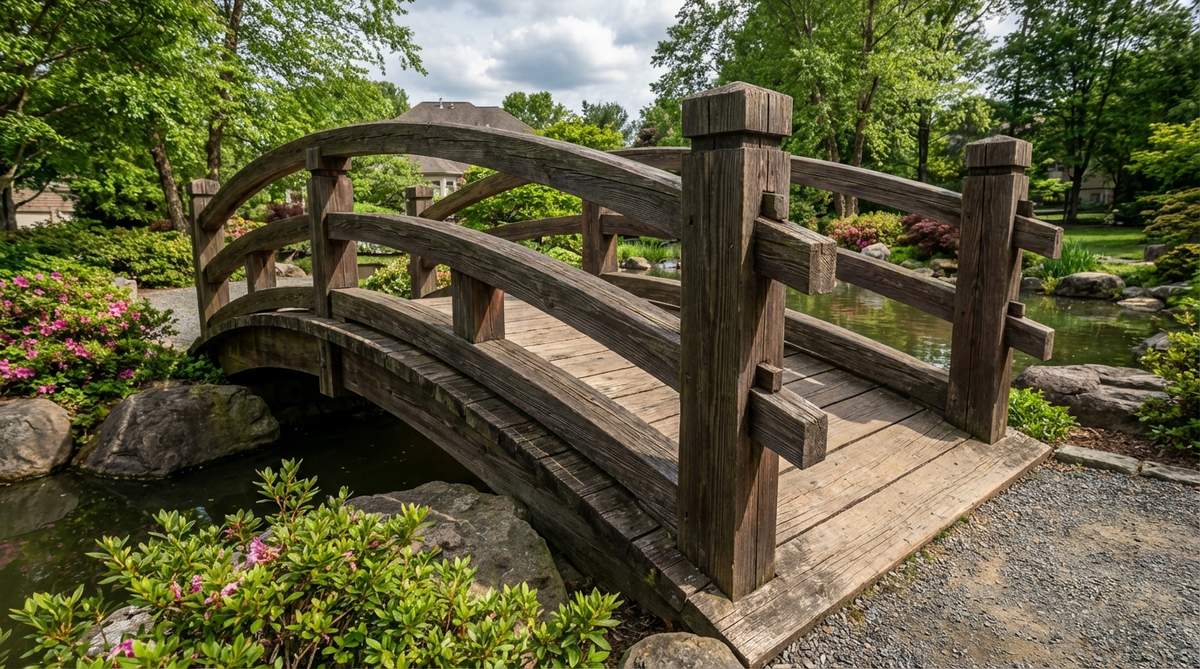
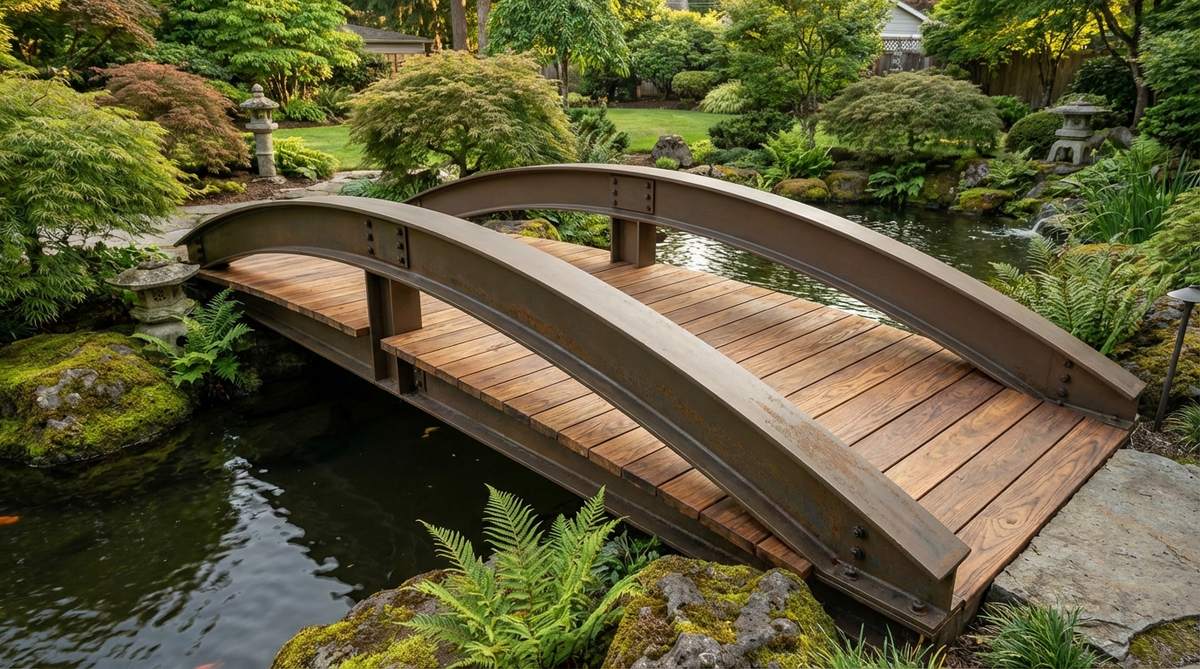
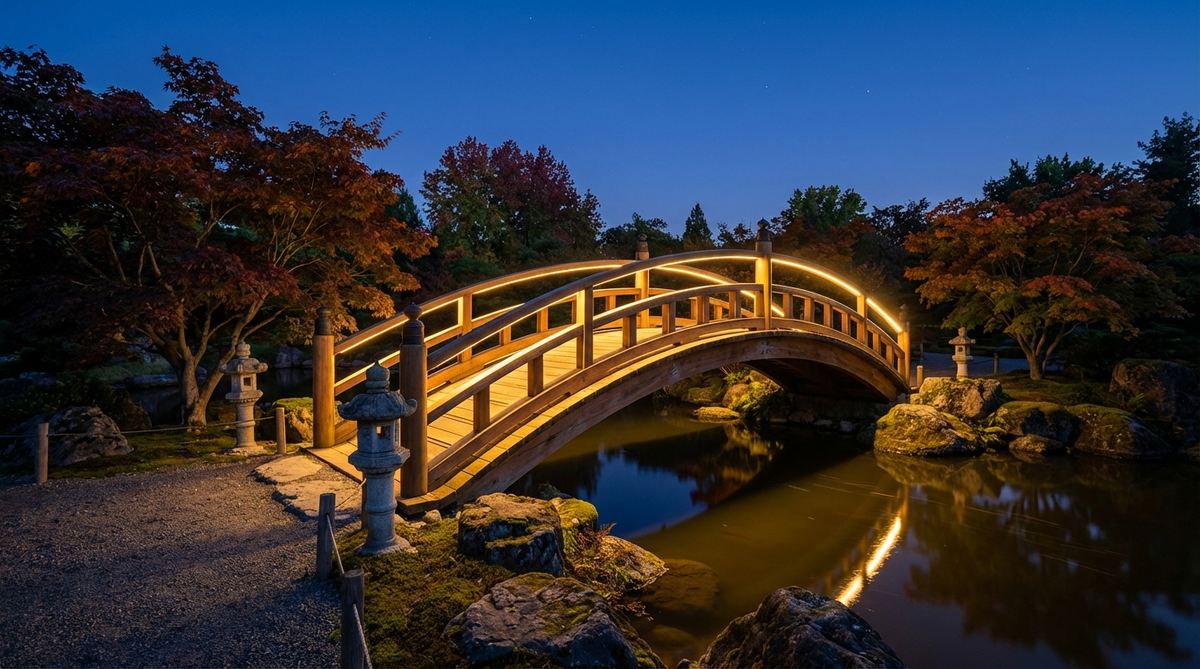
Arched bridges embody the essence of Japanese garden philosophy through their drum-like silhouettes. The steep incline forces visitors to slow their pace and engage with the crossing ritual. Designers use these profiles to create focal points that command attention while maintaining balance with horizontal water planes.
1. Taiko-Bashi Drum Bridge
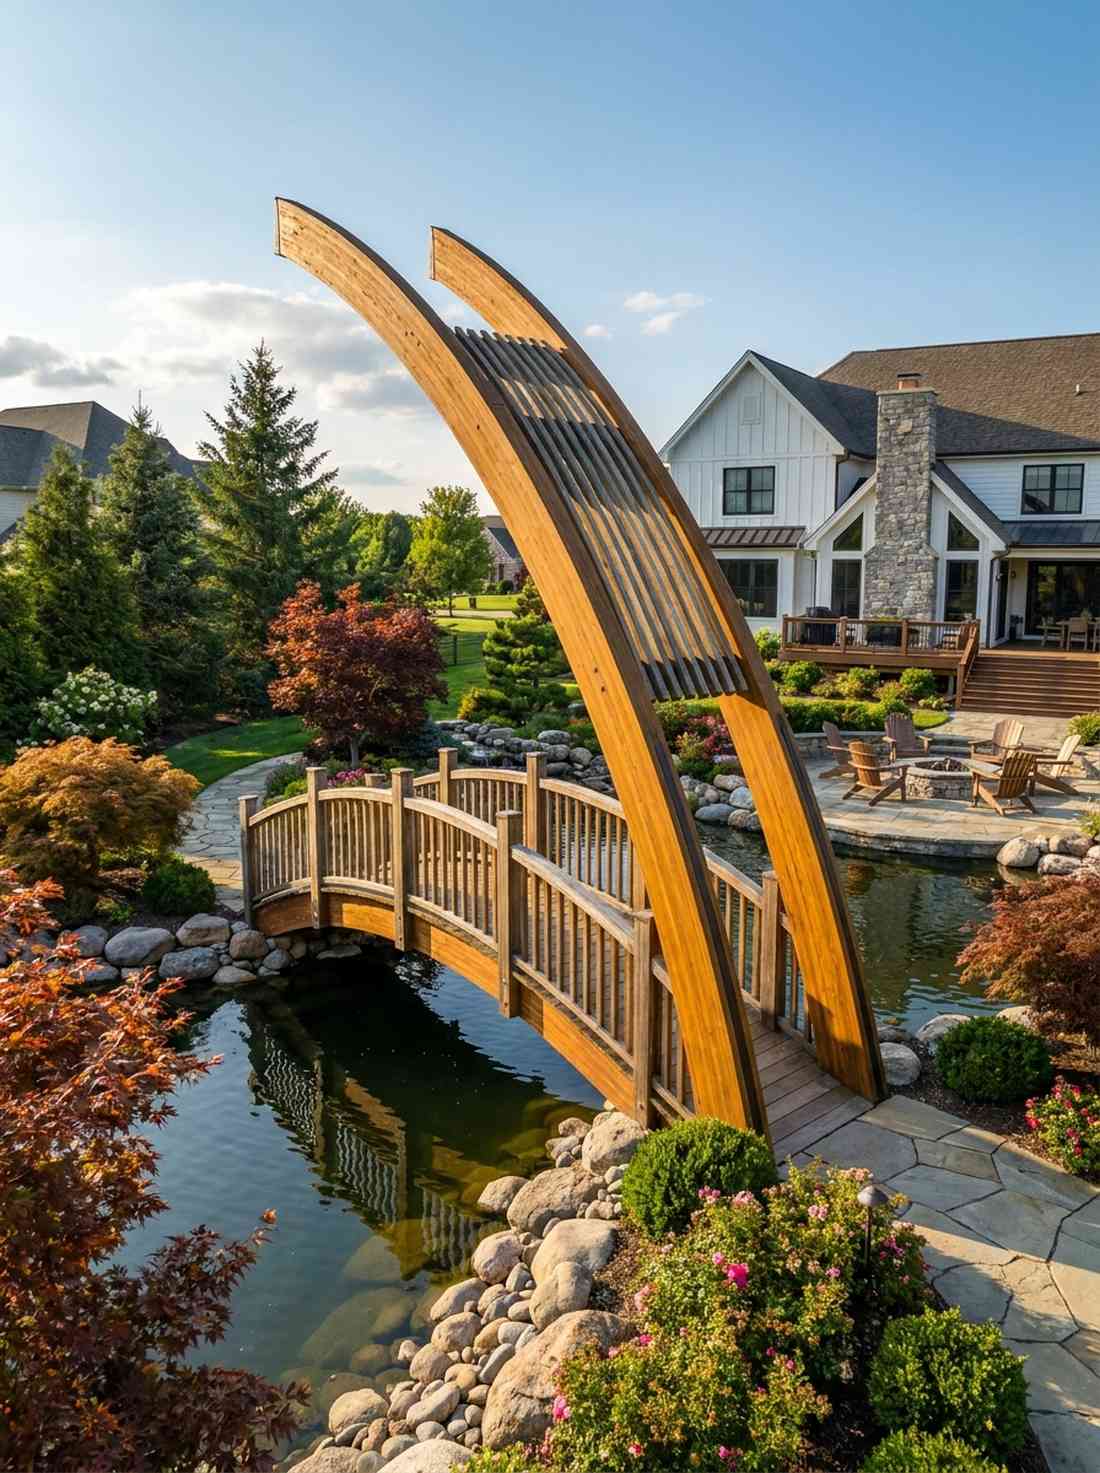
This steep curve feels like a gateway to a spiritual realm, creating a striking silhouette against the sky. As a dramatic pond crossing, it works exceptionally well for large residential estates looking to establish a monumental focal point.
While many assume this requires custom carpentry, utilizing pre-curved laminated beams delivers a surprisingly premium look at a fraction of the effort. Sneak in heavy-duty landscaping brackets beneath the decking to ensure massive load-bearing capacity without compromising the authentic visual.
You can expect to invest around $300–$600 for high-quality laminated timber setups. Pin this to your major backyard renovation board for when you’re ready to tackle the big projects.
- Key Materials: Curved laminated timber beams, weather-treated balusters
- Vibe / Style: Traditional temple grandeur
- Difficulty: Advanced carpentry required
- Budget Breakdown: Arch Support: $250 | Hardwood Decking: $200 | Fasteners: $50
- Creator’s Tip: Use vertical balusters spaced exactly 4 inches apart to visually emphasize the ascent.
- Smart Sourcing: Pre-curved structural glulam beams and marine-grade stainless steel lag screws (bulk pack).
2. Moon Bridge Reflection

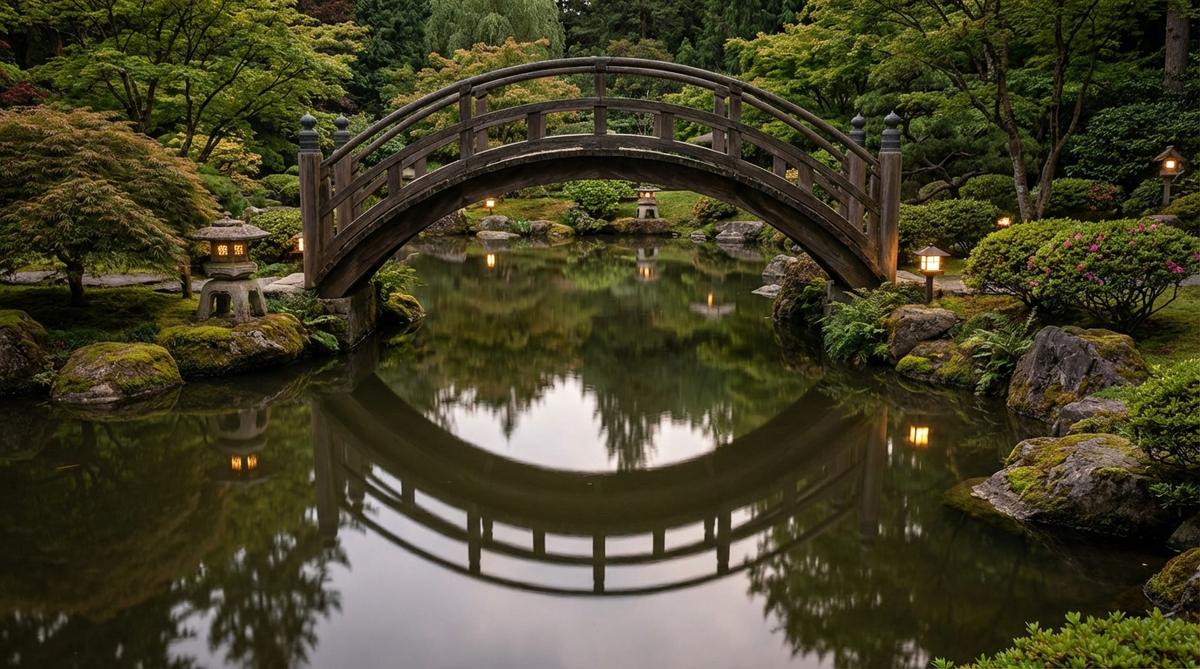
When calm waters align, this design feels like capturing the moon right in your backyard. Perfect as a circular reflection garden feature, it brings unparalleled tranquility to medium-sized koi ponds.
Achieving that perfect optical illusion is notoriously tricky, but painting the underbelly with a dark, waterproof sealant guarantees a sharper, mirror-like reflection in the water. Integrating high-end miniature garden supplies around the base further anchors the dreamy, continuous circle aesthetic.
Pulling off this optical masterpiece usually costs between $200 and $450 depending on wood choice. It’s a weekend build that completely changes the evening vibe of your yard.
- Key Materials: Dark-stained cedar, waterproof pond sealant
- Vibe / Style: Optical Zen masterpiece
- Difficulty: Moderate alignment skills
- Budget Breakdown: Wood Materials: $180 | Dark Stains: $45 | Lighting: $60
- Creator’s Tip: Position the bridge perfectly perpendicular to your patio seating for the best reflection angle.
- Smart Sourcing: UV-blocking dark espresso wood stain and submersible LED warm-white pond lights.
3. Gentle Arc Garden Crossings
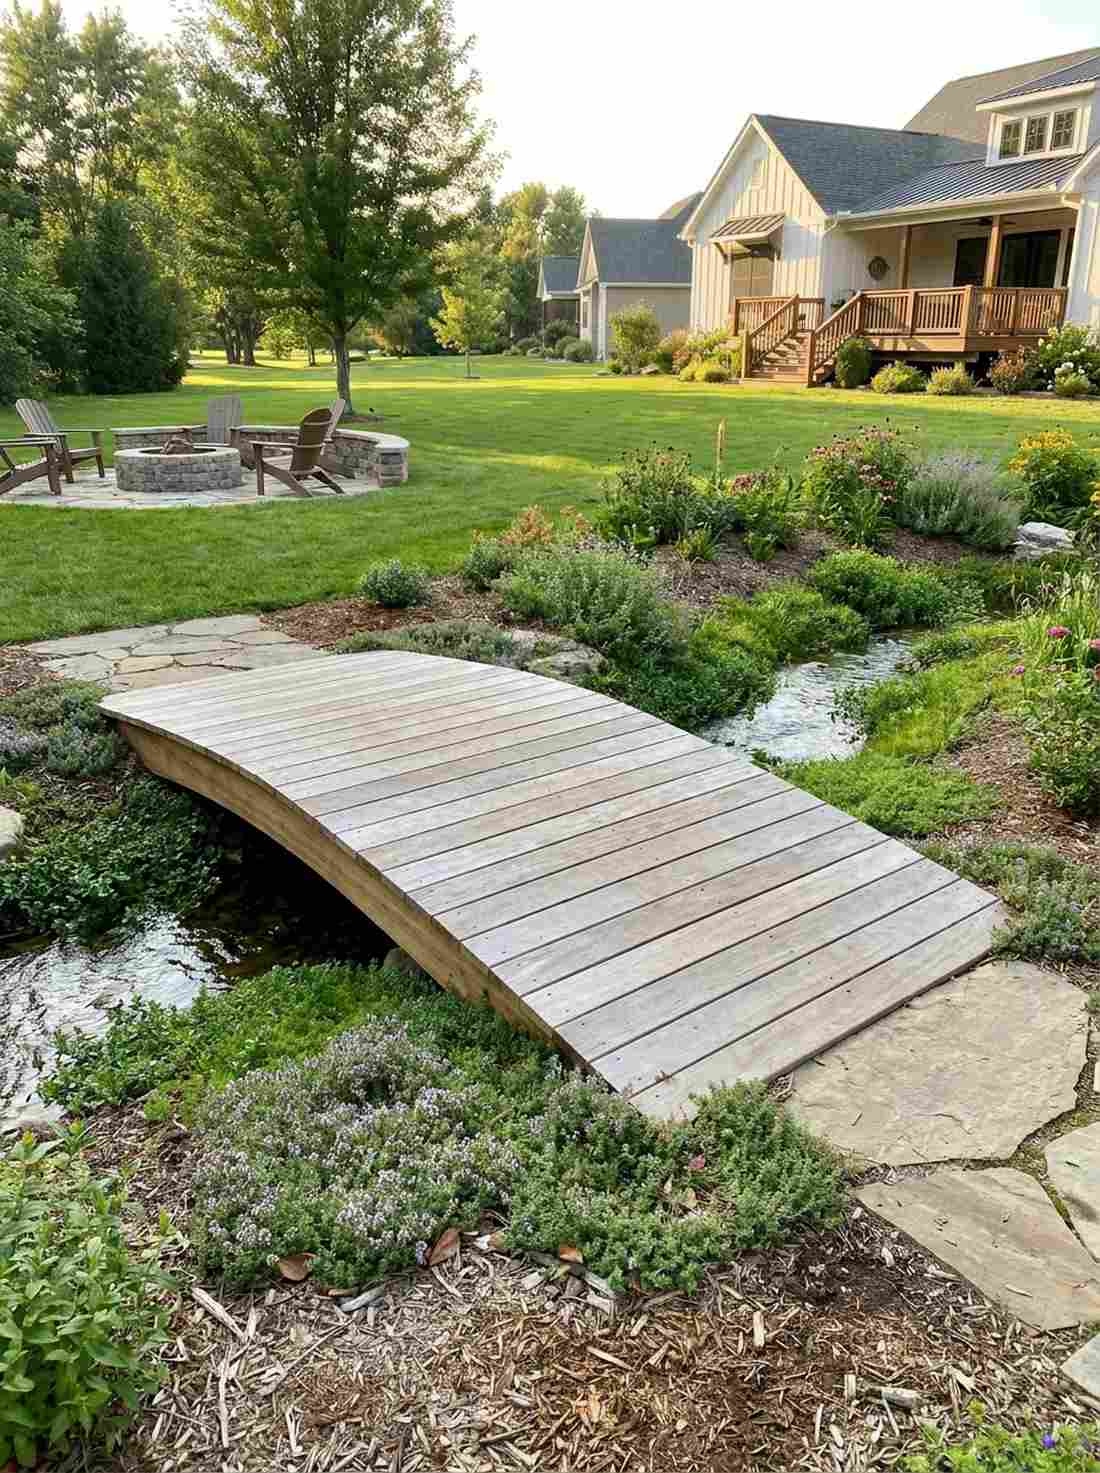
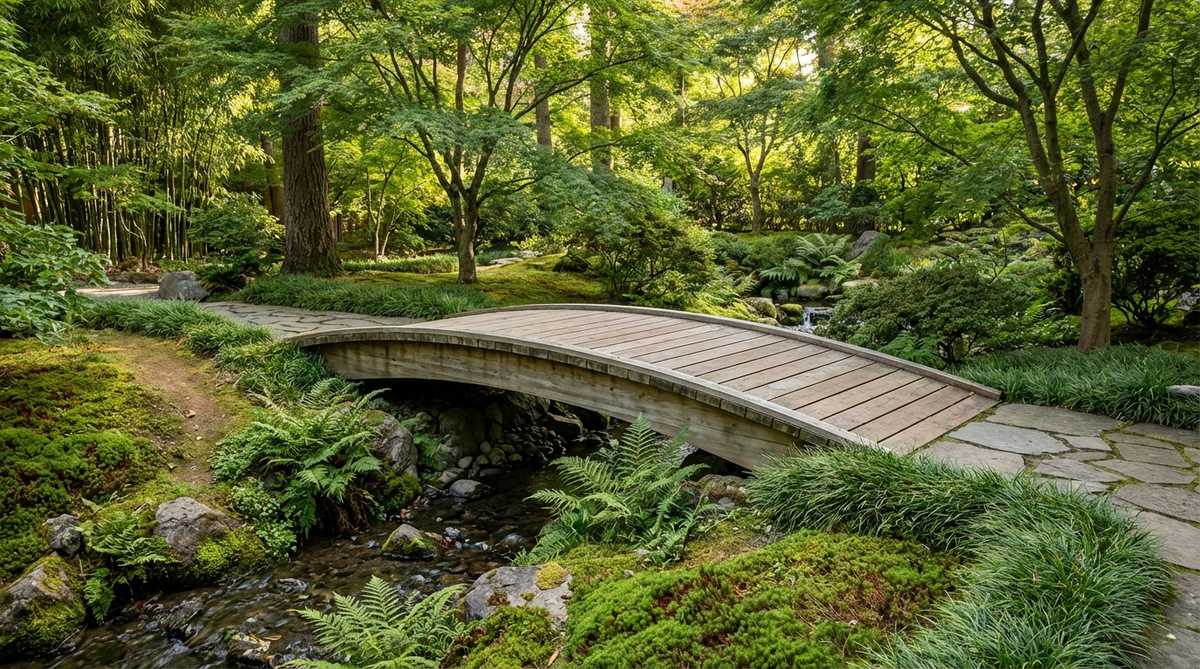
Offering a subtle rise, this approach feels like a soft, natural extension of the walking path. This low-profile stream crossing is ideal for properties that prioritize accessibility without losing traditional charm.
A lower arc looks far more expensive than it is when you use hidden pocket-hole joinery instead of visible top-screws. It avoids the visual clutter of heavy handrails, making your landscaping and groundcovers the true star of the show.
Materials run incredibly cheap here, easily falling into the $100–$250 range for cedar components. Save this if you need a quick weekend win that won’t drain your wallet.
- Key Materials: Standard cedar decking, concealed fasteners
- Vibe / Style: Accessible and understated
- Difficulty: Beginner-friendly DIY
- Budget Breakdown: Cedar Boards: $120 | Framework: $50 | Hidden Screws: $35
- Creator’s Tip: Plant low creeping thyme at the footings to soften the transition from ground to wood.
- Smart Sourcing: Concealed deck fastening starter kit and pre-cut cedar decking bundles.
4. Double-Arch Lenticular Truss

An engineering marvel that feels like a modern museum installation tucked into nature. This architectural water span is an absolute showstopper for contemporary properties bridging large water gaps.
Most DIYers shy away from steel, yet ordering pre-fabricated powder-coated trusses turns a multi-week headache into a simple bolt-together afternoon. Mixing raw industrial steel with warm wooden decking gives a designer-level finish that demands attention.
Because it requires custom metalwork, expect to spend $800+ for a proper setup. Pin this if you want an ultra-modern aesthetic that outlasts traditional timber.
- Key Materials: Earth-toned steel trusses, hardwood top planks
- Vibe / Style: Contemporary Zen fusion
- Difficulty: Requires metal handling
- Budget Breakdown: Steel Fabrication: $600 | Wood Deck: $150 | Hardware: $75
- Creator’s Tip: Use thermally modified ash for the deck to match the structural lifespan of the steel.
- Smart Sourcing: Heavy-duty powder-coated steel connection plates and thermally modified ash deck boards.
Most people get the bridge angle completely wrong… until they try the exact layout coming up next.
5. Steep Ceremonial Ascent

Towering and majestic, this steep climb feels like embarking on an ancient temple pilgrimage. This monumental landscape feature is built for massive estates demanding a true architectural statement.
The secret to keeping this brutal 50-degree incline safe is adding micro-treads or heavy-duty grip strips that blend into the wood grain. It forces visitors to engage fully with the architecture, turning a simple garden stroll into an intentional physical experience.
Given the heavy reinforcement needed, budget around $500–$900 for safety rails and deep footings. Highly recommended if you have the space and want a genuine wow-factor.
- Key Materials: Heavy structural timber, anti-slip tread inserts
- Vibe / Style: Intense ceremonial focus
- Difficulty: Professional-grade build
- Budget Breakdown: Core Timber: $450 | Safety Railings: $300 | Grip Strips: $40
- Creator’s Tip: Space steps strictly at 8 inches to ensure secure footing during the steep descent.
- Smart Sourcing: Clear anti-slip traction tape (commercial roll) and heavy-gauge post anchor brackets.
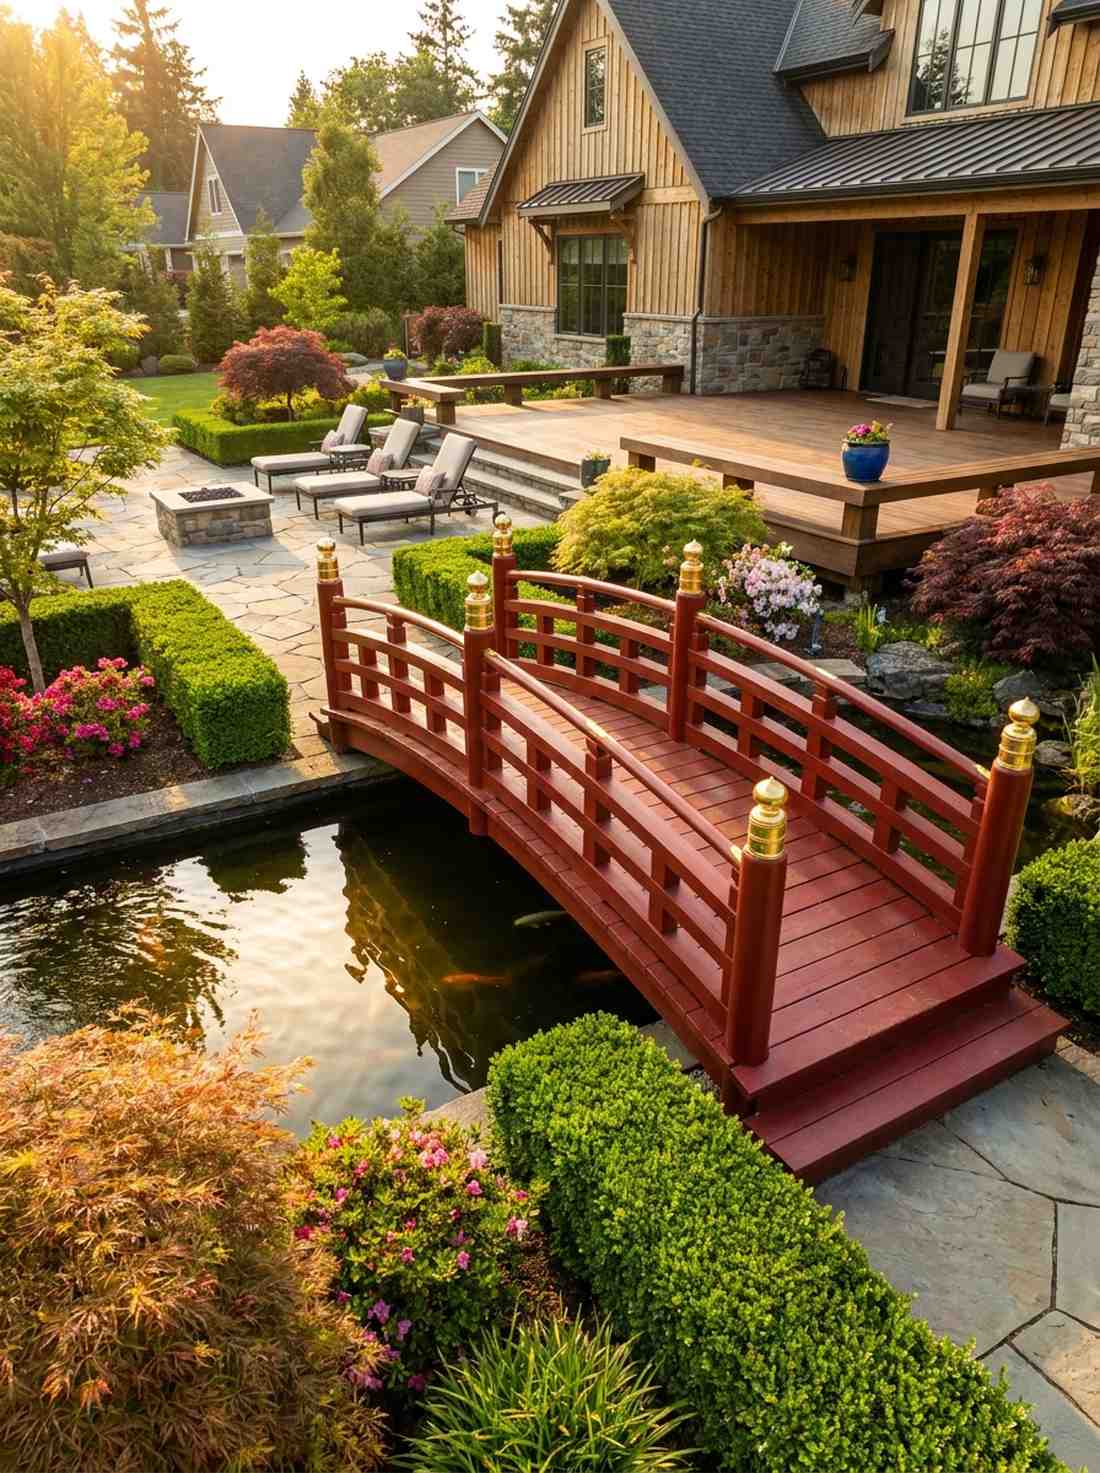
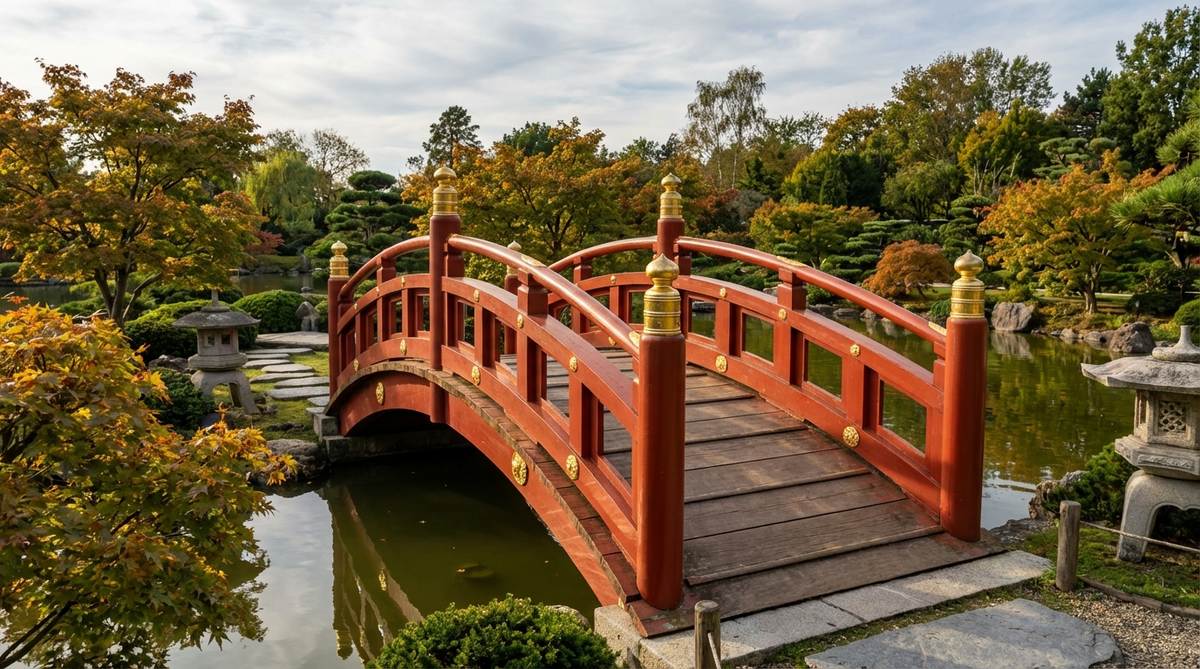
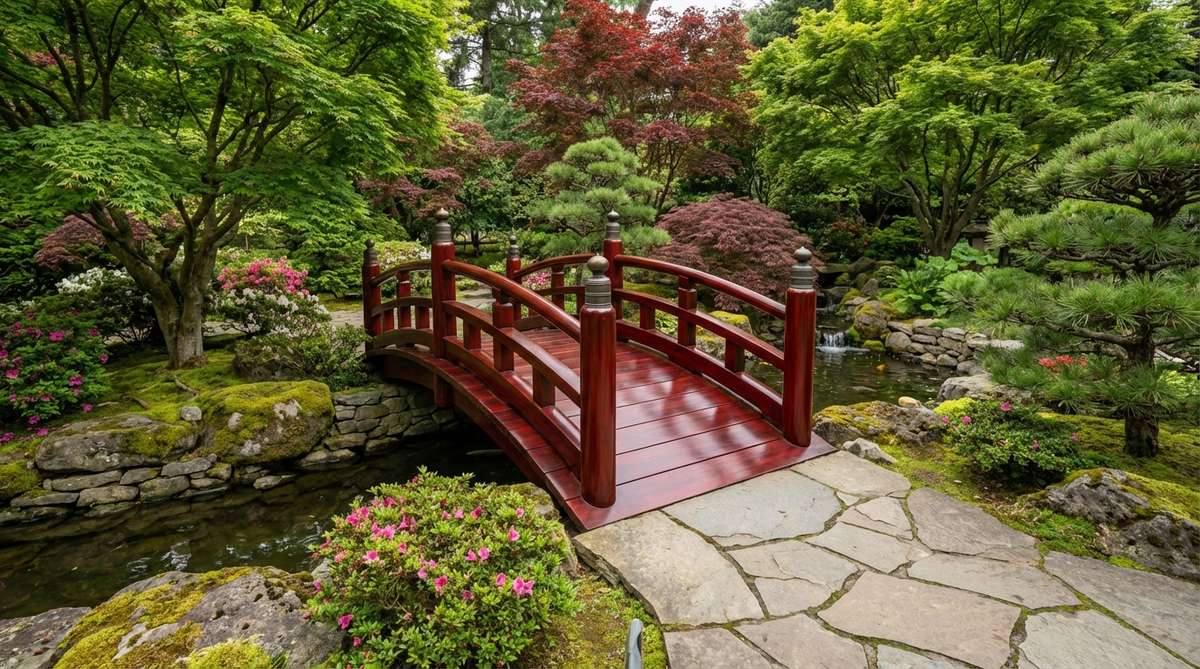
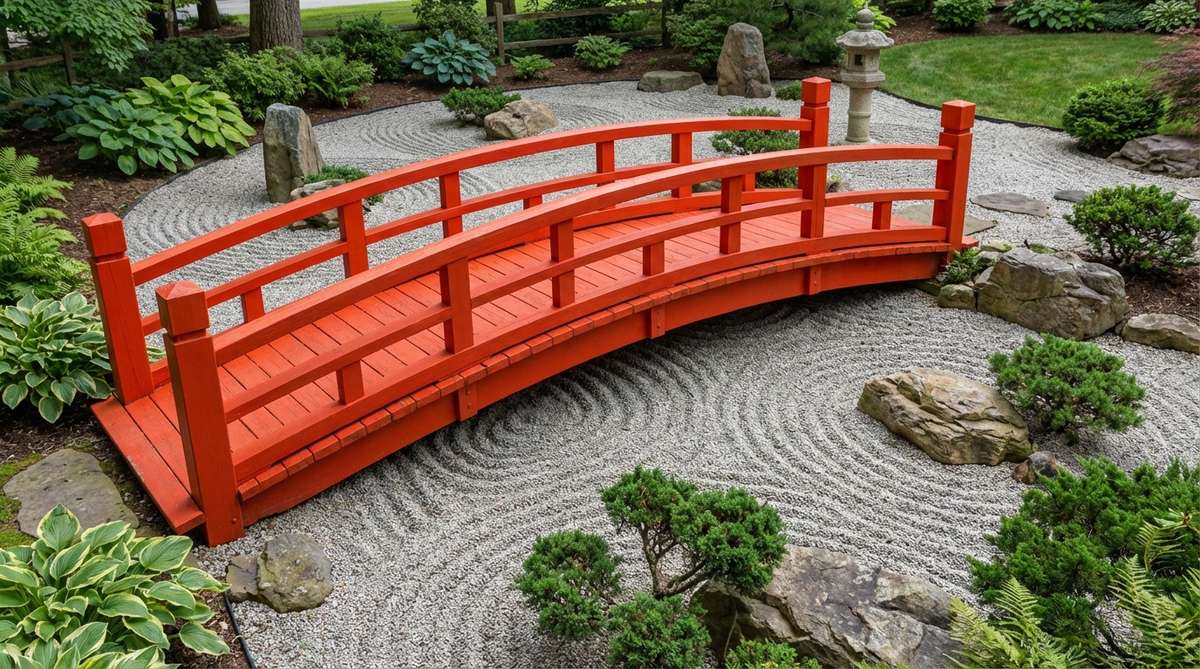
Iconic Red Bridge Expressions
The japanese garden red bridge stands as perhaps the most recognizable element in Eastern landscape architecture. Red pigment (traditionally cinnabar or vermillion) symbolizes protection against malevolent spirits, wisdom, and sacred transformation. These bridges create powerful focal points that energize green palettes while honoring cultural symbolism.
6. Vermillion Arched Guanyin
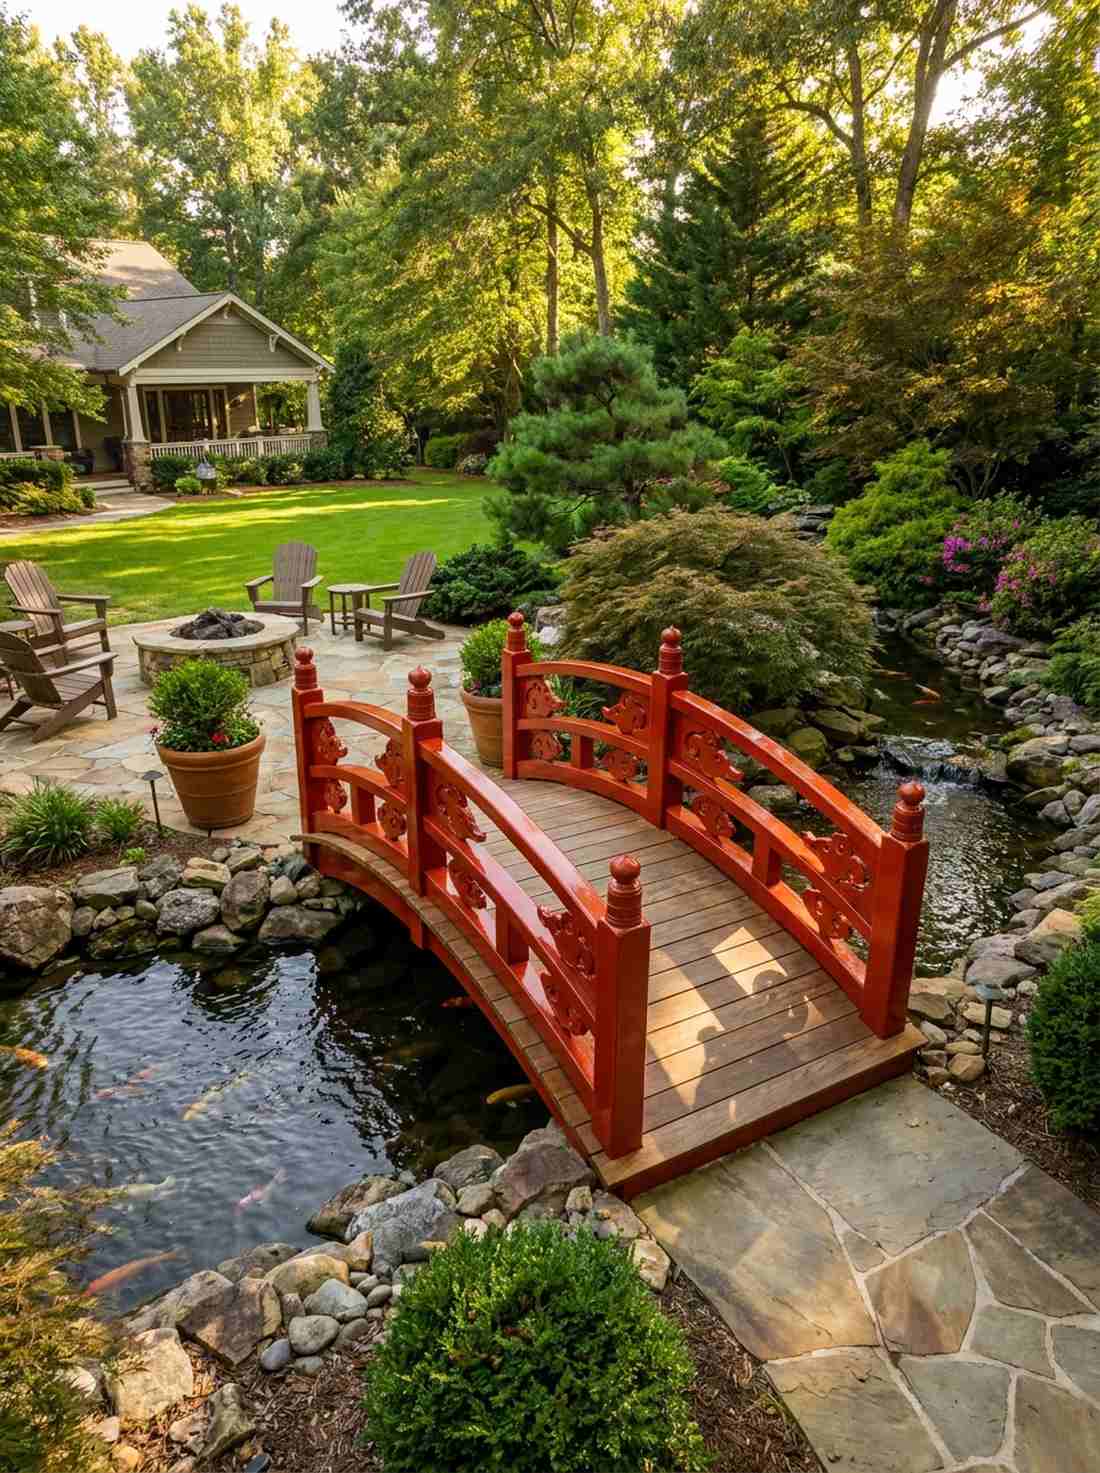
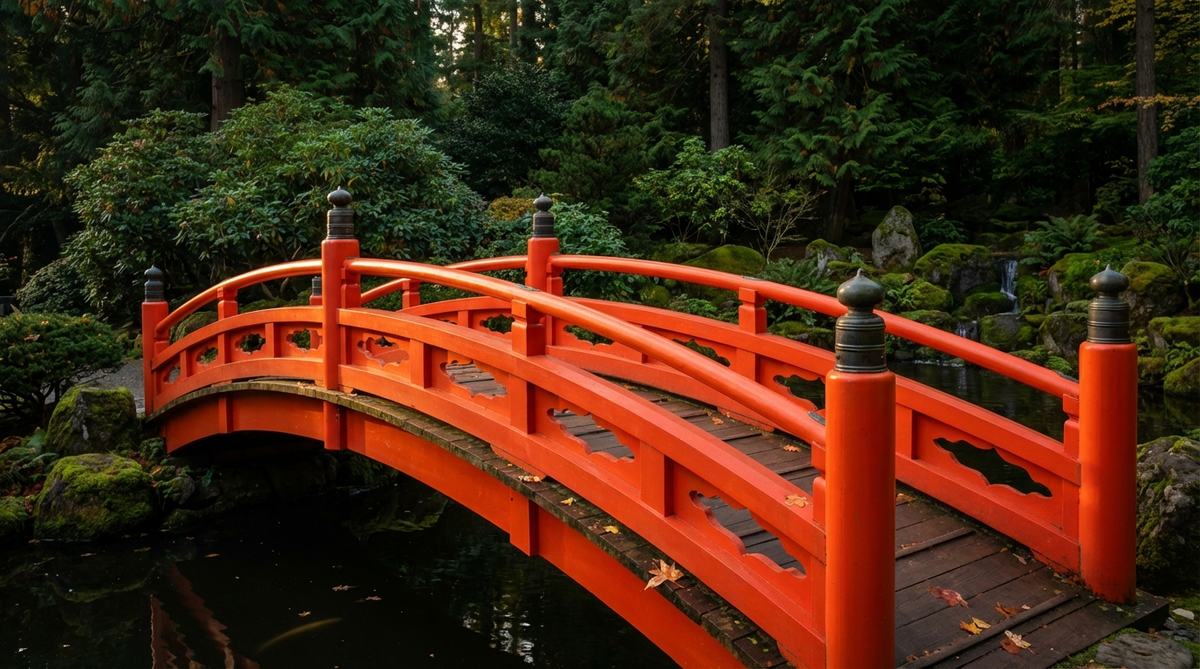
Vibrant and sacred, this iconic silhouette feels straight out of an ancient Kyoto postcard. The classic japanese garden red bridge acts as an instant focal point for deep evergreen landscapes.
Slapping standard exterior paint on this will peel in a year, which is why top designers insist on marine-grade red enamel for an impenetrable, glossy shell. Incorporating decorative CNC-routed cloud motifs in the side rails instantly upgrades a basic build into a cultural masterpiece.
Between premium paint and detailed woodwork, expect to spend $400–$700. Save this to your ultimate dream garden layout board.
- Key Materials: Cinnabar red marine enamel, routed side panels
- Vibe / Style: Highly photogenic classic
- Difficulty: Time-intensive detailing
- Budget Breakdown: Lumber Base: $250 | Marine Paint: $120 | CNC Details: $150
- Creator’s Tip: Sand meticulously between coats to achieve that glass-like vermillion finish.
- Smart Sourcing: High-gloss vermillion marine enamel paint and pre-cut wooden cloud motif appliques.
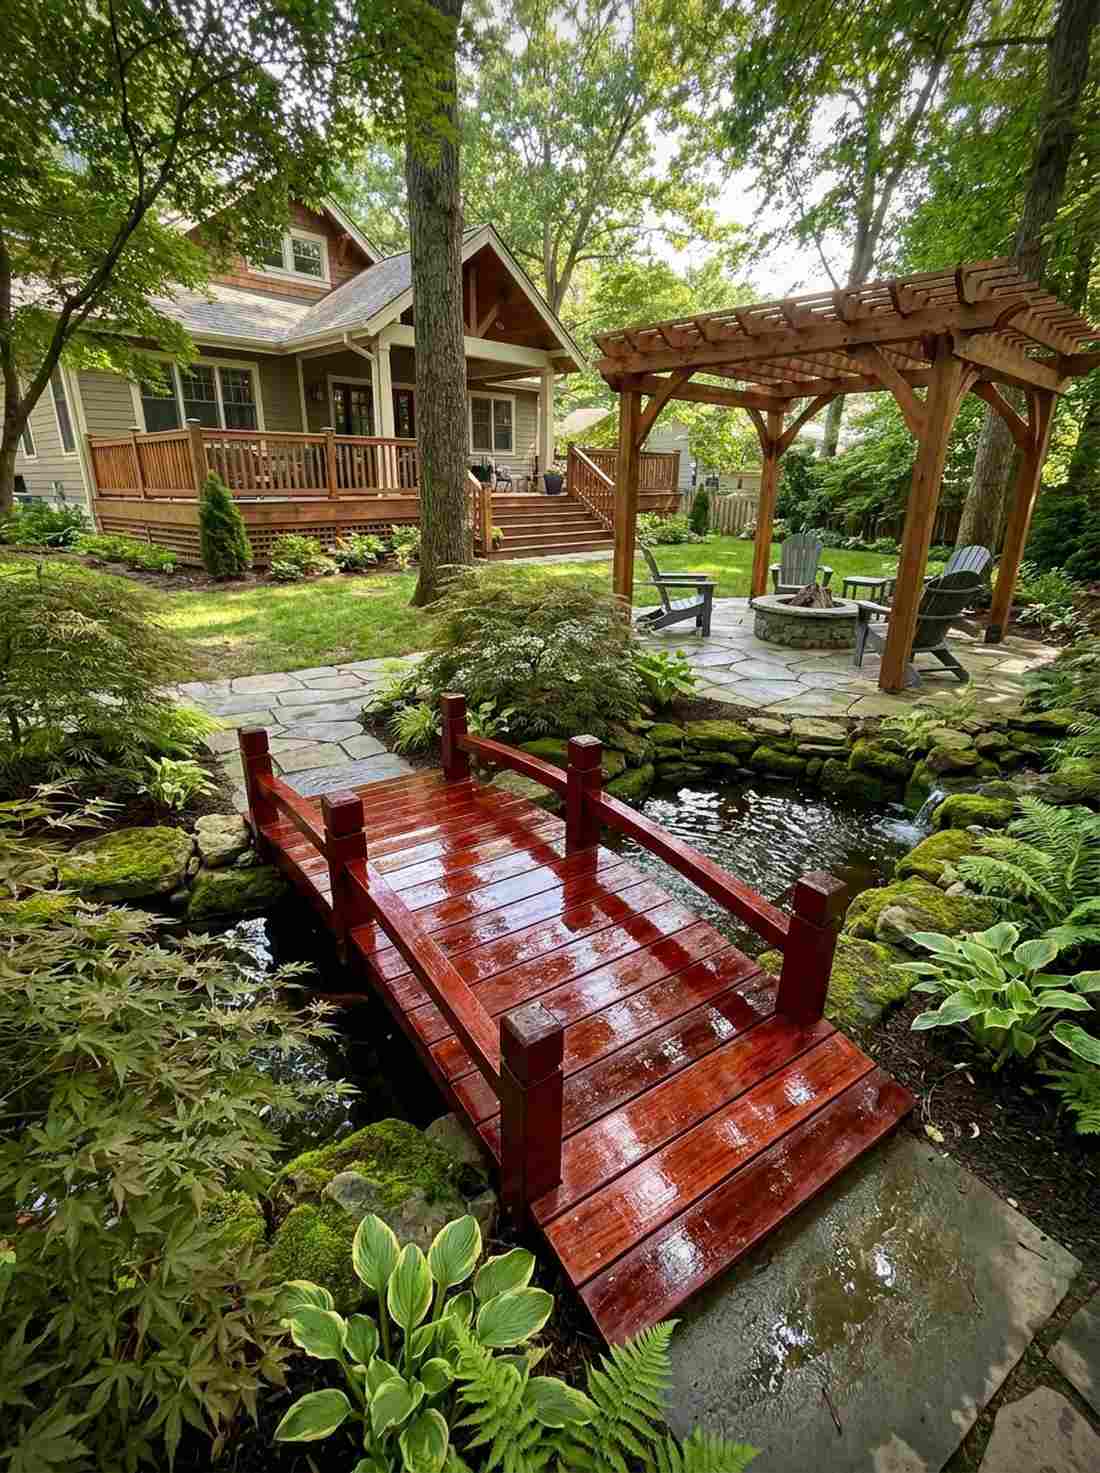
7. Flat Red Span Bridge
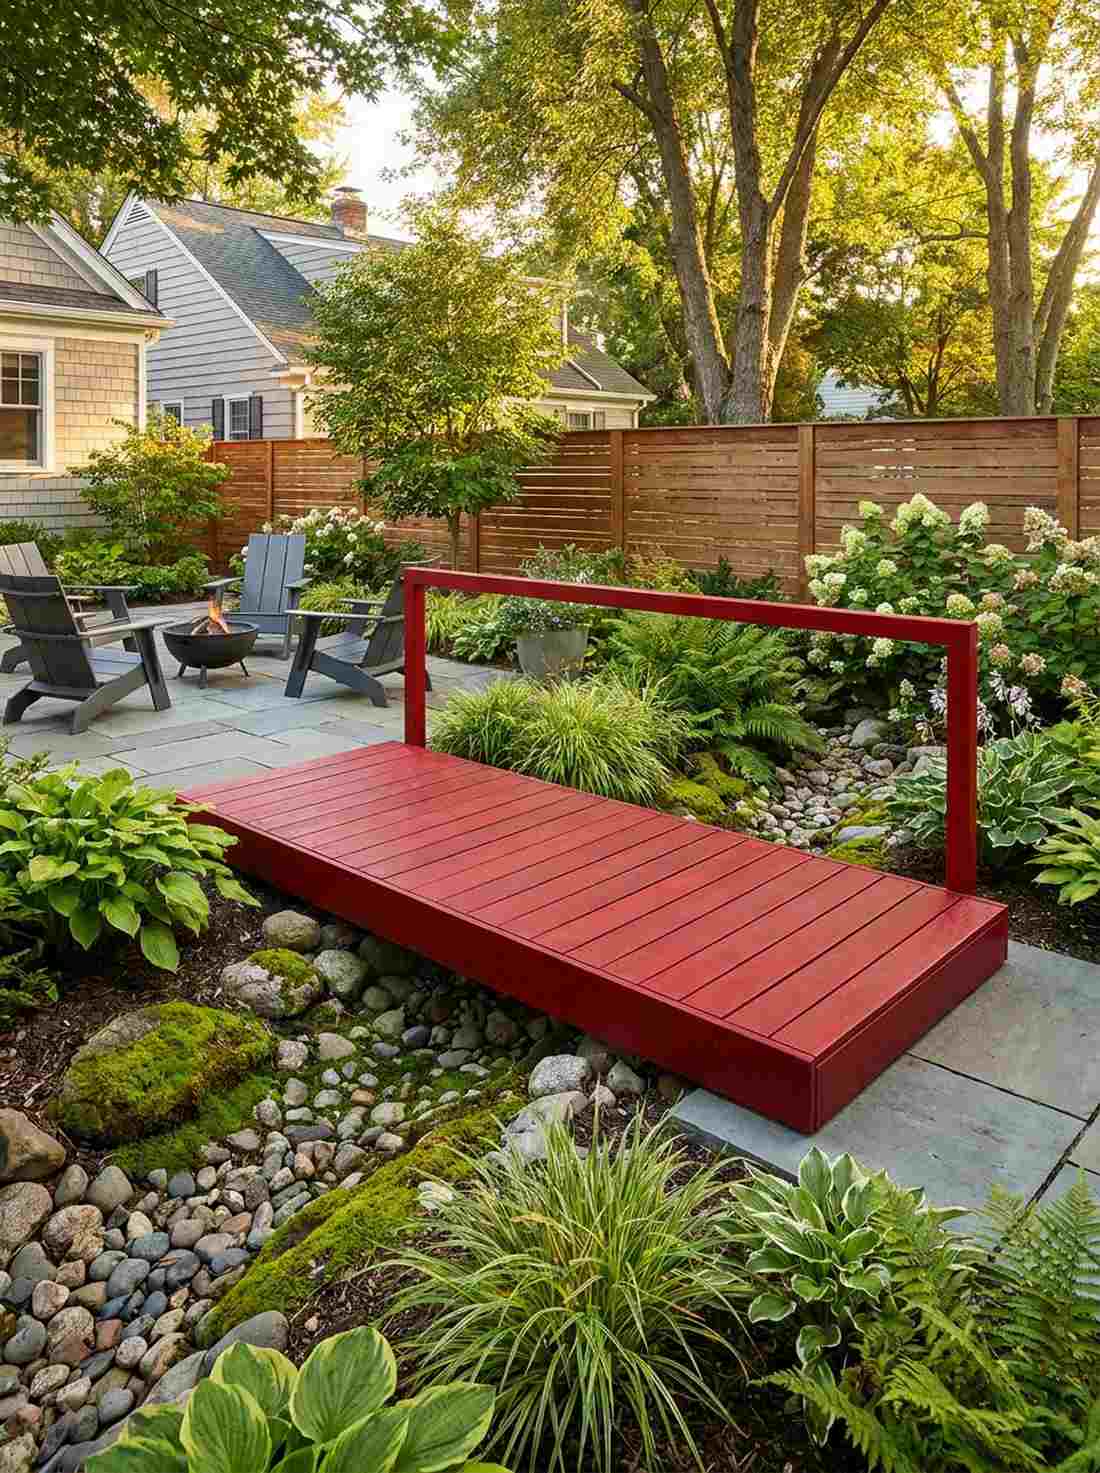
A striking horizontal line that feels like a bold slash of energy across the yard. This vibrant flat walkway is the absolute best way to inject dramatic color into a compact courtyard or small patio setup.
You don’t need complicated arches to make a statement; a low-profile red beam bridge looks incredibly chic and modern when contrasted with lush green moss. It effortlessly directs foot traffic while maintaining a budget-friendly, straightforward structural grid.
You can easily pull this off for around $150–$300 using treated joists and red stains. It’s a fast upgrade that completely changes the vibe of smaller spaces.
- Key Materials: Flat cedar planks, deep red penetrating stain
- Vibe / Style: Minimalist color pop
- Difficulty: Very easy weekend project
- Budget Breakdown: Support Beams: $80 | Top Planks: $100 | Red Stain: $40
- Creator’s Tip: Keep the railings to a single horizontal bar to maintain sleek, modern lines.
- Smart Sourcing: Solid color deep red acrylic deck stain and heavy-duty joist hanger packs.
8. Red Drum Bridge with Gold Accents
Glimmering in the sun, this setup feels like royal architectural jewelry sitting over your pond. This ornate metallic-accented span is perfect for high-end formal gardens craving an opulent touch.
Using cheap gold spray paint ruins the aesthetic immediately; authentic 23-karat gold leaf applied to the post caps delivers an impossibly rich luster that weathers beautifully. The contrast between the striking japanese garden red bridge base and the reflective finials creates an unmatched luxury finish.
Adding authentic gold elements pushes the budget to $600–$1,200. Pin this if you are obsessed with high-end, temple-grade detailing.
- Key Materials: Gold leaf sheets, clear marine varnish, red base paint
- Vibe / Style: Imperial luxury
- Difficulty: Delicate finishing work
- Budget Breakdown: Red Bridge Kit: $500 | Gold Leaf Kit: $85 | Varnish: $40
- Creator’s Tip: Apply gold leaf on a completely windless day, as the sheets are thinner than tissue paper.
- Smart Sourcing: Authentic 23k gold leaf starter kits and UV-resistant clear marine topcoat.
9. Lacquered Red Finish
Deep and glossy, this wet-look surface feels like stepping onto a precious antique box. Utilizing a high-gloss traditional coating makes this perfect for shaded meditation gardens where subtle light catches the shine.
While authentic urushi is hard to source, layering 8-12 coats of high-quality polyurethane spiked with vermillion pigment fakes the multi-generational patina perfectly. The high-build coating not only looks incredibly expensive but completely seals the wood from moisture rot.
The materials cost about $200, but the time investment is heavy. The final glass-like result is entirely worth the week of sanding.
- Key Materials: Tinted polyurethane, fine-grit sanding sponges
- Vibe / Style: Heritage antique gloss
- Difficulty: Patience-testing finish
- Budget Breakdown: Wood Base: $100 | Polyurethane: $60 | Polishing Pads: $25
- Creator’s Tip: Wet-sand with 1000-grit paper on the final two coats for an absolute mirror finish.
- Smart Sourcing: High-build exterior gloss polyurethane and vermillion resin colorant drops.
💡 Must-Have Supplies for High-End Setups
To build these setups faster and ensure they last, skip the generic craft aisles and invest in the right foundational kits.
- Base & Support: Pre-fabricated bridge arch supports (heavy duty)
- Setup Tools: Hidden deck fastener complete starter kits
- Weather/Durability Protection: Marine-grade UV clear sealant (1-gallon tub)
The next design is ridiculously cheap but looks like a $2,000 custom landscape installation…
10. Red Bridge Over Dry Stream
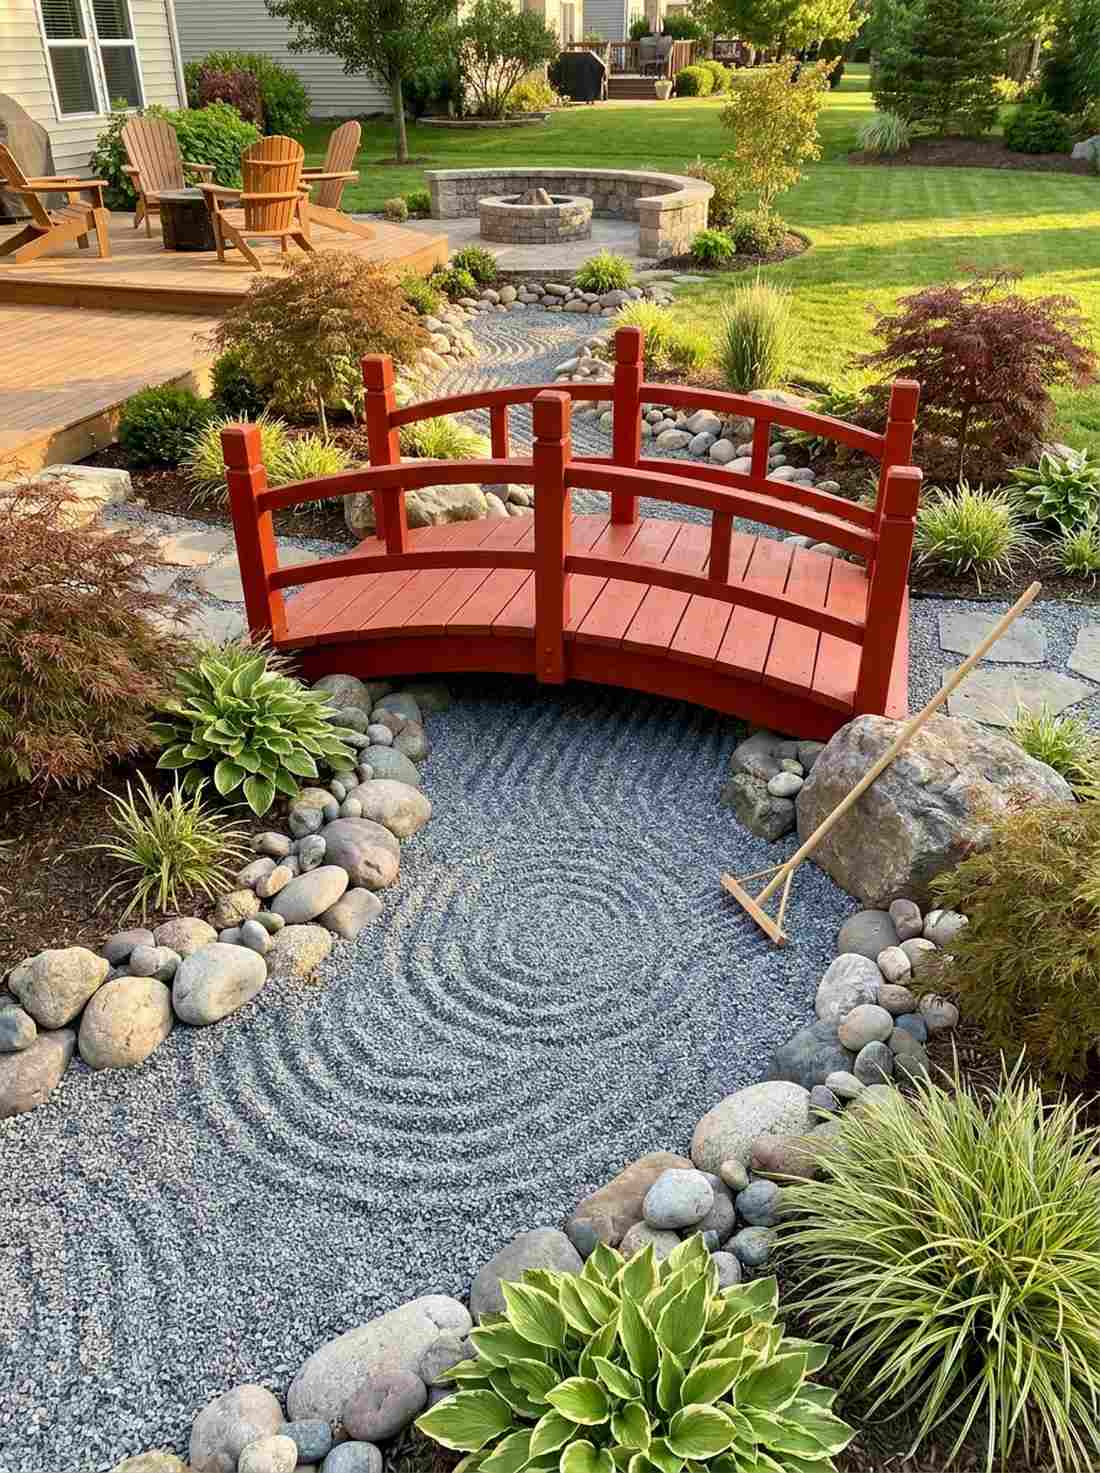
Spanning an ocean of raked gravel, this setup feels like a vivid painting brought to life. A dry landscape structural crossing offers massive visual impact for yards without actual water features.
The genius here is avoiding plumbing entirely; pairing a brilliant japanese garden red bridge over monochromatic gray gravel creates mind-bending visual tension. It’s the ultimate hack for utilizing premium fairy garden supplies to dress the “banks” of a stream that never floods.
By skipping water pumps, you can achieve this look for just $150 in wood and $50 in gravel. Save this to your low-maintenance backyard board!
- Key Materials: Raked crushed granite, vermillion timber frame
- Vibe / Style: Abstract Zen contrast
- Difficulty: Easy ground prep
- Budget Breakdown: Bridge Structure: $120 | Specialty Gravel: $60 | Weed Barrier: $20
- Creator’s Tip: Use a specialized wooden Zen rake to create permanent-looking water ripples beneath the span.
- Smart Sourcing: Heavy-duty woven landscape fabric and crushed granite decorative stone bags.
11. Sunset Red Weathered Timber
Subtle and rustic, this faded tone feels like it has gracefully aged in the woods for decades. This muted rust-colored pathway is the best approach for cottage-style gardens wanting an eastern touch without overwhelming brightness.
Bright vermillion can look gaudy in naturalistic settings, so using a translucent iron-oxide stain lets the raw wood grain show through for a highly sophisticated, aged aesthetic. It blends perfectly with wild ferns and mossy boulders, looking far more organic than heavy paints.
A simple stain job keeps costs radically low, around $80–$150 total. Highly recommended for a quick weekend win that feels historically authentic.
- Key Materials: Rough-sawn lumber, iron-oxide oil stain
- Vibe / Style: Rustic and time-worn
- Difficulty: Quick brush application
- Budget Breakdown: Rough Wood: $90 | Oil Stain: $35 | Brushes: $10
- Creator’s Tip: Hit the edges of the wood lightly with a wire brush before staining to accelerate the weathered look.
- Smart Sourcing: Semi-transparent barn red oil stain and heavy wire brush distressing tools.
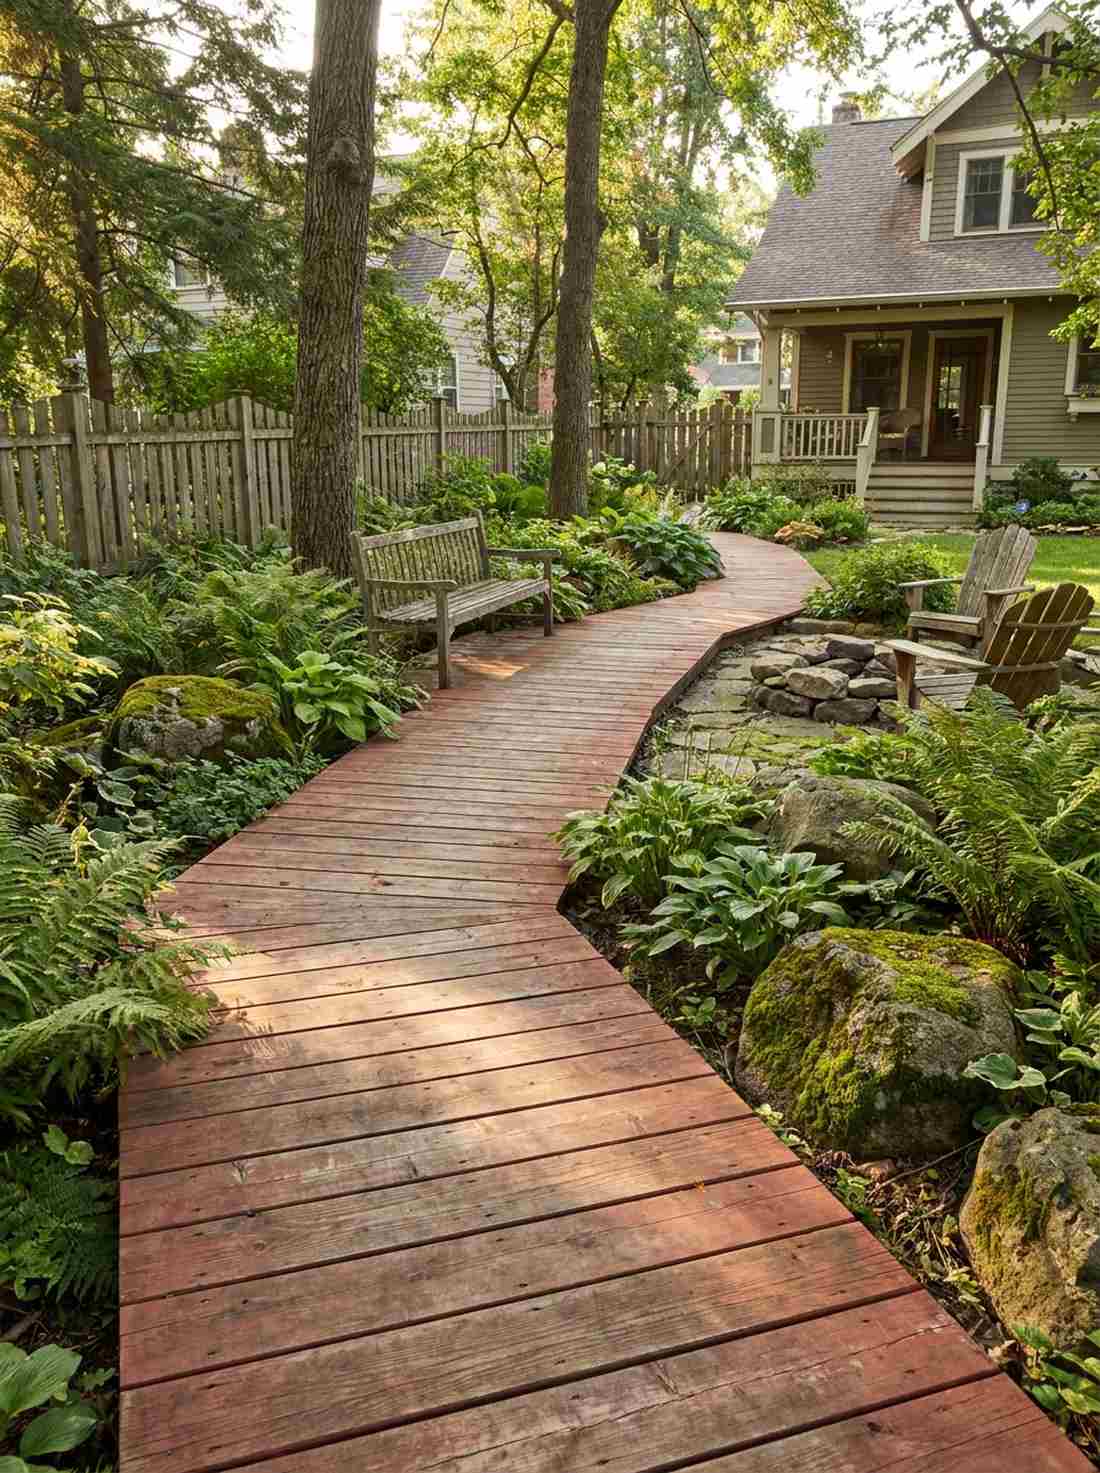
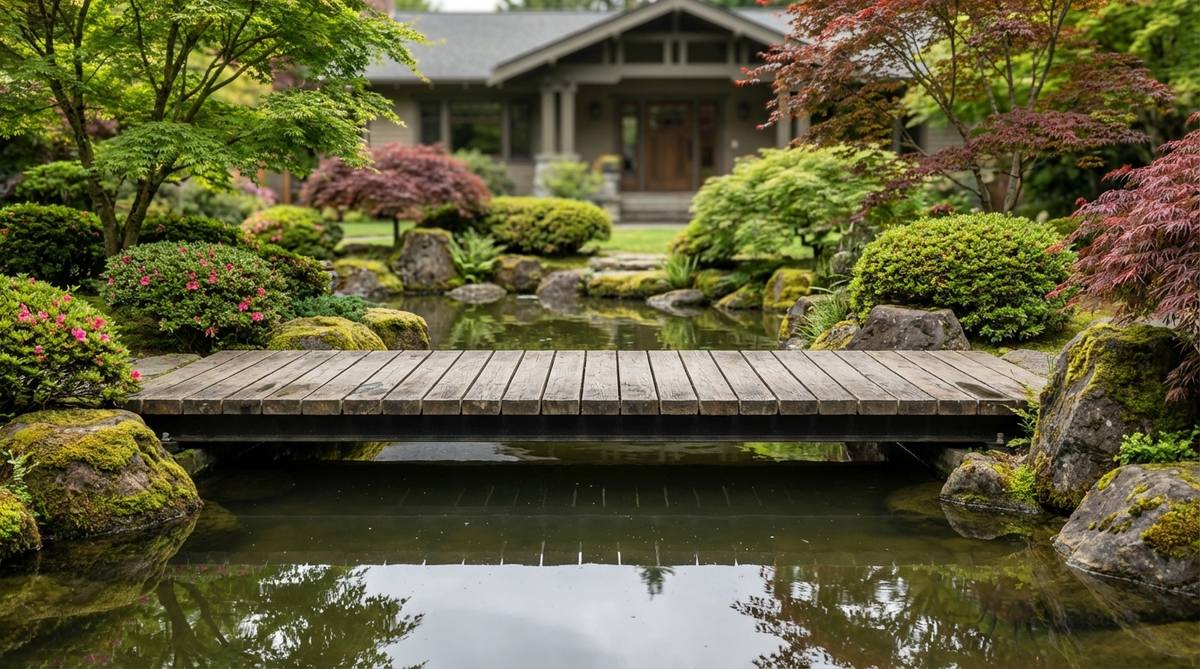
Wooden Platform Designs
Flat wooden bridges offer simplicity and versatility across varied garden scales. These hirabashi designs prioritize clean lines and honest material expression over ornamental complexity.
12. Single Log Crossing

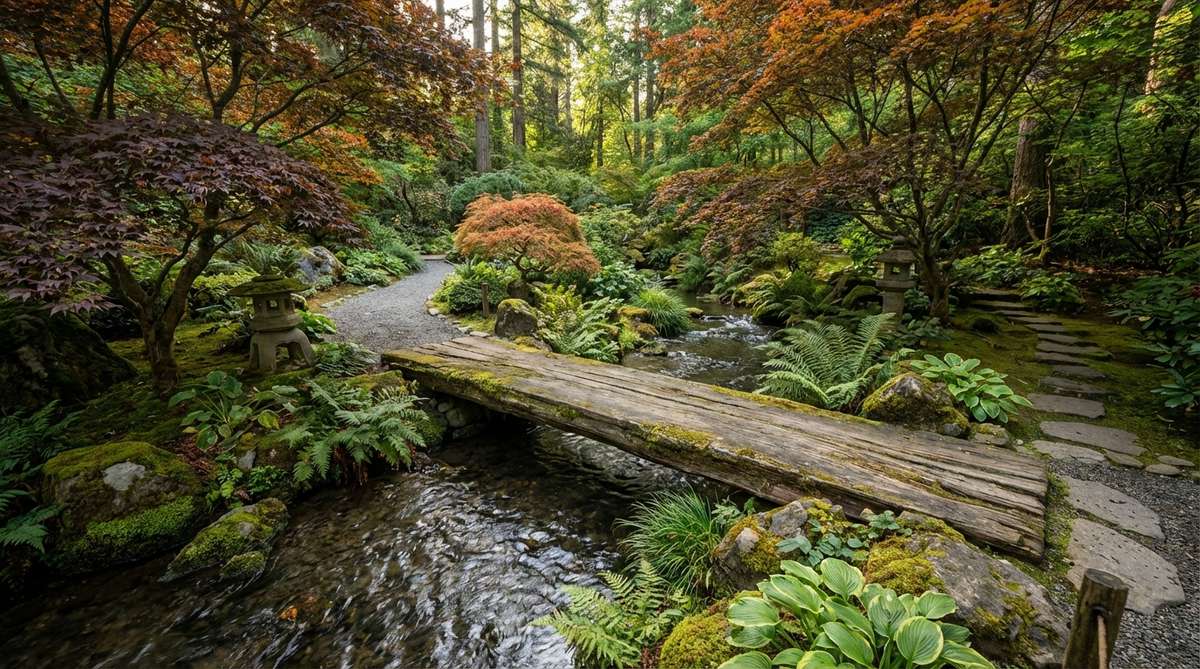
Raw and primal, this feels like an ancient forest path you accidentally discovered. Using a monolithic natural timber span over a small trench is the ultimate secret to a wild, untamed garden aesthetic.
Most beginners overcomplicate this, but simply stripping the bark off a massive rot-resistant black locust log guarantees decades of structural integrity. Flattening just the top walking surface with an adze gives a bespoke, hand-hewn finish that expensive lumber yards can’t replicate.
If you source the log locally, this practically costs nothing—maybe $30 for wood preserver. Pin this for the ultimate organic landscape hack.
- Key Materials: 12+ inch diameter cedar/locust log, end-grain sealer
- Vibe / Style: Deep forest wildness
- Difficulty: Requires heavy lifting
- Budget Breakdown: Log Sourcing: $0-$50 | End Sealer: $25 | Hand Tools: $40
- Creator’s Tip: Heavily coat the cut ends with a clear wax sealer to prevent deep splitting over the seasons.
- Smart Sourcing: Liquid wax end-grain wood sealer and carbon steel drawknives for bark removal.
13. Twin Log Plank Bridge
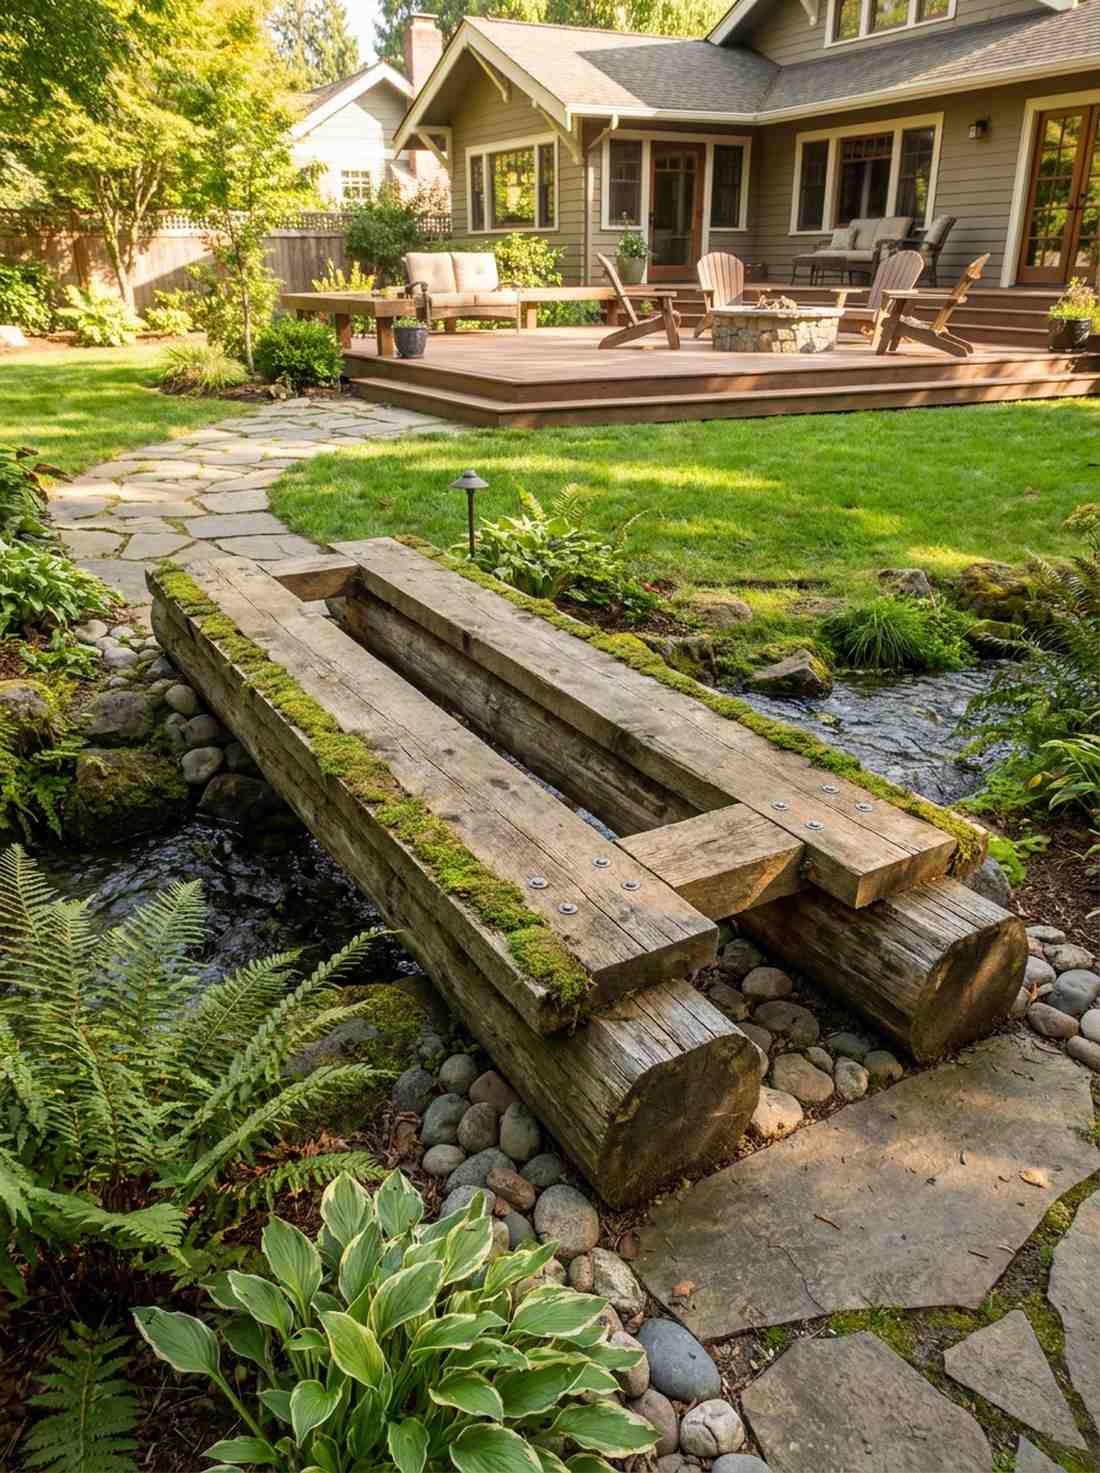
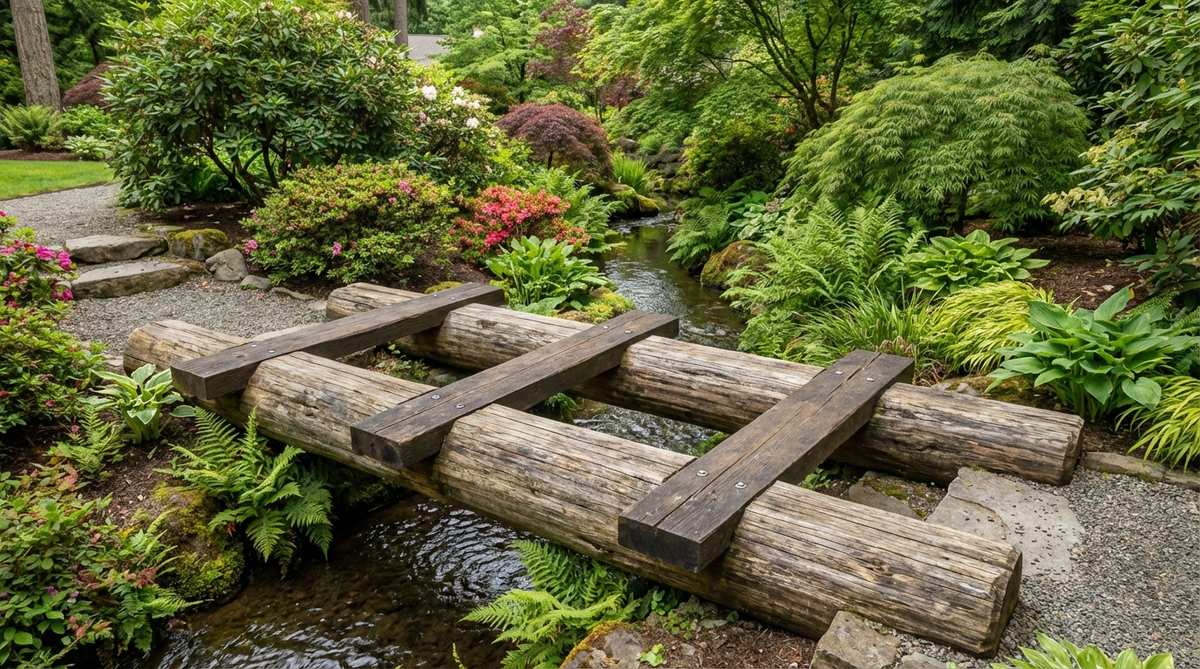
Sturdy and nostalgic, this setup feels like a classic trail crossing in a national park. The parallel rustic timber bridge is an excellent choice for spanning wider creeks up to 12 feet.
Locking cross-planks with deep notches over the support logs completely stops lateral shifting and looks incredibly professional. Utilizing pre-cut moss panels along the edges of the planks ties the structure deeply into the surrounding woodland ecosystem.
You can easily assemble this robust build for $100–$200 in materials. It’s an incredibly durable solution that gets better as it ages.
- Key Materials: Twin log bases, thick cross-planks, heavy galvanized screws
- Vibe / Style: Sturdy wilderness trail
- Difficulty: Moderate notching skills
- Budget Breakdown: Logs: $60 | Planks: $80 | Hardware: $30
- Creator’s Tip: Drive the screws at a slight 15-degree angle to massively increase the pull-out resistance.
- Smart Sourcing: Exterior grade galvanized structural screws and pre-cut preserved moss accents.
14. Maruki-Bashi Natural Log
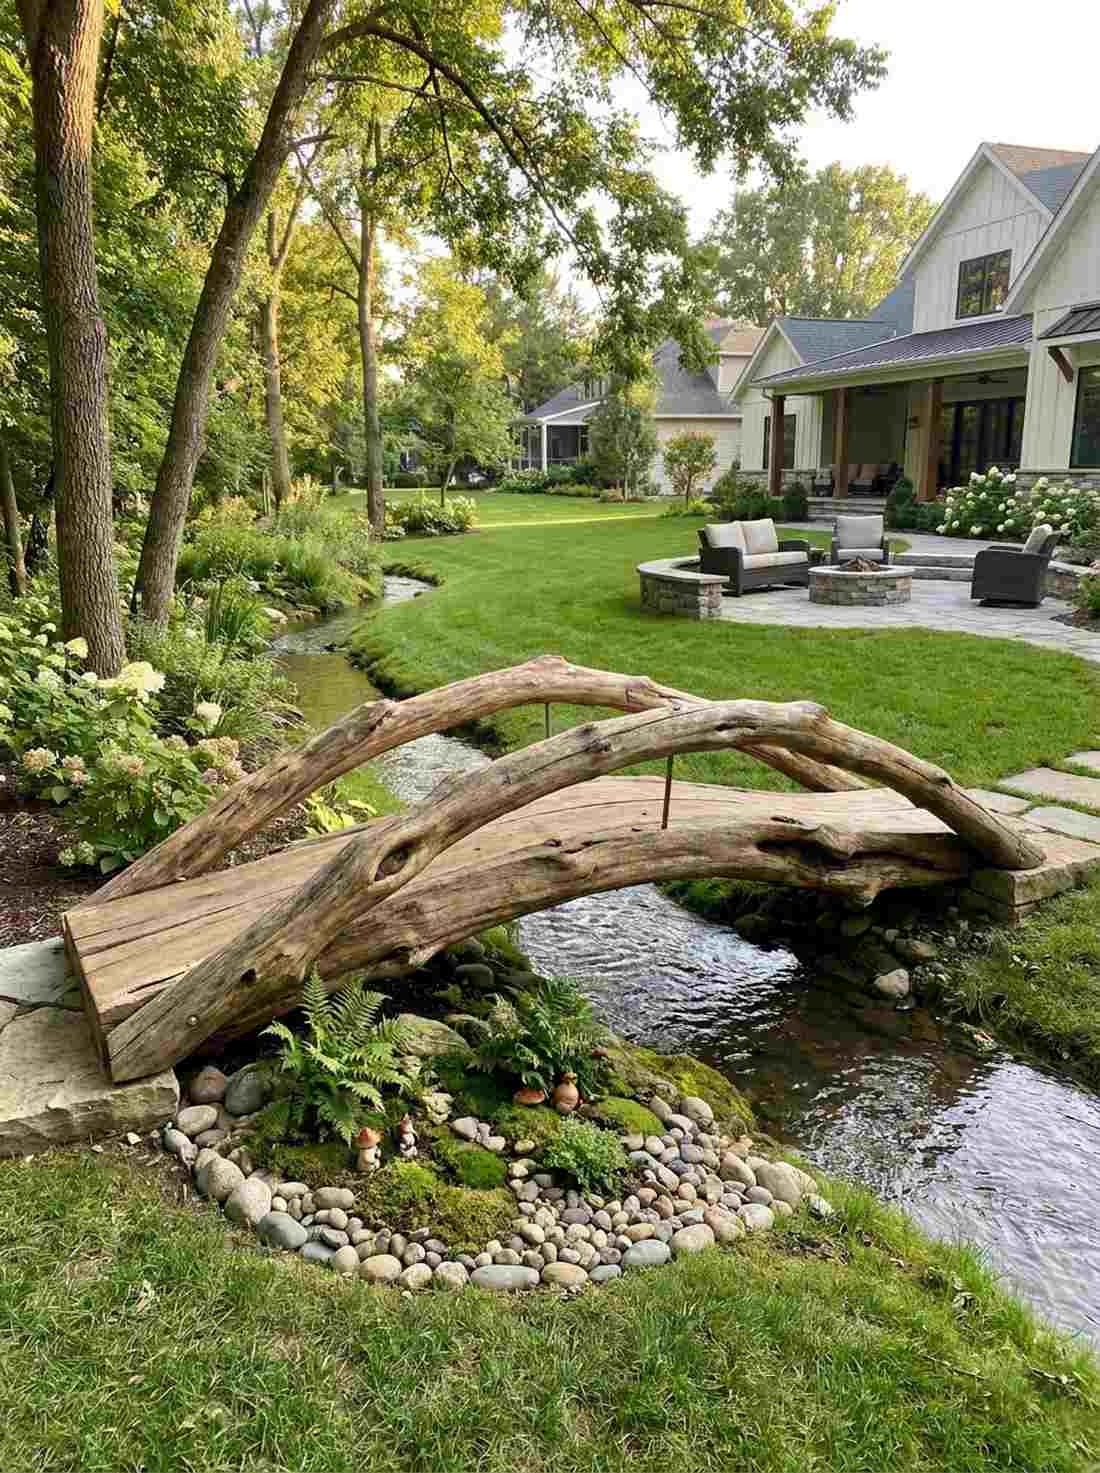
Winding and imperfect, this style feels like a bridge born directly from the earth itself. The curved organic branch crossing deliberately uses irregular wood to celebrate the wabi-sabi philosophy.
Instead of fighting wood warp, smart designers use naturally bowed logs to distribute weight, making the “flaw” the strongest part of the structure. It’s the perfect spot to sprinkle tiny terrarium accessories beneath to create a magical miniature landscape under the arch.
Sourcing the right curved piece is the only hard part; the actual cost stays under $100. Save this if you love embracing natural imperfections.
- Key Materials: Naturally bowed logs, minimal hardware
- Vibe / Style: Wabi-sabi perfection
- Difficulty: Sourcing is the challenge
- Budget Breakdown: Natural Logs: $50 | Base Supports: $30 | Anchors: $20
- Creator’s Tip: Orient the natural curve upwards to mimic an arch and improve weight distribution.
- Smart Sourcing: Heavy-duty ground anchor augers and clear penetrating wood hardener.
Don’t buy expensive timber until you’ve seen this brilliant structural shortcut.
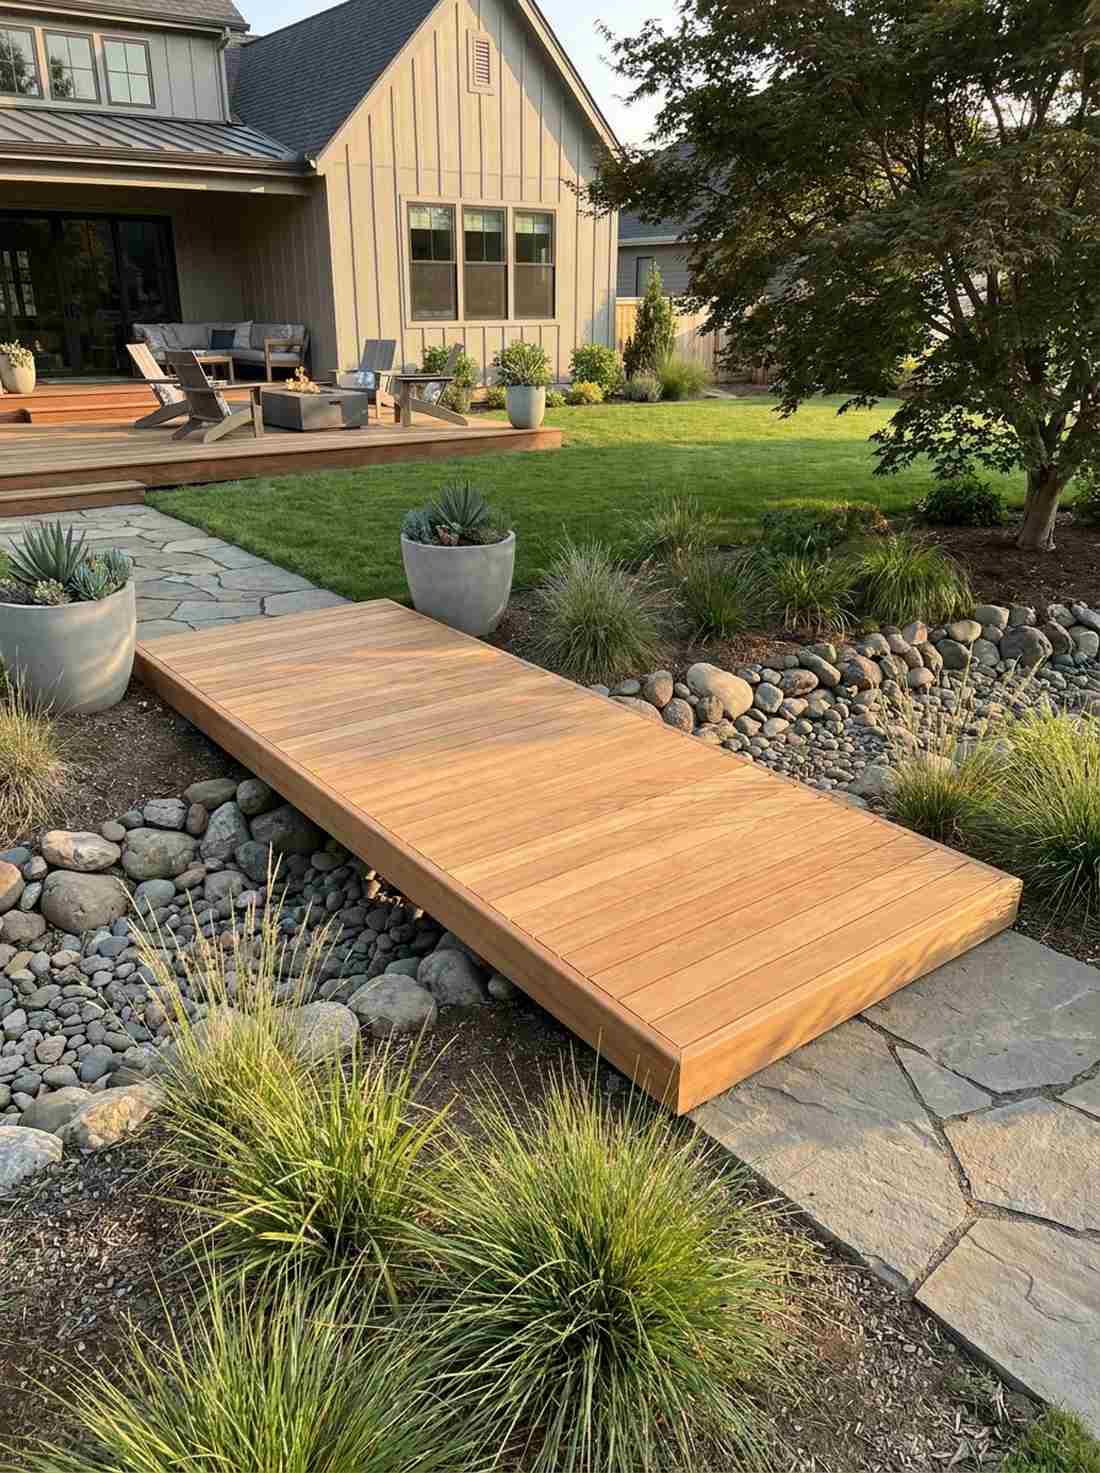
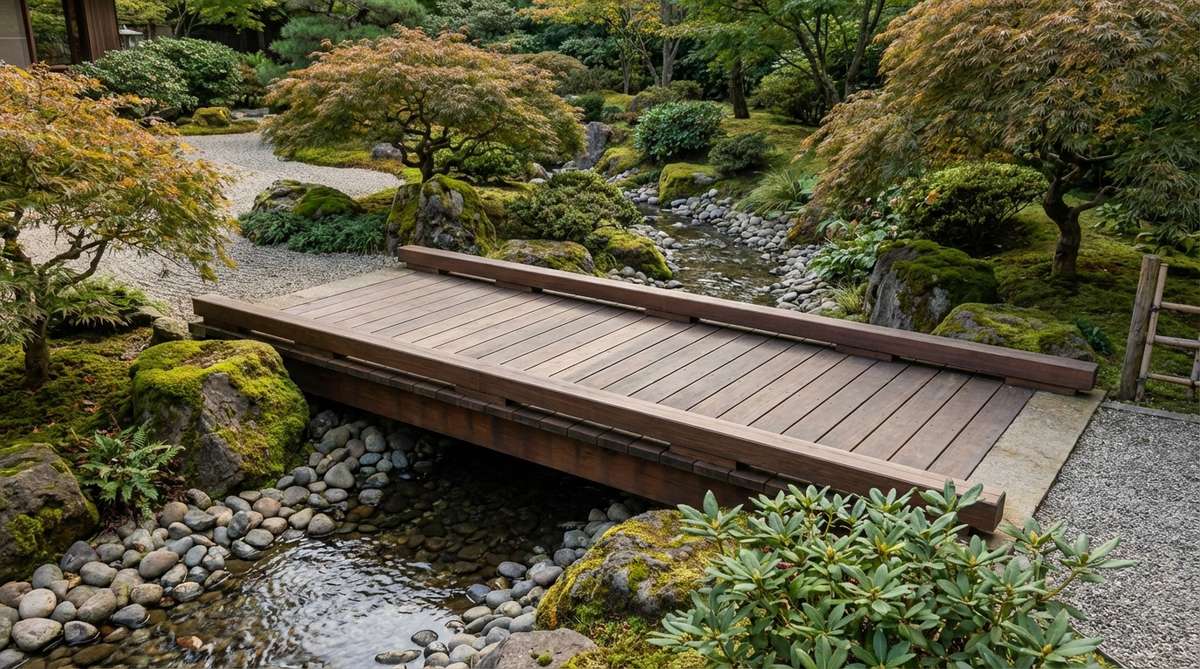
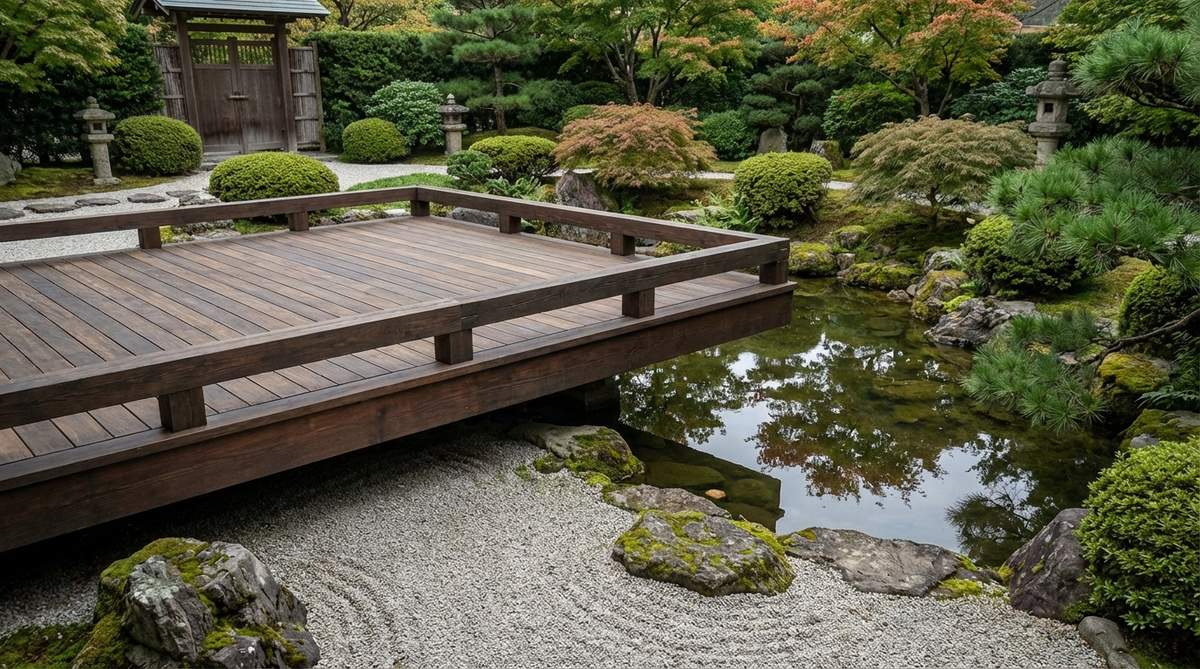
15. Cedar Plank Platform
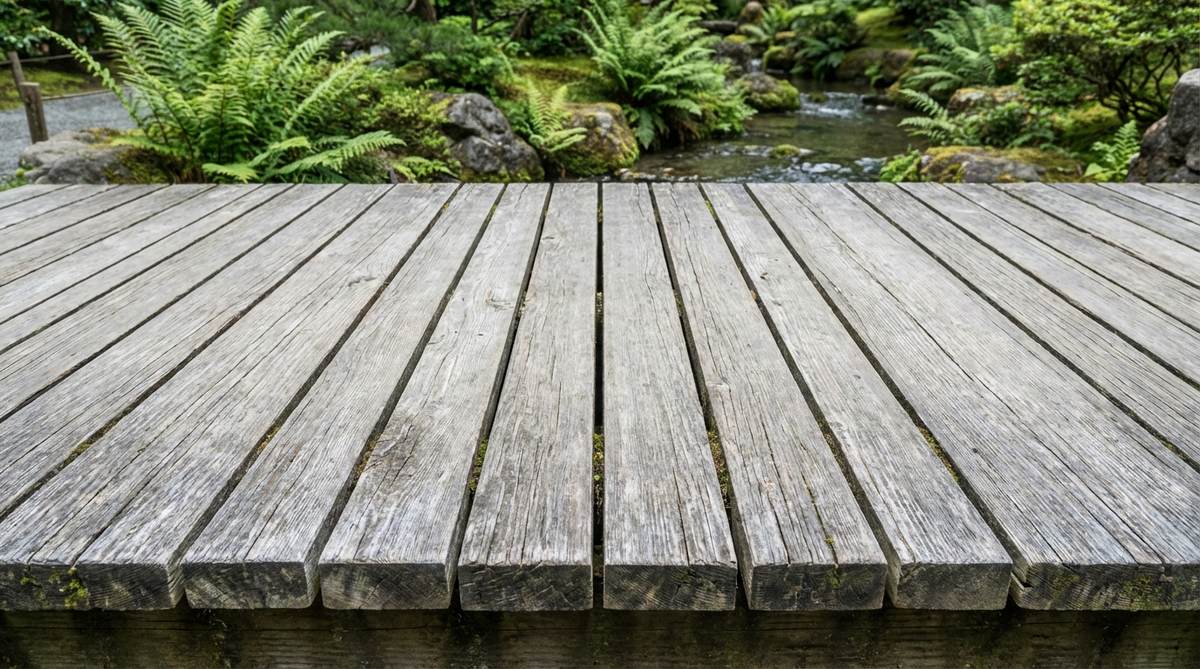
Clean and monolithic, this wide deck feels like a premium resort walkway. A wide-stance cedar platform offers a beautifully grounded, modern aesthetic for manicured courtyards.
Spacing premium 8-inch wide planks with precise 1/8-inch gaps looks far more expensive than it is, ensuring zero standing water issues. Because cedar naturally repels rot without toxic chemicals, the wood safely transitions to a gorgeous silver-gray without polluting your pond.
Expect to spend around $250–$400 for top-grade cedar. Pin this if you want a sleek, low-maintenance upgrade that always looks clean.
- Key Materials: 8-inch wide cedar planks, doubled joists
- Vibe / Style: Modern monolithic luxury
- Difficulty: Straightforward framing
- Budget Breakdown: Premium Cedar: $280 | Joists: $60 | Deck Spacers: $15
- Creator’s Tip: Never eyeball the gaps; use specialized deck spacing tools for absolute uniformity.
- Smart Sourcing: Precision 1/8-inch deck spacer rings and stainless steel trim-head screws.
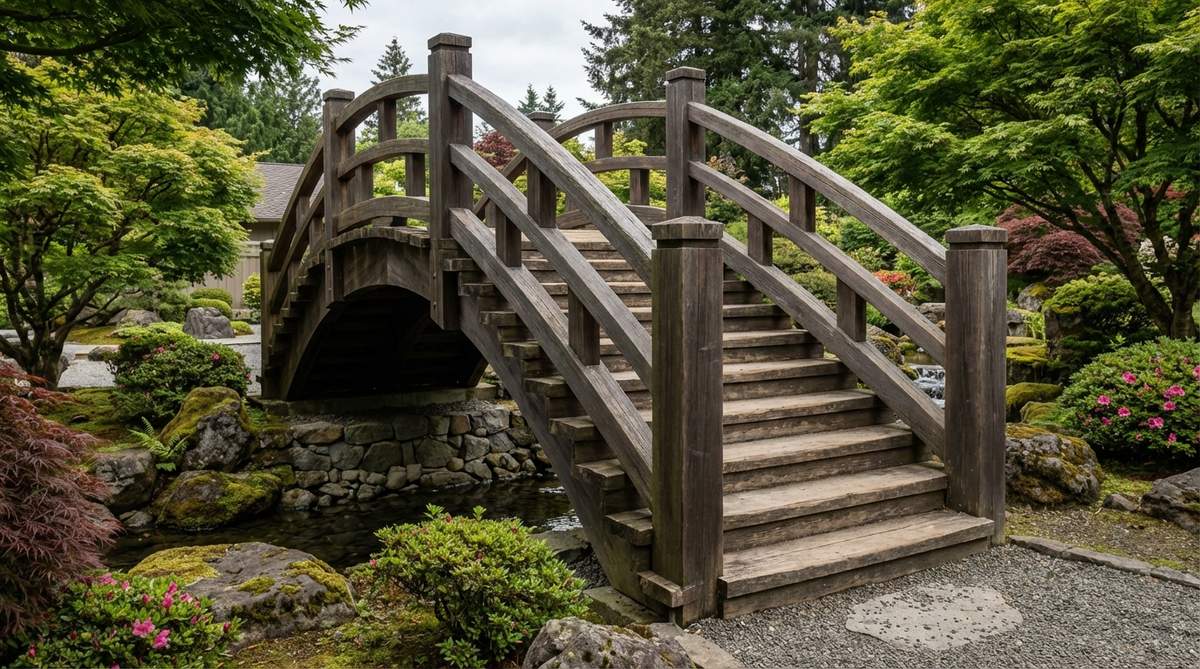
16. Timber Frame with Railings
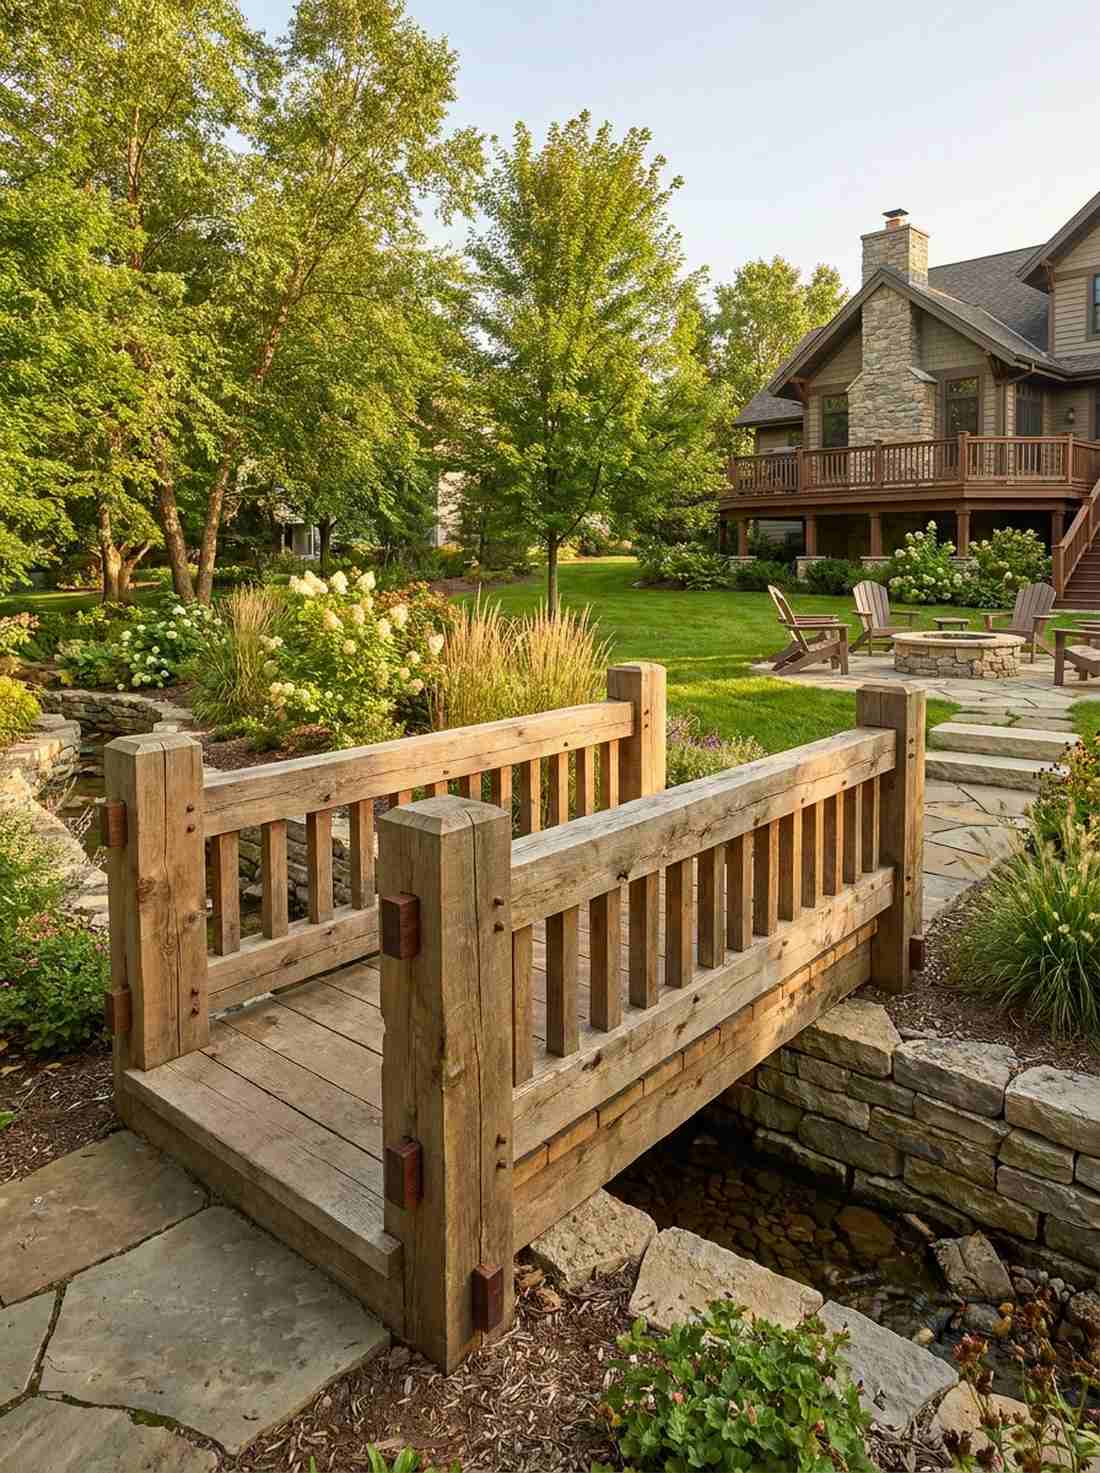
Chunky and masterfully joined, this bridge feels like a tribute to master carpentry. The exposed joinery span proudly displays its construction, making it perfect for educational or highly detailed gardens.
Ditching metal brackets for traditional mortise-and-tenon joints delivers an incredibly satisfying, authentic structural integrity. Adding wooden through-wedges locks everything tight, proving that high-end Japanese craftsmanship relies on precision, not nails.
While materials are cheap (around $200), the labor is intense. Highly recommended for woodworking purists seeking a weekend challenge.
- Key Materials: Thick timber posts, hardwood wedges
- Vibe / Style: Mastercraft authenticity
- Difficulty: Advanced joinery skills
- Budget Breakdown: Heavy Timber: $180 | Hardwood Dowels/Wedges: $30 | Wood Glue: $15
- Creator’s Tip: Use a contrasting dark wood for the wedges to make the joinery visually pop.
- Smart Sourcing: Pre-cut hardwood dowel pins (bulk pack) and waterproof structural wood glue.
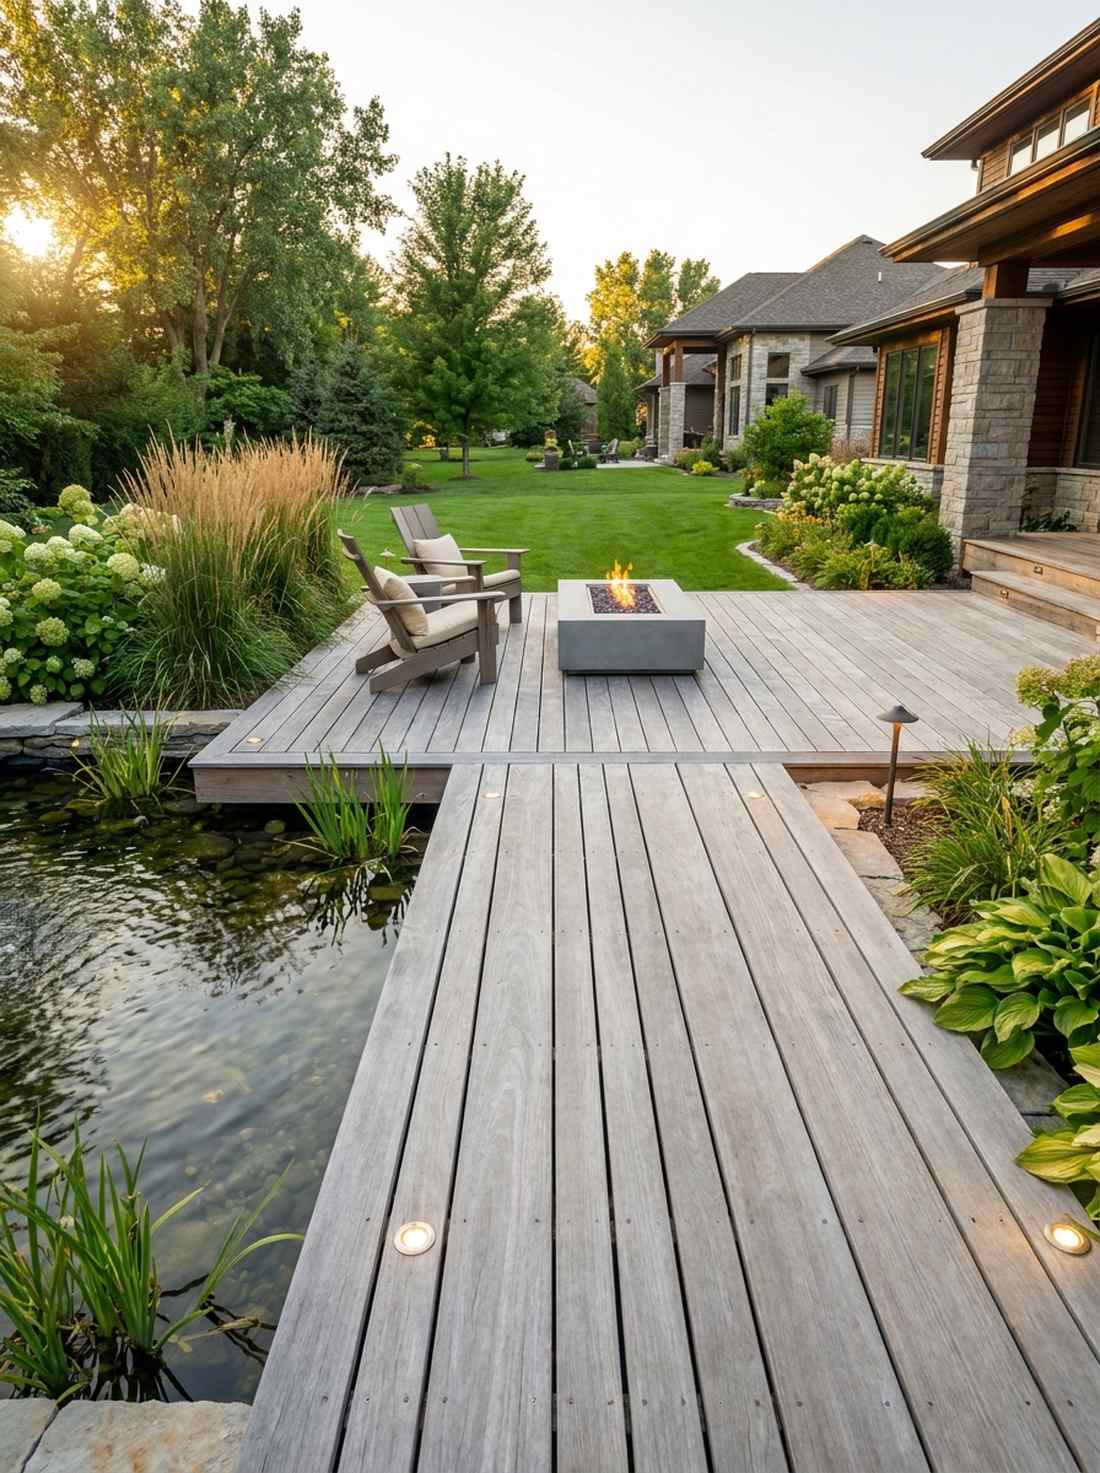
17. Floating Deck Bridge
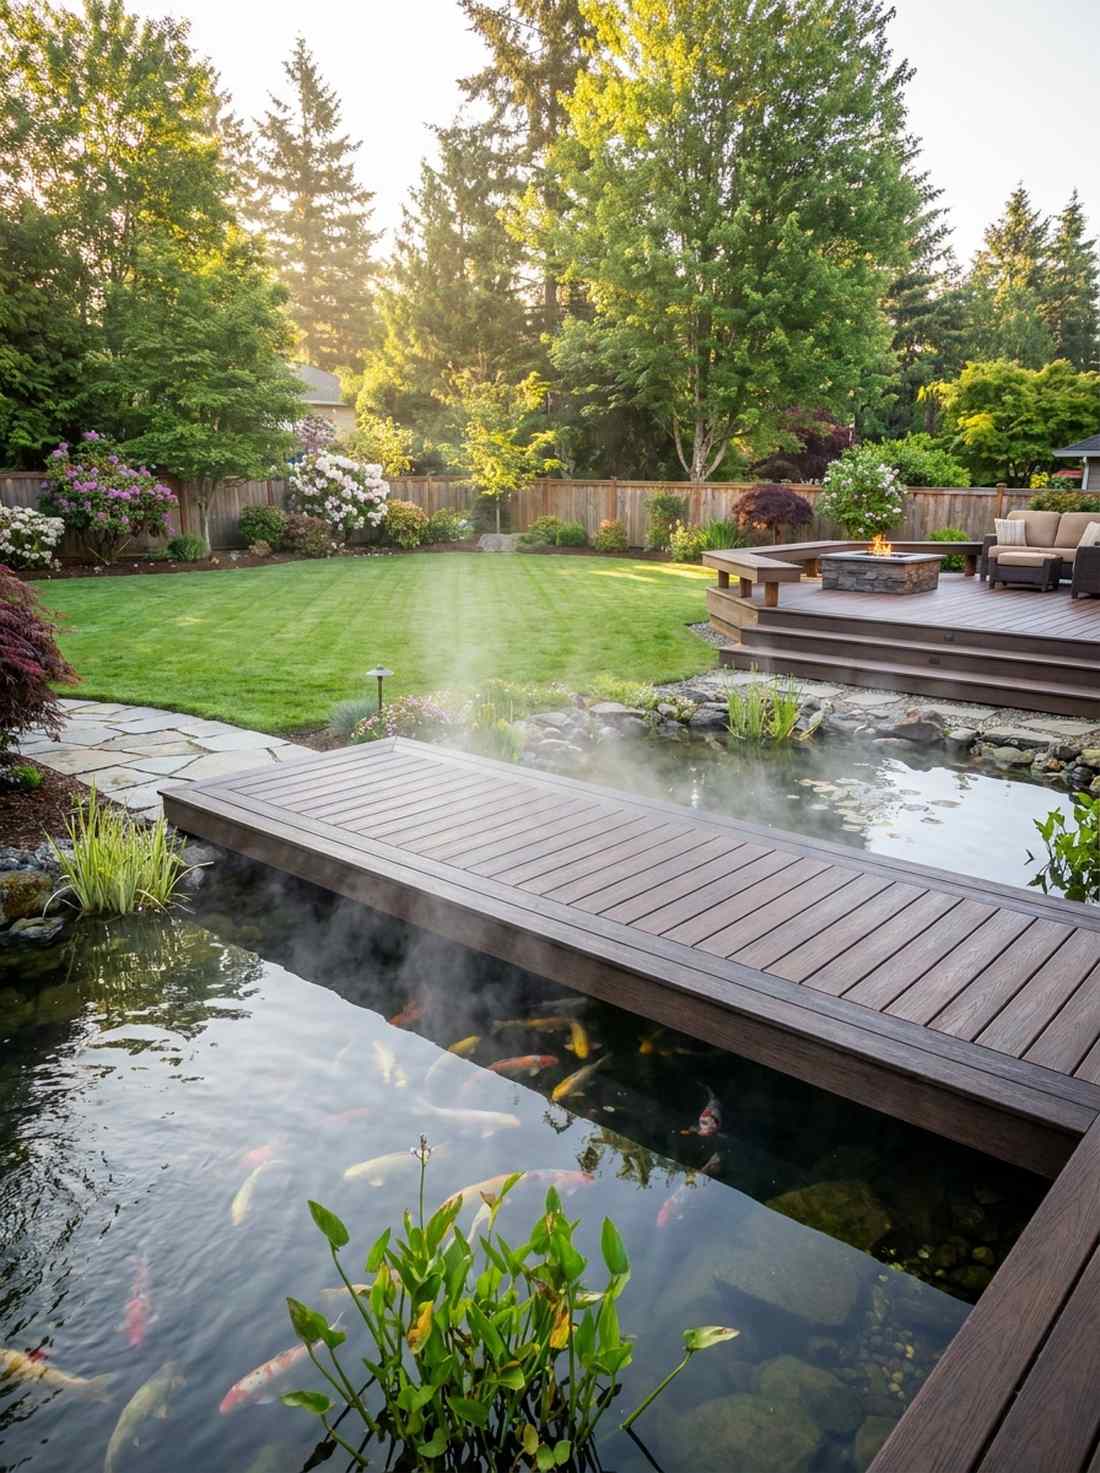
Hovering just inches above the water, this design feels like magic over the morning mist. This ultra-low clearance platform creates profound intimacy with your koi pond and aquatic plants.
By sinking hidden helical piles below the water line, the entire platform appears to defy gravity with zero visible support posts. It brings observers right to the water’s edge, creating unparalleled views of the ecosystem.
Using metal piles and composite framing will cost roughly $300–$600. Save this to your pond design board for the ultimate modern illusion.
- Key Materials: Helical piles, hidden brackets, low-profile decking
- Vibe / Style: Magical floating illusion
- Difficulty: Precise water-level engineering
- Budget Breakdown: Deck Boards: $200 | Helical Piles: $250 | Hidden Hardware: $80
- Creator’s Tip: Set the deck exactly 4 inches above the high-water line to ensure it never submerges during rain.
- Smart Sourcing: Galvanized helical ground anchors and black powder-coated hidden joist ties.
18. Hinoki Cypress Aromatic Bridge
Emitting a rich lemony scent, crossing this bridge feels like entering a high-end spa. Building an aromatic therapeutic walkway engages the senses deeply, making it ideal for enclosed meditation corners.
Never seal this premium wood; leaving the Japanese cypress raw allows natural oils to resist decay while continuously releasing its famous fragrance. While expensive, using it for small accent spans provides a multi-sensory experience that standard pressure-treated lumber simply cannot offer.
Because Hinoki is imported luxury wood, a small span can hit $500–$800. It’s a lavish upgrade that completely changes the atmosphere.
- Key Materials: Raw imported Hinoki cypress, stainless fasteners
- Vibe / Style: High-end sensory luxury
- Difficulty: Easy build, high material cost
- Budget Breakdown: Hinoki Lumber: $600 | Fasteners: $40 | Base Blocks: $30
- Creator’s Tip: Lightly sand the handrails twice a year to re-activate the deep aromatic oils.
- Smart Sourcing: Fine-grit flexible sanding sponges (bulk pack) and stainless steel deck framing brackets.
Stone Bridge Foundations
Stone bridges communicate permanence and geological time scales. These structures weather gracefully, developing moss and lichen coatings that enhance rather than diminish their character.
19. Single Slab Granite Span
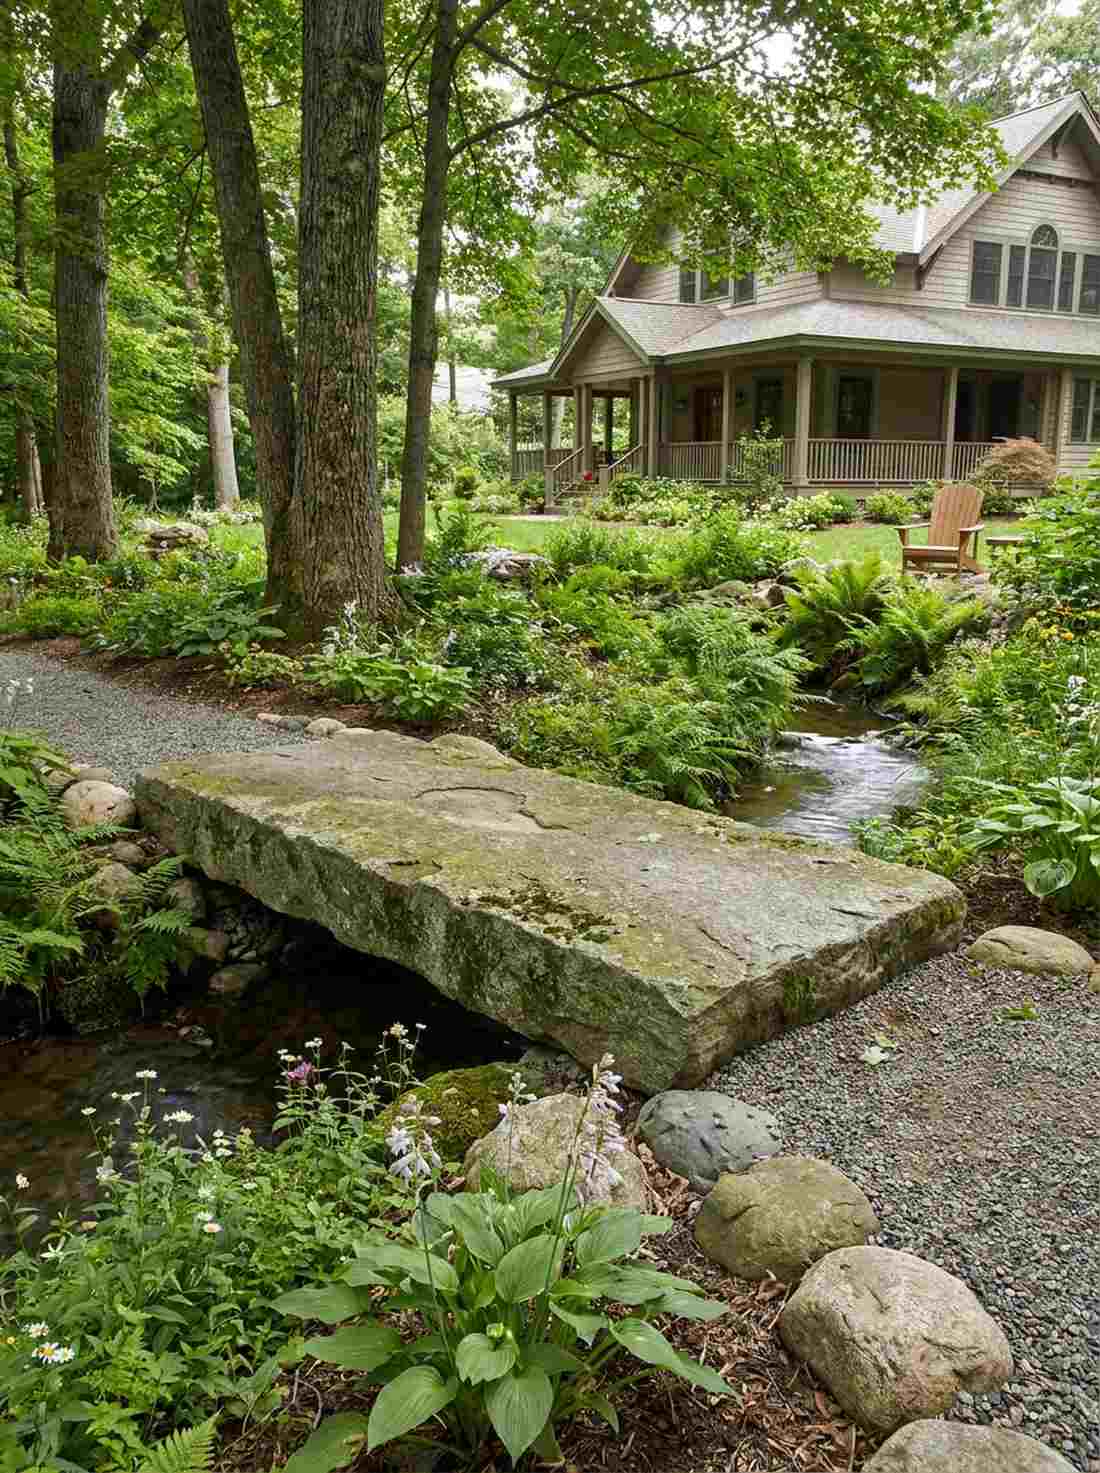
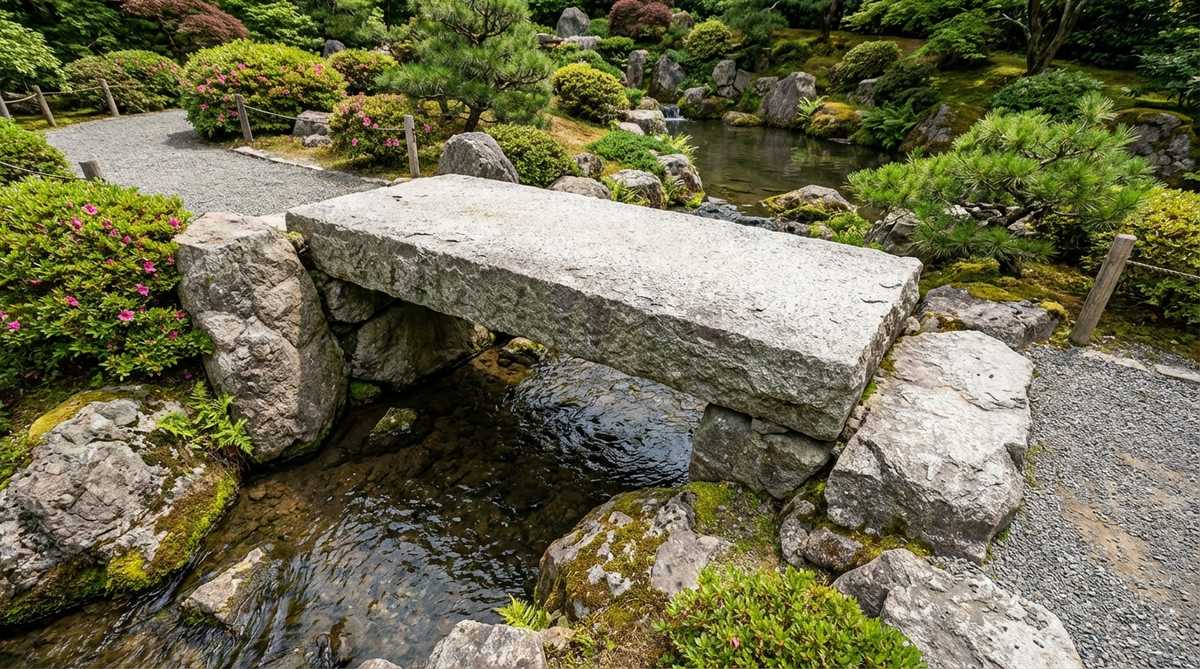
Unmovable and ancient, this massive rock feels like it has been resting there for centuries. A monolithic stone path is perfect for bridging narrow creeks with uncompromising permanence.
Skipping complex masonry, dropping one giant 18-inch thick slab onto buried foundation stones delivers an instantly historic aesthetic. This brutalist simplicity outlasts any wood product and creates an incredible visual anchor in a soft, green landscape.
Depending on local quarries, sourcing this rock costs $300–$800, plus delivery. Pin this if you never want to do bridge maintenance again.
- Key Materials: 18+ inch thick granite slab, gravel footings
- Vibe / Style: Ancient and indestructible
- Difficulty: Requires heavy machinery
- Budget Breakdown: Granite Slab: $450 | Delivery/Placement: $300 | Base Rock: $50
- Creator’s Tip: Ensure your foundation stones are buried below the frost line so the slab never shifts in winter.
- Smart Sourcing: Heavy-duty lifting straps (industrial grade) and compactable limestone base gravel.
Wait until you see how simple it is to fake a heavy stone aesthetic on a weekend budget.
20. Limestone Slab with Texture
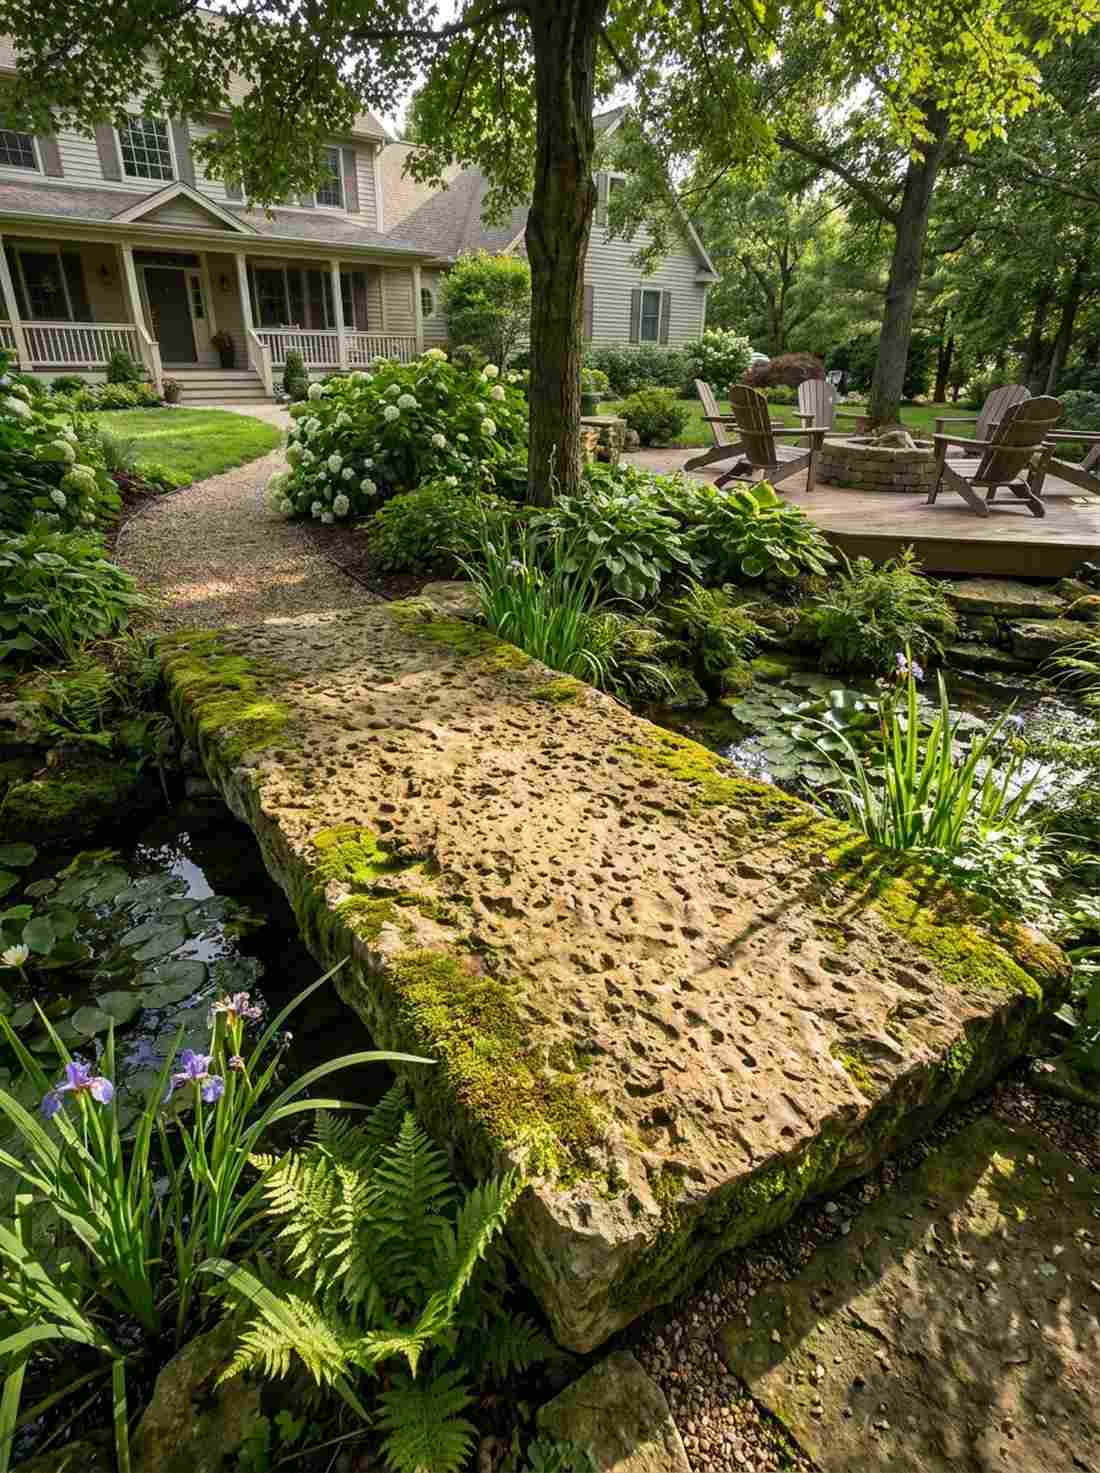
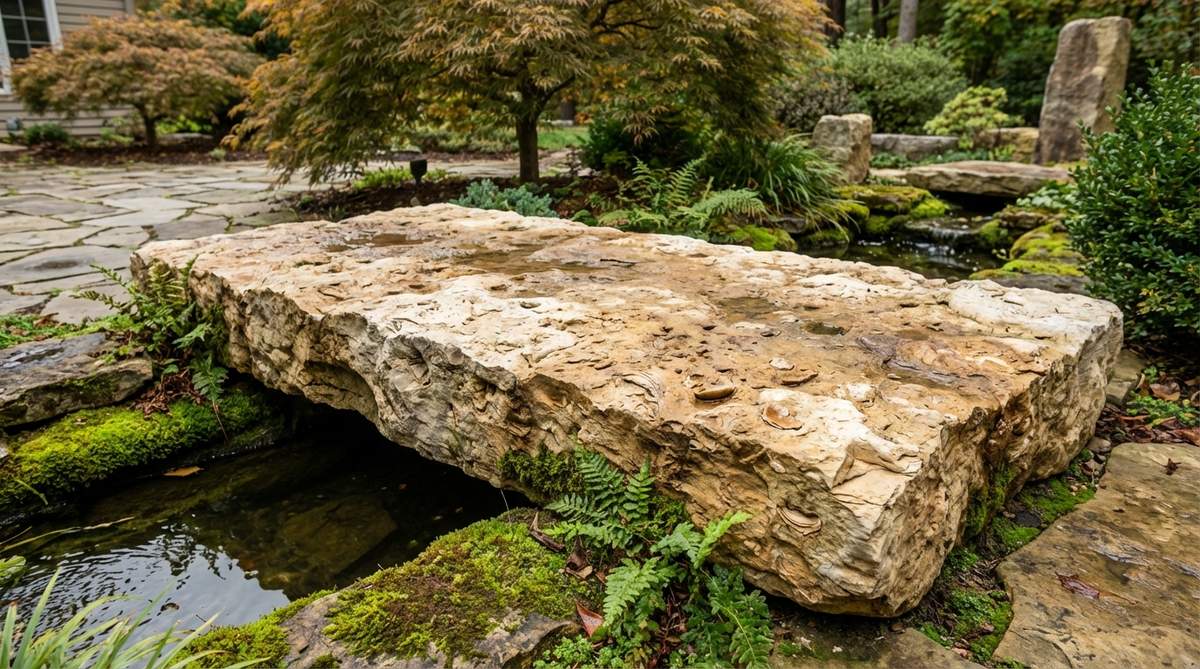
Warm and deeply pitted, this fossil-rich surface feels incredibly organic beneath your feet. A textured natural stone crossing visually softens harsh garden lines and pairs beautifully with aquatic plants.
Because limestone is porous, it acts as a magnet for beautiful moss and algae, accelerating the “ancient ruin” vibe faster than granite ever could. Applying a buttermilk mixture to the edges encourages explosive moss growth, making the bridge look hundreds of years old in just weeks.
Limestone slabs generally run about $200–$400 for a 6-foot span. Highly recommended for achieving that overgrown, romantic aesthetic.
- Key Materials: Thick natural limestone slab, buttermilk moss starter
- Vibe / Style: Romantic, overgrown ruins
- Difficulty: Moderate heavy lifting
- Budget Breakdown: Limestone Slab: $250 | Base Sand: $30 | Moss Spores: $25
- Creator’s Tip: Brush live moss blended with plain yogurt onto the pitted sides to grow instant green patina.
- Smart Sourcing: Live terrarium moss starter kits and polymeric leveling sand bags.
21. Arched Stone Bridge (Sori Ishibashi)
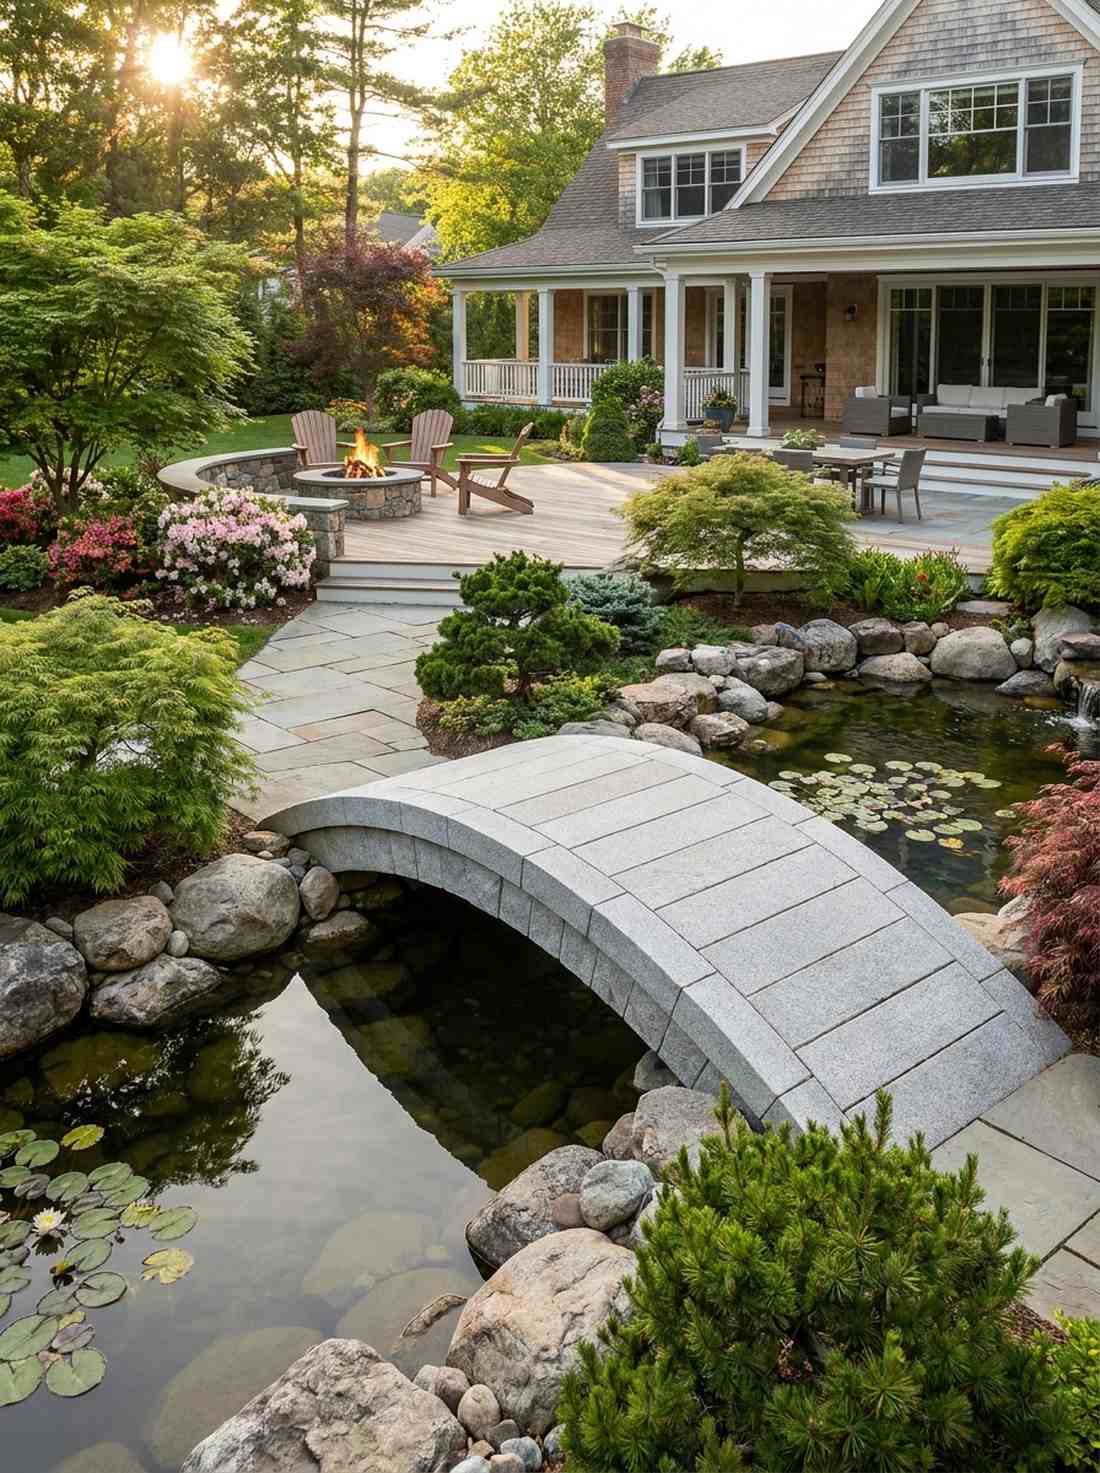
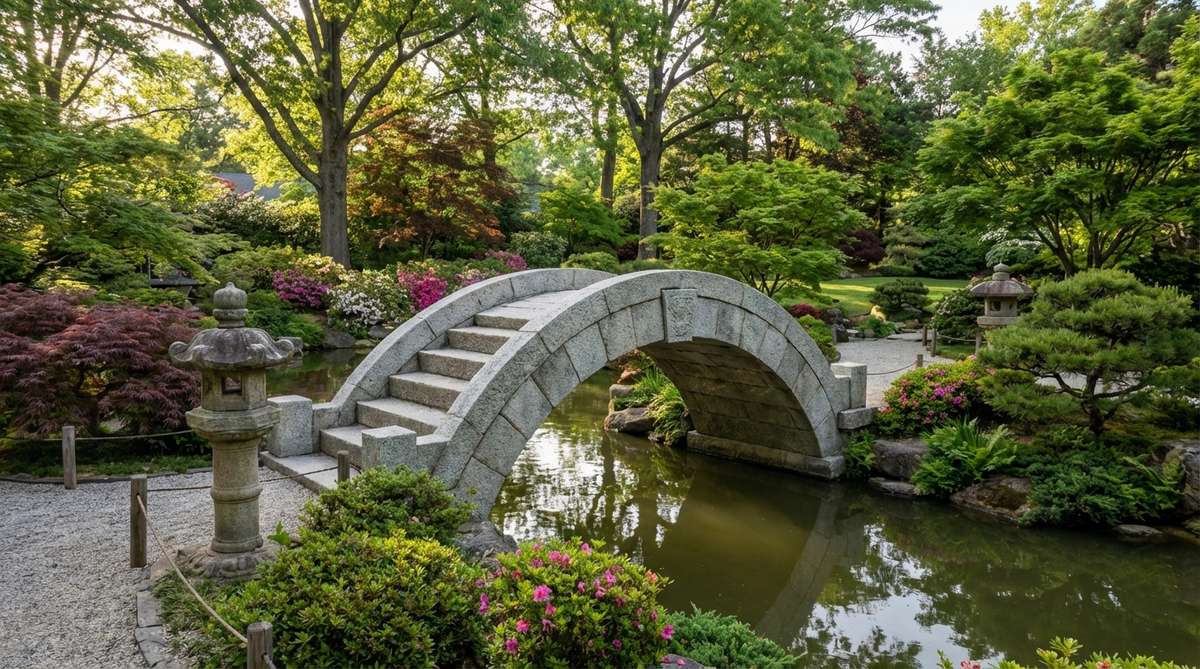
A masterpiece of compression, this sweeping masonry feels like an architectural miracle. This classic curved stone arch is the absolute pinnacle feature for grand Japanese courtyard designs.
While traditionalists use zero mortar, cheating slightly with hidden high-strength construction adhesive ensures the wedge-shaped voussoir blocks never fail under foot traffic. It gives a designer-level finish that proves incredible engineering can exist purely through geometry and stone.
Sourcing precision-cut wedge stones pushes the budget past $1,000 quickly. Save this to your dream landscape architecture board!
- Key Materials: Pre-cut wedge stones, hidden masonry adhesive, wooden formwork
- Vibe / Style: Elite architectural geometry
- Difficulty: Professional masonry required
- Budget Breakdown: Custom Stones: $850 | Adhesive/Mortar: $60 | Temporary Formwork: $100
- Creator’s Tip: Build a sturdy wooden arch template to support the stones until the final keystone is dropped in place.
- Smart Sourcing: Extreme-hold exterior masonry adhesive and flexible plywood formwork boards.
22. Stepping Stone Sequence
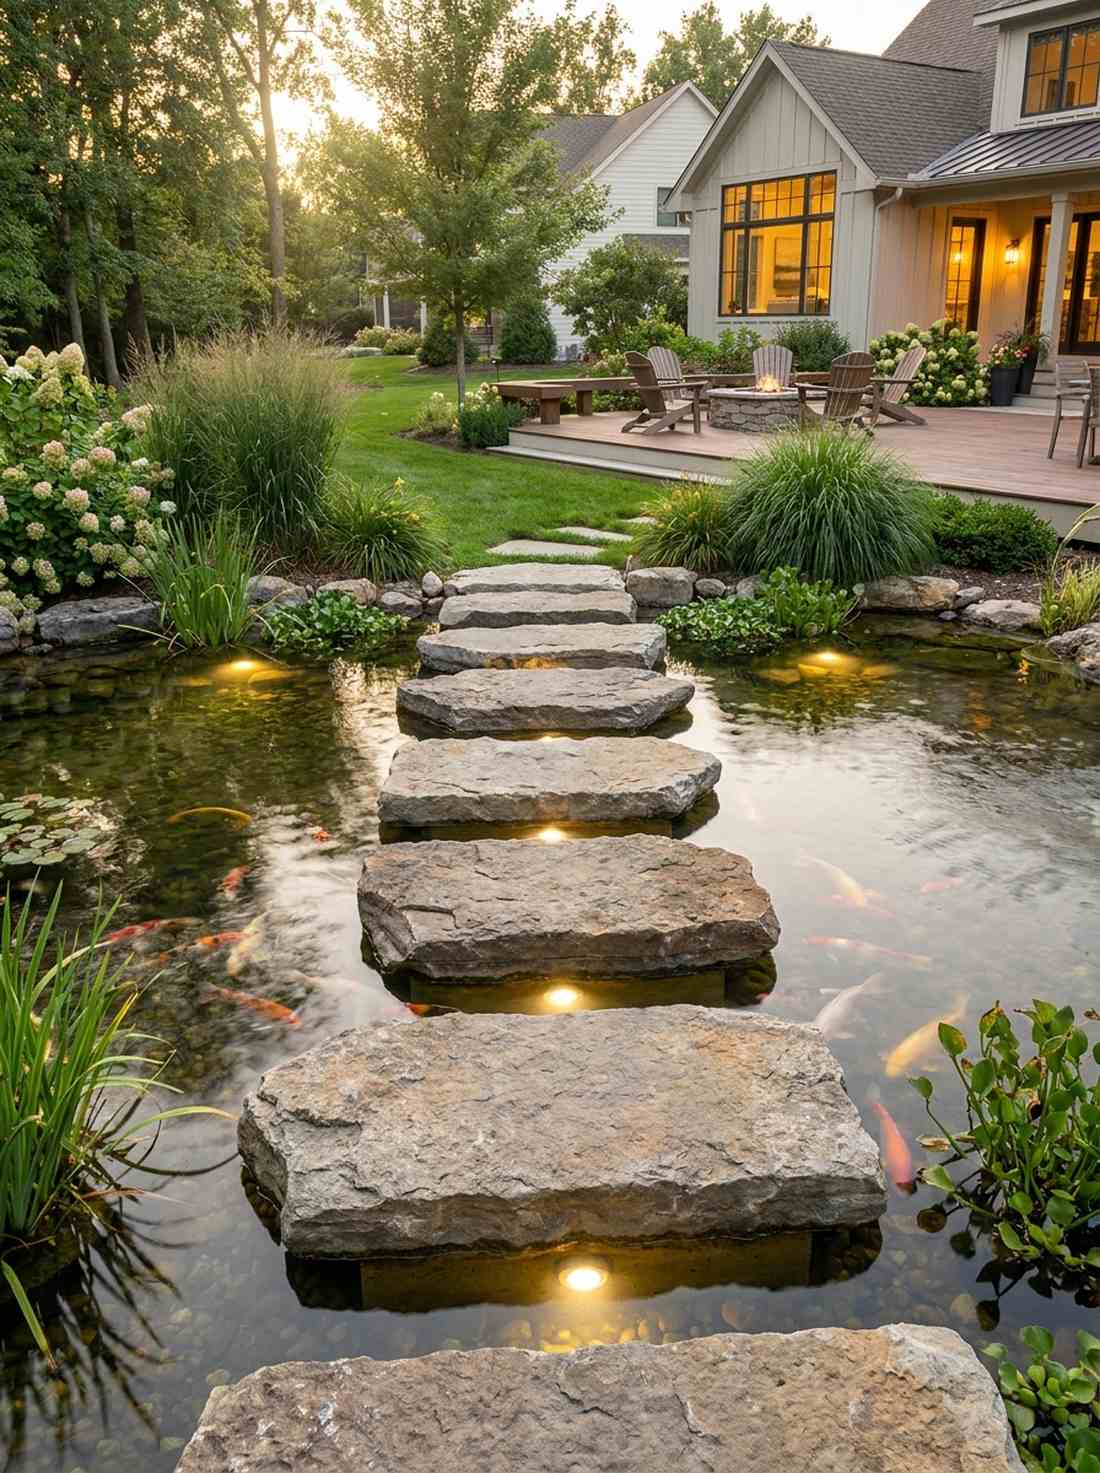
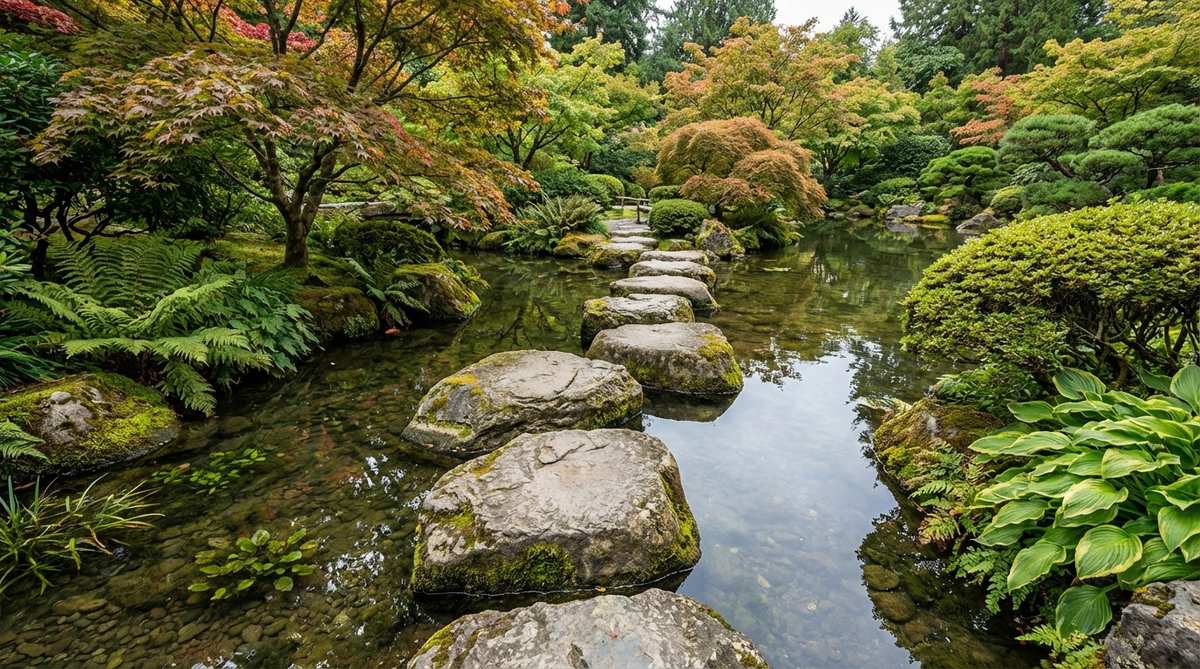
Discontinuous and mindful, this path feels like a meditation puzzle over the water. A measured water-stepping sequence is brilliant for shallow koi ponds where interaction is key.
By leaving calculated 18-inch gaps between flat-topped rocks, visitors are forced out of their racing thoughts and entirely into the present moment. Embedding high-quality miniature garden supplies or underwater lights between the gaps turns a simple crossing into a nocturnal wonderland.
You can execute this flawlessly for under $150 using locally sourced fieldstone. It’s an incredibly cheap way to add profound interactivity to water features.
- Key Materials: Flat-top fieldstones, concrete base pads
- Vibe / Style: Zen interactive mindfulness
- Difficulty: Easy placement, heavy stones
- Budget Breakdown: Fieldstones: $100 | Concrete Mix: $30 | Submersible Lights: $40
- Creator’s Tip: Pour a small underwater concrete footer for each stone to prevent them from wobbling in the mud over time.
- Smart Sourcing: Fast-setting underwater pond concrete and waterproof LED puck lights (bulk pack).
23. Sandstone Platform Bridge

Warm ochre hues combined with sharp edges make this feel like a sunset carved in stone. A wide multi-slab masonry deck brings beautiful earthy rust tones that perfectly contrast bright green foliage.
Laying out multiple slabs tightly side-by-side avoids the extreme cost and weight of sourcing one giant boulder. Filling the minimal gaps with specialized polymeric sand locks the pieces together completely while still allowing heavy rain to drain through without pooling.
Expect to spend $200–$450 for good quality dimensional sandstone. Pin this if you want an elegant, wide pedestrian walkway.
- Key Materials: Dimensional sandstone slabs, polymeric joint sand
- Vibe / Style: Earthy and stable
- Difficulty: Basic hardscaping skills
- Budget Breakdown: Sandstone Slabs: $300 | Base Prep: $50 | Polymeric Sand: $35
- Creator’s Tip: Always compact your gravel base twice before laying stone to prevent ugly uneven settling next spring.
- Smart Sourcing: Commercial-grade polymeric jointing sand and heavy-duty steel hand tampers.
24. Boulder Hop Crossing
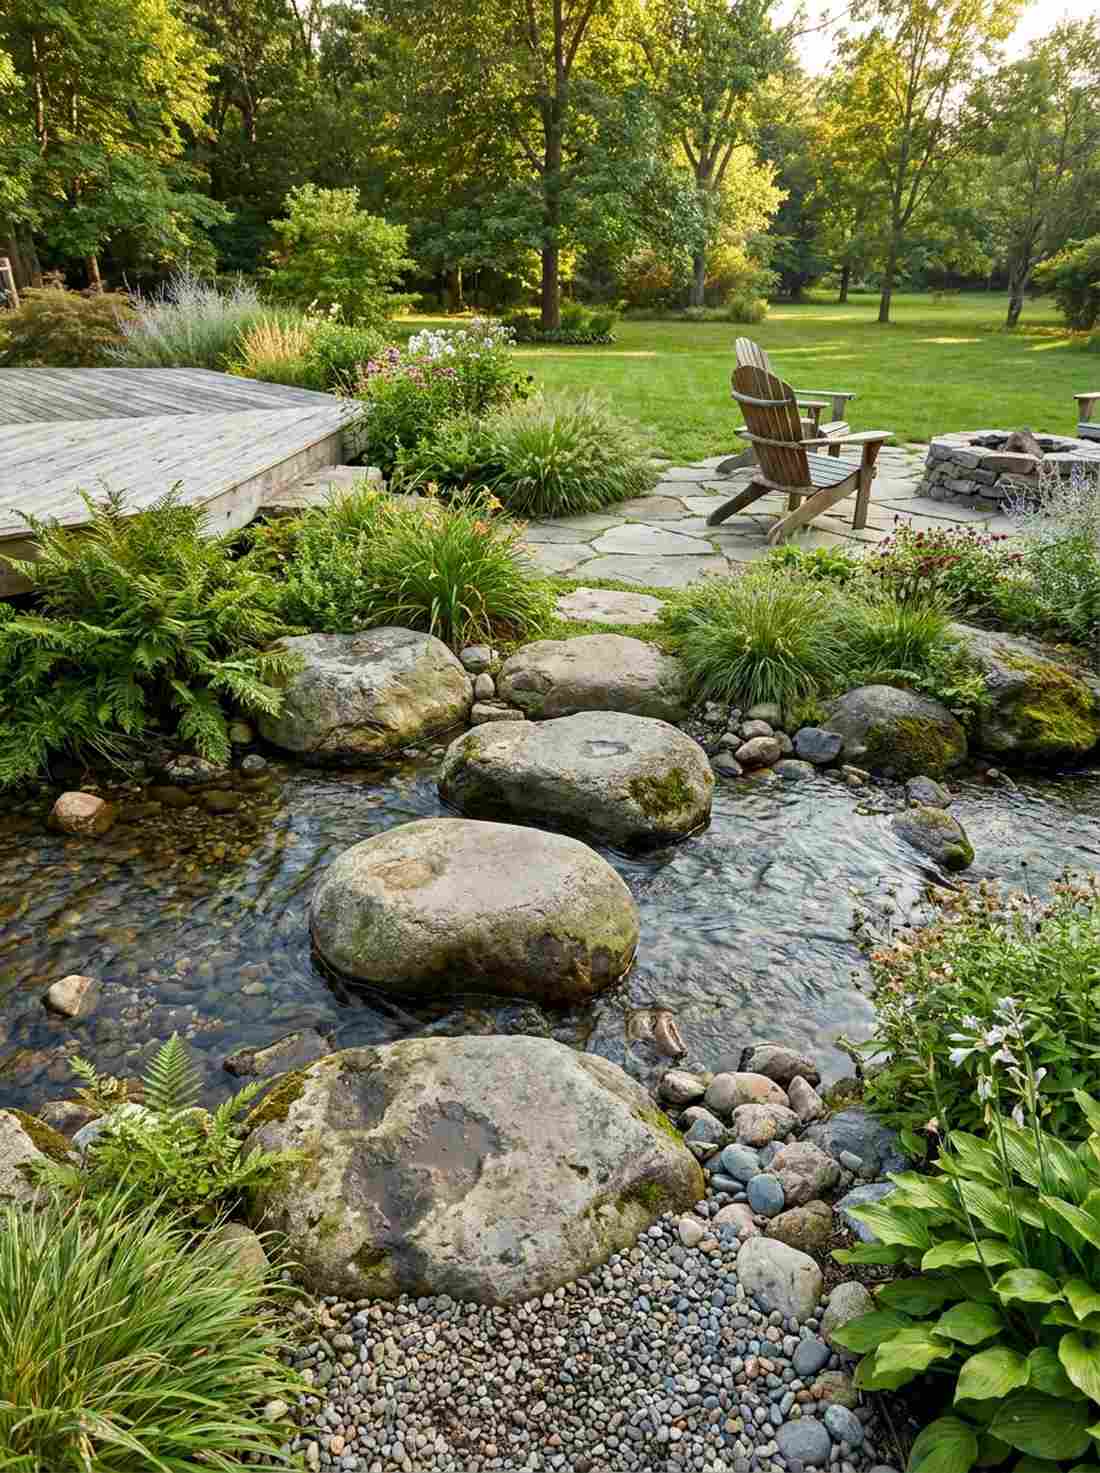
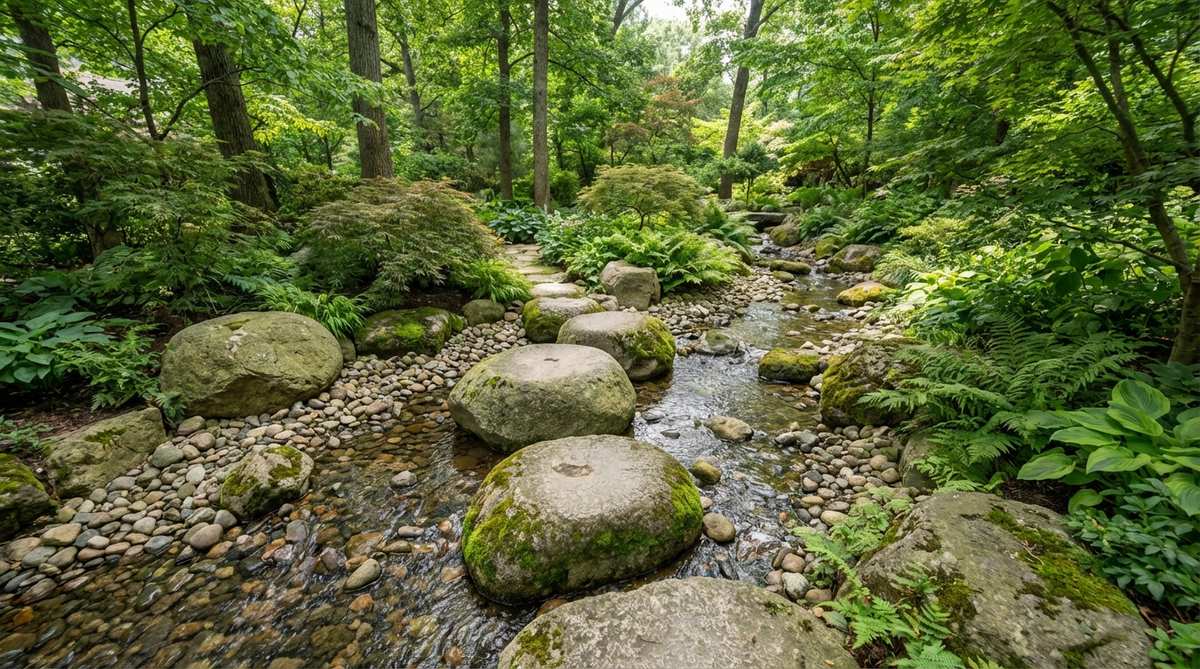
Rugged and challenging, navigating this path feels like hopping across a wild mountain stream. The natural rounded stone crossing is unmatched for creating a deeply naturalistic, untamed landscape.
Burying perfectly rounded boulders halfway into the streambed creates an illusion of massive submerged bedrock that has been carved by water for centuries. The irregular heights challenge your balance, intentionally slowing movement and immersing the walker entirely in the garden ecosystem.
Because you only need 5 to 7 medium boulders, the cost is a staggeringly low $80–$150. Save this idea for a kid-friendly, interactive backyard stream!
- Key Materials: Smooth river boulders 18-30 inches wide
- Vibe / Style: Playful mountain wilderness
- Difficulty: Labor intensive digging
- Budget Breakdown: River Boulders: $120 | Gravel Bedding: $30 | Labor: Sweat Equity
- Creator’s Tip: Place the flattest, widest boulders at the beginning and end of the sequence to ensure safe entry/exit.
- Smart Sourcing: Heavy-duty pond underlayment fabric and smooth decorative river rock bulk bags.
Material Guide: Cheap vs. Premium Aesthetic
Knowing exactly where to save and where to spend makes all the difference in achieving that “looks expensive but isn’t” vibe.
- Standard vs. UV-Resistant/Premium: Using basic wood stains will fade and peel near water within months. Upgrading to a marine-grade UV clear sealant ensures your wood maintains its rich color and repels mold for years.
- Pre-made Kits vs. Sourcing Locally: While buying raw logs is cheap, investing in pre-cut, powder-coated structural kits saves dozens of hours of frustrating framing work and prevents dangerous structural bowing.
If you have a narrow pathway, the upcoming zigzag layout is the ultimate space-saving hack.
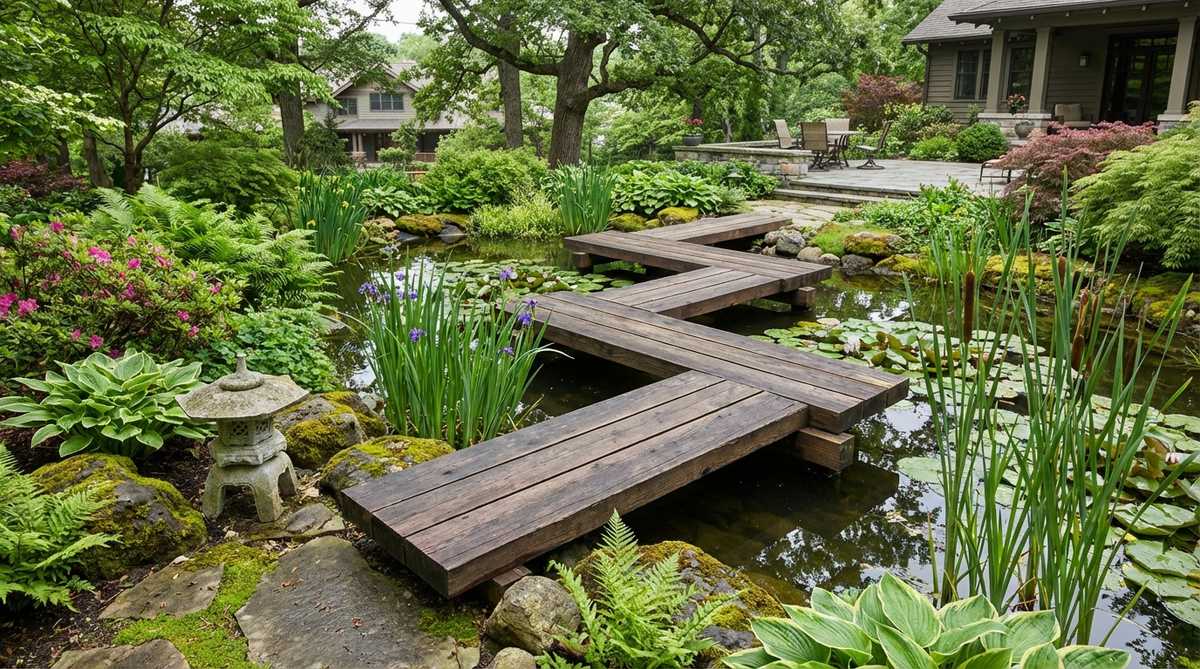
Zigzag Plank Variations
Yatsuhashi (eight-plank bridges) follow angular zigzag paths across marshes and iris ponds. The directional changes serve both functional and spiritual purposes in traditional design.
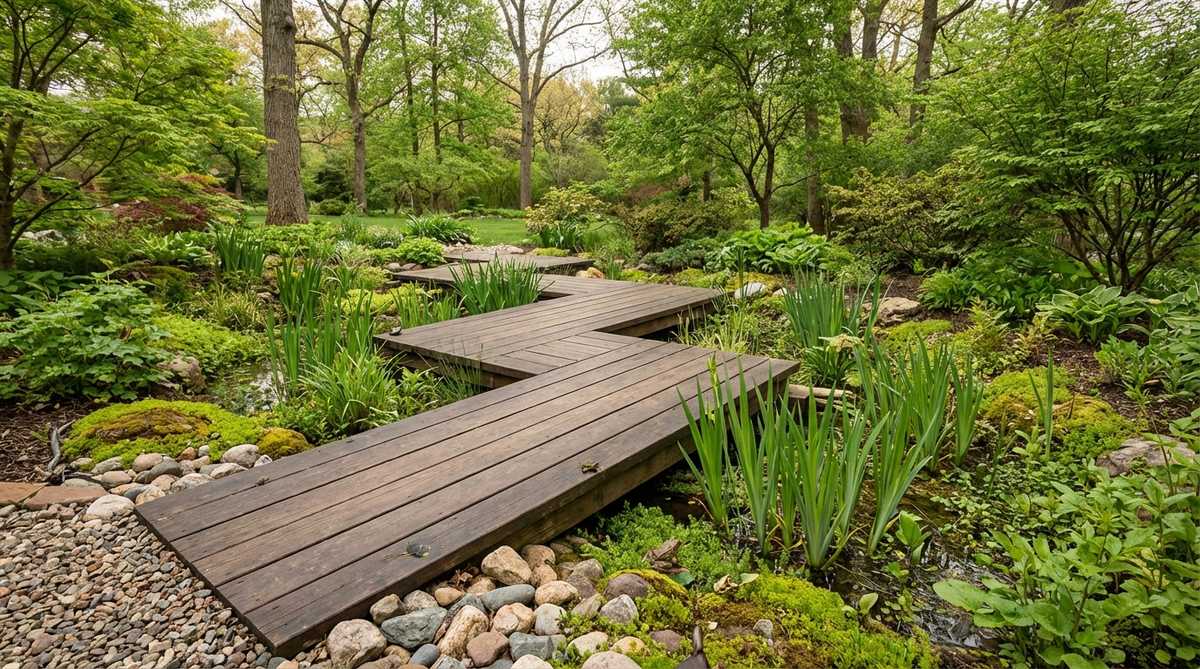
25. Classic Yatsuhashi Eight-Plank
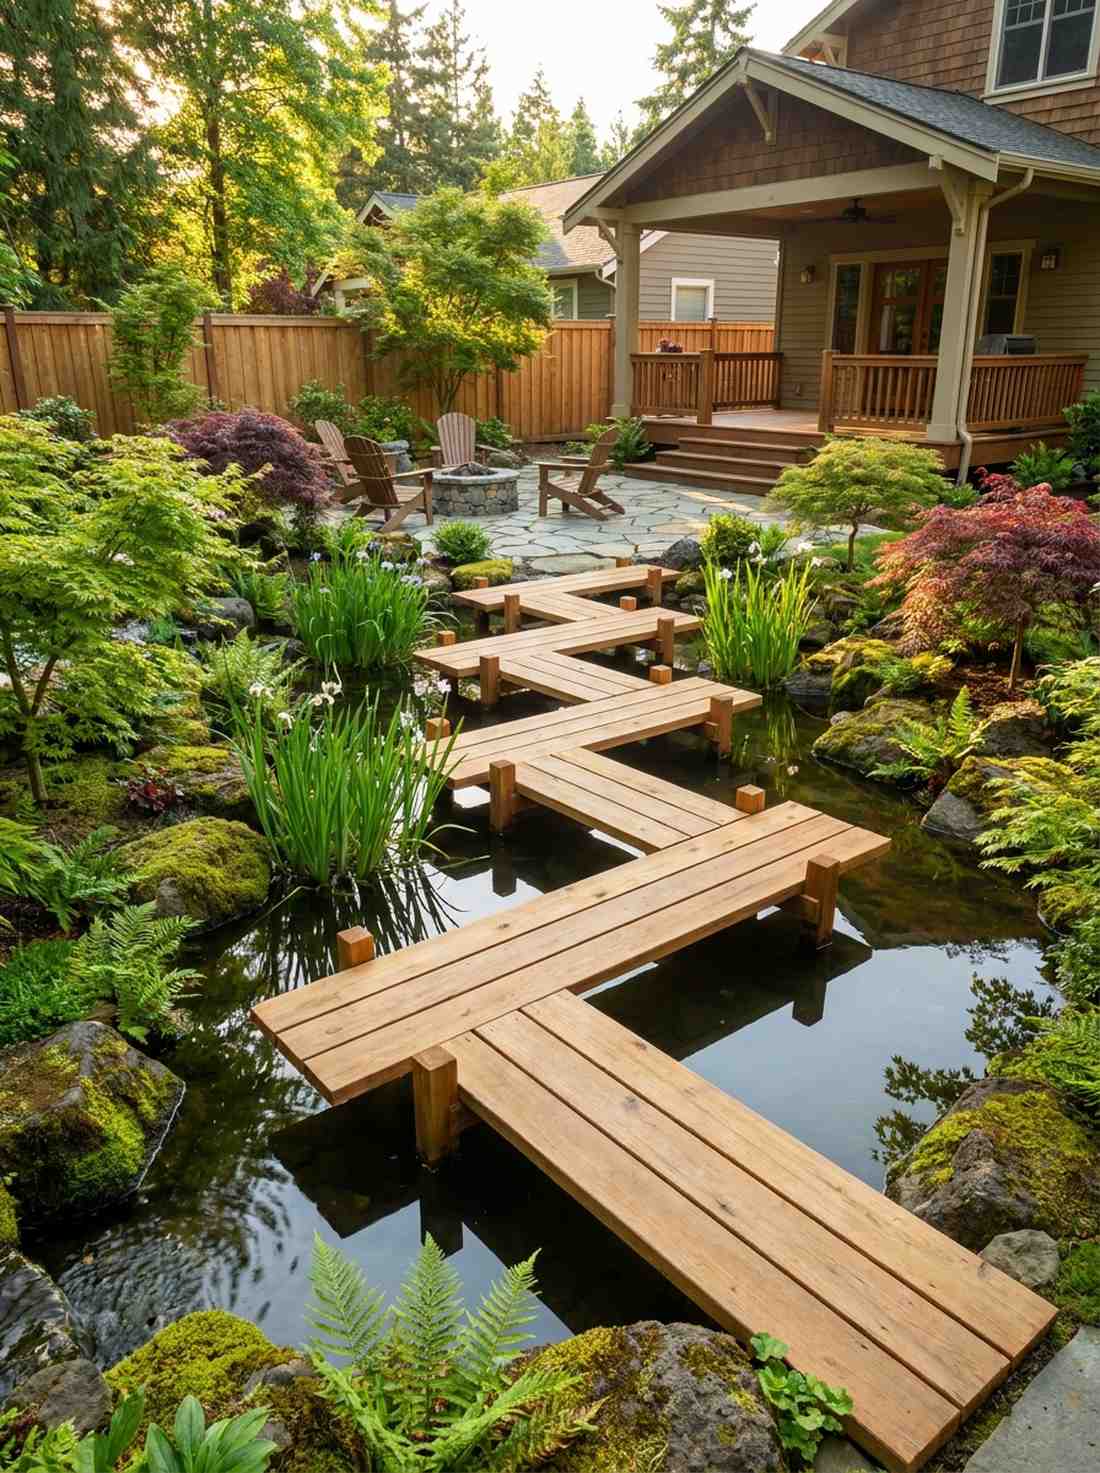
Sharp and legendary, navigating these turns feels like stepping through a protective labyrinth. This traditional angular marsh walkway historically forces visitors to slow down and prevents evil spirits from crossing.
Suspending narrow 3-foot planks right above the water line using hidden vertical posts gives a designer-level finish that looks like the wood is floating. Every 90-degree turn forces you to stop and observe a completely new angle of your curated garden, maximizing a small yard’s visual footprint.
You can execute this multi-plank setup for $200–$400 in rot-resistant wood. Pin this to your small-space garden hacks board!
- Key Materials: Narrow cedar planks, submerged heavy-duty posts
- Vibe / Style: Protective spiritual geometry
- Difficulty: Precise angle leveling
- Budget Breakdown: Deck Planks: $150 | Base Posts: $100 | Waterproofing: $40
- Creator’s Tip: Sink the support posts inside PVC pipes filled with concrete to completely rot-proof the underwater sections.
- Smart Sourcing: Pre-cut cedar decking bundles and marine-grade underwater wood epoxy.
26. Extended Zigzag Sequence

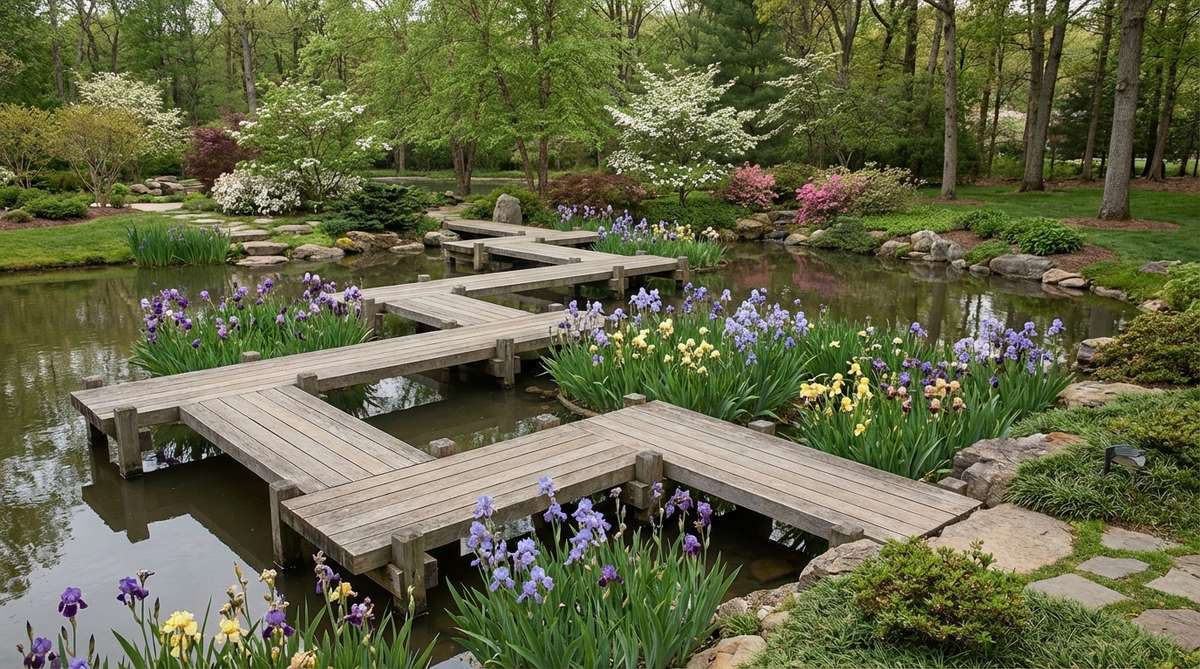
Rhythmic and endless, this path feels like a physical mantra that calms the mind. Building a multi-turn expansive walkway transforms a large, muddy marsh into a captivating journey.
Expanding the setup to twelve or sixteen planks turns a simple crossing into a massive aesthetic statement that commands the landscape. Utilizing high-end UV-coated resin fairy cottage kits tucked into the corners of the turns creates stunning micro-destinations along the way.
Due to the length, materials scale up to $500–$800. Highly recommended if you have a massive yard and want a highly interactive feature.
- Key Materials: Bulk hardwood planks, heavy support posts
- Vibe / Style: Endless meditative rhythm
- Difficulty: Repetitive, time-consuming build
- Budget Breakdown: Planks/Hardware: $450 | Concrete Footers: $150 | Accents: $80
- Creator’s Tip: Plant tall irises exactly at the outer elbows of the bridge so walkers brush past them on every turn.
- Smart Sourcing: UV-coated resin fairy cottage kits and heavy-duty post driving tools.
27. Low-Profile Marsh Walkway
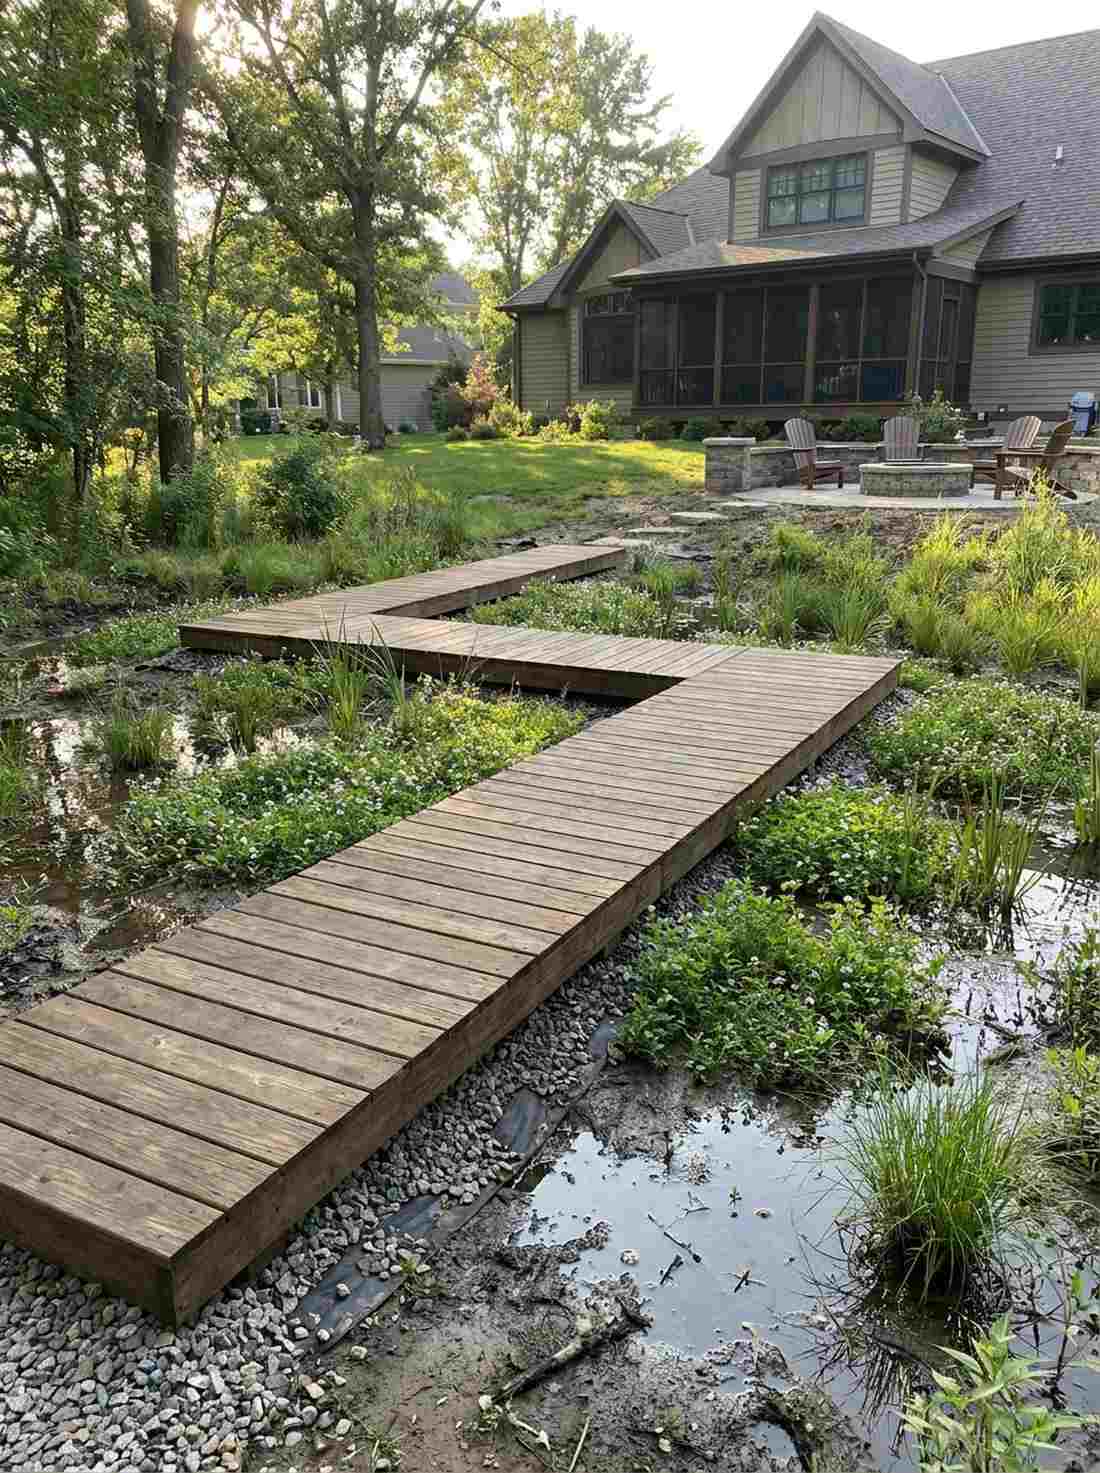
Hovering practically in the mud, this feels like an authentic boardwalk through a private nature reserve. A ground-level wetland path is the ultimate ecological solution for soggy, unusable backyard corners.
Instead of digging deep footers, laying out heavy planks directly on top of a crushed stone drainage base saves days of grueling labor. It instantly immerses you in the blooming groundcovers, offering an incredibly intimate view of low-lying nature and water insects.
This zero-elevation build only costs about $150–$250 in wood and gravel. Save this if your yard suffers from massive drainage issues!
- Key Materials: Treated ground-contact lumber, crushed drainage stone
- Vibe / Style: Ecological nature reserve
- Difficulty: Very fast beginner project
- Budget Breakdown: Ground-Contact Wood: $120 | Crushed Stone: $70 | Anchors: $30
- Creator’s Tip: Lay down heavy-duty landscape fabric under the gravel base to stop the stones from sinking into the mud over time.
- Smart Sourcing: Commercial grade weed barrier fabric and heavy-duty ground anchor stakes.
28. Iris Pond Viewing Platform
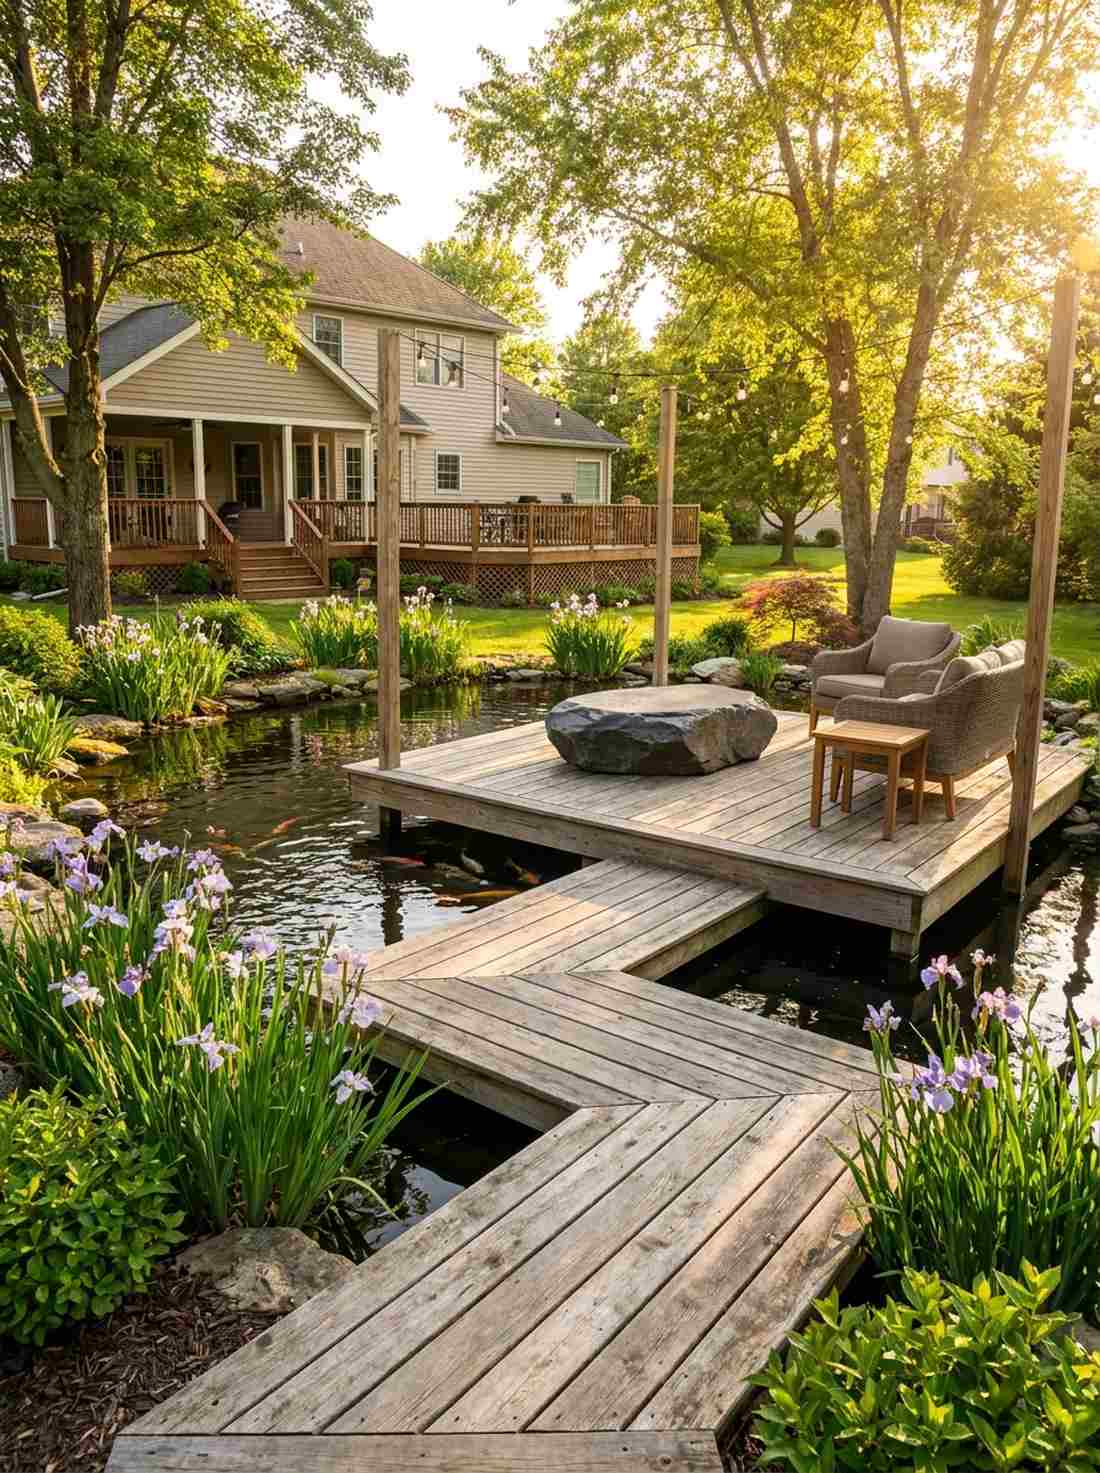
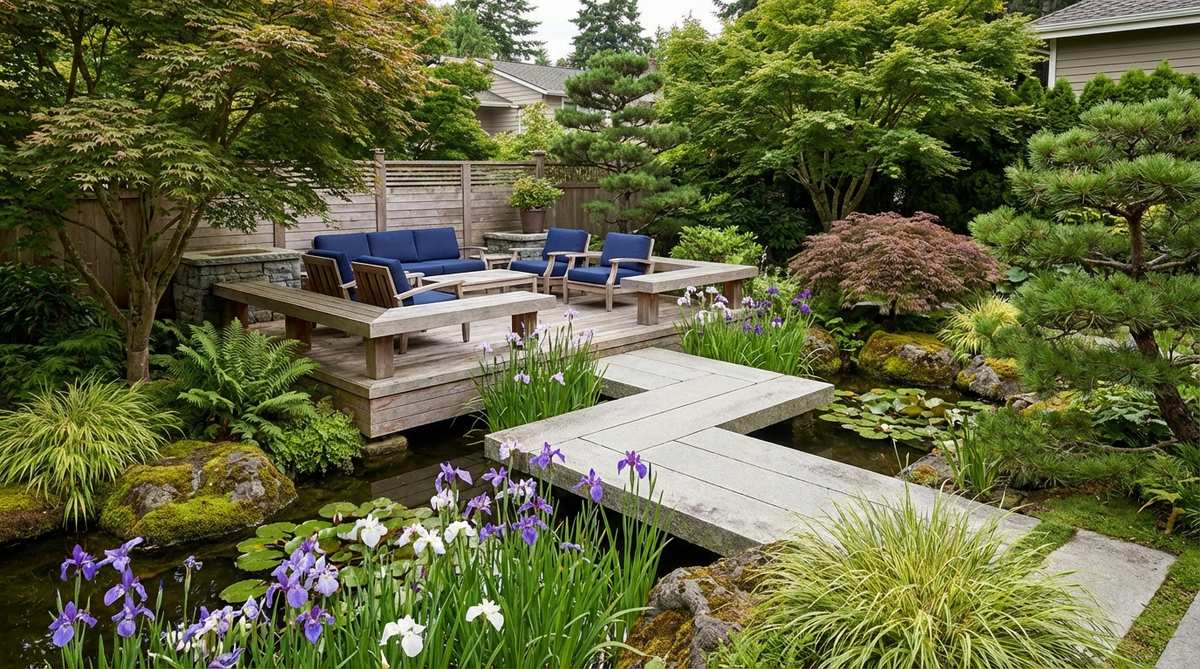
Purposeful and expansive, this wide spot feels like an invitation to stop and breathe. Integrating a flanking observation deck into your zigzag path creates the perfect destination to feed koi.
Interrupting a narrow walkway with a sudden 4×4 platform looks far more expensive than it is, giving the architecture deliberate “pause points”. Placing a heavy, flat seating stone directly on the wooden deck offers a brilliant material contrast that screams professional landscaping.
Adding the extra square footage pushes the project cost up by about $150. Pin this to your relaxing outdoor sanctuary board!
- Key Materials: Extended decking panels, central seating boulder
- Vibe / Style: Curated observation lounge
- Difficulty: Moderate framework expansion
- Budget Breakdown: Platform Wood: $100 | Extra Joists: $50 | Seating Stone: Free/$40
- Creator’s Tip: Ensure the joists directly beneath the viewing platform are doubled up to handle the weight of multiple people standing.
- Smart Sourcing: Pre-cut 4×4 structural wood brackets and heavy-duty joist hanger nails.
These modern alternatives are breaking every traditional rule, but the final aesthetic is undeniable.
Minimalist Contemporary Approaches
Modern interpretations distill traditional forms to essential geometries or introduce new materials while respecting philosophical foundations. These bridges honor heritage through reinterpretation rather than replication.
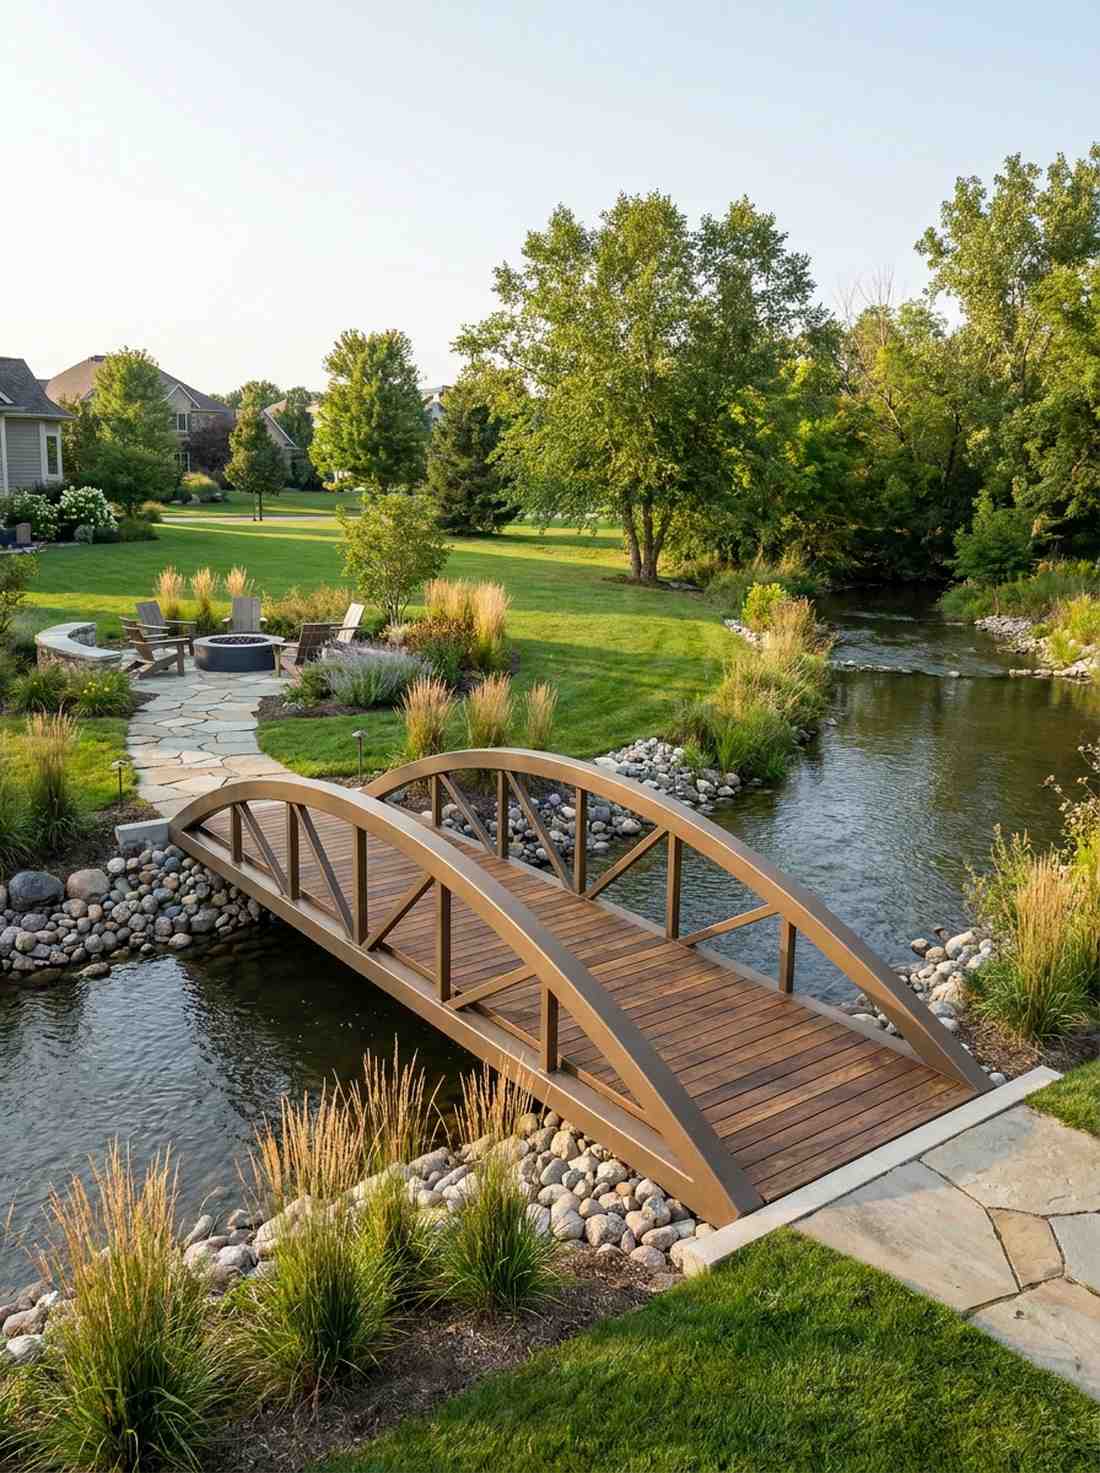
29. Steel Frame Wood Deck Hybrid
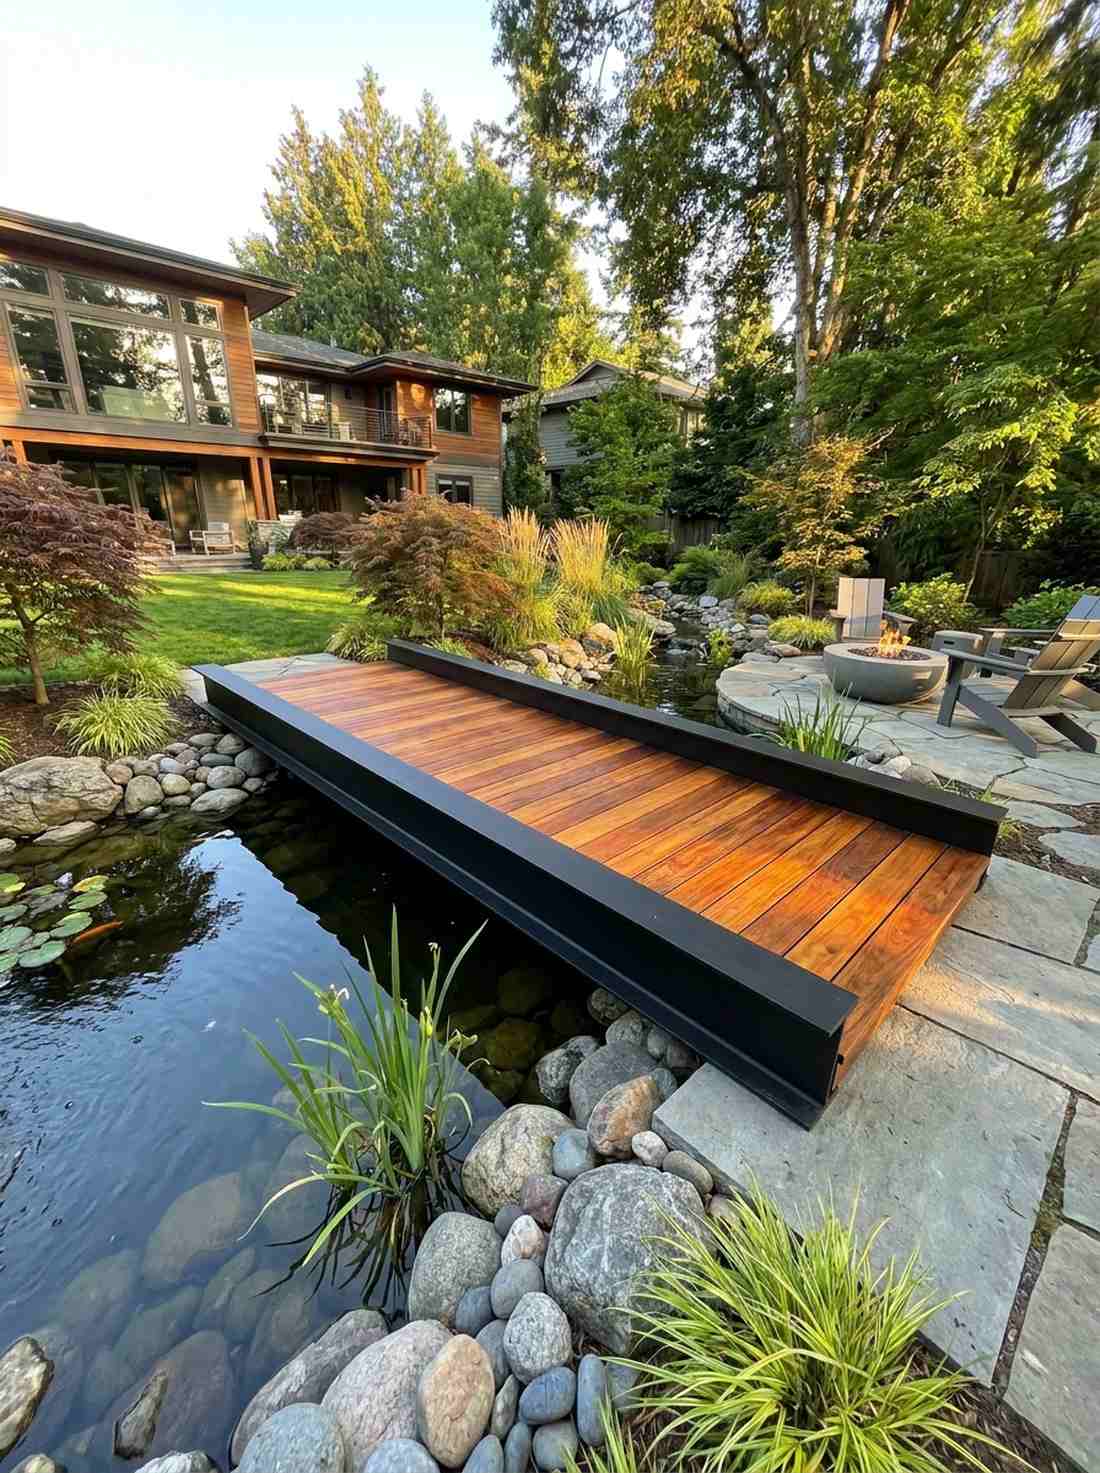
Sleek and industrial, this contrast feels like stepping onto a multi-million dollar architectural property. A metal and timber fusion span perfectly bridges the gap between ancient garden layouts and modern home designs.
Pairing powder-coated steel I-beams with warm teak decking delivers a surprisingly premium look that virtually eliminates the threat of structural sagging over long water gaps. The matte black metal receding visually against the water allows the glowing wood tones to pop brilliantly.
Because steel isn’t cheap, expect a starting budget of $700–$1,200. It’s a high-end investment that literally lasts a lifetime.
- Key Materials: Powder-coated steel beams, premium Ipe/Teak decking
- Vibe / Style: Modern industrial Zen
- Difficulty: Requires metalworking or fabrication
- Budget Breakdown: Steel Frame: $600 | Teak Wood: $300 | Industrial Hardware: $100
- Creator’s Tip: Oil the hardwood decking rather than staining it to maintain that rich, high-contrast modern aesthetic.
- Smart Sourcing: Premium penetrating exotic hardwood oil and black powder-coated steel brackets.
30. Minimalist Flat Span
Stripped of all ornament, this severe profile feels incredibly confident and sharp. The ultra-simple function bridge removes handrails entirely, turning the crossing into a pure geometric plane.
The secret to this severe reduction is flawless execution; using concealed deck fasteners means absolutely no visible screws ruin the uniform wood grain. Any flaw becomes immediately apparent, so selecting knot-free, premium-grade lumber is mandatory to achieve that high-fashion gallery look.
Despite being simple, premium clear lumber keeps the price around $300–$500. Save this if you are obsessed with minimalist backyard styling.
- Key Materials: Clear vertical-grain cedar, hidden fastener system
- Vibe / Style: Uncompromising modern minimalism
- Difficulty: Precision cuts required
- Budget Breakdown: Clear Cedar: $350 | Hidden Clips: $60 | Base Support: $70
- Creator’s Tip: Mill every single board edge with a slight 1/8-inch roundover bit to soften the harshness on bare feet.
- Smart Sourcing: Complete hidden deck fastening kits and high-grade wood router edge bits.
31. Glass Panel Railings
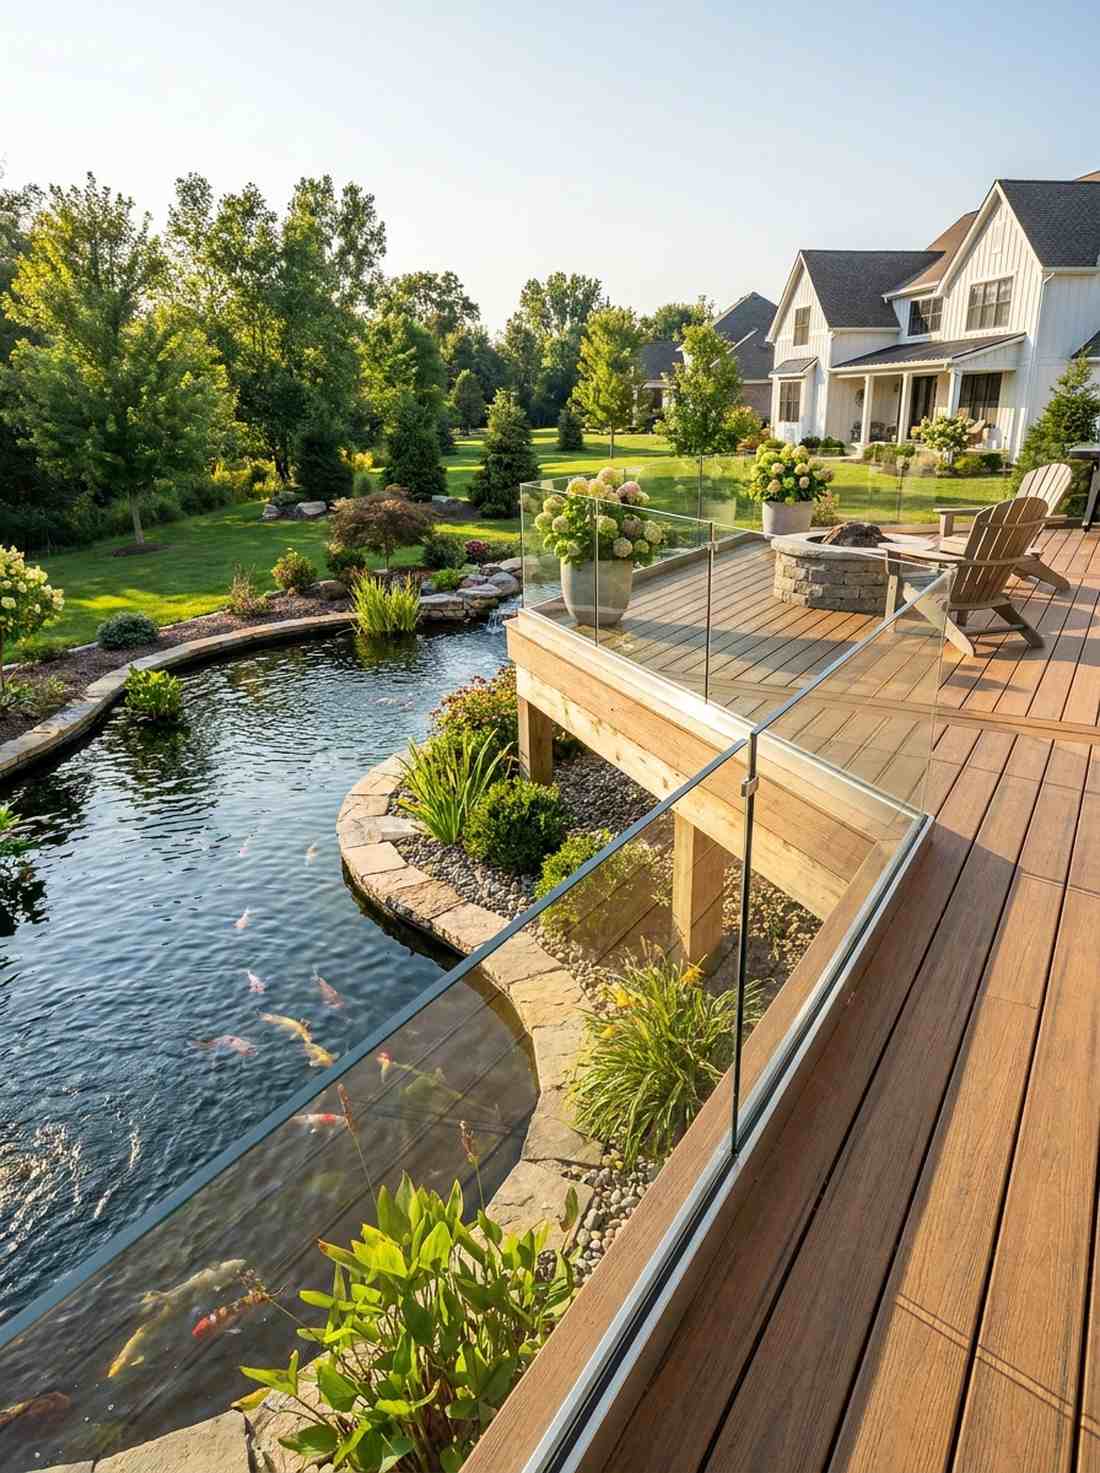

Transparent and airy, this barrier feels completely invisible against the landscape. Using a structural glass balustrade is the ultimate hack for ensuring safety without blocking your gorgeous koi pond views.
Ditching heavy wooden spindles for low-iron tempered glass looks far more expensive than it is and instantly modernizes any traditional frame. It completely protects the walkway from wind while maintaining a totally uninterrupted, cinematic visual connection to the water below.
Custom tempered glass and mounting channels will cost between $800 and $1,500. Pin this to your luxury outdoor renovation board!
- Key Materials: Low-iron tempered glass, stainless steel u-channels
- Vibe / Style: Unobstructed luxury viewing
- Difficulty: Fragile, heavy installation
- Budget Breakdown: Glass Panels: $800 | Stainless Channels: $300 | Hardware: $100
- Creator’s Tip: Specifically request “low-iron” glass to completely eliminate the cheap green tint found on edges of standard glass.
- Smart Sourcing: Marine-grade stainless steel glass clamps (bulk pack) and professional glass handling suction cups.
32. Cantilevered Deck Extension
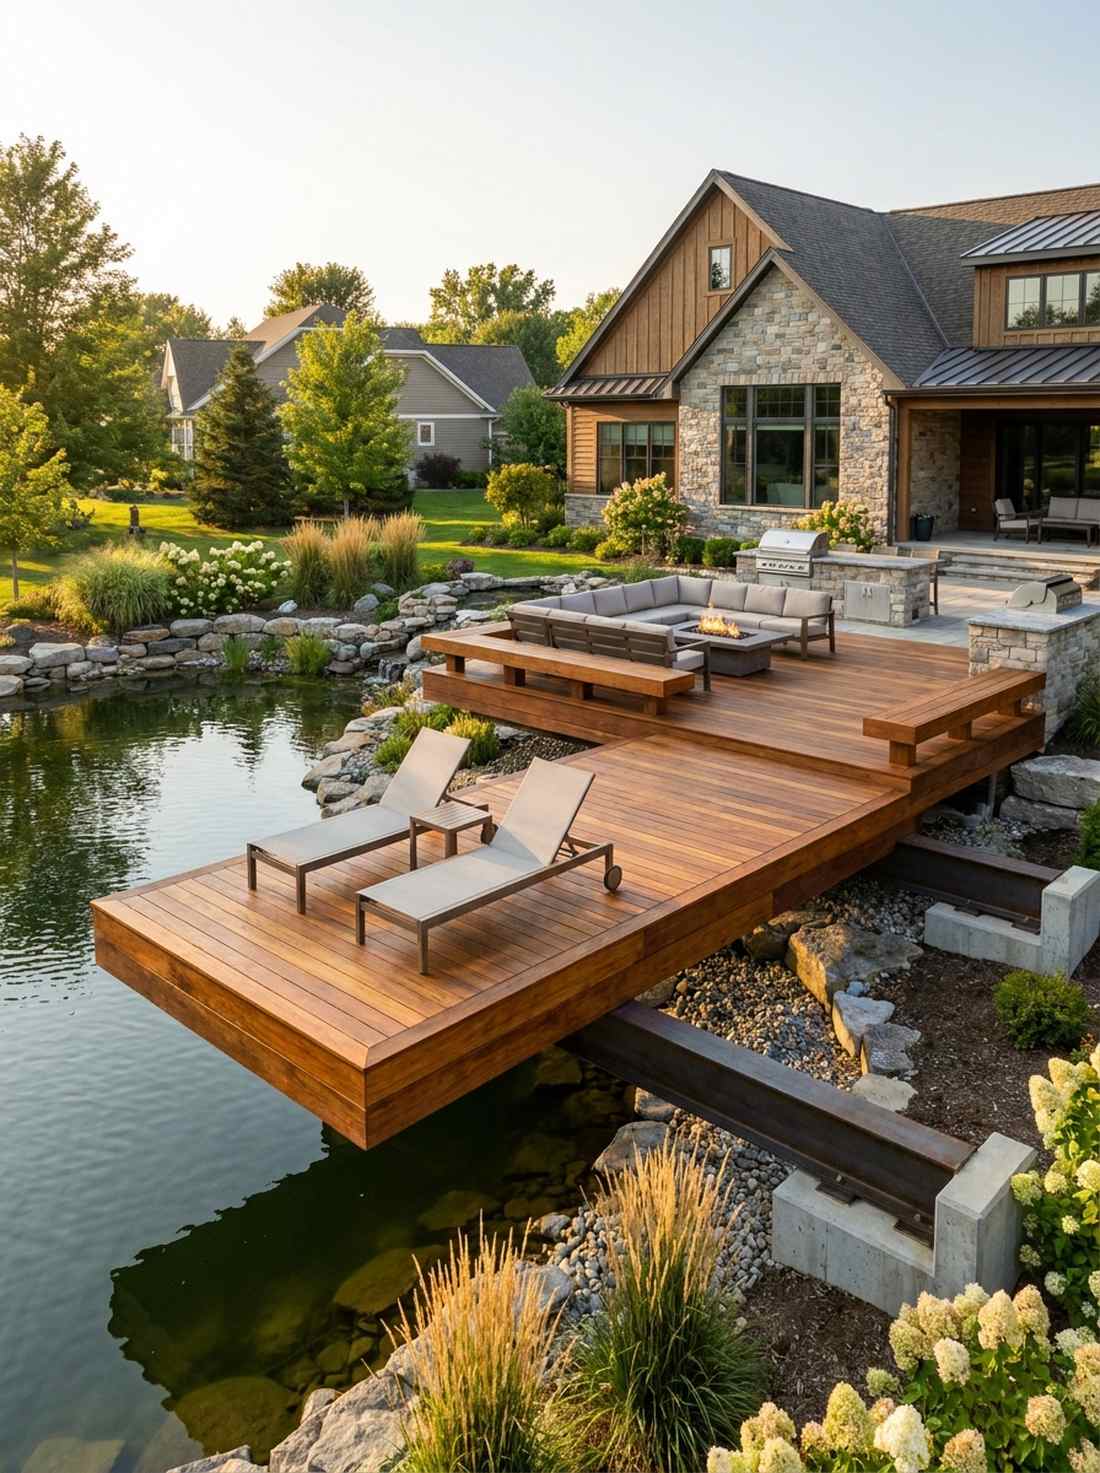
Defying gravity, this floating edge feels like an impossible architectural magic trick. The hovering over-water projection completely challenges perceptions of weight and balance in the garden.
Engineering a massive back-span anchor beneath the dirt allows the deck to extend wildly over the pond with zero visible supports underneath. This visual tension creates an unbelievable focal point that practically begs guests to walk to the edge.
Heavy concrete counter-weights and massive beams push this build into the $900–$1,600 range. Highly recommended for a jaw-dropping modern patio expansion.
- Key Materials: Massive structural joists, heavy concrete anchors
- Vibe / Style: Impossible floating architecture
- Difficulty: High-level structural engineering
- Budget Breakdown: Concrete/Rebar: $300 | Heavy Beams: $500 | Decking: $400
- Creator’s Tip: Never cantilever more than 1/3 of the total beam length to ensure it never tips or flexes under load.
- Smart Sourcing: High-strength structural steel lag bolts and fast-setting concrete mix bags.
33. Recycled Composite Decking

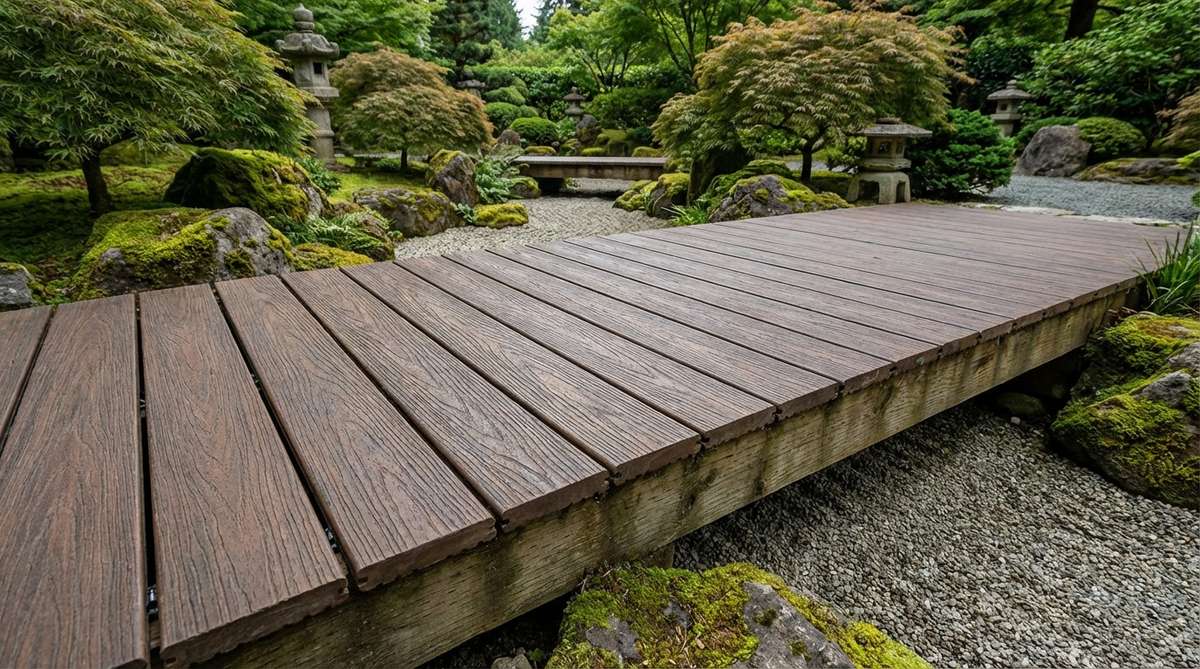
Textured and impenetrable, this feels like real wood but completely ignores the weather. Utilizing high-end composite materials is the smartest way to eliminate maintenance rot in consistently wet garden environments.
Modern composite boards have evolved drastically; selecting a multi-tonal grain pattern gives a designer-level finish that easily mimics exotic hardwoods. You completely bypass the nightmare of annual sanding and staining, making it the perfect sustainable choice for busy homeowners.
Good composite boards run slightly higher than standard wood, putting this project at $400–$700. Save this idea if you absolutely hate outdoor maintenance chores!
- Key Materials: High-end composite boards, aluminum framing
- Vibe / Style: Flawless zero-maintenance modern
- Difficulty: Very easy straightforward build
- Budget Breakdown: Composite Decking: $350 | Treated Frame: $100 | Composite Screws: $45
- Creator’s Tip: Pre-drill every hole near the ends of the boards; composites are notorious for mushrooming or cracking at the edges.
- Smart Sourcing: Color-matched composite deck screws (bulk pack) and premium wood-grain composite boards.
34. Illuminated Evening Bridge
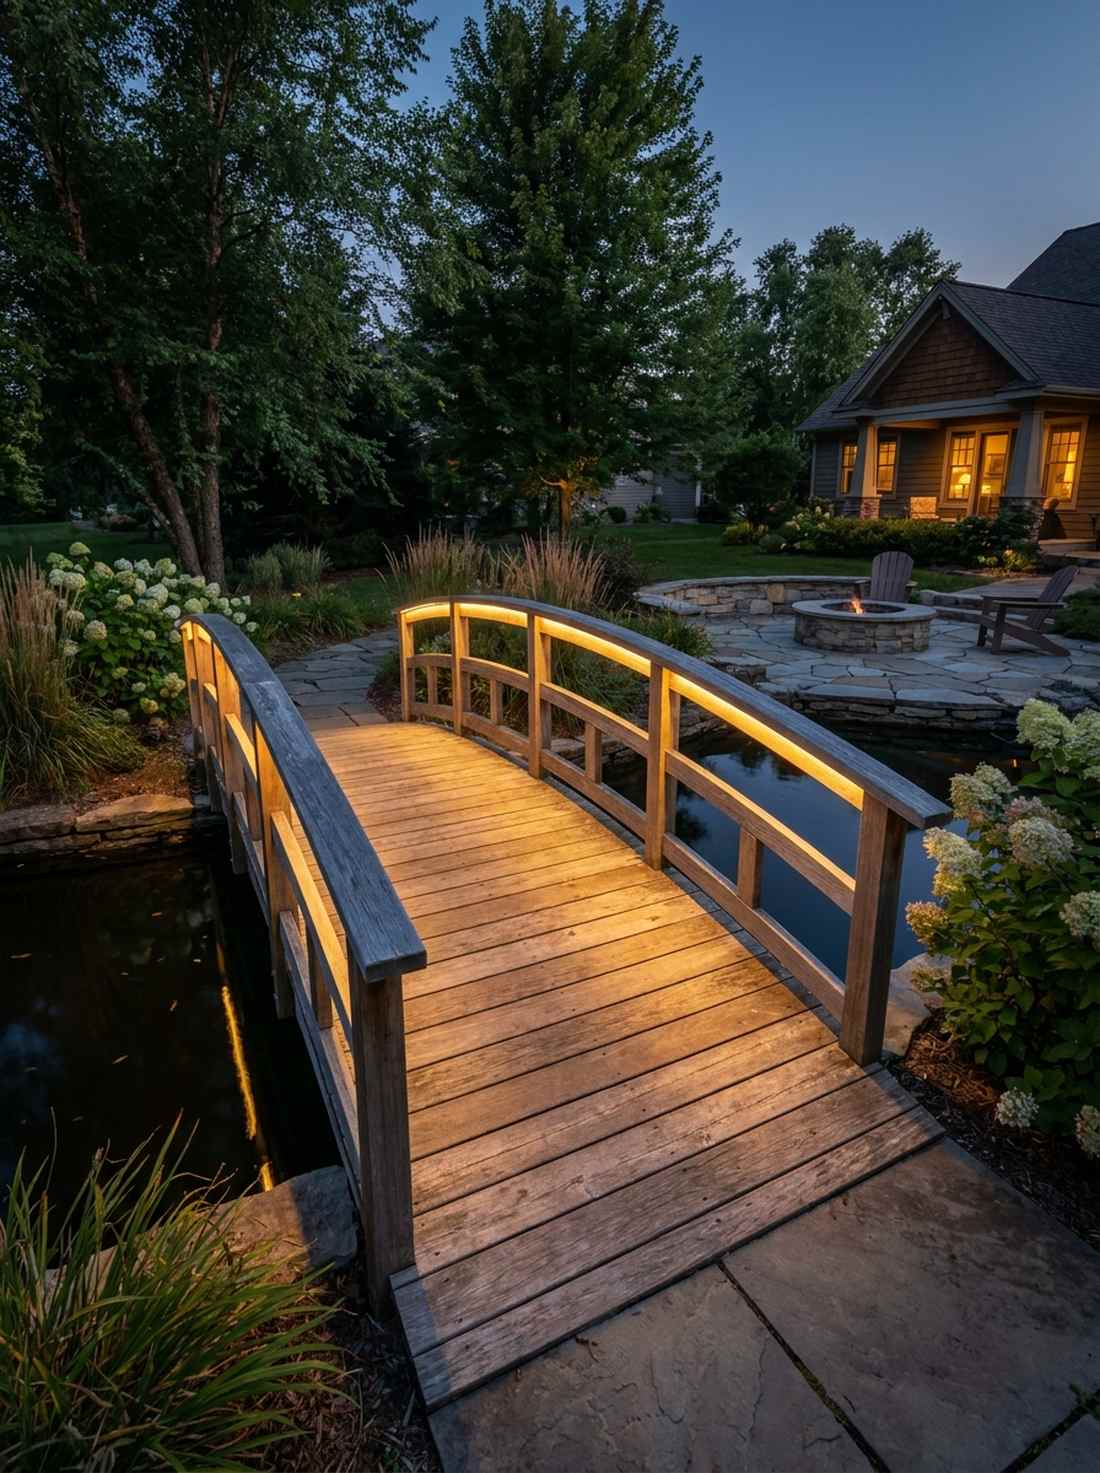
Glowing warmly over the dark water, this setup feels like a lantern guiding you through the night. An integrated low-voltage walkway completely transforms your garden’s visual hierarchy once the sun sets.
Sticking cheap solar lights on the posts looks terrible; instead, hiding waterproof LED strips beneath the lip of the bridge delivers a surprisingly premium, diffused under-glow. Keeping the color temperature strictly between 2700K and 3000K ensures the light flatters the wood tones rather than looking like an institutional parking lot.
Adding high-quality lighting elements only tacks on an extra $100–$200 to your build. Pin this brilliant lighting hack for your next evening garden party!
- Key Materials: Waterproof warm-LED strips, low-voltage outdoor transformer
- Vibe / Style: Glowing nocturnal magic
- Difficulty: Basic low-voltage wiring
- Budget Breakdown: LED Strips: $40 | Transformer: $60 | Wire Hiding Channels: $30
- Creator’s Tip: Mount the LEDs facing inward toward the bridge structure rather than straight down to avoid harsh water glare.
- Smart Sourcing: IP68 waterproof warm LED light strips and outdoor low-voltage landscape transformers.
Conclusion
Implementing a high-end japanese garden bridge doesn’t require a limitless budget—it requires smart sourcing and architectural intent. Whether you choose the striking visual pop of a pre-cut red bridge kit, the monumental arch of a wooden drum span, or the timeless durability of a flat stone crossing, these 34 blueprints prove you can achieve a premium, magazine-quality aesthetic in your own yard. Stop settling for basic outdoor decor; grab some high-quality UV sealants, source the right structural hardware, and transform your ordinary pond or dry landscape into a stunning, meditation-ready sanctuary today.
Frequently Asked Questions
What wood species work best for Japanese garden bridges?
For a bridge that lasts, skip the cheap lumber and invest in naturally rot-resistant woods like Cedar, Hinoki cypress, or Redwood. If you want a premium look on a budget, utilizing pre-cut cedar decking bundles paired with a high-quality UV-resistant outdoor sealant extends the lifespan drastically while fighting off moisture rot. Avoid standard pressure-treated pine for anything visible; it looks incredibly cheap and industrial.
Why are some Japanese garden bridges painted red?
The iconic japanese garden red bridge serves as a bold boundary marker, symbolizing wisdom and protection from evil spirits in traditional design. To get that incredibly rich, expensive shine at home, avoid standard exterior paint and use a high-gloss vermillion marine enamel. This premium finish not only delivers an explosive pop of color against green foliage but also creates a completely waterproof shell.
How steep should an arched Japanese bridge be?
While traditional Taiko-Bashi spans boast intense 45-50 degree angles, most modern residential bridges stick to a safer 5-15 degree gentle arc. If you are building a steep bridge, using pre-curved structural glulam beams will save you days of complex carpentry. You absolutely must incorporate heavy-duty anti-slip traction tape on steeper inclines to keep the crossing safe during rain.
What is the symbolic meaning of zigzag bridges?
Yatsuhashi bridges feature harsh 90-degree angles to stop evil spirits, as folklore suggests negative energy cannot navigate sharp turns. Practically, this design forces you to slow down and observe different angles of your garden. Utilizing pre-cut structural wood brackets makes framing these sharp corners fast and gives an incredibly sturdy, professional finish.
How do you maintain wooden Japanese garden bridges?
Maintenance is easy if you prep correctly; always start your build using concealed deck fastening starter kits to prevent surface rust and water pooling. Once a year, scrub the wood lightly to remove algae, and reapply a premium penetrating exotic hardwood oil or marine clear coat to keep the wood from graying. Replacing weak components immediately with stainless steel hardware prevents total structural failure.