
A well-designed gravel garden path transforms outdoor circulation into an affordable, permeable hardscape feature that complements any landscape style. Whether you’re planning a formal entrance or a meandering cottage walk, pea gravel and crushed stone offer flexibility, excellent drainage, and a natural aesthetic that evolves beautifully with your plantings. Fresh Garden Ideas brings you expert-tested designs that balance visual appeal with practical performance.
Design SnapshotKey Principles
- Base depth matters: Install 4–6 inches of compacted crushed stone for primary paths; 3–4 inches suffices for light-use garden spurs
- Edge for longevity: Steel, granite, or pressure-treated wood edging prevents gravel migration and defines clean borders
- Choose topping wisely: Pea gravel suits barefoot comfort; angular crushed gravel locks better on slopes
- Layer for drainage: Woven landscape fabric beneath the base blocks weeds while maintaining permeability
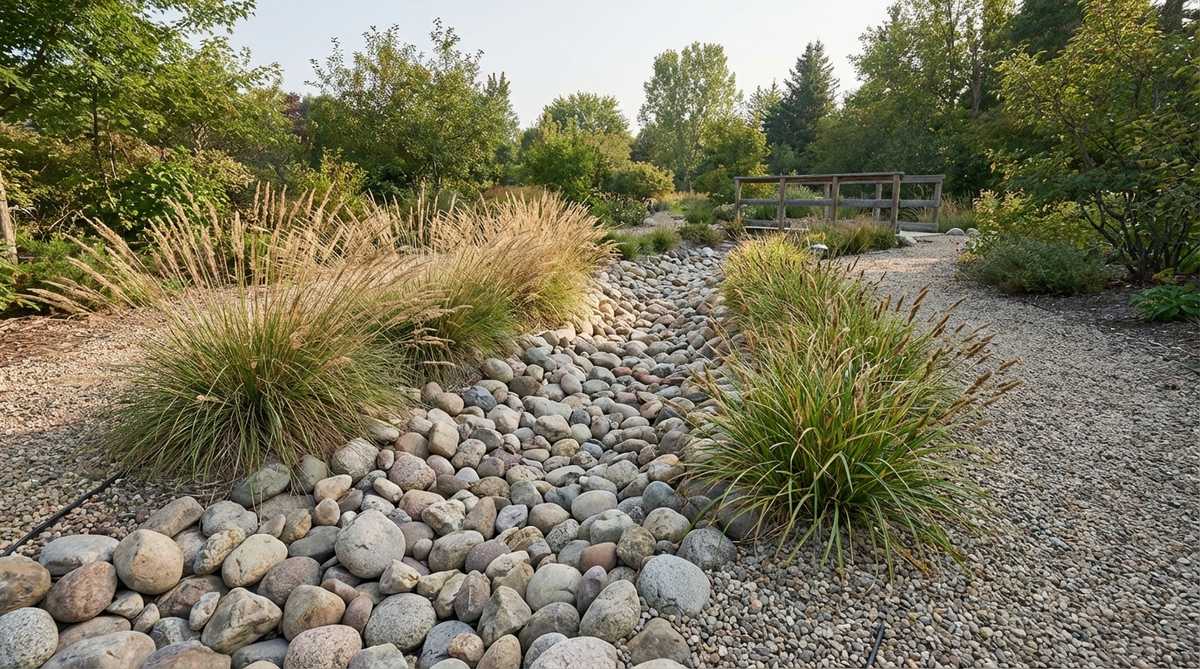
Classic Pea Gravel Pathways for Timeless Appeal
Pea gravel remains the preferred topping for residential garden paths where comfort and informal charm take priority. These rounded stones range from ⅜ to ½ inch, offering a soft surface that works equally well for cottage gardens and Mediterranean courtyards.
1. Straight Formal Entry Path
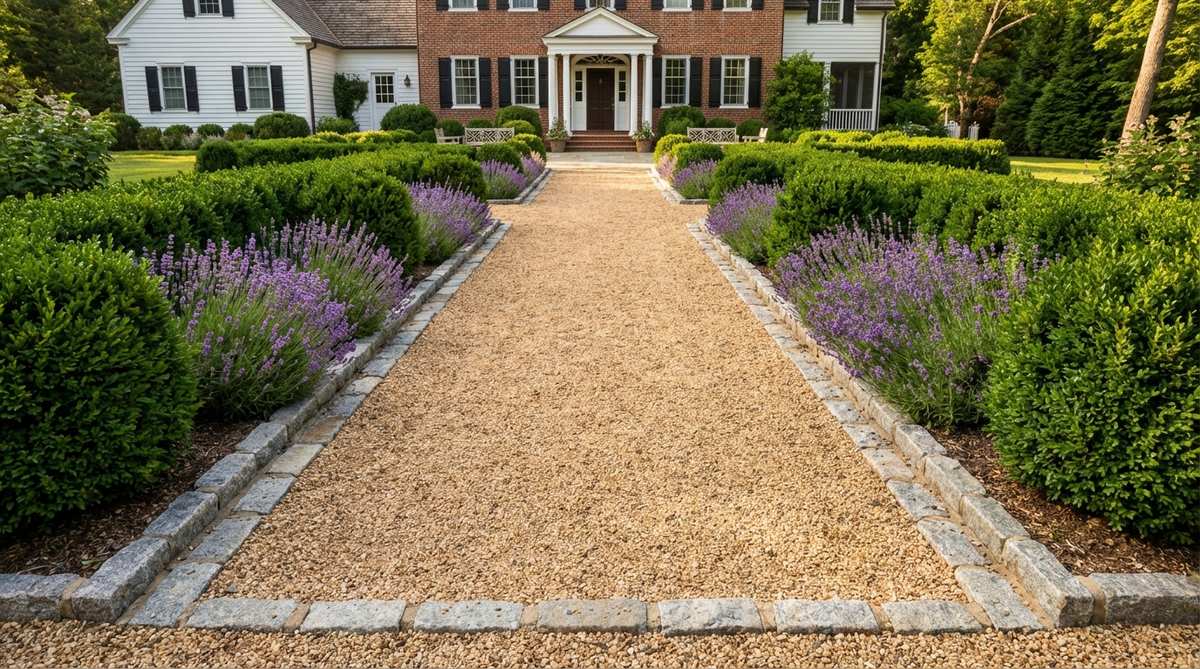
A centered walkway lined with symmetrical boxwood or lavender creates architectural discipline. The uniform width—typically 4 to 5 feet—accommodates two people walking side by side.
Install granite setts flush with the gravel surface to define the perimeter. Compact the base in 2-inch lifts using a plate compactor, then add 1½ inches of tan or buff pea gravel.
This layout suits Colonial, Georgian, and farmhouse exteriors where formality complements period architecture.
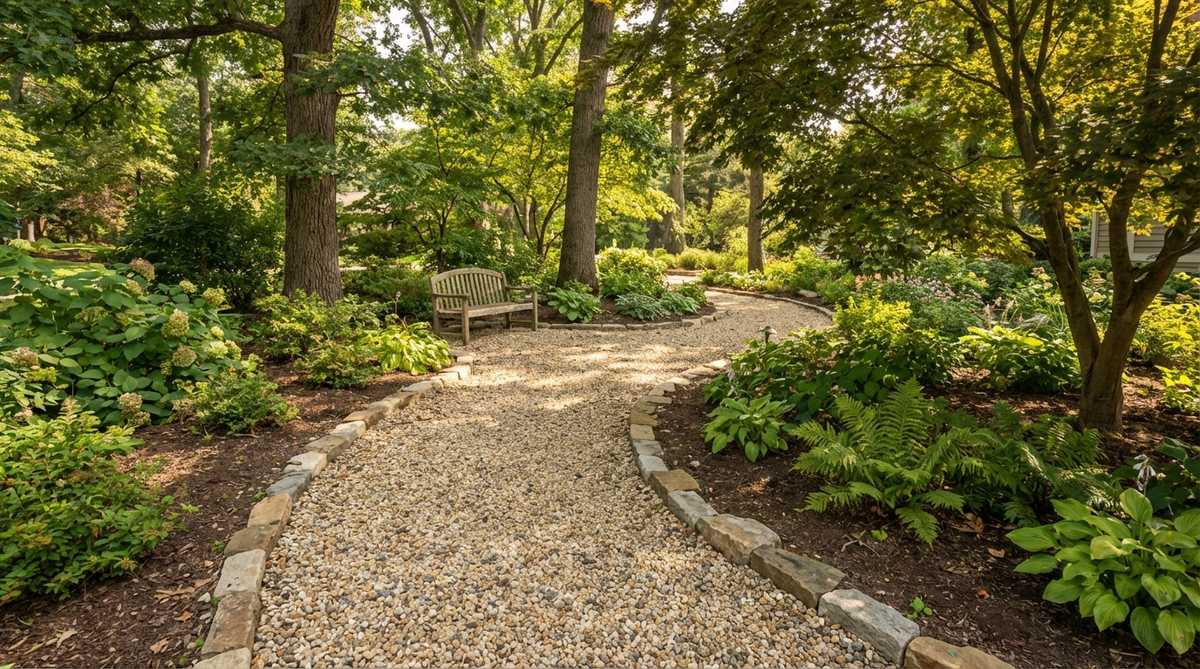
2. Meandering Cottage Garden Walk
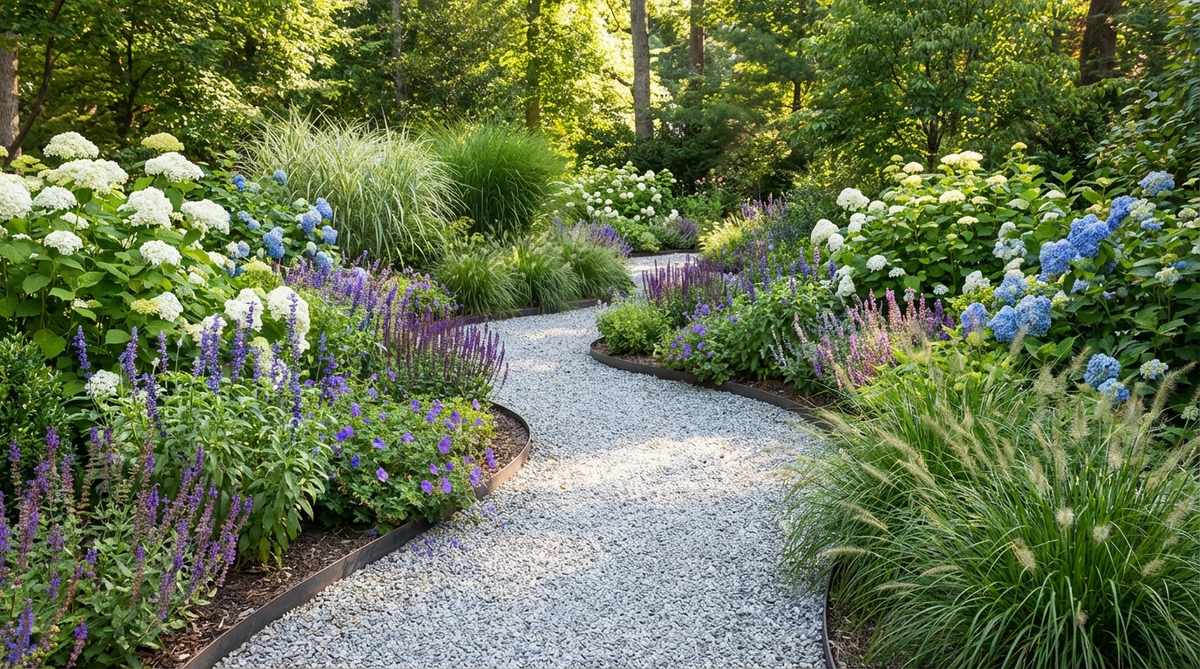
Gentle curves guide visitors through layered plantings of hydrangea, salvia, and ornamental grasses. The winding trajectory invites exploration and softens property lines.
Use flexible steel edging to achieve smooth radius transitions. Spray-paint the layout on existing turf, then excavate 6 to 7 inches below grade.
White or light gray pea gravel reflects sunlight, brightening shaded garden rooms while maintaining a clean appearance even when wet.
3. Kitchen Garden Aisle
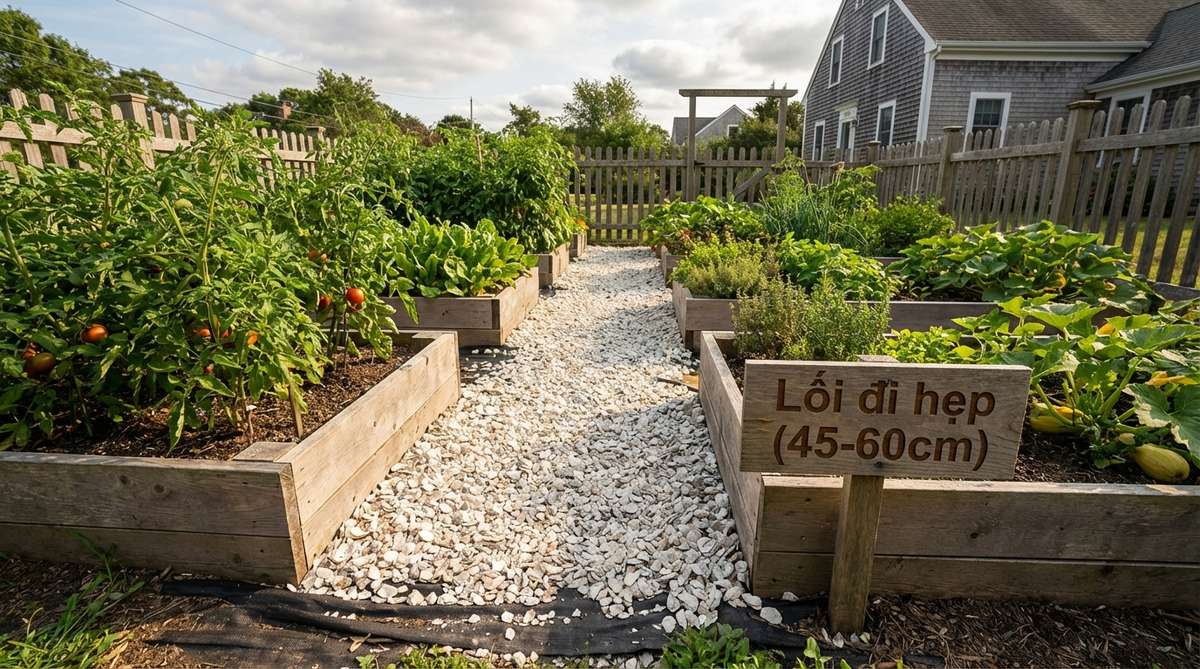
Narrow paths between raised vegetable beds provide mud-free access for tending and harvesting. Width recommendations range from 18 to 24 inches for single-file movement.
Crushed oyster shell blends or pea gravel over landscape fabric suppress weeds without interfering with root zones. Avoid pressure-treated lumber edging near edibles.
The permeable surface drains quickly after rain, reducing soil compaction compared to pavers.
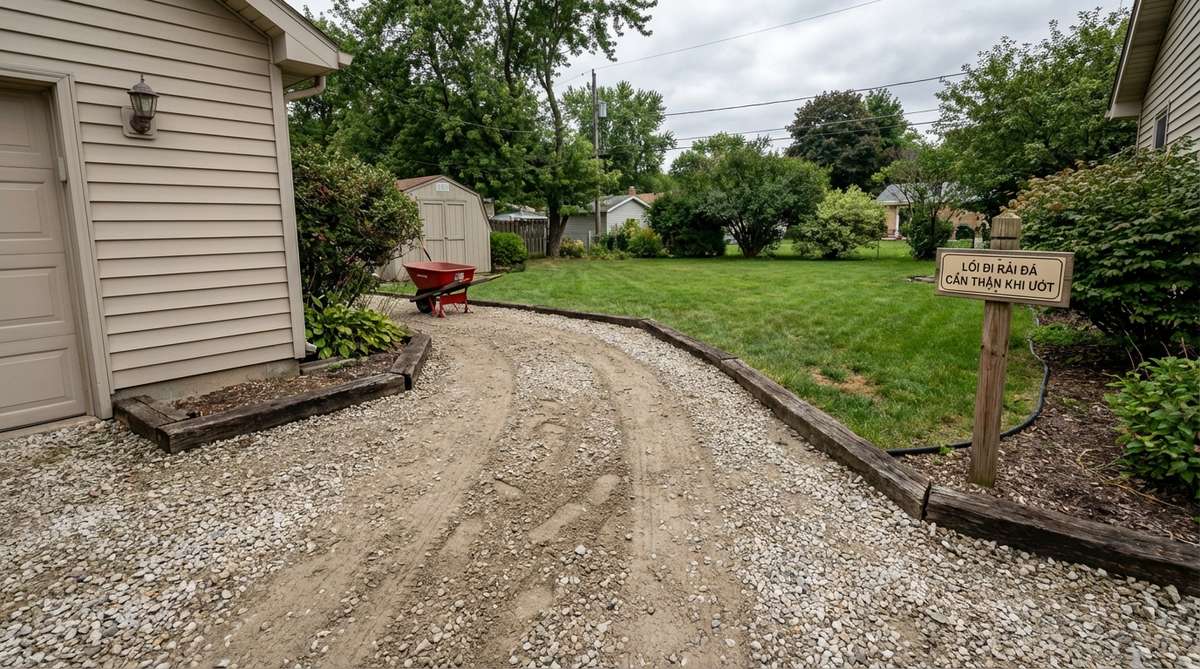
4. Side Yard Utility Corridor
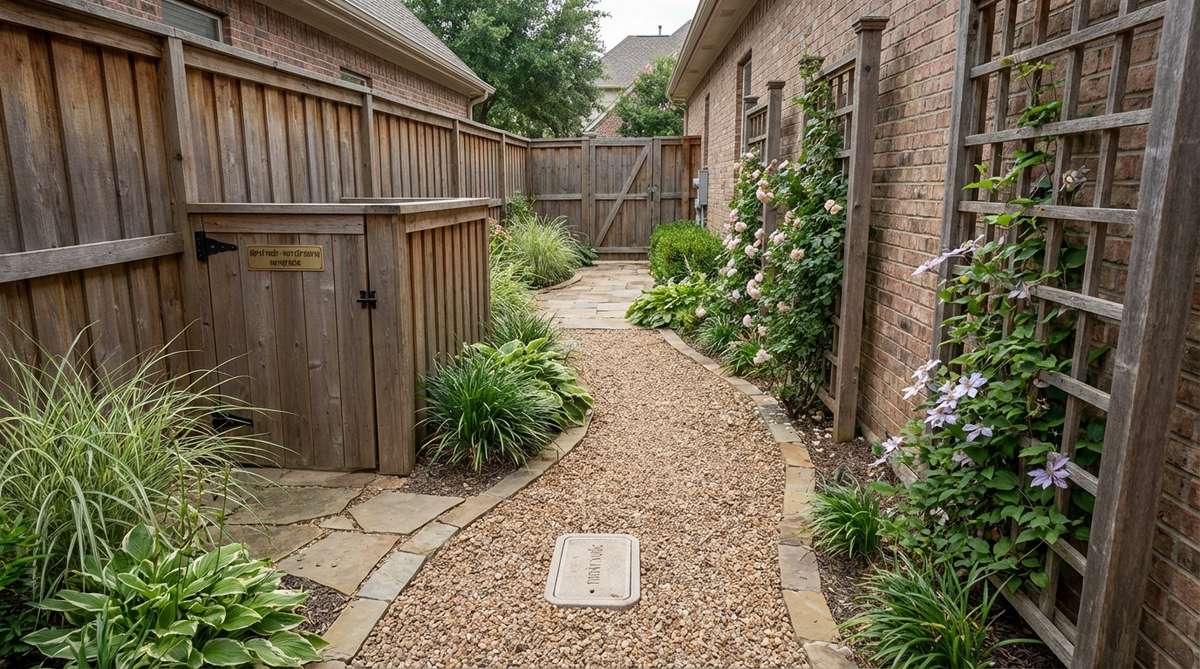
Transform the narrow passage between house and fence into a functional pathway that conceals utilities and service access. This often-neglected zone gains purpose with proper grading and material selection.
Slope the path away from the foundation at ¼ inch per foot to direct runoff. Place woven geotextile directly on compacted subgrade, then install 4 inches of ¾-inch crushed base.
Top with angular ⅜-inch gravel that won’t scatter when carrying tools or equipment. Add motion-sensor lighting to improve nighttime safety.
5. Zen Meditation Loop
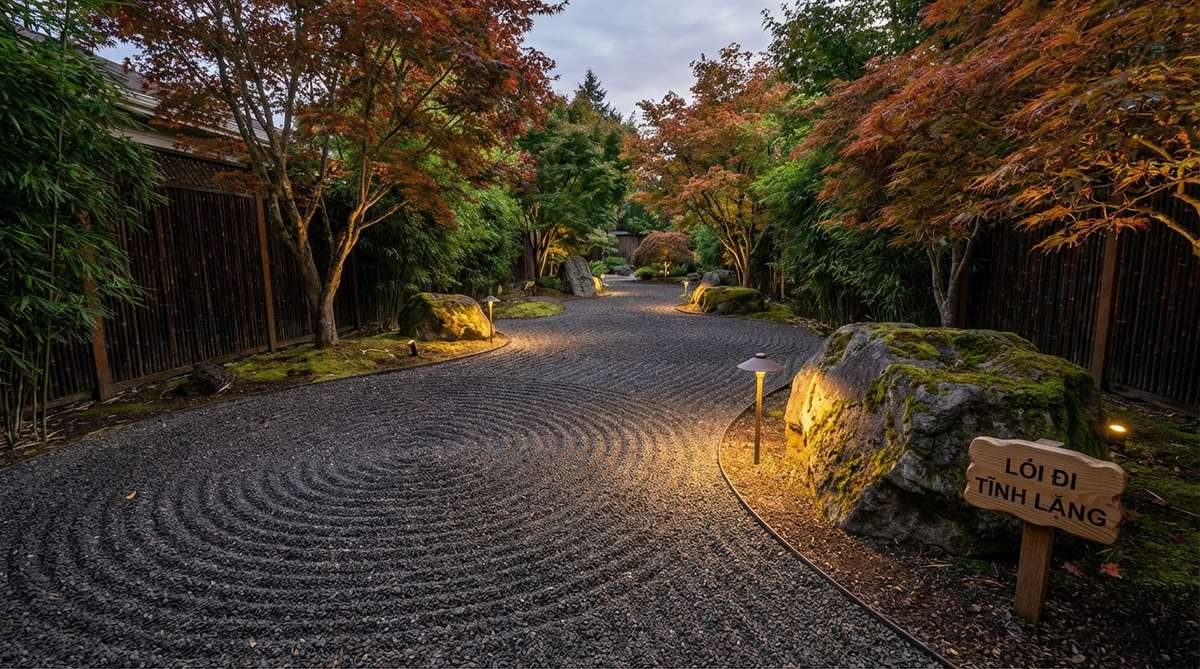
A circular or figure-eight path encourages contemplative walking practice. Designers integrate bamboo screens, Japanese maples, and low-profile lighting to enhance the serene atmosphere.
Rake the gravel into concentric patterns weekly to maintain visual interest. Larger pea gravel—½ to ¾ inch—produces subtle sound underfoot that reinforces mindfulness.
Position specimen boulders at cardinal points or path intersections as focal anchors.
Crushed Stone Walkways for High-Traffic Zones
Angular crushed stone compacts tighter than pea gravel, delivering superior stability on slopes and heavily used routes. The sharp edges interlock when tamped, resisting displacement under foot traffic and wheeled equipment.
6. Garage to Backyard Connector
This workhorse path endures frequent trips with wheelbarrows, lawn equipment, and delivery carts. Crushed limestone or granite in ⅜-inch size provides firm footing without excessive dust.
Excavate 8 inches deep for vehicle crossings; install 6 inches of compacted #4 stone base topped with 2 inches of finer crushed gravel. Edge with pressure-treated 4×4 timbers or steel to contain the material.
The angular texture offers traction in wet conditions, reducing slip hazards during spring and fall.
7. Hillside Switchback Trail
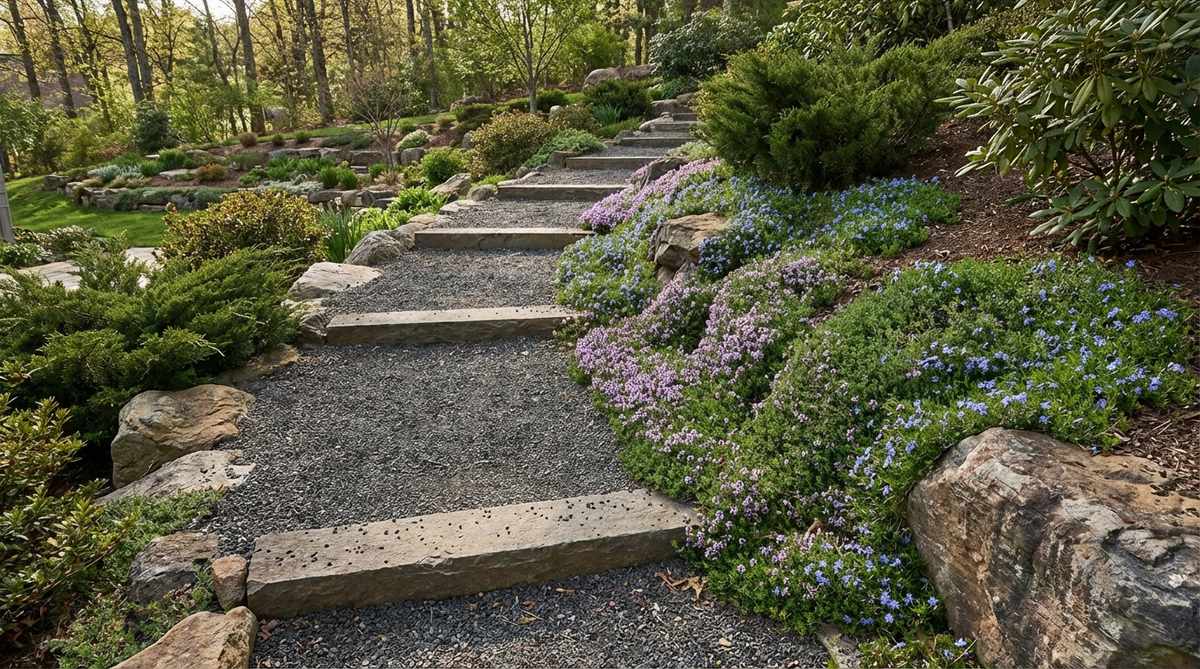
Steep grades demand crushed stone’s superior lock-up properties. Design switchbacks at 8 to 12 percent slope, inserting flush stone bands every 8 feet as check bars.
These horizontal barriers slow gravel migration downhill. Compact each lift thoroughly, paying extra attention to the outer curve where erosion concentrates.
Plant groundcovers like creeping thyme or blue star creeper along the uphill side to stabilize soil and soften the hardscape.
8. Dog Run Perimeter Path
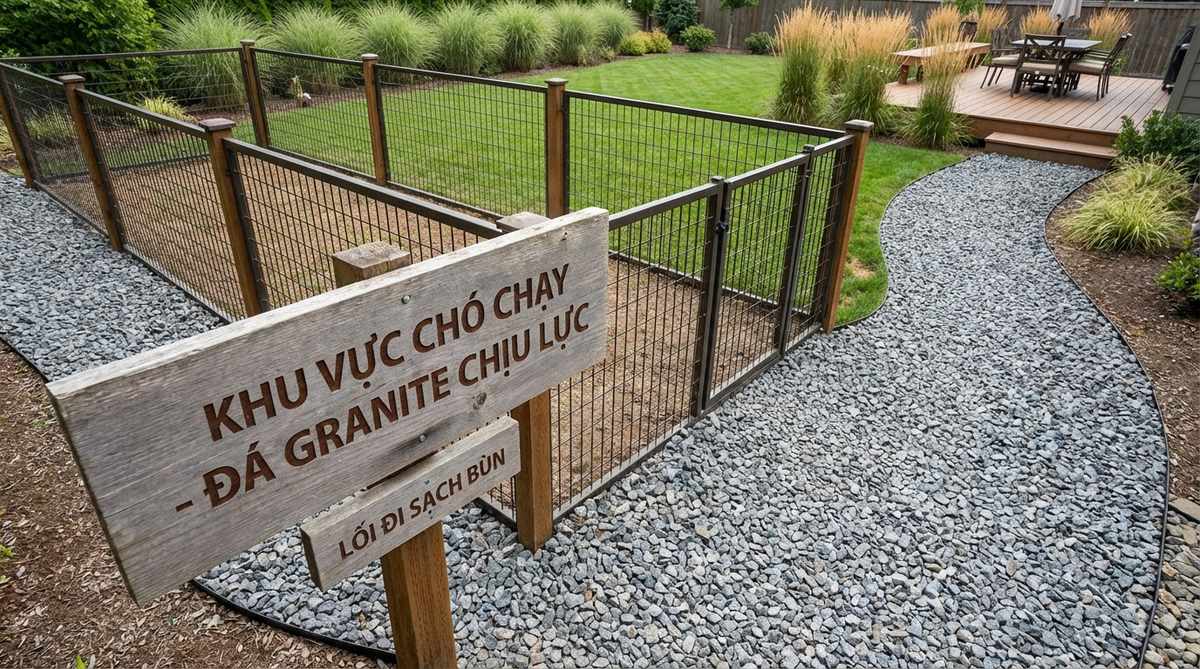
Crushed stone withstands the constant paw traffic and occasional digging that soft lawns cannot. The firm surface stays cleaner than mulch and drains faster than compacted soil.
Install the path 3 to 4 feet wide around the enclosure perimeter. Use ½-inch crushed granite or trap rock that won’t lodge between paw pads.
Rinse monthly with a garden hose to remove organic debris. The angular material resists becoming muddy even in high-use areas.
9. Woodland Hiking Path
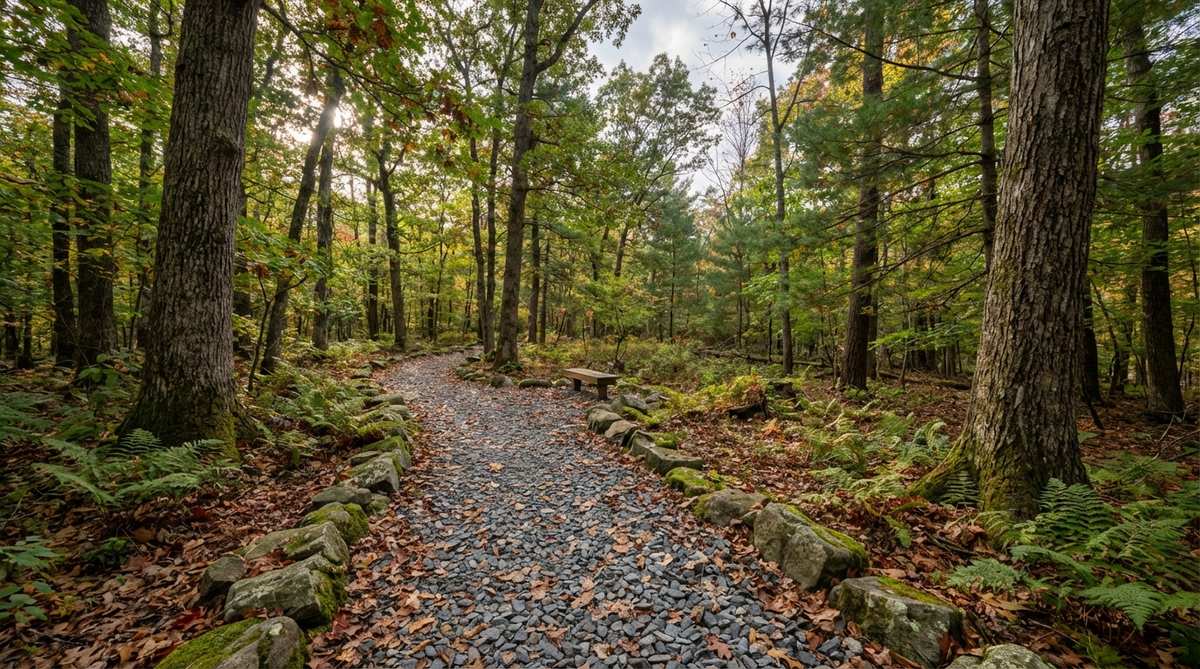
Natural settings benefit from crushed stone that mimics forest floor textures. Brown or gray angular gravel blends with leaf litter while remaining firm underfoot.
Clear roots and organic matter to mineral soil before installing 3 inches of crushed base. The permeable surface minimizes erosion and allows rainwater infiltration.
Edge with native fieldstone or leave borders naturalized where the path meets undisturbed woodland.
Edging and Border Techniques That Define Structure
Professional installations rely on robust edging to contain loose aggregate and maintain crisp lines. Material choice impacts both aesthetic character and long-term performance.
10. Steel Landscape Edging
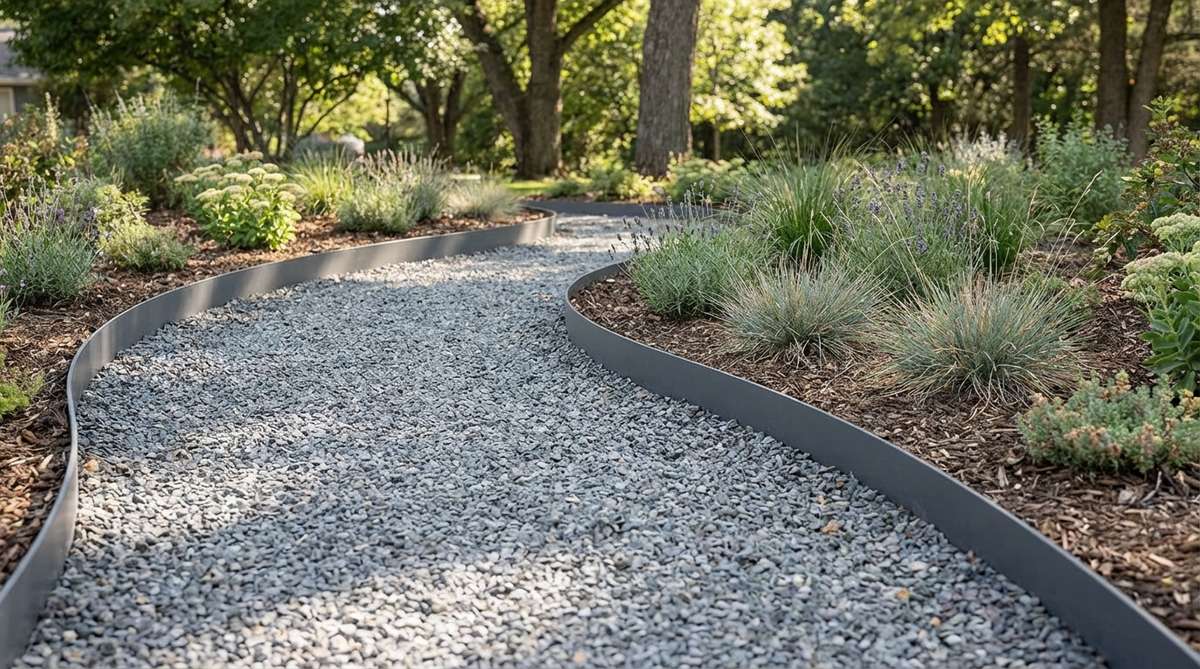
Powder-coated steel strips flex to follow curves while remaining nearly invisible from above. The thin profile—typically ⅛ inch thick—disappears beneath the gravel line.
Drive stakes every 3 feet along straight runs; increase to 18-inch spacing on tight radii. Set the top edge ½ inch below finished gravel height.
This system suits modern and contemporary landscapes where clean geometry takes priority over rustic charm.
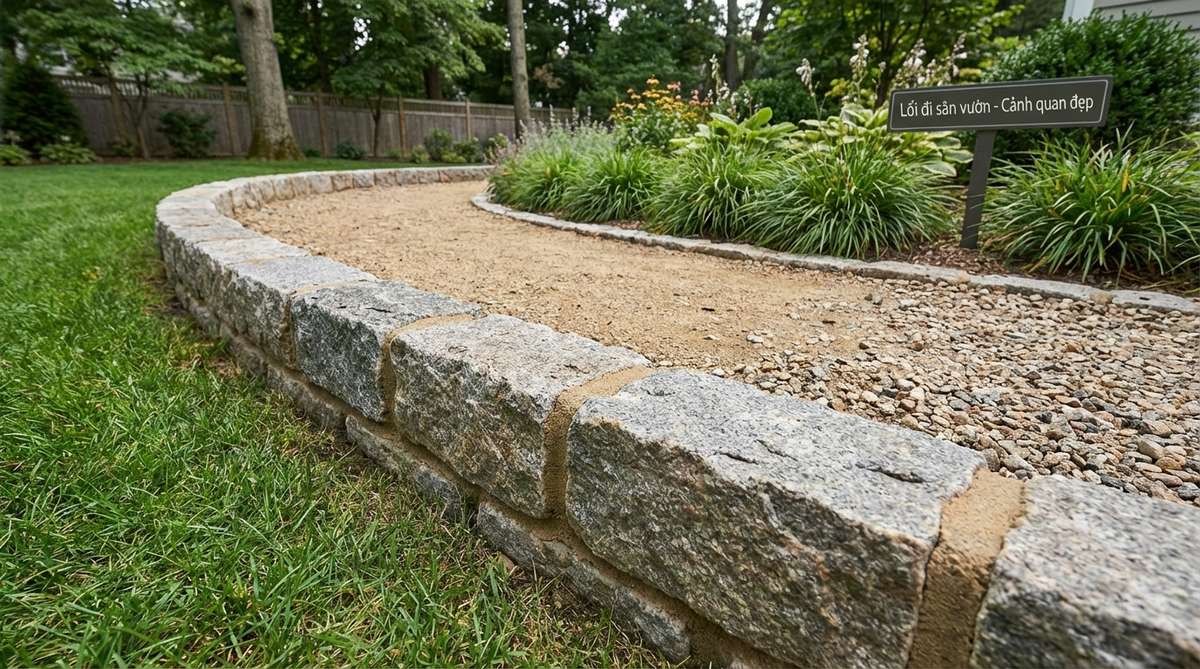
11. Granite Cobble Border
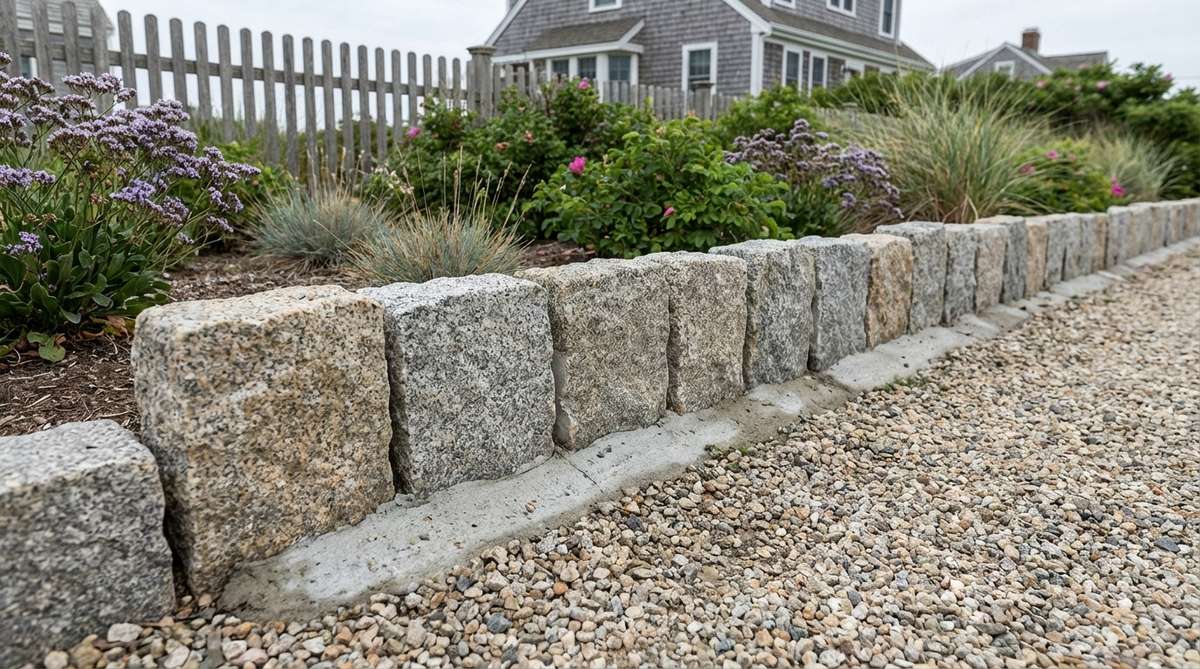
Reclaimed cobblestones or new granite setts installed on edge create a New England coastal aesthetic. The vertical orientation adds 3 to 4 inches of height, preventing gravel scatter.
Set cobbles in a concrete haunching—a 45-degree wedge poured against the back face. This anchors the stones against frost heave and lateral pressure.
The timeless look complements historic properties and Shingle-style architecture throughout Northeast regions.
12. Brick Soldier Course
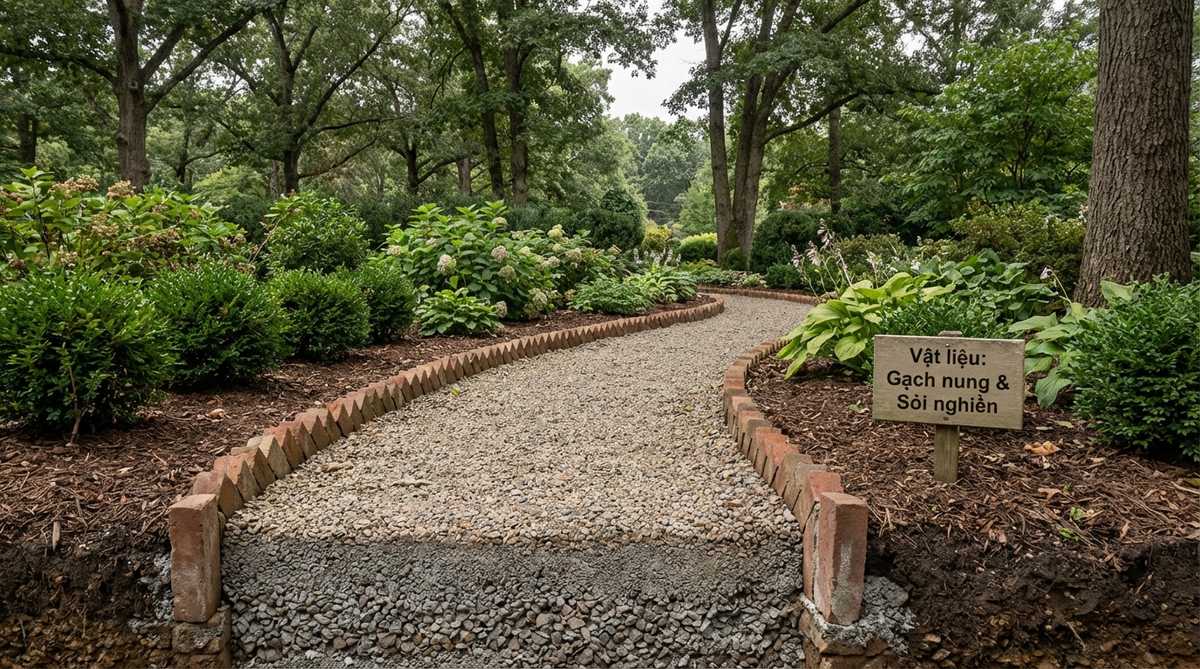
Bricks set vertically on their narrow edge form a decorative sawtooth pattern. Use hard-fired pavers rated for ground contact; avoid standard building brick that crumbles in freeze-thaw cycles.
Dig a trench 6 inches deep and 3 inches wide. Spread 2 inches of crushed stone base, set bricks tight together, then backfill with more stone.
This traditional technique pairs beautifully with Colonial, Federal, and English cottage garden styles.
13. Pressure-Treated Timber Frame
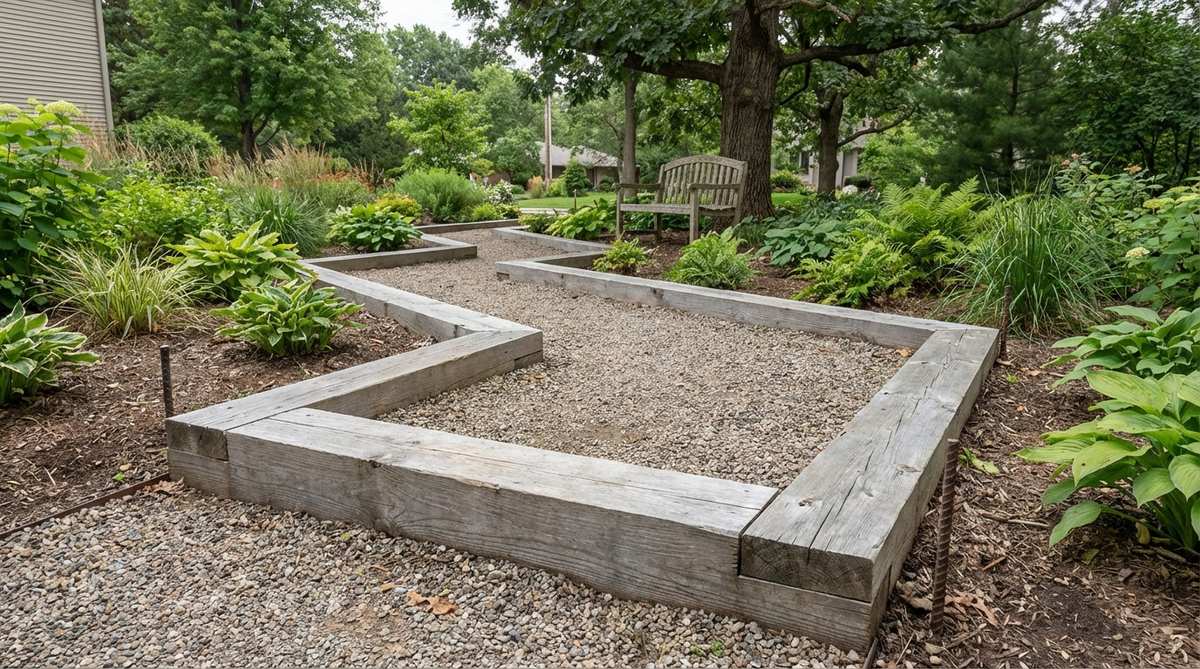
Cedar or ground-contact-rated lumber offers warmth and affordability. Use 4×4 or 4×6 timbers for primary paths; 2×6 boards suffice for garden spurs.
Anchor corners with rebar or landscape spikes driven through pre-drilled holes. Butt joints work for straight runs; miter at 45 degrees for 90-degree turns.
Expect 10 to 15 years of service before replacement becomes necessary. Stain or leave natural to weather to silver-gray.
14. Belgian Block Curbing
These chunky granite blocks—typically 4x8x8 inches—deliver substantial visual weight. Install them end-to-end for a continuous raised curb or space them slightly for a segmented look.
Excavate a trench matching the block depth, add 2 inches of stone dust, then set blocks level with rubber mallet. Sweep stone dust or polymeric sand into joints.
The raised profile works especially well at grade transitions or where paths meet lawn areas.
Multi-Material Combinations for Visual Interest
Mixing gravel with pavers, stepping stones, or wood creates dynamic patterns that reduce material costs while improving functionality. These hybrid approaches suit both formal and informal garden styles.
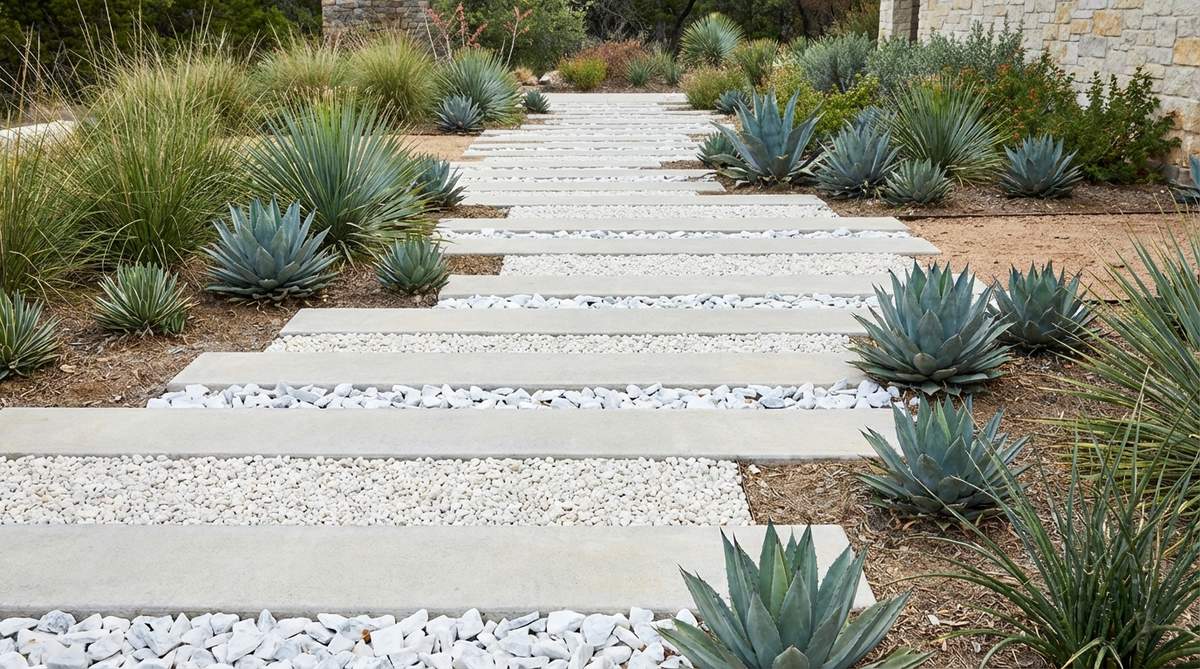
15. Stepping Stone Gravel Path
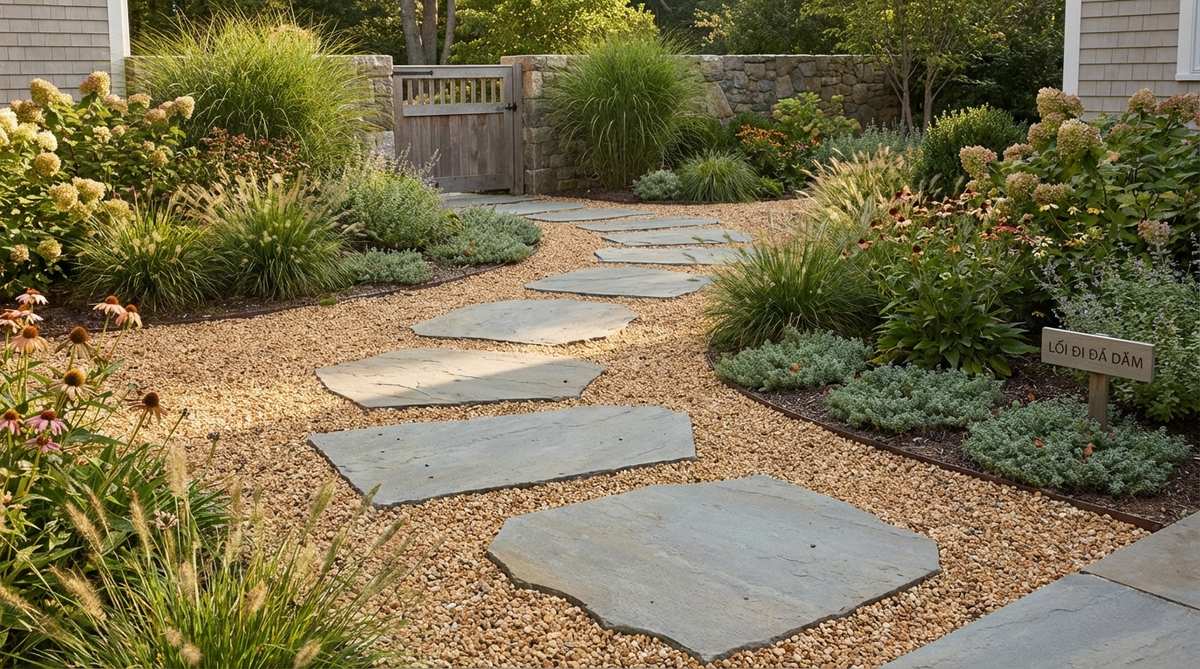
Large flat stones—18 to 24 inches across—emerge from a pea gravel field at comfortable stride intervals. This reduces gravel tracking while maintaining the informal character.
Set stones slightly proud of the gravel surface, about ½ inch higher, to keep footwear clean. Space centers 24 to 30 inches apart for average adult gait.
Use bluestone, limestone, or local fieldstone that echoes regional geology. Surround each stone with larger ¾-inch pea gravel that won’t migrate into shoe treads.
16. Paver and Gravel Checkerboard
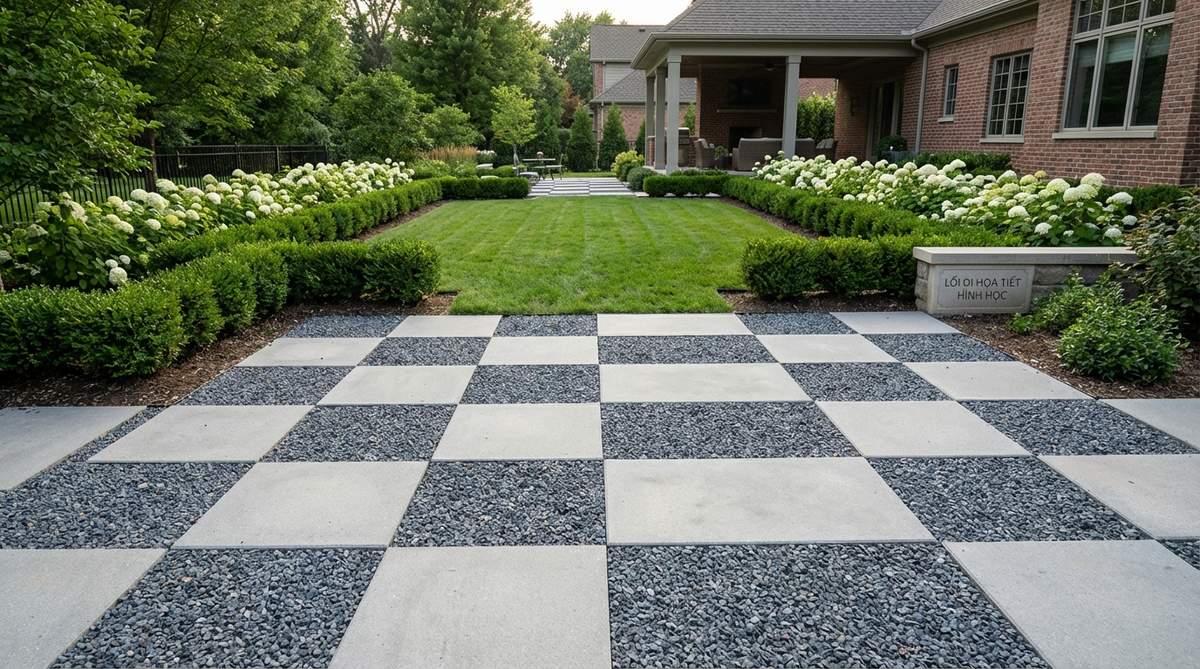
Alternating squares of concrete pavers and pea gravel create a formal geometric grid. This pattern suits modern courtyards and minimalist landscapes where repetition builds visual rhythm.
Use 12×12-inch or 16×16-inch pavers on a 1-inch sand bed over compacted base. Fill intervening squares with 2 inches of contrasting white or black pea gravel.
The solid pavers provide stable footing for furniture placement while gravel sections allow water infiltration.
17. Railroad Tie and Crushed Stone
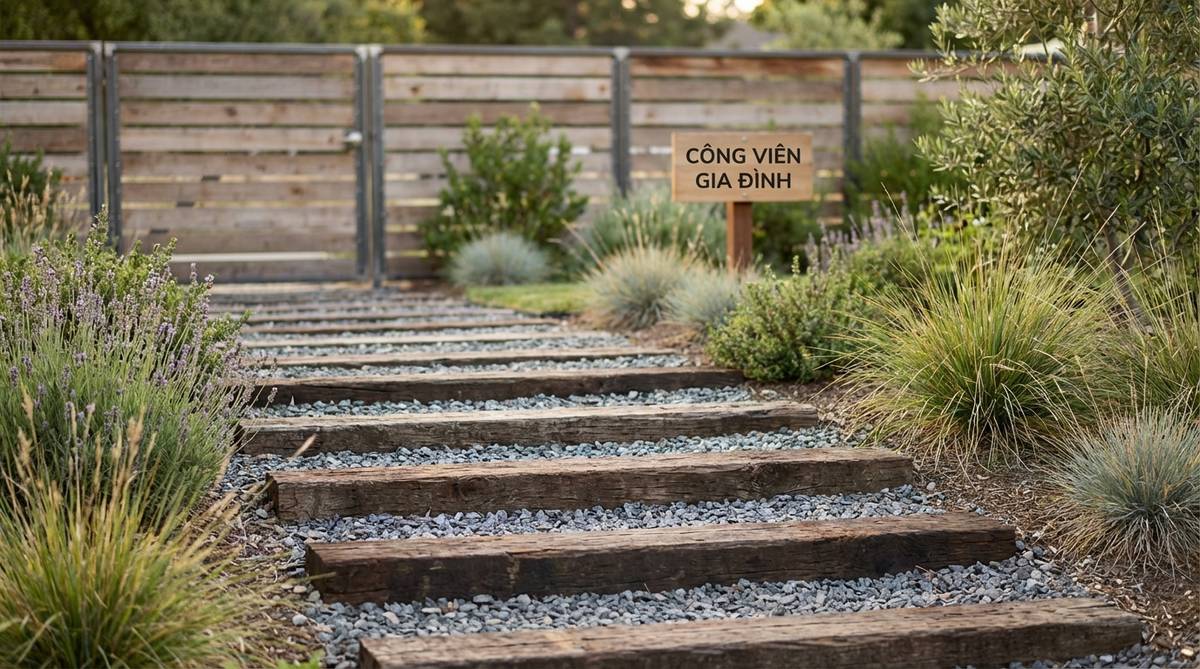
Reclaimed ties laid perpendicular to the path direction function as low steps and textural contrast. Space them 24 to 36 inches apart with crushed stone infill.
Excavate shallow notches so tie tops sit 1 inch above the gravel plane. Drill drainage holes through each tie to prevent water pooling.
This industrial aesthetic suits contemporary and farmhouse properties. Substitute composite railroad ties in areas where creosote off-gassing raises concerns.
18. Oyster Shell and Brick Path
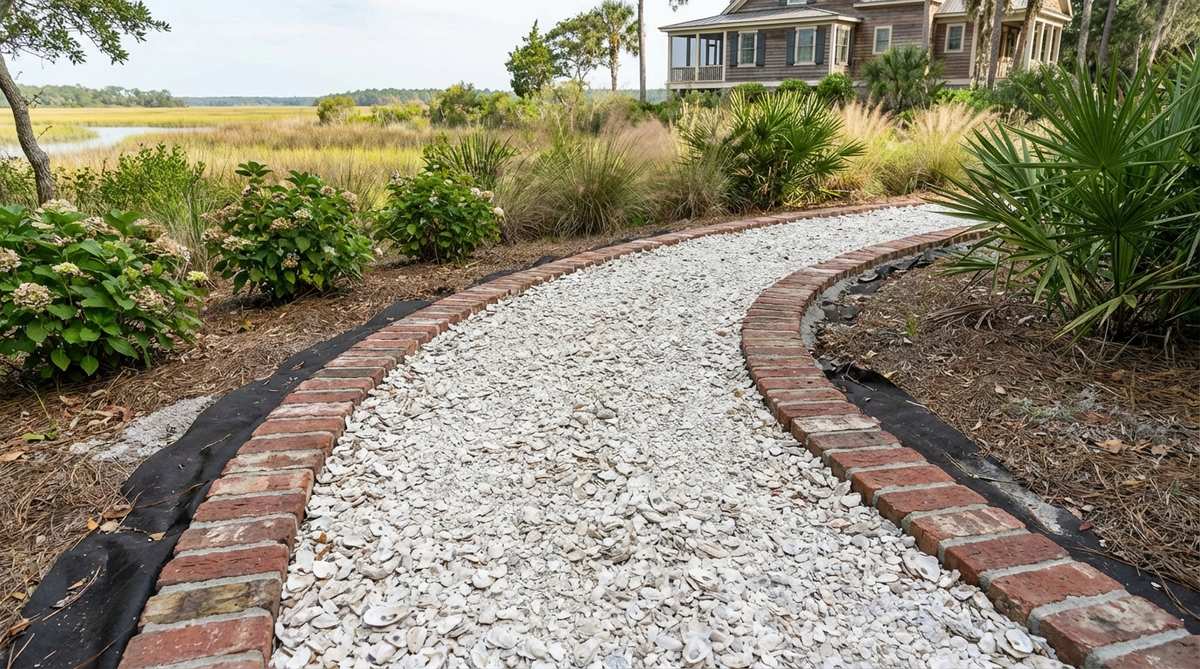
Crushed oyster shell delivers coastal charm with brilliant white color and excellent drainage. Frame the shell pathway with running-bond brick borders for contrast.
Install bricks on edge—4 inches deep—along both path edges. Excavate the center section 4 inches, lay landscape fabric, then fill with oyster shell.
The shells settle and compact over time; top-dress annually. This design thrives in Southern and Mid-Atlantic coastal regions where shells source locally.
19. Wood Round and Pea Gravel
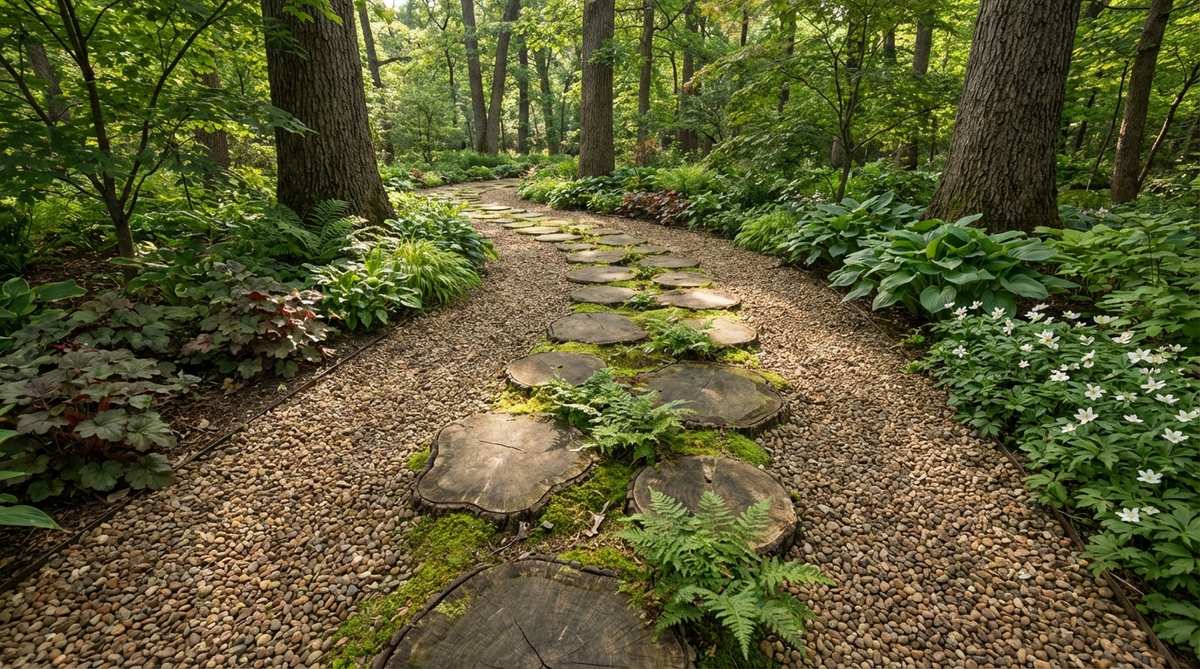
Tree trunk slices—8 to 12 inches in diameter—create organic stepping platforms within a pea gravel matrix. This woodland aesthetic suits shade gardens and naturalized settings.
Set rounds directly on landscape fabric or thin sand bed. Leave irregular spacing that follows natural walking patterns rather than rigid geometry.
Expect 5 to 8 years of service depending on wood species and moisture exposure. Replace rotted rounds individually as needed.
Modern Gravel Walkway Designs with Clean Lines
Contemporary landscapes embrace gravel’s textural contrast against concrete, steel, and architectural plantings. Precision edges and monochromatic palettes define these minimalist installations.
20. Linear Strip Walkway
Parallel bands of white pea gravel separated by concrete strips create bold horizontal lines. This design elongates narrow spaces and directs circulation with graphic clarity.
Pour concrete strips 6 to 8 inches wide on 24-inch centers. Float the surface smooth or broom for texture. Infill with ½-inch angular white marble chips.
The high-contrast palette suits desert, xeriscape, and architectural modern gardens where sculptural agaves and ornamental grasses provide punctuation.
21. Monolithic Poured Edge Path
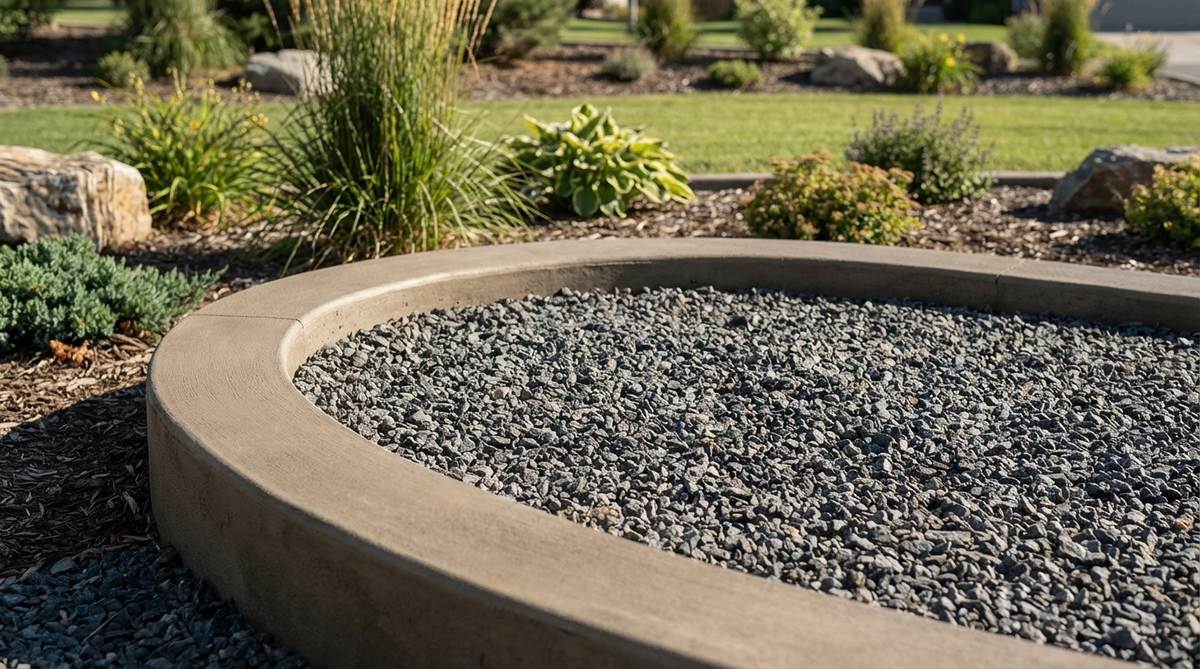
Continuous concrete curbs formed with flexible edging create seamless curves. The 4-inch tall curb contains gravel while doubling as a mow strip.
Build forms from ⅛-inch hardboard soaked and bent to desired radius. Pour and finish concrete, then remove forms after 24 hours. Fill the interior with dark gray crushed granite.
This technique delivers the refined look of custom stonework at a fraction of the cost.
22. Decomposed Granite Minimalist Path
Finely crushed granite compacts to a firm, almost pavement-like surface while maintaining natural color. The material ranges from tan to reddish-brown depending on source quarry.
Install 3 inches over compacted base, then mist with water while tamping with a plate compactor. The fines bind together, resisting erosion and weed growth.
Popular throughout California and Southwestern regions where the material complements native oaks and chaparral plantings.
23. Black Basalt Gravel Accent
Dark volcanic rock creates dramatic contrast against light-colored architecture and foliage. The color intensifies when wet, adding depth during rainy seasons.
Use ⅜ to ¾-inch angular basalt for paths; reserve smaller sizes for decorative borders. The material holds heat, making it suitable for extending growing seasons in cool climates.
Pair with architectural grasses like Miscanthus or fountain grass that echo the vertical drama.
24. Grid Paver Gravel Walkway
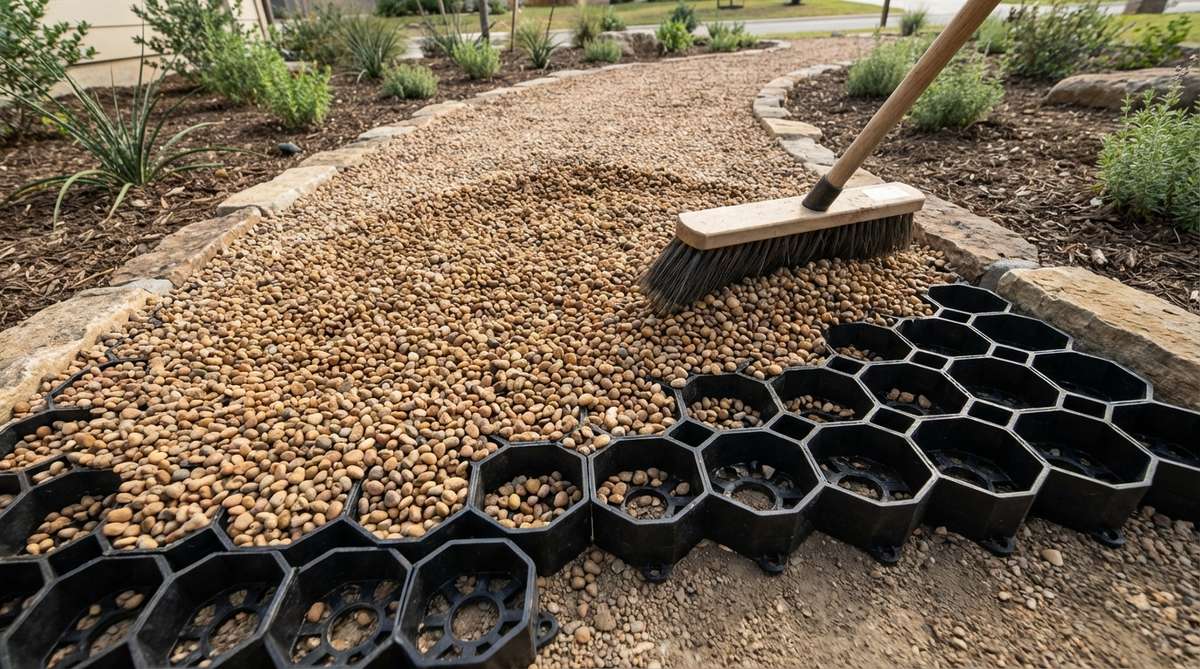
Plastic or concrete grid systems stabilize pea gravel within honeycomb cells. The structure prevents migration while maintaining permeability.
Excavate to accommodate grid depth plus base and gravel topping. Snap panels together, then overfill cells and sweep excess gravel off the surface.
This solution suits high-traffic areas where traditional loose gravel would scatter. Wheelchair and stroller navigation improves significantly.
Functional and Specialty Paths for Unique Needs
Certain applications demand gravel pathway variations that address accessibility, drainage, or specialized use patterns. These designs prioritize performance without sacrificing visual appeal.
25. ADA-Compliant Firm Surface
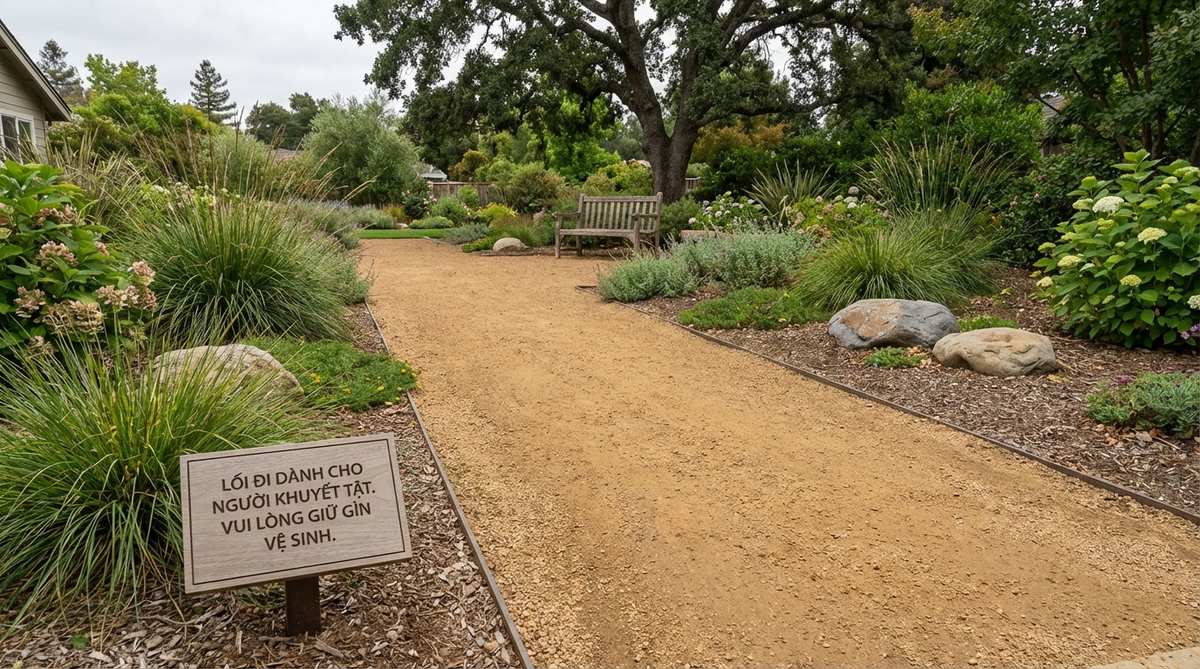
Stabilized decomposed granite or resin-bound gravel meets accessibility standards when properly installed. The compacted surface resists wheelchair tires while allowing water penetration.
Grade the path at 2 percent maximum slope; install edge restraints every 5 feet. Compact fines to 95 percent density using a walk-behind roller.
Consult local ADA guidelines for width requirements—typically 48 inches minimum with passing zones every 200 feet.
26. Rain Garden Swale Path
Gravel paths double as infiltration channels when designed with proper pitch and depth. These bioswales capture roof runoff and filter pollutants before reaching groundwater.
Excavate 12 to 18 inches deep, slope sides at 3:1 ratio. Amend subsoil with compost, then install 6 inches of ¾-inch washed stone topped with 2 inches of decorative gravel.
Plant moisture-tolerant sedges and rushes along the swale edges. Water pools temporarily during storms, then infiltrates within 24 hours.
27. Fire Pit Access Ring
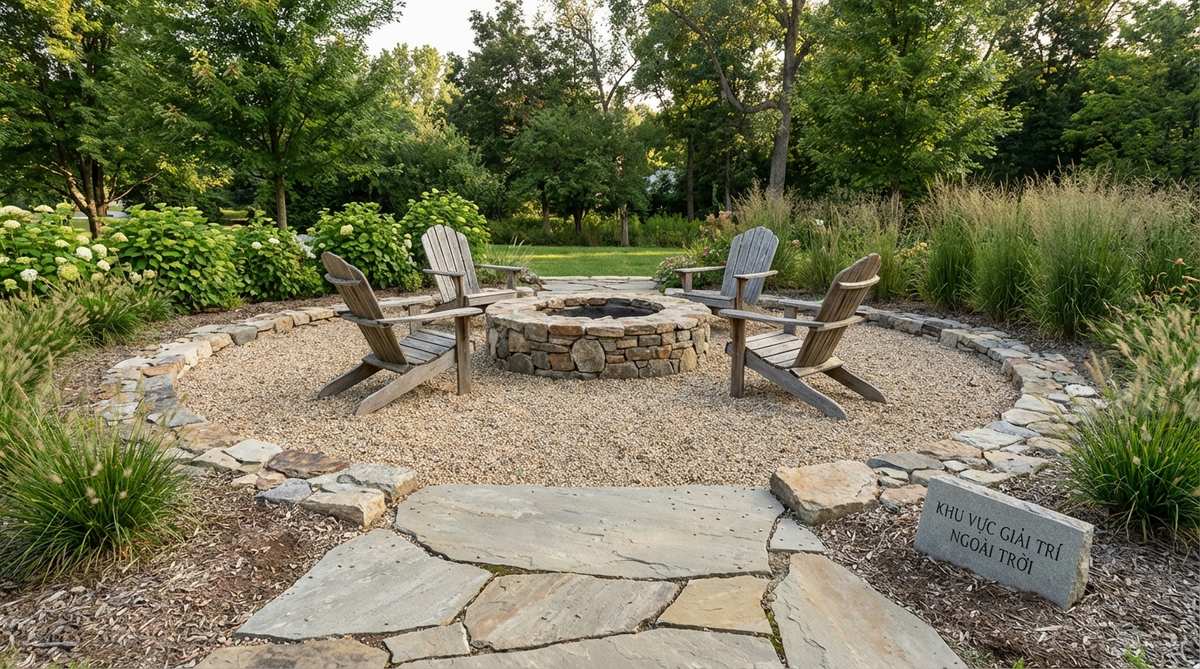
Gravel surrounds provide non-flammable clearance around fire features while accommodating movable seating. The material won’t crack like pavers or become slippery when damp.
Create a ring 10 to 12 feet in diameter centered on the fire pit. Use ¾-inch crushed stone that remains stable when chairs shift.
Install underground drainage beneath the gravel to prevent water pooling. Edge with fieldstone or steel to define the entertainment zone.
28. Greenhouse Service Walk
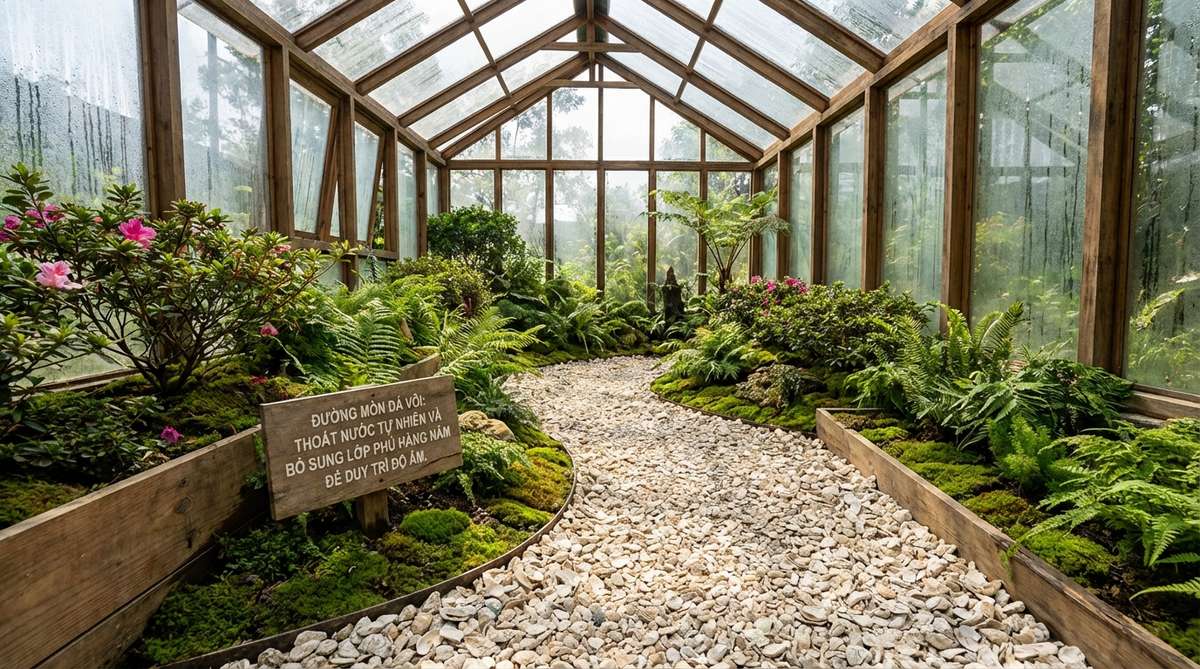
Gravel floors inside cold frames and hoop houses improve drainage while reflecting light upward to plant canopies. The permeable surface regulates moisture better than concrete.
Use ½-inch crushed limestone or oyster shell that brightens interior spaces. Avoid pea gravel that rolls underfoot when carrying flats and equipment.
Top-dress annually to maintain surface height as material compacts. The alkaline nature of limestone benefits acid-loving crops.
29. Pet Relief Area Path
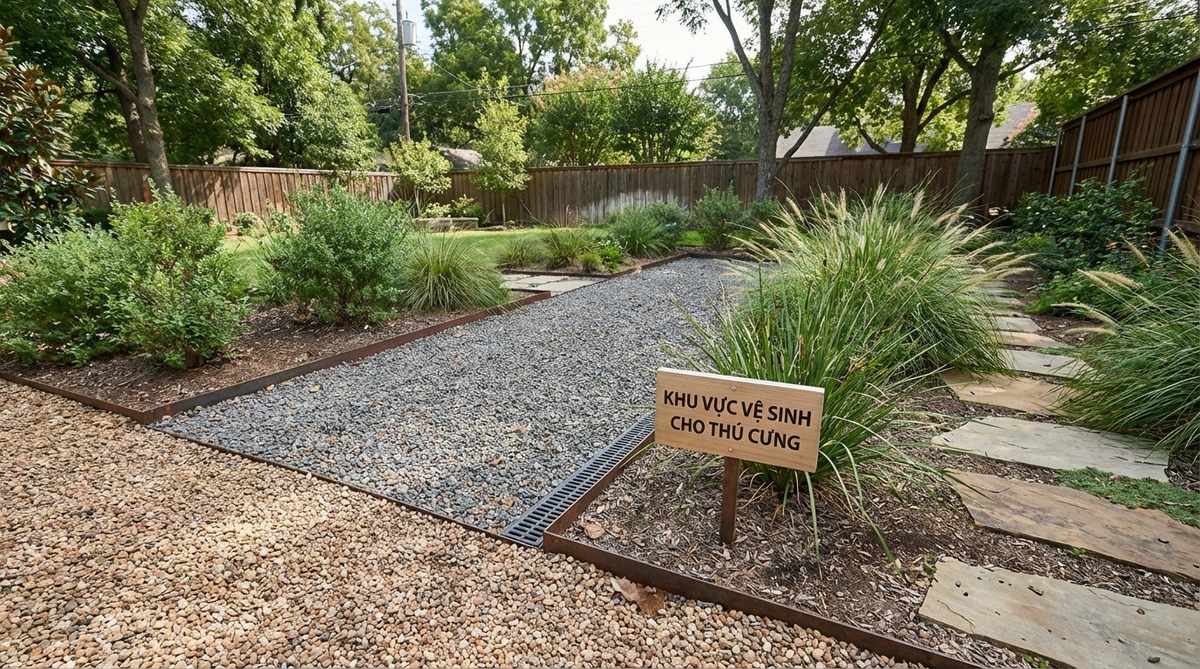
Designated gravel zones contain pet waste while simplifying cleanup and odor control. Coarse crushed stone drains urine quickly and resists odor absorption.
Excavate 8 inches, install perforated drain pipe sloped to discharge point. Backfill with ¾-inch crushed stone, top with 2 inches of ½-inch gravel.
Rinse weekly with enzyme cleaner. Replace top 1 inch of gravel annually. Edge with low fencing or plantings to define boundaries.
Drainage Solutions for Sloped and Wet Sites
Proper water management transforms challenging sites into functional pathways. Gravel’s permeability becomes an asset when layered correctly with drainage infrastructure.
30. French Drain Integrated Path

Embed perforated pipe within the base layer to intercept and redirect subsurface water. This prevents path washout while lowering the water table in chronically damp areas.
Excavate 12 inches deep, slope pipe ⅛ inch per foot toward discharge. Wrap pipe in filter fabric, surround with ¾-inch washed stone, then cap with gravel topping.
Outlet to daylight, dry well, or municipal storm system. Mark cleanout locations with discrete bollards or plant markers.
31. Crown-Graded Pathway
Raise the path center 1 to 2 inches above edges to shed water laterally into planted borders. This simple profile prevents puddling without underground infrastructure.
Shape the crown during base installation using a screed board. Maintain the profile when adding topping gravel by working from edges toward center.
Plant water-tolerant species like ligularia or astilbe along path edges to benefit from runoff.
32. Check Dam Slope Control
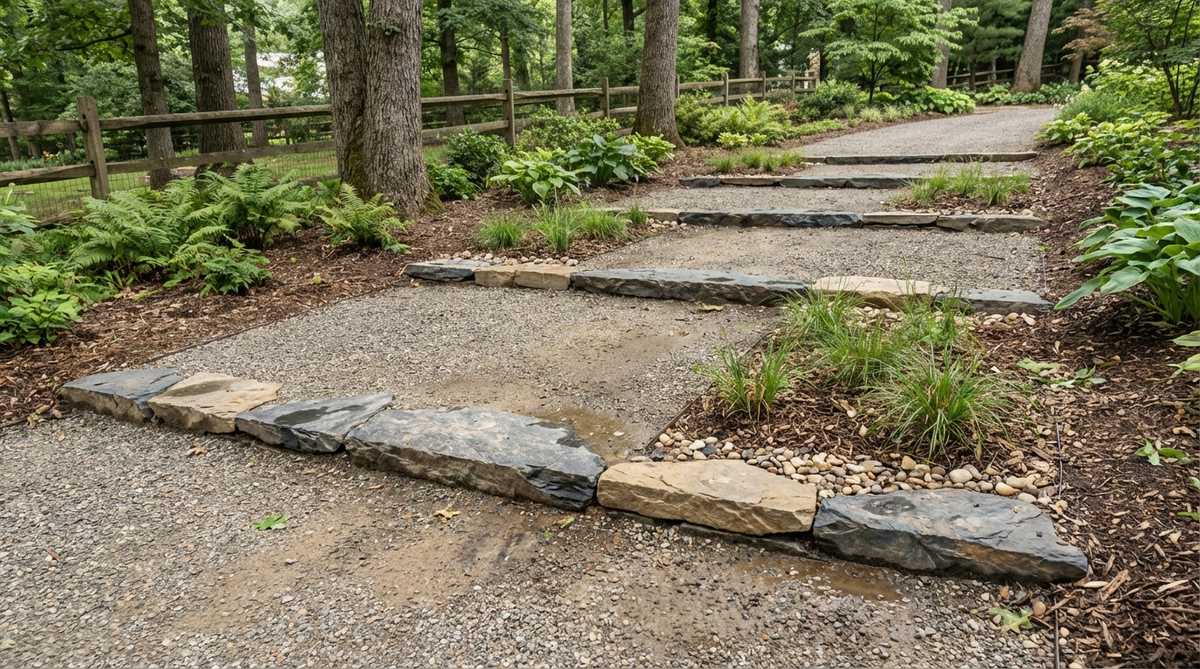
Stone bands placed perpendicular to path direction slow water velocity on grades steeper than 8 percent. These mini-dams catch migrating gravel and reduce erosion.
Set flat stones or pressure-treated boards flush with the gravel surface every 8 to 10 feet. Backfill the uphill side slightly higher to create terraced sections.
Inspect after heavy rains. Add gravel behind check dams as settling occurs.
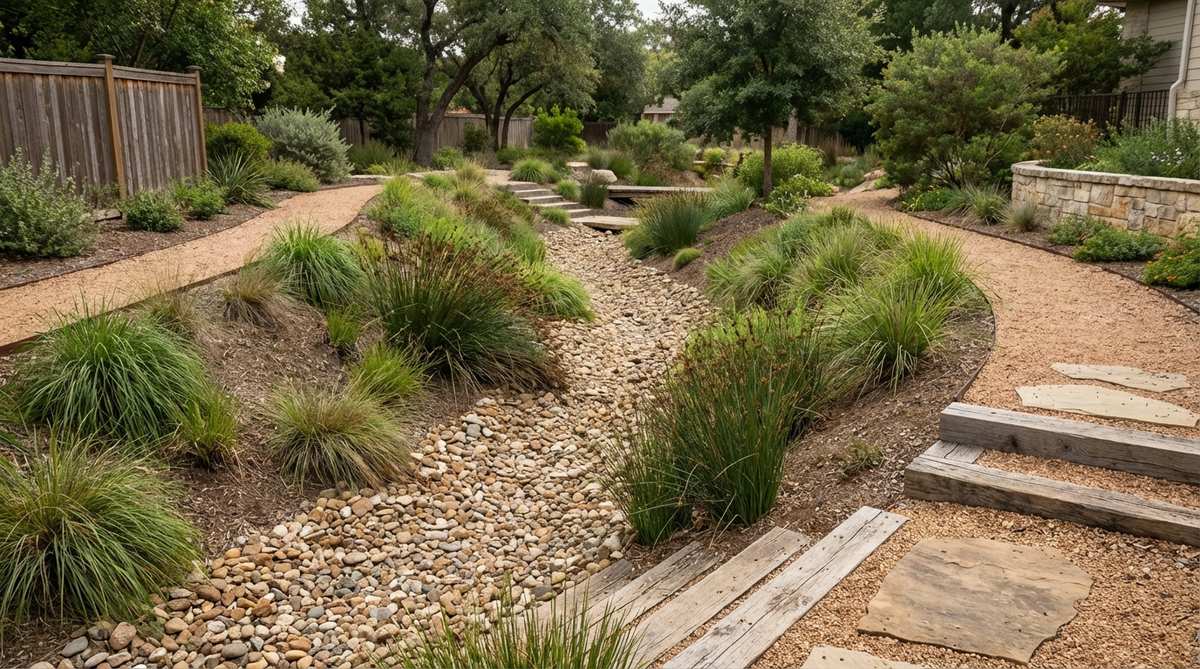
33. Dry Creek Bed Transition
Widen the path at low points to create ephemeral stream crossings. Use larger river rock—3 to 6 inches—in the channel center, grading to finer gravel at edges.
This feature handles occasional water flow while maintaining pedestrian access. Plant moisture-loving ornamental grasses and sedges along banks.
The naturalistic aesthetic suits woodland and prairie garden styles where water movement becomes a design feature rather than a problem.
Low-Maintenance Strategies for Year-Round Beauty
Strategic planning during installation reduces ongoing care requirements. These techniques minimize weeding, replenishing, and edge maintenance.
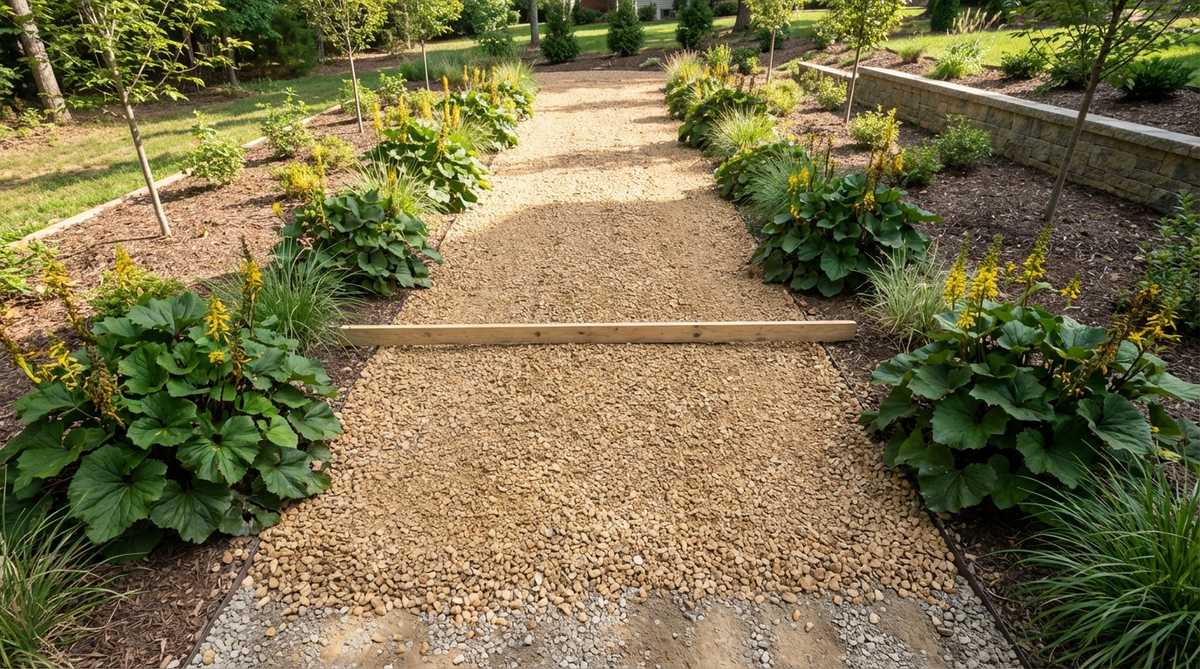
34. Deep Base Installation
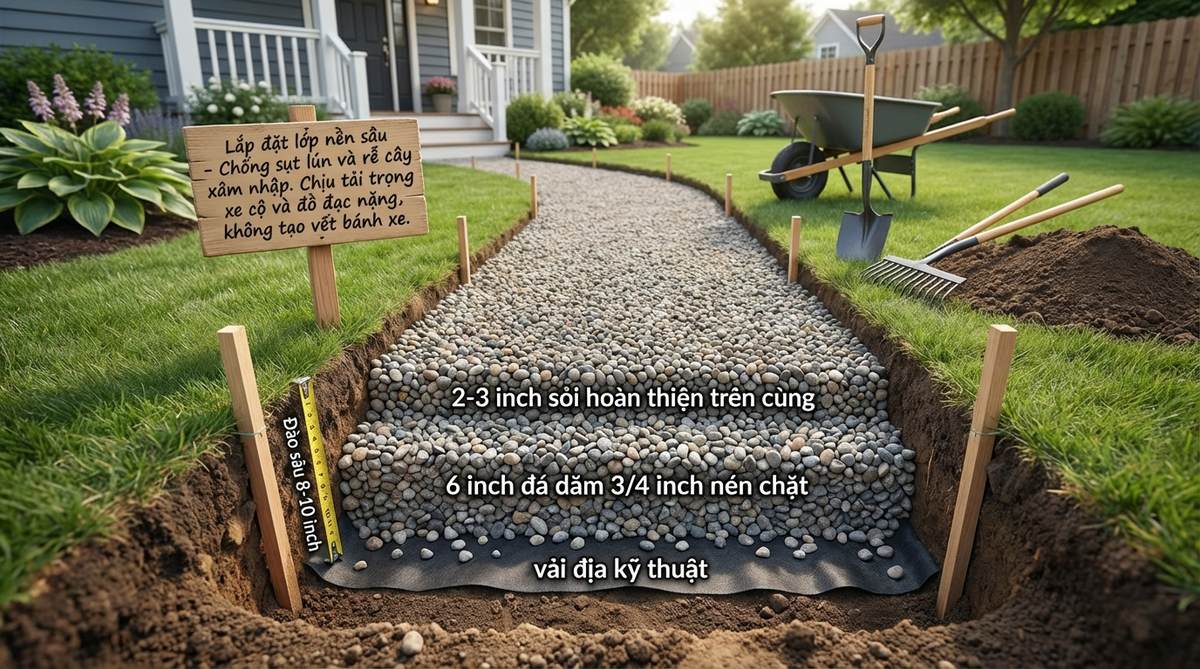
Excavating 8 to 10 inches allows thicker base layers that resist settling and root intrusion. The investment in upfront labor pays dividends through extended service life.
Install 6 inches of compacted ¾-inch stone base over landscape fabric. Top with 2 to 3 inches of finish gravel.
This robust build supports utility vehicle traffic and heavy furniture without rutting. Expect 10 to 15 years before major renovation becomes necessary.
35. Stabilizer Grid System
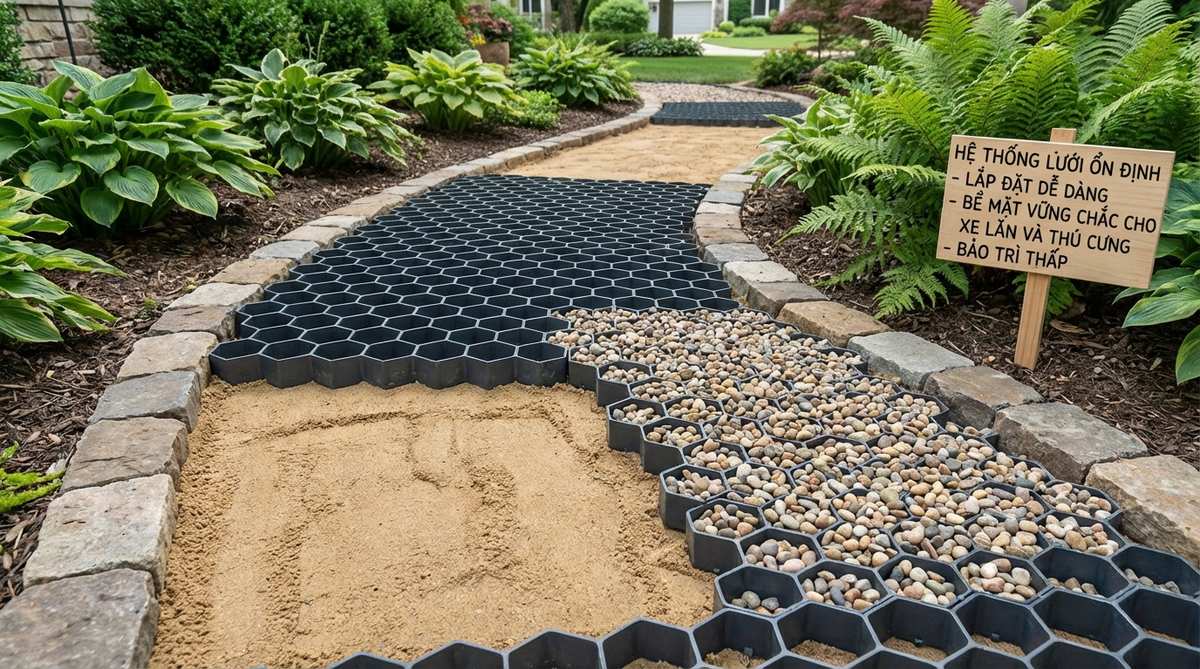
Cellular grids lock gravel in place, eliminating the scatter and raking maintenance that plagues traditional installations. The honeycomb structure remains invisible beneath the surface.
Lay panels on 1 inch of bedding sand over compacted base. Snap edges together, then overfill cells with pea gravel and compact lightly.
Wheelchair users, pets, and high-heeled shoes navigate more easily. The system works exceptionally well for parking courts and event spaces.
36. Pre-Emergent Herbicide Protocol
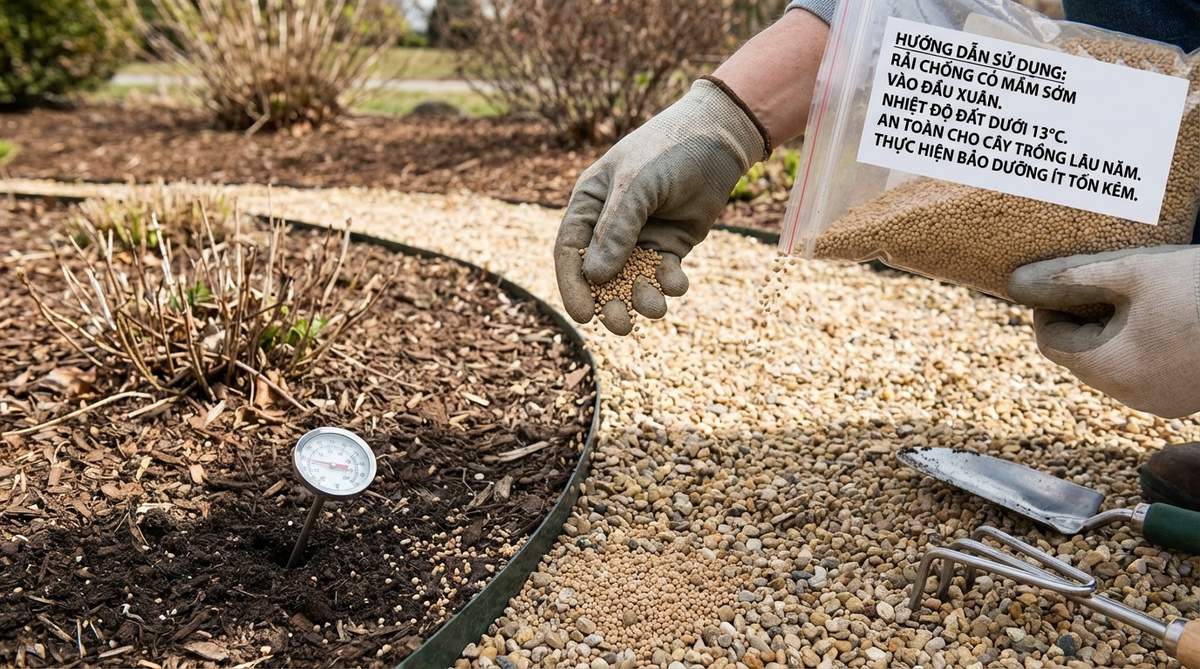
Apply granular pre-emergent in early spring before soil temperatures reach 55°F. This prevents annual weed seeds from germinating without affecting established landscape plants.
Choose products labeled for use over landscape fabric. Reapply per manufacturer directions—typically every 8 to 12 weeks during growing season.
Hand-pull any perennial weeds that emerge from rhizomes. The combination of fabric barrier and chemical prevention reduces weeding to minutes per month.
Conclusion
A thoughtfully designed gravel garden path delivers decades of reliable service when built on proper foundations and maintained with minimal effort. The 35+ designs presented here demonstrate gravel’s versatility across formal and informal landscapes, from high-traffic utility corridors to contemplative garden walks. Start with accurate site assessment, invest in quality base preparation, and select materials that match your climate and aesthetic vision. Your new pathway will enhance property value, improve drainage, and create inviting outdoor circulation that evolves beautifully with your landscape.
Frequently Asked Questions
What is the best depth for a gravel garden path base?
Primary pathways require 4 to 6 inches of compacted crushed stone base topped with 1½ to 2 inches of finish gravel. Garden spurs with lighter foot traffic can use 3 to 4 inches of base. Sites with poor drainage or heavy clay soil benefit from deeper excavation—8 to 10 inches total—with the extra depth filled by additional base material. Vehicle crossings demand 8+ inches of compacted base to prevent rutting.
Should I choose pea gravel or crushed stone for my garden walkway?
Pea gravel works best for low-traffic residential paths where barefoot comfort matters, offering rounded edges and softer texture. Crushed stone delivers superior stability on slopes and high-traffic routes due to angular edges that interlock when compacted. For optimal performance, many designers use crushed stone for the base layer and top with pea gravel for aesthetics. Slopes steeper than 5 percent should use angular crushed stone throughout to prevent migration.
How do I prevent weeds in my gravel pathway?
Install woven landscape fabric directly on subgrade before adding base material. This barrier blocks weed growth from below while maintaining water permeability. Apply granular pre-emergent herbicide each spring to prevent annual weed seeds from germinating. Hand-pull any perennial weeds immediately before they establish root systems. Proper base depth and compaction also discourages weed growth by creating an inhospitable environment.
What edging works best to contain gravel and prevent spreading?
Steel landscape edging offers the most discreet profile for modern designs, flexing to follow curves while remaining nearly invisible. Granite cobbles or Belgian blocks provide substantial visual weight for traditional landscapes. Pressure-treated timber delivers warmth and affordability with 10 to 15 years of service life. Install edging with the top surface ½ inch below finished gravel height to allow rake maintenance without catching edges.
How often does gravel need replenishing?
Well-constructed paths with proper edging and deep base layers require topping every 2 to 3 years. High-traffic areas may need annual top-dressing of ½ to 1 inch. Pea gravel migrates more readily than angular crushed stone, especially on slopes or near lawn edges. Paths with stabilizer grids rarely need replenishing since the cellular structure locks material in place. Annual raking redistributes gravel and identifies low spots before they become problematic.
Can I install a gravel path directly over existing grass?
Strip sod and excavate to proper depth for lasting results. Installing gravel over grass creates a spongy, unstable surface that settles unevenly as organic matter decomposes. The decaying grass feeds weed growth and prevents proper base compaction. Proper installation requires excavation to 5 to 7 inches below finished grade, removal of all organic material, then layered installation of fabric, base, and topping. This method ensures decades of service versus temporary fixes that fail within seasons.