Upgrading with fairy lights outdoor instantly turns a boring yard into a premium evening retreat. Grab commercial-grade bulbs and secure mounting hardware for a flawless, weather-proof design. Skip the cheap stuff and follow these exact blueprints.
Design Snapshot Key Principles
- Layered Illumination: Combine multiple light sources at varying heights to create depth and avoid flat, one-dimensional lighting
- Secure Anchoring: Use weatherproof hardware rated for outdoor use to prevent sagging and ensure lights remain stable during wind and rain
- Power Planning: Map out electrical access points before installation and use outdoor-rated extension cords with GFCI protection
- Visual Balance: Distribute lights evenly across the space while concentrating brighter zones over functional areas like seating and dining
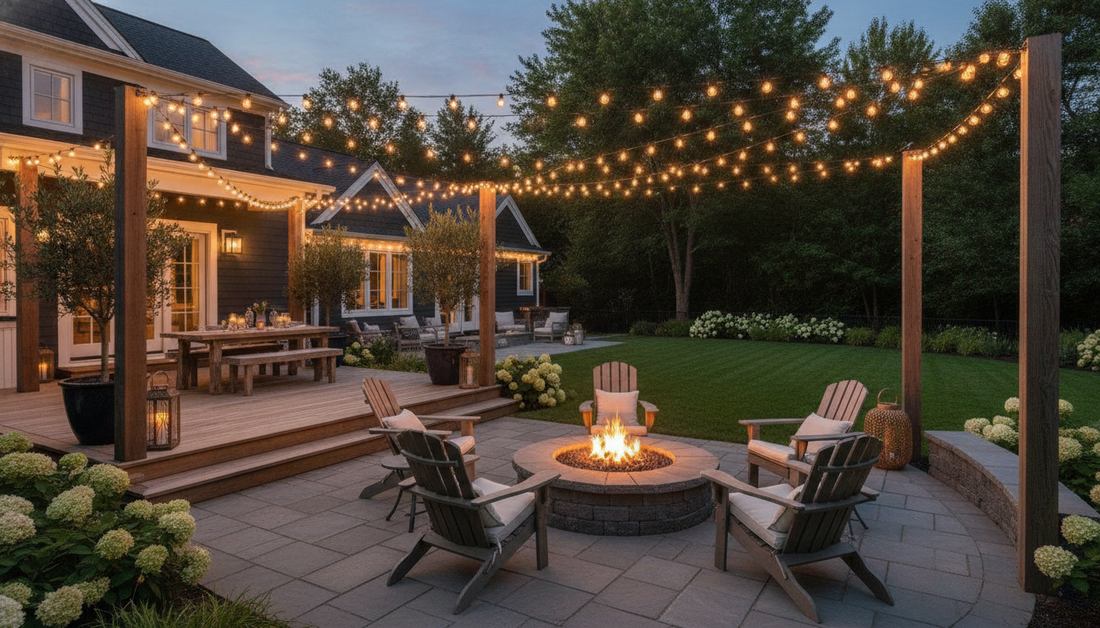
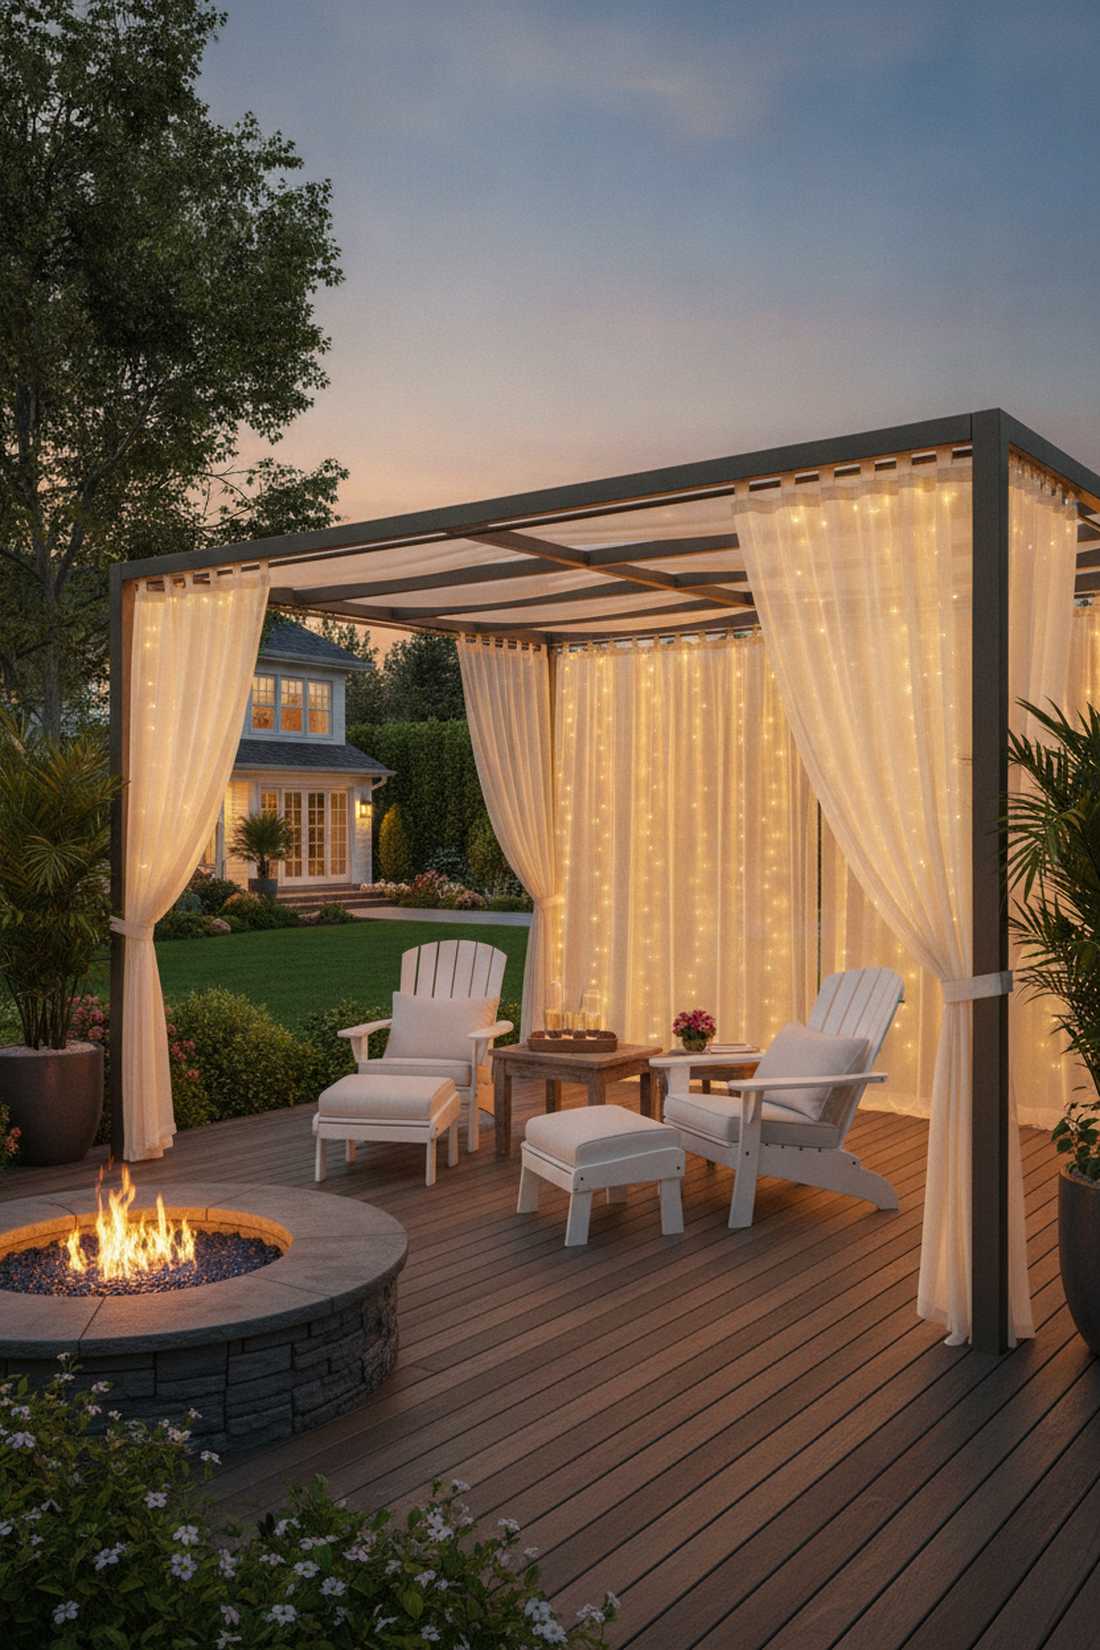
Pergola & Patio Fairy Lights
Pergolas provide natural anchor points that simplify installation while creating structured canopy effects. The beam framework allows designers to experiment with geometric patterns that guide the eye upward and establish clear boundaries for outdoor rooms.
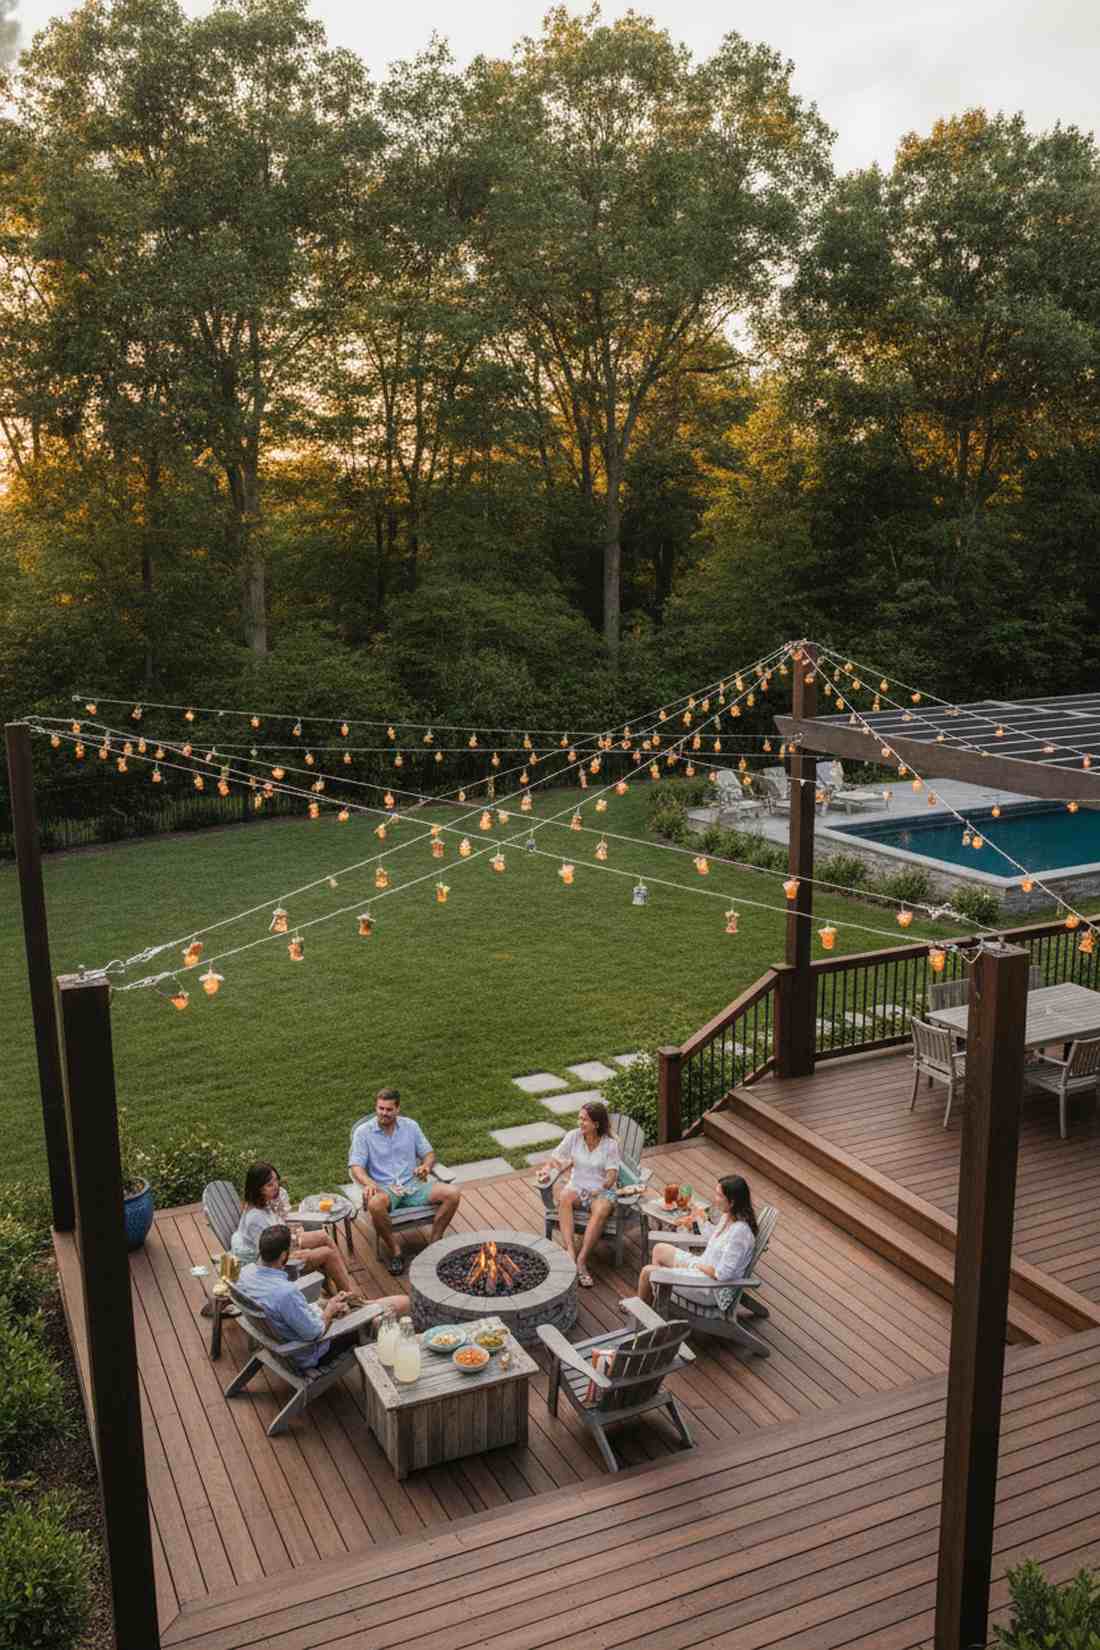
1. Parallel Beam Draping
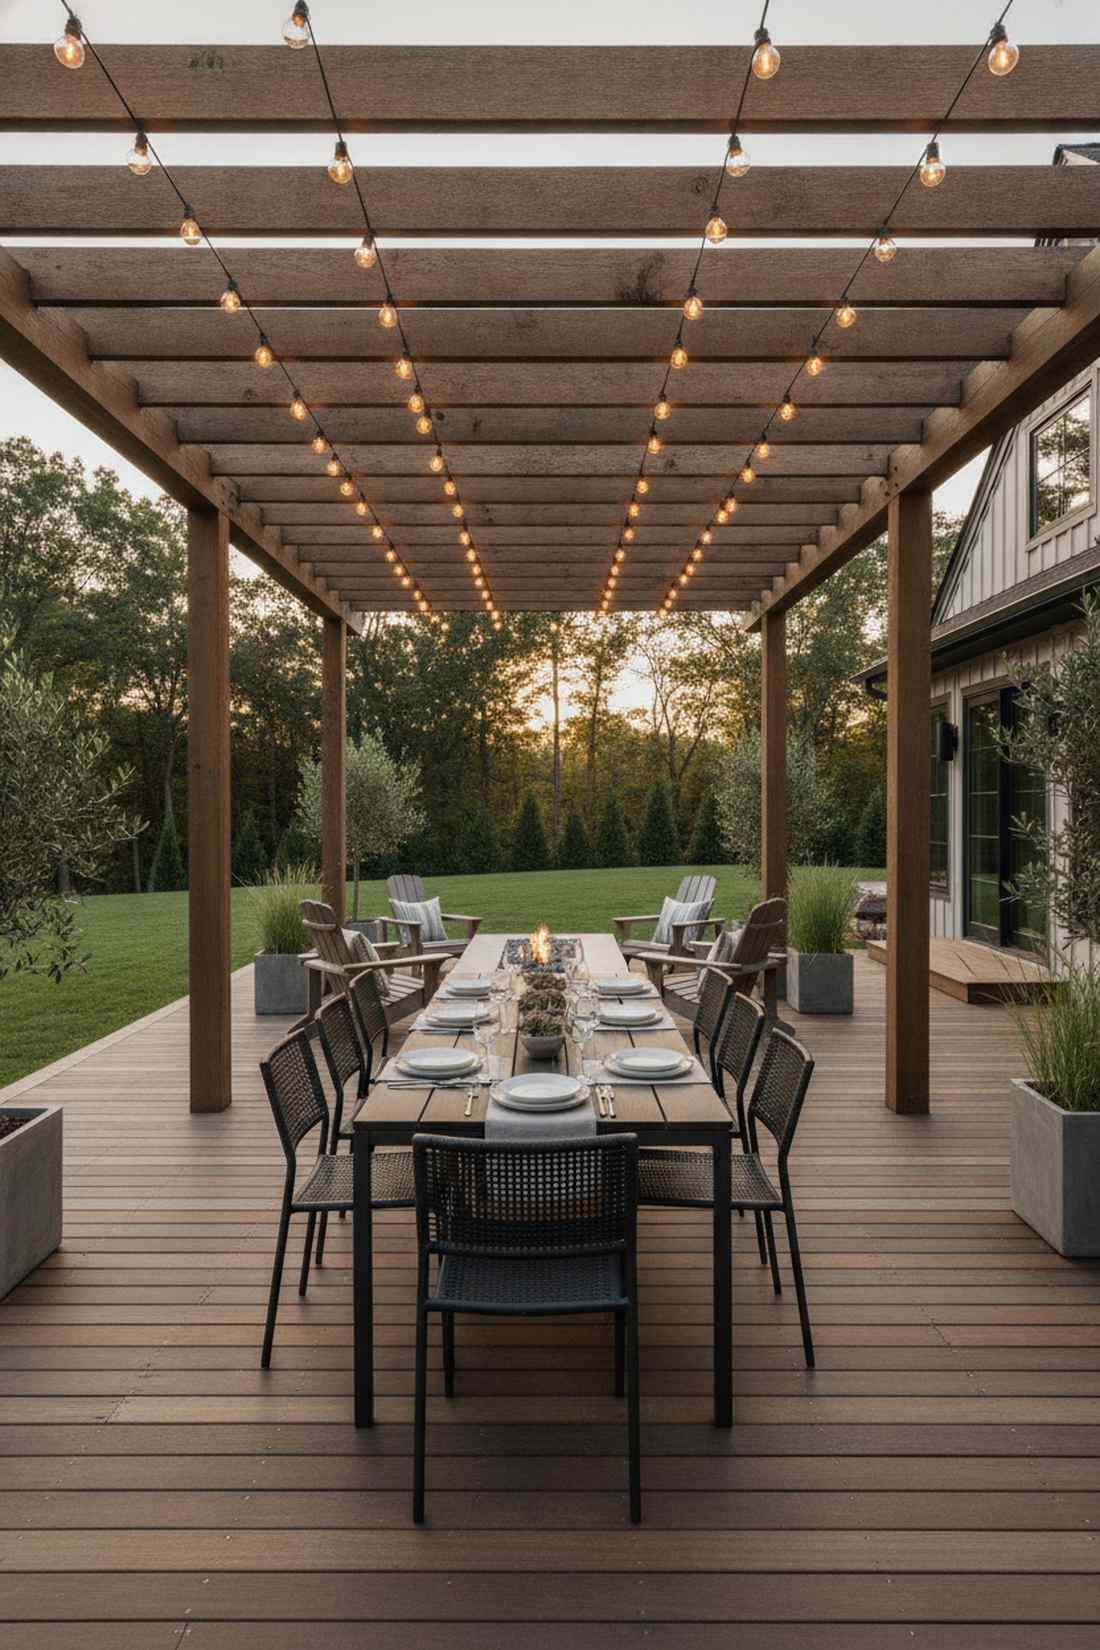
This modern pergola light canopy feels like an exclusive rooftop lounge hidden in plain sight. Works exceptionally well for long rectangular outdoor dining spaces and open-air patios.
While amateur setups often look messy, running these straight lines delivers a designer-level finish that looks far more expensive than it is. Grab a heavy-duty outdoor extension cord and proper anchors to ensure the lines stay perfectly taut and weather-resistant.
You can easily pull this off for around $40–$80 depending on the square footage. Save this to your DIY weekend garden board for your next exterior upgrade.
- Key Materials: Commercial-grade LED globe strings
- Vibe / Style: Upscale minimalist bistro
- Difficulty: Intermediate structural setup
- Budget Breakdown: Bulbs: $50 | Hardware: $15.
- Creator’s Tip: Pre-drill pilot holes for your anchors to prevent pergola wood from splitting under tension.
- Smart Sourcing: shatterproof commercial-grade string lights (bulk pack) and rust-proof outdoor cup hooks.
2. Crisscross Canopy Pattern
A mesmerizing diamond lattice outdoor ceiling that feels like a magical festival tent right in your backyard. Perfect for wide, square pergolas needing robust overhead coverage.
Most people just wrap poles haphazardly, but this overlapping approach creates incredible architectural depth that fools the eye. It completely avoids that cheap dorm-room look by distributing a soft, uniform glow across your fairy lights backyard retreat.
Expect to spend about $60–$100 for proper weatherproof supplies. Highly recommended for a quick weekend win before hosting a major party.
- Key Materials: Weather-resistant wire connectors
- Vibe / Style: Elegant evening gala
- Difficulty: Requires precise measuring
- Budget Breakdown: Lights: $70 | Zip ties: $10.
- Creator’s Tip: Use a chalk line on the ground to pre-plan the intersecting points before getting on the ladder.
- Smart Sourcing: UV-coated zip ties (heavy duty) and warm-white LED outdoor kits.
3. Perimeter Frame Lighting
This slick floating border illumination feels like a chic contemporary art installation. It is an absolutely flawless choice for small-scale urban patios where vertical space is limited.
Instead of overwhelming a tiny space with bulbs, outlining the edges gives a surprisingly premium look with minimal effort. Pair this with sleek miniature garden supplies to keep the aesthetic crisp and highly intentional.
This is a super budget-friendly option coming in around $25–$45. Pin this if you’re planning a small space upgrade on a tight budget.
- Key Materials: Adhesive outdoor light clips
- Vibe / Style: Modern architectural glow
- Difficulty: Super beginner friendly
- Budget Breakdown: Perimeter strands: $30 | Clips: $15.
- Creator’s Tip: Clean the wood with rubbing alcohol before applying adhesive clips to ensure they never peel in the heat.
- Smart Sourcing: waterproof command clips (outdoor rated) and low-voltage landscape edge lights.
4. Zigzag Wave Installation

A dynamic geometric overhead wave that feels like energetic lightning frozen in time above your head. Excellent for narrow, bowling-alley style side yards or long verandas.
By breaking away from boring straight lines, this angled pattern injects serious movement and visual interest into dead spaces. It requires slightly more wire but instantly elevates basic fairy lights outside into a custom-built artistic feature.
Plan for a budget of $50–$85 for high-tension materials. It’s a fast upgrade that completely changes the vibe of long pathways.
- Key Materials: High-tension hanging wire
- Vibe / Style: Quirky modern loft
- Difficulty: Moderate anchor planning
- Budget Breakdown: Copper strands: $45 | Support wire: $20.
- Creator’s Tip: Map the zigzag angles using painter’s tape on the patio floor to visualize the reflection before hanging.
- Smart Sourcing: stainless steel wire rope kits and extra-long LED string light spools.
Most people give up on their outdoor lighting after hanging one basic string… until they see the genius vertical trick coming up next.
5. Spiral Post Wrapping
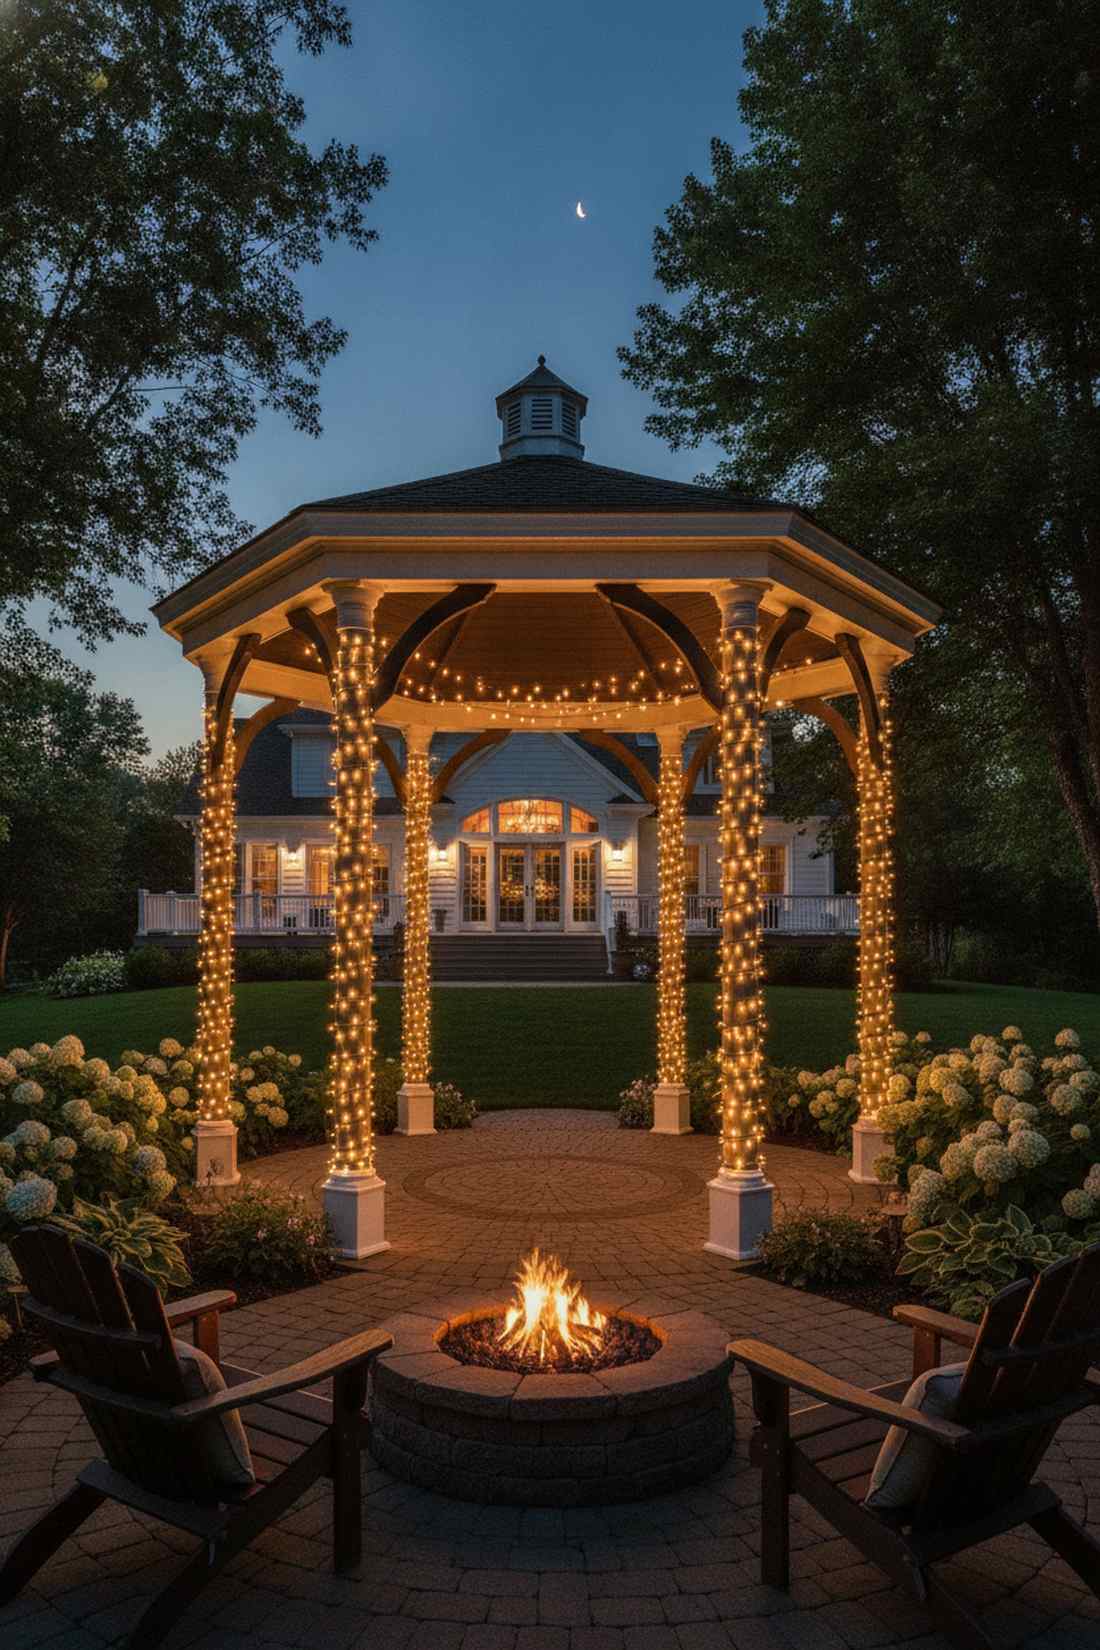
This cozy luminous vertical pillar feels like an enchanted forest tree trunk glowing in the dark. Absolutely stunning for framing entryways or anchoring the corners of a standalone gazebo.
Wrapping columns is an old trick, but using micro-LEDs tightly coiled delivers a flawless textured aesthetic that standard bulbs can’t match. Upgrading to fairy garden kits with battery packs completely hides ugly wires and keeps the look pristine.
You can execute this corner glow-up for about $15–$30 per post. Save this to your DIY patio aesthetic board right now.
- Key Materials: Micro copper wire strands
- Vibe / Style: Whimsical romantic charm
- Difficulty: Easy but time-consuming
- Budget Breakdown: Micro lights: $20 | Fasteners: $5.
- Creator’s Tip: Leave a consistent 3-inch gap between each wrap rotation to prevent the post from looking visually heavy or chaotic.
- Smart Sourcing: copper wire fairy lights (waterproof pack) and clear outdoor mounting tape.
6. Sunburst Radial Design
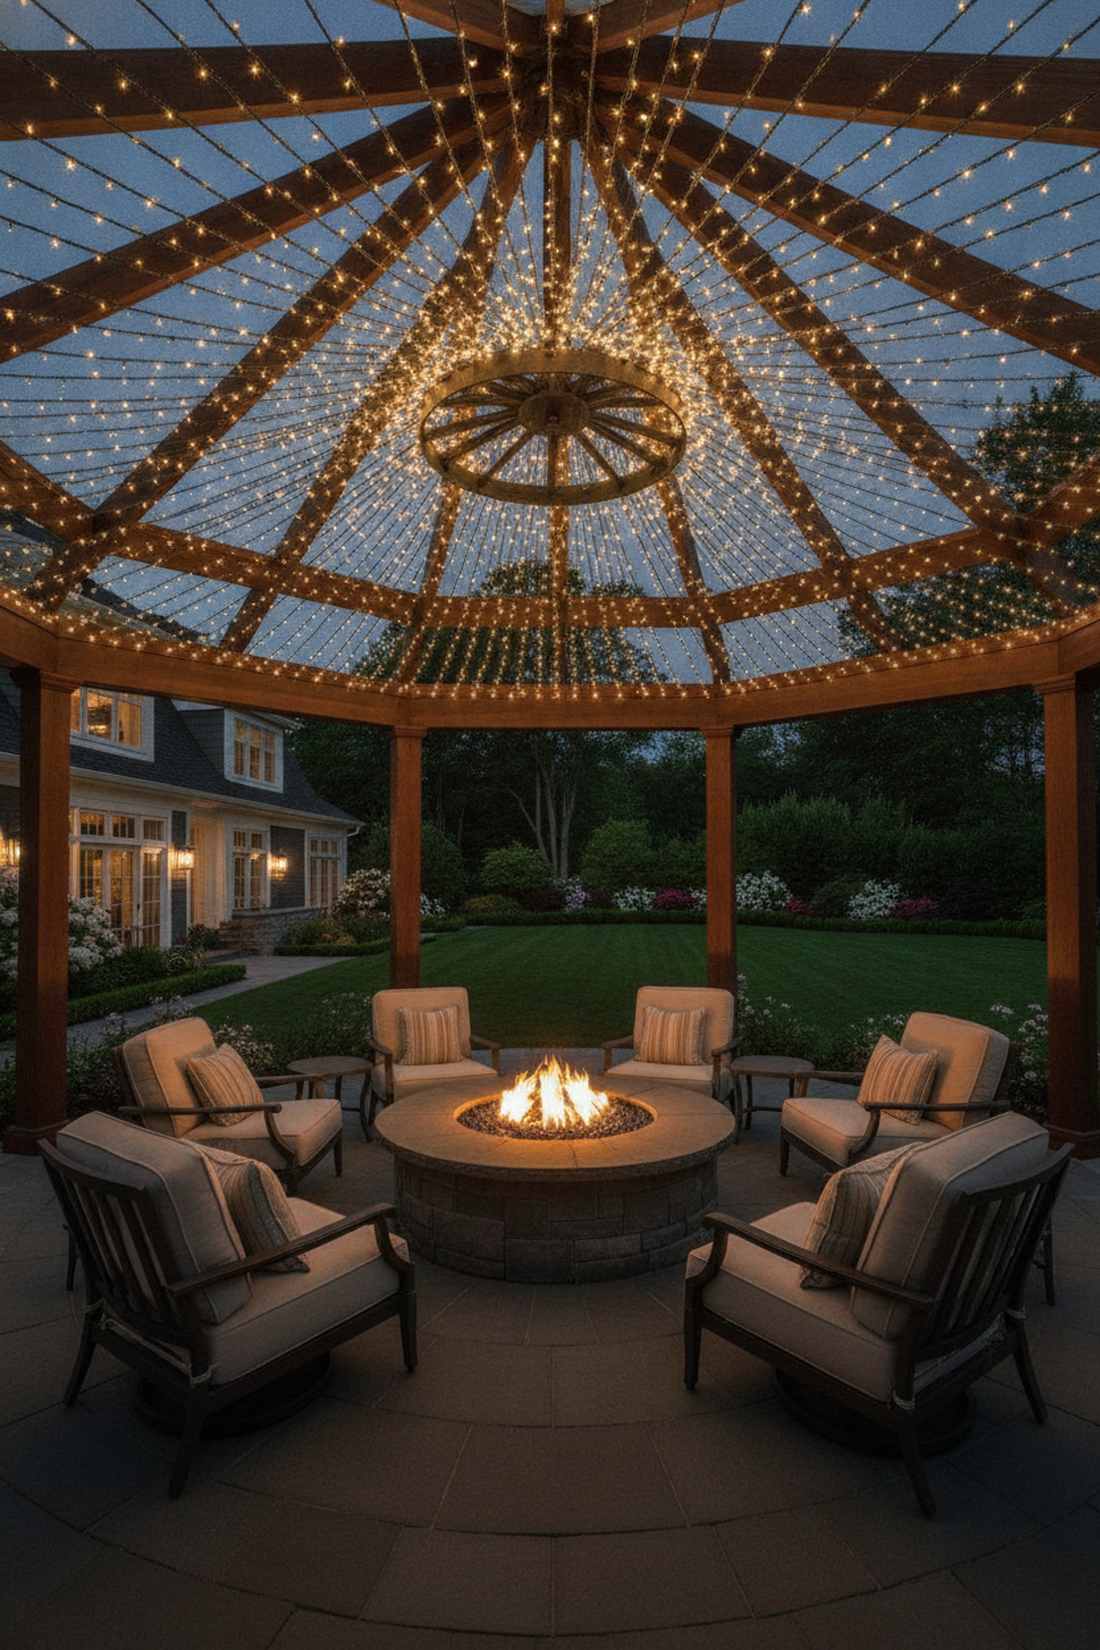
A jaw-dropping starburst overhead canopy that feels like a private fireworks display paused in mid-air. It serves as the ultimate ceiling feature for circular fire pit zones or octagonal pavilions.
Rather than a basic grid, pulling strands from a central hub creates an explosive visual masterpiece that demands attention. Utilizing commercial fairy garden supplies like heavy-duty multi-way splitters ensures the center hub doesn’t become a tangled fire hazard.
This luxury-looking setup generally costs between $80–$130. It’s a showstopper that will have all your guests asking for your designer’s name.
- Key Materials: Multi-way power splitter hub
- Vibe / Style: Dramatic resort luxury
- Difficulty: Advanced electrical routing
- Budget Breakdown: Hub splitter: $30 | Strands: $80.
- Creator’s Tip: Anchor a heavy-duty metal ring dead-center on your ceiling to act as the primary tension bearing point for all strands.
- Smart Sourcing: outdoor multi-plug splitters and heavy-duty carabiner clip sets.
7. Layered Height Variation
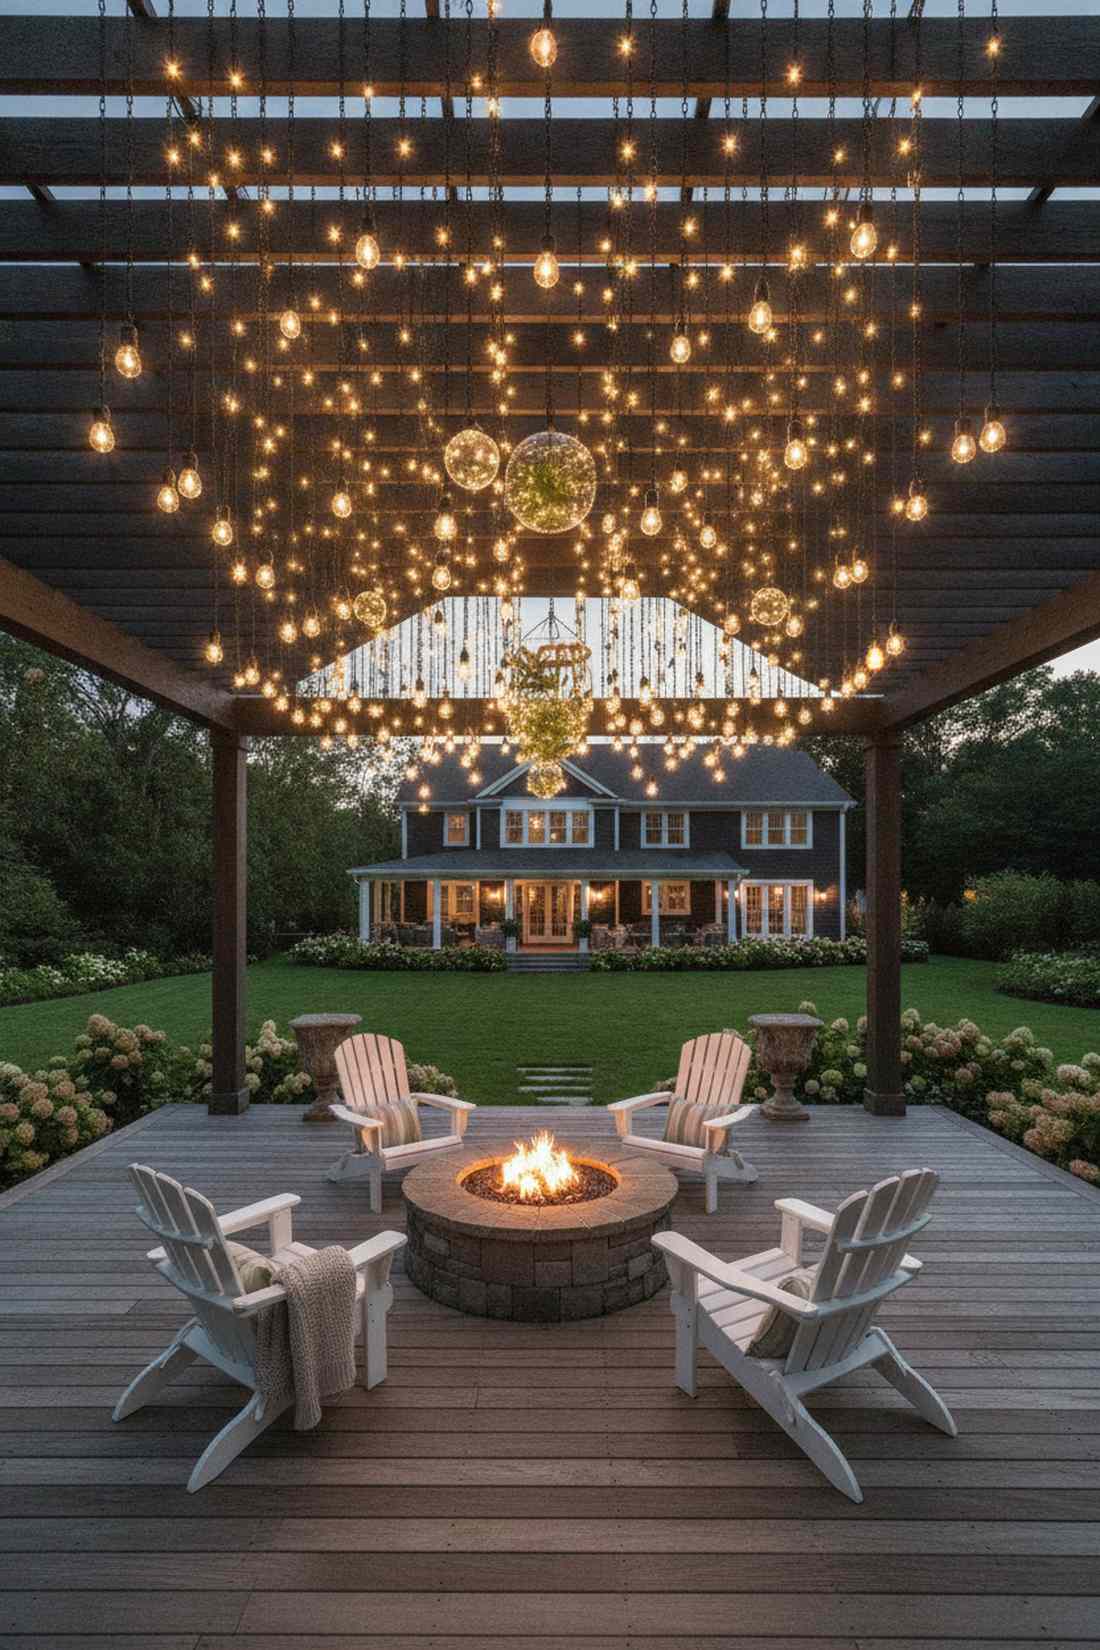
This multi-tier glowing canopy feels like a floating constellation lowering itself into your backyard. Brilliantly effective for high-ceiling pergolas that otherwise feel cold and empty.
Flat lighting kills ambiance, but staggering different drops delivers a surprisingly premium look straight out of a high-end wedding venue. Mixing different bulb sizes and incorporating terrarium accessories hanging from the lowest strands builds incredible 3D volume.
You can achieve this rich, layered depth for $60–$110. Pin this if you want to turn a boring tall ceiling into a cozy enclave.
- Key Materials: Adjustable hanging chains
- Vibe / Style: Boho-chic wonderland
- Difficulty: Intermediate balancing act
- Budget Breakdown: Mixed bulbs: $75 | Chains: $25.
- Creator’s Tip: Hang your brightest bulbs on the highest tier to provide fill light, keeping softer, warmer micro-bulbs closer to eye level.
- Smart Sourcing: dimmable outdoor string light kits and black adjustable hanging chains.
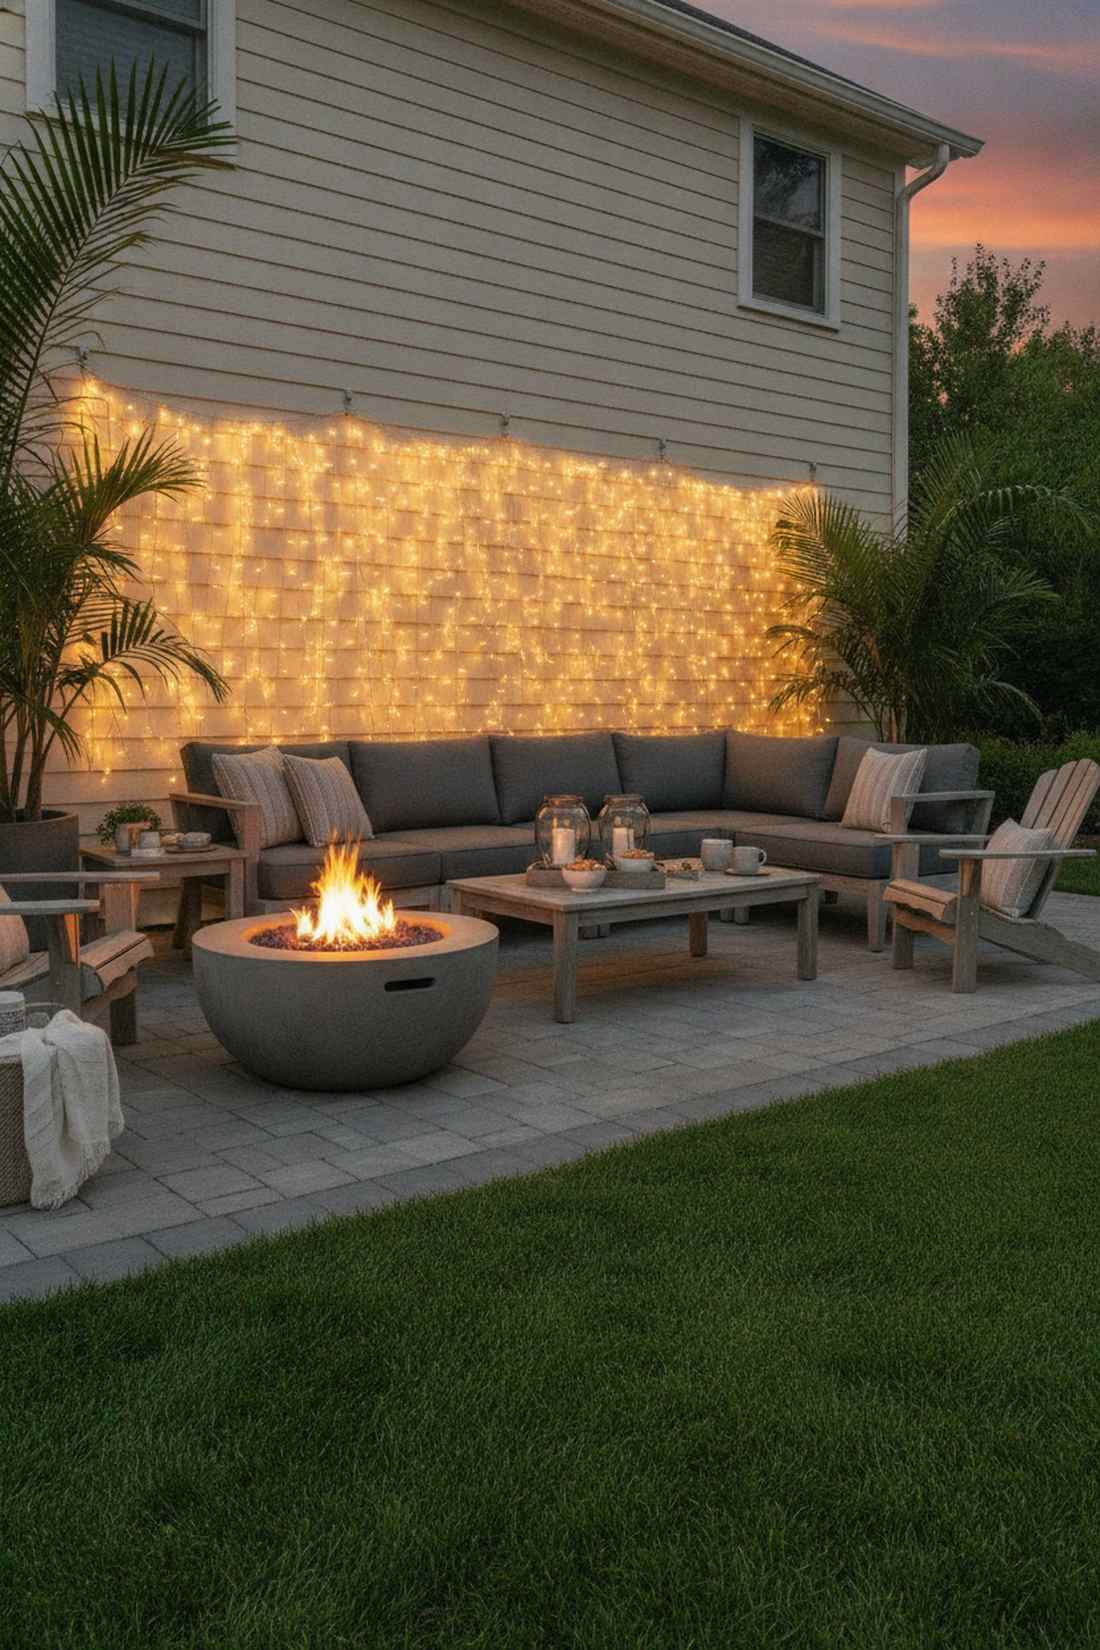
8. Curtain Waterfall Effect
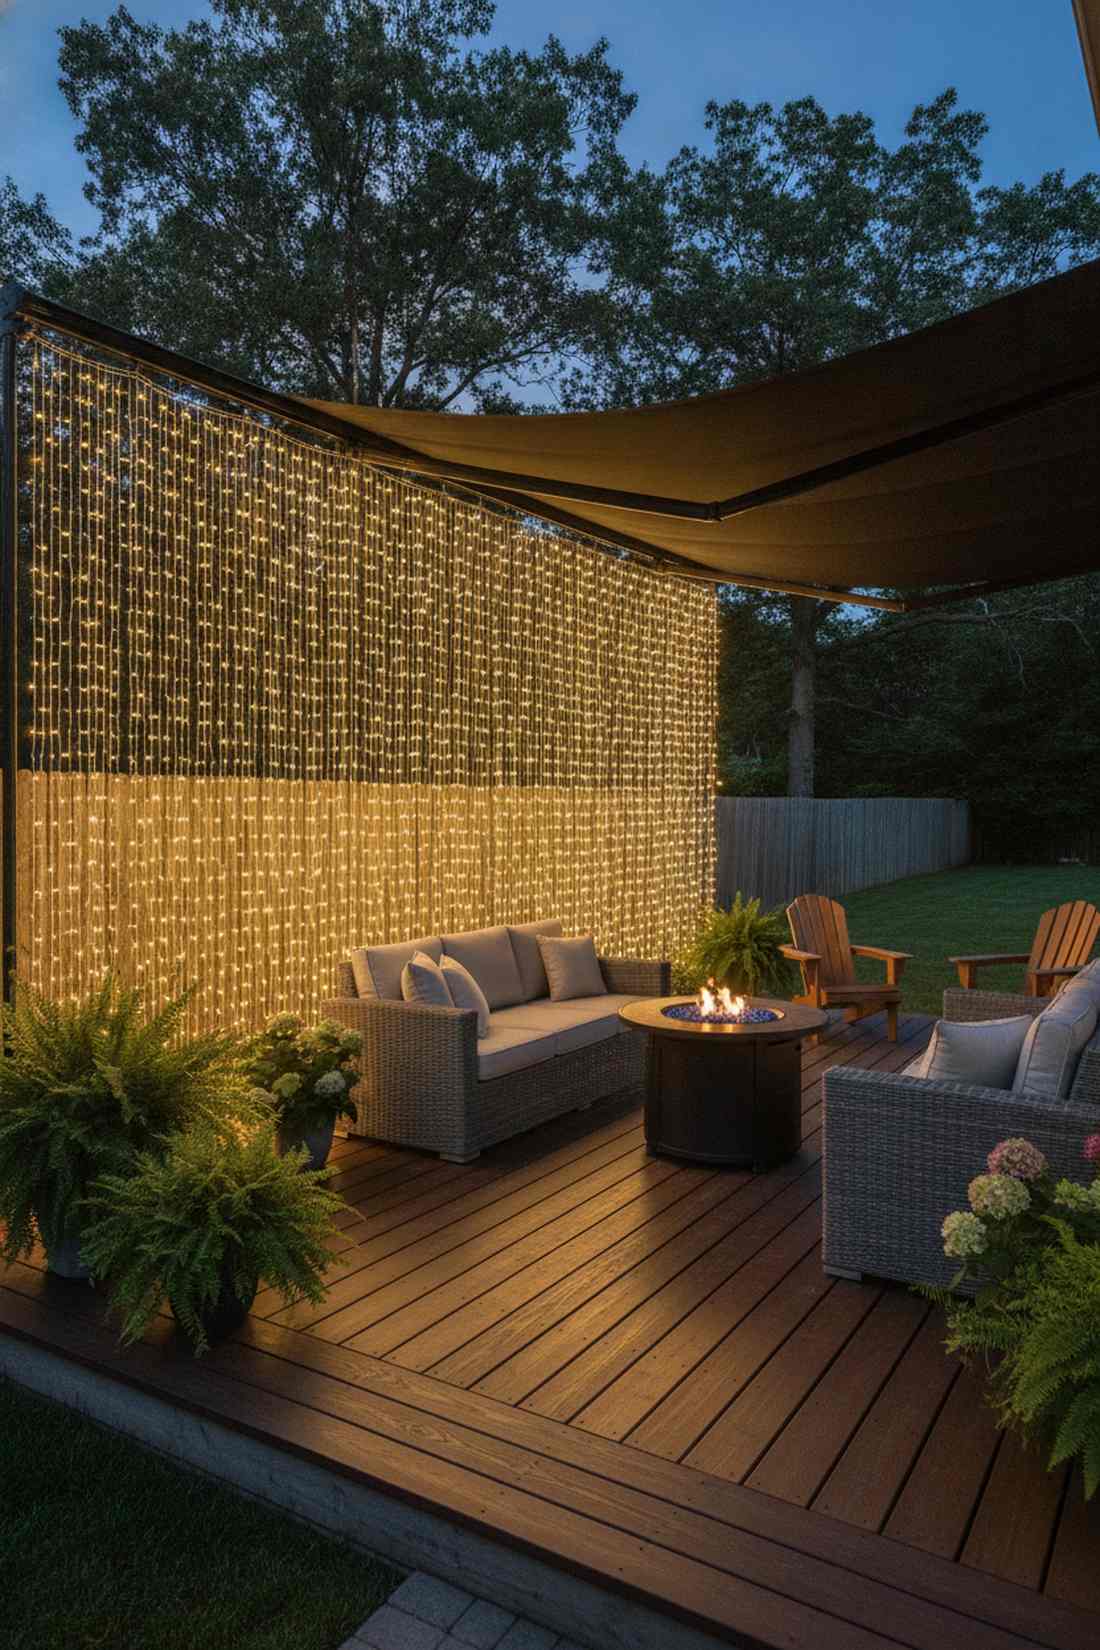
A spectacular cascading light wall that feels like walking through a portal of shimmering raindrops. Use this exact trick to create a privacy screen on a balcony or block an ugly fence line.
Buying individual strands is a rookie mistake; investing in a pre-built curtain mesh gives a designer-level finish in minutes. This strategy instantly solves privacy issues while flooding your fairy lights outdoor seating area with an ultra-flattering, diffused glow.
Ready-made kits make this achievable for just $30–$60. Absolutely perfect for renters wanting huge impact without structural changes.
- Key Materials: Pre-wired LED curtain panel
- Vibe / Style: Dreamy VIP lounge
- Difficulty: Extremely fast setup
- Budget Breakdown: Light curtain: $40 | Hooks: $10.
- Creator’s Tip: Braid the bottom tails of the curtain strands slightly to prevent them from tangling violently during heavy winds.
- Smart Sourcing: LED waterfall curtain lights (outdoor rated) and heavy-duty tension rods.
💡 Must-Have Supplies for High-End Setups
To build these setups faster and ensure they last, skip the generic craft aisles and invest in the right foundational kits.
- Base & Support: commercial-grade vinyl-coated steel wire rope
- Setup Tools: heavy-duty zip tie starter kits with UV protection
- Weather/Durability Protection: waterproof silicone outlet sealing boxes
Fairy Lights Garden & Tree Designs
Trees offer organic support structures that create natural focal points in evening landscapes. Strategic wrapping and draping techniques transform branches into sculptural elements that anchor garden designs after dark.
9. Trunk Spiral Wrap
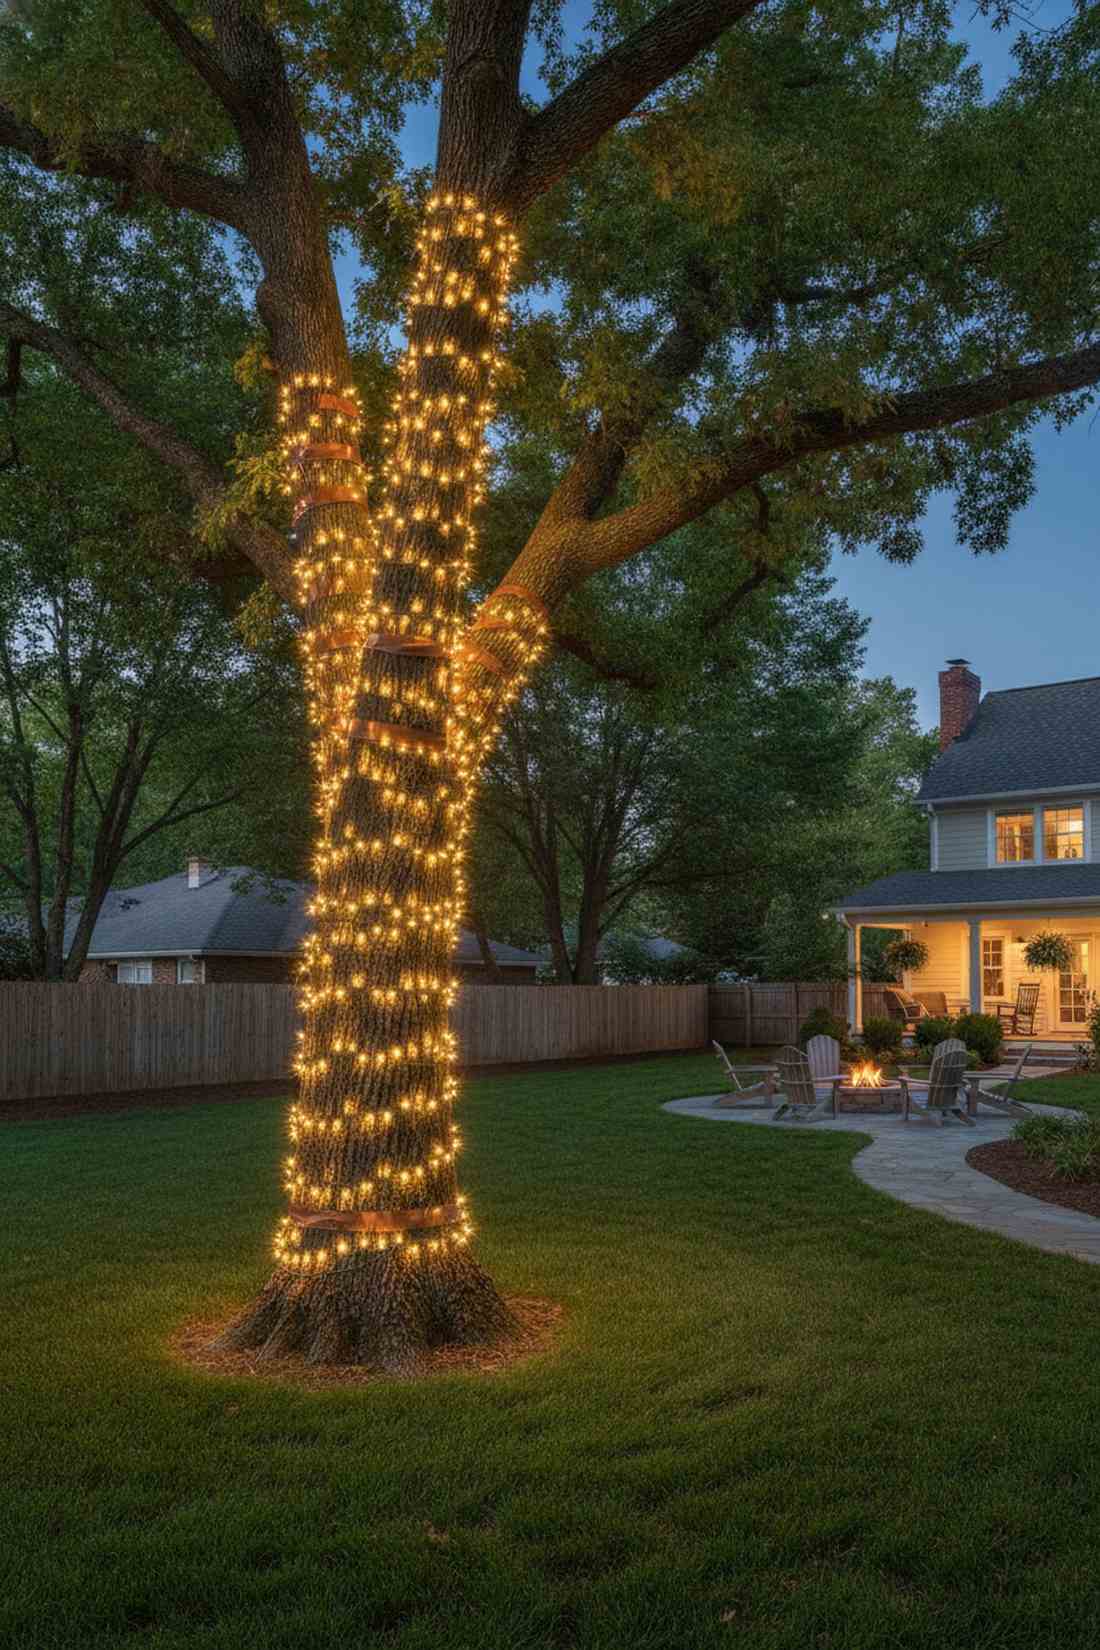
This classic illuminated tree pillar feels like a glowing beacon guiding you into a secret garden. Ideal for showcasing mature oaks, palm trees, or striking birch trunks in your front yard.
While amateur wraps sag after one storm, securing cables tightly at specific intervals looks far more expensive than it is. Using brown or green wire completely camouflages the hardware, making the fairy lights in a garden look naturally bioluminescent.
Trunk wrapping costs roughly $20–$45 per tree depending on girth. Save this to your landscaping inspiration board right away.
- Key Materials: Bark-colored wire strands
- Vibe / Style: Classic estate elegance
- Difficulty: Easy but repetitive
- Budget Breakdown: Lights: $25 | Camouflage ties: $8.
- Creator’s Tip: Never use a staple gun on living trees; instead, use expandable horticultural tape that stretches as the tree grows.
- Smart Sourcing: green-wire outdoor fairy lights (long length) and tree-safe stretch tie ribbons.
Think wrapping a tree trunk is cool? Wait until you see how the pros make the entire canopy glow without a ladder…
10. Branch Canopy Draping
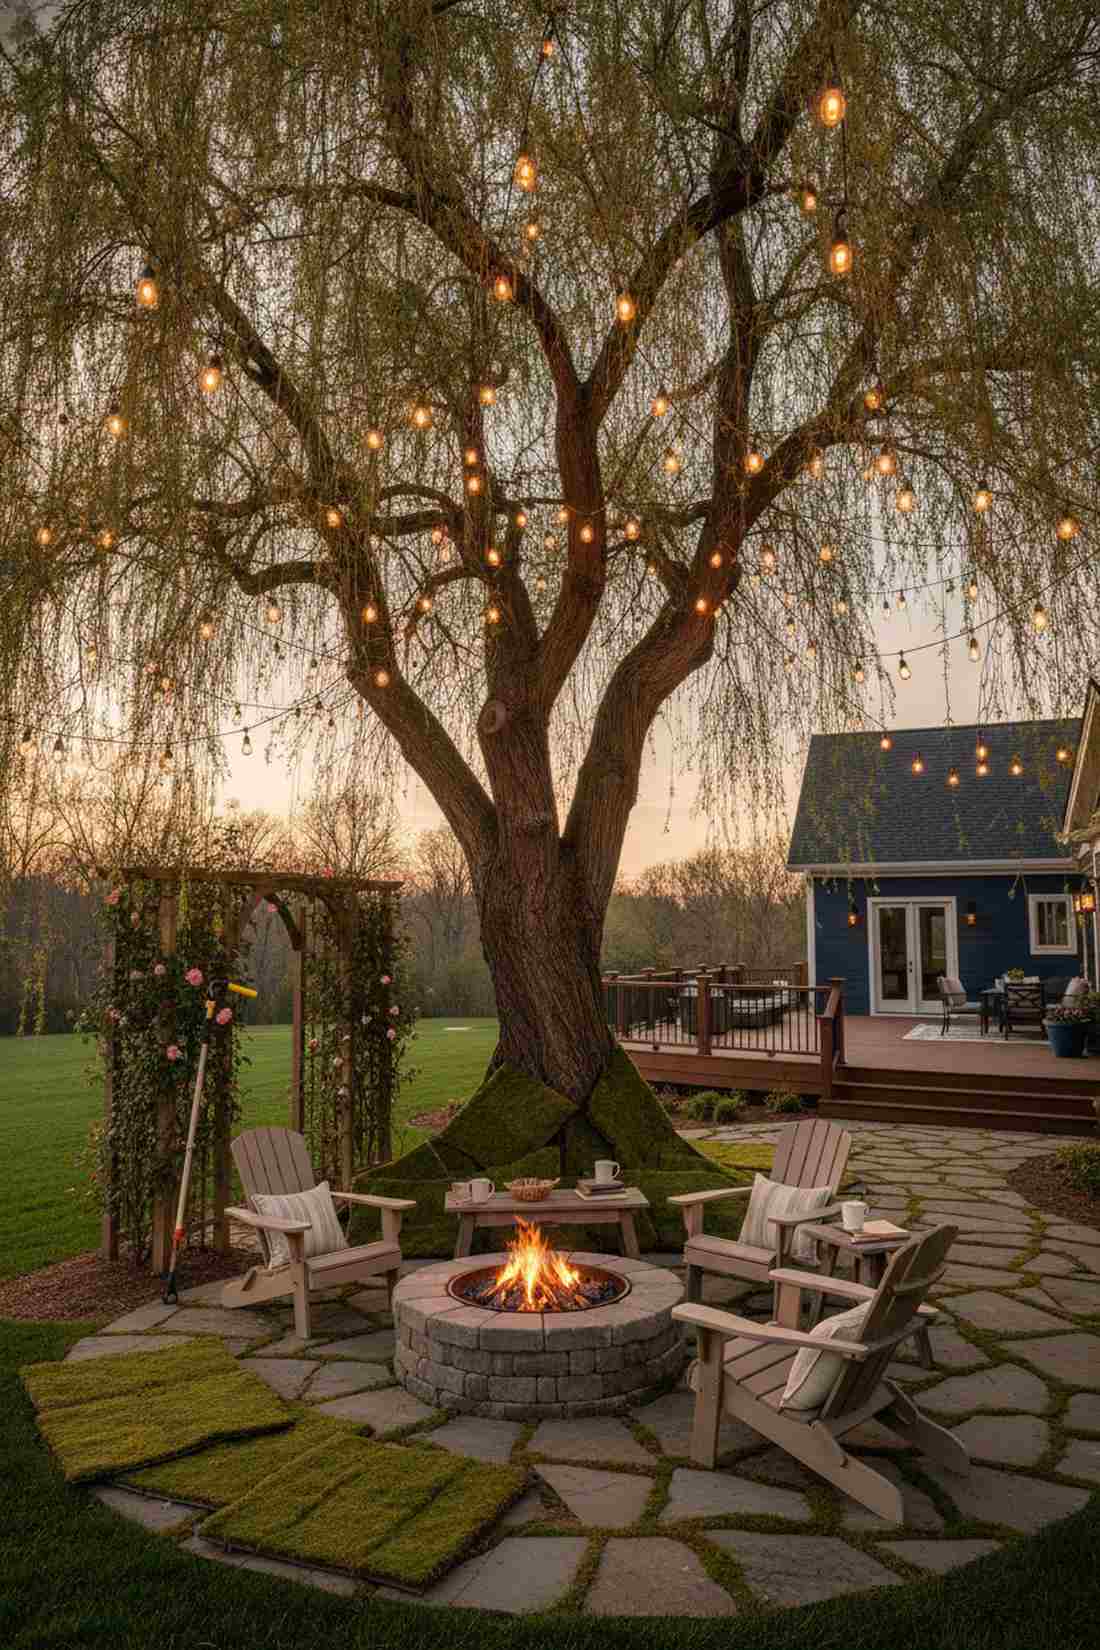
A breathtaking glowing foliage umbrella that feels like a scene straight out of an elven woodland. Perfect for wide, weeping trees that sit above a cozy patio seating arrangement.
Instead of rigid wrapping, letting lines swoop naturally delivers a surprisingly premium look that mimics high-end botanical gardens. Tossing pre-cut moss panels around the base of the tree completes the organic, overgrown aesthetic beautifully.
Achieve this effortless drape for about $40–$75. It’s an enchanting upgrade that requires zero heavy drilling or permanent damage.
- Key Materials: Telescoping hanging pole
- Vibe / Style: Enchanted forest retreat
- Difficulty: Moderate reaching required
- Budget Breakdown: Soft-glow strands: $50 | Reach pole: $20.
- Creator’s Tip: Use a painter’s extension pole with a hooked notch taped to the end to drape lights 15 feet up without touching a ladder.
- Smart Sourcing: warm-amber large bulb strings and telescoping reach hooks.
11. Low Branch Highlighting
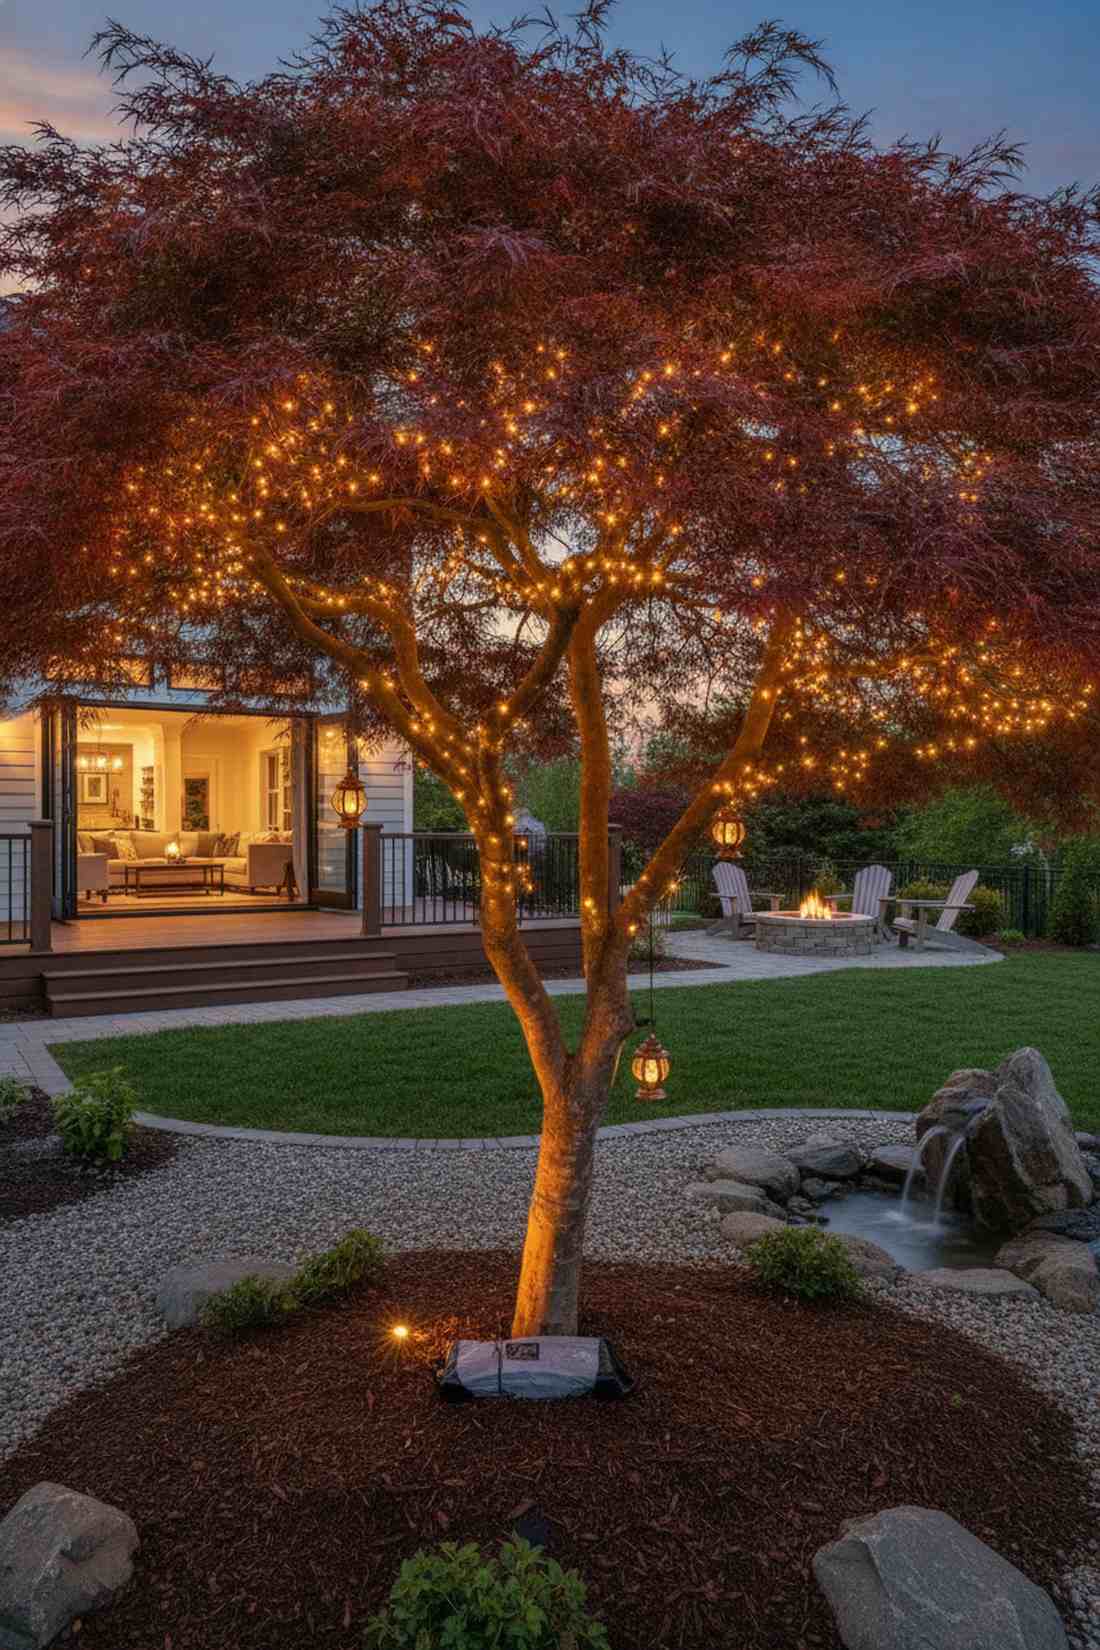
This subtle floating branch accent feels like a cluster of fireflies landed just for you. Specifically designed to elevate Japanese maples or low-hanging weeping willows without overwhelming them.
Most homeowners flood their trees with too much brightness, but targeted micro-lighting gives a designer-level finish that highlights unique bark textures perfectly. Integrating miniature garden supplies like tiny glowing lanterns along the lower limbs creates a brilliant focal point.
This highly detailed look only requires a tiny $15–$25 investment. Pin this if you want maximum curb appeal on a micro-budget.
- Key Materials: Battery-operated copper micro-lights
- Vibe / Style: Zen botanical garden
- Difficulty: Very easy
- Budget Breakdown: Micro-lights: $15 | Concealer tape: $5.
- Creator’s Tip: Wrap the battery pack in waterproof landscape fabric and bury it slightly in the mulch at the base to hide the bulky plastic.
- Smart Sourcing: battery-operated outdoor copper lights and waterproof junction boxes.
12. Tree to Structure Stringing
A sweeping aerial light bridge that feels like a festive European street market spanning your yard. This layout is the ultimate hack to visually connect a detached garage to your main house.
Flimsy strings will snap under their own weight over long distances, but using a steel cable backbone completely solves the sagging issue. This heavy-duty approach turns standard fairy lights garden ideas into permanent, storm-proof architectural elements.
Budget around $70–$120 for the high-tension hardware and lights. It is a game-changing weekend project for wide-open backyards.
- Key Materials: Steel guide wire & turnbuckles
- Vibe / Style: European courtyard
- Difficulty: Advanced tension mounting
- Budget Breakdown: Guide wire kit: $40 | Heavy strands: $60.
- Creator’s Tip: Always install a turnbuckle on the structure side so you can easily tighten the line when the wire naturally stretches over the summer.
- Smart Sourcing: stainless steel turnbuckle tension kits and commercial suspended string lights.
13. Multi-Tree Network
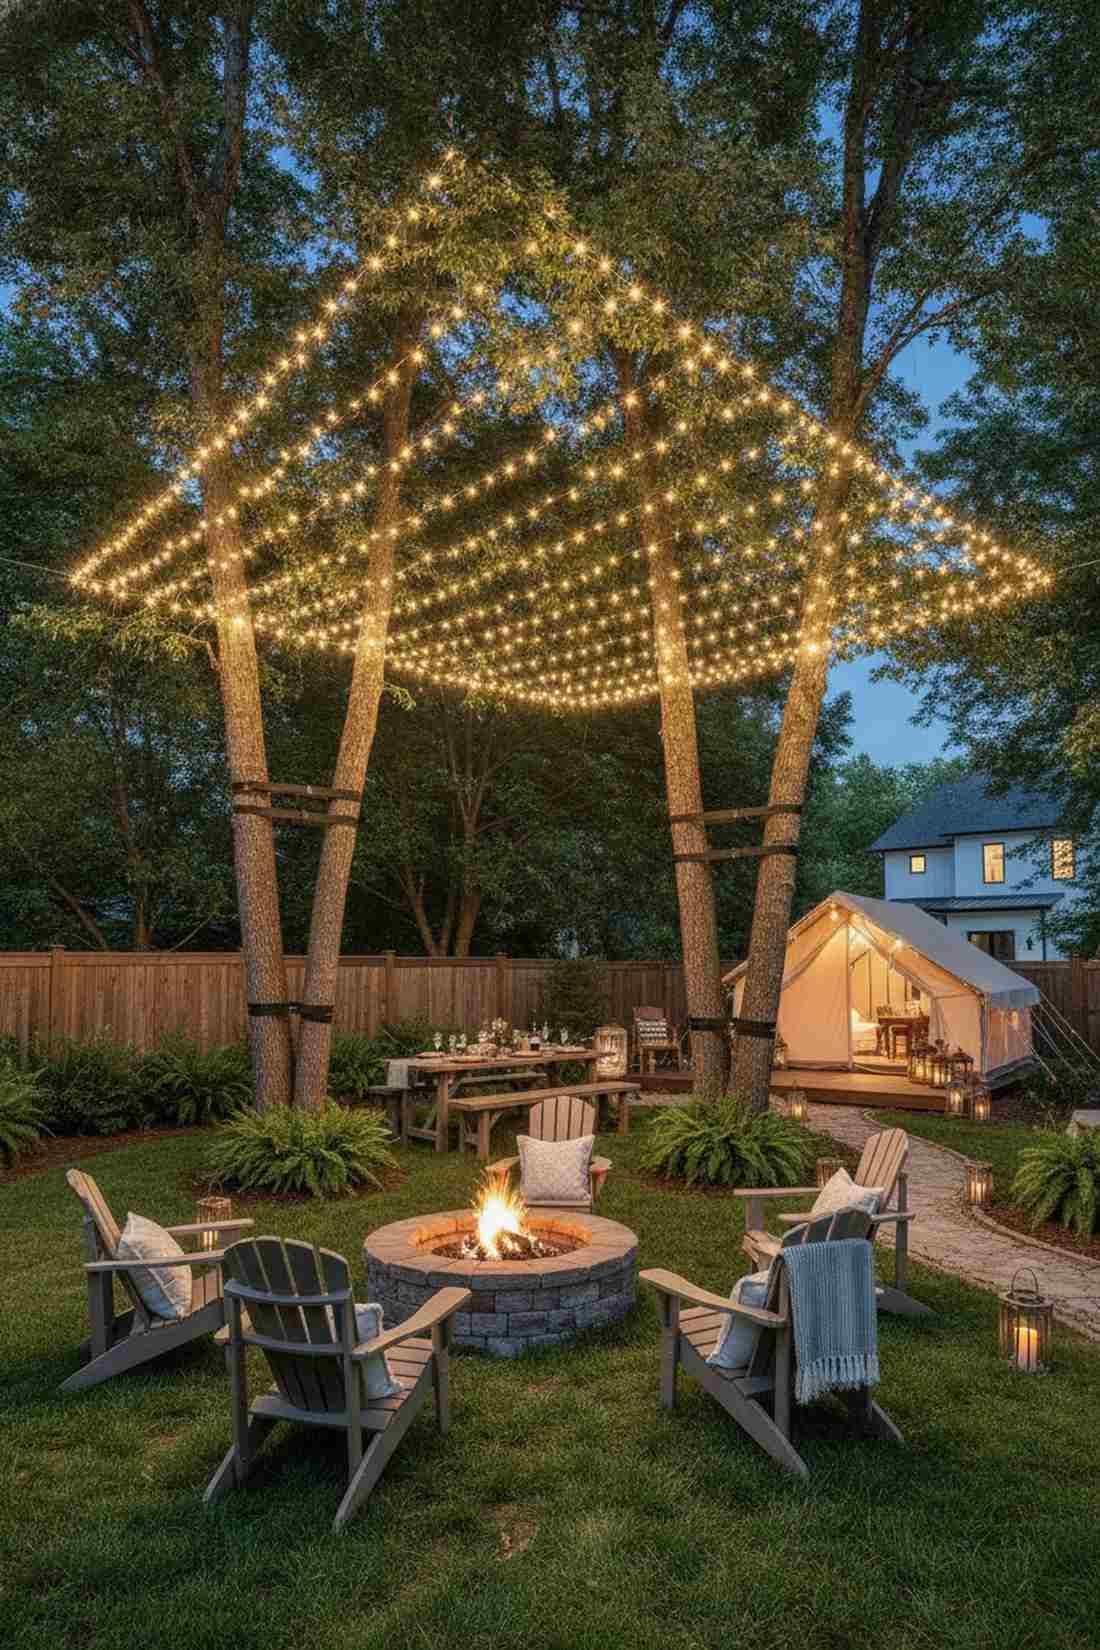
An immersive interconnected forest web that feels like a luminous ceiling woven right into nature. Best deployed in wooded backyards with three or more mature trees clustered together.
Stringing randomly creates a spiderweb mess, but establishing a structured, level perimeter grid looks far more expensive than it is. Using premium fairy lights outside with shatter-proof acrylic bulbs ensures falling acorns and branches won’t shatter your hard work.
This expansive network usually runs $100–$200 for proper commercial coverage. Pin this if you have a heavily wooded lot that turns pitch-black at night.
- Key Materials: Broad tree-safe mounting straps
- Vibe / Style: Luxury glamping site
- Difficulty: High (requires mapping)
- Budget Breakdown: Acrylic bulbs: $120 | Straps: $30.
- Creator’s Tip: Use nylon hammock straps around the trunks instead of metal wire to completely eliminate the risk of girdling and killing your trees.
- Smart Sourcing: tree-safe nylon hammock straps and shatterproof acrylic patio lights (bulk pack).
14. Upward Illuminated Crown
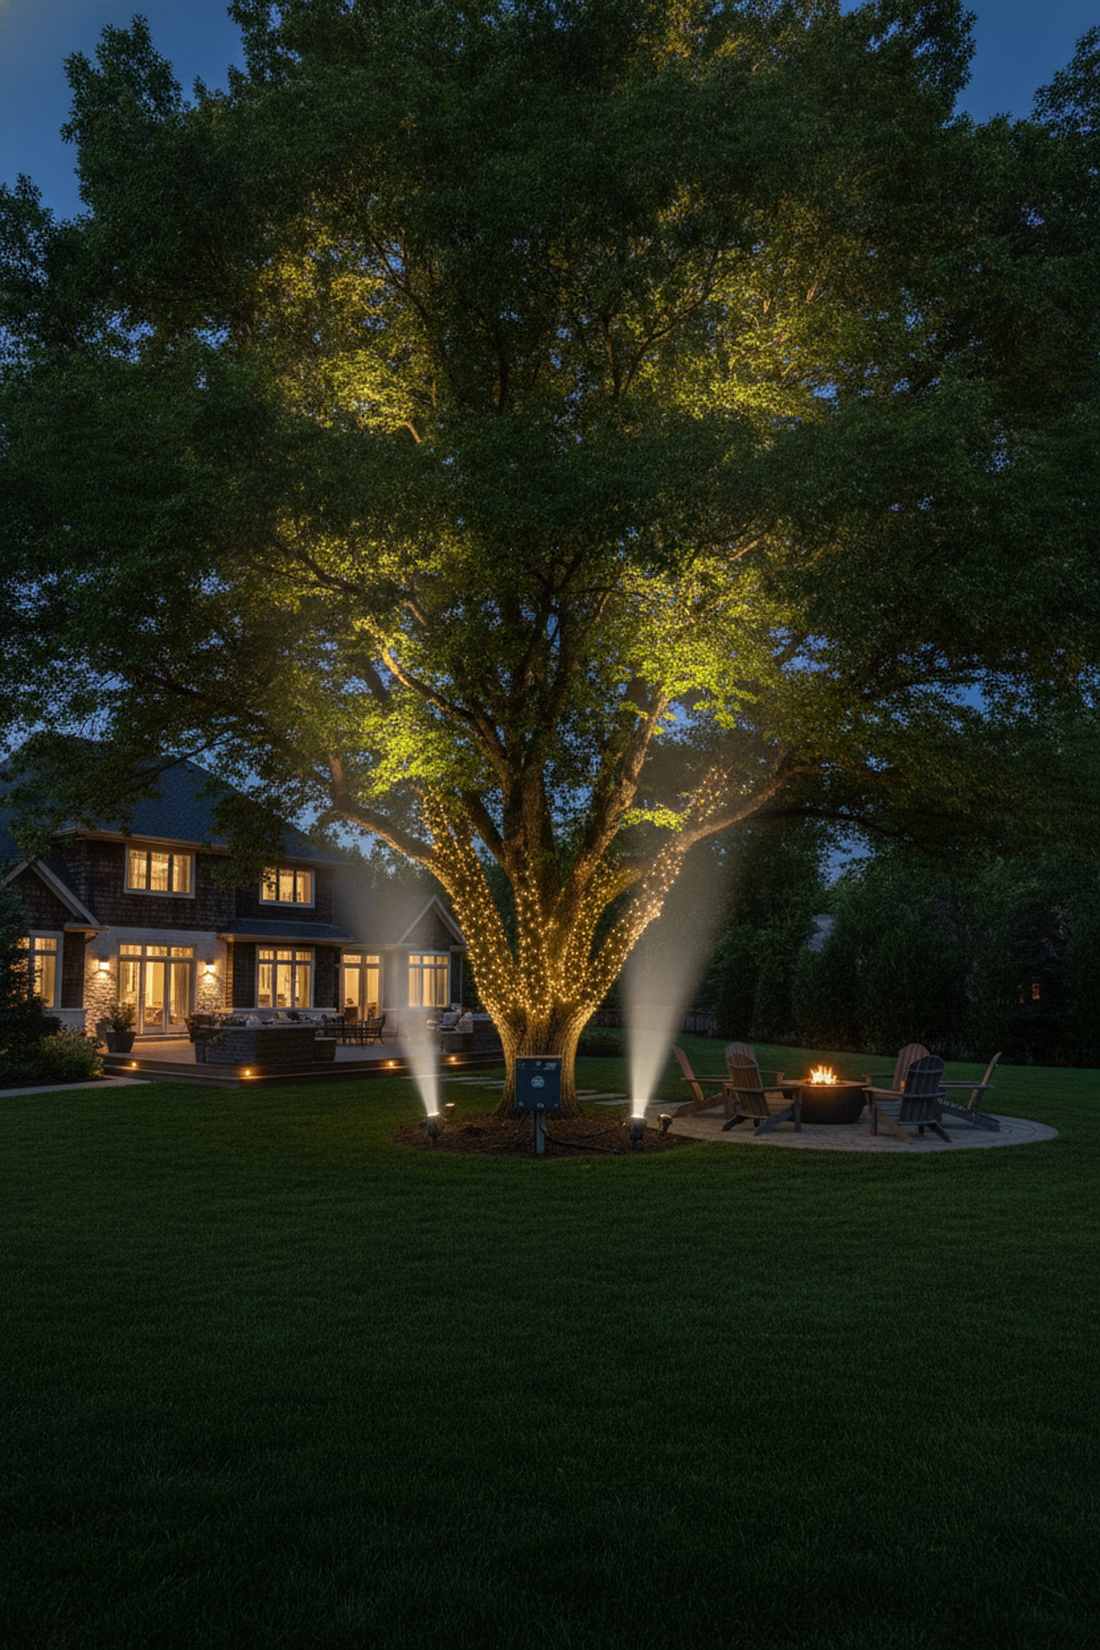
A majestic backlit canopy silhouette that feels like massive emerald clouds hovering in your yard. The ultimate choice for massive shade trees that are simply too tall to wrap with strings.
Relying solely on string lights limits you, but pairing them with a powerful ground up-light delivers a surprisingly premium look straight out of a billionaire’s estate. This high-contrast method creates intense drama and anchors your fairy lights backyard design with deep shadows.
Combining base spots with strings will cost about $60–$90 per tree. It’s a fast upgrade that completely changes the yard’s midnight geometry.
- Key Materials: LED ground spotlights
- Vibe / Style: High-end estate drama
- Difficulty: Simply plug and point
- Budget Breakdown: Spotlights: $50 | Base strands: $20.
- Creator’s Tip: Position the spotlight exactly 3 feet from the trunk, angled at 45 degrees to perfectly catch the underside of the leaves without blinding guests.
- Smart Sourcing: low-voltage LED landscape spotlights and heavy-duty outdoor timers.
If you think lighting up trees is only for Christmas, the next hack is going to completely rewrite your spring and summer landscaping rules…
15. Seasonal Branch Accents
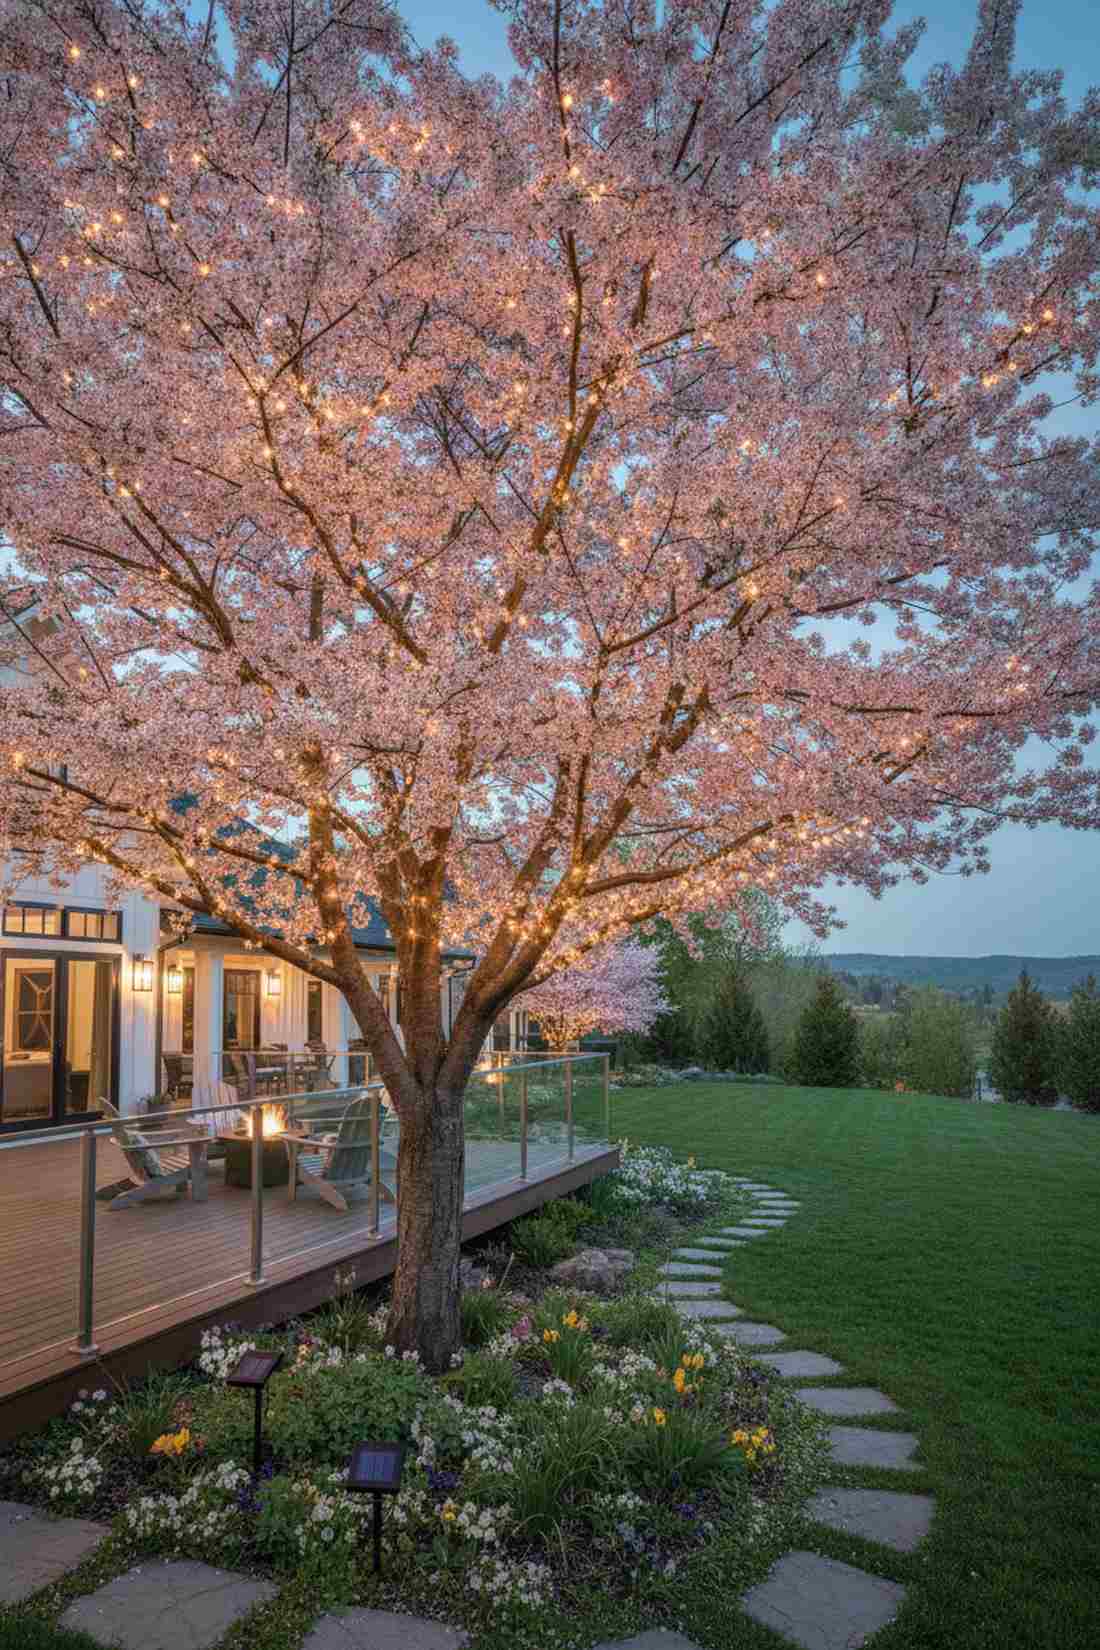
This brilliant blooming focal highlight feels like Mother Nature put on her own light show. Specifically designed to highlight cherry blossoms in spring or fiery maple leaves in late autumn.
Leaving the exact same lights up year-round gets boring, but actively shifting micro-strands to whatever is currently blooming gives a designer-level finish. Snagging some high-quality fairy garden kits with solar panels lets you move the lights weekly without ever worrying about an outlet.
This highly adaptable setup costs merely $20–$35 to execute. Save this to your seasonal garden aesthetic board!
- Key Materials: Solar-powered micro-strings
- Vibe / Style: Ever-changing botanical magic
- Difficulty: Quick 10-minute changes
- Budget Breakdown: Solar strands: $25 | Quick-clips: $5.
- Creator’s Tip: Weave the lights slightly behind the blooms rather than in front of them so the petals glow translucently from the back.
- Smart Sourcing: solar-powered copper wire lights (2-pack) and reusable silicone branch ties.
16. Grove Understory Lighting
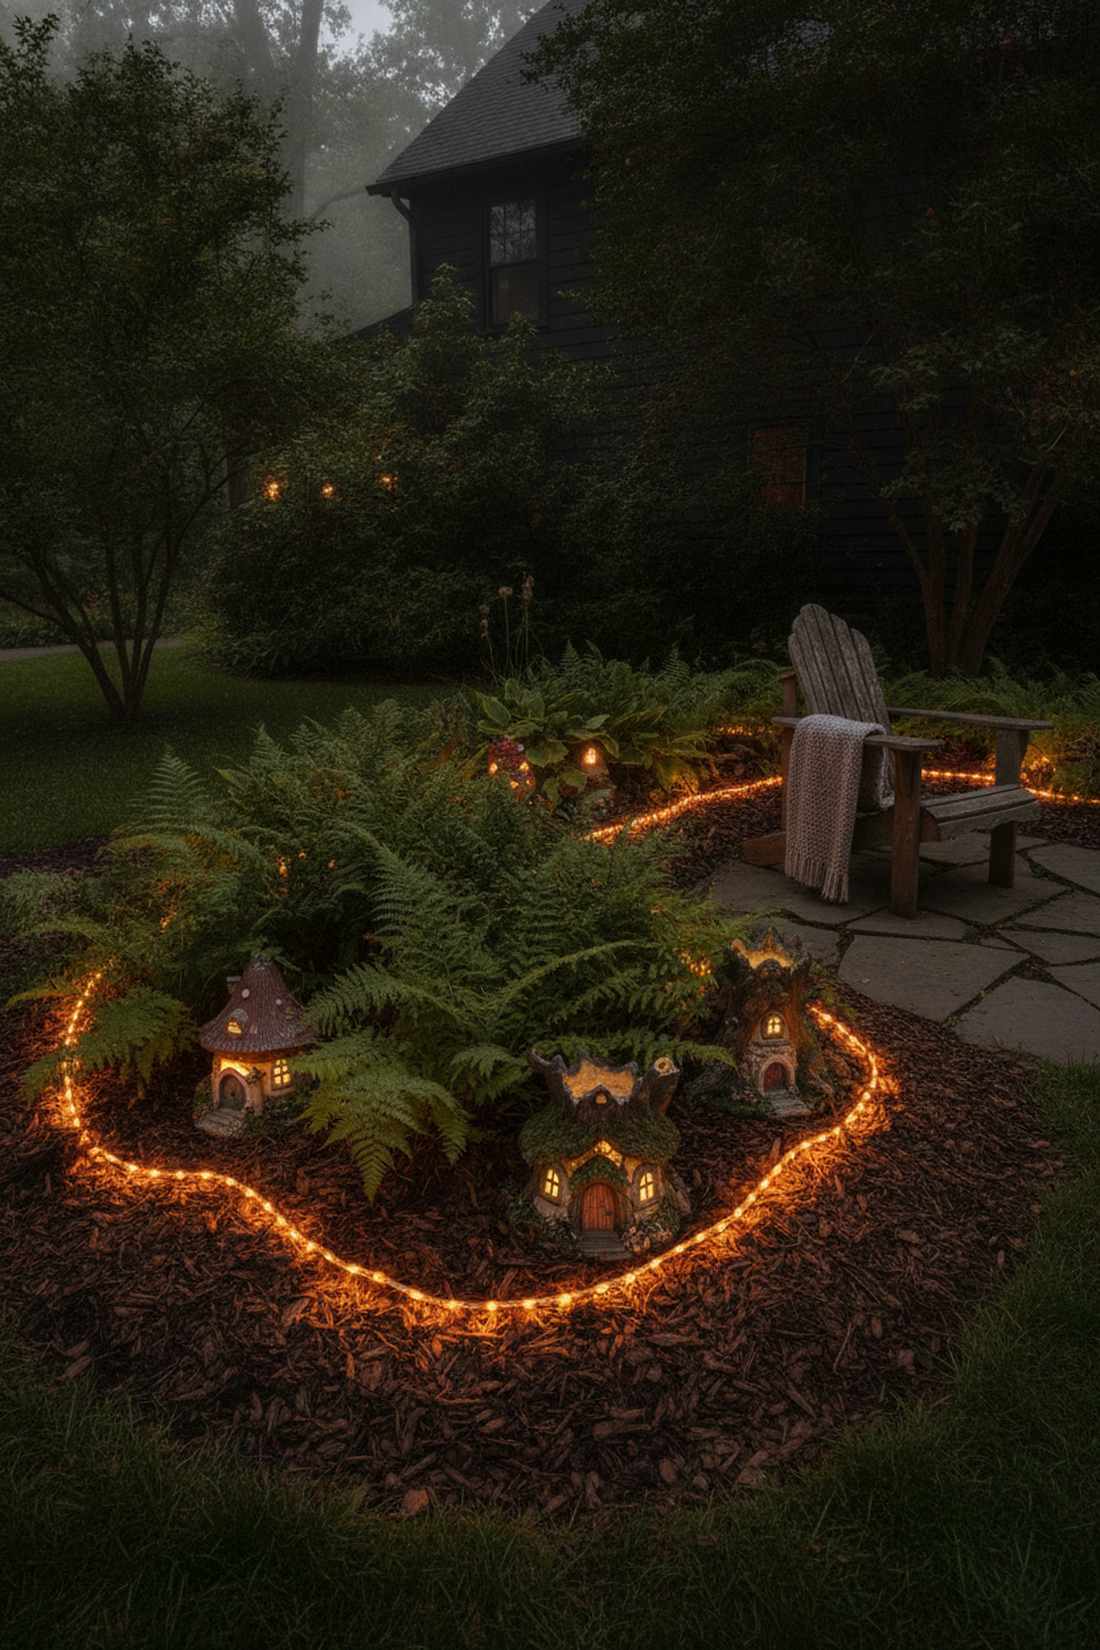
A mysterious low-level mystical floor that feels like a glowing alien landscape hidden in the ferns. It works miracles in dense shrubbery or alongside heavily mulched garden borders.
Elevated lighting is standard, but pushing waterproof strands deep into ground-cover foliage avoids that cheap dorm-room look and creates an incredible ambient base layer. Adding UV-coated resin fairy cottage kits amongst the glowing leaves turns a dark corner into a breathtaking miniature world.
This ground-floor magic usually runs just $30–$50. Highly recommended for breathing life into neglected, shaded garden corners.
- Key Materials: Waterproof rope lights
- Vibe / Style: Secret fairy hollow
- Difficulty: Simple weaving
- Budget Breakdown: Rope lights: $35 | Garden stakes: $10.
- Creator’s Tip: Use frosted or amber rope lights instead of clear string lights to eliminate harsh glare when looking directly down into the bushes.
- Smart Sourcing: waterproof LED rope lights (amber) and UV-coated resin fairy cottage kits.
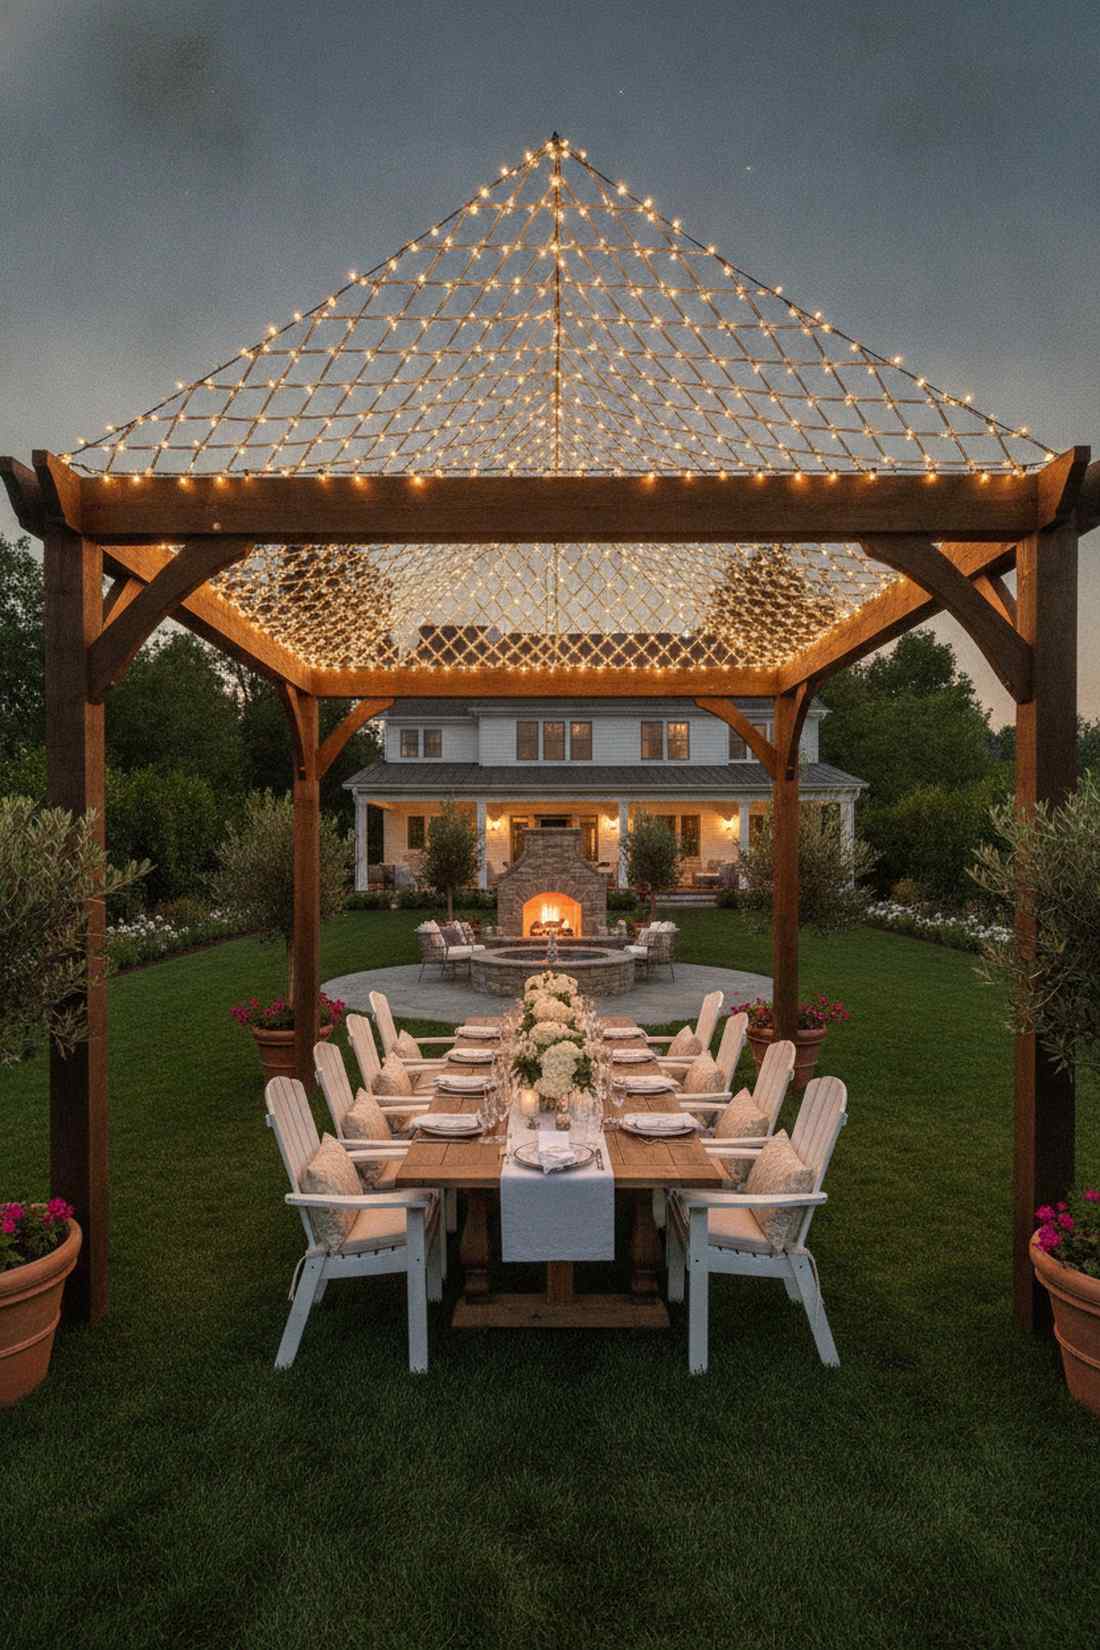
Fairy Lights Backyard Pathways
Pathway lighting serves both practical and aesthetic functions, guiding foot traffic while adding visual rhythm to the landscape. Fairy lights offer flexible alternatives to traditional path fixtures with softer, more informal results.
17. Ground Level Border Lighting
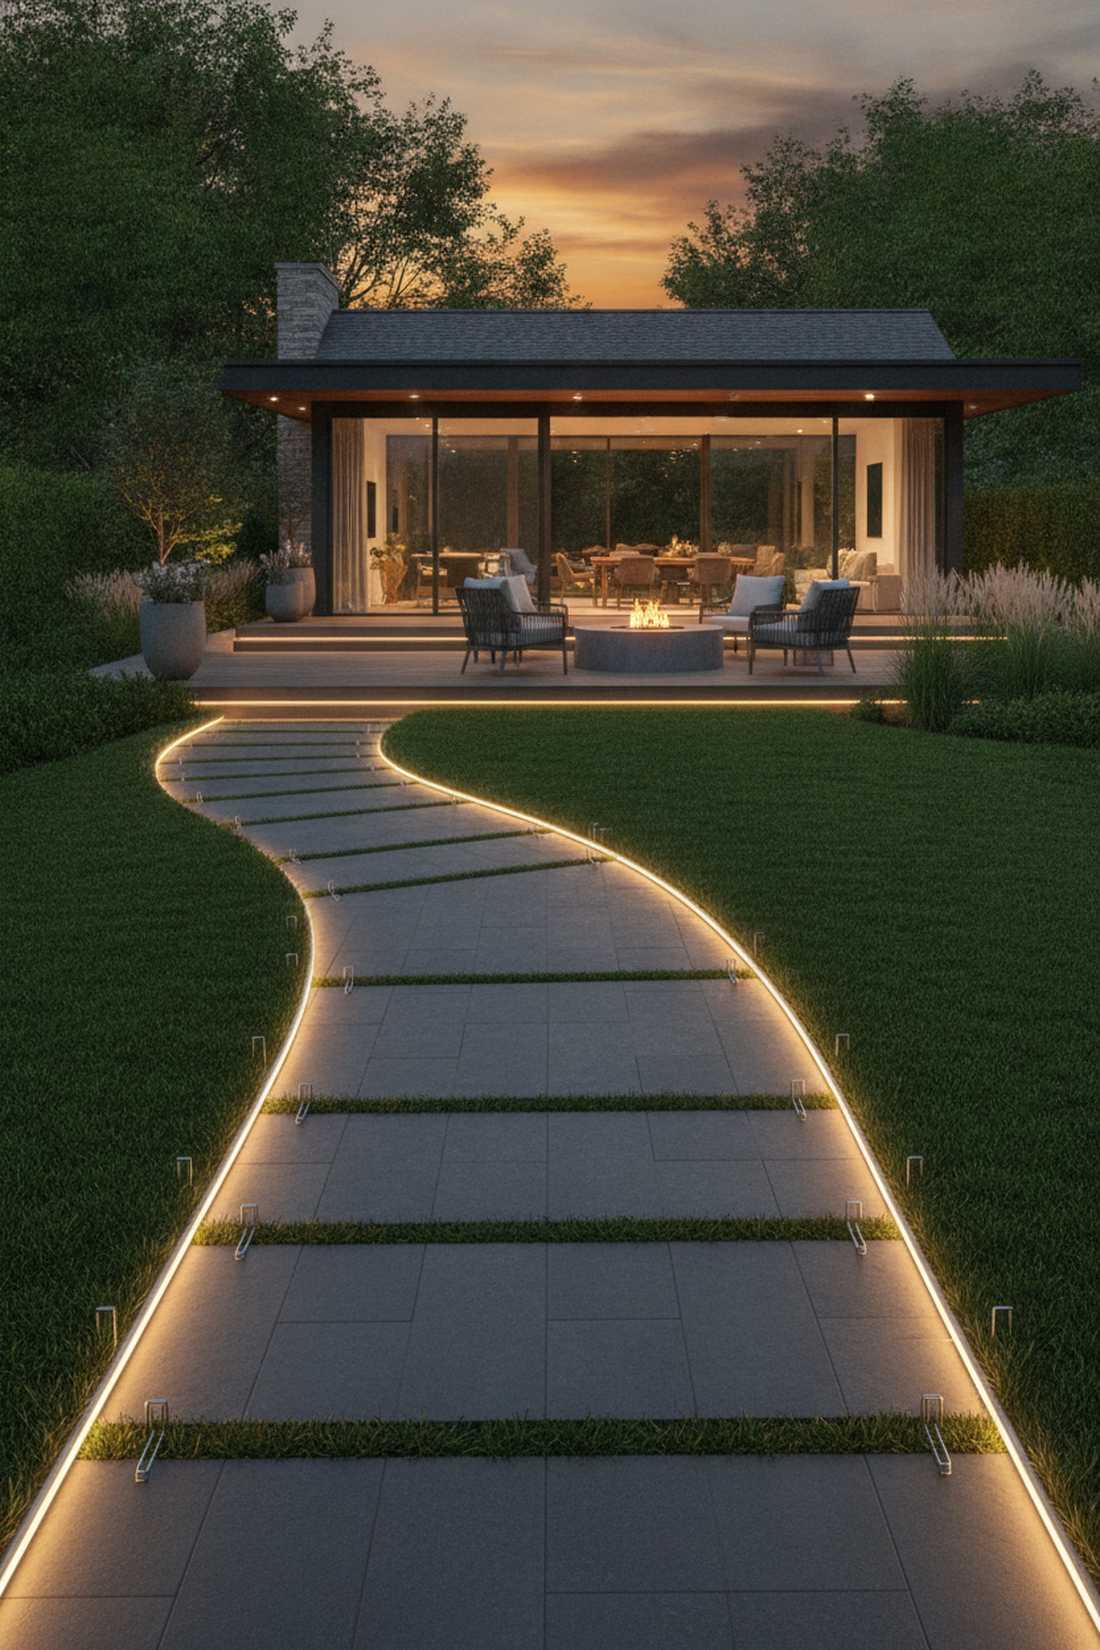
This sharp illuminated walkway edge feels like a glowing runway guiding you to an exclusive VIP lounge. Flawless for outlining concrete sidewalks or modern paver stone garden paths.
Ugly plastic solar stakes break constantly, but staking an unbreakable continuous light ribbon delivers a surprisingly premium look that survives the lawnmower. It anchors your fairy lights outdoor design firmly to the ground, offering sleek, continuous visibility.
You can line a 20-foot path beautifully for $40–$60. Pin this if you want a modern upgrade to those wobbly plastic driveway lights.
- Key Materials: LED neon flex rope
- Vibe / Style: Ultra-modern sleek line
- Difficulty: Very easy staking
- Budget Breakdown: Neon flex rope: $45 | Metal stakes: $10.
- Creator’s Tip: Use U-shaped landscape fabric staples pushed flush into the dirt to keep the light strip perfectly straight and invisible by day.
- Smart Sourcing: waterproof LED neon flex rope (outdoor) and galvanized U-shaped landscape staples.
18. Overhead Pathway Canopy
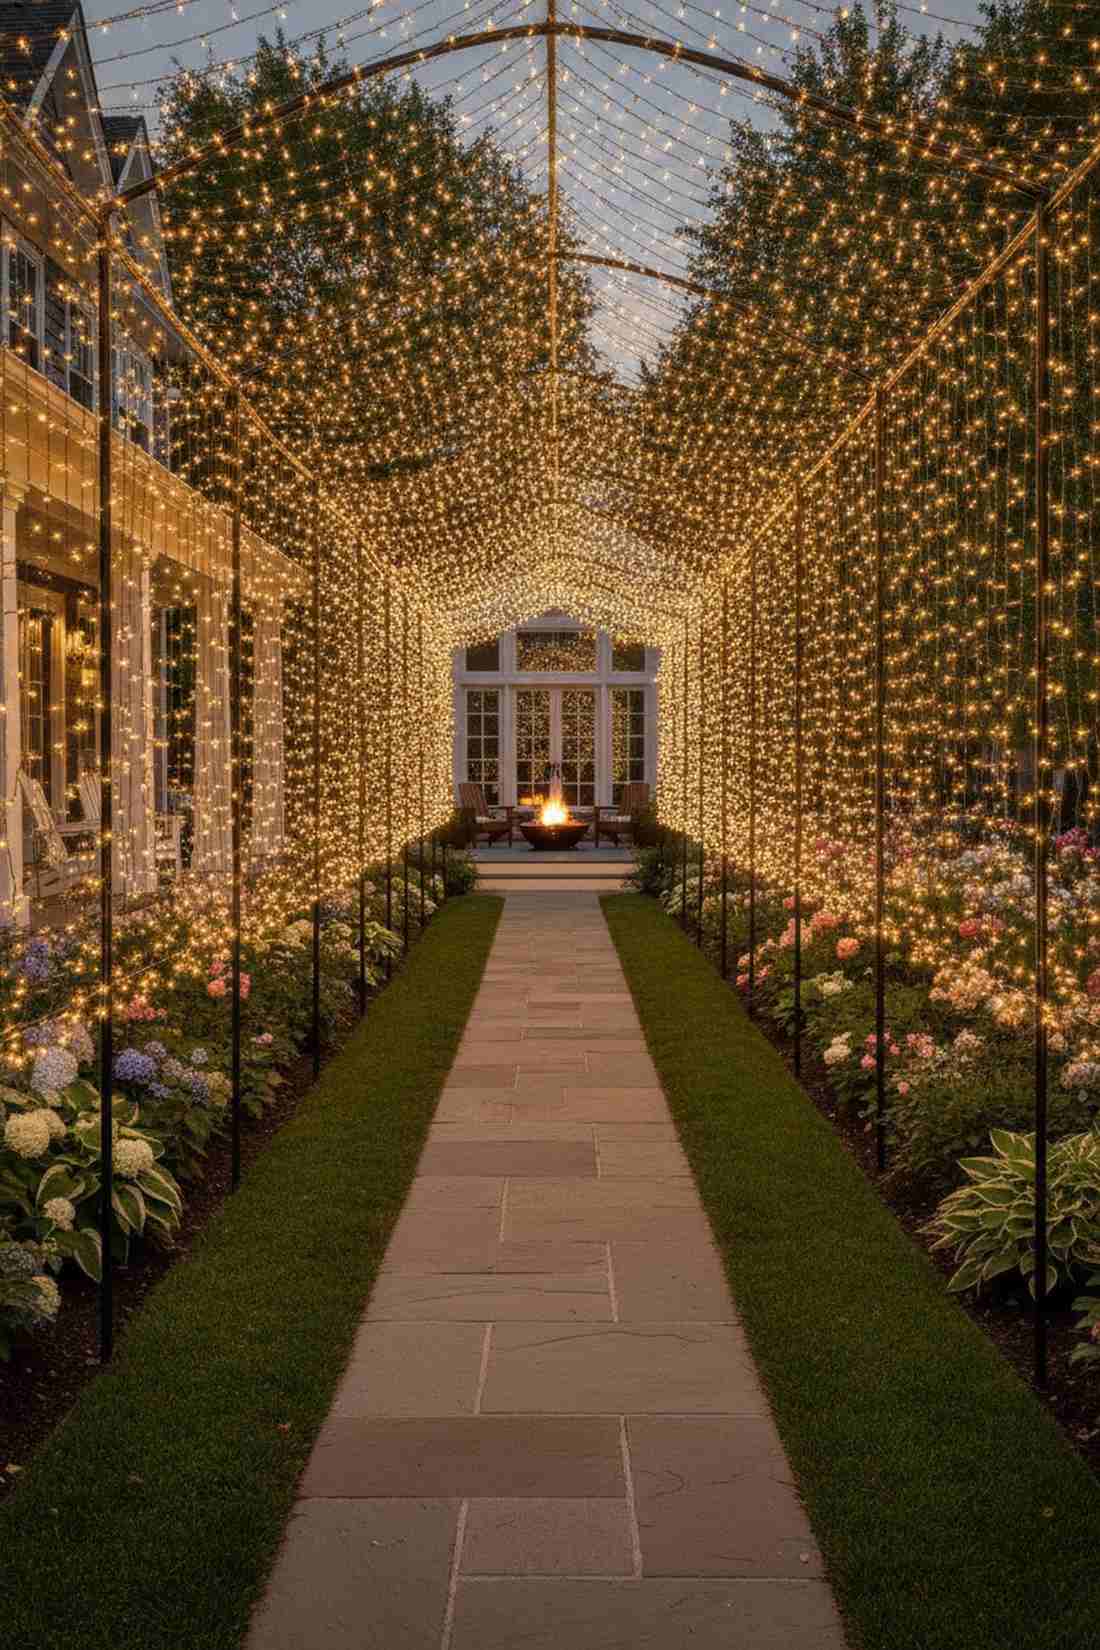
A grand luminous tunnel archway that feels like stepping through a portal into a magical wonderland. Absolutely essential for long, straight walkways leading from the front yard to the backyard.
Lining the ground is fine, but pulling the lights overhead looks far more expensive than it is and prevents people from kicking them at night. Using a heavy-duty commercial string kit creates a dramatic ceiling effect that totally transforms the walking experience.
Building this tunnel requires about $80–$140 depending on the length. It’s a statement piece that completely redefines your home’s evening entrance.
- Key Materials: Tall shepherd’s hooks or poles
- Vibe / Style: Fairytale estate entrance
- Difficulty: Moderate pole anchoring
- Budget Breakdown: Tall hooks: $60 | Canopy strings: $50.
- Creator’s Tip: Drive a 2-foot piece of PVC pipe into the ground first, then slide your shepherd’s hooks inside so they never lean or wobble in wet soil.
- Smart Sourcing: 9-foot heavy-duty shepherd’s hooks and connectable canopy string sets.
19. Stepping Stone Accent Lights
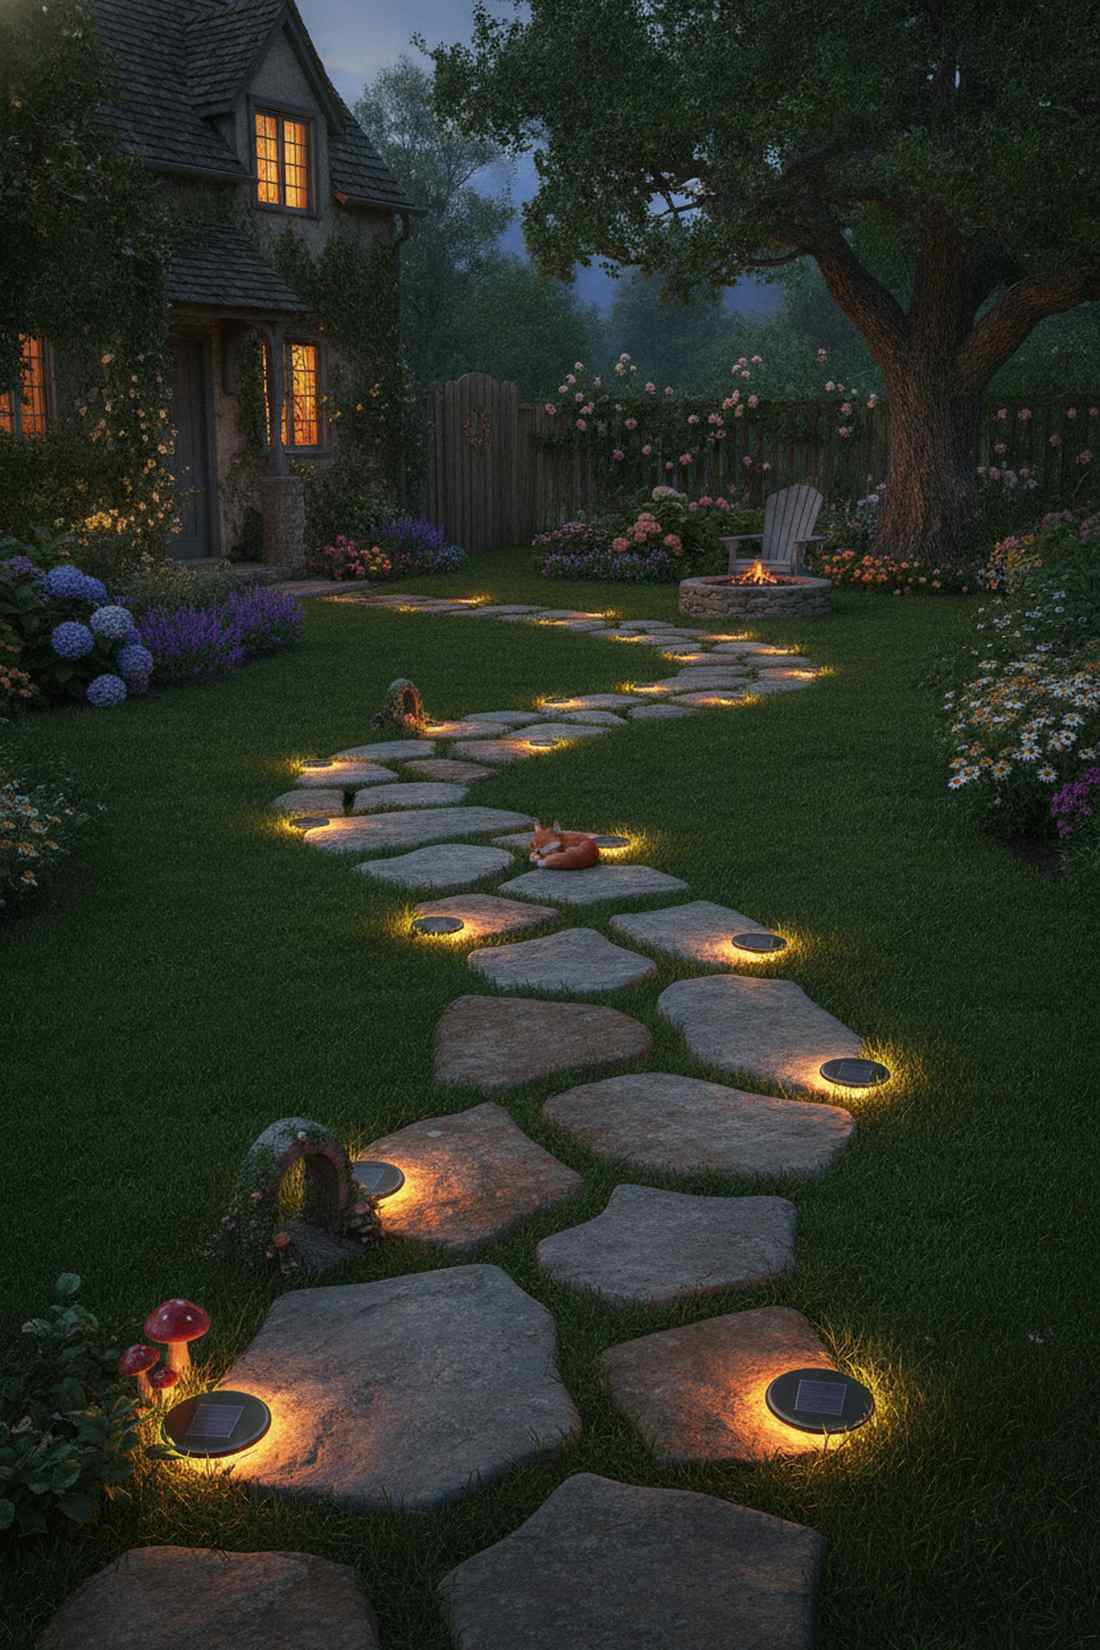
This organic dotted pathway scatter feels like a trail of glowing breadcrumbs left by a wizard. It is the perfect, subtle touch for winding, irregular flagstone paths hidden in the grass.
Rigid straight lines look terrible on curved paths, but clustering micro-bulbs strictly around the stones gives a designer-level finish that honors the natural landscape. Integrating tiny terrarium accessories near the stones makes every single footstep a visual delight.
This highly custom look is surprisingly cheap, costing around $20–$35. Save this to your cottage garden Pinterest board right away!
- Key Materials: Individual solar dot lights
- Vibe / Style: Whimsical cottage core
- Difficulty: Simple placement
- Budget Breakdown: Solar dots: $25 | Accent rocks: $5.
- Creator’s Tip: Dig out a tiny divot for the solar panel so it sits perfectly flush with the stepping stone, making it virtually invisible during the day.
- Smart Sourcing: flat-profile solar ground disk lights (bulk pack) and miniature terrarium accessories.
Think your hedges are just boring bushes? The next technique uses them to hide one of the coolest lighting tricks I’ve ever seen…
20. Hedge Embedded Pathway Lights

An incredible glowing green wall that feels like the bushes themselves are emitting pure light. Incredible for formal boxwood borders or dense privacy hedges flanking a driveway.
Draping lights over the top looks messy, but shoving the bulbs deep into the center of the foliage delivers a surprisingly premium look that hides ugly wires completely. This interior-glow method creates a soft, luxurious fairy lights backyard ambiance without any harsh glare.
You can embed a massive hedge for just $35–$60 using long spools. It’s a fast upgrade that completely changes the vibe of your landscaping.
- Key Materials: Green-wire LED spools
- Vibe / Style: High-end botanical mystery
- Difficulty: Scratched arms (wear sleeves!)
- Budget Breakdown: Green-wire spools: $40 | Protective gloves: $10.
- Creator’s Tip: Use a broom handle to gently part the dense hedge branches so you can snake the wire deep inside without damaging the plant.
- Smart Sourcing: green-wire commercial fairy lights and puncture-resistant gardening gloves.
21. Curved Path Following
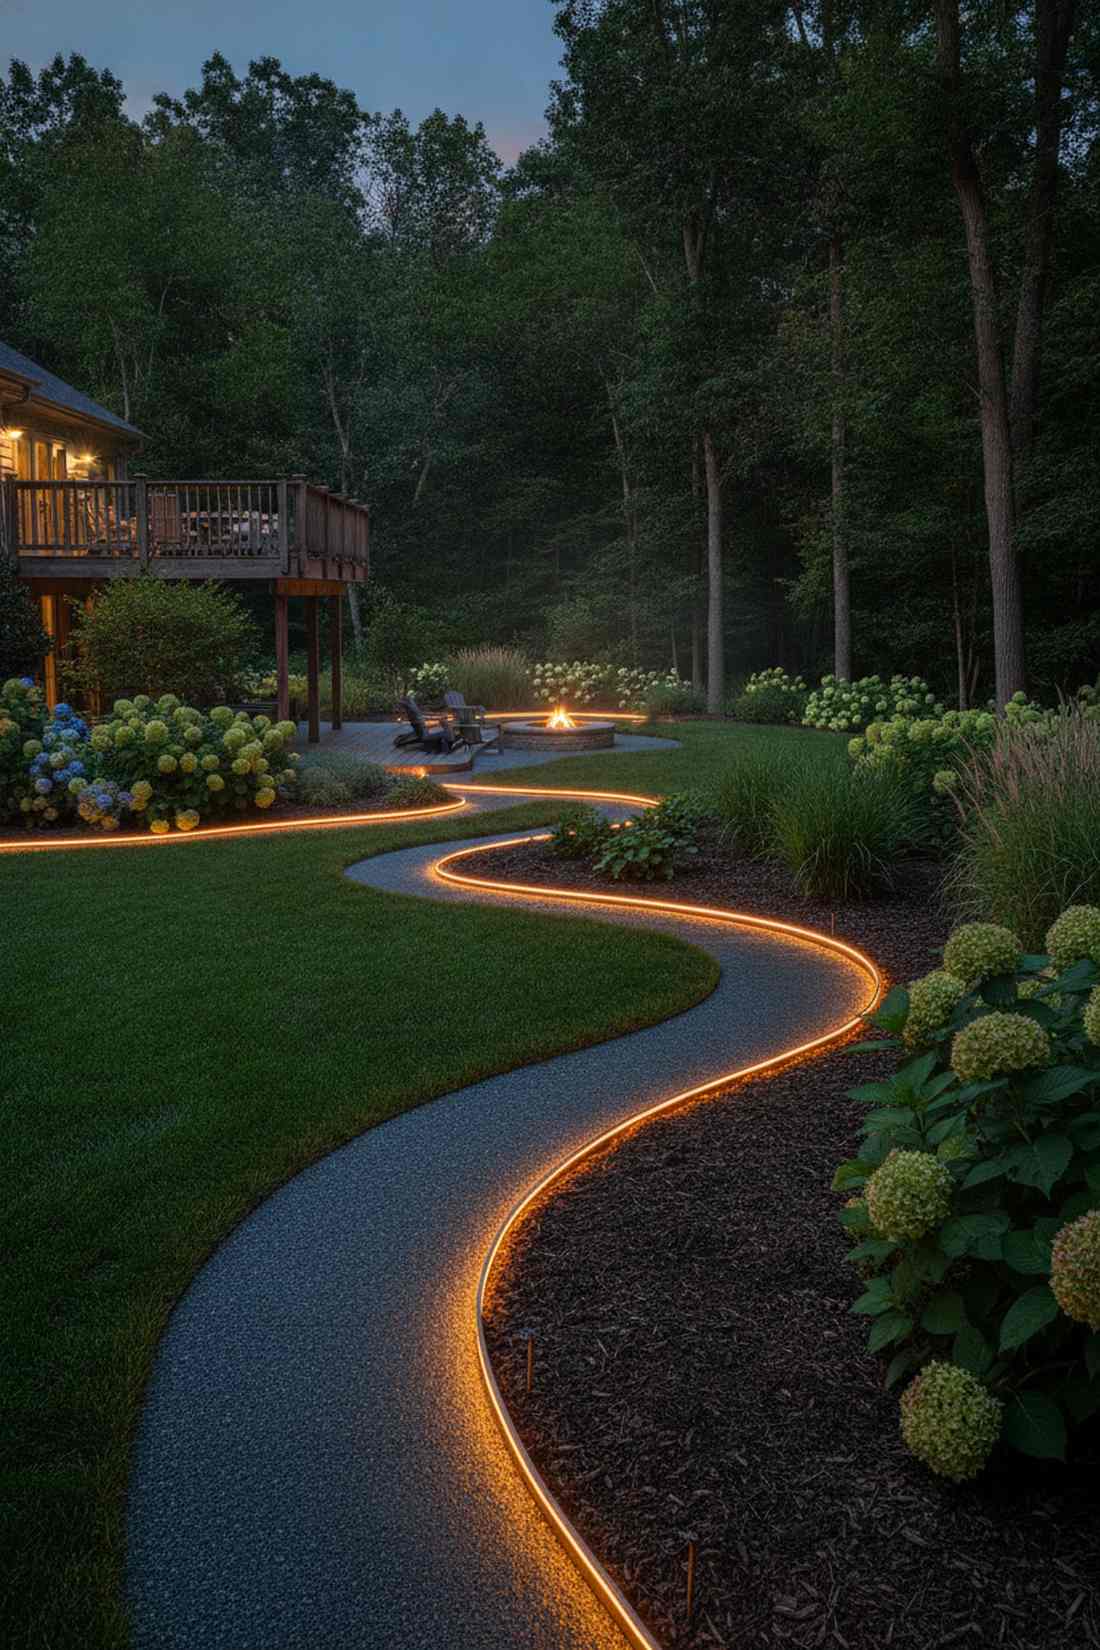
This flowing asymmetrical light ribbon feels like a glowing stream winding through your property. The absolute best way to highlight the elegant curves of a mulch or gravel walking path.
Using rigid fixtures destroys the organic flow, but pinning down a flexible copper strand looks far more expensive than it is and perfectly hugs every bend. This one-sided illumination trick plays with shadow and light, giving your garden a mysterious, professional landscape designer feel.
This highly flexible method costs roughly $25–$45. Pin this if you are tired of stiff, boring geometric garden designs.
- Key Materials: Flexible copper LED tubing
- Vibe / Style: Fluid organic modern
- Difficulty: Requires a good eye for curves
- Budget Breakdown: LED tubing: $30 | Mini pins: $10.
- Creator’s Tip: Only light the inside curve of the path; leaving the outside dark creates an optical illusion that makes the yard look significantly larger.
- Smart Sourcing: flexible copper LED tubing (waterproof) and rust-proof landscape anchor pins.
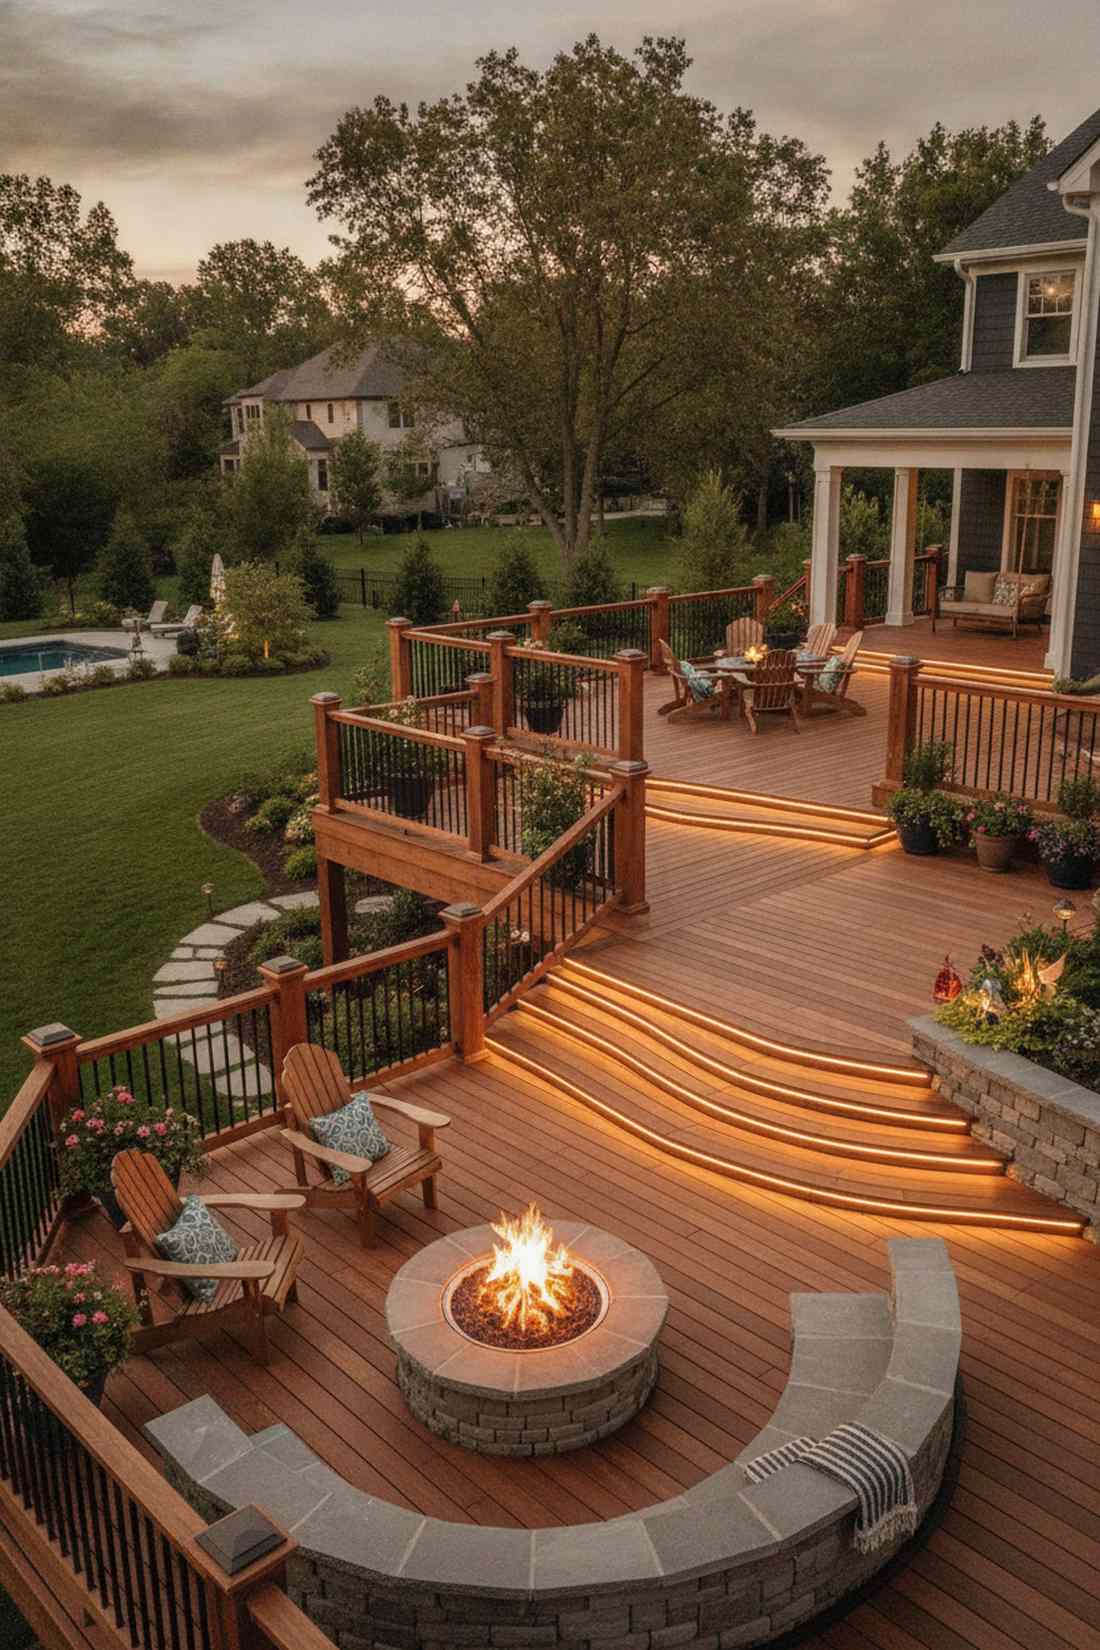
22. Step Riser Integration
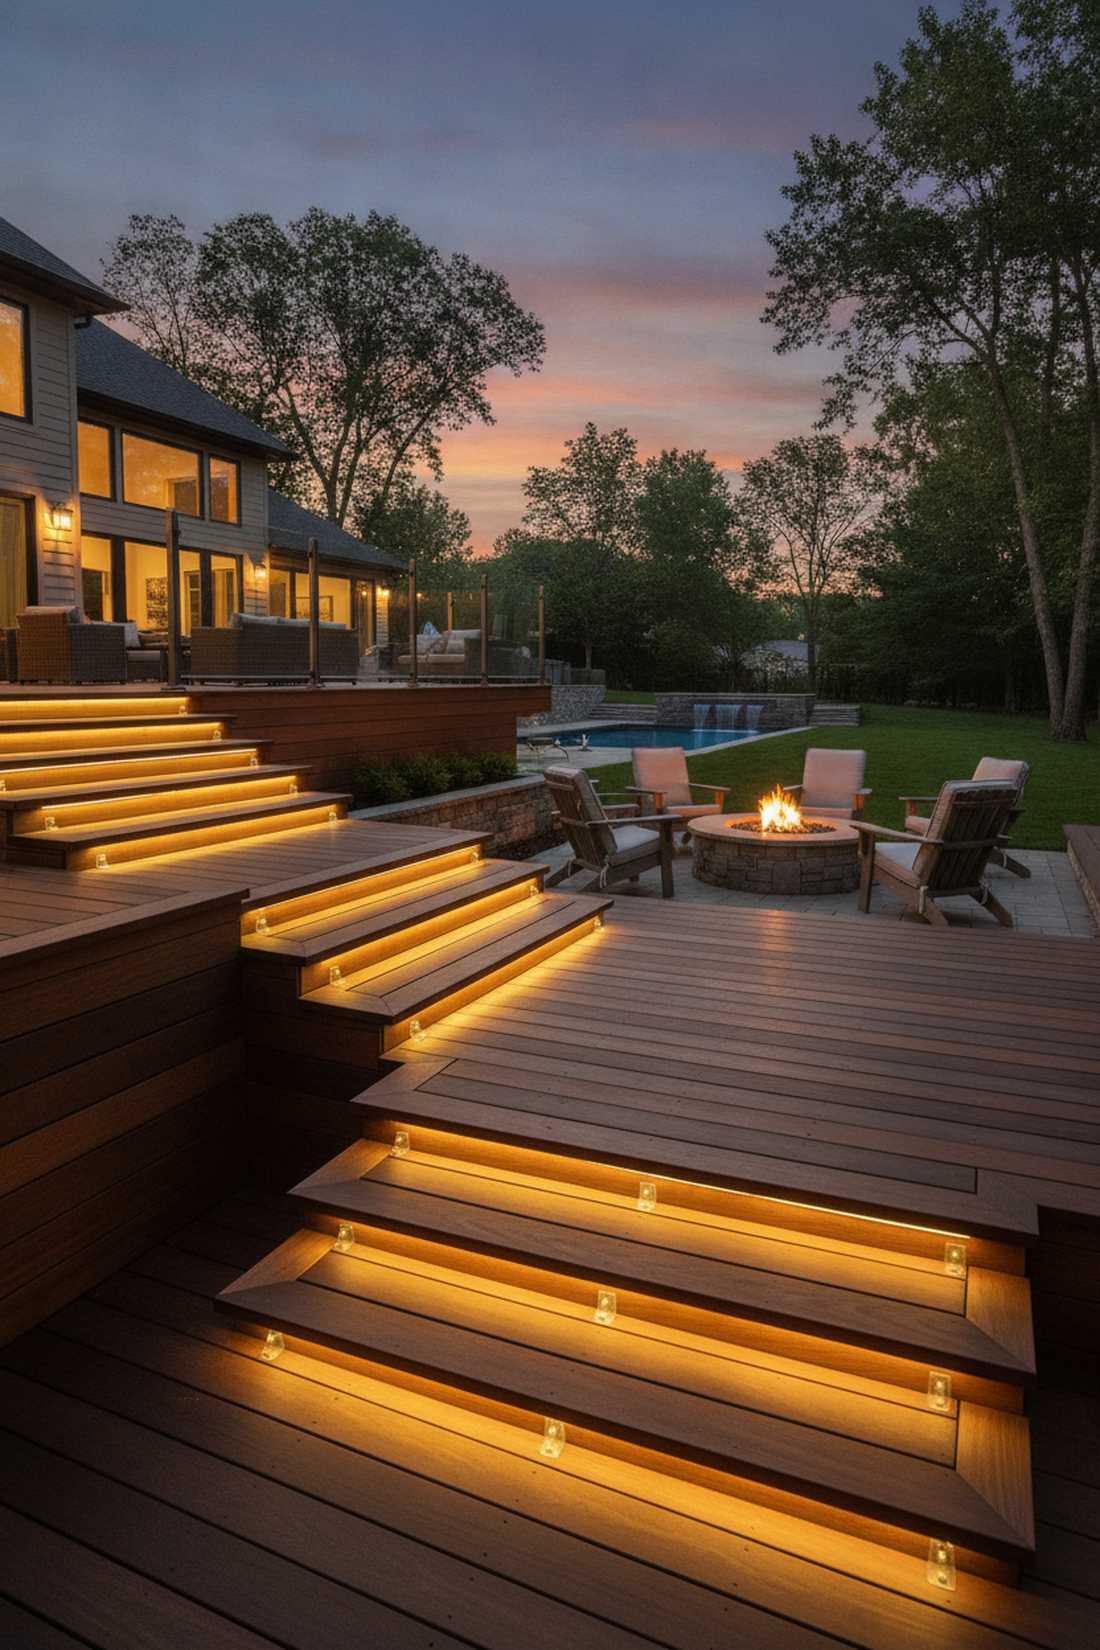
A hyper-functional floating staircase glow that feels like a high-tech modern resort lobby. Crucial for safety on multi-level wooden decks or steep stone garden steps.
Spotlights cast harsh, dangerous shadows on stairs, but tucking strip lights under the lip gives a designer-level finish that provides flawless footing visibility. Sourcing marine-grade waterproof strips ensures this crucial safety feature won’t short out after the first heavy rain.
Outfitting a standard deck staircase costs about $50–$90. It is an absolute must-do project for anyone who entertains at night.
- Key Materials: Adhesive waterproof LED strips
- Vibe / Style: Premium safety luxury
- Difficulty: Precise tape application
- Budget Breakdown: LED strips: $60 | Rubbing alcohol: $5.
- Creator’s Tip: Screw in small plastic wire-retaining clips every 12 inches because adhesive alone will eventually fail on outdoor wood.
- Smart Sourcing: marine-grade waterproof LED strips and screw-in silicone mounting brackets.
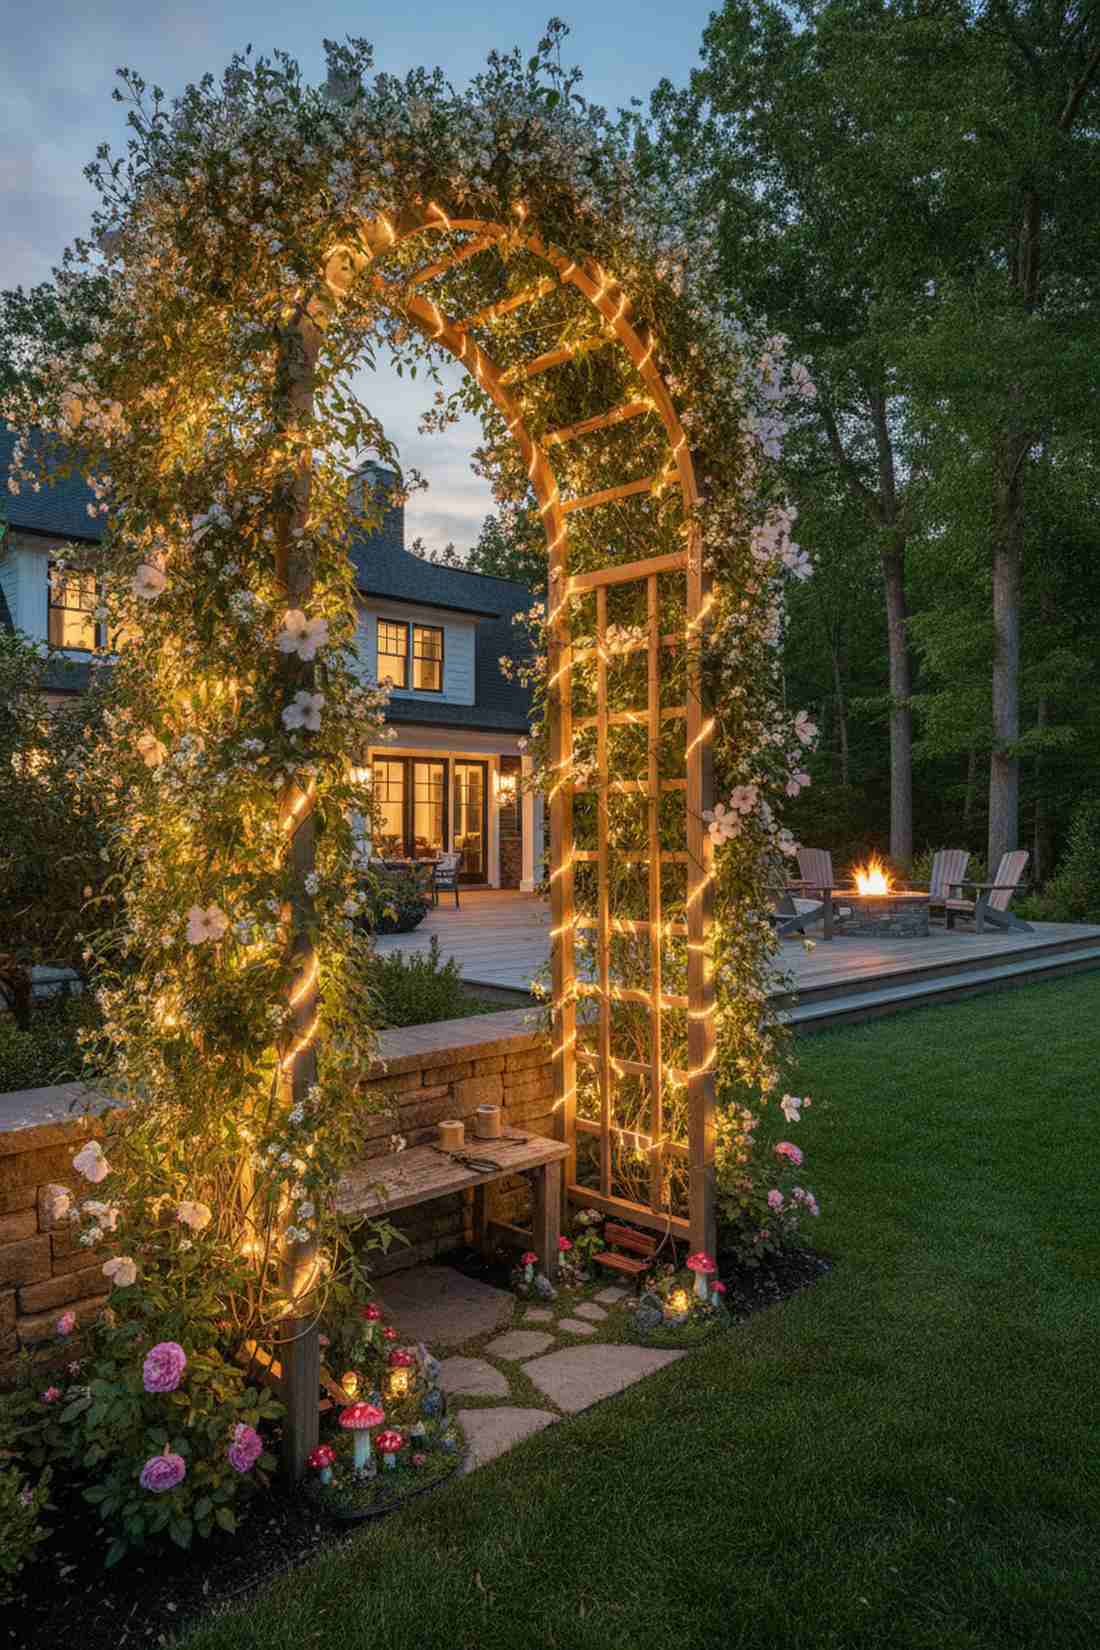
23. Gateway Archway Framing
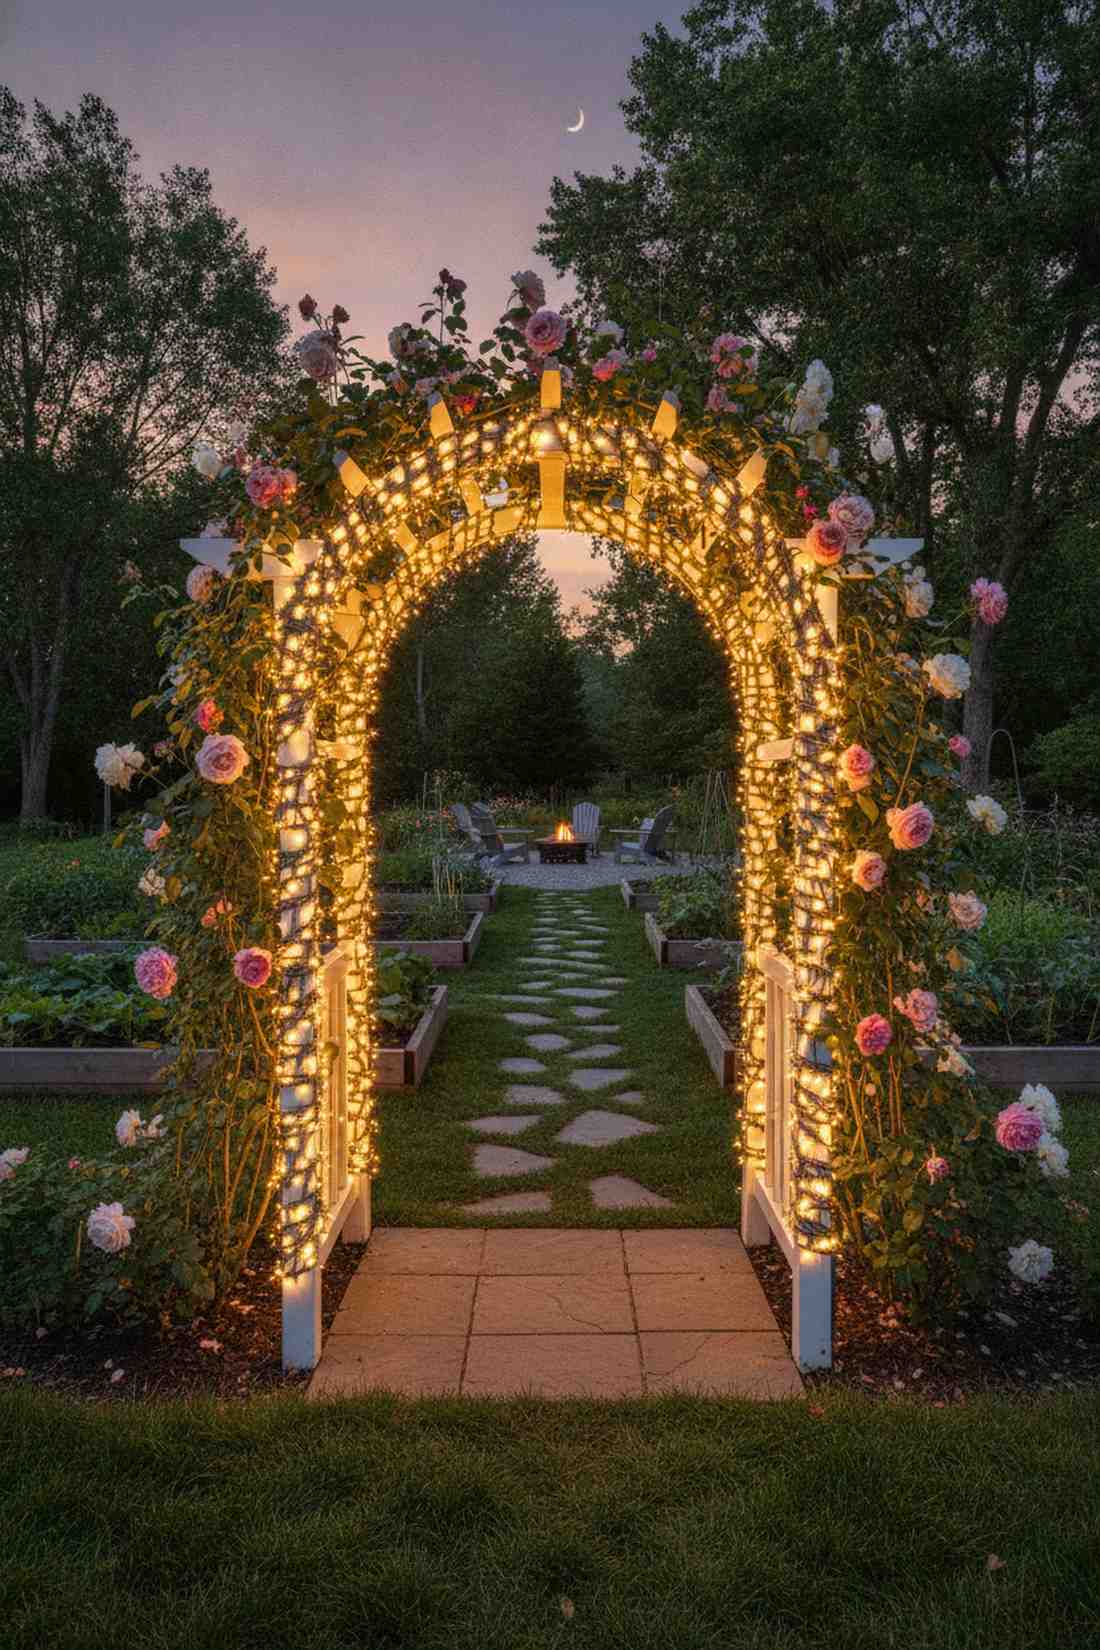
A striking illuminated threshold that feels like passing through a glowing gateway into another dimension. Perfectly suited for rose arbors, garden gates, or the entrance to a vegetable patch.
Leaving arbors dark makes them invisible at night, but tightly spiraling the entire frame creates an explosive visual masterpiece that demands attention. Utilizing heavy-duty miniature garden supplies to secure the strands ensures the opening remains completely clear for walking.
Transforming a standard arbor costs roughly $30–$55. Save this to your DIY garden entrance board immediately.
- Key Materials: High-density cluster lights
- Vibe / Style: Grand magical entrance
- Difficulty: Lots of wrapping
- Budget Breakdown: Cluster strands: $40 | Zip ties: $5.
- Creator’s Tip: Use “cluster” or “garland” style fairy lights which have tiny bulbs extending off the main wire, creating a thick, bushy glow rather than a thin line.
- Smart Sourcing: LED cluster garland lights (outdoor) and miniature zip ties (clear).
24. Meandering Asymmetric Placement
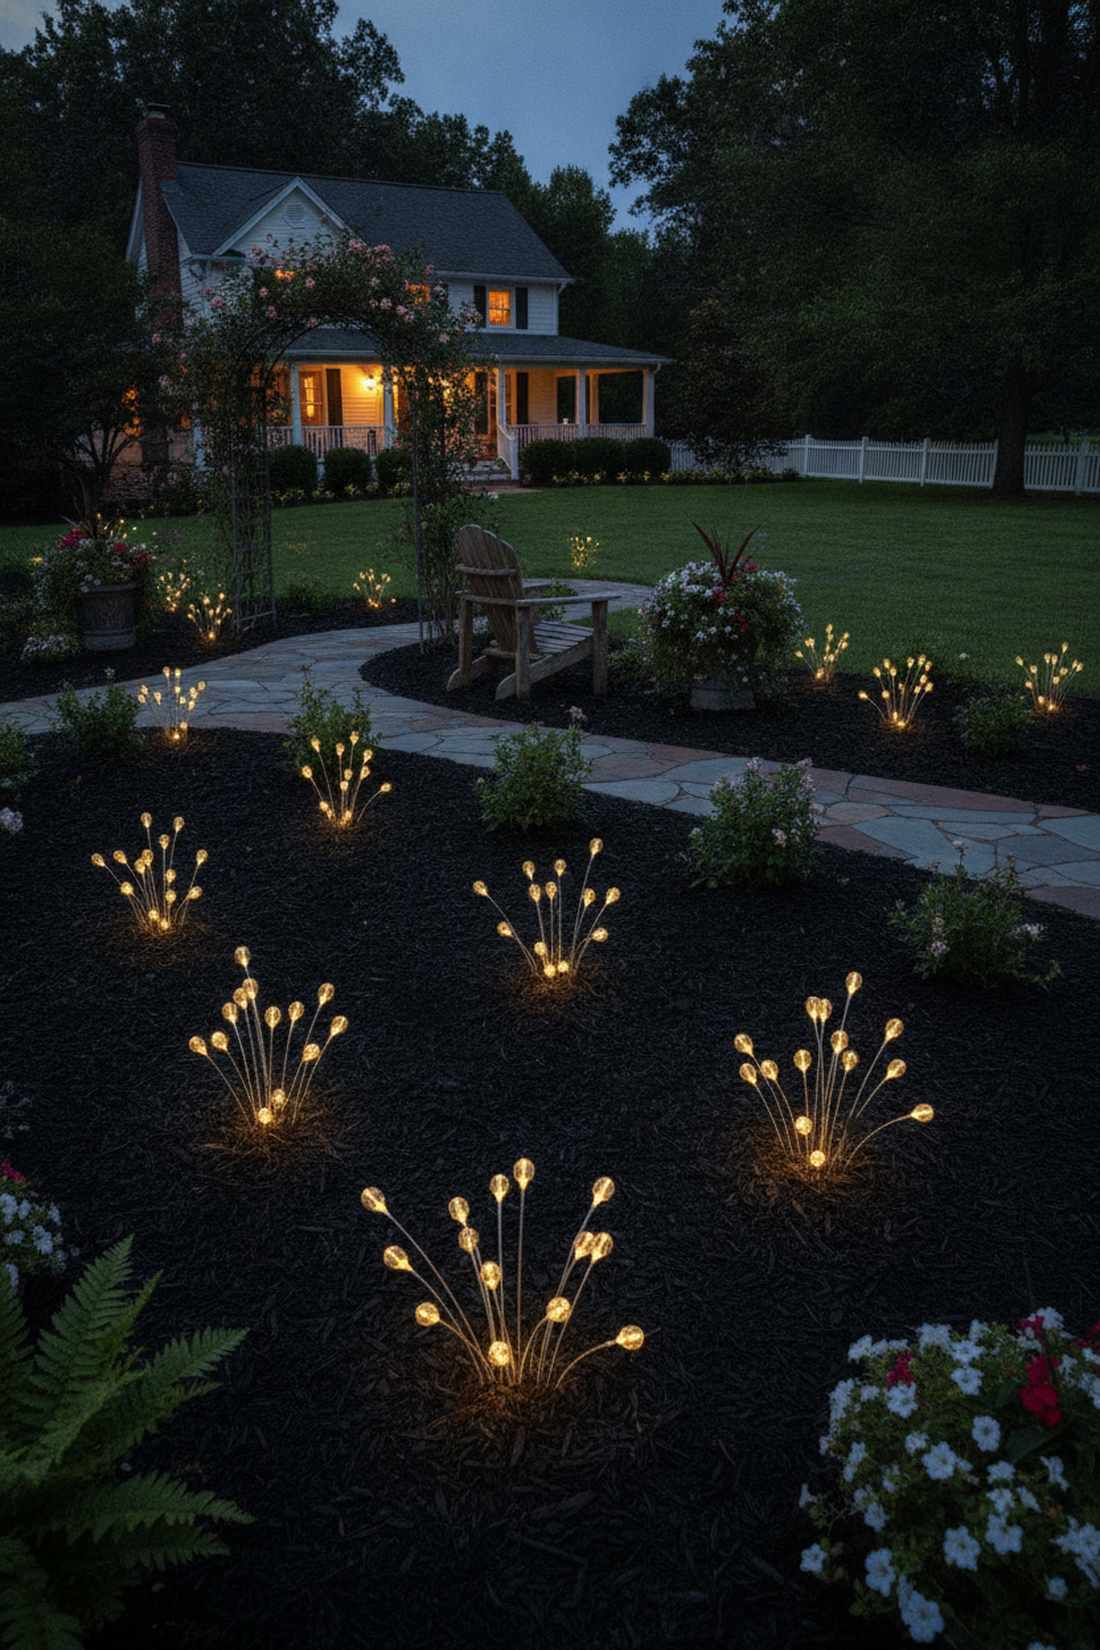
This wild scattered starry-night ground cover feels like the forest floor has literally come alive. Incredible for loose, cottage-style borders where rigid symmetry would ruin the messy charm.
Placing lights in perfectly straight lines looks robotic, but intentionally scattering them in random clumps delivers a surprisingly premium look that mimics wild fireflies. This chaotic brilliance thrives when you mix different bulb sizes to create extreme depth in your fairy lights outside.
This beautifully messy look sets you back about $35–$65. It’s a fast upgrade that completely changes the vibe of boring mulch beds.
- Key Materials: Multi-sized solar pathway clusters
- Vibe / Style: Enchanted cottage chaos
- Difficulty: Easiest setup on the list
- Budget Breakdown: Solar clusters: $45 | Placement mapping: $0.
- Creator’s Tip: Group lights in odd numbers (3s and 5s) and vary their distance from the path edge; symmetry is the enemy of this organic design.
- Smart Sourcing: firefly sway solar garden lights (multi-pack) and shatterproof acrylic path stakes.
Material Guide: Cheap vs. Premium Aesthetic
Knowing exactly where to save and where to spend makes all the difference in achieving that “looks expensive but isn’t” vibe.
- Standard vs. UV-Resistant/Premium: Standard wires crack and yellow in the sun within months. Upgrading to UV-coated cables ensures your setup lasts years without becoming brittle or an electrical hazard.
- Pre-made Kits vs. Sourcing Locally: Scavenging local craft stores often leads to mismatched bulb temperatures. Buying commercial starter kits guarantees perfectly matched color temperatures and heavy-duty waterproofing right out of the box.
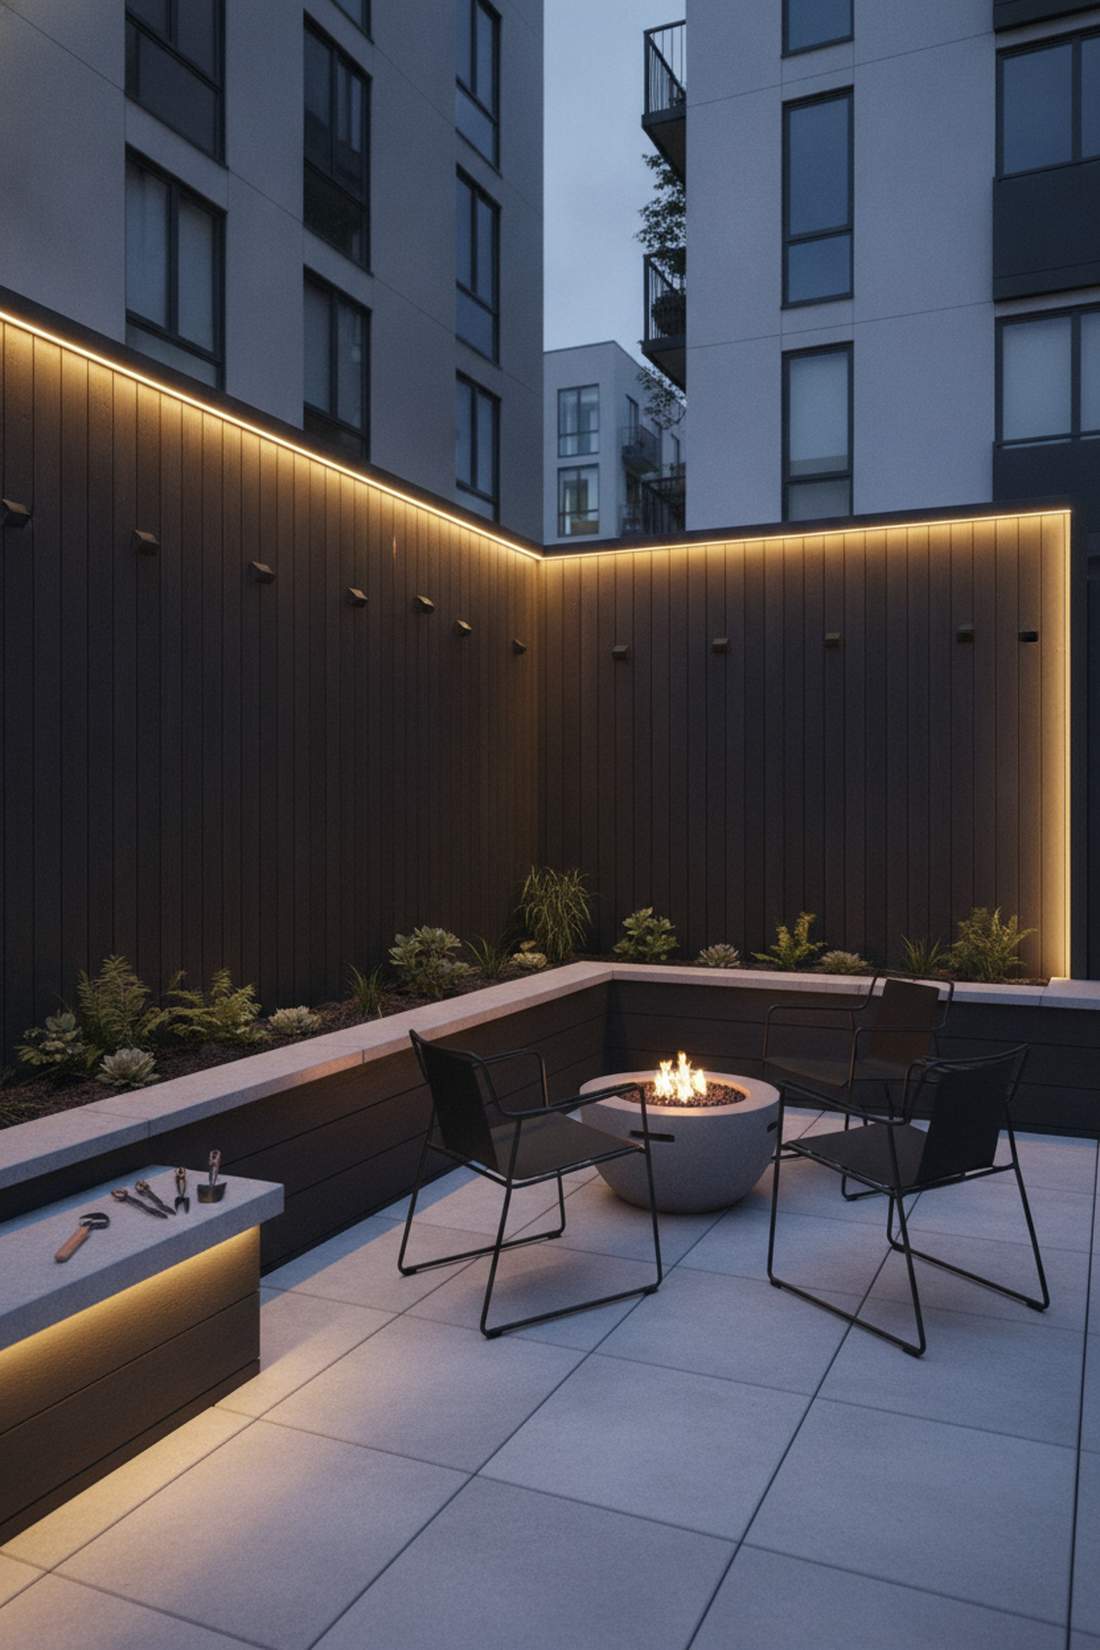
Fence & Wall Fairy Lights Outside
Vertical surfaces provide ideal mounting opportunities for fairy lights while defining property boundaries and creating backdrops for outdoor living areas. Strategic installation on fences and walls adds dimension to flat planes and extends usable illumination.
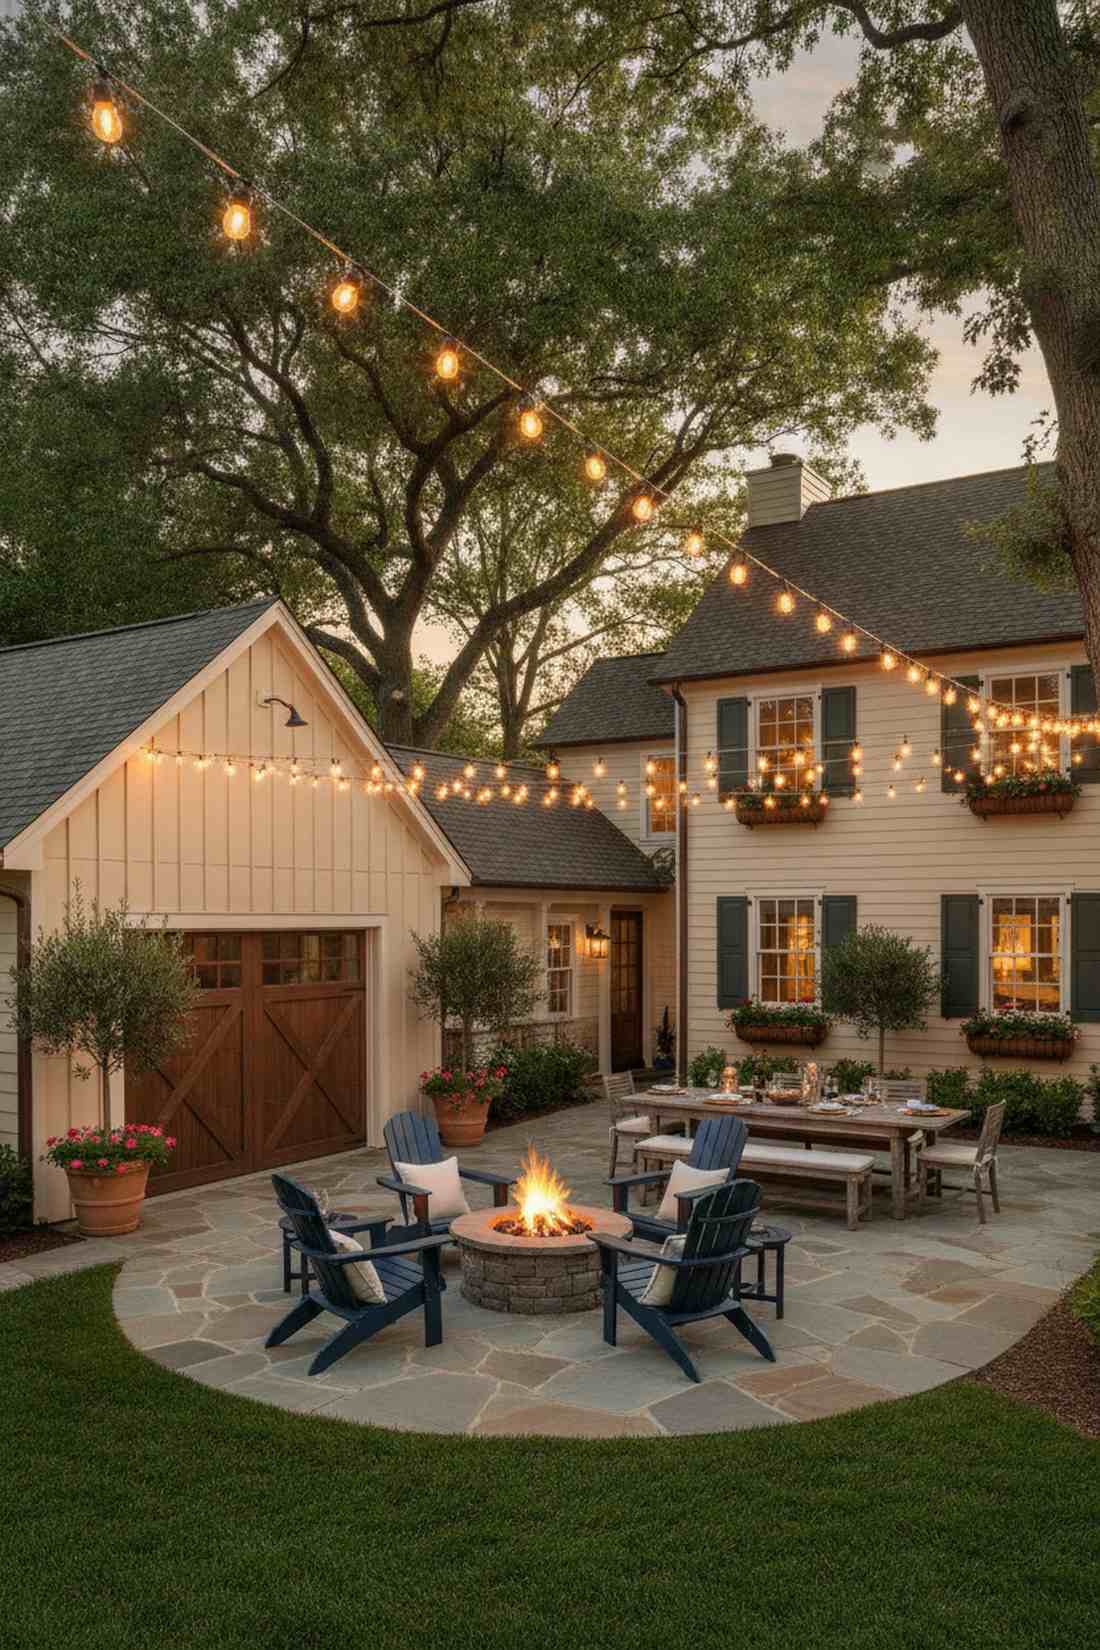
25. Horizontal Fence Line Stringing
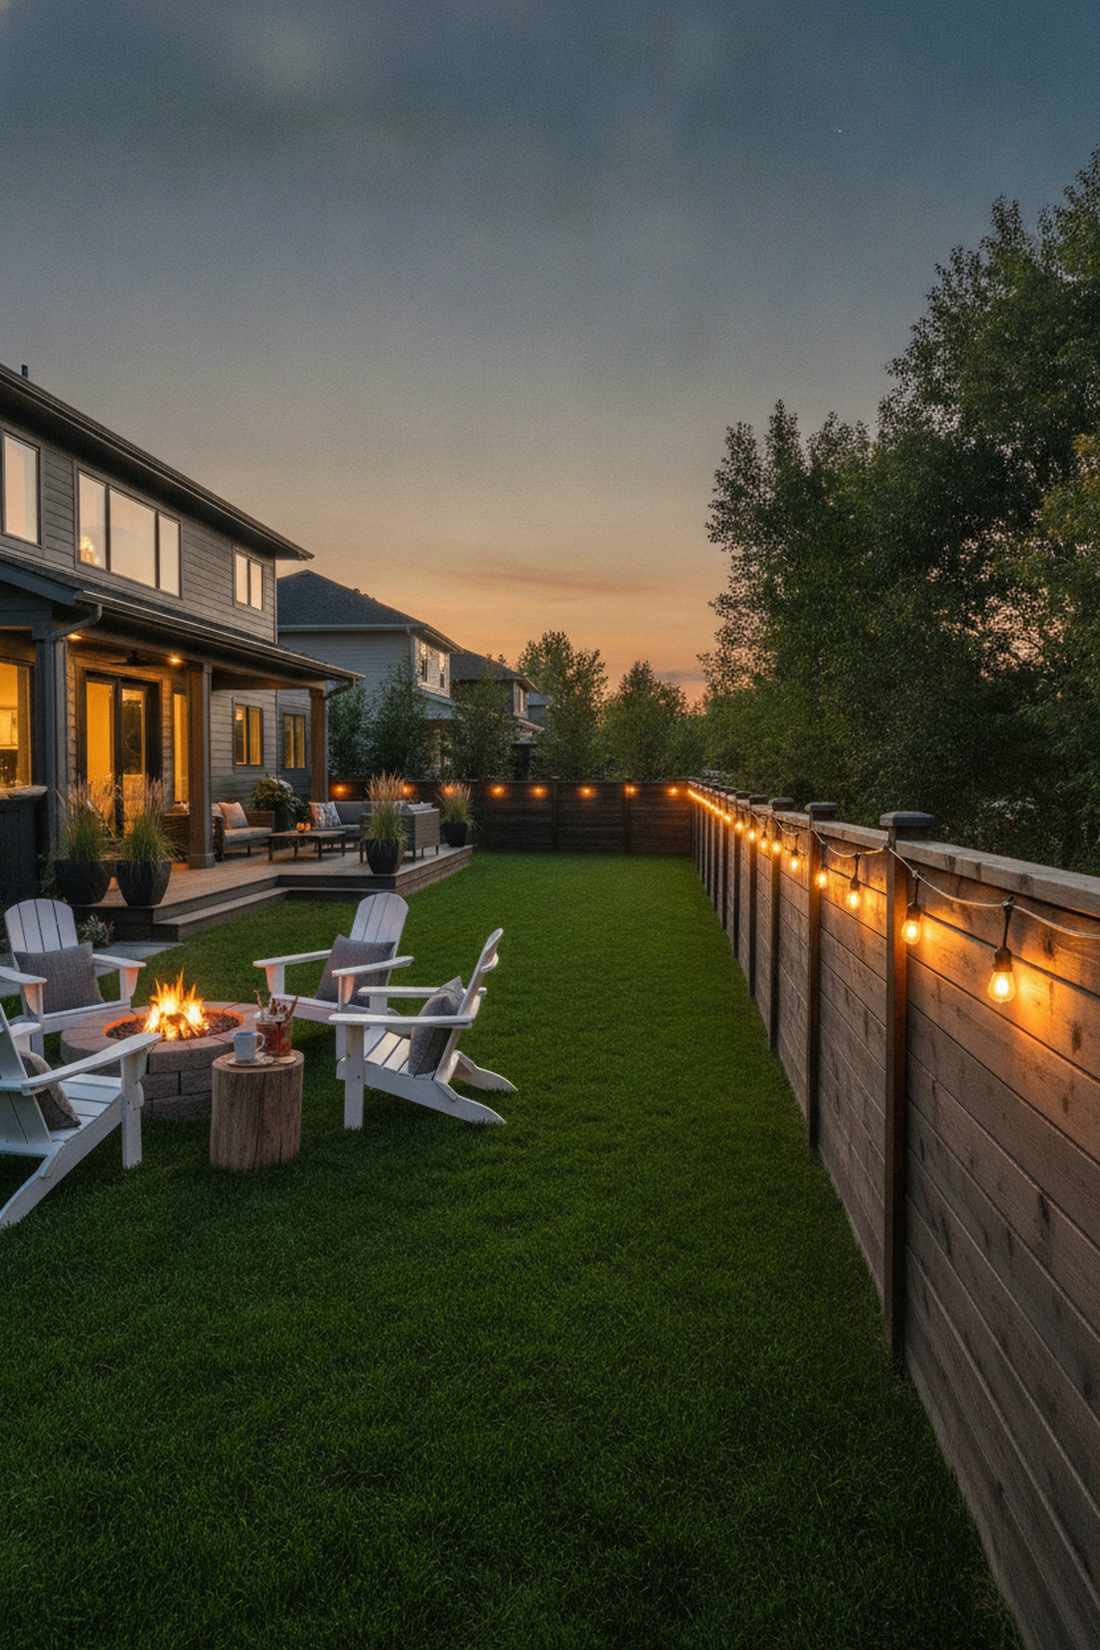
A crisp continuous border horizon that feels like a glowing safety perimeter wrapping your property in warmth. Superb for highlighting the clean, modern lines of horizontal slat fencing.
Sagging lines make a yard look trashy, but pulling a thick, commercial wire tight across the top rail gives a designer-level finish that crisply defines the yard’s edges. This basic fairy lights backyard technique provides immense ambient backlighting without blinding anyone in the seating area.
Securing a tight perimeter usually costs $50–$90 depending on yard size. Pin this if you want to make a small yard feel significantly wider.
- Key Materials: Heavy-duty screw eyes and tensioners
- Vibe / Style: Clean architectural border
- Difficulty: Requires a drill and tight measuring
- Budget Breakdown: Long spools: $65 | Hardware: $15.
- Creator’s Tip: Never rely on the light string itself for tension; run a black paracord or steel wire first, pull it tight, and clip the lights to it.
- Smart Sourcing: black outdoor paracord spool and heavy-duty Edison string lights.
Horizontal lines are safe, but the next trick uses gravity to create an outdoor wall of light that will make your neighbors extremely jealous…
26. Vertical Panel Cascades
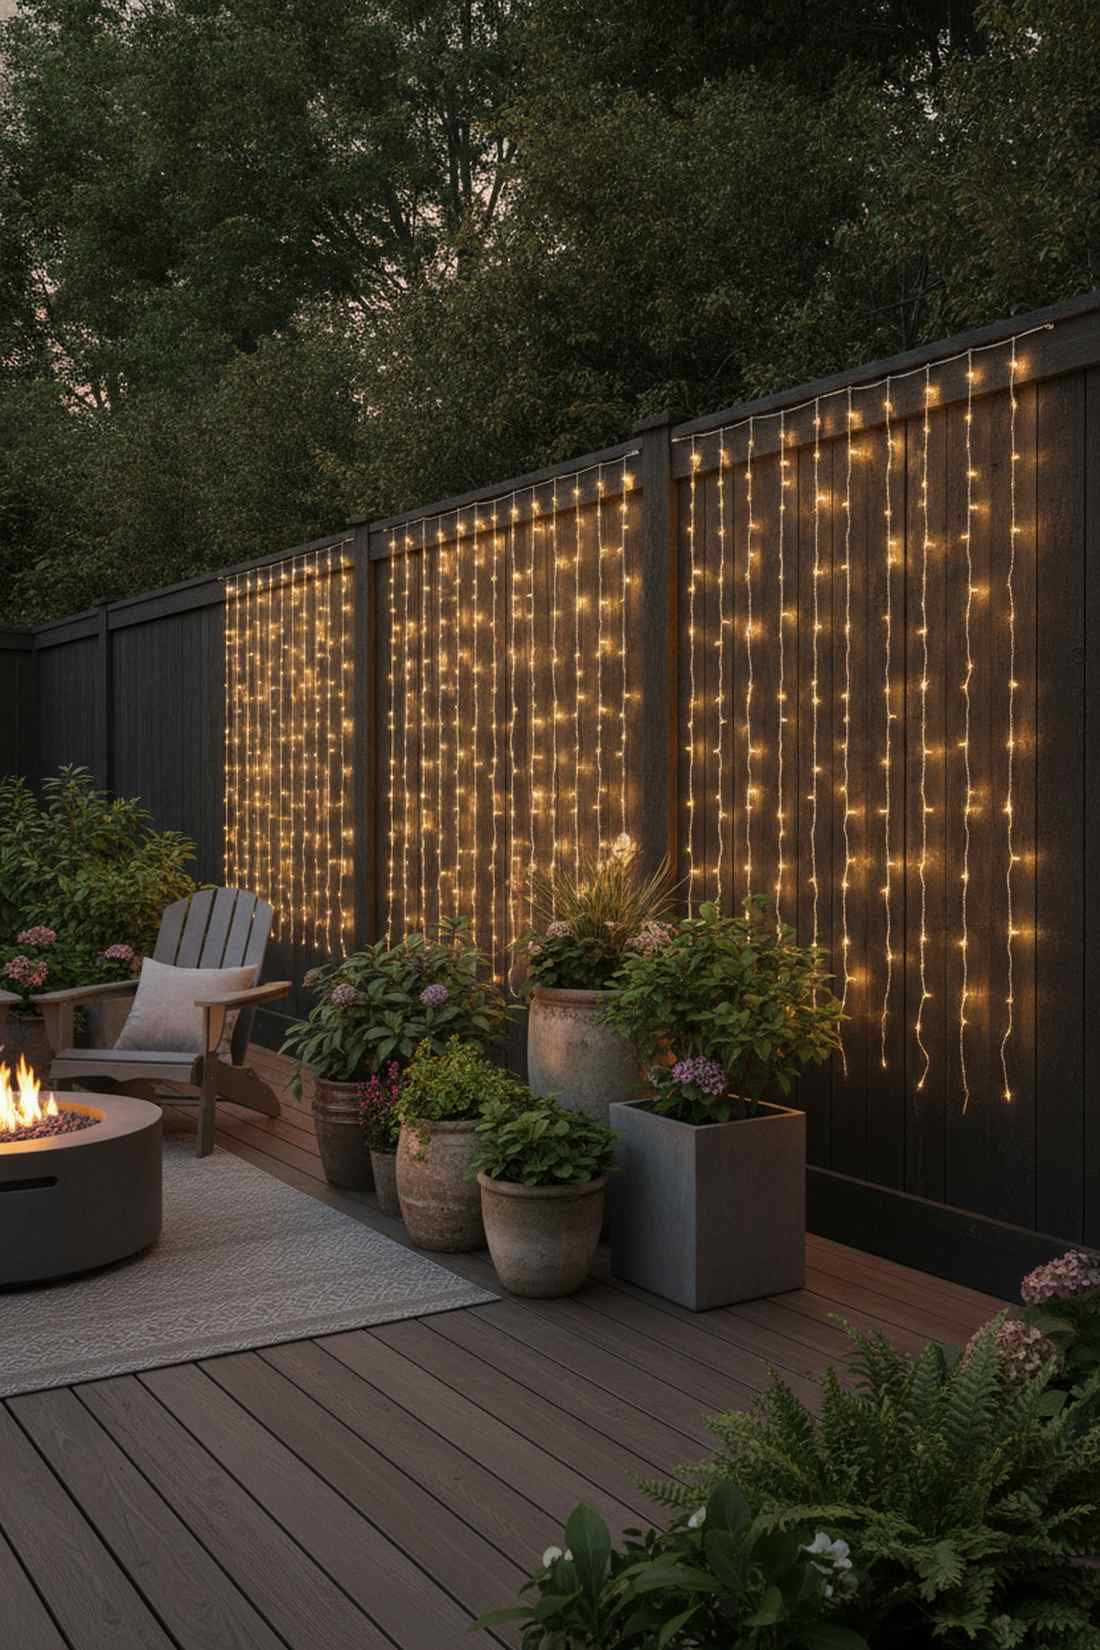
This dramatic weeping light waterfall feels like glowing rain frozen against your fence panels. Absolutely stunning for breaking up the boring, monotonous look of tall, solid privacy fences.
Most people only outline the top, but dropping vertical columns looks far more expensive than it is and creates incredible vertical height. Integrating these drops behind potted plants acts as the ultimate highlight reel for your nighttime patio.
Achieving this cascading effect costs roughly $45–$80. Highly recommended for turning an ugly wooden fence into a feature wall.
- Key Materials: Pre-measured vertical drop strands
- Vibe / Style: Dramatic resort wall
- Difficulty: Fast top-rail anchoring
- Budget Breakdown: Drop kits: $55 | Bottom anchors: $10.
- Creator’s Tip: Secure the bottom tip of every drop strand to the baseboard with a small staple so the wind doesn’t tangle them into a massive knot.
- Smart Sourcing: icicle/drop style outdoor LED strings and heavy-duty cable staples.
27. Zigzag Fence Pattern

An aggressive geometric wall web that feels like a modern art gallery exhibit right in your backyard. A fantastic solution for dressing up massive, blank exterior garage walls or tall solid fences.
Straight lines can feel sterile, but creating sharp diagonal intersections delivers a surprisingly premium look that commands attention even when the lights are off. This pattern uses significantly more length but utterly destroys the boring blank-canvas problem of large walls.
This artistic geometry will cost about $50–$95 for the extra wire needed. Pin this if you have a massive, ugly blank wall you need to hide.
- Key Materials: Bulk spools of flexible fairy wire
- Vibe / Style: Edgy geometric modernism
- Difficulty: Requires precise measuring tape math
- Budget Breakdown: Bulk wire: $65 | Screw hooks: $20.
- Creator’s Tip: Build a custom cardboard template with the exact angle you want, and hold it against the fence to mark perfectly uniform zigzag points.
- Smart Sourcing: 100ft copper wire fairy lights (plug in) and outdoor-rated screw hooks (bulk pack).
28. Outline Perimeter Glow
This encompassing glowing property halo feels like your entire yard has been wrapped in a warm, protective embrace. Perfect for smaller, square-shaped urban courtyards where every inch matters.
Leaving gaps makes a yard look unfinished, but running a flawless, unbroken line completely around the space avoids that cheap dorm-room look and visually expands the boundaries. This technique relies on bulk fairy garden supplies to ensure the color temperature perfectly matches all the way around.
A full perimeter wrap usually costs $70–$130. It is a fundamental investment that serves as the backbone for all other backyard lighting.
- Key Materials: Connectable end-to-end commercial strands
- Vibe / Style: Secure luxury courtyard
- Difficulty: Managing extremely long cords
- Budget Breakdown: Connectable strands: $90 | Weather seals: $15.
- Creator’s Tip: Wrap every single plug connection point tightly with electrical tape and seal it in a plastic clamshell to prevent rain-induced short circuits.
- Smart Sourcing: end-to-end connectable LED spools and waterproof cord connection covers.
29. Trellis Panel Weaving

A highly-detailed luminous lattice screen that feels like a glowing tapestry woven by magical spiders. Unbelievably beautiful when used on privacy dividers or climbing-plant frames near a hot tub.
Just throwing a net over it looks messy, but meticulously threading the wire in and out of the wooden diamonds gives a designer-level finish with incredible 3D depth. As a bonus, it provides crucial structure for your miniature garden supplies without needing extra hardware.
This time-intensive luxury look only costs $20–$40 in materials. Save this to your DIY garden screen ideas board today.
- Key Materials: Bare copper micro-LEDs
- Vibe / Style: Intricate craftsman detail
- Difficulty: Highly tedious weaving
- Budget Breakdown: Micro-LEDs: $25 | Patience: Free.
- Creator’s Tip: Weave the lights while the trellis is laying flat on the grass before you mount it vertically; it will save your arms hours of agonizing strain.
- Smart Sourcing: bare copper micro-LEDs (waterproof) and UV-coated resin fairy cottage kits.
30. Post Cap Accent Lighting
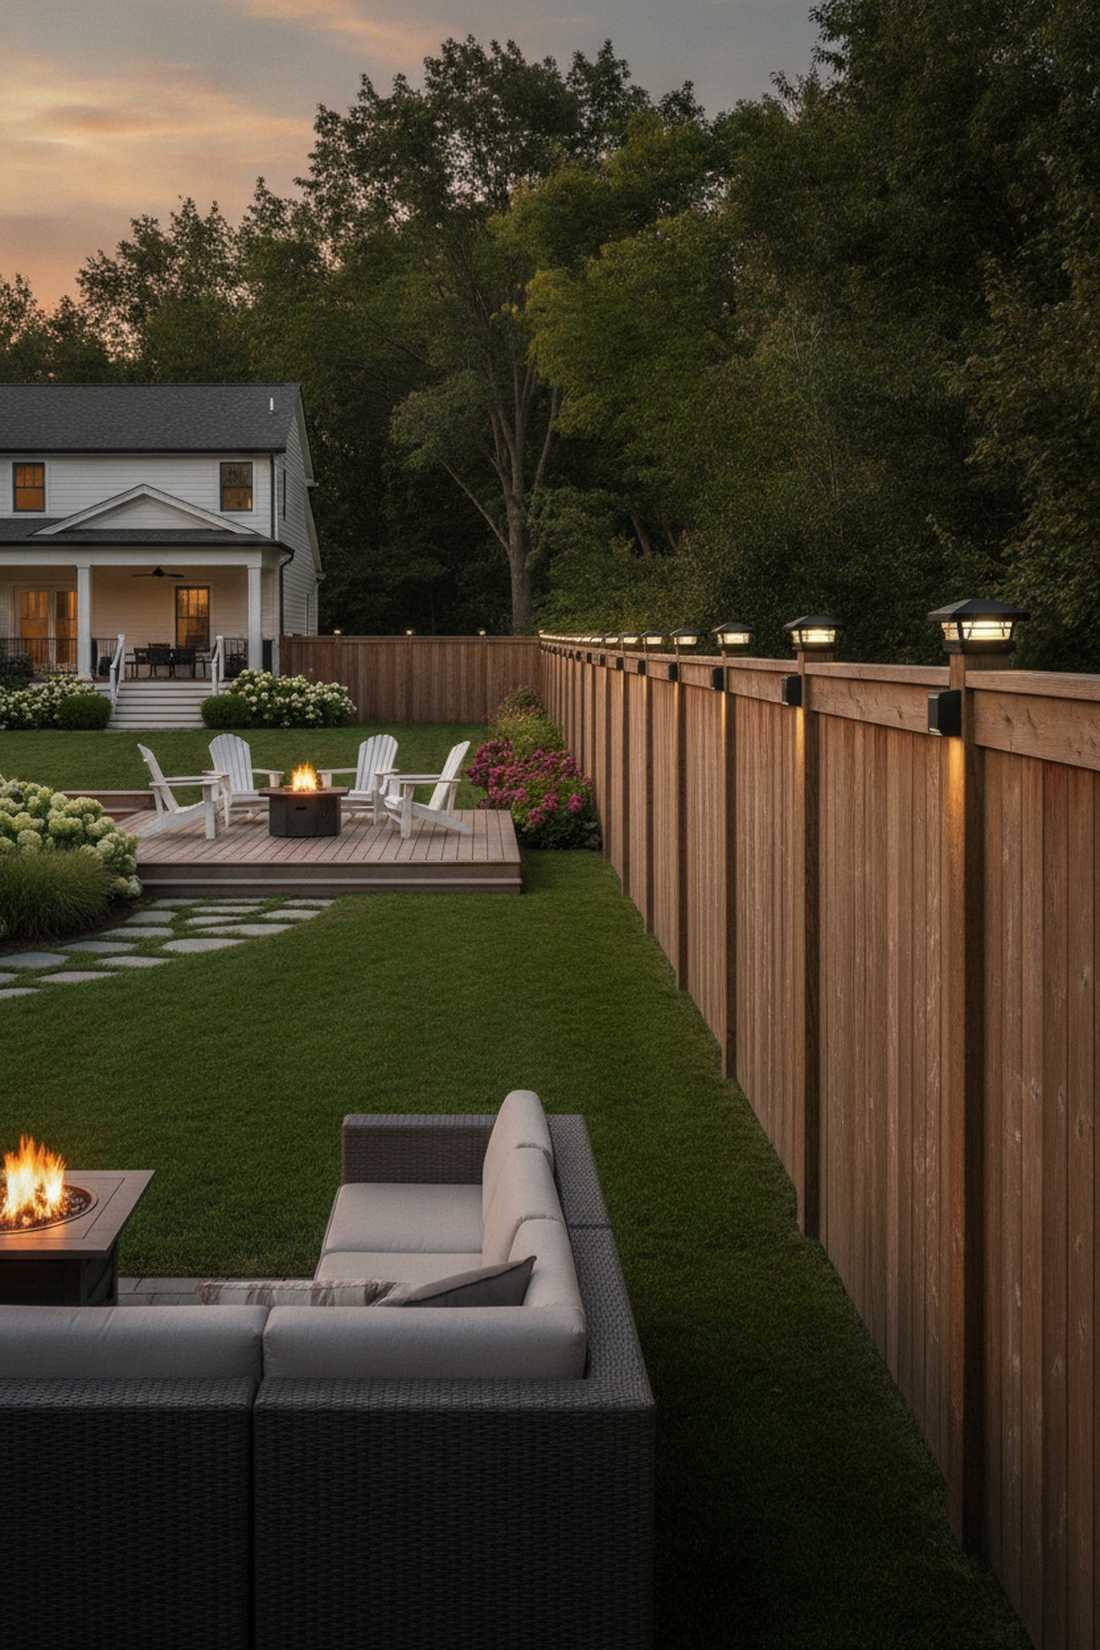
This rhythmic column-topping beacon sequence feels like a row of glowing sentinels guarding your sanctuary. The ultimate subtle touch for classic picket fences or heavy wooden deck railings.
Flooding the whole fence is overkill for some, but capping just the posts looks far more expensive than it is and creates a soothing, rhythmic visual tempo. Sourcing specialized solar caps or wrapping tight coils upgrades standard fairy lights in a garden to a highly architectural feature.
Capping 10 posts runs about $40–$75. Pin this if you want a classy, understated glow without strings dangling everywhere.
- Key Materials: Pre-fit solar post caps or tight micro-coils
- Vibe / Style: Stately traditional elegance
- Difficulty: Super simple
- Budget Breakdown: Cap lights: $60 | Mounting screws: $5.
- Creator’s Tip: If wrapping strings instead of using premade caps, use clear silicone caulk to lock the top coil in place so birds don’t pull it apart.
- Smart Sourcing: solar LED post cap lights (4×4 or 6×6) and clear outdoor silicone sealant.
31. Wall Mounted Sconce Style

A clever faux-fixture clustered drop that feels like custom ironwork sconces salvaged from an old castle. Excellent for flanking outdoor kitchen grills or back-door entryways where hardwiring isn’t possible.
Paying an electrician $500 to wire a real sconce is painful, but coiling thick strings around a heavy bracket delivers a surprisingly premium look for pennies. This clever fairy lights outdoor hack provides serious task lighting exactly where you need to see your burgers flipping.
You can build two massive faux-sconces for just $30–$50. It’s a fast upgrade that completely changes the utility of your cooking space.
- Key Materials: Cast iron plant brackets & thick bulb strings
- Vibe / Style: Rustic industrial chic
- Difficulty: Easy bracket mounting
- Budget Breakdown: Brackets: $20 | Short heavy strings: $20.
- Creator’s Tip: Use a zip tie hidden at the very top of the bracket to tightly bundle the coiled wires so the “sconce” looks like one solid, deliberate fixture.
- Smart Sourcing: heavy cast-iron hanging brackets and short-length Edison bulb strings.
32. Corner Concentration Lighting

An intense illuminated anchor zone that feels like a cozy, bright fireplace tucked into the boundaries of your yard. Perfect for drawing guests away from the house and into the far corners of the garden.
Evenly spacing everything is boring, but bunching massive clusters into the corners completely avoids that cheap dorm-room look while creating distinct, usable rooms in the yard. This high-contrast strategy hides unsightly power blocks easily while acting as a beacon for late-night seating.
Building a bright corner oasis costs roughly $35–$65. Save this to your outdoor entertaining blueprint board.
- Key Materials: High-density curtain or cluster lights
- Vibe / Style: Intimate corner lounge
- Difficulty: Easy bunching
- Budget Breakdown: High-density strands: $50 | Mounting hubs: $10.
- Creator’s Tip: Plant large, broad-leaf plants (like Hostas or Elephant Ears) directly under the bright corner; the huge leaves will reflect the intense light back into the yard beautifully.
- Smart Sourcing: high-density LED cluster lights and weatherproof outdoor power stakes.
Dining & Entertaining Setups
Outdoor dining and entertaining areas require lighting that balances visibility for meals and conversation with atmosphere that encourages lingering. Fairy lights offer adjustable solutions that adapt to different occasions.
33. Overhead Dining Canopy
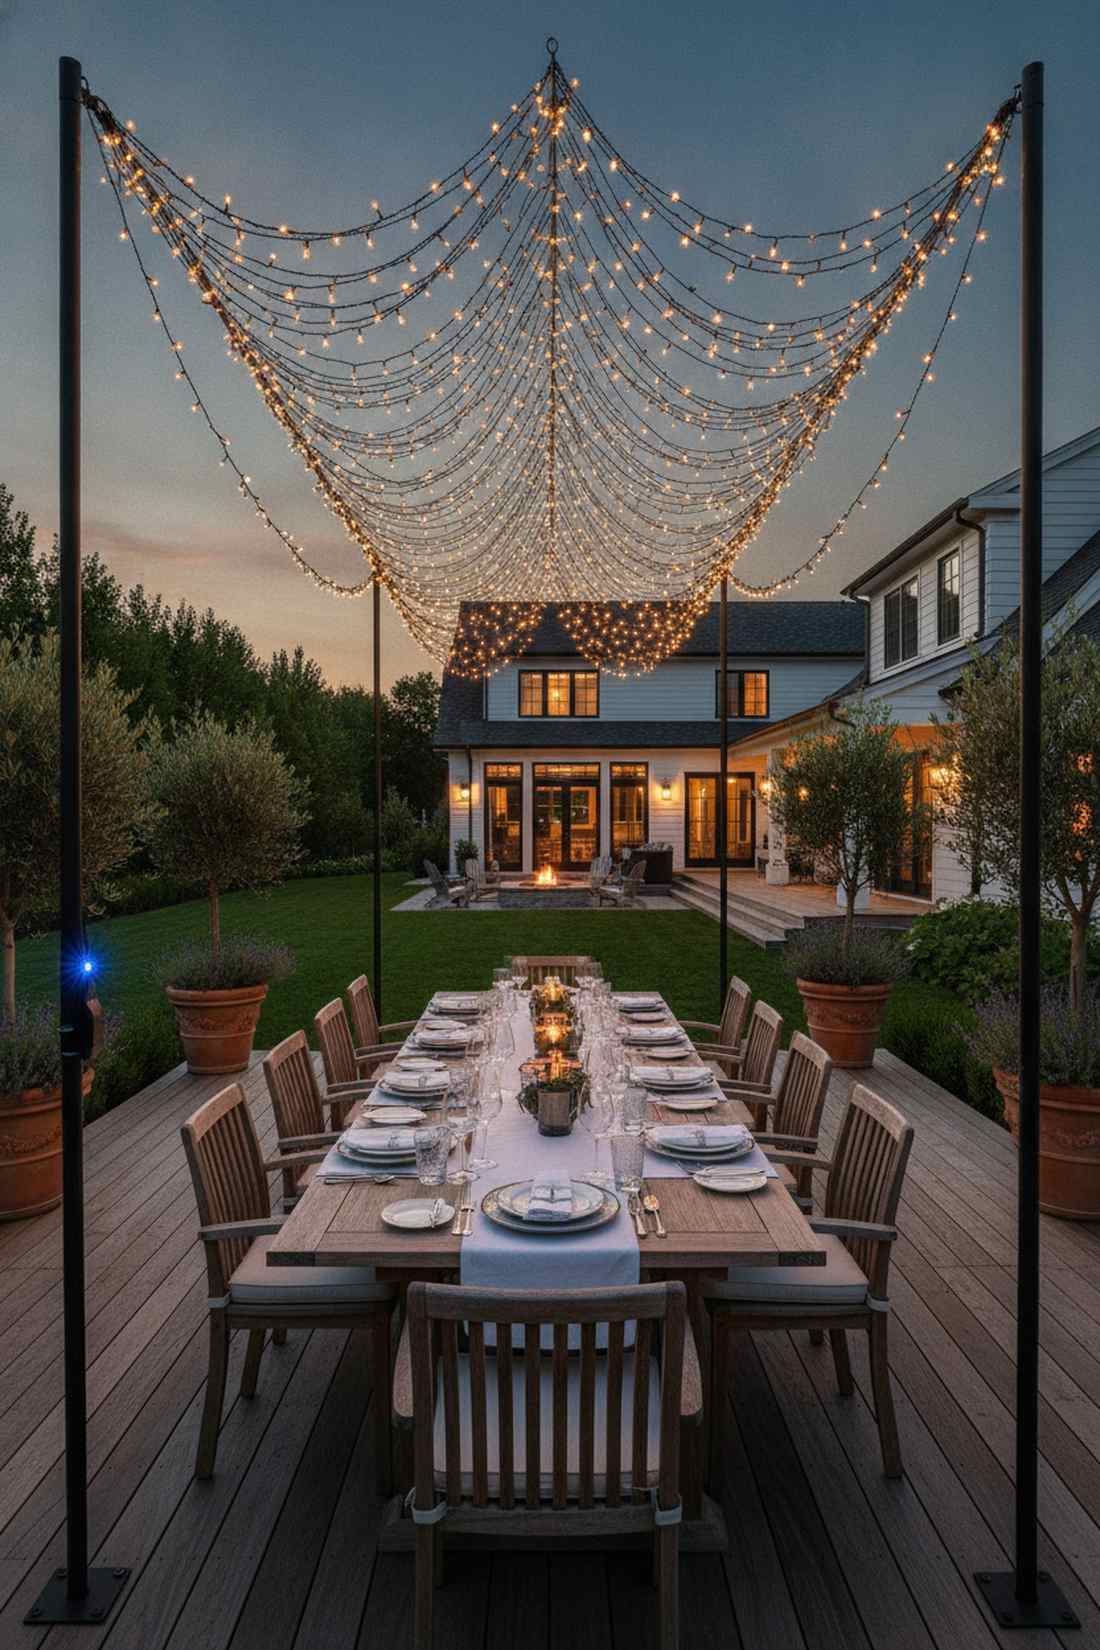
This dense floating chandelier web feels like you booked the best table at a five-star Mediterranean restaurant. The absolute pinnacle upgrade for standalone outdoor dining tables.
Eating in the dark is miserable, but crisscrossing heavy-duty strings directly over the table gives a designer-level finish and flawless visibility for reading menus or seeing your steak. Adding premium fairy garden supplies like an in-line dimmer switch lets you transition from bright dinner lighting to a moody after-drinks glow.
A professional-grade canopy will run you about $80–$140. Pin this if you want to host legendary summer dinner parties.
- Key Materials: Dimmable commercial bulbs & standalone poles
- Vibe / Style: Michelin-star al fresco
- Difficulty: Advanced pole leveling
- Budget Breakdown: Dimmable lights: $75 | Dimmer switch: $20.
- Creator’s Tip: Hang the lowest bulb exactly 36 inches above the tabletop surface—any higher loses the intimacy, any lower blocks eye contact across the table.
- Smart Sourcing: outdoor-rated plug-in dimmer switches and shatterproof commercial-grade string lights (bulk pack).
Don’t have trees or a pergola to hang lights from? The next hack uses an object you already own to create instant overhead magic…
34. Umbrella Pole Wrapping

A clever glowing parasol trunk that feels like a chic pop-up cafe on the streets of Paris. The ultimate, instant lighting fix for standalone patio tables stuck in the middle of a hot, sunny deck.
Running extension cords across the floor is a tripping hazard, but using a battery-powered micro-strand looks far more expensive than it is and keeps the area totally wireless. This vertical element adds height and reflects beautifully off the underside of the open umbrella canopy.
This brilliant zero-wire hack costs a mere $15–$25. Highly recommended for a quick weekend win with massive impact.
- Key Materials: Battery-powered copper wire lights
- Vibe / Style: Chic pop-up cafe
- Difficulty: 5-minute wrap
- Budget Breakdown: Battery strand: $15 | Clear tape: $5.
- Creator’s Tip: Wedge the battery pack underneath the heavy umbrella base to completely hide it from view while keeping it accessible for battery swaps.
- Smart Sourcing: waterproof battery-operated fairy lights and rechargeable high-capacity AA batteries.
35. Table Centerpiece Arrangements
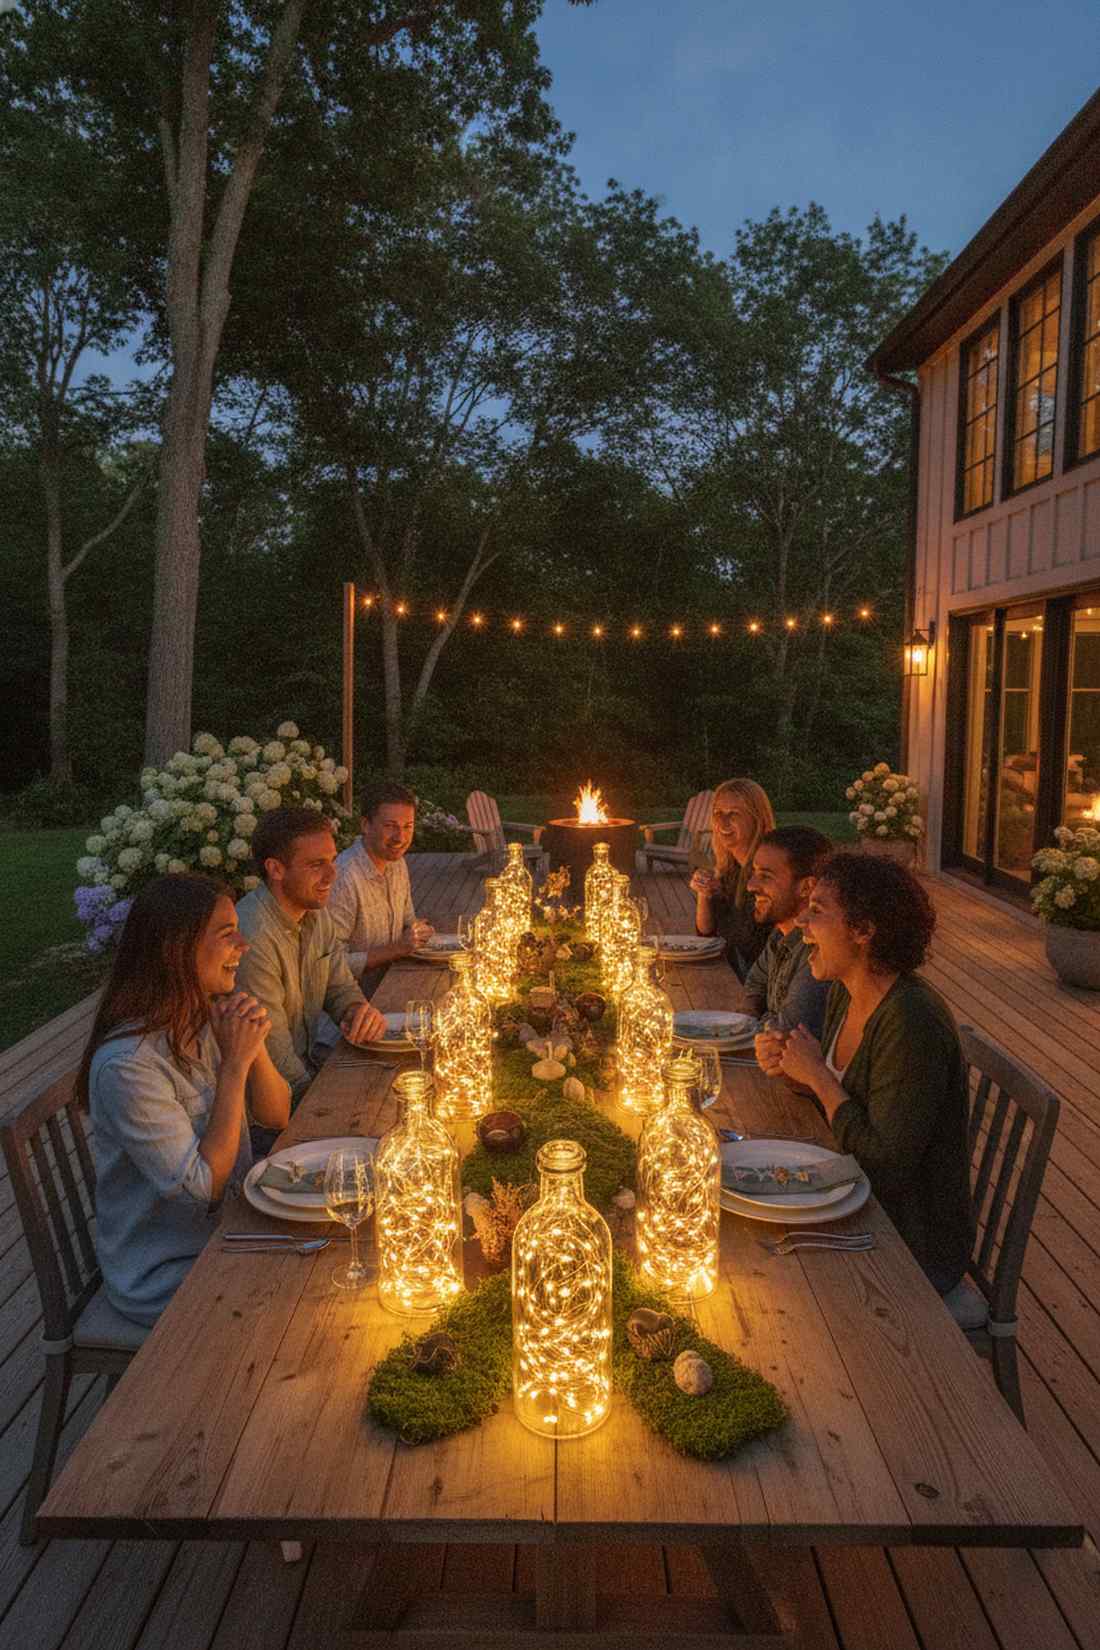
This radiant bottled firefly focal point feels like a whimsical potion glowing right on your dinner table. Perfect for long rustic farm tables or intimate bistro setups where overhead lighting isn’t possible.
Huge floral centerpieces block conversation, but coiling micro-LEDs inside vintage glass avoids that cheap dorm-room look and provides intensely flattering, low-angle uplighting. Mixing these with terrarium accessories like preserved moss turns a boring table into an enchanting fairy lights backyard showcase.
You can easily pull this off for around $10–$25 per jar. Save this to your tablescape aesthetics board right now.
- Key Materials: Glass cloches or hurricane vases
- Vibe / Style: Enchanted dinner party
- Difficulty: As easy as stuffing a jar
- Budget Breakdown: Micro-strings: $10 | Glassware: $15.
- Creator’s Tip: Crumple the copper wire wildly before shoving it into the jar; uniform coils look manufactured, but random bends look like chaotic trapped fireflies.
- Smart Sourcing: micro-LED cork-top bottle lights (bulk pack) and pre-cut preserved moss sheets (bulk pack).
36. Bar Cart Accent Lighting
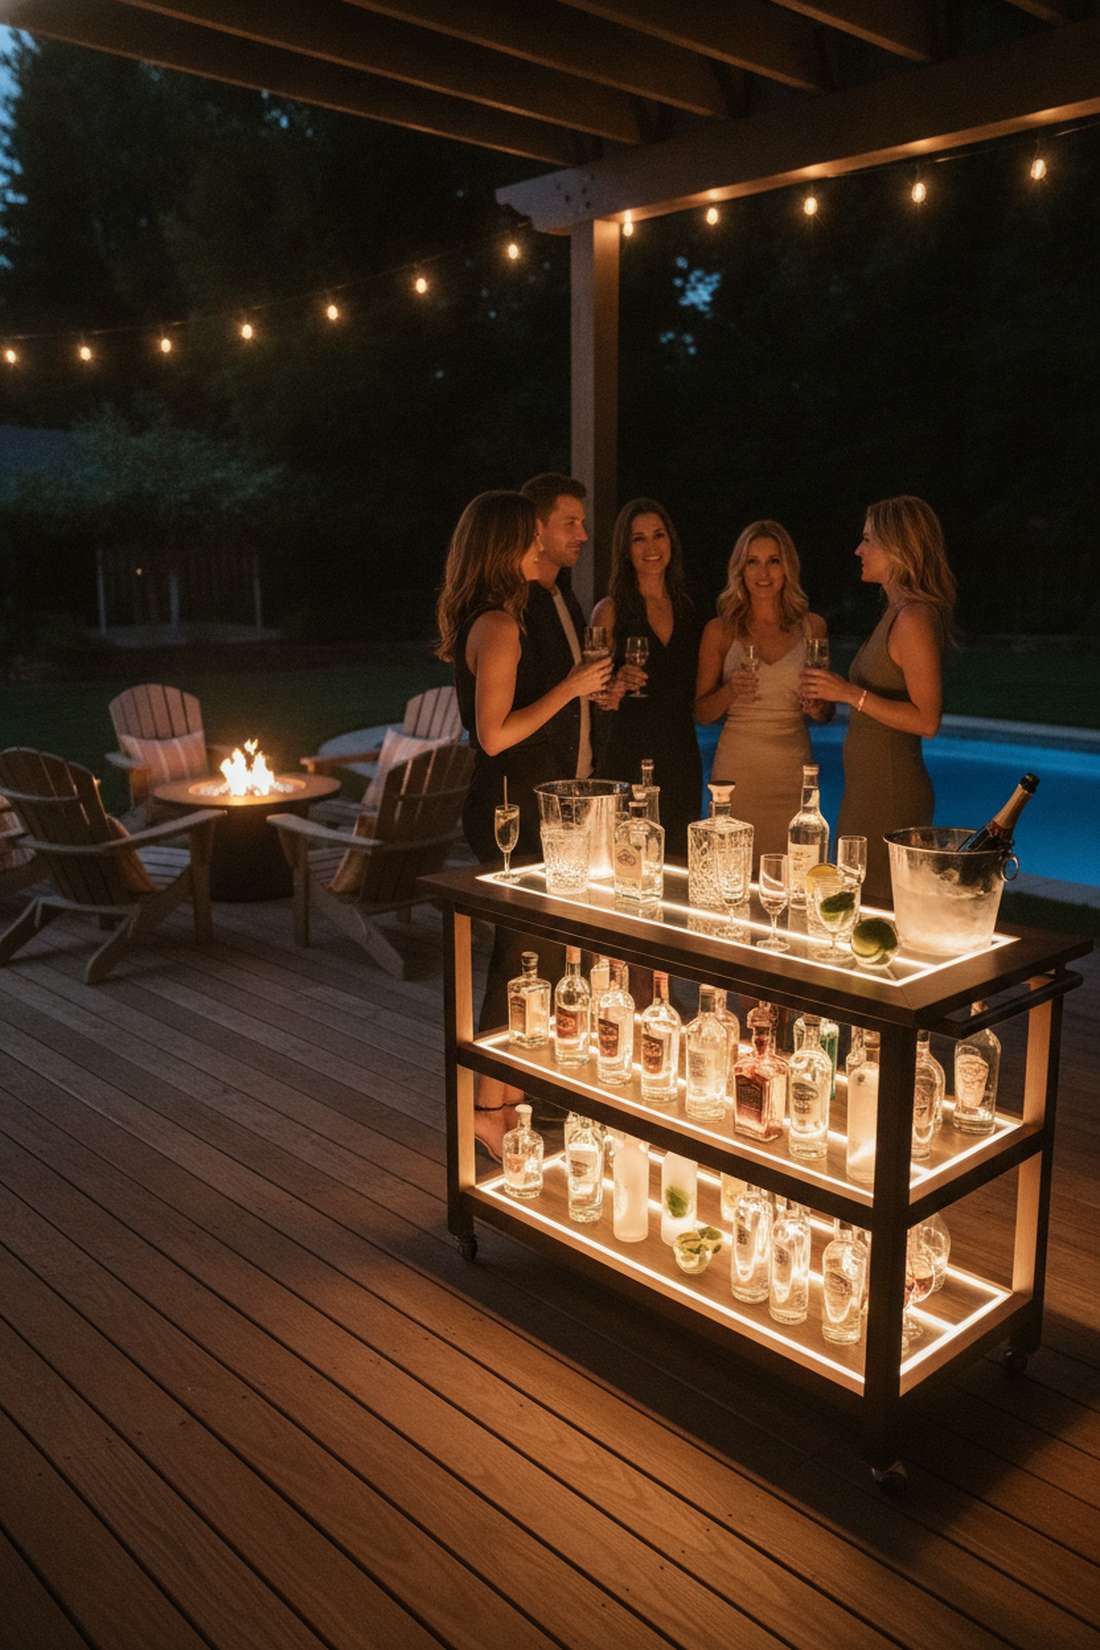
A dazzling illuminated beverage station that feels like the VIP section of a high-end nightclub. An absolute necessity for making your outdoor bar cart pop and keeping guests flowing toward the drinks.
Mixing drinks in the dark leads to spills, but under-lighting the cart’s shelves delivers a surprisingly premium look that makes glass bottles glow like expensive jewels. Using waterproof fairy garden supplies ensures a spilled margarita won’t cause an electrical fire.
Upgrading your drink station costs roughly $20–$40. It’s a fast upgrade that completely changes the party dynamics.
- Key Materials: Battery-operated waterproof strips
- Vibe / Style: Exclusive VIP service
- Difficulty: Simple taping
- Budget Breakdown: Waterproof strips: $25 | Zip ties: $5.
- Creator’s Tip: Mount the lights behind the front lip of the cart’s shelves aiming backward; this silhouetted backlighting makes liquor bottles look incredibly expensive.
- Smart Sourcing: battery-operated waterproof LED strips and heavy-duty double-sided mounting tape.
37. Conversation Pit Enclosure
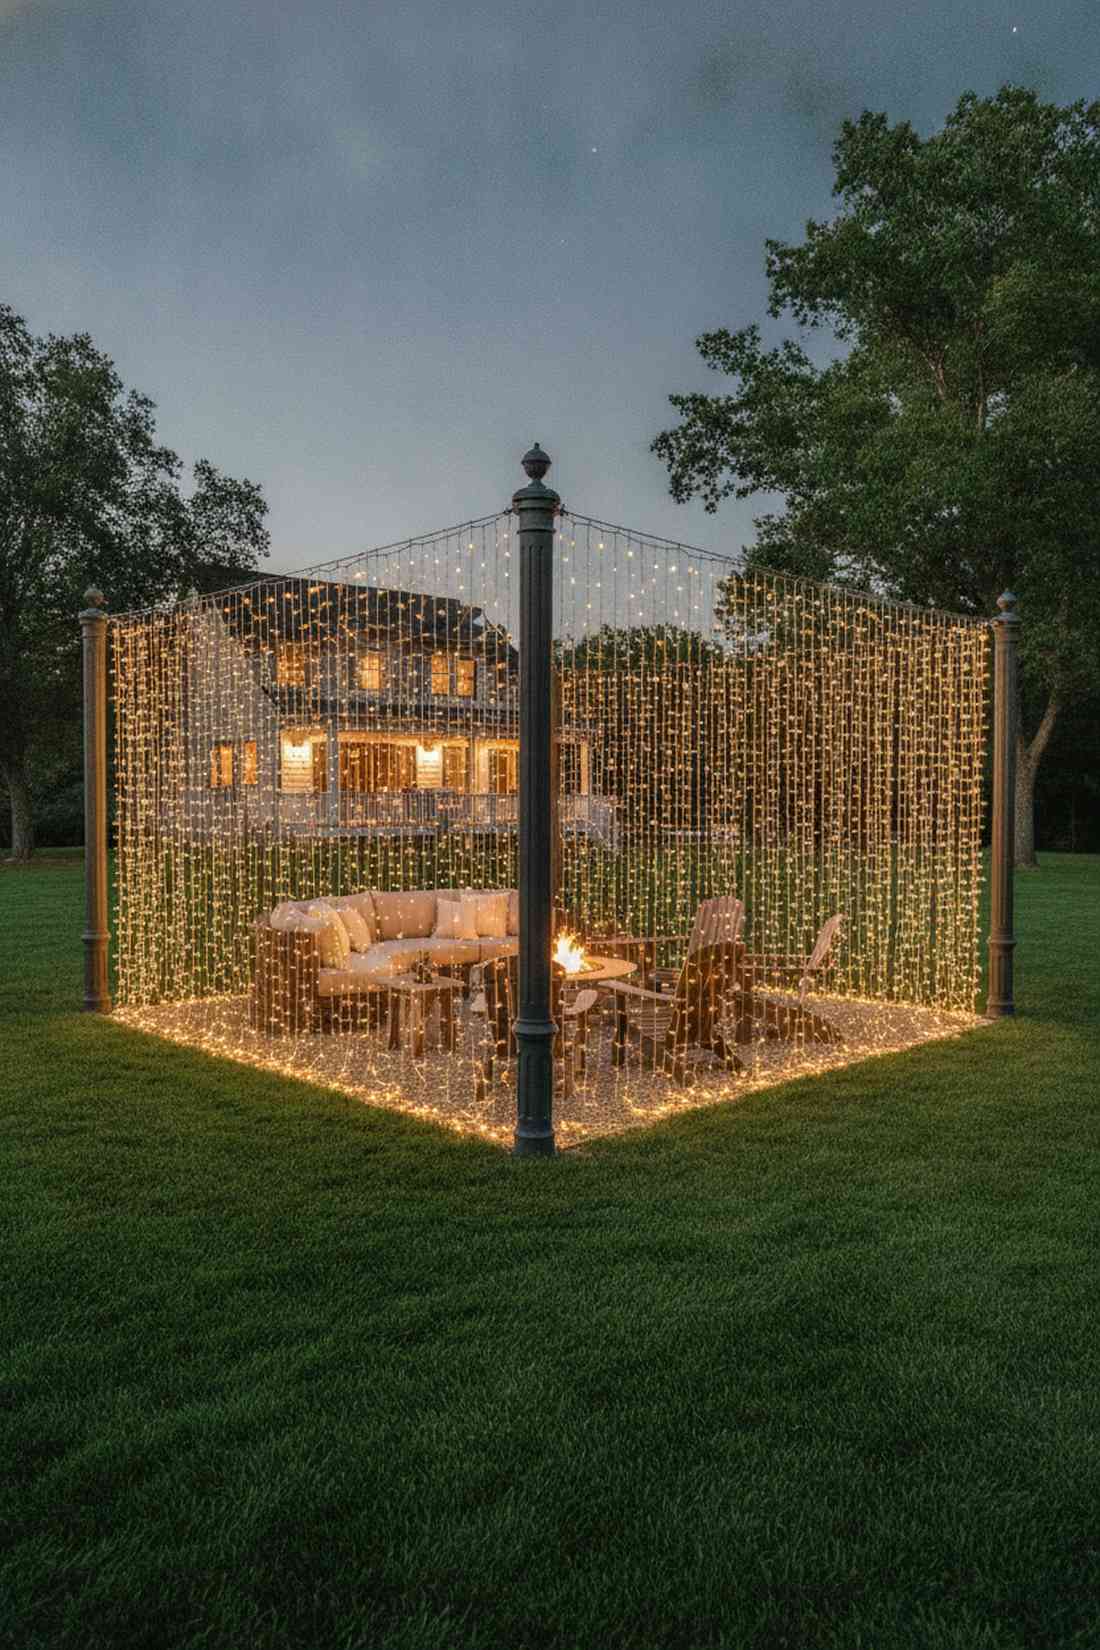
A cozy luminous wall boundary that feels like a private, glowing tent pitched in the wilderness. Superb for defining a plush outdoor sofa or fire pit area in the middle of a massive, empty lawn.
Open spaces feel vulnerable at night, but building a virtual wall of light completely avoids that cheap dorm-room look and forces an intimate, enclosed psychological boundary. This fairy lights outside layout acts as a room divider, keeping your guests huddled close together.
Building these light walls will cost around $60–$110. Pin this if you want to make a giant yard feel infinitely cozier.
- Key Materials: Anchor posts and dense curtain lights
- Vibe / Style: Private luxury cabana
- Difficulty: Moderate post pounding
- Budget Breakdown: Curtain panels: $70 | Posts: $30.
- Creator’s Tip: Always leave one side of the “square” completely open and unlit to serve as an inviting doorway, otherwise the space feels like a glowing cage.
- Smart Sourcing: heavy-duty metal garden fence posts and outdoor-rated LED curtain lights.
38. Outdoor Kitchen Task Lighting
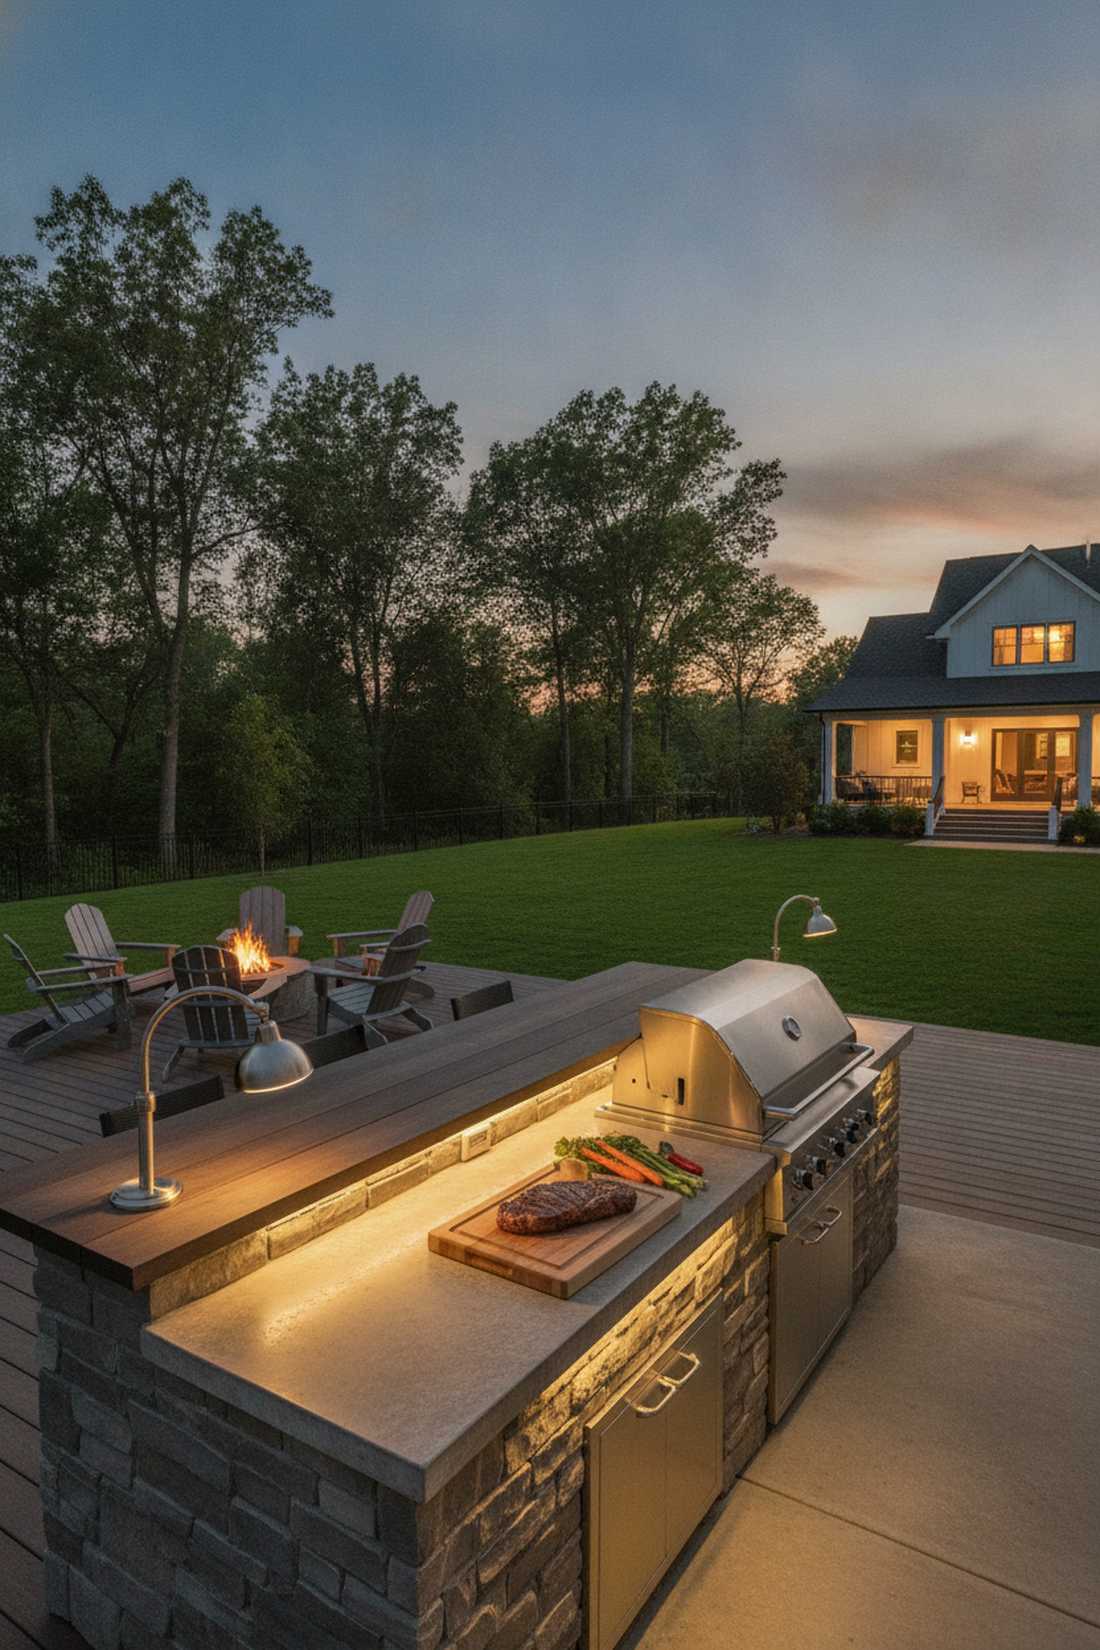
A hyper-bright focused chef’s halo that feels like a professional culinary stage. Crucial for massive outdoor grill islands, pizza ovens, or heavy-duty prep counters.
Ambient fairy strings are useless for cooking, but tightly clustering bright white LEDs under an awning gives a designer-level finish that ensures you never serve raw chicken. Pairing this with sleek, UV-coated miniature garden supplies on the counter keeps the kitchen looking intentionally styled, not just utilitarian.
This high-utility setup runs about $40–$75. It is a mandatory upgrade for anyone serious about outdoor barbecue.
- Key Materials: High-lumen bright white strips
- Vibe / Style: Professional outdoor kitchen
- Difficulty: Easy under-mounting
- Budget Breakdown: High-lumen strips: $50 | Degreaser: $10.
- Creator’s Tip: You must scrub the mounting surface with a heavy-duty degreaser before sticking the lights; grill smoke leaves an invisible grease film that destroys adhesive.
- Smart Sourcing: daylight-white high-lumen outdoor LED strips and heavy-duty surface degreaser spray.
39. Lounge Seating Backdrop
A stunning indirect ambient back-glow that feels like a sunset permanently paused behind your sofa. The perfect addition to an outdoor sectional pushed up against a boring vinyl house siding.
Direct lights blind your guests, but throwing a sheet of light against the wall behind them looks far more expensive than it is and bounces a beautifully soft, diffused glow over the entire patio. This trick eliminates the dark, creepy void behind your seating area.
You can create this massive backdrop for $35–$65. Save this to your patio layout board for a massive aesthetic leap.
- Key Materials: Warm white net lights
- Vibe / Style: Relaxed Ibiza lounge
- Difficulty: Fast hanging
- Budget Breakdown: Net lights: $40 | Siding hooks: $15.
- Creator’s Tip: Use special vinyl siding hooks that slip right into the wall seams without needing to drill holes in your home’s exterior.
- Smart Sourcing: warm-white LED net lights and no-drill vinyl siding hooks (bulk pack).
40. Fire Pit Perimeter Ring
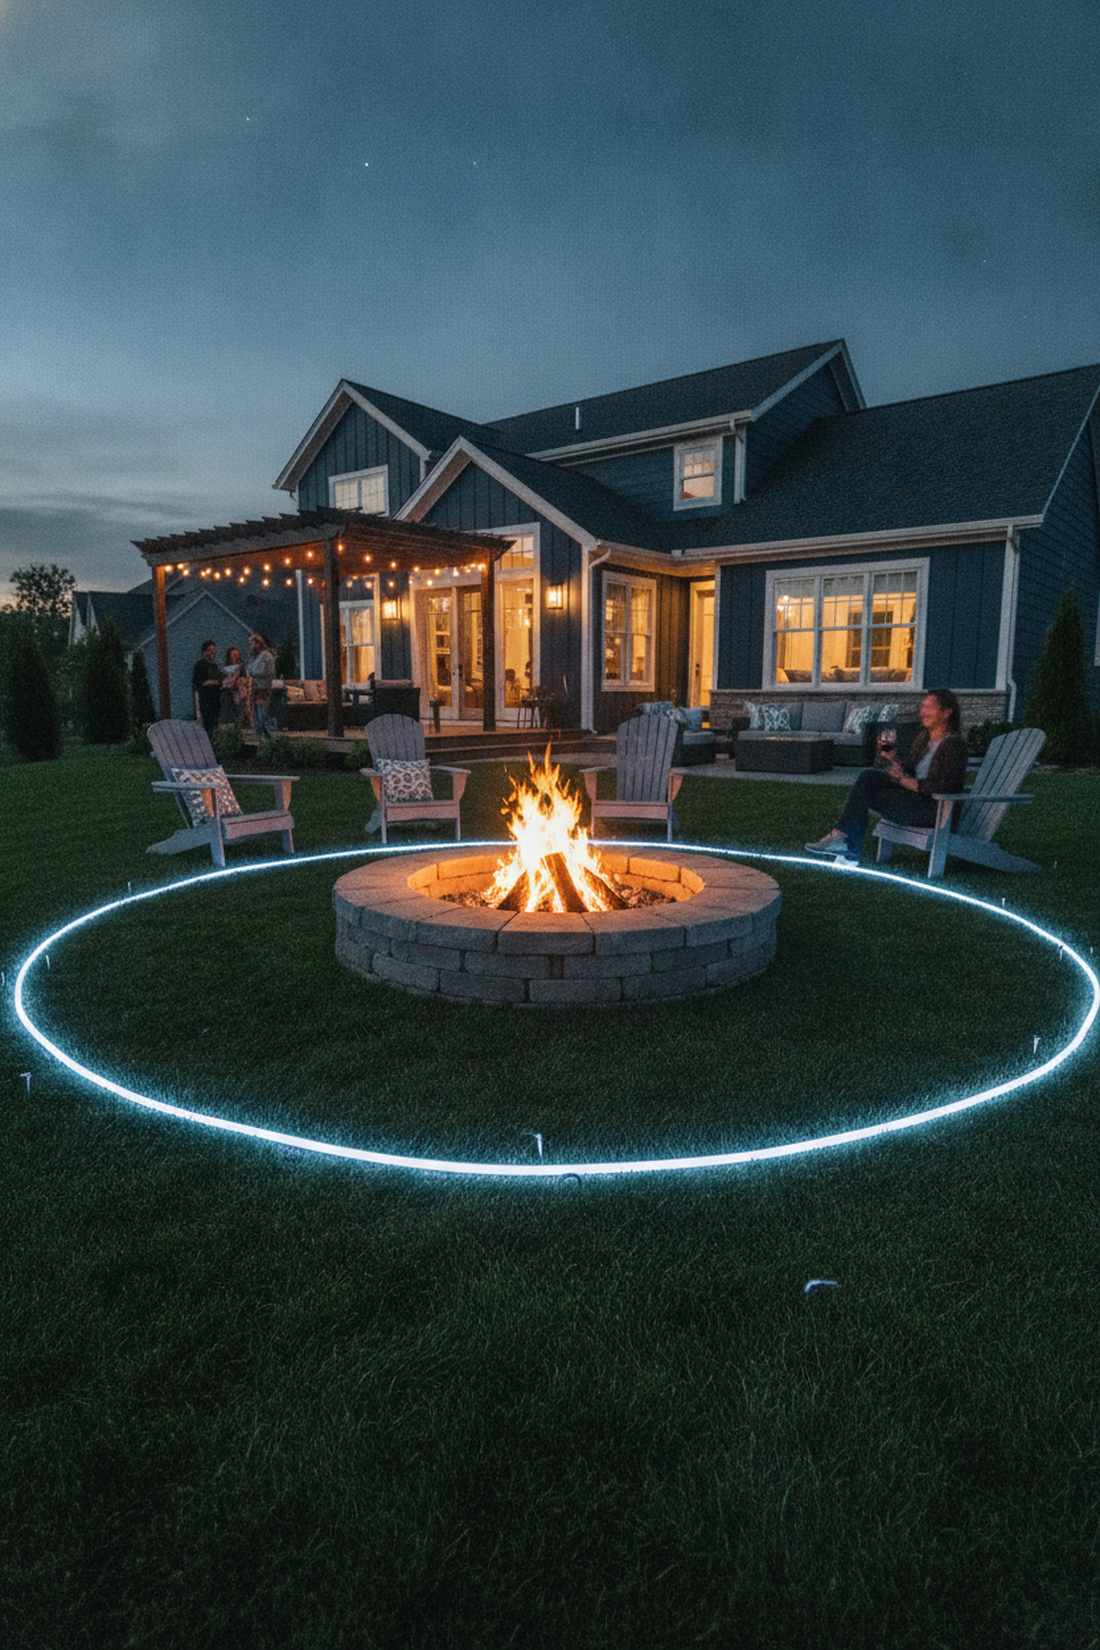
A sleek luminous hazard border that feels like a glowing landing pad surrounding your evening fire. An absolute necessity for sunken stone fire pits or low-profile metal bowls sitting on the grass.
People tripping in the dark is a disaster, but staking a tight glowing ring 3 feet back delivers a surprisingly premium look that safely guides foot traffic. Investing in heat-resistant, thick silicone ropes ensures the fairy lights backyard vibe doesn’t melt when the fire roars.
This critical safety perimeter costs roughly $40–$70. Pin this if you host late-night bonfire parties frequently.
- Key Materials: Heat-resistant silicone neon flex
- Vibe / Style: High-tech campfire safety
- Difficulty: Easy circle staking
- Budget Breakdown: Silicone flex rope: $50 | Stakes: $10.
- Creator’s Tip: Use a string tied to a center stake to draw a perfectly symmetrical circle in the dirt before laying out your lights.
- Smart Sourcing: heat-resistant silicone LED rope lights and heavy-duty metal landscape pins.
Creative Fairy Lights Outside
Beyond standard installation methods, creative applications of fairy lights push boundaries and create unique outdoor experiences. These techniques demonstrate the versatility of flexible lighting in landscape design.
41. Mason Jar Luminaries
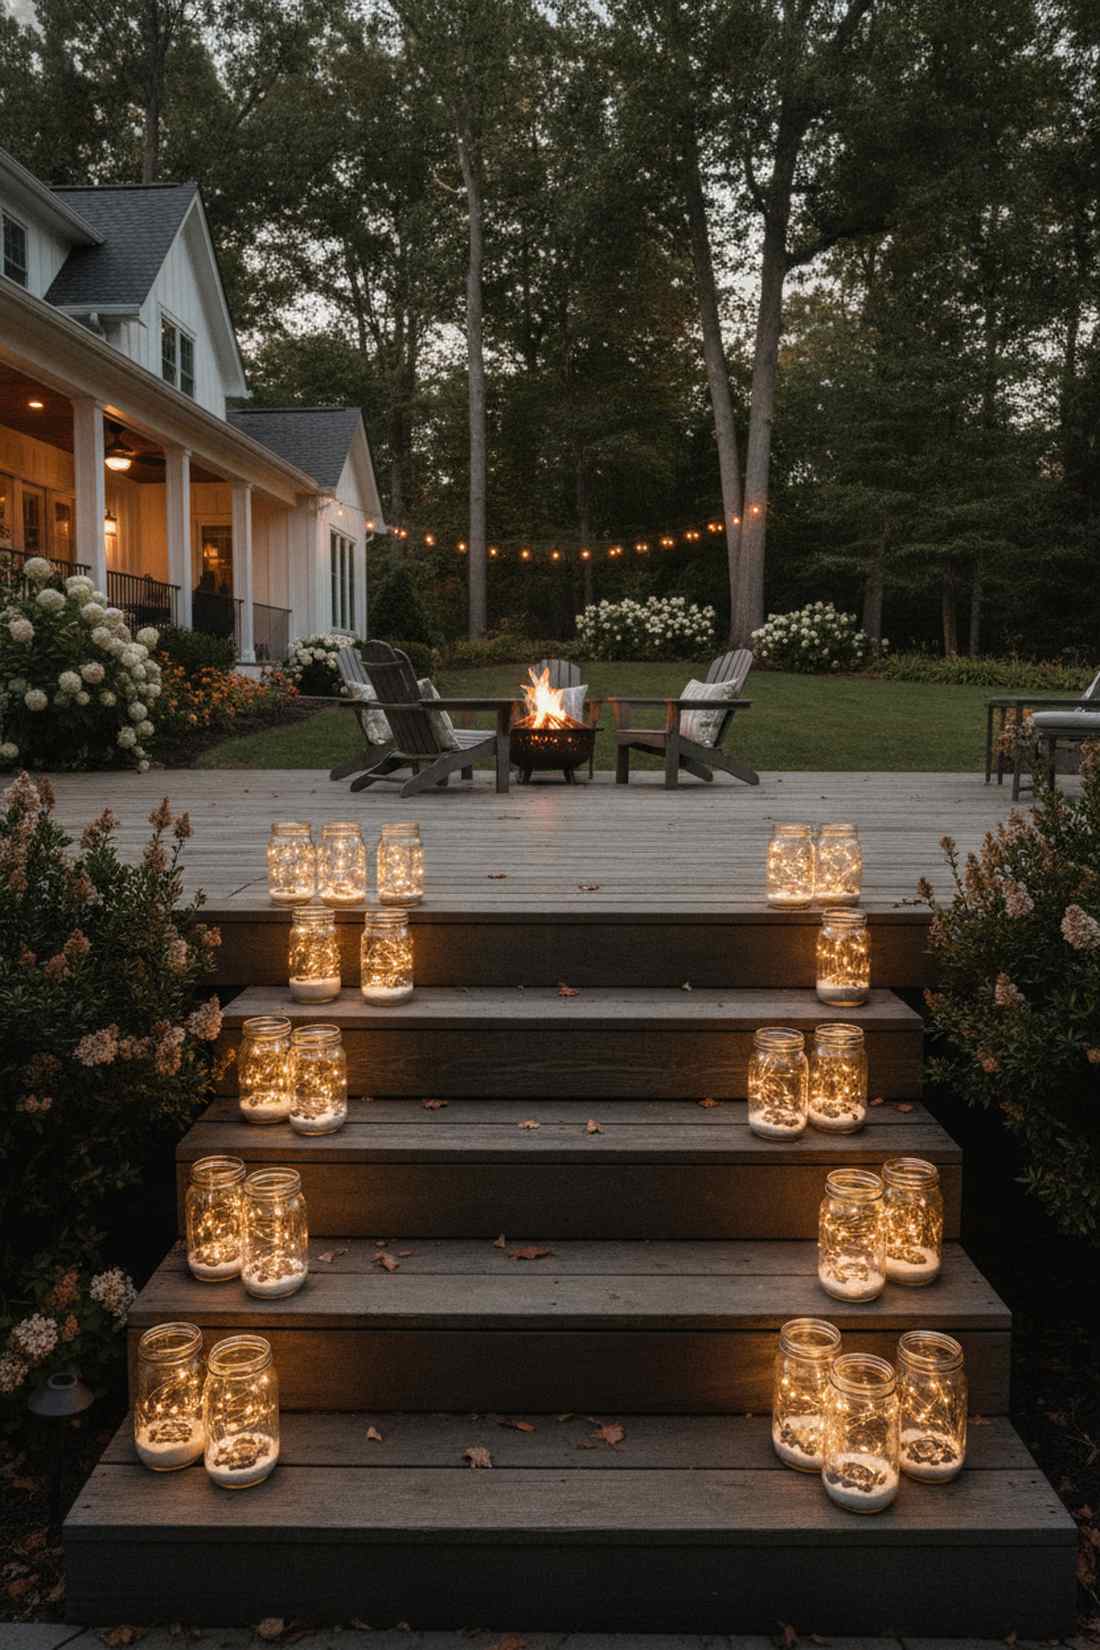
These adorable portable rustic lanterns feel like little captured stars you can carry around. Perfect for lining a temporary party aisle or clustering on patio stairs.
Store-bought lanterns are overpriced, but stuffing jars with copper strings avoids that cheap dorm-room look and creates heavy, glass-refracting brilliance. Adding miniature garden supplies like a layer of white sand or pebbles at the bottom hides the battery pack completely.
You can build a dozen of these for about $30–$50. It’s a fast upgrade that completely changes the vibe of any quick gathering.
- Key Materials: Mason jars and copper battery strings
- Vibe / Style: Rustic country charm
- Difficulty: Fun DIY craft
- Budget Breakdown: Jar case: $15 | Light bulk pack: $20.
- Creator’s Tip: Frost the inside of the jar lightly with a glass-frosting spray paint to diffuse the harsh pinpoint LEDs into a soft, glowing orb.
- Smart Sourcing: bulk pack micro-LED battery strings and frosted glass spray paint.
Mason jars are a cute DIY, but if you want something that looks like modern art, this next sphere trick will blow your mind…
42. Globe Sphere Installations
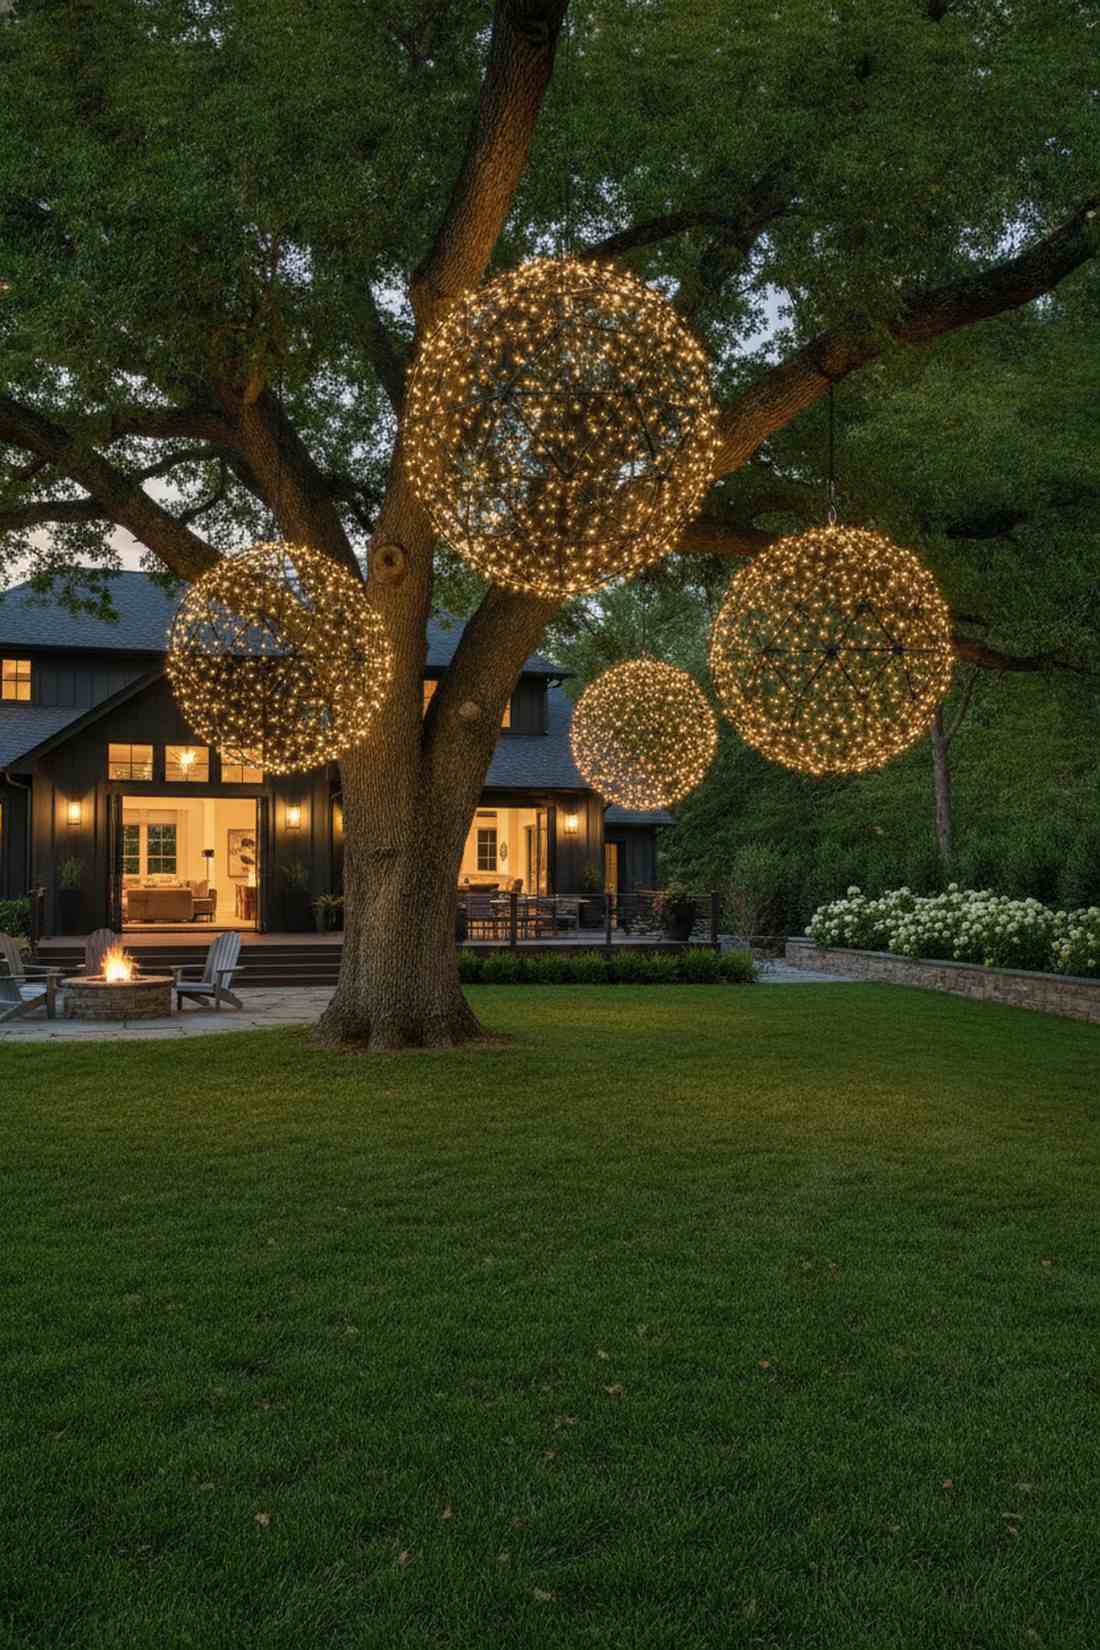
A mesmerizing floating geometric orb that feels like a glowing planet suspended in the night sky. Incredibly striking when hung at varying heights from massive oak branches.
Buying pre-made glowing orbs costs hundreds, but wrapping strings around cheap wire garden frames gives a designer-level finish for pennies. This 3D sculptural fairy lights outdoor hack creates massive volume and throws wild, intricate shadows across the lawn.
You can build three massive orbs for just $40–$70. Save this to your high-end landscape architecture board!
- Key Materials: Wire topiary frames & thick light strings
- Vibe / Style: Modern art installation
- Difficulty: Moderate wrapping patience
- Budget Breakdown: Wire frames: $30 | Strings: $30.
- Creator’s Tip: Use dark green or black wire frames and match the light string wire color perfectly; during the day, the spheres will become virtually invisible.
- Smart Sourcing: wire sphere topiary frames (set of 3) and black-wire outdoor LED strings.
43. Water Feature Illumination
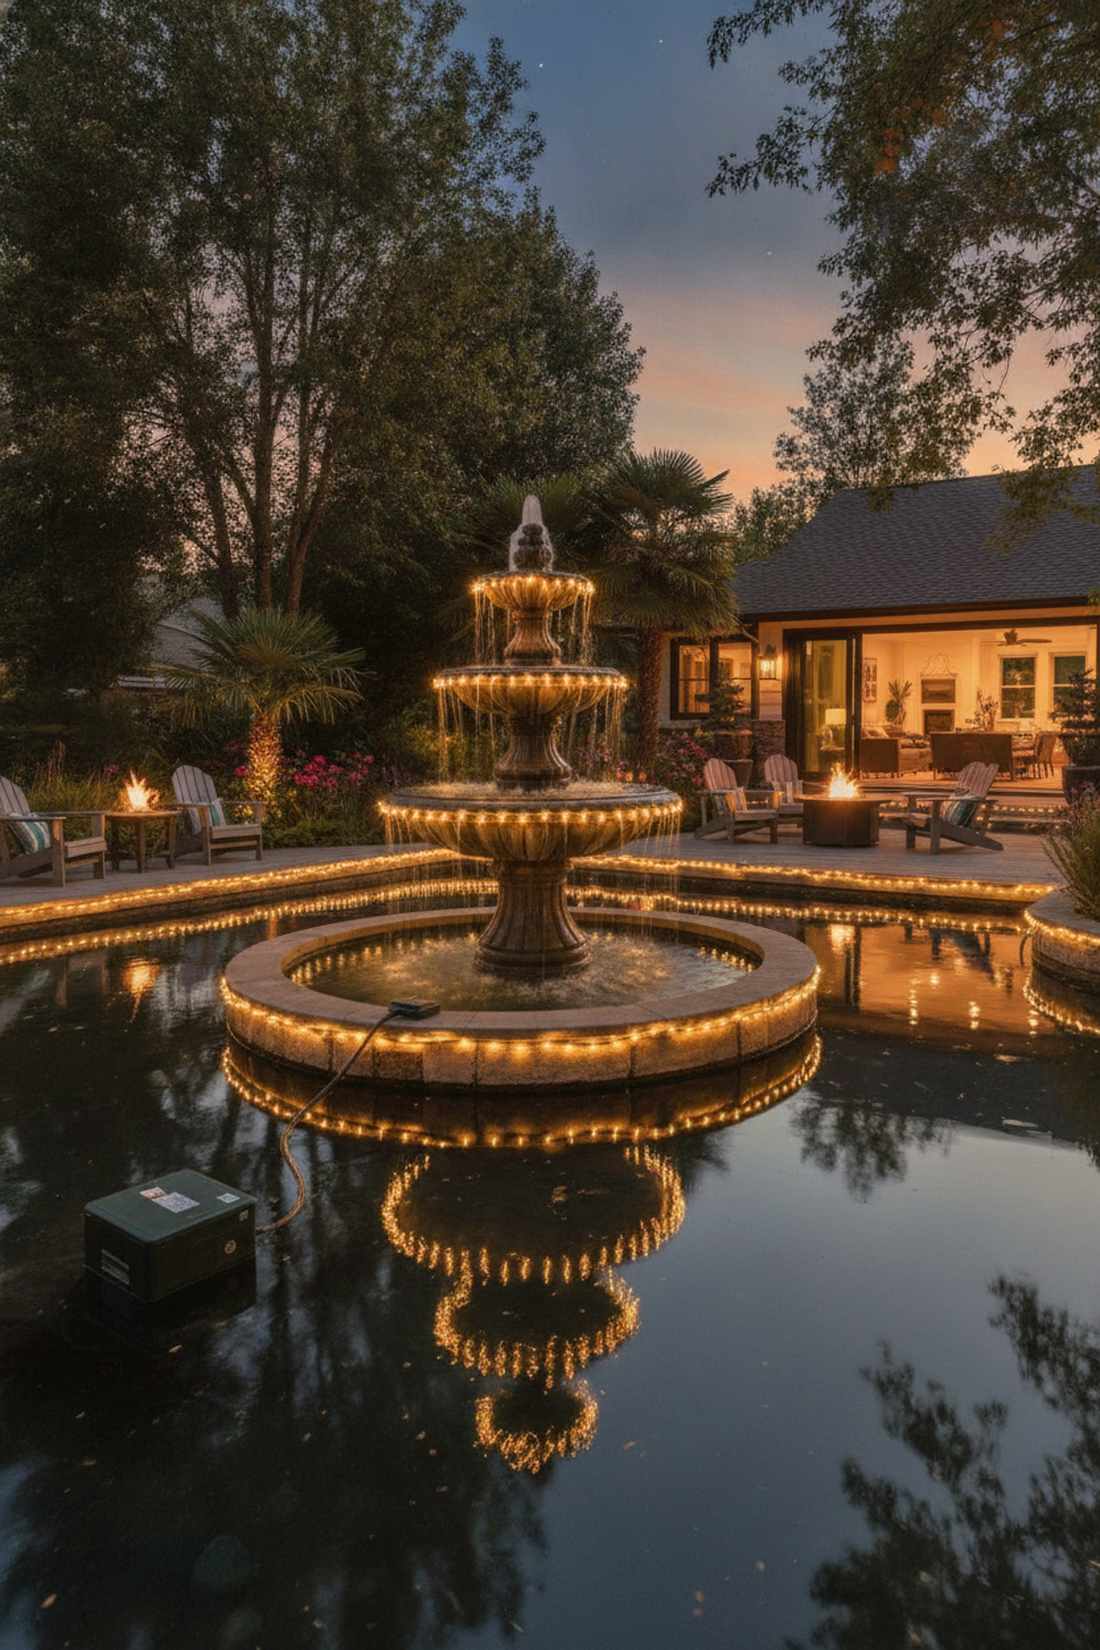
A breathtaking liquid mirror reflection that feels like glowing magic bubbling up from the earth. Essential for backyard koi ponds, tiered fountains, or simple birdbaths.
Standard lighting ignores water completely, but sinking waterproof LEDs under the surface delivers a surprisingly premium look that makes the water shimmer and dance. Utilizing commercial-grade waterproof fairy garden supplies ensures the fish stay safe while the aesthetics explode.
Submerging your water feature properly costs around $35–$60. It is an absolute game-changer for backyard tranquility.
- Key Materials: Fully submersible IP68 LED ropes
- Vibe / Style: Magical lagoon oasis
- Difficulty: Careful waterproof routing
- Budget Breakdown: IP68 strings: $45 | Waterproof sealant: $10.
- Creator’s Tip: Hide the lights just behind the waterfall lip or under large decorative rocks; seeing the glowing water is beautiful, seeing the plastic bulb is tacky.
- Smart Sourcing: IP68 fully submersible LED lights and aquarium-safe clear silicone.
44. Climbing Plant Integration
An intricate glowing ivy wall that feels like a living, breathing bioluminescent organism. The absolute best way to highlight wisteria, jasmine, or climbing roses on a bare trellis.
Wrapping lights over the leaves crushes them, but weaving the wire tightly to the bare structural vine during winter avoids that cheap dorm-room look and lets the leaves grow *over* the bulbs in spring. This creates a deeply integrated fairy lights garden design that pulses with natural life.
This genius seasonal trick costs roughly $25–$50. Pin this if you want your garden to look organically magical.
- Key Materials: Green-wire copper micro-strings
- Vibe / Style: Overgrown enchanted ruins
- Difficulty: Requires winter-time installation
- Budget Breakdown: Micro-strings: $30 | Plant tape: $5.
- Creator’s Tip: Always use flexible, unheated copper wire; standard thick wires get too hot and will literally scorch the delicate climbing plant tendrils.
- Smart Sourcing: green-coated copper fairy wire (bulk pack) and green horticultural stretch tie tape.
45. Deck Railing Underlighting
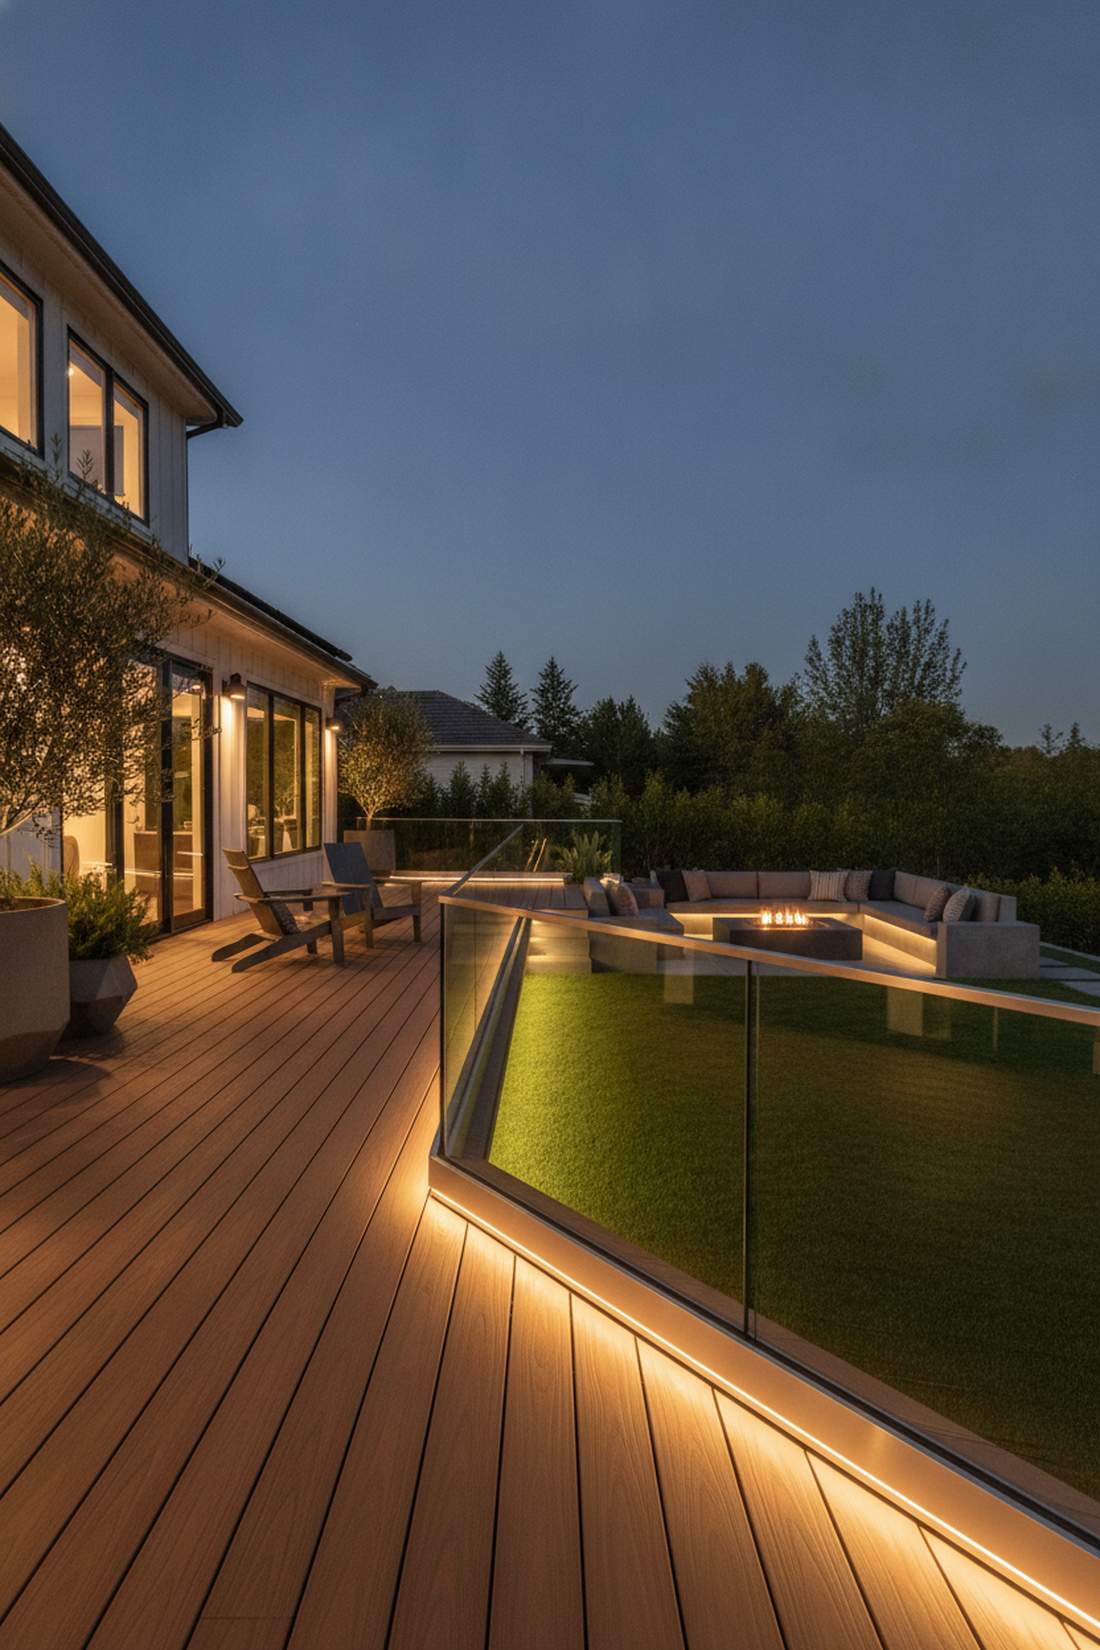
A super sleek floating boundary line that feels like an upscale yacht deck cruising through the night. A massive upgrade for modern wooden or composite backyard decks.
Screwing bulky fixtures to the top rail is ugly, but hiding an LED strip directly under the handrail lip gives a designer-level finish that casts light purely onto the floor. This provides flawless walking visibility without sending blinding glare directly into your eyes while seated.
Outfitting a standard deck perimeter costs about $60–$100. Save this to your modern deck renovation board immediately.
- Key Materials: Waterproof LED flat strips
- Vibe / Style: Minimalist luxury yacht
- Difficulty: Precise under-mounting
- Budget Breakdown: Long strip spools: $75 | Mounting track: $20.
- Creator’s Tip: Buy a cheap aluminum U-channel track to house the LED strip; it acts as a heat sink to prolong the light’s life and diffuses the dots into a solid glowing bar.
- Smart Sourcing: aluminum LED diffuser channel kits and waterproof LED strip light spools.
46. Potted Plant Highlighting
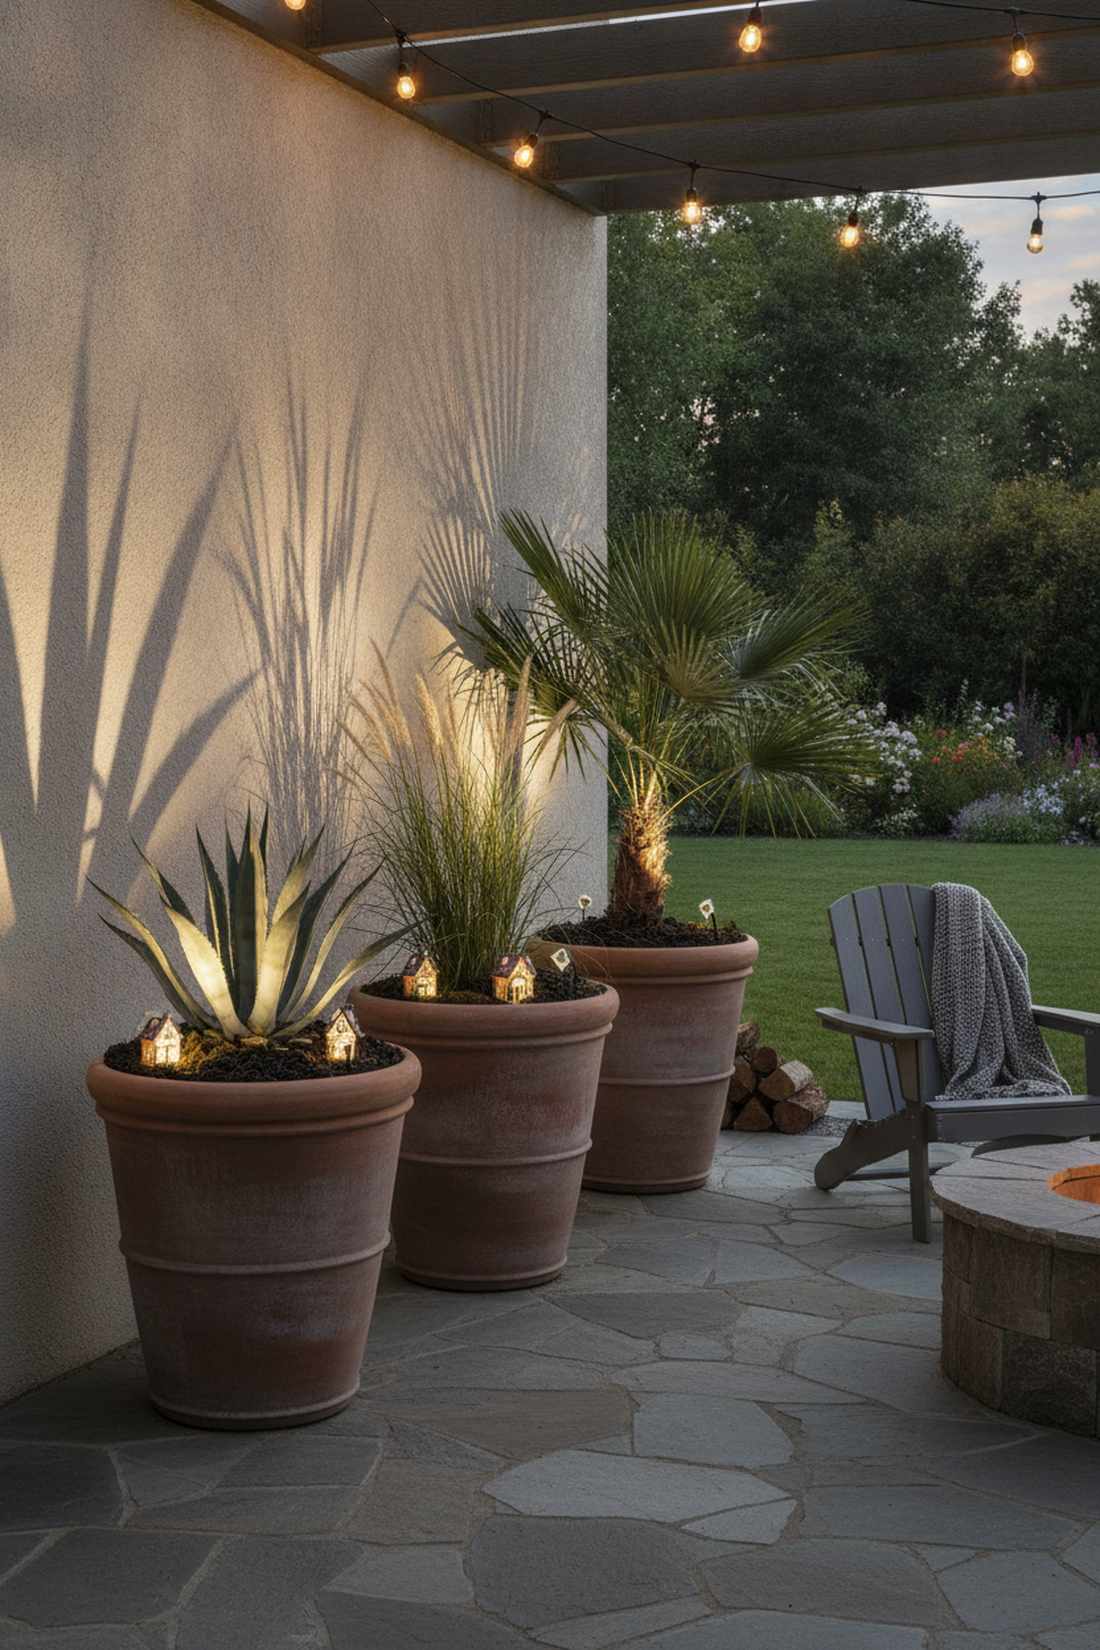
A punchy sculptural container glow that feels like highlighting precious art inside a museum. Brilliant for massive terracotta pots holding spiky agave, tall grasses, or architectural palms on the patio.
Most pots disappear at night, but stabbing a few micro-spots into the soil looks far more expensive than it is and creates dramatic, razor-sharp shadows against the exterior walls. Tossing in UV-coated resin fairy cottage kits at the base turns a simple planter into an entire universe.
You can light up three giant planters for just $20–$40. It’s a fast upgrade that completely changes the vibe of flat patio corners.
- Key Materials: Miniature solar up-lights
- Vibe / Style: Dramatic museum exhibition
- Difficulty: 2-minute staking
- Budget Breakdown: Mini solar spots: $30 | Decorative mulch: $5.
- Creator’s Tip: Bury the bulky solar panel box completely in the decorative moss or mulch, leaving only the clear receptor lens exposed to the sun.
- Smart Sourcing: miniature solar spotlight kits (pack of 4) and UV-coated resin fairy cottage kits.
47. Outdoor Curtain Integration
A soft glowing fabric partition that feels like a romantic cabana on a tropical beach. The ultimate way to add extreme privacy and mood lighting to a cheap metal gazebo or pergola.
Naked lights can feel harsh, but sandwiching strings behind sheer, weather-proof fabric totally avoids that cheap dorm-room look by transforming the entire curtain into a massive, soft diffuser. This fairy lights backyard trick makes the space feel incredibly expensive and highly exclusive.
Combining lights and sheer panels will run you $50–$90. Pin this if you have nosy neighbors and need a stylish privacy fix.
- Key Materials: Sheer outdoor curtains and hanging strings
- Vibe / Style: Romantic beach resort
- Difficulty: Double-rod hanging
- Budget Breakdown: Curtain panels: $40 | String lights: $30.
- Creator’s Tip: Hang the light strand exactly 2 inches behind the curtain fabric; touching the fabric creates hot-spots, while a slight gap creates a perfectly smooth blur.
- Smart Sourcing: sheer waterproof outdoor curtain panels and cool-touch LED curtain strings.
48. Branch Chandelier Creation
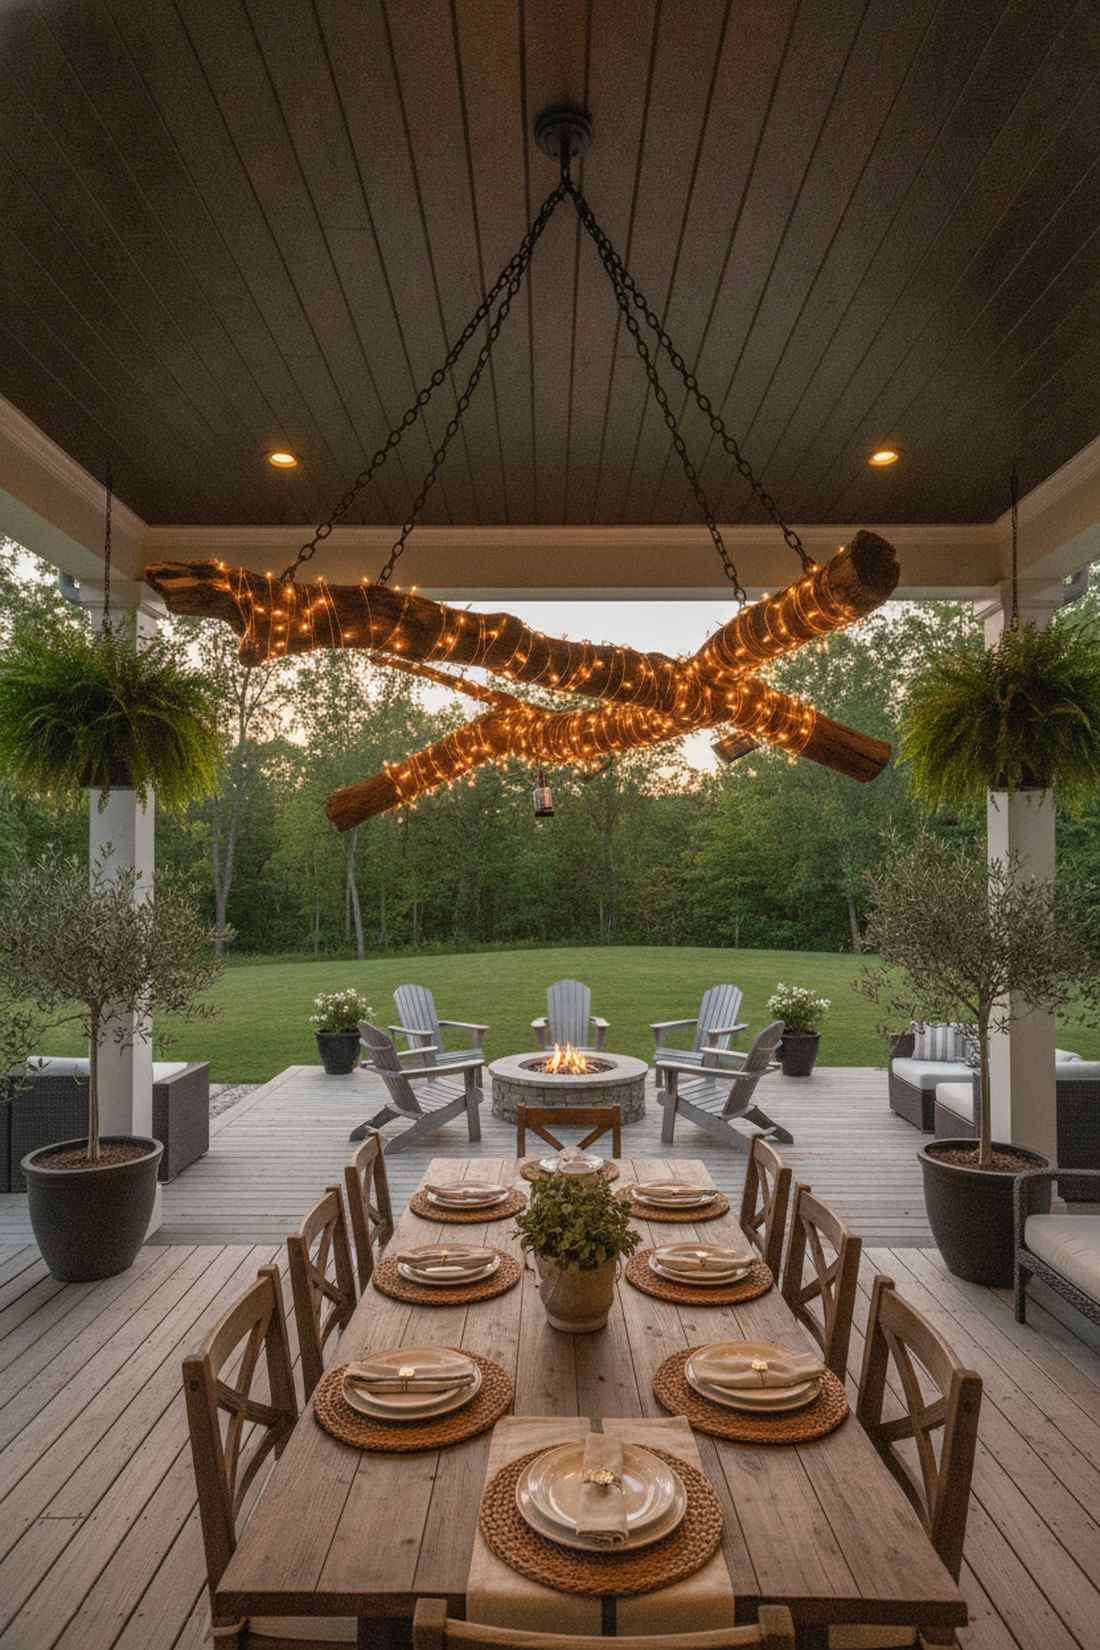
A rustic floating driftwood centerpiece that feels like custom artisan woodwork hanging over your table. Incredible for those wanting a highly organic, natural focal point under a covered patio.
Buying a real outdoor chandelier costs a fortune, but wrapping a massive, interesting dead branch tightly in copper wire gives a designer-level finish that looks 100% bespoke. Suspending it with heavy chains anchors your outdoor dining space with raw, structural beauty.
This massive statement piece costs merely $25–$50 to craft. Save this to your DIY rustic decor board!
- Key Materials: Found branch & battery copper wire
- Vibe / Style: Bespoke rustic artisan
- Difficulty: Requires a heavy-duty ceiling anchor
- Budget Breakdown: Copper wire: $15 | Hanging chains/hooks: $25.
- Creator’s Tip: Power wash and fully dry the branch, then spray it with clear matte polyurethane before wrapping the lights to prevent it from rotting above your dinner table.
- Smart Sourcing: clear matte exterior polyurethane spray and heavy-duty black suspension chains.
49. Ground Pattern Arrangements
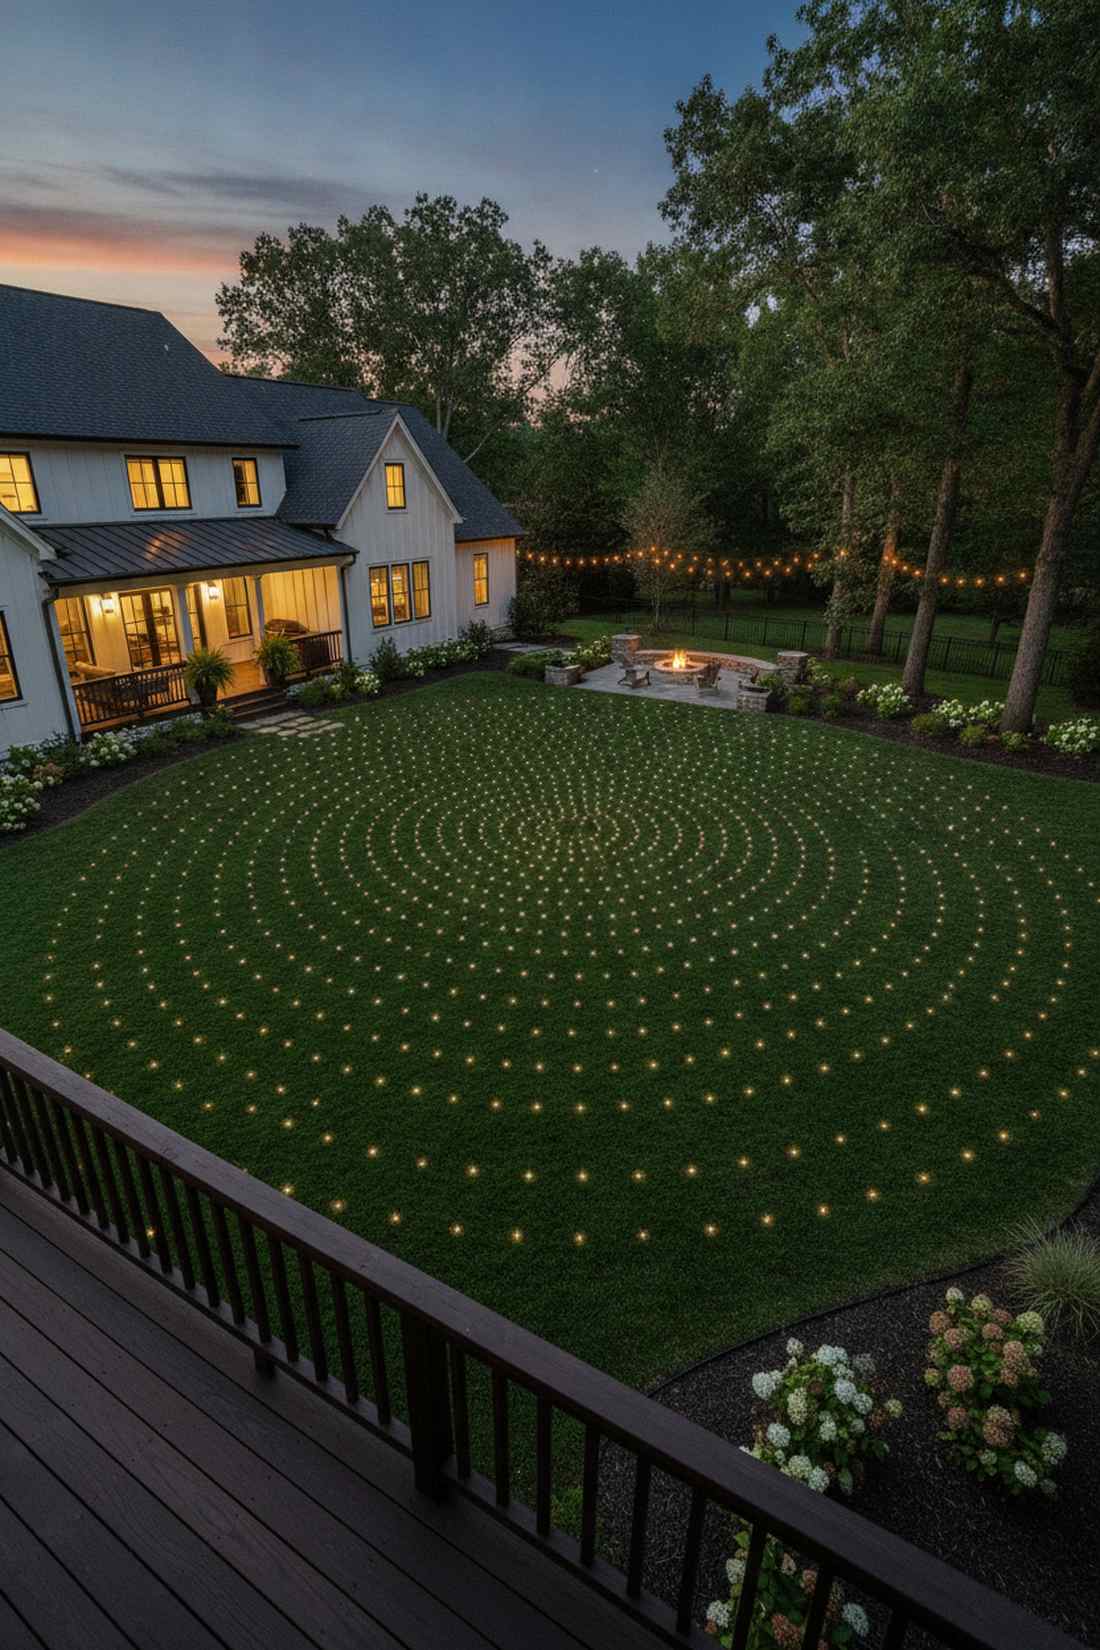
A massive geometric lawn canvas that feels like an ancient, glowing crop circle. This is an epic feature for large, open grass lawns when viewed from an elevated second-story deck.
Randomly throwing stakes in the yard looks messy, but using a tight grid or spiral layout looks far more expensive than it is and treats your grass like an art installation. Utilizing high-quality miniature garden supplies to execute a sharp labyrinth or star pattern elevates your yard into a landmark.
A massive ground installation usually costs $80–$150. Pin this if you host massive lawn parties and want a major conversation starter.
- Key Materials: Bulk packs of low-profile solar discs
- Vibe / Style: Avant-garde landscape art
- Difficulty: Intense geometric measuring
- Budget Breakdown: Solar discs (bulk): $120 | Measuring string: $5.
- Creator’s Tip: Use a cheap laser level placed in the center of the yard at dusk to ensure every single stake is aligned in a perfectly straight line before pushing them down.
- Smart Sourcing: flat-profile solar ground disk lights (bulk pack) and outdoor landscaping laser level.
50. Overhead Shade Sail Outlining
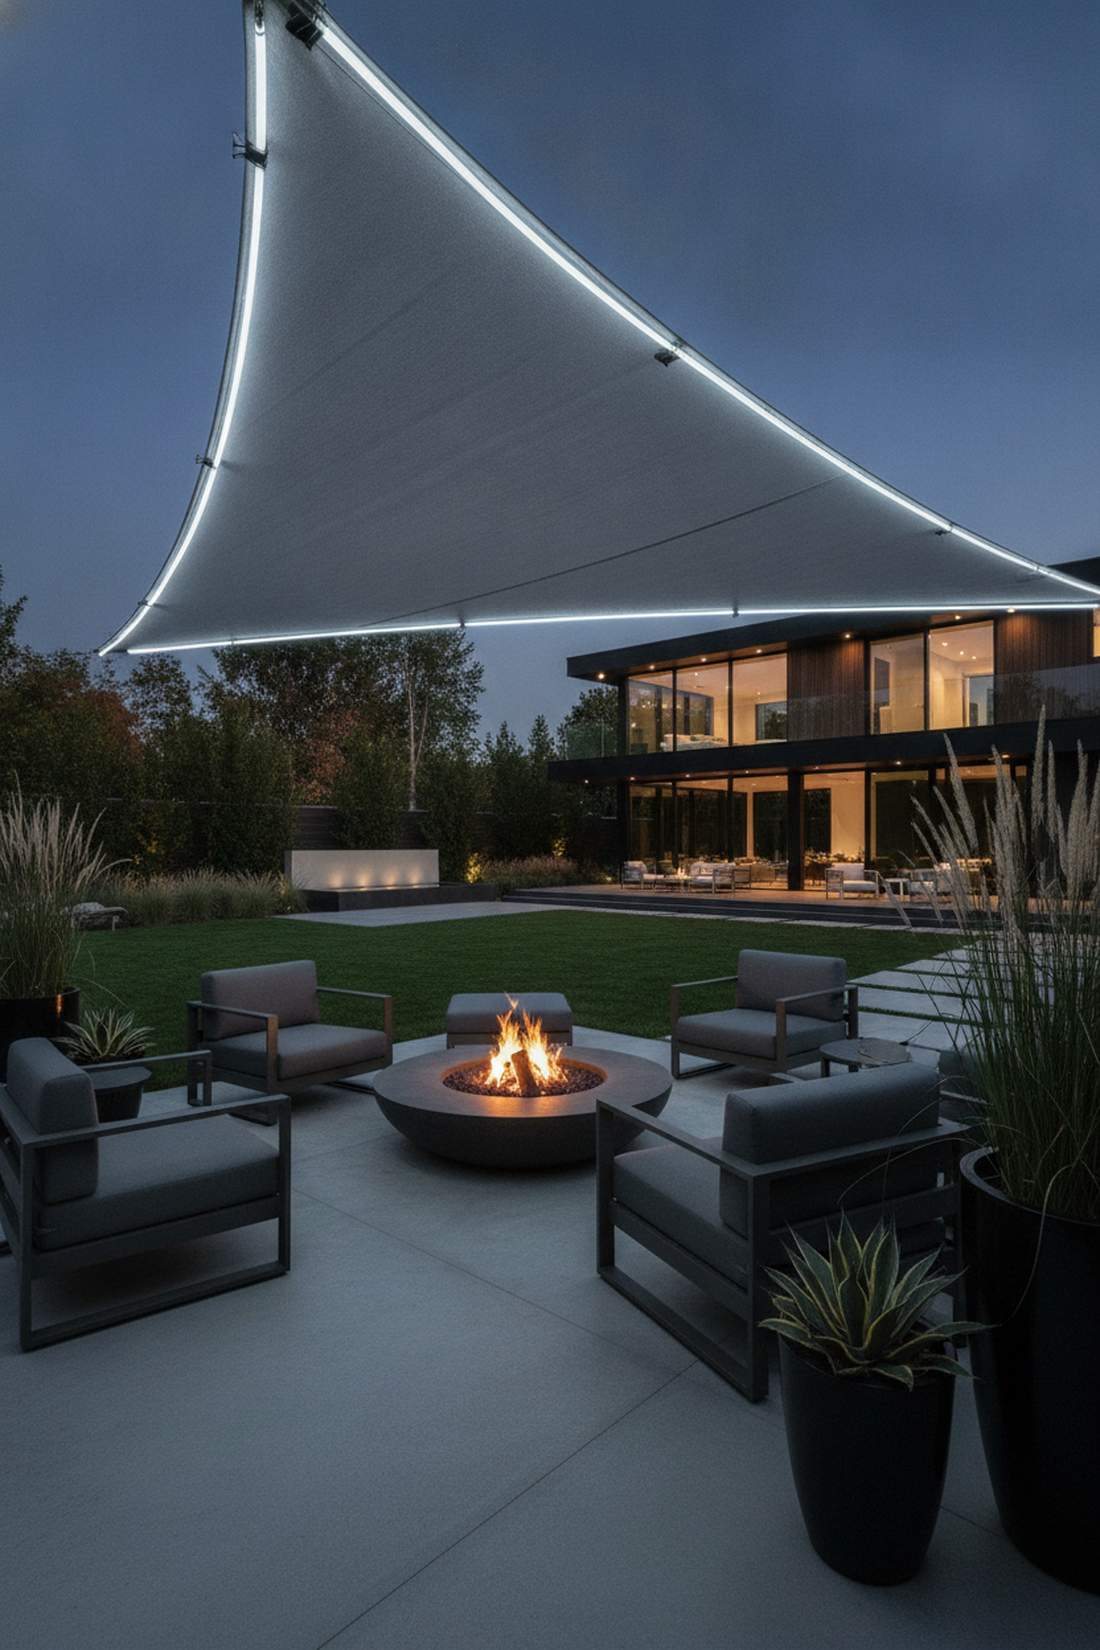
A striking glowing triangular canopy that feels like a futuristic spaceship hovering above your patio. The ultimate way to make your daytime sunshades highly functional at night.
Shade sails turn into invisible black holes at night, but pinning an LED strip perfectly along the tensioned perimeter gives a designer-level finish that highlights their aggressive modern architecture. This fairy lights outside hack provides massive overhead ambient glow without adding any new poles or wires.
Outlining a large sail costs about $40–$75. It’s a fast upgrade that completely changes the vibe of your modern backyard.
- Key Materials: Flexible LED rope & fabric clips
- Vibe / Style: Ultra-modern futuristic tension
- Difficulty: Requires working on a ladder
- Budget Breakdown: LED rope: $50 | Sail clips: $15.
- Creator’s Tip: Do not pierce the shade sail fabric with safety pins; use small black binder clips attached to the reinforced hem to hold the light wire without tearing the canvas.
- Smart Sourcing: waterproof LED neon flex rope (outdoor) and heavy-duty mini tarp clips.
51. Multi-Level Deck Terracing
An expansive layered topographic glow that feels like the cascading terraces of an upscale vineyard. Crucial for massive, split-level wooden decks that are dangerously hard to navigate in the dark.
A single floodlight flattens out beautiful deck architecture, but outlining every single drop-off tier completely avoids that cheap dorm-room look and creates incredible 3D topographical depth. Adding waterproof fairy garden supplies into the corner planters of each tier pulls the whole multi-level design together.
Tiering a large deck usually requires $100–$200 in materials. Save this to your deck renovation blueprint board!
- Key Materials: Connectable low-voltage edge strips
- Vibe / Style: Grand architectural depth
- Difficulty: Advanced cable management
- Budget Breakdown: Edge strips: $140 | Cable hiders: $30.
- Creator’s Tip: Run all the connecting wires underneath the deck boards through the joists to ensure a completely wireless, highly professional topside aesthetic.
- Smart Sourcing: low-voltage landscape deck lighting kits and outdoor wire concealment raceways.
52. Living Wall Integration
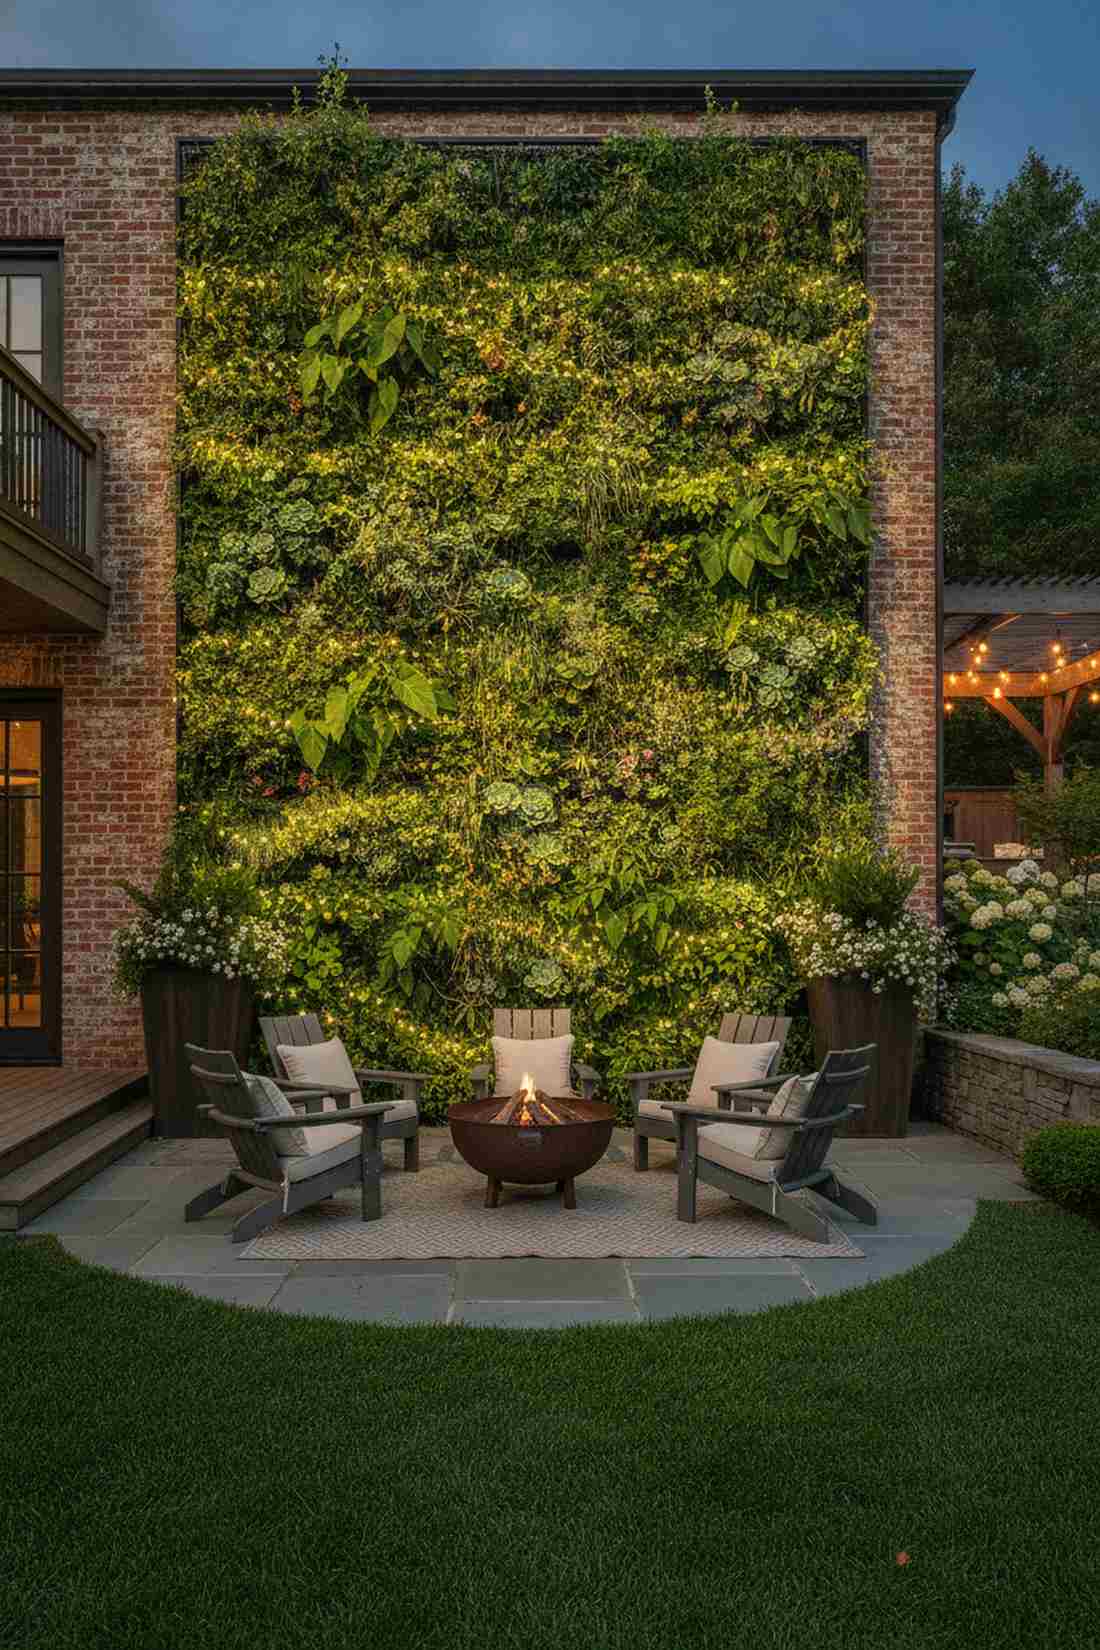
A dense glowing botanical tapestry that feels like a slice of the Amazon rainforest pulsating with light. Perfect for vertical succulent gardens or dense ivy walls mounted against brick exteriors.
Front-lighting a living wall creates harsh, ugly shadows, but weaving IP68 rated strings onto the mesh behind the dirt looks far more expensive than it is and creates an eerie, beautiful backlight. This transforms a dark mass of leaves into the crown jewel of your fairy lights backyard.
Backlighting a vertical planter costs roughly $35–$65. Pin this if you want to elevate your plant-parent aesthetic to designer levels.
- Key Materials: Submersible wire strings
- Vibe / Style: High-end botanical museum
- Difficulty: Messy dirt manipulation
- Budget Breakdown: Waterproof wire: $30 | Zip ties: $5.
- Creator’s Tip: You must use fully submersible IP68 rated lights, not just “water-resistant” strings, because the constant moisture of the soil will corrode standard wires in days.
- Smart Sourcing: IP68 fully submersible LED lights and vertical living wall planter grids.
53. Seasonal Themed Installations
An ever-shifting dynamic mood canopy that feels like a high-end department store window adapting to the calendar. The absolute best strategy for those who want their backyard to feel fresh every three months.
Leaving the same setup up all year induces lighting fatigue, but installing permanent heavy-duty structural wires allows you to rapidly swap the actual strings, giving a designer-level finish all year long. Swapping cool-white icy tones in winter for warm-amber miniature garden supplies in summer keeps the yard alive.
Building the permanent base infrastructure costs $50–$90, with seasonal swaps costing $20 each. Highly recommended for the ultimate hosting house.
- Key Materials: Permanent steel guide-wires & quick clips
- Vibe / Style: Ever-changing premium landscape
- Difficulty: Initial hard setup, easy swaps
- Budget Breakdown: Wire grid: $60 | Carabiners: $20.
- Creator’s Tip: Hang your light strings using small metal carabiners attached to the permanent steel guide-wire; you can unclip and swap an entire yard’s lighting theme in under 15 minutes.
- Smart Sourcing: stainless steel wire rope kits and miniature stainless steel carabiner clips (bulk).
Transform Your Outdoor Living Space
Strategic fairy lights outdoor installations extend the functionality and beauty of your patio well beyond sunset. The 53 techniques outlined above demonstrate how smart product sourcing, heavy-duty mounting, and creative layering transform cheap light strands into premium, commercial-grade landscape features. Whether you implement a simple balcony drape or a massive interconnected tree canopy, always prioritize UV-coated materials, waterproof connectors, and setups that naturally flatter your existing architecture. Start by executing one high-impact area—like the overhead dining canopy or a stunning tree wrap—using the premium starter kits and bulk materials suggested. Once you see that incredible “expensive but cheap” glow, you’ll be ready to expand these blueprints across your entire property.