Transforming tight spaces relies on strategic backyard garden ideas for small yards to balance aesthetics and harvest yields. Using premium vertical layouts and multi-functional hardscaping, you can easily triple your growing capacity on a realistic budget. The outcome is a designer-level outdoor room.
Design Snapshot: Core Space-Maximizing Principles
- Vertical Integration: Utilize all three dimensions by mounting planters on walls, fences, and overhead structures to reclaim floor space.
- Multi-Functionality: Select furniture and hardscape elements that serve dual purposes—storage benches, trellis-fencing, edible hedgerows.
- Layered Planting: Combine ground covers, mid-height specimens, and overhead canopies to create depth without horizontal sprawl.
- Modular Flexibility: Use movable containers and foldable furniture to adapt layouts for different seasons or activities.
Vertical Structures That Expand Growing Zones
Designers redirect attention upward when horizontal space runs out. Vertical gardening techniques convert blank walls, fence panels, and support posts into productive surfaces that increase planting area by 200-400% without claiming additional ground.
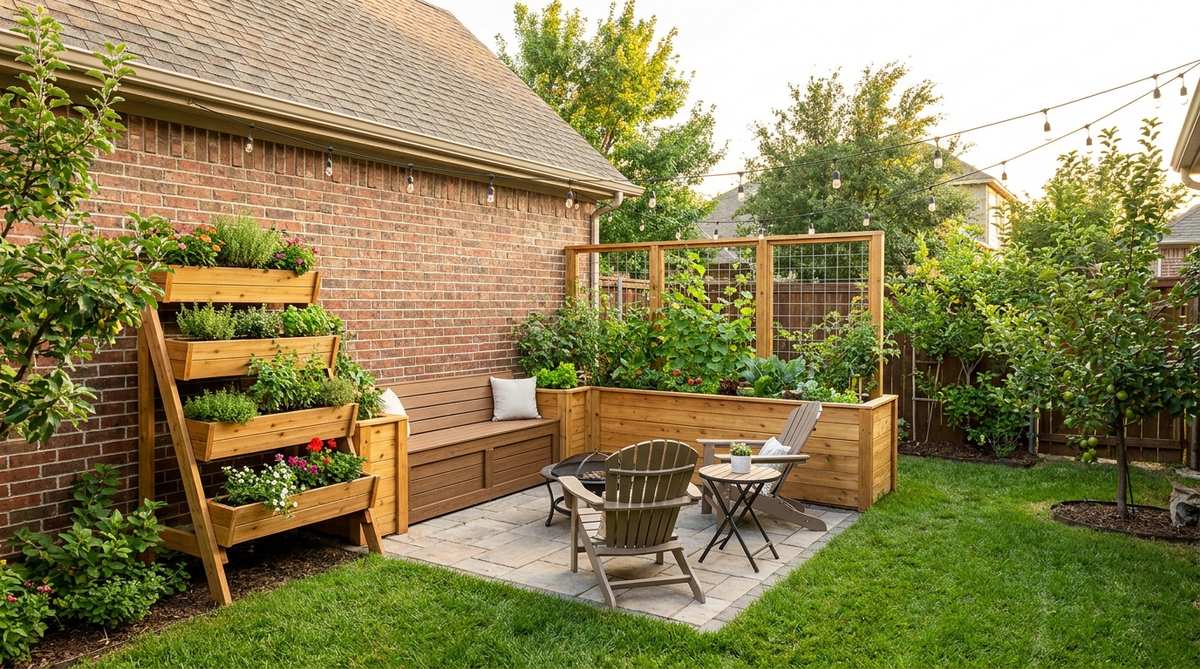
1. Wall-Mounted Planter Grids
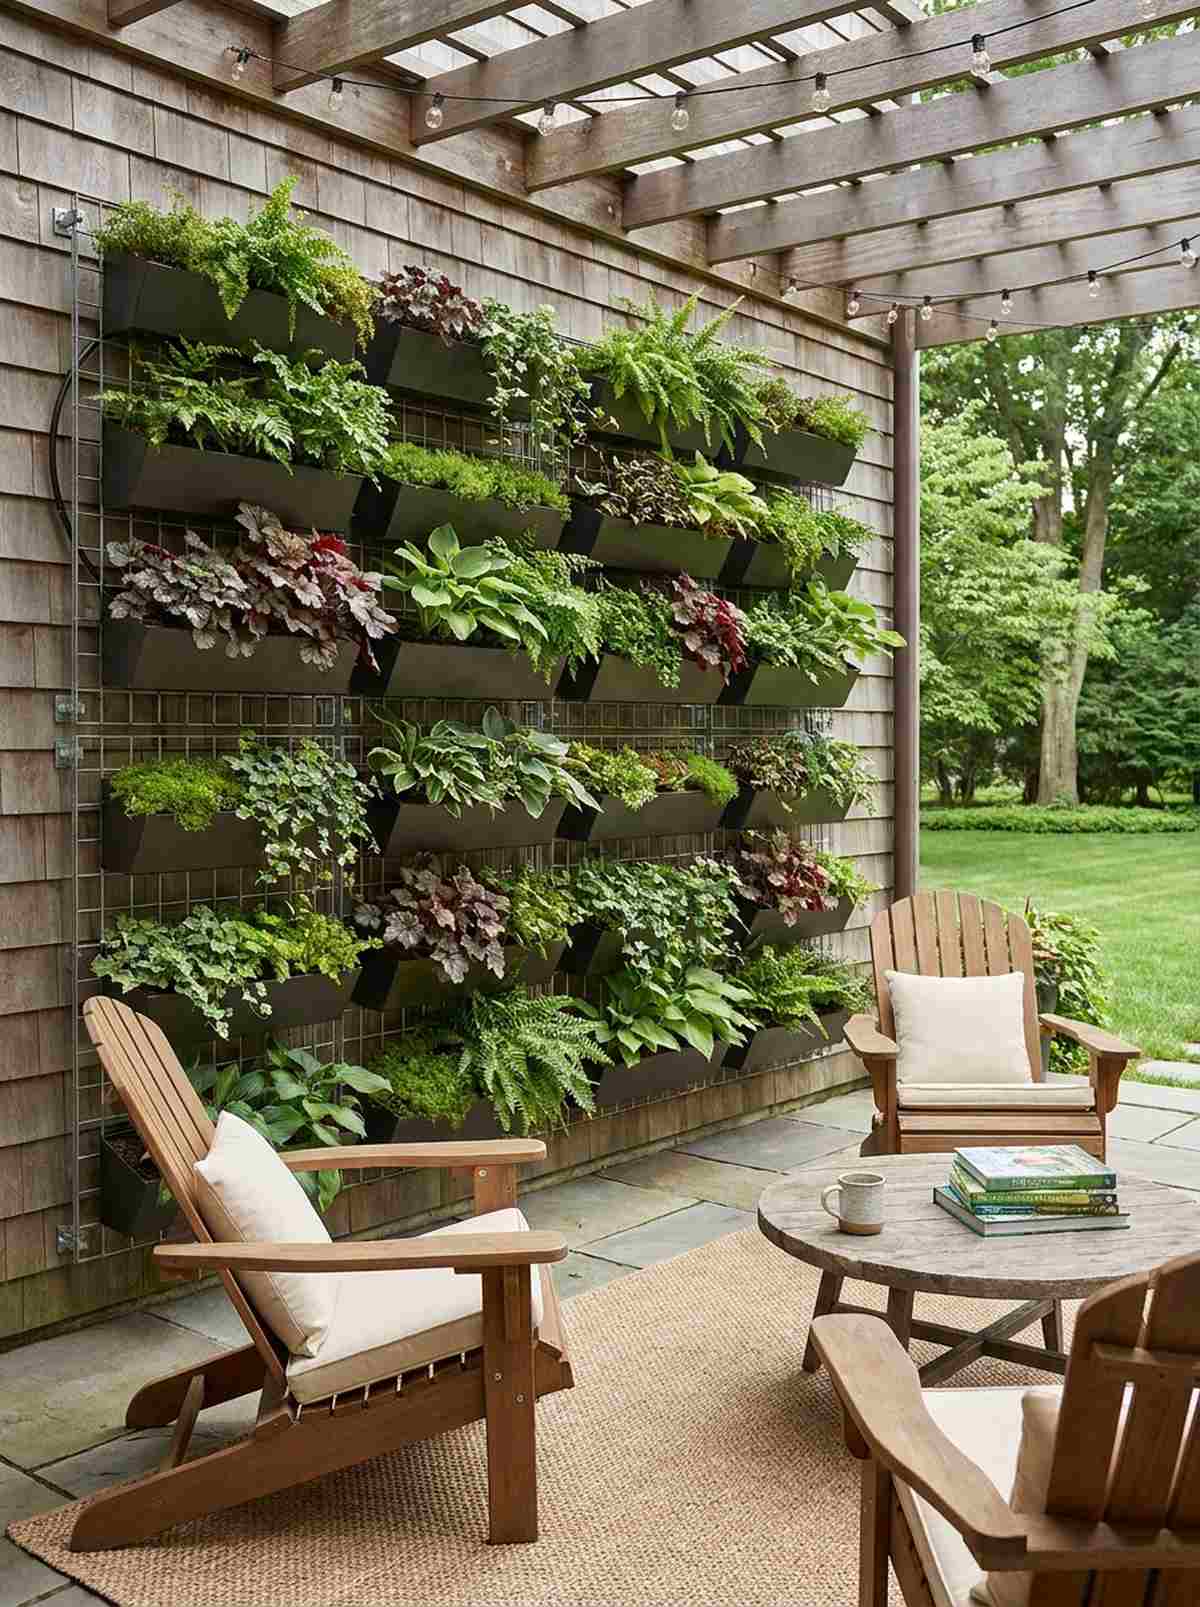
This layout feels like a tiny hidden forest you accidentally discovered right on your own patio. Utilizing modular wall planters works exceptionally well for a shaded balcony or narrow side return.
A designer-level finish is easily achieved when you ditch flimsy plastics for rigid framing. Snagging some premium miniature garden supplies ensures proper drainage and stops soil from rotting your siding.
You can easily pull this off for around $40–$60. Save this to your DIY weekend garden board so you don’t forget the layout!
- Key Materials: Wall grid system, rich potting soil
- Vibe / Style: Lush living wallpaper
- Difficulty: Easy beginner setup
- Budget Breakdown: Grids: $30 | Plants: $25
- Creator’s Tip: Add a drip-line tube behind the top row so gravity waters the rest automatically.
- Smart Sourcing: Pre-drilled modular wall planters (bulk pack)
2. Arched Trellis Walkways
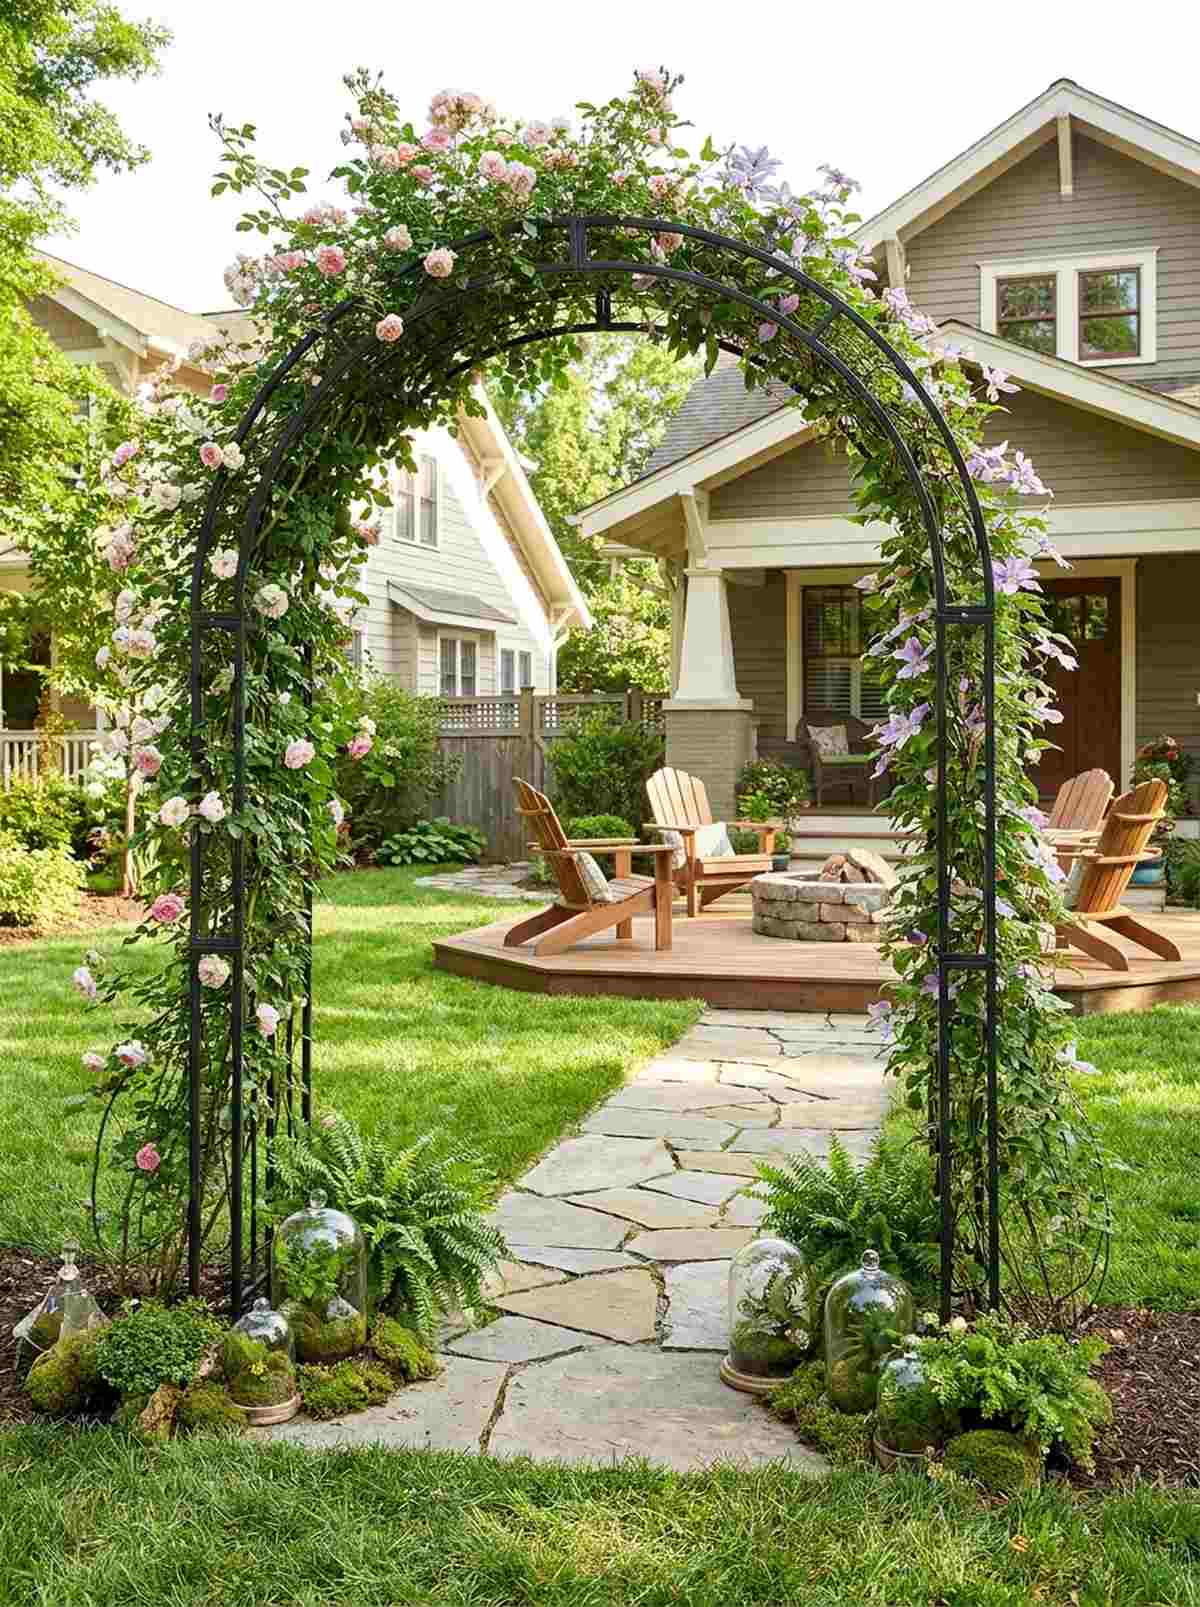
Walking under this setup feels straight out of a storybook courtyard. A beautiful overhead garden archway creates the perfect transition zone for compact suburban backyards.
Most people overcomplicate archways, but using a heavy-duty climbing frame gives a surprisingly premium look in minutes. Integrating high-quality terrarium accessories at the base helps camouflage the metal legs effortlessly.
Expect to spend about $50–$85 for a sturdy structure. It’s a fast upgrade that completely changes the vibe of your outdoor walkway.
- Key Materials: Steel arch trellis, vining plants
- Vibe / Style: Romantic garden stroll
- Difficulty: Moderate assembly required
- Budget Breakdown: Metal Arch: $60 | Vines: $20
- Creator’s Tip: Plant shade-tolerant greens directly under the arch to maximize your harvest zone.
- Smart Sourcing: Rust-resistant powder-coated steel arches
3. Ladder Plant Displays
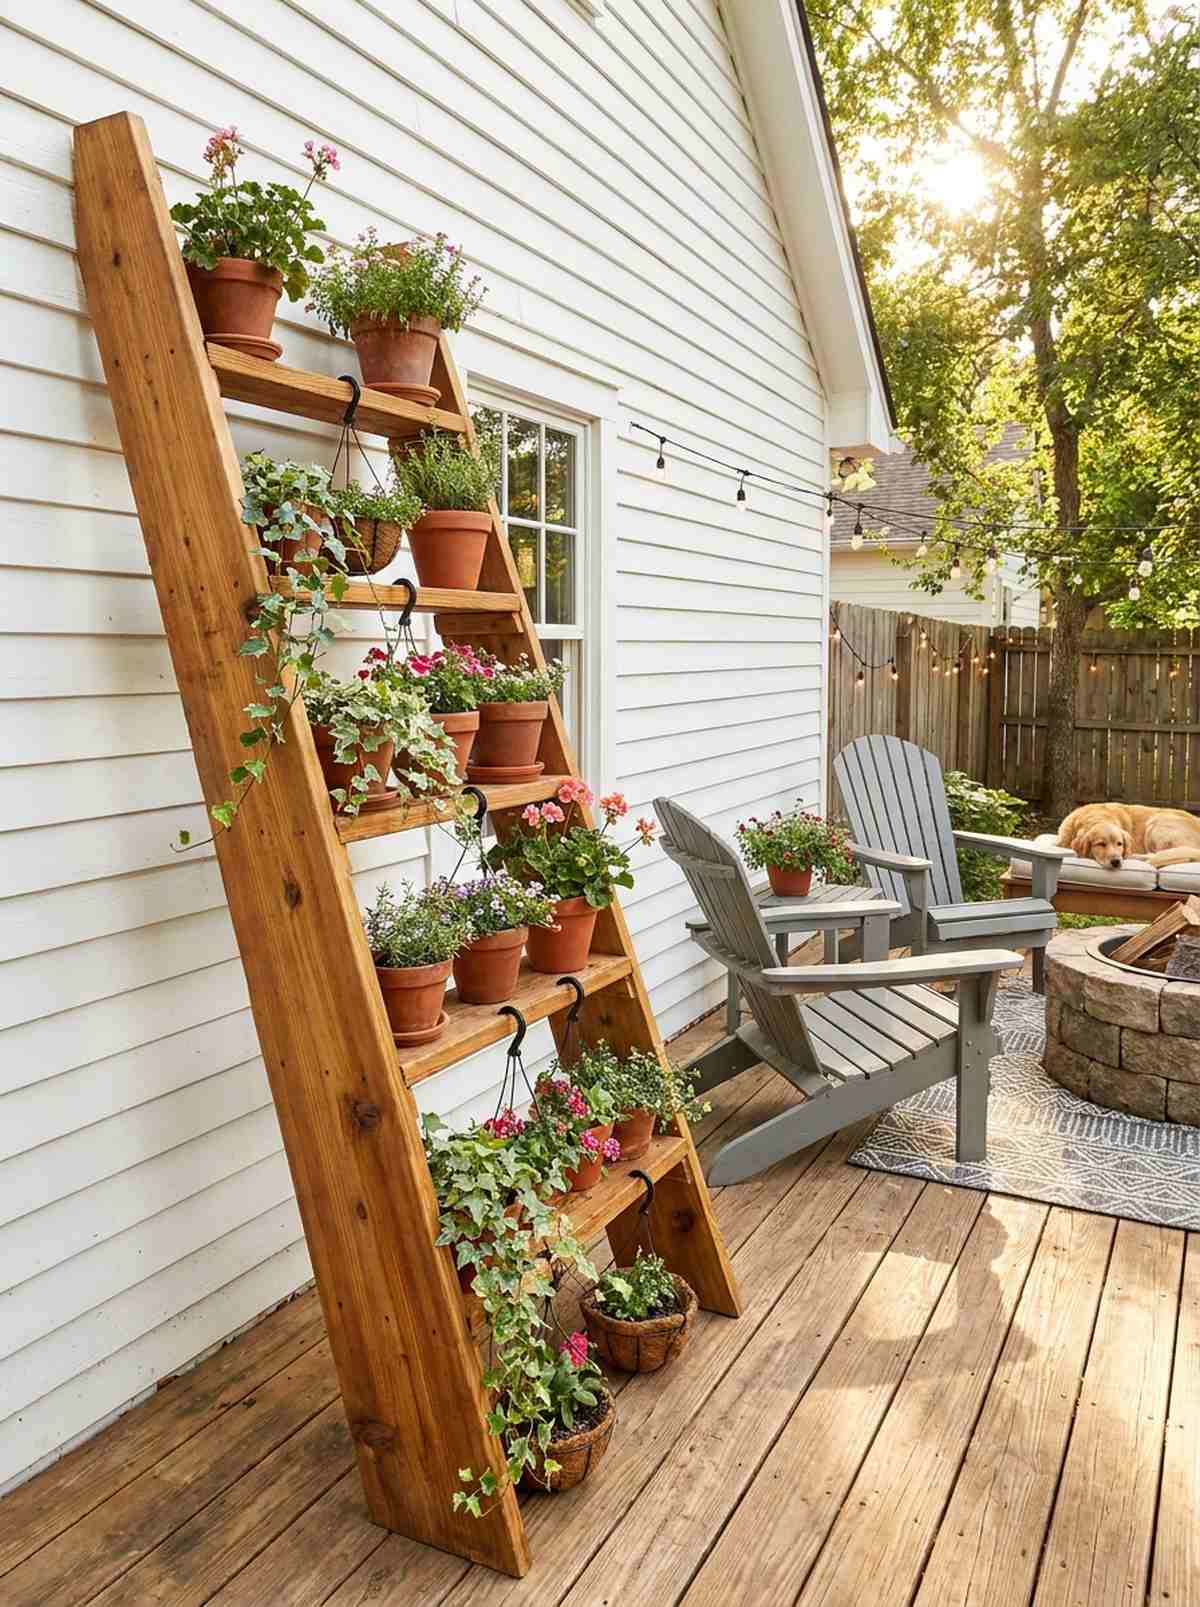
This tiered arrangement brings an instant farmhouse charm that feels endlessly inviting. Deploying a staggered plant ladder is ideal for small decks lacking square footage.
Don’t fall into the trap of using untreated indoor furniture outside; it always warps. Upgrading to weather-treated wood looks far more expensive than it is and secures your heavy terra-cotta pots safely.
A solid tiered setup runs roughly $35–$50. Pin this if you’re planning a small space upgrade for your patio!
- Key Materials: Weatherproof wooden ladder, S-hooks
- Vibe / Style: Rustic vertical cascade
- Difficulty: Very easy
- Budget Breakdown: Ladder: $35 | Hooks & Pots: $15
- Creator’s Tip: Anchor the top rung to your fence with zip ties to prevent wind from knocking it over.
- Smart Sourcing: Pre-treated cedar plant stands (starter kit)
4. Gutter Garden Rails
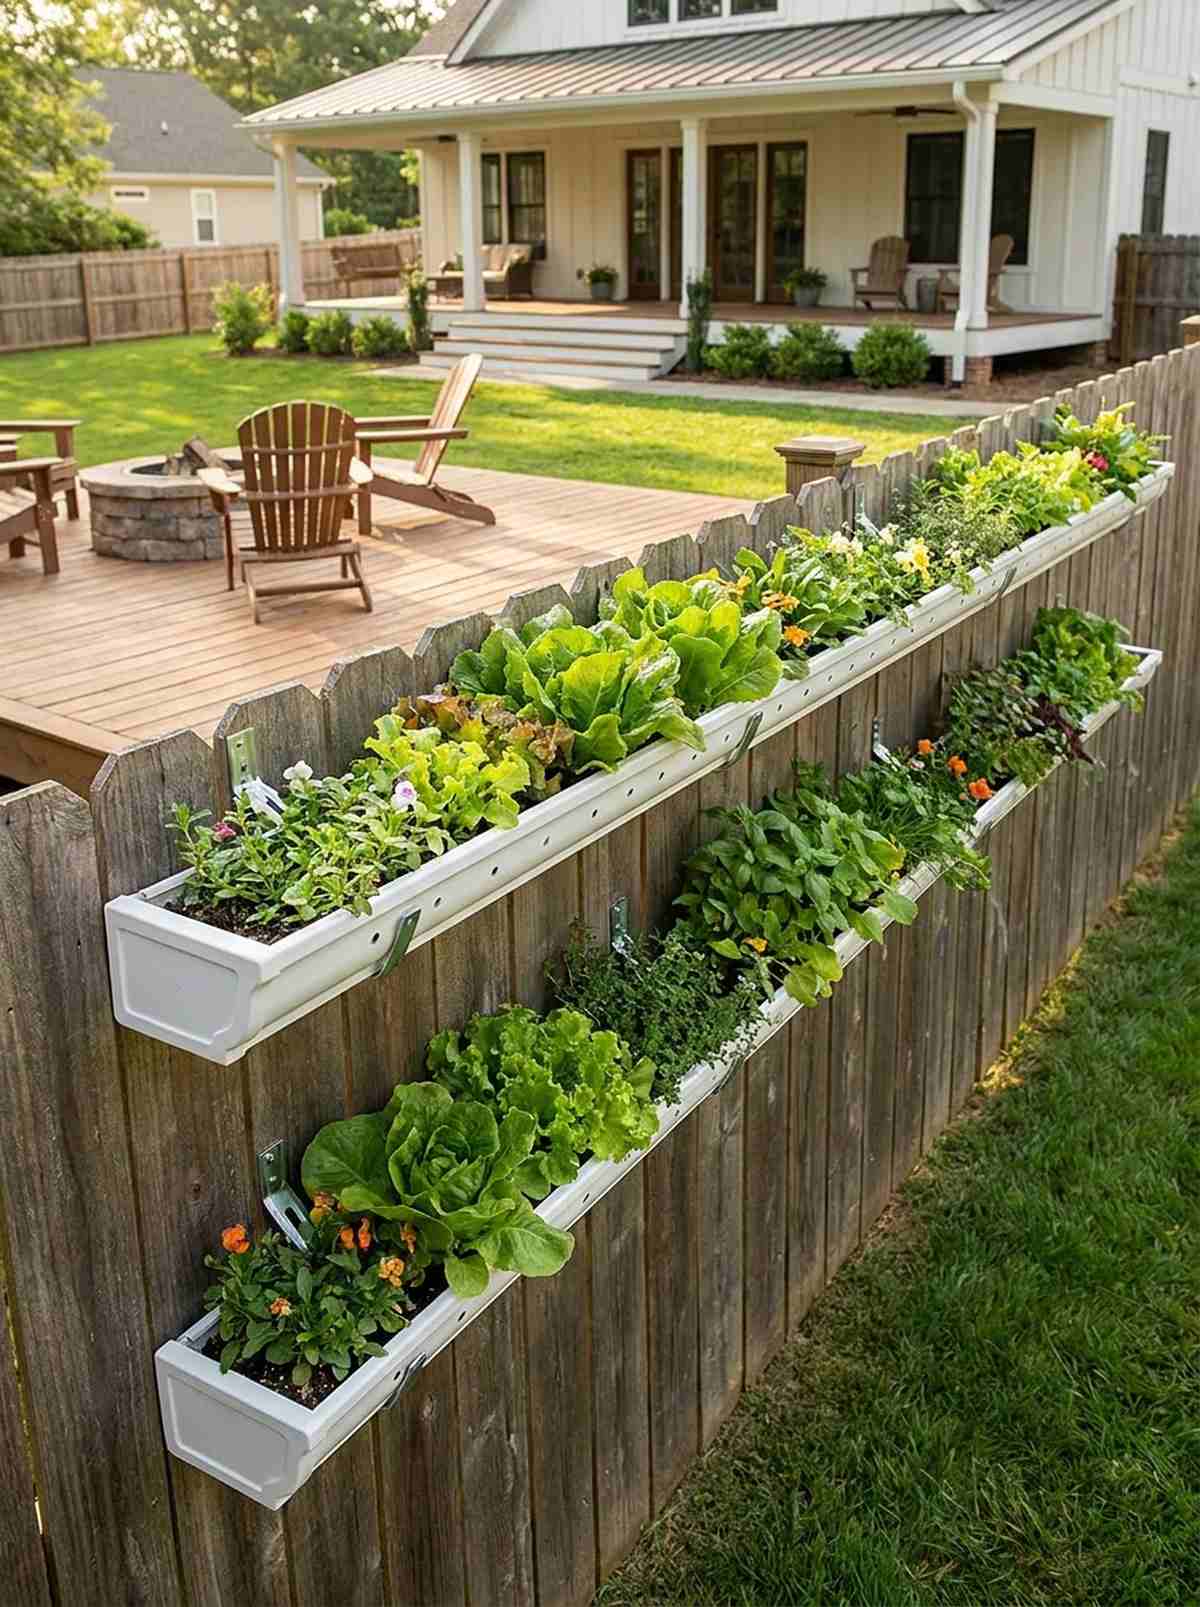
This clever hack feels incredibly satisfying when the first green shoots spill over the edge. A mounted vinyl gutter planter turns any boring wooden fence into a high-yield salad bar.
Skip the cheap plastics that crack in the winter and opt for reinforced channels for a pristine, long-lasting look. Sourcing the right end-caps and heavy-duty brackets prevents the dreaded soil spill after a heavy rain.
You can piece this entire system together for under $30. Highly recommended for a quick weekend win.
- Key Materials: Vinyl rain gutters, mounting brackets
- Vibe / Style: Modern utilitarian
- Difficulty: Requires basic drilling
- Budget Breakdown: Gutters: $15 | Hardware: $10
- Creator’s Tip: Drill drainage holes exactly 8 inches apart to avoid waterlogging your shallow root crops.
- Smart Sourcing: UV-resistant vinyl gutter channels (pre-cut)
Most people get their garden layout completely wrong… until they try the exact layout coming up next.
5. Pallet Vertical Gardens
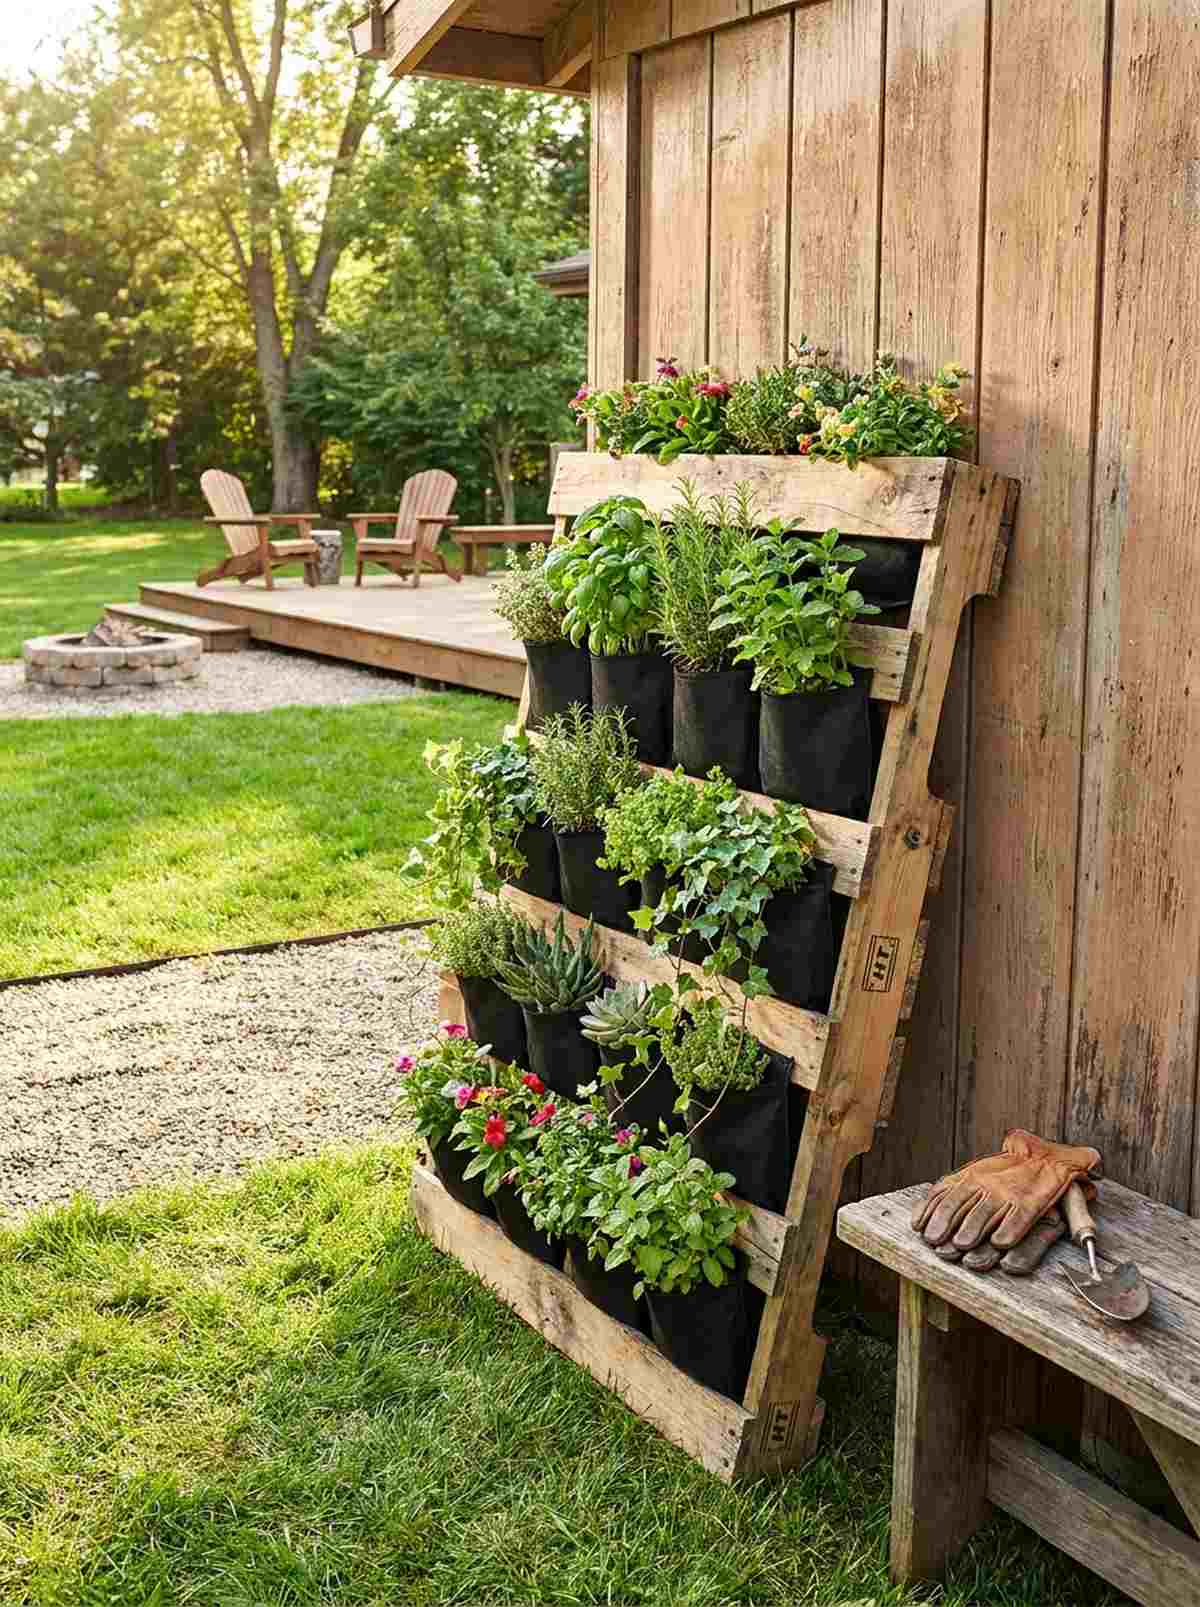
This upcycled layout brings a gritty, industrial edge that feels totally bespoke. Building a freestanding pallet planter fits beautifully against a sunny garage wall.
While standard wood rots quickly, lining the interior with heavy-duty landscape fabric delivers a surprisingly premium look. Using commercial-grade weed barriers inside the pockets keeps the soil contained and moisture locked in.
This budget-friendly project generally costs around $15–$25. Save this idea for a zero-waste garden aesthetic!
- Key Materials: Heat-treated pallet, landscape fabric
- Vibe / Style: Upcycled urban chic
- Difficulty: Beginner DIY
- Budget Breakdown: Pallet: Free | Fabric & Staples: $20
- Creator’s Tip: Always look for the “HT” stamp on the pallet to ensure it was heat-treated, not chemically treated.
- Smart Sourcing: Heavy-duty staple gun kits
6. Espalier Fruit Trees
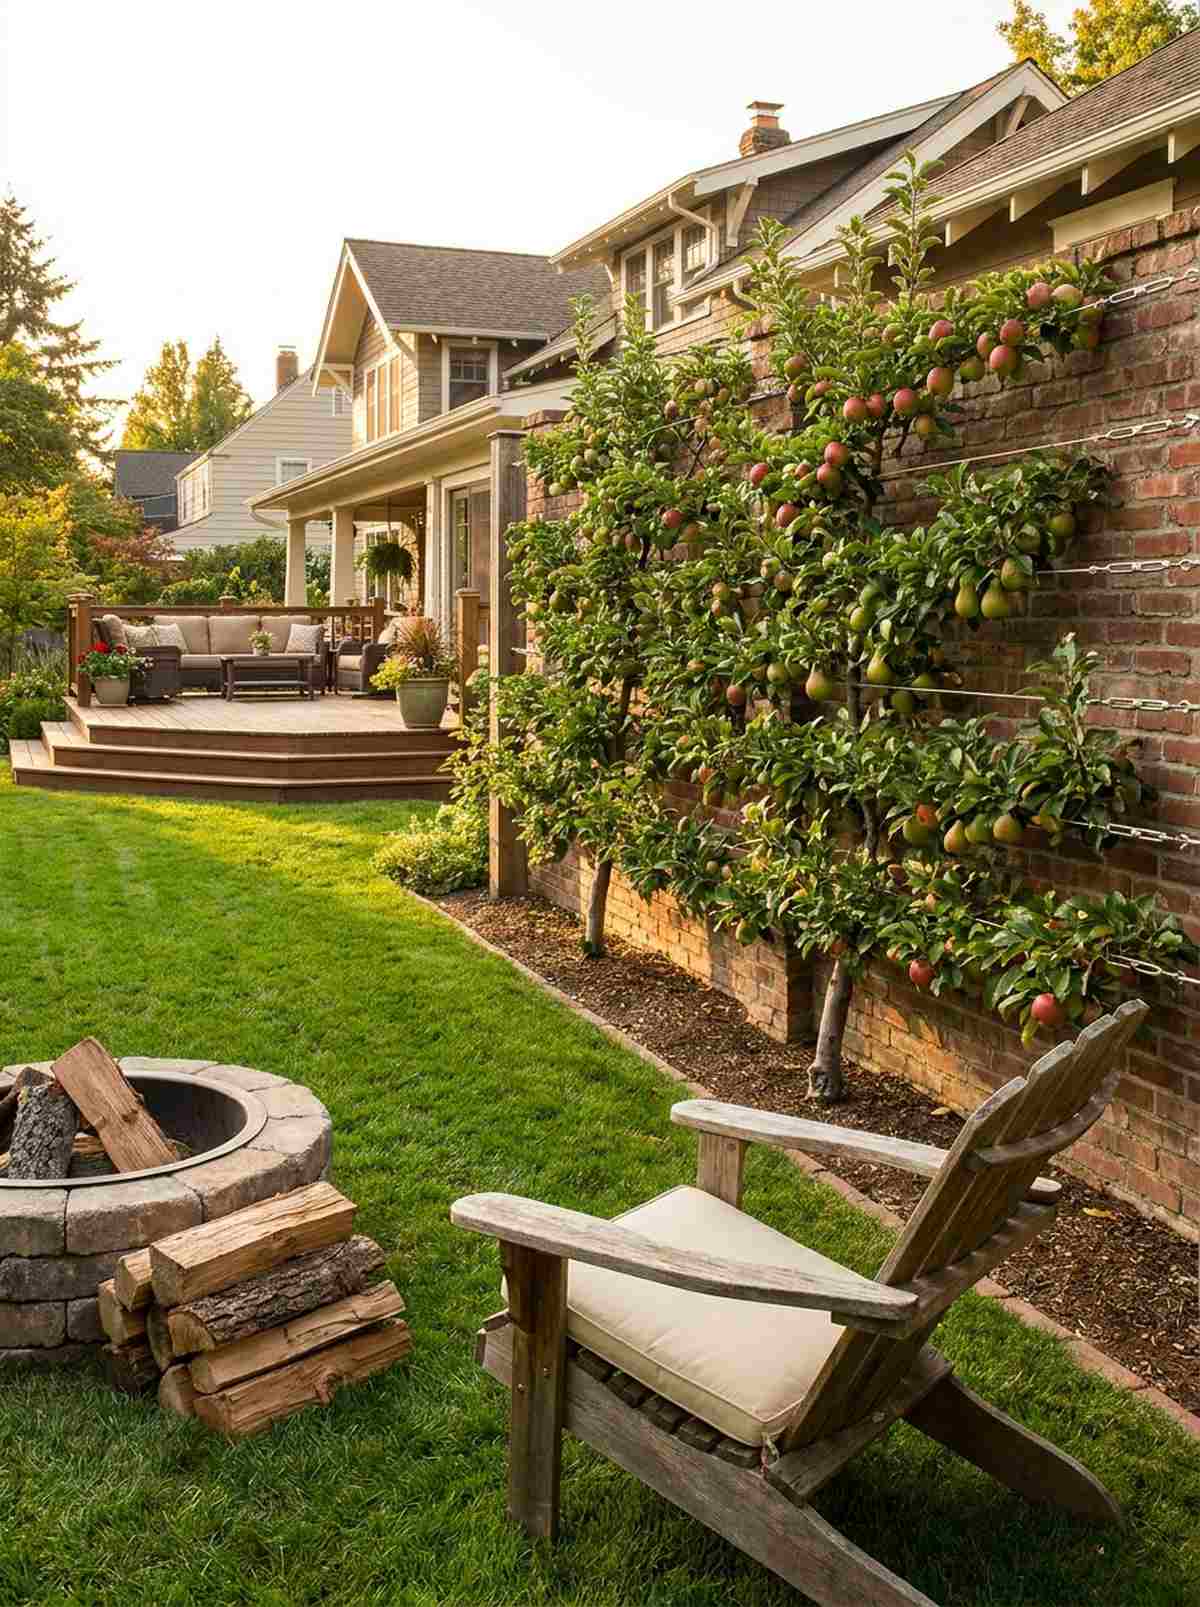
Training trees flat feels like a forgotten aristocratic gardening secret you can use at home. A structural espalier fruit wall is the ultimate space-saver for tight boundary fences.
The trick to making this look expensive is ensuring your wire grid is perfectly taut. Investing in high-tensile training wire elevates the entire presentation and prevents sagging branches down the road.
Securing the proper wire and dwarf tree will run you around $60–$90. It’s a high-impact statement that yields actual fruit.
- Key Materials: Dwarf fruit tree, high-tensile wire
- Vibe / Style: Formal European orchard
- Difficulty: Patient pruning required
- Budget Breakdown: Tree: $45 | Wire Kit: $25
- Creator’s Tip: Install wire supports at exactly 12-inch vertical intervals before planting to guide growth early.
- Smart Sourcing: Stainless steel espalier wire kits
7. Hanging Basket Clusters
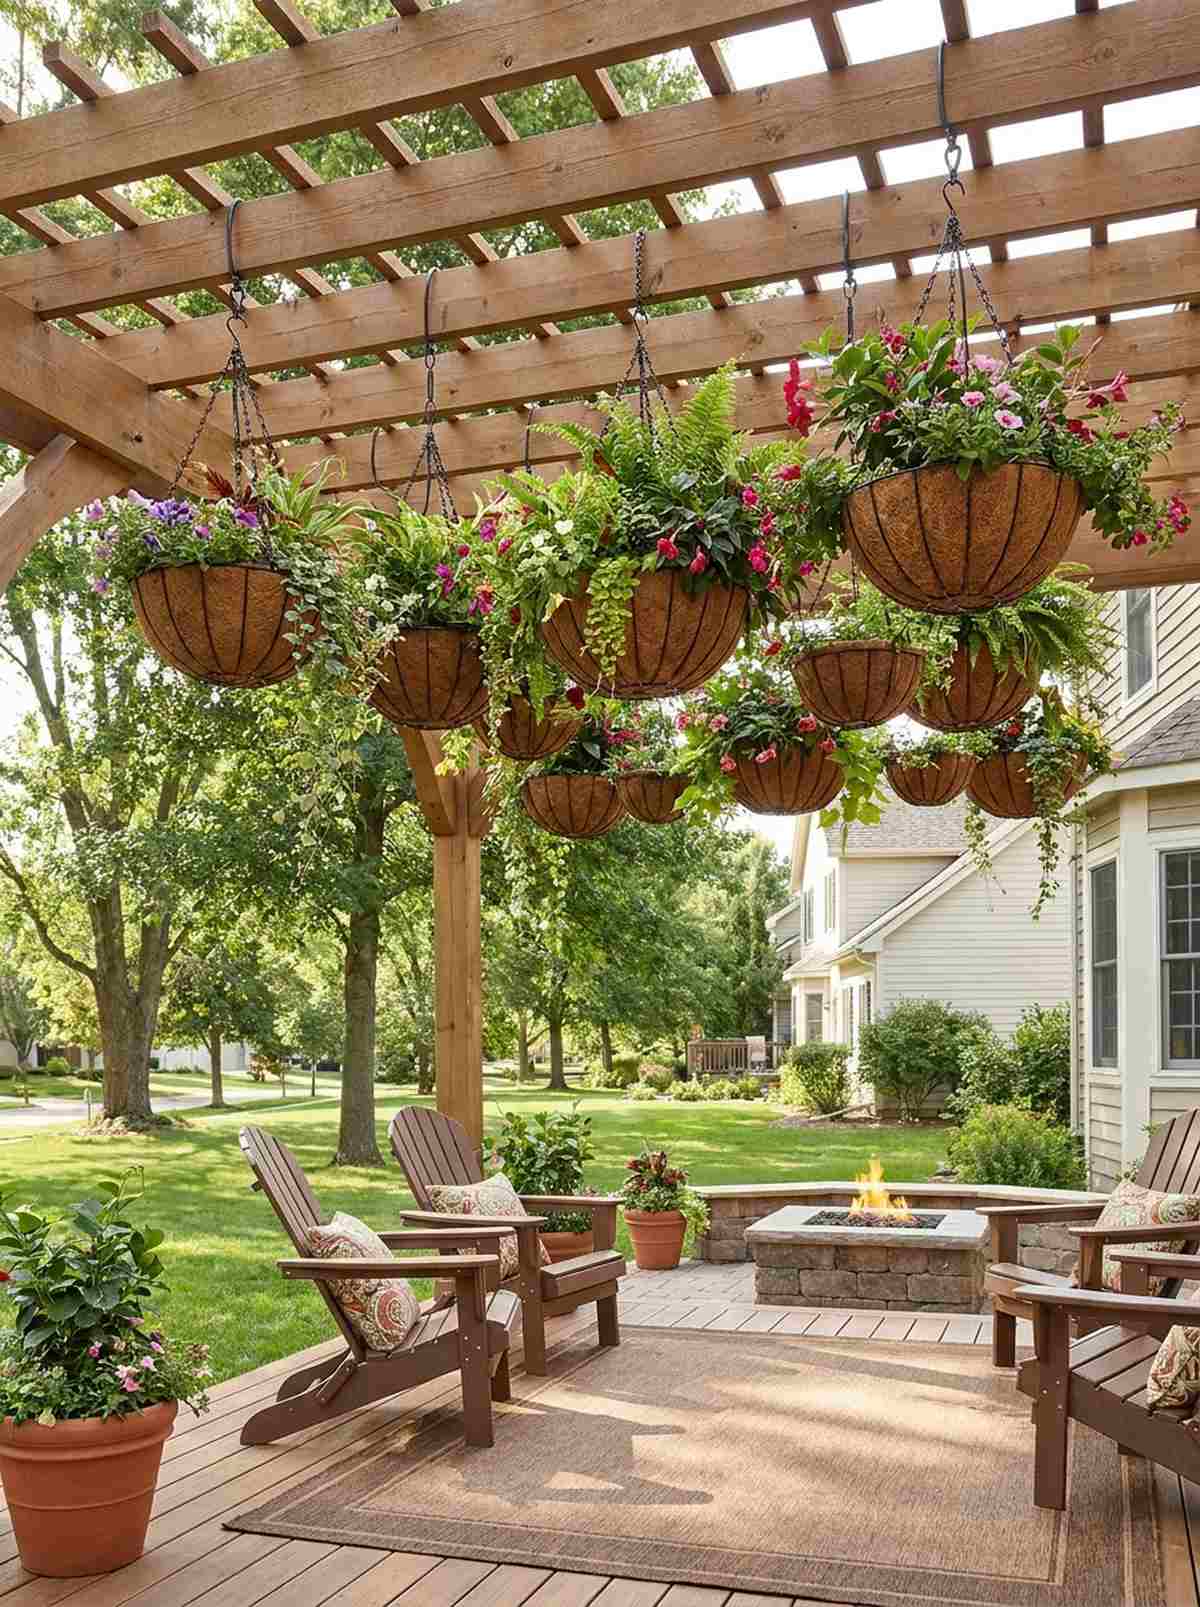
This floating canopy feels like stepping into a lush, tropical conservatory. Suspending a staggered basket display adds immense volume to a bare porch or pergola.
Hanging generic plastic pots ruins the illusion, but swapping them for premium natural coir liners gives a designer-level finish. Integrating an automatic drip-line makes this high-elevation setup practically maintenance-free.
This elegant aerial arrangement costs roughly $40 to perfect. Pin this setup if you love immersive, 360-degree greenery!
- Key Materials: Wire baskets, coir liners, hanging chains
- Vibe / Style: Floating floral oasis
- Difficulty: Easy hanging setup
- Budget Breakdown: Baskets: $25 | Hanging Hardware: $15
- Creator’s Tip: Use a swivel hook so you can easily rotate the baskets for even sun exposure.
- Smart Sourcing: Extra-thick coco coir liners (bulk pack)
8. Cattle Panel Archways
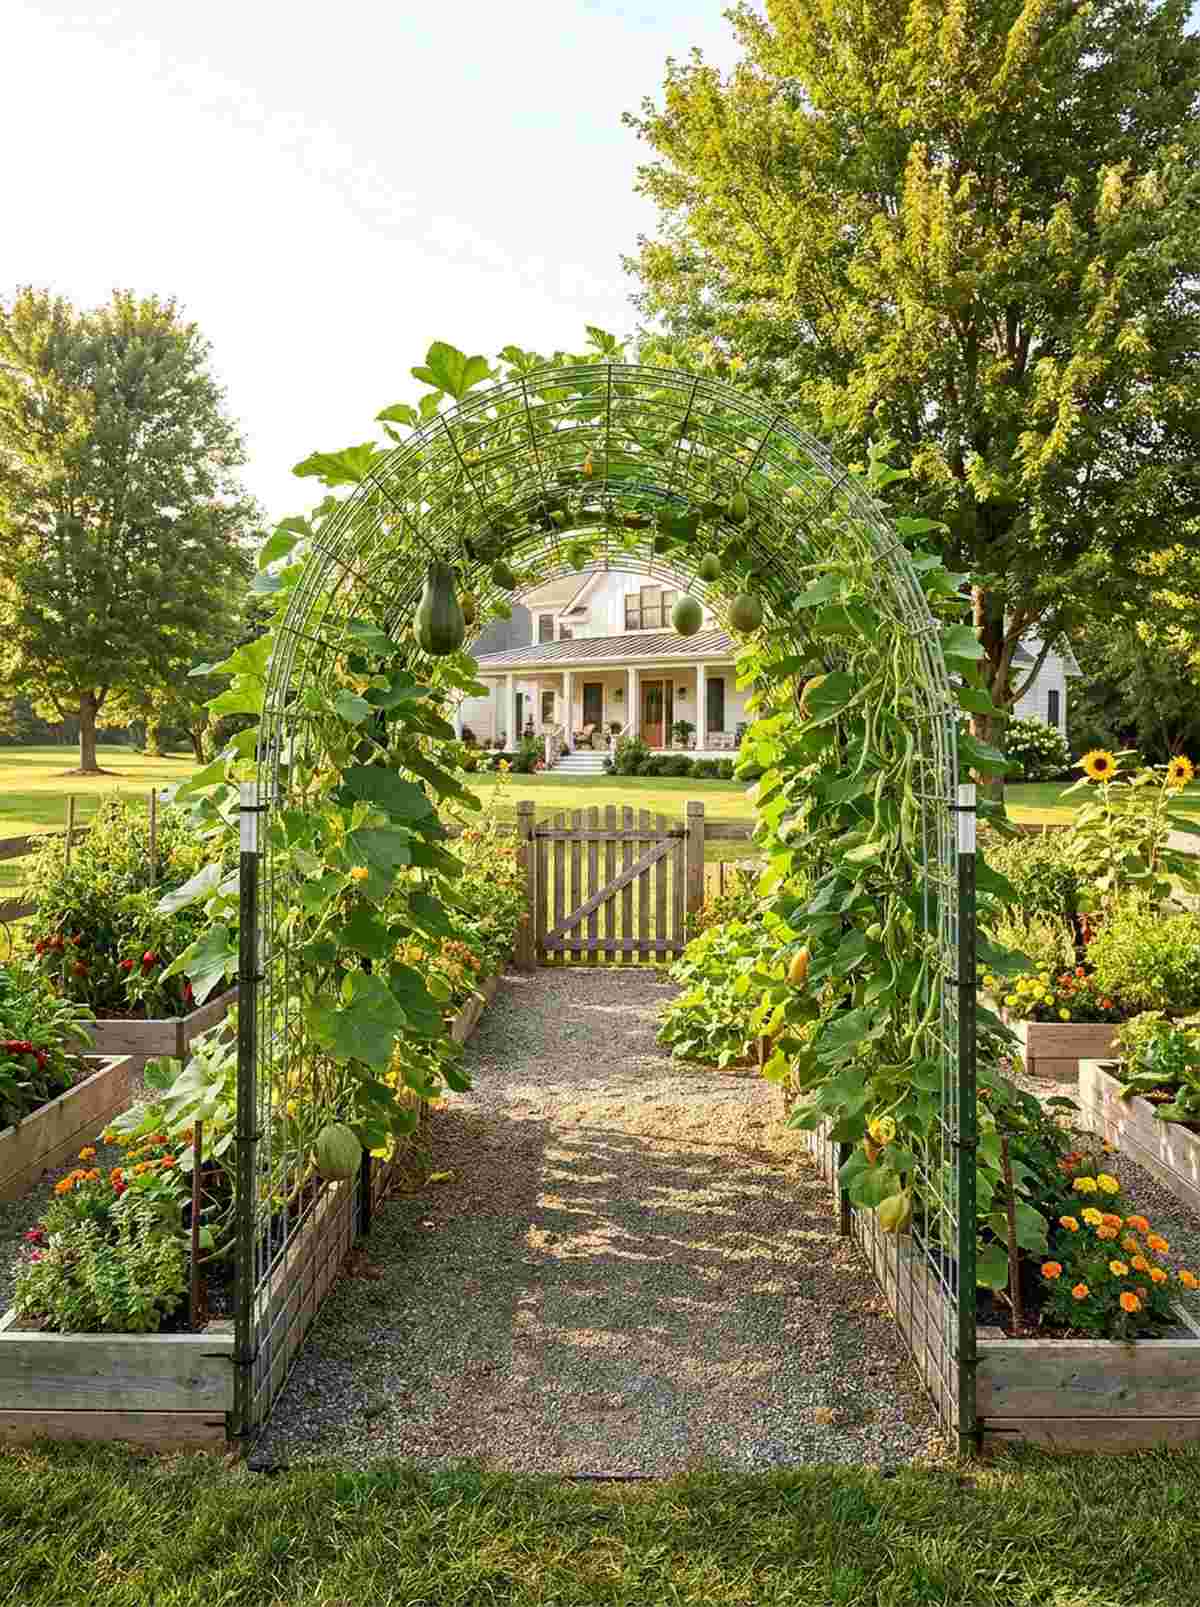
Walking through this vine tunnel feels incredibly immersive and surprisingly grand. A curved galvanized wire archway transforms empty garden rows into shaded, productive tunnels.
Using flimsy netting always collapses, but bending commercial-grade livestock fencing looks far more expensive than it is. This sturdy framework supports heavy squash and melons without buckling under the weight.
You can construct this heavy-duty arch for about $30–$45. The sheer vertical volume you gain is unbelievable.
- Key Materials: 16-foot cattle panel, heavy-duty T-posts
- Vibe / Style: Abundant harvest tunnel
- Difficulty: Requires two people to bend
- Budget Breakdown: Panel: $25 | Stakes & Ties: $10
- Creator’s Tip: Drive your rebar stakes at least 18 inches deep so the arch doesn’t spring loose in high winds.
- Smart Sourcing: Heavy-duty UV-rated zip ties (bulk pack)
💡 Must-Have Supplies for High-End Setups
To build these setups faster and ensure they last, skip the generic craft aisles and invest in the right foundational kits.
- Base & Support: UV-coated rigid modular panels
- Setup Tools: Commercial-grade staple gun starter kits
- Weather/Durability Protection: Heavy-duty clear wood sealant
9. Living Walls With Pocket Systems
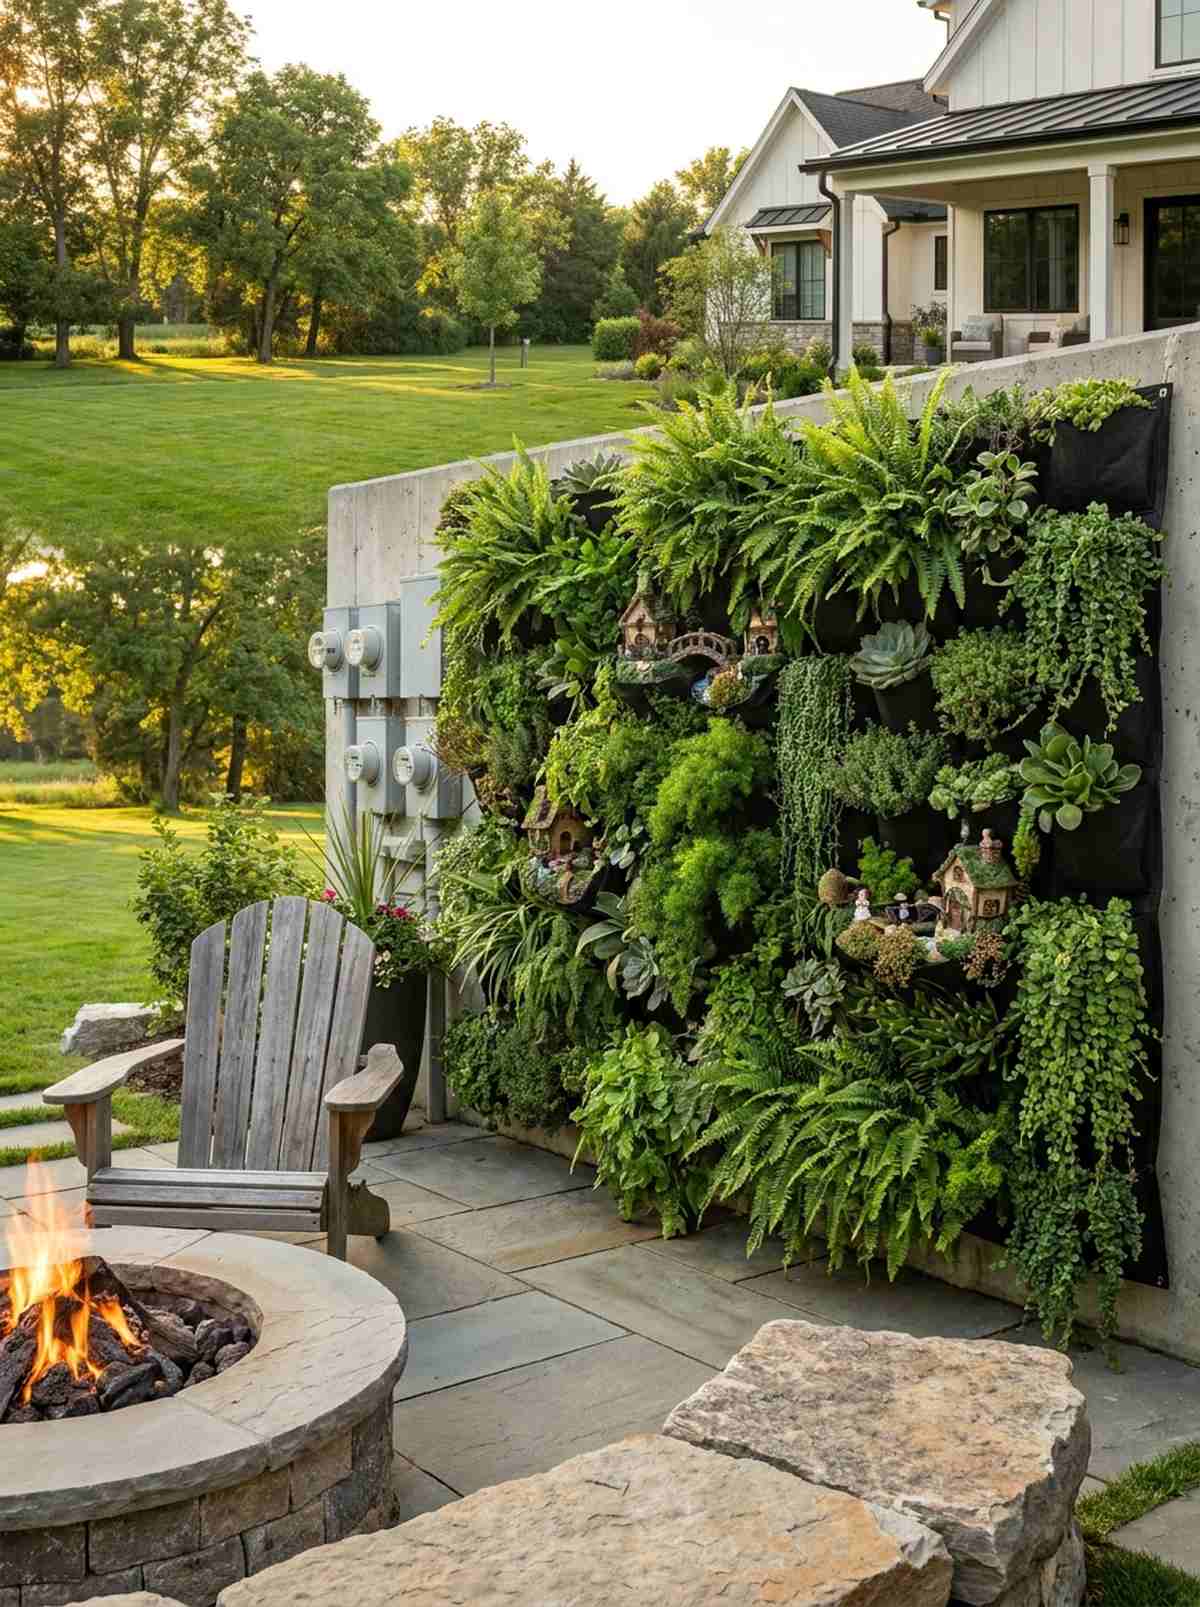
This velvety green wall feels like a luxury spa installation in your own backyard. A dense fabric pocket living wall instantly disguises ugly utility meters or bare concrete.
Avoid cheap felt that dries out in hours; using advanced moisture-retaining synthetic pockets delivers a surprisingly premium look. Sneaking in a few high-end fairy garden kits among the foliage adds whimsical focal points.
A professional-looking pocket wall starts around $45–$70. Save this to your patio inspiration board!
- Key Materials: Breathable planter pockets, waterproof backing
- Vibe / Style: Modern eco-luxury
- Difficulty: Moderate hanging installation
- Budget Breakdown: Pocket Panel: $40 | Hardware: $15
- Creator’s Tip: Wrap the back of the fabric panel with a plastic sheet to prevent moisture damage to your home’s exterior.
- Smart Sourcing: Self-watering vertical pocket kits
10. Bamboo Teepee Trellises
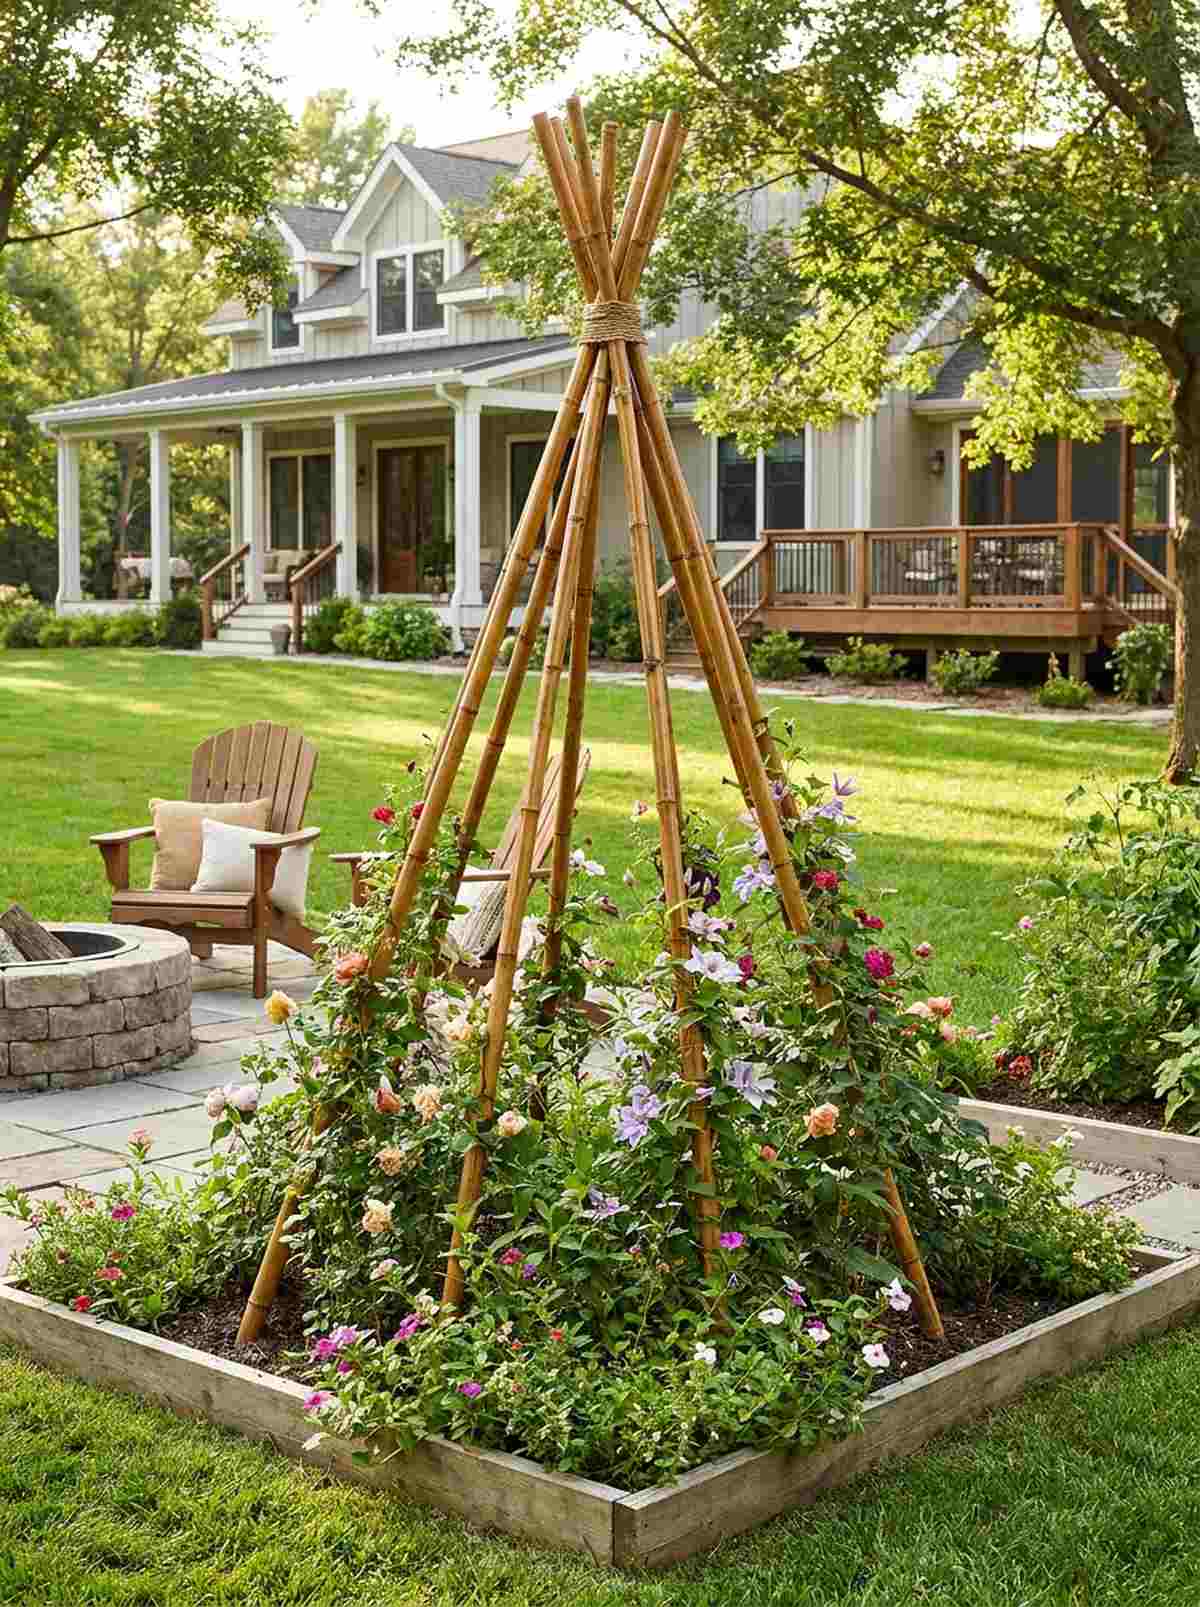
This structural cone feels brilliantly rustic while adding instant height to flat beds. Erecting a bamboo pole teepee provides a 360-degree climbing frame right in the center of your garden.
Standard wooden stakes rot at the soil line, but thick, lacquered bamboo canes give a designer-level finish. Lashing the top securely with weather-resistant twine ensures it survives late summer storms.
Building this classic support structure costs less than $20. It’s an incredibly cheap way to draw the eye upward.
- Key Materials: 6-foot bamboo poles, garden twine
- Vibe / Style: Classic cottage garden
- Difficulty: Fast beginner build
- Budget Breakdown: Bamboo: $15 | Twine: $5
- Creator’s Tip: Push the poles at least 8 inches into the ground before tying the top to ensure absolute stability.
- Smart Sourcing: Pre-cut thick bamboo garden stakes (bulk pack)
If you skip this upcoming trick, you are wasting so much usable patio space it’s actually crazy…
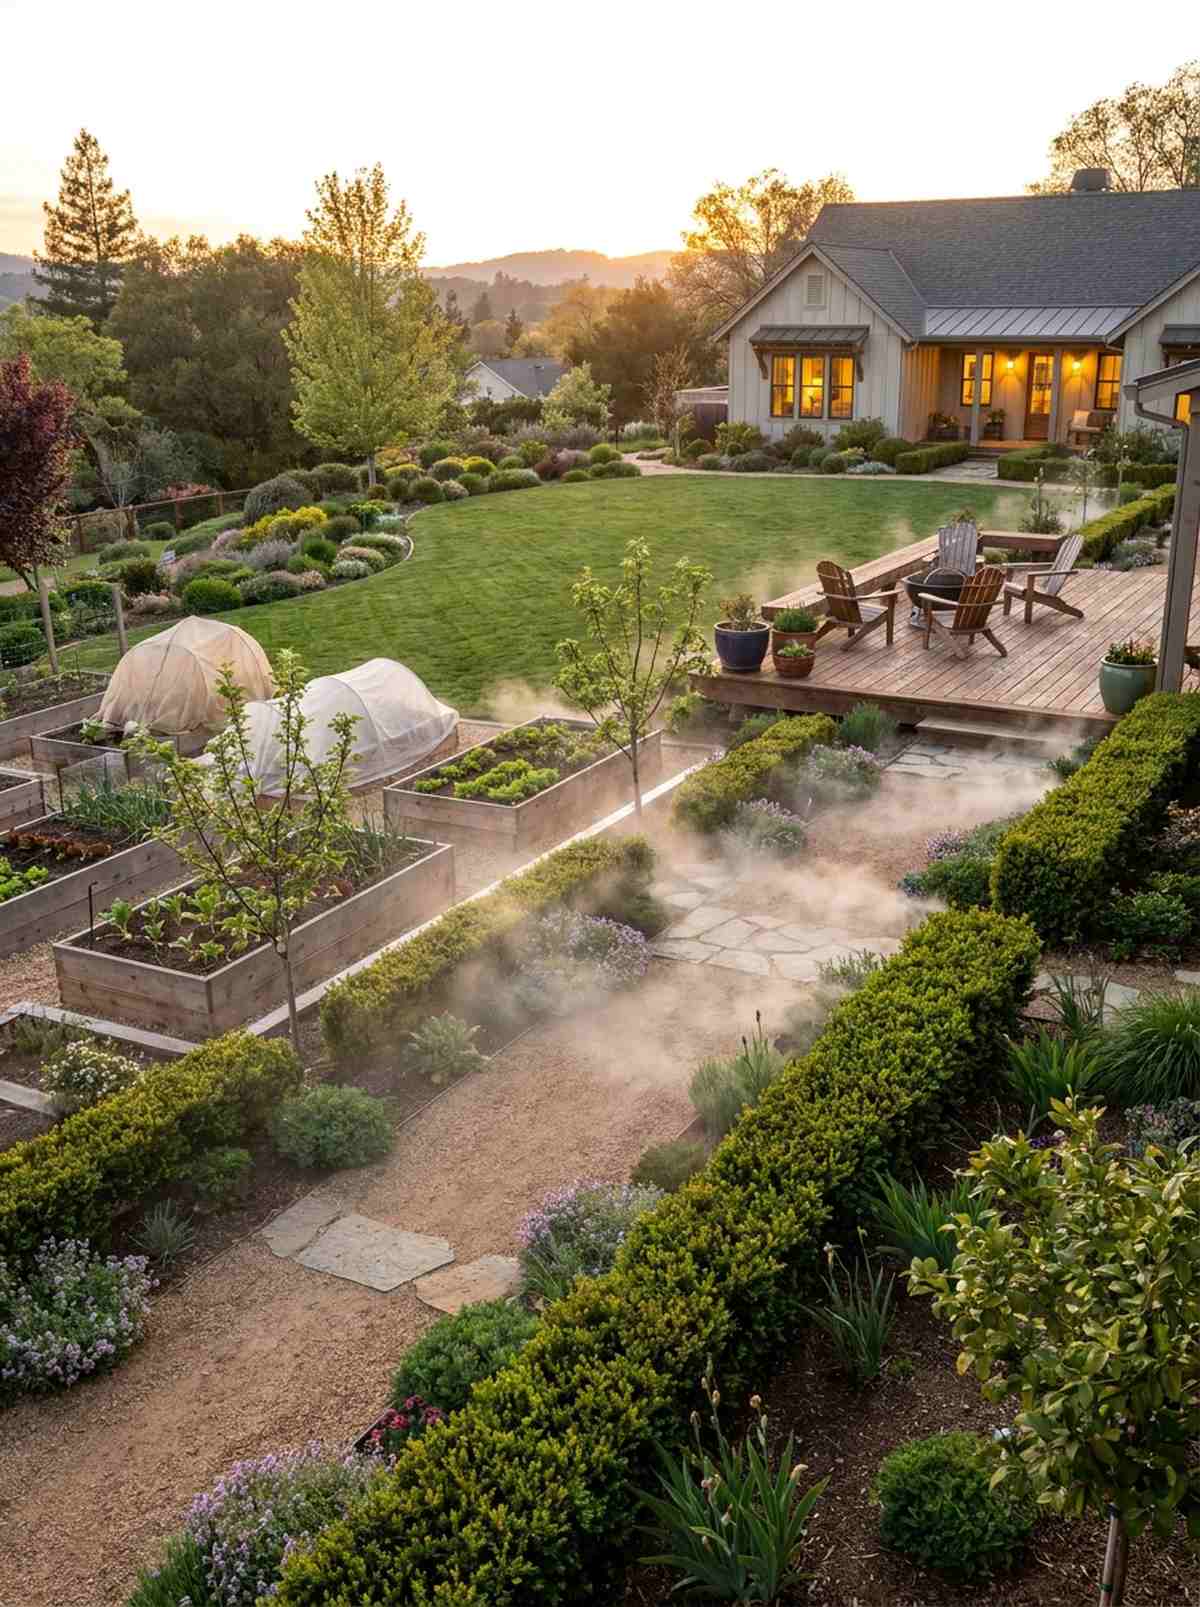
Raised Beds & Strategic Container Placement
Elevated planting zones improve drainage, warm soil faster in spring, and bring crops within comfortable reach. Designers configure raised beds in narrow profiles to maximize perimeter access while containers add mobility to shift plants toward optimal light throughout the season.
11. Narrow Border Beds
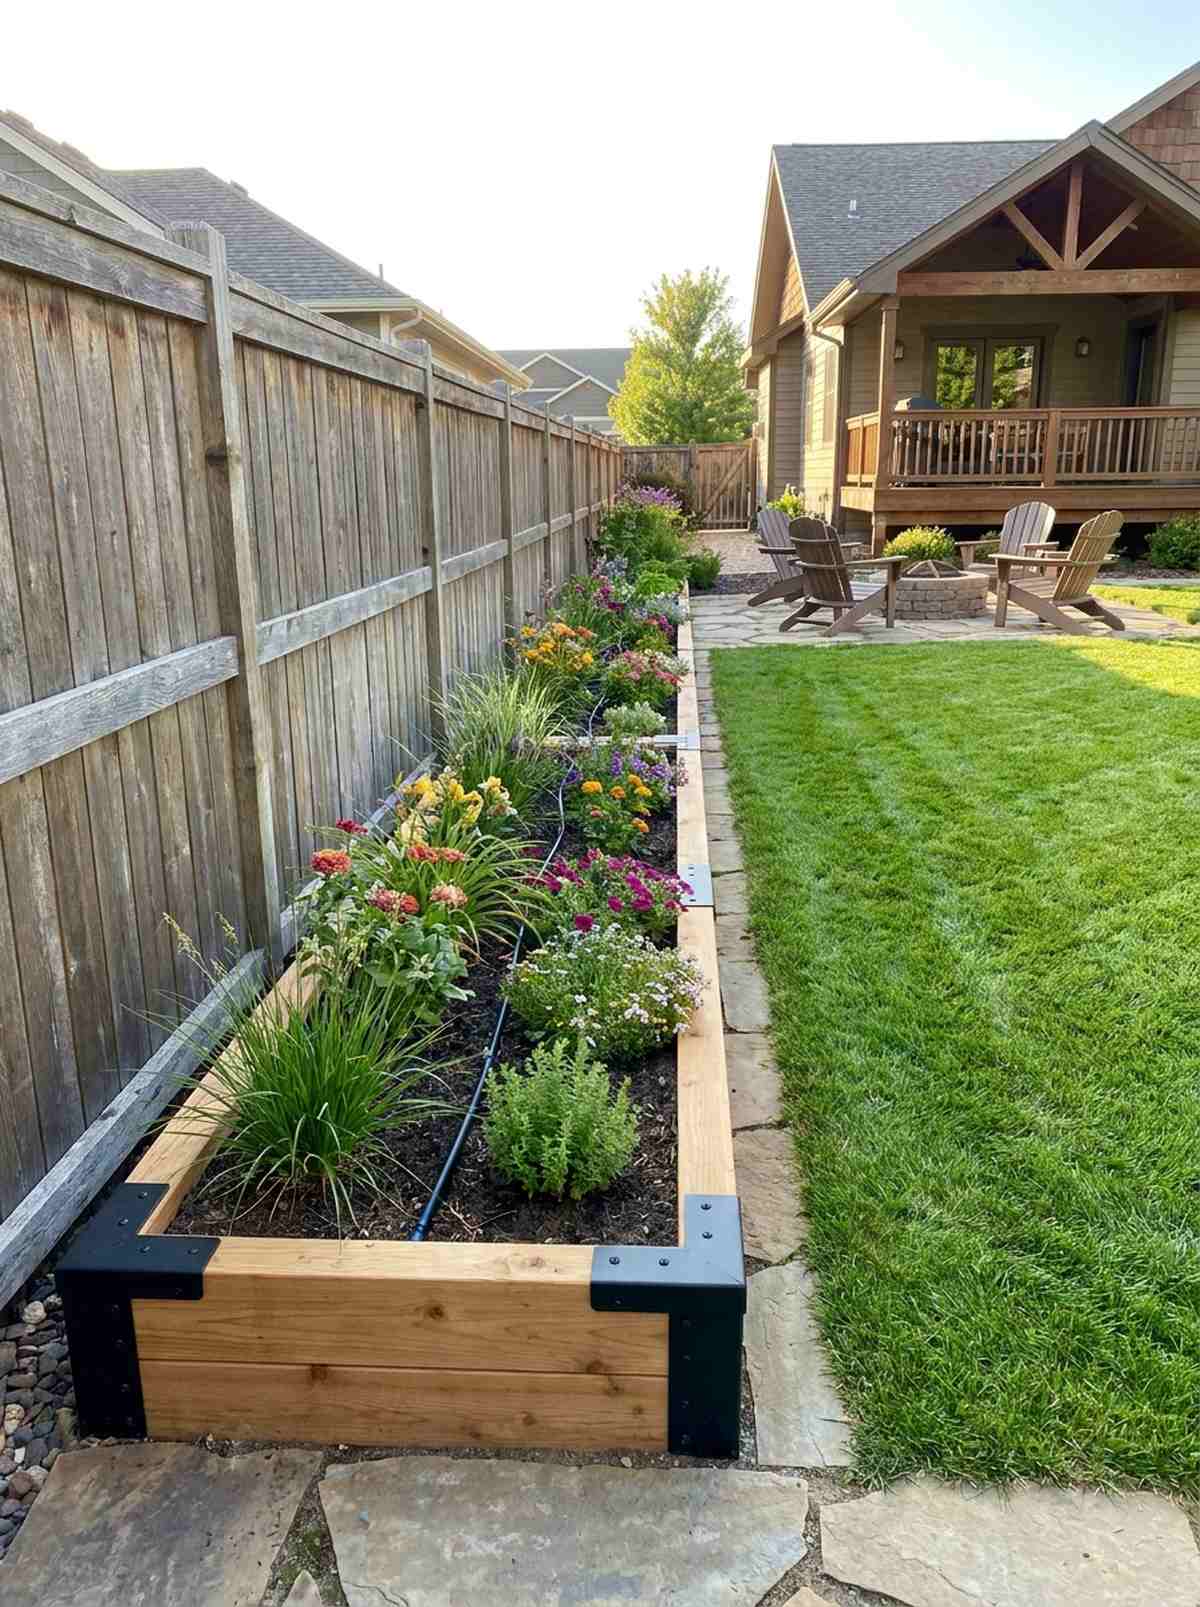
This sleek outline feels incredibly tidy and organizes chaotic yard edges effortlessly. A low-profile narrow perimeter raised bed utilizes dead space along property lines perfectly.
Throwing soil against a fence causes rot, but framing it with premium cedar boards looks far more expensive than it is. Dropping in a discrete drip tape system guarantees your border stays vibrant even in peak summer.
Expect to spend $50–$80 for durable framing materials. Pin this if you want a clean, architectural garden border!
- Key Materials: Rot-resistant lumber, corner brackets
- Vibe / Style: Clean architectural lines
- Difficulty: Basic carpentry required
- Budget Breakdown: Wood: $60 | Brackets: $15
- Creator’s Tip: Keep the width under 24 inches so you never have to step on the soil to reach the back.
- Smart Sourcing: Heavy-duty metal corner brackets (starter kits)
12. Corner L-Shaped Beds
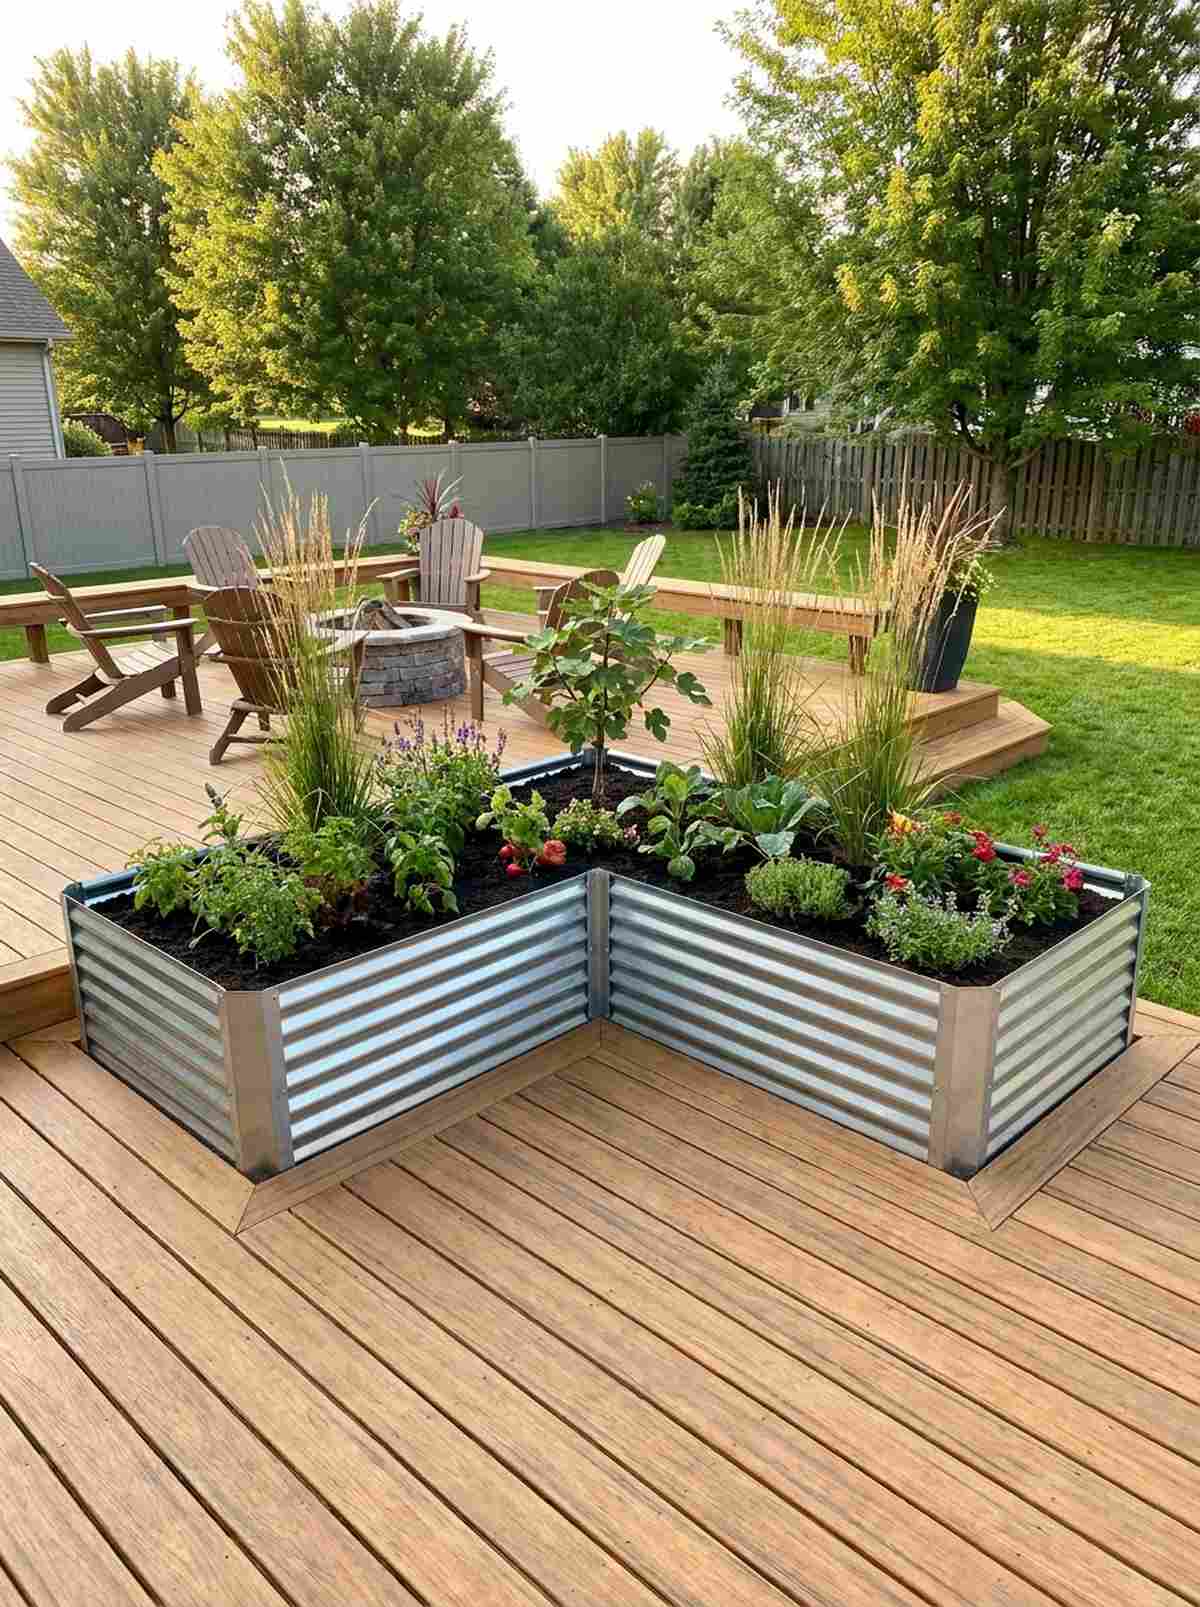
This wrap-around layout feels like a custom landscape architecture piece right out of a magazine. The clever L-shaped corner planter reclaims awkward angles that usually gather weeds.
Using standard straight boxes wastes the intersection, but a custom mitered corner gives a designer-level finish. Utilizing premium raised bed kits saves you the headache of angled math while maximizing root volume.
A solid corner kit will run you about $80–$120 depending on depth. It completely anchors the visual weight of your yard.
- Key Materials: Corner raised bed kit, premium topsoil
- Vibe / Style: Maximized geometric flow
- Difficulty: Moderate assembly
- Budget Breakdown: Kit: $90 | Soil Delivery: $30
- Creator’s Tip: Place tall focal-point plants right in the inner corner so they don’t cast shadows over the edges.
- Smart Sourcing: Galvanized steel L-shaped bed kits
13. Tiered Cascade Planters

This multi-level box feels like a cascading waterfall of herbs and greenery. A wooden stair-step raised bed creates incredible dynamic elevation on totally flat concrete patios.
A single flat box is boring, but stacking varying heights delivers a surprisingly premium look. You can incorporate top-rated miniature garden supplies on the top tier to create a tiny visual landscape.
Building a tiered frame costs roughly $45–$70. Save this for an instant focal point on a boring deck!
- Key Materials: Pre-cut lumber, wood screws
- Vibe / Style: Dynamic layered greenery
- Difficulty: Moderate DIY
- Budget Breakdown: Wood Cuts: $50 | Fasteners: $15
- Creator’s Tip: Leave exactly 8 inches of vertical spacing between tiers to ensure lower plants get adequate sunlight.
- Smart Sourcing: Pre-cut cedar tiered planter kits
14. Mobile Container Clusters
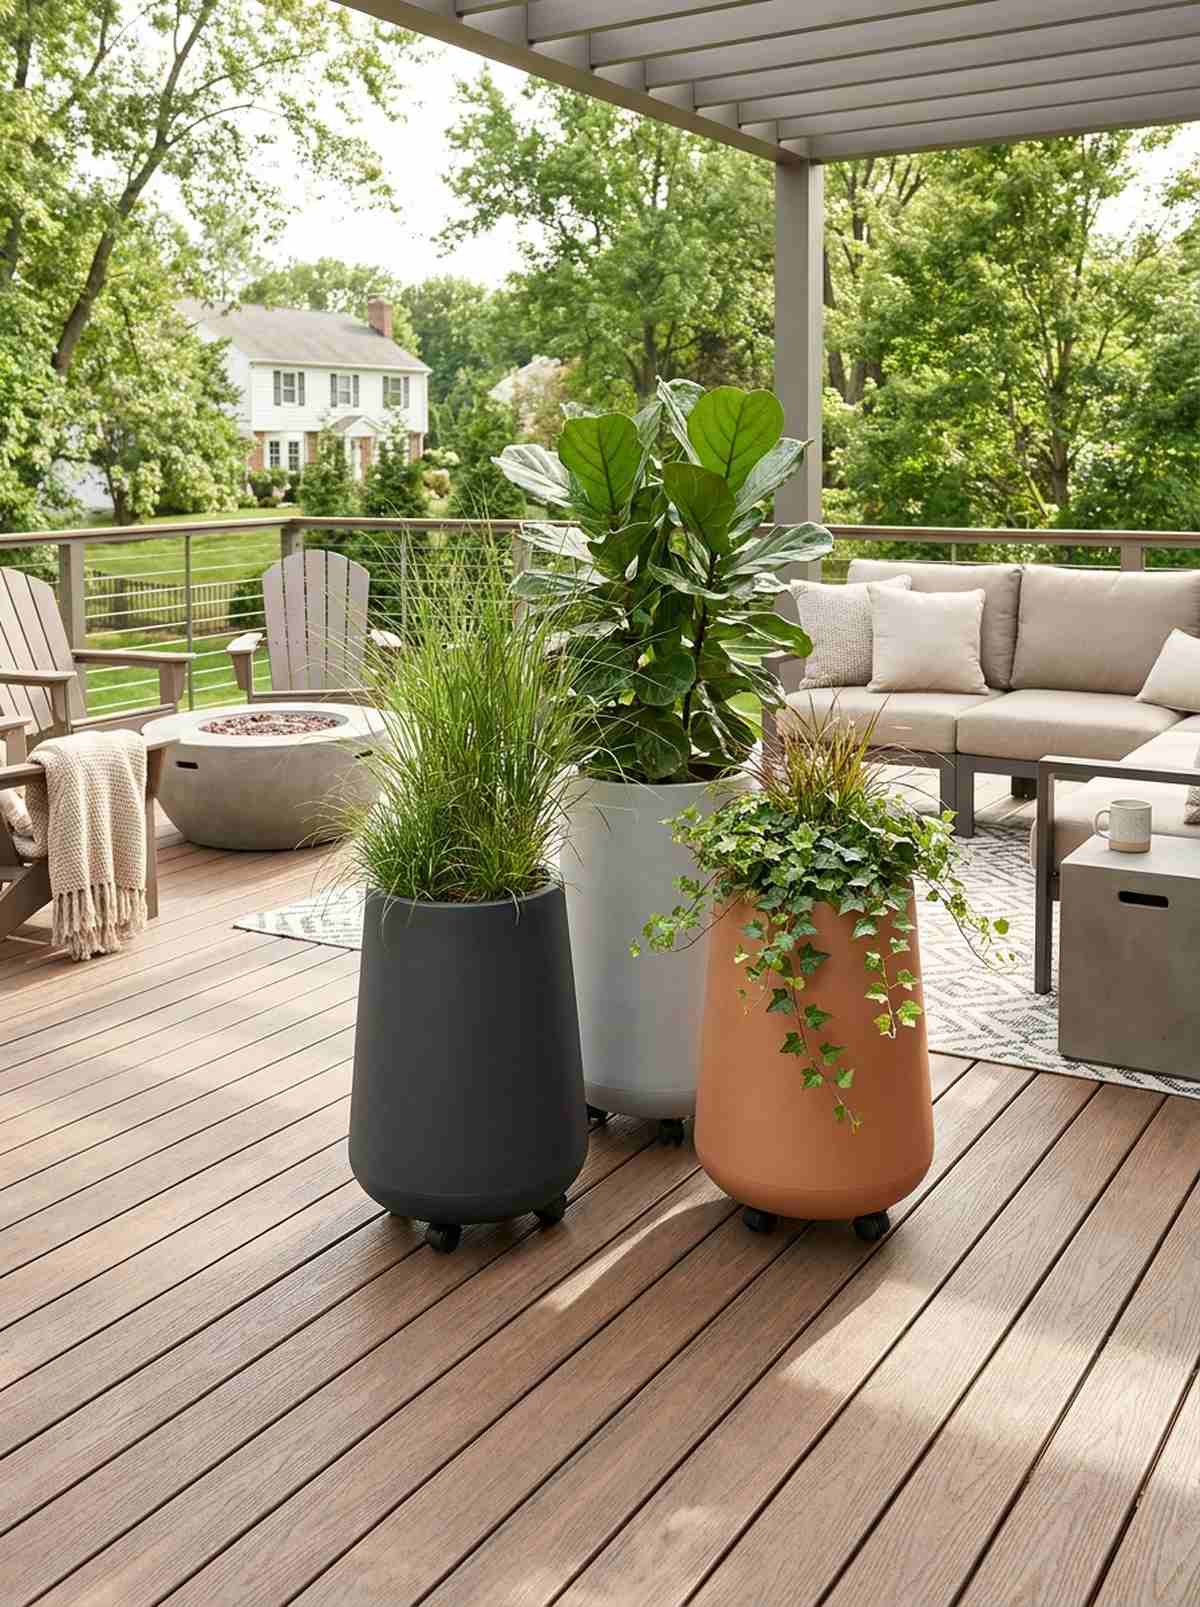
This flexible layout feels like you have a dynamic, ever-changing garden on wheels. Rolling a cluster of large mobile pots allows you to chase the sun across a shady balcony.
Most people drag heavy pots and scratch their deck, but using hidden heavy-duty casters looks far more expensive than it is. Investing in sleek, lightweight resin pots keeps the cluster looking intentional rather than cluttered.
You can create a rolling trio for about $60–$90. It’s the ultimate hack for unpredictable lighting conditions.
- Key Materials: Large resin planters, heavy-duty plant caddies
- Vibe / Style: Modern modular flexibility
- Difficulty: Very easy
- Budget Breakdown: Pots: $50 | Rolling Caddies: $30
- Creator’s Tip: Always cluster pots in odd numbers (like 3 or 5) for a naturally balanced visual weight.
- Smart Sourcing: Heavy-duty locking plant caddies (bulk pack)
This next setup is ridiculously cheap but looks like a highly productive homestead display…
15. Straw Bale Gardens
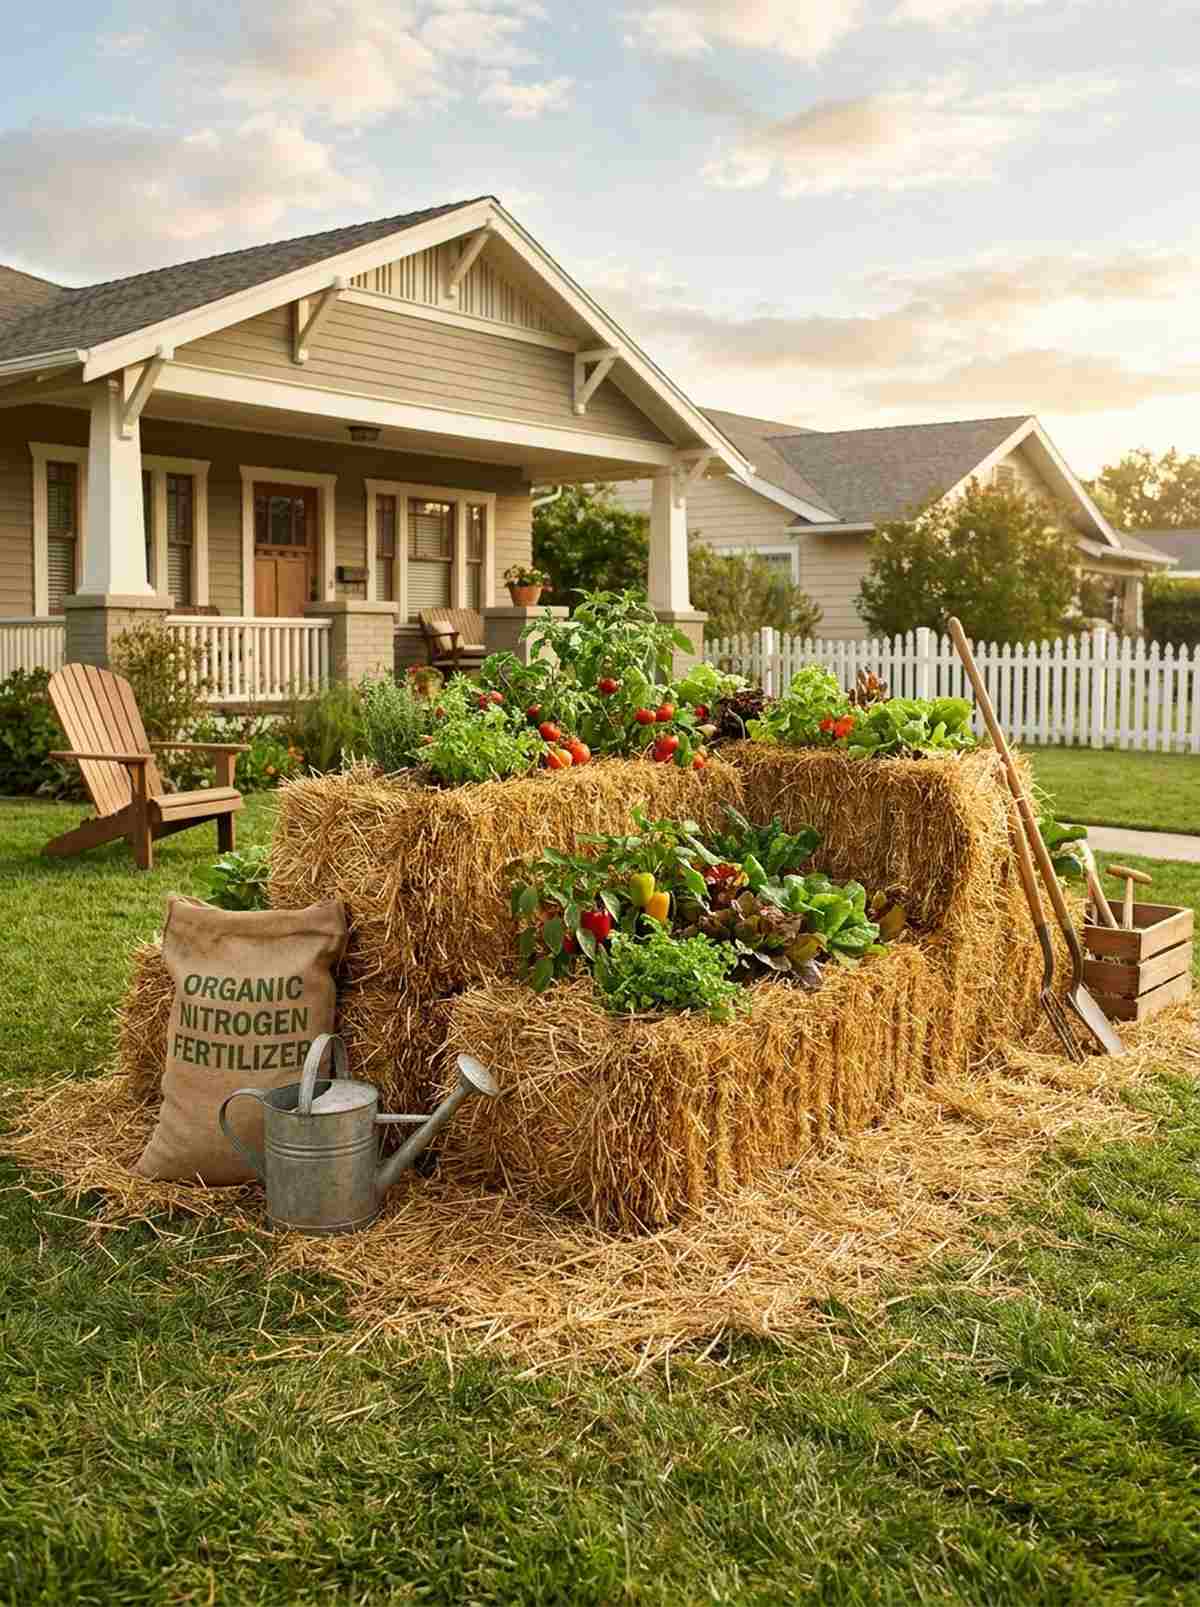
This setup feels like an authentic farm-to-table operation right on your suburban lawn. A temporary conditioned straw bale bed offers incredible drainage and soil warmth without lifting a hammer.
Planting directly into poor ground is a struggle, but conditioning a bale gives a surprisingly premium look with massive yields. This method completely bypasses the need for expensive soil or lumber.
A couple of bales will only cost you about $15–$25. Pin this if you want a zero-construction garden this weekend!
- Key Materials: Straw bales, nitrogen fertilizer
- Vibe / Style: Rustic pop-up farm
- Difficulty: Easy but requires conditioning prep
- Budget Breakdown: Bales: $15 | Fertilizer: $10
- Creator’s Tip: Make sure you buy “straw” and not “hay,” as hay is full of weed seeds that will ruin your crop.
- Smart Sourcing: High-nitrogen organic conditioning kits
16. Keyhole Garden Design
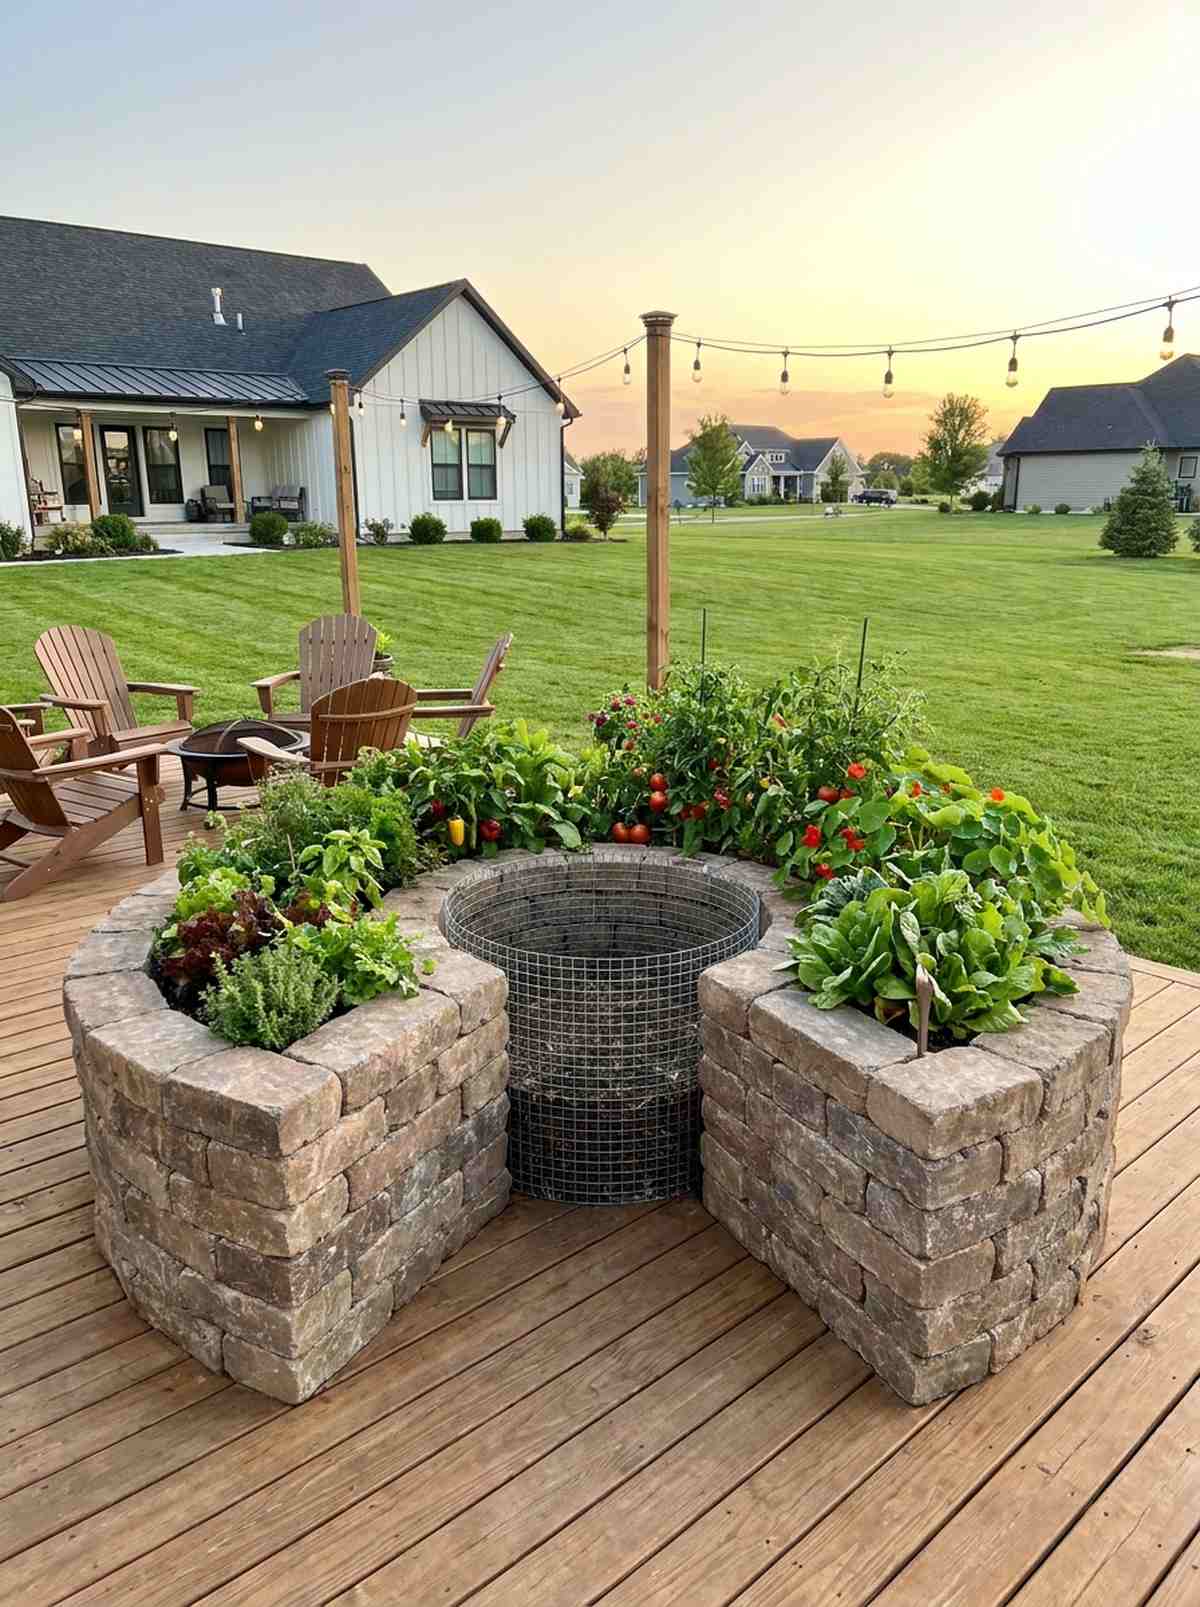
This circular layout feels incredibly efficient, like a perfectly engineered biological machine. The notched central composting keyhole bed feeds your plants automatically while saving massive space.
Standard beds require constant feeding, but this integrated compost basket gives a designer-level finish to sustainability. The circular flow allows you to reach every single plant without stepping in the dirt.
Materials for a beautiful stone or brick keyhole run about $100–$150. It’s a genius long-term investment for a small yard.
- Key Materials: Retaining wall blocks, central wire mesh basket
- Vibe / Style: Smart permaculture hub
- Difficulty: Labor-intensive building
- Budget Breakdown: Blocks: $120 | Mesh Wire: $20
- Creator’s Tip: Pitch the soil slightly downward from the center basket so watering washes compost tea toward the roots.
- Smart Sourcing: Pre-formed wire compost baskets (starter kits)
17. Window Box Extensions
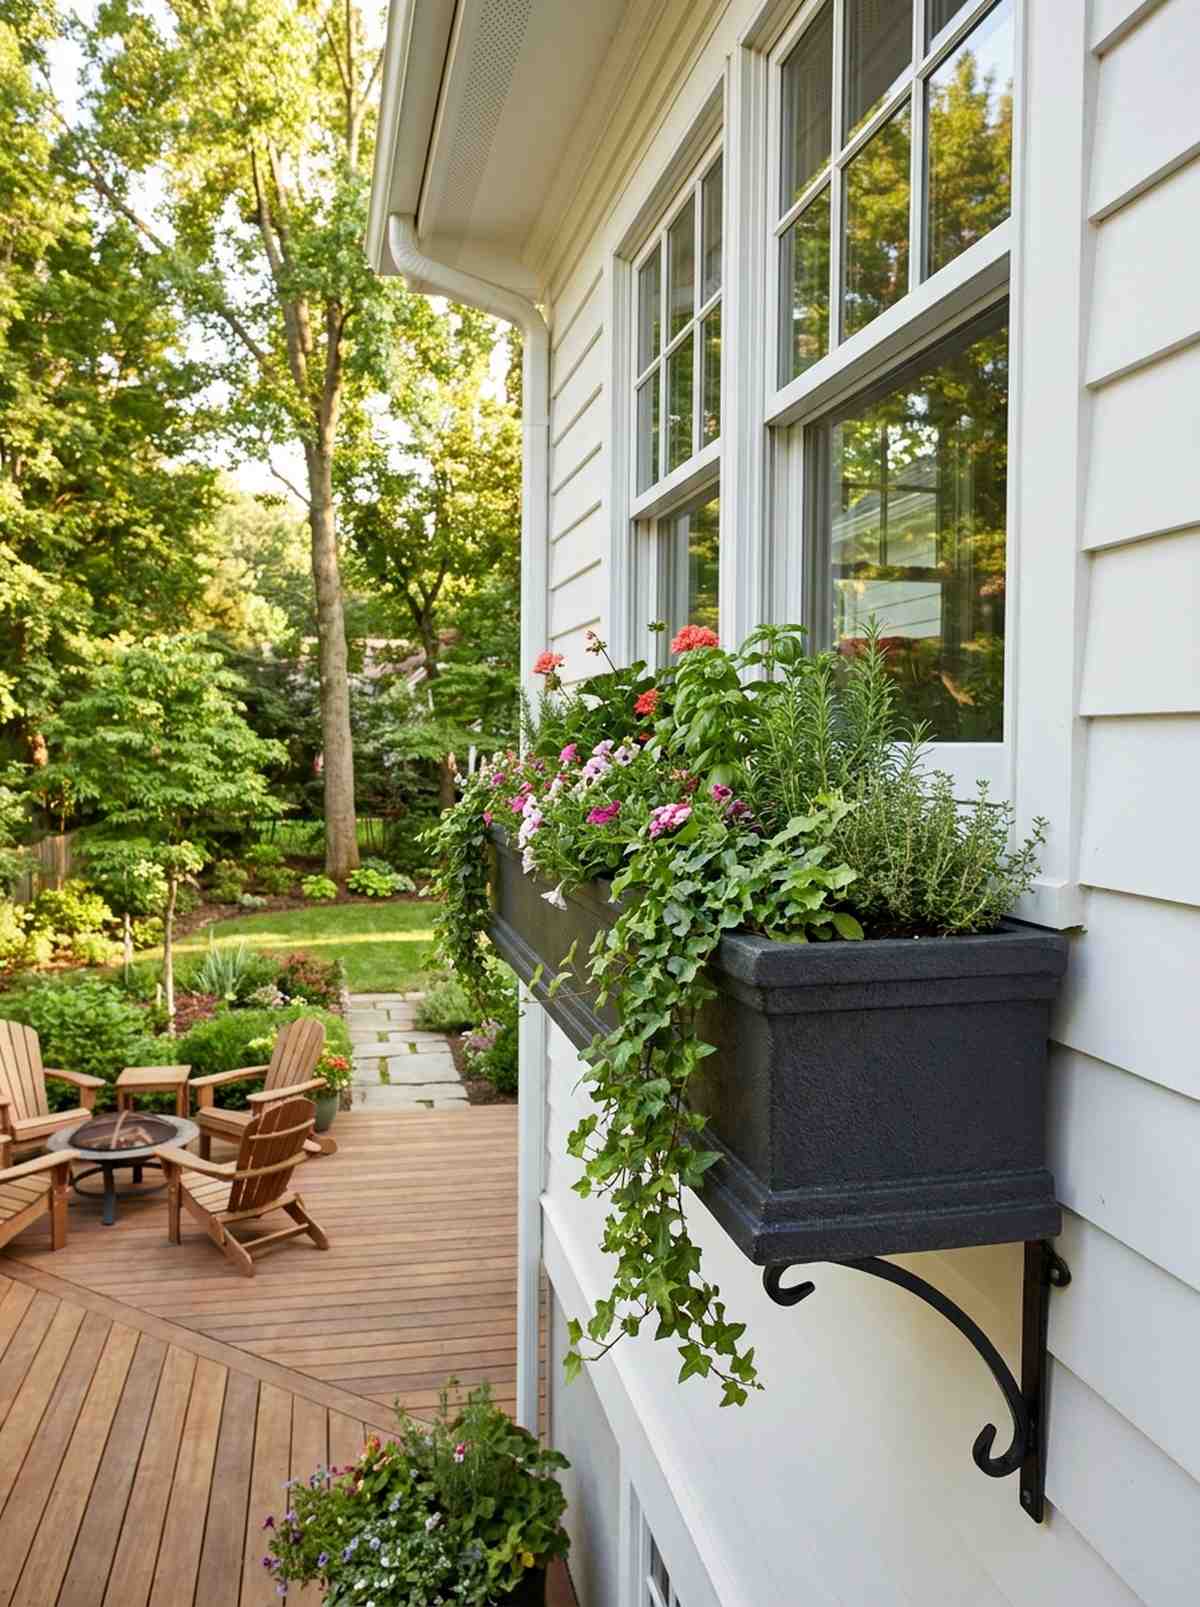
This floating greenery feels like a charming European street café right at your kitchen window. Mounting a railing window planter box reclaims completely unused horizontal air space.
Flimsy plastic boxes crack fast, but mounting a thick fiberglass or wood extension looks far more expensive than it is. Using strong brackets rated for heavy wet soil prevents a catastrophic mess on your deck.
A sturdy window box setup costs about $35–$60. Save this if you love harvesting herbs directly outside your window!
- Key Materials: Planter box, heavy-duty mounting brackets
- Vibe / Style: Classic cottage exterior
- Difficulty: Requires secure drilling
- Budget Breakdown: Box: $40 | Brackets: $15
- Creator’s Tip: Use a lightweight perlite-heavy soil mix to significantly reduce the weight pulling on your siding.
- Smart Sourcing: Adjustable heavy-duty railing brackets (bulk pack)
18. Nested Container Towers

This vertical stack feels like an optical illusion that overflows with vibrant foliage. A progressive staggered pot tower lets you grow 10 times the flowers in a single square foot.
Laying pots flat eats up ground space, but stacking them firmly on a central rebar pole gives a designer-level finish. It creates a lush, cascading pillar that looks stunning by a front doorway.
You can build this whimsical tower for just $25–$40. Pin this trick for an instant porch makeover!
- Key Materials: Graduated terra-cotta pots, central rebar rod
- Vibe / Style: Whimsical leaning pillar
- Difficulty: Very easy
- Budget Breakdown: Pots: $25 | Rebar Stake: $5
- Creator’s Tip: Thread the rebar through the drainage holes to lock the tilted pots securely in place.
- Smart Sourcing: Pre-cut heavy-duty rebar stakes (starter kit)
19. Galvanized Trough Planters
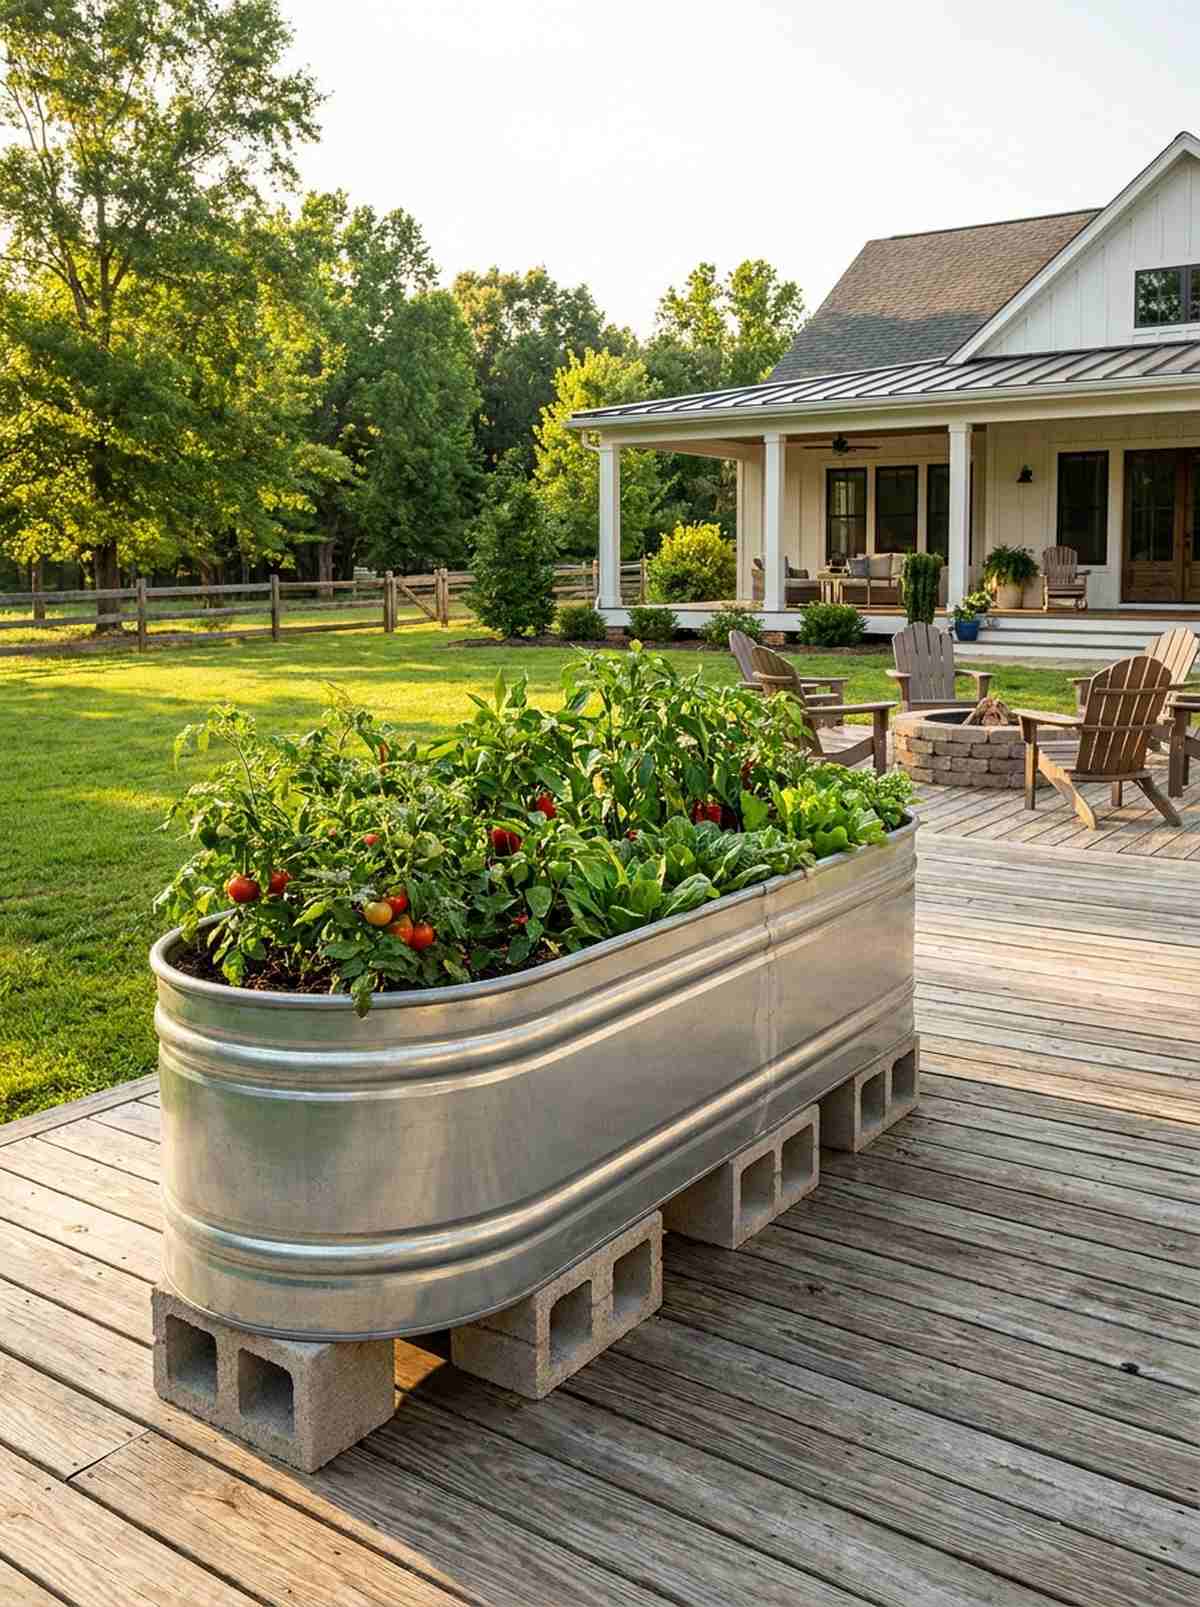
This setup feels wonderfully industrial and commands immediate attention in a modern yard. Repurposing a deep metal livestock trough gives you immense soil volume in a sleek, narrow footprint.
Wooden beds rot eventually, but heavy-duty galvanized steel looks far more expensive than it is and lasts decades. Elevating it slightly on cinder blocks ensures air flows underneath to prevent deck staining.
A mid-sized trough will cost around $80–$120 at a farm supply store. It’s an unbeatable option for deep-rooted veggies.
- Key Materials: Metal stock tank, metal drill bit
- Vibe / Style: Modern farmhouse industrial
- Difficulty: Easy, requires drilling drain holes
- Budget Breakdown: Tank: $90 | Base Blocks: $10
- Creator’s Tip: Line the bottom 3 inches with crushed water bottles before adding soil to reduce weight and save on expensive dirt.
- Smart Sourcing: High-speed titanium drill bit kits
Wait until you see how affordable this next modular idea actually is for renters…
20. Fabric Grow Bags
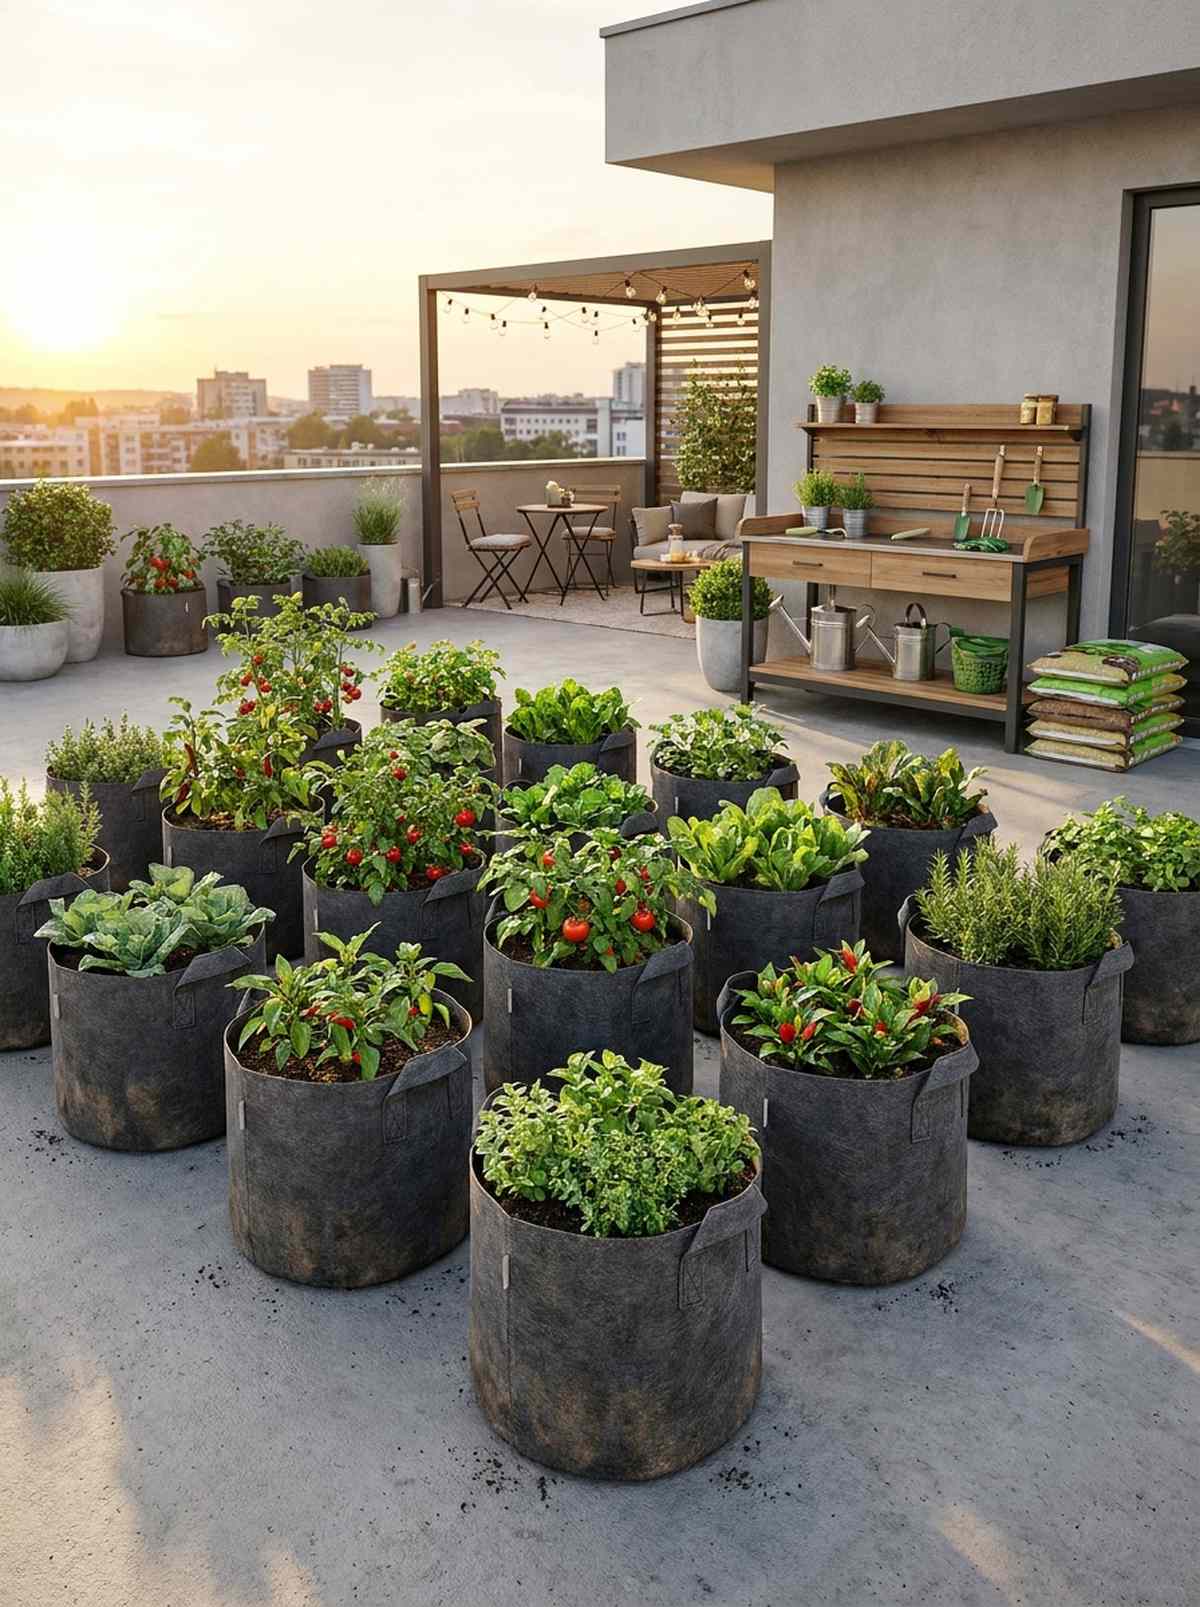
This lightweight layout feels incredibly modern and is an absolute game-changer for renters. Setting out a grid of breathable fabric grow bags creates an instant, high-yield garden on pure concrete.
Hard plastic pots cause root circling, but aerated fabric bags deliver a surprisingly premium look by air-pruning roots for massive growth. They fold completely flat in the winter, freeing up your patio entirely.
A pack of these heavy-duty bags only costs about $15–$25. Save this to your beginner gardening board!
- Key Materials: Non-woven fabric pots, quality potting mix
- Vibe / Style: Temporary urban farm
- Difficulty: Extremely easy
- Budget Breakdown: Grow Bags: $20 | Soil: $25
- Creator’s Tip: Choose bags with reinforced stitched handles so you can easily move them when fully watered and heavy.
- Smart Sourcing: Heavy-duty 10-gallon fabric grow bags (bulk pack)
Edible Landscaping for Dual-Purpose Beauty
Integrating productive plants into ornamental designs eliminates the distinction between food gardens and decorative landscapes. This approach layers fruiting shrubs, perennial vegetables, and culinary herbs into foundation plantings that deliver harvests without sacrificing curb appeal.
21. Blueberry Hedge Borders
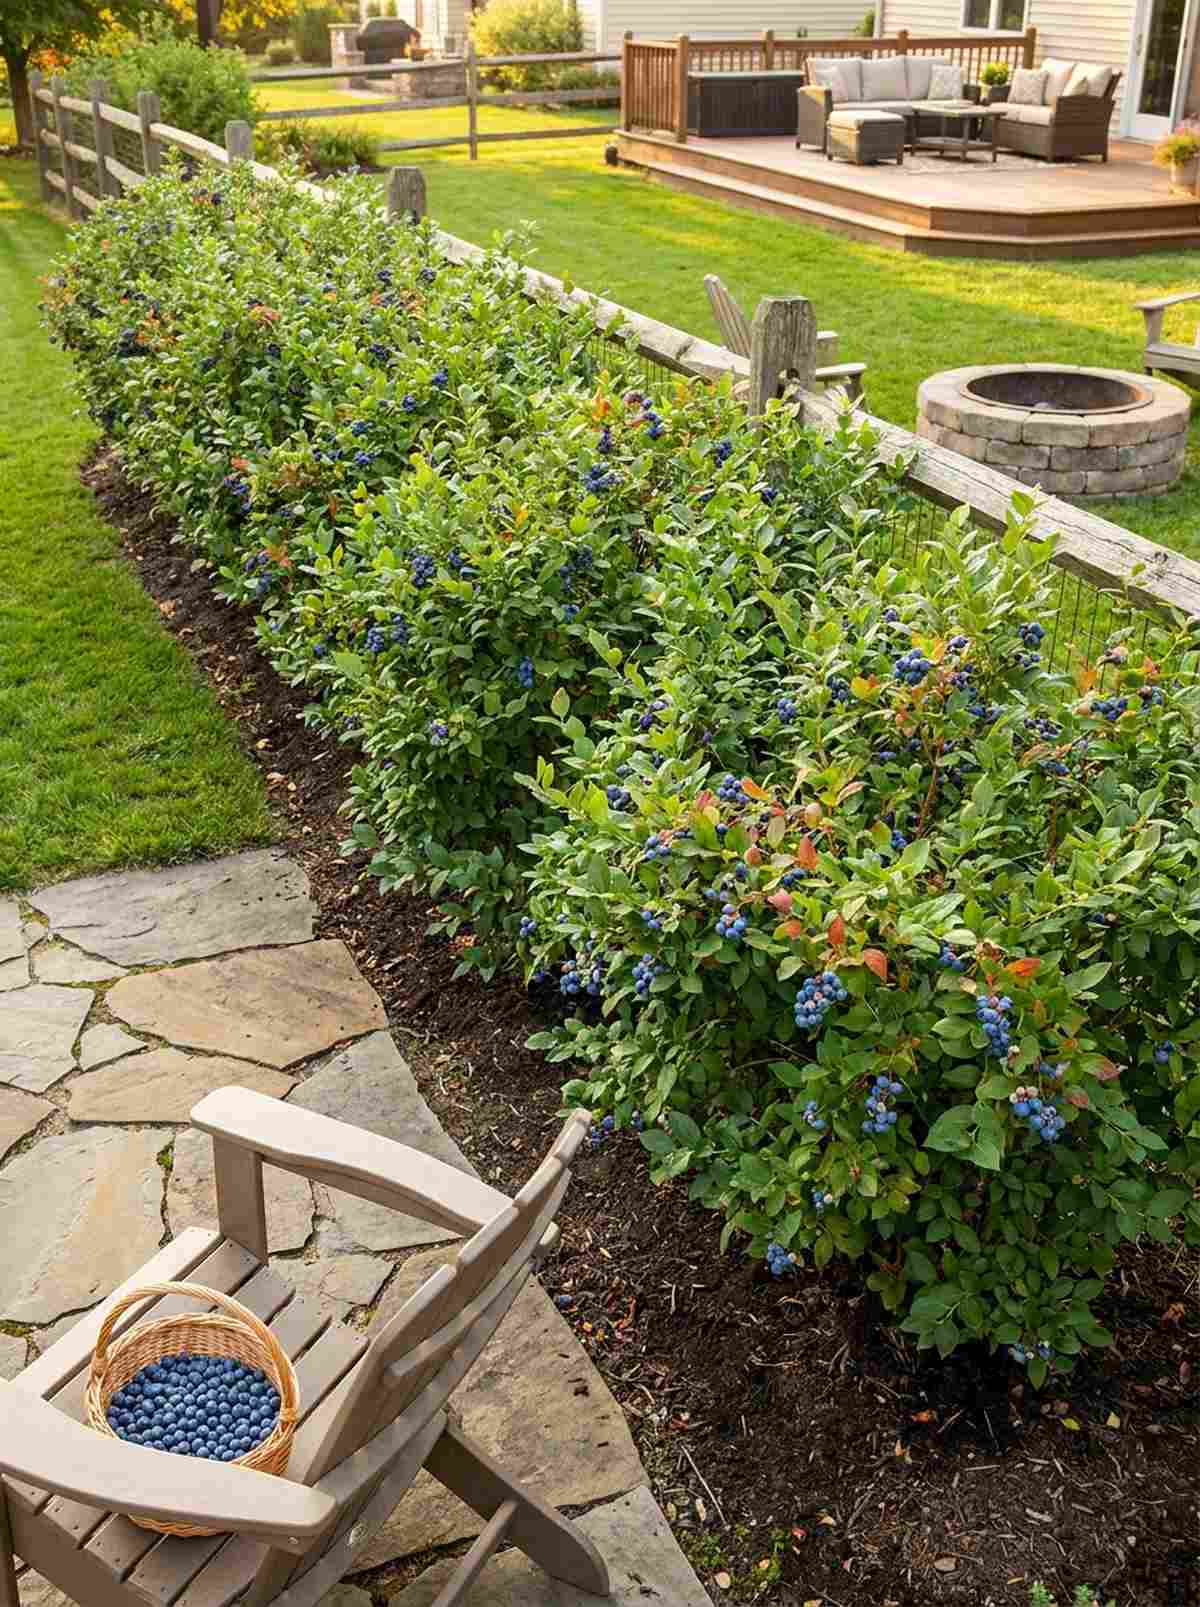
This edible boundary feels like a secret garden feature that pays you back in fresh fruit. Planting a dense blueberry bush hedge replaces boring boxwoods with vibrant seasonal color.
Typical hedges require endless trimming, but allowing these fruiting shrubs to mature gives a designer-level finish. Amending the soil with proper acidifiers ensures you get explosive fruit yields rather than just leaves.
Establishing a short hedge runs about $60–$90 for young plants. It’s a gorgeous dual-purpose landscaping hack.
- Key Materials: Highbush blueberry plants, acidic soil mix
- Vibe / Style: Lush productive boundary
- Difficulty: Moderate, requires soil monitoring
- Budget Breakdown: Shrubs: $70 | Soil Acidifier: $15
- Creator’s Tip: Plant at least two different varieties close together; cross-pollination drastically increases the berry size.
- Smart Sourcing: Premium granular soil acidifier kits
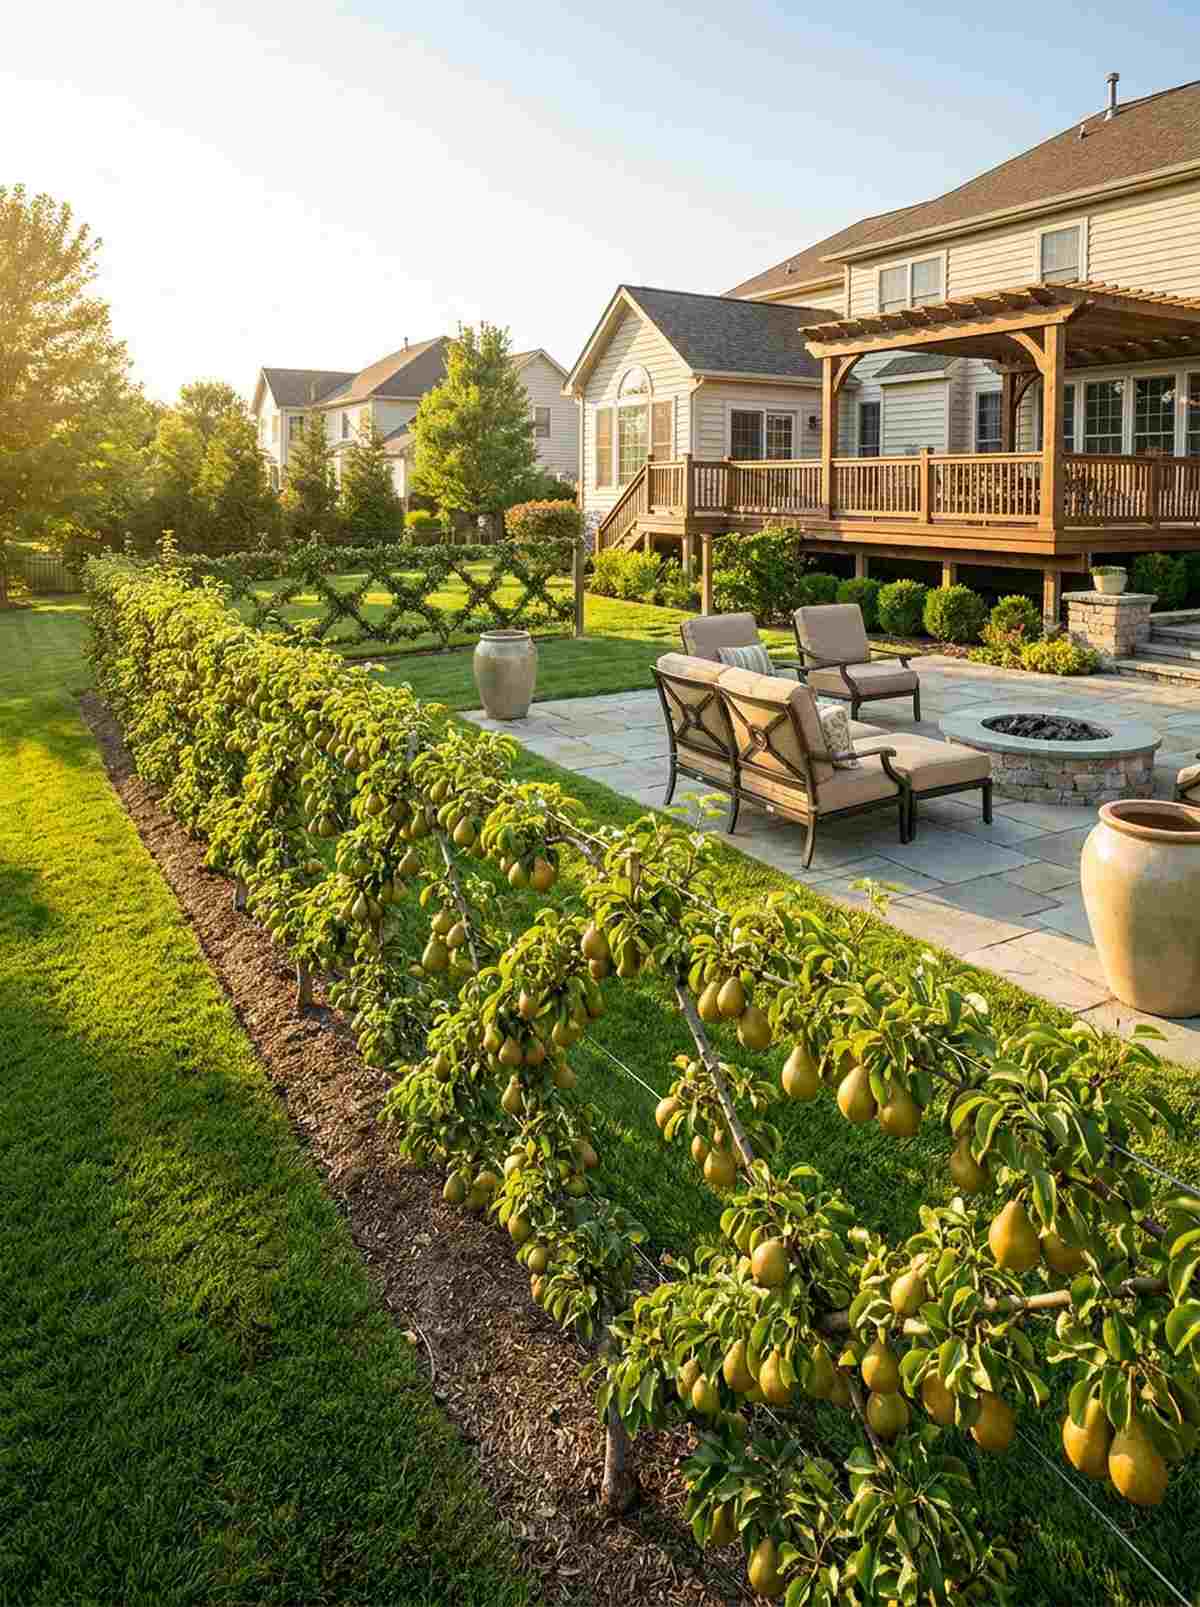
22. Dwarf Fruit Tree Allées
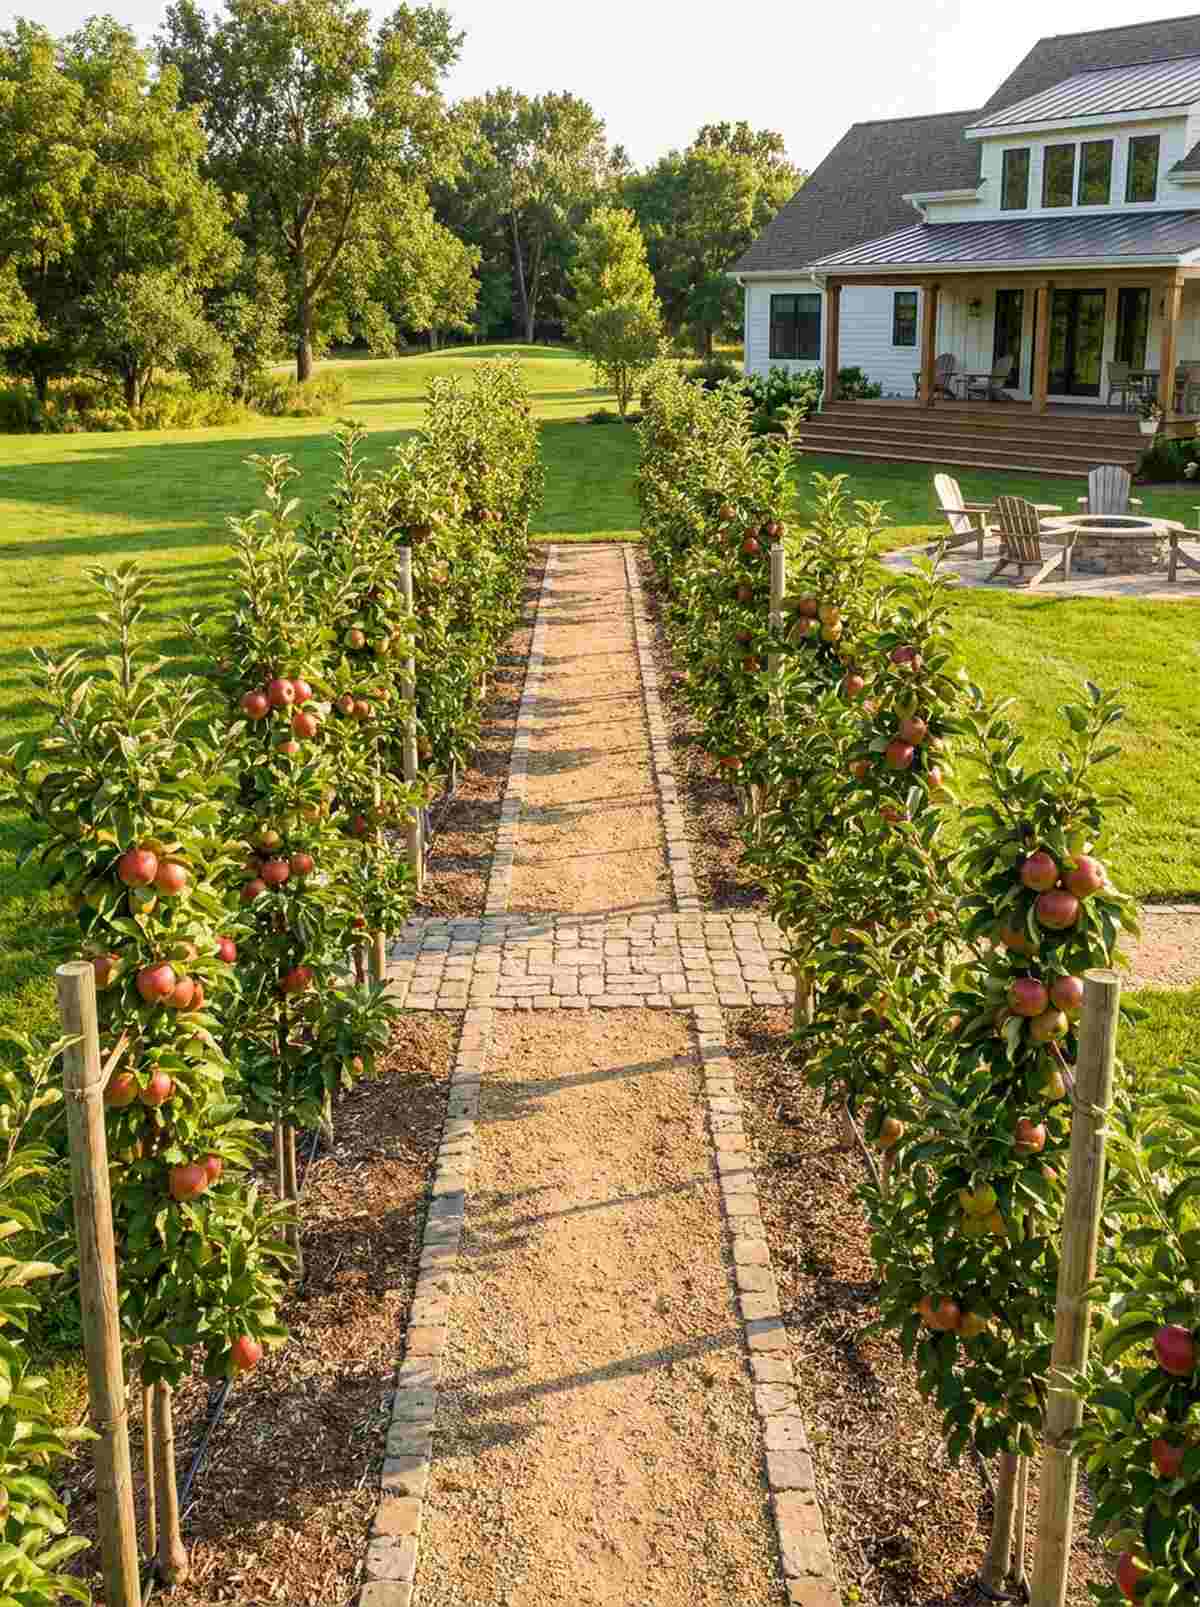
Walking this pathway feels like stepping through a grand European estate on a micro-scale. Lining a walkway with a dwarf fruit tree corridor defines your circulation routes beautifully.
Planting massive canopy trees suffocates a small yard, but utilizing columnar rootstocks looks far more expensive than it is. These ultra-narrow trees produce full-sized apples or cherries without casting huge shadows over your other beds.
You can start an allée with bare-root trees for about $80–$130. Pin this if you crave a structured, formal garden look!
- Key Materials: Columnar fruit trees, tree stakes
- Vibe / Style: Formal orchard pathway
- Difficulty: Patient pruning needed
- Budget Breakdown: Bare-root Trees: $100 | Stakes: $20
- Creator’s Tip: Space them exactly 6 to 8 feet apart so the canopy eventually touches slightly but doesn’t overcrowd.
- Smart Sourcing: Heavy-duty tree staking support kits
23. Grape Arbor Ceilings
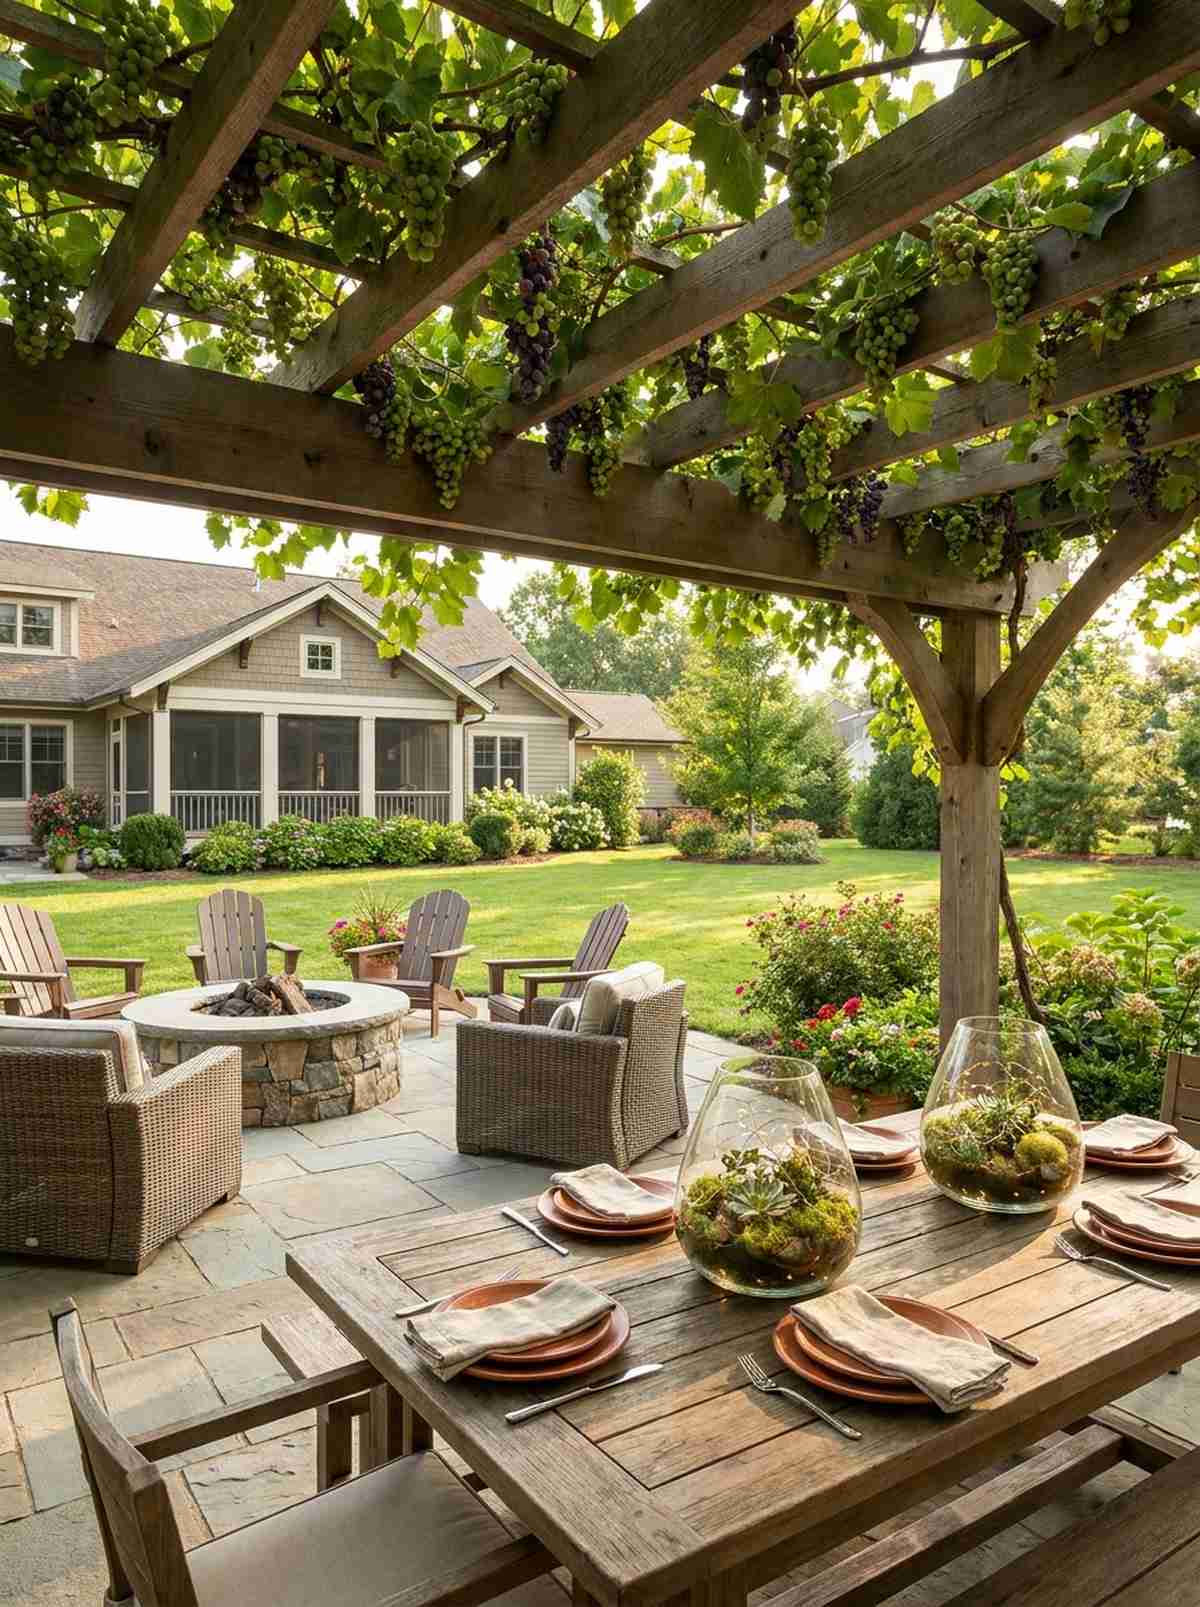
This dappled shade feels like you’re dining outdoors in the Mediterranean countryside. Training vines over a sturdy wooden grape arbor creates an edible, cooling ceiling for your patio.
Basic patio umbrellas blow over, but a rooted overhead canopy delivers a surprisingly premium look that gets better every year. Integrating high-quality terrarium accessories as table centerpieces directly beneath the fruit completes the aesthetic.
Building the support structure and buying vines costs around $150–$250. It transforms blistering hot concrete into a cool retreat.
- Key Materials: Pergola framing, table grape vines
- Vibe / Style: Tuscan vineyard shade
- Difficulty: Advanced building & pruning
- Budget Breakdown: Lumber: $200 | Vines: $30
- Creator’s Tip: Aggressively prune the vines in late winter to force energy into fruiting rather than just leafy growth.
- Smart Sourcing: Pre-cut UV-coated shade cloths
24. Alpine Strawberry Groundcover
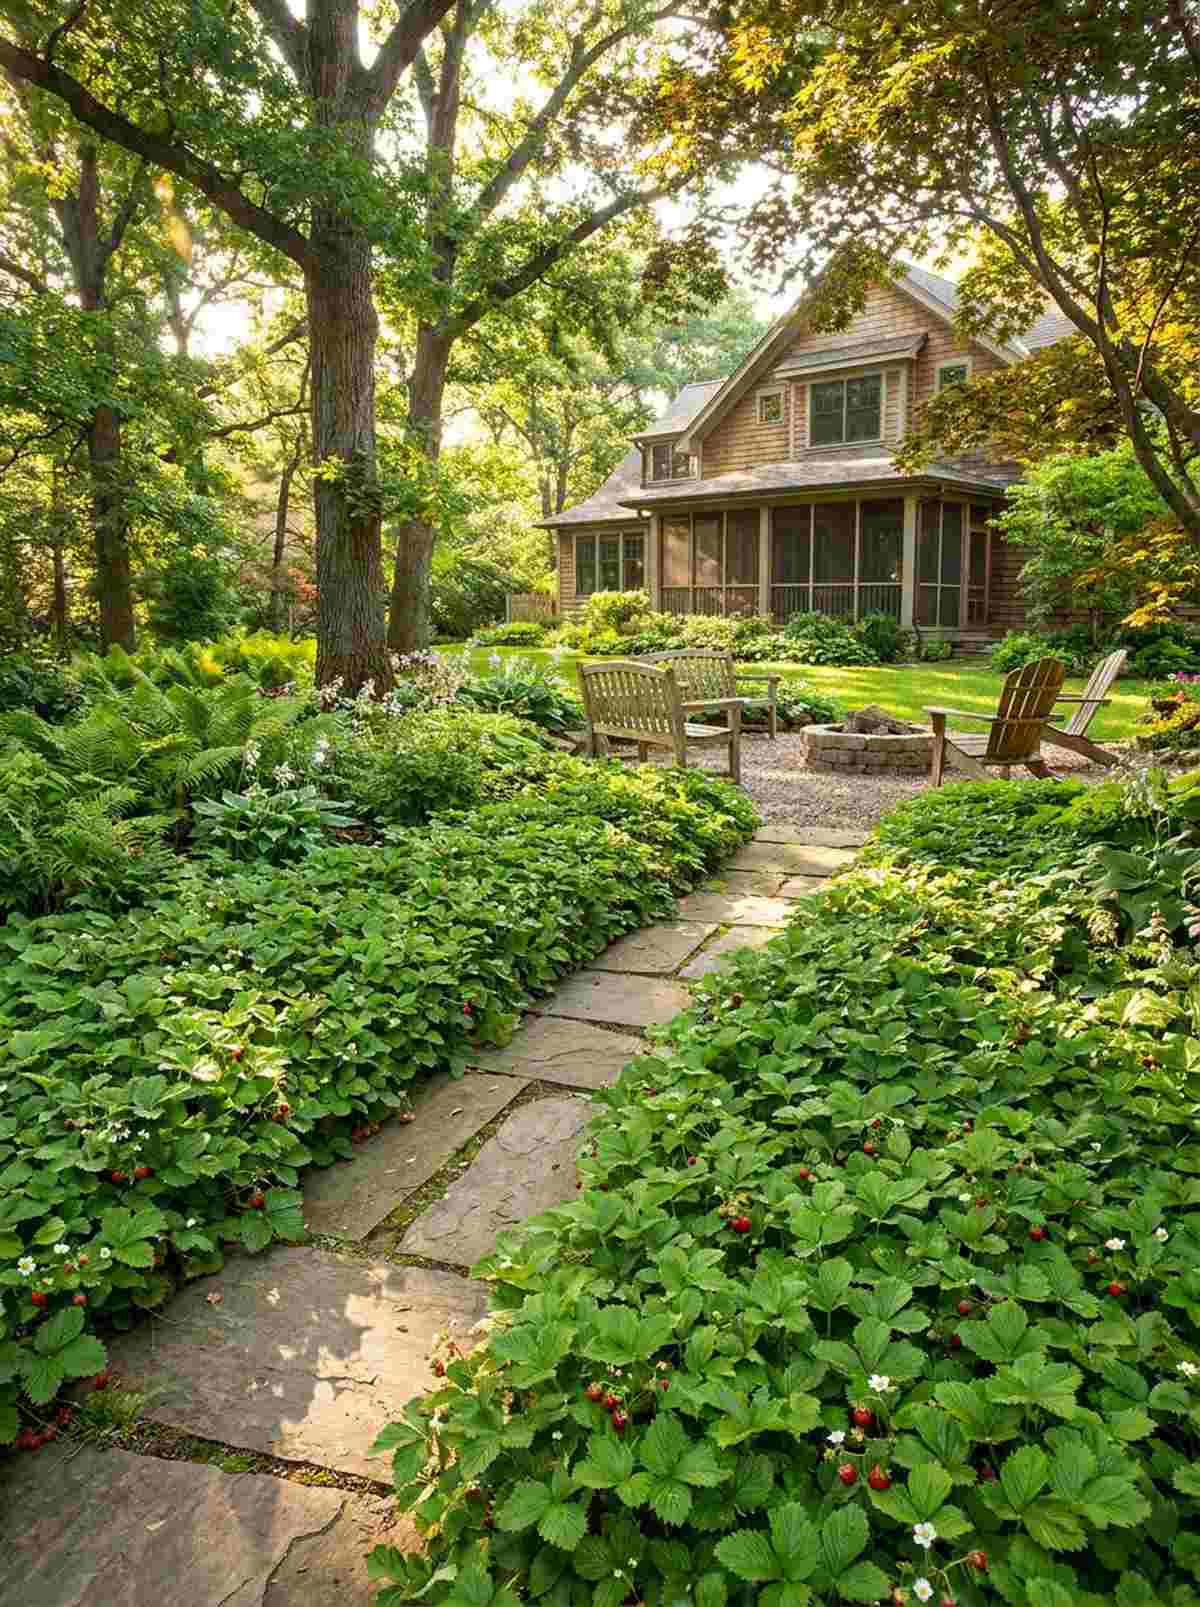
This lush carpet feels like a magical forest floor that hides tiny, sweet treasures. Using compact alpine strawberries instead of mulch suppresses weeds while providing continuous summer snacks.
Standard bark mulch degrades and blows away, but establishing a living edible mat gives a designer-level finish. Because they don’t produce aggressive runners, they stay exactly where you plant them.
A flat of plugs to cover a small area runs about $25–$40. Save this for an enchanting pathway edge!
- Key Materials: Alpine strawberry plugs, light compost
- Vibe / Style: Enchanted edible forest
- Difficulty: Very easy
- Budget Breakdown: Plant Plugs: $35 | Compost: $10
- Creator’s Tip: Plant them on 8-inch centers; they will naturally knit together by mid-summer to block out all weeds.
- Smart Sourcing: Pre-formulated berry fertilizer starter kits
Most beginners ruin their borders with boring plants… until they discover this architectural secret.
25. Kale as Ornamental Foliage

This striking arrangement feels like high-end modern landscape design hidden in plain sight. Mixing vibrant structural kale varieties into your flower beds anchors your fall yard with incredible texture.
Most people yank their gardens in September, but utilizing deep purple and blue dinosaur kale looks far more expensive than it is. It rivals expensive ornamental cabbage while remaining totally delicious in salads.
A packet of high-end kale seeds costs under $5. It’s an incredibly cheap way to get dramatic, frosty color.
- Key Materials: Redbor or Lacinato kale seeds, rich soil
- Vibe / Style: Moody autumn aesthetic
- Difficulty: Extremely easy
- Budget Breakdown: Seeds: $5 | Soil Prep: $10
- Creator’s Tip: Harvest only the lower, outer leaves so the plant maintains its tall, palm-tree-like architectural shape.
- Smart Sourcing: Premium organic heirloom seed kits
26. Rosemary Foundation Planting
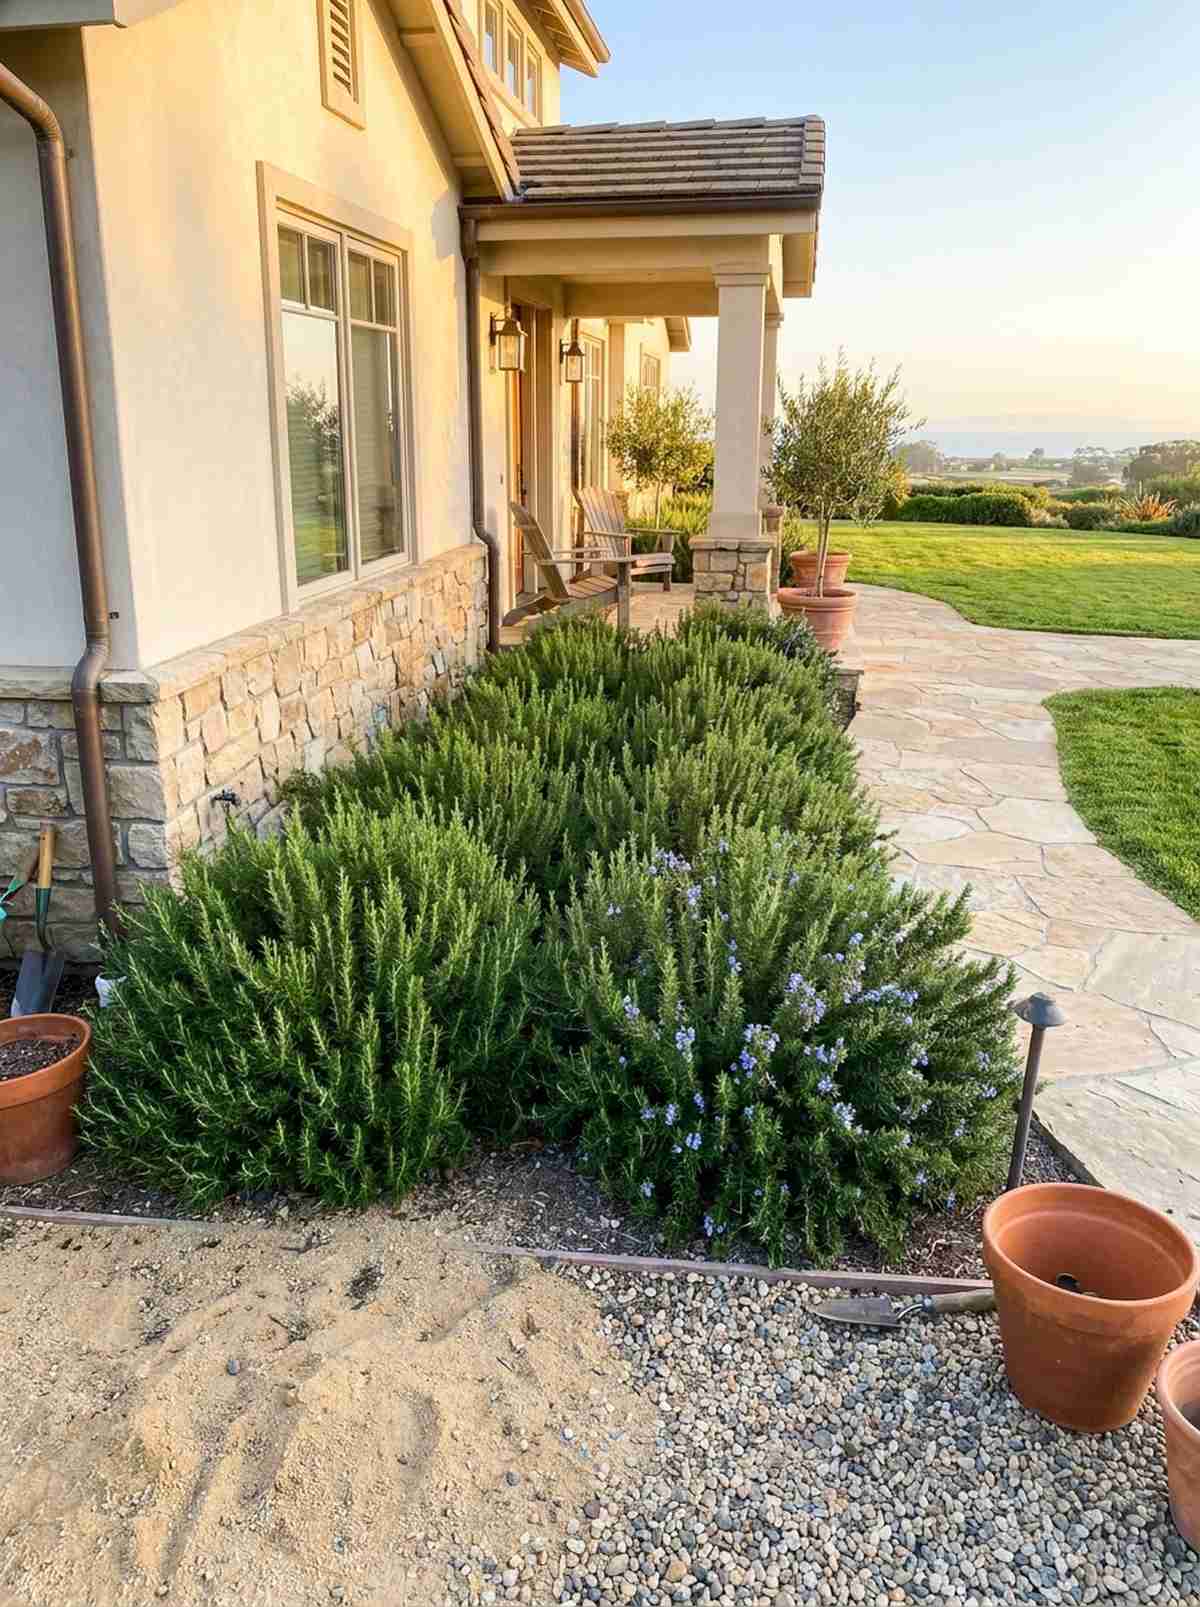
This fragrant border feels like an upscale coastal resort every time you brush past it. Using upright rosemary shrubs against your foundation provides evergreen structure that smells divine.
Standard foundation evergreens are boring and toxic, but a dense culinary herb hedge delivers a surprisingly premium look. In mild climates, it blooms beautifully while supplying endless sprigs for roasting.
Establishing a few large rosemary bushes costs about $45–$65. Pin this if you want a zero-maintenance fragrant border!
- Key Materials: Upright rosemary cultivars, well-draining soil
- Vibe / Style: Coastal Mediterranean structure
- Difficulty: Easy, requires good drainage
- Budget Breakdown: Shrubs: $50 | Sand/Gravel Amendment: $10
- Creator’s Tip: Rosemary hates wet feet; mix coarse sand into the planting hole if your foundation soil is heavy clay.
- Smart Sourcing: Fast-draining perlite soil modifiers (bulk pack)
27. Elderberry Corner Specimens
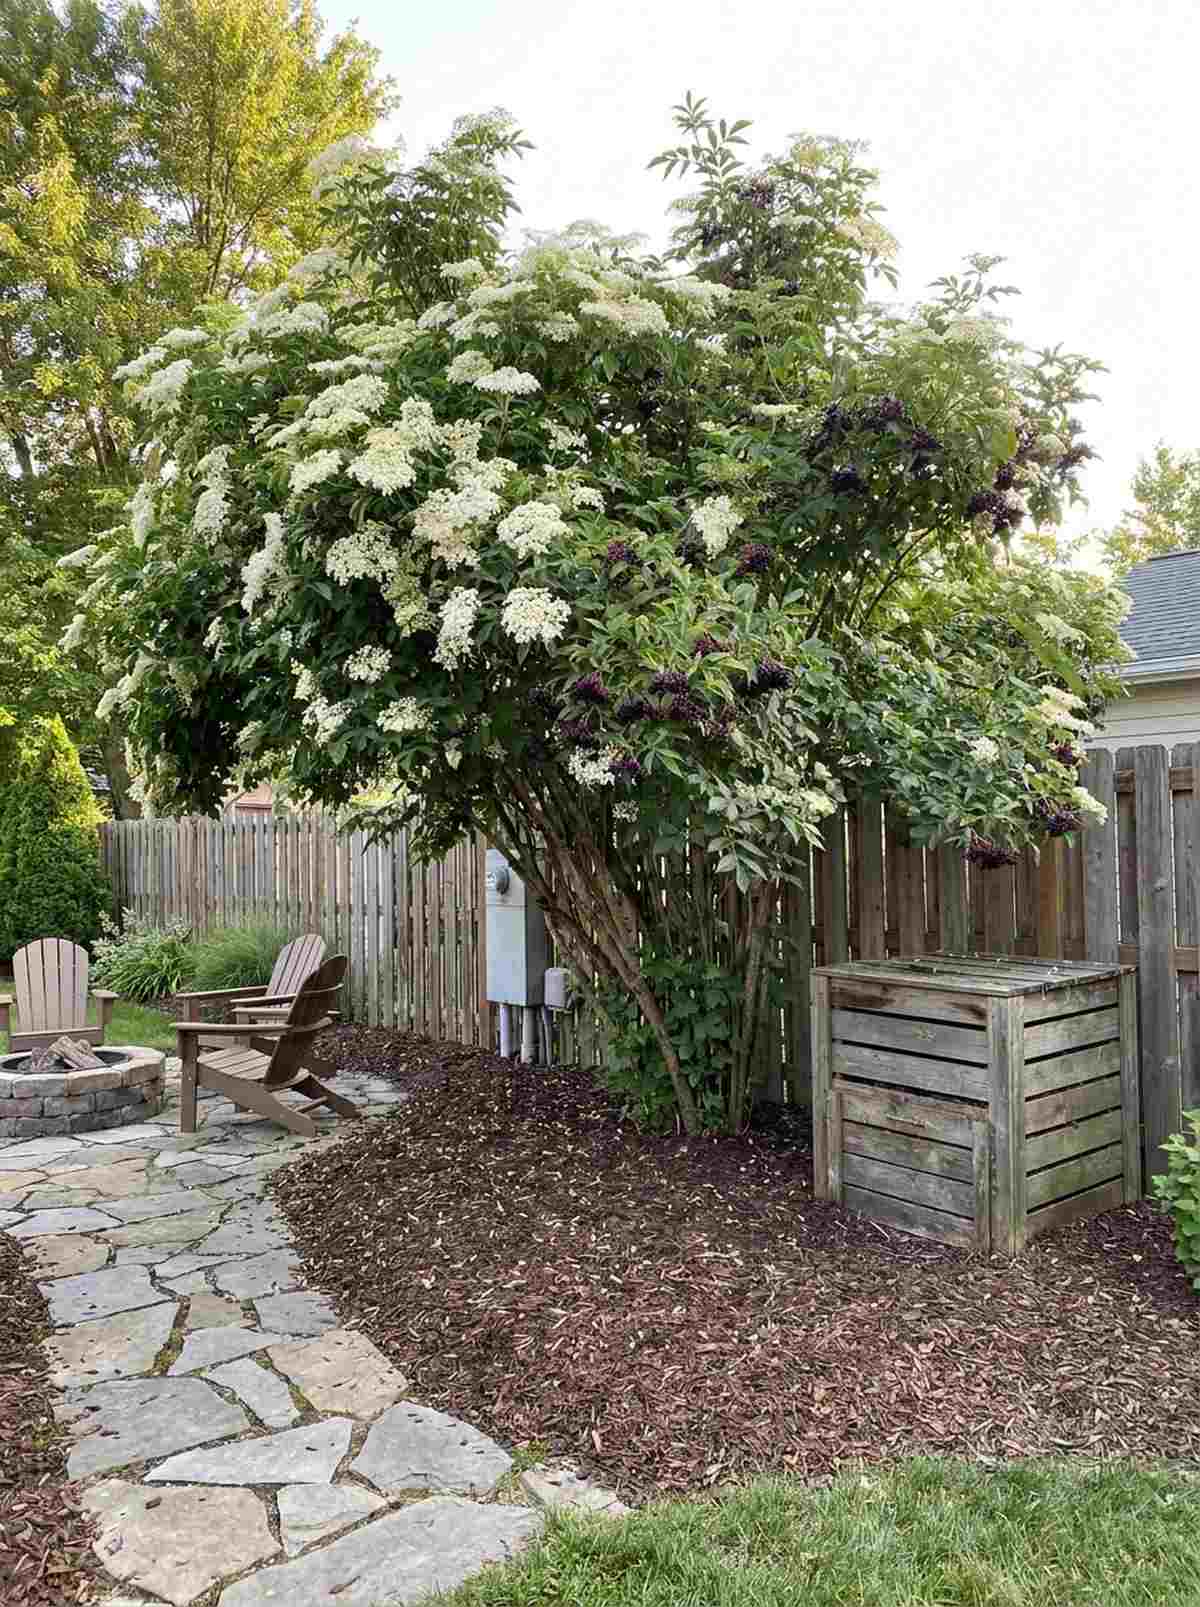
This sprawling shrub feels wonderfully wild and softens harsh property fence lines beautifully. Planting a large multi-stemmed elderberry bush quickly hides ugly utility boxes or compost bins.
Buying mature screening trees costs a fortune, but a fast-growing elderberry gives a designer-level finish in just two seasons. The massive white flower clusters turn into highly sought-after medicinal berries.
A couple of starter shrubs will only set you back $40–$60. It’s an aggressive grower that fills dead corners fast.
- Key Materials: Elderberry starter shrubs, heavy mulch
- Vibe / Style: Wild cottage perimeter
- Difficulty: Easy, requires annual pruning
- Budget Breakdown: Plants: $50 | Mulch: $10
- Creator’s Tip: You must plant two different cultivars near each other for cross-pollination, or you won’t get any berries.
- Smart Sourcing: Heavy-duty bypass pruning shear kits
28. Asparagus Fern Backdrop
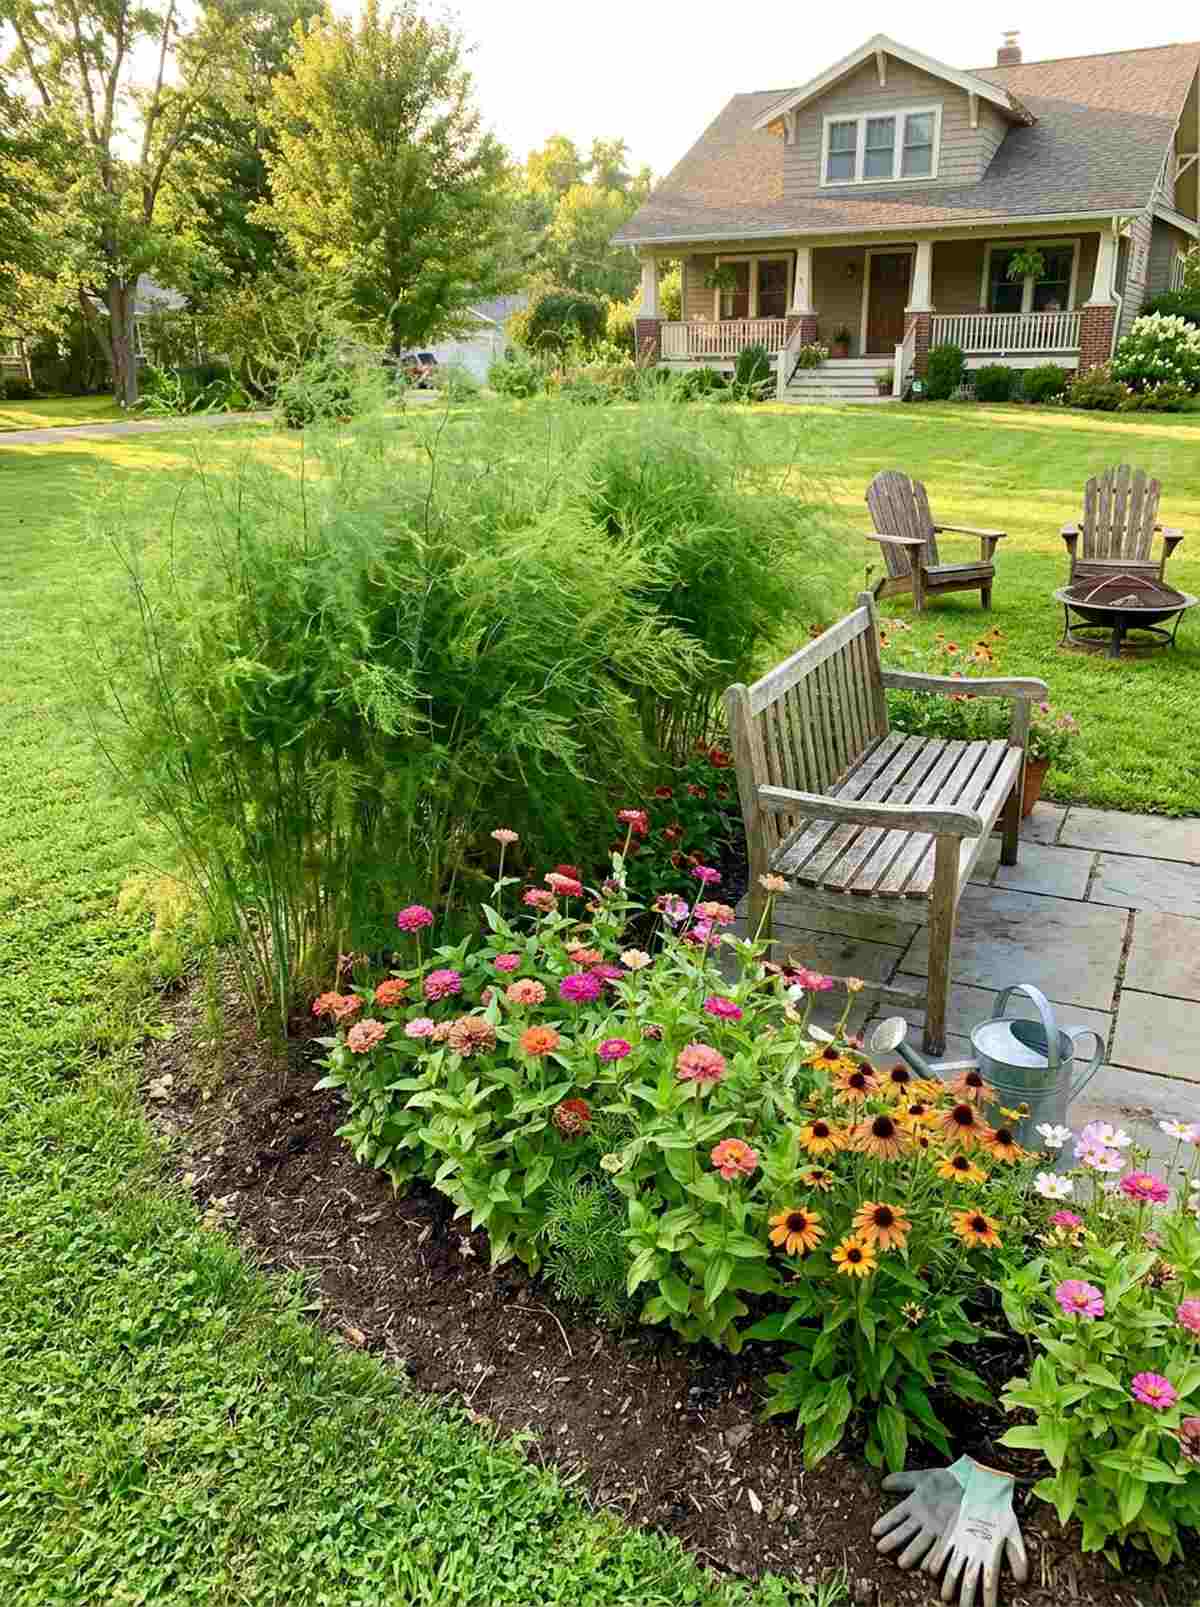
This feathery wall feels like a delicate, airy screen that sways beautifully in the breeze. Allowing an asparagus patch to fern out creates a dense, 5-foot-tall living backdrop by late summer.
Most people hide their vegetable beds, but positioning this feathery texture behind bright flowers looks far more expensive than it is. It pulls double duty as a spring delicacy and a late-summer privacy screen.
Asparagus crowns to start a bed cost around $30–$50. Save this for a long-term, high-yield landscape investment!
- Key Materials: Year-old asparagus crowns, compost-rich trench
- Vibe / Style: Ethereal green screening
- Difficulty: Moderate, requires deep trenching
- Budget Breakdown: Crowns: $40 | Compost: $15
- Creator’s Tip: Do not harvest spears during the first two years; letting them turn into ferns builds massive root energy.
- Smart Sourcing: Pre-mixed organic compost starter bags
29. Currant and Gooseberry Hedges
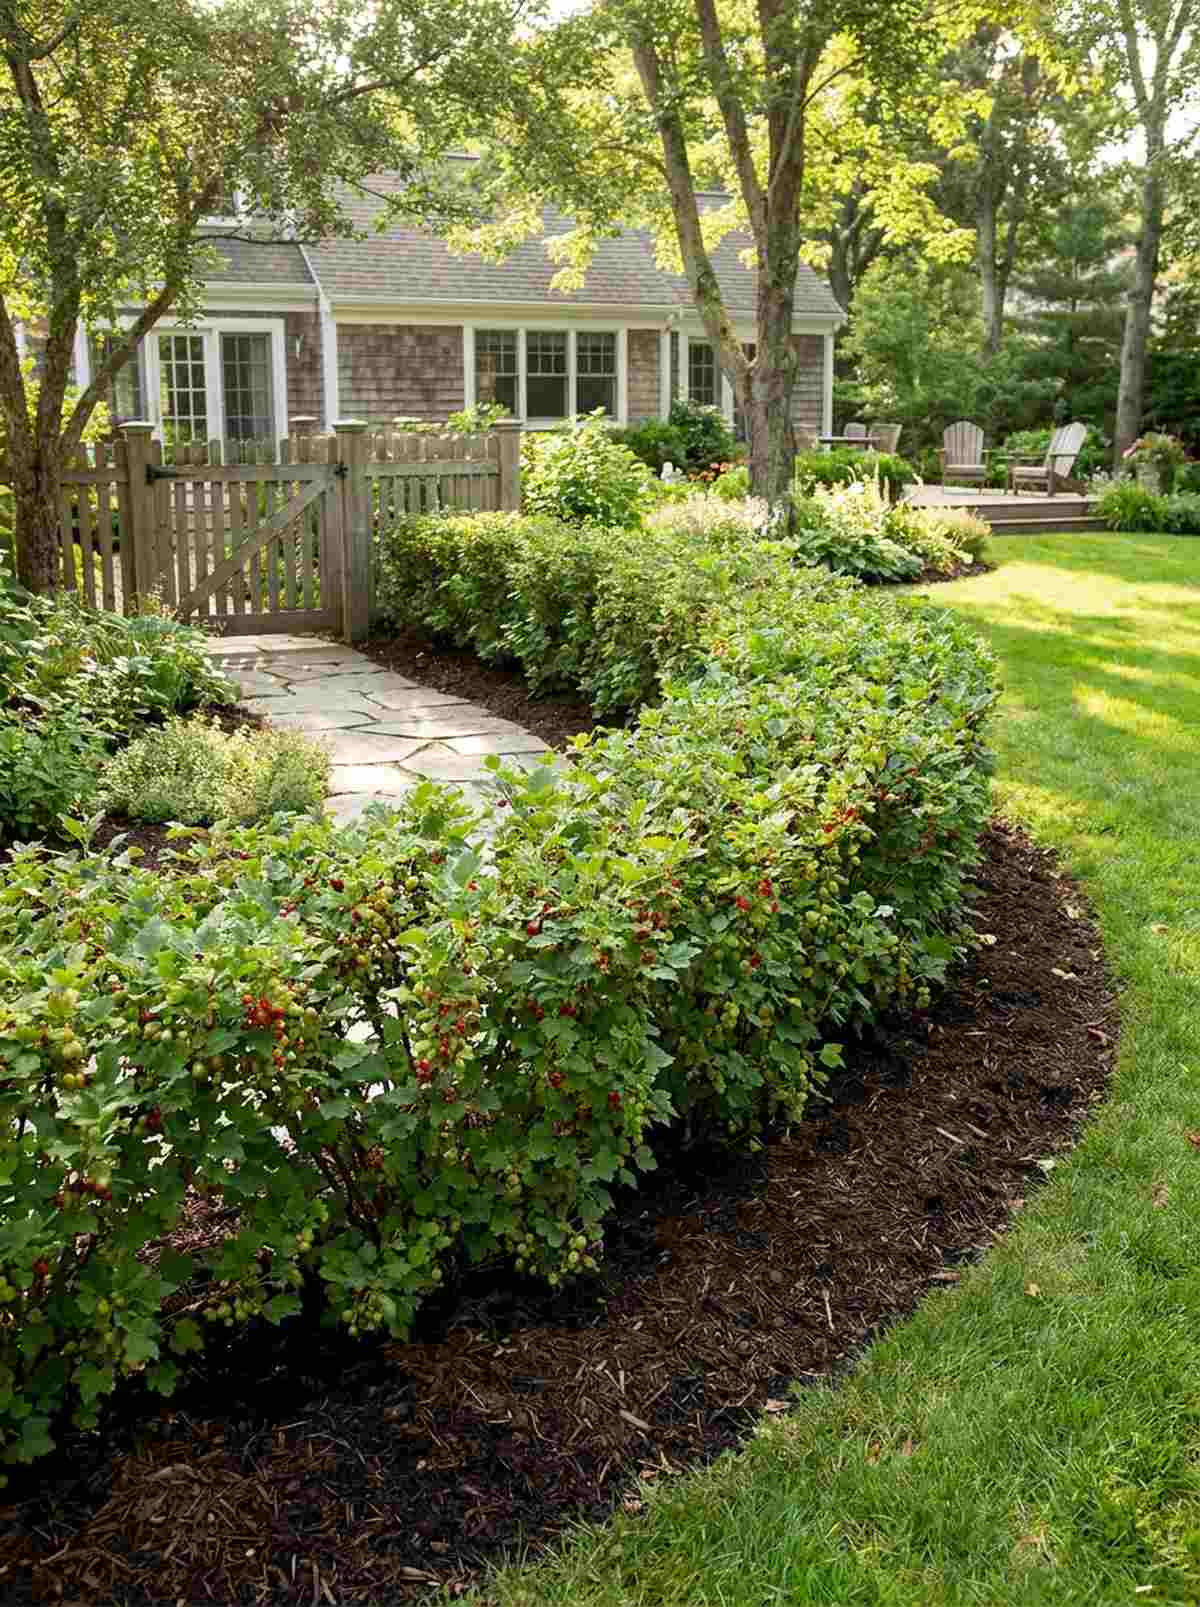
This low hedge feels like a nostalgic nod to traditional English kitchen gardens. Utilizing compact thornless berry bushes creates a beautiful knee-high boundary along a pathway.
Standard low hedges provide nothing but green leaves, but layering these shade-tolerant fruiting shrubs delivers a surprisingly premium look. They produce incredibly early in the season when nothing else is ready.
A few bare-root plants will cost you about $35–$55. It’s a perfect solution for that tricky part-shade spot.
- Key Materials: Currant/Gooseberry plants, thick organic mulch
- Vibe / Style: Traditional English kitchen garden
- Difficulty: Easy shade grower
- Budget Breakdown: Plants: $45 | Mulch: $10
- Creator’s Tip: Prune out the darkest, oldest wood entirely every three years to keep the shrub highly productive.
- Smart Sourcing: Pre-cut organic landscape fabric (bulk pack)
30. Artichoke Architectural Accents
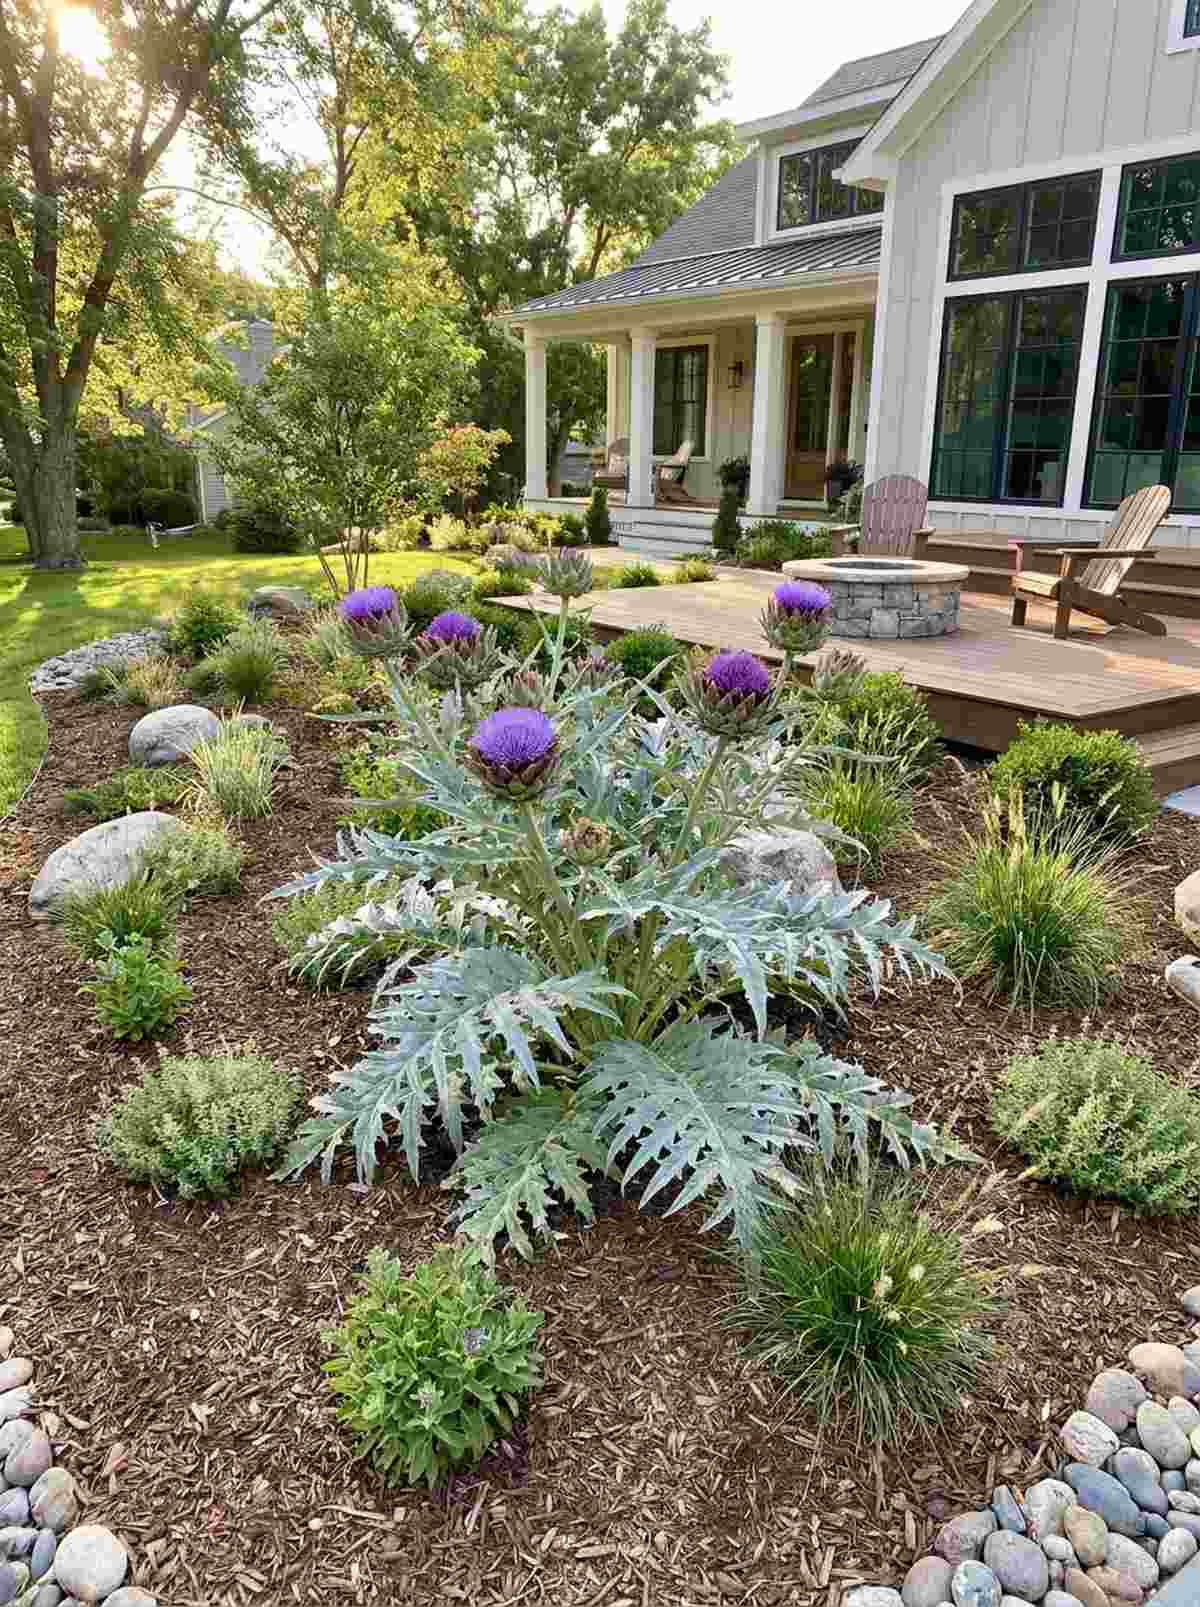
This dramatic plant feels like a prehistoric sculpture dominating your flower bed. Planting a massive silvery globe artichoke creates a jaw-dropping focal point that leaves neighbors jealous.
Standard centerpieces are boring, but this jagged, metallic-looking foliage gives a designer-level finish. If you let a few buds open, they reveal massive, stunning purple thistle flowers.
A mature-sized plant or seeds run around $15–$30. Pin this if you want an absolute showstopper in your small yard!
- Key Materials: Artichoke transplants, well-draining soil
- Vibe / Style: Bold sculptural modernism
- Difficulty: Moderate, requires heavy feeding
- Budget Breakdown: Transplants: $20 | Fertilizer: $10
- Creator’s Tip: These are heavy feeders; side-dress with rich compost every month to ensure massive bud development.
- Smart Sourcing: Slow-release organic vegetable fertilizer starter kits
Material Guide: Cheap vs. Premium Aesthetic
Knowing exactly where to save and where to spend makes all the difference in achieving that “looks expensive but isn’t” vibe.
- Standard vs. UV-Resistant/Premium: Generic plastics crack and fade in one summer. Spending 10% more on UV-coated materials prevents your garden from looking like a junkyard by August.
- Pre-made Kits vs. Sourcing Locally: While DIY lumber cuts seem cheap, premium raised bed starter kits save hours of labor, avoid weird warped angles, and instantly upgrade the visual symmetry of your yard.
Ground-Level Coverage & Pathway Integration
Strategic ground-level plantings eliminate wasted lawn areas while productive pathways combine circulation with harvest zones. These techniques blur boundaries between hardscape and planted space to increase functional density.
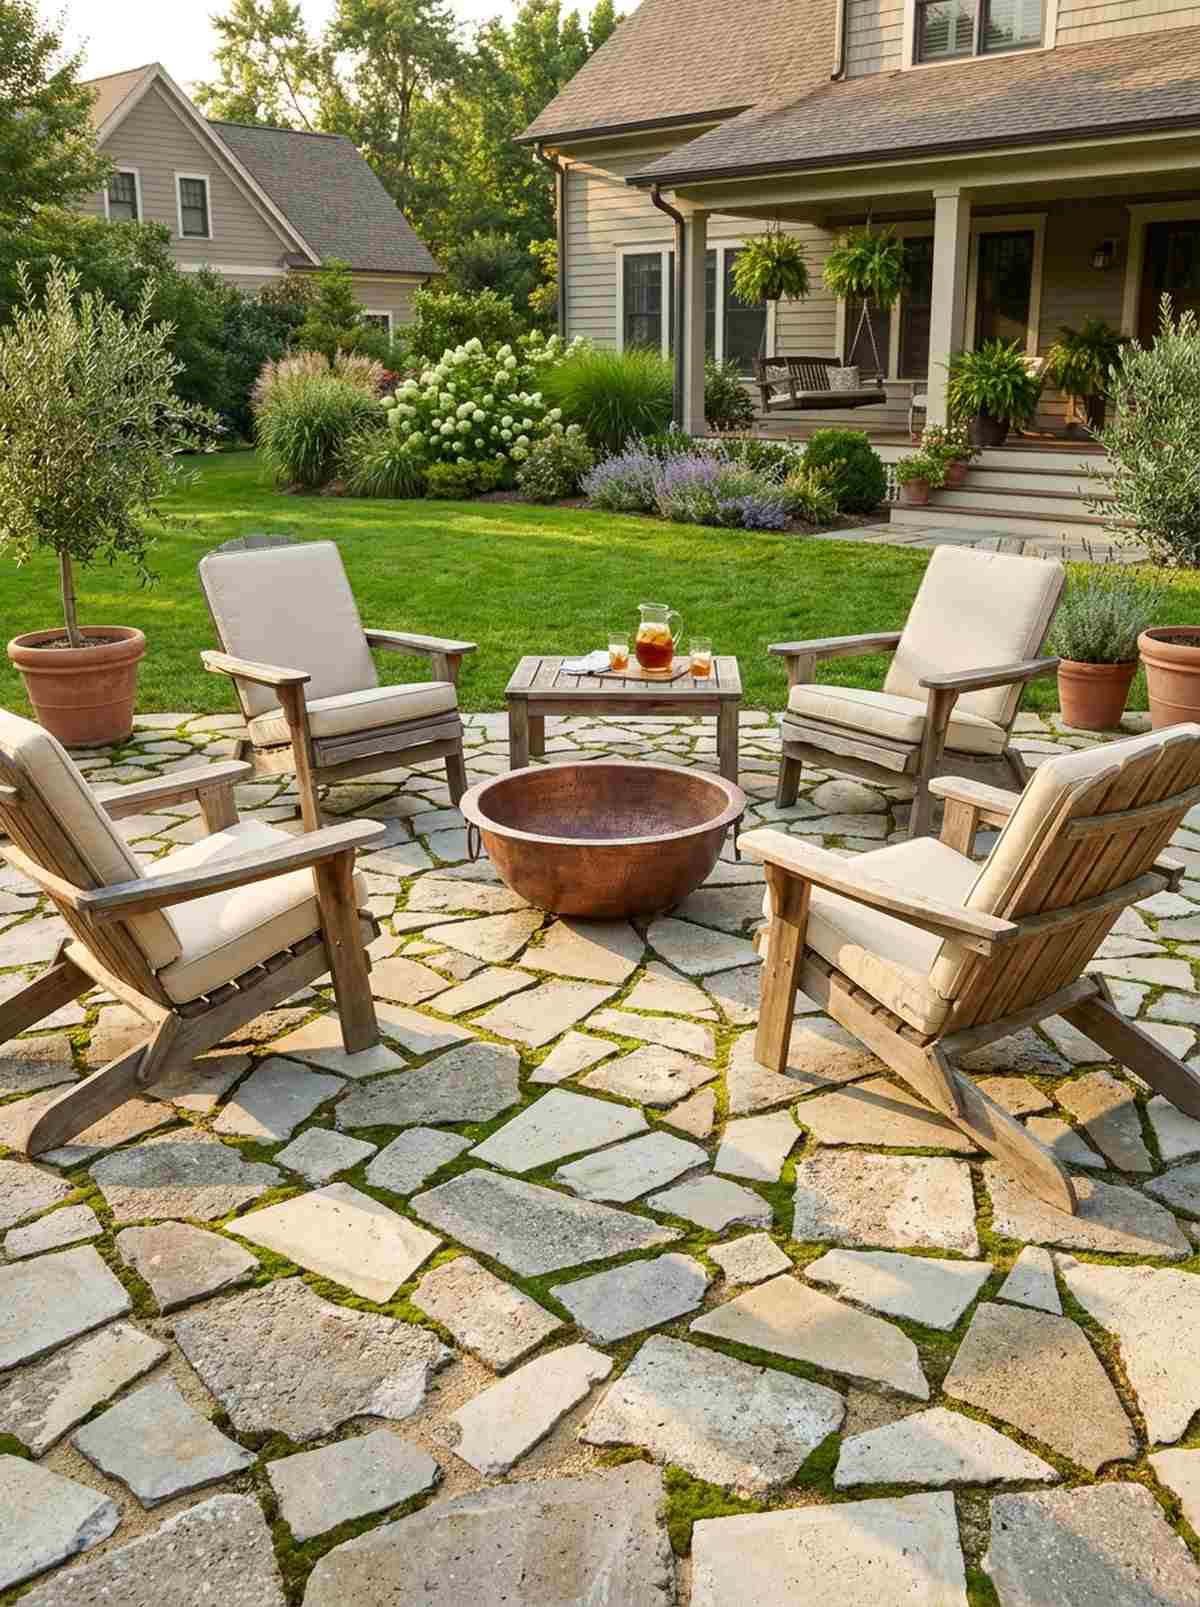
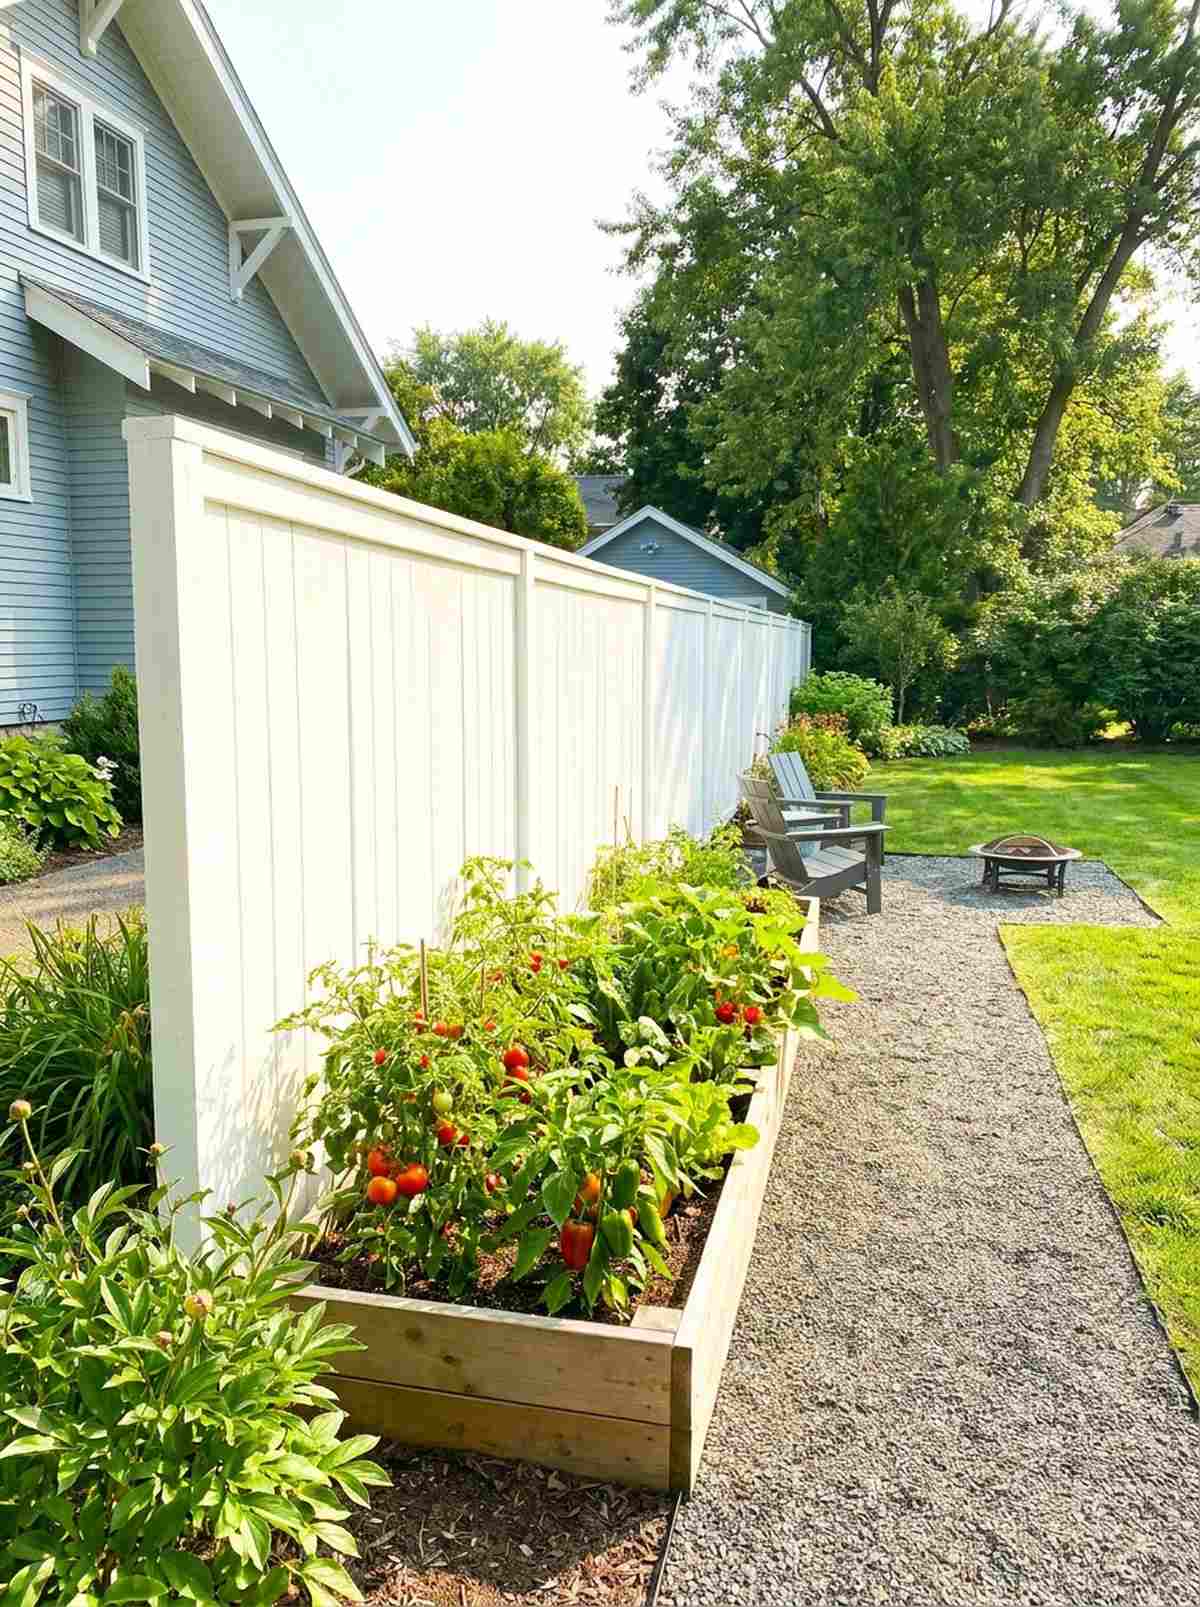
31. Stepping Stone Herb Paths
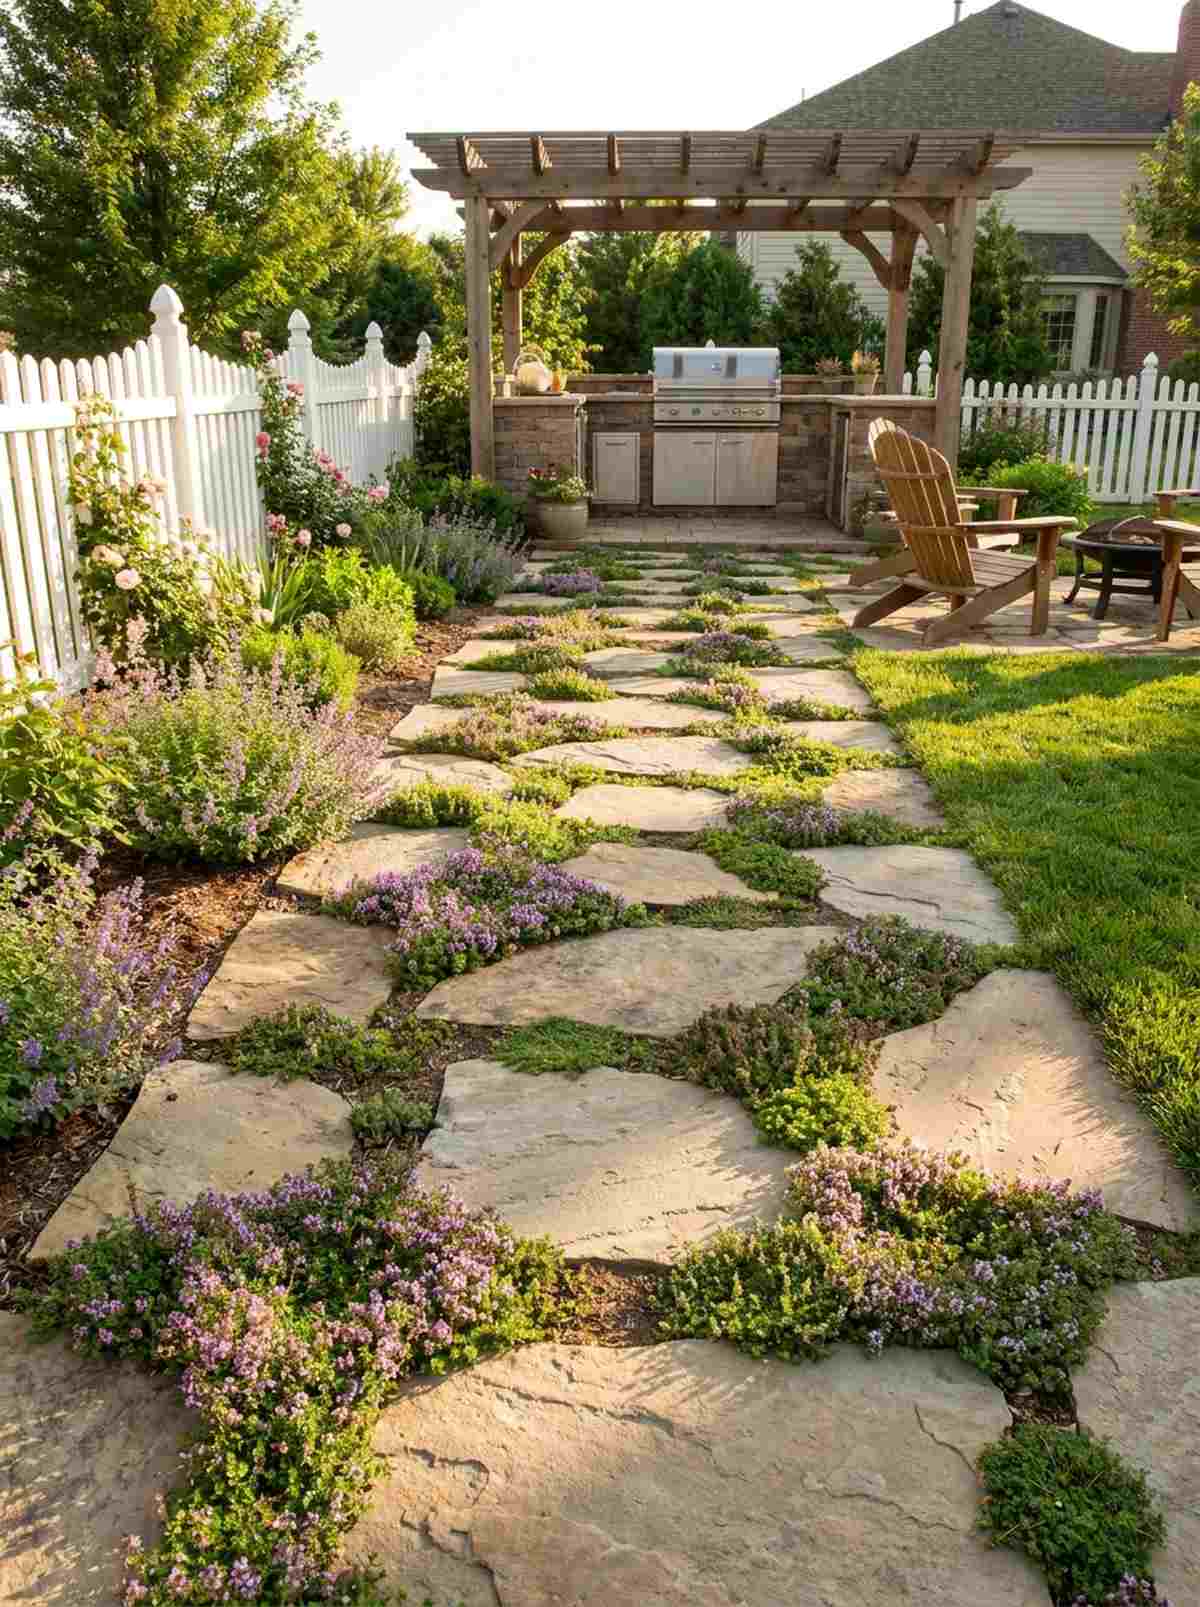
This pathway feels like a fragrant sensory experience every time you walk to the grill. Planting creeping thyme between natural flagstone pavers softens harsh edges instantly.
Paving an entire walkway is expensive and sterile, but leaving gaps for living herbs looks far more expensive than it is. The herbs release a gorgeous scent when lightly stepped on and naturally suppress weeds.
Laying down basic stones and herb plugs costs about $50–$80. It completely transforms a boring dirt path.
- Key Materials: Flat pavers, creeping herb plugs
- Vibe / Style: Fragrant cottage walkway
- Difficulty: Moderate digging required
- Budget Breakdown: Stones: $60 | Plugs: $20
- Creator’s Tip: Sweep a mix of sand and compost into the gaps before planting to give the herb roots a perfect anchor.
- Smart Sourcing: Pre-cut heavy-duty weed barrier rolls
32. Clover Lawn Conversion
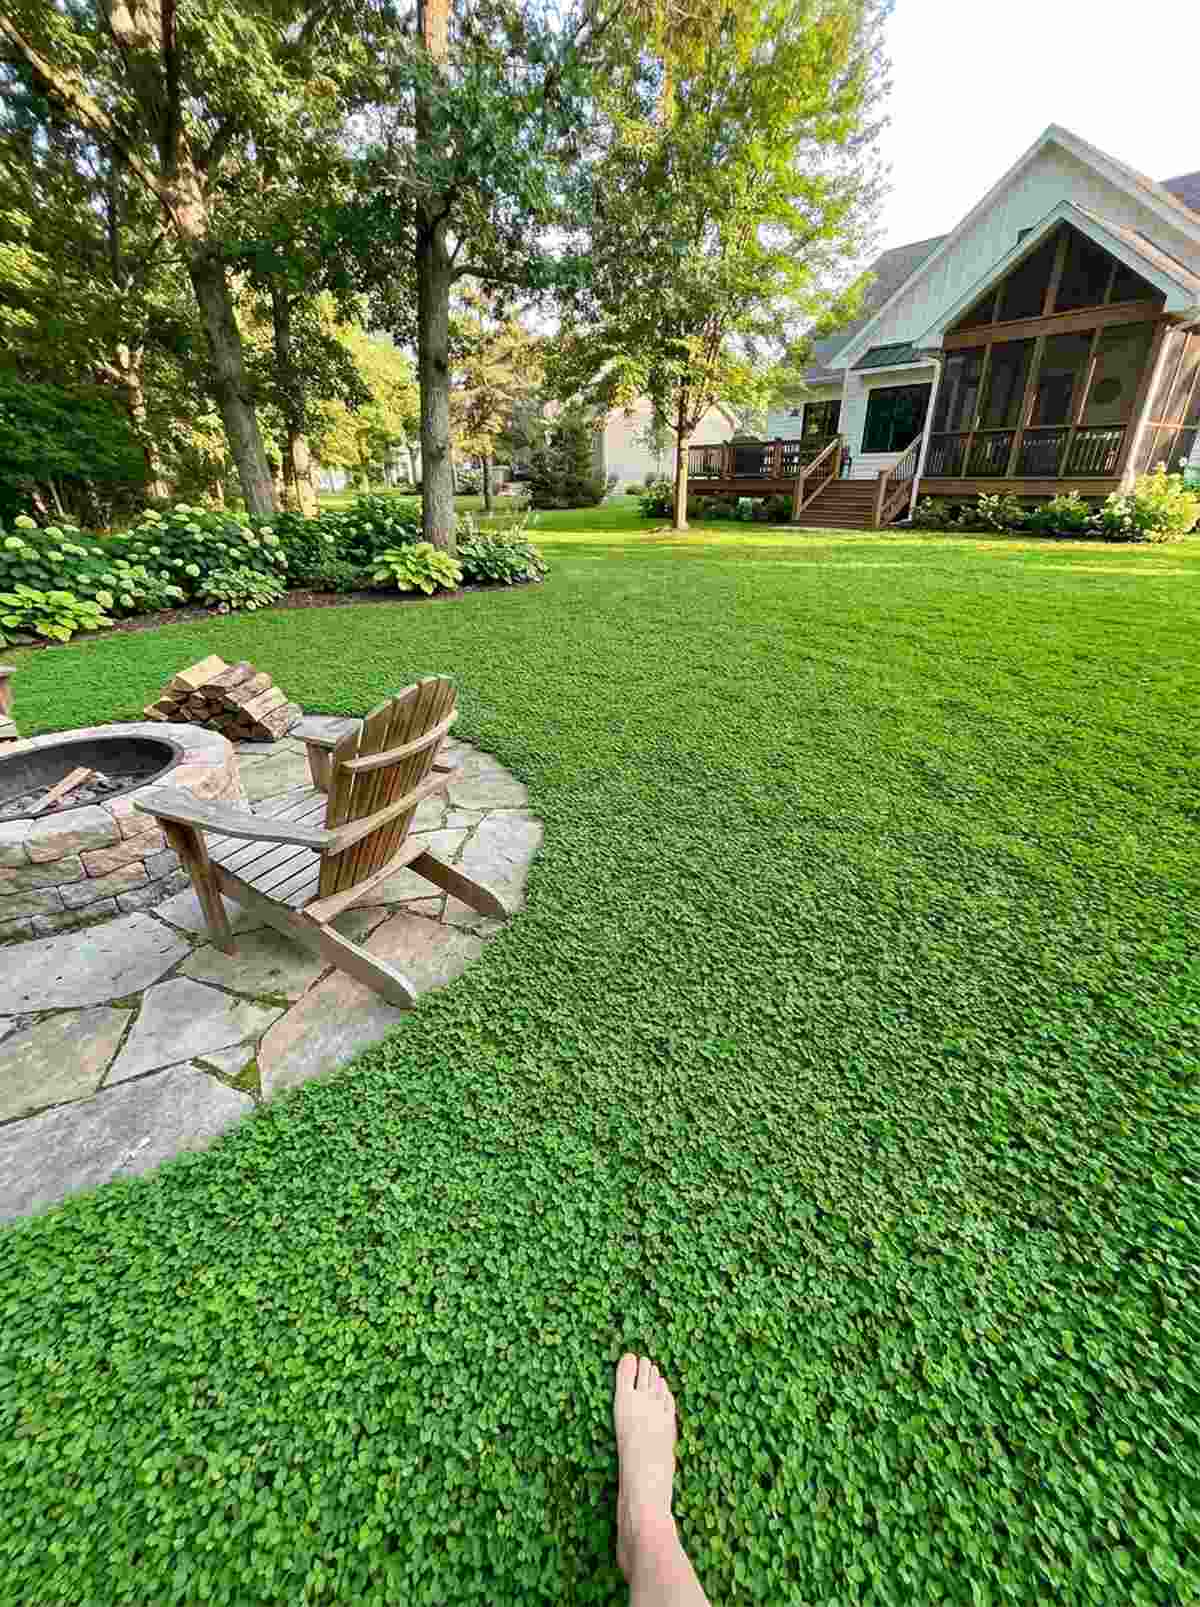
This lush green carpet feels like walking barefoot on a golf course without any of the maintenance. Swapping patchy grass for a dense microclover lawn eliminates mowing almost entirely.
Struggling to keep regular turf alive in small shaded yards is frustrating, but overseeding with clover gives a designer-level finish. It naturally fixes nitrogen into the soil, feeding your surrounding garden beds for free.
A bag of high-quality clover seed costs around $25–$40. Pin this if you are absolutely sick of pushing a lawnmower!
- Key Materials: Microclover seed, soil rake
- Vibe / Style: Velvety eco-friendly turf
- Difficulty: Easy spreading
- Budget Breakdown: Seeds: $30 | Topsoil: $10
- Creator’s Tip: Rake the soil aggressively to expose bare dirt before seeding; clover struggles to germinate through thick dead thatch.
- Smart Sourcing: Premium drought-resistant microclover seed (bulk pack)
33. Gravel Garden With Self-Sowers
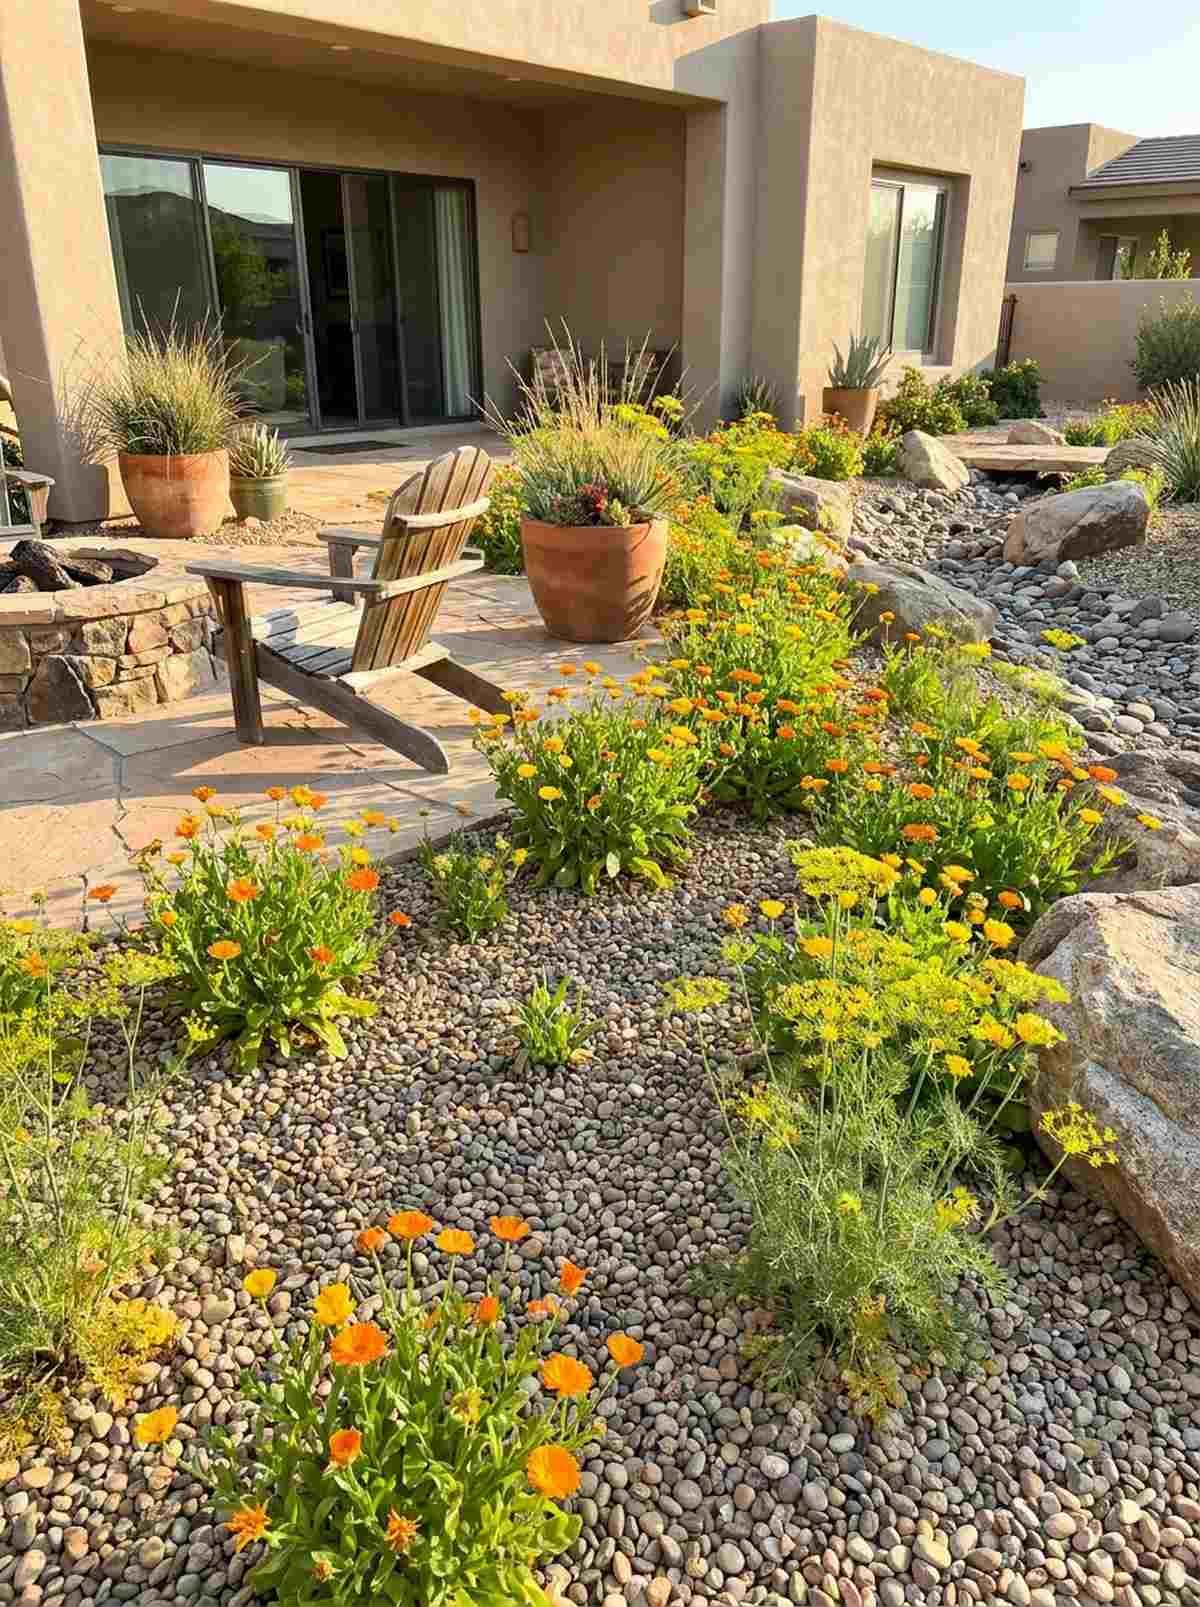
This casual spread feels like a chic, arid courtyard you’d find in a high-end desert villa. Laying a thick pea gravel mulch bed allows tough herbs and flowers to pop up naturally.
Bark mulch looks messy quickly, but crisp washed stone delivers a surprisingly premium look that never degrades. Plants like calendula and dill will self-seed directly into the gravel, creating a beautifully wild aesthetic.
A few bags of gravel and scattered seeds cost under $45. Save this for a zero-watering yard solution.
- Key Materials: Pea gravel, self-seeding herb packets
- Vibe / Style: Modern arid courtyard
- Difficulty: Heavy lifting for gravel
- Budget Breakdown: Gravel: $40 | Seeds: $5
- Creator’s Tip: Do not put landscape fabric under the gravel if you want the plants to self-seed and naturalize freely.
- Smart Sourcing: Pre-washed decorative pea gravel (bulk delivery)
34. Dichondra Carpet Understory
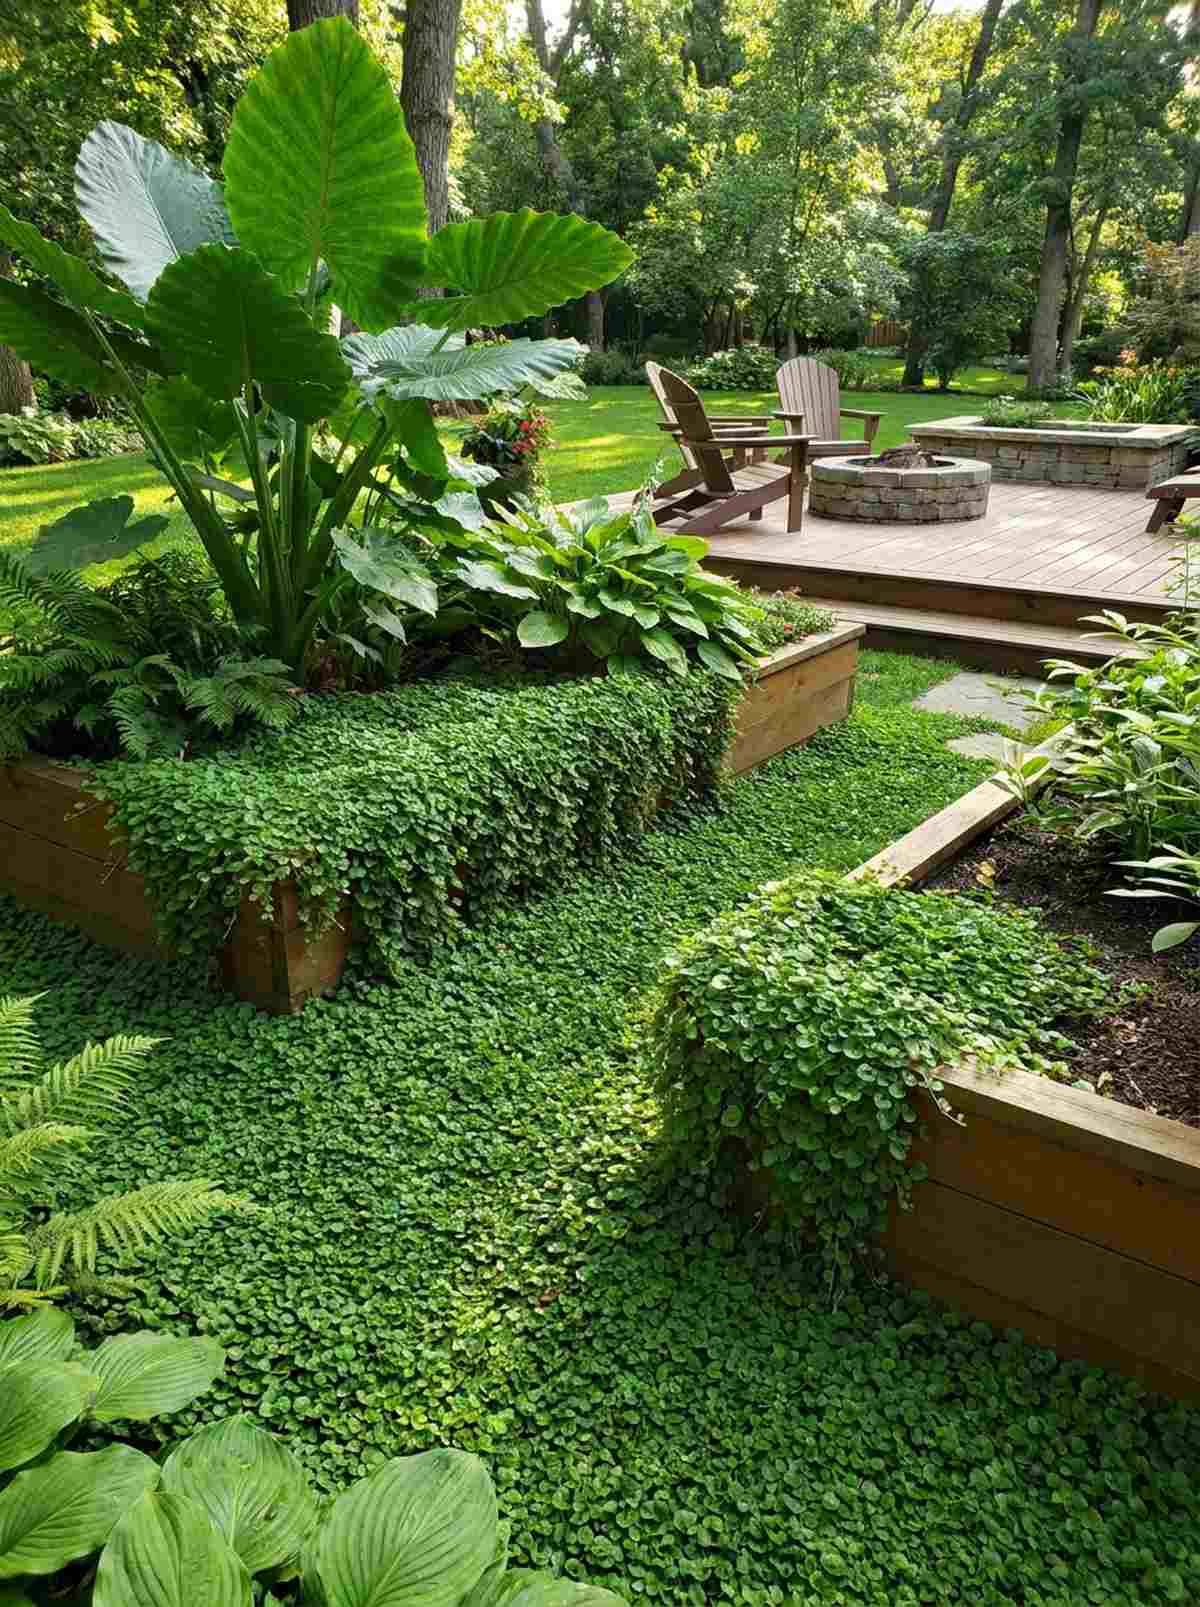
This vibrant mat feels like a flawless, velvety blanket hugging the base of your larger plants. Using a creeping dichondra groundcover fills in bare, shaded soil where nothing else grows.
Leaving dirt exposed invites weeds, but establishing this fine-textured leaf layer looks far more expensive than it is. It cascades beautifully over the edges of raised beds and requires absolutely zero mowing.
A flat of plugs runs about $20–$35. It’s the ultimate secret weapon for deep shade zones.
- Key Materials: Dichondra plugs, moisture-retaining soil
- Vibe / Style: Lush tropical undergrowth
- Difficulty: Very easy
- Budget Breakdown: Plugs: $30 | Soil: $5
- Creator’s Tip: Water it heavily every day for the first two weeks until the carpet knits together fully.
- Smart Sourcing: Slow-release moisture retaining soil crystals
Most DIYers ruin their walkways… until they install this incredibly sharp border trick coming up next.
35. Mulched Pathways With Edging
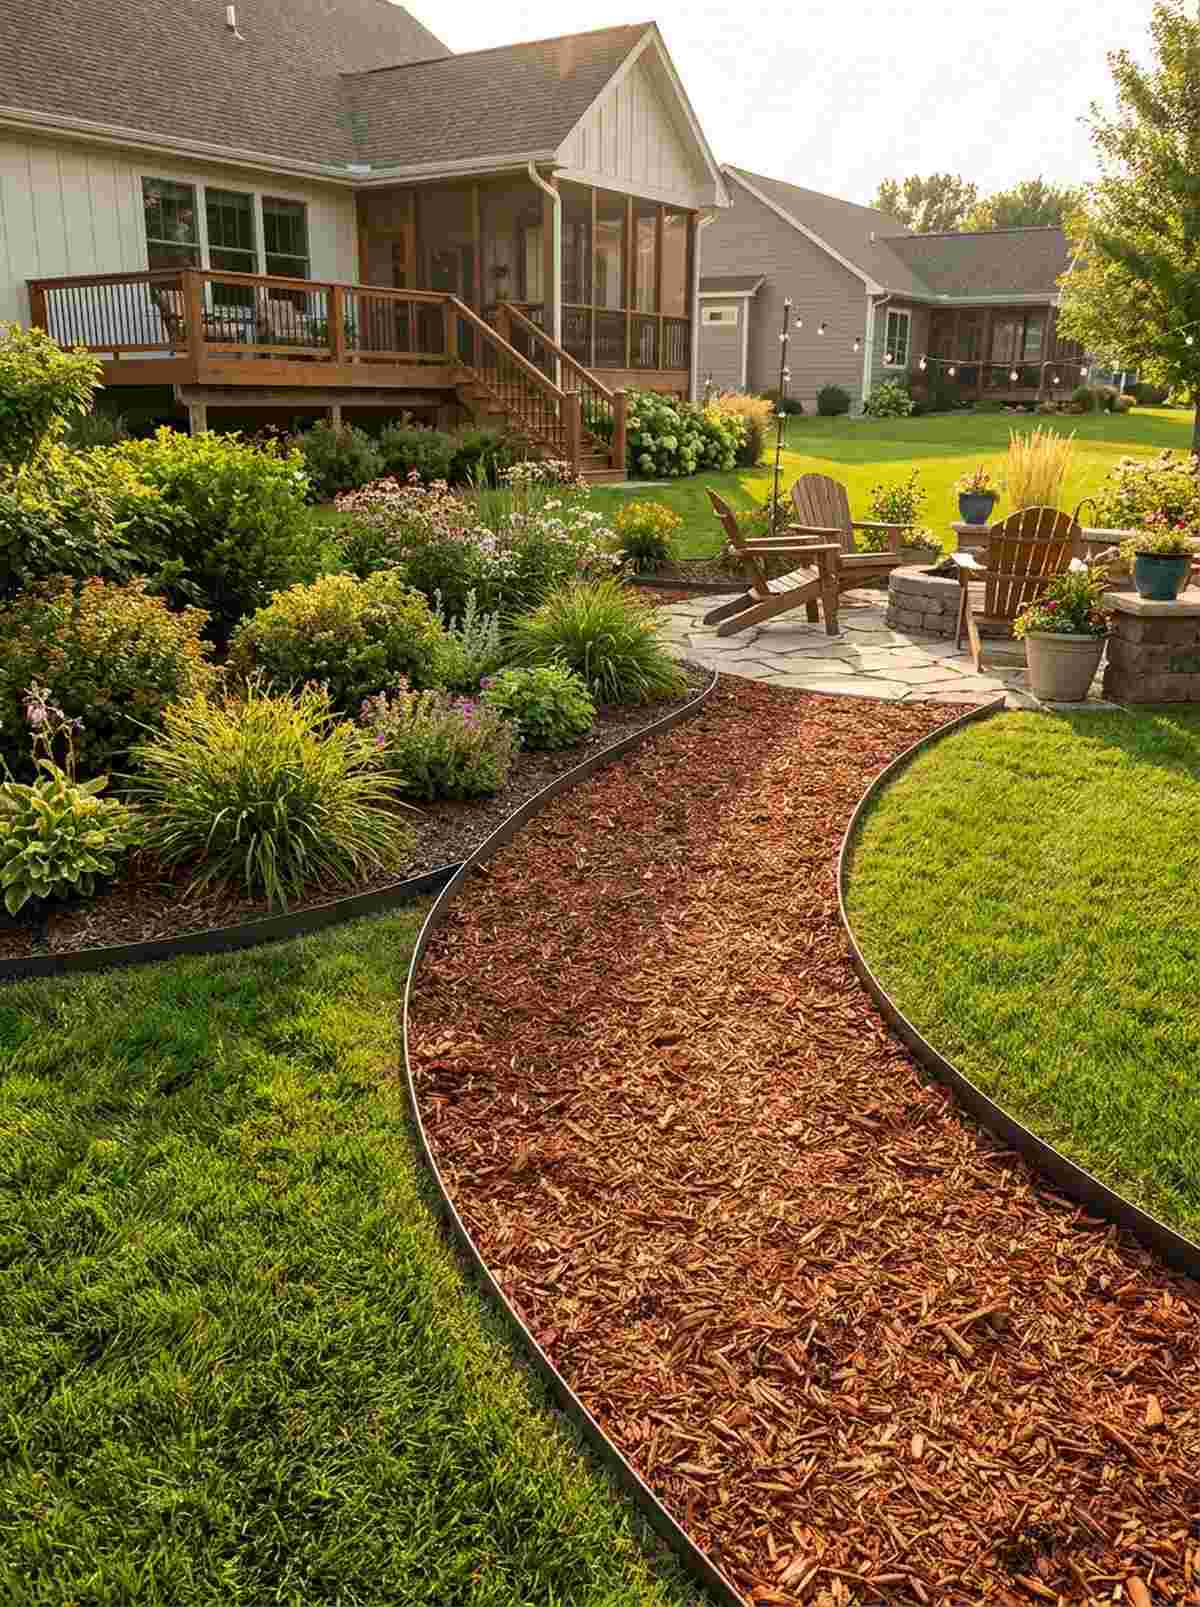
This clean walkway feels incredibly sharp and defines the distinct zones of your backyard perfectly. Pouring a wood chip pathway with metal edging stops your garden from looking like a messy forest.
Plastic edging warps in the sun, but sinking rigid aluminum or steel borders gives a designer-level finish. It locks the mulch strictly in place, preventing it from spilling onto your patio or lawn.
High-quality edging and mulch cost roughly $60–$90. Pin this to give your yard that professional landscaping touch!
- Key Materials: Steel garden edging, cedar mulch
- Vibe / Style: Crisp professional hardscaping
- Difficulty: Moderate, requires trenching
- Budget Breakdown: Metal Edging: $50 | Mulch: $25
- Creator’s Tip: Install the metal edging so only 1 inch peeks above the soil line for a sleek, invisible barrier.
- Smart Sourcing: Heavy-duty rust-proof metal garden edging kits
36. Mosaic Pattern Pavers
This eclectic patio feels like an artisan masterpiece pieced together over centuries. Setting a reclaimed broken concrete mosaic creates a stunning, permeable hardscape for seating areas.
Pouring a solid concrete slab is boring and prone to cracking, but dry-laying broken pieces looks far more expensive than it is. Filling the tiny gaps with sand or moss allows rainwater to drain naturally into the earth.
If you source broken “urbanite” concrete for free, this project only costs about $30 for leveling sand. It’s an amazing, eco-friendly patio hack.
- Key Materials: Reclaimed concrete/brick, leveling sand
- Vibe / Style: Artisan historic courtyard
- Difficulty: Heavy lifting and puzzle-solving
- Budget Breakdown: Concrete: Free | Sand: $30
- Creator’s Tip: Compact the stone dust base heavily before laying pieces to prevent the mosaic from settling unevenly over winter.
- Smart Sourcing: Pre-bagged leveling paver sand
37. Boardwalk-Style Decking
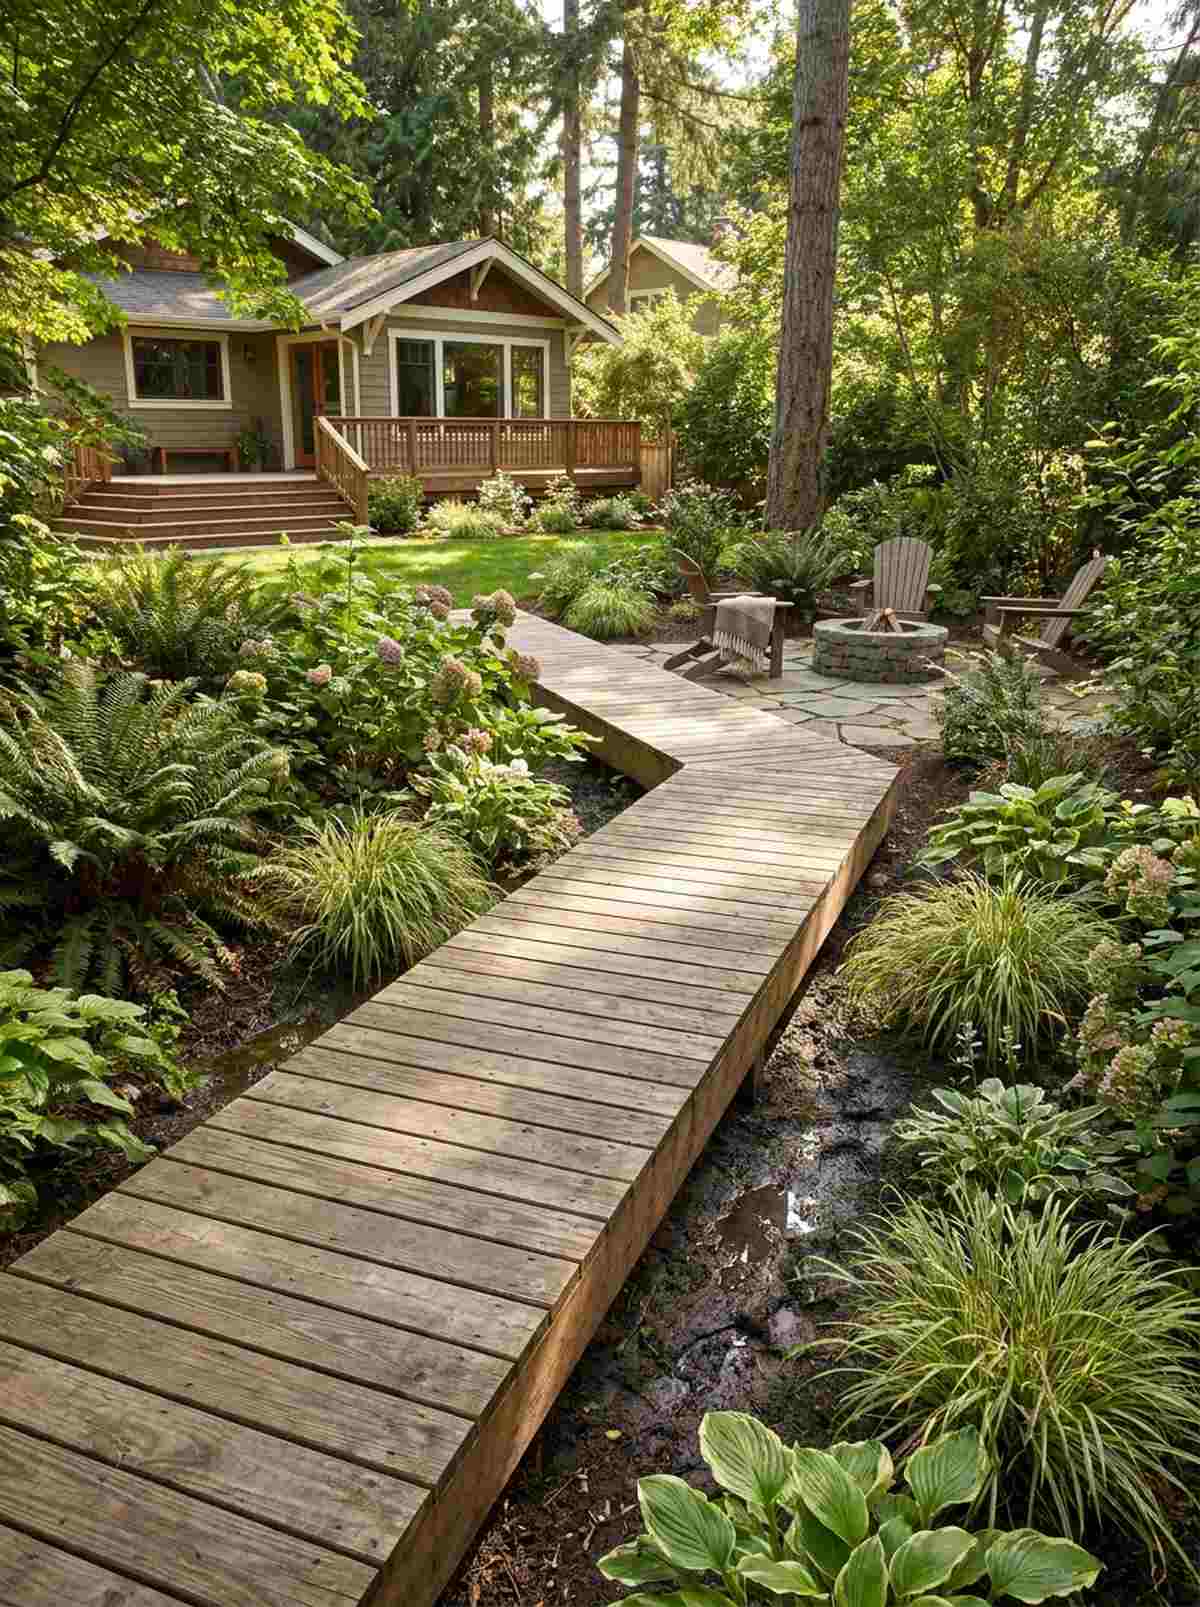
This raised path feels like a serene coastal walkway leading to a hidden retreat. Building a narrow wooden boardwalk path hovers gracefully over muddy or compacted areas in your yard.
Laying stepping stones in deep mud just causes them to sink, but a framed wooden span delivers a surprisingly premium look. The slight elevation keeps your shoes perfectly clean while navigating between garden beds.
Constructing a short boardwalk runs about $80–$130 in treated lumber. Pin this if your yard turns into a swamp after it rains!
- Key Materials: Treated deck boards, sturdy framing joists
- Vibe / Style: Coastal nature reserve
- Difficulty: Moderate carpentry
- Budget Breakdown: Lumber: $100 | Deck Screws: $20
- Creator’s Tip: Leave exactly a 1/4-inch gap between top boards so rainwater and dirt can easily wash through.
- Smart Sourcing: UV-coated exterior decking screws (bulk pack)
38. Permeable Grid Pavers
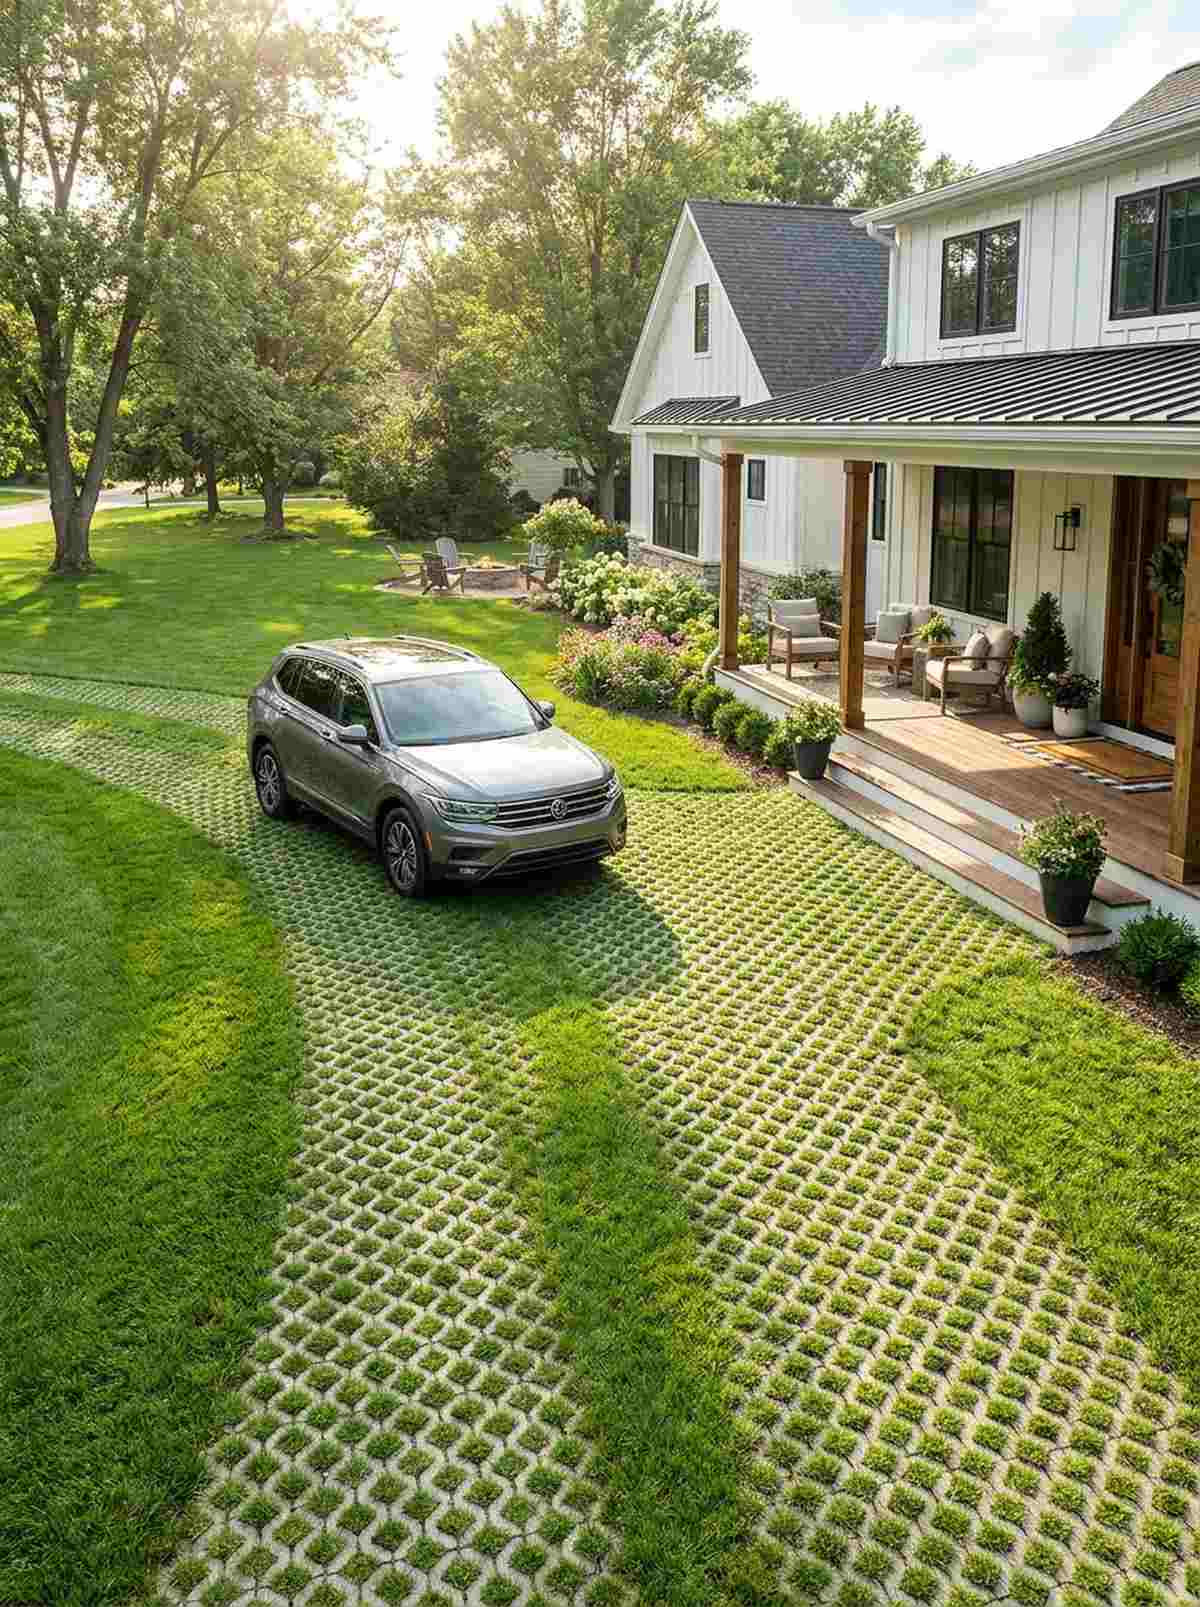
This reinforced zone feels like a hidden driveway wrapped entirely in lush greenery. Laying down plastic permeable paver grids supports heavy foot traffic or vehicles without destroying the grass.
Traditional concrete driveways generate massive heat and runoff, but a seeded grid gives a designer-level finish. It provides the strength of a paved road while looking exactly like a manicured lawn.
A starter pack of strong grids costs about $50–$80. Save this idea to reclaim your driveway as usable garden space!
- Key Materials: Honeycomb paver grids, tough grass seed
- Vibe / Style: Invisible eco-infrastructure
- Difficulty: Intensive excavation needed
- Budget Breakdown: Grids: $65 | Seed/Soil: $20
- Creator’s Tip: Fill the honeycomb cells strictly with a sand/soil mix, not pure compost, to prevent it from compacting down.
- Smart Sourcing: Heavy-duty permeable paver grids (starter kit)
39. Reclaimed Urbanite Terraces
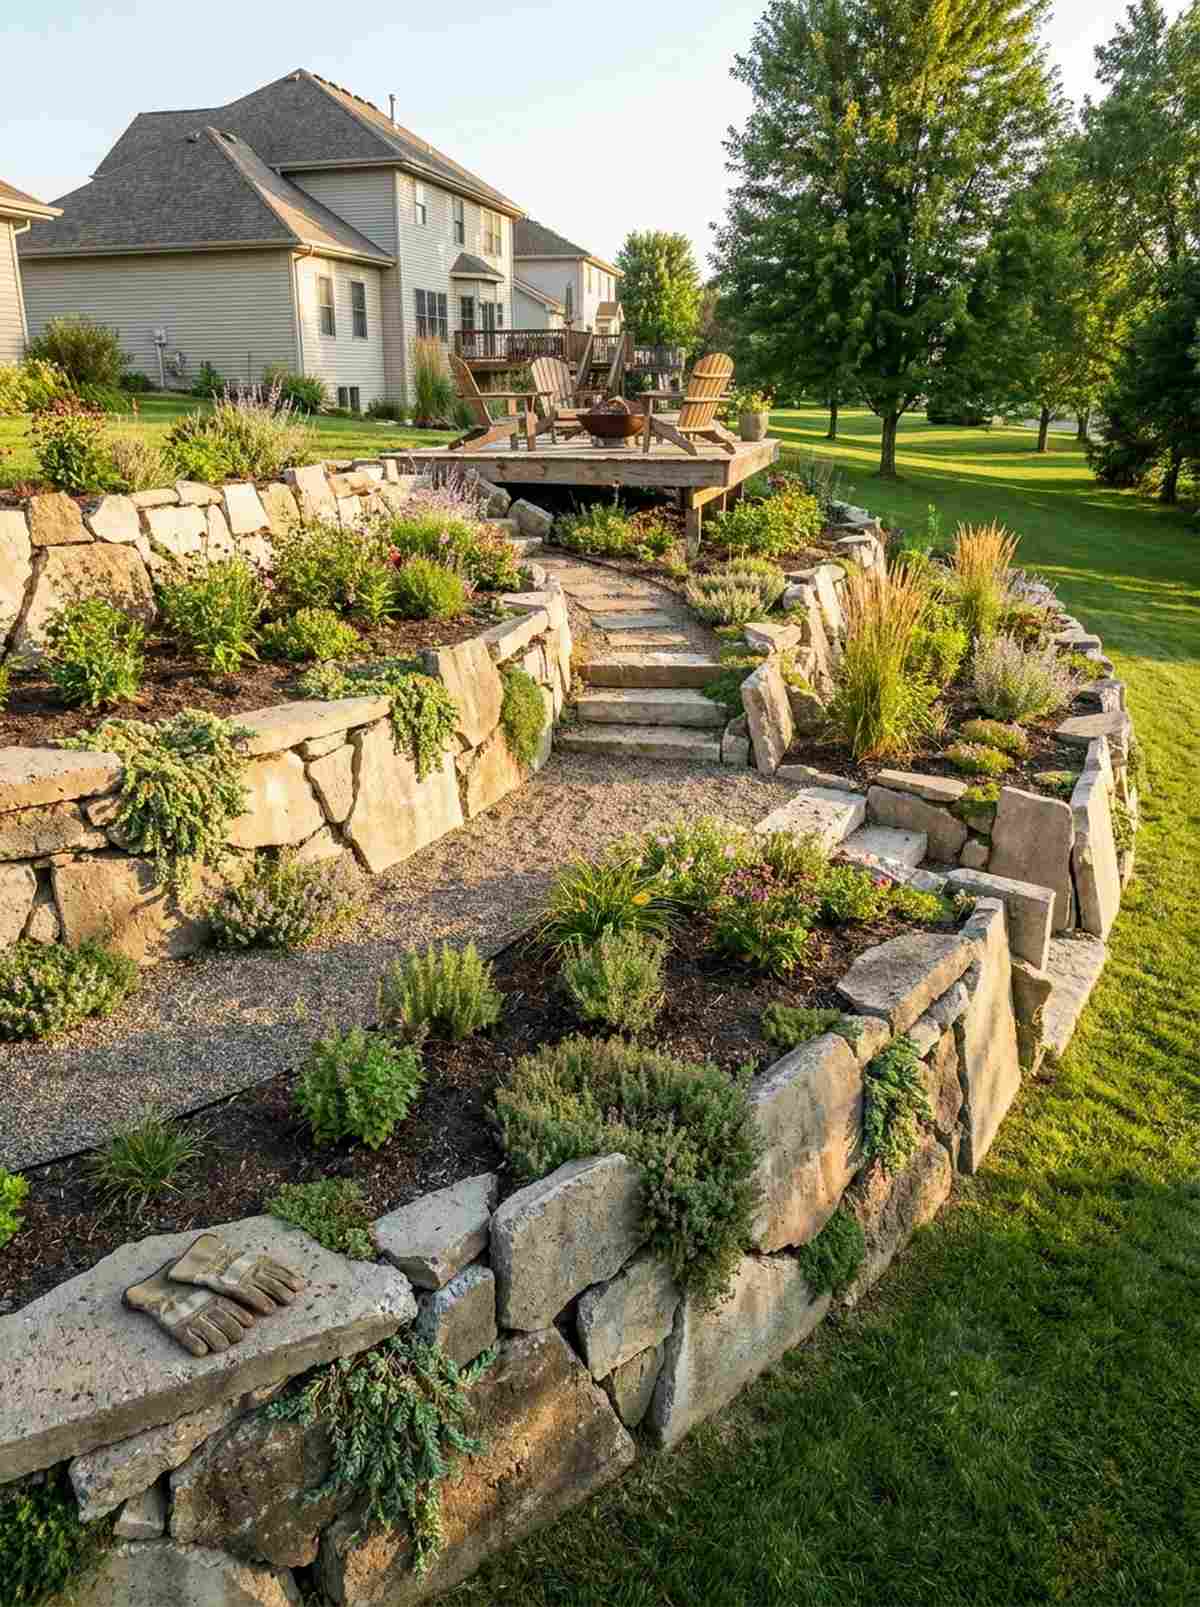
This stepped garden feels like an ancient ruins site brimming with life. Stacking broken concrete to form dry-laid terrace retaining walls turns a useless slope into flat, plantable ledges.
Buying professional retaining wall blocks is absurdly expensive, but repurposing broken slabs looks far more expensive than it is. The irregular crevices are perfect for tucking in trailing succulents or thyme.
If you haul the material yourself, this structural upgrade is completely free. It’s the smartest way to tame a steep, eroding yard.
- Key Materials: Broken concrete slabs, gravel backfill
- Vibe / Style: Ancient terraced hillside
- Difficulty: Very heavy labor
- Budget Breakdown: Concrete: Free | Gravel: $25
- Creator’s Tip: Tilt each layer of concrete slightly backward into the hill to ensure the wall doesn’t blow out under soil pressure.
- Smart Sourcing: Heavy-duty canvas lifting gloves
40. River Rock Drainage Swales
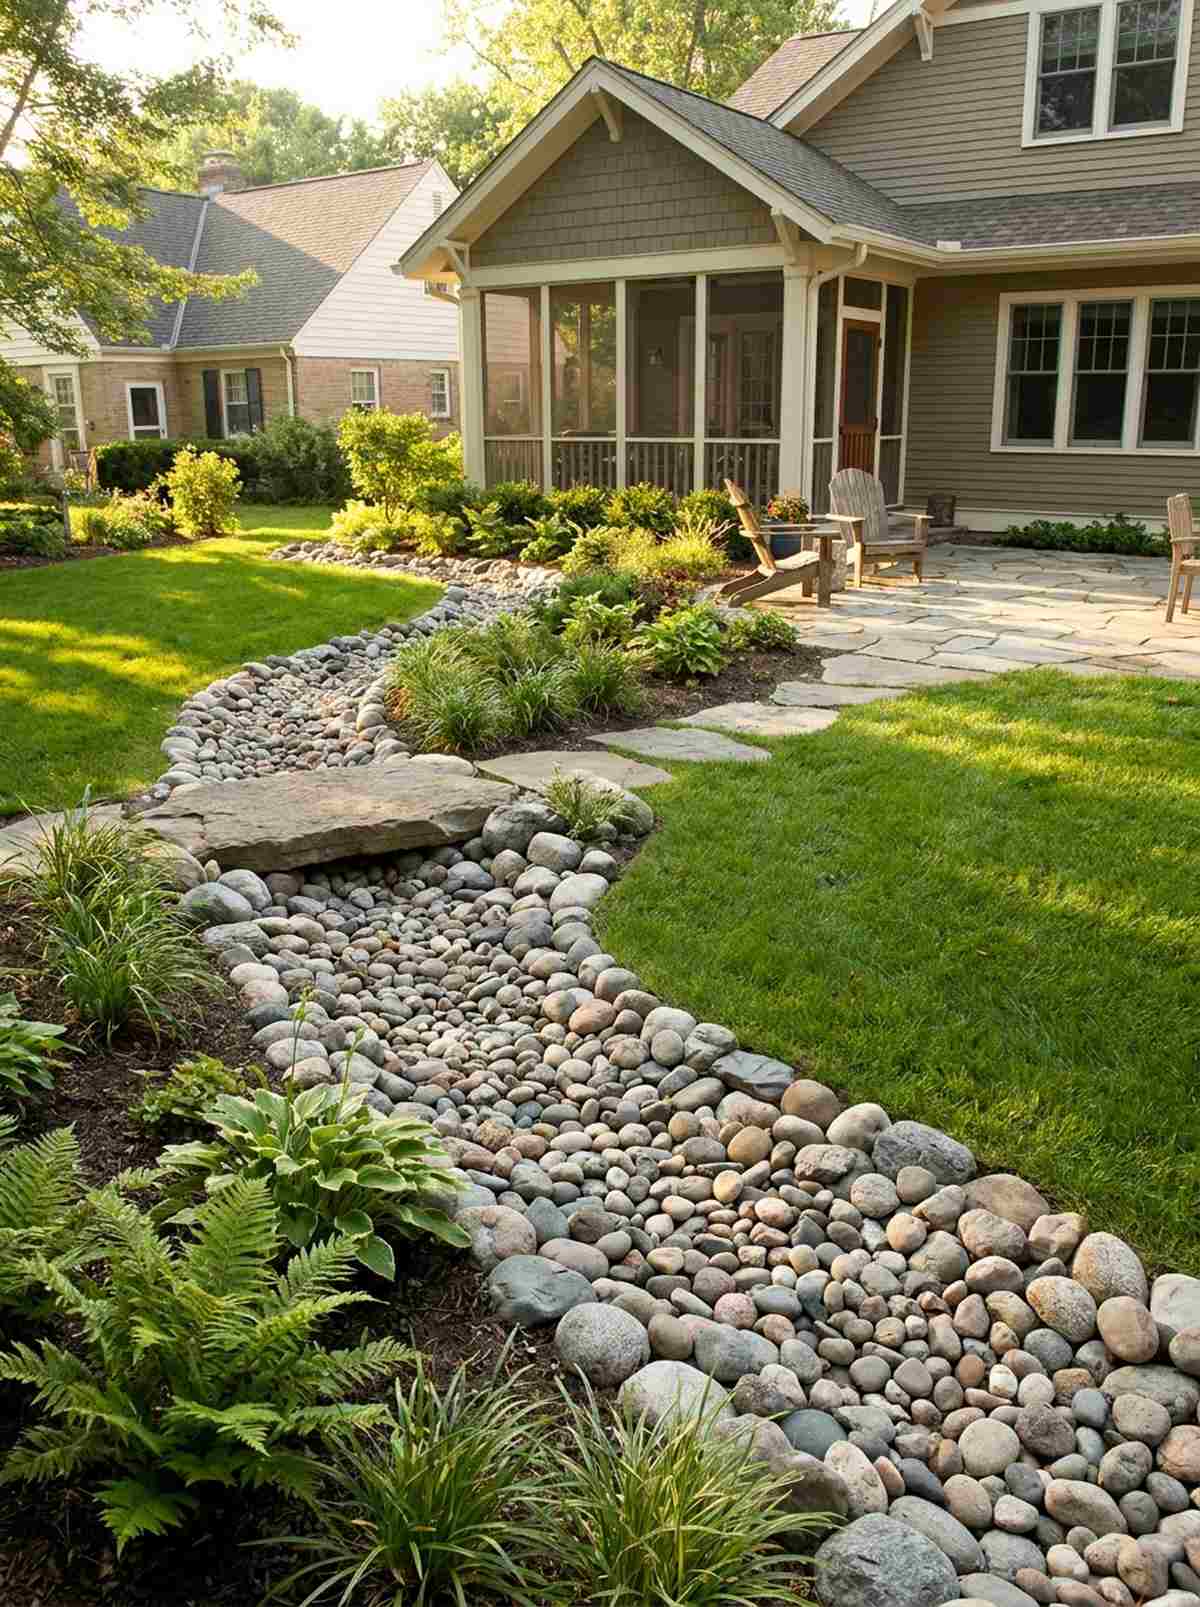
This dry creek bed feels like a natural stream winding gracefully through your property. Digging a shallow rock-lined drainage swale solves flooding issues while looking incredibly decorative.
Burying ugly plastic drainage pipes is tedious, but an exposed cobble trench delivers a surprisingly premium look. Surrounding the edges with ferns and hostas turns a water problem into a gorgeous landscape feature.
A few bags of smooth river rock will cost about $40–$70. Pin this if your yard suffers from pooling water!
- Key Materials: Smooth river cobbles, heavy landscape fabric
- Vibe / Style: Zen dry stream
- Difficulty: Moderate trenching
- Budget Breakdown: Rocks: $50 | Fabric: $15
- Creator’s Tip: Curve the trench naturally instead of a straight line; it slows the water down and looks much more organic.
- Smart Sourcing: Pre-washed decorative river rock (bulk delivery)
Most small patios look cluttered and messy… until you hide everything with this brilliant dual-purpose trick.
Multi-Functional Features & Furniture
Compact yards demand elements that perform multiple roles simultaneously. Storage integrated into seating, trellises that screen utilities, and furniture that folds away maximize usable square footage throughout changing seasons and activities.
41. Storage Bench Seating
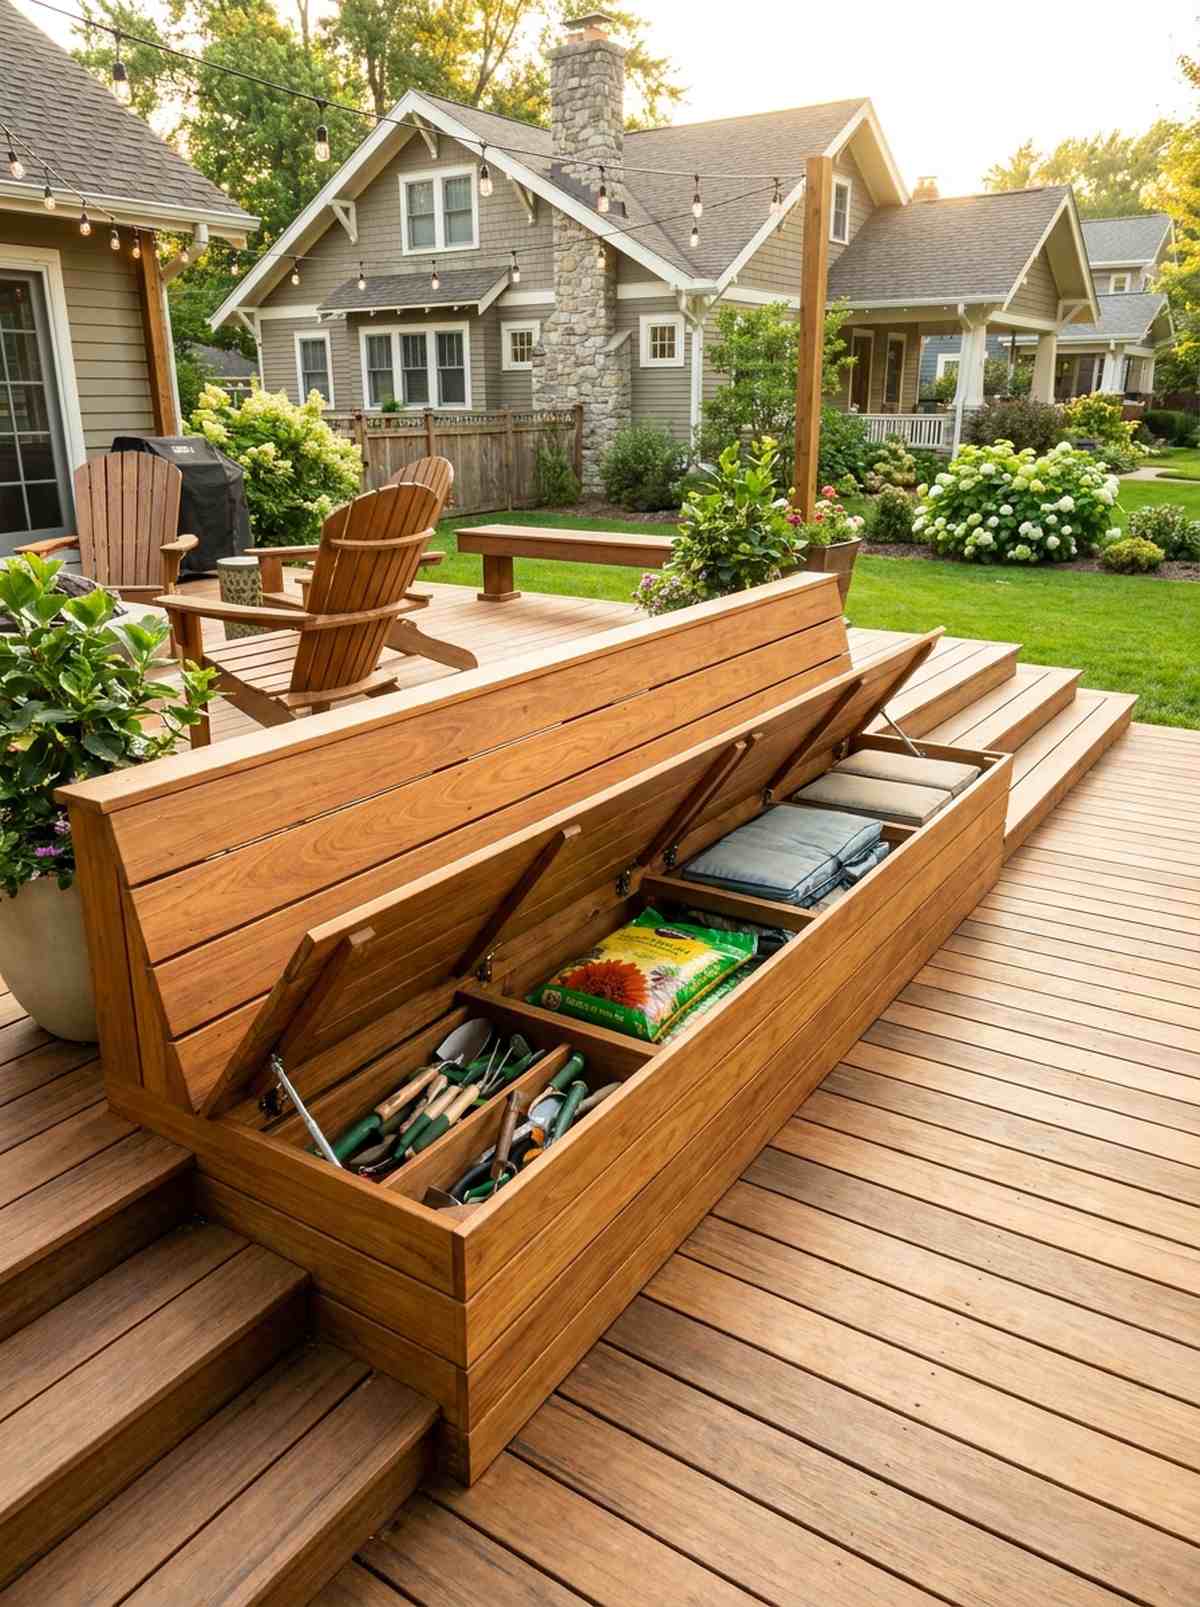
This sleek seating feels like custom yacht furniture designed for absolute efficiency. A built-in wooden bench with hidden storage completely eliminates the need for an ugly plastic shed.
Leaving potting soil and cushions in the open ruins your aesthetic, but a disguised lid gives a designer-level finish. Integrating premium weatherproof outdoor seating materials ensures it survives brutal winters without rotting.
Building a solid storage bench costs roughly $90–$140. Save this if you desperately need to hide your gardening clutter!
- Key Materials: Exterior plywood, rust-proof hinges
- Vibe / Style: Custom nautical efficiency
- Difficulty: Moderate carpentry
- Budget Breakdown: Wood: $100 | Hardware: $30
- Creator’s Tip: Install a hydraulic soft-close hinge so the heavy wooden lid doesn’t slam down on your fingers.
- Smart Sourcing: Heavy-duty soft-close outdoor hinges (starter kits)
42. Folding Bistro Sets
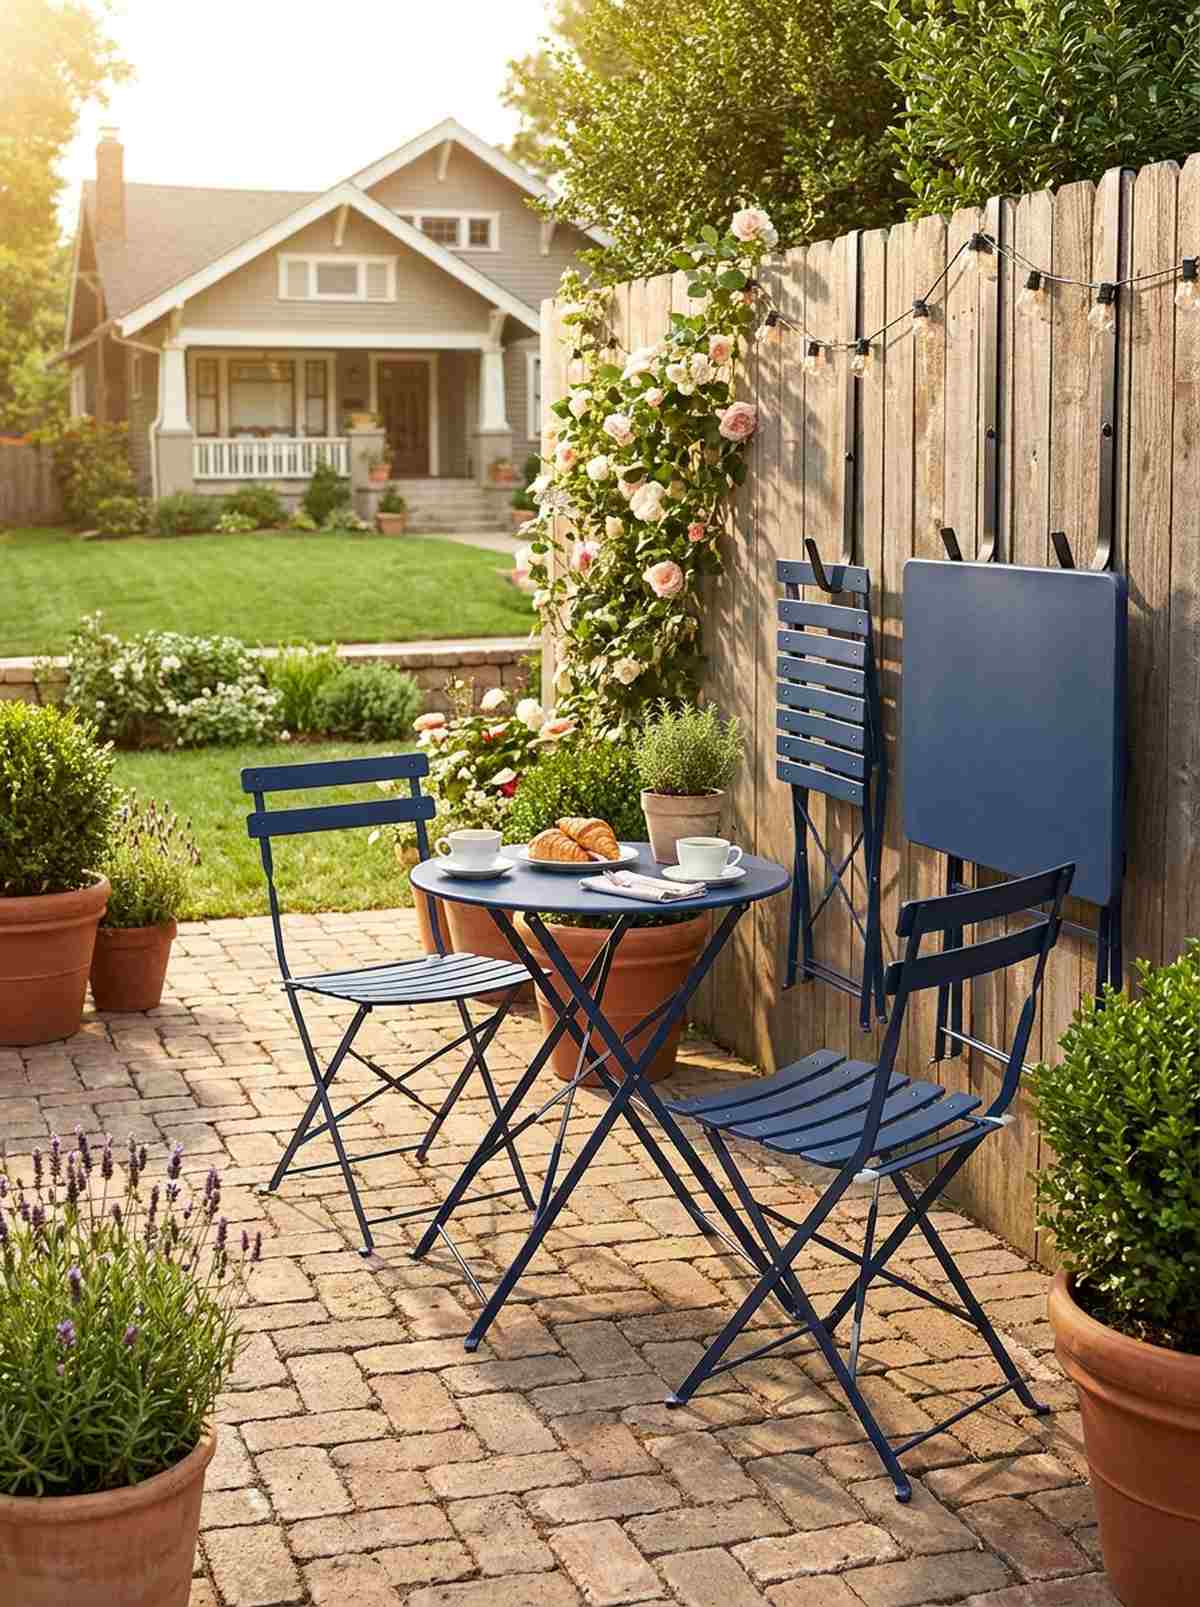
This tiny dining area feels like a romantic Parisian sidewalk cafe on demand. Deploying a metal folding bistro table set gives you instant seating that vanishes flat against the wall when you need space.
Bulky outdoor dining tables swallow small patios whole, but powder-coated steel chairs look far more expensive than they are. When folded, you instantly reclaim the floor space for your weekend gardening projects.
A chic metal set usually runs about $70–$110. It’s the ultimate space-saving hack for narrow balconies.
- Key Materials: Powder-coated folding table and chairs
- Vibe / Style: Parisian cafe chic
- Difficulty: Zero assembly
- Budget Breakdown: Bistro Set: $90 | Wall Hooks: $15
- Creator’s Tip: Mount heavy-duty hooks on your fence so you can hang the chairs up off the ground when not in use.
- Smart Sourcing: UV-coated weather-resistant bistro sets
43. Trellis Privacy Screens
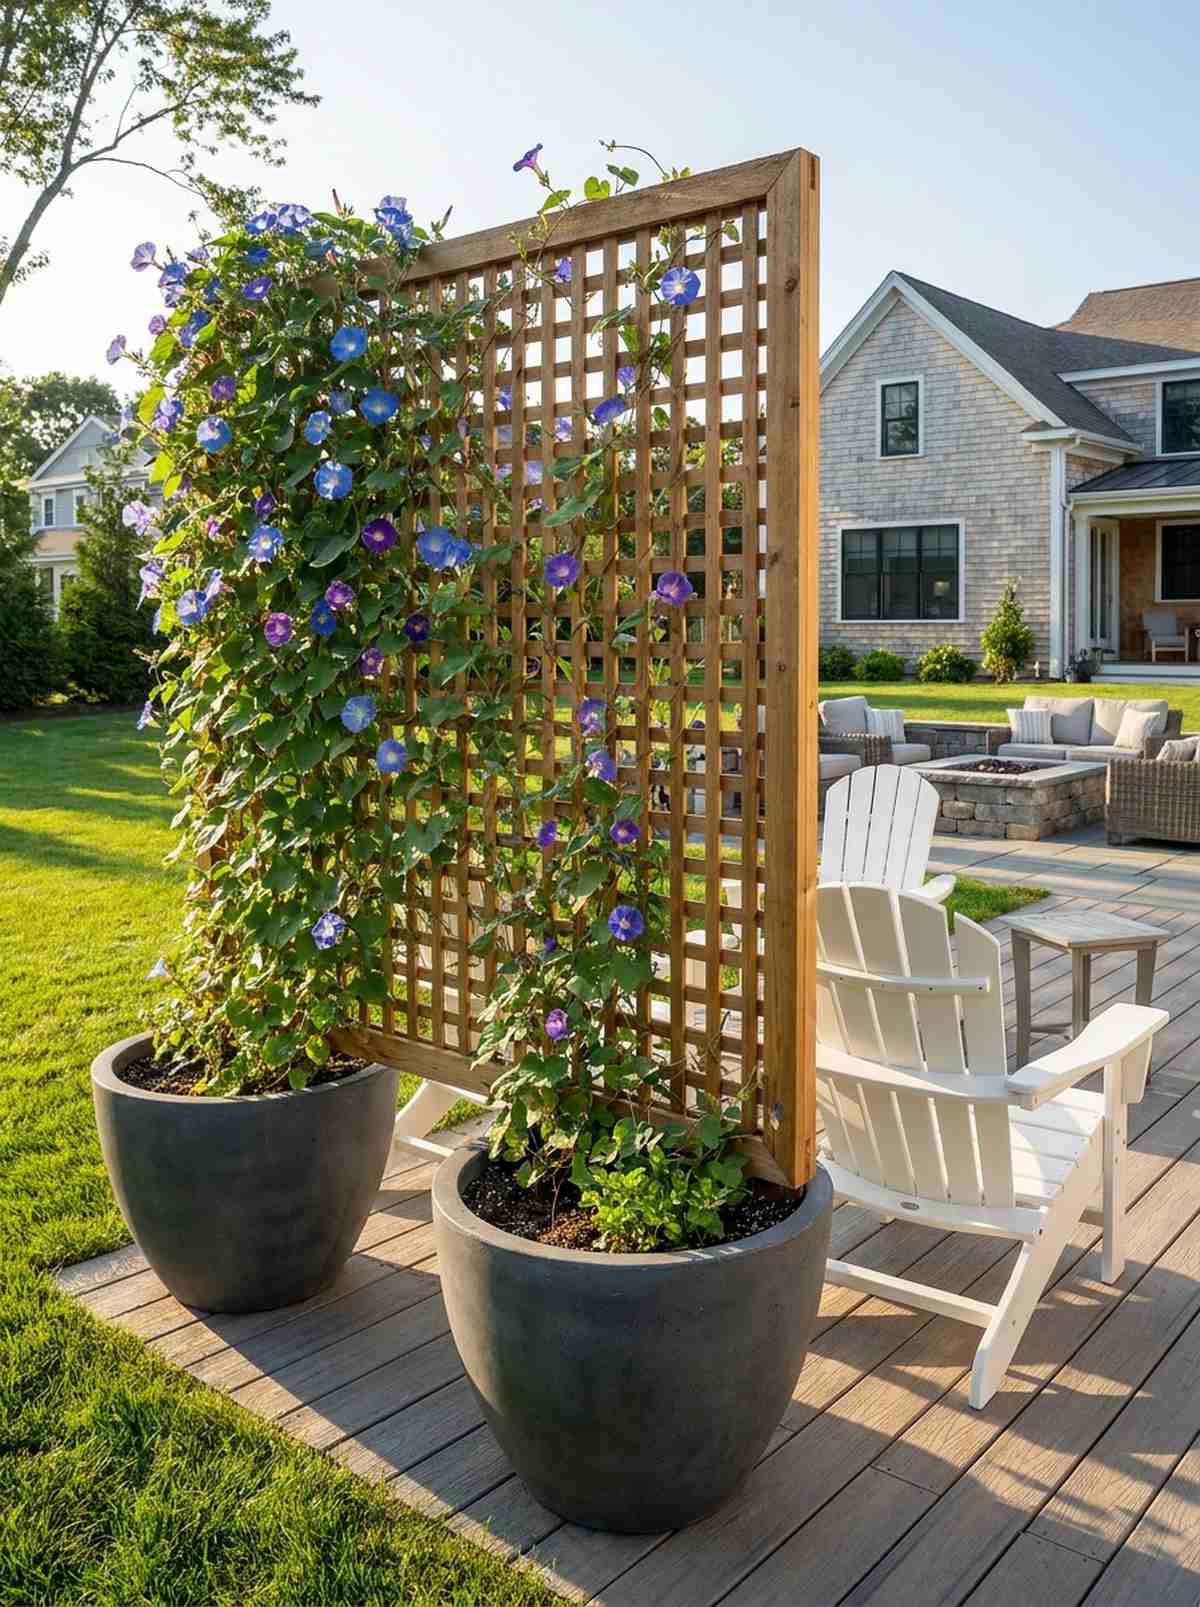
This living wall feels like a cozy, secluded VIP section away from prying eyes. Setting up a freestanding climbing trellis blocks the view of your neighbors while providing vertical harvest space.
Solid fences can make a small yard feel like a prison box, but a vine-covered lattice delivers a surprisingly premium look. Using high-quality UV-coated trellis panels ensures it won’t crack and snap under the weight of heavy beans or morning glories.
A sturdy screen setup costs around $50–$85. Pin this to instantly upgrade your backyard privacy!
- Key Materials: Framed lattice panels, heavy base planters
- Vibe / Style: Secret garden enclosure
- Difficulty: Easy anchoring required
- Budget Breakdown: Panel: $50 | Fasteners & Pots: $25
- Creator’s Tip: Anchor the trellis legs directly into heavy planter pots filled with concrete at the base to prevent wind blow-overs.
- Smart Sourcing: Pre-cut cedar lattice privacy panels
44. Wall-Mounted Fold-Down Tables
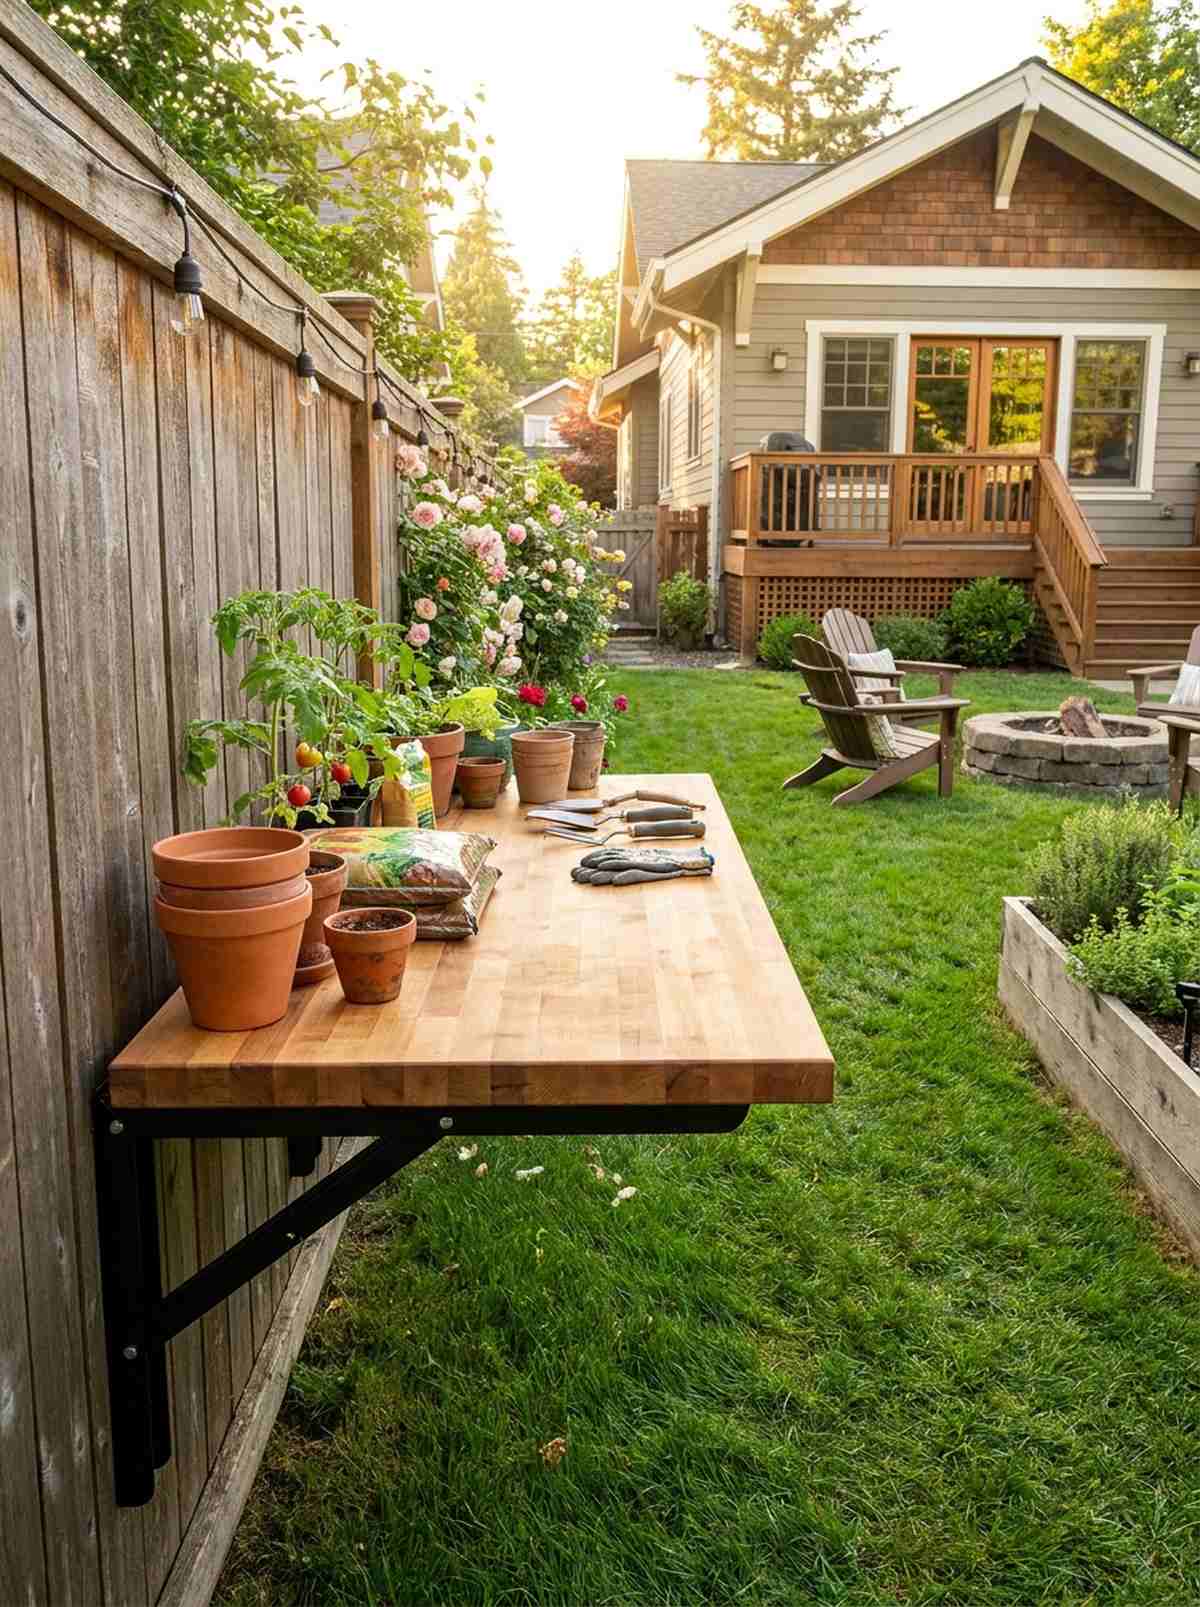
This hidden workspace feels like a brilliant magic trick every time you open it. A drop-leaf potting bench attached to your fence gives you a massive workspace that folds totally flat in seconds.
Permanent potting benches waste valuable floor space, but a hinged murphy-style table gives a designer-level finish. Utilizing thick butcher block and heavy marine-grade brackets ensures you can repot heavy plants safely.
You can construct this genius folding table for about $40–$65. Save this for the ultimate multi-functional patio!
- Key Materials: Sealed wood slab, heavy-duty folding brackets
- Vibe / Style: Smart utilitarian workspace
- Difficulty: Requires precise leveling
- Budget Breakdown: Wood Top: $30 | Folding Brackets: $25
- Creator’s Tip: Mount the surface exactly at 36 inches high; this is the ergonomic sweet spot for standing yard work.
- Smart Sourcing: Heavy-duty locking folding shelf brackets (bulk pack)
45. Nesting Side Tables
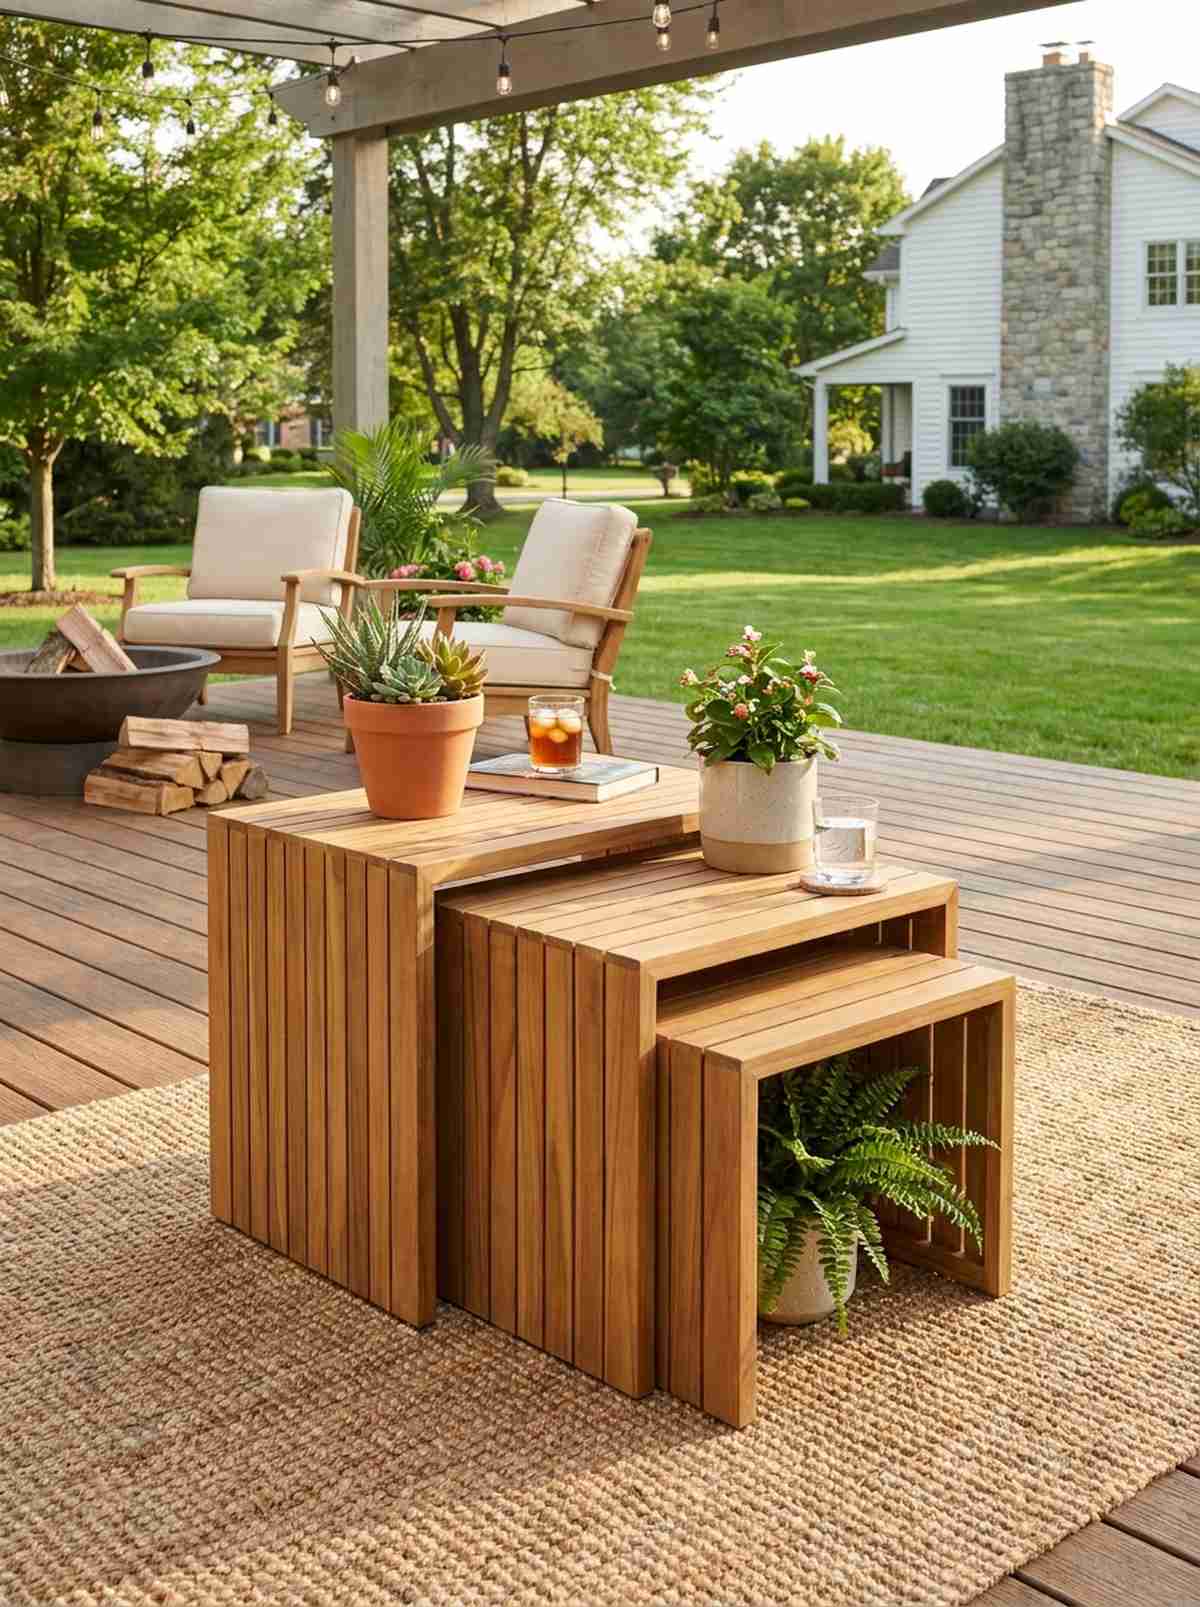
This clustered layout feels incredibly modern and adaptable for entertaining guests. Utilizing a set of staggered nesting tables gives you tiered plant stands that quickly separate into drink tables.
Clunky coffee tables ruin the flow of a small patio, but nesting sets look far more expensive than they are. When the party is over, you simply slide them together to reclaim your precious square footage.
A durable metal or teak set will run you around $60–$100. It’s a chic way to keep your layout totally flexible.
- Key Materials: Weather-treated nesting table set
- Vibe / Style: Sleek modular entertaining
- Difficulty: Zero setup
- Budget Breakdown: Table Set: $85 | Weather Sealant: $10
- Creator’s Tip: Use the varying heights to display sun-loving plants on top and shade-tolerant plants on the lower tucked-in tables.
- Smart Sourcing: Pre-treated teak nesting outdoor tables
This next overhead feature makes your patio feel twice as big and infinitely more expensive…
46. Pergola With Retractable Canopy
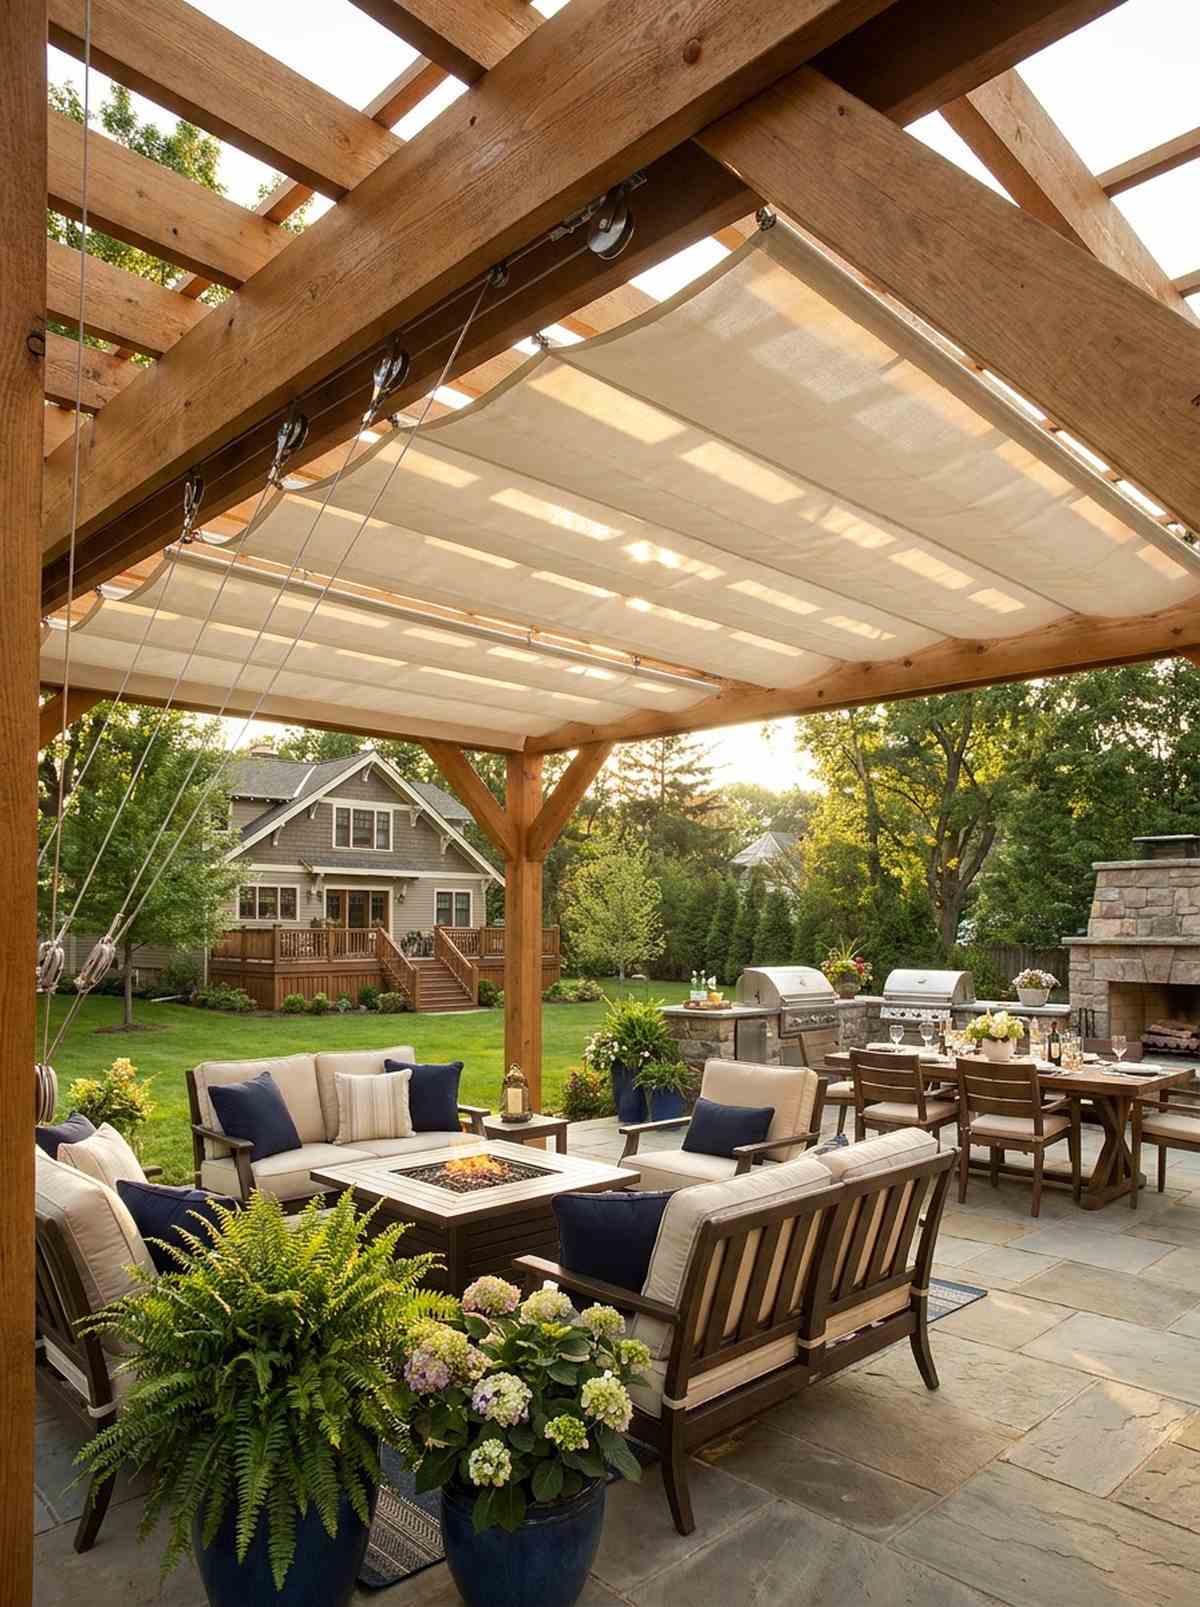
This adjustable ceiling feels like a luxurious cabana at a high-end resort. Installing a slide-wire fabric shade under your pergola beams lets you control the exact amount of sunlight hitting your patio.
Static solid roofs trap heat, but a retractable marine-grade canvas delivers a surprisingly premium look. It protects your delicate container plants during the midday scorch and opens up for stargazing at night.
Rigging this custom shade system costs about $120–$180. Pin this if your backyard gets aggressively hot in the summer!
- Key Materials: Waterproof shade cloth, steel wire, pulleys
- Vibe / Style: Luxury adjustable cabana
- Difficulty: Advanced measuring and rigging
- Budget Breakdown: Fabric: $80 | Cable & Hardware: $60
- Creator’s Tip: Pitch the cables on a very slight angle so rainwater doesn’t pool and sag the fabric during a sudden storm.
- Smart Sourcing: UV-coated retractable shade canopy kits
47. Vertical Tool Storage Panels
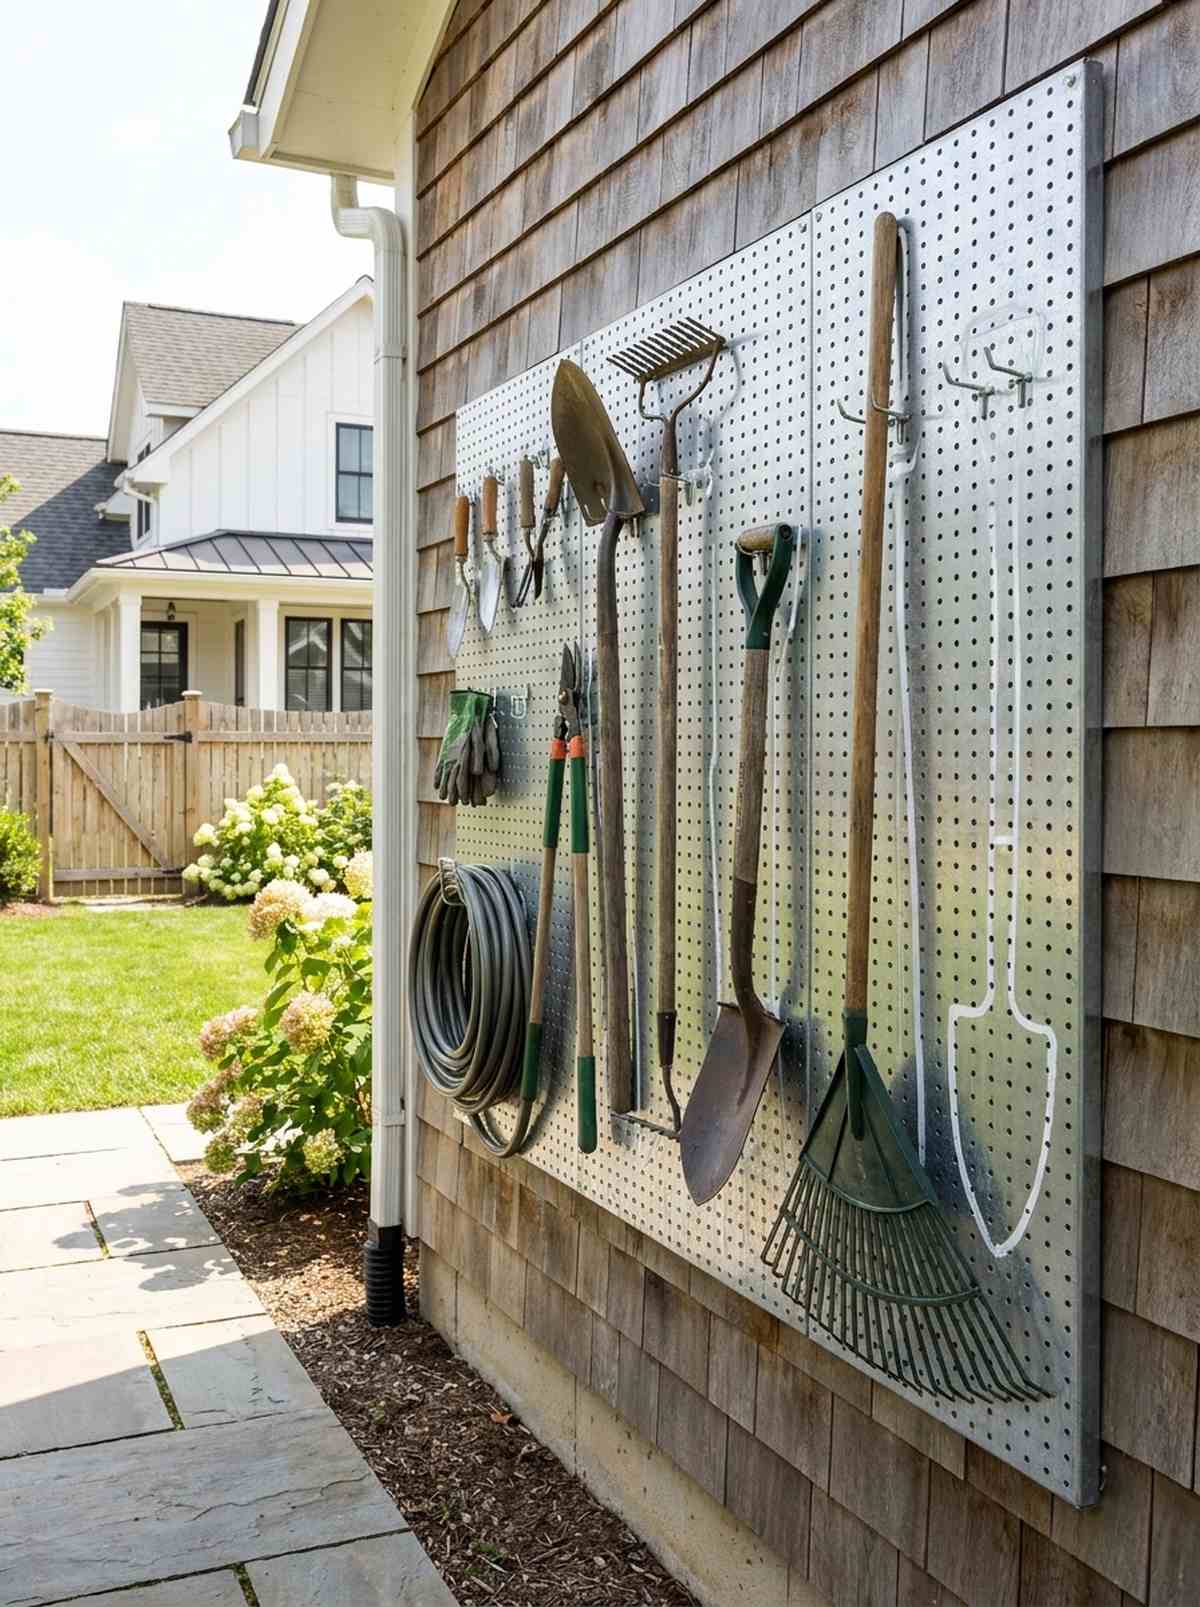
This organized wall feels like a professional workshop where everything is perfectly in its place. Mounting an exterior slat-wall or pegboard system gets every shovel and trowel off the ground.
Leaving tools piled in a corner looks awful and causes rust, but hanging them neatly gives a designer-level finish. Upgrading to galvanized steel pegboards ensures it won’t warp and rot like standard indoor fiberboard.
An outdoor-rated storage panel setup runs about $45–$75. Save this to finally organize that messy side yard!
- Key Materials: Metal pegboard, assorted hanging hooks
- Vibe / Style: Ultra-organized pro shed
- Difficulty: Easy wall mounting
- Budget Breakdown: Metal Board: $45 | Hook Set: $20
- Creator’s Tip: Trace the outline of your tools on the board with a paint pen so you always know exactly where things go back.
- Smart Sourcing: Heavy-duty galvanized steel pegboard kits
48. Ottoman Planter Combos
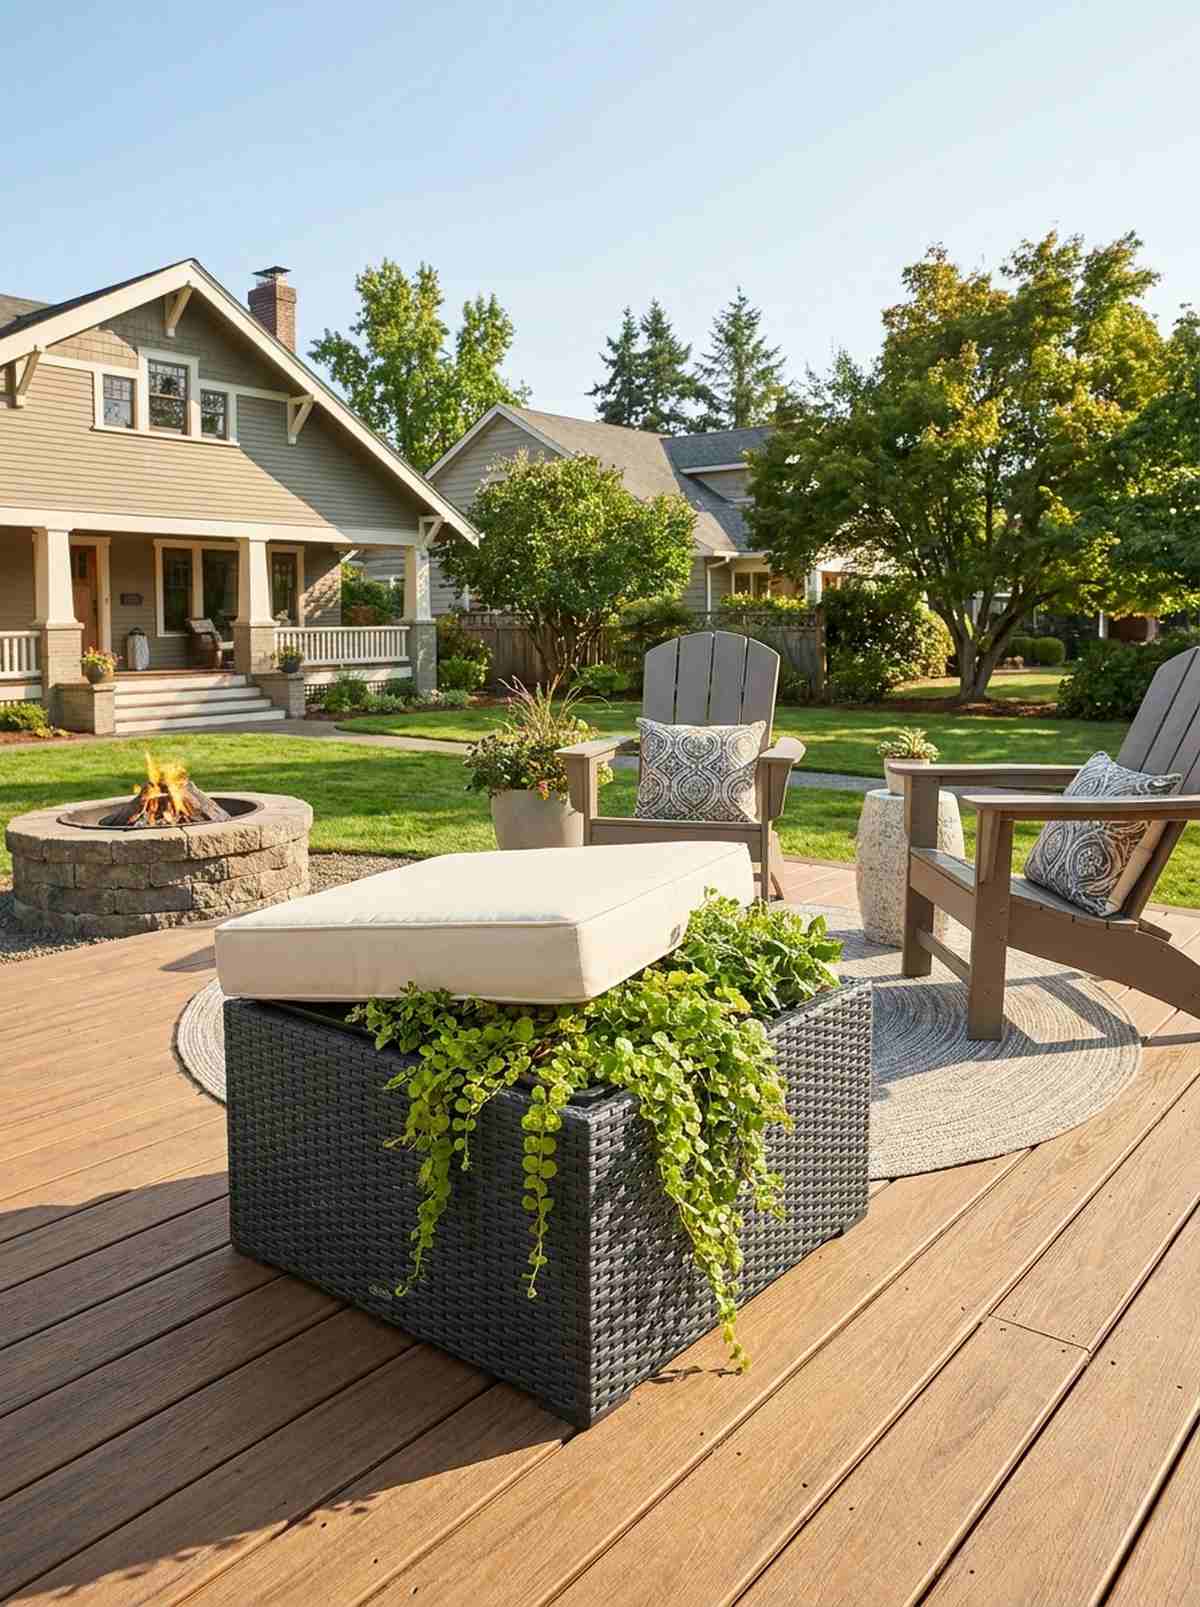
This clever disguise feels like a piece of high-end spy furniture for your deck. Using a hollow outdoor seating cube hides a self-watering planter right underneath the removable cushion.
Most small spaces force you to choose between seating and plants, but this dual-function trick looks far more expensive than it is. The dark, hidden interior actually helps keep the plant roots incredibly cool during heat waves.
A multi-functional planter ottoman costs around $70–$110. It’s an absolute must for tiny apartment balconies.
- Key Materials: Resin storage ottoman, internal drip tray
- Vibe / Style: Stealthy modern comfort
- Difficulty: Ready to use
- Budget Breakdown: Ottoman: $85 | Plant & Soil: $15
- Creator’s Tip: Plant trailing vines like creeping jenny so the greenery spills out beautifully from under the seating lid.
- Smart Sourcing: Self-watering planter systems (inserts)
49. Fire Pit Planter Surrounds
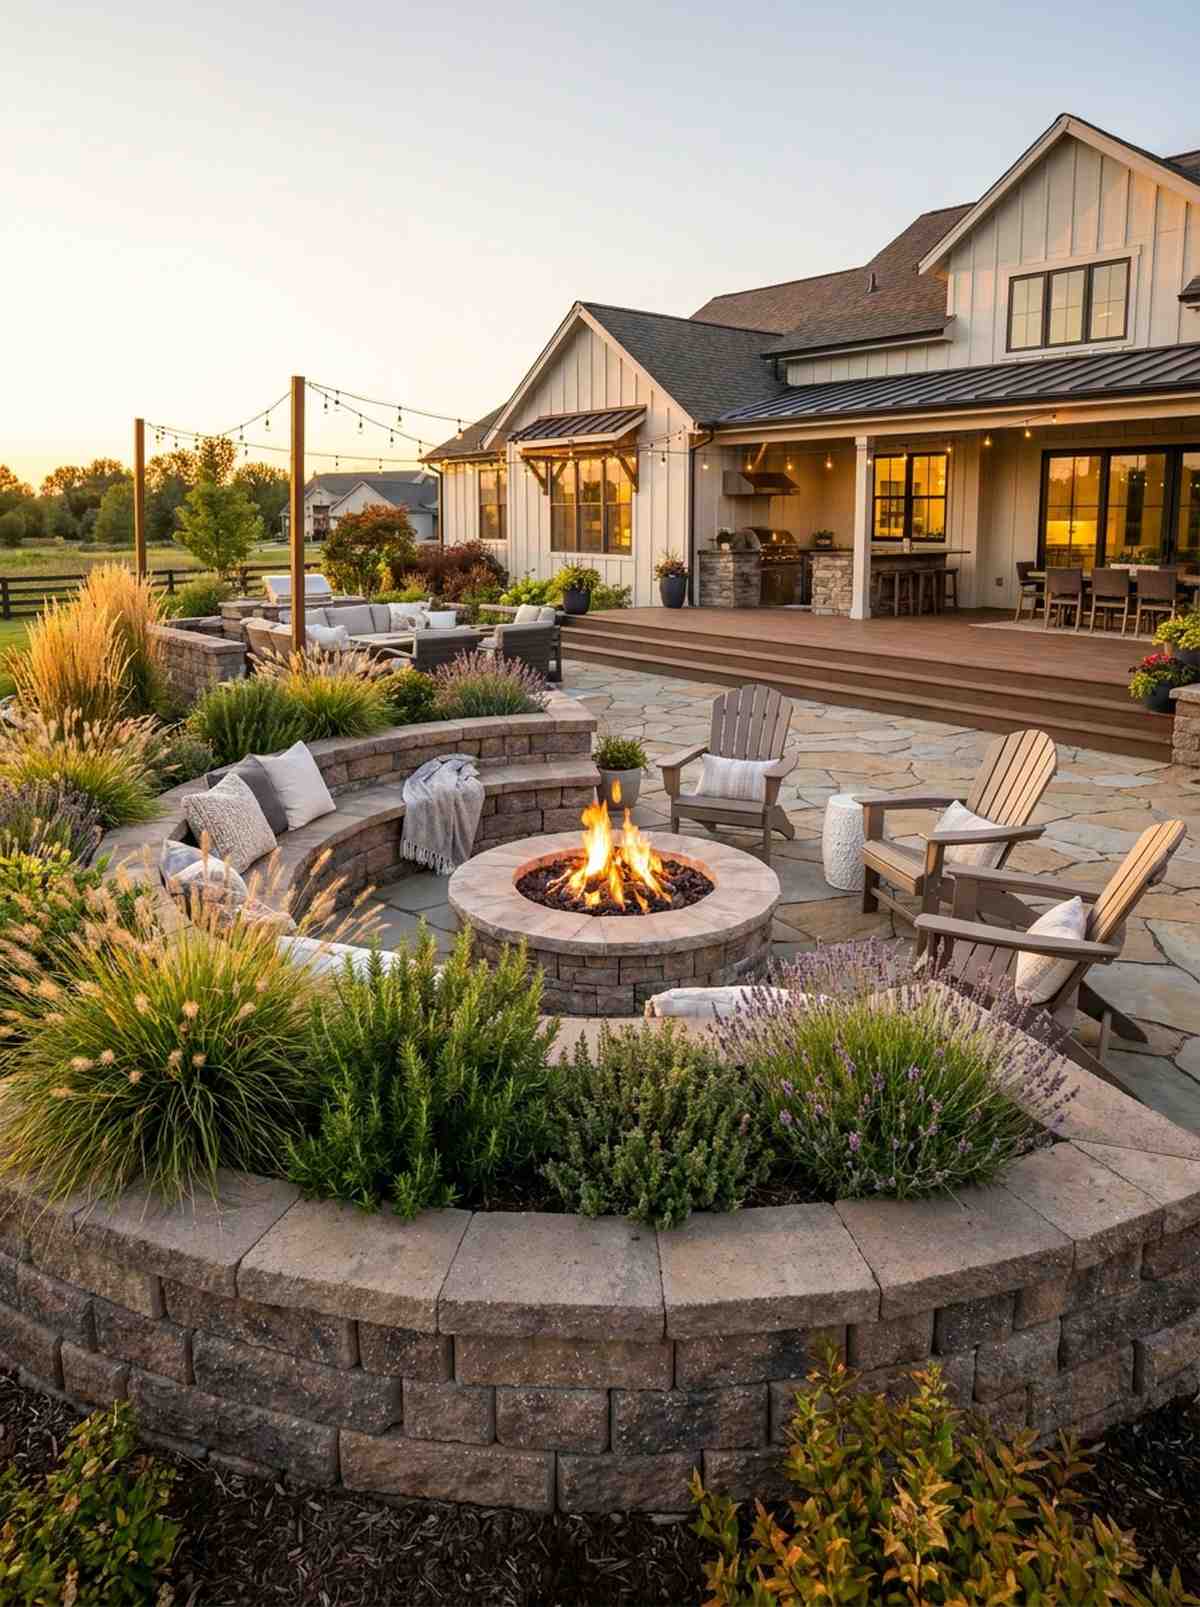
This circular hub feels like an exclusive lounge area designed for late-night gatherings. Building a raised planter retaining ring around your fire pit provides built-in seating and beautiful backrest greenery.
Leaving a fire pit floating alone looks unfinished, but wrapping it in stone and ornamental grass delivers a surprisingly premium look. Utilizing heat-tolerant herbs like rosemary means the fire’s warmth actually releases an amazing fragrance.
A stone planter surround will cost about $150–$250 in blocks. Pin this to make your fire pit the ultimate focal point!
- Key Materials: Retaining wall blocks, heat-safe plants
- Vibe / Style: High-end resort lounge
- Difficulty: Heavy lifting block work
- Budget Breakdown: Blocks: $180 | Capstones: $50
- Creator’s Tip: Leave at least 24 inches of clearance between the fire bowl and the stone wall to ensure knees don’t get scorched.
- Smart Sourcing: Pre-cut fire pit retaining wall kits
50. Convertible Deck Sections
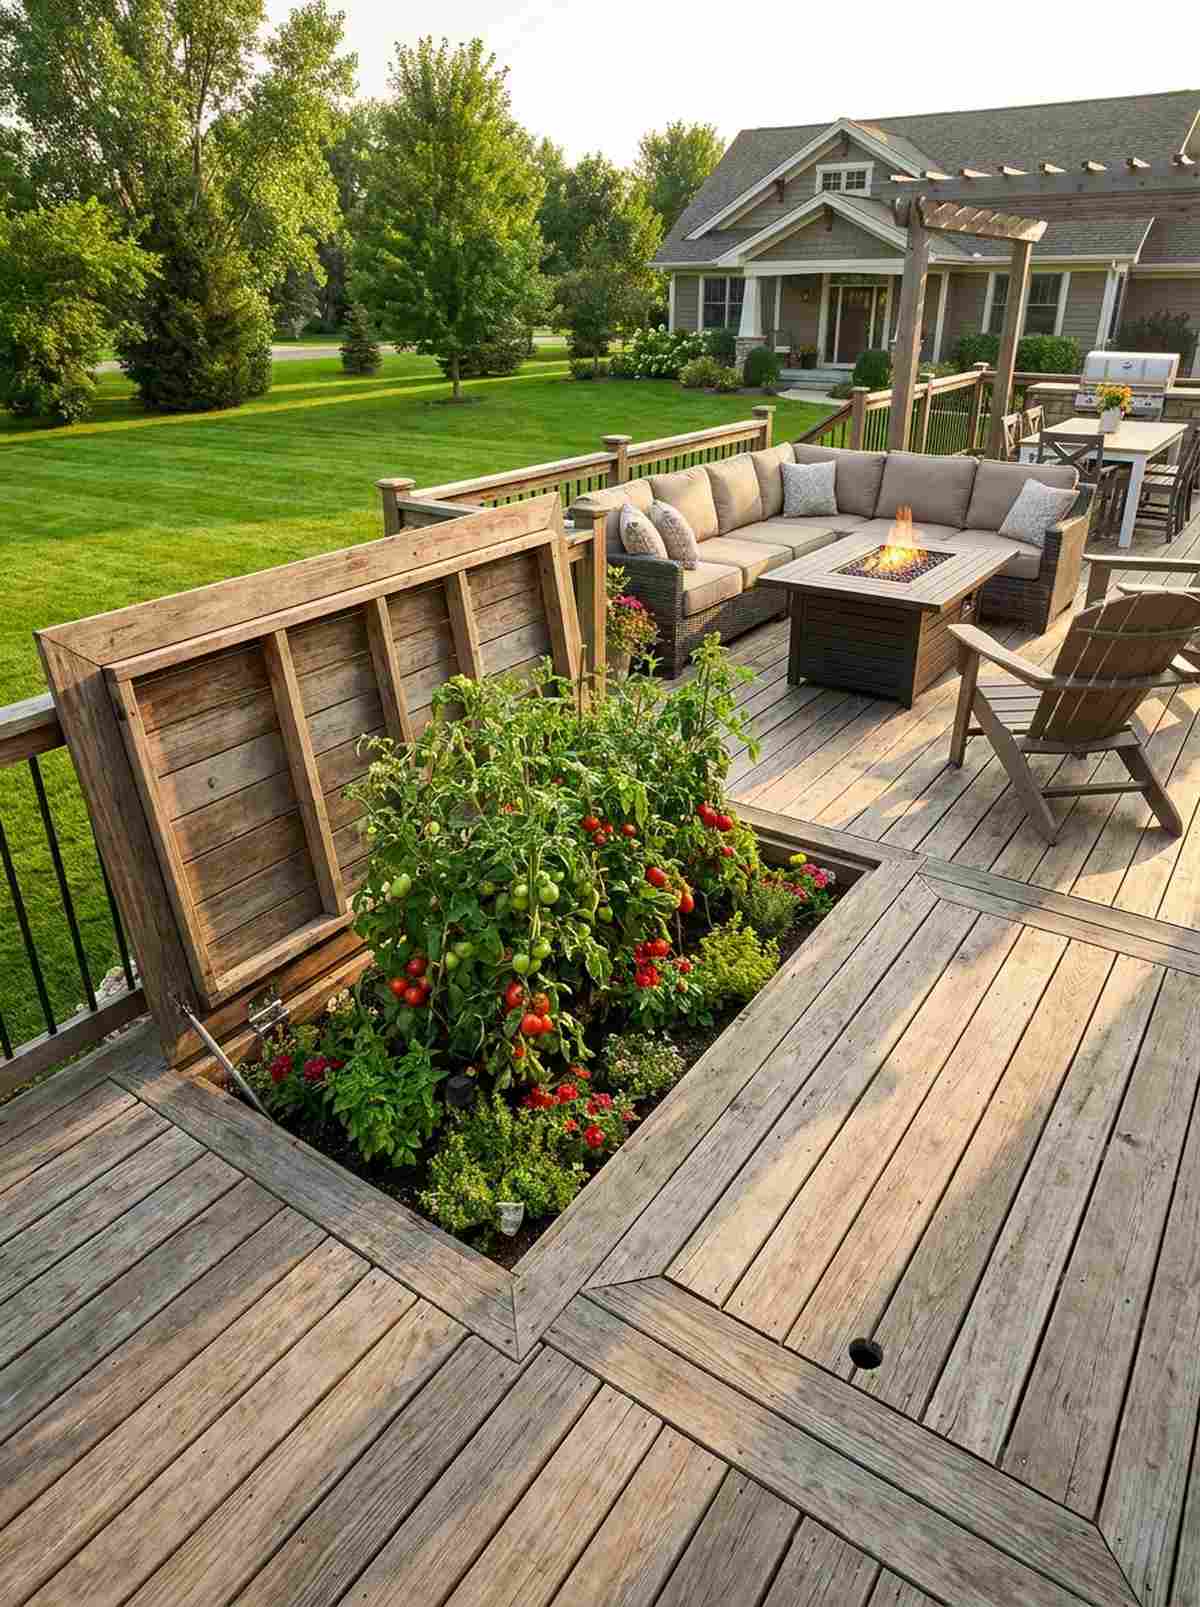
This transformable space feels like architectural wizardry that adapts to the seasons. Designing removable wooden deck hatches reveals hidden garden beds right in the middle of your patio.
Committing permanently to either wood or dirt is limiting, but a lift-away panel gives a designer-level finish to flexibility. You can grow massive tomato plants all summer, then cover the hole for a smooth dance floor in the winter.
Framing out these custom hatches adds about $80–$120 to a deck build. It is the ultimate hack for tiny urban footprints.
- Key Materials: Deck boards, heavy-duty flush hinges
- Vibe / Style: Transforming architectural space
- Difficulty: Advanced framing
- Budget Breakdown: Extra Framing: $60 | Hardware: $40
- Creator’s Tip: Drill a small 1-inch finger hole in the corner of the hatch so you can easily pull the panel up without tools.
- Smart Sourcing: Heavy-duty flush mount deck hinges (bulk pack)
Privacy Screening With Productive Plants
Living screens composed of edible and flowering species block unwanted views while contributing harvests or habitat. These vertical barriers establish boundaries without the permanence of fencing or the sterility of manufactured screens.
51. Bamboo Clumping Groves
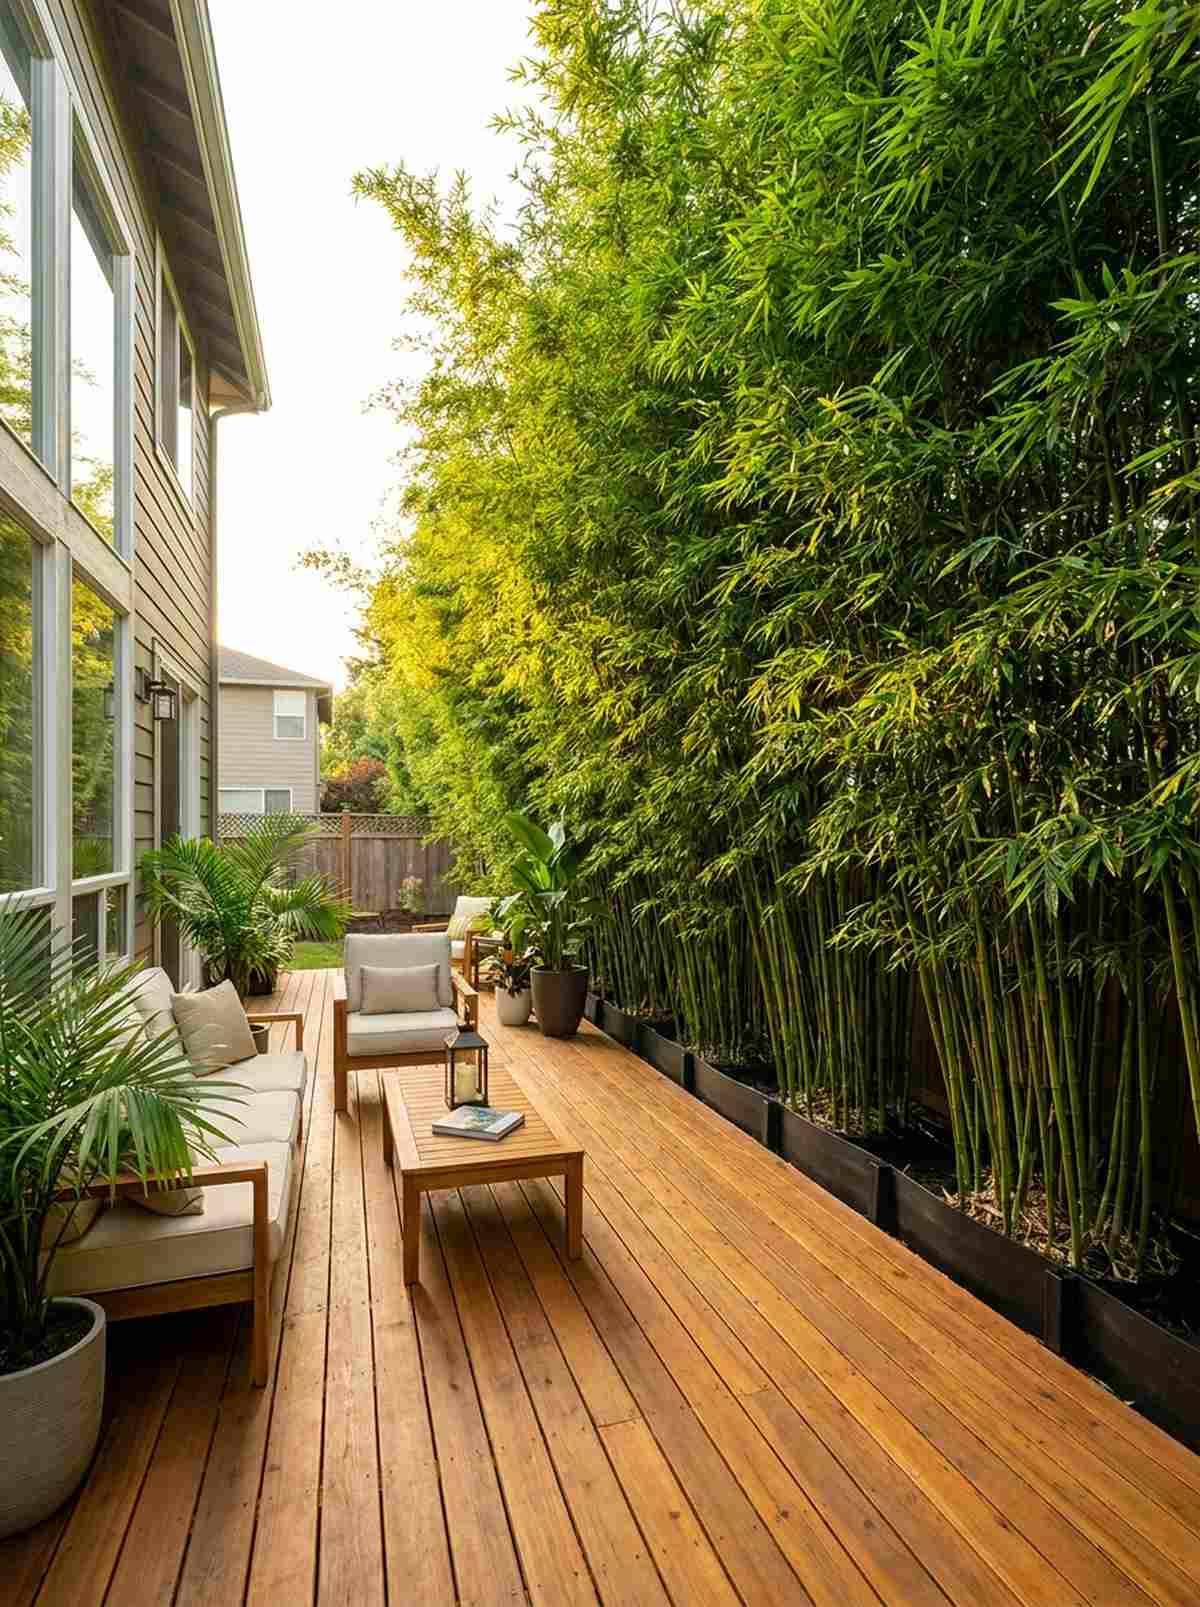
This towering green wall feels like an immersive, wind-swept tropical sanctuary. Planting a tight row of clumping bamboo varieties creates an impenetrable 15-foot privacy screen incredibly fast.
Running bamboo will aggressively destroy your foundation, but utilizing strict clumping species looks far more expensive than it is and stays perfectly contained. It completely blocks out nosy neighbors and muffles street traffic noise.
A row of mature bamboo pots runs about $100–$180. Save this if you need instant privacy without building a fence!
- Key Materials: Clumping bamboo (Fargesia), root barrier
- Vibe / Style: Lush tropical isolation
- Difficulty: Easy planting
- Budget Breakdown: Plants: $120 | Soil: $30
- Creator’s Tip: Even with clumping types, line the trench with a heavy plastic root barrier just for absolute peace of mind.
- Smart Sourcing: Heavy-duty plastic rhizome barriers (pre-cut)
52. Espaliered Pear Fences
This living boundary feels like an elegant estate feature that produces massive harvests. Training trees into a crisscrossing Belgian fence pattern creates a diamond-shaped wall of fruit right on the property line.
Standard wooden privacy fences rot and look boring, but a highly structured fruit wall delivers a surprisingly premium look. The tight geometric diamonds provide excellent screening while yielding bushels of pears in a tiny footprint.
Starting this living fence costs about $150–$200 for trees and wire. Pin this if you love formal, productive garden architecture!
- Key Materials: Bare-root pear trees, high-tensile wire grid
- Vibe / Style: Master horticulturist estate
- Difficulty: Requires meticulous pruning
- Budget Breakdown: Trees: $120 | Wire Frame: $50
- Creator’s Tip: Space the trees exactly 18 inches apart and graft the touching branches together to create an unbreakable living wall.
- Smart Sourcing: Professional grafting tape and wax starter kits
Most privacy screens look like cheap plastic… but this next living wall trick is unbelievably stunning.
53. Hops on Cable Systems
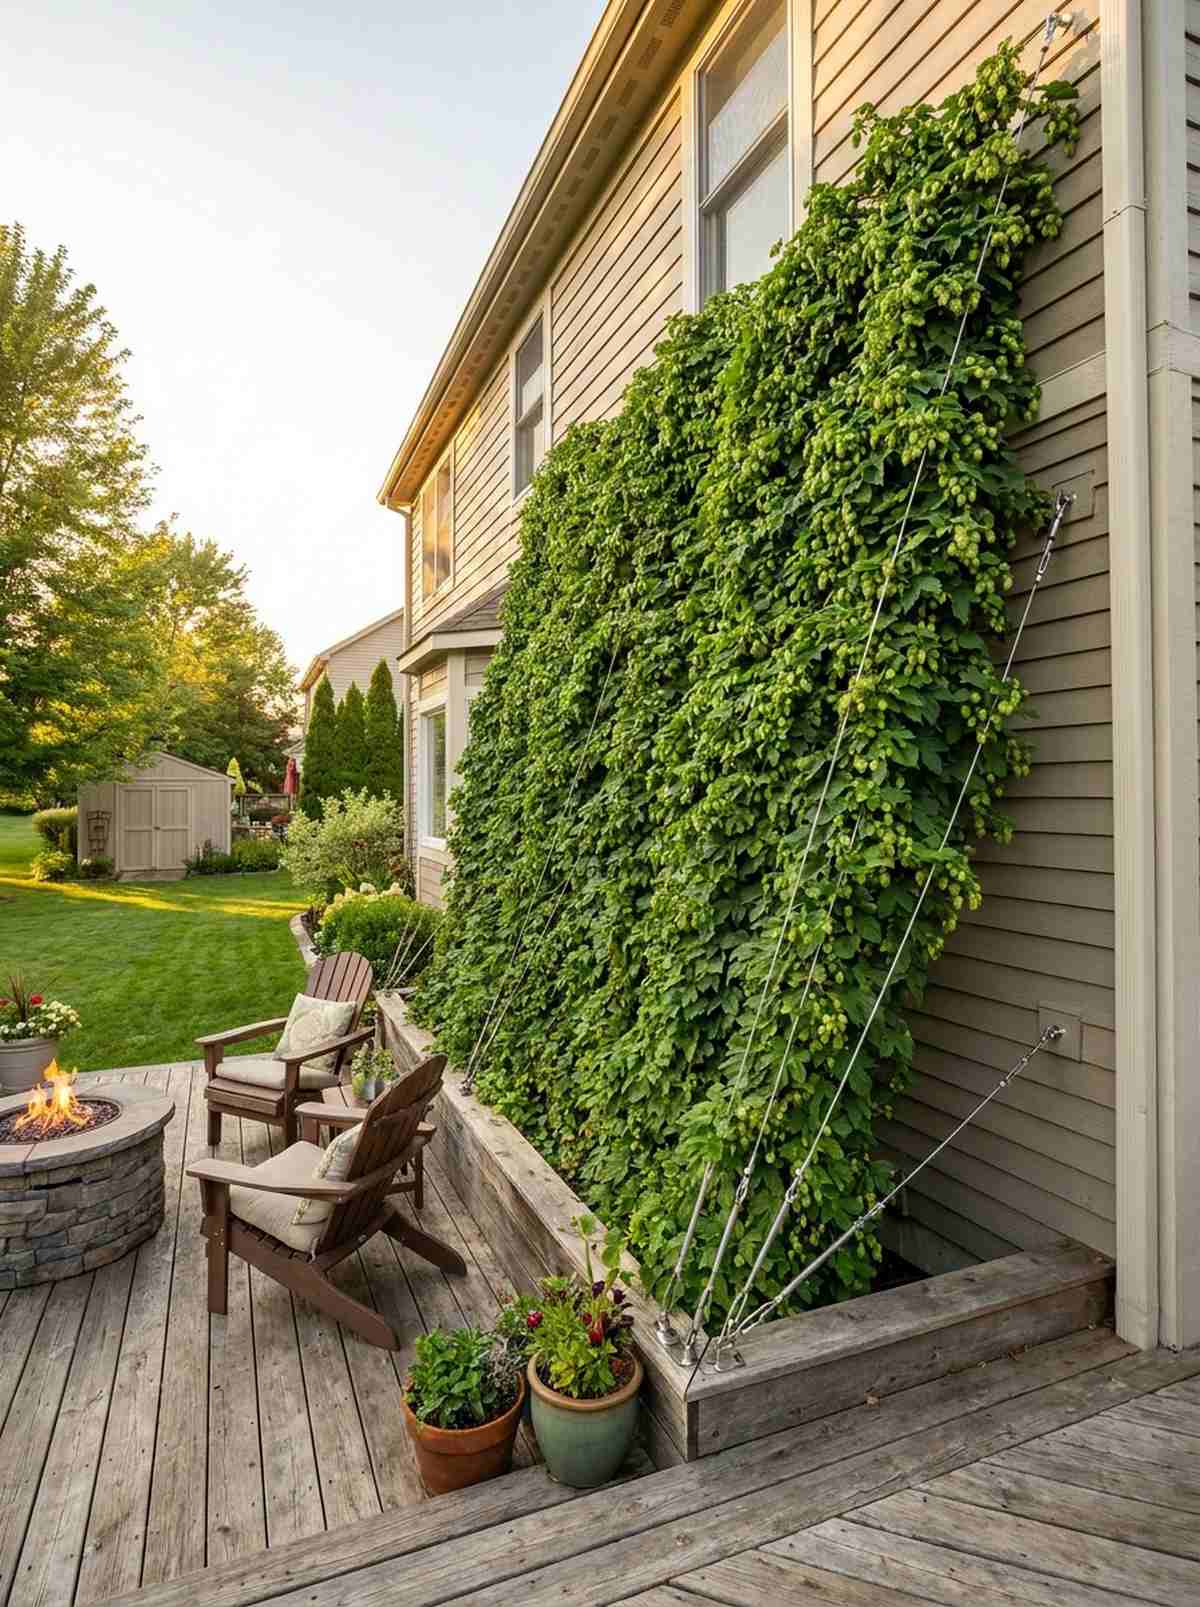
This aggressive vertical climber feels like a lush, fragrant curtain cascading from the sky. Training fast-growing hop bines on steel cables creates a massive 20-foot green wall in a single summer.
Lattice panels don’t go high enough for second-story privacy, but a sleek steel cable system gives a designer-level finish. The vigorous vines covered in brewing cones die back completely in winter, letting the sun warm your house.
Installing the anchors and cables costs roughly $60–$90. It is a wildly fast solution for covering ugly multi-story walls.
- Key Materials: Hop rhizomes, stainless steel wire rope
- Vibe / Style: Towering brewery aesthetic
- Difficulty: Needs strong overhead anchors
- Budget Breakdown: Cables/Anchors: $70 | Rhizomes: $15
- Creator’s Tip: Always train the young hop shoots to wrap clockwise around the wire; they physically will not climb counter-clockwise.
- Smart Sourcing: Stainless steel wire rope tension kits
54. Mixed Evergreen Hedge
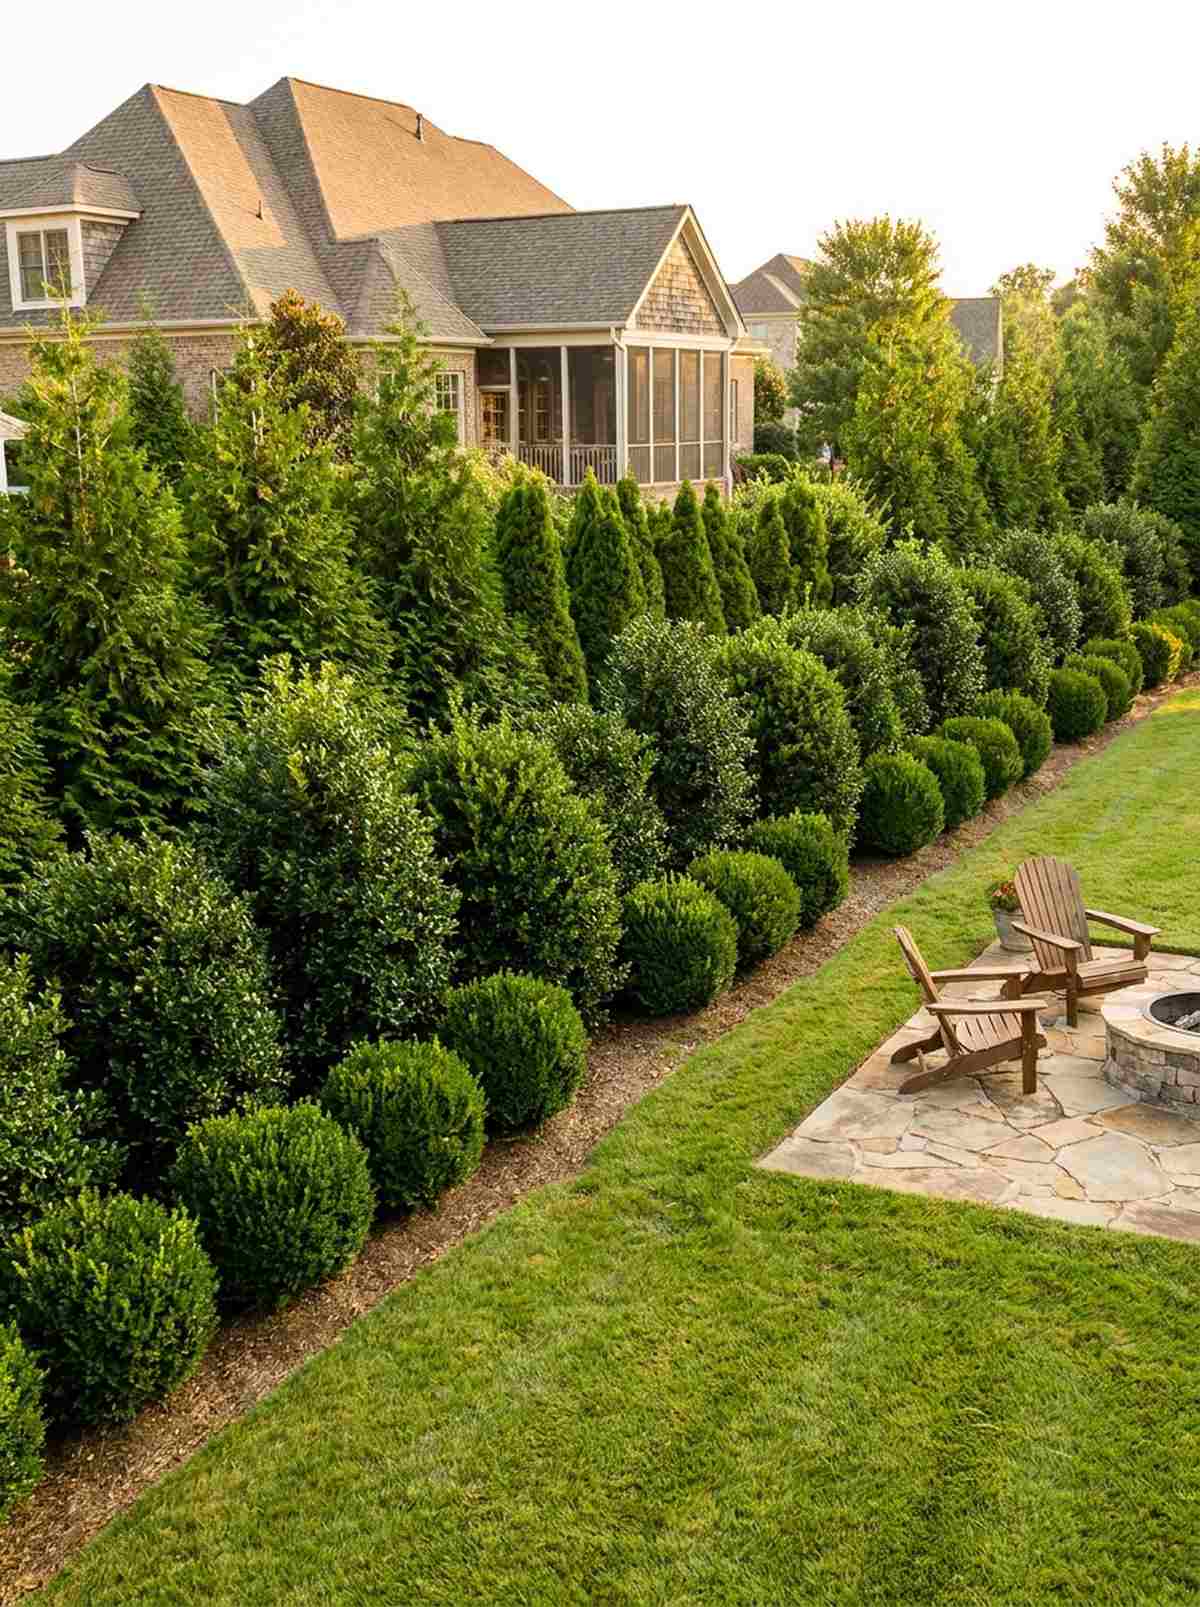
This dense tapestry feels like a highly manicured botanical garden border. Combining staggered rows of varied evergreens builds a thick, impenetrable privacy wall with stunning texture contrast.
Planting a straight line of identical arborvitae looks like a cheap commercial parking lot, but mixing holly and boxwood looks far more expensive than it is. Offsetting the rows slightly ensures no gaps ever form.
A diverse array of young shrubs costs about $120–$180. Save this for year-round, bulletproof property screening!
- Key Materials: Varied evergreen shrubs, compost
- Vibe / Style: Textured estate boundary
- Difficulty: Heavy digging required
- Budget Breakdown: Shrubs: $150 | Compost: $20
- Creator’s Tip: Plant them in a zigzag pattern rather than a straight line; it creates a thicker screen while using fewer plants.
- Smart Sourcing: Pre-mixed organic compost starter bags
55. Fig Tree Espalier
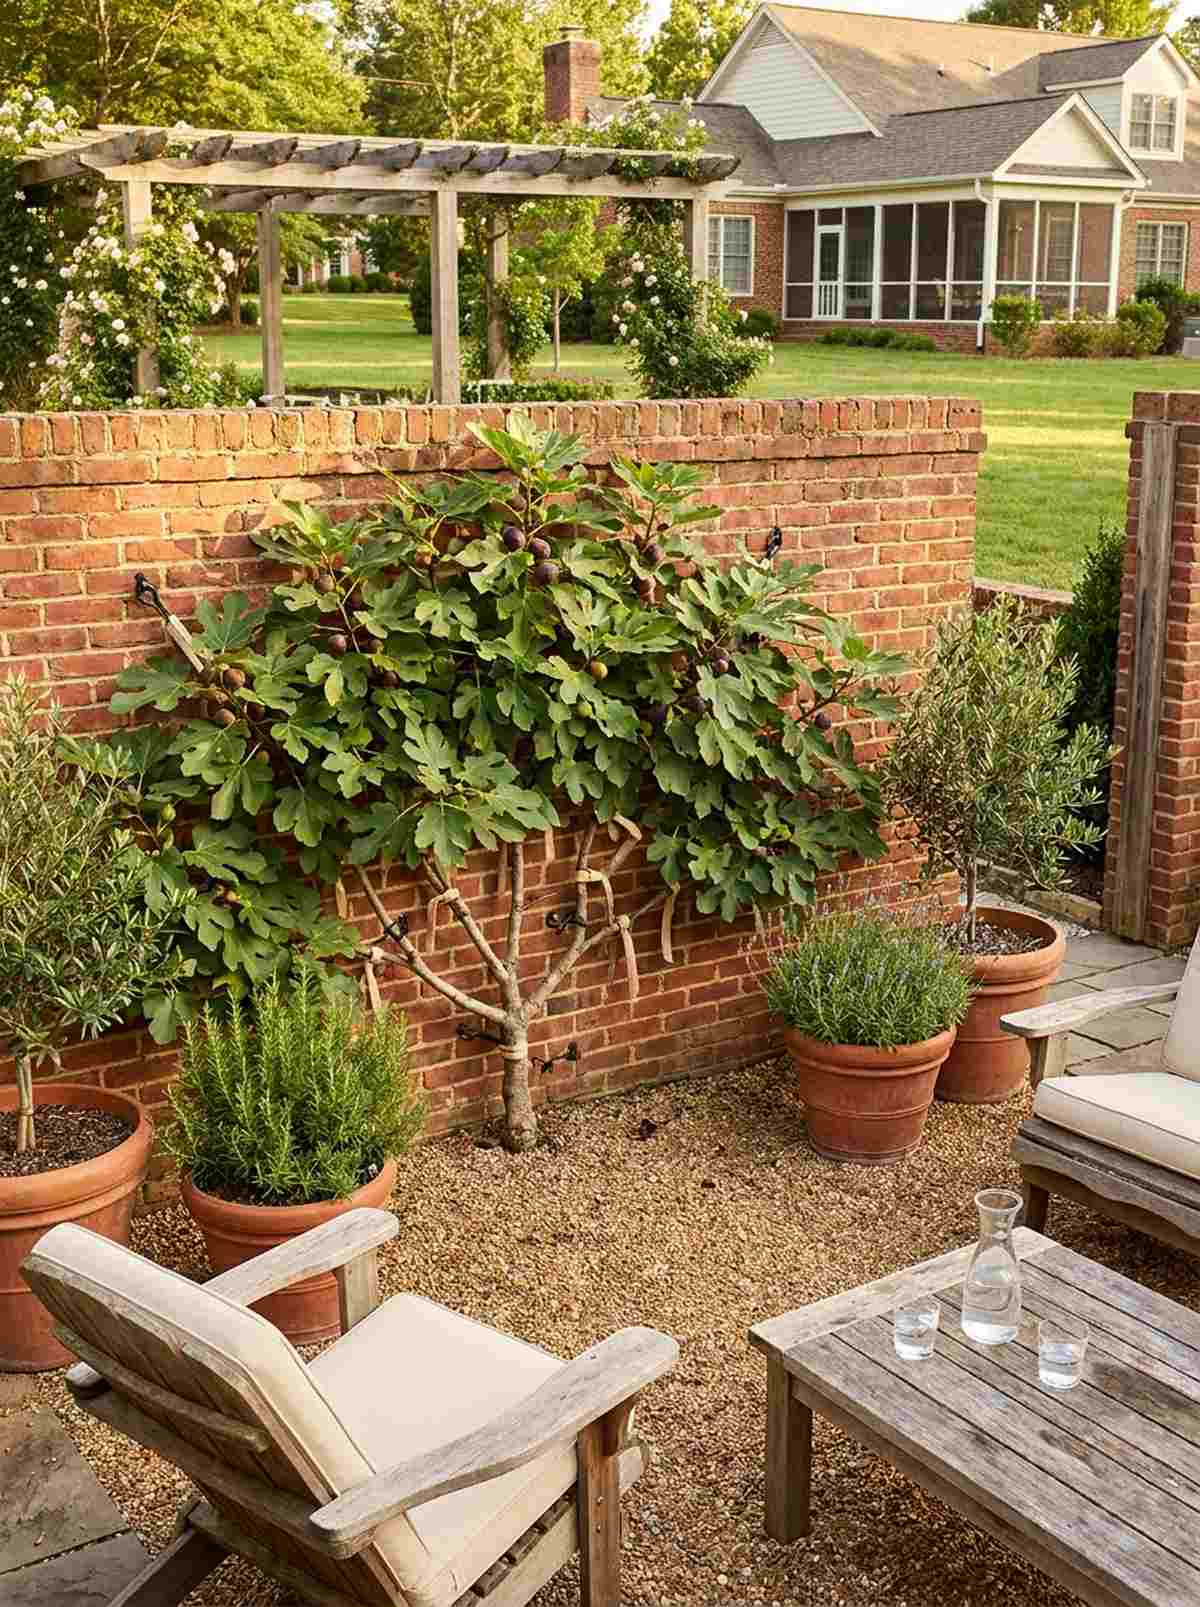
This bold silhouette feels wonderfully exotic and brings a touch of the Mediterranean to an empty brick wall. Pinning a fan-shaped fig tree against a sun-baked surface creates a stunning, productive focal point.
Letting a fig grow wildly consumes the entire yard, but aggressively pruning it flat delivers a surprisingly premium look. The massive lobed leaves provide great visual screening while the bricks radiate heat to ripen the fruit.
A good fig starter and masonry anchors will run about $50–$80. Pin this to utilize that blazing hot side of your house!
- Key Materials: Fig tree, masonry eye-hooks, soft ties
- Vibe / Style: Warm Mediterranean courtyard
- Difficulty: Requires drilling into brick
- Budget Breakdown: Tree: $40 | Masonry Hooks: $15
- Creator’s Tip: In colder zones, the flat shape allows you to easily wrap the entire tree against the wall with burlap for winter protection.
- Smart Sourcing: Heavy-duty masonry drill bit kits
Microclimate Optimization Techniques
Small yards naturally develop distinct temperature and moisture zones based on sun angles, wind patterns, and reflective surfaces. Mapping these microclimates allows precise plant placement that extends growing seasons and increases harvest diversity.
56. Thermal Mass Stone Placement
This brilliant trick feels like hacking nature to create your own localized warm weather. Placing dark landscape boulders directly behind your pepper and tomato plants acts as a natural heater.
Dropping temperatures kill summer crops early, but these stones absorb sun all day and deliver a surprisingly premium look while radiating heat all night. It smooths out those cold autumn spikes effortlessly.
Sourcing a few dark stones is usually free or under $20. Save this microclimate hack to extend your growing season by weeks!
- Key Materials: Dark dense rocks/boulders
- Vibe / Style: Functional naturalism
- Difficulty: Zero setup
- Budget Breakdown: Boulders: $20 | Positioning: Free
- Creator’s Tip: Ensure the stones are positioned on the north side of the plant so they don’t block the southern sun exposure.
- Smart Sourcing: Pre-washed dark decorative boulders (bulk pack)
57. White Wall Reflectors
This lighting trick feels like turning on a massive floodlight in the darkest corner of your yard. Painting an adjacent fence to act as a bright white reflective surface bounces incredible amounts of light into shady beds.
Struggling with gloomy side-yards is frustrating, but utilizing a bright optic reflector looks far more expensive than it is and boosts photosynthesis drastically. You can suddenly grow sun-loving vegetables in former dead zones.
A bucket of premium exterior white paint costs about $35–$55. It’s an instant fix for terrible yard lighting.
- Key Materials: High-LRV white exterior paint, rollers
- Vibe / Style: Bright airy courtyard
- Difficulty: Easy painting
- Budget Breakdown: Paint: $45 | Rollers: $10
- Creator’s Tip: Use a high-gloss finish instead of matte; it bounces significantly more direct light onto your struggling plant leaves.
- Smart Sourcing: Premium UV-resistant high-gloss exterior paint
58. Cold Air Drainage Channels
This invisible layout feels like an advanced agricultural secret you can deploy at home. Leaving an open downhill air channel allows freezing night air to flow away from your sensitive plants like water.
Most people accidentally build solid walls across slopes, which traps frost and kills plants, but opening the pathway gives a designer-level finish to your airflow. Frost literally drains right out of the yard.
This layout adjustment costs absolutely zero dollars. Pin this to save your tender crops from early spring frostbite!
- Key Materials: Open pathway, strategic pruning
- Vibe / Style: Smart permaculture flow
- Difficulty: Requires observation
- Budget Breakdown: Redesign: Free | Labor: Free
- Creator’s Tip: Use a smoke bomb on a cold, still evening to visually see exactly where the cold air pools in your yard.
- Smart Sourcing: Heavy-duty bypass pruning shear kits
59. Water Feature Humidity Zones
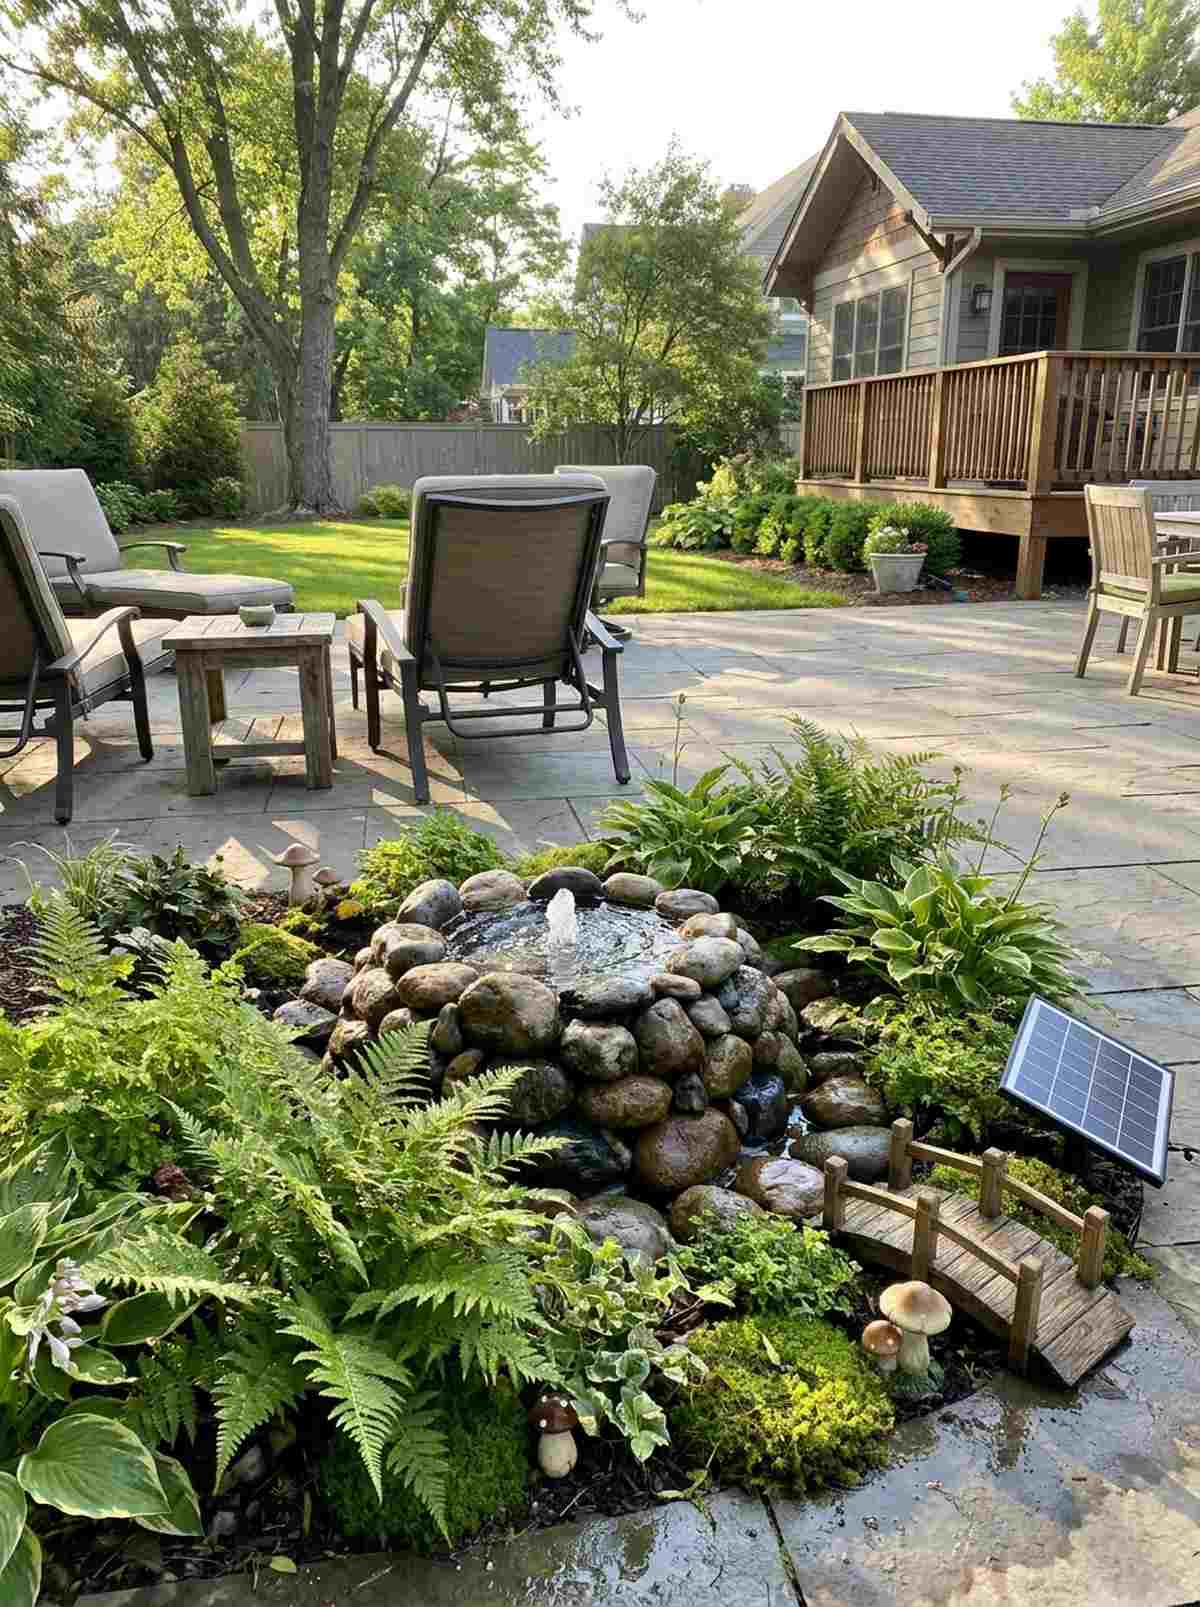
This trick feels like stepping into a lush, dewy rainforest right on a dry suburban patio. Installing a small recirculating fountain directly next to your delicate ferns creates an amazing localized humidity dome.
Running sprinklers wastes water, but a contained splash feature looks far more expensive than it is while keeping the surrounding air moist. Including top-rated miniature garden supplies around the base completes the oasis look.
A beautiful patio water feature runs around $60–$100. It keeps your humidity-loving plants thriving in peak summer.
- Key Materials: Pondless fountain kit, river rocks
- Vibe / Style: Zen rainforest oasis
- Difficulty: Easy plug-and-play
- Budget Breakdown: Fountain Kit: $75 | Extension Cord: $15
- Creator’s Tip: Use a solar-powered pump so you don’t have to ruin your aesthetic by running ugly power cords across the deck.
- Smart Sourcing: Pre-assembled solar fountain starter kits
60. Deciduous Overstory Timing
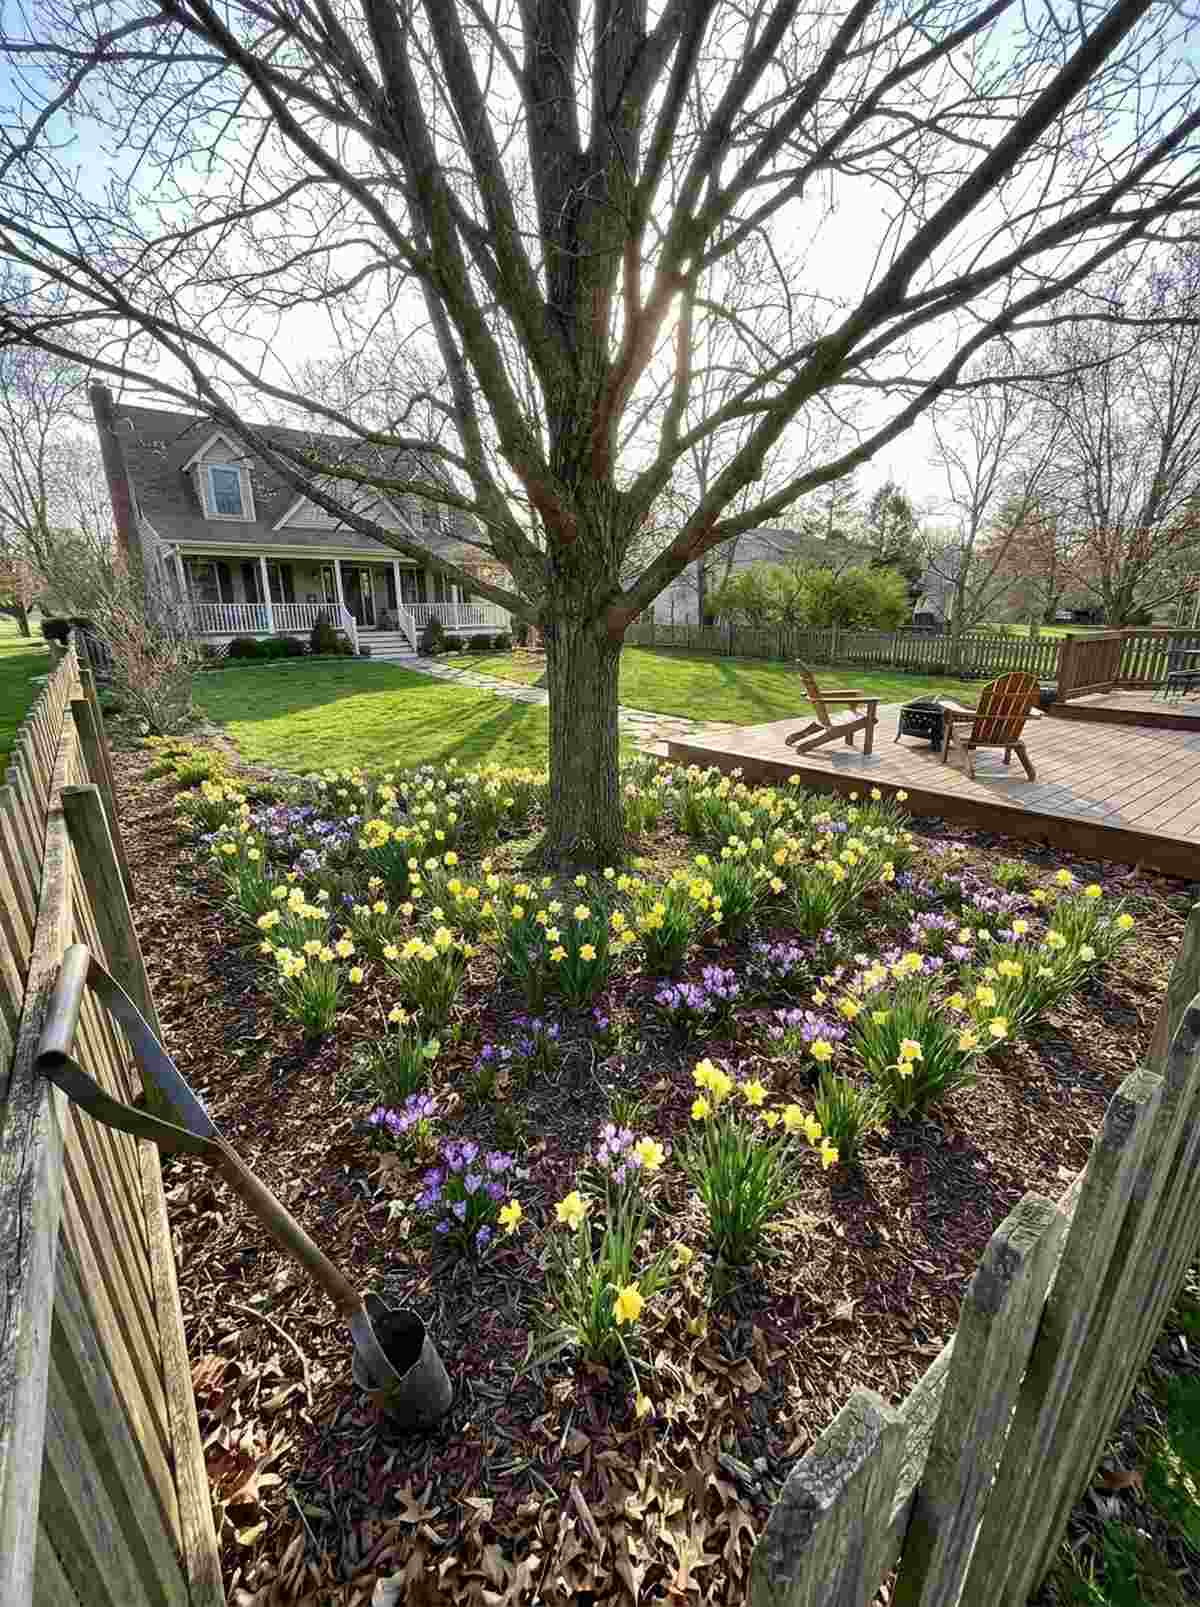
This brilliant planting rhythm feels like nature choreographing a beautiful dance. Planting early spring bulbs under large trees captures the full sun perfectly before the tree canopy leaves out.
Under-tree spaces are notoriously barren in summer, but timing your spring ephemerals delivers a surprisingly premium look in early March. Once the canopy fills in and creates shade, transition to hostas.
A massive bag of bulbs costs around $30–$50. Save this technique to utilize the toughest real estate in your yard!
- Key Materials: Spring bulbs (daffodils/crocus), shade perennials
- Vibe / Style: Seasonal woodland floor
- Difficulty: Easy fall planting
- Budget Breakdown: Bulbs: $40 | Bulb Planter: $10
- Creator’s Tip: Throw the bulbs gently on the ground and plant them exactly where they land for a highly natural, non-grid look.
- Smart Sourcing: Heavy-duty steel bulb planter kits
Transform Limitations Into Design Advantages
Effective backyard garden ideas for small yards convert spatial constraints into creative, high-end opportunities. By layering these 60 premium vertical structures, modular planters, and smart multi-functional elements, you completely rewrite the rules of your outdoor space. Skip the cheap plastics and rely on UV-resistant materials and starter kits to ensure your setup looks expensive and lasts for seasons. Start by picking just three of these layouts to implement this weekend, and watch your tiny backyard transform into a massively productive, designer-level retreat.
Frequently Asked Questions
What are the most space-efficient vegetables for small backyards?
Vertical crops are the absolute king of high-yield small spaces. Training pole beans, cucumbers, and indeterminate tomatoes up UV-coated trellis panels delivers incredible production per square foot. If you don’t have ground space, heavy-duty grow bags are perfect for determinate bush varieties. Prioritize “cut-and-come-again” crops like lettuce and kale to ensure your premium raised bed kits provide a continuous harvest rather than just one single yield.
How do I create privacy in a small yard without losing planting space?
You can achieve total seclusion without sacrificing an inch of ground by installing vertical screens using espaliered fruit trees or clumping bamboo in narrow trenches. Utilizing vine-covered cedar privacy lattice kits creates a gorgeous, impenetrable boundary that stays under 18 inches deep. By strategically positioning these living walls, you block exact sightlines to neighbors while doubling your available surface area for climbing vegetables.
What is the best raised bed size for small yards?
The golden rule for premium cedar raised bed kits in tight yards is keeping the width to a maximum of 3-4 feet. This ensures you can easily reach the center from both sides without ever stepping on the soil and compacting the roots. For extremely narrow side returns, stick to 18-24 inch border beds. Always prioritize lengths of 8 feet to maximize your planting volume without eating up your essential walkway space.
Can I grow fruit trees in a small backyard?
Absolutely, but you must avoid standard rootstocks that will swallow your yard. Opting for dwarf varieties or columnar fruit tree starter kits yields full-sized apples and cherries on trees that stay a manageable 6-8 feet tall with very narrow spreads. For ultimate space-saving, espalier trees trained flat against brick walls or fences using stainless steel wire systems reduce the tree’s depth to a mere 12 inches.
How can I make a small yard feel larger?
The secret to optical illusion in landscaping is layering. Mix groundcovers, mid-tier shrubs, and tall vertical climbers to establish deep visual perception rather than flat, boring borders. Use curved pathways and high-gloss white reflectors to bounce light and trick the eye into seeing more space. Upgrading to sleek, multi-functional weatherproof outdoor seating clears away floor clutter, instantly making the entire footprint feel twice as large.
What are low-maintenance plants for small backyard gardens?
If you want a designer look with zero daily hassle, lean heavily into perennial herbs like rosemary, thyme, and chives that thrive on neglect. Dwarf fruiting shrubs like blueberries offer decades of harvests with almost zero pruning. To suppress weeds naturally without buying expensive mulch, establish thick mats of creeping thyme or use premium drought-resistant microclover seed. These choices eliminate the constant replanting and watering grind.