
Upgrading to contemporary garden beds instantly elevates your outdoor space. Discover premium design blueprints and smart material sourcing for massive impact. Achieve a stunning landscape without overspending on custom contractor fees.
Design Snapshot: Key Principles
- Material Honesty: Expose raw textures like weathered steel, poured concrete, or natural stone without decorative concealment
- Geometric Clarity: Employ rectangular modules, linear runs, or precise circular forms that create visual order
- Layered Heights: Combine beds at multiple elevations to establish spatial hierarchy and improve drainage
- Intentional Repetition: Repeat plant forms, bed dimensions, or material finishes to reinforce design cohesion
Industrial Materials for Lasting Impact
1. Corten Steel Linear Planters
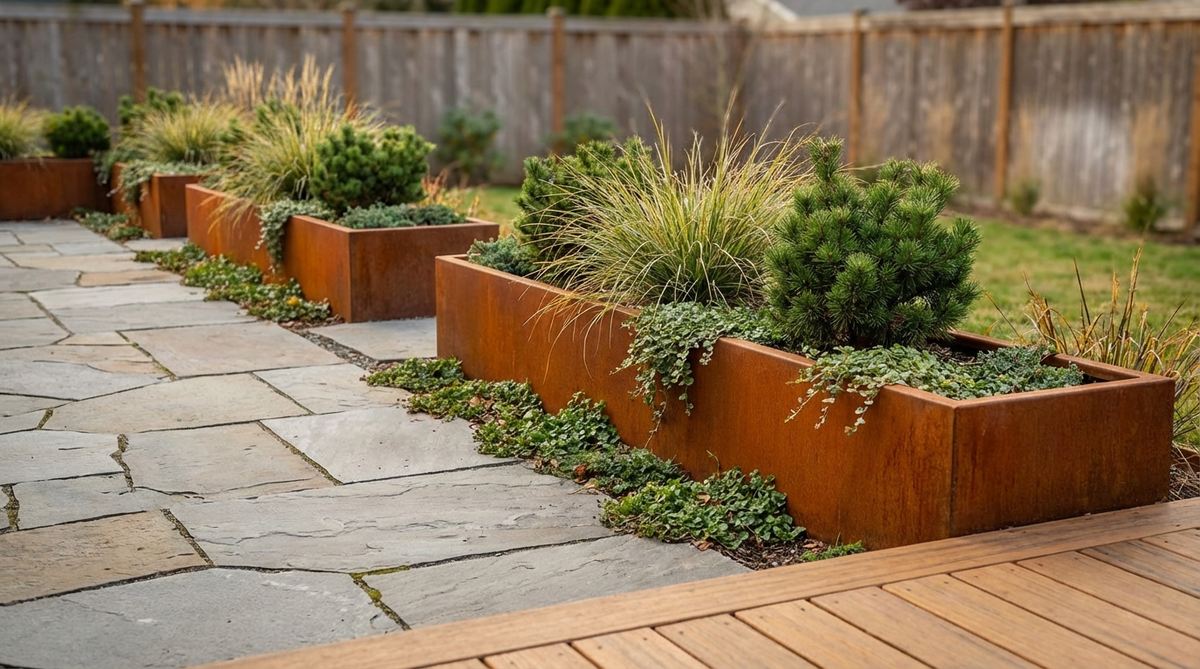
This layout feels straight out of an upscale architectural magazine, anchoring your space with warm, organic rust tones. Integrating a weathered metal planter wall works exceptionally well for defining a minimal patio boundary or a striking front yard focal point.
Many homeowners assume this level of landscape design requires an expensive fabrication team, but modular panels change the game entirely. By sourcing heavy-duty landscape edging and structural corner brackets, you get a premium, indestructible finish without the bespoke price tag.
You can easily pull this off for around $150–$300 per section depending on thickness. Save this to your DIY weekend garden board for your next big outdoor upgrade!
- Key Materials: Heavy-gauge weathering steel panels
- Vibe / Style: Desert modern meets industrial chic
- Difficulty: Moderate weekend build
- Budget Breakdown: Steel panels: $200 | Fasteners & Base: $40
- Creator’s Tip: Speed up the rust patina by spraying the metal with a mixture of hydrogen peroxide, vinegar, and salt immediately after assembly.
- Smart Sourcing: Grab a pre-cut corten steel garden kit or weather-resistant corner bracket sets.
2. Poured Concrete Monolithic Beds
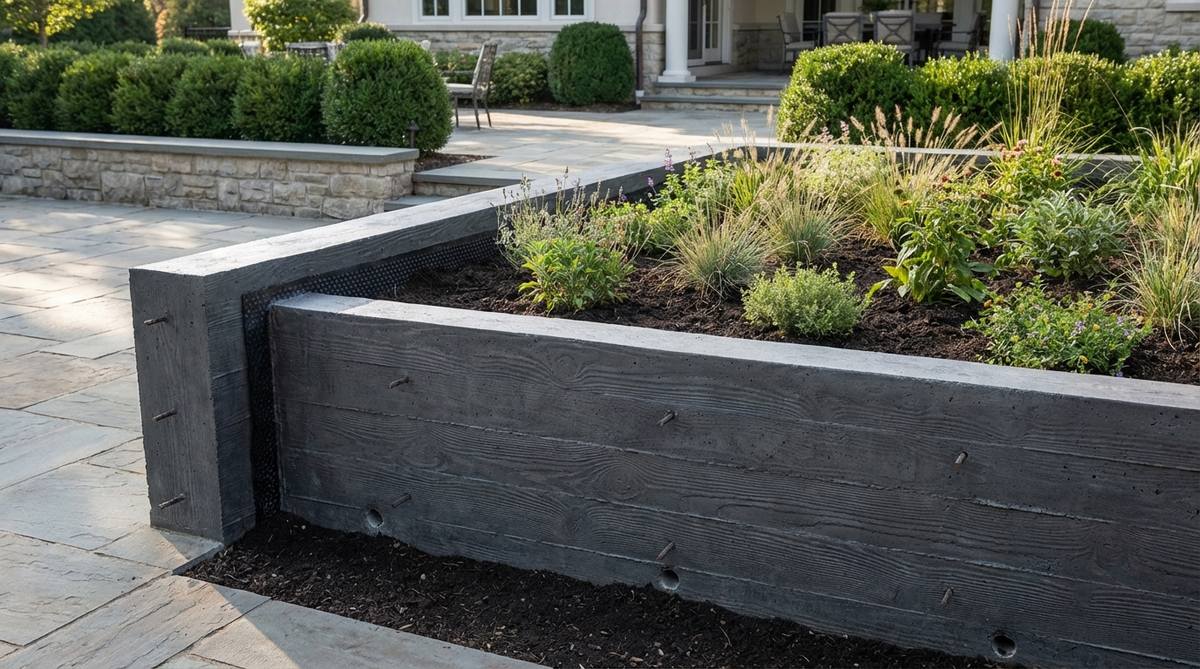
Radiating a calm, grounded energy, this approach feels like a hidden museum courtyard you accidentally discovered. A sleek monolithic concrete planter is the ultimate solution for formal entryways where immovable, permanent structures dictate the luxury aesthetic.
While hiring masons can drain your budget, utilizing board-formed pouring techniques gives a designer-level finish that looks far more expensive than the raw materials. Infusing the mix with charcoal or ochre concrete pigments instantly elevates the standard gray into a bespoke architectural feature.
A mid-sized installation usually runs about $80–$120 in raw concrete and form lumber. It’s a highly durable upgrade that completely changes the yard’s vibe.
- Key Materials: High-strength concrete mix, melamine form boards
- Vibe / Style: Brutalist minimalist courtyard
- Difficulty: Advanced DIY (requires heavy lifting)
- Budget Breakdown: Concrete: $60 | Form lumber & Rebar: $50
- Creator’s Tip: Vibrate the exterior of the wood forms with a rubber mallet aggressively to release trapped air bubbles for a flawless, smooth face.
- Smart Sourcing: Use a heavy-duty concrete bonding adhesive and pre-cut fiberglass rebar rods for reinforcement.
3. Stacked Concrete Block Systems
Delivering serious texture with brutalist undertones, this concept feels perfectly matched for an urban rooftop escape. An exposed modular cinder block garden is incredibly versatile, ideal for carving out functional planting zones on sloped or uneven terrain.
Most people try to hide concrete blocks, but rendering them with a smooth stucco finish or painting them matte black entirely flips the script. This method seamlessly sneaks high-end masonry aesthetics into your space without requiring any complex mortar skills.
Expect to spend about $2–$4 per block, making a full bed cost roughly $40–$75. Pin this if you’re planning a small space upgrade on a strict budget!
- Key Materials: Standard medium-density blocks, exterior stucco mix
- Vibe / Style: Modern urban loft exterior
- Difficulty: Easy beginner setup
- Budget Breakdown: Blocks: $40 | Render/Paint: $25
- Creator’s Tip: Fill the hollow block cores with crushed gravel before planting to drastically improve drainage and prevent cracking in freezing weather.
- Smart Sourcing: Invest in UV-resistant exterior masonry paint and a ready-to-mix stucco finish kit.
4. Galvanized Metal Trough Beds
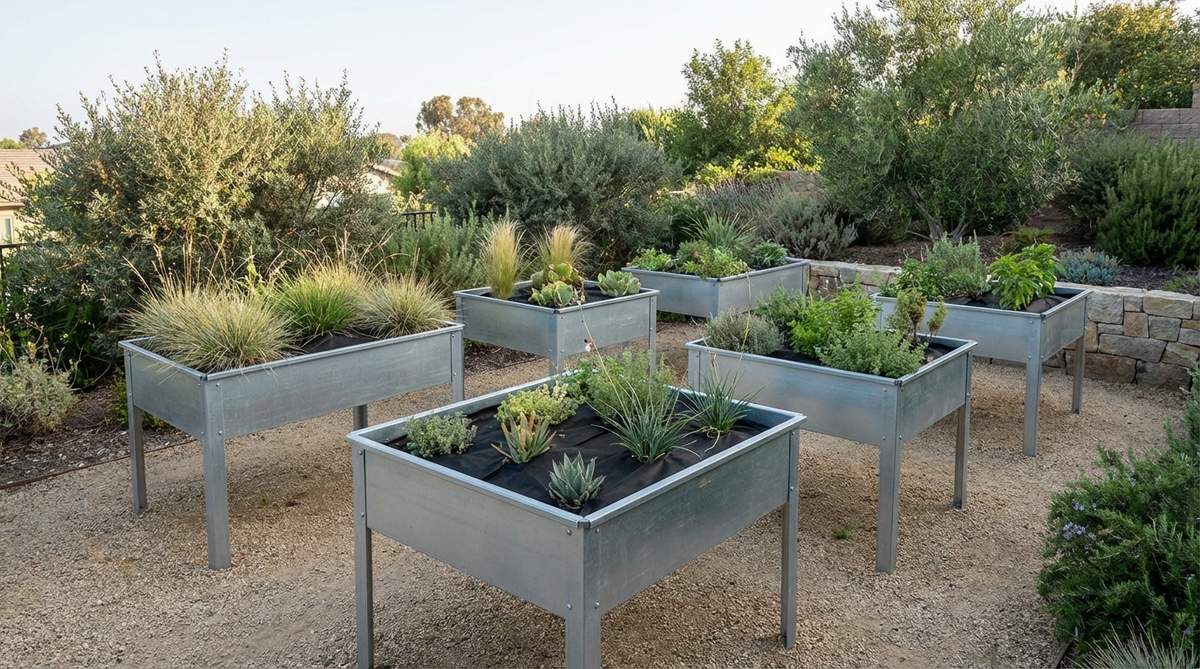
Bringing a clean, farmhouse-meets-modern aesthetic, this setup feels incredibly inviting and unpretentious. Placing a series of elevated zinc planters is practically mandatory for sun-drenched patios where deep, heat-reflective containers keep soil perfectly insulated.
Skip the flimsy garden center plastic pots; agricultural stock tanks are the ultimate landscape hack for instant, massive volume. Drilling your own drainage and adding self-watering reservoir inserts turns these rural staples into highly productive urban farming machines.
You can source these locally for about $100–$150 per tank. They provide an immediate, striking transformation without any construction time.
- Key Materials: Farm-grade stock tanks, landscape fabric
- Vibe / Style: Contemporary homestead
- Difficulty: Extremely easy
- Budget Breakdown: Tank: $120 | Soil & Drainage stone: $60
- Creator’s Tip: Line the inside walls with bubble wrap or thin foam board before adding soil to prevent the sun from cooking your plant roots in mid-July.
- Smart Sourcing: Pick up a metal-safe step drill bit set and bulk pack landscape geotextile fabric.
This next setup is ridiculously cheap to implement but instantly looks like a $5,000 custom landscape installation…
5. Powder-Coated Aluminum Frames

This razor-sharp layout exudes luxury, feeling like the terrace of a high-end penthouse suite. A sleek matte black metal planter system works beautifully for coastal properties or high-rise balconies where salt spray and weight restrictions dictate your choices.
Heavy steel is often a nightmare for elevated decks, which is why utilizing lightweight aerospace-grade aluminum is a massive secret among landscape architects. Paired with concealed hardware, the factory-applied finish delivers a flawlessly smooth boundary that never flakes or rusts.
Kits typically start around $200–$400 for a large bed. Save this idea if you need a weather-proof solution that requires zero maintenance!
- Key Materials: Extruded aluminum frames, concealed corner joints
- Vibe / Style: Ultra-modern high-rise
- Difficulty: Simple bolt-together assembly
- Budget Breakdown: Aluminum Kit: $250 | Premium Potting Mix: $80
- Creator’s Tip: Always use stainless steel or coated fasteners when assembling to prevent galvanic corrosion where different metals touch.
- Smart Sourcing: Look for modular powder-coated planter kits or heavy-duty aluminum corner brackets.
Geometric Configurations That Define Space
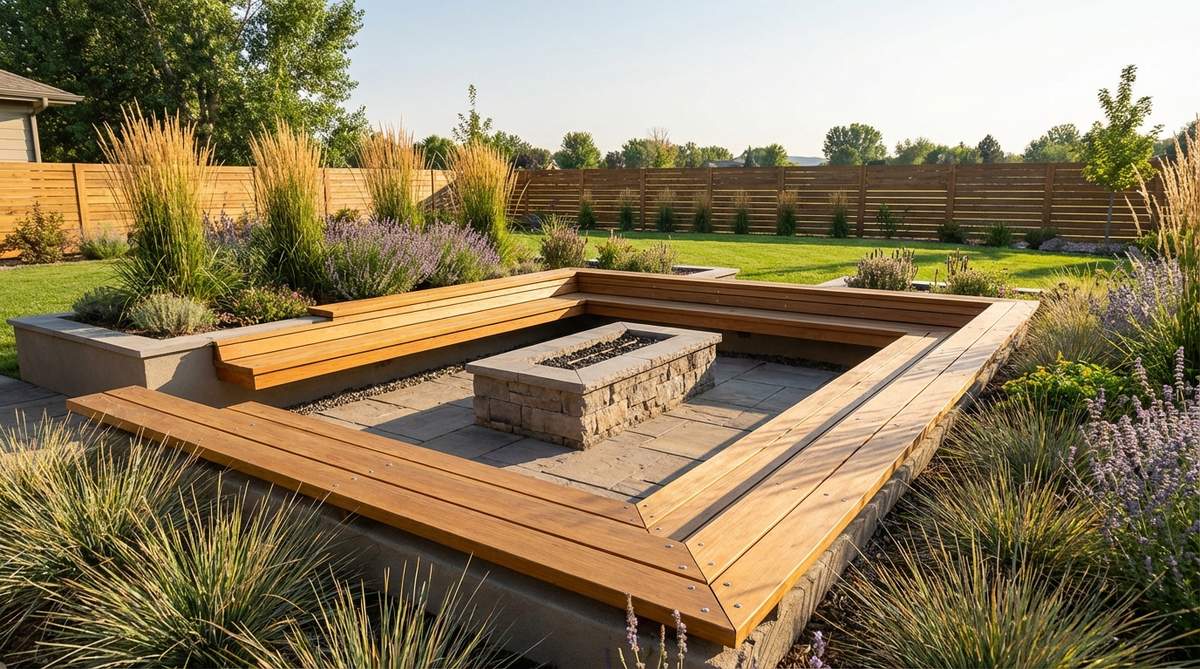
6. U-Shaped Accessibility Beds
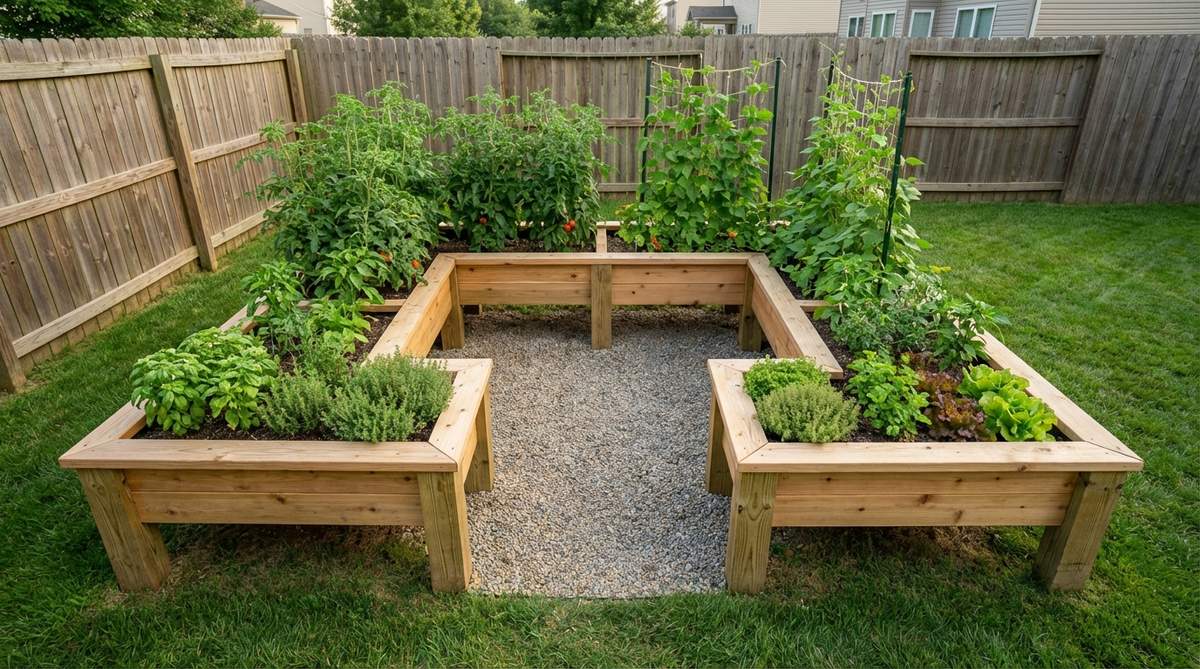
Offering maximum immersion, standing in the center of this configuration feels like commanding your own private botanical sanctuary. A dedicated wrap-around kitchen garden is the ultimate layout for heavy-harvest vegetable plots, putting every single plant within arm’s reach.
Traditional rows waste an absurd amount of space with unnecessary walking paths, whereas a continuous U-shape optimizes every square inch of your yard. By wrapping the growing area around the gardener, you eliminate soil compaction entirely and create a highly efficient micro-farm environment.
Building this from quality lumber runs about $200–$350. It’s a brilliant weekend project that yields incredible long-term gardening comfort.
- Key Materials: Cedar decking boards, heavy-duty corner posts
- Vibe / Style: Productive culinary haven
- Difficulty: Intermediate carpentry
- Budget Breakdown: Lumber: $200 | Hardware & Stain: $50
- Creator’s Tip: Miter the top cap corners at exactly 45 degrees to give the functional shape a much cleaner, more refined architectural finish.
- Smart Sourcing: Use heavy-duty exterior timber screws (bulk pack) and a non-toxic wood waterproofing sealant.
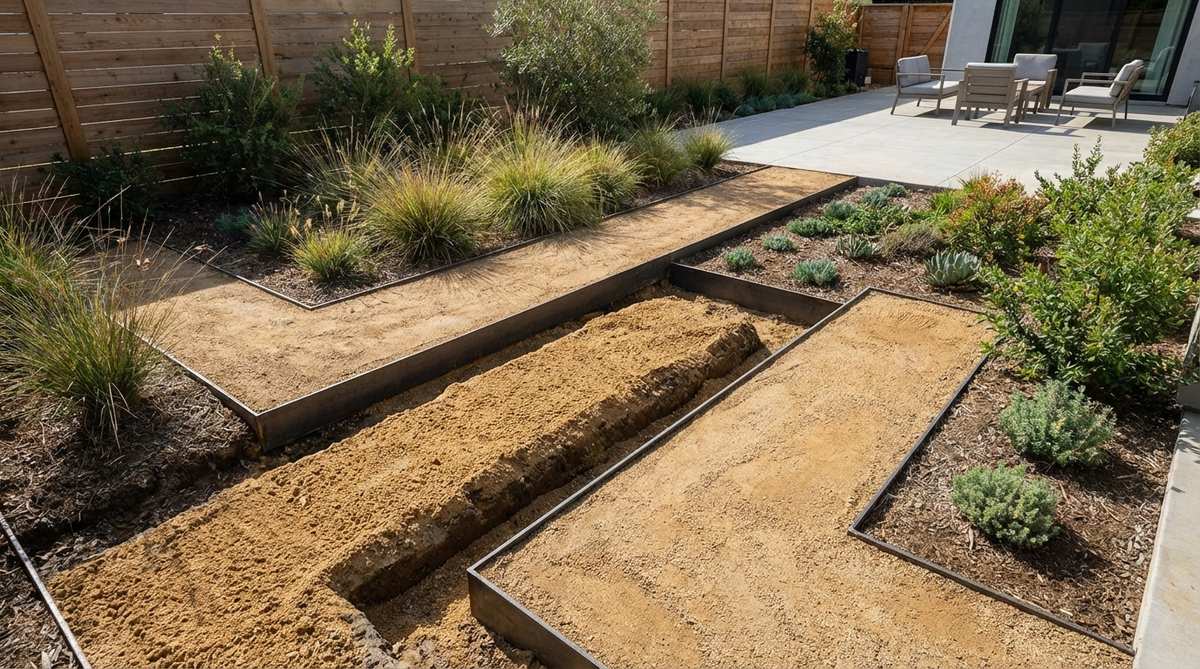
7. Rectangular Grid Modules
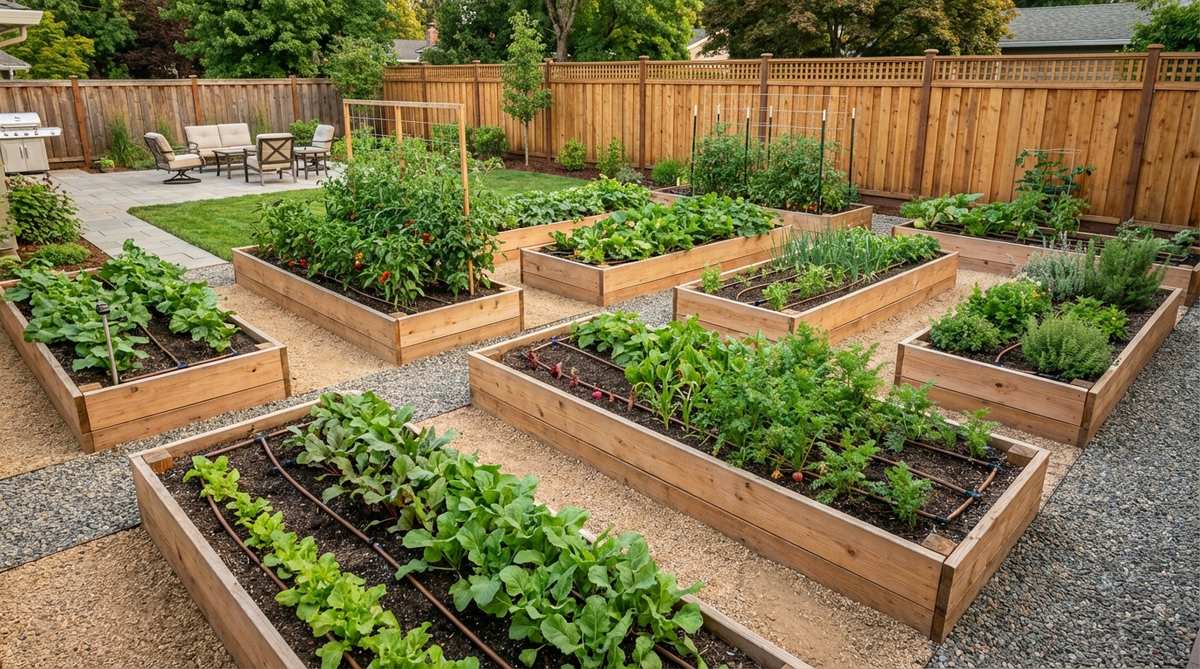
Embodying strict visual order, this patterned aesthetic feels incredibly satisfying and impeccably organized. Setting up a symmetric raised bed grid is a flawless strategy for expansive backyards, breaking overwhelming open lawns into manageable, stunning geometric zones.
Landscapes look chaotic when beds are placed randomly; locking them into a precise grid gives a designer-level finish immediately. Integrating smart irrigation hubs within each identical module guarantees that crop rotation becomes effortless rather than a logistical nightmare.
Depending on materials, a four-bed grid starts around $300 to build. Pin this layout to keep your outdoor renovations completely stress-free!
- Key Materials: Pre-cut raised bed kits, decomposed granite for paths
- Vibe / Style: Classic contemporary estate
- Difficulty: Easy but labor-intensive leveling
- Budget Breakdown: 4 Bed Kits: $240 | Pathway gravel: $80
- Creator’s Tip: Space the paths exactly 24 to 30 inches apart to allow standard wheelbarrows to pass through without bumping the bed walls.
- Smart Sourcing: Pick up a multi-zone drip irrigation starter kit and pre-cut weed barrier fabric rolls.
8. Circular Focal Point Beds
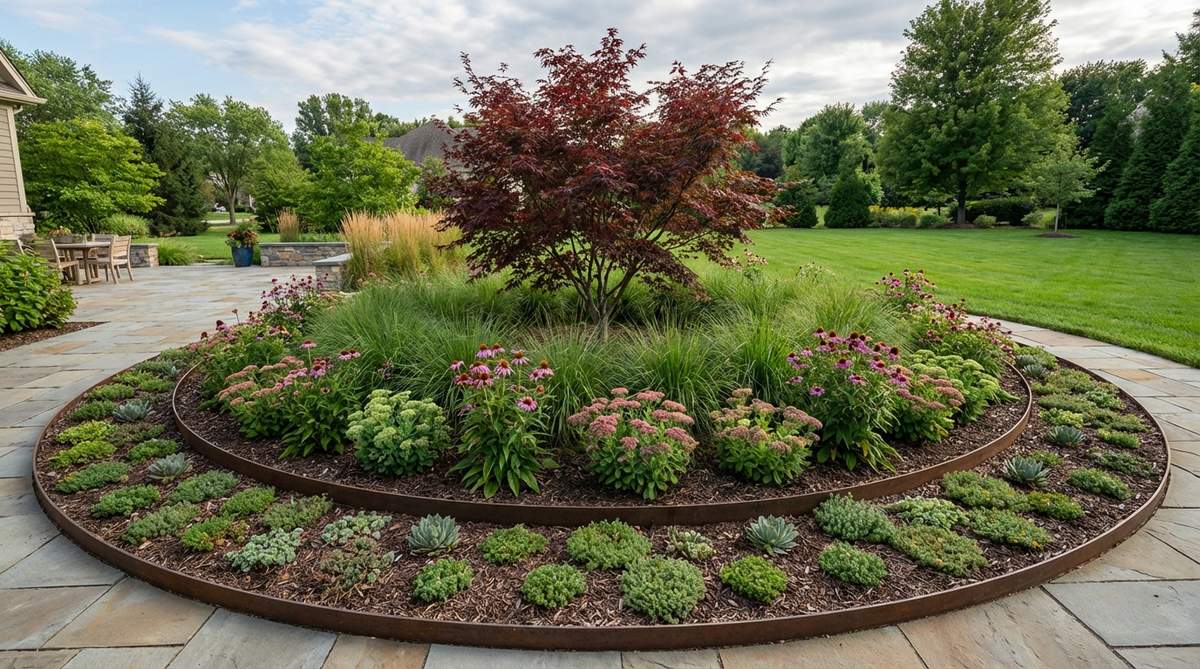
Breaking up harsh lines, this organic layout feels like a striking sculptural centerpiece anchoring the entire yard. Implementing a curved central planter is the ideal maneuver for interrupting boring, straight paving patterns and injecting immediate visual flow.
Most DIYers shy away from curves because wood is notoriously hard to bend, but flexible metal borders make this setup unbelievably simple. Arranging your plants in concentric, bull’s-eye rings forces the eye directly to the center specimen, delivering massive architectural drama.
A 6-foot diameter metal ring costs roughly $80–$130. Highly recommended for a quick aesthetic win that requires zero power tools.
- Key Materials: Flexible landscape edging, anchor spikes
- Vibe / Style: Softened modern geometry
- Difficulty: Very easy beginner setup
- Budget Breakdown: Metal Edging: $90 | Central Specimen Tree: $50
- Creator’s Tip: Use a simple string tied to a central stake to mark a flawless circle on the ground before digging your edging trench.
- Smart Sourcing: Buy bendable steel landscape edging (bulk pack) and heavy-duty grounding stakes.
9. L-Shaped Corner Maximizers

Tucking seamlessly into neglected spaces, this layout feels like you’ve unlocked a secret bonus room in your backyard. Utilizing a custom corner-wrapping garden bed is the smartest way to reclaim dead patio alcoves and turn awkward property lines into lush focal points.
Standard rectangular containers often leave useless gaps in corners, wasting premium sunlight potential. This tailored approach visually extends the depth of your yard by forcing the perspective along two varying sightlines, making small spaces appear dramatically larger.
Materials for a massive L-shape generally cost around $150–$250. Save this to your small space design board immediately!
- Key Materials: Pressure-treated framing, exterior-grade composite cladding
- Vibe / Style: Space-saving patio oasis
- Difficulty: Intermediate measuring required
- Budget Breakdown: Framing lumber: $70 | Cladding & Caps: $130
- Creator’s Tip: Orient the longest leg of the ‘L’ to face south to ensure you capture the maximum amount of direct sunlight throughout the day.
- Smart Sourcing: Use heavy-duty 90-degree corner brackets and composite deck fascia boards for cladding.
💡 Must-Have Supplies for High-End Setups
To build these setups faster and ensure they last, skip the generic craft aisles and invest in the right foundational kits.
- Base & Support: Industrial-grade corten steel bracket kits
- Setup Tools: Self-leveling laser guides and auger drill starter kits
- Weather/Durability Protection: Marine-grade clear wood sealants and geotextile membranes
10. Staggered Offset Arrays
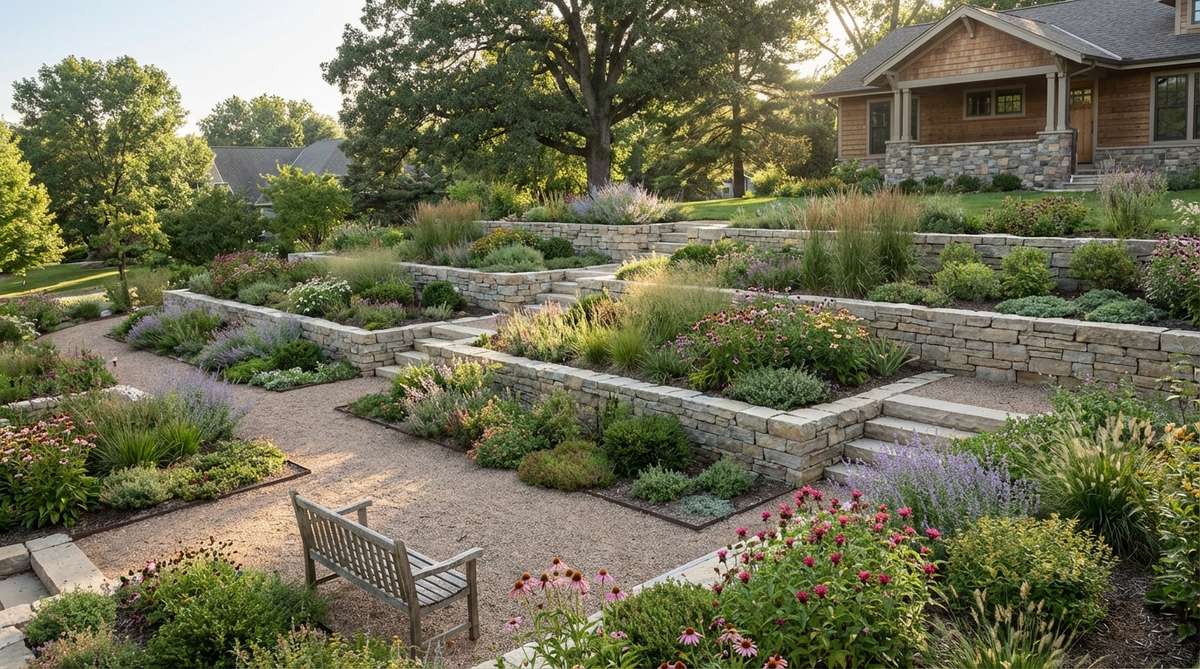
Emanating movement and rhythm, this creative layout feels like navigating an exclusive, modern art gallery. Creating a zigzag geometric planter layout is phenomenal for sloped yards where you need to manage water runoff while maintaining a striking visual aesthetic.
Aligning everything perfectly parallel can sometimes make a backyard feel like a commercial parking lot. Shifting alternate blocks forward completely disrupts the monotony, generating fascinating micro-pathways and varied viewing angles that traditional garden layouts lack.
Configuring an offset layout costs the same as a standard grid—around $200–$400 total. It’s a free design hack that instantly elevates the landscape.
- Key Materials: Modular planter boxes, leveling sand
- Vibe / Style: Dynamic terraced landscape
- Difficulty: Moderate (requires precise leveling)
- Budget Breakdown: Planter boxes: $250 | Base prep materials: $60
- Creator’s Tip: Stagger the beds by exactly 50% of their length to maintain structural visual balance while introducing the aggressive offset pattern.
- Smart Sourcing: Snag some modular composite garden kits and a heavy-duty ground leveling tamper.
Vertical Structures for Dimensional Planting
Most people get vertical gardening completely wrong… until they try the exact architectural layout coming up next.
11. Integrated Trellis Backwalls

Rising dramatically above the landscape, this feature feels like a living, breathing architectural privacy wall. Bolting an overhead climbing vine grid directly to your planter box is a must-do for exposed urban patios that desperately need a fast, green visual block.
Flimsy garden center trellises usually snap under the immense weight of mature fruiting vines. By integrating welded wire panels directly into the bed’s framing, you create an indestructible support system that handles heavy crops while delivering a bold, industrial aesthetic.
Adding this heavy-duty vertical element usually adds just $40–$70 per bed. Pin this if you need to block nosy neighbors fast!
- Key Materials: Cattle panels or welded wire mesh, lag bolts
- Vibe / Style: Industrial urban farm
- Difficulty: Moderate drill work
- Budget Breakdown: Welded wire: $35 | Heavy hardware: $15
- Creator’s Tip: Always mount the trellis on the north side of the garden box so the tall climbing vines don’t cast shadows over your smaller plants.
- Smart Sourcing: Look for galvanized welded wire panels (bulk cut) and heavy-duty U-nail fasteners.
12. Tiered Cascade Planters
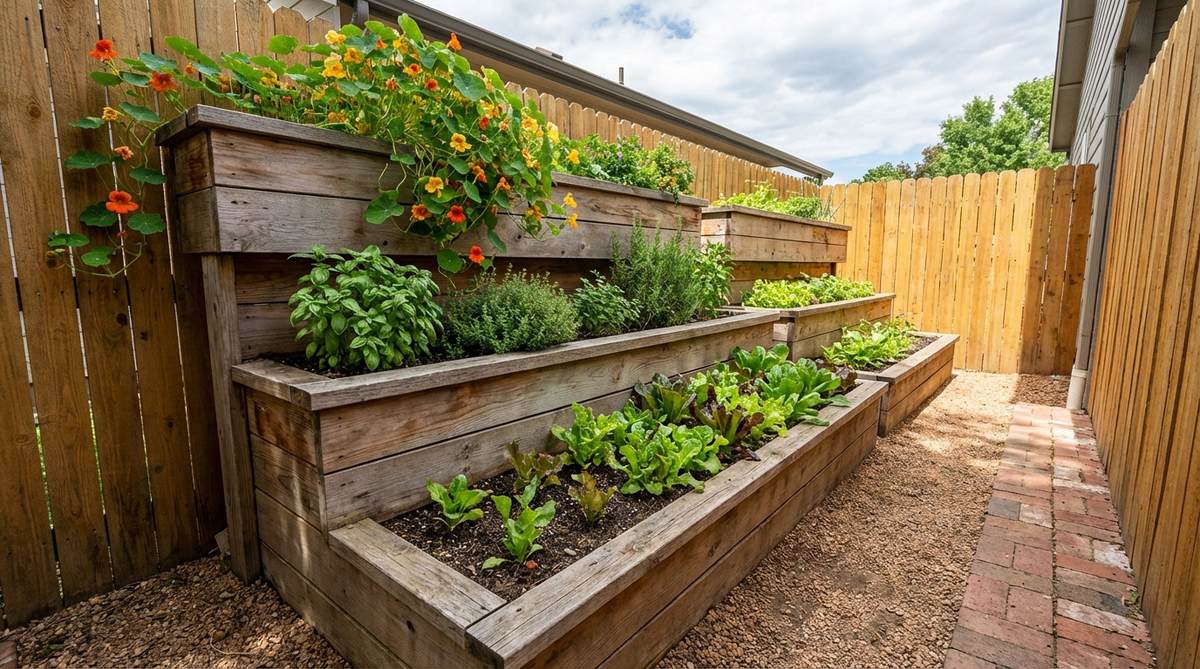
Flowing downward with lush layers, this multi-level design feels like a cascading waterfall of vibrant foliage. Building a stair-step garden system works wonders for incredibly narrow side yards where outward expansion is impossible but upward space is endless.
Single-level beds severely limit what you can grow in a tiny footprint. Implementing a terraced approach multiplies your exact growing area, allowing sun-loving trailers to spill beautifully over the top edges while shade-tolerant herbs thrive in the sheltered lower tiers.
A solid three-tier system can be constructed for about $120–$180. It’s an incredibly smart layout that maximizes every single inch.
- Key Materials: 2×8 cedar boards, structural corner blocks
- Vibe / Style: Lush multi-level greenery
- Difficulty: Intermediate measuring & cutting
- Budget Breakdown: Lumber: $120 | Screws & Soil: $50
- Creator’s Tip: Ensure the bottom tier is at least twice as deep as the upper tiers to properly anchor the entire structure against the weight of wet soil.
- Smart Sourcing: Invest in pre-cut cedar planter tiers and high-drainage raised bed soil mixes.
13. Arbor-Covered Walkthrough Beds
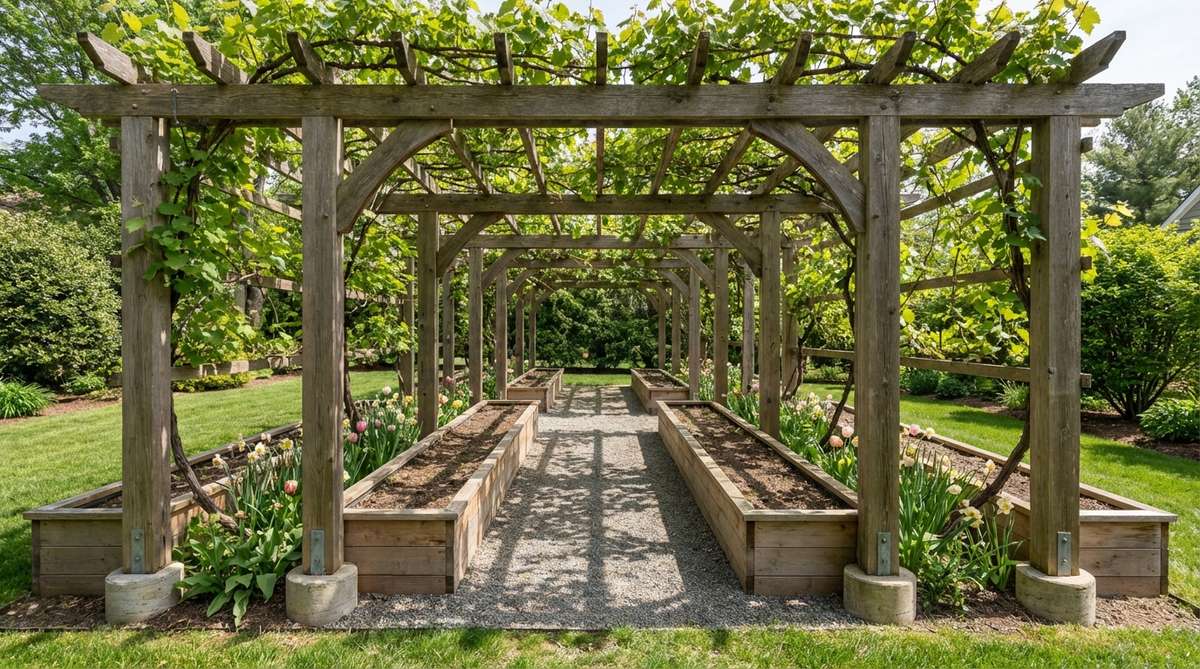
Creating an immersive canopy, walking through this setup feels exactly like stepping into an enchanting, secret garden tunnel. Connecting parallel beds with a living overhead pergola is the most breathtaking way to define the main entrance to your vegetable garden or backyard path.
Most pathways are just dead transitional space, but adding a structural archway instantly turns your daily walk into a high-yield growing zone. This layout provides an incredible designer-level finish while supporting massive, heavy-bearing grape or kiwi vines effortlessly.
A structural arbor addition typically runs about $150–$300 for lumber and hardware. Save this to your dream garden Pinterest board!
- Key Materials: 4×4 posts, lateral support wire, concrete footings
- Vibe / Style: Romantic structural canopy
- Difficulty: Advanced (requires post setting)
- Budget Breakdown: Posts & Beams: $160 | Concrete base: $40
- Creator’s Tip: Set the main arbor posts in concrete *outside* the actual garden beds so you don’t waste precious root-zone space or compact the soil.
- Smart Sourcing: Snag a heavy-duty metal garden arch kit or galvanized vine training wire rope.
14. Obelisk-Centered Beds
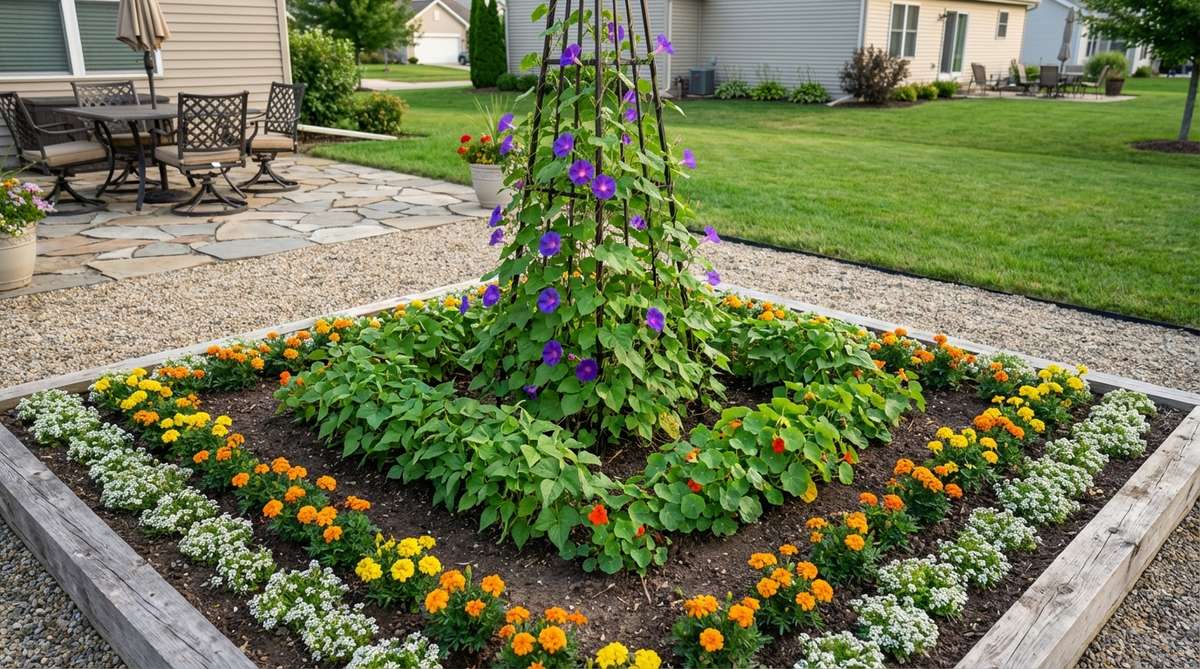
Injecting instant vertical drama, this layout feels like discovering an elegant courtyard in the European countryside. Dropping a pyramid climbing frame directly into the center of a square bed creates an undeniably striking focal point visible from every corner of the lawn.
A completely flat garden bed can look a bit dull against a vast grassy backdrop. By utilizing a central obelisk, you draw the eye straight up, beautifully balancing out the horizontal layout and providing the perfect structure for flowering morning glories or pole beans.
You can purchase or build an obelisk for just $40–$90. It’s an incredibly fast upgrade that transforms the garden’s entire geometry.
- Key Materials: Pre-fab metal obelisk or ripped 2×2 lumber
- Vibe / Style: Classic English modern
- Difficulty: Very easy
- Budget Breakdown: Obelisk kit: $60 | Vining seeds: $10
- Creator’s Tip: Plant your shortest, most compact greens around the very outer edges so the central vertical tower doesn’t block their access to sunlight.
- Smart Sourcing: Use a rust-proof metal garden obelisk kit and heavy-duty garden twine.
This next strategy proves you don’t need a massive yard to grow an orchard—just a blank wall and a smart frame…
15. Espalier Wall Integration
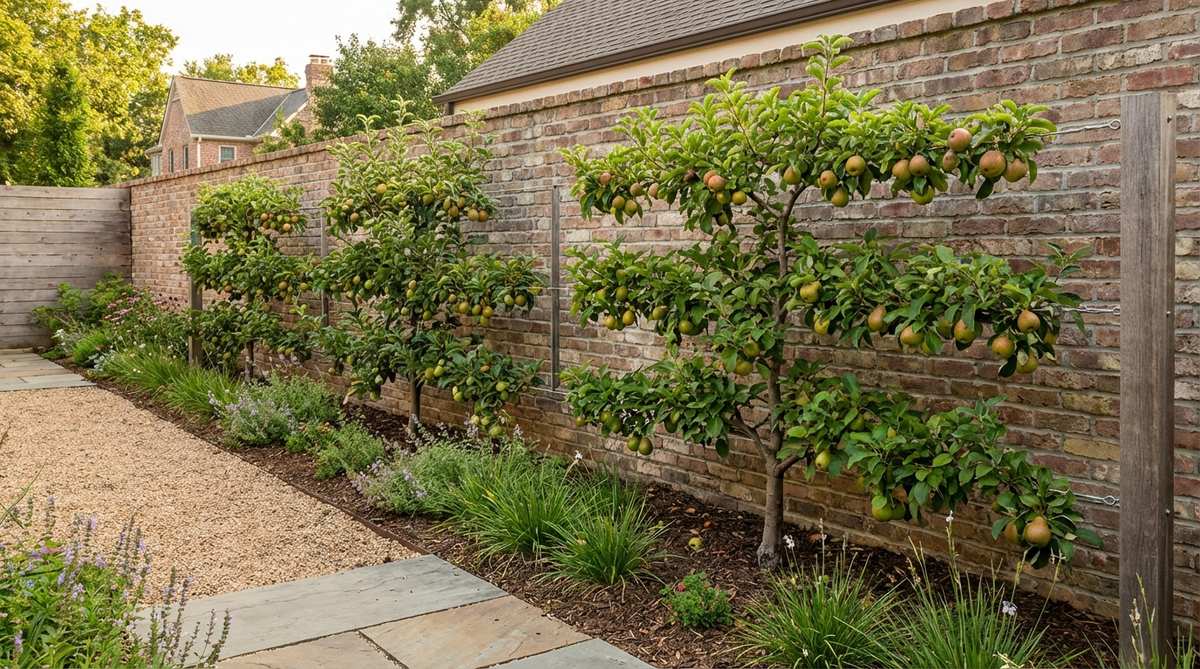
Marrying horticulture with architecture, this technique feels like you’ve brought a historic French chateau detail to your modern fence. Installing an ultra-narrow fruit tree planter against a boundary wall is the ultimate hack for generating massive fruit yields in zero space.
Skip the bulky, space-hogging fruit trees; training branches flat along horizontal tension wires is a surprisingly premium look that designers love. This technique turns an ugly, blank brick wall into a productive, two-dimensional living sculpture that shines beautifully even during the winter.
The wire framework and base planter run roughly $100–$150. Pin this if you want to grow apples or pears on a tiny patio!
- Key Materials: Stainless steel wire rope, eye hooks, narrow trough
- Vibe / Style: European courtyard minimalism
- Difficulty: Intermediate (requires precise pruning)
- Budget Breakdown: Tension wire kit: $40 | Narrow bed: $80
- Creator’s Tip: Use turnbuckles at the end of every wire run so you can easily tighten the supports when the branches get heavier over the years.
- Smart Sourcing: Grab a stainless steel espalier wire starter kit and heavy-duty masonry wall anchors.
Integrated Seating and Functional Edges
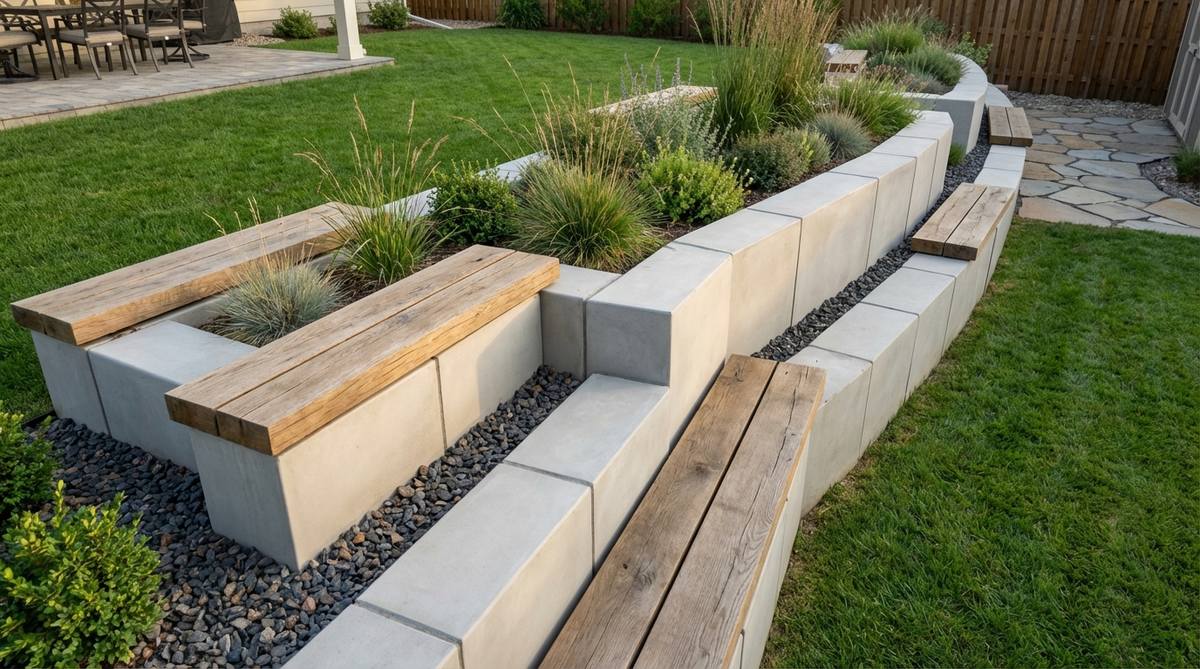
16. Wide Cap Bench Tops
Blending furniture and foliage perfectly, this detail feels like a custom built-in seating area at a luxury resort. Upgrading to a continuous wide planter ledge is practically a necessity around fire pits or patio perimeters where you always need extra casual seating.
Leaving the top edges of your garden boxes raw is a massive missed opportunity for both form and function. By capping the walls with a smooth, oversized composite board, you instantly create a highly functional bench that protects the bed frame from brutal weather damage.
Adding custom caps will add about $60–$100 per bed. It’s a genius dual-purpose detail that maximizes backyard utility.
- Key Materials: 2×12 cedar or composite deck boards, exterior screws
- Vibe / Style: Built-in patio luxury
- Difficulty: Easy carpentry
- Budget Breakdown: Capping lumber: $80 | Plugged screws: $15
- Creator’s Tip: Counter-sink your screws and use wood plugs to hide the hardware, then sand the edges to a 1/8-inch radius for a splinter-free, ultra-premium finish.
- Smart Sourcing: Pick up some UV-coated composite fascia boards and a hidden deck fastener kit.
17. Cantilevered Shelf Extensions
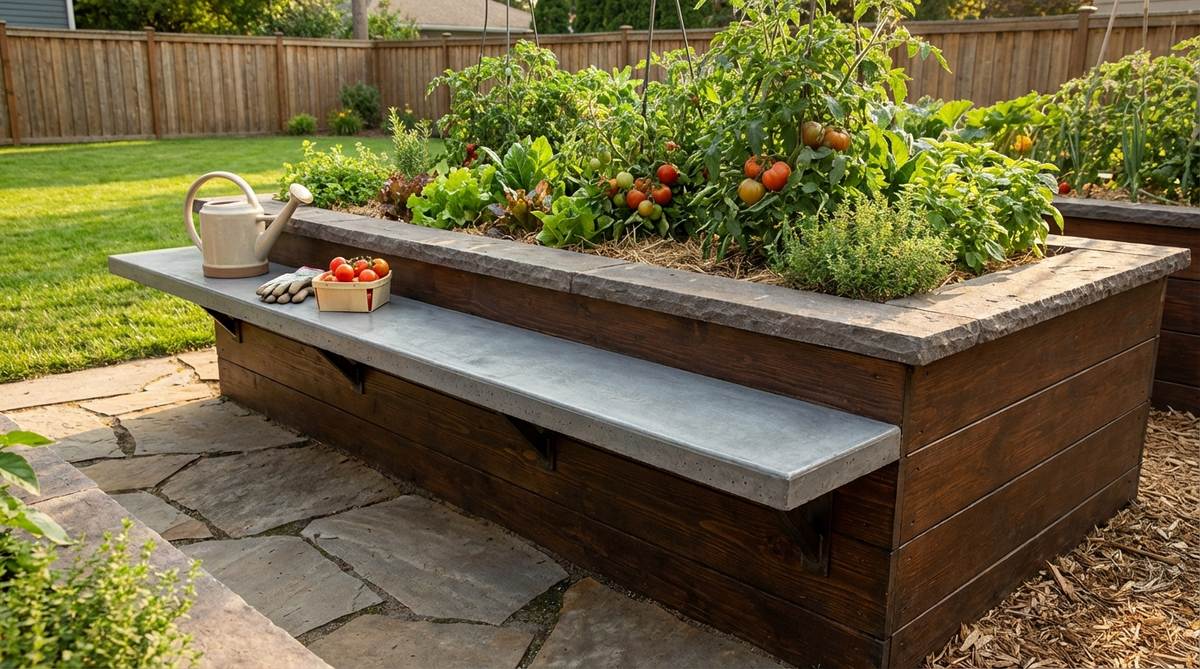
Bringing incredible convenience to your setup, this feature feels like a dedicated outdoor prep kitchen built right into the greenery. Adding a floating planter workstation shelf is perfect for avid gardeners who hate balancing muddy tools and harvest baskets on fragile plant stems.
Most setups require you to bend over awkwardly or track mud onto the patio, but a simple cantilevered ledge entirely eliminates the mess. Utilizing hidden steel L-brackets creates a sleek, floating illusion that delivers massive utility without cluttering the clean, modern sightlines.
This workstation upgrade costs roughly $30–$50 in materials. Save this idea to make your daily garden chores a breeze!
- Key Materials: Heavy-duty concealed brackets, extended lumber cap
- Vibe / Style: High-efficiency modern workspace
- Difficulty: Easy modification
- Budget Breakdown: Steel brackets: $25 | Shelf board: $15
- Creator’s Tip: Apply a heavy-duty marine-grade finish specifically to the shelf portion, as the horizontal flat surface takes the absolute hardest beating from rain and sun.
- Smart Sourcing: Invest in heavy-duty concealed floating shelf brackets and marine-grade polyurethane sealant.
18. Built-In Tool Storage Compartments

Concealing the clutter with absolute genius, this detail feels straight out of a clever custom home design show. Integrating a hidden garden supply chest right into the corner of your planter is the best way to keep pruners, gloves, and twine exactly where you need them.
Nothing ruins a minimalist garden aesthetic faster than leaving brightly colored plastic tools scattered in the dirt. Framing a waterproof box directly into the bed structure with a flush-mounted hinge keeps everything secure and entirely invisible when closed.
This secret compartment adds just about $40 to your build cost. Highly recommended if you hate walking back and forth to the shed!
- Key Materials: Marine plywood, silicone caulk, hydraulic hinges
- Vibe / Style: Ultra-clean concealed utility
- Difficulty: Intermediate woodworking
- Budget Breakdown: Plywood & hardware: $35 | Sealant: $10
- Creator’s Tip: Install a soft-close hydraulic lid stay on the hinge to prevent the heavy wooden cap from violently slamming down on your fingers while digging for tools.
- Smart Sourcing: Grab soft-close hydraulic lid hinges (2-pack) and weatherproof outdoor silicone sealant.
19. LED Strip Lighting Channels
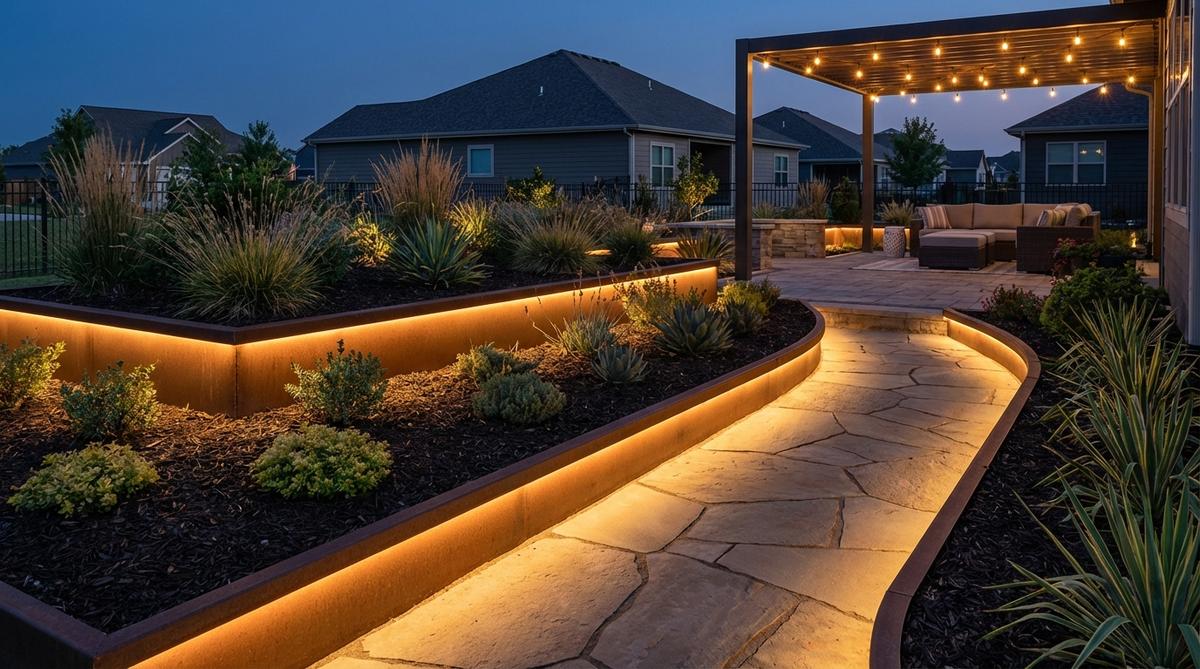
Transforming the space completely after sunset, this lighting technique feels like an exclusive rooftop lounge in the city. Routing a concealed ambient glow system directly under the planter ledge is absolute magic for defining pathways and highlighting foliage textures at night.
Harsh solar spotlights shoved into the dirt look cheap and cast terrible, blinding shadows. Embedding low-voltage waterproof lighting channels into the architectural lip of the bed gives a designer-level finish that washes the wood and concrete in a warm, expensive-looking glow.
A high-quality LED system runs about $60–$120 per zone. Pin this if you want to enjoy your outdoor space long after dark!
- Key Materials: Aluminum LED track channels, outdoor-rated light strips
- Vibe / Style: Resort-style evening ambiance
- Difficulty: Easy low-voltage wiring
- Budget Breakdown: Waterproof LED spool: $40 | Aluminum channels: $35
- Creator’s Tip: Always buy LEDs in the “Warm White” (2700K) spectrum; cool white lights will make your gorgeous natural wood and plants look like a sterile hospital.
- Smart Sourcing: Use an IP68 waterproof LED strip kit and aluminum diffuser channels (bulk pack).
Before moving to layouts, understanding exactly where to source materials makes the difference between a bed that rots in two years and one that lasts a decade…
Material Guide: Cheap vs. Premium Aesthetic
Knowing exactly where to save and where to spend makes all the difference in achieving that “looks expensive but isn’t” vibe.
- Standard Wood vs. Composite UV-Resistant: Natural pine rots in 3 years. Upgrading to composite decking boards or metal siding for the outer walls stops fading, prevents splitting, and completely eliminates the need for yearly staining.
- DIY Scrap vs. Pre-made Modular Kits: While sourcing scrap wood sounds cheap, pre-drilled, powder-coated metal starter kits often save money overall by eliminating wasted cuts, ruined hardware, and massive time sinks.
Modular Systems for Flexible Layouts
20. Snap-Lock Connector Panels
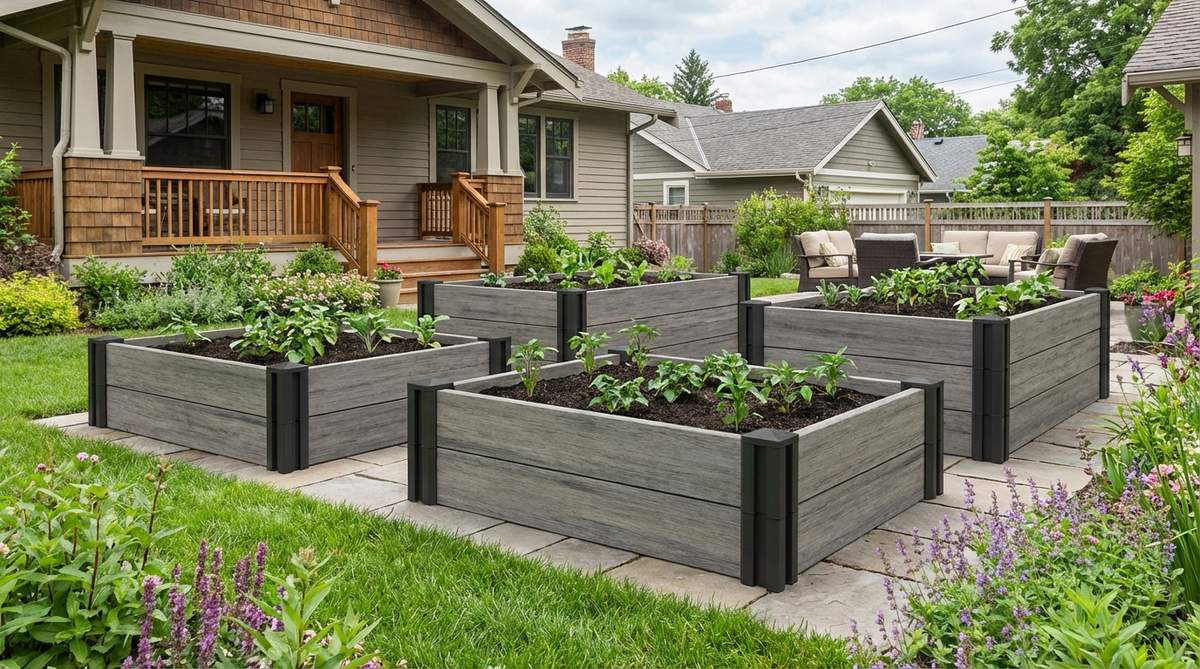
Adapting instantly to your changing ideas, this system feels like building with sophisticated, life-sized LEGO bricks. Using a tool-free composite garden kit is the absolute perfect move for renters or anyone who wants a high-end look without touching a circular saw.
Building custom wooden boxes from scratch is intimidating and permanent, but these sliding corner brackets change everything. Utilizing UV-stabilized materials completely resists the chalking, splitting, and insect damage that plagues standard hardware store plastic borders.
These modular panels generally run $100–$150 per full bed setup. Save this for a flawless, frustration-free weekend garden project!
- Key Materials: Composite interlocking panels, corner post pins
- Vibe / Style: Clean, temporary modern
- Difficulty: Absolute beginner (no tools)
- Budget Breakdown: Kit base: $120 | Expansion panels: $40
- Creator’s Tip: Lay down a thick layer of cardboard underneath the entire footprint before locking the panels together to smother weeds perfectly without toxic chemicals.
- Smart Sourcing: Look for snap-together composite raised garden kits and heavy-duty ground anchor stakes.
21. Expandable Cedar Kit Systems
Radiating natural warmth and timeless appeal, this setup feels incredibly grounded and reliably sturdy. Opting for a pre-cut rot-resistant wood system is a beautiful, aromatic choice for organic vegetable growers who refuse to introduce treated lumber chemicals near their food.
Custom carpentry often leads to mismatched corners and wasted lumber if you make a single bad cut. Expandable dado-joint kits slide together flawlessly, allowing you to instantly morph a standard rectangle into a massive U-shape next season just by clicking in expansion modules.
A premium cedar starter base costs around $150–$250. Pin this if you love the smell and look of natural, untreated wood!
- Key Materials: Pre-slotted cedar boards, aluminum connecting pins
- Vibe / Style: Classic organic farmstead
- Difficulty: Very easy assembly
- Budget Breakdown: Cedar kit: $180 | Organic soil blend: $60
- Creator’s Tip: Even though cedar resists rot, lining the inside walls with heavy plastic (leaving the bottom totally open) will double the lifespan of the wood.
- Smart Sourcing: Use a modular cedar raised bed starter kit and food-safe wood lining rolls.
22. Hexagonal Cluster Arrangements
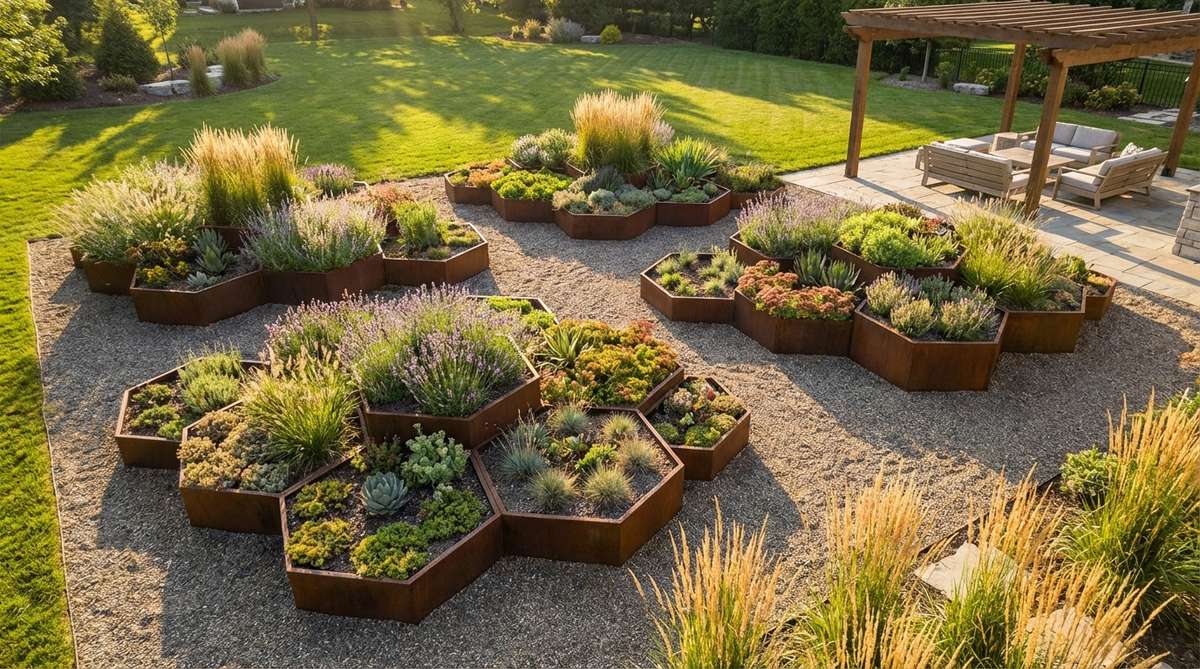
Shattering the boring grid completely, this clustered geometry feels like a futuristic, organic honeycomb sprawling across your yard. Grouping multi-sided geometric planters together is an incredibly dynamic way to fill odd-shaped lawn corners without wasting an inch of interstitial space.
Standard squares and rectangles can make a garden look rigid and uninspired. Bending flexible metal edges into repeating six-sided shapes introduces a massive dose of contemporary visual interest while physically locking together to create a continuous, highly efficient planting zone.
You can form a cluster of three for about $150–$200 using flexible steel. It’s an aggressive design pivot that pays off massively.
- Key Materials: Pliable steel edging, corner bending tools
- Vibe / Style: Avant-garde organic modern
- Difficulty: Intermediate geometry
- Budget Breakdown: Metal edging: $160 | Corner fasteners: $30
- Creator’s Tip: Vary the height of the beds within the cluster—make the center hexagon 24 inches tall and the outer ones 12 inches tall for stunning vertical movement.
- Smart Sourcing: Pick up a flexible metal garden border (bulk pack) and a high-precision angle finder tool.
23. Rolling Mobile Planter Beds
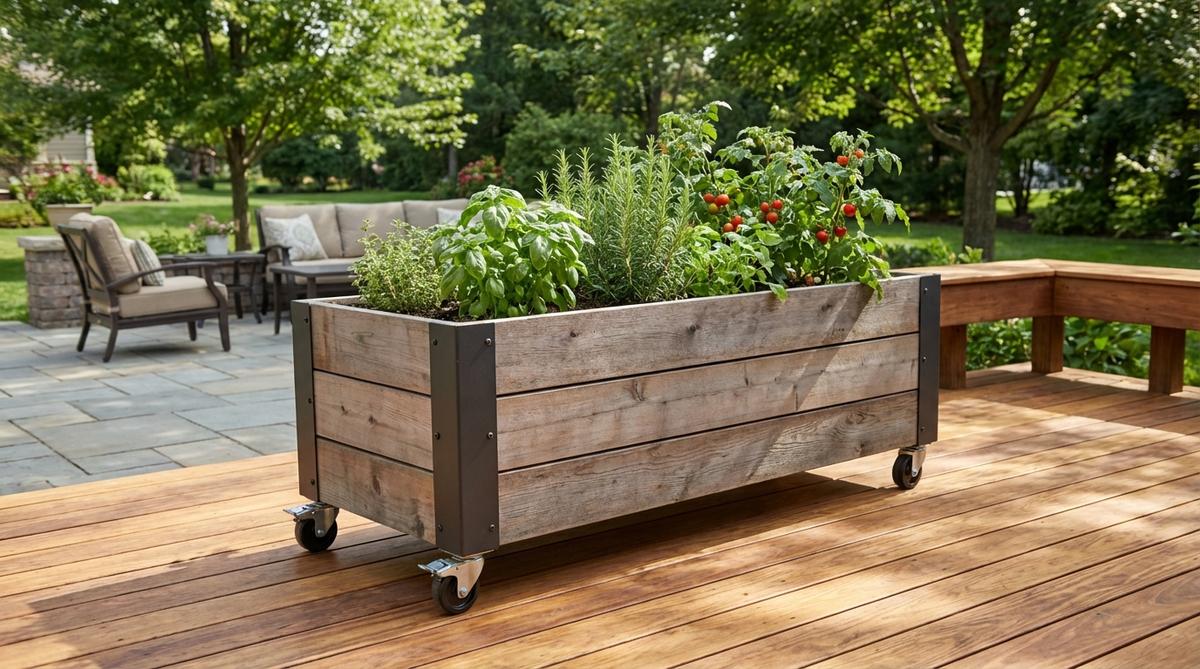
Offering ultimate environmental control, this maneuverable setup feels like a smart, adaptive hack for tricky urban spaces. Constructing a caster-mounted garden cart is practically a survival requirement for shaded apartment balconies where you need to chase the moving sun.
Stationary beds are doomed if a nearby tree suddenly shadows your tomatoes mid-summer. Bolting heavy-duty polyurethane wheels to a shallow planter allows you to seamlessly reposition your crops, protect them from sudden hail, or roll them aside when hosting a patio party.
A sturdy mobile rig costs roughly $80–$130 to build. Save this idea if your outdoor space serves multiple functions!
- Key Materials: Locking outdoor casters, lightweight potting mix, shallow base
- Vibe / Style: Industrial adaptive utility
- Difficulty: Easy hardware mounting
- Budget Breakdown: Wood base: $40 | Heavy casters: $45
- Creator’s Tip: Limit your soil depth to a strict 8 inches and mix in 30% perlite; wet soil is incredibly heavy and will easily snap the wheels off if overloaded.
- Smart Sourcing: Invest in heavy-duty locking polyurethane casters (4-pack) and ultra-lightweight perlite soil amendments.
Most backyard designs fail because they ignore the boundaries. This next trick creates a razor-sharp edge that stops weeds instantly…
Perimeter Strategies and Border Control
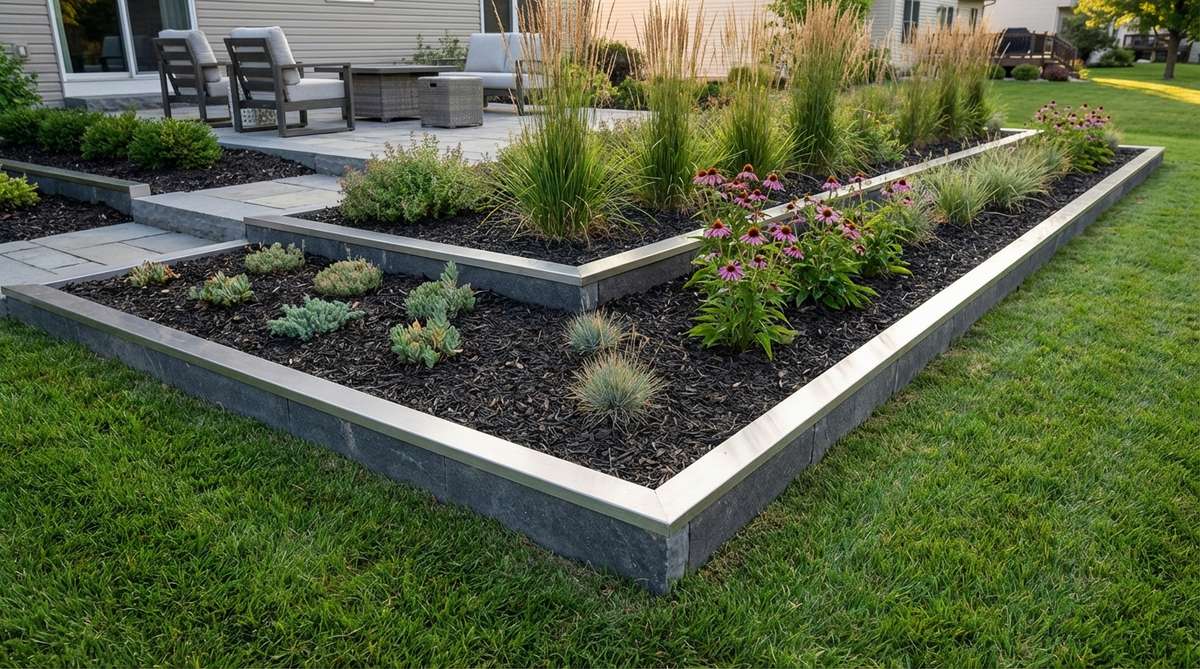
24. Flush-Grade Steel Edging
Delivering an impossibly crisp transition, this detail feels like looking at the impeccably groomed grounds of a modern art museum. Pounding in invisible metal boundary strips is the absolute secret weapon for separating loose soil from pristine turf without any visual interruption.
Flimsy plastic borders heave out of the frost and look incredibly cheap against modern architecture. A heavy-gauge steel strip buried flush with the grass creates an indestructible barrier that blocks creeping rhizomes while letting your mower wheels roll right over without scalping the edge.
Professional-grade steel strips run about $80–$120 per 20 feet. It’s a hidden upgrade that drastically reduces your weekend string trimming.
- Key Materials: 1/4-inch steel strips, heavy mallets
- Vibe / Style: Seamless minimalist landscape
- Difficulty: Labor-intensive trenching
- Budget Breakdown: Steel edging: $100 | Anchoring pins: $20
- Creator’s Tip: Always backfill both sides of the trench tightly before the first rain; the soil pressure locks the heavy metal permanently into place without needing ugly stakes.
- Smart Sourcing: Snag heavy-gauge steel landscape edging kits and a dead-blow rubber mallet.
25. Poured Concrete Mow Strips
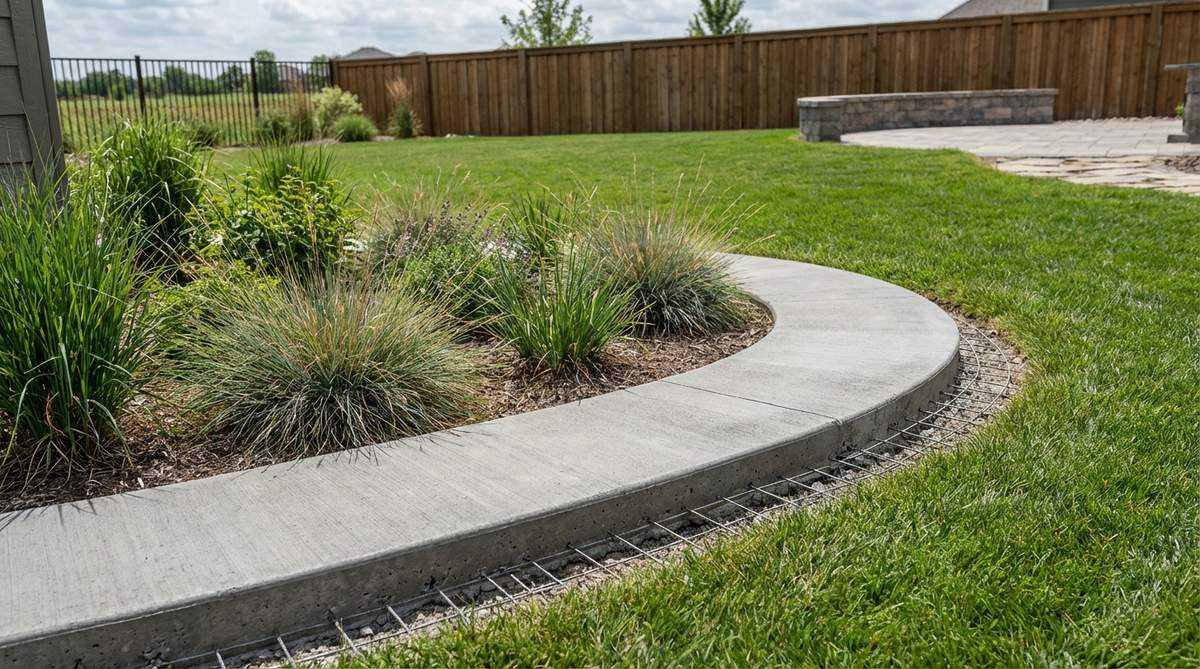
Defining the space with permanent authority, this border feels incredibly substantial and structurally satisfying. Casting a flat masonry mowing ribbon around the perimeter of your planters is a genius, low-maintenance hack that completely eliminates the need for an edge trimmer.
Grass aggressively invades wooden beds, rotting the base and creating a messy, tangled nightmare. A wide concrete band acts as a flawless defensive buffer, providing a perfectly stable track for your lawnmower while adding a sleek, brutalist outline to your garden layout.
Forming and pouring these strips costs roughly $3–$5 per linear foot. Save this if you want to drastically cut down your yard work!
- Key Materials: Concrete mix, wire mesh, flexible form boards
- Vibe / Style: High-end commercial hardscape
- Difficulty: Advanced forming & pouring
- Budget Breakdown: Concrete bags: $60 | Form materials: $30
- Creator’s Tip: Slope the wet concrete very slightly (about 1%) away from the garden beds to guarantee that heavy rain washes out onto the lawn instead of pooling.
- Smart Sourcing: Use a flexible concrete form board kit and high-strength crack-resistant concrete mix.
26. Raised Perimeter Curbing
Creating a highly disciplined boundary, this elevated edge feels like the structured pathways of an elegant historic estate. Integrating a stone containment lip is the smartest way to stop expensive decorative mulch and rich soil from washing out onto your clean walkways.
Beds that sit totally flush with pathways constantly bleed material, making the whole yard look messy after a single rainstorm. A subtle 3-inch raised curb physically traps the loose materials inside the bed while deterring low-crawling pests like slugs from crossing into the foliage.
Adding a stone or metal curb runs roughly $50–$90 per bed. It’s a highly functional finishing touch that looks surprisingly premium.
- Key Materials: Cobblestones, retaining wall block, or thick metal
- Vibe / Style: Structured formal border
- Difficulty: Easy placement
- Budget Breakdown: Curbing blocks: $70 | Leveling sand: $15
- Creator’s Tip: Cap the curbing with a material that sharply contrasts your main planter (like dark stone against light cedar) to strongly emphasize the architectural lines.
- Smart Sourcing: Buy pre-cast concrete edging stones and polymeric jointing sand.
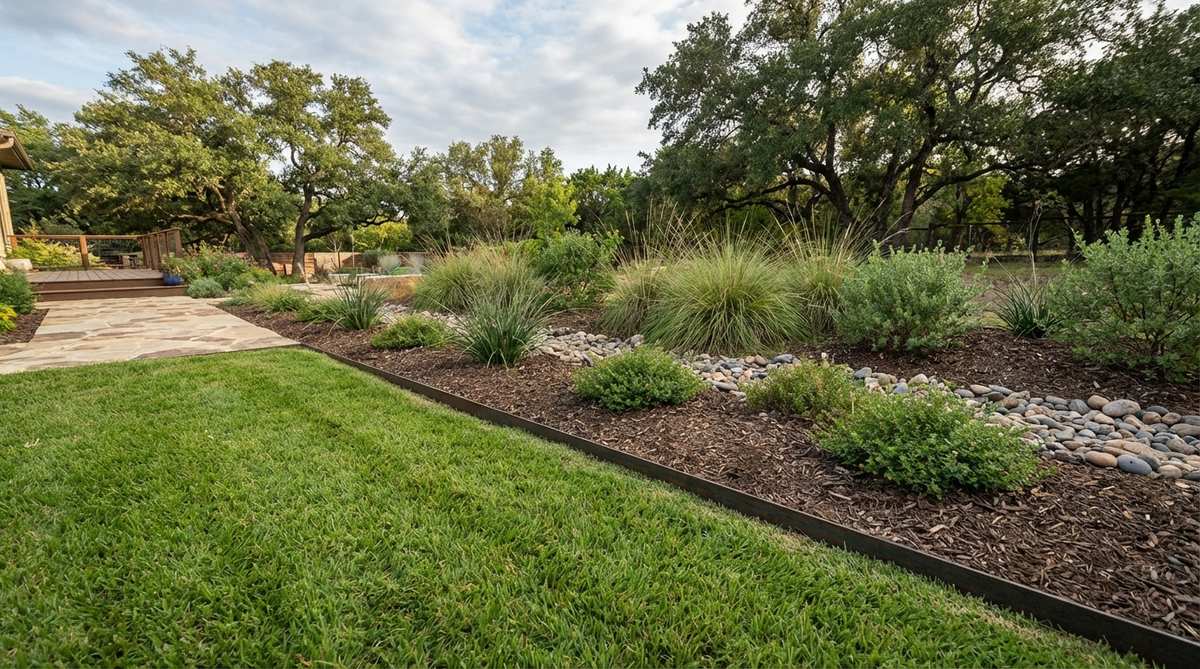
27. Living Edge Groundcover Buffers
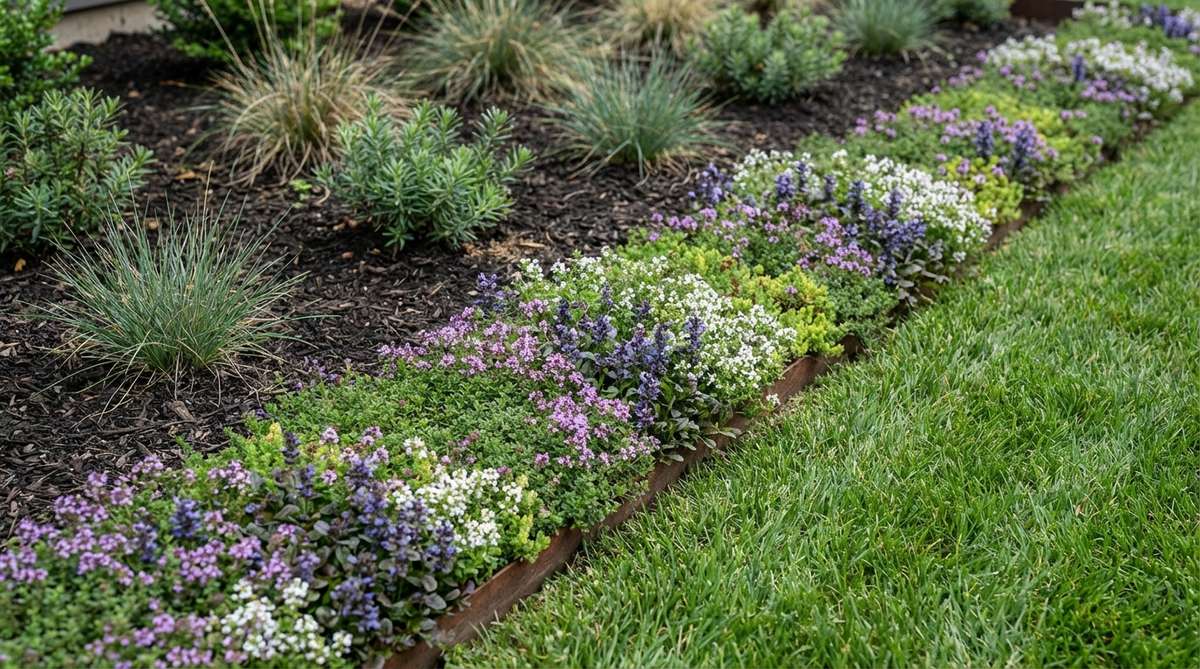
Softening the transition beautifully, this strategy feels incredibly lush and naturally integrated into the environment. Planting a dense creeping floral border right against the planter wall is a gorgeous, eco-friendly way to suppress weeds without relying on harsh chemicals or heavy concrete.
Sometimes raw industrial metal or concrete needs to be toned down so it doesn’t look like a construction zone. Herbaceous buffers like creeping thyme or sedum spill elegantly against the harsh structure, blending the contemporary geometry directly into the surrounding naturalistic landscape.
Sourcing groundcover plugs costs about $30–$60 per boundary strip. Pin this for a brilliant way to invite beneficial pollinators!
- Key Materials: Low-growing perennial plugs, organic mulch
- Vibe / Style: Softened eco-modern
- Difficulty: Very easy planting
- Budget Breakdown: Plant plugs: $45 | Starter fertilizer: $10
- Creator’s Tip: Heavily mulch the bare spots between the tiny plant plugs during the first six months to completely suppress competing weeds until the living carpet fills in.
- Smart Sourcing: Pick up a bulk tray of creeping thyme plugs and organic root-stimulating starter fertilizer.
28. Decomposed Granite Perimeter Bands
Projecting an ultra-clean, minimalist aesthetic, this framing method feels like a high-end desert courtyard in Palm Springs. Surrounding your setup with a compacted stone pathway guarantees you always have a mud-free zone to stand on while tending to your vegetables.
Standard bark mulch blows away and holds gross moisture against your planter walls, accelerating rot. Decomposed granite locks tightly into place like soft concrete, draining water flawlessly while providing a neutral, sophisticated texture that makes the green foliage pop aggressively.
Installing a 2-foot wide granite band costs around $80–$140 depending on volume. Save this for the ultimate low-maintenance path solution!
- Key Materials: Decomposed granite, landscape fabric, plate compactor
- Vibe / Style: Arid modern minimalism
- Difficulty: Moderate (requires heavy tamping)
- Budget Breakdown: Granite bags/bulk: $90 | Fabric: $25
- Creator’s Tip: You must wet the granite lightly with a hose before tamping it down; the moisture acts as a binder that turns the loose gravel into a rock-hard walking surface.
- Smart Sourcing: Use heavy-duty commercial weed barrier fabric rolls and a steel hand tamper tool.
Conclusion
Strategic selection from these exactly 28 contemporary garden beds establishes the architectural framework that defines truly high-end modern landscapes. By pairing smart material choices and geometric planning with premium pre-cut kits and heavy-duty sourcing, you bypass the cheap DIY look and achieve stunning, contractor-level results. Whether implementing indestructible metal systems or cleverly integrated seating ledges, every single one of these 28 blueprints guarantees a layout that performs flawlessly while driving massive visual impact across your property.
Frequently Asked Questions
What materials work best for contemporary garden beds in cold climates?
To survive brutal freeze-thaw cycles without cracking, you need to ditch cheap plastic and invest in heavy-duty corten steel garden kits or rust-proof aluminum setups. If you prefer masonry, heavily reinforced poured concrete is mandatory, but using modular composite raised beds is often the smartest, zero-maintenance hack for zones 3 through 6.
How deep should contemporary raised beds be for vegetable production?
While shallow-rooted herbs only need 8 inches, a premium high-yield vegetable setup requires 12 to 16 inches of depth. To ensure your tomatoes and brassicas thrive, fill these deeper beds with a premium raised bed soil blend combined with a bulk pack organic perlite to keep the heavy root zones perfectly aerated and uncompacted.
What is the optimal width for accessibility in raised garden beds?
For maximum comfort, never exceed a 4-foot width if the bed is only accessible from one side; this ensures you aren’t straining your back or compressing the soil. If you have open access all around, a standard 4×8 modular cedar planter kit is the industry gold standard, allowing an easy 2-foot reach from any edge.
How can I prevent grass from invading contemporary garden beds?
Stopping aggressive rhizomes requires absolute physical barriers, not just chemicals. Pounding a heavy-gauge steel edging strip flush with the lawn creates an invisible, indestructible wall. Alternatively, pouring a 12-inch wide concrete mow strip acts as a permanent buffer that makes your weed barrier fabric infinitely more effective.
Do metal garden beds overheat soil in summer climates?
Dark metals will conduct heat, which is why smart designers immediately line the interior walls of their steel or zinc beds with rigid foam insulation panels before adding soil. Upgrading to a lightweight aluminum planter kit or painting the exterior with a UV-reflective coating drastically drops the thermal transfer, keeping your root zones perfectly safe even above 90°F.