
Upgrading a modern japanese rock garden elevates standard outdoor spaces into premium, architectural sanctuaries without massive contractor fees. By sourcing commercial-grade materials and structural kits, you secure a designer-level aesthetic. This layout strategy completely bypasses expensive landscaping markups.
Design Snapshot Key Principles
- Asymmetric Balance: Traditional karesansui uses odd-numbered stone groupings and deliberate imbalance to create natural harmony
- Material Fusion: Contemporary designs blend weathered steel, polished concrete, and frosted glass with traditional granite and river stones
- Symbolic Minimalism: Empty space represents void and distance while raked gravel patterns depict water movement and life’s impermanence
- Integrated Technology: Modern Zen gardens incorporate smart lighting, hidden drainage systems, and low-voltage accent illumination without disrupting visual serenity
Geometric Minimalism Meets Zen
Contemporary designers reinterpret traditional free-flowing compositions through mathematical precision and architectural geometry. By leveraging exact geometric materials, these layouts lock in a high-end luxury vibe.
1. Rectangular Concrete Slab Pathways
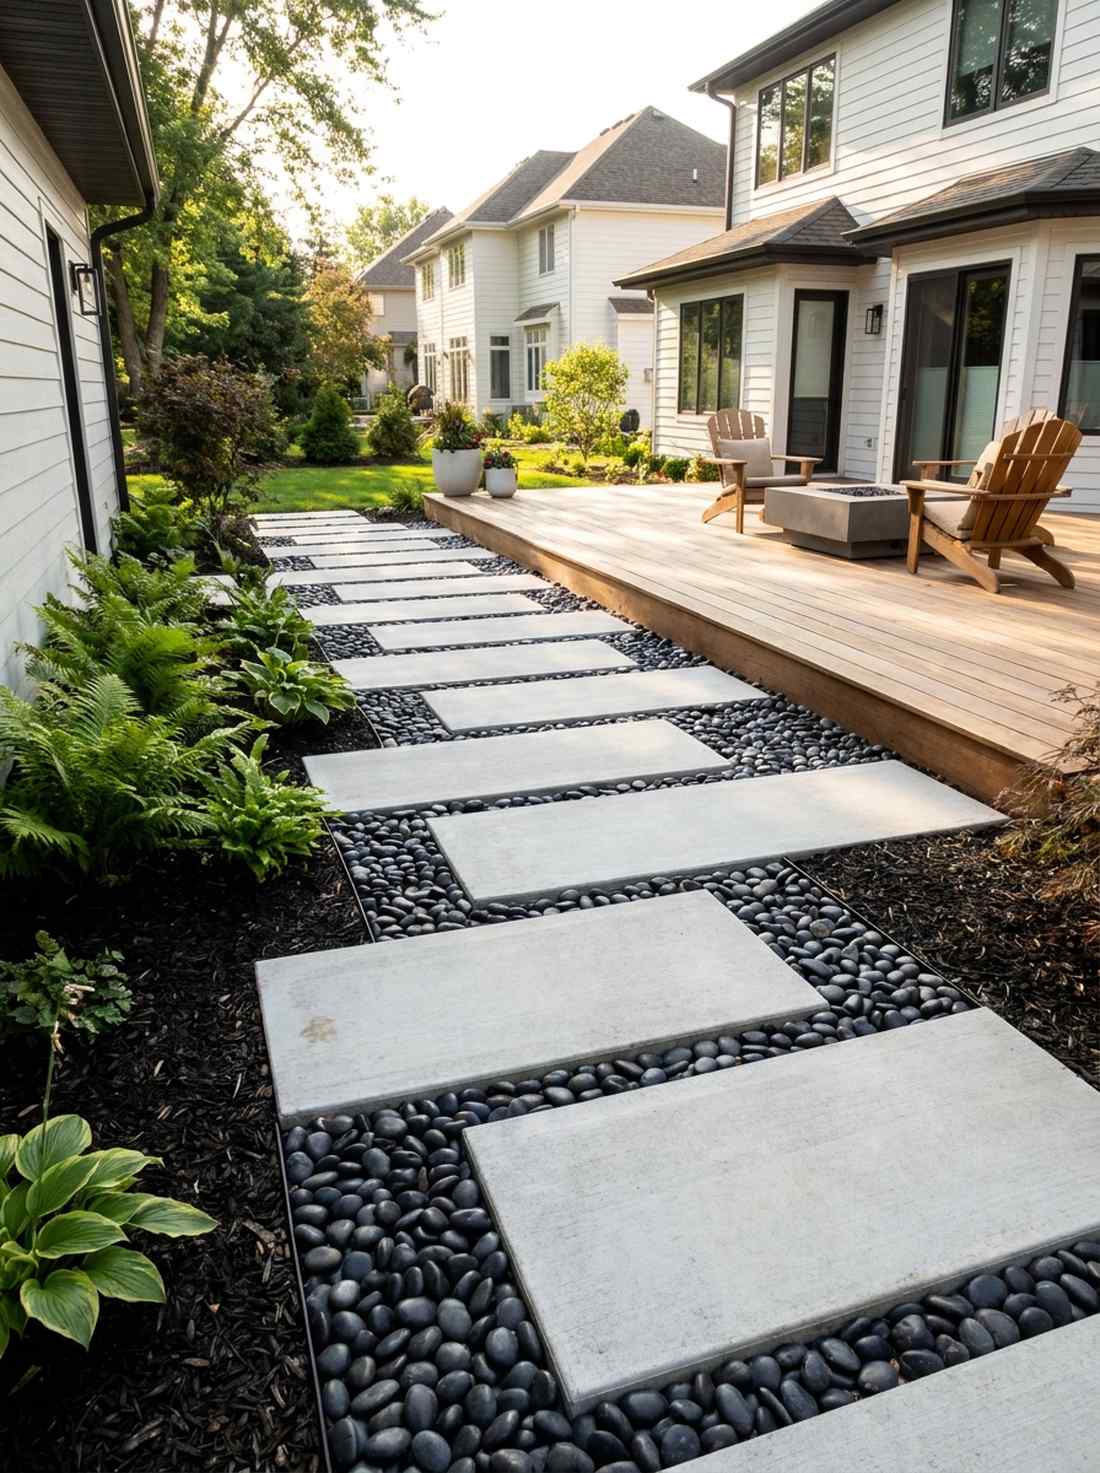
Feels like a minimalist sanctuary you just stepped into at a luxury eco-resort. This modern walkway design works exceptionally well for bridging a shaded side yard to a main patio area.
You achieve a strikingly expensive contrast by floating sharp, industrial lines over organic textures. Instead of standard fill dirt, utilizing heavy-duty commercial weed barriers beneath polished river stones delivers a surprisingly premium look that requires zero maintenance.
You can effortlessly pull this off for around $150–$300 depending on path length. Save this to your weekend DIY yard upgrade board so you don’t lose the blueprint!
- Key Materials: Pre-cast geometric concrete pavers
- Vibe / Style: High-end architectural minimalism
- Difficulty: Intermediate weekend project
- Budget Breakdown: Pavers: $80 | River Stones: $45 | Base: $25.
- Creator’s Tip: Stagger the slabs off-center to force a slower, mindful walking pace.
- Smart Sourcing: commercial-grade landscaping fabric (bulk roll) and polished black river rocks (50lb bag).
2. Golden Ratio Stone Groupings

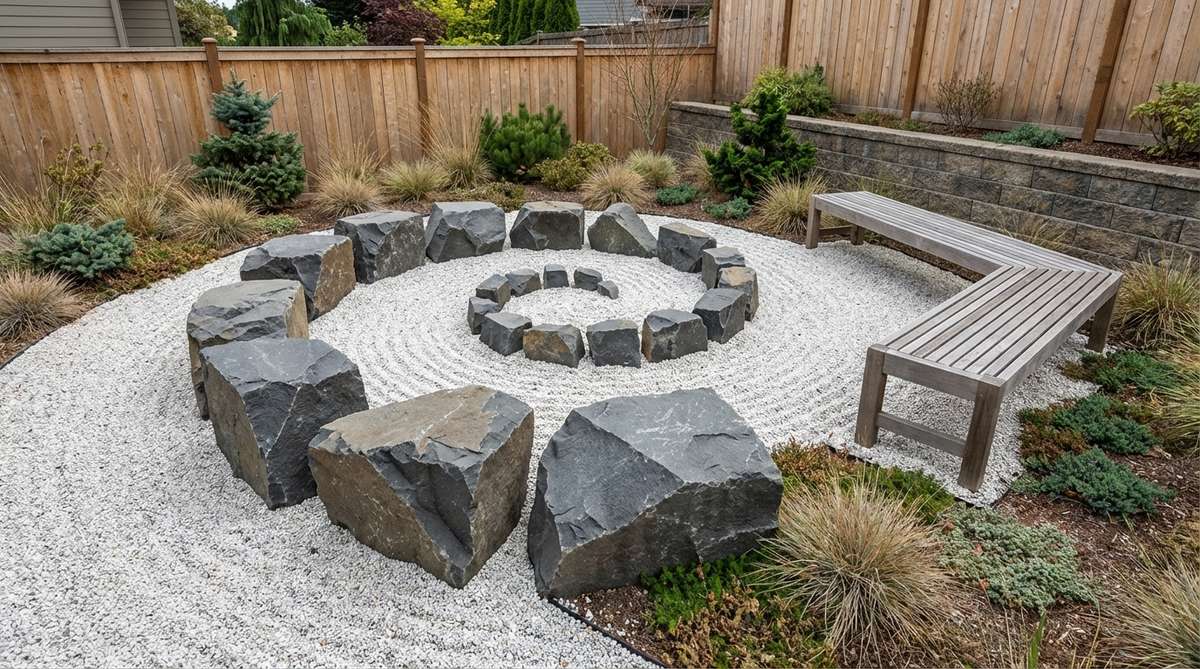
Gives off an intensely calming energy that immediately grounds the surrounding space. This focal point stone arrangement is perfect for the dead center of an otherwise flat, uninspired lawn.
Ditching perfectly rounded stones for sharp, angular boulders bypasses the usual cheap look found in basic home setups. By embedding these into a bed of pristine crushed granite, it gives a designer-level finish that naturally draws the eye.
This layout usually costs between $80 and $200 based on boulder sizing. Highly recommended for a quick Saturday afternoon transformation.
- Key Materials: Angular granite boulders and white quartz gravel
- Vibe / Style: Mathematical Zen elegance
- Difficulty: Beginner-friendly execution
- Budget Breakdown: Boulders: $120 | Quartz Gravel: $60.
- Creator’s Tip: Always bury the bottom third of the boulder so it looks rooted, not placed.
- Smart Sourcing: crushed white quartz gravel (bulk pack) and heavy-duty leveling sand.
3. Monochrome Palette Garden
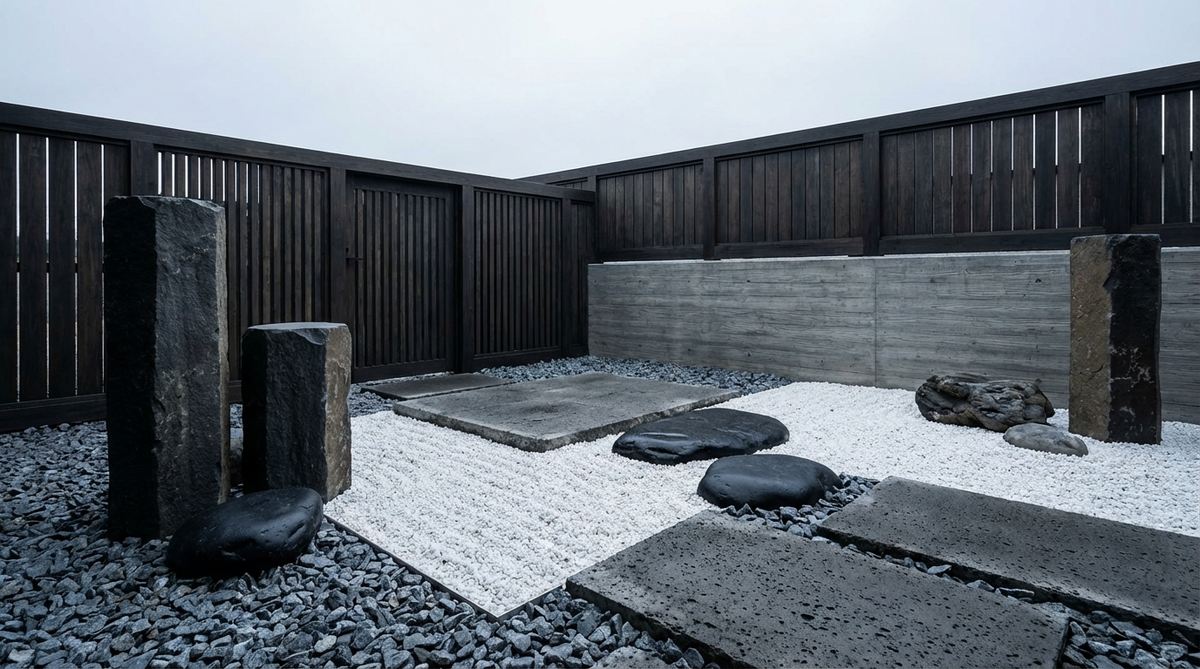
Looks straight out of an elite modern art museum courtyard. A high-contrast gravel layout operates perfectly as a sleek, low-maintenance front yard alternative.
Eliminating warm tones forces the viewer to focus entirely on texture and shadow, which looks far more expensive than it actually is. Utilizing karesansui starter kits with varying shades of slate gray creates incredible optical depth without introducing messy plant life.
Expect to spend around $200–$400 for a medium-sized zone. Pin this if you want maximum visual impact with absolute zero watering required.
- Key Materials: Multi-tone gray slate chips
- Vibe / Style: Moody, cinematic tranquility
- Difficulty: Simple material layering
- Budget Breakdown: Slate Chips: $150 | Basalt Accents: $90 | Edging: $40.
- Creator’s Tip: Use a rigid metal edge guard to keep the black and white gravel boundaries razor-sharp.
- Smart Sourcing: powder-coated steel garden edging (pre-cut strips) and charcoal basalt columns.
4. Geometric Planter Boxes
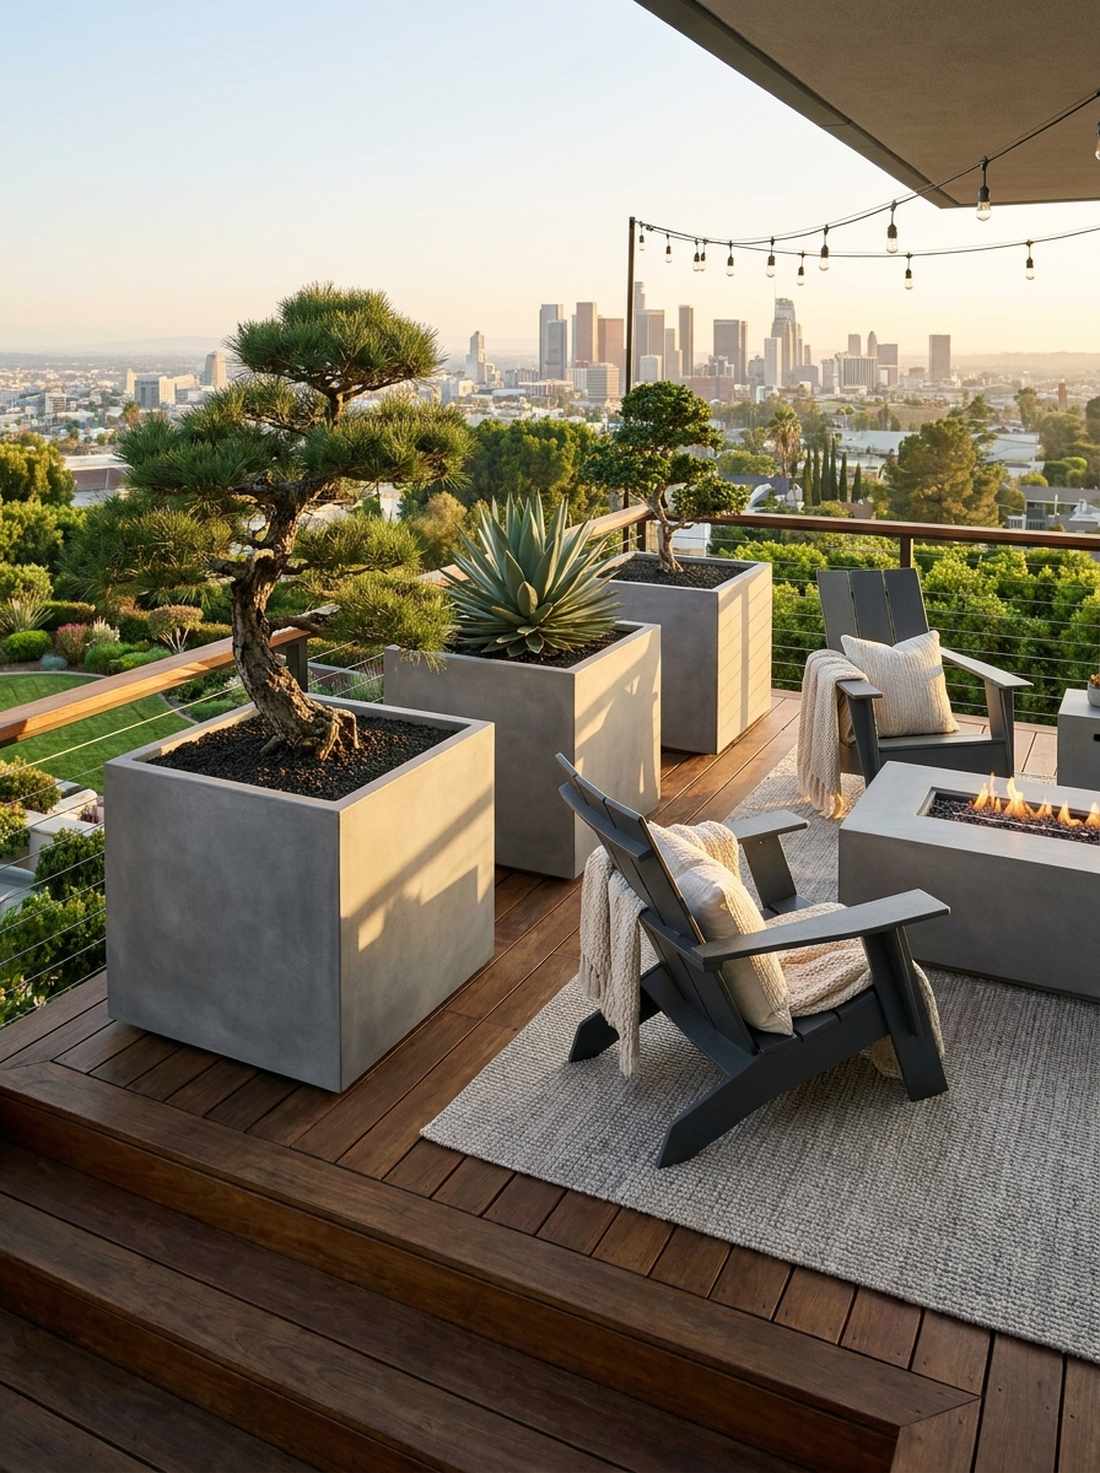
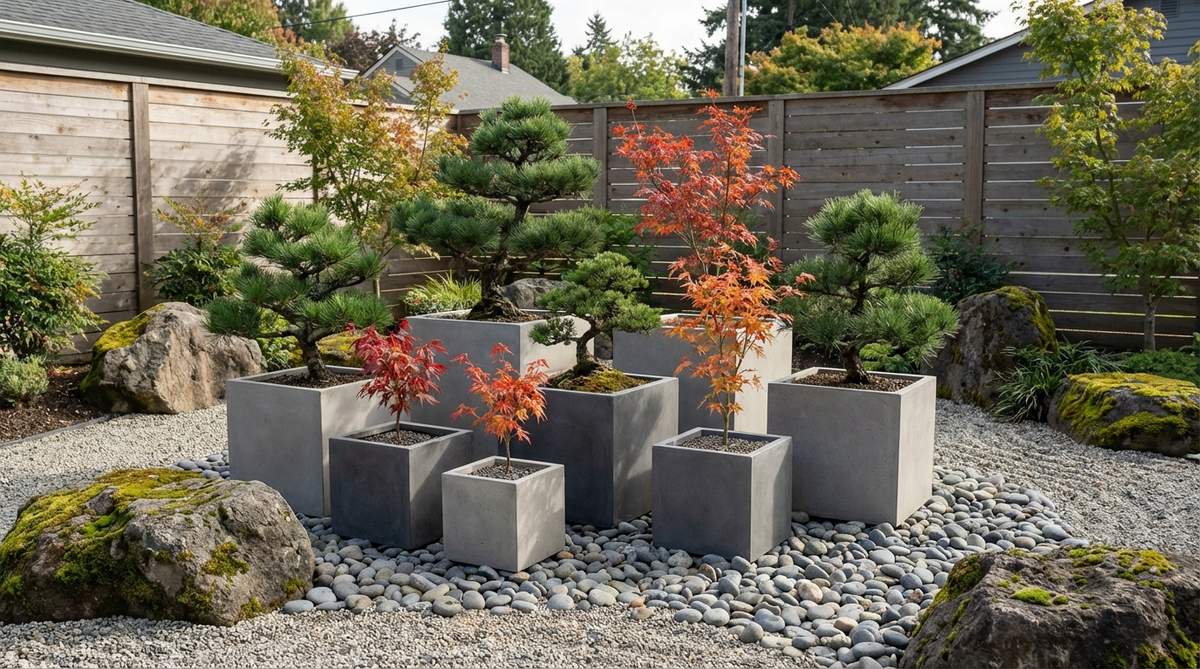
Brings a brilliant structural tension that feels incredibly grounded and orderly. These raised Zen planters serve as an ideal privacy barrier for an exposed urban balcony.
Bringing vertical geometry into a traditionally flat space creates an architectural masterpiece out of thin air. When you load these with specialized bonsai soil and solitary sculptural plants, the entire setup mimics a custom multi-thousand dollar landscape installation.
A set of three quality planters will run you about $250. It’s a fast upgrade that completely changes the spatial dynamics of a boring patio.
- Key Materials: Cast concrete cube planters
- Vibe / Style: Urban industrial Zen
- Difficulty: Easy setup, moderate lifting
- Budget Breakdown: Planters: $180 | Soil/Drainage: $30 | Specimen Plant: $40.
- Creator’s Tip: Line the interior with a foam insulation layer to protect the plant roots from rapid temperature swings.
- Smart Sourcing: lightweight fiber-concrete planter cubes (set of 2) and premium bonsai soil mix (bulk bag).
This next layout completely rewrites the rules of backyard design and looks like a custom $5,000 contractor installation…
5. Linear Water Channels
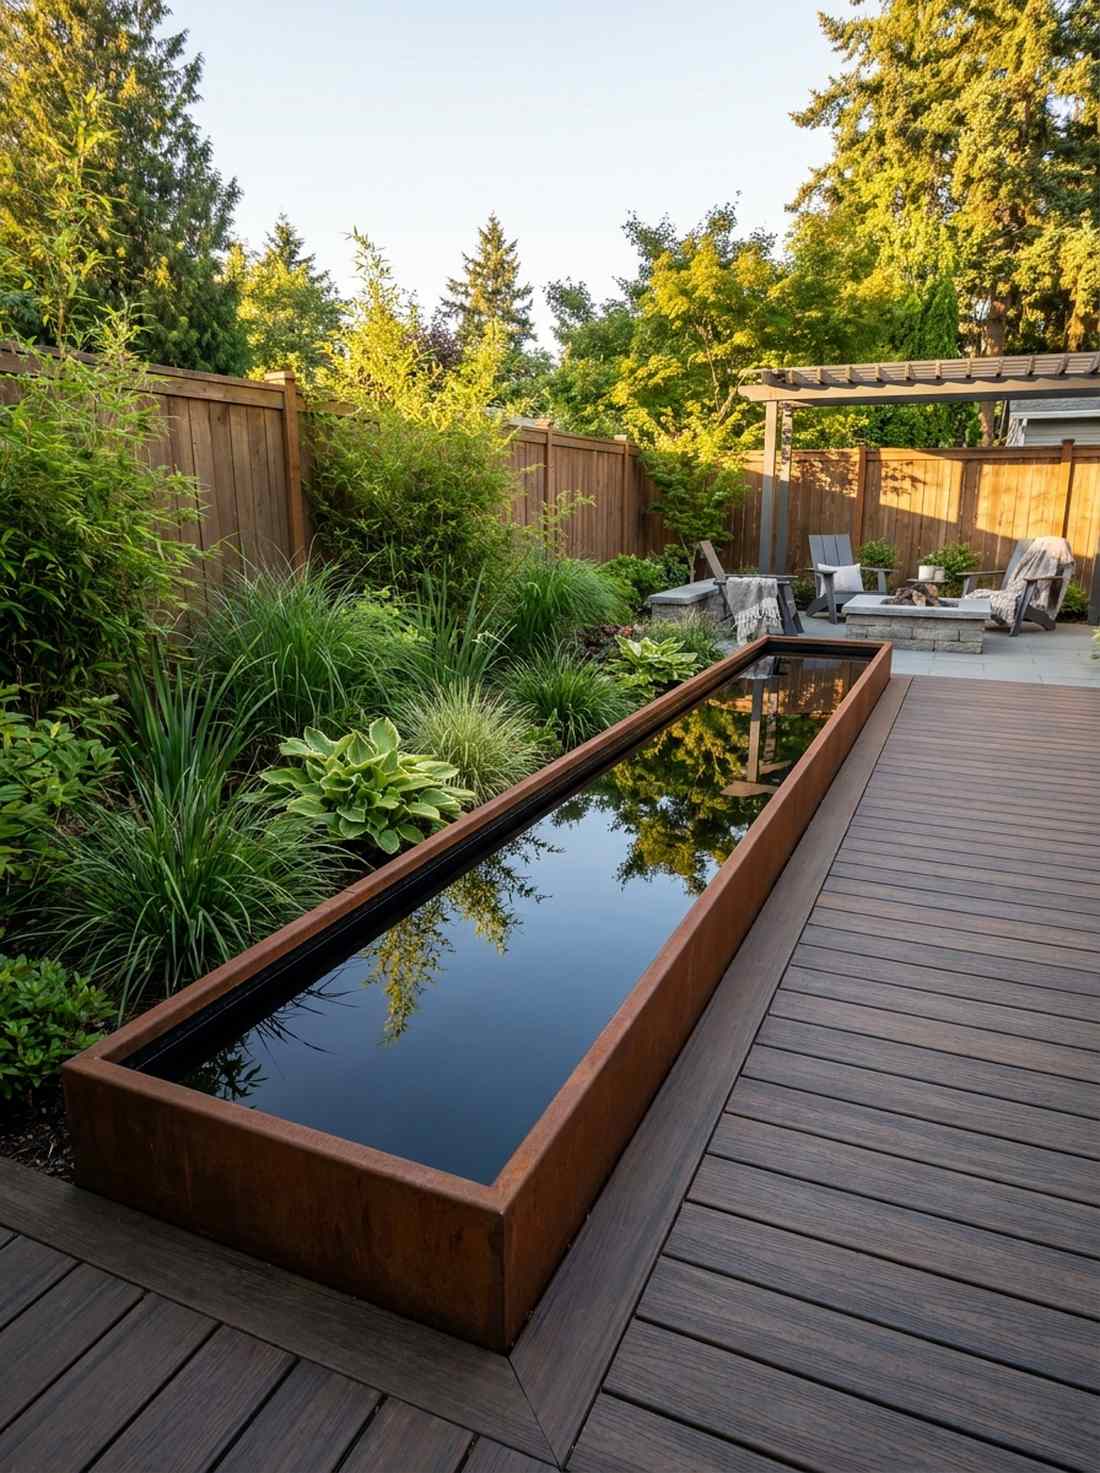
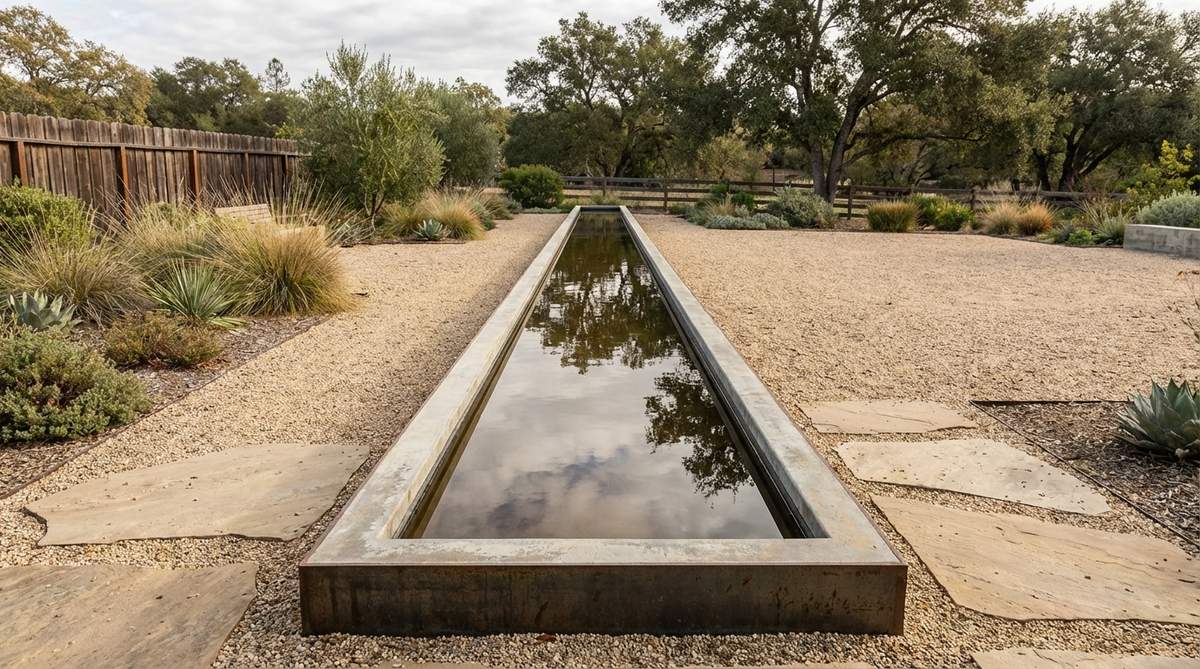
Feels like a secluded meditation room hidden away in a luxury spa. Implementing a geometric water feature is the ultimate hack for drowning out noisy neighborhood street traffic.
Swapping a cheesy, bubbling faux-rock fountain for a flush steel trough elevates the aesthetic instantly. Incorporating smart UV-coated water sealants ensures the dark mirrored surface remains pristine, delivering a flawless reflection that doubles the visual space.
Building this yourself costs roughly $300 to $500. Save this layout if you want an ambient soundscape without the tacky plastic fountain look!
- Key Materials: Corten steel troughs and recirculating pumps
- Vibe / Style: Sleek reflective serenity
- Difficulty: Advanced weekend DIY
- Budget Breakdown: Trough/Channel: $200 | Pump kit: $80 | Waterproofing: $50.
- Creator’s Tip: Dye the water slightly black using pond-safe tint to enhance the perfect mirror reflection.
- Smart Sourcing: submersible quiet water pumps (starter kit) and marine-grade black pond sealant.
Industrial Materials, Natural Harmony
Corten weathering steel, brushed stainless finishes, and poured concrete bring industrial aesthetics into dialogue with natural stone, creating incredible durability.
6. Corten Steel Retaining Walls
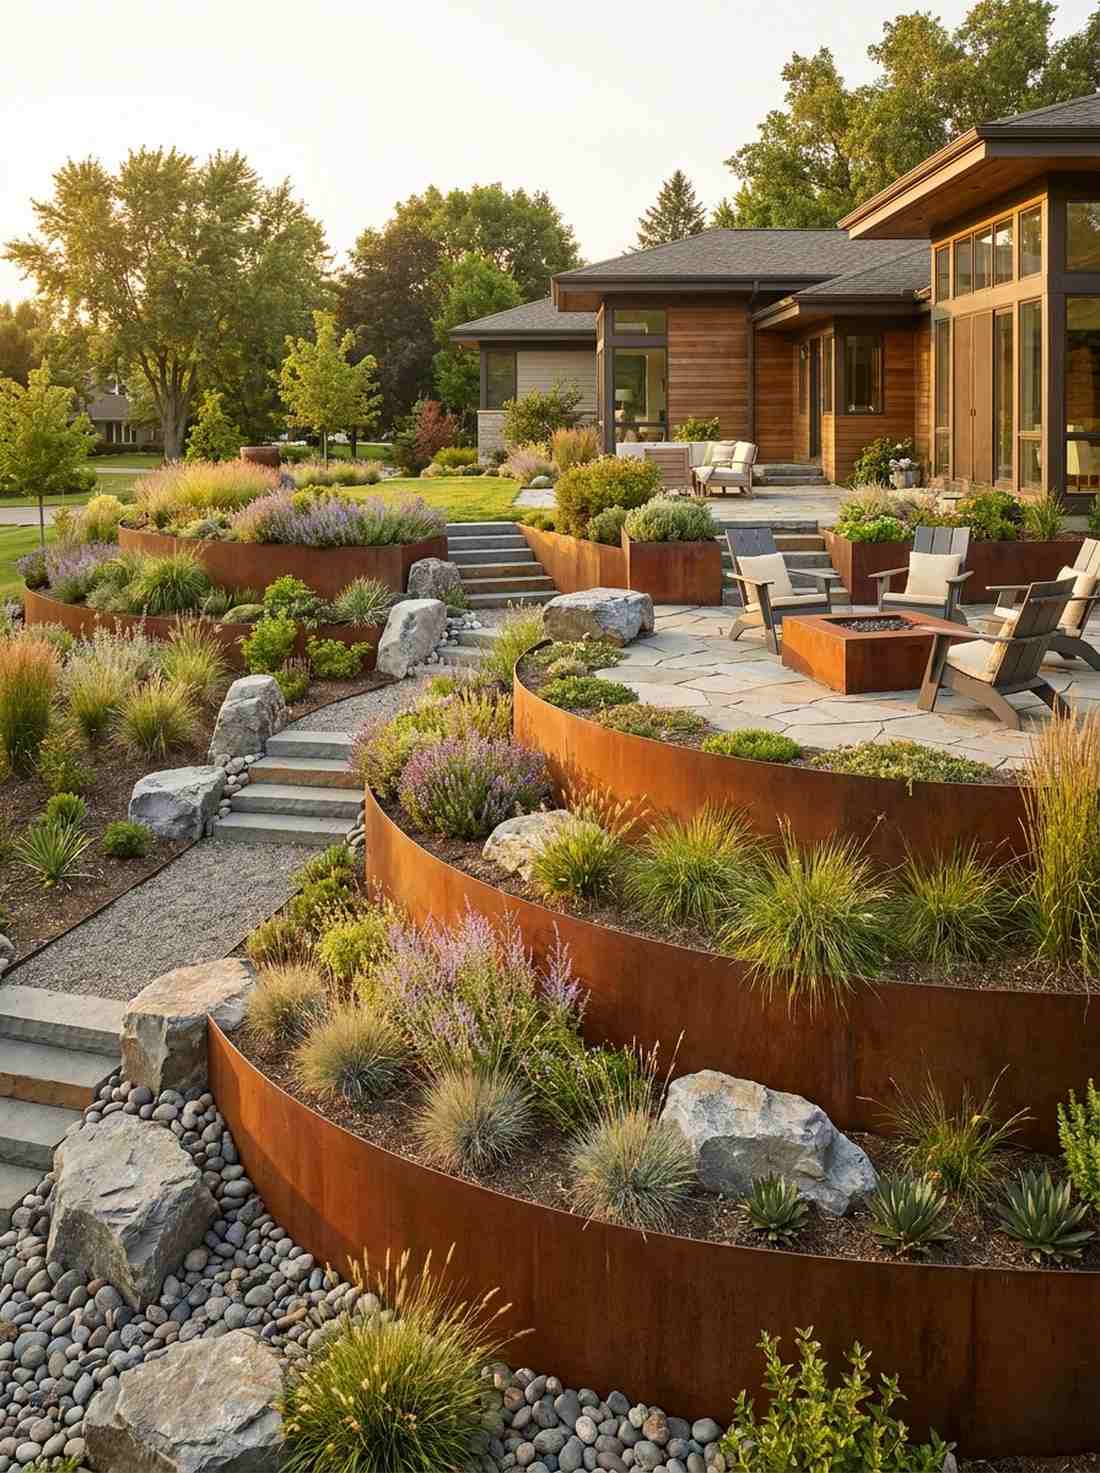
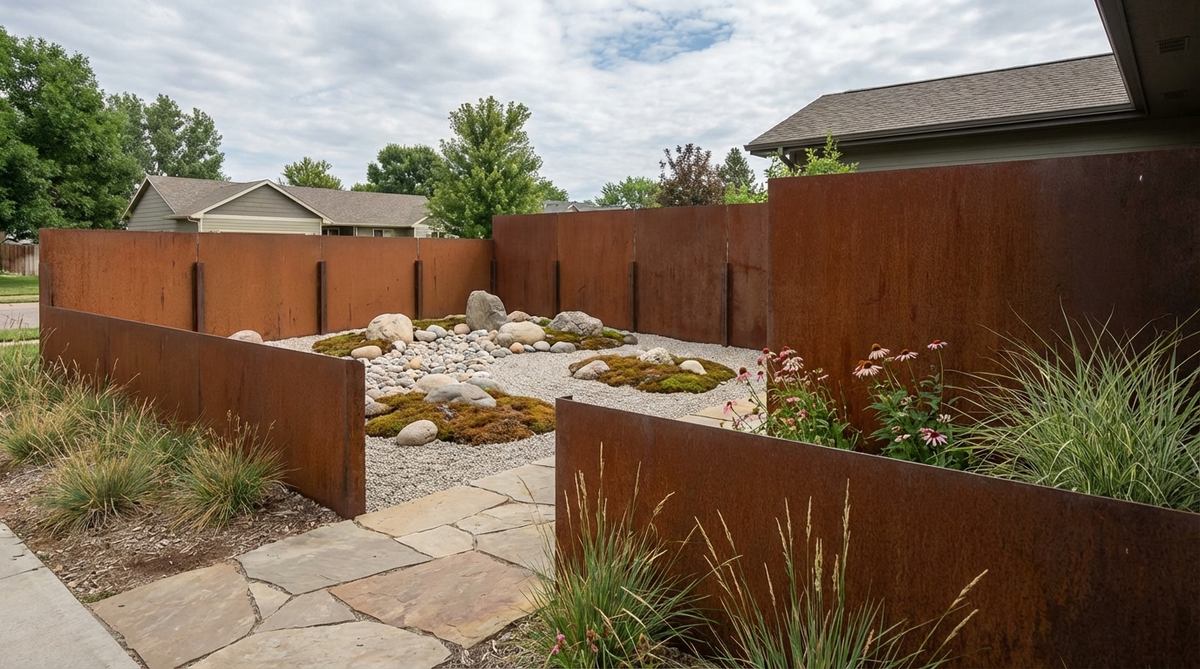
Radiates a rich, earthy warmth that contrasts perfectly against cold gray stones. Utilizing weathered steel borders acts as the ultimate terracing solution for a sloped backyard.
Most basic yards use cheap timber that rots in three years, but steel permanently locks in a high-end designer look. The rust patina process acts as a protective shield, proving that true luxury is often entirely maintenance-free.
Steel panels will run you about $20–$40 per linear foot. It’s a long-term investment that guarantees an architectural magazine finish.
- Key Materials: Corten landscape edging panels
- Vibe / Style: Warm industrial contrast
- Difficulty: Moderate ground prep required
- Budget Breakdown: Steel Edging: $150 | Stakes: $30.
- Creator’s Tip: Spray the new steel with a mixture of hydrogen peroxide, salt, and vinegar to force the rust patina overnight.
- Smart Sourcing: pre-cut Corten steel landscape borders (multi-pack) and heavy-duty steel anchor stakes.
7. Brushed Steel Accent Screens
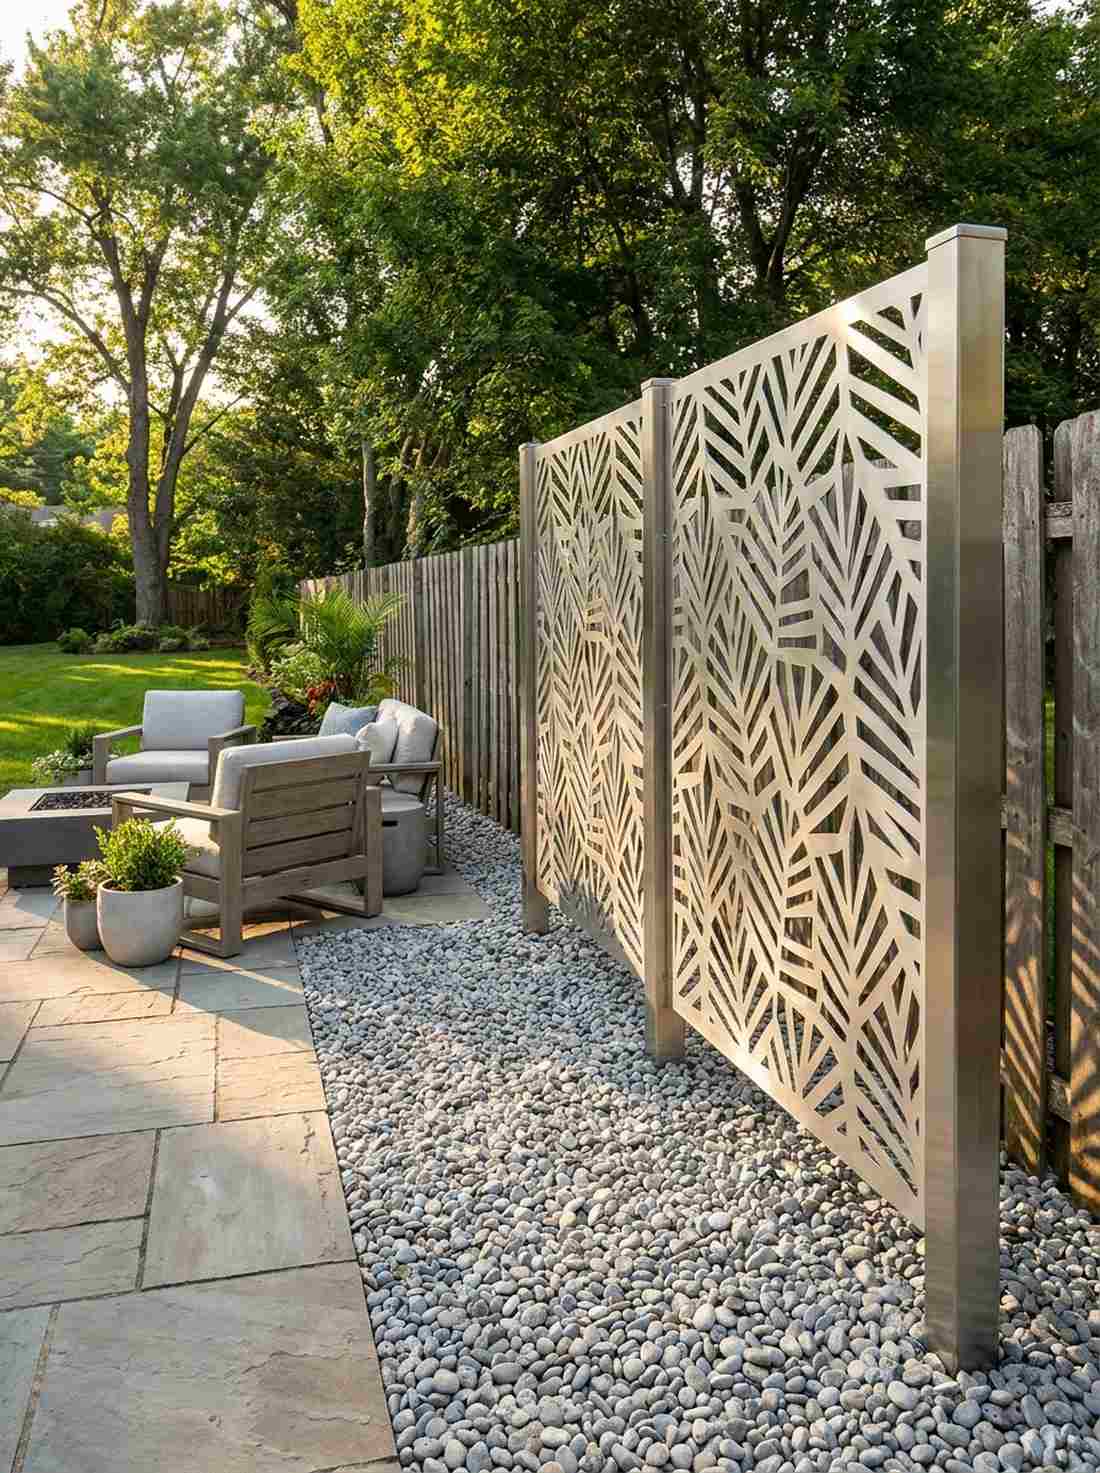

Casts mesmerizing, slowly shifting shadows that change the yard’s entire mood by the hour. A metal privacy divider is the perfect solution for blocking out an ugly neighboring fence line.
Trading flimsy wooden lattice for laser-cut stainless panels creates an immediate visual upgrade. These premium screens serve as durable outdoor art, reflecting natural light while effortlessly resisting harsh weather conditions.
A single statement panel usually costs around $150–$300. Pin this to your exterior design board for an instant privacy hack that doesn’t feel claustrophobic.
- Key Materials: Laser-cut stainless steel privacy screens
- Vibe / Style: Modern dynamic lighting
- Difficulty: Easy bolt-in setup
- Budget Breakdown: Screen Panel: $200 | Mounting Posts: $60.
- Creator’s Tip: Mount them 6 inches above the gravel bed to allow subtle uplighting from the base at night.
- Smart Sourcing: UV-coated decorative metal privacy screens and rust-proof mounting brackets (bulk set).
8. Concrete Boulder Sculptures
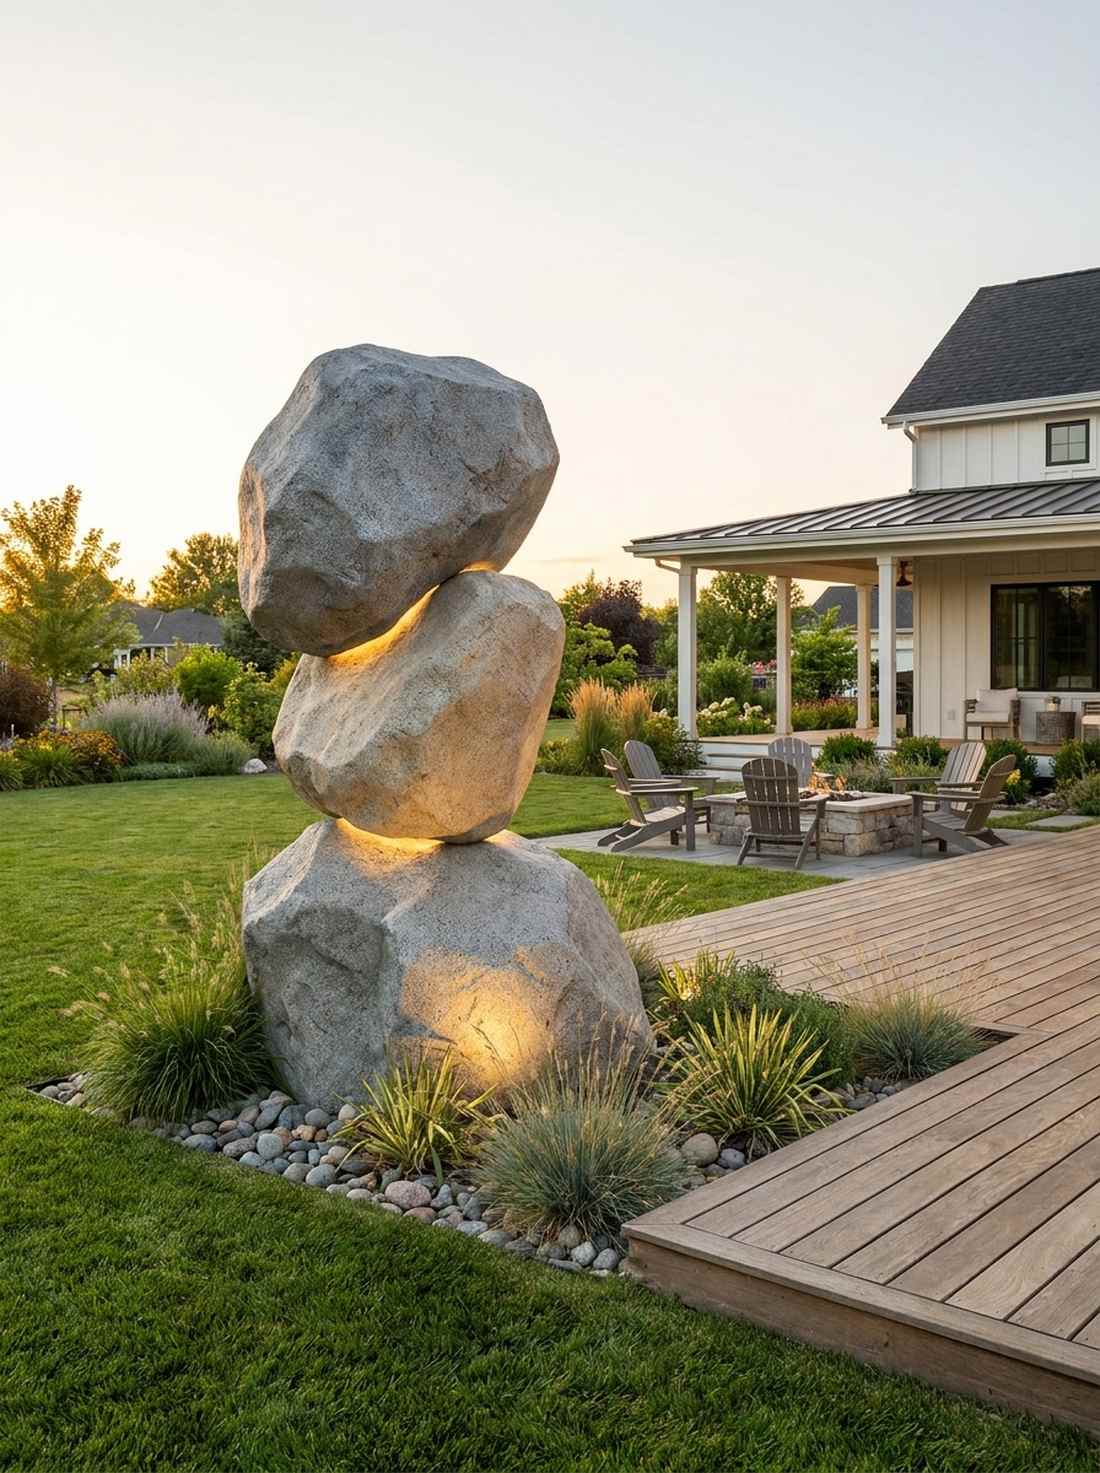
Delivers a mind-bending gravity illusion that instantly becomes a conversation starter. Placing a faux-stone art piece works beautifully as an anchor in a sparse, minimalist corner.
Using hollow cast concrete instead of actual 500-pound boulders gives you the aesthetic of ancient temple ruins without needing heavy machinery. It allows you to seamlessly hide miniature garden supplies and wiring directly inside the stone for stealthy night illumination.
These hollow lightweight setups range from $90 to $200. Highly recommended if you want maximum sculptural impact with zero back pain.
- Key Materials: Cast hollow concrete stones
- Vibe / Style: Impossible balance illusion
- Difficulty: Beginner placement
- Budget Breakdown: Hollow Sculpture: $120 | Internal Lights: $30.
- Creator’s Tip: Use the hollow interior to house electrical transformers safely away from rain.
- Smart Sourcing: lightweight faux granite boulders (hollow core) and waterproof landscape wire connectors.
9. Steel Frame Timber Pavilions
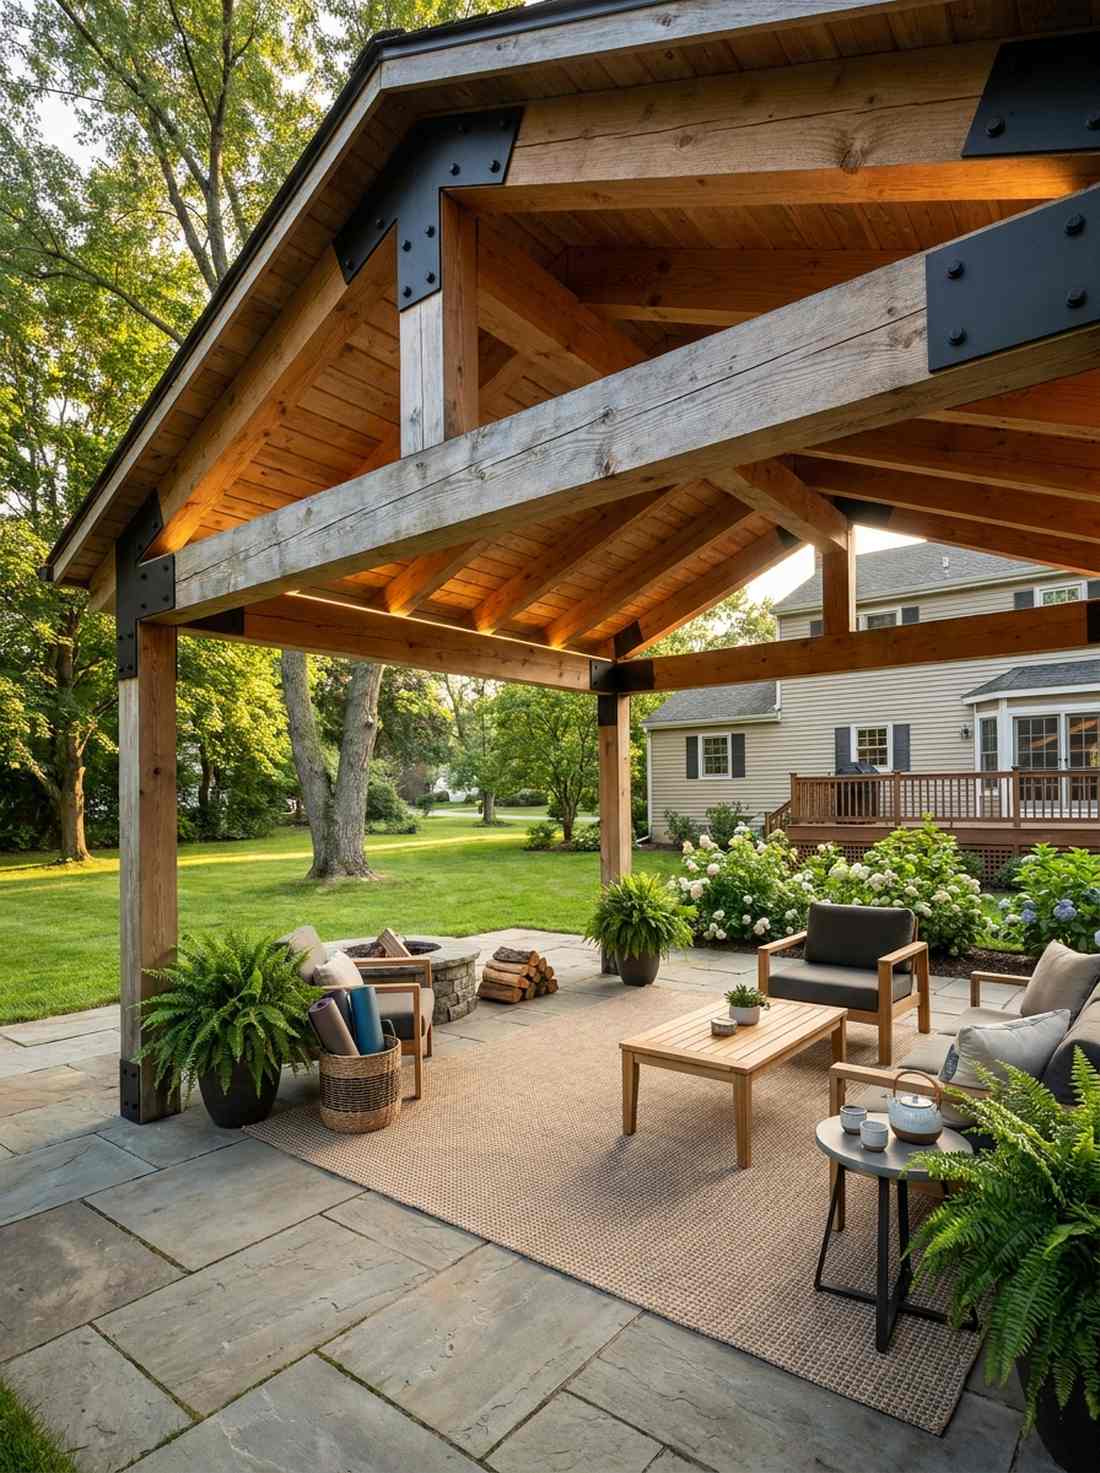
Feels like a private VIP cabana right in your own backyard. Building an open-air meditation shelter creates a dedicated zone for morning yoga or evening tea.
Combining heavy blackened steel brackets with raw Douglas fir provides a massive structural flex that looks professionally commissioned. Adding stealthy weather-resistant sealants to the wood ensures it naturally silvers over time rather than rotting away into an eyesore.
A DIY pavilion kit will cost anywhere from $800 to $1,500. Save this if you’re planning a major weekend overhaul that adds real property value.
- Key Materials: Black powder-coated steel brackets and thick timber
- Vibe / Style: Bold architectural retreat
- Difficulty: Advanced construction
- Budget Breakdown: Steel Hardware: $300 | Timber: $600 | Footings: $150.
- Creator’s Tip: Hide low-voltage wiring directly behind the steel brackets for invisible canopy lighting.
- Smart Sourcing: heavy-duty pergola bracket kits (4-pack) and premium penetrating wood sealer.
💡 Must-Have Supplies for High-End Setups
To build these setups faster and ensure they last indefinitely, skip the generic craft aisles and invest in the right foundational commercial kits.
- Base & Support: commercial-grade non-woven weed barrier fabric
- Setup Tools: professional karesansui rake starter kits
- Weather/Durability Protection: industrial clear matte stone sealants
10. Glass Gravel Boundaries
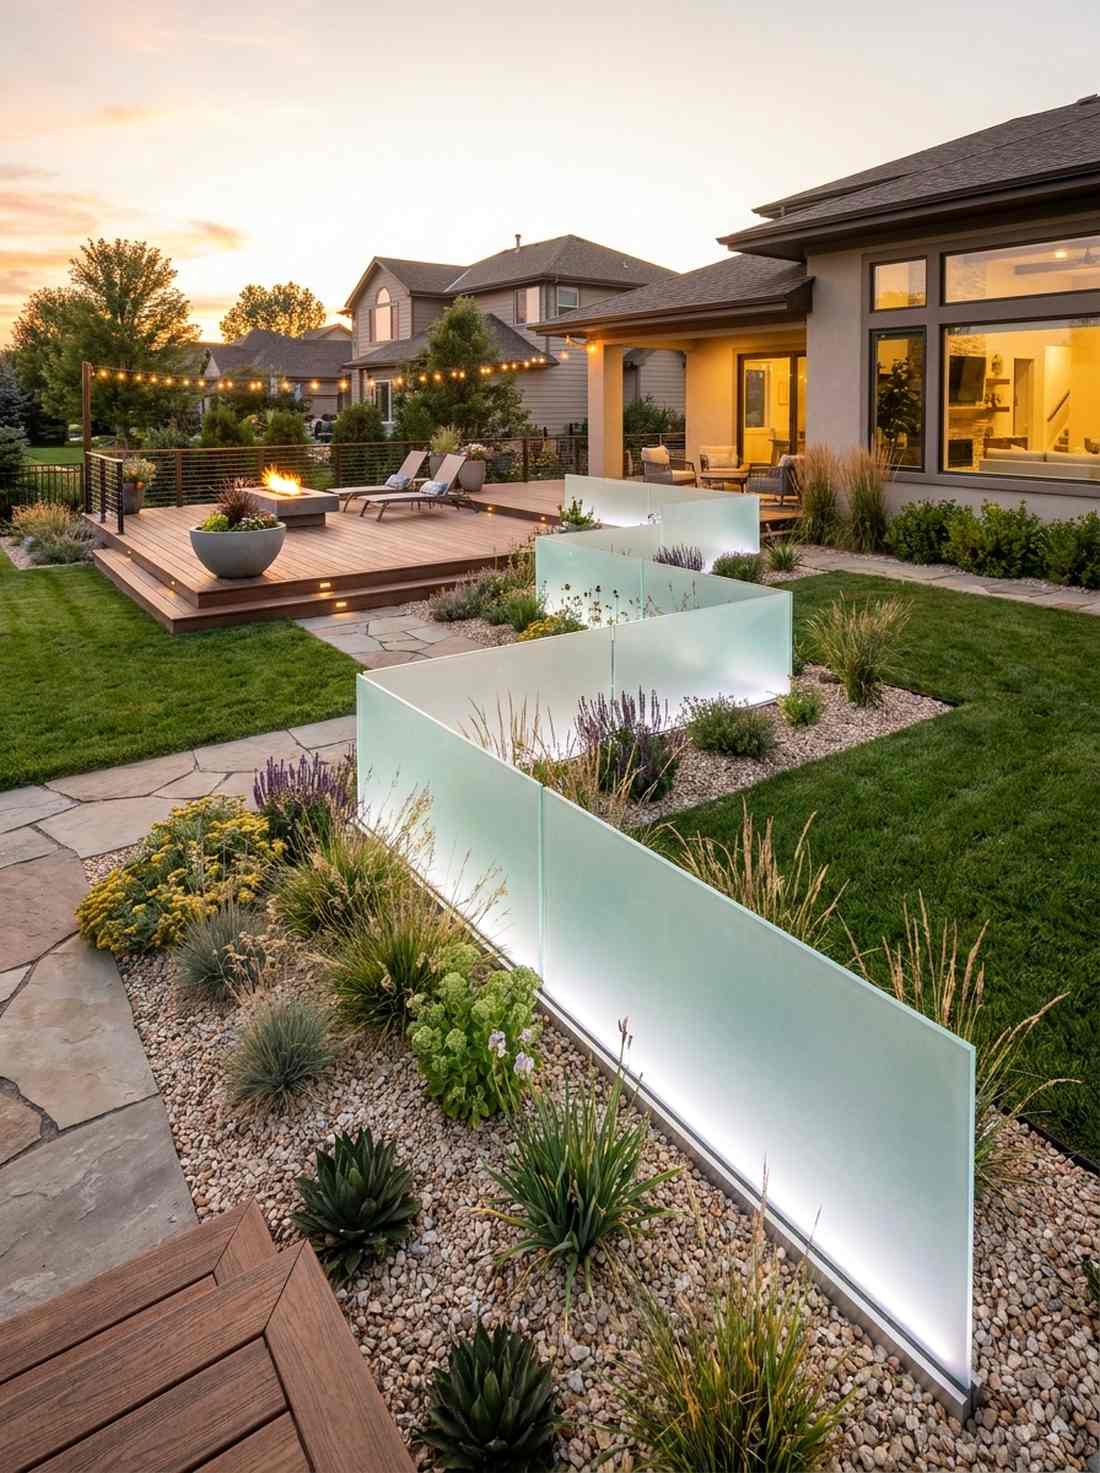

Radiates a soft, ethereal glow that makes the ground look like it’s floating. Implementing a frosted glass divider works wonders for segmenting different flower beds without creating visual clutter.
Burying thick acrylic or frosted panels instead of basic plastic edging delivers a surreal, designer-level finish. It beautifully bridges the gap between raw nature and sleek modernism, catching the moonlight in a way traditional borders simply cannot match.
Sourcing these materials costs roughly $100 per 10-foot section. It’s a brilliantly subtle upgrade that pays massive aesthetic dividends at night.
- Key Materials: Thick frosted acrylic sheets
- Vibe / Style: Luminous contemporary zoning
- Difficulty: Moderate trenching
- Budget Breakdown: Acrylic Panels: $80 | Gravel Base: $20.
- Creator’s Tip: Run a waterproof LED strip along the bottom trench before burying the glass for an insane glowing border.
- Smart Sourcing: pre-cut frosted acrylic panels (shatterproof) and heavy-duty trenching trowels.
Contemporary Stone Compositions
Modern interpretations of traditional stone arrangement techniques incorporate unexpected materials and symbolic placements guided by high-end spatial theory.
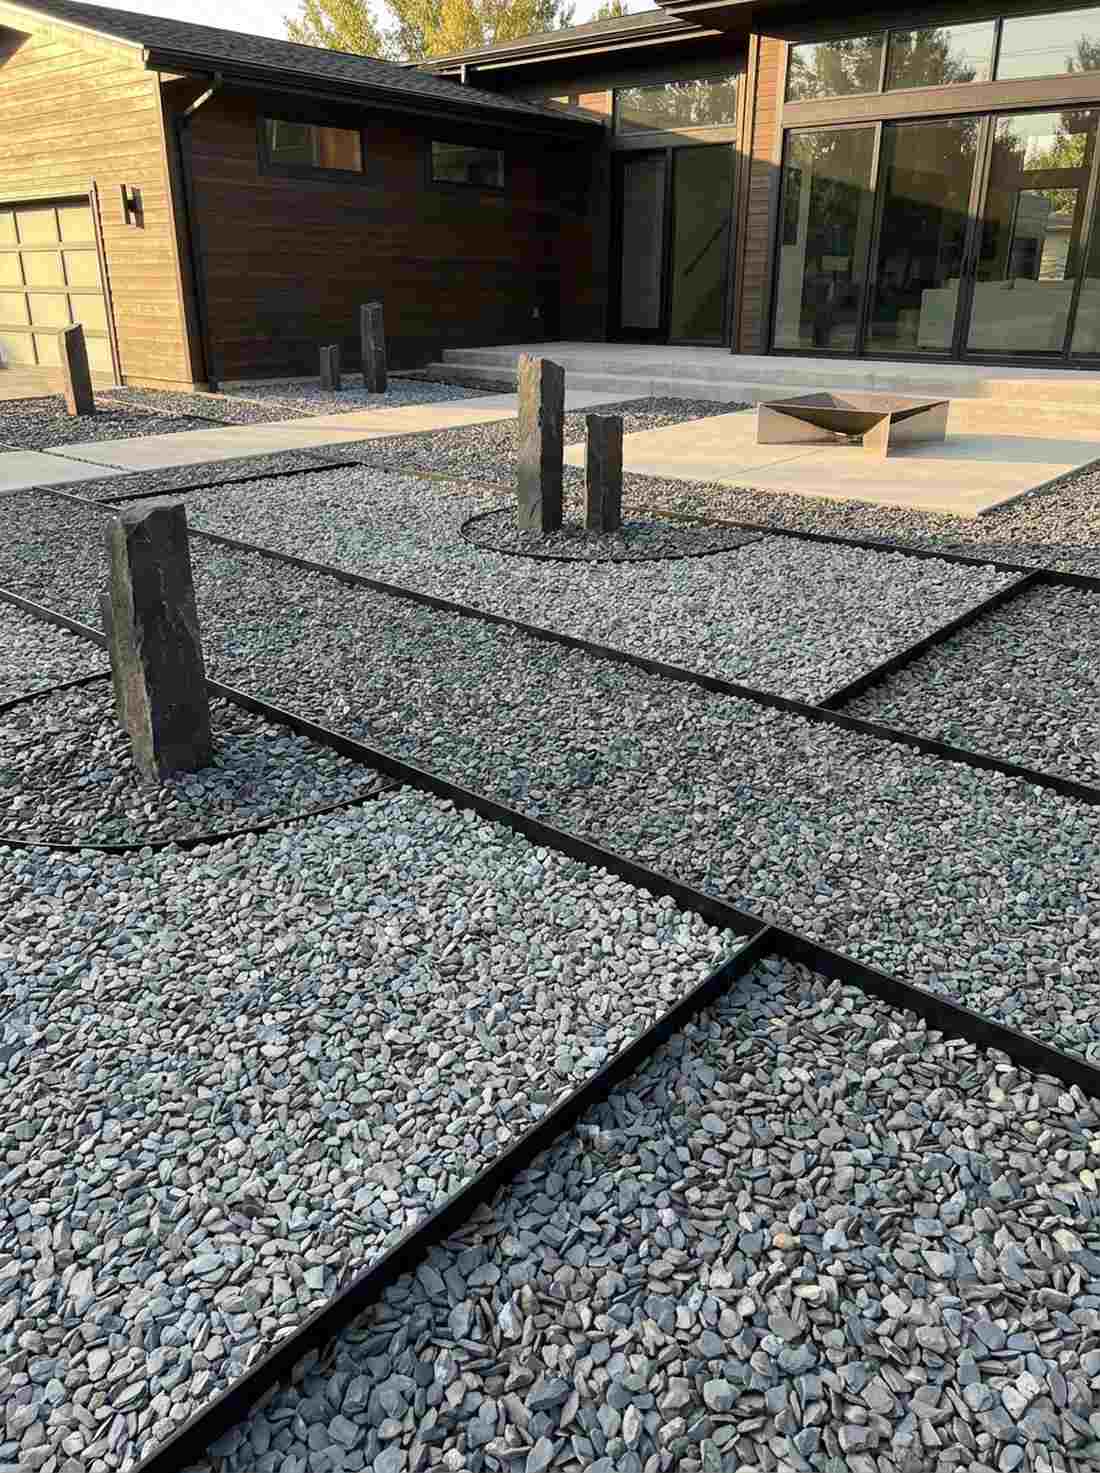
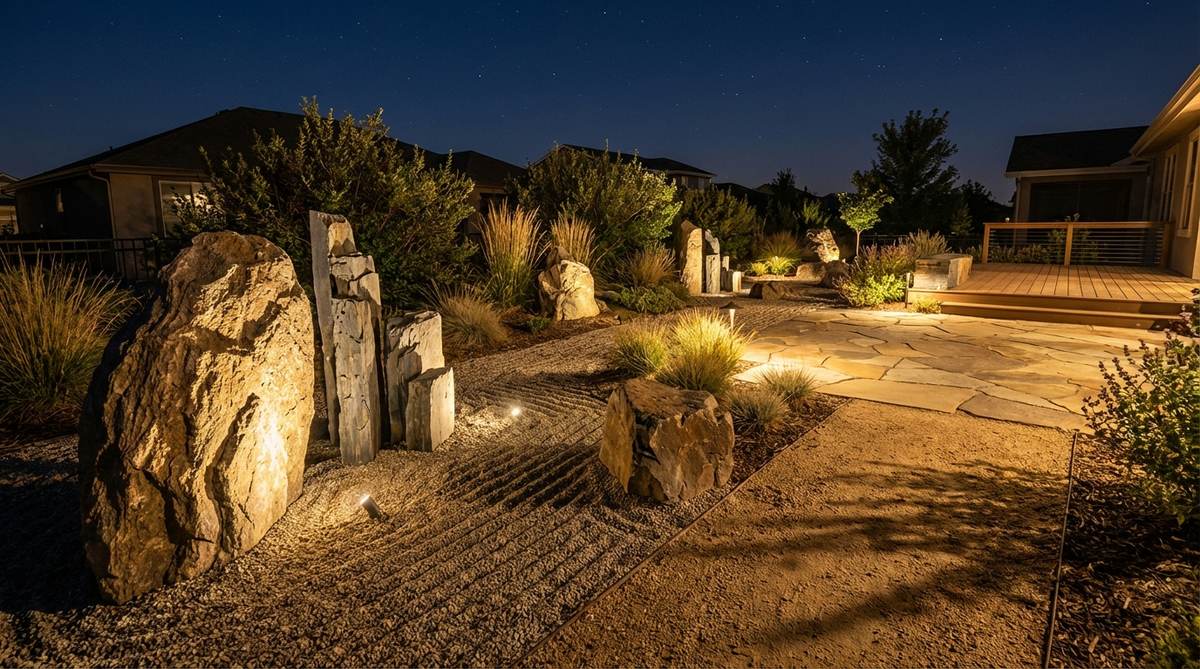
11. Vertical Stone Pillars
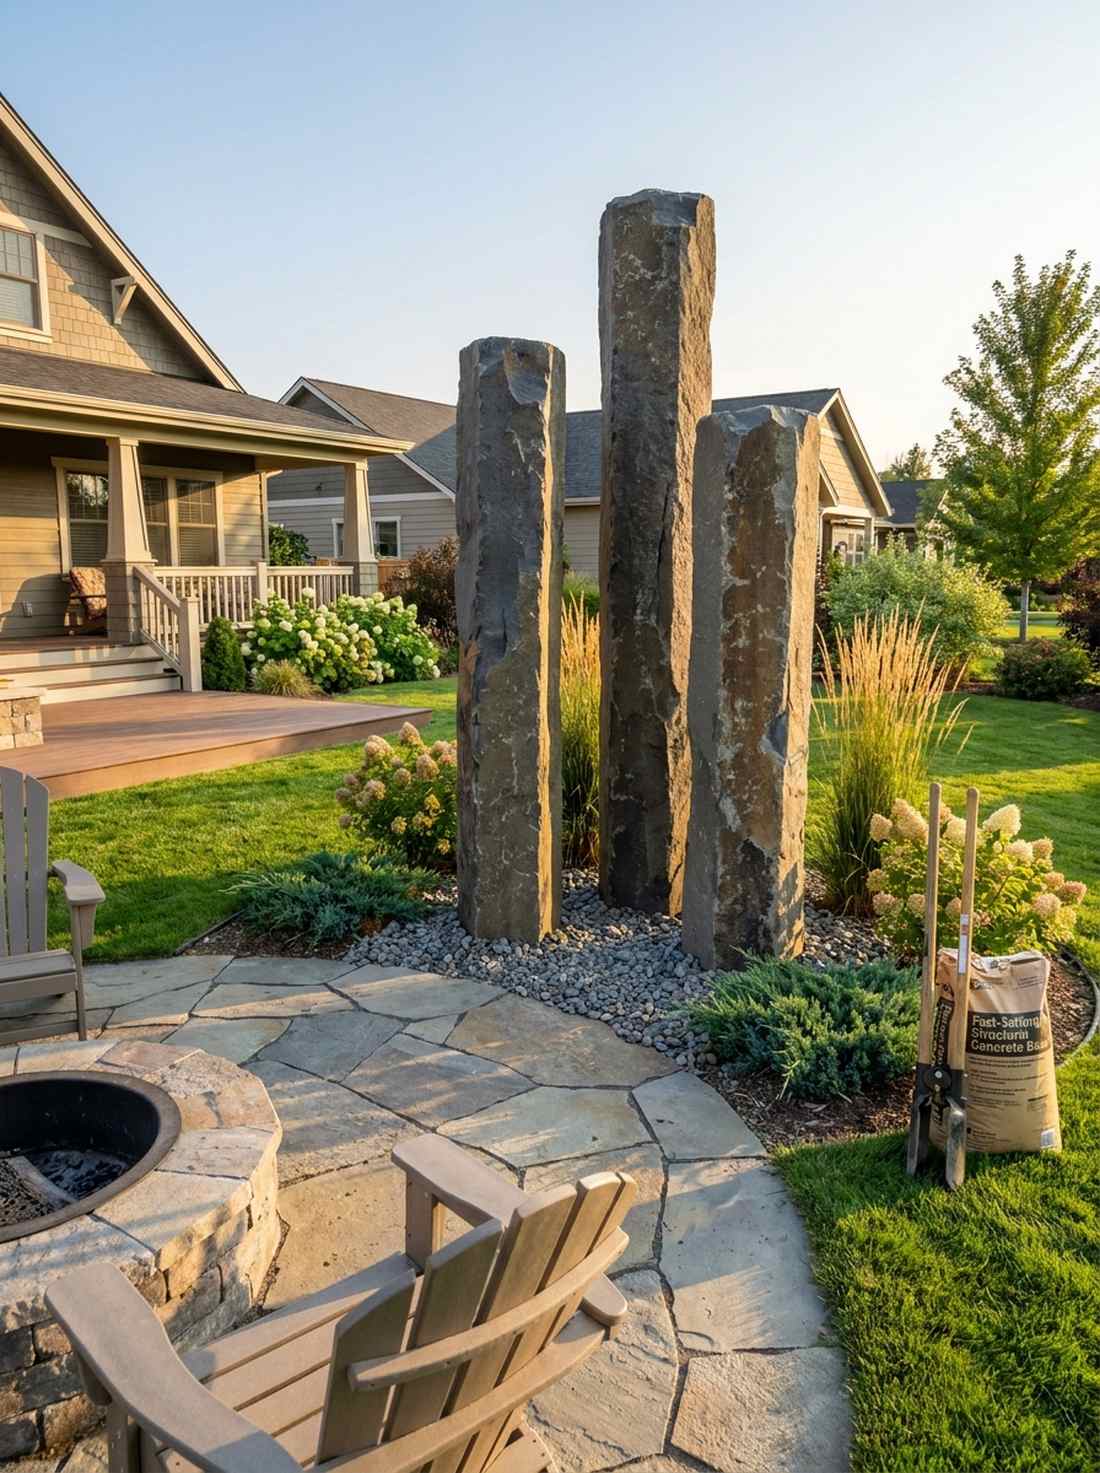
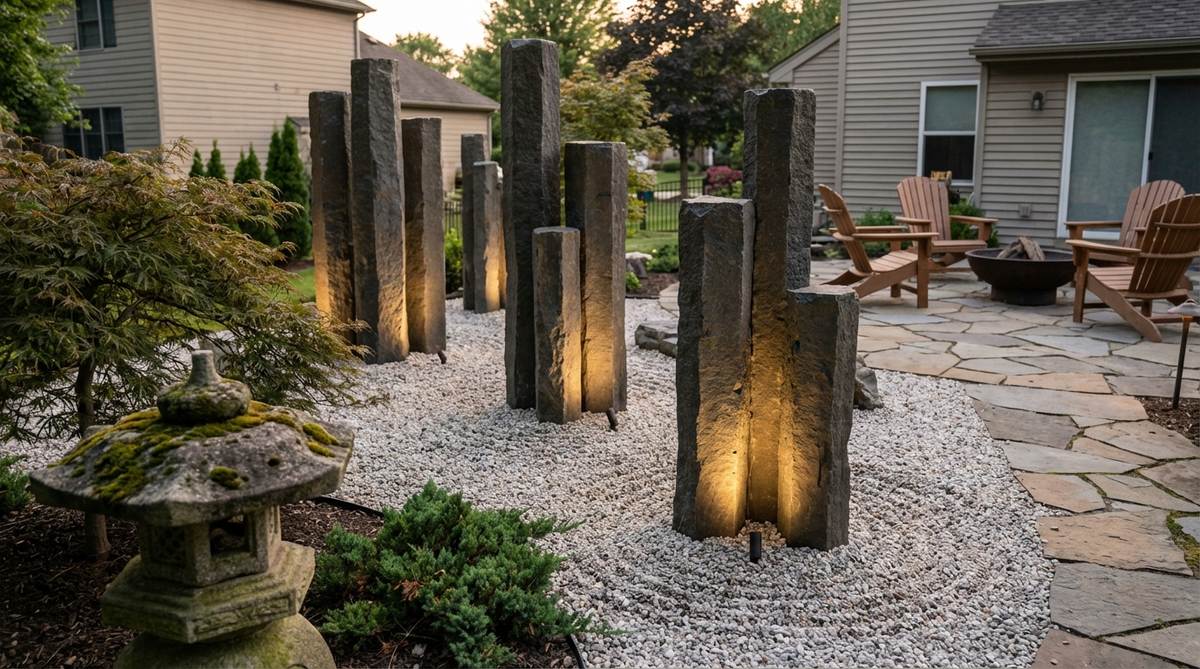
Injects a monumental, spiritual energy that commands the entire yard’s attention. A columnar basalt display is ideal for anchoring the far corners of an expansive property.
Placing towering stones vertically breaks up the boring horizontal plane most amateur gardens suffer from. Using commercial-grade foundation gravel beneath these pillars ensures they stay perfectly plumb and looking wildly expensive year after year.
Three basalt columns usually run about $300–$600 locally. Pin this layout if you need a dramatic focal point that survives every season without fail.
- Key Materials: Natural basalt columns
- Vibe / Style: Towering majestic strength
- Difficulty: Heavy lifting, deep digging
- Budget Breakdown: Pillars: $400 | Base Gravel: $50.
- Creator’s Tip: Bury exactly one-third of the column’s total length underground to prevent leaning over time.
- Smart Sourcing: compact post-hole digger tools and fast-setting structural concrete base bags.
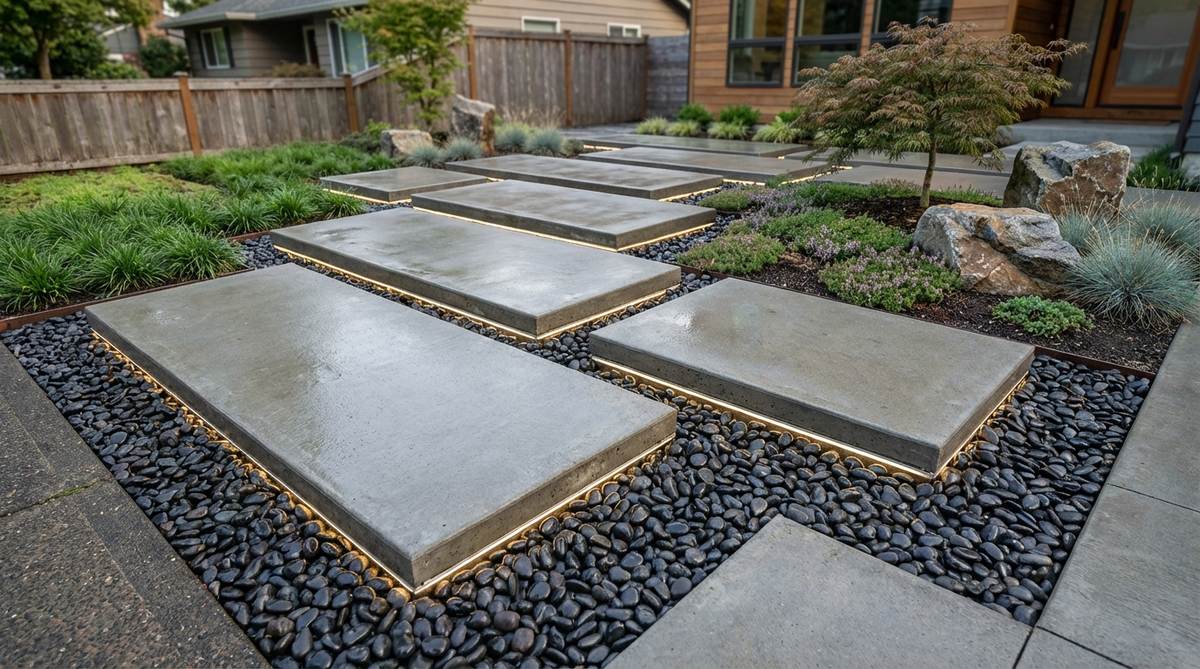
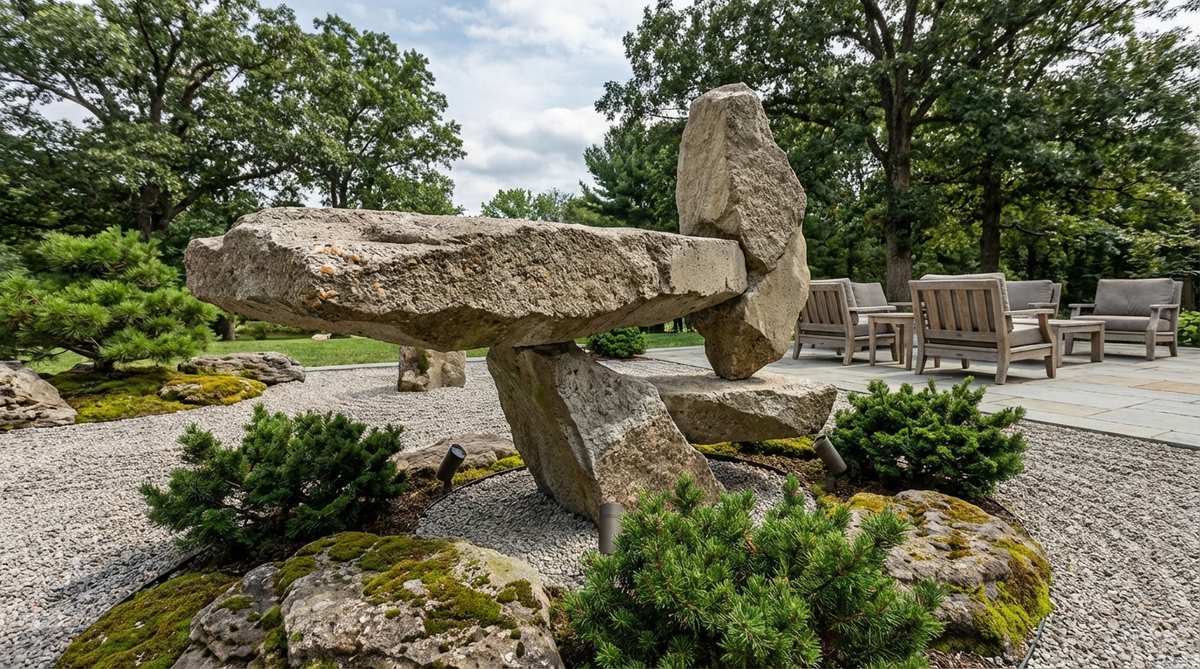
12. Floating Stone Platforms
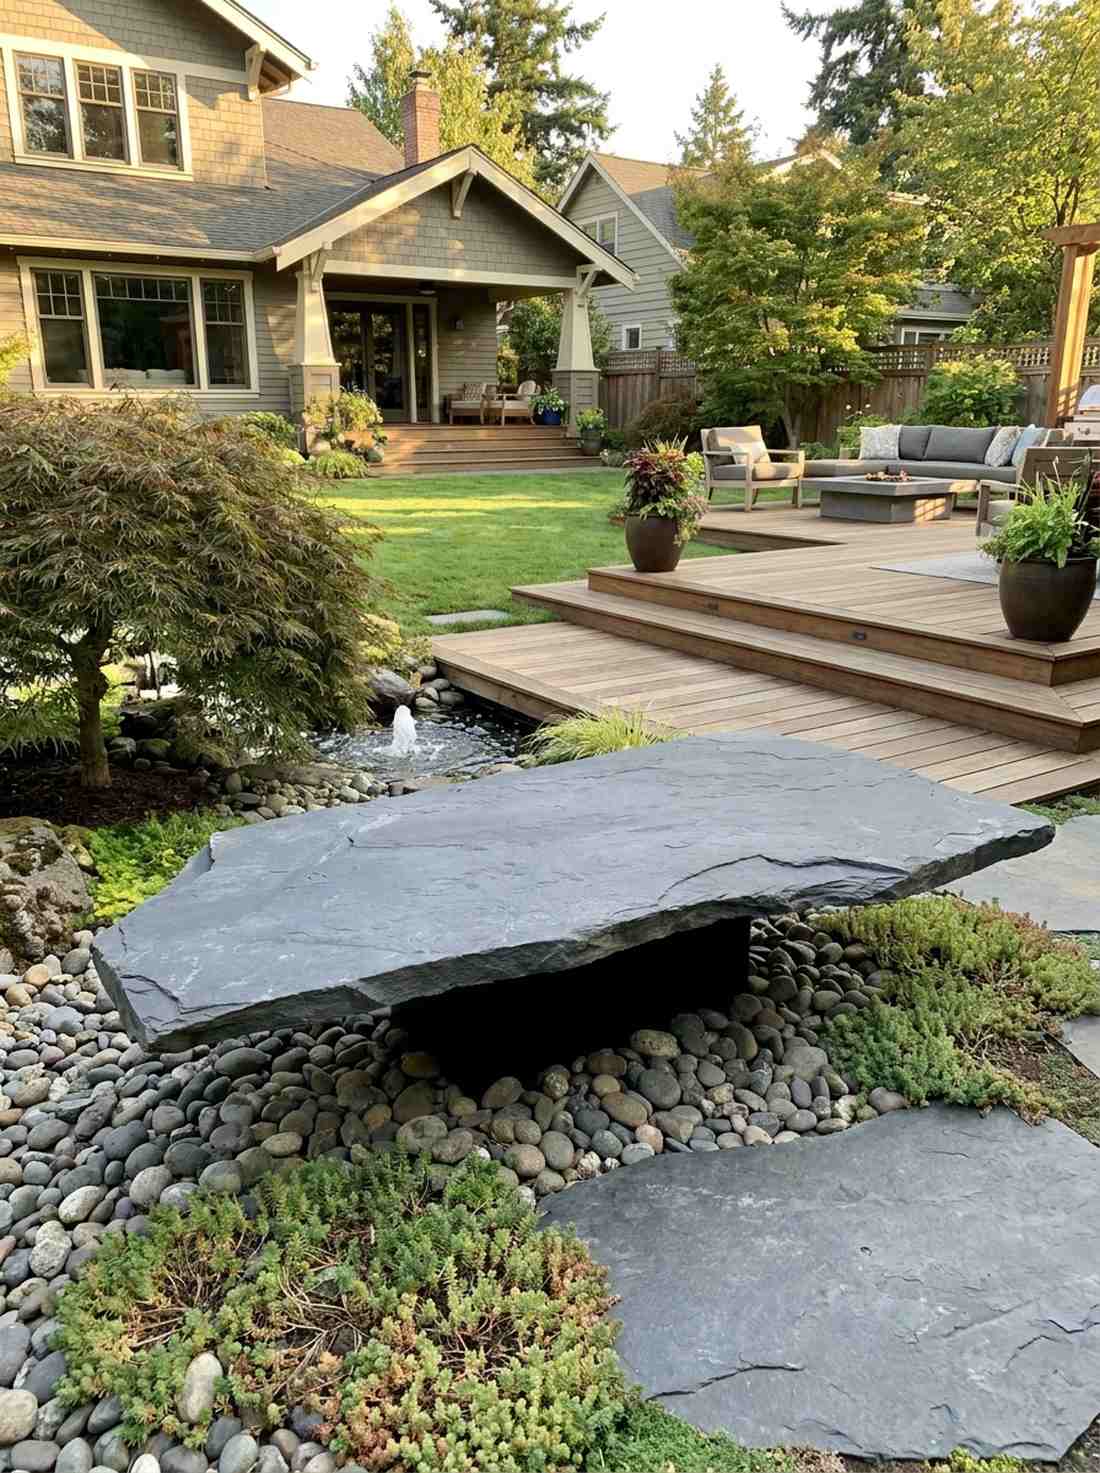
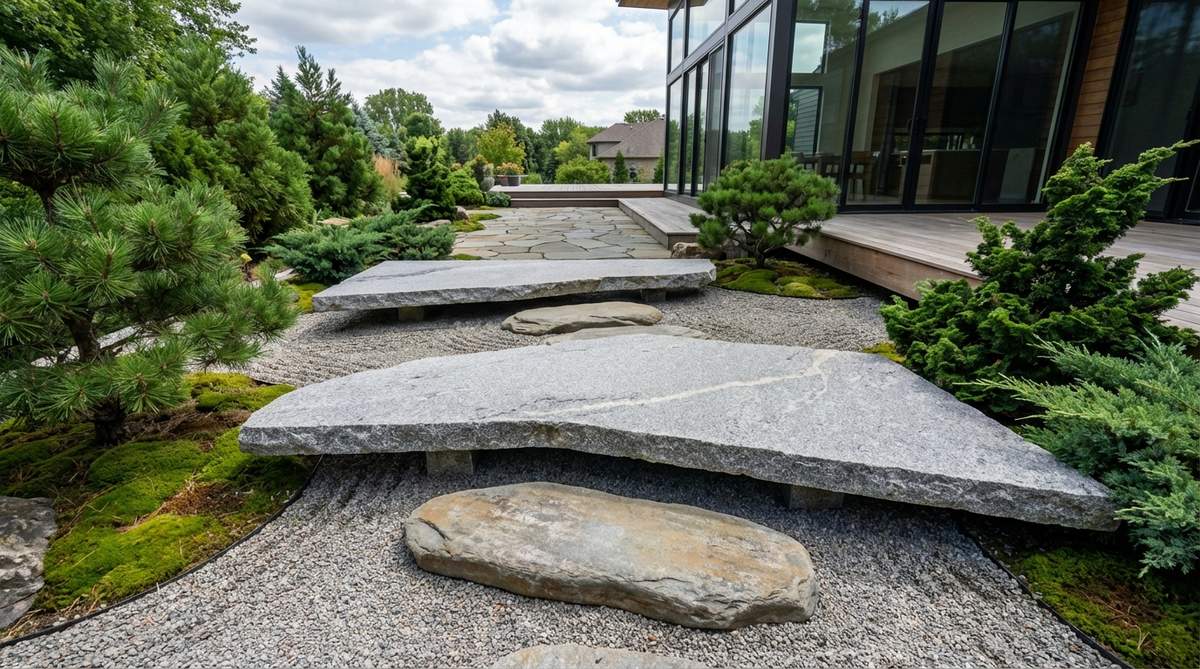
Creates a visual illusion so stunning it stops guests dead in their tracks. This hovering slab aesthetic makes for an unforgettable entryway or dedicated backyard meditation seat.
Concealing a heavy-duty steel pedestal beneath a massive slate piece completely tricks the brain and bypasses traditional chunky benches. It’s a masterful trick that mimics expensive custom art installations, giving your space a designer-level finish for pennies on the dollar.
You can engineer this illusion yourself for around $150 to $250. Highly recommended for injecting a sense of magic into dull corners.
- Key Materials: Flat flagstone and hidden steel supports
- Vibe / Style: Gravity-defying intrigue
- Difficulty: Precision engineering required
- Budget Breakdown: Slate Slab: $100 | Steel Pedestal: $80 | Concrete: $20.
- Creator’s Tip: Paint the hidden steel pedestal flat black to make it entirely invisible in the shadows.
- Smart Sourcing: heavy-duty steel pedestal bases and matte black rust-proof outdoor spray paint.
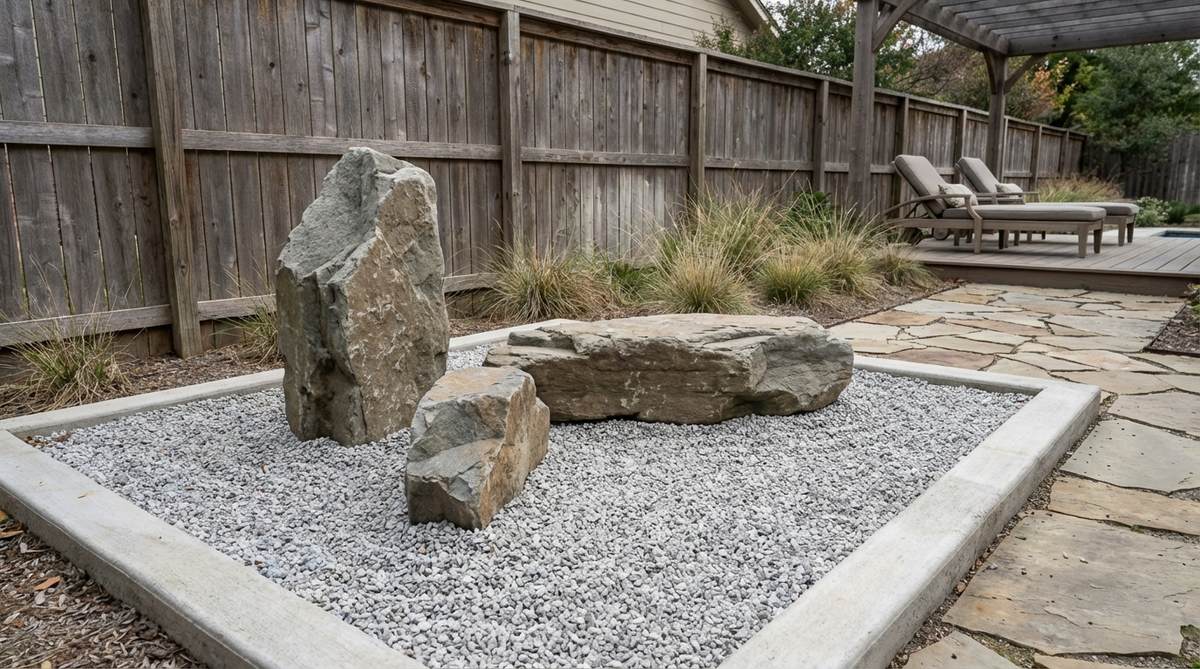
13. Crushed Granite Color Fields
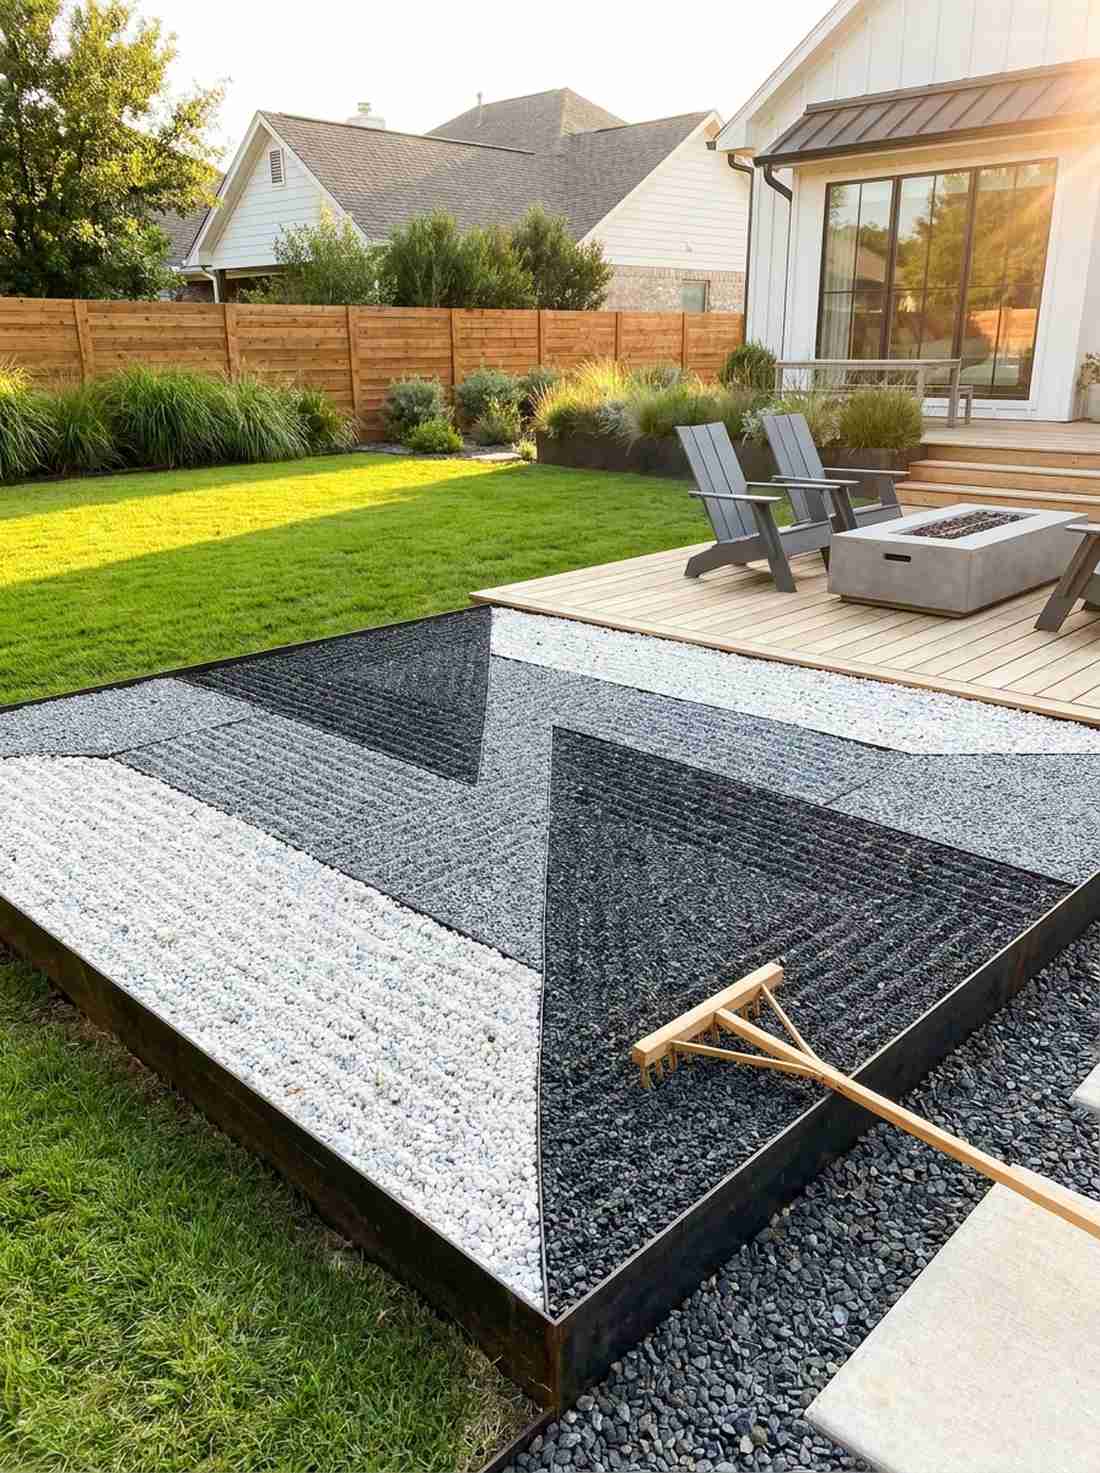
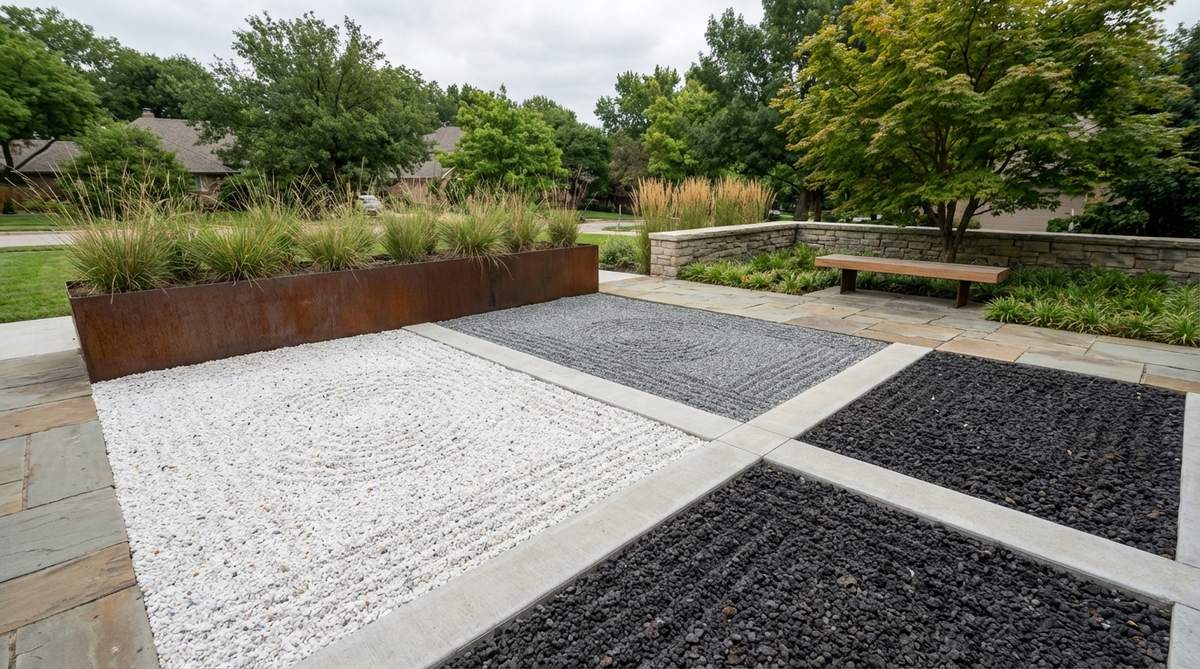
Feels like stepping onto a living, breathing canvas of sharply defined textures. Setting up geometric gravel zones is brilliant for covering large barren patches of dirt where grass refuses to grow.
Mapping out distinct color blocks completely eliminates the chaotic, muddy look of mixed cheap pebbles. Investing in premium landscaping pebbles allows for crisp, architectural rake lines that hold their shape beautifully even after heavy rain.
Covering a 10×10 space will cost roughly $150 in bulk material. Save this to your landscaping board for a zero-mow solution that looks incredibly intentional.
- Key Materials: Sorted granite in white, gray, and black
- Vibe / Style: Crisp modern art canvas
- Difficulty: Easy raking and spreading
- Budget Breakdown: Bulk Granite: $120 | Edging: $30.
- Creator’s Tip: Wash the gravel thoroughly with a hose after laying it down to reveal the true, vibrant stone colors.
- Smart Sourcing: premium landscaping pebbles (multi-color bulk pack) and traditional wooden karesansui rakes.
14. Slate Chip Dry Streams
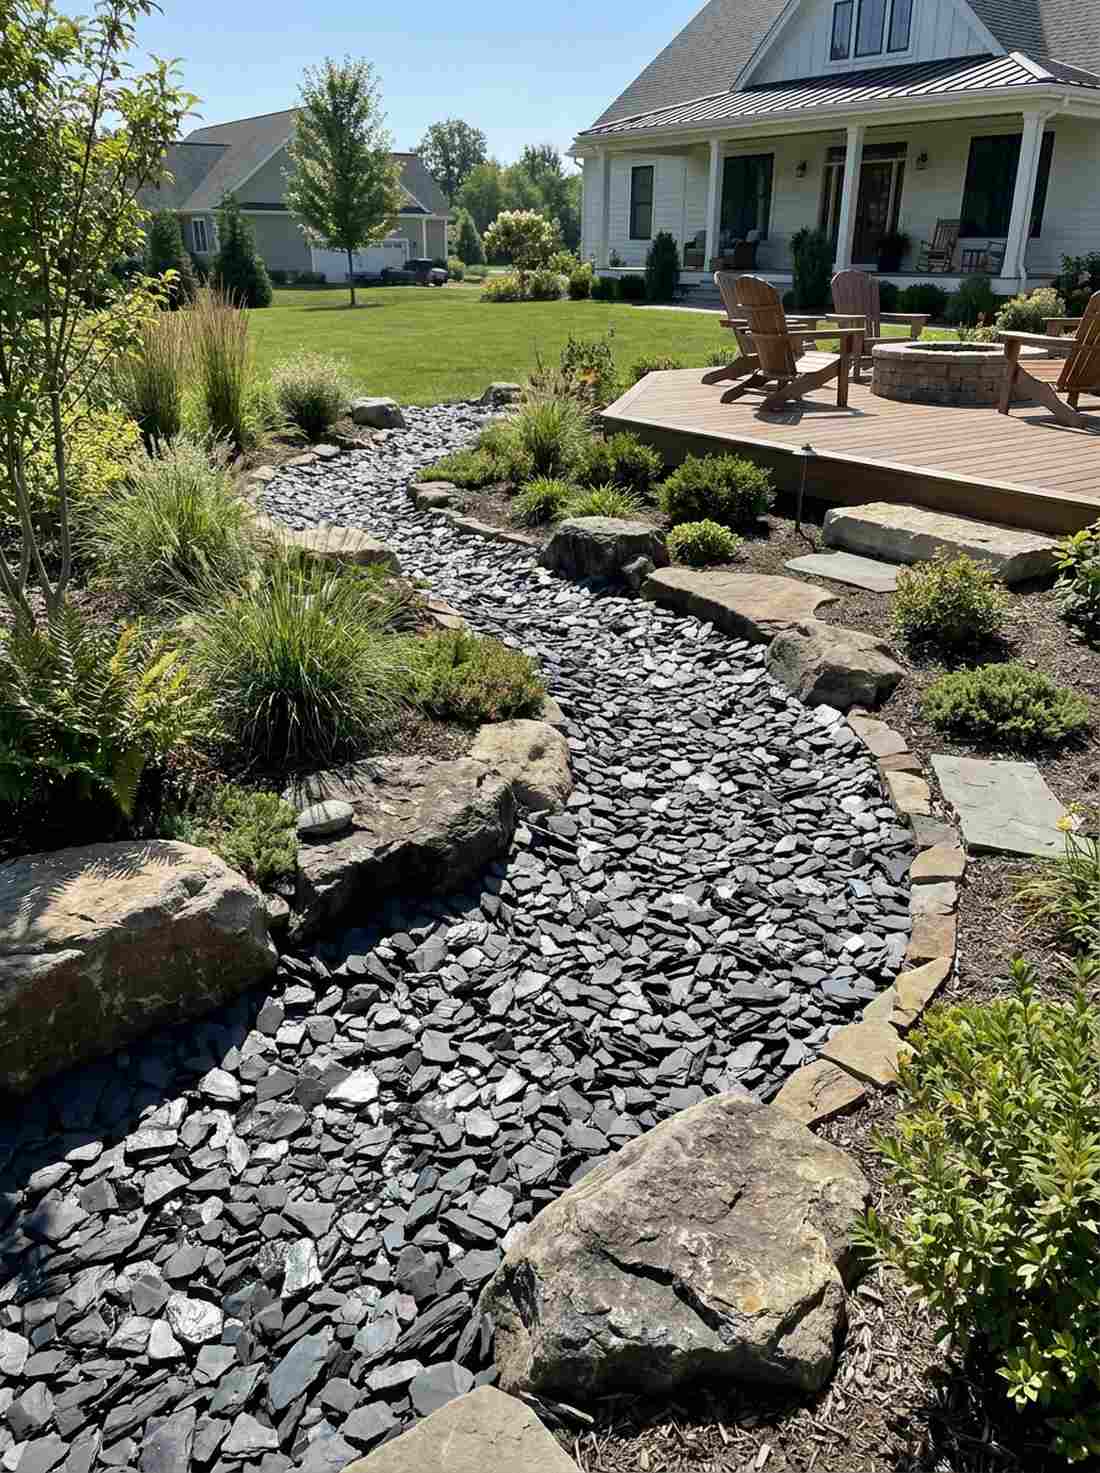
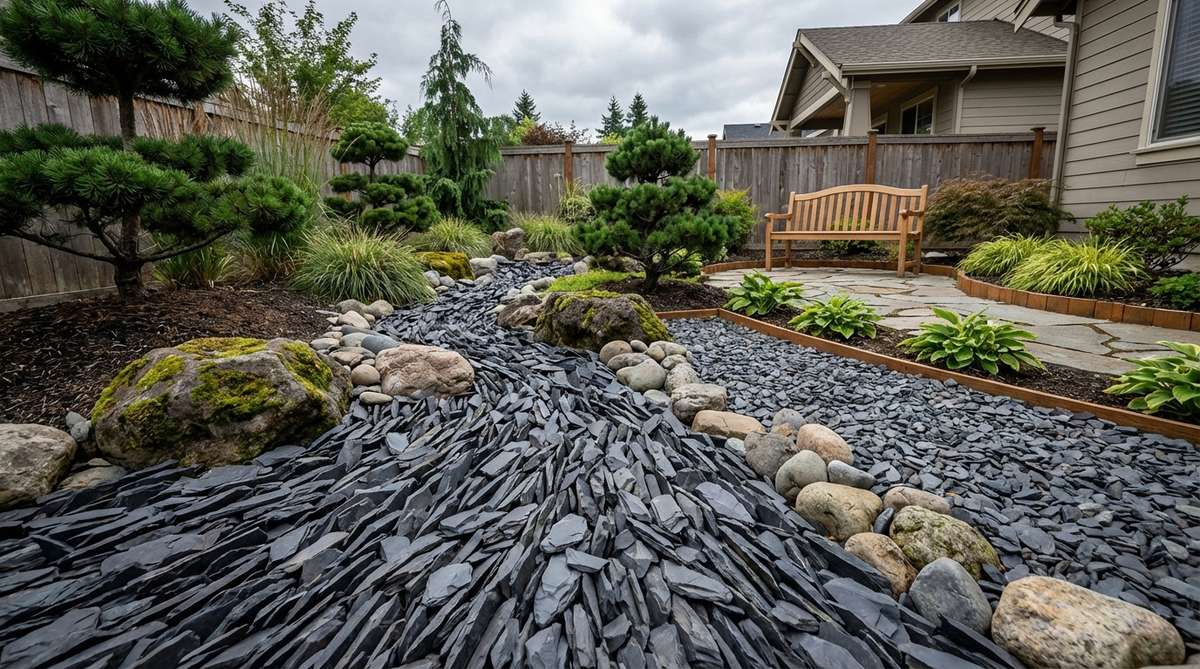
Mimics the dynamic, rushing energy of a mountain creek without a single drop of water. This dry riverbed layout solves horrible yard drainage issues while looking remarkably intentional.
Swapping out generic round river stones for sharp, dark charcoal slate fragments looks far more expensive than it is. Layering these pieces tightly together produces a glistening, textured ribbon that practically sparkles under the midday sun.
A 15-foot dry stream project costs about $100 to $200. Pin this layout if you need a stylish way to hide landscape fabric and control runoff.
- Key Materials: Charcoal slate chips and landscape fabric
- Vibe / Style: Flowing organic movement
- Difficulty: Beginner-friendly trenching
- Budget Breakdown: Slate Chips: $120 | Weed Barrier: $40.
- Creator’s Tip: Vary the width of the stream, making it wider at bends to perfectly mimic natural water erosion.
- Smart Sourcing: charcoal slate landscape chips (bulk bag) and heavy-duty ground cover staples.
Most DIYers get pathway connections completely wrong… until they try the exact bridge layout coming up next, which fixes flow instantly.
15. Stone Bridge Installations
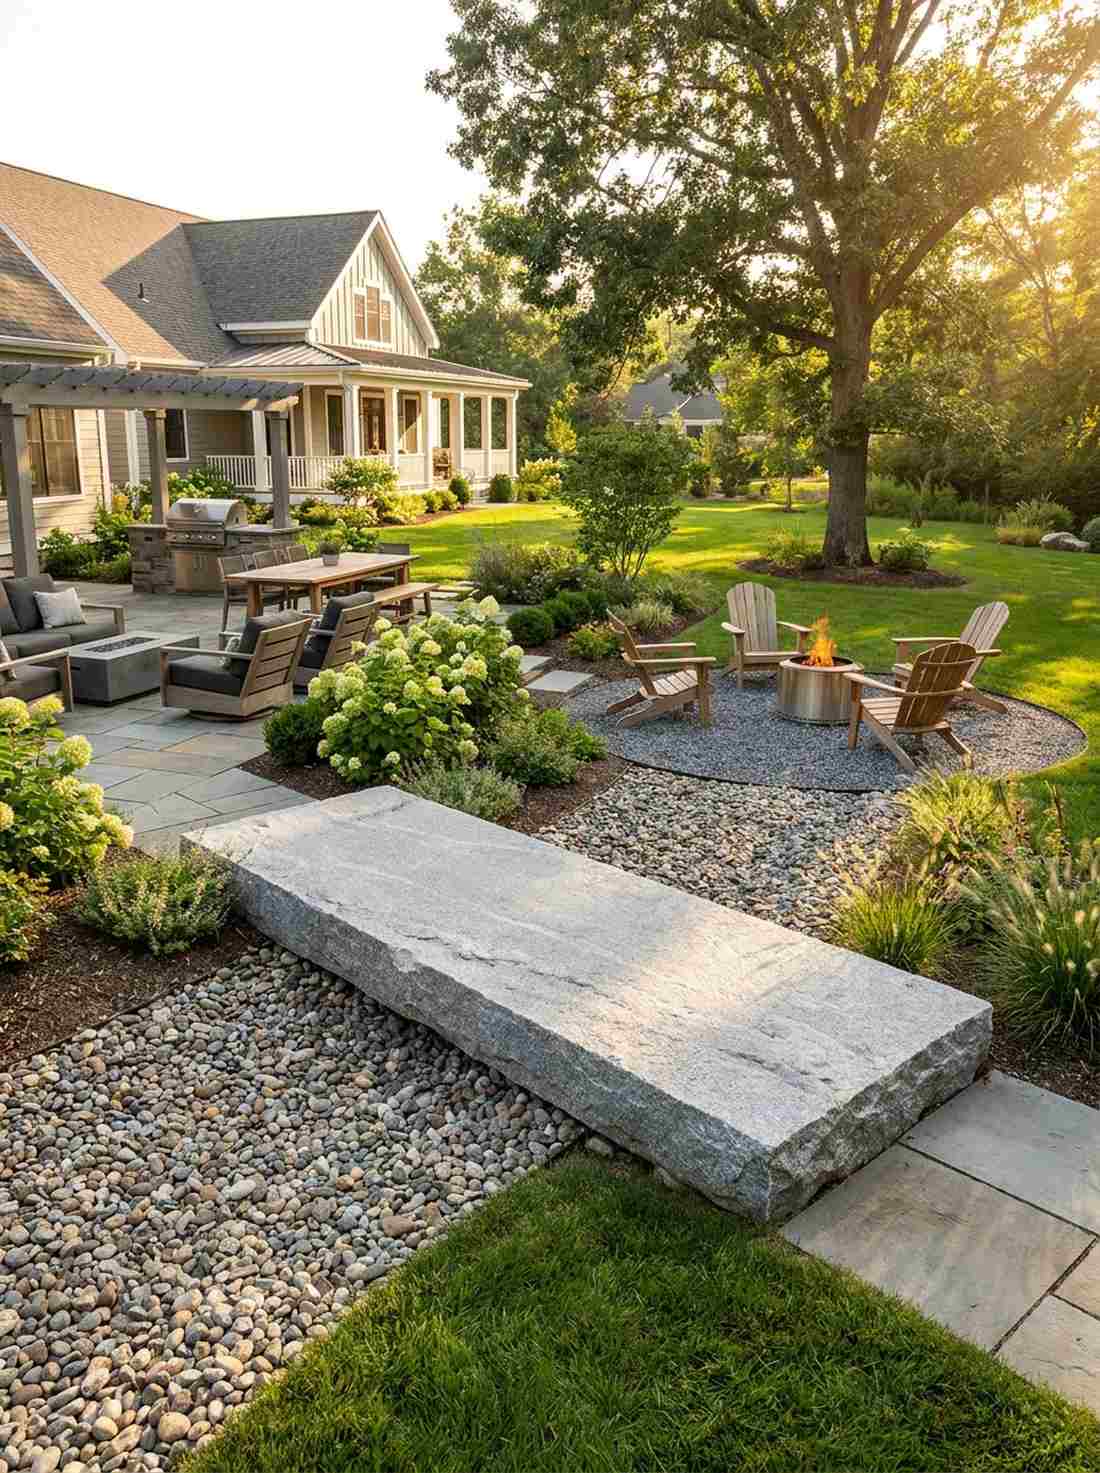
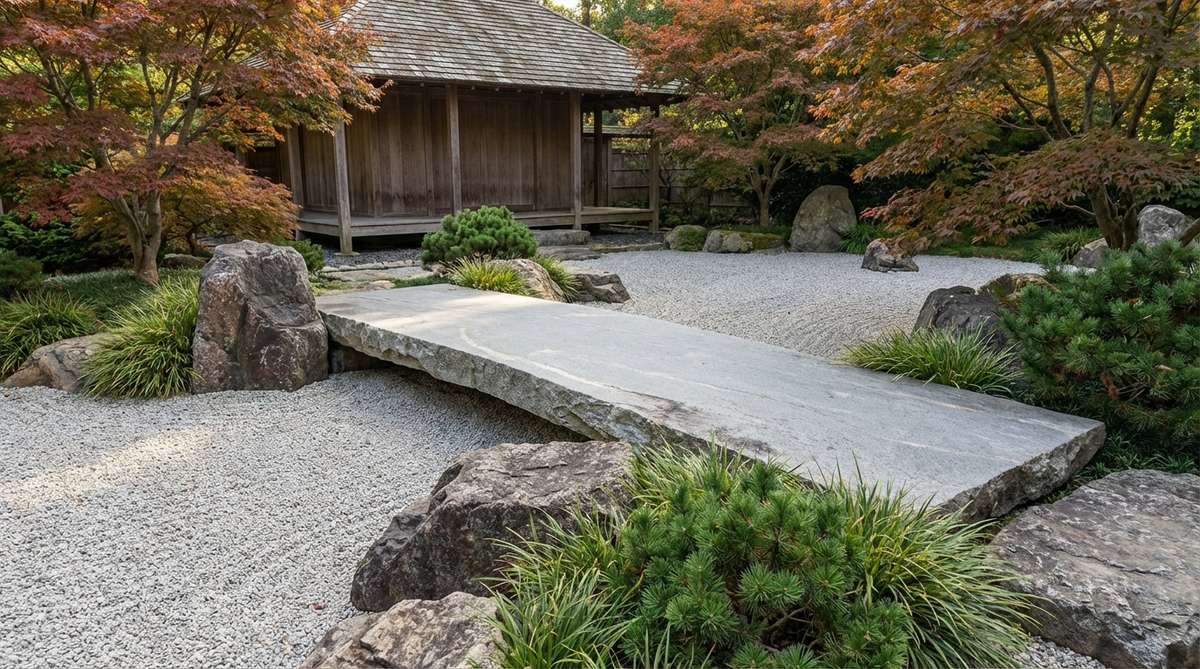
Brings a profound sense of journey and transition to a previously flat landscape. Installing a minimalist slab bridge is the ultimate hack for connecting a patio to a fire pit area over a gravel bed.
Rather than buying a tacky pre-built wooden arch, dropping a single massive stone slab delivers a shockingly premium look. It acts as a literal anchor point that forces visitors to pause, transforming a simple walk into an intentional experience.
Sourcing a thick, durable slab usually costs $150 to $300 at a local stone yard. It’s an architectural flex that requires zero maintenance.
- Key Materials: Single large limestone or granite slab
- Vibe / Style: Grounded transition pathway
- Difficulty: Heavy lifting requires help
- Budget Breakdown: Stone Slab: $200 | Leveling Base: $30.
- Creator’s Tip: Ensure the bridge slab is at least 3 inches thick so it won’t crack under heavy foot traffic.
- Smart Sourcing: commercial-grade leveling sand (bulk) and heavy-duty lifting straps (2-person kit).
Lighting Innovations for Zen Spaces
Contemporary Zen gardens extend their functionality beyond daylight hours through carefully integrated lighting systems that maximize the return on your landscaping investment.
16. LED Strip Pathway Markers
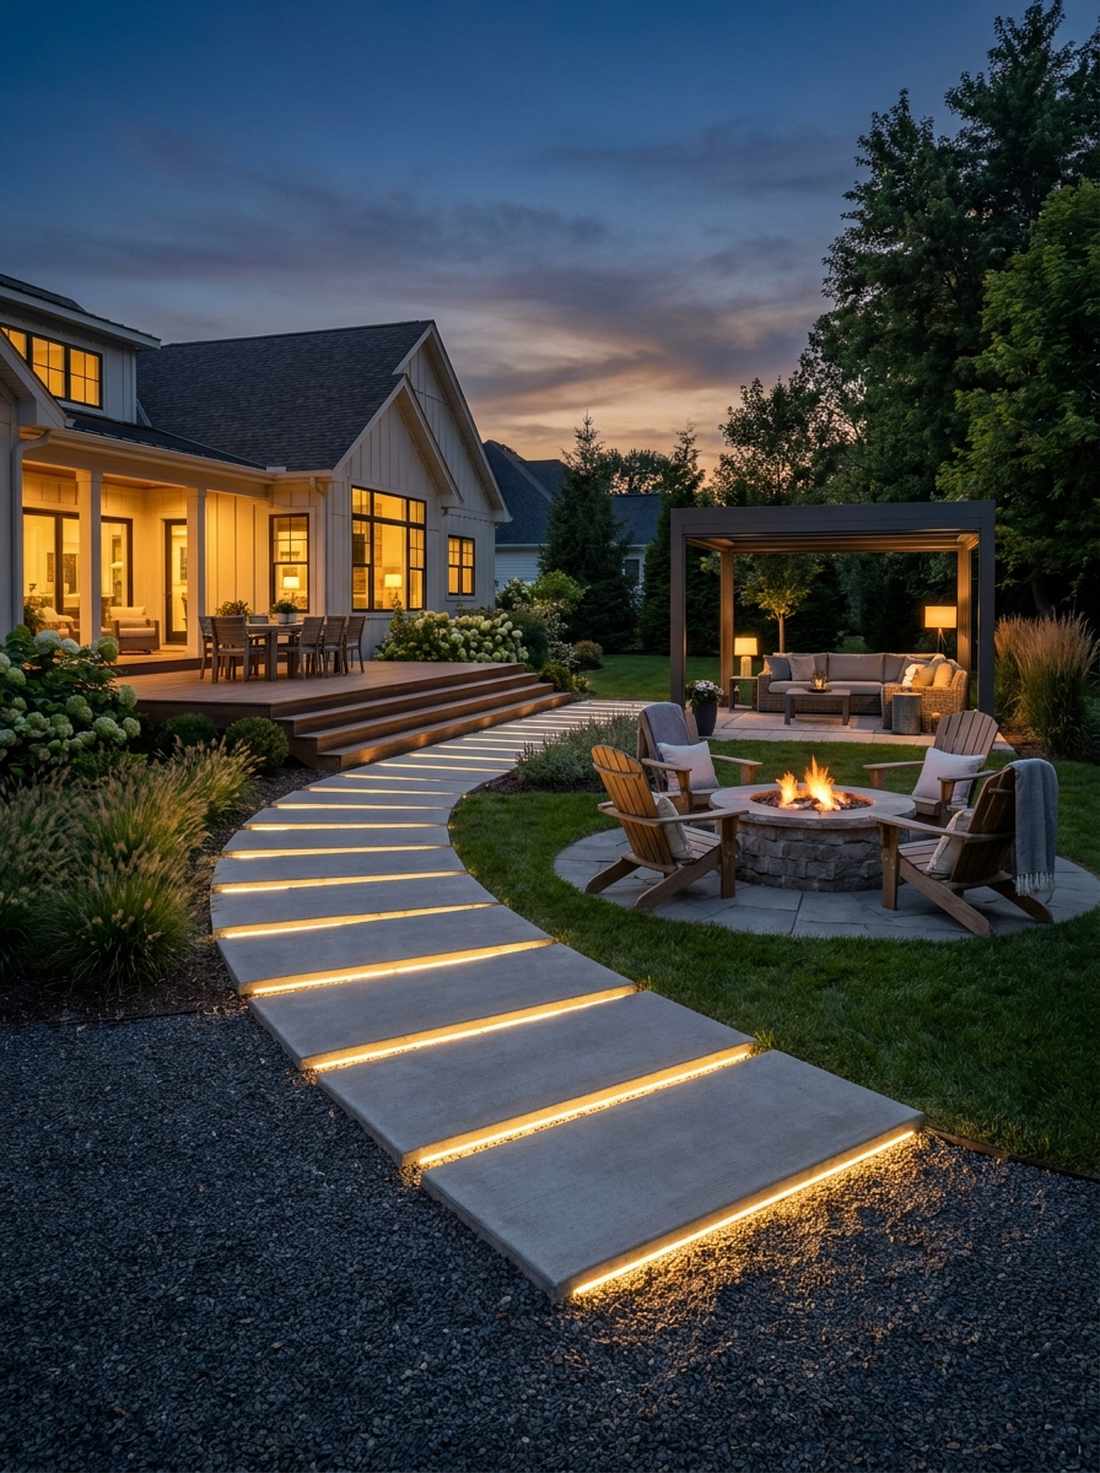
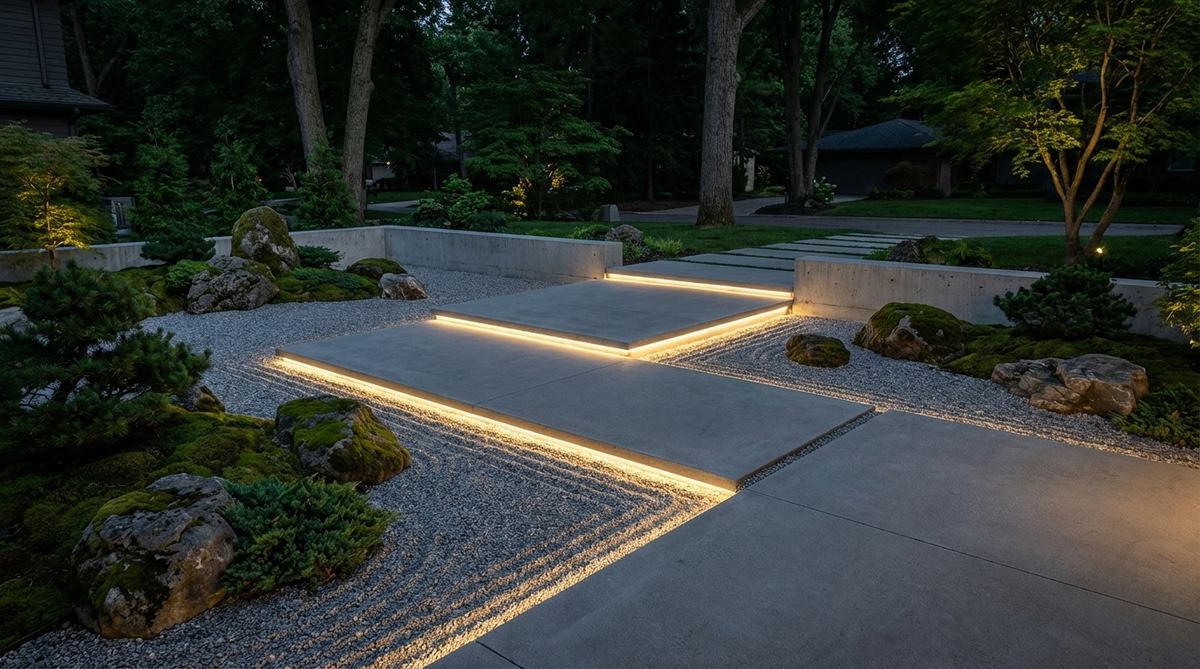
Creates a futuristic yet totally relaxing runway that makes walking around at night feel magical. Concealed edge lighting is highly effective for outlining concrete slabs alongside a dark driveway.
Recessing low-voltage strips under the lip of the stone completely bypasses the ugly glare of traditional stake lights. This specific lighting technique delivers a designer-level finish that makes your outdoor space look like an elite nighttime lounge.
A smart waterproof lighting kit runs about $50 to $100. Save this idea to your outdoor lighting board for a massive curb appeal boost!
- Key Materials: Outdoor-rated LED light strips
- Vibe / Style: Ambient futuristic glow
- Difficulty: Simple plug-and-play wiring
- Budget Breakdown: LED Kits: $60 | Mounting Clips: $15.
- Creator’s Tip: Always choose 2700K warm white LEDs to perfectly mimic the cozy glow of traditional candlelight.
- Smart Sourcing: UV-resistant outdoor LED strip kits and waterproof silicone mounting channels.
17. Uplighted Statement Stones
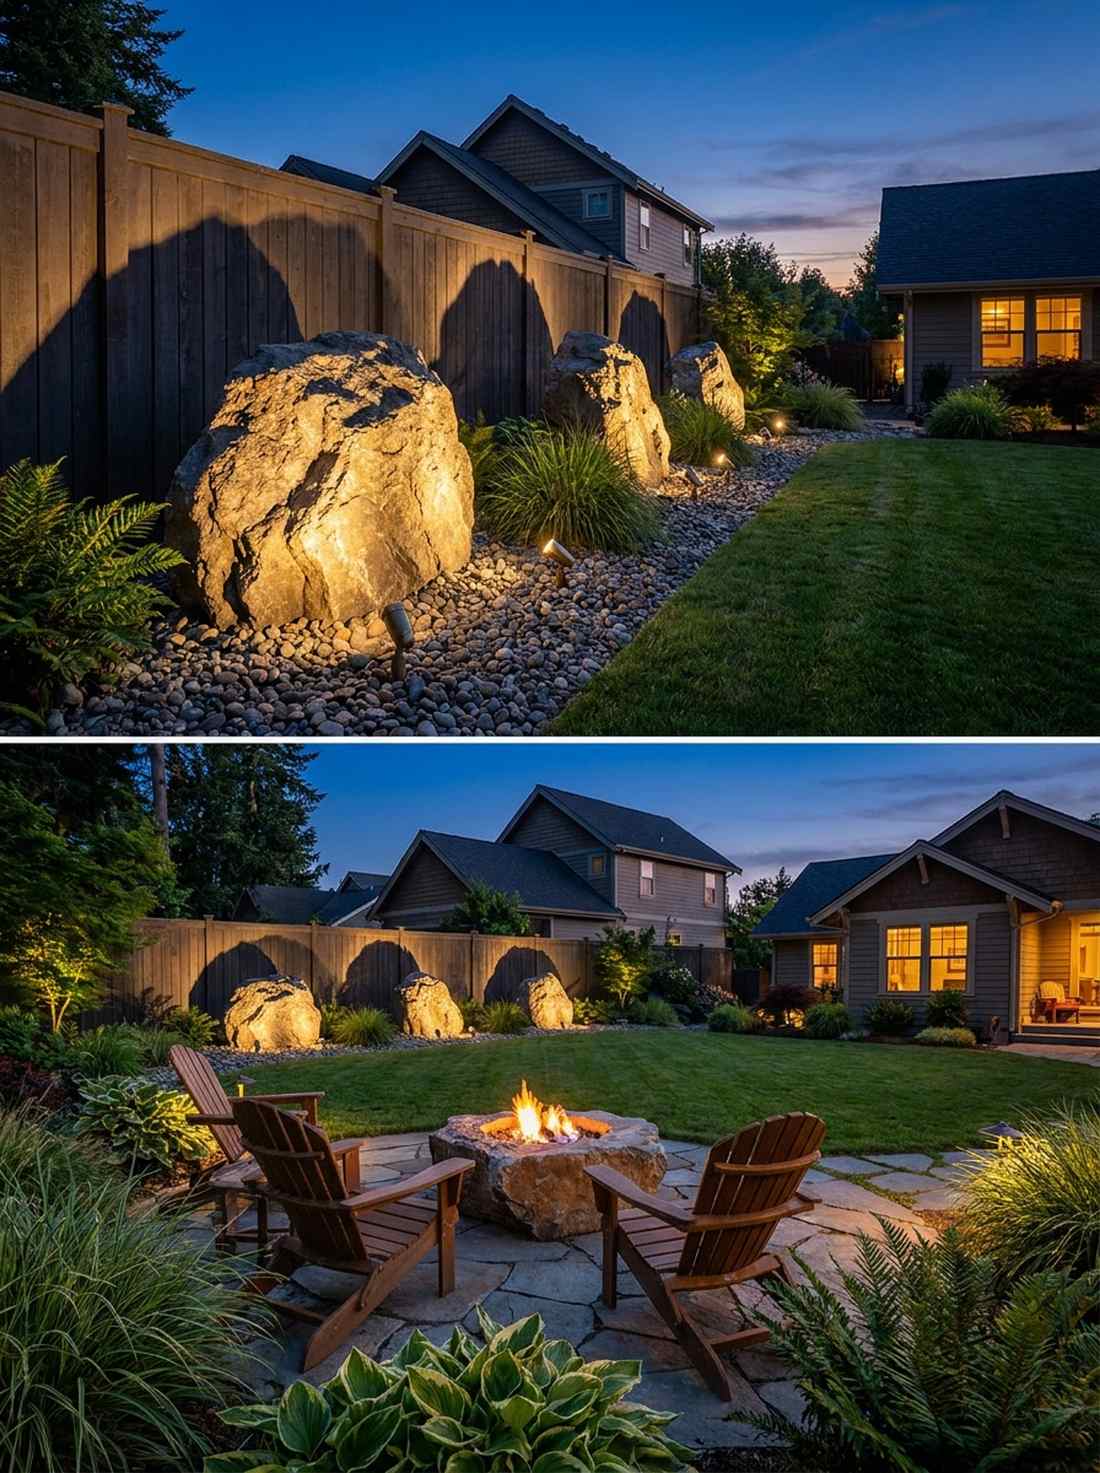
Turns an ordinary rock into a dramatic, theatrical masterpiece the second the sun goes down. Directional base lighting works wonders for highlighting massive boulders positioned near dark fence lines.
Graze-lighting the rough texture of the stone from below creates giant, imposing shadows that look wildly expensive. It’s a landscaping secret that transforms a static daytime garden into an entirely different, dynamic visual experience at night.
High-quality brass spotlights cost roughly $40 to $80 each. Highly recommended for creating massive depth in small, cramped backyards.
- Key Materials: Low-voltage brass uplights
- Vibe / Style: Dramatic theatrical shadows
- Difficulty: Easy placement and aiming
- Budget Breakdown: Brass Fixtures: $120 | Transformer: $40.
- Creator’s Tip: Angle the light at a steep 45-degree trajectory to maximize the shadow length stretching across the gravel.
- Smart Sourcing: low-voltage brass landscape spotlights (starter kit) and smart outdoor lighting timers.
18. Fiber Optic Rock Lights
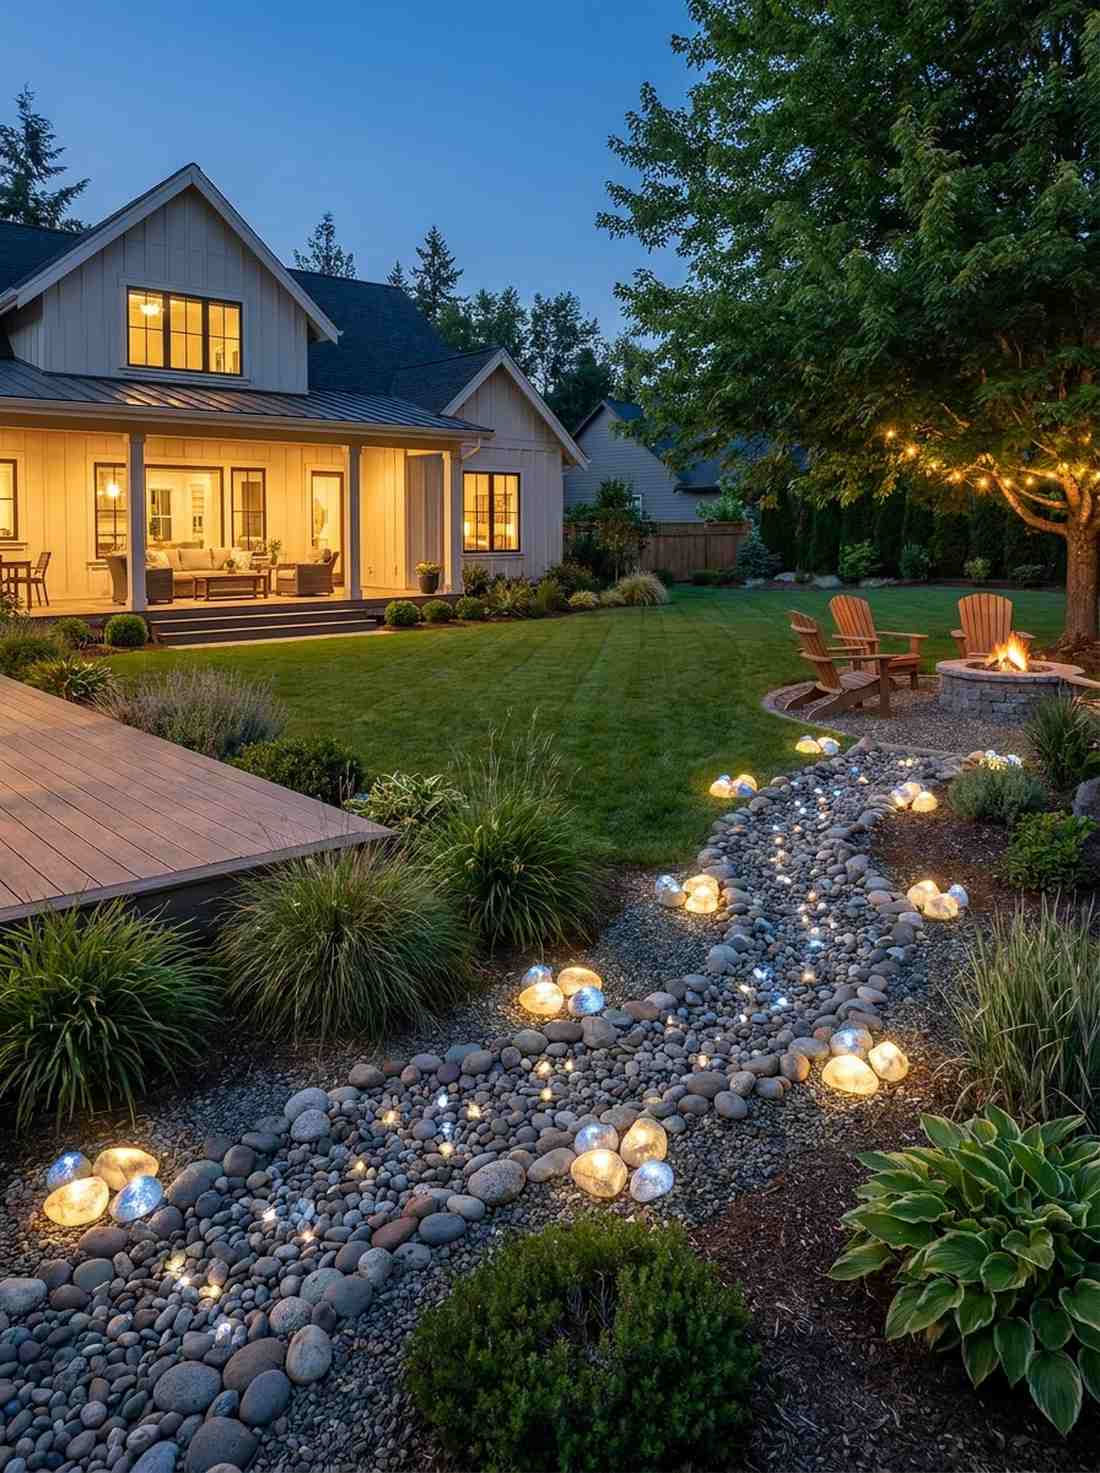
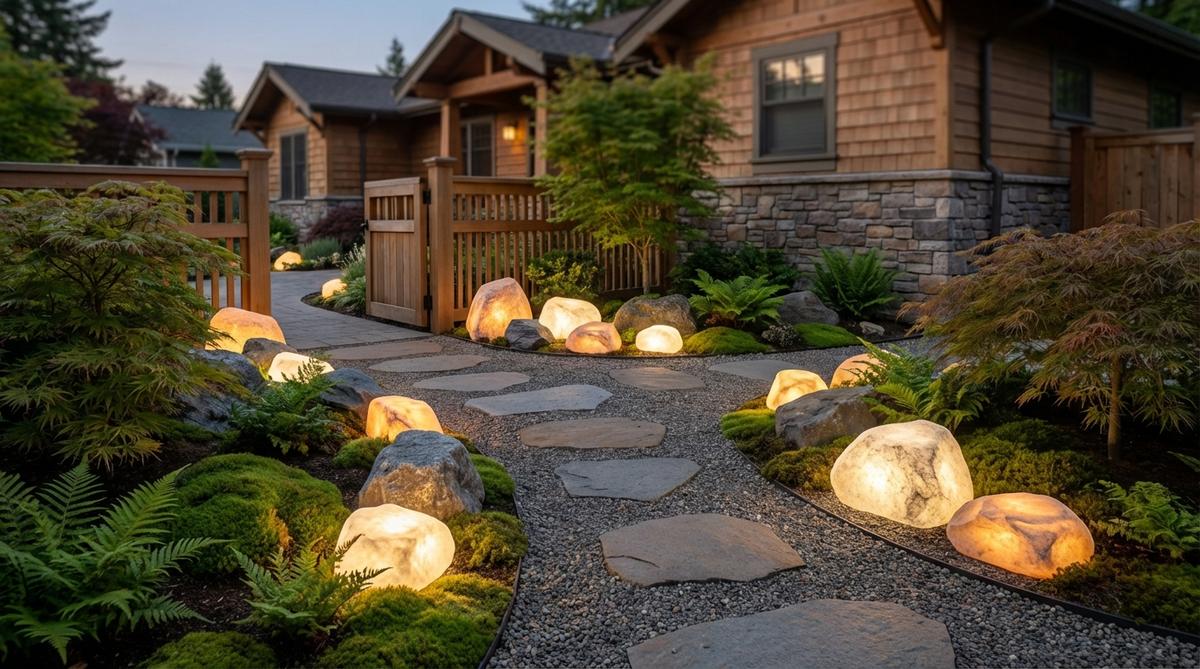
Feels like tiny glowing stars have literally fallen into your garden bed. Scattering faux glowing stones is the ultimate hack for lighting up a twisting dry riverbed layout.
Ditching obvious, bulky light fixtures for stealthy illuminated rocks creates an unbelievably premium look that baffles guests. By weaving these durable resin pieces into your existing gravel, the garden seamlessly transitions from a daytime sanctuary into a glowing nightscape.
A set of premium fiber optic landscape rocks costs around $100 to $150. Pin this to your modern landscaping board for a totally invisible daytime setup!
- Key Materials: Resin artificial rocks with integrated LEDs
- Vibe / Style: Subtle magical wayfinding
- Difficulty: Beginner setup
- Budget Breakdown: Rock Light Set: $120 | Extension Cables: $25.
- Creator’s Tip: Cluster them organically in groups of three or five to mimic how real stones settle in nature.
- Smart Sourcing: fiber optic landscape rock lights (multi-pack) and direct-burial low voltage landscape wire.
19. Backlit Translucent Panels
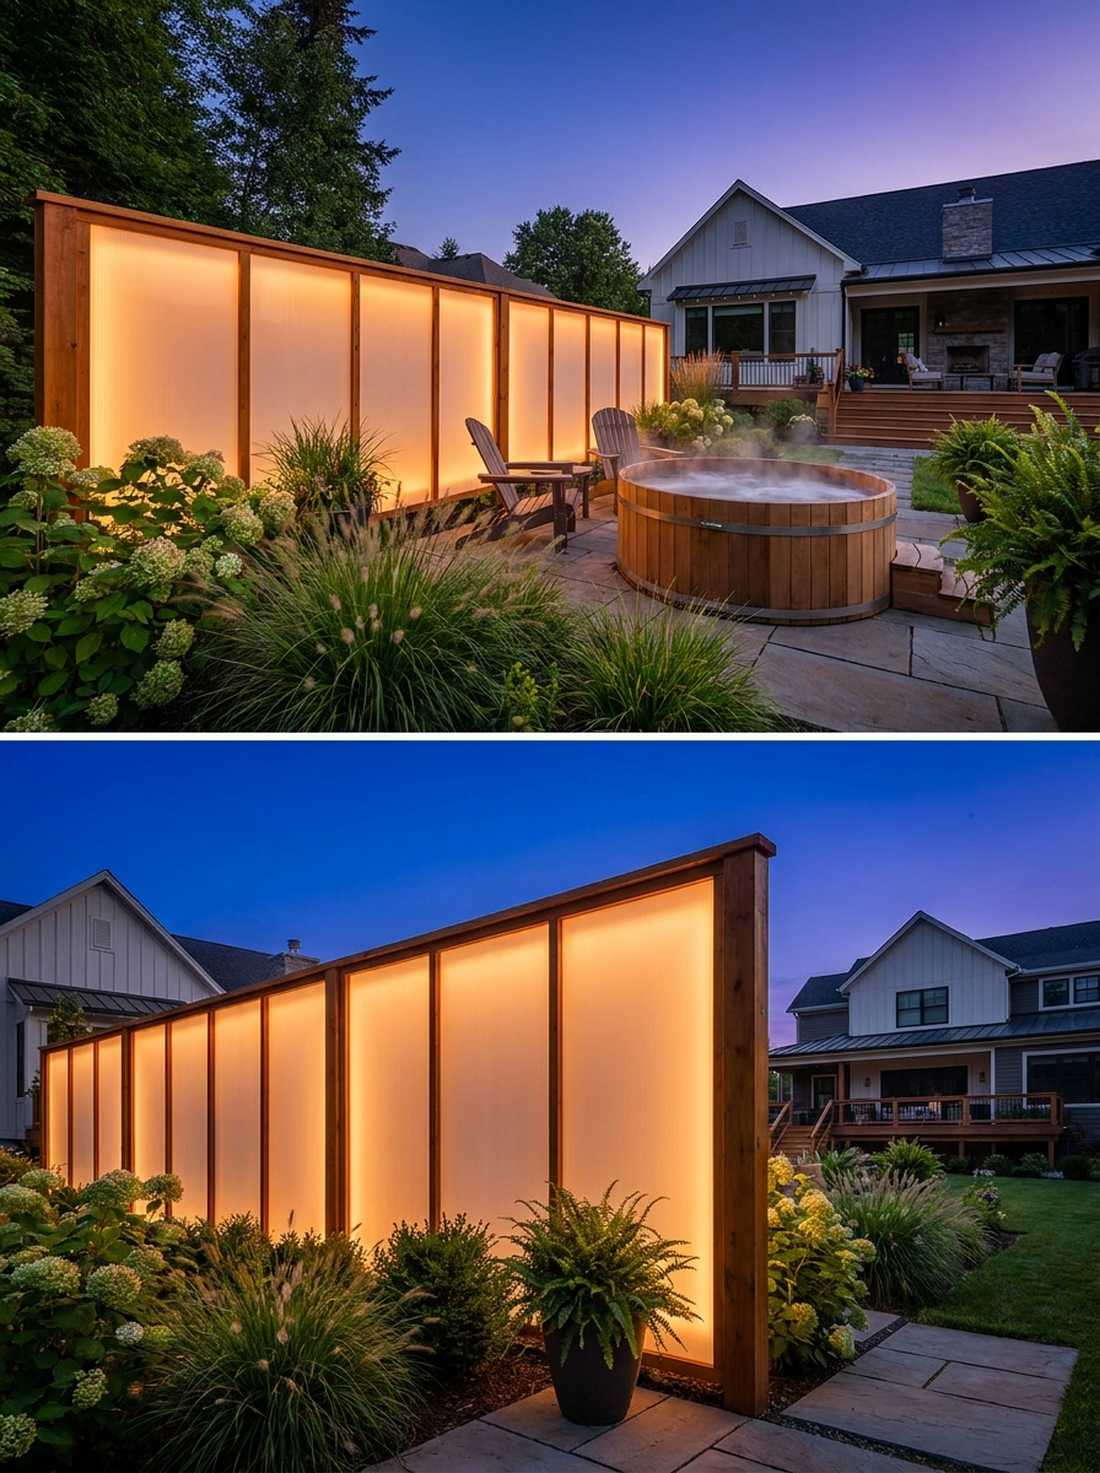
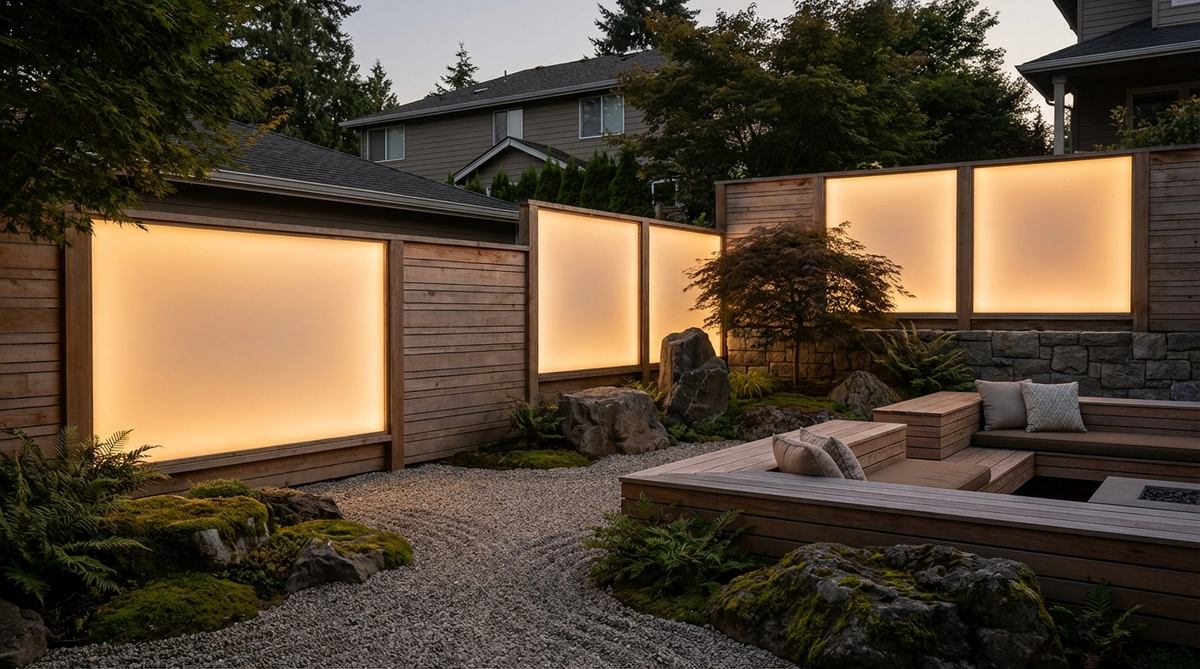
Radiates an atmospheric, spa-like energy that completely transforms the mood of the entire yard. Utilizing a glowing boundary wall is absolutely perfect for screening off a private outdoor shower or hot tub.
Washing light from behind a frosted resin sheet entirely eliminates harsh shadows and bypasses the usual cheap look of bare bulbs. This ambient glow technique practically guarantees a designer-level finish that makes your outdoor space usable 24/7.
You can construct a glowing panel section for roughly $150 to $250. Save this layout if you want to combine premium privacy with breathtaking mood lighting.
- Key Materials: Frosted polycarbonate sheets and LED floodlights
- Vibe / Style: Immersive ambient warmth
- Difficulty: Moderate framing required
- Budget Breakdown: Polycarbonate Sheets: $100 | Framing: $50 | Lights: $70.
- Creator’s Tip: Use smart RGBW bulbs behind the panel so you can shift from warm white to cool blue depending on the mood.
- Smart Sourcing: frosted polycarbonate roofing panels (pre-cut) and smart LED outdoor floodlights (2-pack).
If you think luxury setups require expensive electricians, this next lighting hack proves you can do it completely off-grid for under $100.
20. Solar-Powered Accent Lighting
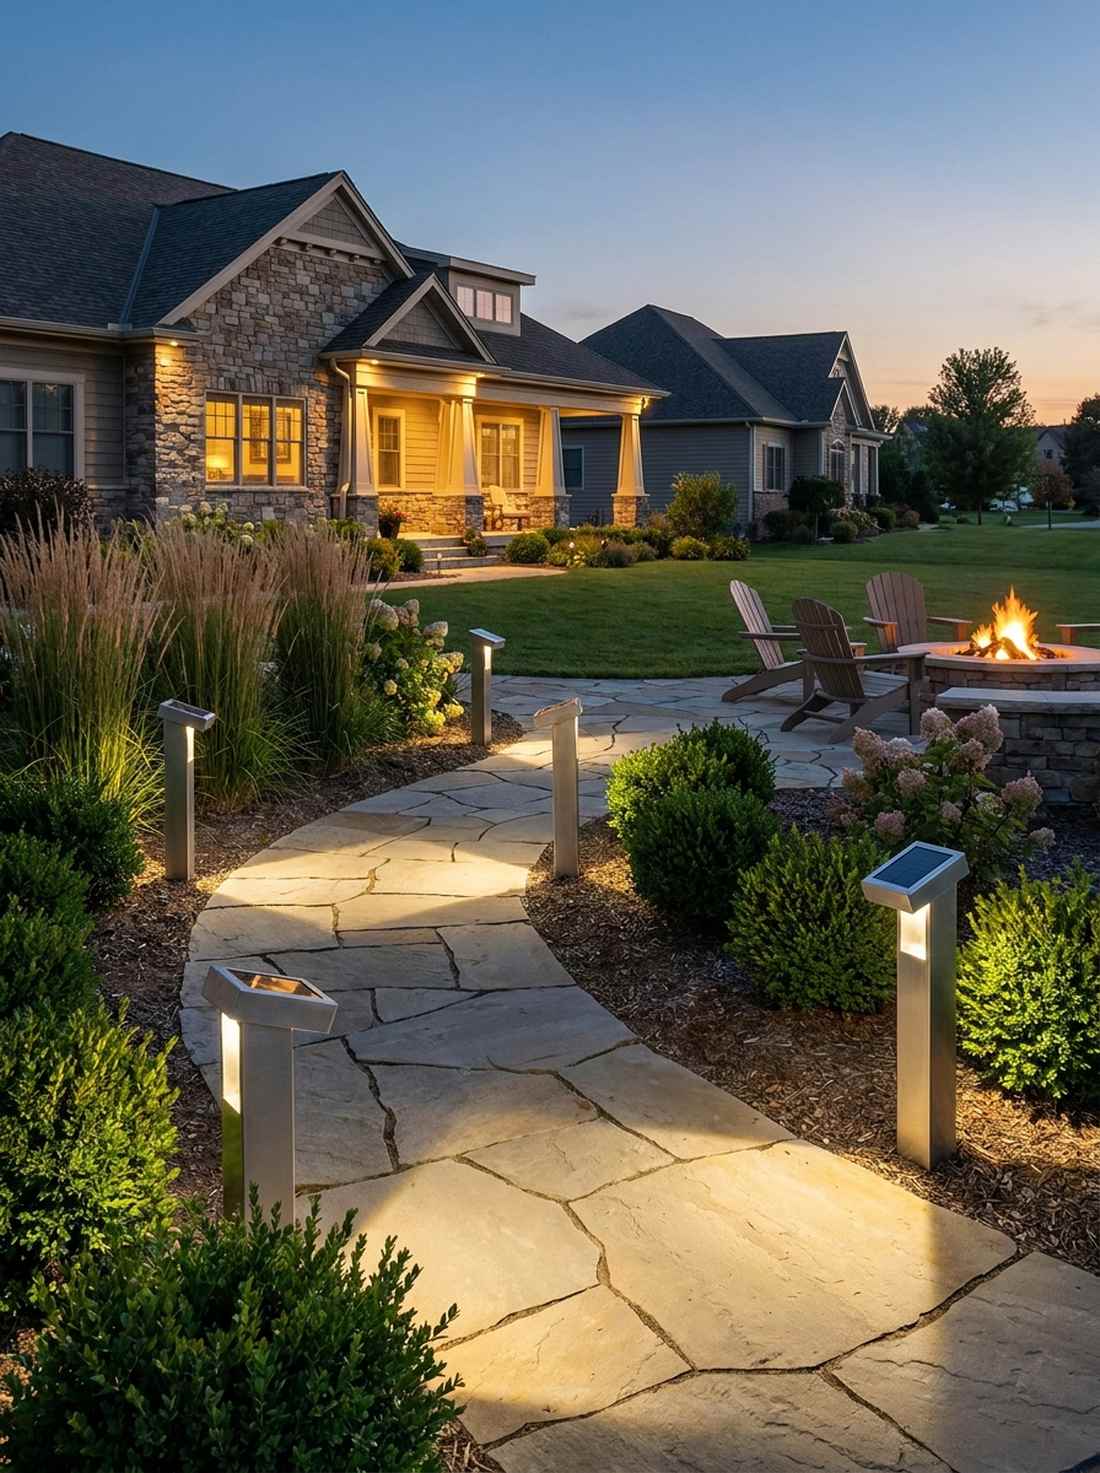
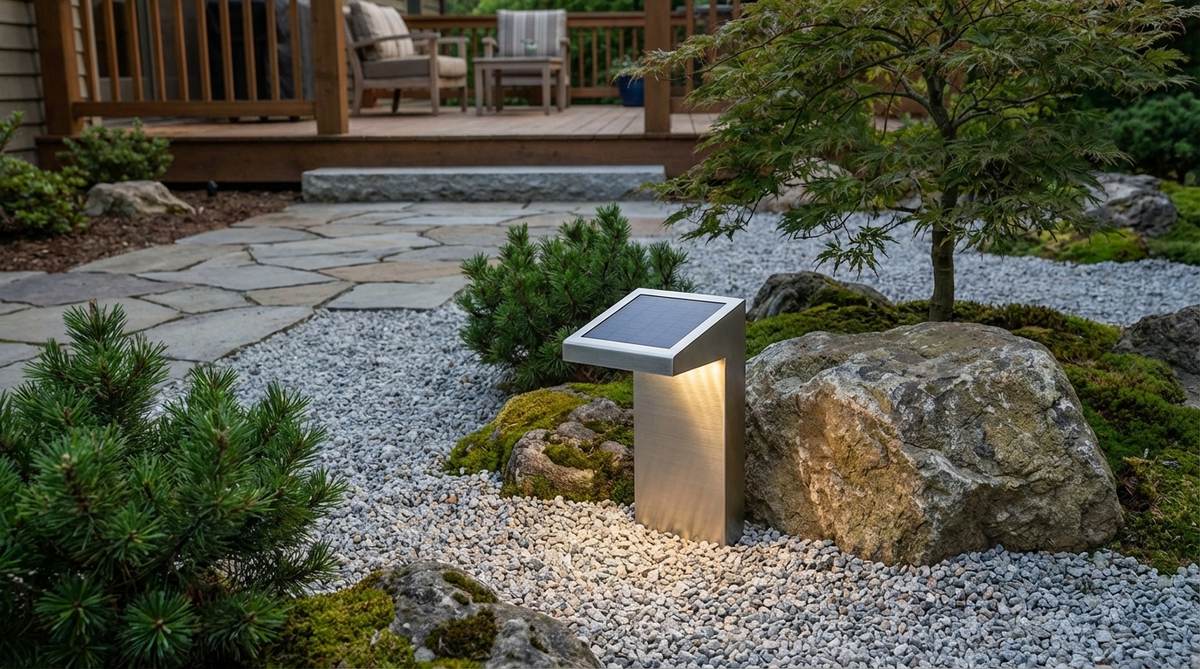
Provides a sharp, architectural glow without the nightmare of burying electrical trenches. Modern solar path kits operate beautifully as boundary markers for off-grid properties or remote garden corners.
Modernizing your setup with sleek, brushed metal solar stakes completely avoids the cheap plastic aesthetic of big-box store lighting. By relying on high-efficiency panels, you secure a highly reliable, premium look that genuinely costs absolutely zero dollars to run.
A set of high-end commercial solar fixtures usually costs $80 to $150. Highly recommended for a fast weekend win that instantly boosts nighttime security.
- Key Materials: Brushed metal solar LED stakes
- Vibe / Style: Sustainable modern efficiency
- Difficulty: Instant plug-and-play
- Budget Breakdown: Premium Solar Stakes: $100.
- Creator’s Tip: Wipe the solar panels once a month with a damp microfiber cloth to maintain peak charging efficiency.
- Smart Sourcing: commercial-grade solar pathway lights (6-pack) and heavy-duty metal ground stakes.
Material Guide: Cheap vs. Premium Aesthetic
Knowing exactly where to save and where to spend makes all the difference in achieving that “looks expensive but isn’t” vibe.
- Standard vs. UV-Resistant/Premium: Upgrading to UV-coated outdoor components completely stops fading, meaning your materials won’t look like cheap, brittle plastic after one summer.
- Pre-made Kits vs. Sourcing Locally: Buying commercial-grade starter kits actually saves money because you bypass the trial-and-error waste of buying the wrong mismatched materials from a hardware store.
Compact Modern Karesansui
Small-space interpretations bring Zen rock garden principles into urban courtyards, proving that high-end minimalist layouts do not require expansive square footage.
21. Corner Zen Pocket Gardens
Turns an awkward, unused sliver of dirt into a hyper-focused visual retreat. A micro-gravel corner layout is the ultimate cheat code for transforming tiny townhome patios.
Scaling down the footprint allows you to invest heavily in just three perfect, premium stones, which looks far more expensive than it is. By framing the space with sharp concrete edging, you deliver a designer-level finish that instantly cures visual clutter.
You can execute this entire pocket setup for under $50. Pin this right now if you are renting an apartment with a tiny, depressing balcony.
- Key Materials: Three specimen stones and fine white gravel
- Vibe / Style: Hyper-focused minimalist tranquility
- Difficulty: Very easy beginner project
- Budget Breakdown: Gravel: $15 | Stones: $20 | Edging: $15.
- Creator’s Tip: Use extremely fine grade sand-gravel so the rake patterns remain highly visible in such a small footprint.
- Smart Sourcing: fine white Zen garden sand (bulk bag) and miniature garden supplies (stone trio).
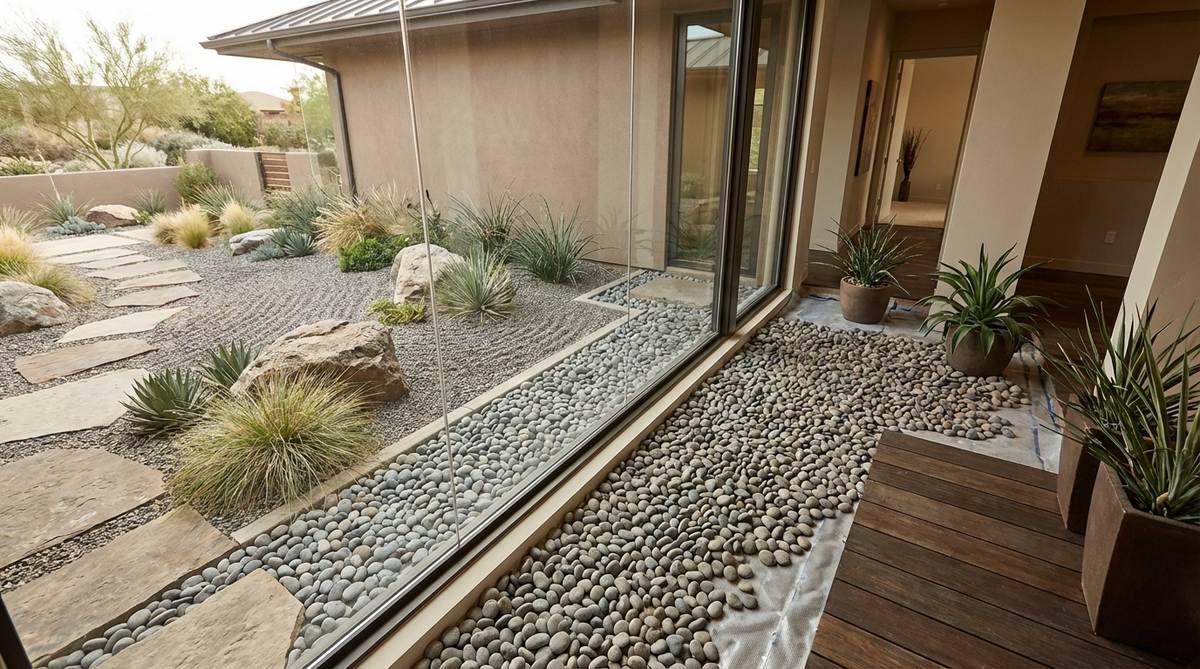
22. Courtyard Viewing Gardens
Feels like looking at a living framed painting every single time you drink your morning coffee. Designing a single-perspective landscape is incredibly powerful when viewed directly through large living room windows.
Optimizing every single stone placement for one specific sightline bypasses the usual chaotic look of 360-degree gardens. It guarantees an impeccably curated aesthetic that essentially acts as dynamic, multi-thousand-dollar outdoor artwork for the home.
Setting up this visual stage costs around $300 to $500. Save this layout idea if you want to visually expand your interior living space outward!
- Key Materials: Large viewing stones and raked gravel plains
- Vibe / Style: Framed living artwork
- Difficulty: Moderate spatial planning
- Budget Breakdown: Feature Stones: $200 | Gravel: $150 | Backdrop Plants: $100.
- Creator’s Tip: Sit in your favorite indoor chair and direct someone else outside to move the stones until the view is absolutely perfect.
- Smart Sourcing: zen garden starter kits (large scale) and premium weed barrier fabric.
23. Balcony Tabletop Zen Gardens
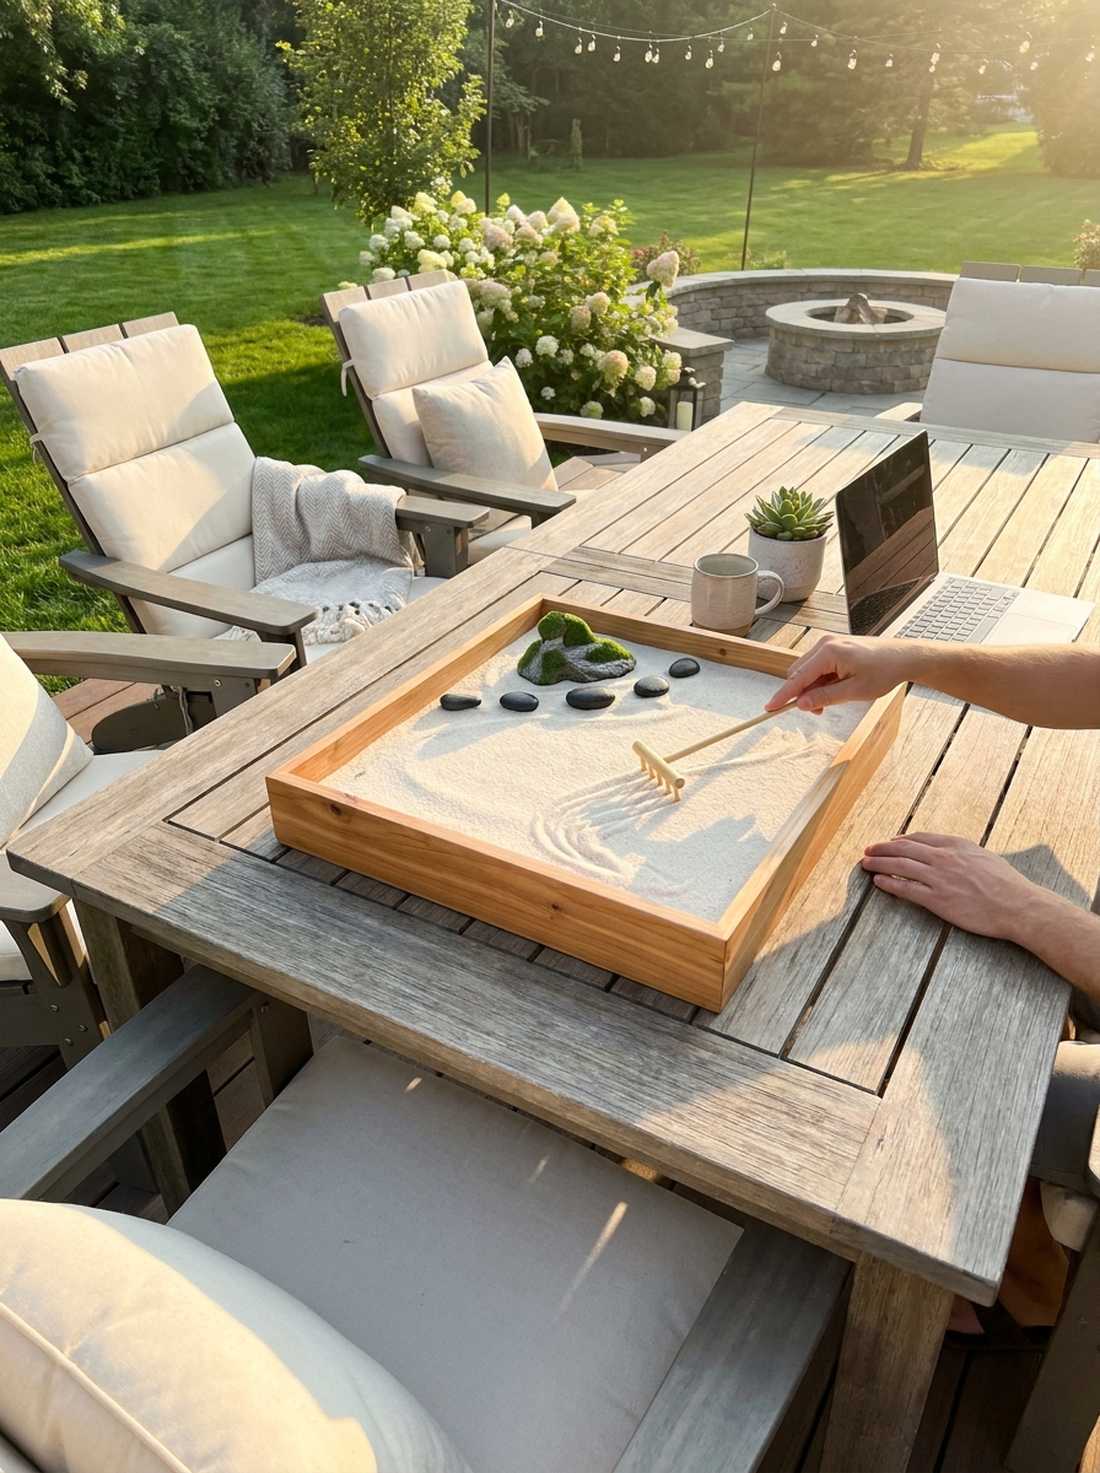
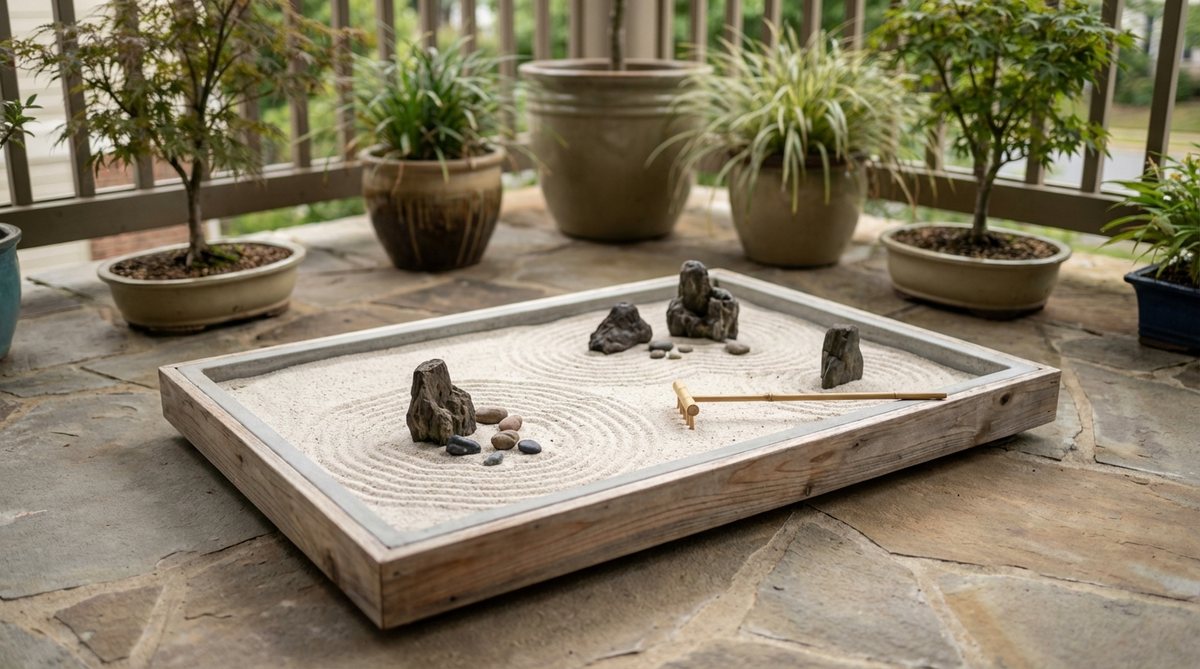
Brings a profound sense of calm right to your fingertips during a stressful workday. A portable tabletop gravel tray works flawlessly as a moving centerpiece for an outdoor dining set.
Condensing the philosophy into a high-quality cedar tray totally bypasses the need for massive backyard labor. Utilizing miniature garden kits allows you to easily switch up the aesthetic weekly, giving you a premium, interactive decor piece.
You can assemble a stunning tabletop version for just $30 to $60. Highly recommended as an anxiety-relieving desk upgrade for remote workers.
- Key Materials: Shallow cedar tray and fine grain sand
- Vibe / Style: Portable tactile relaxation
- Difficulty: Fun 10-minute assembly
- Budget Breakdown: Cedar Tray: $30 | Sand/Stones: $15 | Mini Rake: $5.
- Creator’s Tip: Seal the inside of the wooden tray with beeswax so the sand moisture doesn’t warp the wood over time.
- Smart Sourcing: premium tabletop Zen garden kits (complete set) and replacement miniature bamboo rakes.
24. Vertical Zen Wall Gardens
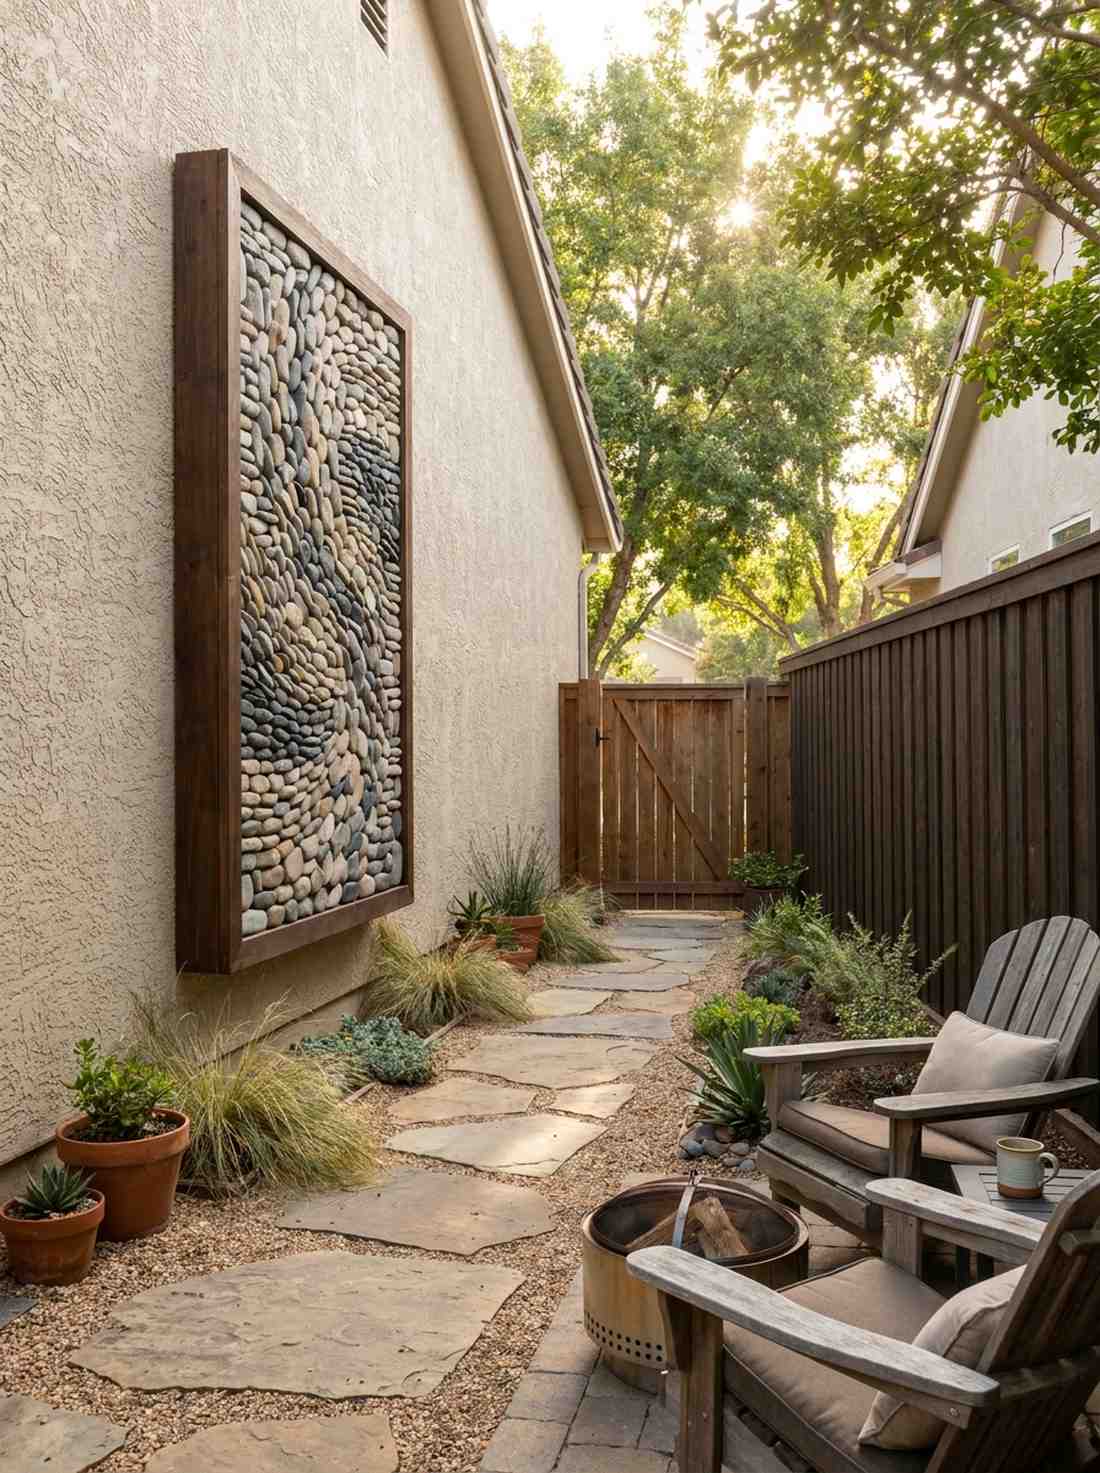
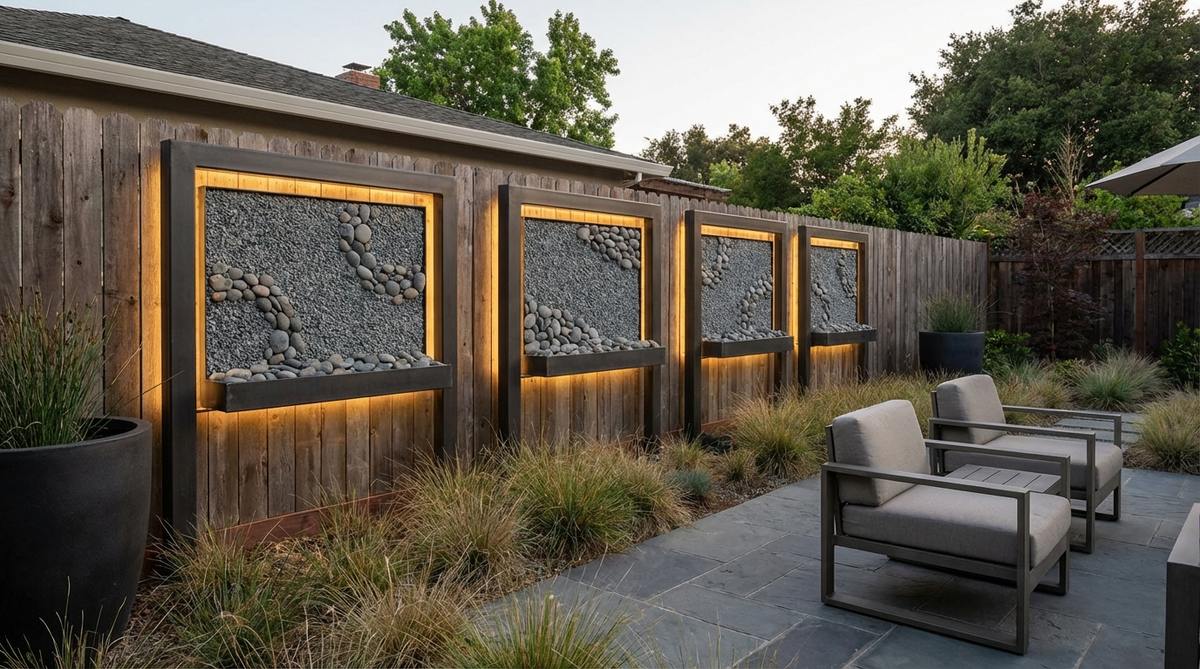
Looks like an incredibly expensive piece of modern gallery art hanging directly on your exterior wall. This vertical stone installation is perfect for hiding ugly stucco siding on a narrow side walkway.
Gluing carefully selected stones into a framed vertical arrangement completely flips traditional landscape design on its head. It delivers a stunning designer-level finish that uses literally zero square feet of precious ground space.
Building a custom framed panel runs about $100 to $200. Pin this to your home improvement board if you want to turn a boring fence into a masterpiece.
- Key Materials: Heavy-duty frame, construction adhesive, flat stones
- Vibe / Style: Gravity-defying architectural art
- Difficulty: Intermediate crafting and mounting
- Budget Breakdown: Custom Frame: $60 | Industrial Glue: $20 | Stones: $40.
- Creator’s Tip: Use a high-grab construction adhesive meant for masonry to ensure the stones never slide down in extreme summer heat.
- Smart Sourcing: heavy-duty masonry construction adhesive and pre-sorted flat river stones (bulk pack).
Most homeowners separate their house from their yard… until they see this incredibly fluid indoor-outdoor hack that makes a home feel twice as big.
Architectural Integration
The most successful layouts dissolve boundaries between built structures and landscape elements, utilizing commercial framing techniques for a seamless transition.
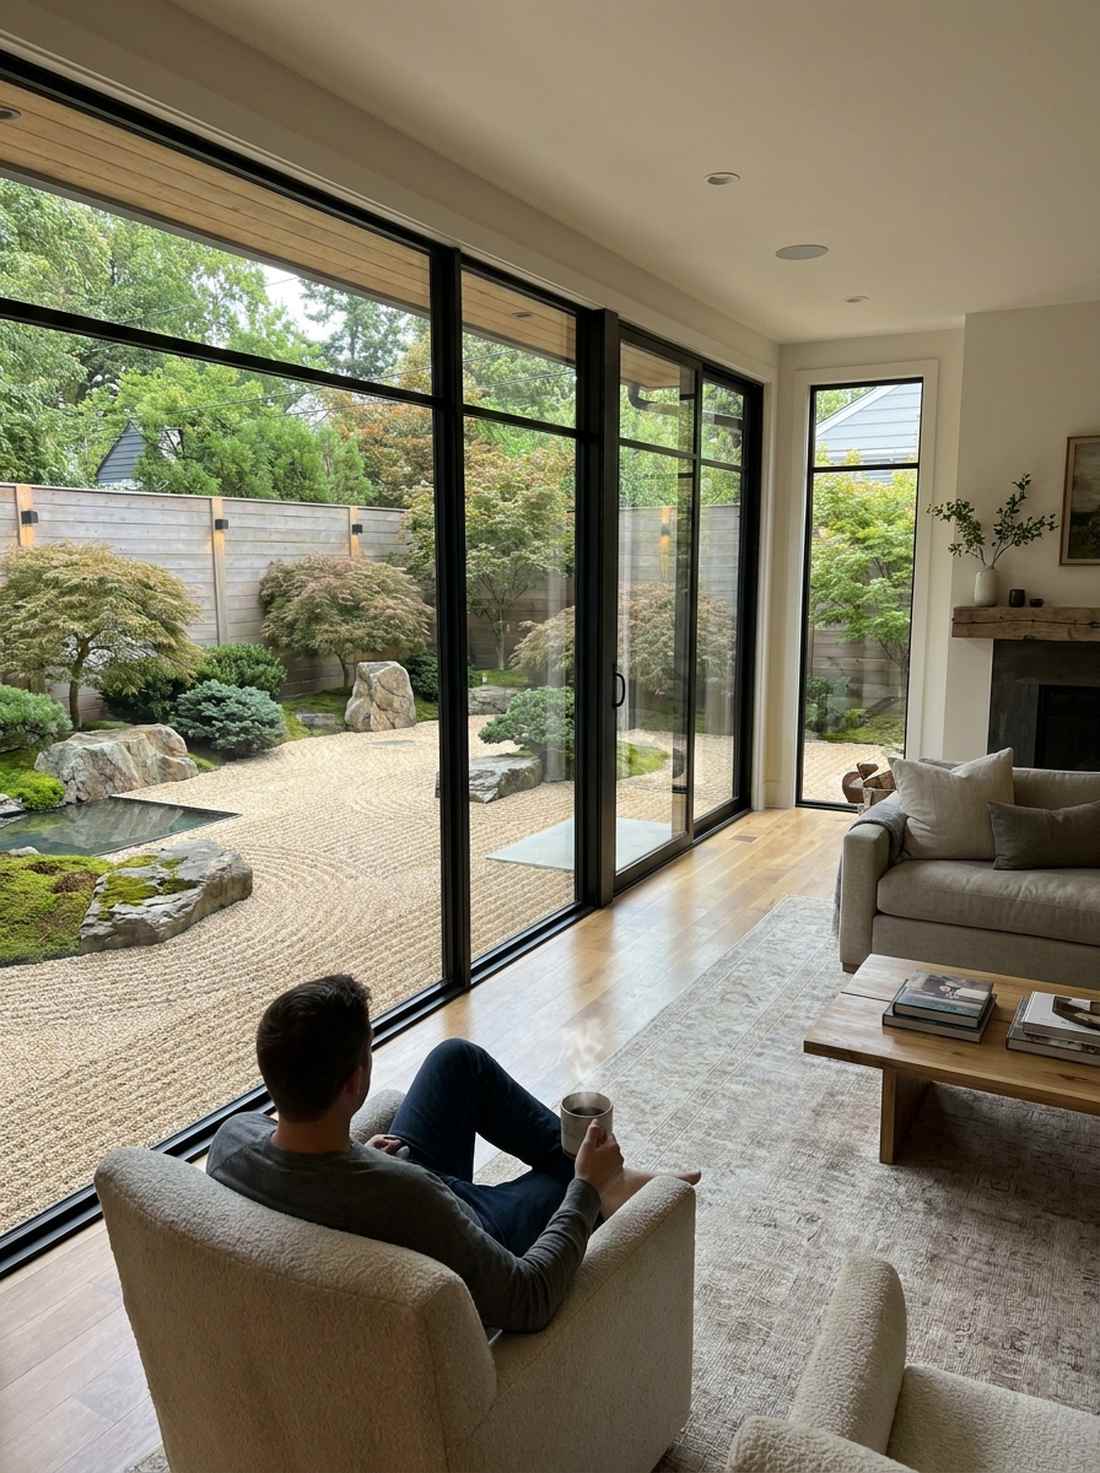
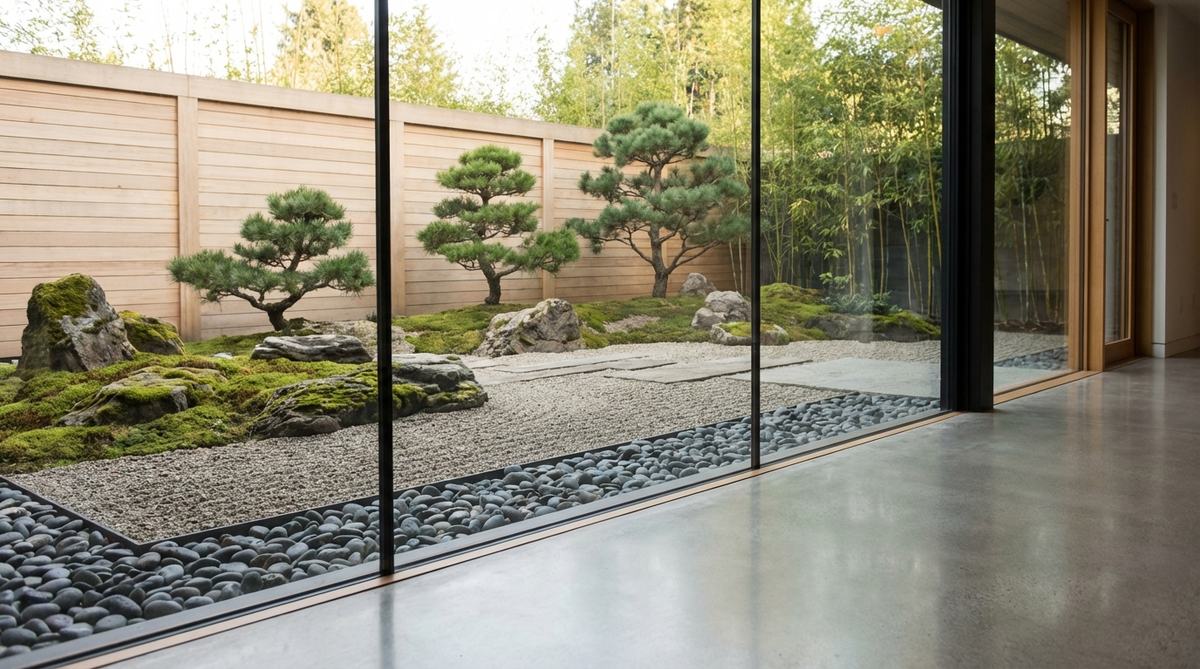
25. Indoor-Outdoor Gravel Continuity
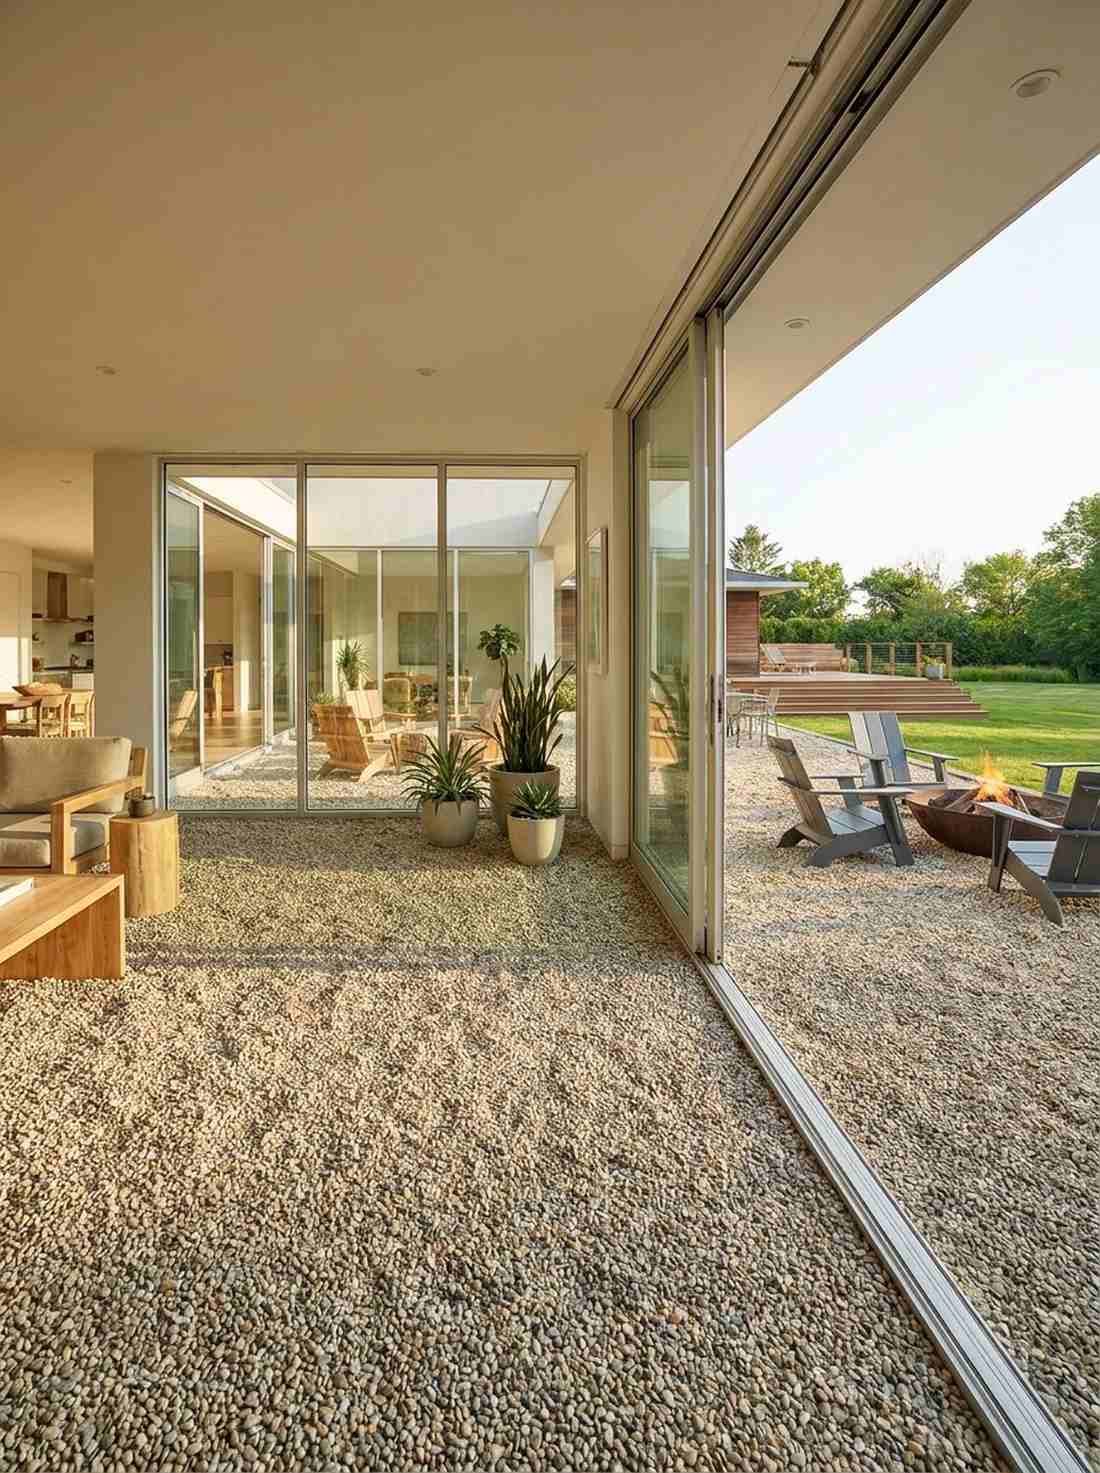
Creates a mind-blowing optical illusion that literally erases the boundary of your home. A continuous gravel flow pattern is the ultimate architectural flex for homes with sliding glass walls.
Running the exact same premium gravel from the patio straight into an indoor atrium looks ridiculously expensive and highly custom. By utilizing heavy-duty moisture barriers inside, you lock in a world-class aesthetic without risking interior water damage.
Executing this material bridge costs roughly $300 to $600. Save this concept to your dream home board for an unforgettable spatial upgrade.
- Key Materials: Uniform gravel and low-profile door tracks
- Vibe / Style: Seamless modern expansion
- Difficulty: Advanced interior/exterior prep
- Budget Breakdown: Bulk Gravel: $250 | Indoor Moisture Barrier: $100 | Edging: $50.
- Creator’s Tip: Wash and dry the indoor portion of the gravel thoroughly before placing it to avoid tracking dust into the house.
- Smart Sourcing: commercial-grade indoor moisture barrier rolls and premium washed landscaping pebbles.
26. Glass Wall Framed Compositions
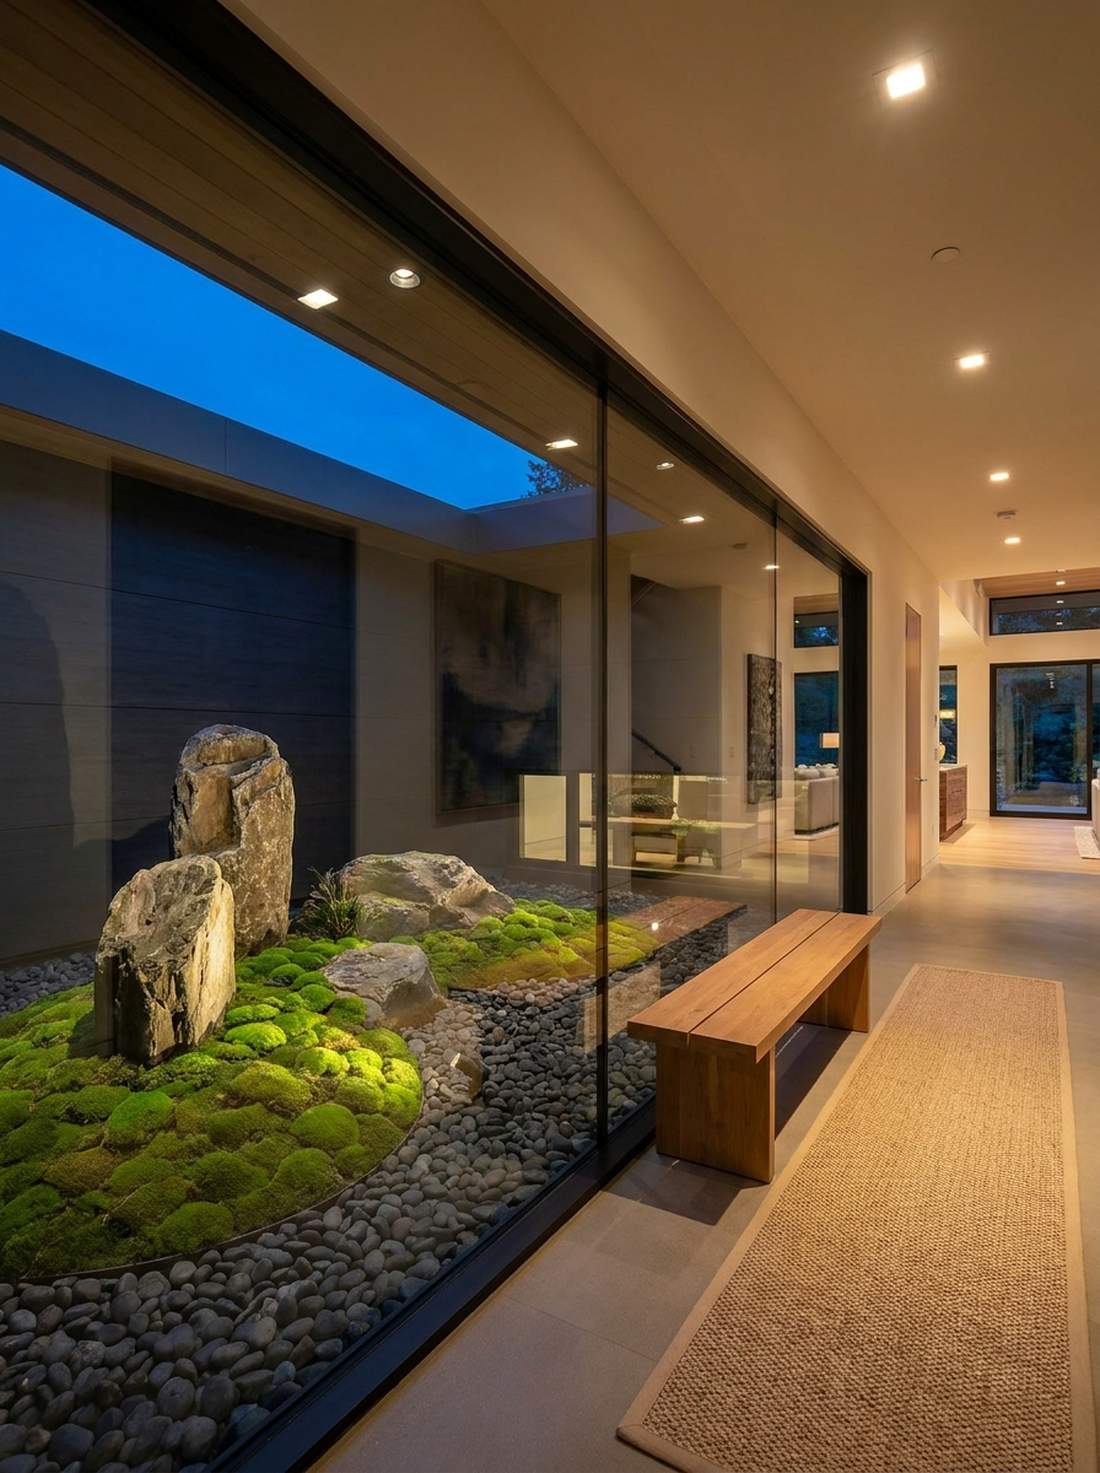
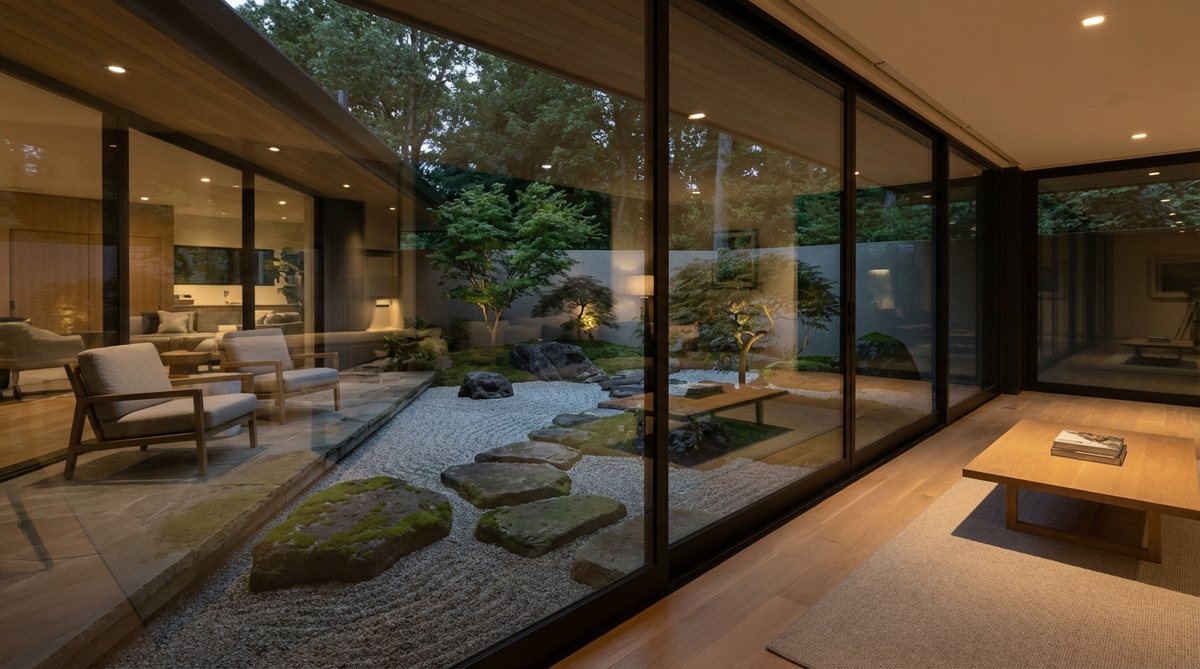
Turns your hallway window into an exclusive, high-end nature documentary playing 24/7. Glazing-framed landscape art operates brilliantly in narrow, otherwise useless architectural cutouts.
By treating the glass as a literal picture frame, you bypass generic planting and force a highly intentional, museum-quality display. It’s a fantastic layout trick that delivers a designer-level finish by using interior lighting to reflect against the exterior stones at night.
Prepping a mini viewing zone costs between $200 and $400. Highly recommended for instantly elevating the interior value of a modern home.
- Key Materials: Feature stones, moss, and targeted spotlights
- Vibe / Style: Museum-quality interior viewing
- Difficulty: Moderate exterior setup
- Budget Breakdown: Specimen Stones: $150 | Moss/Gravel: $100 | Lighting: $80.
- Creator’s Tip: Position the exterior lighting slightly angled away from the glass to completely eliminate blinding indoor glare.
- Smart Sourcing: pre-cut preserved moss sheets (bulk pack) and anti-glare outdoor landscape spotlights.
27. Rooftop Zen Installations
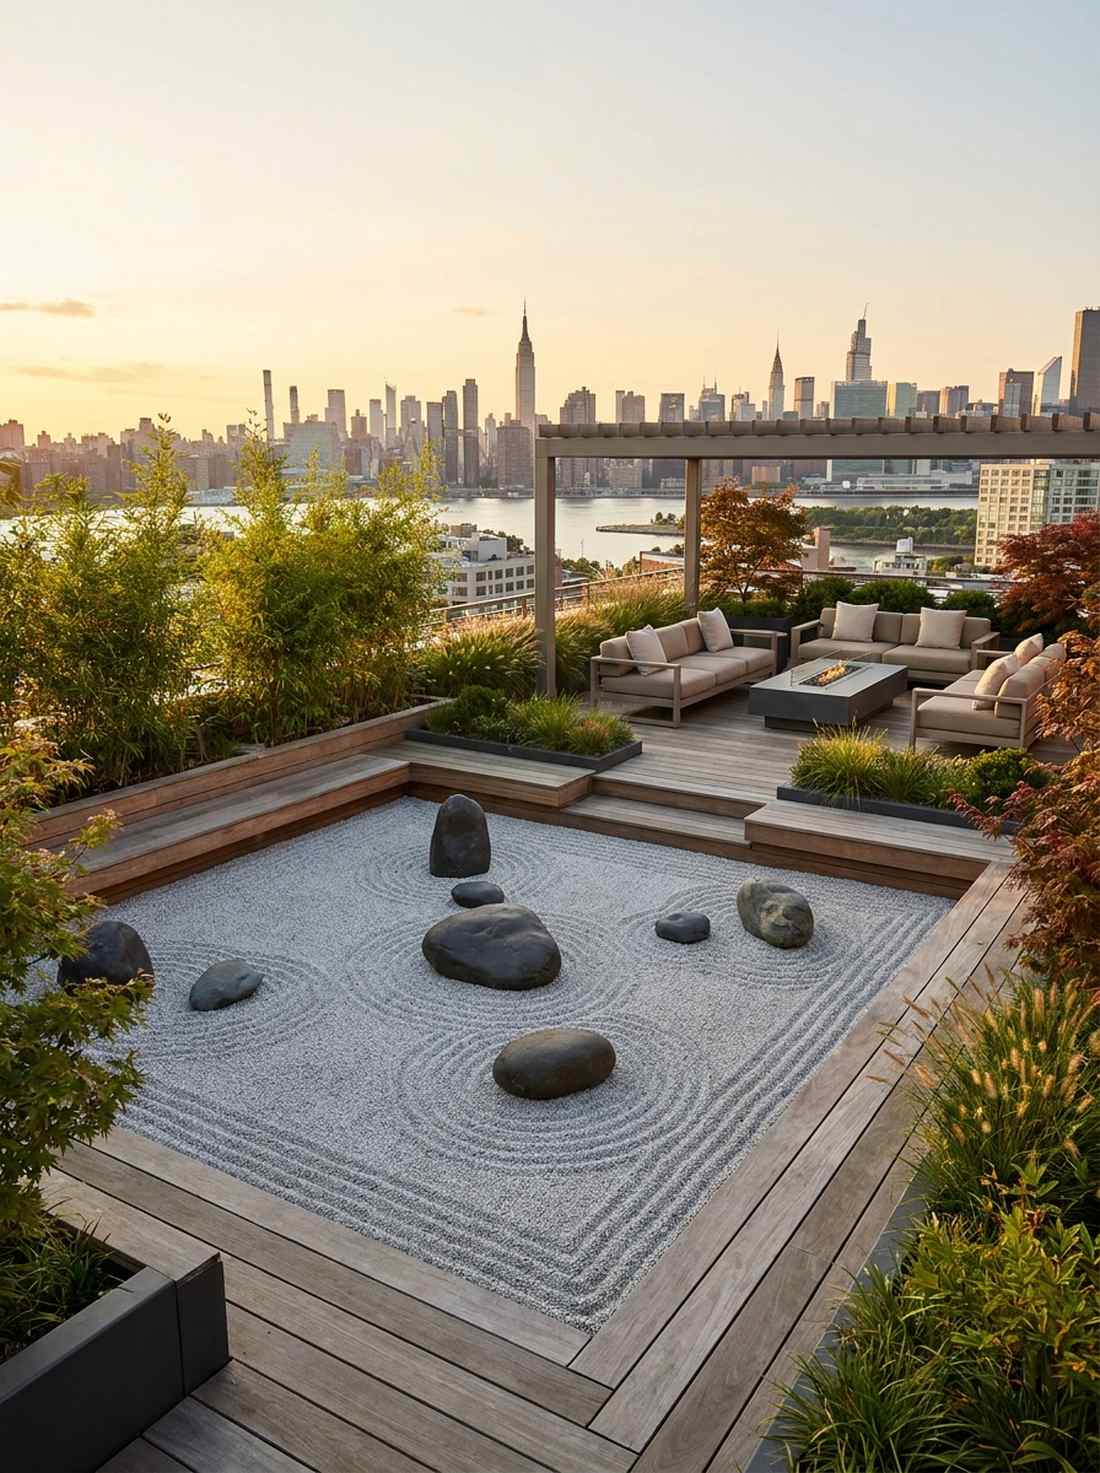
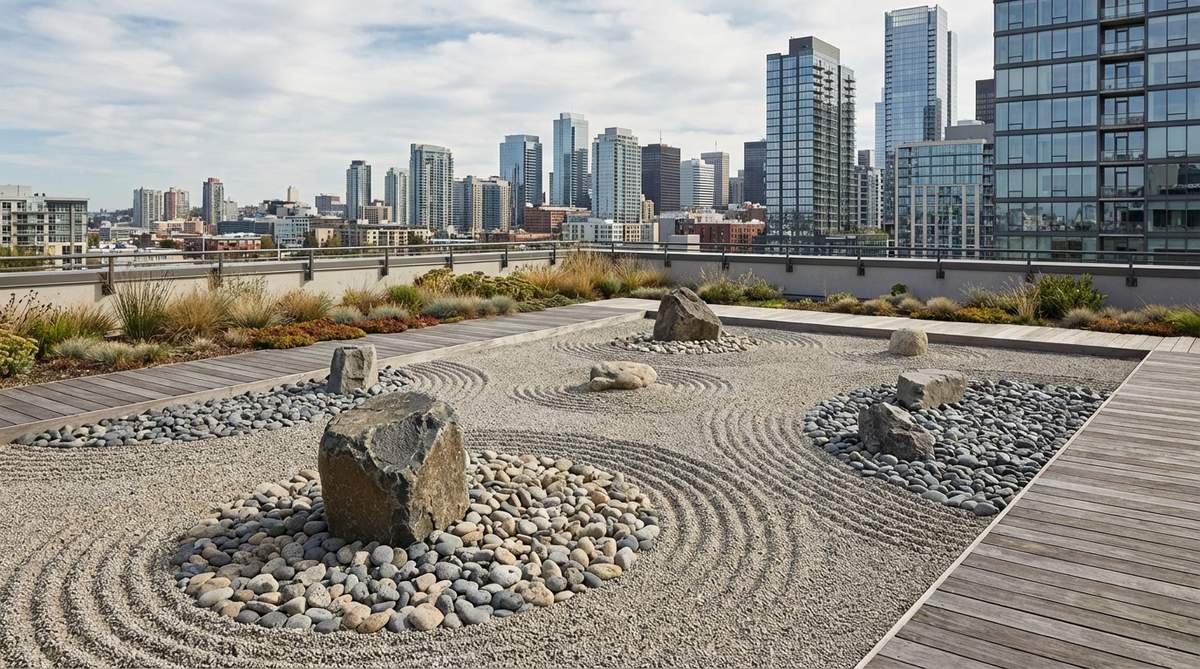
Feels like a secret billionaire’s oasis floating high above the chaotic city streets. A lightweight elevated garden serves as the perfect escape mechanism for high-rise apartment living.
Swapping out heavy traditional gravel for ultra-lightweight pumice stone entirely bypasses structural weight limits while maintaining the authentic look. Utilizing smart commercial drainage membranes ensures you get a breathtaking premium look without causing roof leaks.
A specialized rooftop setup ranges from $400 to $800. Pin this if you want to turn a barren concrete roof into a luxury sky-lounge!
- Key Materials: Lightweight pumice gravel and drainage mats
- Vibe / Style: Elevated urban sanctuary
- Difficulty: Advanced planning and material lifting
- Budget Breakdown: Pumice Stone: $200 | Drainage Mats: $150 | Anchor Stones: $100.
- Creator’s Tip: Always use a dimpled drainage mat underneath the gravel to allow rapid rain runoff and protect the roof membrane.
- Smart Sourcing: lightweight pumice landscaping stone (bulk) and heavy-duty dimpled drainage mats.
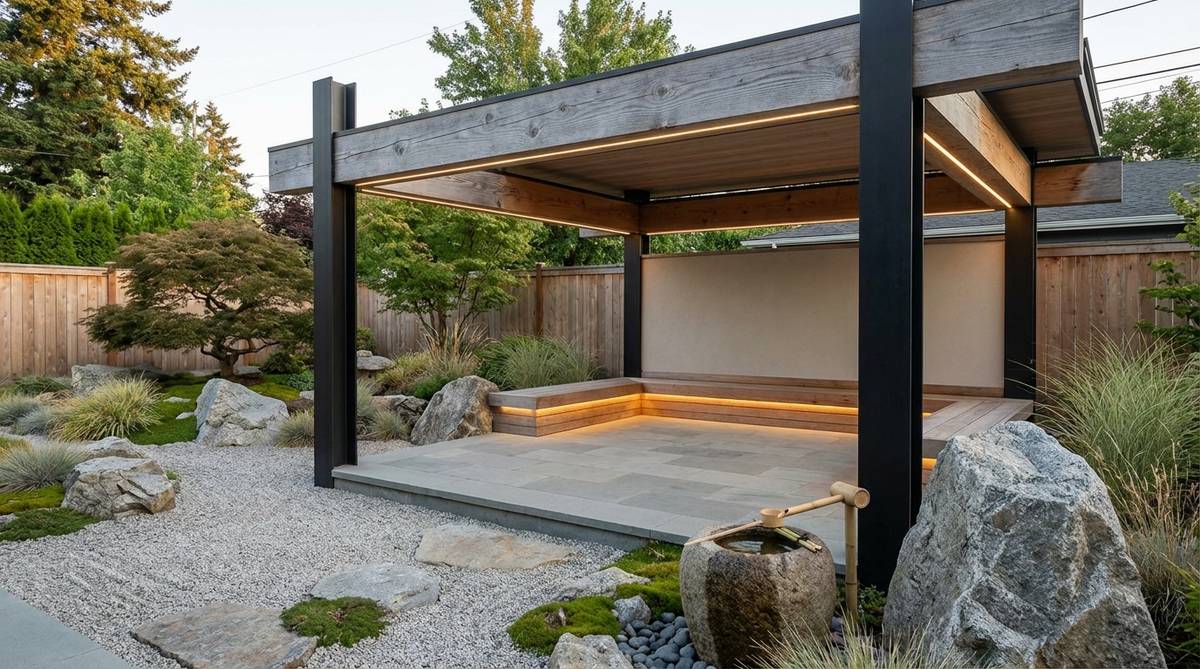
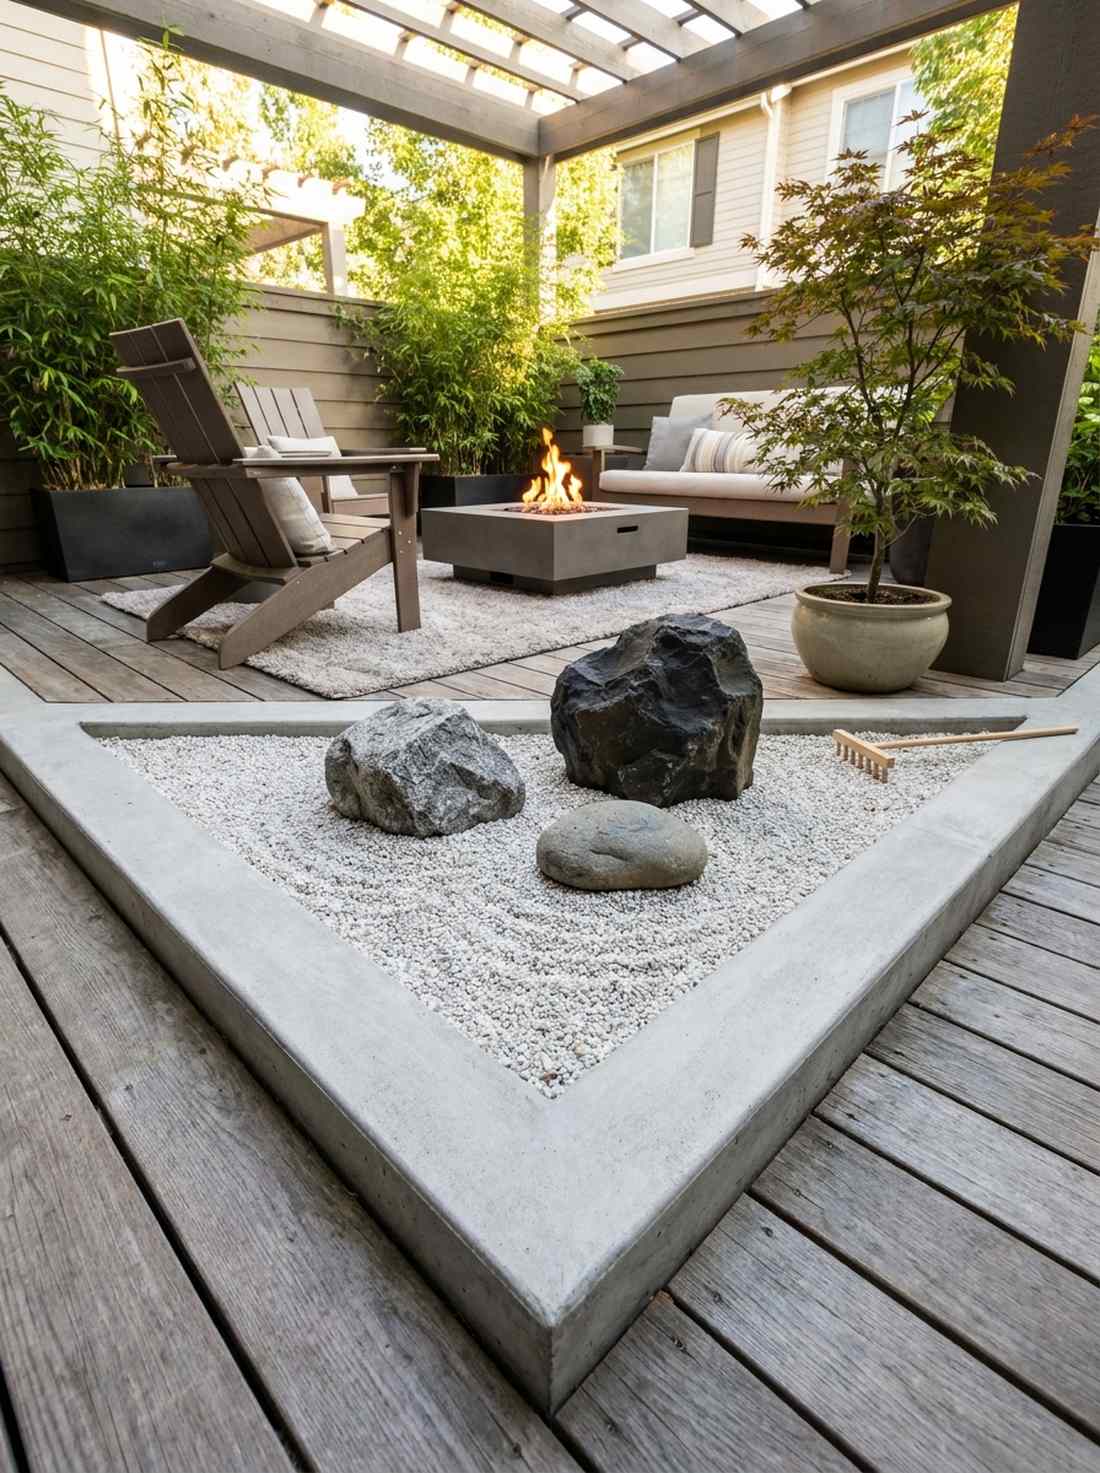
28. Meditation Room Adjacent Gardens
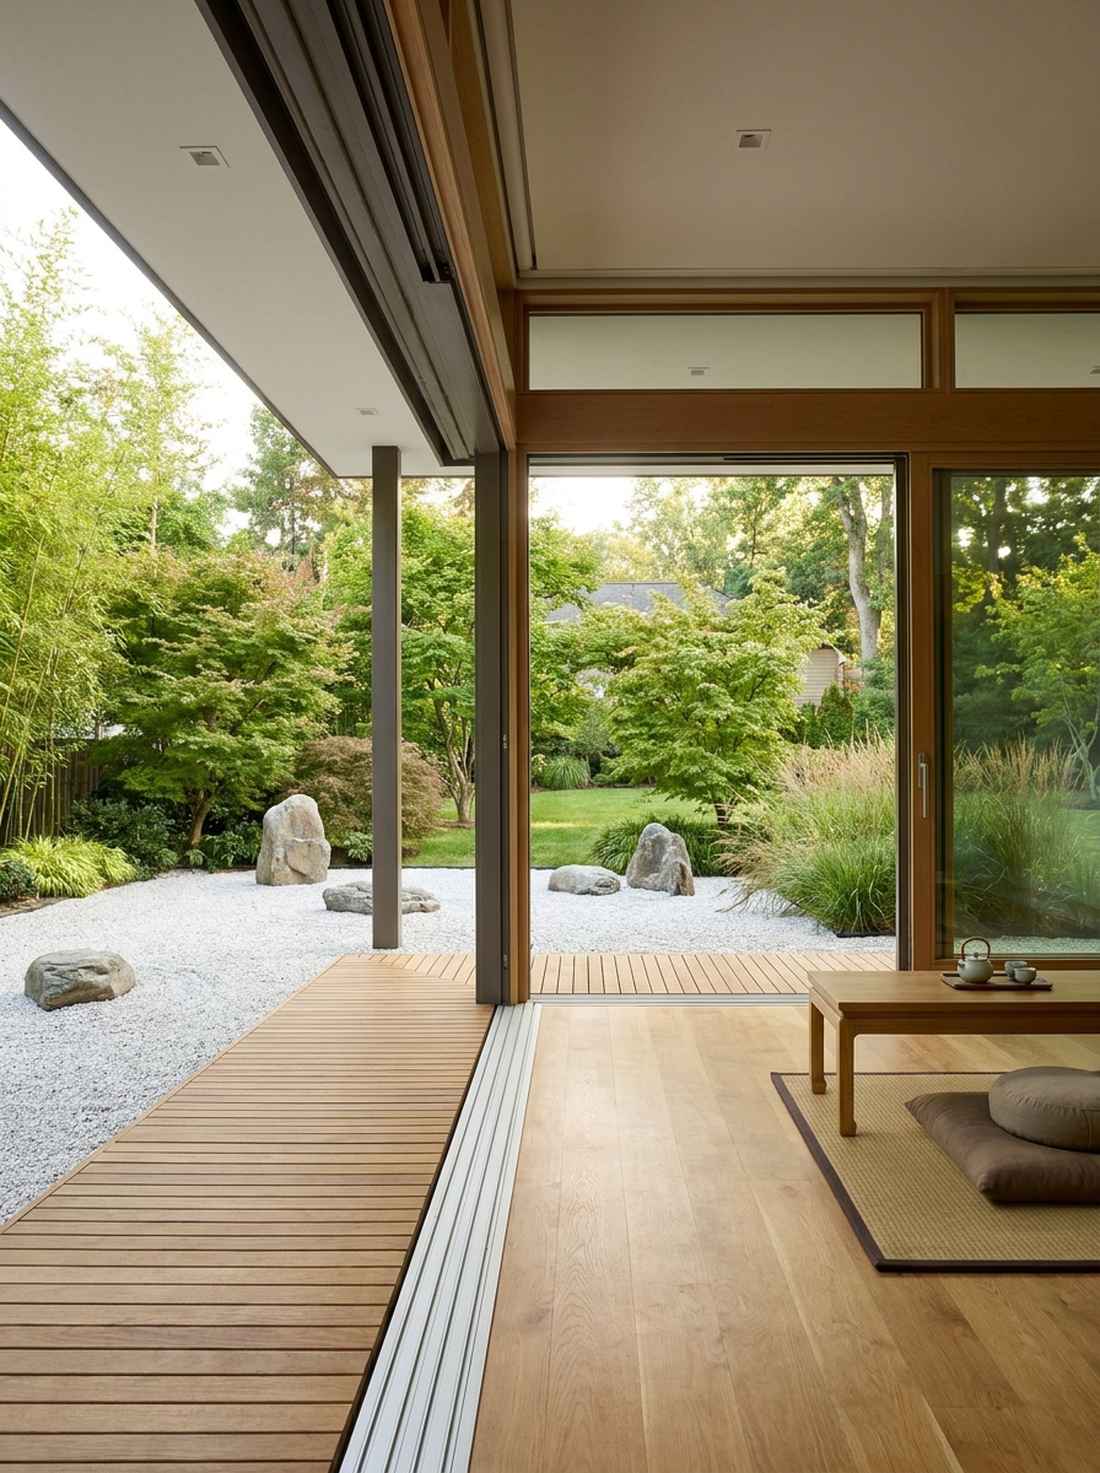
Generates an incredibly deep sense of focus that immediately drops your heart rate. An attached private sanctuary layout is absolutely essential for tying a home yoga studio to the outdoors.
Aligning the structural geometry of the room with the precise rake lines of the gravel looks far more expensive than it is. Buying into commercial-grade zen garden starter kits guarantees that the transition from indoor wood flooring to outdoor stone feels flawlessly integrated.
Completing this dedicated adjacent zone costs roughly $250 to $500. Save this blueprint to finalize your perfect at-home wellness retreat.
- Key Materials: Complementary wood decking and uniform gravel
- Vibe / Style: Immersive wellness retreat
- Difficulty: Intermediate patio integration
- Budget Breakdown: Gravel/Sand: $150 | Transition Decking: $200 | Layout Tools: $40.
- Creator’s Tip: Keep the floor level of the meditation room perfectly flush with the outdoor gravel to create an unbroken horizon line.
- Smart Sourcing: interlocking teak wood decking tiles (starter kit) and professional karesansui layout tool sets.
Bringing Zen Forward
These 28 premium modern japanese rock garden concepts definitively prove that you can achieve a luxury, architecturally sound outdoor space without paying inflated contractor rates. By smartly sourcing heavy-duty commercial kits, bulk material packs, and UV-coated accessories, you can install any of these precise layouts over a single weekend. Whether you are building a tiny tabletop oasis or a massive gravel courtyard, leveraging these exact blueprints guarantees a stunning, low-maintenance aesthetic that radically upgrades your home’s value.
Frequently Asked Questions
What defines a modern Japanese rock garden compared to traditional designs?
While traditional designs rely heavily on strict historical rules, modern layouts achieve a premium aesthetic by utilizing commercial-grade Corten steel, UV-resistant frosted acrylic panels, and poured concrete. This fusion guarantees a highly durable, low-maintenance setup that perfectly complements contemporary homes while still utilizing high-end miniature garden supplies for classic balance.
How much space is required for a meaningful rock garden?
You can achieve a shockingly expensive look in as little as 4×6 feet. Buying compact zen garden starter kits allows you to create high-impact corner installations or tabletop displays. The real trick to making it look premium isn’t the total square footage, but rather investing in high-quality, pre-cut geometric borders and strictly limiting visual clutter.
What type of gravel works best for modern rock gardens?
To avoid a cheap, messy look, always source premium landscaping pebbles like crushed granite or quartz in a 3/8-inch particle size. Buying these in bulk packs ensures perfectly crisp rake patterns that don’t wash away in the rain. Never use standard rounded pea gravel, as it shifts underfoot and fails to hold the geometric lines that give the space its designer-level finish.
Can rock gardens survive harsh winters or extreme heat?
Absolutely. In fact, this layout is the ultimate hack for extreme climates because you bypass dead grass and massive water bills. However, to guarantee it lasts indefinitely, you must use industrial clear matte stone sealants on your concrete and UV-coated protective gear on any synthetic elements to completely eliminate frost cracking and sun bleaching.
How often should gravel patterns be raked?
If you use commercial-grade crushed granite, the patterns will easily hold their shape through heavy weather, meaning you only need to rake it once a week for maintenance. Many DIYers invest in professional karesansui rake starter kits to make this process feel like a relaxing weekend ritual rather than an annoying chore.
What lighting color temperature works best for evening garden viewing?
To secure that luxury resort aesthetic, strictly source UV-resistant outdoor LED strip kits in the 2700K to 3000K warm white range. Anything cooler (like 4000K or 5000K) instantly makes the garden look like a cheap, sterile parking lot. Using warm tones creates deep, theatrical shadows across the stones that look incredibly expensive at night.