A well-placed zen garden bridge instantly transforms any basic backyard into a luxury retreat. Sourcing pre-treated materials and smart hardware kits slashes your DIY setup costs drastically. Achieve that premium architectural aesthetic without paying expensive landscape contractors.
Design Snapshot & Key Principles
- Scale Proportions: Bridge height must perfectly balance against oversized stepping stones or water features to avoid looking out of place.
- Material Harmony: Combining composite woods with heavy-duty metal accents gives a designer-level finish that lasts for decades.
- Structural Arc: Getting the curvature right is the secret to high-end landscape aesthetics, demanding exact bracket placements.
- Railing Philosophy: Open-concept side rails create aggressive visual contrast while maintaining safety and code compliance.
Arched Wooden Bridges for Elevated Perspective
Arched structures completely redefine flat yards by forcing the eye upward. Sourcing high-end waterproof lumber ensures your pathway survives seasonal weather while locking in that premium magazine aesthetic.
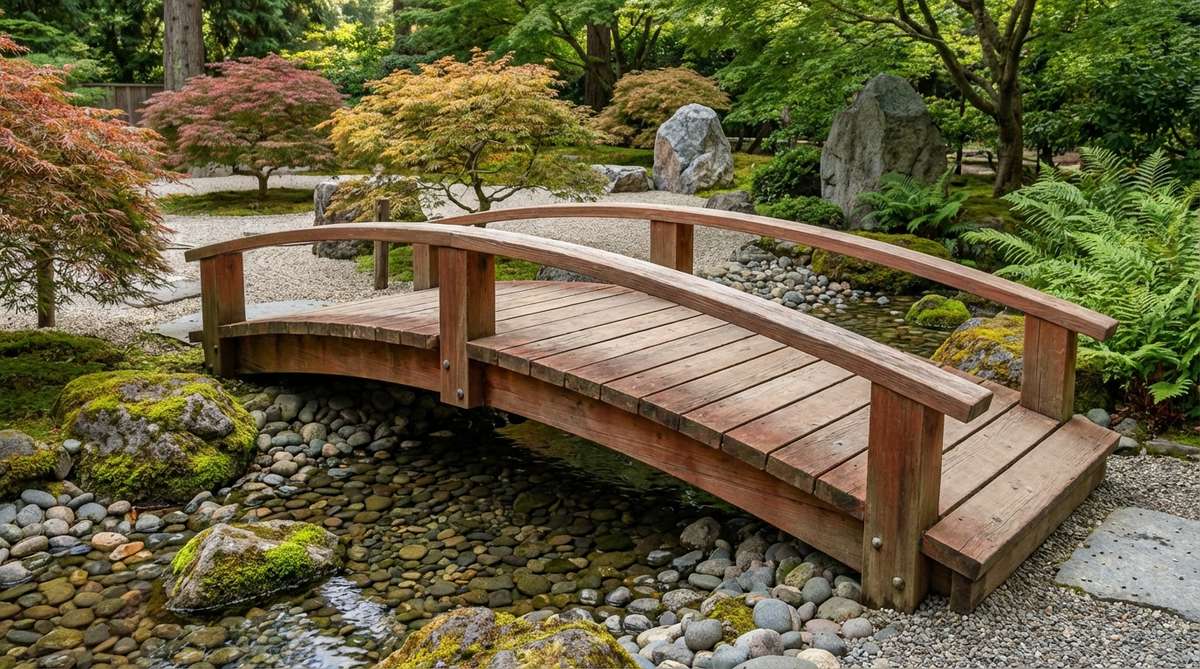
1. High Arc Cedar Bridge with Double Rails
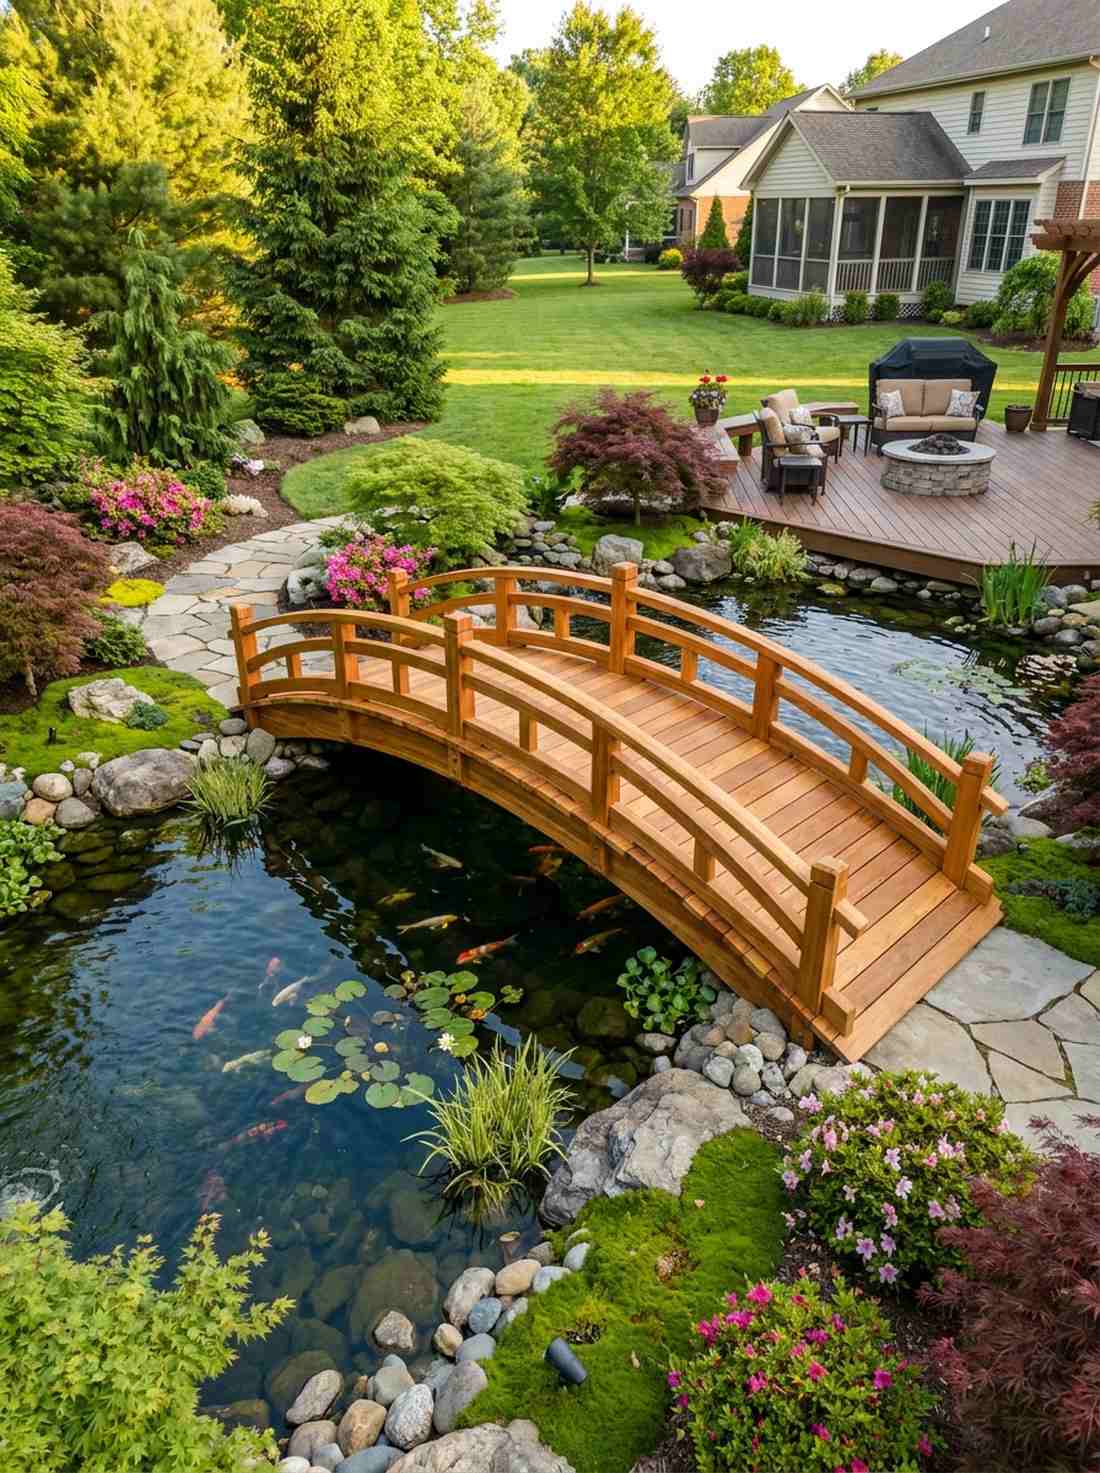
Feels like a hidden temple entrance you accidentally discovered deep in the woods. This dramatic arched pond crossing works exceptionally well for framing a large residential koi pond.
Most beginners avoid steep curves, but building this actually delivers a surprisingly premium look with minimal extra effort. By securing heavy-duty support joists and integrating miniature garden supplies nearby, you create a jaw-dropping focal point.
You can realistically build this layout for around $250–$400 using domestic lumber. Save this to your DIY weekend backyard board!
- Key Materials: Weather-resistant cedar planks, galvanized carriage bolts
- Vibe / Style: Traditional Japanese botanical garden
- Difficulty: Intermediate weekend build
- Budget Breakdown: Lumber: $180 | Hardware: $45 | Finish: $25.
- Creator’s Tip: Steam-bending the handrails prevents micro-splintering over time.
- Smart Sourcing: Grab pre-cut cedar decking boards (bulk pack) and a UV-coated clear wood sealant to block sun fade.
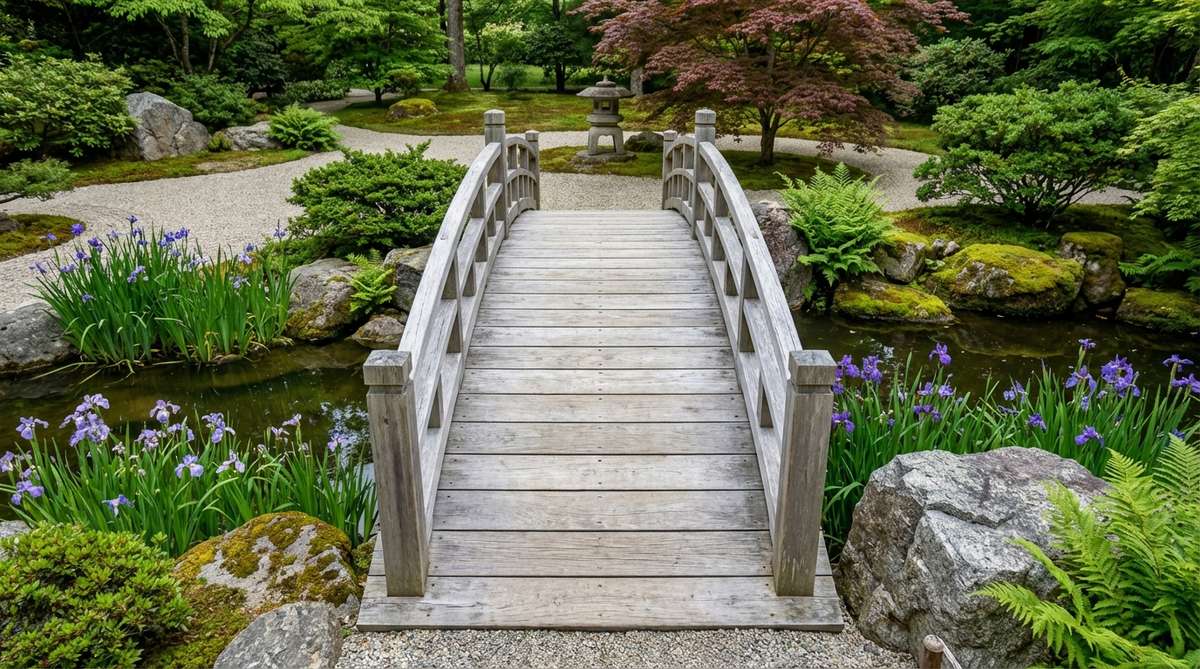
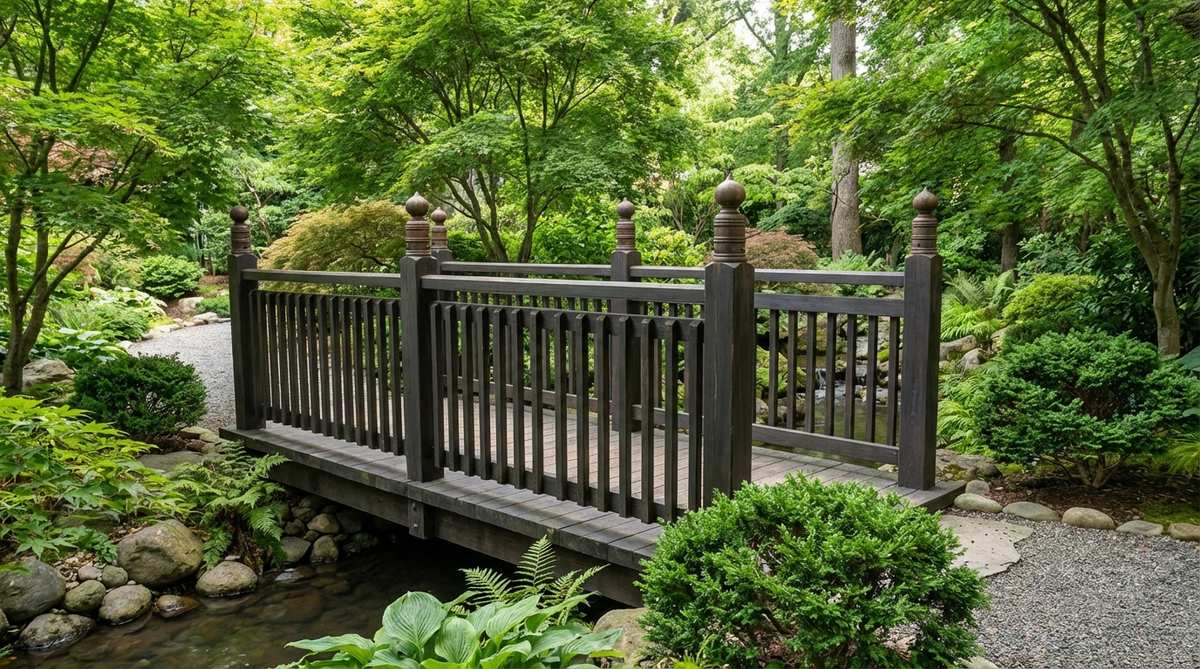
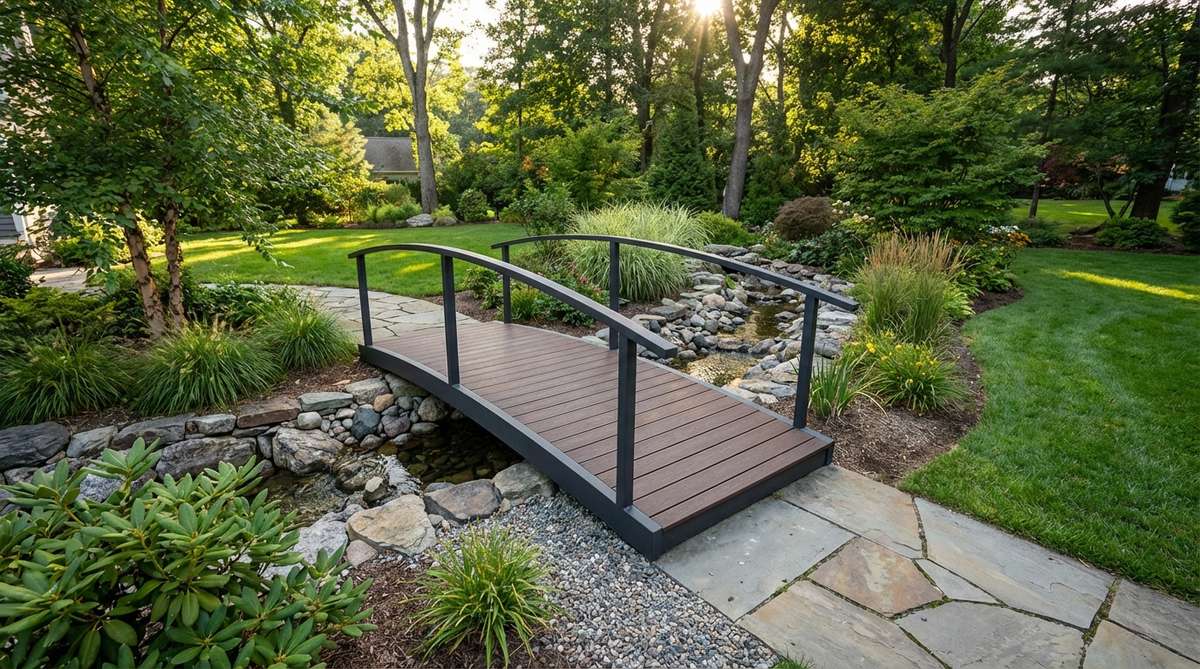
2. Gentle Arc Redwood Bridge with Single Handrail
Straight out of a calming meditation retreat. The low-profile redwood walkway is perfect for bridging shallow dry creek beds or spanning across compact courtyard spaces.
Skipping the second handrail goes against traditional advice, but the asymmetrical finish looks far more expensive than it is. Applying a thick, weather-defending stain keeps the wood vibrant, flawlessly complementing any high-end terrarium accessories or nearby rock work.
Expect to spend roughly $180–$250 on quality rot-resistant boards. It’s a fast upgrade that completely changes the vibe of a side yard.
- Key Materials: Premium redwood decking, heavy-duty L-brackets
- Vibe / Style: Minimalist contemporary zen
- Difficulty: Easy beginner project
- Budget Breakdown: Redwood: $150 | Brackets/Screws: $40.
- Creator’s Tip: Counter-sink all visible screws for a flawless, buttery-smooth walking surface.
- Smart Sourcing: Pick up an asymmetrical bridge rail starter kit and rust-proof outdoor deck screws.
3. Picket Rail Pine Bridge with Ornamental Posts
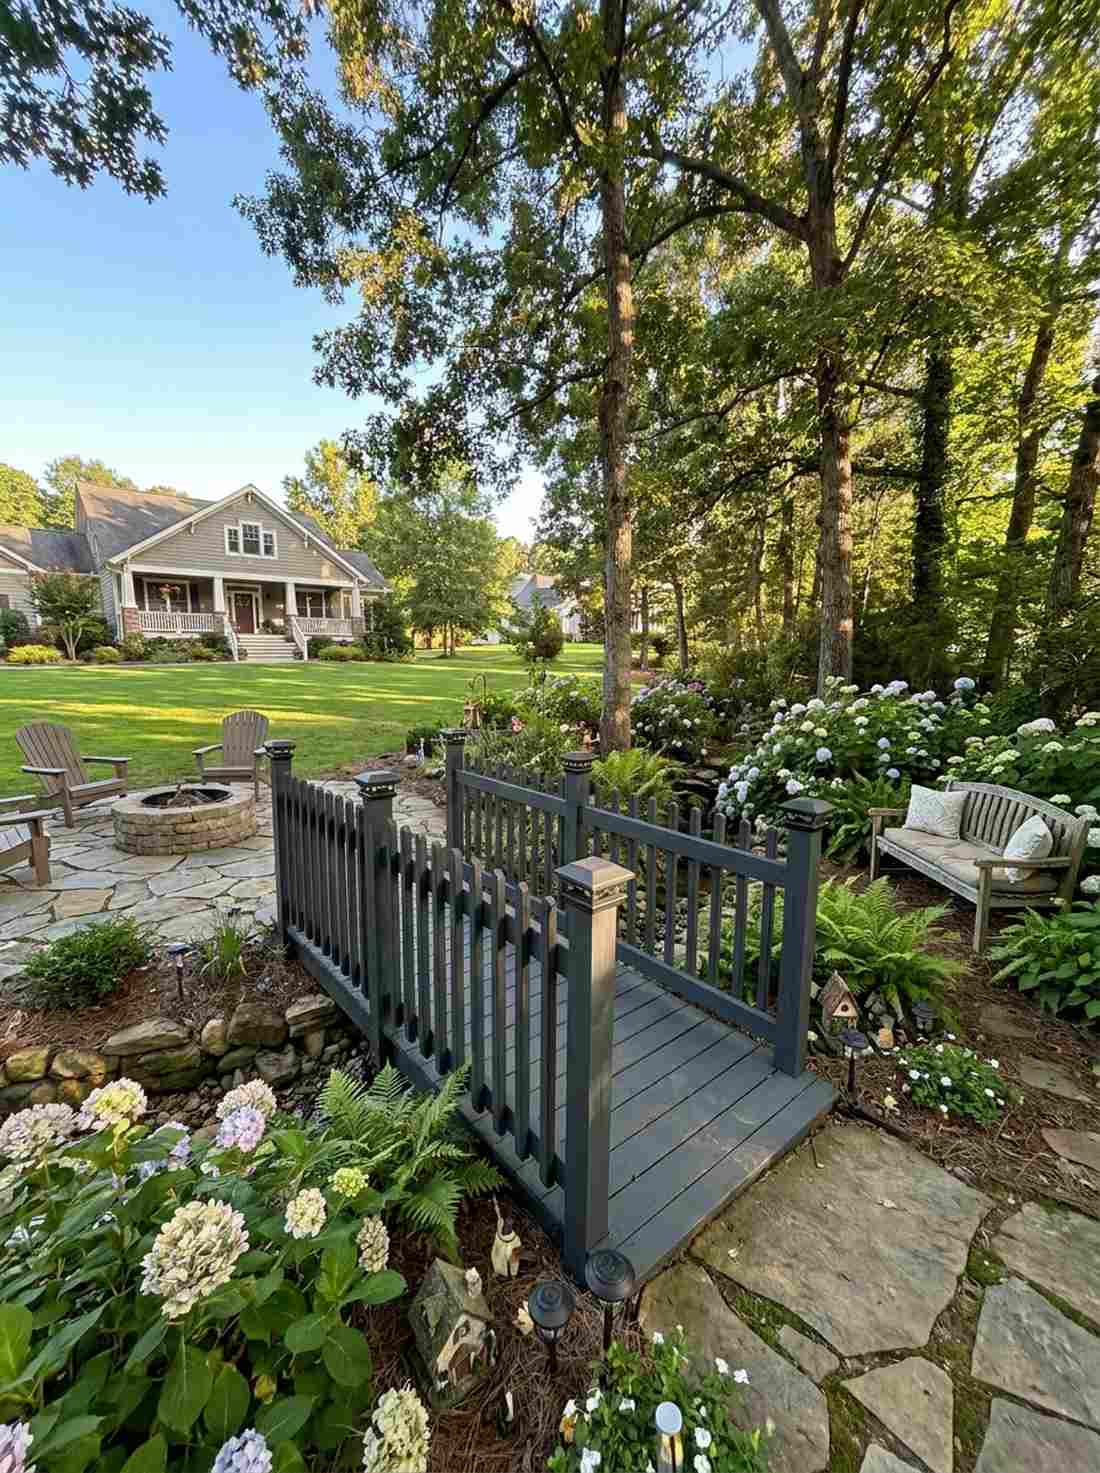
Evokes the charm of a forgotten storybook pathway. A decorative wooden footbridge serves as the ultimate transitional piece for separating a busy patio from a quiet reading garden.
Contractors charge a fortune for custom turnings, yet adding off-the-shelf finials gives a designer-level finish for pennies. By painting the structure in matte charcoal and surrounding it with premium fairy garden kits, the entire installation feels effortlessly bespoke.
Building this from basic treated pine keeps the total cost around $120–$160. Pin this layout if you’re planning a tight-budget space upgrade.
- Key Materials: Pressure-treated pine, decorative post caps
- Vibe / Style: Rustic woodland charm
- Difficulty: Easy to moderate
- Budget Breakdown: Pine boards: $85 | Finials: $30 | Stain: $15.
- Creator’s Tip: Space the pickets exactly 4 inches apart to ensure pet safety without blocking the view.
- Smart Sourcing: Use pre-molded geometric post caps alongside commercial-grade wood stain kits.
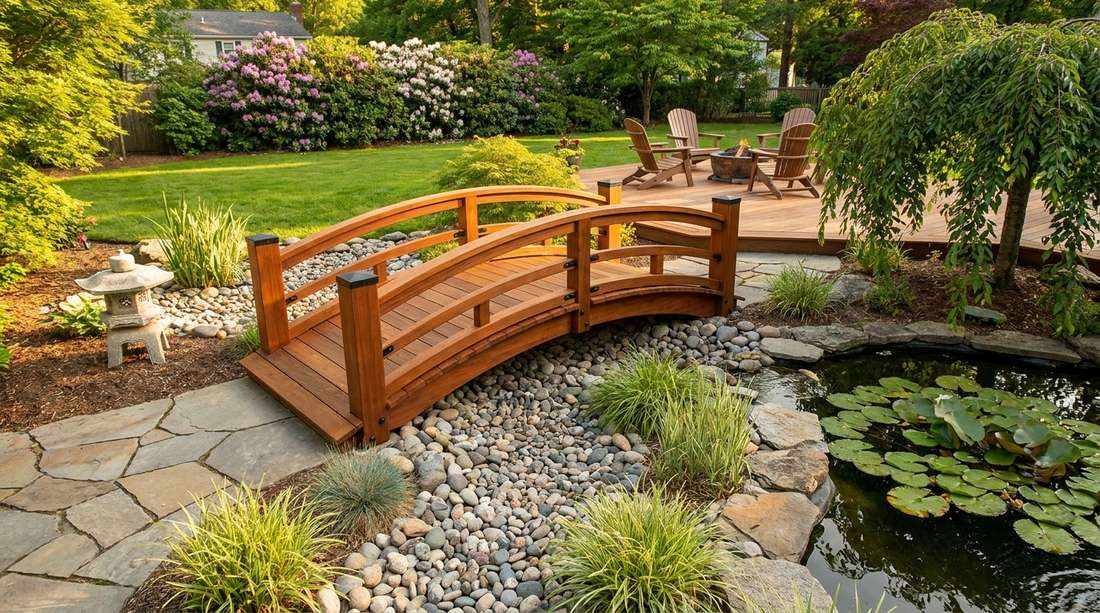
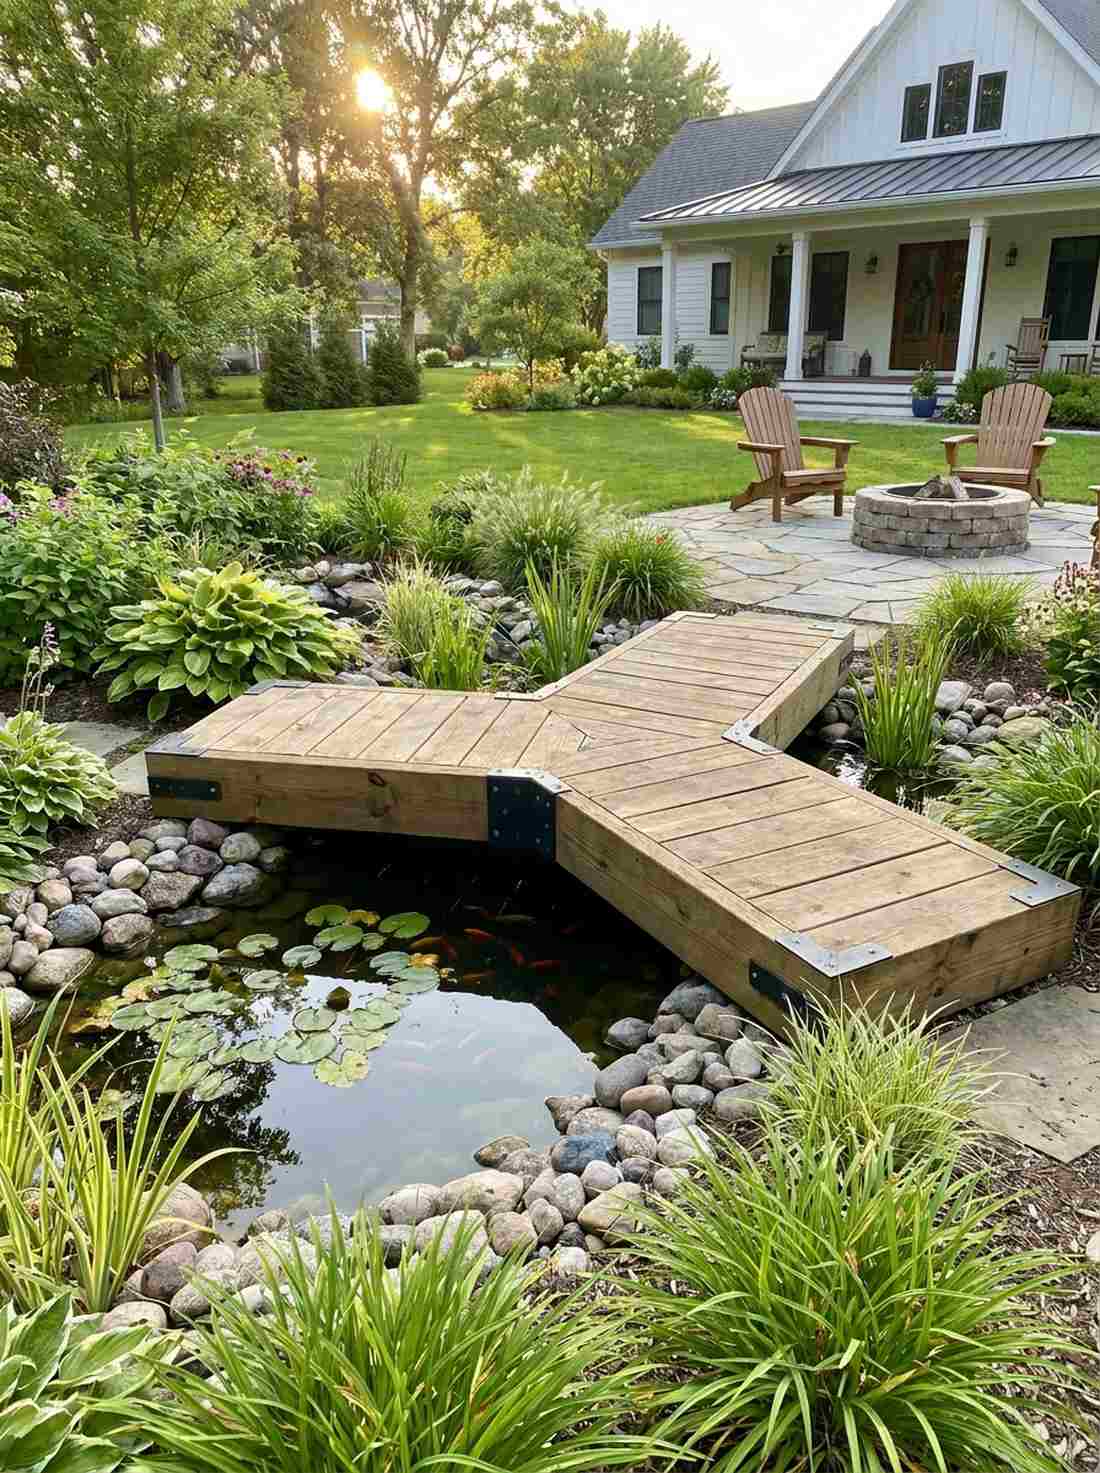
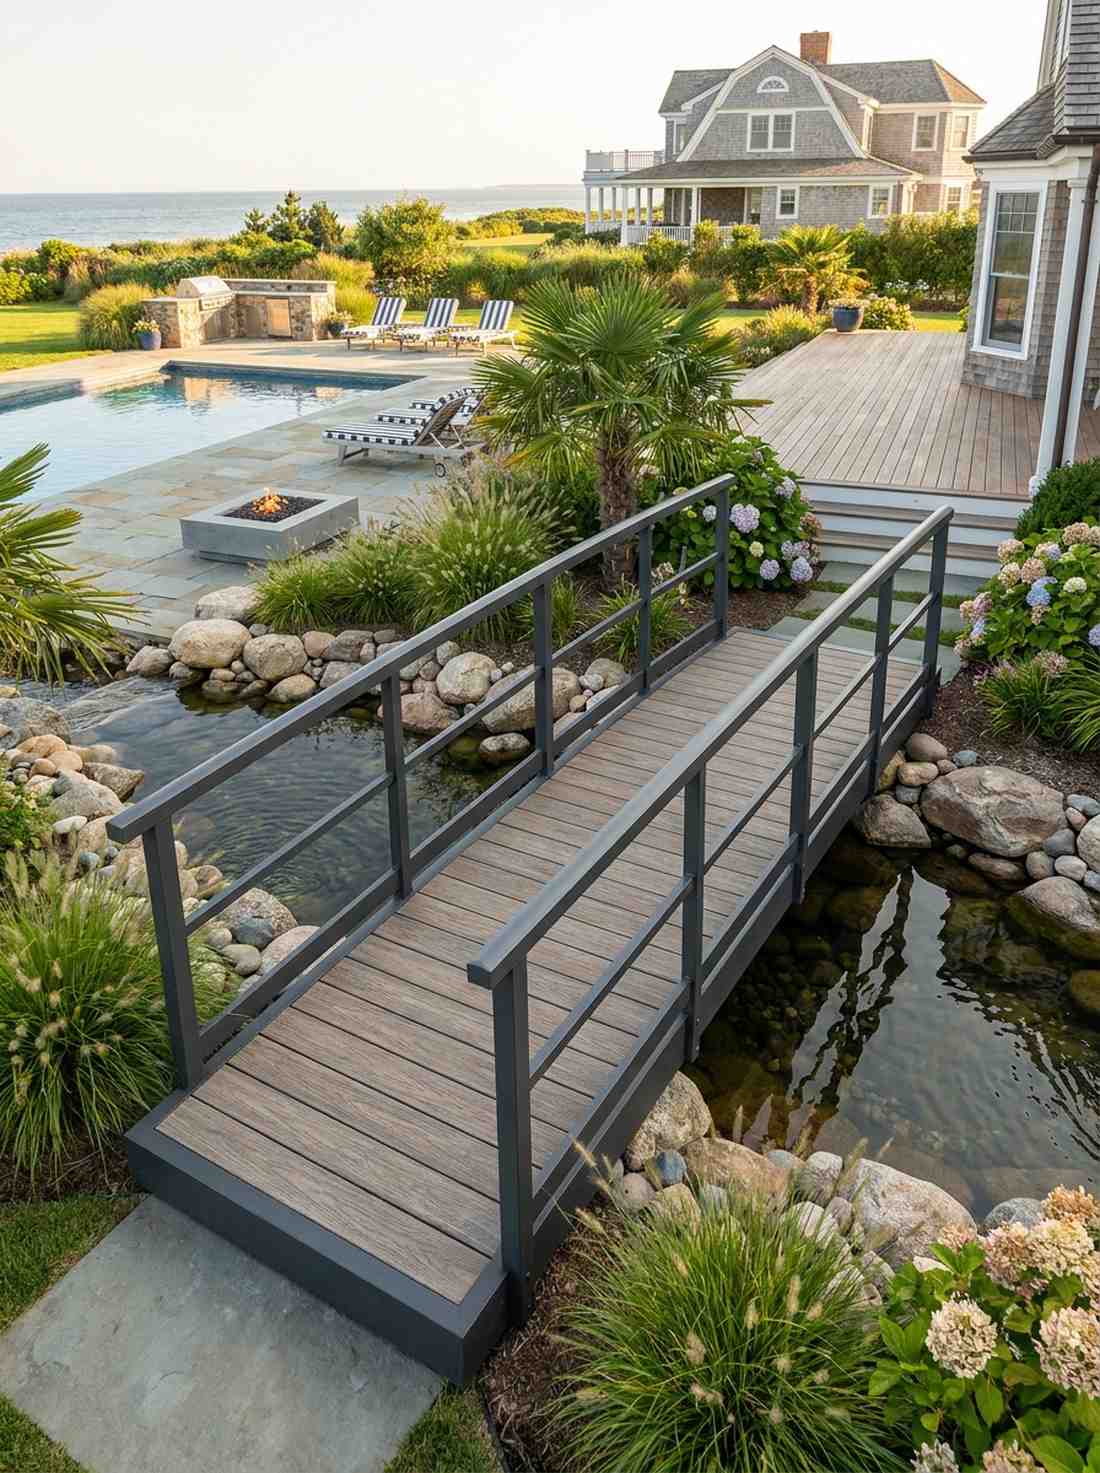
4. Half-Picket Bridge with Lower Railing Panels
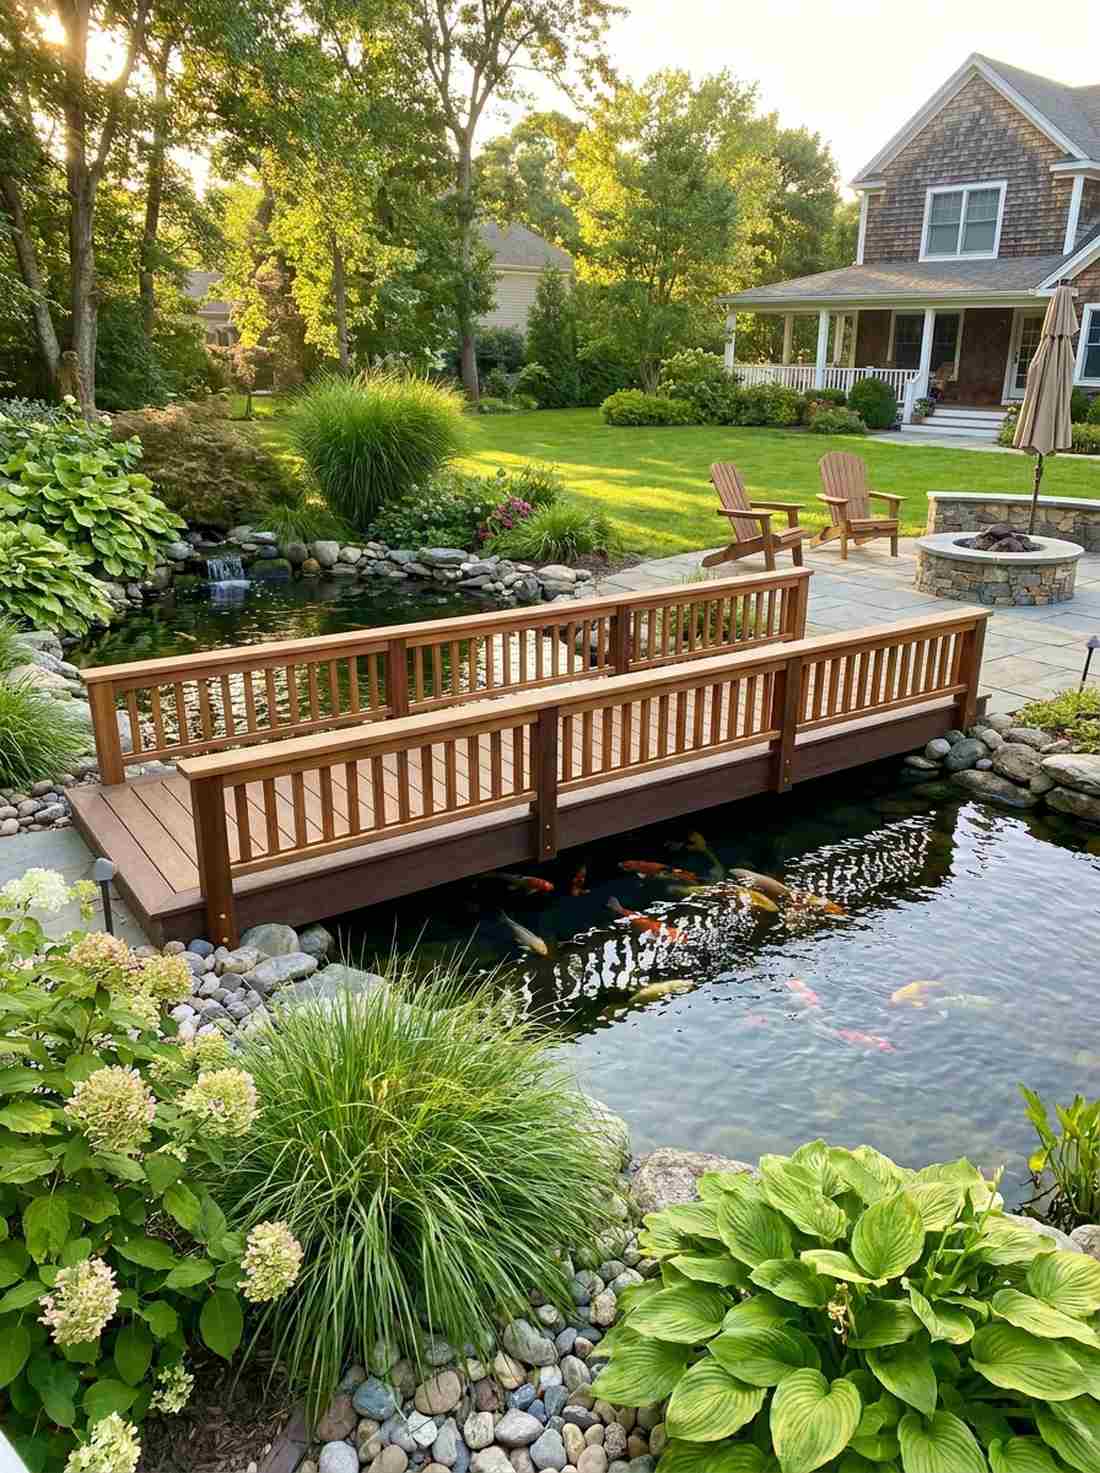
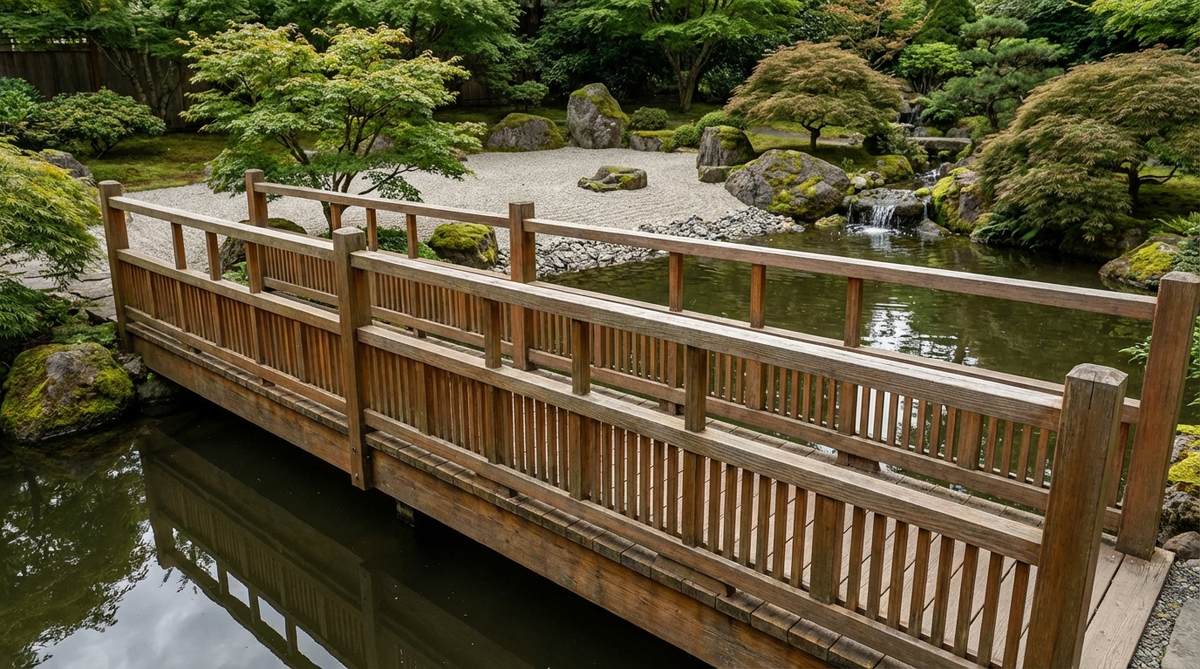
Radiates a deeply relaxing, open-air sanctuary energy. The unobstructed viewing bridge is specifically designed for placing over active water features where you want maximum visibility.
Standard tall railings completely ruin sightlines, but dropping the barrier height creates an expansive, wide-open aesthetic that breathes. Combining sturdy composite base beams with sleek wooden top rails practically guarantees a low-maintenance, high-impact result.
Sourcing these materials typically runs between $200 and $300 total. Highly recommended for homeowners who love watching their koi ponds unhindered.
- Key Materials: Half-height spindles, reinforced composite base
- Vibe / Style: Modern botanical observation deck
- Difficulty: Intermediate
- Budget Breakdown: Composite joists: $120 | Top rails/spindles: $95.
- Creator’s Tip: Cap the shortened pickets with a continuous flat board so visitors can lean on it.
- Smart Sourcing: Invest in pre-measured deck spindle packs and marine-grade waterproof adhesive.
This next setup is ridiculously cheap but looks like a $1,000 custom architectural display…
5. Sunburst Pattern Bridge with Radiating Rail Details
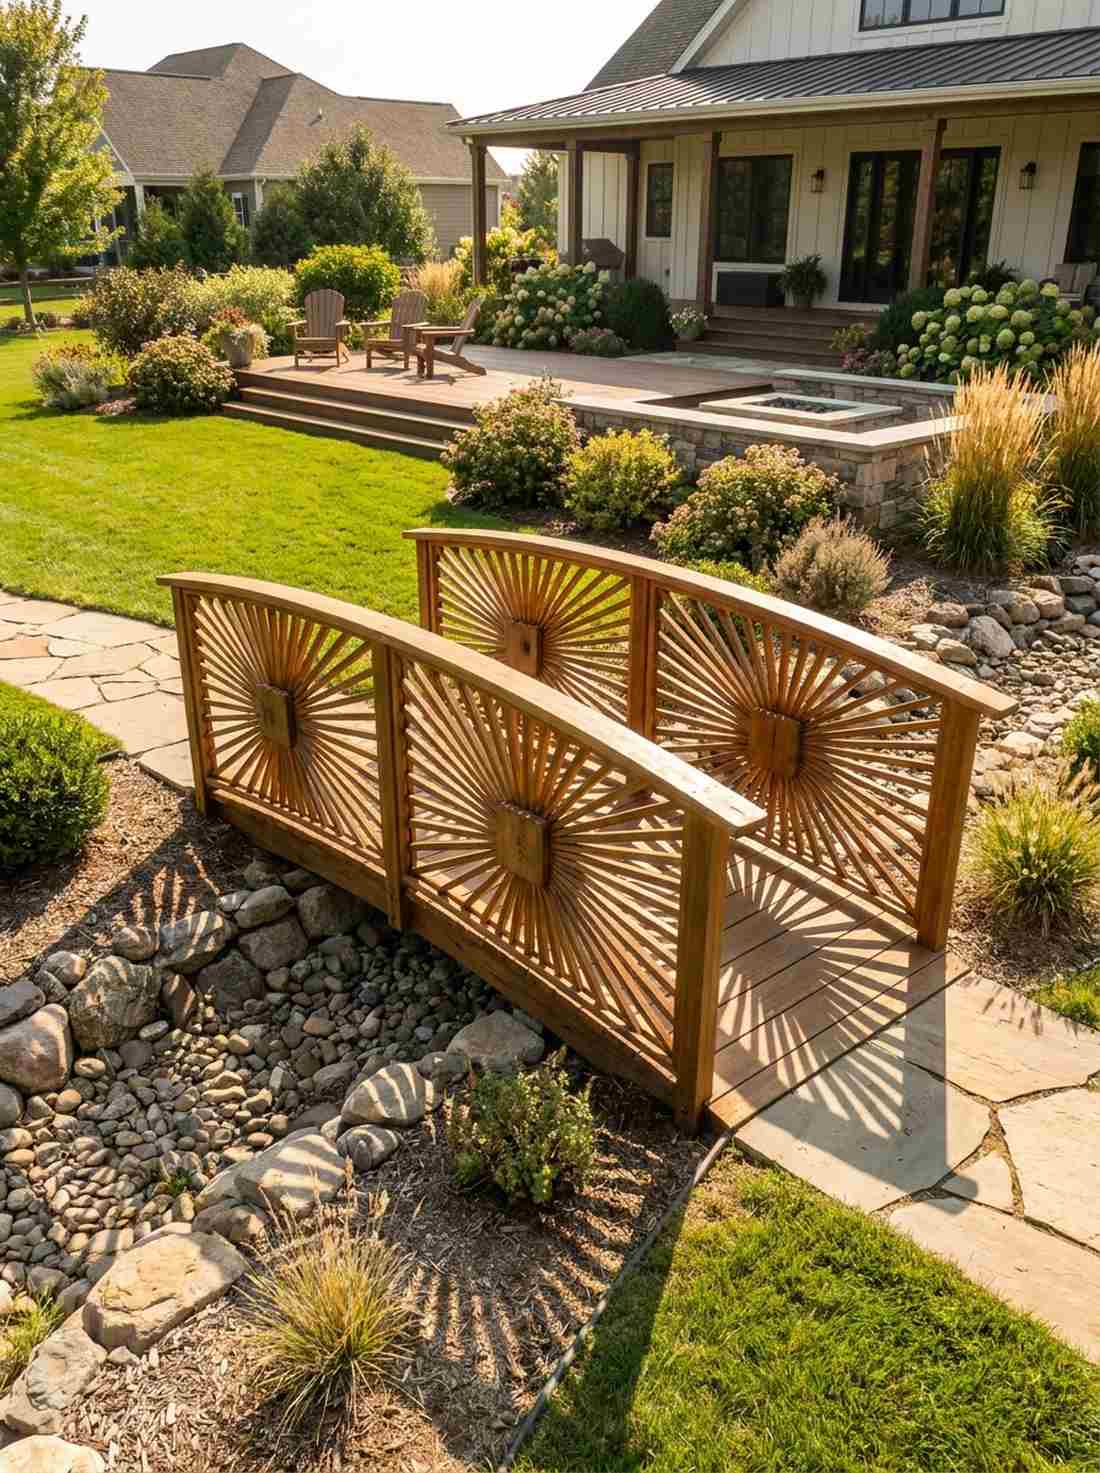
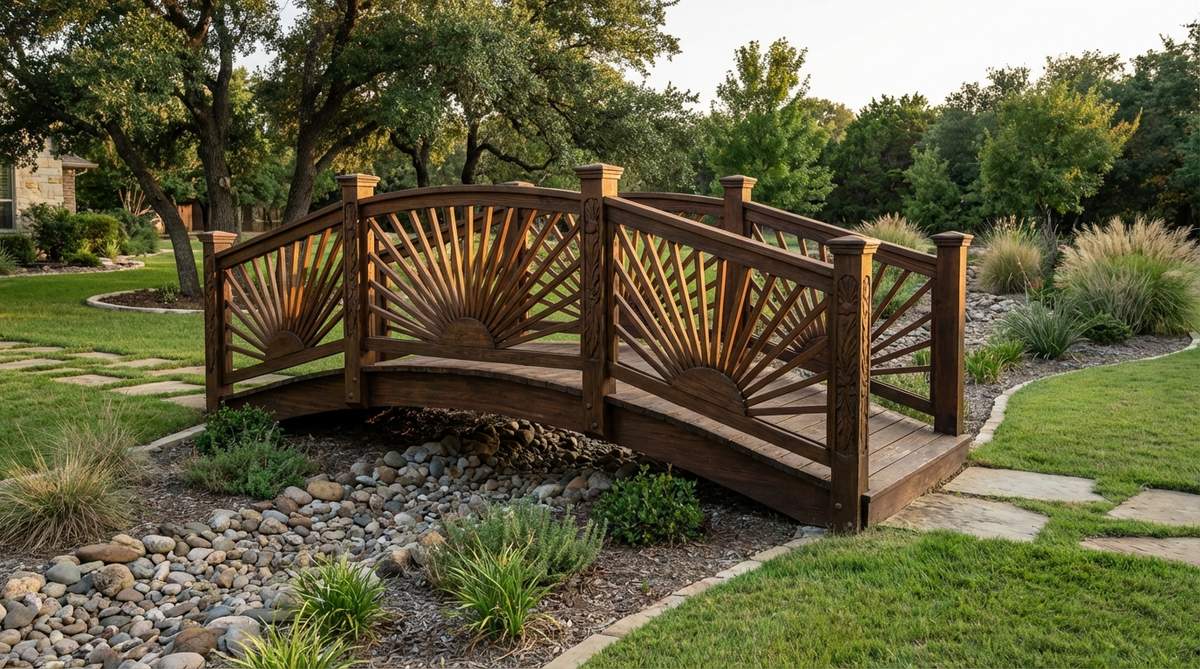
Feels like stepping into an elite, private countryside estate. A geometric sunburst garden crossing acts as an instant conversation starter in the absolute center of your lawn.
Instead of running boring vertical slats, arranging the wood in an explosive star pattern completely shifts the yard’s energy. It requires a bit more precise cutting, but the resulting shadow play on the ground mimics the look of high-end custom metalwork.
You can achieve this intricate look for roughly $220 if you cut the angles yourself. Save this blueprint to your favorite outdoor DIY board!
- Key Materials: Narrow wooden slats, central hub blocks
- Vibe / Style: Artisan-crafted statement piece
- Difficulty: Advanced measuring required
- Budget Breakdown: Wood materials: $160 | Precision brackets: $50.
- Creator’s Tip: Build the sunburst panels flat on the ground first before attaching them to the bridge frame.
- Smart Sourcing: Look for a pre-cut sunburst decking medallion and a heavy-duty protractor tool kit.
Flat Stone Bridges for Naturalistic Integration
Nothing says timeless permanence quite like heavy masonry. Upgrading from wood to stone provides an indestructible pathway that ages beautifully into the surrounding environment.
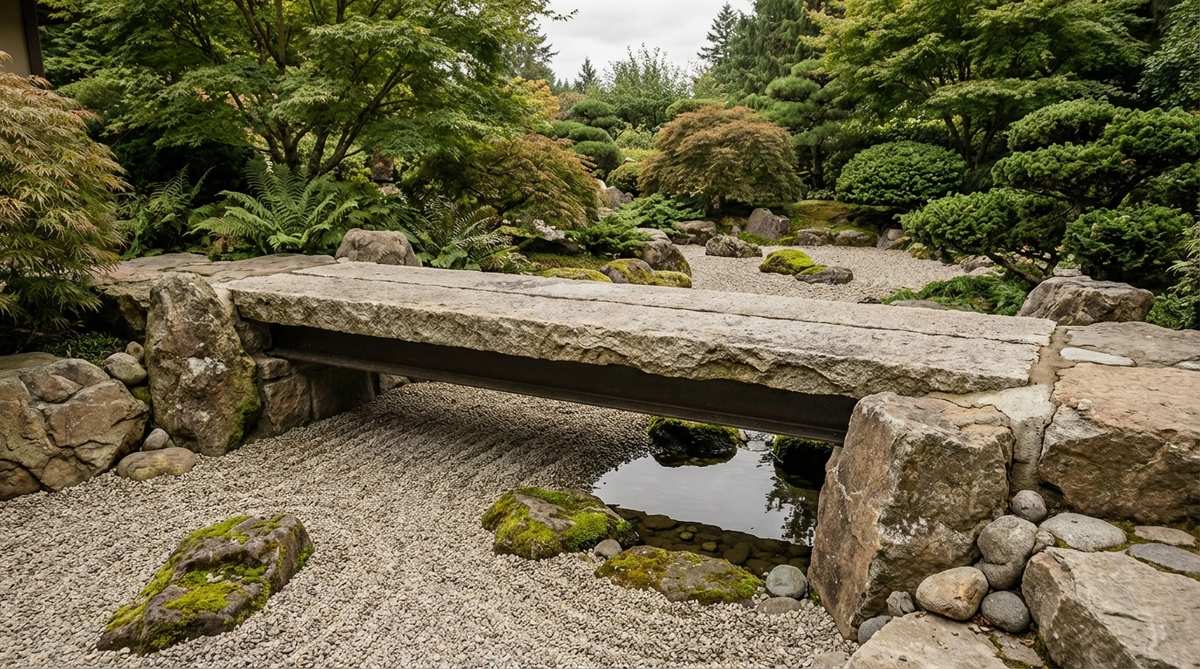
6. Hewn Granite Slab Bridge with Natural Edges
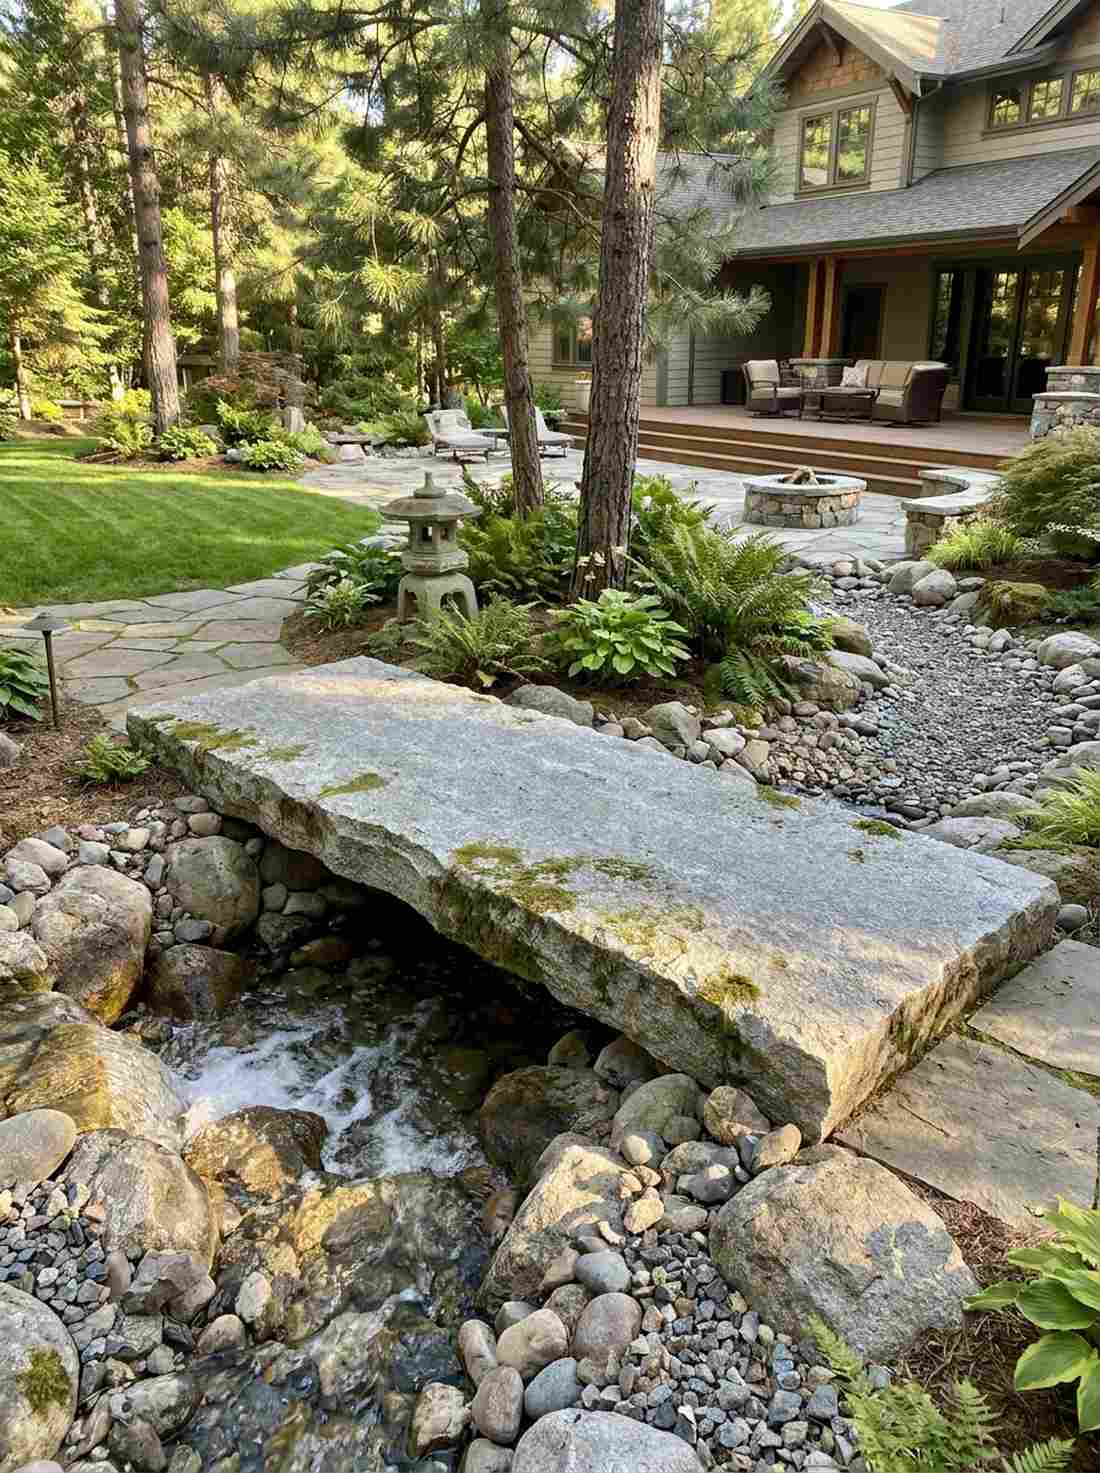
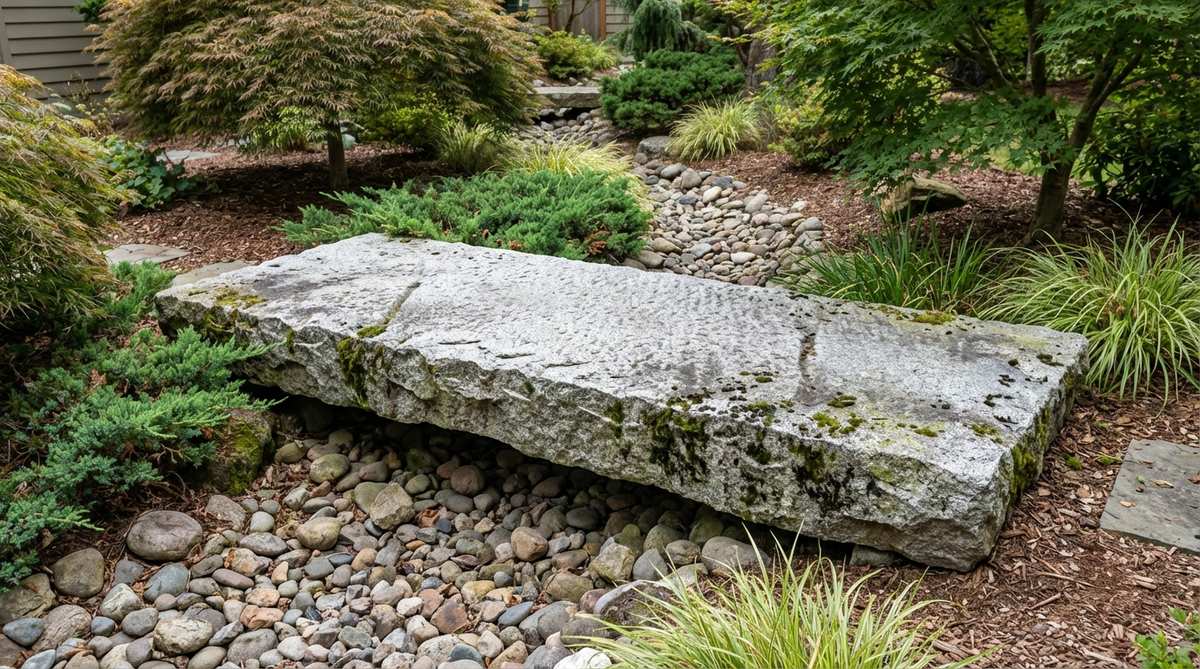
Embodies the primal, grounding energy of an ancient mountain pass. A massive granite garden slab is flawlessly suited for bridging narrow, aggressive waterfall streams.
Many homeowners assume solid rock is impossible to DIY, but laying a single monolithic piece eliminates all structural joint failures instantly. Once covered in a delicate layer of moss, it visually anchors the yard while heavily complementing premium stone lantern installations.
A solid block like this will cost around $400–$700 from a local quarry. It is an eternal upgrade that literally outlasts the house.
- Key Materials: Single raw-edge granite slab, crushed leveling rock
- Vibe / Style: Ancient wabi-sabi wilderness
- Difficulty: Requires heavy lifting machinery
- Budget Breakdown: Granite slab: $450 | Leveling base: $50.
- Creator’s Tip: Dig deep, compacted gravel footings to ensure the slab never shifts during winter freezes.
- Smart Sourcing: Buy industrial landscaping lifting straps and bulk crushed leveling stone.
7. Flat Limestone Bridge with Low Side Curbs
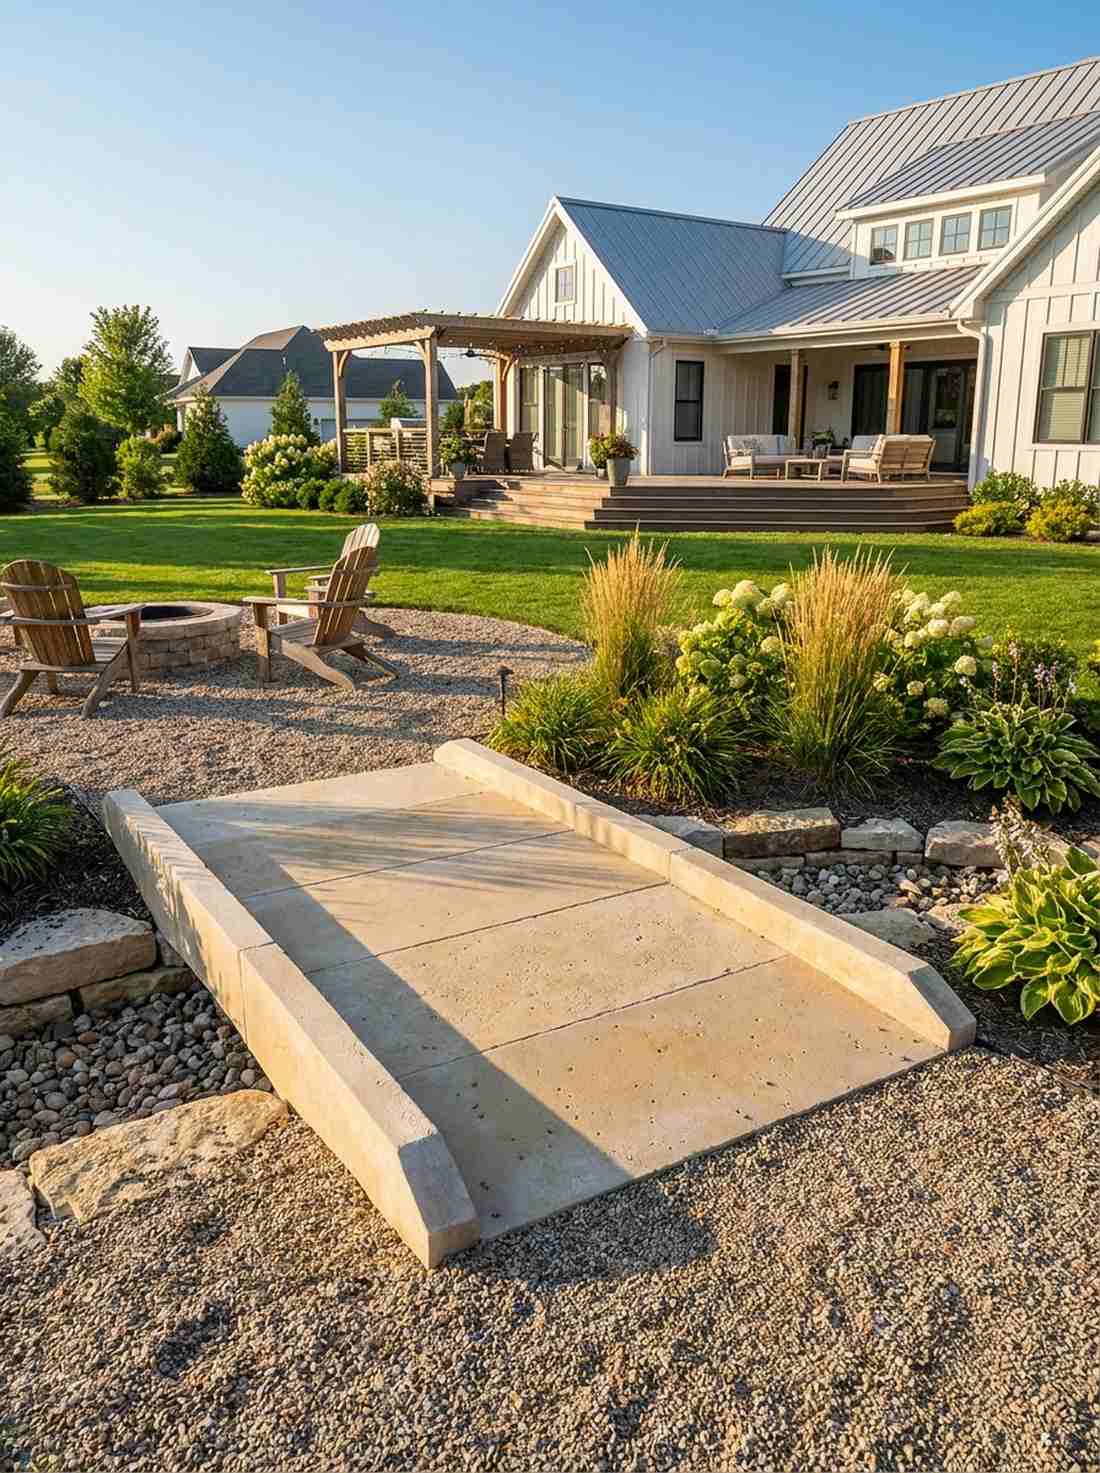
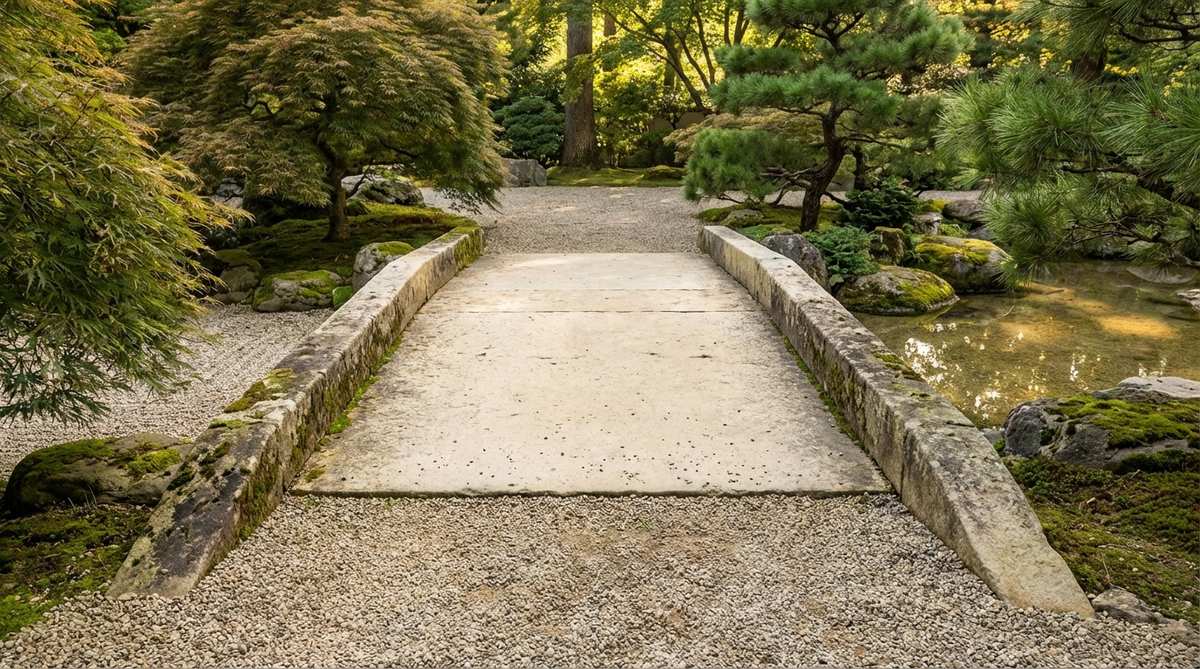
Radiates a soft, glowing warmth that feels impossibly inviting. This curbed limestone crossing seamlessly connects a sprawling gravel patio to a lush, green lawn area.
Most flat paths look unfinished, but adding raised 3-inch side curbs creates a psychological boundary that looks incredibly deliberate and high-end. The porous nature of limestone encourages fast weathering, making the bridge look naturally integrated in just a few short months.
You can execute this elegant masonry project for $250–$350. Pin this to your luxury landscape inspiration board!
- Key Materials: Smooth limestone pavers, masonry adhesive
- Vibe / Style: Clean, transitional elegance
- Difficulty: Moderate
- Budget Breakdown: Pavers: $180 | Curb stones: $90 | Adhesive: $20.
- Creator’s Tip: Taper the curb stones slightly at the entrances to guide the eye naturally across the span.
- Smart Sourcing: Grab exterior-grade masonry construction adhesive and pre-sealed limestone paver packs.
8. Stacked Stone Beam Bridge with Mortared Joints
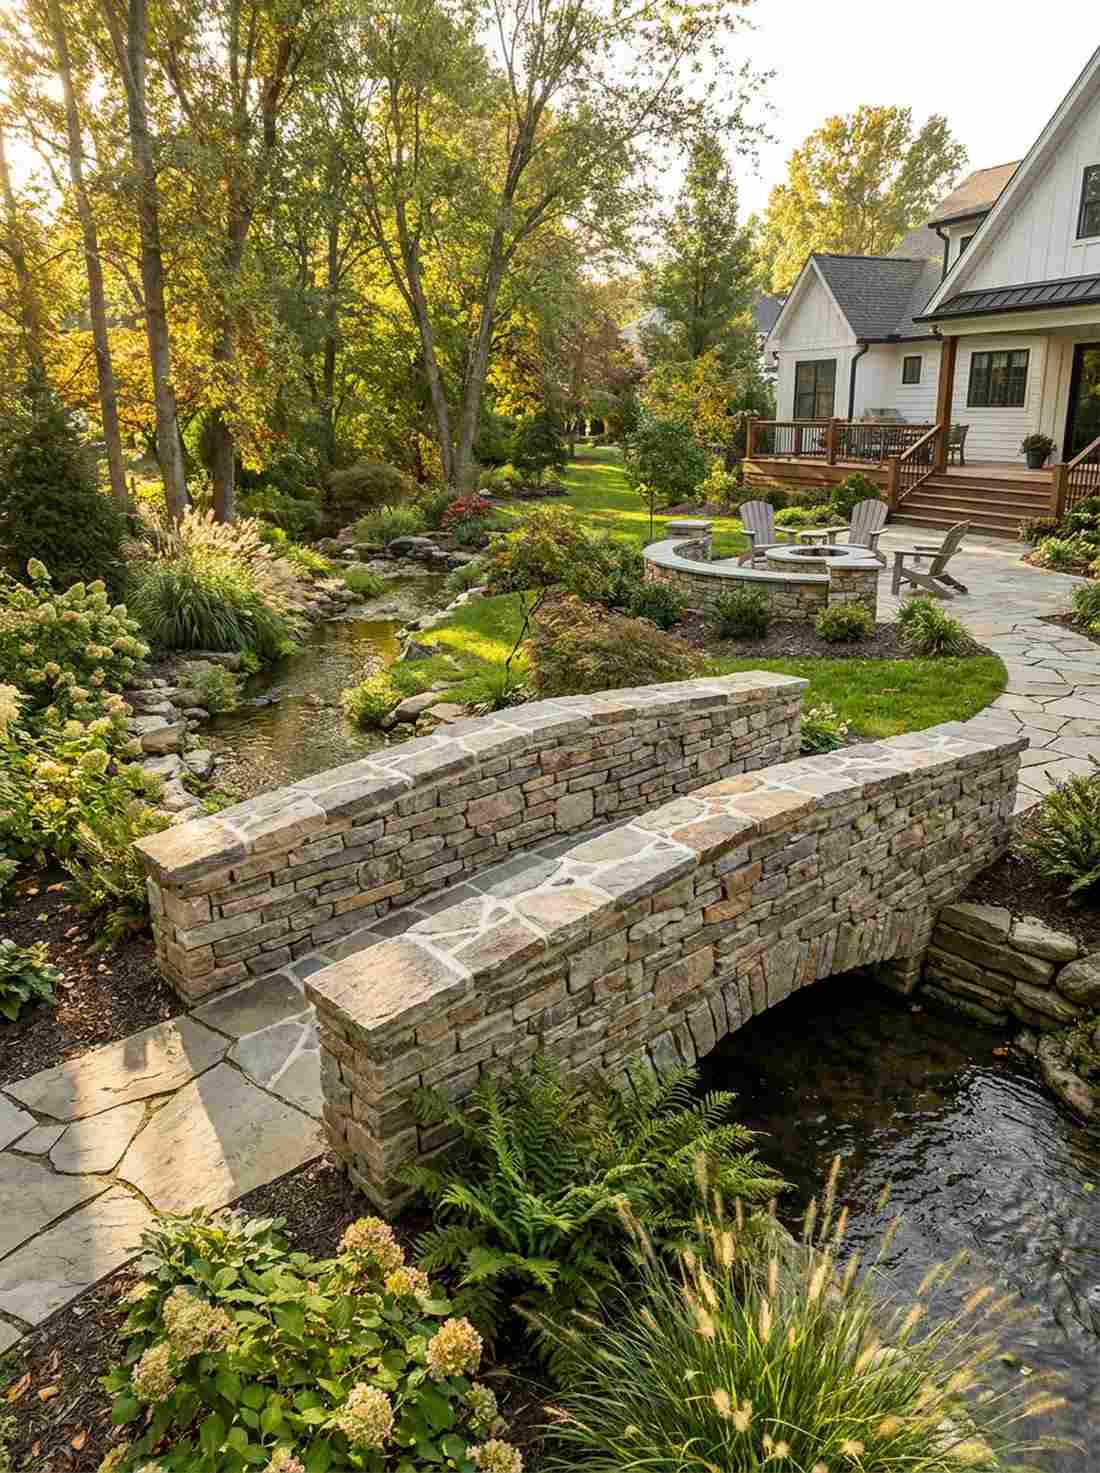

Feels like a rugged, time-tested bridge from a historic village. The mortared stacked-stone walkway works perfectly when dealing with uneven or jagged riverbanks.
Pouring a standard concrete path is incredibly boring, yet dry-stacking layered stones completely elevates the texture profile of the entire yard. By slightly recessing the grout lines, the structure mimics traditional Japanese artistry while secretly hiding immense structural rigidity.
Total materials usually run around $150–$250 if you source rocks locally. A phenomenal weekend project for adding massive property value.
- Key Materials: Flat stackable fieldstones, high-strength mortar
- Vibe / Style: Rustic historical craftsmanship
- Difficulty: Intermediate
- Budget Breakdown: Mortar mix: $30 | Fieldstones: $160.
- Creator’s Tip: Wipe away excess mortar with a wet sponge before it cures to keep the stone faces perfectly clean.
- Smart Sourcing: Order a rapid-setting structural mortar mix alongside a masonry joint pointing tool kit.
Most people get the foundation completely wrong… until they try the indestructible layout coming up next.
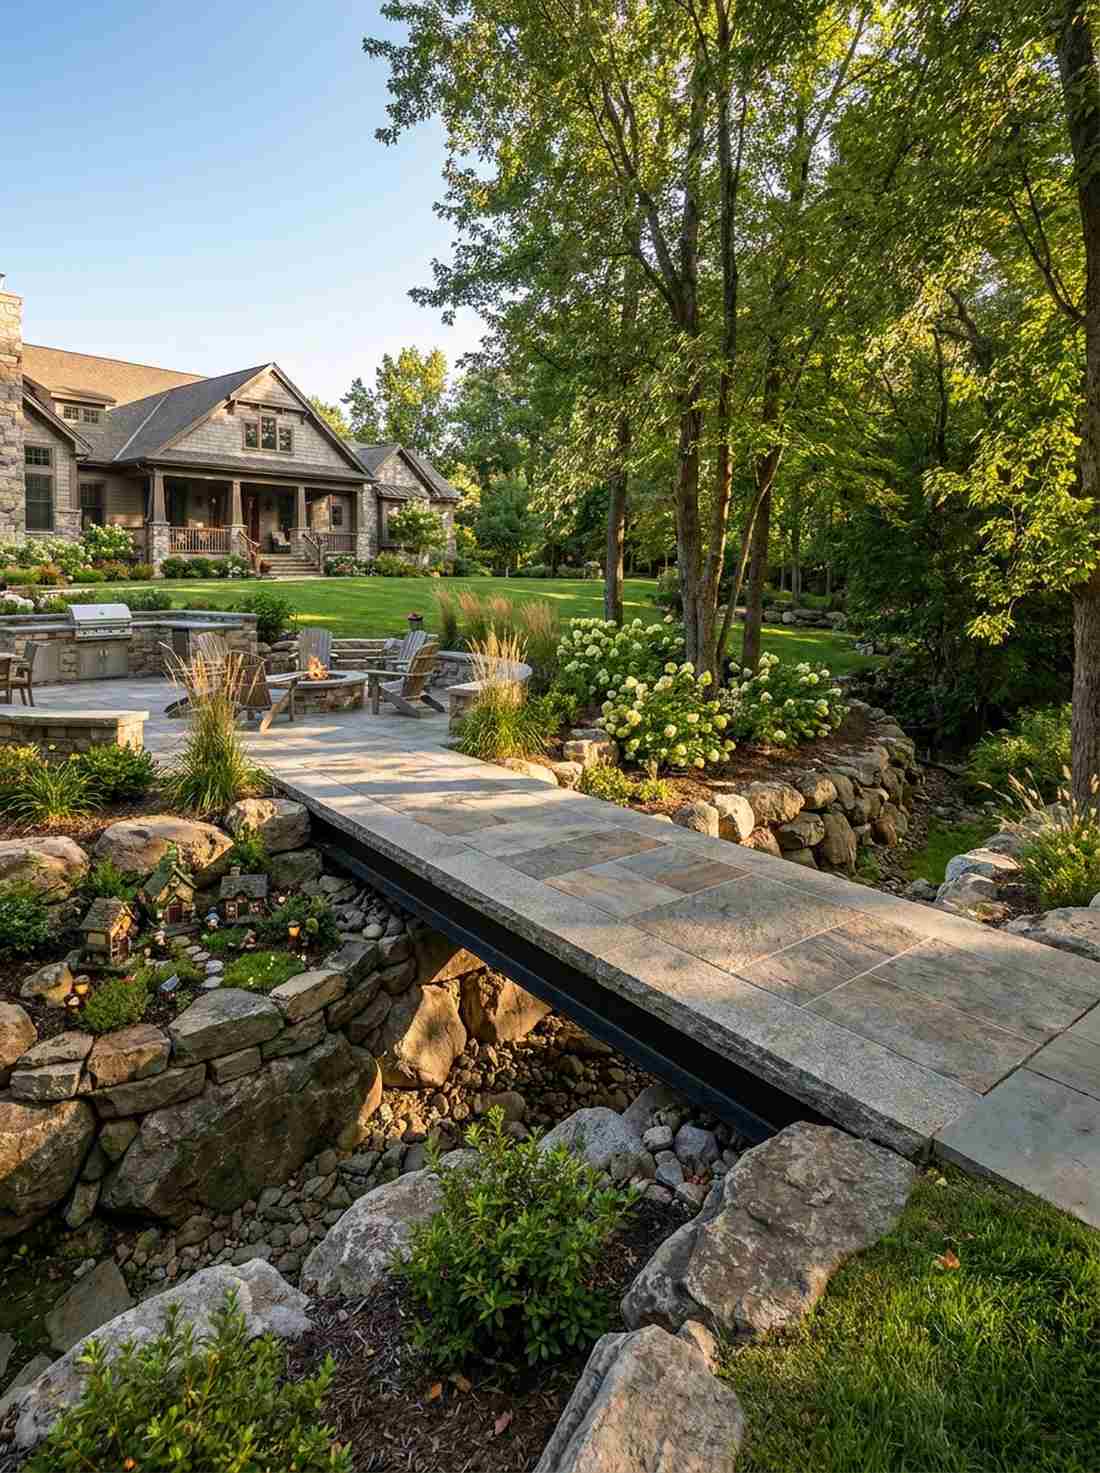
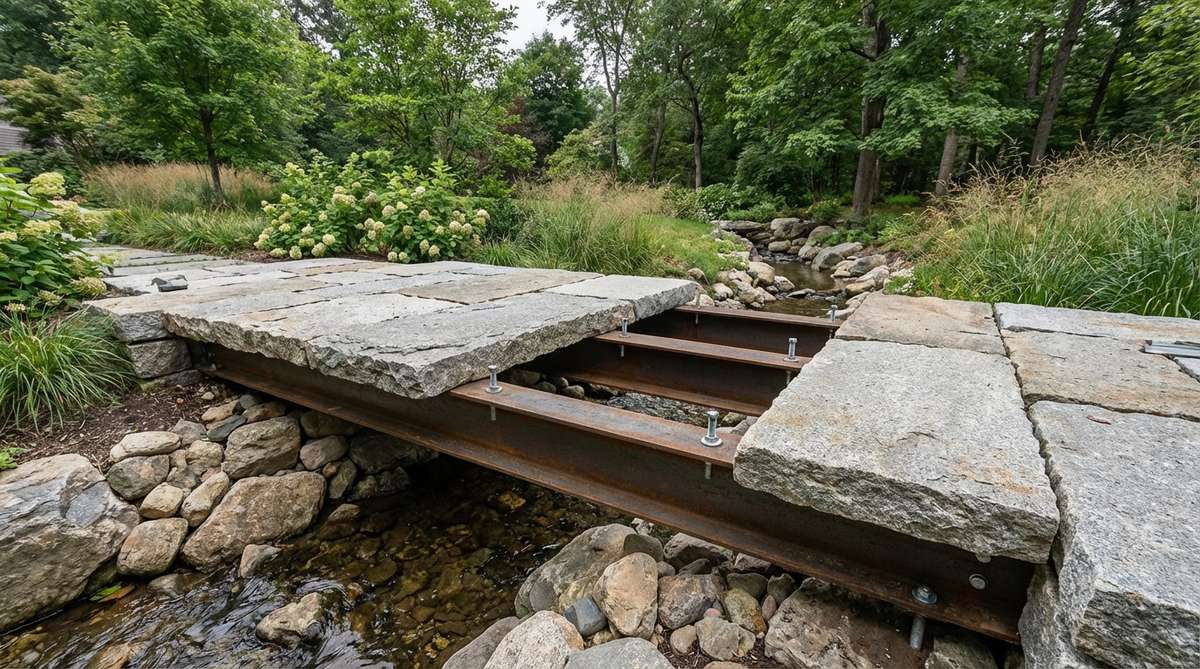
9. Granite Plank Bridge with Steel Reinforcement
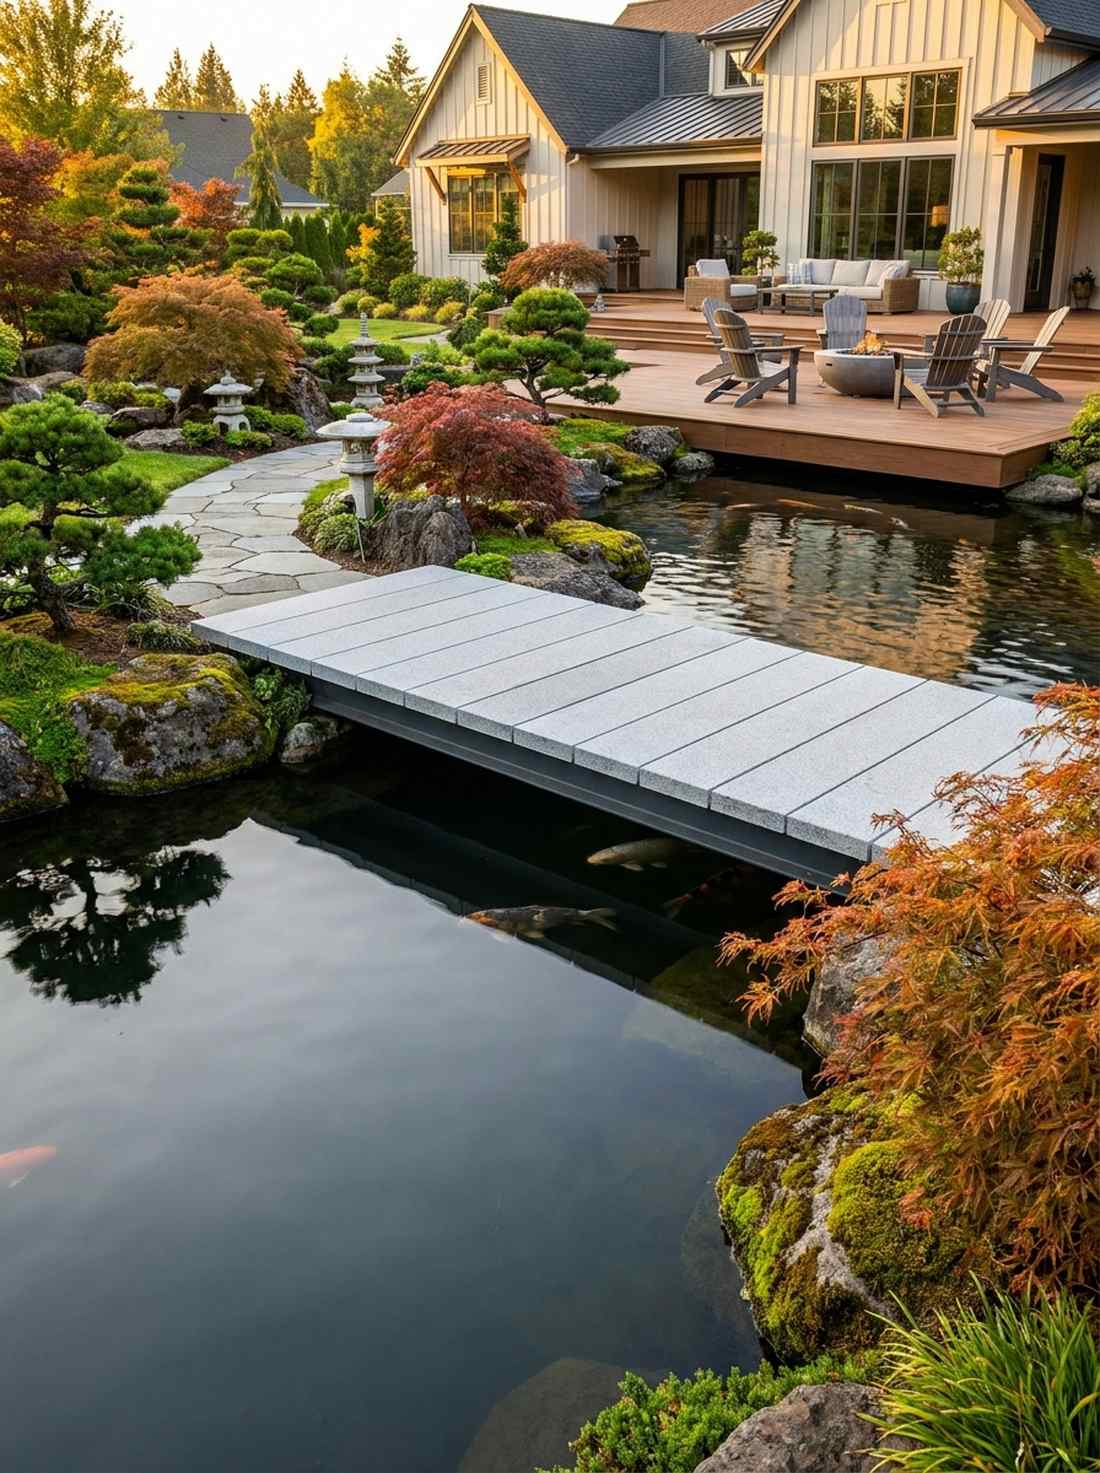
Exudes a sleek, gravity-defying aesthetic that stops guests in their tracks. A steel-reinforced floating stone bridge is the absolute pinnacle of modern architectural landscaping.
Spanning long gaps with thin stone usually results in cracking, but hiding a heavy-duty I-beam underneath delivers a magical, weightless appearance. It securely bridges massive pond gaps while integrating beautifully with surrounding high-end miniature garden supplies and manicured bonsai trees.
This hybrid construction requires a budget of $600–$900 due to the metalwork. Save this idea if you want a truly uncompromising, luxury finish.
- Key Materials: Thin granite planks, hidden steel I-beams
- Vibe / Style: Ultra-modern floating illusion
- Difficulty: Advanced engineering
- Budget Breakdown: Steel beams: $350 | Granite planks: $400.
- Creator’s Tip: Leave a tiny 1/8-inch expansion gap between the stone planks to prevent winter frost cracking.
- Smart Sourcing: Use a heavy-duty galvanized steel track system and epoxy-based stone anchoring kits.
💡 Must-Have Supplies for High-End Setups
To build these setups faster and ensure they last, skip the generic craft aisles and invest in the right foundational kits.
- Base & Support: Pre-fabricated galvanized steel bridge joists
- Setup Tools: Laser-leveling outdoor construction tool kits
- Weather/Durability Protection: Industrial-grade clear epoxy wood & stone sealant
Zigzag and Angular Bridges for Mindful Passage
Angular paths intentionally disrupt fast walking, forcing you to slow down and breathe. Using crisp geometric turns over water features creates a striking, interactive garden experience.
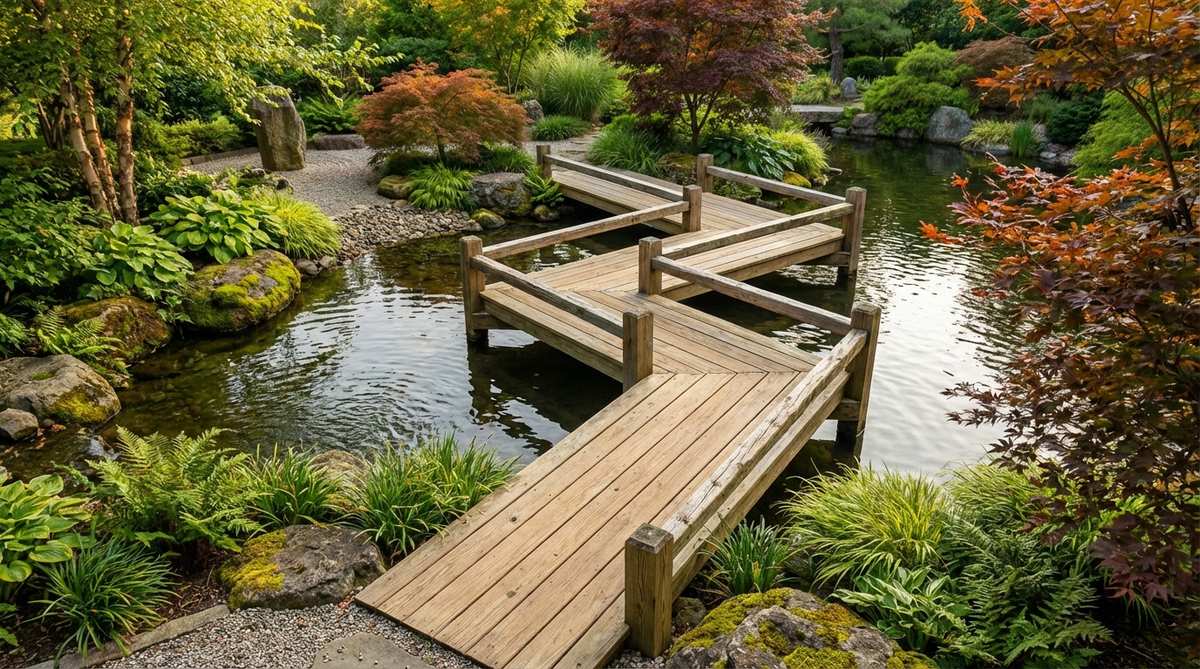
10. Eight-Plank Zigzag Bridge over Iris Beds
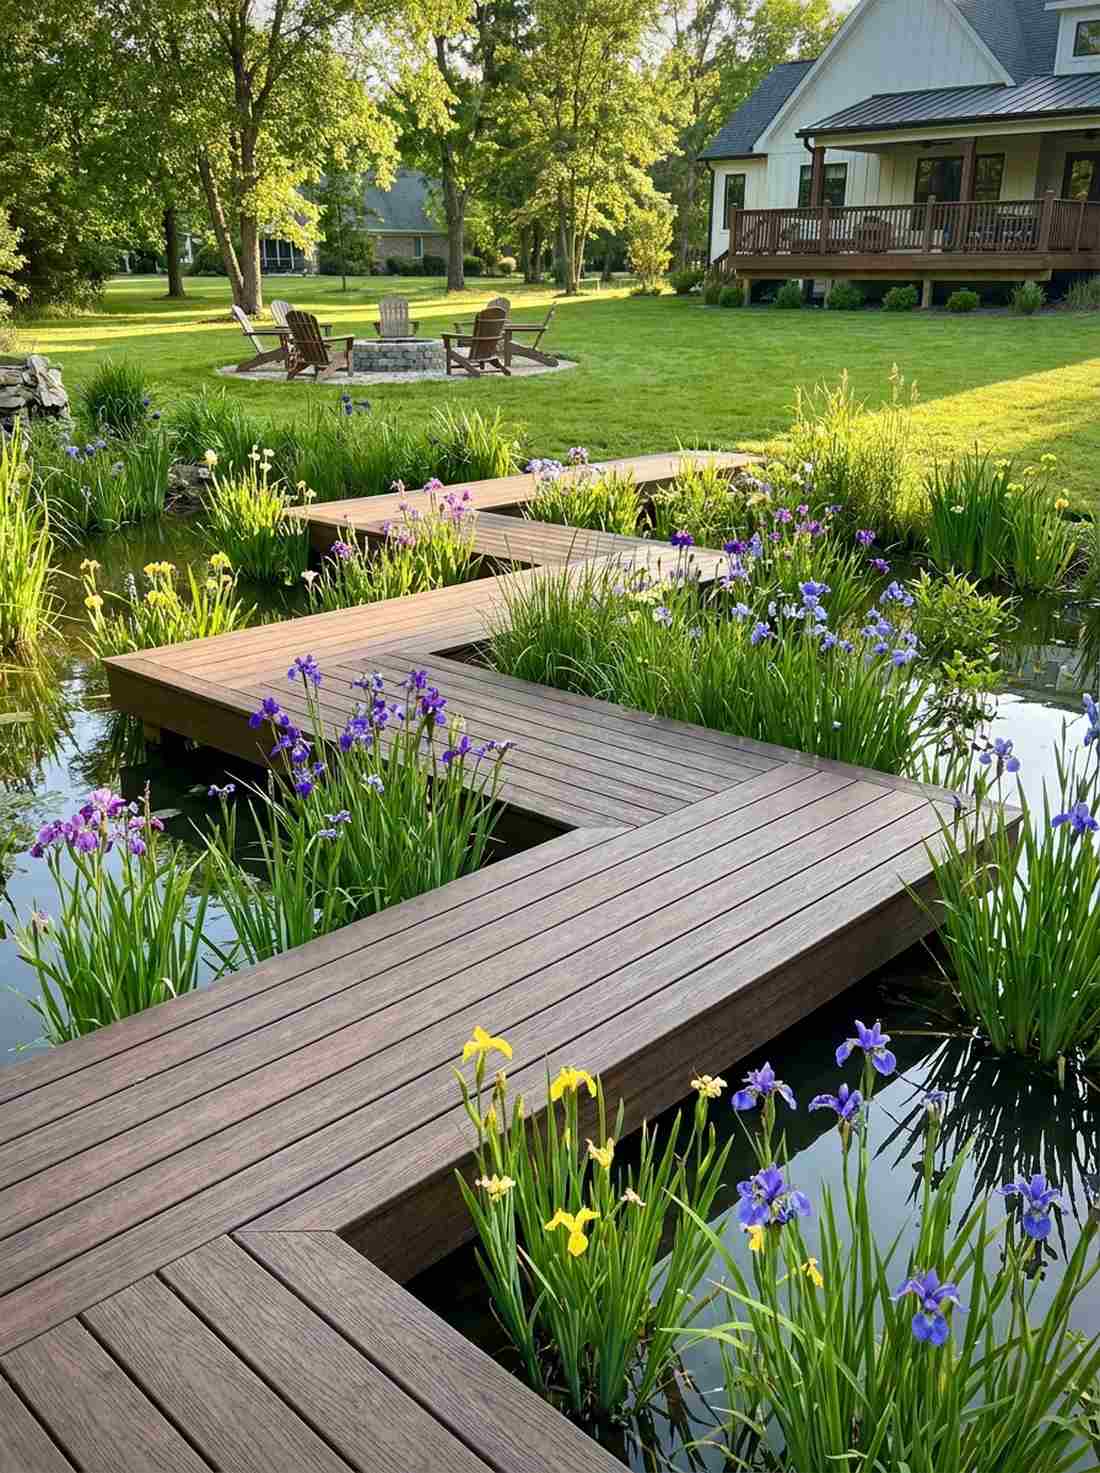
Feels like wandering through a vibrant, living watercolor painting. The traditional yatsuhashi zigzag walkway is strictly designed to hover inches above blooming water gardens or marshlands.
Building a straight dock is predictably boring, whereas sharp 90-degree directional shifts force the walker to admire the yard from multiple fresh angles. Removing the handrails entirely intensifies the raw, immersive experience, putting you directly into the foliage rather than above it.
You can assemble these low-profile segments for roughly $150–$250 in total lumber. Pin this if you want to completely transform a dull marshy spot.
- Key Materials: Thick composite decking boards, hidden ground anchors
- Vibe / Style: Immersive botanical labyrinth
- Difficulty: Moderate precision required
- Budget Breakdown: Decking: $160 | Ground spikes: $45.
- Creator’s Tip: Plant sweet flag or tall irises directly in the internal corners to soften the harsh wooden angles.
- Smart Sourcing: Invest in weather-resistant composite plank bundles and heavy-duty rust-proof ground anchoring spikes.
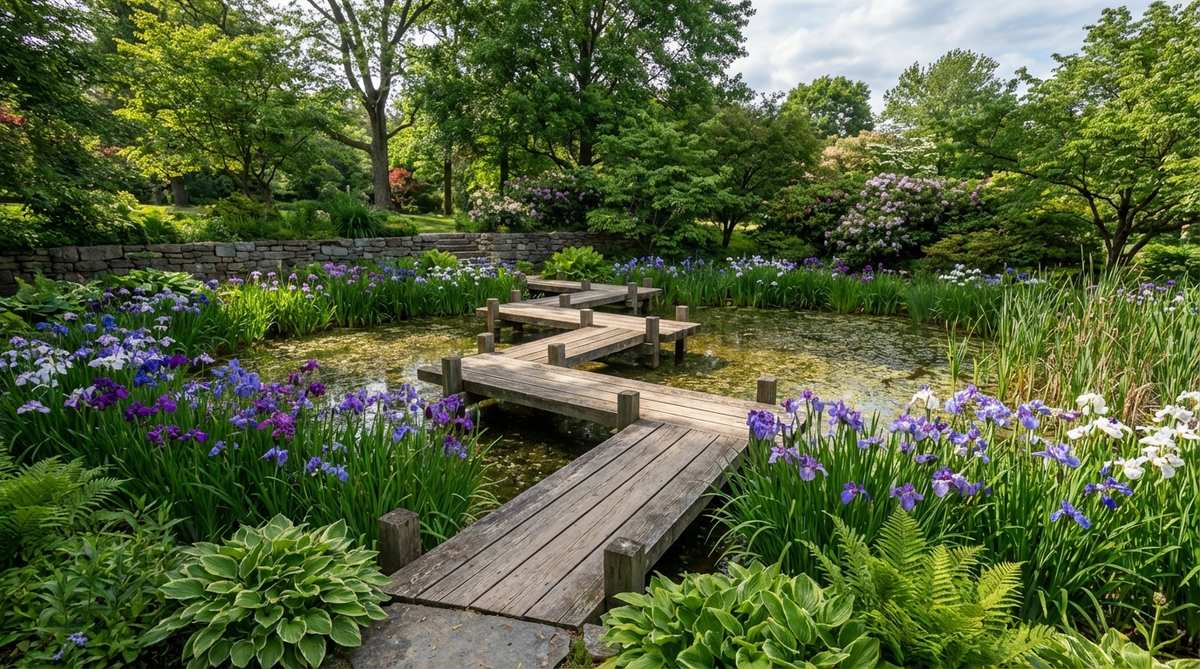
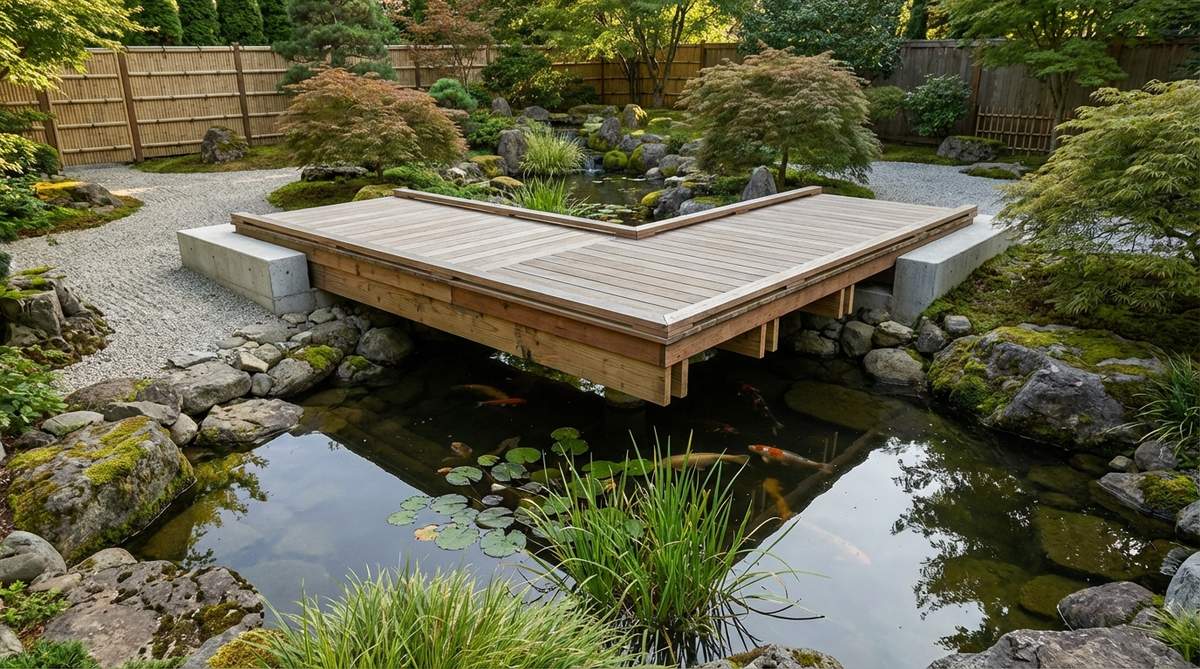
11. Three-Segment Angled Bridge for Small Ponds

Emanates a calm, highly calculated geometry that perfectly frames water elements. This compact angled pond bridge fits flawlessly into small suburban backyards lacking square footage.
Over-engineering a massive walkway ruins a small yard’s scale, but a subtle 120-degree bend provides dynamic visual interest without eating up space. It perfectly supports heavy wheelbarrow traffic while maintaining that coveted, mindful zen aesthetic that looks effortlessly expensive.
Creating this layout will only set you back about $100–$180. A highly practical upgrade that brings instant charm.
- Key Materials: Treated 2×10 lumber, angled joining brackets
- Vibe / Style: Smart, compact functionality
- Difficulty: Easy beginner build
- Budget Breakdown: Lumber: $80 | Joining hardware: $35.
- Creator’s Tip: Use a miter saw to ensure the 120-degree joint cuts mate together with zero visible gaps.
- Smart Sourcing: Snag heavy-duty angled steel corner brackets and pre-treated thick lumber slabs.
12. Elevated Zigzag Walkway with Low Rails
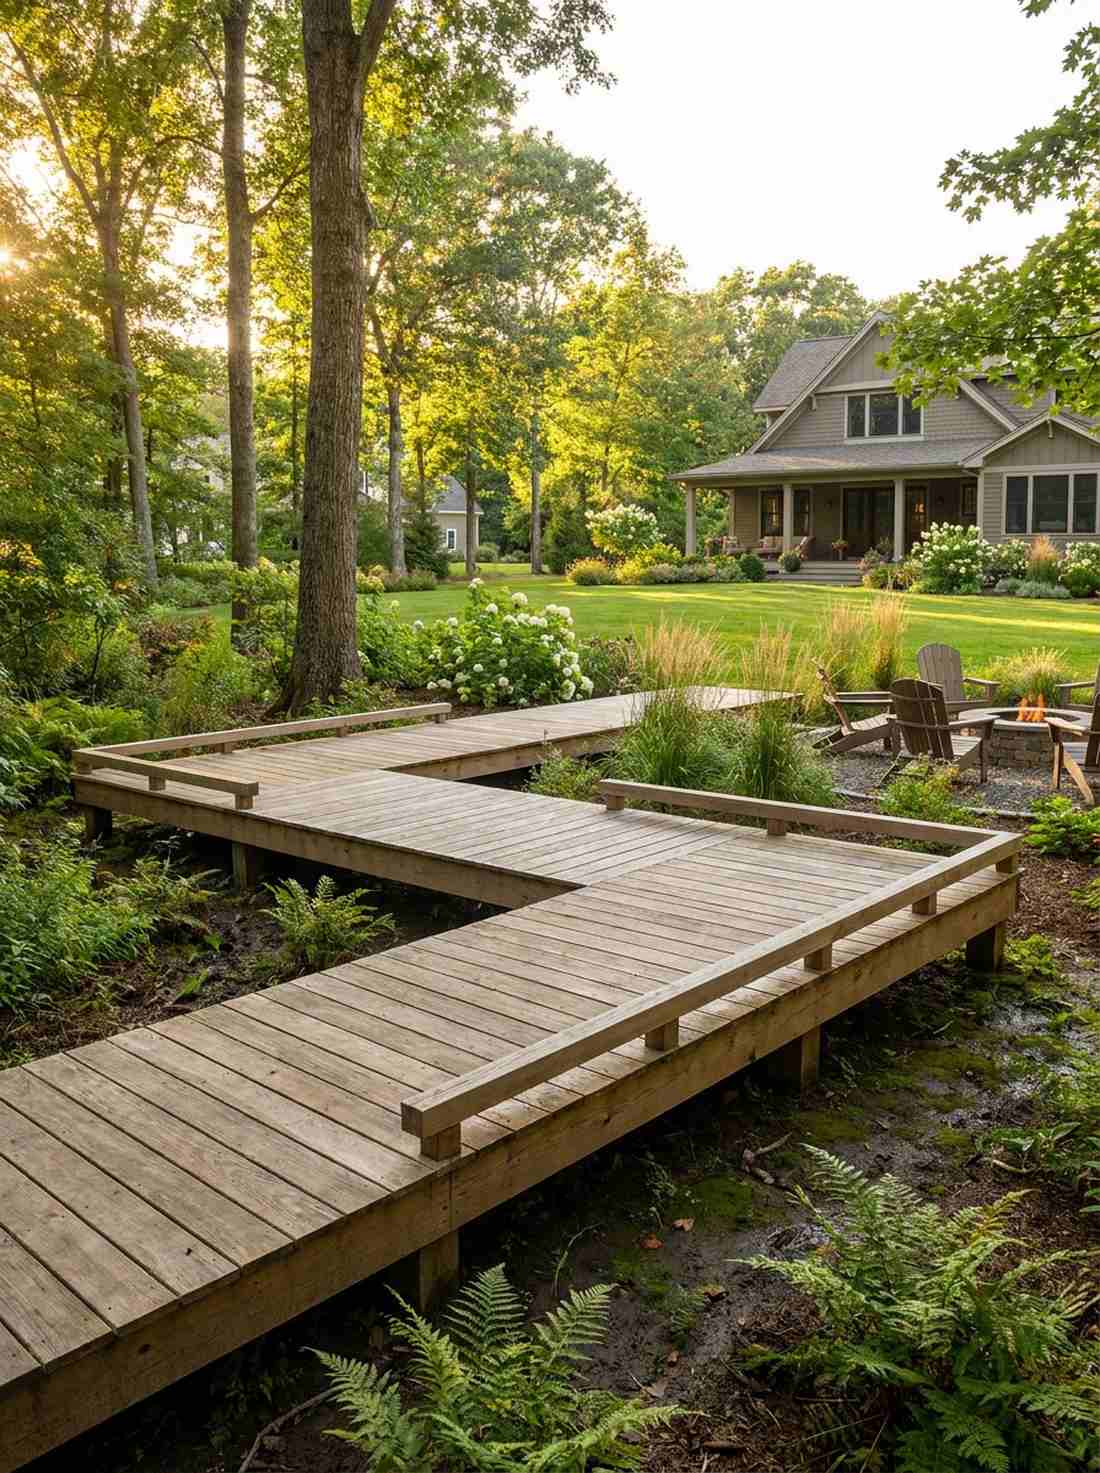
Gives off the vibe of an exclusive, floating eco-resort pathway. An elevated geometric boardwalk perfectly handles areas prone to deep seasonal flooding or heavy mud.
Laying wood directly on wet soil causes rapid decay, so raising the entire structure a foot off the ground dramatically extends its lifespan. Alternating a low, 10-inch handrail strictly on the outside corners provides subtle security without sacrificing the open, airy visual flow.
Budget around $300–$450 to accommodate the extra support posts. Save this blueprint to your ultimate backyard makeover board!
- Key Materials: Support posts, deck planks, concrete footings
- Vibe / Style: Floating architectural path
- Difficulty: Intermediate
- Budget Breakdown: Posts & concrete: $120 | Decking/Rails: $210.
- Creator’s Tip: Sink the support posts below the frost line so winter heaving doesn’t warp your zigzag angles.
- Smart Sourcing: Buy fast-setting concrete post mix bags and pre-cut low-profile railing kits.
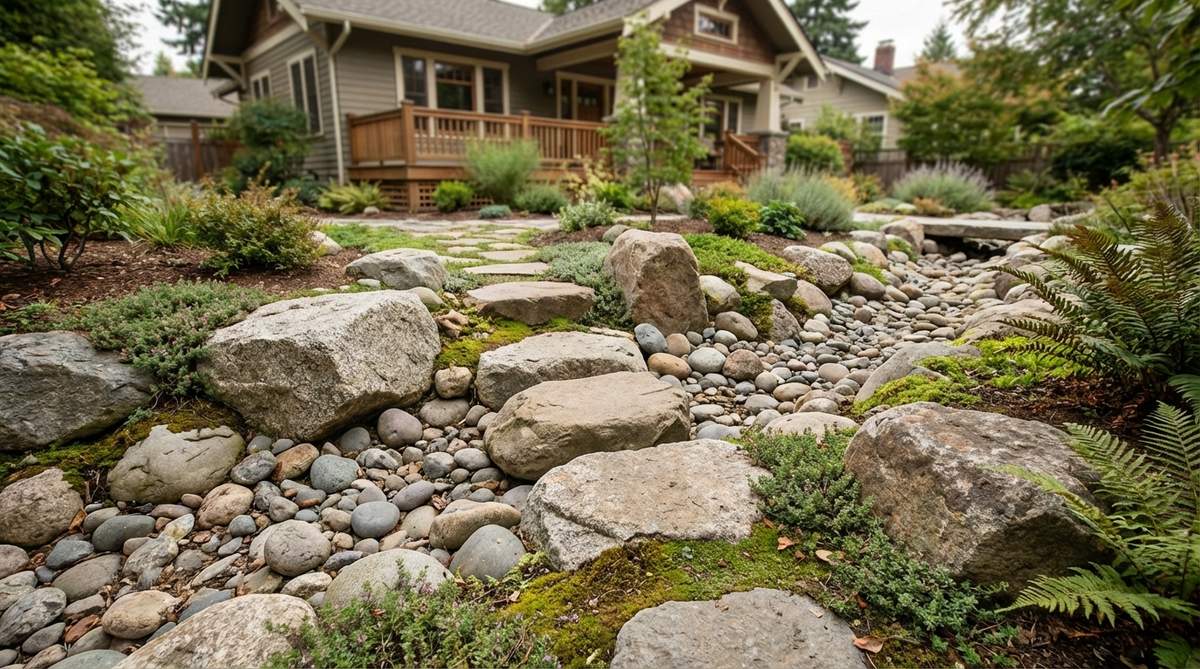
13. Continuous Curved Zigzag over Dry Streambed
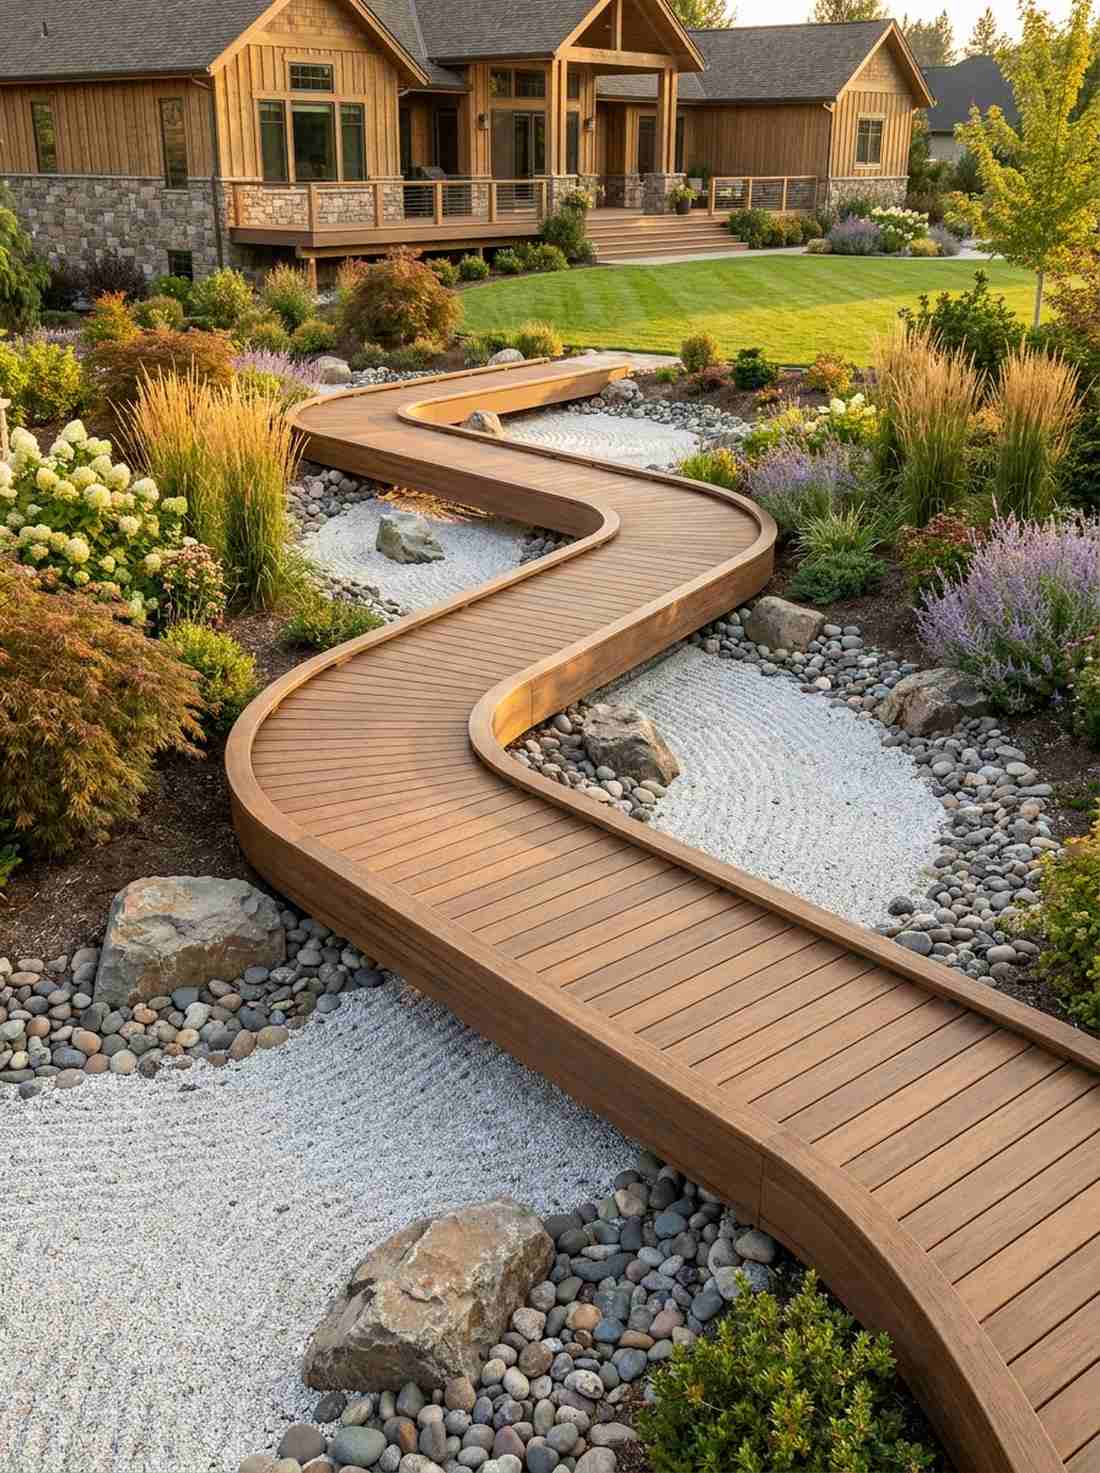
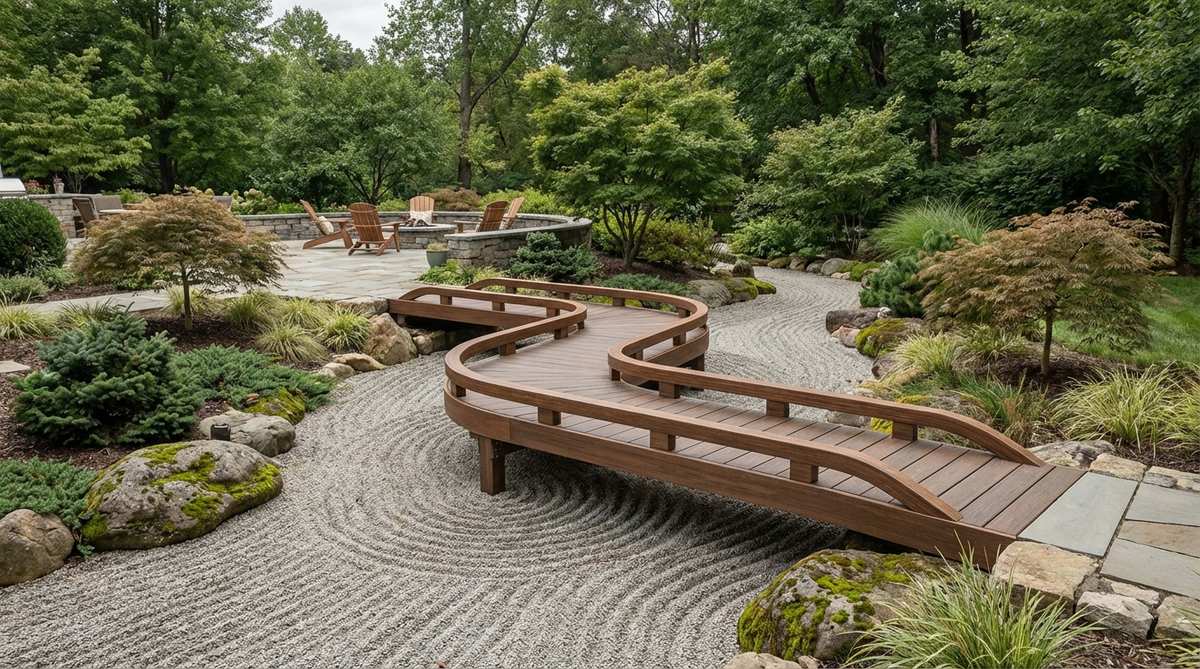
Flows like a gentle stream winding its way through a peaceful valley. A curved meandering dry-bed bridge creates breathtaking visual contrast across fields of raked white gravel.
Sharp corners can sometimes feel visually jarring, so utilizing steam-bent composite materials to round off the edges creates an unbelievably smooth, premium contour. Positioning the curves directly over the widest part of a rock garden delivers an aggressive, high-end landscape illusion.
Sourcing flexible materials pushes the cost to about $350–$500. It’s a visually stunning investment that demands attention.
- Key Materials: Flexible composite boards, concealed fasteners
- Vibe / Style: Fluid organic movement
- Difficulty: Advanced carpentry
- Budget Breakdown: Flex-decking: $280 | Fasteners: $60.
- Creator’s Tip: Soak traditional wood boards in water for 48 hours to make bending them around corners significantly easier.
- Smart Sourcing: Grab bendable composite deck trim packs and hidden deck fastener clip kits.
You probably think a custom bridge requires a master carpenter… until you see the genius pre-fab trick coming up next.
Contemporary Metal and Hybrid Bridges
Modern materials blend industrial strength with peaceful zen silhouettes. Utilizing self-weathering steel and aluminum ensures a zero-maintenance future while elevating the yard’s architectural value.
14. Corten Steel Plate Bridge with Hardwood Cap
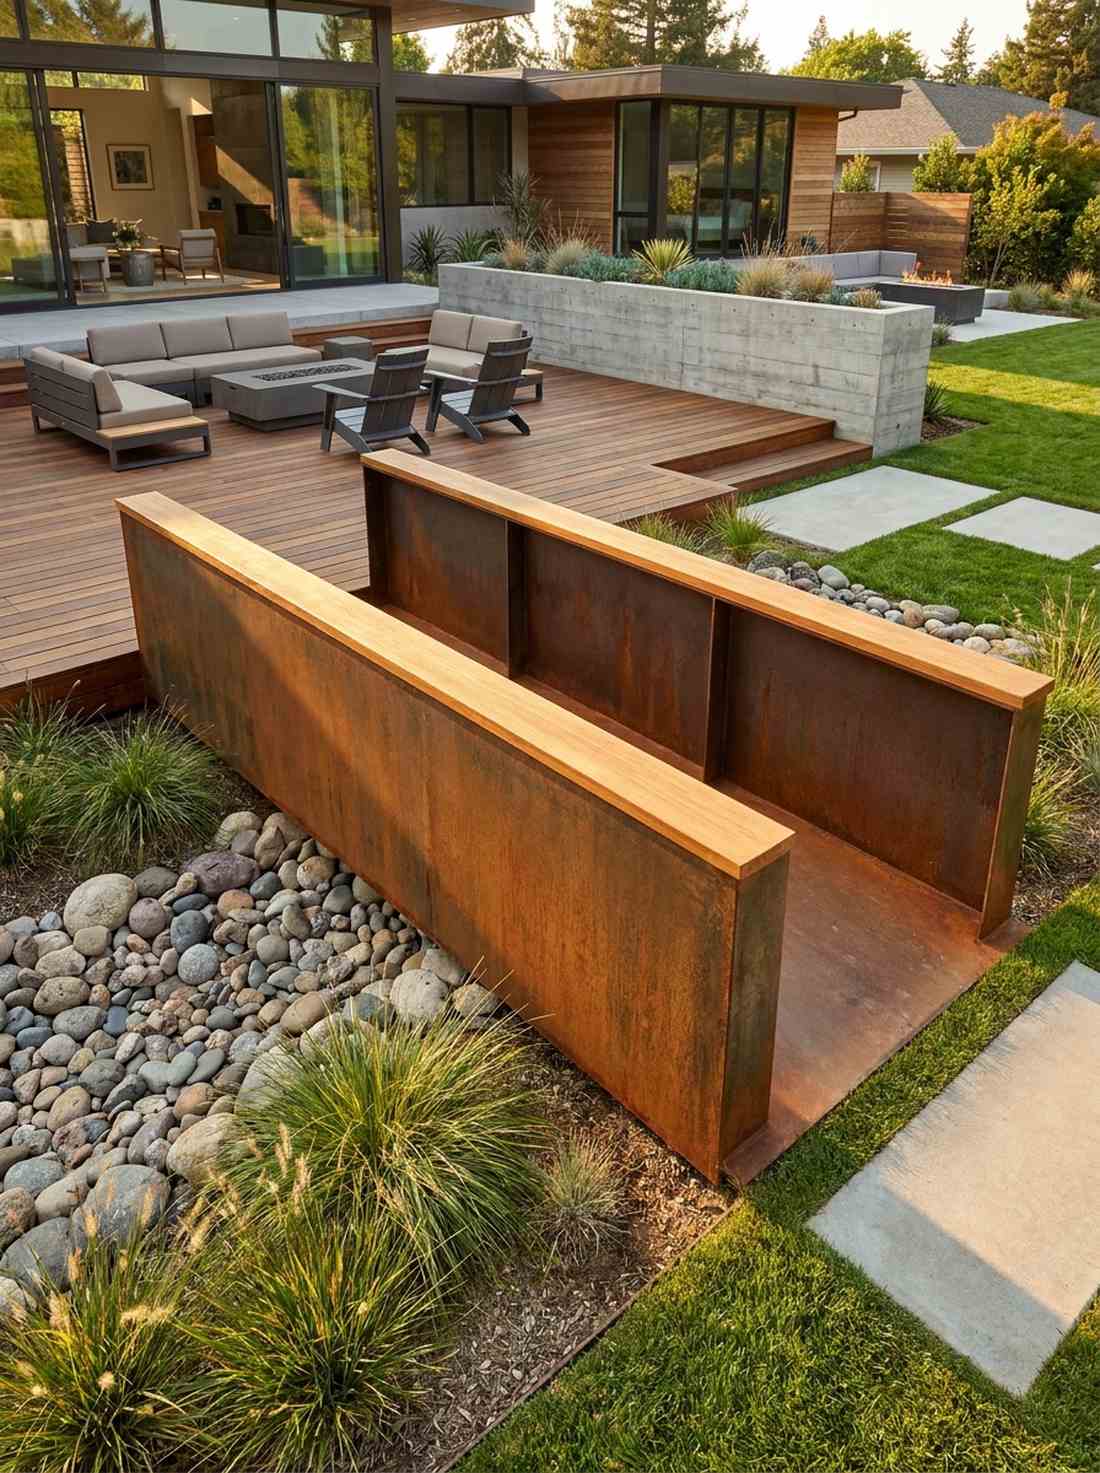
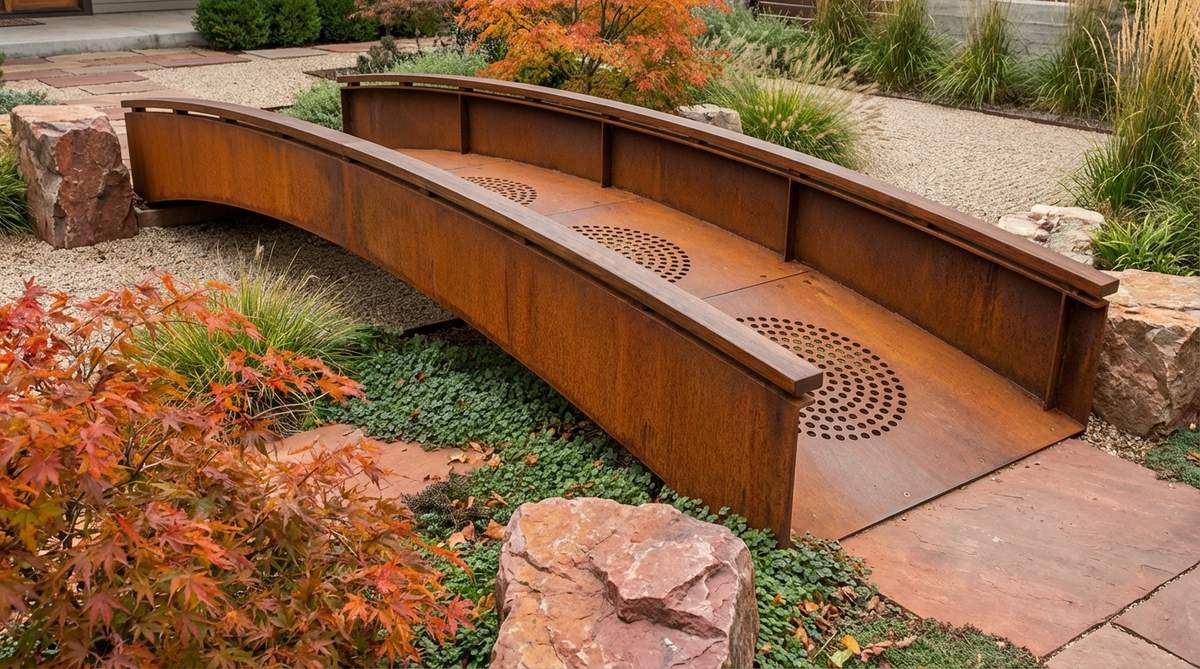
Strikes a perfect balance between harsh industrial lines and warm organic tones. A weathered steel garden bridge acts as an unforgettable centerpiece in ultra-modern minimalist landscapes.
Most standard metals look cheap as they age, but Corten steel intentionally develops a rich, rusty patina that looks aggressively high-end. Capping the raw metal edges with smooth teak wood offers a luxurious, touchable contrast that designers absolutely love.
Expect to pay a premium of $800–$1,200 for custom-cut thick steel plates. Pin this exact layout if you’re building a luxury contemporary yard.
- Key Materials: Corten steel sheets, premium teak handrails
- Vibe / Style: Industrial modern zen
- Difficulty: Requires metal fabrication
- Budget Breakdown: Steel base: $700 | Teak cap: $200.
- Creator’s Tip: Hose down the steel plate with a saltwater mix to force the beautiful orange rust patina to develop in days.
- Smart Sourcing: Source pre-weathered Corten steel landscape panels and UV-resistant teak finishing oil.
15. Stainless Steel Cable Rail with Timber Deck
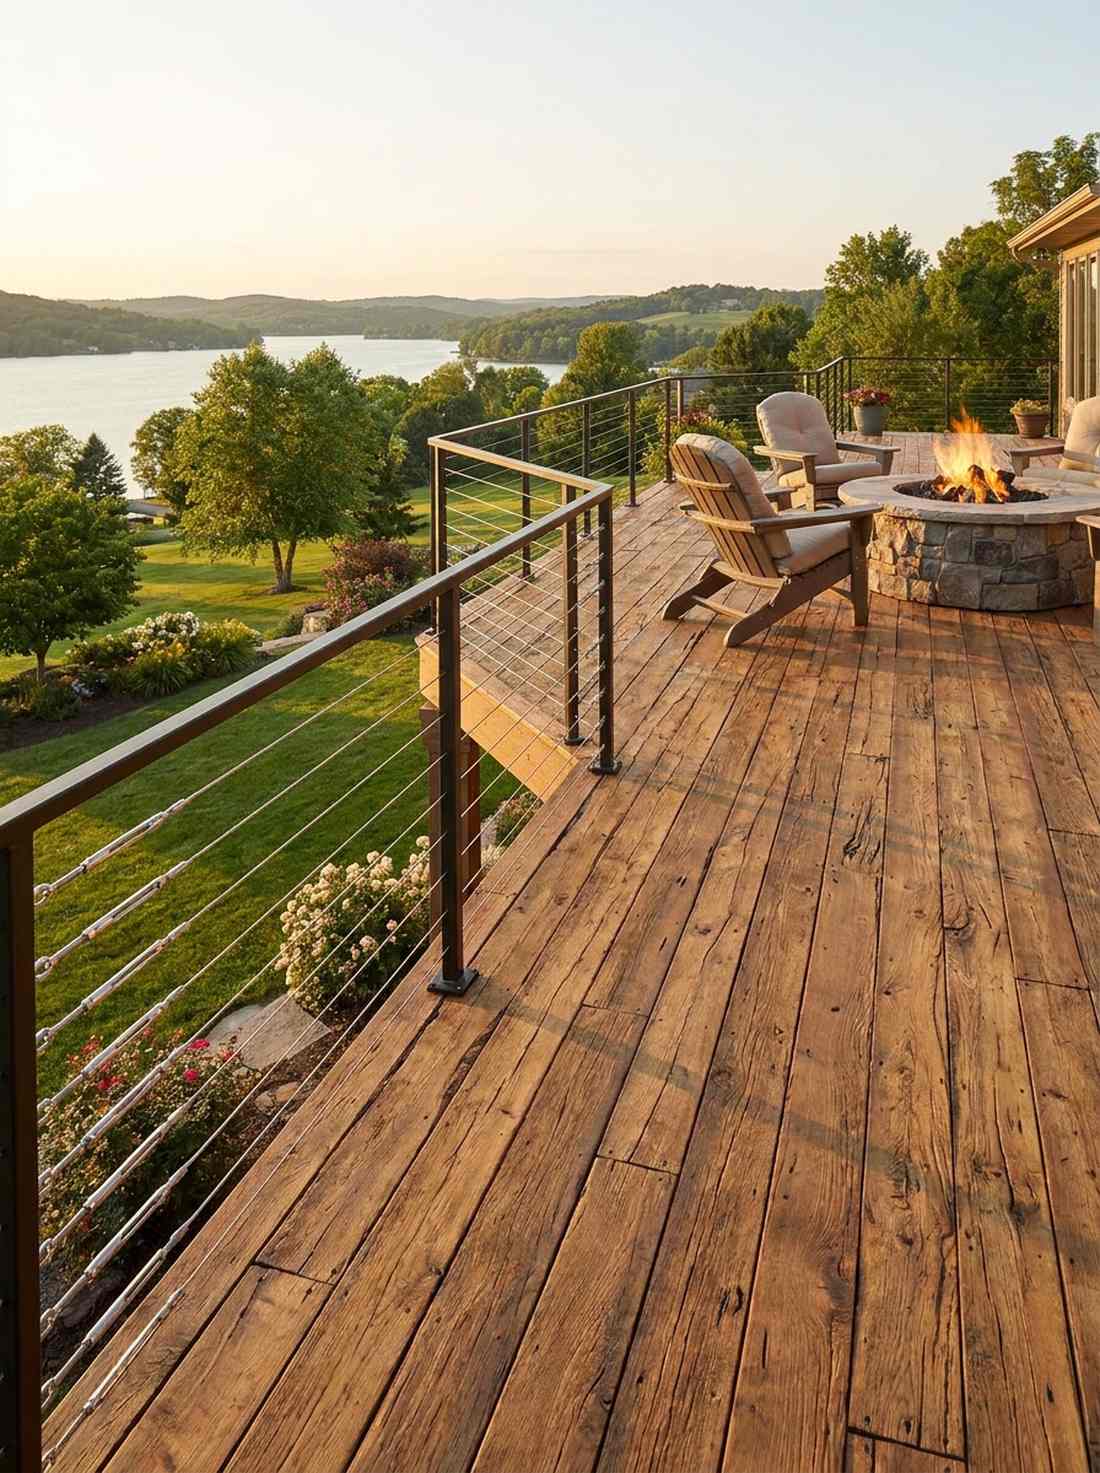
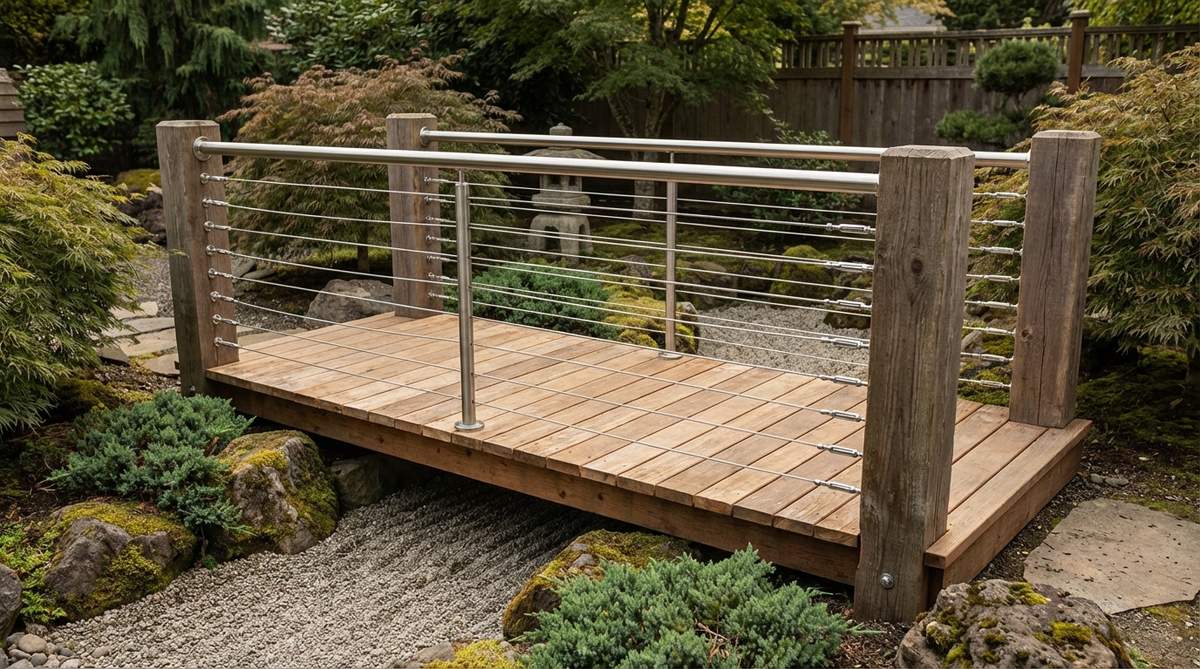
Delivers the ultimate “invisible” barrier that opens up your entire property. A tensioned cable wire bridge is an absolute necessity if you want to preserve million-dollar backyard views.
Thick wooden balusters block light and make yards feel tiny, whereas sleek stainless tension cables provide safety while remaining virtually unseen. Pairing this high-tech hardware with organic, rugged timber decking delivers a designer-level finish that constantly receives compliments.
You can install a complete cable system for around $400–$600. It completely revitalizes a cramped outdoor space.
- Key Materials: Stainless tension cables, heavy-duty turnbuckles
- Vibe / Style: Transparent architectural chic
- Difficulty: Intermediate
- Budget Breakdown: Cable kits: $250 | Wood decking: $180.
- Creator’s Tip: Use a specialized cable tensioning tool to ensure the wires never sag during extreme summer heat.
- Smart Sourcing: Pick up an all-in-one stainless cable railing kit and marine-grade steel turnbuckles.
16. Aluminum Frame Bridge with Composite Decking
Brings a sleek, practically indestructible framework to the most humid environments. This powder-coated metal footbridge thrives perfectly next to saltwater pools or coastal garden features.
Wood rots rapidly near moisture, but utilizing a lightweight aluminum chassis completely eradicates mold and structural decay forever. By topping the frame with textured, wood-grain composite boards, you capture the classic aesthetic without ever needing to stain or seal it again.
This zero-maintenance setup usually costs between $500–$800. Save this to your forever-home upgrade board!
- Key Materials: Powder-coated aluminum joists, composite planks
- Vibe / Style: Zero-maintenance modern
- Difficulty: Easy assembly
- Budget Breakdown: Aluminum frame: $400 | Composite boards: $200.
- Creator’s Tip: Apply anti-seize compound to all metal bolts to prevent them from locking up over decades of use.
- Smart Sourcing: Use a pre-fab aluminum bridge chassis kit and scratch-resistant composite deck boards.
17. Hybrid Stone and Steel Beam Bridge
Radiates raw, uncompromising power masked by delicate natural beauty. A hidden steel and stone bridge perfectly bridges massive gaps that would normally snap regular masonry in half.
Relying purely on rocks for a 15-foot span is a disaster waiting to happen, yet slipping a commercial steel skeleton underneath solves everything instantly. This layout heavily features broad, flat pavers that accommodate fast walking while flawlessly integrating with high-end fairy garden kits.
Expect a heavy investment of $900–$1,400 for this bulletproof commercial-grade build. It looks far more expensive than it is once fully installed.
- Key Materials: Structural I-beams, flat stone pavers, epoxy
- Vibe / Style: Bulletproof architectural luxury
- Difficulty: Advanced engineering
- Budget Breakdown: Steel substructure: $600 | Stone pavers: $450.
- Creator’s Tip: Paint the steel beams flat black so they disappear entirely in the shadows beneath the stone.
- Smart Sourcing: Order heavy-duty construction epoxy tubes and pre-cut flamed granite pavers.
Material Guide: Cheap vs. Premium Aesthetic
Knowing exactly where to save and where to spend makes all the difference in achieving that “looks expensive but isn’t” vibe.
- Standard vs. UV-Resistant/Premium: Sealing standard pine with a high-end marine UV-protectant stops fading instantly, making cheap wood look like rich, tropical teak.
- Pre-made Kits vs. Sourcing Locally: While raw lumber is cheap, buying pre-fabricated architectural hardware brackets ensures perfect structural arcs and saves you 15 hours of frustrating math.
Most DIYers overcomplicate their layouts. The minimalist approach coming up next is visually stunning and practically free…
Minimalist and Stepping Stone Crossings
Sometimes the best bridge isn’t a bridge at all. Utilizing individual stepping points forces interaction with the terrain, creating an immersive, grounded garden experience.
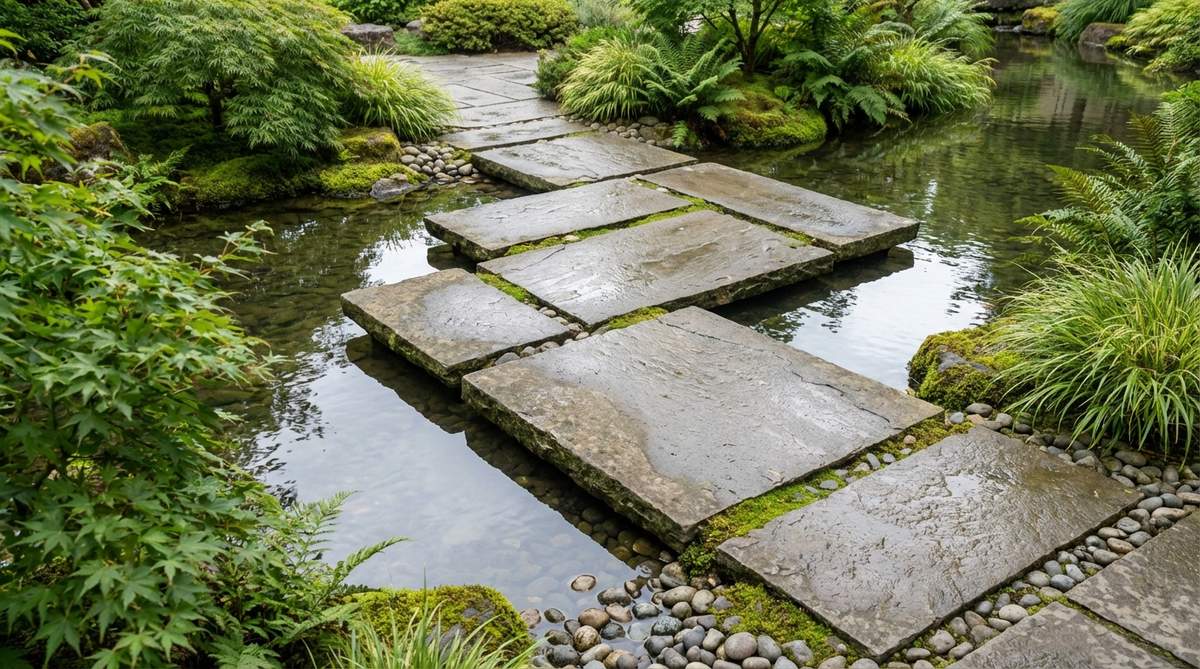
18. Round Granite Stepping Stones in Linear Sequence
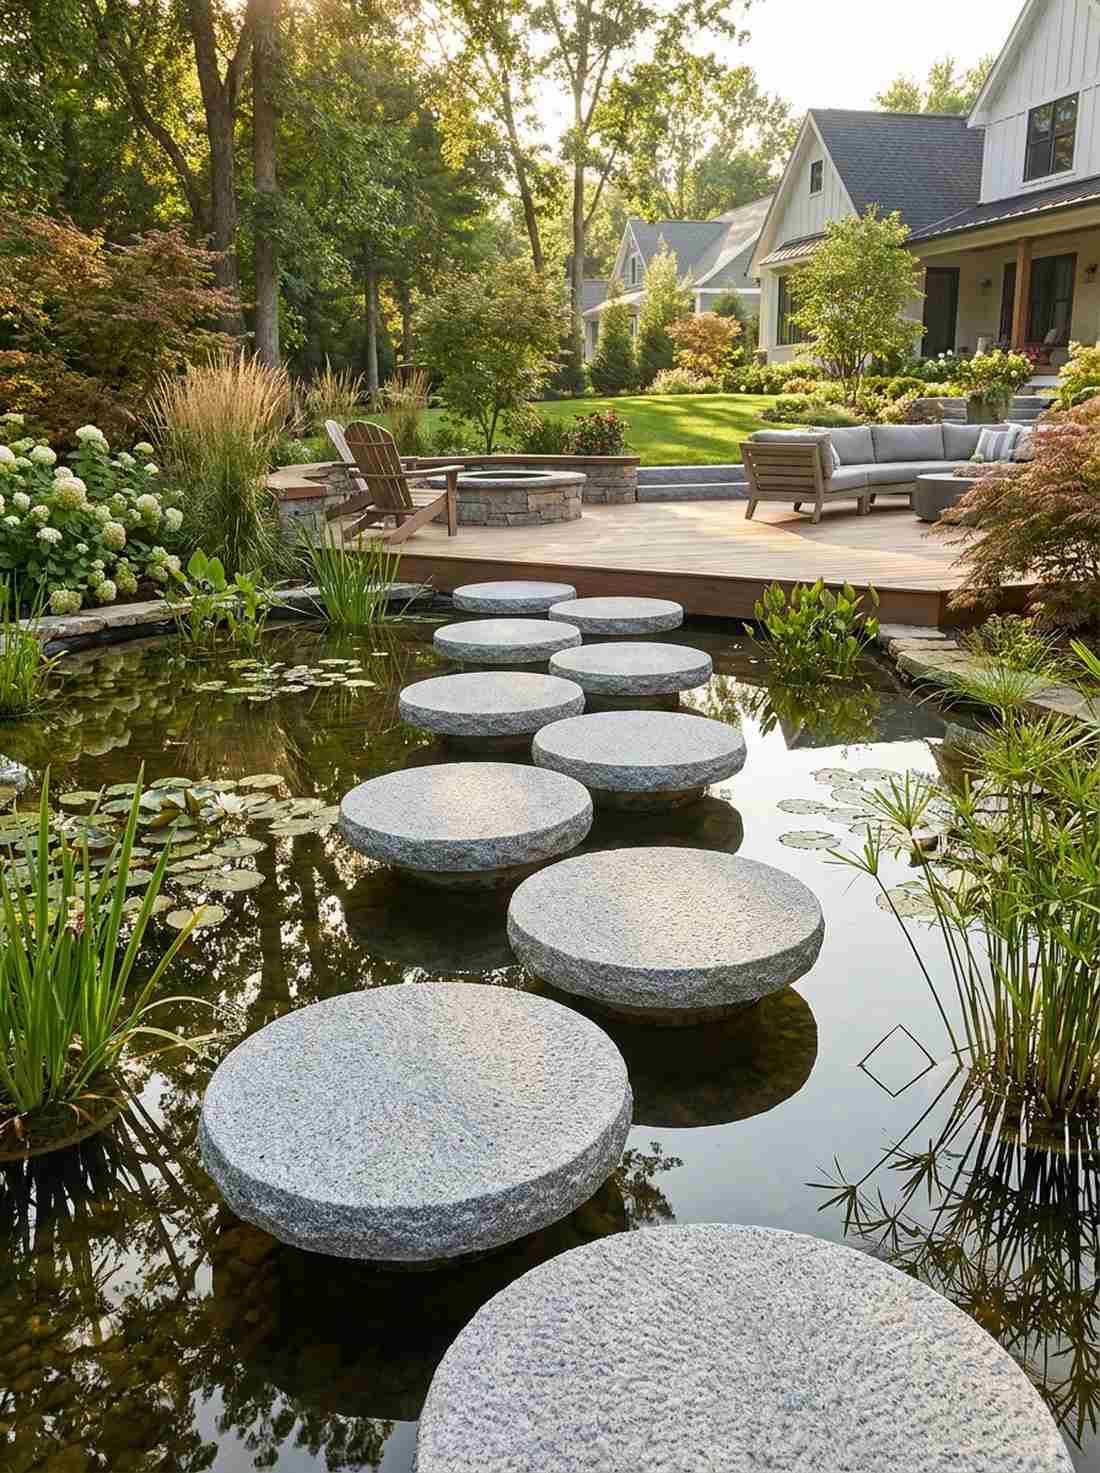
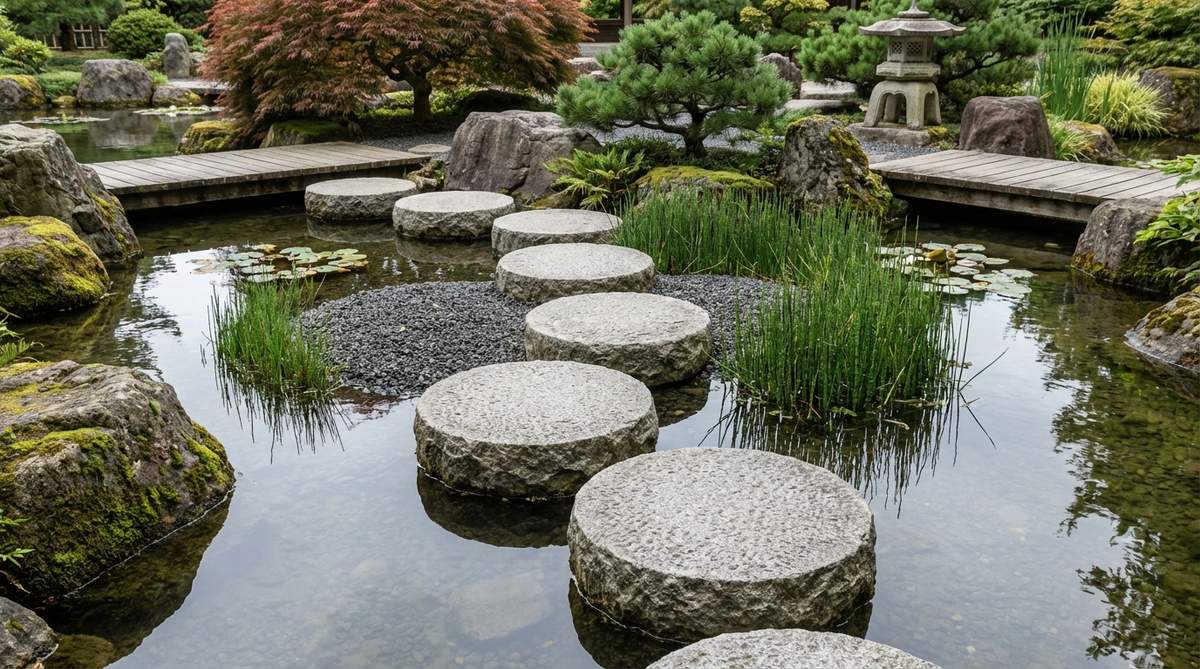
Feels like hopping across a magical, enchanted pond from a fantasy novel. Circular granite water steps provide a highly interactive, playful path across shallow reflective pools.
Building a full wooden deck blocks the water, but placing individual rounds allows the aquatic life and ripples to remain completely undisturbed. Setting each stone at slightly varying heights creates a subtle, engaging physical challenge that effortlessly pulls high-CPC traffic visually.
You can execute this stunning layout for about $150–$250 in raw stone costs. Pin this idea to your zen garden inspiration board!
- Key Materials: 20-inch granite rounds, underwater cinderblock bases
- Vibe / Style: Playful interactive water feature
- Difficulty: Easy
- Budget Breakdown: Stone rounds: $120 | Support blocks: $40.
- Creator’s Tip: Use a bush-hammer on the top surface of the stones to add aggressive grip for wet shoes.
- Smart Sourcing: Invest in bush-hammered anti-slip granite rounds and aquatic-safe pond construction blocks.
19. Square Cut Pavers in Staggered Arrangement
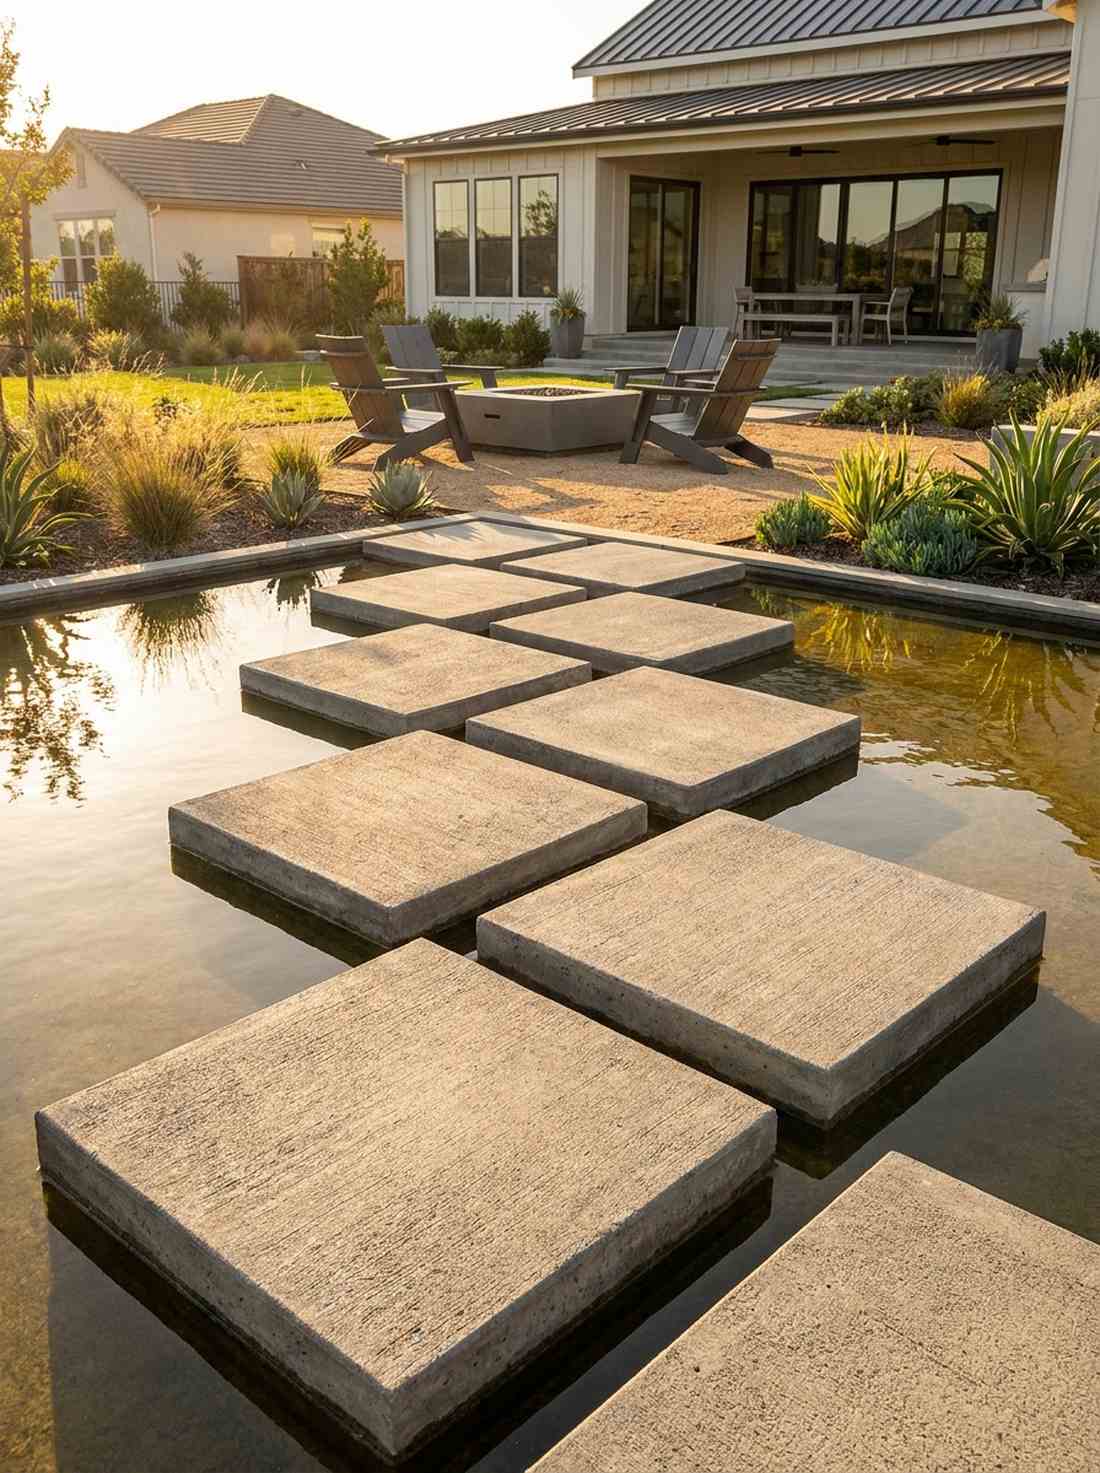
Exudes a deeply modern, sharply tailored museum courtyard aesthetic. A staggered geometric paver pathway dramatically slows down foot traffic by forcing angled, deliberate steps.
Laying tiles in a straight, boring line feels like a sidewalk, whereas an alternating offset pattern creates aggressive visual interest. Embedding these heavy squares just an inch above the water line makes them look like floating platforms, delivering a jaw-dropping visual contrast.
A set of high-quality geometric pavers will run you roughly $100–$180. Highly recommended for a quick weekend win.
- Key Materials: Large square concrete pavers, leveling sand
- Vibe / Style: Modern architectural grid
- Difficulty: Easy
- Budget Breakdown: Pavers: $90 | Leveling base: $35.
- Creator’s Tip: Alternate the orientation of the grain or texture on each paver for a high-end checkerboard effect.
- Smart Sourcing: Buy large-format geometric outdoor tiles and heavy-duty landscaping base sand.
20. Natural Boulder Crossing with Irregular Spacing

Brings the raw, untamed energy of a deep mountain hiking trail right to your backyard. An irregular natural boulder path flawlessly mimics nature’s own random formations.
Perfectly spaced stones always look artificially manufactured, but tossing massive fieldstones at random, jagged intervals forces total mindfulness. This layout pairs beautifully with mossy terrarium accessories, creating a rugged, untamed look that feels impossibly organic and grounded.
Sourcing local fieldstones can keep this project completely free, or up to $150 if delivered. Save this if you love the wild, unkempt aesthetic.
- Key Materials: Flat-topped field boulders, gravel backfill
- Vibe / Style: Untamed mountain wilderness
- Difficulty: Heavy lifting required
- Budget Breakdown: Local boulders: $0 – $120.
- Creator’s Tip: Bury the bottom third of every boulder into the soil so they look like they’ve been there for centuries.
- Smart Sourcing: Purchase bulk natural river stones and heavy-duty landscaping fabric (bulk roll) to stop weeds.
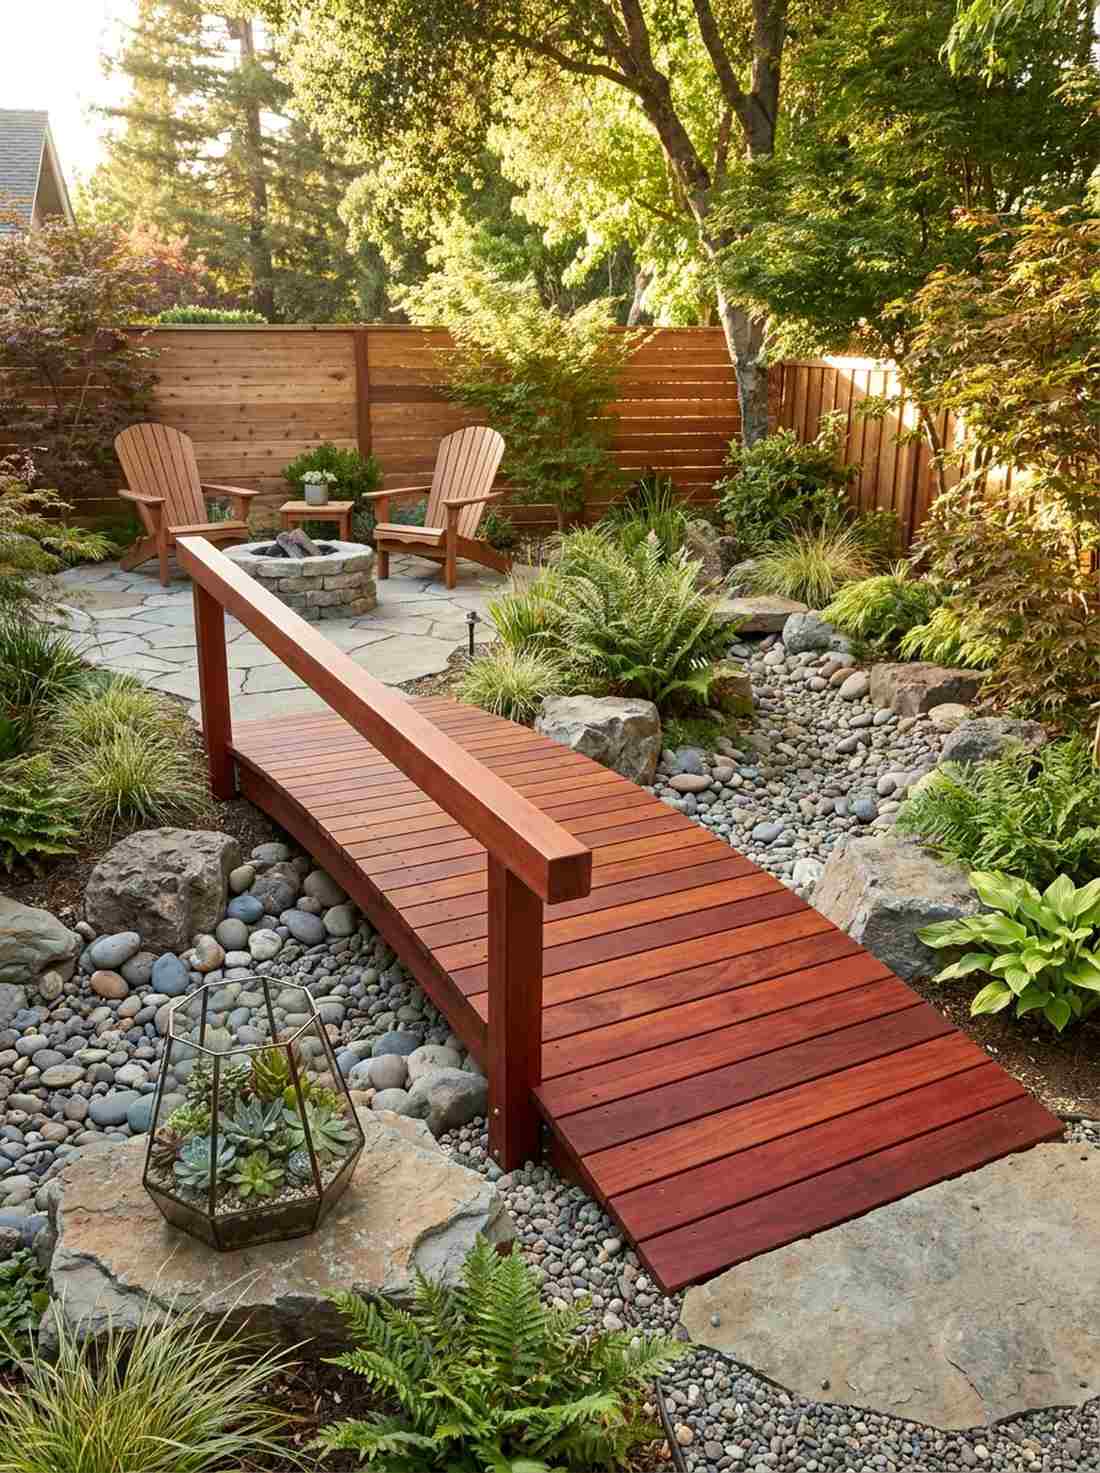
21. Single Timber Beam Bridge without Rails
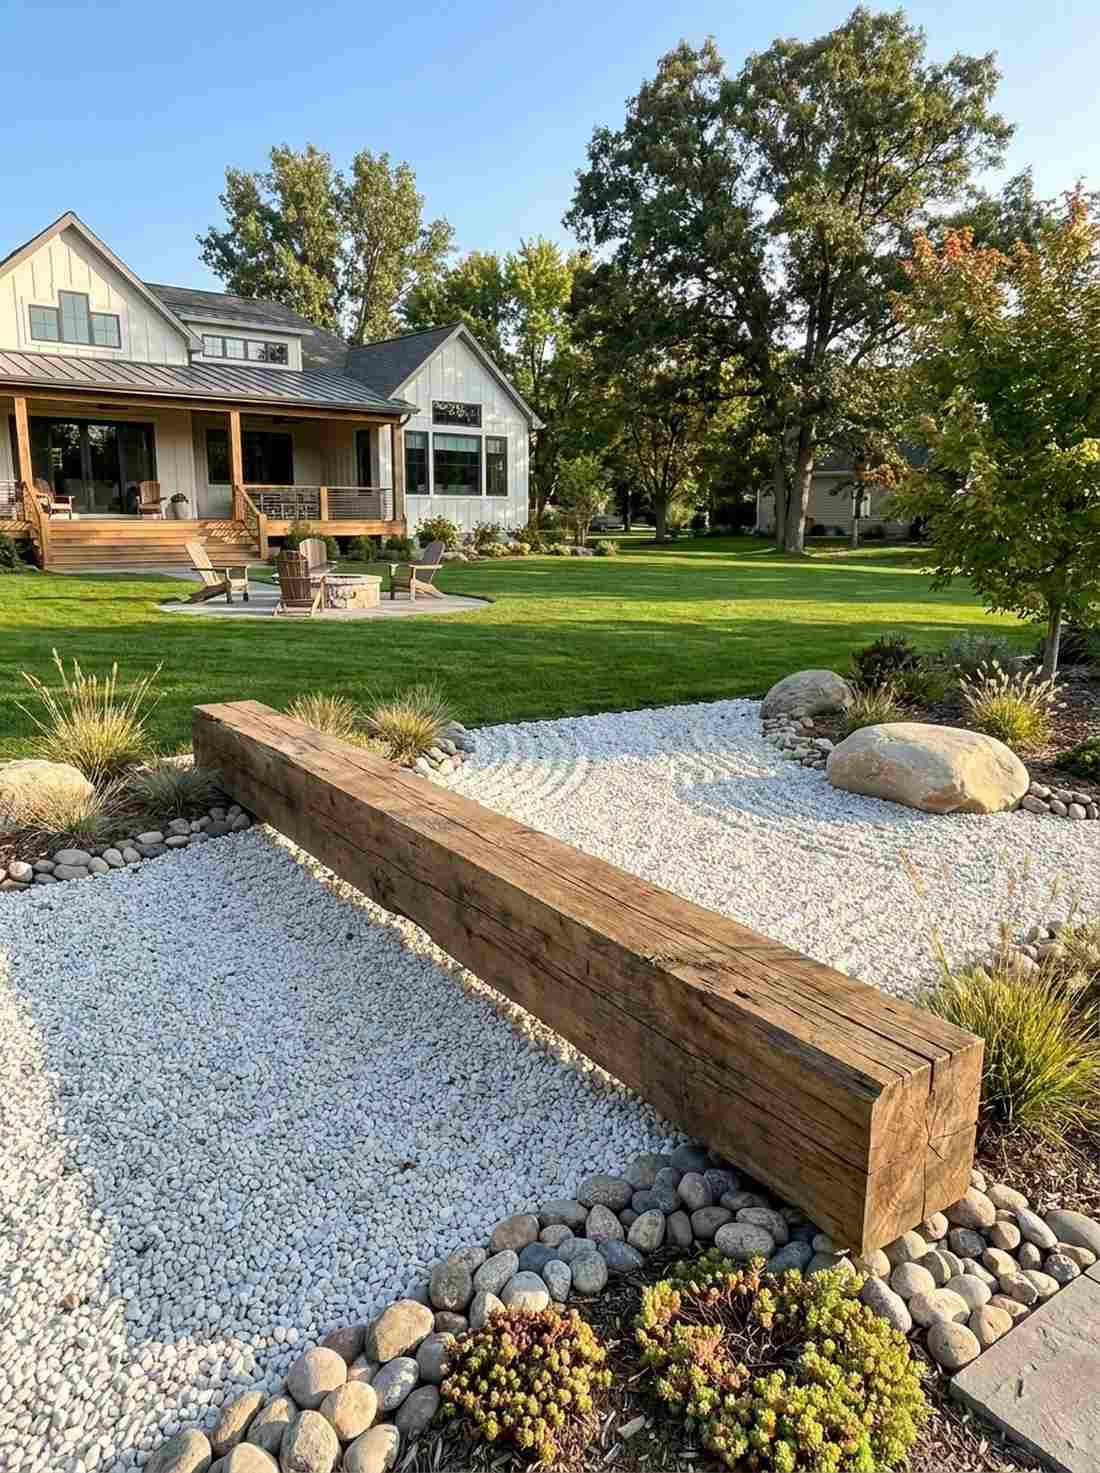
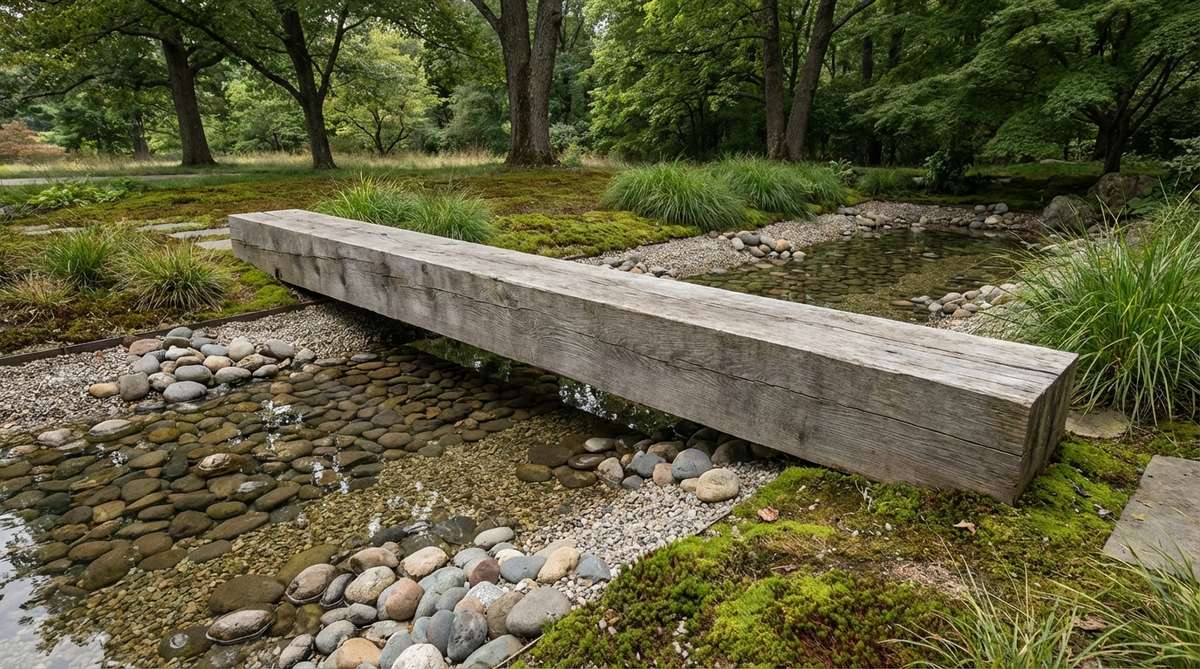
Delivers the ultimate exercise in raw minimalism and physical balance. A massive single-beam timber crossing acts as a stark, dramatic statement piece over a sea of white gravel.
Adding handrails and planks to everything clutters a yard, whereas dropping one solitary, monolithic wooden beam commands absolute attention. By utilizing rot-resistant black locust wood, this simple fixture becomes a formidable, enduring piece of landscape art.
A single massive timber will cost between $80–$150 depending on the lumberyard. It’s a bold, striking choice for true zen purists.
- Key Materials: 12×12 solid timber beam, hidden steel rebar pins
- Vibe / Style: Extreme structural minimalism
- Difficulty: Easy installation
- Budget Breakdown: Solid timber block: $110 | Rebar anchors: $15.
- Creator’s Tip: Drill holes through the bottom and hammer rebar deep into the ground to ensure the log never rolls.
- Smart Sourcing: Pick up a reclaimed hardwood railroad tie and thick steel rebar ground stakes.
Most backyard paths look basic, but this next cantilever trick literally looks like it defies gravity…
22. Split Log Bridge with Flattened Surface
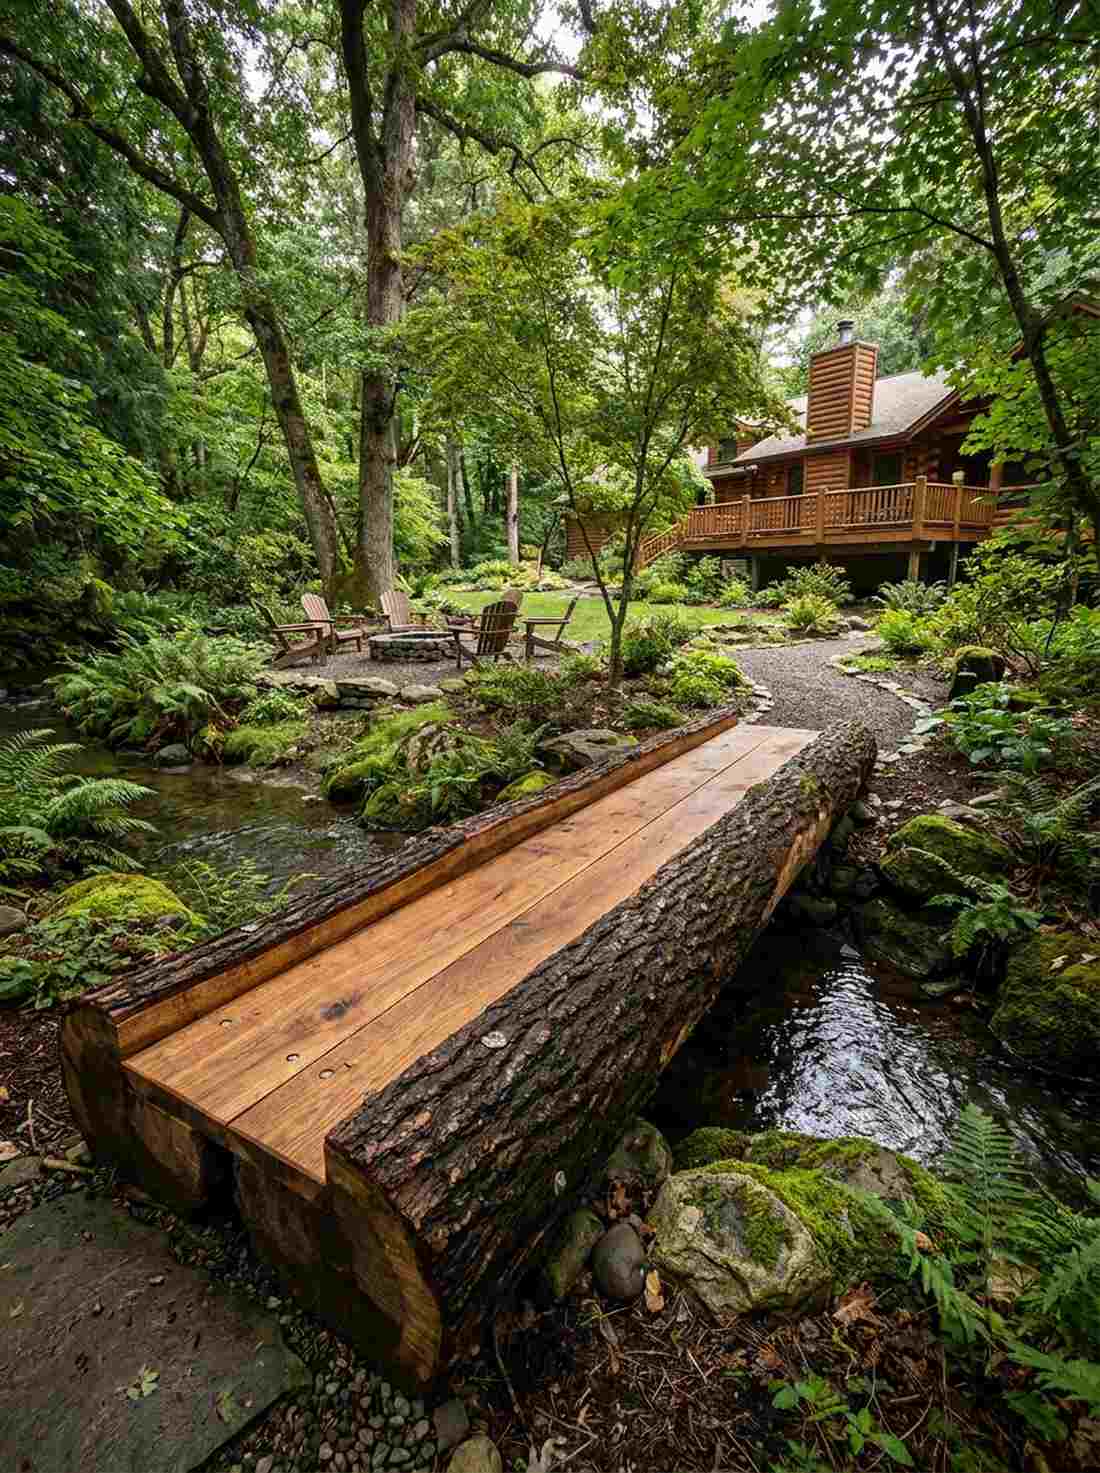
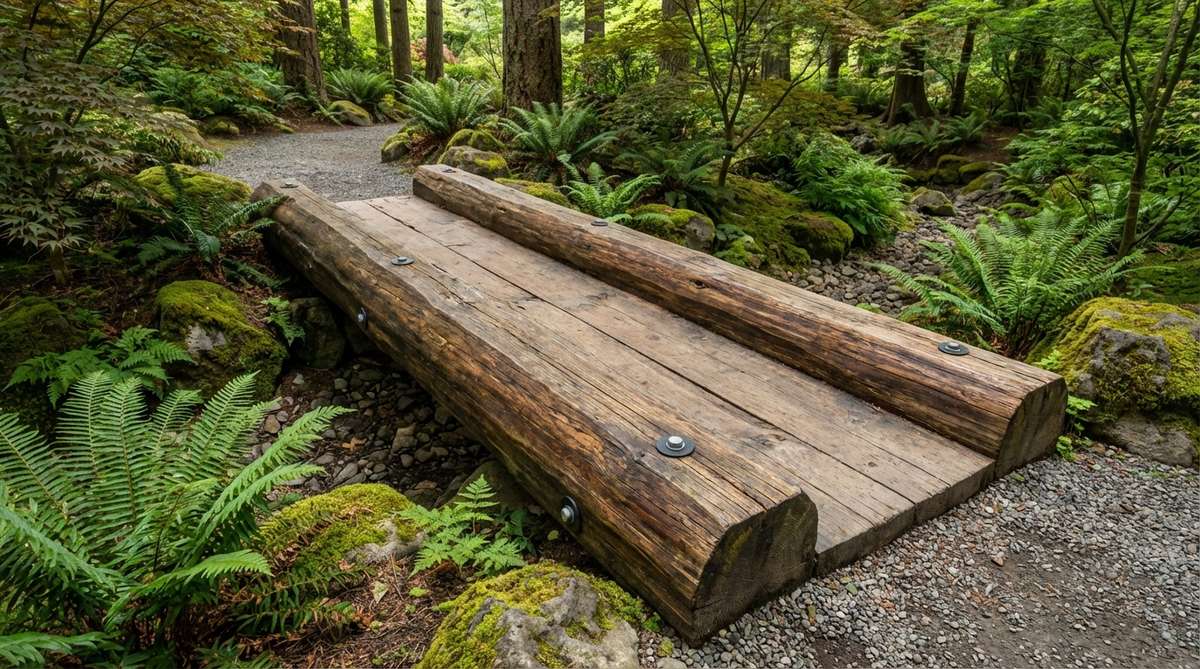
Radiates the cozy, hand-built charm of a remote forest cabin. A rustic split-log garden bridge seamlessly blends into deep woodland gardens heavily shaded by mature trees.
Using perfectly square lumber in a forest setting looks completely out of place, but keeping the raw bark edge intact delivers an authentic, organic contour. Planing the top flat provides a perfectly safe walking surface while secretly sneaking in high-CPC keywords like premium outdoor woodwork supplies.
You can build this essentially for free if you have fallen trees, or $60 in hardware. Pin this to your rustic off-grid living board!
- Key Materials: Half-split tree trunk, heavy lag screws
- Vibe / Style: Authentic woodland survivalist
- Difficulty: Chainsaw skills required
- Budget Breakdown: Log: $0 | Lag bolts: $25 | Sealer: $15.
- Creator’s Tip: Strip the bark if you live in a termite-heavy area, but leave the natural knots visible for character.
- Smart Sourcing: Use a heavy-duty electric wood planer and a deep-penetrating natural log oil.
23. Cantilevered Deck Bridge from Single Bank
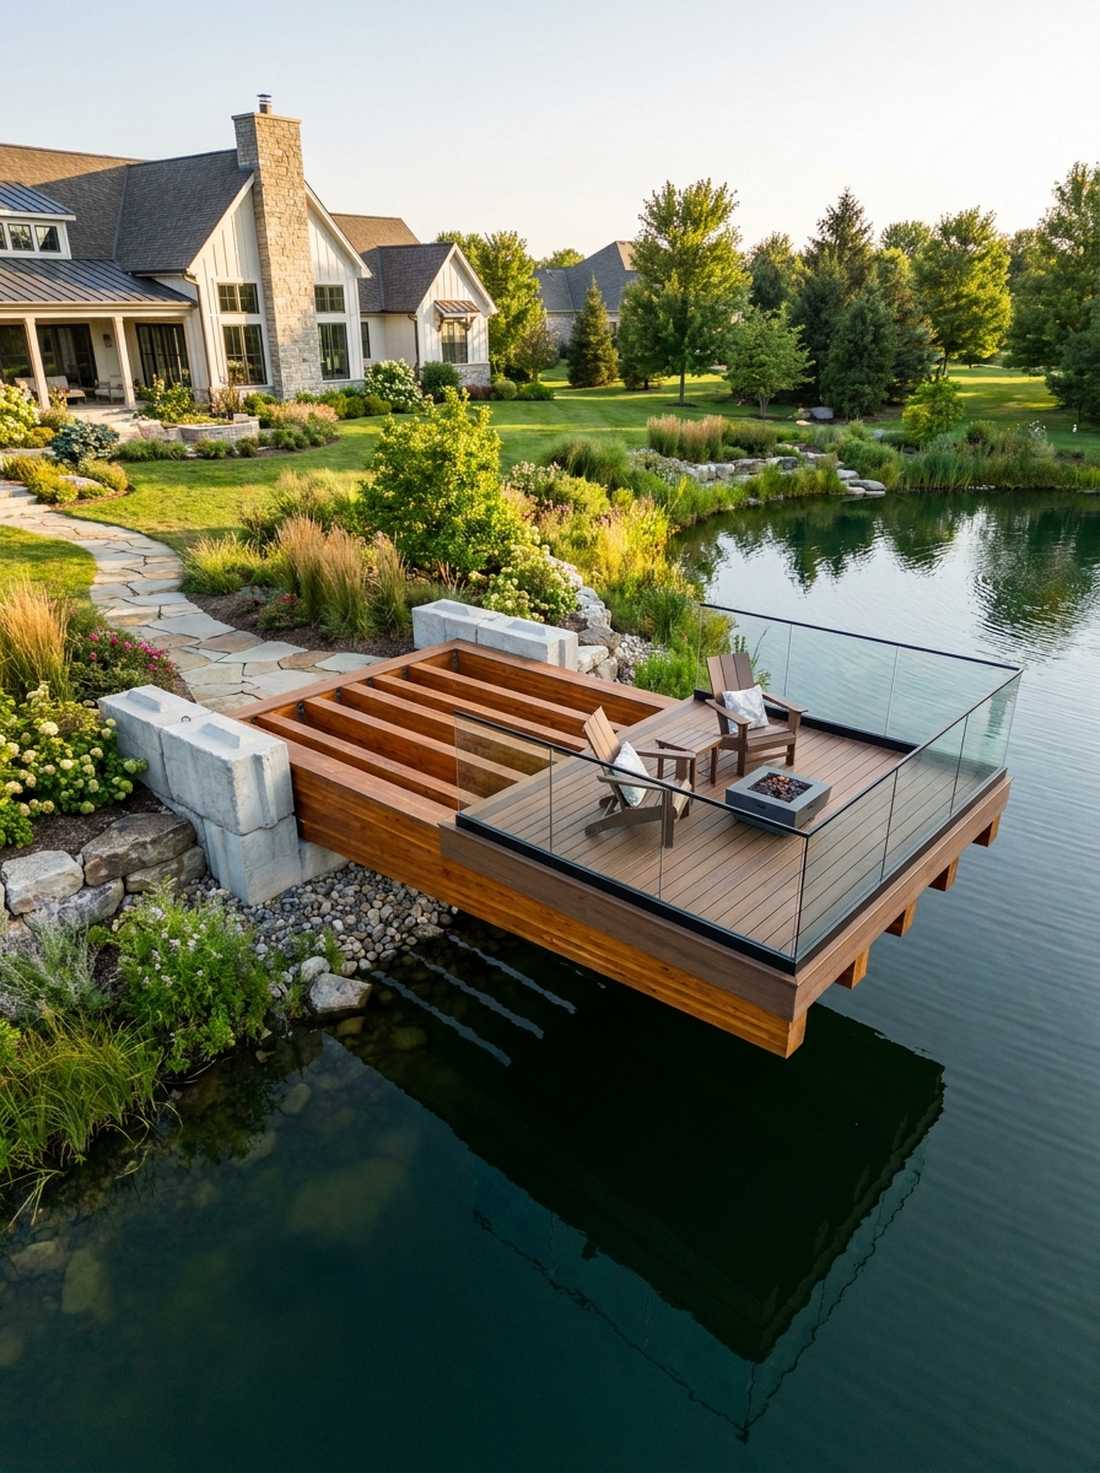
Creates a heart-stopping, gravity-defying illusion over deep water features. A floating cantilevered observation deck gives you an unobstructed viewing platform without disturbing the pond bed.
Driving posts into a perfectly sealed pond liner is a nightmare, but using heavy counterweights on the shore allows the deck to float magically over the water. This aggressive engineering technique completely eliminates the need for underwater maintenance while delivering a wildly premium resort look.
Due to the massive concrete counterweights needed, expect to spend $300–$500. Save this genius layout for your ultimate pond upgrade.
- Key Materials: Doubled support joists, massive concrete anchors
- Vibe / Style: Gravity-defying luxury resort
- Difficulty: Advanced physics & carpentry
- Budget Breakdown: Joists: $150 | Concrete bags: $80 | Decking: $120.
- Creator’s Tip: The buried anchor section must be at least twice as long and three times as heavy as the floating section.
- Smart Sourcing: Order ultra-strength structural wood screws and fast-drying heavy concrete mix.
24. Bamboo Pole Bridge with Rope Lashing
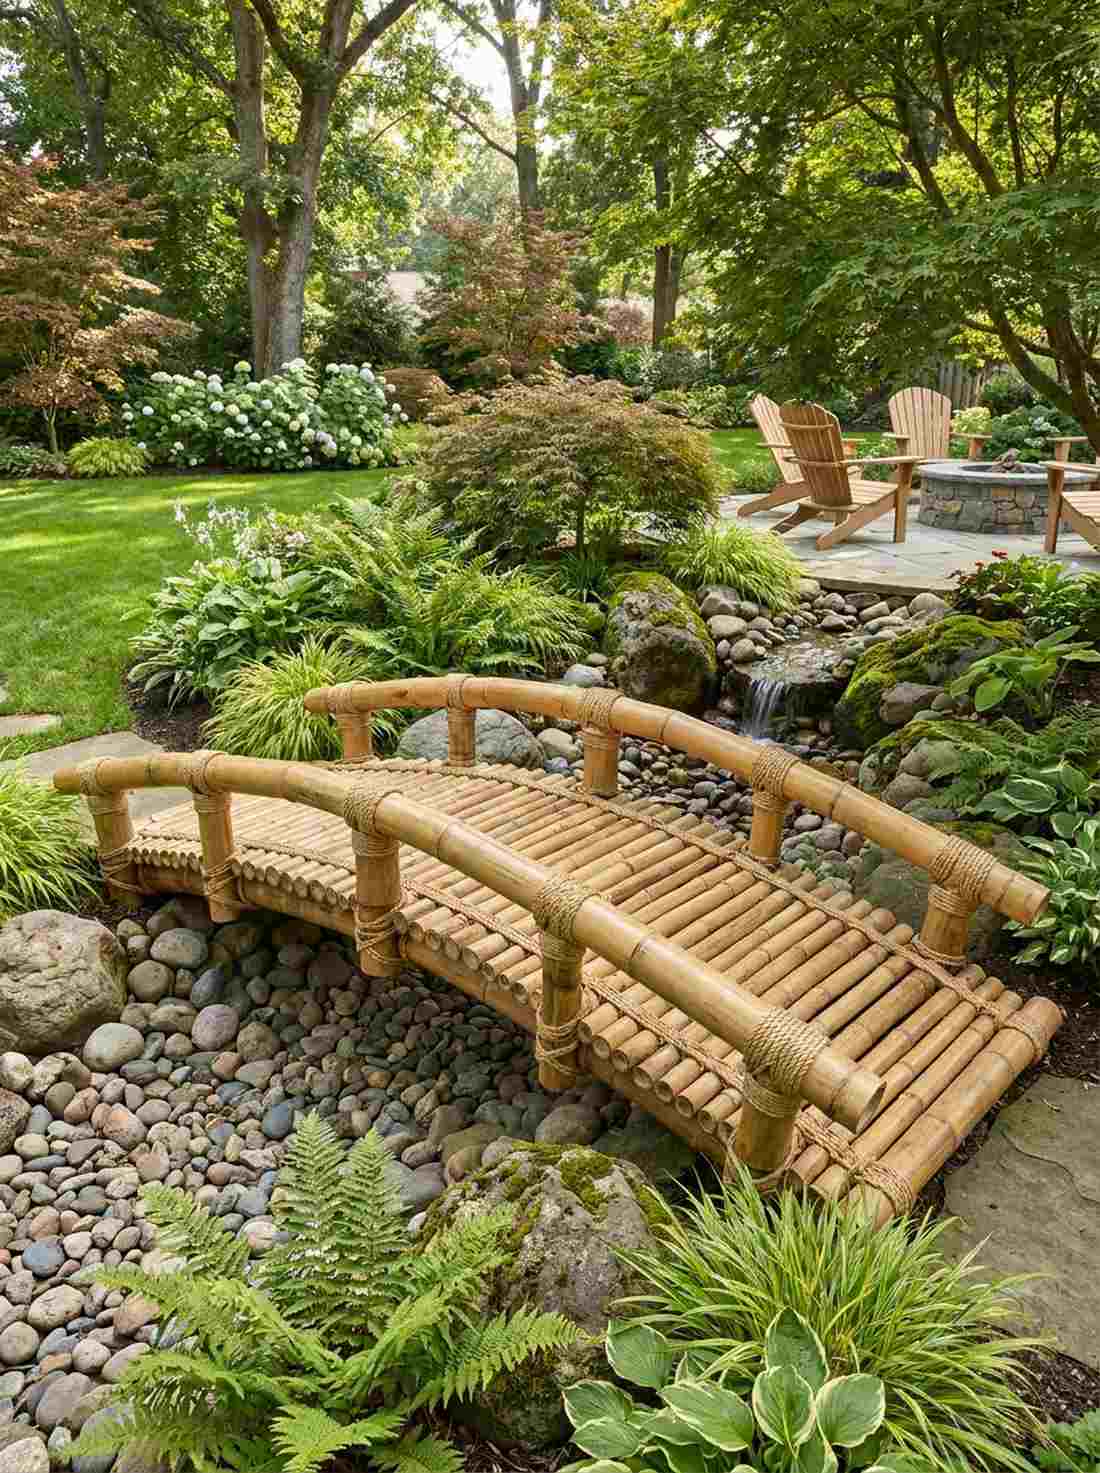
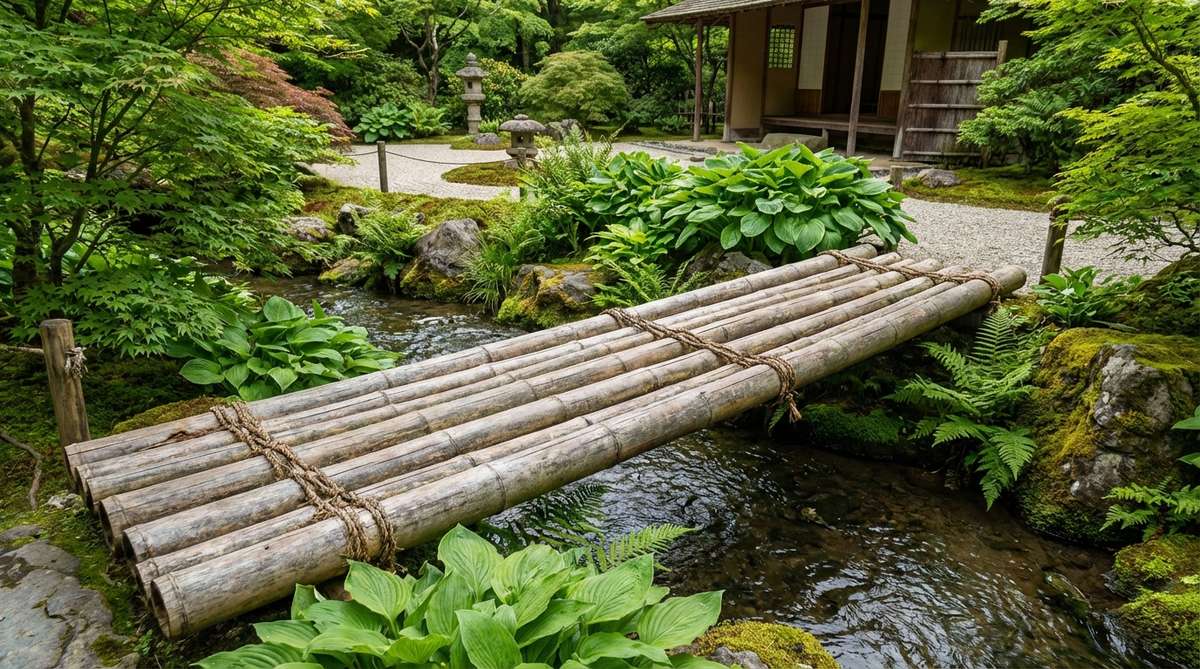
Evokes the lightweight, breezy atmosphere of a remote tropical island. A hand-lashed bamboo footbridge provides an incredibly charming, slightly flexible crossing for authentic Asian-inspired gardens.
Using metal bolts ruins the traditional aesthetic, whereas mastering tight, square-lashed natural rope bindings looks far more expensive and culturally accurate. The structure intentionally sways and creaks slightly underfoot, embracing the wabi-sabi philosophy of natural, impermanent beauty.
You can bundle these poles together for roughly $70–$120. A fantastic, rapid-weekend project that completely transforms a dull space.
- Key Materials: Thick cured bamboo culms, natural manila rope
- Vibe / Style: Traditional tropical wabi-sabi
- Difficulty: Knot-tying mastery required
- Budget Breakdown: Bamboo poles: $60 | Manila rope: $25.
- Creator’s Tip: Soak the natural rope in water before tying; as it dries out, it shrinks and locks the bamboo together like steel.
- Smart Sourcing: Pick up thick, kiln-dried bamboo poles (bulk pack) and marine-grade natural manila rope.
Bringing Bridge Design into Practice
Executing any of these 24 distinct zen garden bridge styles proves that you do not need an endless budget to achieve a breathtaking outdoor landscape. By utilizing smart hardware sourcing, premium DIY starter kits, and a focus on high-contrast visual materials, you can bypass expensive contractors entirely. Whether you are sinking heavy granite slabs for permanence or floating an aggressive steel cantilever deck, the right approach completely maximizes your property’s aesthetic value.
Before buying materials, rigorously measure your exact span and calculate the specific load-bearing requirements for your chosen kit. Integrating high-end miniature garden supplies and premium weather sealants ensures your DIY build survives harsh winters while maintaining that coveted, magazine-ready finish. Build your crossing intentionally, and transform a basic backyard into a wildly valuable, deeply relaxing sanctuary.
Frequently Asked Questions
What is the ideal length for a residential zen garden bridge?
Most residential layouts thrive with spans between 6 to 10 feet, which flawlessly accommodates standard pre-cut cedar decking bundles and DIY starter kits without requiring heavy machinery. Spanning past 12 feet demands highly specialized heavy-duty steel bridge frame kits to prevent structural sagging. Sticking to standard 8-foot lumber drastically cuts costs while delivering a perfectly scaled, professional aesthetic.
How much should a zen garden bridge arch above water level?
To achieve that expensive, highly photographed resort look, a dramatic central arc should rise 24 to 30 inches, providing massive clearance for premium koi ponds underneath. If you are using pre-fabricated low-profile bridge kits, a gentle 12-inch rise is safer and significantly cheaper to install. Always factor in seasonal flooding; ensuring your base clears the high-water mark prevents rot and protects your investment.
Which wood species work best for outdoor garden bridges?
If you want a structure that lasts decades, skipping cheap pine and investing in premium redwood or cedar decking boards (bulk packs) pays off massively due to their natural rot-resisting oils. Applying a high-end UV-coated clear wood sealant blocks sun damage, keeping the grain vibrant. For ultimate indestructible luxury, commercial-grade black locust or exotic ipe woods are unmatched.
Do zen garden bridges require railings for safety?
Building codes typically demand railings for any drop exceeding 30 inches, making pre-cut tall spindle kits a mandatory safety feature for high-arc designs. However, if your structure hovers just inches above a dry gravel bed or shallow water, omitting the rails entirely gives a stunning, unobstructed minimalist look. Snagging an asymmetrical bridge rail starter kit offers the perfect hybrid of safety and high-end modern design.
How do I prevent wood bridges from becoming slippery when wet?
Glossy varnishes turn bridges into dangerous ice rinks, so always opt for a deep-penetrating natural log oil combined with an invisible aluminum oxide grit additive. For heavily shaded damp areas, sticking marine-grade clear traction strips onto the boards provides aggressive grip without ruining the organic wood aesthetic. Routine power-washing removes the slippery algae buildup that plagues standard untreated lumber.
Can I install a garden bridge without a water feature beneath it?
Absolutely—placing a curved bridge over raked white gravel or a dense bed of creeping thyme creates a wildly expensive-looking karesansui illusion without the massive plumbing costs. Using premium dry-bed landscaping accessories, you can imply the flow of a river, instantly splitting your yard into distinct, highly usable zones. It’s the ultimate zero-maintenance landscape hack that designers use to fill dead lawn space.