Professional stone garden edging transforms ordinary yards into structured landscapes with clean lines and visual hierarchy. Fresh Garden Ideas brings you field-tested techniques from landscape architects who use stone borders to solve drainage issues, prevent grass encroachment, and create permanent definition that outlasts temporary materials.
Design SnapshotKey Principles
- Foundation depth matters: Dig trenches 3-6 inches deep depending on stone size to prevent shifting and frost heave
- Base layer stability: Compacted gravel or sand creates drainage and prevents settlement over multiple seasons
- Stone selection impacts maintenance: Smooth river rocks suit informal gardens while cut flagstone delivers architectural precision
- Installation method determines longevity: Dry-stack offers flexibility for DIY projects; mortared joints provide permanence for slopes and high-traffic zones
Classic Stone Edging Foundations
Traditional stone garden borders edging methods establish the groundwork for durable landscape definition. These time-tested approaches prioritize structural integrity and work across multiple climate zones.
1. Upright Soldier Brick Edging
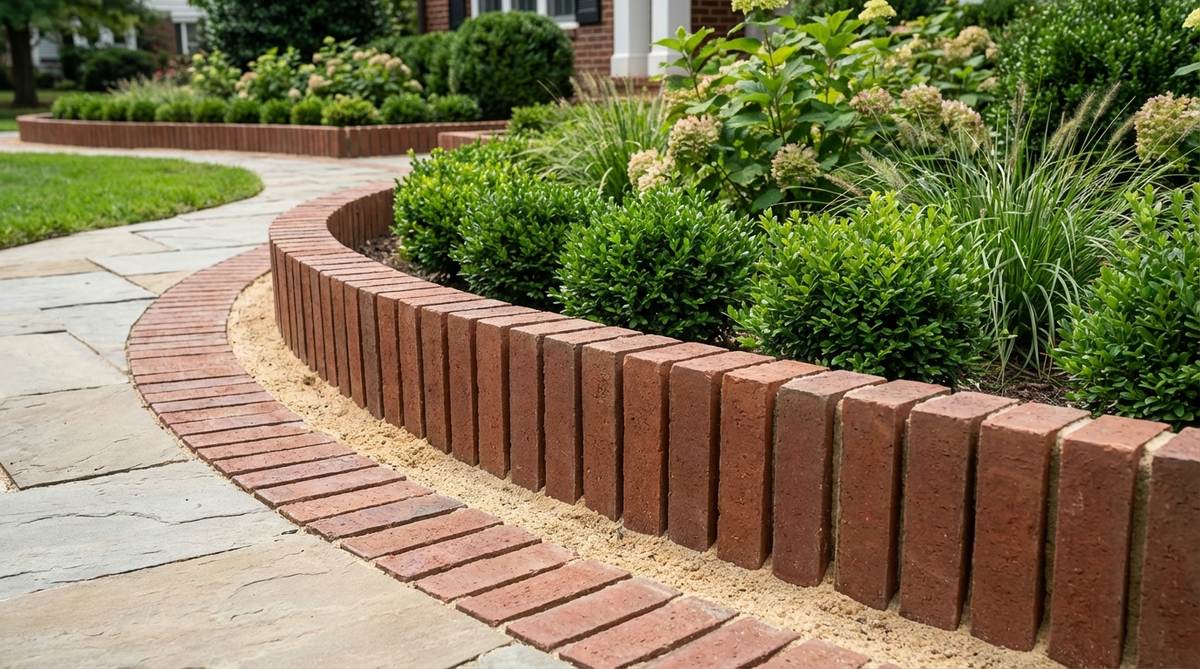
Bricks positioned vertically on their narrow edge create a formal, architectural boundary measuring 7-8 inches in height. The uniform rhythm of repeating vertical elements guides the eye along planting beds and pathways.
Set each brick into a 2-inch sand bed after excavating a 10-inch trench. Backfill with soil on the garden side and compact thoroughly to maintain vertical alignment.
This method excels in formal garden layouts and works as an effective mow strip when the top edge sits flush with lawn height.
2. Tilted Soldier Brick Pattern
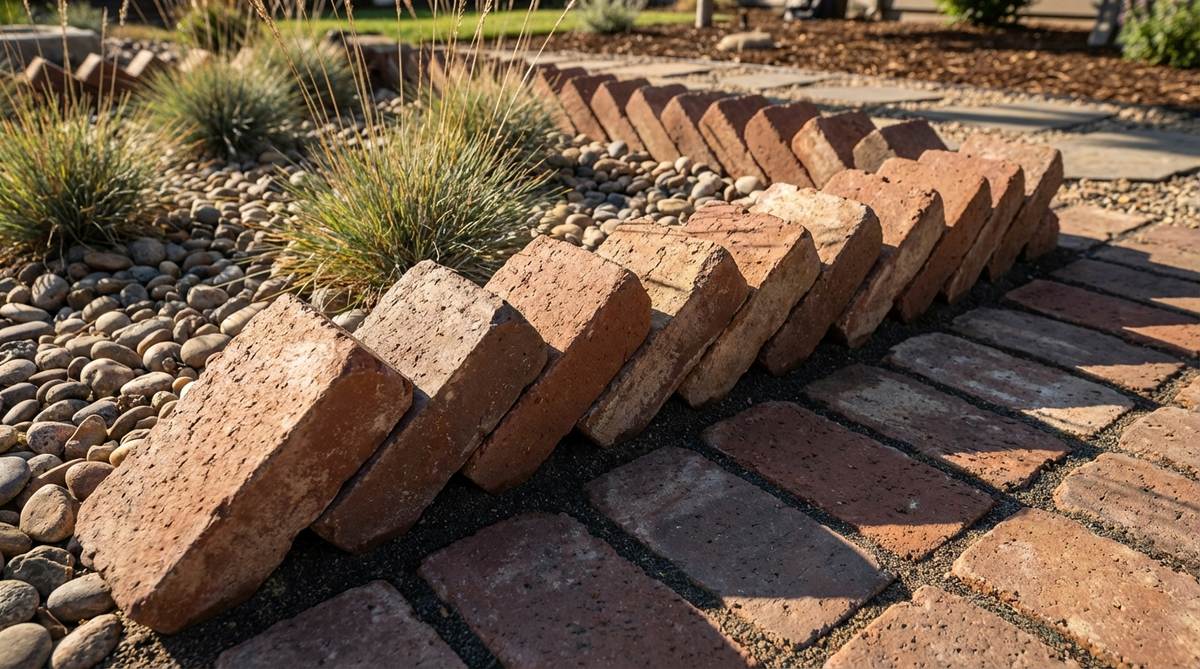
Angling bricks at 45 degrees creates a sawtooth profile that adds shadow play and textural interest. Each brick leans against its neighbor for mutual support without requiring mortar.
Alternate the tilt direction every 6-8 feet to create visual rhythm, or maintain consistent angles for geometric precision. Tamp sand into gaps between bricks to lock the pattern in place.
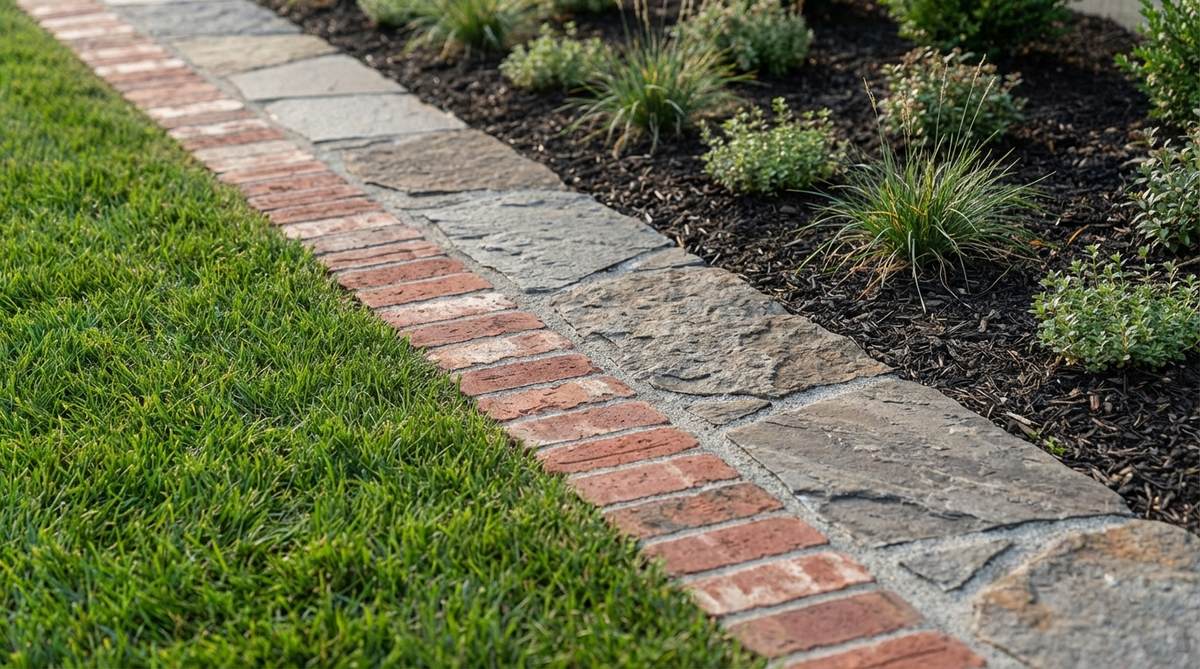
3. Flat Flagstone Border
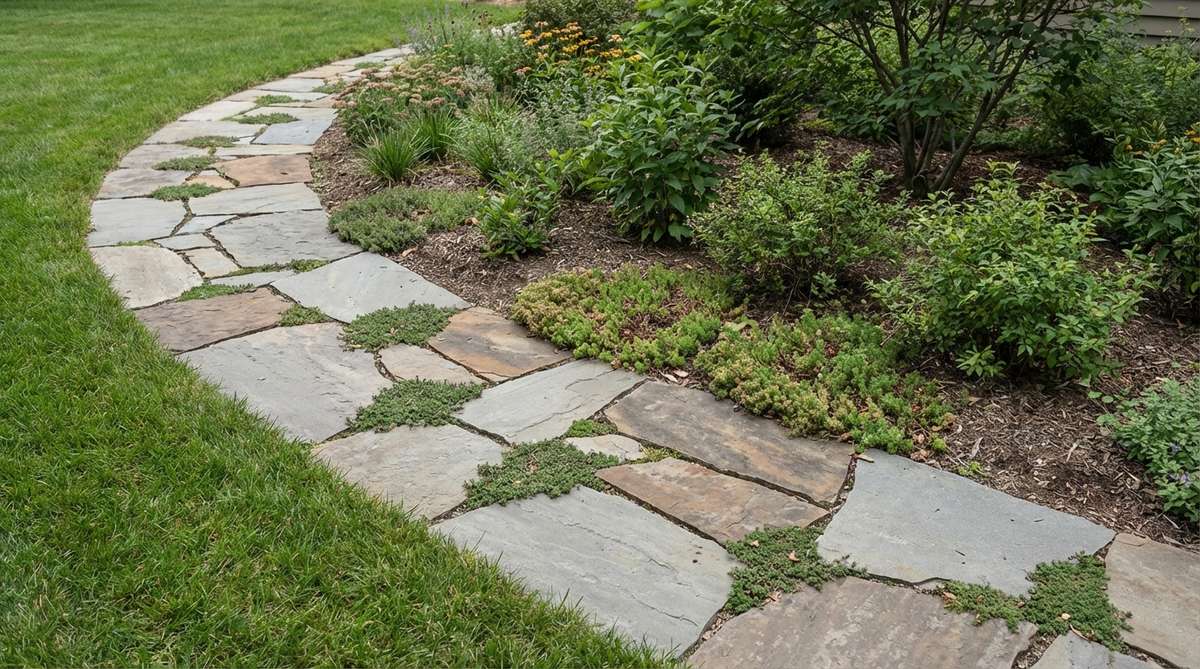
Irregular flagstone pieces laid horizontally in single-file formation deliver understated elegance. Their muted grays and browns recede visually, emphasizing plantings rather than hardscape.
Select stones 12-18 inches wide and 1-2 inches thick. Position them with tight joints to minimize weed growth, or leave deliberate gaps for creeping thyme and other ground covers.
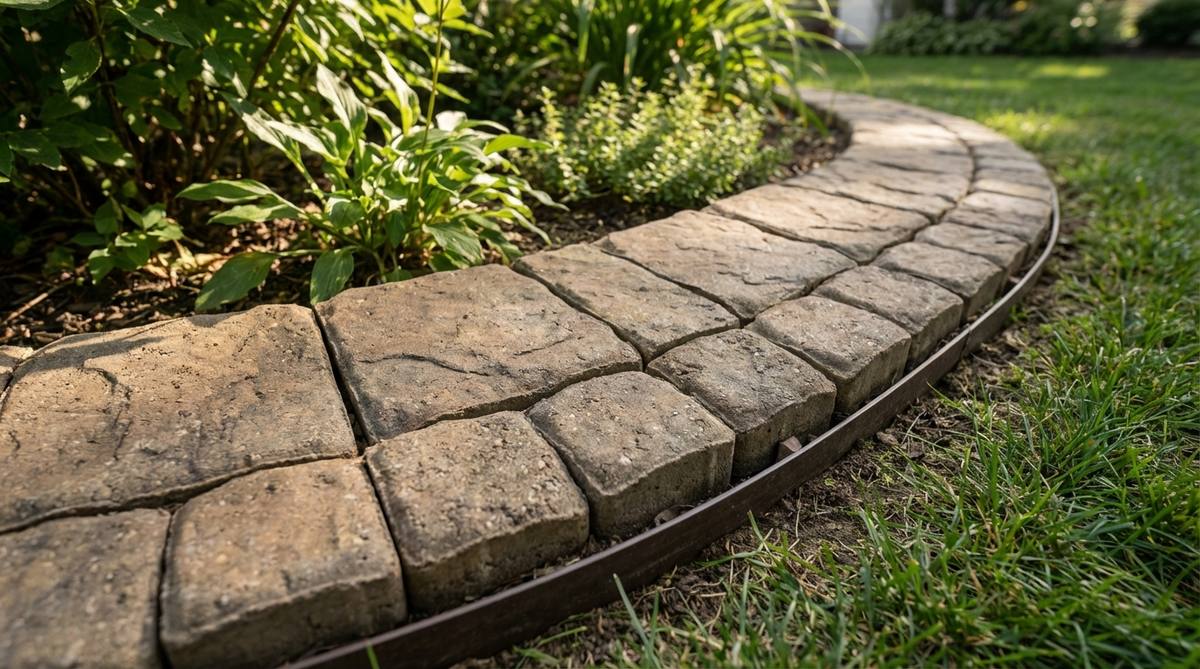
4. Cut Bluestone Linear Edging
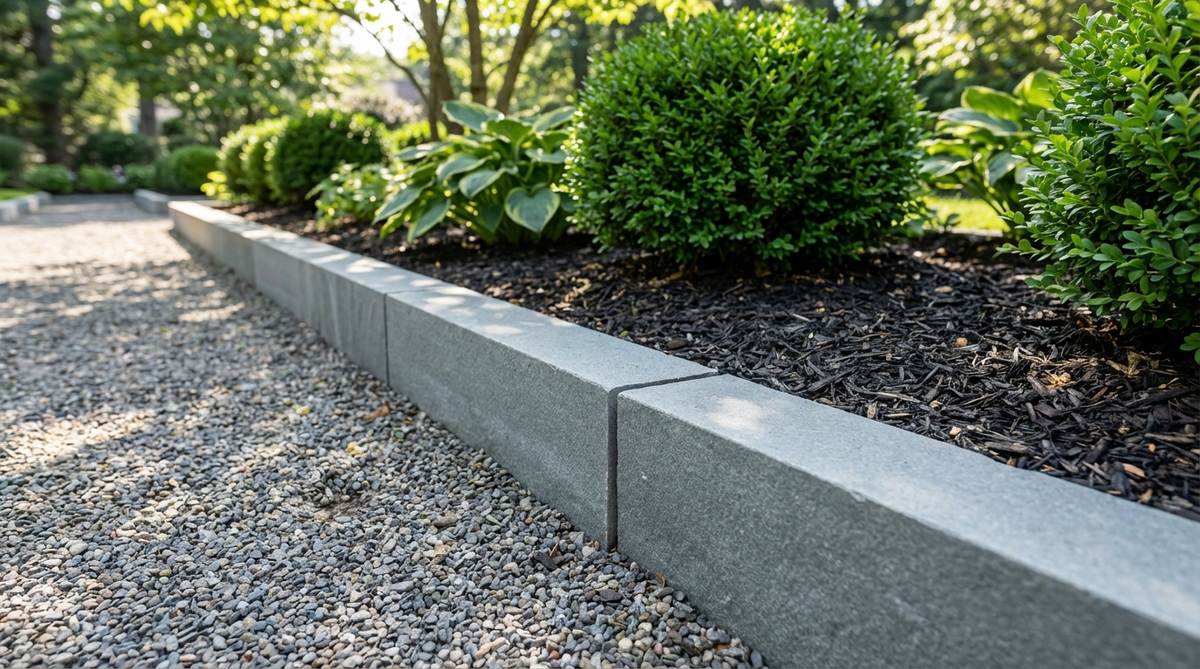
Machine-cut bluestone strips provide the sharpest edges in landscape architecture. Their precise dimensions enable perfect alignment along straight runs and gentle curves.
Standard 4×12-inch or 6×24-inch strips install rapidly on level sites. The dense stone resists chipping and maintains crisp edges through decades of mower contact.
5. Granite Cobblestone Border
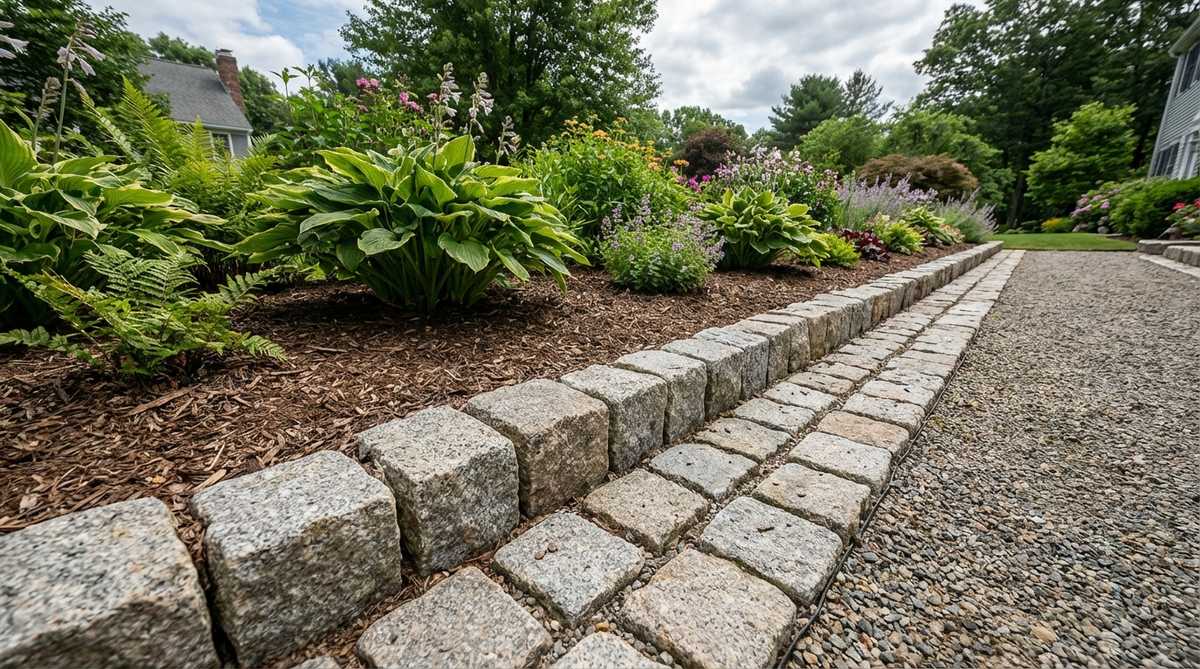
Historic cobbles ranging from 4×4 to 6×6 inches bring Old World character to contemporary gardens. Their cube-like shape allows installation in running bond or basketweave patterns.
Set cobbles into mortar for permanent pathways or use the dry-stack method for edging that can adapt to settling. The granular surface of granite provides slip resistance in wet conditions.
6. Limestone Block Edging
Sawn limestone blocks offer warm buff and gray tones that complement both cool and warm plant palettes. Their straight edges and consistent thickness simplify installation.
Choose blocks 4-6 inches high for subtle definition or stack to 12 inches for retaining low berms. Limestone develops a weathered patina over time as minerals leach to the surface.
7. Sandstone Natural Edge Border
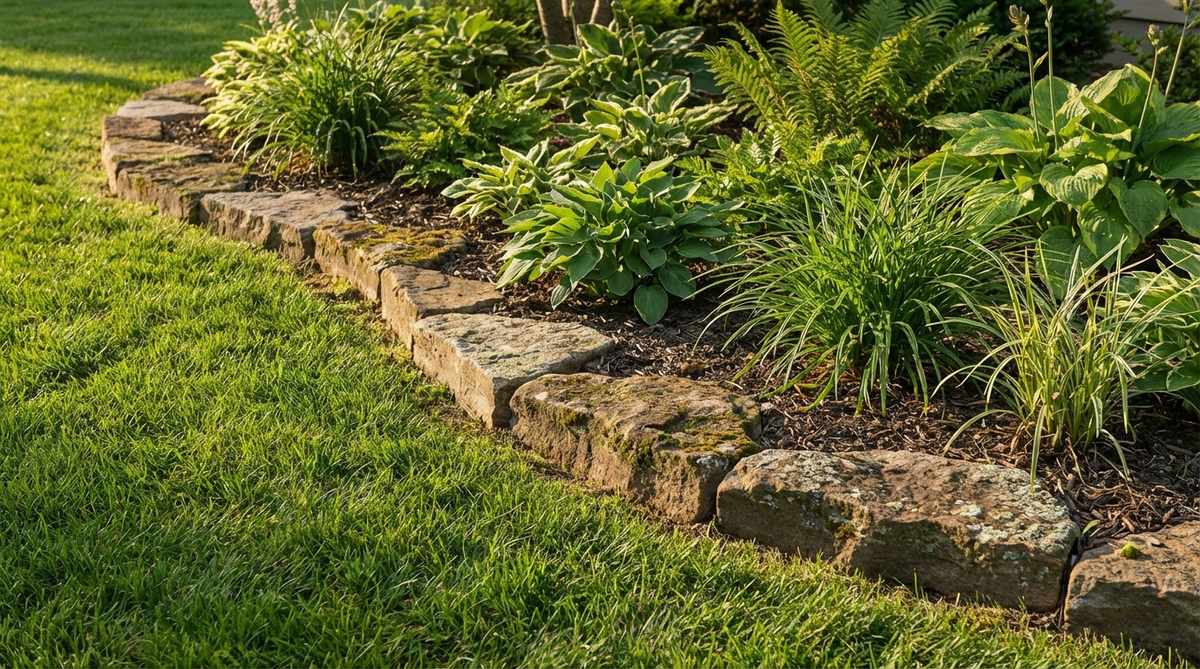
Rough-split sandstone pieces maintain one natural edge for an organic appearance. The varied thickness from 1-4 inches creates an informal profile.
Lay stones with the natural edge facing the lawn and the split edge buried in the planting bed. This orientation showcases the weathered texture while hiding the geometric cut.
8. Concrete Paver Stone Edging
Manufactured concrete pavers deliver stone aesthetics at reduced cost and weight. Modern molding techniques replicate flagstone, cobble, and ashlar patterns convincingly.
Interlock units with concealed tabs for structural continuity, or select individual pavers for traditional sand-set installation. Edge restraints prevent lateral creep in high-traffic areas.
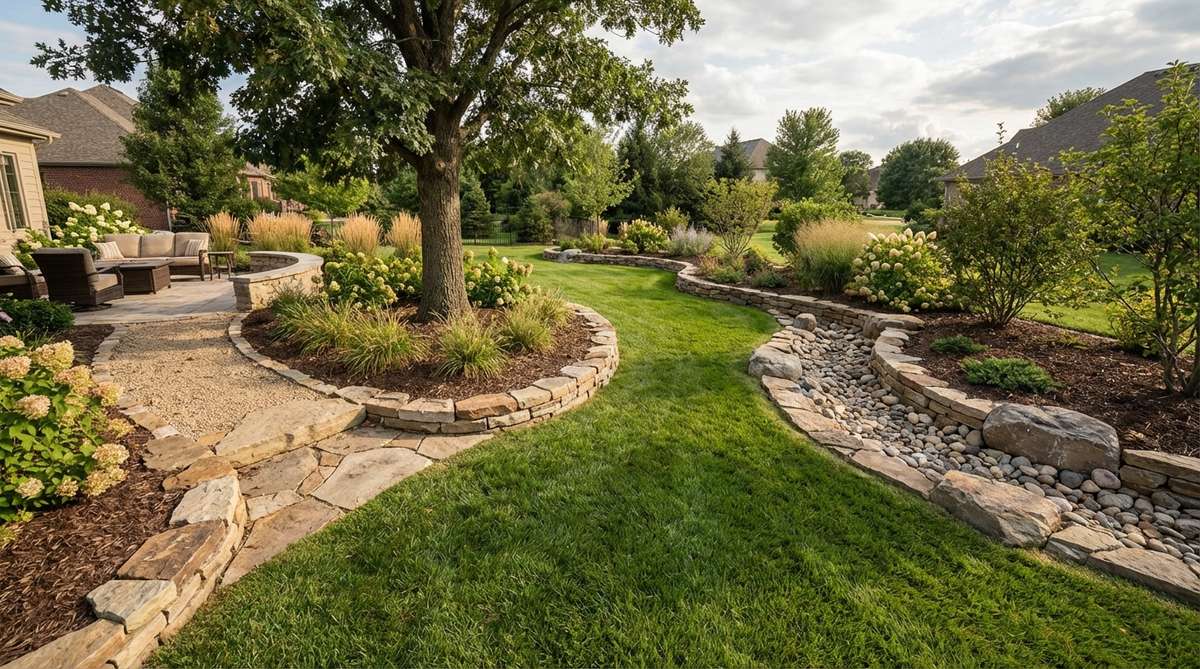
River Rock & Pebble Applications
Smooth water-worn stones introduce organic curves and natural color gradients. These stone garden edging ideas work particularly well in informal cottage gardens and Xeriscape designs.
9. Graded River Rock Band
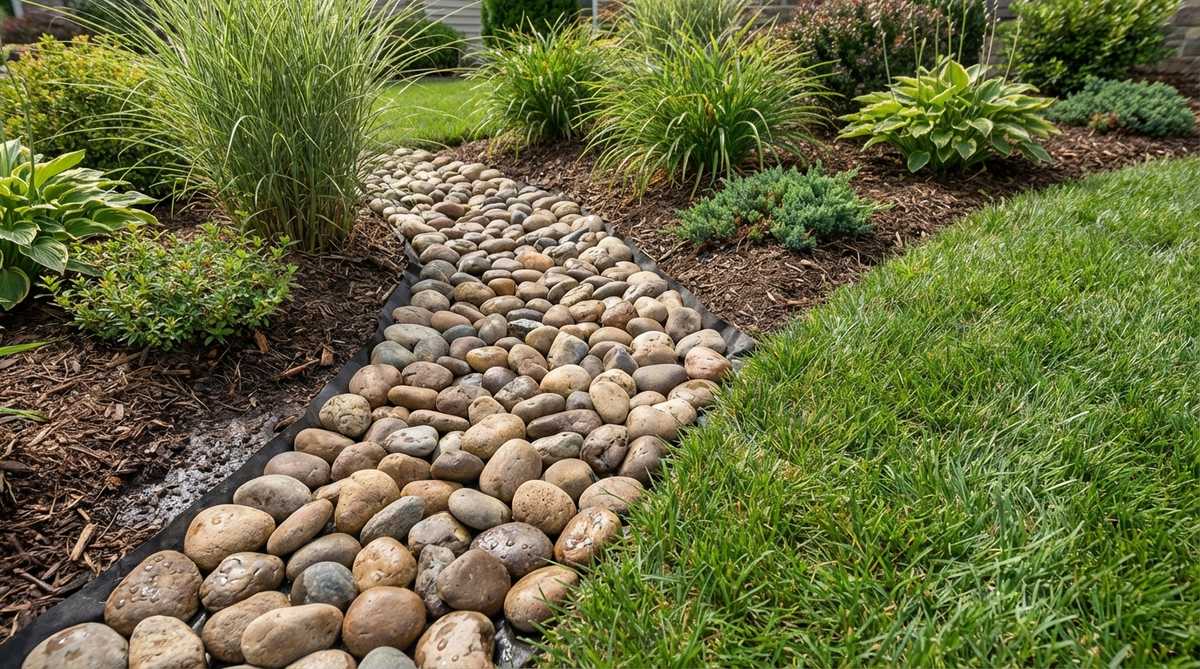
A 6-12 inch band of river rocks sized from 2-4 inches creates a textured transition zone between lawn and planting beds. The smooth stones shift underfoot, discouraging foot traffic while allowing water infiltration.
Excavate to match the rock diameter, line with landscape fabric, then fill with a single layer of stone. This prevents rocks from sinking into soil during freeze-thaw cycles.
10. Multi-Layered Rock Gradation
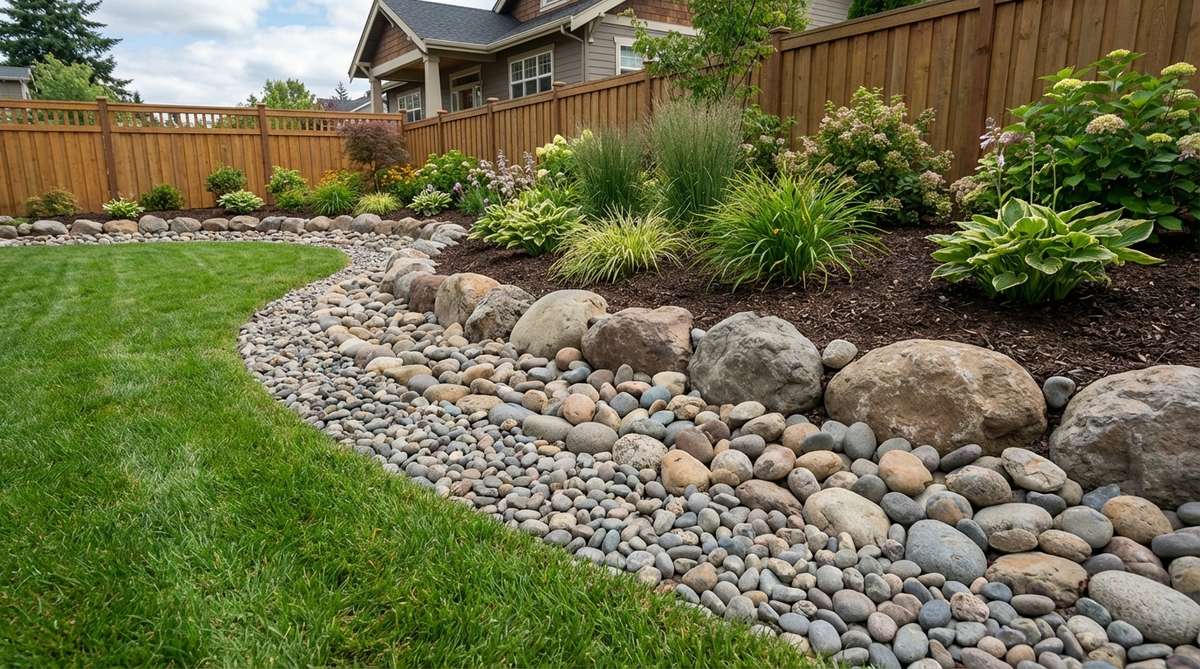
Combining three size grades—1-inch, 3-inch, and 6-inch river rocks—adds dimensional depth. Position largest stones at the rear against the planting bed, medium in the center, and smallest along the lawn edge.
This stratification mimics natural stream beds and improves drainage on slopes. The varied sizes interlock to resist displacement from rain runoff.
11. River Rock and Mulch Transition

A 4-inch strip of river rock positioned between lawn and wood mulch prevents mulch migration during heavy rain. The stone barrier anchors organic material while maintaining clear boundaries.
Refreshing mulch annually becomes simpler when rocks define the exact edge. This combination reduces maintenance time by 30-40% compared to mulch-only edging.
12. Serpentine River Rock Pathway Edge
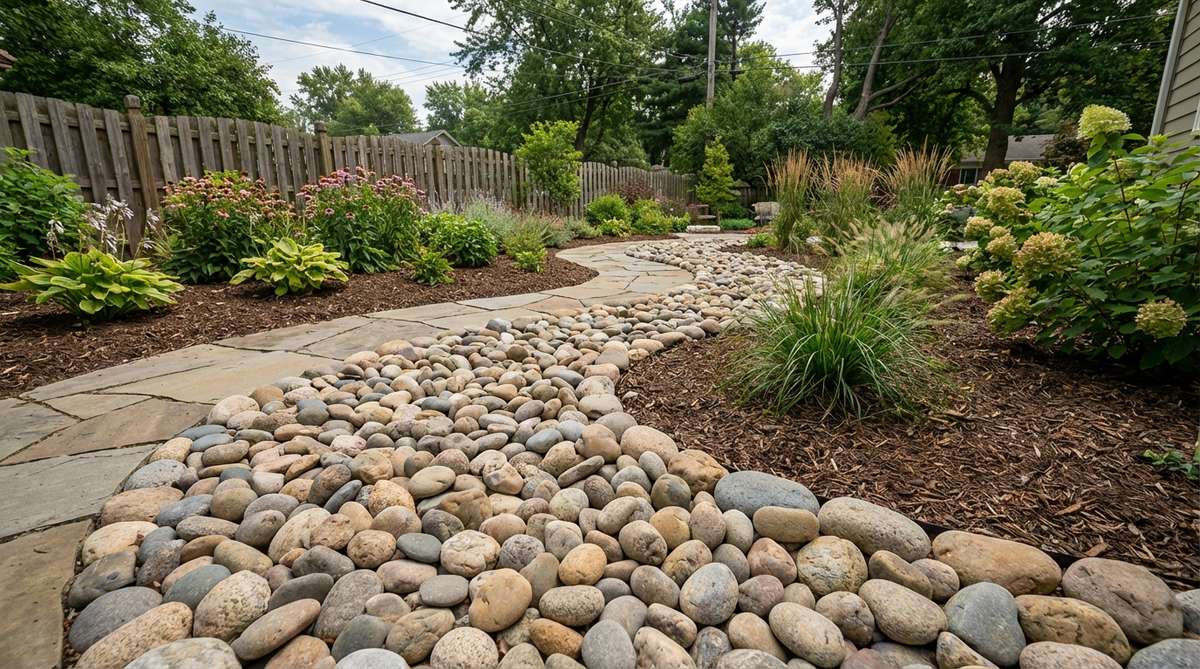
Flowing curves outlined with smooth river rocks guide visitors through garden spaces organically. The rounded stones emphasize sinuous lines better than angular materials.
Lay out the curve using a garden hose, then outline with spray paint before excavating. Position rocks shoulder-to-shoulder to maintain the intended curve without gaps.
13. Polished Pebble Mosaic Border
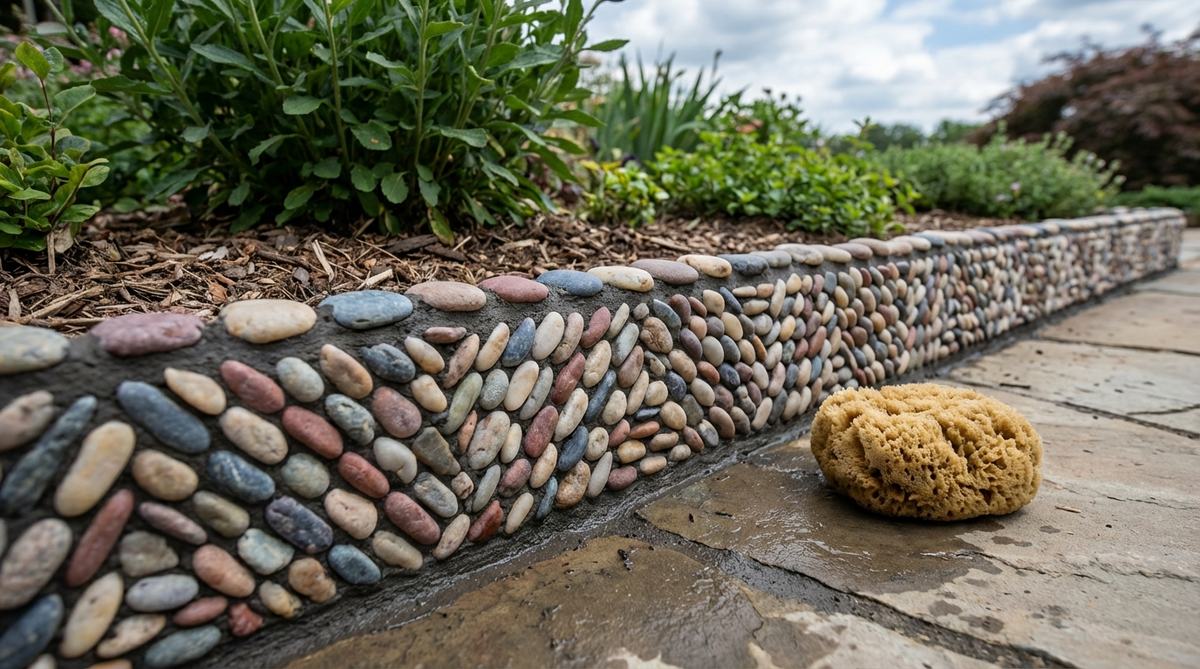
Small polished pebbles (0.5-1 inch) set in mortar create artistic borders with color patterns. Arrange by hue to form stripes, gradients, or geometric motifs.
Work in 2-foot sections to prevent mortar from setting before pebbles are placed. A grout sponge cleans excess mortar while pebbles are still adjustable.
14. Beach Stone Coastal Edging
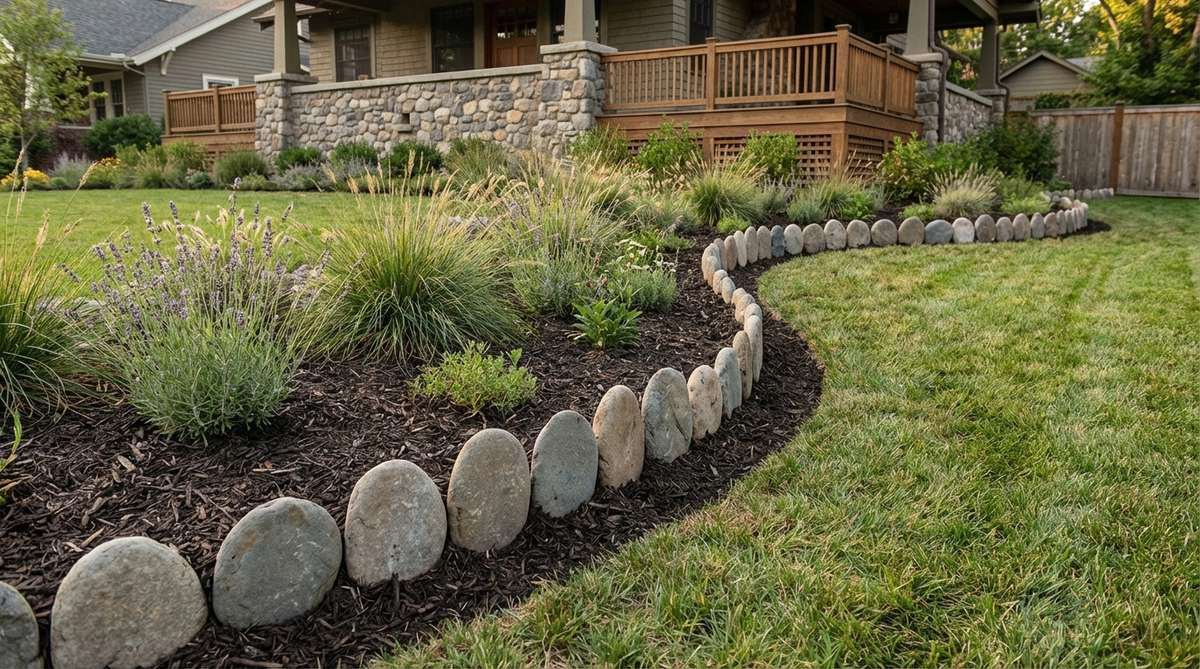
Flat beach stones ranging from 3-8 inches diameter bring maritime character inland. Their disk-like shape allows vertical positioning for a standing stone effect.
Bury half the stone diameter to ensure stability. The varied heights create an undulating profile that feels naturally weathered.
15. Mexican Beach Pebble Band
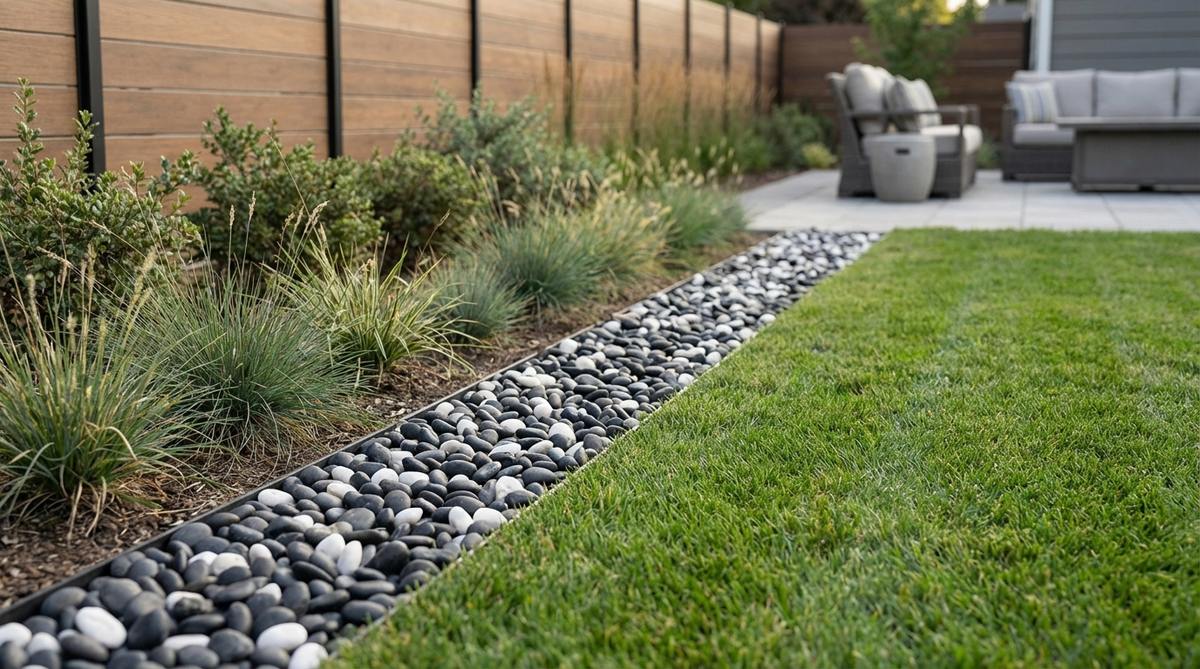
Uniformly smooth black, white, or mixed pebbles form a refined edge in contemporary landscapes. Their consistent 2-3 inch size creates a clean, monochromatic statement.
Contain pebbles with metal or composite edging strips to maintain a crisp 4-6 inch band. The dark colors absorb heat, making them suitable for cool-season zones.
16. Tree Base River Rock Ring
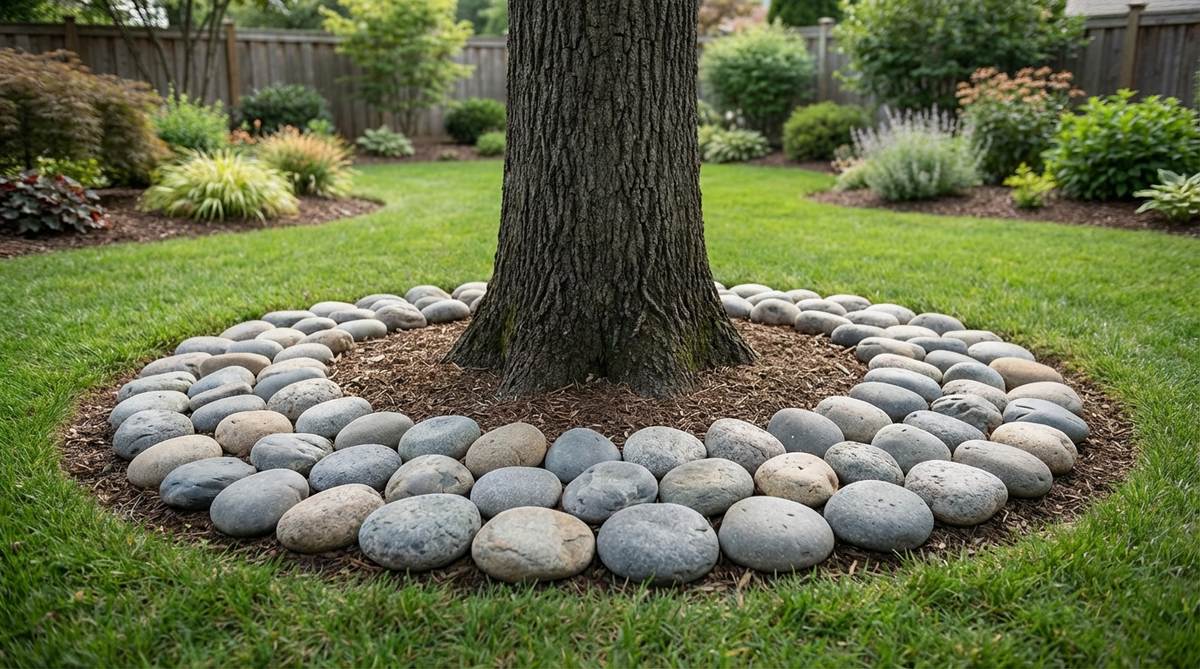
Circular bands of river rock around tree trunks protect surface roots from mower damage. A 24-36 inch diameter ring provides adequate clearance for root flare.
Maintain a 3-inch gap between rocks and bark to prevent moisture accumulation and fungal issues. Replenish rocks annually as they settle into surrounding soil.
Stacked & Layered Stone Borders
Vertical stone arrangements create elevated planting beds and manage grade changes. These stone garden border techniques combine edging with retaining wall functions.
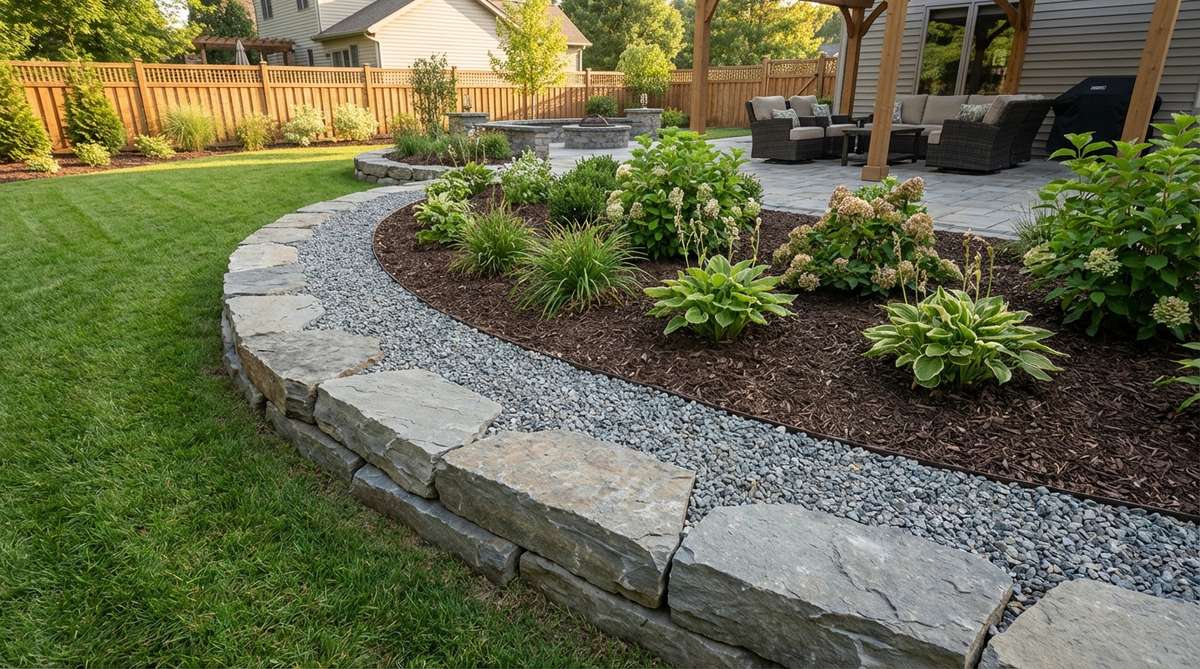
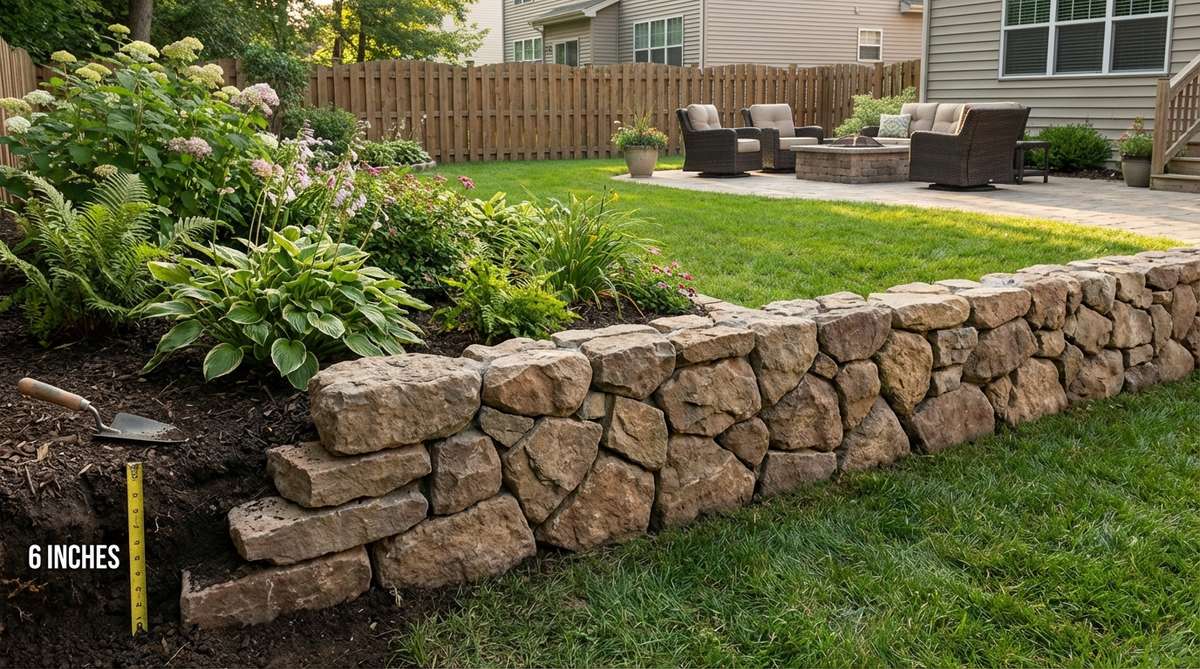
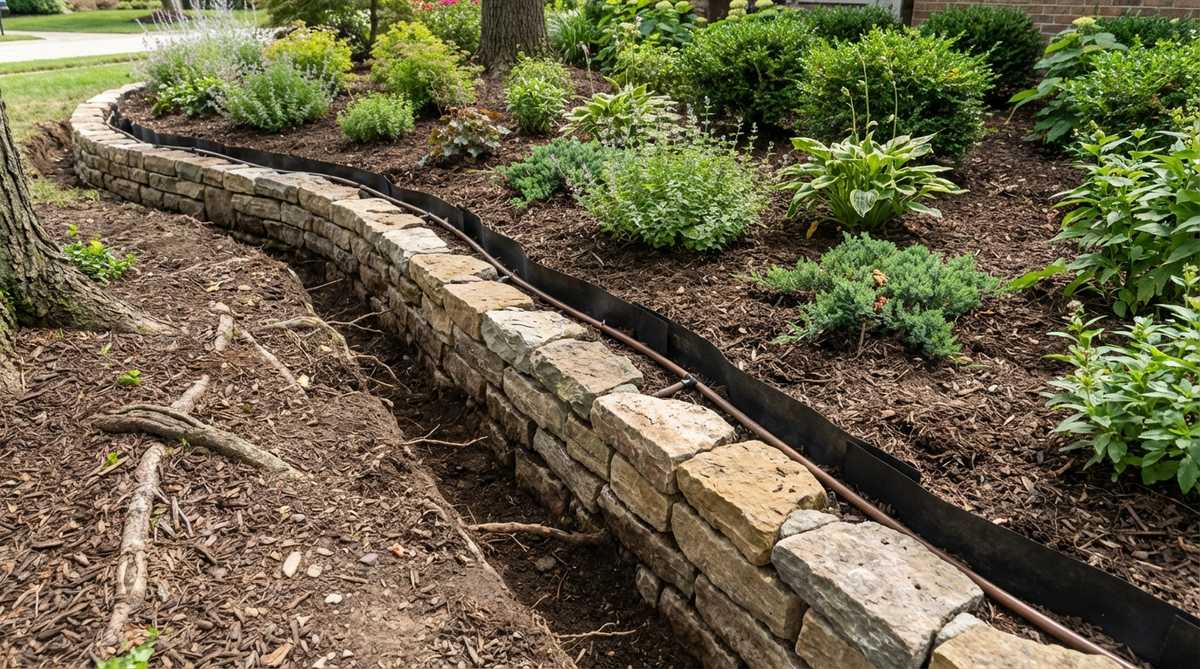
17. Dry-Stacked Fieldstone Wall
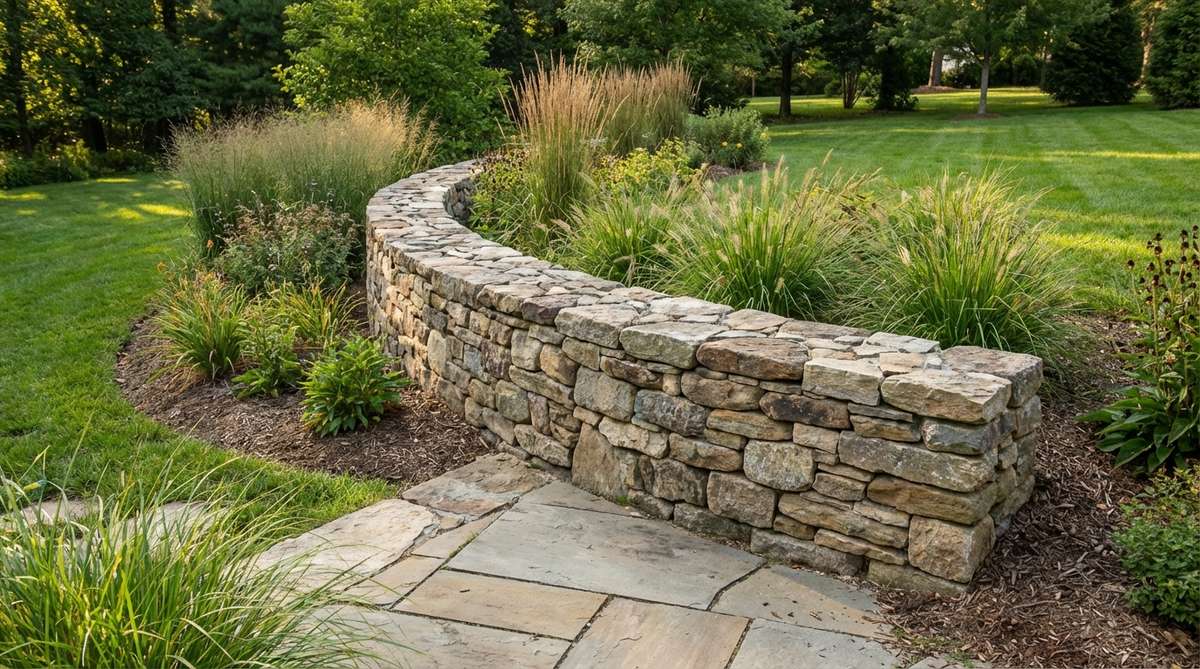
Native fieldstone stacked without mortar to 12-18 inches height creates rustic raised beds. The irregular shapes fit together like three-dimensional puzzles, with gaps hosting creeping plants.
Select stones with at least one flat face for the front wall surface. Tilt each course slightly backward into the retained soil for gravitational stability.
Fill crevices with soil pockets to establish sedums, thyme, or hens-and-chicks. These plantings soften the wall visually while their roots help lock stones in place.
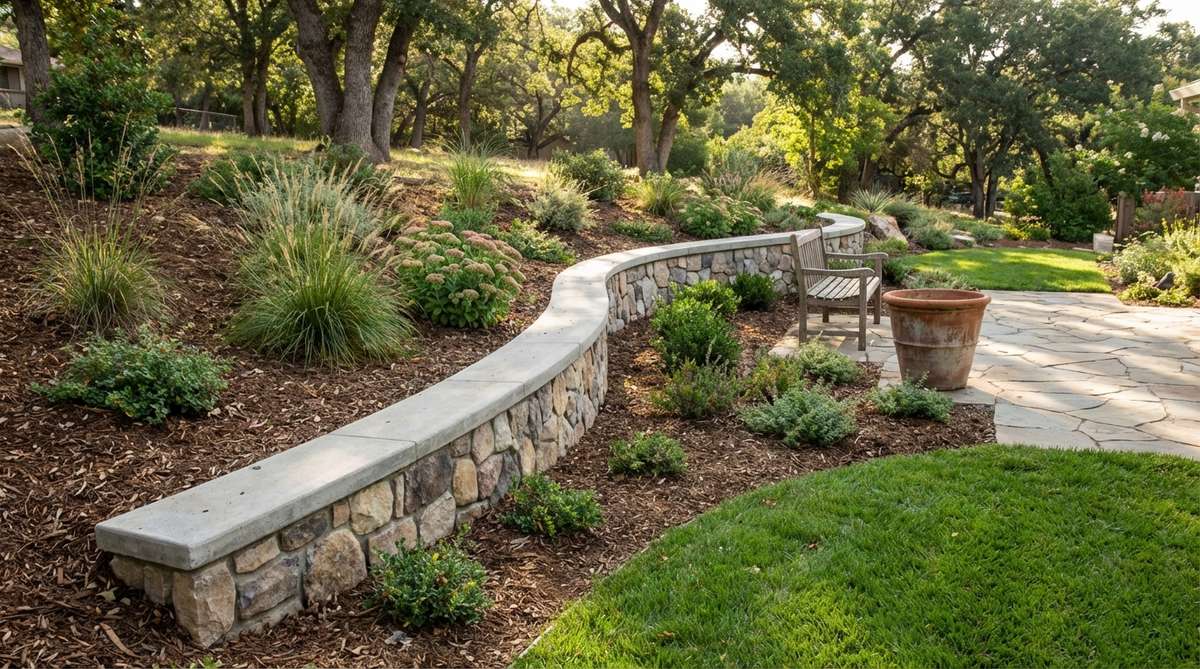
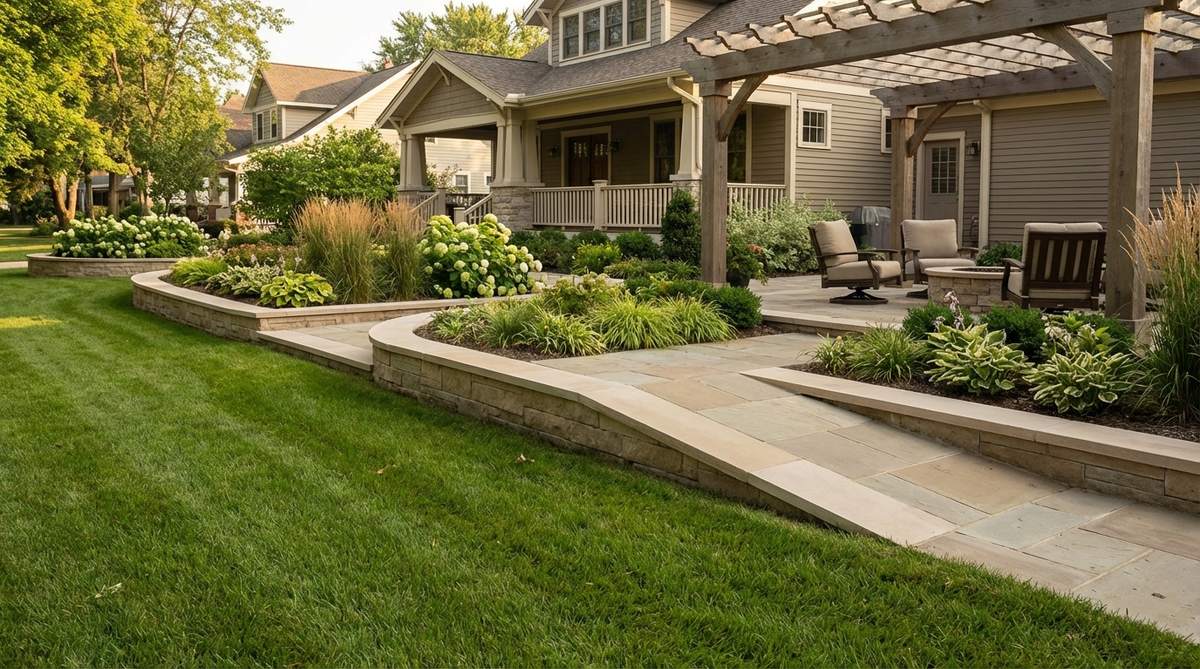
18. Mortared Flagstone Retaining Edge
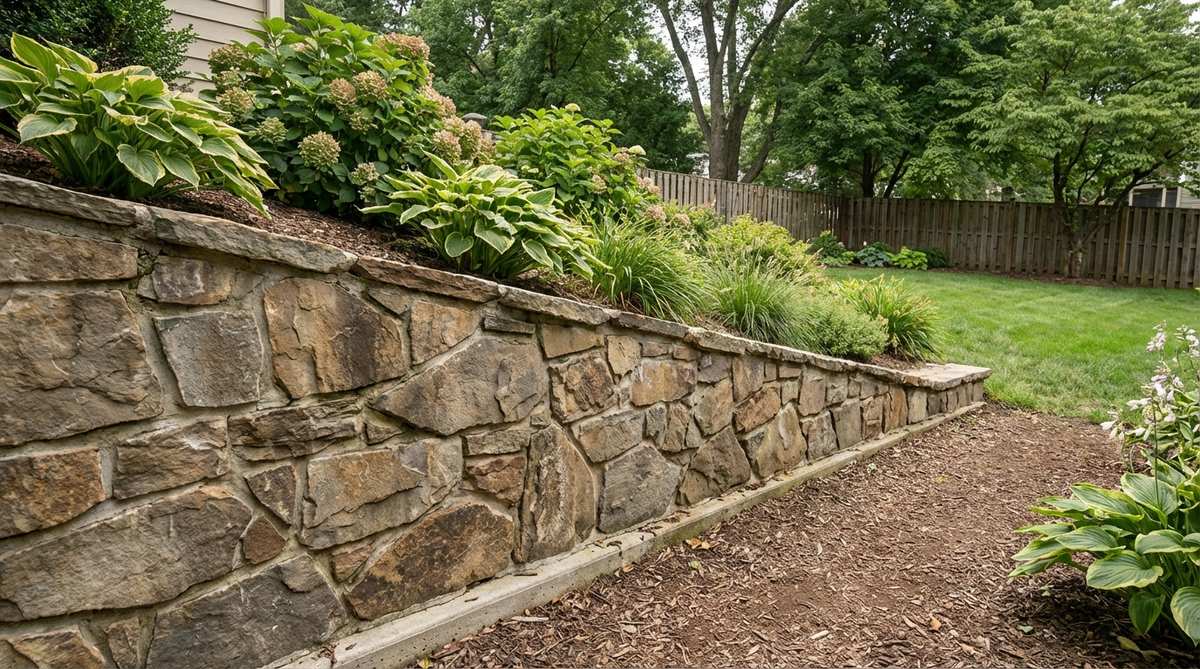
Flagstone pieces set in mortar create permanent borders for slopes exceeding 10% grade. The mortar joints transfer lateral soil pressure across multiple stones.
Pour a concrete footing 6 inches deep and 12 inches wide as the foundation. Build the wall in courses, allowing each to cure 24 hours before adding the next.
19. Stacked Slate Vertical Edging
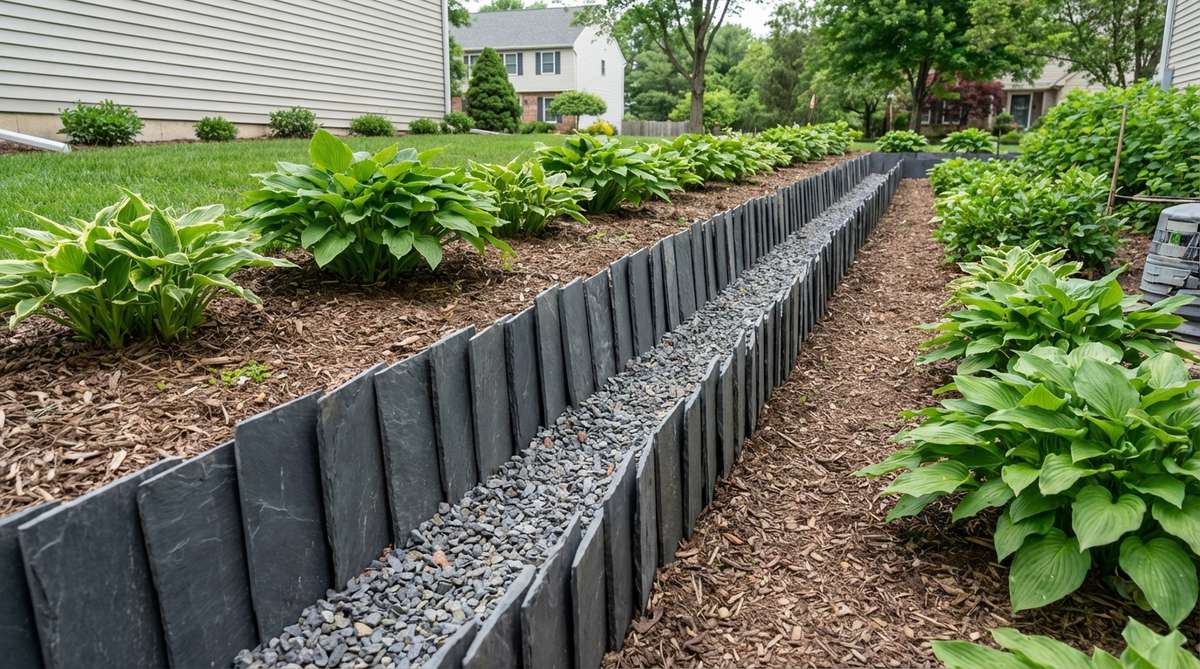
Slate’s natural cleavage planes produce thin sheets perfect for vertical stacking. Standing slate on edge creates a 6-12 inch fence-like border with minimal footprint.
Position pieces in a narrow trench with two-thirds below grade. Backfill with gravel and compact to prevent toppling from frost heave.
20. Layered Ledgestone Outcropping
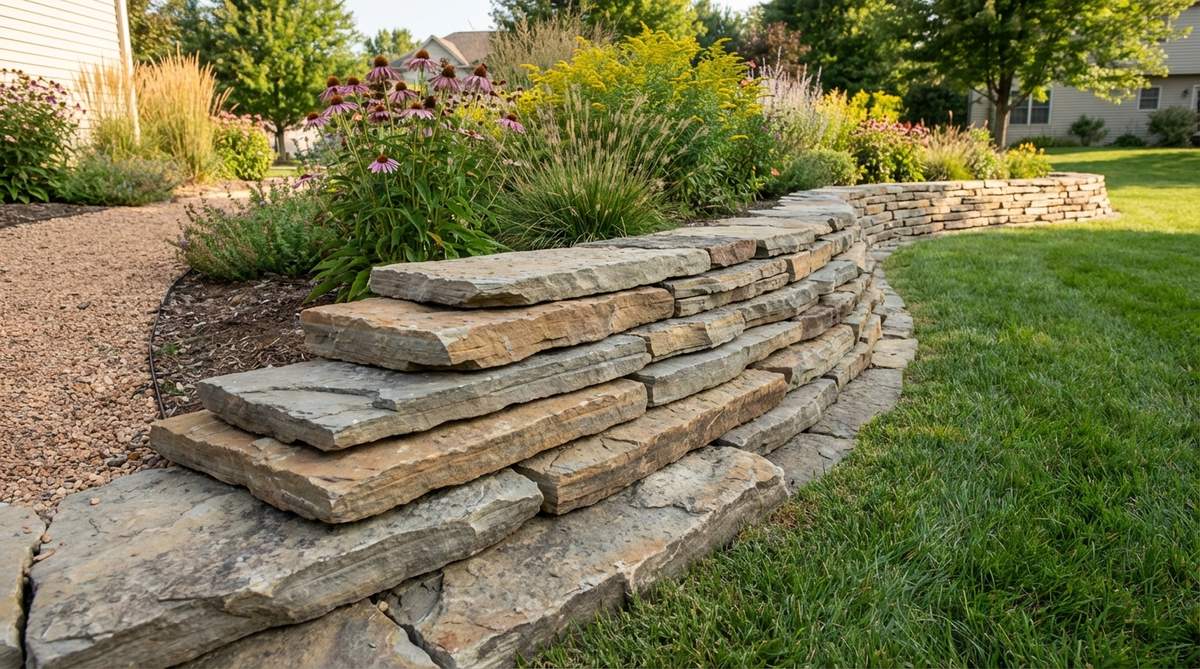
Flat ledgestone pieces stacked horizontally mimic natural rock strata. Each layer projects slightly beyond the one below, creating shadow lines and dimension.
Start with the largest stones at the base and decrease size toward the top. This proportion appears naturally weathered and structurally sound.
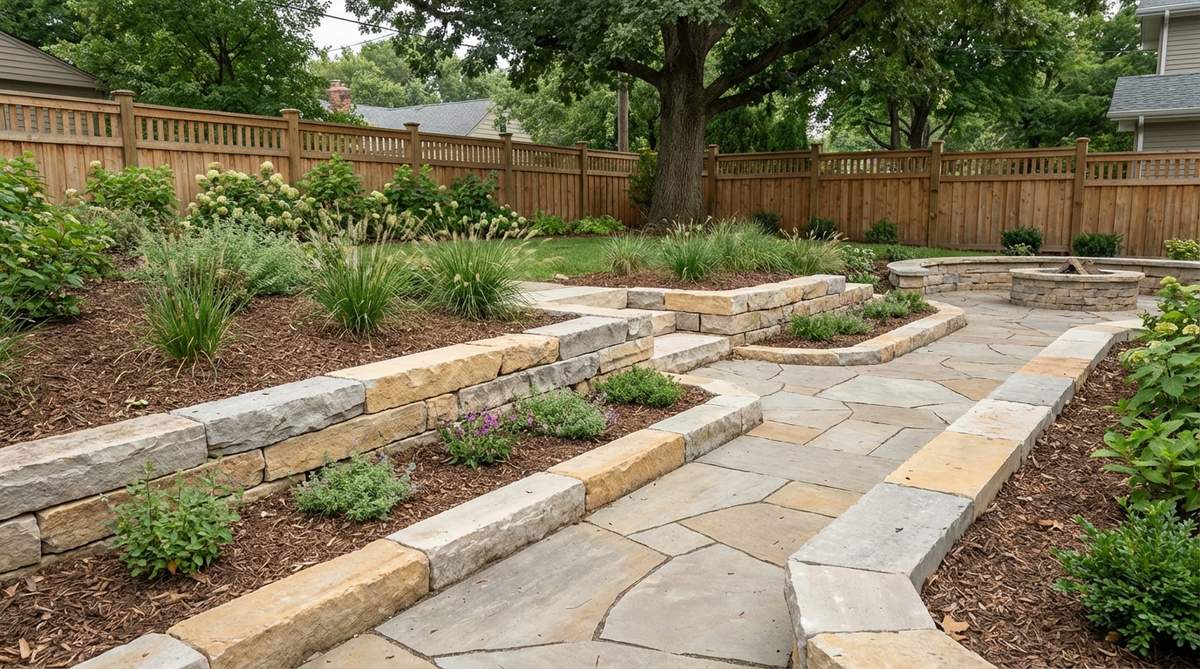
21. Terraced Stone Step Edging
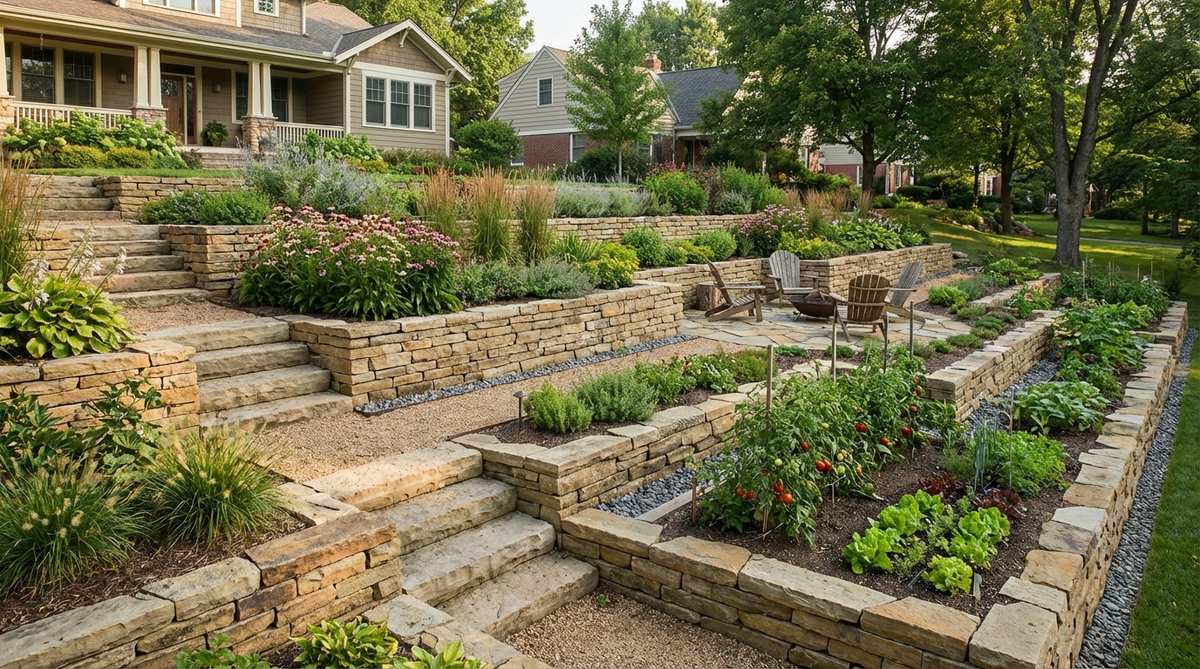
Multiple tiers of 6-8 inch stone walls transform steep slopes into accessible planting zones. Each terrace reduces erosion and creates level beds for vegetables or perennials.
Calculate terrace heights to minimize grade on each level—aim for 3-5% slope for drainage. Space tiers 3-4 feet apart to accommodate plant mature width.
22. Gabion Basket Stone Wall
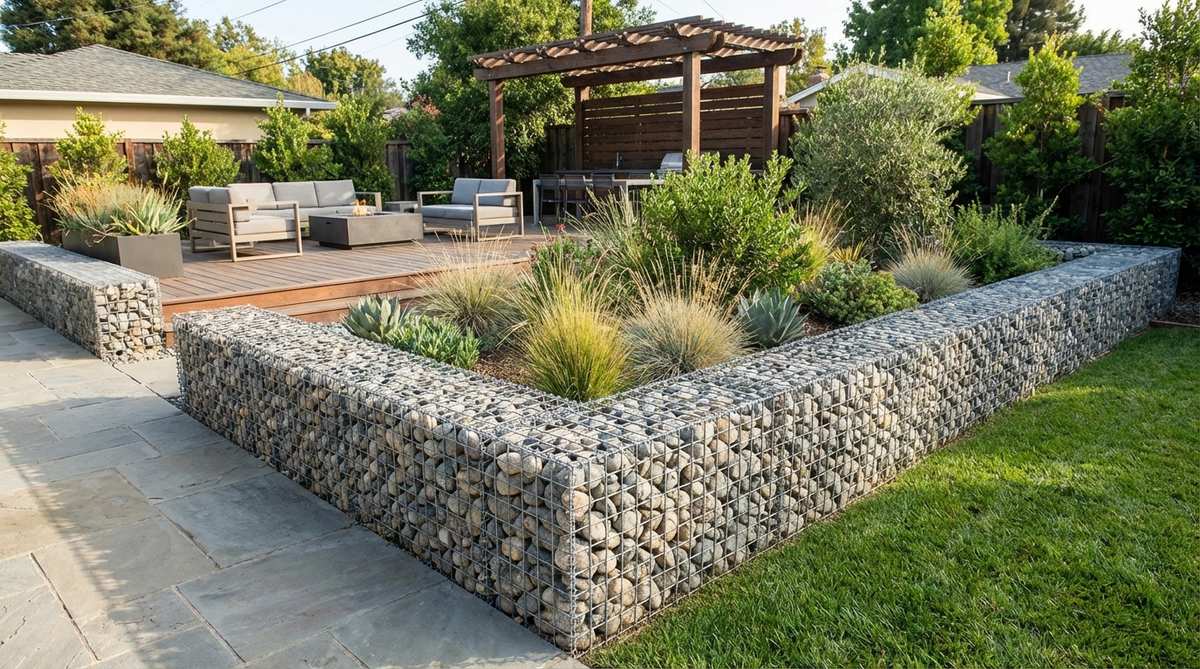
Wire mesh cages filled with stones create industrial-modern edging from 12-36 inches high. The modular baskets install rapidly and provide excellent drainage.
Fill baskets with uniform stones for contemporary aesthetics or mix sizes for texture. The wire framework contains material while allowing air and water movement.
23. Boulder Wall Low Profile
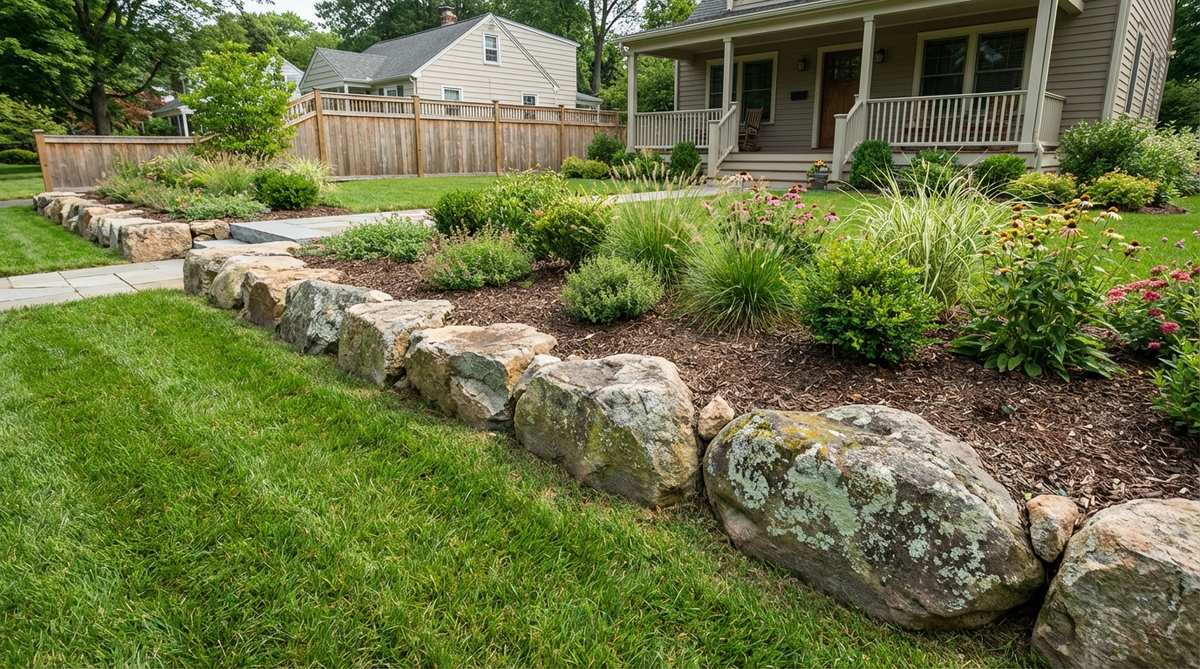
Large boulders (200-500 pounds) positioned in a single course create substantial borders requiring minimal excavation. Their mass provides stability without mortar or stacking.
Bury one-third of boulder height to prevent rocking. Position the most weathered face forward to showcase natural character and lichen growth.
24. Stacked Stone Raised Bed Corners
Concentrating decorative stacked stone at bed corners allows economical edging elsewhere. The corner accents anchor the design while simple materials fill straight runs.
Build corner pillars 18-24 inches square using mortared ashlar or dry-stacked fieldstone. Connect corners with treated timber, concrete block, or landscape edging.
Modern Mixed Material Techniques
Combining stone with complementary materials expands design possibilities and addresses specific site challenges. These hybrid approaches balance aesthetics with function.
25. Brick and Stone Alternating Pattern
Alternating sections of brick soldier course with flagstone segments creates rhythmic variation. The repetition establishes visual order while showcasing different textures.
Use 4-foot brick sections separated by 2-foot flagstone intervals, or reverse proportions for stone-dominant designs. Align top edges for a continuous mowing surface.
26. Stone and Steel Edging Combination
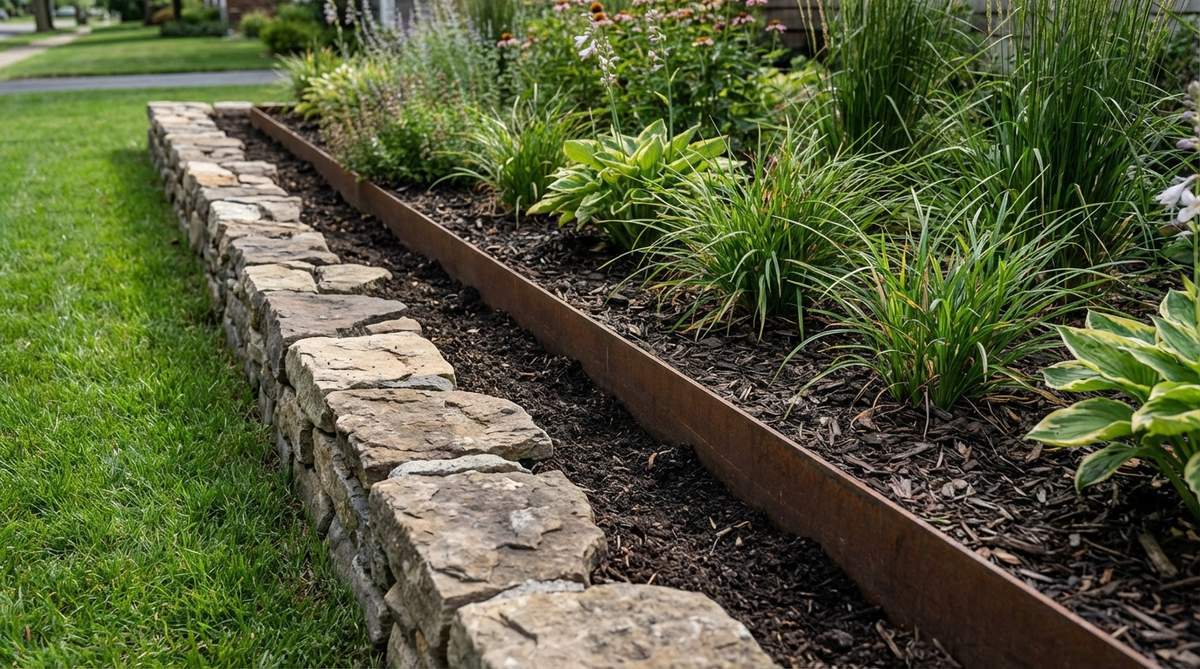
Cor-ten steel strips behind stone borders contain mulch and soil while allowing the stone to remain the visual focus. The steel provides structural backup without competing aesthetically.
Install steel edging 4 inches behind the stone row. The gap fills with soil, hiding the metal while maintaining separation between stones and planting bed.
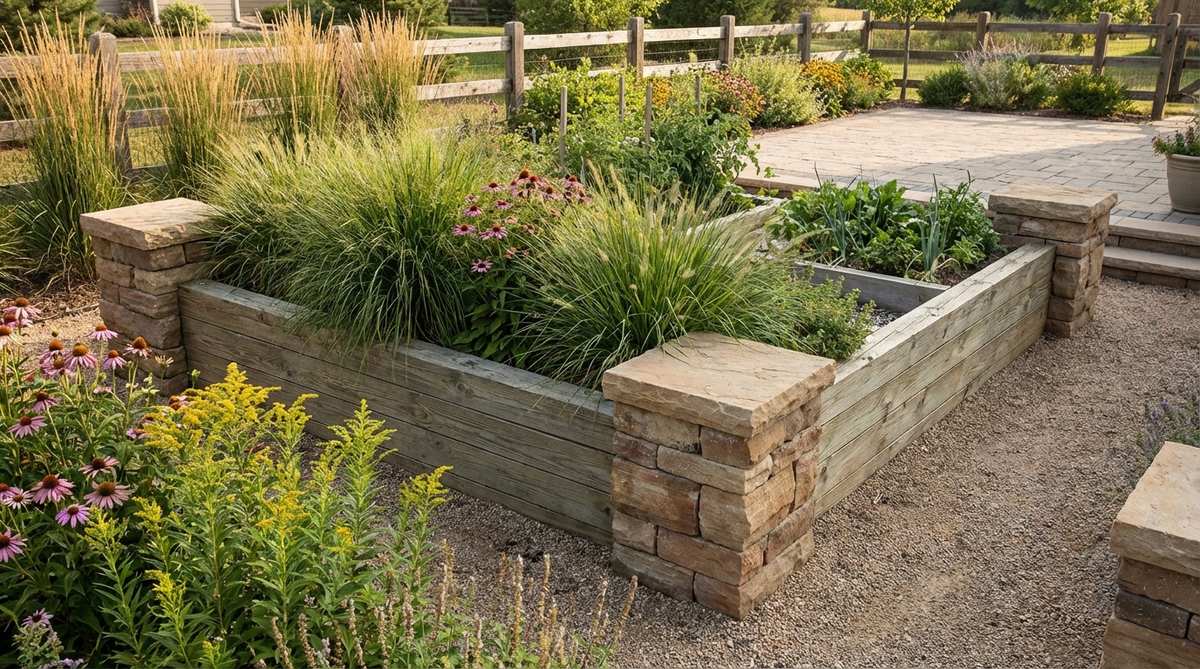
27. Stone and Timber Raised Edge
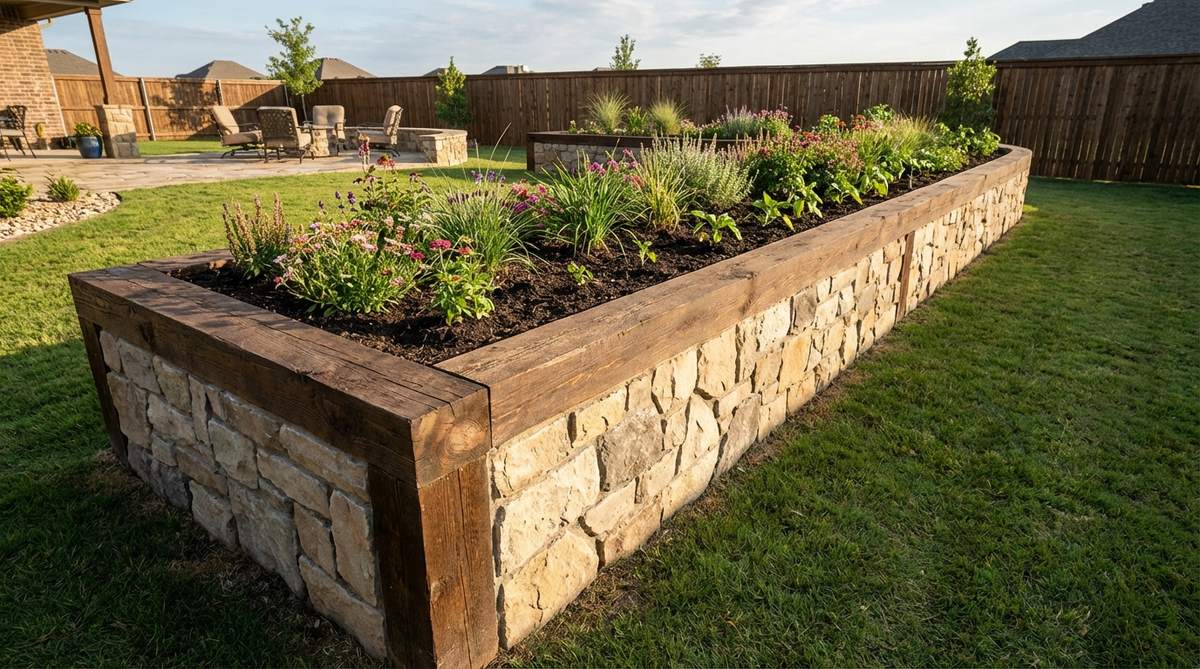
Landscape timbers form the structural frame while stone veneer provides the finished face. This combination delivers raised bed strength at lower cost than solid stone construction.
Secure timbers with rebar stakes, then mortar thin flagstone or stacked stone to the timber face. The wood remains hidden behind the stone façade.
28. Concrete Curb with Stone Facing
Poured concrete forms a stable foundation for slopes and high-traffic areas while stone facing maintains natural aesthetics. The concrete handles structural demands invisibly.
Pour a 4-inch wide concrete curb, then attach stone veneer using construction adhesive and mortar. This method suits commercial landscapes requiring ADA-compliant borders.
29. Stone-Gravel Transition Band
Large stones form the primary edge with pea gravel filling a 6-inch band behind them. The gravel provides drainage and a neutral backdrop for stone texture.
Select gravel in complementary tones—gray gravel with bluestone, tan with sandstone. The fine material contrasts with bold stone shapes for visual interest.
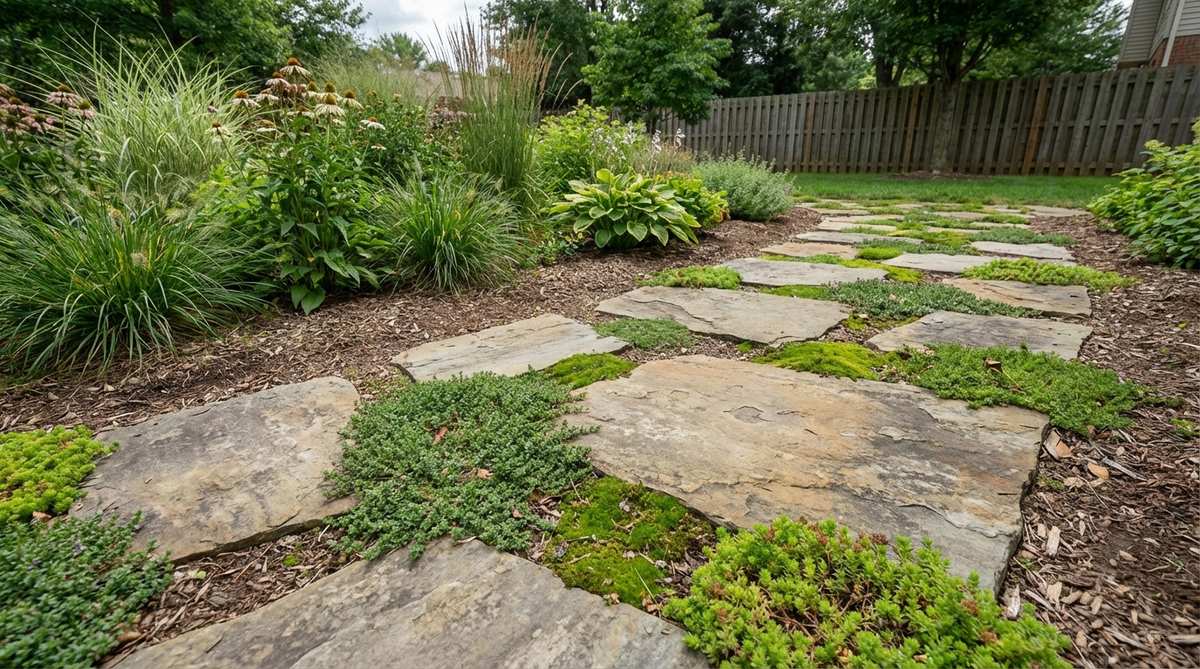
30. Stone and Ground Cover Integration
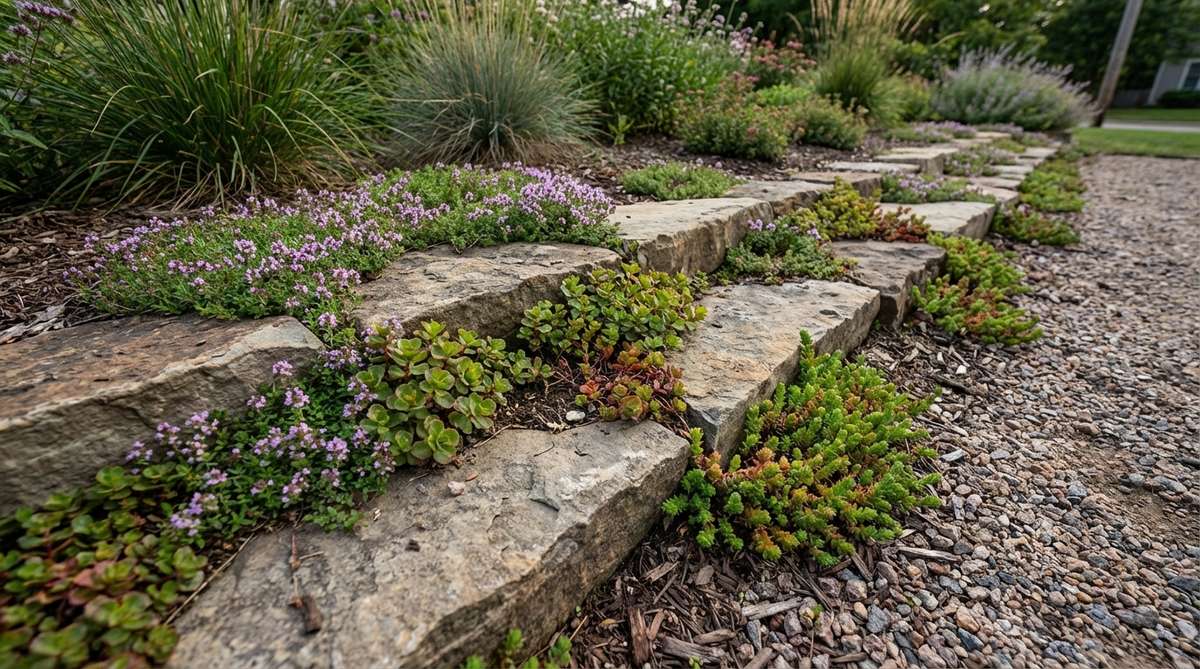
Spacing stones 2-4 inches apart allows creeping thyme, sedum, or Irish moss to colonize gaps. The living element softens hard edges and releases fragrance when stepped on.
Plant ground covers after stone installation using 2-inch plugs. Established plants will spread to fill gaps within one growing season.
31. Stone Border with Integrated Lighting
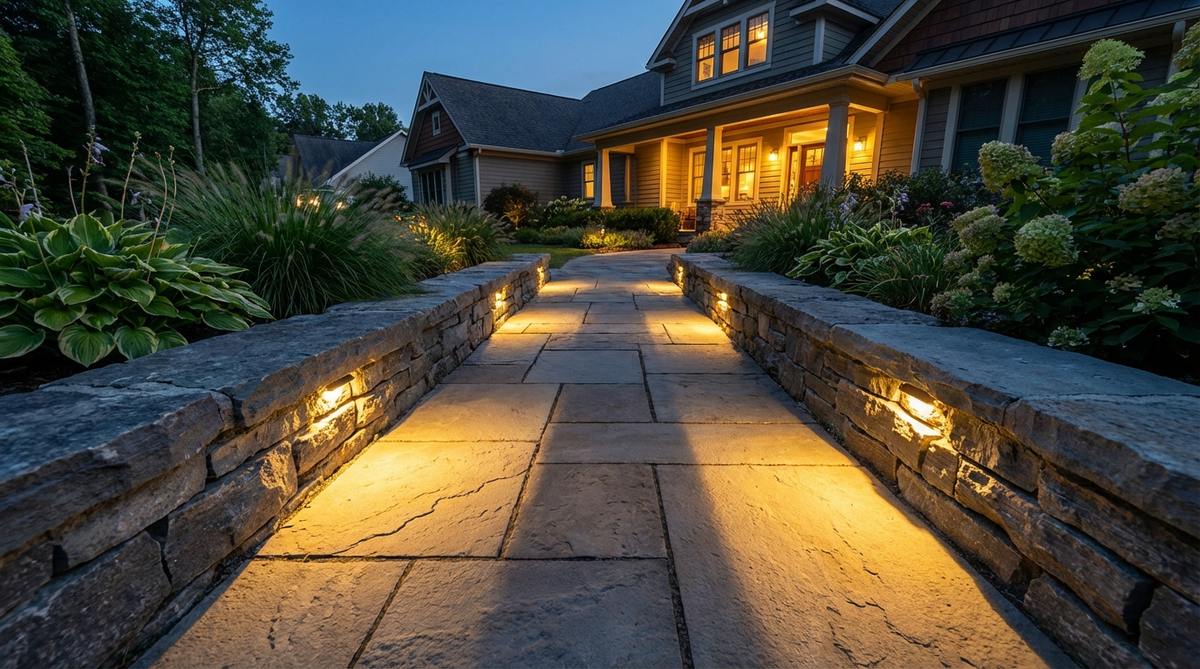
Low-voltage LED fixtures tucked between stones illuminate pathways and highlight plantings after dark. The lights nestle invisibly during daylight hours.
Position fixtures every 6-8 feet, angling them to graze stone surfaces and create dramatic shadows. Use warm white (2700-3000K) for natural evening ambiance.
32. Stone and Metal Decorative Accent
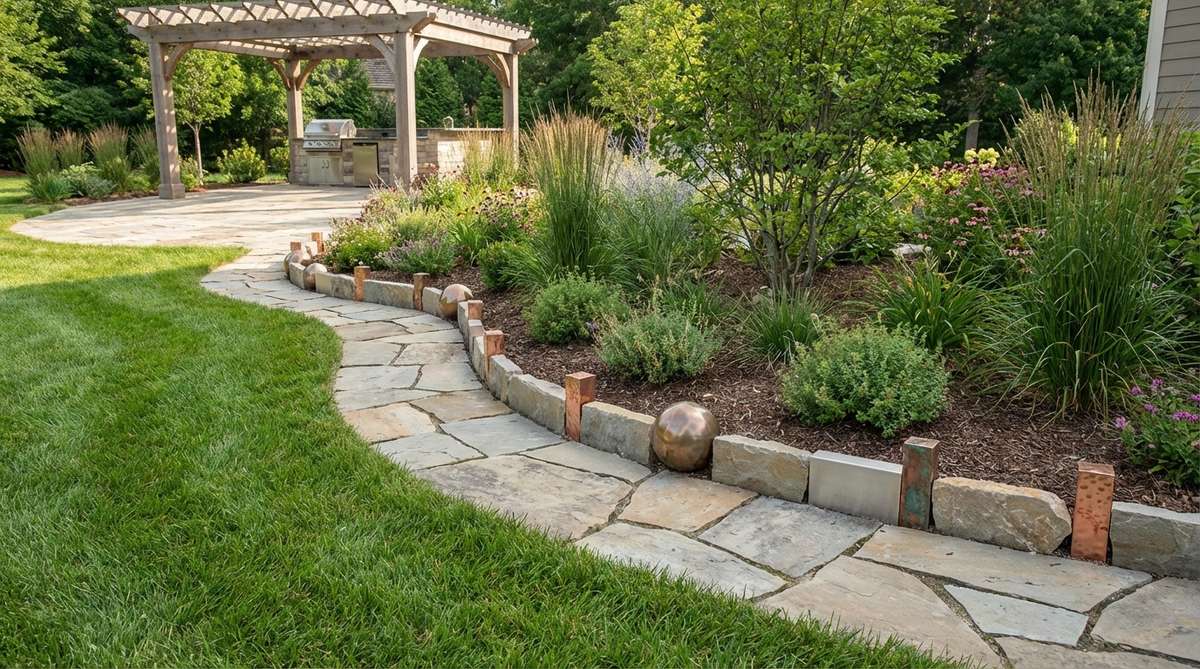
Copper, bronze, or stainless steel elements inserted between stones add contemporary flair. Vertical metal strips, spheres, or geometric shapes punctuate organic stone patterns.
Limit metal accents to 10-15% of total edge length to avoid overwhelming the stone. The metal develops patina over seasons, coordinating better with weathered stone.
Functional Problem-Solving Borders
Strategic stone placement addresses drainage, erosion, accessibility, and maintenance challenges. These solutions prioritize performance while maintaining visual appeal.
33. French Drain Stone Edging

Perforated drainage pipe surrounded by river rock manages water runoff while forming an edging element. This dual-purpose installation eliminates standing water in low areas.
Excavate a 12-inch trench sloped 1% toward drainage outlet. Line with landscape fabric, add 3 inches gravel, lay pipe, cover with 6 inches river rock, then cap with topsoil and sod.
Surface stones conceal the drainage system while the subsurface components handle water management. This approach works in clay soils and areas with seasonal flooding.
34. Mow Strip Stone Edging
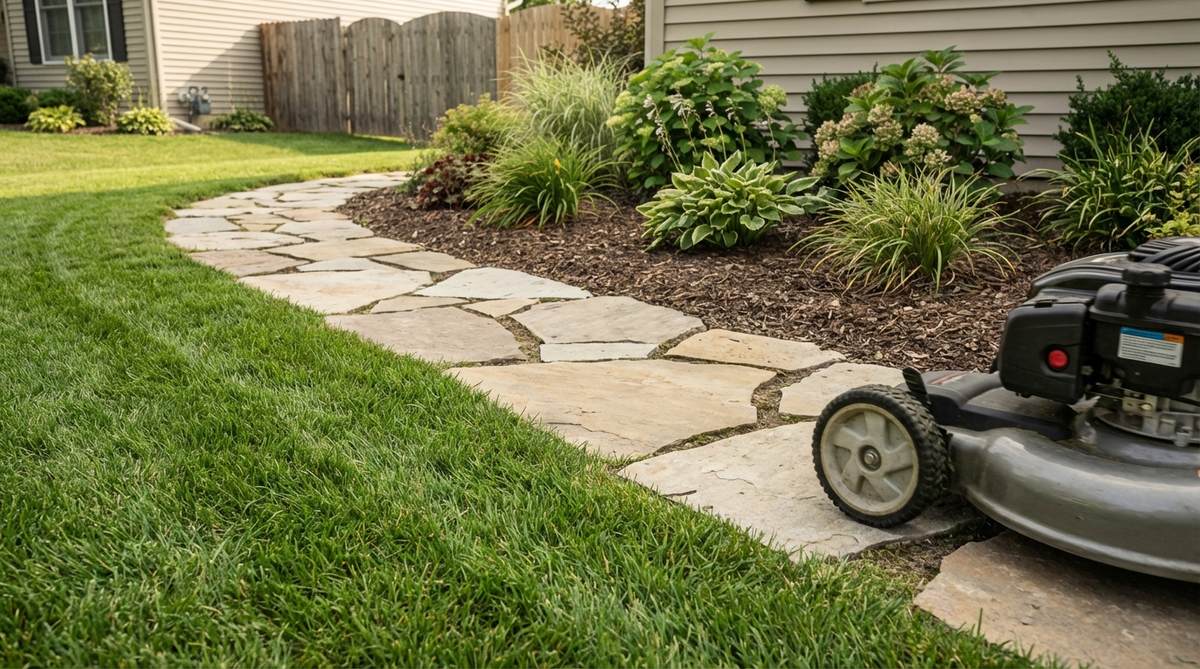
Flat stones positioned flush with lawn grade create a mowing surface that eliminates trimming. Mower wheels roll onto the stone, allowing blades to cut grass at the exact bed edge.
Use stones 12-18 inches wide and install with the top surface 1/4 inch below lawn height. This slight recess prevents scalping while catching grass clippings.
35. Wheelchair-Accessible Stone Border
Smooth-topped stone borders installed at precise heights accommodate mobility devices without creating barriers. The edges define spaces while maintaining barrier-free circulation.
Limit edge height to 1/2 inch maximum where paths cross planting beds. Use beveled stones or gradually sloped transitions to prevent catching wheels or casters.
36. Anti-Erosion Riprap Edging
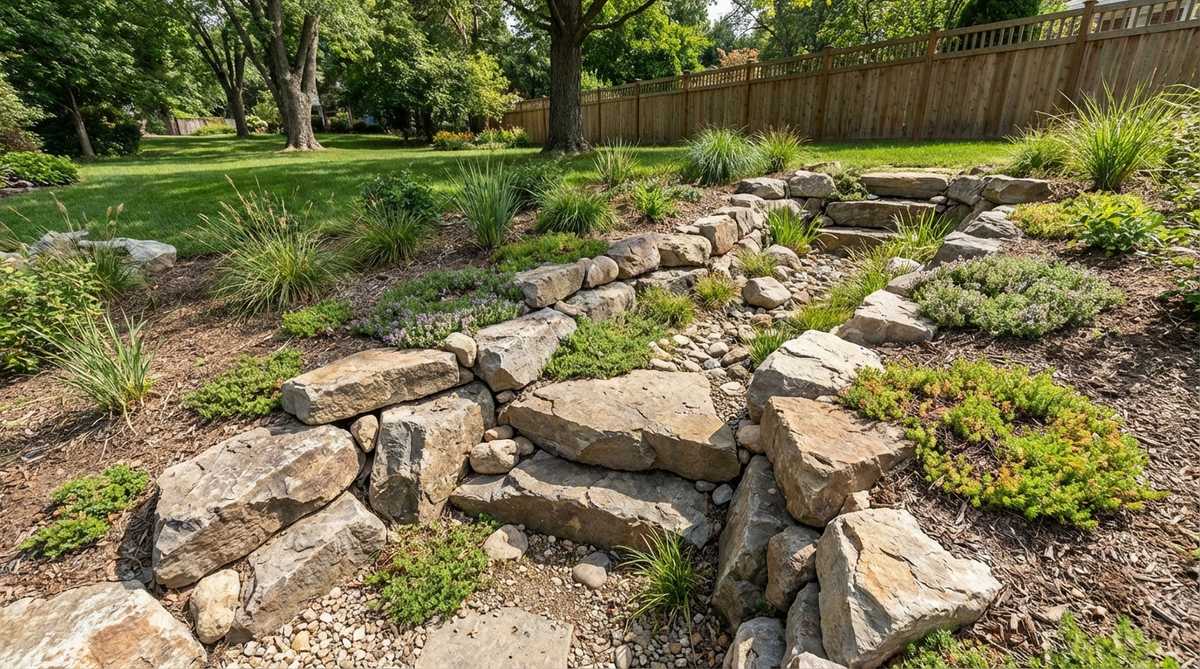
Large angular stones (6-12 inches) placed on slopes dissipate water energy and prevent soil loss. The irregular shapes interlock under gravity and flowing water.
Calculate required stone size based on slope angle and expected water velocity—steeper slopes need larger riprap. Extend stones 12 inches below grade to prevent undermining.
37. Pet Barrier Stone Border
Tight-fitting stones prevent dogs from digging into planting beds while creating an uncomfortable surface for cats. The solid barrier redirects pet activity to designated areas.
Install stones with minimal gaps and bury 6 inches deep. Determined diggers encounter stone subsurface and abandon excavation attempts.
38. Snow Plow Resistant Boulder Edge
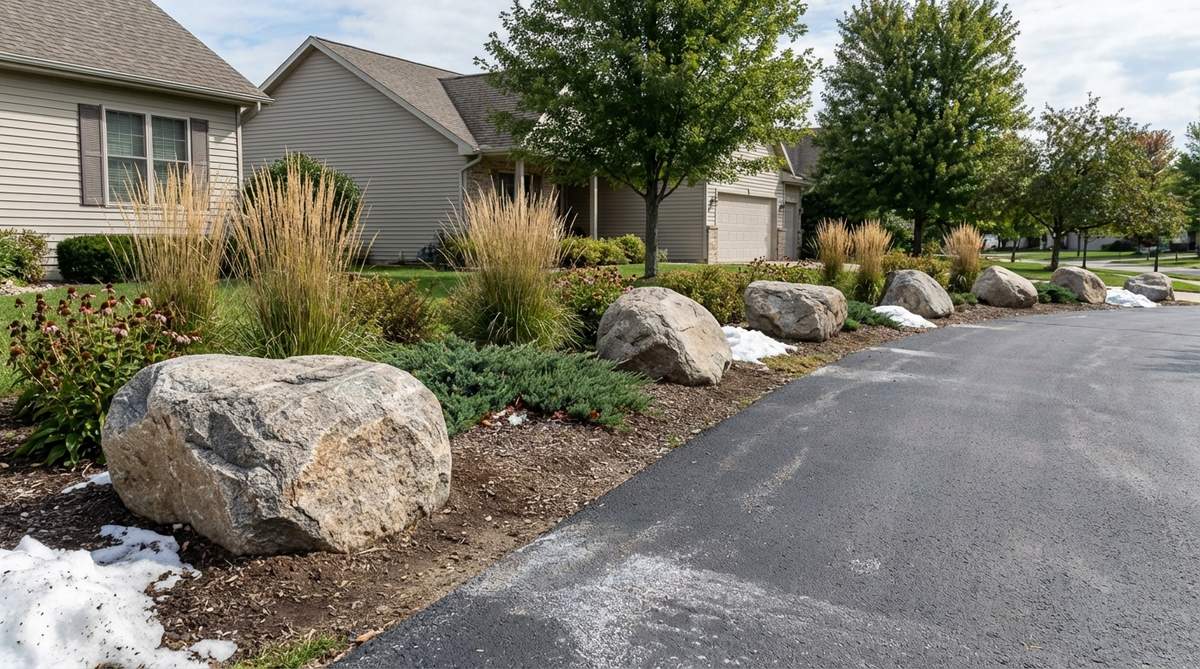
Substantial boulders (300+ pounds) positioned along driveways withstand plow impact without displacement. They protect planting beds from snow pile damage and salt spray.
Space boulders every 6-8 feet to create a visible barrier for plow operators. The mass absorbs impacts that would destroy lighter edging materials.
39. Root Barrier Stone Installation
Deep-set stones combined with root barrier fabric prevent tree roots from invading planting beds. The stone edge marks the barrier location for future landscaping projects.
Dig trenches 18-24 inches deep and install vertical root barrier before placing stones. This protects irrigation lines and perennial roots from tree competition.
40. Slope Stabilization Stone Terracing
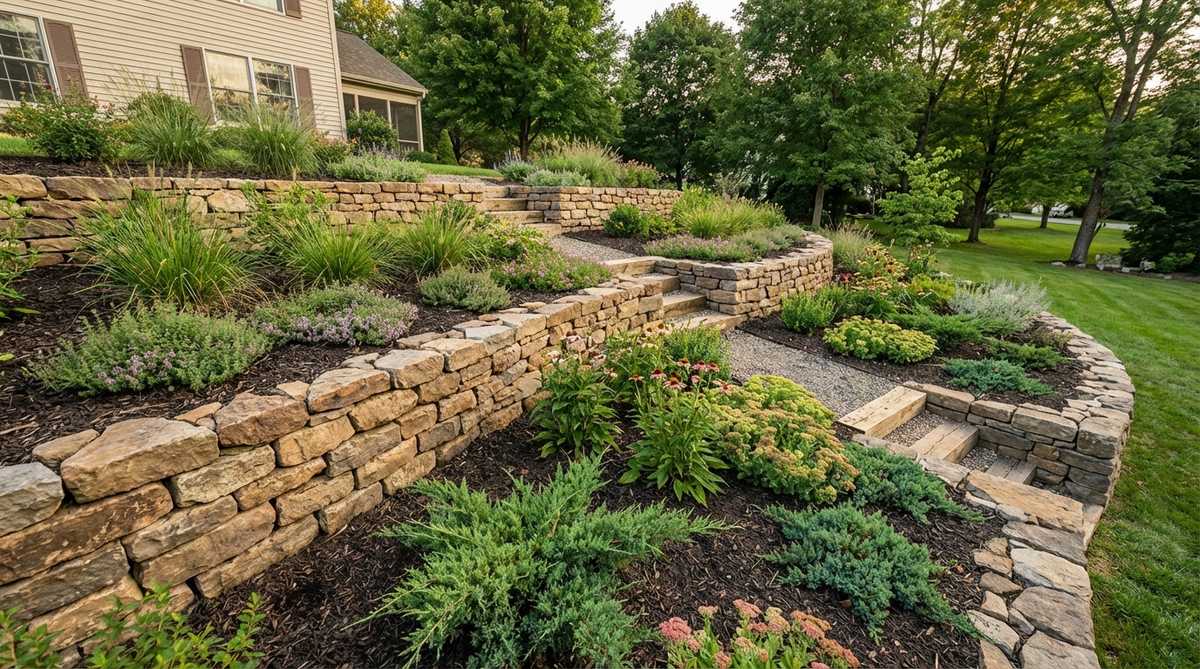
Multiple low stone walls (8-12 inches) spaced down slopes create planting pockets and slow water movement. This approach stabilizes grades too steep for conventional edging.
Construct walls on contour lines using dry-stack or mortared methods. Fill terraces with amended soil to support plantings that further anchor the slope.
Decorative & Specialty Stone Edging
These artistic approaches elevate stone garden borders edging from functional necessity to landscape focal points. Specialized techniques create signature styles and unique character.
41. Zen Garden Raked Stone Border

Precisely placed accent stones surrounded by raked gravel create meditative spaces inspired by Japanese dry gardens. The minimal palette emphasizes form, texture, and negative space.
Position 3-5 feature stones asymmetrically within a gravel bed edged with cut stone or buried steel. Rake parallel lines or concentric circles in 1/4-inch decomposed granite.
This style demands regular maintenance to preserve patterns but delivers unmatched serenity and contemplative quality.
42. Alpine Crevice Garden Edge
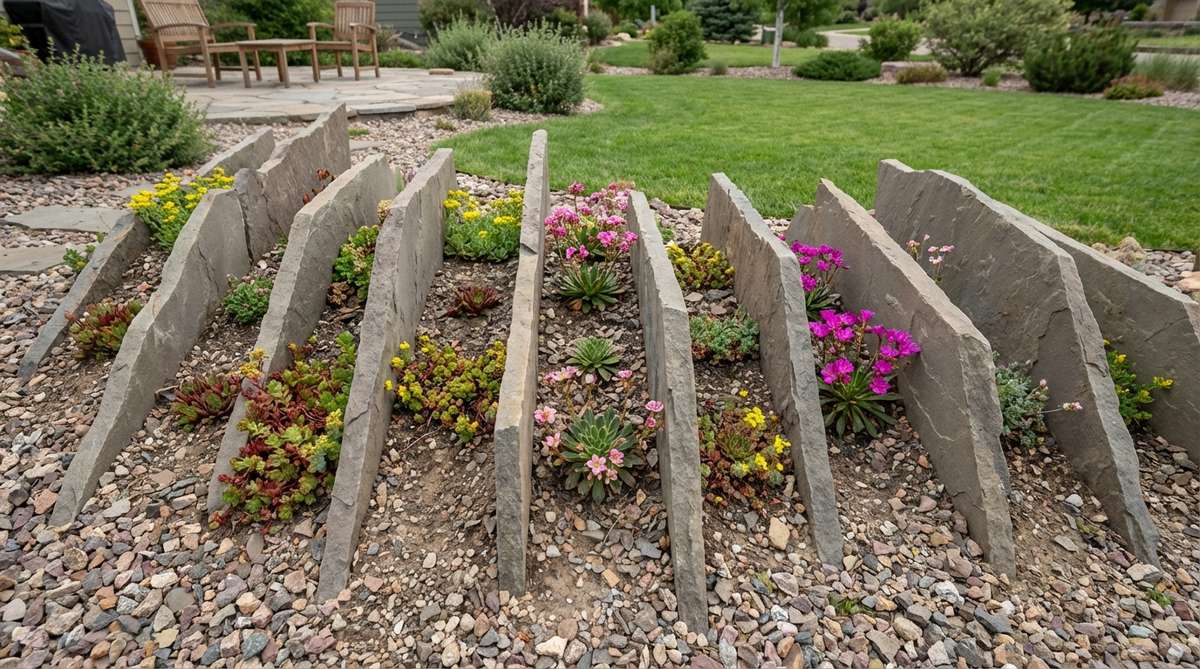
Vertical stone slabs positioned 4-8 inches apart create narrow planting slots for alpines and rock garden plants. The stones serve as edging while providing specialized growing conditions.
Fill crevices with gritty, free-draining mix suitable for saxifrages, lewisias, and sedums. The vertical orientation improves drainage and mimics alpine scree habitats.
43. Stepping Stone Playful Border
Large flat stones spaced at stride intervals (24-30 inches) invite interaction as both edging and pathway. This dual-function design works well in family gardens.
Set stones level with surrounding grade for easy walking. Plant low ground covers between stones to soften the hardscape and prevent mud tracking.
44. Colored Quartz Stone Accent
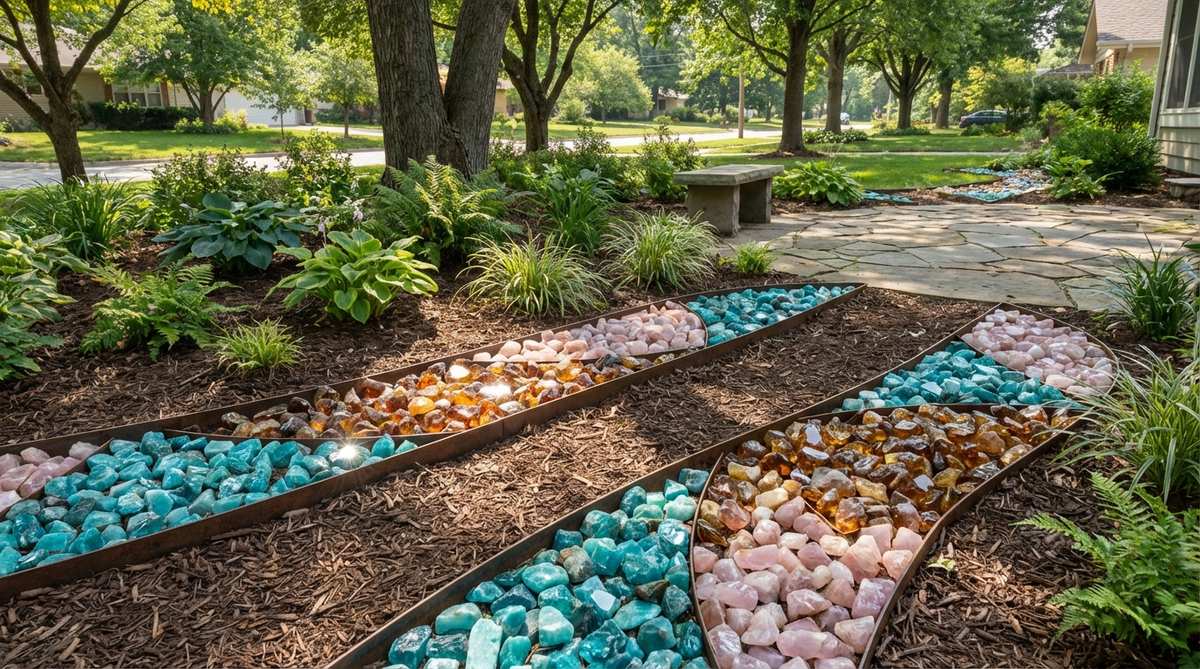
Polished quartz in vibrant hues—turquoise, amber, rose—creates unexpected color pops in neutral landscapes. Use sparingly as accent bands or corner highlights.
Contain colored stone within metal or composite edging to prevent dispersal. The reflective surfaces catch sunlight and add sparkle to shaded areas.
45. Fossil Stone Educational Border
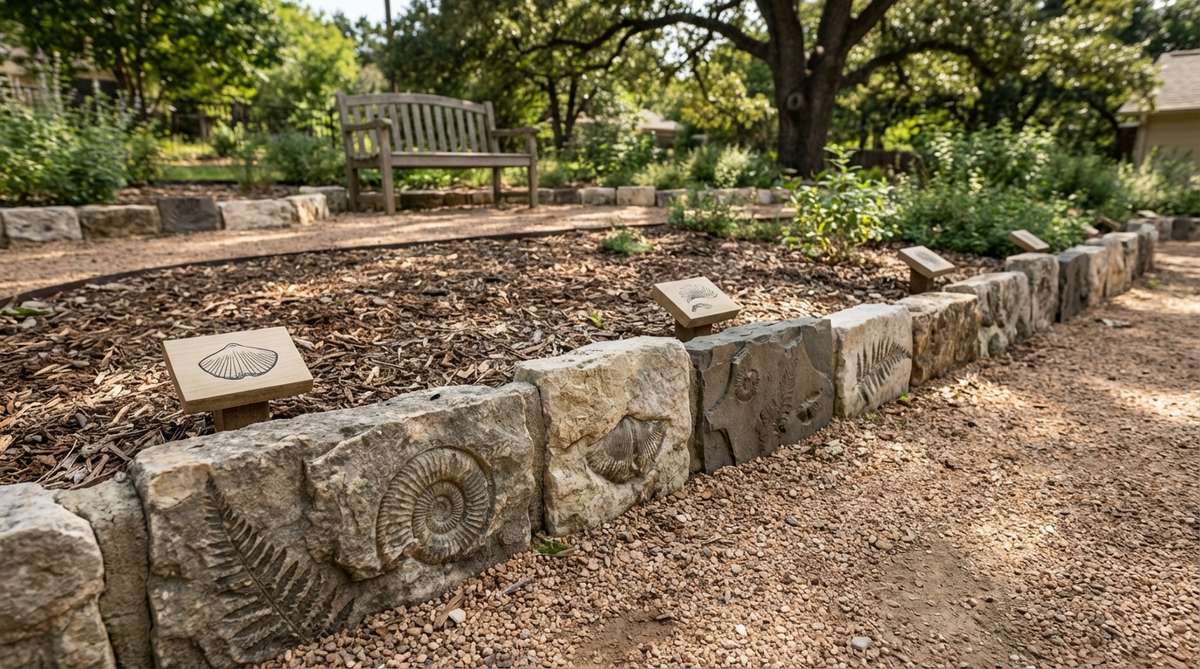
Limestone or shale containing visible fossils transforms edging into learning opportunities for children. The ancient imprints spark curiosity about geology and paleontology.
Source fossil-rich stone from quarries specializing in sedimentary materials. Position the most interesting specimens where viewers can examine details up close.
46. Glow-in-Dark Stone Pathway Edge
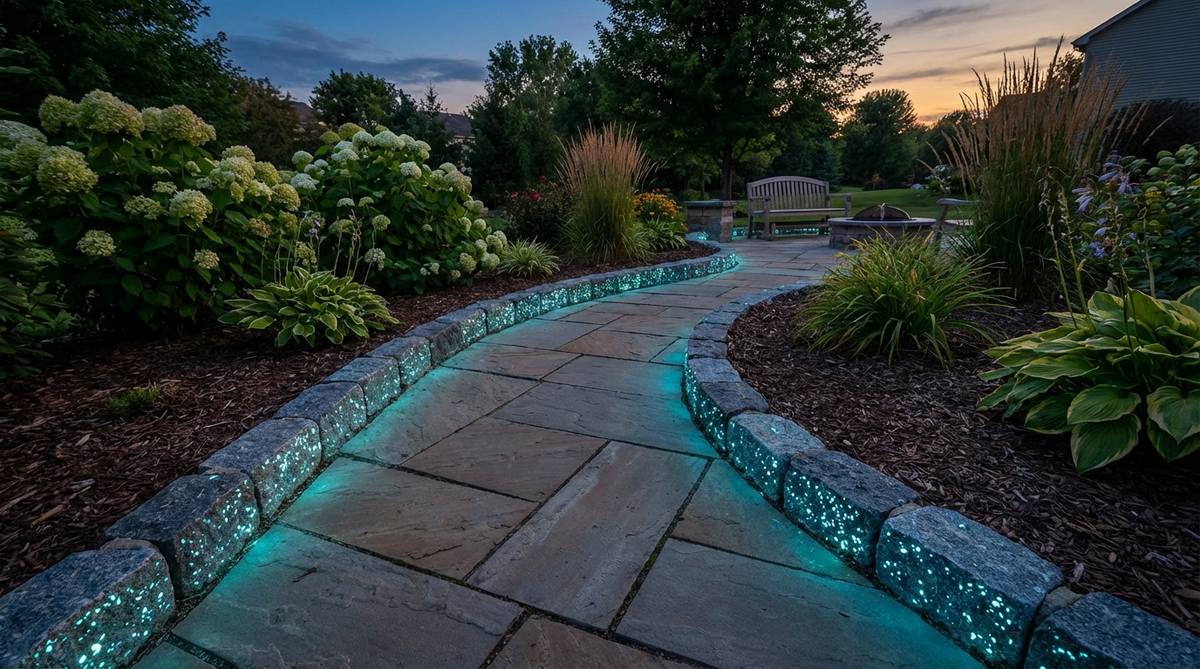
Photoluminescent aggregate mixed into concrete pavers or resin-bound stone creates self-illuminating edges. The material charges during daylight and glows for 8-10 hours after dark.
This safety feature marks pathway edges without electricity. Choose blue-green glow colors for maximum visibility and extended glow duration.
47. Petrified Wood Stone Border
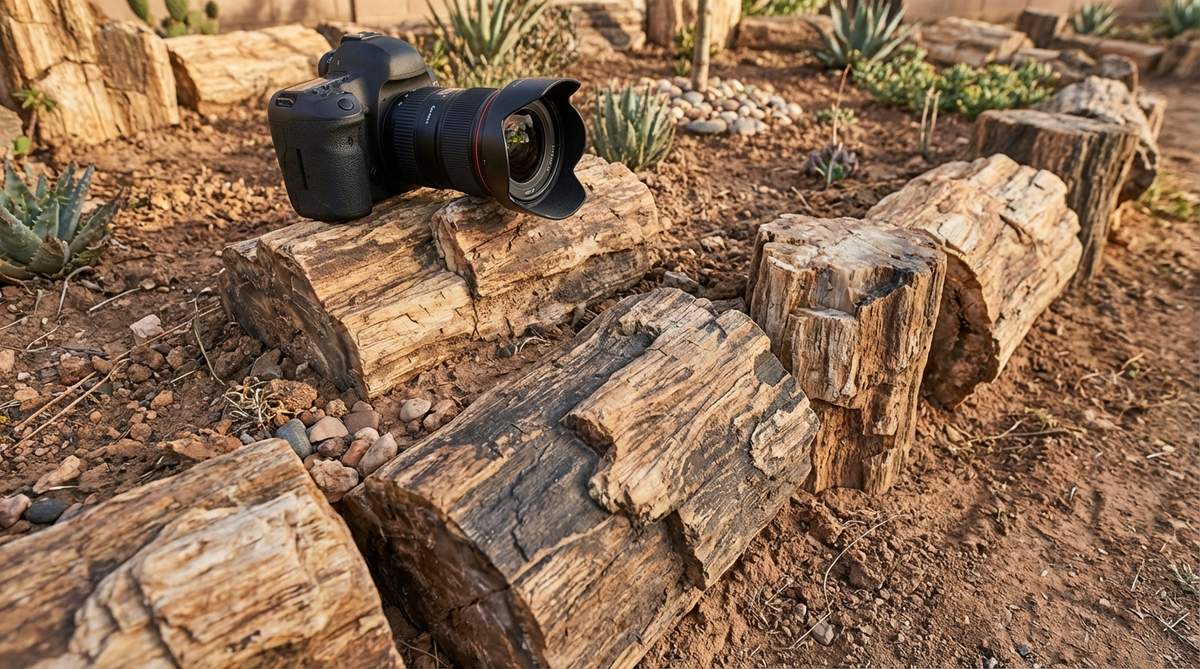
Mineralized wood pieces combine organic grain patterns with stone durability. The fossilized material bridges natural and geological aesthetics uniquely.
Petrified wood works best in rock gardens and Xeriscape designs where its desert origins feel contextually appropriate. Costs are higher than conventional stone, so use as accents.
Transform Your Landscape with Strategic Stone Selection
Professional stone garden edging combines structural engineering with aesthetic refinement. The techniques presented here range from straightforward DIY installations to specialist applications requiring masonry skills. Start with simple dry-stack methods to develop proficiency, then progress to mortared and mixed-material approaches as confidence builds. Proper base preparation and appropriate stone selection for your climate zone ensure borders that enhance property value and garden enjoyment for decades.
Frequently Asked Questions
How deep should I dig for stone garden edging?
Excavate trenches 3-6 inches deep depending on stone size and regional frost depth. Smaller stones (2-4 inches) require 3-inch trenches, while larger flagstone and boulders need 6 inches to prevent frost heave. Add 2 inches of compacted gravel base before placing stones to ensure stability and drainage. In zones 5 and colder, increase depth by 1-2 inches to account for deeper frost penetration.
What prevents weeds from growing between edging stones?
Install landscape fabric beneath stones before backfilling to block weed seed germination from below. For dry-stacked installations, pack polymeric sand between joints—this material hardens when wet to seal gaps. Alternatively, plant low-growing ground covers like creeping thyme in deliberate gaps to outcompete weeds while adding visual interest. Annual applications of pre-emergent herbicide around stone edges provide additional protection.
Can I install stone edging on slopes without mortar?
Dry-stack stone edging works on slopes up to 10% grade when stones are tilted backward into the retained soil. For grades between 10-20%, use larger stones (50+ pounds) and bury half their mass for stability. Slopes exceeding 20% require mortared construction with concrete footings to resist gravitational forces and prevent collapse. Consider terracing steep areas into multiple lower walls rather than attempting single tall installations.
How much stone do I need for garden edging projects?
Calculate linear feet of planned edging and multiply by stone width to determine square footage. For river rock bands 8 inches wide, you need 0.67 square feet per linear foot. Flagstone edging 12 inches wide requires 1 square foot per linear foot. Add 10% extra material to account for breakage, fitting adjustments, and irregular stone shapes. A 100-foot border using 12-inch flagstone needs approximately 110 square feet of stone.
What stone types last longest in freeze-thaw climates?
Dense stones with low porosity resist freeze-thaw damage best—granite, bluestone, and quartzite top the durability list for northern zones. Avoid soft sedimentary stones like sandstone and limestone in zones 5 and colder, as absorbed water expands when frozen and causes spalling. River rocks perform well since water erosion has already eliminated weak specimens. Properly installed stone edging in suitable materials lasts 30-50 years in harsh climates.
Should stone edging sit above or flush with lawn level?
Flush installation creates effective mow strips that eliminate trimming—mower wheels roll onto stones while blades cut at the exact bed edge. Position stone tops 1/4 inch below lawn height to prevent blade damage. Raised edging 2-4 inches above grade provides stronger visual definition and prevents mulch migration but requires string trimming around the perimeter. Choose based on maintenance preferences and desired aesthetic impact.