
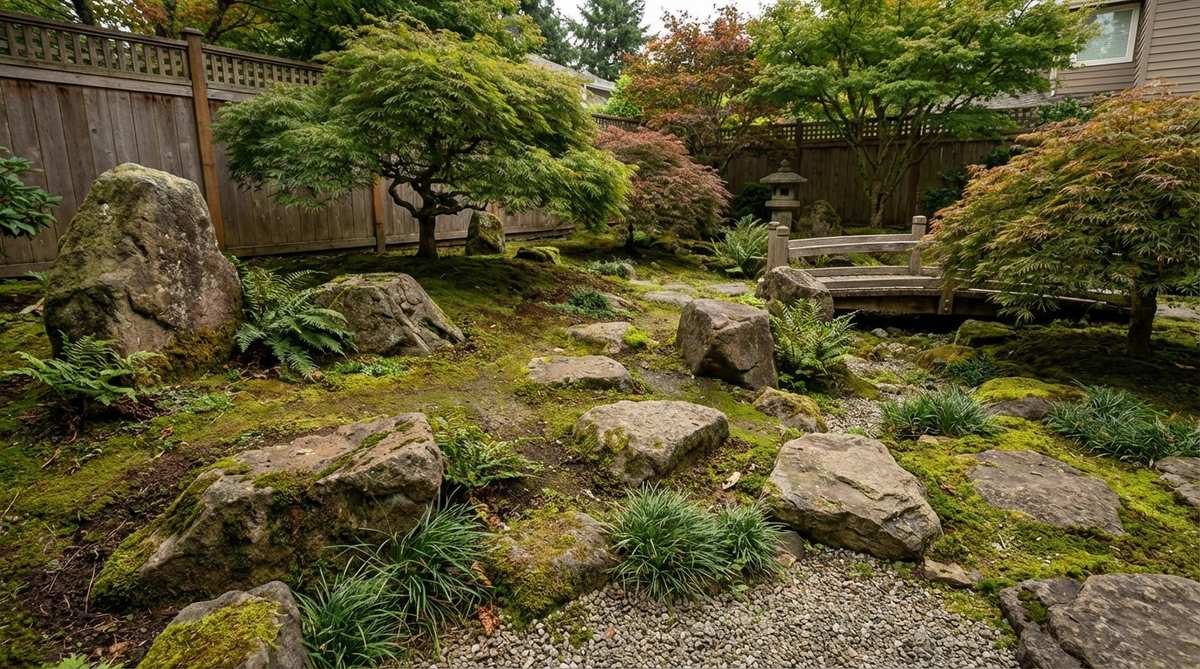
Japanese garden stones transform ordinary outdoor spaces into contemplative landscapes that balance natural beauty with intentional design. Whether you’re creating a winding pathway through a tea garden or establishing a dramatic rock arrangement that mimics mountain peaks, the placement of stones follows centuries-old principles rooted in asymmetry, natural groupings, and visual harmony. Fresh Garden Ideas brings you this comprehensive collection of authentic stone placement techniques to help you design a garden that promotes tranquility and reflection.
Design SnapshotKey Principles
- Asymmetry Over Symmetry: Japanese garden design avoids geometric patterns and straight lines, instead embracing natural irregularity and odd-numbered groupings (3, 5, or 7 stones)
- Grounding Through Burial: Stones should appear to emerge from the earth rather than sit on top of it, with approximately one-third of each stone buried for authentic appearance
- Material Selection: Traditional gardens use granite, basalt, limestone, and weathered fieldstones for rocks, paired with crushed granite or fine gravel sized 3-8mm for pathways
- Purposeful Spacing: The space between stones holds equal importance to the stones themselves, allowing room for moss, plants, and the eye to rest
Stepping Stone Pathways That Guide and Inspire

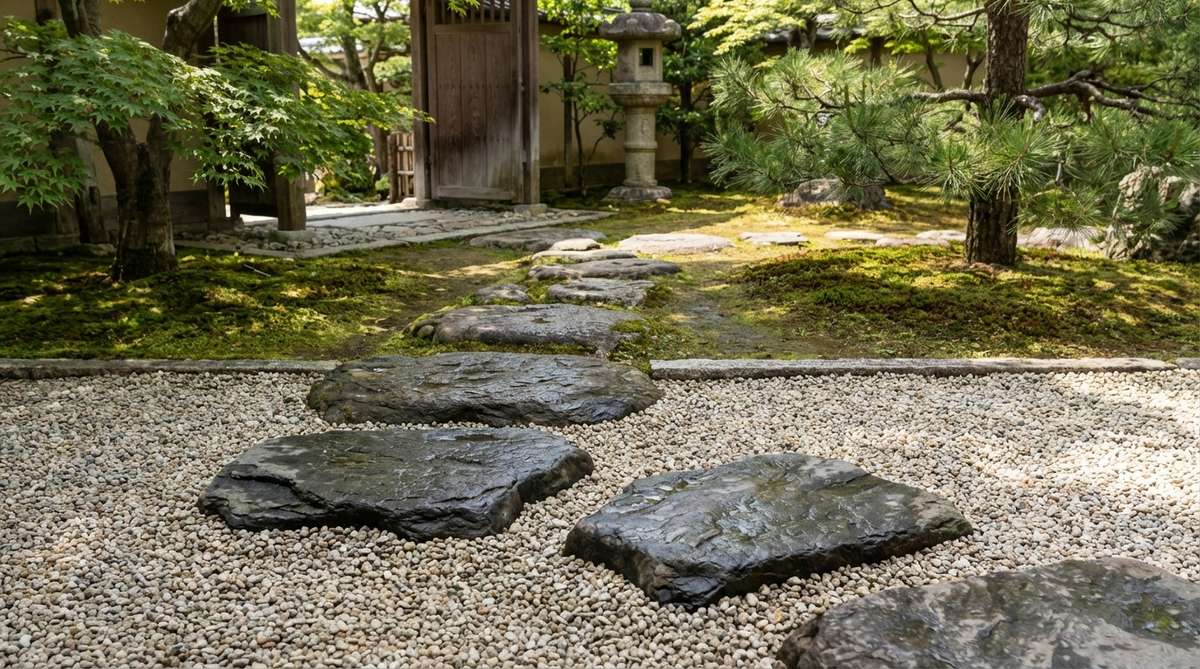
Stepping stone paths (tobi-ishi) represent the most iconic element of Japanese garden design. These irregular stone placements guide visitors through the garden while encouraging a slower, more mindful pace of movement.
1. Offset Diagonal Stepping Pattern
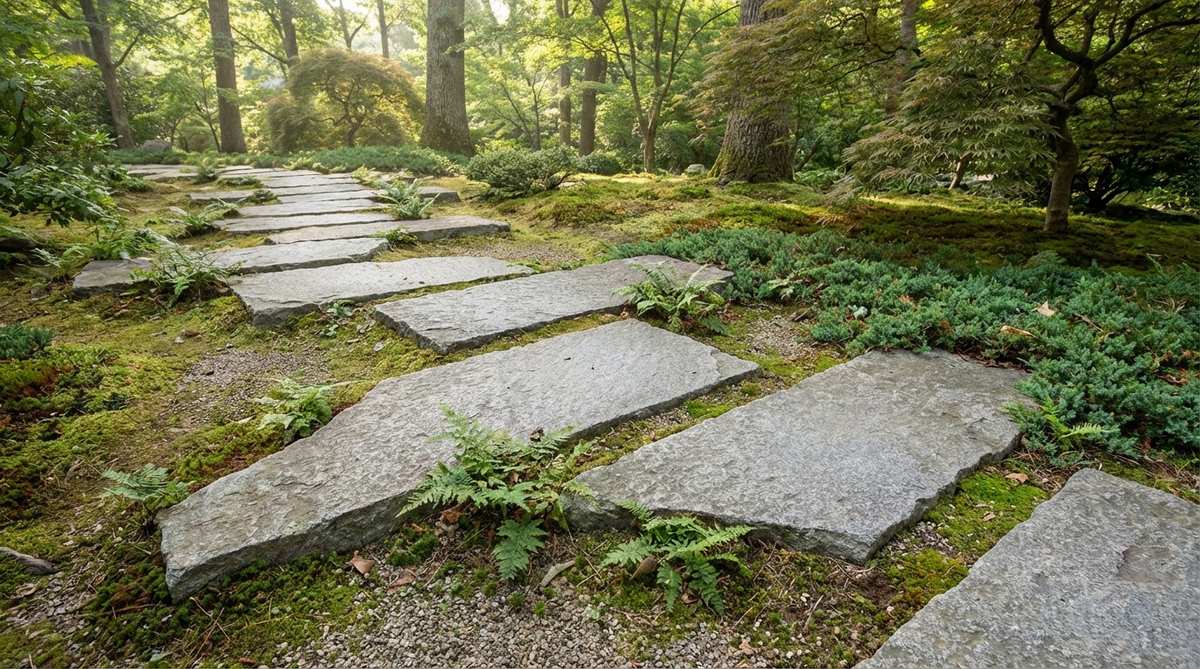
Arrange flat granite slabs in a gentle diagonal pattern that moves across the garden at a 30-degree angle. Each stone should be rotated slightly to avoid parallel edges and positioned with irregular spacing that naturally slows the walker’s pace.
Position stones 18-24 inches apart to accommodate a comfortable stride. Bury each stone one-third of its depth so it appears to have emerged naturally from the ground over centuries.
This layout works exceptionally well in tea gardens where the journey to the tea house should feel contemplative rather than rushed.
2. Two-Three Rhythm Stepping Sequence
Create a traditional rhythm by placing two stones close together, followed by three stones in a clustered group, then returning to two. This pattern originated in tea gardens to naturally regulate walking speed and encourage presence.
Use stones of varying sizes within each grouping. The paired stones should be medium-sized slabs, while the triple grouping can mix one large stone with two smaller companions.
The irregular rhythm prevents automatic walking and brings attention to each footfall and the surrounding garden elements.
3. Straight-Line Tobi-Ishi
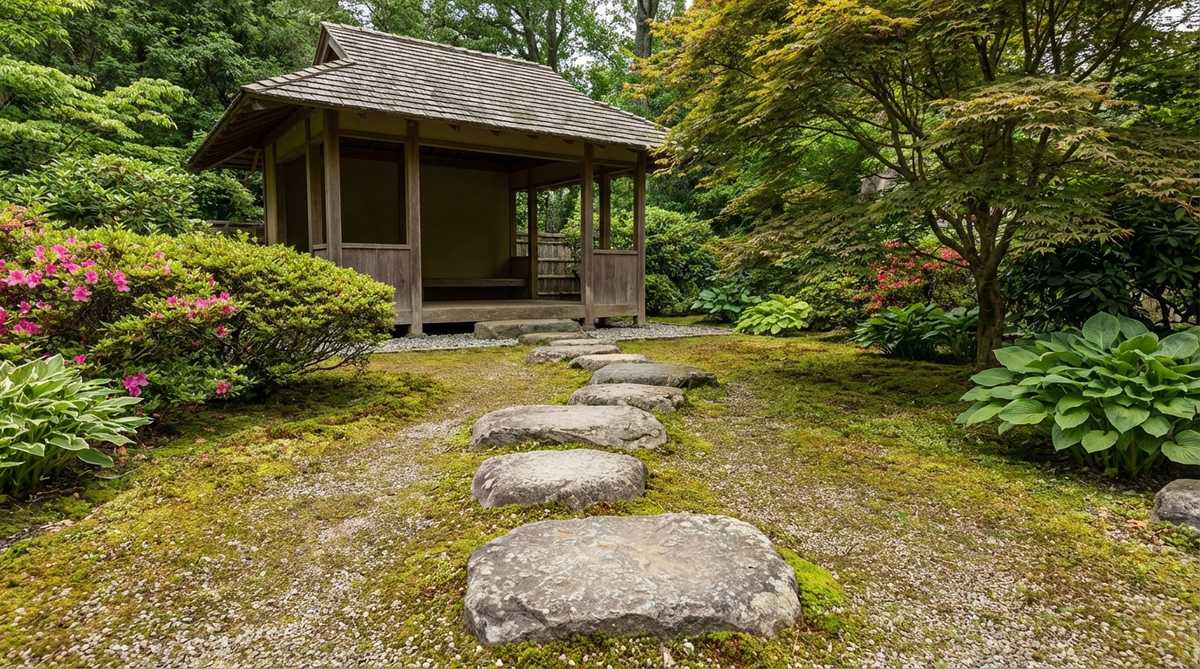
Place seven stepping stones in a relatively straight line for a formal approach to a viewing pavilion or entrance gate. While the overall direction is linear, rotate each individual stone to maintain subtle irregularity.
Vary the size progressively, starting with medium stones and gradually increasing to larger ones as you approach the destination. This creates a sense of arrival and importance.
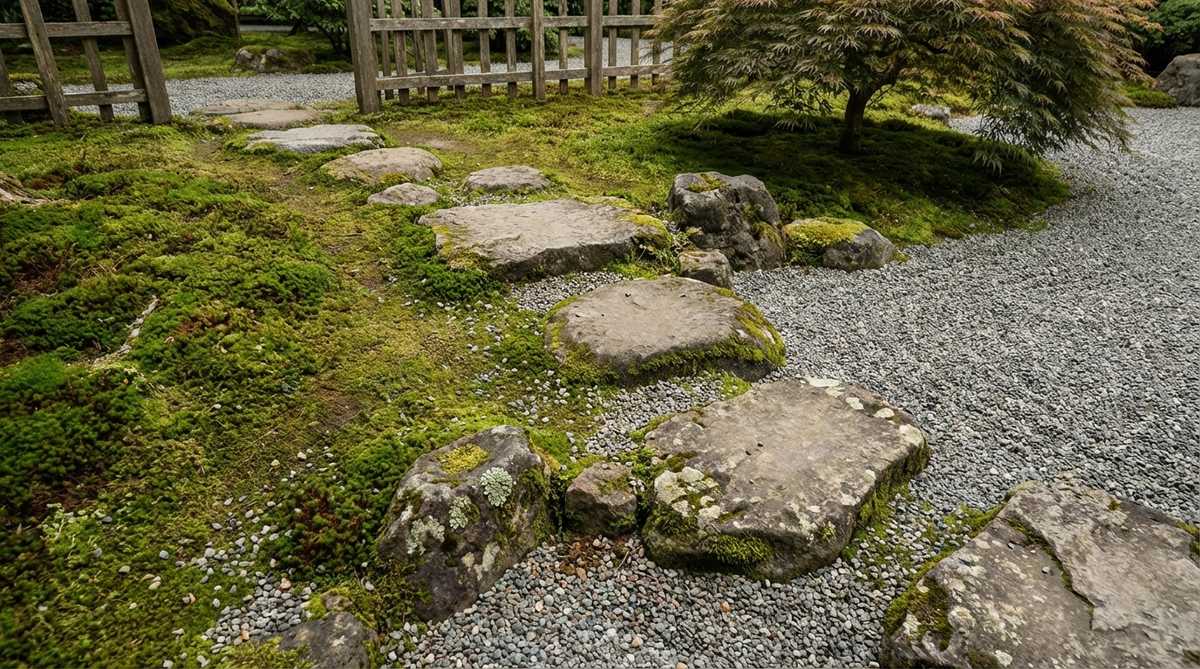
4. Curved Moss Pathway
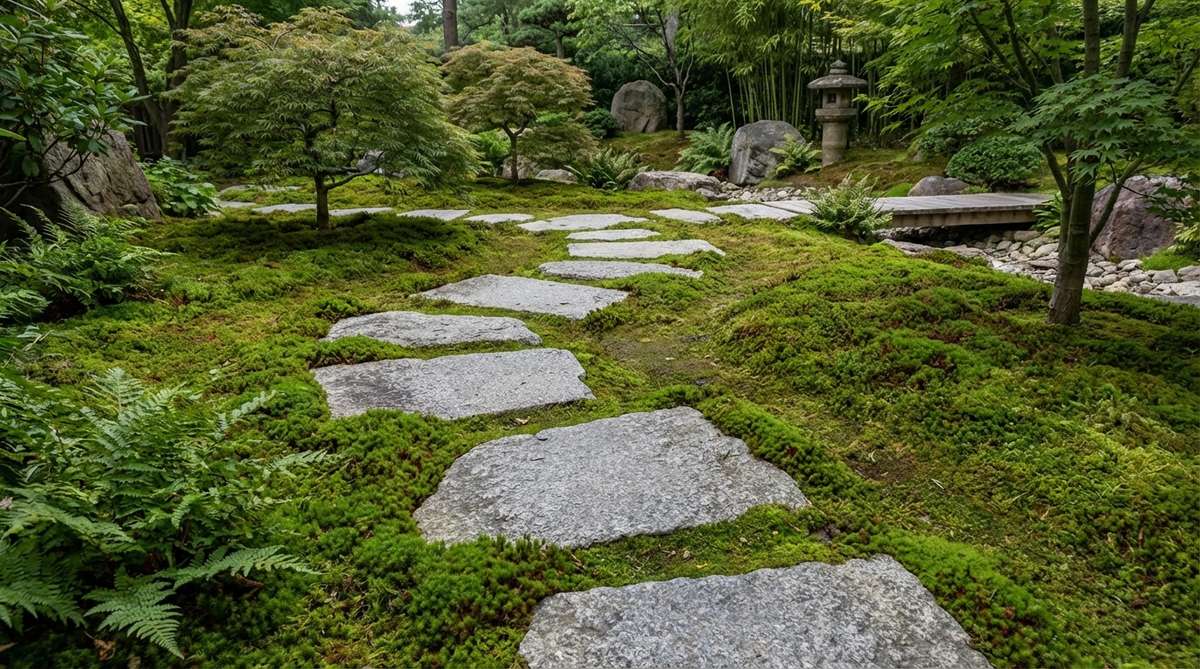
Set large flat stones in a gentle S-curve through a moss garden. Allow the moss to grow right up to and partially over the stone edges, creating a soft transition between path and ground cover.
Choose stones with smooth, weathered surfaces that complement the soft texture of moss. Space them generously to showcase the moss between each step and avoid compacting the delicate ground cover.
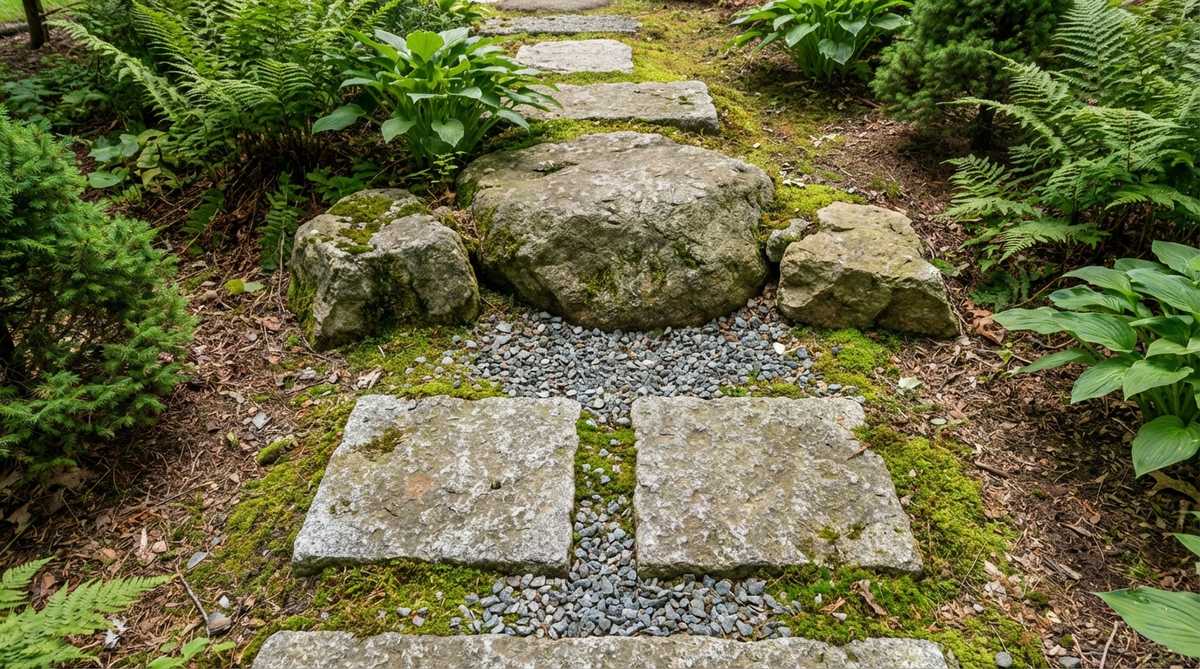
5. Triple Stone Clusters
Group stepping stones in sets of three at decision points where paths diverge. Position one large central stone with two smaller flanking stones angled slightly outward to suggest multiple directions.
This arrangement creates natural pausing points where visitors can consider their route. The triangular composition also serves as a visual anchor in the broader garden design.
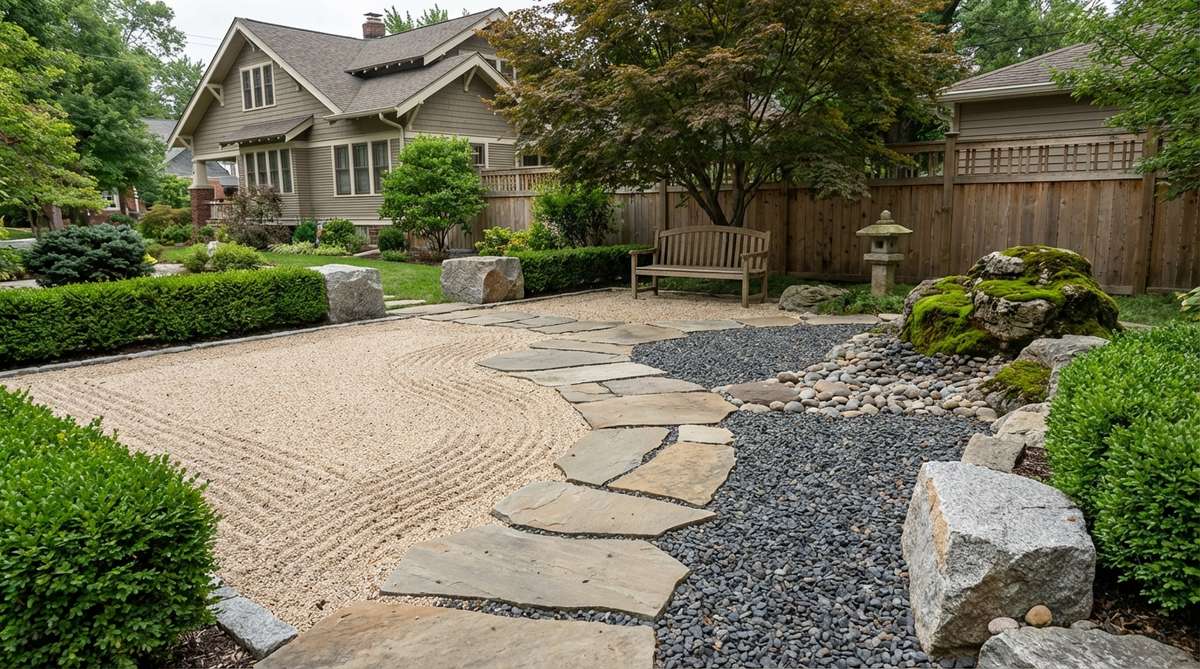
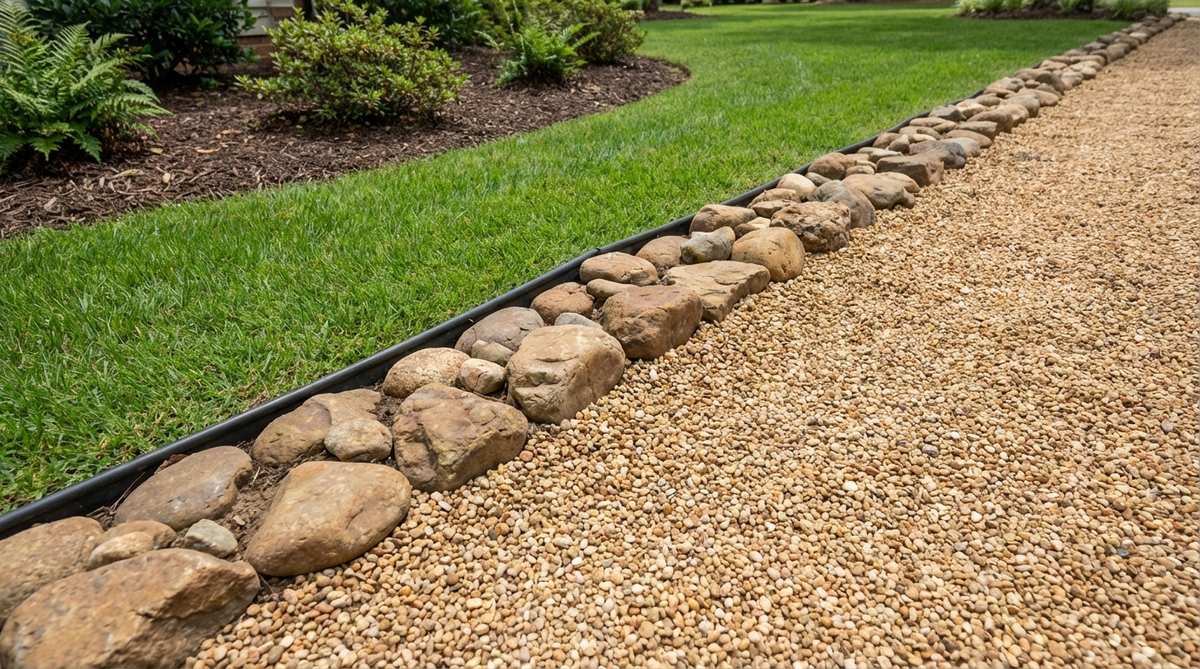
6. Gravel-Embedded Stepping Path
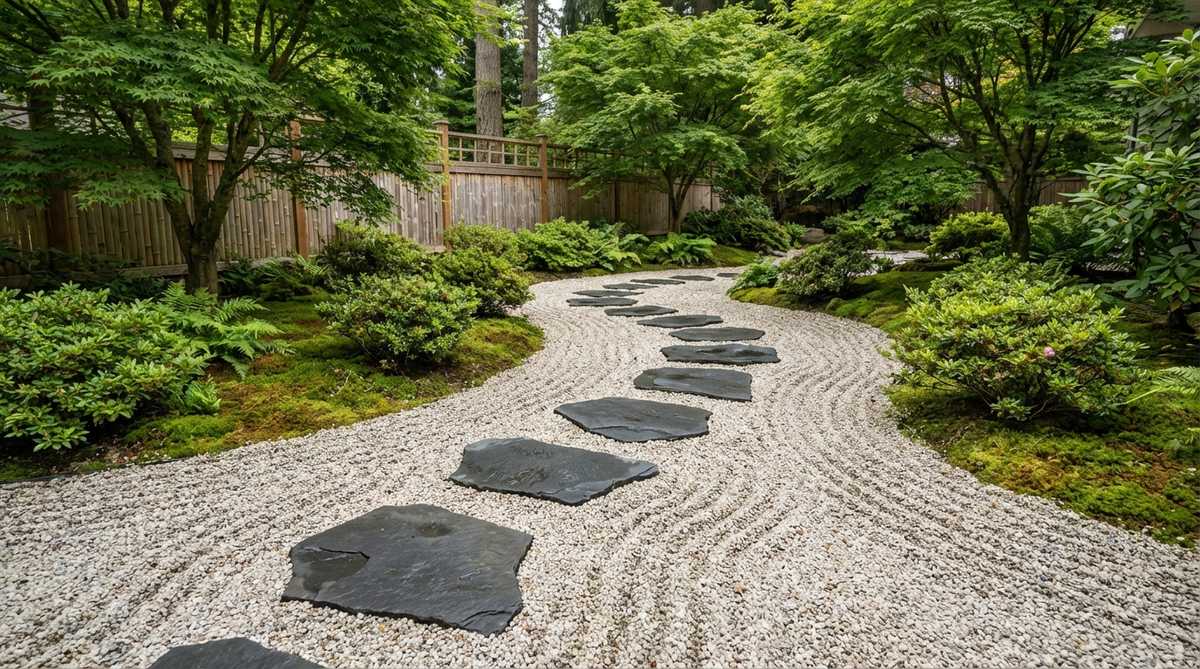
Sink flat slate or granite stepping stones into a bed of fine crushed granite gravel. The stones should sit flush with or slightly above the gravel surface to remain functional after raking.
Choose darker stones that contrast with light-colored gravel for clear visual definition. This combination allows you to rake patterns around the stepping stones, creating dynamic designs that change with maintenance.
7. Millstone Feature Placement
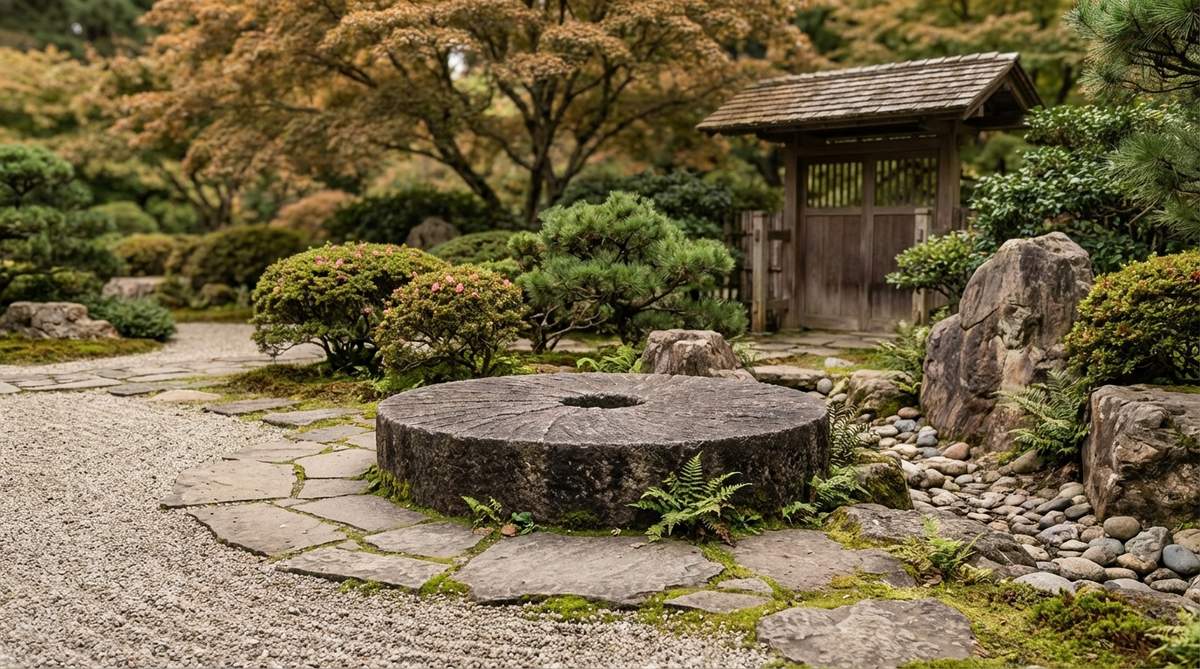
Incorporate a circular millstone at pathway intersections or transition points. The round shape and central hole create strong visual interest that distinguishes these locations as meaningful spaces.
Position the millstone where two different pathway types meet, such as where gravel transitions to stepping stones. The distinct circular form acts as a visual announcement of change.
8. Irregular Flagstone Alternative
While traditional Japanese gardens avoid flagstone, carefully selected thick flagstones with naturally rounded edges can work in contemporary interpretations. Choose pieces at least 3 inches thick to provide proper presence.
Arrange them with significant spacing rather than fitting them tightly together. This prevents the walkway from resembling Western patio designs and maintains Japanese aesthetic principles.
9. Bamboo Grove Pathway
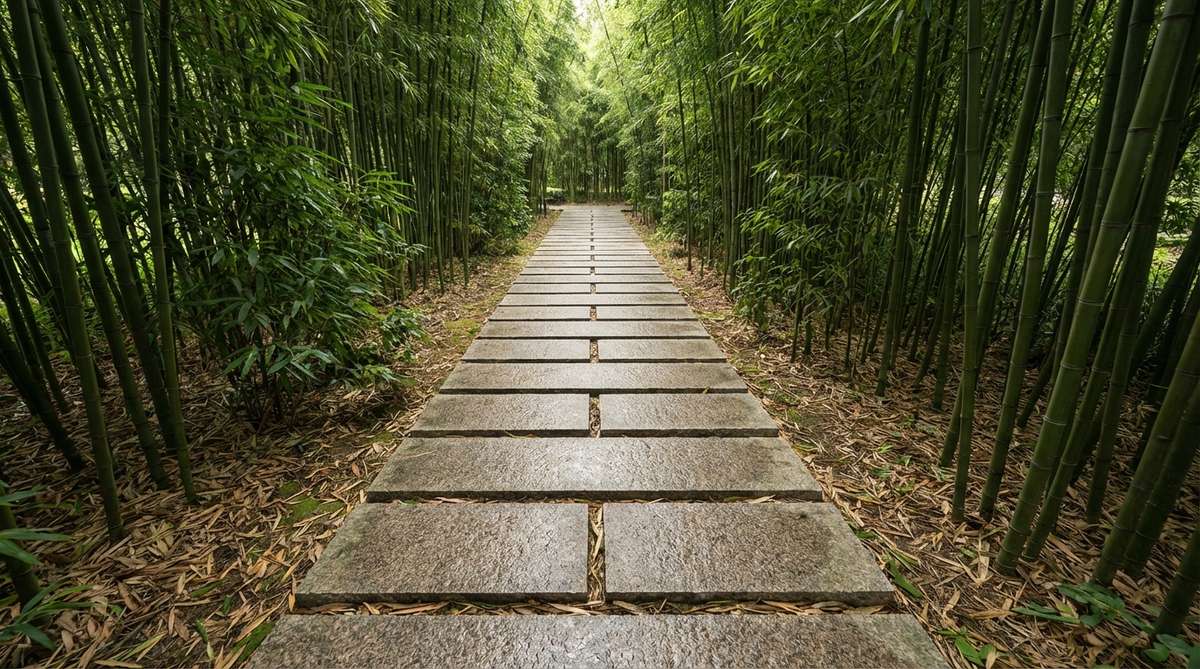
Create a straight path through bamboo using rectangular granite slabs placed end-to-end with minimal gaps. The formal linear arrangement contrasts beautifully with the organic vertical lines of bamboo stalks.
Keep stones uniform in width but varied in length to avoid a manufactured appearance. The path should feel like a calm corridor through the dynamic bamboo growth.
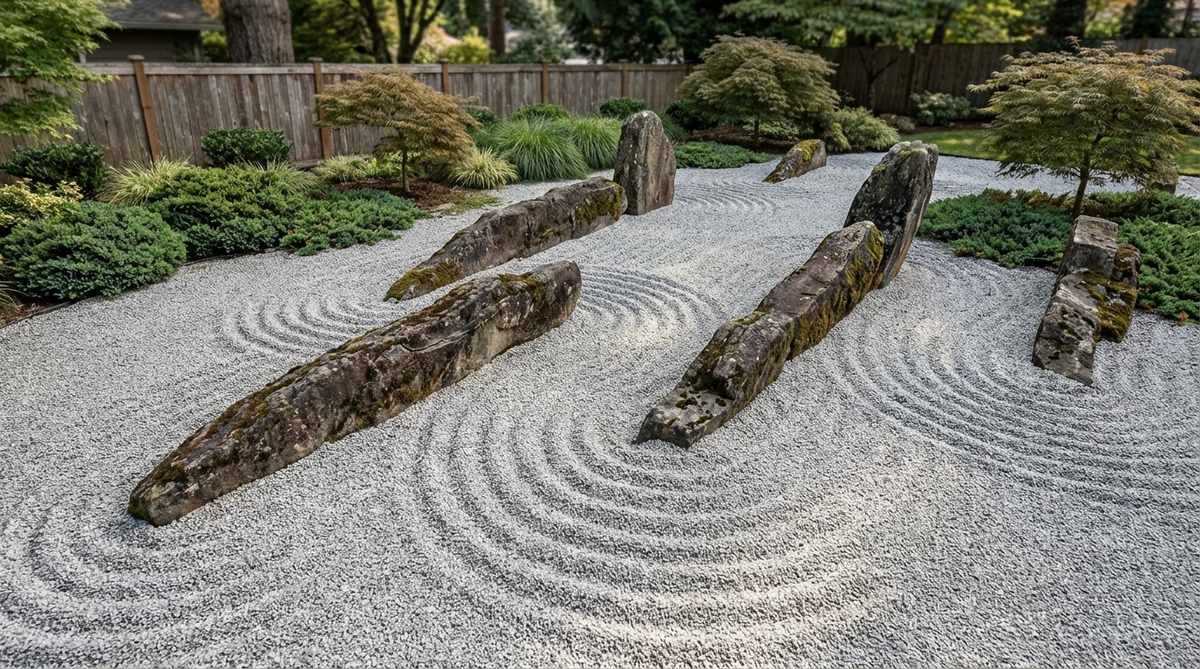
Japanese Garden Gravel Foundations and Raked Patterns
Japanese garden gravel serves as more than ground cover—it represents water, emptiness, or flowing energy depending on how it’s raked. Crushed granite in the 3-8mm range holds patterns best while remaining comfortable for walking.
10. Aranamimon Rough Wave Pattern
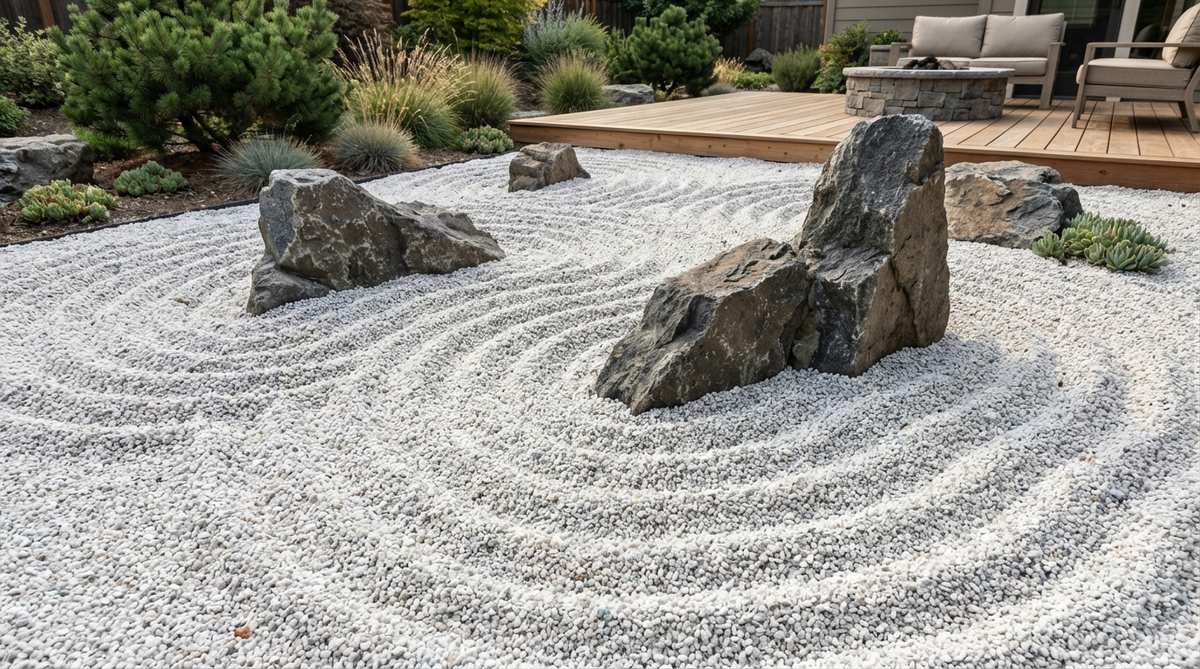
Rake crushed granite into bold, irregular wave patterns that evoke stormy ocean water. The lines should vary in spacing and curve intensity to suggest natural turbulence rather than mechanical repetition.
This dramatic pattern works best in larger gravel areas where the full wave forms can develop. Position rocks within the gravel to serve as islands or obstacles around which the waves flow.
Refresh the pattern weekly to maintain crisp lines and use the raking process as a meditative practice.
11. Sazanamimon Ripple Circles
Create concentric circles around prominent rock groupings to represent ripples emanating from an island. Begin each circle close to the rock base and gradually increase spacing as the ripples move outward.
Use a specialized Japanese garden rake with evenly spaced tines to ensure consistent line width. The ripples should eventually intersect with other patterns or fade into straight lines representing calm water.
12. Straight-Line Raking
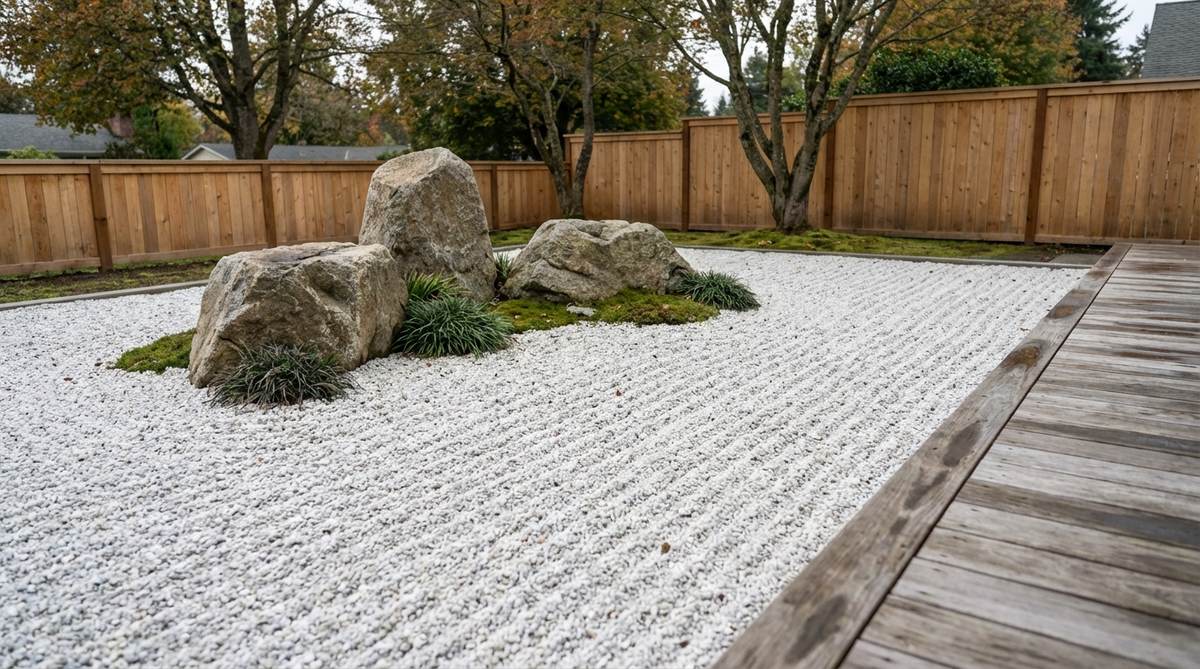
Rake parallel straight lines through white crushed granite to symbolize still water or emptiness. Lines should run perpendicular to the main viewing angle for maximum visual impact.
This minimalist pattern suits zen meditation gardens where the goal is contemplative simplicity. Maintain perfectly straight lines by using a guide or sight line to a distant reference point.
13. Mixed Gravel Textures
Combine different gravel colors and sizes in separate zones to delineate garden areas. Use light crushed granite in formal areas and darker flint or slate gravel in transitional spaces.
Create clean borders between gravel types using buried metal or plastic edging hidden beneath the surface. The color contrast enhances the sense of distinct garden rooms within a unified design.
14. Gravel Pathways with Moss Borders
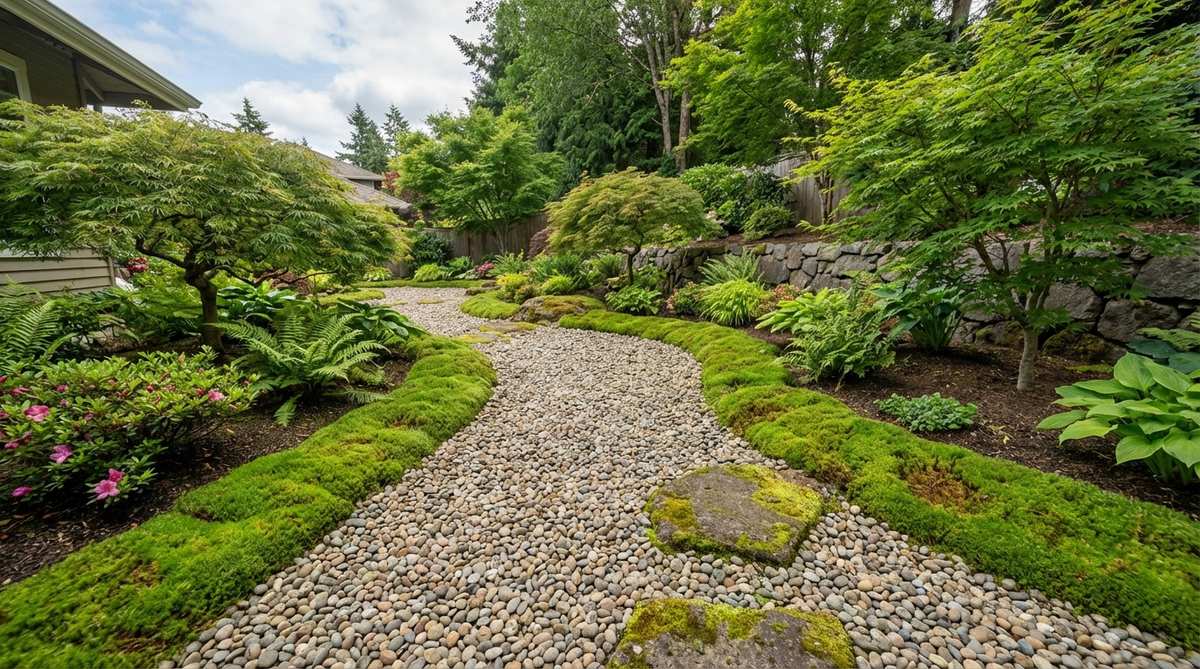
Edge informal gravel pathways with strips of cultivated moss rather than rigid borders. The moss creates a natural, organic transition between the path and surrounding planted areas.
Use pea gravel or quartz pebbles sized 10-14mm for walking paths to ensure comfortable foot traffic. The larger size also prevents gravel from migrating into moss areas.
15. Dry Waterfall Gravel Collection
Arrange smooth river stones at the base of vertical rock groupings to suggest water pooling beneath a waterfall. Surround these worn stones with raked gravel flowing away in multiple directions.
The smoother, rounded stones contrast with angular gravel to indicate where imaginary water has gathered and worn the stone over time. Rake subtle flowing patterns that originate from this collection point.
16. Courtyard Gravel Field
Fill enclosed courtyard spaces entirely with fine white gravel to create a sea of calm. Position minimal rock groupings as focal points that draw the eye without cluttering the serene expanse.
This approach maximizes the sense of space in small urban gardens. The reflective quality of light-colored gravel brightens shaded courtyards and creates the illusion of greater depth.
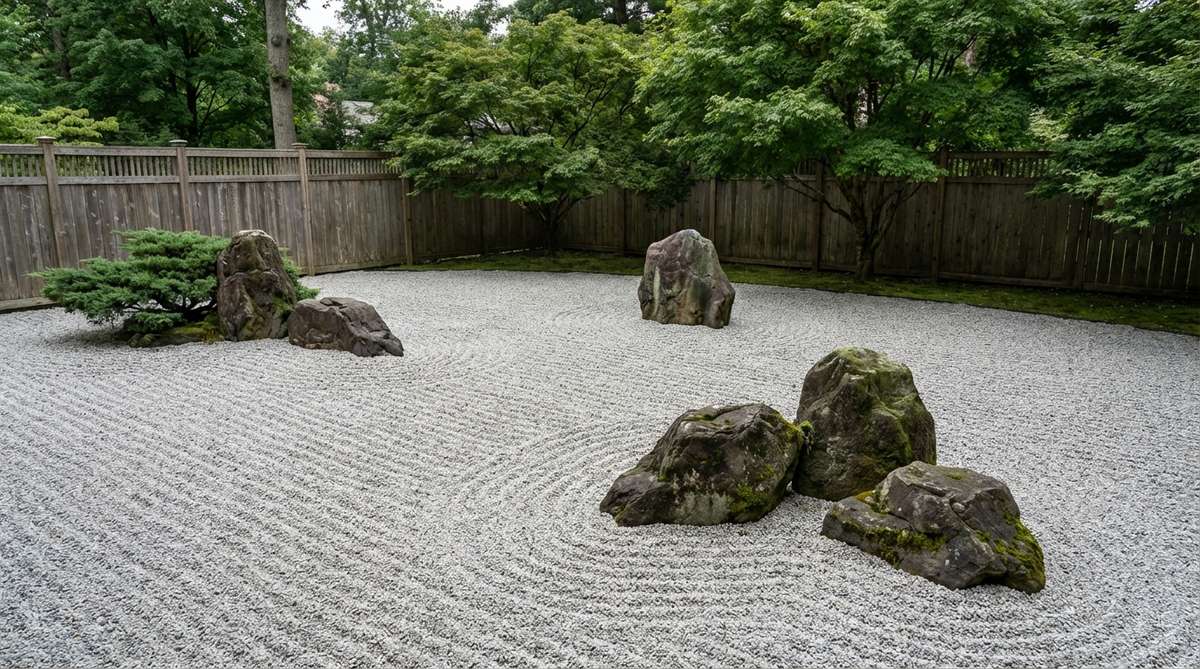
Strategic Japanese Garden Rocks Arrangements
Rock groupings form the structural foundation of Japanese gardens. Designers arrange stones in odd numbers with careful attention to size, orientation, and implied relationships between individual rocks.
17. Sanzon Stone Triad
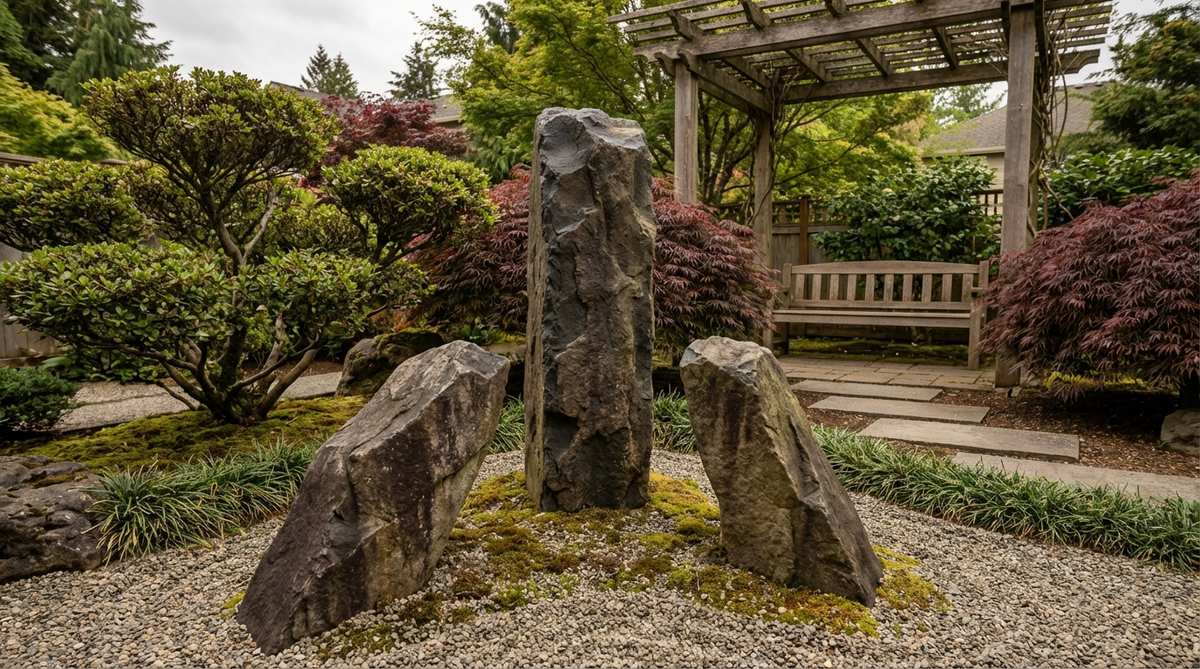
Position three rocks in the traditional Buddhist trinity arrangementone tall vertical stone (representing Buddha) flanked by two shorter stones (representing attendant bodhisattvas). The central stone should be positioned slightly back from the supporting stones.
Use basalt or dark granite for the central stone to create visual weight and importance. The two flanking stones should lean subtly inward, directing attention toward the central element.
This arrangement works powerfully as a garden’s primary focal point when viewed from a main seating area or building entrance.
18. Turtle Island Arrangement
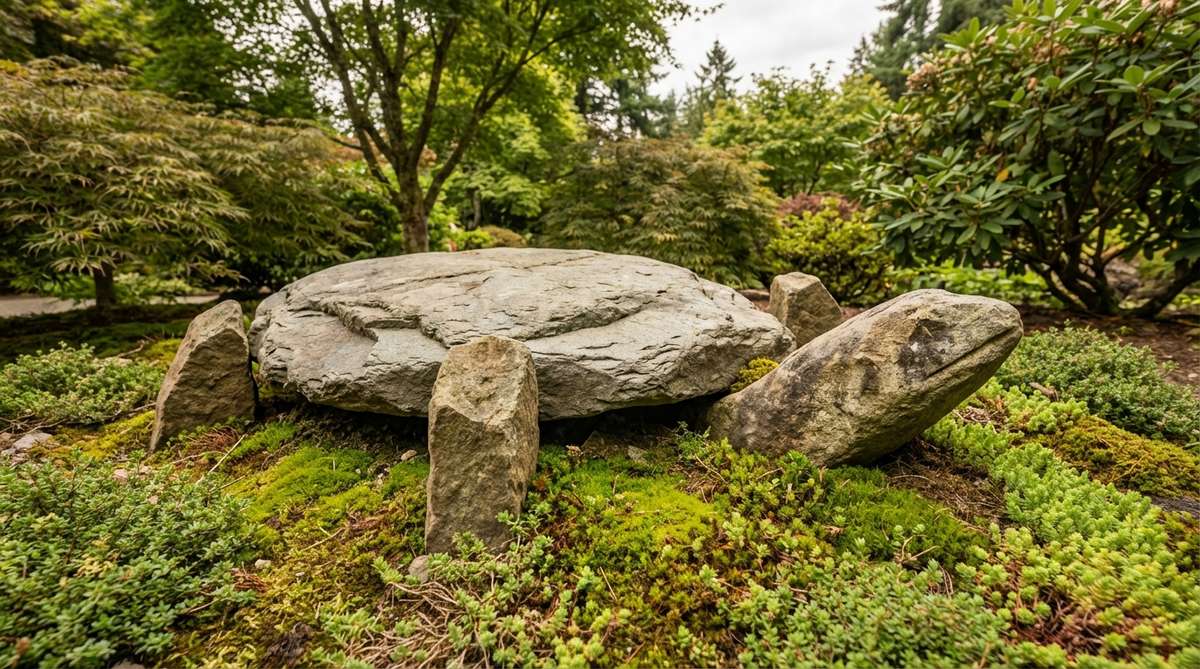
Create a turtle symbol by placing one flat, horizontal stone (the shell) with four smaller upright stones positioned as legs and a pointed stone projecting forward as the head. This represents longevity in Japanese symbolism.
Partially bury all stones to suggest the turtle is moving through or emerging from the ground. Surround the arrangement with moss or low ground cover to enhance the organic appearance.
19. Mountain Peak Grouping
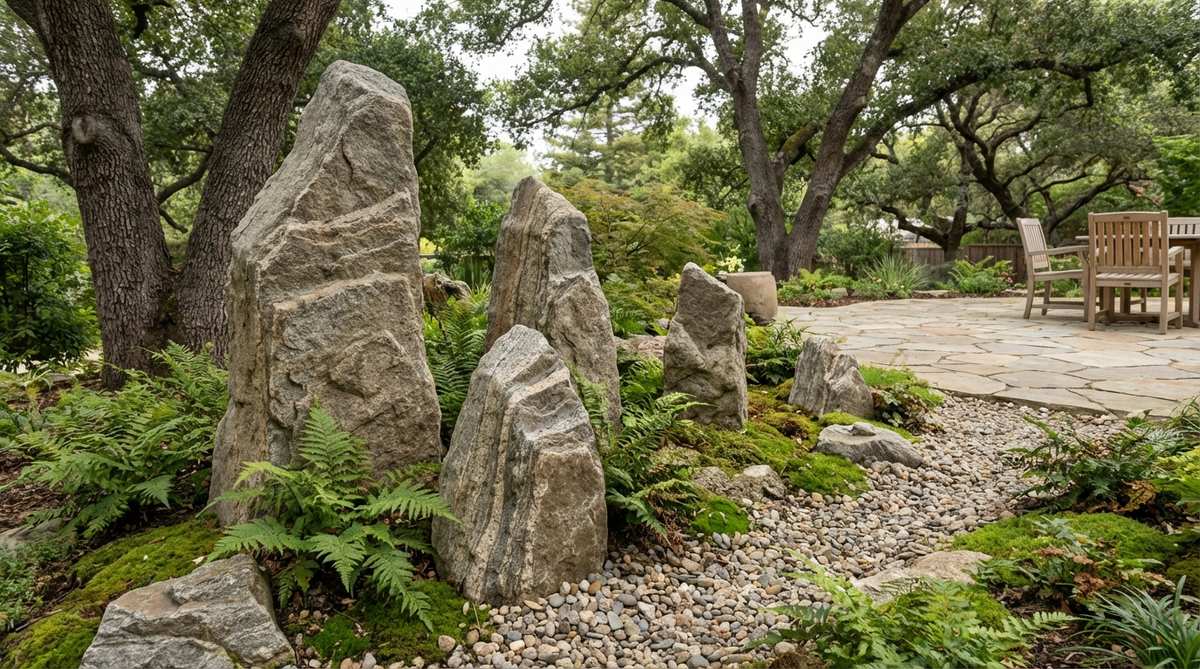
Arrange five vertical rocks of decreasing height to suggest distant mountain ranges. Position the tallest stone off-center with progressively shorter stones extending in both directions to create asymmetrical balance.
Choose weathered granite or limestone that shows natural stratification lines running horizontally. These geological features reinforce the mountain metaphor and add authentic detail.
20. Reclining Shoreline Stones
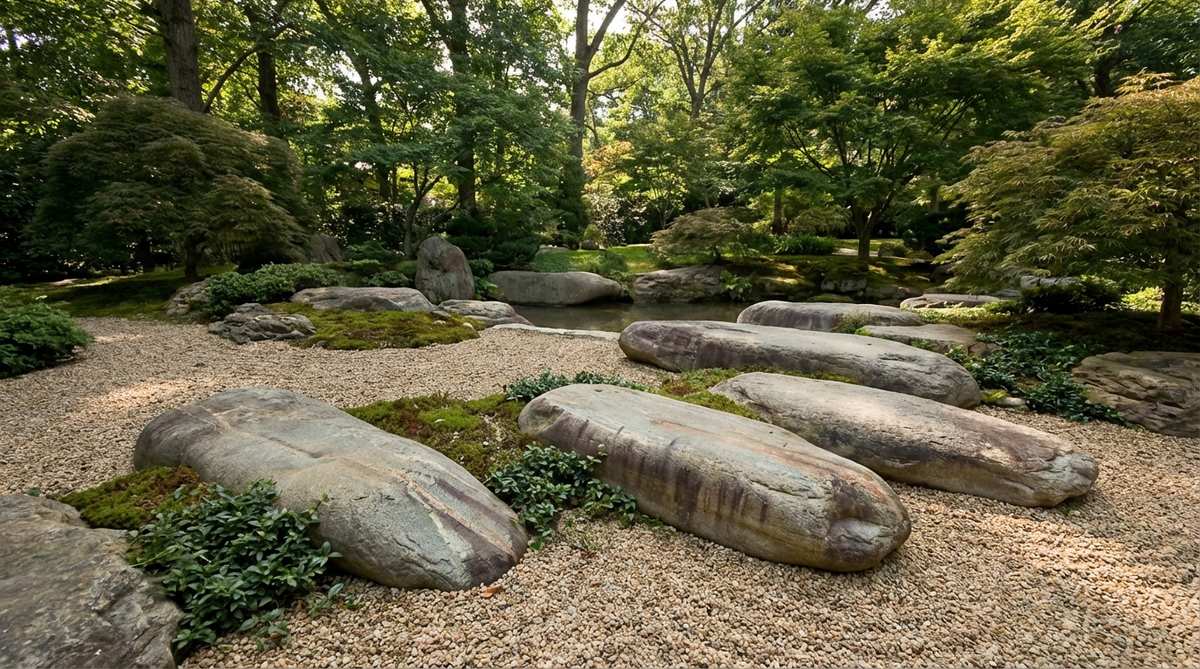
Place long, horizontal stones partially embedded in gravel to represent a shoreline meeting water. The stones should lie at gentle angles with their longest dimension parallel to the gravel edge.
Select water-worn river stones that show smooth surfaces and rounded edges from natural erosion. These stones tell the visual story of centuries of water contact.
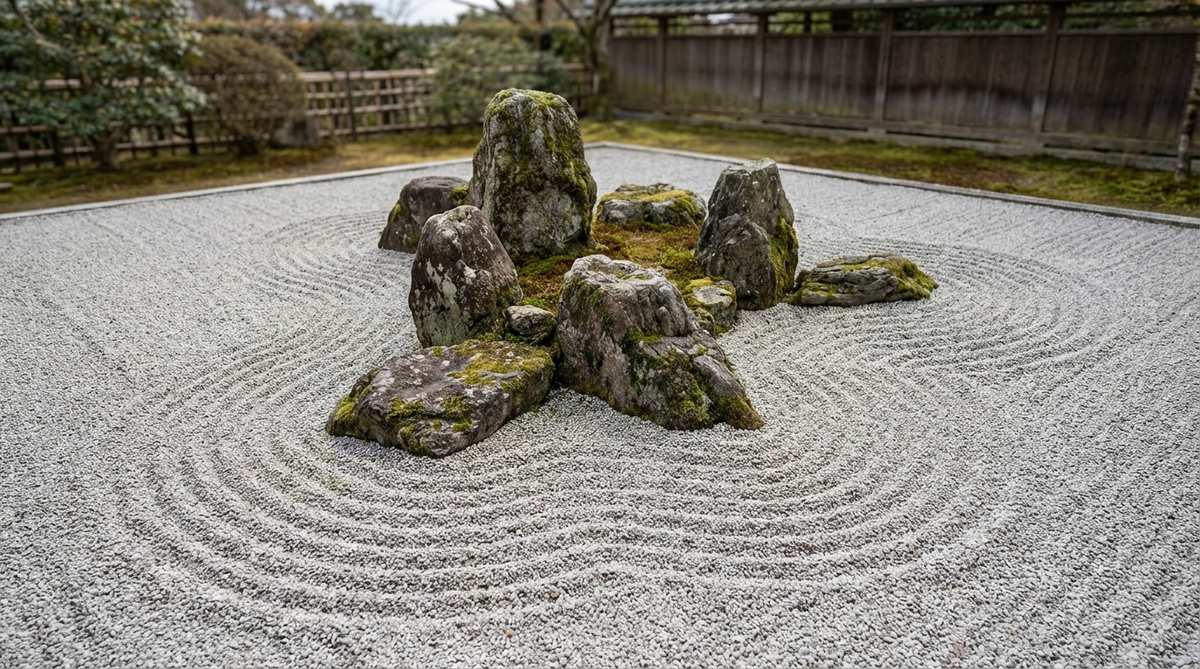
21. Five-Stone Garden Arrangement
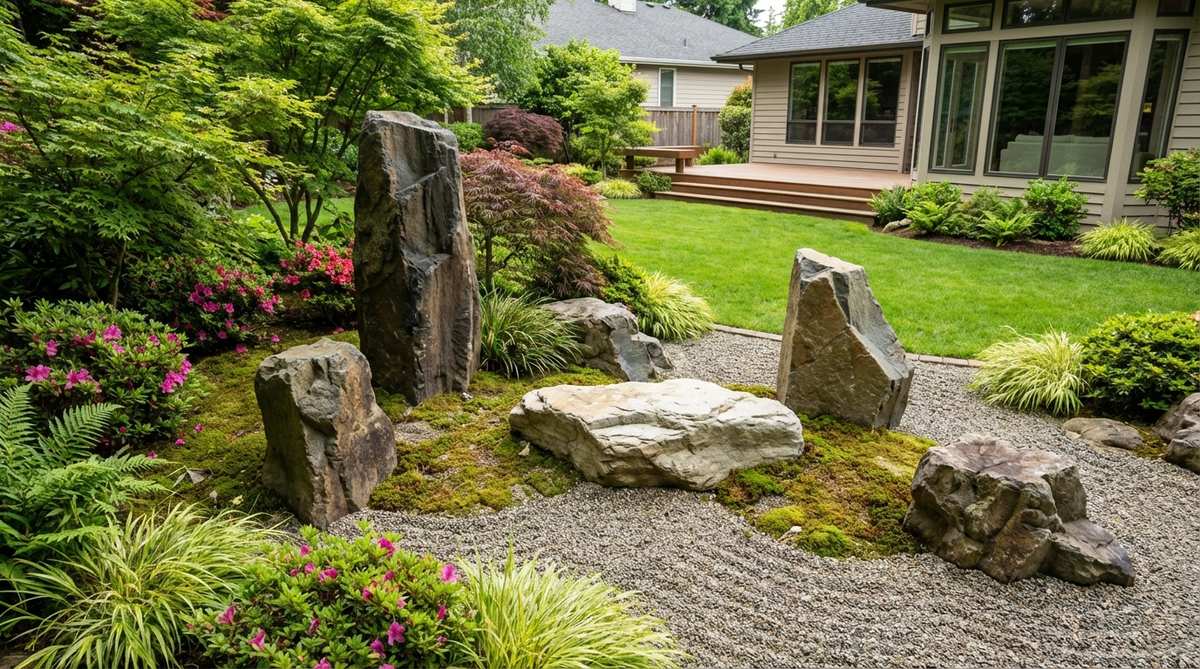
Distribute five major rocks throughout the garden in positions that create visual triangulation from any viewing angle. No three stones should form a straight line or symmetrical pattern.
Vary the rock types, sizes, and orientations dramatically. One might be vertical and dark, another horizontal and light, a third medium-height and angular, ensuring each contributes distinct character.
22. Guardian Stones at Entrance
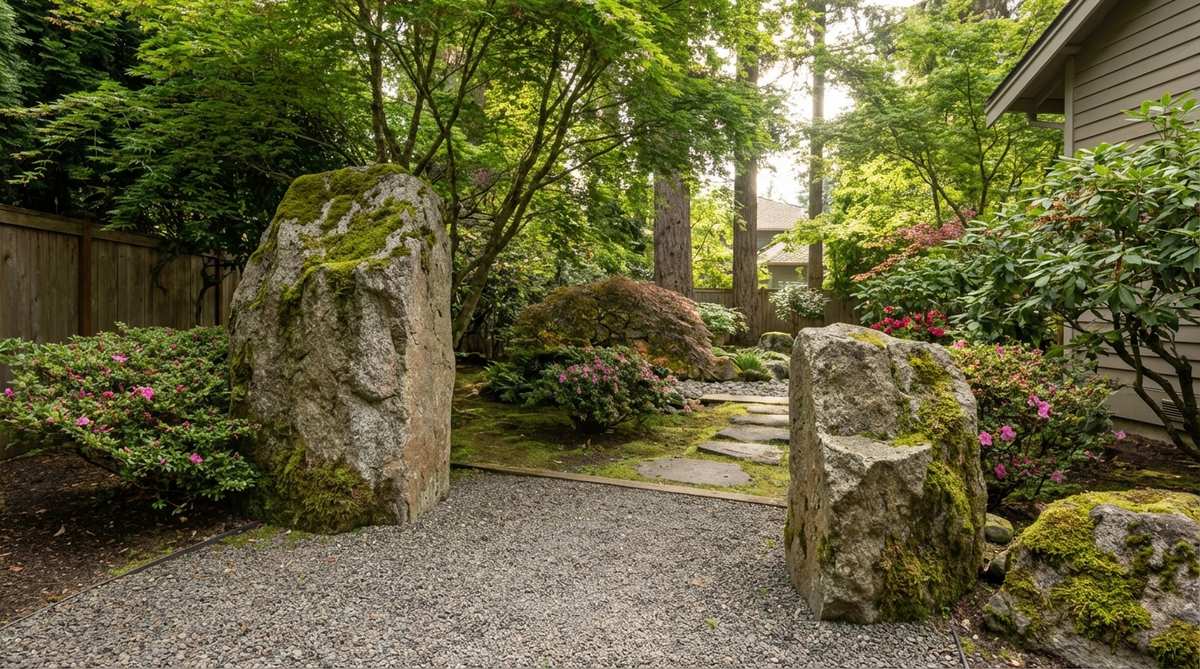
Position two substantial upright stones flanking a garden entrance or gate. These should be unequal in height and placed at slightly different distances from the path centerline.
Choose stones with strong vertical presence that stand at least waist-height. Their role is to create a sense of threshold and announce the transition into contemplative garden space.
23. Crane Island Configuration
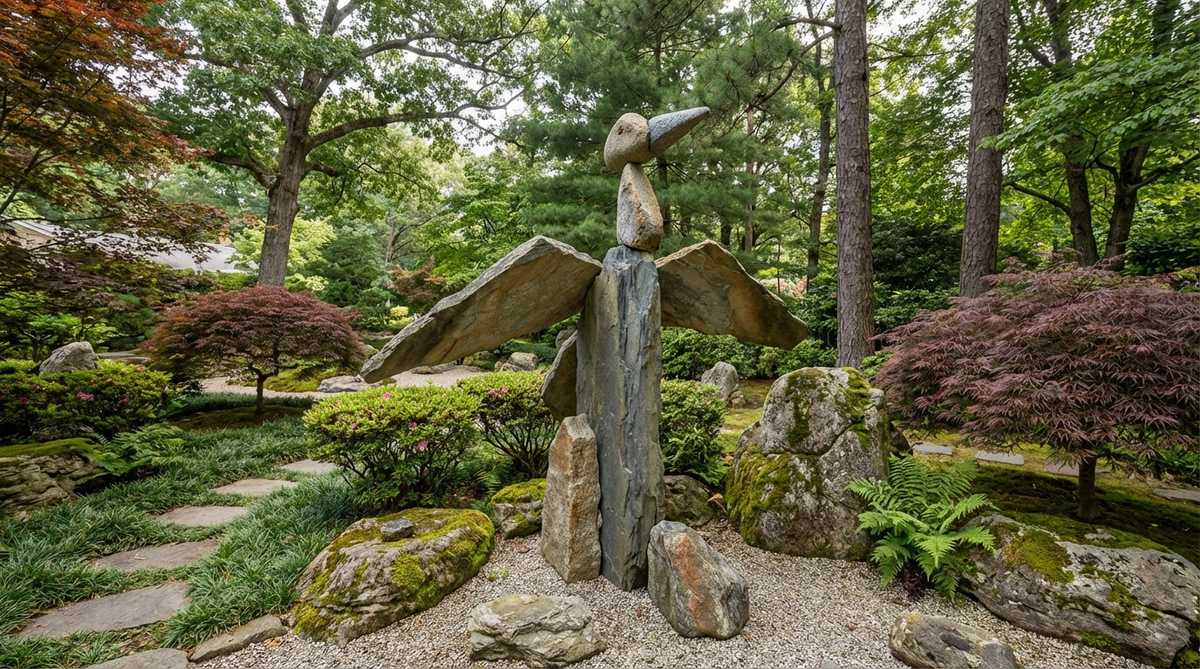
Arrange stones to suggest a crane in flight, symbolizing health and good fortune. Use one tall vertical stone for the body, angled stones projecting outward as wings, and a pointed stone as the head.
This more stylized arrangement requires careful balance between literal representation and abstract suggestion. The overall form should be recognizable without becoming cartoonish.
24. Stacked Stone Grouping
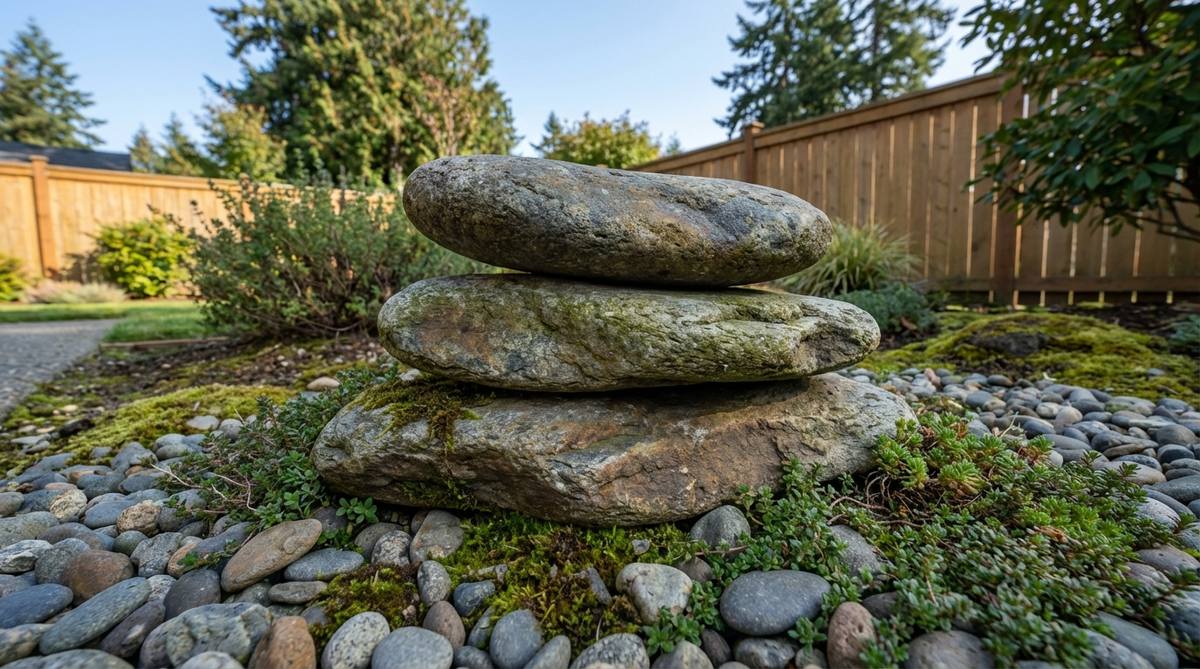
Carefully stack two or three flat stones to create a layered composition that defies the typical rule against obvious human intervention. The stack should appear stable yet precarious, suggesting careful attention.
Use stones with complementary textures and colors that create visual interest through their differences. Secure the arrangement with hidden mortar or metal pins to ensure long-term stability.
25. Scattered Field Stones
Distribute medium-sized weathered fieldstones randomly across a moss or low ground cover area. The placement should appear completely natural, as though the stones have always existed in these locations.
Vary the burial depth significantly—some stones nearly flush with the ground, others more exposed. This variation mimics natural settling and erosion patterns observed in meadows and forests.
Water-Inspired Stone Placements
Many Japanese garden stone arrangements evoke water features without using actual water. These dry landscapes (karesansui) use stone and gravel to represent rivers, waterfalls, and oceans.
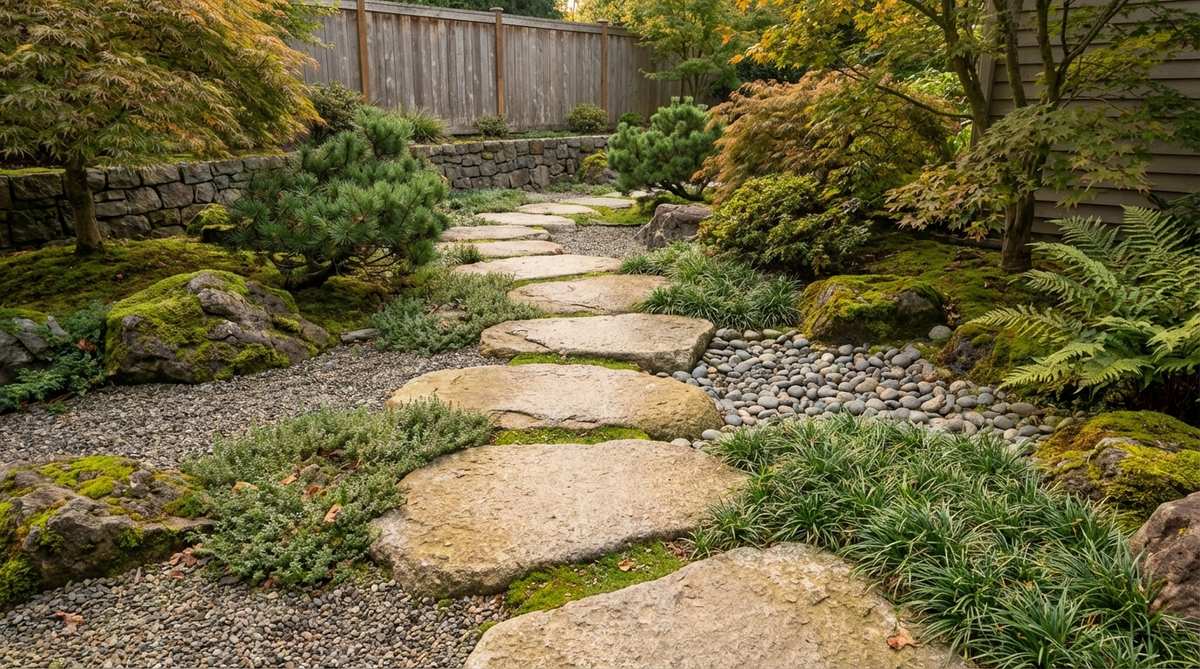
26. Dry Stream Bed
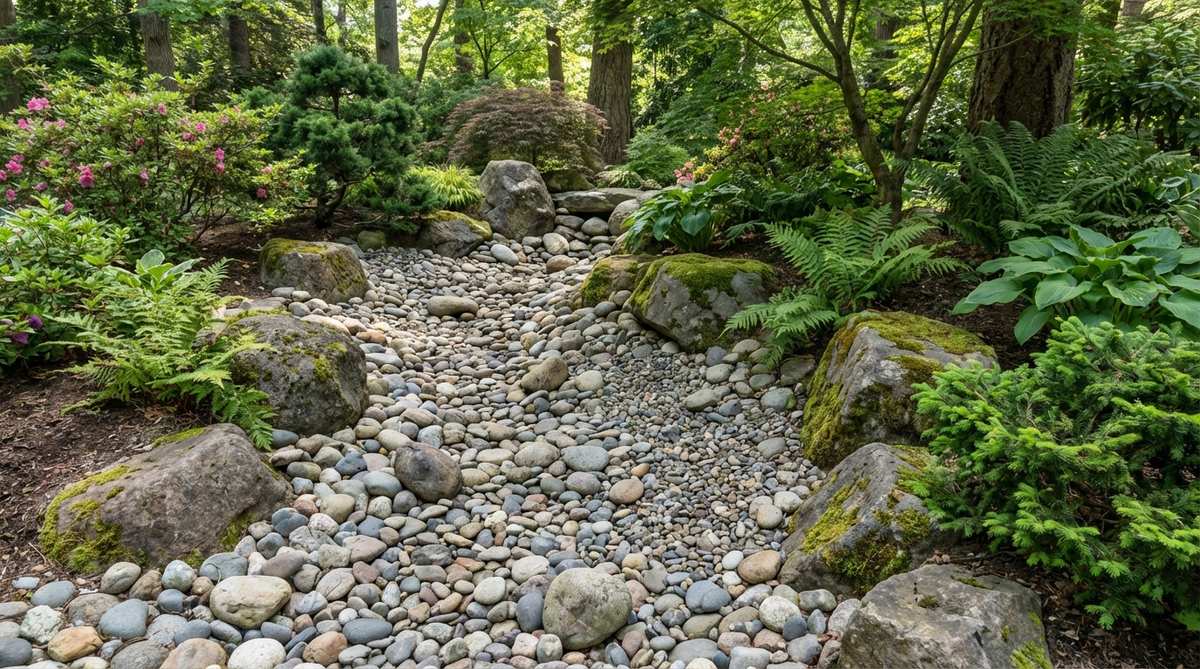
Create a curving depression filled with smooth river rocks of varying sizes to suggest a stream course. Arrange larger stones along the outer curves where rushing water would naturally push them.
Grade the stones from larger boulders at the “source” to progressively smaller pebbles as the dry stream flows downhill. This mimics natural sorting that occurs in actual waterways.
Edge the stream with moss-covered rocks to define the banks and add aged character to the feature.
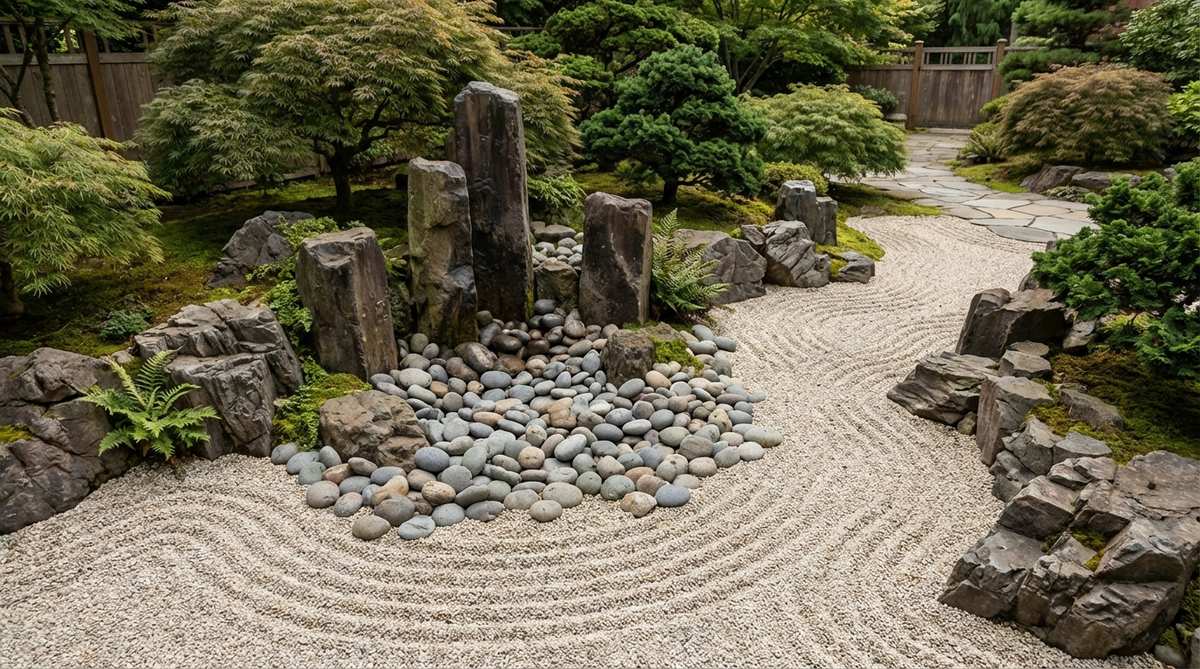
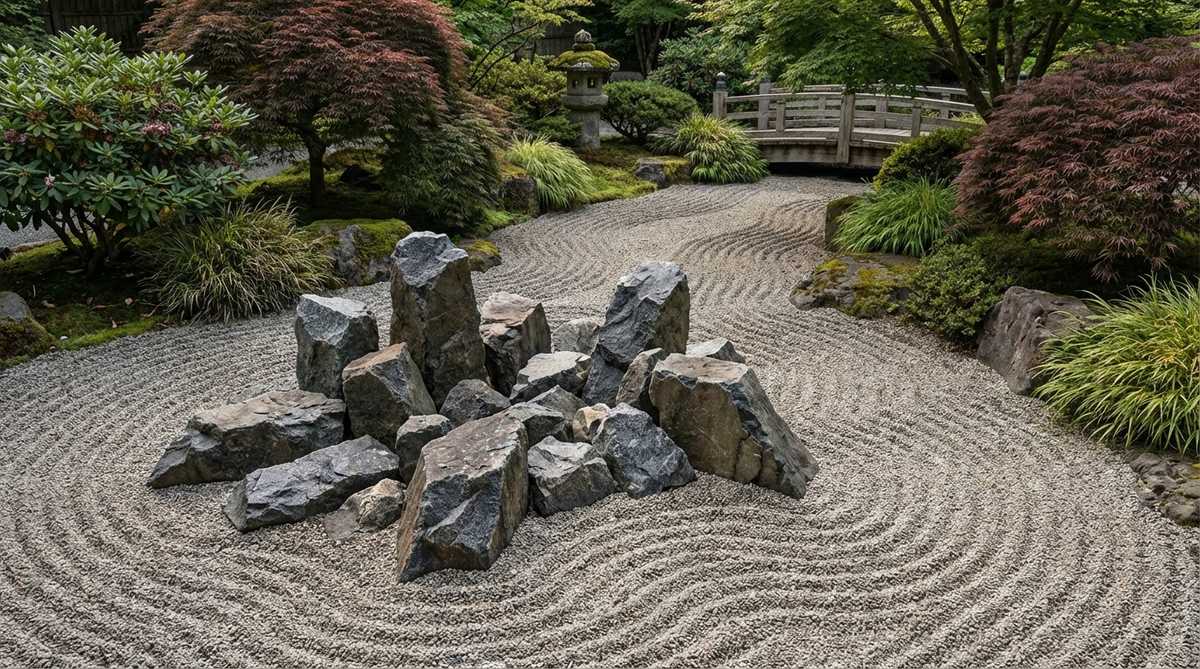
27. Vertical Waterfall Stones

Stand tall, flat stones on edge to create a dry waterfall (karetaki). The vertical stones should be positioned in a stepped arrangement suggesting the cascade of water over cliff faces.
Place the tallest stone at the top of a slope with progressively shorter stones below, each angled slightly forward. The orientation and stratification lines should all run horizontally to reinforce the cliff illusion.
28. Ocean Wave Rock Pattern
Position a series of long, low rocks emerging from raked gravel at angles that suggest waves approaching shore. The rocks should be oriented diagonally to the viewing angle, creating dynamic movement.
Rake the gravel in wave patterns that flow around and over the partially buried rocks. The interaction between solid stone and flowing pattern creates rich visual texture.
29. Pool Collection Basin
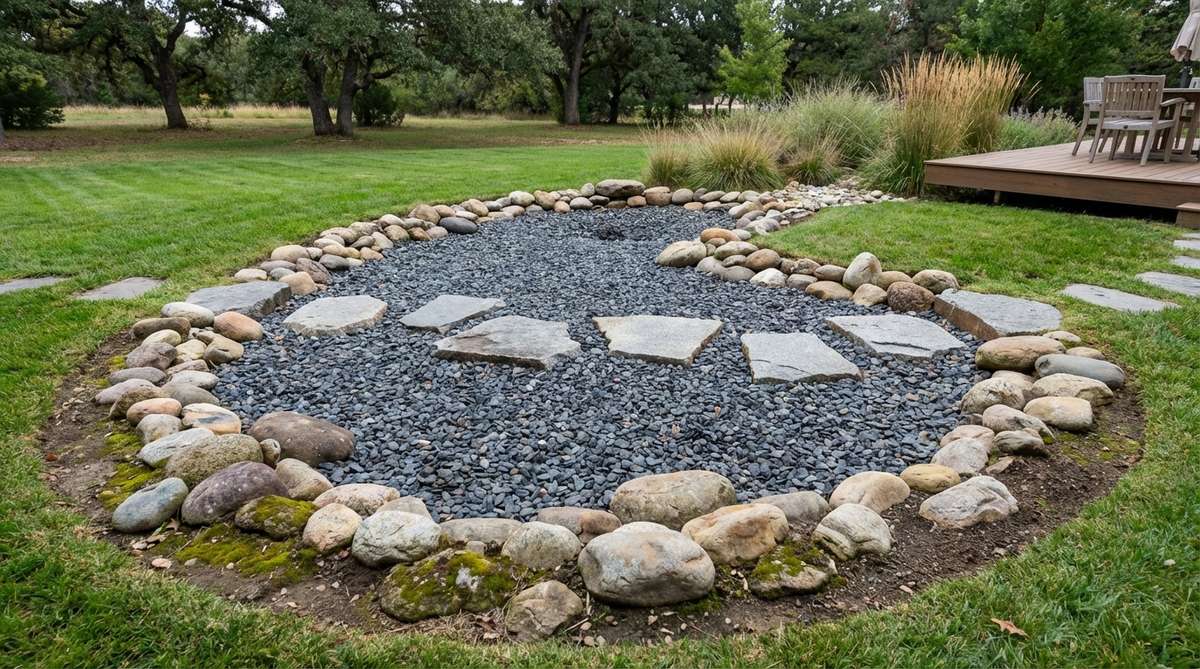
Arrange flat stones in a depression to suggest a pool where water collects. Fill the space between stones with dark gravel or small black pebbles to enhance the water illusion.
Position worn river stones around the perimeter at varying heights to indicate the pool’s edge. The smooth stones provide visual evidence of water presence over time.
30. Island Archipelago
Create multiple small rock groupings emerging from a sea of raked gravel. Position islands in asymmetrical patterns with varying distances between them to suggest natural formation.
Each island should consist of 1-3 stones grouped with intentional relationships. Some islands might be distant and isolated, others clustered in small groups, mimicking natural geography.
31. Bridge Crossing Stones

Lay a series of long, flat stones across a dry stream bed to function as a symbolic bridge. The stones should be thick enough to support weight but arranged to require careful foot placement.
Position the bridge stones perpendicular to the stream flow at a narrow point. Allow moss or lichen to grow on the upper surfaces to suggest age and authentic weathering.
32. Rapids Stone Cluster
Group angular rocks tightly in the center of a dry stream to represent rapids or obstacles around which water would rush. Surround these with smaller stones and gravel raked in turbulent patterns.
The central rocks should be jagged and positioned at various angles, suggesting the chaotic energy of rushing water. Contrast this cluster with calmer raked patterns upstream and downstream.
Accent and Focal Point Stones
Special stones serve as accent features that draw attention, mark significant locations, or add cultural authenticity to Japanese garden designs.
33. Lantern Base Stone
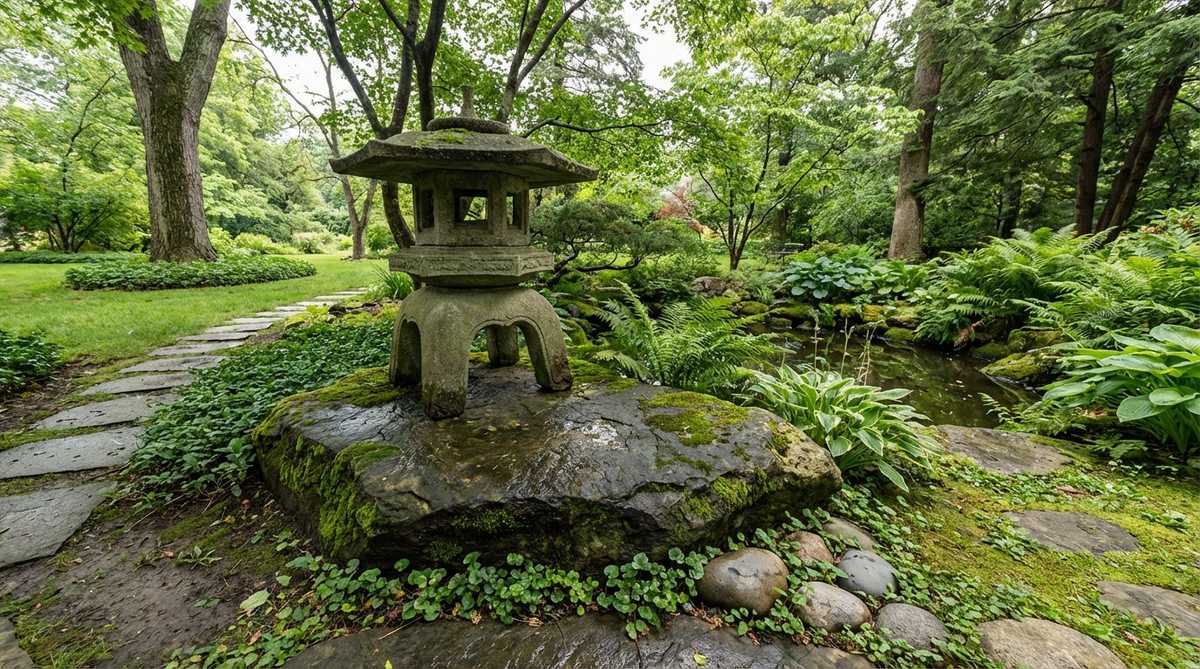
Place a flat, substantial stone beneath a stone lantern to provide both practical foundation and aesthetic grounding. The base stone should extend beyond the lantern’s footprint by several inches on all sides.
Choose a stone with an interesting natural surface that complements the carved lantern. Partially bury the base stone so it appears to emerge from the earth rather than rest on top.
Position the lantern and base stone at path intersections or beside water features where their illumination function makes symbolic sense.
34. Viewing Stone (Suiseki)
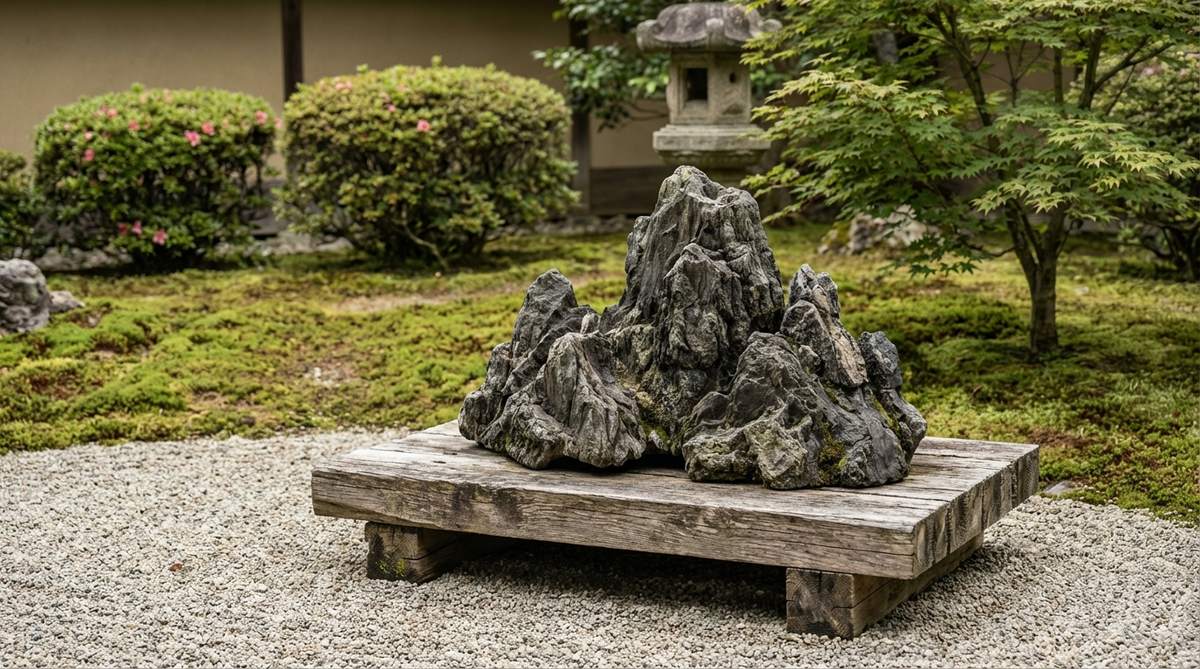
Display a carefully selected viewing stone on a dedicated platform or stand. These naturally formed stones suggest landscapes, mountains, or abstract forms and serve as objects of contemplation.
Choose stones with inherent sculptural quality—interesting shapes, colors, or textures formed entirely by natural processes. The stone should provoke imagination and invite extended viewing.
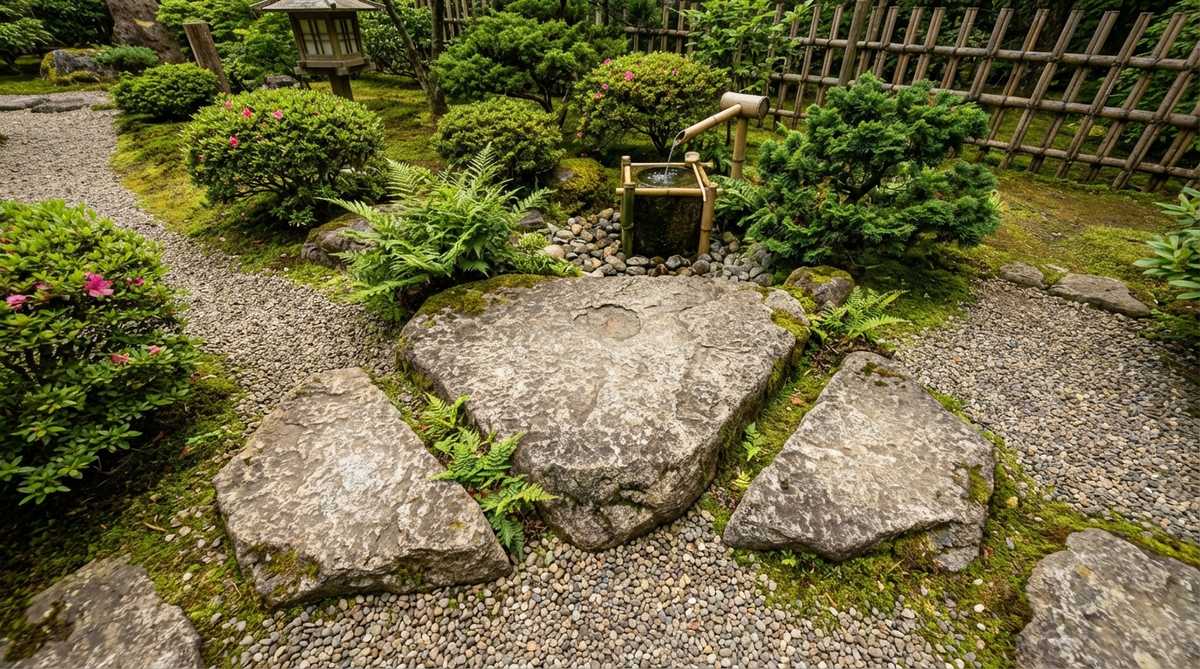
35. Tea Garden Basin Stone
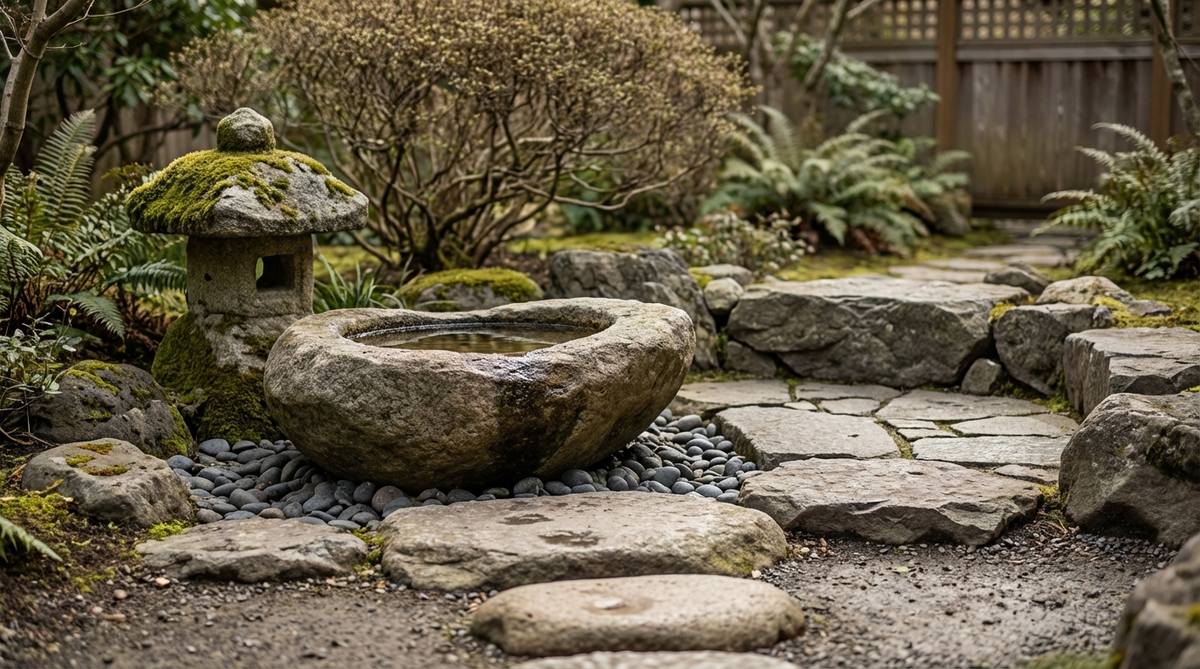
Install a naturally hollowed stone or carved basin (tsukubai) for the ritual hand-washing ceremony in tea gardens. Surround it with smaller stones that serve as step platforms and accent elements.
The main basin stone should sit low to the ground, requiring visitors to bend down—a gesture of humility in tea ceremony tradition. Place smooth stones in front for kneeling and rough stones behind for drainage.
36. Moon-Viewing Platform
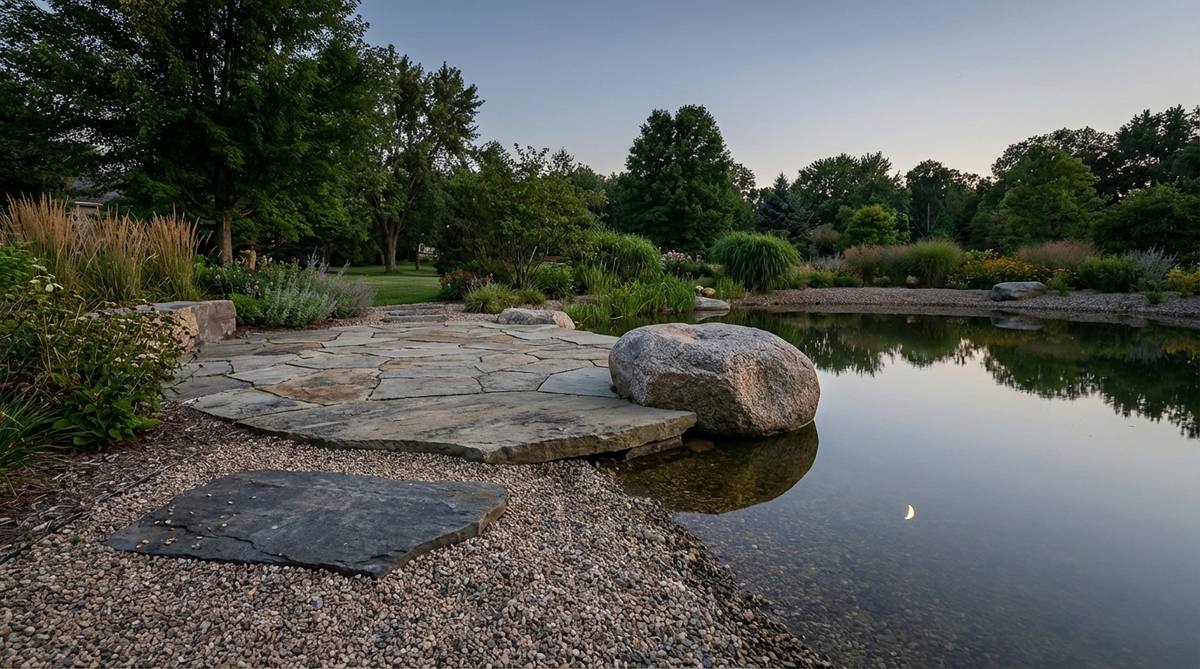
Create a flat stone platform large enough for sitting while observing the moon’s reflection in water or gravel. Use one massive flat stone or fit several large slabs tightly together.
Position the platform at the optimal viewing angle for seasonal moon positions. The stone surface should be smooth enough for comfortable sitting but retain natural texture and character.
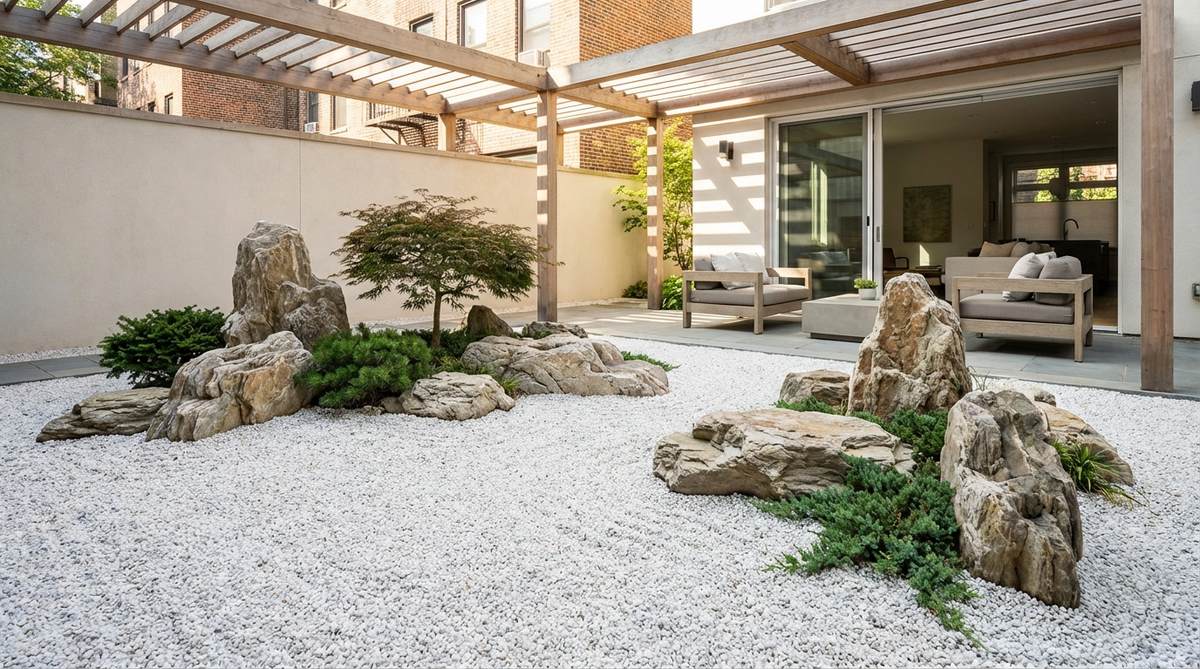
37. Decorative Boulder Specimen
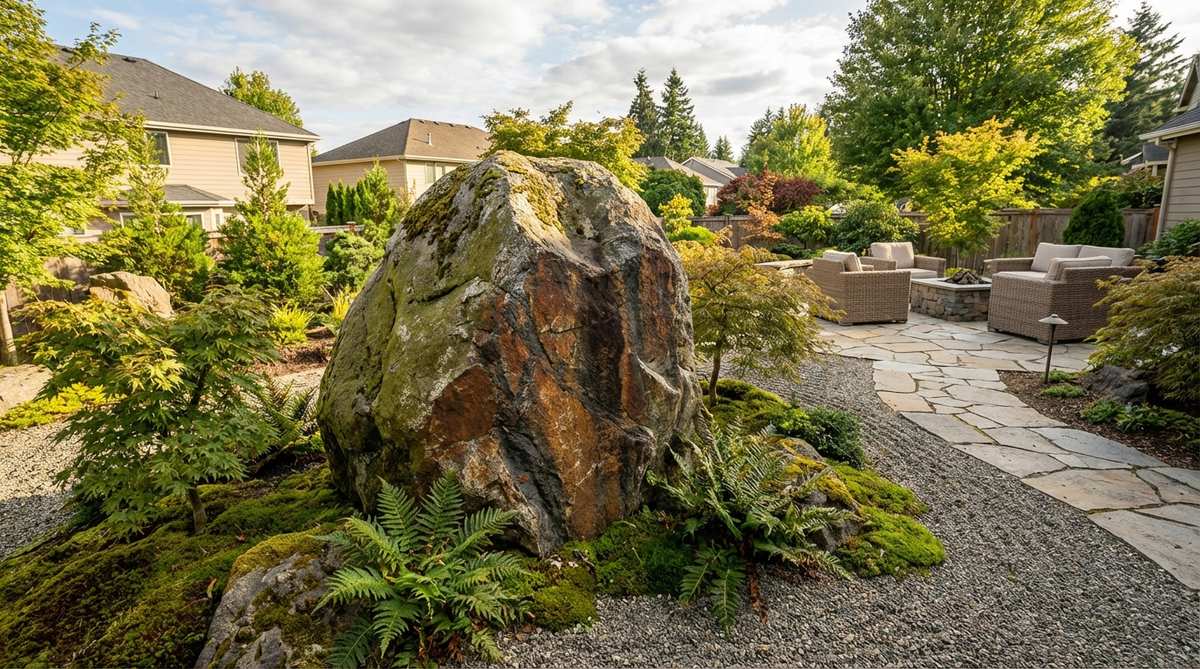
Feature a single exceptional boulder as a primary focal point. The stone should possess remarkable color, shape, or geological features that justify its prominence.
Bury at least one-third of the boulder to give it appropriate weight and presence. Orient the stone’s most interesting face toward the main viewing area and leave generous space around it to prevent crowding.
38. Seasonal Marker Stone
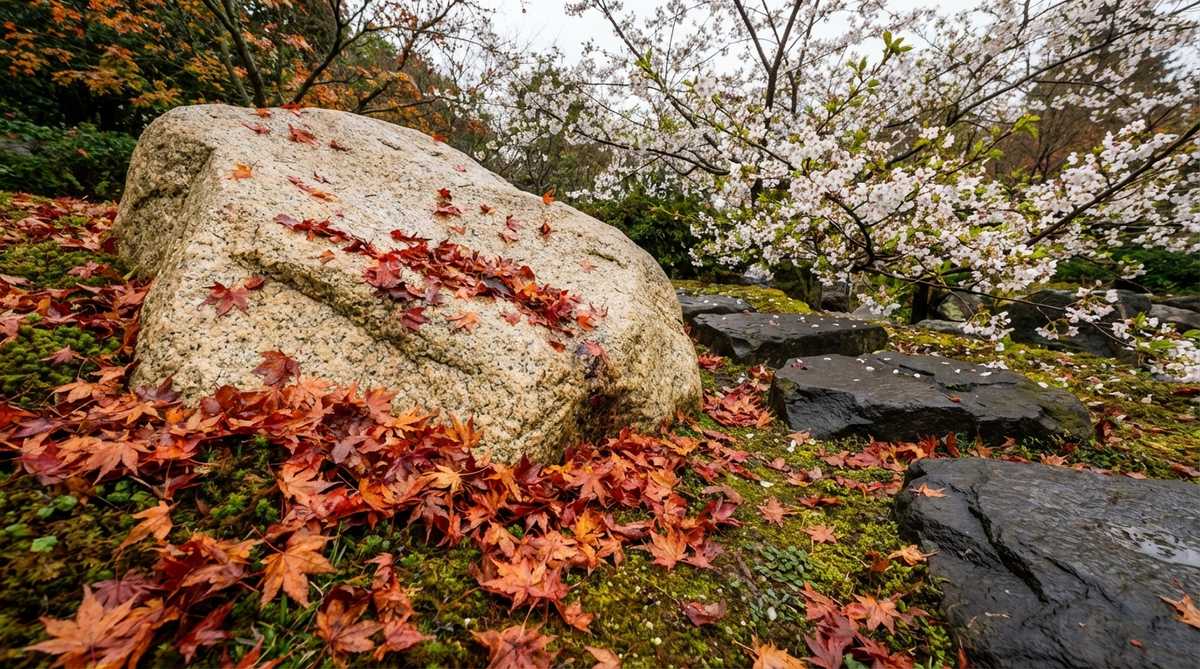
Place specific stones in positions where seasonal plants will frame them differently throughout the year. Position a light-colored stone where autumn maple leaves will collect, or dark basalt beneath flowering cherry branches.
These stones serve as constants against which seasonal change becomes more visible. Their permanent presence helps mark the passage of time and natural cycles.
39. Meditation Seat Stone

Install a flat-topped boulder at comfortable sitting height in a quiet garden corner. The stone should have a naturally level surface that requires minimal modification.
Position the seat to face a particularly contemplative view—perhaps a rock arrangement, water feature, or carefully framed plant composition. Surround the area with low plantings to create enclosure without blocking sightlines.
Border Stones and Transitional Elements
Border stones define garden areas, contain materials, and create transitions between different design zones. These functional elements contribute to overall aesthetic coherence when properly selected and placed.
40. Formal Cut Stone Edging
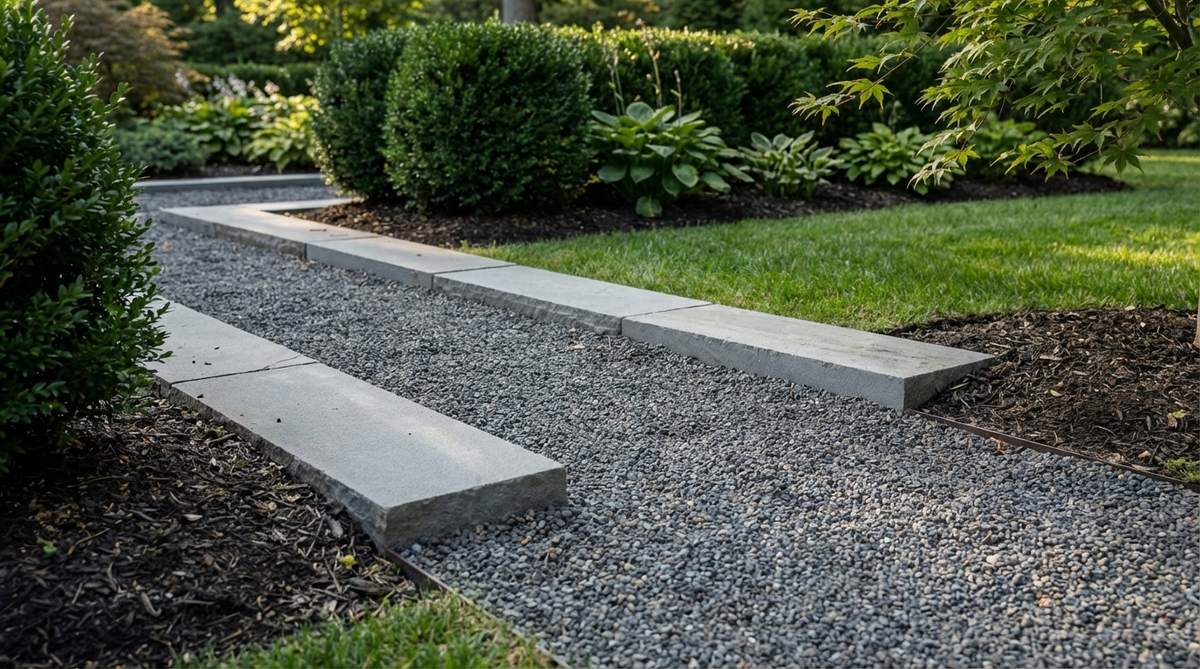
Line pathways with precisely cut rectangular stones stood on edge to create formal borders. These cut stones provide clean definition in areas requiring strong structural organization.
Bury the edging stones halfway into the ground so their top edge sits slightly above the path surface. This prevents gravel migration while maintaining visual order.
This technique works particularly well for nobedan pavements and formal approach paths where precision reinforces ceremonial function.
41. Natural Stone Curbing
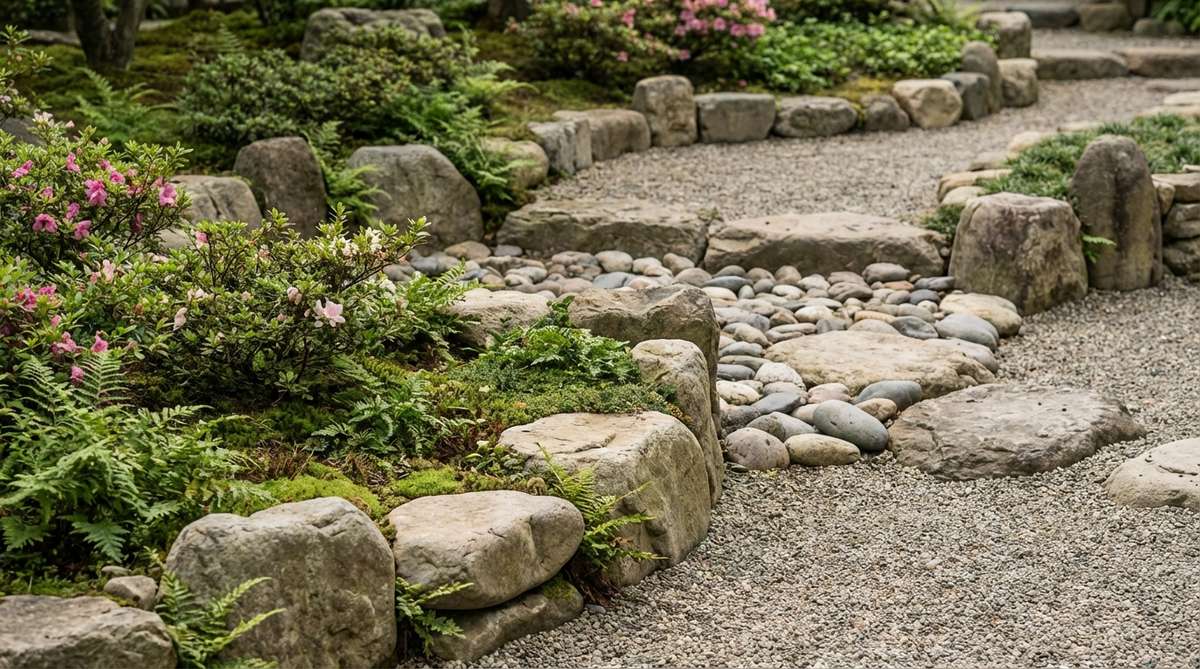
Use uncut fieldstones or river rocks to create informal borders between gravel areas and planted beds. The natural stones should vary in size and shape while maintaining consistent height.
Position stones to create gentle curves rather than straight lines. Allow low plants to spill over the stones slightly, softening the transition and creating organic integration.
42. Raised Bed Retaining Wall
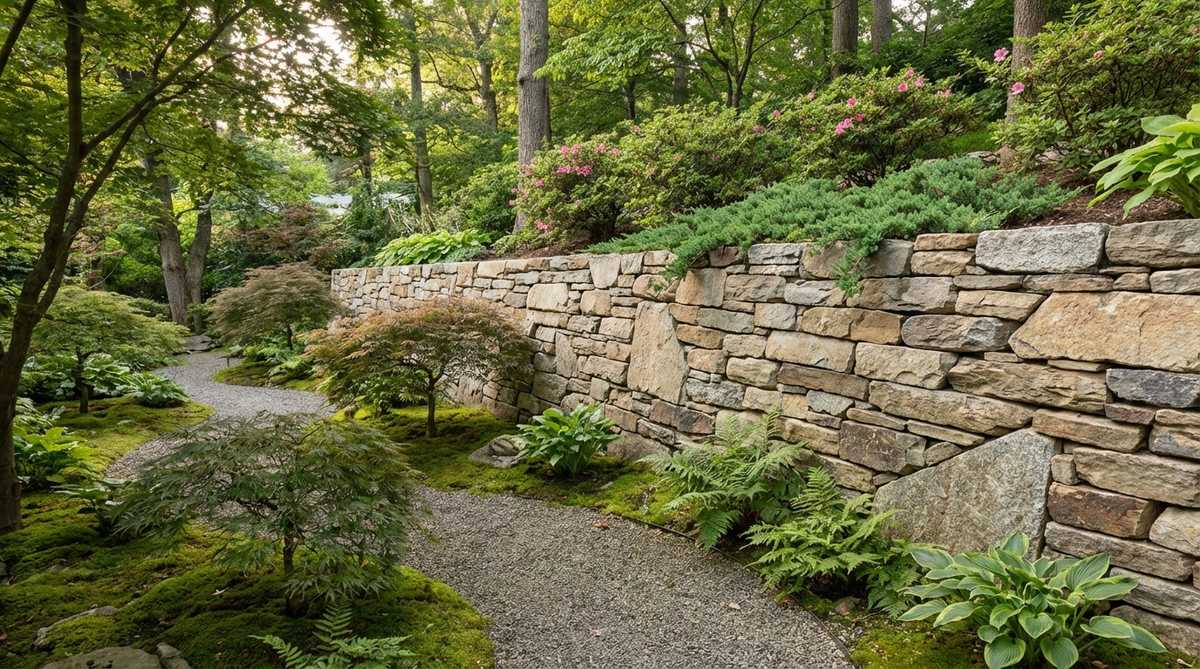
Stack flat stones without mortar to create dry-stacked retaining walls for elevated planting beds. The stones should interlock through careful placement and vary in size to create visual interest.
Angle the wall slightly backward into the retained soil for structural stability. Select stones with relatively flat faces for the visible front surface while using irregular stones for hidden structural support.
43. Threshold Transition Stones
Mark transitions between garden areas with distinctive threshold stones that differ in size, color, or type from surrounding materials. A large flat stone or contrasting gravel color announces the change.
These transitional markers create rhythm in the garden journey and provide visual cues that prepare visitors for different experiences ahead.
44. Gravel Containment Border
Install buried plastic or metal edging beneath gravel areas to prevent migration into surrounding lawns or beds. Top the edging with a row of small stones that disguise the utilitarian material.
The visible stone border should appear natural and intentional rather than functional. Choose stones that complement the gravel color and size.
45. Moss-to-Gravel Transition
Create soft transitions between moss gardens and gravel areas by allowing the materials to intermingle at their boundaries. Place individual stones at the transition zone to bridge both materials.
The moss will gradually colonize some stones while gravel particles nestle into moss edges, creating authentic weathered appearance. This natural integration develops slowly and improves with age.
46. Stair Step Risers
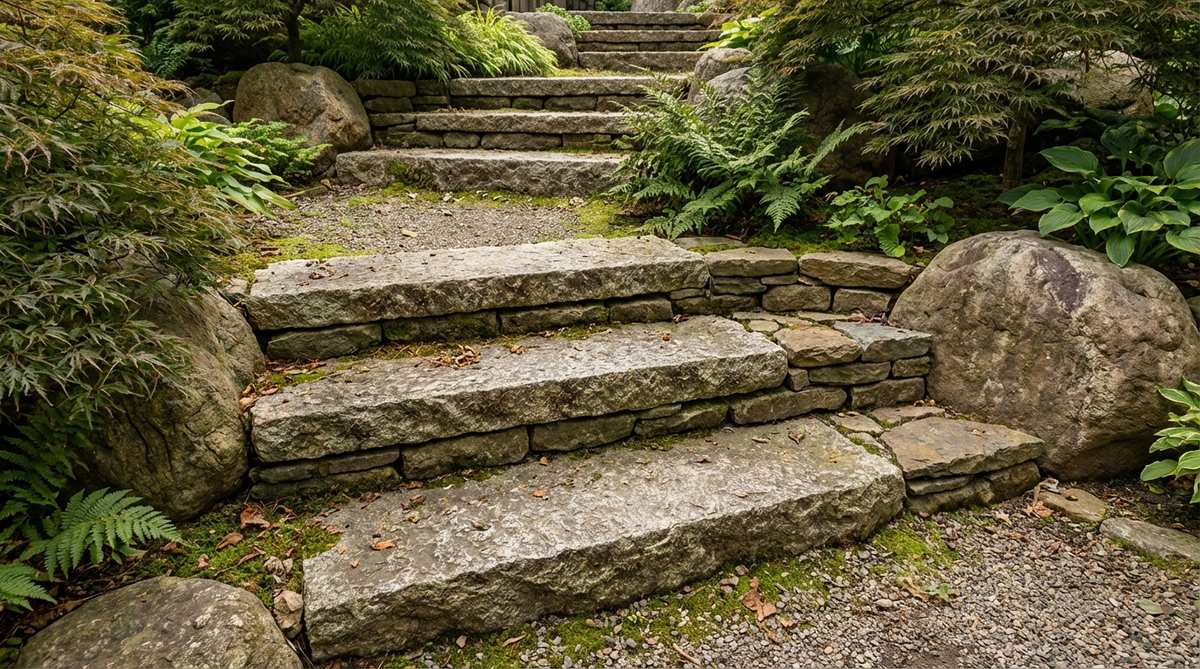
Build garden stairs using thick stone slabs as treads with smaller stones stacked as risers. Each step should be slightly irregular in height and depth to maintain organic character.
Choose stones for treads that provide secure, non-slip surfaces. Weather-worn granite or sandstone develops natural texture that improves traction over time.
47. Decorative Cobblestone Fill
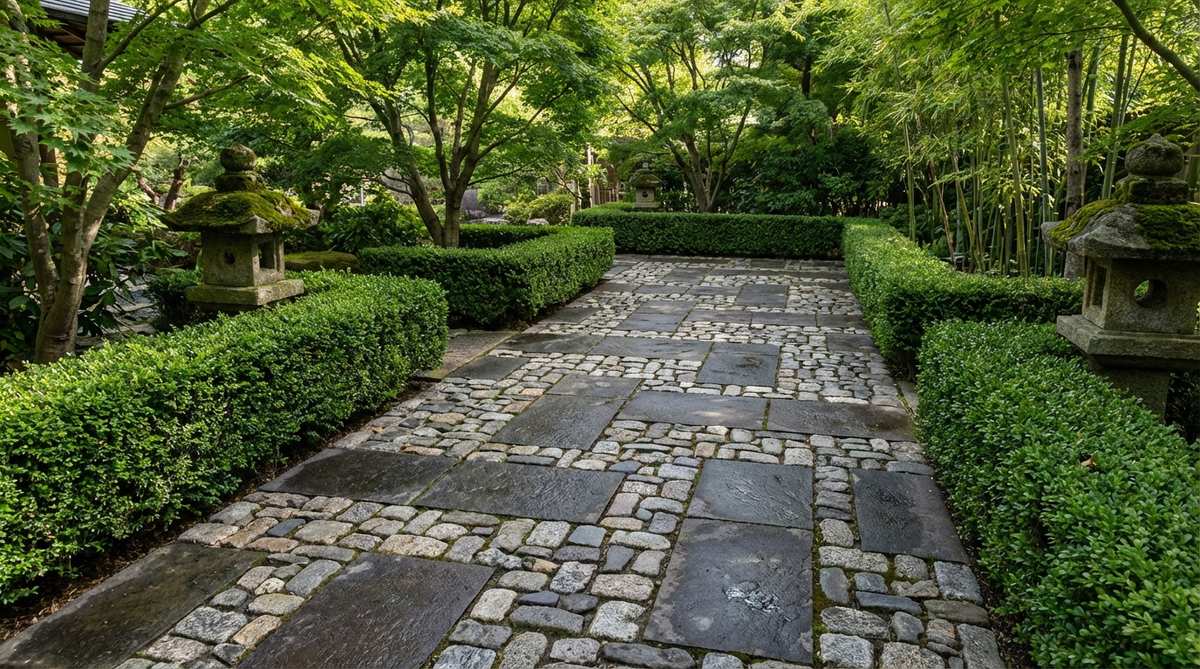
Fill spaces between formal paved areas with tightly fitted cobblestones to add texture and visual complexity. The cobbles should be similar in size but varied in shape and orientation.
This technique appears in semi-formal pathways where structure and spontaneity balance. The irregular cobblestones soften the rigid geometry of cut stone borders while maintaining functional durability.
Transform Your Garden with Authentic Stone Placement
These 47 japanese garden stones placements offer a comprehensive foundation for creating authentic pathways and rockeries that embody centuries of design wisdom. Whether you begin with a simple stepping stone path through moss or commit to a complete rock garden with raked gravel patterns, remember that successful Japanese garden design prioritizes natural asymmetry, purposeful spacing, and the creation of contemplative spaces. Start with one or two techniques that resonate with your existing landscape, and gradually expand your stone vocabulary as your garden matures and your understanding deepens.
Frequently Asked Questions
What type of gravel is best for Japanese garden pathways?
Crushed granite sized between 3-8mm works best for areas you’ll rake into patterns, as its angular edges hold designs longer than smooth pebbles. For walking paths where raking isn’t planned, use larger 10-14mm pea gravel or quartz pebbles for comfort and stability. Light-colored gravels like pale limestone or granite reflect light and brighten shaded areas, while darker gravels create dramatic contrast with lighter rocks.
How far apart should stepping stones be placed in a Japanese garden?
Position stepping stones 18-24 inches apart measured from center to center for comfortable adult walking pace. However, Japanese garden design intentionally varies spacing to slow movement and encourage mindfulness—some stones might be 15 inches apart while others stretch to 26 inches. The irregular spacing prevents automatic walking and brings attention to each step and the surrounding garden elements.
Should Japanese garden rocks be buried or placed on top of the ground?
Rocks should be buried approximately one-third of their depth to appear as though they’ve emerged naturally from the earth over centuries. This grounding technique provides visual weight, prevents wobbling, and creates authentic appearance. Surface-placed rocks look artificial and unstable. Dig proper holes, position rocks at natural angles that suggest geological formation, and backfill firmly to ensure long-term stability.
Can I use flagstone instead of traditional Japanese stepping stones?
Traditional Japanese gardens avoid flagstone because it typically has sharp edges, insufficient thickness, and tends to sink and disappear under surrounding materials. If you prefer flagstone aesthetics, select pieces at least 3 inches thick with naturally rounded edges, and space them generously rather than fitting them tightly together. This approach maintains Japanese design principles while accommodating Western material preferences.
How many rocks should be in a Japanese garden arrangement?
Japanese garden design uses odd numbers—typically 3, 5, or 7 rocks per grouping—based on the principle that odd numbers feel more natural and less rigid than even numbers. A single spectacular boulder can serve as a focal point, while the classic sanzon arrangement uses three stones to represent Buddhist trinity. Avoid symmetrical patterns and ensure no three stones create straight lines when viewed from primary angles.