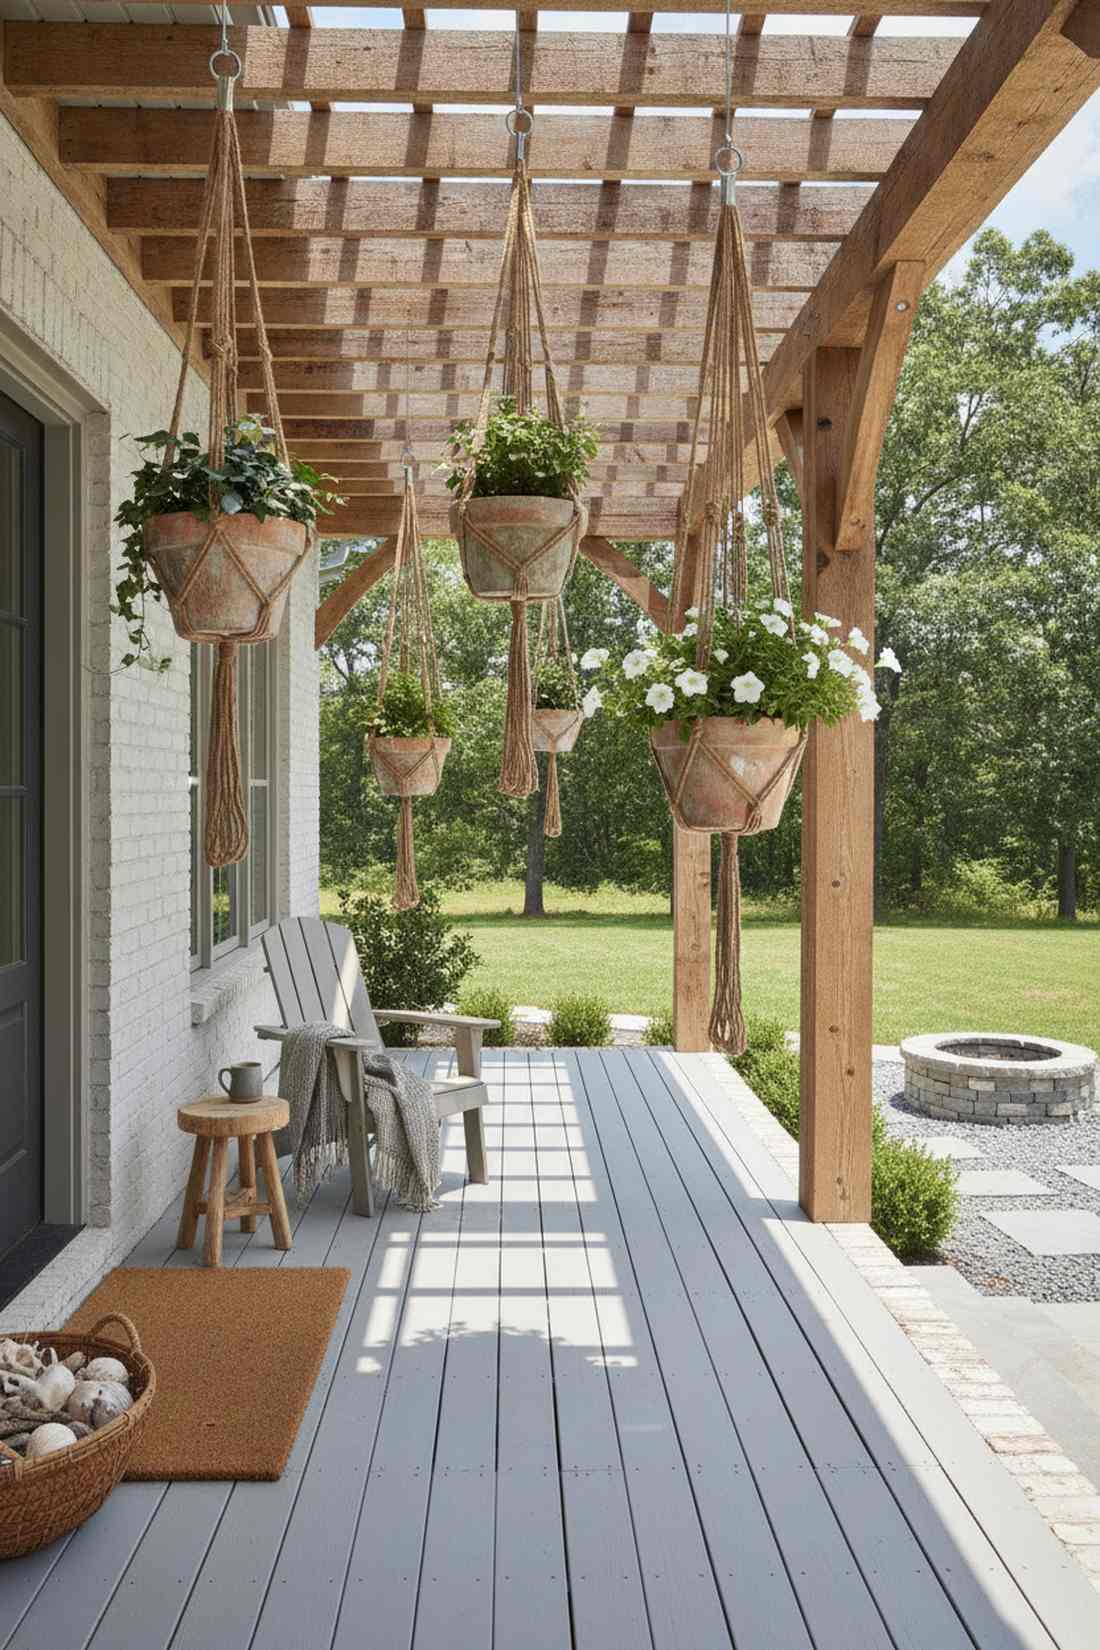
Mounting hanging plants on wall surfaces instantly doubles your usable outdoor footprint. This guide breaks down exact material costs and premium sourcing tricks for vertical boundary designs. Upgrade any blank space with designer-level greenery today.
Design SnapshotKey Principles
- Layered Heights: Position trailing plants at eye level and above to create cascading visual flow down vertical surfaces
- Weight Distribution: Mount heavy planters directly into wall studs or fence posts using brackets rated for outdoor loads
- Moisture Management: Install drip trays or use self-watering systems to prevent staining on walls and decks below hanging installations
- Light Zoning: Match plant selections to sun exposure—sun-loving herbs for south walls, shade-tolerant ferns for north-facing boundaries
Wall-Mounted Classics for Vertical Impact
Wall-mounted planters anchor your vertical garden with structural integrity and design flexibility. These installations work on exterior siding, interior accent walls, and courtyard boundaries where floor space is premium real estate.
1. Tiered Shelf Planter Grid
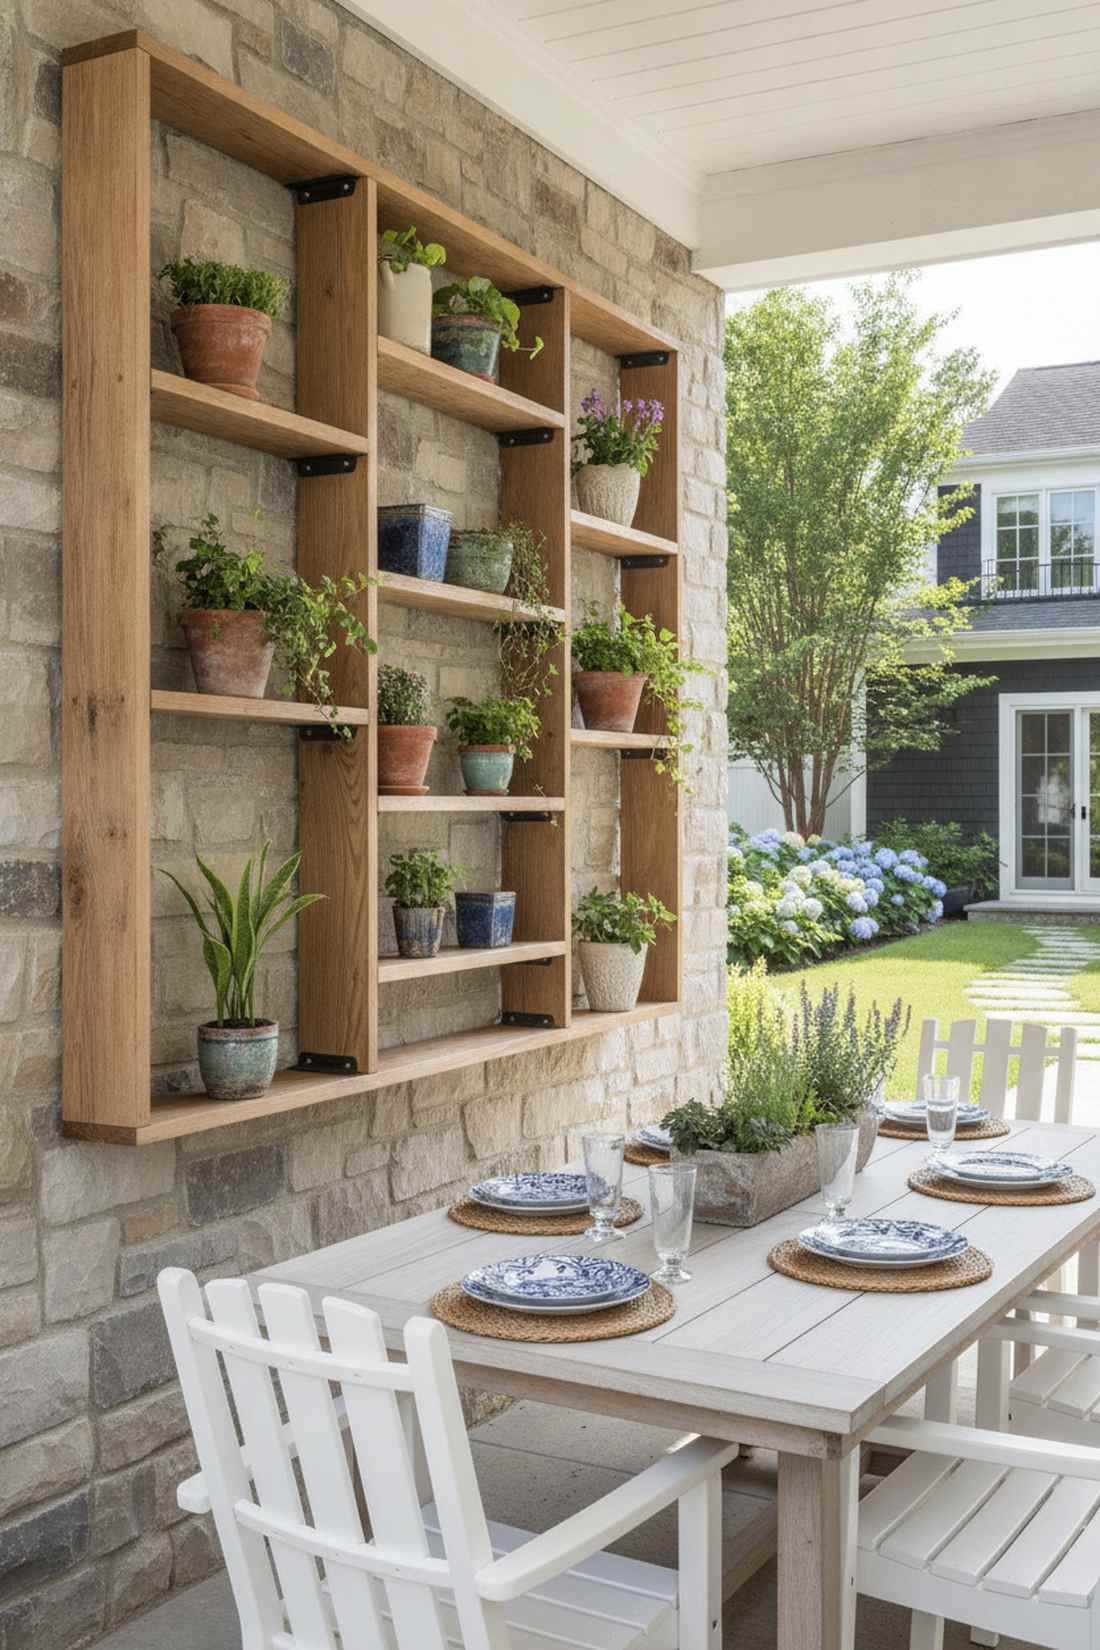
Feels like a rustic apothecary wall that effortlessly organizes your botanical collection. The wooden vertical shelving aesthetic works exceptionally well for a sun-drenched courtyard or outdoor dining space.
Most people overcomplicate shelving, but a straightforward staggered grid delivers a surprisingly premium look. Utilizing weatherproof garden brackets ensures your tiered display survives heavy watering without sagging.
You can easily pull this off for around $35–$50 depending on your wood choice. Save this to your DIY weekend garden board!
- Key Materials: Weather-treated cedar planks, heavy-duty black iron L-brackets
- Vibe / Style: Structured farmhouse chic
- Difficulty: Intermediate drilling required
- Budget Breakdown: Wood: $25 | Hardware: $20
- Creator’s Tip: Seal the edges of your wood to prevent moisture swelling over time.
- Smart Sourcing: Pre-cut cedar board multi-packs and heavy-duty rustic bracket kits.
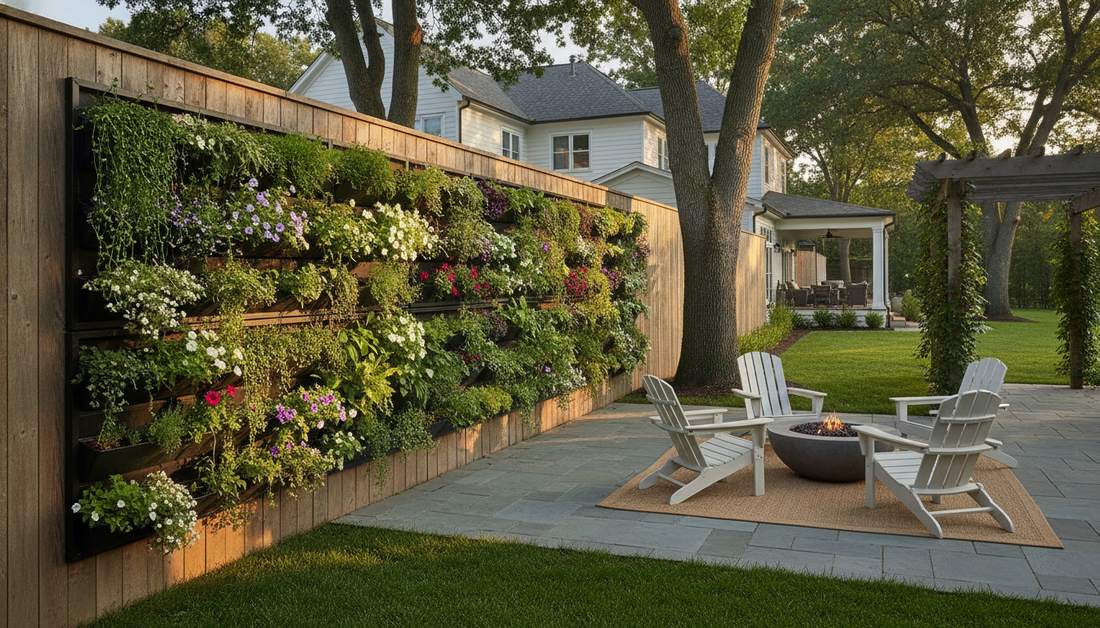
2. Pocket Planter Panels
Straight out of an eco-luxury resort, this lush approach completely hides raw materials. A high-density fabric wall garden is ideal for masking an ugly garage exterior or bare fence line.
Skip rigid plastic setups; a felt-based hanging system looks far more expensive than it is. The breathable material acts naturally to air-prune roots for explosive plant growth.
Expect to spend about $25 per large panel module. It’s a fast upgrade that completely changes the vibe.
- Key Materials: UV-resistant felt pocket panels, wall anchors
- Vibe / Style: Dense tropical jungle
- Difficulty: Beginner friendly
- Budget Breakdown: Pockets: $15 | Anchors: $10
- Creator’s Tip: Line the very bottom row with moisture-loving ferns to catch excess runoff.
- Smart Sourcing: UV-coated vertical pocket starter kits and bulk waterproof masonry screws.
3. Floating Box Planters
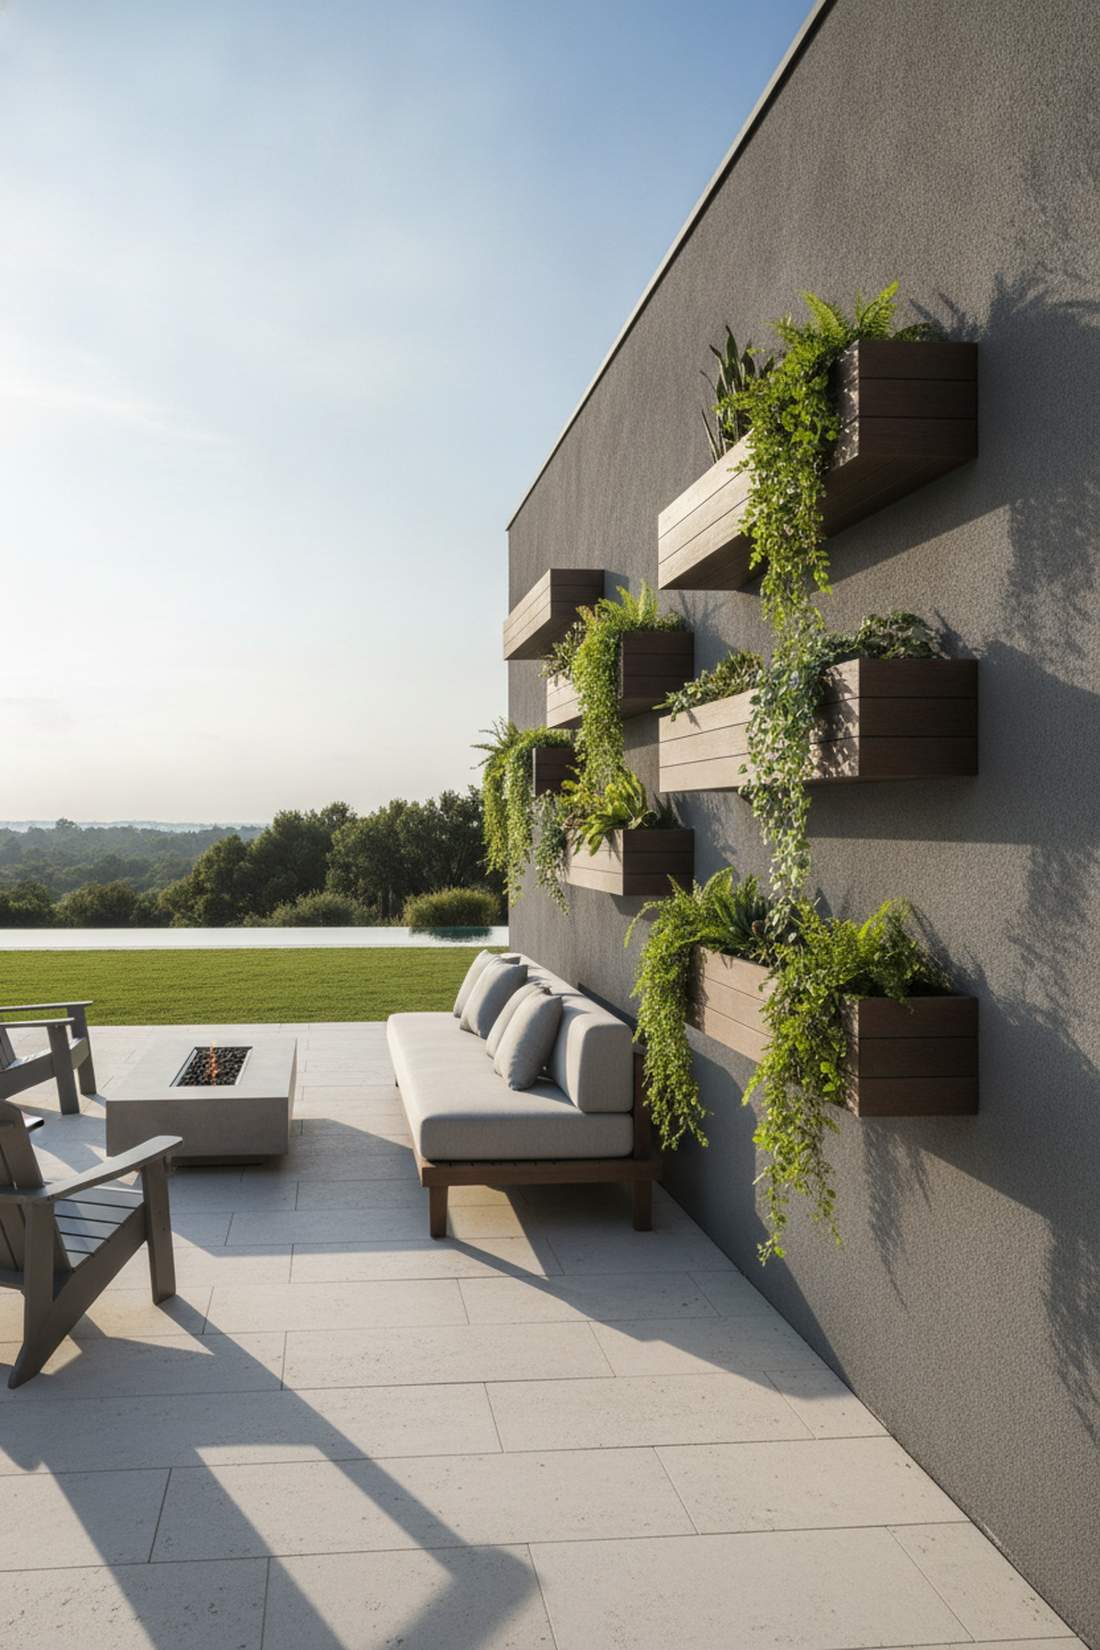
Exudes sleek modern architecture vibes that make the greenery pop. The minimalist hovering greenery setup is a stunning addition to contemporary outdoor patios or sleek balcony walls.
Hidden backplates create a mounting illusion that totally fools the eye. It instantly transforms standard container gardening into a designer-level architectural feature.
This aesthetic typically runs under $45 per floating box. Pin this if you’re planning a small space upgrade.
- Key Materials: Composite deck boxes, invisible blind shelf supports
- Vibe / Style: Ultra-modern minimalist
- Difficulty: Advanced leveling required
- Budget Breakdown: Planter: $30 | Mounts: $15
- Creator’s Tip: Use lightweight perlite soil mixes to keep the floating load manageable.
- Smart Sourcing: Pre-drilled floating planter boxes and commercial-grade invisible bracket kits.
4. Metal Rail Wall Systems
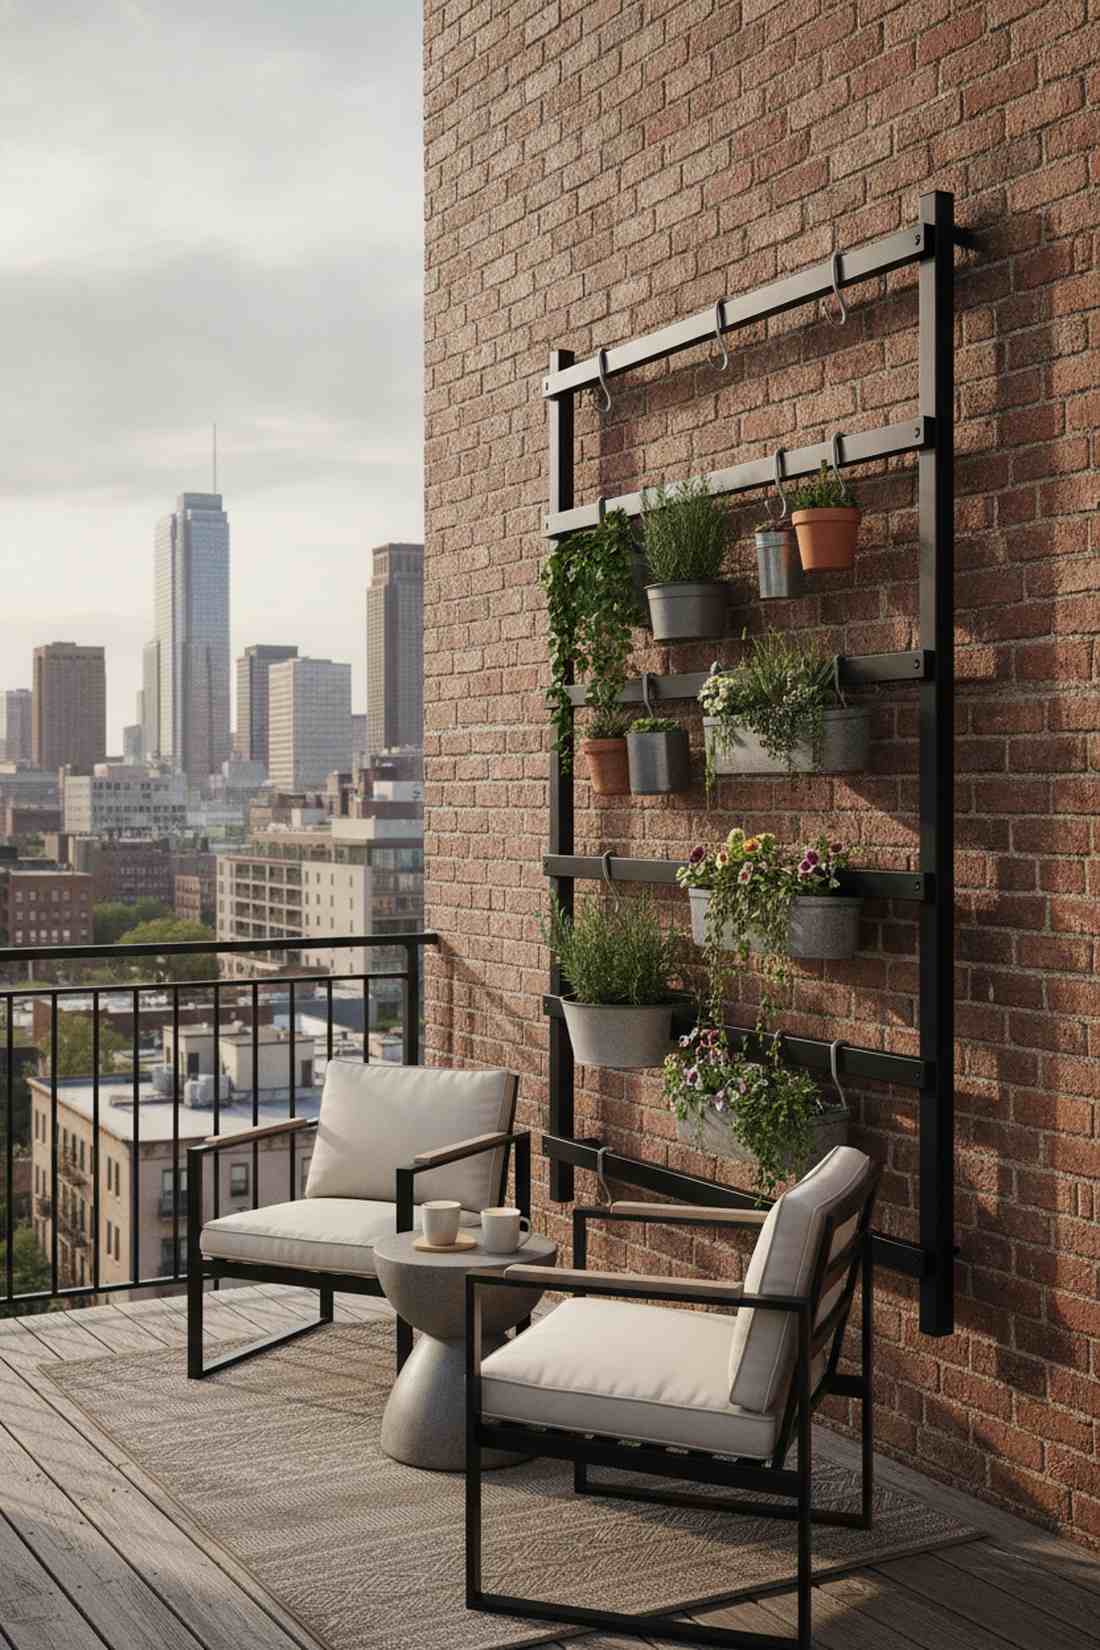
Feels like a chic urban loft garden wrapped in industrial utility. A modular industrial botanical grid is brilliant for renters wanting adjustable balcony decor without drilling massive holes.
Fixed pots are restrictive; an adjustable metal rail layout gives a designer-level finish while letting you chase the sun. Sourcing commercial vertical garden systems guarantees rust-proof longevity.
You can grab a base setup for under $40. Highly recommended for a quick weekend win.
- Key Materials: Powder-coated aluminum rails, adjustable S-hooks
- Vibe / Style: Urban industrial flex
- Difficulty: Easy rail mounting
- Budget Breakdown: Rails: $25 | Hardware: $15
- Creator’s Tip: Hang your heaviest pots on the exact studs where the rail anchors are located.
- Smart Sourcing: Rust-resistant balcony rail starter sets and heavy-duty S-hook bulk packs.
This next setup is ridiculously cheap but looks like a $150 custom landscape installation…
5. Corner Cascade Planters
Like a secret garden wedge that softens harsh architectural lines. A geometric corner oasis completely revolutionizes unused 90-degree junctions on your patio.
Most overlook the corners entirely, but wedge containers create an immersive wrap-around effect. It completely upgrades dead space into a dynamic focal point.
Budget around $30 for a solid corner bracket setup. Save this layout for your ultimate courtyard mood board!
- Key Materials: Triangular resin pots, corner masonry anchors
- Vibe / Style: Immersive architectural softening
- Difficulty: Intermediate corner drilling
- Budget Breakdown: Wedge Pots: $20 | Anchors: $10
- Creator’s Tip: Plant trailing vines at the very edge to hide the corner seam completely.
- Smart Sourcing: UV-coated triangular corner pots and outdoor-grade toggle bolt kits.
6. Living Picture Frames
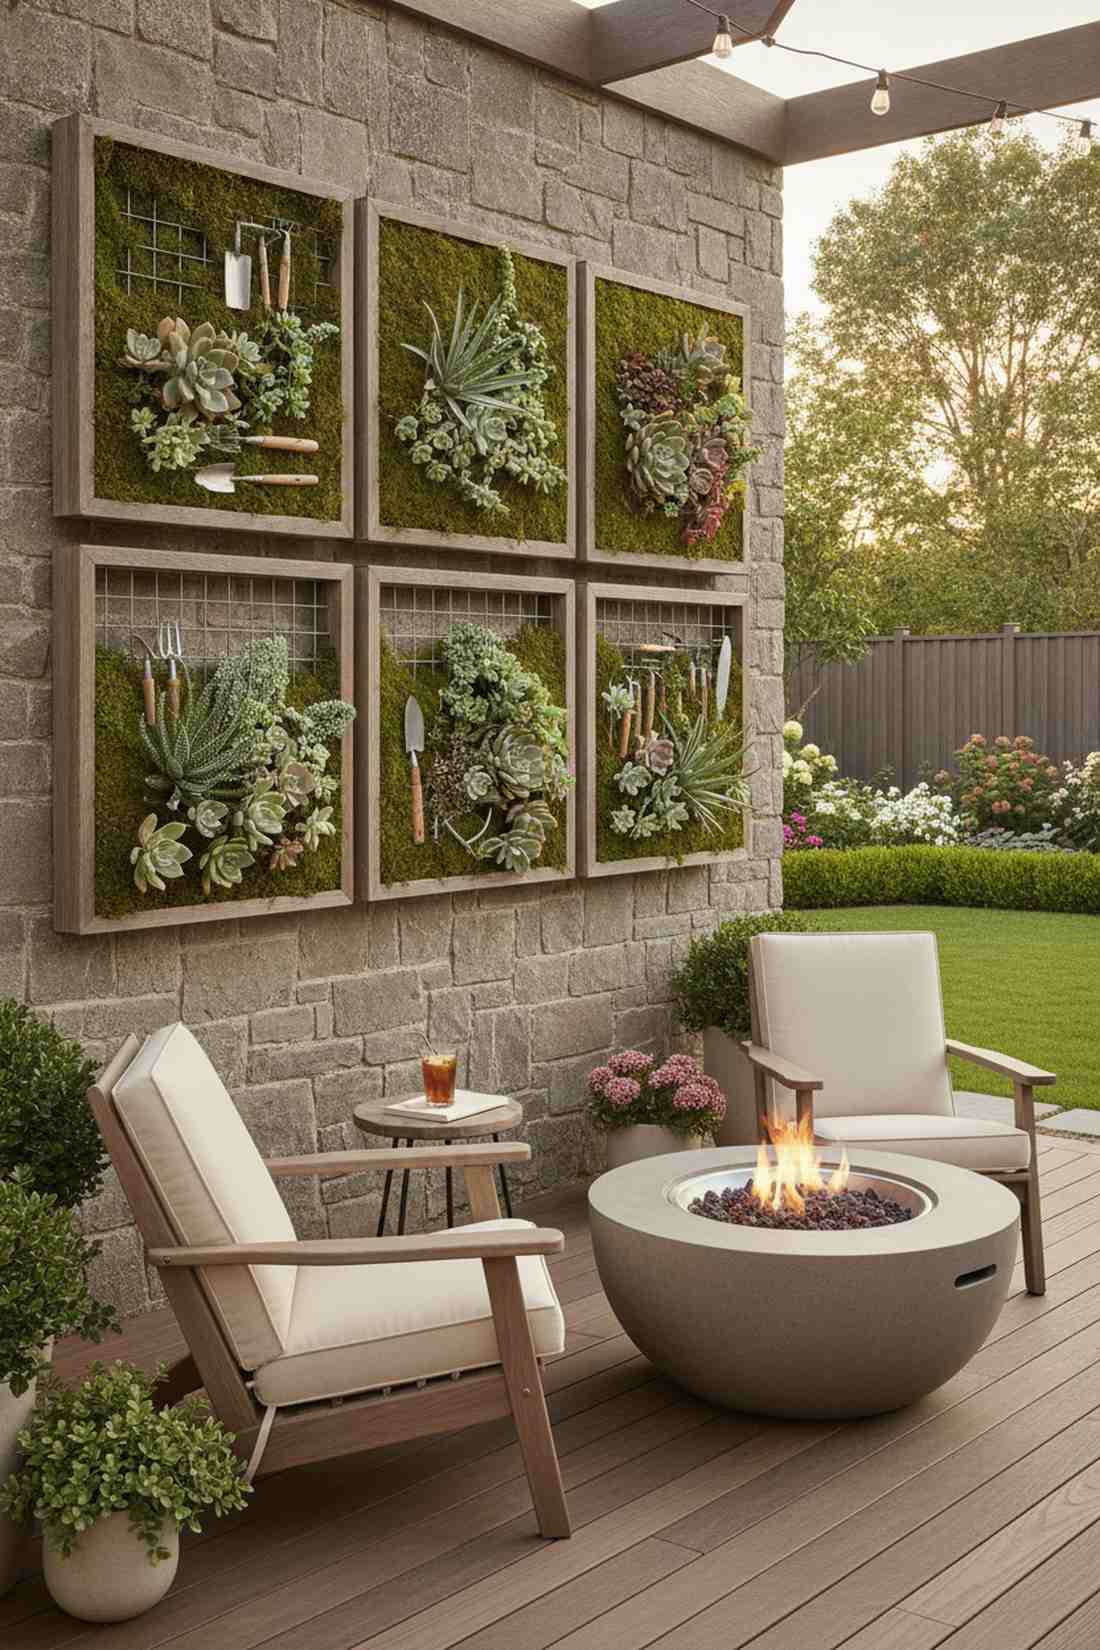
Feels like stepping into an art gallery curated by Mother Nature. The succulent gallery wall concept is perfect for intimate courtyard seating areas or protected outdoor living rooms.
Using basic pots is boring, but framing live succulents elevates the display to museum quality. Integrating miniature garden supplies into the frame adds micro-texture that draws the eye close.
This luxurious display costs roughly $40 to piece together. An absolute must-try for succulent lovers.
- Key Materials: Shadowbox frames, galvanized wire mesh, sphagnum moss
- Vibe / Style: Sophisticated living art
- Difficulty: Patience required for rooting
- Budget Breakdown: Frame kit: $25 | Moss/Mesh: $15
- Creator’s Tip: Leave the frame flat for 3 weeks before hanging so the roots lock the soil in place.
- Smart Sourcing: Pre-meshed shadowbox planter kits and bulk preserved sphagnum moss.
Fence Boundary Displays That Define Perimeters
Fences provide ready-made vertical infrastructure for hanging plants fence installations that boost privacy while adding living texture. These designs work on wood slats, chain-link, and vinyl fencing materials with appropriate hardware adjustments.
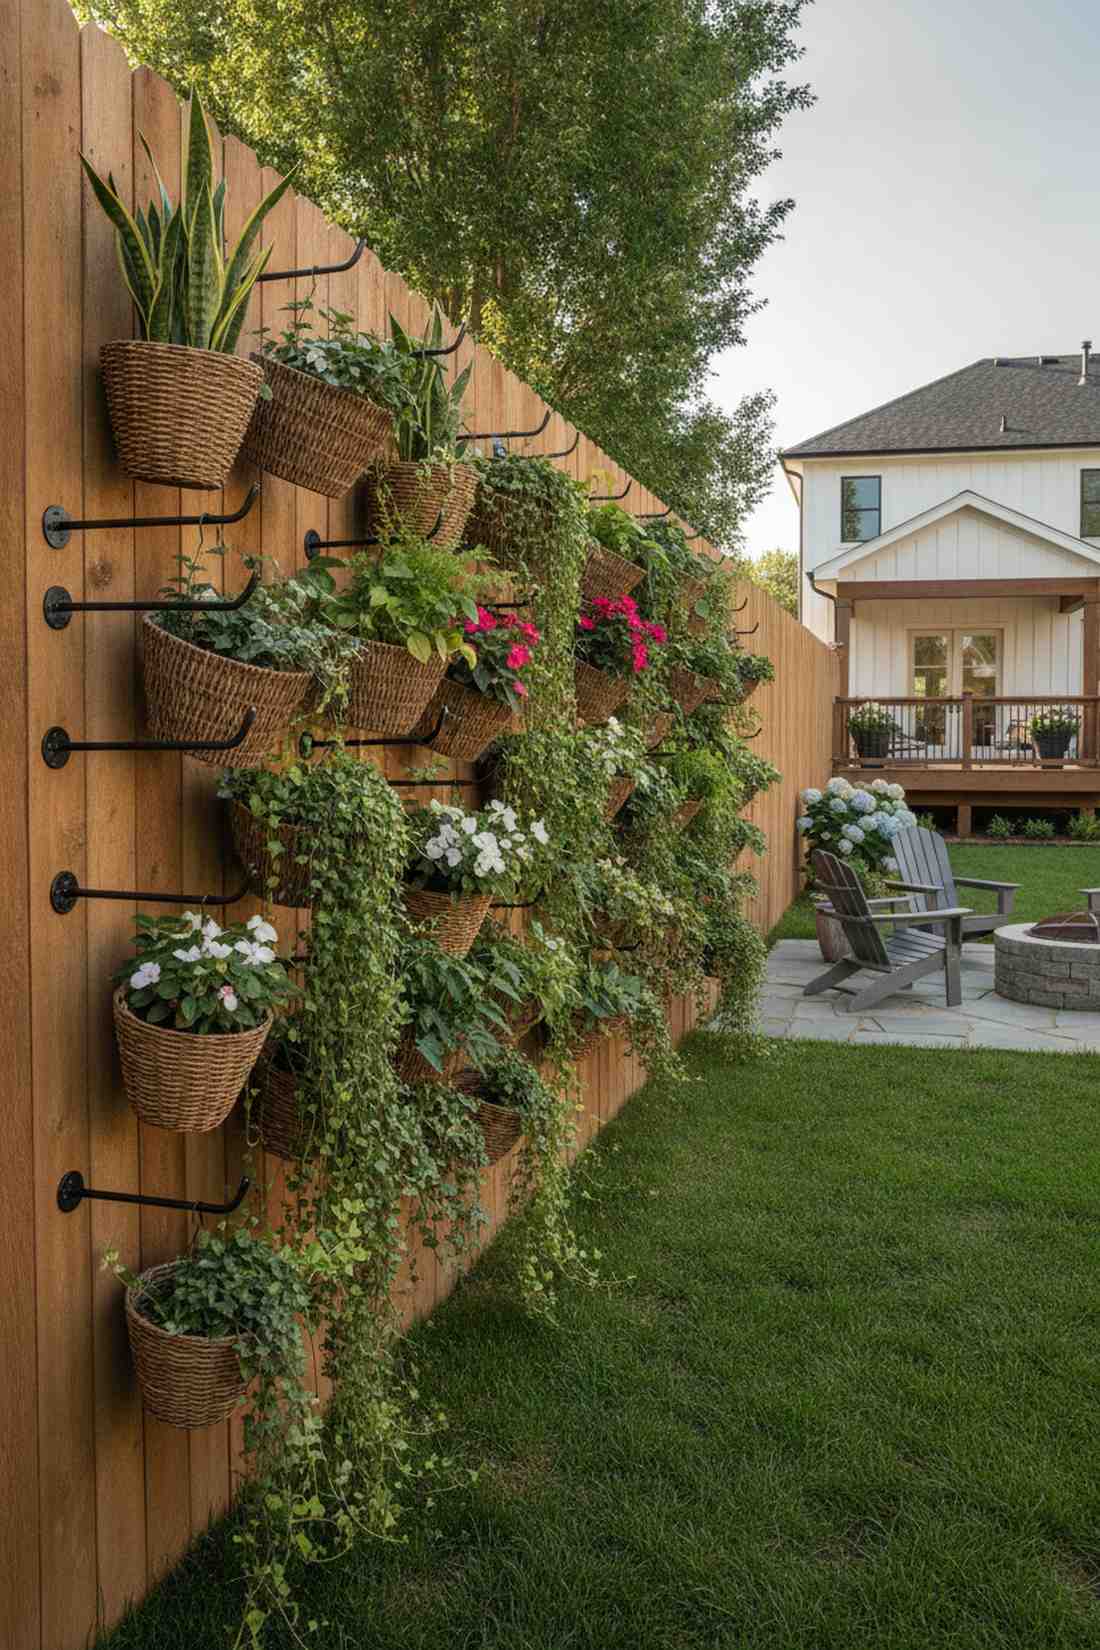
7. Chain-Link Basket Weave
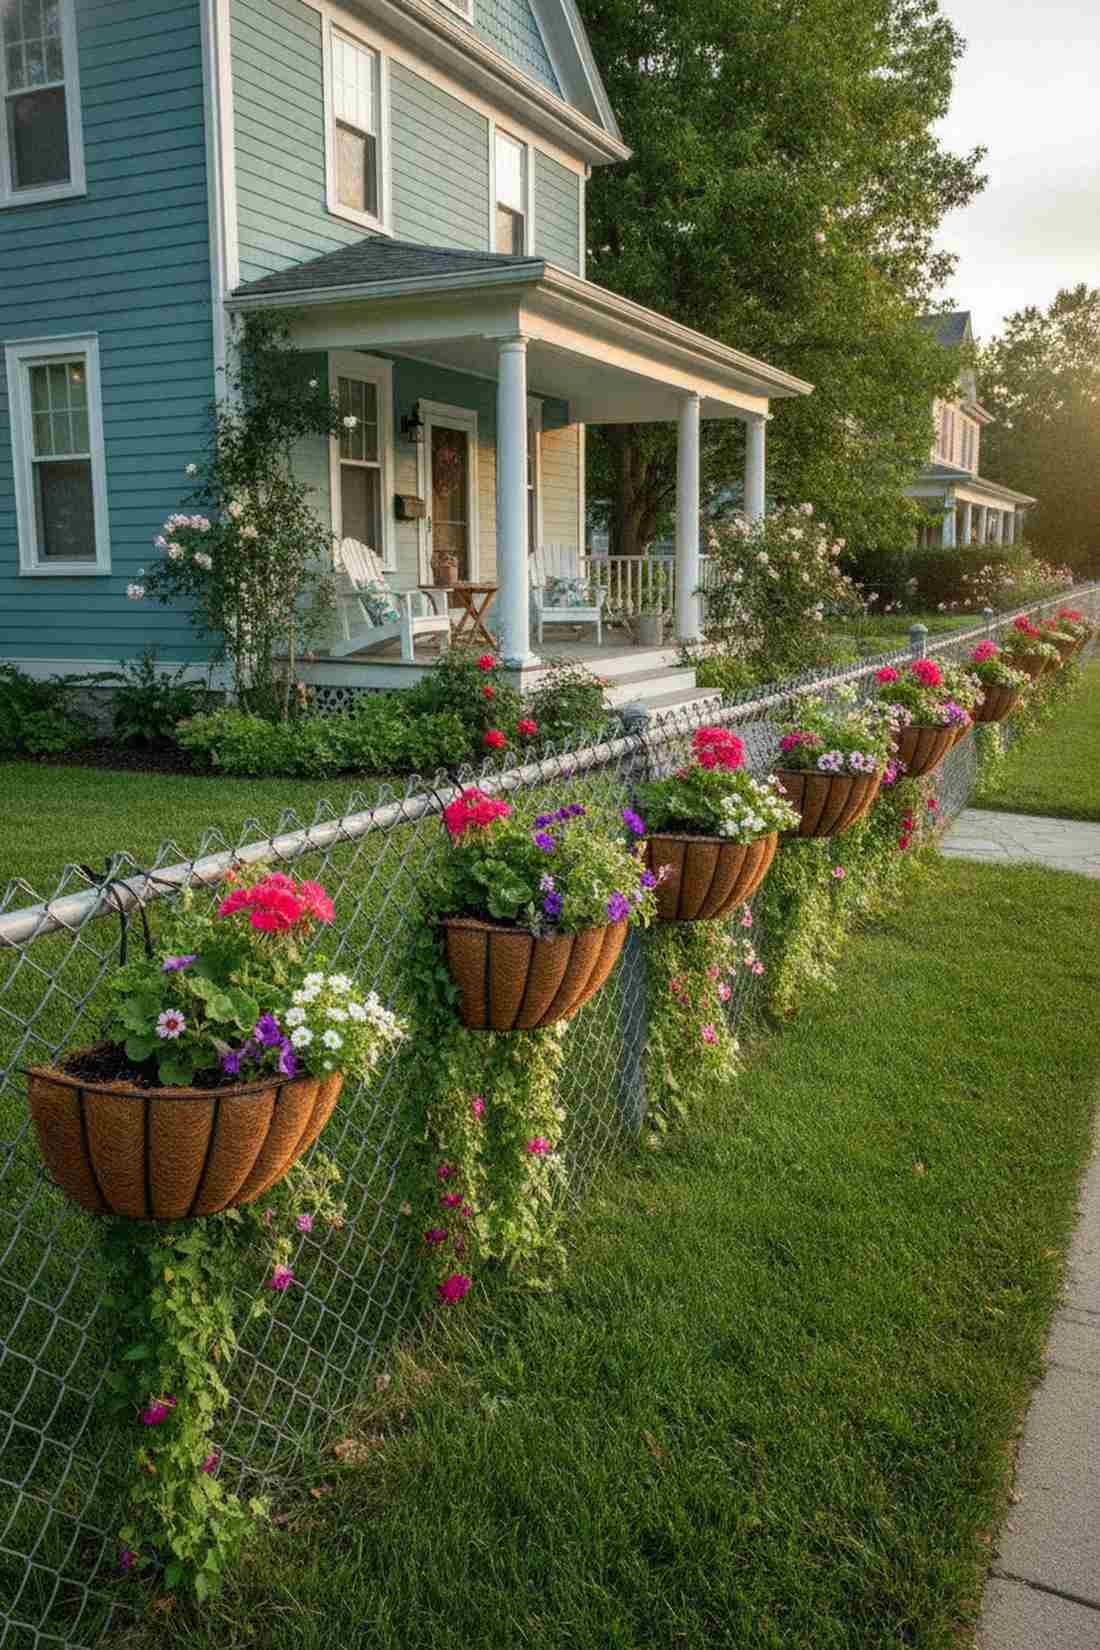
Transforms cold metal barriers into a whimsical neighborhood boundary. This suspended floral fence line works exceptionally well for front yards needing a splash of welcoming color.
Don’t fight the chain-link; leaning into the grid pattern delivers a surprisingly cohesive aesthetic. Securing coco-liners directly to the mesh offers unparalleled airflow for root health.
You can execute a stunning five-basket weave for about $50. Pin this to your exterior facelift board!
- Key Materials: Half-moon wire baskets, zip ties, coco coir liners
- Vibe / Style: Cottage core exterior
- Difficulty: Extremely easy
- Budget Breakdown: Baskets: $35 | Zip ties: $15
- Creator’s Tip: Double up your zip ties on the top rim to handle the weight of saturated soil.
- Smart Sourcing: Bulk half-moon planter sets and heavy-duty UV-resistant cable ties.
8. Wooden Fence Rail Boxes
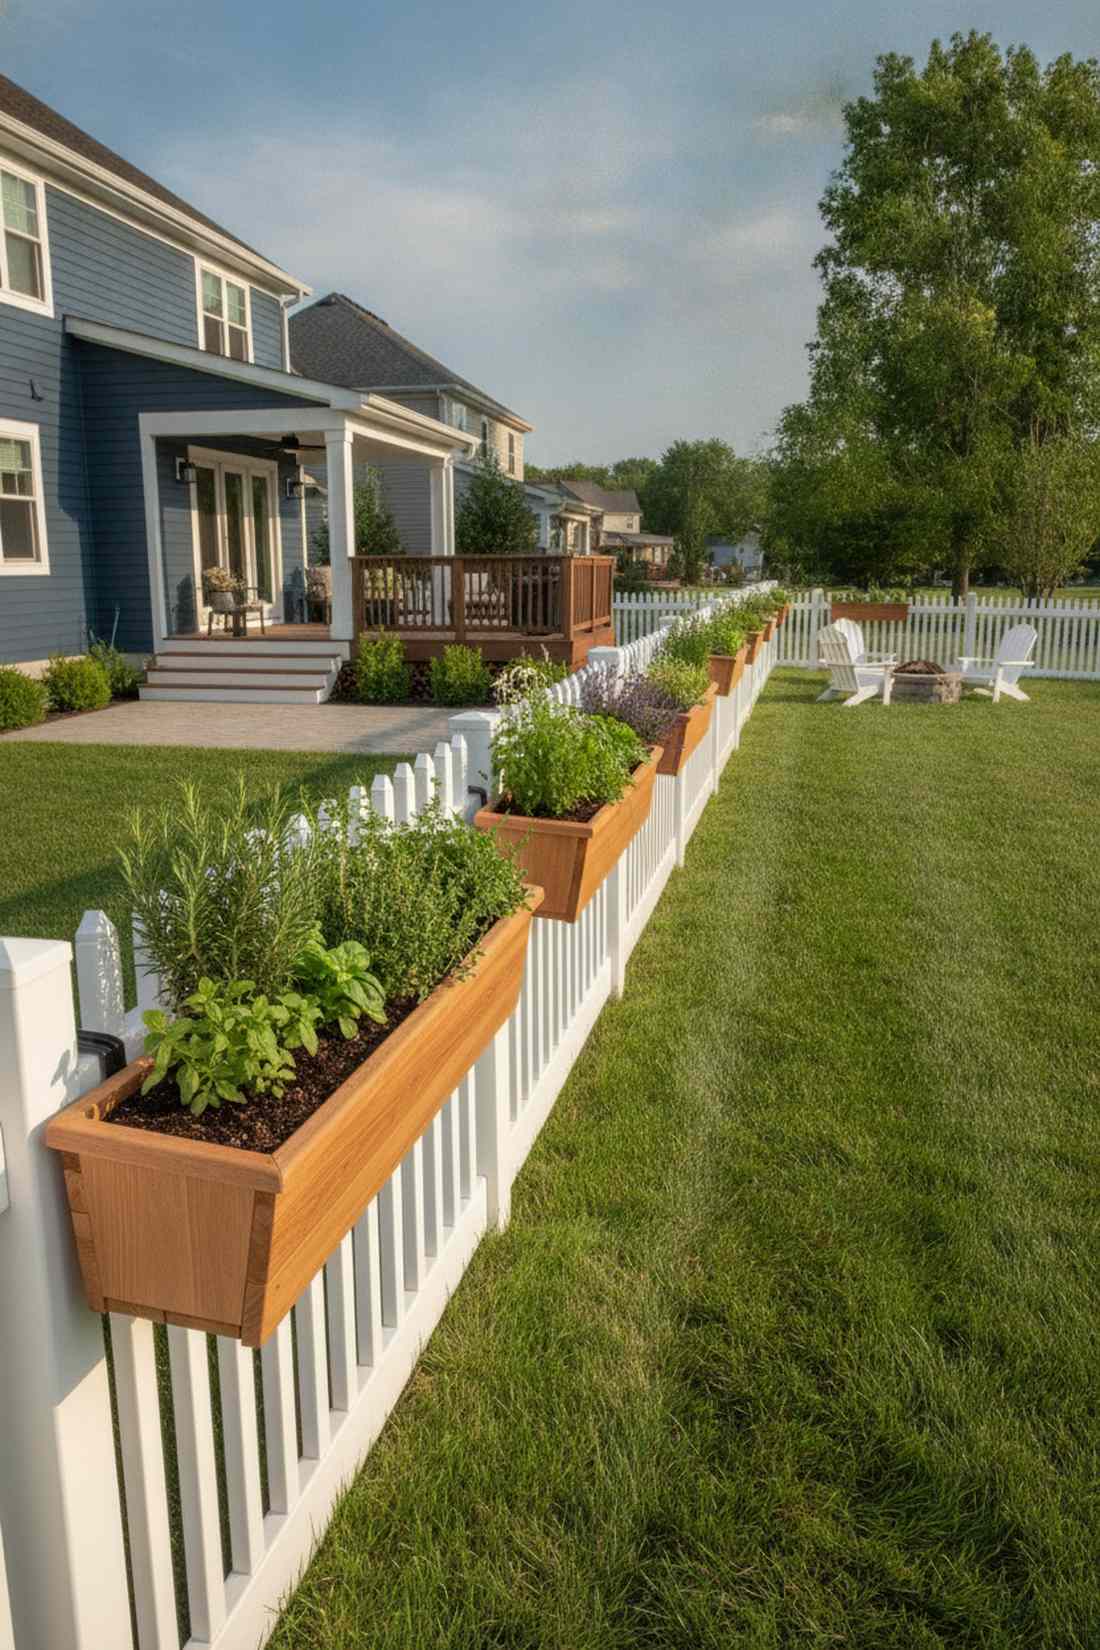
Feels like a structured botanical crown running along your property line. The continuous perimeter garden box is the ultimate solution for cultivating a vast herb collection right on your privacy fence.
While many scatter random pots, a continuous linear trough gives a designer-level finish. Utilizing premium potting soil mix ensures these elevated beds retain moisture during brutal summer afternoons.
A 10-foot run will set you back around $60. Highly recommended for standard picket fence borders.
- Key Materials: Trough window boxes, over-the-rail bracket clamps
- Vibe / Style: Clean suburban linear
- Difficulty: Straightforward bolting
- Budget Breakdown: Troughs: $40 | Brackets: $20
- Creator’s Tip: Line the bottom with coffee filters to stop soil from leaking onto the fence panels below.
- Smart Sourcing: Pre-drilled resin trough kits and adjustable top-rail clamp sets.
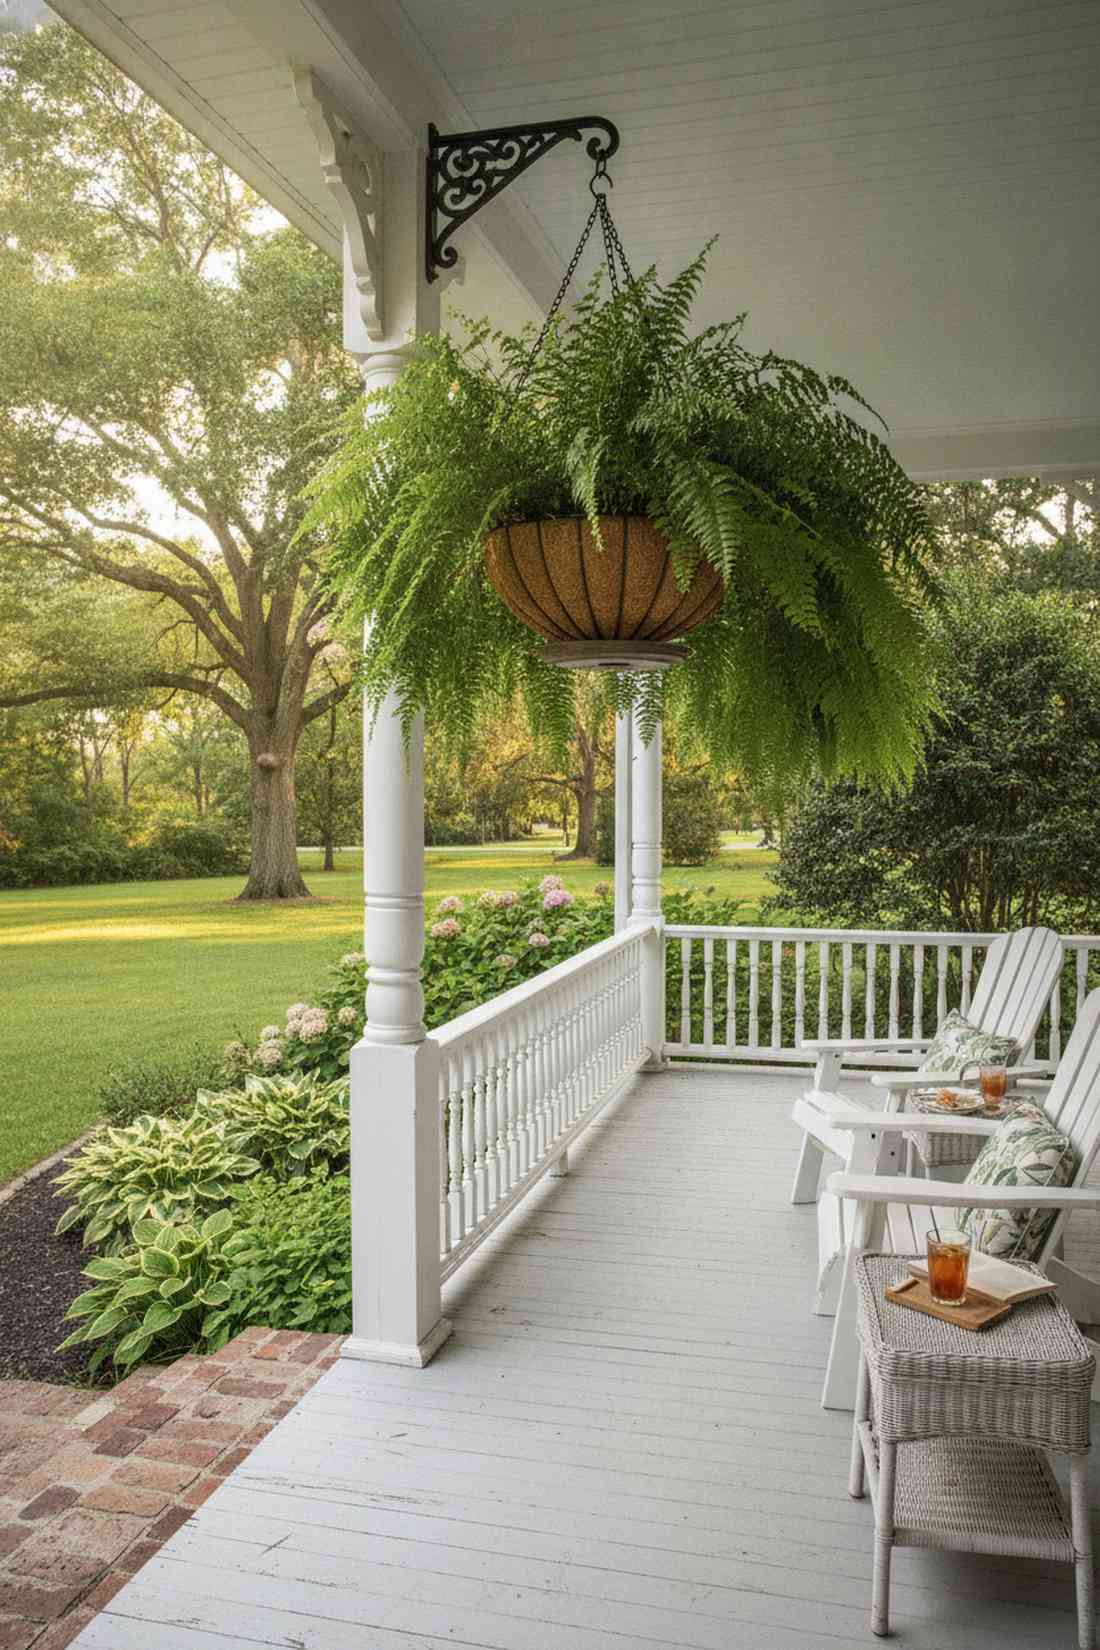
9. Hanging Basket Extravaganza
A chaotic-good explosion of greenery that feels wonderfully overgrown. This multi-tiered hanging basket array is brilliant for creating instant depth against flat wooden privacy screens.
Standard uniform spacing looks boring; staggering different hook lengths creates a cascading masterpiece. It maximizes vertical real estate while turning a boring wall into a focal jungle.
You can assemble a mixed cluster for under $45. Save this layout for your ultimate spring makeover!
- Key Materials: Extended shepherd hooks, woven rattan baskets
- Vibe / Style: Bohemian jungle chaos
- Difficulty: Easy screw-in installation
- Budget Breakdown: Hooks: $20 | Baskets: $25
- Creator’s Tip: Mix upright spike plants in the top tier and trailing creepers in the bottom tier for massive volume.
- Smart Sourcing: Heavy-duty extended fence hooks and weatherproof rattan basket sets.
💡 Must-Have Supplies for High-End Setups
To build these setups faster and ensure they last, skip the generic craft aisles and invest in the right foundational kits.
- Base & Support: Commercial-grade rust-resistant mounting bracket packs
- Setup Tools: Self-watering planter starter kits with indicators
- Weather/Durability Protection: UV-blocking exterior clear wood sealants
Most people get this completely wrong… until they try the exact layout coming up next.
10. Vertical Pallet Garden on Fence
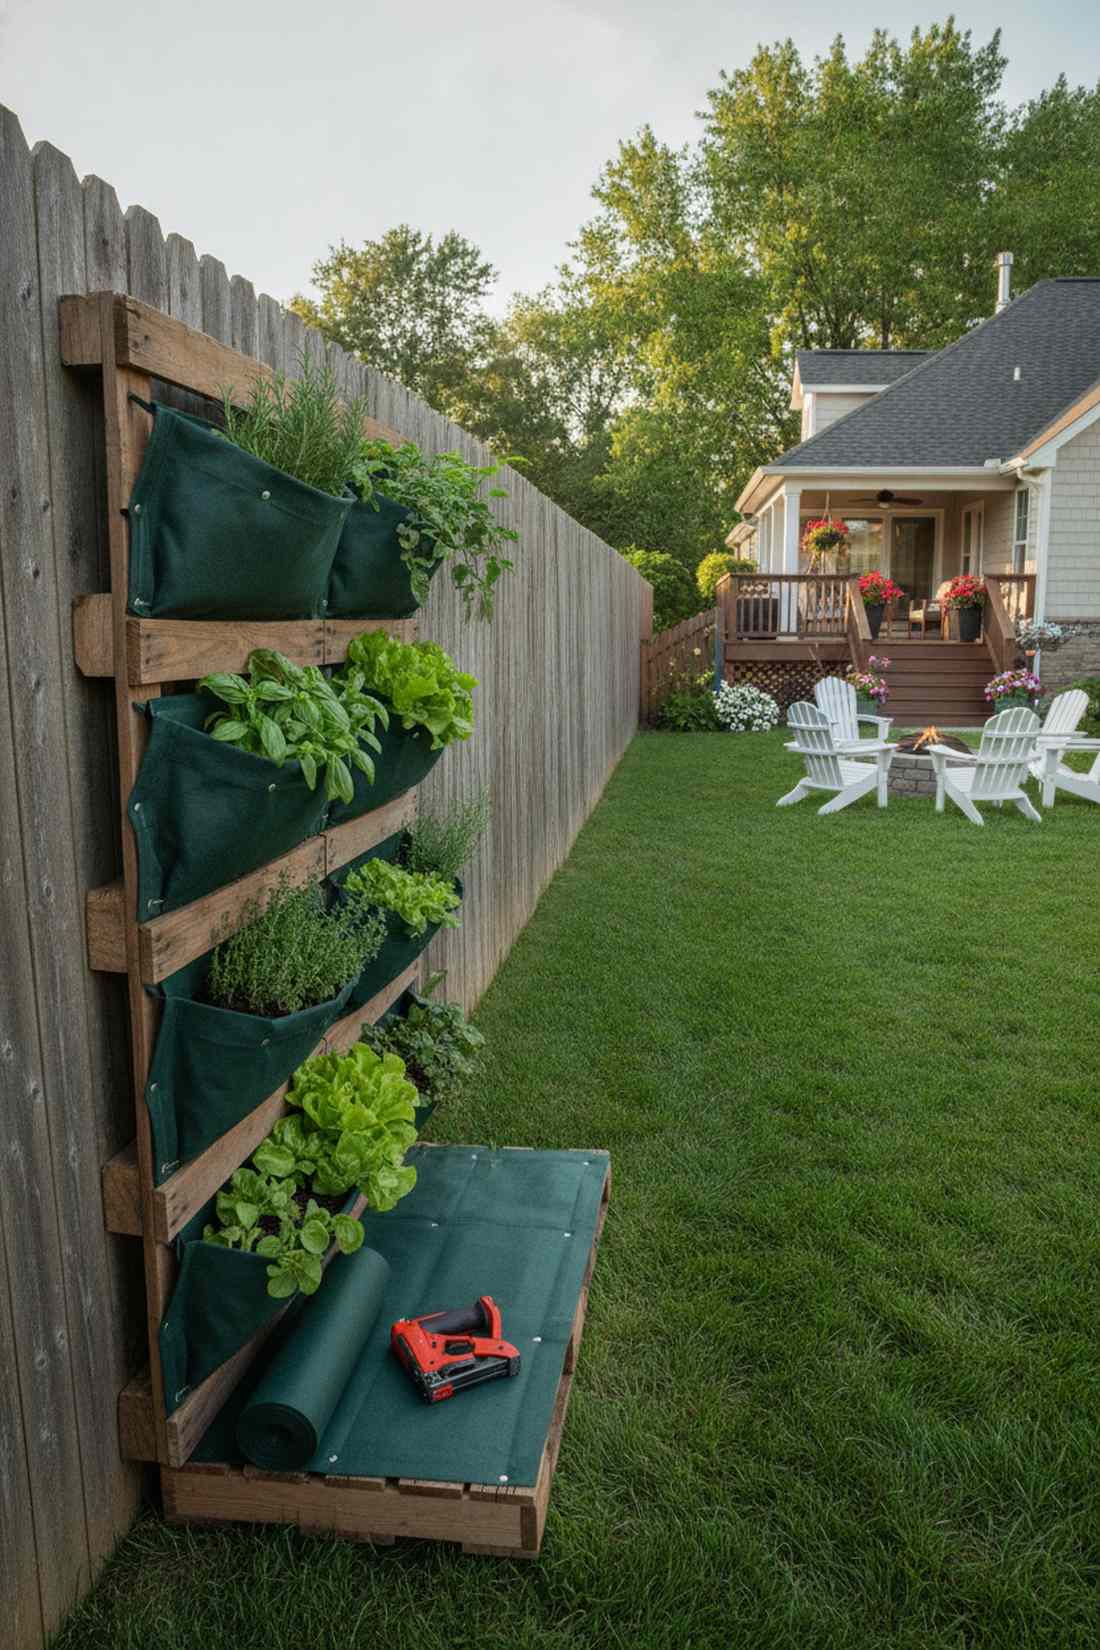
Exudes raw, upcycled charm that perfectly complements farmhouse aesthetics. A reclaimed wood pocket planter transforms heavy wooden fences into fully functioning vegetable or herb stations.
Bare pallets rot quickly, but wrapping the interiors properly looks far more expensive than it is. Adding a protective barrier ensures the wood survives countless watering cycles without degrading.
This zero-waste approach usually costs around $15 for liners. Pin this if you love sustainable DIYs.
- Key Materials: Clean shipping pallets, heavy landscape fabric, staple gun
- Vibe / Style: Upcycled rustic charm
- Difficulty: Intermediate stapling and mounting
- Budget Breakdown: Pallet: Free | Fabric: $15
- Creator’s Tip: Only use pallets stamped with ‘HT’ (Heat Treated) to avoid toxic chemical leaching.
- Smart Sourcing: Commercial-grade landscape fabric rolls and heavy-duty outdoor staple guns.
11. Rain Gutter Fence Planters
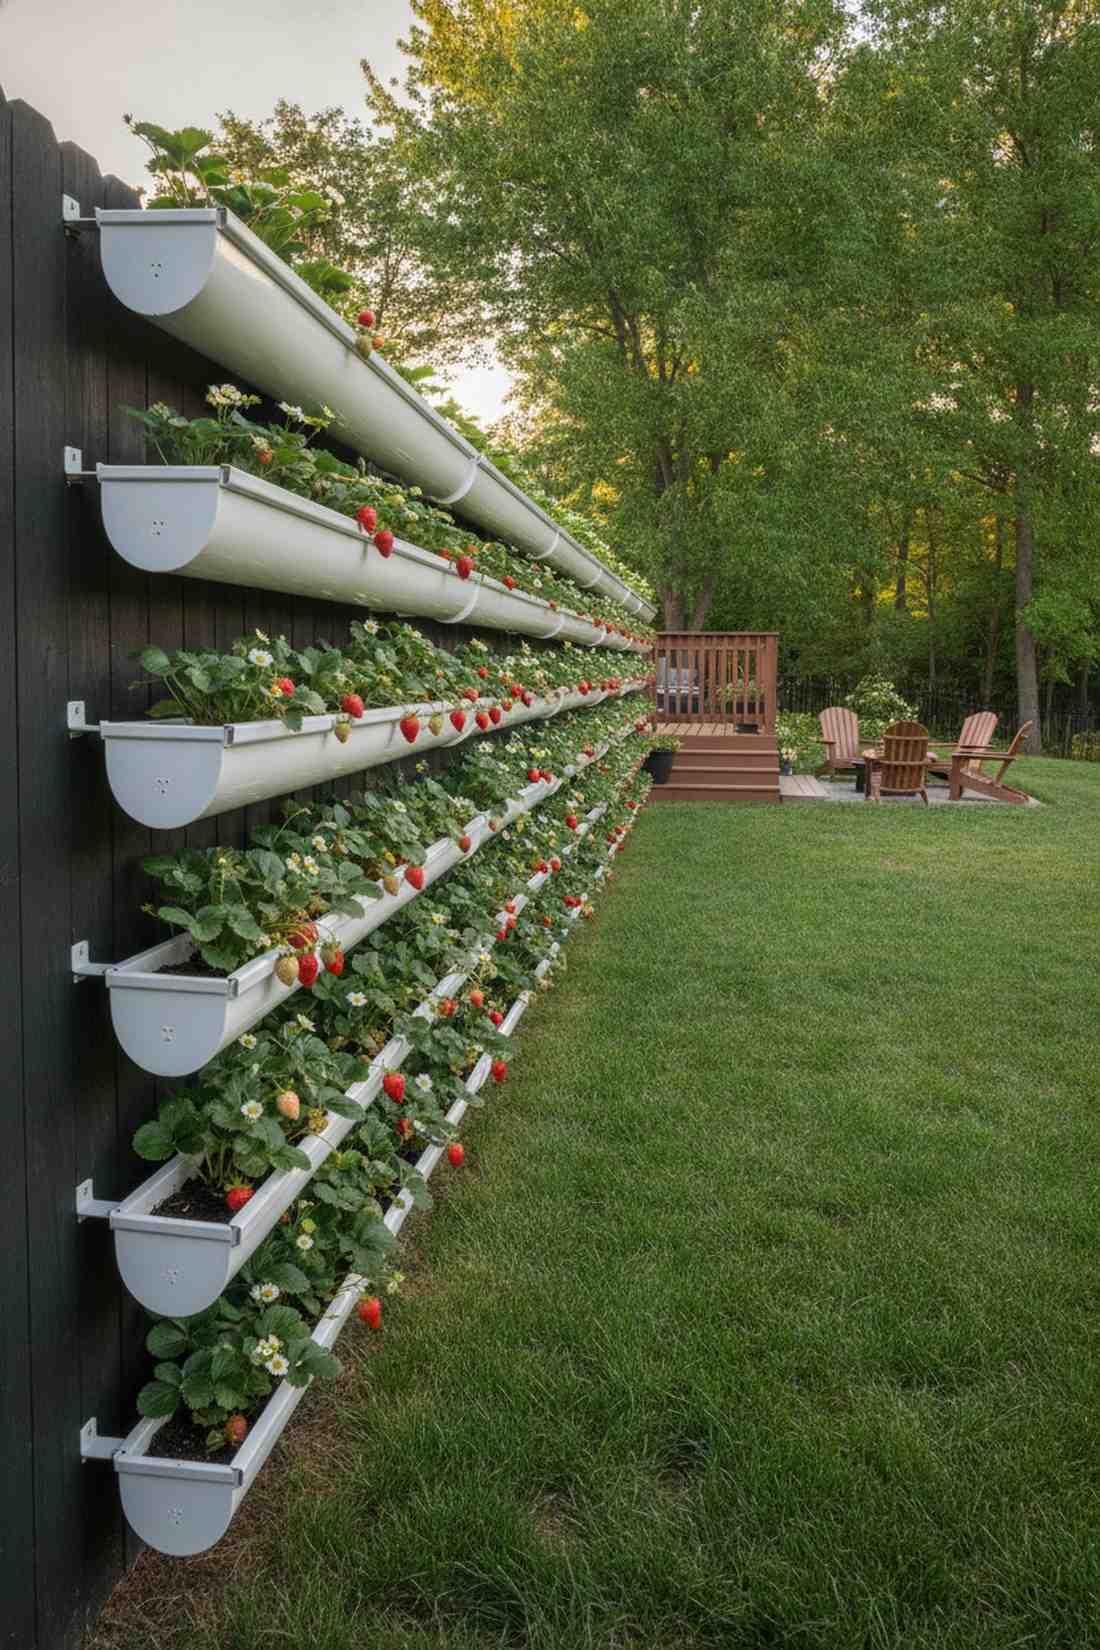
Feels like a hyper-efficient urban farm stacked neatly along the perimeter. The shallow horizontal trough system is a genius hack for growing massive strawberry crops away from ground pests.
Repurposing standard construction materials yields a surprisingly sleek, continuous line. It completely bypasses the need for expensive custom planter boxes while delivering the same modern aesthetic.
A full fence stretch costs roughly $30 in vinyl parts. It’s a wildly efficient weekend project.
- Key Materials: Vinyl gutter tracks, end caps, U-brackets
- Vibe / Style: Modern utilitarian
- Difficulty: Easy cutting and drilling
- Budget Breakdown: Gutters: $20 | Caps/Mounts: $10
- Creator’s Tip: Drill quarter-inch drainage holes every 4 inches to prevent your shallow roots from drowning.
- Smart Sourcing: Pre-cut vinyl gutter starter kits and bulk gutter snap-bracket packs.
12. Hexagon Felt Pocket Wall
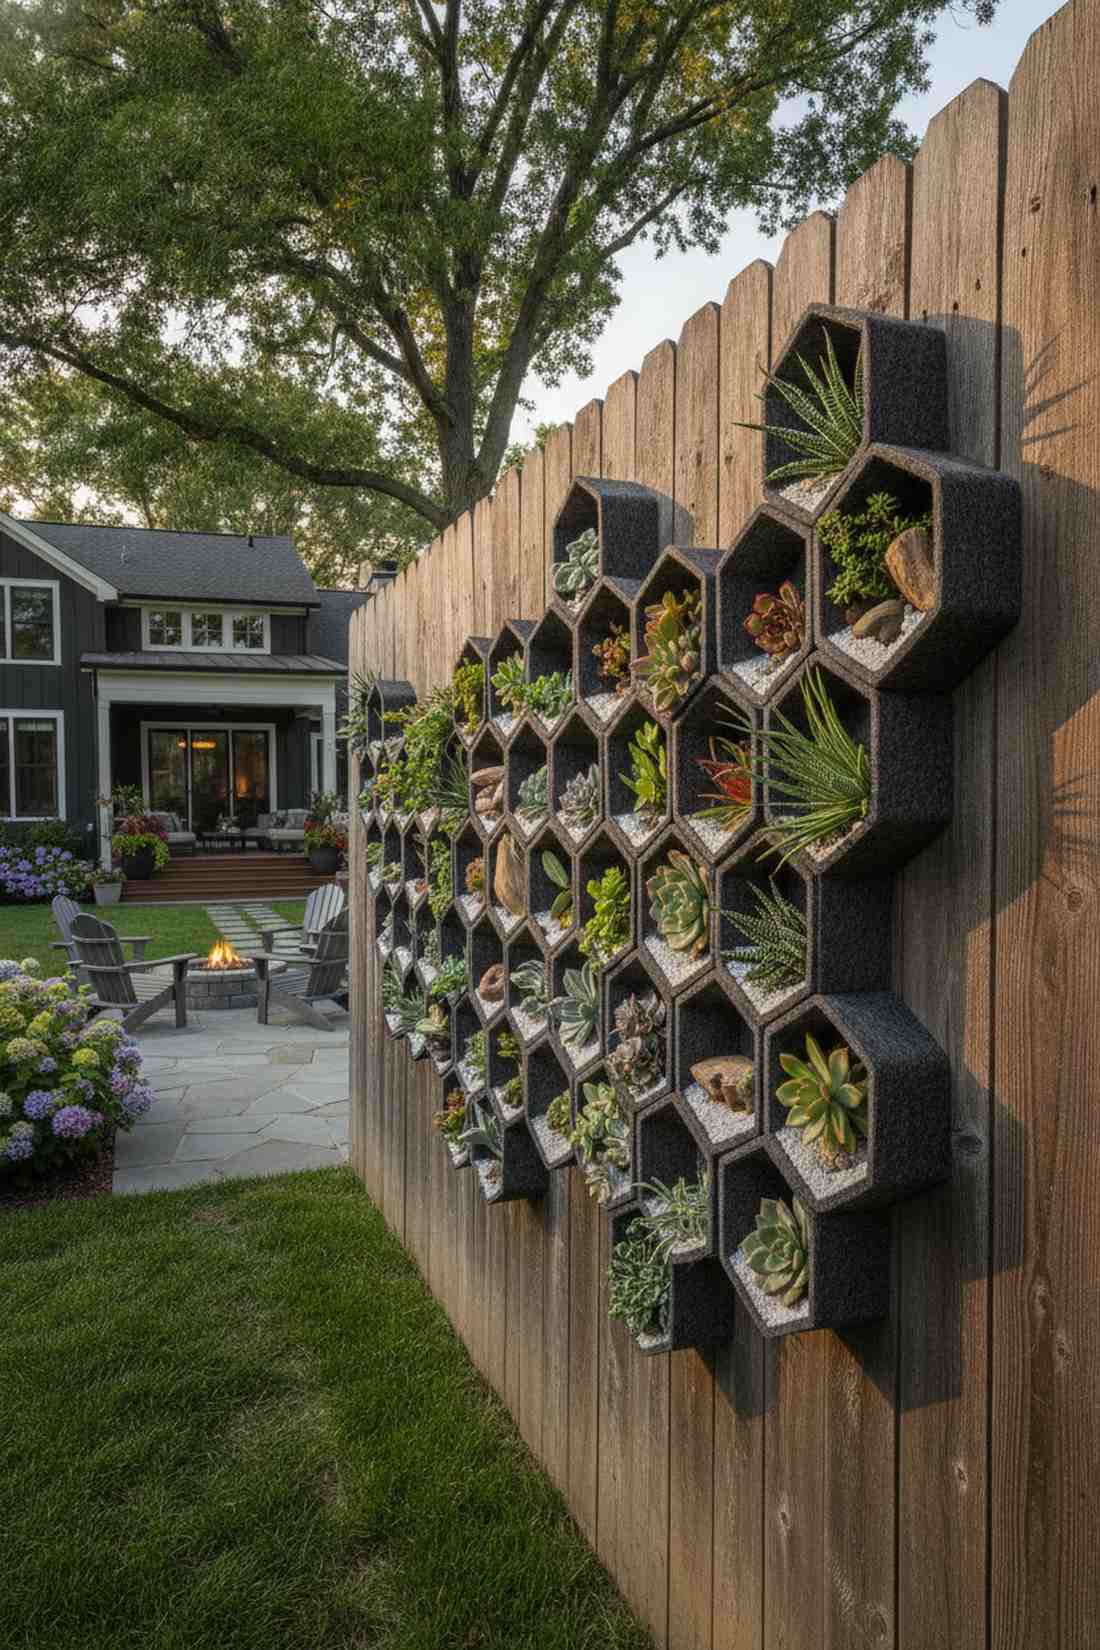
Like a living honeycomb that turns a dull wooden barrier into geometric art. A modular geometric succulent display is perfect for adding contemporary flair to an aging suburban fence.
Traditional squares feel stiff, but a honeycomb pattern delivers a surprisingly premium look. Utilizing terrarium accessories inside these pockets creates a fascinating micro-landscape on your wall.
Expect to spend about $35 for a starter cluster. Save this to your modern outdoor styling board!
- Key Materials: Hexagonal felt pocket modules, brass grommet screws
- Vibe / Style: Contemporary geometric
- Difficulty: Beginner arrangement
- Budget Breakdown: Hex Pockets: $25 | Screws: $10
- Creator’s Tip: Arrange the hexagons in an asymmetrical, spreading pattern to mimic organic growth.
- Smart Sourcing: UV-coated geometric pocket modules and rust-proof brass masonry screws.
13. Fence Post Cap Planters
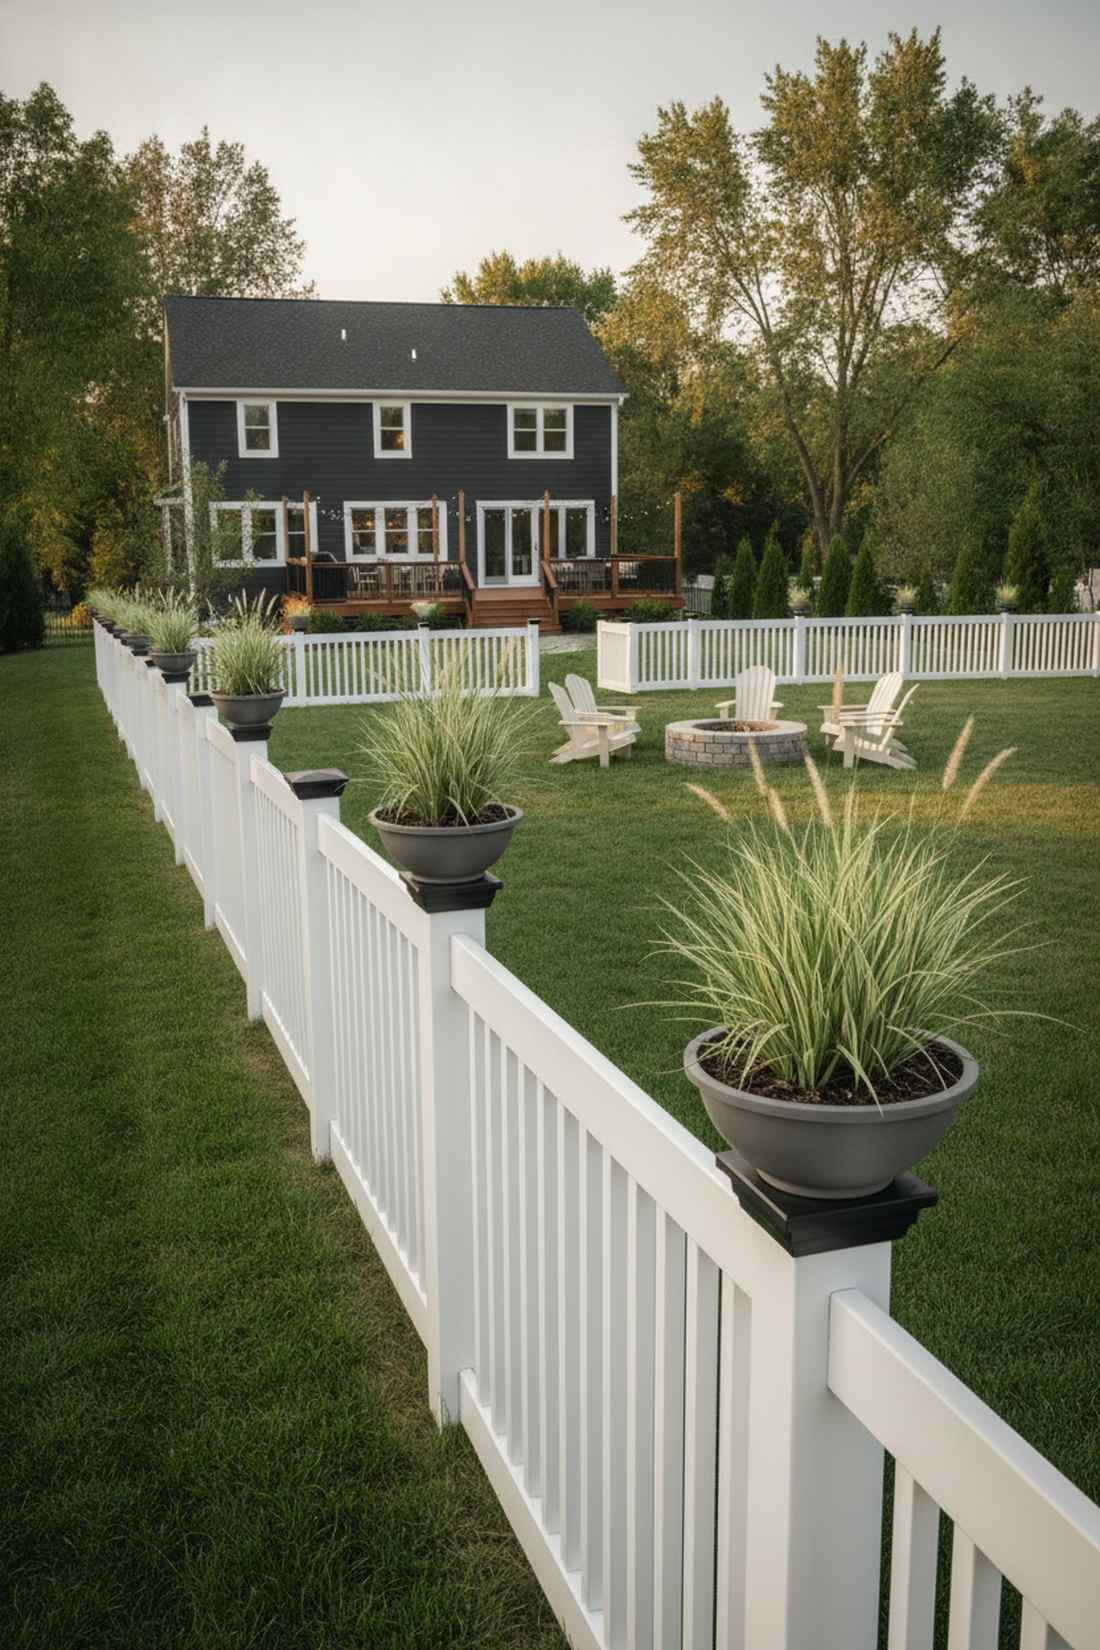
Acts as an elevated crown of greenery that punctuates your yard’s perimeter. The pillar-top botanical accent is a majestic way to showcase spiky ornamental grasses above eye level.
Leaving posts bare is a missed opportunity; capping them gives a designer-level finish to ordinary fencing. It draws the gaze upward and makes the entire yard feel taller.
You can cap four posts for roughly $40. A brilliant micro-upgrade with massive visual impact.
- Key Materials: Post-cap adapter platforms, shallow decorative bowls
- Vibe / Style: Elevated estate aesthetic
- Difficulty: Simple screw-on
- Budget Breakdown: Adapters: $20 | Bowls: $20
- Creator’s Tip: Choose drought-tolerant plants here, as elevated soil dries out twice as fast in the wind.
- Smart Sourcing: Universal fence post planter brackets and weatherproof shallow resin bowls.
Railing Edge Gardens for Balconies and Decks
Hanging plants railing designs maximize deck and balcony perimeters without sacrificing floor space for furniture. These installations require specialized brackets that accommodate varying rail dimensions and materials.
Stop risking your security deposit… this temporary solution is completely brilliant.
14. Adjustable Rail Brackets
Feels like a lush security blanket wrapping around your elevated balcony. A clamp-on perimeter floral box allows apartment renters to drown out city noise with dense foliage.
Permanent screws destroy metal, but a tension-based clamp looks far more expensive than it is. Integrating heavy-duty railing brackets guarantees your heavy soil won’t tip over during a storm.
A set of high-end clamps costs around $25. Pin this if you need a zero-damage apartment hack!
- Key Materials: Adjustable steel vice brackets, standard window boxes
- Vibe / Style: Safe renter-friendly luxury
- Difficulty: Zero-tool setup
- Budget Breakdown: Brackets: $25 | Boxes: Free (reuse old ones)
- Creator’s Tip: Add foam weather stripping inside the clamp jaws to prevent scratching your landlord’s paint.
- Smart Sourcing: Heavy-duty adjustable rail clamps and weather-sealed balcony box starter sets.
15. Balconera Deck Rail System
Delivers an ultra-premium, European cafe vibe directly to your second-story deck. This strap-mounted modern planter conforms flawlessly to odd-shaped or extra-thick railings.
Rigid brackets often fail on custom builds, but a heavy-duty strap system provides a secure, designer-level finish. It tightly hugs the rail, preventing any rattling during high winds.
This premium aesthetic will run about $50 per unit. Totally worth it for the high-end look.
- Key Materials: Woven nylon strap mounts, locking clasps
- Vibe / Style: High-end European balcony
- Difficulty: Snap and tighten
- Budget Breakdown: Strap Kit: $20 | Planter: $30
- Creator’s Tip: Tuck the excess strap tails inside the bottom lip of the planter for a completely seamless look.
- Smart Sourcing: UV-resistant strap mounting kits and premium self-watering balconera boxes.
16. Railing Shelf Planters
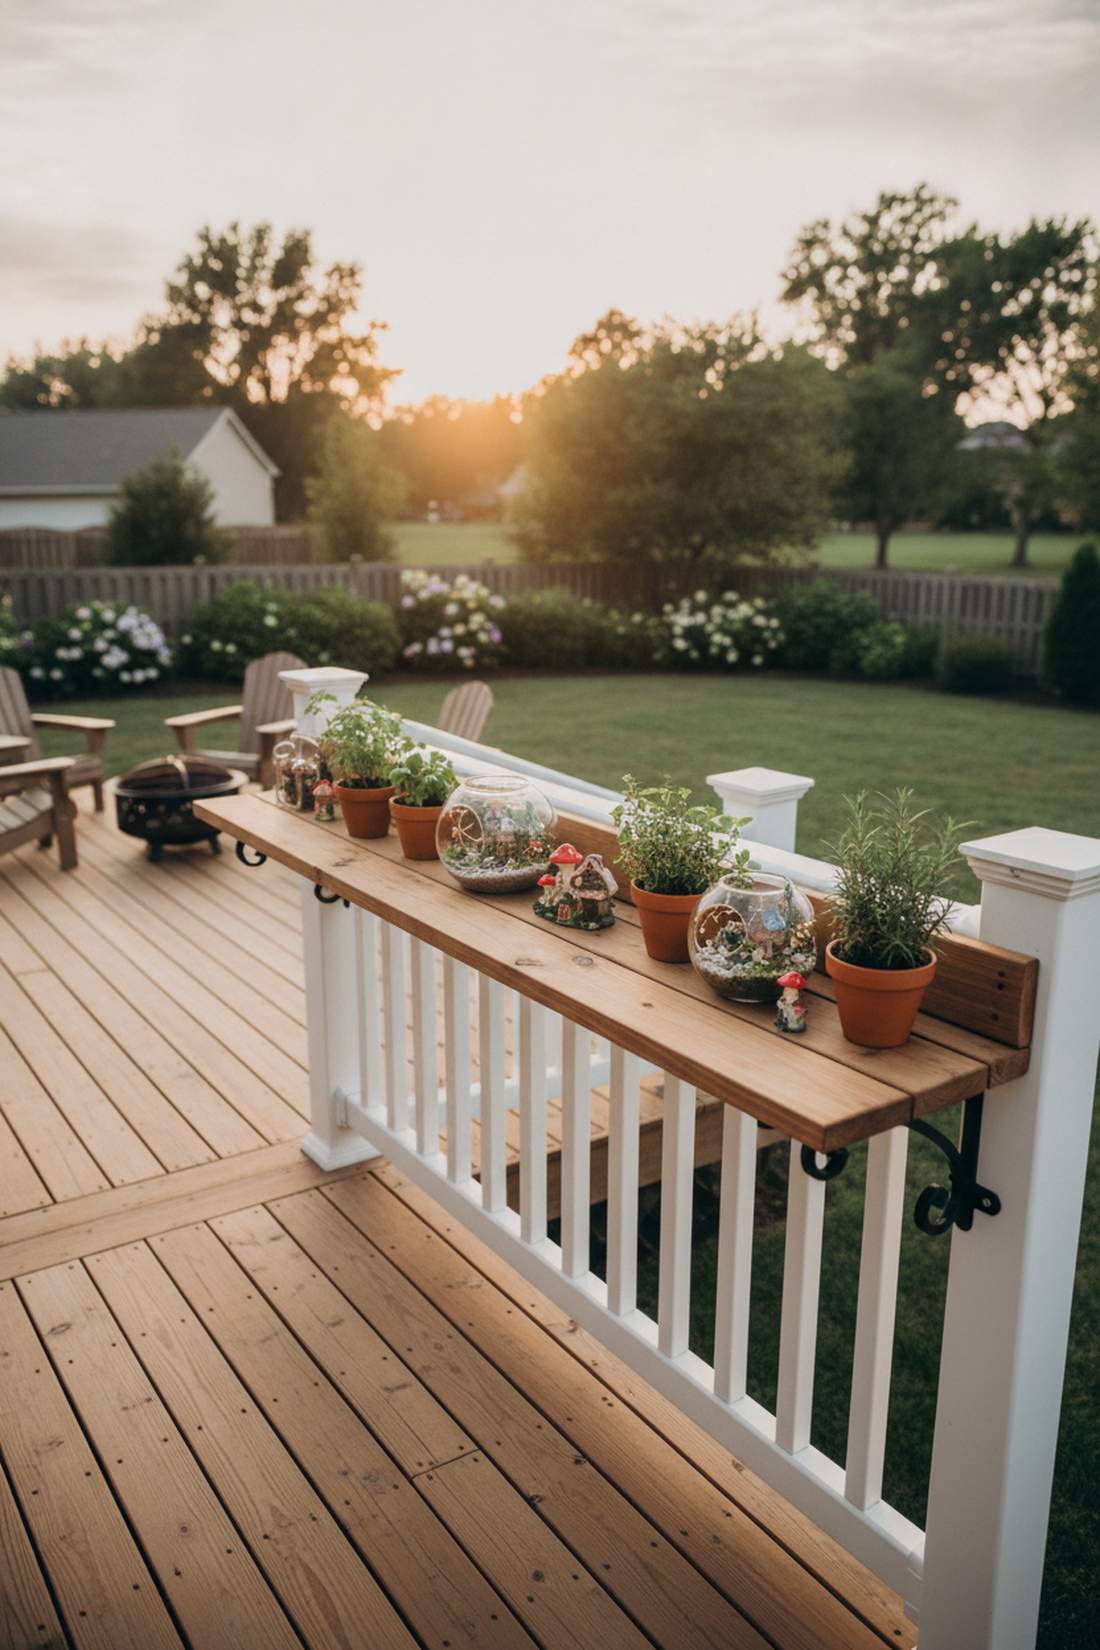
Transforms a skinny handrail into a bustling botanical bar top. The horizontal deck edge shelving is a game-changer for hosting multiple tiny terrariums or small potted herbs.
Balancing loose pots is risky, but a dedicated shelf platform delivers a surprisingly premium look. Utilizing fairy garden kits across the shelf creates an interactive visual for guests leaning over the rail.
You can build a sturdy shelf for roughly $35. Save this to your small patio makeover board!
- Key Materials: Balcony shelf brackets, treated wooden planks
- Vibe / Style: Elevated botanical bar
- Difficulty: Easy leveling
- Budget Breakdown: Shelving: $15 | Brackets: $20
- Creator’s Tip: Attach a tiny raised lip to the back of the wood to prevent pots from getting accidentally knocked off.
- Smart Sourcing: Pre-cut weather-treated shelf boards and bulk balcony shelf bracket packs.
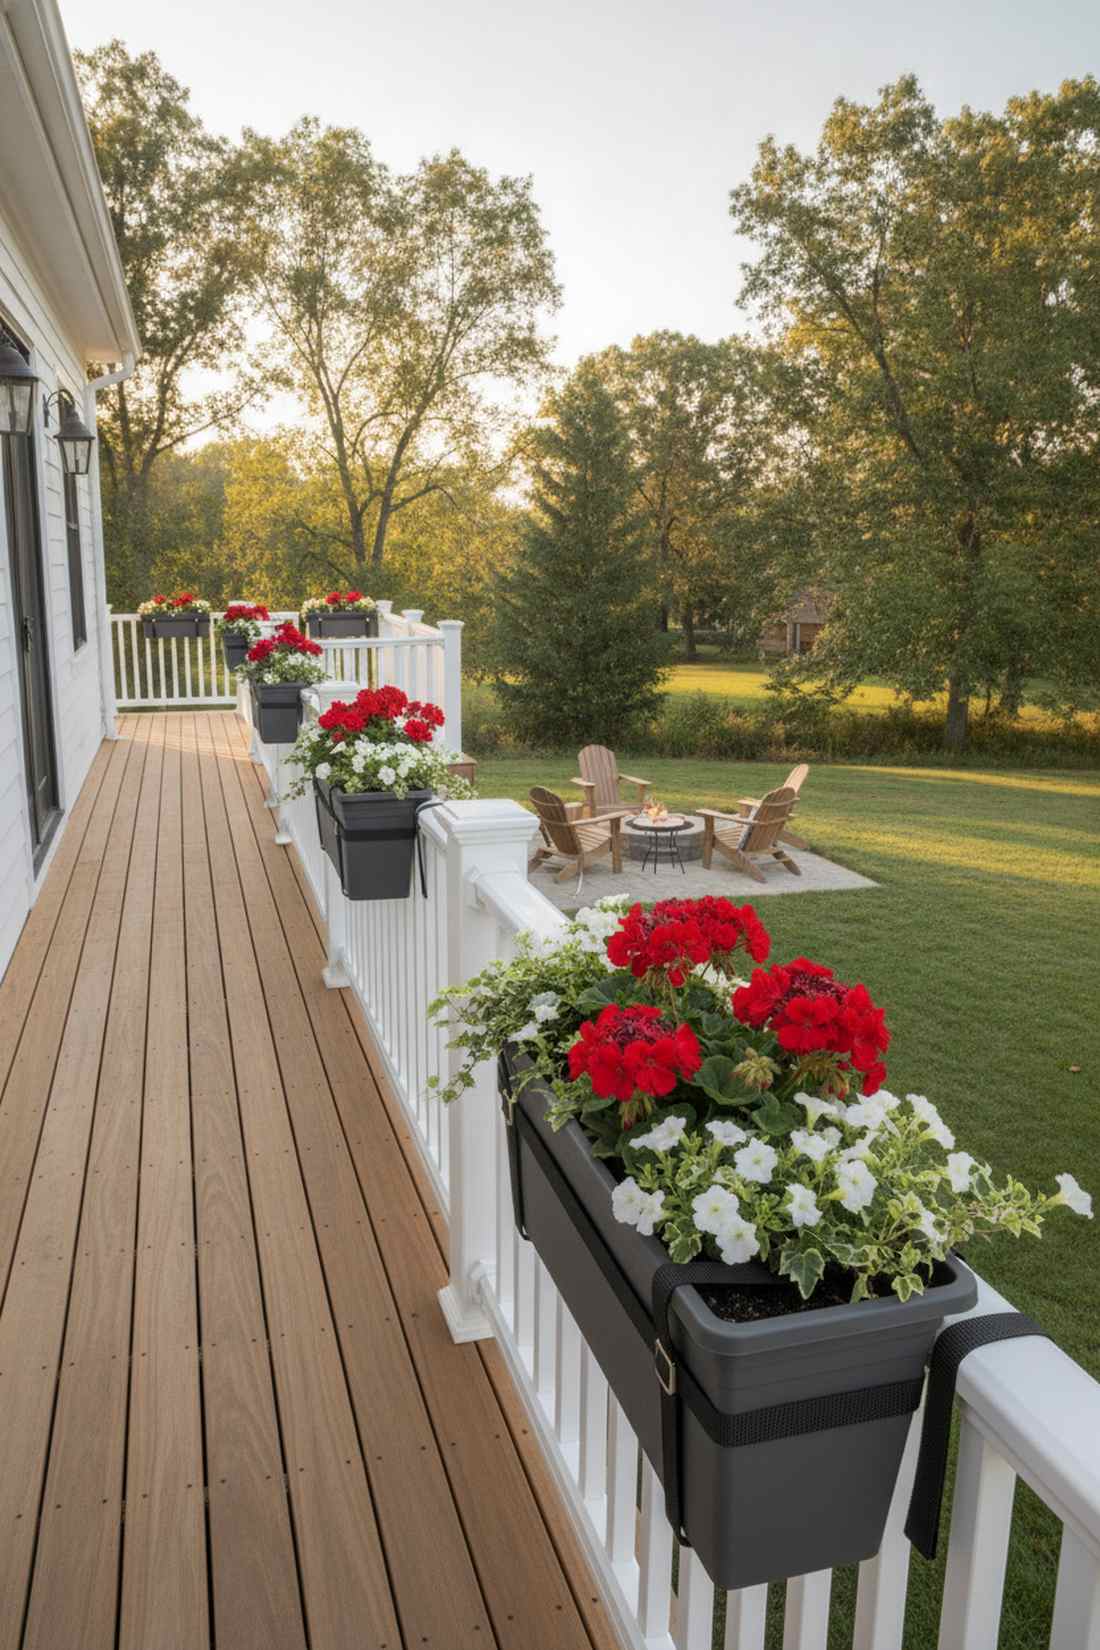
17. Hanging Herb Garden Rail
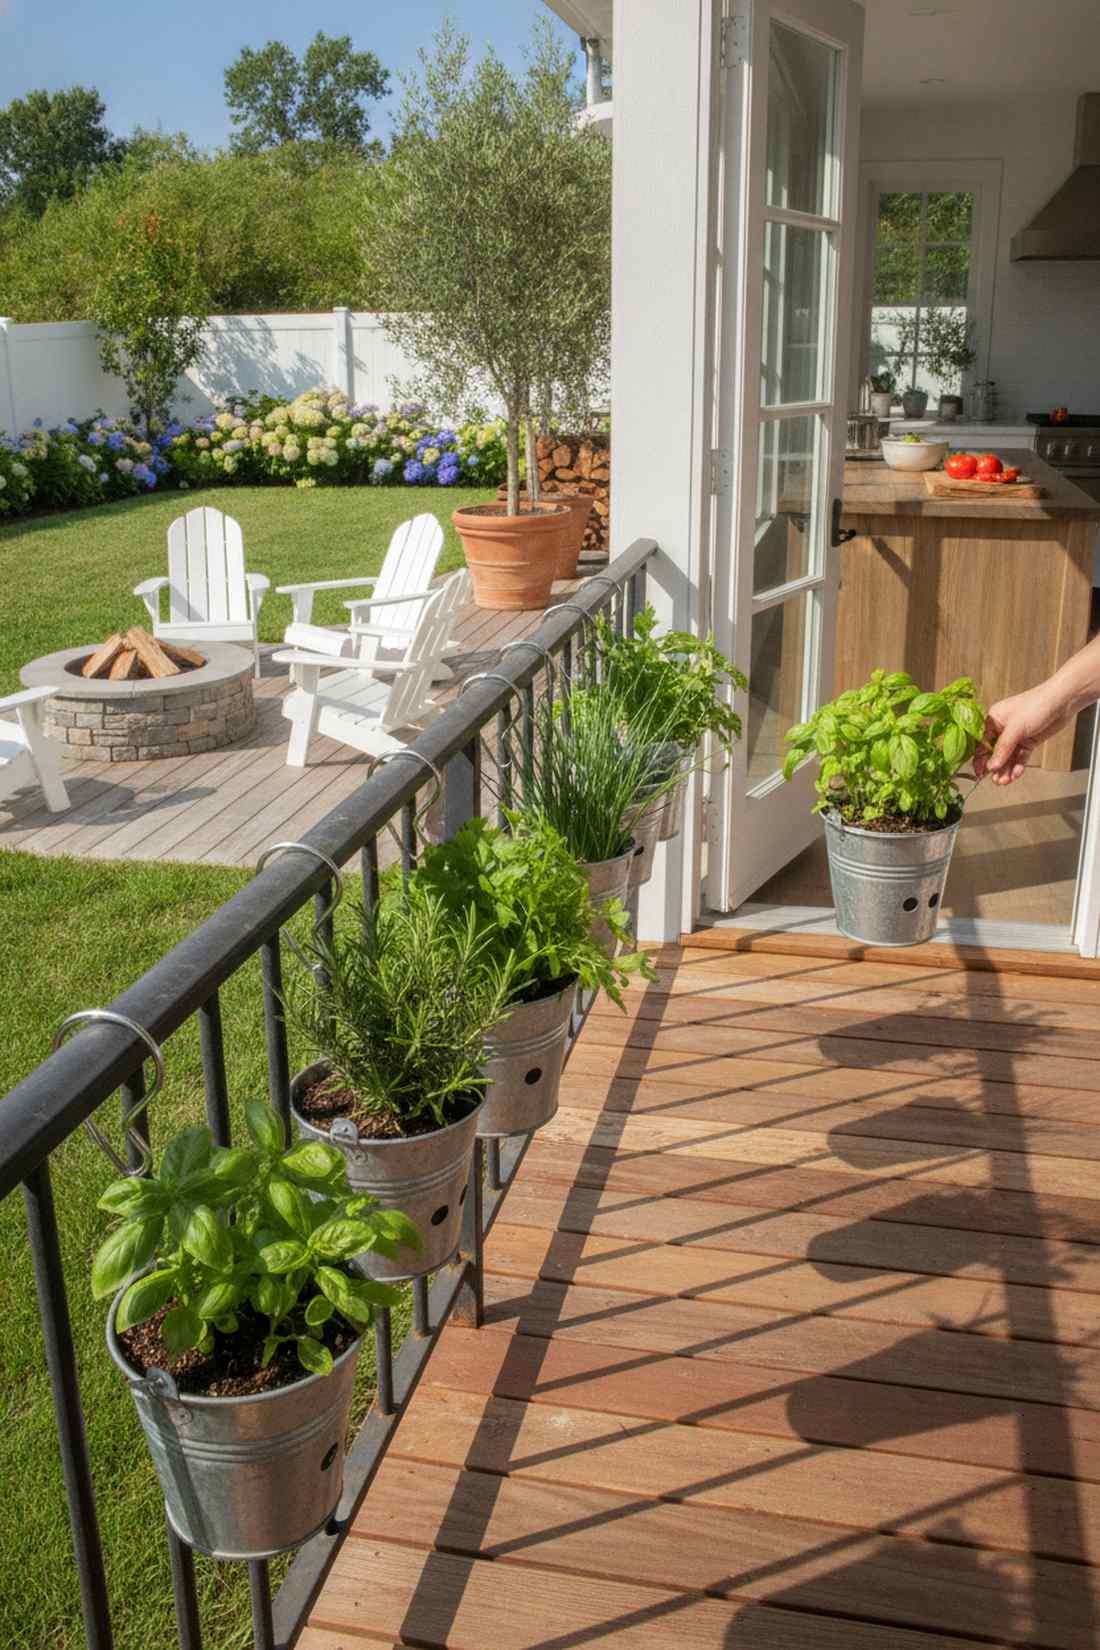
Feels like a chef’s dream hovering right outside the kitchen door. A suspended culinary pot series turns a sunny southern deck rail into a highly productive harvest zone.
Massive pots waste space, but isolating individual herbs on S-hooks transforms standard container gardening into a functional feature. You can effortlessly unhook the basil and carry it straight to the cutting board.
This practical setup costs under $25 to complete. Highly recommended for avid home cooks.
- Key Materials: Mini galvanized buckets, S-hooks, organic herb soil
- Vibe / Style: Functional culinary chic
- Difficulty: Beginner hook-and-hang
- Budget Breakdown: Buckets: $15 | Hooks: $10
- Creator’s Tip: Drill holes slightly up the sides of the bucket rather than the very bottom to create a tiny water reservoir.
- Smart Sourcing: Rust-proof galvanized bucket multi-packs and heavy-duty hanging S-hooks.
18. Tiered Railing Cascade
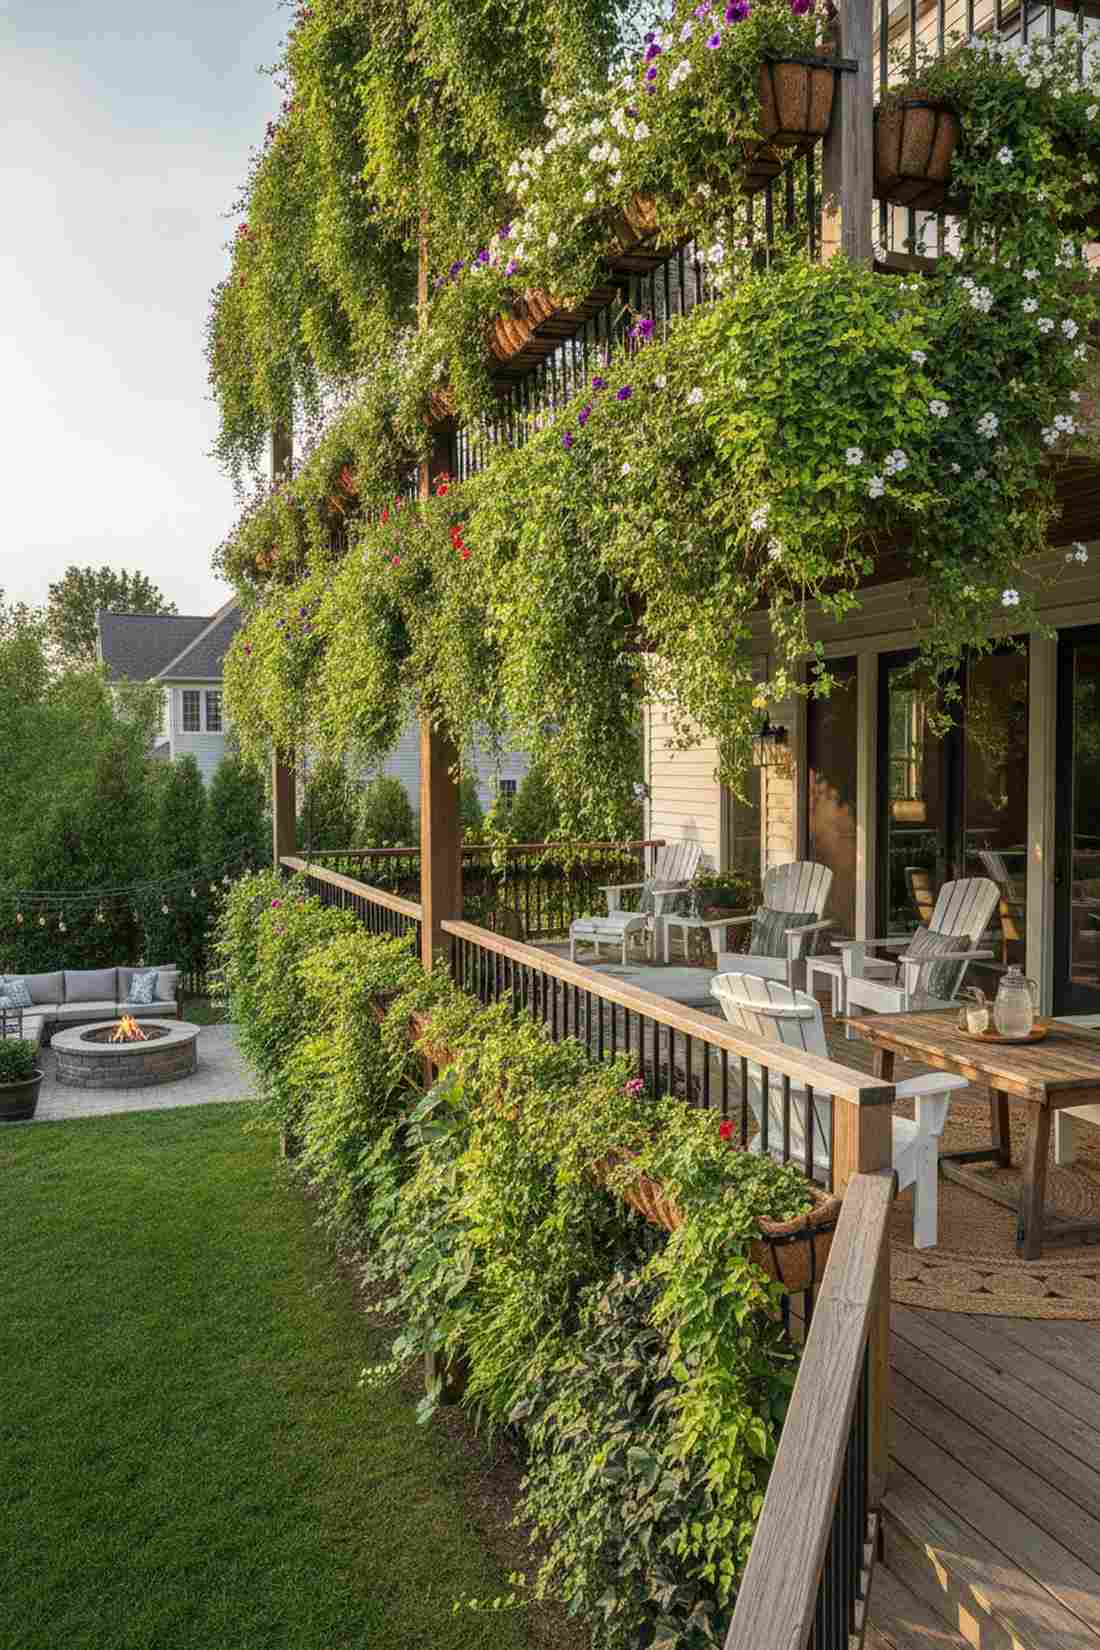
Creates an awe-inspiring waterfall of foliage that completely conceals the railing posts. The multi-level vertical rail blanket maximizes privacy while looking incredibly luxurious.
Using a single row is fine, but double-stacking brackets creates an illusion that totally fools the eye into seeing a solid green wall. It easily blocks nosy neighbors without violating building codes.
Budget around $55 for this dense, layered look. Pin this layout for your privacy screen inspiration!
- Key Materials: High-low double tier brackets, dense trailing vines
- Vibe / Style: Total privacy cascade
- Difficulty: Intermediate spacing
- Budget Breakdown: Tiered Brackets: $35 | Long boxes: $20
- Creator’s Tip: Plant sun-lovers on the top tier and shade-tolerant creepers on the bottom tier to accommodate the shadow cast.
- Smart Sourcing: Commercial double-tier rail brackets and bulk coco-lined trough planters.
Most DIYers throw their money away on setups that blow over… until they lock in this design.
19. Corner Rail Planters
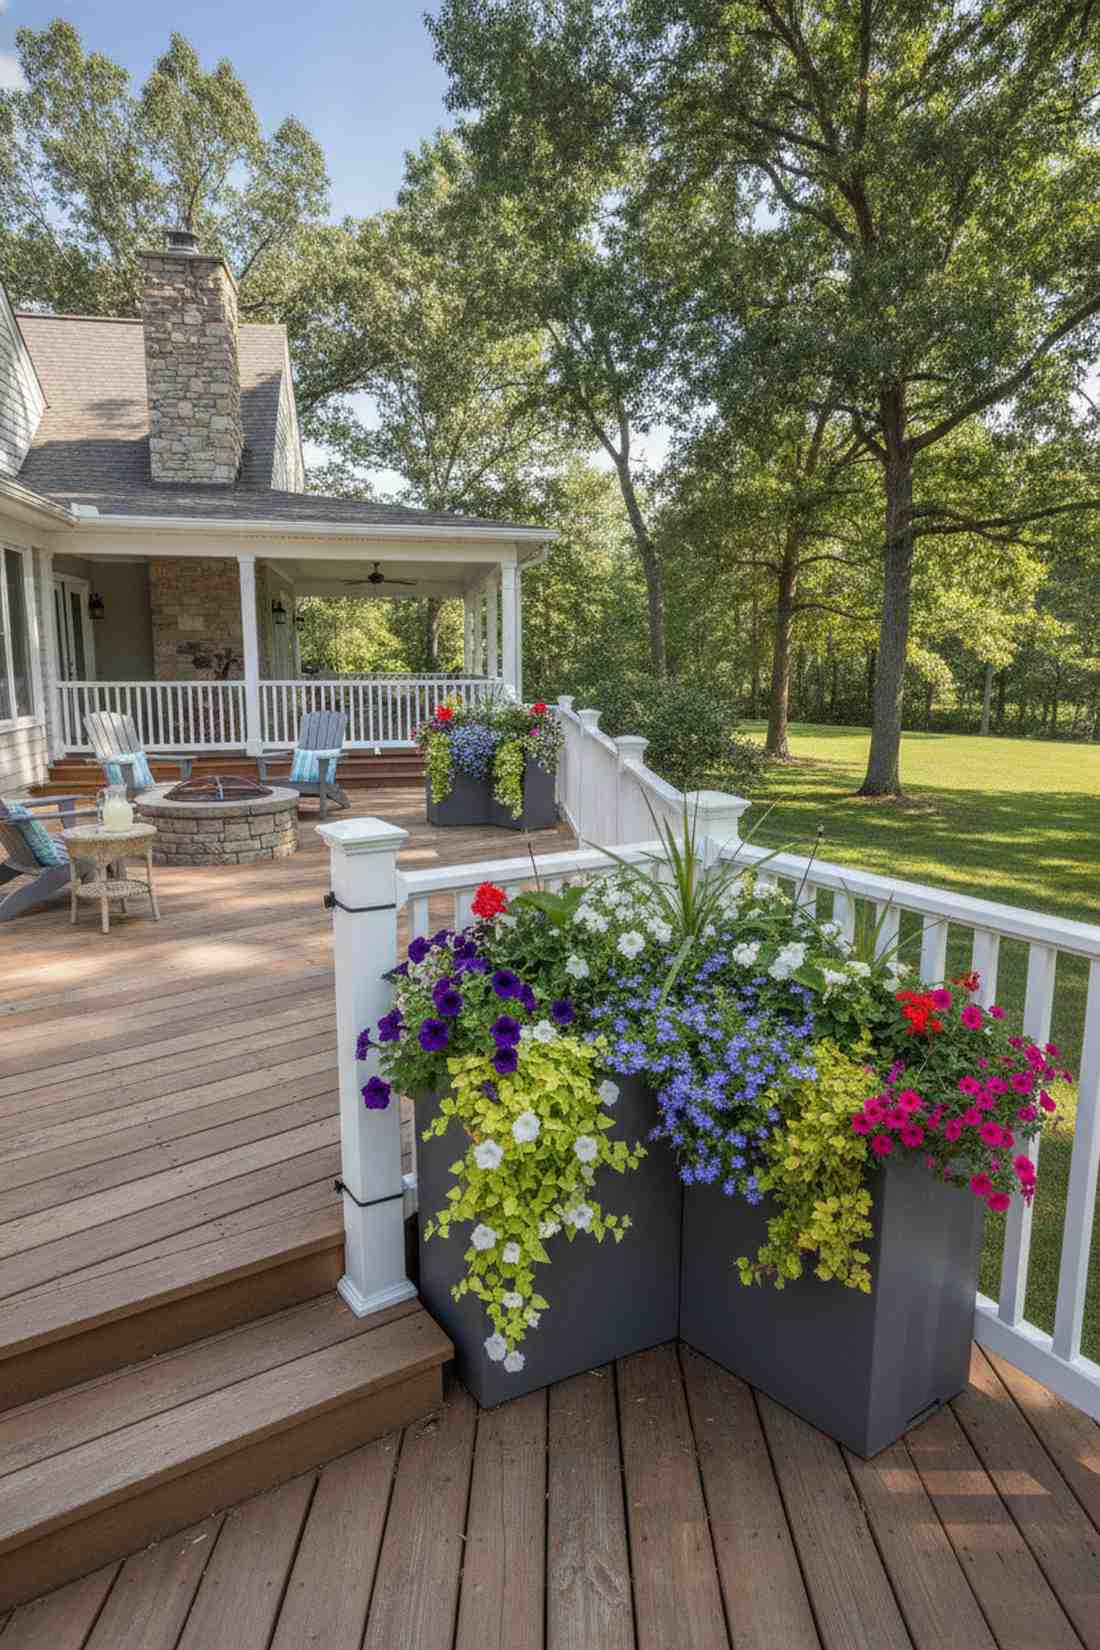
Acts like a grand botanical pillar anchoring the edges of your outdoor living room. A wrap-around corner deck box makes brilliant use of the dead zones where handrails meet.
Corners are notoriously hard to decorate, but an L-shaped vessel gives a designer-level finish. It softens the hard 90-degree angles of your deck with sprawling, voluminous greenery.
These specialty containers cost roughly $40. A massive visual upgrade for very little effort.
- Key Materials: L-shaped corner rail planters, zip-tie security anchors
- Vibe / Style: Structural perimeter softening
- Difficulty: Drop and secure
- Budget Breakdown: L-Planter: $35 | Anchors: $5
- Creator’s Tip: Drop a heavy landscaping brick into the bottom before adding soil to prevent wind-lift on exposed deck corners.
- Smart Sourcing: UV-coated L-shaped corner planters and weatherproof outdoor plant tie packs.
Macramé and Textile Hangers for Layered Dimension
Textile plant hangers add bohemian texture and adjustable heights to hanging plants wall decor schemes. These handcrafted or store-bought supports bring artistic character while solving practical hanging challenges.
20. Classic Macramé Spiral Hanger
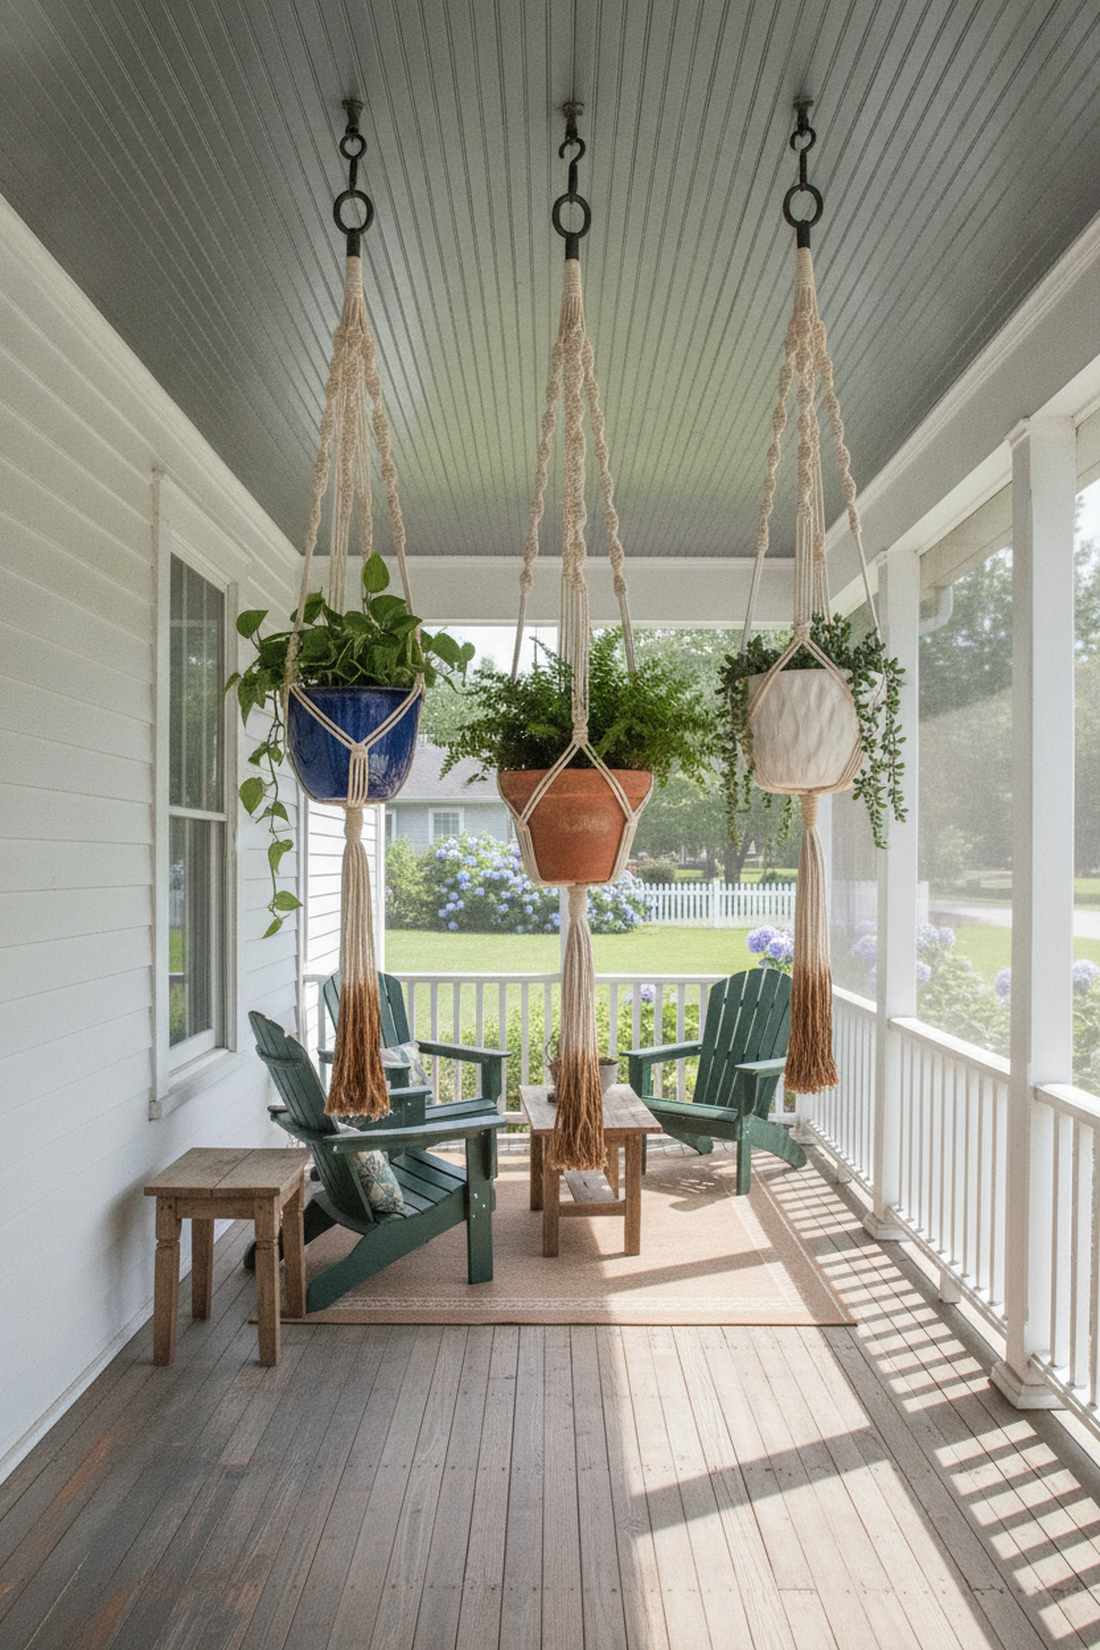
Brings a magical, swaying kinetic energy to a static corner of your porch. A woven bohemian ceiling drop adds incredible vertical dimension when grouped in asymmetrical clusters.
Naked plastic hooks look cheap, but a thick cotton spiral hanger looks far more expensive than it is. Sourcing macrame plant hanger kits ensures your heavy ceramic pots are cradled safely.
You can knot your own or buy pre-made for about $20. Save this to your cozy outdoor decor board!
- Key Materials: 5mm twisted cotton cord, heavy ceiling hooks
- Vibe / Style: Breezy boho magic
- Difficulty: Beginner knotting
- Budget Breakdown: Cord: $10 | Hooks: $10
- Creator’s Tip: Dip dye the bottom tassels in tea or coffee for a gorgeous, organic ombre effect.
- Smart Sourcing: Bulk 5mm natural cotton macrame cords and heavy-duty ceiling hook starter kits.
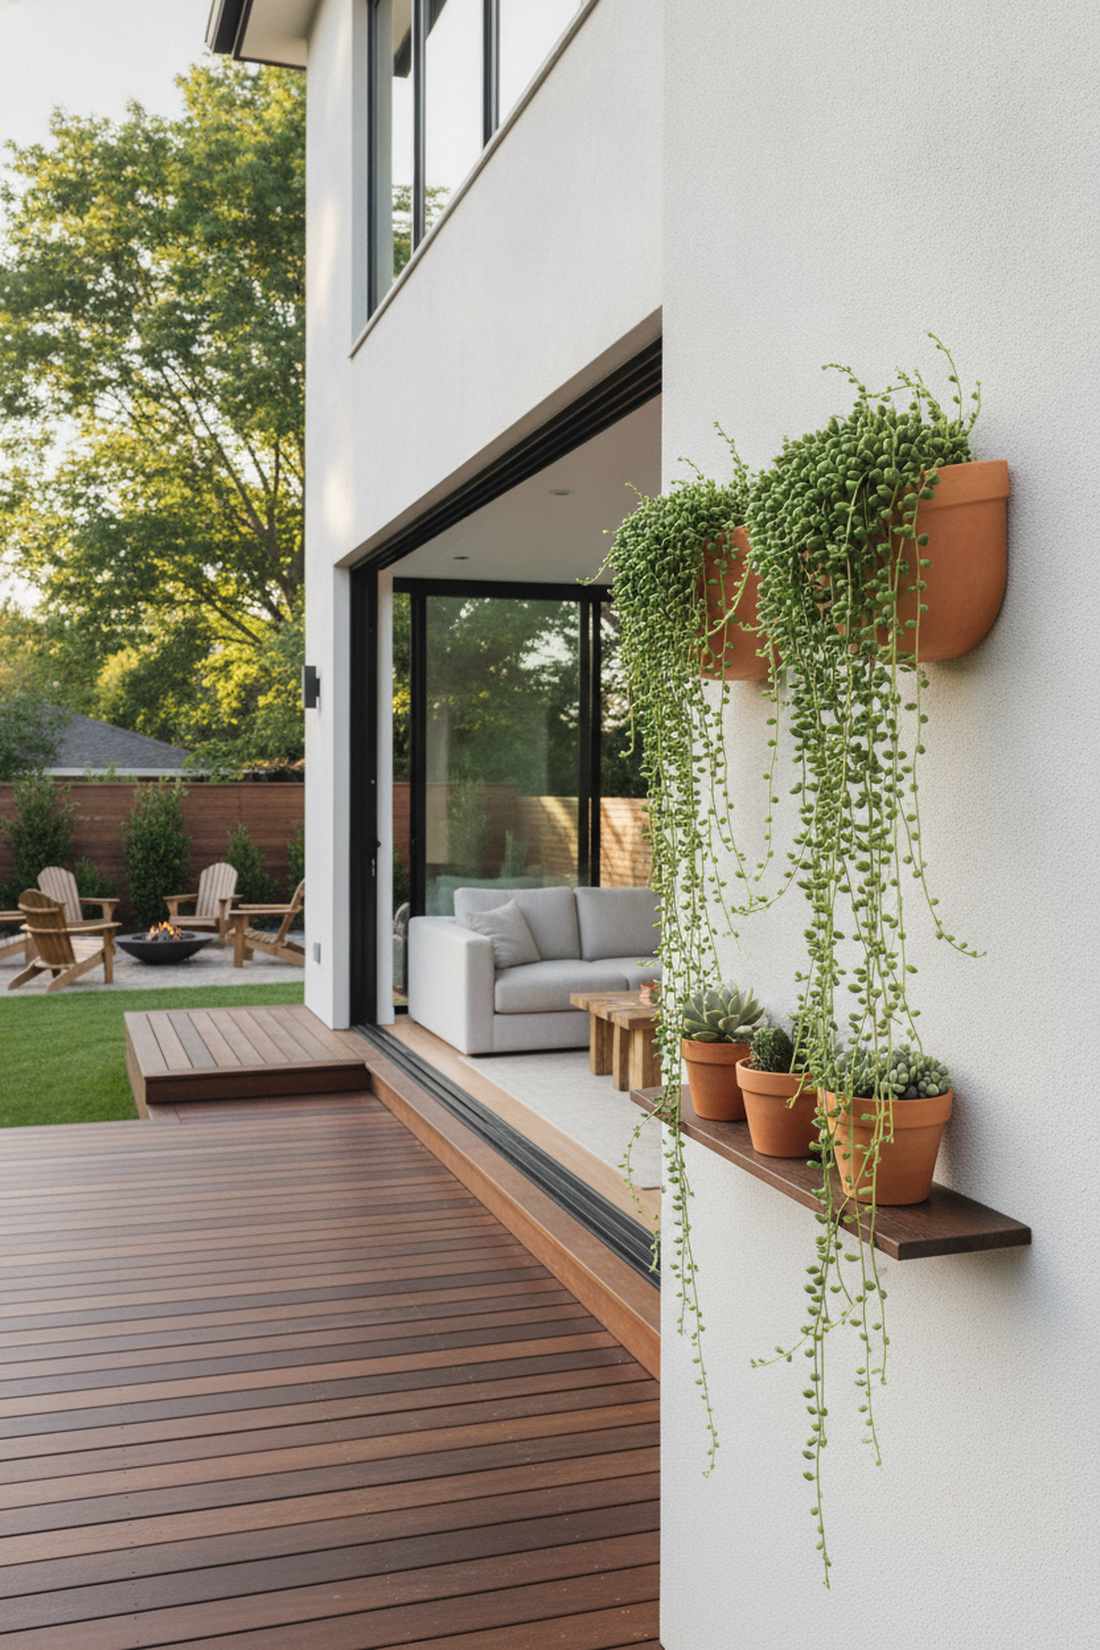
21. Wall-Mounted Macramé Diamond Pattern
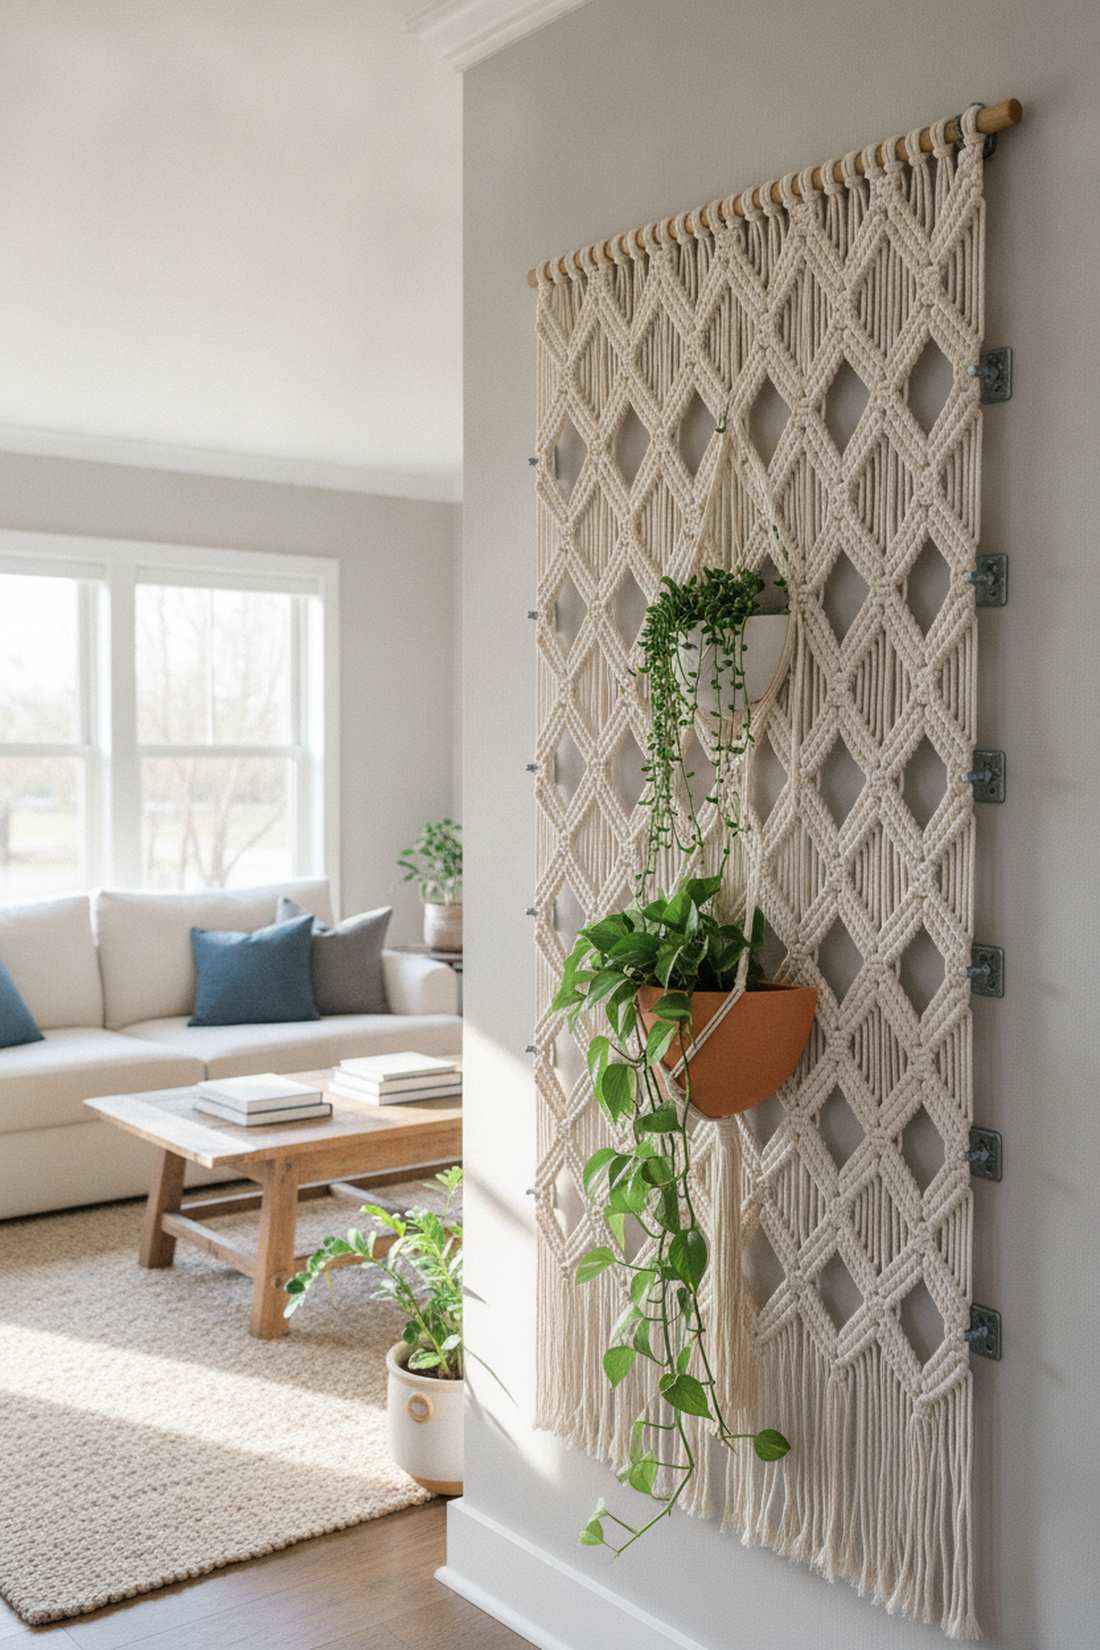
Feels like a custom tapestry that happens to hold living art. The flat-back woven wall cradle is the ultimate solution for spaces with ceilings that are too high or fragile to drill into.
Standard hangers bump off the wall, but a flat-back diamond weave delivers a surprisingly premium look that stays flush. It merges textile art seamlessly with container gardening.
This aesthetic upgrade costs around $25. A must-try for interior accent walls or covered patios.
- Key Materials: Wall-specific flat macrame, drywall anchors
- Vibe / Style: Artistic flat-lay botanical
- Difficulty: Simple wall anchoring
- Budget Breakdown: Hanger: $20 | Anchors: $5
- Creator’s Tip: Use a flat-backed semi-circle pot rather than a full round pot so the tapestry lays completely flat against the drywall.
- Smart Sourcing: Pre-woven flat-back macrame hangers and heavy-duty drywall anchor multi-packs.
22. Fabric Pocket Hanging Garden
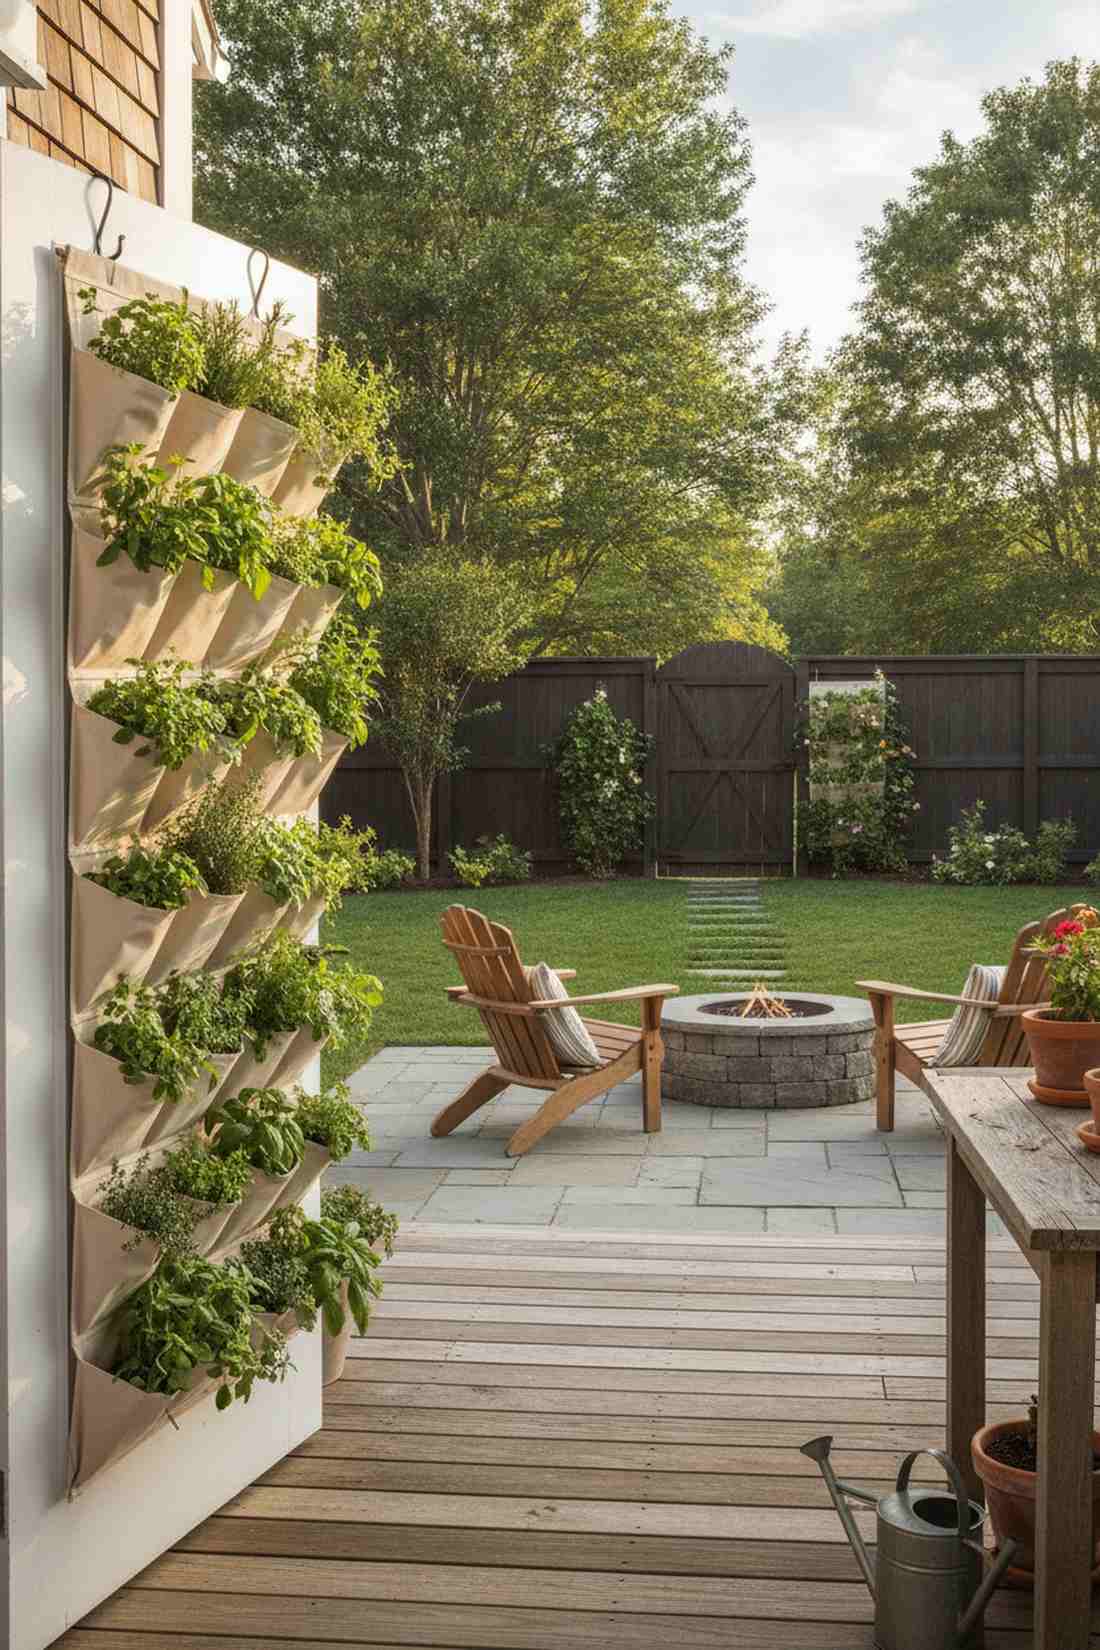
Instantly transforms a plain exterior door or fence gate into a lush vertical nursery. The over-the-door botanical organizer is a wildly clever way to grow a massive herb variety in zero square feet.
While often used for shoes, repurposing this heavy canvas creates an illusion that totally fools the eye. It becomes a towering wall of greenery that hides its humble, budget-friendly origins.
You can execute this genius hack for under $15. Pin this for the ultimate cheap garden hack!
- Key Materials: Canvas multi-pocket organizer, over-door hooks
- Vibe / Style: Clever vertical utility
- Difficulty: Zero-tool instant setup
- Budget Breakdown: Canvas Organizer: $10 | Hooks: $5
- Creator’s Tip: Slide a cheap plastic sandwich bag (with a tiny pinhole) into each pocket before adding soil to protect the canvas from rot.
- Smart Sourcing: Heavy-duty canvas pocket organizers and bulk plastic planter liners.
23. Jute Rope Net Hangers
Exudes a relaxed, coastal fisherman vibe that perfectly cradles weathered terracotta. The wide-weave natural fiber netting is brilliant for covered porches where rustic textures shine.
Synthetic ropes look plastic and fake; natural jute transforms standard container gardening into an authentic, earthy display. It allows maximum airflow around the pot, keeping root temperatures beautifully regulated.
This raw setup usually runs under $20. Save this to your rustic patio inspiration board!
- Key Materials: Natural jute rope, stainless O-rings
- Vibe / Style: Coastal rustic charm
- Difficulty: Basic netting knots
- Budget Breakdown: Jute Rope: $15 | O-rings: $5
- Creator’s Tip: Spray the jute lightly with an outdoor fabric protector to extend its life against high humidity.
- Smart Sourcing: Thick natural jute rope spools and weatherproof hanging O-ring packs.
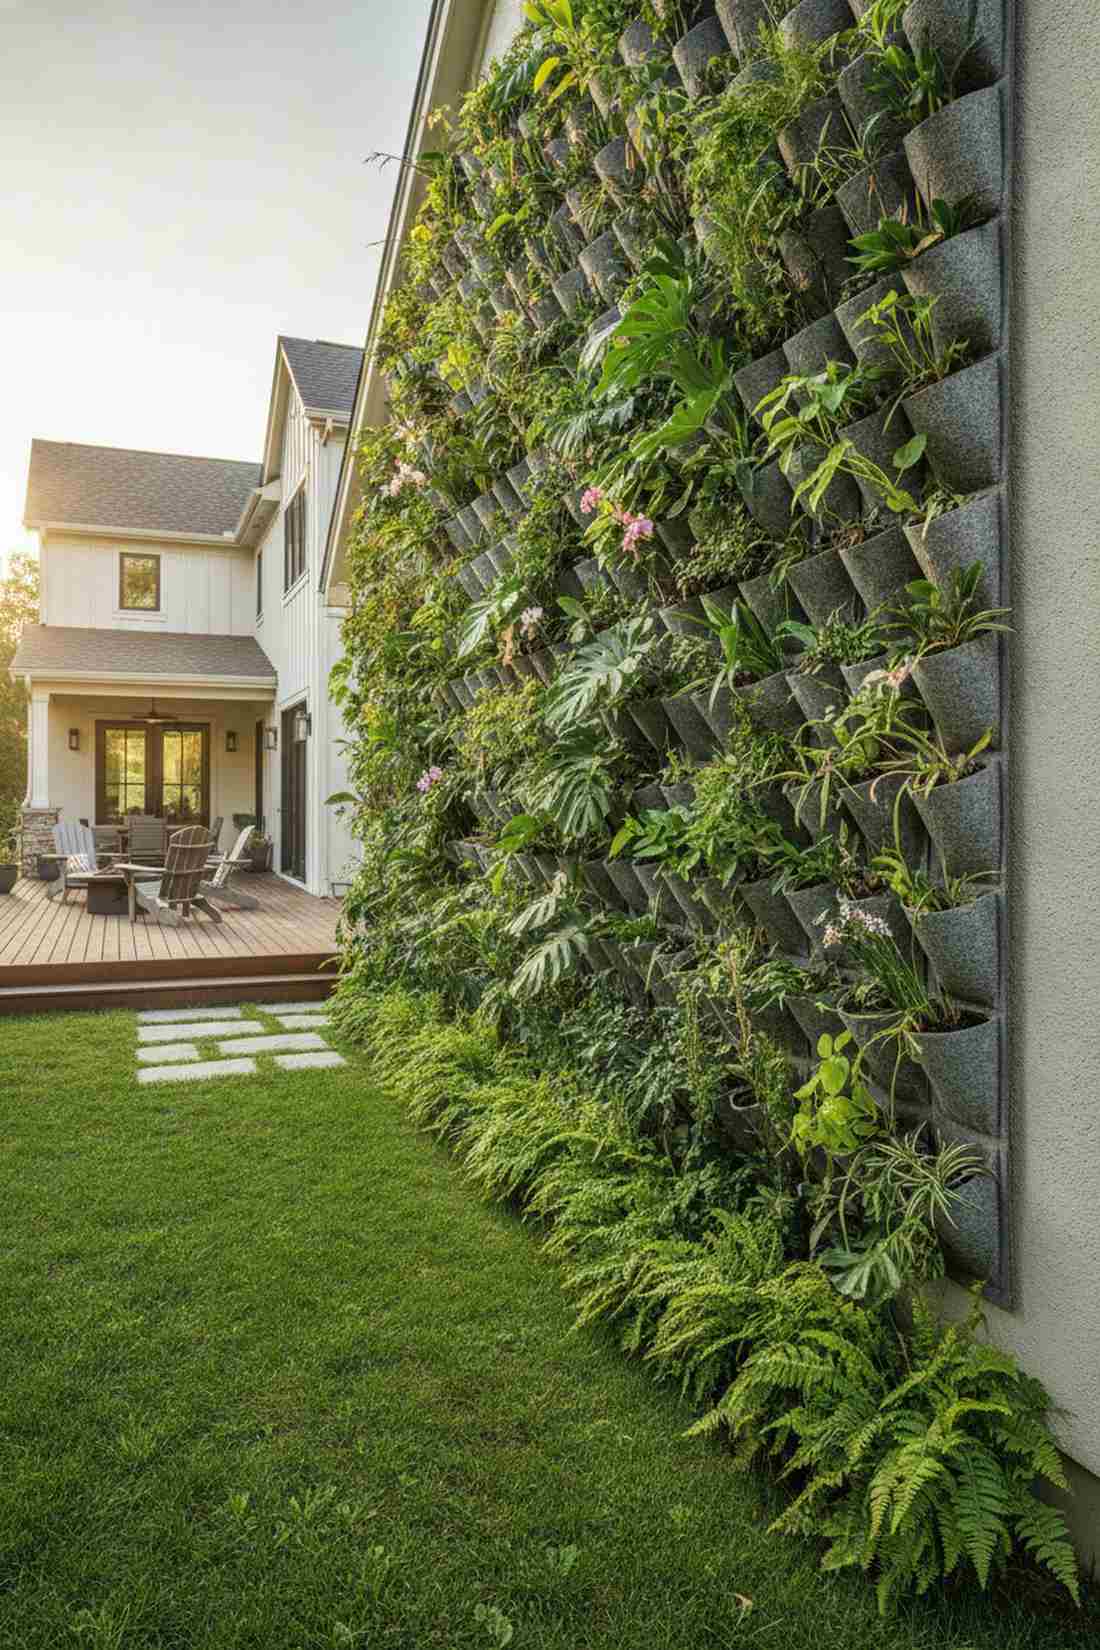
24. Modular Grid Panel System
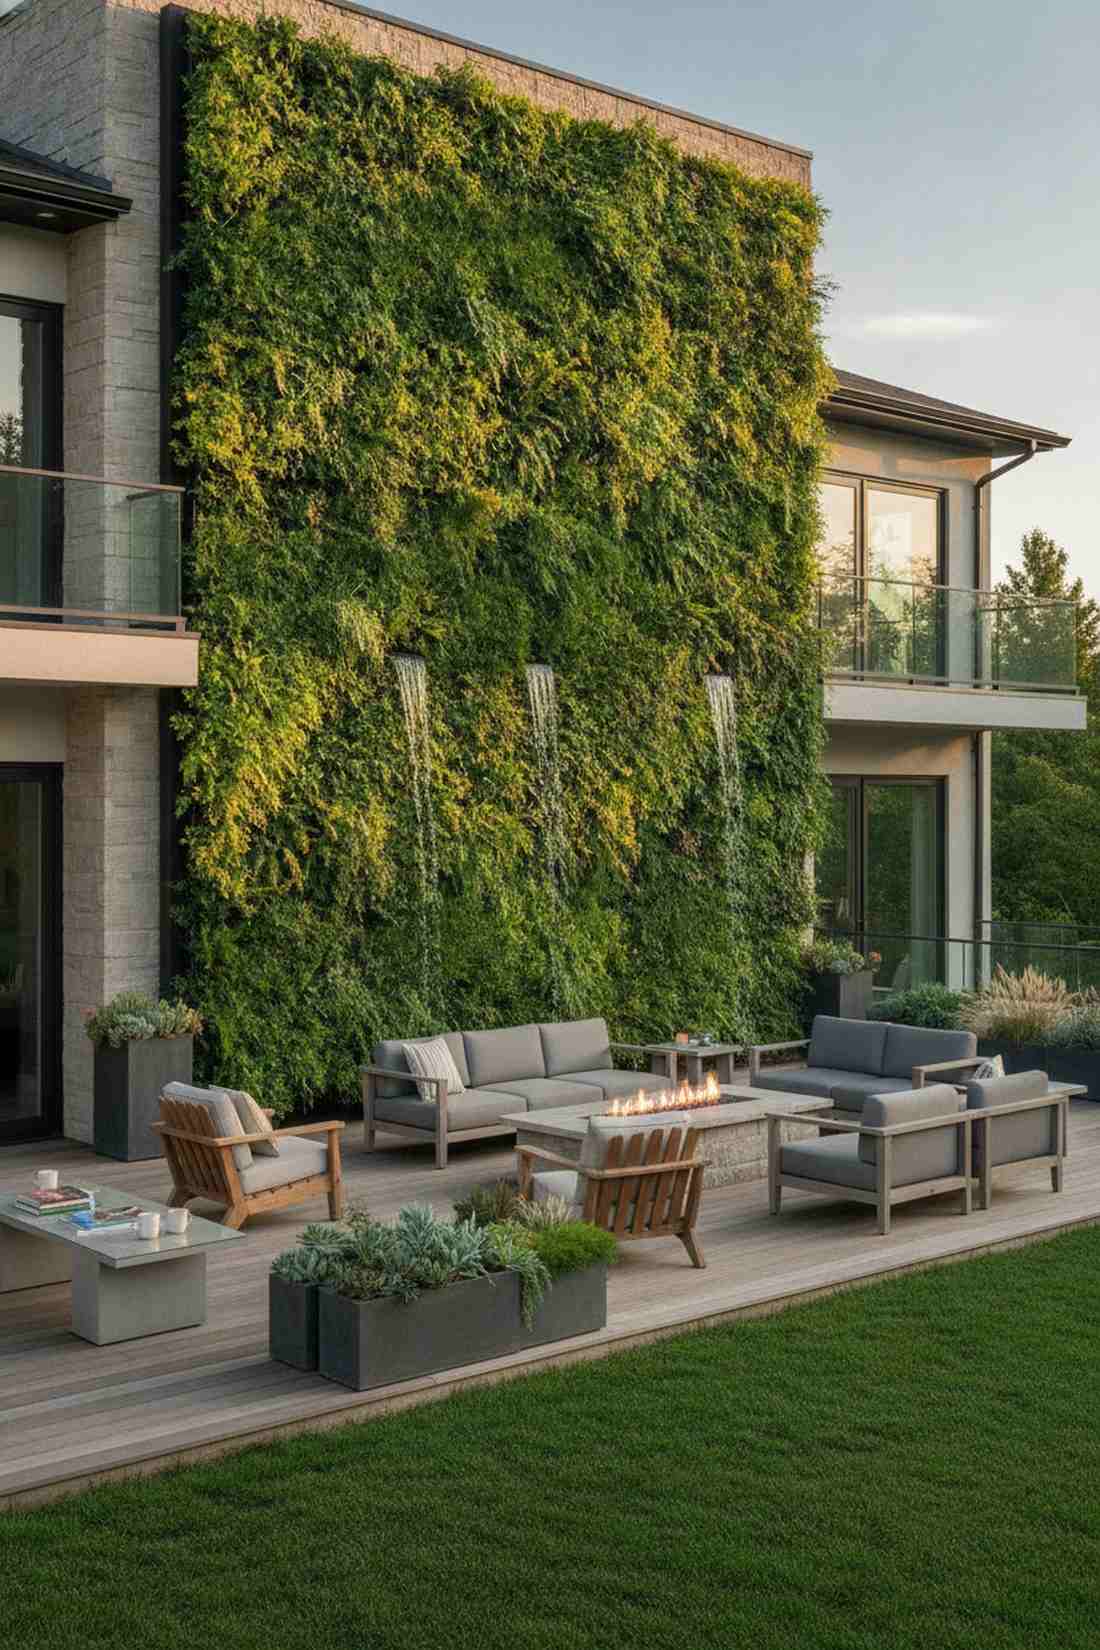
Feels like a high-tech bio-wall plucked straight from a commercial lobby. The interlocking vertical foliage grid is the absolute pinnacle for achieving 100% dense, gap-free wall coverage.
Scattered pots look messy; a precision grid gives a designer-level finish that looks like a professional installation. Integrating commercial vertical garden systems ensures water cascades perfectly from top to bottom.
Budget roughly $60 per square meter for this elite look. Pin this if you want a massive statement wall!
- Key Materials: Snap-together planter grid modules, integrated drip tubing
- Vibe / Style: Commercial luxury bio-wall
- Difficulty: Advanced grid mounting
- Budget Breakdown: Grid Panels: $45 | Irrigation: $15
- Creator’s Tip: Paint the wall behind the grid dark green or black so any temporary gaps in the foliage become completely invisible.
- Smart Sourcing: Pre-cut modular wall grid starter kits and automated drip irrigation packs.
Before you spend $300 on a pre-built planter, check out the insane DIY hack coming up next…
Vertical Garden Systems for Dense Coverage
Engineered vertical systems provide high-density planting capacity for maximum greenery per square foot. These professional-grade solutions work for ambitious projects targeting complete wall coverage.
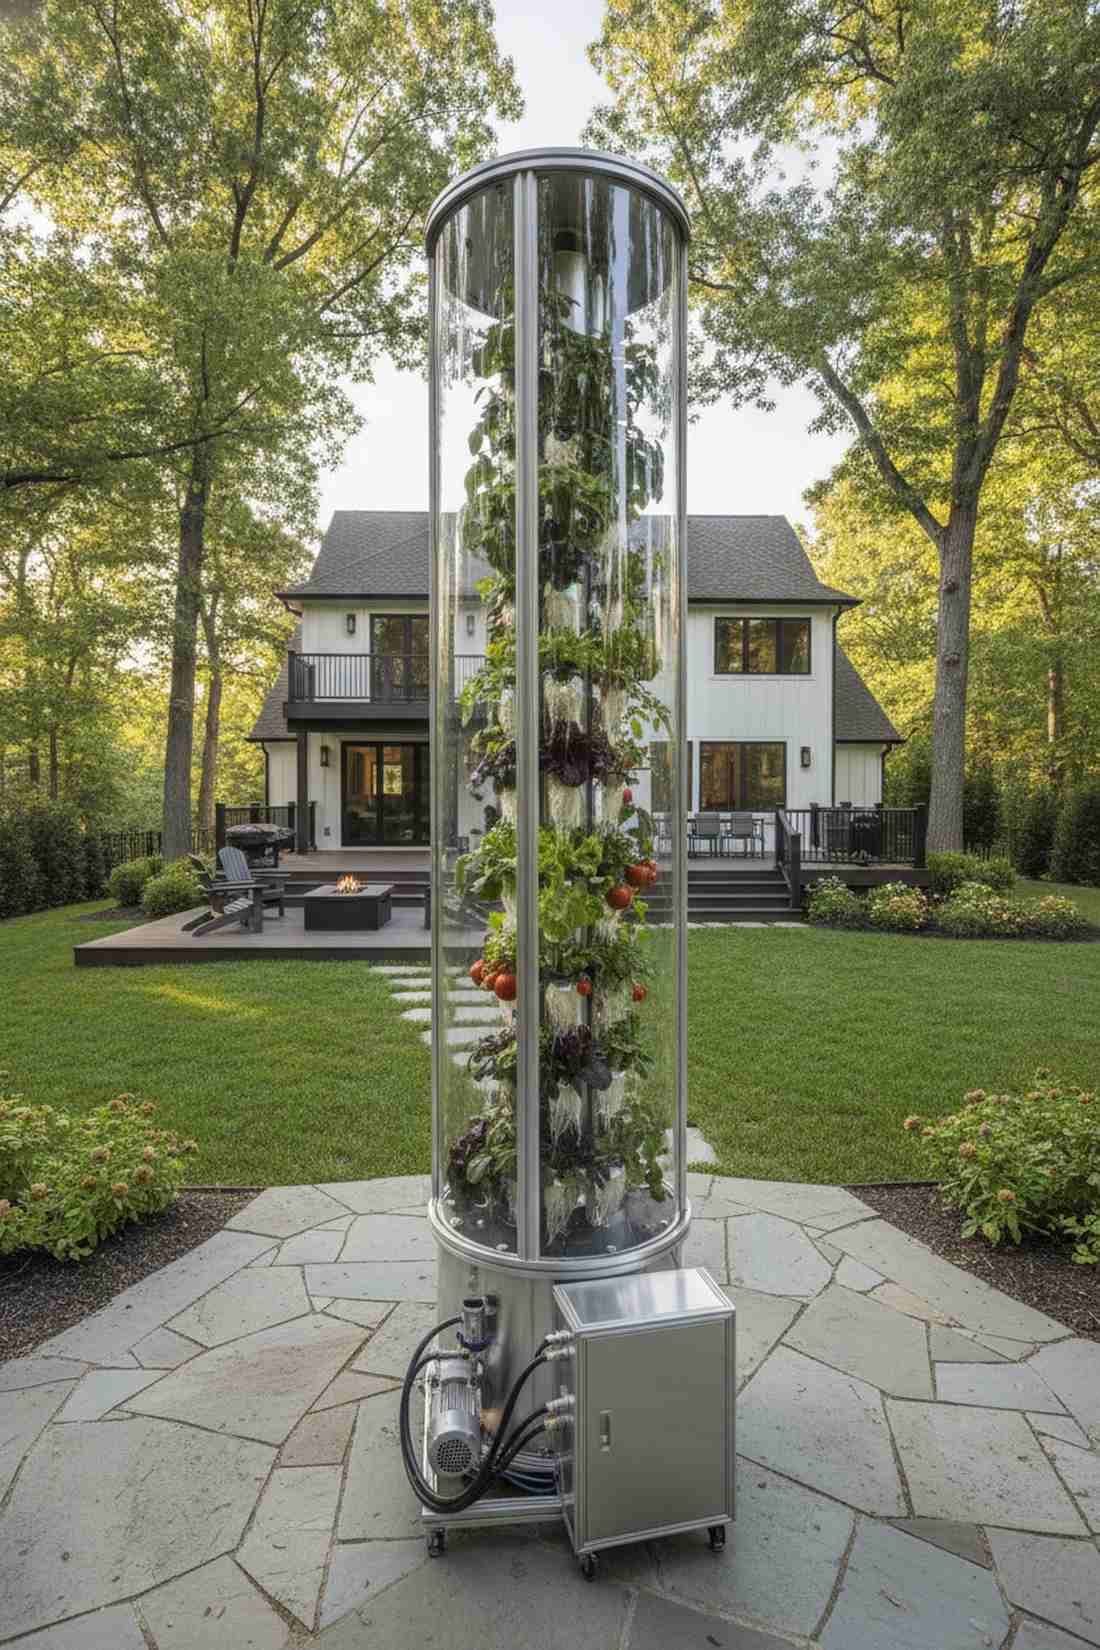
25. Hydroponic Vertical Tower
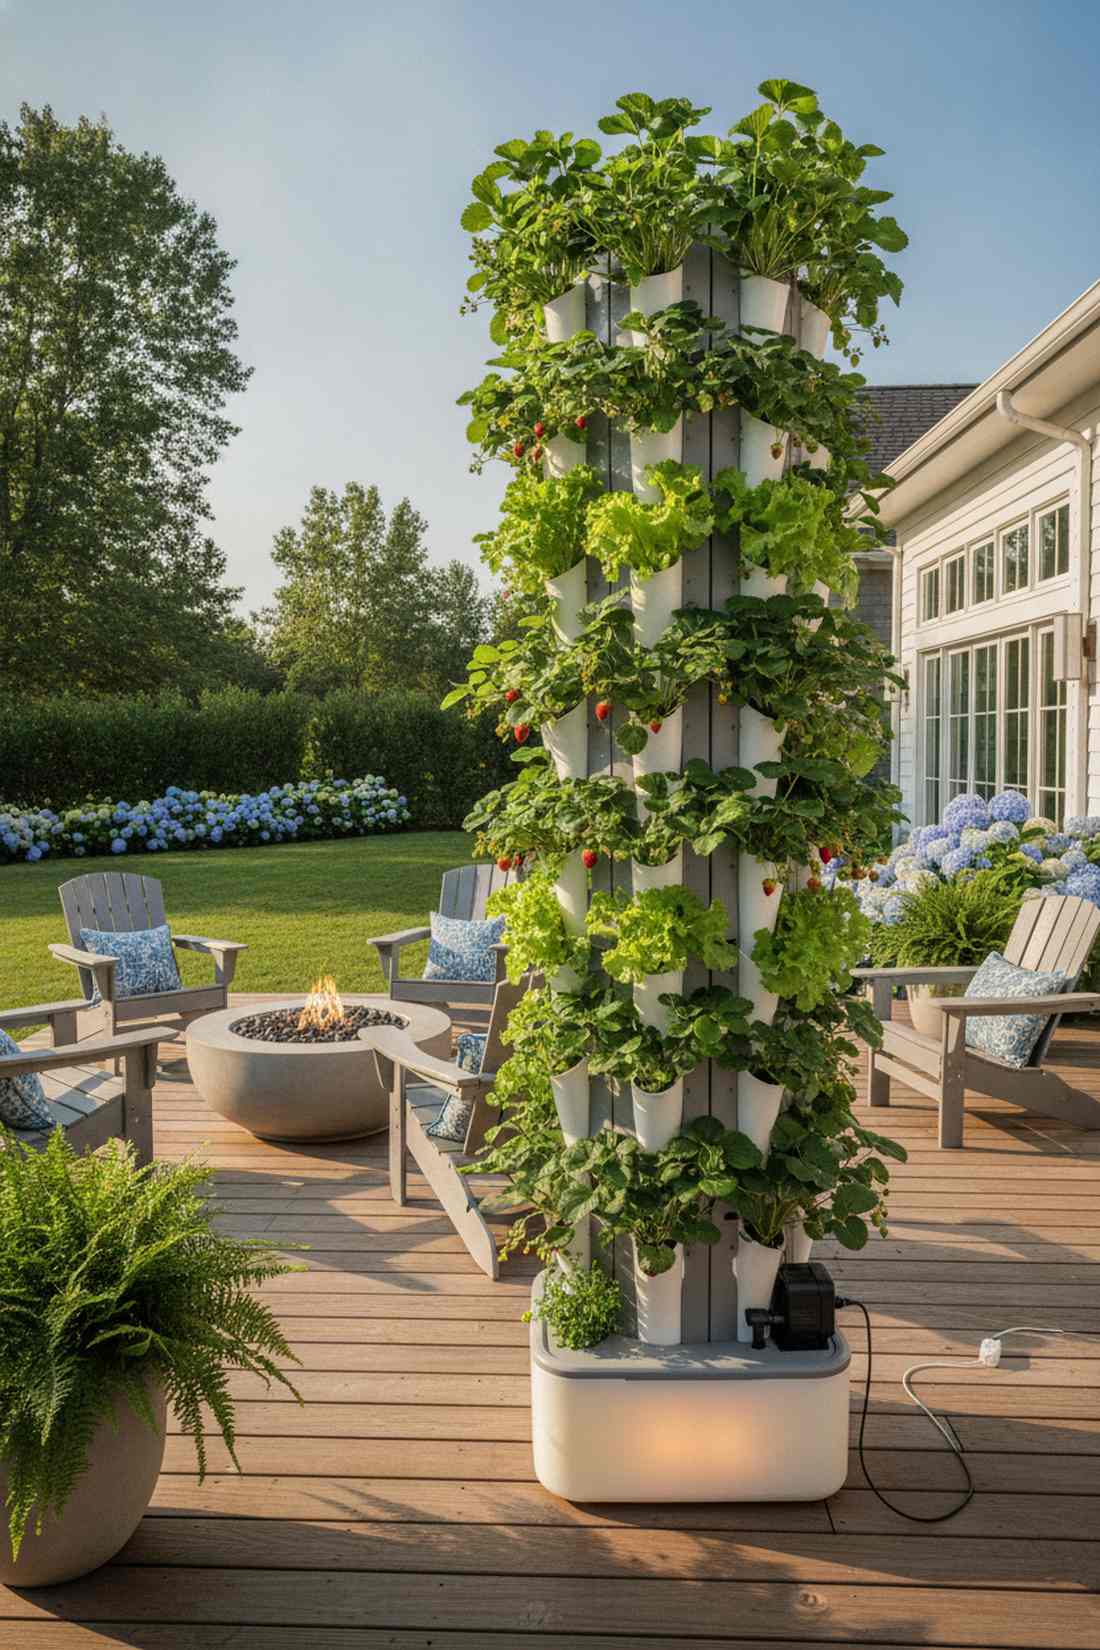
Looks like a futuristic crop pillar generating massive yields in a single corner. A soilless automated harvest tower is the ultimate flex for tech-savvy gardeners wanting balcony strawberries.
Soil towers get heavy and messy, but a hydroponic loop looks far more expensive than it is. Securing hydroponic starter kits means you get explosive growth with zero weeding and zero dirt.
Expect to invest about $80 for a solid starter tower. A brilliant investment for automated greenery.
- Key Materials: Stacked hydro modules, submersible pump, nutrient solution
- Vibe / Style: Sleek futuristic farming
- Difficulty: Intermediate pump wiring
- Budget Breakdown: Tower Kit: $60 | Pump/Nutrients: $20
- Creator’s Tip: Plug the pump into a cheap smart-plug so you can control the watering schedule directly from your phone.
- Smart Sourcing: Pre-drilled hydroponic tower starter kits and premium liquid nutrient bulk packs.
Material Guide: Cheap vs. Premium Aesthetic
Knowing exactly where to save and where to spend makes all the difference in achieving that “looks expensive but isn’t” vibe.
- Standard Plastic vs. UV-Resistant Resin: Cheap plastics crack and fade in one summer; UV-coated resin flexes with temperature changes and holds a matte, premium finish forever.
- Pre-made Bracket Kits vs. DIY Hardware: While bare screws are cheap, commercial railing bracket starter kits prevent catastrophic wind damage and protect your property from rust stains.
26. Living Wall Tray System
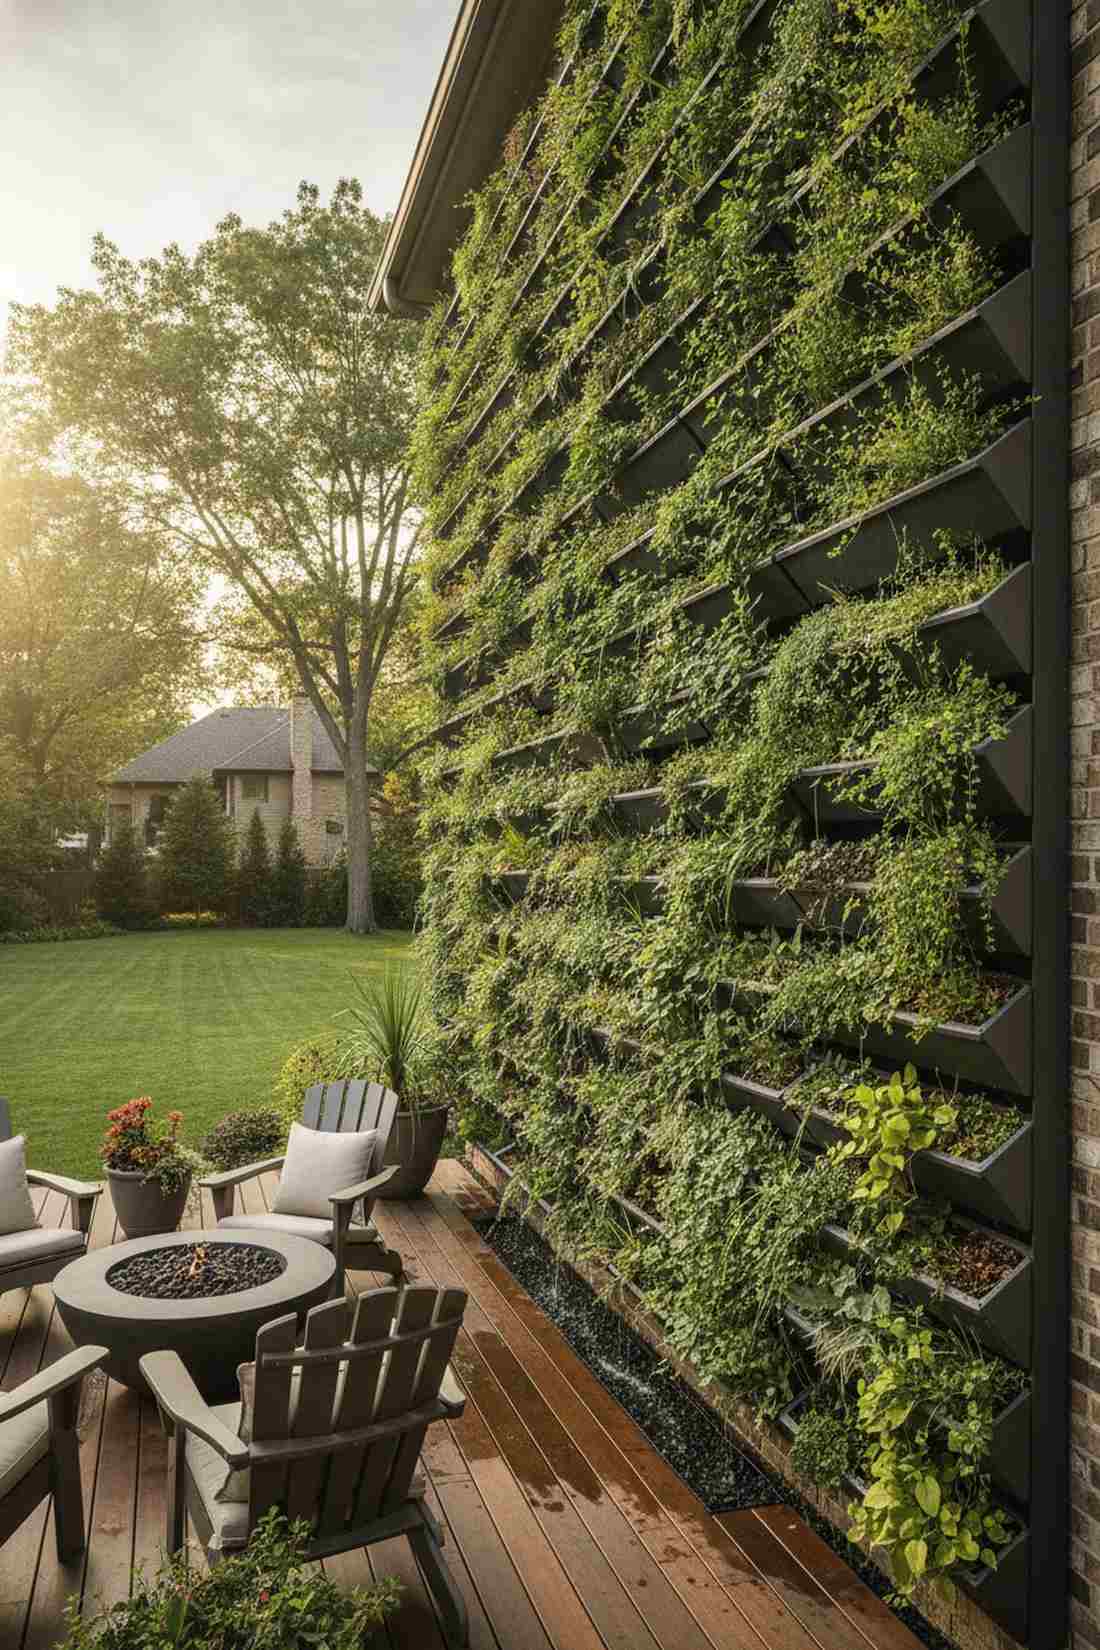
Creates a mesmerizing shingled effect of cascading botanical shadows. The overlapping angled planter trays are perfect for hiding harsh masonry on a hot exterior boundary.
Flat walls lack depth; angled trays deliver a surprisingly premium look by pushing the foliage outward. It naturally directs rainwater backward into the root reservoirs instead of spilling down the front.
You can mount a three-tray system for roughly $45. Save this layout for your premium patio pins!
- Key Materials: Angled wall trays, waterproof wall backing, lightweight soil
- Vibe / Style: Lush architectural overlap
- Difficulty: Moderate waterproof mounting
- Budget Breakdown: Trays: $30 | Backing: $15
- Creator’s Tip: Mix 30% perlite into your soil to drastically reduce the sheer weight pulling against the wall anchors.
- Smart Sourcing: UV-coated angled wall tray kits and bulk lightweight perlite soil mix.
27. Pegboard Planter Wall
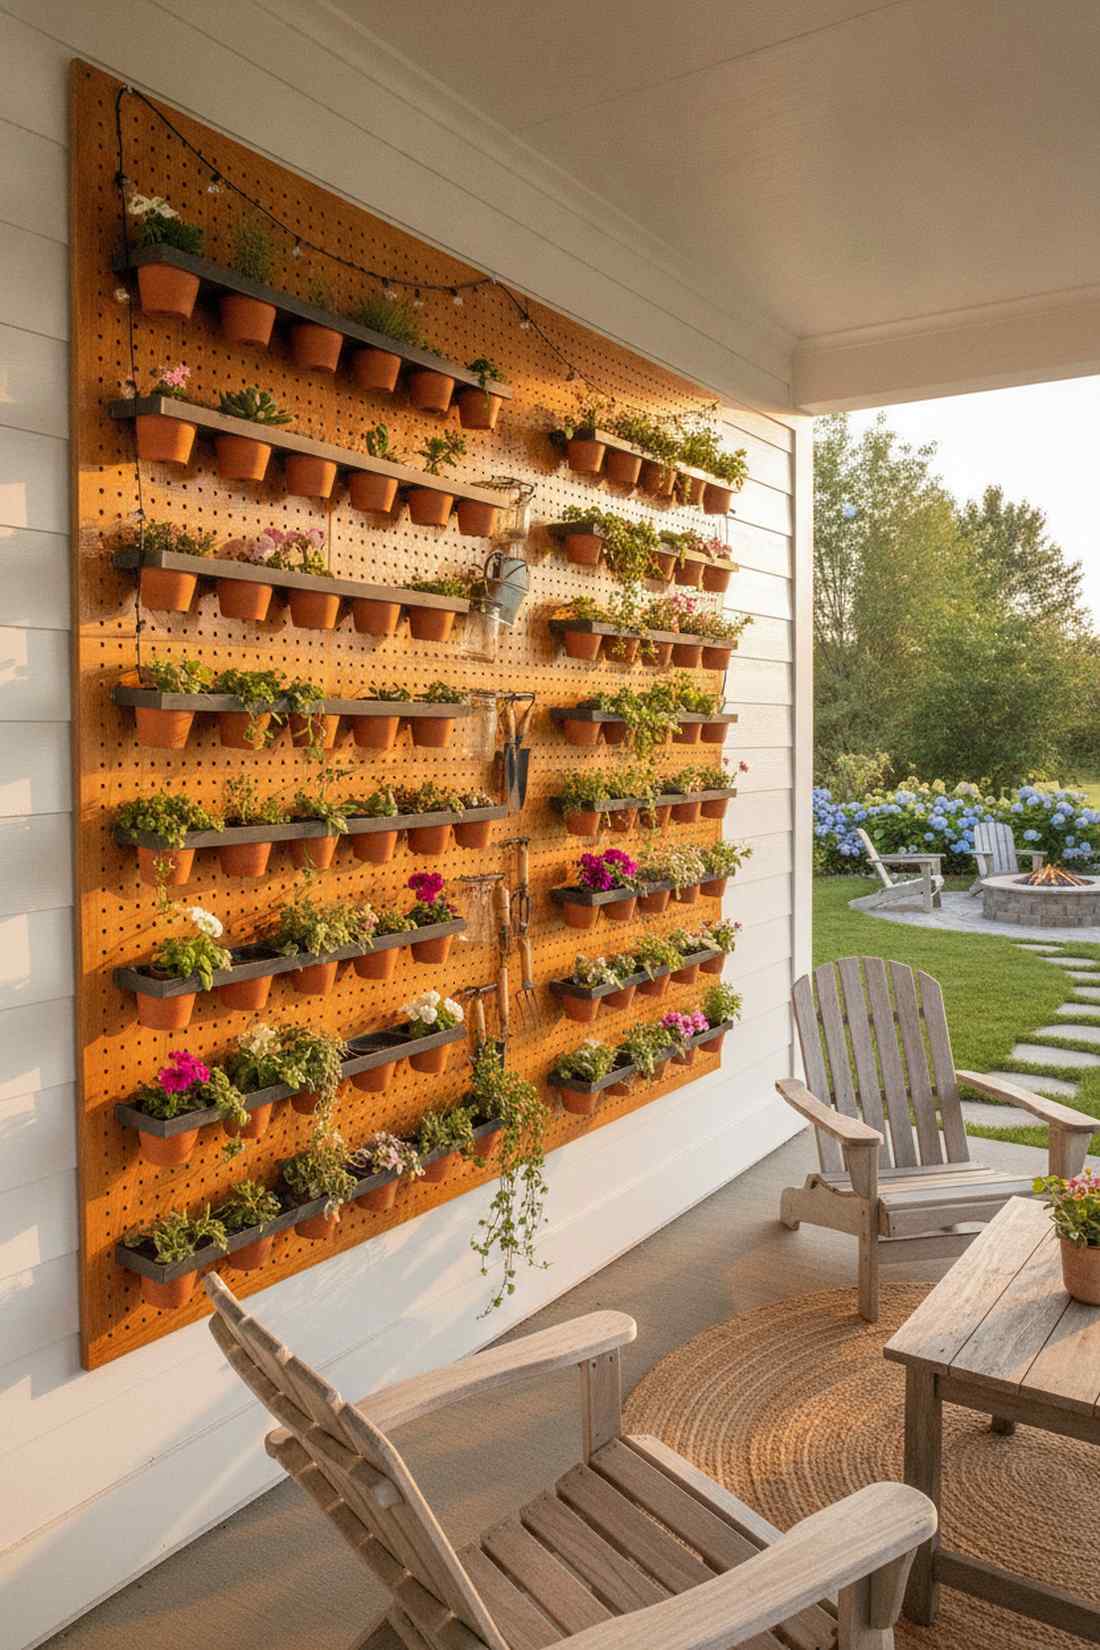
A hyper-organized, wildly adaptable canvas that acts as a living mood board. This movable custom hook wall is ideal for creative minds who constantly want to rearrange their patio design.
Fixed shelves are permanent, but an exterior pegboard creates an illusion that totally fools the eye into seeing custom architecture. You can effortlessly pop hooks in and out to chase seasonal sunlight.
This brilliant hack costs under $35 to execute. Pin this for the ultimate customizable garden!
- Key Materials: Exterior-grade pegboard, marine varnish, peg hooks
- Vibe / Style: Dynamic creative studio
- Difficulty: Easy sealing and hanging
- Budget Breakdown: Pegboard: $20 | Varnish/Hooks: $15
- Creator’s Tip: Seal the front, back, and heavily inside every single hole with marine varnish so moisture never warps the board.
- Smart Sourcing: Pre-cut heavy-duty pegboard panels and weatherproof pegboard hook multi-packs.
28. Vertical Aeroponic System
Feels like a NASA-engineered oasis floating in your backyard. The enclosed root-misting pillar is the ultimate solution for aggressive growth with absolutely minimal water waste.
Traditional watering drowns roots, but aeroponic misting gives a designer-level finish to your harvest yields. It completely revolutionizes vertical growing by exposing roots to pure oxygen and fine nutrient fog.
Budget around $90 for a basic aeroponic setup. A high-end approach that pays for itself in crops.
- Key Materials: Aeroponic chamber, misting nozzles, high-pressure pump
- Vibe / Style: Ultra-modern scientific
- Difficulty: Advanced system tuning
- Budget Breakdown: Chamber Kit: $60 | Pump/Nozzles: $30
- Creator’s Tip: Install an inline water filter before the misting nozzles so hard water calcium doesn’t clog the micro-sprayers.
- Smart Sourcing: Commercial vertical aeroponic starter kits and bulk anti-clog misting nozzles.
29. Recycled Tin Can Wall
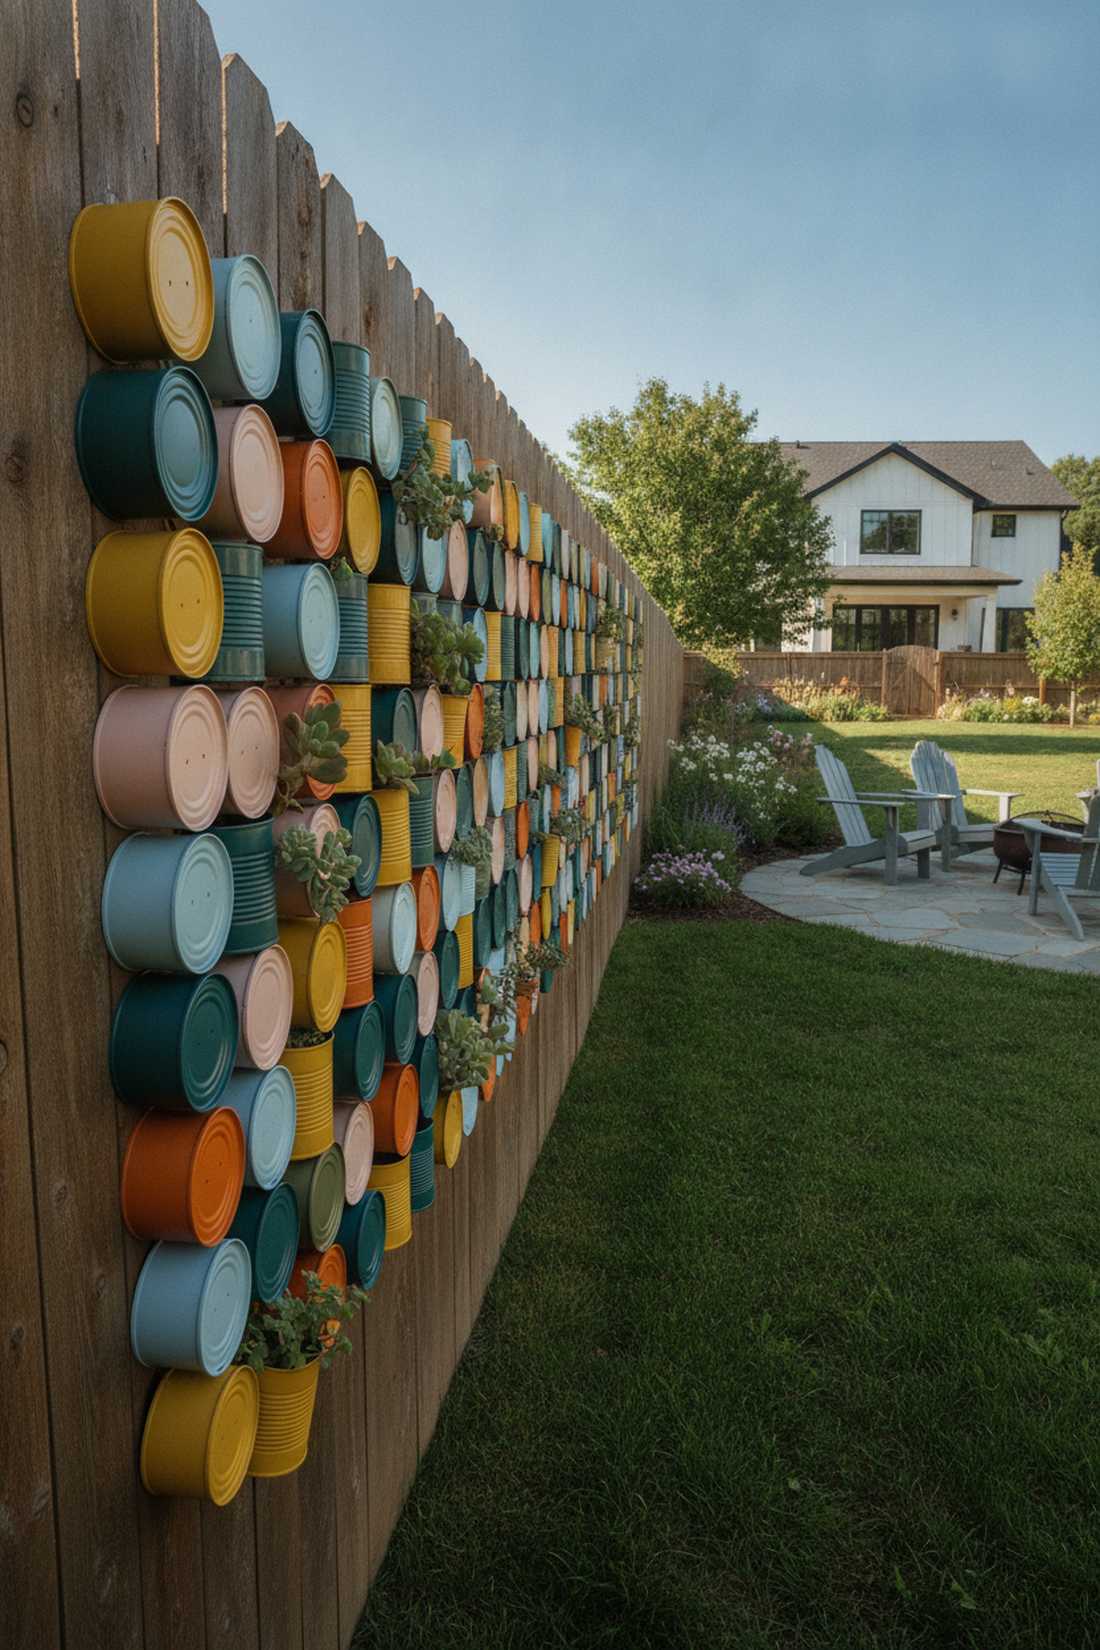
Radiates a charming, eclectic industrial vibe that costs almost nothing. A painted tin can mosaic turns a bland wooden fence into an explosion of bright, metallic colors.
Don’t throw away kitchen waste; upcycling cans looks far more expensive than it is when painted in chic matte tones. It creates a bulletproof, zero-waste planter that reflects brutal summer heat away from roots.
This entirely recycled project costs around $10 for paint. Save this to your DIY weekend garden board!
- Key Materials: Cleaned soup cans, matte exterior spray paint, wood screws
- Vibe / Style: Eclectic upcycled pop-art
- Difficulty: Super simple drilling
- Budget Breakdown: Cans: Free | Paint/Screws: $10
- Creator’s Tip: Use a hammer and nail to punch five drainage holes from the inside-out before painting to prevent rust rings.
- Smart Sourcing: Rust-resistant matte exterior spray paint and weatherproof outdoor wood screws.
Most beginners ruin their plants by ignoring drainage… until they see the clever hack below.
DIY and Repurposed Planters for Budget-Friendly Green Walls
Creative reuse of household items and reclaimed materials builds unique vertical gardens at minimal cost. These projects combine sustainability with personal expression.
30. Repurposed Ladder Plant Stand

Feels like a vintage farmhouse relic leaned effortlessly against your courtyard wall. The slanted wooden step display provides instant, deep shelving without drilling a single hole.
Store-bought tiered stands are flimsy, but a real wooden ladder delivers a surprisingly premium look with massive structural integrity. It draws the eye upward while providing wide platforms for heavy terracotta pots.
You can thrift this look for under $20. Pin this if you’re styling a cozy patio corner!
- Key Materials: Vintage wooden step ladder, clear weather sealant
- Vibe / Style: Rustic vintage lean
- Difficulty: Zero-tool leaning
- Budget Breakdown: Thrifted Ladder: $10 | Sealant: $10
- Creator’s Tip: Drive a single heavy-duty U-bracket over the top rung into the wall so strong winds can’t tip the display.
- Smart Sourcing: UV-blocking clear exterior wood sealant and heavy-duty safety anchor packs.
31. PVC Pipe Vertical Planter
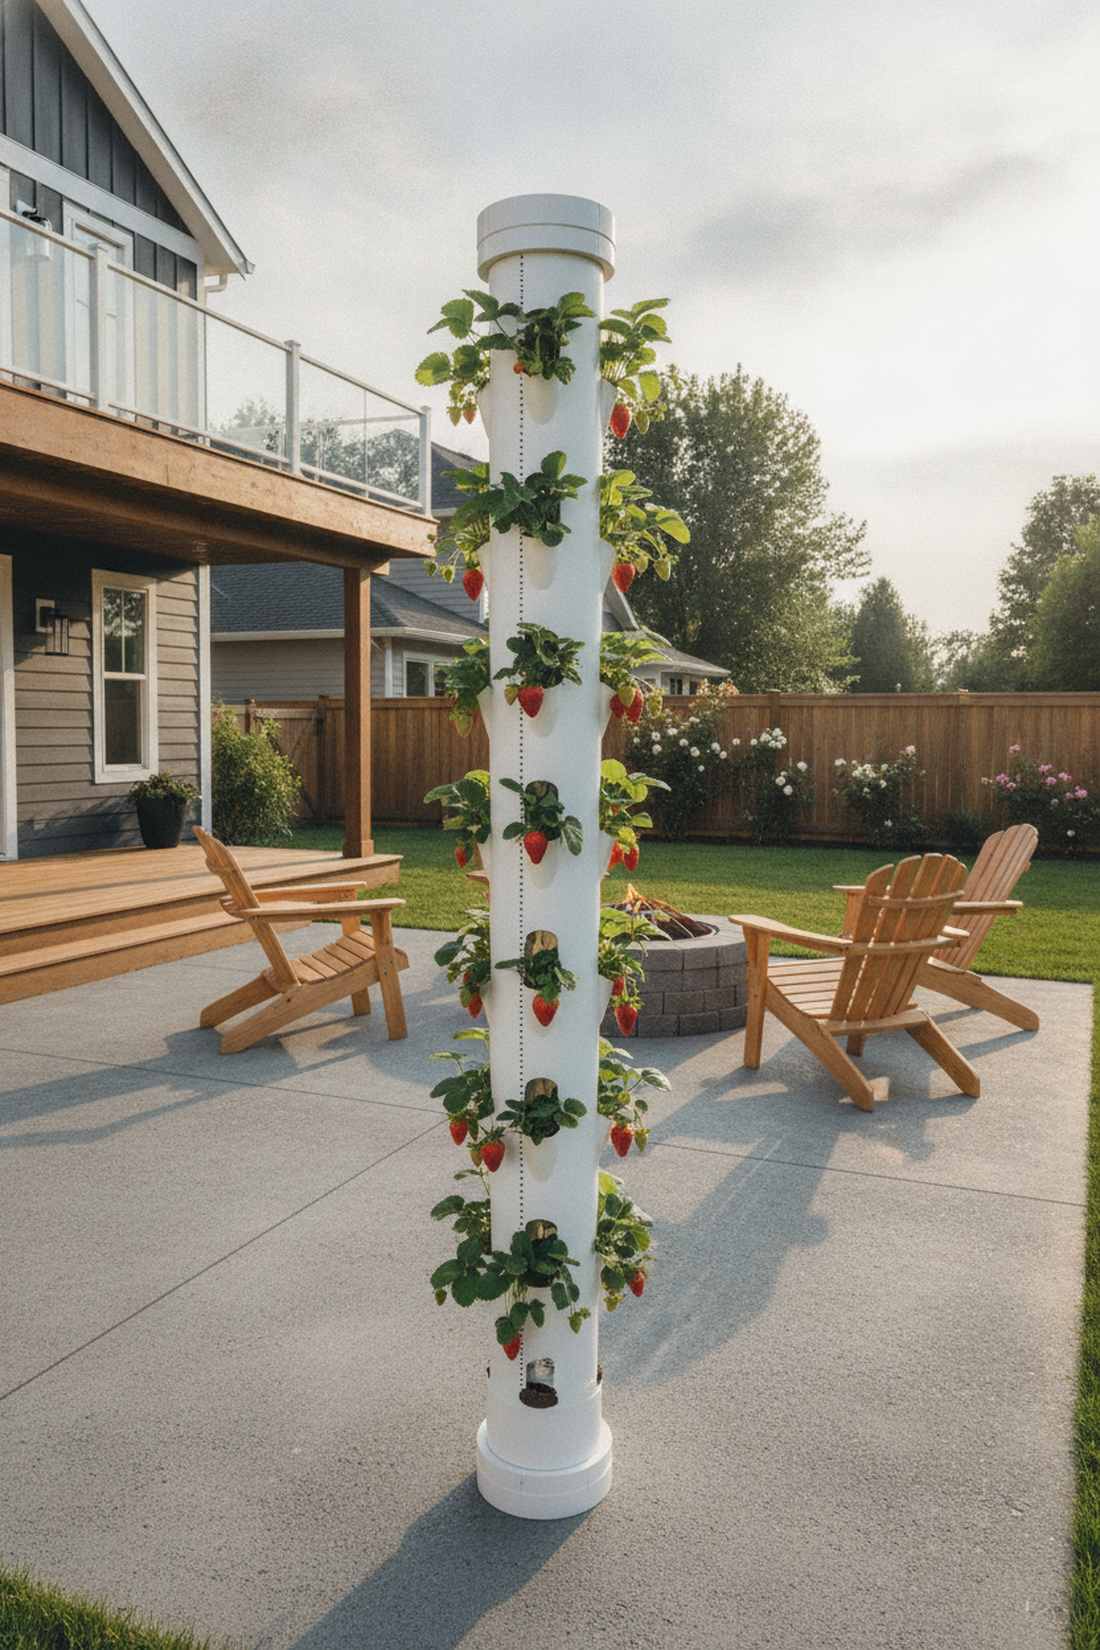
Looks like a sleek, modern architectural column packed with blooming life. A slotted cylindrical tower is the ultimate budget hack for growing massive strawberry cascades.
Commercial towers cost hundreds, but drilling holes into construction pipes creates an illusion that totally fools the eye. Adding premium potting soil mix ensures this budget column performs like a high-end system.
This brilliant weekend project runs about $25. Highly recommended for maximizing narrow spaces.
- Key Materials: 6-inch PVC pipe, hole saw drill bit, end caps
- Vibe / Style: Industrial modern pillar
- Difficulty: Intermediate power drilling
- Budget Breakdown: PVC Pipe: $15 | Hardware: $10
- Creator’s Tip: Insert a thinner PVC pipe with tiny holes down the center of the main pipe to act as a deep-watering column.
- Smart Sourcing: Pre-cut heavy-duty PVC columns and bulk deep-watering tube kits.
32. Stacked Wooden Crate Planter
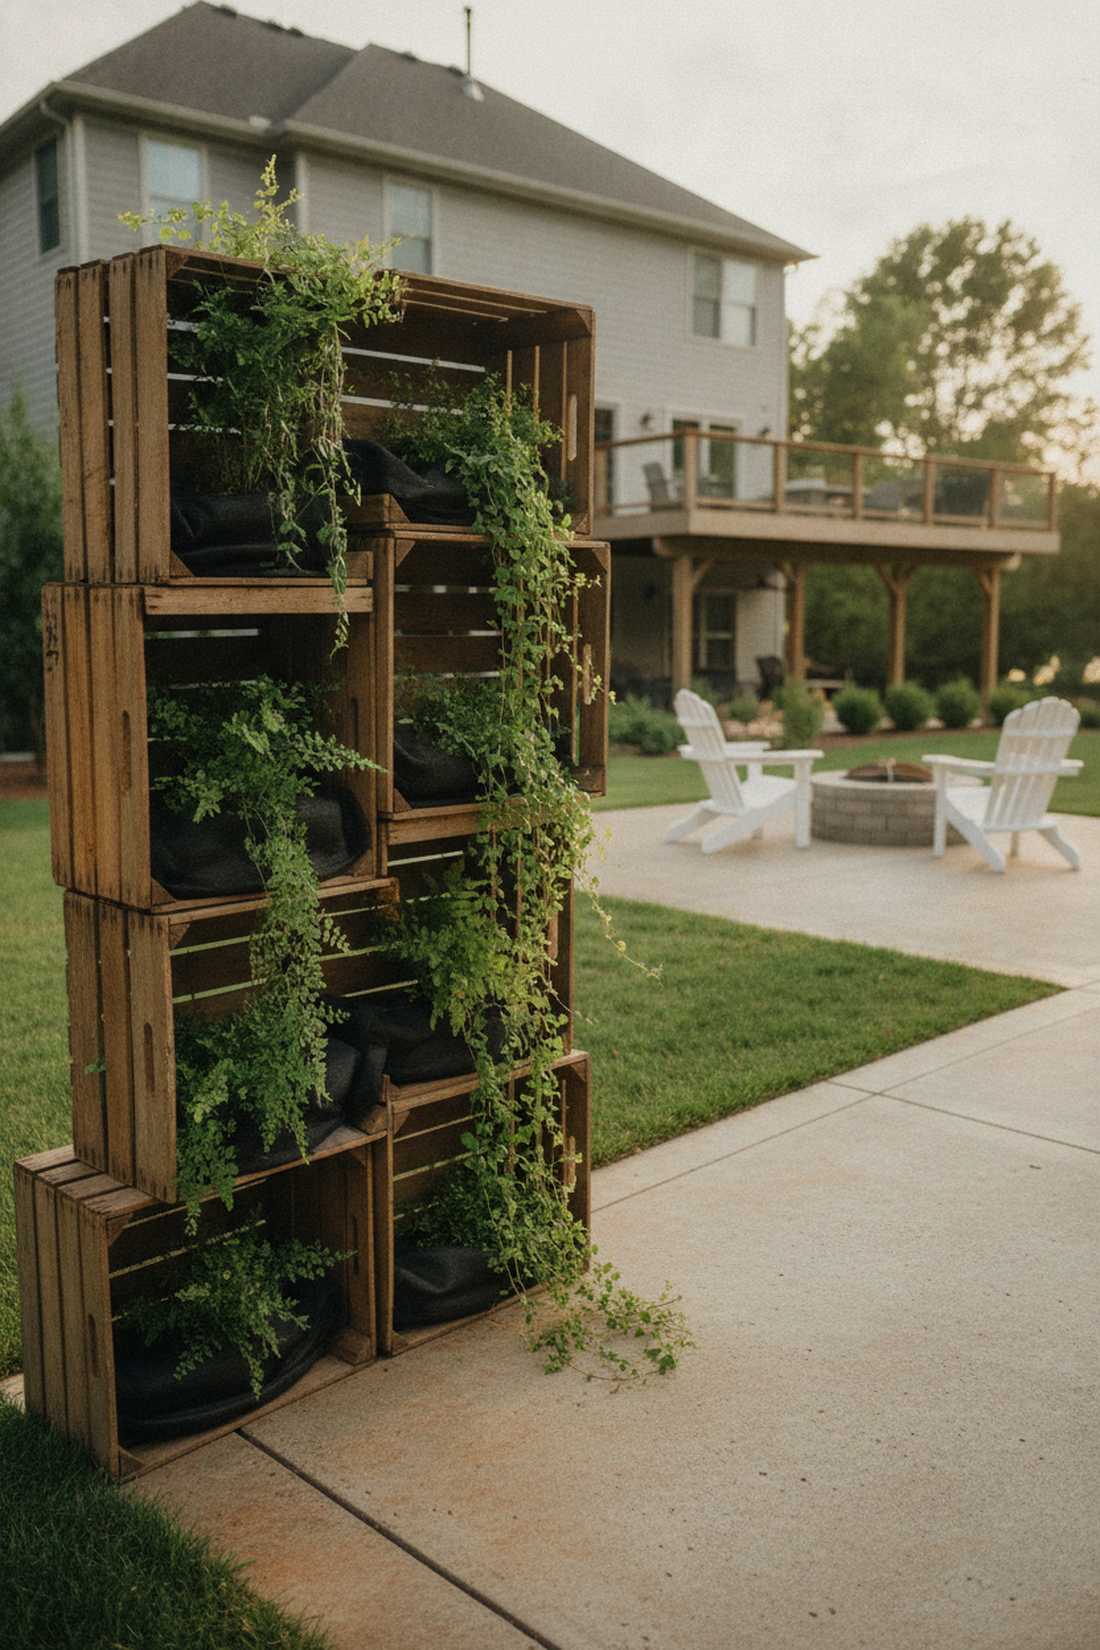
Exudes a cozy, vineyard-inspired warmth that softens hard concrete patios. The interlocking vintage fruit box wall creates deep, shadowy cubbies perfect for mixed ferns.
Flimsy plastic shelves degrade, but stacking real wood crates gives a designer-level finish with incredible rustic durability. The natural slatted gaps provide built-in airflow that roots absolutely love.
Budget roughly $40 for a solid multi-crate stack. Save this layout for your rustic DIY board!
- Key Materials: Wooden slatted crates, landscape fabric, wood glue
- Vibe / Style: Warm vineyard rustic
- Difficulty: Easy stacking and lining
- Budget Breakdown: Crates: $30 | Liner: $10
- Creator’s Tip: Stagger the crates slightly off-center to create external ledges for trailing vines to spill over.
- Smart Sourcing: Bulk vintage-style wooden crates and pre-cut heavy landscape fabric liners.
33. Recycled Bottle Tower Garden
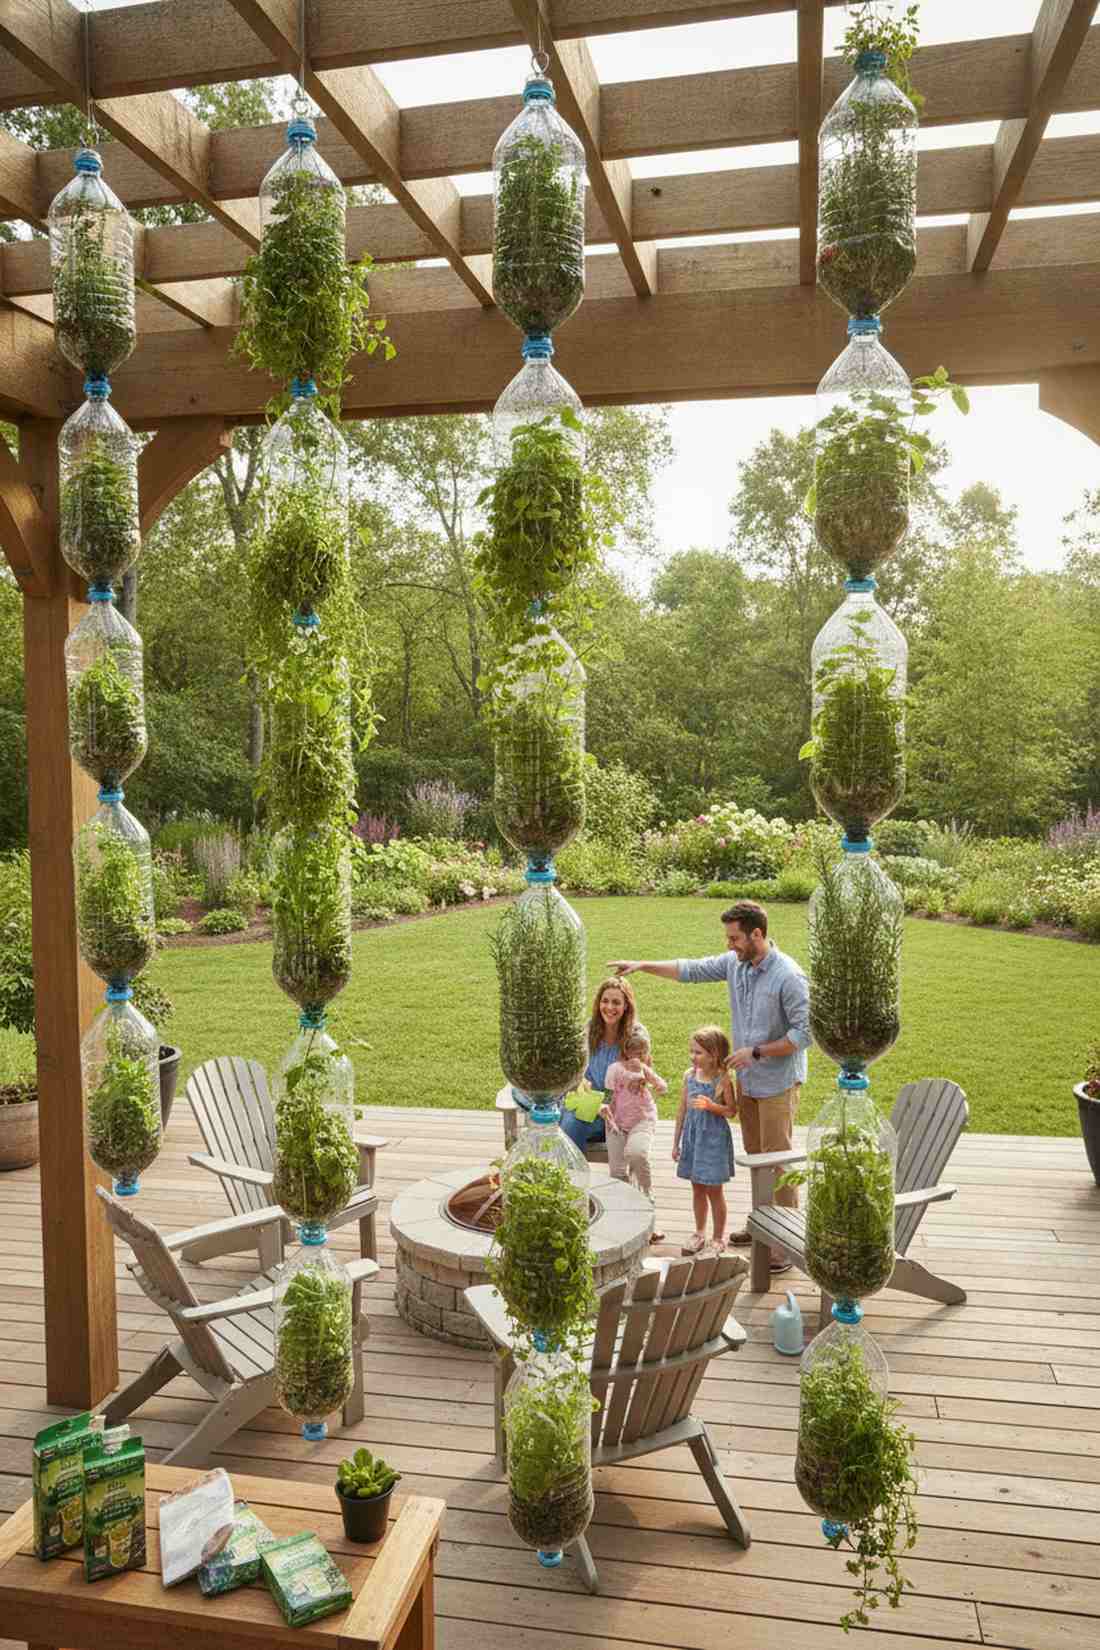
Feels like a clever, eco-friendly science project that actually produces beautiful results. The inverted plastic bottle chain is a wildly fun way to teach kids about vertical hydroponics.
Throwing away bottles is a waste; linking them vertically looks far more expensive than it is when the foliage fills in. It creates a brilliant self-draining system where top water drips down to feed the bottom plants.
This zero-cost hack requires only a few dollars for suspension wire. An amazing educational patio feature.
- Key Materials: 2-liter plastic bottles, utility knife, suspension wire
- Vibe / Style: Clever eco-upcycle
- Difficulty: Easy cutting and threading
- Budget Breakdown: Bottles: Free | Wire: $5
- Creator’s Tip: Keep the bottle caps on, but drill a tiny hole in each so the water drains slowly rather than flushing out instantly.
- Smart Sourcing: Heavy-duty weather-resistant hanging wire and bulk organic seed starter packs.
Specialty Trailing Plants for Dramatic Cascades
Plant selection determines the ultimate visual impact of vertical installations. These trailing specialists deliver cascading foliage and flowers that maximize the hanging effect.
The hardware is useless if you choose the wrong plants… these specific varieties guarantee that luxury waterfall effect.
34. String of Pearls Succulent
Looks like a delicate curtain of green gemstones spilling over your planter’s edge. This cascading bead-like succulent is the absolute perfect choice for high, bright, minimalist indoor/outdoor walls.
Standard vines get messy, but these architectural strands deliver a surprisingly premium look with almost zero maintenance. Integrating UV-resistant outdoor planters ensures the vessel matches the high-end aesthetic of the plant.
You can buy a mature starter pot for roughly $15. Pin this if you love low-effort, high-impact plants!
- Key Materials: String of Pearls starter plant, terracotta wicking pot
- Vibe / Style: Delicate modern luxury
- Difficulty: Very low maintenance
- Budget Breakdown: Plant: $15 | Pot: $10
- Creator’s Tip: Never mist this plant; keep the pearls dry and only bottom-water the soil to prevent rot.
- Smart Sourcing: Live trailing succulent starter kits and premium unglazed terracotta wicking pots.
35. Boston Fern Cascade
Exudes a lush, Victorian-era elegance that turns any shaded porch into a tropical sanctuary. The voluminous arching frond canopy is perfect for softening the hard corners of covered patios.
Sparse plants look cheap, but a mature fern creates an illusion that totally fools the eye into seeing a dense jungle. It commands massive visual space while thriving in the damp shadows where other plants die.
A massive hanging basket usually runs about $25. Save this to your shade garden inspiration board.
- Key Materials: Boston Fern basket, heavy ceiling hook, humidity tray
- Vibe / Style: Lush Victorian tropical
- Difficulty: Requires frequent watering
- Budget Breakdown: Fern: $20 | Hardware: $5
- Creator’s Tip: Place a couple of wet sponges at the very bottom of the basket before adding soil to keep the roots consistently humid.
- Smart Sourcing: Bulk moisture-retaining coco liners and heavy-duty swivel hanger hooks.
36. Golden Pothos Trailing Vines
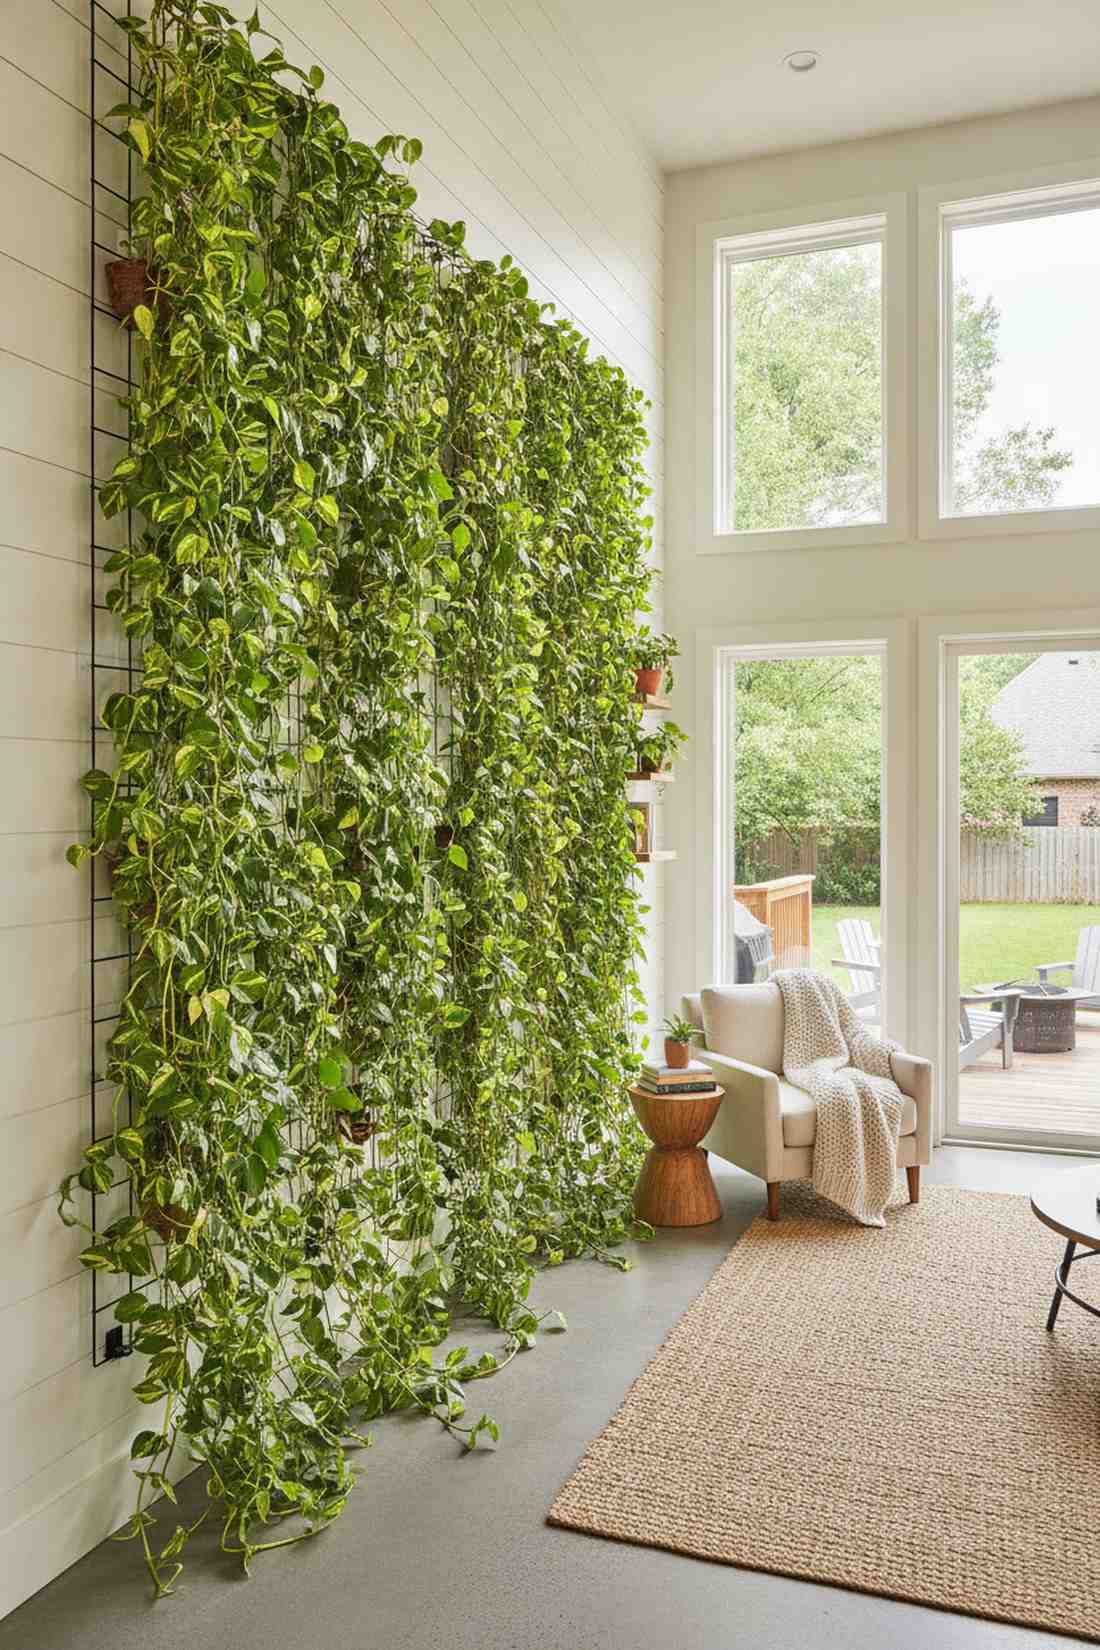
Acts like a brilliant, yellow-flecked waterfall that brings light to dark corners. The indestructible variegated creeper is the ultimate beginner plant for achieving massive vertical drops.
Fussy vines die quickly, but Pothos gives a designer-level finish while surviving absolute neglect. Sourcing trailing plant starter packs lets you instantly weave a dense jungle across your wall grid.
This bulletproof plant costs under $15. Highly recommended for absolute beginners.
- Key Materials: Golden Pothos clippings, wall-safe adhesive climbing clips
- Vibe / Style: Bright jungle cascading
- Difficulty: Nearly impossible to kill
- Budget Breakdown: Plant: $10 | Wall Clips: $5
- Creator’s Tip: Pinch off the longest tip every few weeks; it forces the plant to shoot out two new branches, creating massive volume.
- Smart Sourcing: Live Pothos trailing starter kits and invisible wall-climbing vine clips.
37. Black-Eyed Susan Vine
Feels like a cheerful, blooming explosion of orange and yellow trumpets climbing your boundary. The rapid-growth floral creeper is incredible for instantly covering ugly chain-link or bare trellises.
Plain green is fine, but adding a flowering vine looks far more expensive than it is. It aggressively climbs upward while simultaneously trailing downward, creating a solid wall of vibrant color in weeks.
A pack of seeds or a starter vine runs roughly $10. Pin this for a massive summer color pop!
- Key Materials: Black-Eyed Susan seeds/starts, vertical twine support
- Vibe / Style: Vibrant cottage explosion
- Difficulty: Easy rapid growth
- Budget Breakdown: Seeds: $5 | Twine: $5
- Creator’s Tip: Feed it a high-phosphorus fertilizer every two weeks during summer to force hundreds of blooms instead of just leaves.
- Smart Sourcing: Bulk rapid-climbing vine seed packs and premium bloom-boosting fertilizer liquid.
38. Creeping Jenny Golden Cascade
Pours over the edges like liquid chartreuse sunshine illuminating the wall. This neon trailing groundcover acts as a brilliant, eye-catching “spiller” in any mixed vertical container.
Dark greens blend in, but this neon foliage creates an illusion that totally fools the eye, making the surrounding flowers pop. It thrives beautifully in partial shade where true golden plants usually fade to dull green.
You can grab a starter pot for under $12. A fast, cheap way to completely change your planter’s vibe.
- Key Materials: Creeping Jenny starts, moisture-control potting mix
- Vibe / Style: Striking neon contrast
- Difficulty: Very easy spiller
- Budget Breakdown: Plant: $8 | Soil: $5
- Creator’s Tip: Pair this chartreuse foliage with dark purple sweet potato vines in the same pot for an absolutely stunning high-contrast look.
- Smart Sourcing: Live Creeping Jenny starter packs and premium moisture-control soil mix.
Conclusion
Implementing these 38 precise blueprints transforms underutilized vertical surfaces into high-end, productive garden spaces. Whether you’re investing in commercial vertical garden systems or hacking together a cheap DIY boundary, sourcing the right brackets and UV-coated planters makes all the difference. Start with three complementary installations—perhaps a macramé wall hanger, an adjustable railing planter, and a trailing vine kit—to build a layered, premium aesthetic. Experiment with these exact material break-downs to achieve that highly sought-after designer look on any budget.
Frequently Asked Questions
What are the best low-maintenance hanging plants for outdoor walls?
Succulents like string of pearls and sedums require minimal watering, especially when paired with UV-resistant outdoor planters that prevent rapid soil evaporation. Pothos and spider plants also tolerate irregular care while delivering dense foliage. If you want hassle-free flowers, investing in self-watering planter kits allows million bells and moss rose to thrive without daily attention.
How do I prevent wall damage when installing hanging planters?
Always mount heavy loads into studs using commercial-grade rust-resistant mounting brackets instead of cheap drywall anchors. You must install waterproof backing boards or use premium planter liners with integrated drip trays to catch destructive moisture. For renters, tension-mounted clamp kits and over-the-rail brackets provide a highly secure hold without leaving permanent drill marks.
Can hanging plants survive on north-facing walls with limited sunlight?
Absolutely. Boston ferns and pothos actually prefer the low-light conditions of north exposures and will scorch in direct sun. To maximize growth in the shade, use a premium potting soil mix that doesn’t stay soggy, as shaded soil takes much longer to dry out. Creeping jenny and coral bells are also excellent shade-tolerant choices that maintain vibrant color without direct sunlight.
What spacing should I use when arranging multiple hanging plants on a fence?
Space your hardware 18-24 inches apart horizontally so mature foliage doesn’t aggressively choke out neighboring pots. Vertically staggering your commercial vertical garden systems at 12-16 inch intervals creates a lush, tiered depth while leaving room for watering cans. Always read the spread-width on your trailing plant starter packs to adjust spacing accordingly.
How often should I water hanging plants on walls and railings?
Exposed containers face high winds and dry out significantly faster than ground beds, often needing water every 1-2 days in summer. You can drastically reduce this by upgrading to self-watering planter starter kits with indicators that hold a week’s worth of water in a hidden reservoir. Alternatively, hooking up an automated drip irrigation pack completely eliminates the daily watering chore.