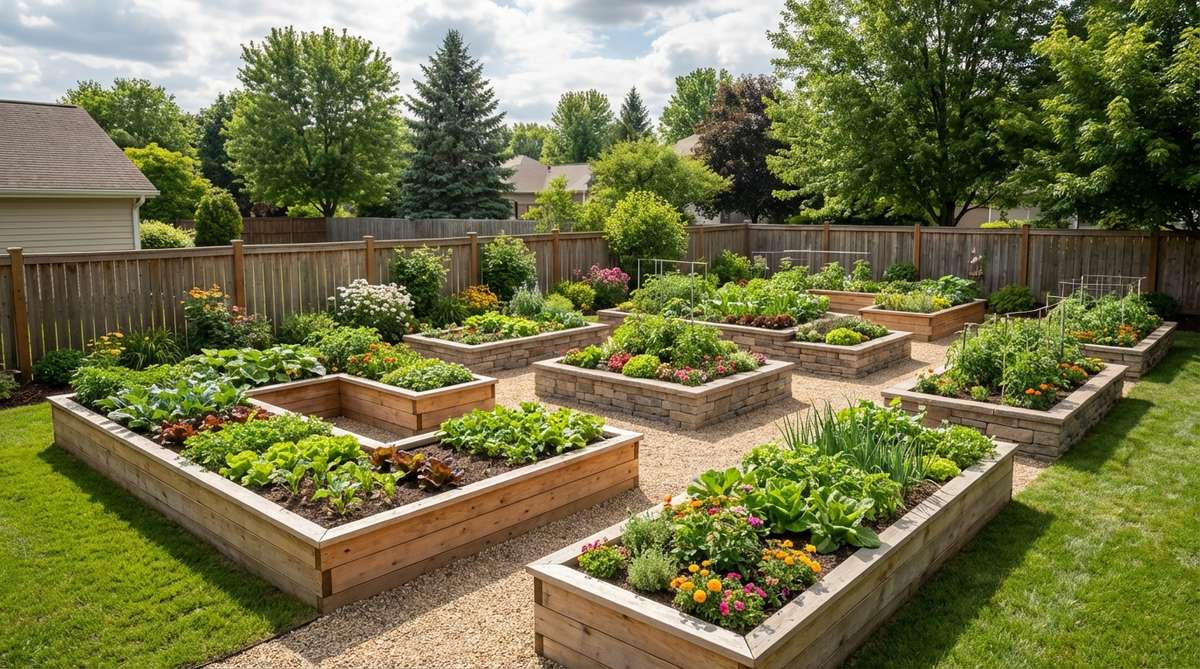
Smart garden design raised beds transform ordinary yards into productive food gardens while enhancing outdoor aesthetics. Whether you’re growing heirloom tomatoes or cutting flowers, the right layout maximizes space, improves drainage, and simplifies maintenance. Fresh Garden Ideas brings you tested designs that work in American backyards, from compact urban plots to expansive suburban landscapes.
Design SnapshotKey Principles
- Accessibility First: Design pathways 24-48 inches wide for comfortable access with wheelbarrows and garden carts
- Sun Exposure: Orient beds east-west with tall plants on the north side to prevent shading shorter crops
- Intensive Planting: Raised beds allow tighter spacing than traditional rows, increasing yields per square foot
- Soil Quality: Elevated beds provide superior drainage and let you control soil composition for optimal growth
Classic Rectangular Configurations That Maximize Production
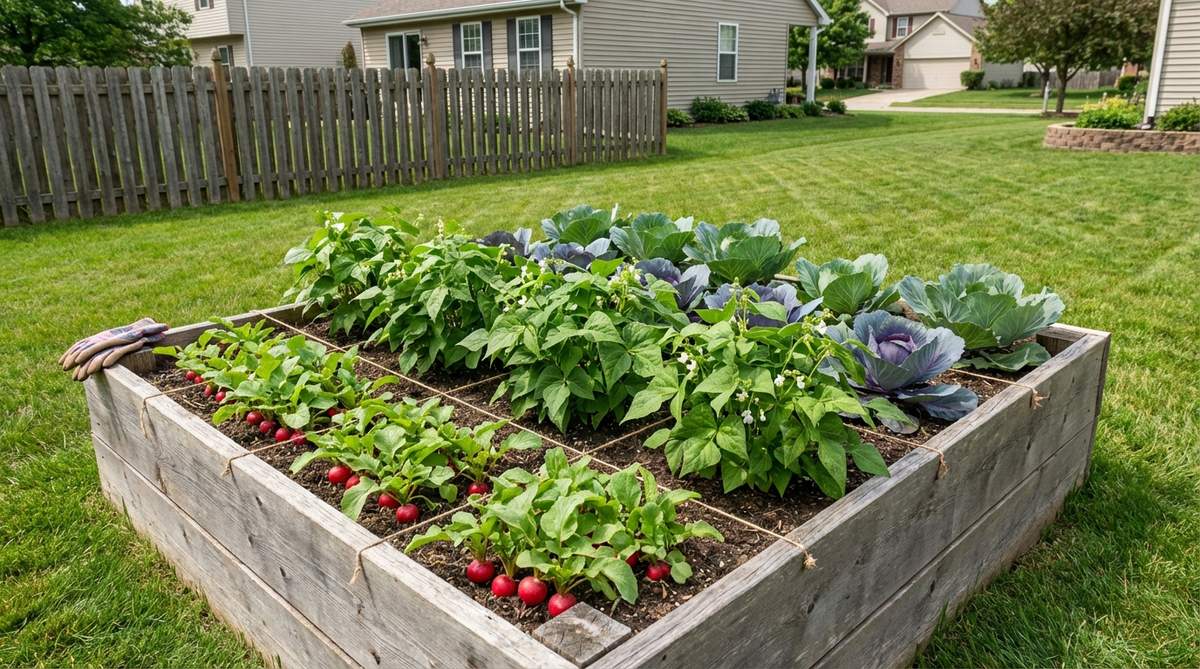
Rectangular beds form the foundation of productive vegetable gardening. These workhorse layouts provide straightforward construction, efficient space usage, and simple crop rotation. Most American gardeners start here before experimenting with complex designs.
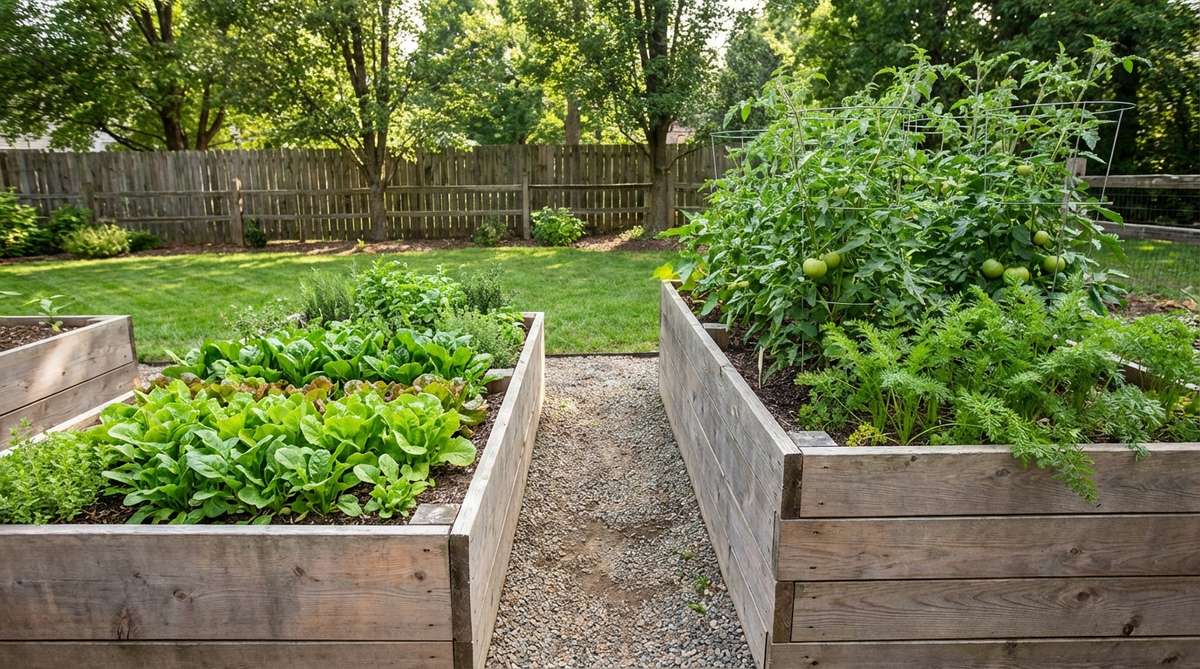
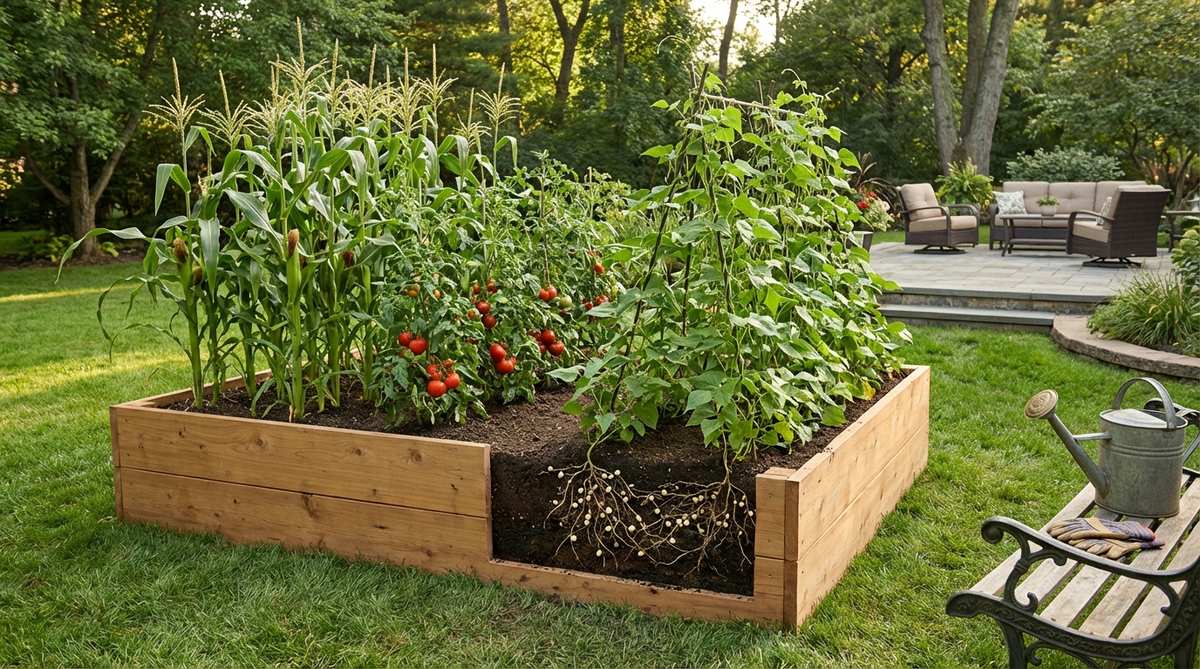
1. Standard 4×8 Family Garden Bed
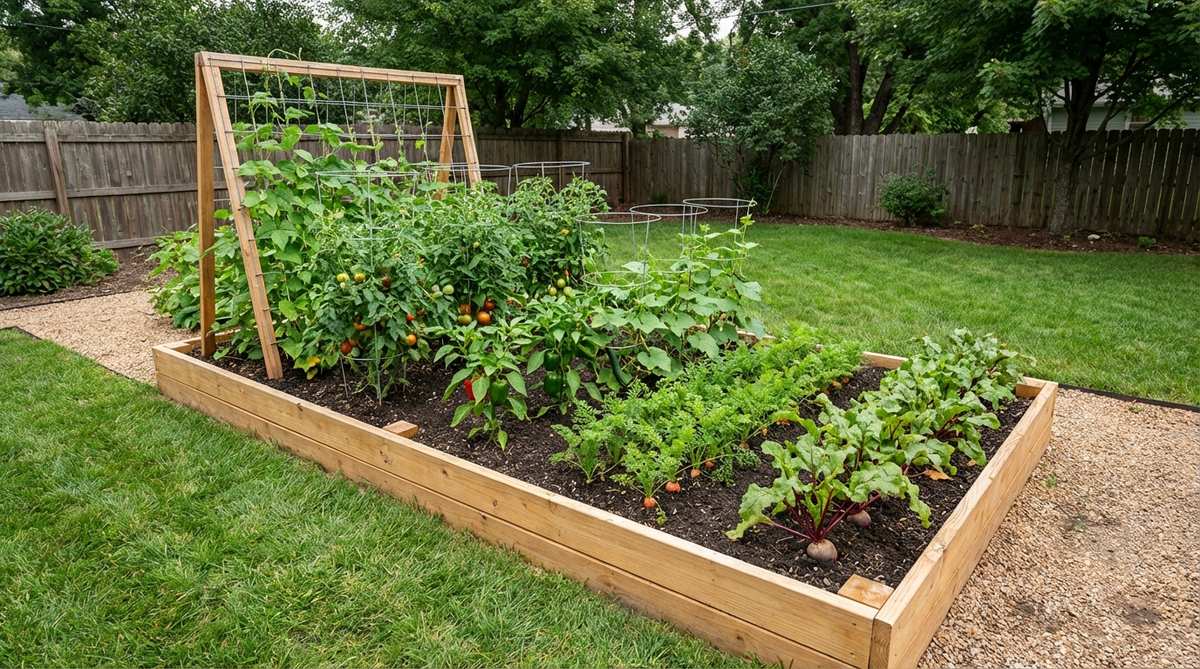
The 4×8 footprint delivers 32 square feet of growing space while keeping all plants within arm’s reach from either side. This dimension works perfectly for two adults who can comfortably tend the bed without stepping on soil.
Plant eight rows running the 8-foot lengthtwo rows of climbing beans on a north-end trellis, followed by tomatoes, peppers, and cucumbers in cages, then root vegetables like carrots or beets. This classic arrangement feeds a family of four throughout the growing season.
The 4-foot width prevents soil compaction since you never need to walk inside the bed. Pair two or three of these beds with 3-foot pathways between them for a complete kitchen garden.
2. Double-Row Production Bed
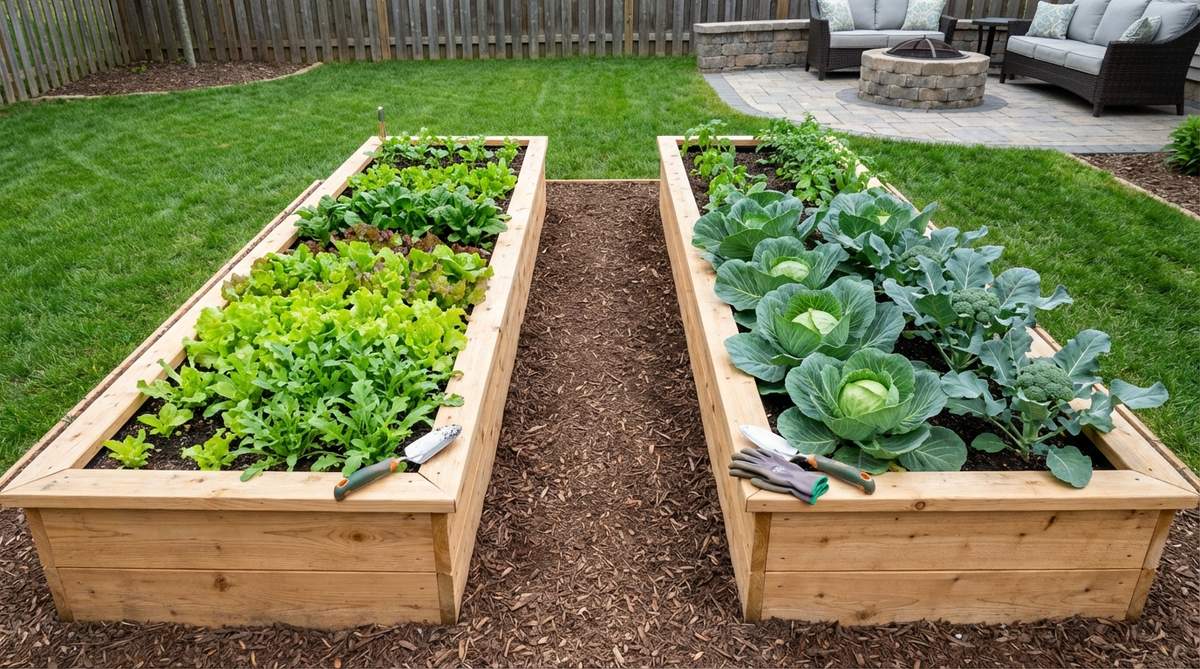
A 3×12-foot bed arranged in two parallel planting rows creates maximum edge access for harvesting. The narrower width means you can reach plants from both sides without stretching.
Dedicate one row to quick-growing salad greens and the other to slower crops like cabbage or broccoli. This layout simplifies succession planting since you can replant an entire row after harvest without disturbing neighboring crops.
3. Three Sisters Arrangement
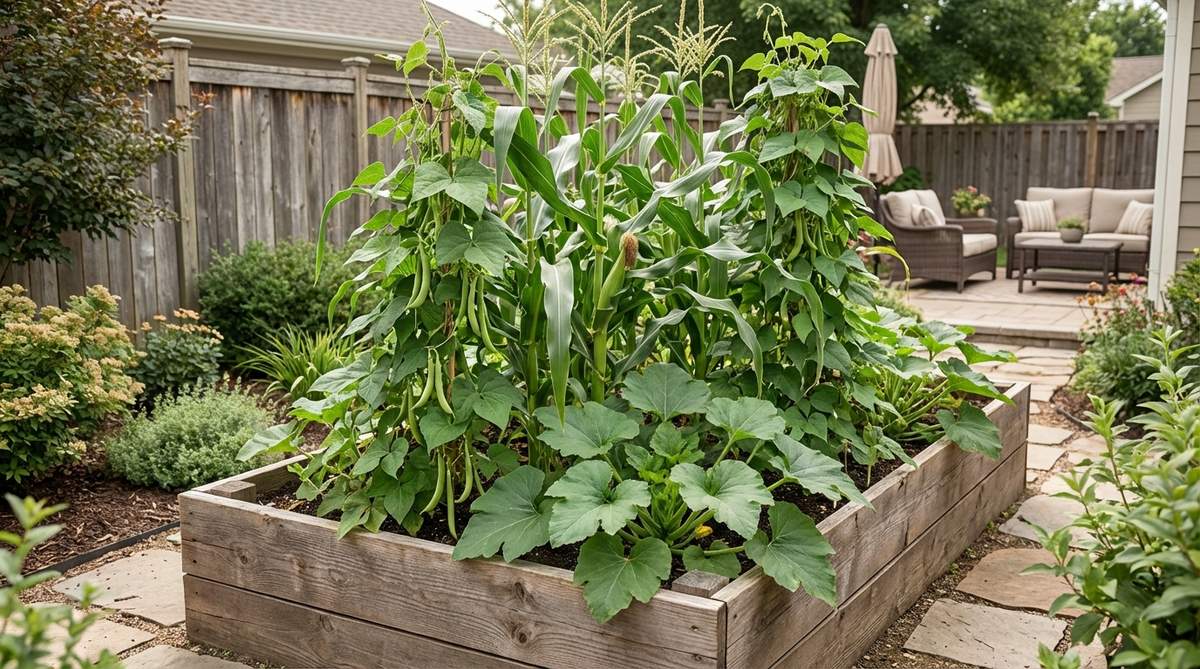
This Native American technique places corn, pole beans, and squash together in a single raised bed. Corn stalks provide natural trellises for beans, which fix nitrogen in the soil, while squash leaves shade the ground to retain moisture.
Plant corn in the center third of a 4×6 bed once soil reaches 50°F. Two weeks later, add pole beans around corn stalks, then plant squash along the bed edges. This polyculture reduces pest pressure and increases overall yields.
4. Alternating Height Bed
Construct one bed at 12 inches high and an adjacent bed at 24 inches to accommodate different root depths. Deep-rooted vegetables like tomatoes and carrots thrive in taller beds, while shallow-rooted lettuce and spinach perform well in shorter structures.
The height variation also creates visual interest and improves ergonomics for gardeners with mobility limitations. Taller beds reduce bending and kneeling during planting and harvest.
5. Mirror Image Twin Beds
Two identical 3×8 beds positioned parallel with a central pathway create symmetry and simplify crop planning. Plant the same vegetables in both beds to double your harvest or use one for vegetables and one for cutting flowers.
This layout works exceptionally well for crop rotation—simply swap what you grow in each bed annually. The mirror design also makes drip irrigation installation straightforward since you can use identical watering systems on both sides.
6. Tiered Cascading Beds
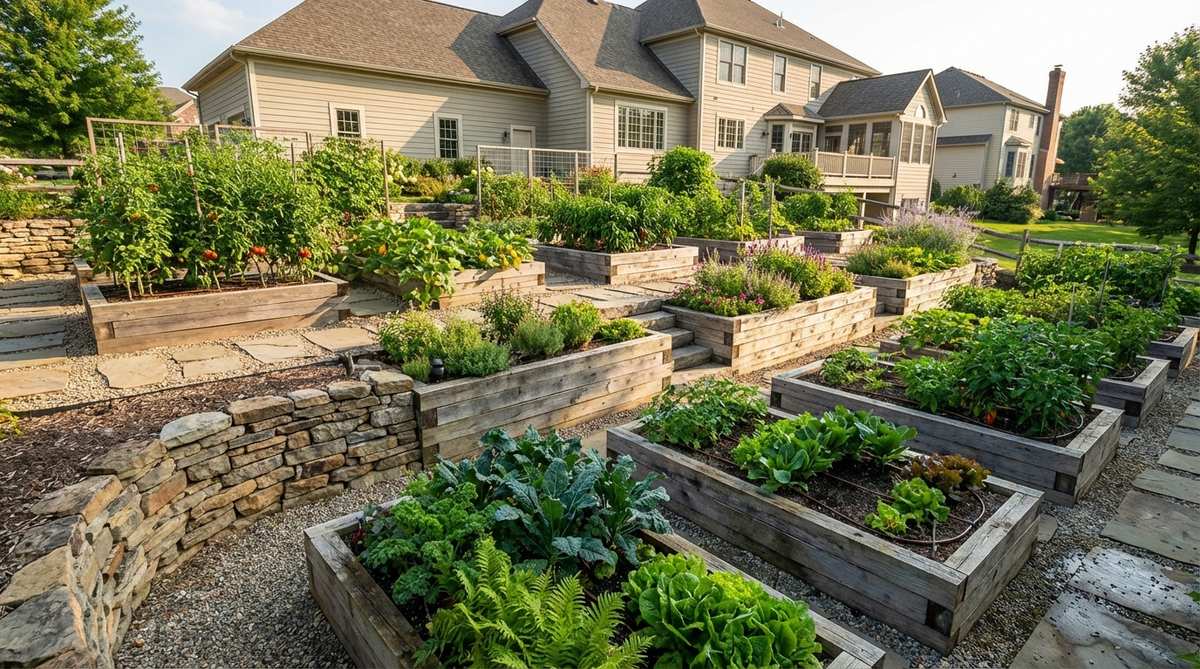
On sloped terrain, build raised beds in descending levels like stair steps. Each bed sits 6-12 inches lower than the one above it, following the natural grade of your yard.
This terraced approach prevents erosion, improves drainage, and creates microclimates for different plants. Use upper beds for heat-loving peppers and tomatoes, lower beds for moisture-loving leafy greens. The cascading effect adds dramatic visual appeal to hillside properties.
Vertical Growing Structures For Maximum Space Utilization
Vertical elements triple your growing capacity by using airspace above beds. Trellises, arches, and towers improve air circulation around plants, reducing fungal diseases while creating stunning focal points. These structures work particularly well in small urban yards where horizontal space comes at a premium.
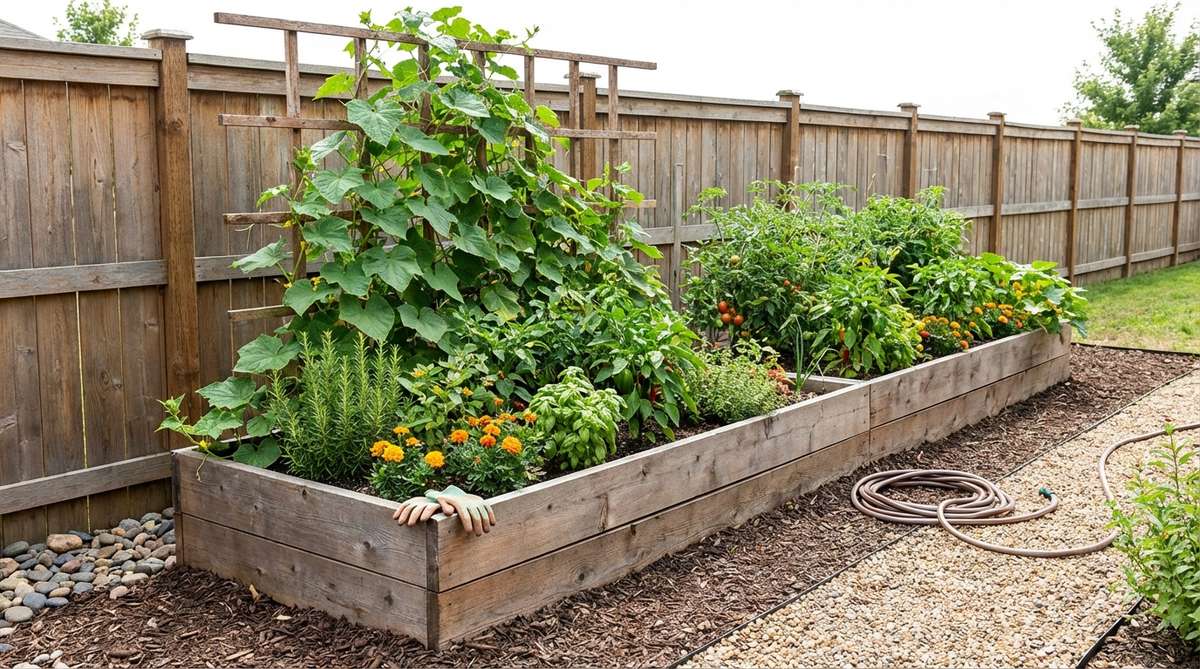
7. Wire Panel Trellis Wall
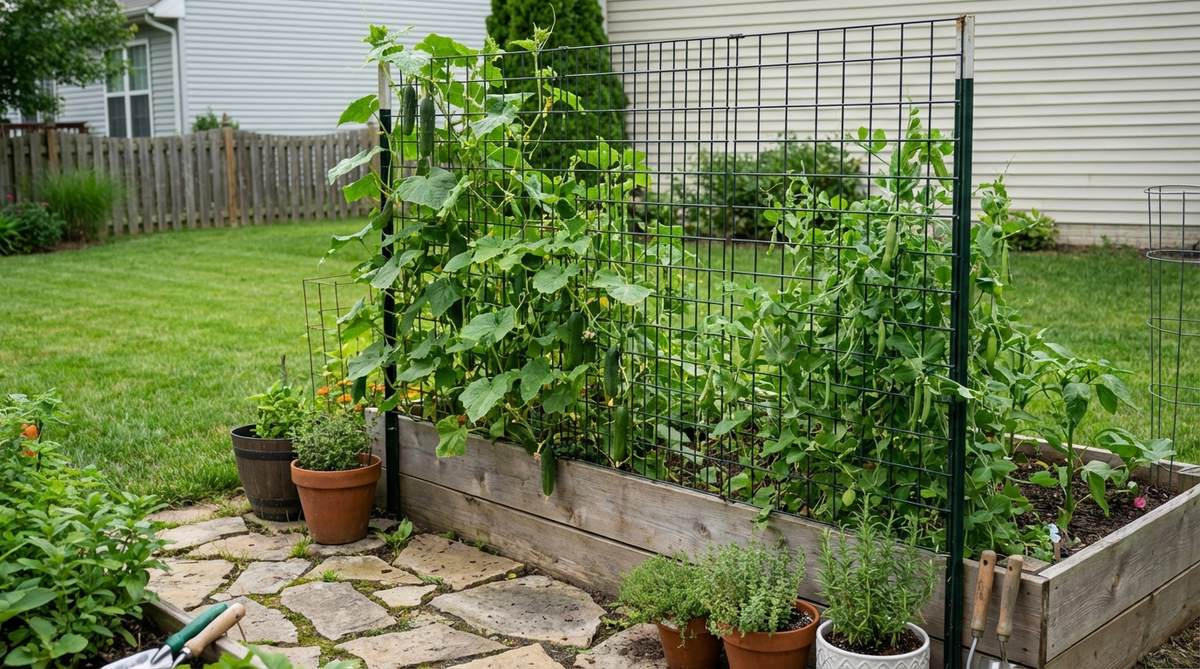
Mount 4×8-foot welded wire panels or cattle panels to the north side of your raised bed using sturdy wooden stakes. This creates an instant vertical growing surface for pole beans, peas, cucumbers, and even small melons.
The open mesh allows sunlight to filter through while providing hundreds of attachment points for vining plants. Install the trellis at a slight backward lean for better stability and easier harvesting from the front.
One trellis panel can support 15-20 cucumber plants or 30-40 pea plants, dramatically increasing yields. The vertical growth also keeps fruits off the ground, reducing rot and pest damage.
8. Arched Tunnel Trellis

Bend cattle panels into a 6-foot-tall arch spanning the width of your bed to create a walk-through tunnel. This romantic structure works beautifully for cucumbers, pole beans, or flowering vines like morning glories.
The arch provides shade underneath, making it ideal for heat-sensitive crops like lettuce planted at the base. Children love harvesting from inside the tunnel, making this design perfect for family gardens.
9. A-Frame Double-Sided Trellis
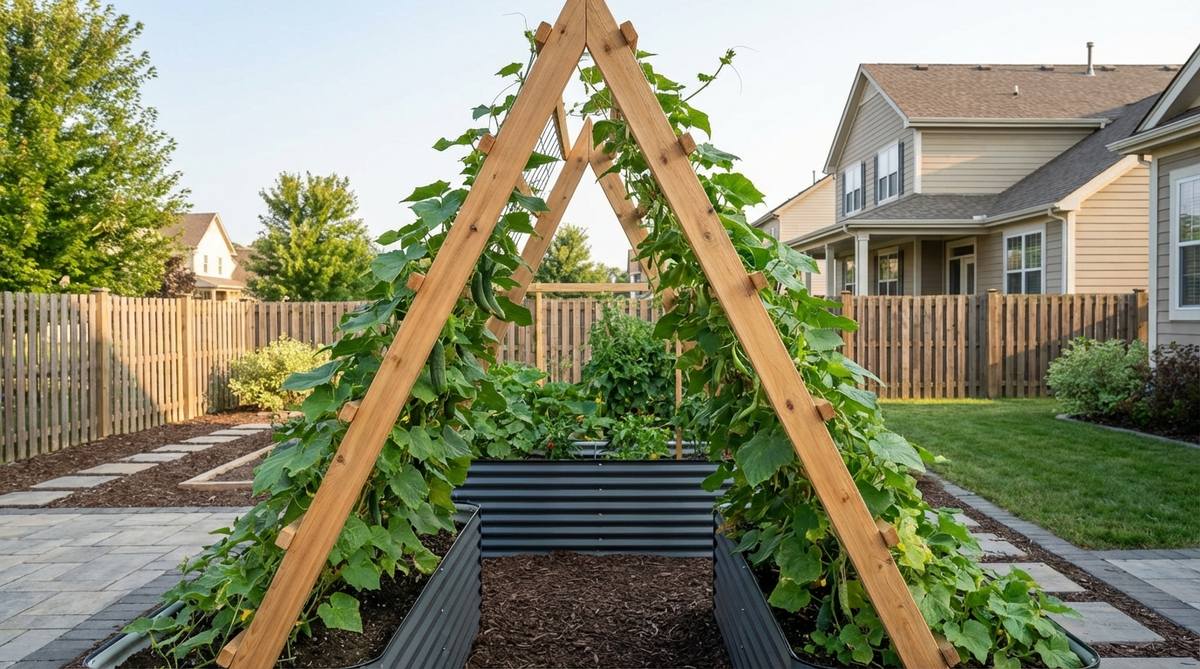
Build a peaked A-frame trellis straddling a raised bed to create two vertical growing surfaces. Plant cucumbers on one side and pole beans on the other, or use both sides for the same crop.
The A-frame provides excellent stability without corner bracing and creates a cathedral-like effect in the garden. This structure works in windy locations where flat trellises might blow over. Harvest is simple since plants grow on both accessible sides.
10. Bamboo Teepee Cluster
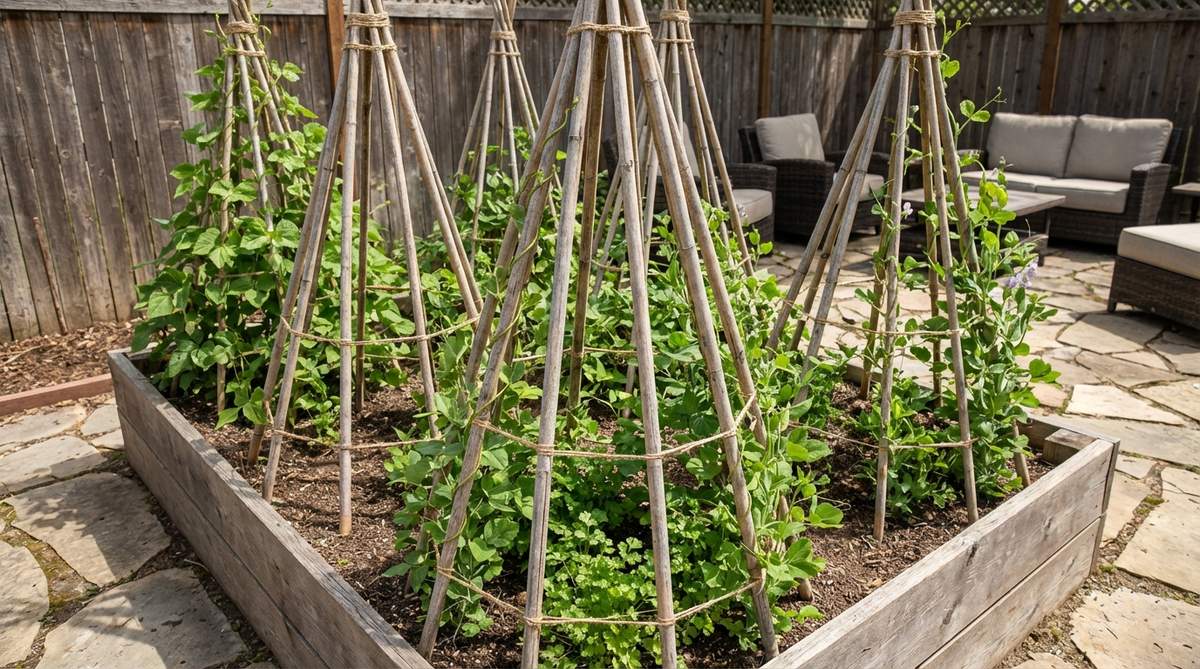
Arrange 6-8 bamboo poles in a circle, securing tops with twine to form a cone-shaped teepee. Plant pole beans or flowering sweet peas around the base, letting them spiral upward.
The eco-friendly bamboo adds rustic charm while providing sturdy support for heavy crops. Position multiple teepees throughout a bed to create vertical interest at different points. The open center of each teepee can shelter heat-sensitive herbs like cilantro.
11. String Trellis System
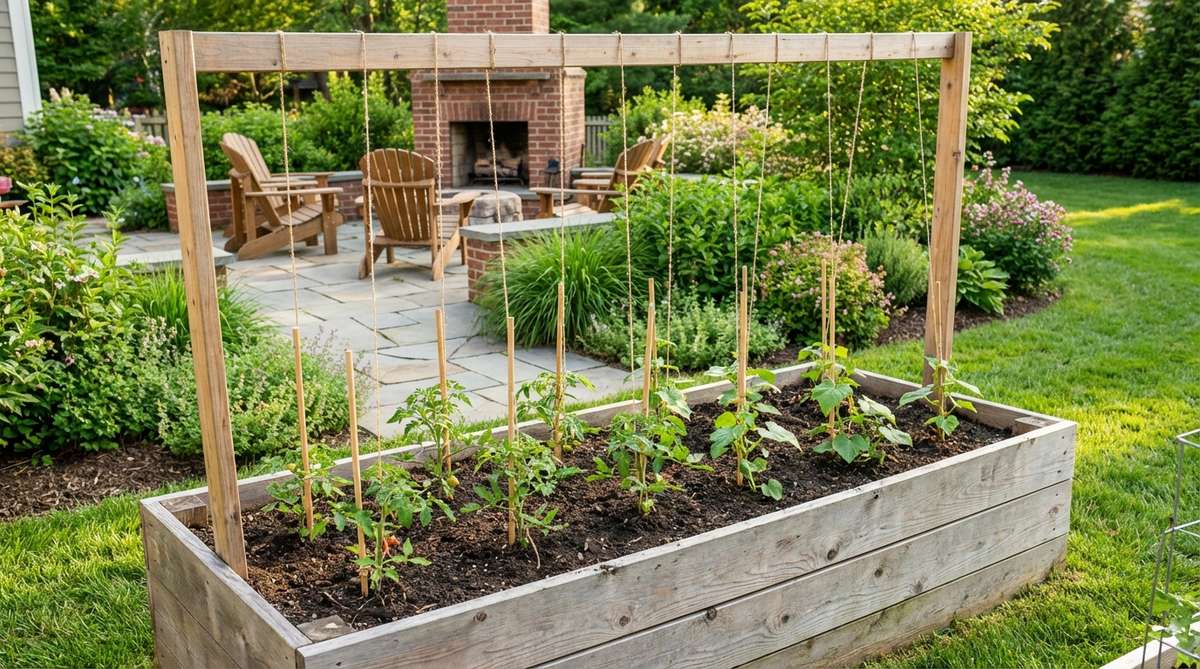
Install a horizontal 2×4 beam 6-7 feet above your bed, then run biodegradable twine from the beam to the bed’s base. This creates individual vertical strings for each tomato or cucumber plant.
The string method allows precise plant spacing and makes it easy to prune and train indeterminate tomatoes. At season’s end, cut strings at the base and compost the entire plant-and-string combination. This commercial greenhouse technique adapts perfectly to home gardens.
12. Obelisk Tower Accents
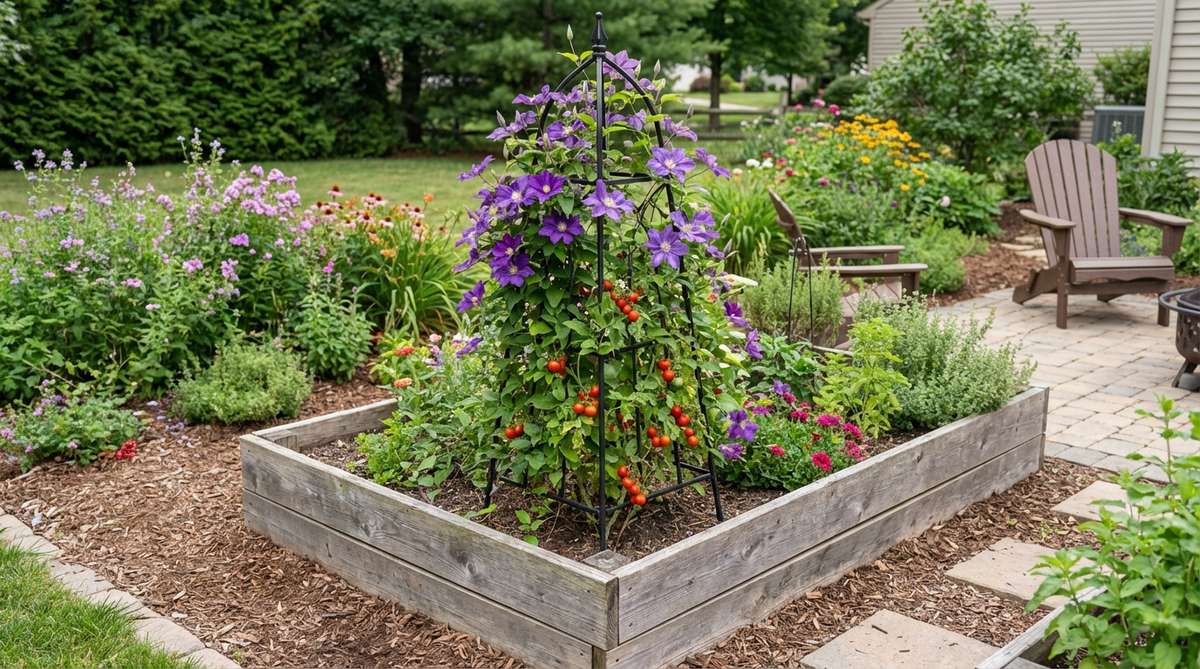
Place decorative obelisk trellises at corners or centers of beds to add architectural elegance. These pyramid-shaped structures work beautifully for flowering vines, cherry tomatoes, or ornamental pole beans with purple blossoms.
Metal or wooden obelisks range from 4 to 7 feet tall and create strong vertical focal points. They’re particularly effective in beds that combine vegetables and flowers, providing structure during the off-season when the garden is bare.
Specialty Shaped Beds For Unique Garden Spaces
Non-rectangular beds adapt to challenging yard layouts and create conversation-starting designs. These configurations work around trees, fences, and property lines while maintaining full functionality. Specialty shapes often provide better access than straight beds in corner locations or tight spaces.
13. U-Shaped Accessibility Bed
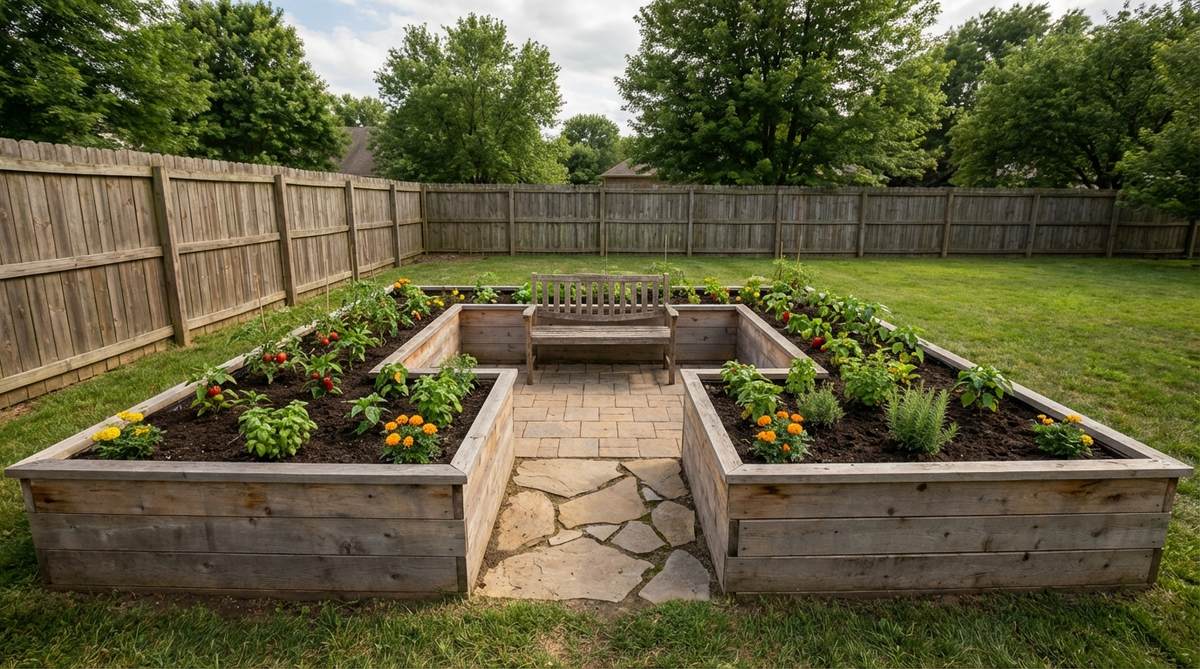
Form three connected beds in a U configuration with the open side facing a patio or pathway. The center space creates a three-sided work area perfect for wheelchair users or gardeners who prefer sitting while tending plants.
Build each arm of the U at 3 feet wide and 6-8 feet long, with a 4-foot opening between arms. This design puts all plants within easy reach from the center position. The wraparound effect also creates an immersive garden room that feels private and protected.
14. L-Shaped Corner Garden
Utilize neglected corner spaces by building two perpendicular beds that share a corner. This L-configuration fits perfectly along fence lines or property boundaries.
Make each leg 4×8 feet for generous growing space, or scale down to 3×6 for smaller yards. The corner becomes an ideal spot for a vertical trellis supporting cucumbers or flowering vines. This layout makes efficient use of dead zones that typically become weed patches.
15. Keyhole Garden Bed
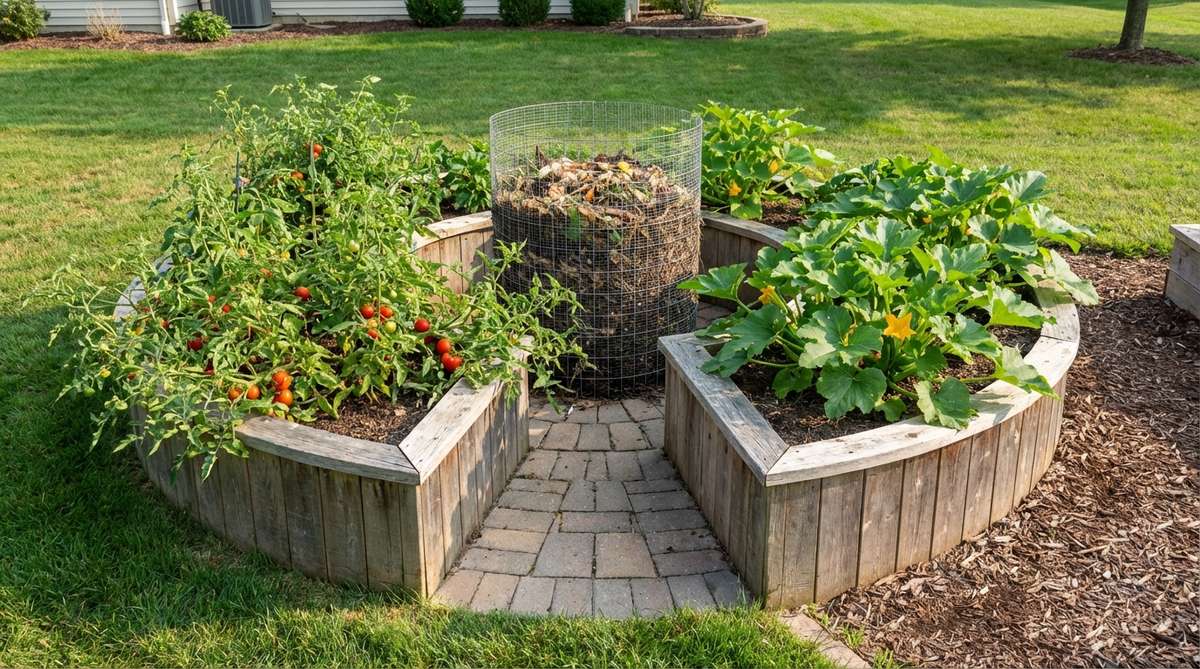
A circular bed with a wedge-shaped path extending to a central compost basket combines growing space with on-site composting. The circular design places all plants within arm’s reach of the center pathway.
Build the bed 6-7 feet in diameter with an 18-inch-wide entrance path. Install a wire basket or perforated composting tube in the center where you add kitchen scraps throughout the season. Nutrients leach directly into surrounding soil, feeding plants continuously.
This African-inspired design conserves water and eliminates trips to a distant compost pile. The unique shape creates a focal point in any garden while maximizing edge planting space.
16. Hexagonal Honeycomb Layout
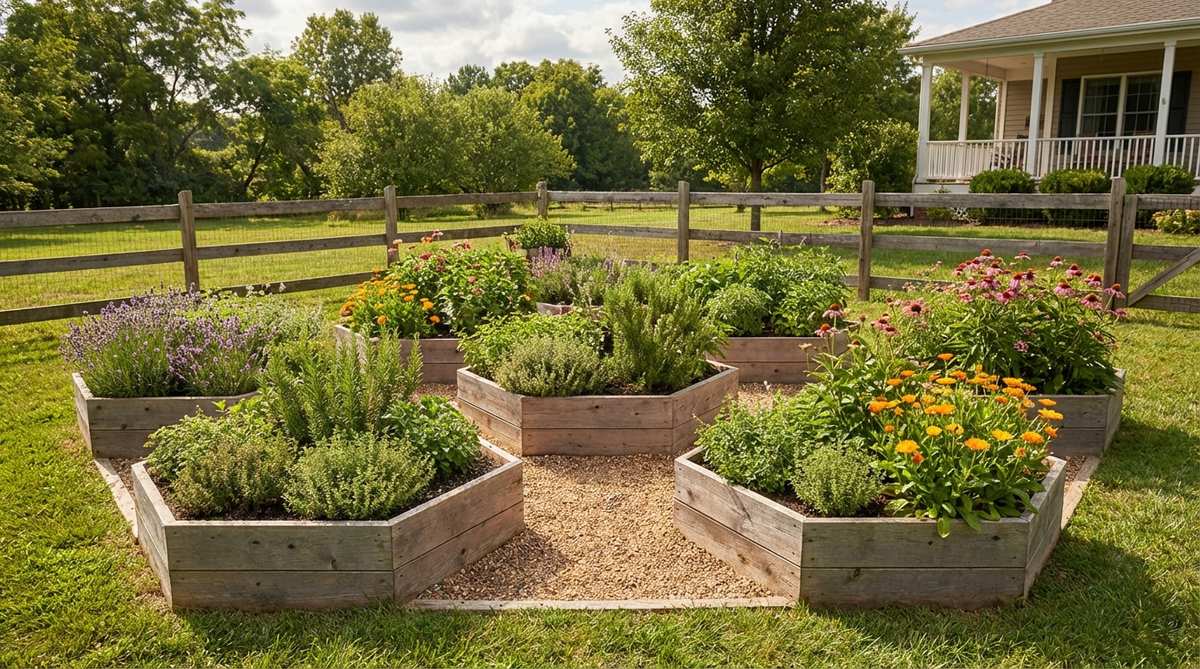
Six-sided beds nest together like honeycomb cells, creating efficient pathways between beds. Each hexagon provides multiple access sides while minimizing wasted pathway space.
Build beds 4-5 feet across for easy reach to the center. This modular design lets you expand your garden by adding more hexagons over time. The geometric pattern creates stunning visual appeal and works exceptionally well for herb gardens or cutting flower plots.
17. Circular Mandala Garden
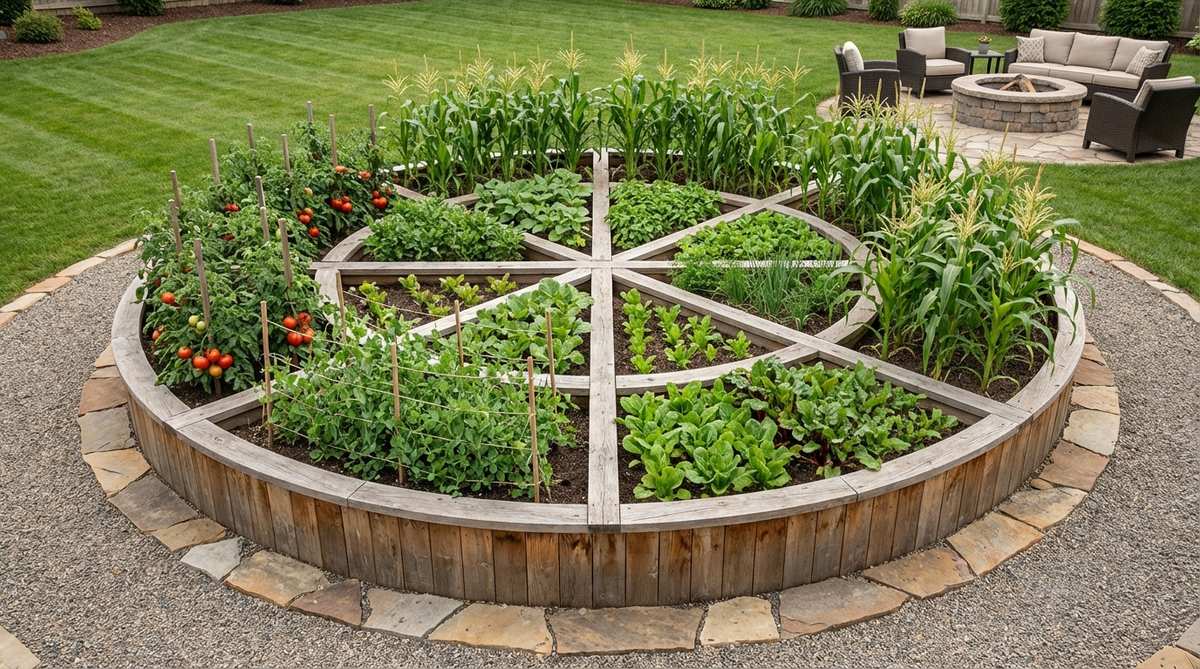
A large circular bed divided into pie-slice sections radiating from a central point creates organized growing zones. Each wedge can hold a different vegetable family, simplifying crop rotation.
Divide a 10-12 foot diameter circle into 8-10 sections using small wooden dividers or stone edging. Plant tall crops near the outer edge to avoid shading inner sections. The mandala shape has spiritual significance in many traditions and creates a meditative garden space.
18. Serpentine Curved Bed

Gentle S-curves create flowing lines that soften the geometric rigidity of traditional raised beds. Use flexible composite boards or bendable metal edging to form graceful curves.
The serpentine shape adds movement and interest to flat yards while providing more linear edge space than straight beds of equivalent area. Plant colorful flowers along the curves to emphasize the flowing design. This artistic approach works well in ornamental vegetable gardens visible from living spaces.
Companion Planting Layouts That Boost Garden Health
Strategic plant pairings reduce pests, improve pollination, and increase yields through mutualistic relationships. Companion planting transforms raised beds into balanced ecosystems where plants support each other. These layouts incorporate flowers, herbs, and vegetables in scientifically-proven combinations.
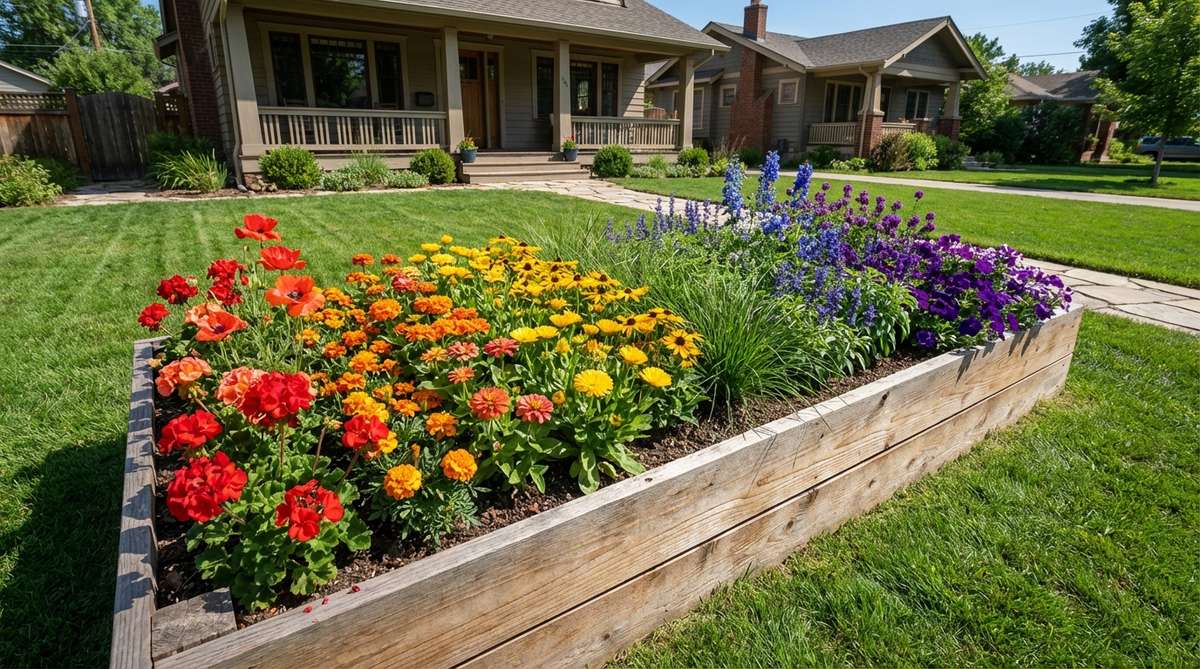
19. Tomato-Basil-Marigold Triangle
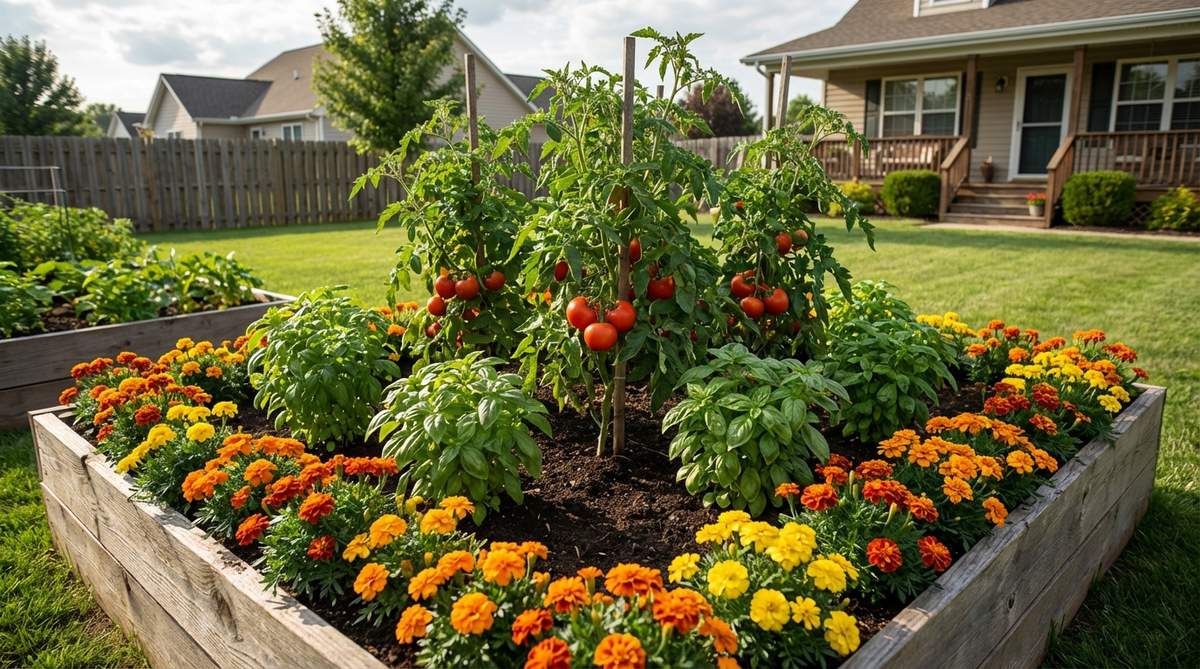
Plant tomatoes in the center of a 4×4 bed, surround them with basil plants 12 inches away, then edge the bed with marigolds. Basil repels tomato hornworms while improving tomato flavor, and marigolds deter aphids and whiteflies.
This classic combination also creates a visually appealing color palette with red tomatoes, green basil, and orange or yellow marigolds. Harvest basil regularly to promote bushy growth that provides more pest protection.
20. Carrot-Onion Interplanting
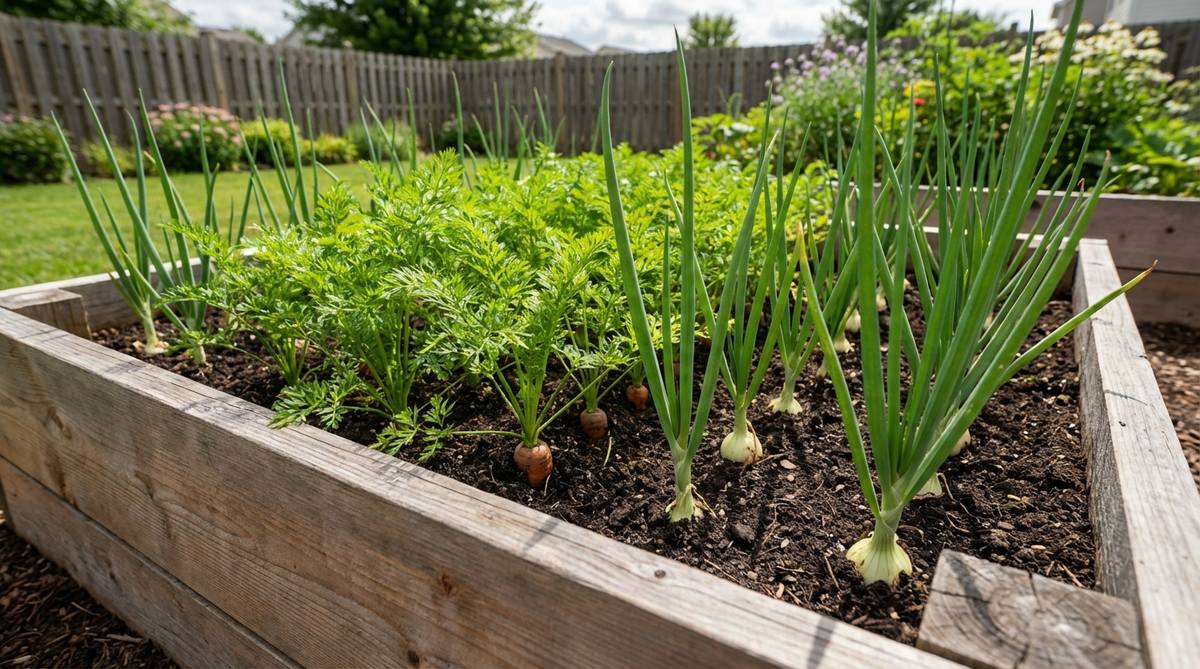
Alternate rows of carrots and onions in a 3×6 bed to confuse carrot rust flies and onion maggots. The strong scent of onions masks carrot foliage, while carrot greens deter onion pests.
Plant onion sets first, then sow carrot seeds in between rows once onions establish. Both crops have similar water needs and harvest at different times, making them compatible bed partners. This space-efficient combination produces two harvests from a single small bed.
21. Pest-Confusing Polyculture Bed
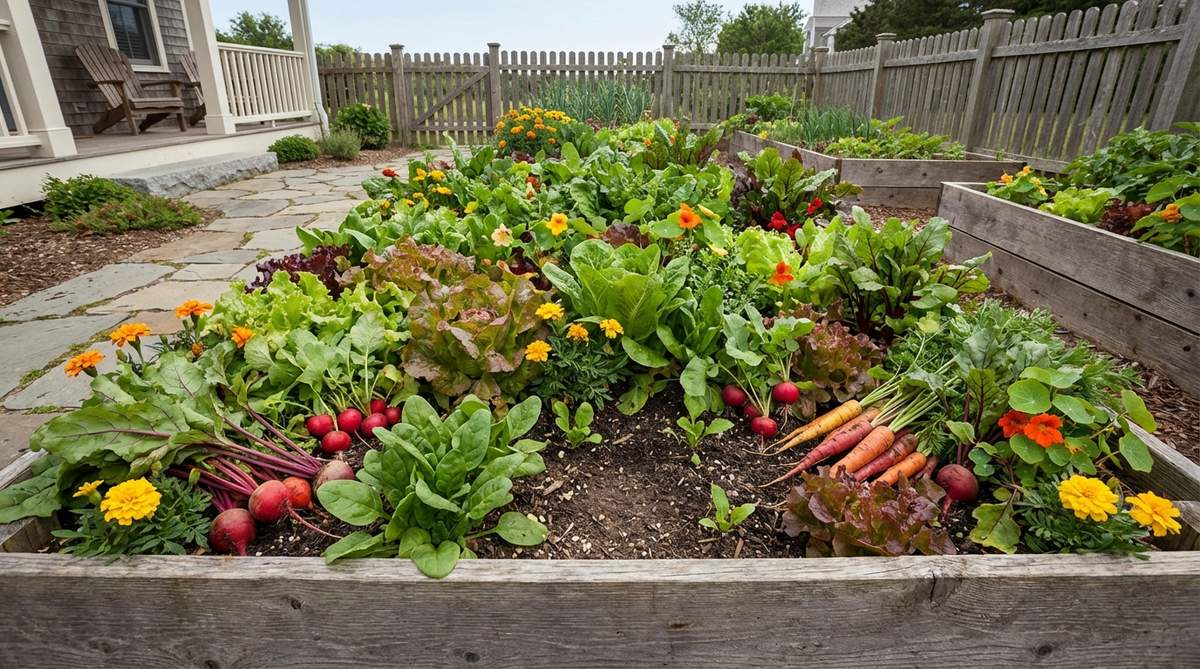
Mix multiple plant families in seemingly random patterns to confuse specialist pests. Combine lettuce, radishes, spinach, carrots, beets, and flowers in a 4×6 bed without organizing into rows.
The biodiversity prevents pest population explosions since insects can’t easily locate their preferred host plants. Plant densely to create a living mulch that shades soil and retains moisture. Harvest creates open pockets where you can tuck in succession plantings.
22. Nitrogen-Fixing Bean Partnership
Plant nitrogen-hungry crops like corn, tomatoes, or cabbage alongside pole beans or bush beans. Bean roots harbor rhizobia bacteria that convert atmospheric nitrogen into plant-available forms.
Position beans on the east side of a bed where they won’t shade other plants. After beans finish producing, cut plants at soil level, leaving roots to decompose and release stored nitrogen for fall crops. This natural fertilization reduces synthetic fertilizer needs.
23. Pollinator-Attracting Edge Planting
Frame vegetable beds with continuous borders of flowering herbs and annuals that bloom throughout the season. Include early bloomers like calendula, mid-season zinnias, and late-blooming sunflowers.
These flowering edges attract bees, butterflies, and beneficial insects that pollinate vegetables and prey on garden pests. The diverse bloom times ensure pollinators have food from spring through fall. This technique increases fruit set on tomatoes, peppers, squash, and cucumbers.
24. Herb Spiral Garden
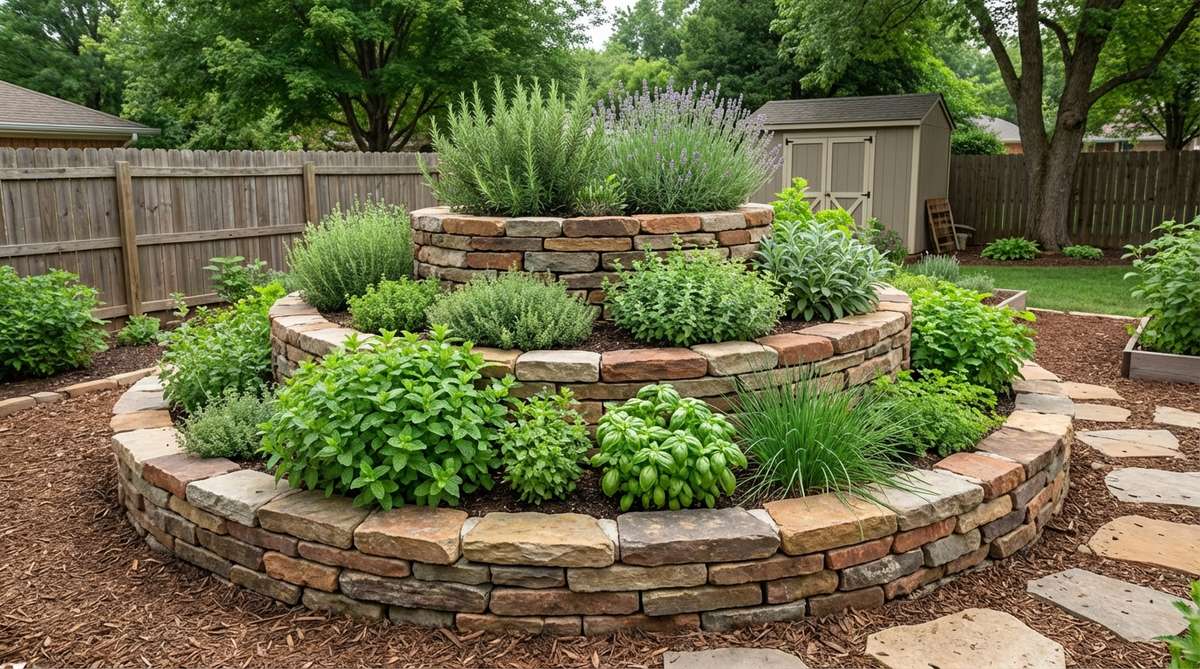
Build a spiral-shaped mound in a circular bed, creating different moisture and sun zones from top to bottom. The elevated center stays dry and hot, perfect for Mediterranean herbs like rosemary and thyme.
Mid-level zones suit basil, oregano, and cilantro, while the moist base supports parsley, chives, and mint. This 3D structure fits dozens of herbs in a 5-6 foot diameter footprint. The spiral design also adds dramatic sculptural interest to kitchen gardens.
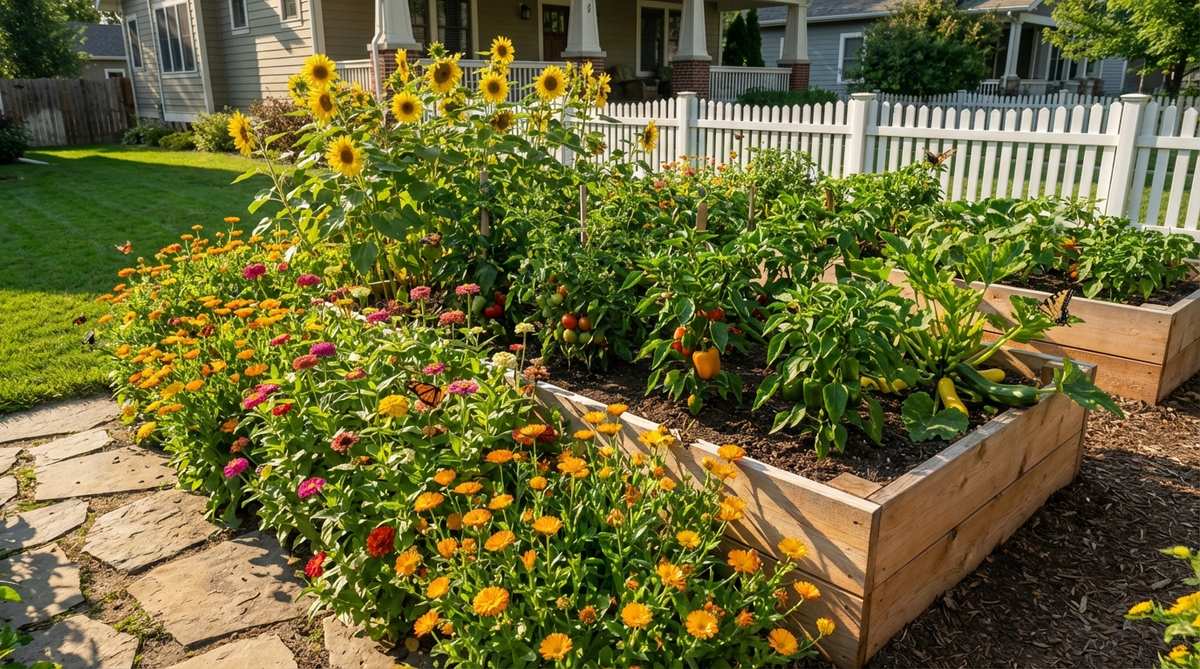
Decorative Flower-Focused Designs For Cut Flowers And Beauty
Raised beds aren’t just for vegetables—they create perfect growing environments for cut flowers, pollinator plants, and ornamental displays. These designs prioritize aesthetics while maintaining the practical benefits of raised bed gardening. Many combine flowers with edible crops for beautiful potager-style gardens.
25. Cut-Flower Production Row
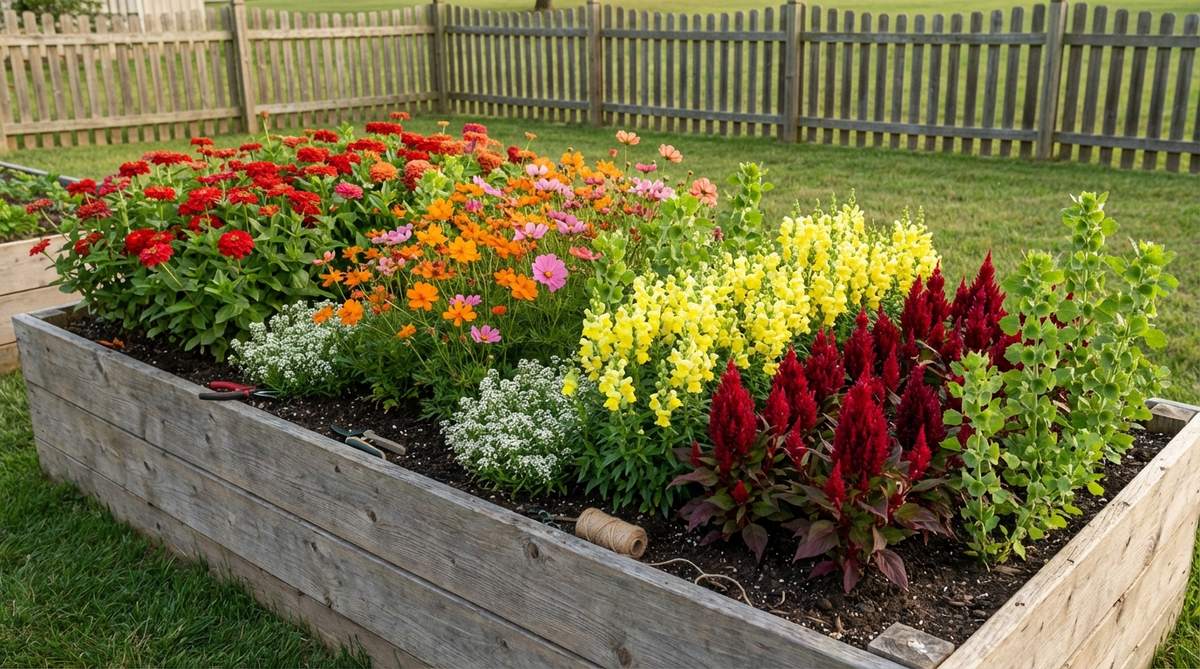
Dedicate a 3×10 bed exclusively to cut flowers planted in tight rows like a commercial operation. Grow cut-and-come-again varieties like zinnias, cosmos, snapdragons, and celosia that produce more blooms with frequent harvesting.
Plant in blocks of single colors rather than mixing for easier bouquet arrangement. Include filler flowers like baby’s breath and greenery like bells of Ireland. This utilitarian layout focuses on production rather than ornamental display, making it ideal for placement in out-of-sight garden areas.
26. Rainbow Gradient Bed
Arrange flowering plants in color-wheel order, transitioning smoothly from warm reds and oranges through yellows to cool blues and purples. This ombre effect creates stunning visual impact.
Use a 4×8 bed and plant flowers in diagonal bands running from one corner to the opposite corner. Choose varieties with similar heights and bloom times for cohesive appearance. This Instagram-worthy design works beautifully in front yards or highly visible garden spots.
27. Four-Season Succession Bed
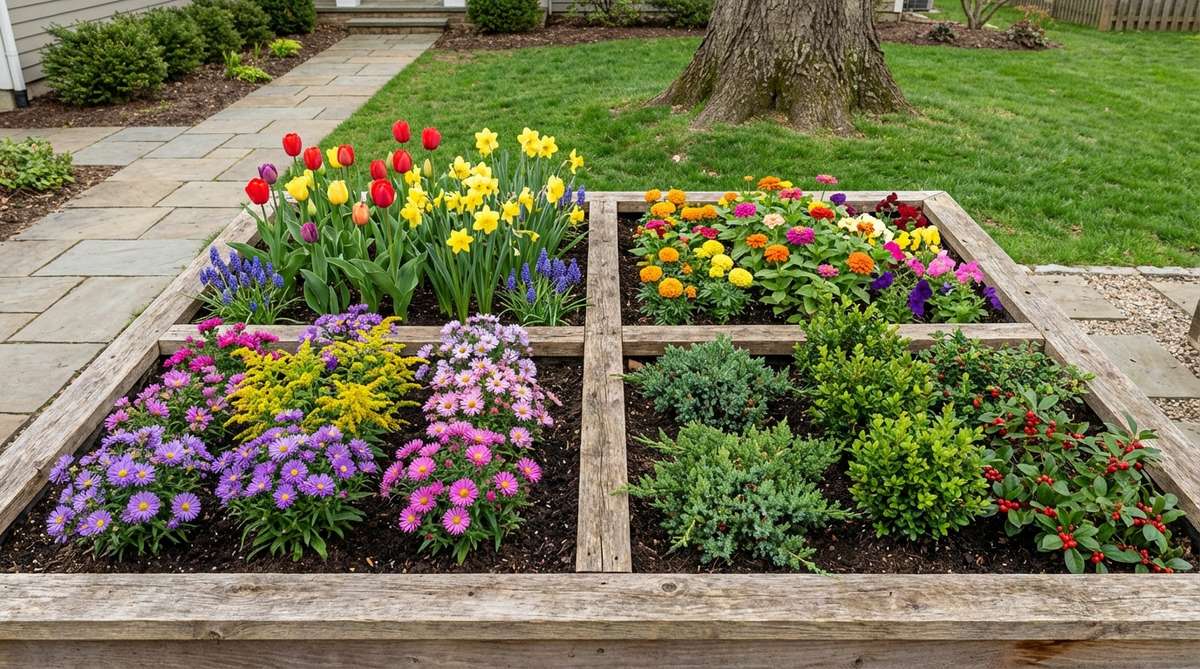
Plan a 4×6 bed with four distinct planting zones, each featuring flowers that peak in a different season. Spring bulbs in one quadrant, summer annuals in another, fall asters in the third, and evergreen winter interest in the fourth.
This design ensures something is always blooming, providing year-round color and pollinator food. Mix perennials with annuals for long-term structure. The organized approach simplifies maintenance since you can focus on one section at a time.
28. Cottage Garden Mix
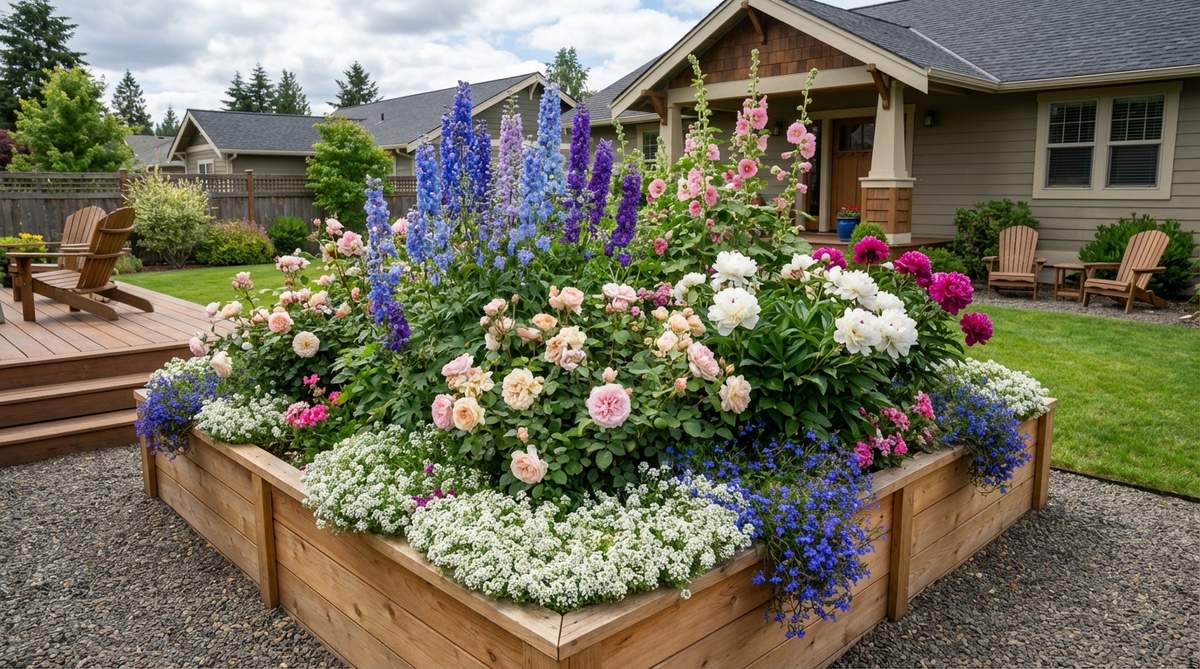
Create an overflowing, romantic look by cramming a raised bed with old-fashioned flowers in exuberant combinations. Layer tall delphiniums and hollyhocks in back, mid-height roses and peonies in the middle, and low edging plants like alyssum and lobelia in front.
The cottage style embraces controlled chaos where plants intermingle and self-seed freely. This forgiving approach works well for beginning gardeners since the lush density hides minor mistakes. The raised bed provides the excellent drainage that cottage garden perennials demand.
29. Dahlia Showcase Bed
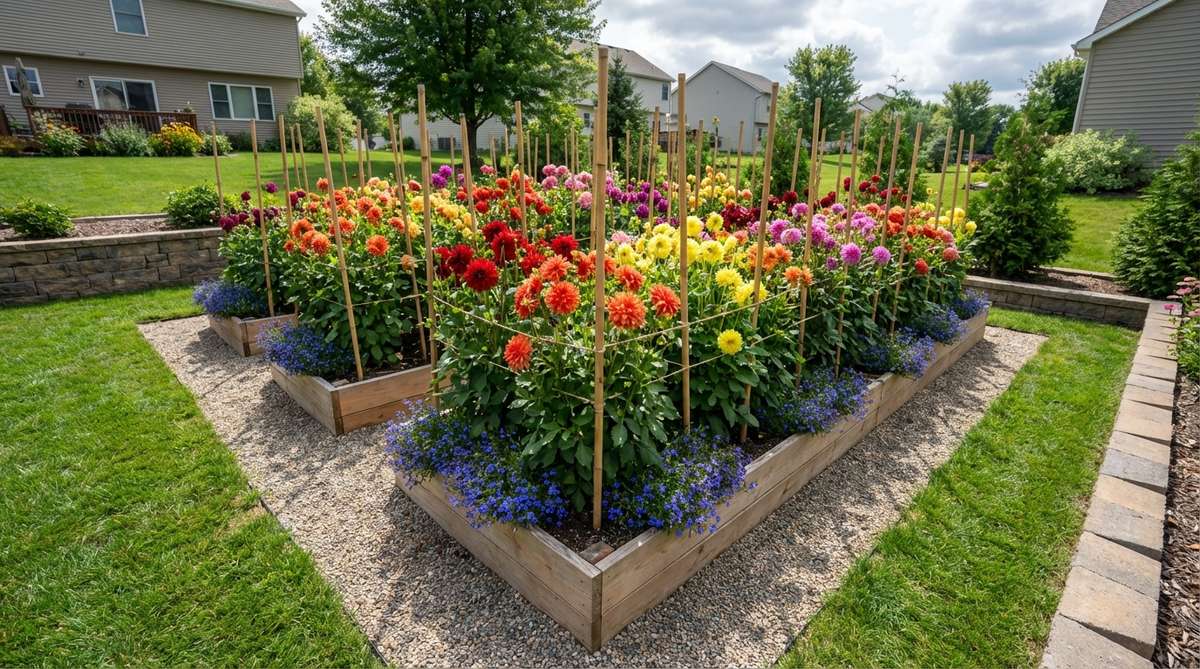
Dedicate an entire raised bed to dahlias for spectacular late-summer and fall color. Space tubers 18-24 inches apart in a grid pattern, allowing room for the large plants to develop.
Install individual stakes at planting time to avoid damaging tubers later. Raised beds provide the sharp drainage dahlias require and make fall digging easier when you lift tubers for winter storage. Plant low-growing annuals like lobelia around dahlia bases to hide bare stems.
30. Butterfly and Hummingbird Haven
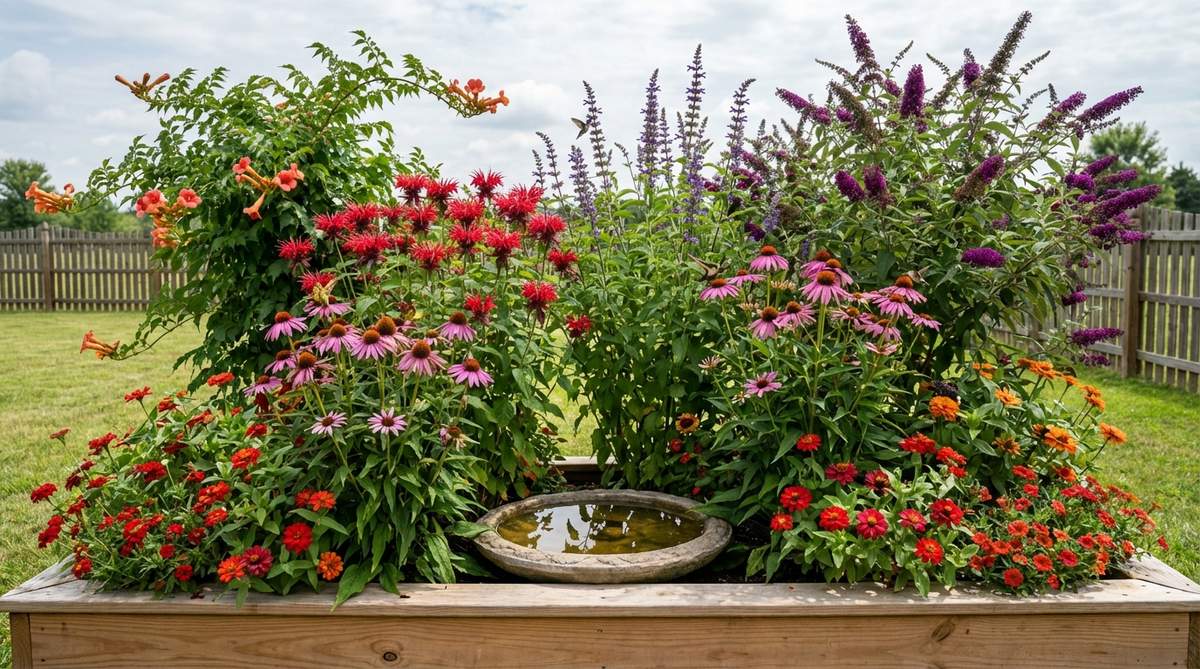
Fill a bed with nectar-rich flowers in reds, oranges, and purples that attract butterflies and hummingbirds. Include trumpet vine, salvia, bee balm, coneflowers, and butterfly bush.
Layer plants by height with taller varieties in the center or back to create dimension. Add a shallow water source like a birdbath at bed level to provide drinking spots for butterflies. This pollinator paradise becomes a living entertainment center where you can watch wildlife up close.
Space-Efficient Solutions For Small Yards And Urban Gardens
Limited space demands creative solutions that maximize every square inch. These compact designs prove you don’t need acreage to grow substantial harvests. Vertical elements, intensive planting, and smart crop selection turn tiny yards into productive gardens.
31. Elevated Table Garden
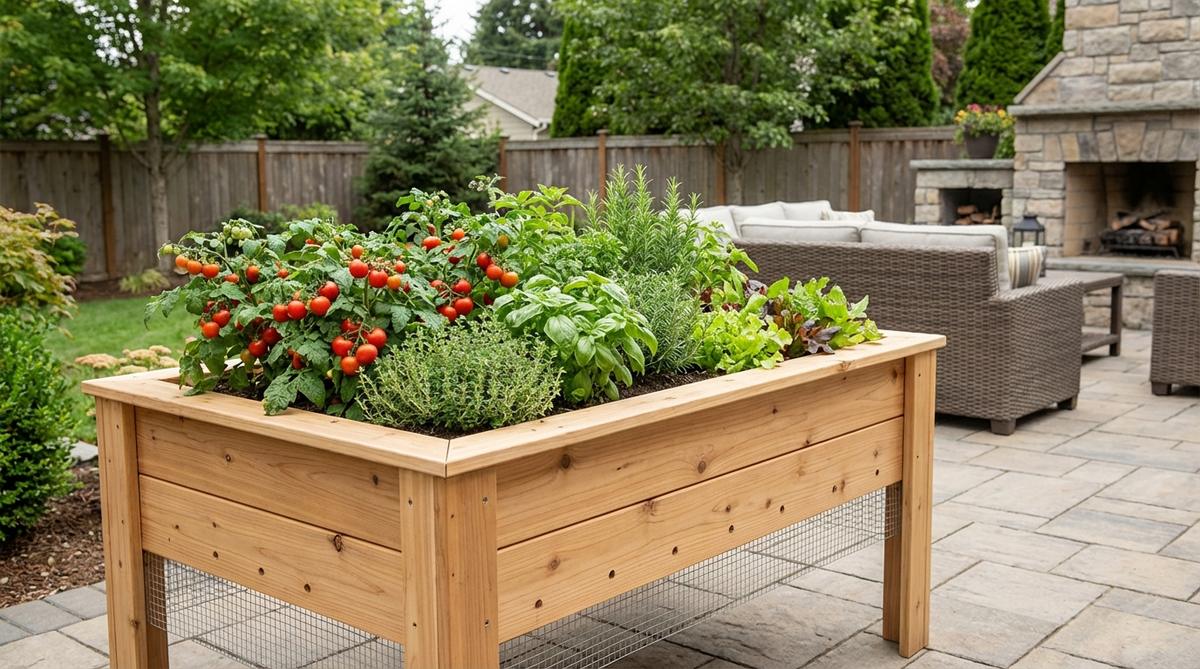
Waist-high table gardens eliminate bending and work perfectly on decks, patios, or balconies. Build or purchase tables 30-36 inches tall with beds 2×4 feet or smaller.
The elevated height also deters rabbits and groundhogs while improving drainage. These portable units can be moved to follow the sun or relocated seasonally. Plant compact varieties like cherry tomatoes, herbs, and salad greens that don’t require deep root systems.
Table gardens work exceptionally well for gardeners with mobility issues or back problems. The comfortable working height makes planting, weeding, and harvesting pain-free activities.
32. Fence-Line Narrow Bed
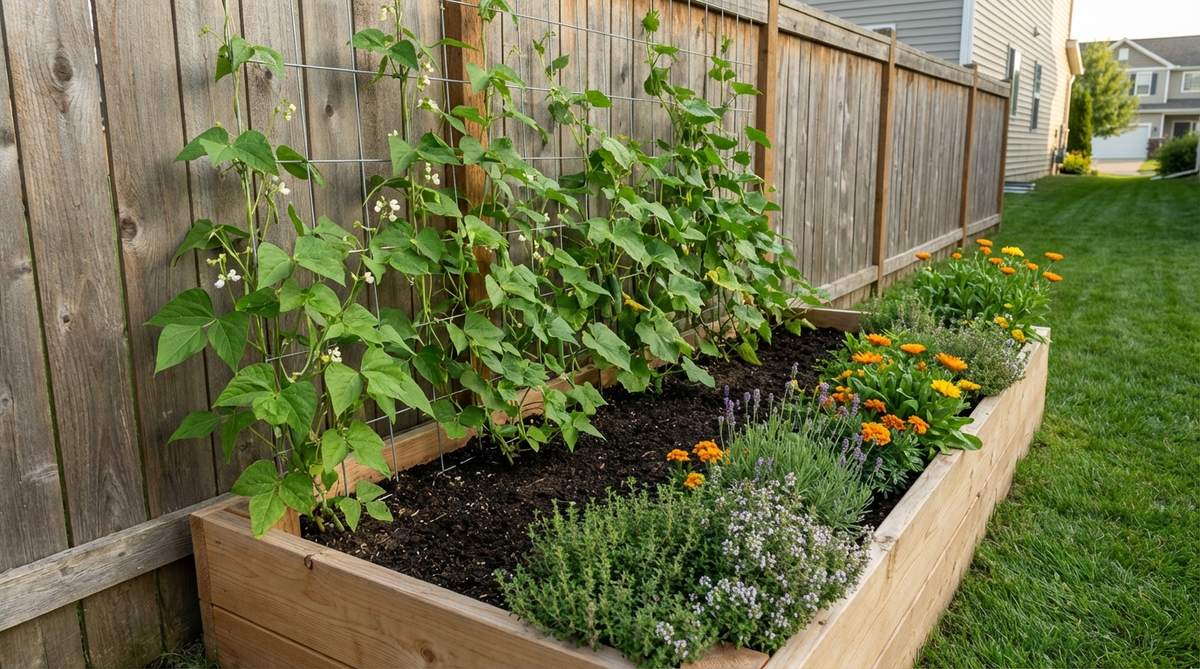
Install shallow 18-inch-wide beds along fence lines to utilize often-wasted edge spaces. The fence provides instant trellis support for vining crops while creating a productive privacy screen.
Plant pole beans, peas, or cucumbers that can climb the fence, with lower-growing herbs or flowers along the front edge. This design works along property boundaries, garage walls, or house foundations. The narrow profile fits in side yards too tight for standard beds.
33. Stacked Tiered Planter
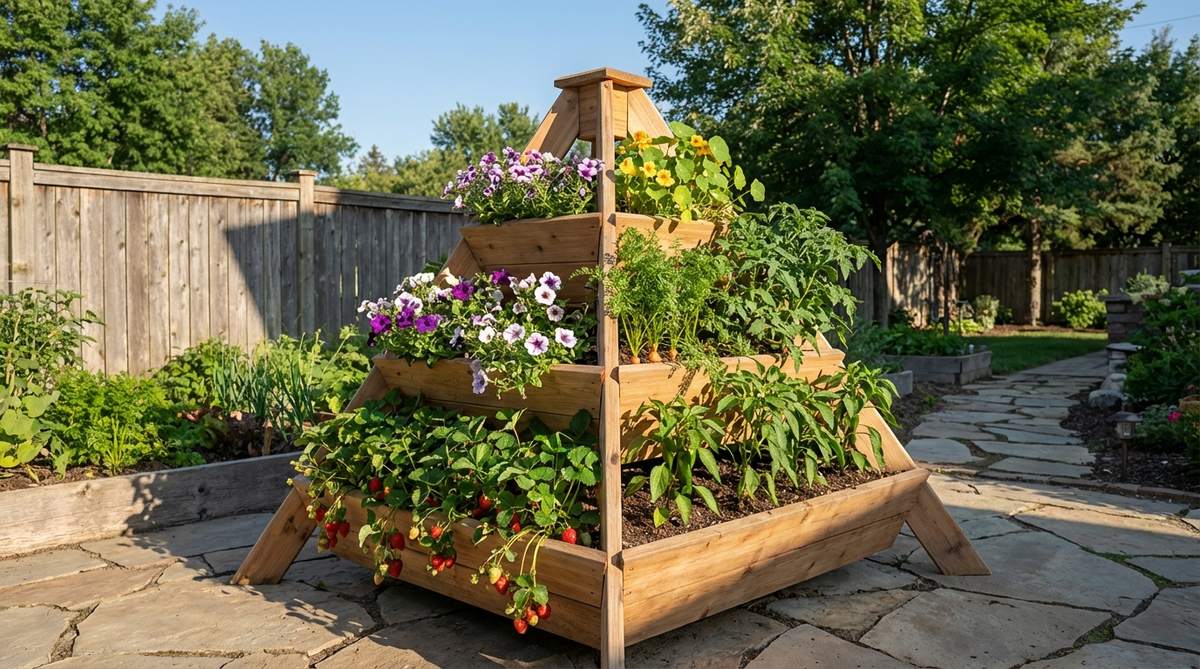
Build a pyramid-style planter with three or more levels stacked concentrically, each tier stepping back from the one below. The smallest top tier might be 2×2 feet, with increasingly larger levels below.
This vertical design creates multiple growing zones in a single footprint, ideal for small patios. Plant trailing strawberries or cascading flowers on upper levels that can spill downward. Use lower levels for vegetables with deeper root needs. The architectural form becomes a garden focal point even in winter.
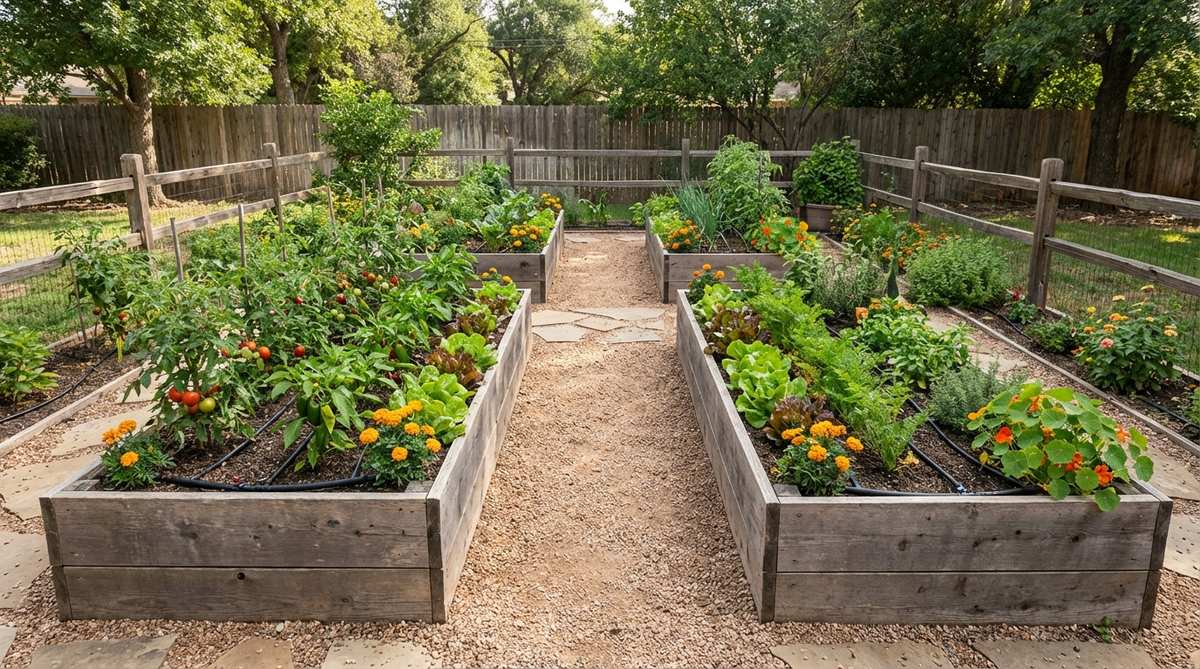
34. Square-Foot Intensive Bed
Divide a 4×4 bed into sixteen 1-foot squares using string or wooden dividers. Each square holds a different crop planted according to mature size—sixteen small plants like radishes, nine medium plants like bush beans, or one large plant like cabbage per square.
This method maximizes diversity in minimal space and makes crop planning simple. The organized grid prevents overcrowding while looking tidy and intentional. Begin with this layout if you’re new to raised bed gardening since it provides clear structure.
Building Your Dream Raised Bed Garden
These garden design raised beds offer proven solutions for every yard size, skill level, and growing goal. Start with one or two basic rectangular beds to build confidence, then experiment with vertical structures and specialty shapes as your gardening skills develop. Remember that the best layout balances productivity with accessibility—a beautiful garden you can’t easily maintain becomes a chore rather than a joy.
Whether you’re growing vegetables for your table, flowers for cutting, or a combination of both, raised beds provide the control and convenience that leads to gardening success. The layouts featured here from Fresh Garden Ideas have been tested in American gardens across different climates and regions. Choose designs that match your physical space, then adapt them to reflect your personal style and plant preferences.
Frequently Asked Questions
What is the best size for a raised vegetable garden bed?
A 4×8 foot bed provides optimal growing space while keeping all plants within comfortable reach from either side. This size accommodates most vegetable varieties, allows for efficient crop rotation, and can be built with standard 8-foot lumber without waste. For limited mobility, consider 3×6 feet, and for maximum production, expand to 4×12 feet with a stepping stone in the center for access.
How deep should raised beds be for vegetables and flowers?
Most vegetables and flowers thrive in beds 10-12 inches deep, though root crops like carrots and parsnips benefit from 18-24 inches. Shallow-rooted crops like lettuce, spinach, and most flowers perform well in beds as shallow as 6-8 inches. Deeper beds provide better drought resistance since more soil volume retains moisture longer between waterings.
Should I line the bottom of raised garden beds?
Leave bottoms open when building on soil or grass to allow drainage and let plant roots access subsoil. Only add landscape fabric if building over contaminated soil or invasive grass like bermudagrass. For beds on concrete, decks, or patios, install slatted wood bottoms or drainage holes to prevent waterlogging. Avoid solid plastic liners that trap water and create anaerobic conditions.
How far apart should raised garden beds be spaced?
Space beds 24-36 inches apart for comfortable foot traffic and basic garden maintenance. Increase spacing to 48 inches if you need to accommodate wheelbarrows, garden carts, or wheelchair access. Narrower 18-inch paths work in space-limited situations, but they become muddy and difficult to navigate during wet weather.
Can I grow both vegetables and flowers in the same raised bed?
Mixing vegetables and flowers creates beautiful and productive gardens. Plant flowers along bed edges or in corners where they attract pollinators that improve vegetable yields. Choose edible flowers like nasturtiums, calendula, and marigolds that serve dual purposes. Ensure flowers don’t shade vegetables and select varieties with similar water and fertilizer needs for easier maintenance.
What orientation is best for raised garden beds?
Orient beds east-west with the long axis running from east to west. This positioning ensures plants on the north side don’t shade those on the south side during critical midday sun hours. Place trellises, tall plants, and vertical structures on the north end of beds so they cast shadows away from shorter crops. In shaded yards, position beds perpendicular to the direction of available sunlight for maximum exposure.