
A premium climbing plants trellis instantly transforms barren walls into lush vertical focal points. Discover exact material blueprints to build stunning garden architecture on a tight budget. Elevate your entire landscape aesthetic with these durable, designer-grade structural solutions.
Design Snapshot & Key Principles
- Match Structure to Climber Type: Heavy-duty climbing plants wire suits twining vines, while scrambling roses need rigid crosshatch grids.
- Material Durability: Pre-sealed cedar and stainless steel hardware outlast cheap raw pine alternatives by decades.
- Space Optimization: Utilizing a garden trellis for climbing plants instantly triples vertical yield in compact urban footprints.
- Air Circulation: Freestanding climbing plants support systems prevent mildew and rot by maximizing airflow around dense foliage.
Traditional Wooden Trellis for Climbing Plants
Durable lumber delivers a natural aesthetic that seamlessly grounds a landscape. Implementing a wooden trellis for climbing plants immediately infuses organic charm into modern or rustic spaces.
1. Classic Lattice Panel Trellis
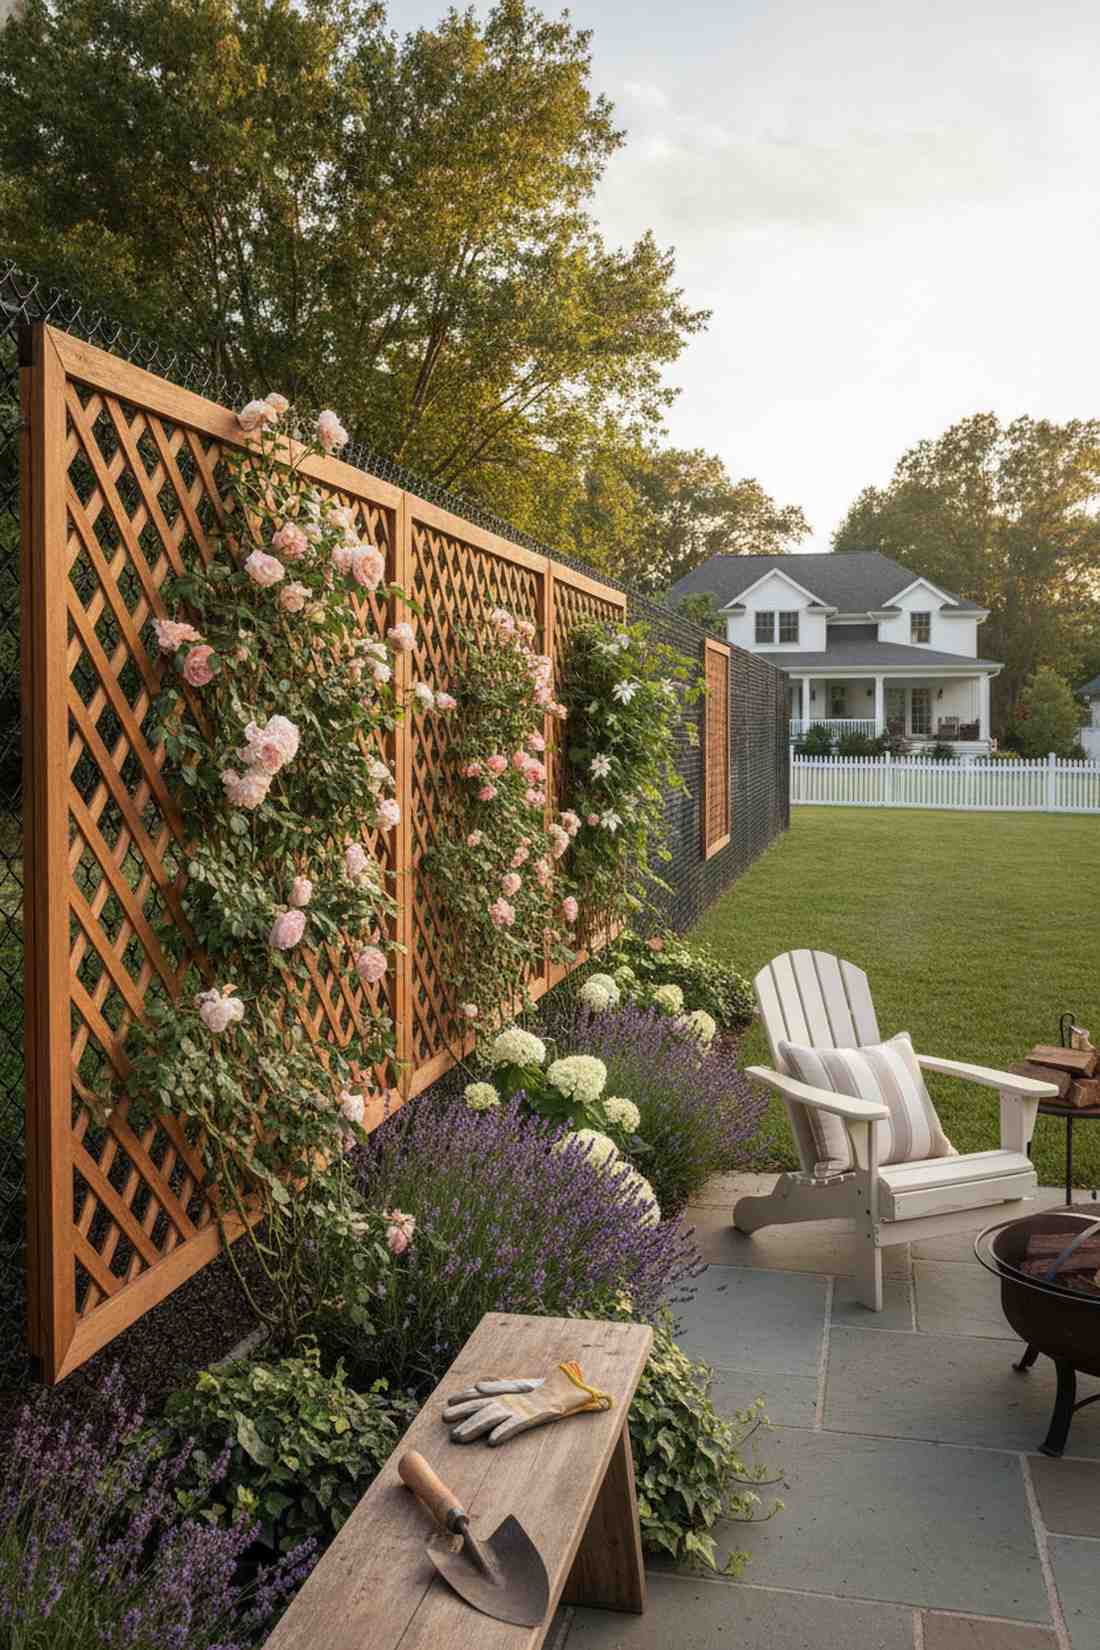
Radiates a timeless cottage estate energy, utilizing pre-framed cedar lattice boards. Flawlessly suited for disguising ugly neighborhood fences.
While novices settle for flimsy pine, opting for weather-treated structural support completely changes the lifespan. It instantly elevates basic vines into a high-end architectural feature without needing contractors.
You can execute this foundation for roughly $40 to $60. Save this to your DIY weekend garden board!
- Key Materials: Heavy-duty coated lattice panels
- Vibe / Style: Classic botanical backdrop
- Difficulty: Beginner-friendly wall mount
- Budget Breakdown: Panels: $35 | Hardware: $15
- Creator’s Tip: Use outdoor deck screws instead of nails to prevent winter warping.
- Smart Sourcing: pre-cut cedar lattice (bulk pack) and UV-coated exterior wood screws.
2. Fan-Shaped Corner Trellis
Feels like a Victorian botanical garden discovery, emphasizing flared hardwood stakes. Works exceptionally well for transforming awkward empty patio corners.
Avoid the common mistake of shallow anchoring; securing the base deeply gives a designer-level finish. It provides phenomenal climbing plants support for dense, top-heavy blooms.
You can easily pull this off for around $25–$45.
- Key Materials: Tapered wooden slat kits
- Vibe / Style: Elegant vertical fan
- Difficulty: Quick afternoon upgrade
- Budget Breakdown: Wood Kit: $30 | Ground Anchor: $10
- Creator’s Tip: Stain the wood a deep espresso to make bright green foliage pop vividly.
- Smart Sourcing: pre-drilled hardwood fan kits and anti-rot ground spikes.
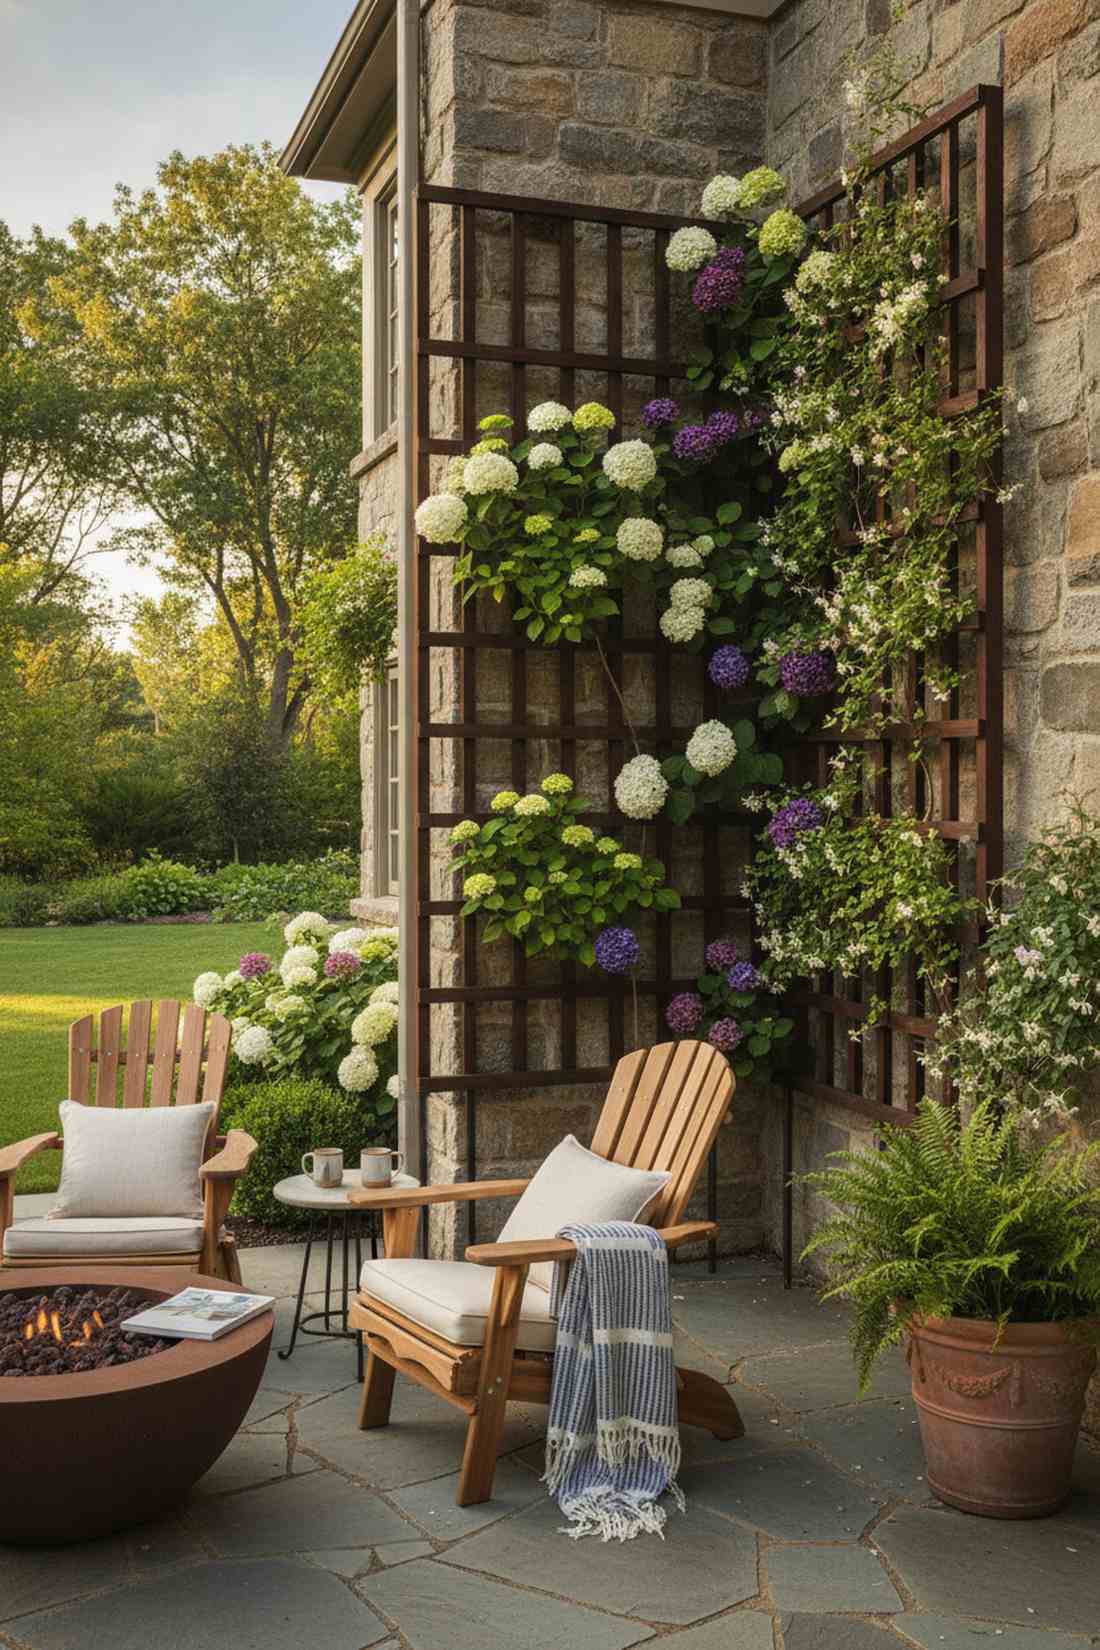
3. Rectangular Wall-Mounted Trellis
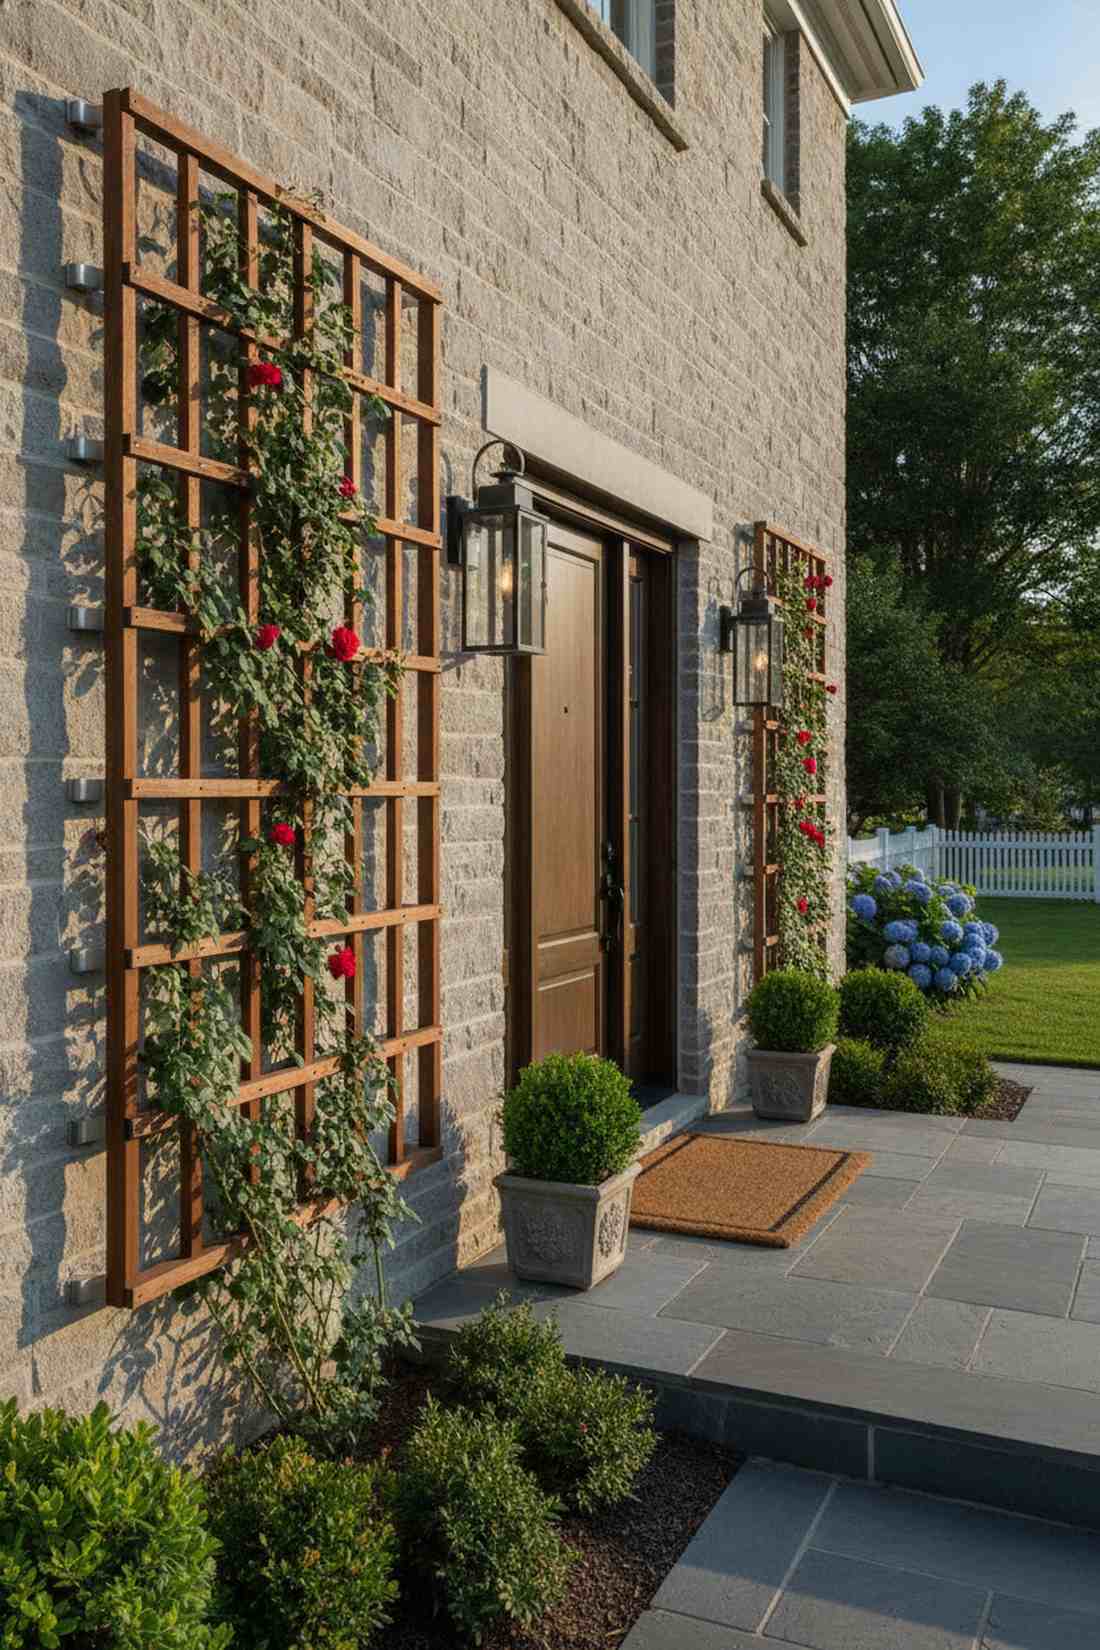
Delivers a sharp, structured masonry backdrop, leaning into floating rectangular grid frames. Unbelievably suited for flanking a home’s front entryway.
Mounting this off the wall slightly avoids devastating moisture damage and looks far more expensive than it is. It creates striking geometry that forces climbing roses to behave formally.
Set this up beautifully for about $50. Pin this if you’re planning a front yard exterior upgrade!
- Key Materials: Standoff mounting brackets and linear lumber
- Vibe / Style: Clean architectural lines
- Difficulty: Intermediate drilling required
- Budget Breakdown: Frame: $30 | Brackets: $20
- Creator’s Tip: Add a spacer behind every screw to ensure vines can wrap fully around the wood.
- Smart Sourcing: stainless steel standoff cylinders and weather-sealed timber grids.
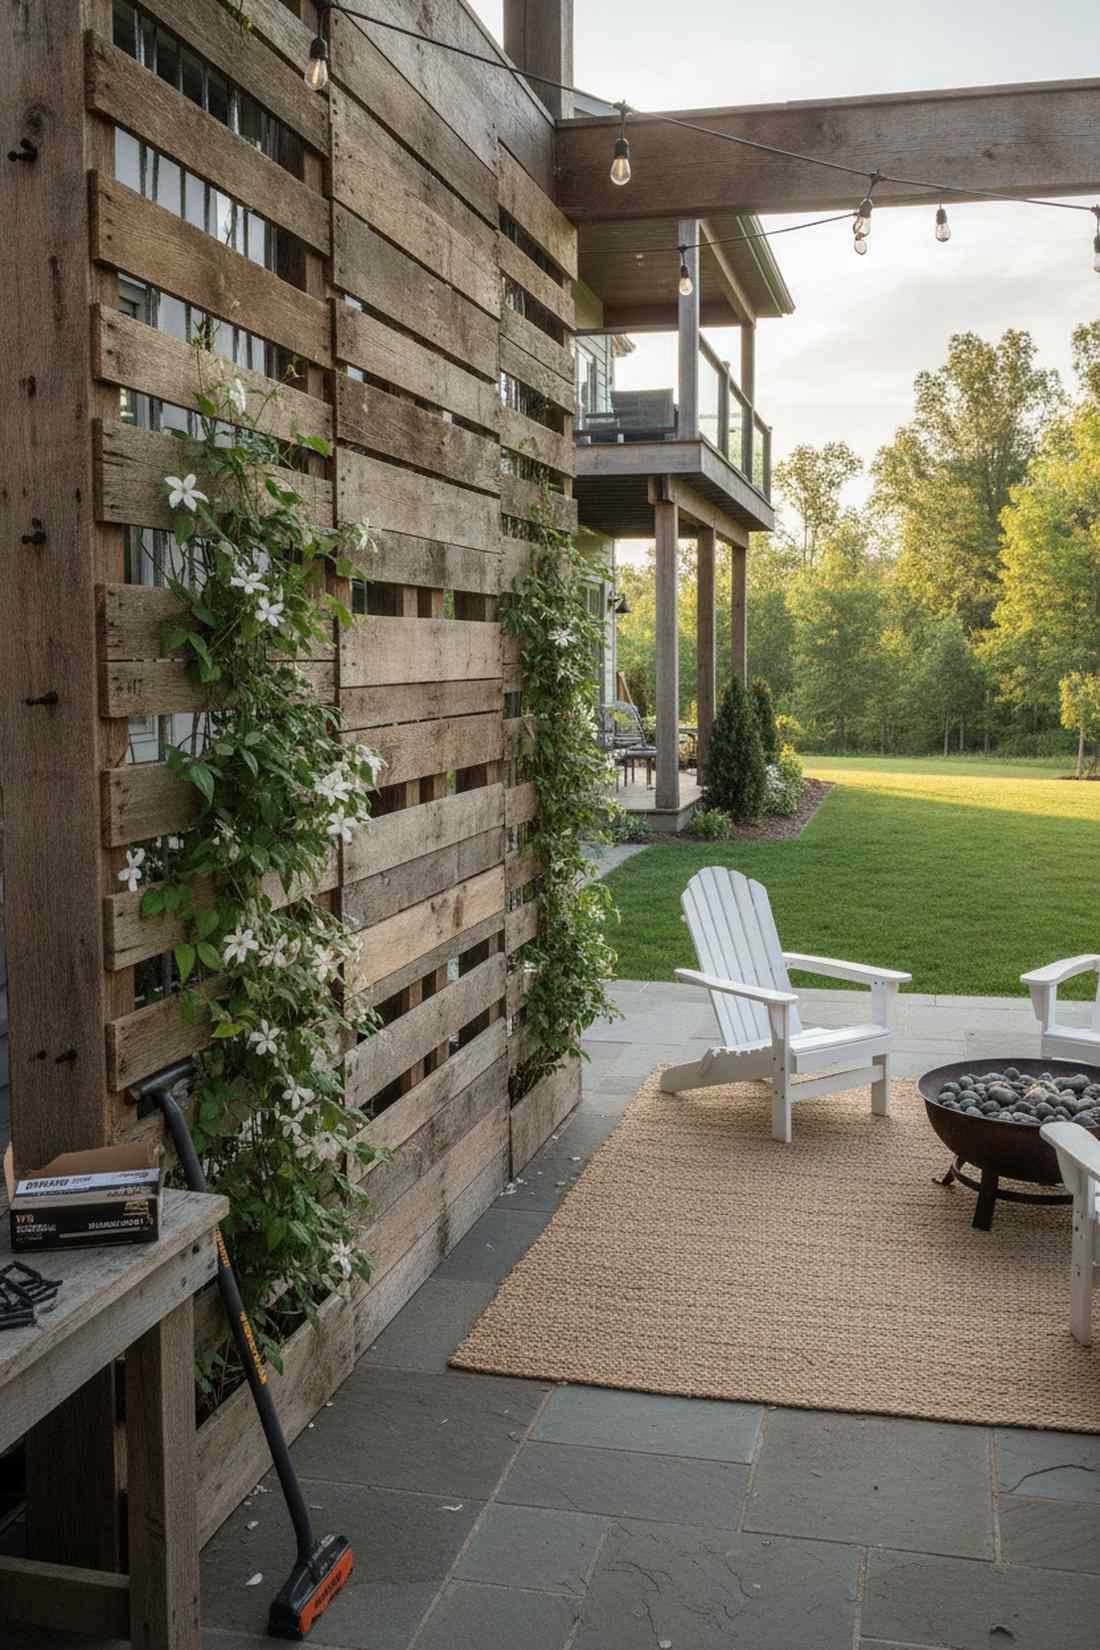
4. Horizontal Slat Privacy Screen
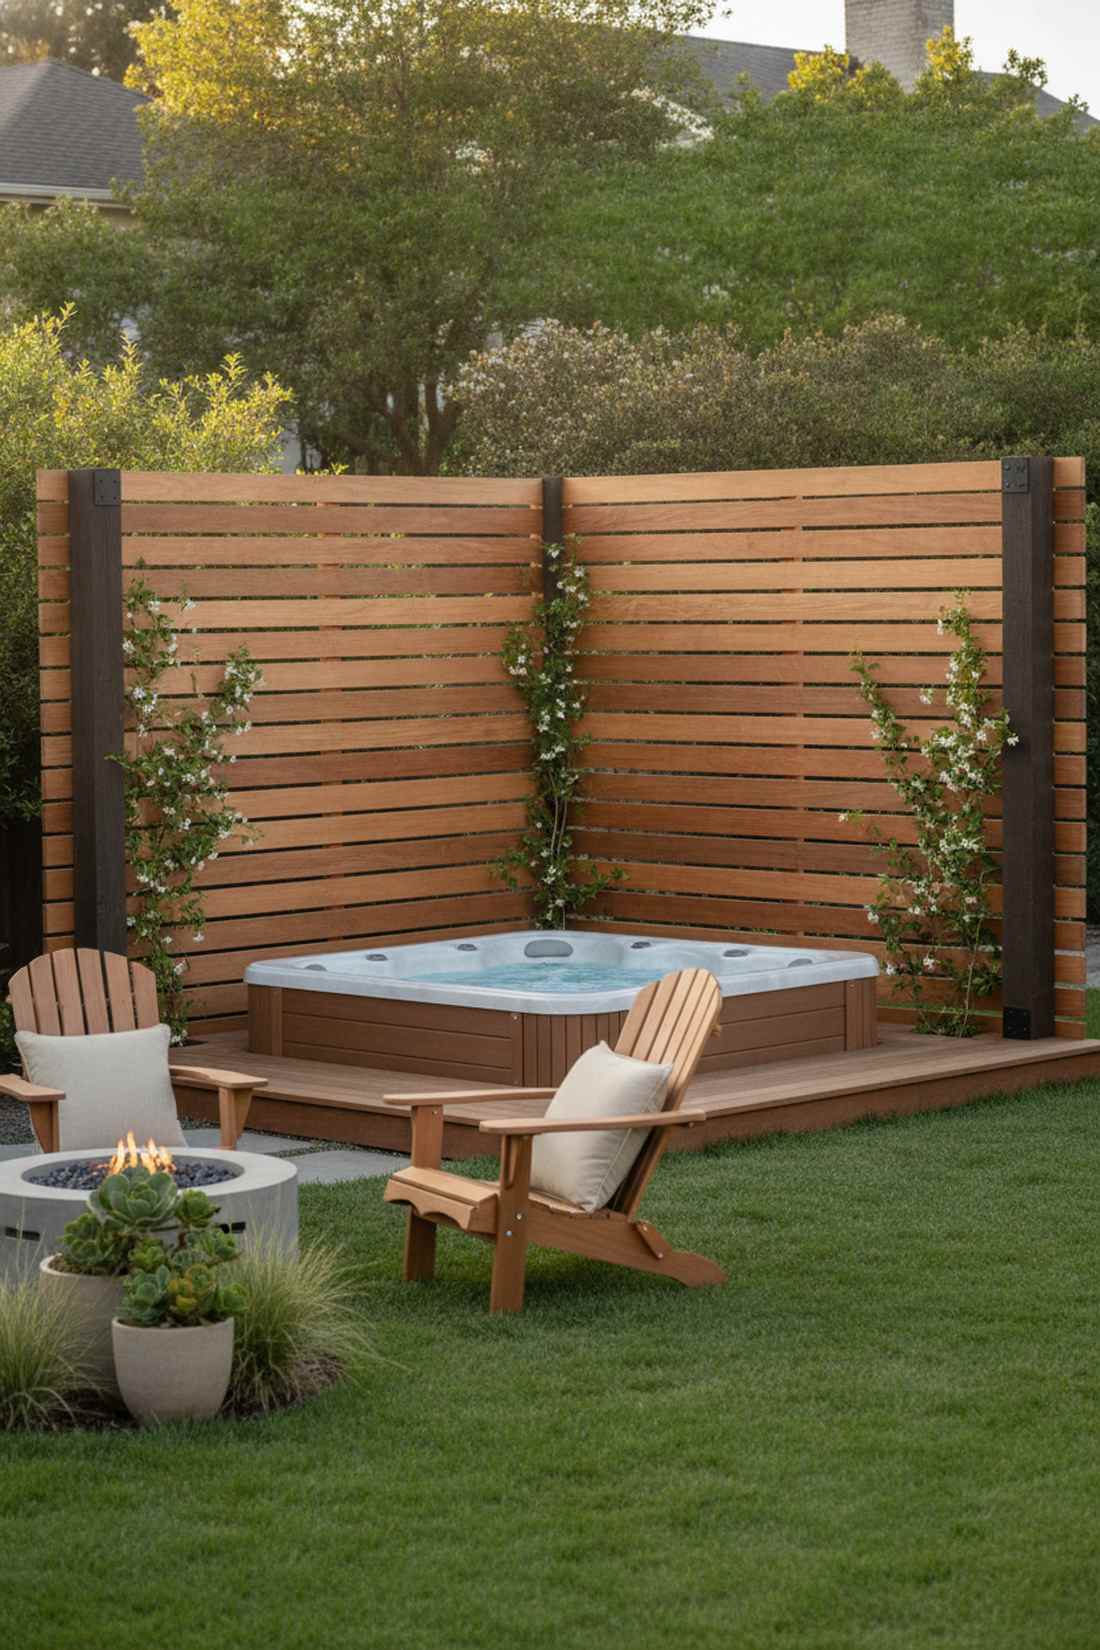
Brings a sleek mid-century modern aesthetic, prioritizing wide horizontal cedar planks. Perfect for shielding a hot tub or low-level deck from neighbors.
Instead of building a claustrophobic solid fence, this airy design delivers a surprisingly premium look. Utilizing a wooden trellis for climbing plants this way merges privacy with lush greenery effortlessly.
Expect to invest $80–$120 depending on the span width.
- Key Materials: 1×4 horizontal boards and heavy posts
- Vibe / Style: Modern coastal privacy
- Difficulty: Weekend carpentry project
- Budget Breakdown: Slats: $70 | Posts: $30
- Creator’s Tip: Keep exactly 4 inches between slats for optimal sunlight penetration and tendril grip.
- Smart Sourcing: pre-sanded cedar slats (bundle) and rust-proof structural brackets.
This next configuration is ridiculously cheap to source but looks exactly like a $300 custom architectural display…
5. Cedar Ladder Trellis
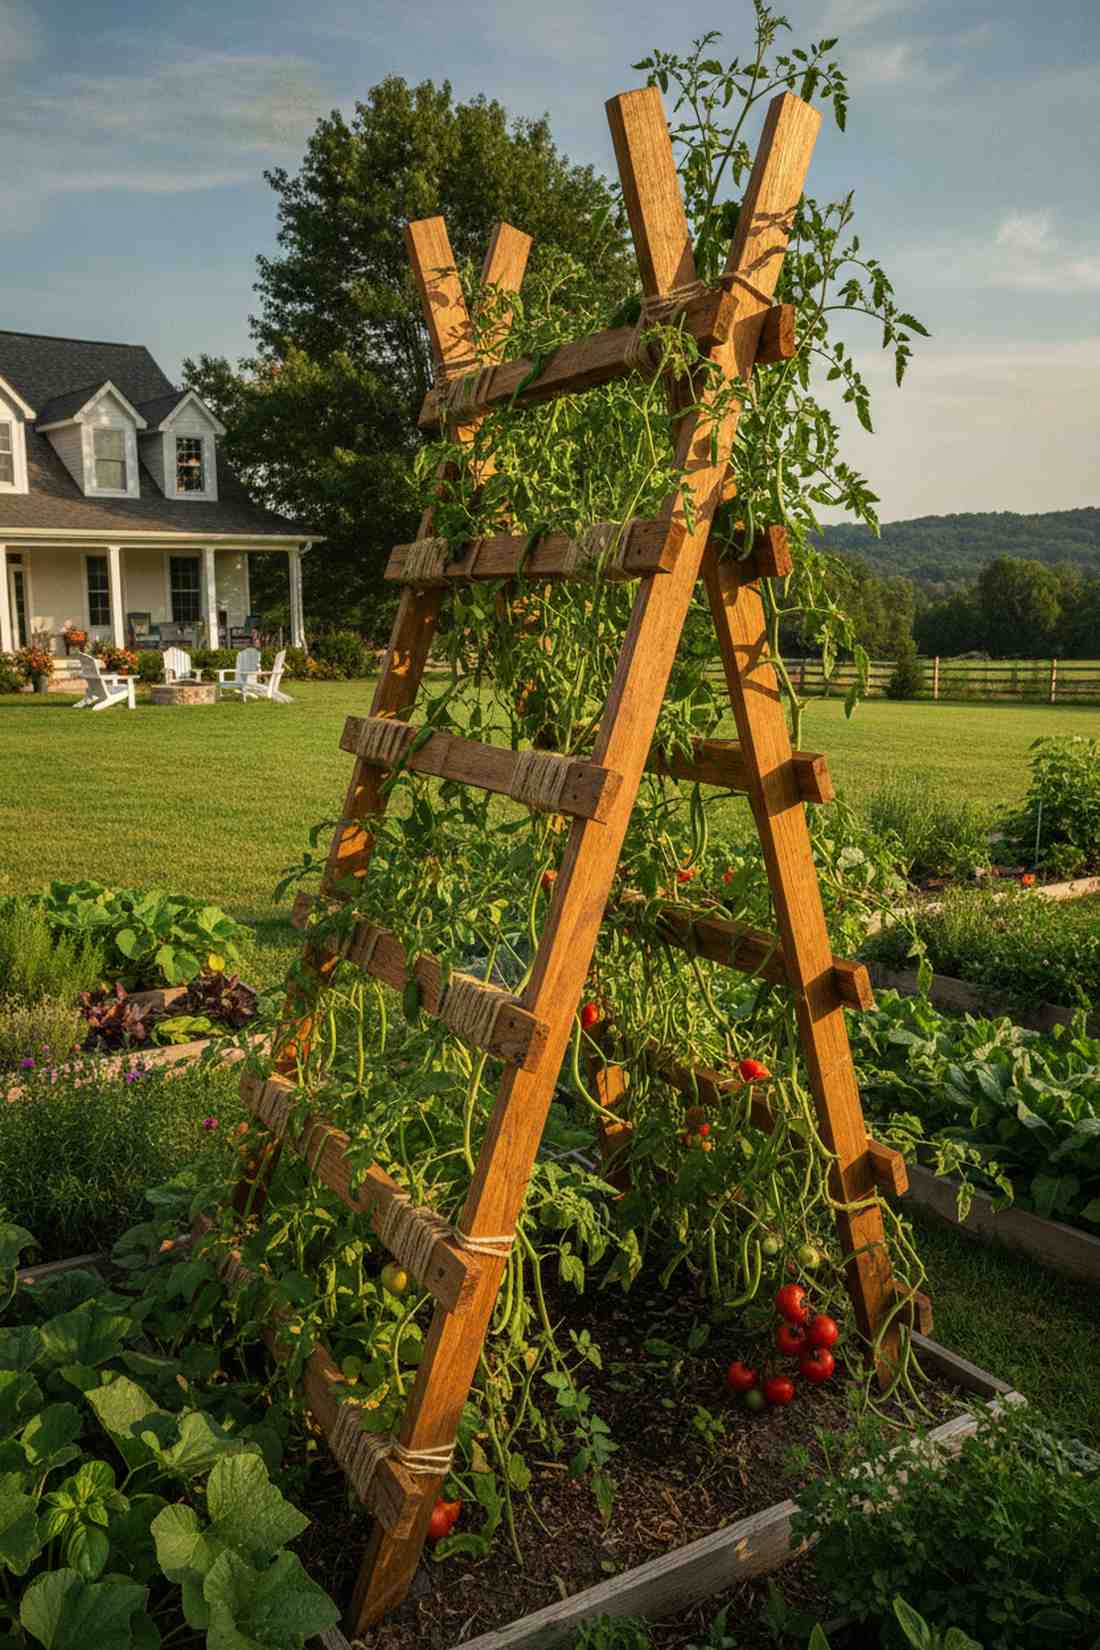
Looks straight out of an organic farm-to-table vineyard, repurposing angled rustic rungs. An absolute powerhouse for supporting heavy heirloom tomatoes or beans.
Repurposing vertical structures completely bypasses the cheap DIY aesthetic. This specific garden trellis for climbing plants allows you to tie-in stems with incredible precision.
You can thrift or build this for under $20. Save this idea for your upcoming spring vegetable prep!
- Key Materials: Repurposed ladders or rough-cut 2x2s
- Vibe / Style: Rustic homestead utility
- Difficulty: Utterly effortless
- Budget Breakdown: Wood: $15 | Twine: $5
- Creator’s Tip: Lean it at exactly a 70-degree angle so gravity helps heavy vegetables hang safely.
- Smart Sourcing: reclaimed orchard ladder kits and heavy-duty jute twine rolls.
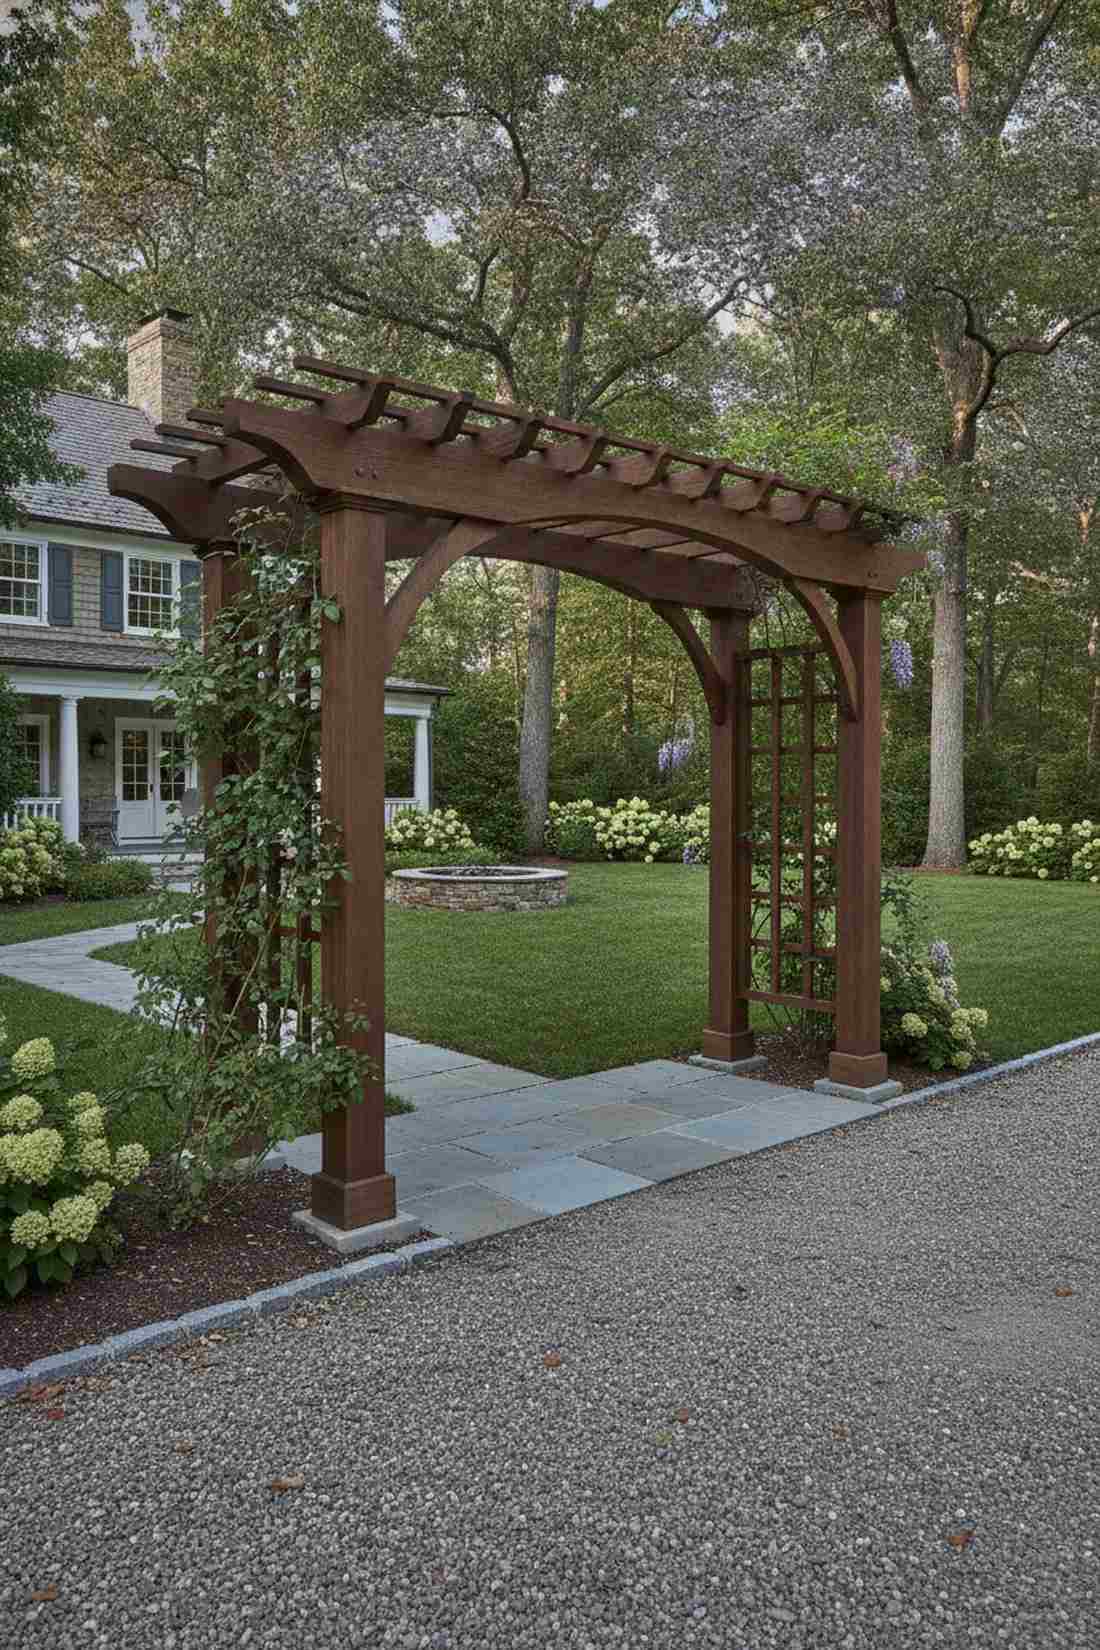
6. Pergola-Style Overhead Trellis
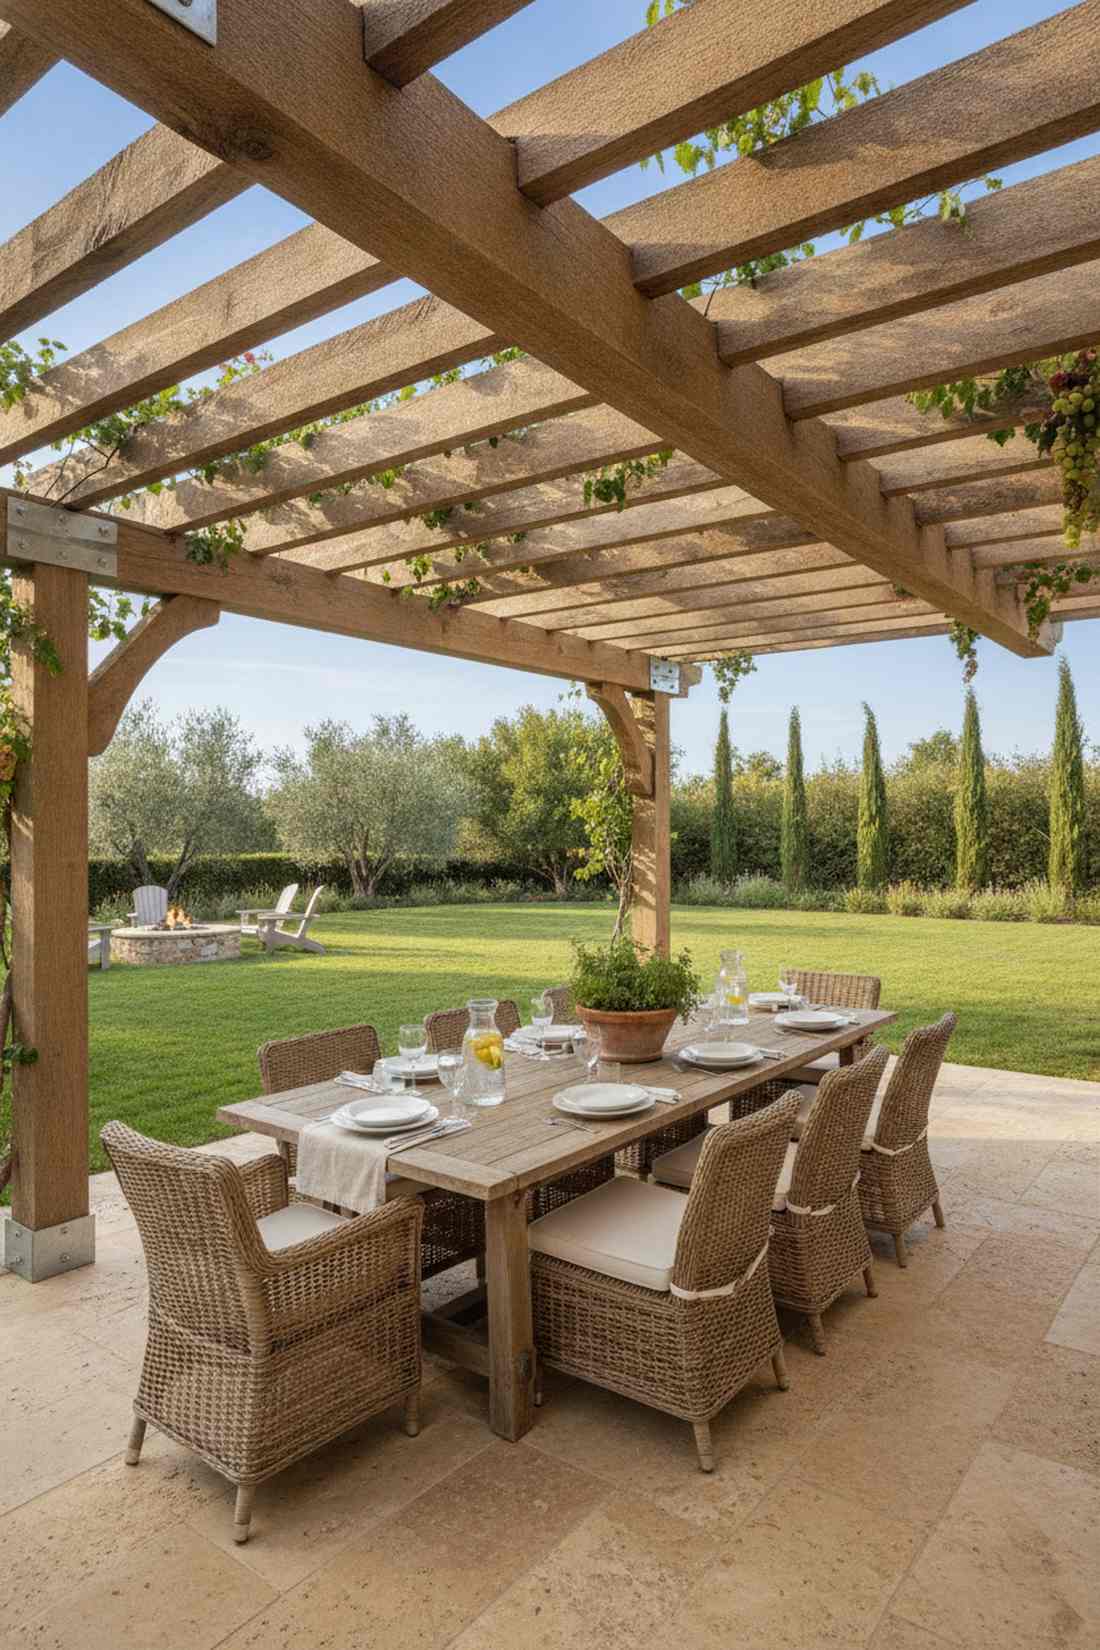
Feels like dining in a Mediterranean villa, utilizing thick overhead canopy rafters. The ultimate placement for spanning over a dining table or fire pit.
Skimping on post thickness ruins the visual weight, but using 6×6 beams makes it look incredibly luxurious. It creates an immersive, living ceiling that shades you from harsh summer suns.
A true investment piece ranging from $300 to $600 depending on lumber grade.
- Key Materials: 6×6 base posts and notched 2×6 rafters
- Vibe / Style: Luxury resort courtyard
- Difficulty: Advanced multi-person build
- Budget Breakdown: Lumber: $400 | Concrete/Hardware: $100
- Creator’s Tip: Install decorative corbels at the joints to immediately fake a high-end custom carpentry look.
- Smart Sourcing: galvanized pergola bracket kits and commercial-grade post bases.
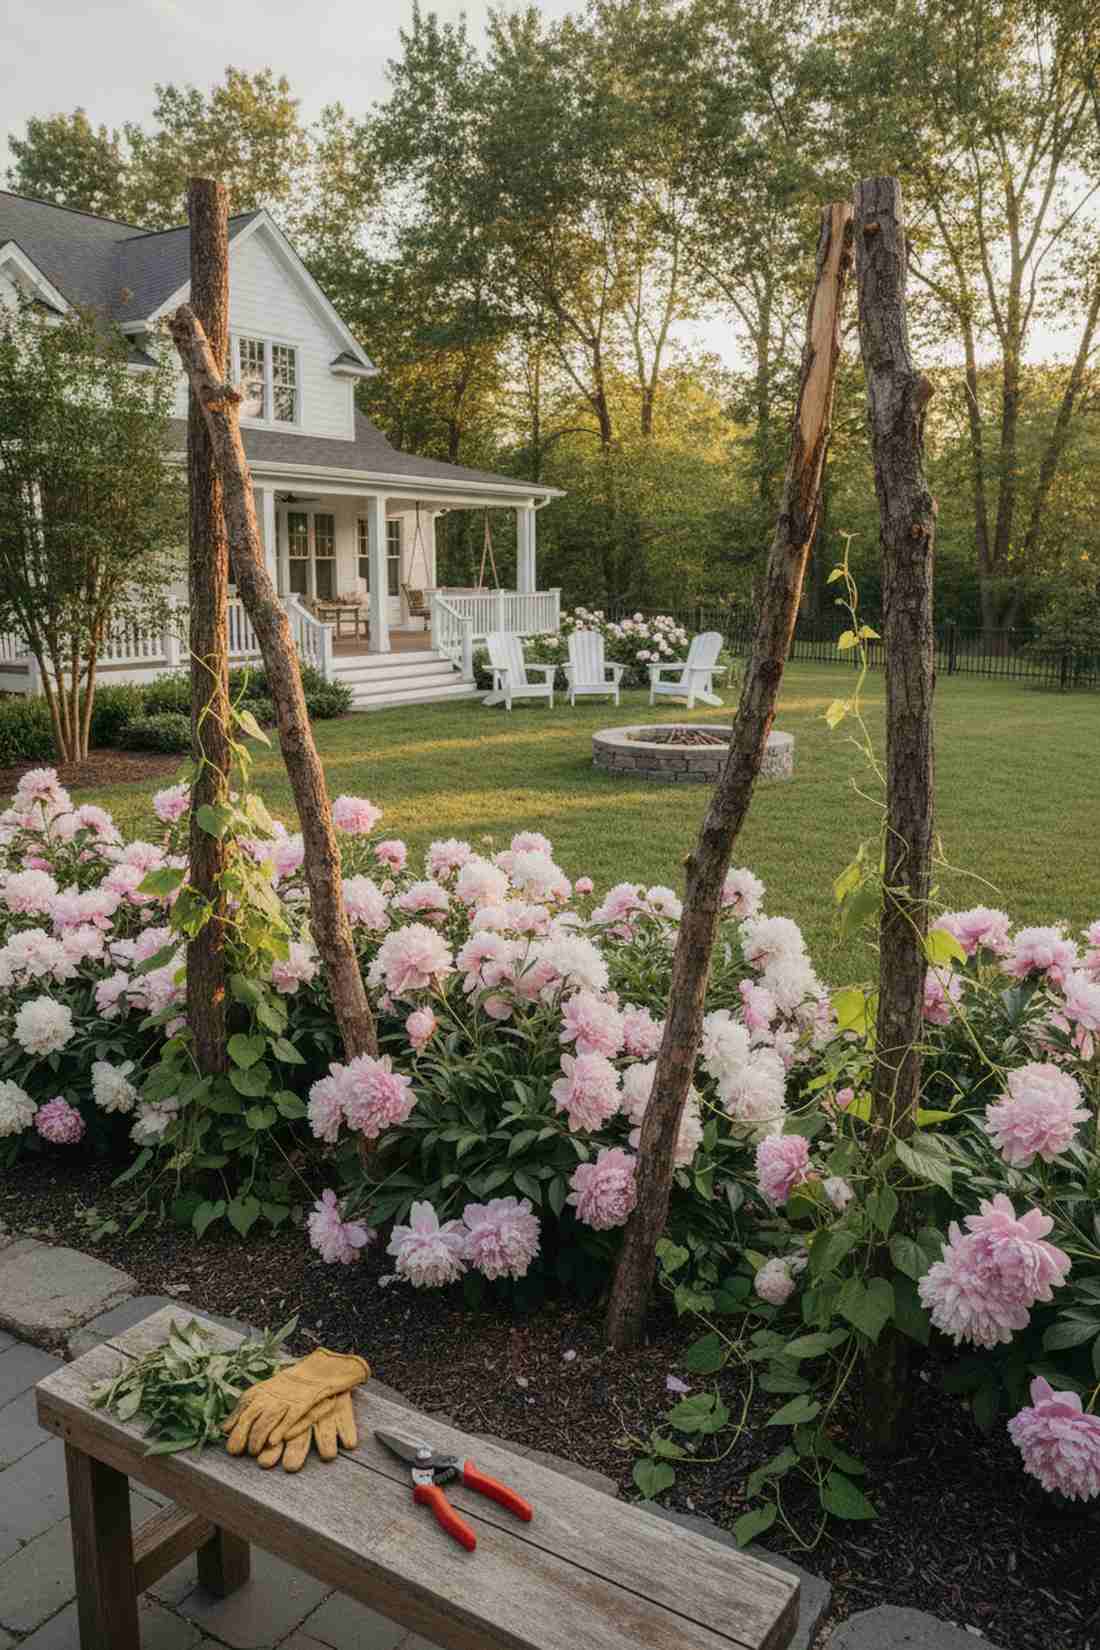
7. Rustic Branch Trellis

Creates a whimsical fairy-tale atmosphere, twisting together foraged hardwood limbs. Simply magical for leaning against a backyard shed or cottage wall.
While structured lumber can feel sterile, this raw approach delivers an unexpectedly bespoke aesthetic. This natural climbing plants support provides erratic, highly grippable textures for delicate tendrils.
Essentially free if you source materials from your own yard pruning!
- Key Materials: Fallen oak or maple branches and wire
- Vibe / Style: Enchanted woodland retreat
- Difficulty: Creative freeform assembly
- Budget Breakdown: Branches: $0 | Lashing Wire: $10
- Creator’s Tip: Soak the thinner branches in water overnight to make them pliable for weaving arches.
- Smart Sourcing: copper floral binding wire and heavy-duty branch loppers.
8. Picket Fence Trellis
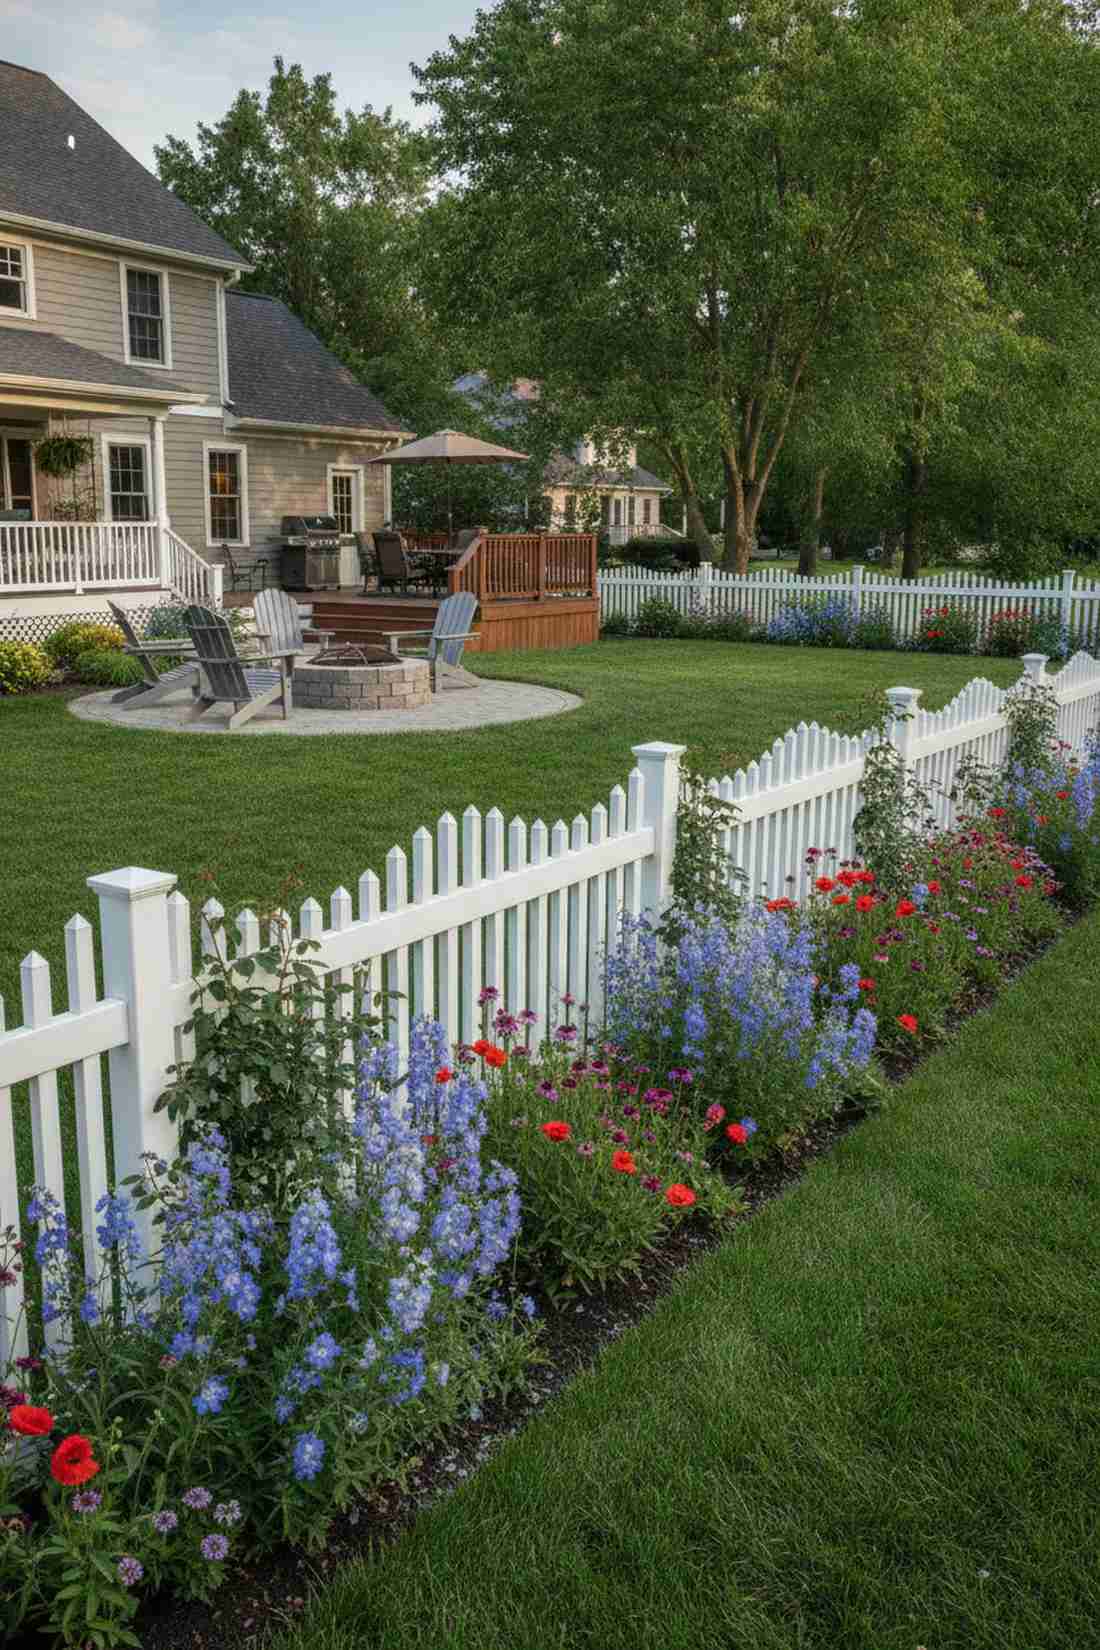
Exudes classic Americana charm, integrating staggered vertical pickets. A flawless transition border between your manicured lawn and wild flower beds.
Staggering the horizontal rails creates depth that completely outperforms flat, boring panels. This setup turns a basic boundary marker into a blooming, three-dimensional feature wall.
Tackle this classic upgrade for roughly $40 per linear section. Pin this to your curb-appeal inspiration board!
- Key Materials: Pre-cut picket panels and deck rails
- Vibe / Style: Traditional suburban charm
- Difficulty: Moderate fencing skills needed
- Budget Breakdown: Pickets: $25 | Rails: $15
- Creator’s Tip: Paint the pickets bright white to contrast dramatically against dark green vine leaves.
- Smart Sourcing: vinyl-coated picket caps and exterior weather-defense paint.
Metal Garden Trellis for Climbing Plants
Industrial strength meets artistic elegance. Upgrading to a metal garden trellis for climbing plants guarantees decades of flawless structural integrity against brutal weather elements.
Most backyard designers get this completely wrong… until they try the exact layout coming up next.
💡 Must-Have Supplies for High-End Setups
To build these setups faster and ensure they last, skip the generic craft aisles and invest in the right foundational kits.
- Base & Support: commercial-grade heavy gauge anchor stakes
- Setup Tools: impact driver bits and leveler starter kits
- Weather/Durability Protection: UV-resistant clear rust-sealant sprays
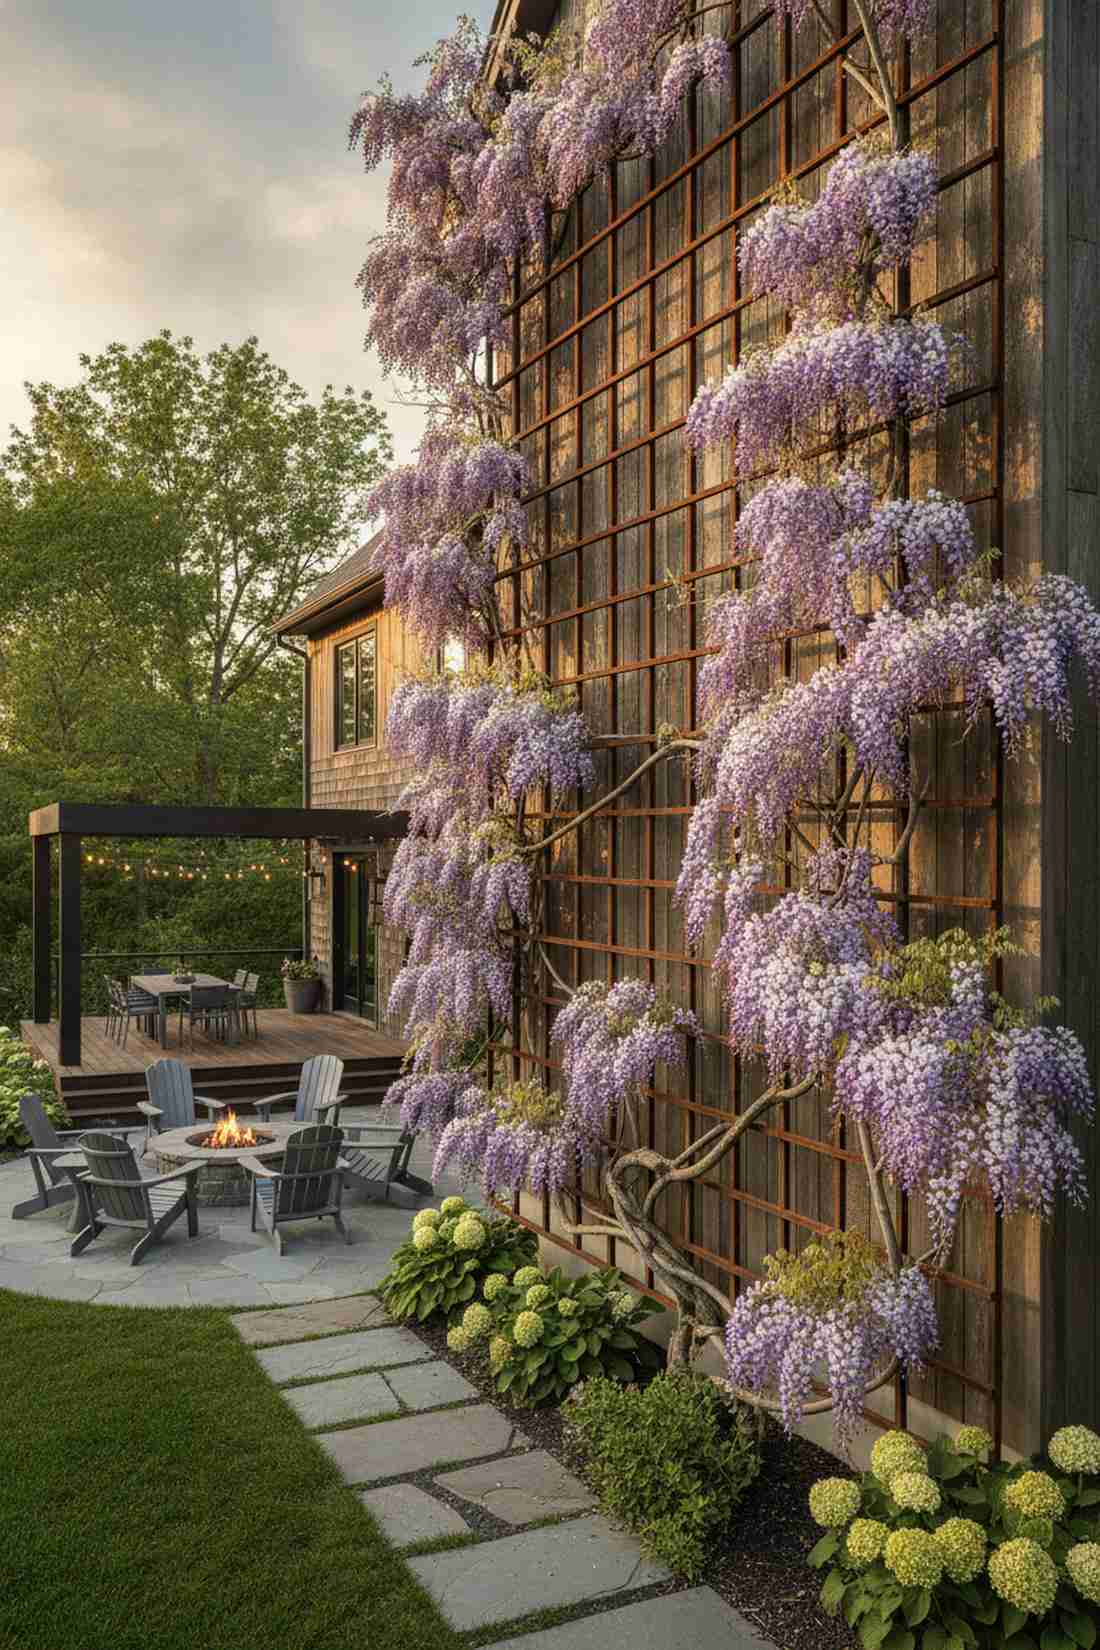
9. Wrought Iron Scroll Trellis
Gives off an aristocratic European estate vibe, showcasing heavy ornamental metalwork. The absolute best choice for standing proudly in the center of a prominent rose bed.
Rather than replacing rotted wood every five years, this iron masterpiece provides a lifetime of elite aesthetics. It easily handles the monstrous weight of mature Wisteria without buckling.
Expect to spend $100–$250 for a solid, non-hollow piece.
- Key Materials: Powder-coated wrought iron panel
- Vibe / Style: Gothic botanical elegance
- Difficulty: Simply push into the soil
- Budget Breakdown: Iron Panel: $150 | Rust Sealer: $15
- Creator’s Tip: Coat the bottom 12 inches with a rubberized spray to prevent soil moisture from initiating rust.
- Smart Sourcing: solid iron scroll panels (pre-welded) and matte black anti-rust spray.
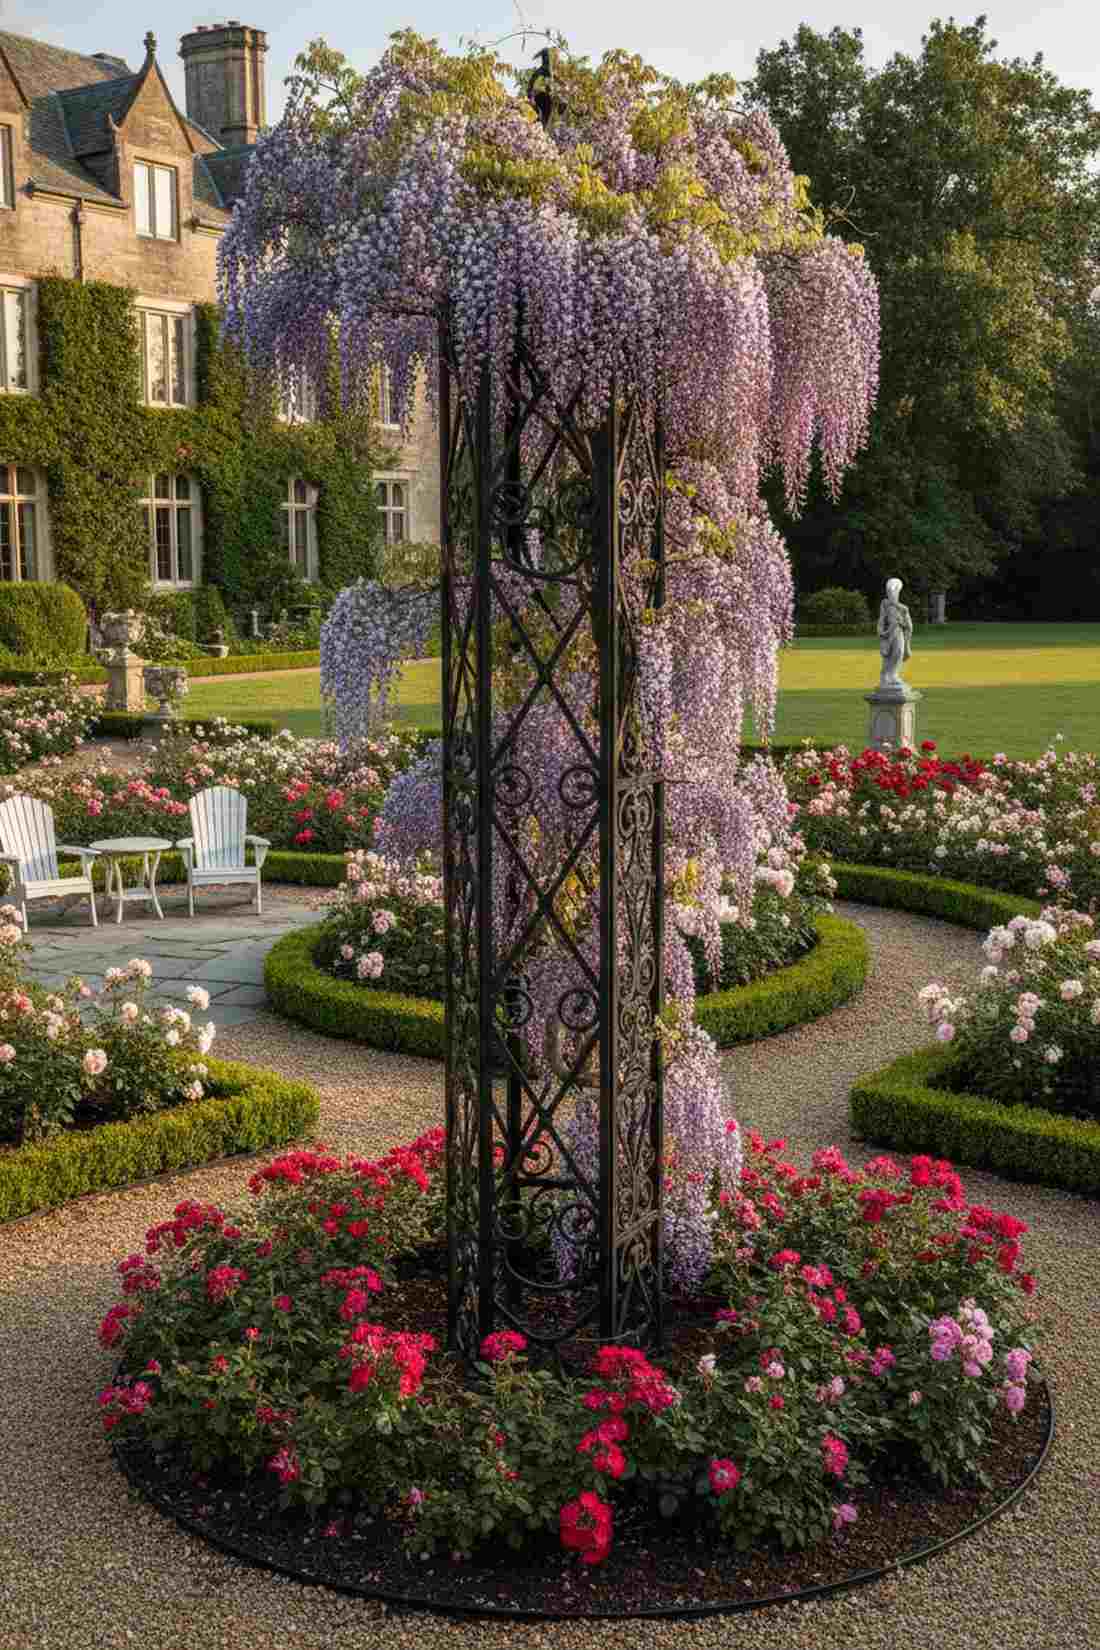
10. Steel Obelisk Tower
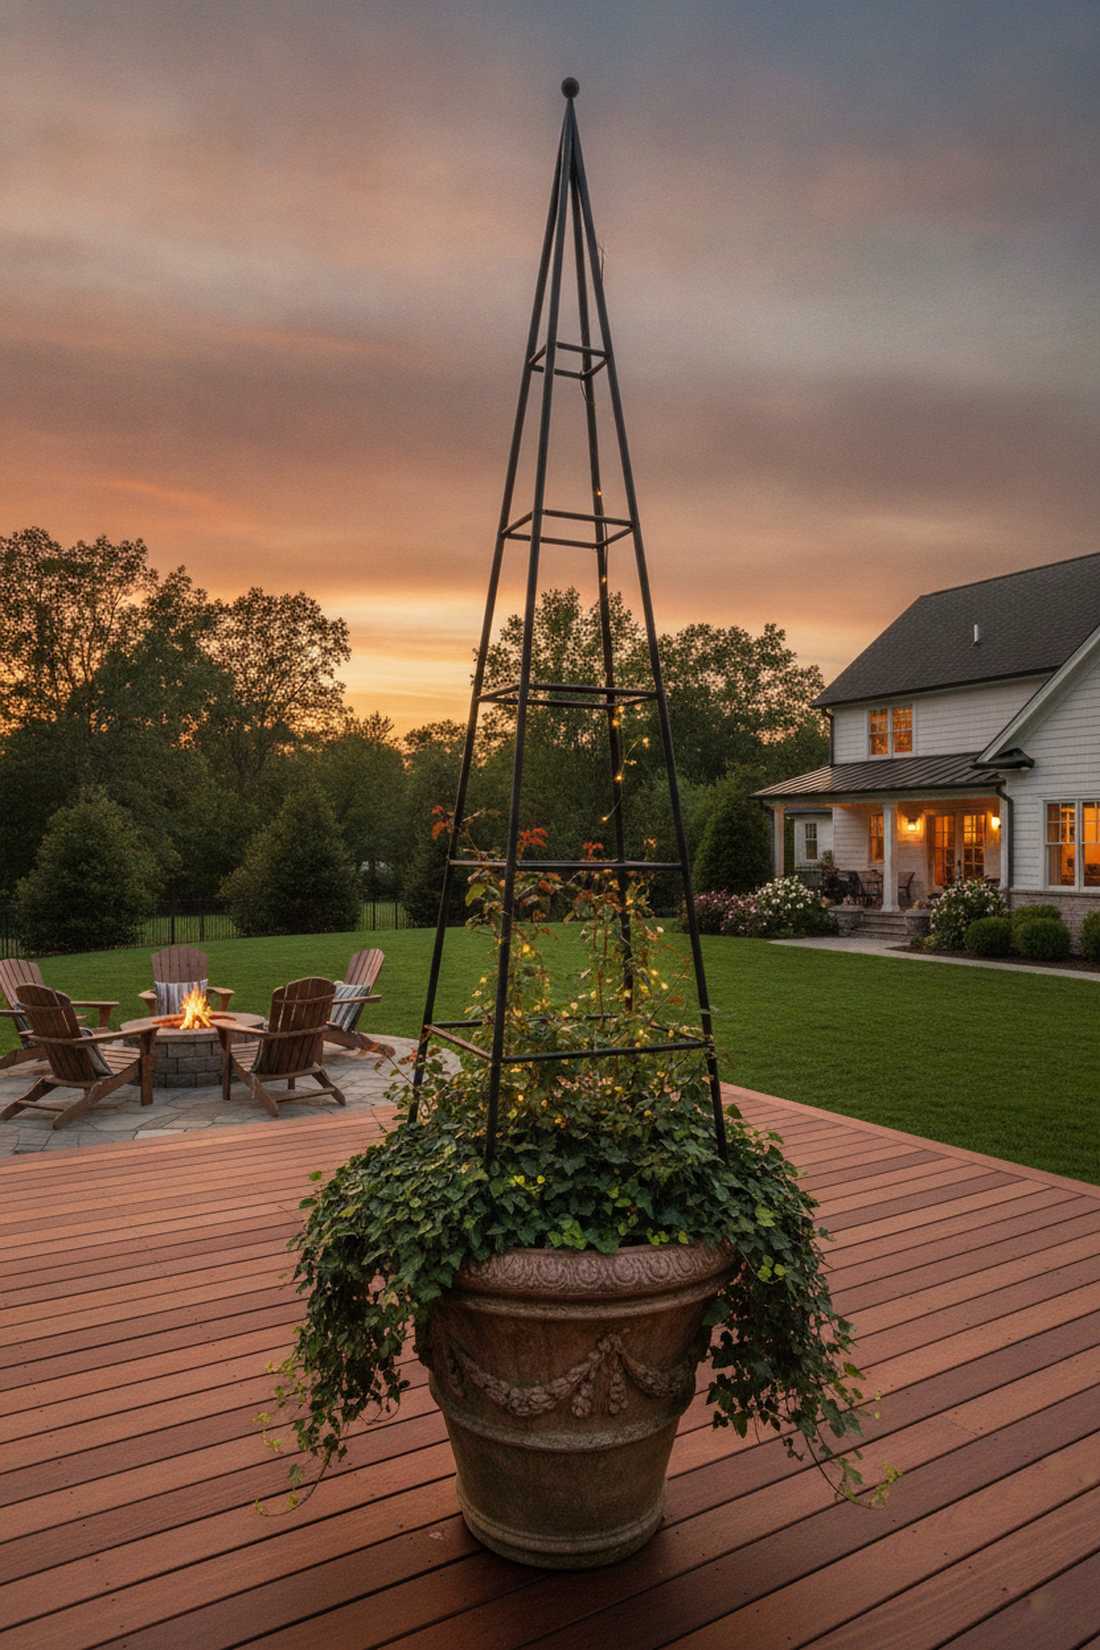
Strikes a majestic architectural pose, utilizing tall pyramidal metal frames. Brilliantly suited for dropping right into the middle of a massive decorative planter.
A metal garden trellis for climbing plants formed into an obelisk draws the eye directly upward, maximizing vertical space. It creates a stunning sculptural focal point even in the dead of winter.
Secure a high-quality tower for $60–$90. Save this to your container gardening board!
- Key Materials: Tapered tubular steel segments
- Vibe / Style: Formal English garden accent
- Difficulty: Tool-free bolt assembly
- Budget Breakdown: Tower Kit: $75 | Base Anchors: $10
- Creator’s Tip: Wrap the interior with subtle fairy lights to make the structure glow under nighttime blooms.
- Smart Sourcing: powder-coated steel obelisk kits and heavy-duty landscaping staples.
11. Galvanized Grid Panel
Radiates a stark, ultra-modern industrial chic, built around rigid welded wire mesh. Unbelievably effective when mounted against modern concrete retaining walls.
Instead of flimsy netting, this hyper-durable grid delivers a surprisingly premium, uniform look. It acts as an unbreakable backbone for dense, sprawling green wall installations.
Pull off this pro-level grid for about $40 a panel.
- Key Materials: 4×4 inch welded wire panels and wall clips
- Vibe / Style: Minimalist urban loft exterior
- Difficulty: Moderate mounting required
- Budget Breakdown: Mesh Panel: $30 | Clips: $10
- Creator’s Tip: Leave a 3-inch gap between the grid and the wall so plant tendrils can actually weave through.
- Smart Sourcing: galvanized welded wire panels (bulk) and stainless steel mounting hardware.
12. Copper Tube Trellis
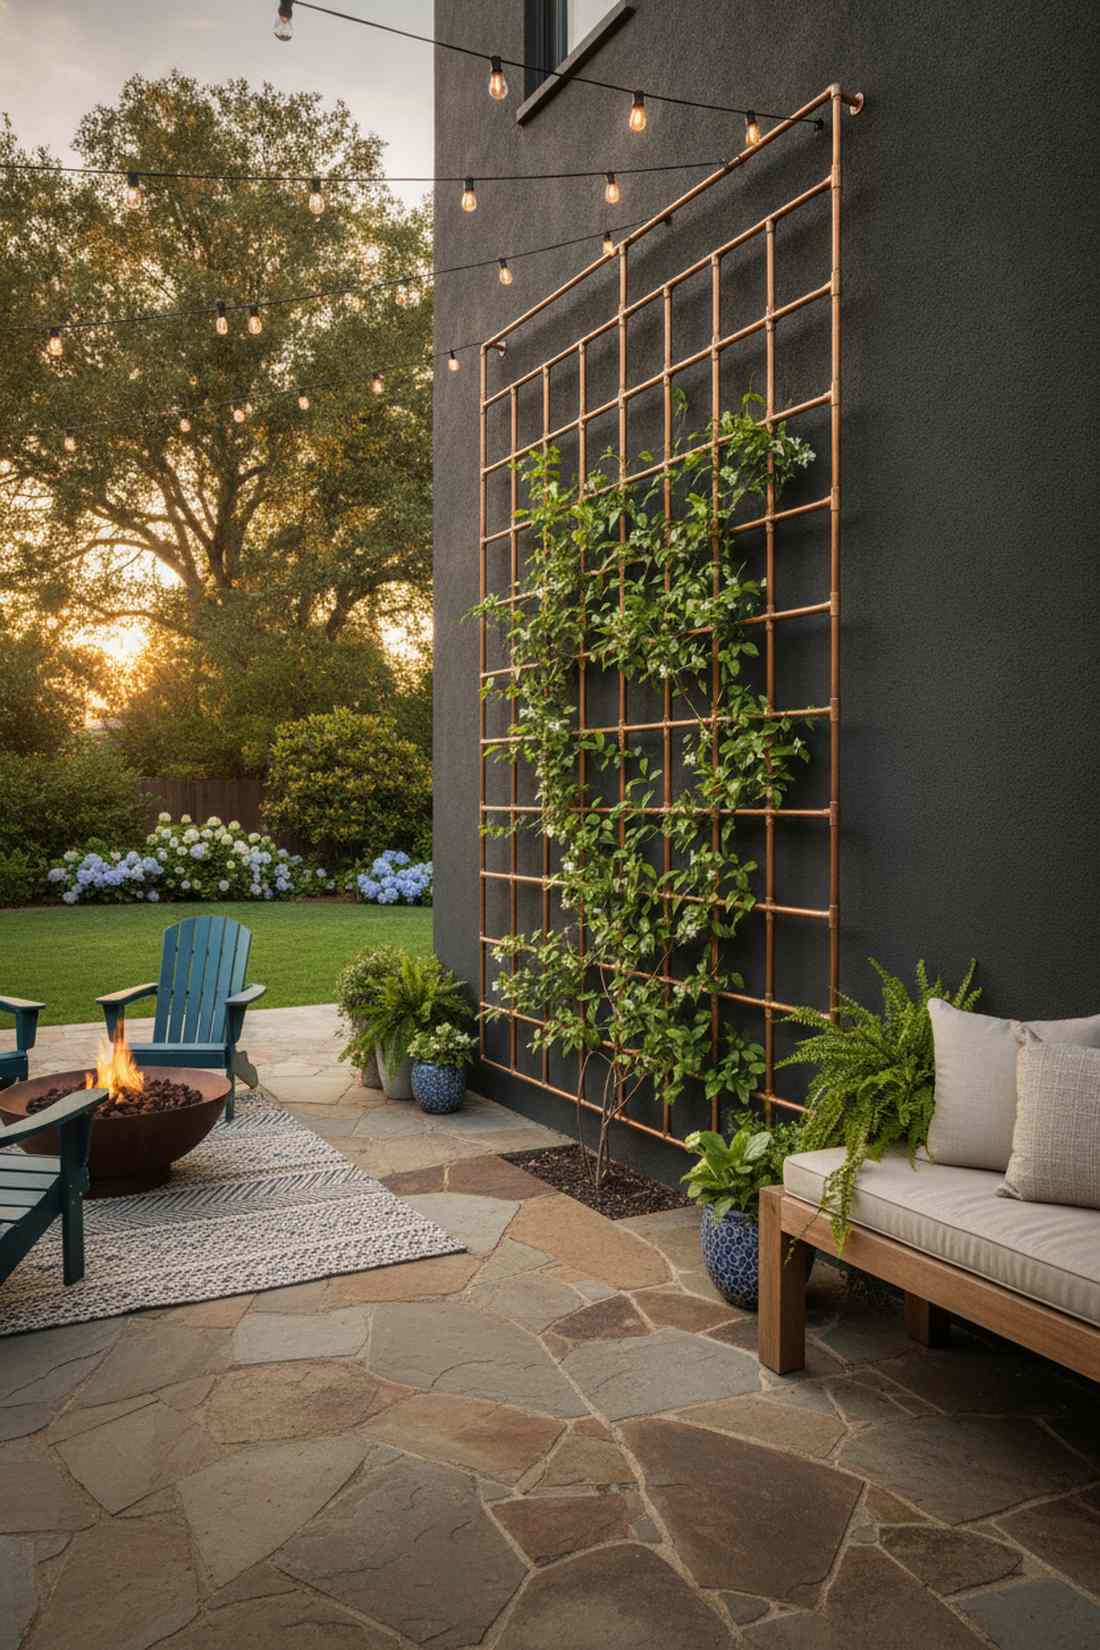
Feels like a high-end bespoke art installation, starring patina-ready metallic piping. Simply gorgeous when contrasted against dark painted brick or stucco.
While standard steel blends in, letting copper weather naturally gives a designer-level finish that gets better with age. The natural antimicrobial properties also secretly help prevent fungal diseases on your vines.
A custom copper framework will run you around $80–$120. Pin this for a truly unique patio upgrade!
- Key Materials: Half-inch copper plumbing pipes and T-joints
- Vibe / Style: Warm industrial artisan
- Difficulty: Requires basic pipe cutting/gluing
- Budget Breakdown: Pipes: $70 | Fittings: $30
- Creator’s Tip: Don’t solder the joints; use a strong marine-grade epoxy so you can build it without a blowtorch.
- Smart Sourcing: pre-cut copper pipe bundles and weatherproof copper epoxy.
13. Rebar Minimalist Frame
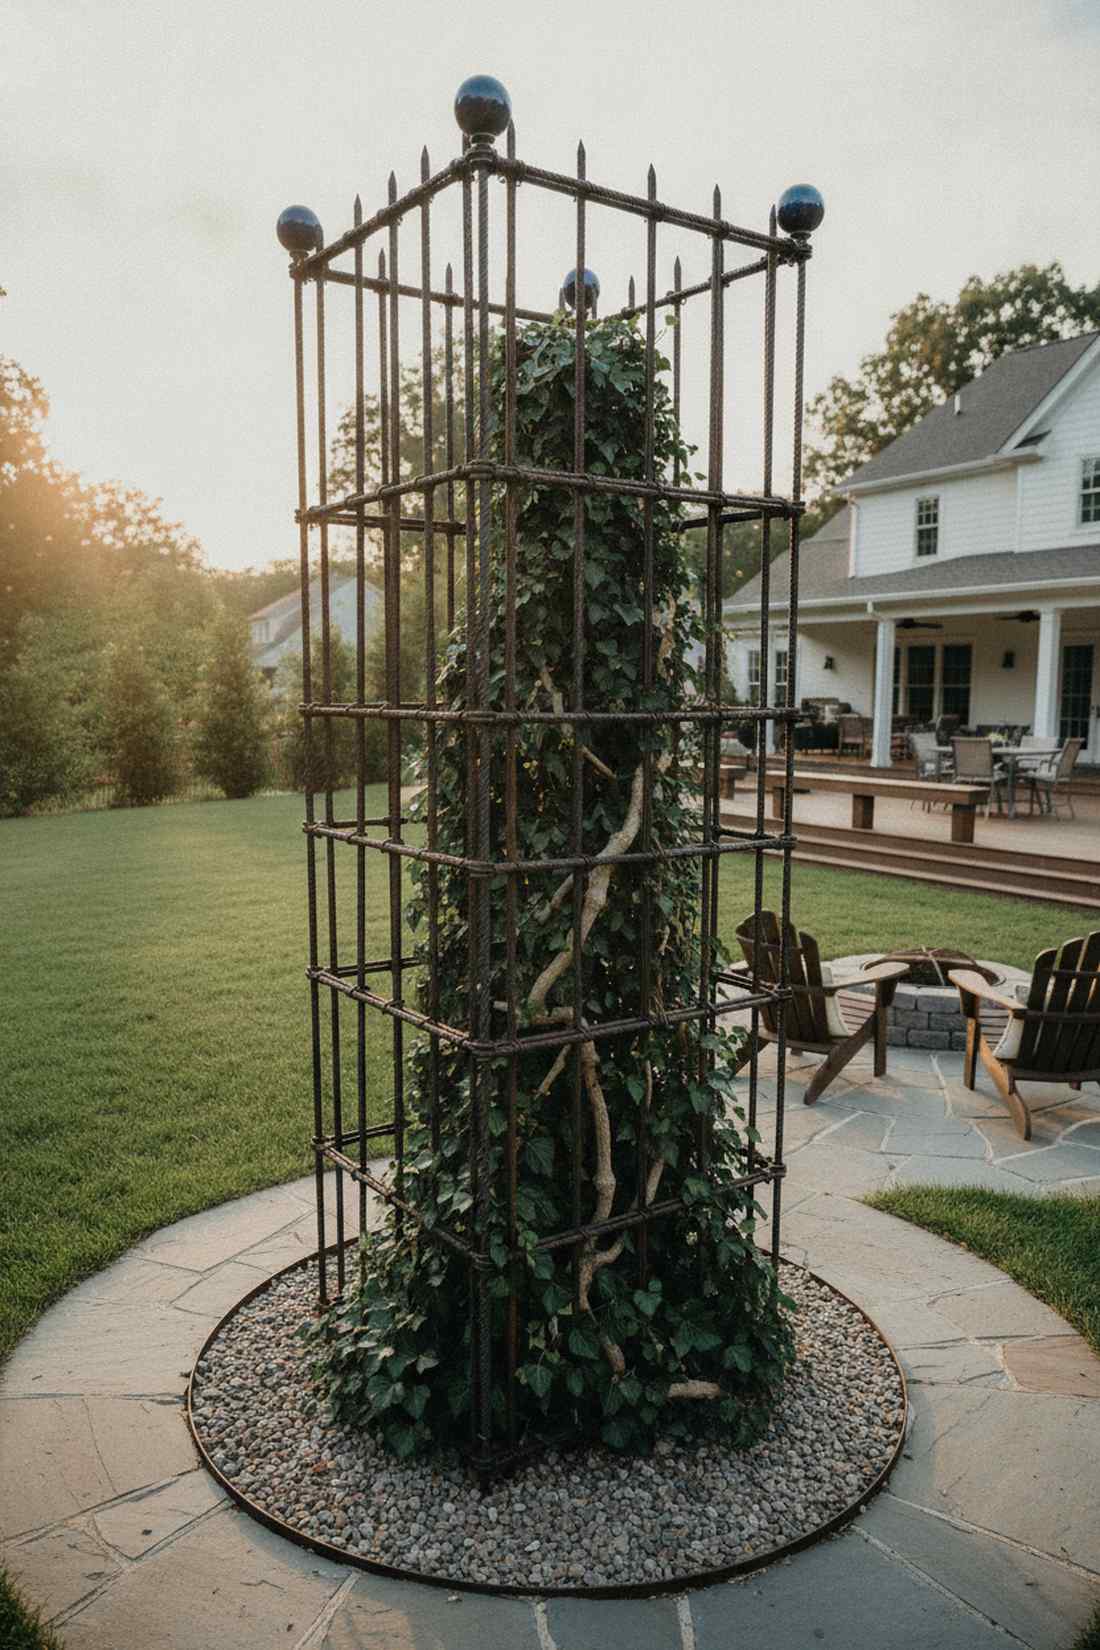
Brings a rugged, unpretentious strength, leveraging heavy-duty iron reinforcing bars. Flawlessly suited for holding up massive, aggressive vines that destroy weaker structures.
Repurposing construction materials avoids the cheap DIY look while offering bomb-proof climbing plants support. The dark, rusted finish disappears completely once the foliage takes over.
You can weld or lash this together for a mere $20.
- Key Materials: Standard construction rebar and binding wire
- Vibe / Style: Brutalist garden utility
- Difficulty: Heavy lifting and securing needed
- Budget Breakdown: Rebar: $15 | Wire: $5
- Creator’s Tip: Cap the sharp exposed top ends of the rebar with decorative ceramic knobs for safety and style.
- Smart Sourcing: pre-cut steel rebar lengths and rebar safety caps (bulk pack).
14. Aluminum Freestanding Screen
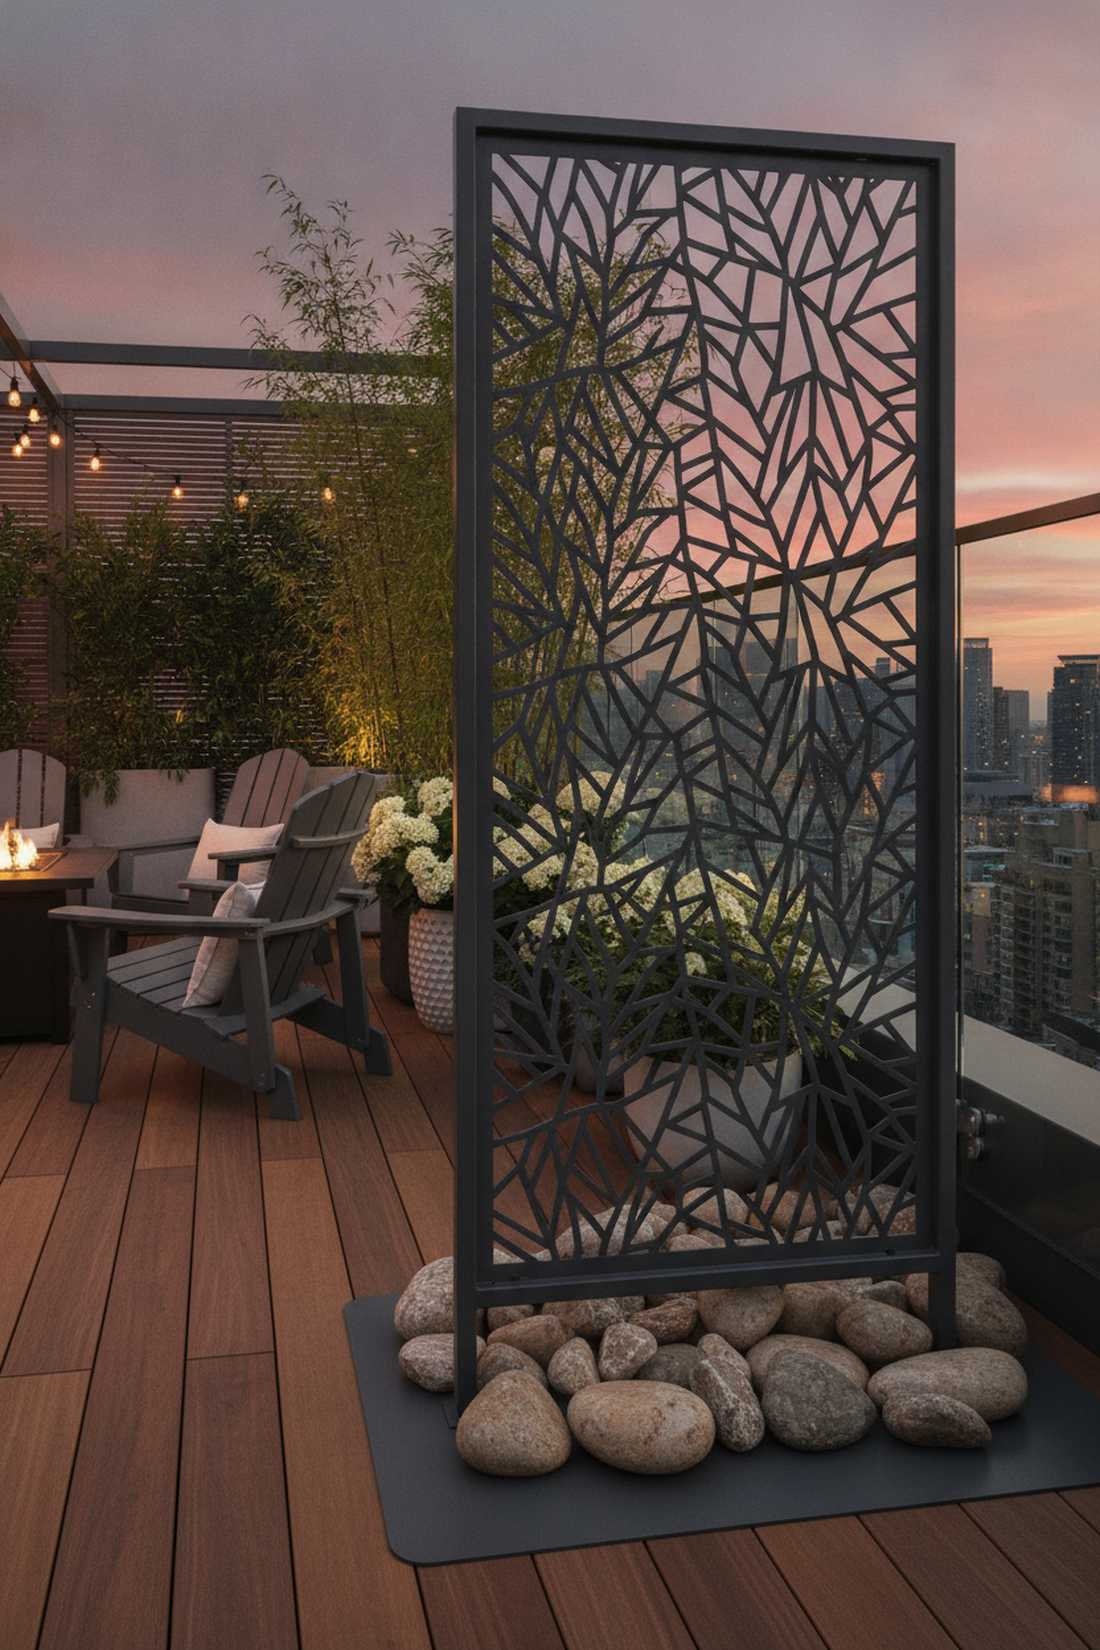
Looks like a luxury privacy fixture from a boutique hotel, relying on lightweight laser-cut metals. The ultimate cheat code for balcony gardens with strict weight limits.
Choosing aluminum over iron ensures zero rust stains on your expensive decking while remaining incredibly easy to reposition. It delivers instant modern privacy without blocking vital airflow.
Invest in a quality aluminum screen for $150–$250. Save this idea for your rooftop terrace makeover!
- Key Materials: Powder-coated aluminum screen panels
- Vibe / Style: High-end contemporary patio
- Difficulty: Unbox and stand up
- Budget Breakdown: Screen: $180 | Weighted Base: $30
- Creator’s Tip: Secure the base with decorative heavy river rocks to prevent the lightweight frame from blowing over.
- Smart Sourcing: laser-cut aluminum privacy panels and heavy-duty deck anchors.
Wait until you see this next wire trick—it basically makes ugly fences disappear overnight.
15. Chain-Link Fabric Support
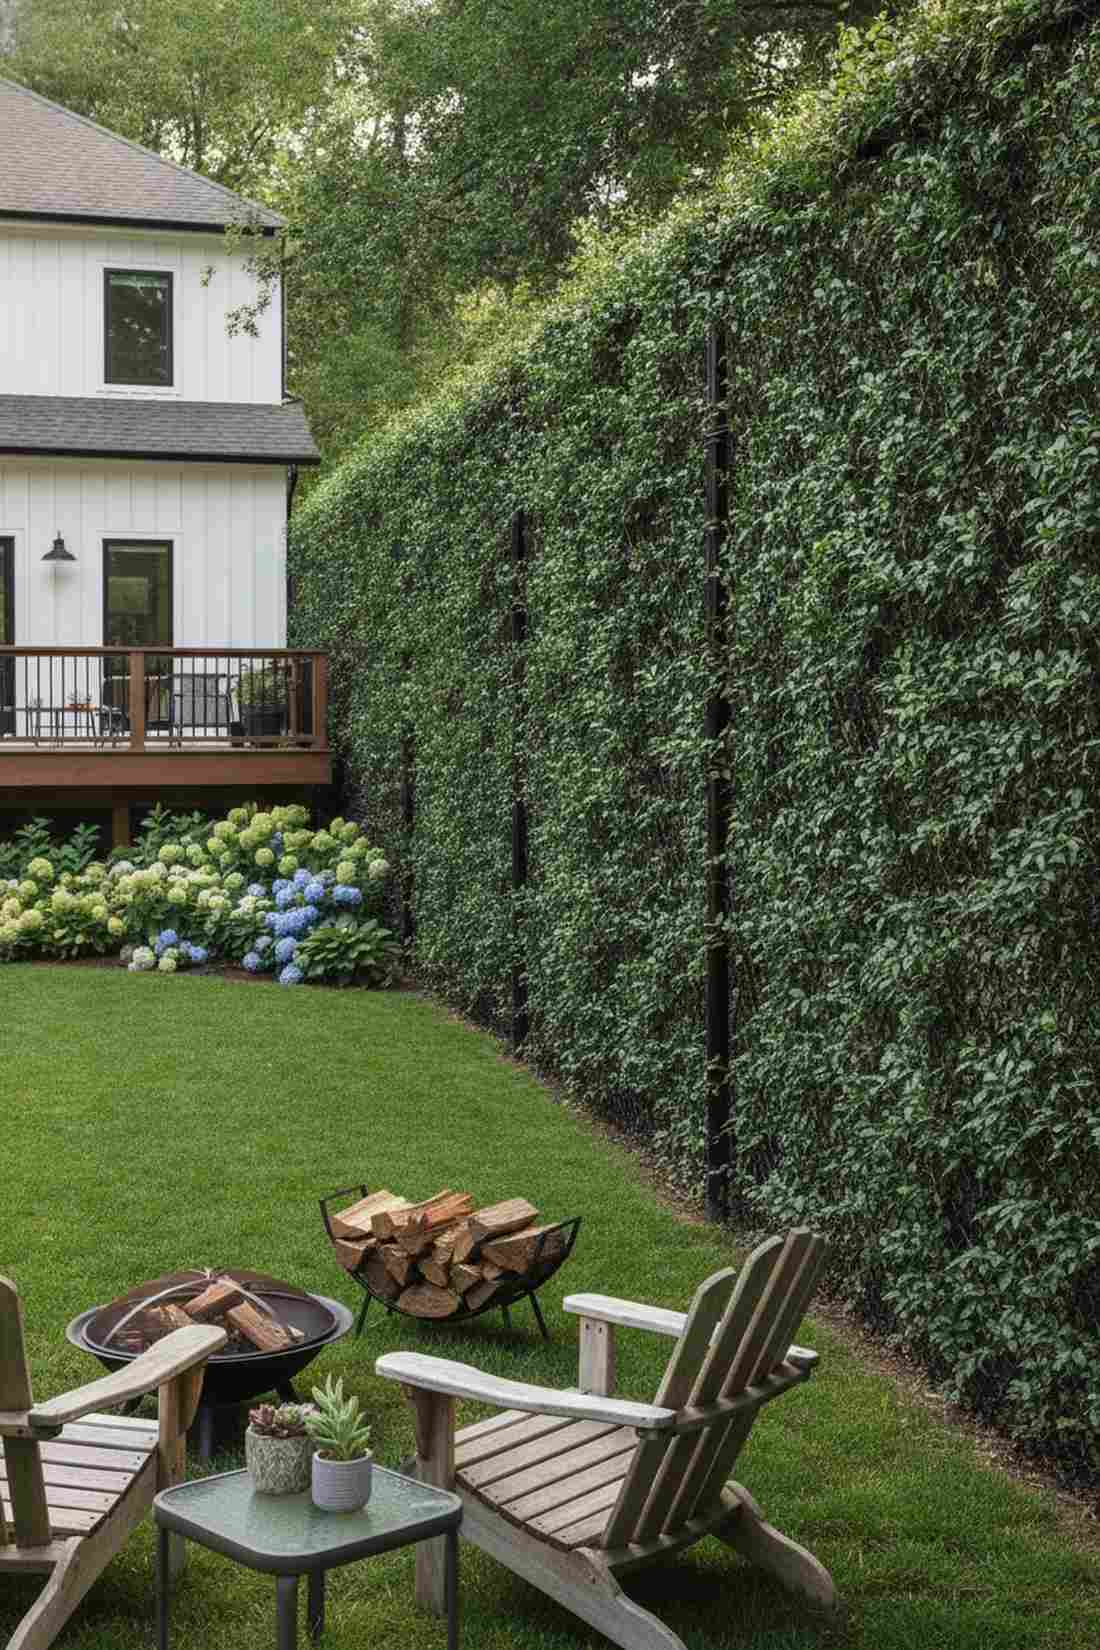
Exudes extreme practical utility, transforming repurposed vinyl-coated fencing mesh. Brilliantly suited for building a massive continuous boundary line of jasmine or ivy.
Instead of ripping out an old fence, using it as a direct climbing plants wire base saves thousands in landscaping fees. The diagonal diamond pattern offers unparalleled grip points for fast-growing tendrils.
Repurposing costs nothing, but buying new rolls runs about $60.
- Key Materials: Green or black vinyl chain-link rolls
- Vibe / Style: Invisible boundary blanket
- Difficulty: Stretching and tensioning required
- Budget Breakdown: Mesh Roll: $50 | Tension Ties: $10
- Creator’s Tip: Always buy the black vinyl coated version—it tricks the eye into disappearing against the shadows of the plants.
- Smart Sourcing: black vinyl chain-link fabric and steel tension bands.
Climbing Plants Wire Systems
Achieve the coveted “floating” plant illusion. Using climbing plants wire systems creates a minimalist, modern framework that highlights the greenery rather than the structure itself.
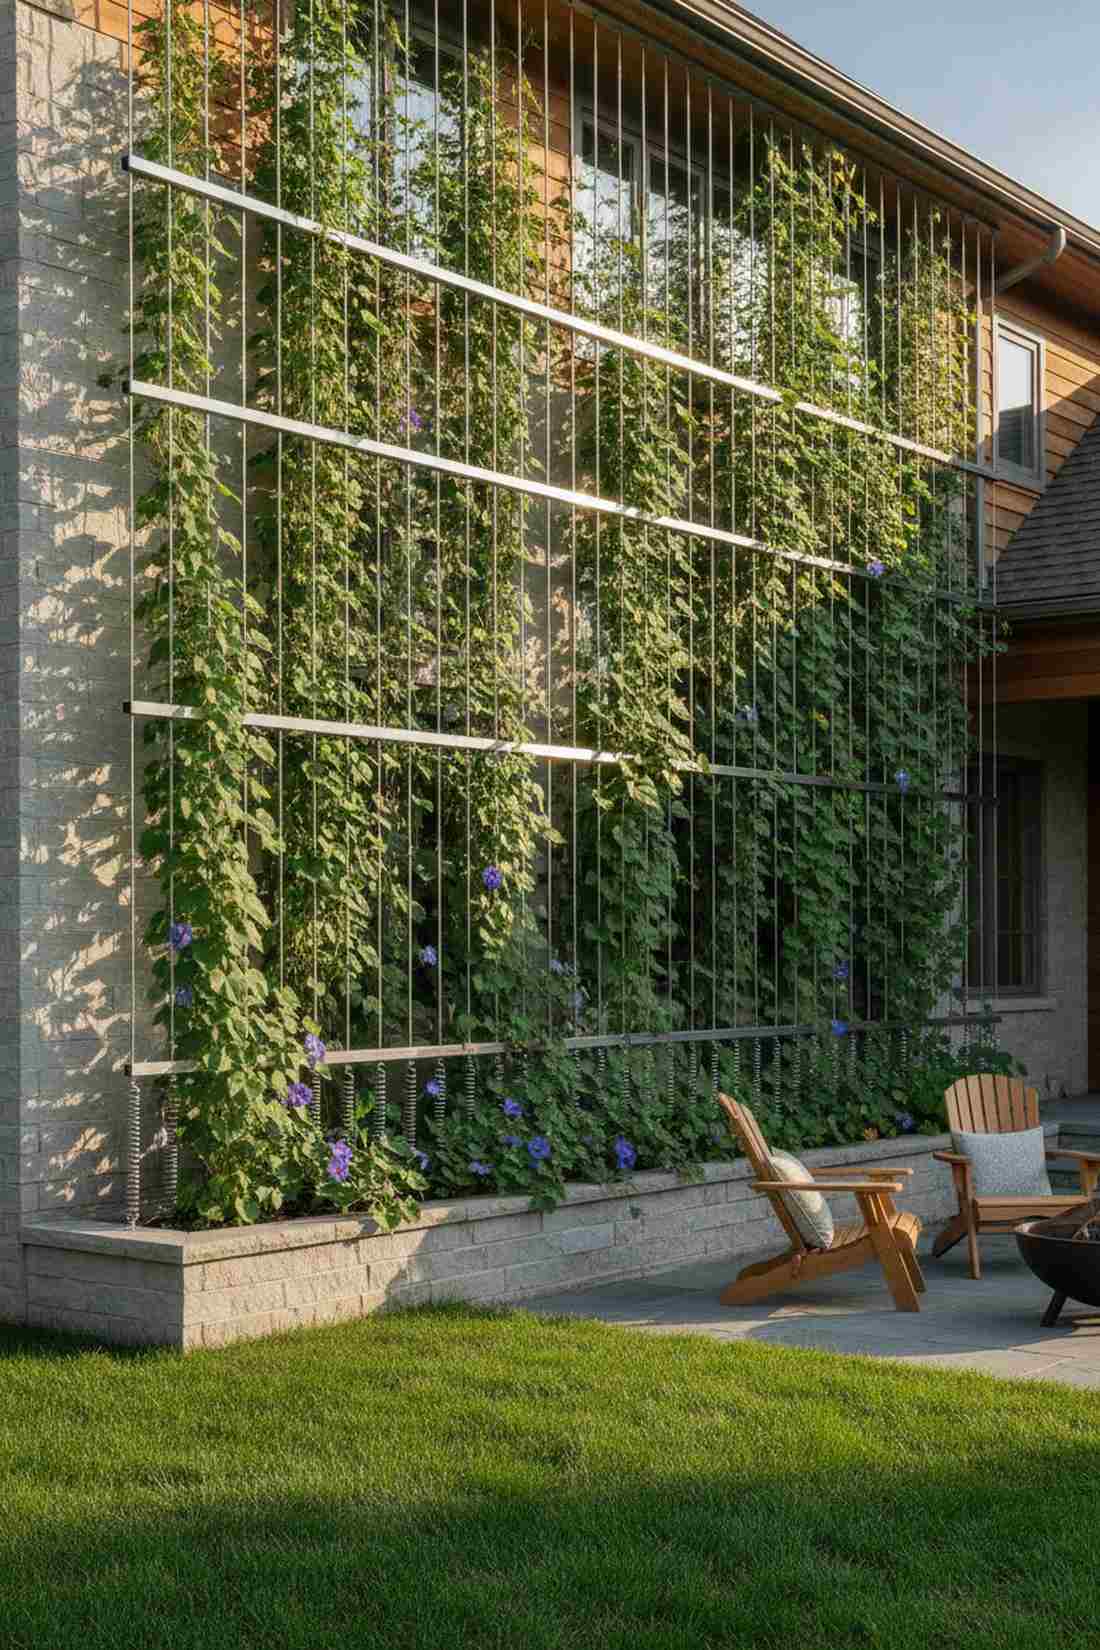
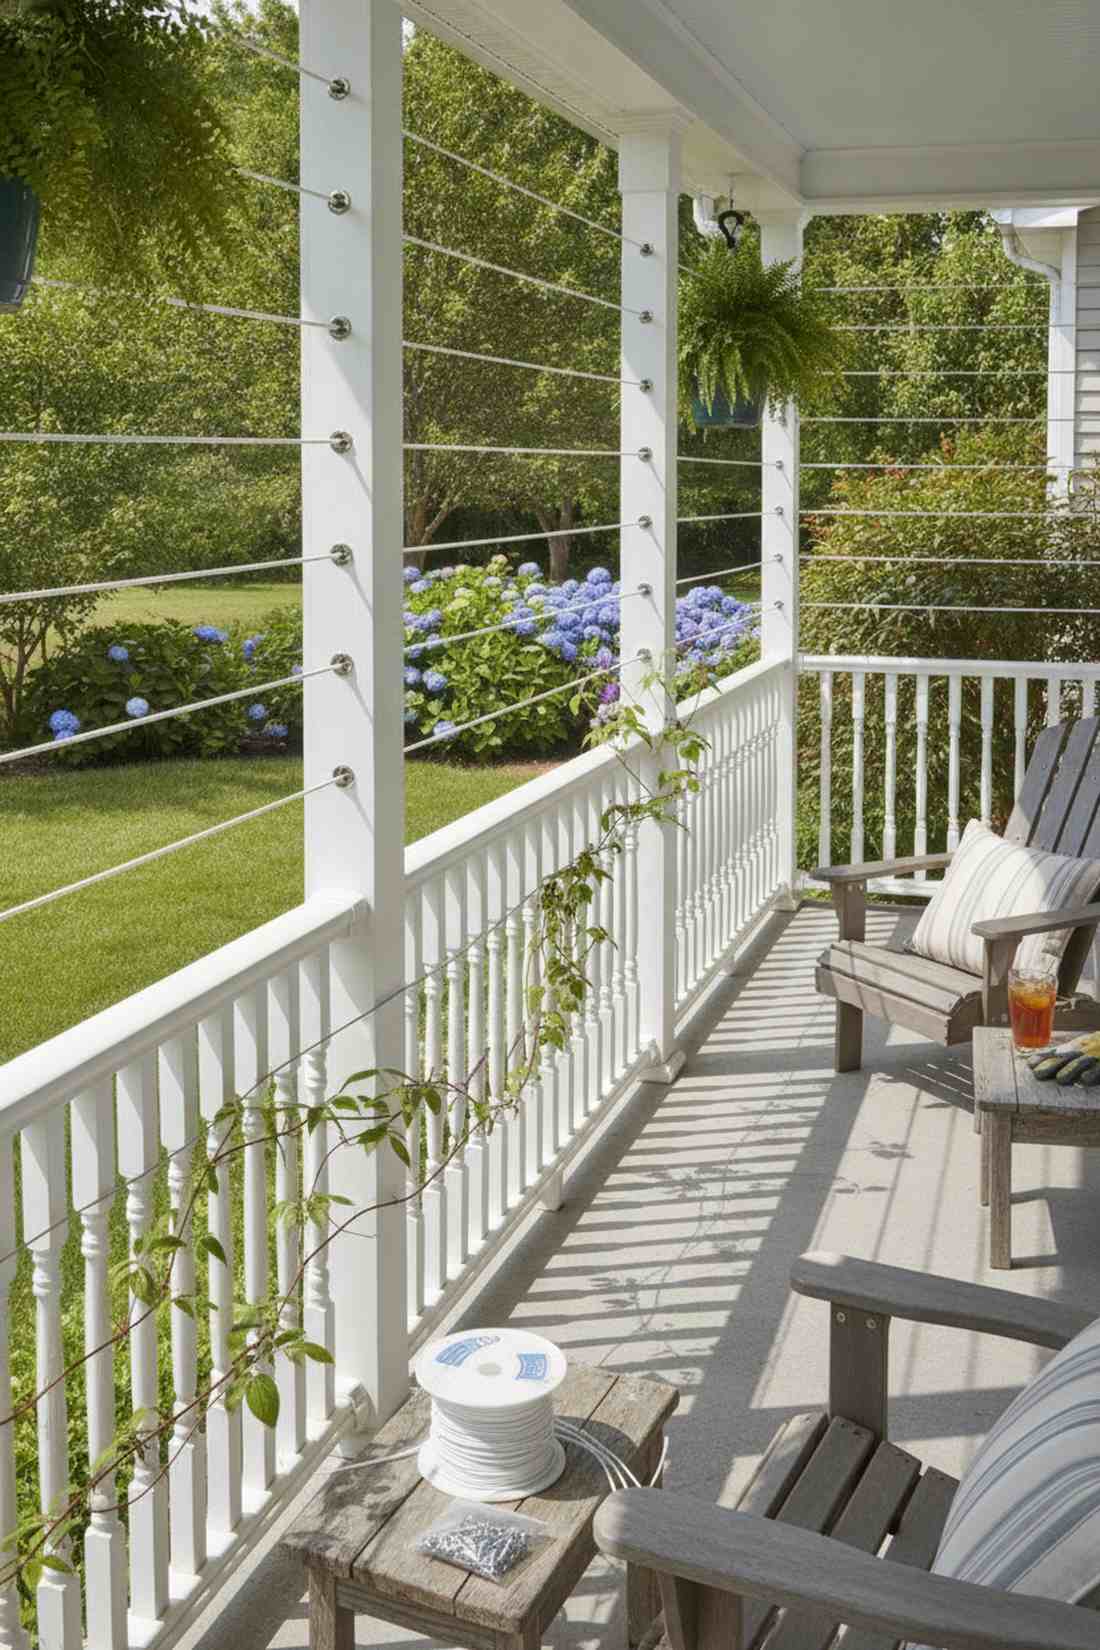
16. Horizontal Cable Runs

Radiates a sleek architectural elegance, utilizing tensioned steel aircraft cables. Works exceptionally well for training elegant espalier fruit trees against a blank garage wall.
Ditching clunky wood for horizontal tensile lines looks far more expensive than it is. This specific layout forces lateral plant growth, turning bare surfaces into manicured green stripes.
You can execute this modern upgrade for about $50 to $80. Pin this to your modern landscape board!
- Key Materials: 1/8-inch stainless wire and heavy turnbuckles
- Vibe / Style: Modern floating espalier
- Difficulty: Requires careful measuring and tensioning
- Budget Breakdown: Wire Spool: $30 | Turnbuckles: $25
- Creator’s Tip: Never use cheap aluminum crimps; spend the extra $5 on stainless wire clamps to prevent snapping under plant weight.
- Smart Sourcing: stainless steel wire rope kits and heavy-duty turnbuckle tensioners.
17. Vertical Cable Grid
Feels like an elite commercial green-building façade, starring floor-to-eave metallic strings. Unbelievably suited for rocketing fast-growing morning glories straight up to a second-story roofline.
Most basic trellises max out at six feet, but this climbing plants wire system allows infinite vertical growth. It provides aggressive twining vines the exact straight trajectory they crave.
Set up a stunning 15-foot vertical grid for around $60.
- Key Materials: Vertical steel cables and top/bottom anchor rails
- Vibe / Style: Soaring eco-architecture
- Difficulty: Ladder work required
- Budget Breakdown: Cables: $40 | Anchor Hooks: $20
- Creator’s Tip: Install a heavy-duty spring at the bottom of each cable to automatically absorb wind shock and prevent snapping.
- Smart Sourcing: vertical wire trellis starter kits and stainless steel eye lag screws.
18. Crosshatch Cable Mesh
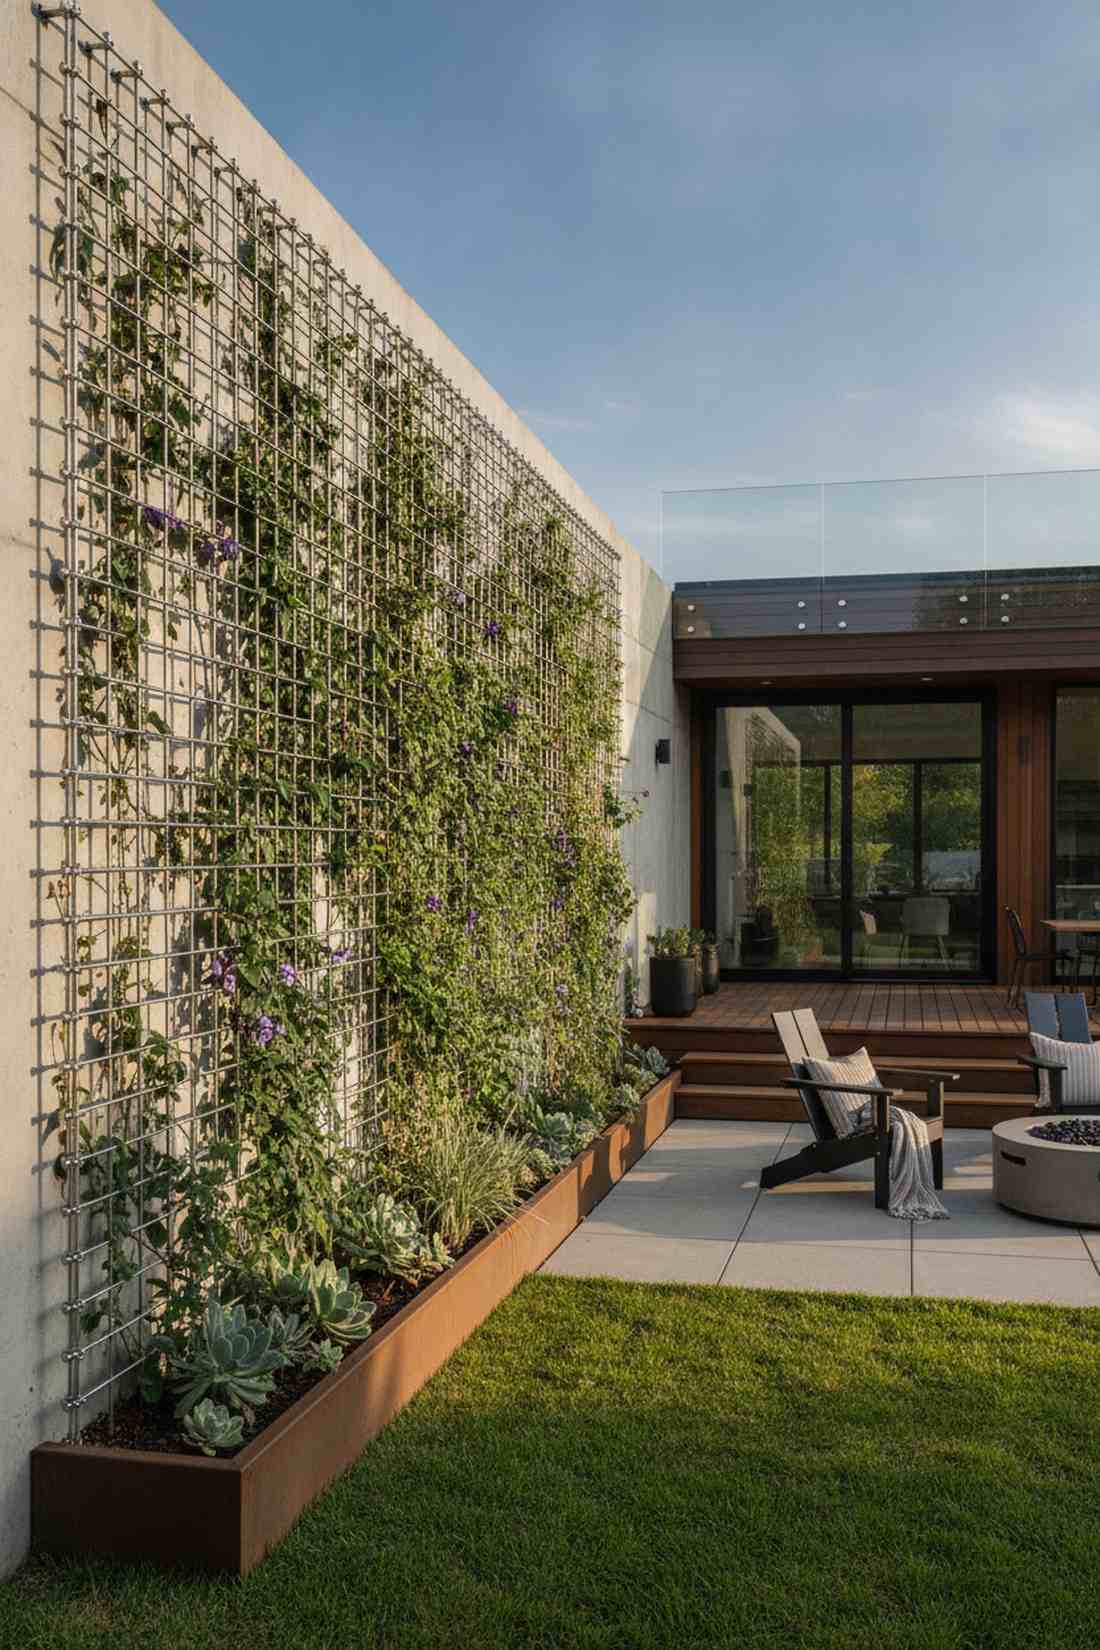
Delivers a flawless, mathematically perfect matrix, integrating perpendicular intersecting steel lines. The ultimate foundation for creating a massive, dense living wall on a concrete boundary.
While diamond lattice feels dated, this square metallic mesh gives a designer-level finish to modern homes. The intersecting clamp points ensure the grid never sags, even under a wet, heavy canopy.
Achieve this robust framework for roughly $90–$130. Save this for a blank-wall makeover!
- Key Materials: Grid wire layouts and cross-clamp hubs
- Vibe / Style: High-density modern grid
- Difficulty: Meticulous layout planning needed
- Budget Breakdown: Wire: $50 | Cross Clamps: $60
- Creator’s Tip: Use a laser level to mark your drill holes; even a half-inch mistake ruins the crisp geometric aesthetic.
- Smart Sourcing: stainless steel wire cross clips (bulk) and marine-grade wire spools.
19. Single Rope Vertical Lines
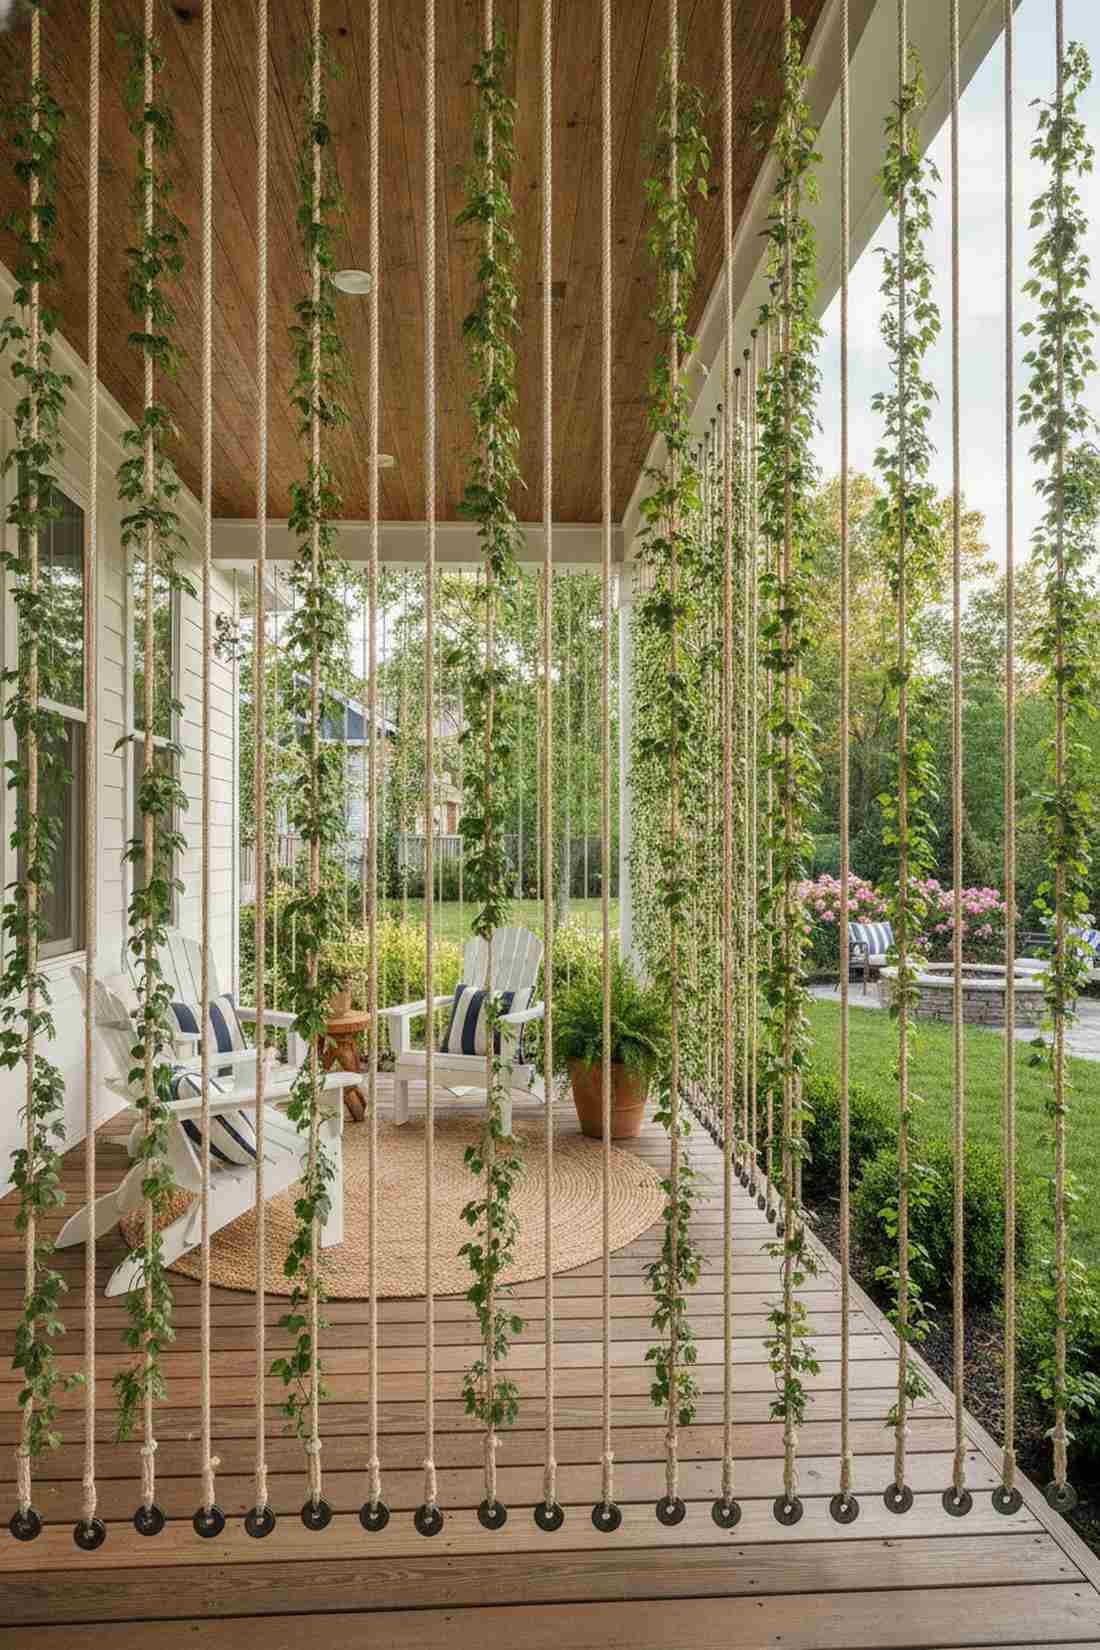
Creates a dramatic botanical curtain effect, utilizing individual suspended drop lines. Brilliantly suited for creating a see-through green divider on a covered porch.
Instead of building a rigid wall, letting vines climb single suspended lines yields a surprisingly upscale, breezy finish. It highlights the individual beauty of each plant rather than clumping them together.
Incredibly budget-friendly, costing around $15 for the whole setup.
- Key Materials: Weatherproof paracord or heavy rope and top hooks
- Vibe / Style: Floating bohemian curtain
- Difficulty: Fast and beginner-friendly
- Budget Breakdown: Paracord: $10 | Ceiling Hooks: $5
- Creator’s Tip: Tie a heavy steel washer to the bottom of the rope and bury it slightly to keep the line perfectly taut.
- Smart Sourcing: UV-resistant heavy paracord (spool) and heavy-duty cup hooks.
Stop buying flimsy plastic supports. The following layout changes the entire durability game for pennies.
20. Wire Rope with Standoffs
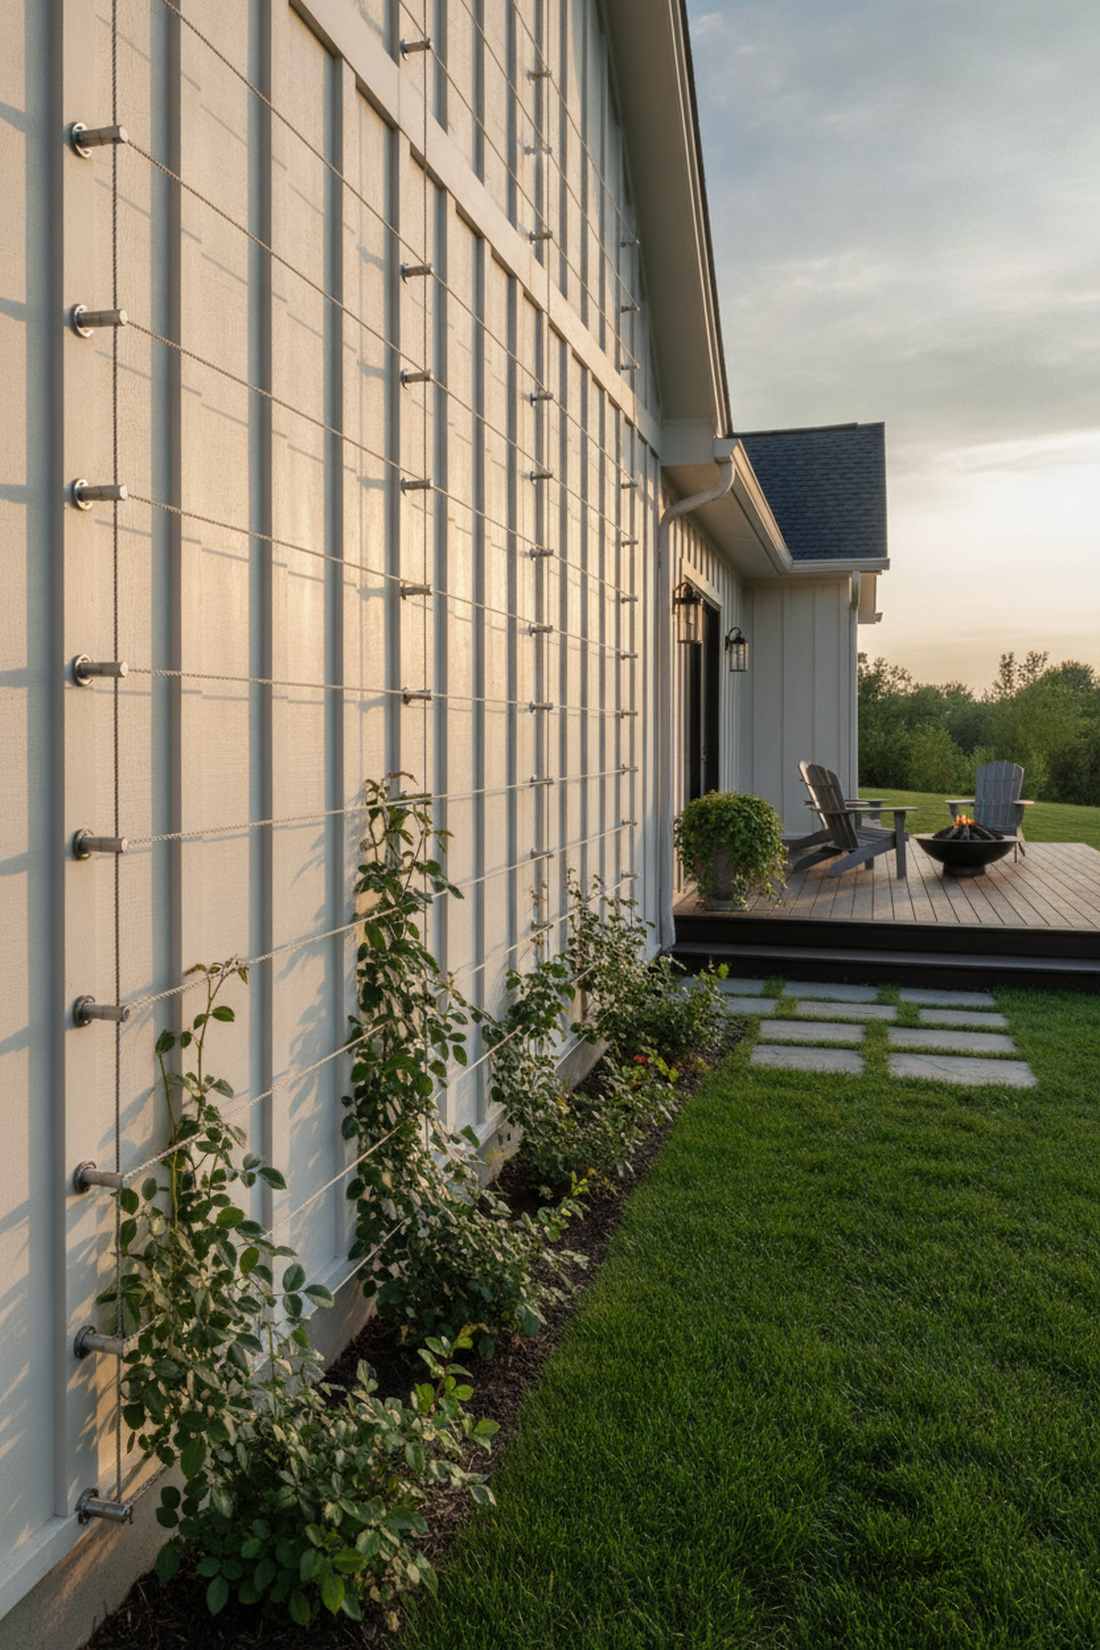
Looks like a museum-quality exterior installation, featuring machined steel spacer cylinders. Absolutely essential when mounting delicate climbing flora against expensive home siding.
Screwing flat against a wall invites rot, but using standoffs completely bypasses moisture damage to your home. It creates a bold 3D shadow effect that looks stunning even before the plants grow in.
Expect to spend $70 to $100 for proper architectural hardware. Pin this to your exterior design board!
- Key Materials: Stainless steel wire and 4-inch standoff hubs
- Vibe / Style: Commercial building luxury
- Difficulty: Requires masonry or stud drilling
- Budget Breakdown: Wire: $30 | Standoff Hubs: $60
- Creator’s Tip: Fill the drill holes with exterior silicone sealant before inserting the anchors to totally waterproof your siding.
- Smart Sourcing: stainless steel trellis standoff hubs and exterior-grade masonry anchors.
21. Tensile Mesh Panels
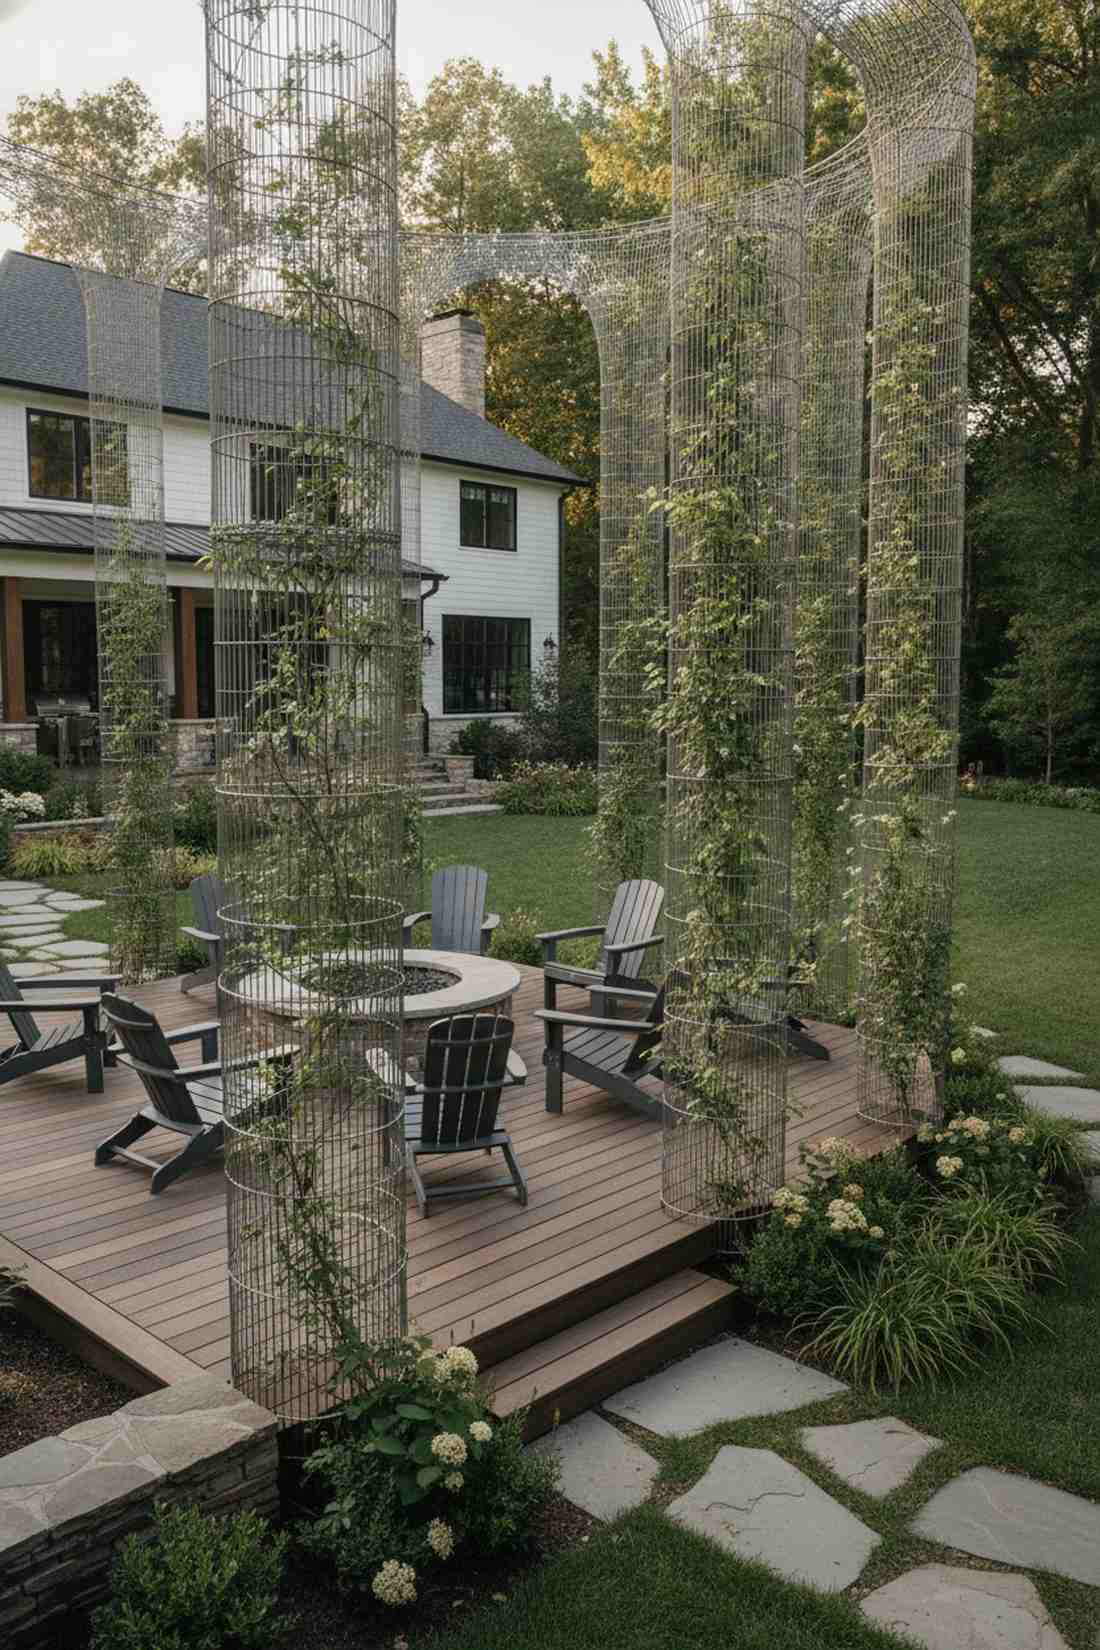
Exudes a hyper-futuristic zoo-enclosure chic, leaning into pre-woven stainless steel netting. The definitive choice for wrapping around curved outdoor pillars or structural columns.
Using flexible mesh instead of rigid bars delivers an unexpectedly bespoke aesthetic that bends to any shape. This climbing plants wire matrix prevents any plant stems from slipping through large gaps.
A premium choice that runs roughly $150 per custom sheet.
- Key Materials: Woven steel cable netting and border frames
- Vibe / Style: Cutting-edge organic wrap
- Difficulty: Requires strong perimeter tensioning
- Budget Breakdown: Mesh Sheet: $120 | Border Hardware: $30
- Creator’s Tip: Weave a thicker perimeter border wire through the mesh edges first to allow for extremely tight corner pulling.
- Smart Sourcing: flexible stainless steel rope mesh and heavy-duty tensioning ratchets.
22. Fishing Line Lightweight Support
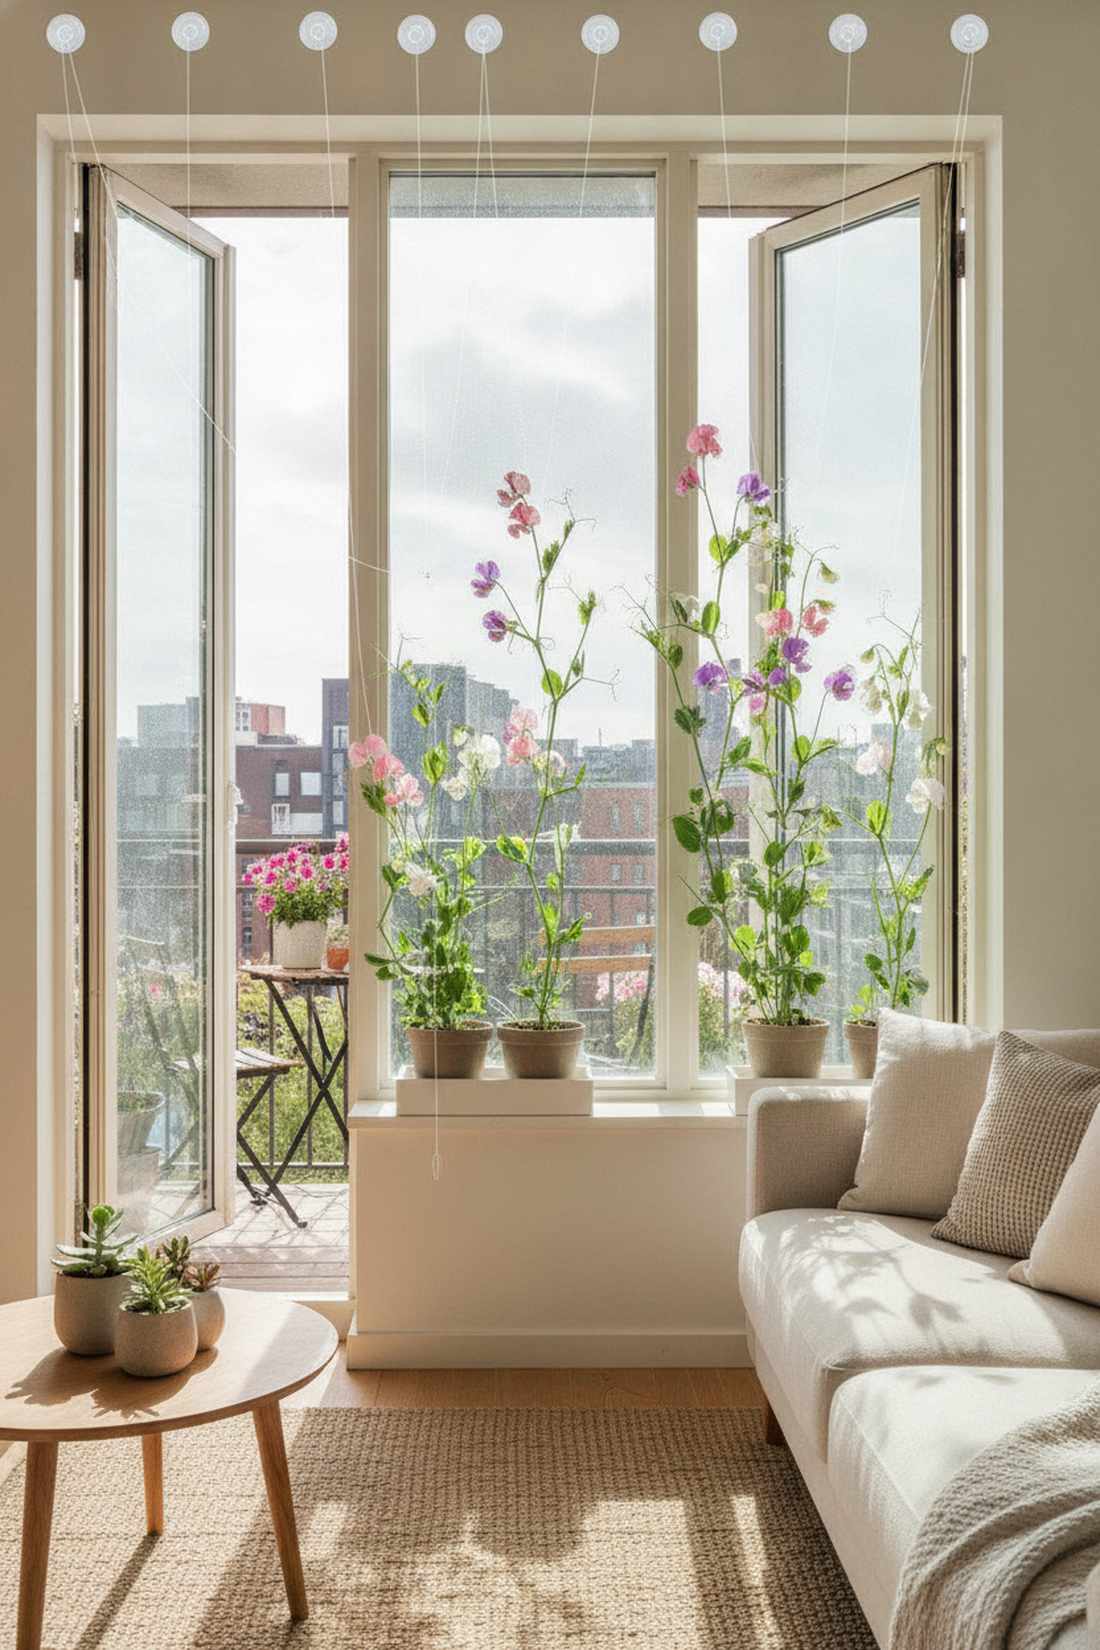
Delivers a purely magical floating illusion, starring heavy-test clear monofilament. A flawless, invisible trick for guiding delicate sweet peas up a sunny apartment window.
While wire is visible, thick fishing line looks entirely invisible, making flowers appear to hover in mid-air. It provides the ultimate low-cost, zero-damage climbing plants support for temporary renters.
This optical illusion costs less than $10 to set up. Save this hack for your indoor/balcony garden board!
- Key Materials: 50+ lb test clear fishing line and suction hooks
- Vibe / Style: Invisible floating blooms
- Difficulty: Quick, tool-free setup
- Budget Breakdown: Line Spool: $6 | Suction Anchors: $4
- Creator’s Tip: Don’t use standard sewing thread; heavy marine monofilament won’t stretch or snap when wet plants get heavy.
- Smart Sourcing: 80lb test clear monofilament spool and heavy-duty window suction hooks.
Garden Trellis Arches and Tunnels
Walking under a canopy of blooming flowers is the peak of garden design. Utilizing arches maximizes vertical square footage while creating a breathtaking, immersive structural experience.
Almost everyone overlooks this simple arch method, yet it yields the most dramatic floral canopy imaginable…
23. Cattle Panel Arch

Creates an incredibly lush, bountiful farm tunnel, repurposing curved galvanized livestock grates. The absolute holy grail for growing heavy pumpkins or squash vertically.
Most commercial arches collapse under vegetable weight, but this agricultural hack offers bomb-proof rigidity. Bending a single massive panel over a pathway yields a surprisingly upscale, highly productive canopy.
You can build this indestructible tunnel for around $40. Pin this immediately for your ultimate vegetable garden layout!
- Key Materials: 16-foot cattle panel and heavy T-posts
- Vibe / Style: Abundant homestead tunnel
- Difficulty: Requires two people to bend and tie
- Budget Breakdown: Panel: $30 | T-Posts: $15
- Creator’s Tip: Wrap the sharp cut edges of the panel with heavy tape or foam to prevent tearing your vines.
- Smart Sourcing: heavy-duty galvanized cattle panels and steel T-post ground anchors.
24. Wooden Arbor Gateway
Radiates formal English manor grandeur, featuring thick timber posts and slotted roofs. Flawlessly suited for marking the transition from a driveway to a private backyard sanctuary.
Avoiding cheap big-box store kits and using real 4×4 timber totally outperforms standard landscaping. This robust garden trellis for climbing plants creates a permanent, welcoming architectural hug.
A solid DIY build will cost between $150 and $250.
- Key Materials: 4×4 cedar posts, 2×6 headers, and concrete bases
- Vibe / Style: Traditional estate entrance
- Difficulty: Intermediate woodworking and concrete pouring
- Budget Breakdown: Wood: $180 | Concrete: $20
- Creator’s Tip: Cut elegant curves into the ends of the top headers with a jigsaw for an instant custom-carpentry upgrade.
- Smart Sourcing: pre-notched arbor wood kits and fast-setting concrete bags.
25. Metal Garden Arch
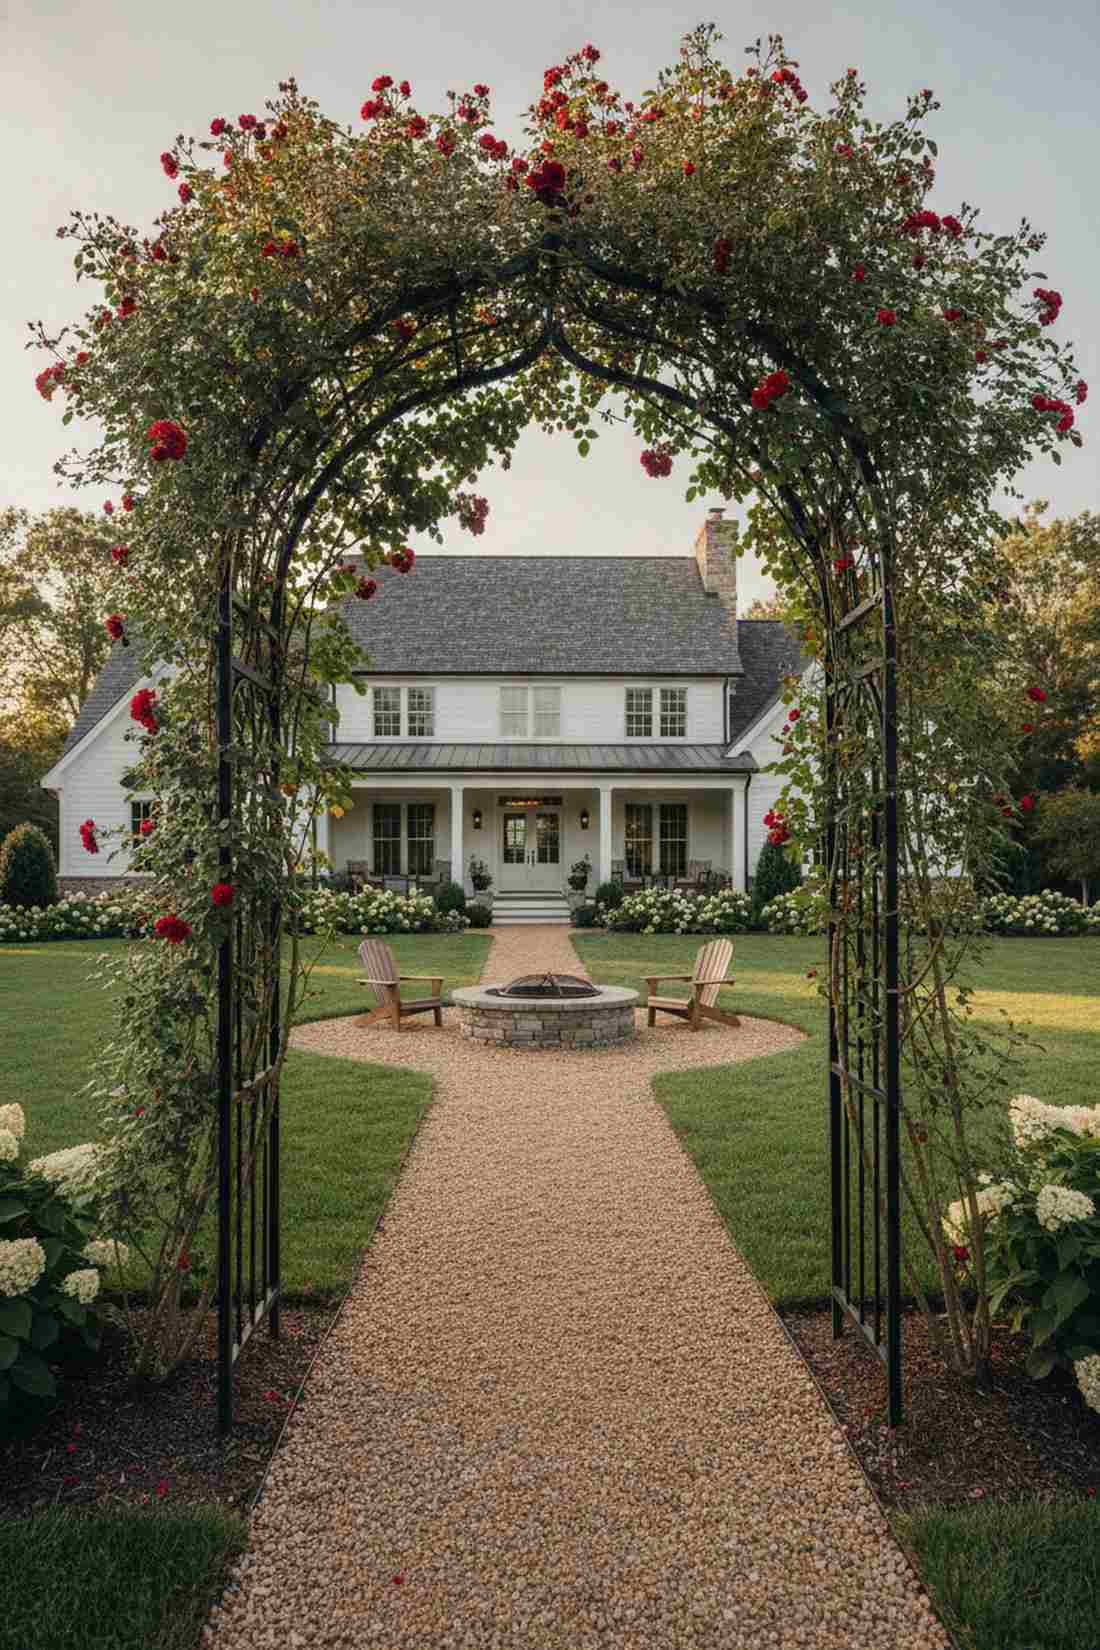
Looks straight out of a romantic period film, showcasing intricate steel scrollwork arches. The ultimate foundation for supporting a sprawling, thorny climbing rose over a garden path.
While wooden arches require staining, powder-coated metal gives a designer-level finish that ignores the weather entirely. It provides instant, sturdy elegance that defines your landscape’s walking flow.
Expect a durable steel arch to cost roughly $100 to $200. Save this for your romantic pathway inspiration board!
- Key Materials: Pre-fabricated powder-coated steel archway
- Vibe / Style: Romantic Victorian pathway
- Difficulty: Easy bolt-together assembly
- Budget Breakdown: Steel Arch Kit: $140 | Base Pegs: $10
- Creator’s Tip: Dig an 8-inch trench for the base legs instead of just using pegs to prevent wind-wobble when fully overgrown.
- Smart Sourcing: rust-resistant powder-coated arch kits and heavy-duty ground anchor augers.
26. Bamboo Tunnel Series
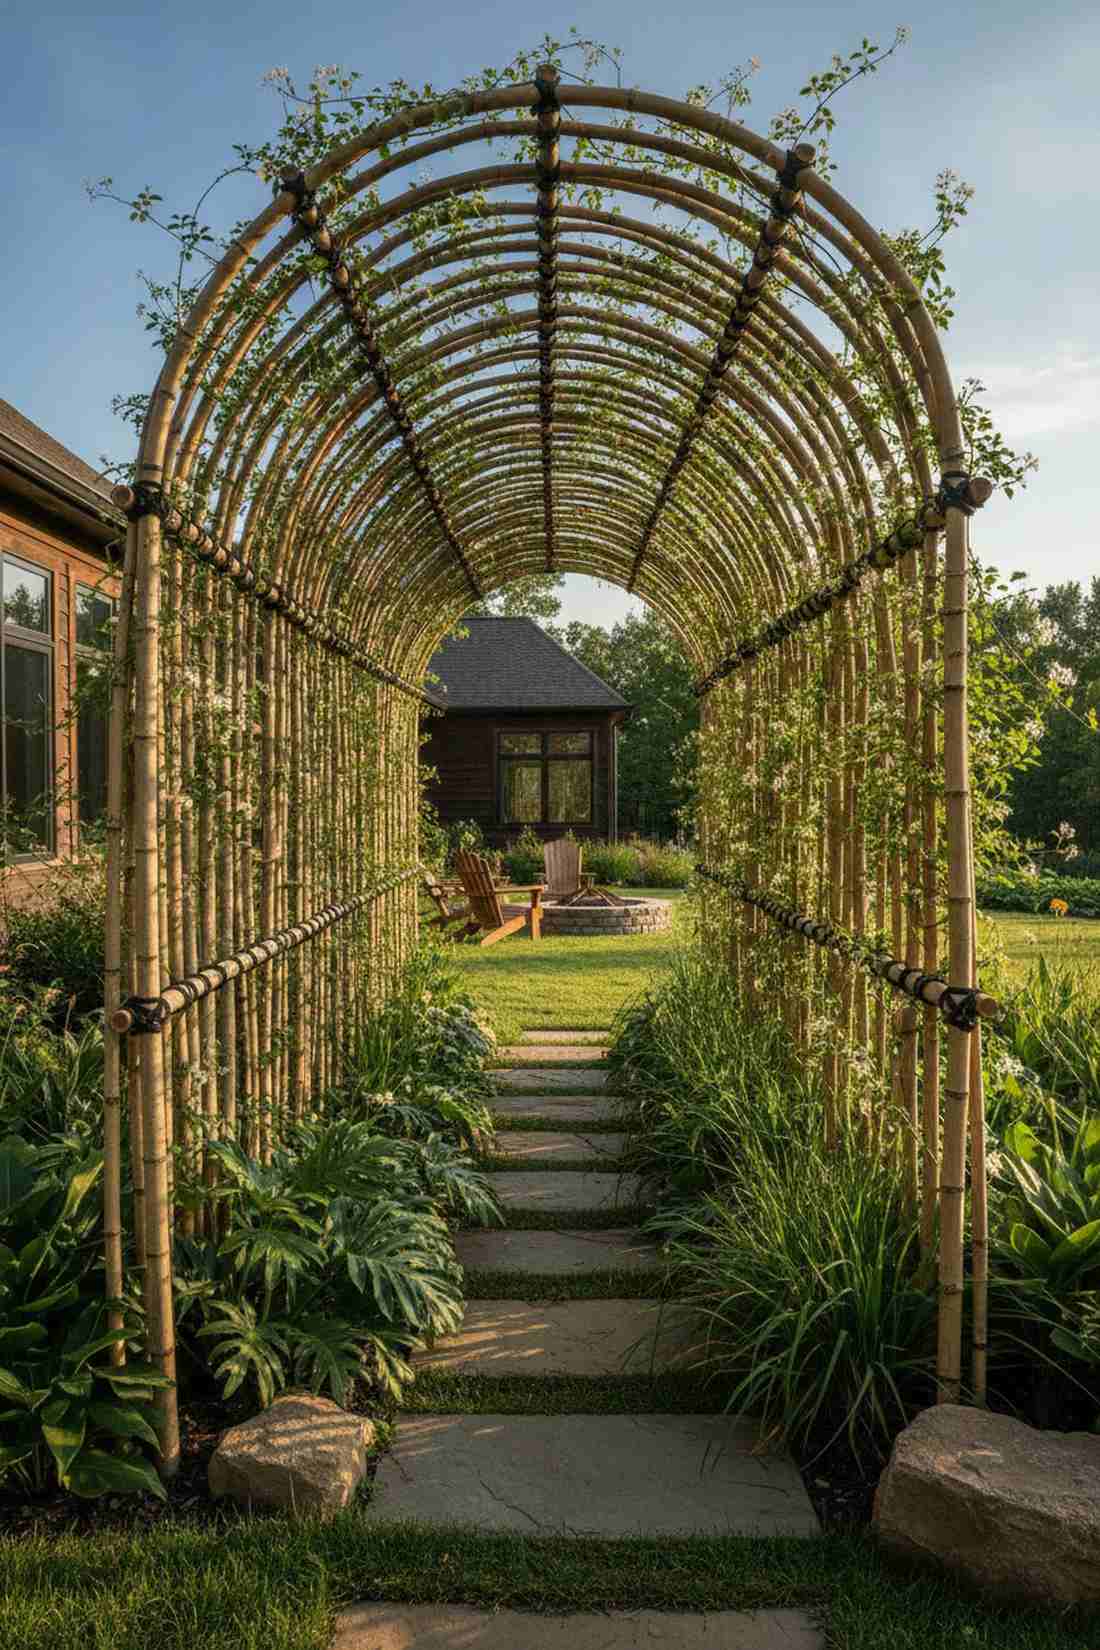
Exudes a serene, zen-like jungle atmosphere, leaning into lashed natural bamboo poles. Simply magical for shading a long, narrow side-yard walkway with lightweight vines.
Instead of cold metal, utilizing organic bamboo poles avoids the cheap DIY look while maintaining incredible flexibility. It seamlessly blends the climbing plants support straight into the surrounding natural environment.
Create a stunning 10-foot tunnel for about $60.
- Key Materials: Long flexible bamboo poles and lashing twine
- Vibe / Style: Tropical zen pathway
- Difficulty: Fun, creative bending and tying
- Budget Breakdown: Bamboo Bundles: $45 | Twine: $10
- Creator’s Tip: Use the traditional Japanese square-lashing knot method; it tightens as the bamboo ages and shrinks.
- Smart Sourcing: flexible 8-foot bamboo pole bundles and weatherproof synthetic lashing cord.
27. PVC Pipe Arch Frame
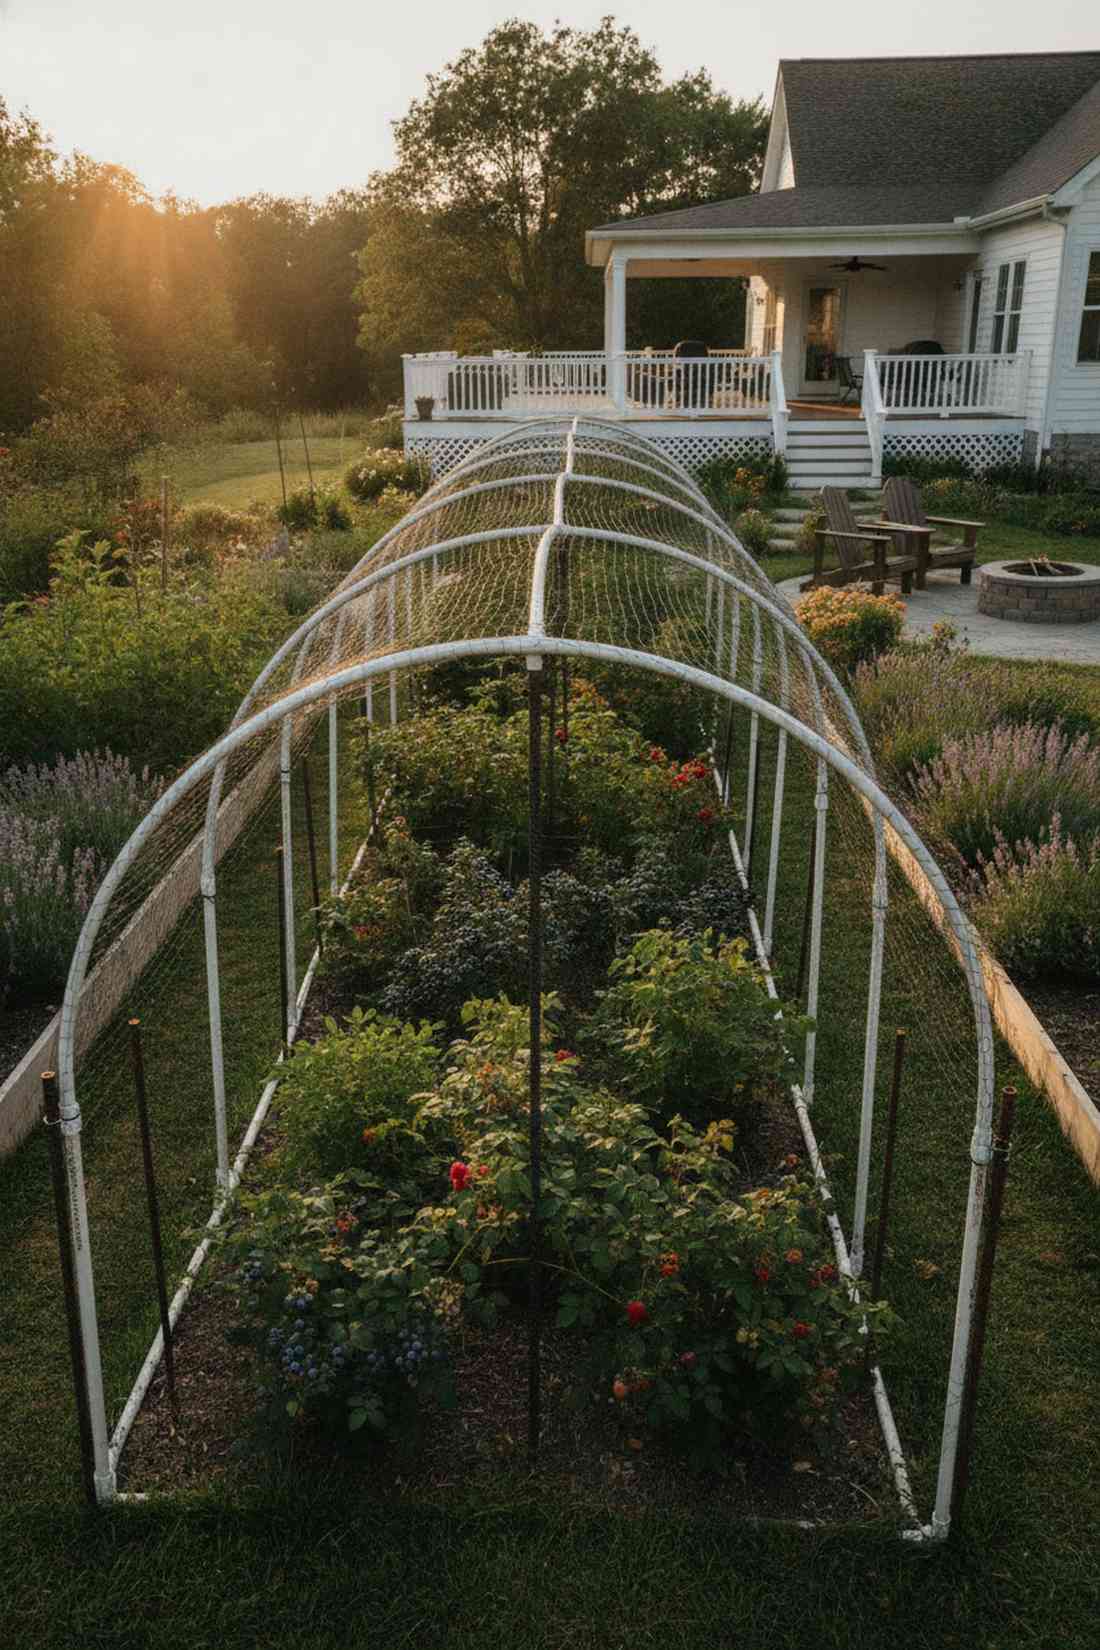
Brings extreme lightweight modularity, built purely from flexible white plumbing pipes. Brilliantly suited for throwing a temporary, protective bird-netting canopy over delicate berry bushes.
Most snob at plastic, but bending Schedule 40 pipe delivers a surprisingly robust, perfectly symmetrical arch curve. It is the absolute cheapest way to create massive overhead volume fast.
You can build a huge tunnel structure for under $30. Pin this to your budget homesteading board!
- Key Materials: 3/4-inch PVC pipes and rebar ground stakes
- Vibe / Style: High-yield modular farming
- Difficulty: Incredibly fast and easy
- Budget Breakdown: PVC: $15 | Rebar: $10
- Creator’s Tip: Spray paint the PVC a dark matte green before assembly so it completely vanishes into the garden background.
- Smart Sourcing: schedule 40 flexible PVC bundles and 18-inch rebar anchor stakes.
28. Living Willow Arch
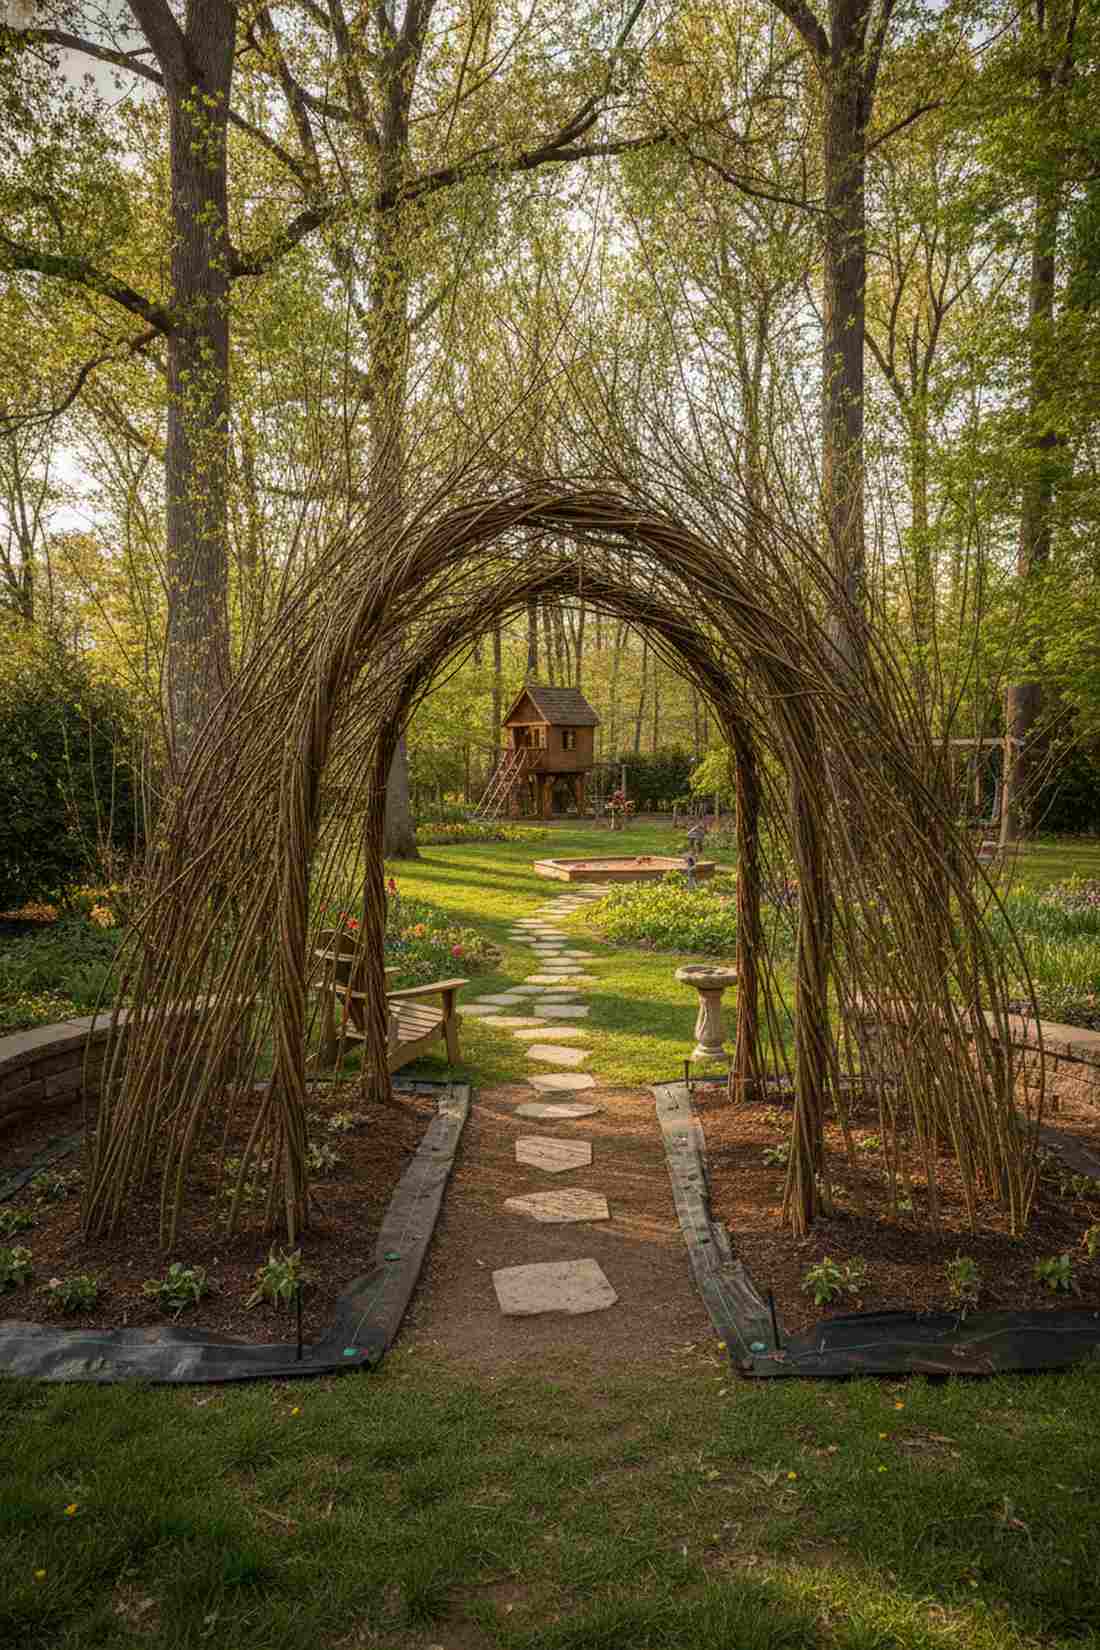
Feels exactly like a druid’s forest sanctuary, weaving together live, rooting willow branches. The most breathtaking entrance you can possibly create for a children’s hidden play garden.
Instead of building a structure for plants, making the structure OUT of the plants looks far more expensive than it is. The branches fuse together over time, creating a permanent, self-healing living architecture.
You can source dormant willow whips for about $40 to $70.
- Key Materials: Long dormant willow whips (cuttings)
- Vibe / Style: Ancient fairy-tale living structure
- Difficulty: Requires patience and seasonal weaving
- Budget Breakdown: Willow Whips: $50 | Soil Prep: $10
- Creator’s Tip: Plant them through a heavy weed-barrier fabric at the base to prevent grass from stealing their necessary water.
- Smart Sourcing: live dormant willow whips (bulk bundle) and heavy-duty landscape fabric.
29. Gothic Arch with Pointed Top
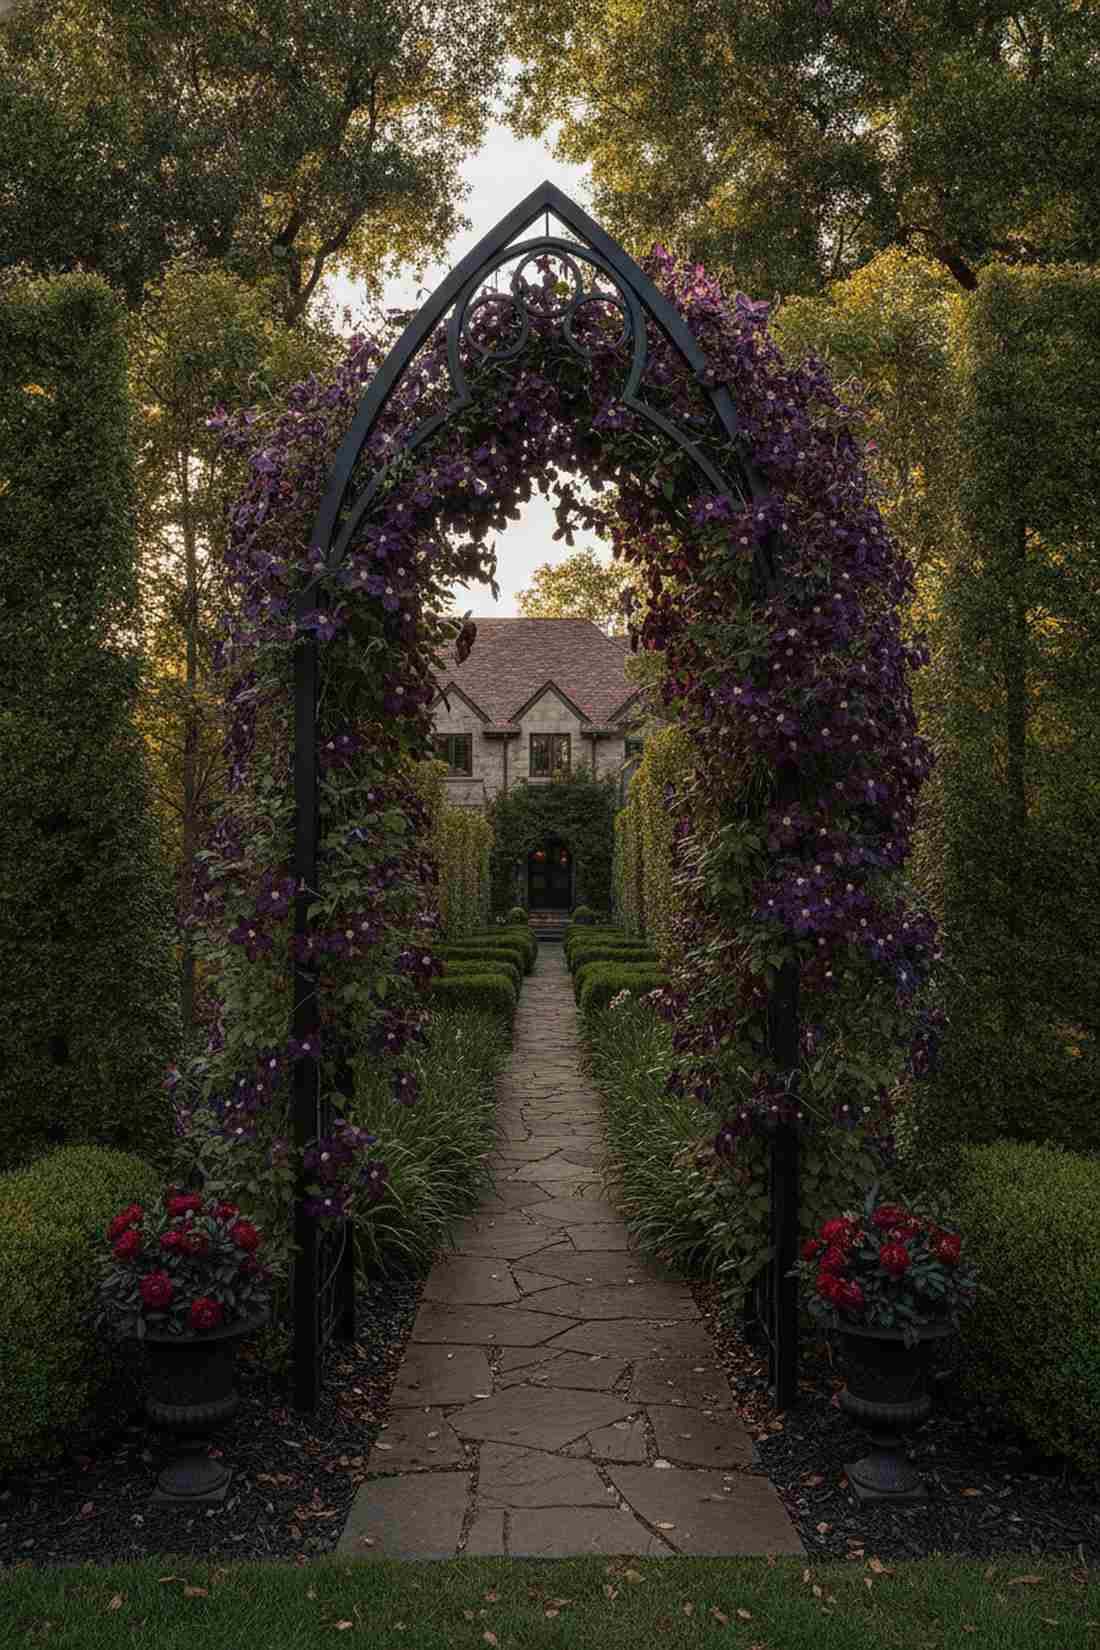
Radiates stunning historical drama, emphasizing a steep, peaked overhead crest. Unbelievably suited for drawing the eye upward in narrow, claustrophobic side passages.
A standard round arch feels basic, but that sharp Gothic point completely changes the landscape’s visual geometry. It provides incredible climbing plants support while acting as a standalone piece of yard art.
Expect a premium pointed arch to run $120–$180. Save this for your dark-academia garden aesthetic!
- Key Materials: Pointed welded steel or bent-wood archway
- Vibe / Style: Dramatic cathedral elegance
- Difficulty: Simple ground staking
- Budget Breakdown: Arch Kit: $150 | Anchors: $15
- Creator’s Tip: Plant a dark, moody Clematis variety like ‘Niobe’ to fully lean into the romantic, gothic architectural vibe.
- Smart Sourcing: gothic peaked metal arch kits and premium clematis starter vines.
If you think freestanding setups are unstable, the upcoming gravity-defying trick will blow your mind.
Freestanding Climbing Plants Support Frames
Eliminate the need for blank walls. Freestanding frames give you the ultimate flexibility to create vertical lushness literally anywhere in your yard, patio, or lawn.
30. A-Frame Double-Sided Trellis
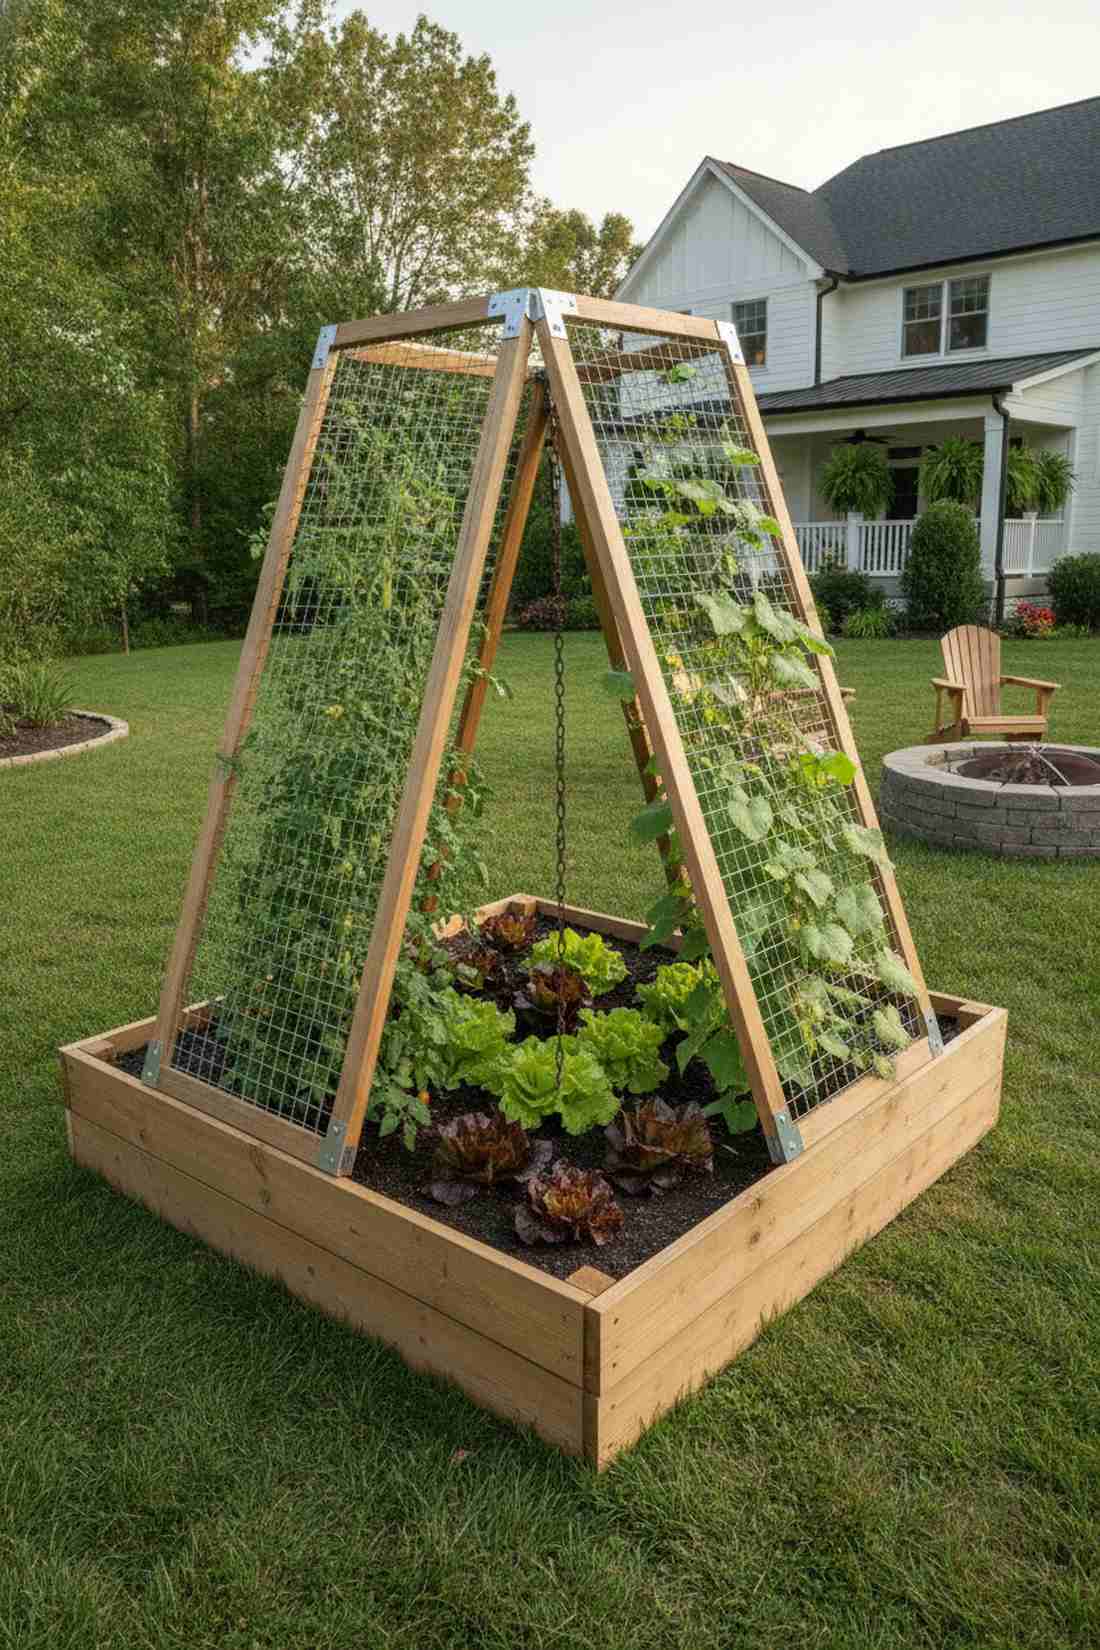
Exudes aggressive growing efficiency, utilizing two leaning hinged panels. The absolute best layout for straddling right over the center of a raised vegetable bed.
This layout doubles your growing surface without increasing your footprint, yielding a surprisingly upscale finish. It creates a shaded interior cavity perfectly suited for growing cool-weather lettuces underneath.
Build this highly functional frame for roughly $35. Pin this for maximum raised-bed yields!
- Key Materials: Wooden frames, wire mesh, and top hinges
- Vibe / Style: Hyper-efficient raised bed utility
- Difficulty: Basic screwing and stapling
- Budget Breakdown: Lumber: $20 | Hinges/Mesh: $15
- Creator’s Tip: Connect the bottom legs with a loose chain so the A-frame never flattens out under heavy wind or fruit loads.
- Smart Sourcing: galvanized utility hinges and pre-cut welded wire sheets.
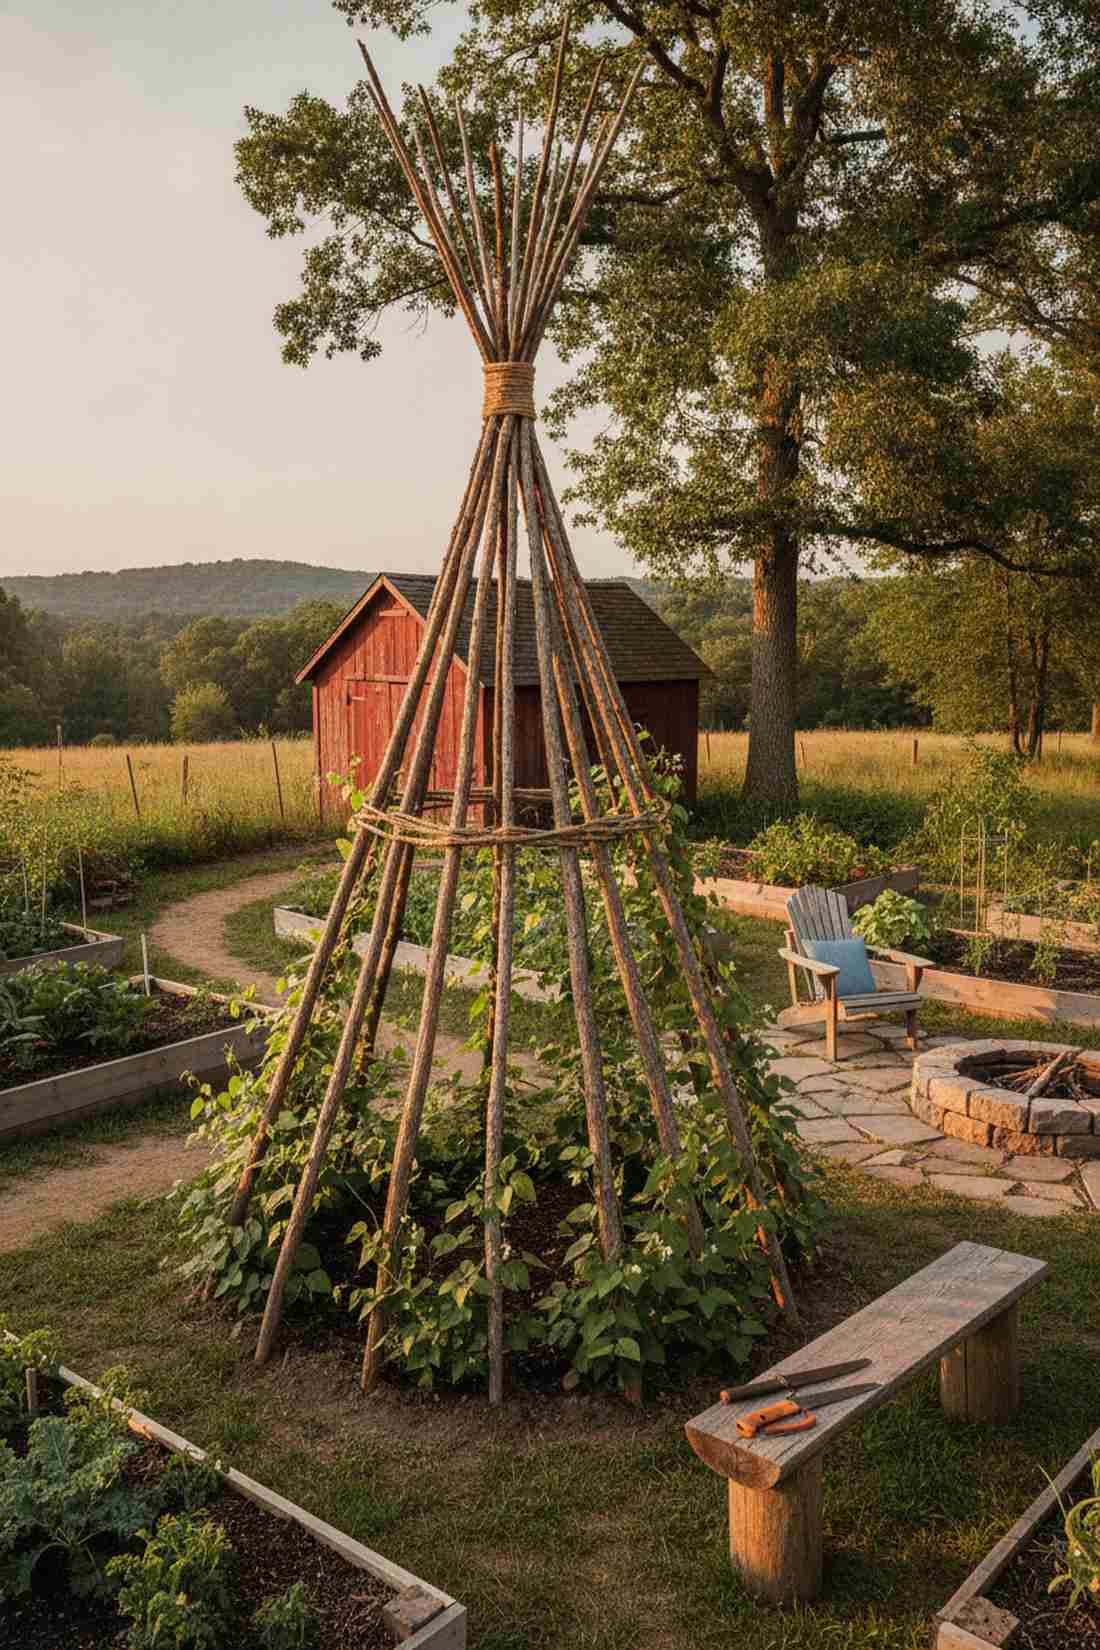
31. Bamboo Tepee Wigwam
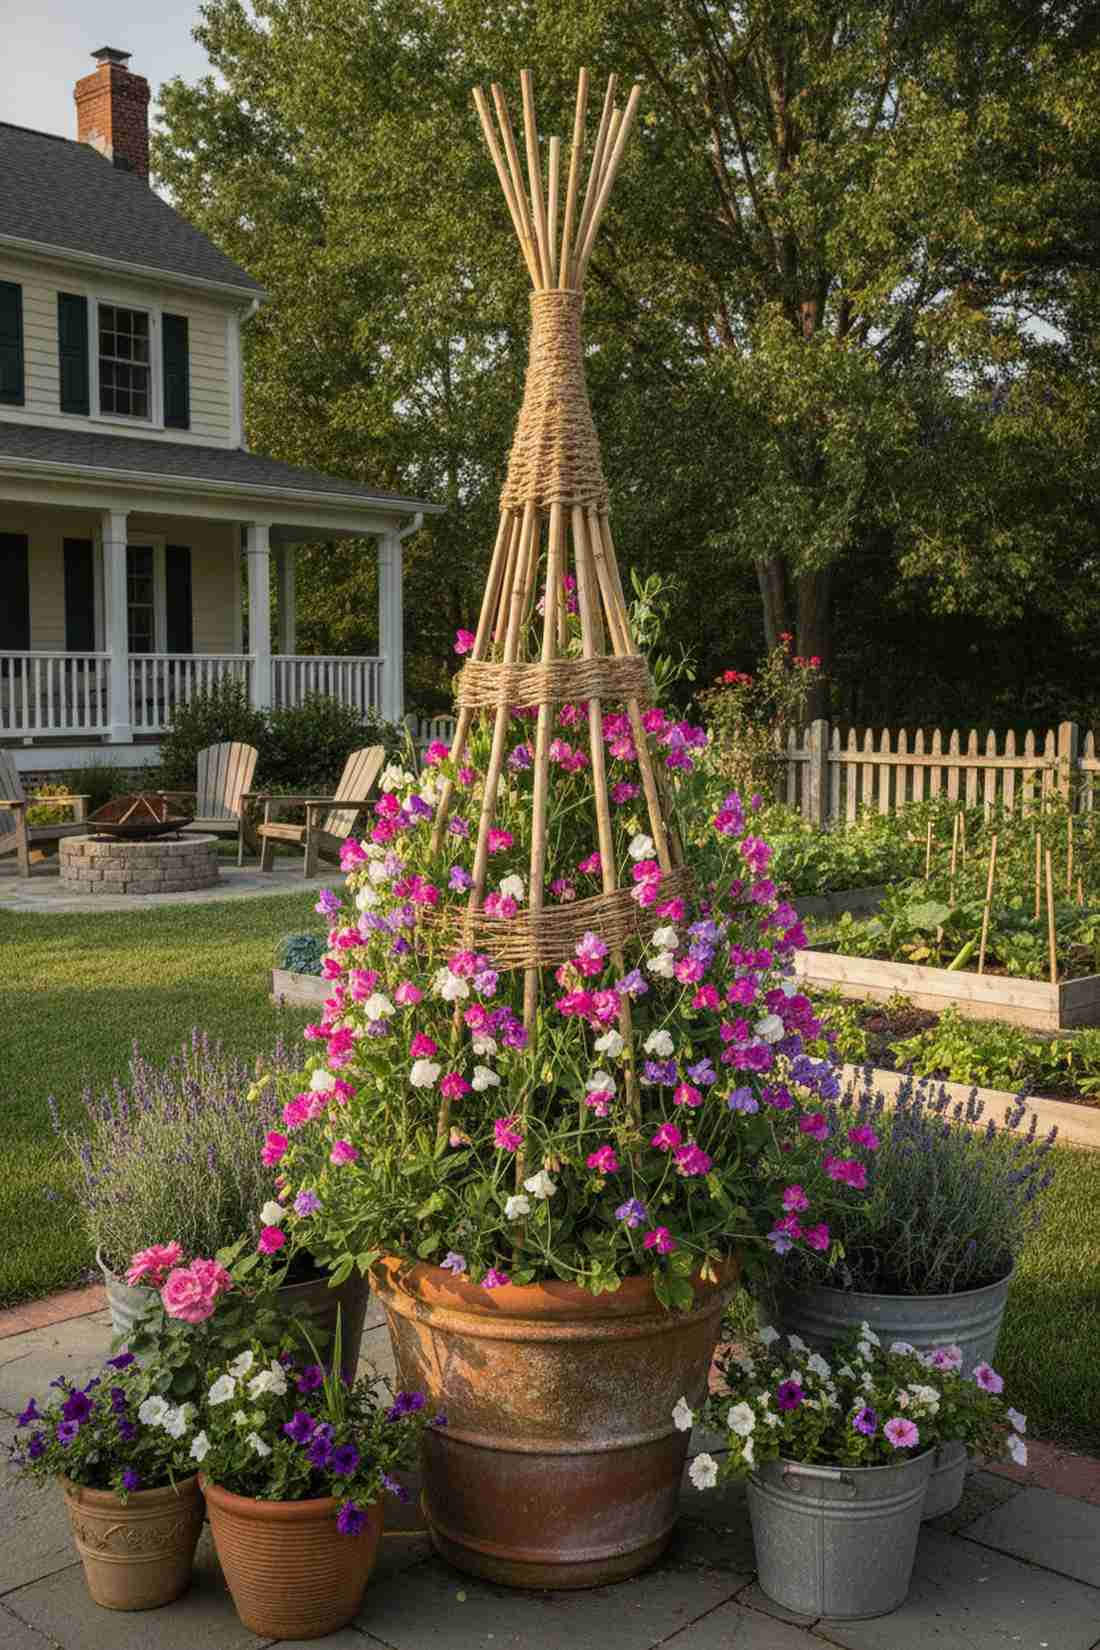
Feels like a classic English allotment, starring a tightly bundled pole cone. Brilliantly suited for throwing directly into a round container for a towering sweet pea display.
Rather than using ugly plastic poles, natural bamboo totally outperforms cheap hardware store alternatives. The conical shape naturally forces the climbing plants support inward, creating a dense, explosive pillar of color.
Incredibly cheap—execute this for under $15.
- Key Materials: 6-foot bamboo poles and heavy twine
- Vibe / Style: Traditional cottage garden tower
- Difficulty: Fast, 5-minute setup
- Budget Breakdown: Bamboo: $10 | Twine: $3
- Creator’s Tip: Weave a continuous spiral of twine horizontally around the poles to give small tendrils a ladder to grab between poles.
- Smart Sourcing: 6-foot natural bamboo stakes (pack) and biodegradable garden twine rolls.
32. Box Cage Trellis
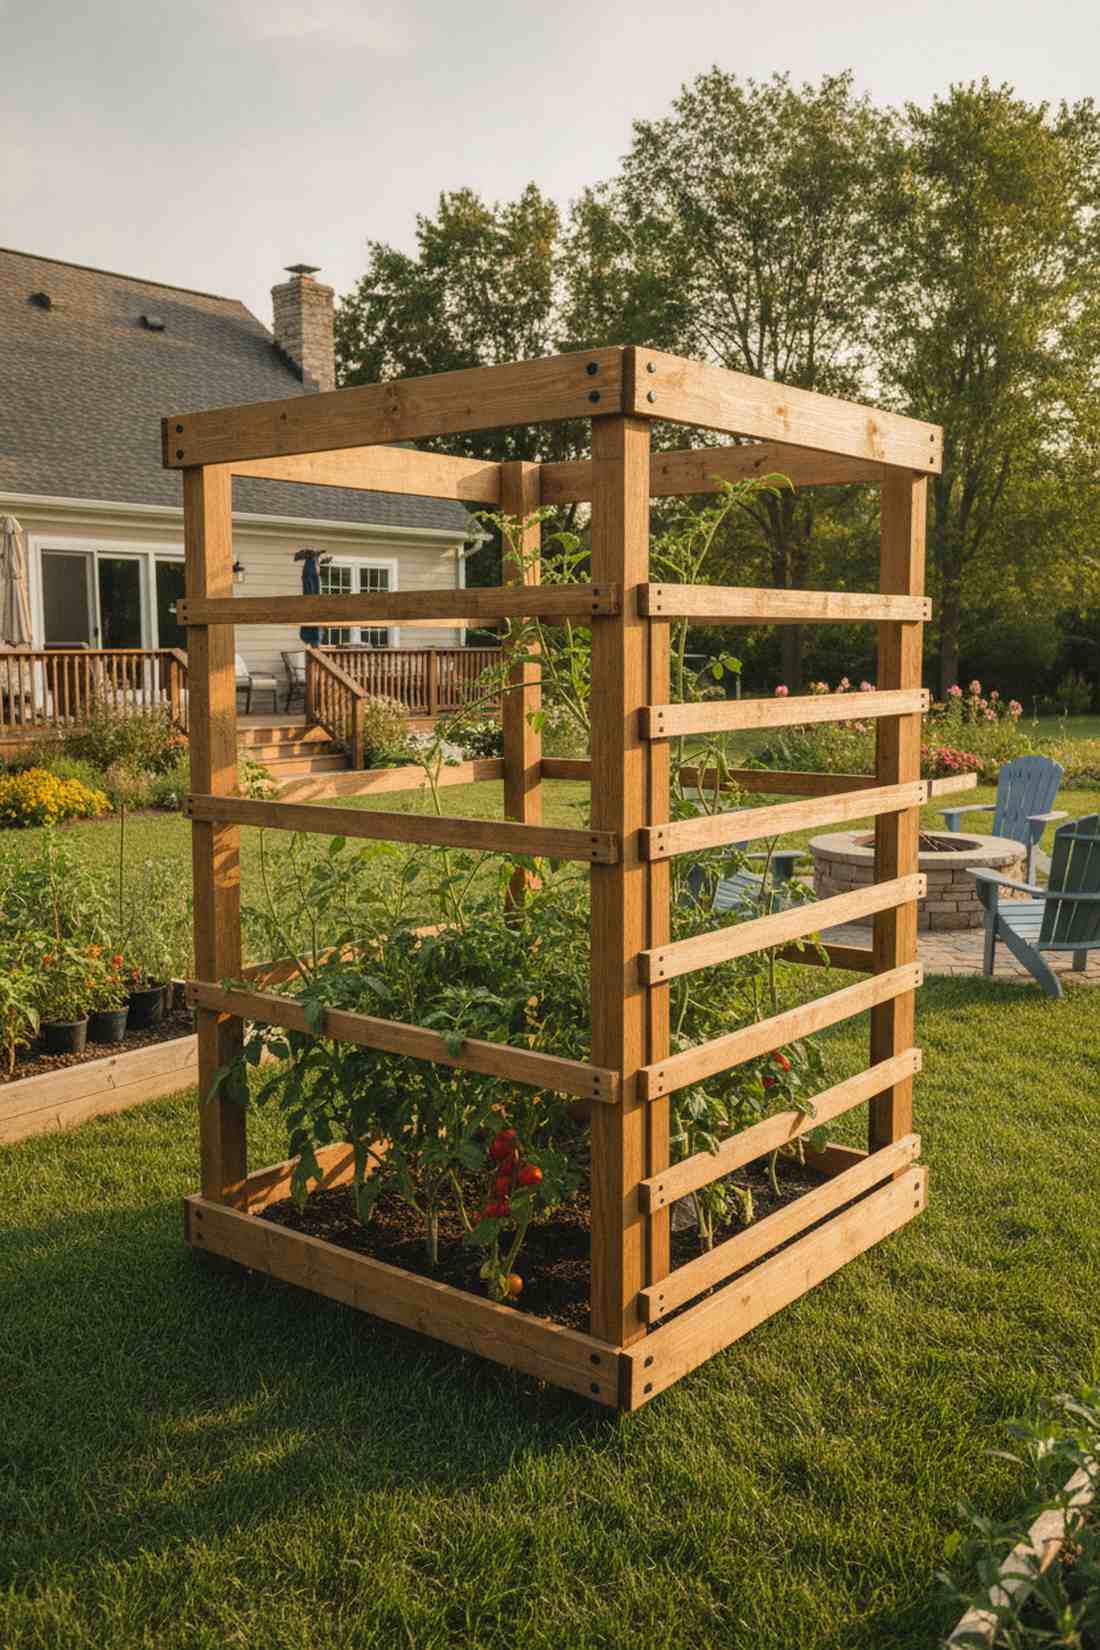
Delivers structured, unyielding containment, relying on a rigid 3D wooden square frame. The ultimate foundation for controlling monstrous, sprawling indeterminate tomato plants.
Ditch the flimsy, crushing wire rings; building a wooden box completely bypasses the cheap DIY look. It keeps heavy, moisture-laden branches separated, drastically improving critical airflow to prevent blight.
Construct a lifetime-durable cage for around $25. Save this to your heavy-duty gardening board!
- Key Materials: 2×2 lumber posts and horizontal 1×2 slats
- Vibe / Style: Heavy-duty heirloom farming
- Difficulty: Simple drill and screw assembly
- Budget Breakdown: Wood: $20 | Screws: $5
- Creator’s Tip: Build one side with removable slats so you can actually reach inside to harvest the hidden center tomatoes.
- Smart Sourcing: pre-cut 2×2 lumber bundles and coated deck screws.
33. Ladder A-Frame Configuration
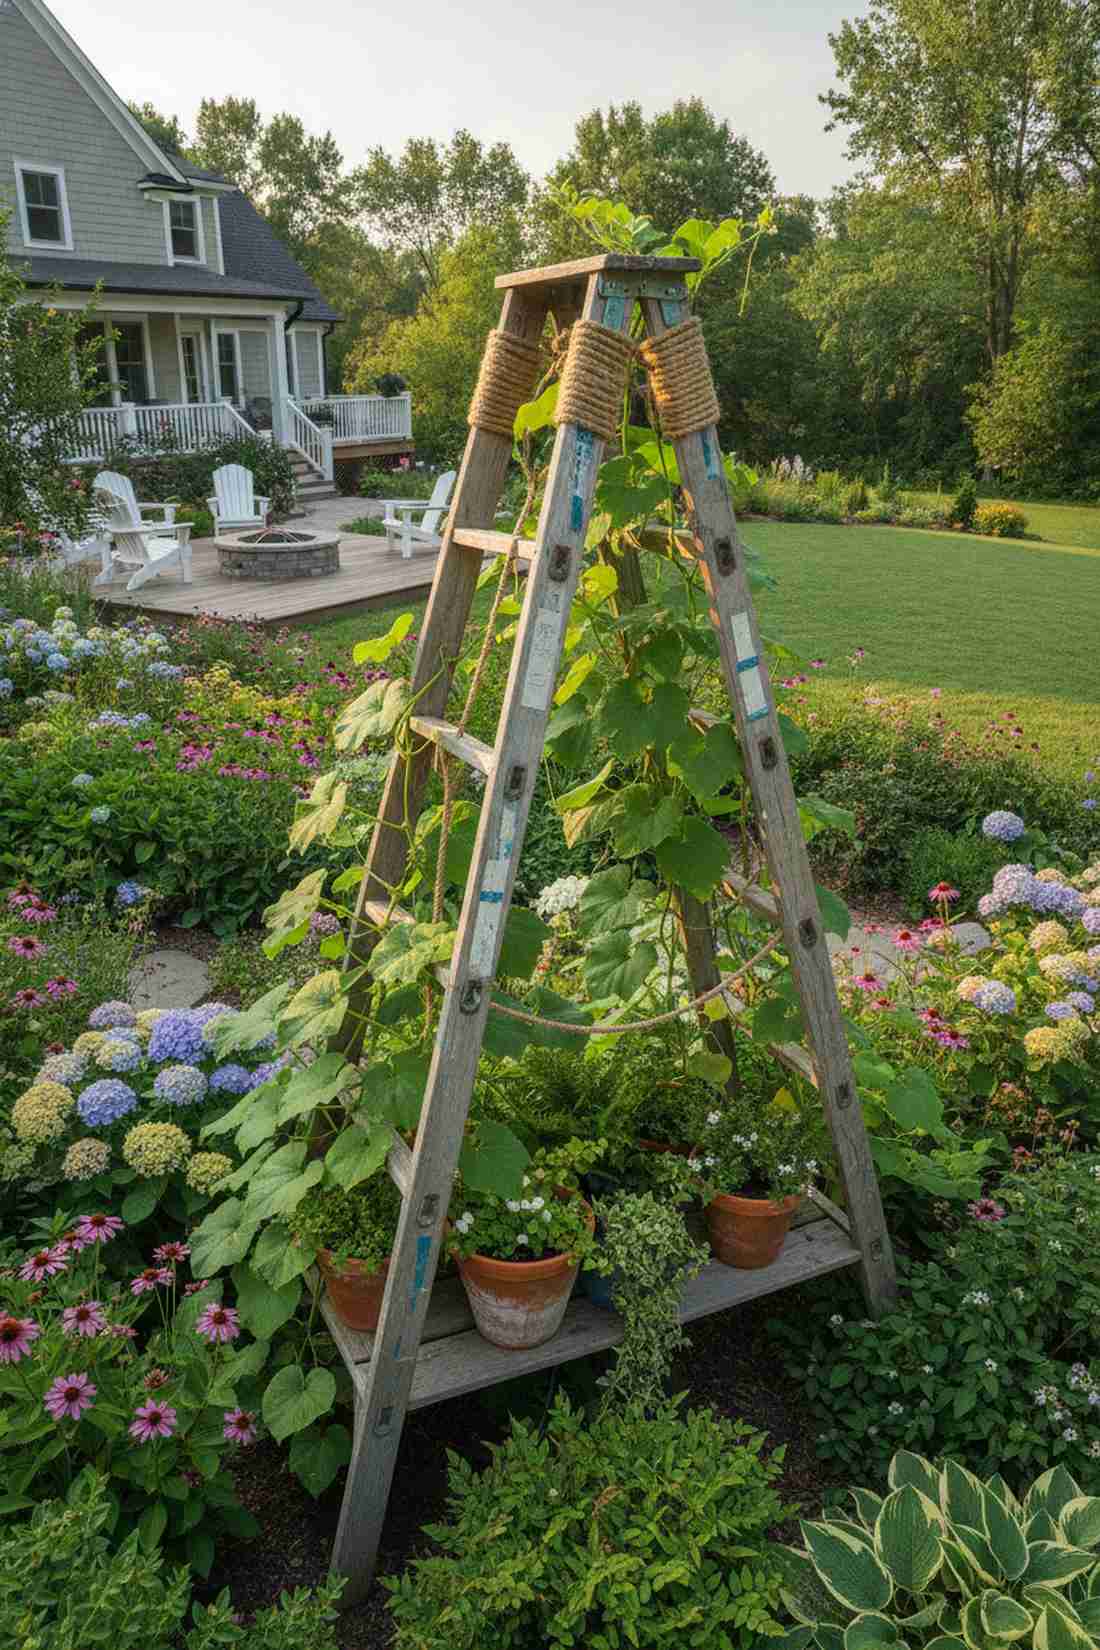
Brings a heavy dose of vintage farmhouse charm, repurposing two old wooden stepladders. Works exceptionally well as an instant, quirky centerpiece in an eclectic flower border.
Throwing out old ladders is a crime when they give a designer-level finish for vertical growing. The thick rungs provide massive, sturdy tie-off points for aggressively heavy gourd or melon vines.
Basically free if you hit up a local garage sale!
- Key Materials: Two vintage wooden ladders and heavy top-lashing
- Vibe / Style: Vintage rustic upcycle
- Difficulty: Effortless leaning and tying
- Budget Breakdown: Vintage Ladders: $15 | Hardware: $5
- Creator’s Tip: Lay reclaimed wooden planks across the bottom rungs to create instant shelving for potted trailing plants.
- Smart Sourcing: vintage-style decorative ladders and heavy sisal rope spools.
34. Spiral Tower Structure
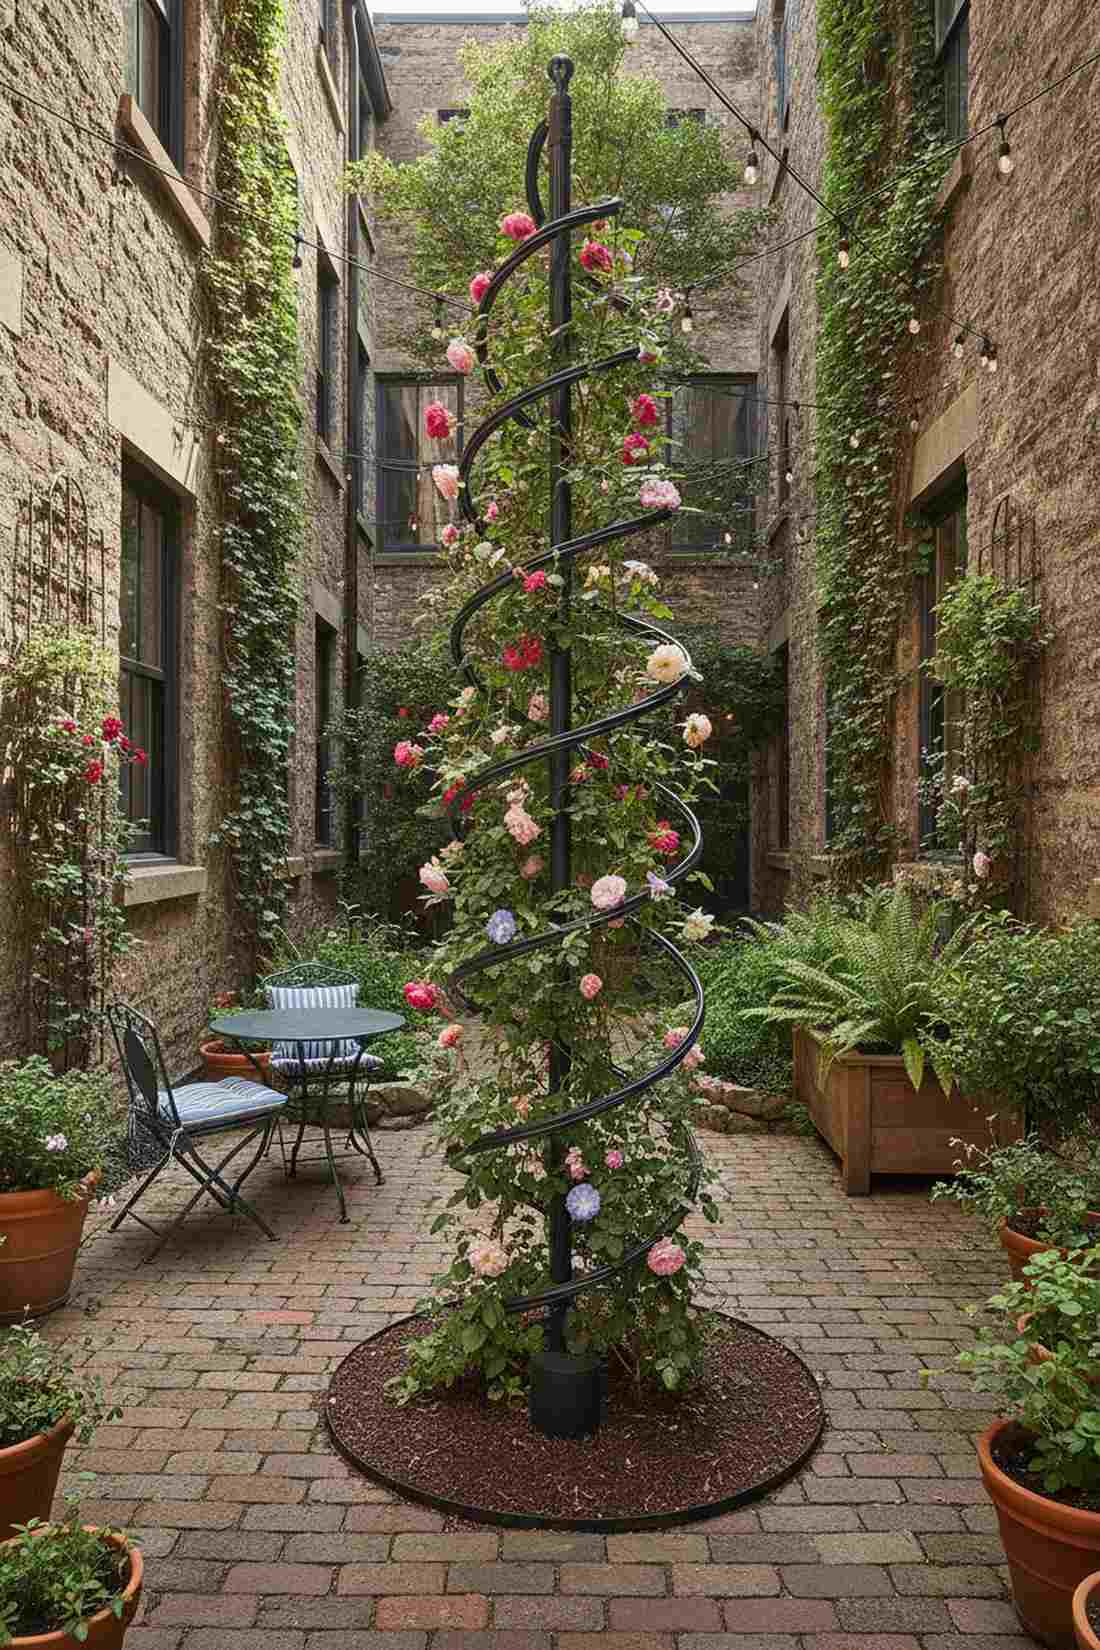
Looks like a kinetic garden sculpture, featuring a central pole with rotating helical arms. Unbelievably suited for maximizing flower visibility in a tiny, cramped urban courtyard.
Most straight towers hide the back flowers, but this rotating spiral setup changes the entire visual game. This specialized garden trellis for climbing plants guarantees 360-degree bloom exposure to sunlight.
You can buy or build a spiral frame for $40 to $70. Pin this for a unique architectural patio upgrade!
- Key Materials: Heavy central steel post and bendable thick wire arms
- Vibe / Style: Whimsical 3D garden art
- Difficulty: Needs careful bending if DIYing
- Budget Breakdown: Steel Core: $20 | Wire/Welds: $30
- Creator’s Tip: Wind the spiral exactly counter-clockwise; most twining vines naturally prefer climbing in that specific direction.
- Smart Sourcing: pre-formed spiral plant supports and sturdy ground core stakes.
Material Guide: Cheap vs. Premium Aesthetic
Knowing exactly where to save and where to spend makes all the difference in achieving that “looks expensive but isn’t” vibe.
- Standard Pine vs. UV-Resistant Cedar: Raw pine rots in three years, but treated cedar stops decay dead, securing your climbing plants trellis for decades.
- Pre-made Kits vs. Sourcing Locally: Scavenging hardware stores takes hours; buying bulk starter kits often saves both time and overall project cash.
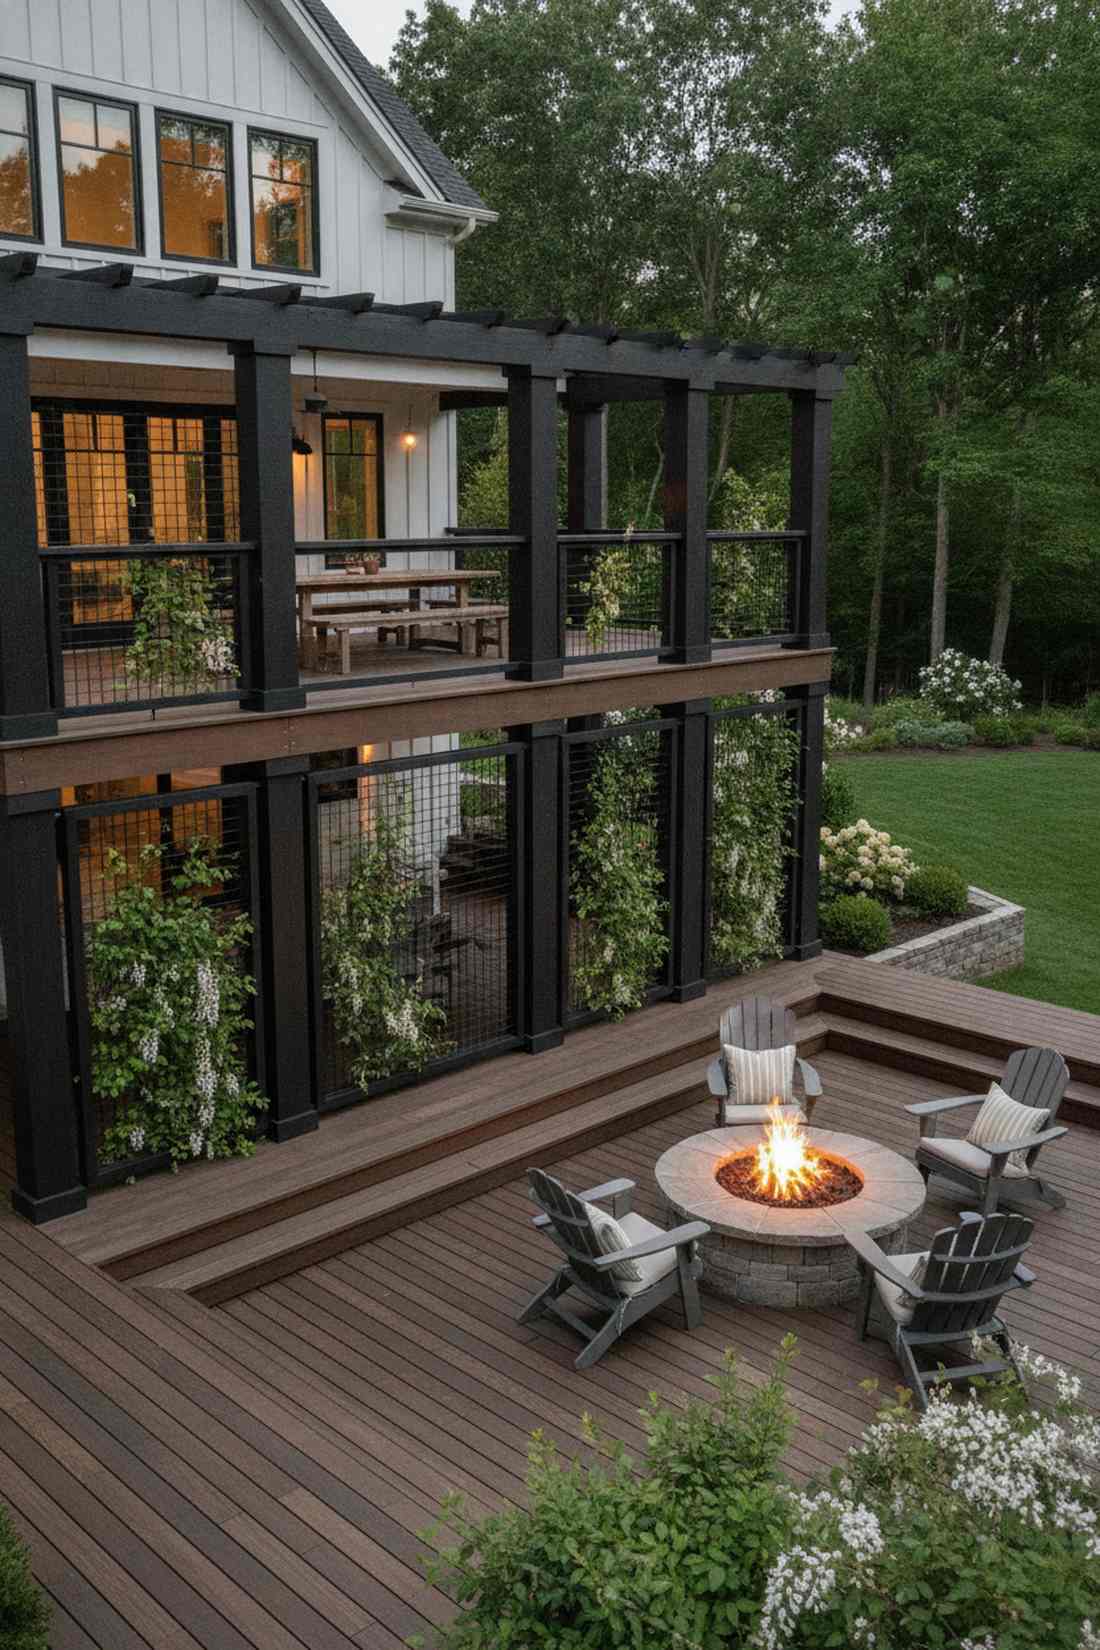
35. Freestanding Trellis Wall
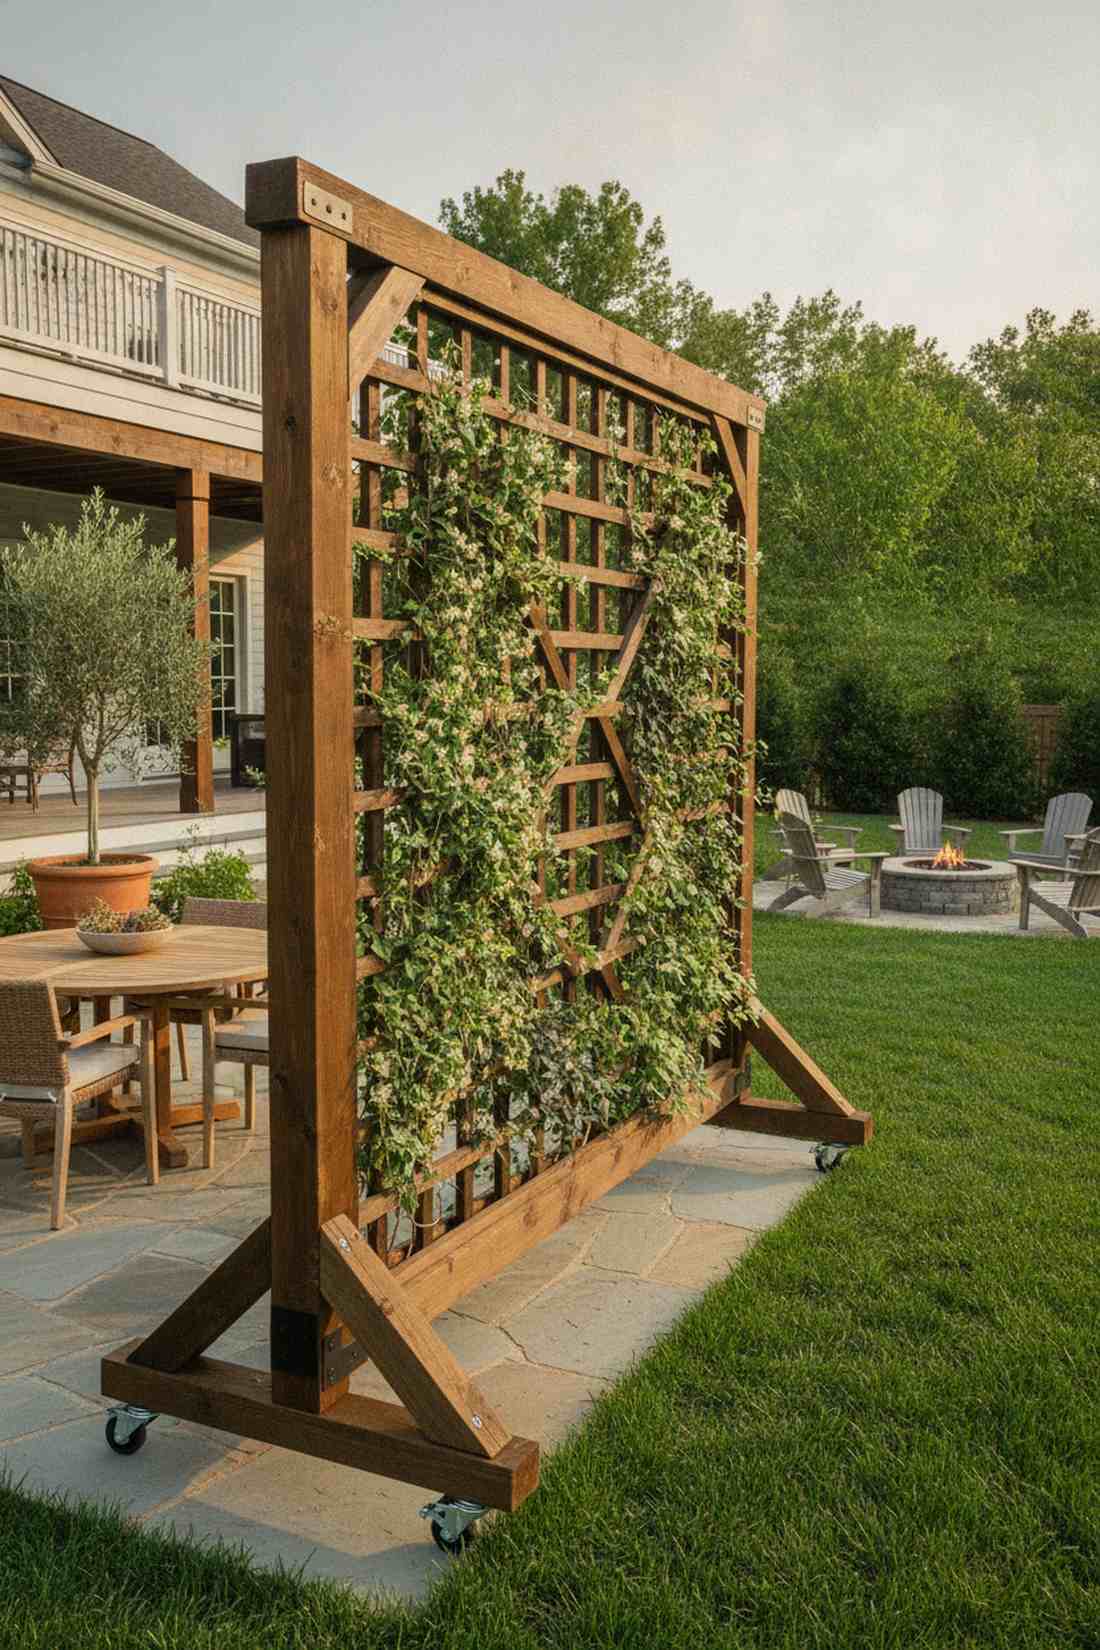
Acts as an instant outdoor room divider, leaning into a massive heavy-footed panel frame. The absolute perfect trick for creating an immediate green barrier around a dining patio.
Instead of hiring contractors to dig post holes, using deep-angled rear support legs avoids the cheap DIY look. It delivers a colossal surface area for a wooden trellis for climbing plants without permanent yard damage.
A large 6×6 foot wall will cost around $100 to build safely.
- Key Materials: Thick 2×4 framing, lattice, and 45-degree brace legs
- Vibe / Style: Portable luxury privacy
- Difficulty: Intermediate framing logic needed
- Budget Breakdown: Wood/Lattice: $80 | Heavy Brackets: $20
- Creator’s Tip: Bolt heavy-duty locking caster wheels to the bottom frame so you can roll your living wall to block the shifting sun.
- Smart Sourcing: heavy-duty locking outdoor casters and structural angled brace brackets.
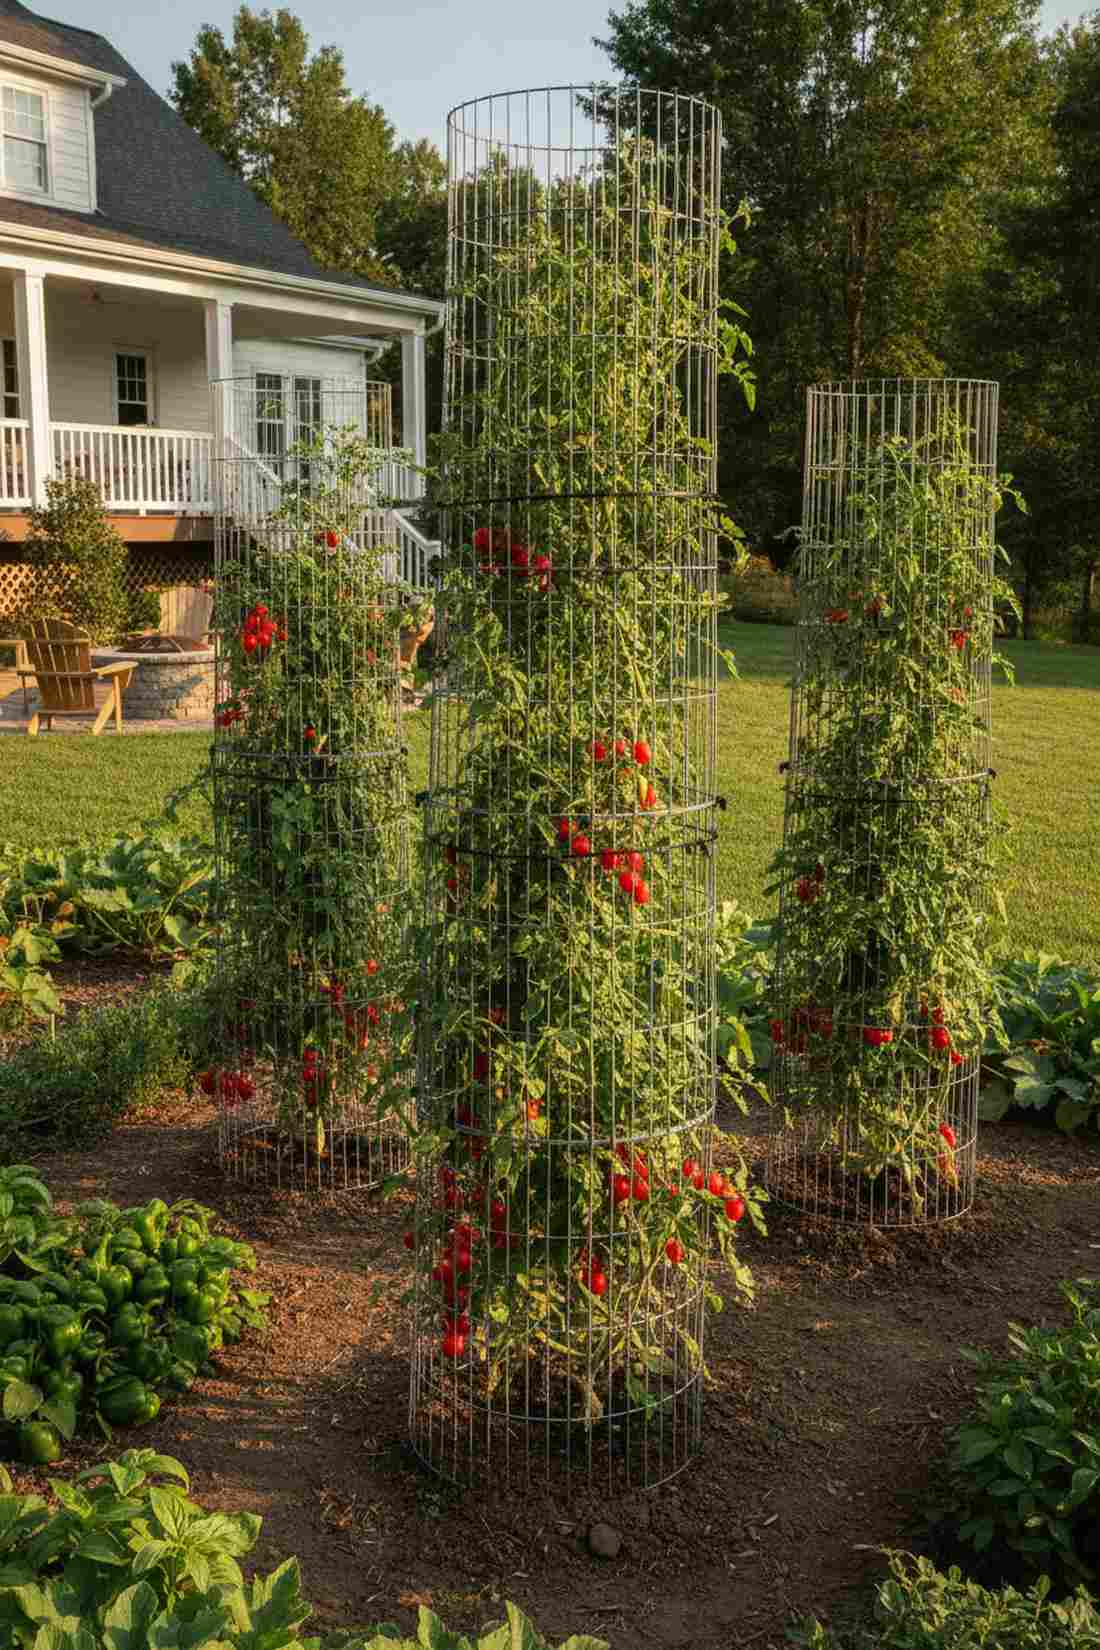
36. Welded Wire Cylinder
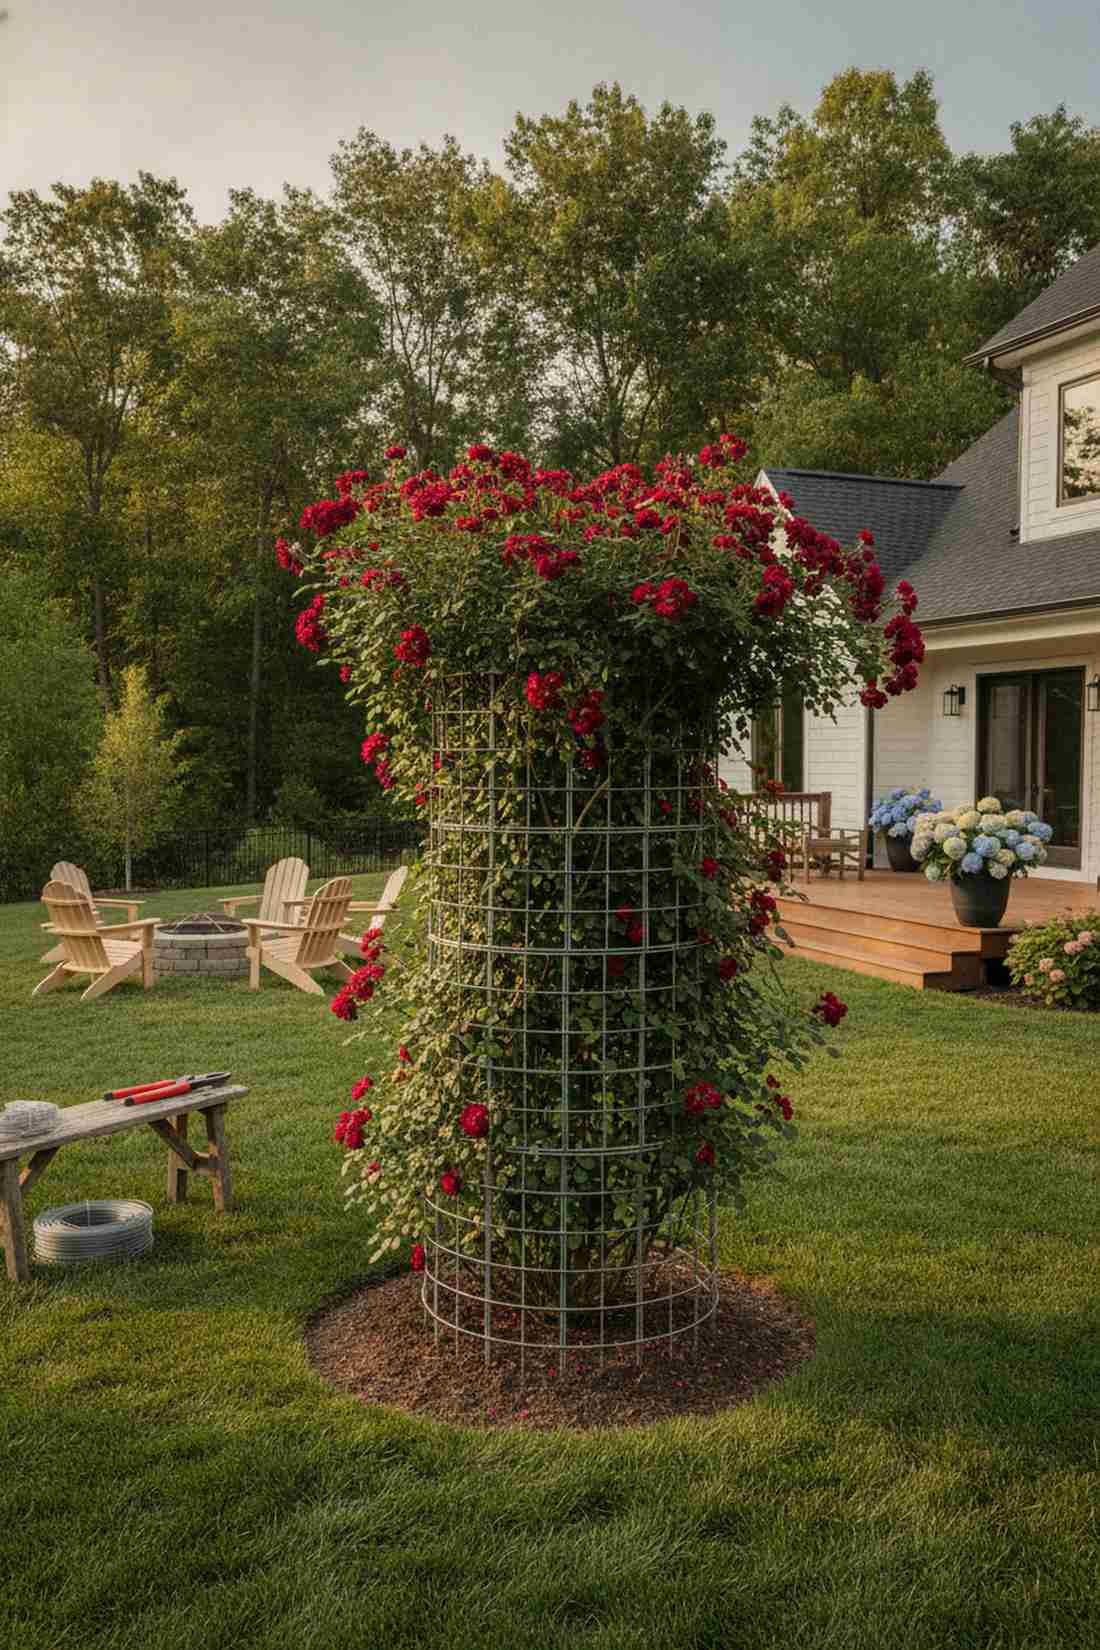
Radiates raw, highly efficient agricultural geometry, rolling up stiff concrete reinforcing mesh. Flawlessly suited for containing an explosive, bushy climbing rose in the middle of the lawn.
Flimsy thin wire bends immediately, but industrial mesh completely outperforms standard garden center cages. Once the foliage grows through the grid, the heavy steel skeleton becomes totally invisible.
Cut and roll a lifetime cylinder for about $25. Save this structural hack for your heavy blooms!
- Key Materials: Heavy-gauge welded mesh roll and bolt cutters
- Vibe / Style: Invisible industrial strength
- Difficulty: Requires tough cutting and bending
- Budget Breakdown: Mesh Length: $20 | Zip Ties: $5
- Creator’s Tip: Cut the bottom horizontal wire off entirely so you are left with raw vertical spikes to shove deep into the dirt.
- Smart Sourcing: galvanized welded wire rolls and heavy-duty steel bolt cutters.
This next framework is a heavily guarded secret among commercial nurseries looking to maximize tight spaces…
Specialized Trellis Applications
Sometimes standard structures don’t cut it. These specialized blueprints are designed to solve unique garden geometry and aggressive plant behavior problems flawlessly.
37. Espalier Fruit Tree Trellis

Feels exactly like a royal French orchard, prioritizing hyper-tight horizontal wire tiers. The ultimate layout for forcing a massive apple tree to grow totally flat against a wall.
Standard tree planting wastes yard space, but this architectural layout completely changes the fruit-yielding game. High-tension climbing plants wire literally bends nature to your aesthetic will.
Install this precision framework for roughly $60–$90.
- Key Materials: Heavy-gauge wire, turnbuckles, and 4×4 end posts
- Vibe / Style: High-end flat orchard art
- Difficulty: Requires meticulous tensioning and pruning
- Budget Breakdown: Hardware: $50 | Lumber Posts: $30
- Creator’s Tip: Space the horizontal wires exactly 16 inches apart—this perfectly matches the natural fruiting spur growth of most apples.
- Smart Sourcing: espalier wire training kits and professional bypass pruning shears.
38. Grape Arbor Overhead System
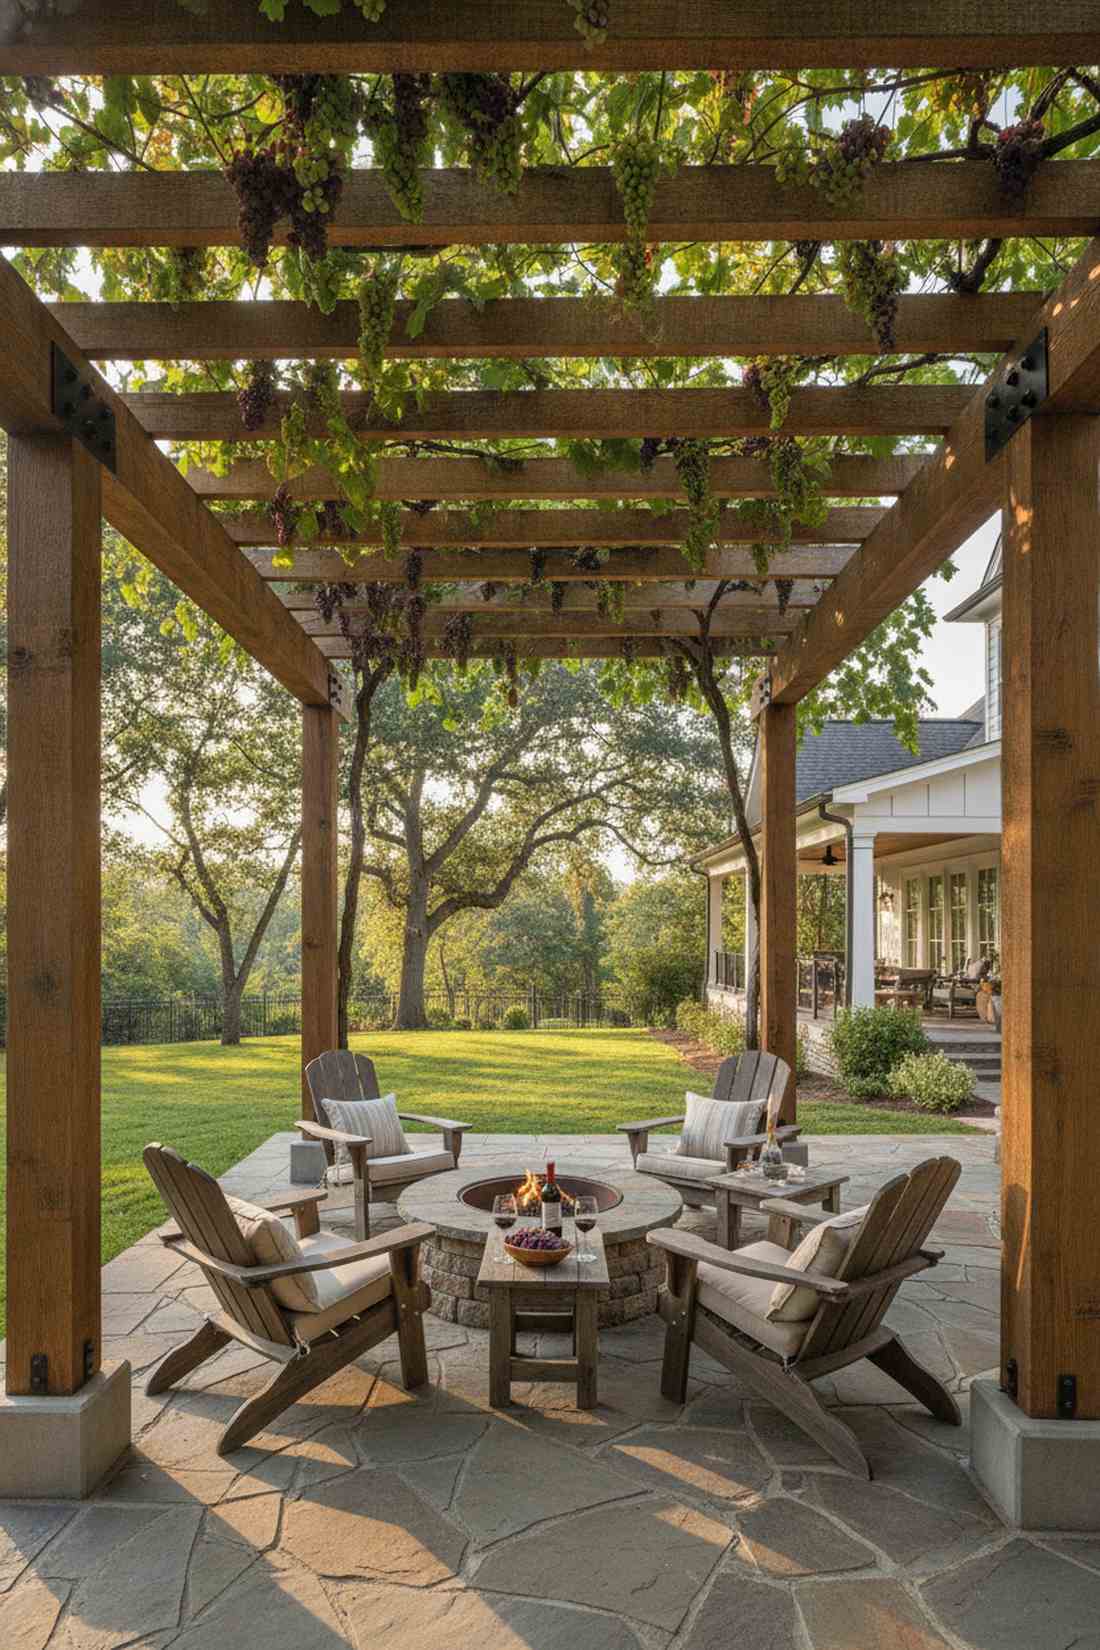
Brings intense Napa Valley vineyard energy, utilizing ultra-thick reinforced timber spans. Brilliantly suited for creating a shaded, fruit-dangling roof over your backyard seating area.
Never underestimate vine weight; building this with 6×6 posts completely bypasses the catastrophic collapse risk. It offers supreme climbing plants support that only gets stronger as the trunks turn to wood.
A heavy-duty grape structure runs between $300 and $500. Pin this to your dream backyard board!
- Key Materials: 6×6 posts, heavy joists, and concrete footings
- Vibe / Style: Romantic winery patio
- Difficulty: Advanced heavy carpentry
- Budget Breakdown: Heavy Lumber: $350 | Bracing: $80
- Creator’s Tip: Run thick galvanized wire between the wooden rafters to give the grape tendrils something thin enough to actually wrap around.
- Smart Sourcing: heavy-duty structural wood ties and galvanized vine training wire.
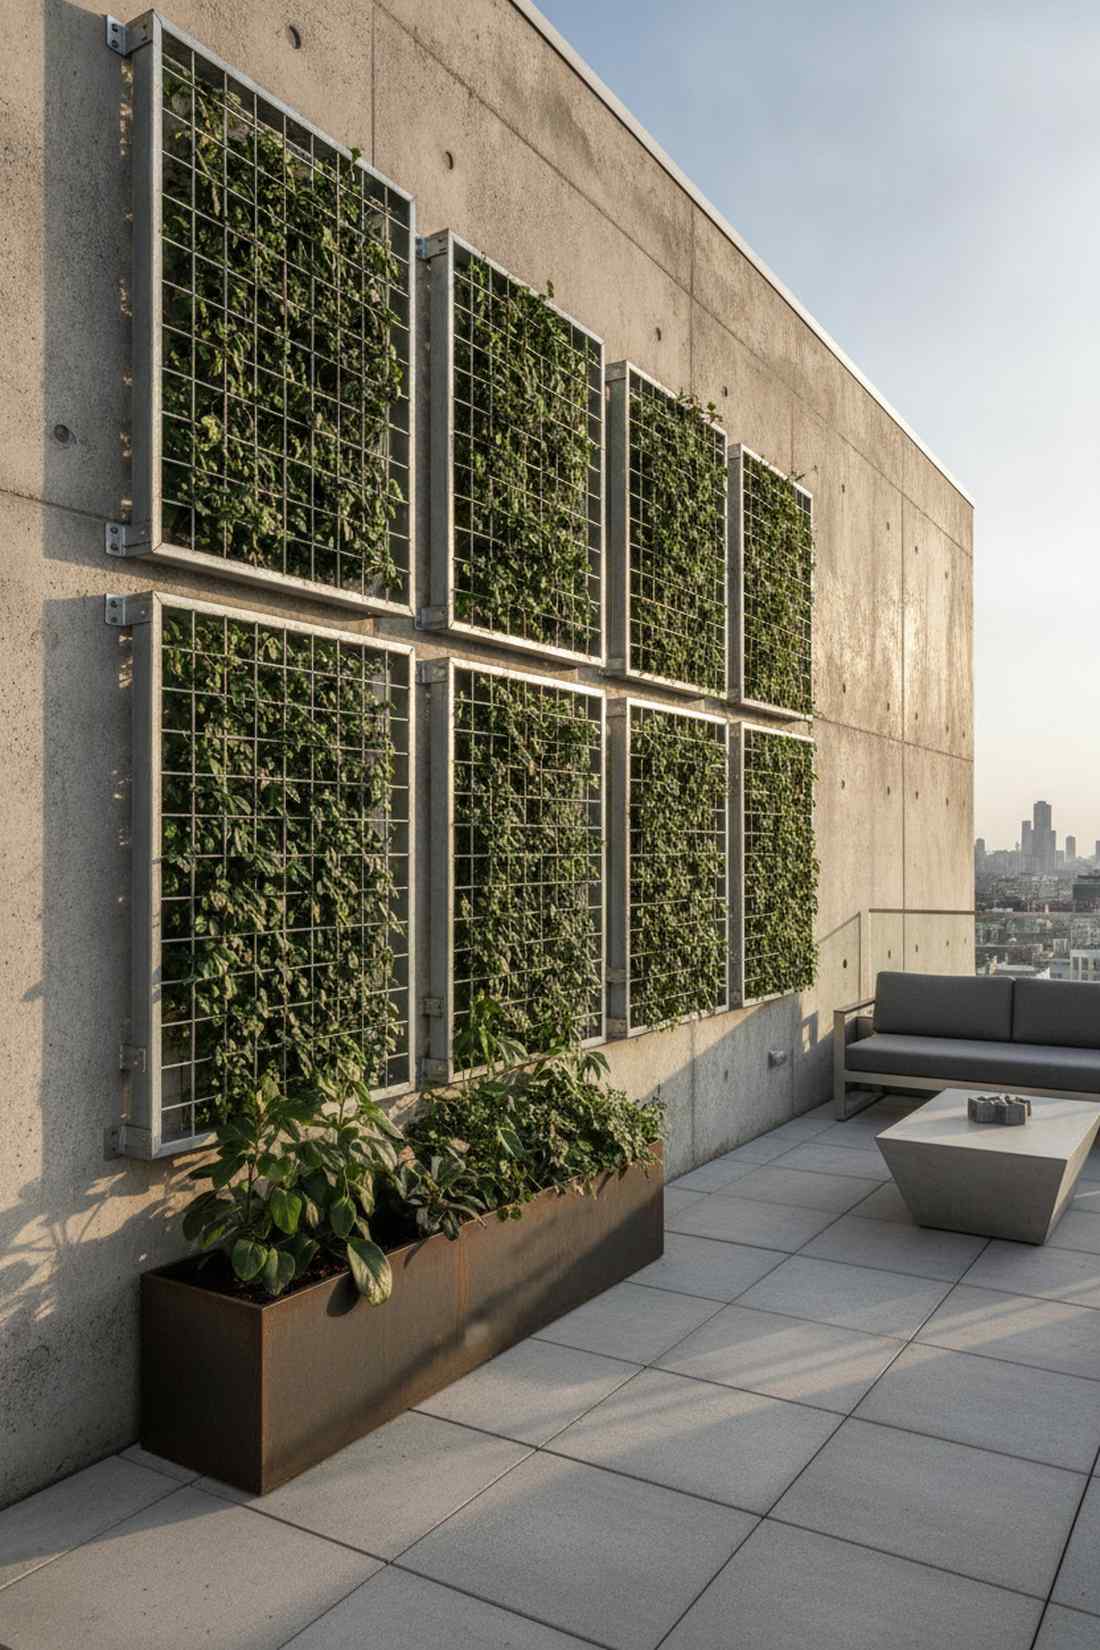
39. Green Wall Modular Panels
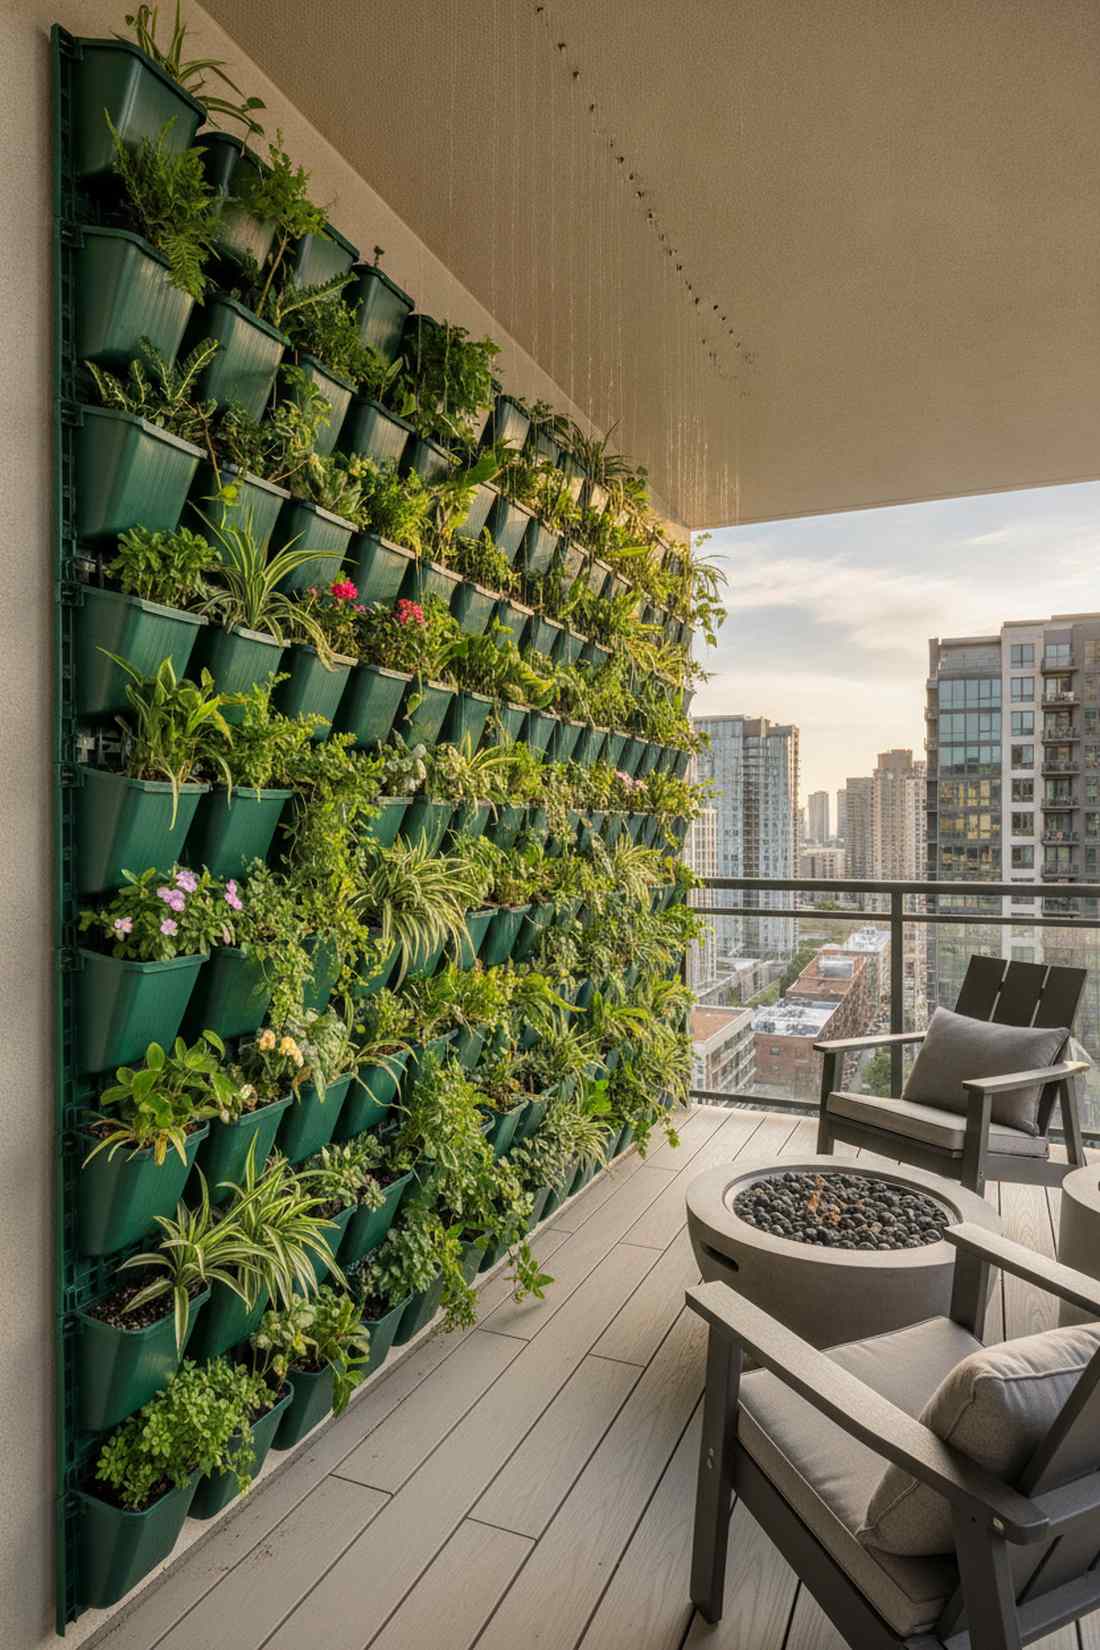
Exudes a hyper-modern luxury hotel aesthetic, starring interlocking plastic planting grid-pockets. Unbelievably suited for turning an ugly stucco apartment balcony wall into a lush jungle.
While DIY dirt pockets fail and leak, snapping together engineered panels gives a designer-level finish. It comes with built-in micro-drainage, ensuring your wall doesn’t rot from constant watering.
A robust modular grid will cost about $100 per square meter.
- Key Materials: Commercial snap-together planter panels
- Vibe / Style: High-tech eco-luxury
- Difficulty: Simple modular clicking and mounting
- Budget Breakdown: Panel Kits: $90 | Anchor Screws: $10
- Creator’s Tip: Install a cheap drip irrigation tube along the top row; gravity will perfectly water every single pocket below it automatically.
- Smart Sourcing: vertical garden modular planter kits and micro drip irrigation starter kits.
Before you spend another dime on generic pots, look at how this next method completely hides ugly planters.
40. Balcony Rail Attachments
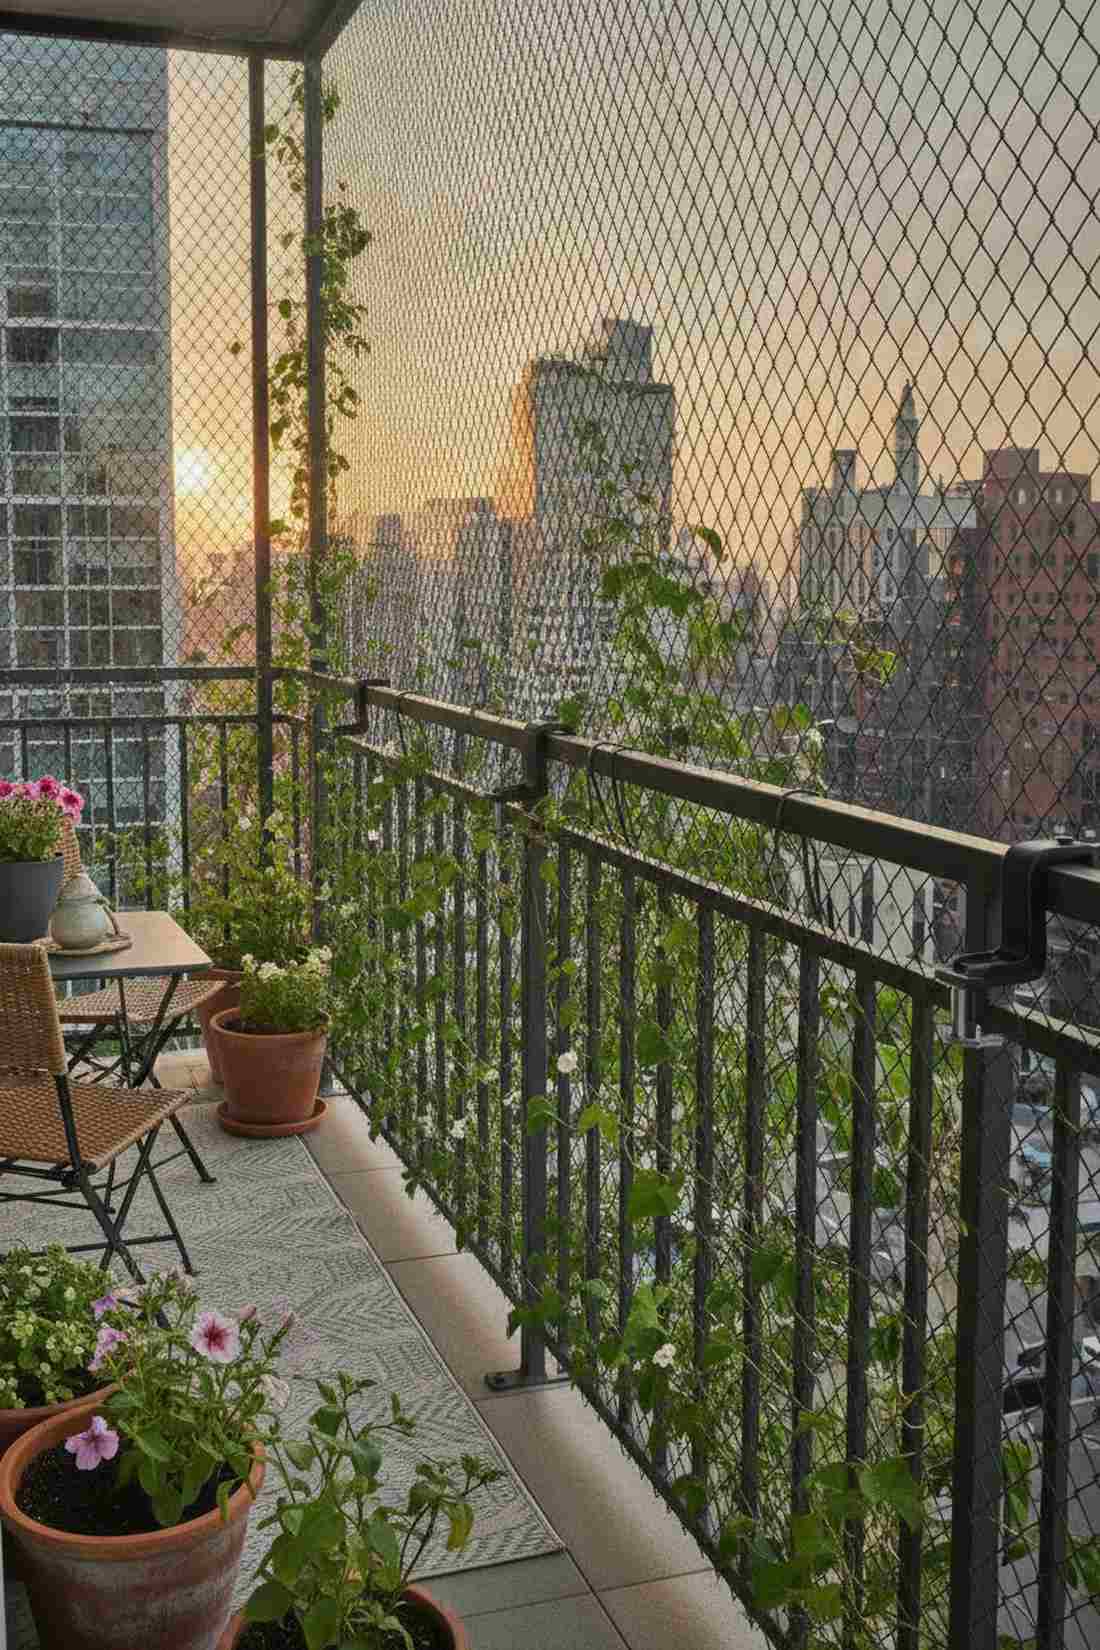
Creates an instant urban oasis, relying on heavy-duty railing clamp brackets. Flawlessly suited for renters who want a privacy vine wall but aren’t allowed to drill holes.
Skipping wall damage entirely, this clamp system looks far more expensive than it is. It safely anchors a metal garden trellis for climbing plants directly over the void of your balcony.
Secure this renter-friendly upgrade for $40–$60. Save this idea for your apartment balcony makeover!
- Key Materials: Adjustable C-clamp rail brackets and lightweight mesh
- Vibe / Style: Renter-friendly sky garden
- Difficulty: Tool-free hand tightening
- Budget Breakdown: Clamps: $25 | Mesh/Frame: $25
- Creator’s Tip: Use zip-ties hidden by foliage to double-secure the grid to the clamps in case of high-story wind gusts.
- Smart Sourcing: adjustable balcony railing clamp brackets and UV-coated heavy duty zip ties.
41. Planter Box Integrated Trellis
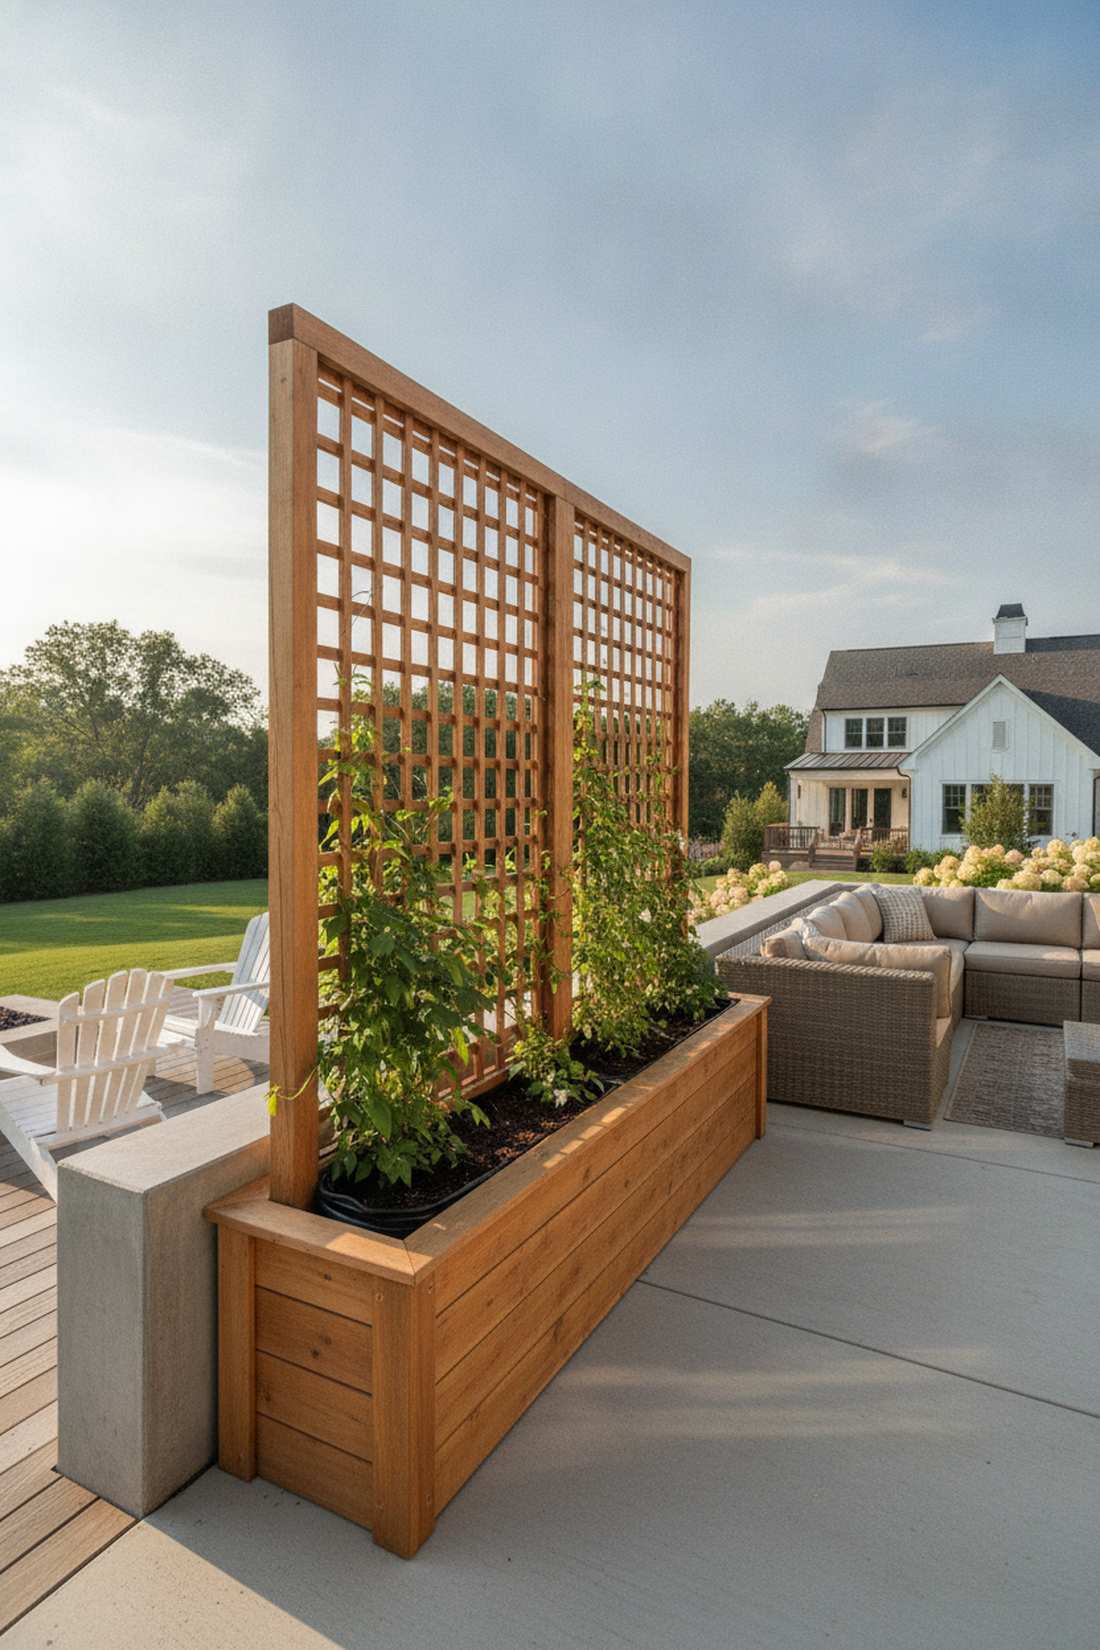
Feels like a cohesive, premium catalog buy, combining a deep wood base with an attached tall backboard. The absolute best choice for breaking up long, monotonous concrete patios.
Rather than having separate ugly pots and stakes, this all-in-one unit totally outperforms piecemeal setups. The heavy soil in the box acts as the perfect counter-weight, preventing the tall lattice from blowing over.
Build or buy an integrated box for $80–$150.
- Key Materials: Cedar planter box and attached heavy lattice
- Vibe / Style: Unified patio elegance
- Difficulty: Beginner box assembly
- Budget Breakdown: Box Kit: $70 | Soil/Lattice: $40
- Creator’s Tip: Line the inside of the wooden box with thick plastic sheeting (poke drain holes) to stop wet dirt from rotting the wood.
- Smart Sourcing: planter box with integrated trellis kits and heavy-duty planter liners.
42. Gabion Wall Wire Integration
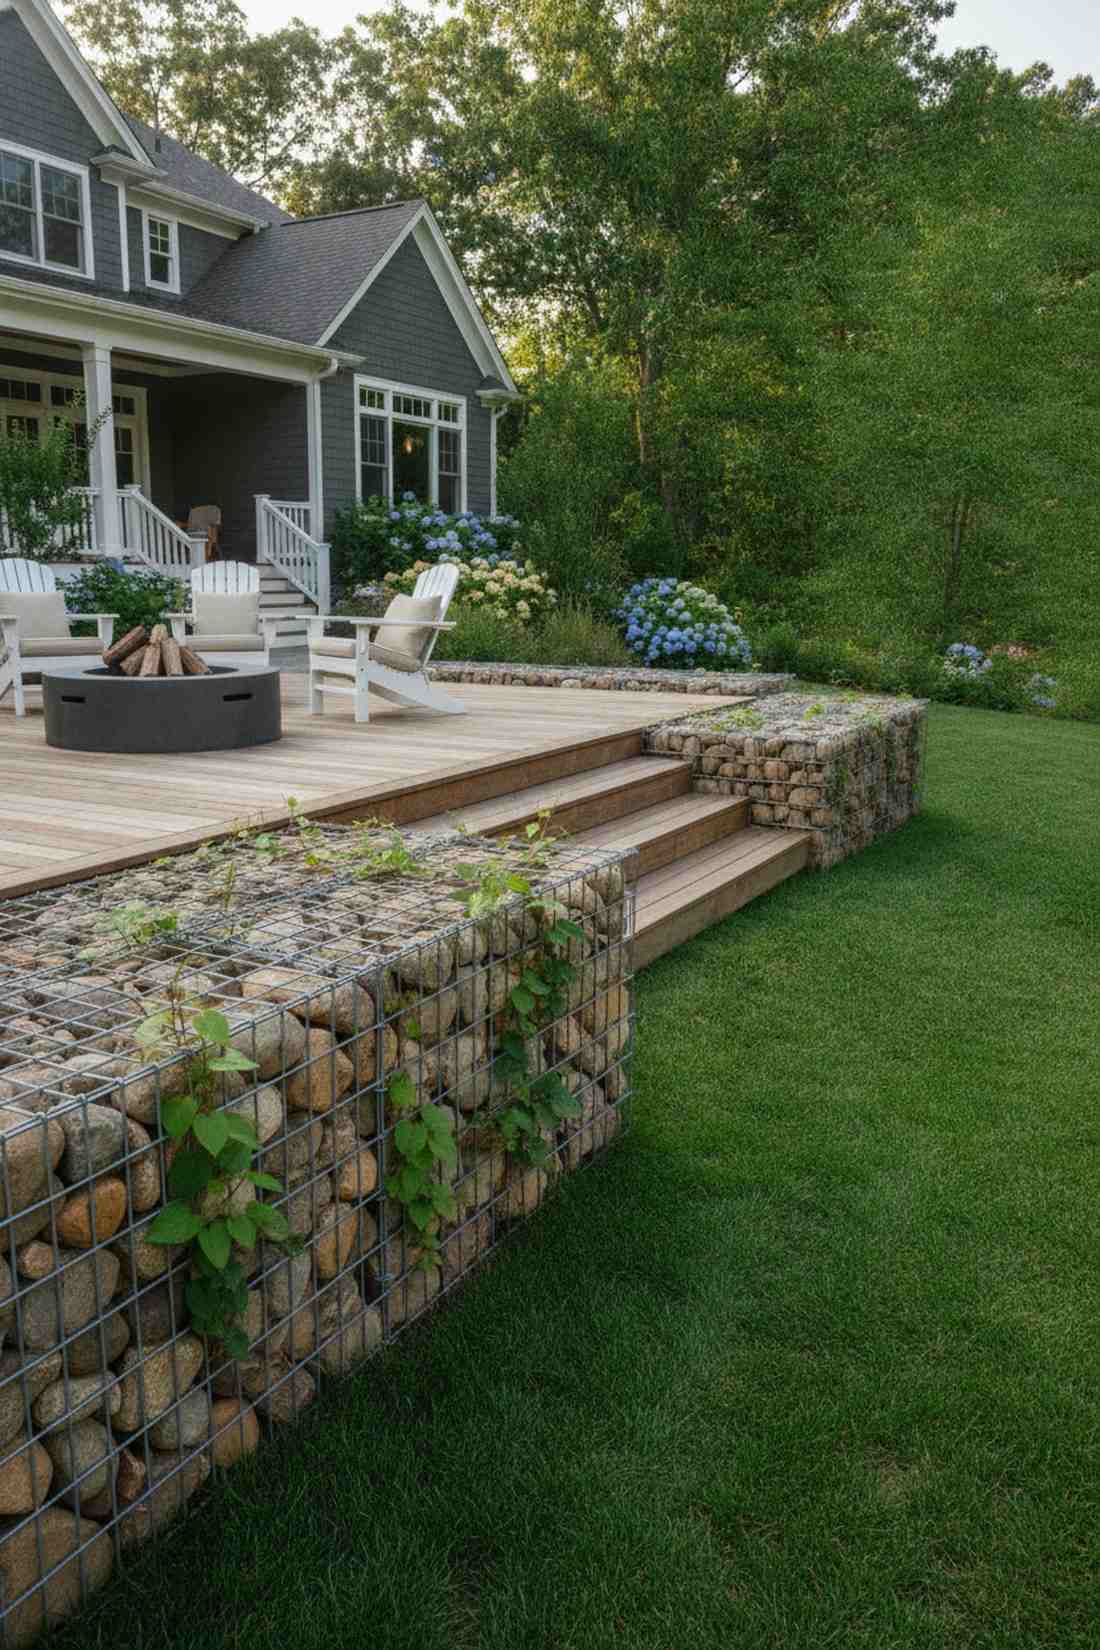
Radiates severe, cutting-edge landscape architecture, leveraging wire baskets filled with heavy river rock. Simply stunning when used as a low retaining wall that sprouts vertical vines.
Combining rugged stone thermal mass with delicate climbing plants wire creates an unbelievable texture contrast. The rocks naturally hold daytime heat, keeping your sensitive vines warm during chilly nights.
Expect the wire and stone combo to cost around $150 per section. Pin this for extreme landscape contrast!
- Key Materials: Galvanized gabion baskets, river rocks, and trellis wire
- Vibe / Style: Industrial stone-and-vine fusion
- Difficulty: Requires heavy rock hauling
- Budget Breakdown: Baskets/Wire: $60 | Bulk Stone: $90
- Creator’s Tip: Hook the vertical trellis wires directly to the inside back of the cage before adding stones for an unbreakable anchor.
- Smart Sourcing: galvanized gabion basket kits and stainless steel carabiner clips (bulk pack).
43. Retaining Wall Terraced Support
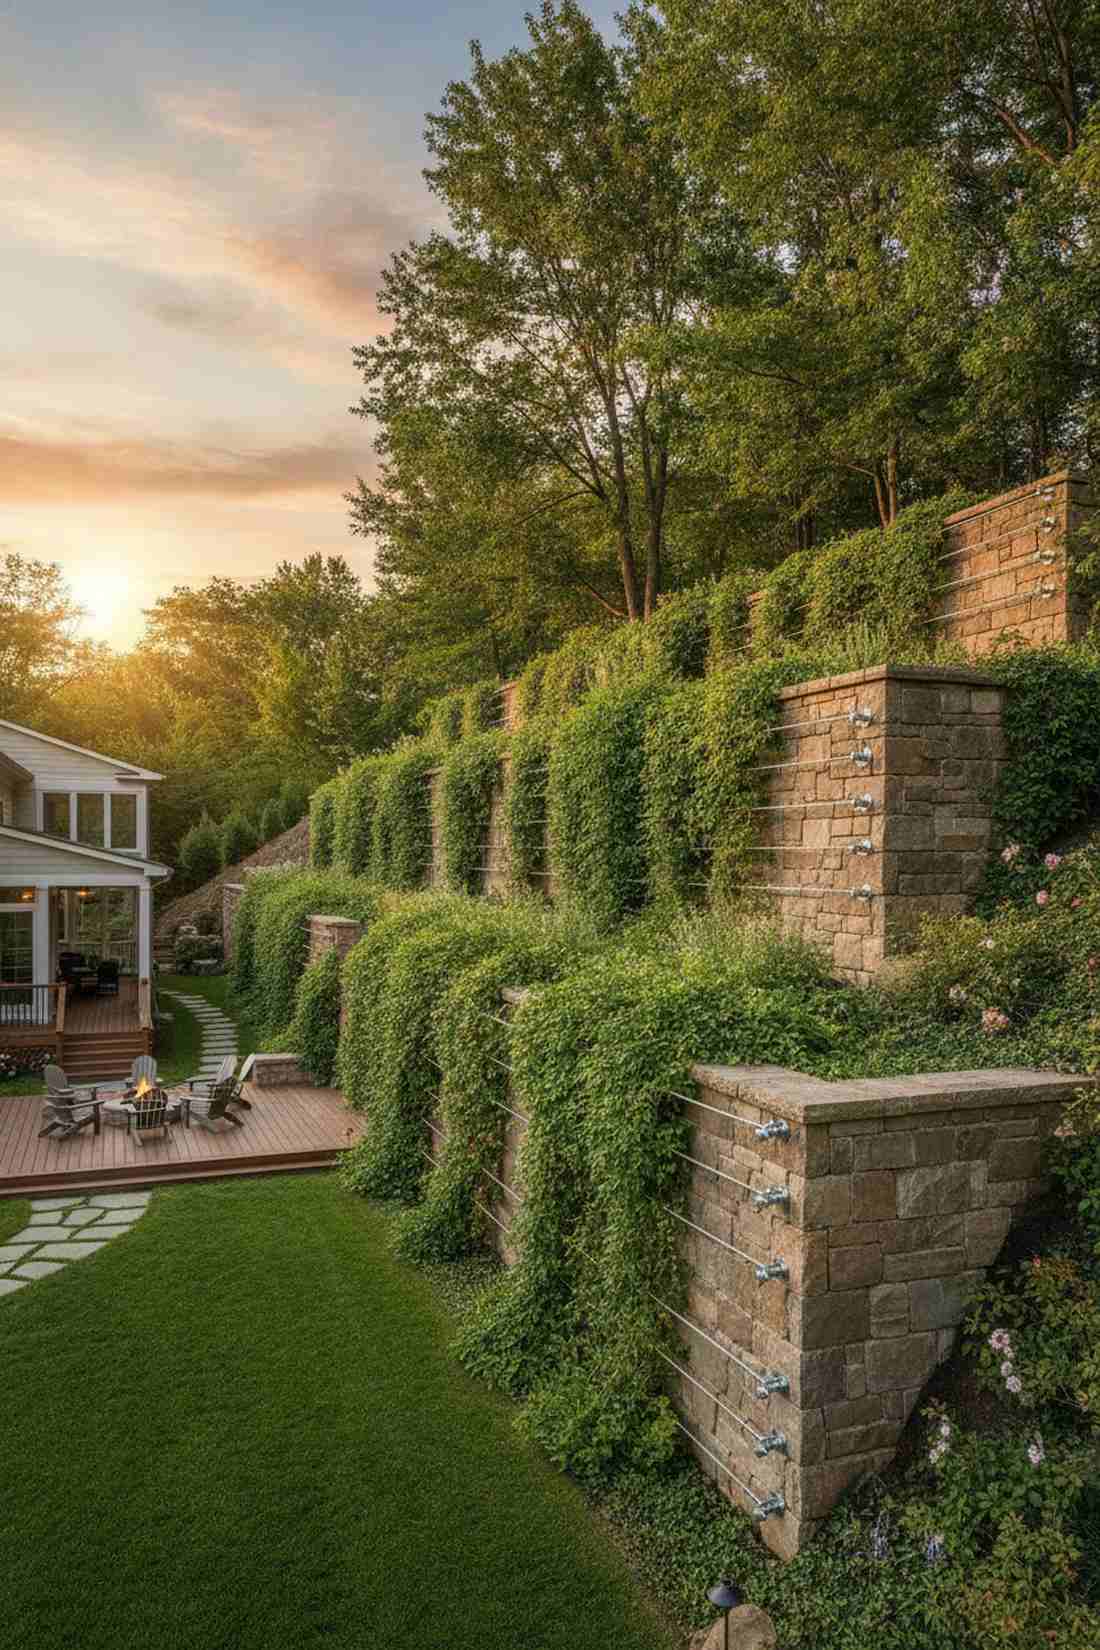
Brings a hanging-gardens-of-Babylon effect, integrating horizontal cables mounted across stacked stone. Unbelievably suited for taming steep, eroding backyard hillsides.
Leaving retaining walls bare is a wasted opportunity; adding cables completely changes the visual game. It provides massive climbing plants support, turning an ugly structural wall into a cascading green waterfall.
Mounting the cables costs roughly $50 per level.
- Key Materials: Masonry anchors, steel cables, and turnbuckles
- Vibe / Style: Cascading terraced estate
- Difficulty: Hammer-drilling into stone needed
- Budget Breakdown: Masonry Anchors: $20 | Cable Kits: $30
- Creator’s Tip: Drill into the mortar joints, not the actual stones, to prevent cracking your expensive hardscaping.
- Smart Sourcing: heavy-duty masonry anchor bolts and carbide-tipped masonry drill bits.
44. Greenhouse Interior Overhead Systems
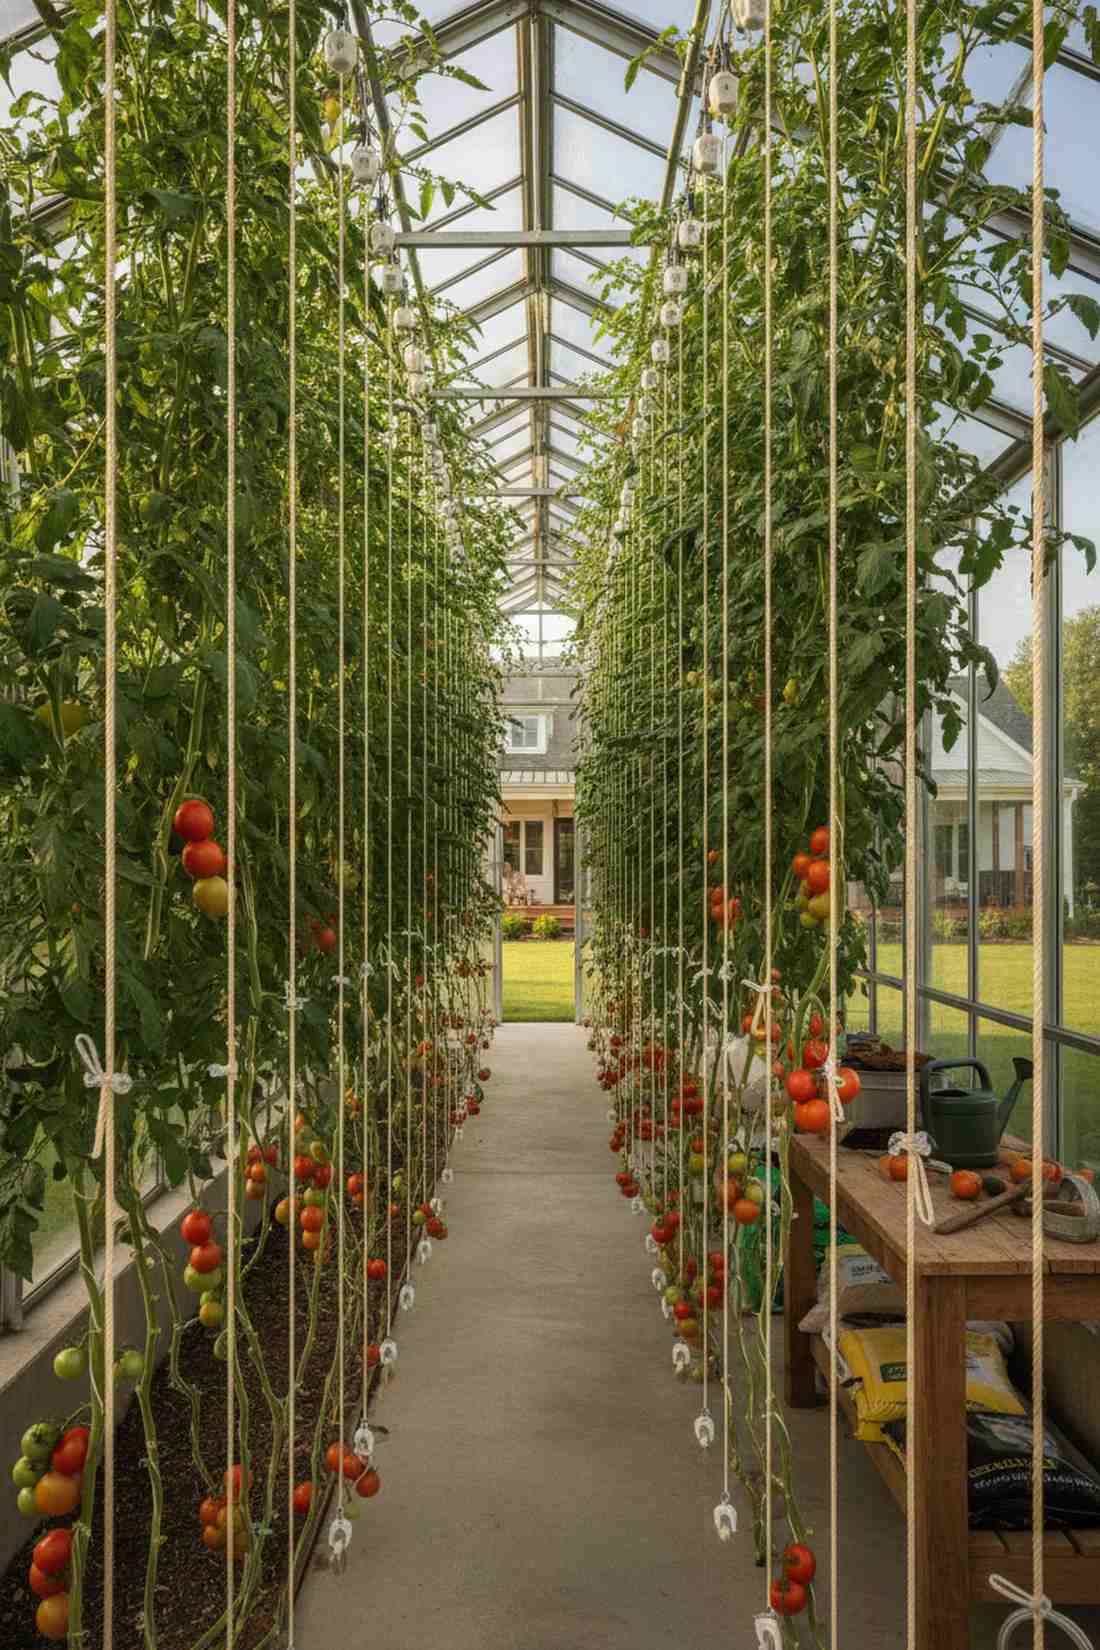
Delivers hyper-optimized commercial farming yields, utilizing roller-hook drop strings from roof rafters. The only way to grow 15-foot tomato plants inside a climate-controlled enclosure.
Using standard cages inside a greenhouse wastes cubic volume, but top-drop strings give a designer-level finish. This specific setup lets you lower the plant as it grows, keeping the fruit directly at picking height.
Equip a whole greenhouse for under $40. Save this to your advanced homesteading board!
- Key Materials: Tomato roller hooks and heavy nylon twine
- Vibe / Style: High-yield precision farming
- Difficulty: Simple roof clipping
- Budget Breakdown: Hooks/Twine: $25 | Plant Clips: $15
- Creator’s Tip: Use quick-release plastic tomato clips to attach the stem to the string instead of tying knots that choke the plant.
- Smart Sourcing: commercial tomato roller hooks (bulk pack) and ventilated plant support clips.
The craziest part? The upcoming budget hack uses literal trash to create a magazine-worthy cottage aesthetic…
DIY and Budget-Friendly Options
You don’t need a massive budget to create vertical impact. Upcycling everyday materials into a stunning climbing plants trellis proves that creativity beats cash every time.
45. Branch Prunings Natural Stakes
Creates a raw, deeply authentic woodland vibe, repurposing thick, freshly pruned hardwood branches. Works exceptionally well for staking up floppy peonies or small climbing beans.
Stop buying plastic stakes when free yard waste looks far more expensive than it is. The rough, jagged bark provides microscopic grip points that slippery metal poles simply cannot offer.
Literally $0 out of pocket. Pin this for the ultimate free garden hack!
- Key Materials: Straight hardwood prunings (oak, maple)
- Vibe / Style: Organic woodland foraging
- Difficulty: Effortless stick-in-dirt
- Budget Breakdown: Branches: $0 | Effort: Free
- Creator’s Tip: Strip the leaves but leave the tiny side-twigs intact to act as natural hooks for the vines to rest on.
- Smart Sourcing: heavy-duty bypass loppers and gardening utility gloves.
46. Pallet Wood Upcycled Panels
Brings a heavy dose of distressed industrial farmhouse charm, breaking down free shipping pallets. Flawlessly suited for building a rugged, staggered feature wall on a budget patio.
Reclaiming shipping wood completely bypasses the cheap DIY look if you stagger the slats artistically. Constructing a wooden trellis for climbing plants from weathered oak offers insane durability for pennies.
Expect to spend about $10 on screws, with the wood being free.
- Key Materials: Heat-treated (HT) shipping pallets and long screws
- Vibe / Style: Distressed upcycled rustic
- Difficulty: Requires tough pry-bar teardown
- Budget Breakdown: Pallets: $0 | Coated Screws: $10
- Creator’s Tip: Only use pallets stamped with ‘HT’ (Heat Treated); avoid ‘MB’ (Methyl Bromide) as it’s highly toxic to food plants.
- Smart Sourcing: heavy-duty pallet buster pry bars and weatherproof wood screws (bulk).
47. String Netting Temporary Annual Support
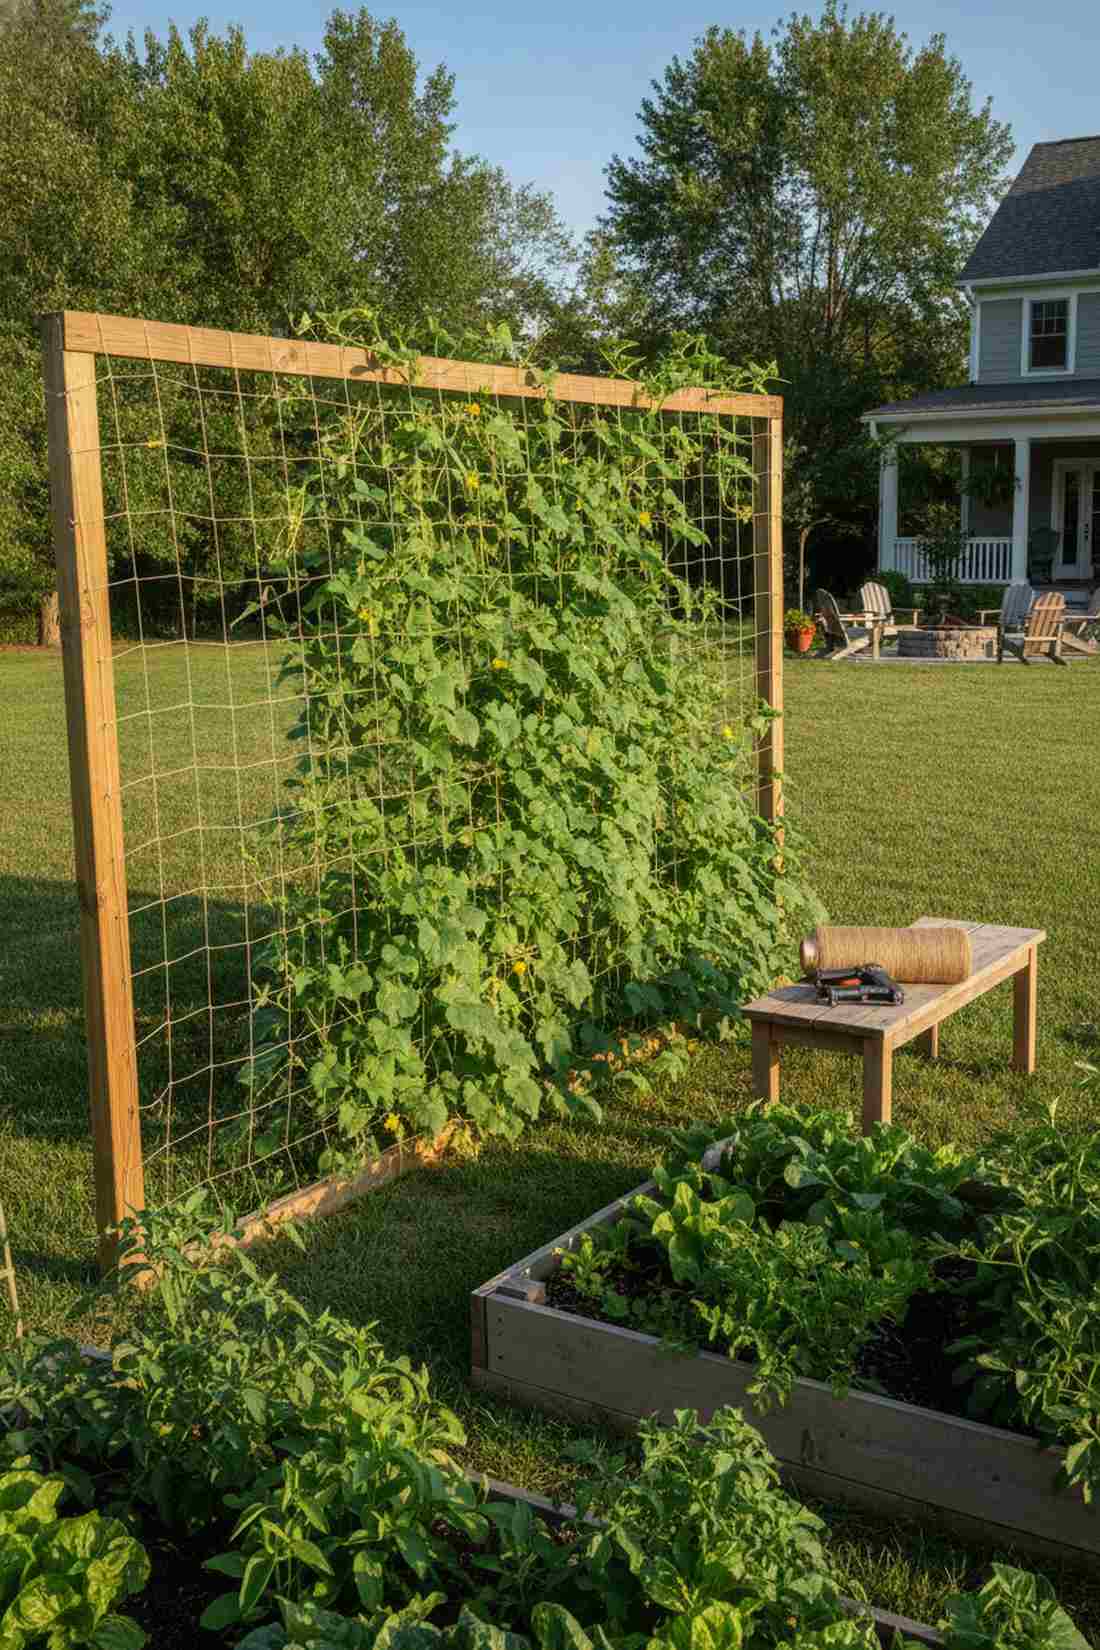
Delivers a fast, invisible wall of green, stretching biodegradable jute webbing. Unbelievably suited for blasting a quick wall of cucumbers across an empty sunny fence.
Plastic netting shreds into microplastics, but natural jute netting totally outperforms by turning into compost by winter. It offers a massive, ultra-cheap climbing plants support grid that requires zero end-of-year cleanup.
Cover a massive 10×10 area for under $15. Save this for your spring vegetable planting board!
- Key Materials: Natural jute or sisal trellis netting
- Vibe / Style: Ephemeral summer utility
- Difficulty: Quick unroll and staple
- Budget Breakdown: Jute Netting: $10 | Staples: $5
- Creator’s Tip: Stretch the net as painfully tight as possible before stapling; loose nets will collapse heavily once the vines fruit.
- Smart Sourcing: biodegradable jute trellis netting (bulk roll) and heavy-duty staple guns.
48. Rebar Grid Welded Custom Designs
Exudes a moody, brutalist modern art vibe, piecing together custom cut, rusted iron rods. The absolute best layout for holding up massive, destructive woody vines like Wisteria.
Learning basic welding completely changes the structural game, making $20 of steel look like a $400 custom fixture. The dark rust acts as a perfect shadow against bright blooms.
Build an indestructible custom grid for about $30.
- Key Materials: 3/8-inch steel rebar and welding wire
- Vibe / Style: Custom industrial artisan
- Difficulty: Requires basic MIG welding skills
- Budget Breakdown: Steel Rods: $25 | Welding Wire: $5
- Creator’s Tip: Wipe the raw steel down with vinegar and hydrogen peroxide to force a gorgeous, even rust patina overnight.
- Smart Sourcing: magnetic welding angle holders (pack) and protective rust-converter spray.
49. Tomato Cage Stacking
Creates a towering, unyielding pillar of production, interlocking multiple conical wire cages. Brilliantly suited for containing explosive cherry tomato varieties that normally snap in half.
A single cage always tips over, but zip-tying two inverted cages together gives a surprisingly premium finish. It upgrades a flimsy dollar-store item into a 6-foot monolithic fortress.
Combine these for a total cost of $8. Pin this crucial hack for tomato season!
- Key Materials: Two standard wire tomato cages and zip ties
- Vibe / Style: Towering heavy-yield farm
- Difficulty: Two-minute clipping
- Budget Breakdown: Cages: $6 | Zip Ties: $2
- Creator’s Tip: Cut the bottom rings off the top inverted cage, then shove its sharp legs firmly into the dirt-facing cage for insane stability.
- Smart Sourcing: heavy-gauge galvanized tomato cages and UV-resistant outdoor cable ties.
You’re about to discover why hoarding random garage scraps is actually the smartest gardening move you can make…
50. Clothesline Wire Horizontal Runs
Looks remarkably sleek and deliberate, stretching vinyl-coated laundry cables across open expanses. Flawlessly suited for training lightweight clematis vines across a long, boring porch railing.
Standard metal wire burns tender plant stems in the hot sun, but plastic-coated clothesline avoids that damage entirely. This climbing plants wire hack is insanely cheap and handles tension beautifully.
String up 50 feet of support for under $12.
- Key Materials: Coated clothesline wire and screw-in eye hooks
- Vibe / Style: Clean horizontal minimalism
- Difficulty: Easy pulling and tying
- Budget Breakdown: Wire Spool: $8 | Eye Hooks: $4
- Creator’s Tip: Run the wire in a zig-zag pattern between top and bottom hooks to use one continuous line instead of cutting multiples.
- Smart Sourcing: heavy-duty vinyl coated clothesline spools and stainless steel screw-in eyelets.
51. Bike Wheel Circular Support
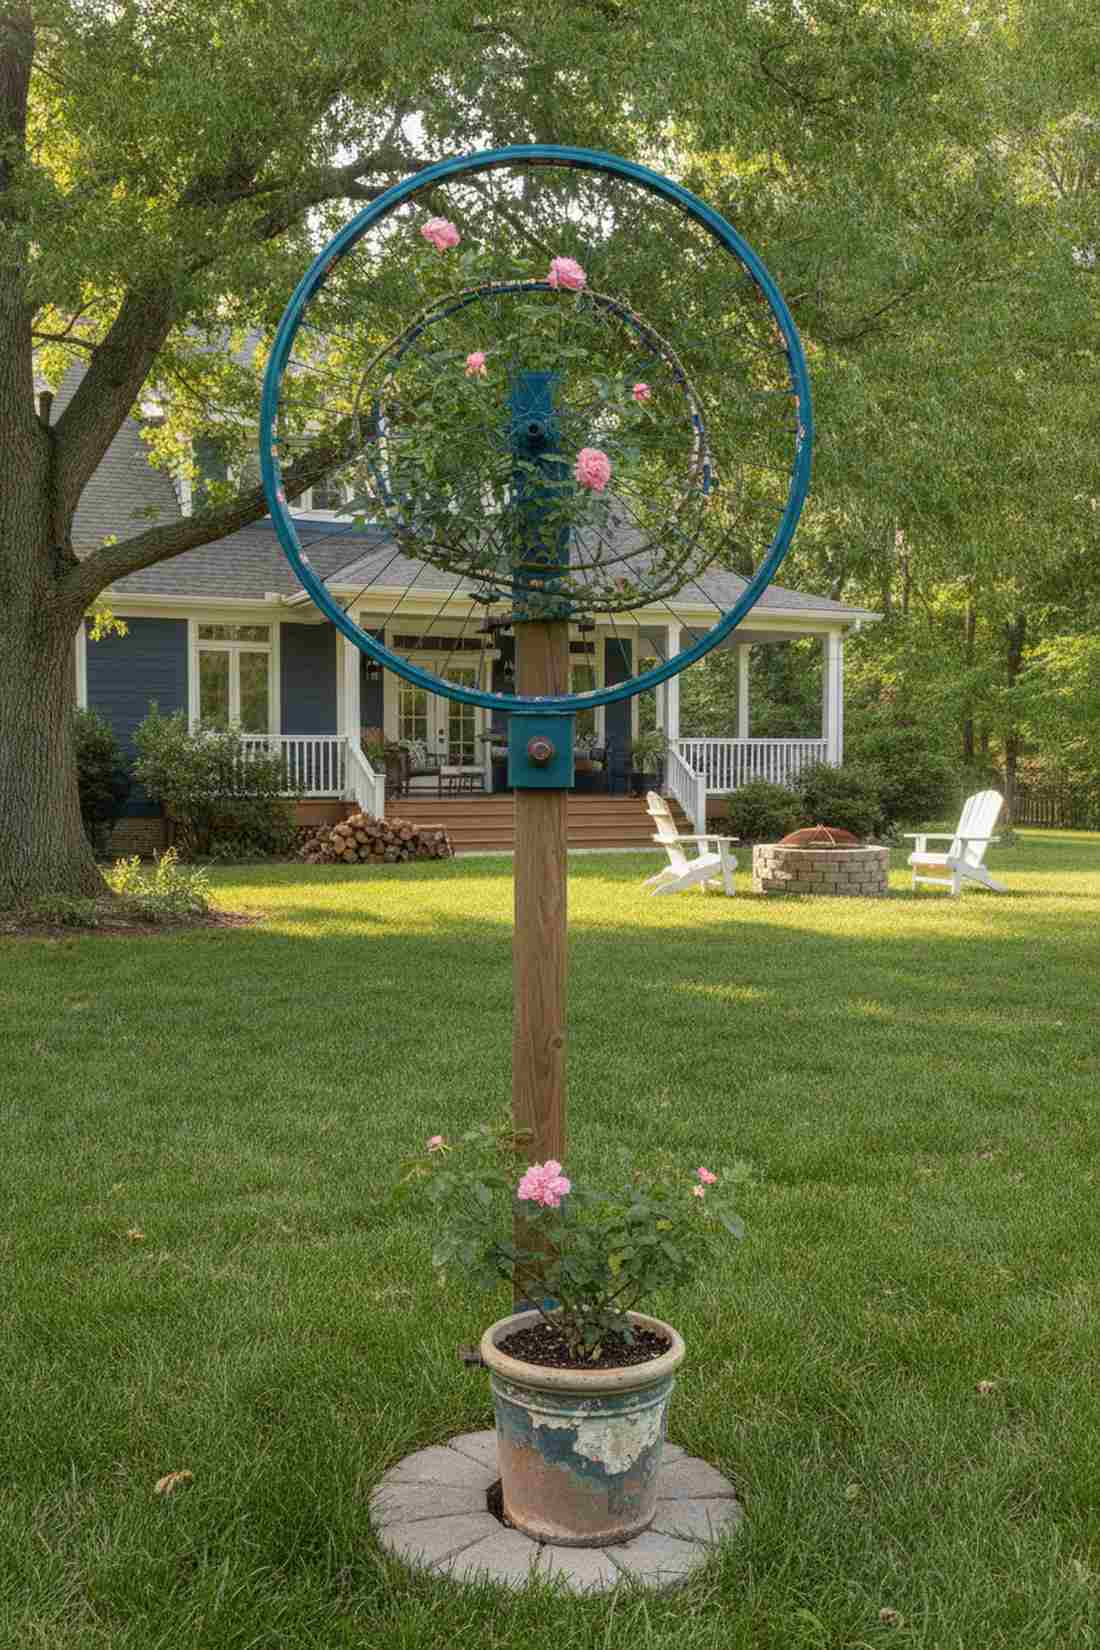
Radiates a quirky, eclectic bohemian energy, mounting a repurposed spoked bicycle tire rim. The ultimate whimsical canopy for shading a small container-grown climbing rose.
Mounting this horizontally atop a post gives a designer-level finish for upcycled yard art. The dense metal spokes provide the absolute perfect radial climbing plants support for vines spreading outward.
Usually free from local bike repair shop trash bins! Save this to your upcycled garden art board!
- Key Materials: Discarded metal bike rim and a single wooden post
- Vibe / Style: Funky upcycled geometry
- Difficulty: Simple top-mounting
- Budget Breakdown: Wheel: $0 | Post/Screws: $10
- Creator’s Tip: Remove the rubber tire but leave the inner rim tape on to prevent sharp spoke-holes from cutting your vines.
- Smart Sourcing: heavy-duty lag bolts and spray paint for metal adhesion.
52. Wire Fencing Leftover Panels
Delivers a hyper-clean, rigid border grid, utilizing snipped surplus welded garden fencing. Unbelievably suited for filling the empty gaps between existing wooden deck posts.
Instead of throwing away awkward fence scraps, framing them in thin 1×1 wood completely bypasses the cheap DIY look. A metal garden trellis for climbing plants made from scraps looks like an expensive custom insert.
Cost is negligible if using leftover project scraps.
- Key Materials: Welded wire scraps and thin border trim wood
- Vibe / Style: Framed custom inserts
- Difficulty: Wire snipping and basic framing
- Budget Breakdown: Scrap Wire: $0 | Wood Trim: $15
- Creator’s Tip: Paint the wooden frame pitch black; it instantly makes the cheap wire inside look like high-end architectural wrought iron.
- Smart Sourcing: heavy-duty wire snips and exterior black matte paint.
53. Sapling Poles from Straight Growth
Feels like an ancestral foraging triumph, harvesting young, straight woodland tree offshoots. The absolute purest, most organic way to construct a massive tepee for heirloom beans.
Milled lumber lacks character, but using raw saplings yields a surprisingly upscale, highly textured rustic finish. It offers immense strength and natural rot resistance if you use the right hardwood.
Completely free with a walk in the woods. Pin this for true off-grid gardening inspiration!
- Key Materials: 2-inch thick straight saplings (locust or cedar)
- Vibe / Style: Ancestral organic homestead
- Difficulty: Requires woodland foraging and chopping
- Budget Breakdown: Saplings: $0 | Labor: Free
- Creator’s Tip: Harvest these in late winter when the sap is down; they will cure much harder and resist rotting in the summer soil.
- Smart Sourcing: folding woodland hand saws and heavy-duty machetes.
Building Your Vertical Garden
Selecting the perfect setup from these 53 climbing plants trellis upgrades depends entirely on your specific space, vine weight, and design aesthetic. Upgrading to a premium wooden trellis for climbing plants offers warmth, while a heavy-duty metal garden trellis for climbing plants guarantees lifetime durability. Always remember that smart sourcing—like buying bulk climbing plants wire or UV-coated kits—elevates a cheap DIY into a high-end architectural feature without breaking the bank. Start with a solid, well-anchored climbing plants support system, and watch your garden’s vertical dimension explode into life.
Frequently Asked Questions
What is the best material for a climbing plants trellis?
For longevity and a premium look, you must invest in UV-coated cedar kits or heavy-duty powder-coated steel setups. Scrimping on raw pine will rot in three years, whereas a pre-sealed wooden trellis for climbing plants lasts decades. If you want a zero-maintenance aesthetic, opt for starter kits featuring stainless steel climbing plants wire.
How far apart should climbing plants trellis wires be spaced?
To maximize grip and visual density, space your horizontal climbing plants wire exactly 12-18 inches apart. For a highly productive espalier fruit tree layout, 16 inches is the golden rule. Buying a pre-cut wire starter kit ensures your grid remains mathematically perfect and won’t sag under heavy vegetable yields.
Can I attach a trellis directly to my house wall?
Never mount climbing plants support completely flush against your siding. You must use commercial standoff bracket kits to create a 4-inch air gap, preventing catastrophic moisture rot on your home. This gap not only protects your expensive paint but gives the vines necessary 360-degree wrapping space.
What trellis works best for heavy climbing plants?
Massive Wisteria or mature grapevines will instantly crush flimsy plastics; you need a commercial-grade metal garden trellis for climbing plants. Invest in heavy welded steel grids, 6×6 thick pergola timber brackets, or solid wrought iron. Always secure these heavy-duty frames with fast-setting concrete anchor bases.
How deep should trellis posts be installed?
The golden rule for ultimate stability is burying one-third of the total post length underground. For a premium wooden trellis for climbing plants spanning 6 feet high, sink heavy-duty ground anchor stakes at least 3 feet deep. Upgrading to steel anchor augers prevents high winds from tearing down your mature green walls.
What is the most affordable DIY trellis option?
The smartest budget hack is upcycling free heat-treated (HT) pallets or using galvanized cattle panel bulk packs. If you need something temporary, biodegradable jute netting rolls offer insane square footage for under $15. Combining these cheap materials with premium UV-resistant zip ties completely masks the low-budget origin.