Upgrading a home garden kitchen doesn’t require a massive contractor budget. Strategic modular layouts and pre-cut stone kits create designer-level outdoor cooking zones instantly. Discover precise material sourcing for these exact setups.
Design Snapshot Key Principles
- Work Triangle Efficiency: Position prep sink, cooking surface, and serving counter within 4-7 feet of each other for optimal movement flow
- Harvest Proximity: Locate herb and vegetable beds within 10 feet of primary prep stations to reduce retrieval time during active cooking
- Material Continuity: Use matching stone, wood, or composite materials across kitchen structures and raised bed frames to unify the design language
- Zone Layering: Separate high-heat cooking areas from seating by at least 6 feet while maintaining visual connection for social interaction
Classic L-Shaped Configurations
The L-shaped layout anchors two perpendicular counter runs against existing structures or property lines. This configuration creates natural workflow zones while leaving the third side open for garden bed access and guest circulation.
1. Corner-Anchored Grill Station
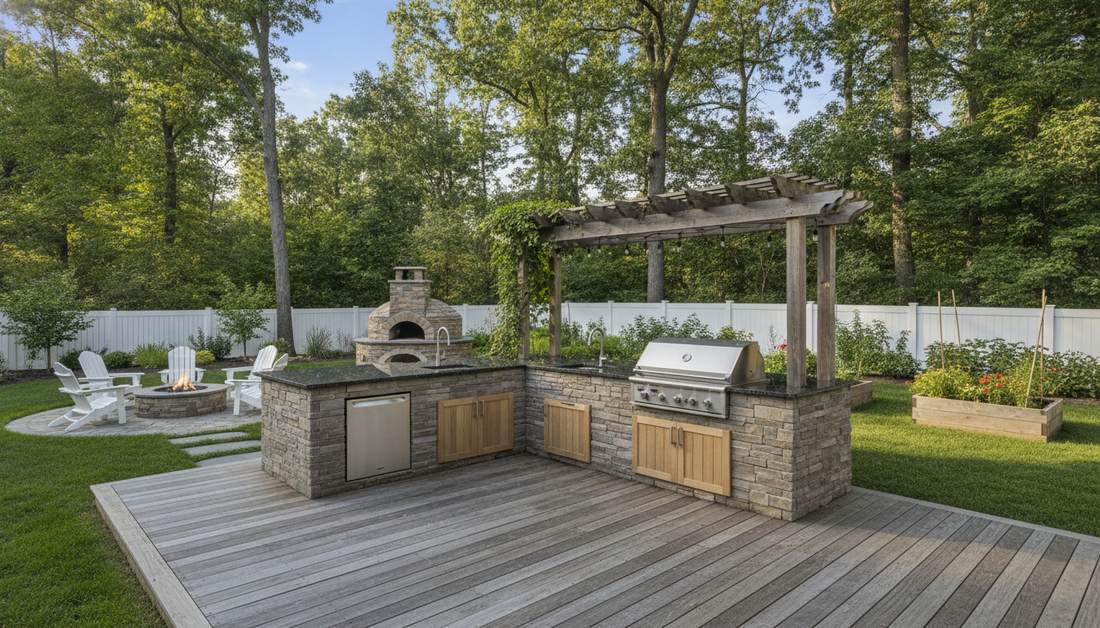
This layout feels like a private luxury resort tucked into your own backyard. Centering the grill anchors the classic corner outdoor kitchen design perfectly. Works exceptionally well for medium-sized suburban patios needing a distinct entertainment zone.
Tucking the heavy appliances into the corner delivers a surprisingly premium look while cleverly directing smoke away from guests. By incorporating high-end modular outdoor kitchen kits, you skip the expensive custom masonry fees entirely. Add sleek under-counter weatherproof cabinets to disguise the utility hookups.
You can easily pull this off for around $800–$1,500 depending on the grill insert. Pin this if you’re planning a weekend backyard overhaul!
- Key Materials: Pre-cast stone veneer panels, modular grill islands
- Vibe / Style: Modern luxury patio
- Difficulty: Moderate DIY weekend build
- Budget Breakdown: Frame materials: $400 | Finishings: $350 | Hardware: $100
- Creator’s Tip: Use self-leveling concrete on the base before placing your modular frames to ensure the grill drops in perfectly flush.
- Smart Sourcing: pre-cut faux stone veneer sheets (bulk pack) and weatherproof stainless steel drawer modules.
2. Stepped-Elevation Design
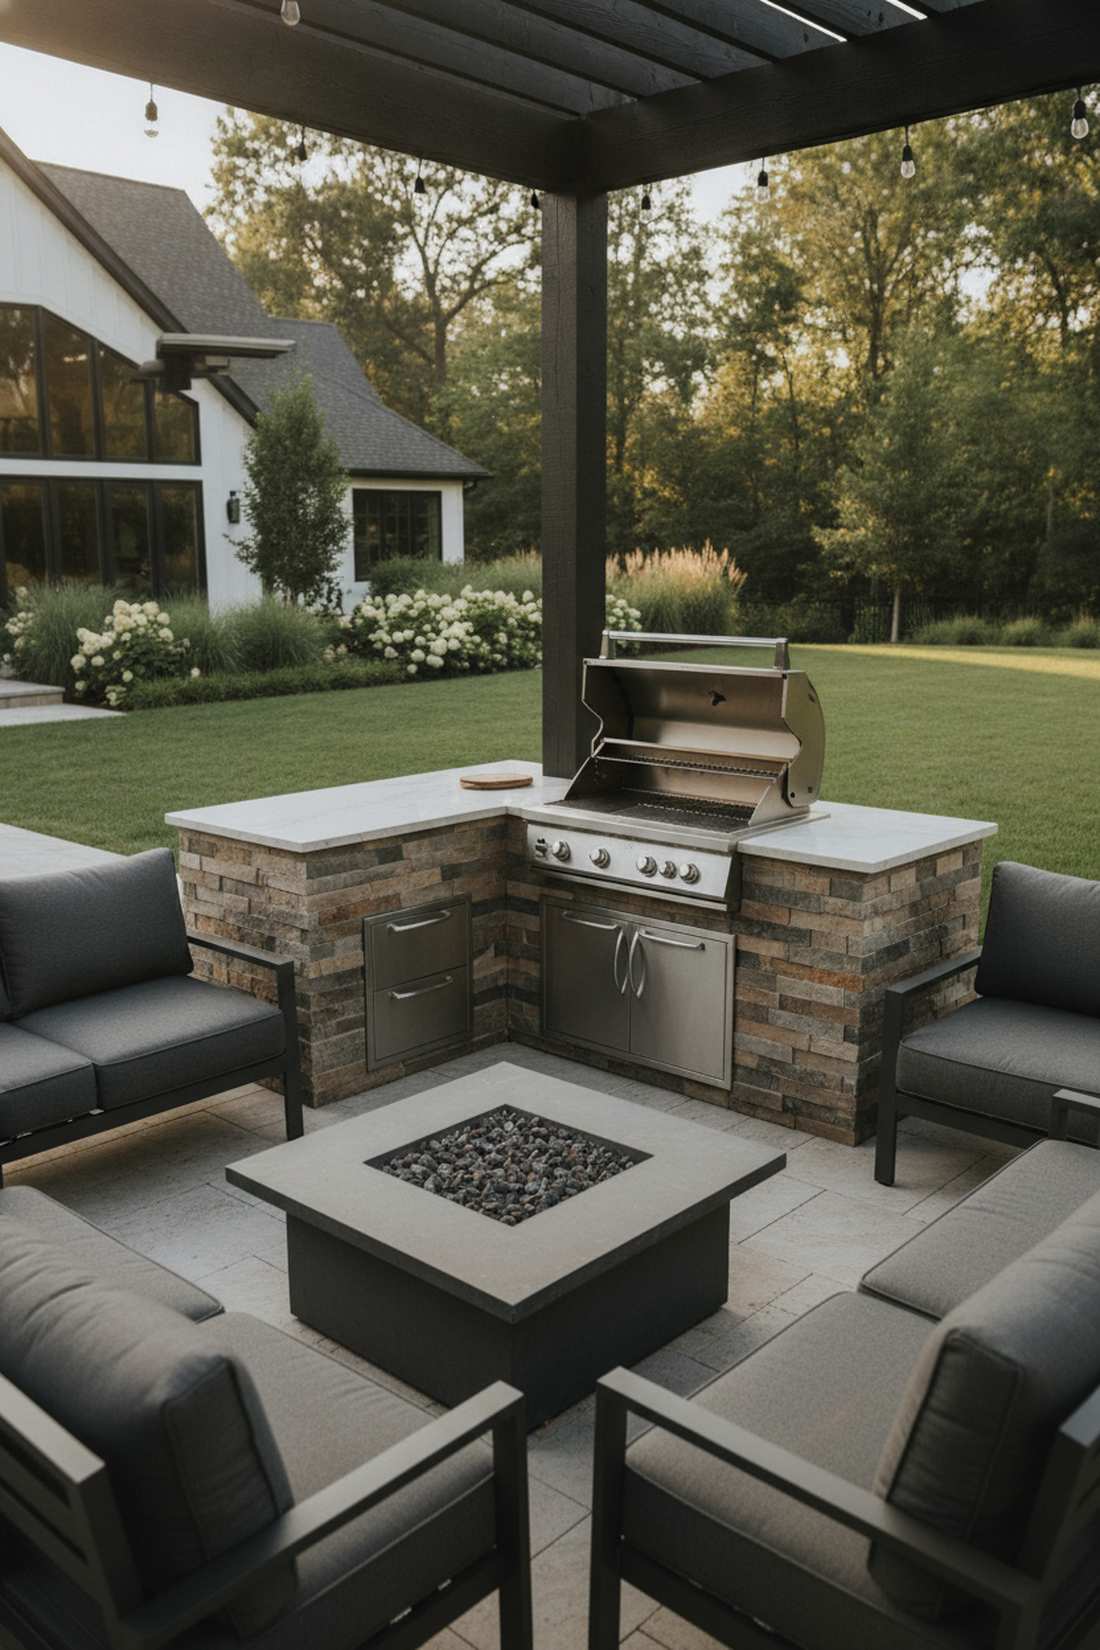
Instantly brings a high-energy rooftop bar aesthetic to ground level. This multi-tier outdoor bar setup is a brilliant architectural trick. Ideal for separating the messy cooking chaos from the relaxed guest seating area.
Creating two distinct counter heights visually tricks the eye into thinking the space is twice as large. Elevating the guest side with a commercial-grade UV-resistant bar top guarantees the layout looks far more expensive than it actually is. It acts as an organic safety barrier against open flames.
Expect to spend roughly $400 extra on materials to achieve that elevated tier. It’s a fast upgrade that completely changes the social dynamic.
- Key Materials: Heavy-duty corbels, composite bar-top decking
- Vibe / Style: Contemporary alfresco lounge
- Difficulty: Intermediate structural framing
- Budget Breakdown: Raised framing: $150 | Premium top: $200 | Brackets: $50
- Creator’s Tip: Extend the top tier overhang by exactly 12 inches to provide comfortable knee space for standard outdoor bar stools.
- Smart Sourcing: heavy-duty steel countertop support brackets and UV-coated composite decking boards (multi-pack).
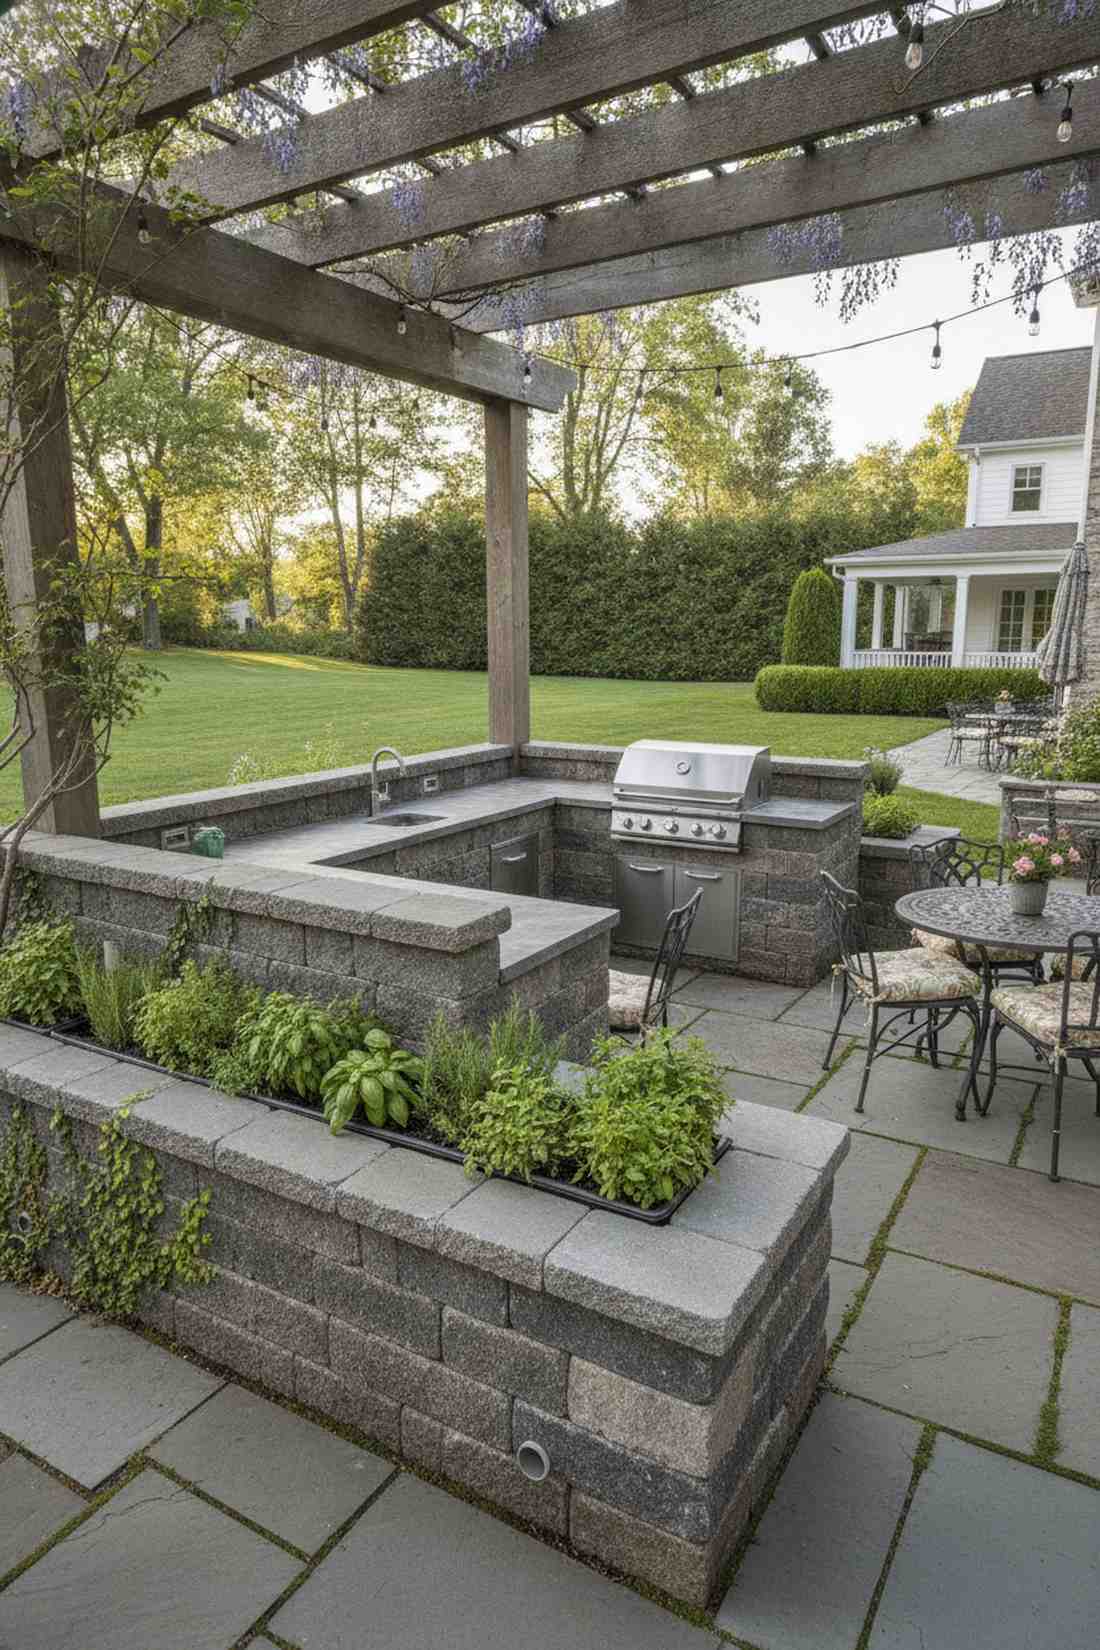
3. Pergola-Covered L-Configuration
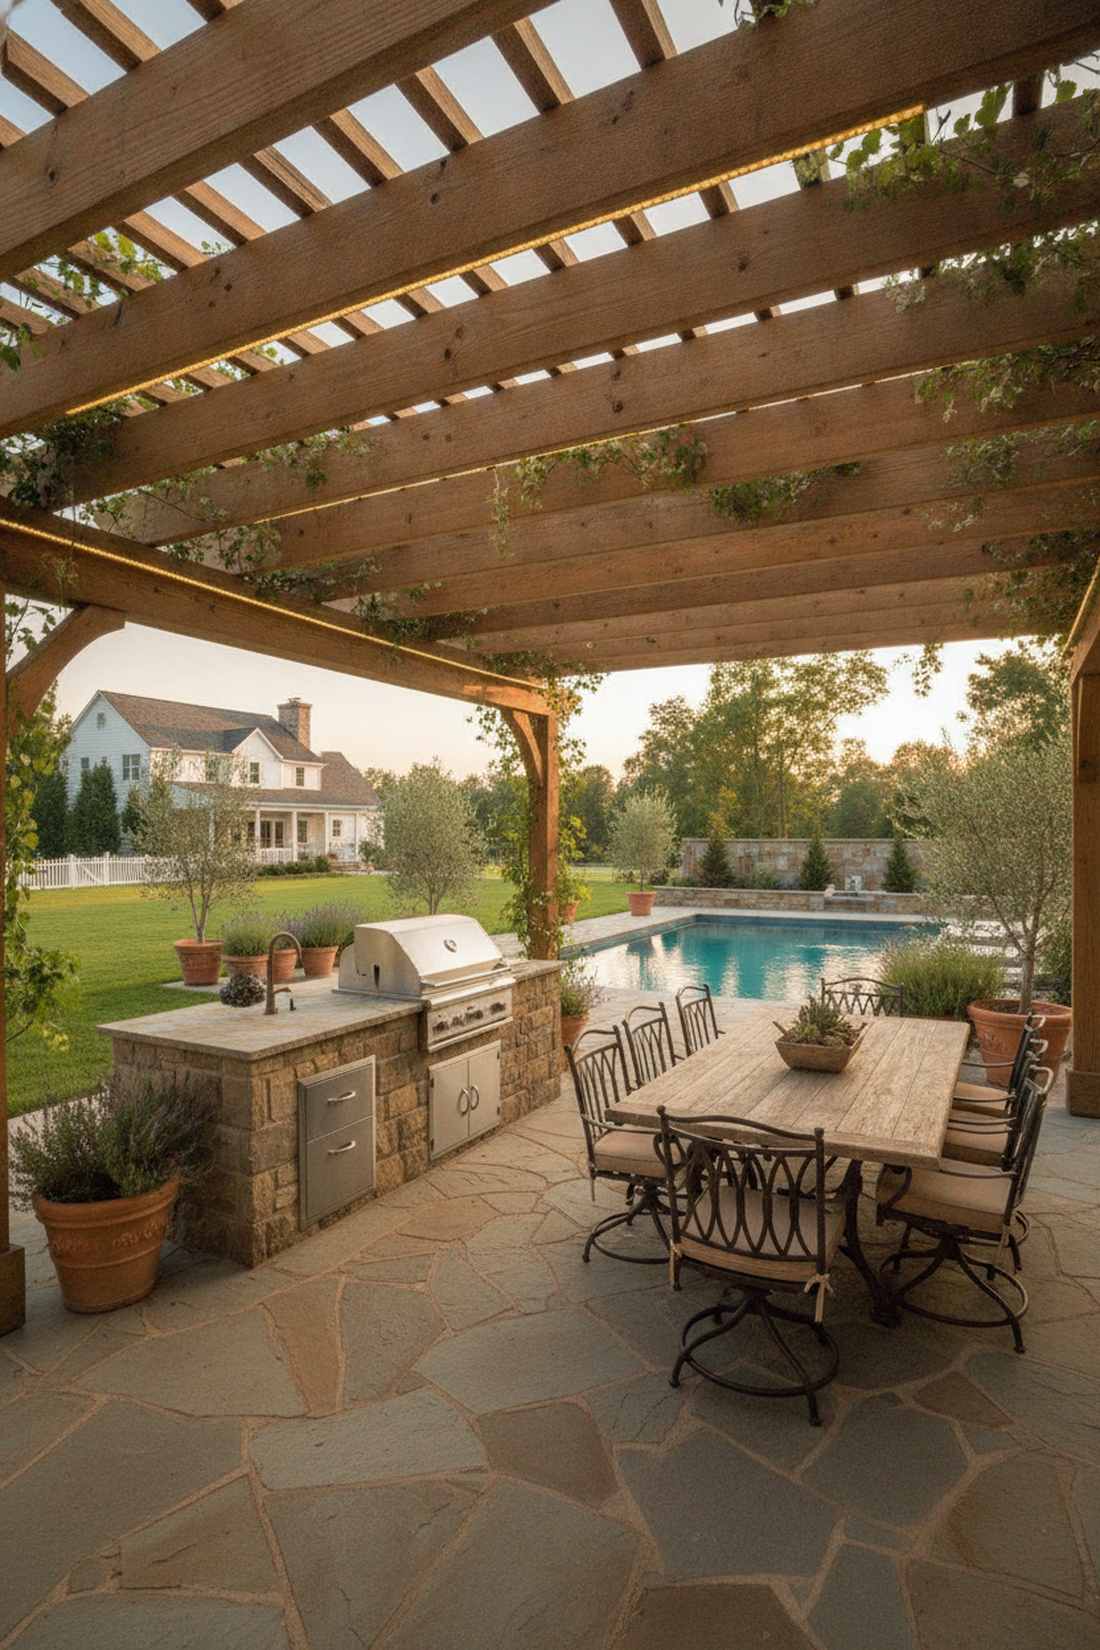
Feels exactly like a shaded Mediterranean villa where time completely stops. This pergola-shaded patio kitchen marries architecture with nature flawlessly. Perfect for properties that suffer from brutal afternoon sun exposure.
Adding a roof structure transforms a basic grill station into a genuine four-season outdoor living room. The overhead beams provide the perfect anchor for hardwired LED patio lighting kits and trailing greenery. Position the hot zones carefully to avoid scorching the wood.
A basic structural kit will set you back about $600–$1,200. Save this to your DIY garden builds board for future reference.
- Key Materials: Pre-drilled cedar pergola kits, outdoor LED strips
- Vibe / Style: Rustic Tuscan retreat
- Difficulty: Advanced weekend assembly
- Budget Breakdown: Timber kit: $800 | Concrete footings: $100 | Lighting: $150
- Creator’s Tip: Run all electrical wiring through the hollow vertical posts before anchoring them to hide ugly black cables.
- Smart Sourcing: pre-drilled cedar pergola starter kits and waterproof outdoor LED light strips (commercial grade).
Linear Galley Systems
Single-run kitchens fit narrow side yards and tight property setbacks. Designers arrange all appliances and prep surfaces along one continuous counter, maximizing efficiency in constrained footprints.
4. Wall-Backed Linear Kitchen
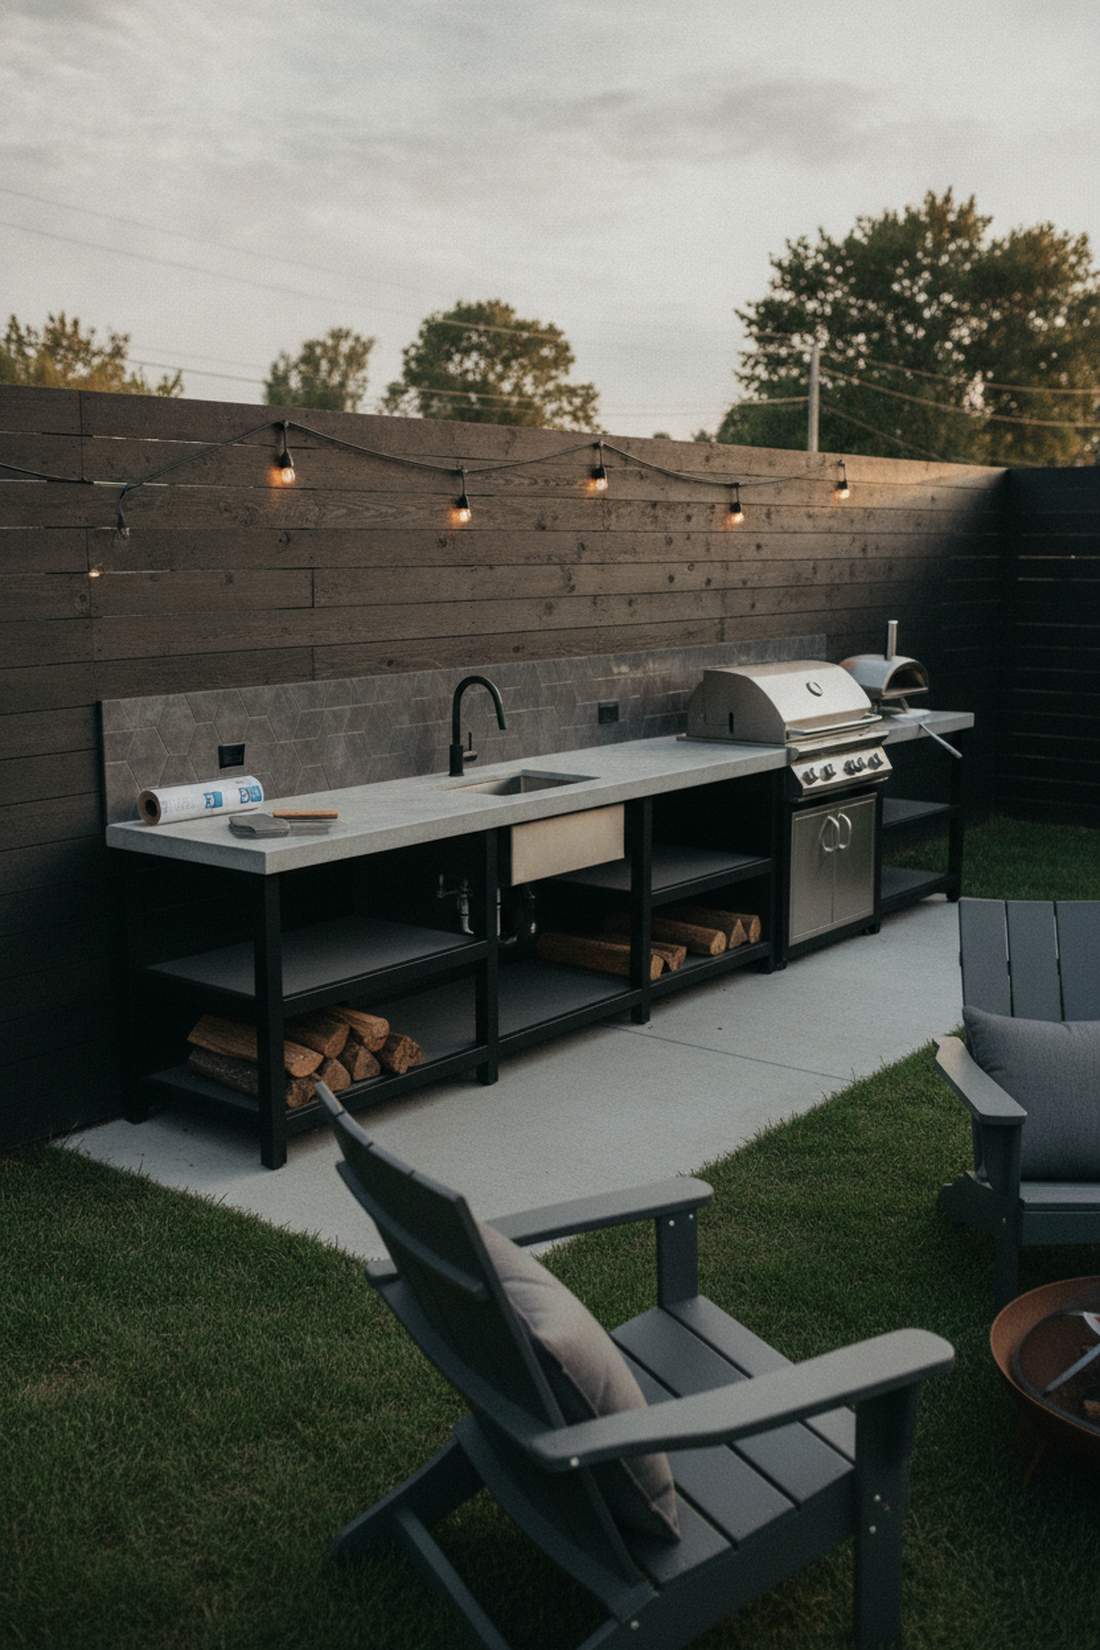
Brings a sleek, urban restaurant kitchen vibe straight to your fence line. The straight run outdoor kitchen is the ultimate space-saving maneuver. Fits brilliantly against a blank exterior garage wall or tall privacy fence.
Leveraging an existing wall cuts your structural framing costs exactly in half. Applying a high-heat outdoor tile backsplash gives a designer-level finish while completely protecting the property line. Keep the workflow strictly linear to maximize speed.
Materials for this tight layout usually run around $500 to start. Highly recommended for a quick, high-impact weekend win.
- Key Materials: Heat-resistant backsplash tile, outdoor-rated mortar
- Vibe / Style: Urban minimalist prep station
- Difficulty: Easy beginner masonry
- Budget Breakdown: Wall prep: $100 | Tile/Mortar: $250 | Base frame: $150
- Creator’s Tip: Always install a waterproof membrane between the house siding and the new kitchen backsplash to prevent hidden rot.
- Smart Sourcing: high-heat outdoor ceramic tile packs and premium waterproof wall membrane rolls.
This next setup completely ignores traditional rules but creates a shockingly premium entertaining space…
5. Double-Sided Galley Prep Station
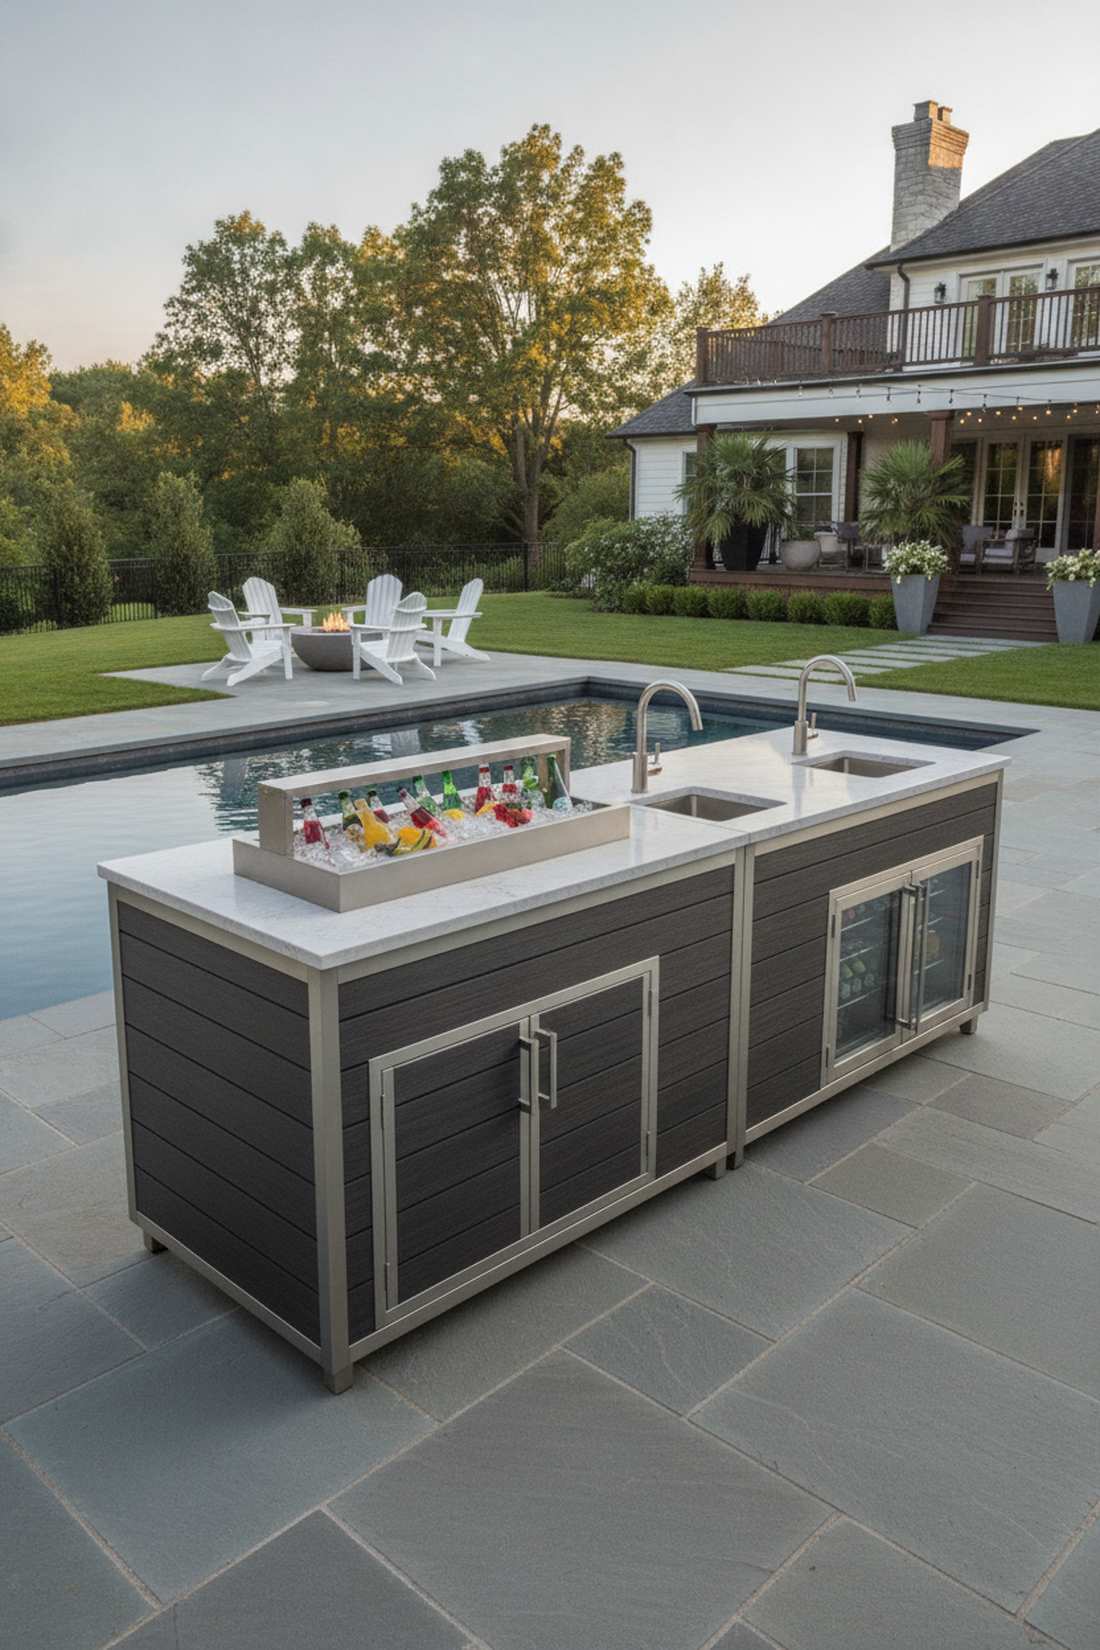
Feels like your own private poolside cabana bar. This freestanding outdoor galley island breaks up an empty yard beautifully. Works wonderfully for deep, narrow backyards where guests naturally mingle in the center.
Creating a pass-through dynamic completely eliminates the annoying bottleneck of people crowding the grill. This configuration demands high-end exterior finishes on both sides, making it a showstopper from any angle. Adding a drop-in ice chest rail elevates the hosting experience instantly.
The dual-sided finishing bumps the price to roughly $900–$1,400. Pin this if you love hosting massive summer parties!
- Key Materials: Stainless steel drop-in ice bins, dual-sided cabinet doors
- Vibe / Style: High-end resort cabana
- Difficulty: Intermediate structural planning
- Budget Breakdown: Island frame: $400 | Double cladding: $600 | Ice bin: $150
- Creator’s Tip: Keep the guest side slightly lower (around 32 inches) to make casual leaning and drink-grabbing much more comfortable.
- Smart Sourcing: stainless steel drop-in ice chest modules and weather-sealed outdoor cabinet doors.
6. Modular Linear Cart-System
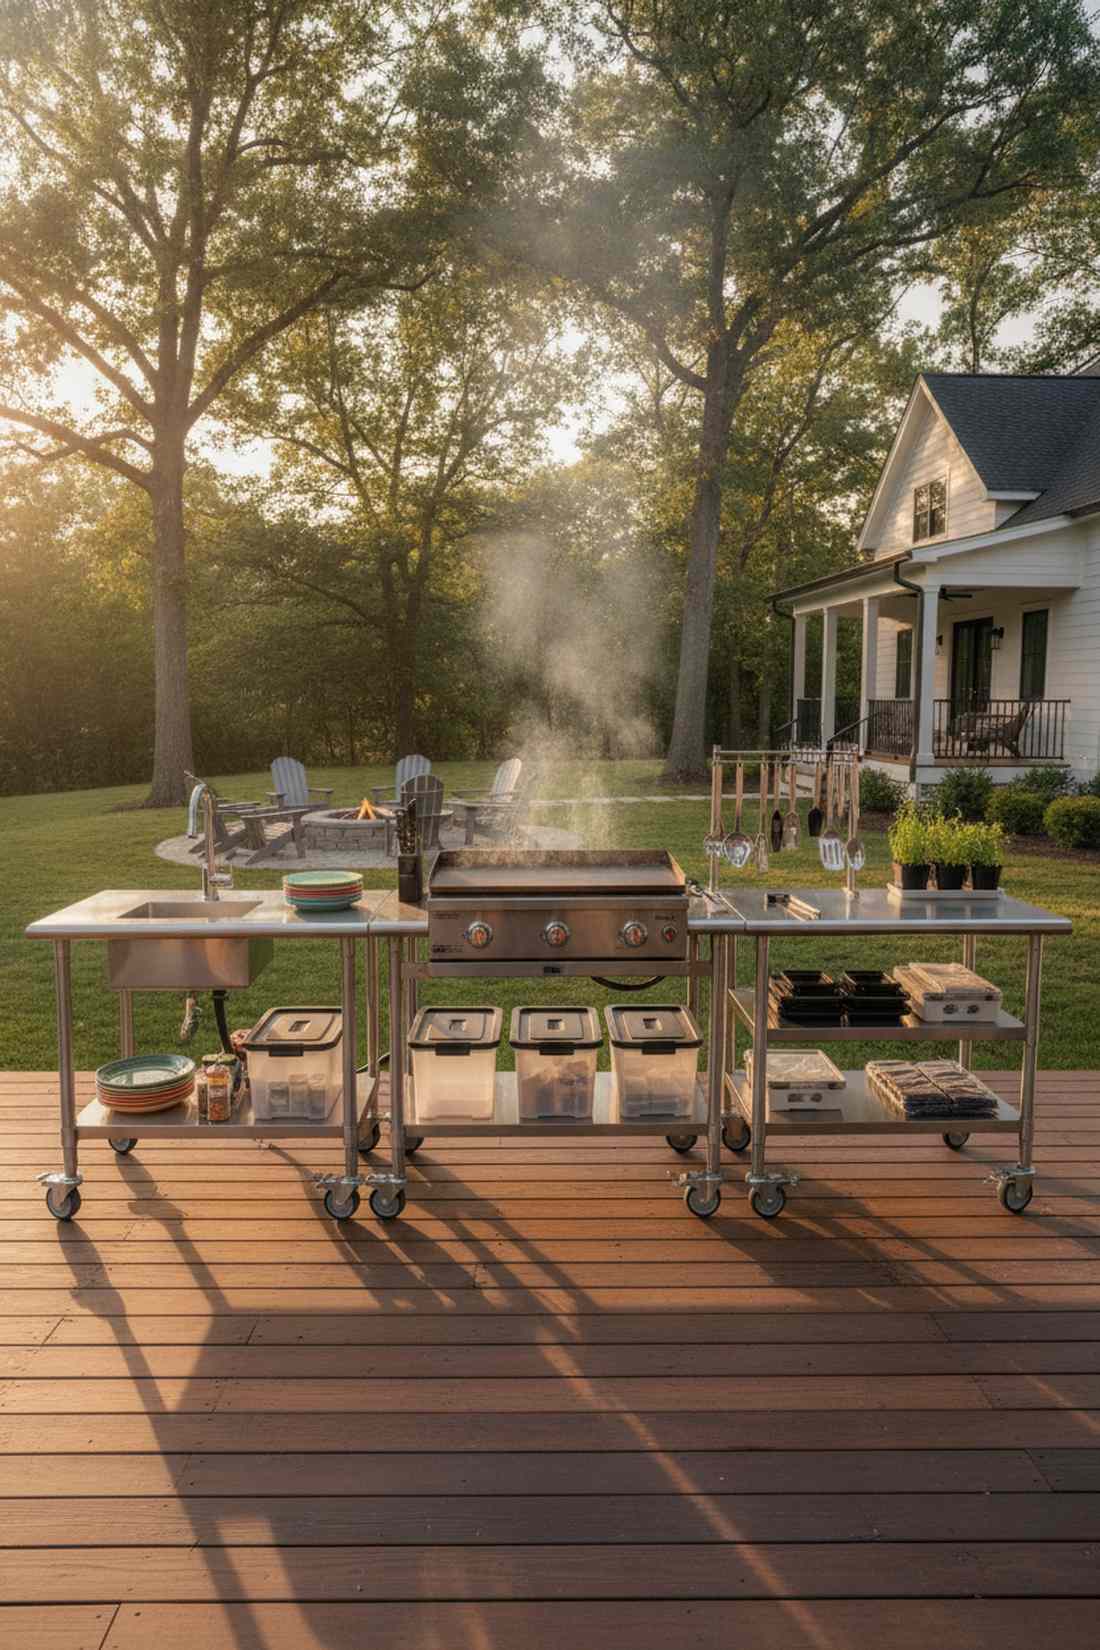
Gives off an industrial, chef-on-the-go aesthetic that looks effortlessly cool. The mobile outdoor cooking cart station is absolute genius for temporary setups. Ideal for renters who refuse to leave their expensive upgrades behind.
Skipping permanent poured foundations saves you thousands of dollars while maintaining ultimate layout flexibility. Snagging commercial-grade stainless steel prep tables creates an indestructible cooking line that withstands brutal weather. You simply lock the casters in place when the party starts.
You can assemble this entire modular line for under $400 if you shop smart. It’s the most functional, risk-free upgrade possible.
- Key Materials: Heavy-duty locking casters, stainless steel utility tables
- Vibe / Style: Industrial pop-up kitchen
- Difficulty: Absolute beginner
- Budget Breakdown: Prep tables: $250 | Locking wheels: $50 | Storage bins: $100
- Creator’s Tip: Apply a high-quality automotive rust-proofing spray to the joints and casters to ensure they roll smoothly after rainstorms.
- Smart Sourcing: commercial stainless steel prep tables (NSF certified) and heavy-duty locking caster wheel kits.
U-Shaped Entertaining Hubs
Three-sided configurations surround the cook with continuous counter space and storage. This layout maximizes prep area while creating a semi-enclosed workspace that still allows social interaction.
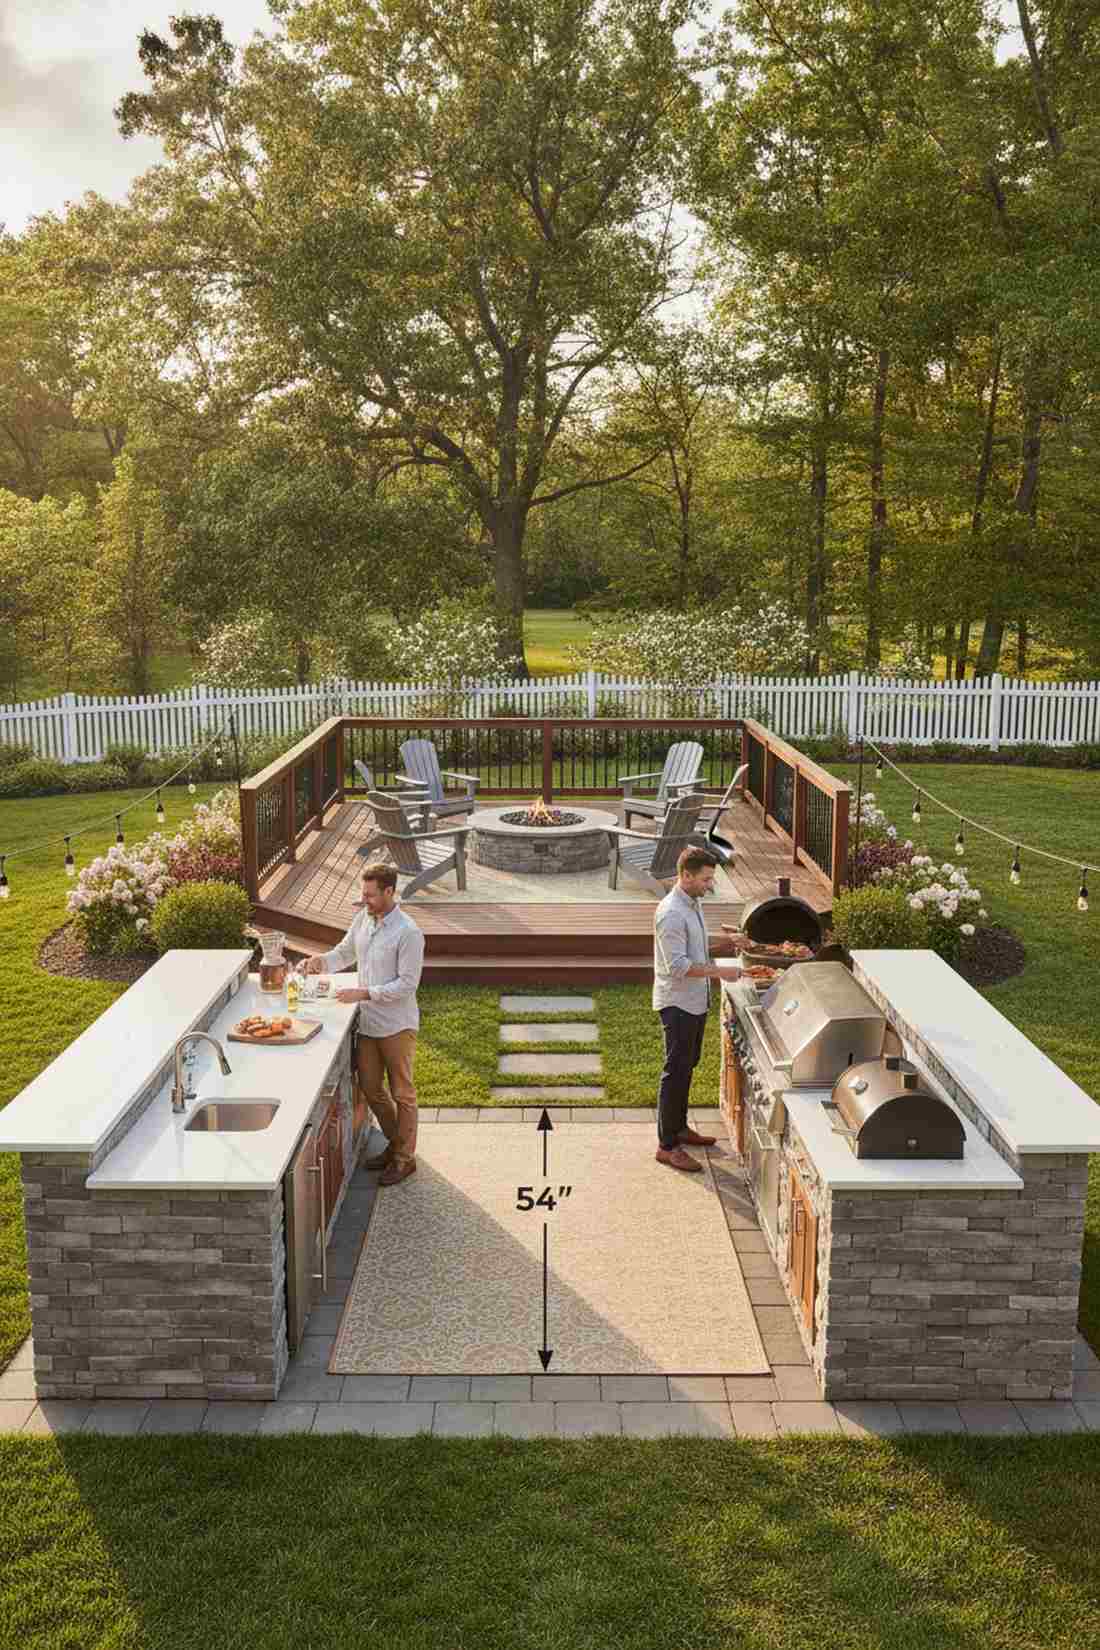
7. Open-Front U-Kitchen
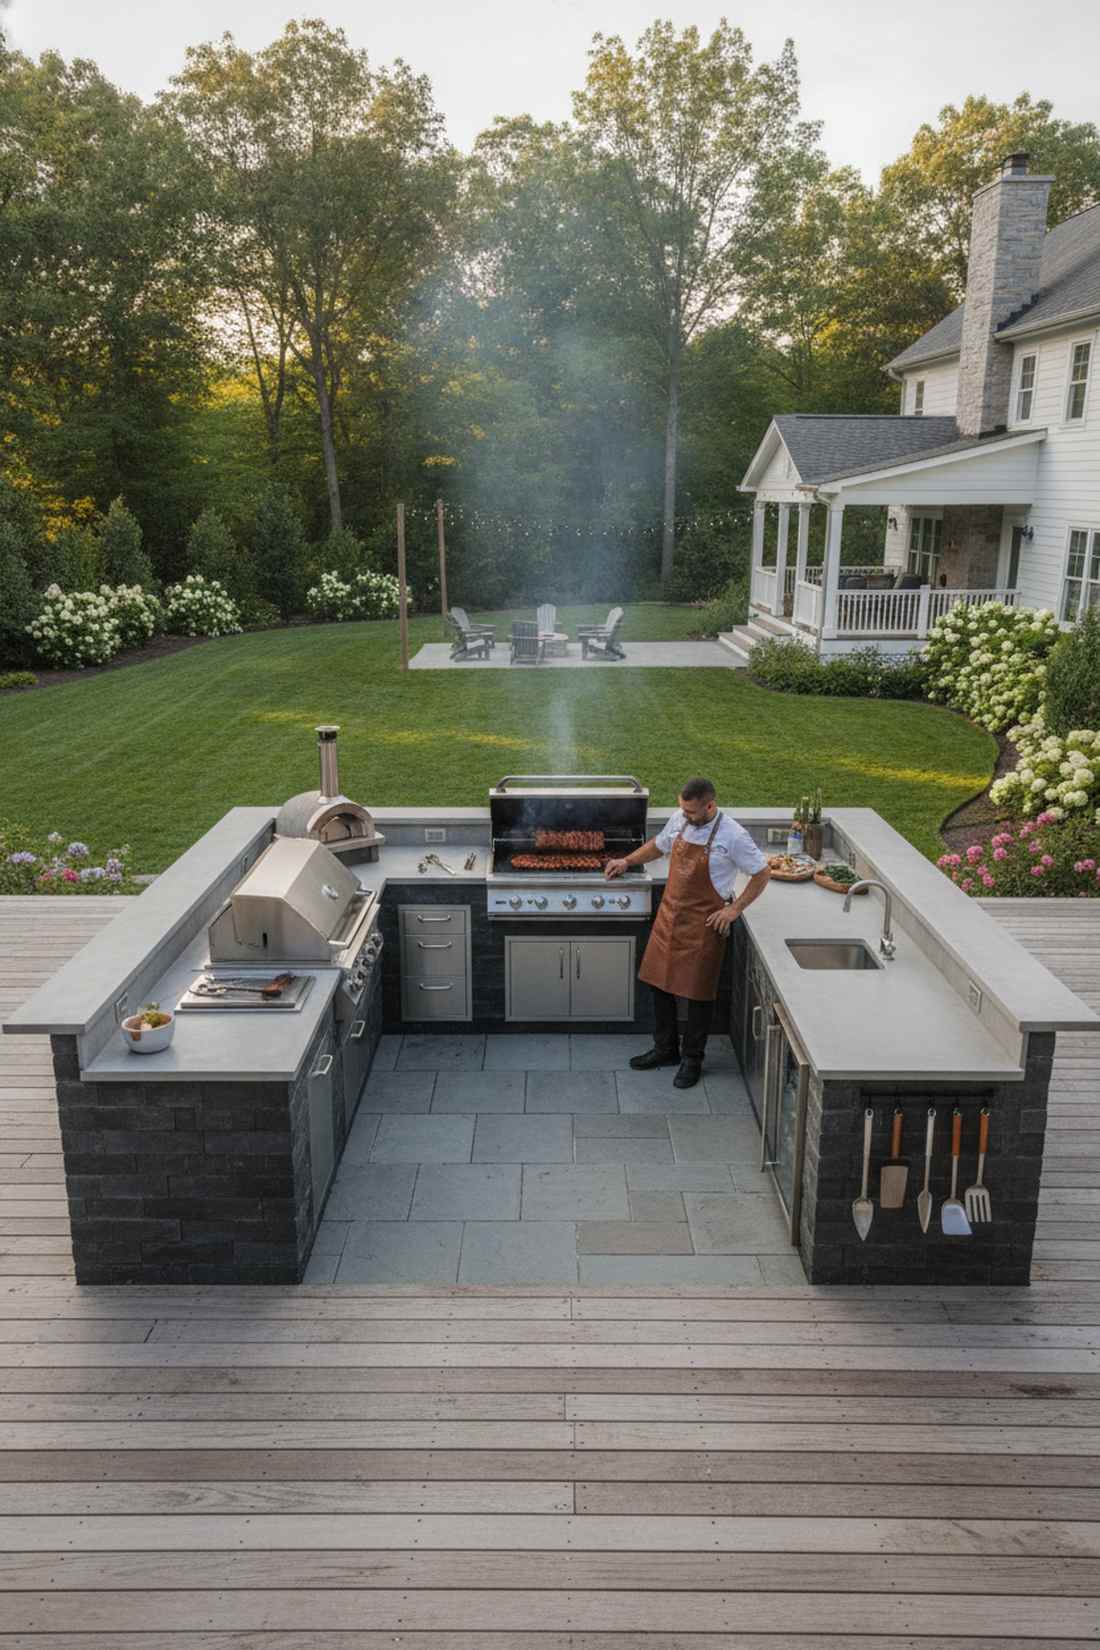
Feels like stepping into the command center of a professional culinary show. This wrap-around outdoor cooking hub gives you ultimate spatial control. Highly recommended for serious pitmasters who need massive prep areas.
Enclosing the cook on three sides drastically reduces the time spent running back inside for forgotten tools. Investing in pre-fabricated outdoor kitchen islands makes assembling this massive footprint surprisingly fast. It naturally blocks harsh crosswinds from blowing out your grill flames.
Expect a baseline material cost of $1,500–$2,500 for a structure this large. Save this layout if you cook outdoors more than indoors.
- Key Materials: Pre-fabricated corner island modules, extended countertops
- Vibe / Style: Professional pitmaster arena
- Difficulty: Advanced framing and leveling
- Budget Breakdown: U-frame kits: $1,200 | Counter surfaces: $800 | Connectors: $100
- Creator’s Tip: Ensure the interior floor space of the U is at least 48 inches wide so you can bend over to check low cabinets without hitting the opposite wall.
- Smart Sourcing: pre-fabricated outdoor kitchen corner modules and seamless concrete countertop mix (bulk).
8. Courtyard-Style Enclosed U
Projects the cozy, secretive aura of a hidden European garden cafe. A semi-enclosed patio kitchen layout blends landscaping right into the architecture. Flawless for windy properties where napkins and lightweight tools constantly blow away.
Capping the fourth wall with a low-profile planter box injects vibrant life into an otherwise heavy stone structure. Using self-watering planter inserts inside that wall keeps your herbs thriving with zero daily effort. The subtle barrier creates a highly intimate conversational dynamic.
Adding the masonry planter wall tacks on about $300 to your overall budget. An incredibly smart move for elevated aesthetics.
- Key Materials: Masonry retaining blocks, self-watering trough liners
- Vibe / Style: Secret garden bistro
- Difficulty: Intermediate hardscaping
- Budget Breakdown: Low wall blocks: $150 | Trough liners: $80 | Potting mix: $50
- Creator’s Tip: Add small drainage weep holes at the base of the planter wall so heavy rain doesn’t turn your herbs into a swamp.
- Smart Sourcing: self-watering rectangular planter trough inserts and architectural masonry adhesive (bulk tubes).
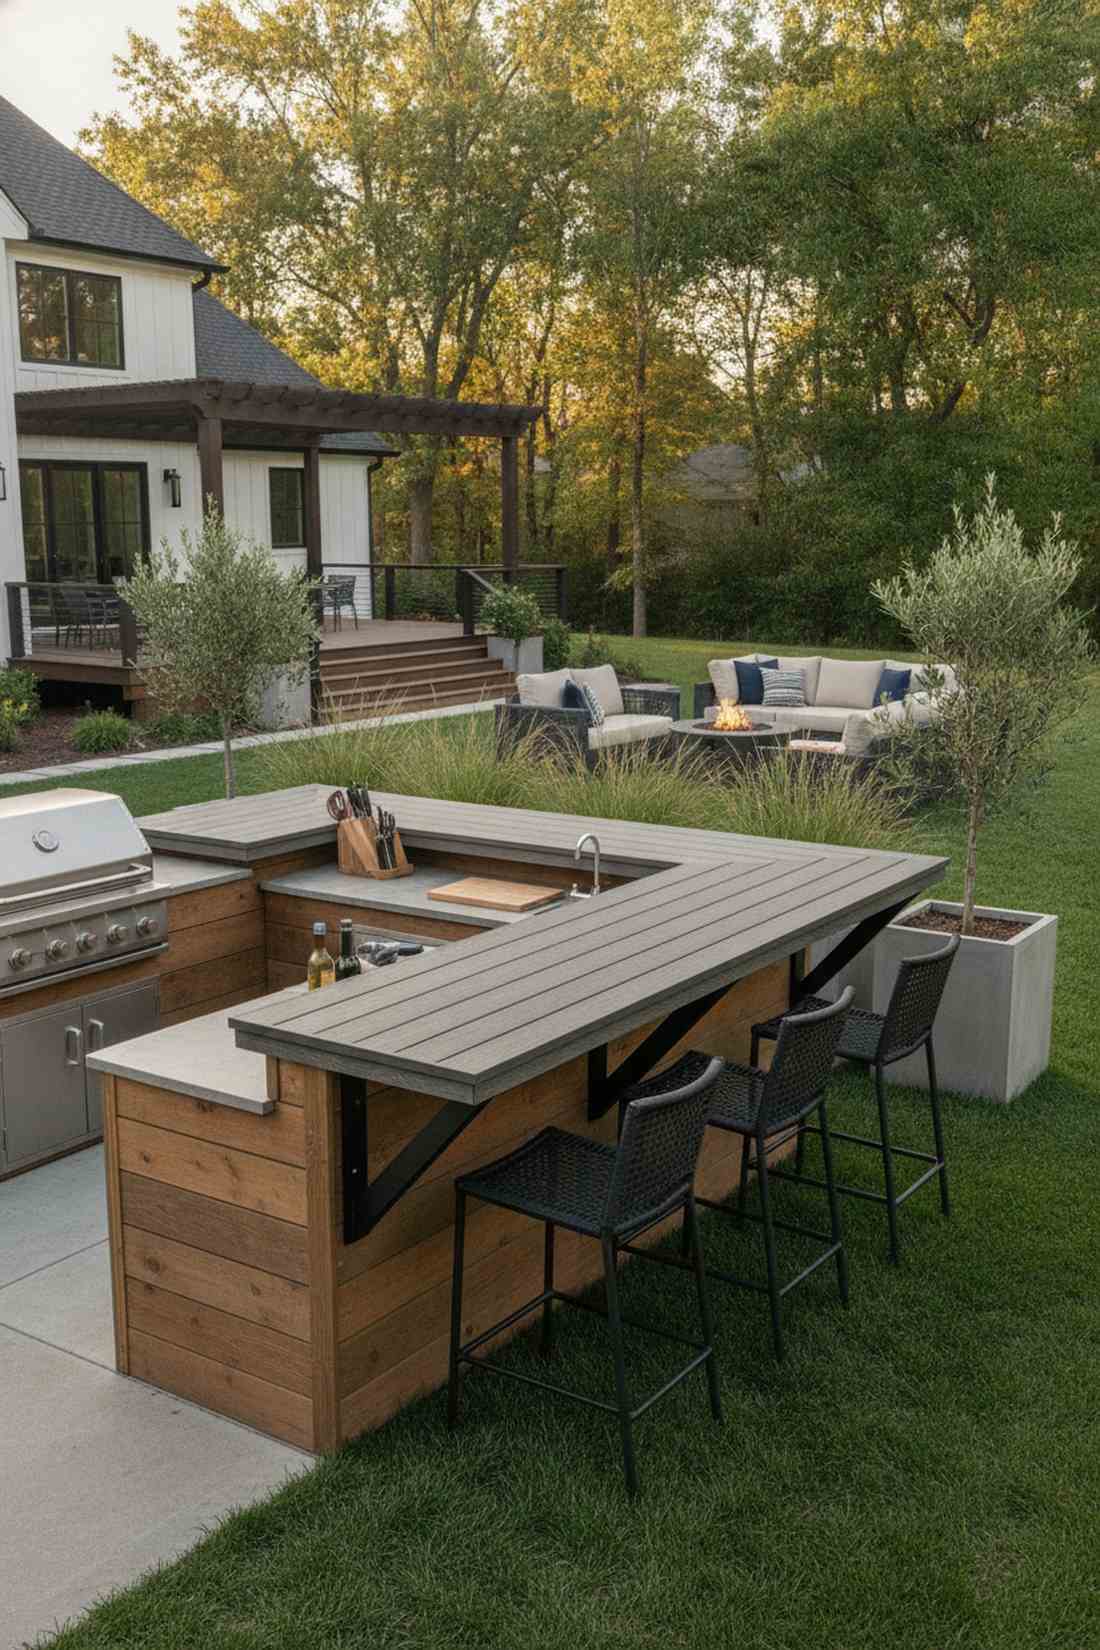
9. Tiered U with Bar Seating
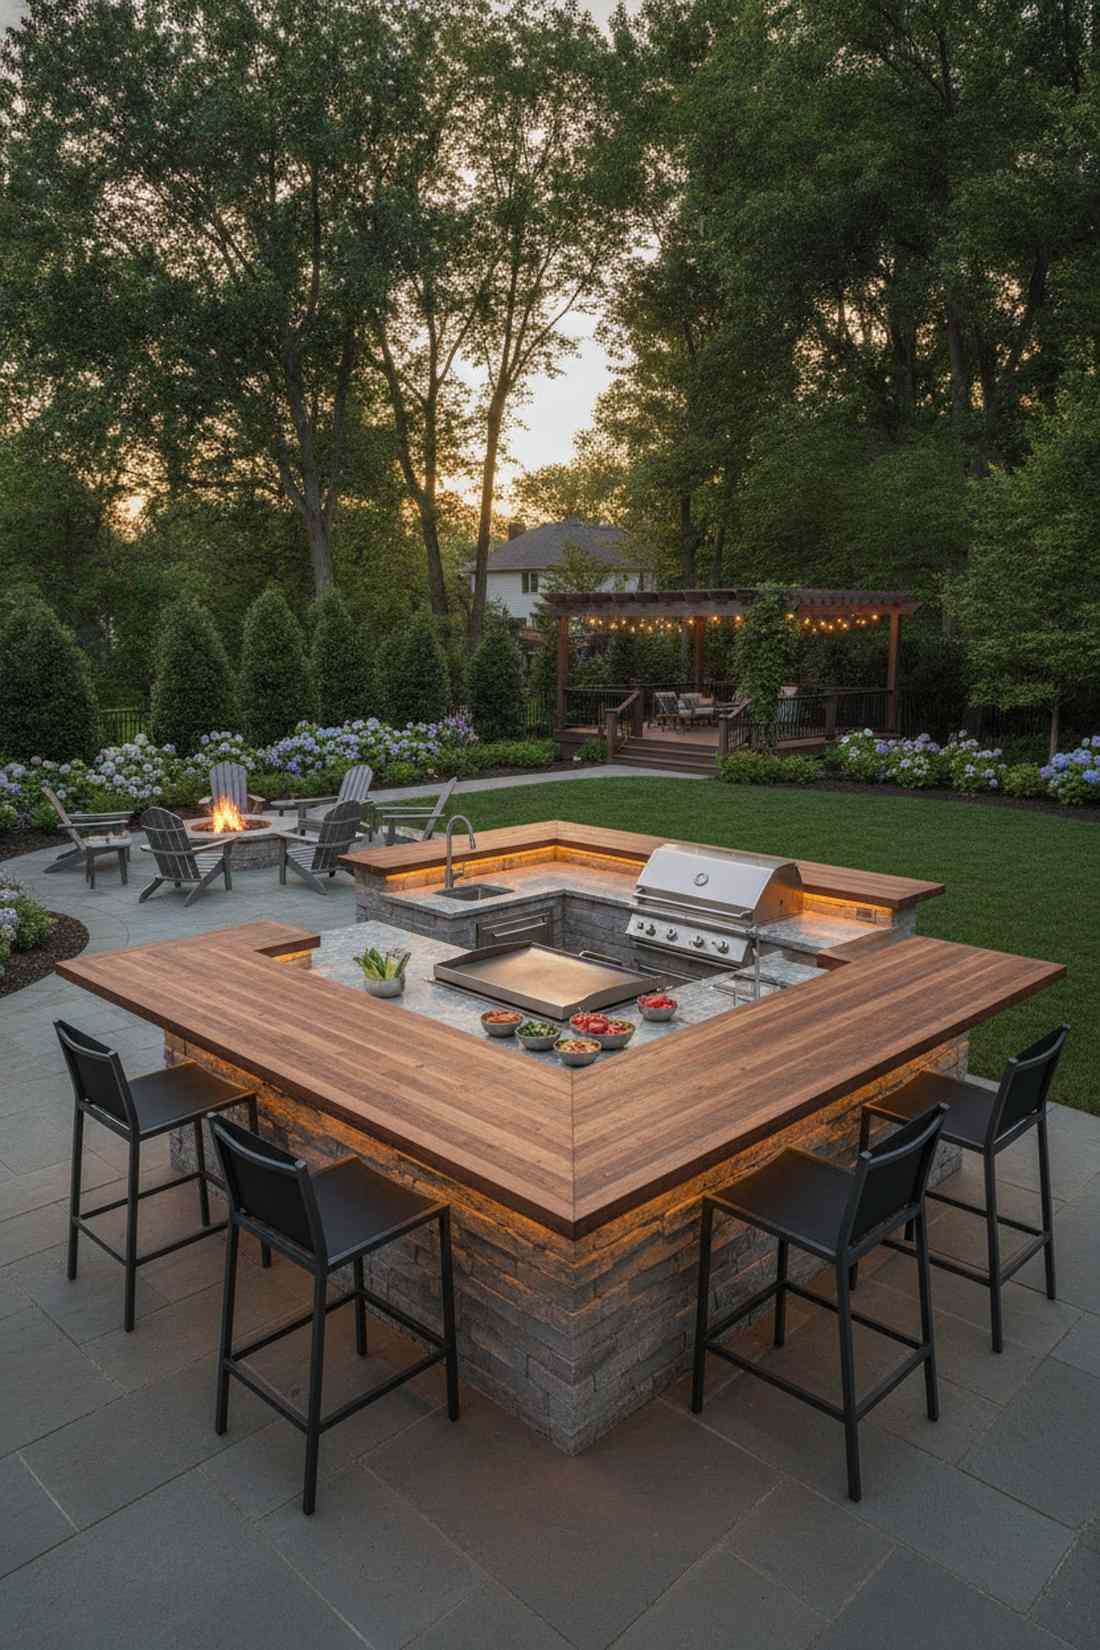
Feels like you are starring in your own backyard cooking channel. The wrap-around outdoor bar kitchen guarantees the host is the center of attention. Perfect for large families who love casual, interactive dining.
Wrapping the exterior in a cantilevered eating ledge totally eliminates the need for a separate, bulky dining table. Installing heavy-duty hidden steel brackets ensures the bar top won’t sag under the weight of leaning guests. It pushes the boundaries of standard outdoor entertaining.
This premium entertaining build will run you closer to $2,000 to execute properly. Pin this layout to your dream home exterior board!
- Key Materials: Hidden cantilever support brackets, wide plank bar tops
- Vibe / Style: Interactive hibachi-style social hub
- Difficulty: Advanced structural support
- Budget Breakdown: Core framing: $1000 | Steel supports: $200 | Seating ledge: $400
- Creator’s Tip: Space your support corbels exactly every 18 inches to prevent the raised bar top from bowing over time in the summer heat.
- Smart Sourcing: heavy-duty invisible countertop support brackets and marine-grade exterior wood sealant.
Wait until you see the next layout—it’s ridiculously cheap but looks like a $10,000 custom masonry installation…
💡 Must-Have Supplies for High-End Setups
To build these setups faster and ensure they last, skip the generic craft aisles and invest in the right foundational kits.
- Base & Support: heavy-duty galvanized steel island frame kits
- Setup Tools: professional outdoor masonry tool starter kits
- Weather/Durability Protection: UV-resistant clear concrete sealant (industrial grade)
Island-Centric Designs
Freestanding islands create 360-degree access patterns and serve as magnetic gathering points. Landscape architects position these elements as sculptural centerpieces within larger patio environments.
10. Central Cooking Island
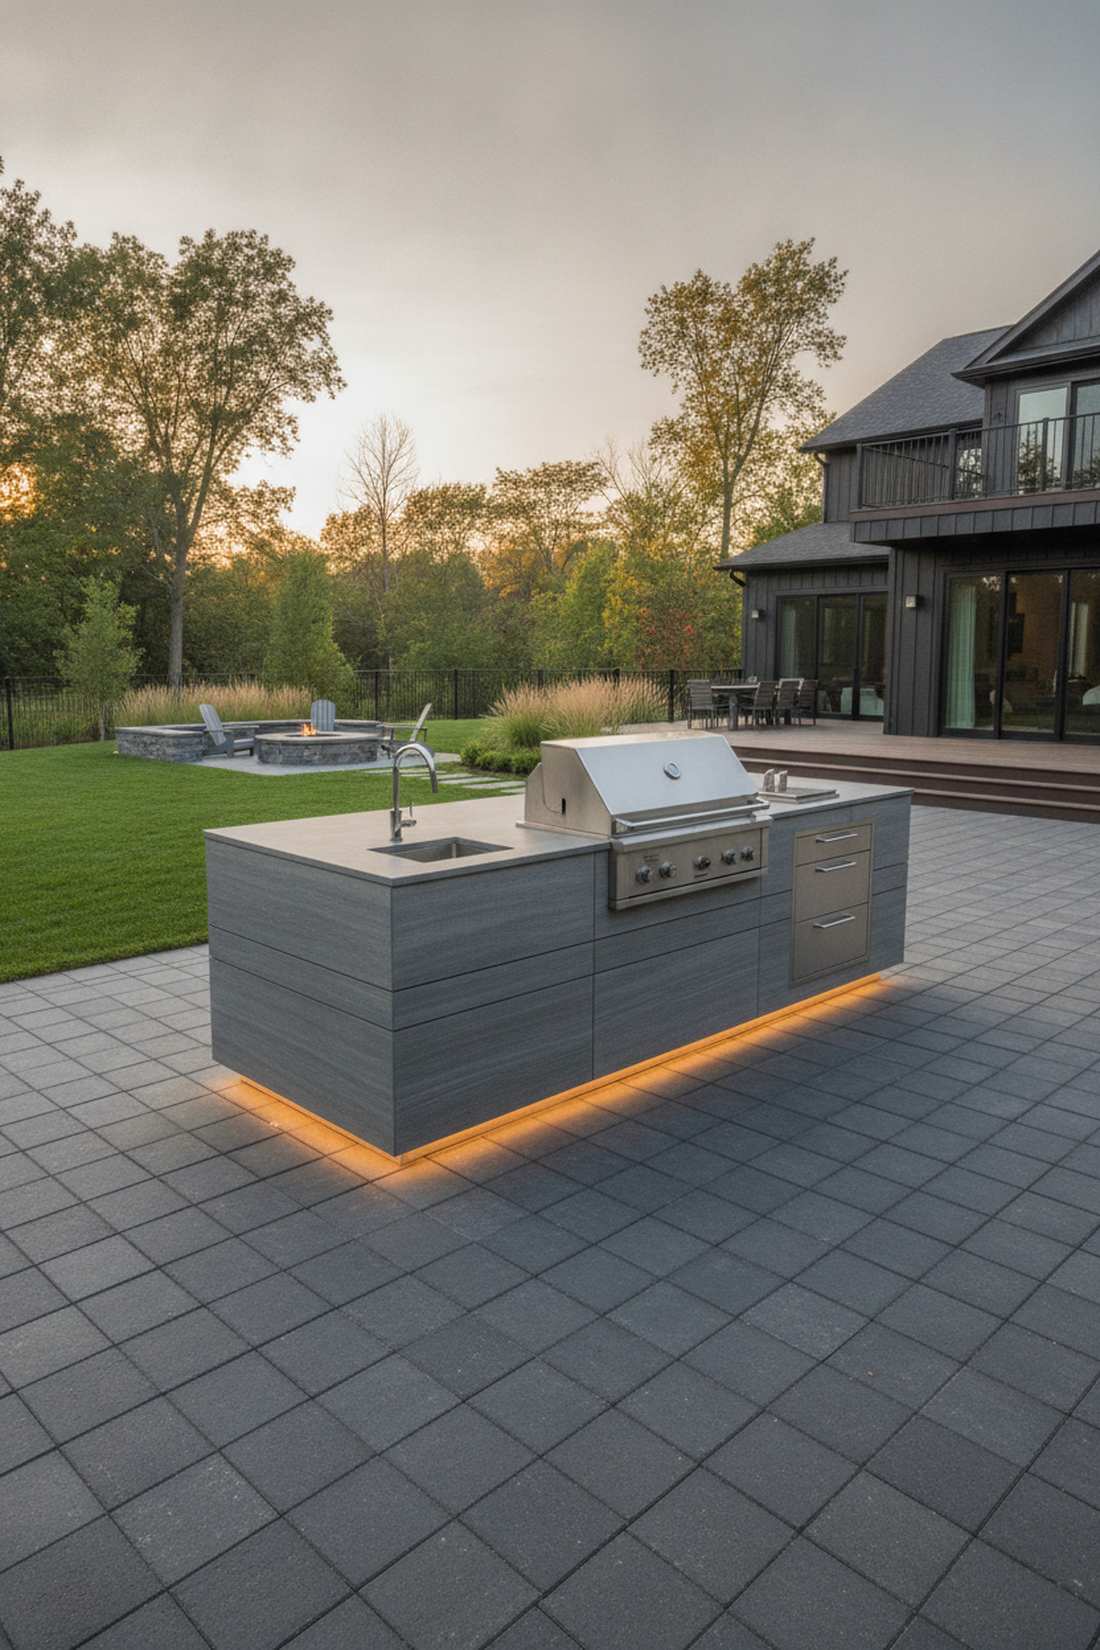
Creates a dramatic, sculptural focal point that totally anchors an empty space. A standalone outdoor grill island commands attention instantly. Works best in perfectly square, expansive concrete or paver patios.
Pulling the kitchen away from the house walls stops siding from melting and gives the design a massive luxury feel. You must trench your gas and electrical lines early, but the floating visual impact is absolutely worth the effort. It forces traffic to flow smoothly in a continuous circle.
Laying the underground utilities and building the base costs around $1,200. It’s a foundational upgrade that boosts property value.
- Key Materials: Underground conduit pipes, 360-degree finish materials
- Vibe / Style: Modern architectural centerpiece
- Difficulty: Advanced utility trenching
- Budget Breakdown: Trenching/Pipes: $300 | Core structure: $500 | Wrap finishes: $400
- Creator’s Tip: Always install an oversized conduit pipe under the patio—this makes running future electrical upgrades or water lines infinitely easier.
- Smart Sourcing: direct-bury outdoor electrical conduit kits and drop-in stainless side burner modules.
11. Dual-Island Prep and Cook Zones
Gives the sophisticated layout of an upscale outdoor catering event. The twin outdoor kitchen island setup is a masterclass in functional spacing. Ideal for couples who love cooking together without bumping elbows constantly.
Splitting the hot fire zone from the cold beverage zone totally prevents frustrating cross-traffic during a busy party. Utilizing matching pre-built modular island bases ensures symmetry and saves weeks of construction time. It simply looks fiercely professional.
Building two distinct stations generally runs about $1,800 to $2,500 total. Save this layout if you hate feeling cramped while prepping.
- Key Materials: Twin modular frames, matching stone cladding
- Vibe / Style: Executive catering symmetry
- Difficulty: Intermediate spacing and alignment
- Budget Breakdown: Frames (x2): $1000 | Finishes: $800 | Plumbing: $200
- Creator’s Tip: Keep exactly 48 to 60 inches of walking space between the two islands so multiple people can pass through while carrying hot platters.
- Smart Sourcing: pre-built modular outdoor island base kits and outdoor-rated compact beverage refrigerators.
12. Pizza Oven Focal Island
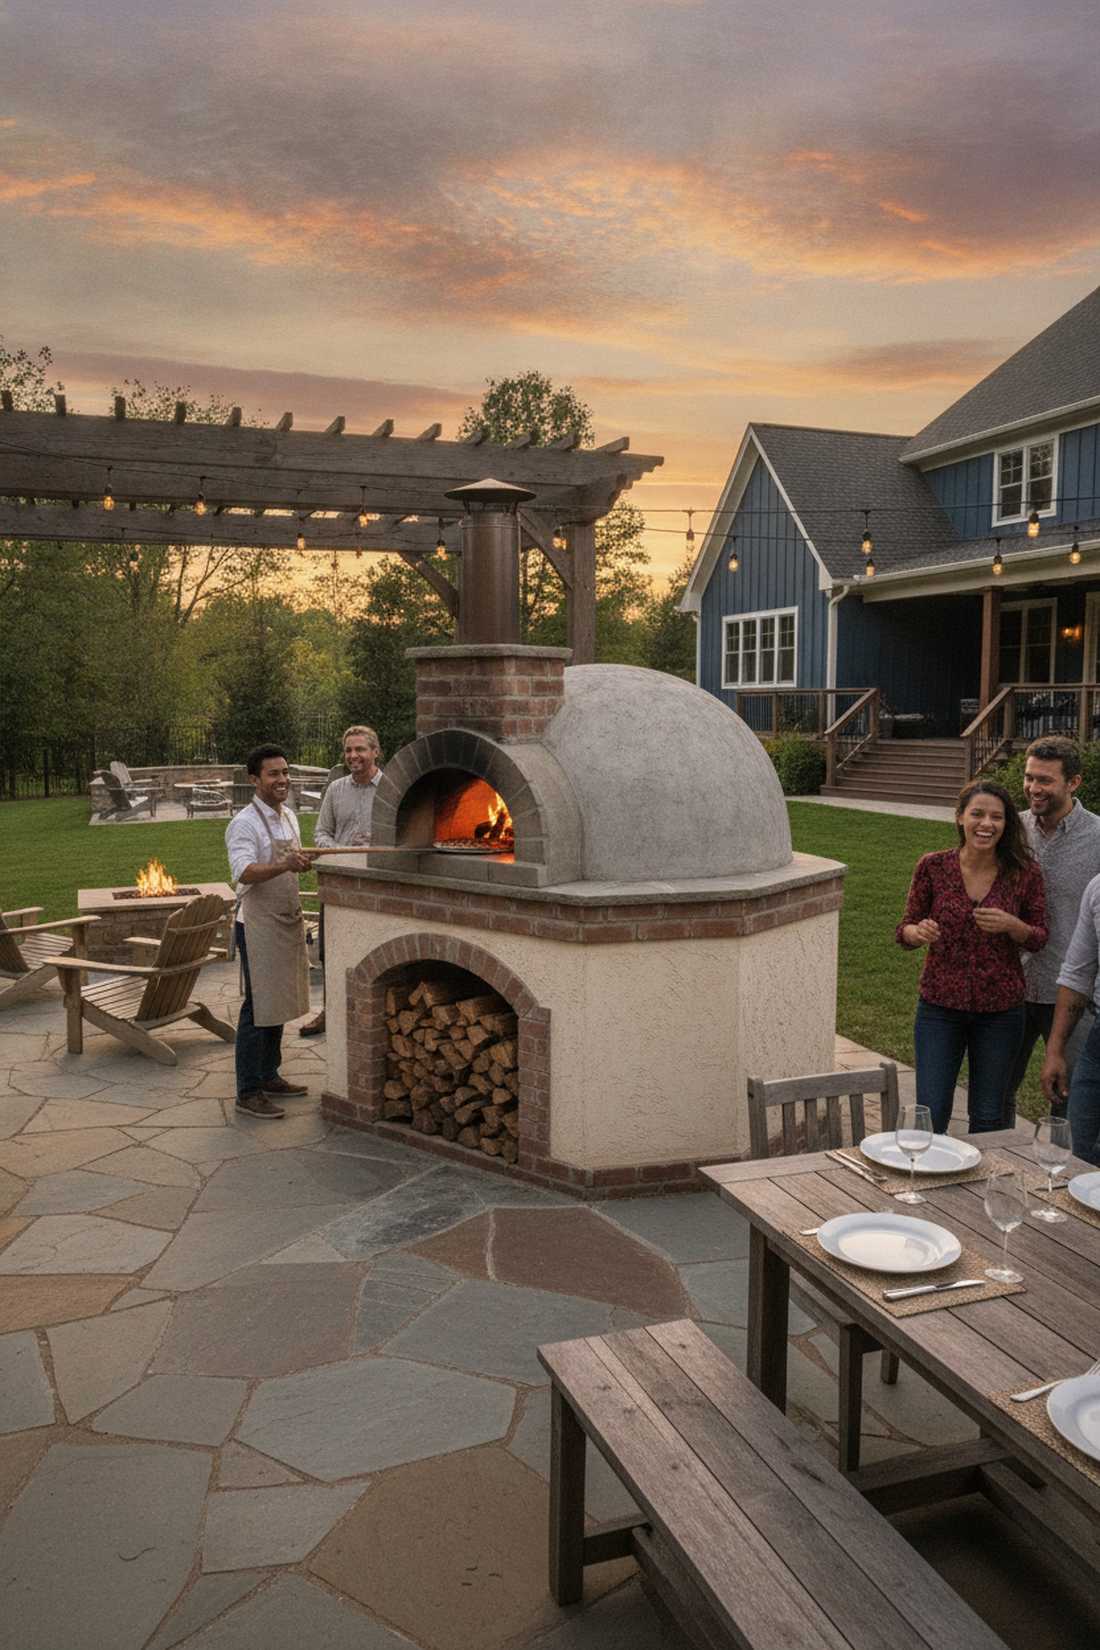
Emits the nostalgic, smoky warmth of a traditional rustic Italian piazza. A wood-fired pizza oven patio island acts like a magnet for guests as the sun sets. Perfectly suited for cool evening entertaining and large backyard gatherings.
The soaring chimney draws the eye upward, delivering a shockingly premium architectural silhouette. Securing a pre-cast refractory cement oven dome allows you to achieve authentic artisan heat without mastering complex bricklaying. It completely redefines the meaning of backyard takeout.
A quality pre-cast oven dome and base materials will cost roughly $1,500–$3,000. Pin this if you want an unforgettable outdoor dining experience!
- Key Materials: Refractory cement dome kit, high-heat firebrick
- Vibe / Style: Authentic Neapolitan courtyard
- Difficulty: Advanced heavy lifting
- Budget Breakdown: Oven core kit: $1,500 | Base blocks: $400 | Finishing stucco: $150
- Creator’s Tip: Build a deep, dry wood-storage cavity directly underneath the oven base so your fuel is always within an arm’s reach.
- Smart Sourcing: pre-cast refractory cement pizza oven kits and high-temperature authentic firebrick packs.
Raised Garden Bed Integrations with Home Garden Beds
Strategic home garden beds positioned adjacent to cooking zones reduce harvest-to-plate time and create living design elements. Designers match bed height and materials to kitchen structures for visual continuity.
13. Perimeter Herb Bed Frame
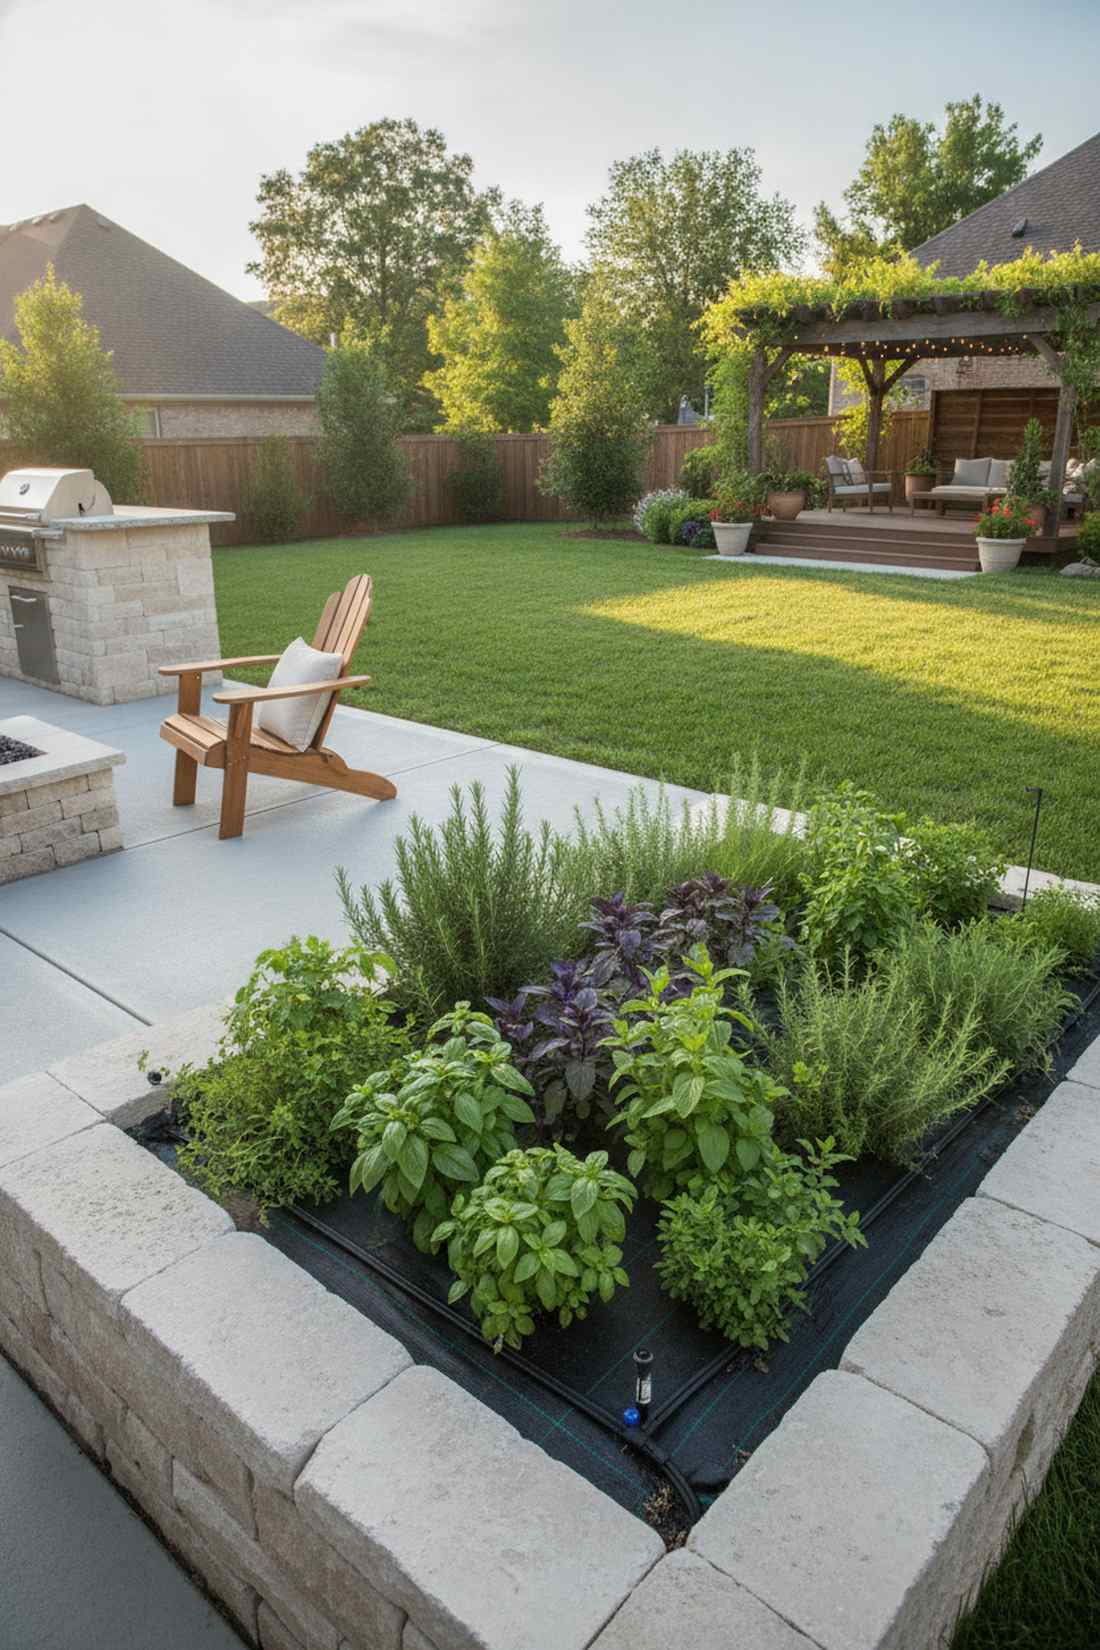
Feels incredibly fresh, like plucking ingredients inside a lush botanical greenhouse. Integrating stone border home garden beds fuses nature right into the culinary action. Excellent for connecting hard concrete patios with the soft lawn.
Mirroring the exact stone material from your counter base into the garden walls gives a designer-level finish that screams cohesion. Dropping an automated drip irrigation line into these beds guarantees your basil never wilts in the summer heat. It blurs the line between landscaping and architecture.
You can frame these perimeter boxes for just $150–$300 using bulk block. A must-do upgrade that completely changes the vibe.
- Key Materials: Landscape wall blocks, automated drip lines
- Vibe / Style: Farm-to-table organic
- Difficulty: Easy weekend project
- Budget Breakdown: Stone blocks: $150 | Soil mix: $60 | Irrigation line: $40
- Creator’s Tip: Line the bottom of the raised bed with thick landscaping fabric to prevent aggressive yard weeds from pushing up into your delicate herbs.
- Smart Sourcing: commercial-grade heavy-duty weed barrier fabric and micro-drip irrigation starter kits.
Most DIYers get the next configuration entirely wrong, ruining their expensive materials…
14. Integrated Planter Countertop
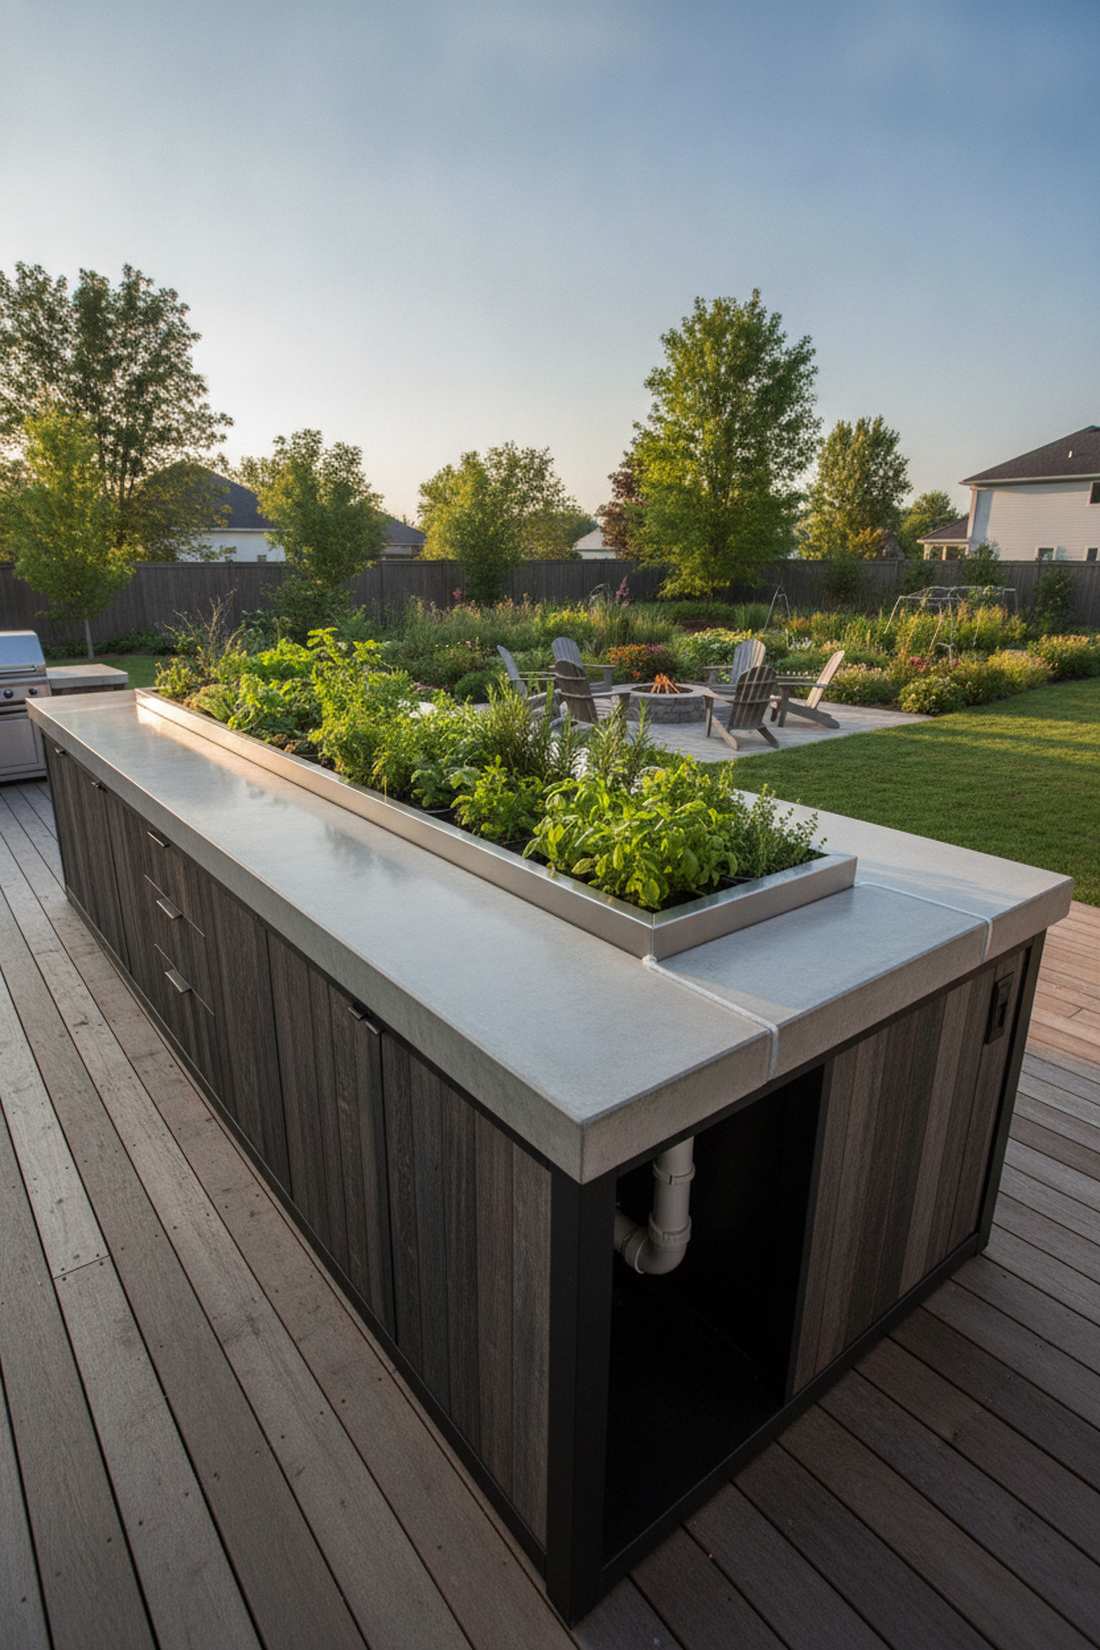
Looks like a wildly futuristic eco-kitchen ripped from a luxury design magazine. The built-in countertop herb trench puts fresh garnishes literally at your fingertips. Works magic on deep, oversized outdoor islands with unused back-space.
Carving a growing channel directly into the work surface demands absolute waterproof perfection. Utilizing custom-fit stainless steel planter inserts prevents destructive moisture from rotting out your expensive base cabinets below. It is the ultimate flex for the home chef.
Waterproof inserts and drainage setups will add about $200 to your counter build. Pin this if you obsess over culinary details!
- Key Materials: Stainless steel trough drop-ins, waterproof silicone
- Vibe / Style: Ultra-modern culinary ecosystem
- Difficulty: Intermediate cutting and sealing
- Budget Breakdown: Trough inserts: $120 | Silicone sealant: $20 | Specialty herbs: $40
- Creator’s Tip: Drill a hidden PVC drainage pipe from the bottom of the metal trough down through the cabinet floor to divert excess watering.
- Smart Sourcing: drop-in stainless steel planter troughs and marine-grade waterproof silicone sealants.
15. Vertical Garden Wall Backdrop
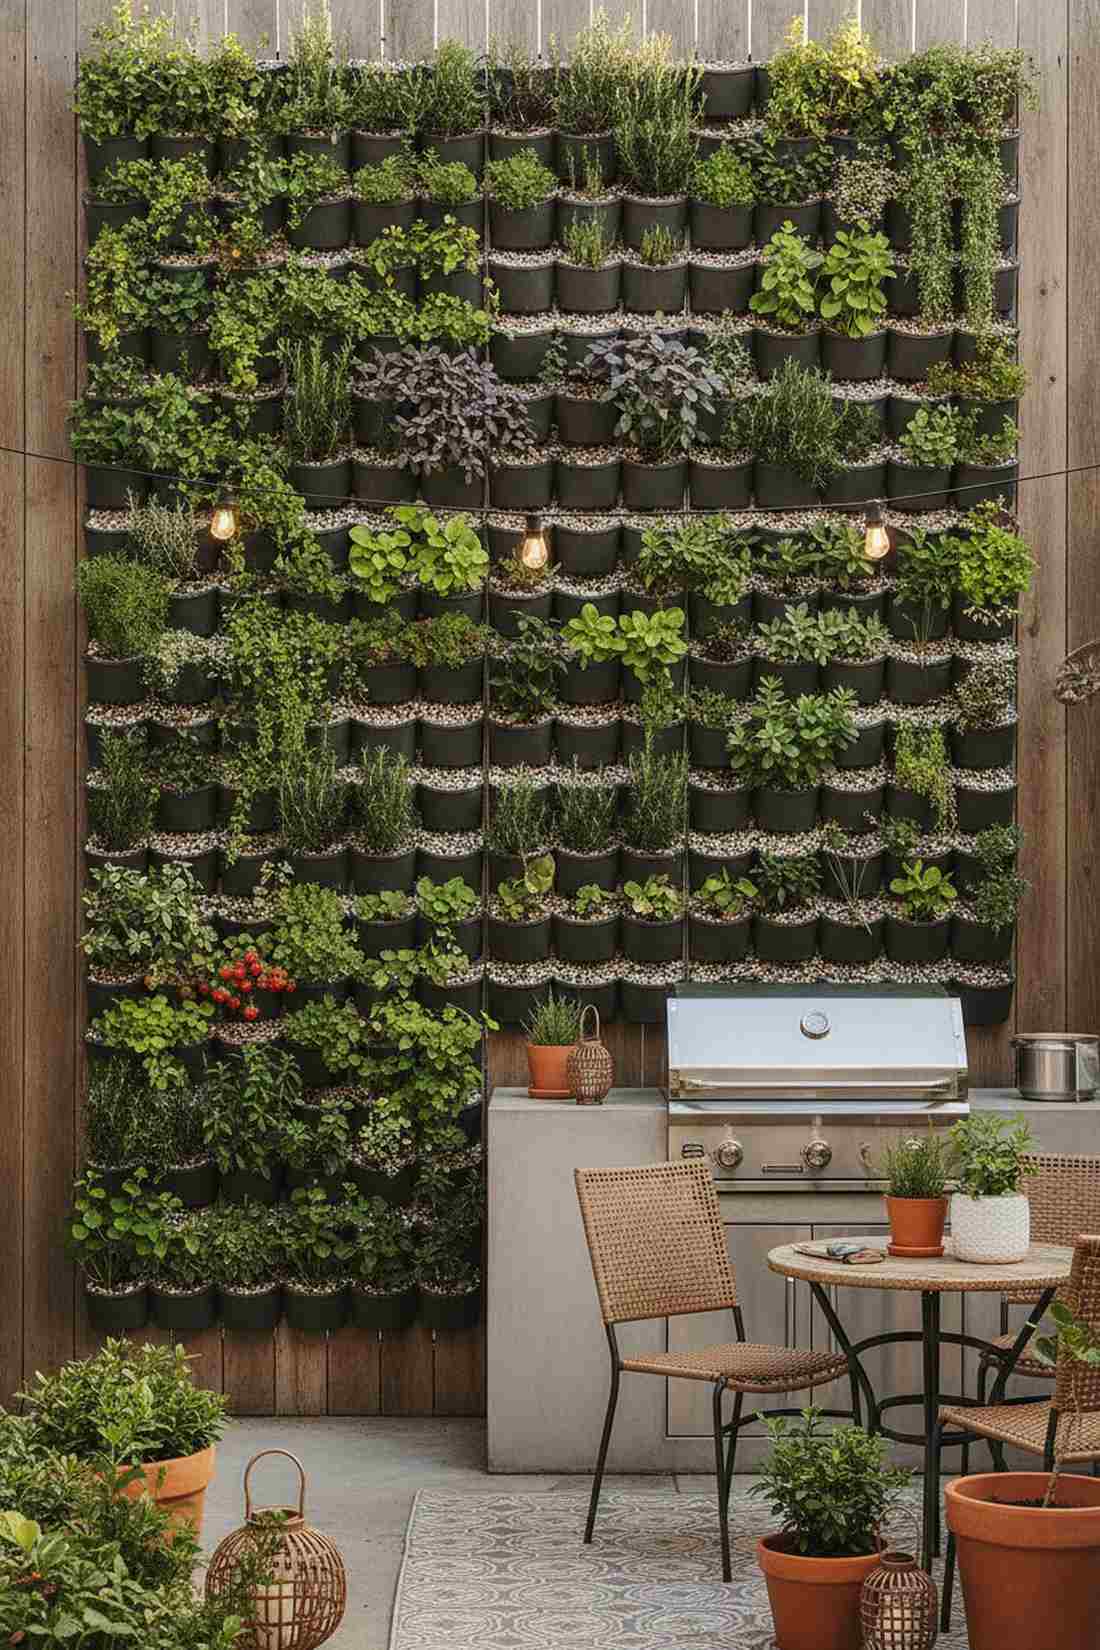
Transforms a boring privacy fence into a soaring wall of vibrant, edible greenery. A vertical pocket garden backdrop is a brilliant space-multiplier. Highly effective for tight urban patios where ground soil is completely non-existent.
Hanging dense foliage upwards masks ugly neighbor views while creating a lush microclimate that cools the cooking zone. Snapping together modular UV-resistant pocket planters ensures the plastic won’t crack and drop dirt onto your prep station after one summer. It softens harsh architectural lines beautifully.
A full 6-foot wall system can be achieved for about $150–$250. Save this idea if you need instant backyard privacy.
- Key Materials: Modular vertical planting grids, lightweight potting mix
- Vibe / Style: Urban jungle oasis
- Difficulty: Easy wall-mounting
- Budget Breakdown: Planter grid frames: $150 | Soil: $40 | Hardware mounting: $20
- Creator’s Tip: Use moisture-control potting soil heavily mixed with perlite to keep the vertical pockets light so they don’t rip the screws out of the fence.
- Smart Sourcing: UV-resistant modular vertical wall planters (bulk pack) and moisture-retaining lightweight potting mix.
16. Mobile Raised Bed Carts
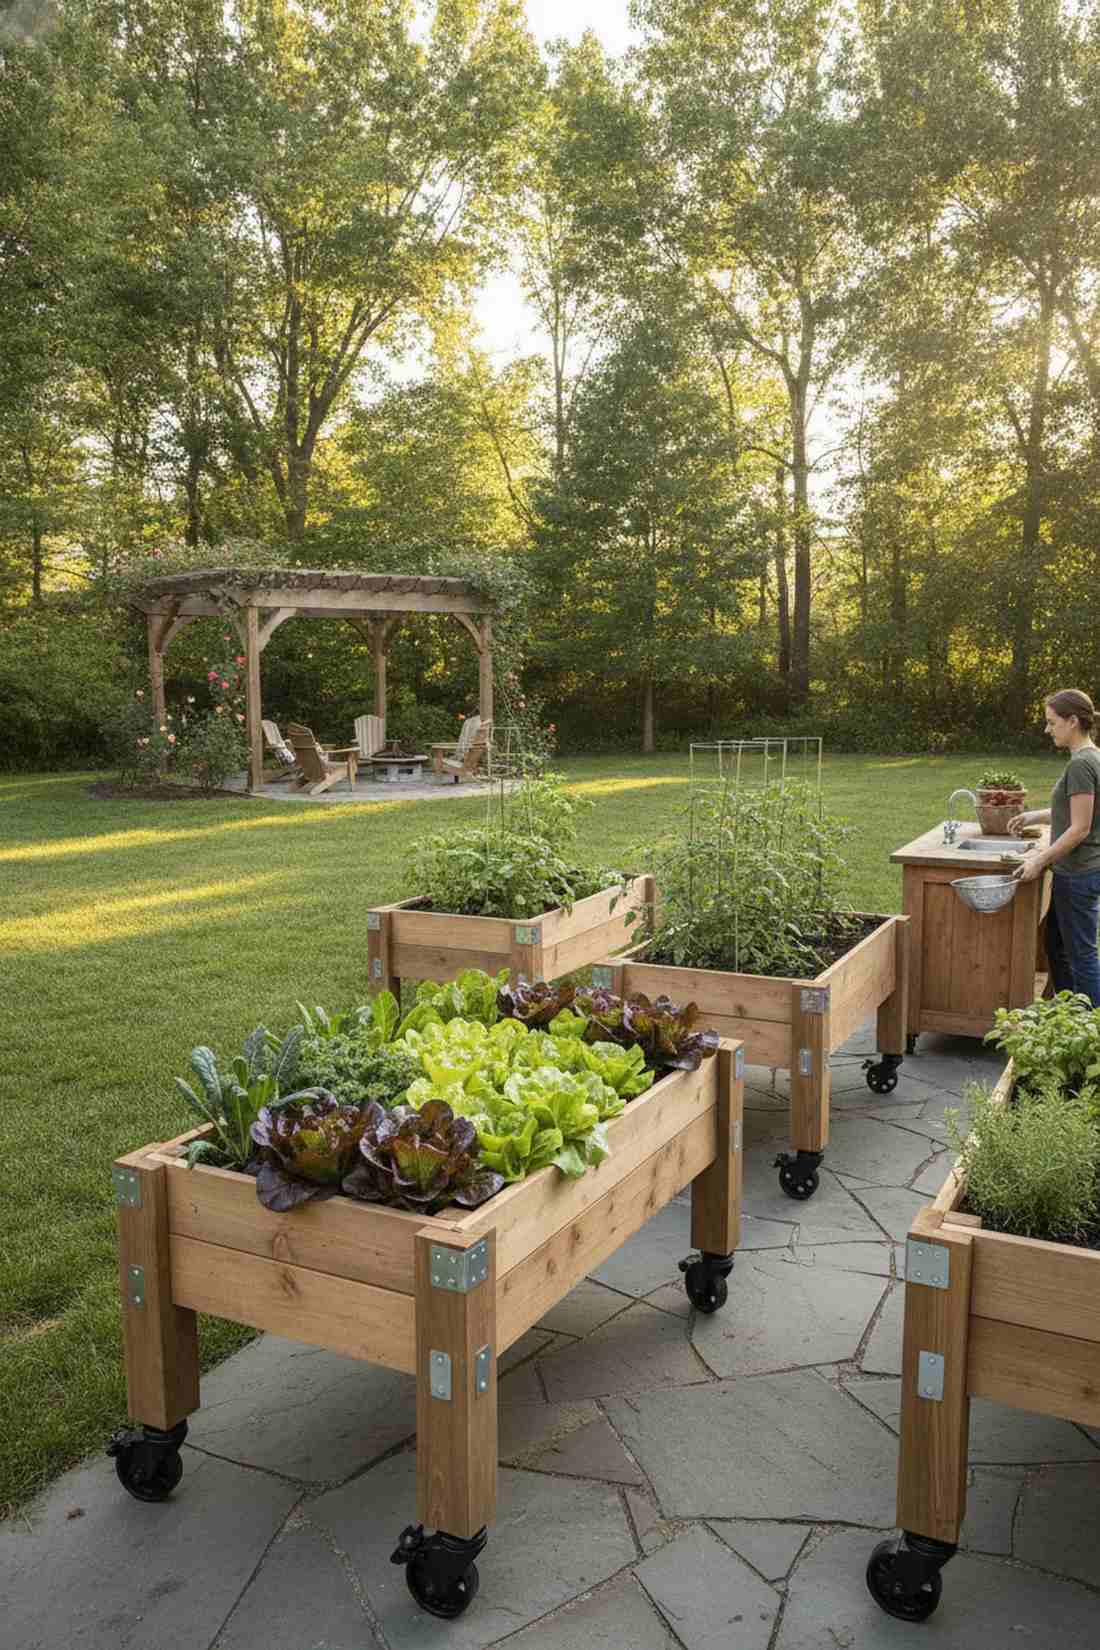
Delivers the charming practicality of a working, bustling cottage farm. Rolling home garden beds solve the eternal problem of shifting sun patterns. Perfect for yards surrounded by tall trees that cast long, unpredictable shadows.
Slapping industrial casters on a deep planter box looks far more expensive than it actually is. Constructing these from thick, rot-resistant cedar ensures they survive constant movement and heavy, wet soil weight without warping. You literally wheel your salad ingredients to the sink.
Building one heavy-duty rolling cart costs approximately $80 to $120. Highly recommended for a functional, mobile weekend build.
- Key Materials: Cedar lumber boards, industrial locking wheels
- Vibe / Style: Nomadic farmhouse
- Difficulty: Beginner woodworking
- Budget Breakdown: Cedar wood: $60 | Industrial casters: $35 | Corner brackets: $15
- Creator’s Tip: Only buy casters rated for at least 300 lbs each, because wet potting soil and mature plants weigh dramatically more than you think.
- Smart Sourcing: heavy-duty locking polyurethane casters (4-pack) and galvanized steel corner brace brackets.
Material Guide: Cheap vs. Premium Aesthetic
Knowing exactly where to save and where to spend makes all the difference in achieving that “looks expensive but isn’t” vibe.
- Standard vs. UV-Resistant/Premium: Upgrading to UV-coated components stops plastics from becoming brittle and prevents composite woods from fading into an ugly chalky gray after one sunny summer.
- Pre-made Kits vs. Sourcing Locally: Utilizing pre-cut modular island kits often saves hundreds in labor and wasted lumber, ensuring your frames are perfectly square and ready for heavy stone finishes instantly.
Fruit Tree Canopy Kitchens with Home Garden Trees
Home garden trees provide natural shade structures and seasonal harvests when positioned correctly. Landscape architects select dwarf and semi-dwarf varieties that mature at 12-15 feet to avoid overwhelming outdoor kitchen spaces.
17. Citrus Grove Kitchen Surround
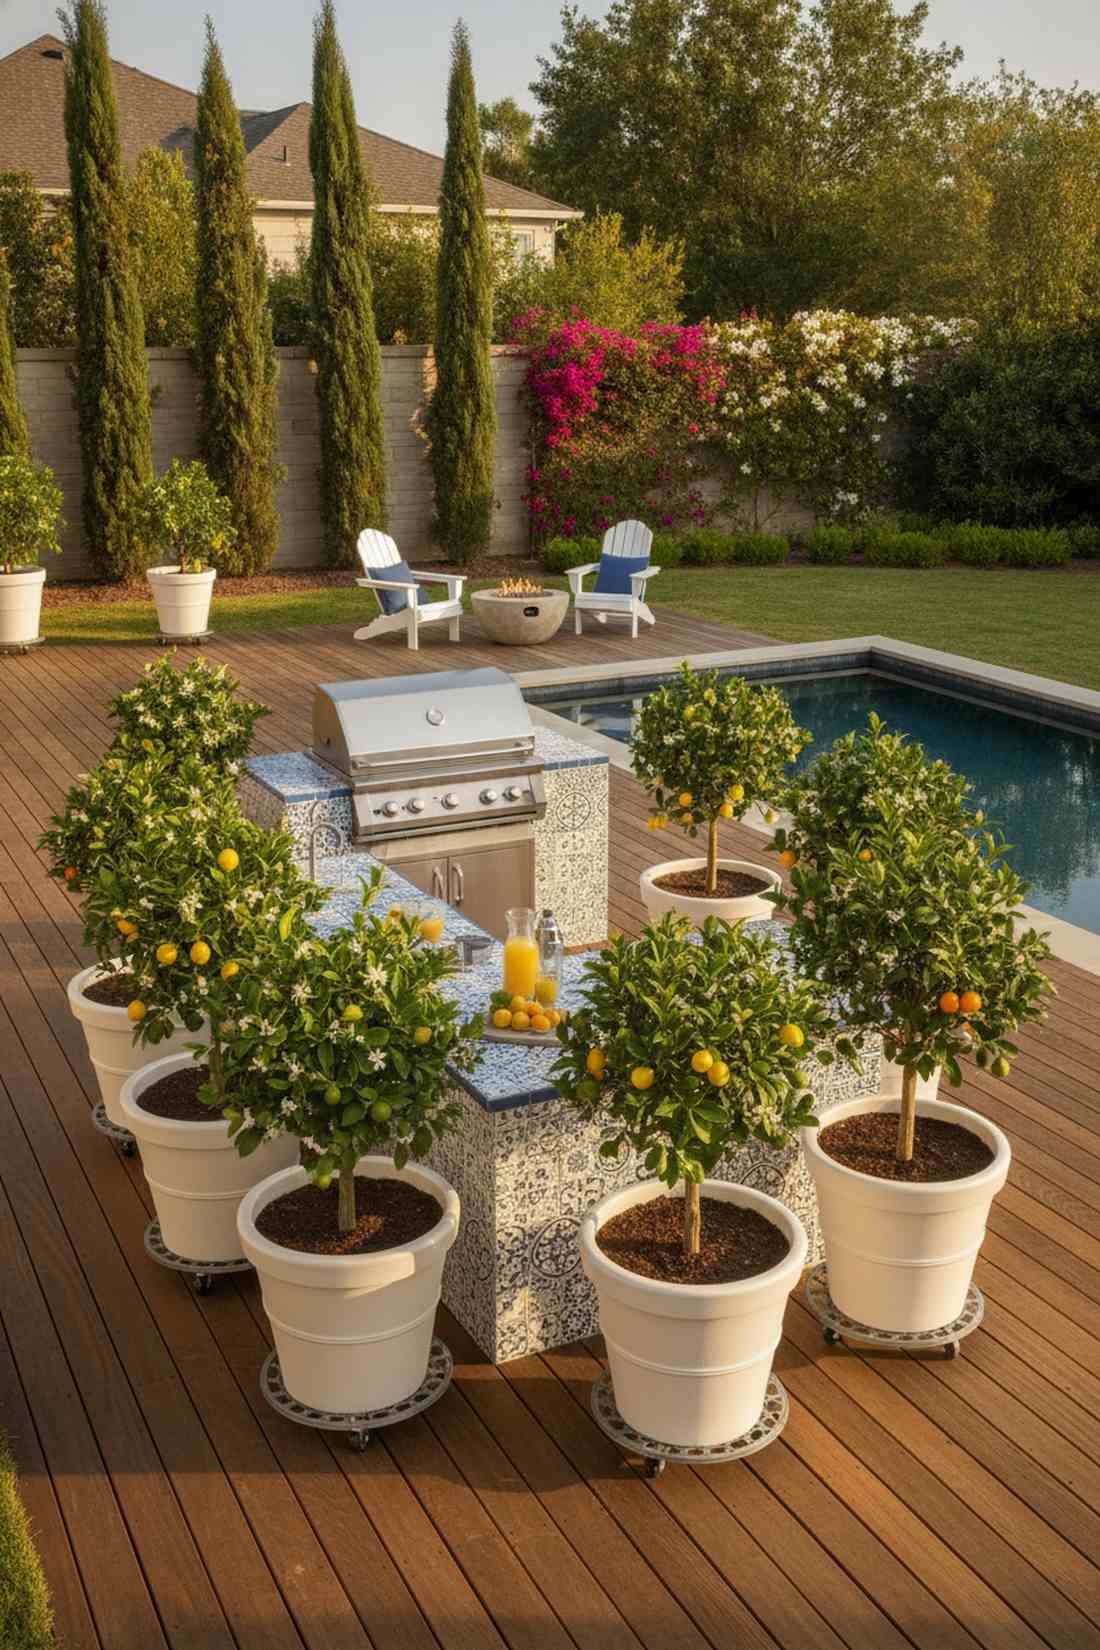
Breathes a sweet, intoxicating aroma over the entire patio every spring. Framing with potted home garden trees like dwarf citrus brings immediate Mediterranean elegance. The absolute best choice for sunny, warm-climate outdoor entertaining zones.
Using oversized, premium resin planters prevents the root-baking heat associated with cheap plastic pots. Arranging these vibrant trees creates a mobile privacy screen that delivers a surprisingly premium look with minimal digging. Plus, the cocktail garnishes are literally an arm’s length away.
Sourcing high-end large planters and dwarf trees runs about $300 total. Pin this if you love making fresh summer drinks!
- Key Materials: Double-walled resin planters, citrus-specific fertilizer
- Vibe / Style: Sun-drenched Amalfi Coast
- Difficulty: Easy container gardening
- Budget Breakdown: Premium pots: $150 | Dwarf trees: $100 | Citrus soil: $30
- Creator’s Tip: Place your massive planters on heavy-duty wheeled caddies before filling them with dirt so you can spin the trees for even sun exposure.
- Smart Sourcing: double-walled insulated resin large planters and heavy-duty rolling plant caddies (metal frame).
18. Espalier Fruit Wall
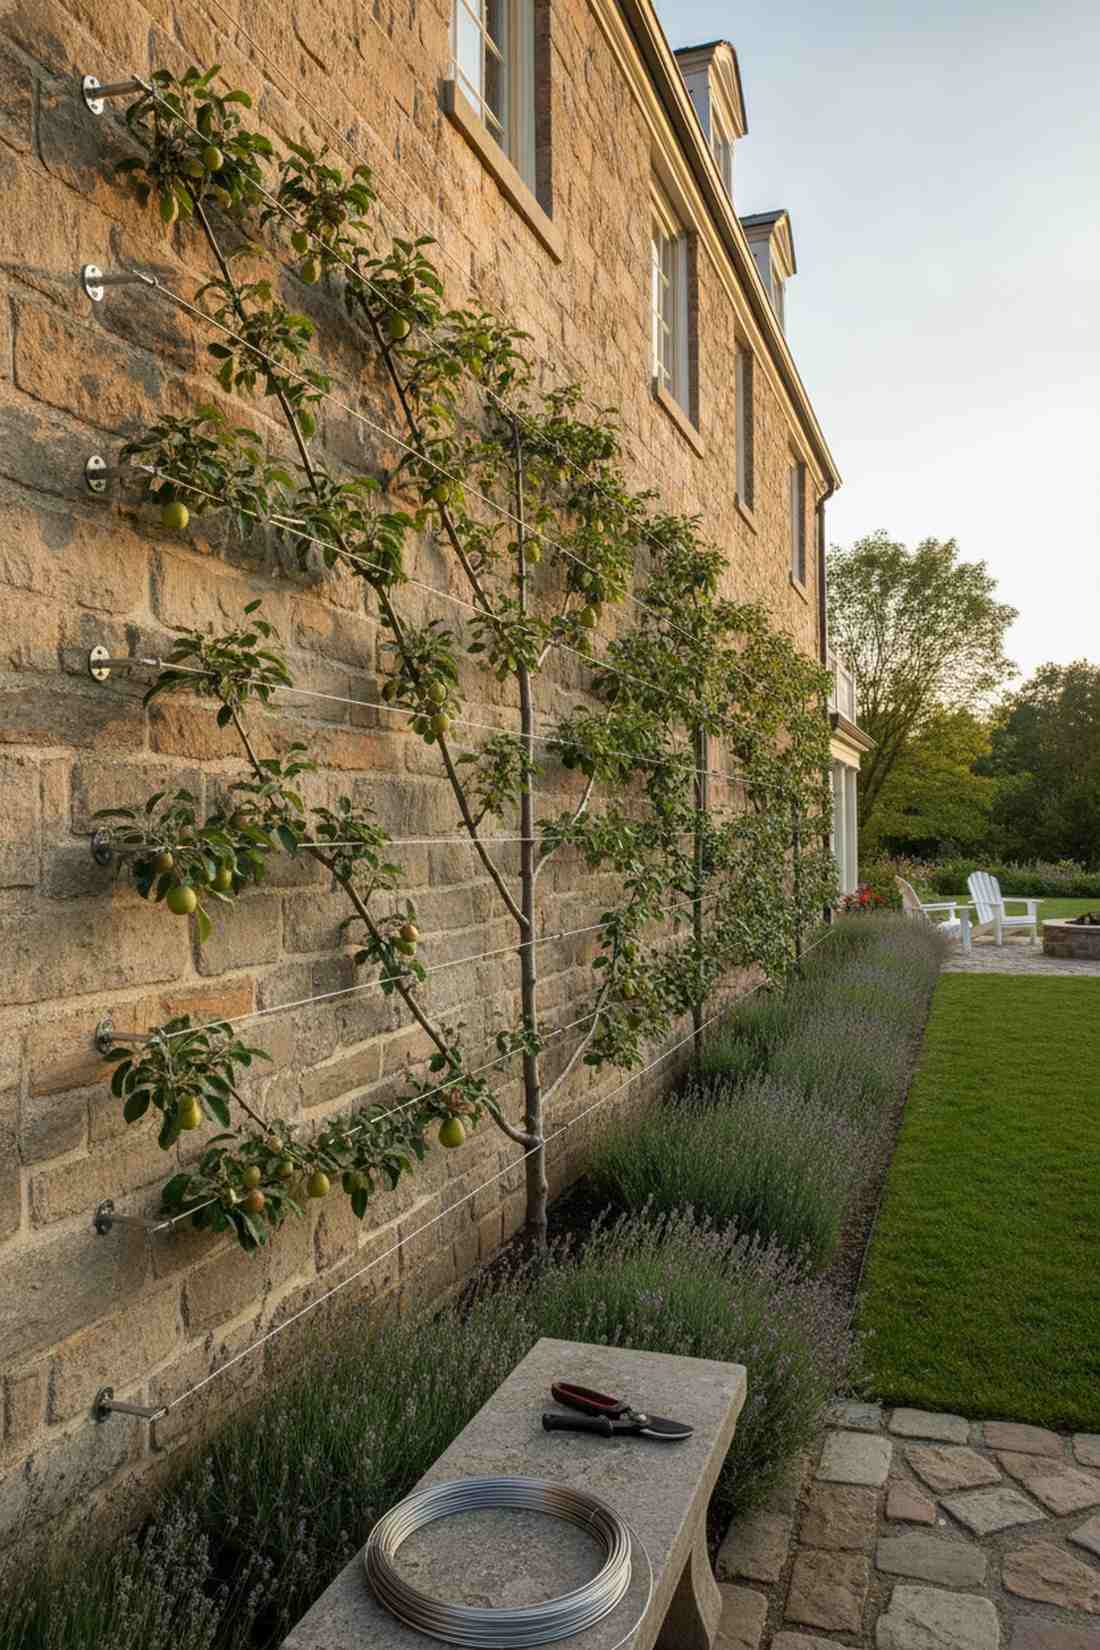
Feels like a centuries-old French chateau technique resurrected in your backyard. The flat espalier fruit tree wall is a jaw-dropping living sculpture. Superb for tiny side yards where a traditional tree canopy would block walkways.
Forcing branches to grow flat against a hot wall produces a massive fruit yield in virtually zero horizontal space. Using high-tension wire kits keeps the branches perfectly straight, guaranteeing that ultra-expensive formal garden look. It requires patience but pays off tremendously in aesthetics.
The trellis wire setup and bare-root trees cost roughly $100 to start. An incredible trick to maximize tight architectural spaces.
- Key Materials: Heavy-gauge training wire, wall anchors
- Vibe / Style: Formal French estate
- Difficulty: Advanced pruning and training
- Budget Breakdown: Wire/Anchors: $40 | Bare-root trees: $50 | Plant ties: $10
- Creator’s Tip: Install your anchor wires at least 4 inches away from the brick or wood fence so the fruit has room to swell without rotting against the wall.
- Smart Sourcing: stainless steel espalier wire tension kits and soft silicone plant training ties (bulk pack).
19. Pergola Grape Arbor
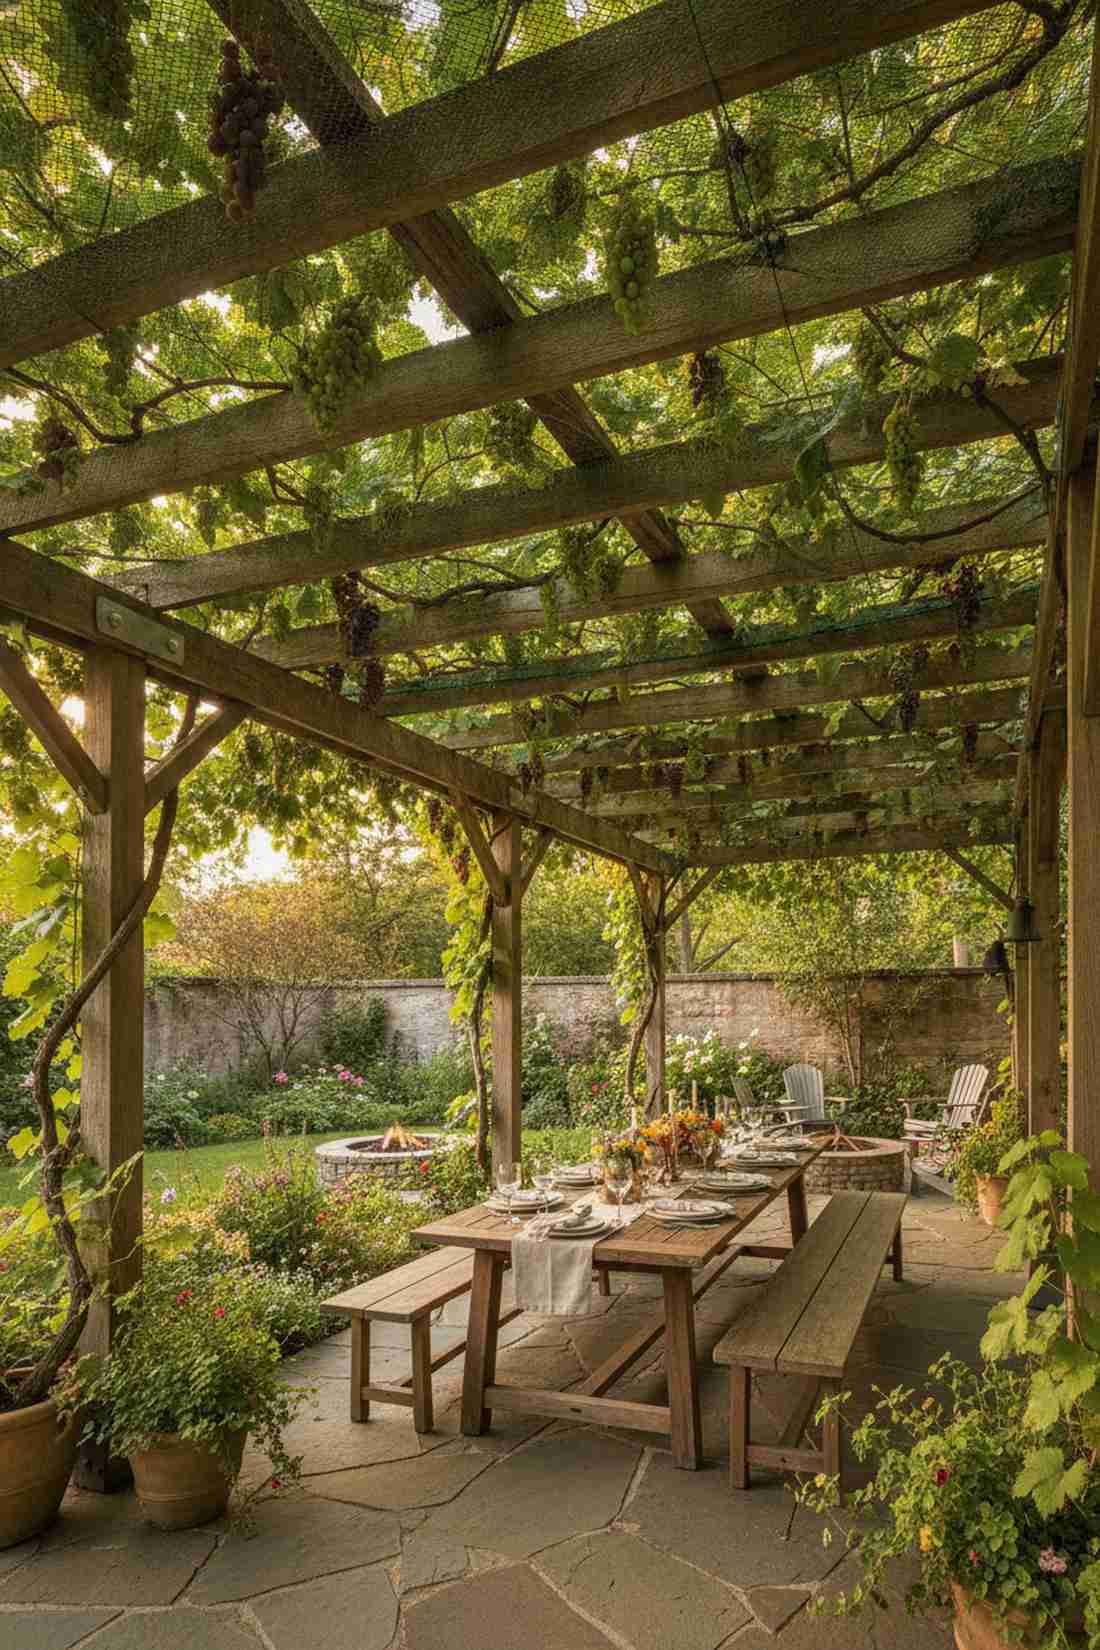
Casts a magical, dappled green light over your cooking space on hot days. A vine-covered pergola arbor merges raw structural woodwork with creeping nature. Flawless for integrating an outdoor dining space into an older, established garden.
Letting aggressive vines conquer your shade structure completely transforms a basic wood frame into a living canopy. Beefing up the top rafters is crucial, as the mature grapevines become incredibly heavy in late summer. It creates a romantic, timeless dining atmosphere.
Adding the vines and reinforced trellis netting costs around $60. Save this to your garden inspiration board immediately!
- Key Materials: Climbing vine supports, reinforced trellis netting
- Vibe / Style: Romantic winery patio
- Difficulty: Intermediate structural reinforcement
- Budget Breakdown: Trellis netting: $30 | Vine starters: $20 | Fasteners: $10
- Creator’s Tip: aggressively prune the vines every single winter while they are dormant; otherwise, the tangled mess will eventually collapse your pergola roof.
- Smart Sourcing: heavy-duty commercial trellis netting rolls and galvanized heavy-duty vine screw eyes.
If you have zero space, this upcoming micro-layout will completely blow your mind…
20. Stone Fruit Allee
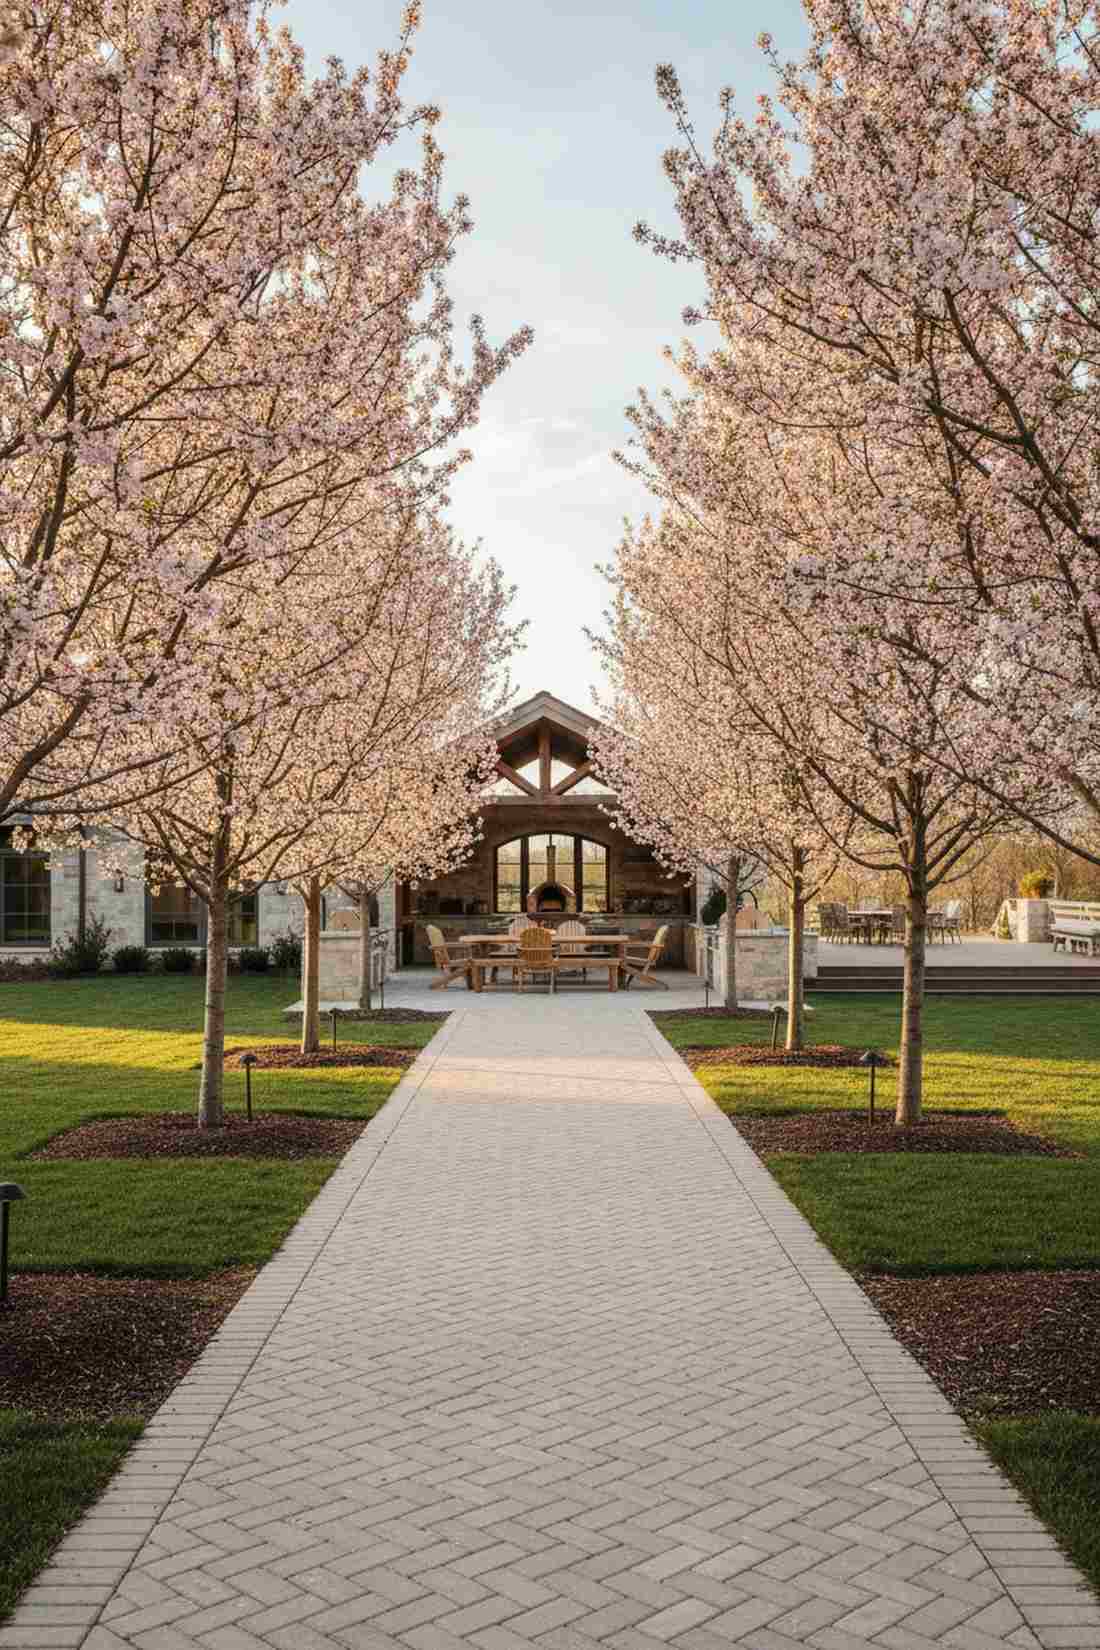
Generates a majestic, grand entrance that makes guests feel like royalty. The stone fruit tree pathway frames the journey to the cooking zone. Works beautifully for deep properties where the kitchen is set far back from the house.
Lining the approach with identical blooming trees delivers a breathtaking visual impact that looks like a high-end estate. Installing deep-root watering spikes ensures the trees grow uniformly without their roots destroying your pathway pavers. The spring blossoms alone make it entirely worth the effort.
Planting a symmetrical row of 4-6 trees costs about $300–$500. A majestic landscape addition that elevates the entire property.
- Key Materials: Dwarf stone fruit saplings, deep-root watering stakes
- Vibe / Style: Grand estate entrance
- Difficulty: Moderate landscaping
- Budget Breakdown: Saplings (x4): $250 | Root stakes: $60 | Mulch: $40
- Creator’s Tip: Dig the planting holes exactly twice as wide as the root ball, but no deeper, to prevent the trees from sinking and suffering root rot.
- Smart Sourcing: deep-root tree watering spike kits and premium organic fruit tree fertilizer spikes.
Compact Urban Solutions
Limited square footage demands creative stacking and folding strategies. Urban designers focus on multi-functional elements and vertical space utilization.
21. Murphy Fold-Down Kitchen
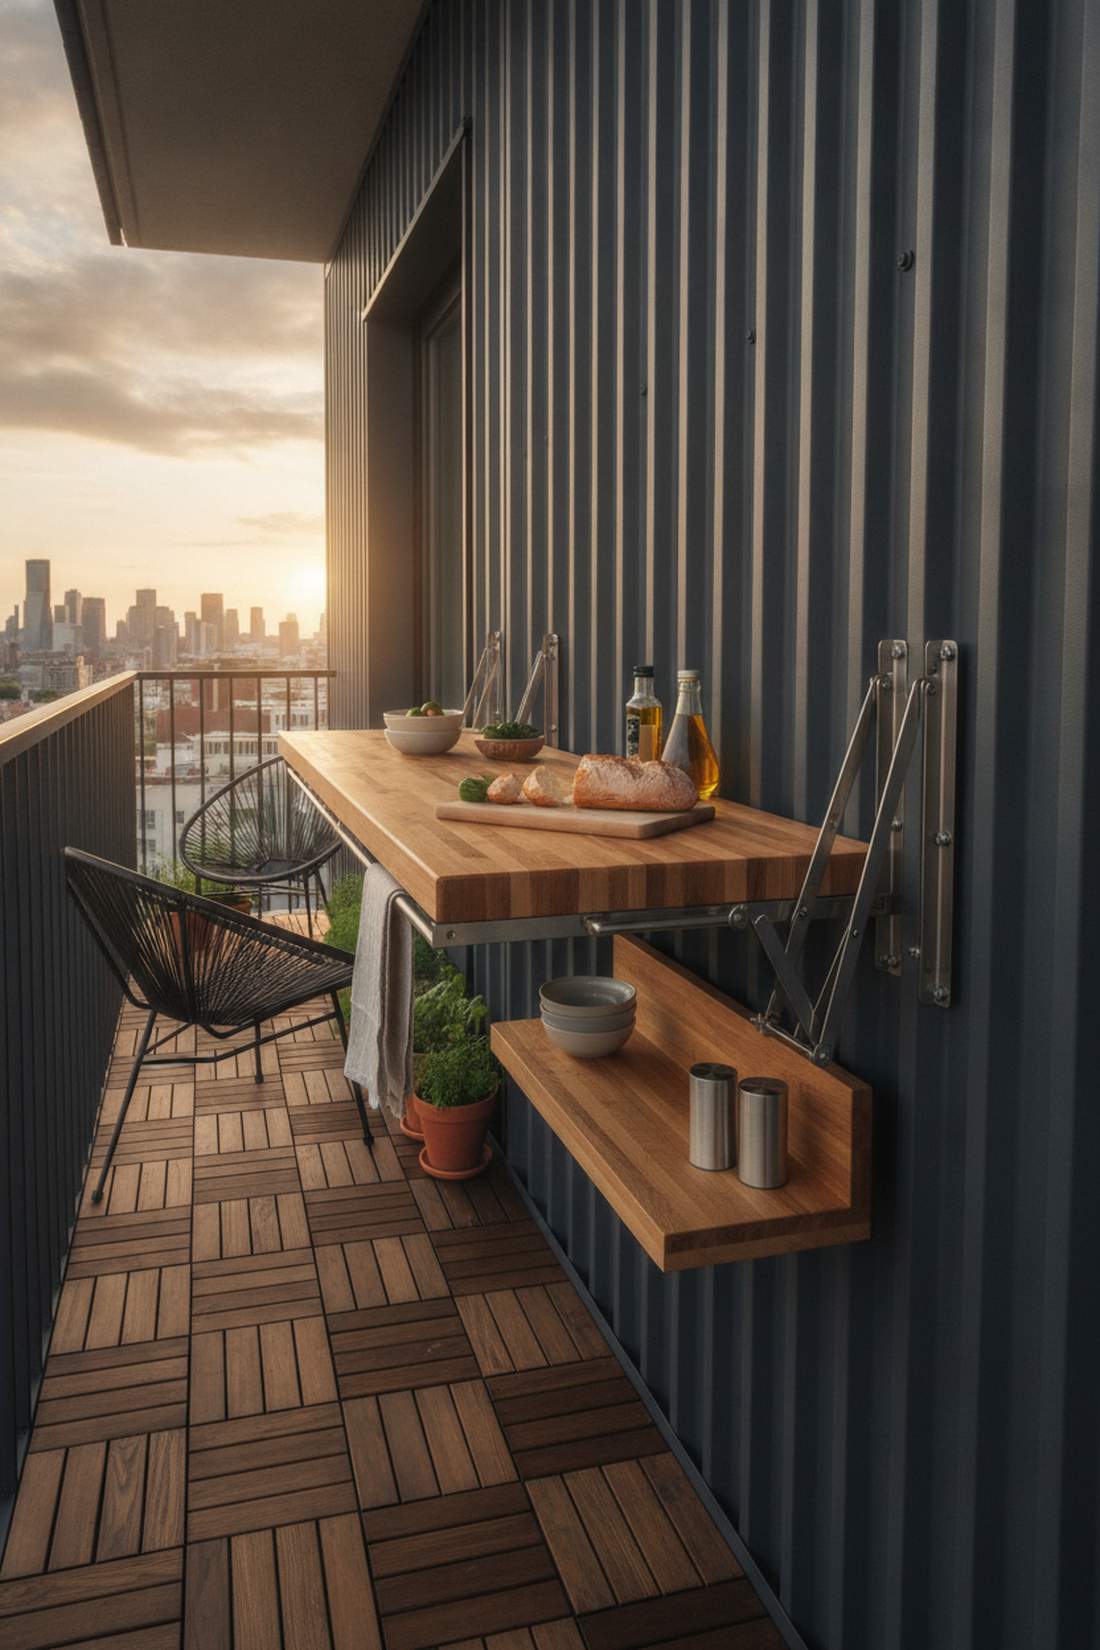
Operates like a secret agent gadget hidden in plain sight. This fold-away balcony prep station is pure, unadulterated urban genius. Essential for tiny apartment balconies where floor space is worth its weight in gold.
Utilizing heavy-duty marine hardware allows you to collapse a fully functional prep area flush against the siding. Incorporating weather-sealed wood finishes guarantees this ultra-compact setup survives rainstorms without swelling or jamming. It virtually disappears when the party is over.
You can build this hidden gem for about $150 in specialty hardware. Pin this if you are desperate for balcony space!
- Key Materials: Marine-grade folding brackets, butcher block scraps
- Vibe / Style: Stealth urban utility
- Difficulty: Intermediate precise measuring
- Budget Breakdown: Folding brackets: $60 | Wood top: $50 | Marine sealer: $30
- Creator’s Tip: Always hit a structural wall stud when mounting the brackets—a fold-down table loaded with heavy meat platters will instantly rip through standard drywall or weak siding.
- Smart Sourcing: heavy-duty locking folding shelf brackets (stainless steel) and marine-grade spar urethane sealant.
22. Stacked Appliance Tower
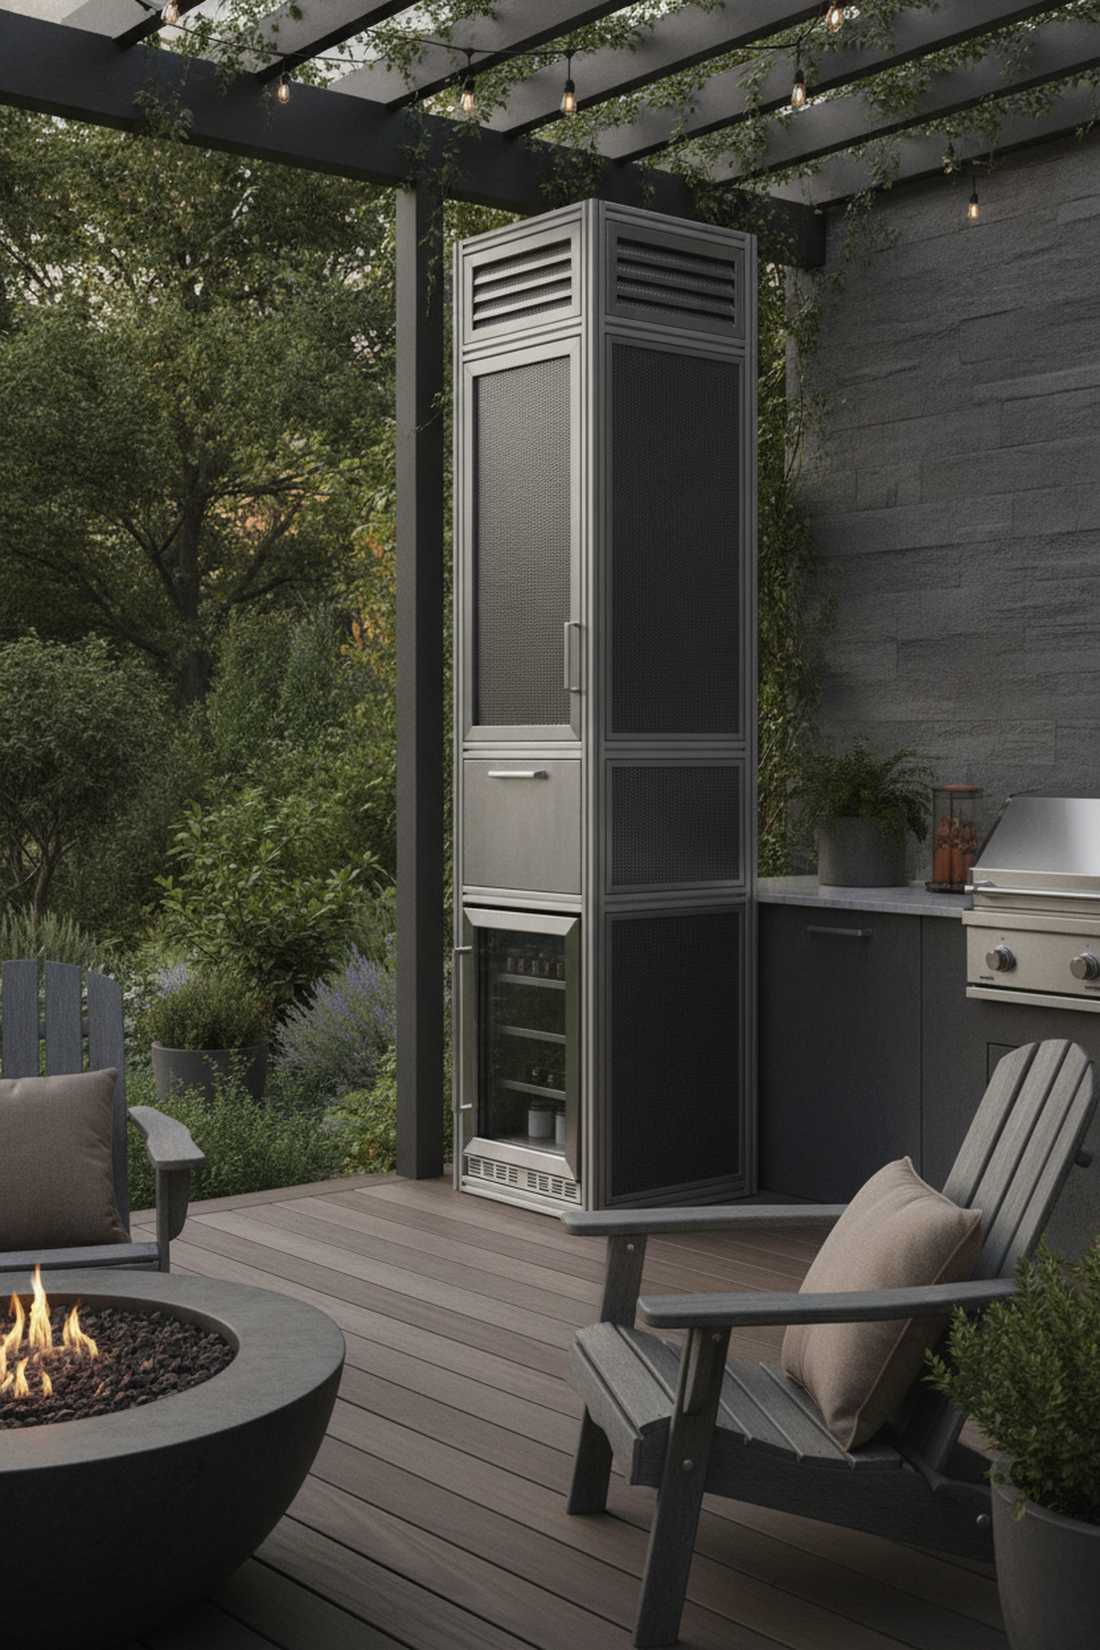
Looks like a sleek, high-tech command tower squeezed into a forgotten corner. The vertical outdoor appliance cabinet reclaims wasted airspace. Perfect for tight courtyard corners where wide horizontal cabinets simply refuse to fit.
Stacking the fridge, drawer, and storage vertically gives a designer-level finish that maximizes a tiny footprint. Securing an aluminum-framed outdoor tower kit prevents the heavy appliances from crushing the base over time. It creates a highly centralized, single-step cooking flow.
A bare aluminum tower frame kit usually costs around $300–$500. A brilliant hack for spatially challenged patios.
- Key Materials: Aluminum framing profiles, vented cabinet doors
- Vibe / Style: High-rise modern
- Difficulty: Advanced appliance balancing
- Budget Breakdown: Tower frame kit: $350 | Cladding: $150 | Ventilation panels: $50
- Creator’s Tip: Install louvered metal vent panels at the very top and bottom of the tower so the refrigerator compressor heat doesn’t get trapped and fry your appliances.
- Smart Sourcing: extruded aluminum structural framing kits and stainless steel louvered vent panels.
23. Corner Triangle Kitchen
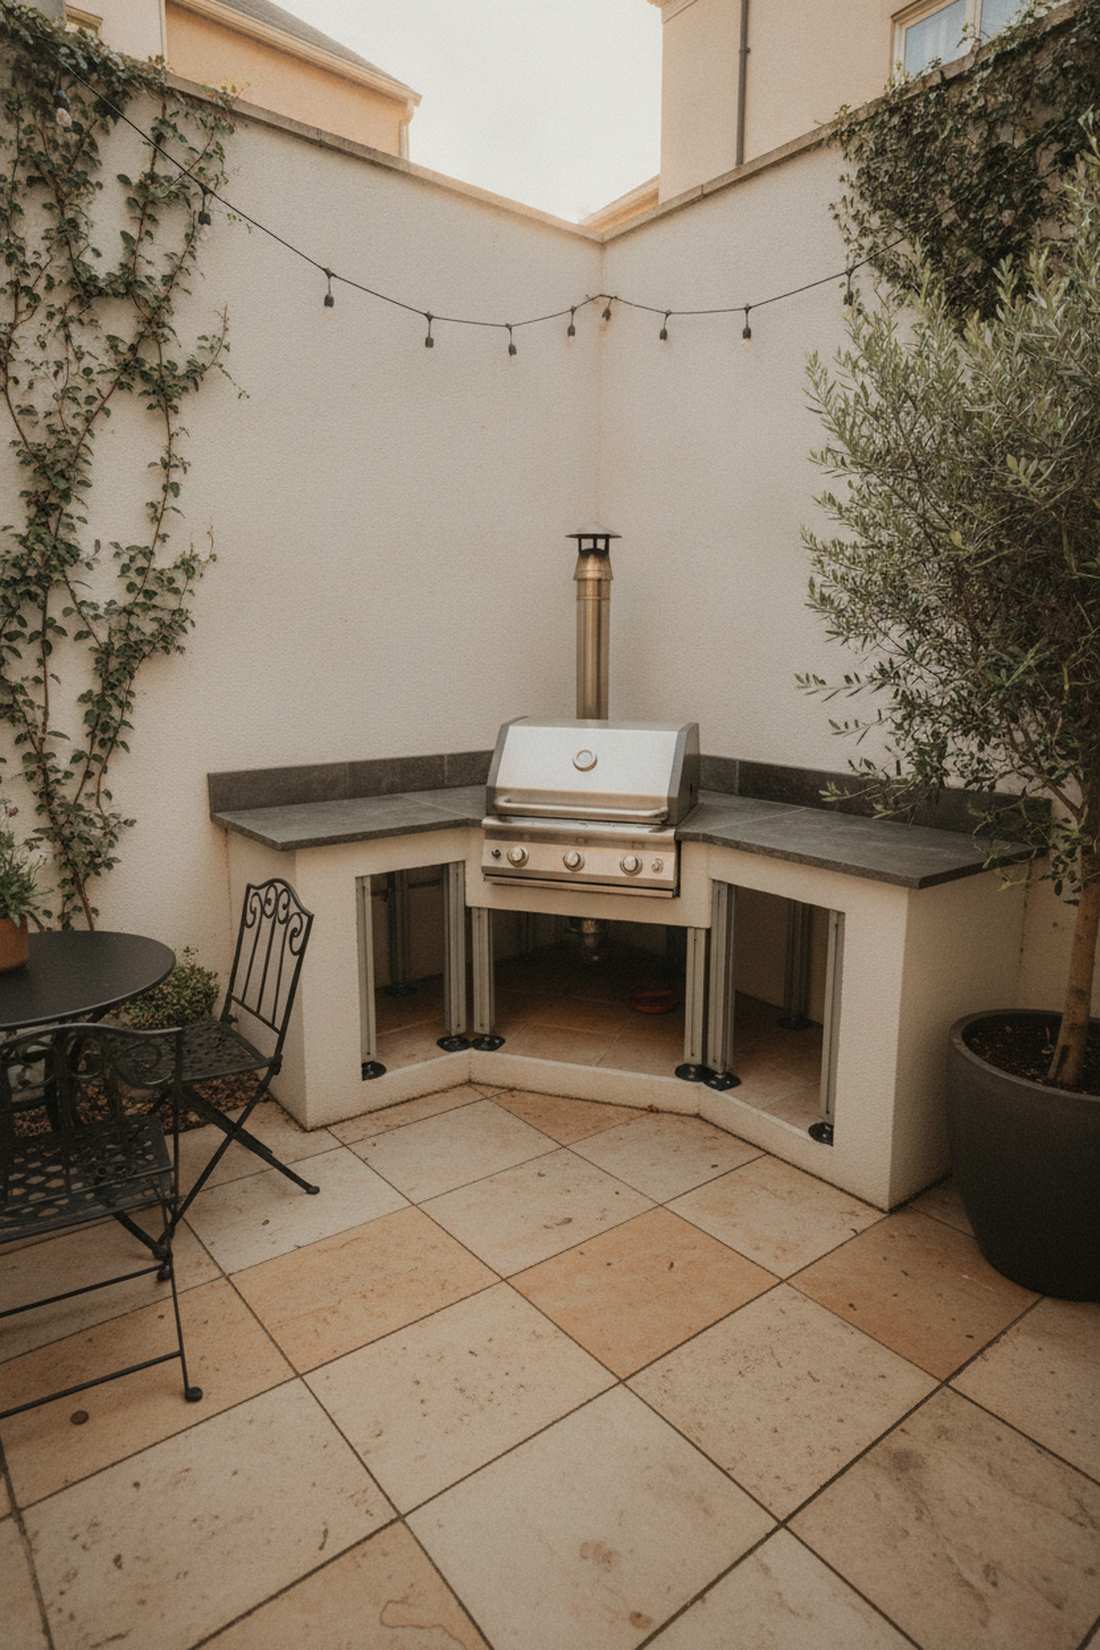
Snugs perfectly into a dead zone, transforming it into a high-functioning hub. The angled corner outdoor grill setup makes geometry work for you. Ideal for townhome patios hampered by strict boundary walls and awkward right angles.
Placing the primary heat source deep in the corner naturally channels smoke up and away from seated guests. Snapping together angled modular base pieces ensures you don’t spend hours trying to cut complex 45-degree angles from raw lumber. It reclaims the most useless part of the yard.
Corner modules and custom-cut counters will run you about $600 to $900. Save this layout to maximize every inch of your courtyard!
- Key Materials: 45-degree modular frame connectors, custom-cut stone tops
- Vibe / Style: Clever courtyard optimization
- Difficulty: Intermediate geometry and cutting
- Budget Breakdown: Corner frame: $300 | Custom top: $400 | Leveling feet: $50
- Creator’s Tip: Leave a hidden 2-inch gap behind the extreme back corner point to allow gas lines and electrical cords to drop down out of sight.
- Smart Sourcing: outdoor kitchen modular corner brackets and heavy-duty adjustable cabinet leveling feet.
Bringing It All Together
Professional home garden kitchen layouts succeed by balancing workflow efficiency with edible landscape integration. By exploring these exact 23 high-end configurations, you can achieve a premium, custom-built look using smart, productized modular kits and UV-resistant materials. The most effective designs position prep zones within immediate reach of growing areas while maintaining clear separation between hot cooking and cold storage functions. Start with one of these 23 proven layout blueprints, invest in heavy-duty starter framing, and transform your backyard into an elite culinary space on a realistic budget.
Frequently Asked Questions
What is the minimum space required for a functional home garden kitchen?
A functional layout requires an 8×10-foot footprint to safely house a modular grill unit, a 4-foot prep zone, and a compact outdoor refrigerator. Utilizing pre-built linear outdoor kitchen kits allows you to maximize this tight space effortlessly. Always maintain a 3-4 foot clearance zone in front of your weatherproof cabinets to ensure safe movement while handling hot grates.
How far should raised garden beds be from cooking surfaces?
Keep raised planter boxes strictly 3-5 feet away from open flame modular grill islands to avoid radiant heat scorching your herbs. Upgrading to heat-resistant masonry planter kits provides an extra layer of protection against grease splatter. Place your heavy-duty raised beds near the prep sink instead, making quick harvests completely seamless without risking plant damage.
Which fruit trees work best near outdoor kitchens?
Dwarf citrus, espalier apples, and fig trees are exceptional choices due to their highly manageable 10-12 foot mature height. Investing in premium UV-resistant large resin planters gives you the mobility to roll these trees away from extreme grill heat. Avoid messy varieties; sticking to compact, container-friendly fruit trees keeps your expensive stone countertops free from rotting fruit stains.
What counter height works best for outdoor kitchen layouts?
The golden rule is 36 inches for active food prep, perfectly matching standard commercial outdoor kitchen inserts. If you are adding a guest seating ledge, elevate that specific section to 42 inches using heavy-duty cantilever support brackets. This split-tier approach creates a professional bar-top aesthetic while keeping guests safely away from the active cooking surface.
How do I protect garden beds integrated with kitchen structures?
You absolutely must install a commercial-grade waterproofing membrane between damp soil and your expensive outdoor cabinet frames. Utilizing drop-in stainless steel planter troughs ensures no water leakage destroys your base structure. Always apply a premium food-safe wood sealant to any adjacent timber, and ensure weep holes are drilled to direct heavy rain away from your utility lines.