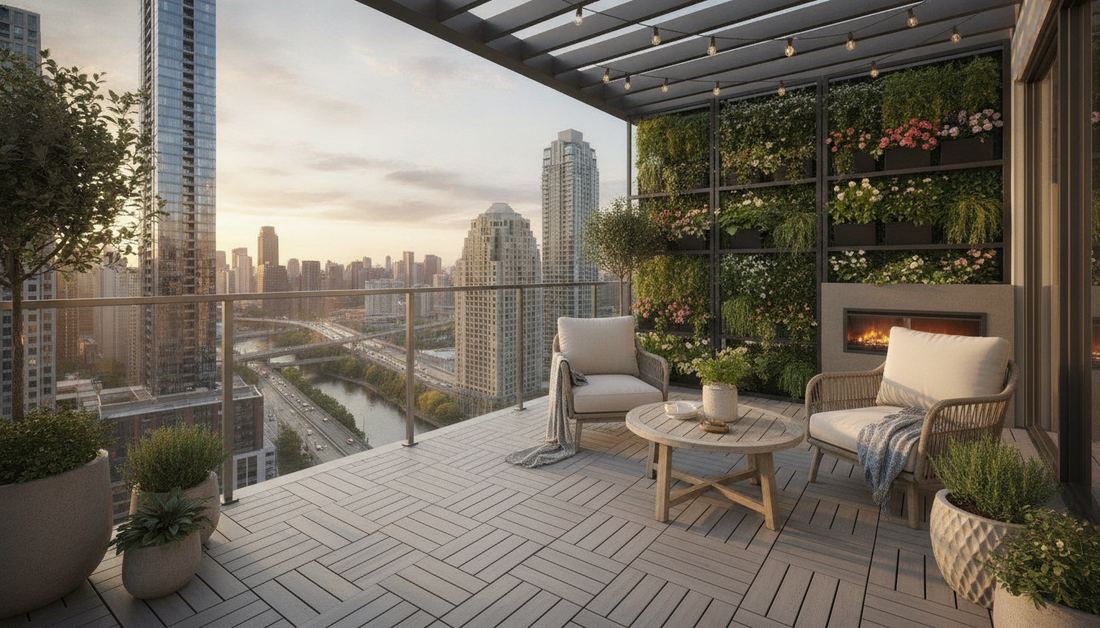
Smart city balcony ideas instantly elevate cramped footprints into premium urban retreats. Maximize vertical potential using weather-resistant layouts and high-end outdoor structural components. Strategic material sourcing guarantees a designer finish on any realistic budget.
Design Snapshot: Key Principles
- Vertical Optimization: Exploit wall and railing surfaces to multiply usable growing and storage area without consuming floor space
- Multi-Functional Elements: Select furniture and fixtures that serve dual purposes—storage benches, fold-down tables, and modular systems
- Microclimates: Assess sun exposure, wind patterns, and rain shadow zones to position plants and seating for maximum comfort and productivity
- Visual Flow: Create depth perception through layered planting heights, strategic lighting, and material transitions that guide the eye outward
Vertical Garden Solutions for Urban Balconies
Vertical structures multiply planting capacity while maintaining floor circulation. Contemporary systems range from modular pocket planters to self-watering tower units that support up to 50 plants in a four-square-foot footprint.
1. Living Wall Panel Systems
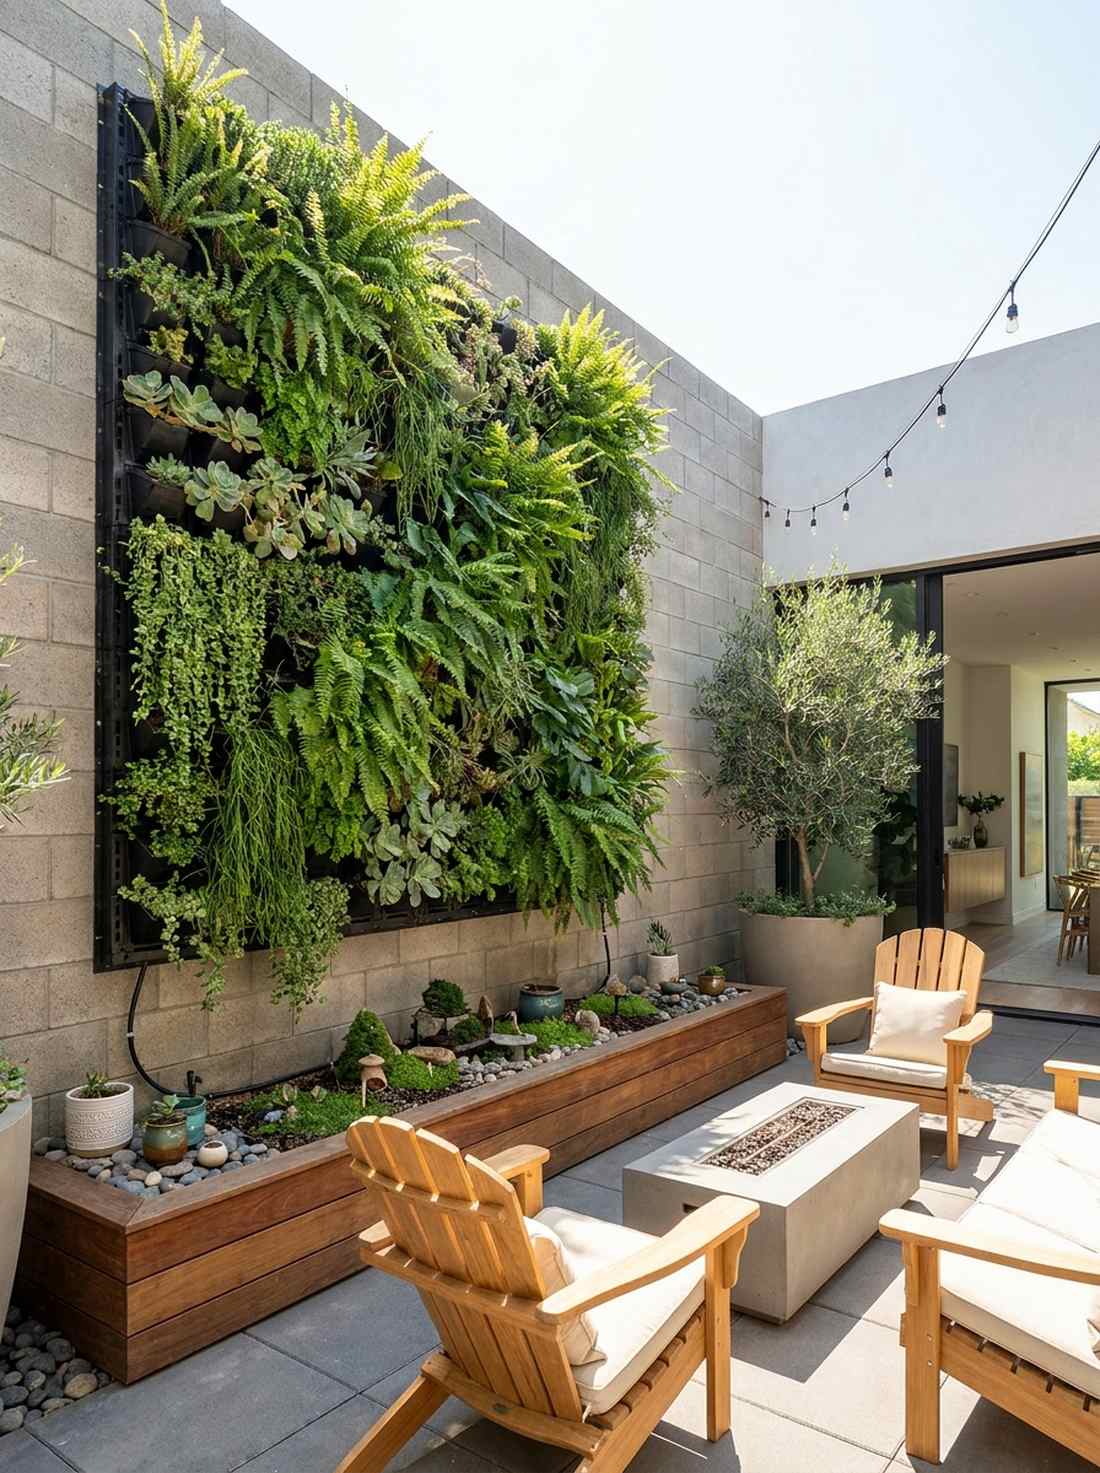
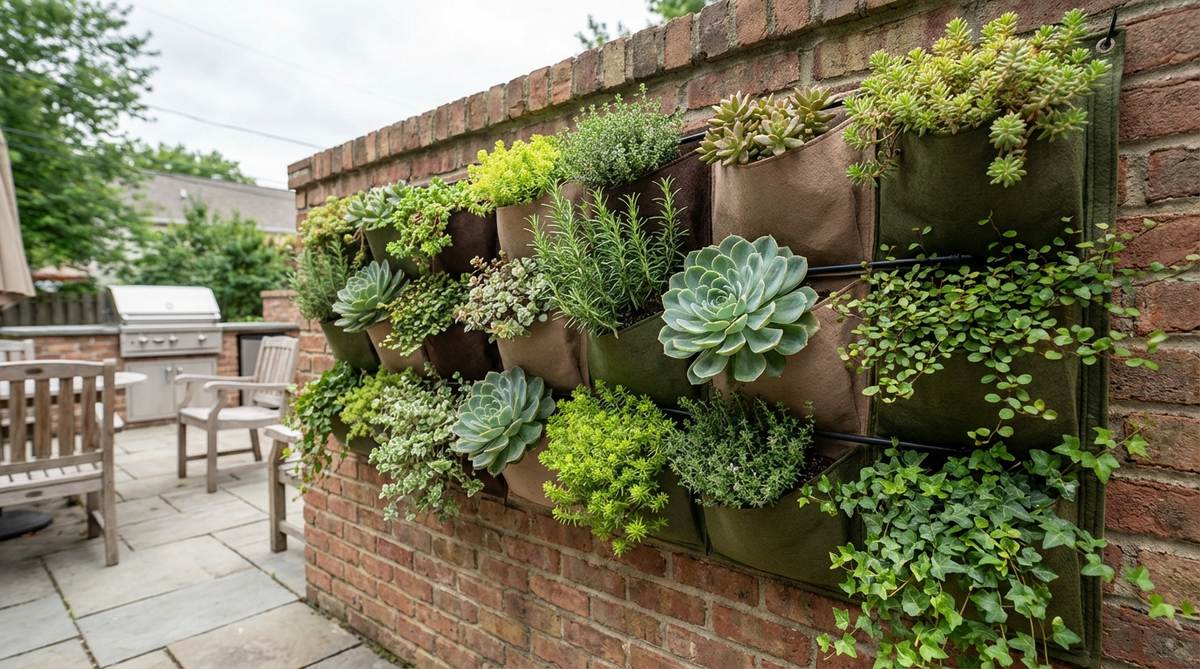
This lush vertical garden facade feels like a tiny hidden forest you accidentally discovered. Works exceptionally well for a shaded balcony craving vibrant organic texture.
Most DIYers ruin their walls with cheap fabric, but utilizing rigid modular systems delivers a surprisingly premium look. Integrate professional miniature garden supplies for robust root protection.
You can easily pull this off for around $40–$80 depending on coverage. Pin this to your urban oasis inspiration board to reference the structural layout later.
- Key Materials: Heavy-duty plastic mounting grids, moisture-barrier backings
- Vibe / Style: Botanical luxury lounge
- Difficulty: Moderate weekend installation
- Budget Breakdown: Panels: $35 | Mounting Hardware: $15 | Plants: $30.
- Creator’s Tip: Map your drill holes on painters tape first to ensure level grid alignment.
- Smart Sourcing: waterproof modular pocket panels (bulk pack) and pre-cut moisture barrier sheeting.
2. Ladder-Style Tiered Planters
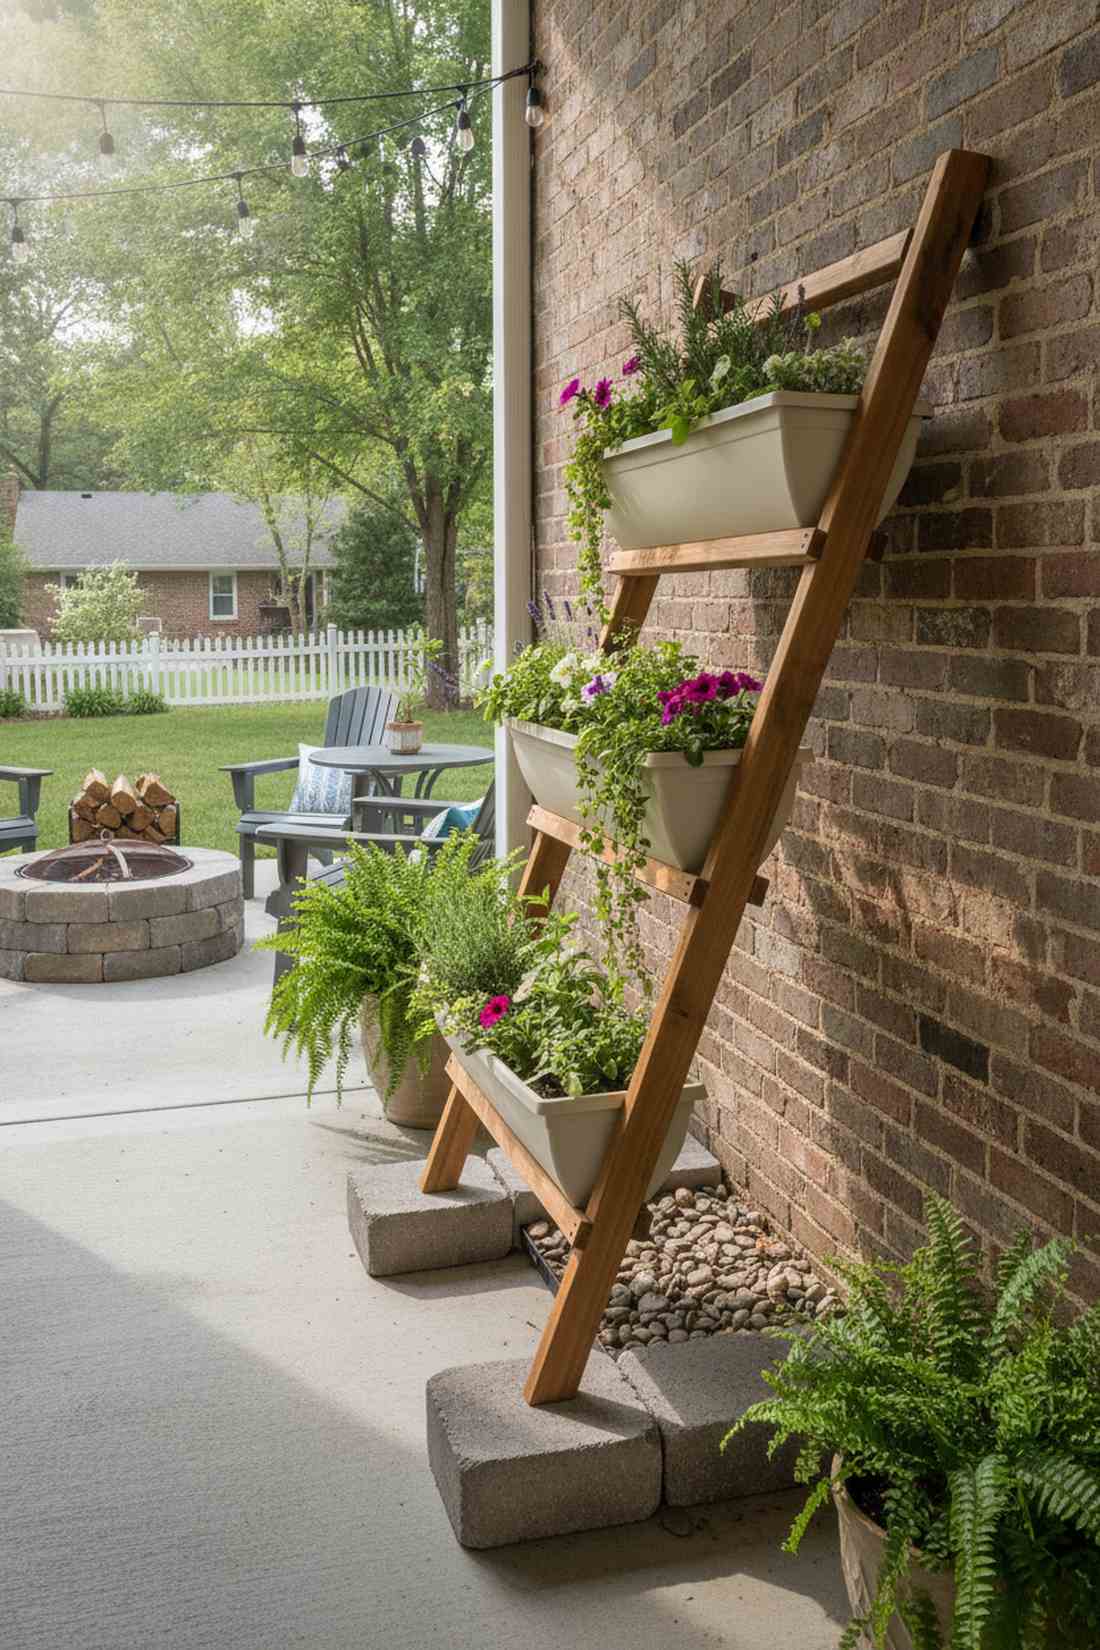
A staggered leaning planter stand brings a storybook cottage ambiance to harsh concrete environments. Perfectly suited for sunny corners needing layered vertical depth.
Skip the flimsy wire racks; leaning angled structures completely alter how sunlight filters through cramped spaces. It gives a designer-level finish while anchoring your overall outdoor aesthetic.
Expect to spend about $25–$50 to establish this framework. It’s a fast upgrade that completely changes the vibe of your outdoor living zone.
- Key Materials: Weather-treated cedar rungs, heavy base pavers
- Vibe / Style: Rustic urban farmhouse
- Difficulty: Easy beginner setup
- Budget Breakdown: Frame: $25 | Anchors: $10 | Pots: $15.
- Creator’s Tip: Weigh down the lowest tier with heavy decorative stones to prevent wind tipping.
- Smart Sourcing: UV-coated tiered wooden frames and high-drainage resin planter bowls (starter kit).
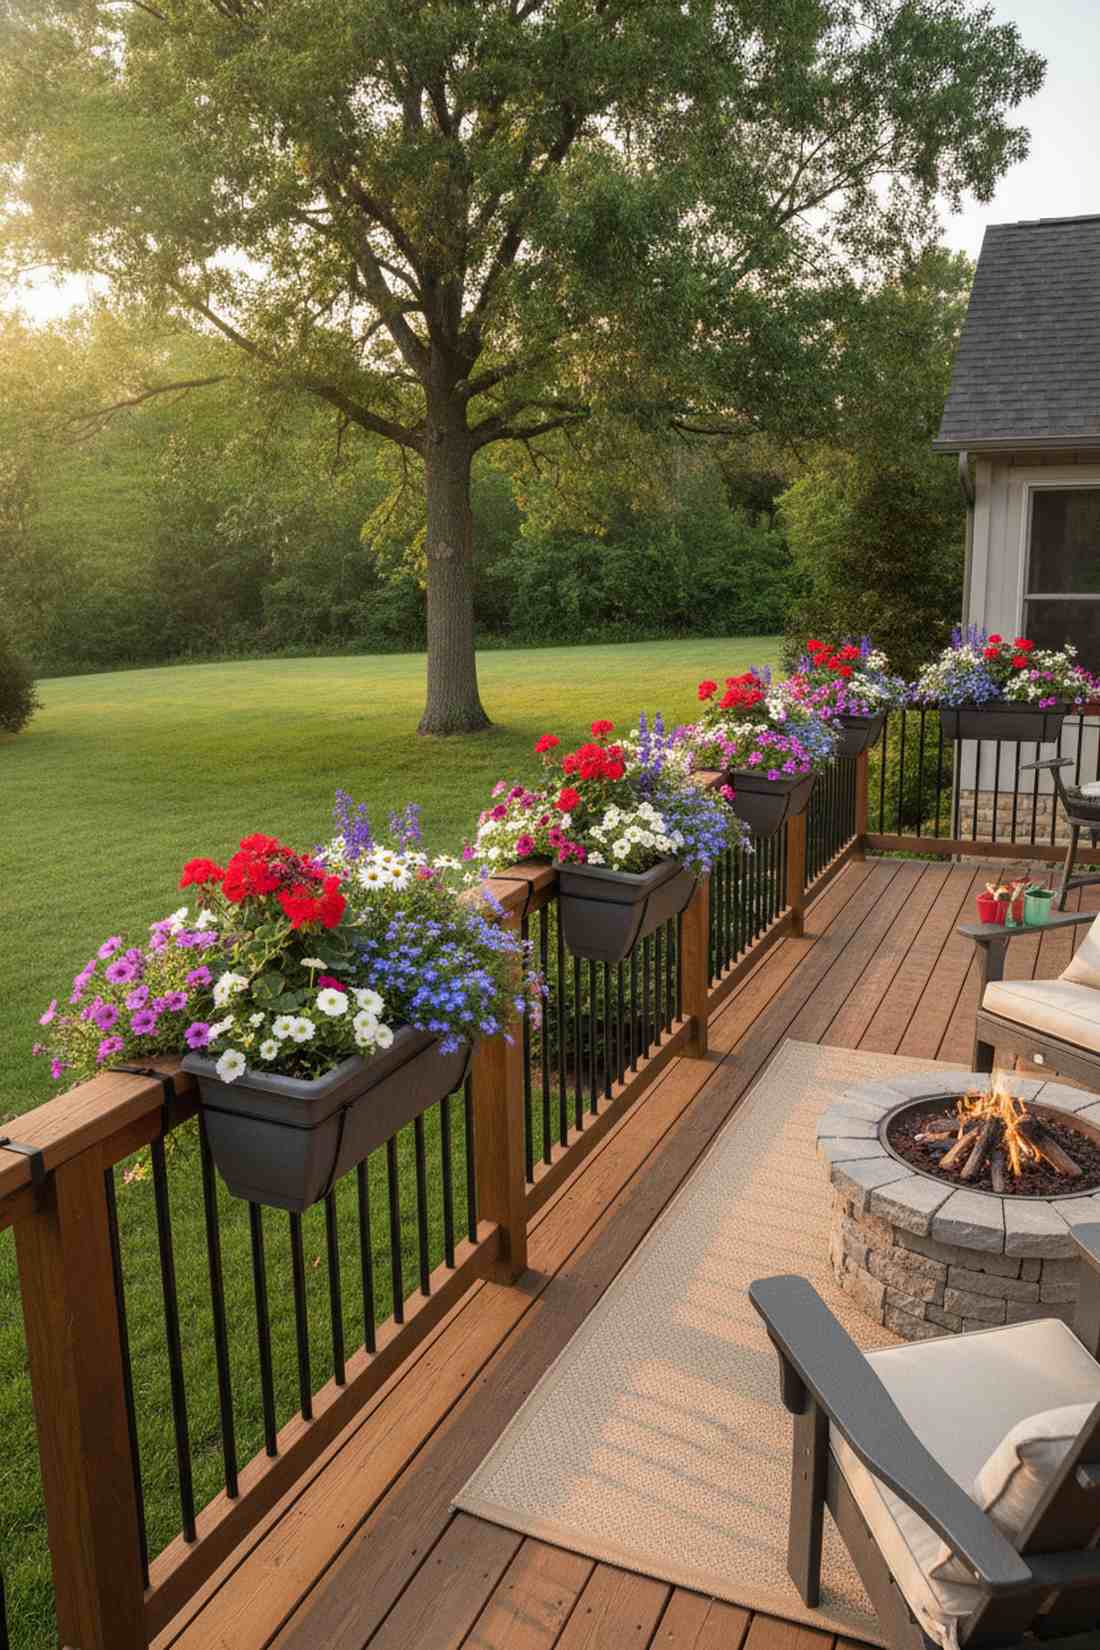
3. Railing-Mounted Planter Boxes
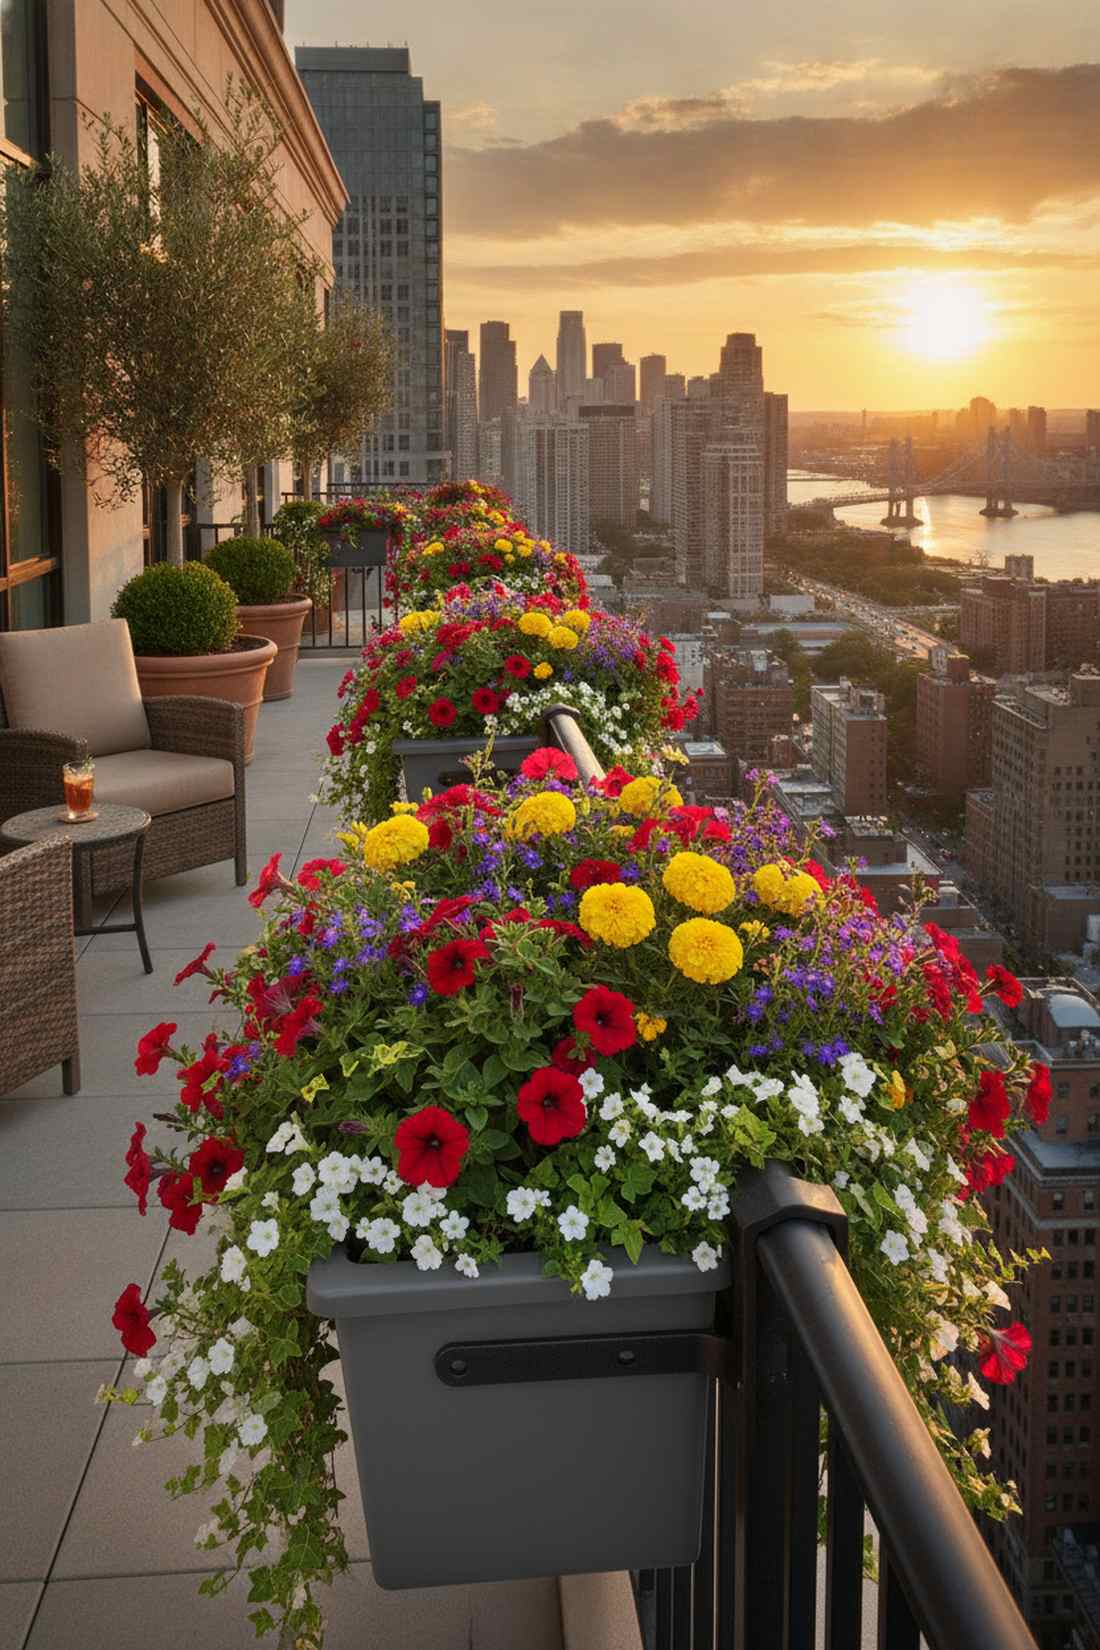
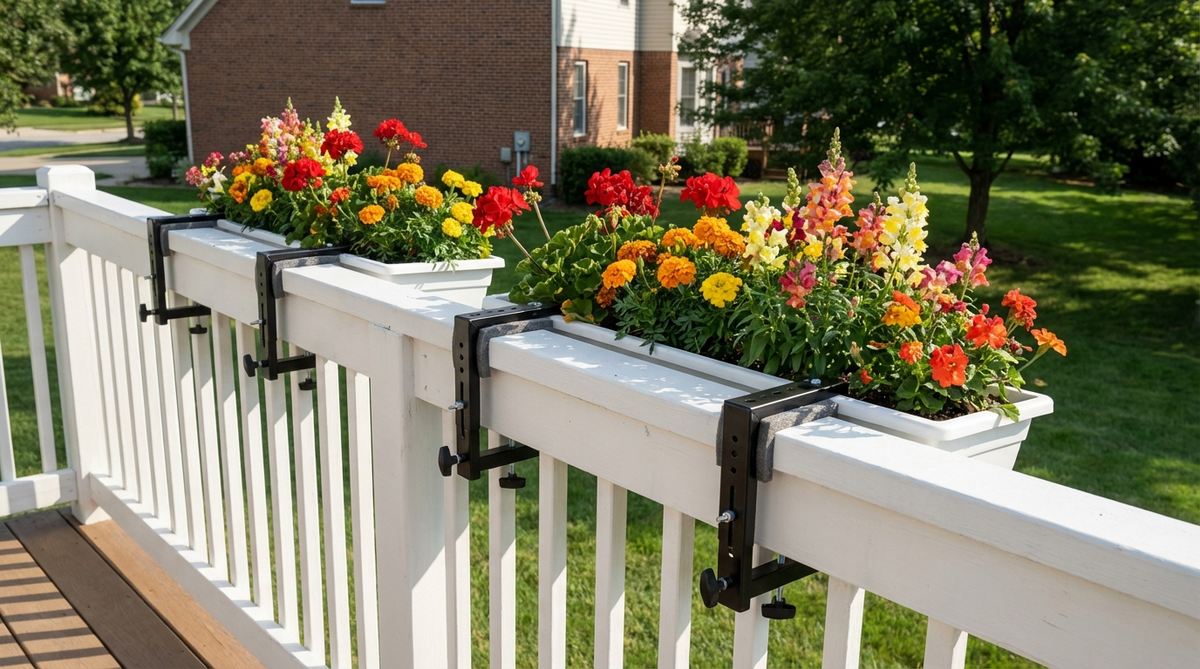
These over-the-rail floral troughs cast an enchanting romantic perimeter that feels straight out of a Parisian café. Excellent for narrow spaces requiring unhindered foot traffic.
Rookie decorators often under-secure their boxes, missing out on a layout that looks professionally installed. Locking metal brackets ensures your terrarium accessories stay firmly mounted during aggressive city winds.
Implementation averages $20–$45 per railing section. Save this to your DIY weekend garden board so you don’t forget the mounting trick.
- Key Materials: Adjustable railing brackets, composite trough boxes
- Vibe / Style: Classic European terrace
- Difficulty: Quick afternoon project
- Budget Breakdown: Brackets: $15 | Trough: $20 | Liners: $5.
- Creator’s Tip: Line the bottom with expanded clay pebbles before adding soil to prevent waterlogging.
- Smart Sourcing: adjustable steel railing brackets (heavy-duty) and weather-resistant fiberglass troughs.
4. Trellis Arches for Climbing Vegetables
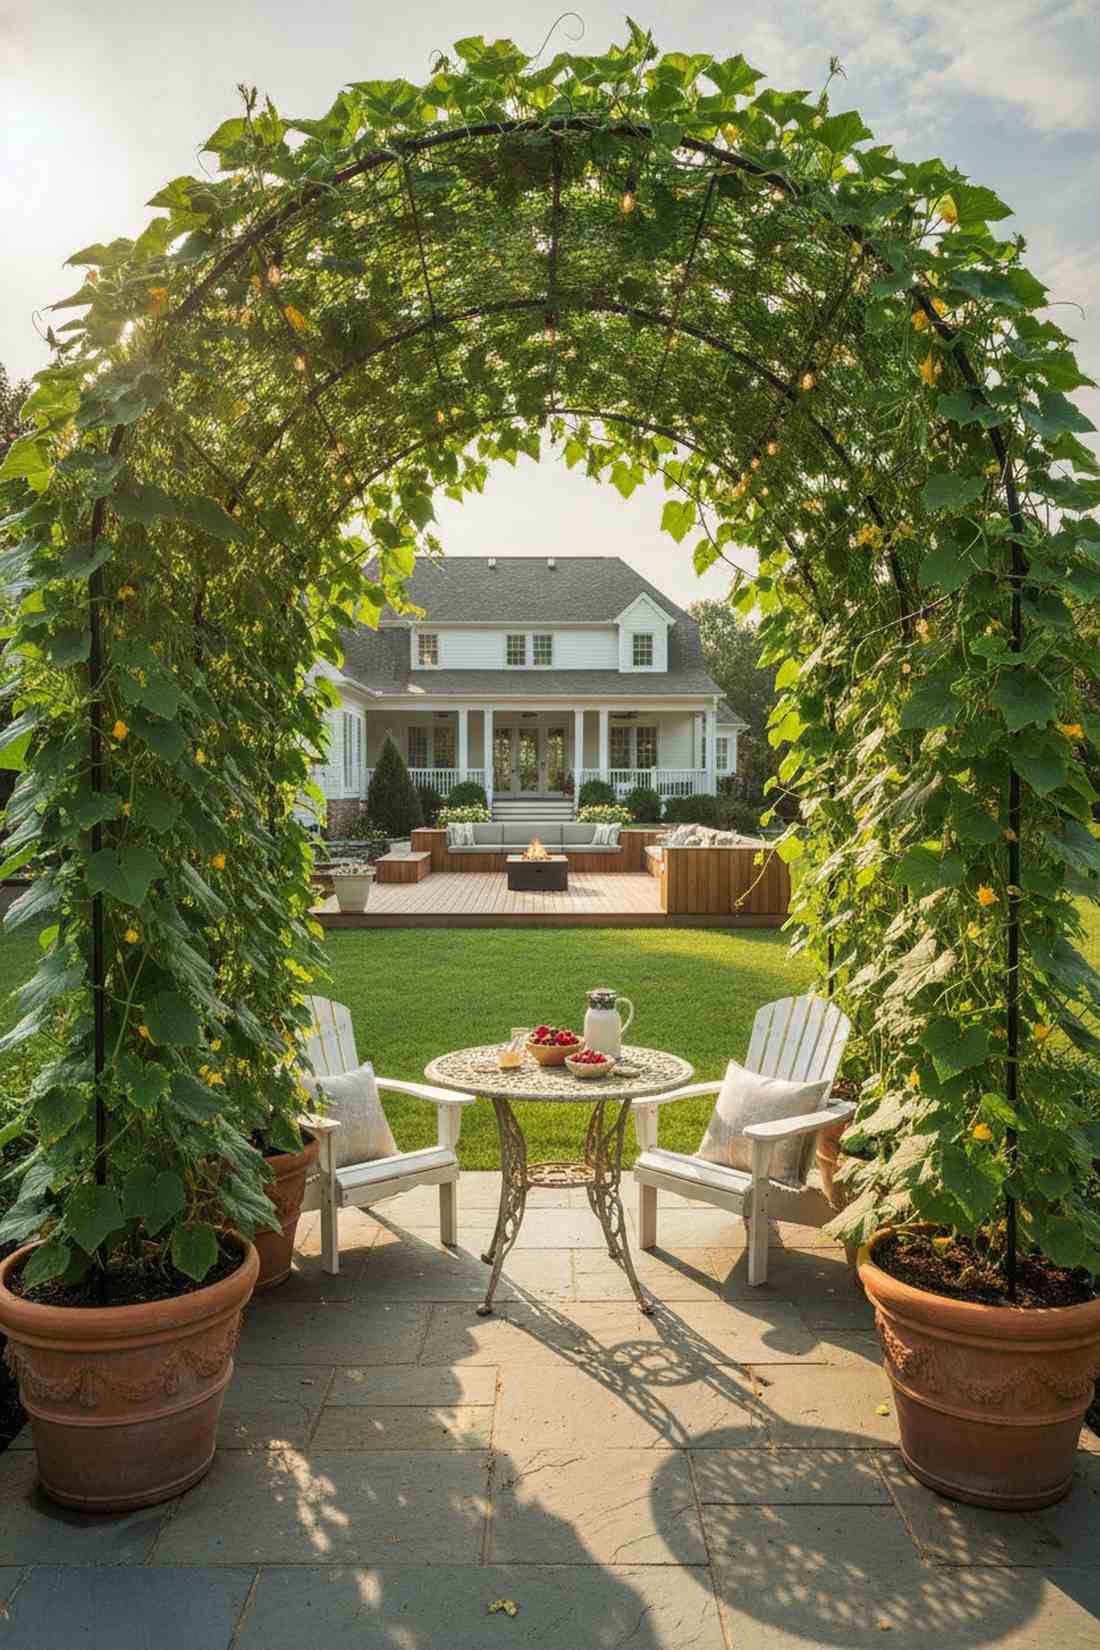
An overhead green canopy arch creates an immersive, secret-garden entrance right on your patio. Unbeatable for masking unsightly upper-floor neighbors or harsh building shadows.
Never rely on flimsy twine; leveraging structured metal arches looks far more expensive than it is. It maximizes yields while turning basic vines into architectural focal points.
Building this lush tunnel costs roughly $30–$60. Highly recommended for a quick weekend win that pays off massively by mid-summer.
- Key Materials: Tubular steel garden arch, concrete footing bases
- Vibe / Style: Abundant greenhouse corridor
- Difficulty: Requires two people
- Budget Breakdown: Metal Arch: $35 | Base Weights: $15 | Vines: $10.
- Creator’s Tip: Zip-tie the arch legs directly to heavy corner planters for zero-drill stability.
- Smart Sourcing: rust-proof tubular steel arches and commercial-grade plant training clips (bulk pack).
This next configuration is ridiculously cheap but visually commands attention like a $200 custom setup…
5. Magnetic Wall-Mounted Pots
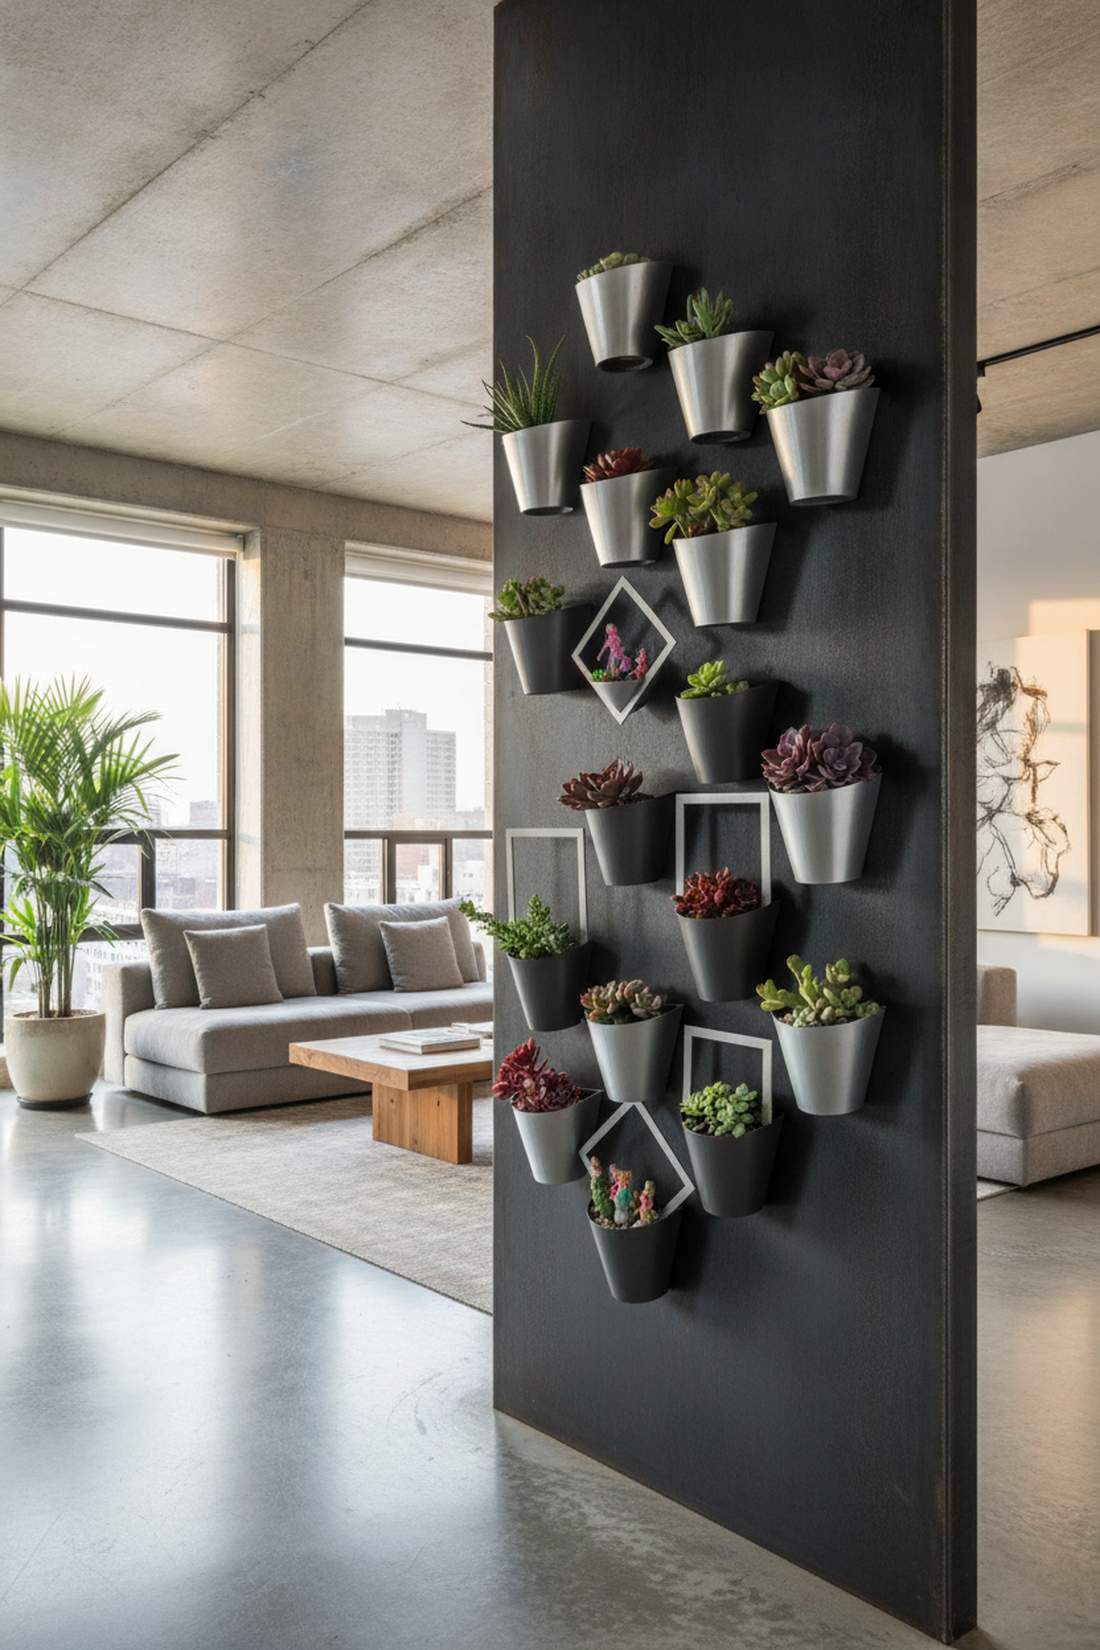
A floating geometric wall garden brings a sleek, futuristic serenity to exposed metal dividers. This is the ultimate renter-friendly aesthetic for industrial-style city apartments.
Instead of struggling with drill bits, utilizing neodymium holds delivers an instant high-end showroom finish. You can easily rotate your fairy garden kits and succulents as seasonal light shifts.
This mesmerizing floating effect runs about $40–$75 depending on pot density. Save this if you need zero-damage decoration ideas for strict landlords.
- Key Materials: Magnetic backing plates, lightweight aluminum pots
- Vibe / Style: Modern industrial minimal
- Difficulty: Five-minute installation
- Budget Breakdown: Magnetic Pots: $40 | Steel Backing: $20 | Flora: $15.
- Creator’s Tip: Wipe the metal surface with rubbing alcohol before placing magnets to prevent micro-sliding.
- Smart Sourcing: neodymium magnetic planter pots (starter kit) and ultra-lightweight succulent mediums.
6. Hydroponic Tower Gardens
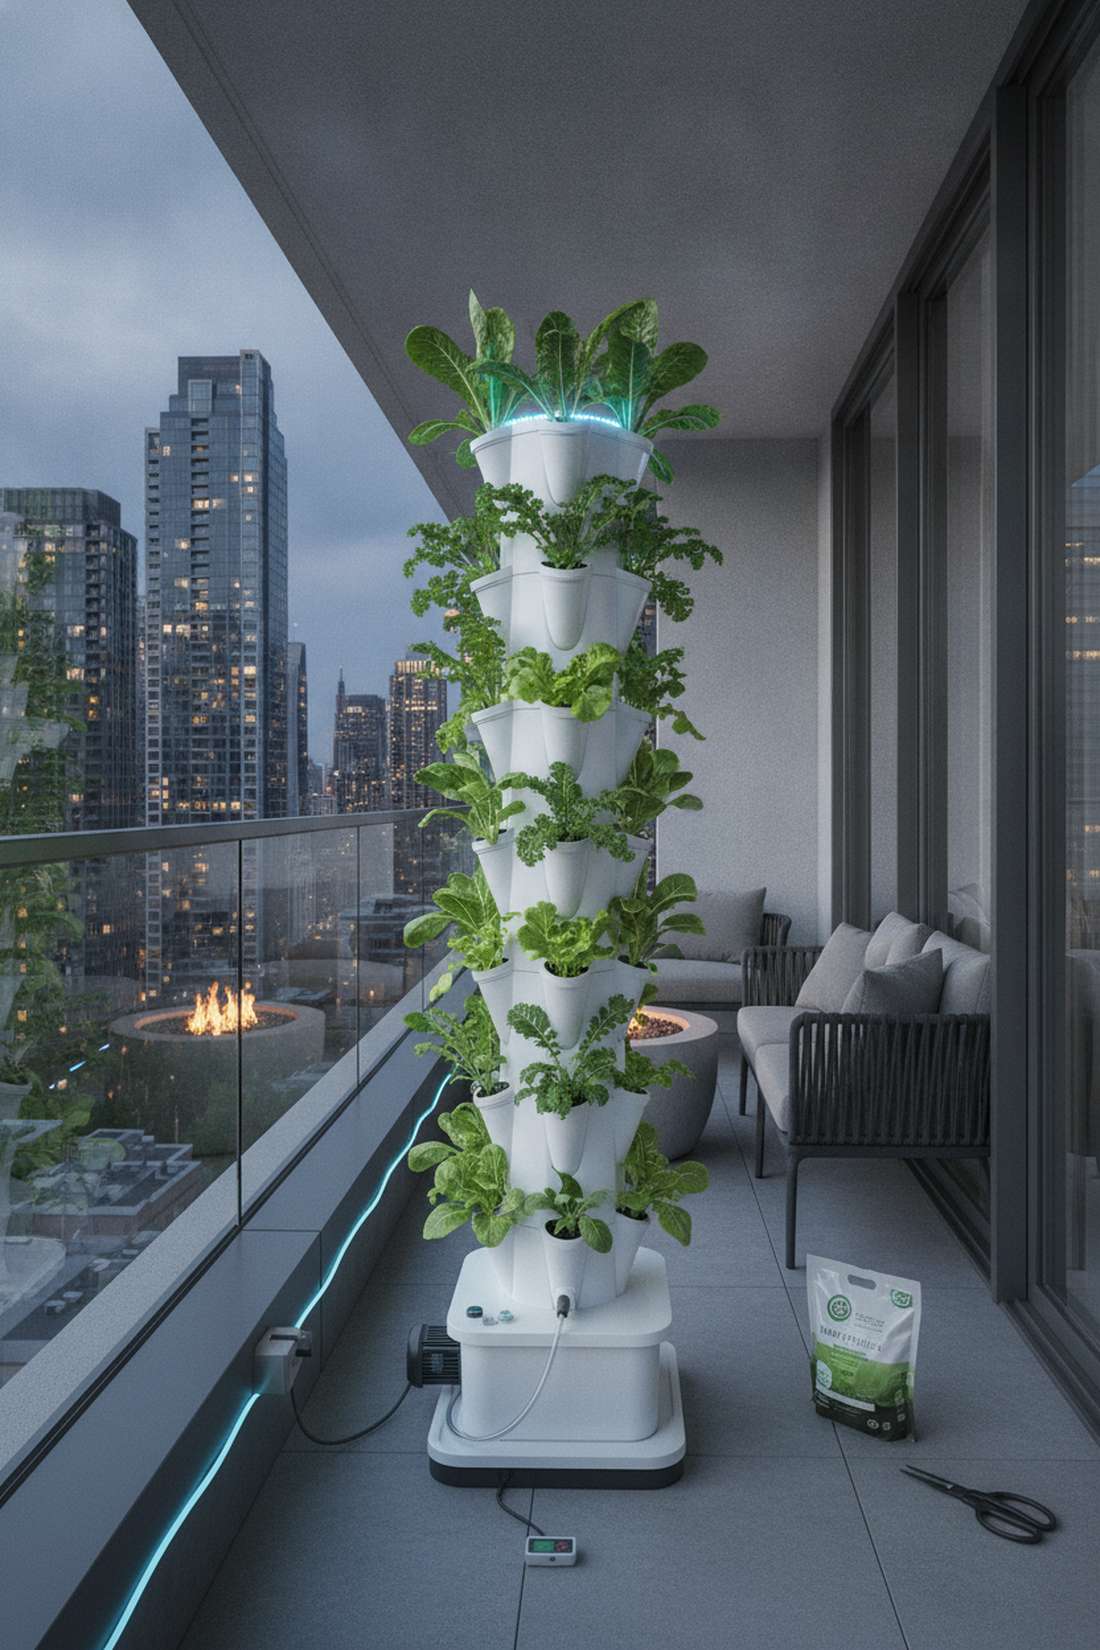
The freestanding water-culture column feels like harvesting fresh produce on a luxury space station. An absolute necessity for serious city balcony garden enthusiasts wanting massive yields.
While soil containers limit growth, investing in an automated pump system solves the constant watering nightmare. It guarantees your leafy greens explode with growth in record time.
Initial framework requires a $150–$300 investment, but pays for itself in grocery savings. Pin this setup if you want hands-free harvesting all season long.
- Key Materials: Stackable grow columns, submersible pump, timer
- Vibe / Style: High-tech organic productivity
- Difficulty: Advanced assembly
- Budget Breakdown: Tower Kit: $180 | Pump/Timer: $40 | Nutrients: $30.
- Creator’s Tip: Hide the electrical cord along the baseboard using weatherproof cable tape.
- Smart Sourcing: aeroponic vertical tower kits and liquid organic nutrient solutions (bulk pack).
Space-Saving Furniture and Layout Strategies
Compact urban balconies demand furniture that adapts to multiple functions while folding or stacking when not in use. Contemporary manufacturers engineer pieces specifically for small-scale outdoor applications.
7. Wall-Mounted Folding Table
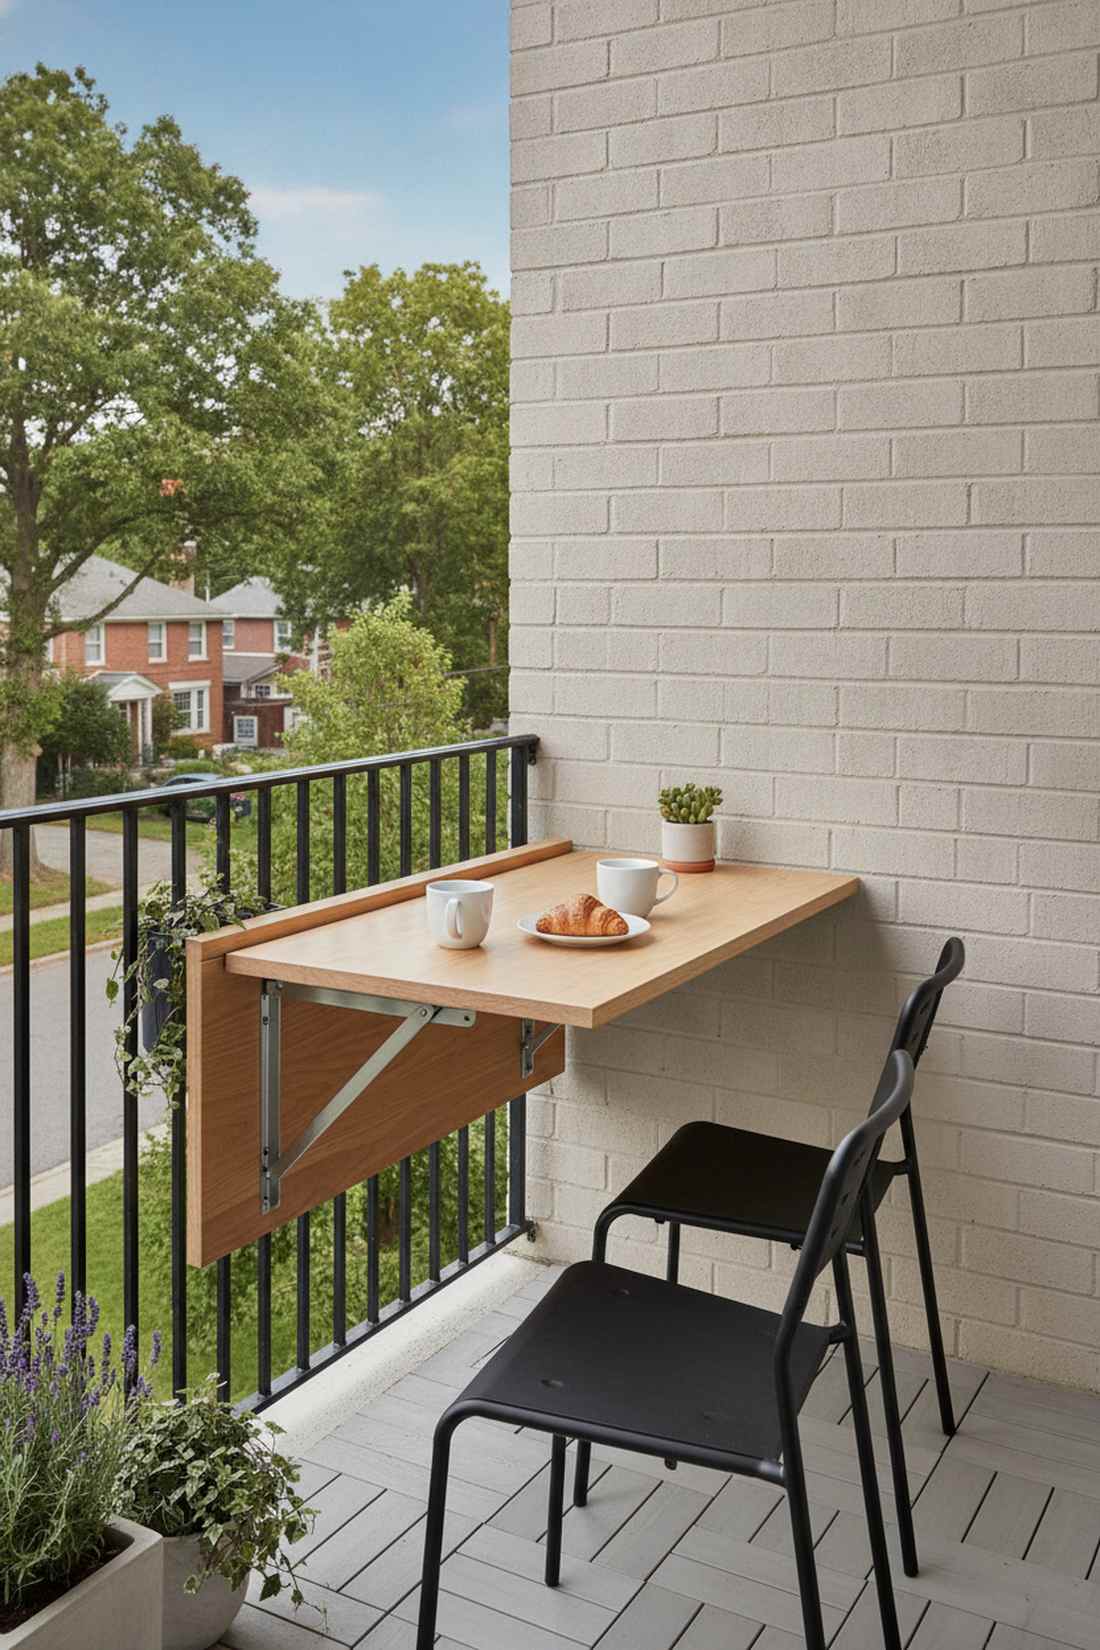
A drop-leaf dining ledge transforms tight corners into an intimate, Parisian-style breakfast nook. Incredible for squeezing full dining functionality into mere inches of clearance.
Bulky patio sets suffocate small spaces, but a collapsing bracket mechanism reclaims your floor instantly. The sleek marine-grade wood ensures it survives thunderstorms while looking wildly chic.
You can secure this hardware and wood for $45–$90. It’s a fundamental upgrade that makes micro-balconies incredibly functional.
- Key Materials: Locking folding brackets, marine plywood
- Vibe / Style: Sleek minimalist café
- Difficulty: Requires basic power tools
- Budget Breakdown: Brackets: $30 | Wood Surface: $40 | Sealant: $15.
- Creator’s Tip: Mount exactly at 36 inches high so it doubles as a comfortable standing desk.
- Smart Sourcing: heavy-duty folding shelf brackets (stainless steel) and pre-cut marine grade wood panels.
8. Corner Bench with Hidden Storage
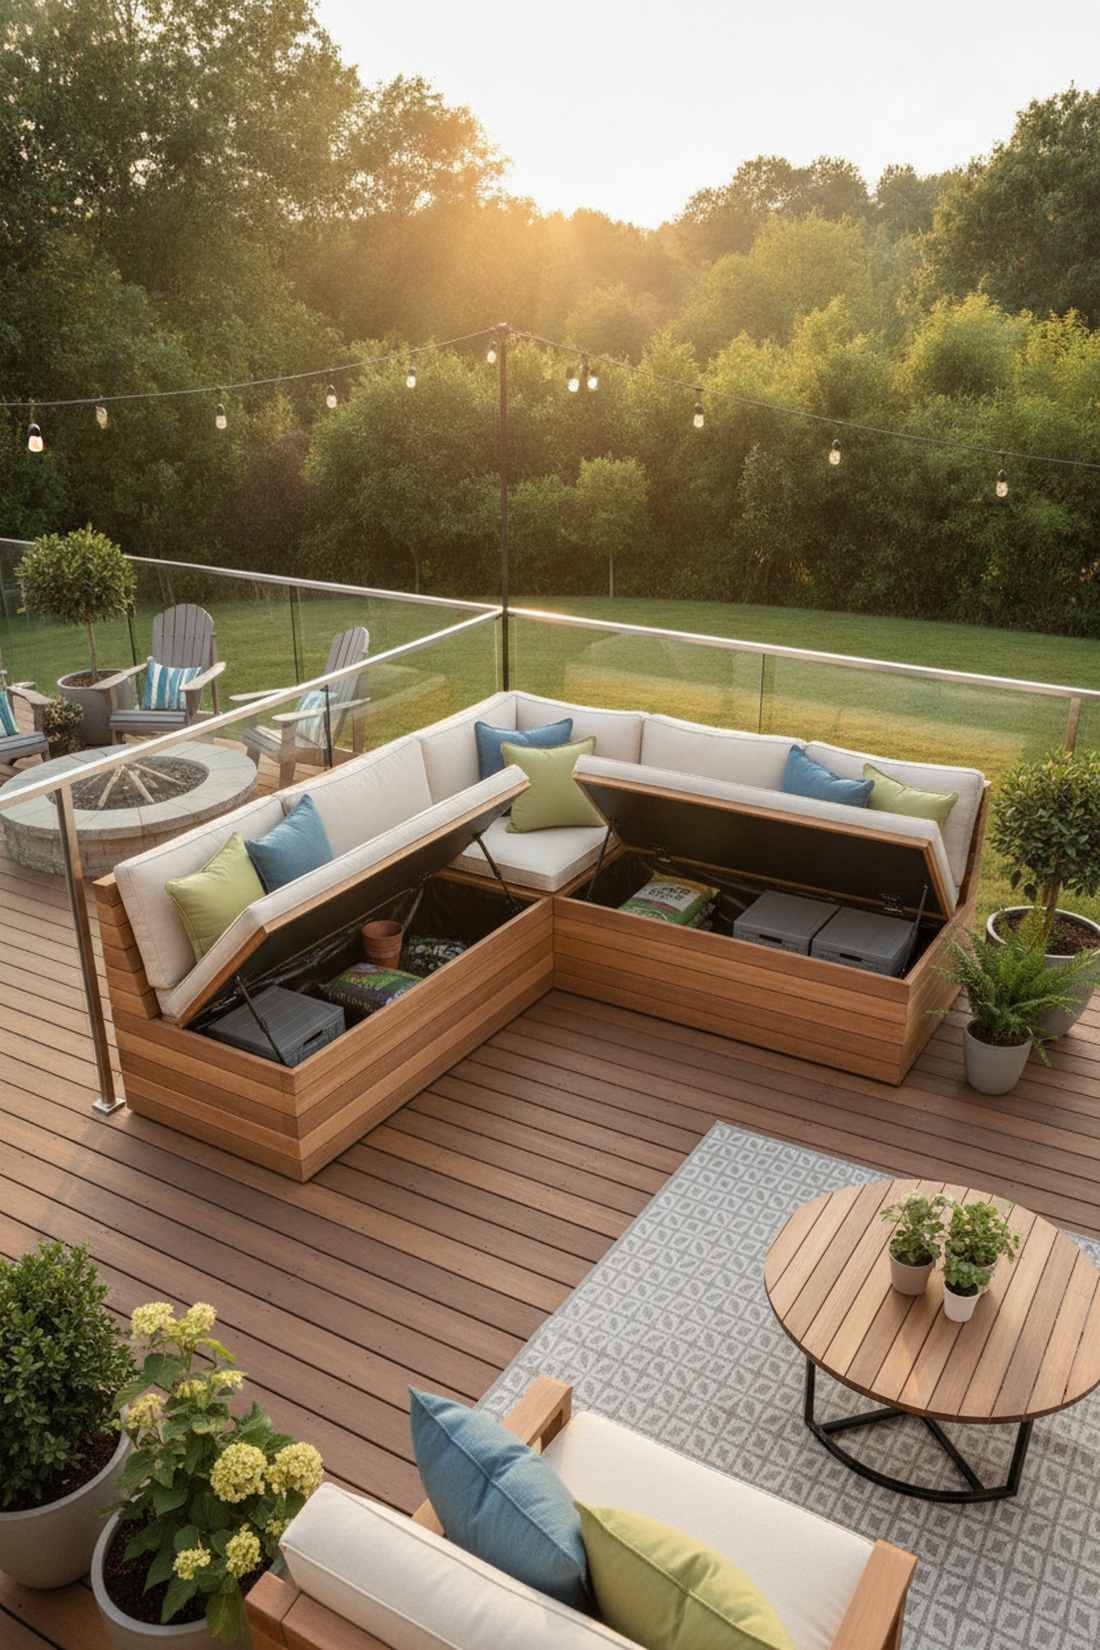
The modular storage banquette wraps around dead space, radiating cozy, custom-built luxury. Ideal for keeping unsightly soil bags and tools completely out of view.
Most renters buy flimsy plastic boxes, but a structured wooden corner unit feels like custom cabinetry. This is where clever city balcony ideas truly shine by hiding the mess.
Expect materials to run between $80–$150 for a solid build. Pin this layout to maximize every single square inch of your deck.
- Key Materials: Outdoor decking boards, pneumatic hinges
- Vibe / Style: Integrated custom lounge
- Difficulty: Moderate DIY construction
- Budget Breakdown: Lumber: $70 | Hinges: $25 | Weatherproofing: $20.
- Creator’s Tip: Line the interior with a staple-gunned tarp to make it 100% waterproof.
- Smart Sourcing: pneumatic lid support hinges (starter kits) and UV-coated resin deck boxes.
9. Stackable Bistro Chairs
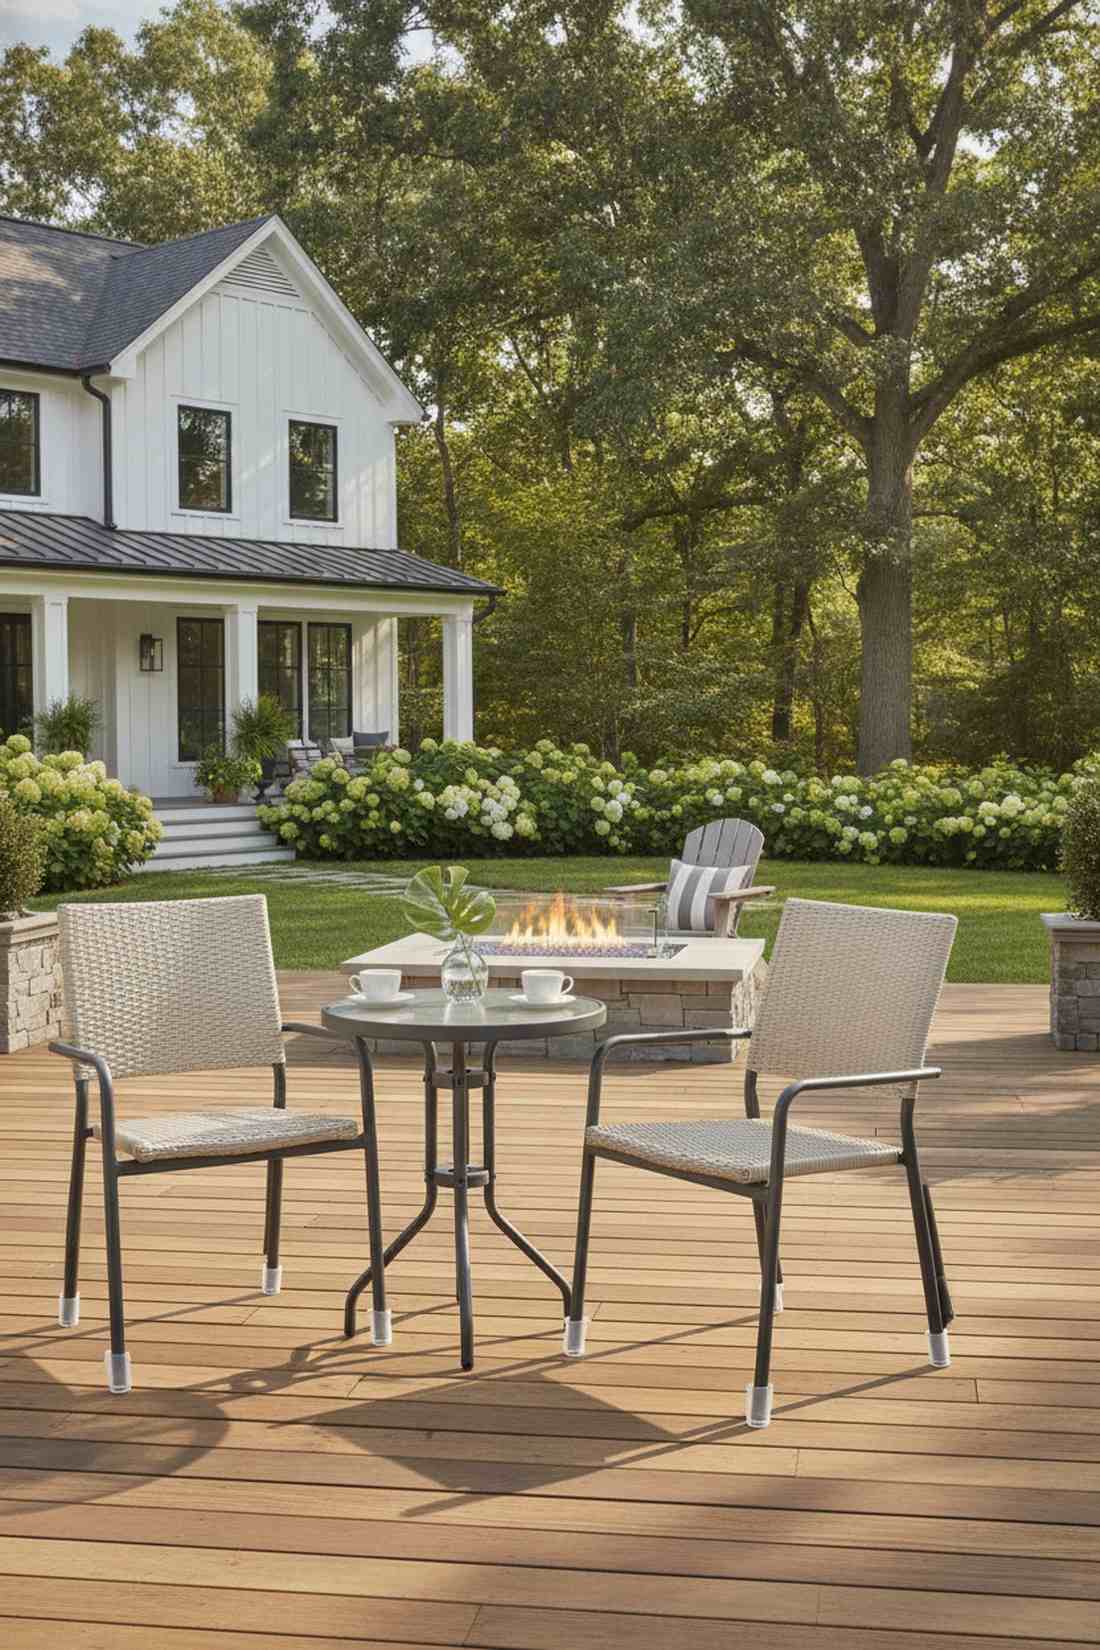
Open-weave nesting seating instantly curates an airy, high-end hotel balcony aesthetic without the clutter. Perfect for entertaining guests and then instantly reclaiming your floor plan.
Heavy wrought iron damages concrete, but powder-coated aluminum delivers incredible strength with zero rust. These materials reflect a premium alternative to typical discount store plastics.
A solid pair usually costs around $60–$120. It’s an essential purchase for anyone needing rapid layout transitions.
- Key Materials: Powder-coated aluminum, UV-resistant resin wicker
- Vibe / Style: Breezy resort elegance
- Difficulty: Zero setup required
- Budget Breakdown: Chairs (Pair): $90 | Cushions: $30.
- Creator’s Tip: Buy silicone leg caps immediately to stop scraping noises against concrete floors.
- Smart Sourcing: stackable aluminum bistro chairs (bulk pack) and waterproof silicone chair leg protectors.
💡 Must-Have Supplies for High-End Setups
To build these setups faster and ensure they last, skip the generic craft aisles and invest in the right foundational kits.
- Base & Support: commercial-grade structural zip ties (UV-resistant)
- Setup Tools: concrete-safe drill bit starter kits
- Weather/Durability Protection: marine-grade clear protective sealants
Most urban renters get this completely wrong… until they try the exact layout coming up next.
10. Rolling Bar Cart Station
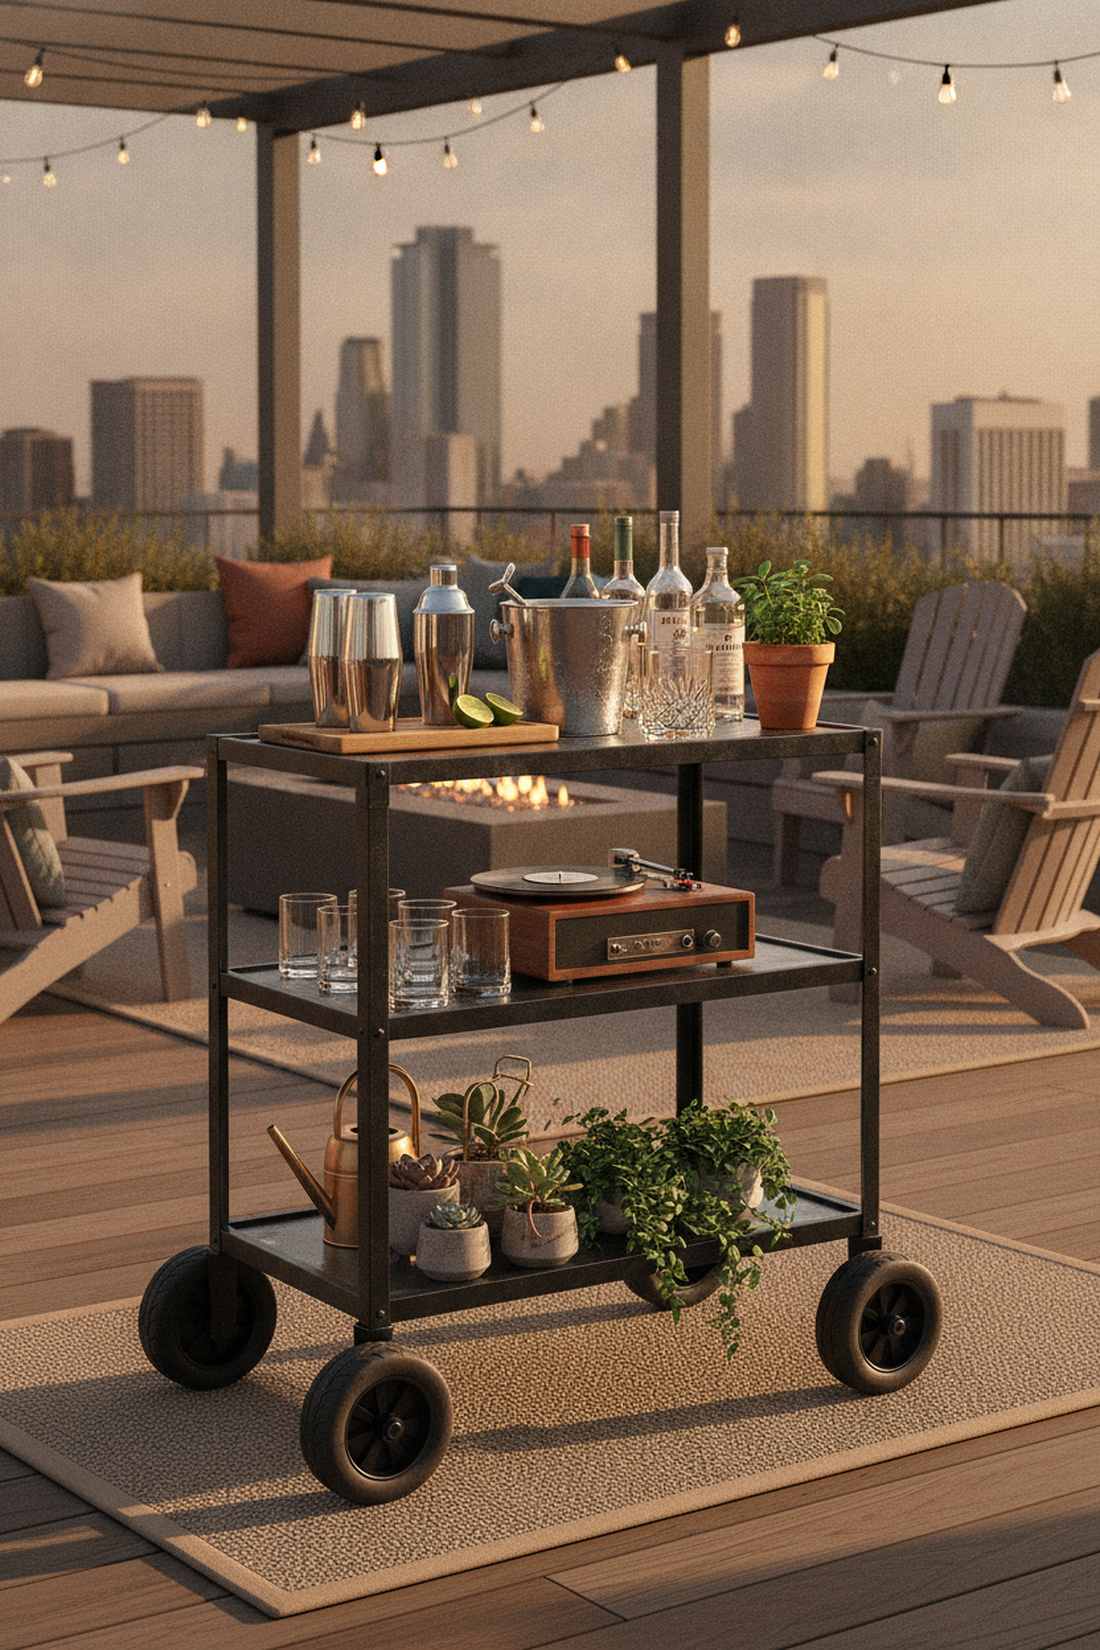
A multi-tier mobile entertaining cart gives off elite, urban-host vibes that command attention during golden hour. Brilliant for transitioning from a morning plant-care station to an evening cocktail hub.
Static tables waste space, whereas a locked-caster system provides dynamic functionality that designers swear by. Add premium miniature garden supplies on the bottom shelf for a lush layered aesthetic.
You can snag a weather-ready cart for $50–$90. Pin this if you love hosting but hate feeling cramped outside.
- Key Materials: Powder-coated steel cart, locking polyurethane wheels
- Vibe / Style: Dynamic rooftop lounge
- Difficulty: Simple bolt assembly
- Budget Breakdown: Metal Cart: $60 | Upgraded Casters: $20 | Decor: $15.
- Creator’s Tip: Spray the wheel bearings with WD-40 silicone to prevent rust lock in high humidity.
- Smart Sourcing: outdoor-rated rolling utility carts (rust-proof) and heavy-duty locking caster wheels (bulk pack).
11. Hanging Hammock Chair
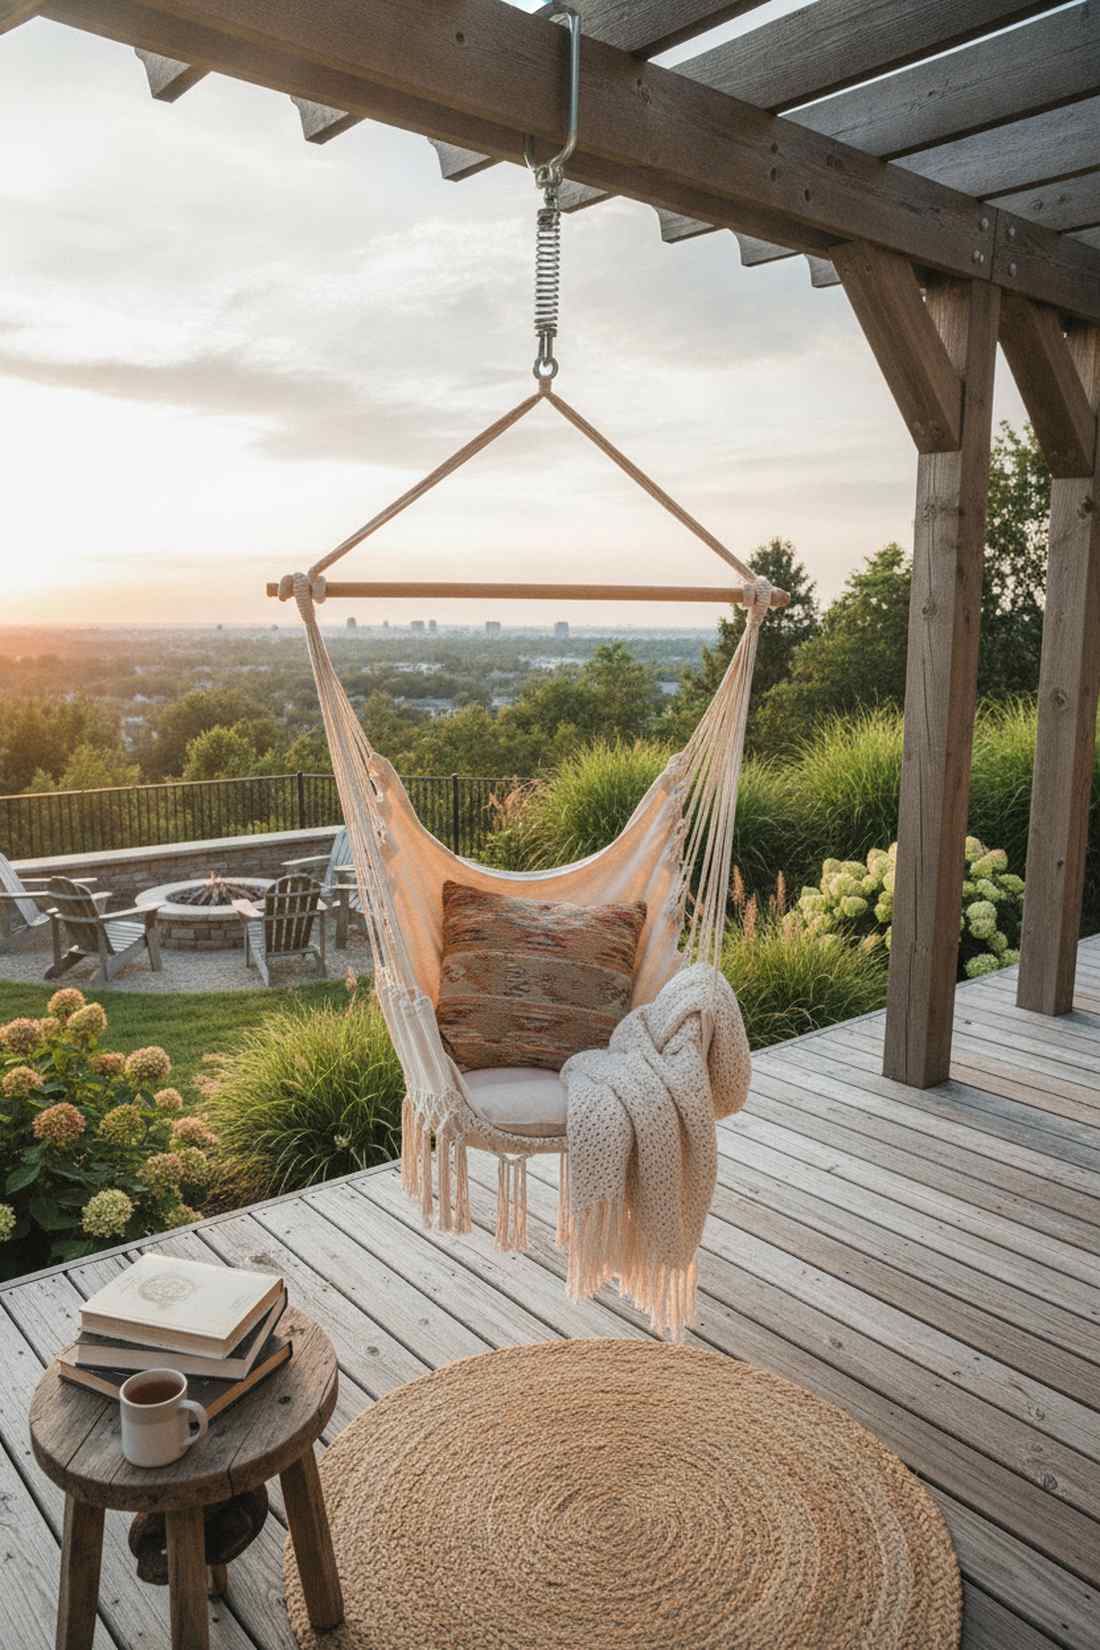
The suspended macrame swing provides an utterly weightless, bohemian sanctuary suspended above the skyline. Unbeatable for establishing a dedicated reading corner without touching the floor.
Many amateur decorators fear ceiling mounts, but using proper stud finders ensures a rock-solid, luxurious focal point. This single addition completely redefines how relaxing your exterior feels.
Hardware and seating together cost roughly $40–$85. Highly recommended for a massive comfort upgrade in under an hour.
- Key Materials: Heavy-duty eye bolts, structural carabiners, woven chair
- Vibe / Style: Elevated boho retreat
- Difficulty: Requires stud-finding accuracy
- Budget Breakdown: Chair Kit: $50 | Structural Hardware: $20.
- Creator’s Tip: Add a high-tension spring between the hook and chair for a softer, bouncier seat.
- Smart Sourcing: macrame hammock chair starter kits and stainless steel ceiling suspension hooks.
12. Modular Sectional Ottoman
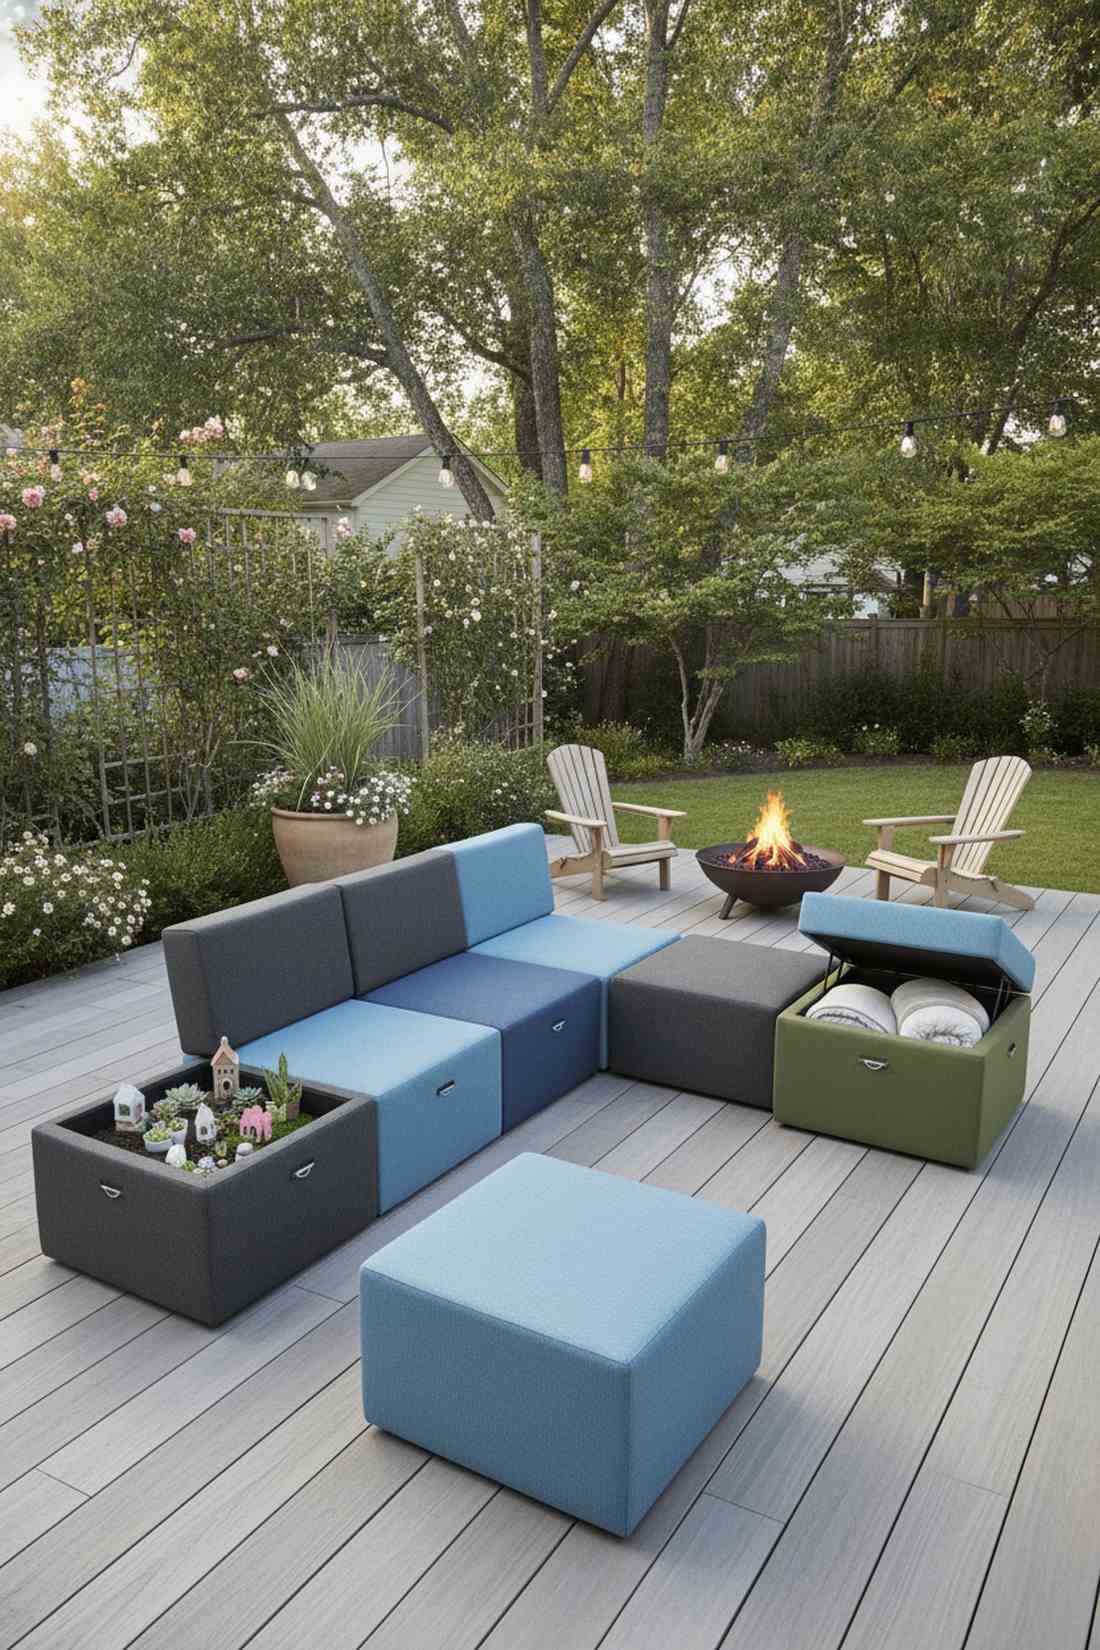
Connecting geometric seating cubes create an adaptable lounge puzzle tailored exactly to your guest count. Flawless for long, narrow spaces where traditional sofas physically cannot fit.
Avoid rigid, bulky couches; separate interlocking units give a designer-level finish while preserving flexibility. Store your fairy garden kits or extra blankets inside hollow versions.
Investing in modular pieces costs around $100–$250 total. Save this to your outdoor furniture board for future spatial planning.
- Key Materials: Water-repellent foam blocks, hidden interlocking clips
- Vibe / Style: Modern adaptive terrace
- Difficulty: Out-of-the-box ready
- Budget Breakdown: Base Cubes: $150 | Connectors: $20 | Covers: $40.
- Creator’s Tip: Treat the fabric with a waterproofing spray annually to prevent rain soak-through.
- Smart Sourcing: modular outdoor seating cubes (UV-coated) and universal furniture interlocking clips (bulk pack).
City Balcony Garden Concepts for Productivity
Strategic plant selection and placement transform recreational balconies into supplemental food sources. Successful city balcony garden designs balance ornamental appeal with edible yields.
13. Herb Spiral Container
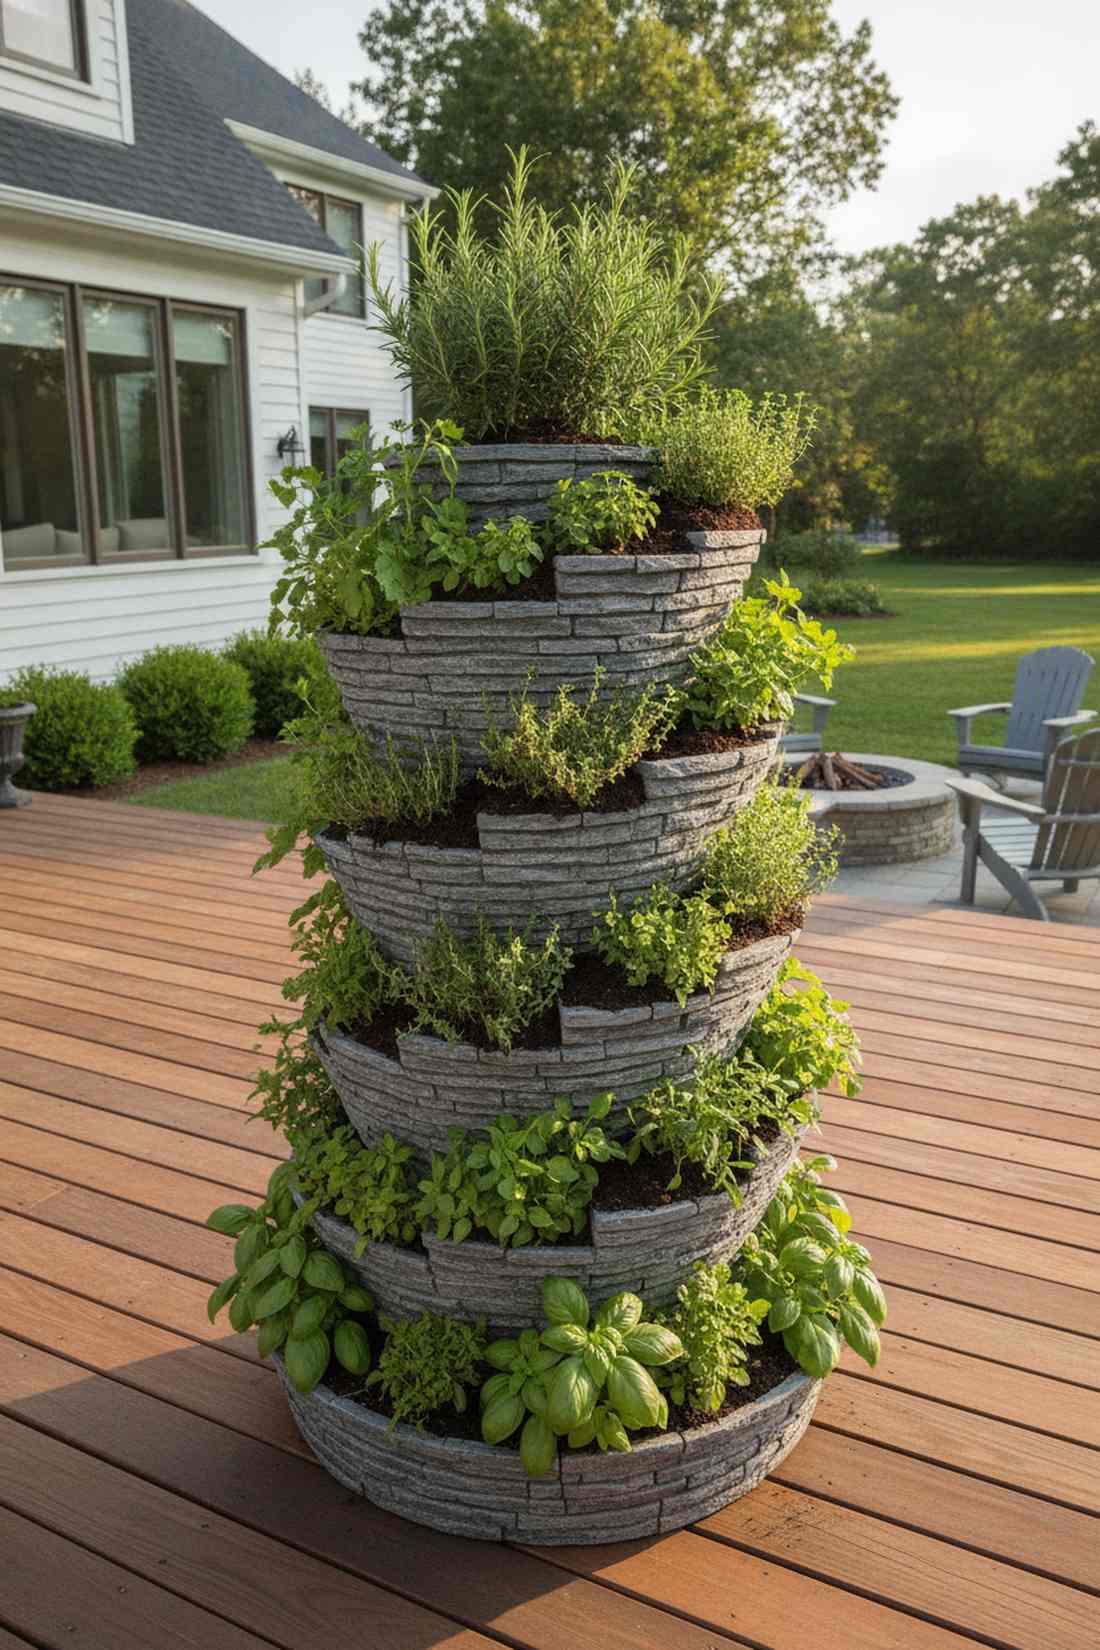
A vertical spiraling herb tower mimics a dense, fragrant Mediterranean hillside right outside your window. The ultimate solution for maximizing harvest variety in a shockingly small footprint.
Standard flat planters waste sunlight, but a 3D spiral creates perfect microclimates for diverse city balcony garden ideas. It delivers a surprisingly premium look with incredible culinary utility.
You can build this productive centerpiece for $35–$60. Pin this if you want fresh cooking ingredients without sacrificing aesthetic charm.
- Key Materials: Tiered resin spiral or stacked slate, organic loam
- Vibe / Style: Productive culinary oasis
- Difficulty: Fun weekend build
- Budget Breakdown: Spiral Base: $30 | Soil Mix: $15 | Seeds: $10.
- Creator’s Tip: Plant drought-tolerant rosemary at the top and thirsty basil at the moisture-retaining bottom.
- Smart Sourcing: pre-formed vertical herb spiral kits and premium organic potting soil (bulk pack).
Wait until you see this next trick—it completely alters how sunlight filters through cramped spaces…
14. Salad Table Garden
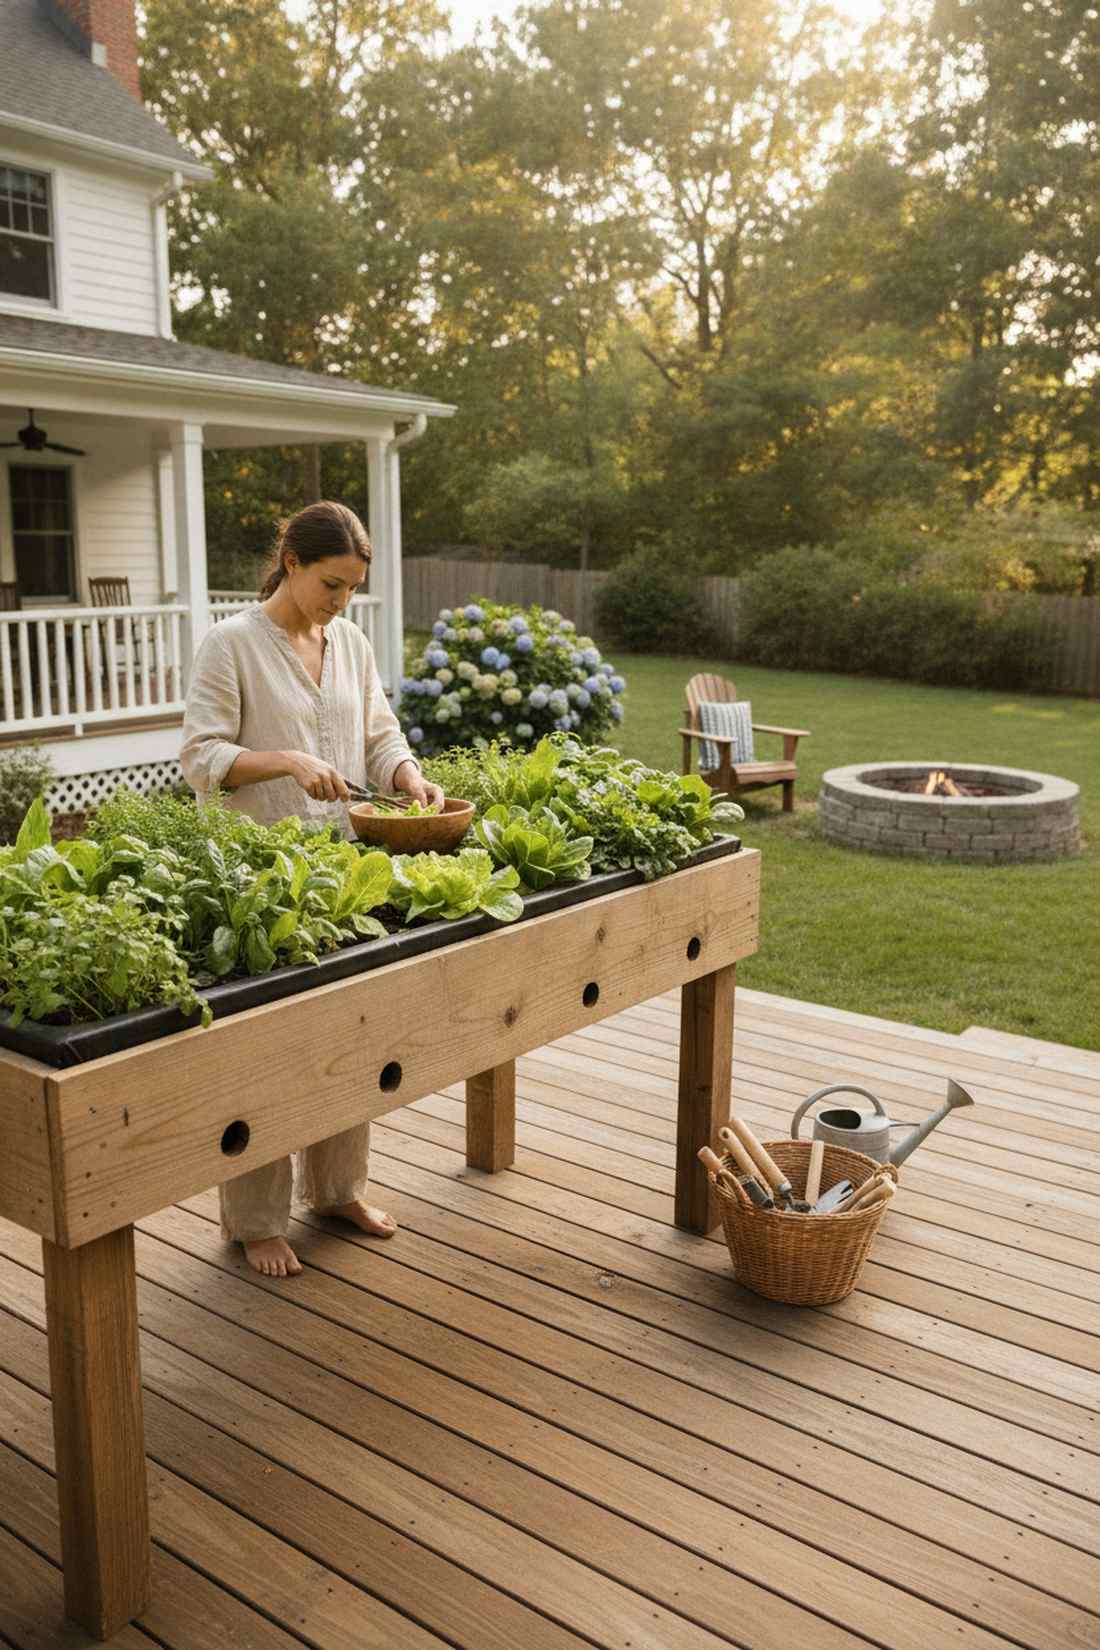
An elevated wooden greens trough keeps fresh, vibrant foliage right at waist height for effortless snipping. Incredible for keeping delicate lettuce crops safe from ground-level pests.
Most growers break their backs bending over floor pots, but raised tables look far more expensive than they are. Implement high-drainage liners to guarantee your greens never suffer from root rot.
Constructing this station takes about $40–$75 in materials. It’s a rapid upgrade that dramatically enhances your daily meal prep.
- Key Materials: Untreated cedar boards, heavy-duty pond liner
- Vibe / Style: Farm-to-table studio
- Difficulty: Moderate woodworking
- Budget Breakdown: Cedar: $45 | Liner: $15 | Fasteners: $10.
- Creator’s Tip: Drill one-inch drainage holes every six inches through the wood before attaching the liner.
- Smart Sourcing: pre-cut cedar elevated planter kits and heavy-duty breathable pond liners.
15. Dwarf Fruit Tree Collection
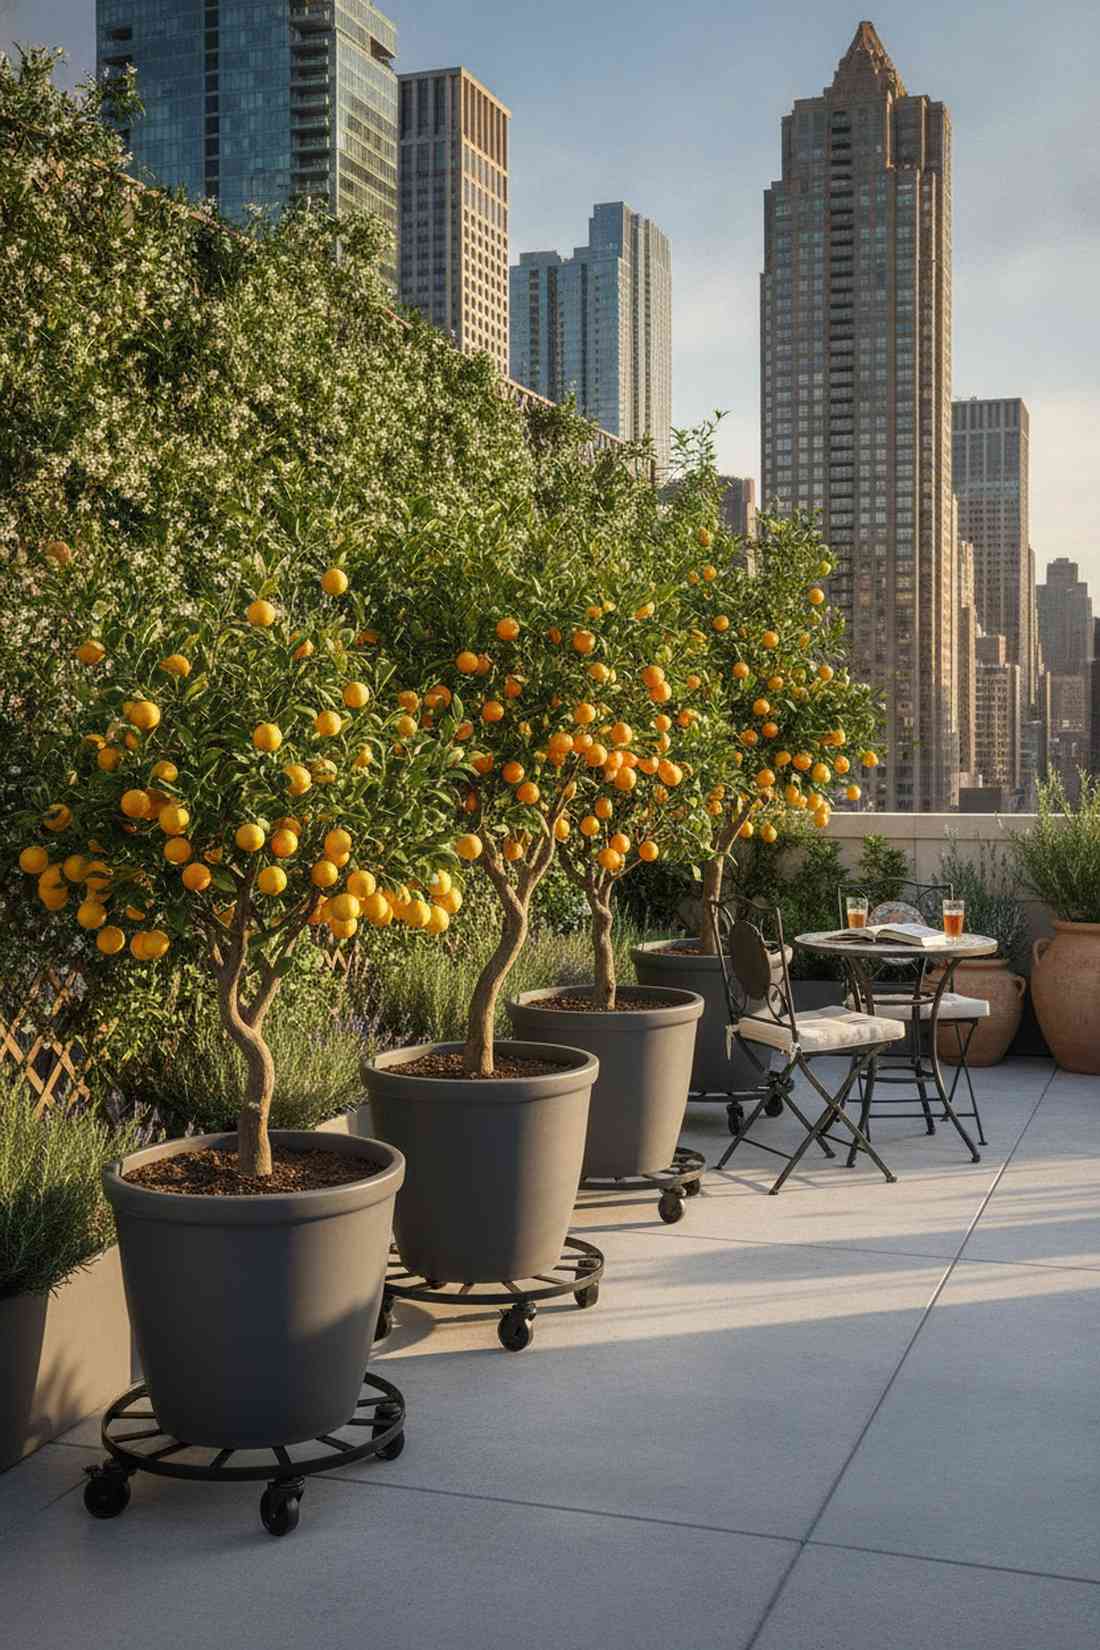
Potted miniature citrus groves bring an undeniable, wealthy-estate energy directly to your high-rise terrace. Stunningly beautiful when golden lemons contrast against a stark concrete skyline.
Avoid fast-growing giant species; genetic dwarf cultivars provide a designer-level finish while staying perfectly proportioned. This is how you implement city balcony garden ideas that actually yield heavy fruit.
A starter tree and proper pot will run $60–$120. Save this to your urban orchard board to track your favorite fruit varieties.
- Key Materials: 20-gallon resin pots, heavy-duty rolling caddies
- Vibe / Style: Mediterranean luxury villa
- Difficulty: Requires diligent seasonal care
- Budget Breakdown: Dwarf Tree: $50 | Large Pot: $30 | Rolling Base: $20.
- Creator’s Tip: Always place the tree on wheels so you can pull it indoors before the first winter frost.
- Smart Sourcing: heavy-duty plant caddies with locks (bulk pack) and dwarf citrus fertilizer spikes.
16. Strawberry Tower System
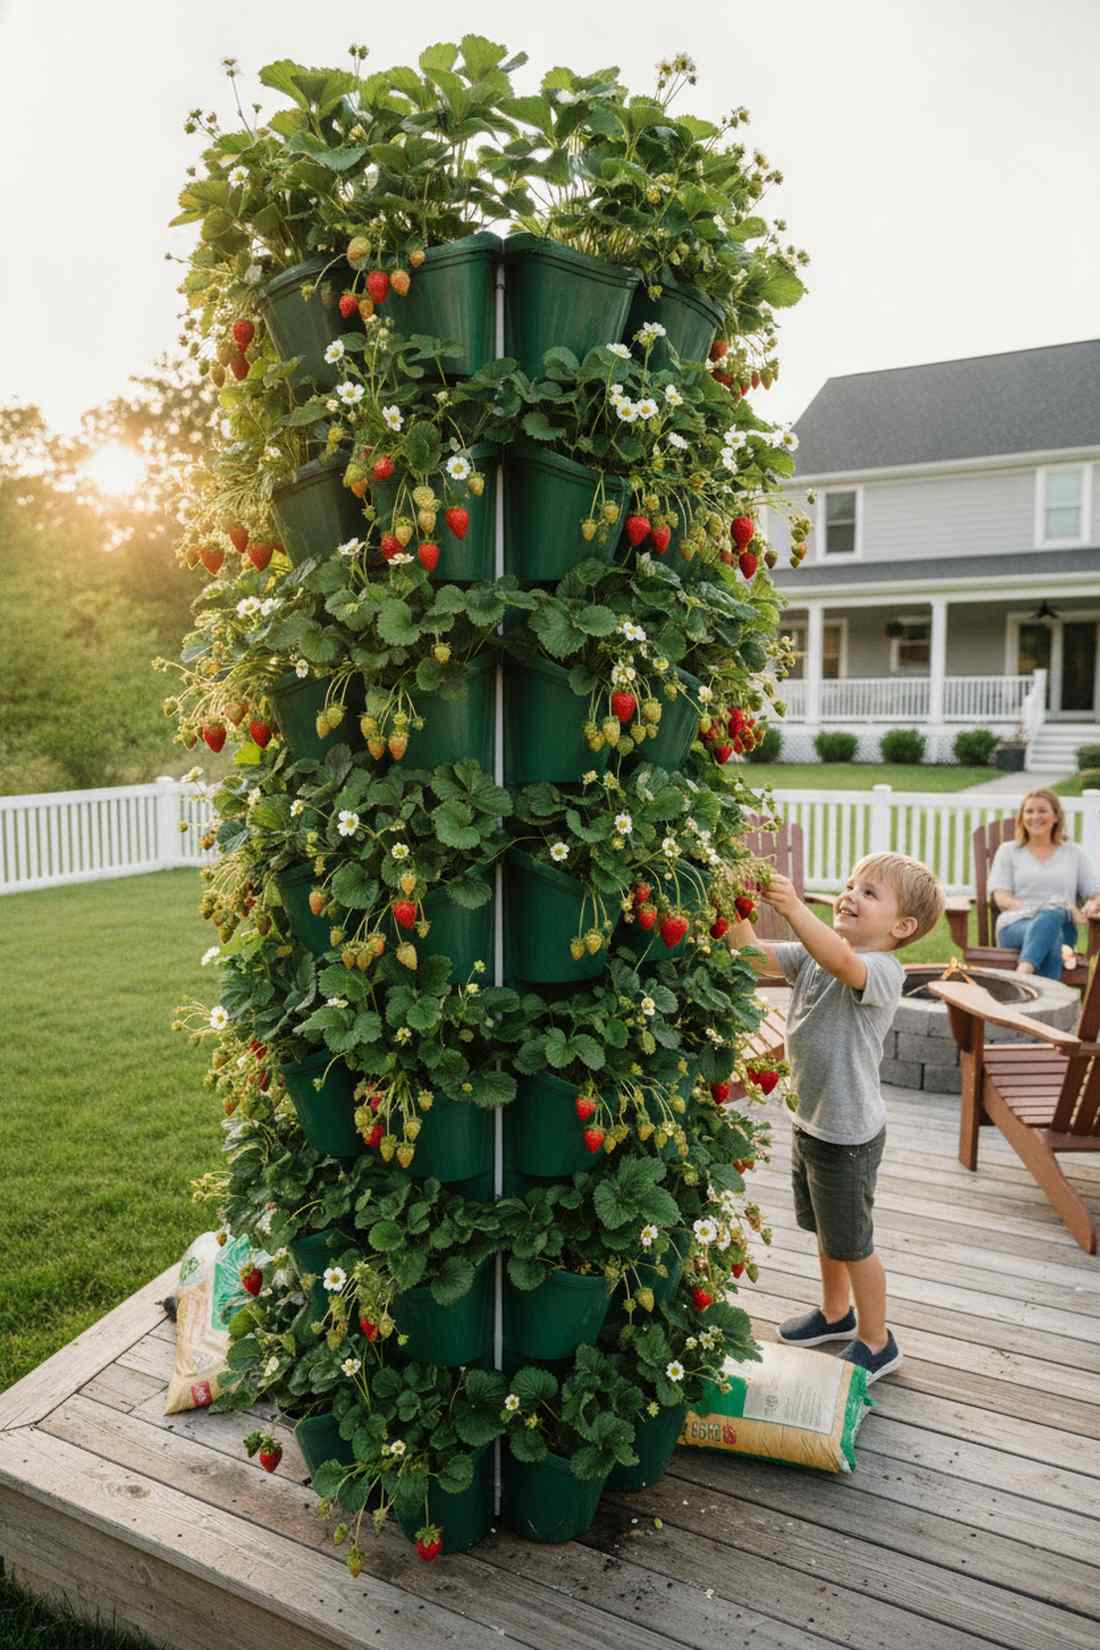
A cascading berry pocket pillar explodes with red fruit and white blossoms, feeling like a cascading organic waterfall. Perfect for sneaking massive berry yields into neglected sunny corners.
Standard window boxes dry out instantly, but internal-reservoir towers ensure consistent, professional-grade hydration. It completely changes the game for high-yield, low-maintenance urban agriculture.
You can set up a high-quality tower for $45–$80. Highly recommended for a fast weekend win that children absolutely love.
- Key Materials: Stackable clover-shaped pots, central PVC watering pipe
- Vibe / Style: Playful abundant harvest
- Difficulty: Very easy assembly
- Budget Breakdown: Tower Kit: $40 | Soil: $15 | Bare Root Plants: $20.
- Creator’s Tip: Mix a heavy ratio of perlite into the soil so the vertical pockets never compact over time.
- Smart Sourcing: stackable vertical strawberry planters (starter kit) and horticultural grade perlite (bulk pack).
17. Microgreens Growing Trays
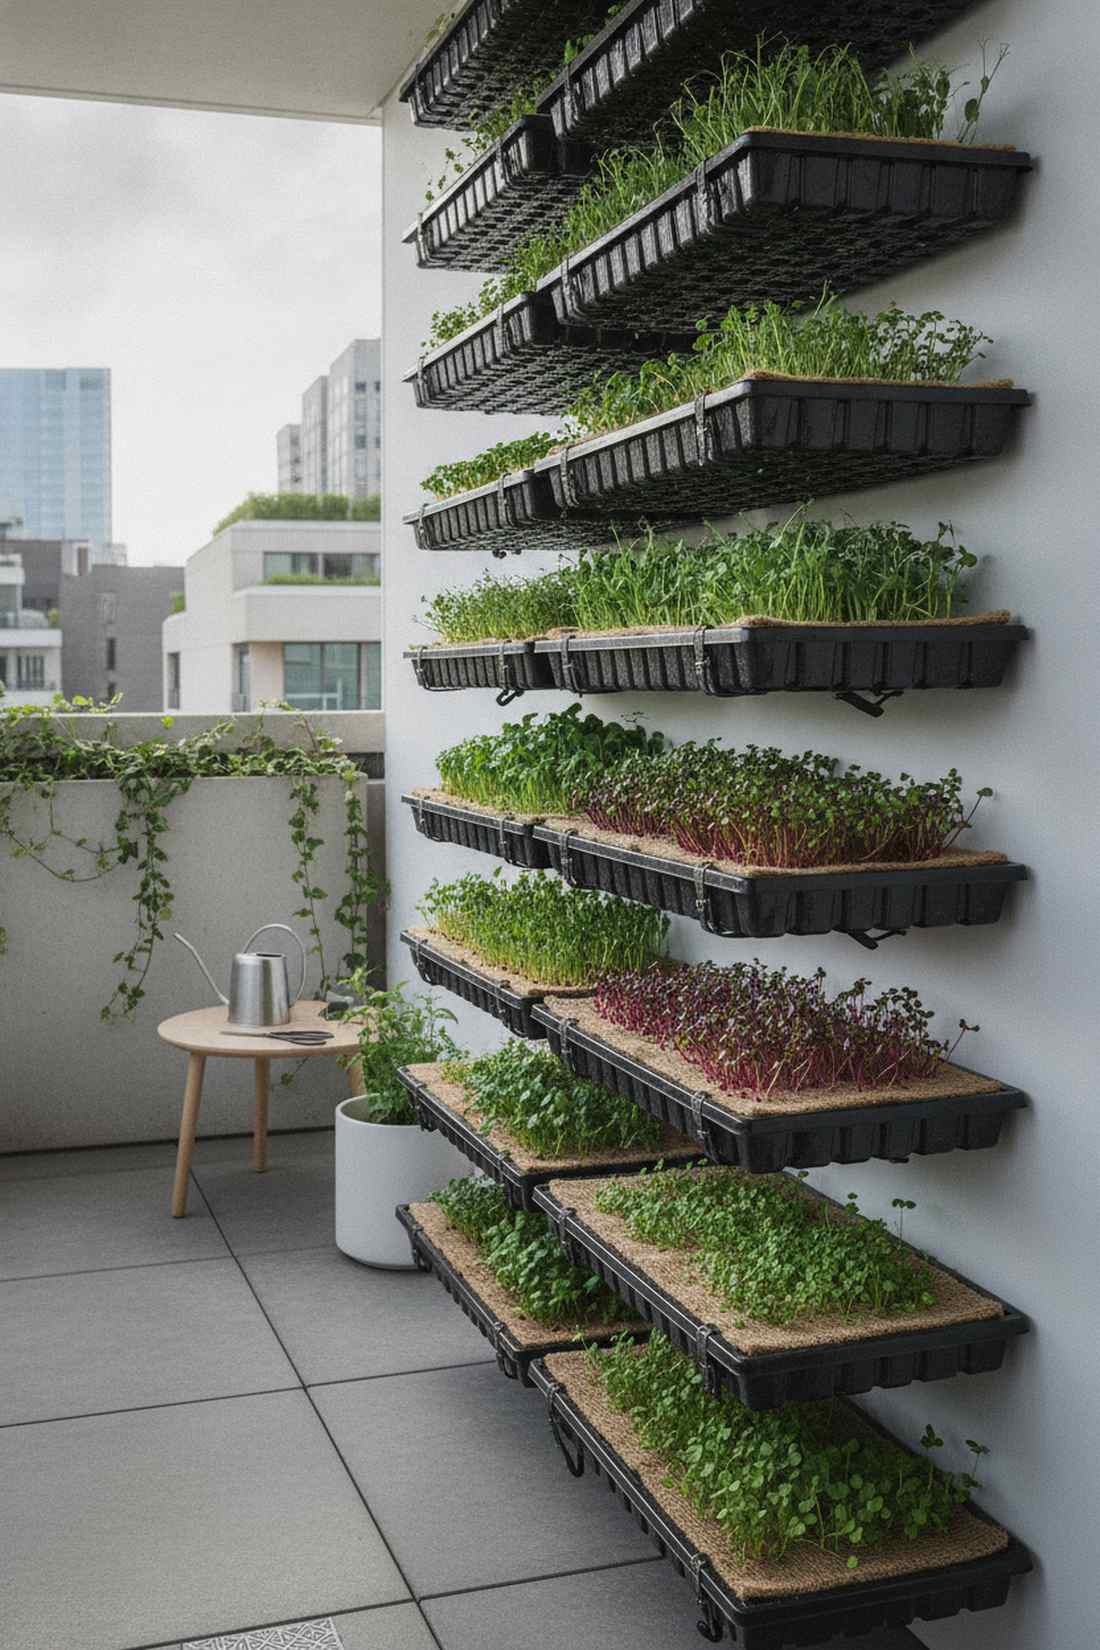
These sleek shallow sprouting shelves add a vibrant, hyper-modern green aesthetic to shaded exterior shelving. The smartest possible use-case for balconies that barely get direct sunlight.
Most beginners try growing demanding tomatoes in the shade, but microgreens give a designer-level finish in mere days. A brilliant execution of city balcony garden ideas for the impatient gardener.
A multi-tray starter setup costs roughly $20–$40. Pin this to your healthy living board for instant superfood access.
- Key Materials: 10×20 BPA-free germination trays, hemp growing mats
- Vibe / Style: Ultra-modern culinary lab
- Difficulty: Foolproof for beginners
- Budget Breakdown: Trays: $15 | Hemp Mats: $10 | Seeds: $10.
- Creator’s Tip: Stack a heavy empty tray on top of the seeds for the first two days to force stronger root growth.
- Smart Sourcing: 10×20 shallow germination trays (bulk pack) and pre-cut hemp growing mats.
18. Vertical Tomato Cage Columns
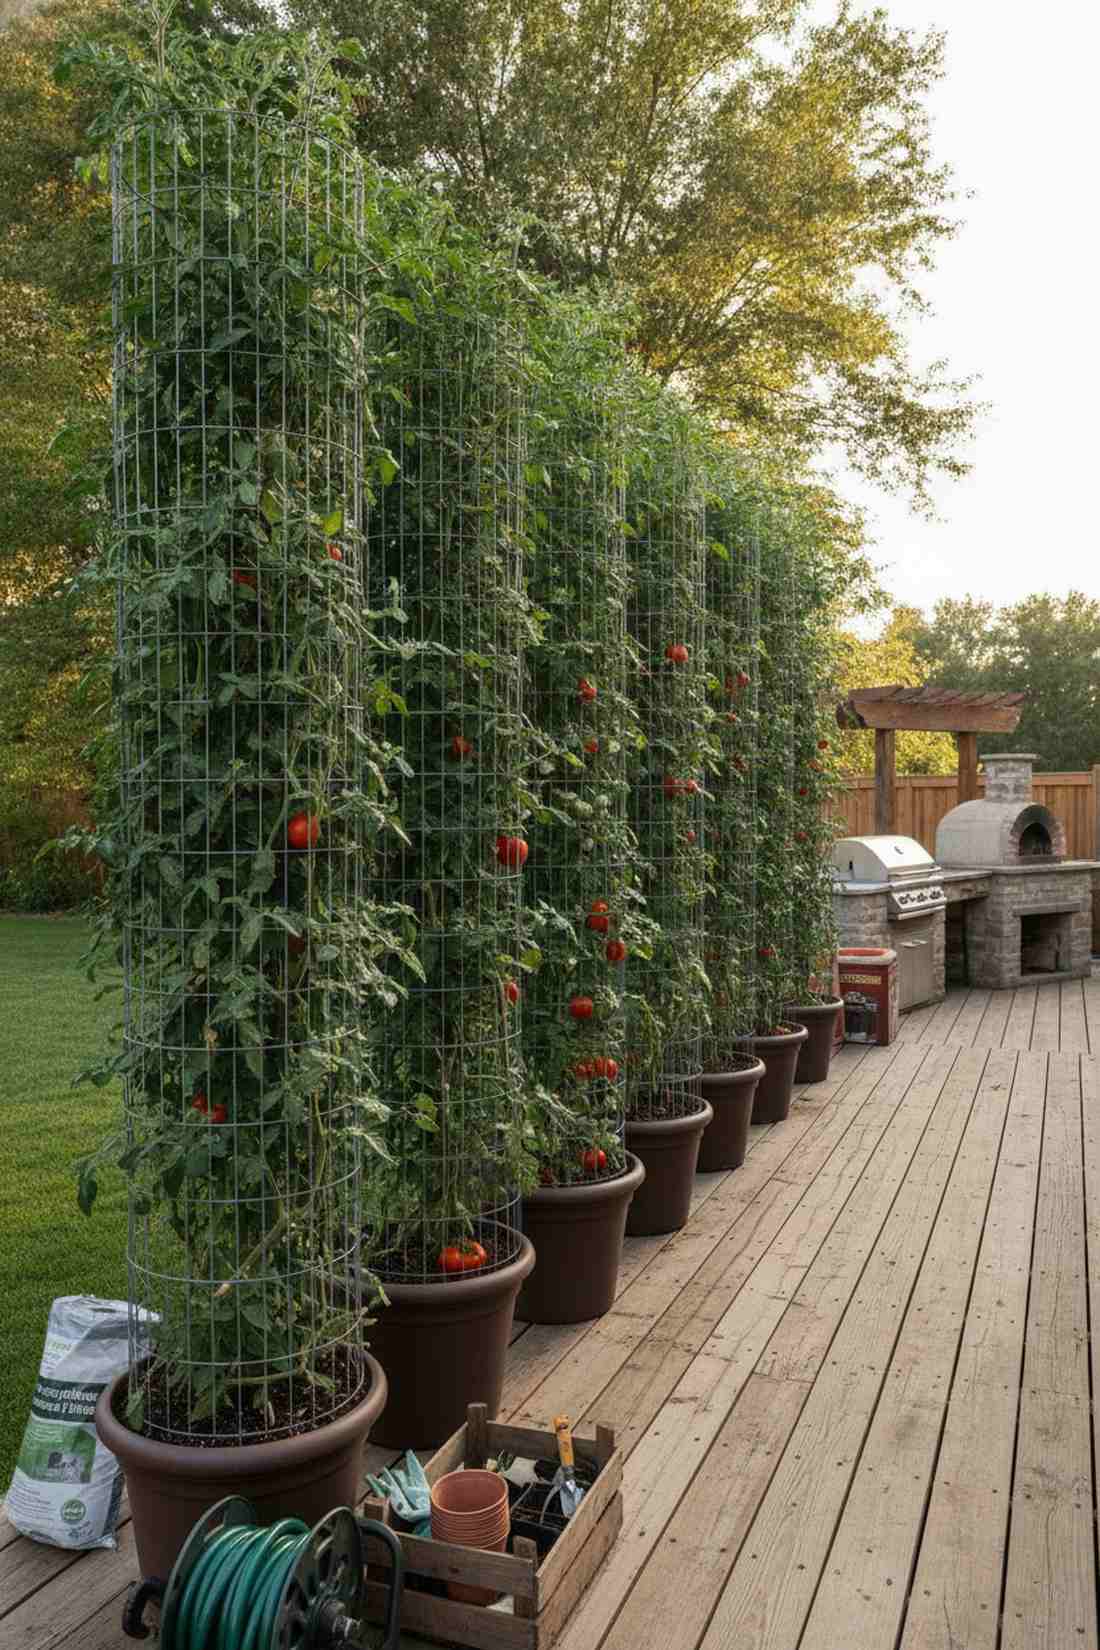
Extra-tall structural vine cages create towering green pillars that provide incredible privacy while yielding massive crops. Ideal for creating a living wall that actually feeds you all summer.
Flimsy garden-center cones collapse under weight; utilizing 6-foot heavy-gauge wire delivers a surprisingly premium look. Keep your miniature garden supplies strictly organized around the sturdy base.
Heavy-duty caging and pots will cost $30–$65 per setup. It’s an essential strategy for serious outdoor food production.
- Key Materials: Concrete remesh wire, heavy zip ties, deep containers
- Vibe / Style: Robust urban farmstead
- Difficulty: Moderate heavy lifting
- Budget Breakdown: Wire Mesh: $25 | Zip Ties: $5 | Container: $25.
- Creator’s Tip: Weave the tomato branches through the wire horizontally before letting them grow up for maximum yield.
- Smart Sourcing: heavy-gauge galvanized tomato towers (starter kits) and UV-coated structural zip ties.
19. Pollinator-Friendly Flower Borders
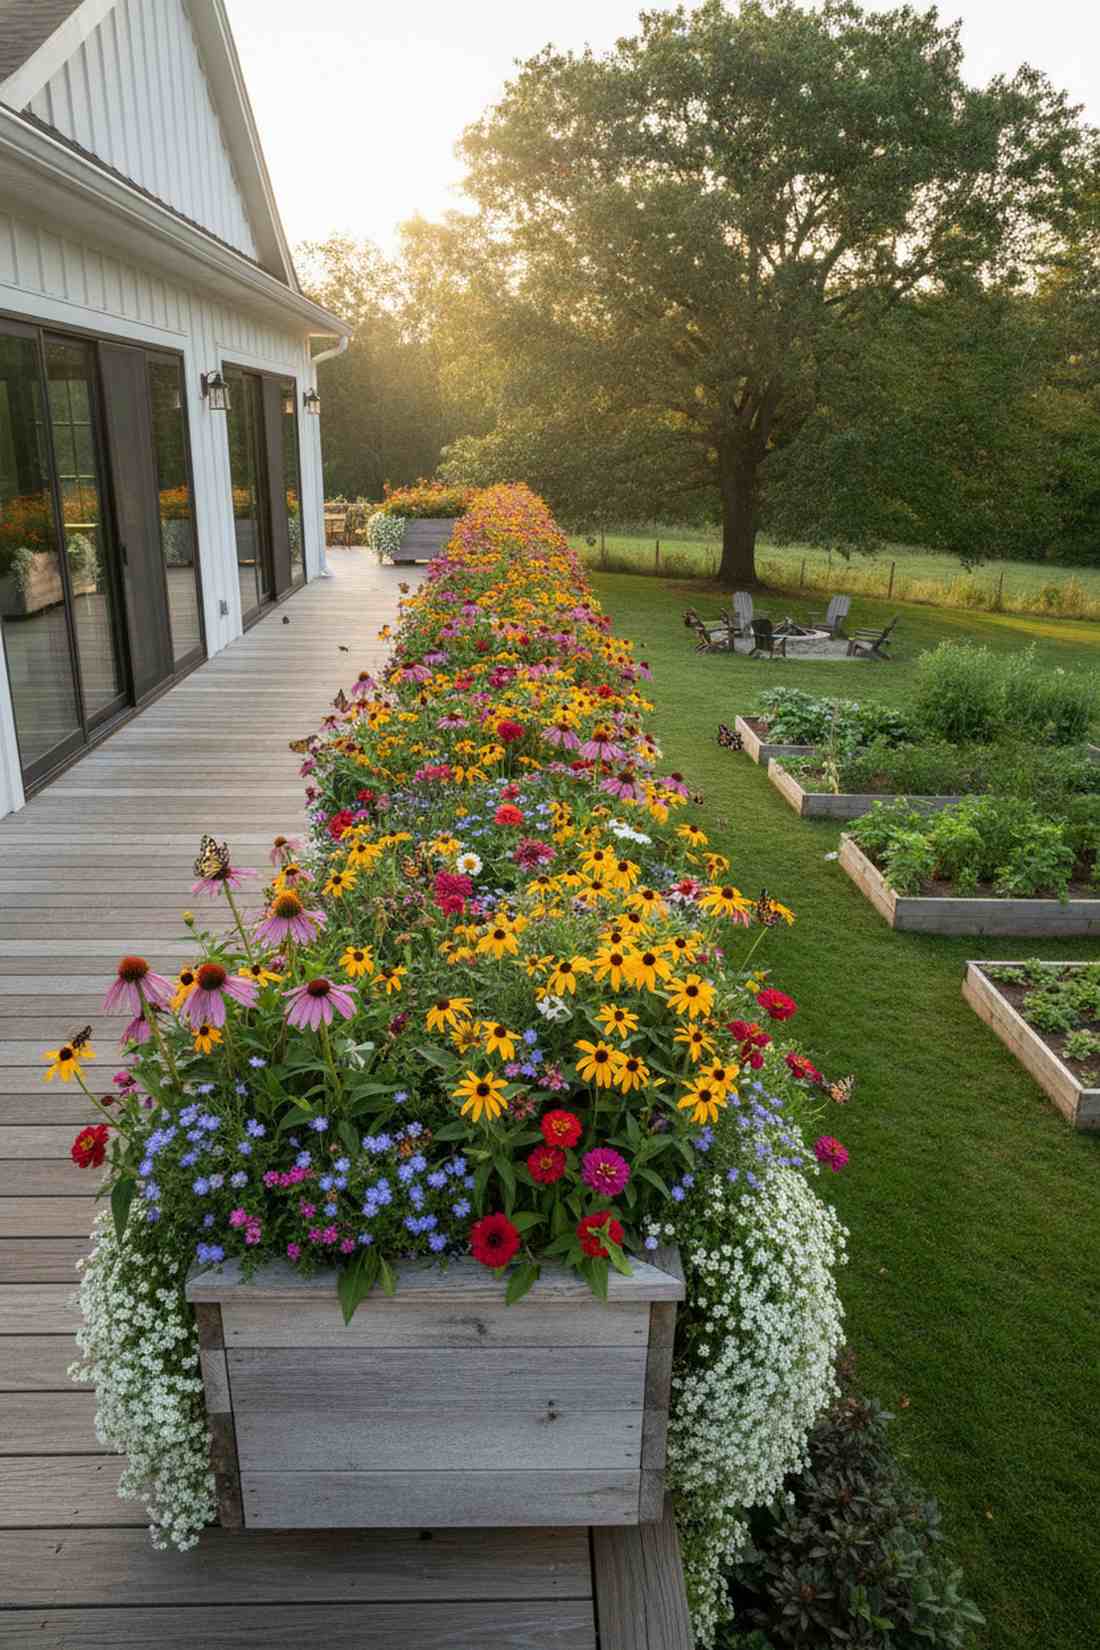
A vibrant native wildflower perimeter transforms sterile building edges into a buzzing, colorful butterfly haven. Absolutely essential for boosting vegetable yields through increased insect traffic.
Skip the boring, generic evergreen shrubs; strategic seasonal blooms look far more expensive than they are. This approach seamlessly blends wild aesthetics with functional city balcony garden concepts.
Establishing these lush borders requires about $25–$50. Save this if you want to bring wild nature back into the concrete jungle.
- Key Materials: Long window boxes, native seed mixes, organic compost
- Vibe / Style: Whimsical urban meadow
- Difficulty: Easy planting
- Budget Breakdown: Border Pots: $20 | Native Seeds: $10 | Compost: $15.
- Creator’s Tip: Plant sweet alyssum at the edges—it cascades beautifully and aggressively attracts beneficial hoverflies.
- Smart Sourcing: native pollinator seed mixes (bulk pack) and organic bloom-boosting compost.
If you think your square footage is too small, the upcoming vertical hack changes everything.
Privacy Screening and Wind Protection
Urban balconies often face neighboring units or busy streets. Strategic screening solutions block unwanted sightlines while reducing wind speeds that stress plants and guests.
20. Bamboo Roll Fencing
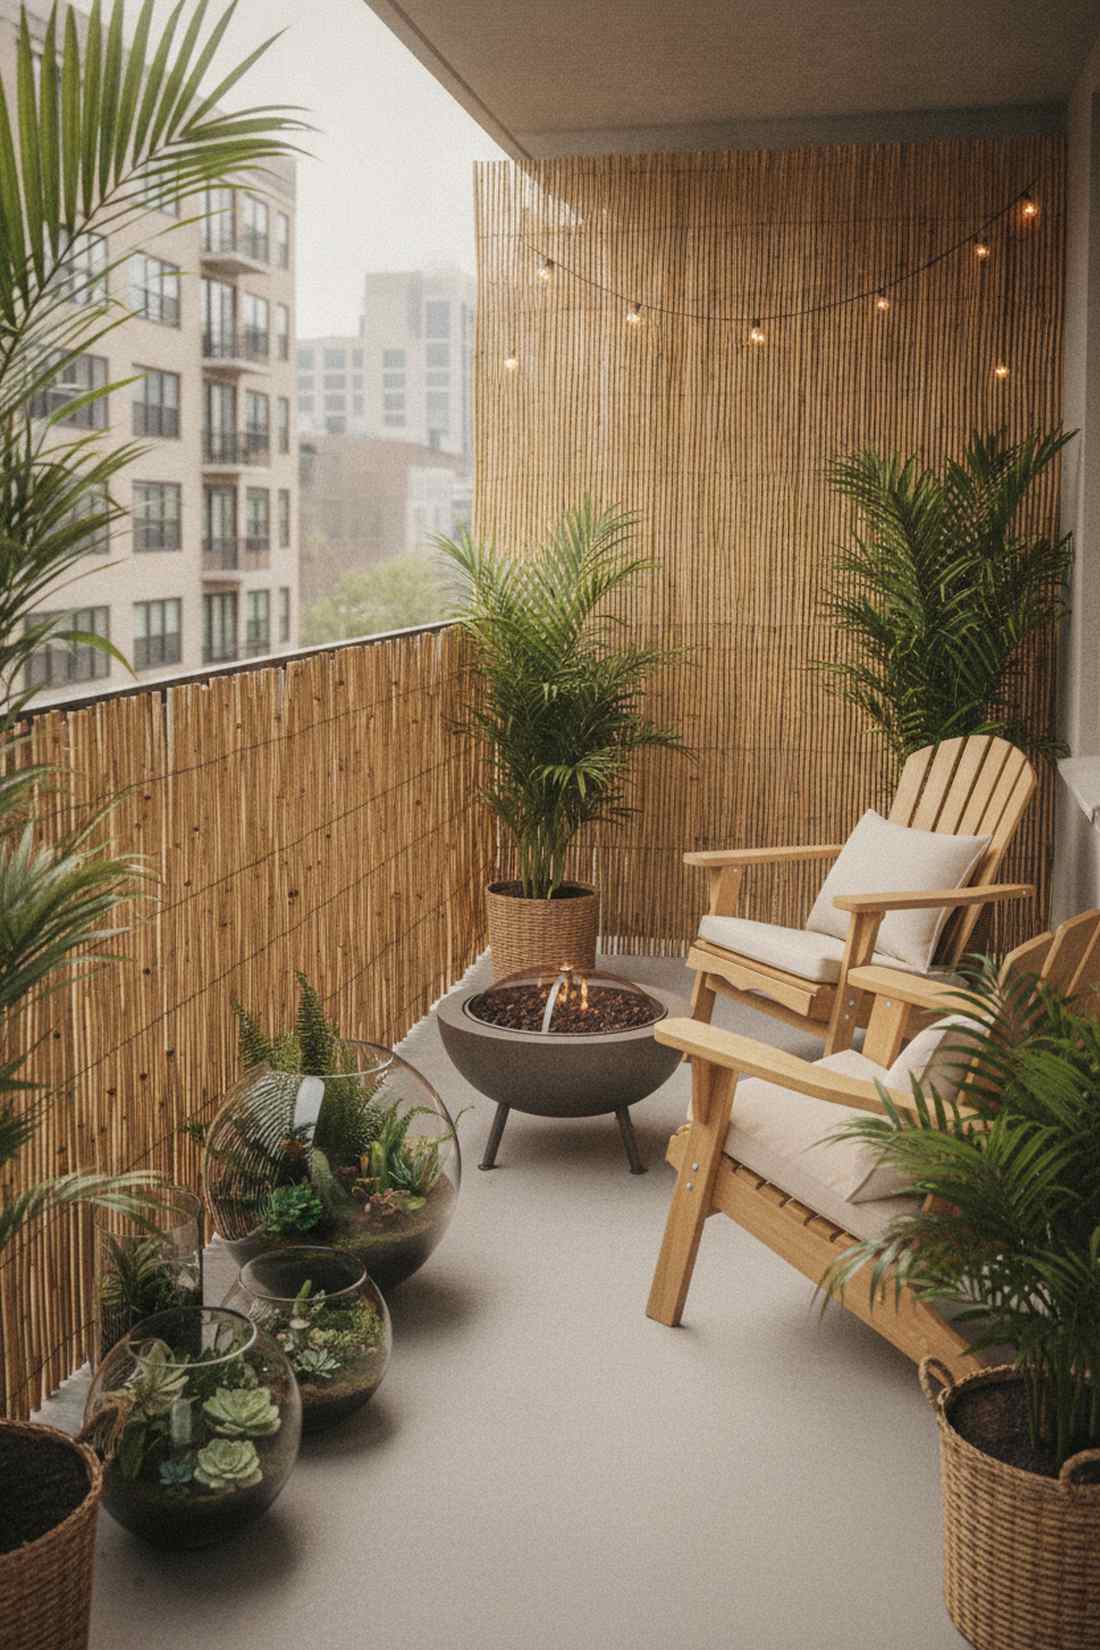
Natural woven cane barriers instantly inject a warm, tropical-resort serenity into harsh metal apartment railings. Flawless for immediately blocking the intrusive gaze of nearby neighbors.
Cheap plastic privacy screens look tacky, but natural bamboo delivers a surprisingly premium look while filtering harsh winds. It acts as an incredible backdrop for your terrarium accessories.
A large roll typically sets you back $40–$75. It’s a fast upgrade that completely changes the vibe of your outdoor zone.
- Key Materials: Bamboo fencing rolls, galvanized binding wire
- Vibe / Style: Zen tropical retreat
- Difficulty: Quick afternoon unrolling
- Budget Breakdown: Bamboo Roll: $50 | Binding Wire: $10.
- Creator’s Tip: Keep the bottom edge of the bamboo one inch off the concrete so it doesn’t absorb standing rainwater.
- Smart Sourcing: UV-coated natural bamboo fencing rolls and galvanized rust-proof binding wire (bulk pack).
21. Outdoor Curtain Panels
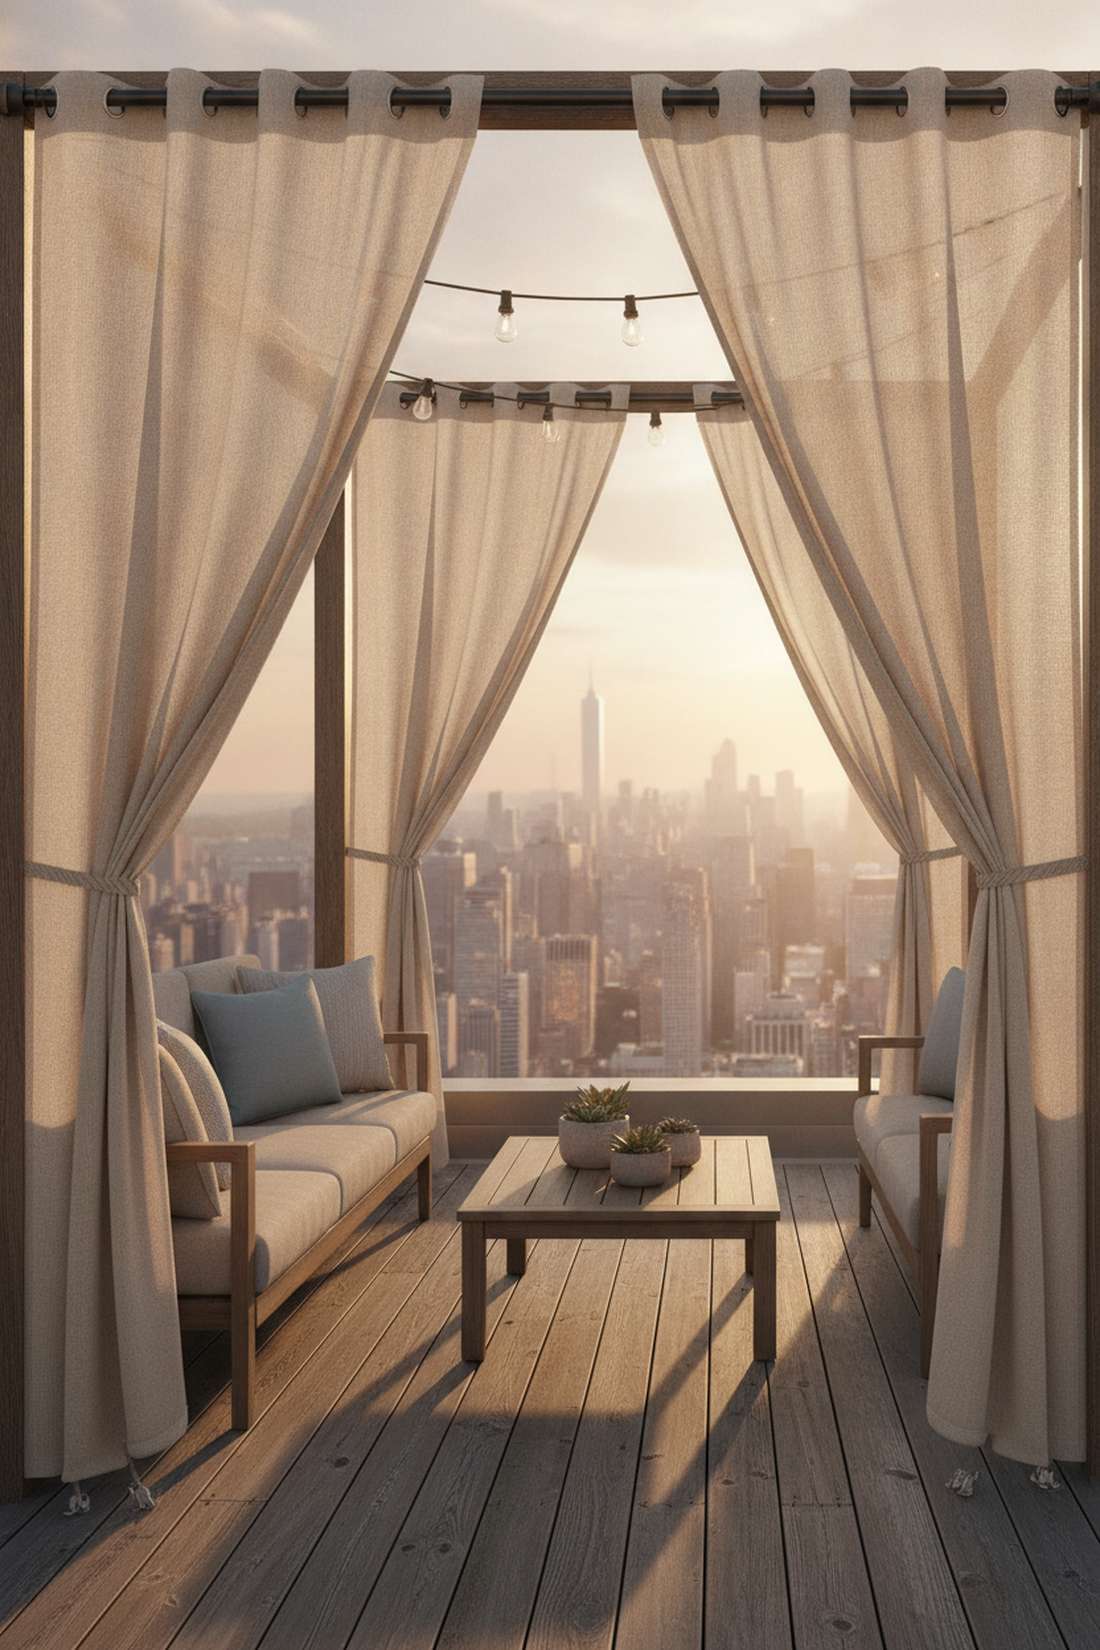
Flowing weather-resistant drapes create a dramatically sweeping, cabana-like enclosure high above the city streets. Perfect for softening sharp architectural lines and managing brutal afternoon sunlight.
Designers often charge thousands for custom enclosures, but tension-rod drapery looks far more expensive than it is. The flexibility allows you to shift from wide-open views to intimate privacy instantly.
Premium outdoor fabric and rods cost around $50–$100. Pin this to your luxury balcony inspiration board right now.
- Key Materials: UV-blocking acrylic fabric panels, outdoor tension rods
- Vibe / Style: Luxury rooftop cabana
- Difficulty: Easy no-drill setup
- Budget Breakdown: Outdoor Curtains: $60 | Tension Rod: $25.
- Creator’s Tip: Sew small fishing weights into the bottom hem so the curtains don’t whip wildly in high city winds.
- Smart Sourcing: fade-resistant outdoor curtain panels (pre-cut) and heavy-duty rust-proof tension rods.
22. Living Screen Planters
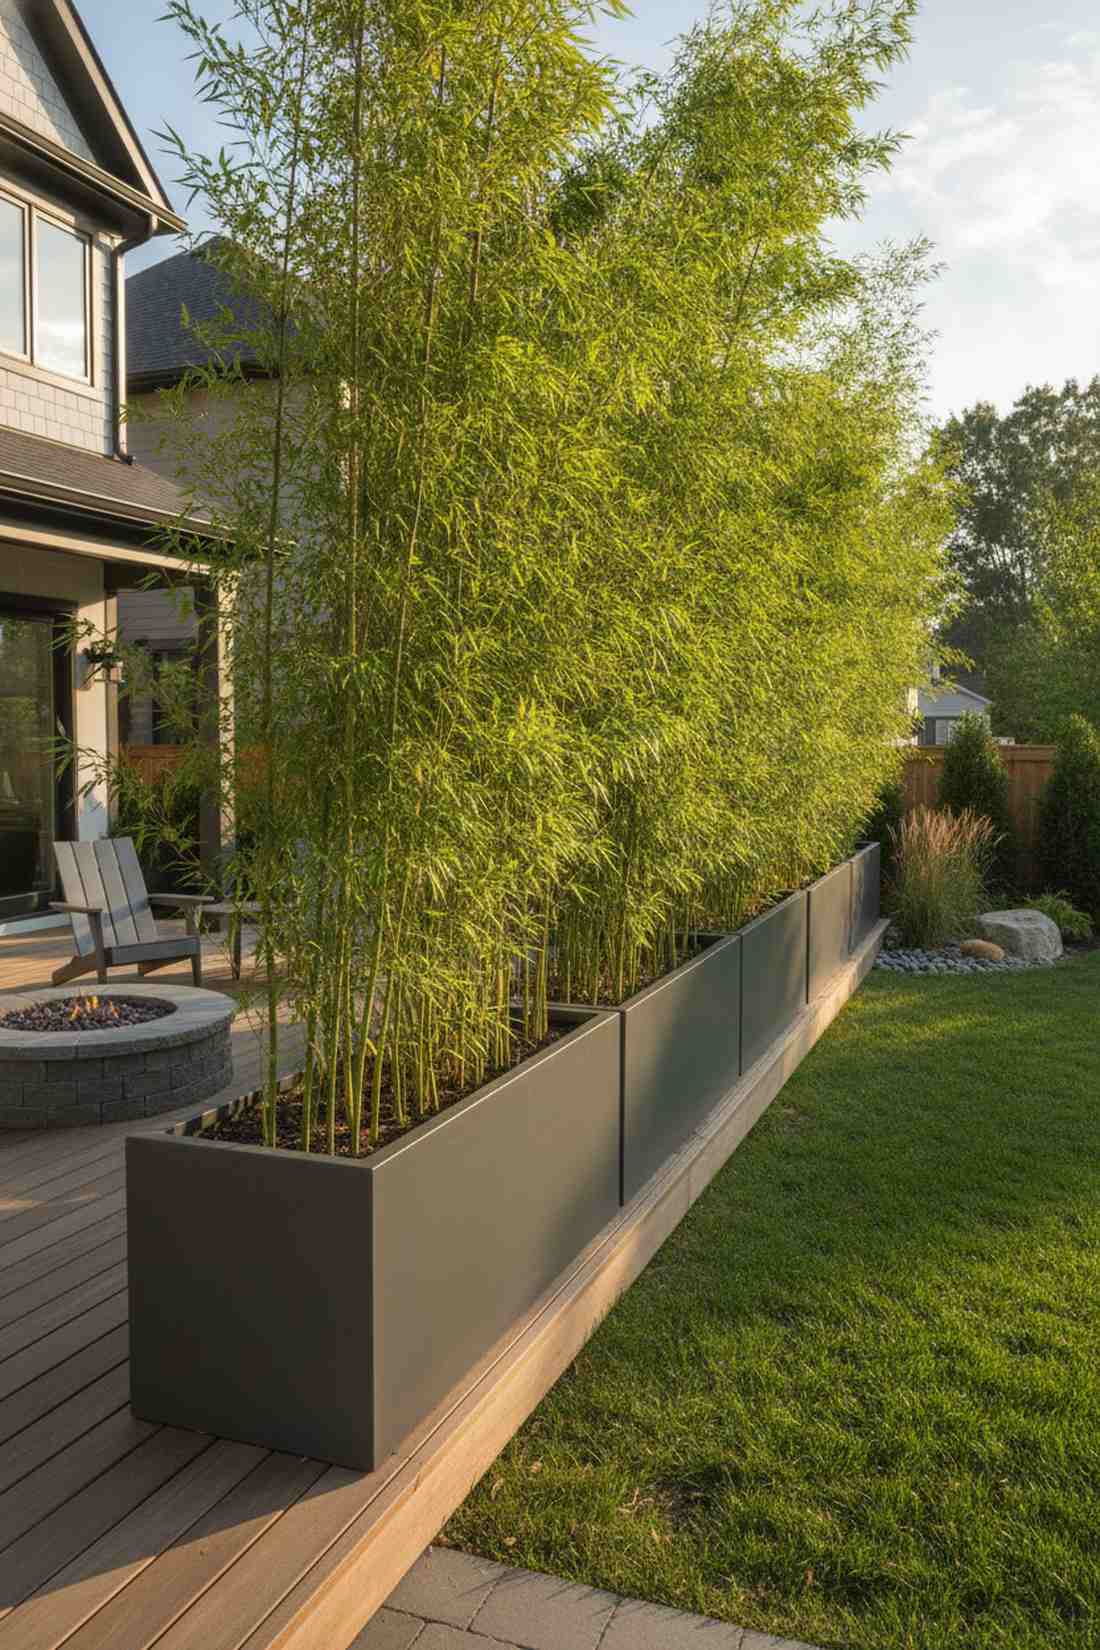
A dense row of tall ornamental grasses acts as a whispering, organic barricade against urban noise. The most sophisticated way to block ugly adjacent buildings without building a solid wall.
Most DIYers use fake ivy grids, but a real clumping bamboo barrier delivers a designer-level finish. It continuously breathes life into the space while purifying your immediate air supply.
Investing in large deep planters and tall grasses costs $100–$200. Highly recommended for a high-end, architectural landscaping aesthetic.
- Key Materials: Extra-deep trough planters, clumping bamboo (Fargesia)
- Vibe / Style: High-end architectural perimeter
- Difficulty: Heavy soil moving
- Budget Breakdown: Deep Planters: $80 | Soil: $40 | Tall Grasses: $60.
- Creator’s Tip: Ensure your troughs have a false bottom to reduce the incredible weight of the necessary soil.
- Smart Sourcing: extra-deep fiberglass trough planters and clumping bamboo root starter kits.
23. Slatted Wooden Privacy Panels
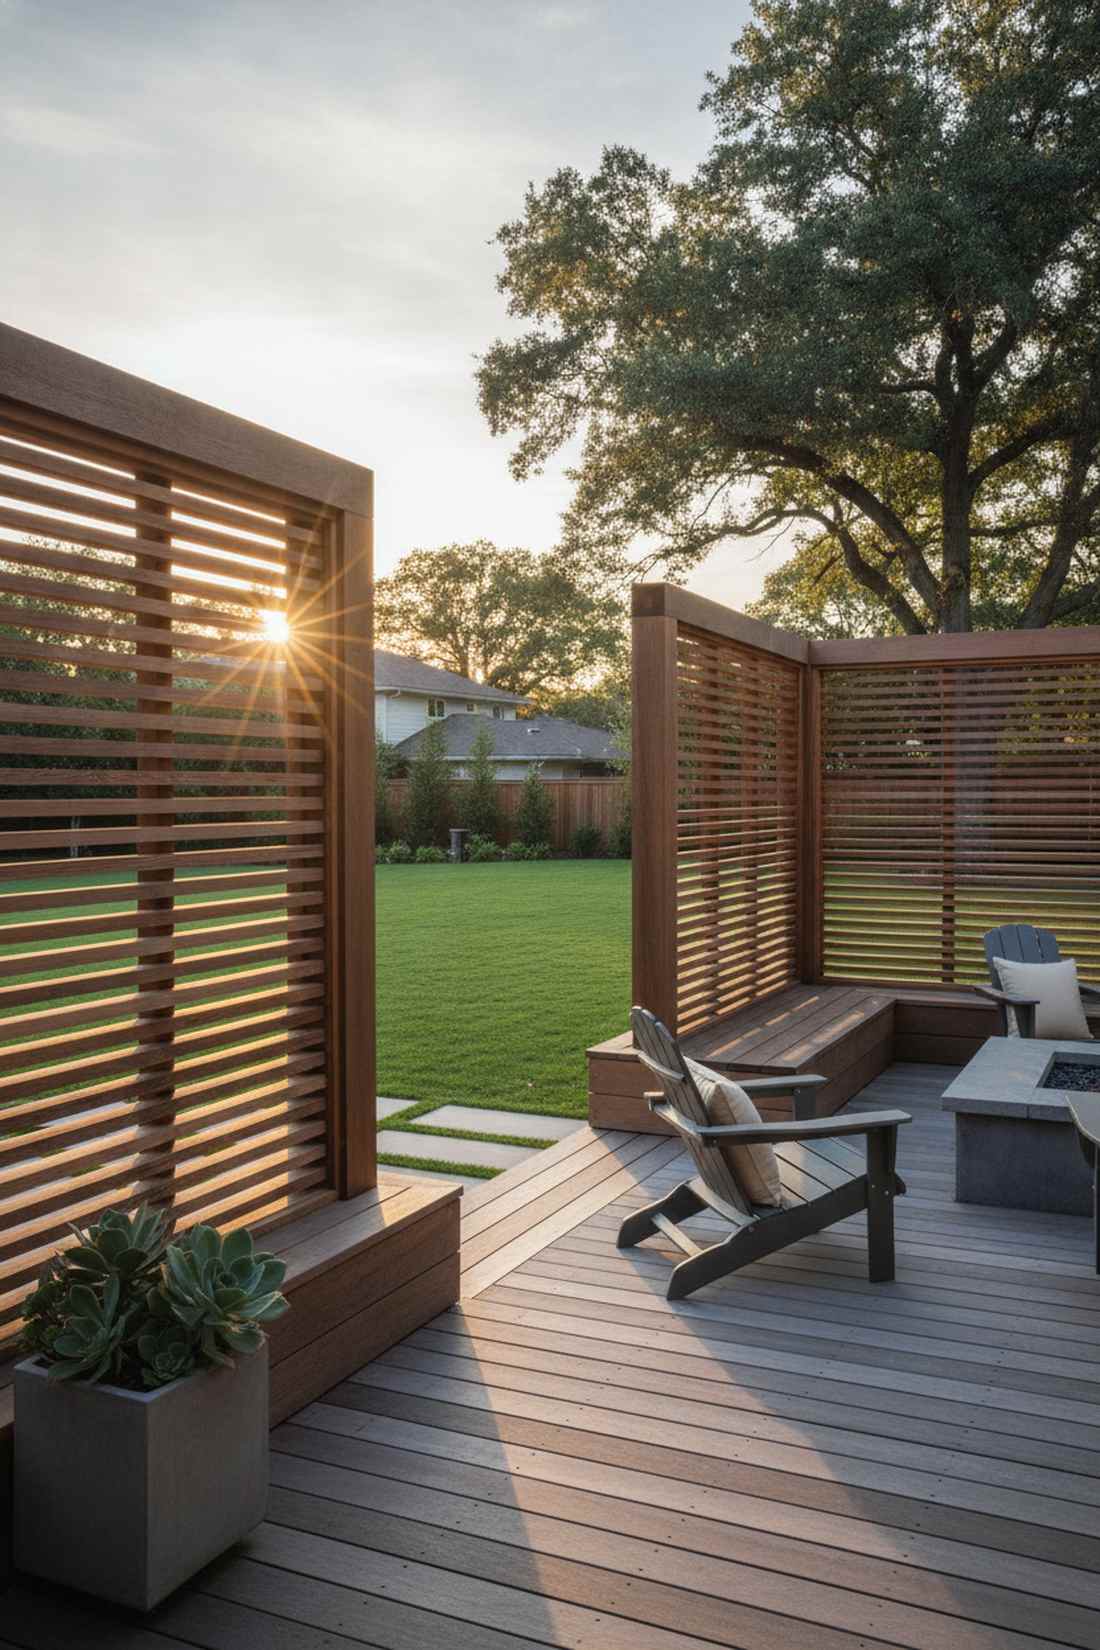
Horizontal louvered wood dividers bring a highly modern, architectural elegance to boring standard boundaries. Excellent for deflecting cross-winds while maintaining partial outward visibility.
Solid walls make spaces feel claustrophobic, but angled gapping totally changes how sunlight filters through cramped spaces. This technique is a staple in premium urban condo designs.
Building custom slatted screens averages $70–$140 in materials. Save this if you love crisp, modern lines and warm wood tones.
- Key Materials: Weathered cedar slats, heavy structural bases
- Vibe / Style: Contemporary architectural woodcraft
- Difficulty: Advanced leveling required
- Budget Breakdown: Cedar Slats: $80 | Fasteners: $15 | Stain: $25.
- Creator’s Tip: Use a physical wooden spacer block during installation to guarantee every single gap is exactly identical.
- Smart Sourcing: pre-cut cedar slat panels (starter kits) and marine-grade wood sealing stains.
24. Retractable Shade Screens
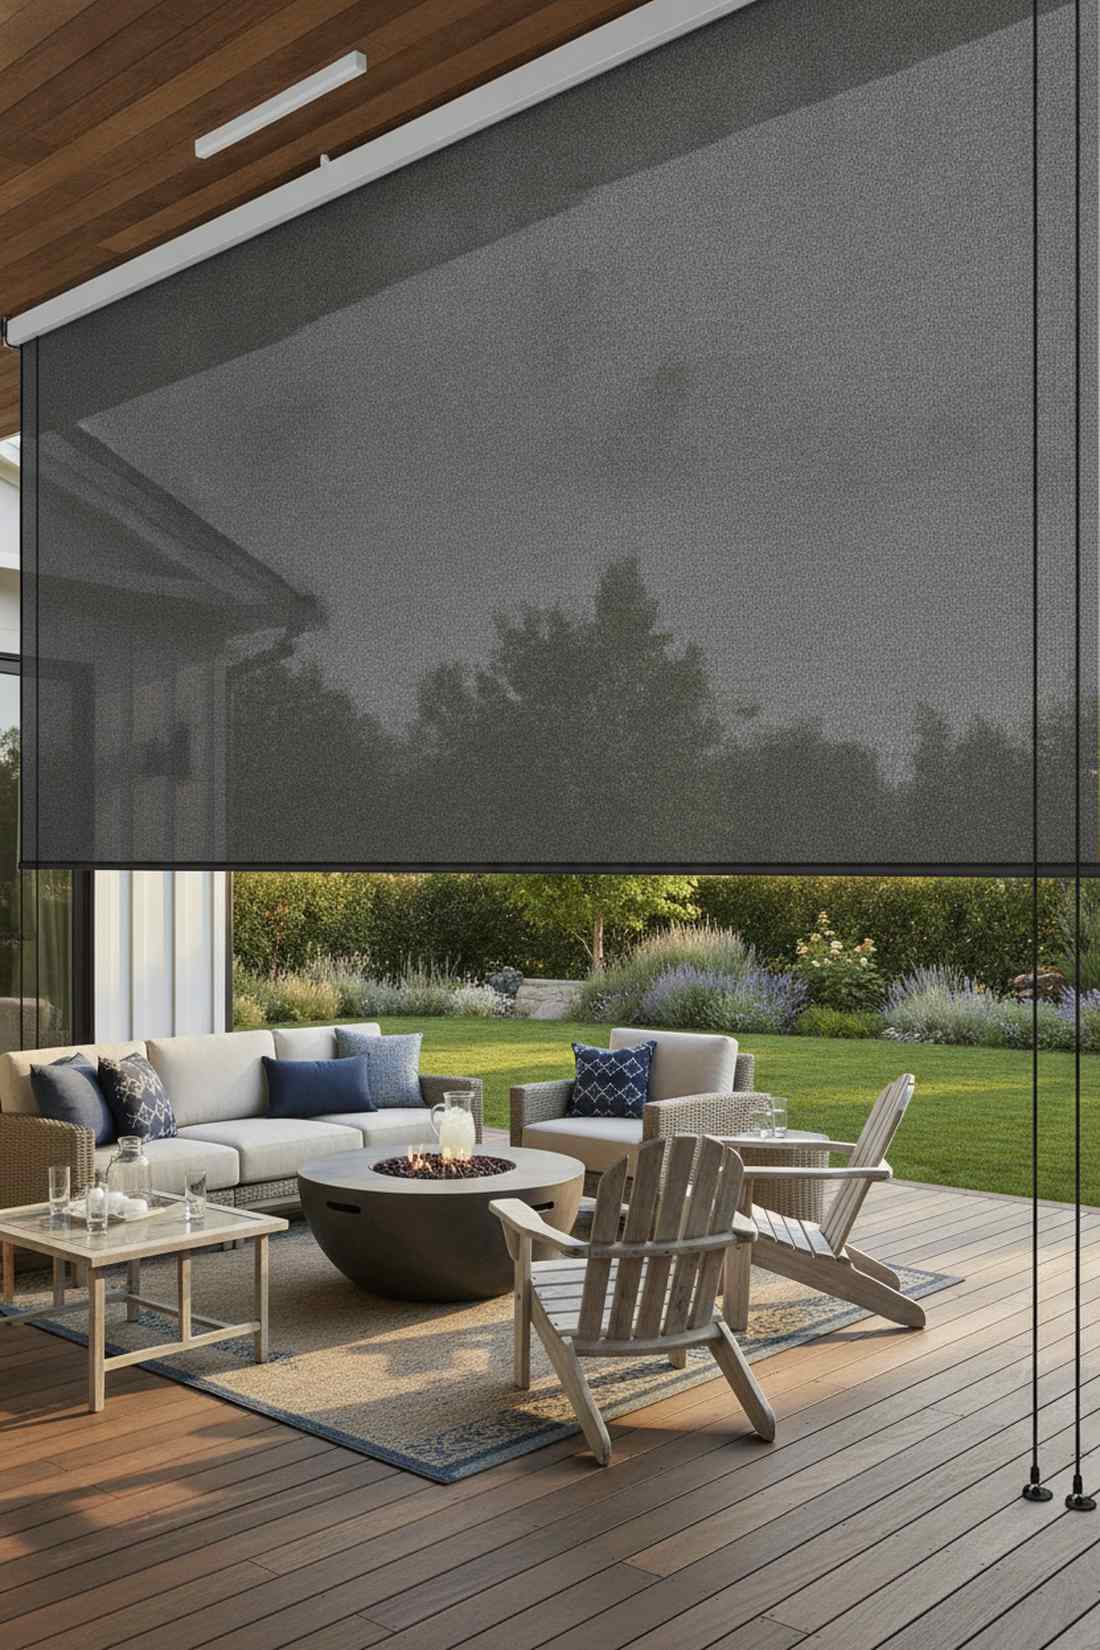
A pull-down solar mesh roller creates a cool, shadowy sanctuary during the absolute peak of summer heat waves. Unbeatable for west-facing units that get baked by the afternoon sun.
People often suffer through the heat, but a UV-blocking barrier gives a designer-level finish and drops temperatures dramatically. It is a highly functional investment that protects your furniture from fading.
Quality manual screens run about $80–$150. It’s an essential purchase for maximizing comfort during July and August.
- Key Materials: Outdoor solar mesh shade, ceiling track mounts
- Vibe / Style: Sleek climate-controlled lounge
- Difficulty: Requires overhead drilling
- Budget Breakdown: Shade Roller: $90 | Mounting Hardware: $20.
- Creator’s Tip: Buy the bungee tie-down system for the bottom bar so the screen stays taut during storms.
- Smart Sourcing: UV-blocking retractable exterior shades and wind-resistant bungee tie-down kits.
Most DIYers skip this crucial step, missing out on a layout that looks professionally installed…
25. Trellis Walls with Climbing Vines

Freestanding wire grid walls explode into seasonal curtains of vibrant morning glories and sweet peas. The perfect dramatic backdrop that makes tiny balconies feel like endless lush courtyards.
Solid privacy panels block precious winter sun, but an annual vine system looks far more expensive than it is while naturally dying back for winter light. Nestle your fairy garden kits at the base.
You can build this living frame for a mere $25–$45. Pin this idea for the fastest way to achieve floor-to-ceiling greenery.
- Key Materials: Treated 2×4 framing, galvanized wire mesh, deep buckets
- Vibe / Style: Secret garden oasis
- Difficulty: Simple frame assembly
- Budget Breakdown: Lumber: $15 | Wire Grid: $15 | Fasteners: $10.
- Creator’s Tip: Sink the wooden trellis legs directly into concrete-filled buckets before covering with decorative soil.
- Smart Sourcing: galvanized heavy-duty wire grids (bulk pack) and fast-growing annual vine seed kits.
Lighting and Ambiance for Evening Use
Strategic illumination extends balcony functionality into evening hours while creating inviting atmospheres. Layered lighting designs combine ambient, task, and accent fixtures.
26. String Light Canopy
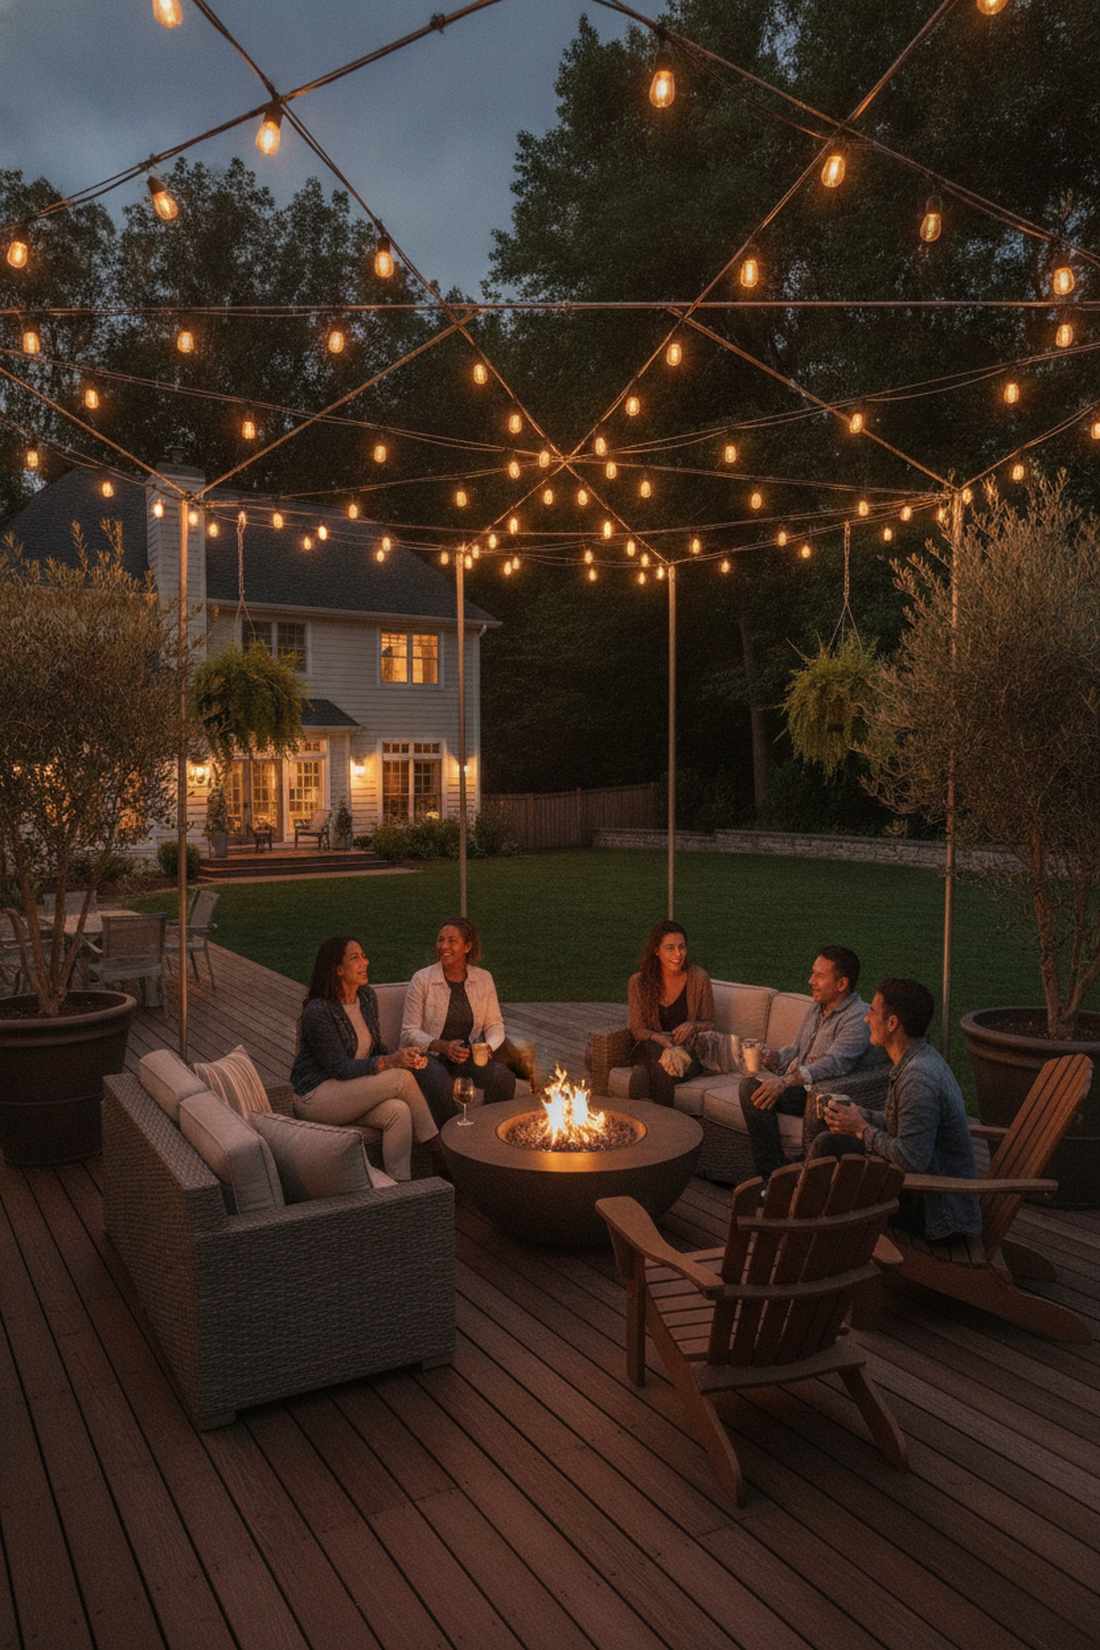
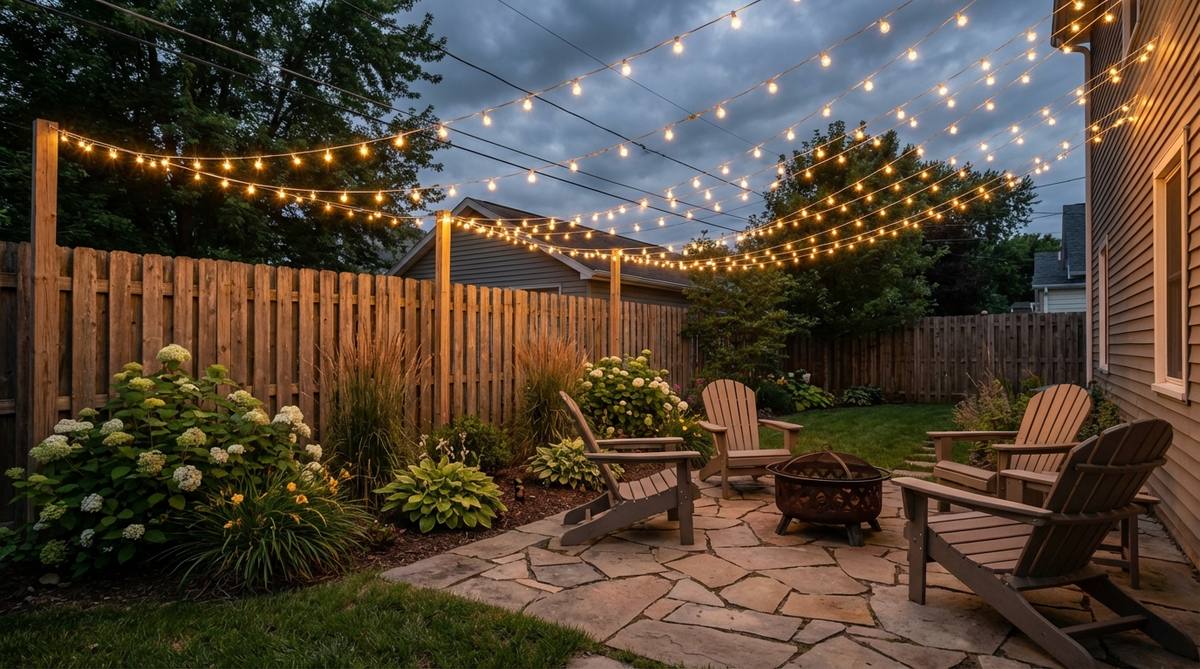
A draped Edison bulb ceiling casts a warm, golden-hour glow over your nighttime cocktail sessions. Essential for creating that highly sought-after trendy rooftop bar atmosphere at home.
Avoid harsh white LEDs; utilizing warm 2200K vintage bulbs gives a designer-level finish that softens industrial concrete. It completely transforms the nocturnal vibe of your outdoor living space.
Commercial-grade strands run about $30–$60. Save this to your patio lighting board to remember the zigzag ceiling layout.
- Key Materials: Shatterproof LED string lights, outdoor command hooks
- Vibe / Style: Warm vintage speakeasy
- Difficulty: Very easy hanging
- Budget Breakdown: Light Strands: $40 | Hooks/Wire: $15.
- Creator’s Tip: Run a thin steel guide wire first, then zip-tie the lights to it to prevent ugly sagging over time.
- Smart Sourcing: shatterproof commercial outdoor string lights and steel lighting guide wire kits.
27. Solar Pathway Markers

Low-profile solar floor pucks trace the edges of your space, creating a luxurious runway effect after dusk. Brilliant for preventing trip hazards while establishing clear visual boundaries.
Standing lamps eat up premium space, but flush-mounted solar lights look far more expensive than they are. They deliver subtle depth perception without causing harsh overhead glare.
A reliable set of markers costs $25–$45. Highly recommended for a quick weekend win that requires zero electrical work.
- Key Materials: Flat LED solar ground lights, double-sided exterior tape
- Vibe / Style: Modern luxury resort deck
- Difficulty: Peel-and-stick easy
- Budget Breakdown: Solar Puck Lights: $35 | Mounting Tape: $5.
- Creator’s Tip: Clean the concrete perfectly with rubbing alcohol before taping them down so they survive heavy rain.
- Smart Sourcing: waterproof flat solar ground markers (bulk pack) and extreme-hold exterior mounting tape.
28. Wall-Mounted Sconce Fixtures

Architectural downlighting sconces cast dramatic, focused beams across textured brick or sleek siding. The ultimate requirement for an elegant outdoor dining or late-night reading corner.
Most renters think they can’t have hardwired looks, but battery-operated fixtures deliver a surprisingly premium look with zero electrical skills. It’s an instant face-lift for boring exterior walls.
These sophisticated fixtures cost roughly $40–$80 a pair. Pin this idea to upgrade your apartment without violating your lease.
- Key Materials: Battery-operated LED sconces, concrete anchors
- Vibe / Style: High-end contemporary gallery
- Difficulty: Basic wall drilling
- Budget Breakdown: Sconce Pair: $50 | Rechargeable Batteries: $20.
- Creator’s Tip: Buy models with built-in timers so they automatically welcome you home with light every single evening.
- Smart Sourcing: battery-operated outdoor wall sconces (starter kit) and high-capacity rechargeable battery packs.
29. LED Strip Under-Rail Lighting
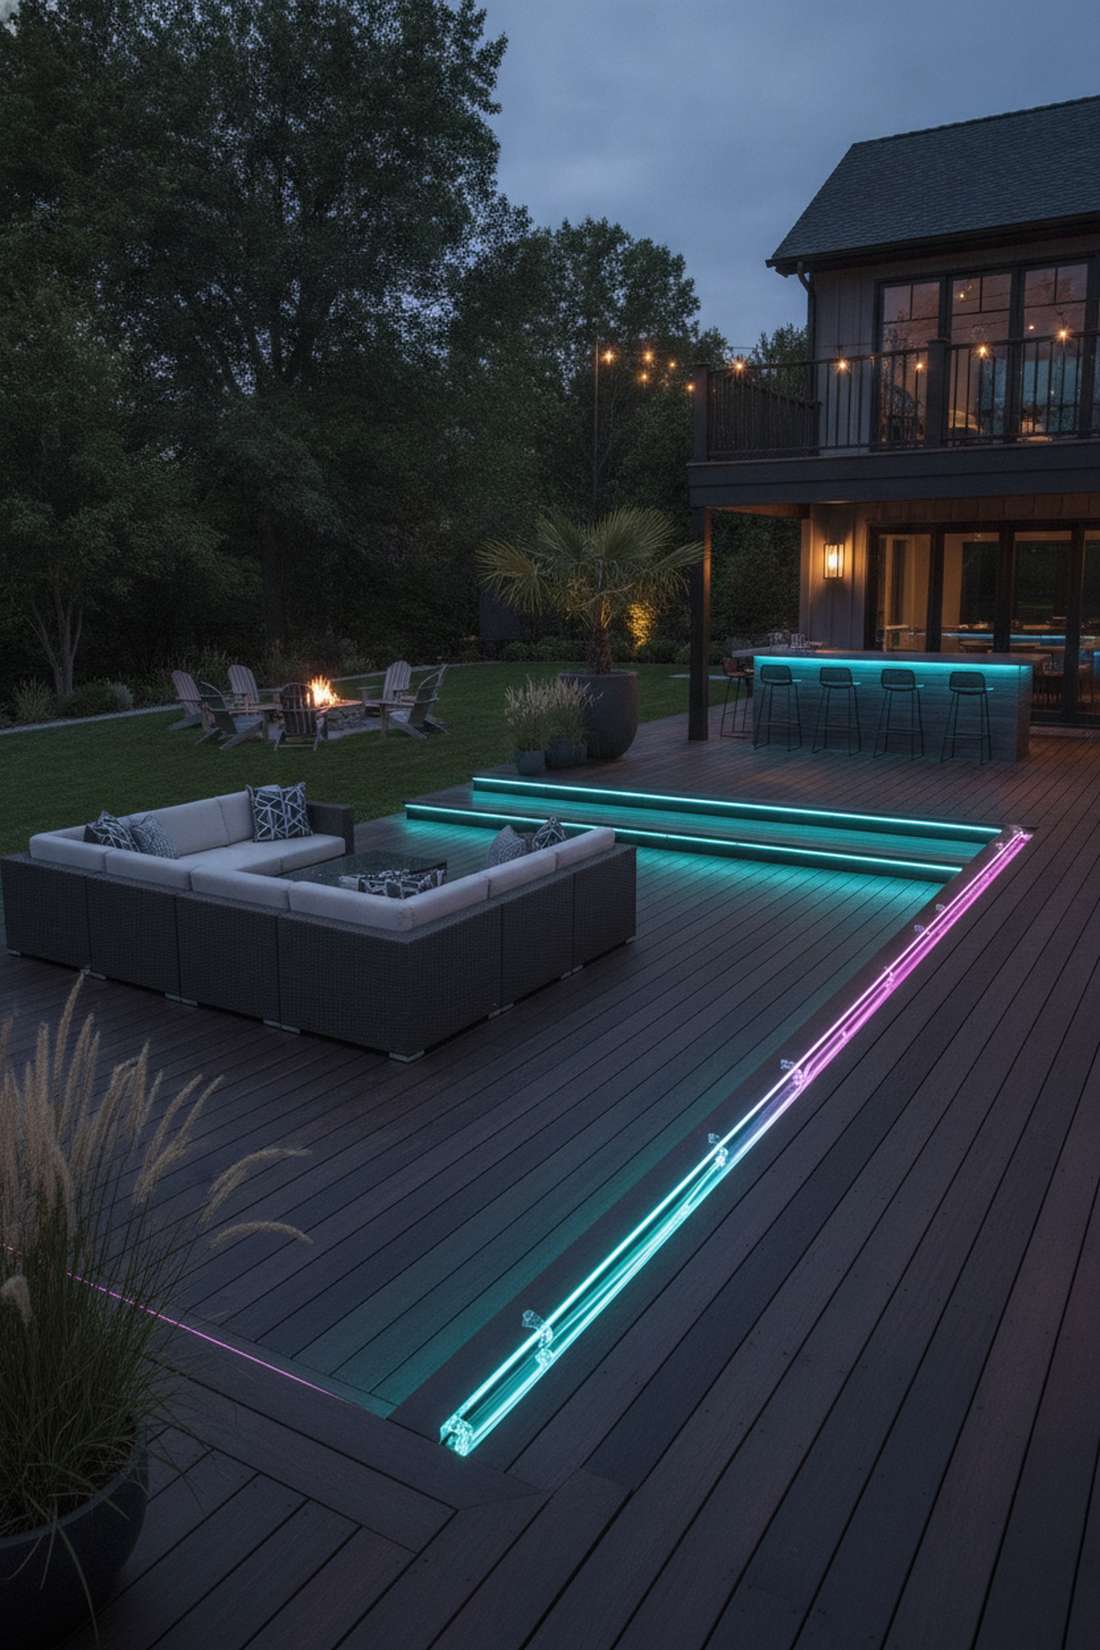
Hidden continuous glow strips radiate an ultra-modern, floating neon effect around the entire perimeter. Outstanding for setting moody, customizable color tones during late-night parties.
Exposed bulbs can look messy, but hiding silicone-coated tape beneath the railing completely alters how sunlight filters through cramped spaces. It’s an elite trick used in high-end club designs.
A smart-controlled lighting strip costs $30–$50. It’s a fast upgrade that completely changes the vibe of the entire deck.
- Key Materials: Waterproof RGB LED tape, silicone mounting clips
- Vibe / Style: Futuristic neon lounge
- Difficulty: Simple adhesive application
- Budget Breakdown: LED Strip: $30 | Silicone Clips: $10.
- Creator’s Tip: Never rely purely on the adhesive backing; use small silicone brackets every two feet to prevent drooping.
- Smart Sourcing: waterproof smart LED outdoor strips (pre-cut) and silicone LED mounting bracket clips (bulk pack).
Material Guide: Cheap vs. Premium Aesthetic
Knowing exactly where to save and where to spend makes all the difference in achieving that “looks expensive but isn’t” vibe.
- Standard vs. UV-Resistant/Premium: Standard plastics crack and fade in one summer. Upgrading to UV-coated resins ensures your setup survives harsh sun and deep freezes without losing color.
- Pre-made Kits vs. Sourcing Locally: Scavenging parts takes weeks. Using starter kits guarantees all components interlock seamlessly, saving you massive amounts of time and frustration.
The next lighting technique is the secret weapon high-end designers use for luxury urban lofts…
30. Lantern Cluster Arrangements
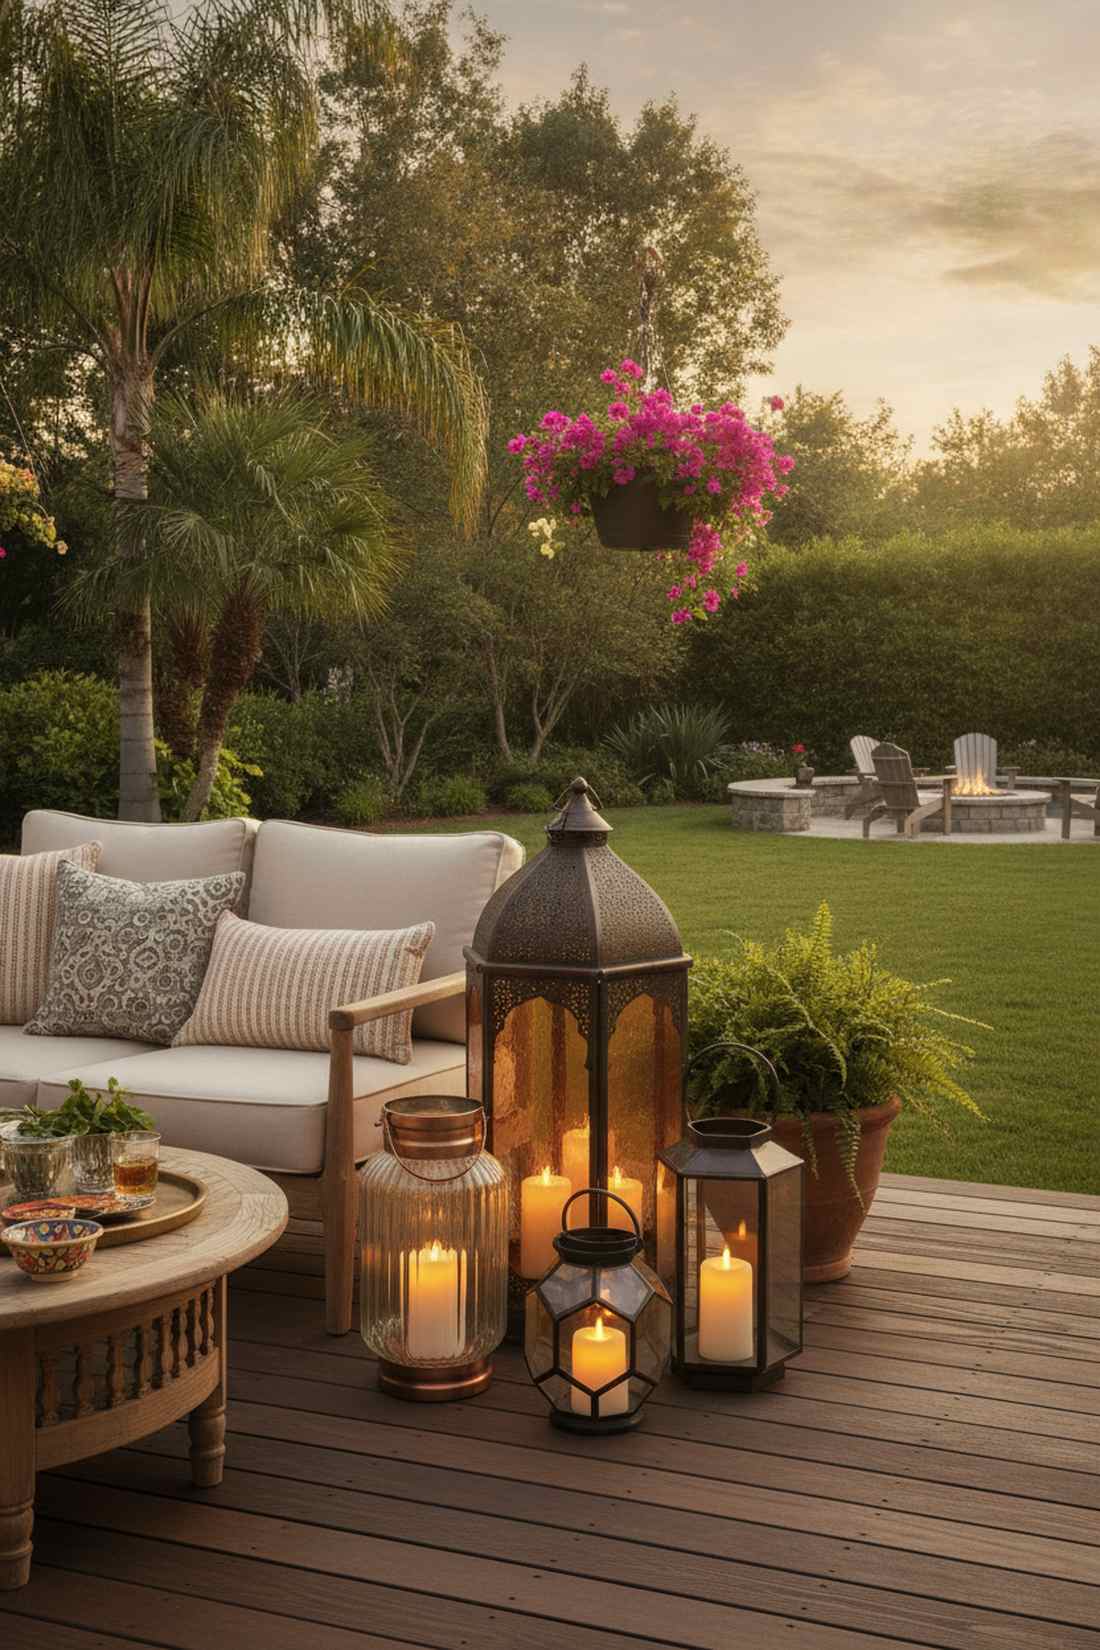
A staggered grouping of floor lanterns creates a captivating, flickering focal point in dead corner zones. Phenomenal for adding romance and warmth without the hazard of real fire.
A single tiny candle looks pathetic, but massive clustered arrangements look far more expensive than they are. Combine different metals and glass textures for a highly curated aesthetic.
Pulling together a diverse cluster costs $50–$100. Save this to your decor board for an instant cozy atmosphere.
- Key Materials: Mixed-height metal lanterns, waterproof flameless pillars
- Vibe / Style: Cozy Moroccan terrace
- Difficulty: Zero setup required
- Budget Breakdown: Lantern Trio: $60 | LED Candles: $25.
- Creator’s Tip: Place the tallest lantern in the very back of the corner to maximize perceived depth.
- Smart Sourcing: weatherproof flameless LED candles (bulk pack) and mixed-height outdoor lantern sets.
31. Uplighting for Plant Features
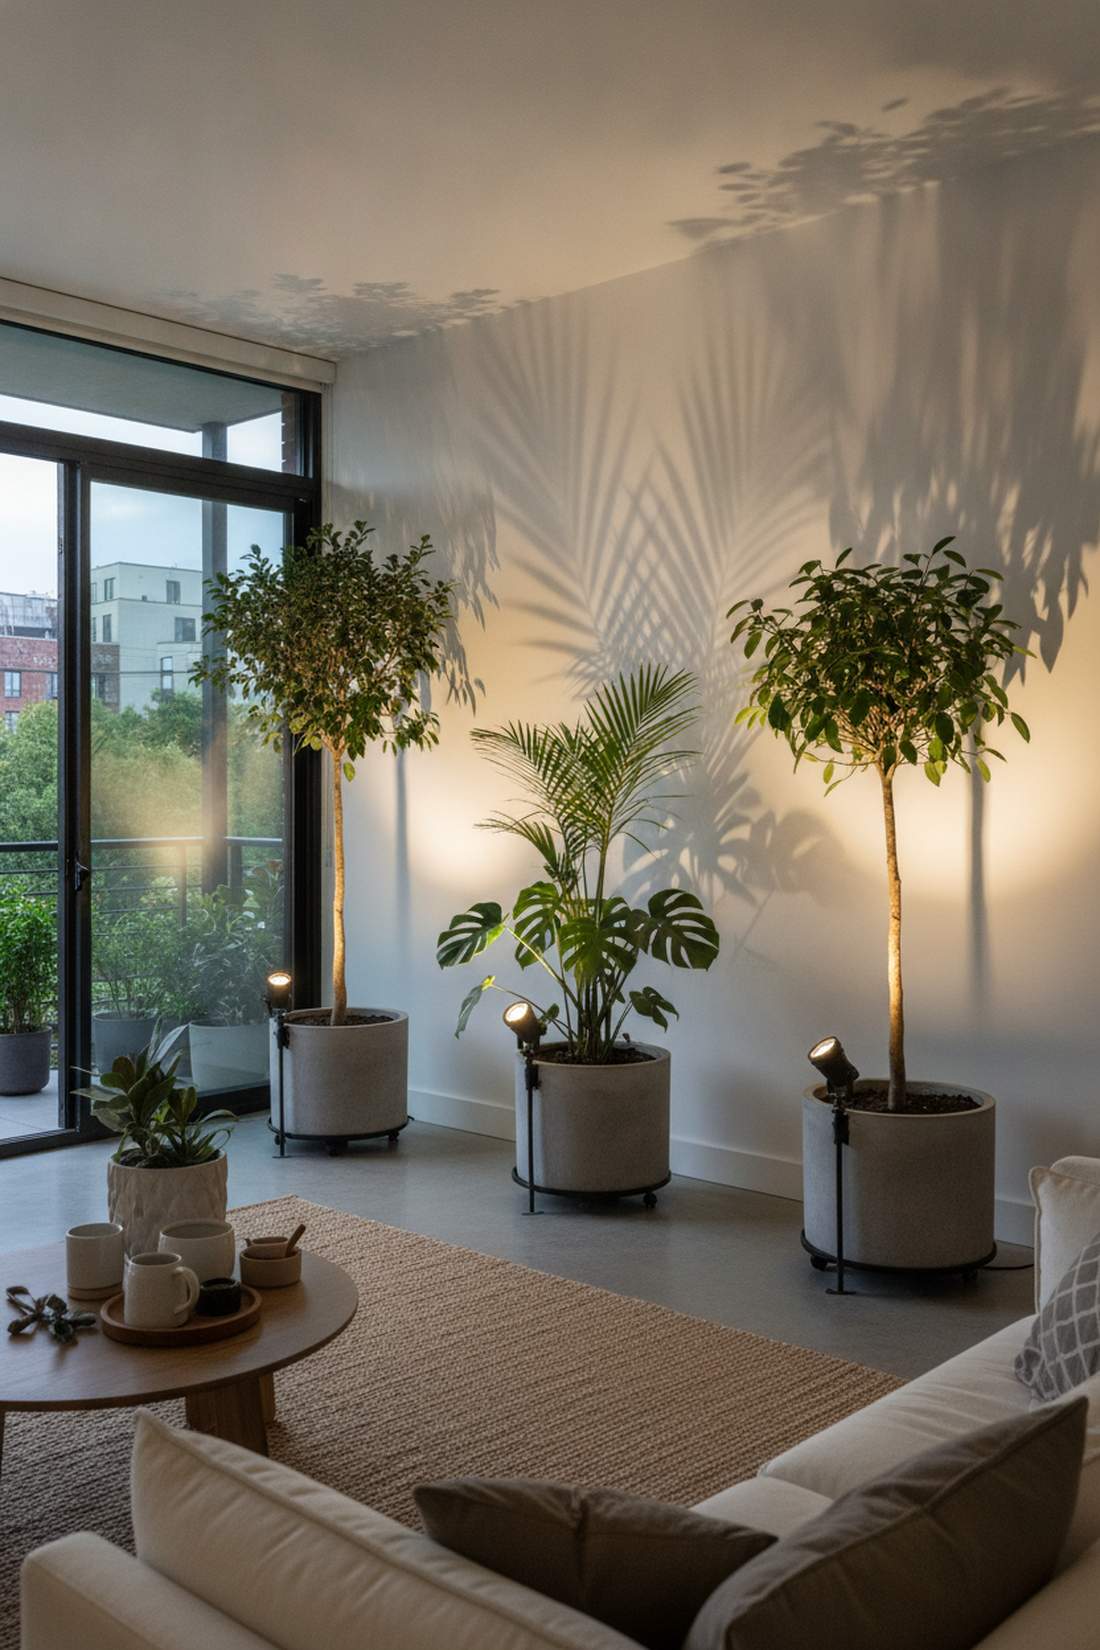
Focused directional ground spotlights cast massive, dramatic botanical shadows against your blank apartment walls. The absolute best way to make standard potted trees look like expensive sculptural art.
Most beginners ignore landscape lighting, but aiming a beam straight up through foliage delivers a surprisingly premium look. It highlights your miniature garden supplies and large leaves beautifully.
A reliable set of adjustable solar spotlights runs $25–$50. Highly recommended for a quick weekend win with massive visual impact.
- Key Materials: Solar-powered narrow-beam spotlights, adjustable stakes
- Vibe / Style: Dramatic botanical gallery
- Difficulty: Simple soil insertion
- Budget Breakdown: Spotlights (4-pack): $35 | Batteries: included.
- Creator’s Tip: Adjust the beam angle slightly sideways to emphasize the rough texture of the tree trunk.
- Smart Sourcing: adjustable narrow-beam solar spotlights (bulk pack) and heavy-duty lighting ground stakes.
Flooring Foundations and Surface Treatments
Balcony floor treatments transform cold concrete slabs into comfortable outdoor rooms while providing drainage, traction, and aesthetic appeal.
32. Interlocking Deck Tiles
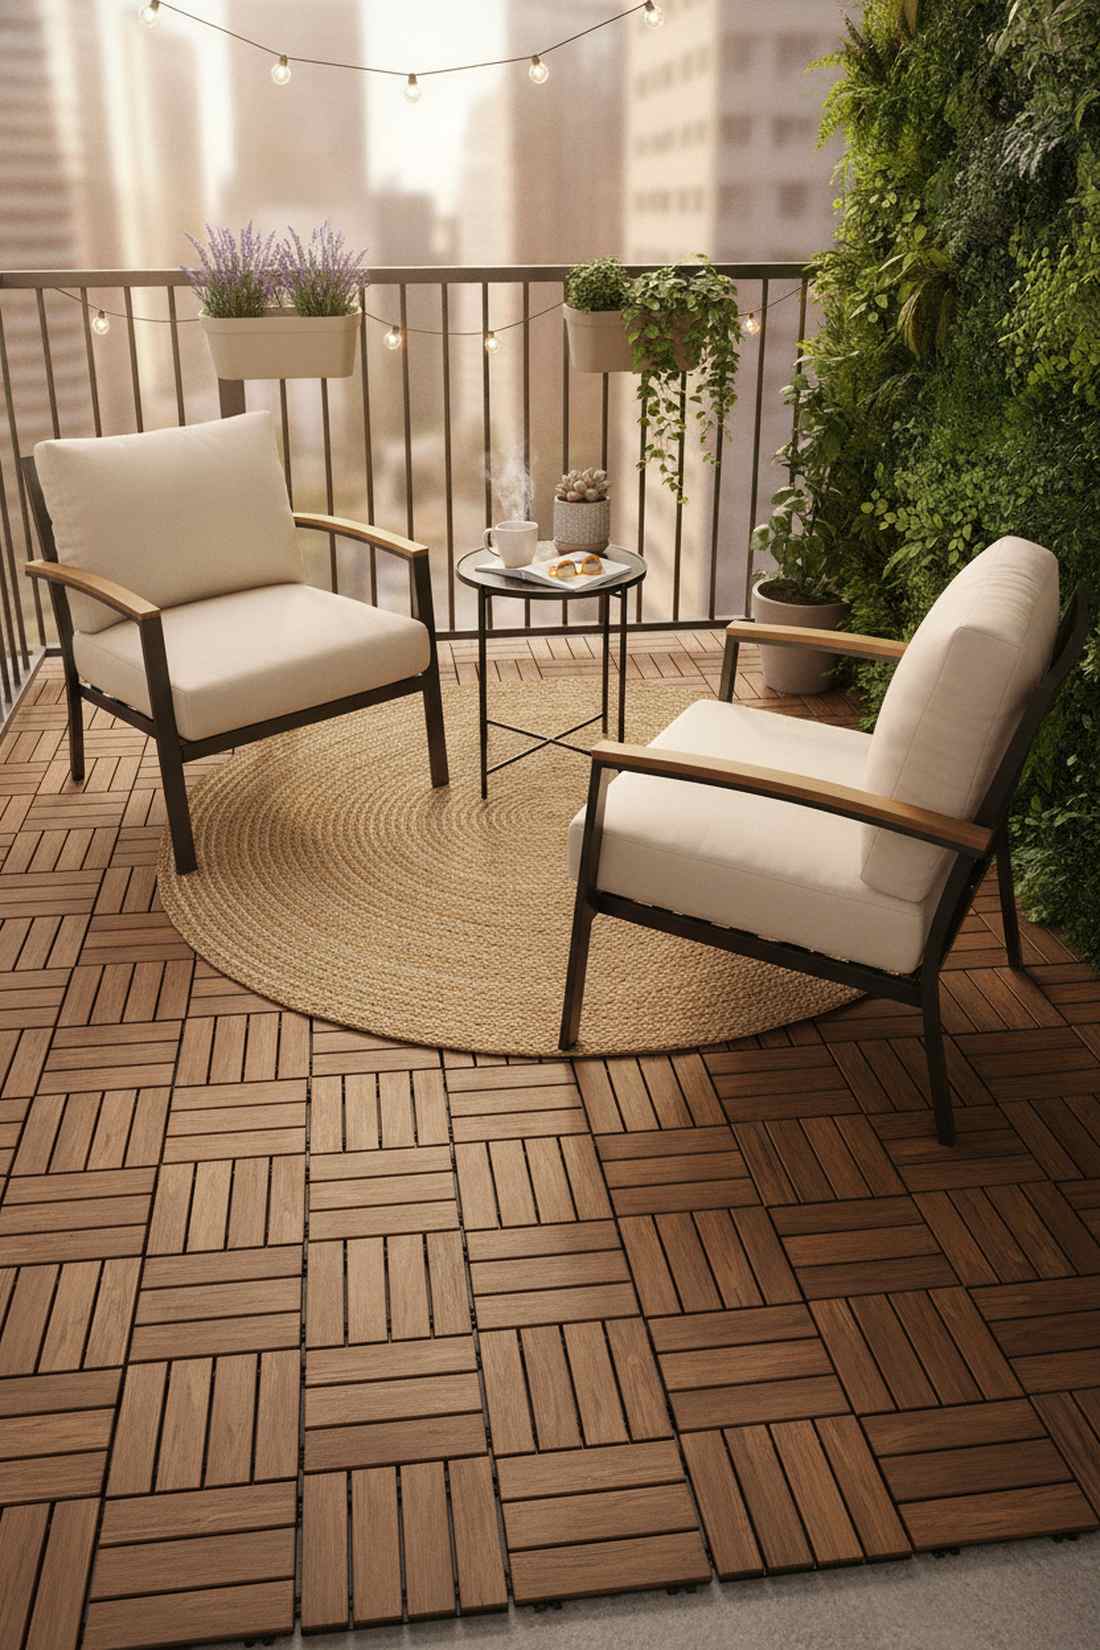
Snap-together wooden grid flooring instantly buries ugly, stained concrete under a warm, barefoot-friendly surface. The undisputed champion of renter-friendly makeovers for small outdoor spaces.
Painting old floors flakes off instantly, but elevated composite matrices look far more expensive than they are. This allows water to drain perfectly underneath without rotting the material.
Covering a small balcony runs about $80–$150. Pin this to your apartment upgrade board for the ultimate deposit-safe hack.
- Key Materials: Composite or acacia wood interlocking tiles, plastic grid bases
- Vibe / Style: Premium spa deck
- Difficulty: Fast snap-together assembly
- Budget Breakdown: Tile Packs: $100 | Edge Trim: $20.
- Creator’s Tip: Start snapping tiles from the most visible outside corner and work your way back toward the door.
- Smart Sourcing: acacia wood interlocking deck tiles (starter kit) and composite deck tile edge transitions.
33. Outdoor Area Rugs
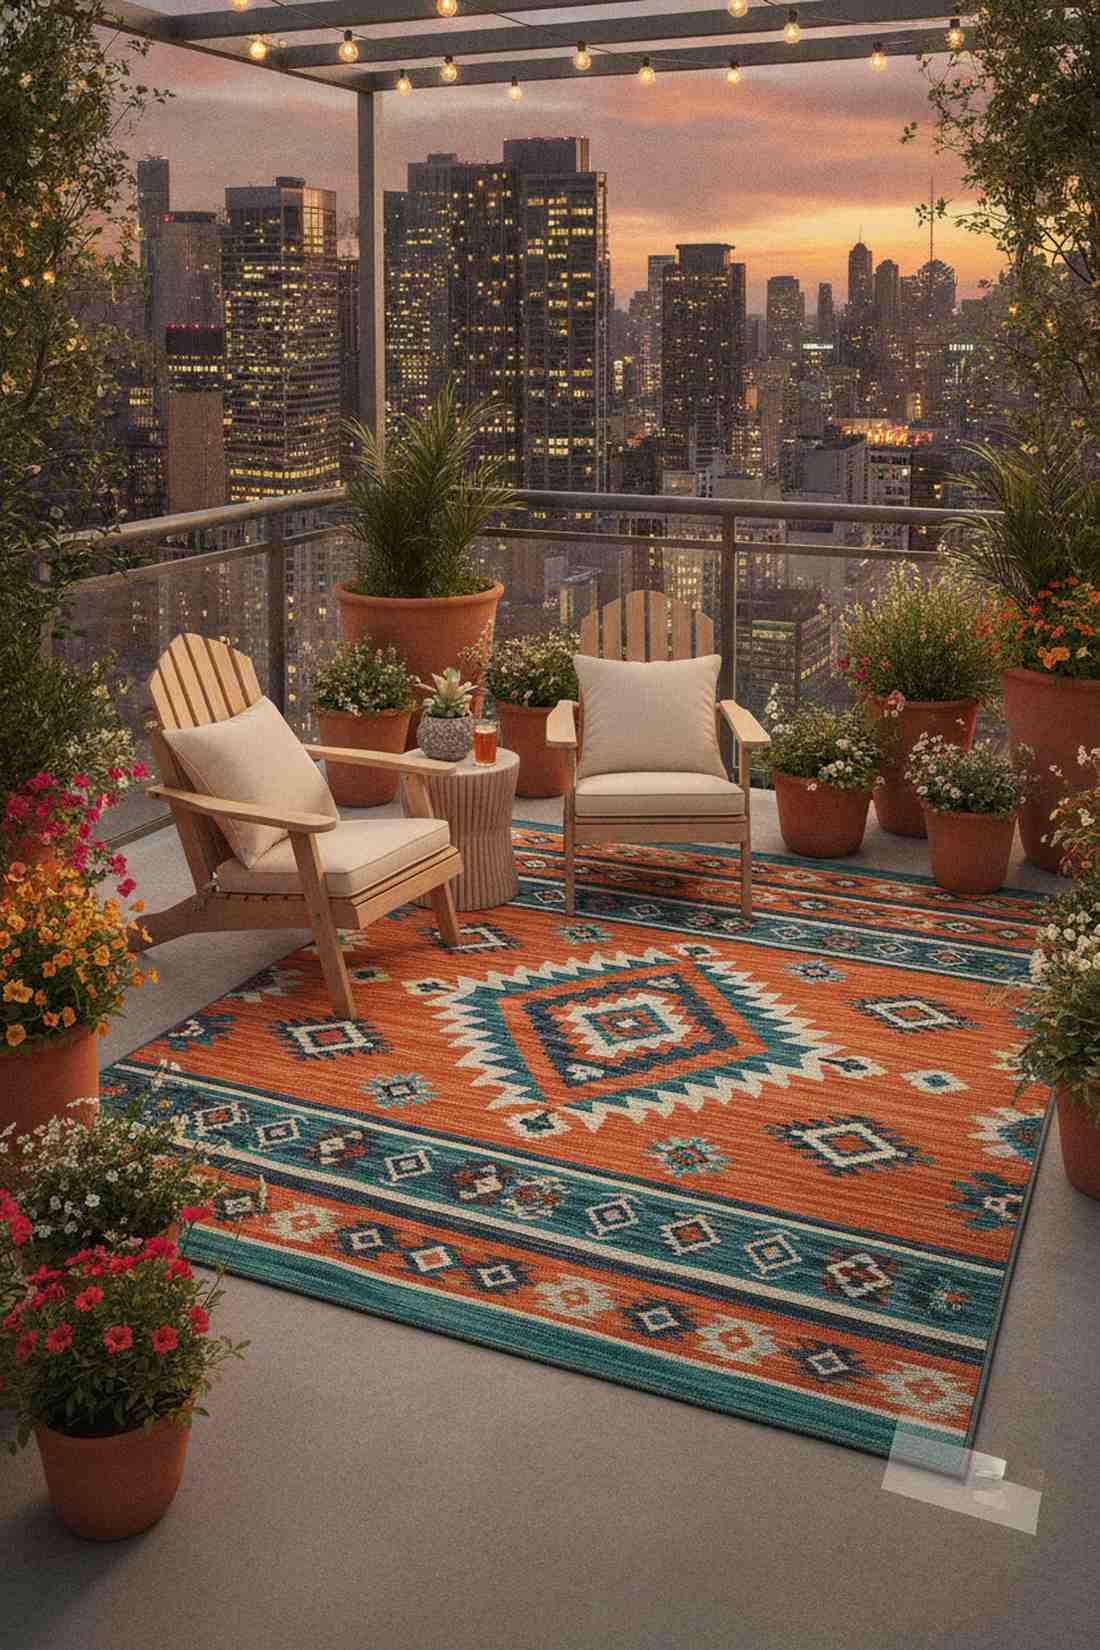
A boldly patterned woven mat acts as the ultimate visual anchor, defining your seating zone instantly. Fantastic for adding massive splashes of color to boring monochromatic high-rises.
Fabric rugs trap mold, but utilizing recycled polypropylene completely alters how sunlight filters through cramped spaces. It dries in minutes and refuses to fade under brutal UV exposure.
A stylish 5×7 rug generally costs $40–$80. It’s an essential purchase for making the outside feel like a true living room.
- Key Materials: Flat-weave polypropylene rug, outdoor double-sided tape
- Vibe / Style: Vibrant bohemian lounge
- Difficulty: Just unroll and tape
- Budget Breakdown: Rug: $60 | Securing Tape: $10.
- Creator’s Tip: Tape down all four corners aggressively, otherwise high city winds will flip the rug over constantly.
- Smart Sourcing: fade-resistant polypropylene outdoor rugs and heavy-duty outdoor carpet tape (bulk pack).
34. Artificial Grass Carpet

Lush synthetic turf rolls bring a ridiculously soft, vibrant grassy lawn to the fiftieth floor. The absolute best choice for pet owners or anyone craving barefoot backyard vibes.
Cheap neon turf looks terrible; upgrading to multi-toned thatch delivers a surprisingly premium look that fools the eye. It is the perfect soft base for your terrarium accessories.
Premium turfing will run you about $60–$120. Save this if you want to walk outside barefoot without freezing on concrete.
- Key Materials: Multi-tone drainage-backed turf, seaming tape
- Vibe / Style: Secret rooftop lawn
- Difficulty: Requires careful cutting
- Budget Breakdown: Turf Roll: $80 | Tape: $15 | Utility Knife: $10.
- Creator’s Tip: Always unroll the turf so the grass blades lean slightly toward your main viewing window for the best look.
- Smart Sourcing: premium multi-tone artificial grass rolls (pre-cut) and heavy-duty turf seaming tape.
This upcoming floor hack takes five minutes to install but completely redesigns the entire atmosphere…
35. Painted concrete-stencils
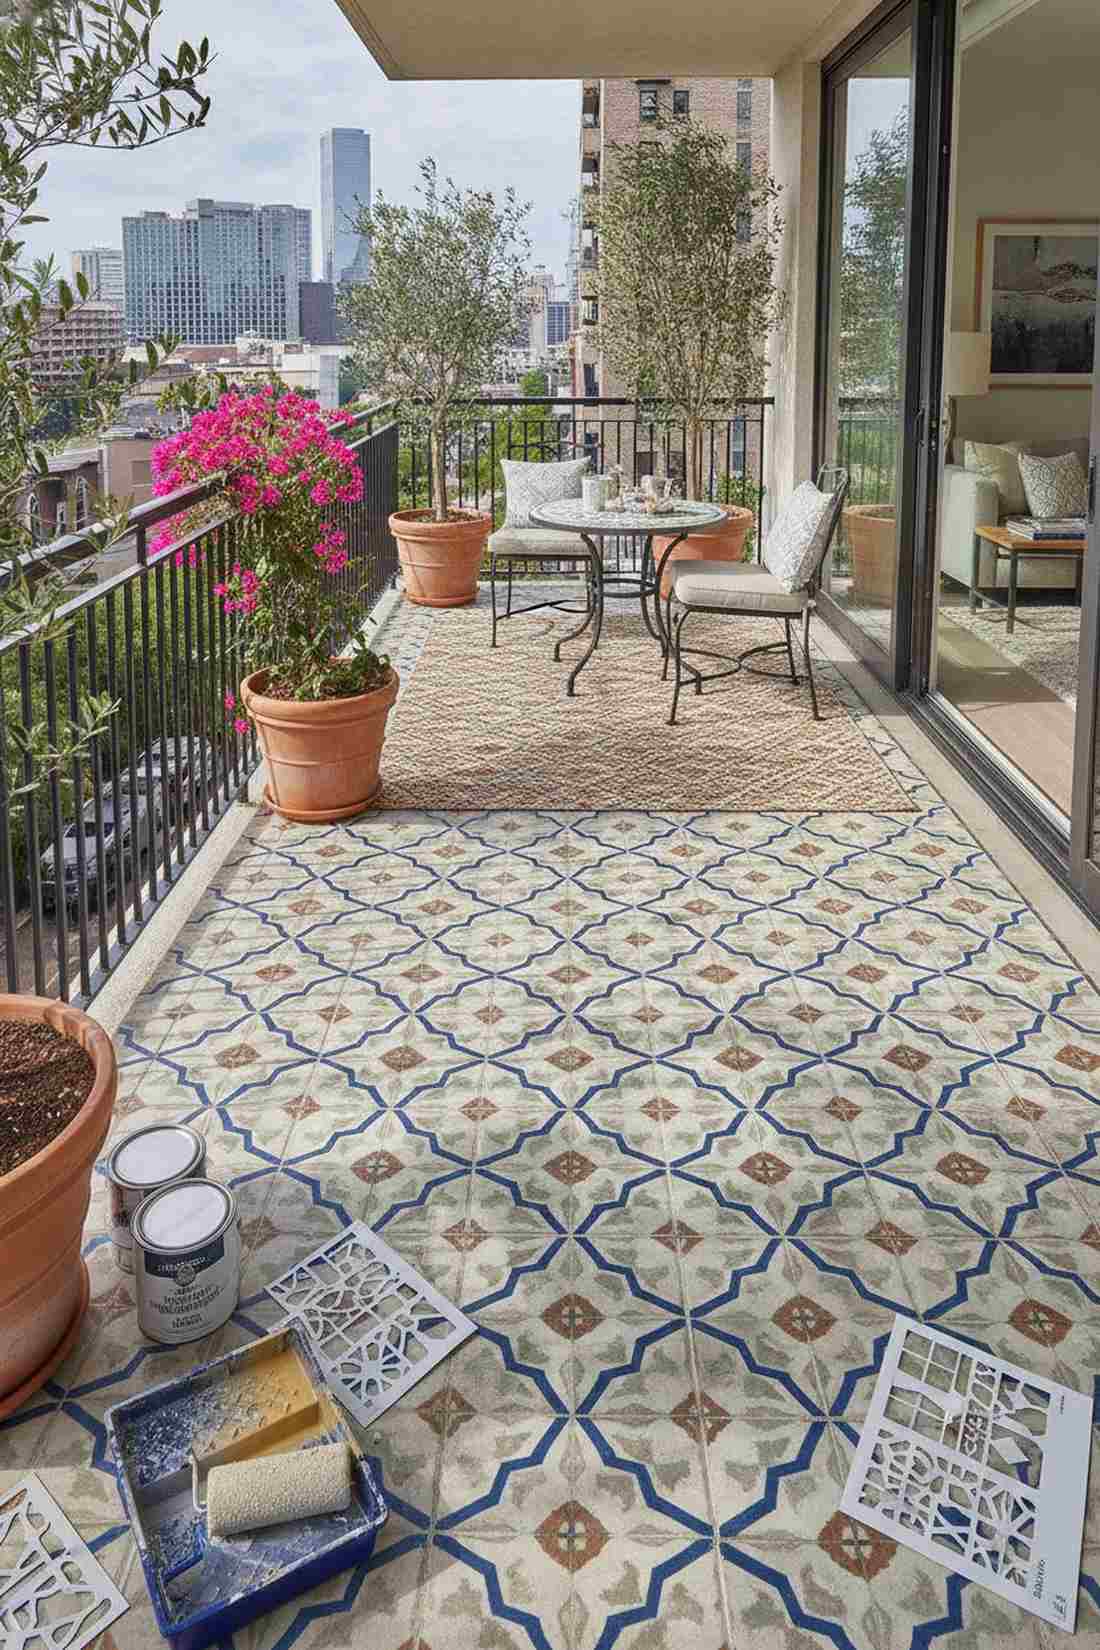
Elaborate hand-painted tile motifs trick the eye into seeing expensive imported ceramics across your floor. Flawless for budget-conscious homeowners wanting massive character on a dime.
Replacing actual tile costs thousands, but concrete-specific paint delivers a designer-level finish for pennies. A brilliant execution of city balcony ideas that demands respect.
Paint, sealer, and stencils total around $40–$75. Pin this project if you have a free weekend and a steady hand.
- Key Materials: Reusable geometric stencils, exterior masonry paint, clear sealer
- Vibe / Style: Artisan Moroccan courtyard
- Difficulty: Tedious but easy
- Budget Breakdown: Stencil: $20 | Paint/Sealer: $40 | Brushes: $10.
- Creator’s Tip: Use a very dry foam roller—too much paint will bleed instantly under the plastic stencil edges.
- Smart Sourcing: reusable geometric concrete stencils (starter kits) and UV-resistant clear masonry sealers.
36. Composite Decking Sections
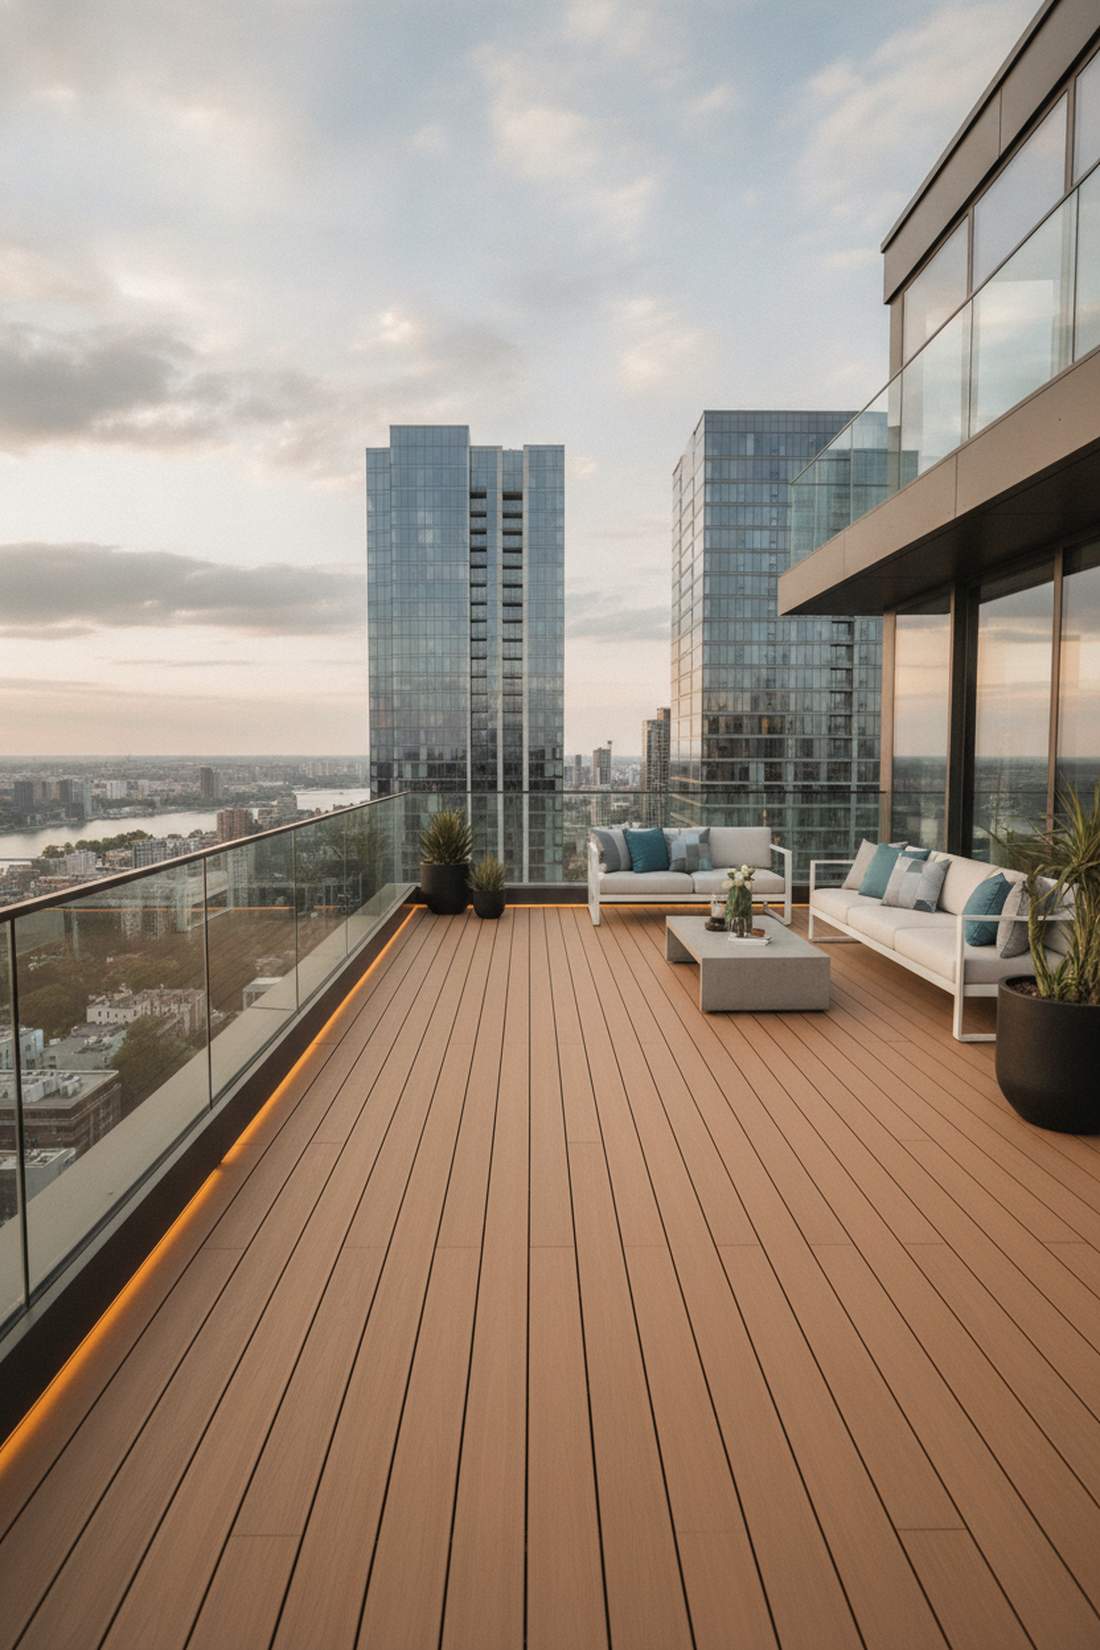
Sleek engineered wood planks lay down a permanent, architectural-grade boardwalk feel over failing slabs. The ultimate high-ROI upgrade for owned condos looking for a luxury facelift.
Real wood rots and splinters, but a composite system completely alters how sunlight filters through cramped spaces while lasting decades. It’s a permanent structural investment.
Expect to spend $150–$300 for a small footprint. Highly recommended for a high-end, completely maintenance-free outcome.
- Key Materials: Capped composite boards, hidden fastening clips
- Vibe / Style: Modern luxury penthouse
- Difficulty: Advanced carpentry required
- Budget Breakdown: Composite Boards: $180 | Fasteners: $30 | Framing: $40.
- Creator’s Tip: Never screw through the top of the boards; strictly use hidden track fasteners for a flawless, barefoot-safe surface.
- Smart Sourcing: capped composite decking boards (pre-cut) and hidden deck fastening clip kits (bulk pack).
Maximizing City Balcony View Potential
Strategic design choices frame and enhance balcony overlooking city panoramas rather than obstructing valued sightlines with furniture or plantings.
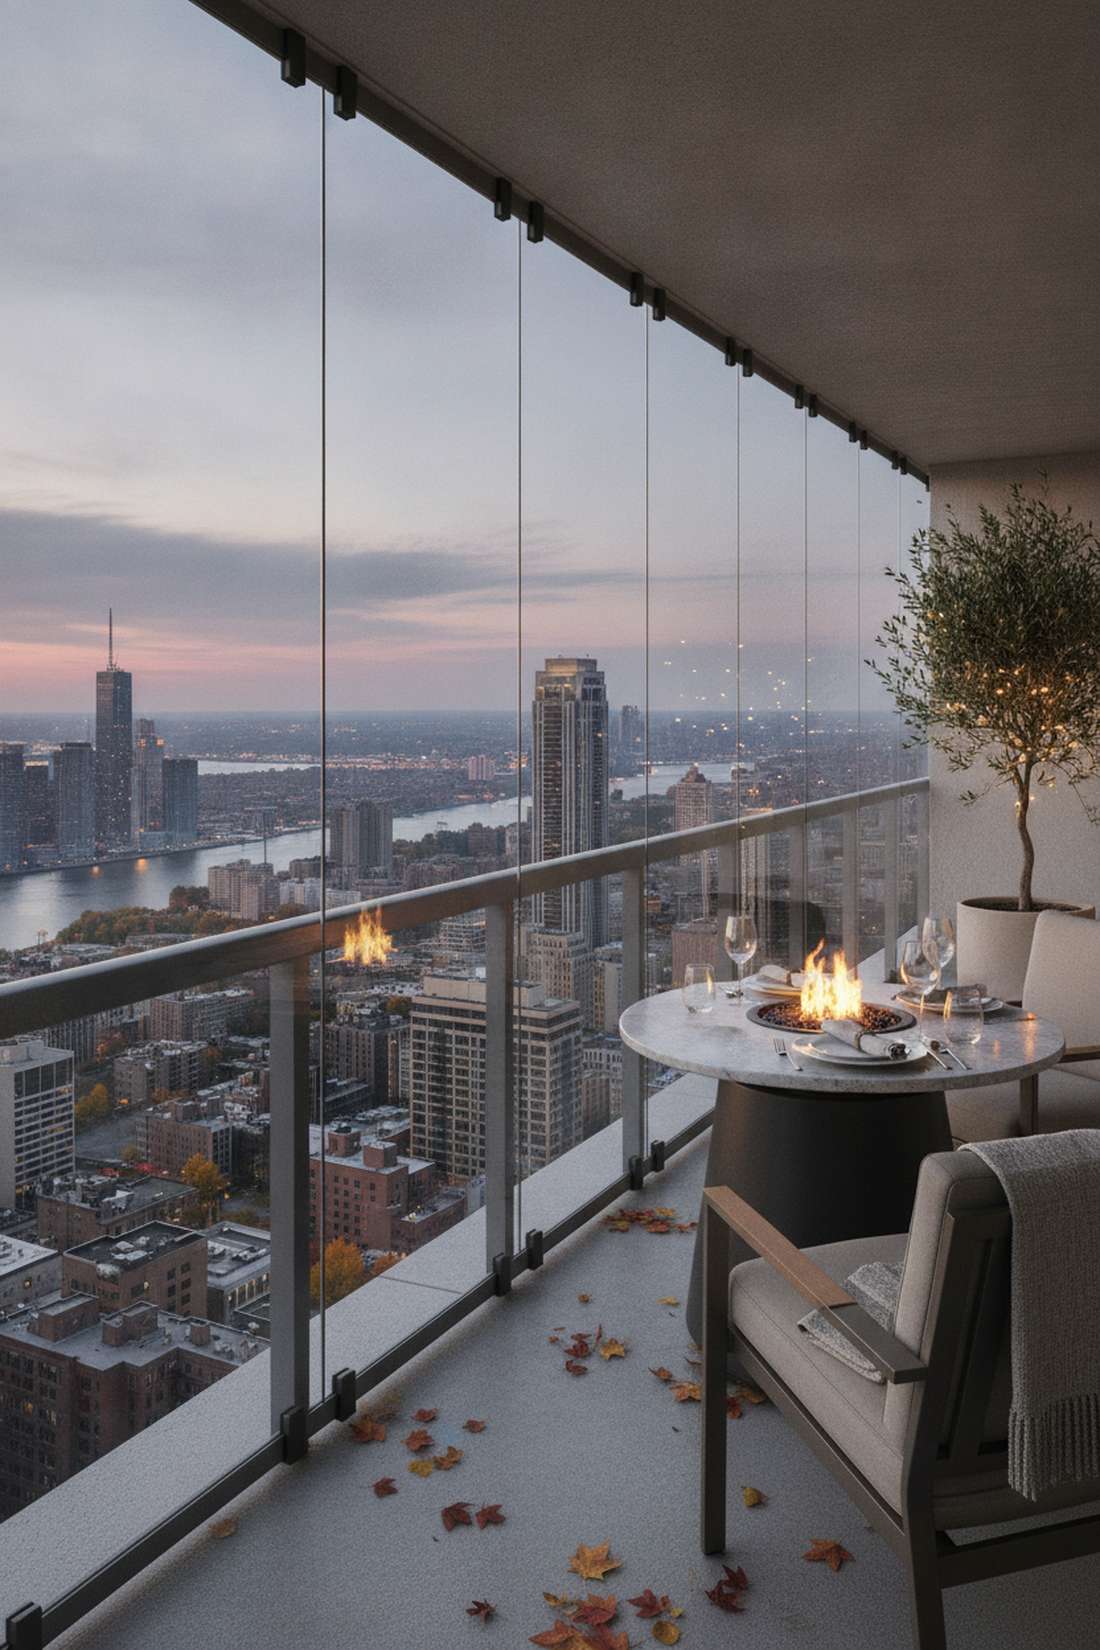
37. Glass Railing Panels
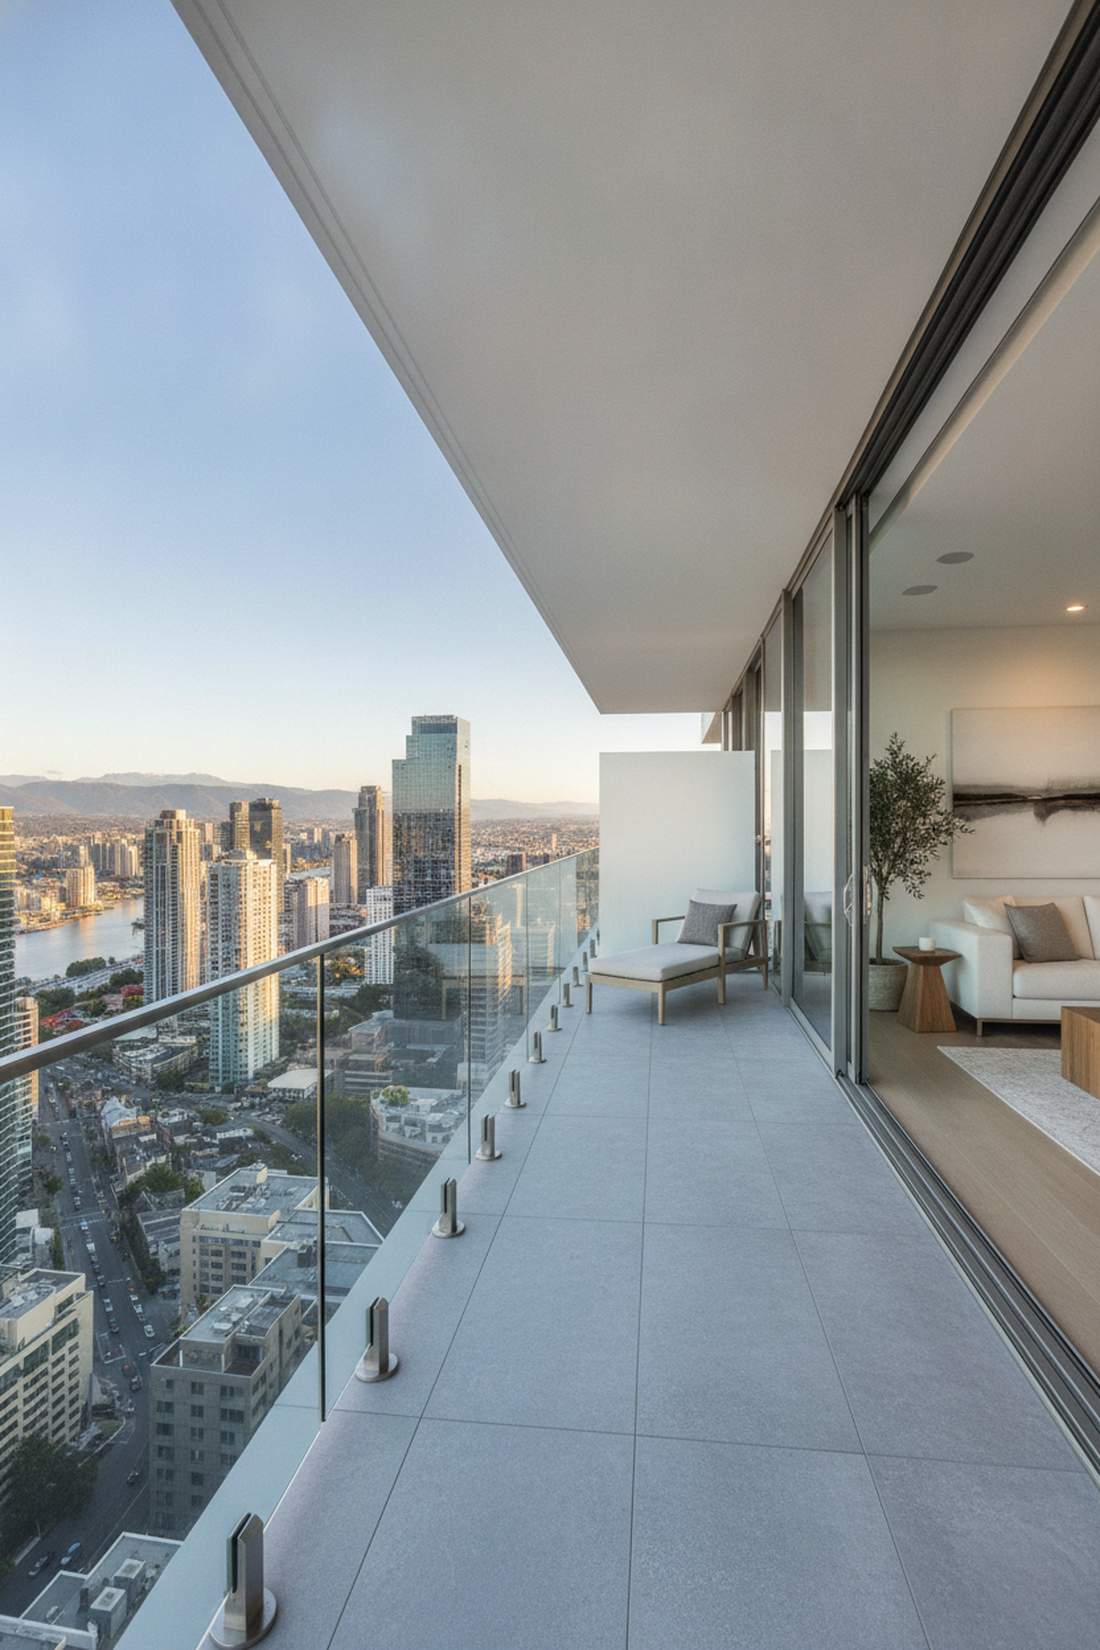
Frameless transparent safety barriers erase visual borders, letting the stunning skyline flood directly into your living room. The peak flex for any high-rise balcony overlooking city landscapes.
Metal spindles chop up the horizon, but pure tempered glass gives a designer-level finish that amplifies perceived space. The uninterrupted city balcony view is absolutely breathtaking.
Professional glass retrofits cost between $300–$600+. Pin this to your luxury condo renovation board for ultimate inspiration.
- Key Materials: 1/2-inch tempered safety glass, stainless steel base spigots
- Vibe / Style: Ultra-premium modern high-rise
- Difficulty: Requires professional installation
- Budget Breakdown: Glass Panels: $300 | Spigots: $100 | Labor: $200.
- Creator’s Tip: Apply a rain-repellent windshield coating to the exterior side to drastically reduce hard-water spots.
- Smart Sourcing: stainless steel glass railing spigots (bulk pack) and professional glass rain-repellent coatings.
38. Low-Profile Planters
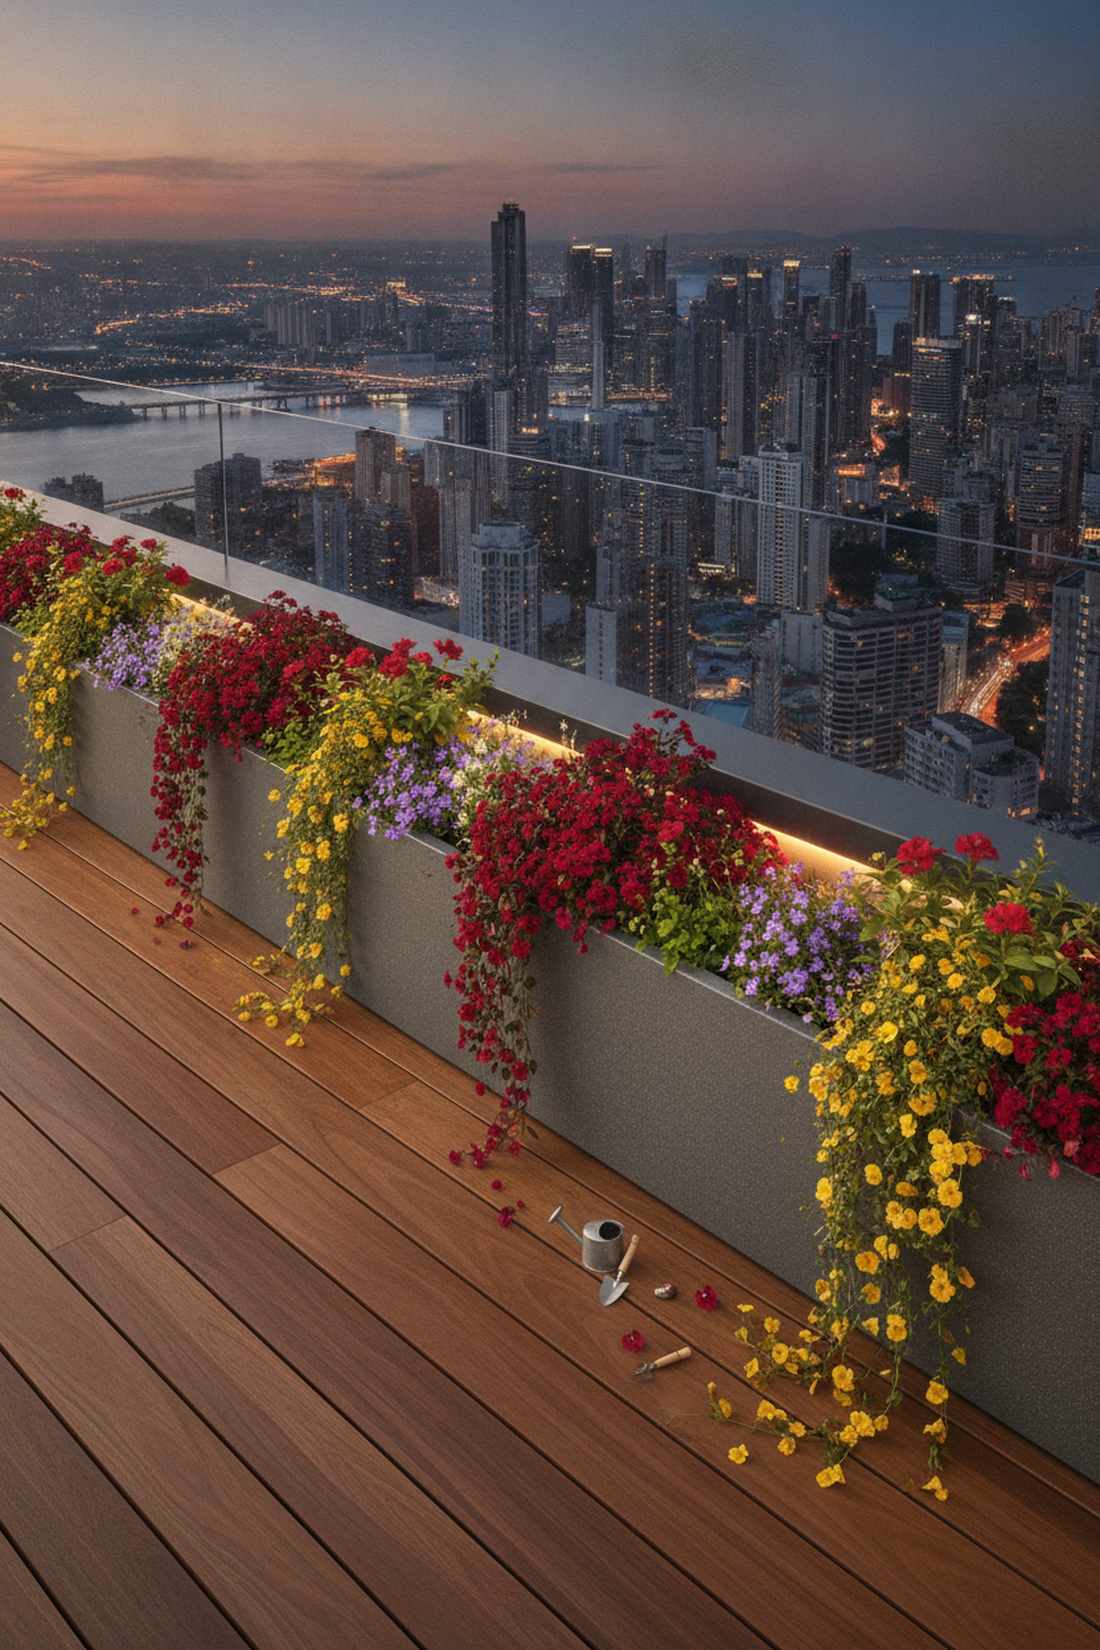
Sleek horizontal ground troughs provide a vibrant burst of foreground color without ever blocking the horizon. Perfect for framing the city balcony view without overwhelming it.
Tall bushes destroy your sightlines, but hugging the floor with low creepers looks far more expensive than it is. Scatter miniature garden supplies among the low-lying petals.
Snagging a set of low modern troughs costs $60–$120. It’s an essential strategy for balancing greenery with epic vistas.
- Key Materials: Shallow fiberglass troughs, trailing floral varieties
- Vibe / Style: Minimalist framing border
- Difficulty: Very easy planting
- Budget Breakdown: Troughs: $80 | Soil: $20 | Flora: $20.
- Creator’s Tip: Plant trailing verbena at the very edge so it spills downward, leaving the upward view totally clear.
- Smart Sourcing: low-profile fiberglass trough planters and high-drainage succulent potting mix (bulk pack).
39. Corner Viewing Bench
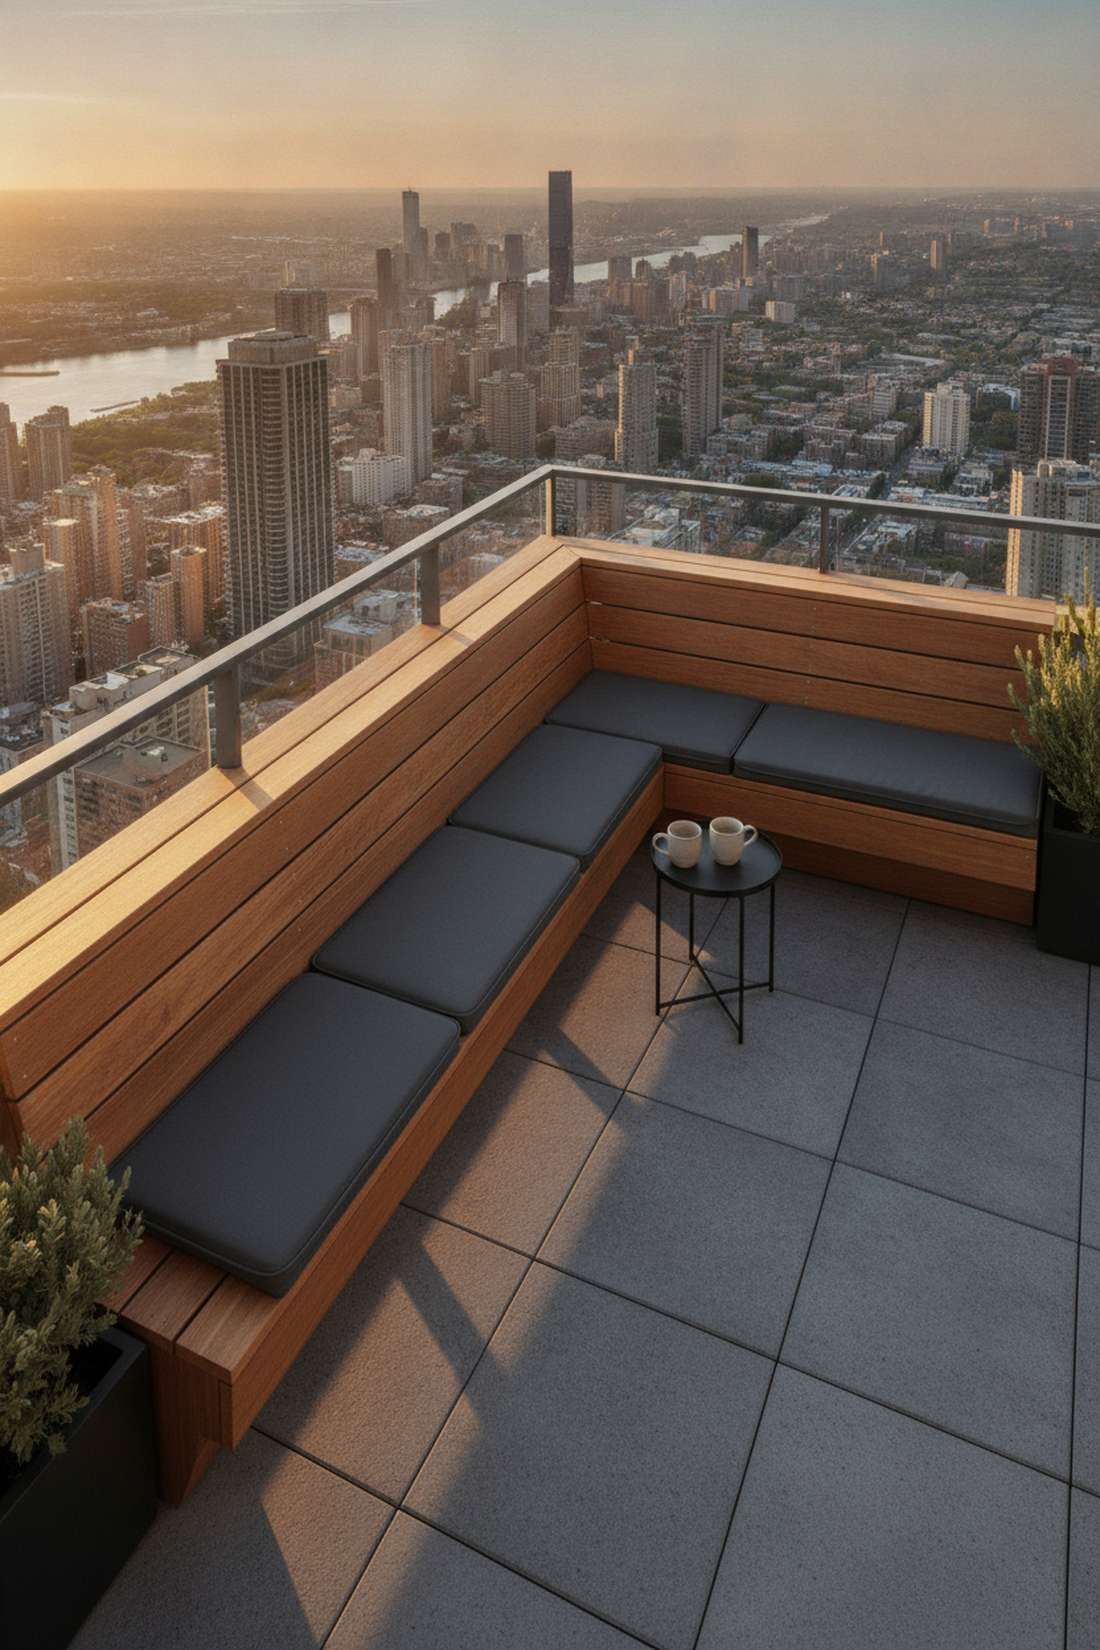
A custom-angled perimeter seat literally forces your guests to face outward toward the sweeping urban panorama. The smartest seating arrangement for a balcony overlooking city lights.
Most people put chairs facing inward, ruining the entire point; an L-shaped bench completely alters how sunlight filters through cramped spaces. It optimizes the flow and orientation instantly.
Building this custom bench runs around $100–$200. Save this layout hack before you buy any bulky patio furniture.
- Key Materials: Weather-treated lumber, custom angled cuts, outdoor cushions
- Vibe / Style: Strategic scenic overlook
- Difficulty: Moderate woodworking
- Budget Breakdown: Wood: $90 | Cushions: $60 | Screws/Stain: $30.
- Creator’s Tip: Build the seat depth exactly 18 inches—anything deeper eats up too much floor space for no real comfort gain.
- Smart Sourcing: waterproof outdoor bench cushions (pre-cut) and marine-grade structural wood screws (bulk pack).
Never arrange your seating until you read this next approach—it transforms tight corners instantly…
40. Minimalist Railing Design

High-tension steel cable wires provide rock-solid safety while remaining virtually invisible to the naked eye. Flawless for maintaining that crisp, unhindered city balcony view.
Chunky wooden balusters look dated and bulky; stainless marine cables give a designer-level finish favored by modern architects. It feels incredibly open and liberating.
Cable railing hardware kits cost roughly $150–$250. Highly recommended for a high-end, contemporary structural upgrade.
- Key Materials: 316 stainless steel cables, tensioning turnbuckles
- Vibe / Style: Invisible modern boundary
- Difficulty: Precise measuring required
- Budget Breakdown: Cable Kits: $180 | Posts: $70 | Tools: $30.
- Creator’s Tip: Buy a specialized cable-crimping tool immediately; doing it with standard pliers will ruin the tensioning process.
- Smart Sourcing: stainless steel cable railing kits (starter kit) and heavy-duty hydraulic cable crimpers.
41. Strategic Furniture Placement
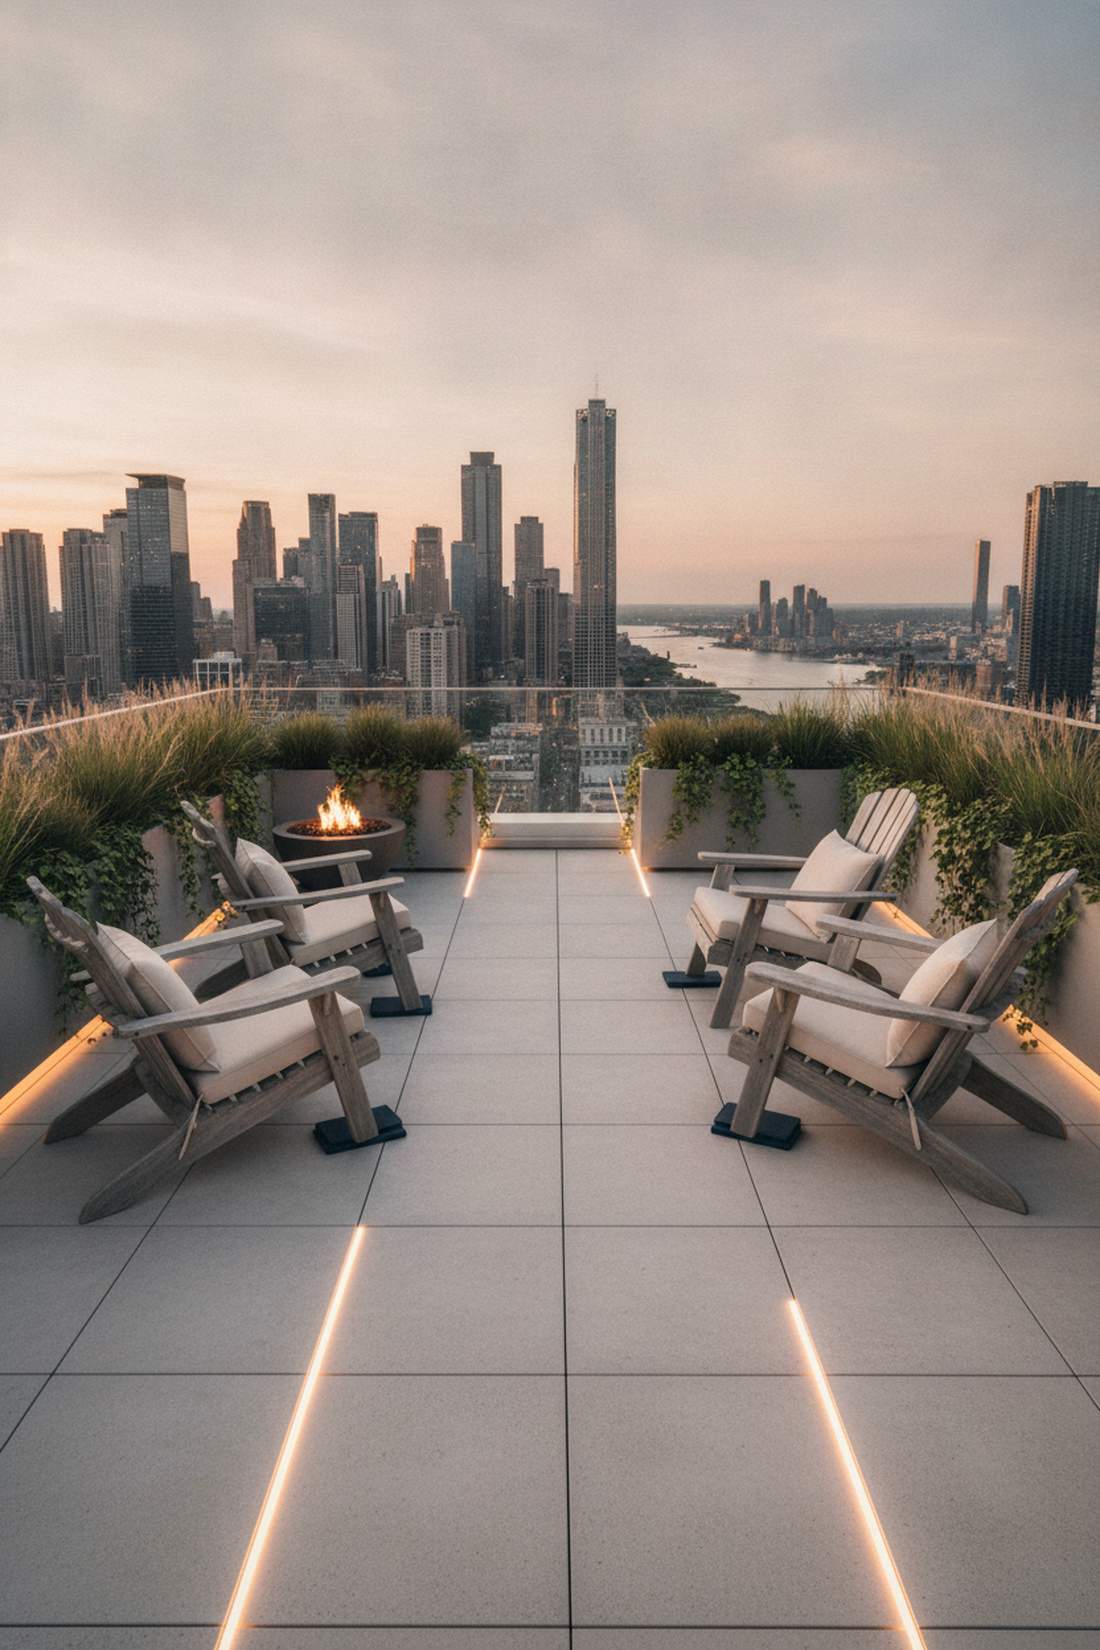
Offset seating corridors purposely create physical pathways that guide the eye straight toward the most dramatic skyline elements. The ultimate secret to making a balcony overlooking city skylines feel vast.
Amateurs block the center point with heavy tables, but hugging the side walls delivers a surprisingly premium look. This invisible spatial flow is what separates messy patios from luxury terraces.
This layout trick costs absolutely $0. Pin this diagram to your spatial planning board to avoid cramped mistakes.
- Key Materials: Existing furniture, measuring tape
- Vibe / Style: Curated spatial flow
- Difficulty: Just slide it over
- Budget Breakdown: Free layout hack.
- Creator’s Tip: Always angle your main lounge chairs exactly 45 degrees outward toward the skyline focal point.
- Smart Sourcing: furniture moving sliding pads (bulk pack) and weatherproof outdoor layout tape.
42. Frameless Wind Screens
Crystal-clear acrylic shields block brutal high-altitude gusts without sacrificing a single inch of your precious view. Vital for high-rise dwellers who want to eat outside without their napkins blowing away.
Solid barriers block the light, but transparent polycarbonate completely alters how sunlight filters through cramped spaces. It extends your patio season well into the blustery autumn months.
Acquiring and mounting these panels costs $100–$200. Save this if wind constantly ruins your outdoor dinners.
- Key Materials: Polycarbonate clear panels, rubber-grommet brackets
- Vibe / Style: Invisible climate control
- Difficulty: Requires careful drilling
- Budget Breakdown: Acrylic Panels: $120 | Rubber Brackets: $40.
- Creator’s Tip: Always use rubber washers when bolting the acrylic to prevent vibration cracking during heavy windstorms.
- Smart Sourcing: clear polycarbonate exterior panels (pre-cut) and vibration-damping rubber grommets (bulk pack).
The final two strategies are the ultimate game-changers for maintenance-free balcony luxury…
Container Garden Systems and Planters
Specialized containers optimize growing conditions while addressing weight restrictions and drainage requirements inherent to elevated balcony environments.
43. Self-Watering Reservoir Planters
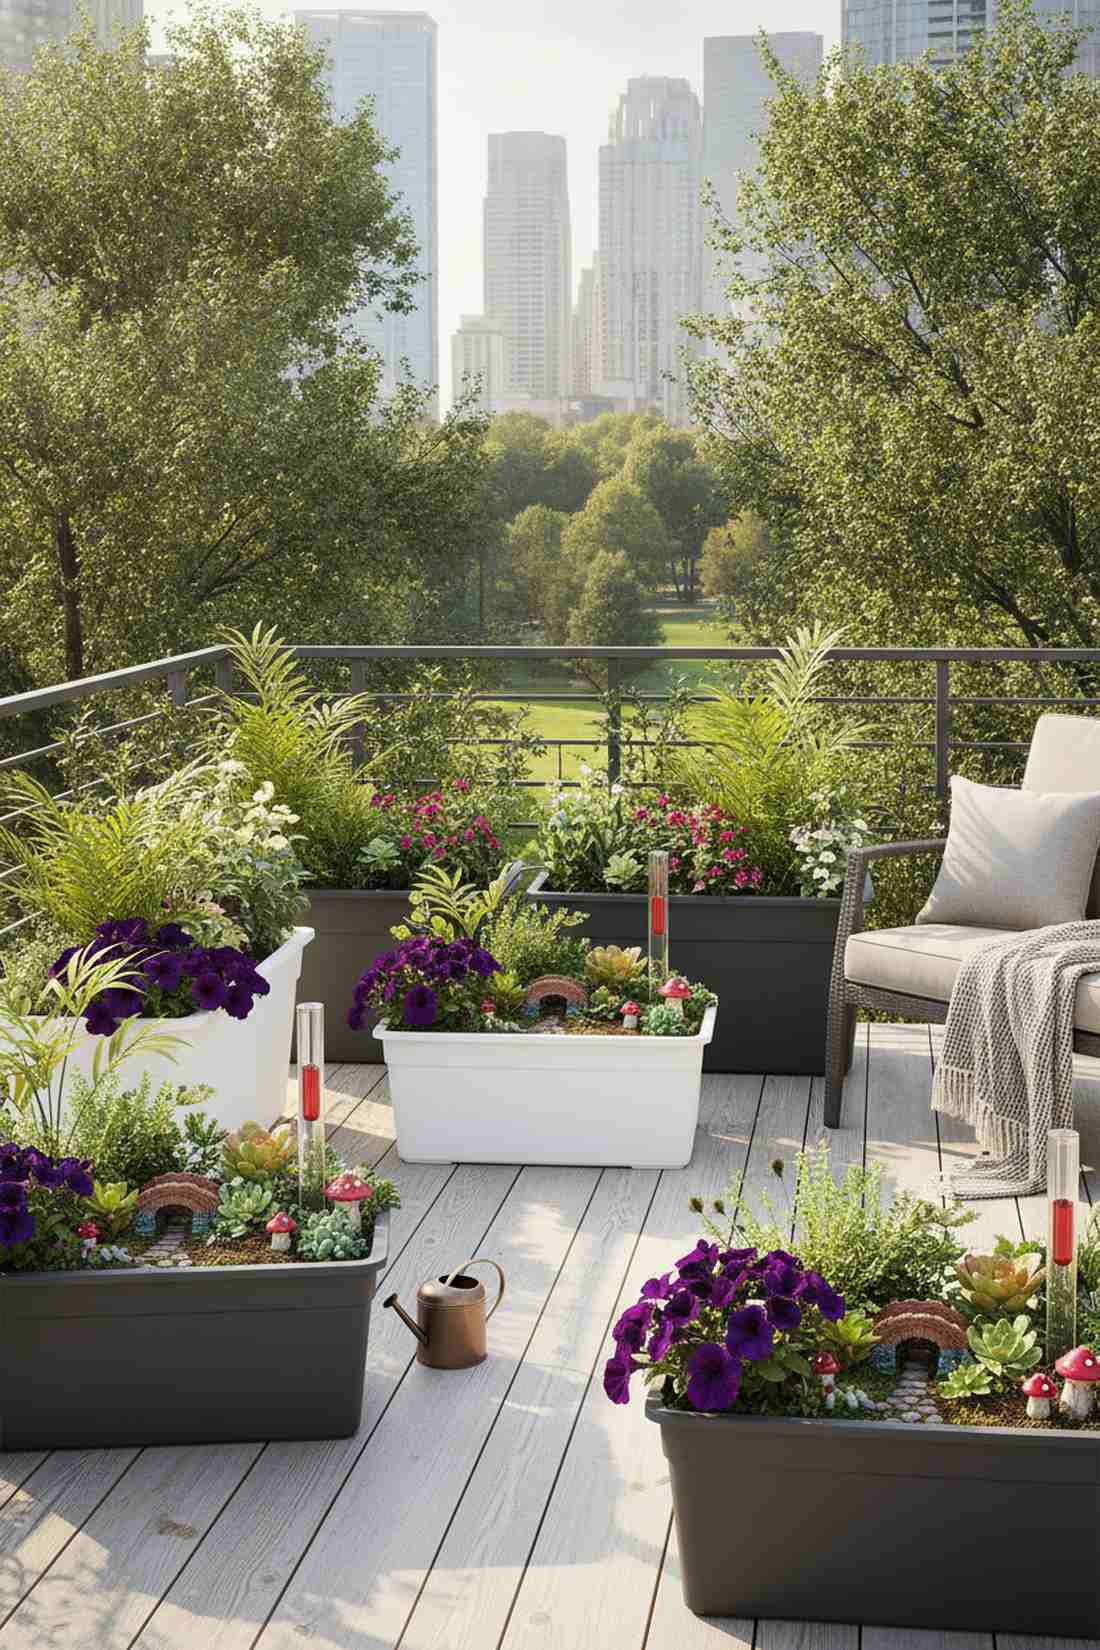
Double-walled hydration boxes act like a life-support system for your plants, keeping them lush during brutal summer heatwaves. The only way to survive long weekends away from your city balcony garden.
Normal pots dry out and bake roots, but integrated capillary action looks far more expensive than it is. It ensures your fairy garden kits never wither when you forget to water them.
These advanced planters average $30–$70 each. It’s an essential purchase for busy professionals who love greenery.
- Key Materials: UV-stabilized resin double-wall planters, water-level indicators
- Vibe / Style: Stress-free lush modernism
- Difficulty: Just add water once a week
- Budget Breakdown: Reservoir Planter: $45 | Potting Mix: $10.
- Creator’s Tip: Only fill the reservoir when the red indicator stick drops completely to the bottom to avoid overwatering.
- Smart Sourcing: self-watering reservoir planters (starter kits) and moisture-control potting soil mixes.
44. Fabric Grow Bags
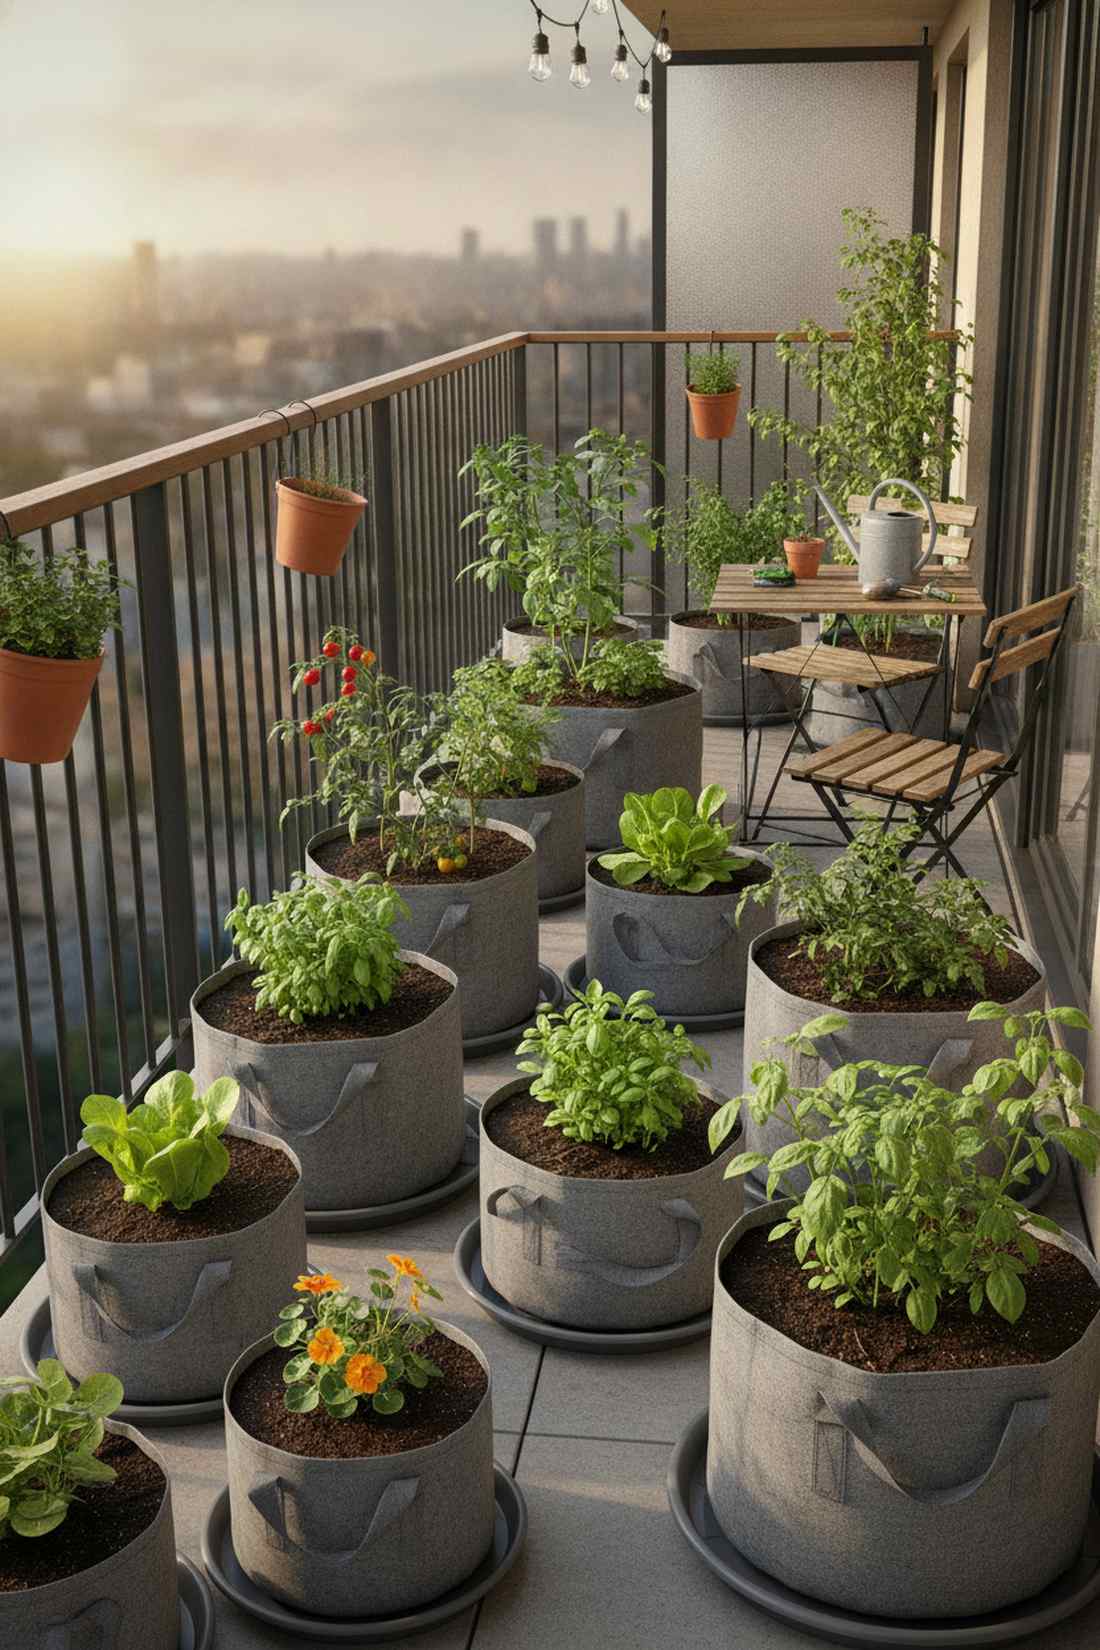
Breathable felt planting sacks force robust root growth while weighing practically nothing on your delicate balcony structure. The absolute smartest choice for cultivating a massive city balcony garden.
Heavy ceramic pots crack concrete, but lightweight fabric completely alters how sunlight filters through cramped spaces. When winter hits, you just fold them completely flat for storage.
A multipack of quality bags costs merely $15–$30. Pin this to your budget gardening board right now.
- Key Materials: Heavy-duty non-woven aeration fabric, organic compost
- Vibe / Style: Pragmatic urban agriculture
- Difficulty: Foolproof setup
- Budget Breakdown: Grow Bags (5-Pack): $20 | Soil: $15.
- Creator’s Tip: Place a plastic drainage saucer underneath the bag to catch the muddy water that seeps out the bottom.
- Smart Sourcing: heavy-duty fabric grow bags (bulk pack) and heavy-duty plastic drainage saucers.
45. Railing Saddle Planters
Straddling dual-chamber pots literally hug your balcony railing, turning wasted cap space into vibrant floral displays. Unbeatable for maximizing vertical space without drilling a single hole.
Most people leave their railings bare, but saddle planters give a designer-level finish from both the inside and outside. Hide miniature garden supplies in the inner chamber for a personal touch.
These straddling units run roughly $15–$35 each. Highly recommended for an instant, pop-on burst of color.
- Key Materials: U-shaped resin saddle pots, zip ties for security
- Vibe / Style: Bountiful blooming boundary
- Difficulty: Pop on and plant
- Budget Breakdown: Saddle Pots: $20 | Flowers: $15.
- Creator’s Tip: Run a discreet black zip-tie through the bottom drainage holes to lock it tightly to the railing during storms.
- Smart Sourcing: resin railing saddle planters (starter kit) and UV-coated structural zip ties (bulk pack).
46. Tiered Corner Plant Stands
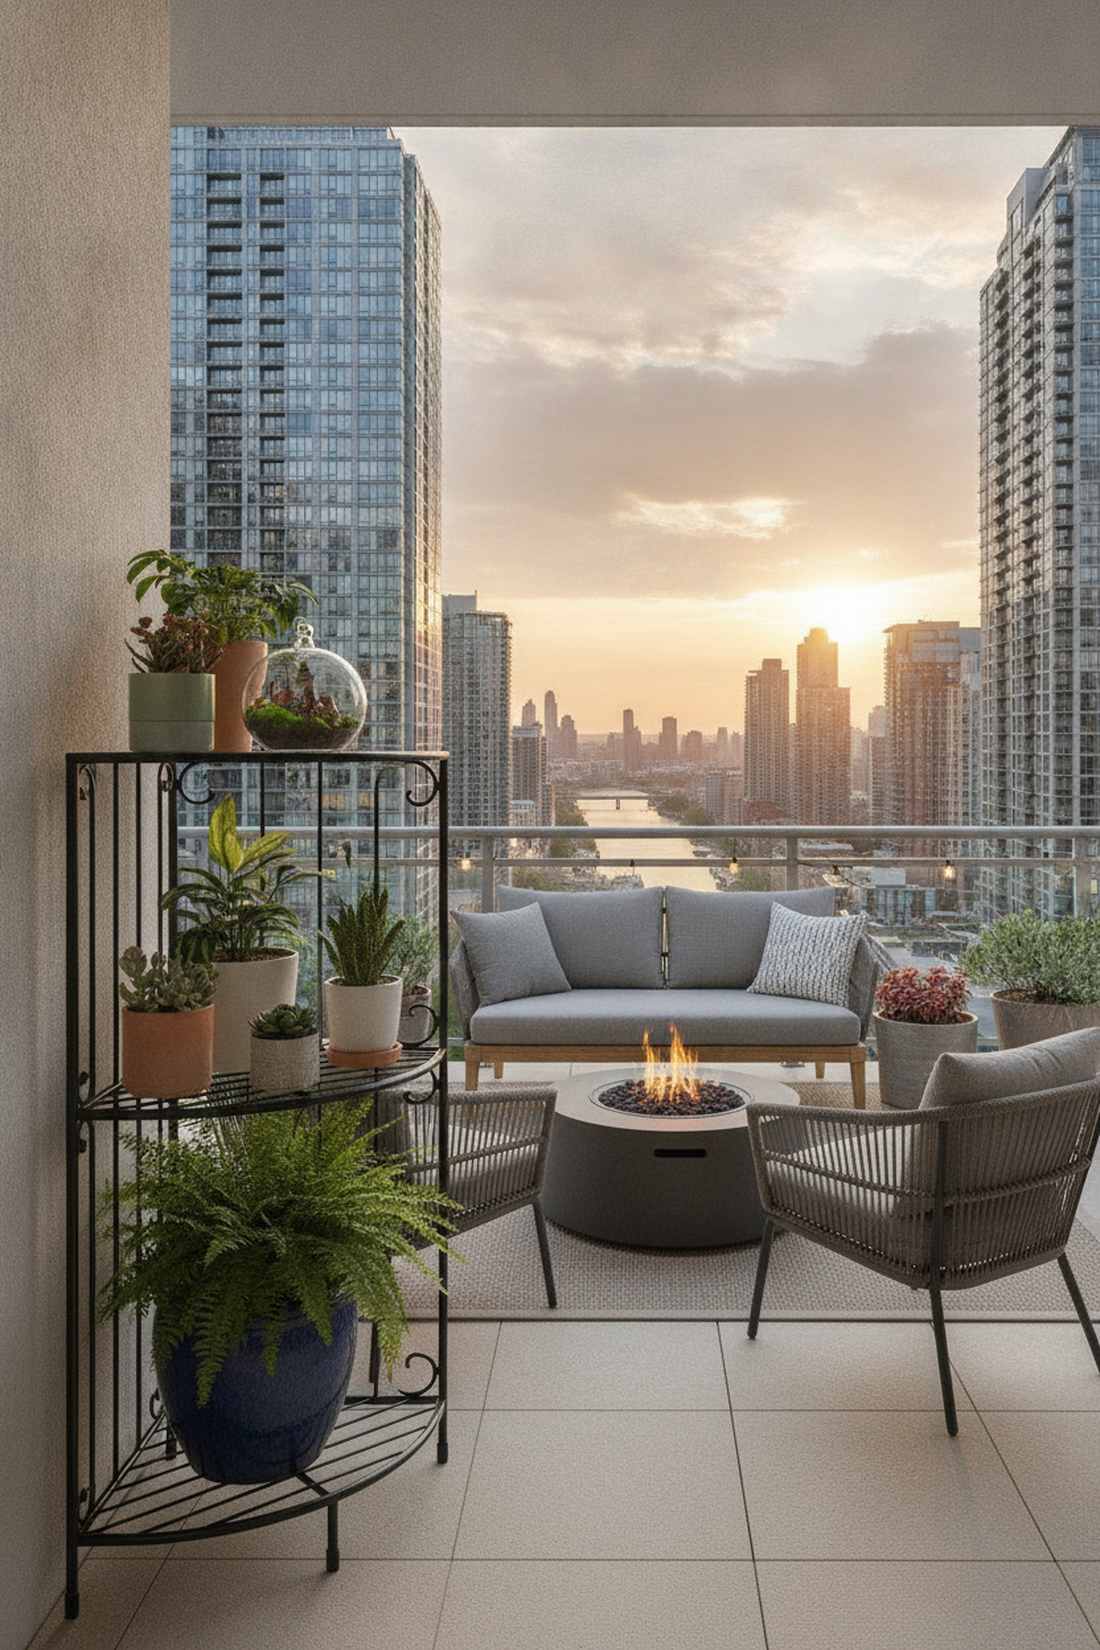
Multi-level quarter-circle shelving tucks flawlessly into dead 90-degree corners, creating a towering display of cascading greenery. The perfect sculptural stage for your finest terrarium accessories.
A single floor pot wastes volume, but an escalating iron stand delivers a surprisingly premium look in tight quarters. It maximizes your exact city balcony ideas without crowding the seating area.
A sturdy metal corner stand costs $40–$80. Pin this if you need to organize a chaotic mess of small pots.
- Key Materials: Rust-proof iron shelving, varied pot sizes
- Vibe / Style: Curated botanical corner
- Difficulty: Simple hex-key assembly
- Budget Breakdown: Metal Stand: $50 | Assorted Pots: $20.
- Creator’s Tip: Always place your heaviest ceramic pots on the absolute bottom tier to ensure a stable, wind-proof center of gravity.
- Smart Sourcing: tiered metal corner plant stands (rust-proof) and lightweight resin display pots (bulk pack).
Transform Your Urban Space Today
These 46 high-end city balcony ideas prove that tight square footage should never restrict your luxury design ambitions. By integrating premium starter kits, strategic material sourcing, and vertical setups, you can execute a flawless designer-level finish. Whether you are building an edible city balcony garden, installing sleek interlocking flooring, or optimizing a balcony overlooking city lights, these blueprints guarantee maximum ROI. Stop buying cheap plastics that crack; invest in UV-coated resins, sturdy modular grids, and targeted LED lighting. Take action on just one or two of these setups this weekend, and instantly elevate your standard outdoor space into a premium urban retreat.
Frequently Asked Questions
What is the best flooring for a small city balcony?
Interlocking deck tiles are the undisputed champion for any small city balcony. Skip cheap rugs and grab acacia wood interlocking deck tiles (starter kit) for a premium spa aesthetic that drains perfectly over concrete. They snap together in under an hour and won’t trap moisture, making them the ultimate deposit-safe hack.
How can I create privacy on my city balcony without blocking views?
Use dynamic zoning with fade-resistant outdoor curtain panels (pre-cut) and tension rods. For living barriers, clumping bamboo root starter kits in deep trough planters block unwanted sightlines while preserving your overall city balcony view perfectly.
What vegetables grow best in balcony container gardens?
Compact and high-yield varieties absolutely dominate any city balcony garden. Use heavy-gauge galvanized tomato towers (starter kits) for vertical tomatoes, or grab aeroponic vertical tower kits for massive leafy green yields in tiny, shaded footprints.
How much weight can a typical apartment balcony support?
Standard codes demand 60 lbs per square foot, but you should still prioritize lightweight materials. Always use heavy-duty fabric grow bags (bulk pack) instead of concrete pots, and mix horticultural grade perlite into your soil to slash the overall weight profile.
What lighting options work best for balconies without electrical outlets?
You don’t need hardwiring to look expensive. Utilizing battery-operated outdoor wall sconces (starter kit) and waterproof flat solar ground markers creates a high-end luxury resort vibe automatically every evening without ever touching a power cord.
How do I protect balcony plants during winter in cold climates?
Preparation requires heavy-duty insulation. Wrap your pots with thick burlap and move mobile plants indoors using heavy-duty plant caddies with locks (bulk pack). Keep your miniature garden supplies secure and cover soil surfaces with organic mulch to fight the freeze-thaw cycle.