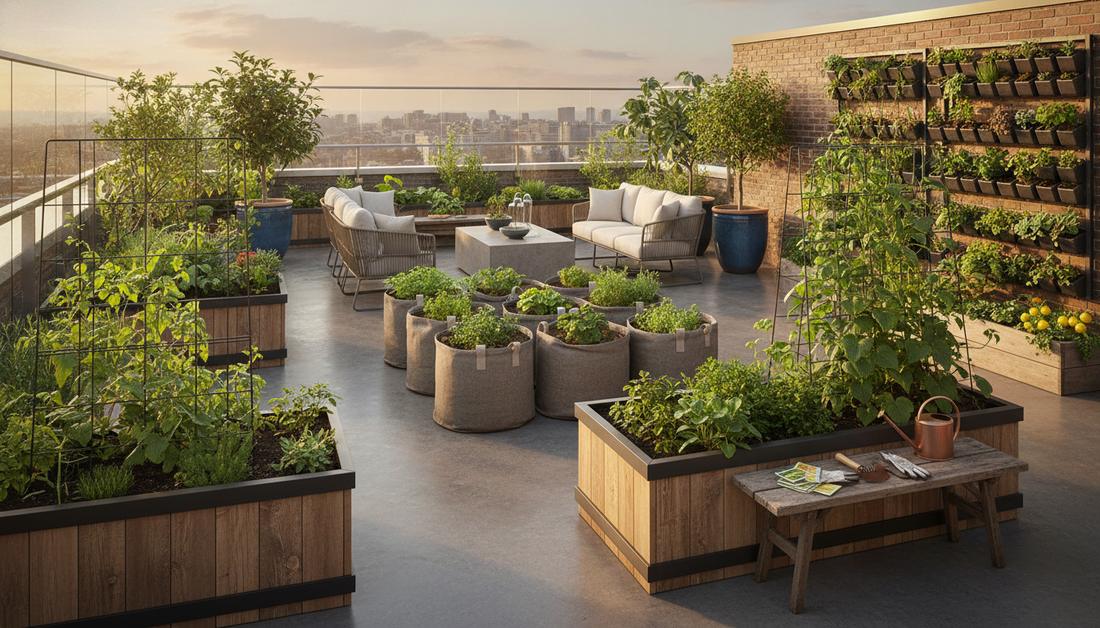
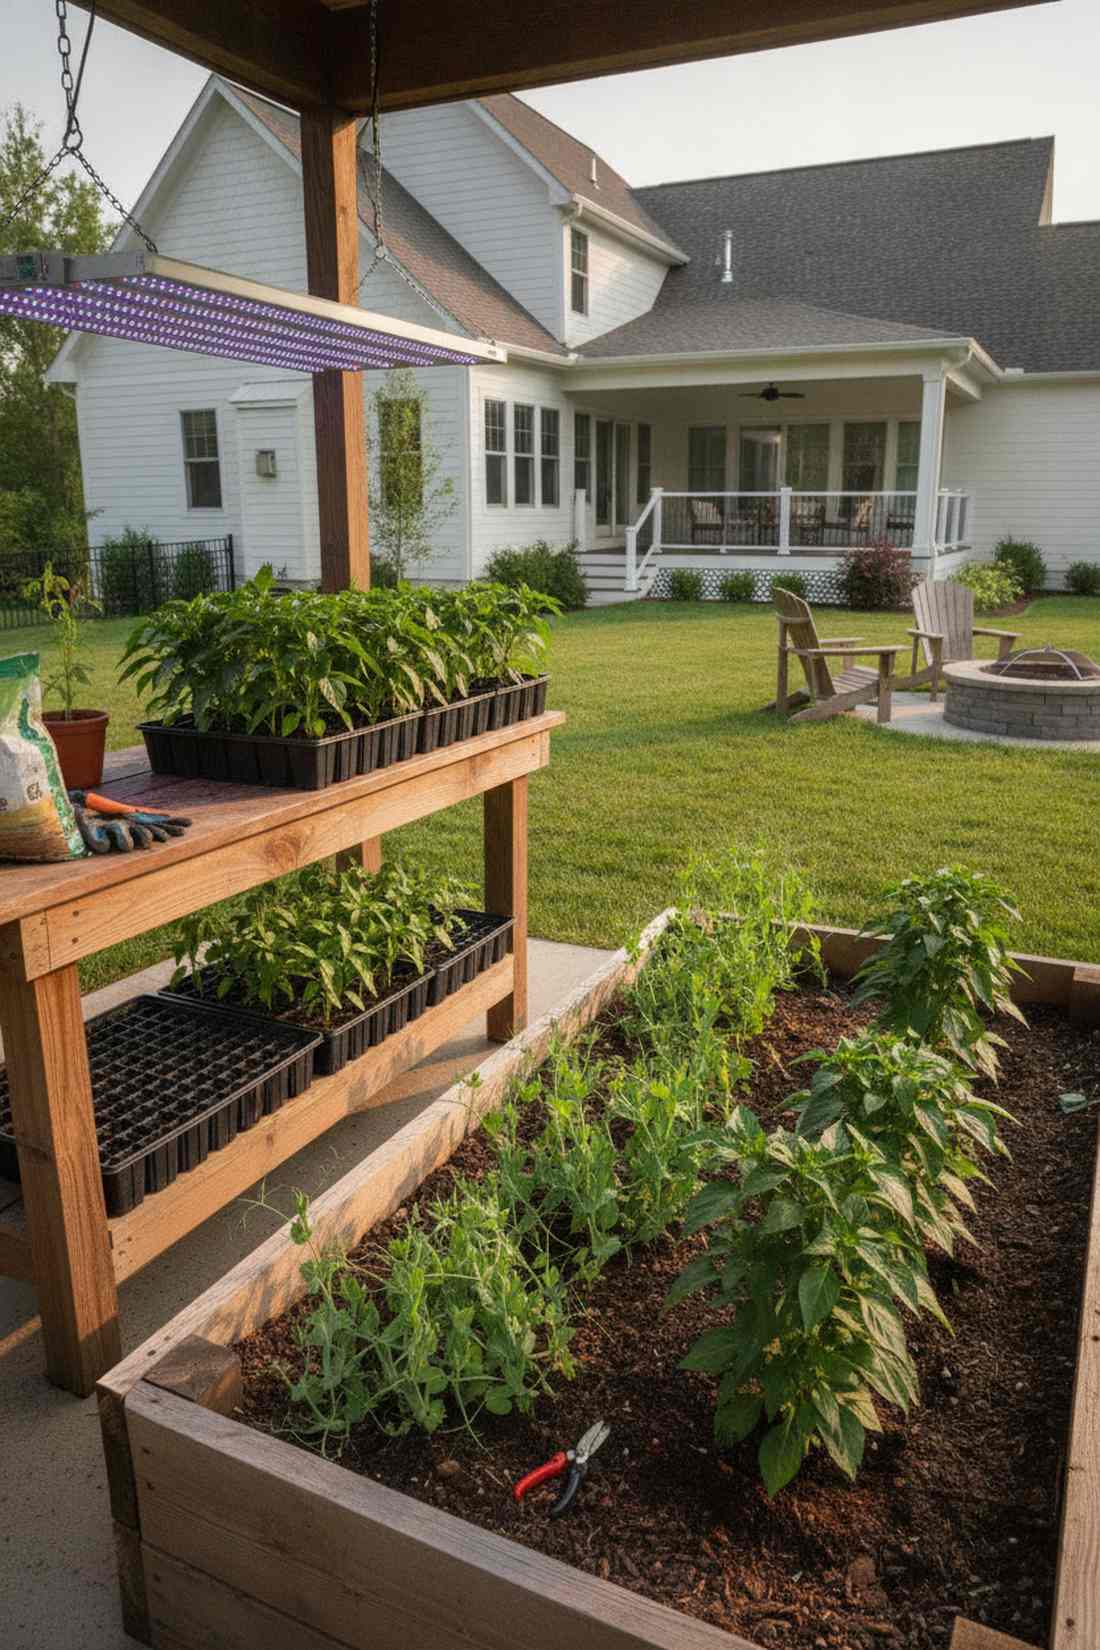
Transforming concrete spaces into lush urban gardening sanctuaries requires strategic material sourcing. This blueprint reveals exact budget breakdowns and premium setup hacks. Build an expensive-looking green retreat without paying the designer price tag.
Design SnapshotKey Principles
- Vertical Integration: Utilize upward space with trellises, wall planters, and stacking systems to multiply growing area
- Container Optimization: Select portable, well-draining vessels that adapt to seasonal changes and lighting conditions
- Microclimate Management: Position plants according to sun exposure, wind patterns, and temperature variations unique to urban settings
- Companion Synergy: Pair compatible plants to enhance growth, deter pests, and maximize harvest from minimal square footage
Vertical Urban Garden Ideas That Transform Walls into Productive Spaces
Vertical structures redirect growth upward, converting neglected wall surfaces into high-yield growing zones. These techniques work exceptionally well on balconies, fence lines, and exterior building walls where horizontal space remains scarce.
1. Trellis Arches for Climbing Vegetables
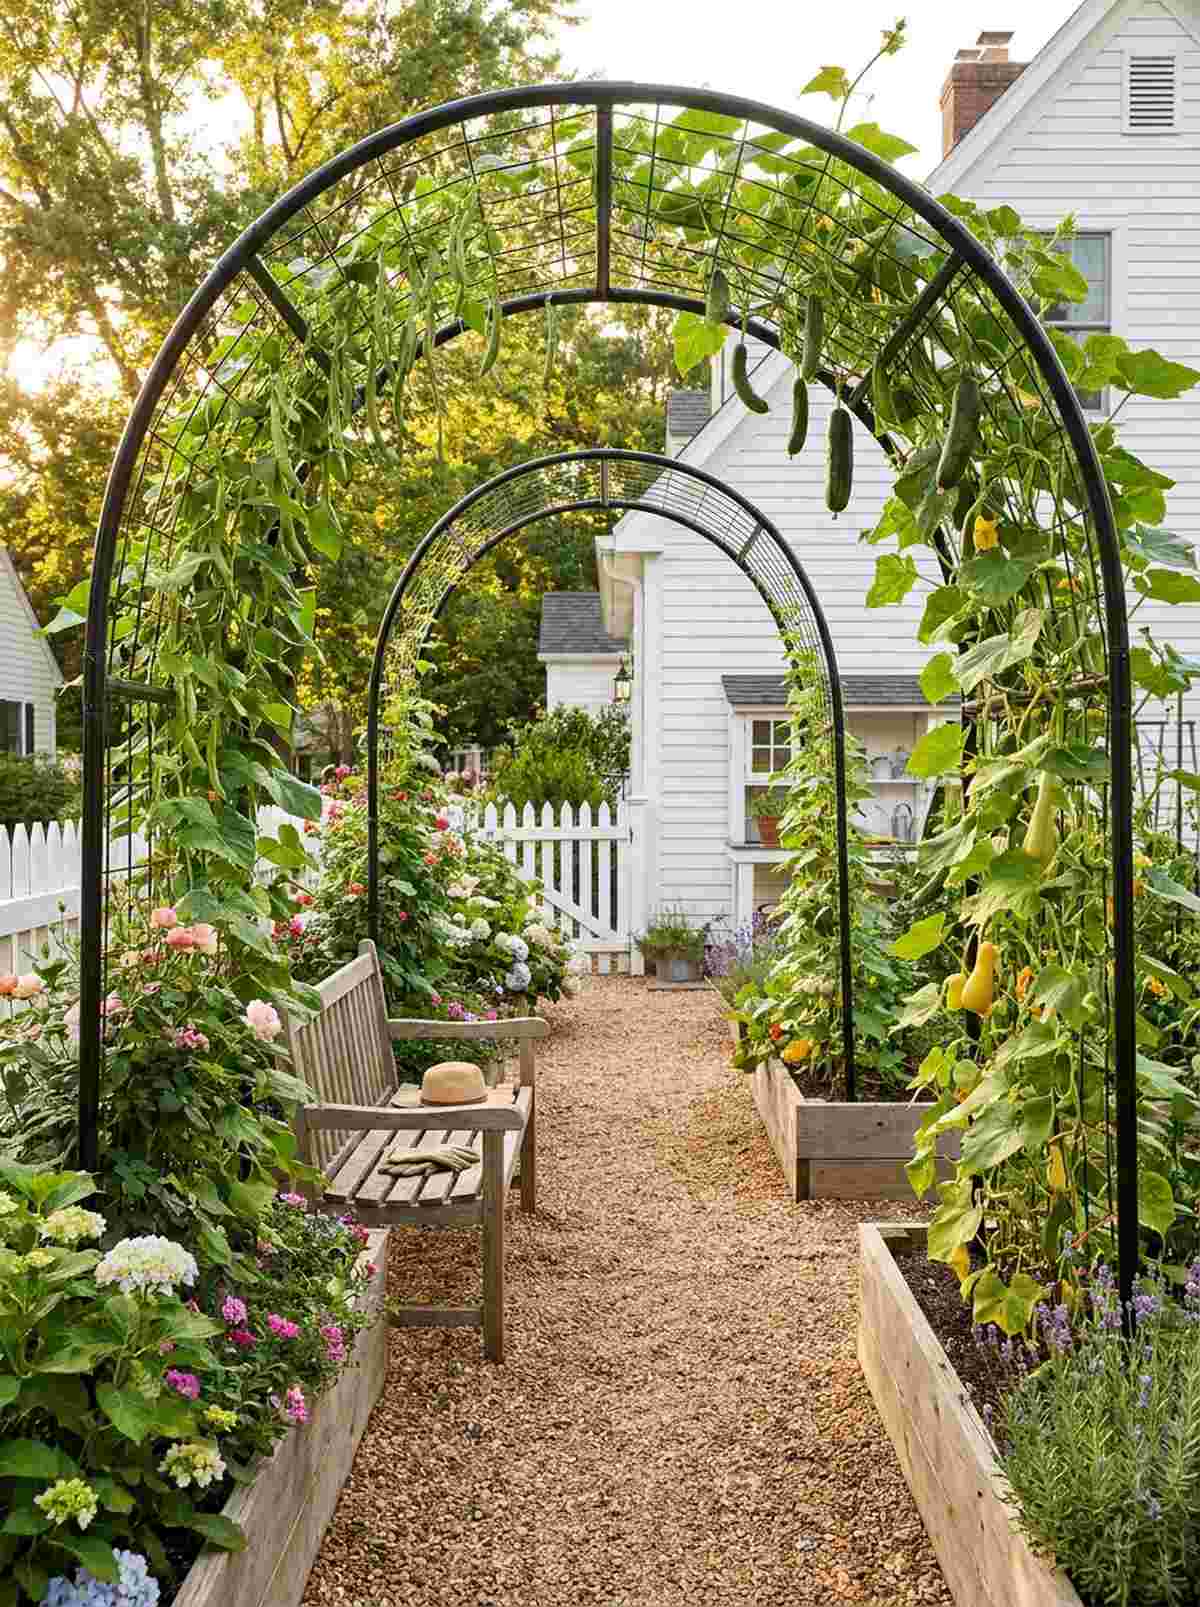
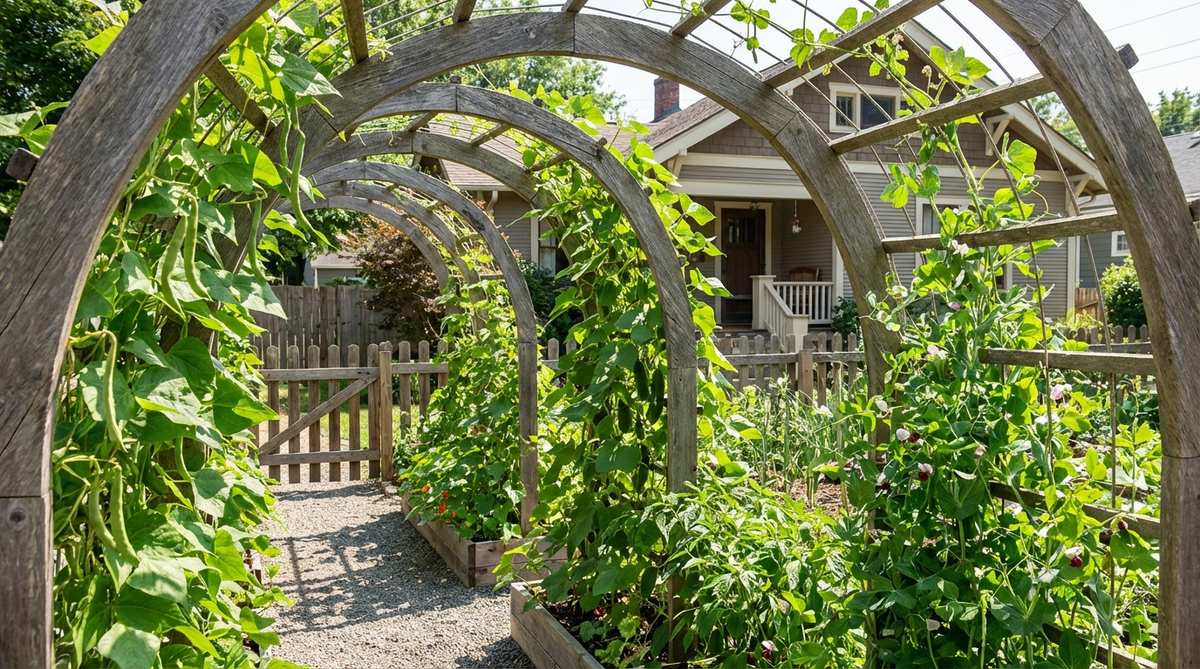
Feels like a hidden vineyard you accidentally discovered in the city. This arched urban garden design is perfect for framing narrow patio walkways.
Most beginners skip overhead space, but this layout delivers a surprisingly premium look instantly. Integrating heavy-duty arched trellis kits ensures your heavy vines won’t collapse during summer storms.
You can easily pull this off for around $35–$50. Pin this if you’re planning a small space upgrade!
- Key Materials: Steel garden arches and climbing vegetable seeds.
- Vibe / Style: Lush botanical tunnel.
- Difficulty: Easy weekend assembly.
- Budget Breakdown: Arch Frame: $30 | Seeds: $5.
- Creator’s Tip: Plant shade-loving greens underneath the arch to maximize your footprint.
- Smart Sourcing: rust-proof metal arch kits and bulk pack zip ties.
2. Wall-Mounted Pocket Planters
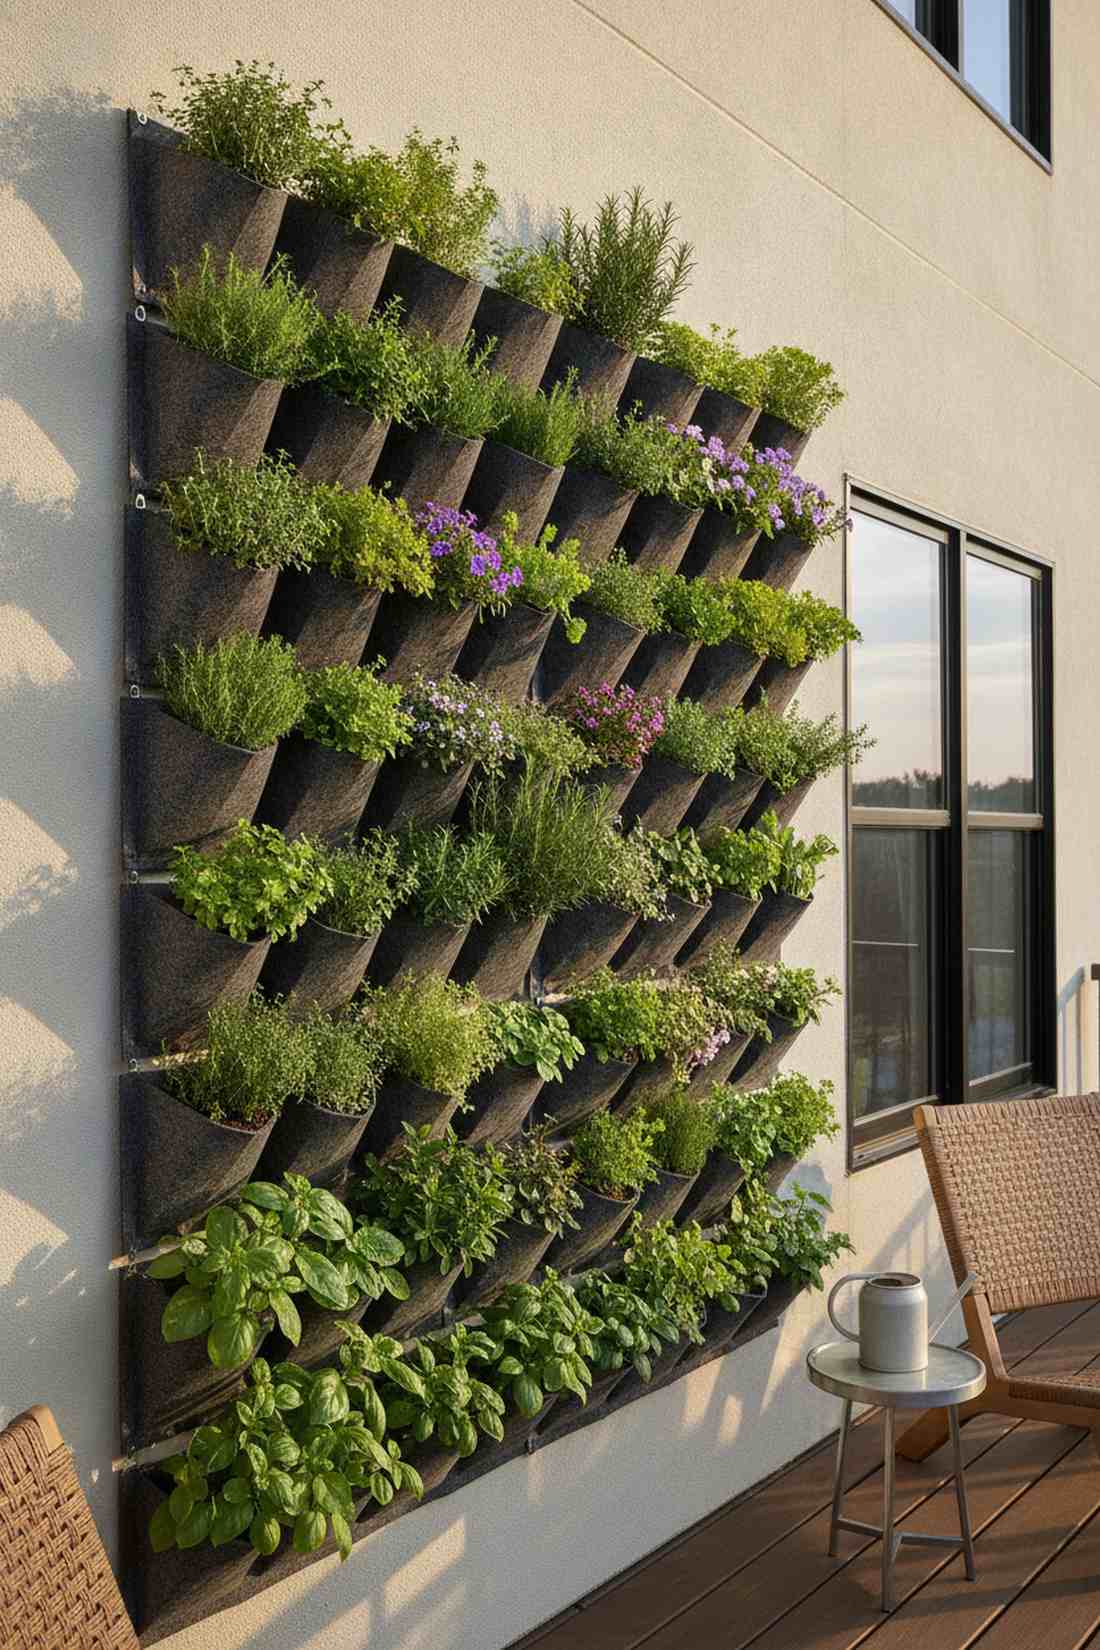
Straight out of a modern eco-magazine spread. This living wall decor concept works exceptionally well for blank exterior apartment walls.
Ditch the rigid plastic pots; this setup gives a designer-level finish while saving floor space. Snagging breathable felt pocket planters prevents root rot and keeps herbs thriving.
You can assemble this entire wall for about $20. It’s a fast upgrade that completely changes the vibe.
- Key Materials: Multi-pocket fabric planters and premium potting mix.
- Vibe / Style: Modern vertical jungle.
- Difficulty: Beginner-friendly hanging.
- Budget Breakdown: Planter: $15 | Hooks: $5.
- Creator’s Tip: Place moisture-loving plants at the bottom where water naturally drains.
- Smart Sourcing: waterproof-backed wall planters and pre-mixed indoor potting soil.
3. Ladder Shelf Gardens
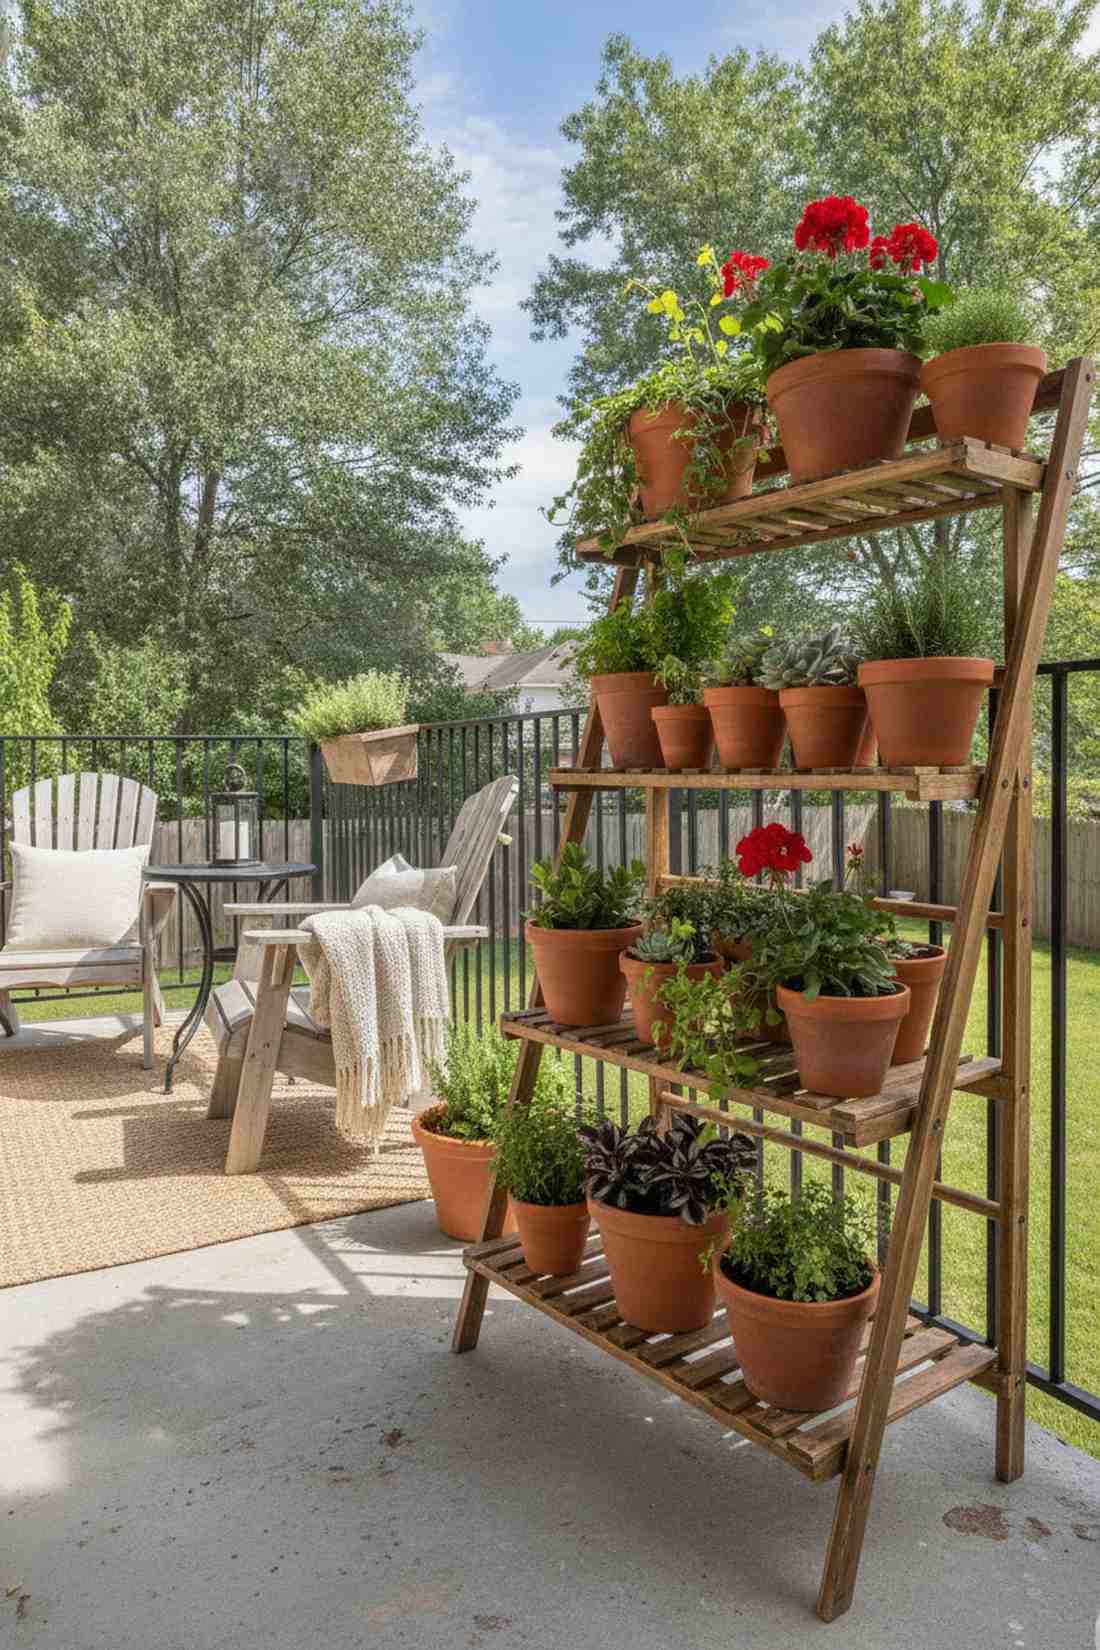
Emanates a cozy rustic charm that warms up cold concrete. A tiered balcony plant display is the ultimate use-case for renters needing portable greenery.
People often overcomplicate shelving, but repurposing wood looks far more expensive than it is. Utilizing weather-sealed wooden plant stands protects against warping over the seasons.
Expect to spend around $40 if sourcing smart. Save this to your DIY weekend garden board!
- Key Materials: Wooden ladder frame and assorted terracotta pots.
- Vibe / Style: Rustic urban farmhouse.
- Difficulty: Zero-tool setup.
- Budget Breakdown: Shelf: $30 | Pots: $10.
- Creator’s Tip: Rotate the pots weekly to ensure even sun exposure on all sides.
- Smart Sourcing: folding bamboo plant ladders and bulk pack terracotta pots.
4. Living Wall Panel Systems
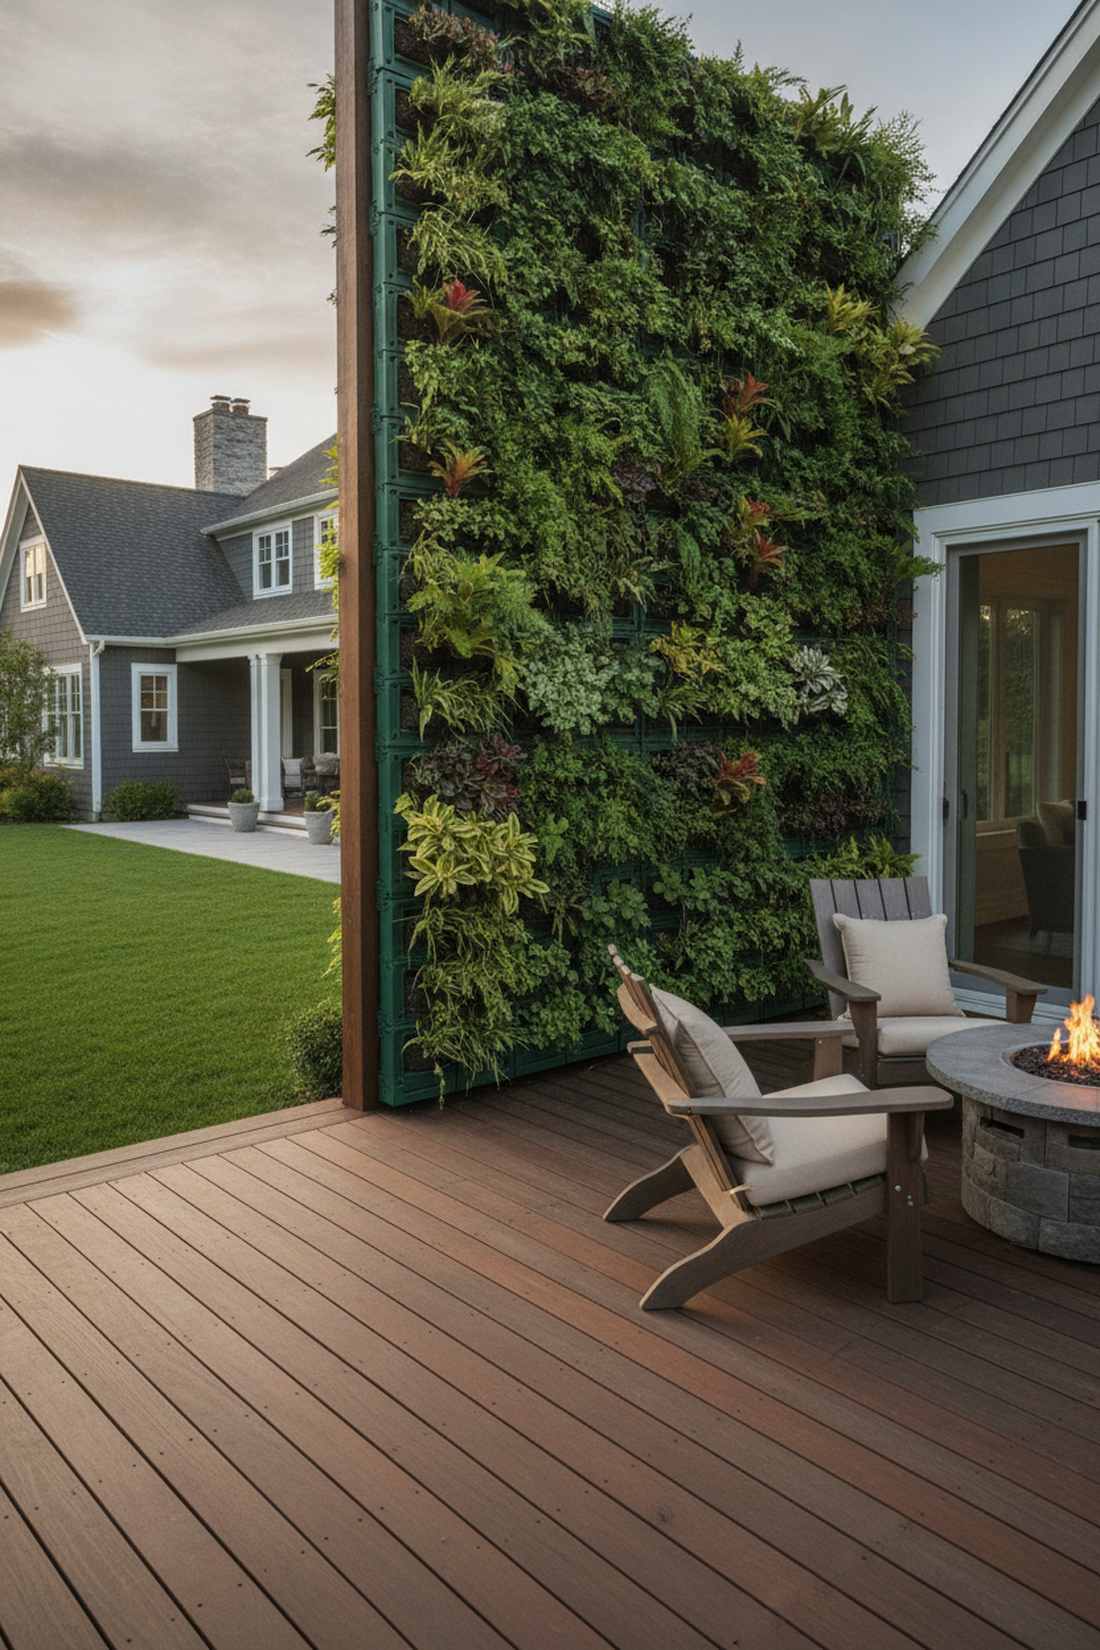
Feels like an upscale hotel lobby installation right on your deck. This modular living wall setup is perfect for concealing ugly fences or privacy screens.
Stop relying on flimsy DIY methods; professional panels deliver a seamless, high-end aesthetic. Investing in self-watering wall panel kits makes maintenance completely foolproof.
This premium look costs roughly $60–$90 per panel section.
- Key Materials: Interlocking plastic panels and drip lines.
- Vibe / Style: Luxury architectural greenery.
- Difficulty: Intermediate drilling required.
- Budget Breakdown: Panels: $50 | Hardware: $10.
- Creator’s Tip: Use a template to drill your anchor holes perfectly straight the first time.
- Smart Sourcing: UV-coated modular wall planters and automated micro-drip kits.
Most beginners get vertical spacing completely wrong… until they try the linear layout coming up next.
5. Gutter Garden Strips
Gives off an industrial-chic homesteading energy. A linear shallow root planter is brilliant for maximizing the dead space along porch railings.
You might think hardware store gutters look cheap, but painting them provides a shockingly custom finish. Securing heavy-duty aluminum gutter sections guarantees they won’t bow under wet soil weight.
You can easily pull this off for around $25. Highly recommended for a quick weekend win.
- Key Materials: Rain gutters, end caps, and mounting brackets.
- Vibe / Style: Utilitarian modern farm.
- Difficulty: Light DIY skills needed.
- Budget Breakdown: Gutters: $15 | Brackets: $10.
- Creator’s Tip: Drill drainage holes every 4 inches to prevent swampy soil.
- Smart Sourcing: pre-painted aluminum gutter tracks and rust-proof mounting brackets.
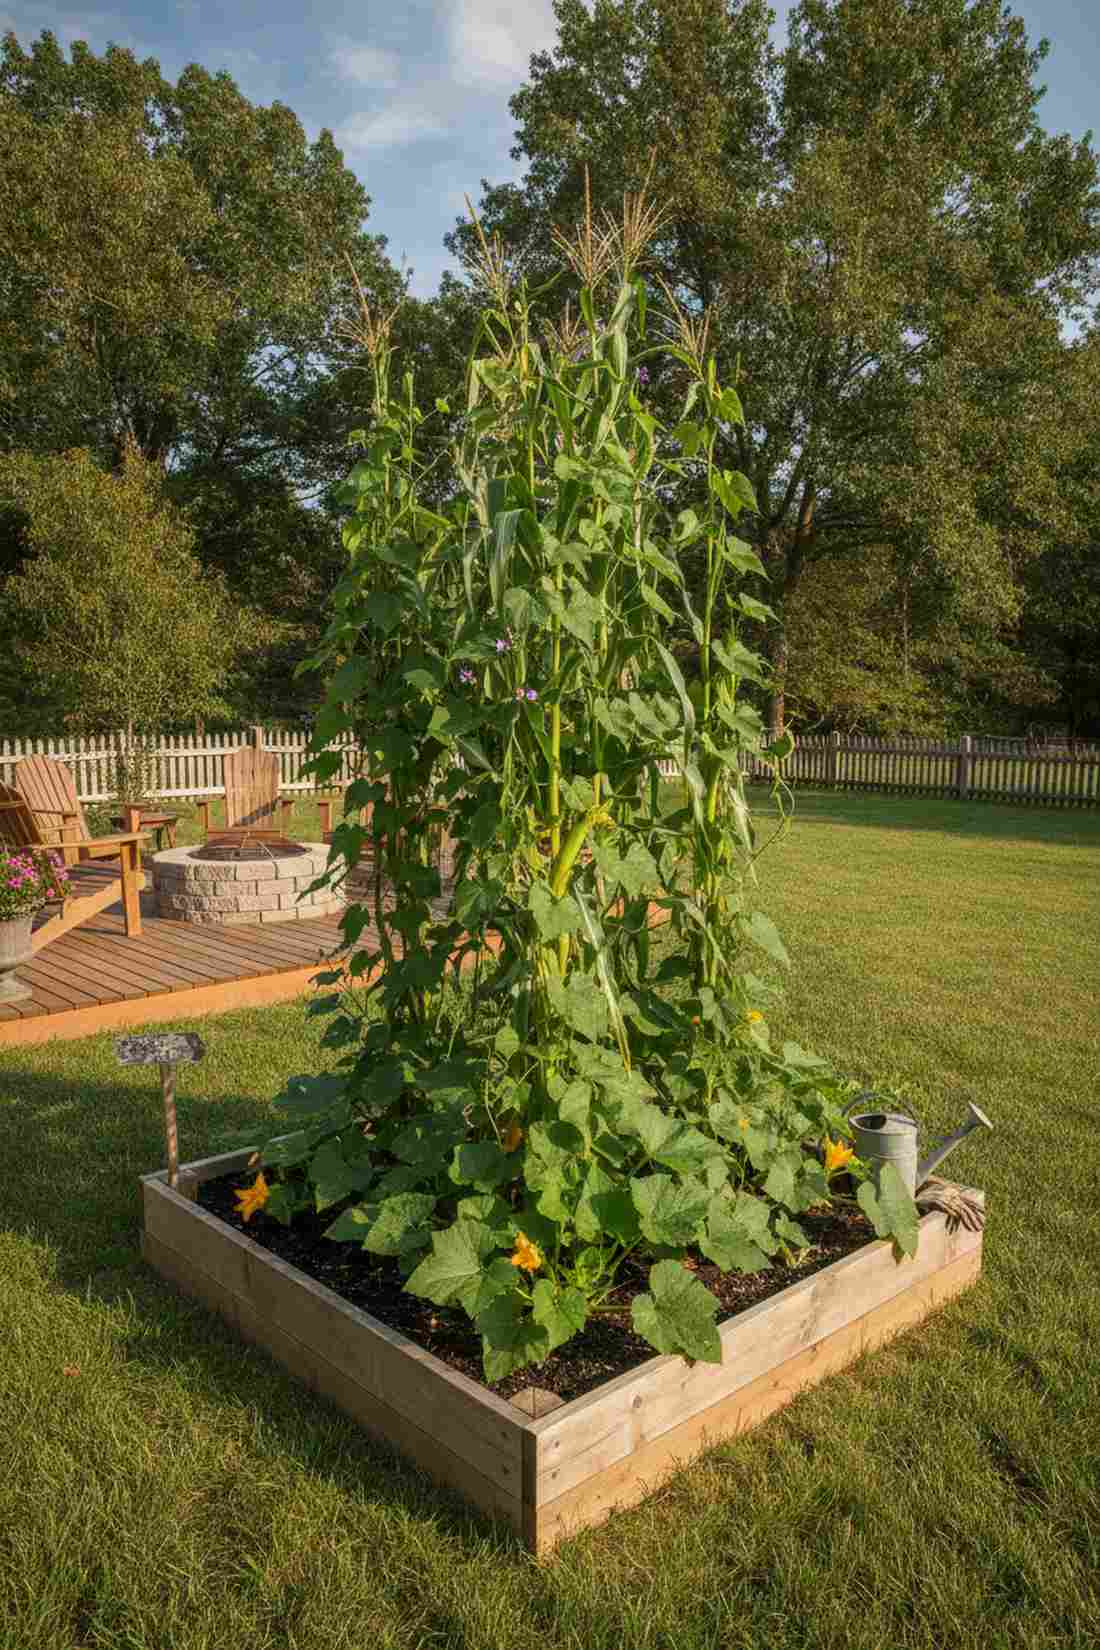
6. Bamboo Stake Teepees

Feels like a whimsical secret hideaway. Utilizing a freestanding plant support structure works beautifully in the center of an urban garden bed.
Traditional tomato cages are an eyesore, but this natural approach elevates the entire yard’s aesthetic. Tying together thick-gauge bamboo poles creates architectural interest even before the plants grow.
This structural hack costs less than $15 to execute. Pin this to your favorite gardening tricks board!
- Key Materials: Long bamboo stakes and natural twine.
- Vibe / Style: Organic sculptural garden.
- Difficulty: Fun and simple.
- Budget Breakdown: Bamboo: $10 | Twine: $5.
- Creator’s Tip: Sink the poles at least 8 inches deep to withstand wind gusts.
- Smart Sourcing: treated bamboo garden stakes (bulk pack) and weather-resistant garden twine.
7. Wire Mesh Trellis Panels
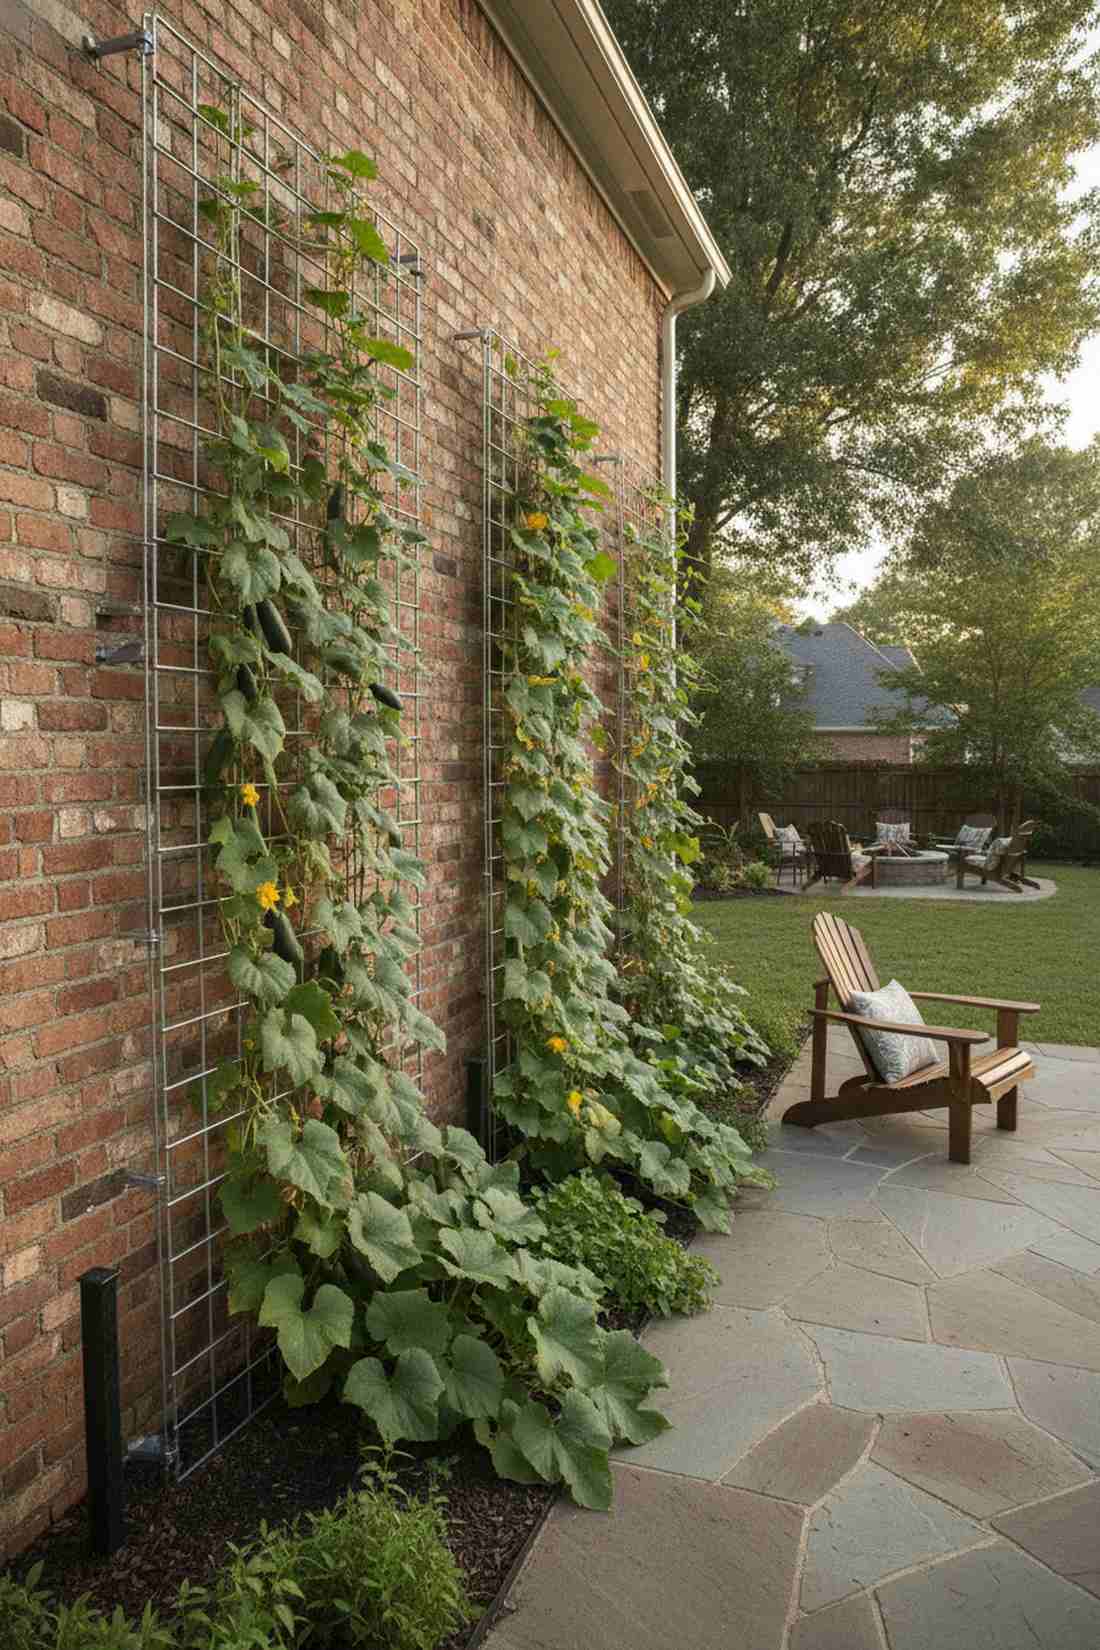
Projects a clean, geometric modernism against brick walls. A grid-style vertical trellis system is the smart choice for heavy squash or cucumbers.
Forget rotting wood lattice; this metal grid looks far more expensive and lasts decades. Utilizing galvanized cattle panels transforms basic fencing into high-yield vertical real estate.
Set this up for about $30–$40 per panel.
- Key Materials: Welded wire mesh and sturdy posts.
- Vibe / Style: Sleek industrial garden.
- Difficulty: Requires wire cutters and gloves.
- Budget Breakdown: Mesh Panel: $25 | Anchors: $10.
- Creator’s Tip: Leave a 3-inch gap between the mesh and the wall for airflow.
- Smart Sourcing: pre-cut galvanized wire grids and heavy-duty U-staples.
8. Hanging Gutter Cascades
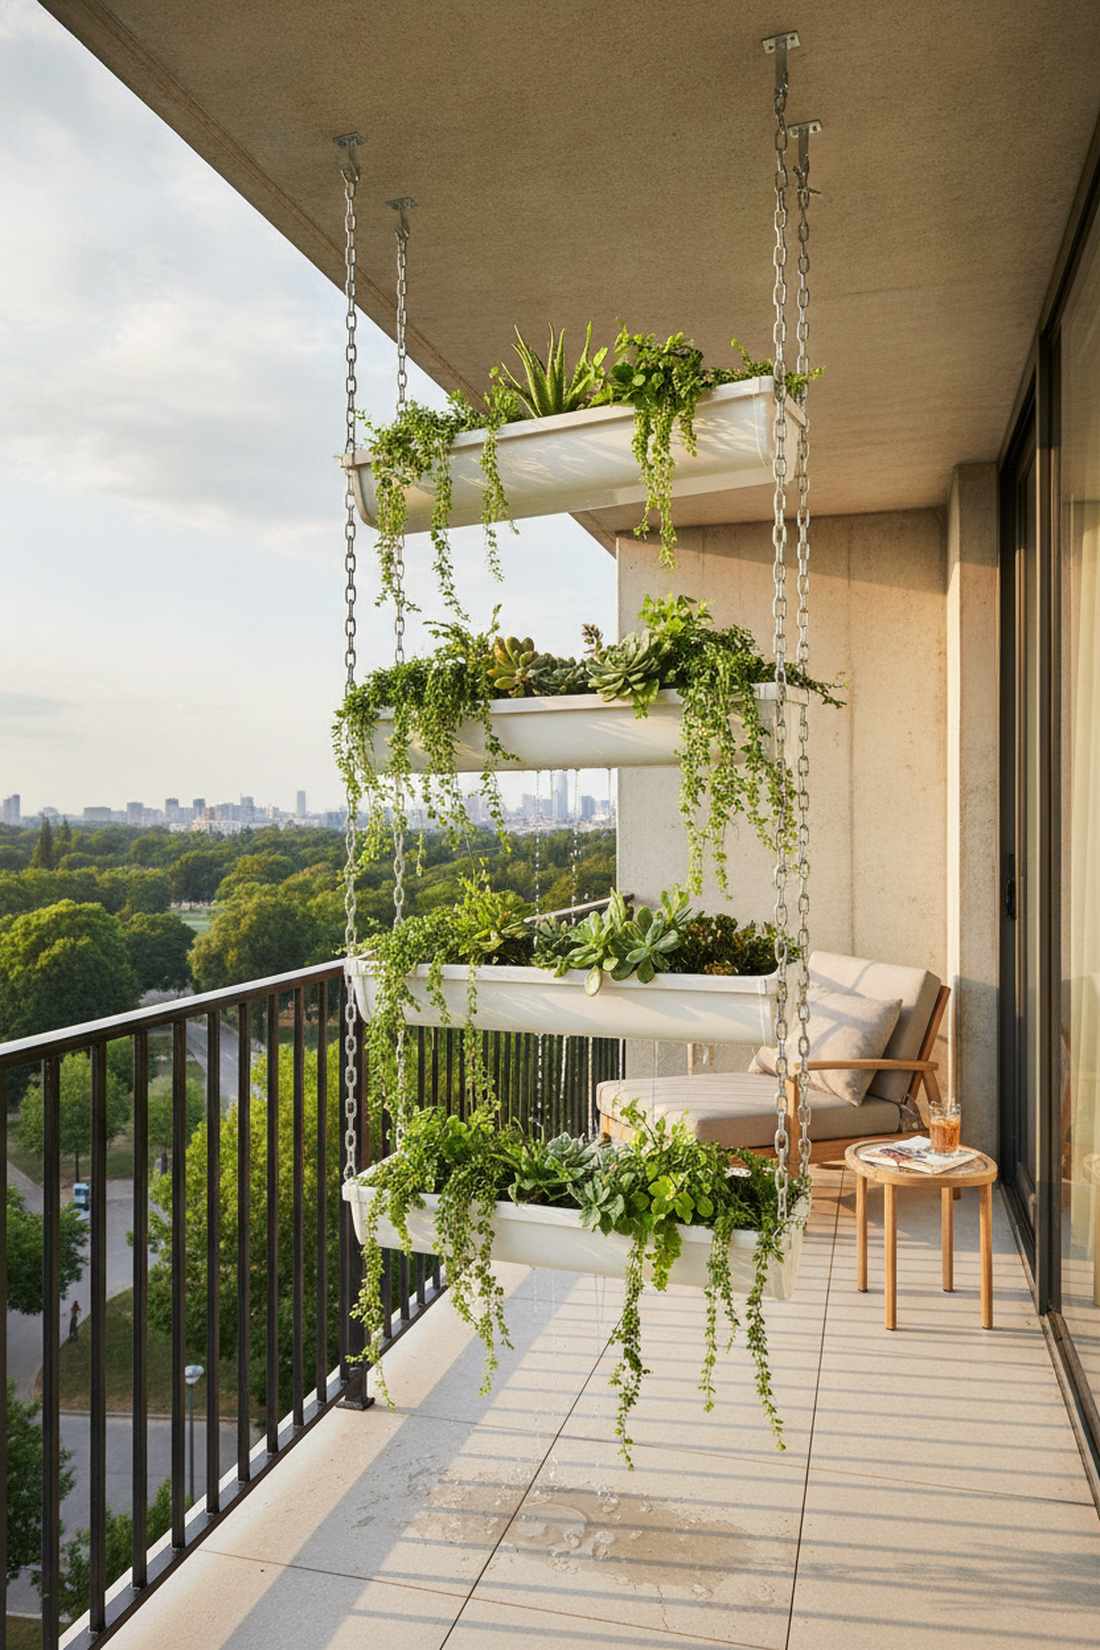
Looks like a floating waterfall of fresh greens. This suspended cascade planter layout is perfect for high apartment overhangs with unused vertical drop.
While basic hanging baskets dry out fast, this chained system delivers a surprisingly premium look with efficient water runoff. Incorporating stainless steel hanging chains prevents ugly rust stains on your patio floor.
You can build this dynamic display for roughly $45. Save this idea for a dramatic balcony makeover!
- Key Materials: Gutter lengths, chain, and S-hooks.
- Vibe / Style: Floating hydroponic aesthetic.
- Difficulty: Moderate measuring required.
- Budget Breakdown: Gutters: $20 | Chain/Hooks: $25.
- Creator’s Tip: Tilt each tier slightly so excess water drops perfectly into the tier below.
- Smart Sourcing: stainless steel link chains and heavy-duty S-hook multi-packs.
9. Espalier Fruit Tree Training
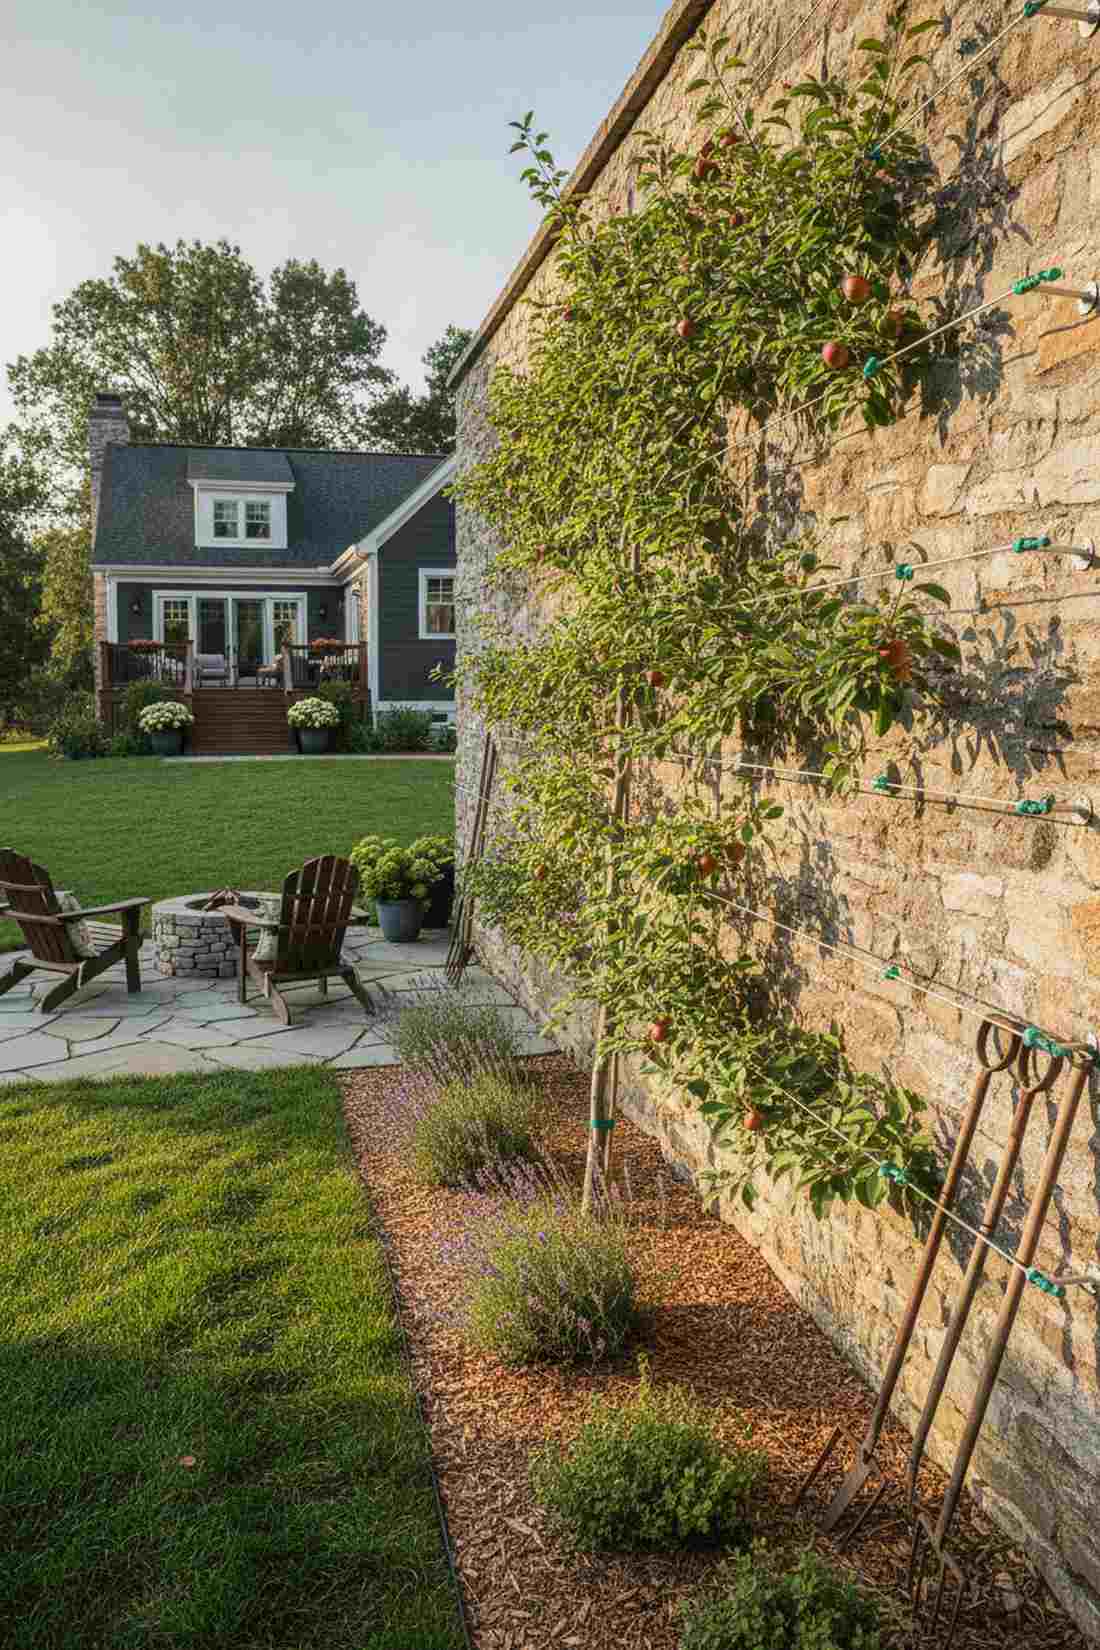
Brings a slice of an aristocratic French chateau to a city wall. This flat-trained fruit tree technique is a genius use-case for narrow sunny side-yards.
Most urbanites think they can’t grow fruit, but this method gives a designer-level finish while producing actual apples. Installing high-tension training wire kits ensures the branches stay perfectly horizontal.
Initial setup runs about $60 plus the tree. It’s a long-term investment that absolutely transforms a space.
- Key Materials: Dwarf fruit tree, wire, and soft ties.
- Vibe / Style: Formal European orchard.
- Difficulty: Requires patience and pruning.
- Budget Breakdown: Wire Kit: $25 | Tree: $35.
- Creator’s Tip: Use specialized rubber ties so you don’t cut into the growing bark.
- Smart Sourcing: stainless espalier wire starter kits and soft silicone plant ties.
💡 Must-Have Supplies for High-End Setups
To build these setups faster and ensure they last, skip the generic craft aisles and invest in the right foundational kits.
- Base & Support: heavy-duty powder-coated planter frames
- Setup Tools: precision urban gardening tool starter kits
- Weather/Durability Protection: UV-resistant clear acrylic sealants
If you think standard pots are fine, this next setup will completely change how you approach watering…
Container Urban Garden Design for Maximum Flexibility
Portable containers adapt to changing sunlight, seasonal weather, and evolving aesthetic preferences. Strategic vessel selection and arrangement transforms patios, balconies, and entryways into productive mini-farms.
10. Self-Watering Container Systems
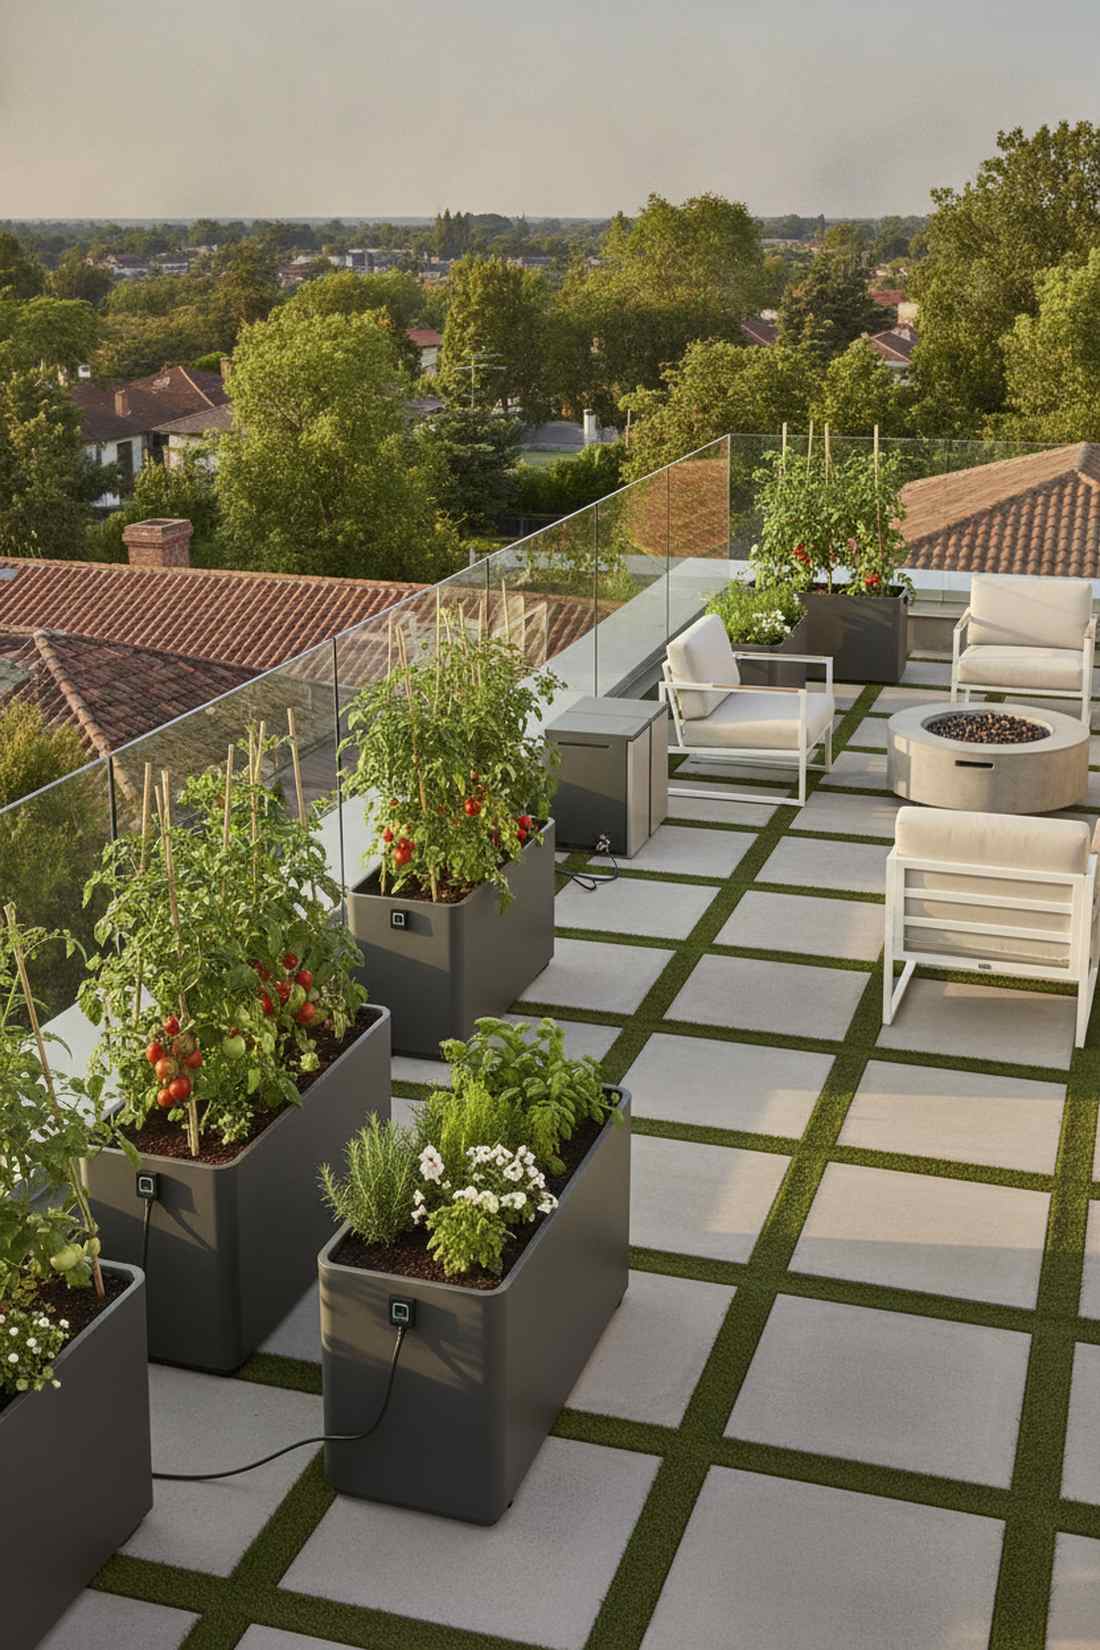
Feels like having a smart-home system for your plants. This automated container hydration layout is a lifesaver for frequent travelers or sun-baked rooftops.
Stop killing your tomatoes during heatwaves; this tech delivers a surprisingly premium look with zero wilt. Upgrading to reservoir-base planter kits cuts your daily watering chores down to once a week.
You can secure top-tier containers for around $35–$50. Pin this to your zero-maintenance gardening board!
- Key Materials: Dual-chamber pots and wicking soil.
- Vibe / Style: Sleek high-tech patio.
- Difficulty: Just add water.
- Budget Breakdown: Planter: $30 | Soil: $10.
- Creator’s Tip: Always add liquid fertilizer directly to the water reservoir, not the top soil.
- Smart Sourcing: UV-resistant self-watering planter boxes and premium wicking soil blends.
11. Fabric Grow Bags
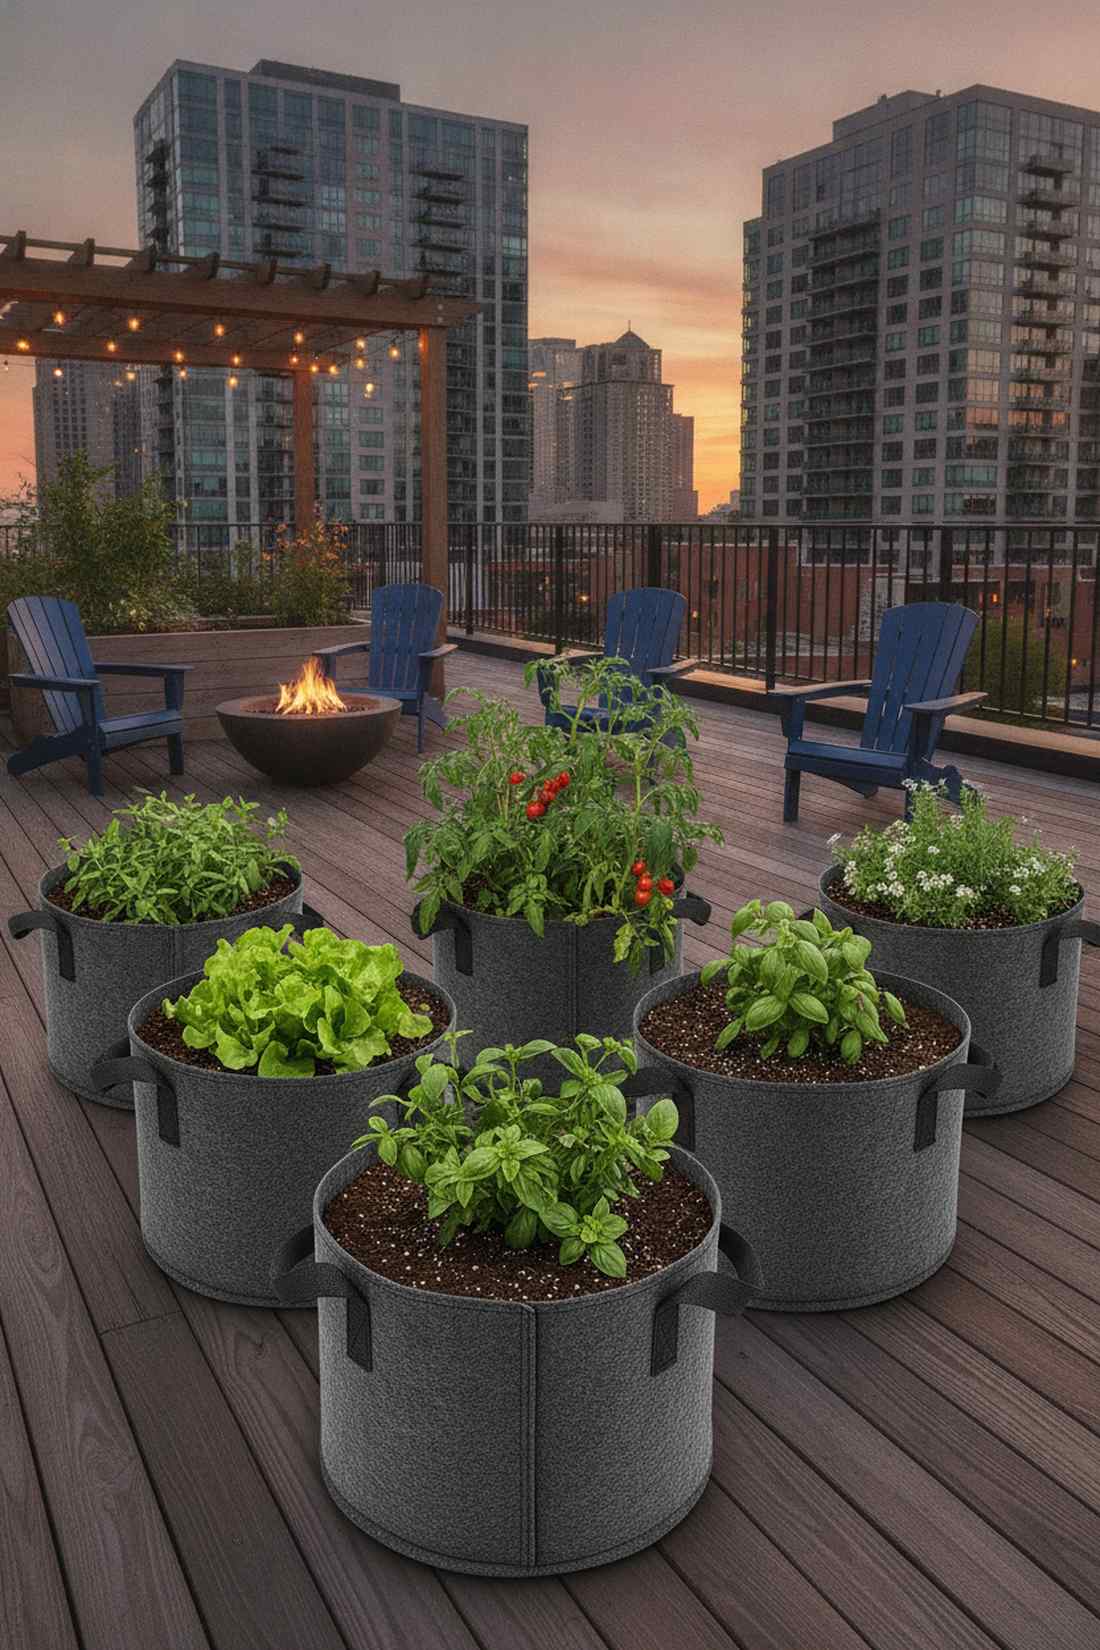
Radiates a cool, temporary pop-up farm aesthetic. Using an aerated root bag setup is the absolute best use-case for renters who move frequently.
Plastic buckets suffocate roots, but this breathable fabric looks unexpectedly trendy and boosts growth. Stocking up on heavy-duty felt grow bags air-prunes your plants for massive yields.
A set of five bags costs under $20. It’s the cheapest way to start a massive urban garden today.
- Key Materials: Fabric containers with reinforced handles.
- Vibe / Style: Urban pop-up farm.
- Difficulty: Unfold and fill.
- Budget Breakdown: Bags (5-pack): $18 | Soil: $15.
- Creator’s Tip: Fold the top edge down an inch to create a sturdy rim that stays open.
- Smart Sourcing: thick non-woven fabric grow bags (bulk pack) and organic raised bed soil.
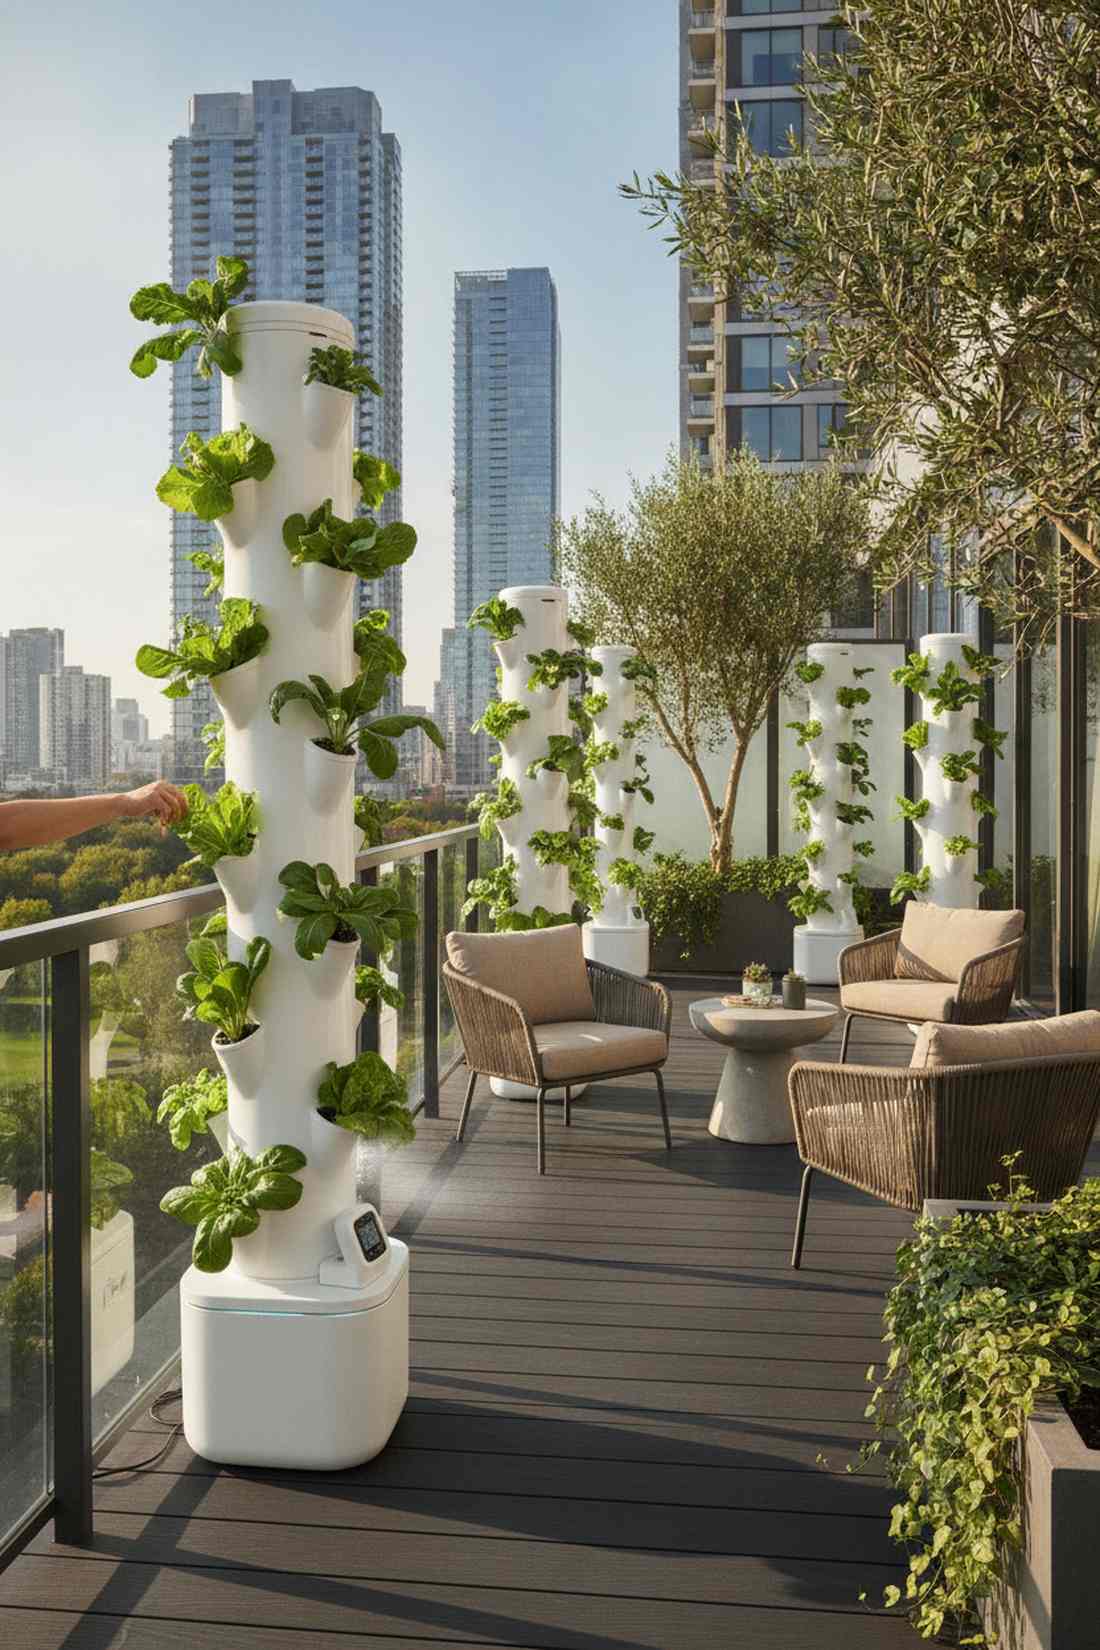
12. Stacking Tower Planters
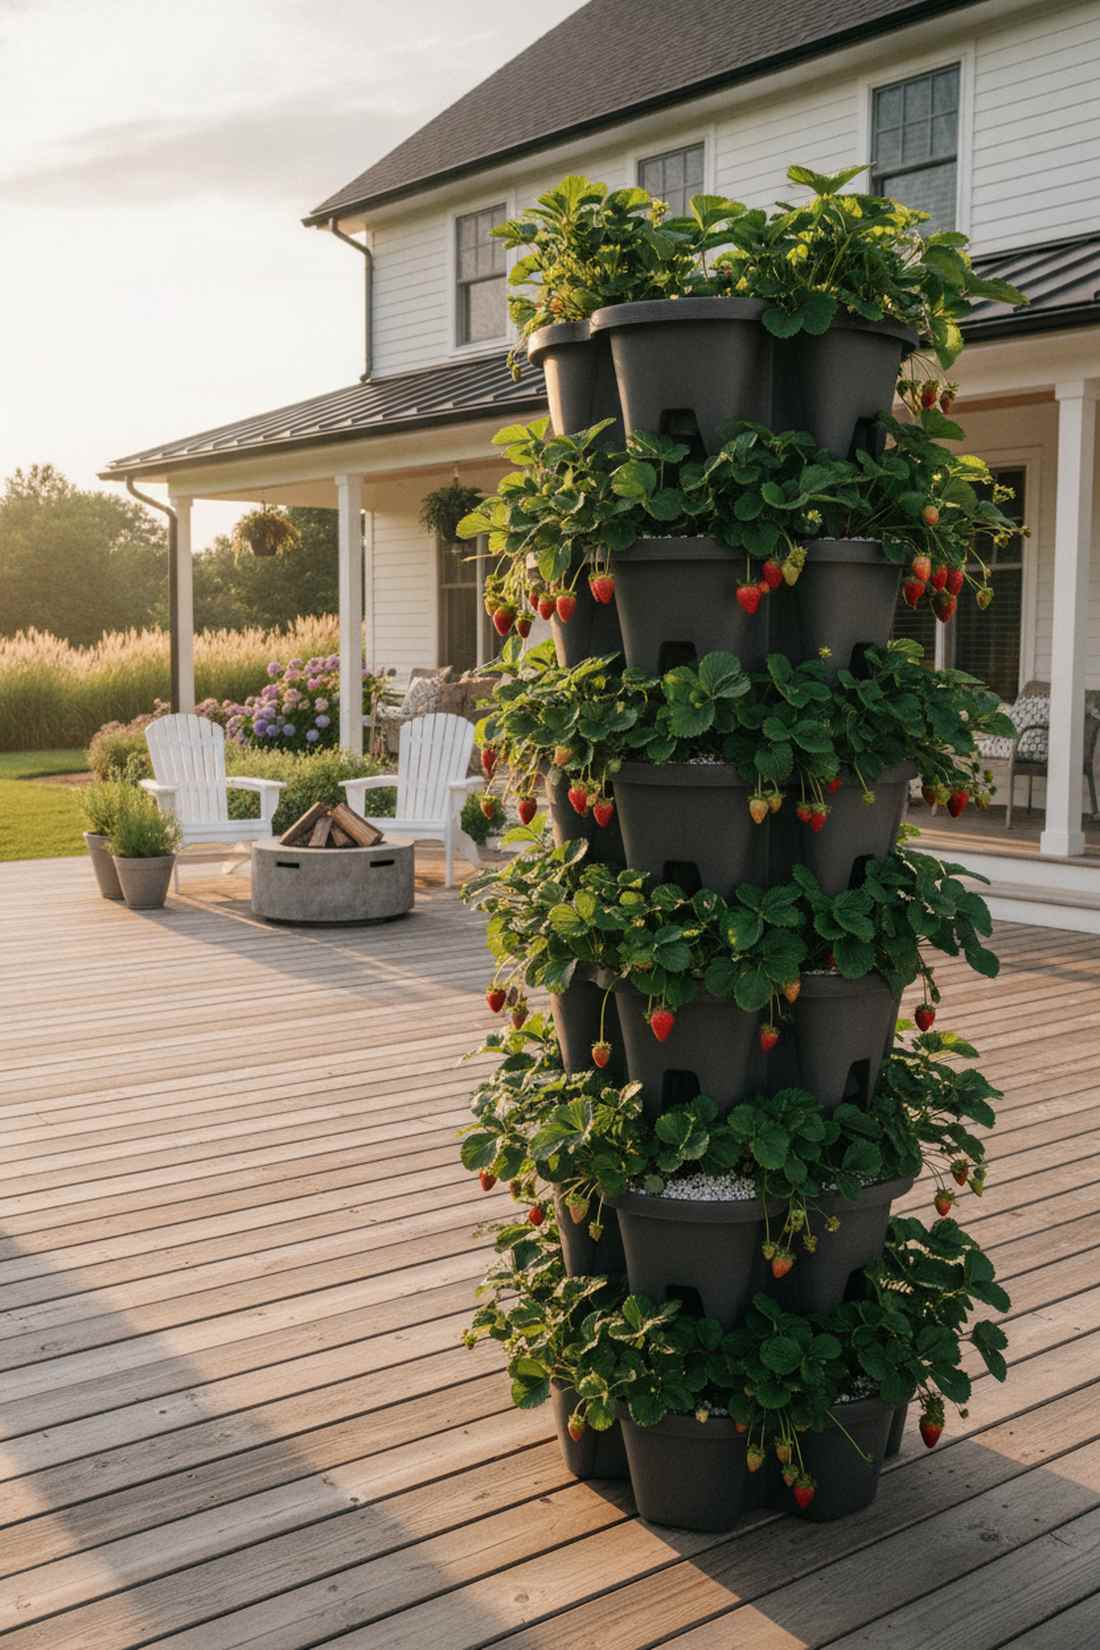
Looks like a futuristic green pillar of abundance. A spiral vertical stacking tower is perfect for growing 30+ strawberry plants in a tiny corner.
Most floor pots waste space, but this configuration gives a designer-level finish while maximizing every inch. Purchasing interlocking modular planter tiers ensures the whole tower won’t tip over.
A full tower system usually runs $40–$60. Save this for your next patio space-saving project!
- Key Materials: Multi-tier plastic planters and perlite-heavy soil.
- Vibe / Style: Modern vertical column.
- Difficulty: Very easy stacking.
- Budget Breakdown: Tower Kit: $45 | Soil: $10.
- Creator’s Tip: Put a heavy rock or brick in the very bottom tier to lower the center of gravity.
- Smart Sourcing: 5-tier stacking planter starter kits and lightweight perlite soil additives.
13. Half-Barrel Planters
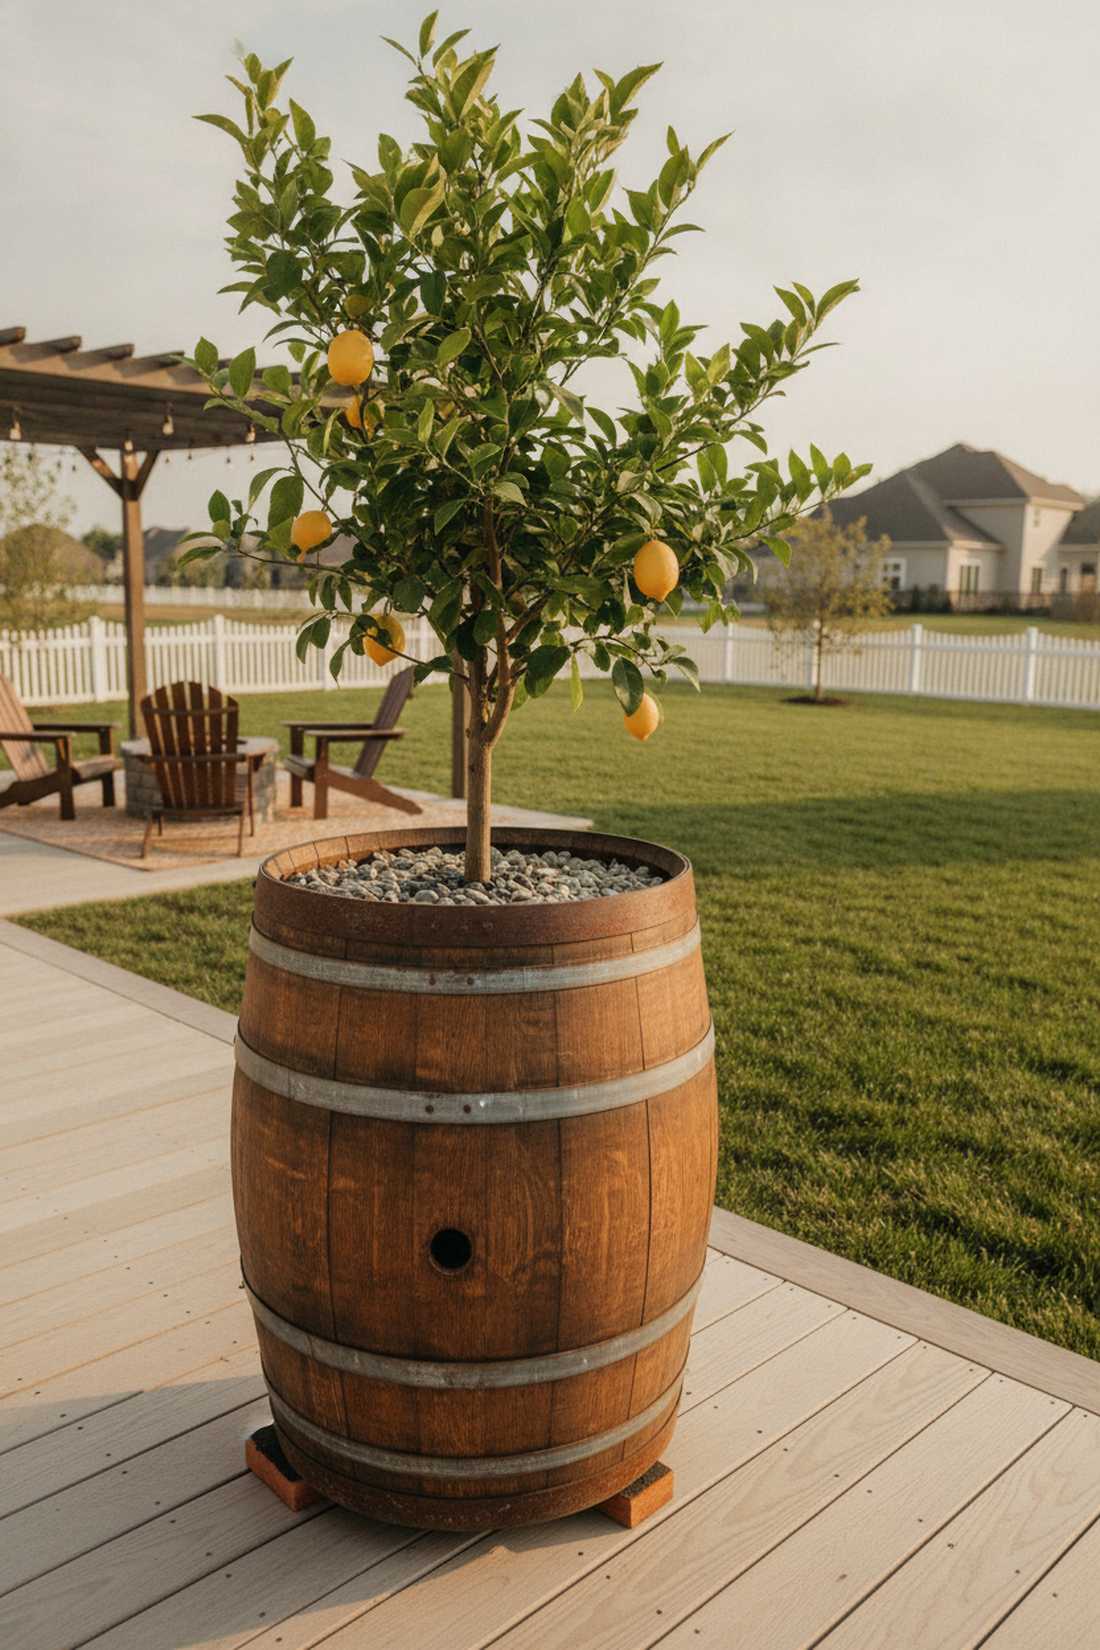
Brings a deep, rich winery vibe straight to your backyard. Using a large-capacity rustic barrel design is exactly what you need for planting a dwarf lemon tree.
Faux plastic barrels look tacky, but sealing real wood looks far more expensive than it is. Utilizing weatherproofed oak barrel halves provides incredible root insulation during cold snaps.
Expect to pay $40–$70 depending on the wood quality. Highly recommended for statement plants.
- Key Materials: Wooden half-barrel and drainage rocks.
- Vibe / Style: Vintage wine country.
- Difficulty: Heavy lifting required initially.
- Budget Breakdown: Barrel: $50 | Drain Stones: $10.
- Creator’s Tip: Elevate the barrel on three terracotta “pot feet” so the wood bottom doesn’t rot.
- Smart Sourcing: resin-coated faux oak barrels (premium alternative) and heavy-duty pot risers.
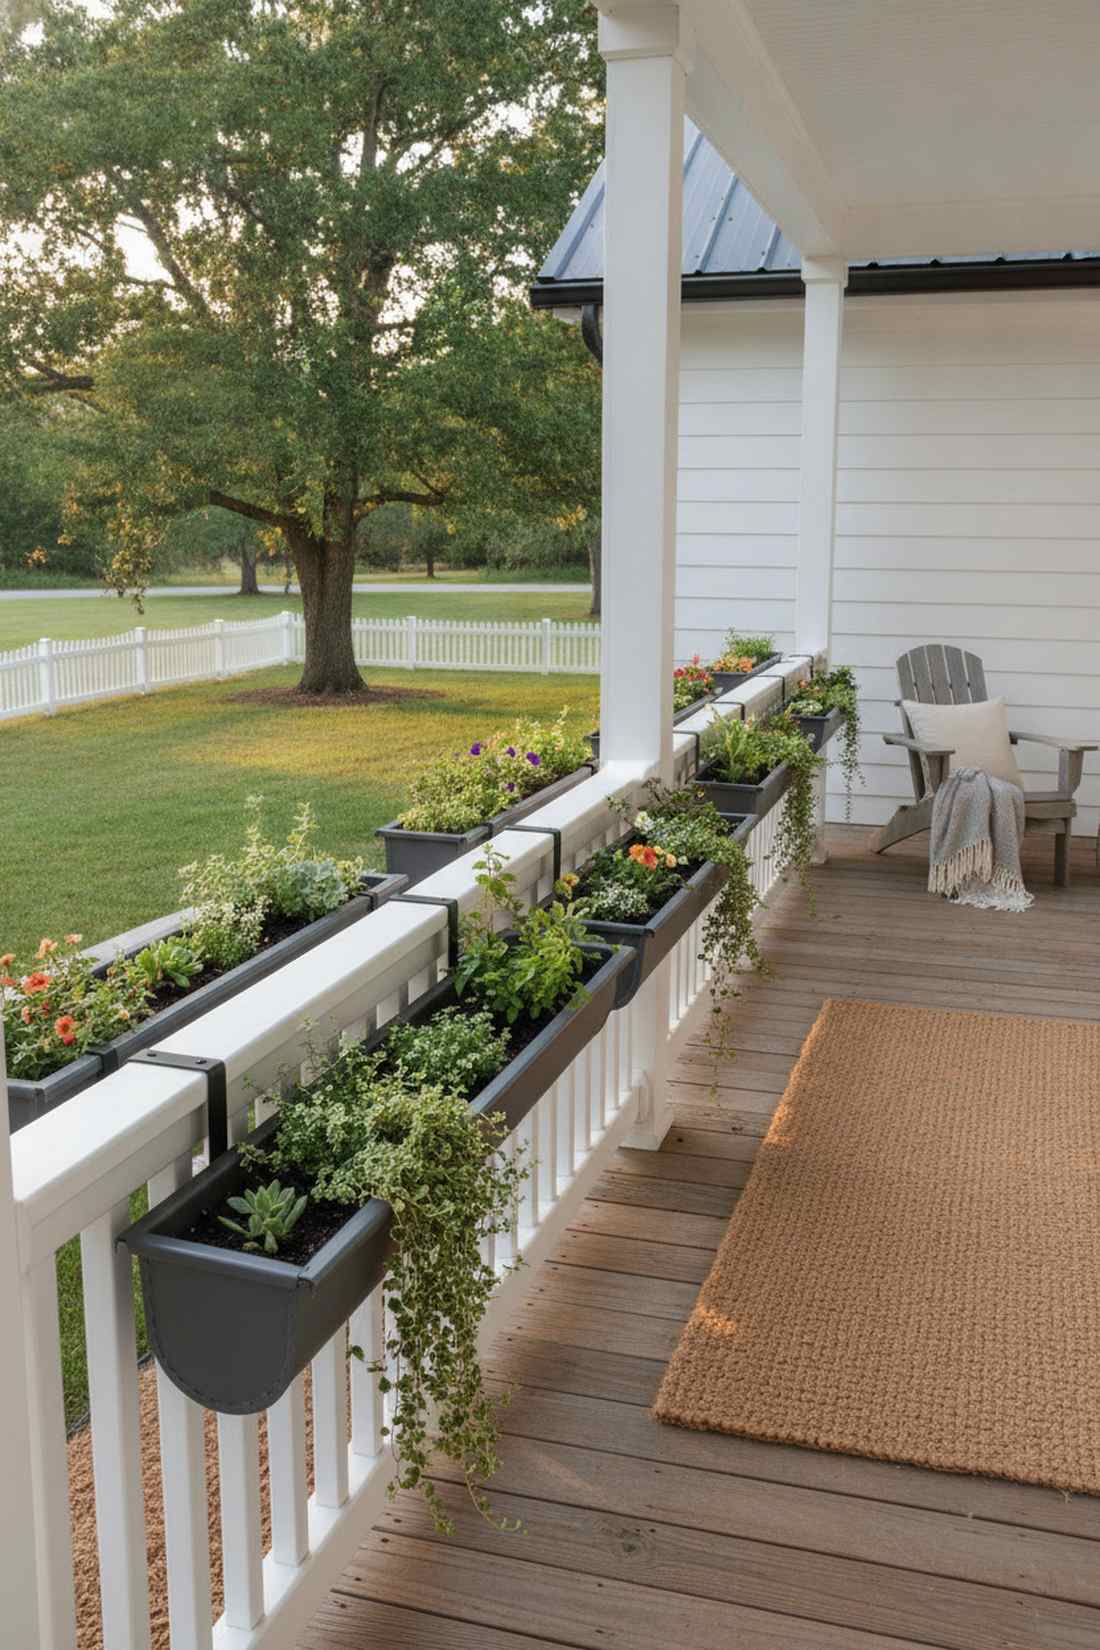
14. Window Box Installations
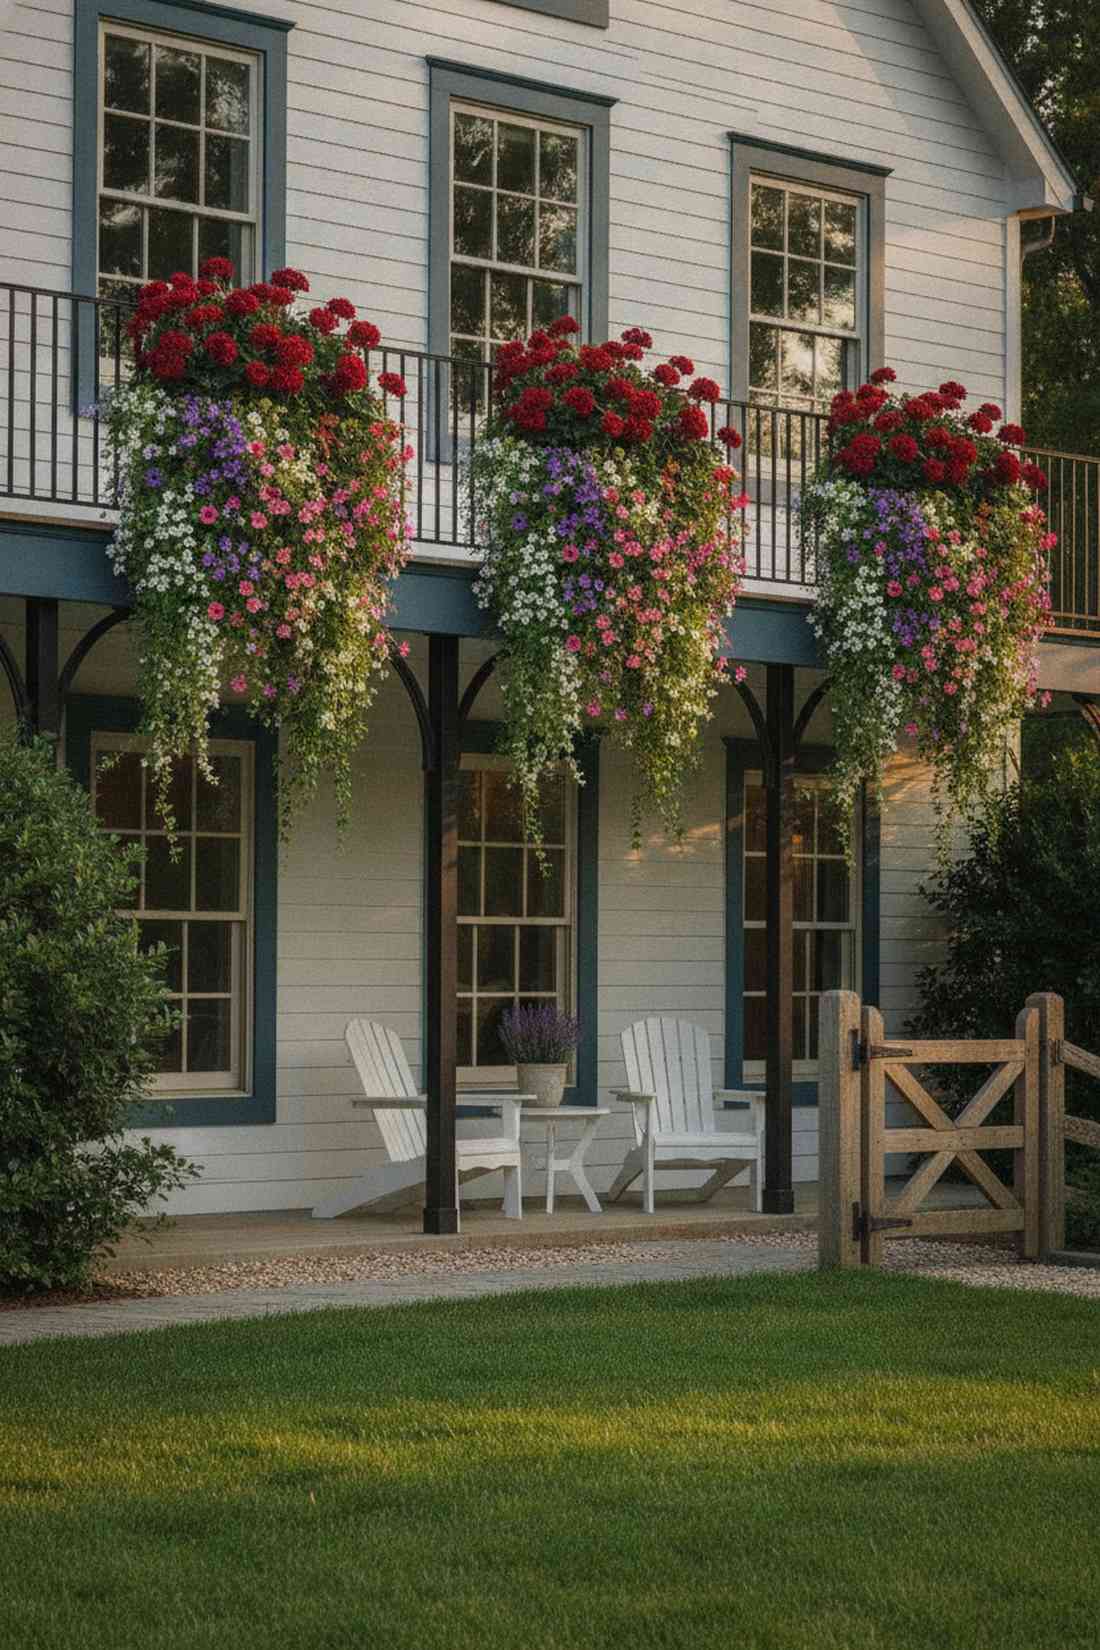
Emanates a charming cottage-core feeling right outside your glass. This railing-mounted floral setup is the perfect use-case for injecting color into a drab apartment facade.
Flimsy hooks will drop your plants, but this mounting method delivers a surprisingly premium look that stays put. Securing adjustable wrought-iron box brackets guarantees safety and style.
You can easily pull this off for around $30–$50. Pin this if you want instant curb appeal!
- Key Materials: Trough planter, brackets, and trailing flowers.
- Vibe / Style: Classic European balcony.
- Difficulty: Requires secure tightening.
- Budget Breakdown: Window Box: $20 | Brackets: $15.
- Creator’s Tip: Line the bottom with empty plastic bottles to reduce the soil weight on your window sill.
- Smart Sourcing: copper-finish window trough kits and adjustable heavy-duty railing brackets.
Most balcony setups fail because they can’t adapt to the sun… until you use this mobility trick.
15. Rolling Container Gardens
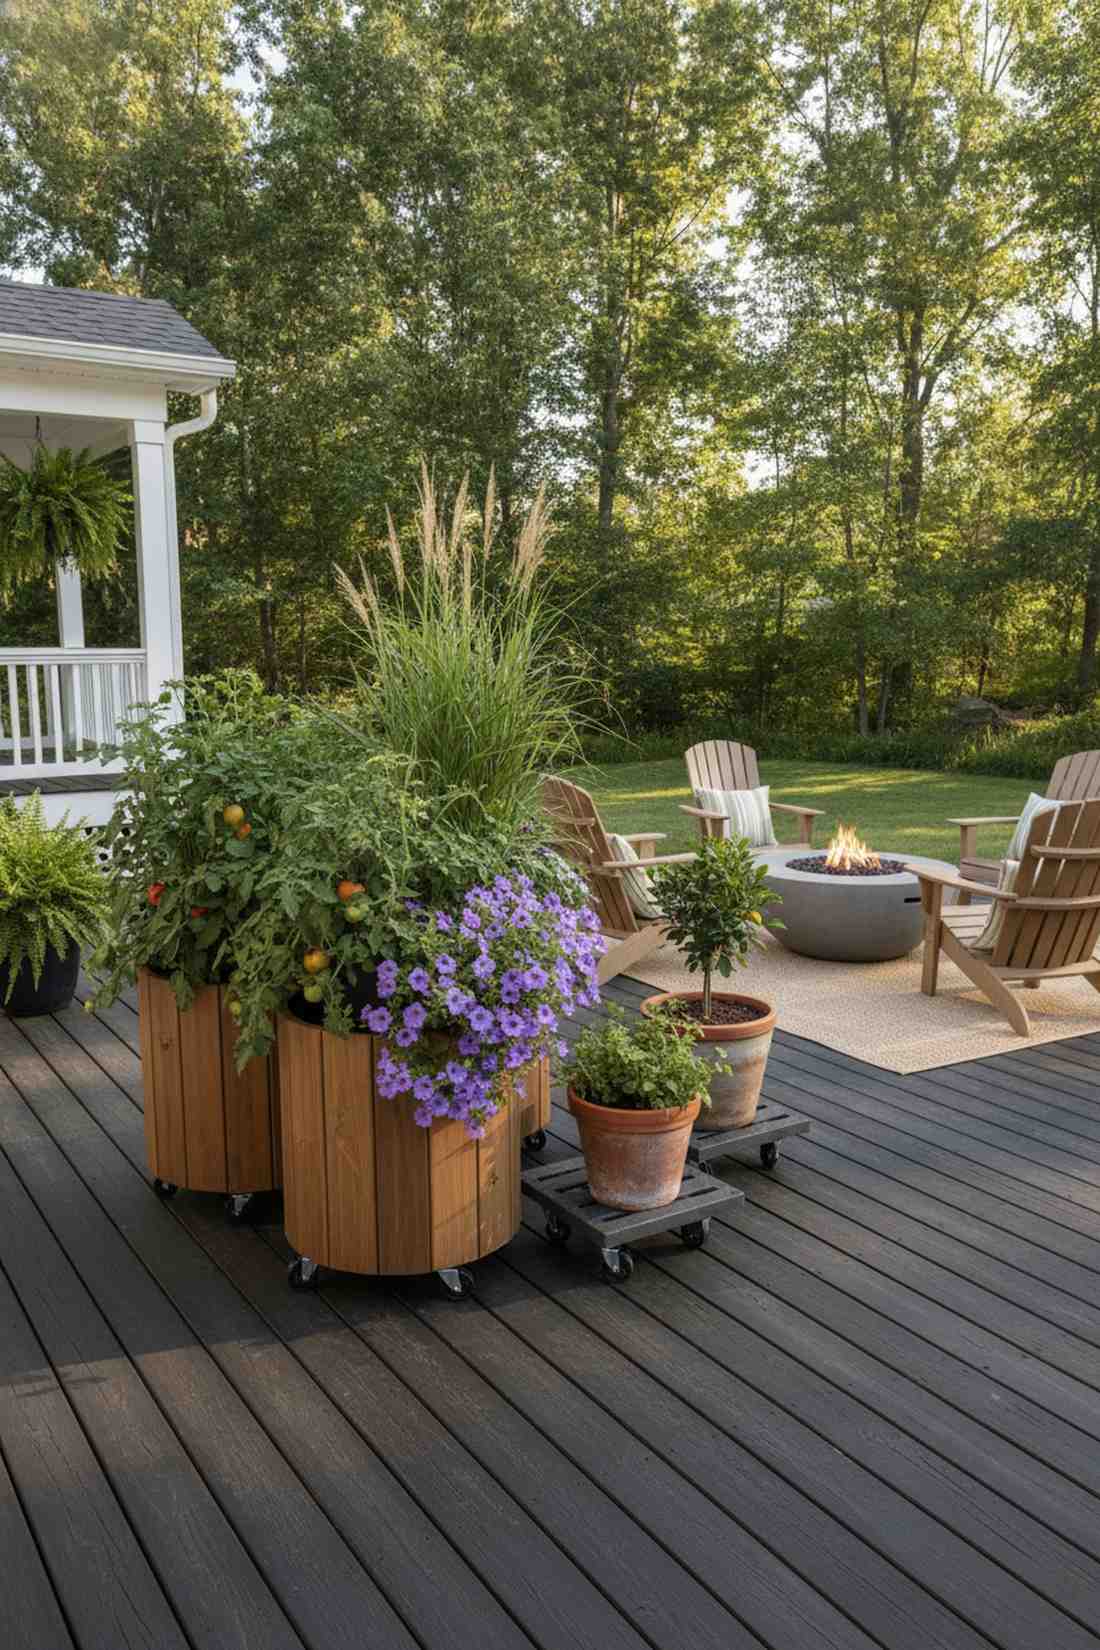
Feels like having a dynamic, shape-shifting patio. A mobile plant caddy layout is ideal for chasing the sun across a heavily shaded deck.
Dragging heavy pots ruins floors, but adding hidden wheels looks unexpectedly sleek and highly functional. Investing in locking heavy-duty caster bases stops your prized tomatoes from rolling away in the wind.
A good set of rolling bases costs about $20–$35. It’s a fast upgrade that completely changes the vibe.
- Key Materials: Plant caddies with locking wheels.
- Vibe / Style: Modular modern terrace.
- Difficulty: Zero installation.
- Budget Breakdown: Caddy (2-pack): $25.
- Creator’s Tip: Group three rolling pots together to create an instant, movable privacy screen.
- Smart Sourcing: solid wood rolling plant stands and rust-proof steel caster caddies.
16. Hypertufa Trough Planters
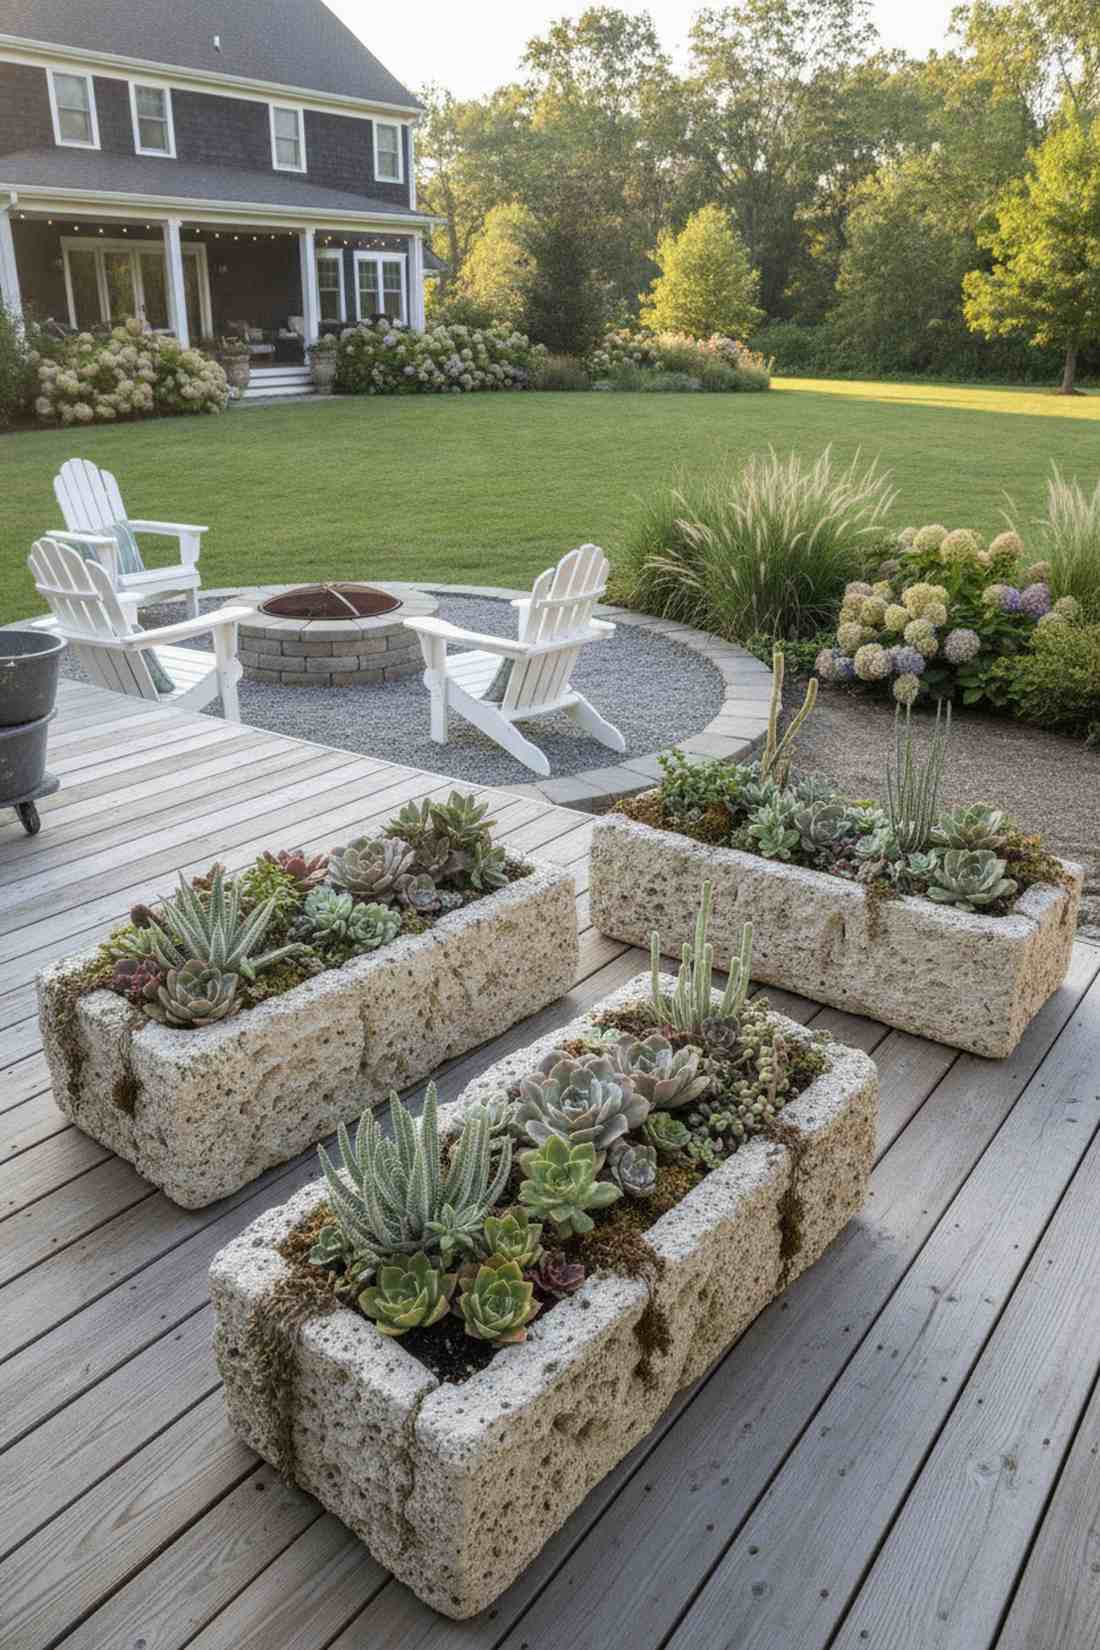
Looks exactly like ancient, weathered stone carved by hand. This porous alpine planter design works exceptionally well for displaying rare succulents.
Buying real stone costs a fortune, but mixing this yourself gives a designer-level finish for pennies. Crafting with a premium perlite and cement blend creates a lightweight, frost-proof masterpiece.
You can cast three troughs for around $25. Save this to your DIY weekend garden board!
- Key Materials: Portland cement, peat moss, perlite, and molds.
- Vibe / Style: Weathered artisan stone.
- Difficulty: Messy but rewarding DIY.
- Budget Breakdown: Cement: $10 | Perlite/Peat: $15.
- Creator’s Tip: Brush the outside with yogurt after it cures to encourage instant moss growth.
- Smart Sourcing: coarse horticultural perlite (bulk pack) and heavy-duty mixing tubs.
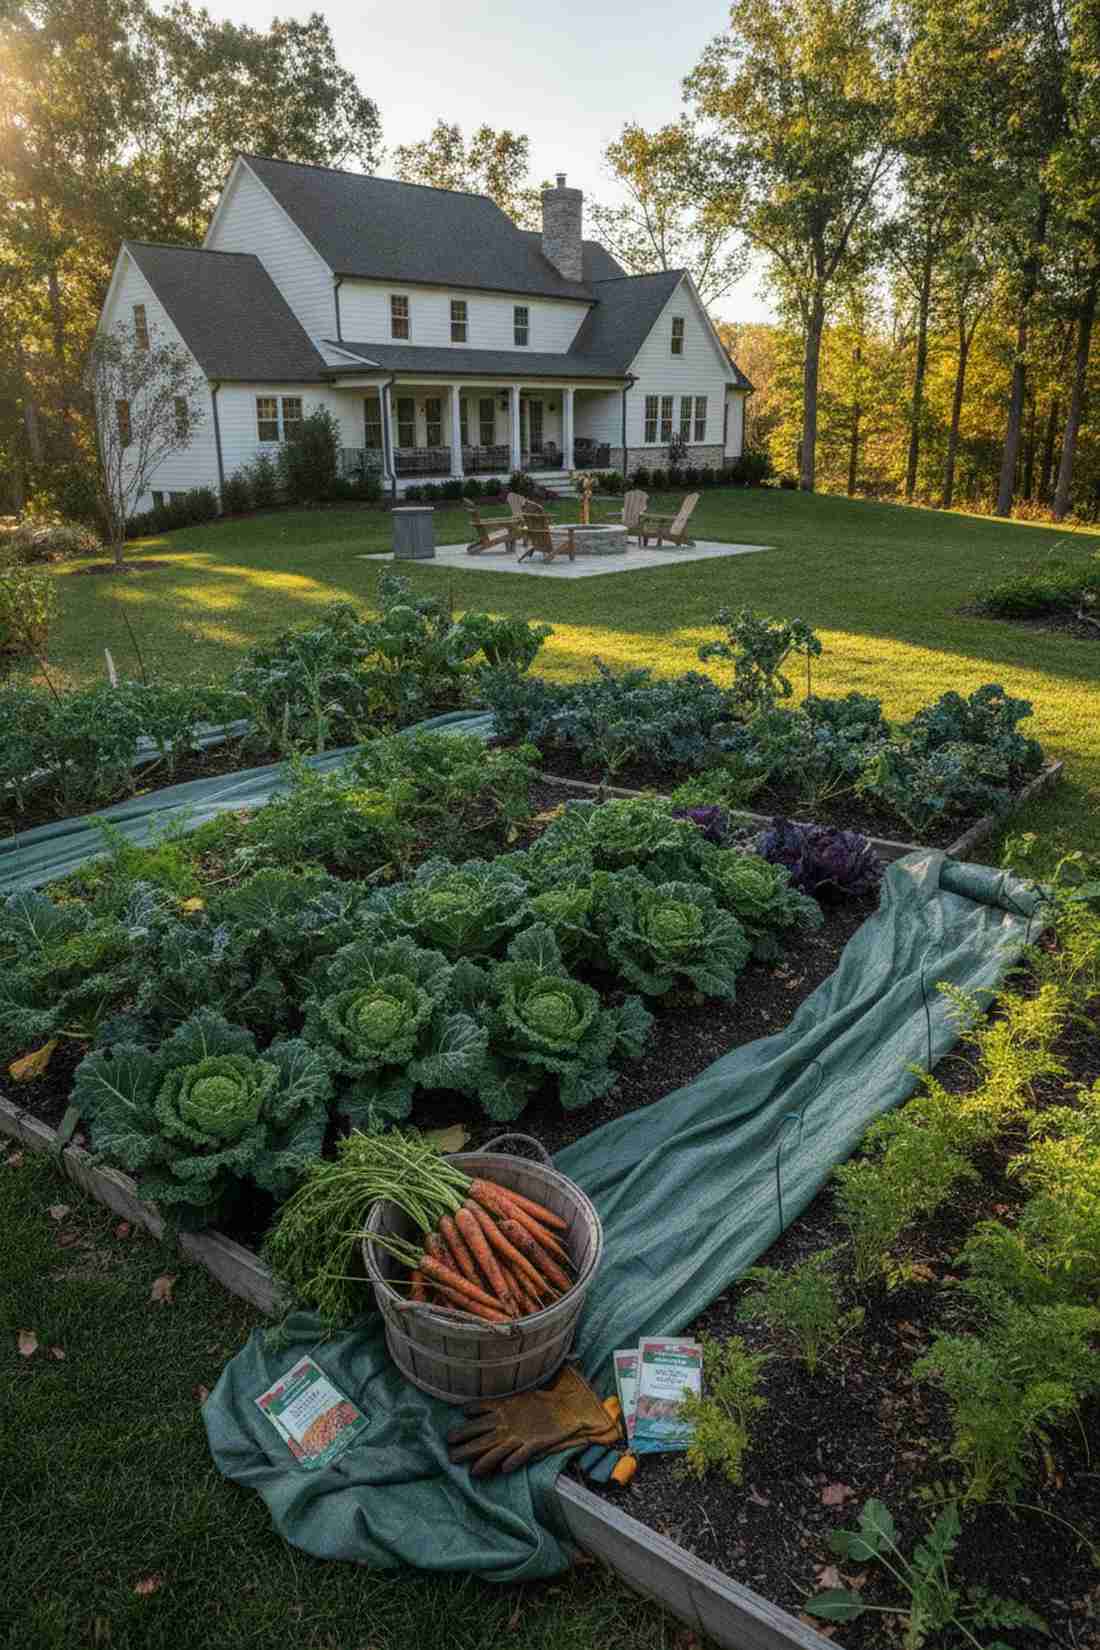
Urban Garden Raised Beds Engineered for Small Footprints
Elevated planting beds define growing zones while improving drainage and soil quality control. These structures integrate seamlessly into patios, rooftops, and corner spaces where ground planting proves impractical.
17. Narrow Border Beds
Transforms a boring fence line into a lush green ribbon. An edge-hugging urban garden bed is the ultimate strategy for maximizing narrow concrete alleyways.
People waste space with wide boxes, but a slim profile looks far more expensive than it is. Installing composite wood border kits prevents the rot that usually destroys ground-level wood.
You can easily pull this off for around $40–$60. Pin this to your side-yard makeover board!
- Key Materials: Composite decking boards and corner brackets.
- Vibe / Style: Clean perimeter landscaping.
- Difficulty: Basic drilling required.
- Budget Breakdown: Wood/Composite: $45 | Hardware: $10.
- Creator’s Tip: Keep the width under 24 inches so you never have to step on the soil to reach the back.
- Smart Sourcing: pre-cut cedar raised bed kits and rust-proof aluminum corner brackets.
18. Tiered Cascade Beds
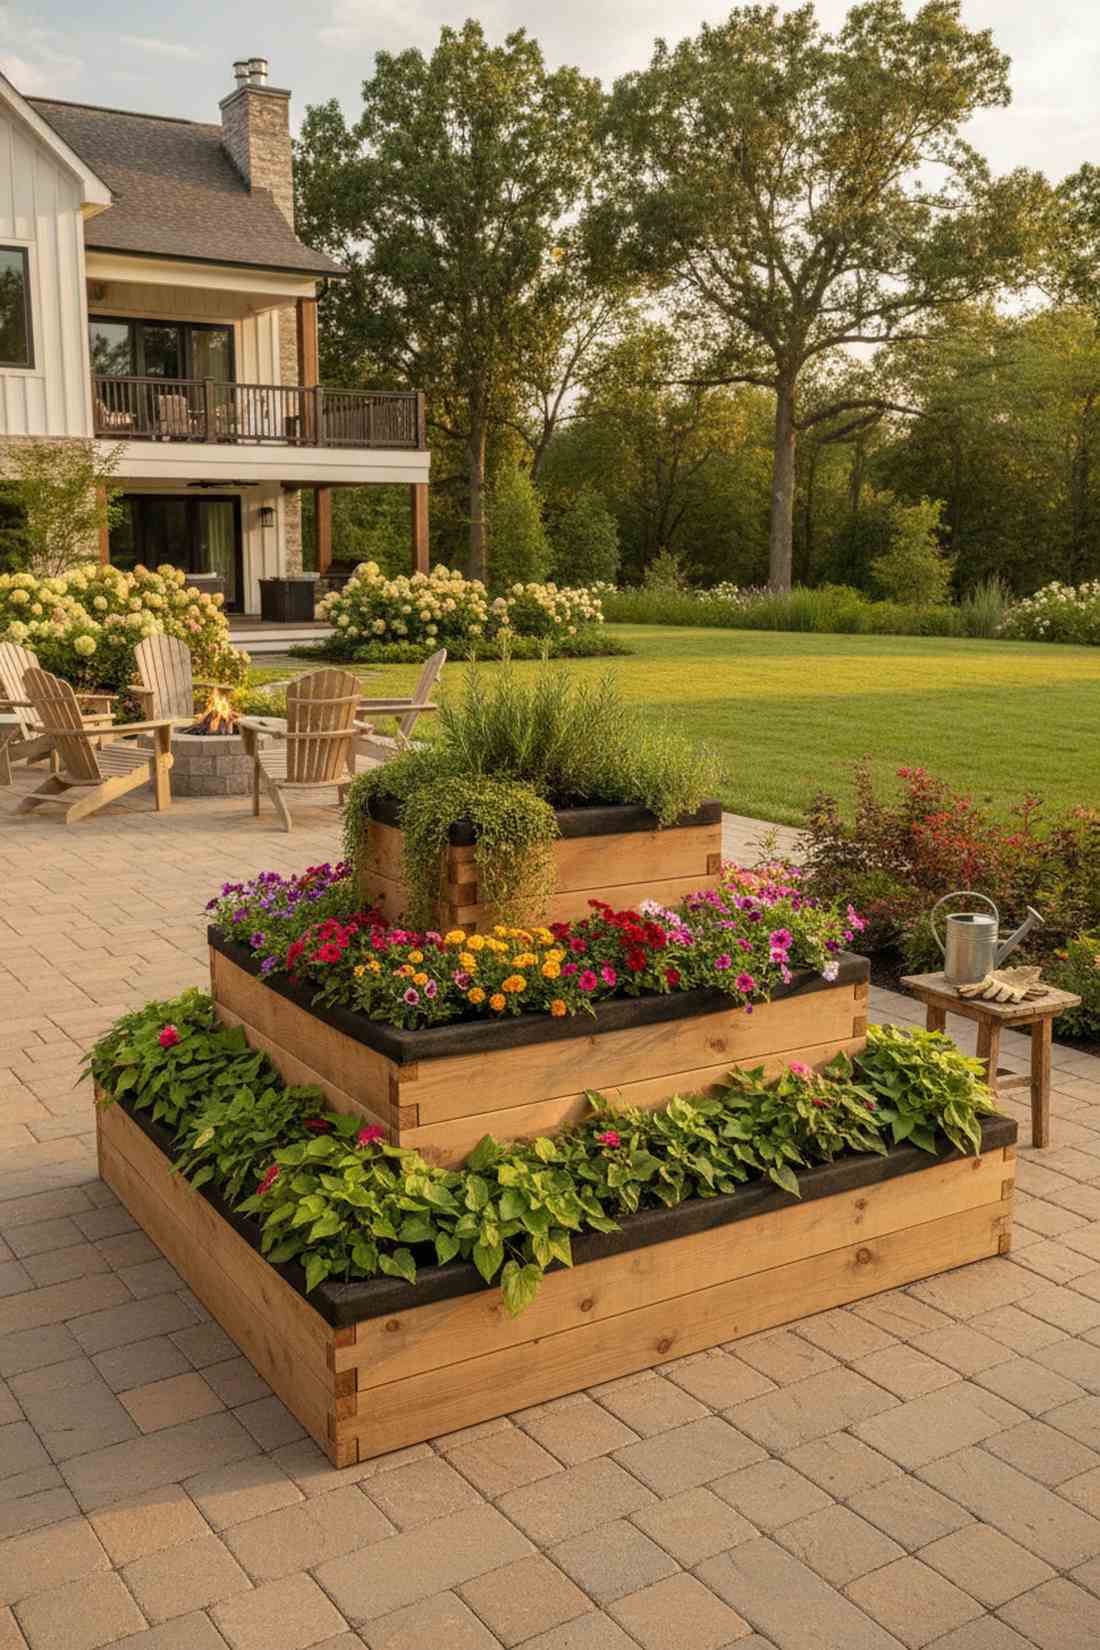
Feels like a miniature hillside terrace right on your patio. A stair-step planter configuration is perfect for showing off trailing herbs and bright florals simultaneously.
Flat beds lack visual drama, but this multi-level approach delivers a surprisingly premium look. Utilizing pre-notched stacking timber kits lets you build elevation without needing complex carpentry skills.
A three-tier setup usually runs $60–$90. Highly recommended for a high-impact weekend win.
- Key Materials: Stacking timbers and premium soil.
- Vibe / Style: Sculptural landscape architecture.
- Difficulty: Like building with adult blocks.
- Budget Breakdown: Timbers: $65 | Soil: $20.
- Creator’s Tip: Plant drought-tolerant herbs on the top tier, as water will naturally drain to the bottom.
- Smart Sourcing: dovetail joint raised bed kits and heavy-duty landscape fabric rolls.
19. Keyhole Garden Beds
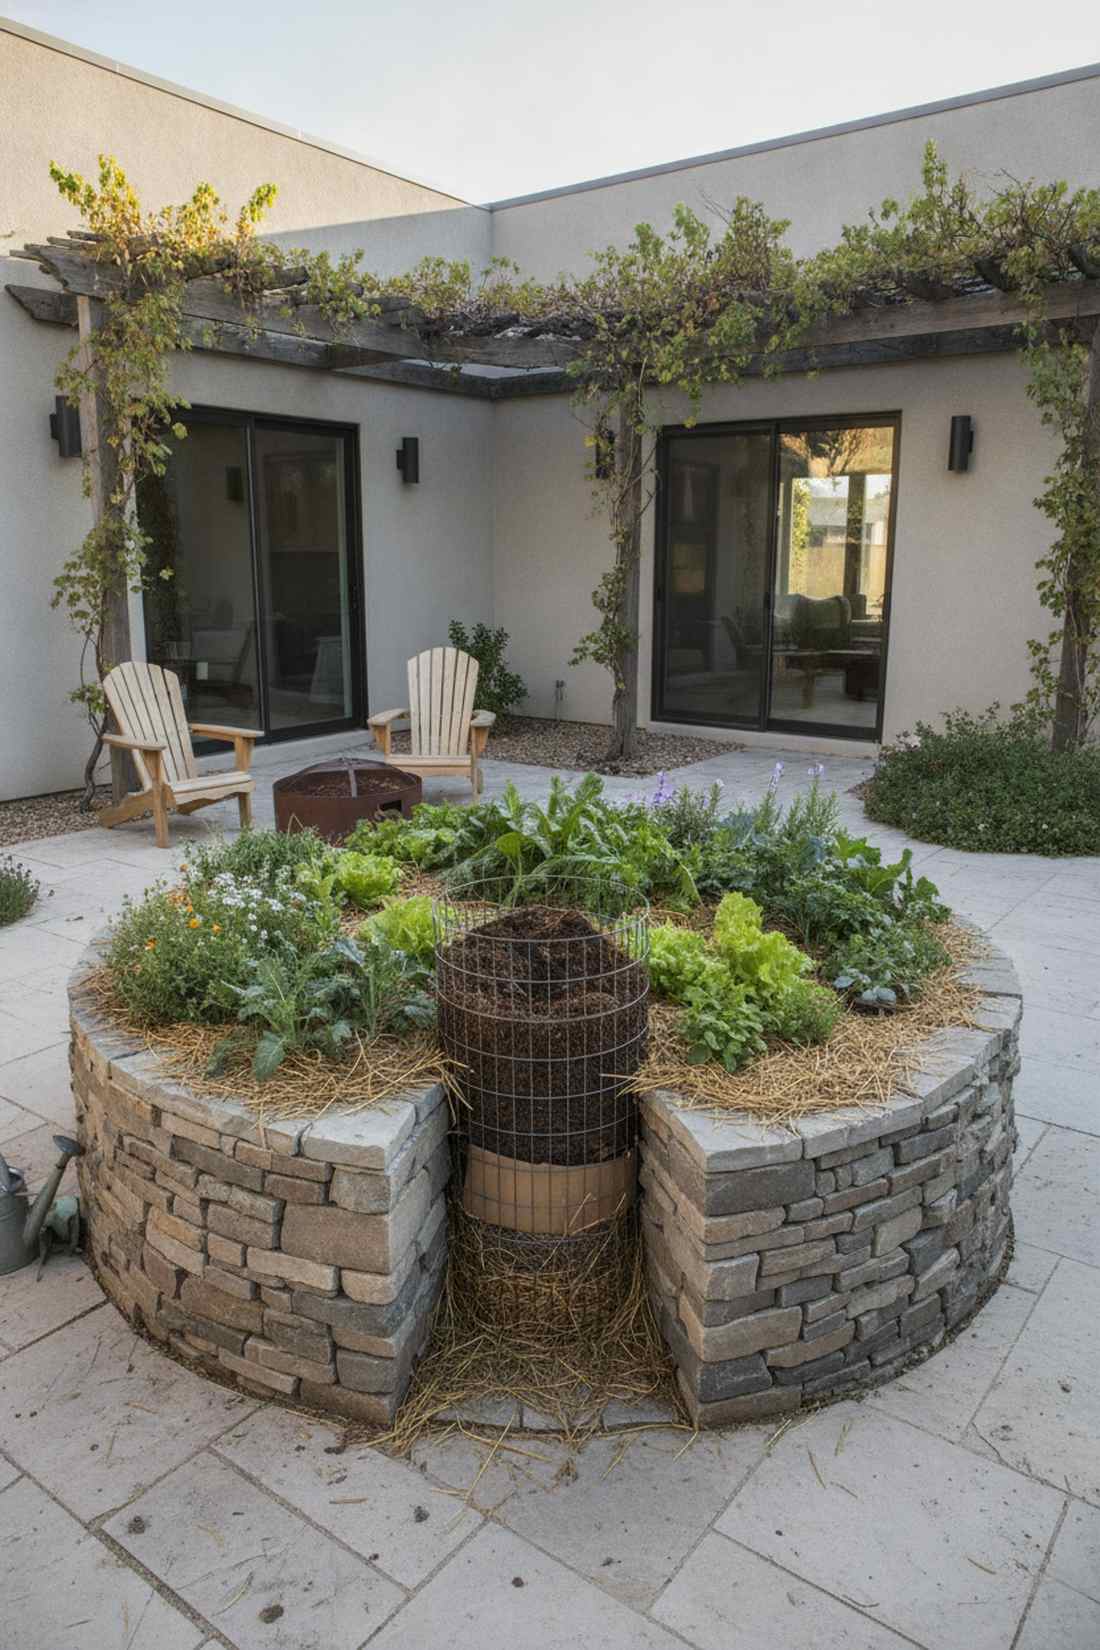
Emanates an eco-conscious, self-sustaining homestead vibe. This circular compost-integrated design is an absolute powerhouse for dry, hot urban courtyards.
Most gardens need constant feeding, but this built-in compost system gives a designer-level finish while fertilizing itself. Building the outer wall with dry-stack landscaping stones creates a beautiful, permanent architectural feature.
Materials can range from $50–$100 depending on the stone. Save this for your ultimate eco-garden plan!
- Key Materials: Wall stones, wire mesh tube, and cardboard base.
- Vibe / Style: Rustic permaculture hub.
- Difficulty: Moderate heavy lifting.
- Budget Breakdown: Stones: $70 | Wire Mesh: $15.
- Creator’s Tip: Layer twigs and cardboard at the very bottom of the bed to hold moisture like a sponge.
- Smart Sourcing: galvanized hardware cloth rolls and bulk organic compost starters.
This next raised bed layout is ridiculously cheap but saves your back from hours of pain…
20. U-Shaped Access Beds
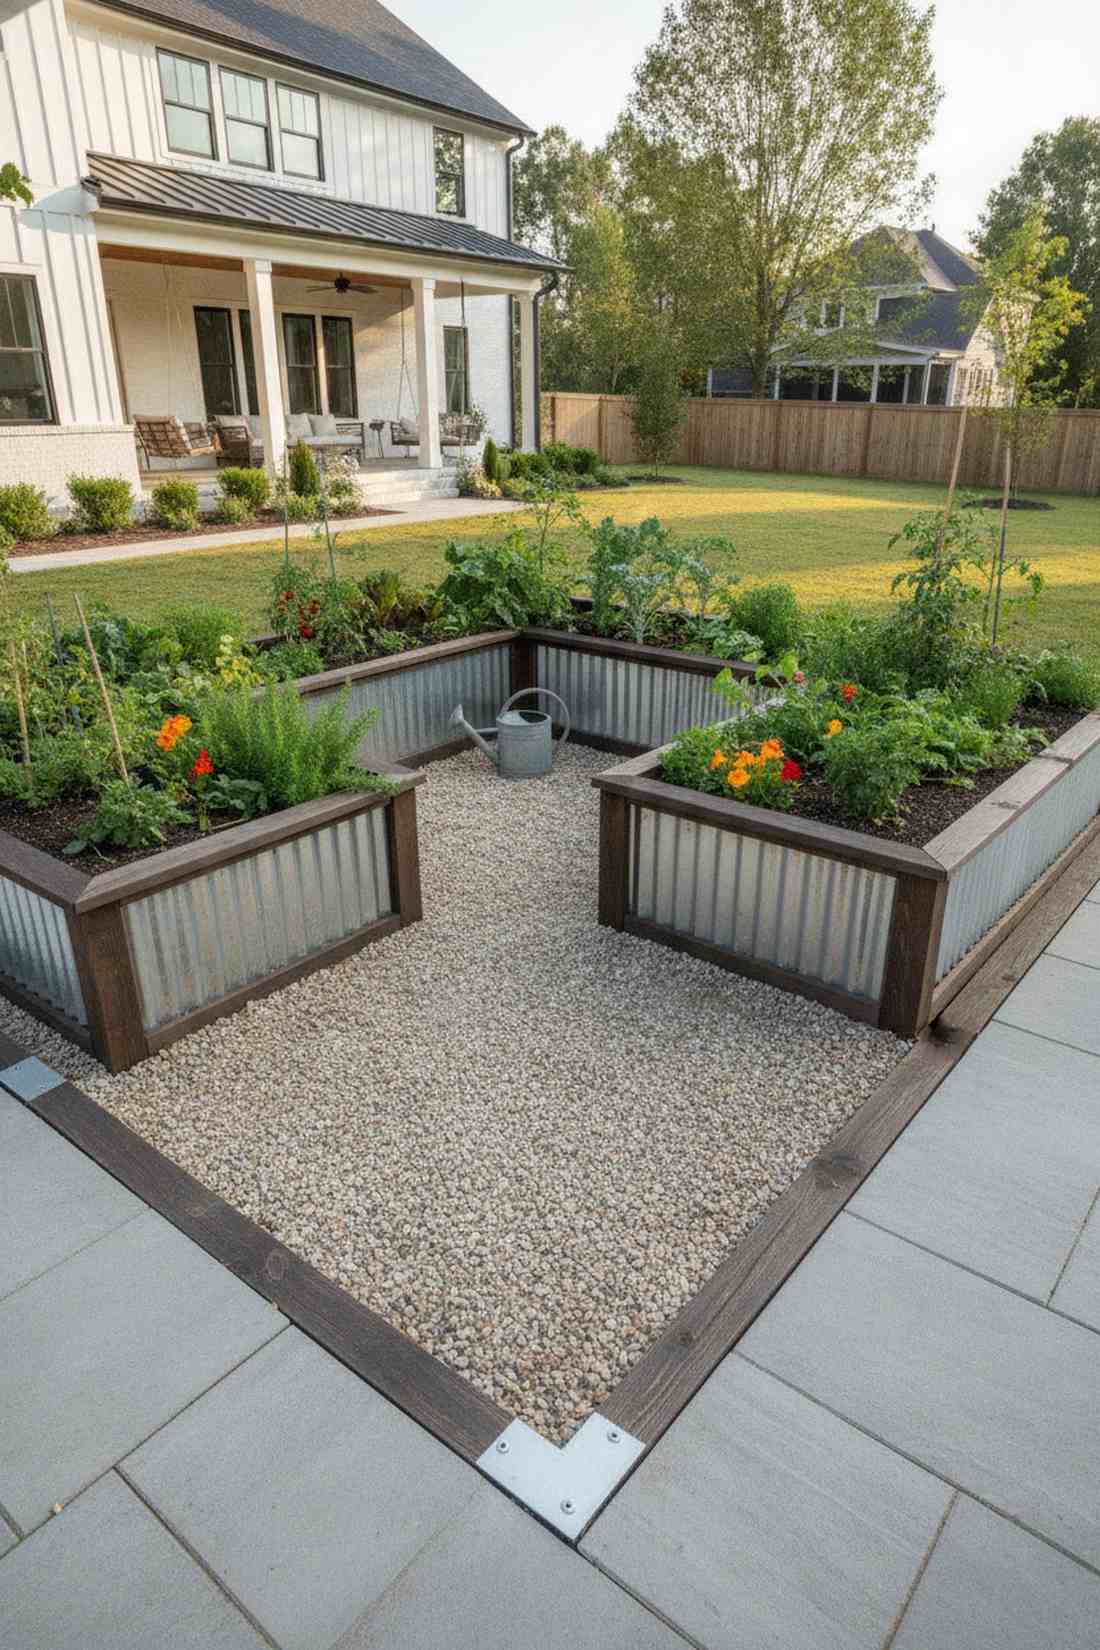
Feels like stepping into a professional market gardener’s command center. This surround-style planting layout works exceptionally well for awkward square patios.
Standard rectangles leave you stretching, but this wraparound method looks far more expensive than it is. Using corrugated metal siding panels for the walls adds a sleek, modern industrial edge.
You can build a large U-bed for roughly $80–$120.
- Key Materials: Corrugated metal, wood framing, and screws.
- Vibe / Style: Modern industrial farm.
- Difficulty: Intermediate DIY skills.
- Budget Breakdown: Metal Panels: $60 | Wood: $40.
- Creator’s Tip: Ensure the walking path in the middle is at least 24 inches wide for a watering can.
- Smart Sourcing: galvanized raised bed corners and anti-rust exterior wood screws.
21. Waist-High Raised Beds
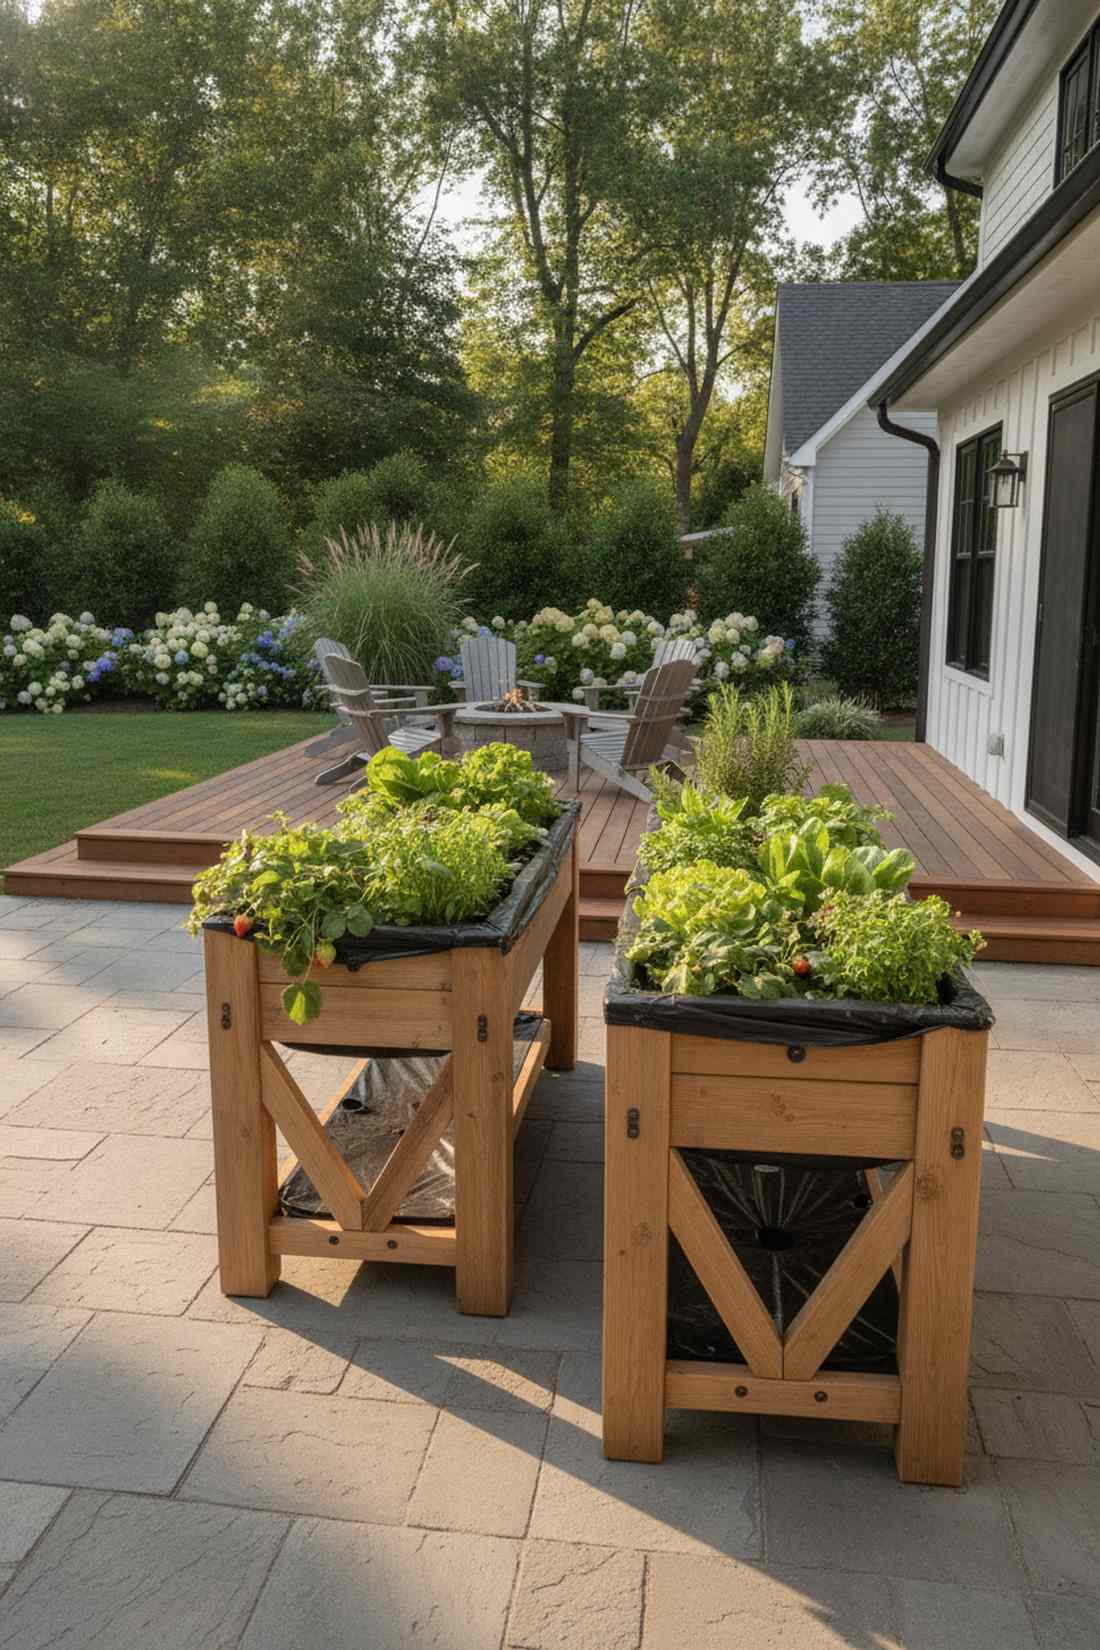
Looks like a high-end display table bursting with fresh greens. An elevated standing planter design is the absolute best use-case for gardeners with bad knees.
Bending over ruins the gardening experience, but this standing setup delivers a surprisingly premium look and total comfort. Investing in heavy-duty elevated planter kits ensures the bottom won’t drop out under wet soil weight.
Expect to spend around $70–$110. Pin this to your accessible gardening board!
- Key Materials: Tall wooden frame and structural cross-bracing.
- Vibe / Style: Ergonomic patio chic.
- Difficulty: Requires solid assembly.
- Budget Breakdown: Lumber: $80 | Hardware: $15.
- Creator’s Tip: Line the wood interior with heavy plastic sheeting (poke drain holes) to double the wood’s lifespan.
- Smart Sourcing: pre-built cedar elevated planter boxes and heavy-duty plastic liners.
22. Galvanized Stock Tank Beds
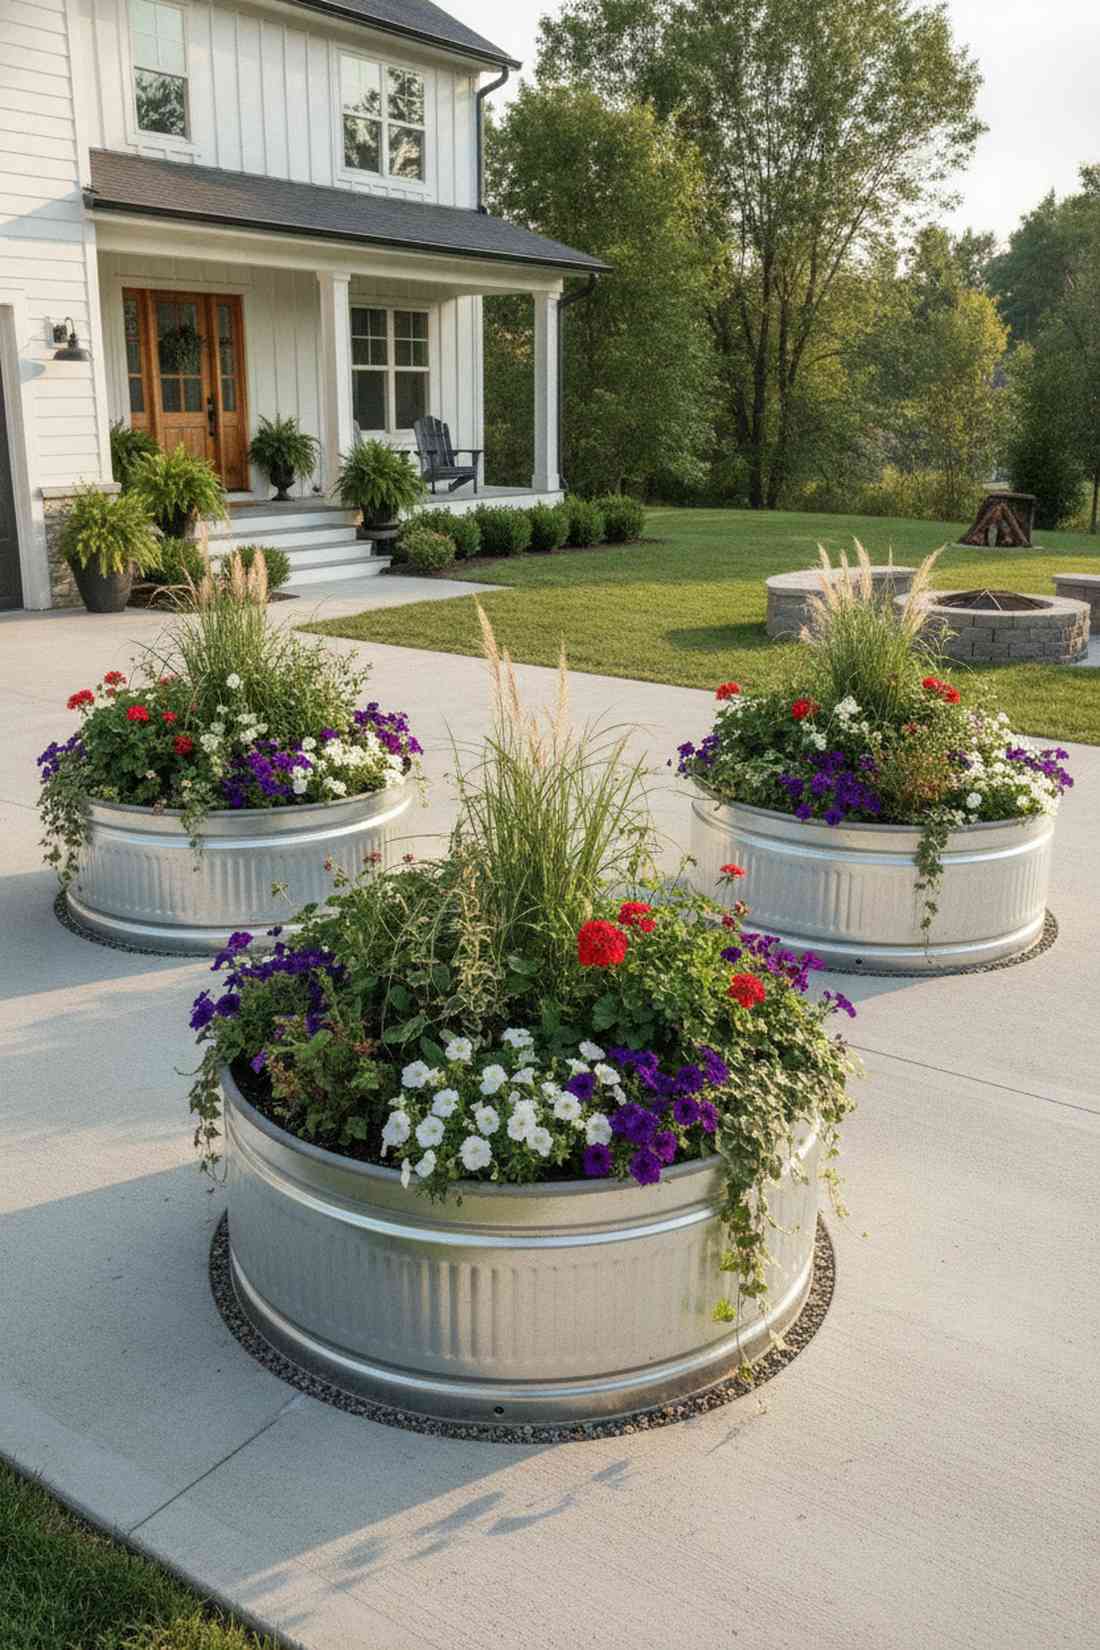
Radiates a trendy, modern-farmhouse aesthetic instantly. Using a metal trough garden bed is brilliant for creating a durable centerpiece on a concrete driveway.
Wood rots eventually, but this steel approach looks unexpectedly sleek and lasts a lifetime. Sourcing rust-proof livestock watering tanks gives you massive planting volume with zero carpentry required.
Tanks usually run $80–$150 at farm supply stores. It’s a fast upgrade that completely changes the vibe.
- Key Materials: Metal stock tank and a metal drill bit.
- Vibe / Style: Contemporary agricultural.
- Difficulty: Just drill and fill.
- Budget Breakdown: Tank: $100 | Drainage Gravel: $15.
- Creator’s Tip: Drill at least ten 1/2-inch holes in the bottom, or your tank will become a swamp.
- Smart Sourcing: seamless galvanized steel planters and titanium step drill bits.
23. Cinder Block Modular Beds
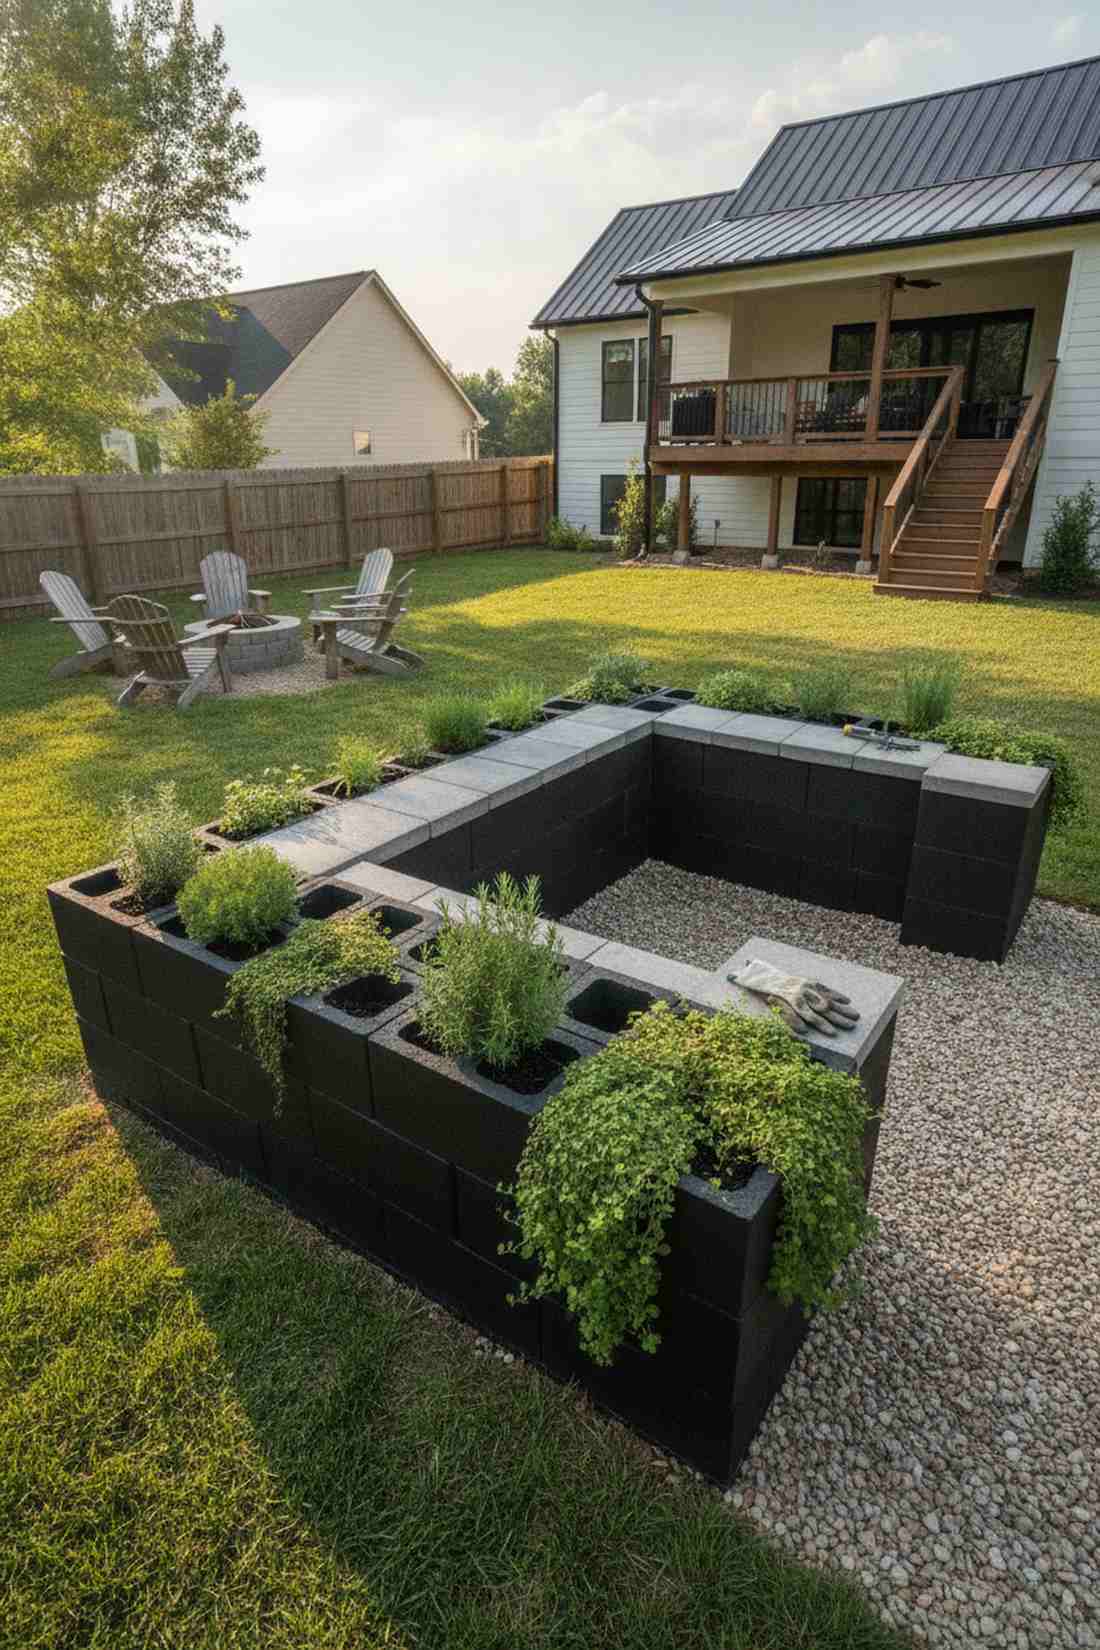
Projects a rugged, geometric street-style vibe. A concrete block stacking design works exceptionally well for renters who need a temporary, cheap raised bed.
Most people think blocks look unfinished, but painting them black gives a designer-level finish for pennies. Utilizing the hollow core block pockets allows you to plant trailing herbs that drape beautifully over the sides.
You can easily pull this off for around $20–$35. Save this to your extreme budget garden board!
- Key Materials: Standard cinder blocks and outdoor spray paint.
- Vibe / Style: Urban geometric grit.
- Difficulty: Heavy lifting only.
- Budget Breakdown: Blocks: $25 | Paint: $10.
- Creator’s Tip: Cap the top holes with flat pavers if you prefer a clean bench-seating look instead of planting in them.
- Smart Sourcing: matte black exterior spray paint (multi-pack) and concrete construction adhesive.
Most rooftop setups crack the ceiling below… unless you use this exact weight-saving material mix.
Rooftop & Terrace Strategies for Elevated Urban Spaces
Rooftop gardens transform underutilized overhead areas into productive oases while providing insulation benefits. Strategic planning addresses weight loads, wind exposure, and water drainage unique to elevated locations.
24. Lightweight Growing Media Mixes
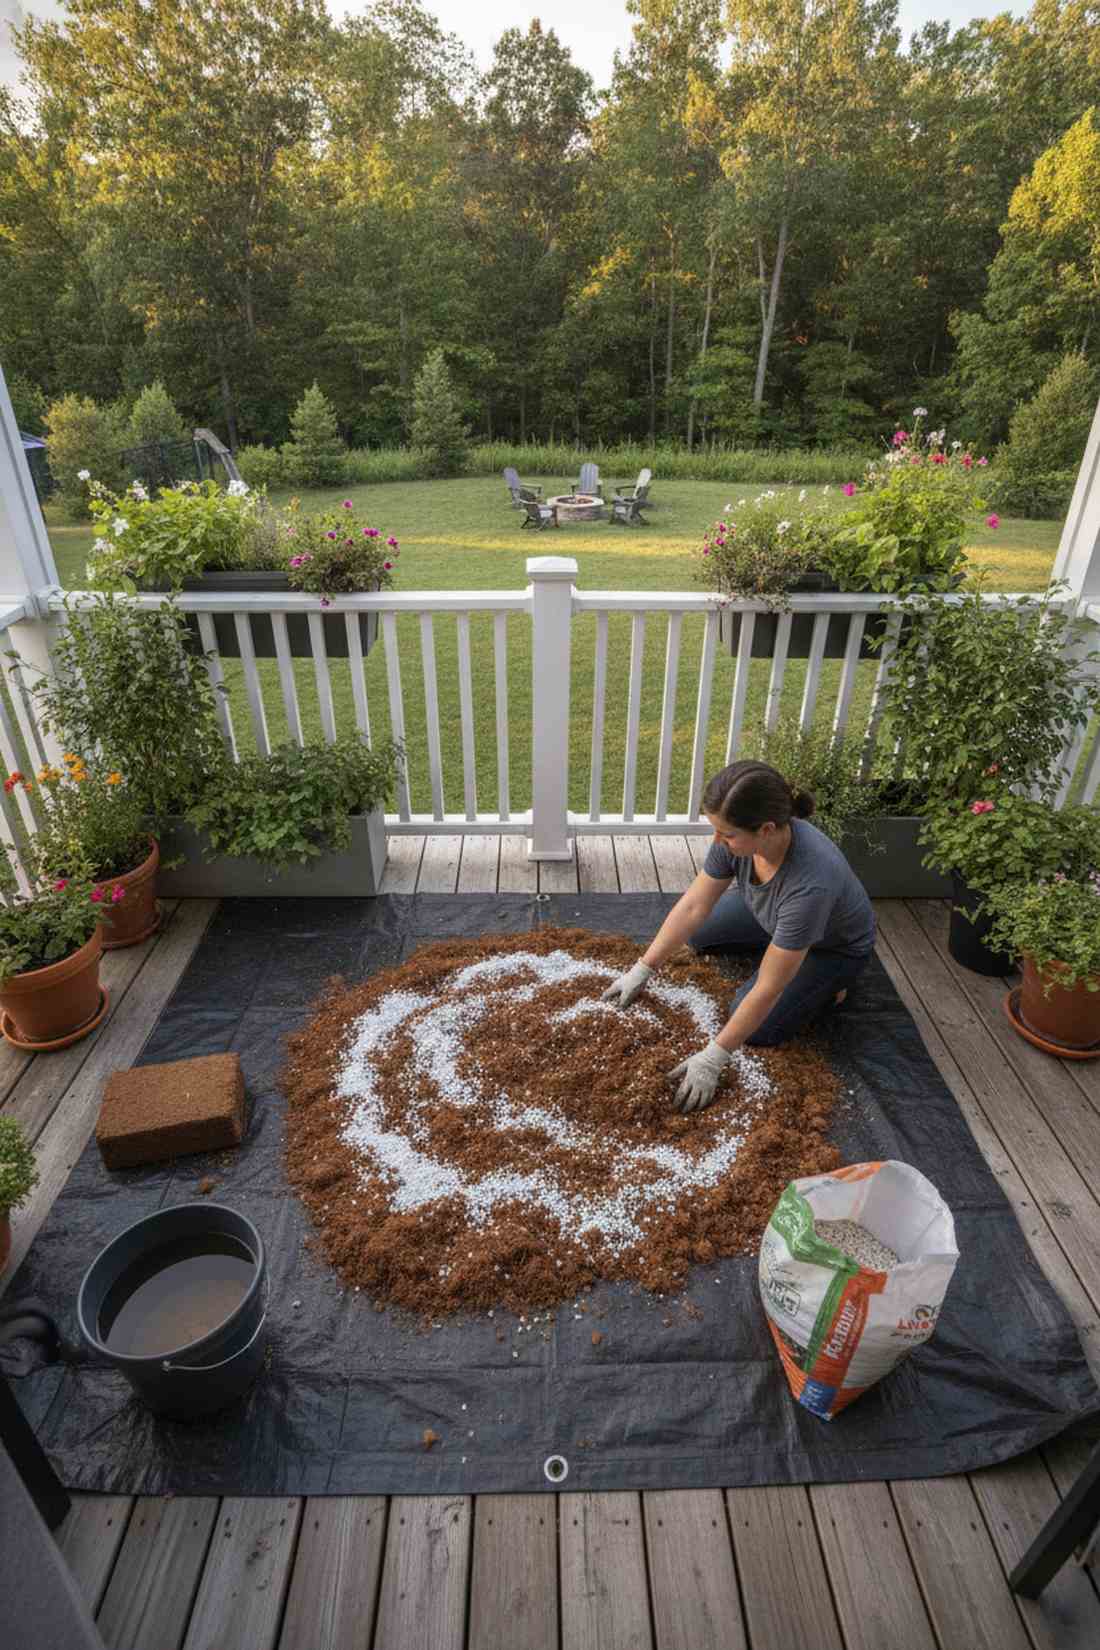
Feels like handling fluffy dark clouds instead of heavy mud. Using an engineered light soil blend is mandatory for old balconies with strict weight limits.
Heavy topsoil will collapse a balcony, but this formula delivers a surprisingly premium look while cutting weight by 60%. Mixing in premium horticultural perlite ensures roots get oxygen without the crushing density of dirt.
Mixing your own batch costs around $15–$25. Highly recommended for any elevated garden.
- Key Materials: Coco coir, perlite, and vermiculite.
- Vibe / Style: High-tech horticulture.
- Difficulty: Just mix in a tarp.
- Budget Breakdown: Coir: $10 | Perlite: $10.
- Creator’s Tip: Hydrate the coco coir blocks with warm water—it expands twice as fast.
- Smart Sourcing: compressed coco coir bricks (bulk pack) and coarse horticultural perlite.
25. Wind-Break Panel Systems

Creates a calm, resort-like oasis high above the windy city streets. A perforated privacy screen setup is the perfect use-case for exposed, blustery penthouse terraces.
Solid walls create turbulent downdrafts, but this slatted approach looks far more expensive than it is while protecting delicate stems. Installing UV-coated privacy lattice panels filters the gale without blocking your panoramic view.
You can secure a beautiful barrier for roughly $50–$80. Pin this to your rooftop design board!
- Key Materials: Wooden or vinyl lattice and heavy zip ties.
- Vibe / Style: Shielded luxury cabana.
- Difficulty: Easy attachment to existing rails.
- Budget Breakdown: Panels: $60 | Zip Ties: $5.
- Creator’s Tip: Leave a small gap at the bottom of the panel to allow wind to escape smoothly.
- Smart Sourcing: heavy-duty faux-ivy privacy screens and UV-resistant industrial zip ties.
26. Modular Deck Tile Gardens
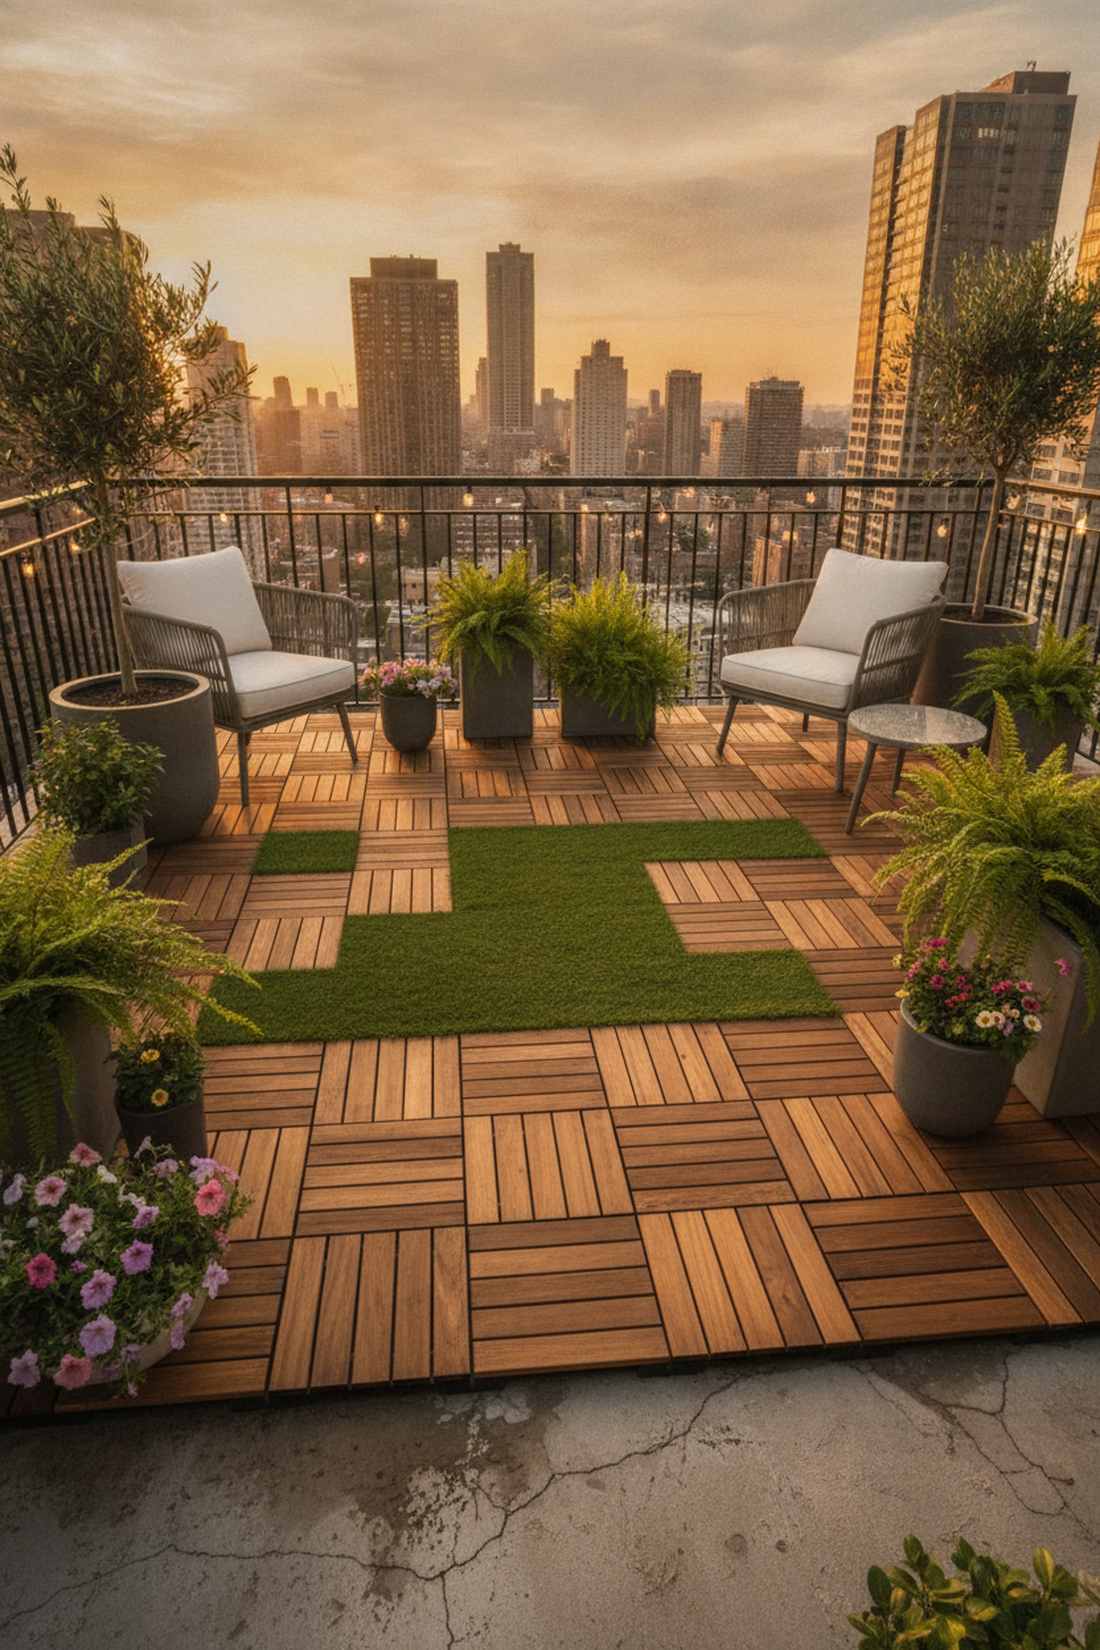
Looks like a high-end designer showroom floor that snaps together. A drainage-integrated flooring layout works exceptionally well over ugly, cracked concrete apartment balconies.
Painting concrete chips away fast, but these tiles give a designer-level finish instantly without glue. Snapping down acacia wood interlocking deck tiles elevates your pots out of standing puddles.
Expect to spend around $40–$60 for a small balcony. It’s a fast upgrade that completely changes the vibe.
- Key Materials: Interlocking deck tiles with plastic grid bases.
- Vibe / Style: Premium spa decking.
- Difficulty: Snap and go.
- Budget Breakdown: Tiles (10-pack): $45.
- Creator’s Tip: Cut the edge tiles with a simple handsaw to fit perfectly around balcony pillars.
- Smart Sourcing: interlocking acacia wood deck tiles and snap-together faux grass squares.
27. Rooftop Drip Irrigation Networks
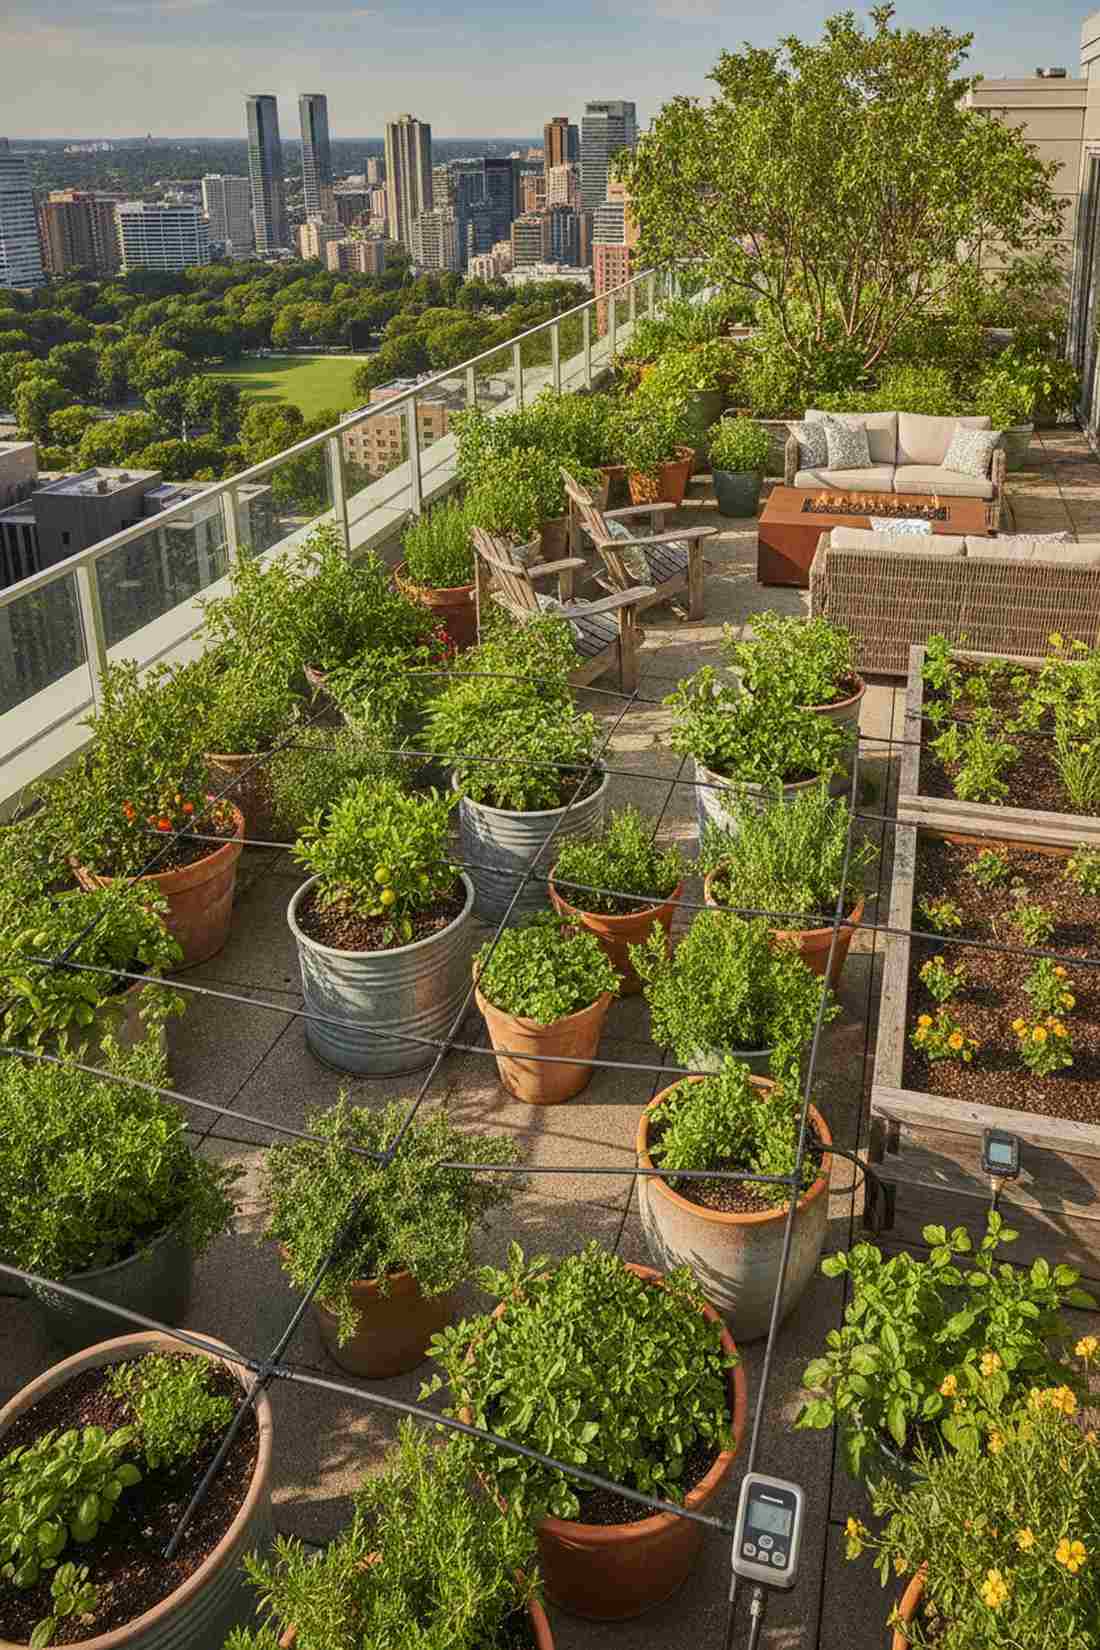
Feels like having a microscopic rainstorm on command. This automated micro-watering system is an absolute lifesaver for massive rooftop container collections.
Hand-watering 40 pots is exhausting, but this hidden tubing delivers a surprisingly premium look with zero daily effort. Setting up an automated digital water timer means your urban garden bed thrives even while you’re on vacation.
You can easily pull this off for around $35–$55. Save this for your smart-garden setup!
- Key Materials: 1/4-inch tubing, drip emitters, and a hose timer.
- Vibe / Style: Invisible tech landscape.
- Difficulty: Scissor cutting and pushing tubes.
- Budget Breakdown: Tubing Kit: $25 | Timer: $20.
- Creator’s Tip: Soak the end of the tubing in hot water for 5 seconds before pushing on the emitter—it slides on like butter.
- Smart Sourcing: comprehensive micro-drip starter kits and programmable digital hose timers.
28. Shade Sail Installations
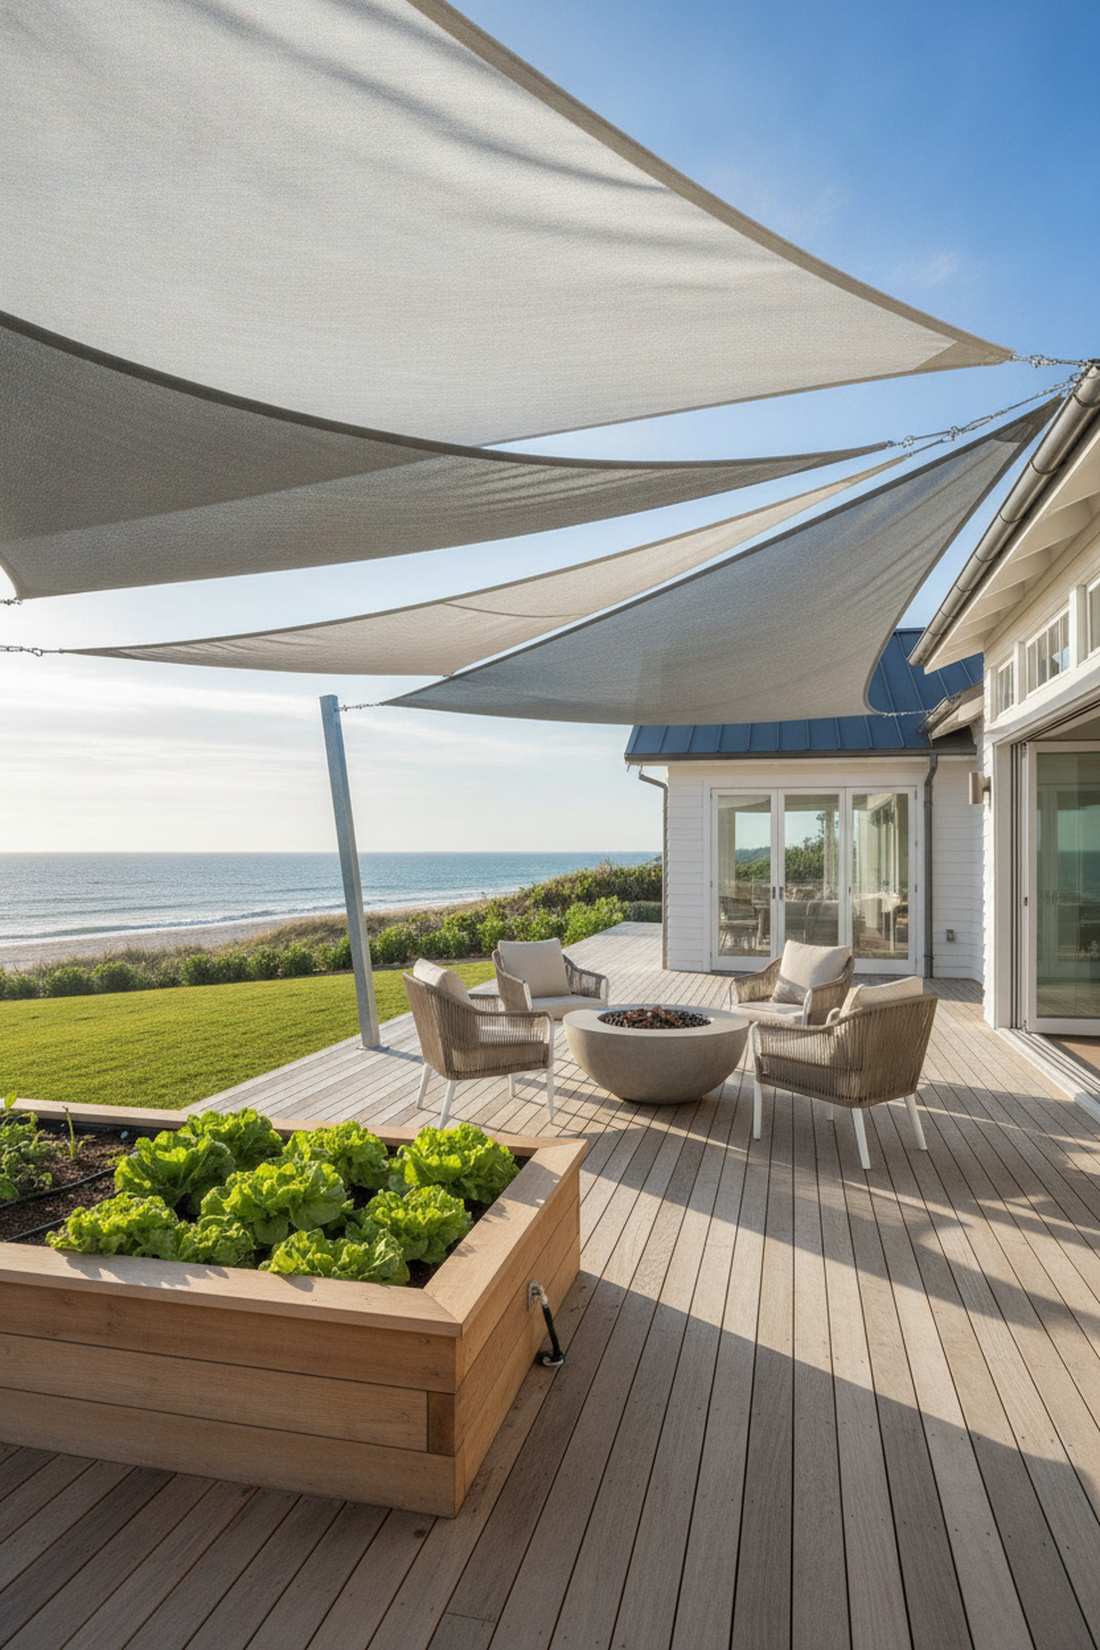
Casts a cool, geometric shadow that turns a baking roof into a lounge. A tensioned fabric canopy design is exactly what you need to protect lettuce from the harsh July sun.
Umbrellas blow over constantly, but this architectural fabric looks unexpectedly sleek and handles high winds beautifully. Anchoring UV-blocking triangular shade sails lowers the ambient temperature of your plants by 15 degrees.
You can rig a professional-looking sail for roughly $30–$50.
- Key Materials: Woven shade fabric, turnbuckles, and carabiners.
- Vibe / Style: Modern coastal retreat.
- Difficulty: Requires solid anchor points.
- Budget Breakdown: Sail: $25 | Hardware Kit: $15.
- Creator’s Tip: Always install one corner significantly lower than the others so rain runs off instead of pooling.
- Smart Sourcing: breathable UV-resistant shade sails and stainless steel tension hardware kits.
29. Green Roof Tray Systems
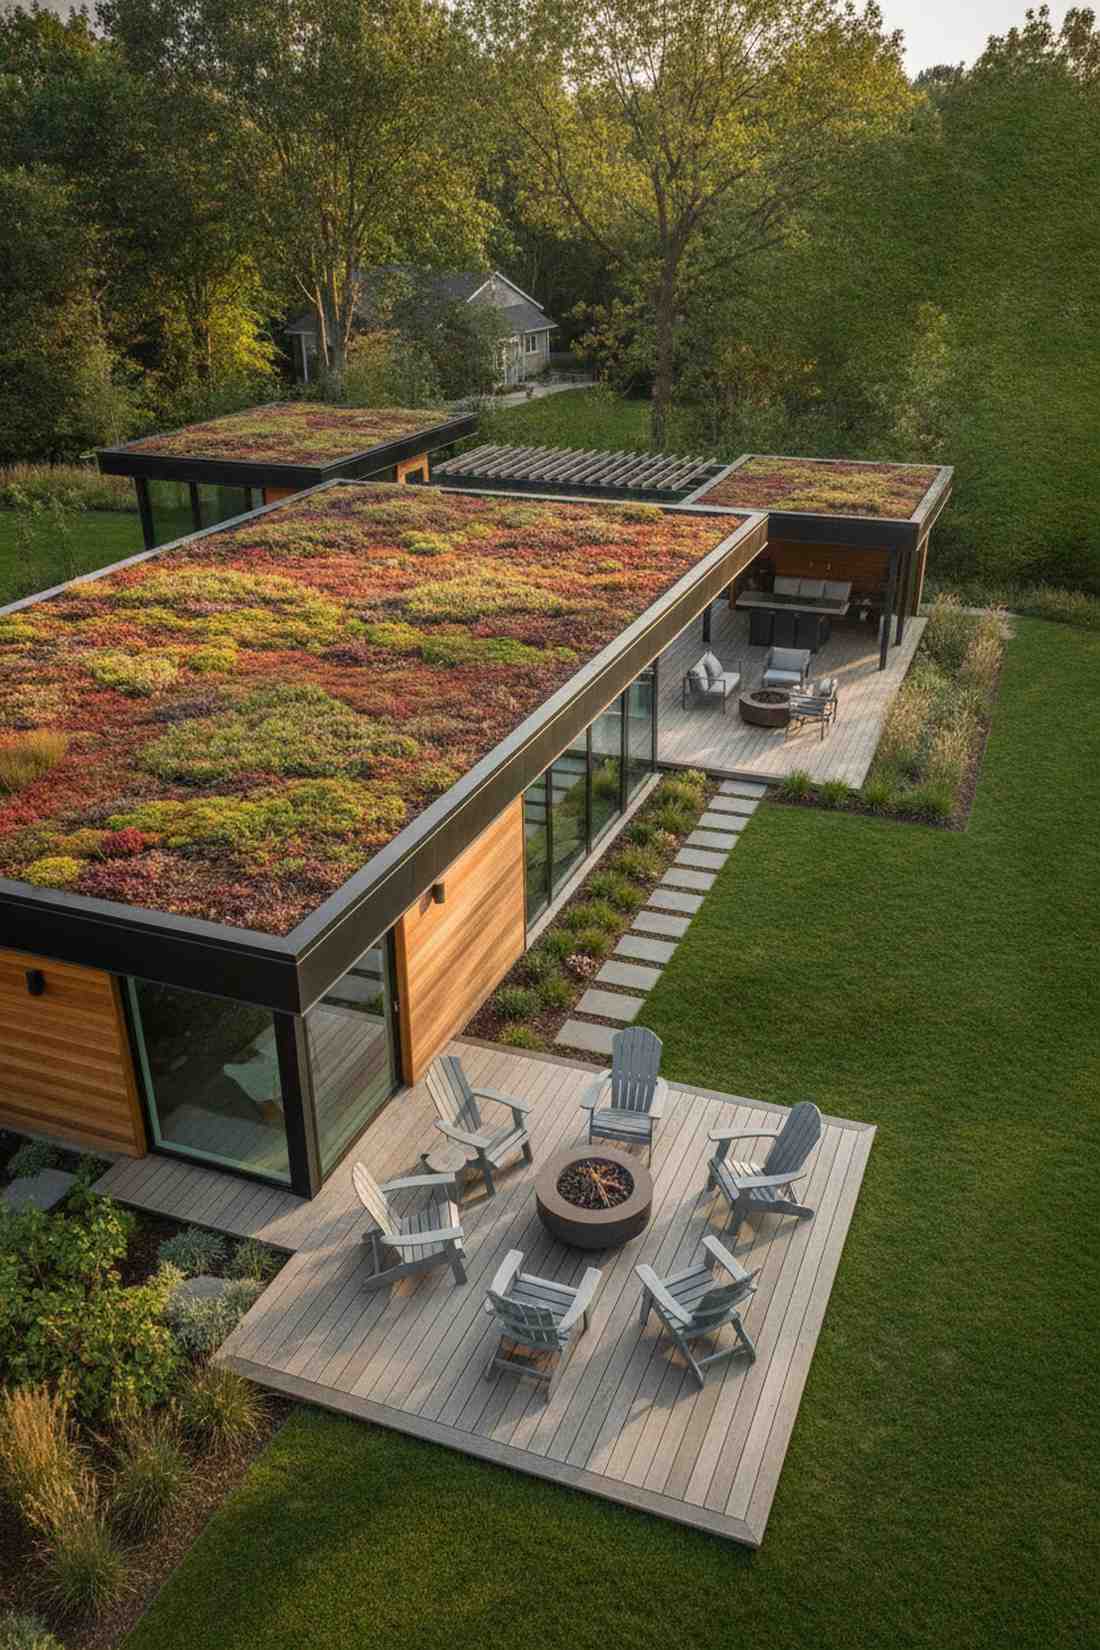
Looks like a seamless carpet of succulents rolled out over your roof. A pre-vegetated modular tray layout works exceptionally well for flat garage roofs or sturdy sheds.
Building a custom green roof is incredibly complex, but these drop-in trays give a designer-level finish in an afternoon. Purchasing interlocking sedum planter trays provides instant insulation and stormwater management.
This premium system costs about $15–$25 per square foot. Pin this to your ultimate eco-home board!
- Key Materials: Plastic grid trays and drought-tolerant sedums.
- Vibe / Style: Ultra-modern eco-architecture.
- Difficulty: Heavy lifting, simple placement.
- Budget Breakdown: Trays: $20/sq ft.
- Creator’s Tip: Always lay down a thick waterproof root-barrier membrane before placing the trays on any roof structure.
- Smart Sourcing: modular green roof starter trays and heavy-duty EPDM waterproof liners.
Most balcony gardeners complain about low yields… until they realize they forgot the most crucial flying component.
30. Rooftop Pollinator Gardens
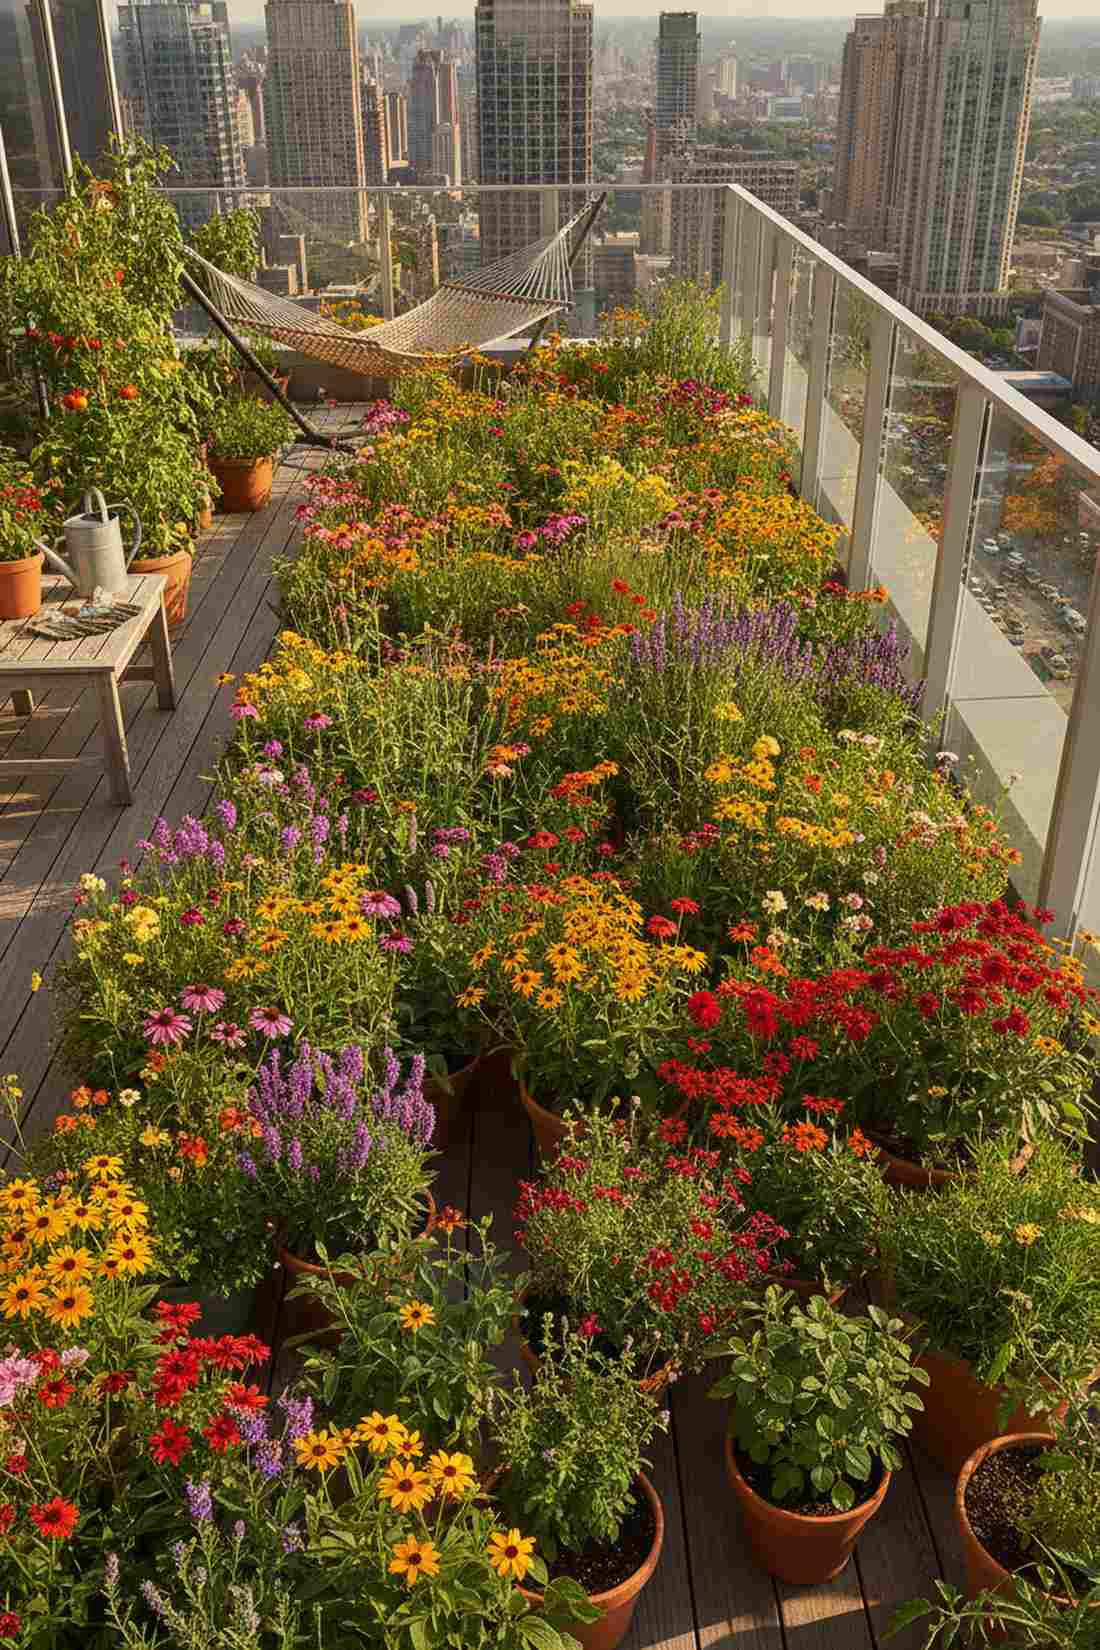
Feels like a buzzing, colorful wildlife sanctuary hovering above the traffic. A high-altitude nectar display is the absolute best strategy for getting your tomatoes to actually fruit.
People wonder why their urban flowers drop off, but adding specific native blooms looks far more expensive than it is while drawing in bees. Scattering premium wildflower seed mixes ensures your vegetables get the pollination they desperately need.
You can start a thriving pollinator patch for under $15.
- Key Materials: Native flower seeds and shallow pots.
- Vibe / Style: Wild urban meadow.
- Difficulty: Scatter and water.
- Budget Breakdown: Seeds: $10 | Pots: $5.
- Creator’s Tip: Plant bright purple and yellow flowers in clusters—bees spot large clumps of color easier from high up.
- Smart Sourcing: regional native pollinator seed blends and biodegradable starter pots.
Hydroponic & Balcony Systems for Soil-Free Growing
Water-based cultivation eliminates soil mess while accelerating growth rates and yields. Compact hydroponic systems adapt perfectly to balconies, patios, and indoor-outdoor transitions.
31. NFT Vertical Towers
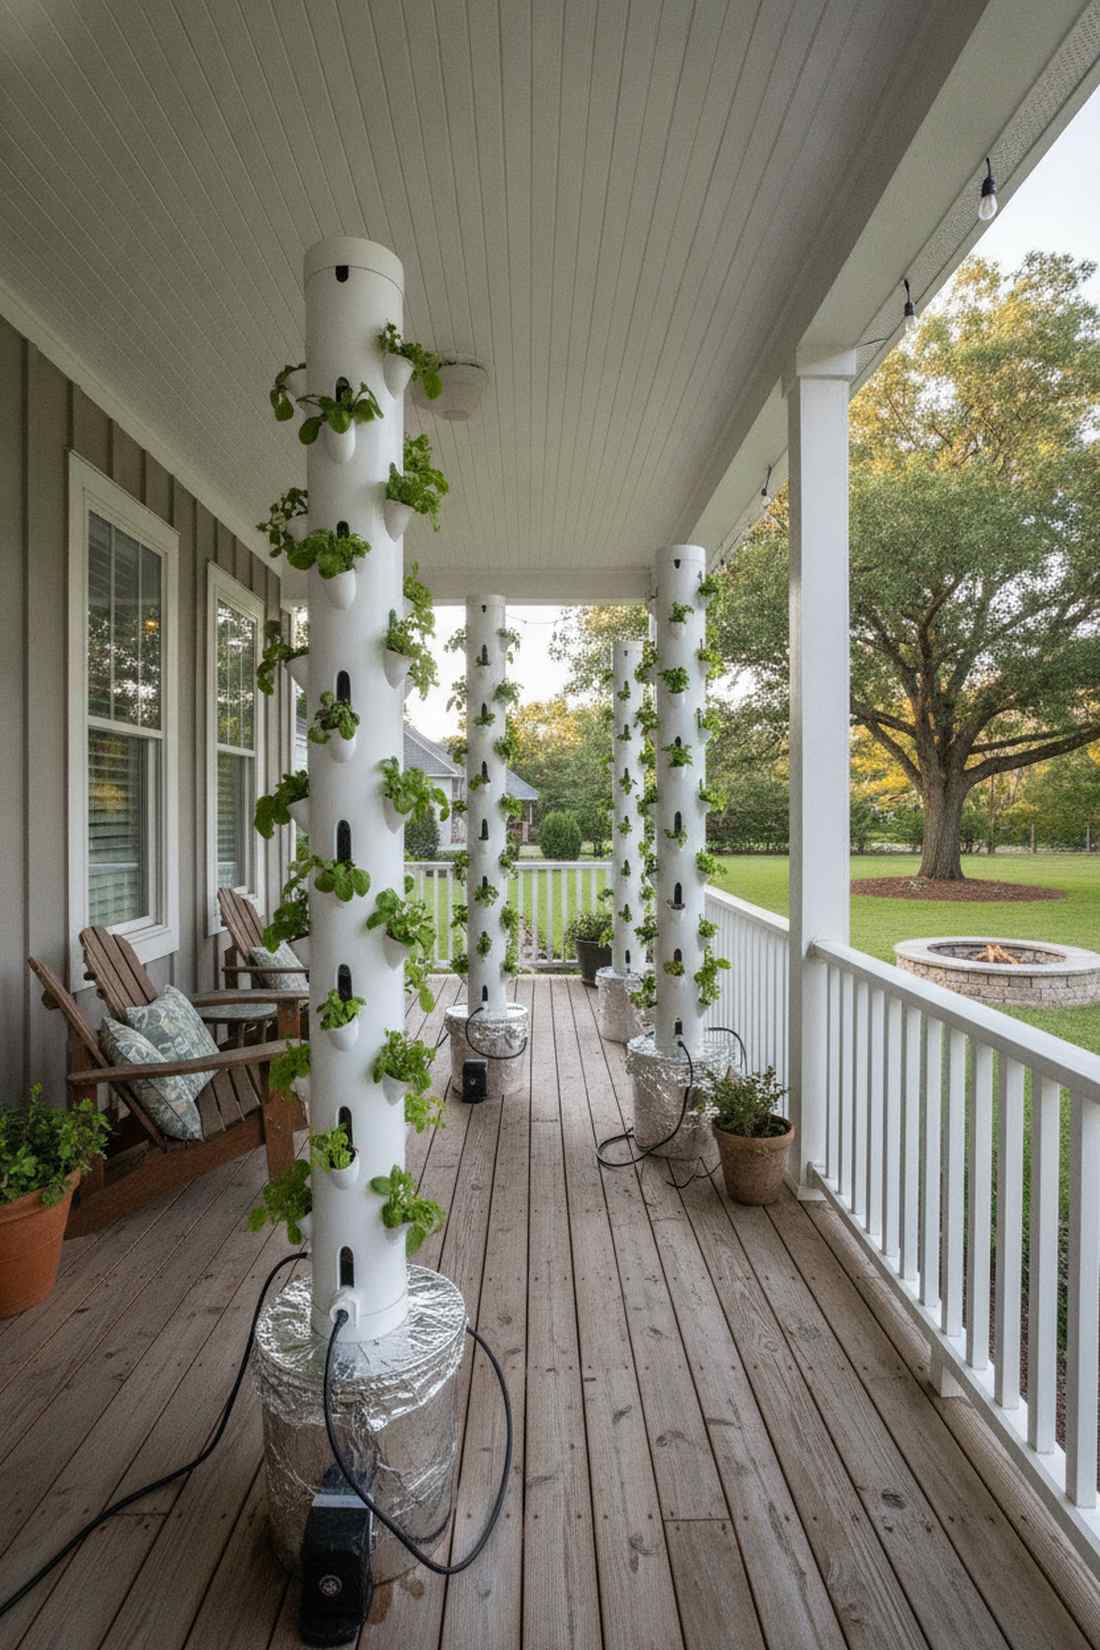
Looks like a space-station food lab right on your porch. A nutrient film pipe system is brilliant for producing massive amounts of lettuce in zero footprint.
Soil bags are messy and heavy, but this water-flow method delivers a surprisingly premium look with hyper-fast growth. Assembling pre-drilled PVC hydroponic pipes creates a continuous waterfall of nutrients to bare roots.
You can easily pull this off for around $60–$90. Pin this to your high-tech gardening board!
- Key Materials: PVC pipes, water pump, and net cups.
- Vibe / Style: Futuristic vertical farm.
- Difficulty: Requires basic plumbing.
- Budget Breakdown: Pipe Kit: $50 | Pump: $15.
- Creator’s Tip: Wrap the reservoir bucket in reflective foil to keep the nutrient water cool in summer sun.
- Smart Sourcing: complete vertical NFT hydroponic kits and submersible quiet water pumps.
32. Kratky Method Containers
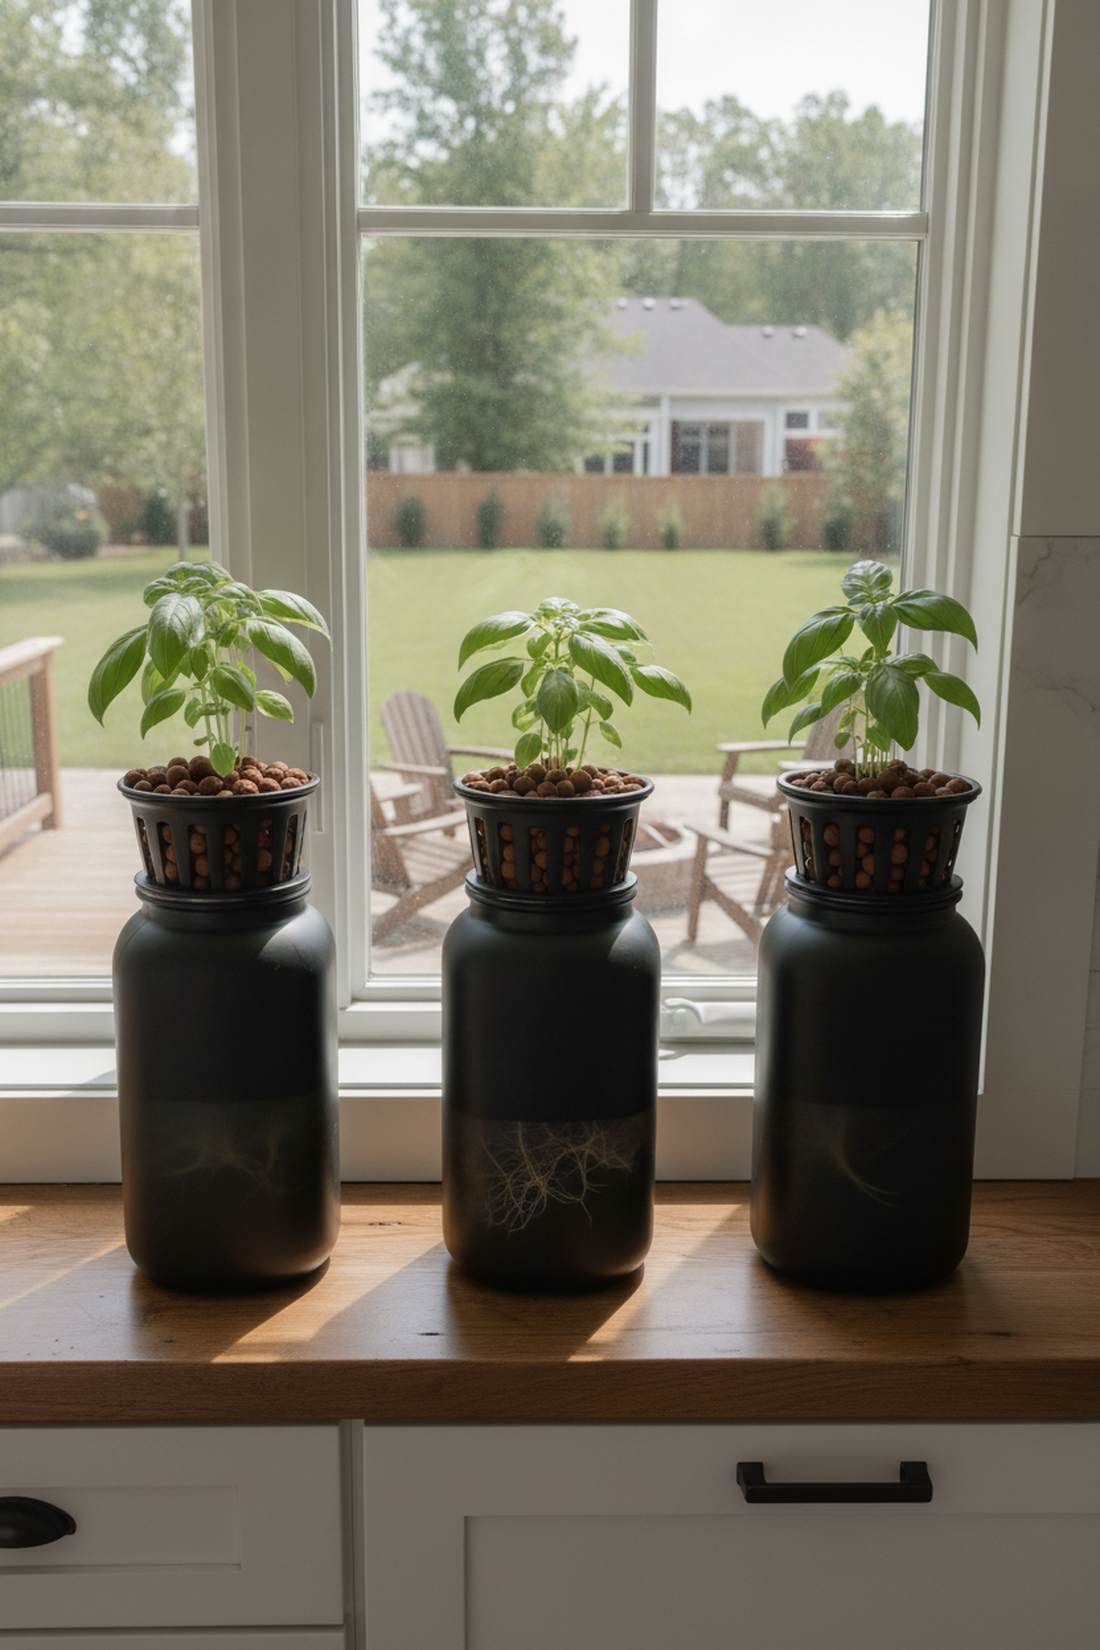
Emanates a slick, minimalist mad-scientist energy. This passive zero-power hydroponic setup works exceptionally well for growing basil on a sunny windowsill.
Pumps and timers break, but this static water technique looks unexpectedly sleek and requires zero electricity. Upgrading a mason jar with blackout sleeves and net cups prevents algae while exploding root growth.
You can set one up for literally $5. Highly recommended for complete beginners.
- Key Materials: Opaque container, net pot, and clay pebbles.
- Vibe / Style: Minimalist desktop farm.
- Difficulty: Incredibly easy.
- Budget Breakdown: Net Cups: $3 | Nutrients: $2.
- Creator’s Tip: Never refill the water all the way to the top—leave an air gap so the roots can breathe oxygen.
- Smart Sourcing: heavy-duty slotted net cups (bulk pack) and hydroponic clay pebble media.
33. Balcony Aeroponic Gardens
Feels like a high-end appliance that just happens to grow food. An automated misting root chamber is the ultimate use-case for tech-lovers who want harvestable greens in 21 days.
Standard hydroponics is great, but aeroponics gives a designer-level finish while using 90% less water. Investing in vertical aeroponic tower kits saturates roots in a nutrient fog for explosive, unmatched growth rates.
A starter tower system costs about $150–$250. Save this for your premium balcony wish list!
- Key Materials: Aeroponic tower, timer, and nutrient sprayers.
- Vibe / Style: Premium appliance garden.
- Difficulty: Plug and play.
- Budget Breakdown: Tower System: $180 | Nutrients: $20.
- Creator’s Tip: Clean the misting nozzles with vinegar every month to prevent calcium buildup blockages.
- Smart Sourcing: compact aeroponic tower systems and liquid hydroponic nutrient blends.
34. Windowsill Hydroponic Units

Looks like a glowing, chic piece of smart-home decor. This LED countertop herb layout is perfect for dark, gloomy city apartments with terrible natural light.
Winter usually kills indoor herbs, but this self-contained unit delivers a surprisingly premium look with year-round basil. Purchasing smart indoor garden kits takes the guesswork out of lighting schedules entirely.
You can grab a sleek unit for around $40–$70.
- Key Materials: Countertop unit with built-in LED halo.
- Vibe / Style: Sleek culinary tech.
- Difficulty: Zero effort.
- Budget Breakdown: Unit: $55 | Seed Pods: $10.
- Creator’s Tip: Prune your herbs aggressively right above a leaf node to force them to grow bushy instead of tall.
- Smart Sourcing: LED smart hydroponic planters and pre-seeded herb pod refill kits.
Most large plants fail in hydroponics… until you connect them using this specific bucket hack coming up.
Material Guide: Cheap vs. Premium Aesthetic
Knowing exactly where to save and where to spend makes all the difference in achieving that “looks expensive but isn’t” vibe in your urban garden bed.
- Standard Plastic vs. UV-Resistant Fabric: Cheap plastic cracks in one winter and fades ugly. Upgrading to heavy-duty fabric grow bags or composite wood stops fading and ensures multi-year durability.
- DIY Scrap Wood vs. Pre-made Kits: While scrap wood is free, pre-cut cedar starter kits often save you 6 hours of labor, look mathematically perfect, and resist rot instantly without toxic chemical treatments.
35. Balcony Dutch Bucket Systems
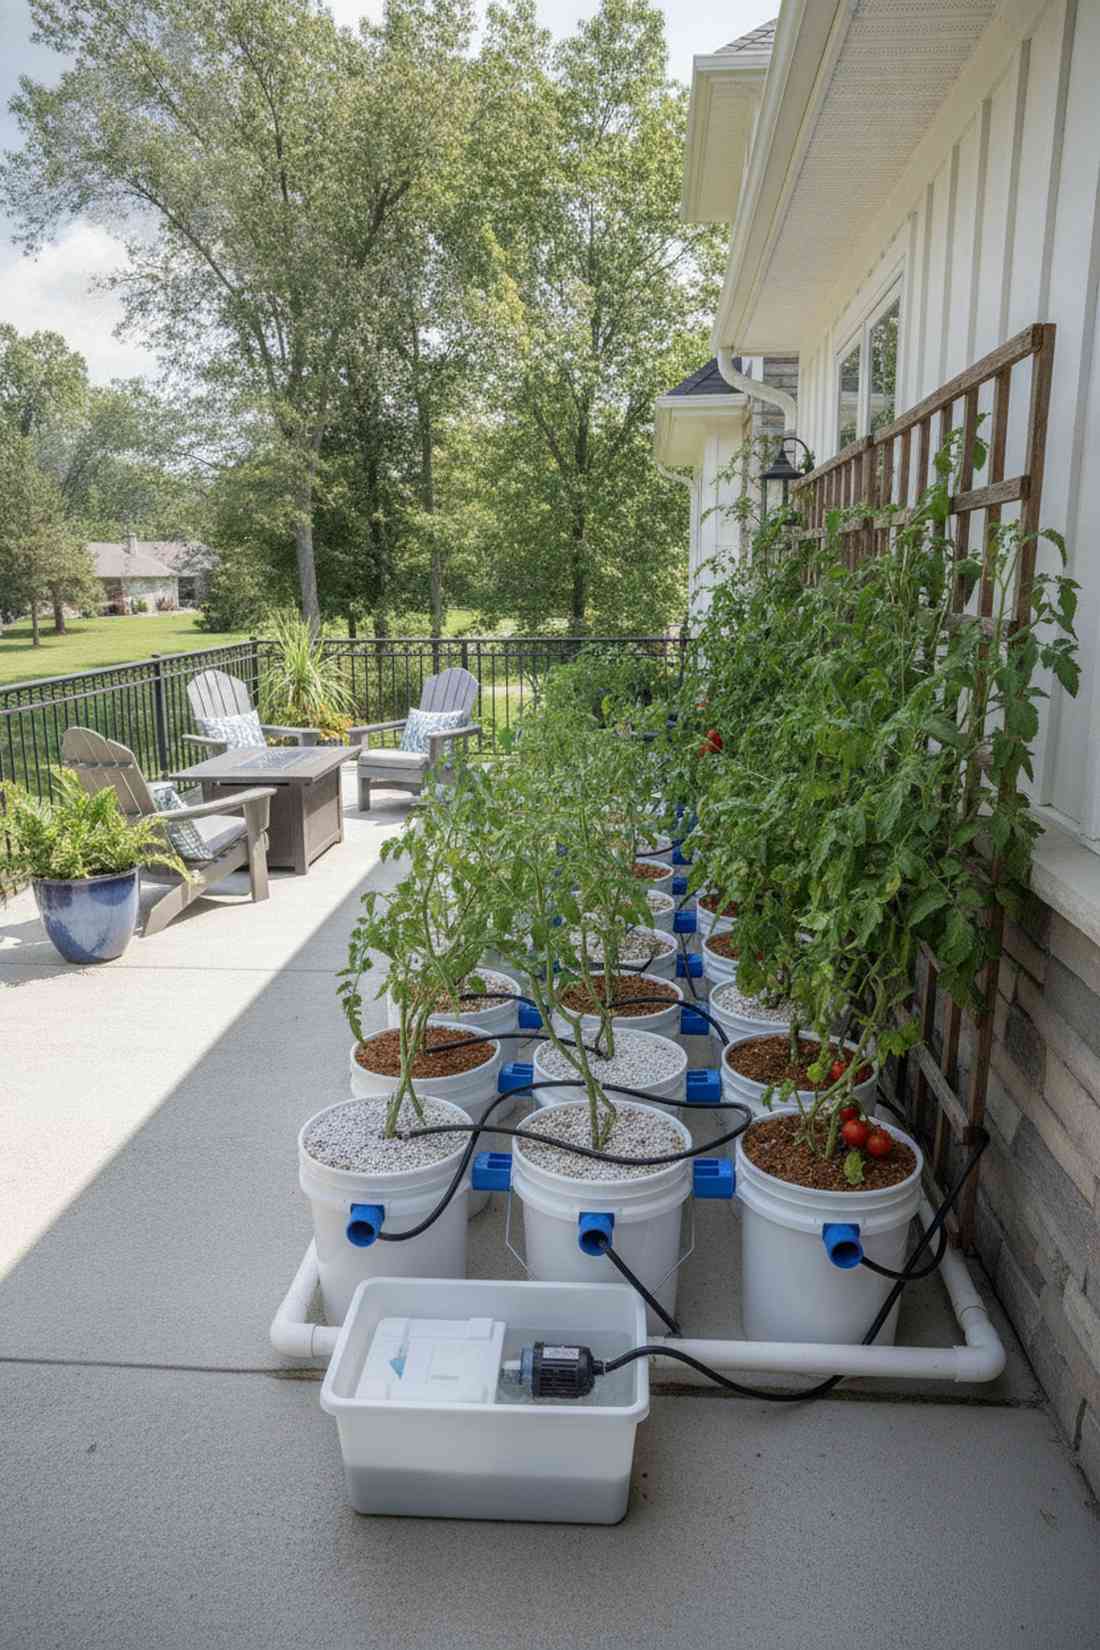
Emanates an industrial, high-yield commercial greenhouse energy. A linked reservoir bucket array is the absolute best strategy for growing massive tomato vines on a concrete slab.
Small pots stunt large fruiting plants, but this recirculating setup looks far more expensive than it is. Linking specialized drain-elbow buckets ensures deep roots get constant feeding without drowning.
You can easily pull this off for around $50–$80. Pin this to your heavy-harvest planning board!
- Key Materials: Bato buckets, perlite, and a return PVC pipe.
- Vibe / Style: Commercial vine production.
- Difficulty: Intermediate tubing setup.
- Budget Breakdown: Buckets (4-pack): $30 | Tubing/Pump: $25.
- Creator’s Tip: Use a 50/50 mix of perlite and coco coir to give the large roots something sturdy to anchor into.
- Smart Sourcing: pre-drilled Dutch bucket kits and hydroponic siphon elbows.
36. Floating Raft Systems
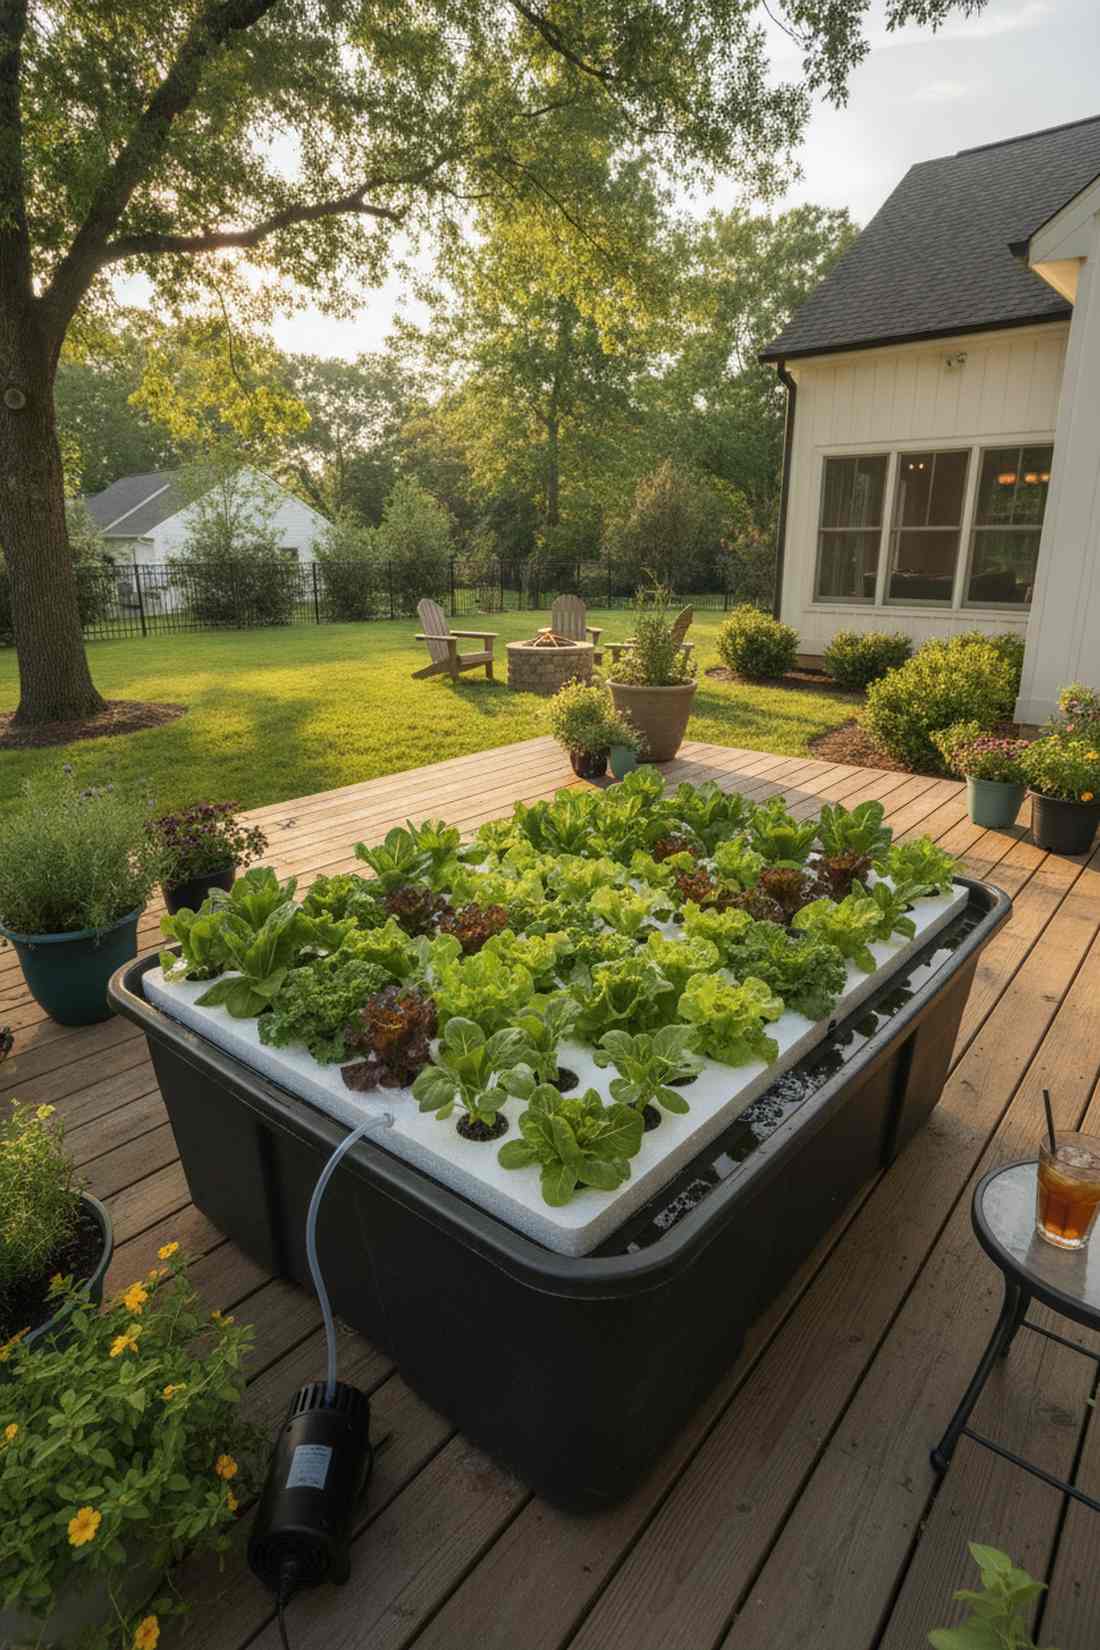
Feels like a magical floating island of crisp greens. This deep water culture configuration works exceptionally well for rapid-fire lettuce harvesting in a tight corner.
Soil gets exhausted quickly, but this foam-board technique delivers a surprisingly premium look with explosive leafy growth. Cutting holes in dense extruded polystyrene boards lets plants literally float on their food source.
Set this up in a heavy-duty tote for about $25. Highly recommended for salad lovers!
- Key Materials: Storage tote, foam board, and an air pump.
- Vibe / Style: Innovative raft gardening.
- Difficulty: Easy cutting and drilling.
- Budget Breakdown: Tote: $10 | Air Pump: $10 | Foam: $5.
- Creator’s Tip: Paint the outside of your clear plastic totes black to completely block sunlight and prevent green algae soup.
- Smart Sourcing: dual-outlet aquarium air pumps and heavy-duty opaque mixing tubs.
Edible Landscaping Techniques That Merge Beauty and Function
Ornamental arrangements featuring productive plants create visually stunning spaces that yield harvests. Strategic species selection provides year-round interest while meeting nutritional needs.
37. Rainbow Chard Borders
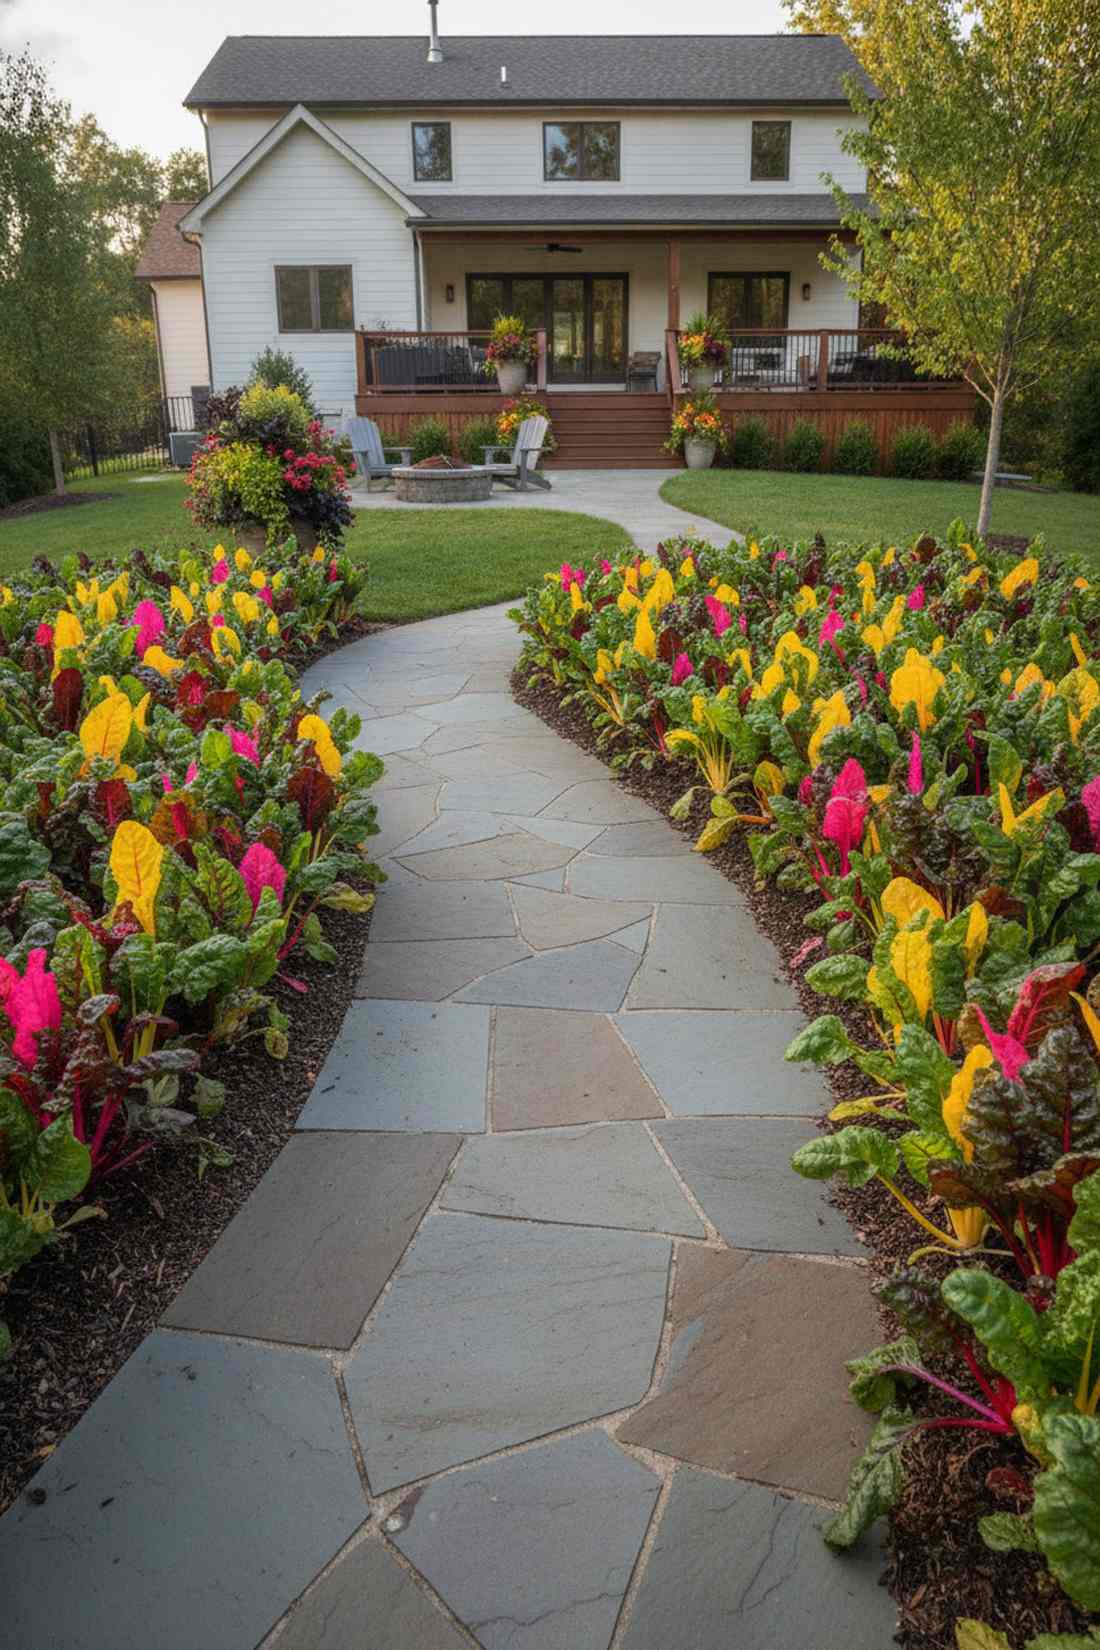
Looks like a neon-colored architectural border lining your walkway. A vibrant edible perimeter design is perfect for injecting bright colors into dull urban garden raised beds.
Standard green hedges are boring, but these glowing stems give a designer-level finish while feeding your family. Planting heirloom bright lights chard seeds provides sculptural foliage that withstands light frosts beautifully.
You can easily pull this off for around $5 in seeds. Save this for a dual-purpose landscaping idea!
- Key Materials: Swiss chard seeds and rich compost.
- Vibe / Style: Ornamental edible chic.
- Difficulty: Just plant and water.
- Budget Breakdown: Seeds: $5.
- Creator’s Tip: Harvest only the outer leaves so the center continues pushing up new neon stalks all season.
- Smart Sourcing: rainbow chard heirloom seed packets and organic leaf-growth fertilizers.
38. Blueberry Hedge Screens
Feels like a lush, fruiting privacy wall shielding you from the neighbors. A multi-bush barrier layout is the perfect use-case for softening harsh metal fencing.
Arborvitae trees do nothing but sit there, whereas this edible hedge looks far more expensive than it is. Utilizing compact fruiting blueberry varieties gives you spring flowers, summer berries, and fiery autumn red leaves.
Planting a solid 10-foot hedge costs roughly $80–$120.
- Key Materials: 3-4 blueberry bushes and acidic soil.
- Vibe / Style: Productive privacy screen.
- Difficulty: Digging and soil prep.
- Budget Breakdown: Bushes: $75 | Acidifier: $15.
- Creator’s Tip: You must plant at least two different varieties of blueberries close together to ensure heavy cross-pollination.
- Smart Sourcing: soil acidifier granules (bulk pack) and bird-proof protective netting.
39. Artichoke Focal Points
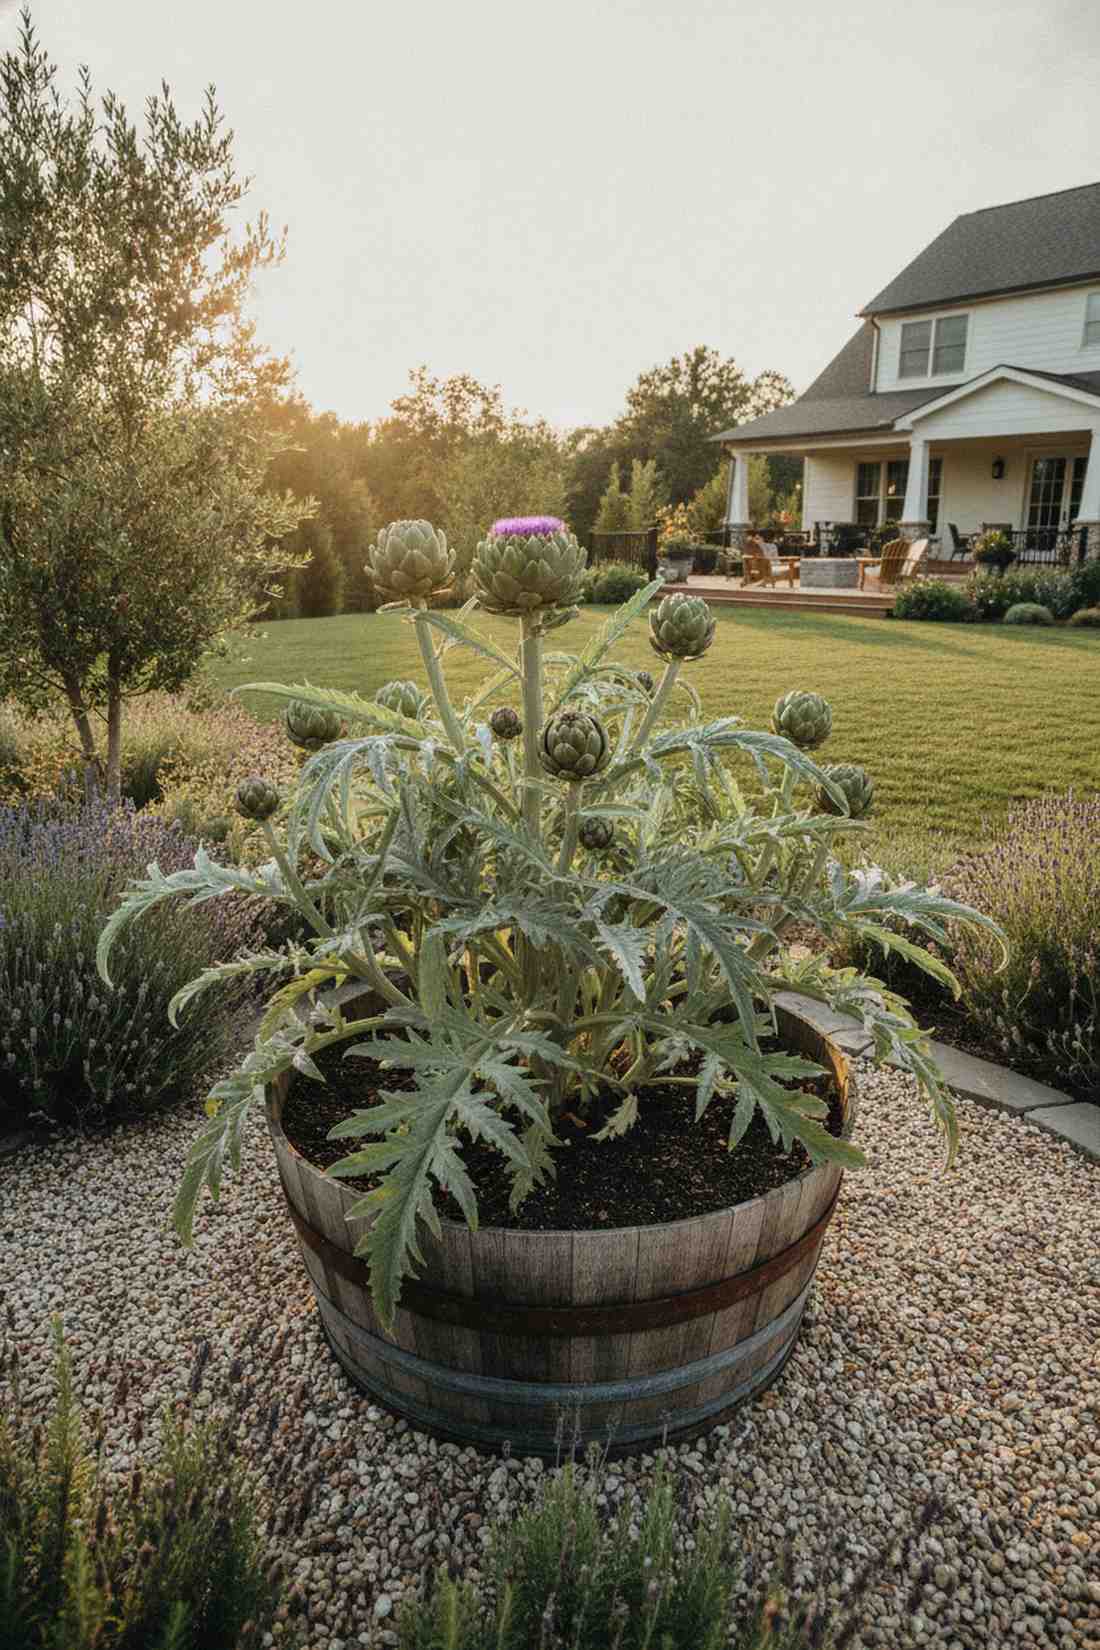
Radiates a dramatic, prehistoric architectural energy in the center of the yard. An oversized silver foliage display works exceptionally well as a massive statement piece in a half-barrel.
Most centerpieces are expensive statues, but this living sculpture delivers a surprisingly premium look for a fraction of the cost. Positioning globe artichoke crowns creates a striking focal point that eventually yields gourmet food or massive purple blooms.
You can establish this showstopper for around $15–$25. Pin this to your exotic gardening board!
- Key Materials: Artichoke crowns and deep, well-draining soil.
- Vibe / Style: Mediterranean architectural.
- Difficulty: Needs heavy feeding.
- Budget Breakdown: Crowns/Seeds: $10 | Fertilizer: $10.
- Creator’s Tip: If you let just one artichoke open, it turns into a stunning, massive electric-purple thistle flower.
- Smart Sourcing: globe artichoke starter roots and high-nitrogen organic plant food.
Most edible gardens look chaotic and messy… until you apply this strict geometric trick.
40. Flowering Herb Knot Gardens
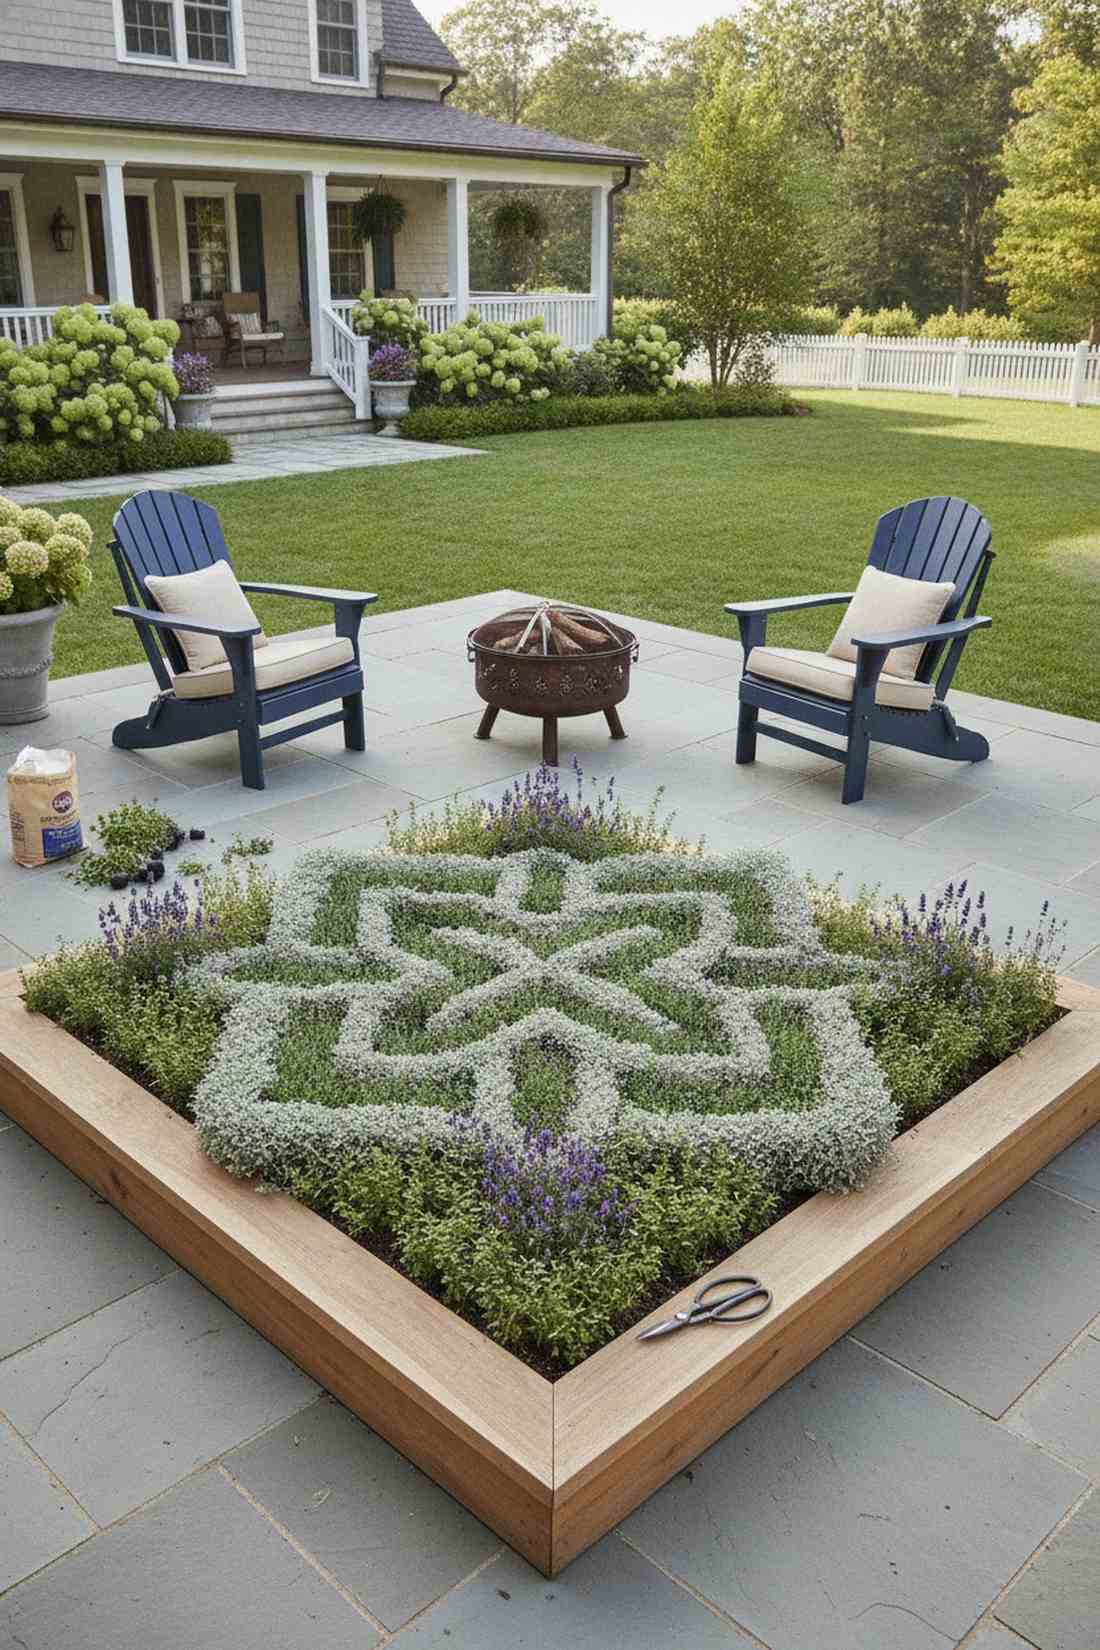
Feels like a miniature royal palace courtyard scaled down for a patio. A geometric interwoven herb layout is brilliant for creating formal structure in a tiny square footprint.
Wild herb pots look messy, but this tightly trimmed pattern gives a designer-level finish. Trimming contrasting silver and green herbs into overlapping shapes makes your space look impeccably manicured.
You can easily pull this off for around $40 in small starter herbs.
- Key Materials: Thyme, lavender, santolina, and detail shears.
- Vibe / Style: Formal English estate.
- Difficulty: Requires meticulous trimming.
- Budget Breakdown: Starter Herbs: $30 | Shears: $15.
- Creator’s Tip: Draw the pattern in the dirt with flour before you plant to ensure your lines are perfectly symmetrical.
- Smart Sourcing: precision botanical pruning shears and bulk live herb starter plugs.
41. Strawberry Groundcover Carpets
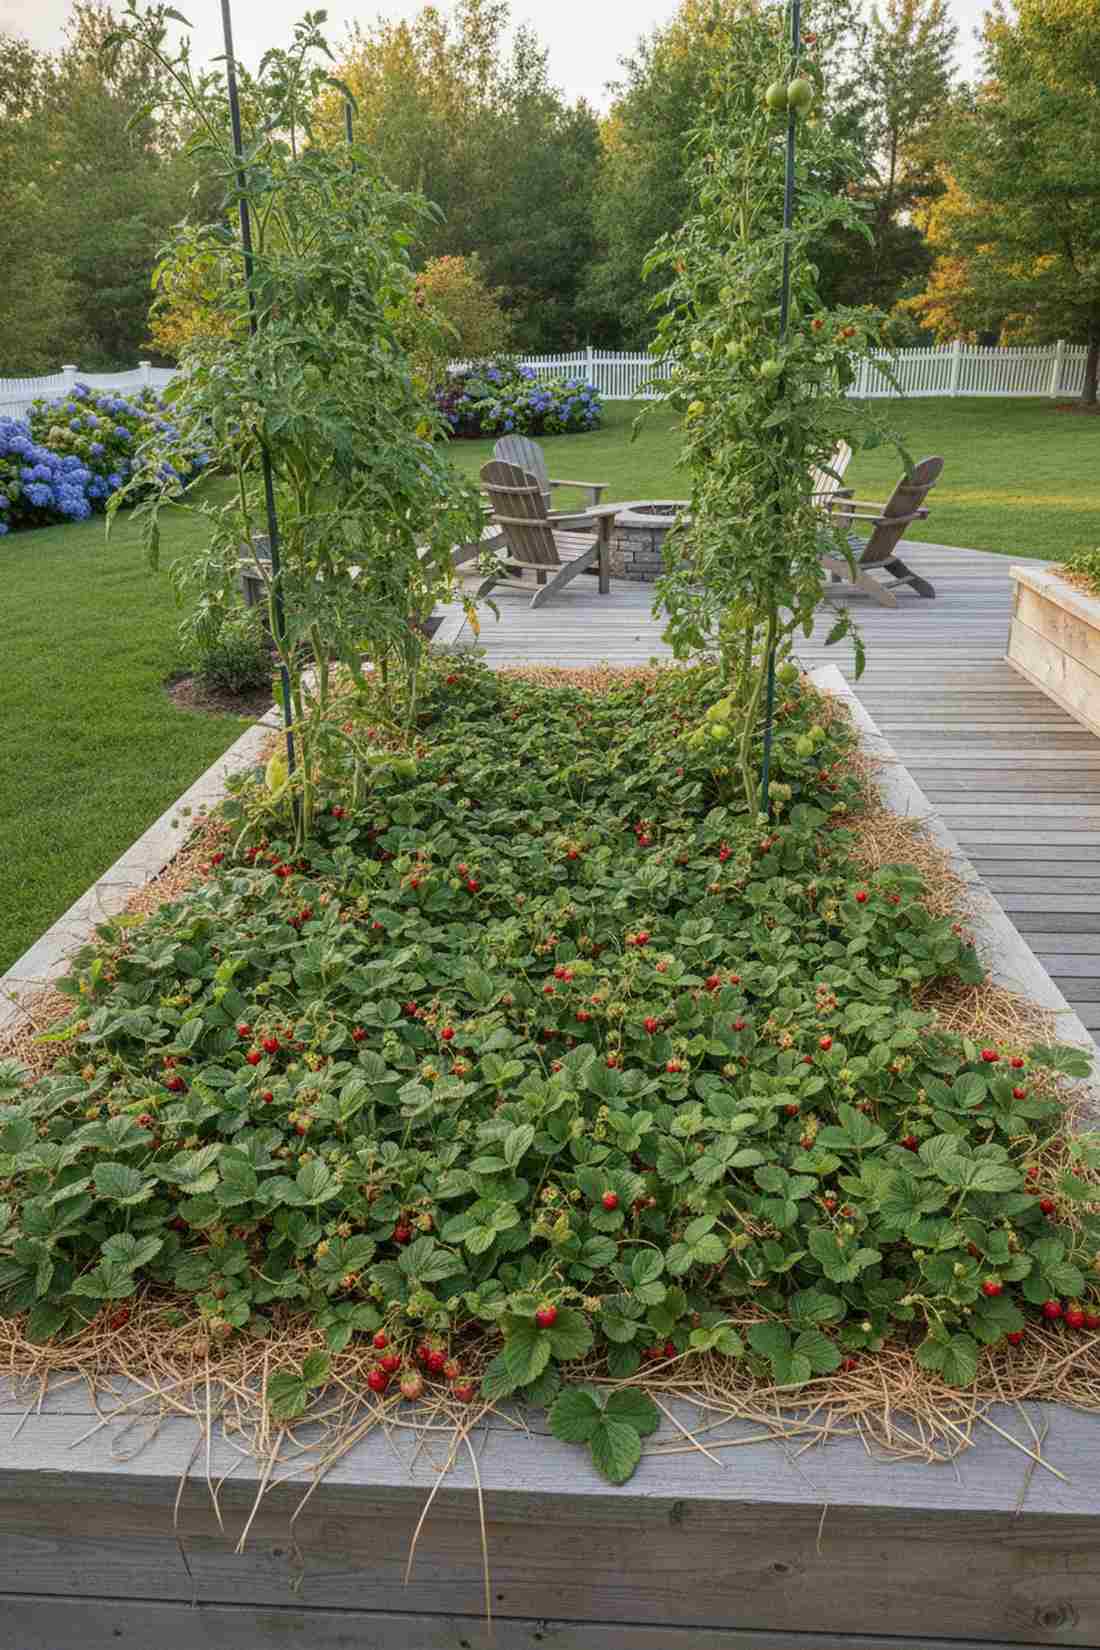
Looks like a lush green rug dotted with red jewels. A creeping fruiting base layer is the absolute best strategy for hiding ugly bare dirt beneath taller tomato plants.
Wood mulch is boring, but this living mulch looks unexpectedly sleek while suppressing weeds. Planting day-neutral alpine strawberries creates a dense, edible mat that produces sweet treats all summer.
Covering a large bed costs about $20. Save this for your companion planting masterplan!
- Key Materials: Strawberry bare roots and rich topsoil.
- Vibe / Style: Enchanted forest floor.
- Difficulty: Very easy spreading.
- Budget Breakdown: Bare Roots (20-pack): $18.
- Creator’s Tip: Tuck straw directly under the ripening berries to keep them from rotting against the wet soil.
- Smart Sourcing: everbearing strawberry bare roots and natural garden straw mulch.
42. Dwarf Fruit Tree Groves
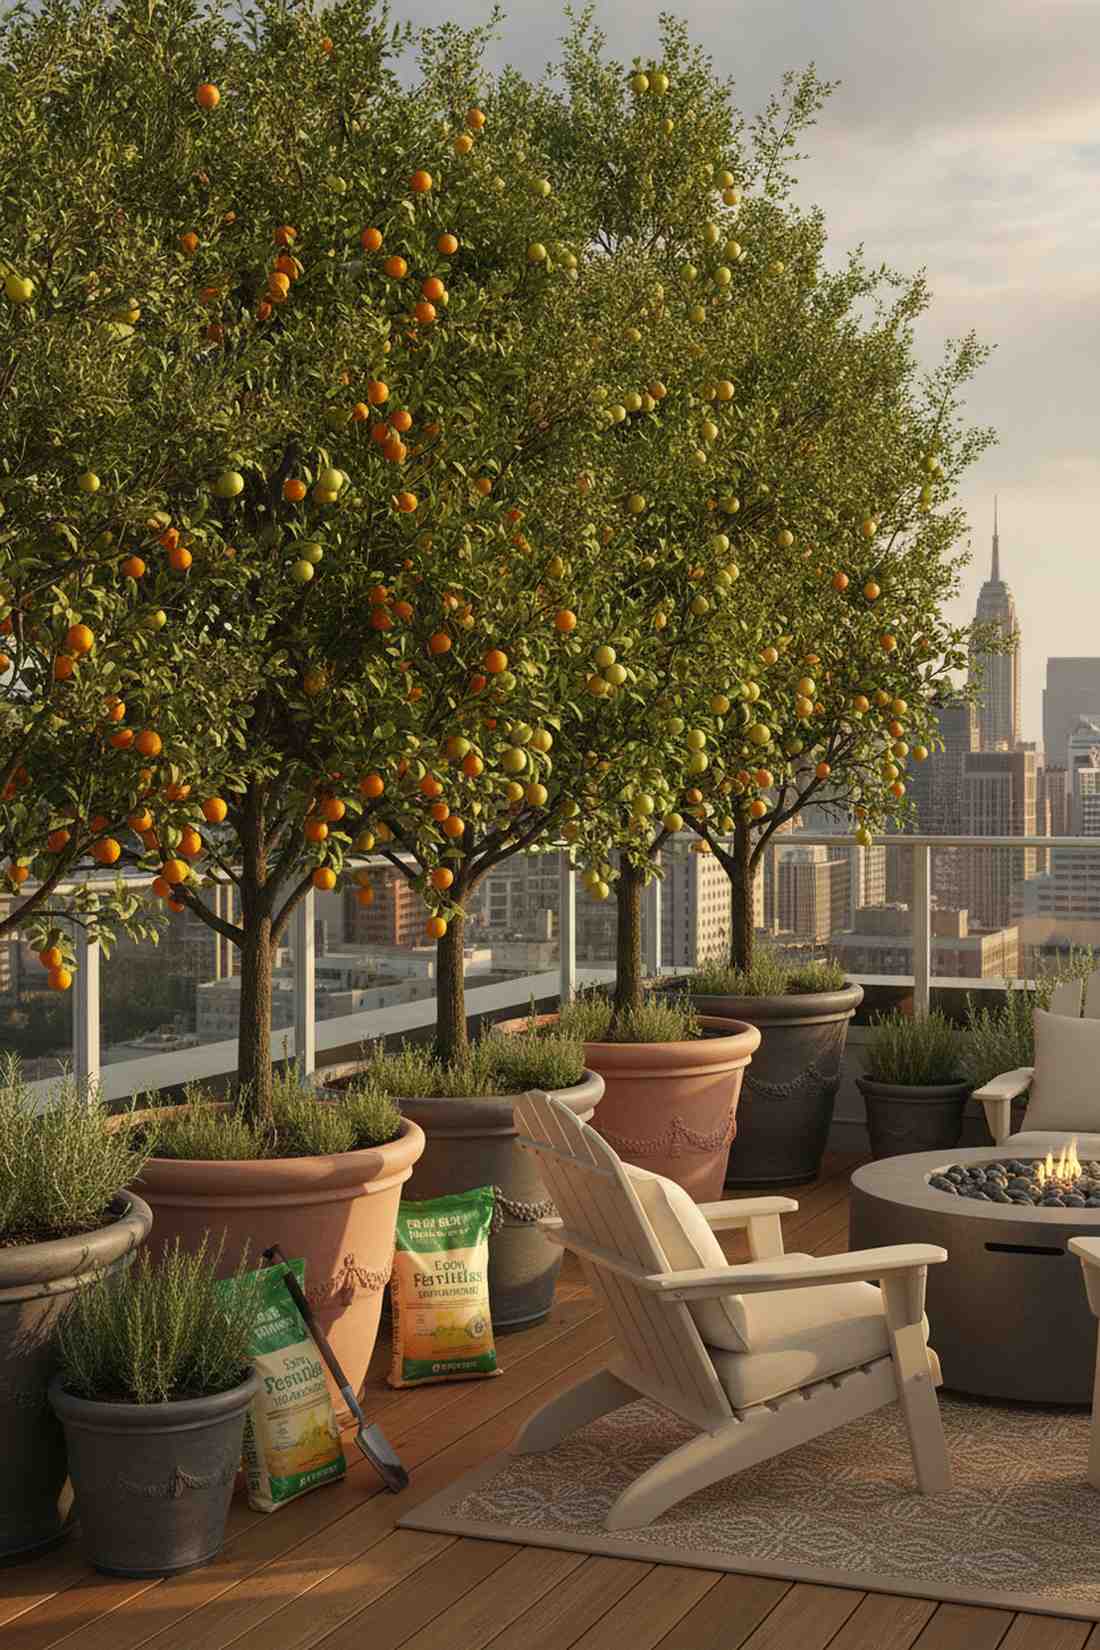
Emanates the magical feeling of a hidden urban orchard. A high-density container tree cluster works exceptionally well for transforming a barren rooftop into a shaded retreat.
Standard trees outgrow pots fast, but genetic dwarfs look far more expensive than they are while staying under 6 feet tall. Clustering self-pollinating dwarf citrus or apple trees maximizes cross-pollination and visual impact in minimal square footage.
Expect to invest $100–$150 for a multi-tree setup. Highly recommended for long-term value.
- Key Materials: Large heavy pots and grafted dwarf trees.
- Vibe / Style: Miniature fruiting forest.
- Difficulty: Requires deep watering habits.
- Budget Breakdown: Trees (2): $80 | Pots: $40.
- Creator’s Tip: Prune the centers of the trees open to let wind pass through, preventing them from blowing over in storms.
- Smart Sourcing: heavy-duty resin tree planters and slow-release fruit tree fertilizer spikes.
43. Edible Flower Mixtures
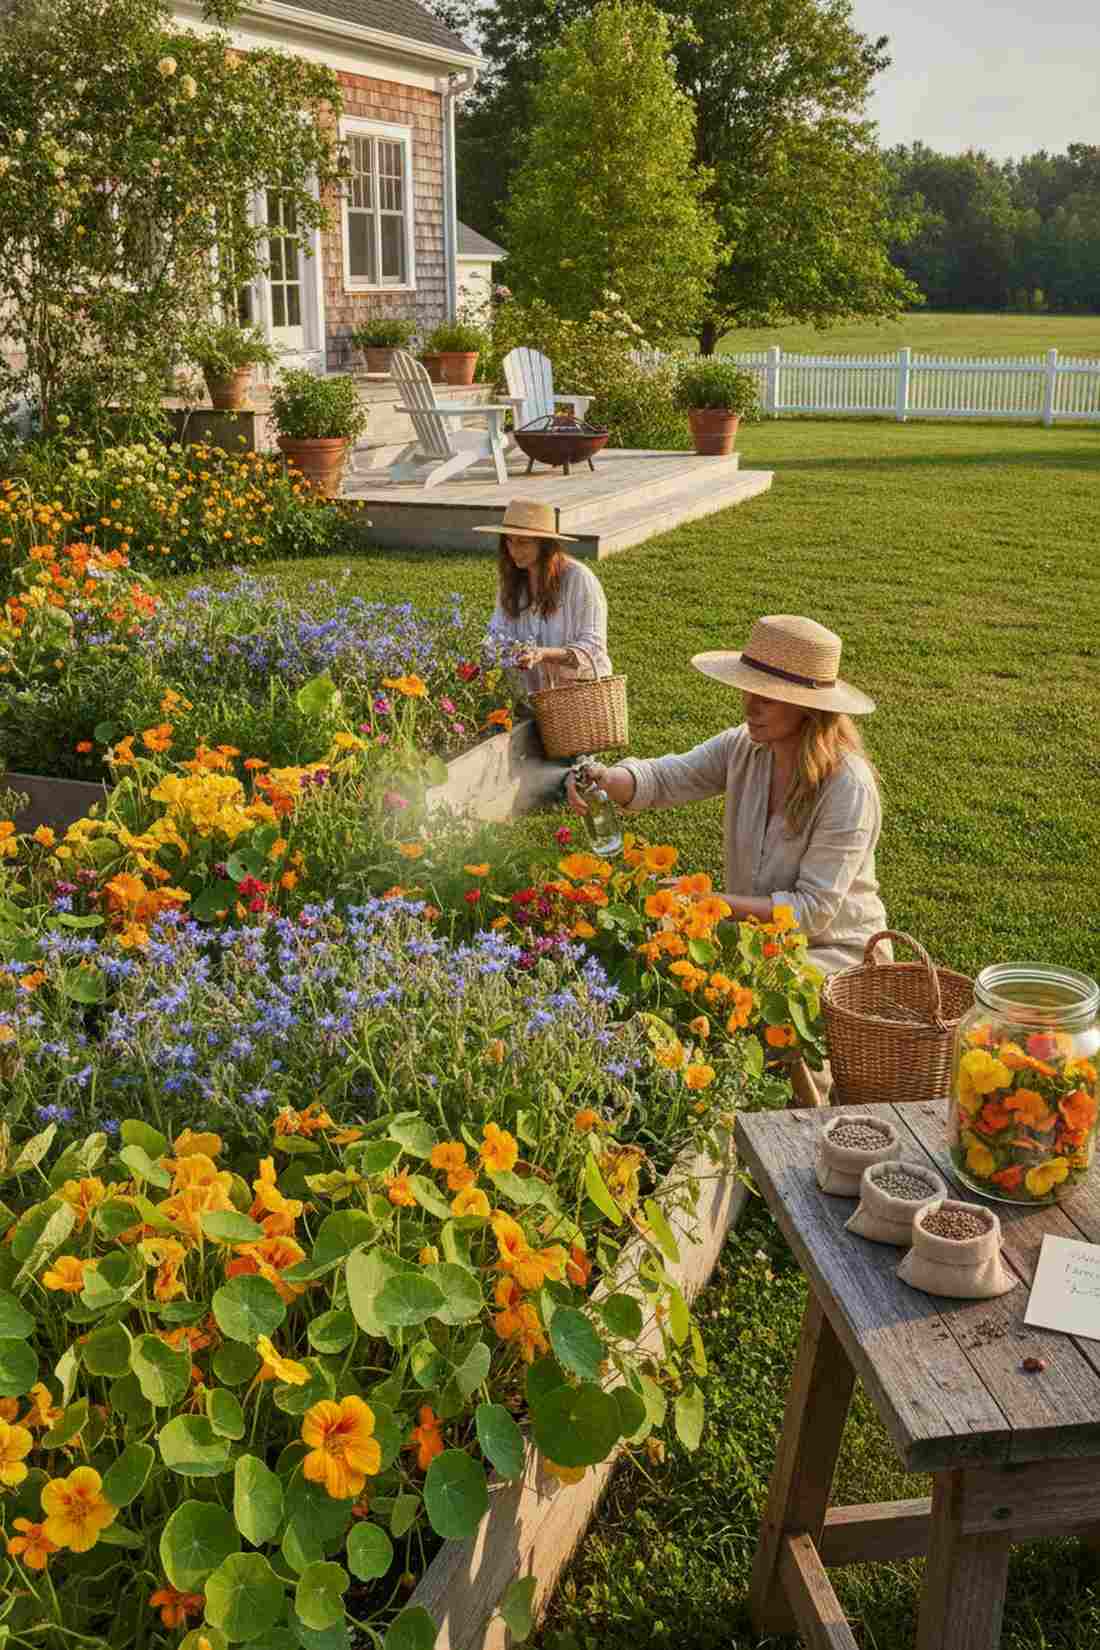
Feels like throwing a vibrant confetti party in your garden beds. A culinary floral companion setup is perfect for adding a pop of gourmet color to green salads.
Basic marigolds are fine, but edible nasturtiums deliver a surprisingly premium look with a peppery bite. Broadcasting gourmet edible flower seed blends draws in crucial ladybugs while making your dinner plates look Michelin-starred.
You can easily pull this off for around $8. Pin this to your gourmet kitchen garden board!
- Key Materials: Nasturtium, borage, and calendula seeds.
- Vibe / Style: Colorful gourmet cottage.
- Difficulty: Scatter and forget.
- Budget Breakdown: Seed Mix: $8.
- Creator’s Tip: Pick the flowers in the early morning when they are fully hydrated, before the afternoon sun wilts them.
- Smart Sourcing: organic edible flower seed collections and fine-mist trigger sprayers.
Space Maximization Methods for Intensive Production
Strategic techniques multiply yields from limited square footage through succession planting, interplanting, and microgreens. These methods require planning but dramatically increase productivity per area.
44. Succession Planting Schedules
Looks like a perfectly synchronized conveyor belt of fresh produce. A staggered timing planting approach is the absolute best use-case for avoiding the feast-or-famine harvest cycle.
Planting everything at once leaves you with rotting veggies, but this phased method gives a designer-level finish to your harvest baskets all season. Utilizing a waterproof garden planner journal ensures you drop new seeds every two weeks like clockwork.
This costs zero extra dollars—just smarter timing.
- Key Materials: Seed packets and a calendar.
- Vibe / Style: Professional market efficiency.
- Difficulty: Requires strict organization.
- Budget Breakdown: Seeds: $10 | Planner: $15.
- Creator’s Tip: When you harvest a row of radishes, immediately push a little compost in the hole and drop a new seed.
- Smart Sourcing: waterproof outdoor garden journals and multi-pack fast-maturing seeds.
Most people waste 50% of their dirt on empty pathways… until they discover this grid technique.
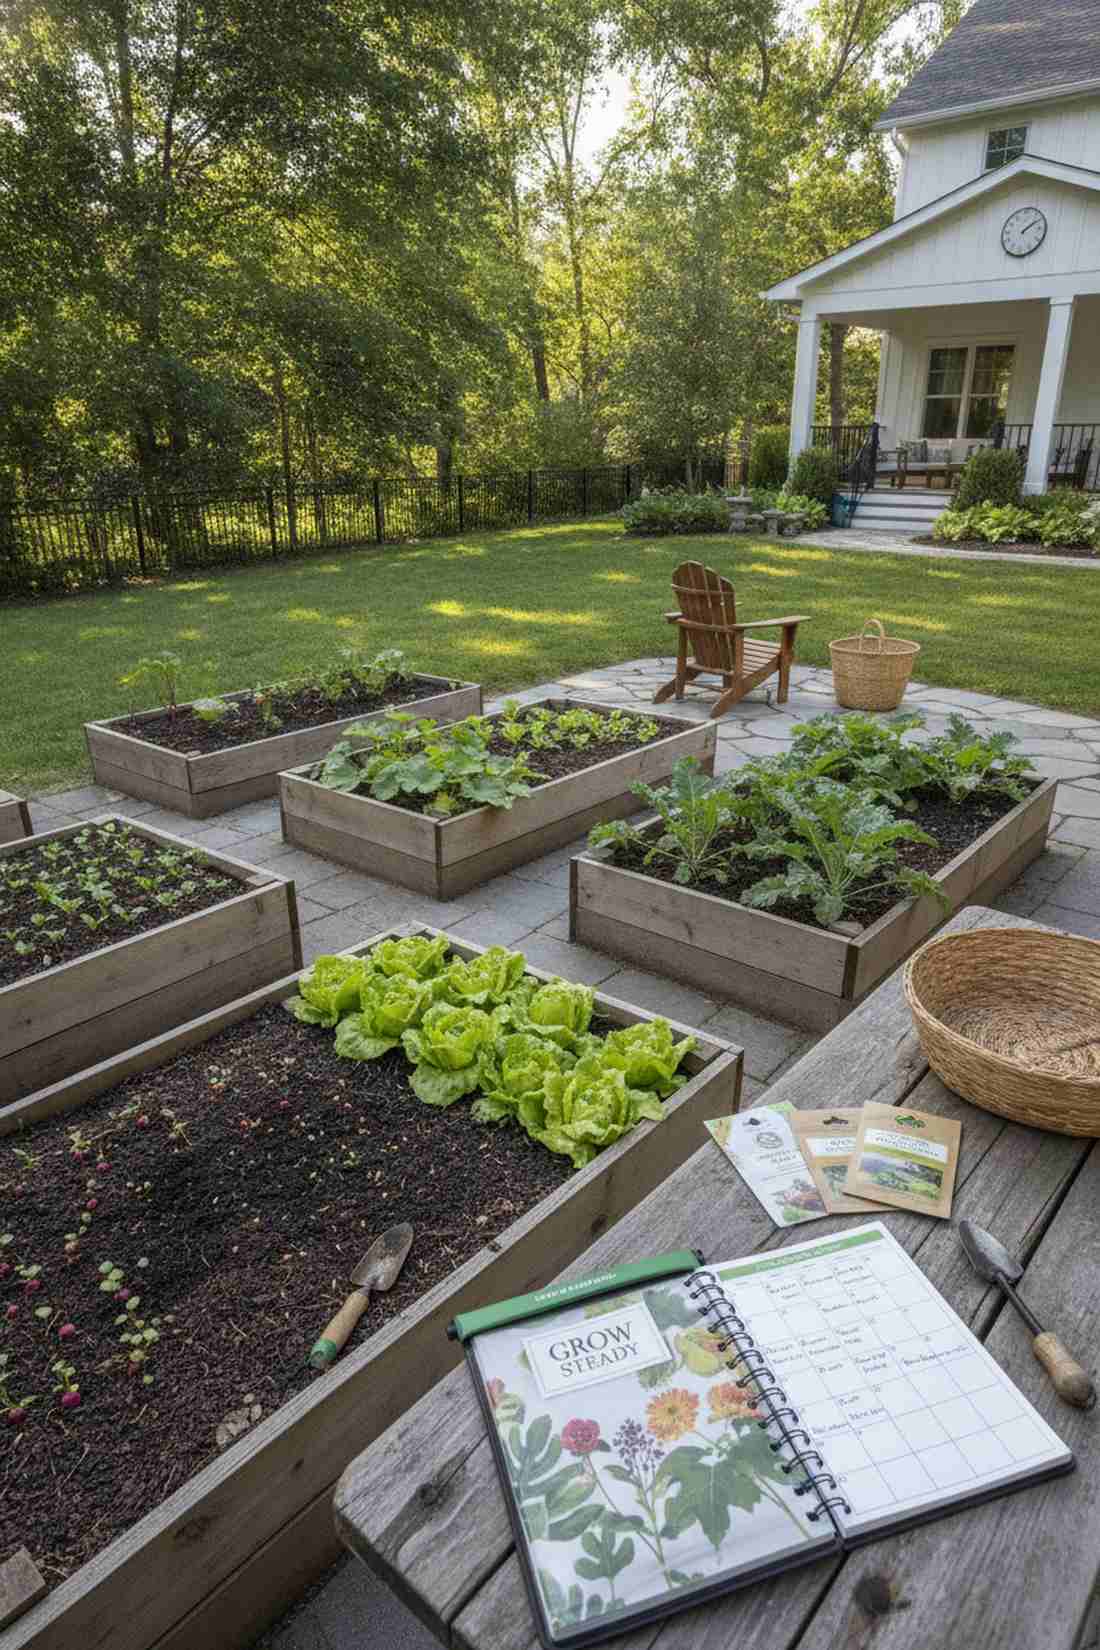
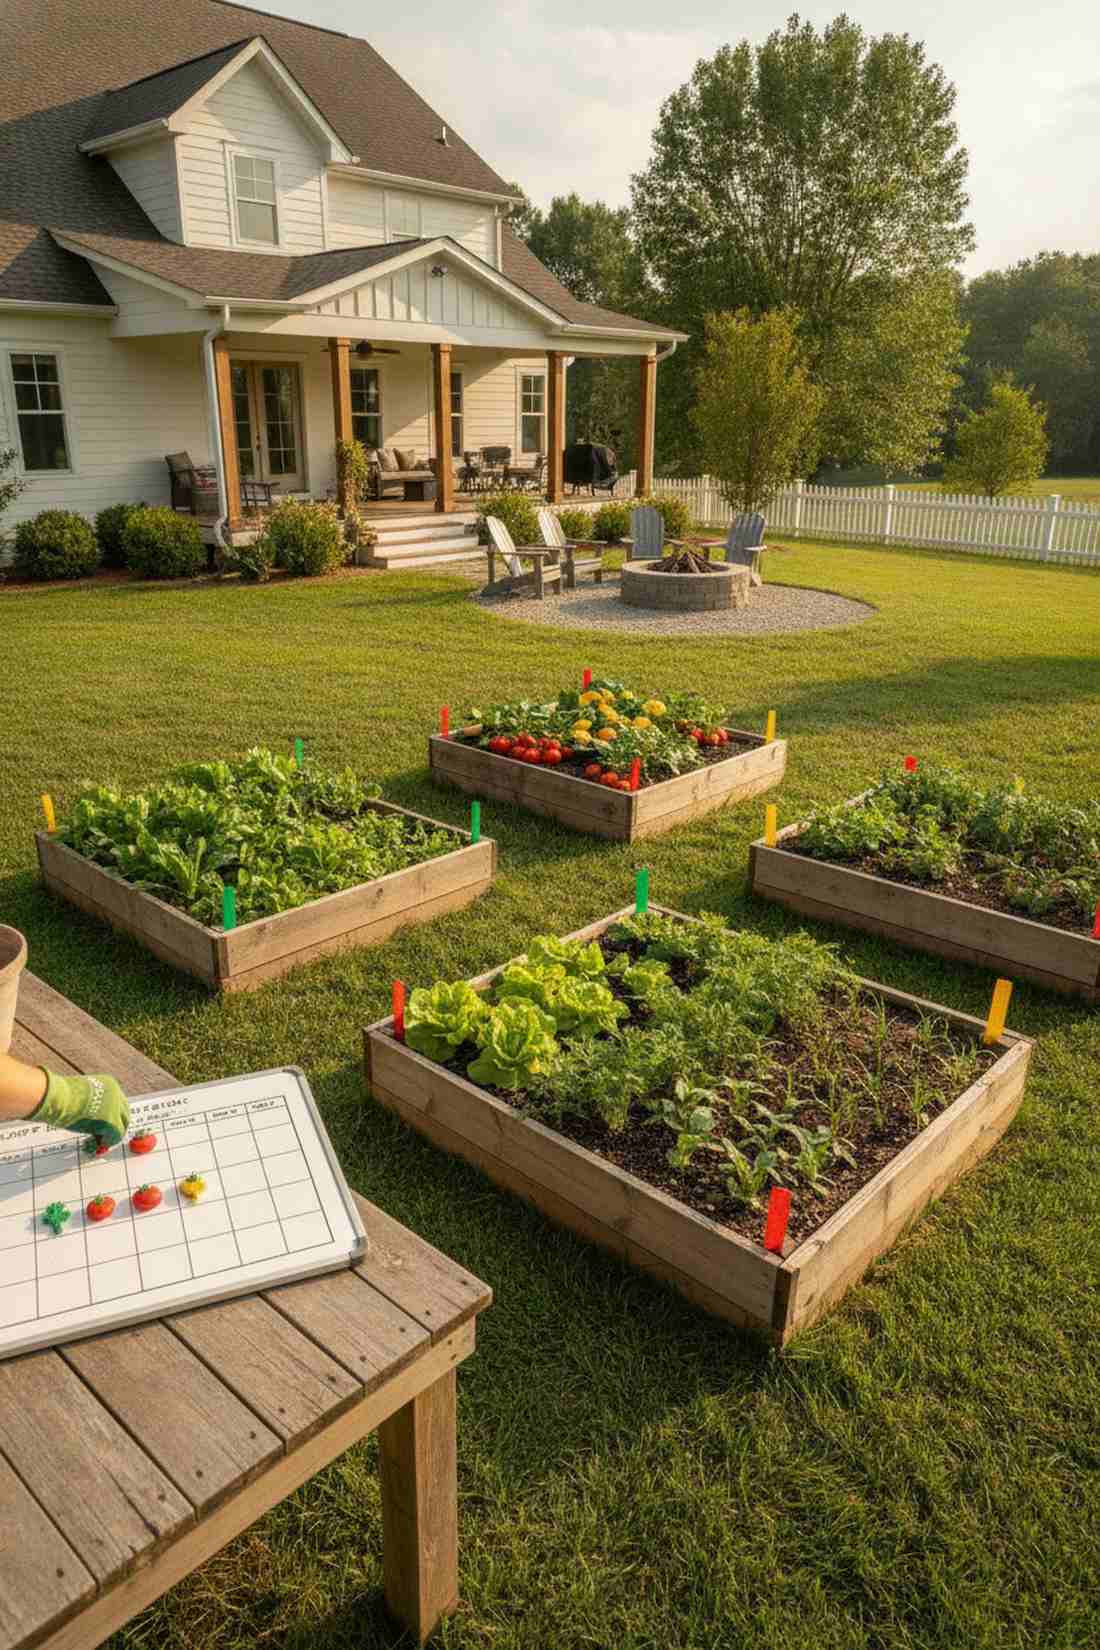
45. Intensive Square Foot Gardening
Projects a highly organized, satisfyingly geometric aesthetic. A grid-based high-density layout works exceptionally well for maximizing small 4×4 raised beds.
Traditional long rows waste precious soil, but this blocked approach looks unexpectedly sleek and quintuples your yield. Snapping down pre-measured planting grid overlays eliminates spacing guesswork completely.
You can easily pull this off for around $15–$25. Save this for your ultimate yield-boosting board!
- Key Materials: String or wood strips for the grid, and varied seeds.
- Vibe / Style: Mathematical botanical grid.
- Difficulty: Easy visual planning.
- Budget Breakdown: Grid Material: $10 | Seeds: $10.
- Creator’s Tip: Put the tallest plants in the northernmost squares so they don’t cast shadows on your shorter crops.
- Smart Sourcing: flexible square-foot planting templates and premium blended composts.
46. Microgreens Production Trays
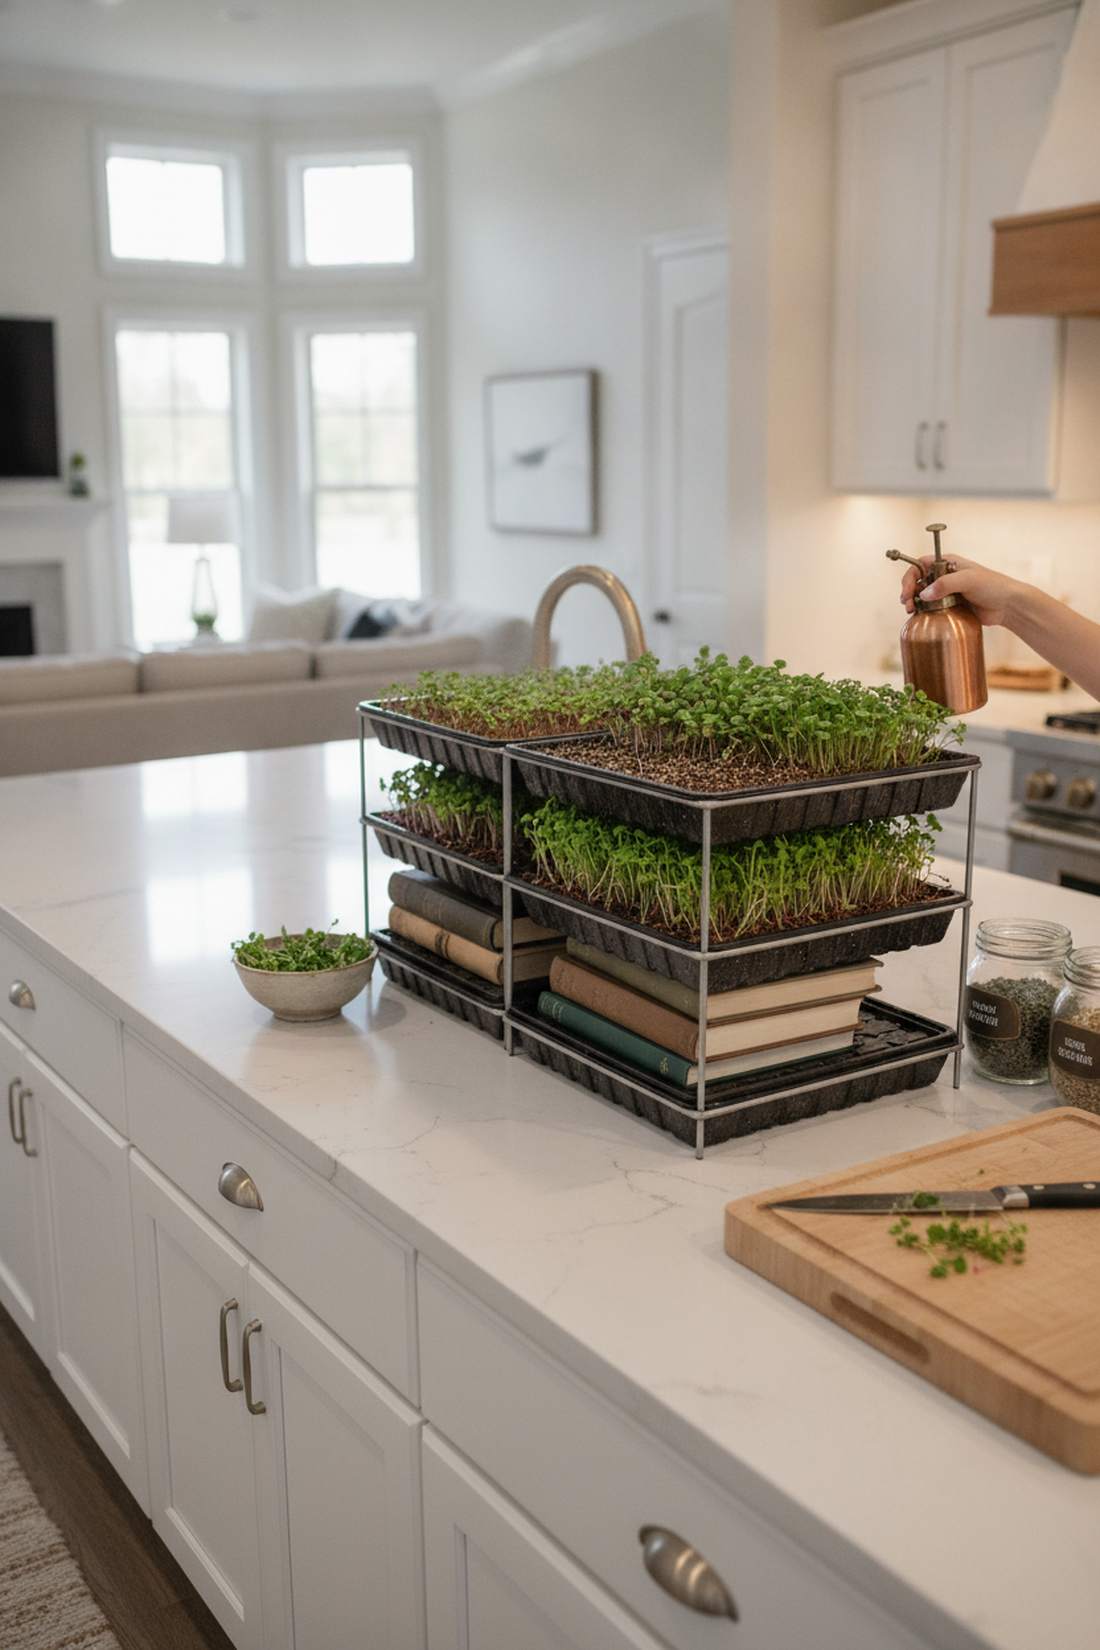
Feels like having a high-end superfood factory on your kitchen counter. A dense shallow-tray propagation setup is brilliant for getting nutrient-packed greens in just 10 days.
Waiting months for broccoli is tough, but this micro-scale technique delivers a surprisingly premium look and instant gratification. Stocking up on heavy-duty 10×20 planting trays allows you to rotate crops continuously indoors.
A starter setup costs about $25. Highly recommended for impatient gardeners.
- Key Materials: Shallow trays, coco coir, and bulk seeds.
- Vibe / Style: Commercial culinary prep.
- Difficulty: Mist daily and watch.
- Budget Breakdown: Trays (5-pack): $15 | Bulk Seed: $10.
- Creator’s Tip: Stack an empty tray with a heavy book on top of your planted seeds for 3 days to force strong, thick stems.
- Smart Sourcing: extra-thick 10×20 growing trays without holes and bulk organic microgreen seeds.
47. Interplanting Combinations
Looks like a beautifully chaotic, thriving jungle puzzle. A mixed maturity-rate planting layout is the perfect use-case for squeezing fast radishes next to slow tomatoes.
Bare soil between seedlings is wasted space, but this layered approach looks far more expensive than it is while suppressing weeds naturally. Utilizing companion planting shade charts ensures the fast crops finish right before the big plants need the room.
You can execute this strategy with the seeds you already have. Pin this to your advanced gardening board!
- Key Materials: Mixed fast and slow-growing seeds.
- Vibe / Style: Dense permaculture weave.
- Difficulty: Requires spatial awareness.
- Budget Breakdown: Mixed Seeds: $15.
- Creator’s Tip: Plant lettuce directly under your pepper plants; the pepper leaves provide perfect shade during the hot afternoon.
- Smart Sourcing: companion planting guide wheels and fast-germinating radish seed packs.
48. Cut-and-Come-Again Harvesting
Emanates the feeling of an endless, self-replenishing salad bowl. A selective leaf-pruning technique works exceptionally well for keeping leafy greens producing for months.
Ripping out the whole head of lettuce ends the party, but this gentle harvesting method delivers a surprisingly premium look with 300% more yield. Using precision micro-snips allows you to clip outer leaves without damaging the fragile growing center.
This technique costs nothing but careful hands. It’s a fast upgrade that completely changes the vibe of your harvest.
- Key Materials: Sharp scissors and loose-leaf greens.
- Vibe / Style: Continuous culinary supply.
- Difficulty: Gentle snipping required.
- Budget Breakdown: Snips: $10.
- Creator’s Tip: Never cut more than 30% of the plant’s leaves at one time, or it won’t have enough energy to regrow.
- Smart Sourcing: stainless steel precision pruning snips and loose-leaf mesclun seed mixes.
49. Undersowing Living Mulches

Looks like a soft, emerald-green blanket tucked around your tall crops. A nitrogen-fixing groundcover design is an absolute must for urban garden raised beds that dry out too quickly.
Exposed dirt invites weeds, but this creeping clover setup gives a designer-level finish while feeding the soil. Broadcasting dwarf white clover seeds locks in moisture and looks infinitely better than dry straw.
You can easily pull this off for around $10. Save this for your soil-health checklist!
- Key Materials: Low-growing cover crop seeds.
- Vibe / Style: Lush verdant carpet.
- Difficulty: Scatter after main plants grow tall.
- Budget Breakdown: Clover Seed: $10.
- Creator’s Tip: Only sow the mulch seeds after your main crops are at least 6 inches tall, so they don’t get smothered.
- Smart Sourcing: bulk white Dutch clover seeds and organic soil inoculants.
If you think your balcony is full, this vertical layering trick will prove you have 3x more space…
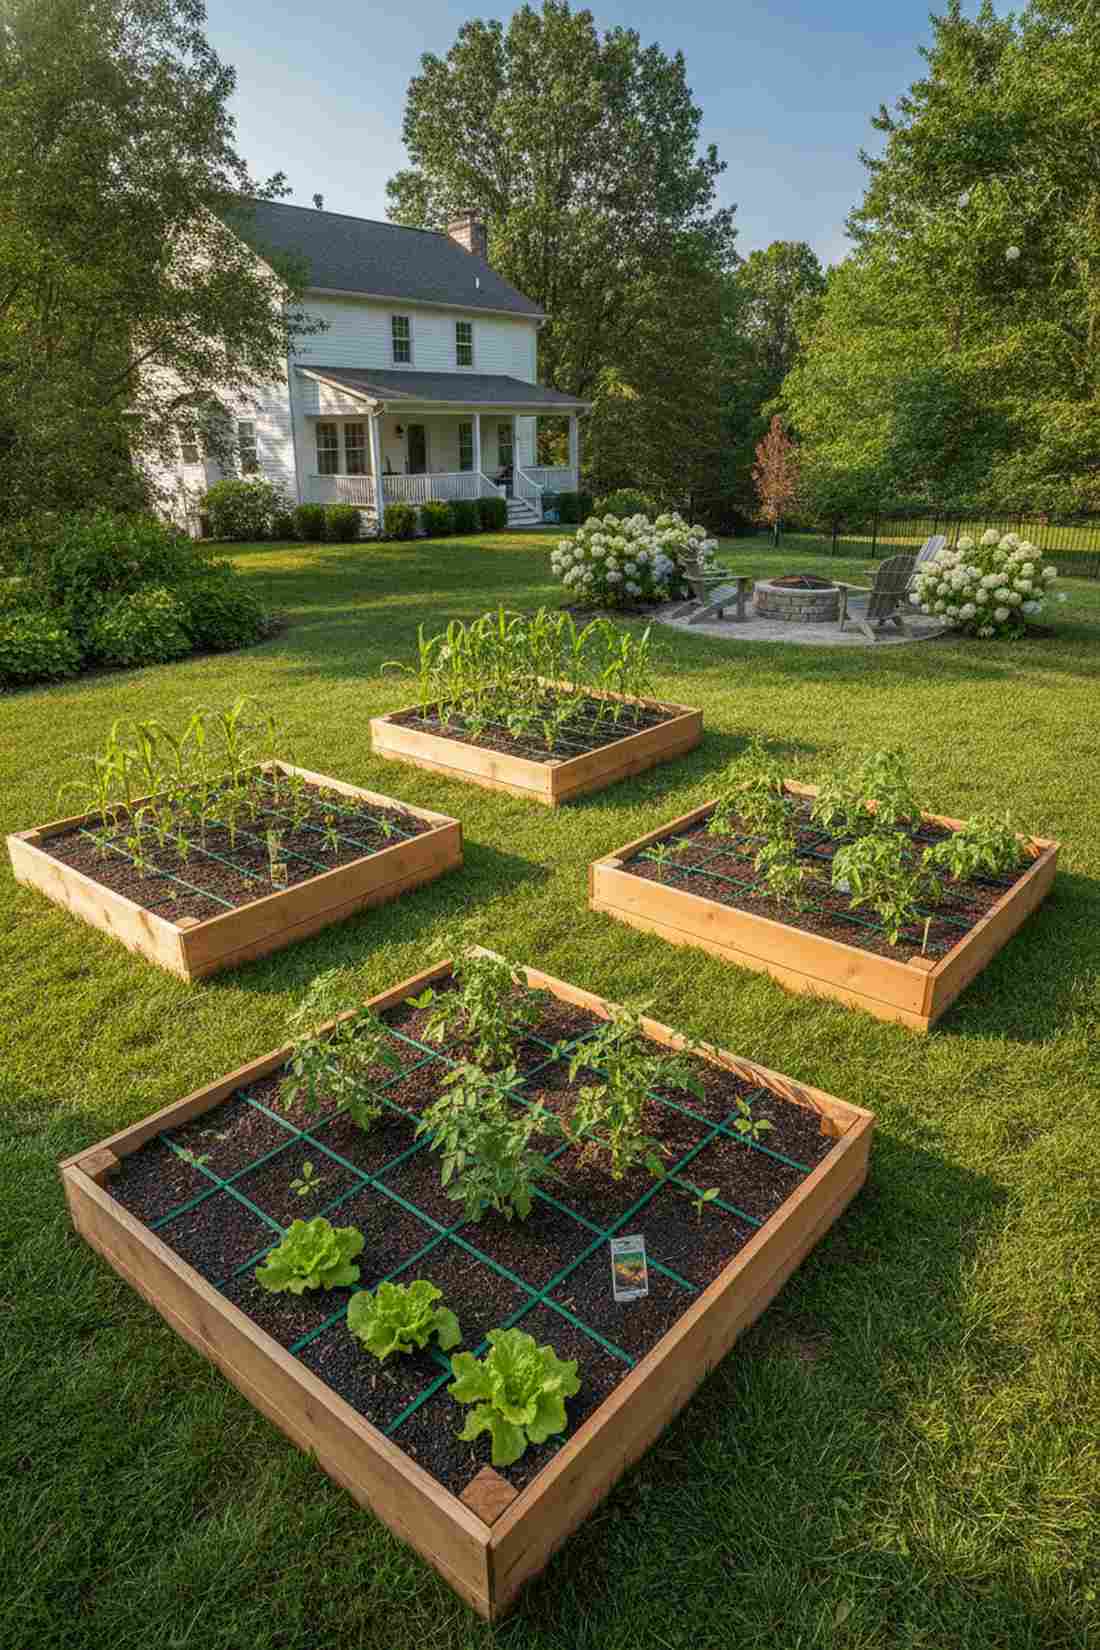
50. Vertical Layer Companion Planting
Feels like an ancient, synergistic forest ecosystem operating in a 3-foot square. A three-dimensional climbing guild setup is the ultimate strategy for growing corn, beans, and squash together.
Planting items separately eats up square footage, but this “Three Sisters” method looks unexpectedly sleek while maximizing verticality. Sourcing sturdy heirloom pole bean seeds allows them to naturally trellis right up the corn stalks.
You can establish this historical layout for about $15.
- Key Materials: Corn, climbing beans, and sprawling squash seeds.
- Vibe / Style: Ancient indigenous efficiency.
- Difficulty: Timed planting is critical.
- Budget Breakdown: Seed Trio: $12.
- Creator’s Tip: Plant the corn first. Wait until it’s a foot tall before planting the beans, or the beans will pull the baby corn down.
- Smart Sourcing: heirloom “Three Sisters” seed bundles and organic granular fertilizer.
Seasonal Rotation & Planning for Year-Round Harvests
Strategic crop rotation maintains soil health while providing continuous harvests across seasons. Careful planning transitions cool-season crops to warm-season varieties seamlessly.
51. Spring-to-Summer Transitions
Projects a seamless, ever-changing landscape of productivity. A rapid seasonal swap layout works exceptionally well for replacing fading spring peas directly with summer peppers.
Leaving beds empty in May is a rookie mistake; this rapid-fire approach delivers a surprisingly premium look with zero downtime. Starting your summer vegetable plugs indoors ensures they are huge and ready to drop in the second the spring crops finish.
Pre-planning this swap costs only the price of an indoor grow light. Pin this to your seasonal garden planner!
- Key Materials: Seed starting trays and a grow light.
- Vibe / Style: High-efficiency turnover.
- Difficulty: Requires indoor space planning.
- Budget Breakdown: Grow Light: $30 | Trays: $10.
- Creator’s Tip: Don’t rip out the spring pea roots; snip them at the base to leave their nitrogen nodules in the dirt for the tomatoes.
- Smart Sourcing: full-spectrum LED grow lights and heavy-duty seedling starter trays.
52. Fall Crop Succession
Feels like cheating the system to get a second, massive spring harvest. A late-summer sowing strategy is perfect for getting the crispest, sweetest carrots as the weather cools.
Most gardeners quit in August, but this autumn push looks far more expensive than it is and suffers from way fewer pests. Tossing frost-hardy brassica seeds into the ground in late summer yields massive broccoli heads in November.
You can easily pull this off for around $10. Highly recommended for extending your season.
- Key Materials: Cool-weather seeds and light shade cloth.
- Vibe / Style: Crisp autumn abundance.
- Difficulty: Battling late-summer heat for germination.
- Budget Breakdown: Seeds: $10 | Shade Cloth: $15.
- Creator’s Tip: Use a shade cloth over the soil in August to keep the dirt cool enough for fall seeds to germinate.
- Smart Sourcing: cool-season heirloom vegetable seed kits and 30% block shade cloth rolls.
53. Winter Cold Frames
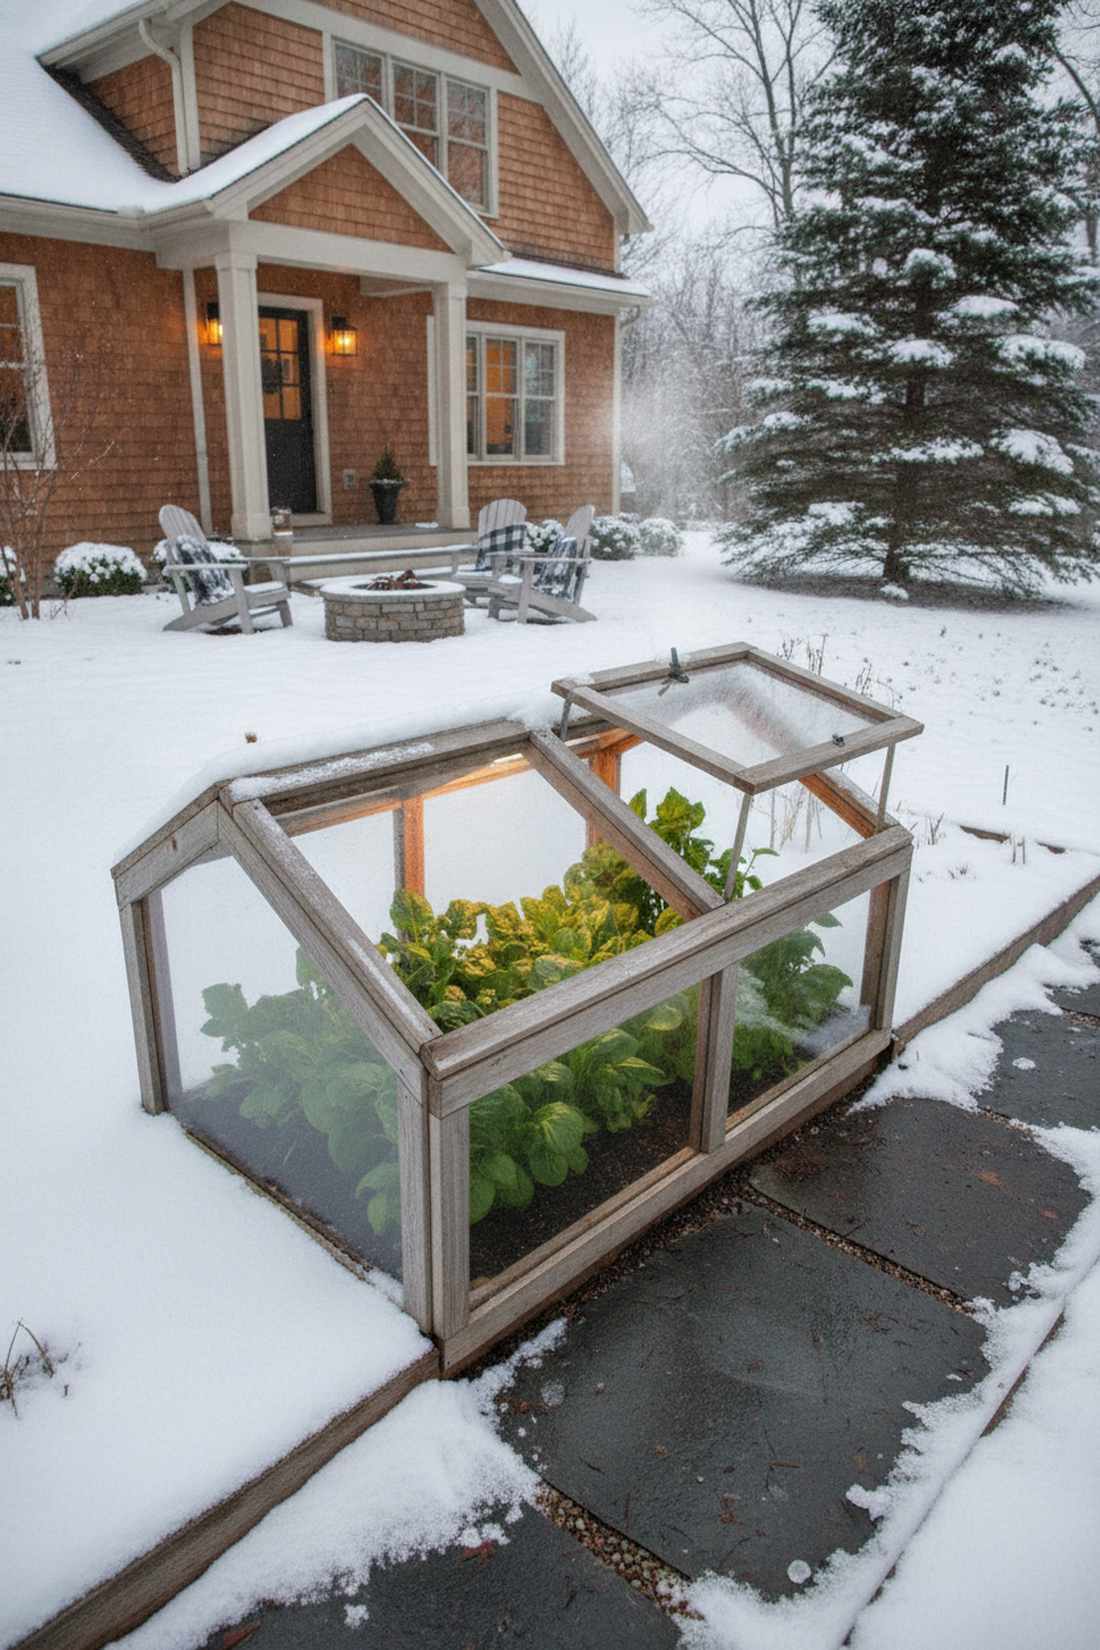
Looks like a glowing, transparent jewelry box protecting your greens from the snow. A miniature greenhouse box setup is the ultimate use-case for picking fresh spinach in January.
Tarping beds looks trashy, but this glass-top method gives a designer-level finish while trapping massive solar heat. Assembling a polycarbonate cold frame kit creates a microclimate 20 degrees warmer than the freezing air outside.
You can build or buy one for roughly $50–$100. Save this for your hardcore winter survival board!
- Key Materials: Wood frame and old windows or polycarbonate panels.
- Vibe / Style: Rugged winter oasis.
- Difficulty: Basic carpentry and hinging.
- Budget Breakdown: Wood: $30 | Hinges/Lid: $40.
- Creator’s Tip: Install an automatic vent opener that pops the lid when the sun comes out, so you don’t accidentally cook your plants.
- Smart Sourcing: twin-wall polycarbonate glazing panels and temperature-sensitive automatic vent openers.
54. Crop Family Rotation
Emanates the invisible, intelligent design of ancient agricultural masters. A four-year bed swapping layout works exceptionally well for keeping your urban garden raised beds completely disease-free.
Planting tomatoes in the same spot ruins soil, but this systematic movement delivers a surprisingly premium look by preventing blight entirely. Using a magnetic garden planning board makes tracking where the nightshades and brassicas go foolproof.
This brilliant disease-prevention tactic is completely free.
- Key Materials: Garden map and knowledge of plant families.
- Vibe / Style: Scientific crop management.
- Difficulty: pure mental organization.
- Budget Breakdown: Planning Board: $20.
- Creator’s Tip: Remember the rule: Leaf, Fruit, Root, Legume. Rotate your beds in that exact order every year.
- Smart Sourcing: magnetic whiteboard garden planners and color-coded garden stakes.
Don’t let a sudden frost murder your entire garden. This next fabric trick saves everything instantly…
55. Season-Extension Row Covers
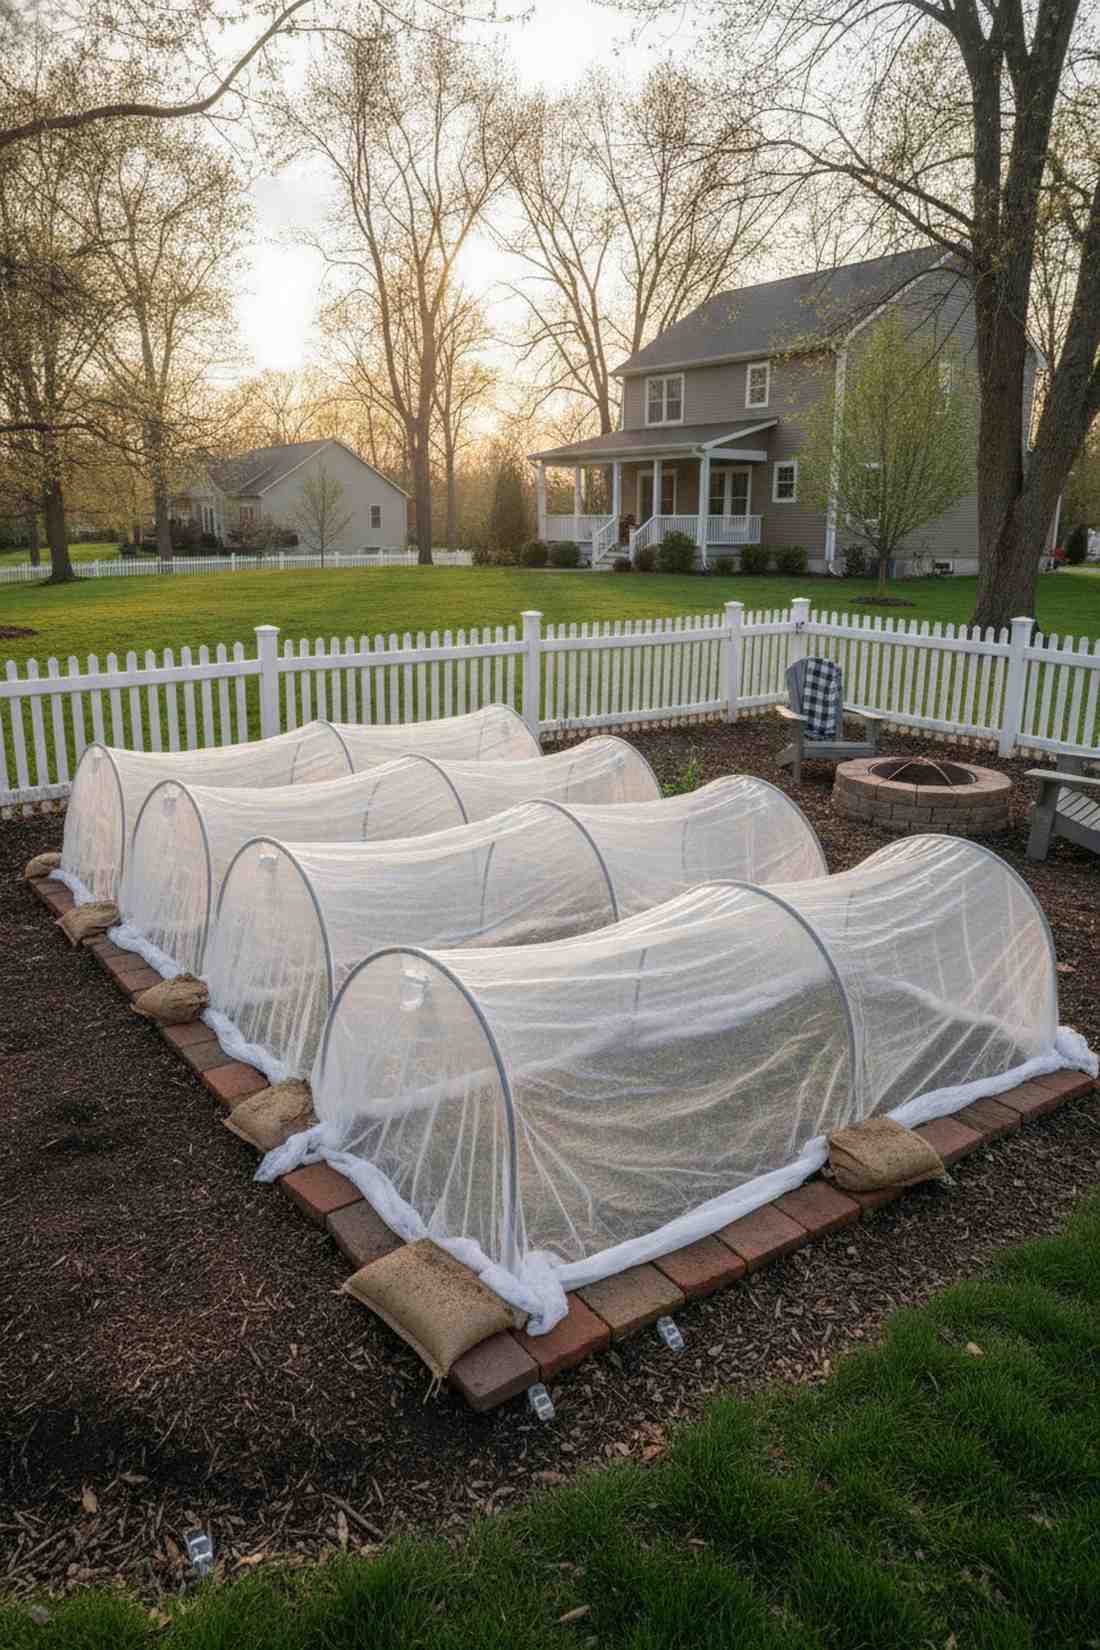
Looks like a row of ghostly, glowing tunnels protecting your precious crops. A hooped fabric barrier design is exactly what you need to survive surprise spring frosts.
Throwing old bedsheets over plants crushes them, but this tensioned tunnel looks unexpectedly sleek and professional. Securing heavy-weight agricultural fleece over flexible hoops buys you an extra month of growing on both ends of the year.
You can easily pull this off for around $30–$50. Pin this to your early-spring prep board!
- Key Materials: PVC hoops, frost blanket, and clips.
- Vibe / Style: Commercial farm tech.
- Difficulty: Bending and clipping.
- Budget Breakdown: Fabric: $20 | Hoops: $15.
- Creator’s Tip: Weigh down the edges of the fabric with sandbags or bricks; wind will rip clips right off.
- Smart Sourcing: heavy-weight frost protection blankets and flexible fiberglass garden hoops.
56. Greenhouse-Balcony Hybrids
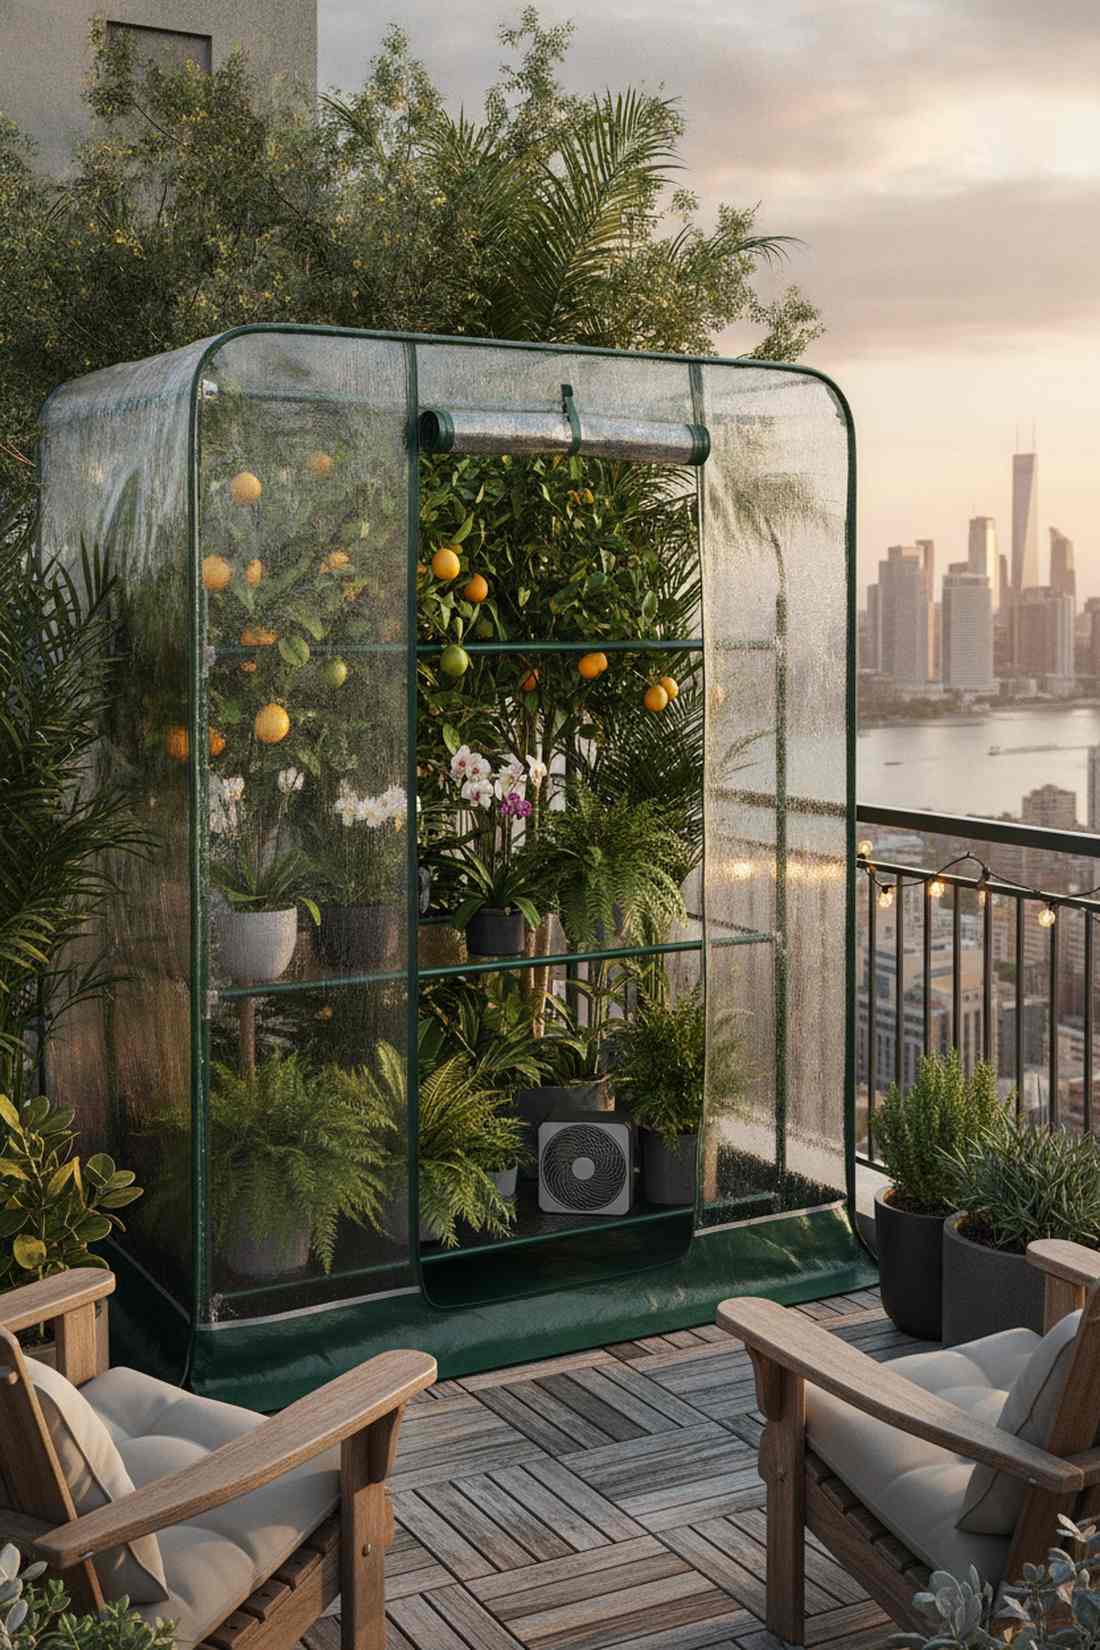
Feels like stepping into a humid, tropical terrarium floating in the city skyline. A temporary plastic enclosure setup is the absolute best strategy for overwintering citrus trees.
Hauling massive pots inside ruins your living room, but this zip-up enclosure gives a designer-level finish right on the patio. Investing in a heavy-duty PVC walk-in greenhouse tier turns a breezy balcony into a steaming jungle.
You can grab a reliable pop-up unit for roughly $60–$90. It’s a fast upgrade that completely changes the vibe.
- Key Materials: Metal frame and fitted clear plastic cover.
- Vibe / Style: Pop-up botanical conservatory.
- Difficulty: Easy push-together assembly.
- Budget Breakdown: Greenhouse Kit: $70 | Heater: $20.
- Creator’s Tip: Add a small, waterproof oscillating fan inside to prevent mold from growing in the stagnant humid air.
- Smart Sourcing: reinforced PE cover walk-in greenhouses and waterproof greenhouse circulation fans.
57. Perennial Vegetable Beds
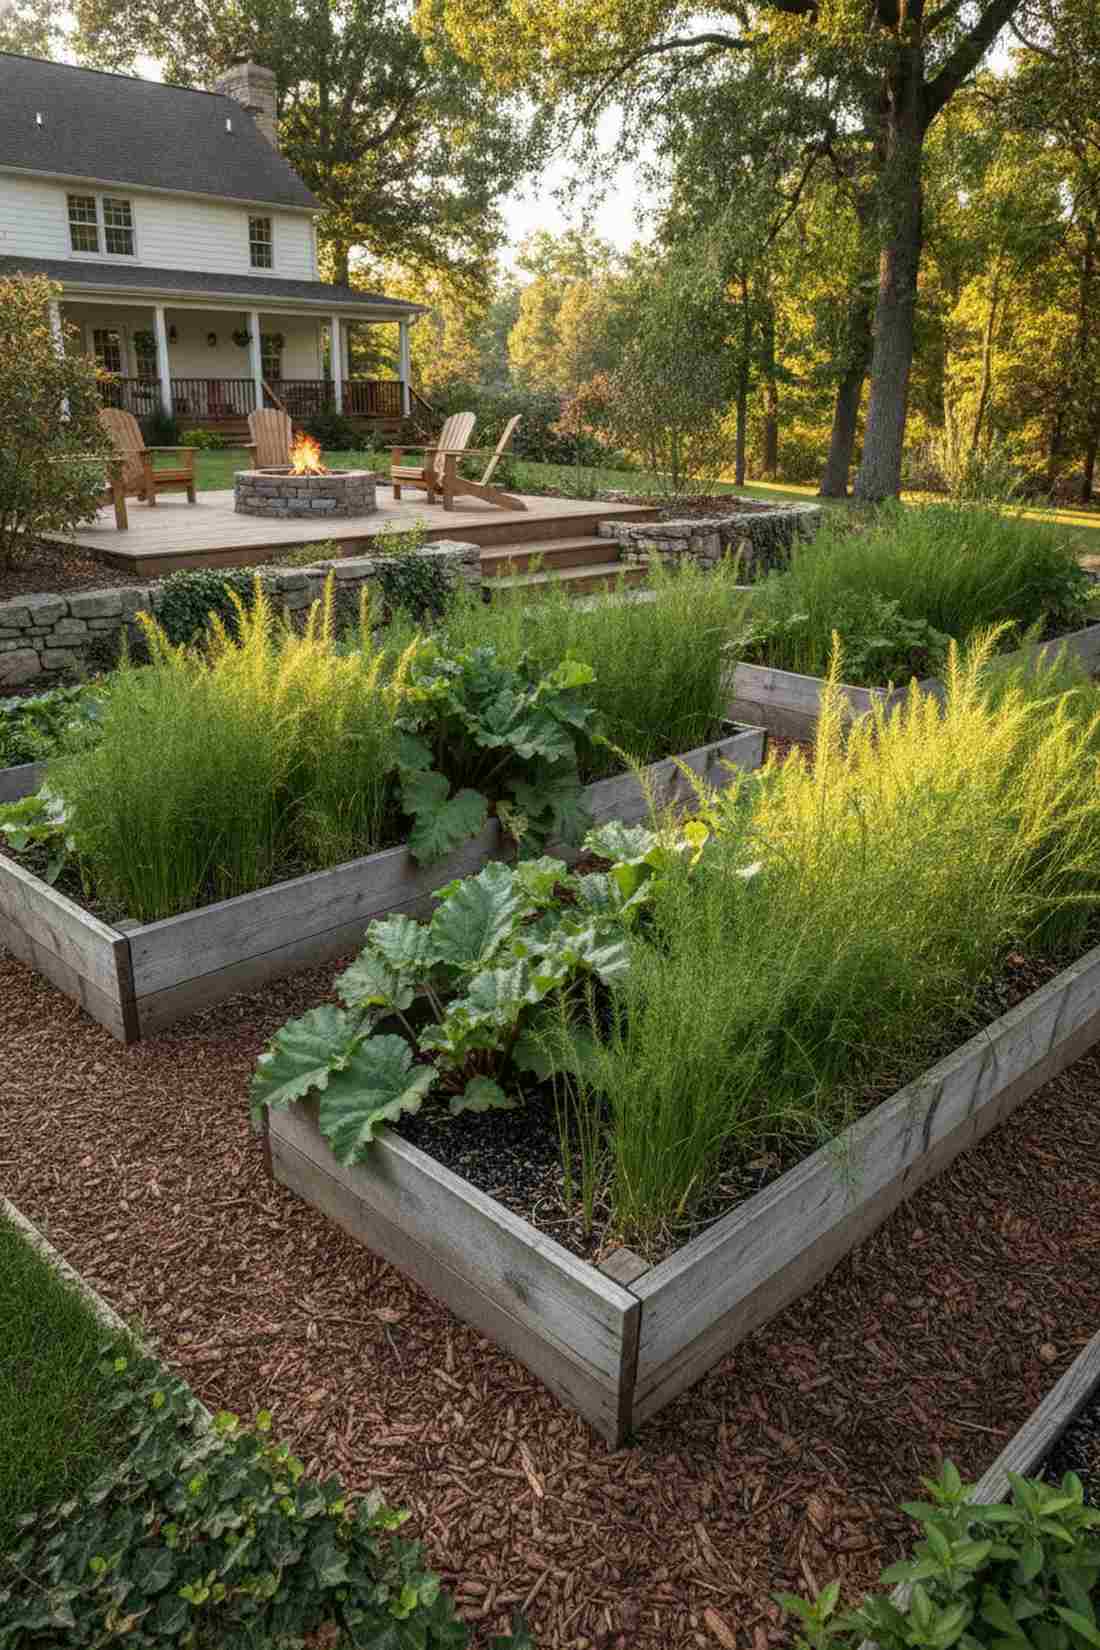
Radiates a sense of permanent, deep-rooted homesteading security. A dedicated long-term crop layout works exceptionally well for establishing a corner of the yard you never have to replant.
Buying seeds every year gets exhausting, but this “plant once, eat forever” approach looks far more expensive than it is. Sourcing premium asparagus crowns and rhubarb roots creates an unstoppable, architectural food source that lasts 20 years.
Establishing this legacy bed costs around $40–$60. Save this for your ultimate low-maintenance garden goals!
- Key Materials: Dormant crowns, rich compost, and dedicated space.
- Vibe / Style: Generational heritage gardening.
- Difficulty: Hard trench digging initially, then zero work.
- Budget Breakdown: Asparagus Crowns: $30 | Compost: $20.
- Creator’s Tip: Dig a trench 8 inches deep and slowly fill it in over the first summer as the asparagus fern grows taller.
- Smart Sourcing: dormant Mary Washington asparagus crowns and bulk organic bone meal.
Transform Your Metropolitan Space into a Productive Urban Garden
These 57 urban gardening strategies prove that tight concrete spaces, strict budgets, and limited sunlight never have to limit your high-end aesthetic. Whether you are building smart urban garden raised beds or utilizing vertical premium urban planter kits, strategic material sourcing multiplies your growing potential while keeping costs low. Begin by selecting 3-5 blueprints tailored to your specific balcony or patio, invest in the right heavy-duty starter kits, and expand as your confidence peaks. Stop overpaying for basic setups—start your premium metropolitan garden transformation today and turn that empty space into a high-yield green sanctuary.
Frequently Asked Questions
What is the best urban gardening technique for apartment balconies?
Vertical container systems combined with heavy-duty railing planter kits maximize balcony production with a premium aesthetic. Start with UV-resistant self-watering containers for herbs, then add commercial-grade vertical trellises for climbing vines. This approach leverages high-CPC miniature garden supplies to use both horizontal and vertical space perfectly, making it the ultimate urban garden design for busy renters.
How much sunlight do urban gardens need to produce vegetables?
Most fruiting vegetables require 6-8 hours of direct light, but you can hack this by using highly reflective materials or LED smart hydroponic planters. Leafy greens thrive in 3-4 hours, making them ideal for shaded urban garden beds. If you lack sun, investing in full-spectrum outdoor grow lights or premium reflective shade cloths can dramatically shift your yield potential.
Can I start urban gardening with no prior experience?
Absolutely, especially if you skip the frustrating DIY methods and start with professional-grade elevated planter kits. These pre-cut systems eliminate guesswork. Begin with 3-5 premium fabric grow bags, use a foolproof automated micro-drip kit for watering, and master easy crops like radishes before expanding your urban garden ideas into complex hydroponics.
What soil should I use for container urban gardens?
Never use cheap topsoil; it compacts and ruins the expensive look of your plants. You must use a premium, lightweight potting mix tailored for containers. Blend high-quality coco coir bricks, coarse horticultural perlite, and organic worm castings. This engineered mix ensures optimal drainage in your urban garden raised beds and keeps your rooftop weight limits safely in check.
How do I protect urban gardens from pests without chemicals?
Skip the toxic sprays and upgrade to physical, high-tech barriers. Installing heavy-weight frost protection blankets and UV-coated insect netting provides a sleek, commercial-farm aesthetic while physically blocking pests. Combining this with companion planting (like bulk marigold seeds) creates a bulletproof, natural defense system that keeps your urban gardening space pristine.
What vegetables grow best in raised bed urban gardens?
Root vegetables thrive beautifully when you use deep, composite wood raised bed kits filled with loose perlite soil. For high-density urban garden raised beds, intensive square-foot grid spacing allows leafy greens and compact bush tomatoes to produce massive yields without turning your sleek patio into a chaotic, overgrown mess.
How often should I water urban container gardens?
While cheap plastic pots require exhausting daily watering, upgrading to reservoir-base self-watering planters or programmable digital hose timers reduces your chore to once a week. These premium tech additions maintain perfect, consistent moisture, preventing the wilted, sad look that plagues most beginner urban gardening setups during peak summer heat.
Can urban gardens produce enough food to make a difference?
A well-optimized 4×8 foot urban garden bed using intensive grid-planting and vertical heavy-duty trellis kits can easily yield 60-100 pounds of premium organic produce annually. While it won’t replace the grocery store entirely, utilizing smart succession planting ensures a continuous, high-value harvest that dramatically slashes your weekly organic produce bill.