Elevate your botanical display with the right hanging plants hook for a stunning, secure installation. Sourcing bulk-pack hardware and UV-coated accessories delivers a premium designer aesthetic without the massive budget. Here are the exact blueprints professionals rely on.
Design Snapshot Key Principles
- Load Capacity Matching: Calculate plant weight when fully watered, then select hooks rated for 3-5× that mass
- Structural Integration: Identify ceiling joists, studs, or masonry anchors before drilling to ensure hardware engages load-bearing materials
- Swivel Functionality: Rotating hooks prevent chain tangling and allow 360-degree light exposure without repositioning hardware
- Corrosion Resistance: Outdoor installations require galvanized, stainless steel, or powder-coated hardware to withstand moisture and UV exposure
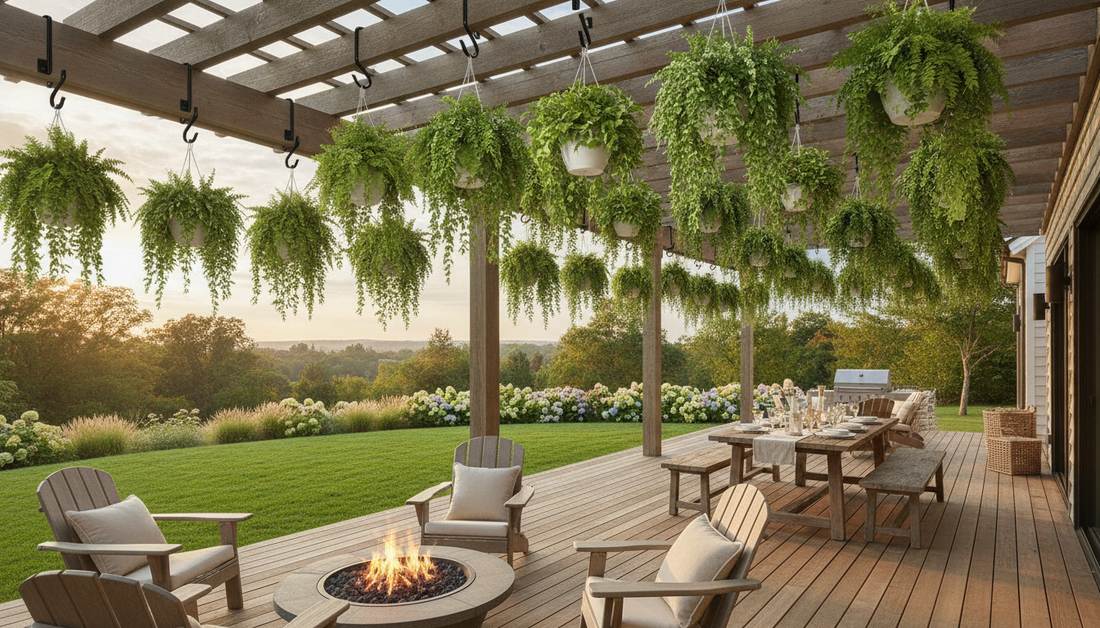
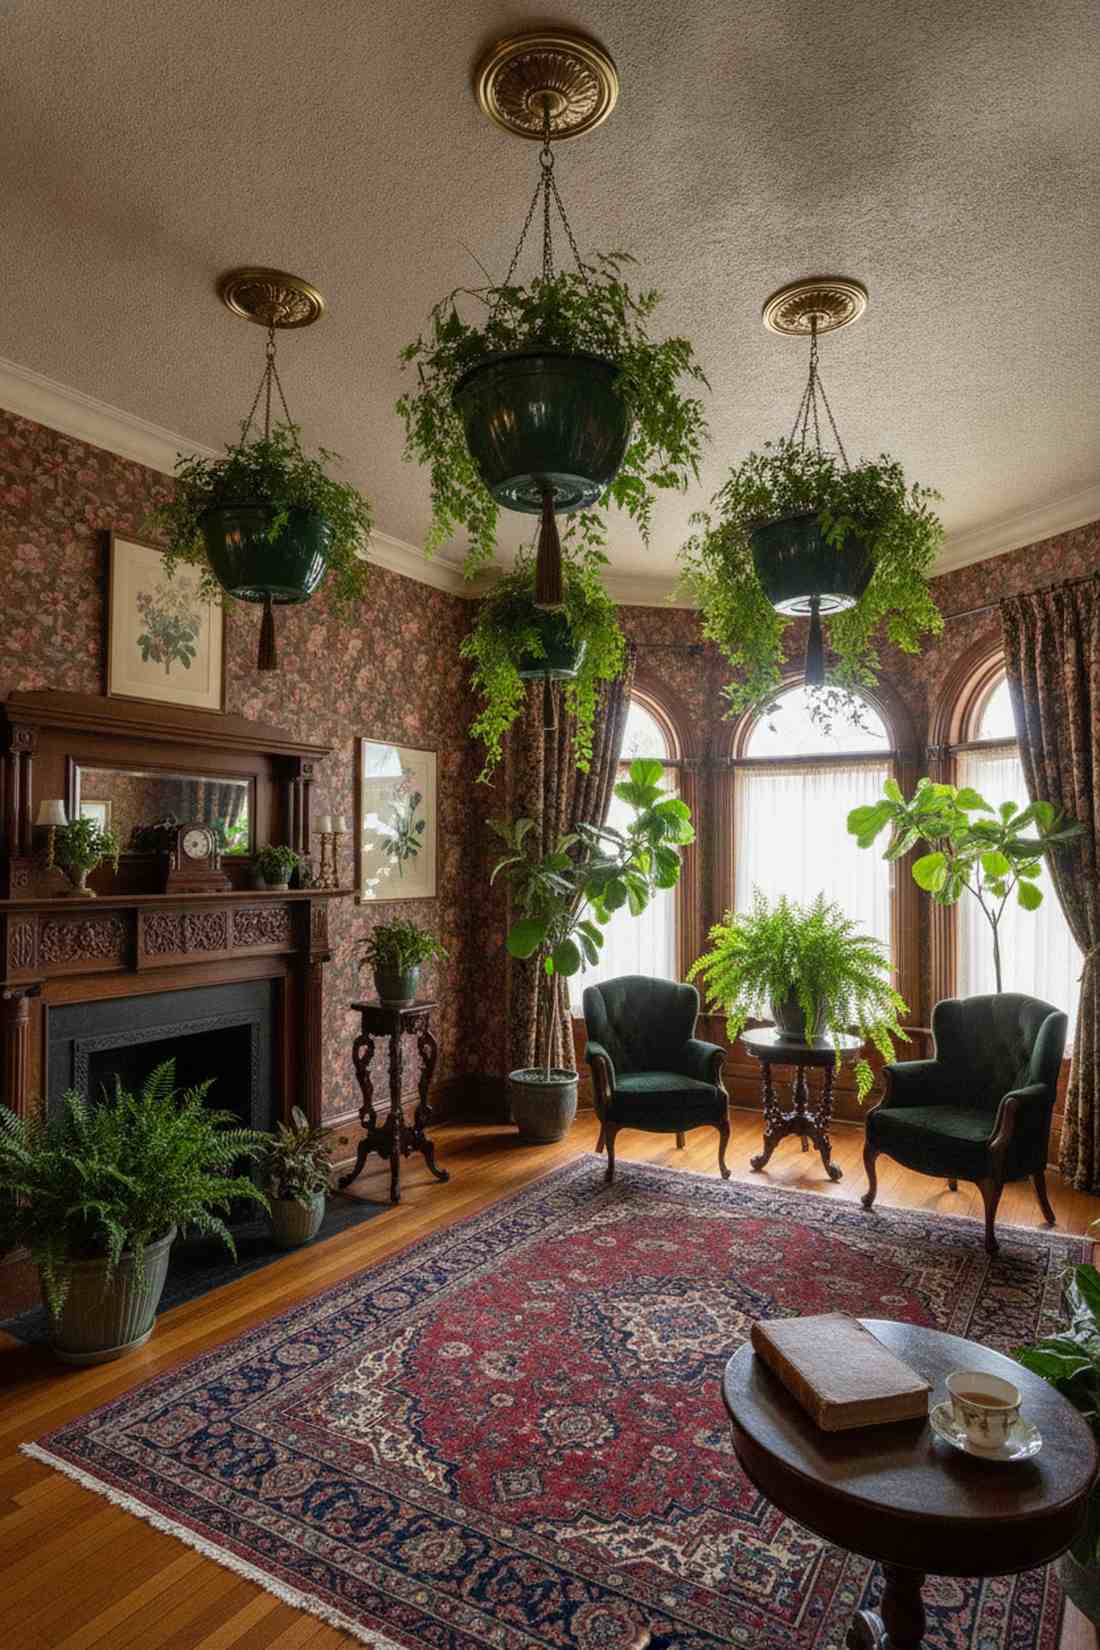
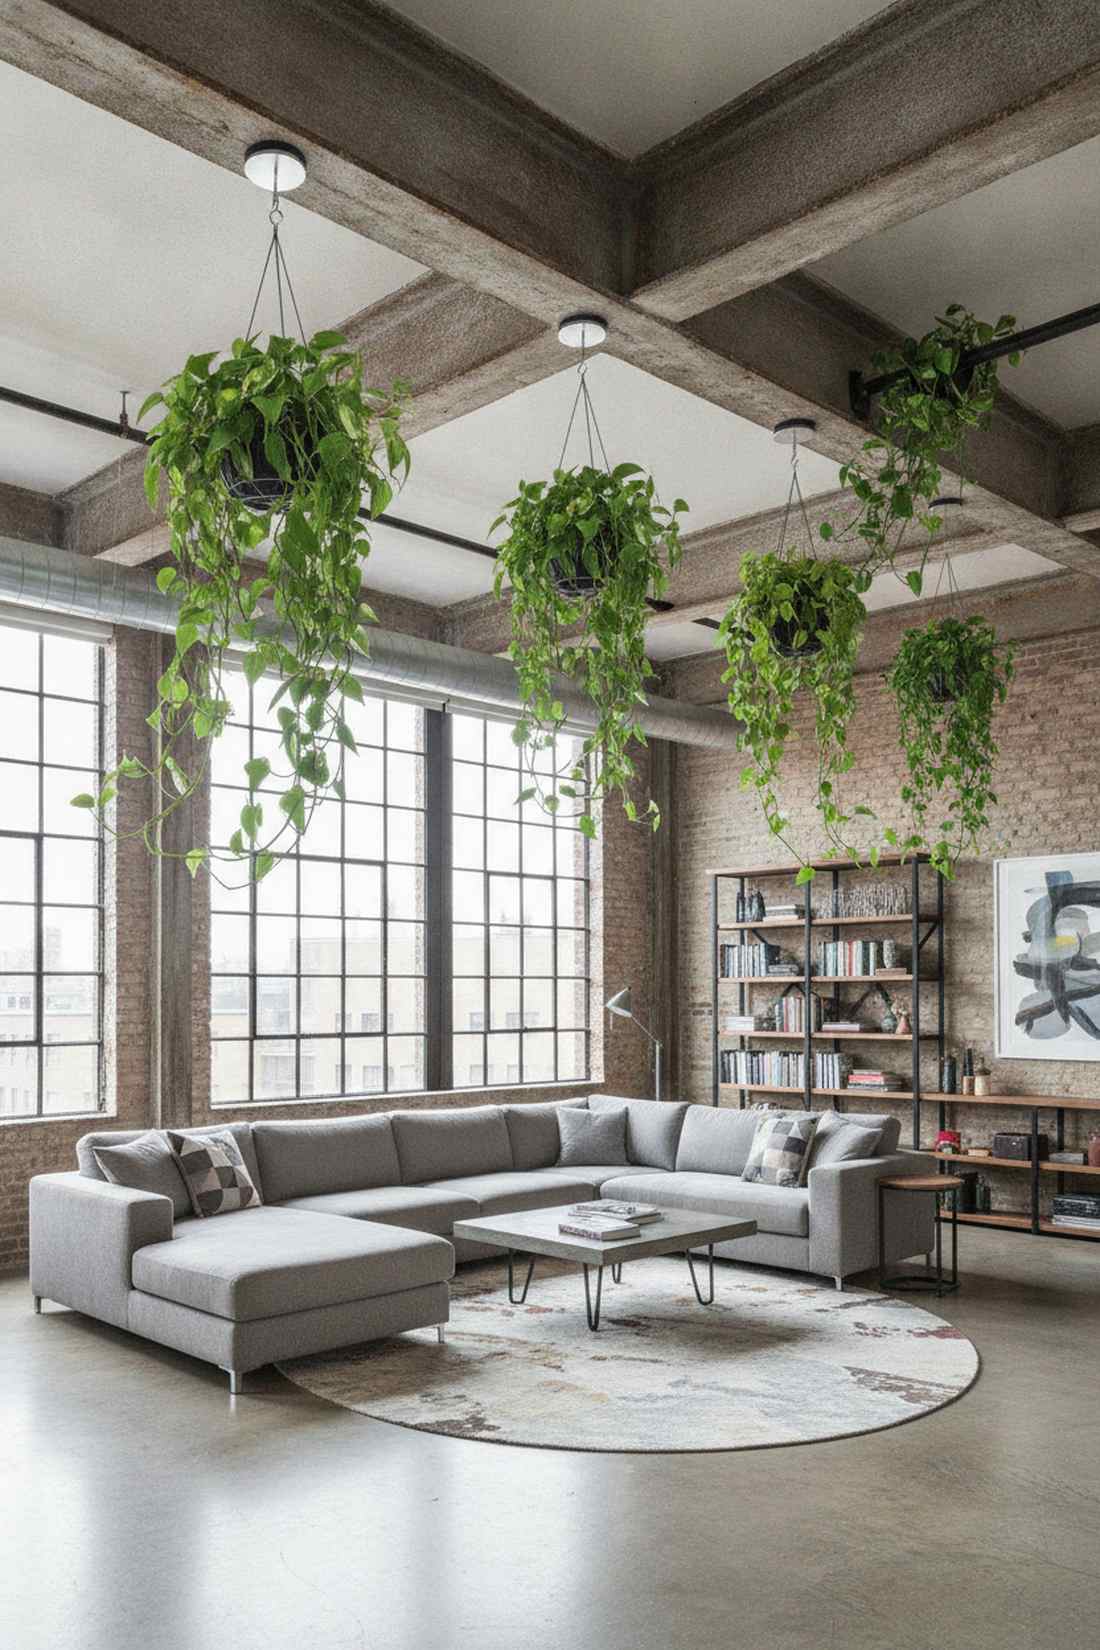
Ceiling-Mounted Hook Systems
Overhead installations provide maximum floor space efficiency while creating dramatic vertical layers in garden rooms and conservatories. These systems anchor directly into ceiling structures, distributing weight across joists and beams.
1. Swag Hook with Toggle Bolt
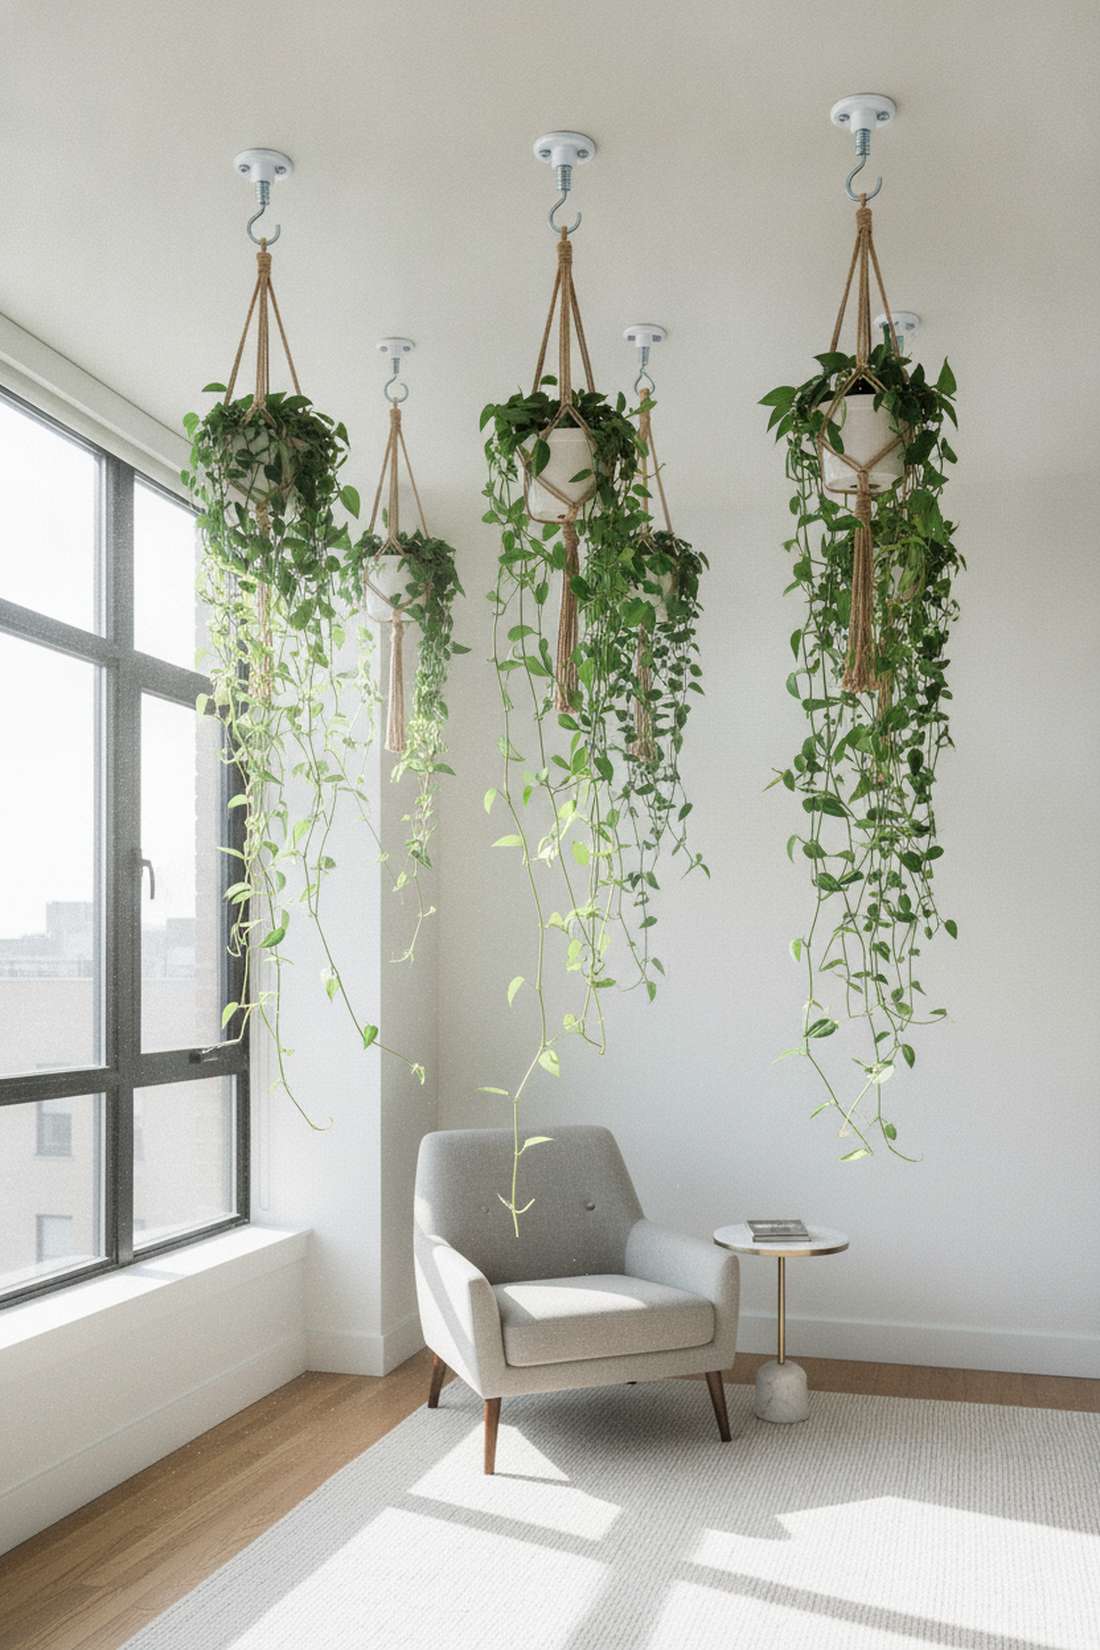
Feels like discovering a secret floating oasis in the corner of your bedroom. A minimalist overhead trailing vine display works exceptionally well for a shaded apartment corner where floor space is virtually non-existent.
A surprisingly premium look happens when you skip standard nails and opt for specialized drywall anchors. It delivers an architectural finish that looks far more expensive than it is, especially if you source top-tier indoor plant mounting kits to eliminate any risk of sagging under heavy water weight.
You can easily pull this off for around $12–$25 depending on your anchor choice. Save this to your DIY weekend garden board if you’re planning a quick room refresh!
- Key Materials: High-capacity toggle bolts, enamel-coated swag hooks
- Vibe / Style: Clean modern loft
- Difficulty: Easy beginner setup
- Budget Breakdown: Hardware: $10 | Macrame Support: $15
- Creator’s Tip: Pre-thread the bolt through your hook before pushing it through the drywall hole to avoid losing the wing inside the ceiling.
- Smart Sourcing: Grab a zinc-plated toggle bolt assortment (bulk pack) and a set of UV-coated decorative swag hooks to future-proof your setup.
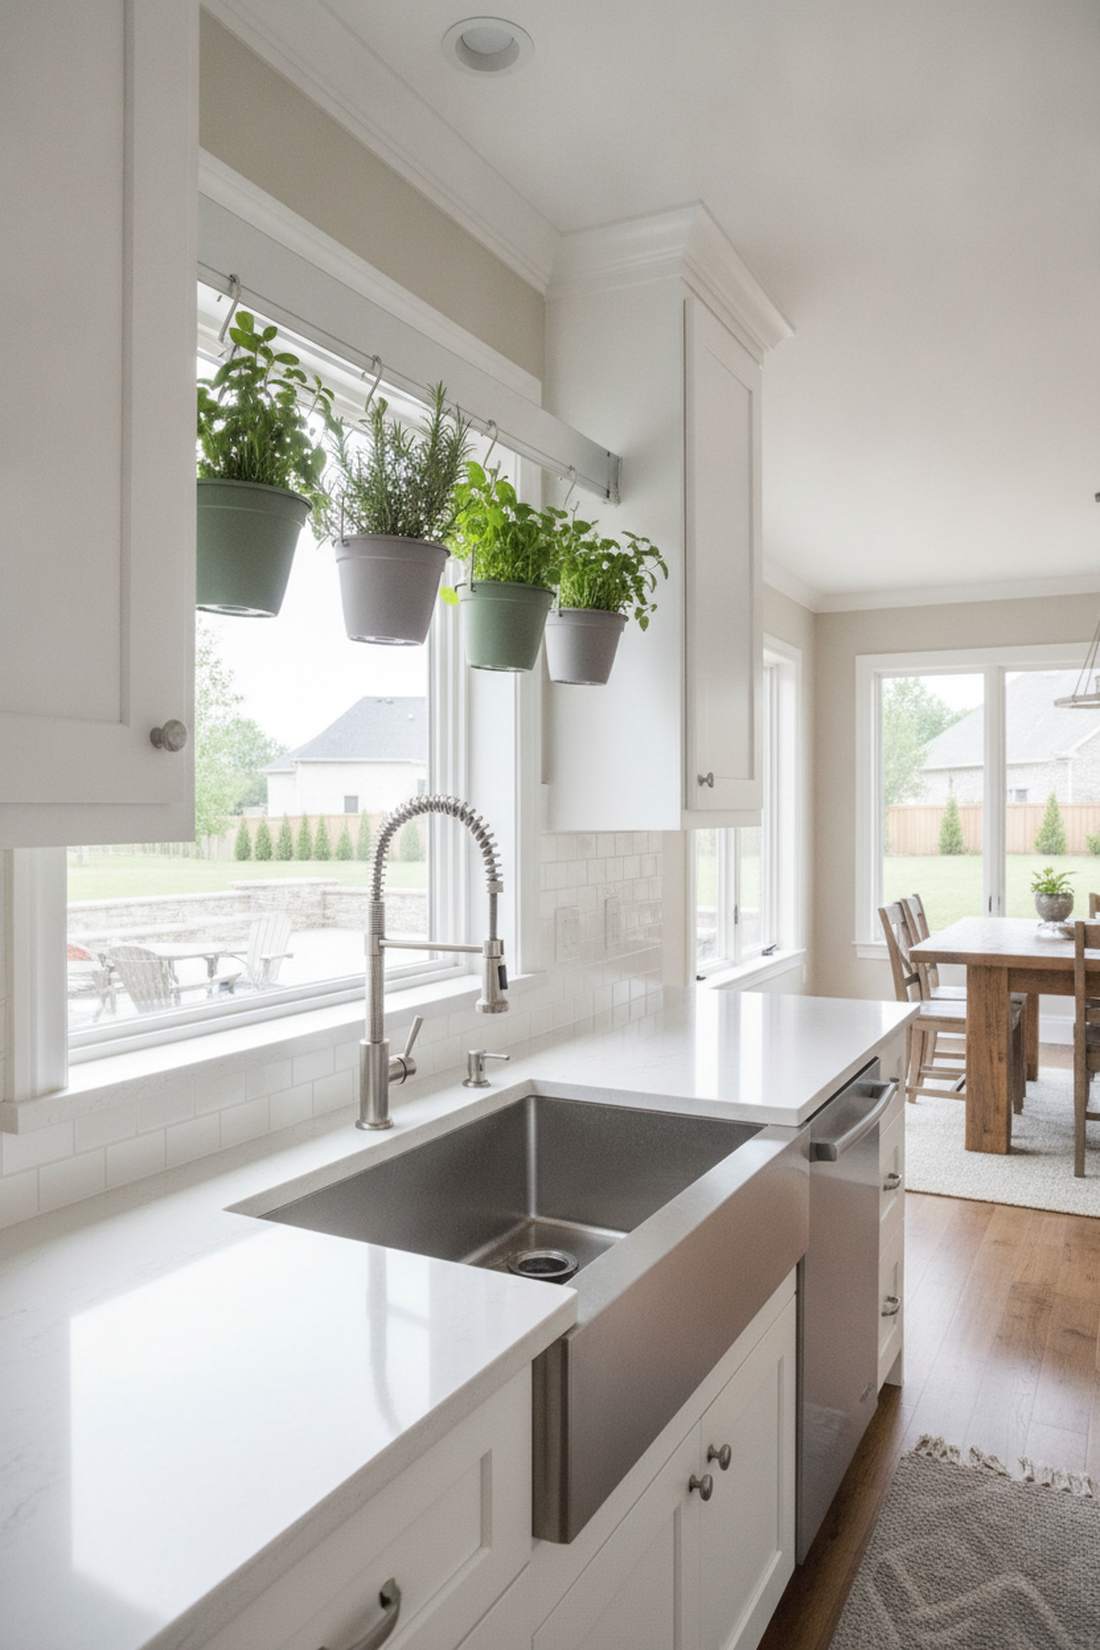
2. Screw-In Ceiling Hook for Joists
Straight out of an upscale botanical greenhouse. A heavy-canopy fern suspension acts as the perfect living chandelier above a rustic dining table or reading nook.
Ditching the stick-on plastic and drilling straight into solid framing ensures zero catastrophic failures. Injecting professional-grade heavy-duty ceiling anchors completely transforms a simple pot into a permanent architectural feature. The stability allows for much larger, eye-catching ceramic containers without fear of the drywall crumbling.
Expect to spend about $20–$35 for quality hardware and a thick linked chain. It’s a fast upgrade that completely changes the vibe of a room.
- Key Materials: Heavy-gauge steel threaded hooks, stud finder
- Vibe / Style: Upscale conservatory
- Difficulty: Intermediate drilling required
- Budget Breakdown: Hook: $12 | Chain: $18
- Creator’s Tip: Always use a 1/8-inch pilot bit first to prevent the wooden joist from splintering under the pressure of thick steel threads.
- Smart Sourcing: Use heavy-duty vinyl-coated ceiling hooks (multi-pack) alongside a contractor-grade magnetic stud finder kit.
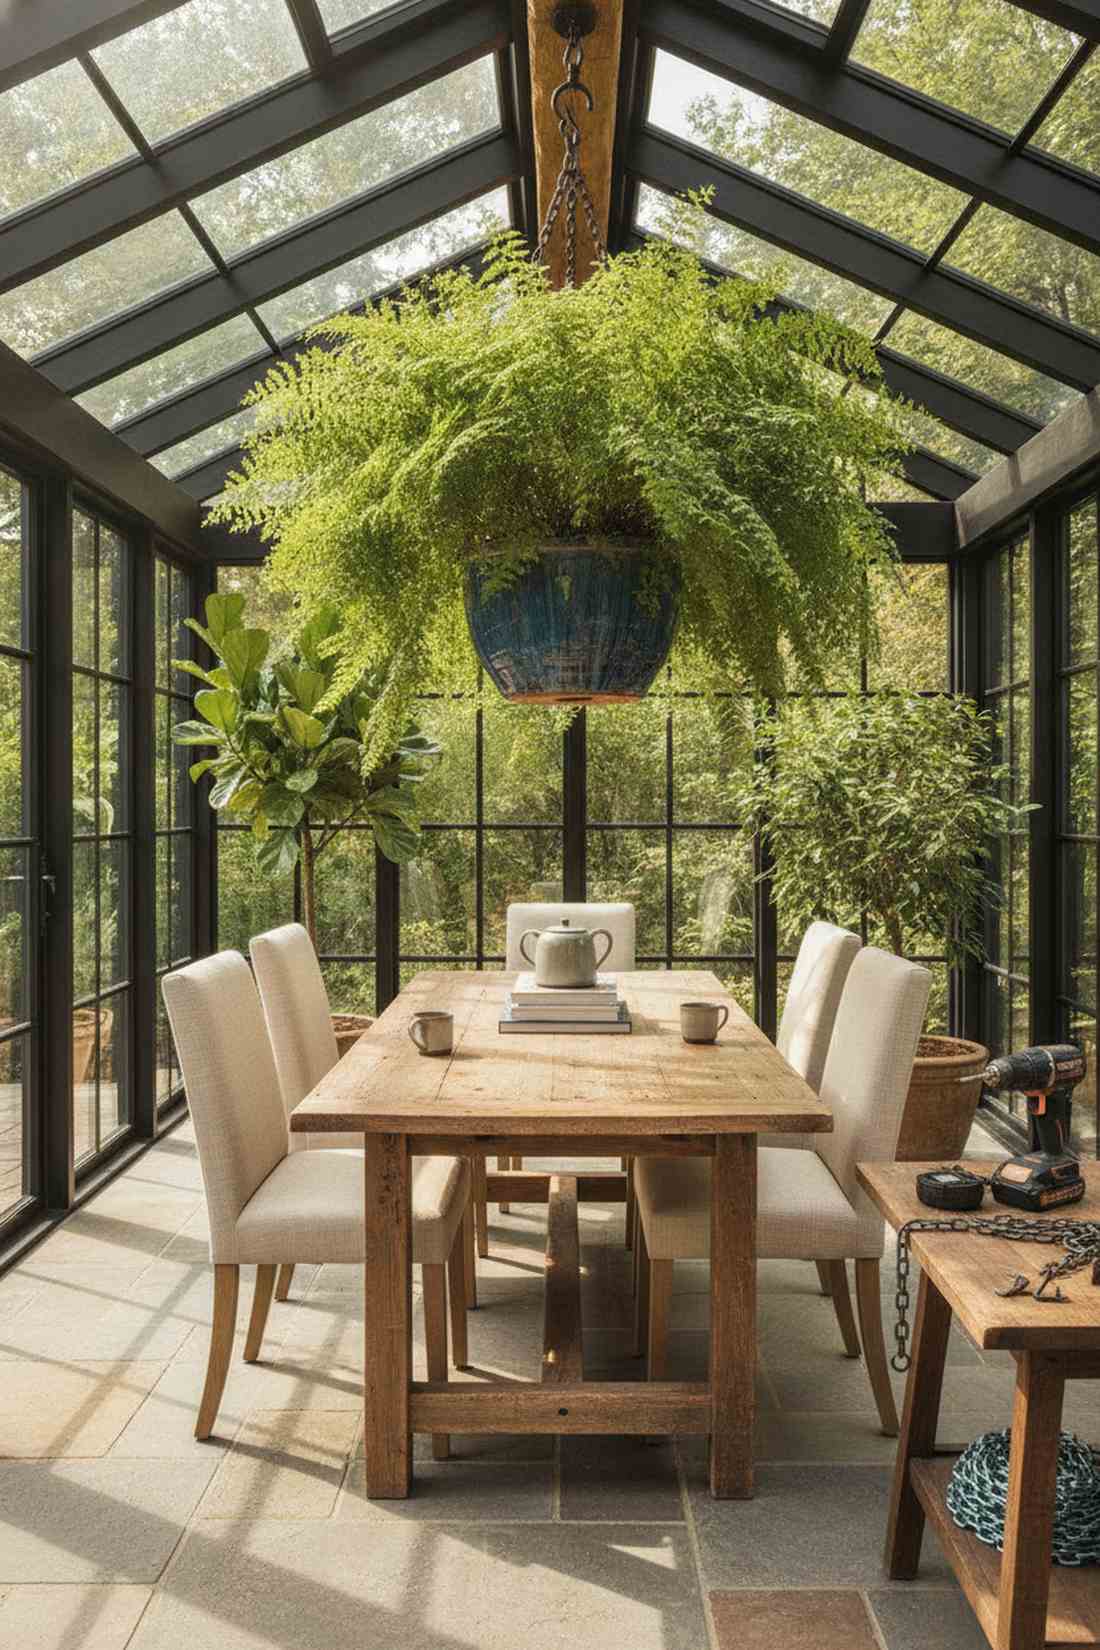
3. Spring Toggle Hook System
Brings a sense of old-world charm, like a lush Victorian parlor. An elevated heavy-pot anchor setup is ideal for vintage homes with thick plaster ceilings that resist traditional stud-finding methods.
Most DIYers ruin their plaster ceilings until they discover this load-spreading method. Using specialized four-point tension wings delivers a surprisingly premium look by preventing ugly cracks around the insertion site. You can safely leverage heavy-duty indoor plant stands and hanging baskets without stressing delicate historical architecture.
This sturdy weekend project will typically cost around $25–$40. Pin this layout if you’re dealing with challenging plaster or custom drywall!
- Key Materials: Spring-loaded toggle bolts, decorative canopy covers
- Vibe / Style: Classic heritage home
- Difficulty: Moderate precision needed
- Budget Breakdown: Hardware System: $20 | Decorative Base: $15
- Creator’s Tip: Mark your drill depth with masking tape on the bit to ensure you don’t puncture flooring or pipes on the level above.
- Smart Sourcing: Invest in a spring-loaded toggle anchor kit (contractor pack) and a set of premium brass-finish ceiling medallions.
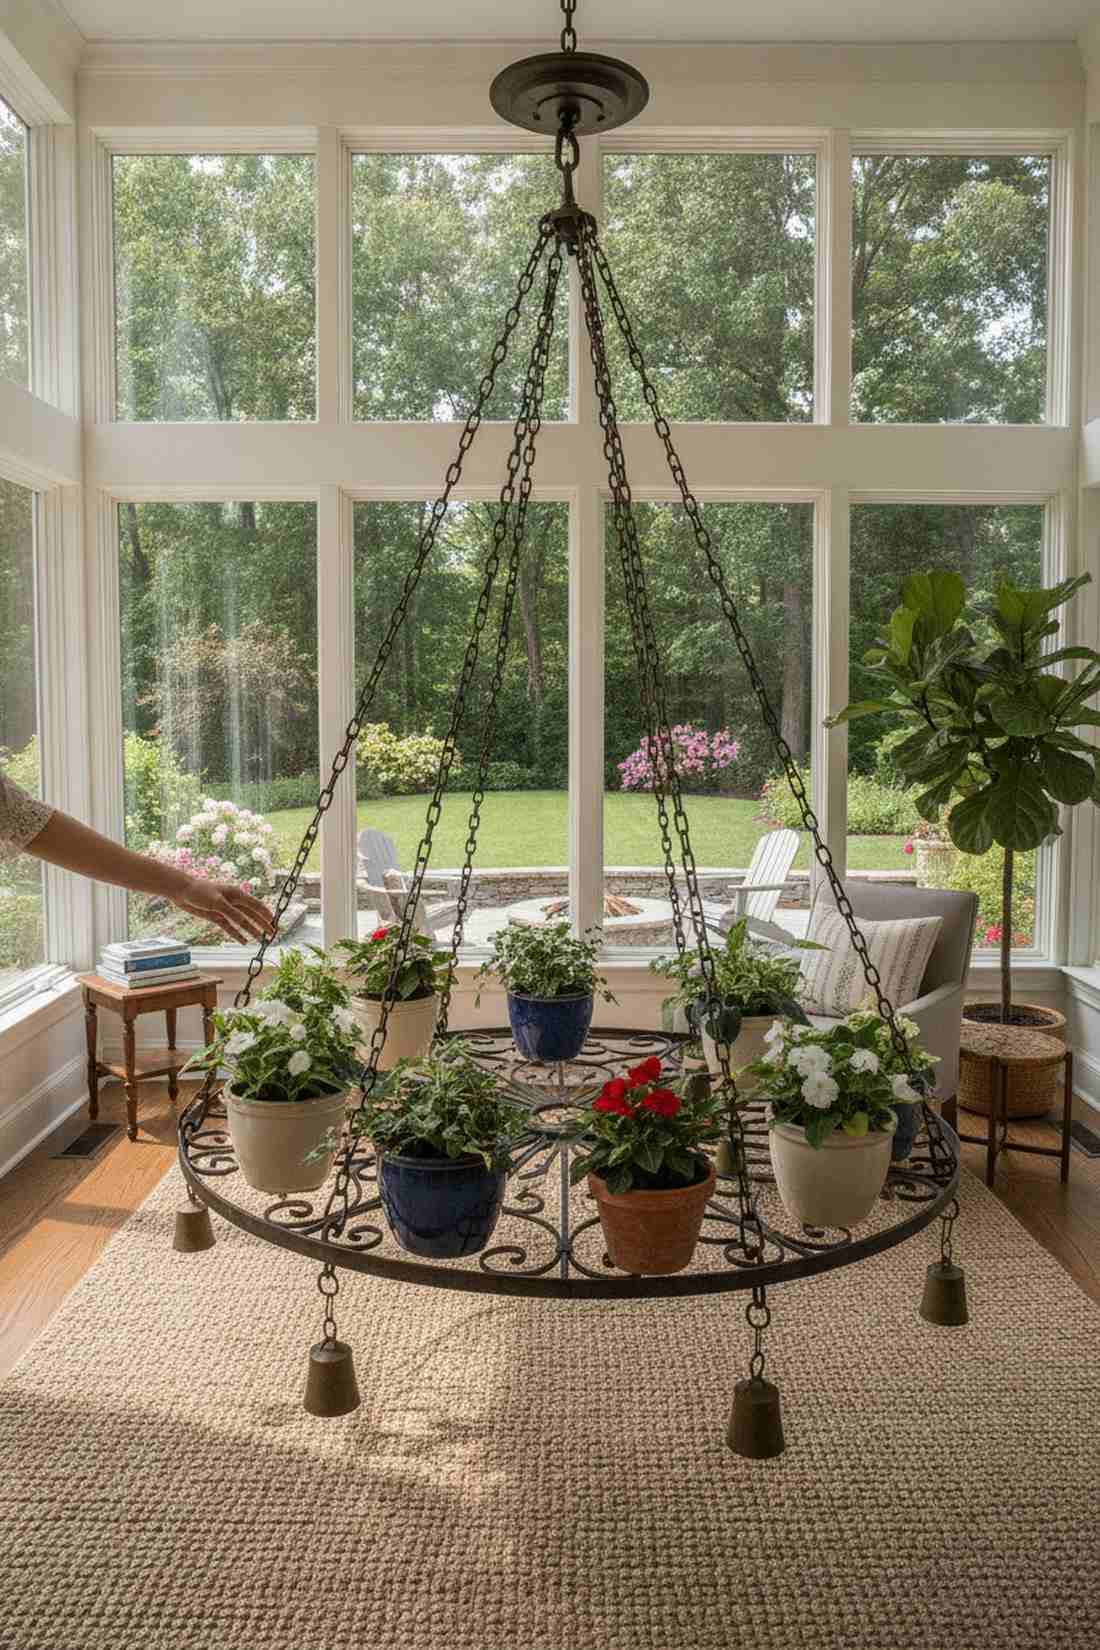
4. Retractable Pulley Hook
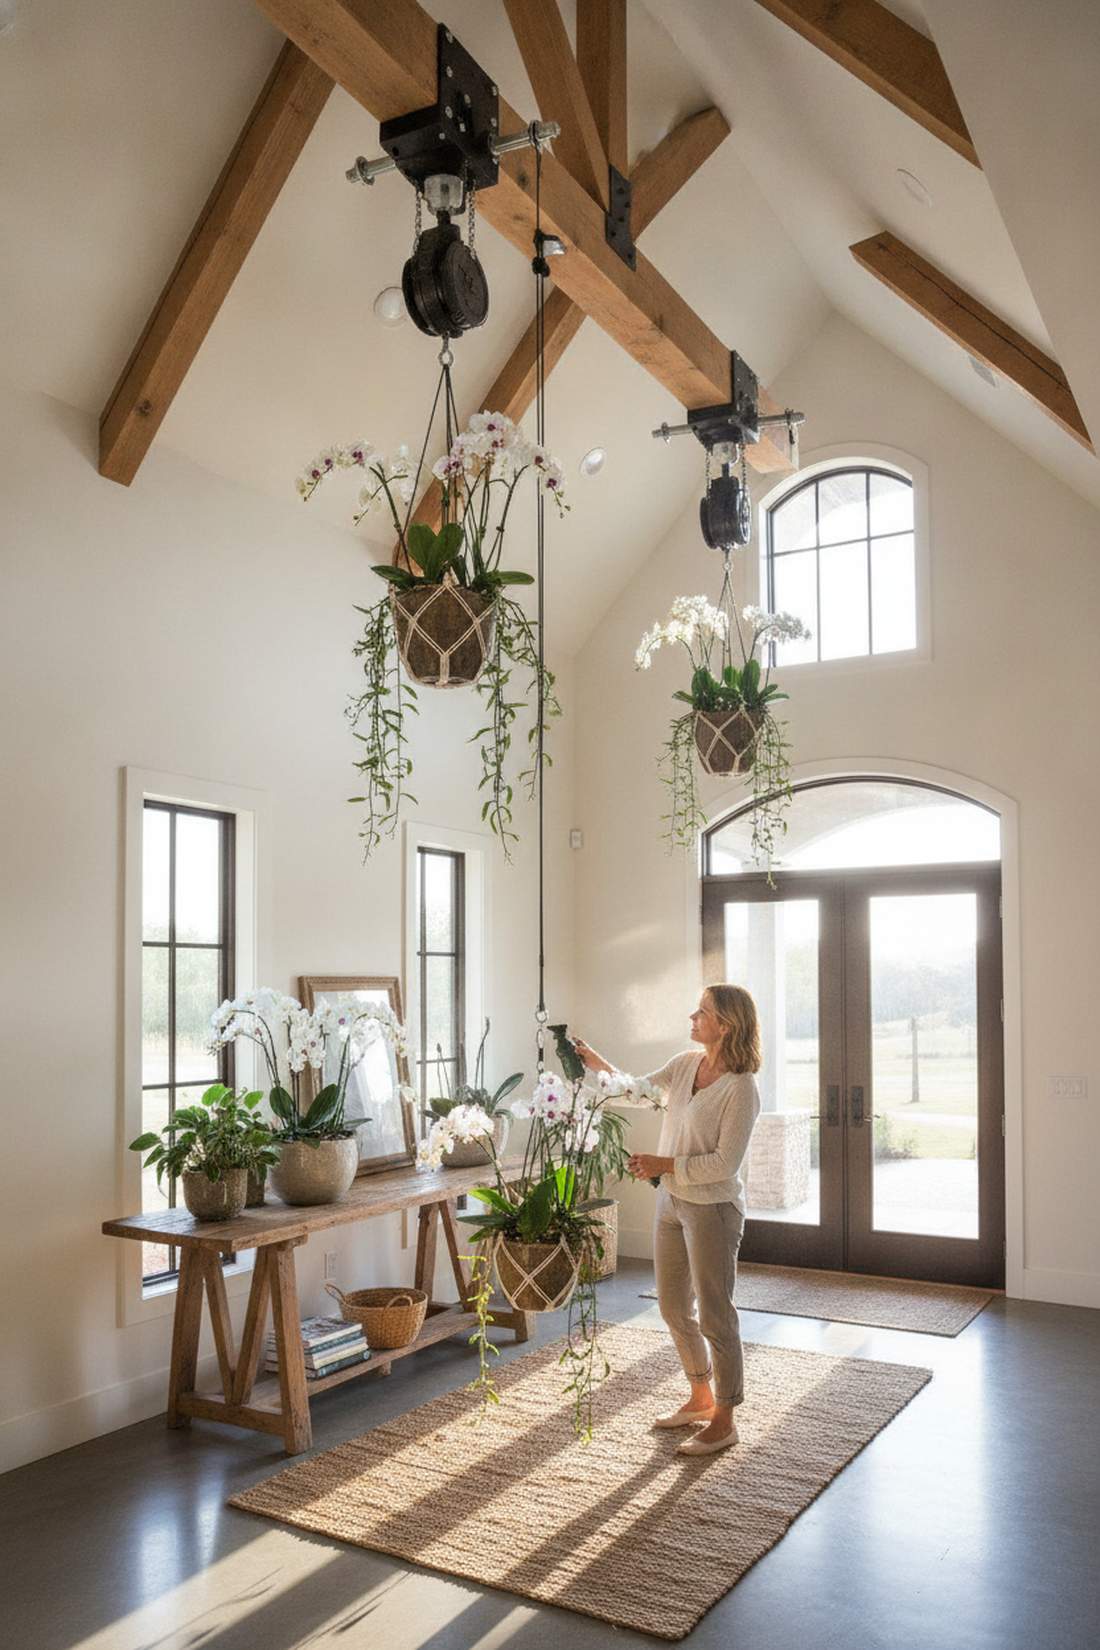
Feels like a high-tech smart garden hidden in plain sight. An adjustable canopy management system works exceptionally well for massive high-ceiling entryways where watering usually requires a terrifying ladder climb.
Elevating convenience, this kinetic hardware totally redefines how you interact with overhead displays. Instead of static chains, integrating premium pulley carabiner systems allows the greenery to descend smoothly for maintenance. It adds incredible functionality that makes the whole display feel highly engineered and luxurious.
Putting together this dynamic rig costs around $30–$50 per hook. Highly recommended for a quick weekend win if you have vaulted ceilings.
- Key Materials: Nylon ratcheting pulleys, lag screws
- Vibe / Style: Modern smart-home
- Difficulty: Intermediate installation
- Budget Breakdown: Pulley Mechanism: $25 | Anchors: $10
- Creator’s Tip: Test the locking tension with a sack of flour before hanging your prized orchids to ensure the internal ratchet bites properly.
- Smart Sourcing: Pick up a heavy-duty retractable plant pulley kit (2-pack) paired with stainless steel lag bolts (bulk box).
Most people get their spatial layout completely wrong… until they try the genius vertical hack coming up next.
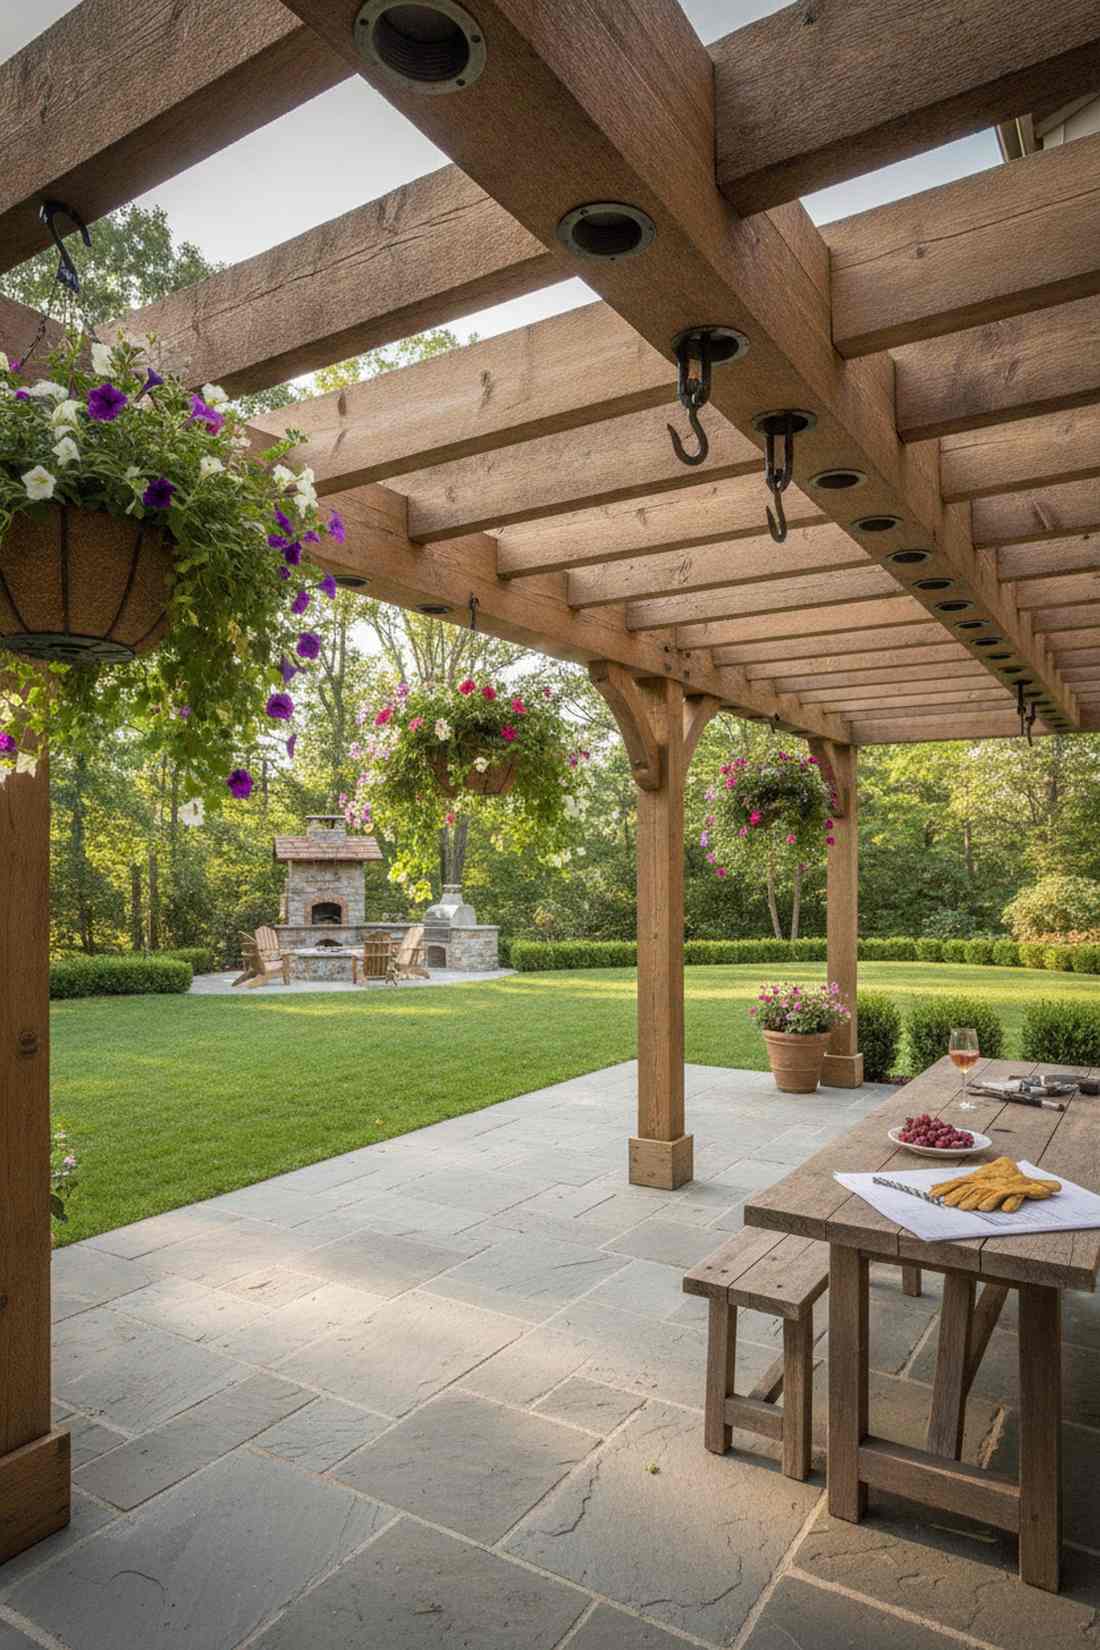
5. Decorative Cast Iron Ceiling Hook
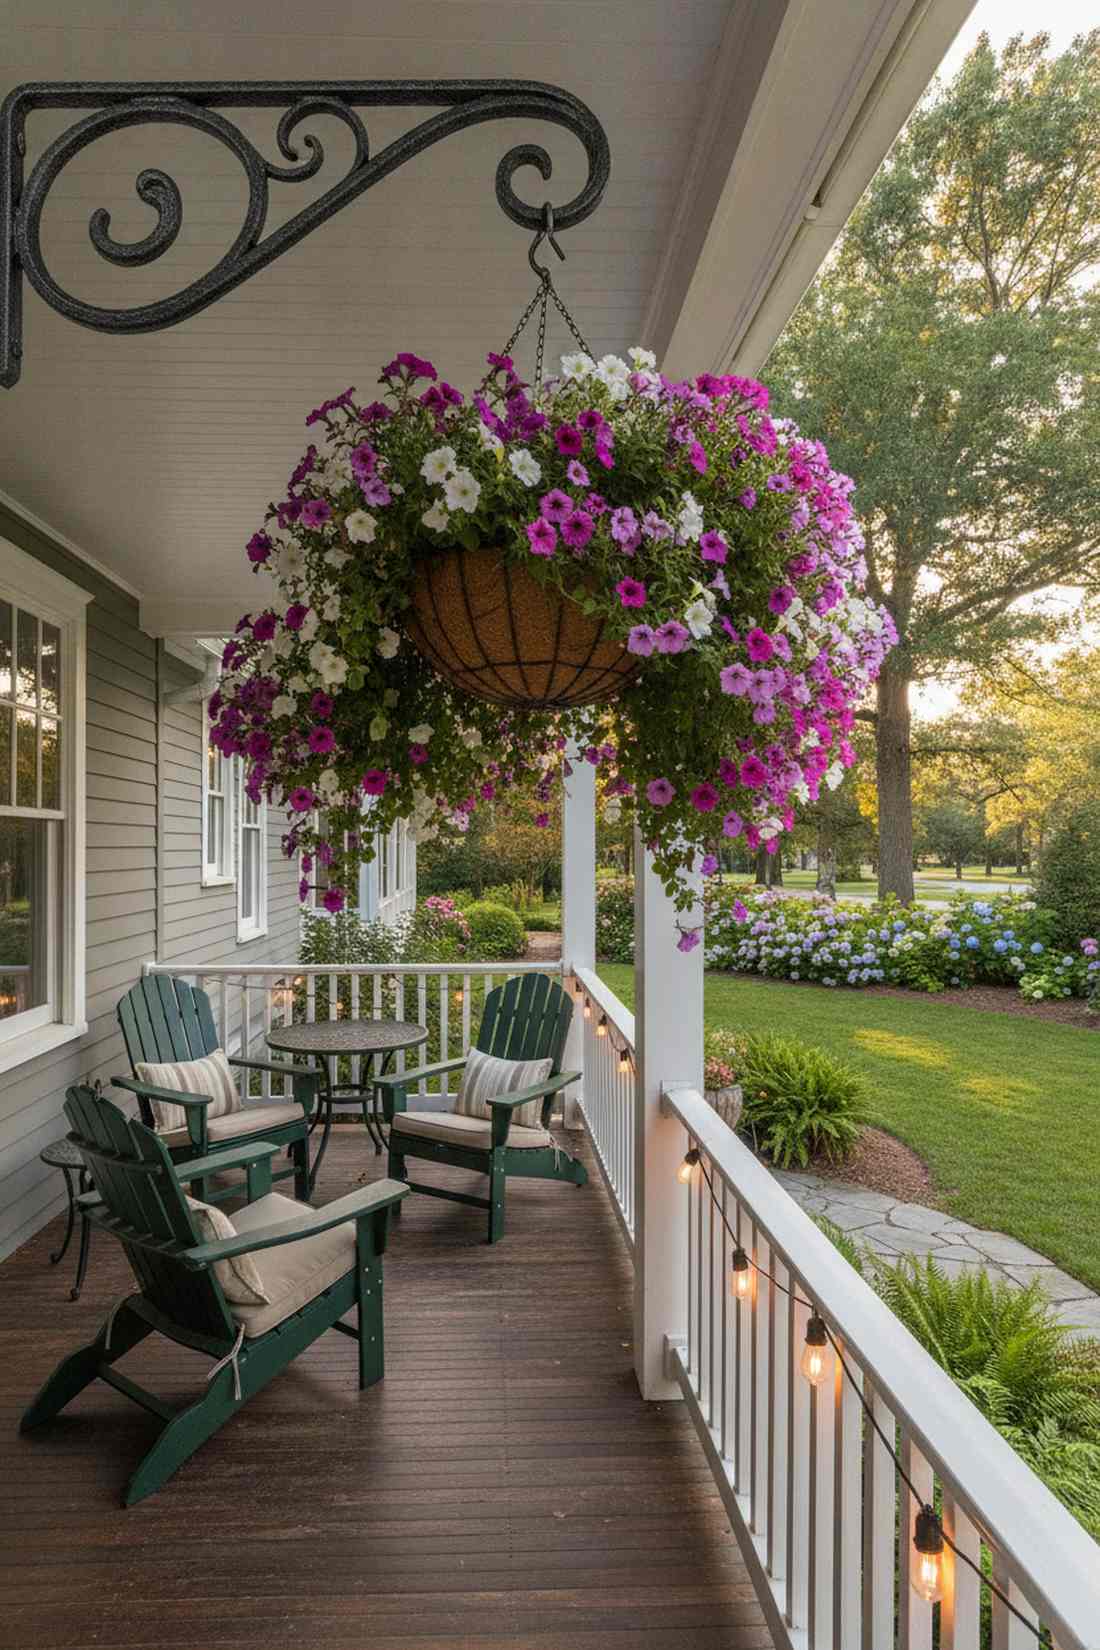
Transports your patio into an enchanting French Quarter courtyard. A wrought-iron scrollwork suspension is the absolute perfect centerpiece for hanging massive, blooming petunia baskets over a shaded porch.
Swapping cheap plastic for solid metal completely alters the perceived value of the space. Adding authentic, sand-cast detailing delivers a designer-level finish that frames the foliage beautifully. When you weave in premium outdoor garden accessories, the entire setup feels intentionally architectural rather than randomly hung.
You can capture this boutique look for roughly $35–$60. Save this idea to your outdoor living board for spring porch renovations!
- Key Materials: Sand-cast iron hooks, rust-inhibiting primer
- Vibe / Style: Rustic European
- Difficulty: Sturdy joist required
- Budget Breakdown: Cast Hook: $30 | Primer & Chain: $20
- Creator’s Tip: Spray the entire hook with clear, UV-resistant enamel before hanging to prevent rust stains from bleeding onto your white ceiling paint.
- Smart Sourcing: Find pre-primed cast iron ornamental hooks and a can of UV-coated clear matte sealant spray.
6. Rail-Mounted Sliding Hook
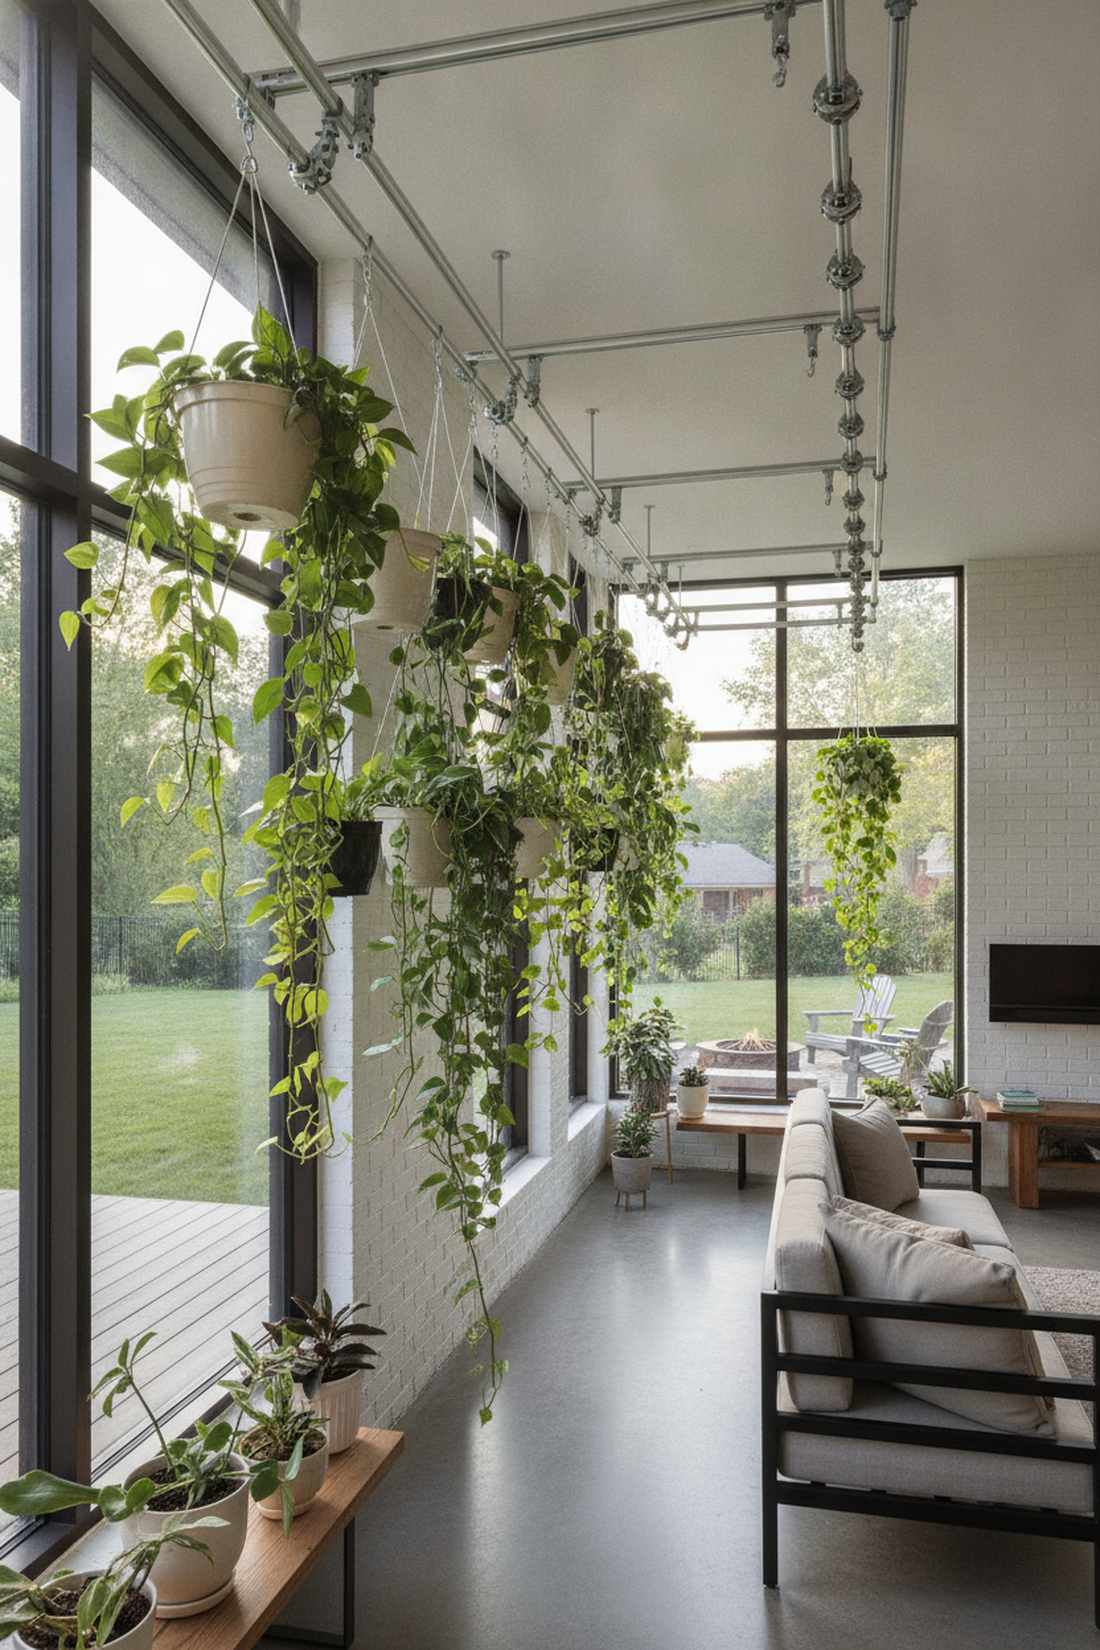
Radiates the slick energy of a boutique professional plant shop. An aluminum track gallery system is brilliantly suited for sunrooms where the angle of sunlight shifts dramatically between winter and summer.
Locking greenery into a single static spot is the biggest mistake indoor gardeners make. Installing a modular rail system gives a surprisingly premium look while allowing endless rotational freedom. Utilizing commercial greenhouse tracking gear means you can slide heavy pothos right into the morning light without remounting anything.
A full track system typically runs about $60–$100. It’s an incredibly smart investment for serious indoor canopy management.
- Key Materials: Aluminum ceiling track, sliding locking carriages
- Vibe / Style: Industrial minimalist
- Difficulty: Advanced alignment
- Budget Breakdown: Track Kit: $50 | Extra Sliders: $25
- Creator’s Tip: Stagger the length of your hanging chains so the plants form a cascading, overlapping wall of green rather than a uniform horizontal line.
- Smart Sourcing: Check out commercial-grade aluminum sliding rail kits and pre-cut stainless suspension cables.
7. Magnetic Ceiling Hook for Metal Beams
Feels like an impossibly cool industrial loft conversion. A neodymium floating anchor display works perfectly in modern warehouse apartments where drilling into the structural steel is strictly prohibited by landlords.
It sounds unbelievable, but the right rare-earth elements hold massive weight securely. Relying on extreme magnetic force looks far more expensive than it is, completely eliminating power tools from the equation. Sourcing industrial-strength rare-earth magnet kits lets you instantly populate exposed ductwork or I-beams with cascading vines.
You can grab heavy-duty magnetic mounts for about $15–$30. Pin this hack immediately if you live in an industrial rental space!
- Key Materials: Neodymium magnet bases, rubber anti-scratch pads
- Vibe / Style: Urban warehouse
- Difficulty: Tool-free instant
- Budget Breakdown: Magnet Base: $20 | Hanger Wire: $5
- Creator’s Tip: Clean the steel beam thoroughly with a strong degreaser before attaching; a tiny layer of dust will drastically reduce the magnetic grip strength.
- Smart Sourcing: Use heavy-duty neodymium magnetic hooks (bulk pack) and silicone anti-slip mounting pads.
Wall Bracket Hanging Plants Holder
Vertical surface mounting concentrates displays near natural light sources while maintaining clear floor circulation paths. These holders project outward from studs or masonry, creating layered depth in narrow garden corridors.
8. L-Bracket with Masonry Anchors
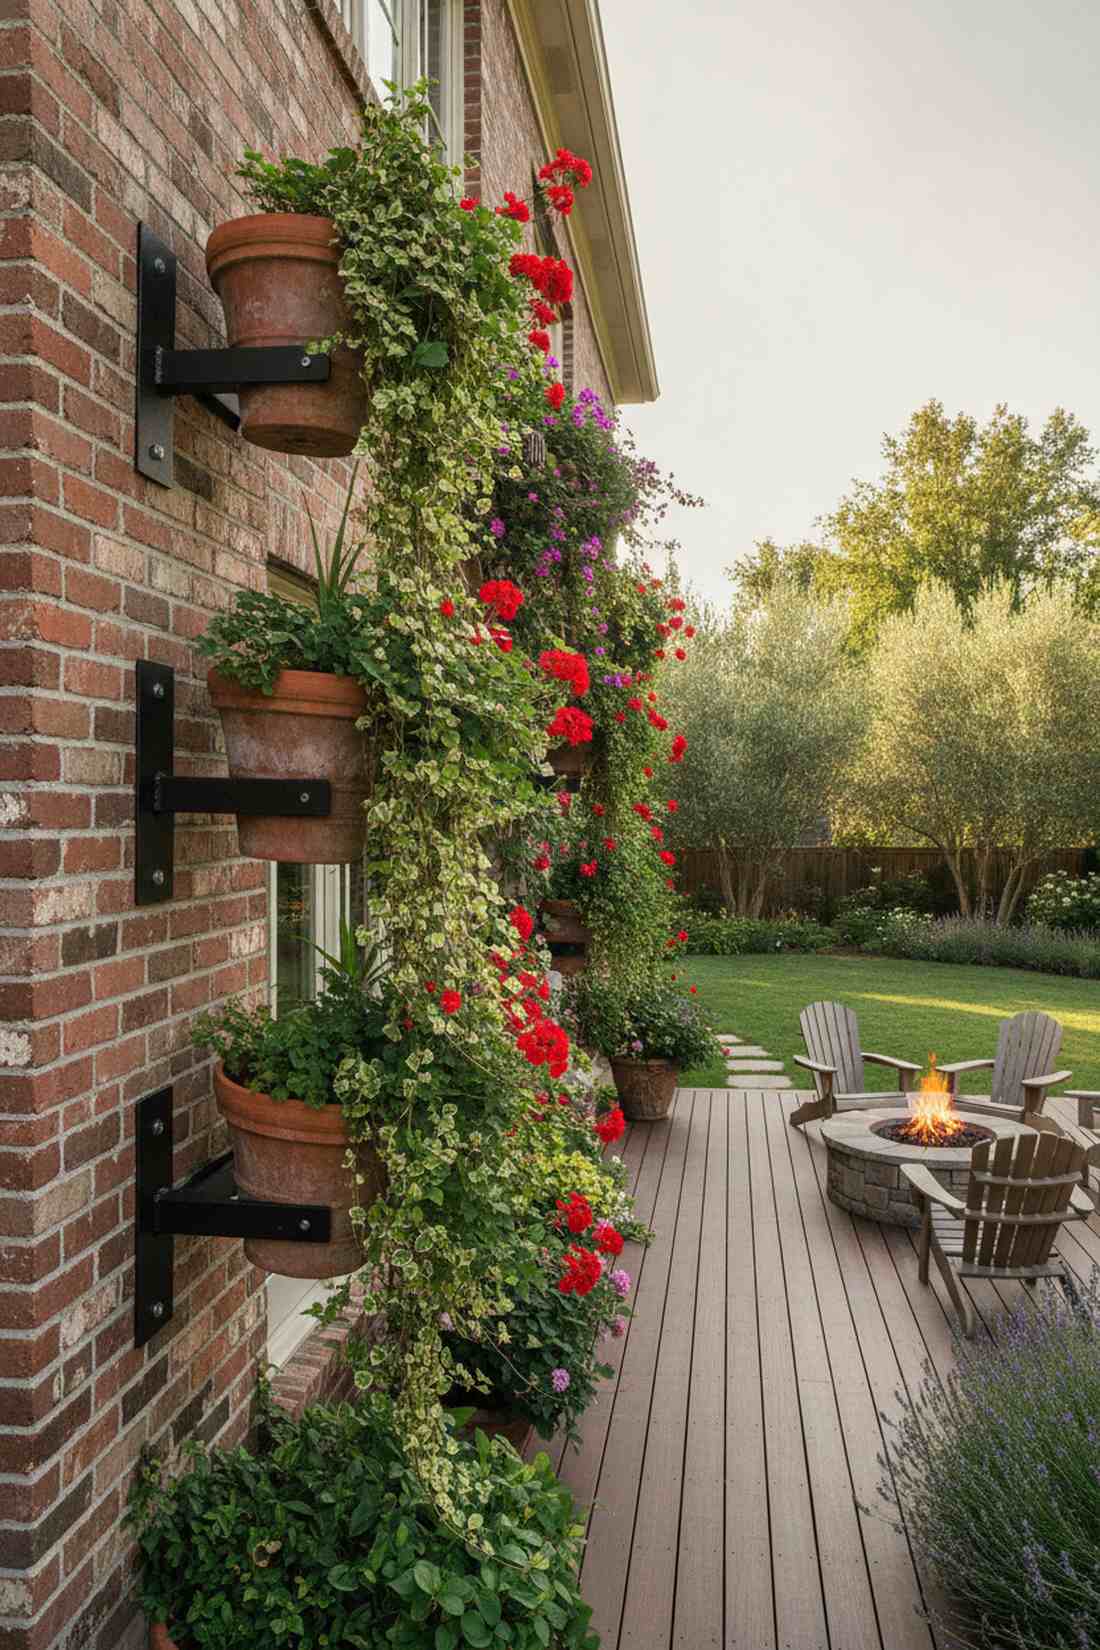
Like a rugged Mediterranean alleyway dripping with terra cotta. A heavy-duty exterior brick projection is the ultimate solution for bare concrete balconies or stark brick siding that desperately needs some organic texture.
Stop settling for flimsy wire that bends under a soaked clay pot. Utilizing industrial-strength steel right-angles delivers a designer-level finish that easily supports massive outdoor arrangements. Embedding proper masonry expansion shields ensures your prized ceramic containers remain safe during severe thunderstorms or high winds.
This bulletproof exterior upgrade costs roughly $20–$40. A brilliant, permanent investment for rugged architectural surfaces.
- Key Materials: Powder-coated L-brackets, carbide drill bits
- Vibe / Style: Robust Mediterranean
- Difficulty: Power tools required
- Budget Breakdown: Steel Bracket: $25 | Concrete Anchors: $10
- Creator’s Tip: Always drill slightly deeper than the length of your plastic expansion shield so the lag bolt doesn’t bottom out and strip the grip.
- Smart Sourcing: Opt for weather-resistant powder-coated L-brackets (2-pack) alongside a masonry anchor and drill bit starter kit.
9. Articulating Arm Wall Mount
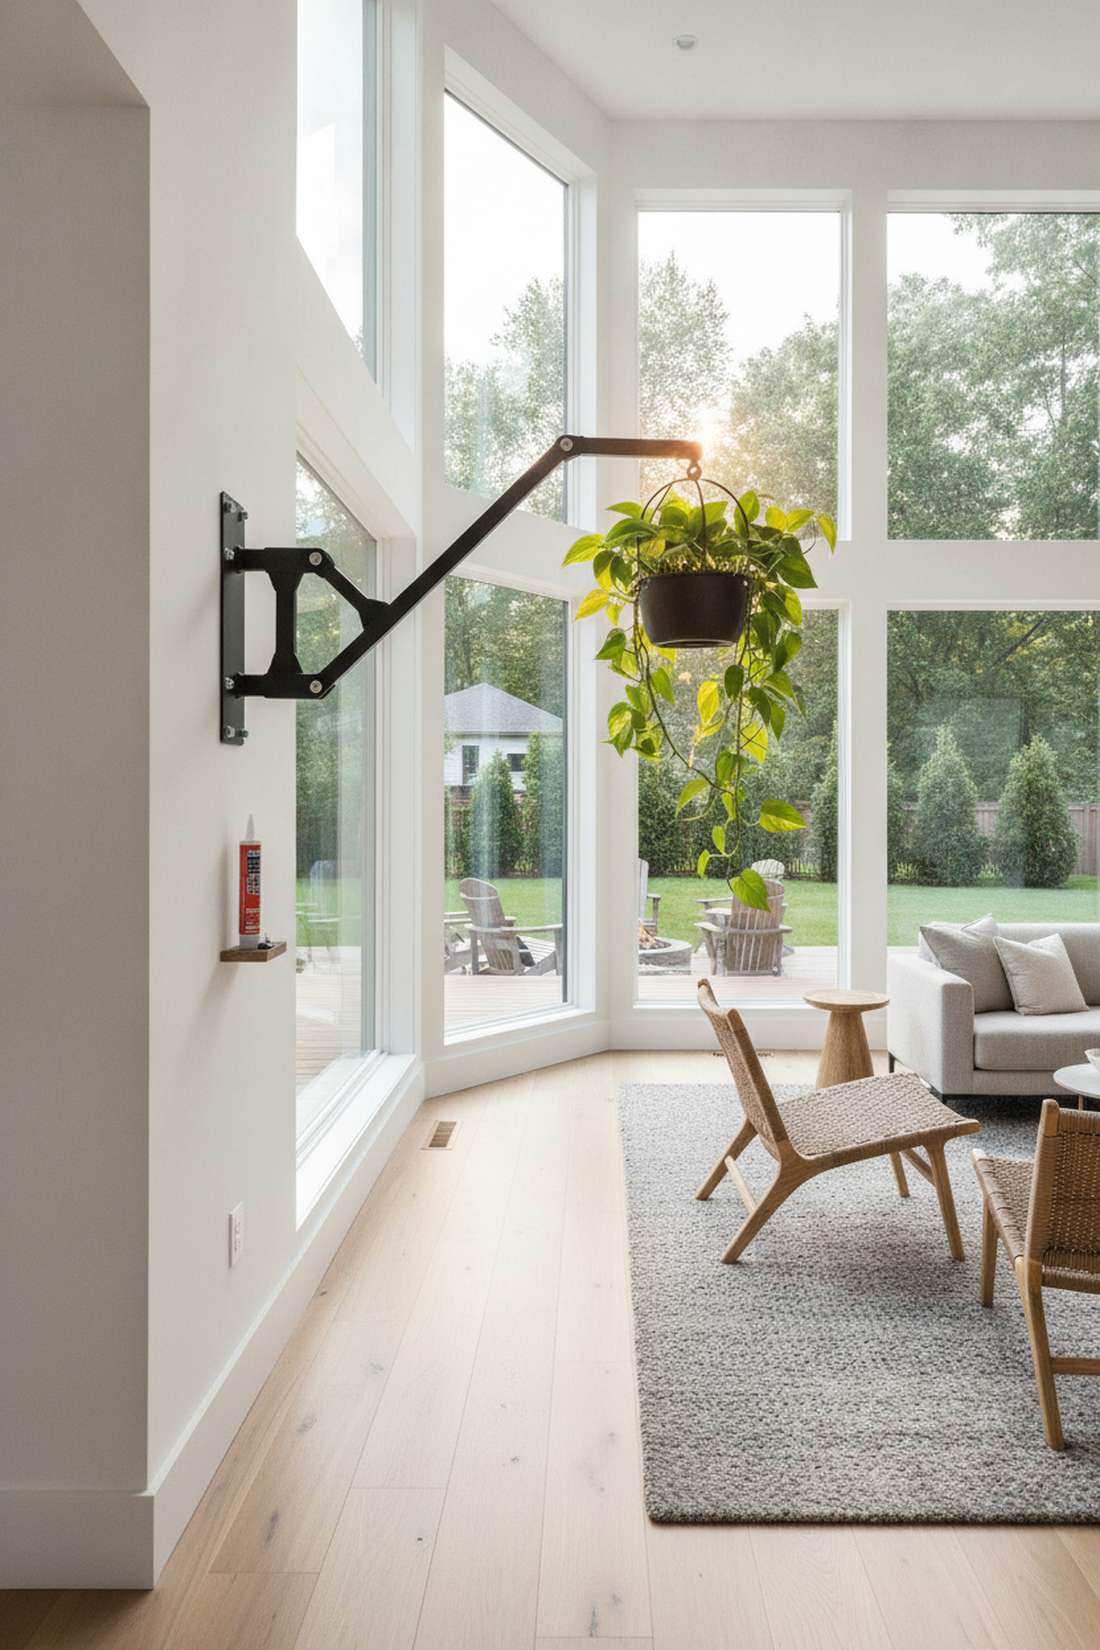
Feels like a robotic garden arm straight out of a futuristic eco-lab. An adjustable sunlight tracking mount works exceptionally well for angular bay windows where static hooks simply can’t reach the brightest zones.
Static displays often cause plants to grow lopsided as they stretch toward the glass. Integrating hinged wall brackets looks far more expensive than it is, giving you the power to pull plants directly into the sunbeams. Combining these with a sleek hanging plants holder lets you push the foliage away from walls to prevent damaging moisture buildup.
You can set up this pivoting hardware for about $35–$55. Save this to your indoor jungle board to solve awkward lighting issues!
- Key Materials: Dual-pivot metal arms, heavy-duty stud screws
- Vibe / Style: Dynamic modern
- Difficulty: Precision mounting
- Budget Breakdown: Articulating Arm: $40 | Base Hardware: $10
- Creator’s Tip: Add a dab of construction adhesive behind the wall plate before screwing it into the stud; this prevents lateral wobbling over time.
- Smart Sourcing: Snag an adjustable articulating wall plant mount and high-grade polyurethane construction adhesive.
This next installation is ridiculously cheap to source but looks like a $200 custom designer piece…
💡 Must-Have Supplies for High-End Setups
To build these setups faster and ensure they last, skip the generic craft aisles and invest in the right foundational kits.
- Base & Support: Commercial-grade powder-coated anchor multi-packs
- Setup Tools: Electronic stud finder and masonry bit starter kits
- Weather/Durability Protection: UV-resistant clear matte exterior sealant sprays
10. Shepherd Hook Wall Variant
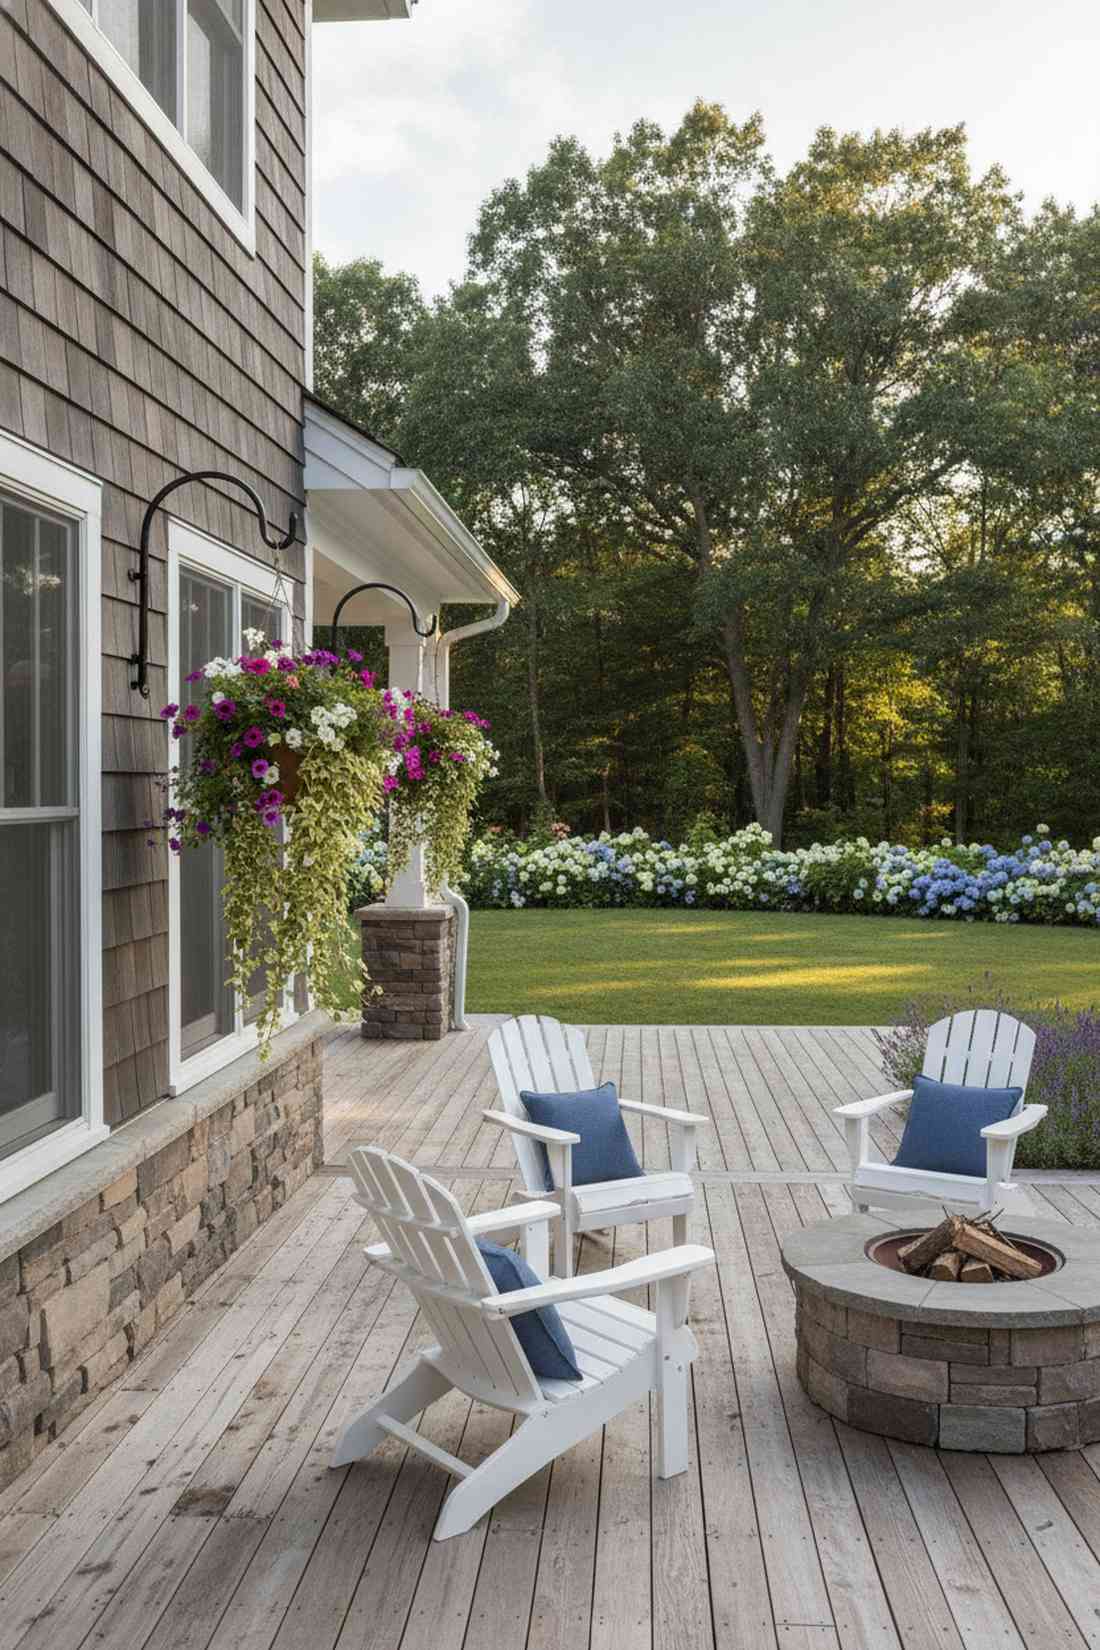
Conjures the elegant silhouette of a quiet cottage pathway. A classic curved-neck vertical mount creates instant storybook charm against flat, boring wooden lap siding or patio fencing.
Bringing a lawn classic up onto the vertical plane completely subverts expectations. It gives a designer-level finish that softens harsh architectural lines while keeping fragile blooms far away from lawnmower hazards. Tapping into outdoor patio styling kits allows you to blend traditional wrought-iron aesthetics seamlessly with modern outdoor living.
Achieve this nostalgic exterior look for roughly $25–$45. Highly recommended for injecting instant character into dull backyard walls.
- Key Materials: Wall-mounted shepherd necks, exterior wood screws
- Vibe / Style: Classic cottage core
- Difficulty: Very straightforward
- Budget Breakdown: Iron Hook: $30 | Weatherproof Screws: $8
- Creator’s Tip: Countersink your screws perfectly beneath the lip of lap siding boards to ensure rainwater doesn’t seep into the wood behind the plate.
- Smart Sourcing: Source wrought-iron wall shepherd hooks (set of 2) and a box of ceramic-coated exterior screws (bulk pack).
11. Hanging Plants Holder with Drip Tray
Looks like a polished, spill-proof professional setup. An integrated drainage catch system is absolutely brilliant for pristine white indoor walls where muddy overflow water would cause a total disaster.
Nothing ruins a beautifully curated indoor garden faster than water stains running down the drywall. Utilizing an all-in-one hanging plants holder with a built-in reservoir delivers a surprisingly premium look by concealing the mess. It leverages smart design so you don’t have to awkwardly balance loose saucers while standing on a chair.
You can lock in this pristine, mess-free setup for about $20–$35. Pin this essential layout if you’re terrified of ruining your apartment floors!
- Key Materials: UV-stable plastic brackets, silicone sealing gaskets
- Vibe / Style: Ultra-clean practical
- Difficulty: Beginner friendly
- Budget Breakdown: Bracket System: $25 | Wall Anchors: $5
- Creator’s Tip: Mount these brackets exactly at eye-level so you can easily see when the detachable reservoir needs to be unclipped and emptied.
- Smart Sourcing: Buy an integrated drip-tray plant holder kit paired with replacement silicone drainage gaskets (bulk pack).
12. Corner Bracket Dual Hook
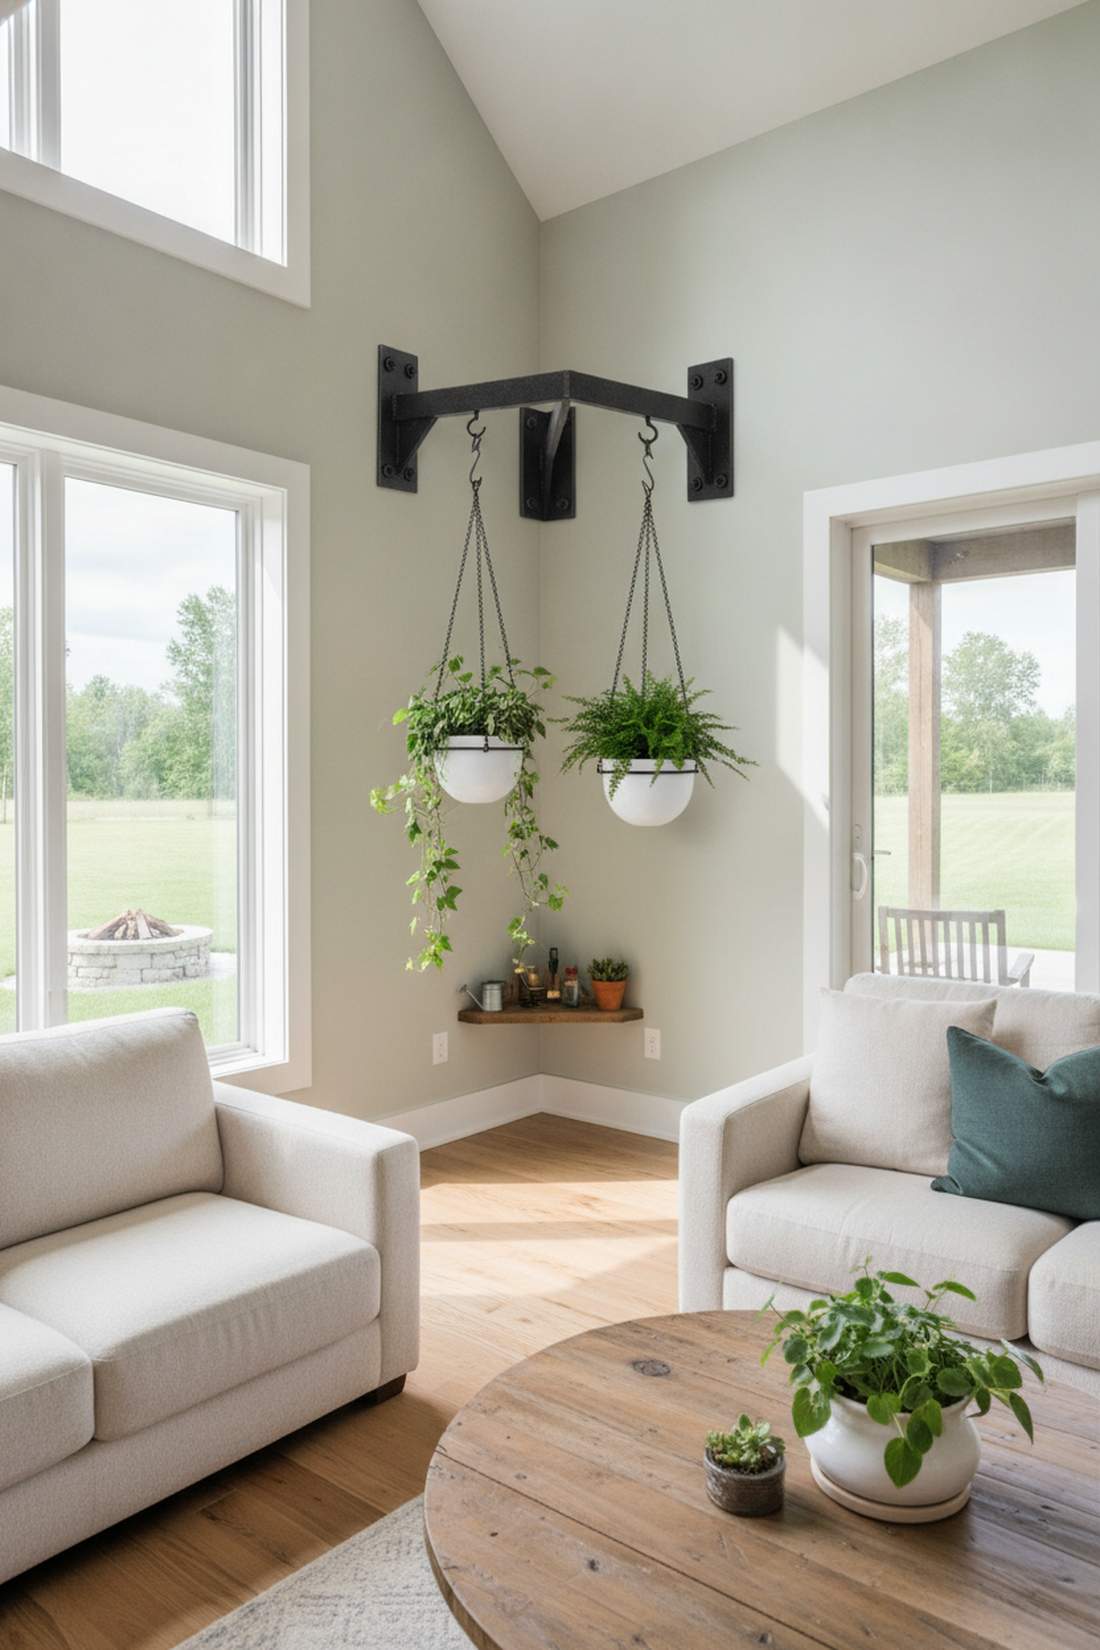
Feels like discovering a secret botanical alcove. A triangular dual-display nest works exceptionally well to breathe life into harsh, 90-degree hallway intersections or dead living room corners.
Empty corners are the biggest missed opportunities in interior design styling. Employing a shared-load mounting plate creates an aggressive, layered geometry that looks far more expensive than it is. When you utilize high-quality miniature garden supplies alongside a double-hook system, it forces a beautiful, symmetrical focal point from dead space.
This space-maximizing hardware generally costs around $30–$50. A fantastic, high-impact choice for tight indoor spaces.
- Key Materials: Right-angle mounting plates, heavy lag bolts
- Vibe / Style: Geometric lush
- Difficulty: Moderate alignment
- Budget Breakdown: Corner Bracket: $35 | Pot Chains: $15
- Creator’s Tip: Use an electronic stud finder on both adjacent walls and pre-drill long pilot holes; corners often have complex, reinforced wood framing.
- Smart Sourcing: Grab a heavy-duty steel corner plant bracket and a pack of pre-cut black iron suspension chains.
13. Fold-Down Wall Hook
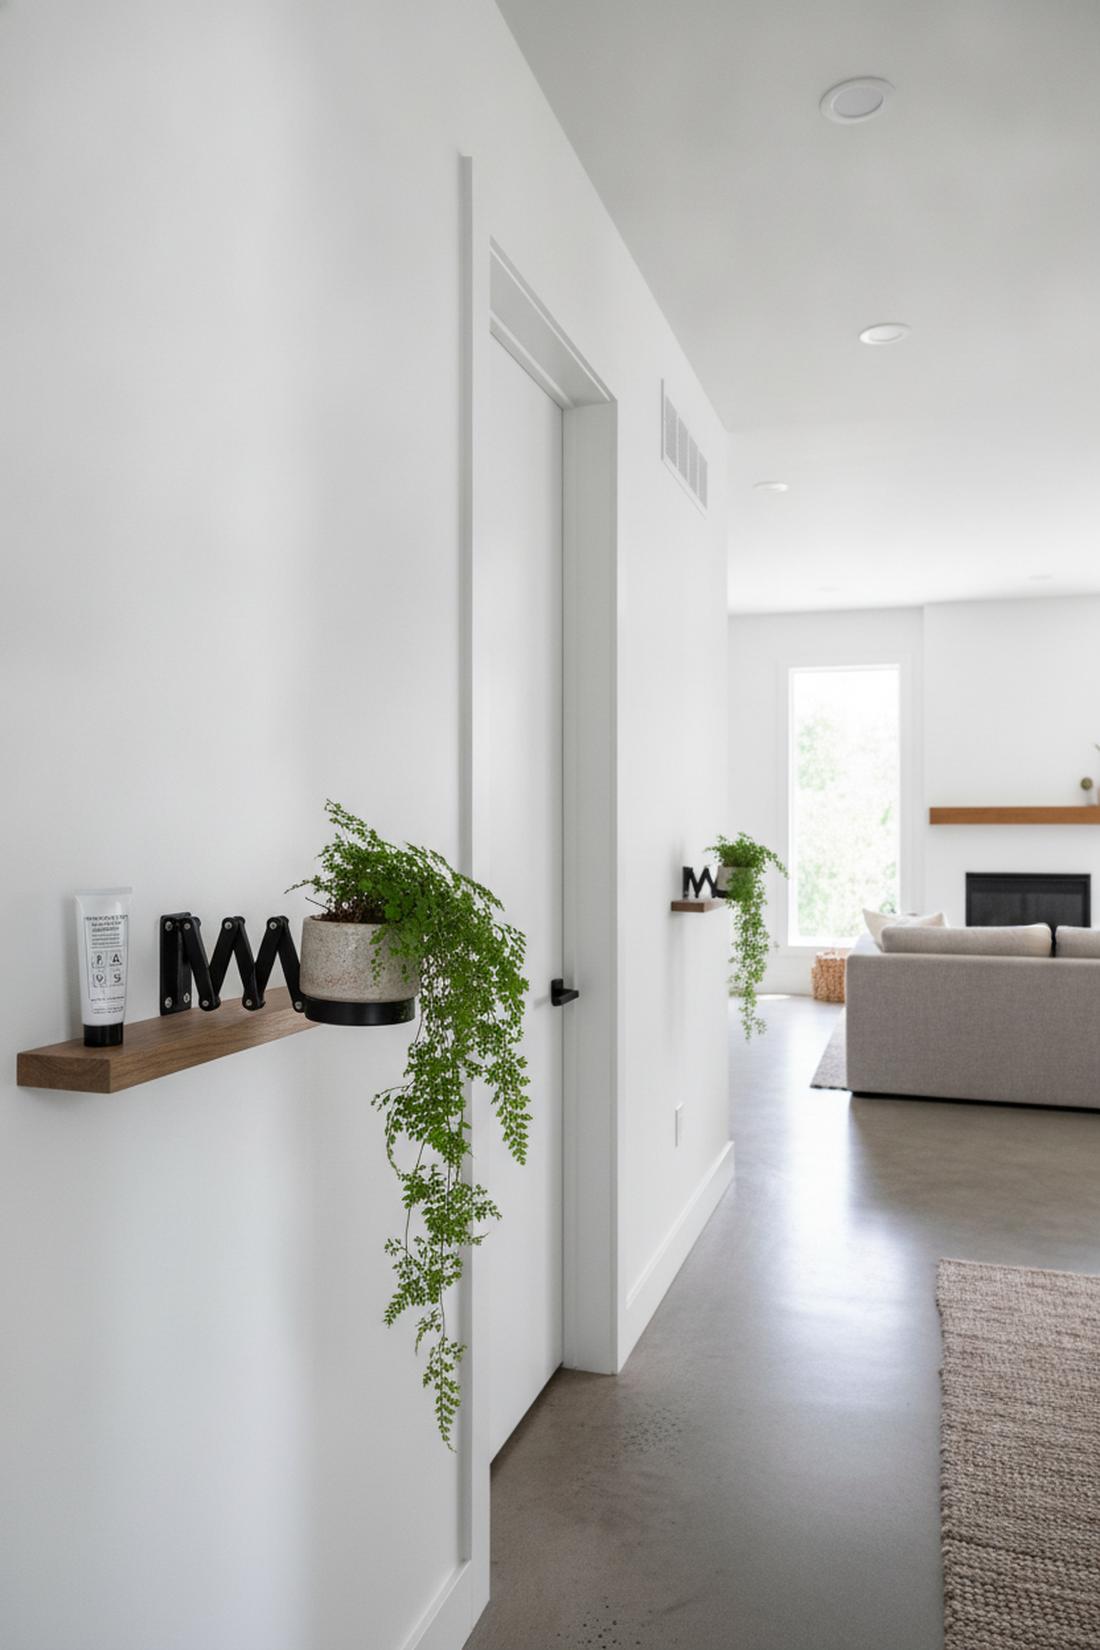
Like a sleek, convertible fixture from a minimalist tiny home. A collapsible corridor mounting arm is the perfect seasonal solution for narrow entryways that only need plant displays during the darker winter months.
Bulky protruding hooks are a nightmare in high-traffic hallways. Incorporating a spring-loaded hinge delivers a designer-level finish, snapping completely flat against the wall when your ferns move outside for the summer. It’s an incredibly smart use of compact space-saving accessories that proves hardware can be both functional and invisible.
Install this brilliant retracting feature for roughly $18–$30. Save this smart space hack to your minimal living board immediately!
- Key Materials: Spring-loaded folding brackets, locking pins
- Vibe / Style: Stealth minimalist
- Difficulty: Quick installation
- Budget Breakdown: Folding Hardware: $22 | Anchors: $5
- Creator’s Tip: Apply a tiny drop of silicone lubricant to the pivot joint once a year to ensure the collapsing action remains buttery smooth.
- Smart Sourcing: Pick up a spring-loaded fold-down wall hook kit alongside a small tube of weatherproof silicone hinge lubricant.
14. Shepherd Hook Stake
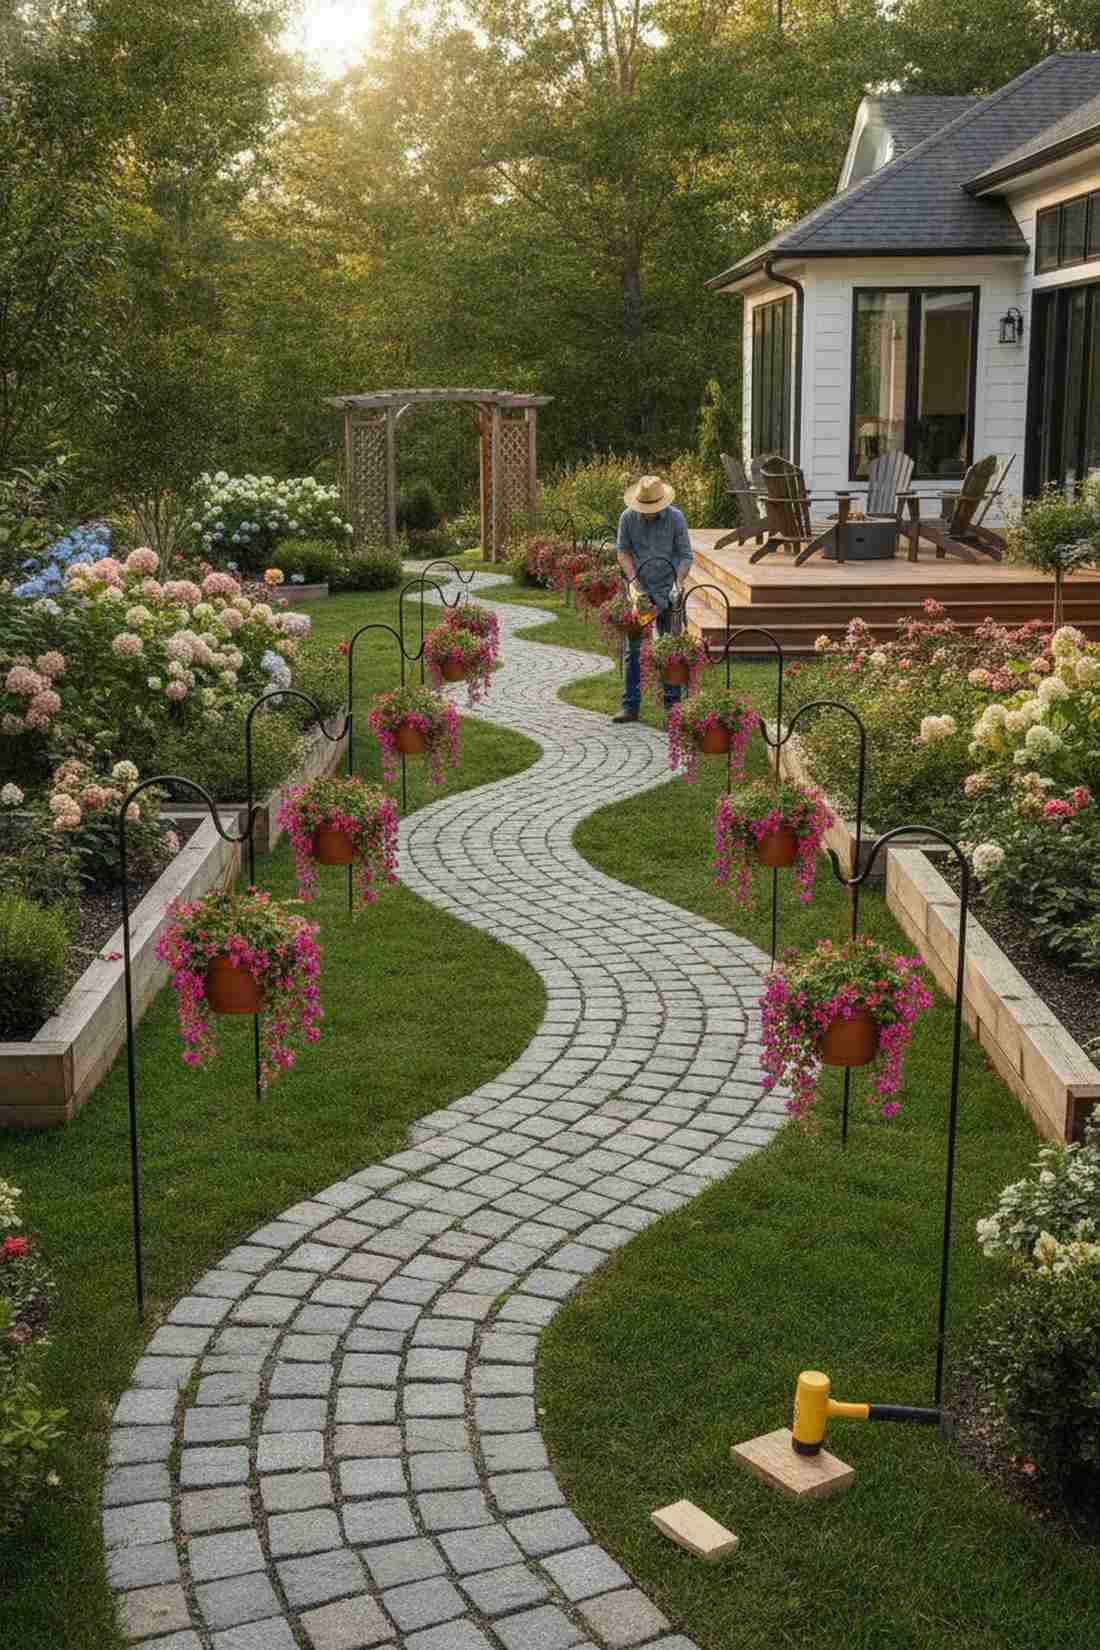
Brings a sweeping, romantic rhythm right to the edge of your flower beds. A freestanding curved border anchor works exceptionally well to elevate trailing fuchsias just above your lower-ground shrubbery.
Sticking massive pots blindly into the dirt is a surefire way to invite rot and pests. Using a classic steel ground spike gives a surprisingly premium look, establishing a structured, wavy visual line along garden walkways. It’s the easiest way to incorporate a portable hanging plants stand without pouring an ounce of concrete.
You can line your walkway with these for about $15–$25 a piece. Highly recommended for instant curb appeal.
- Key Materials: Solid steel single-stakes, rubber mallet
- Vibe / Style: Romantic garden walk
- Difficulty: Zero tools required
- Budget Breakdown: Steel Stake: $20 | Rubber Buffer: $5
- Creator’s Tip: Always use a scrap piece of wood as a buffer between your hammer and the stake to prevent chipping the black protective paint.
- Smart Sourcing: Use heavy-duty solid steel shepherd hooks (4-pack) and a polyurethane deadblow mallet for damage-free driving.
Stop wasting money on flimsy wire setups. The next heavy-duty trick changes the aesthetic entirely.
Freestanding Hanging Plants Stand
Portable support structures eliminate installation requirements while offering unlimited spatial flexibility across patios, decks, and indoor conservatories. These stands create instant vertical gardening zones without committing to permanent hardware.
15. C-Frame Hanging Plants Stand
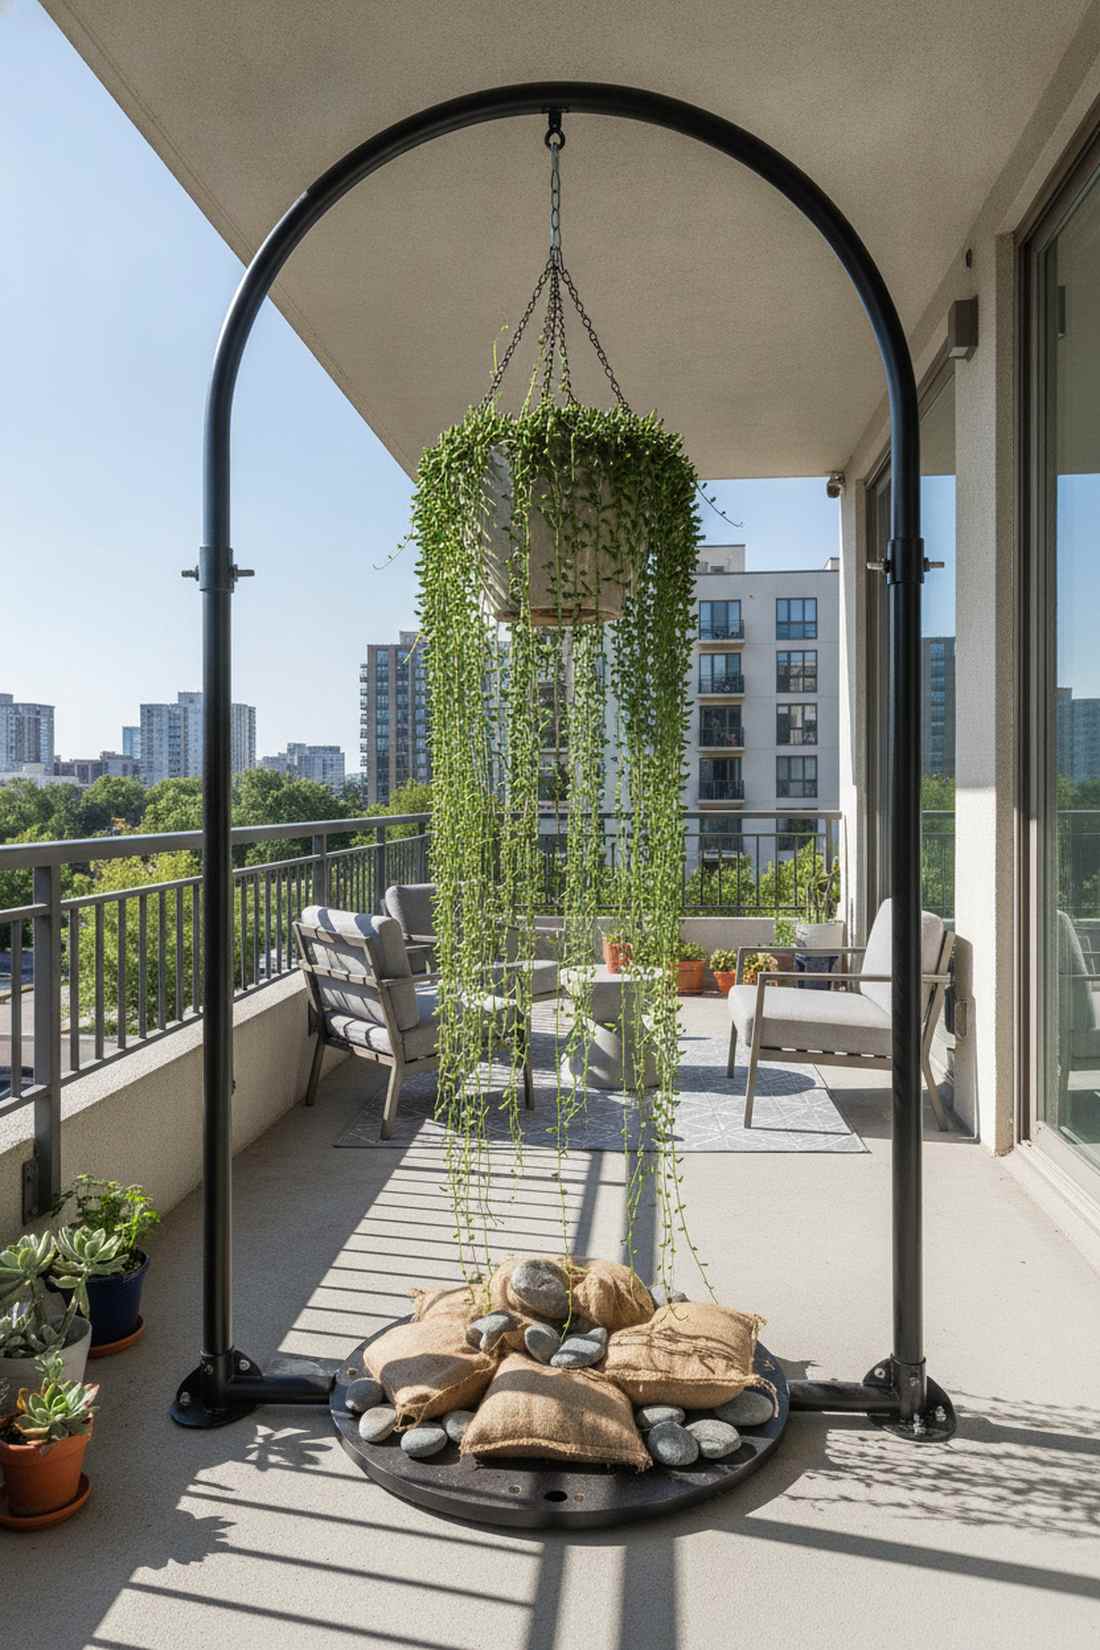
Feels like a modern sculptural archway highlighting your best botanical specimen. An open-sided tubular arch is perfectly designed for showcasing massive, cascading string-of-pearls on a flat, concrete apartment balcony.
Trying to balance heavy cascades on flimsy wire stands usually ends in shattered pottery. Opting for a weighted C-arm structure looks far more expensive than it is, providing 270 degrees of unobstructed sunlight. When utilized as a dedicated hanging plants stand, it completely removes the need to drill into your landlord’s exterior siding.
This bold freestanding statement piece usually costs around $45–$80. Pin this to your renter-friendly outdoor decor board!
- Key Materials: Tubular steel framing, hex-bolt assembly
- Vibe / Style: Modern patio statement
- Difficulty: Simple assembly
- Budget Breakdown: C-Frame Structure: $60 | Base Ballast: $15
- Creator’s Tip: Place decorative river rocks or heavy sandbags over the bottom base plate before hanging your plant to ensure it never tips in high winds.
- Smart Sourcing: Grab a powder-coated C-frame hanging plant stand and weatherproof decorative weight bags (bulk pack).
16. Tripod Hanging Plants Stand
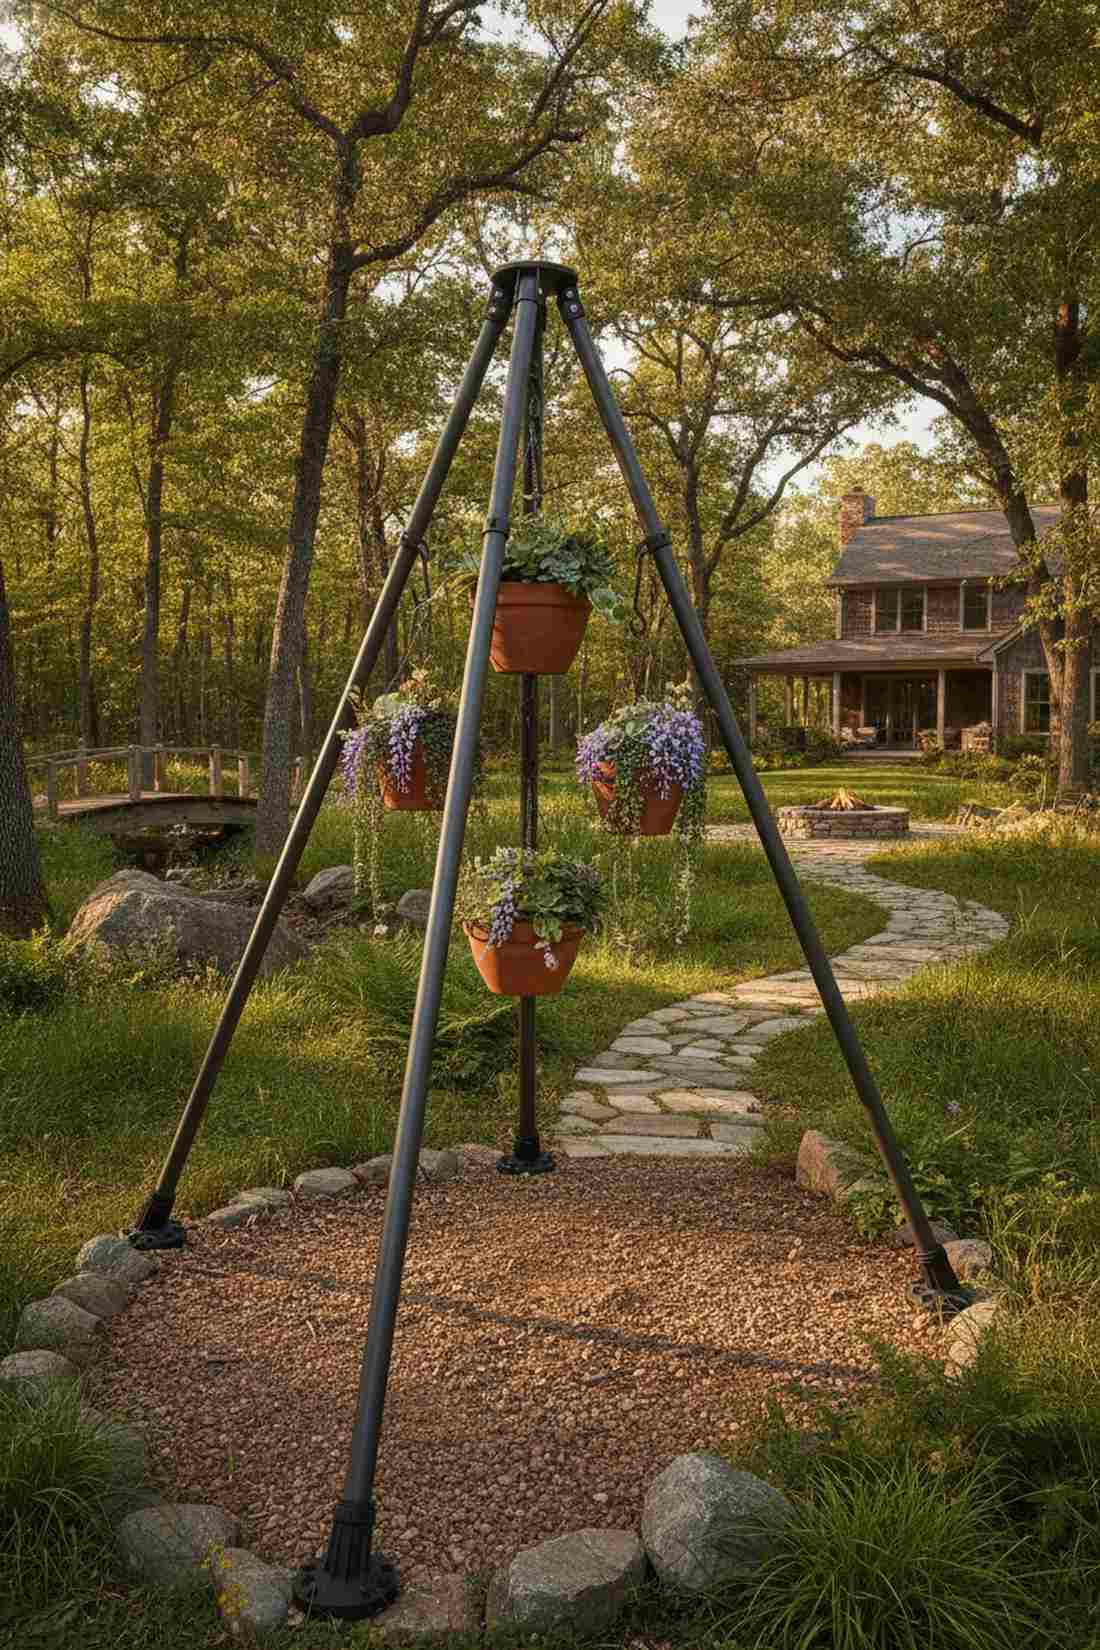
Projects the raw, adventurous vibe of a wilderness survey camp. A telescoping multi-leg support is brilliantly suited for sloped, uneven backyard terrain where traditional flat-based stands instantly fall over.
Fighting against rocky, natural garden gradients is a losing battle with standard flat plates. Utilizing a widely splayed three-legged geometry delivers a designer-level finish that auto-stabilizes on rough landscapes. Integrating a rugged hanging plants stand adds serious architectural scale, framing your plants perfectly against wild, overgrown backdrops.
This terrain-conquering setup costs roughly $50–$90. A perfect addition to rustic or wildly natural garden designs.
- Key Materials: Telescoping steel legs, rubber foot caps
- Vibe / Style: Rugged expedition
- Difficulty: Easy deployment
- Budget Breakdown: Tripod Frame: $70 | Protective Caps: $10
- Creator’s Tip: Spread the legs to their absolute maximum diameter before loading any weight to ensure the center of gravity stays impossibly low.
- Smart Sourcing: Invest in a heavy-duty telescoping tripod plant stand along with all-weather rubber foot grips (multi-pack).
17. Tiered Cascade Stand
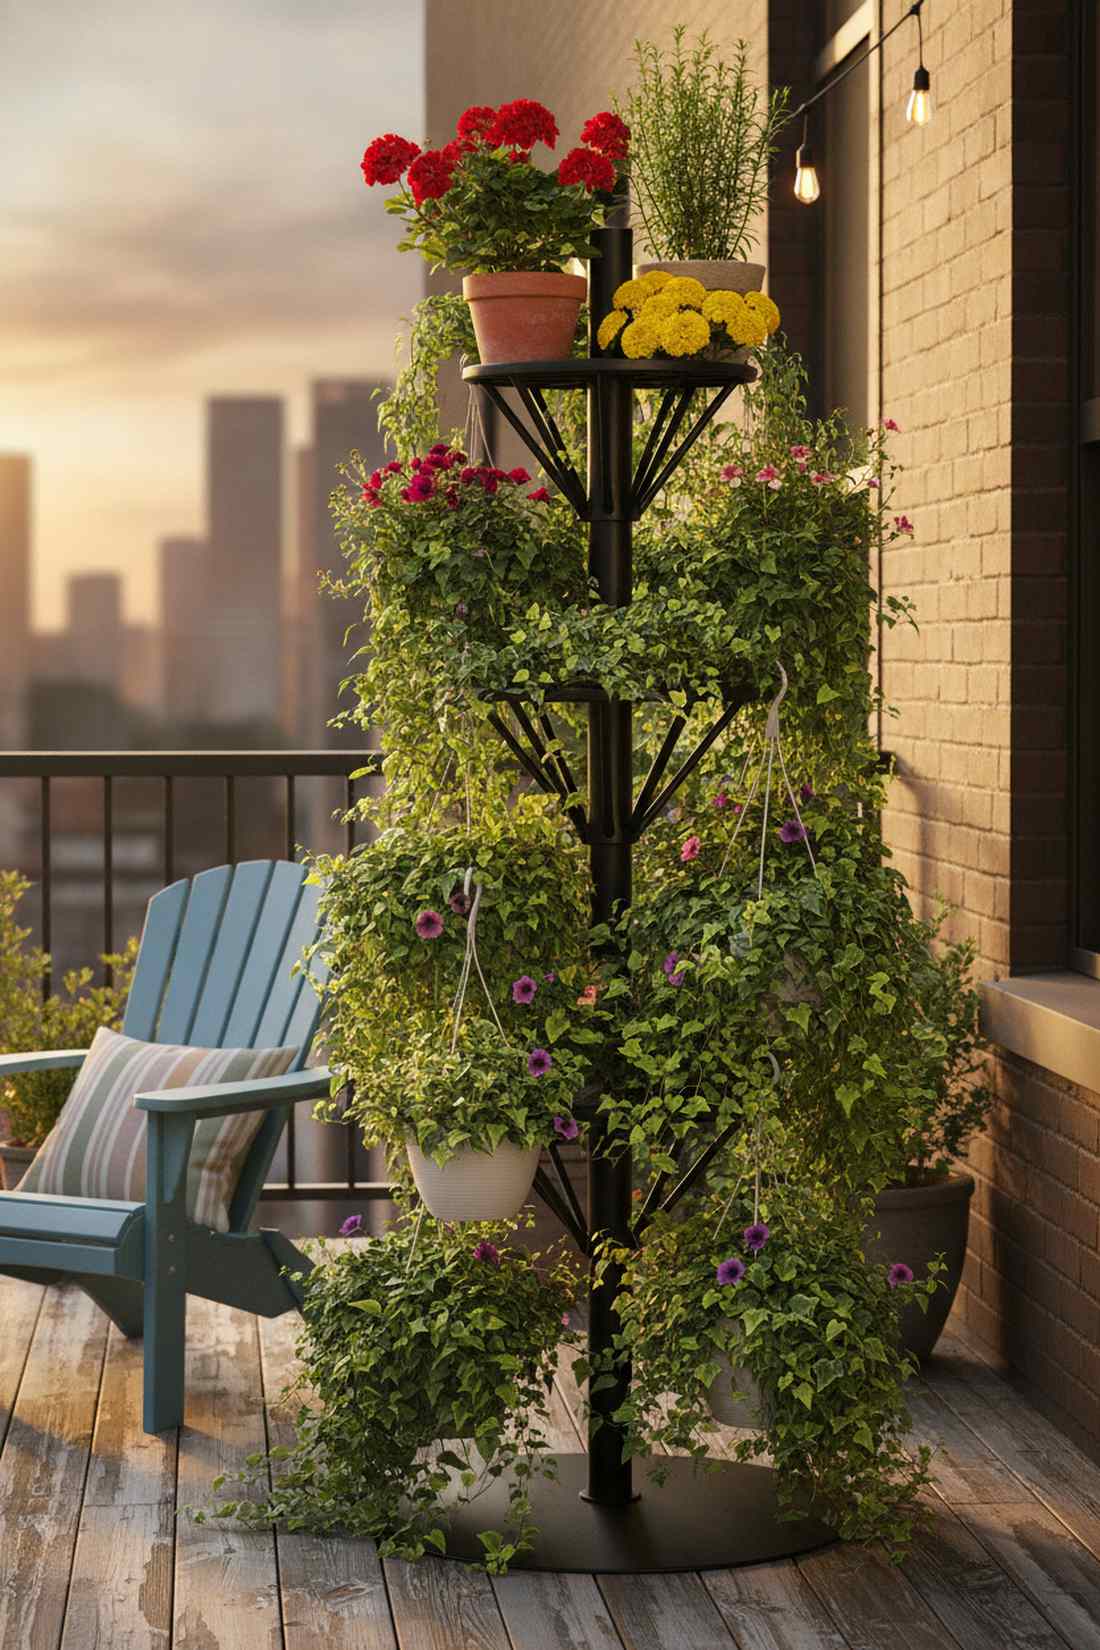
Looks like a lush, multi-level botanical fountain bursting with color. A staggered vertical array works exceptionally well to transform a tiny, two-foot balcony corner into a massive, high-yield container garden.
Crowding all your pots onto the floor blocks light and looks completely chaotic. Building upward with a graduating pole system gives a surprisingly premium look, creating dense layers of complementary foliage. Utilizing this smart vertical garden framework multiplies your growing space dramatically without widening your actual footprint.
You can score this high-density display for about $40–$75. Save this brilliant space-saving tower to your urban patio board!
- Key Materials: Graduated hook arms, weighted central post
- Vibe / Style: High-density urban
- Difficulty: Quick bolt-together
- Budget Breakdown: Tiered Rack: $55 | Extra S-hooks: $10
- Creator’s Tip: Place upright, sun-loving plants on the very top hooks and let moisture-loving trailing vines cascade from the lower, shaded tiers.
- Smart Sourcing: Source a multi-tier cascade hanging stand kit paired with stainless steel heavy-duty S-hooks (bulk pack).
18. Arch Gateway Stand
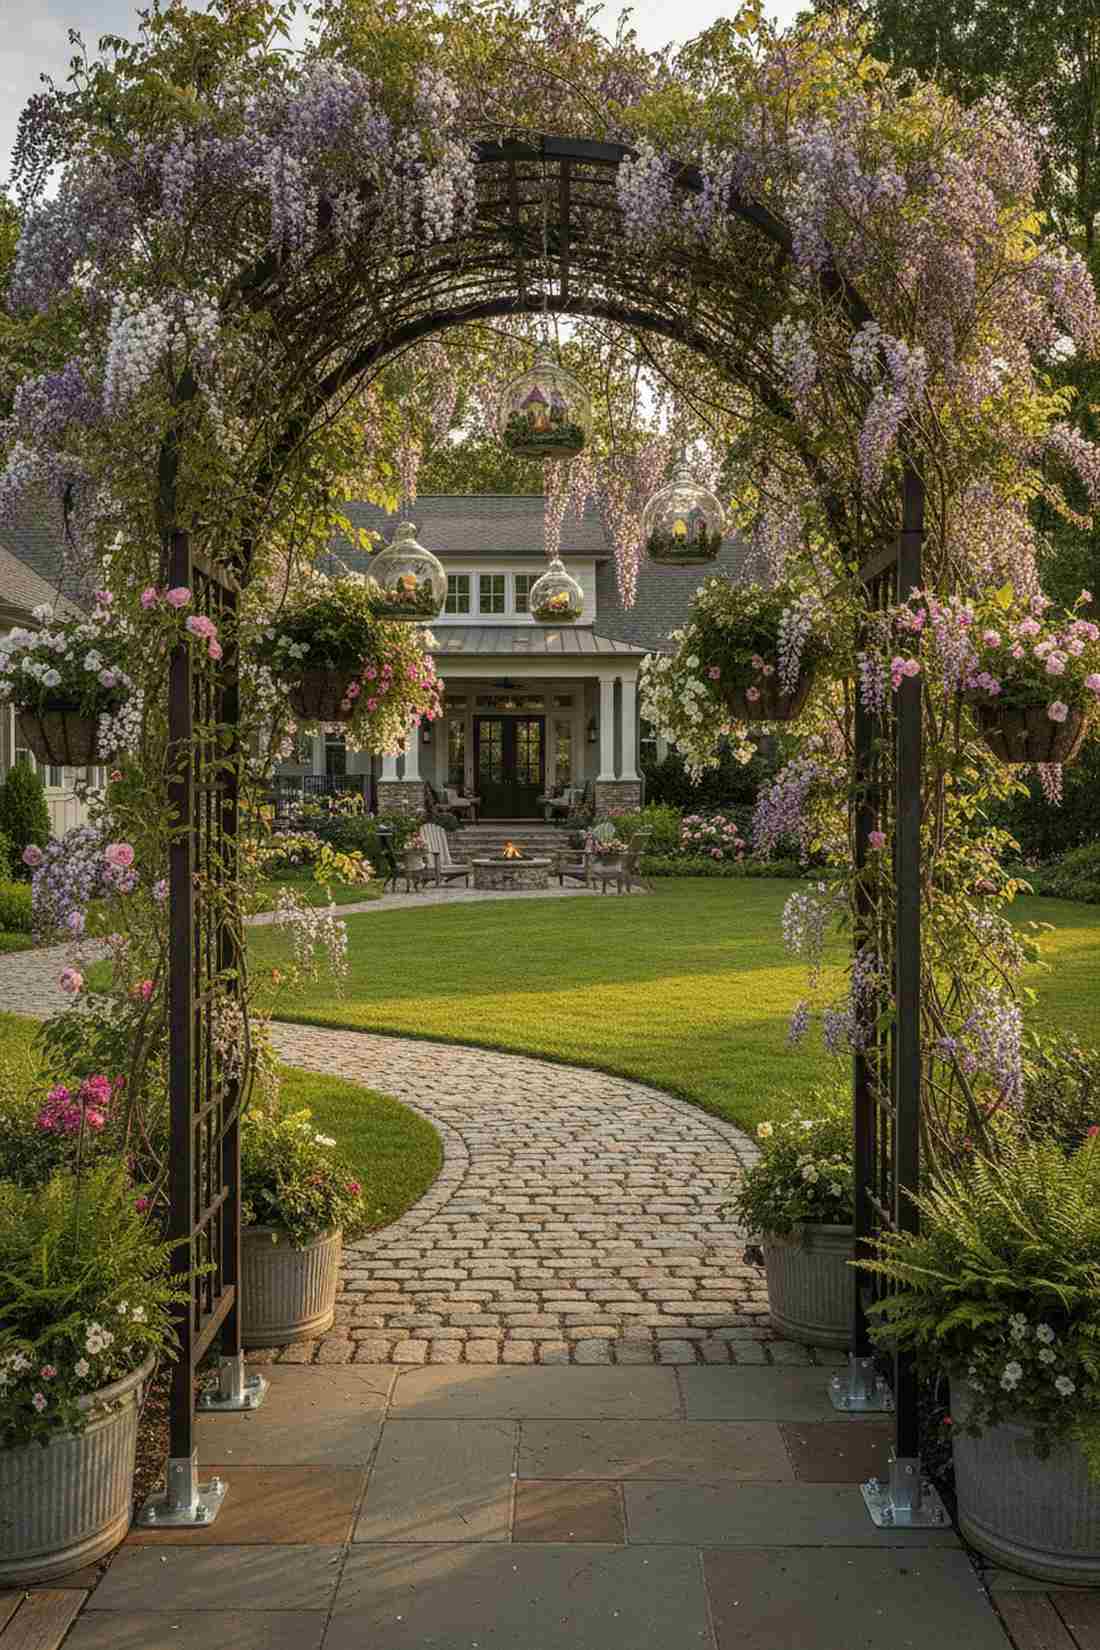
Feels like stepping through a magical floral portal into a hidden courtyard. A dual-post lattice overhead framework is the ultimate structure for defining a grand entrance from your lawn to a secluded patio.
Most backyard transitions lack any real architectural drama or boundary definition. Bridging a pathway with a suspended curtain of vines looks far more expensive than it is, establishing instant luxury landscaping. Incorporating premium fairy garden kits or delicate hanging blooms creates an immersive, sensory experience every time you walk beneath it.
Constructing this dramatic threshold will run about $100–$180. A spectacular, high-impact choice for serious garden landscaping.
- Key Materials: Steel arch sections, concrete footings (optional)
- Vibe / Style: Grand botanical estate
- Difficulty: Two-person assembly
- Budget Breakdown: Arch Structure: $130 | Deck Flanges: $30
- Creator’s Tip: If installing on a wooden deck, toss the included ground stakes and use heavy bolt-down steel flanges to prevent catastrophic wind damage.
- Smart Sourcing: Grab a weatherproof steel garden archway kit and heavy-duty galvanized bolt-down deck flanges.
19. Wheeled Mobile Plant Rack
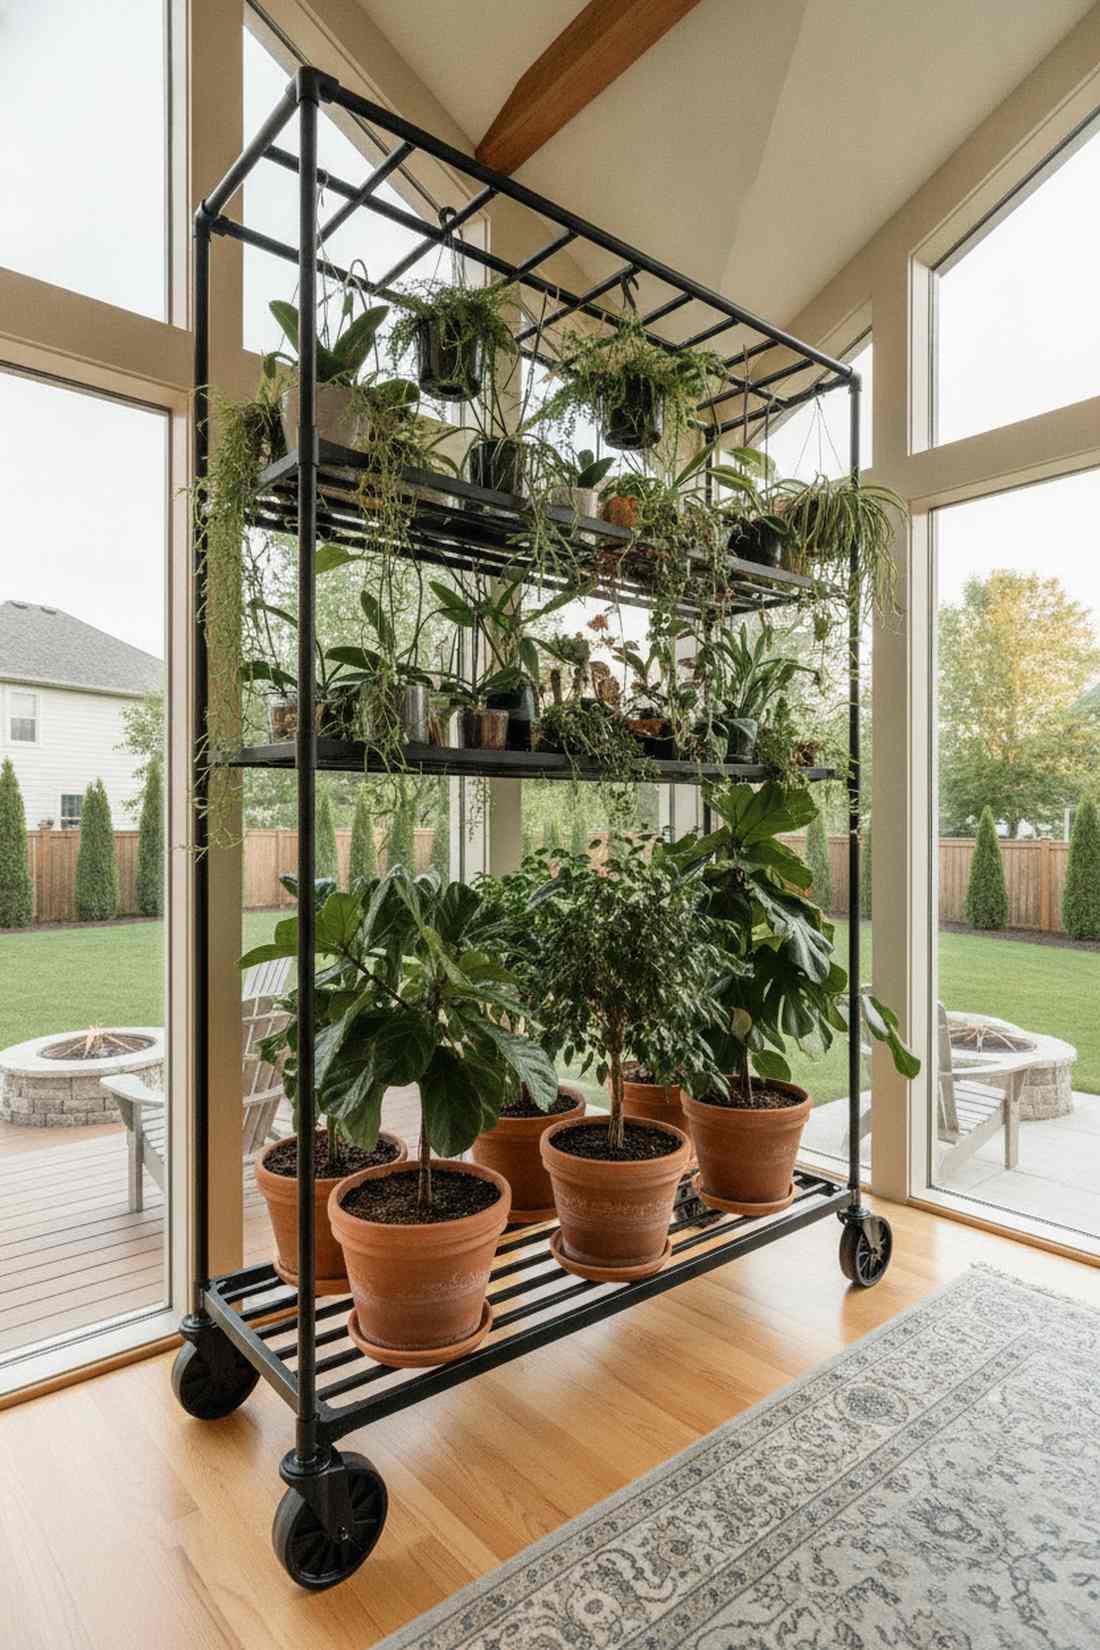
Radiates the dynamic efficiency of a high-end commercial nursery. An industrial caster tracking system works beautifully for large sunrooms where you need to chase the seasonal sunlight or quickly protect fragile orchids from storms.
Dragging heavy, saturated pots across hardwood floors is a guaranteed way to ruin your security deposit. Upgrading to a heavy-duty rolling framework delivers a designer-level finish while granting total layout freedom. A specialized hanging plants rack mounted on wheels transforms passive décor into an interactive, constantly evolving living gallery.
This ultra-mobile gallery setup generally costs $70–$120. Pin this right now if you have a massive, ever-changing plant collection!
- Key Materials: Heavy-duty rack frame, locking polyurethane casters
- Vibe / Style: Commercial greenhouse
- Difficulty: Wrench assembly
- Budget Breakdown: Rack System: $80 | Upgraded Casters: $25
- Creator’s Tip: Always load your heaviest, wettest pots symmetrically near the bottom center to prevent the whole rack from tipping when rolling over door thresholds.
- Smart Sourcing: Pick up a heavy-duty mobile hanging plant rack and swap the default wheels for locking polyurethane industrial casters (4-pack).
Warning: Once you install this next dynamic track system, you will want to remodel your entire living room around it.
Specialty Hardware Solutions
Advanced mounting systems address unique architectural challenges and specific plant requirements through engineered solutions. These specialized options solve problems that standard hooks cannot accommodate.
20. Beam Clamp Hanging System
Looks like a high-end architectural intervention in a luxury timber-framed cabin. An adjustable compression jaw mount is flawlessly designed for vaulted living rooms with beautiful exposed wooden rafters that you absolutely refuse to drill into.
Punching holes into expensive decorative beams is an architectural crime. Leveraging specialized friction clamps gives a surprisingly premium look, securely biting the wood without leaving a single scratch behind. Using these heavy-duty ceiling anchors allows you to drop threaded rods to the exact custom height your canopy needs.
This damage-free professional hardware costs roughly $25–$45 per clamp. Highly recommended for preserving expensive exposed architecture.
- Key Materials: Steel beam clamps, threaded drop rods
- Vibe / Style: Industrial timber luxury
- Difficulty: Easy wrench tightening
- Budget Breakdown: Clamp Hardware: $20 | Rubber Padding: $8
- Creator’s Tip: Insert small squares of high-density rubber between the steel clamp jaws and your wooden beam to drastically increase grip while protecting the stain.
- Smart Sourcing: Use adjustable steel I-beam clamp kits alongside pre-cut high-density rubber grip pads.
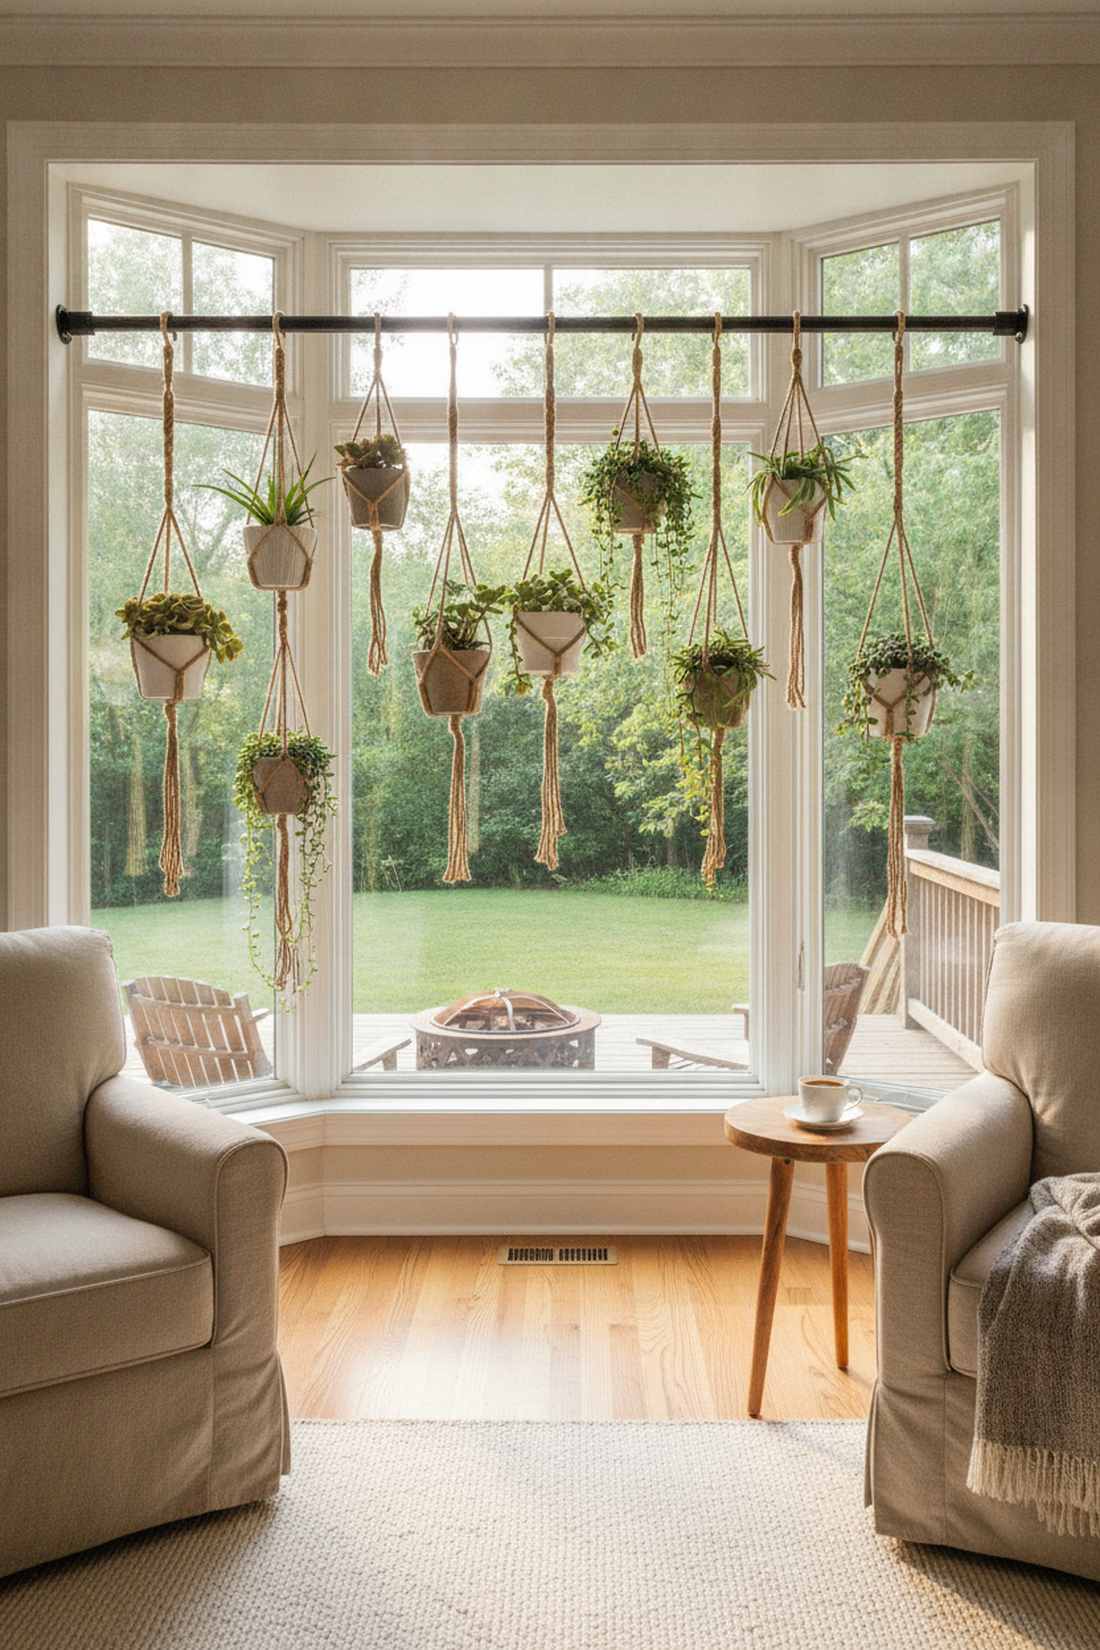
21. Cable Suspension Kit
Feels like a minimalist, floating art installation in a modern gallery. An aircraft-grade horizontal tension line works exceptionally well to stretch living greenery across wide, blank living room walls without cluttering the floor.
Clunky wooden shelves instantly kill a sleek, modern aesthetic. Spanning thin, high-tension steel wires looks far more expensive than it is, making your hanging pots appear to levitate mid-air. When utilizing terrarium accessories or small glass globes on sliding S-hooks, the entire system practically disappears into the background.
You can execute this invisible floating illusion for about $35–$60. Save this idea to your modern interior design board immediately!
- Key Materials: Braided steel cable, tension turnbuckles
- Vibe / Style: Invisible modern gallery
- Difficulty: Intermediate tensioning
- Budget Breakdown: Cable Kit: $40 | Anchor Eyes: $10
- Creator’s Tip: Always crank the turnbuckle until the center of the wire deflects less than 2 inches under full weight, otherwise the pots will slide to the middle.
- Smart Sourcing: Snag an aircraft-grade steel cable suspension kit and heavy-duty stainless steel turnbuckles (multi-pack).
22. Adjustable Rope Ratchet Hanger
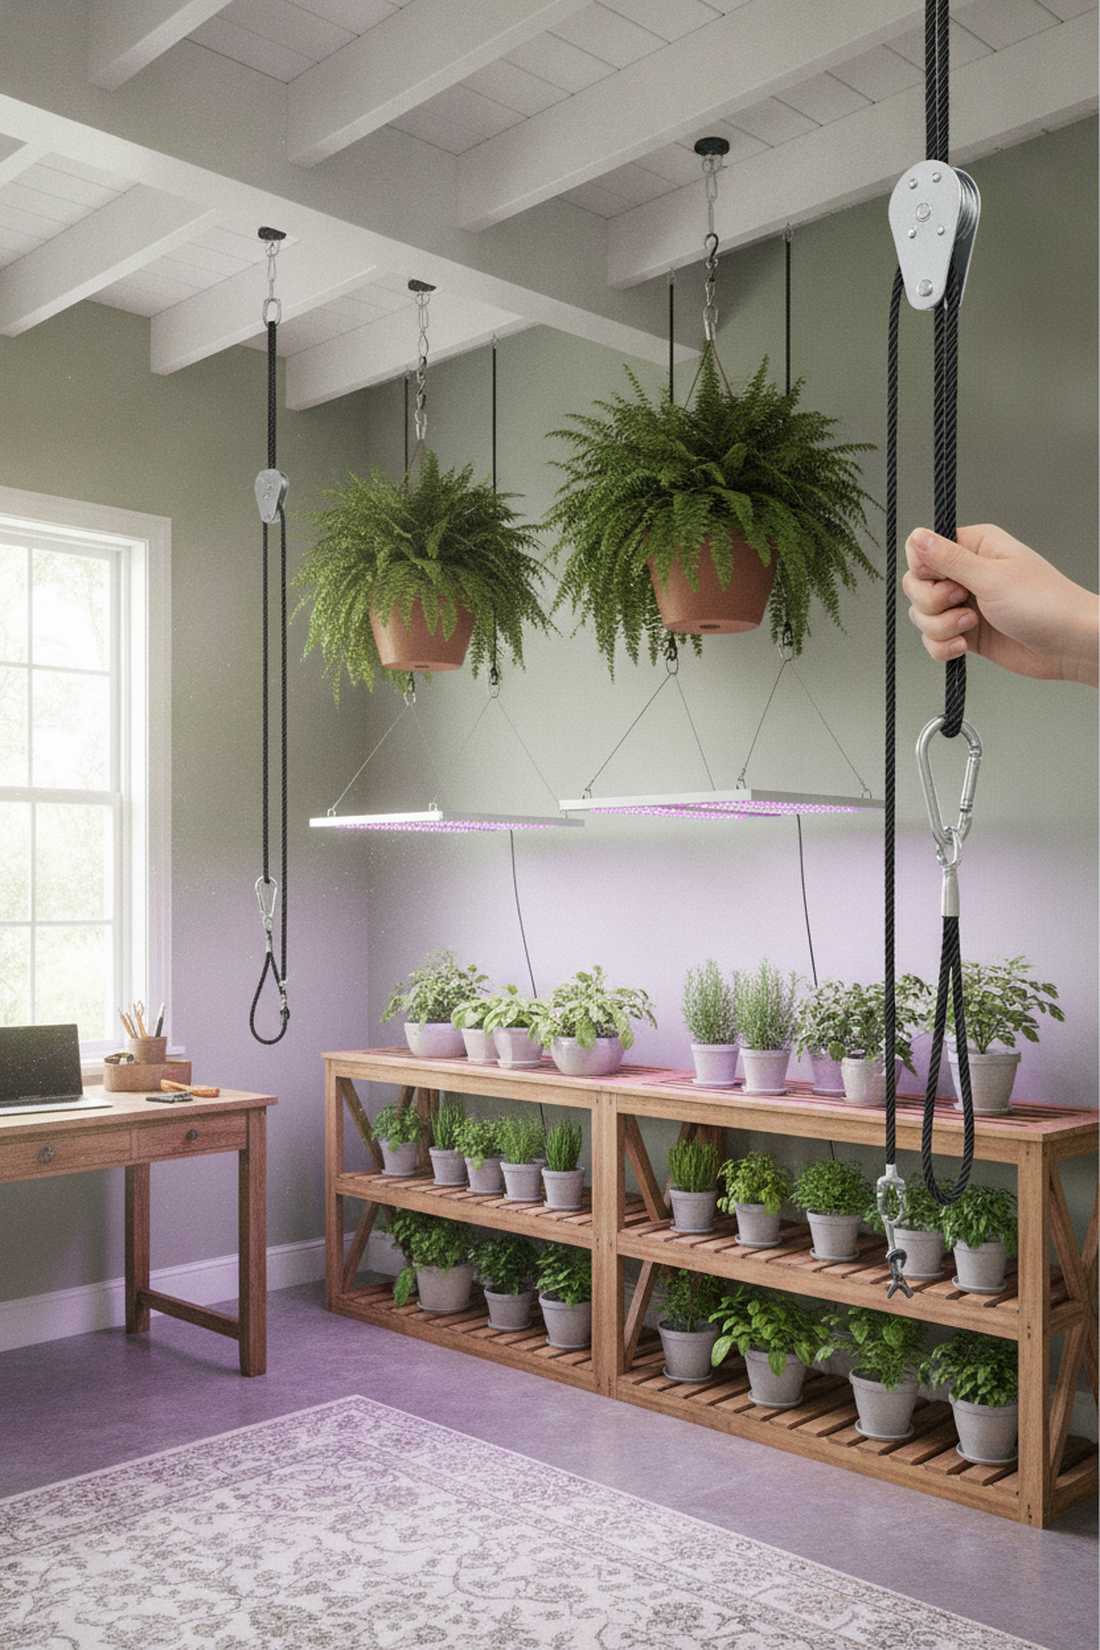
Radiates the intense, functional energy of a professional indoor grow room. A cam-lock braided nylon pulley is the absolute perfect choice for heavy LED grow lights or massive ferns that require constant, one-handed height adjustments.
Fumbling with knot-tying while balancing a 30-pound wet basket is a disaster waiting to happen. Incorporating an internal ratchet lock delivers a designer-level finish of sheer utility, safely locking the weight in place with zero slip. It’s an essential part of premium indoor plant mounting kits that guarantees rapid, frustration-free maintenance.
These bulletproof adjustment rigs cost around $15–$25 per pair. A must-have upgrade for serious canopy management.
- Key Materials: Braided nylon rope, internal cam-locks
- Vibe / Style: Professional utility
- Difficulty: Beginner click-and-pull
- Budget Breakdown: Ratchet Pair: $18 | Carabiners: $5
- Creator’s Tip: Always clip the fixed-end carabiner to the ceiling hook and the adjustable end to the pot so you pull the slack downward, using gravity to your advantage.
- Smart Sourcing: Invest in adjustable heavy-duty rope ratchet hangers (bulk pack) and high-capacity locking carabiners.
23. Gutter Mount Bracket
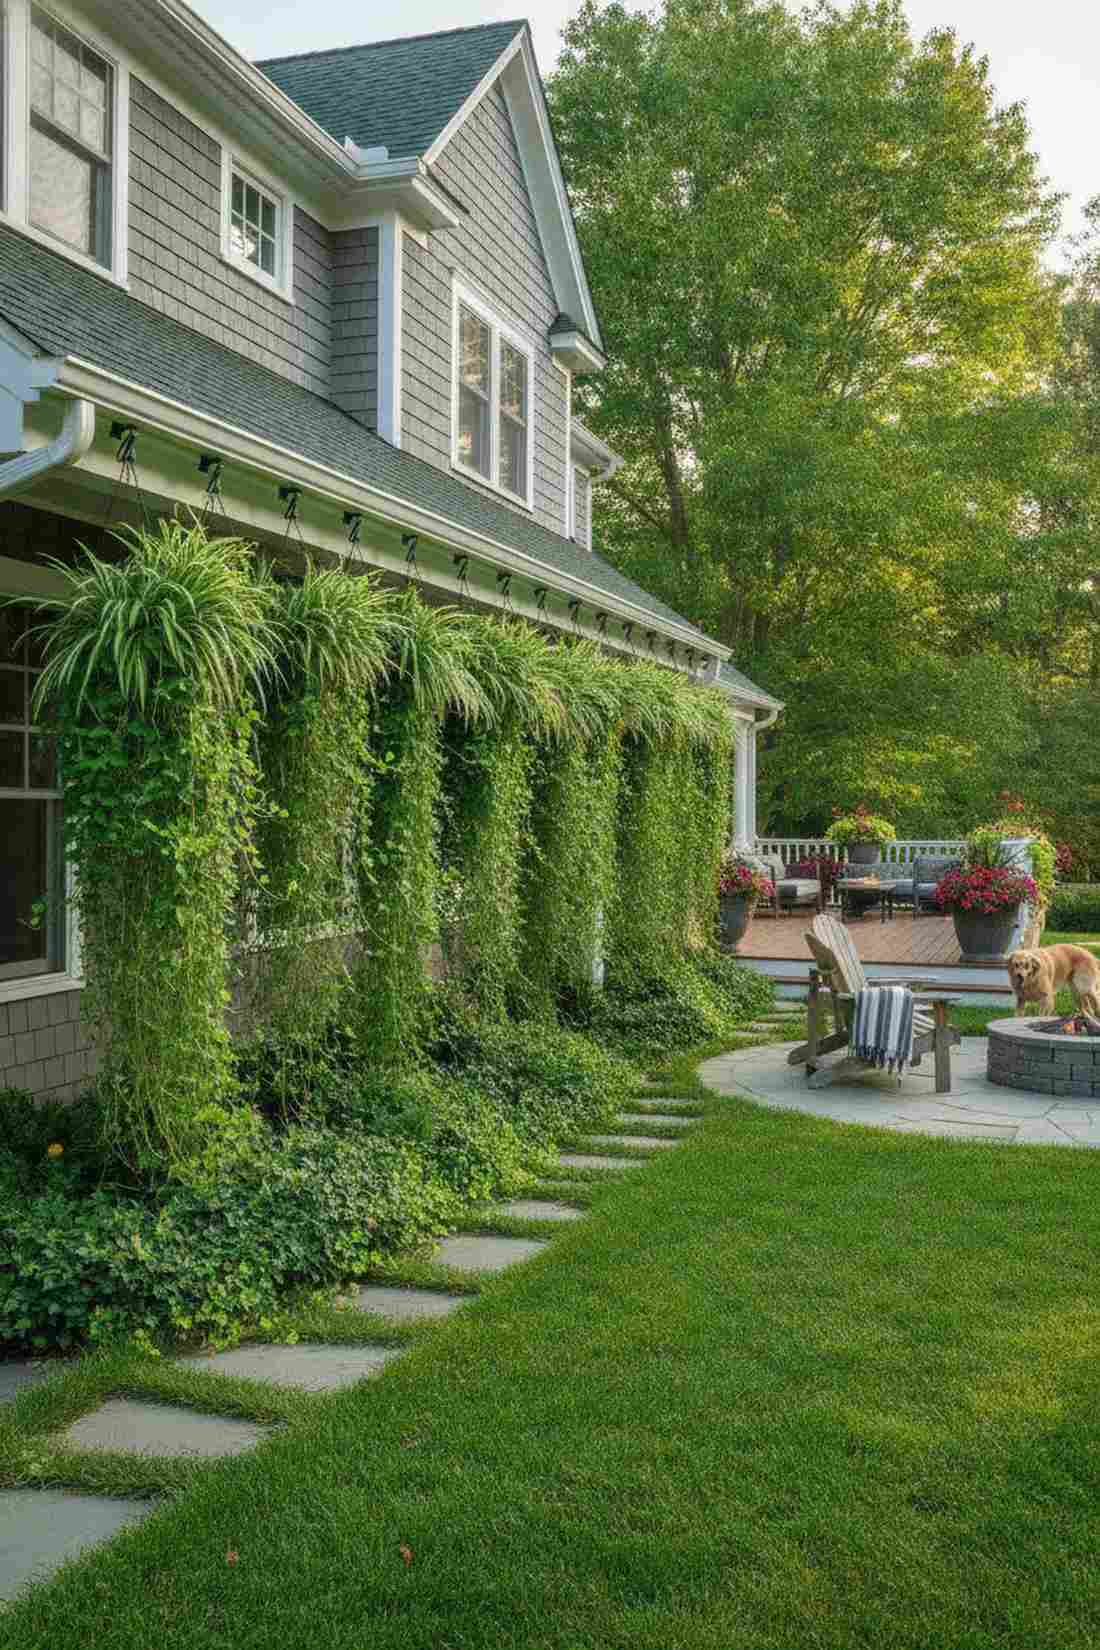
Transforms wasted exterior space into a cascading wall of ivy. A specialized eaves-clamping hook works brilliantly to hang lightweight spider plants or trailing vines right off the lip of your roof’s rain gutters.
Drilling holes into your expensive fascia board invites devastating water rot into your home’s framing. Clipping directly onto the gutter’s edge gives a surprisingly premium look by distributing the weight evenly without a single puncture. It creates an incredible, shaded micro-climate for delicate hanging plant stands to thrive under the eaves.
You can unlock this hidden vertical real estate for just $10–$20. Pin this to your outdoor curb-appeal board for an instant architectural upgrade!
- Key Materials: Weatherproof tension clips, set screws
- Vibe / Style: Hidden cottage canopy
- Difficulty: Tool-free snapping
- Budget Breakdown: Bracket Set: $15 | Securing Screws: $5
- Creator’s Tip: Carefully inspect the structural integrity of your aluminum gutter before loading; if the gutter is pulling away from the house, fix that first.
- Smart Sourcing: Source no-drill gutter mount plant brackets (multi-pack) and rust-proof stainless set screws.
24. Pergola Hook Insert
Feels incredibly bespoke, like a custom-built Italian vineyard terrace. A recessed flush-mount threaded cup is the ultimate solution for wooden pergolas where you want to completely hide the mounting hardware during the winter months.
Leaving rusty exterior hooks empty during the off-season destroys the clean lines of expensive woodworking. Sinking metal inserts perfectly flush with the wood looks far more expensive than it is, allowing you to unscrew the hooks completely when not in use. It is the smartest way to prep an outdoor hanging plants rack without permanently ruining the lumber’s profile.
Embedding these stealthy anchors costs about $25–$40 for a full setup. A brilliant, low-profile investment for custom carpentry.
- Key Materials: Threaded metal inserts, removable eye-hooks
- Vibe / Style: Custom luxury carpentry
- Difficulty: Advanced drilling required
- Budget Breakdown: Inserts & Hooks: $20 | Forstner Bit: $15
- Creator’s Tip: Use a Forstner drill bit to create a perfectly flat-bottomed hole, and coat the insert threads with exterior wood glue before driving it in for a permanent bond.
- Smart Sourcing: Pick up heavy-duty threaded wood inserts (bulk pack) and a high-quality Forstner woodworking drill bit starter kit.
Renters usually scroll past this stuff—but this next tension trick requires zero drilling and looks insanely high-end.
Material Guide: Cheap vs. Premium Aesthetic
Knowing exactly where to save and where to spend makes all the difference in achieving that “looks expensive but isn’t” vibe.
- Standard vs. UV-Resistant/Premium: Standard plastics turn brittle and chalky outdoors within a year. Upgrading to UV-coated acrylics or powder-coated steel stops fading and prevents sudden structural snapping under heavy wind loads.
- Pre-made Kits vs. Sourcing Locally: Scavenging hardware stores for matching pieces often costs more in gas and time. Professional-grade starter kits (like complete toggle-bolt arrays) ensure weight ratings match perfectly, saving both time and money.
25. Balcony Railing Hook
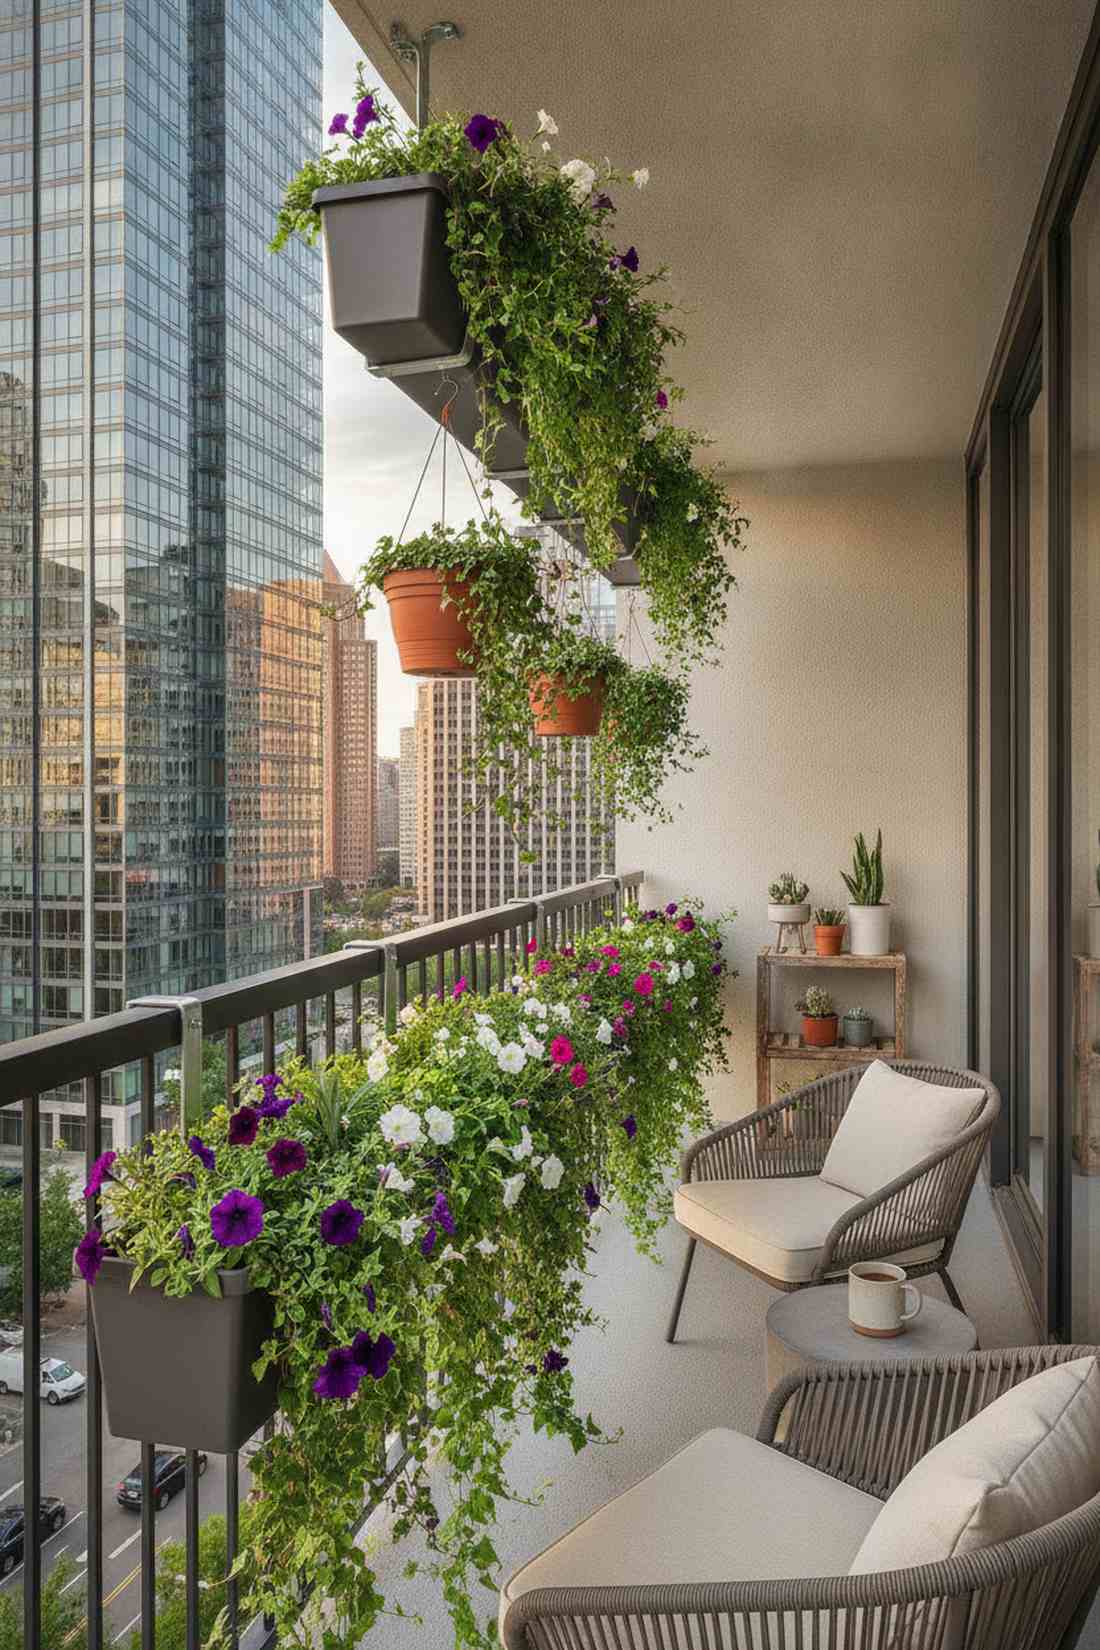
Looks like a lush, floating green barrier floating above the city streets. A U-shaped adjustable guard rail bracket is the holy grail for high-rise apartment dwellers who want a privacy screen without drilling into metal balcony barriers.
Violating a strict lease agreement with power tools is a costly mistake. Hooking directly over the existing railing delivers a designer-level finish that securely cradles flower boxes or heavy hanging vines. By orienting these hanging plant racks inward, you maintain perfect compliance with strict urban building codes while maximizing tight square footage.
Equip your entire balcony rail for roughly $25–$50. Save this absolute must-have hack for urban patio living!
- Key Materials: Adjustable steel U-brackets, locking set screws
- Vibe / Style: Urban sky garden
- Difficulty: Simple hand tightening
- Budget Breakdown: Railing Hooks: $35 | Protective Pads: $8
- Creator’s Tip: Always position the hook on the interior side of the railing so strong wind gusts blow the plants toward your wall rather than off the edge of the building.
- Smart Sourcing: Use adjustable balcony railing plant brackets (set of 4) and high-grip rubber padding strips (pre-cut).
Hanging Plants Rack Systems
Multi-tier frameworks consolidate numerous hanging plants into organized vertical arrays, optimizing light capture and maintenance efficiency. These systems function as living architecture elements that structure garden rooms.
26. Ladder-Style Display Rack
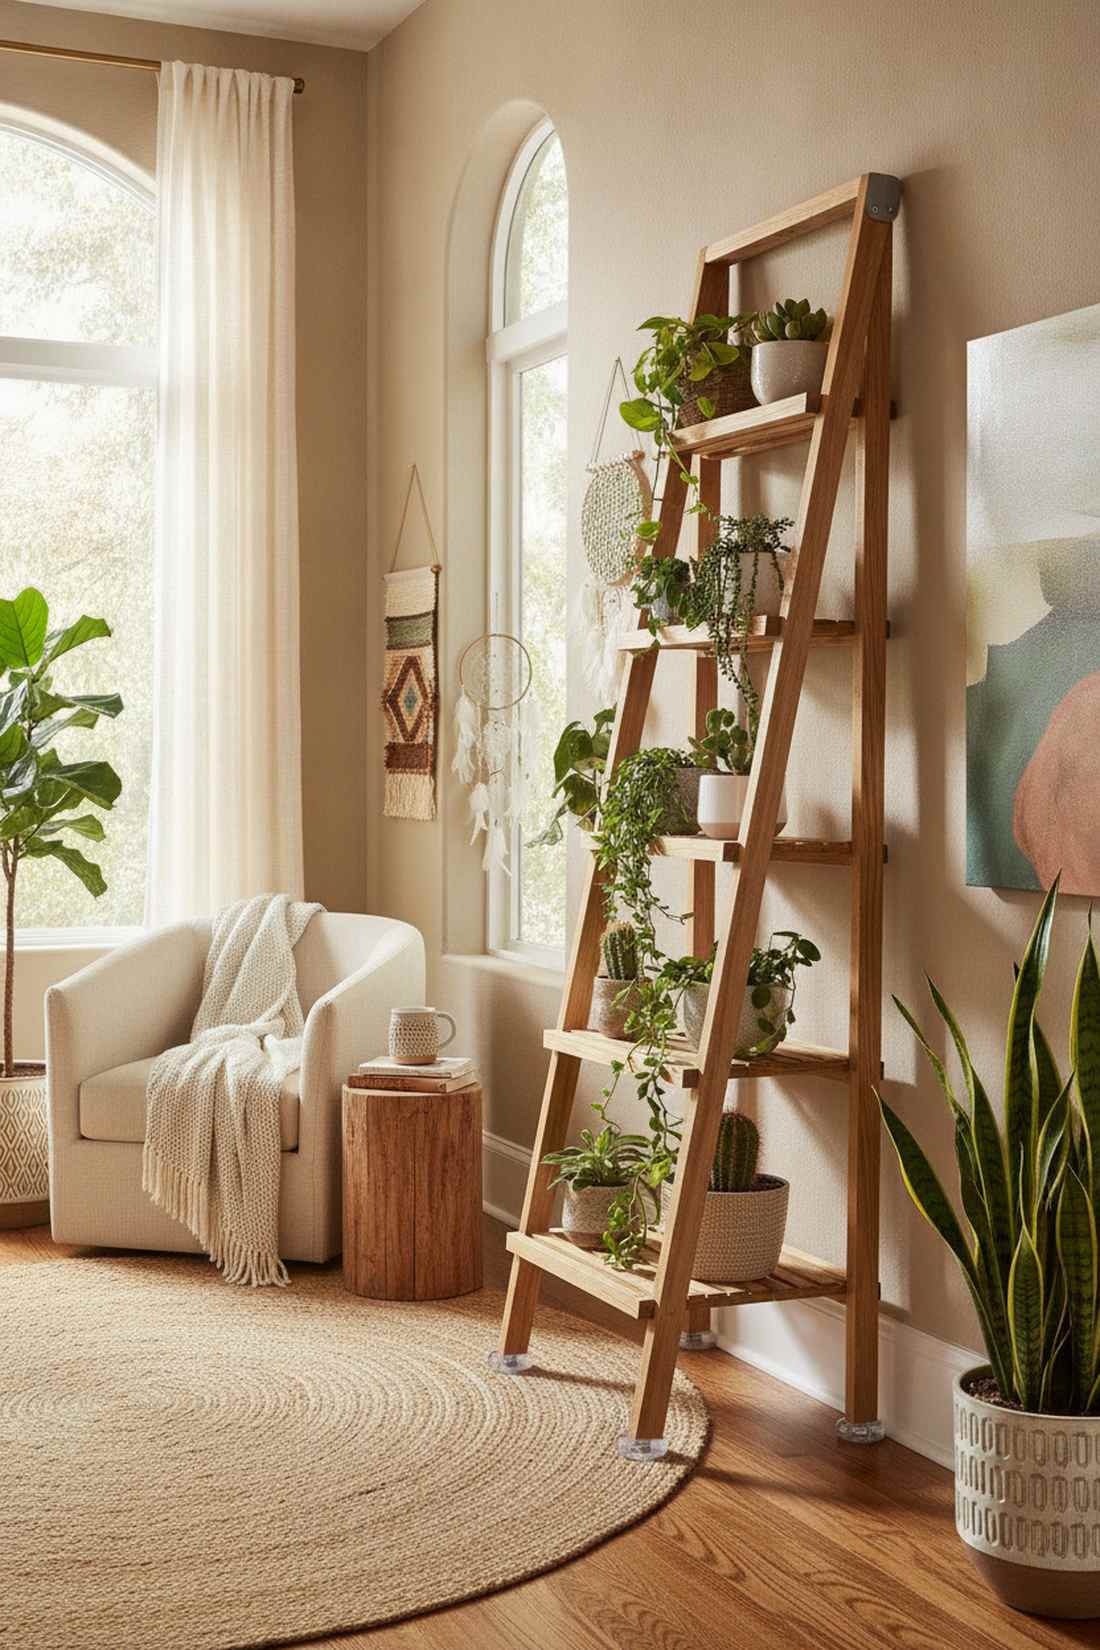
Feels like a curated, boho-chic leaning art installation. An A-frame angled resting tier works perfectly in a bright bedroom corner to stack a dozen small succulents and trailing pothos without taking up precious desk space.
Cluttering every flat surface with tiny pots makes a room feel chaotic and disorganized. Opting for a slanted wooden framework gives a surprisingly premium look, treating your botanical collection as intentional vertical décor. This highly portable hanging plants rack adapts beautifully to the changing seasons, easily moving closer to the windows during dark winter months.
This aesthetic wooden structure generally costs $50–$90. A beautifully stylish addition for cozy, plant-heavy interiors.
- Key Materials: Hardwood ladder frame, anti-slip feet
- Vibe / Style: Cozy bohemian chic
- Difficulty: Just lean it up
- Budget Breakdown: Ladder Frame: $70 | Base Grip: $10
- Creator’s Tip: Ensure you space the hanging pots to allow at least 6 inches of clearance between containers to promote healthy airflow and prevent mold.
- Smart Sourcing: Grab a pre-finished wooden ladder plant stand alongside a pack of clear silicone anti-slip floor grips.
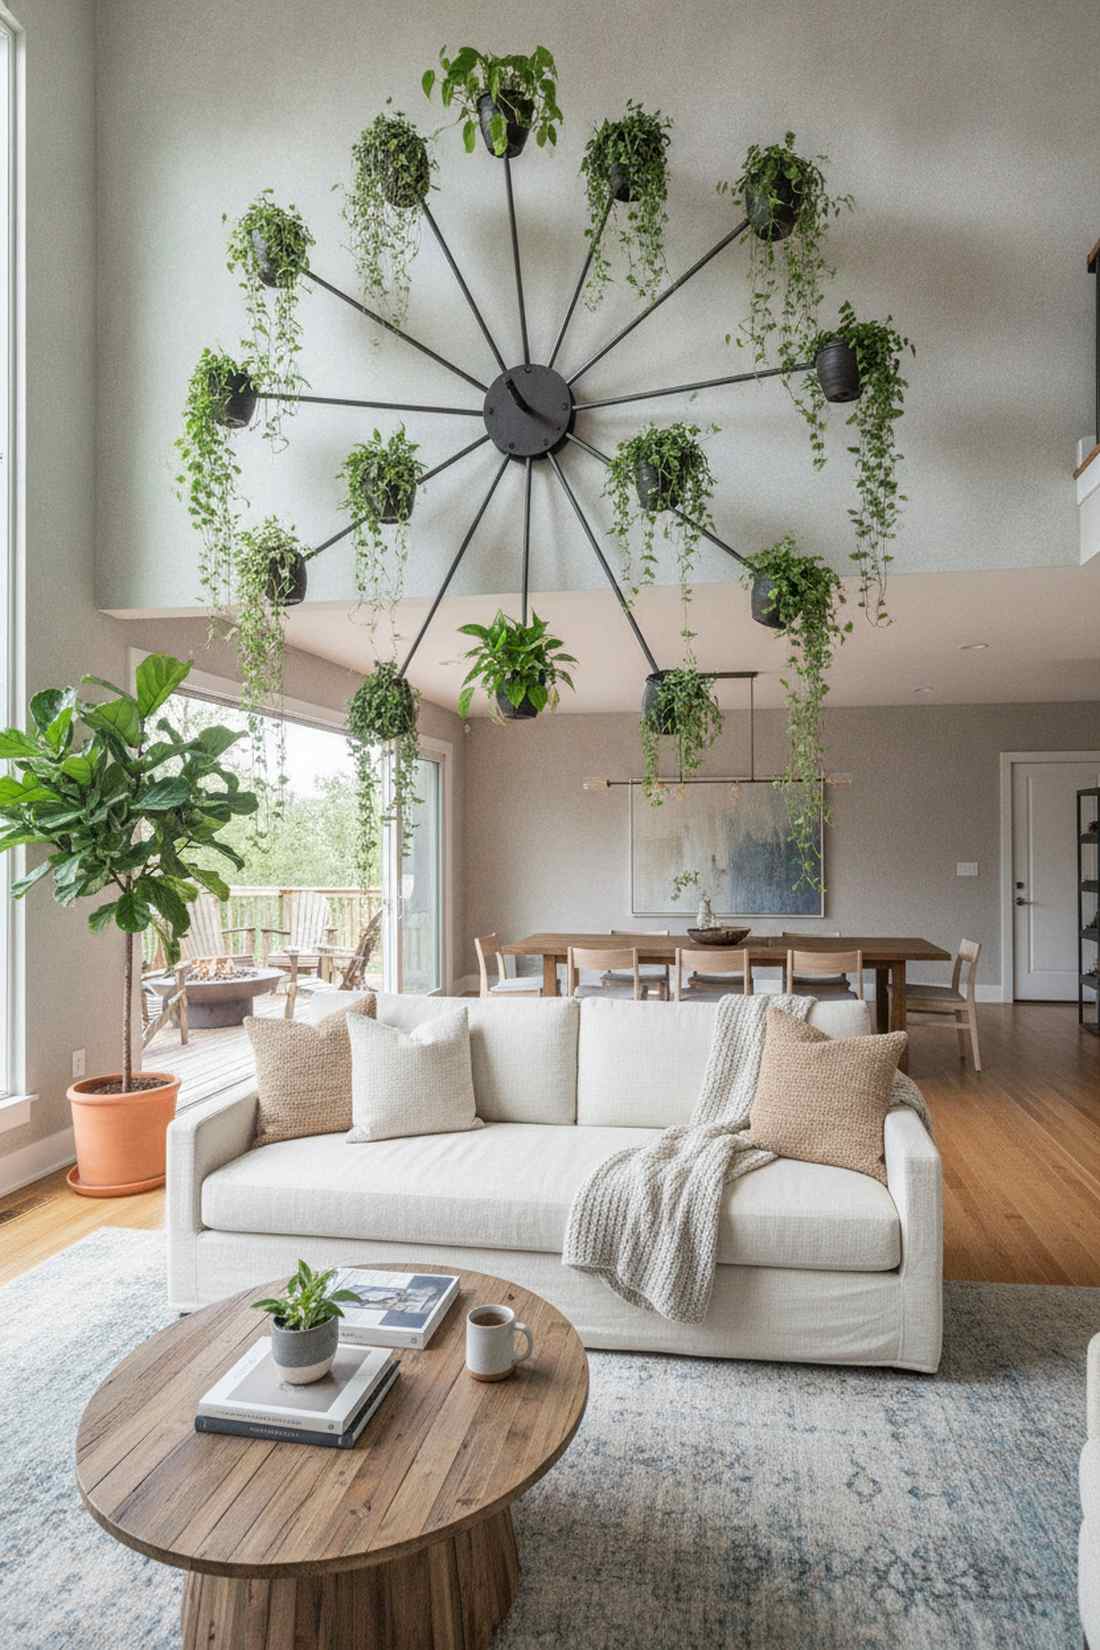
27. Overhead Grid Rack
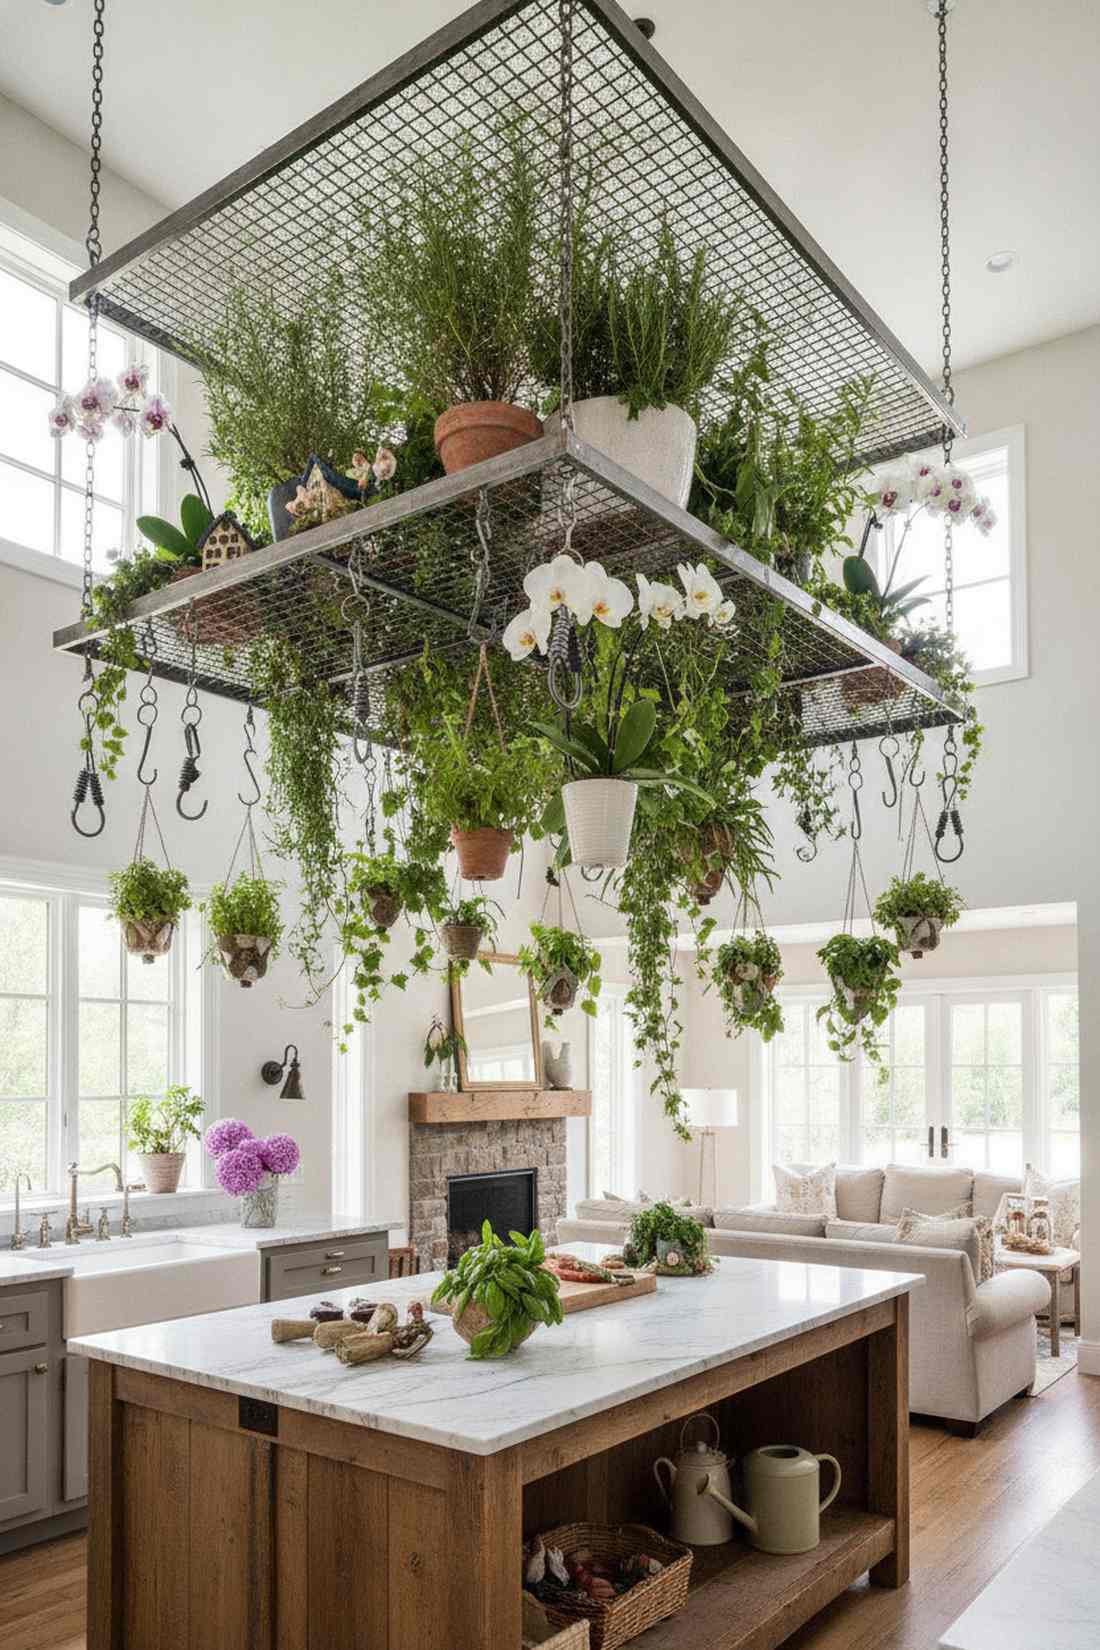
Channels the lush, immersive atmosphere of a high-end commercial conservatory. A suspended metal ceiling grid is absolutely perfect for turning a tall, empty kitchen ceiling into a dense, floating canopy of herbs and vines.
Hanging one pot at a time from individual ceiling anchors creates a messy, disorganized ceiling map. Suspending a unified steel lattice looks far more expensive than it is, providing hundreds of instant clipping points for your collection. Utilizing premium fairy garden kits or heavy orchids alongside safety latches guarantees a spectacular, high-density jungle vibe.
Creating this immersive floating canopy will cost roughly $80–$150. Pin this to your dream kitchen remodel board immediately!
- Key Materials: Steel mesh panels, lag bolt anchors
- Vibe / Style: Immersive botanical canopy
- Difficulty: Two-person ceiling mounting
- Budget Breakdown: Steel Grid: $90 | Lag Bolts & Hooks: $35
- Creator’s Tip: Always use S-hooks with built-in spring safety latches so your heavy pots cannot accidentally get knocked off the grid during rigorous watering.
- Smart Sourcing: Source a heavy-duty ceiling hanging grid rack and safety-latch S-hooks (bulk pack).
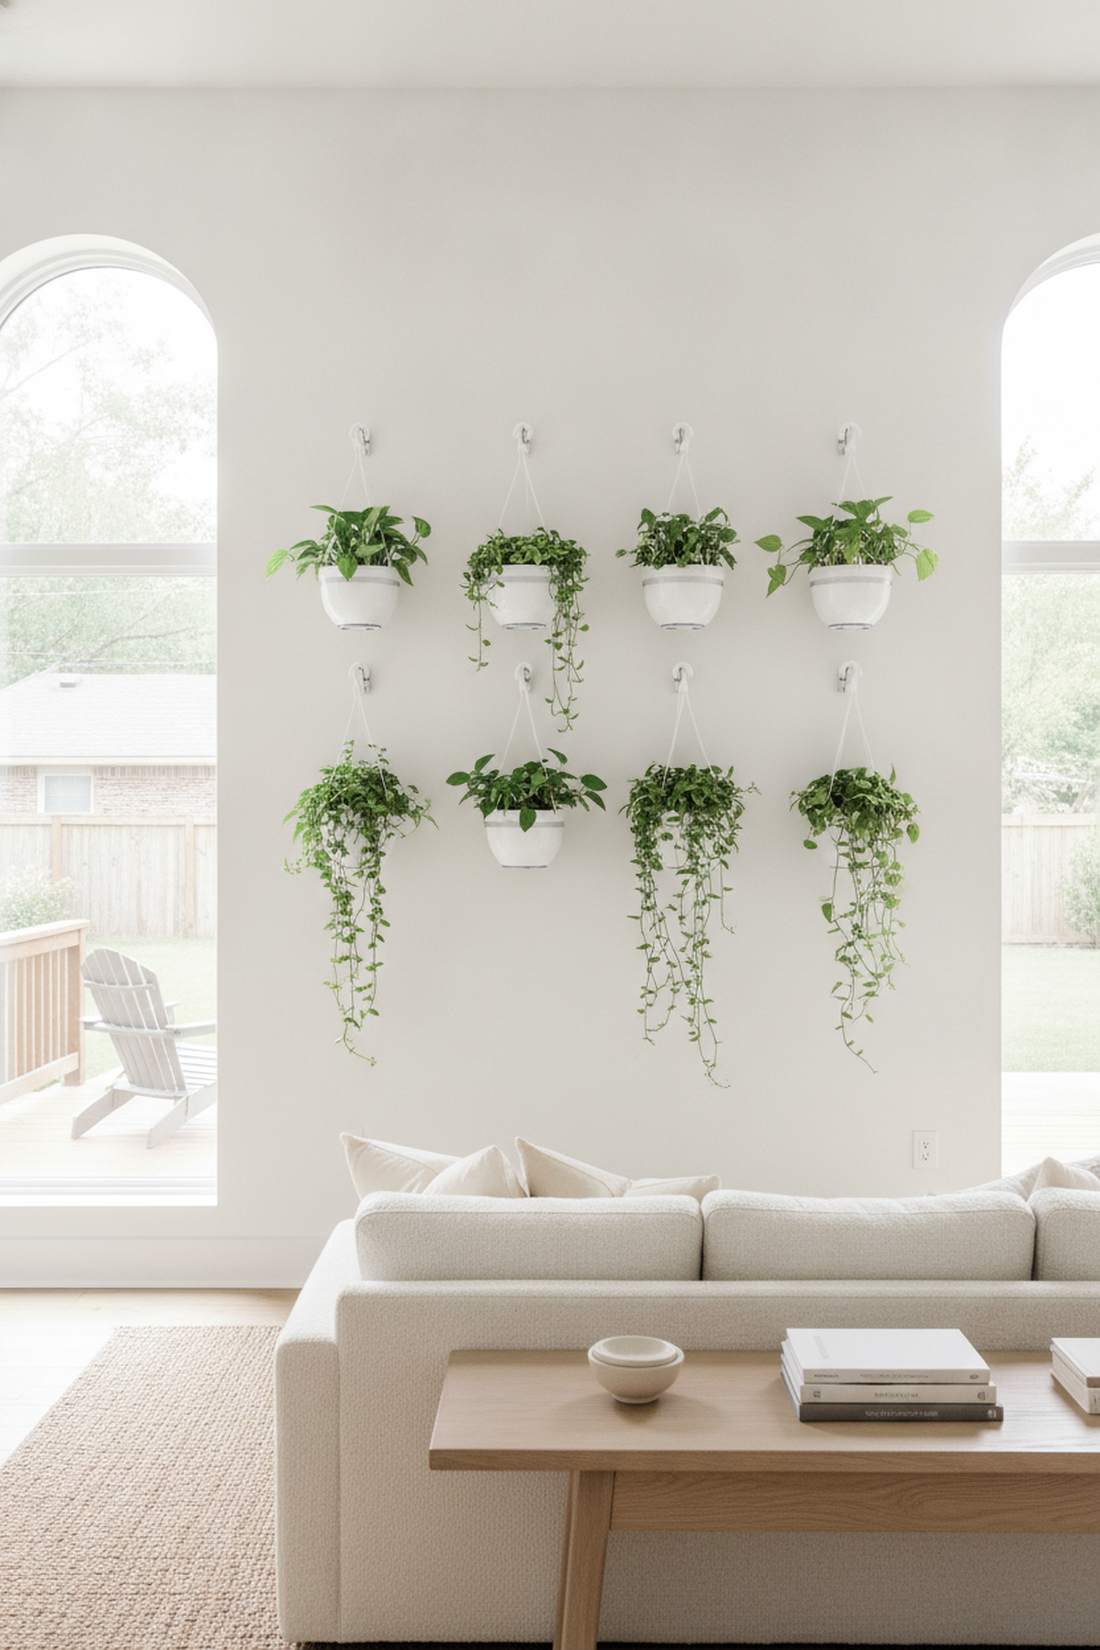
28. Wall-Mounted Multi-Arm Rack
Like an exploding starburst of vibrant green foliage. A cantilevered radiating arm bracket works brilliantly as an aggressive, three-dimensional focal point above a living room sofa, completely replacing the need for traditional framed art.
Standard flat shelves do nothing to highlight the wild, organic shape of your plants. Installing staggered steel arms delivers a designer-level finish, allowing each pot to extend outward at custom depths. This architectural hanging plants rack concentrates an massive amount of greenery into a very small footprint while creating striking visual rhythm.
This dramatic focal piece costs around $60–$110. Highly recommended to instantly upgrade a blank, boring apartment wall.
- Key Materials: Heavy central wall plate, staggered steel arms
- Vibe / Style: Striking 3D geometry
- Difficulty: Crucial stud anchoring
- Budget Breakdown: Multi-Arm Rack: $80 | Anchor Screws: $10
- Creator’s Tip: Anchor the central mounting plate directly into three solid wall studs in a triangular pattern to guarantee it never rips out under the extreme cantilevered weight.
- Smart Sourcing: Invest in a heavy-duty multi-arm wall plant rack and a box of high-shear strength structural screws (starter kit).
29. Rotating Carousel Rack
Feels like an elegant, kinetic display from a vintage apothecary window. A bearing-mounted circular spinner is the ultimate hack for keeping plants perfectly symmetrical when hanging near a harsh, single-direction light source.
Constantly taking pots down to rotate them away from the sun is an exhausting chore. Incorporating a smooth central bearing gives a surprisingly premium look, allowing you to spin the entire canopy with one finger. This solves uneven growth patterns effortlessly, acting as a highly functional, kinetic hanging plants stand that responds to your touch.
This kinetic hanging system costs about $50–$85. Save this genius lighting hack to your indoor gardening board!
- Key Materials: Steel carousel frame, heavy-duty ceiling bearings
- Vibe / Style: Vintage kinetic elegance
- Difficulty: Requires solid joist
- Budget Breakdown: Rotating Hardware: $60 | Balancing Weights: $15
- Creator’s Tip: You must perfectly balance the weight around the perimeter of the circle; an unbalanced carousel will violently tilt and grind the internal bearings to dust.
- Smart Sourcing: Grab a rotating hanging plant carousel rack and a heavy-duty thrust bearing mounting plate.
If you have dead space in your kitchen, this upcoming compact layout will instantly upgrade your daily routine.
30. Vertical Tension Pole Rack
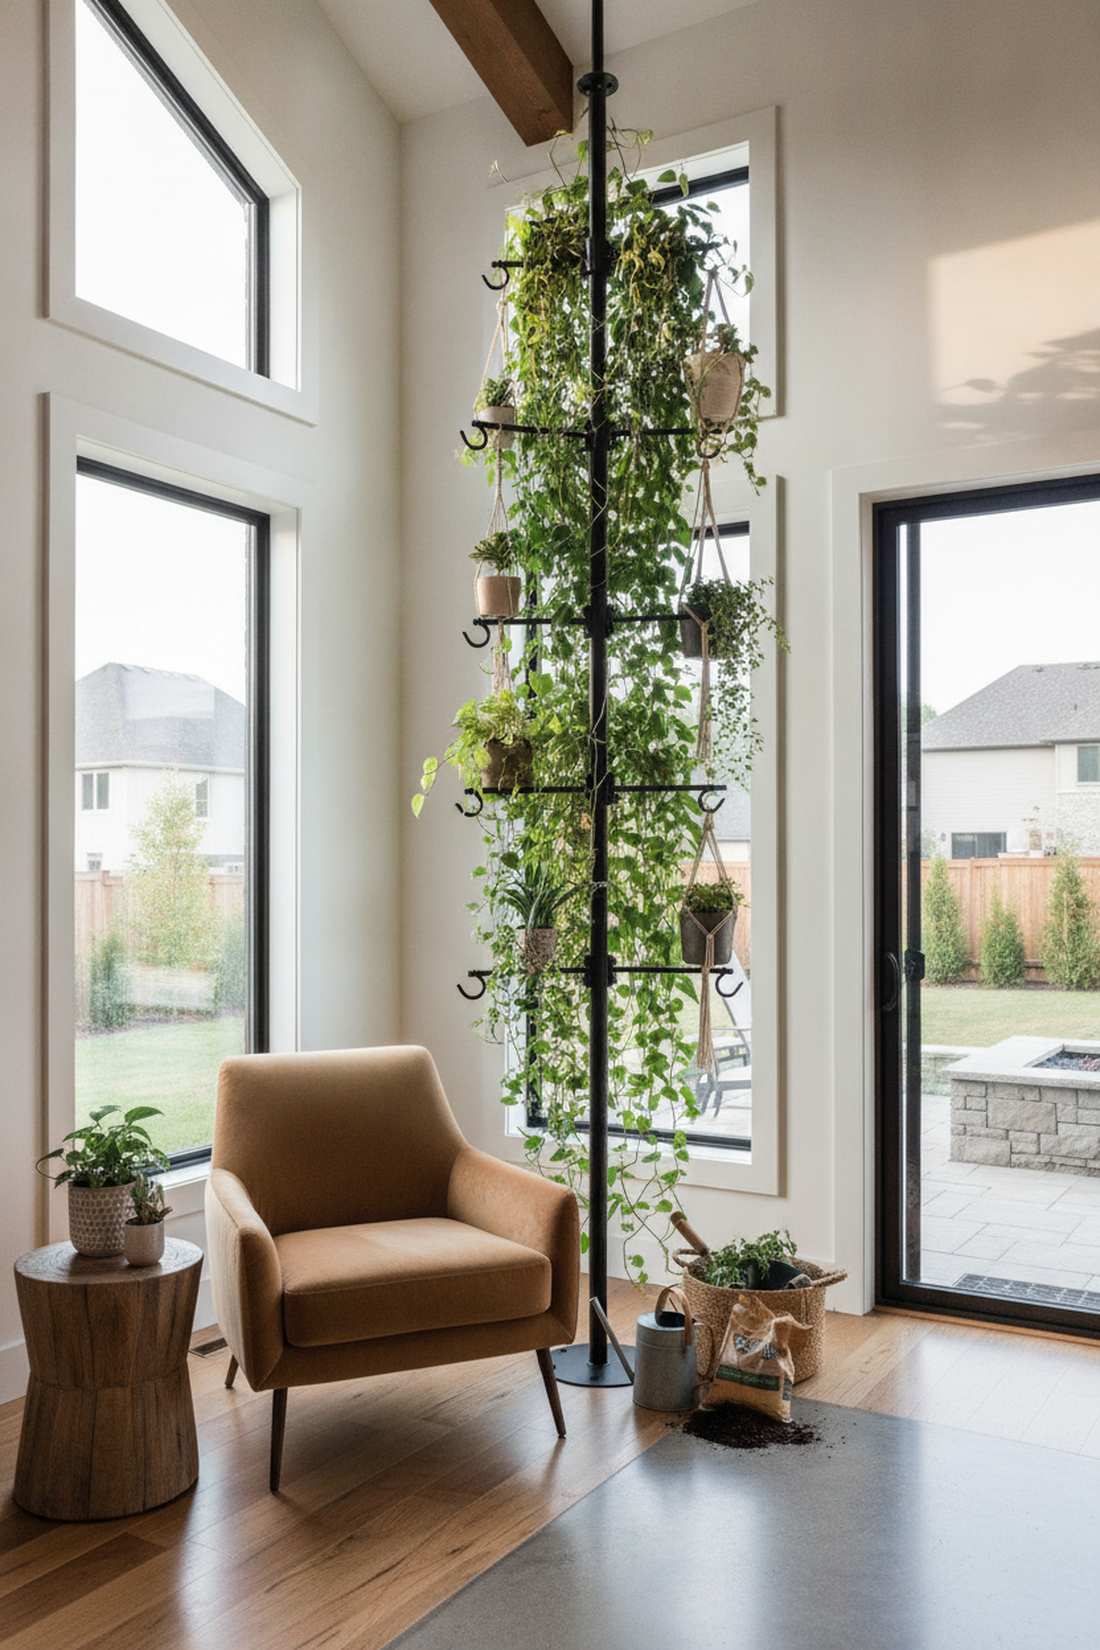
Looks like a sleek, floor-to-ceiling tree constructed entirely of steel and foliage. A spring-loaded compression pillar is the absolute greatest invention for renters wanting a massive botanical tower without drilling a single hole.
Losing your security deposit over drywall holes is completely avoidable. Jamming a heavy-duty pole between the floor and ceiling looks far more expensive than it is, providing 360-degree rotational hook arms. Snapping on specific miniature garden supplies or trailing vines turns a tiny square foot of floor space into a massive vertical jungle.
You can erect this tool-free tower for roughly $45–$80. Pin this life-saving apartment hack immediately!
- Key Materials: Spring-loaded steel poles, rotating clamp hooks
- Vibe / Style: Urban jungle tower
- Difficulty: Tool-free locking
- Budget Breakdown: Tension Pole Kit: $65 | Extra Hooks: $15
- Creator’s Tip: Once extended, aggressively test the stability by attempting to wobble the pole; if it shifts at all, you need to crank the internal tension spring tighter.
- Smart Sourcing: Use a floor-to-ceiling tension plant pole stand and adjustable 360-degree hook attachments (multi-pack).
31. Modular Cube Rack System
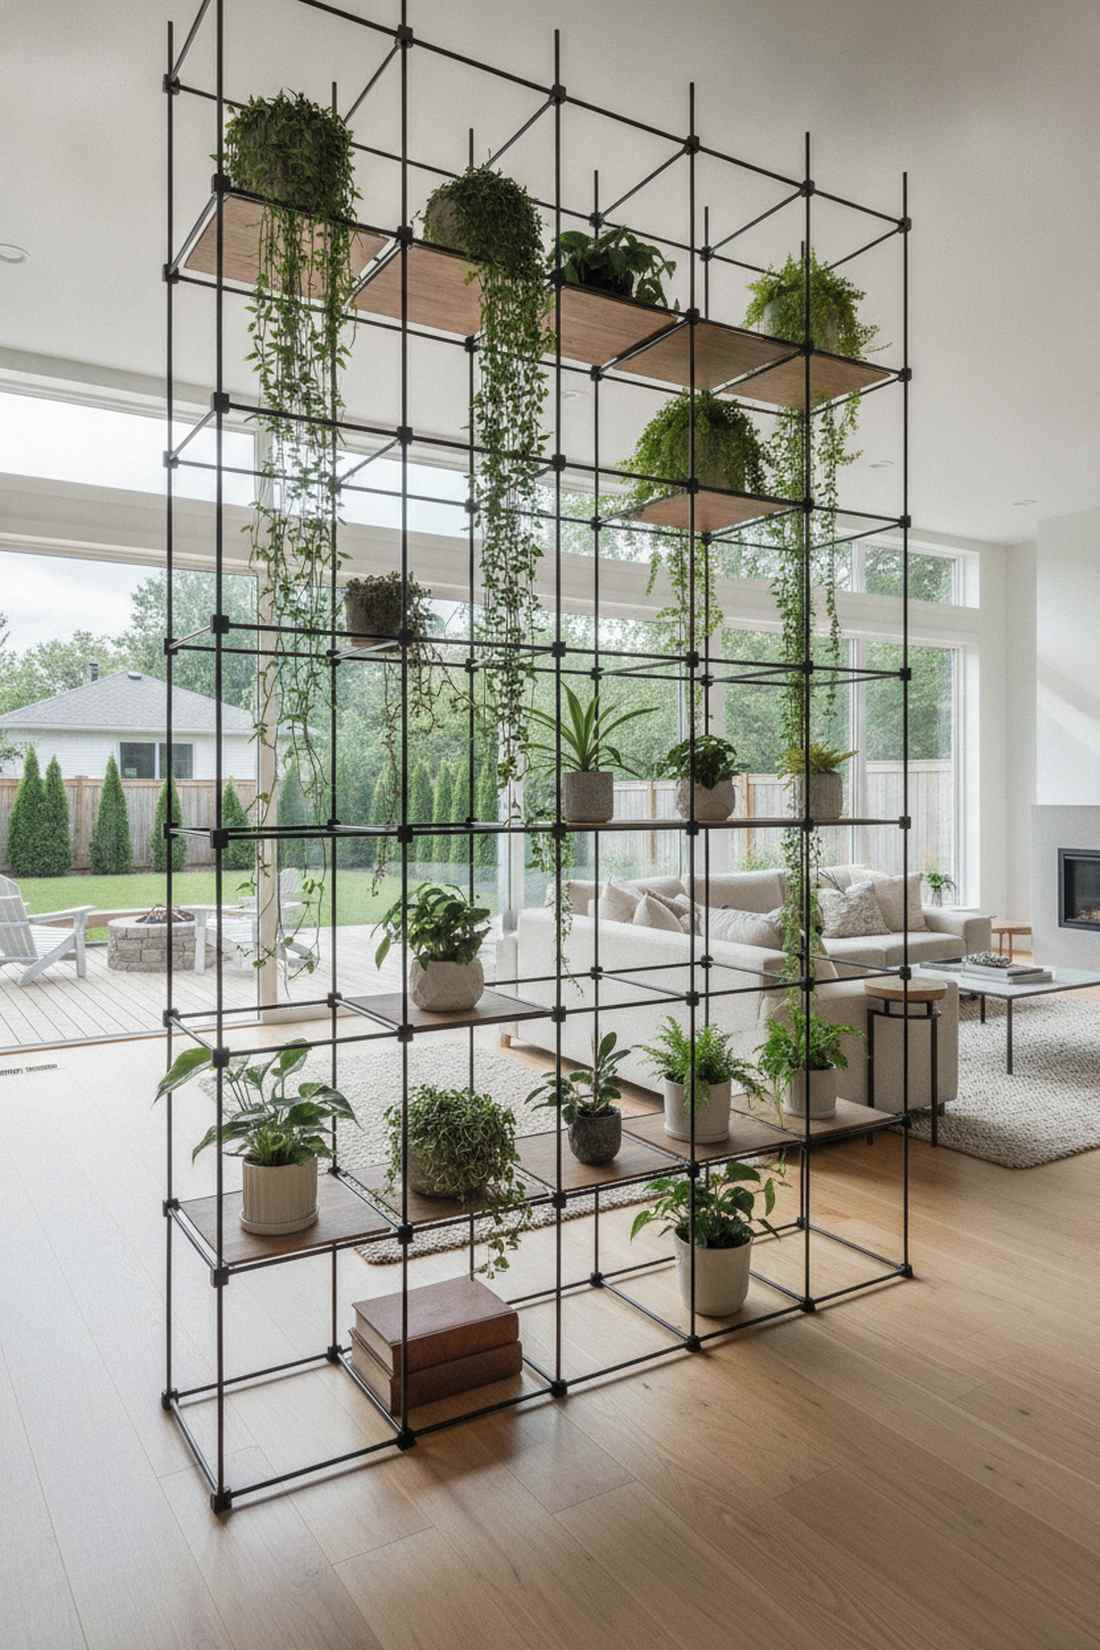
Radiates the clean, structural energy of a modern art museum exhibit. An interlocking geometric framework works flawlessly to build a customized, three-dimensional room divider completely out of living plants.
Buying static furniture limits your future design options. Snapping together customizable metal grids delivers a designer-level finish that can grow horizontally or vertically as your plant collection expands. Treating this setup as a scalable hanging plants rack allows you to integrate solid shelves alongside hanging voids for maximum visual contrast.
A solid starter cube set generally costs $55–$95. A fantastic investment for ever-changing, dynamic interior layouts.
- Key Materials: Wire grid squares, high-tension corner clips
- Vibe / Style: Modern architectural grid
- Difficulty: Snap-together easy
- Budget Breakdown: Base Kit: $70 | Anchor Clips: $15
- Creator’s Tip: As your cube tower grows taller, you must anchor the base to the wall or fill the bottom cubes with heavy books to prevent a catastrophic tipping accident.
- Smart Sourcing: Pick up a modular wire cube shelving kit (starter pack) and heavy-duty zip ties (bulk pack) for reinforced joints.
32. Under-Cabinet Hanging Rack
Feels like a Michelin-star chef’s secret ingredient stash. A shallow-profile hidden track is the perfect concealed solution for suspending fresh culinary herbs directly over your kitchen sink without wasting an inch of counter space.
Leaving messy terra cotta pots on the counter guarantees daily soil spills. Utilizing the dead airspace beneath upper cabinetry gives a surprisingly premium look, maintaining incredibly clean sightlines. When you secure these low-profile mounts, you elevate mundane cooking prep into a lush, interactive culinary experience.
This highly efficient kitchen hack costs only $20–$40. Save this genius space-saver to your kitchen remodel board!
- Key Materials: Low-profile metal tracks, sliding snap hooks
- Vibe / Style: Gourmet chef’s kitchen
- Difficulty: Simple under-mount screwing
- Budget Breakdown: Track Kit: $25 | Hanging Pots: $15
- Creator’s Tip: Position the track directly above your sink basin so that any accidental overflows during your watering routine drain safely away without ruining the countertops.
- Smart Sourcing: Source an under-cabinet sliding hanging rail kit and compact self-watering herb pots (multi-pack).
33. Window Frame Tension Rack
Like a brilliant, sun-drenched curtain made entirely of living leaves. A telescoping lateral pressure bar works exceptionally well for flooding sun-loving succulents with morning light without installing permanent hardware.
Screwing brackets into expensive vinyl window casings usually voids the manufacturer’s warranty. Wedging a high-friction rod between the frames looks far more expensive than it is, completely avoiding permanent damage. It creates a temporary but highly secure hanging plants stand right in the brightest possible zone of your home.
You can snap this temporary setup in place for about $15–$30. Highly recommended for capturing prime south-facing sunlight without tools.
- Key Materials: Heavy-duty tension rods, rubber grip ends
- Vibe / Style: Sun-drenched curtain
- Difficulty: Twist-and-lock instant
- Budget Breakdown: Heavy Tension Rod: $20 | Hanging Rope: $5
- Creator’s Tip: Do not use flimsy shower curtain rods; buy industrial-rated tension bars to ensure the combined weight of wet soil doesn’t cause a sudden collapse.
- Smart Sourcing: Invest in a heavy-duty adjustable window tension rod and high-friction rubber end caps.
Conclusion
Implementing a secure, premium-looking hanging plants hook setup doesn’t require a massive budget if you know exactly how to leverage the right e-commerce kits. Whether you are utilizing advanced heavy-duty ceiling anchors for massive ferns, utilizing zero-damage tension pole setups for apartment living, or building out these 33 exact blueprints, smart hardware sourcing is the key. By upgrading to UV-coated accessories and bulk-pack structural components, you guarantee that your living architecture will remain safely elevated, beautifully displayed, and highly secure for years to come.
Frequently Asked Questions
What weight capacity do I need for hanging plants hook hardware?
Calculate your plant weight when fully saturated with water (including the soil and pot), then select heavy-duty ceiling anchors rated for 3-5 times that mass. A typical 10-inch hanging basket easily hits 15-20 pounds wet, so sourcing premium hardware starter kits rated for 50+ pounds is essential to prevent drywall failure. Buying commercial-grade anchors in bulk packs is the cheapest way to guarantee safety.
How do I find ceiling joists for secure hook installation?
Ditch the guessing game and invest in a professional magnetic stud finder kit. Scan perpendicular to the ceiling until the device flags solid wood framing (usually spaced 16 to 24 inches apart). Once located, always drill a tiny pilot hole to confirm you hit timber rather than an empty cavity before driving in your heavy-duty mounting hardware.
Can hanging plants stand systems support multiple large plants?
Yes, provided you utilize heavy-duty indoor plant stands with properly weighted bases. Single-post kits handle roughly 20-30 pounds, while commercial-grade tiered kits and thick C-frames can easily manage 50+ pounds total if the weight is balanced symmetrically. Always check the manufacturer limits on your starter kits to avoid leaning or buckling.
What is the difference between swag hooks and toggle bolts for hanging plants holder installations?
Swag hooks combine a curved decorative holder and a hinged clip in one unit, ideal for quick 20-30 pound jobs. Toggle bolts use massive, separate expansion wings that butterfly open behind the drywall, accepting any threaded eye-bolt for heavy 40-50 pound loads. Grabbing a zinc-plated toggle bolt assortment (bulk pack) gives you the highest capacity for dense architectural layouts.
How do I prevent hanging plants rack systems from tipping over?
Always extend adjustable legs to their absolute maximum width to lower the center of gravity. For tall indoor racks, utilize weatherproof decorative weight bags at the base, or secure the top tiers to a wall stud. If you are outside, swap flimsy stakes for heavy-duty galvanized bolt-down deck flanges or bury the ground anchors at least 12 inches deep.
Are there rental-friendly alternatives to drilling for hanging plants hook installations?
Absolutely. You can achieve a premium look without sacrificing your deposit by utilizing damage-free tension pole systems that wedge firmly between floors. Other professional favorites include heavy-duty neodymium magnetic hooks (bulk pack) for exposed metal beams, clamp-on balcony railing hooks, and sturdy freestanding mobile racks that require absolutely zero power tools.