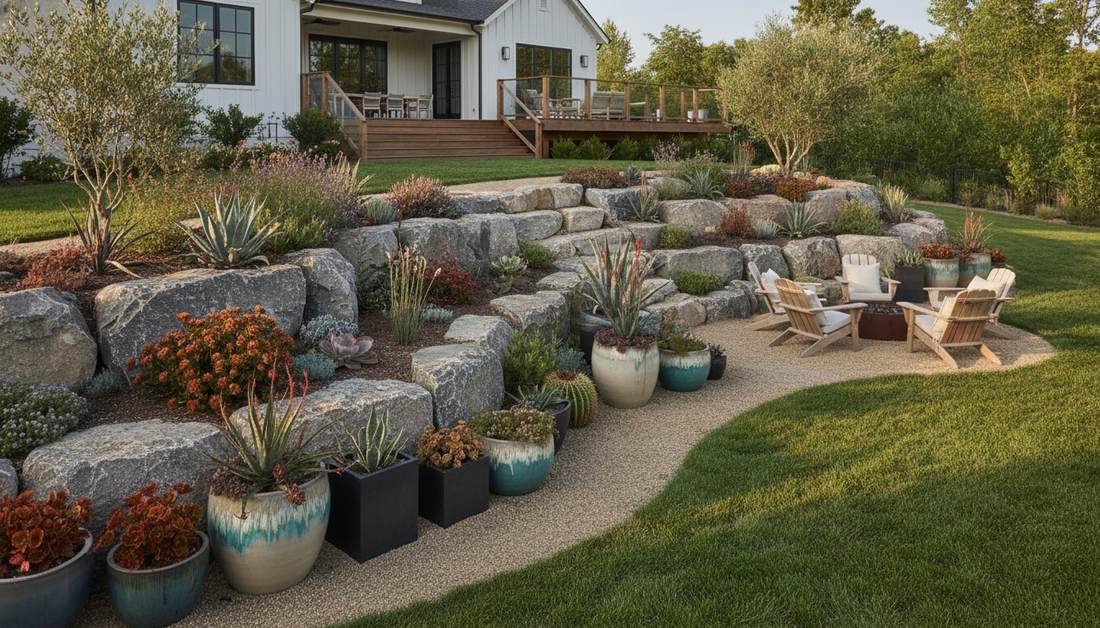
A strategic rock garden with potted plants instantly elevates outdoor aesthetics. Smart layering techniques completely transform barren yards into premium xeric sanctuaries. Learn exact layout tricks and high-end sourcing blueprints.
Design Snapshot Key Principles
- Elevation Stacking: Use containers to create vertical interest among horizontal rock beds, establishing focal points at eye level
- Mobility Advantage: Rotate pots seasonally to refresh visual compositions and protect tender specimens during temperature extremes
- Soil Customization: Tailor substrate mixes for individual plant needs while maintaining uniform xeric aesthetic across the rock garden
- Thermal Mass: Position heat-absorbing containers strategically near rocks to extend growing seasons for borderline-hardy succulents
Small Rock Garden with Potted Plants Compact Solutions
1. Clustered Succulent Trios in Terracotta
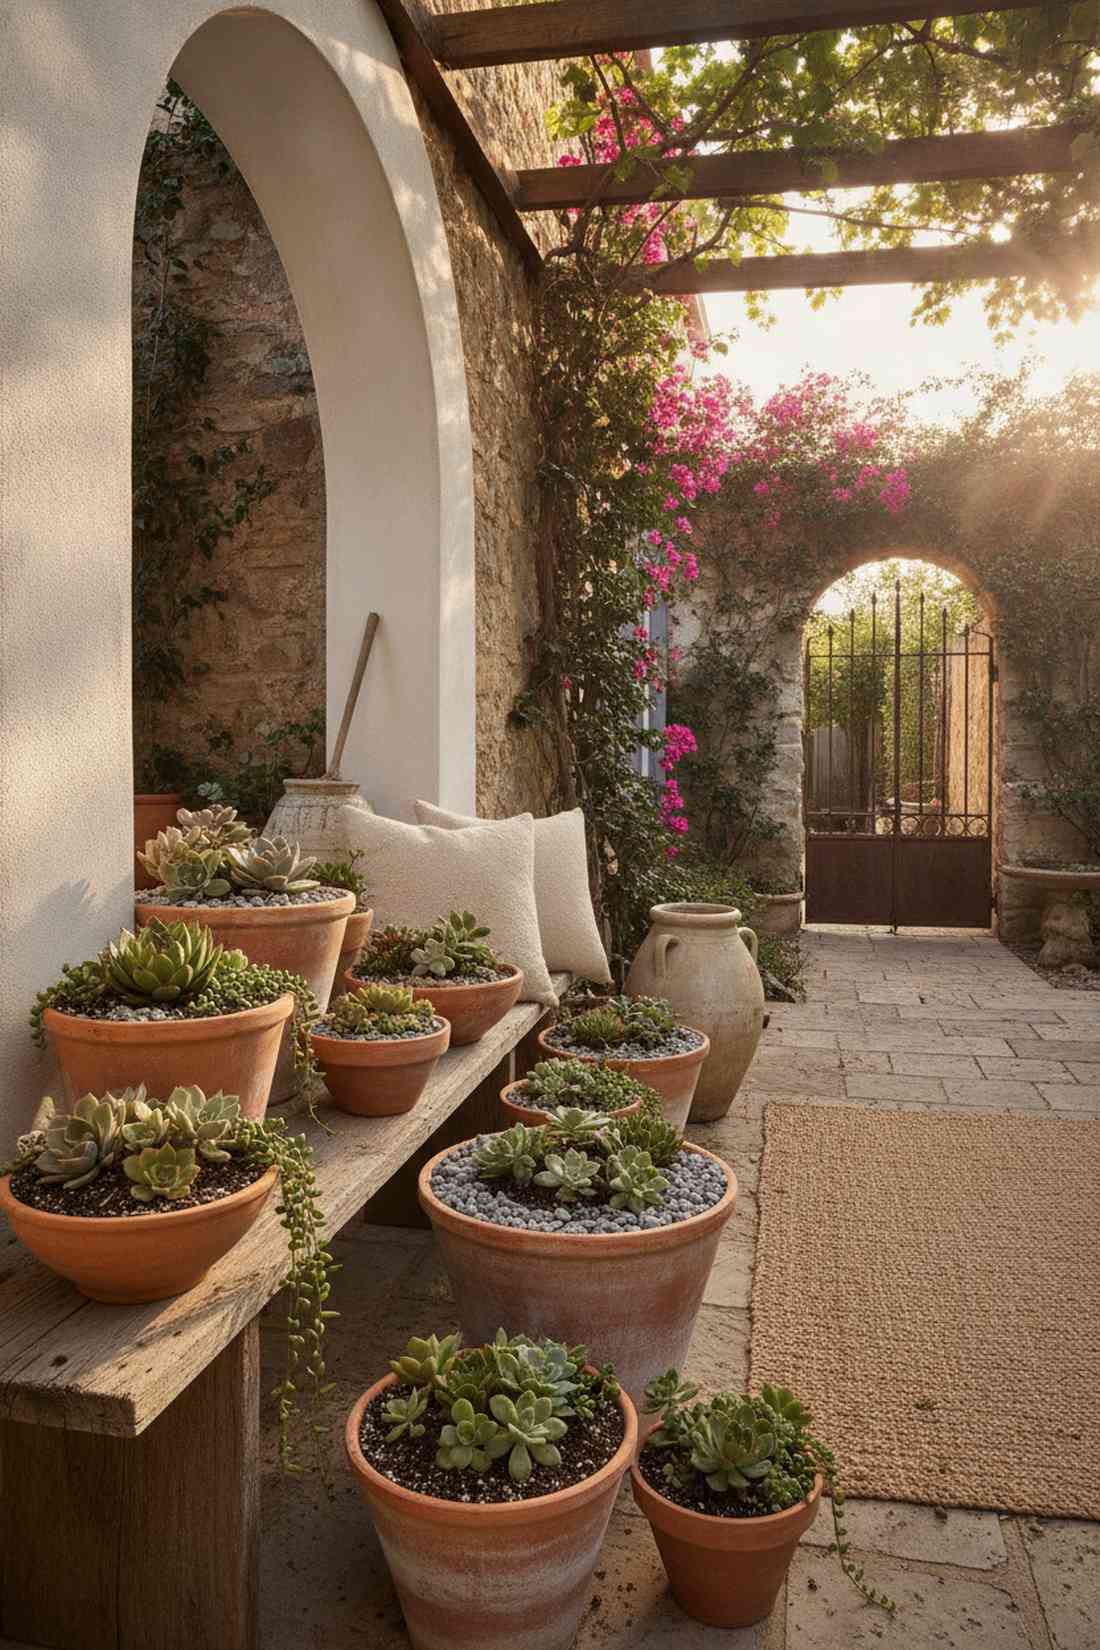
This rustic patio plant display feels like a sun-baked Mediterranean villa you accidentally discovered. It works exceptionally well for a shaded balcony or narrow side yard needing instant warmth.
Skip the symmetrical rows that most amateurs use; staggering varying heights delivers a surprisingly premium look. By incorporating wholesale terracotta planters, you achieve a designer-level finish while naturally regulating root moisture.
You can easily pull this off for around $35–$50. Pin this to your outdoor oasis board if you’re planning a weekend upgrade.
- Key Materials: Unglazed porous clay vessels, graded river stone
- Vibe / Style: Warm European minimalist
- Difficulty: Quick beginner setup
- Budget Breakdown: Pots: $25 | Plants & Base: $25.
- Creator’s Tip: Layer coarse gravel at the bottom of the pots to maximize drainage during heavy rains.
- Smart Sourcing: bulk pack unglazed terracotta pots and premium cactus soil starter kits.
2. Miniature Desert Vignette in Concrete Bowl
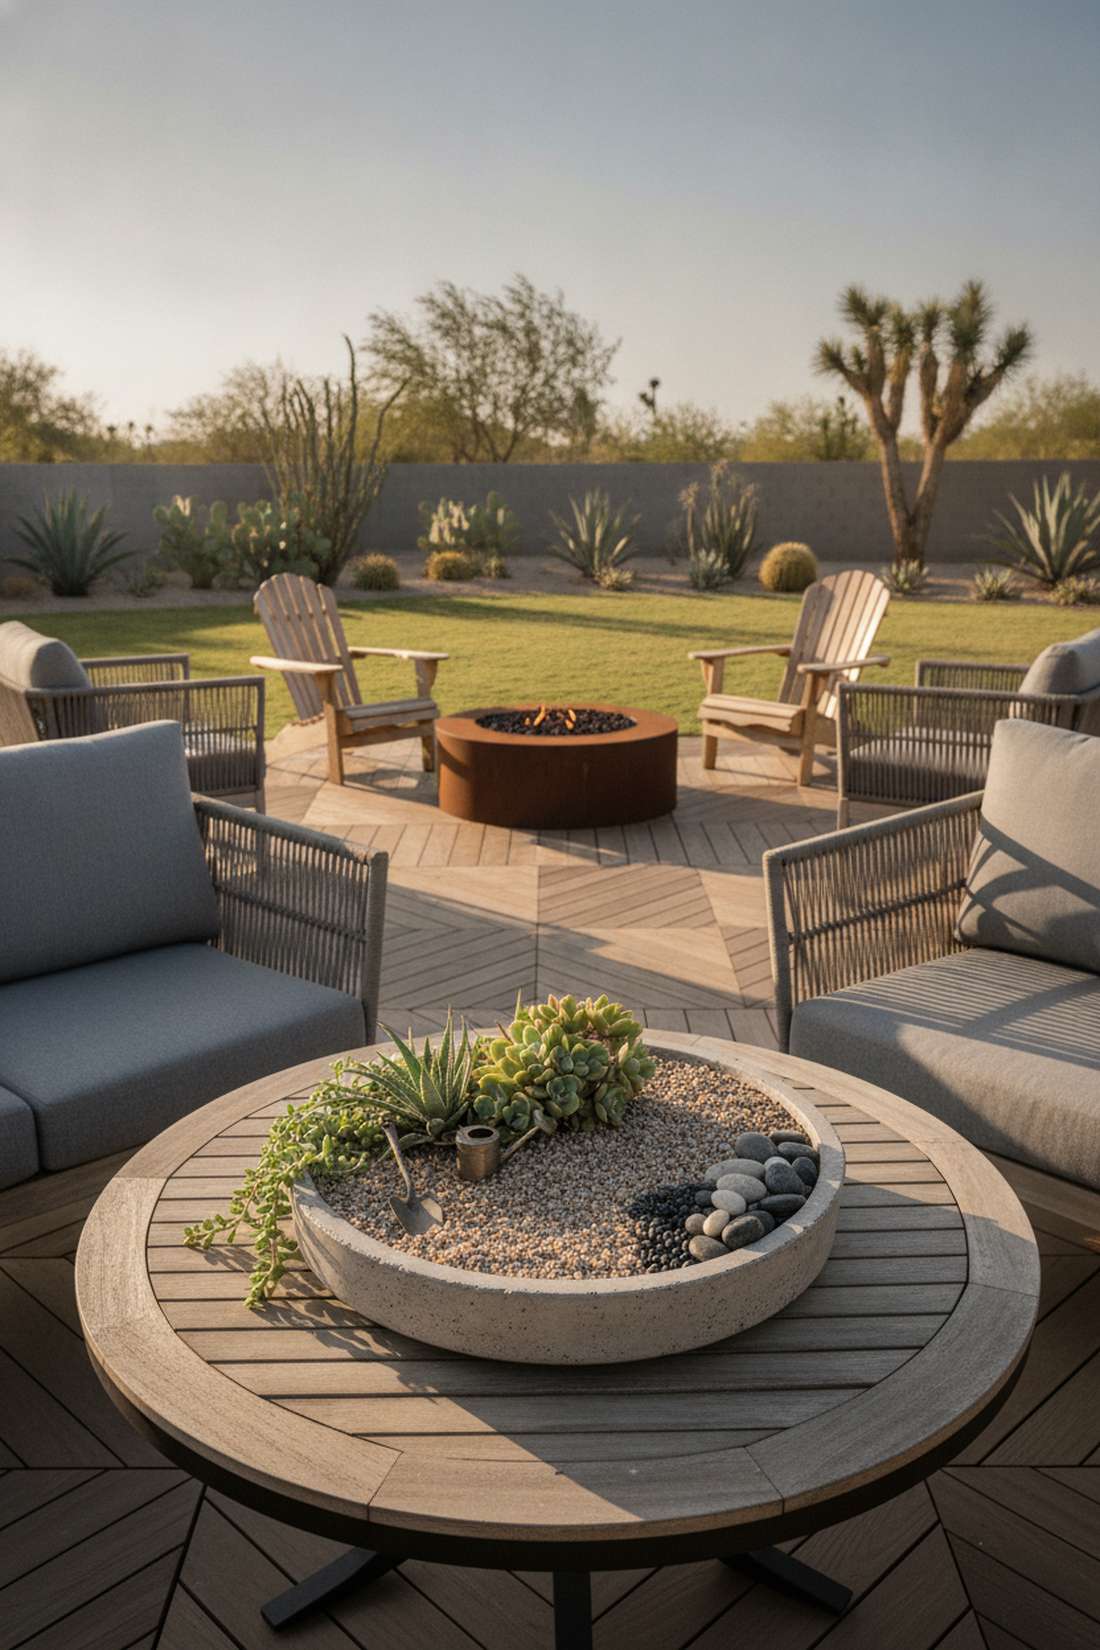
This monolithic desert centerpiece feels straight out of a luxury Joshua Tree resort. It is perfect for anchoring a minimalist patio table or a compact porch stoop.
Many assume concrete looks too industrial, but pairing it with organic trailing succulents gives a remarkably sophisticated contrast. Sneaking in miniature garden supplies and contrasting top-dressing stones makes the focal point pop.
Expect to spend about $45 for the container and specialized soil. It’s a fast upgrade that completely changes the vibe.
- Key Materials: Shallow concrete planter bowl, decomposed granite top-dress
- Vibe / Style: Modern arid chic
- Difficulty: Moderate heavy lifting
- Budget Breakdown: Bowl: $30 | Substrate: $15.
- Creator’s Tip: Use a lighter pumice mix inside to keep the heavy bowl somewhat movable.
- Smart Sourcing: UV-coated resin concrete-look bowls or pre-mixed gritty succulent substrate.
3. Vertical Stacked Hypertufa Planters
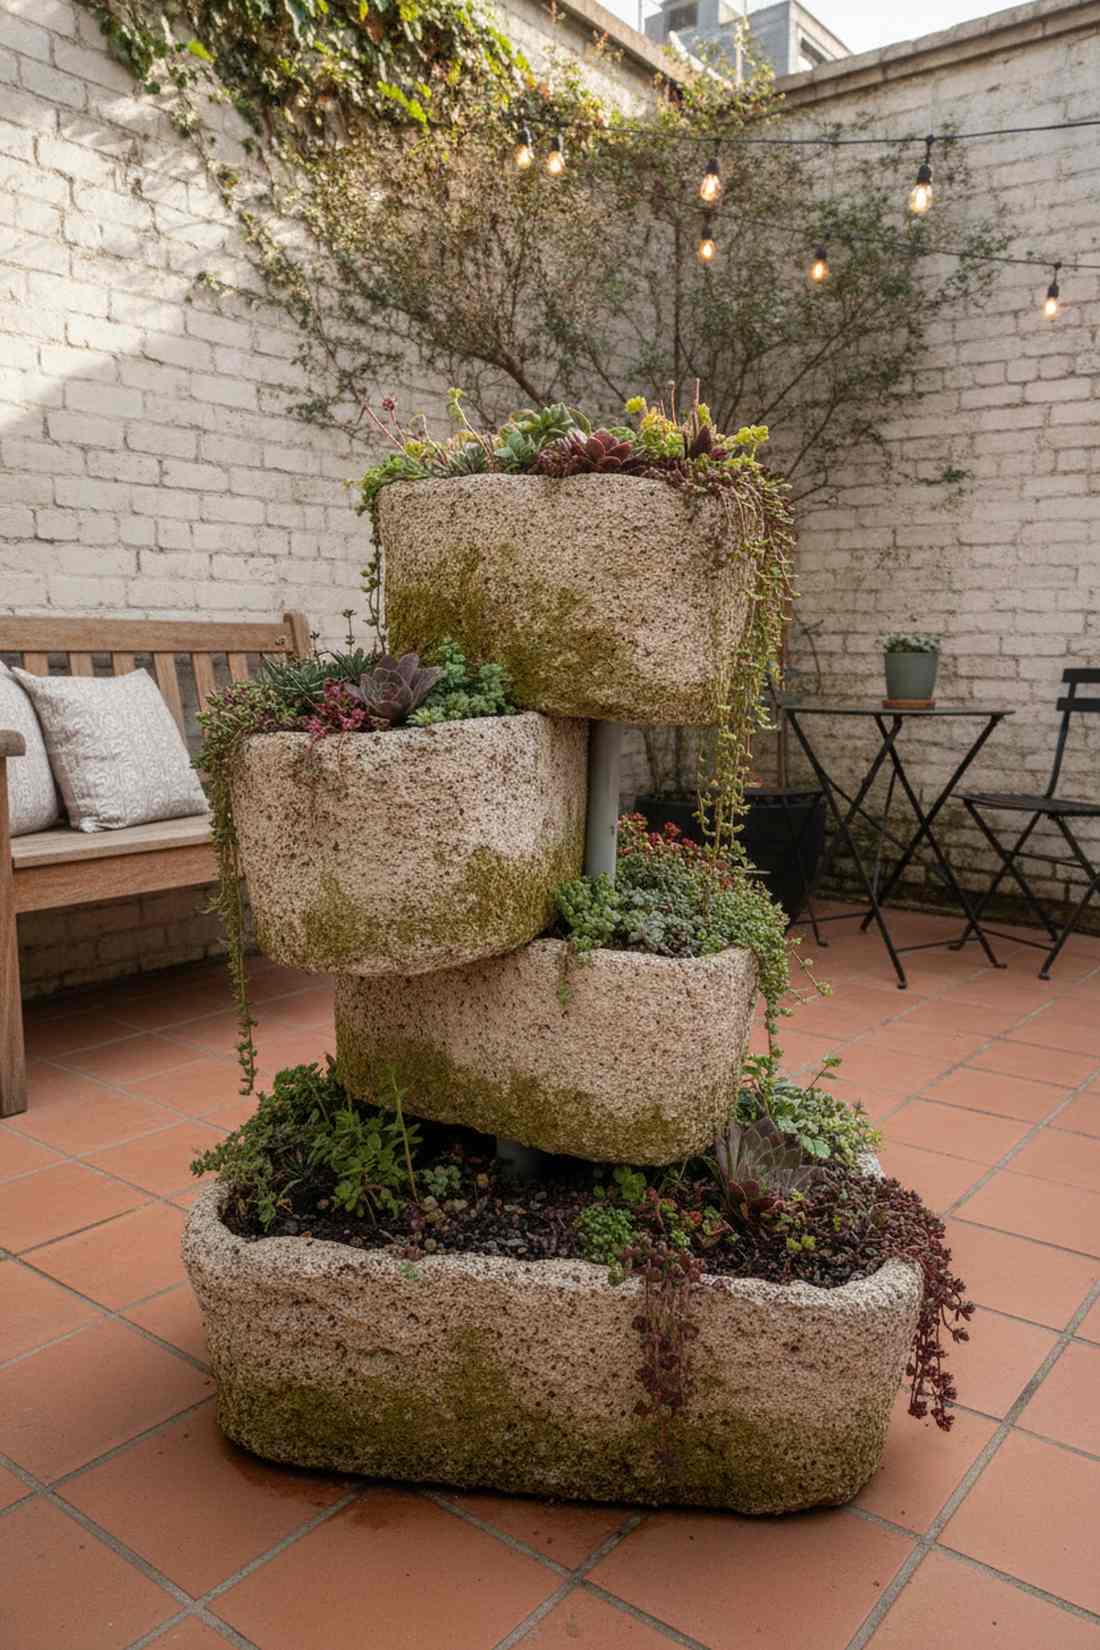
This layered alpine tower feels like uncovering an ancient, moss-covered garden ruin. It functions beautifully for maximizing vertical space on tight apartment balconies or small courtyard corners.
Arranging these in perfect alignment looks rigid; offsetting them slightly looks far more expensive than it is. The porous texture flawlessly mimics aged stone without the back-breaking weight of real rock.
Building this tiered setup will run you roughly $60. Save this idea to your small space landscaping board!
- Key Materials: Trough-style hypertufa pots, trailing sedum
- Vibe / Style: Weathered historic estate
- Difficulty: Requires structural balance
- Budget Breakdown: Troughs: $40 | Alpine filler: $20.
- Creator’s Tip: Insert a hidden PVC pipe down the center to stabilize the stacked tiers against wind.
- Smart Sourcing: lightweight faux-stone planter packs and bulk alpine gravel.
4. Galvanized Trough Alpine Collection
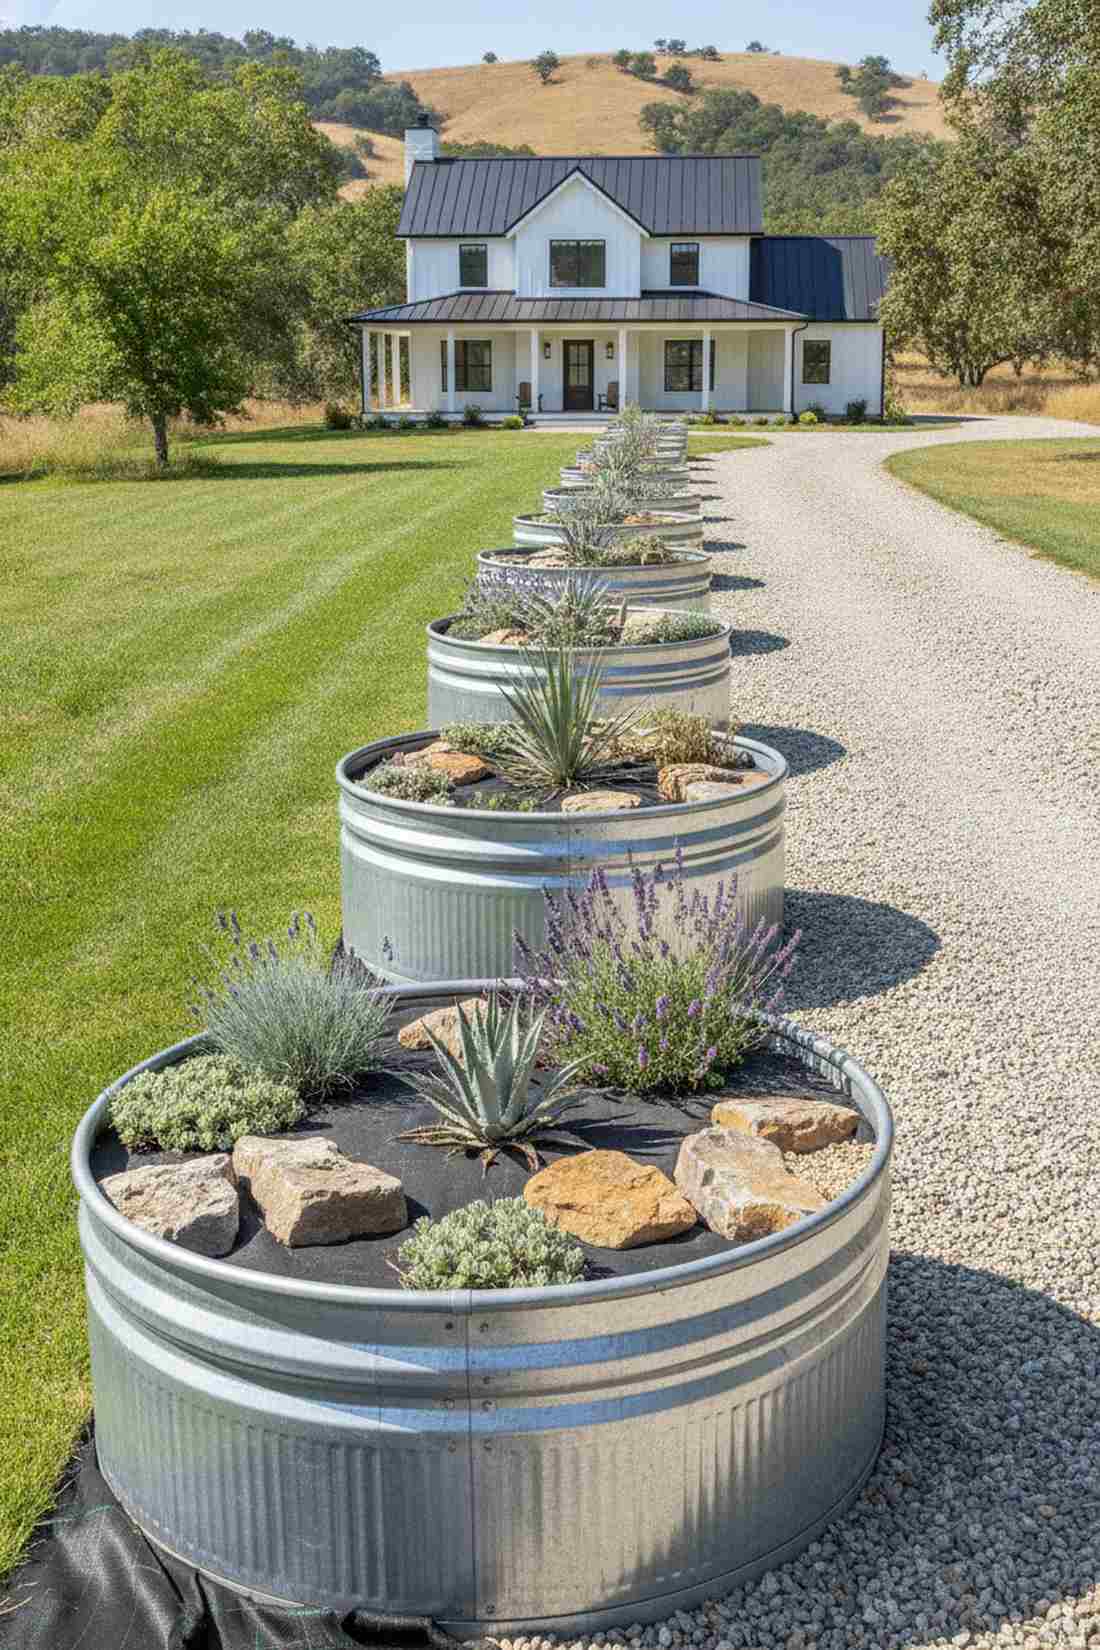
This industrial farmstead planter feels like a modern countryside retreat crossed with a rugged desert aesthetic. Works brilliantly as a boundary marker along driveway edges or property lines.
Ditch standard plastic borders; metal livestock troughs add instant architectural weight that traditional beds lack. Utilizing galvanized steel garden beds reflects harsh summer sun, protecting delicate alpine root systems.
A mid-sized trough setup costs around $80 to $100 depending on steel gauge. Highly recommended for a low-maintenance barrier.
- Key Materials: Steel animal trough, metal drill bit, landscape fabric
- Vibe / Style: Rustic industrial xeric
- Difficulty: Power tools required
- Budget Breakdown: Trough: $65 | Drainage rock: $25.
- Creator’s Tip: Drill at least 10 extra holes in the bottom—these hold more water than you think.
- Smart Sourcing: rust-proof galvanized planter kits and heavy-duty weed barrier rolls.
This next setup is ridiculously cheap but looks like a $150 custom landscape display…
5. Nested Pot Elevation System
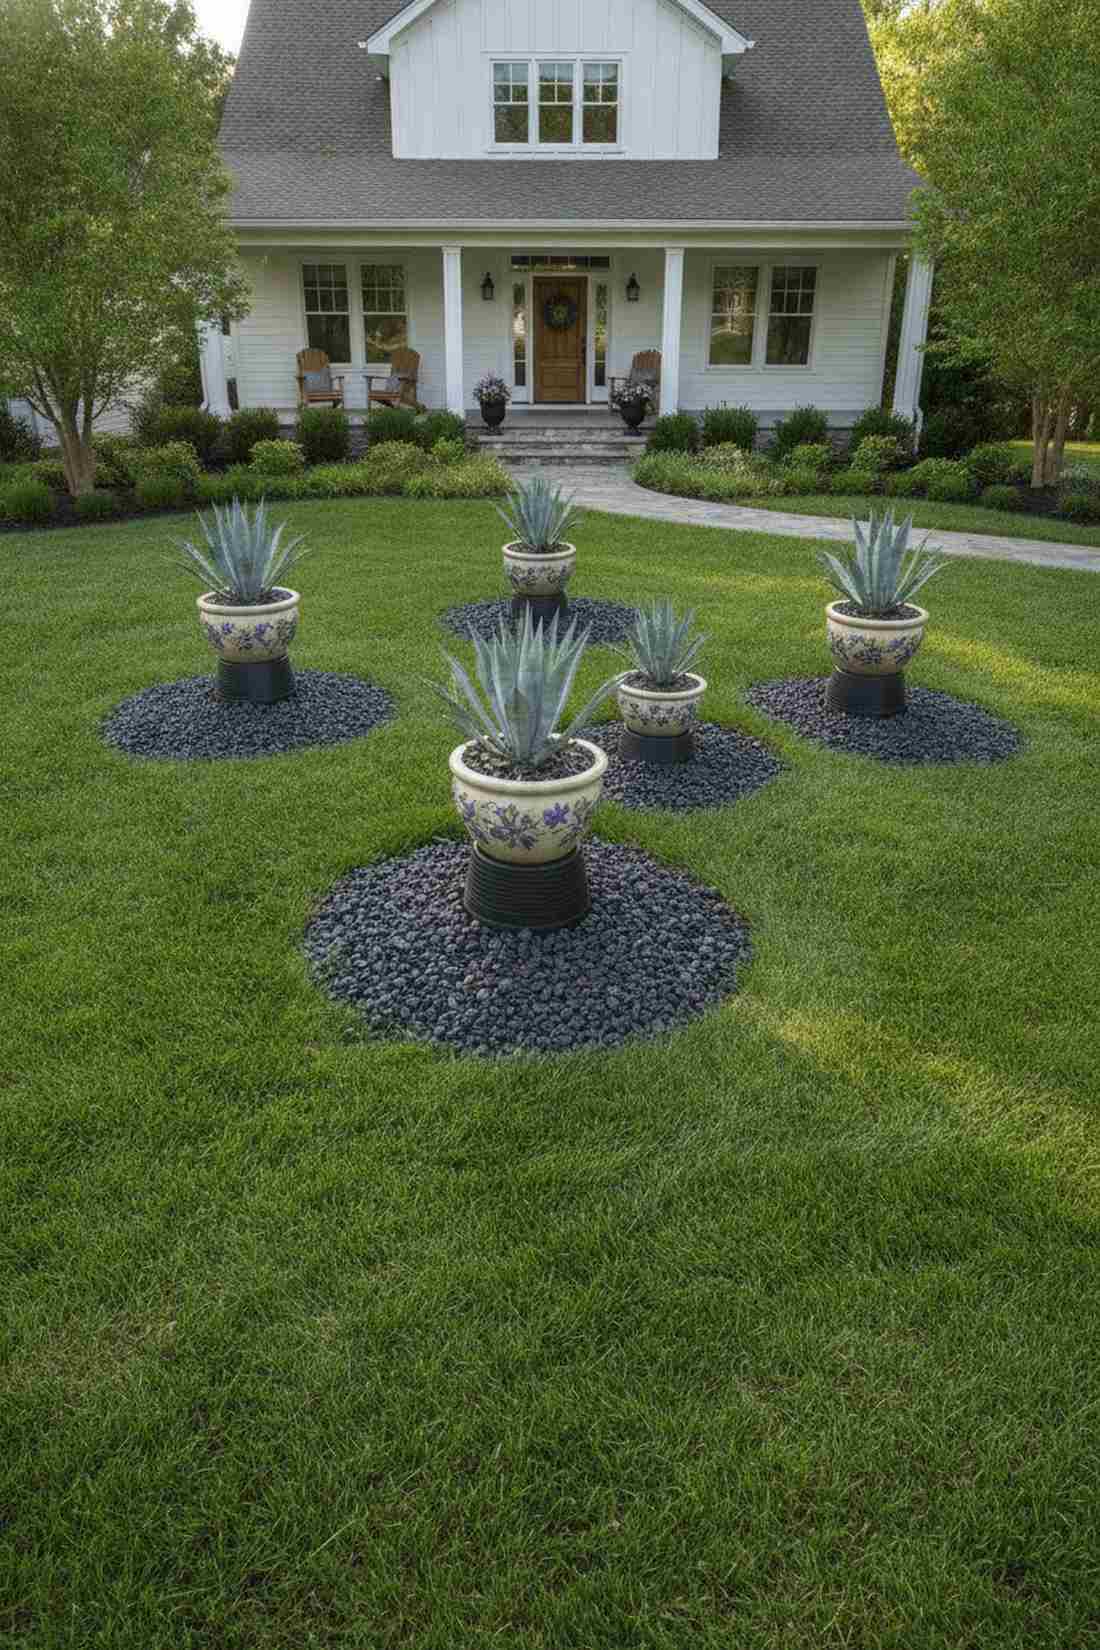
This floating botanical pedestal gives the illusion of custom-built, multi-level topography. It perfectly solves the problem of flat, boring front lawns that lack visual depth.
Most people spend hundreds on hardscaping; simply burying inverted nursery pots as a base creates instant elevation for pennies. This technique elevates statement agaves, keeping them away from crawling pests.
The secret structural base costs literally nothing if you reuse old pots. Pin this genius budget hack for your next yard remodel.
- Key Materials: Empty heavy-duty nursery pots, decorative mulch rock
- Vibe / Style: Dynamic rolling terrain
- Difficulty: Clever DIY hack
- Budget Breakdown: Base pots: $0 | Top displays: $30.
- Creator’s Tip: Wrap the buried base pot in landscape fabric so soil doesn’t wash into it over time.
- Smart Sourcing: commercial-grade plastic risers and pre-washed black river rock (bulk pack).
6. Corner Cascade Container Arrangement
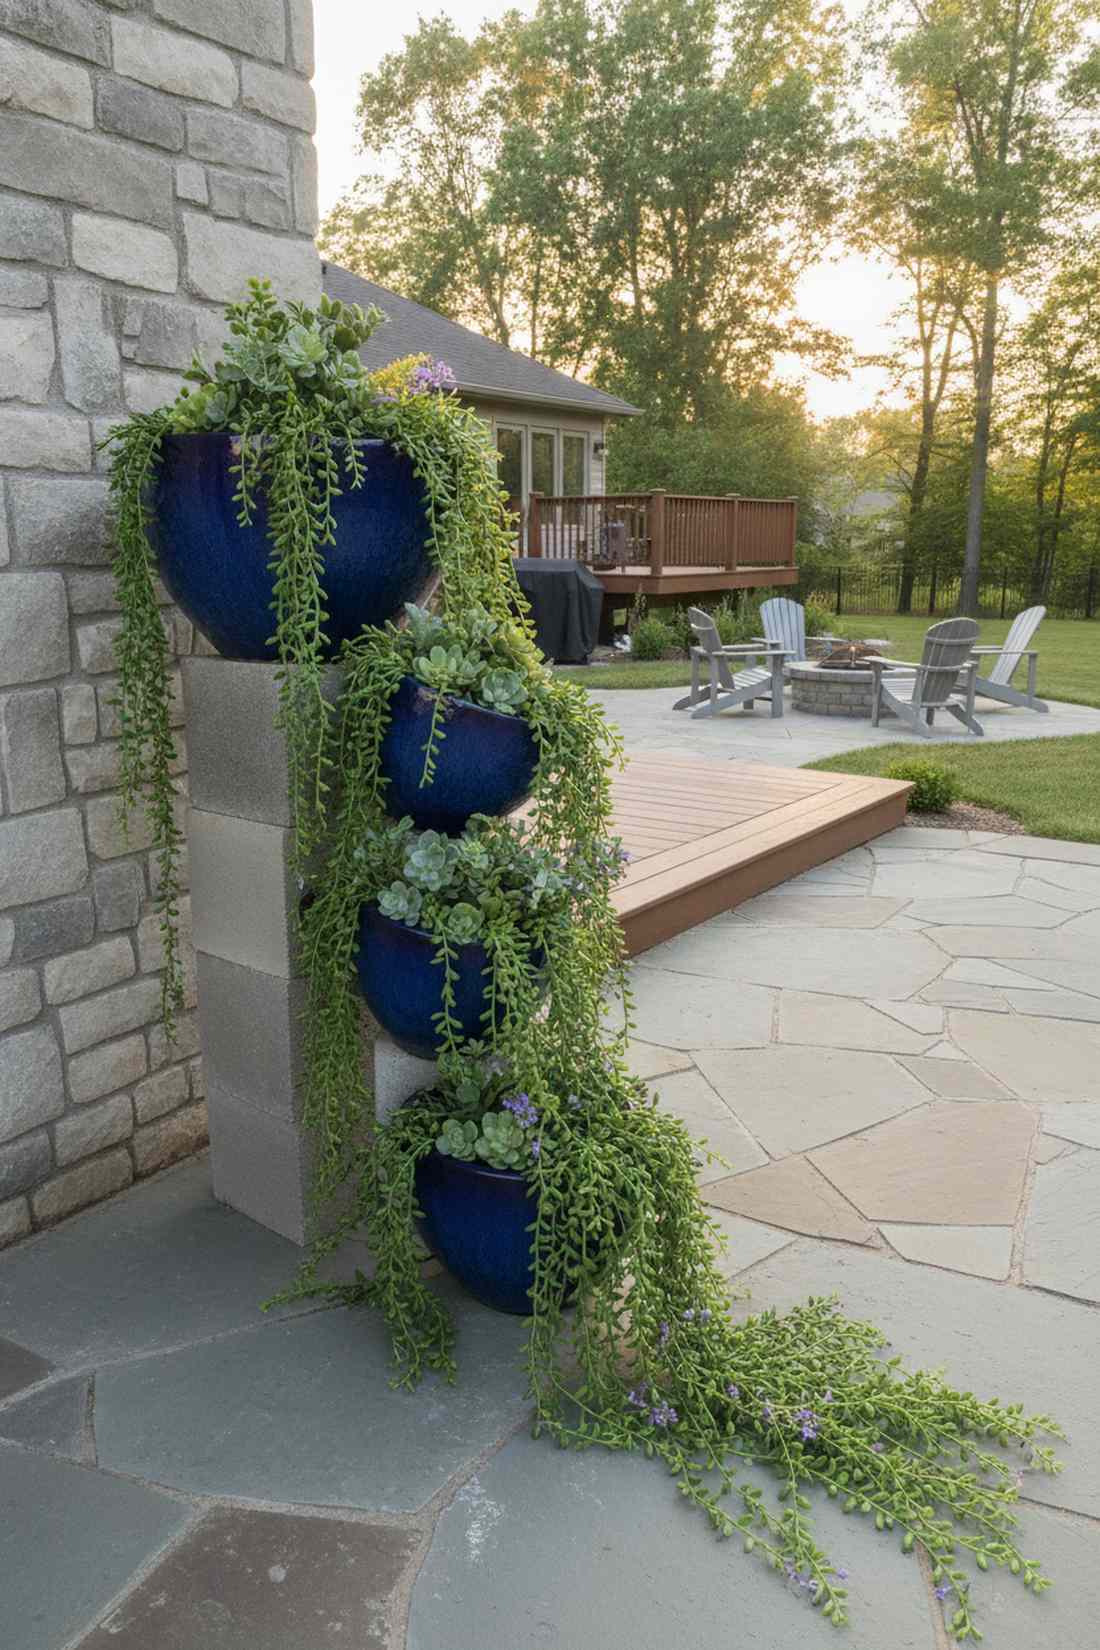
This flowing corner plant waterfall feels like a cascading living sculpture pouring onto your pathway. It transforms awkward right-angle dead zones into stunning vertical features.
Instead of throwing one sad bush in a corner, stepping down various bowl sizes creates aggressive movement. Matching the glaze colors unifies the look, making it read as a single, expensive installation.
Achieving this cascading tier effect costs around $75. It is a brilliant way to guide visitor attention.
- Key Materials: Graduated ceramic bowls, trailing vines
- Vibe / Style: Liquid botanical flow
- Difficulty: Easy arranging
- Budget Breakdown: Ceramic set: $50 | Trailing plants: $25.
- Creator’s Tip: Place the tallest pot on a hidden cinder block to exaggerate the height difference.
- Smart Sourcing: shatterproof nested planter trios and UV-resistant trailing faux succulents.
Rock Garden Potted Plants for Dramatic Focal Points
7. Single Specimen Urn at Pathway Terminus
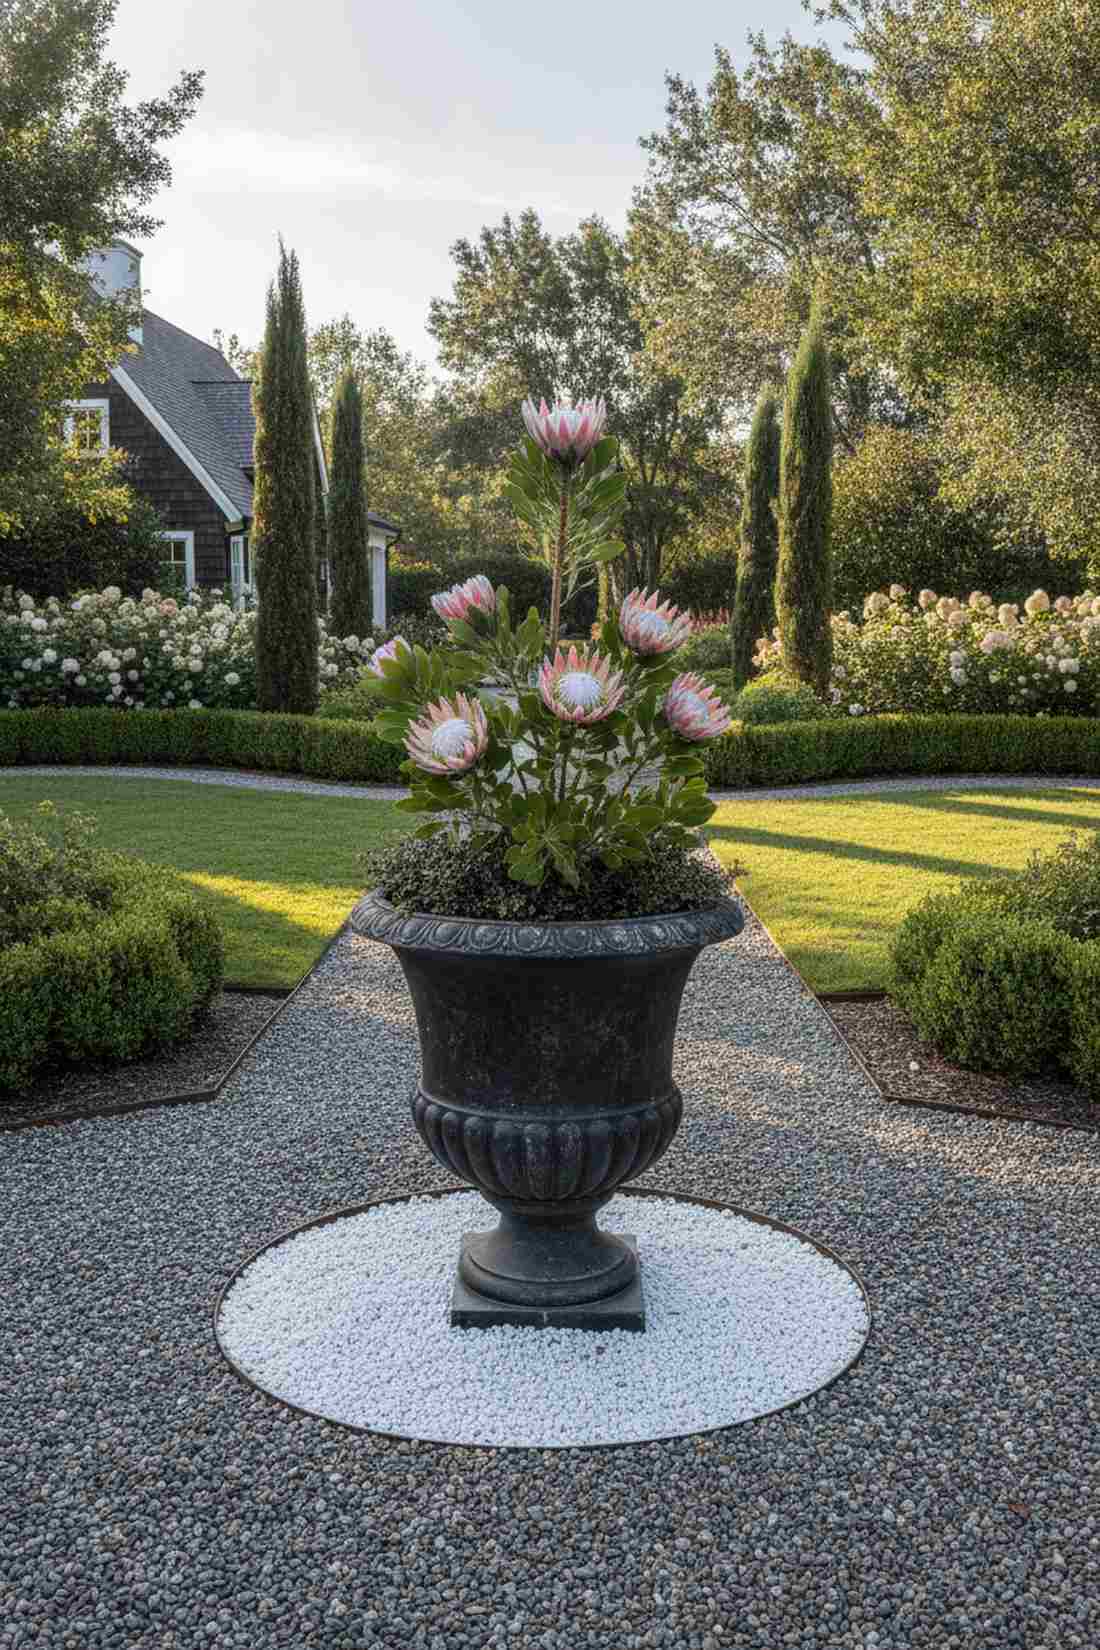
This monumental gallery pedestal commands attention like a masterpiece at the end of a museum hall. It serves as the ultimate destination anchor for wandering gravel pathways.
Do not clutter this area with smaller accents; a solitary, massive vessel surrounded by negative space delivers massive impact. Planting a dramatic King Protea or Tree Aloe gives it that high-end architectural magazine finish.
A quality oversized urn and specimen plant will range from $150–$200. Save this if you need a show-stopping yard feature!
- Key Materials: 24-inch fiberglass or stone urn, contrasting fine gravel
- Vibe / Style: Bold estate luxury
- Difficulty: Heavy installation
- Budget Breakdown: Large Urn: $120 | Halo gravel: $30.
- Creator’s Tip: Create a 3-foot circular clearing around the base using white quartz to make the dark urn pop.
- Smart Sourcing: lightweight faux-stone mega planters and high-drainage structural soil mixes.
8. Paired Pillars Flanking Seating Areas

This living architectural gateway feels like walking into an exclusive luxury resort lounge. It beautifully frames fire pits, outdoor couches, or hidden garden benches.
Avoid squat, wide pots here; tall, sleek columns planted with upright Snake Plants absolutely force the eye upward. This framing technique creates psychological boundaries in open spaces without blocking the breeze.
Two premium tall planters cost roughly $110 together. A highly recommended layout for entertaining zones.
- Key Materials: Matching 30-inch columnar planters, vertical succulents
- Vibe / Style: Structured contemporary
- Difficulty: Alignment focused
- Budget Breakdown: Pillar pots: $80 | Upright plants: $30.
- Creator’s Tip: Fill the bottom half of tall pots with empty plastic bottles to save money on soil and reduce weight.
- Smart Sourcing: weather-proof tall resin columns (2-pack) and premium white top-dressing stones.
💡 Must-Have Supplies for High-End Setups
To build these setups faster and ensure they last, skip the generic craft aisles and invest in the right foundational kits.
- Base & Support: heavy-duty invisible pot risers (bulk pack)
- Setup Tools: commercial-grade cactus soil starter kits
- Weather/Durability Protection: UV-blocking clear masonry sealant
9. Offset Boulder and Pot Pairing

This organic stone duet captures the raw, rugged tension of a high-altitude hiking trail. It is the perfect anchor for sprawling, otherwise monotonous dry riverbed landscapes.
Never center the pot directly in front of the rock; placing it slightly askew creates dynamic, natural asymmetry. Choosing a glazed charcoal vessel against a raw granite boulder delivers an incredibly photogenic contrast.
If you already have the boulder, the planter addition is only $40. Pin this to master the art of naturalistic landscaping.
- Key Materials: Existing landscape boulder, contrasting glazed ceramic pot
- Vibe / Style: Zen desert modern
- Difficulty: Creative placement
- Budget Breakdown: Ceramic pot: $30 | Specimen plant: $15.
- Creator’s Tip: Leave exactly 18 inches of breathing room between the rock and the pot so neither loses its silhouette.
- Smart Sourcing: frost-resistant glazed ceramic planters and faux landscape boulders (lightweight).
Most people get this completely wrong… until they try the exact optical illusion layout coming up next.
10. Central Fountain Planter Hybrid
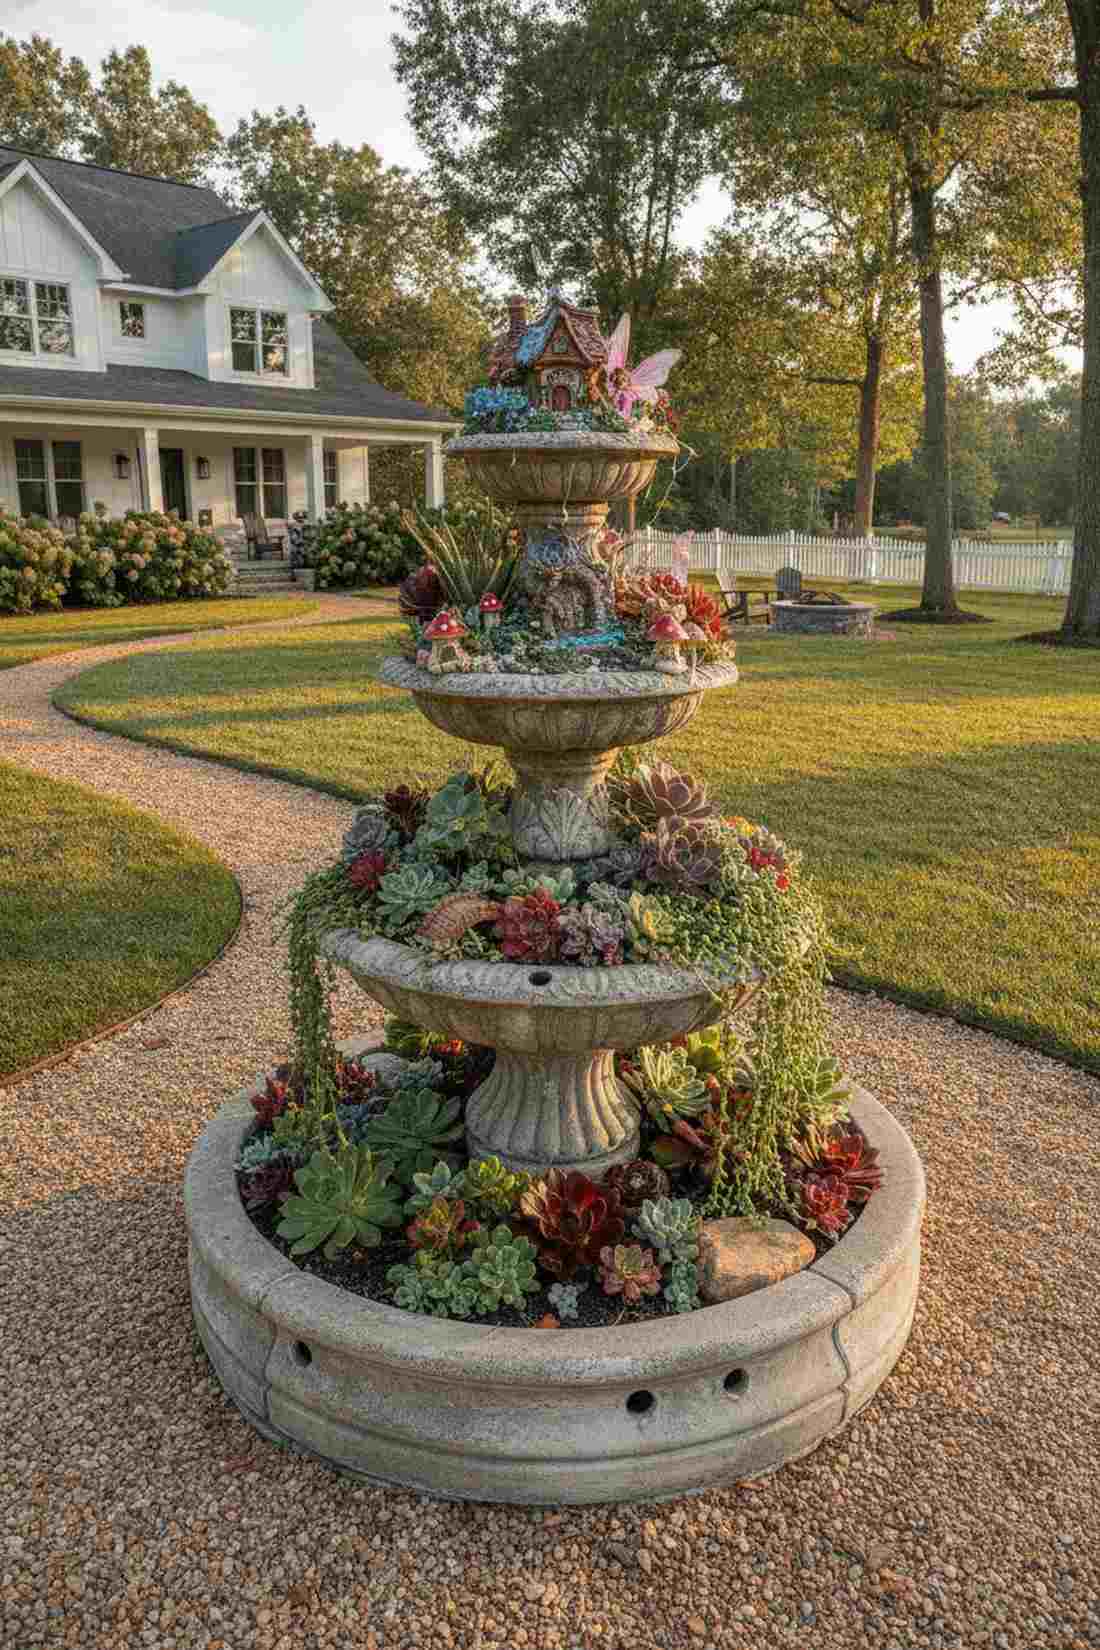
This repurposed tiered oasis feels like a whimsical heritage piece that stops guests in their tracks. It serves as a breathtaking centerpiece where multiple front yard pathways intersect.
Throwing away broken birdbaths is a waste; converting them into xeric planters creates instant, multi-level architectural magic. By utilizing fairy garden kits in the top tiers, you can build a captivating micro-world that requires zero water plumbing.
Retrofitting an old fountain costs about $35 in soil and sealants. It’s an epic weekend upcycling project.
- Key Materials: Decommissioned fountain basin, masonry drill bit
- Vibe / Style: Whimsical upcycled heritage
- Difficulty: Advanced DIY drilling
- Budget Breakdown: Old fountain: $0 (Thrifted) | Succulents: $35.
- Creator’s Tip: Seal the old plumbing holes with waterproof epoxy, then drill fresh drainage holes at the lowest water pooling points.
- Smart Sourcing: diamond-tip masonry drill bit sets and UV-coated resin fairy cottage kits.
Potted Plants in Garden Bed Seamless Integration
11. Sunken Rim Integration Technique
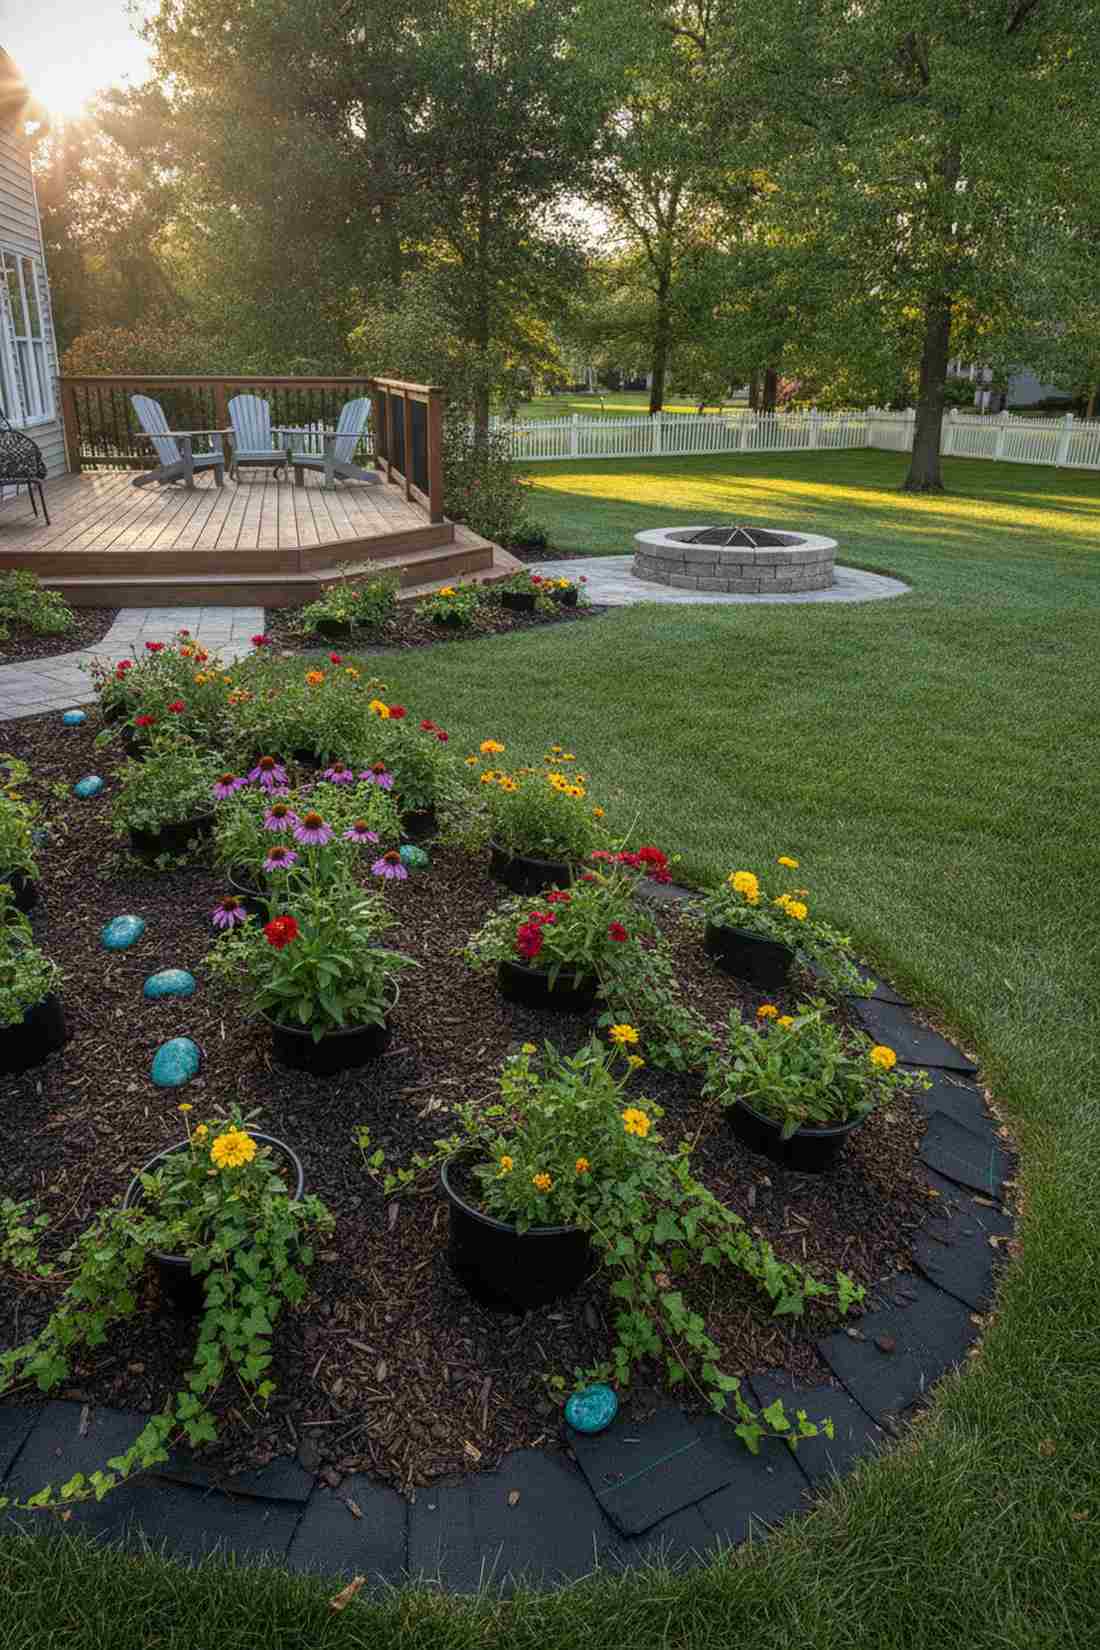
This hidden planter illusion feels like Mother Nature carefully curated the landscape herself. It works wonders for expanding flower beds without committing to permanent, deep-rooted plantings.
Leaving the plastic rims visible ruins the magic; burying them flush with the mulch makes the plants look naturally embedded. This sneaky method allows you to swap out dead plants instantly without digging up the whole yard.
Executing this sunken trick costs nothing extra but your time. Pin this stealthy landscaping secret!
- Key Materials: Standard nursery pots, weed barrier fabric
- Vibe / Style: Seamless organic wild
- Difficulty: Moderate digging
- Budget Breakdown: Nursery pots: $5 | Landscape fabric: $15.
- Creator’s Tip: Mark the buried pot locations with a distinct colored pebble so you don’t accidentally step on the hollow edges.
- Smart Sourcing: heavy-duty pre-cut landscape fabric squares and reinforced plastic nursery pots (bulk pack).
12. Partial Emergence Tiered Effect
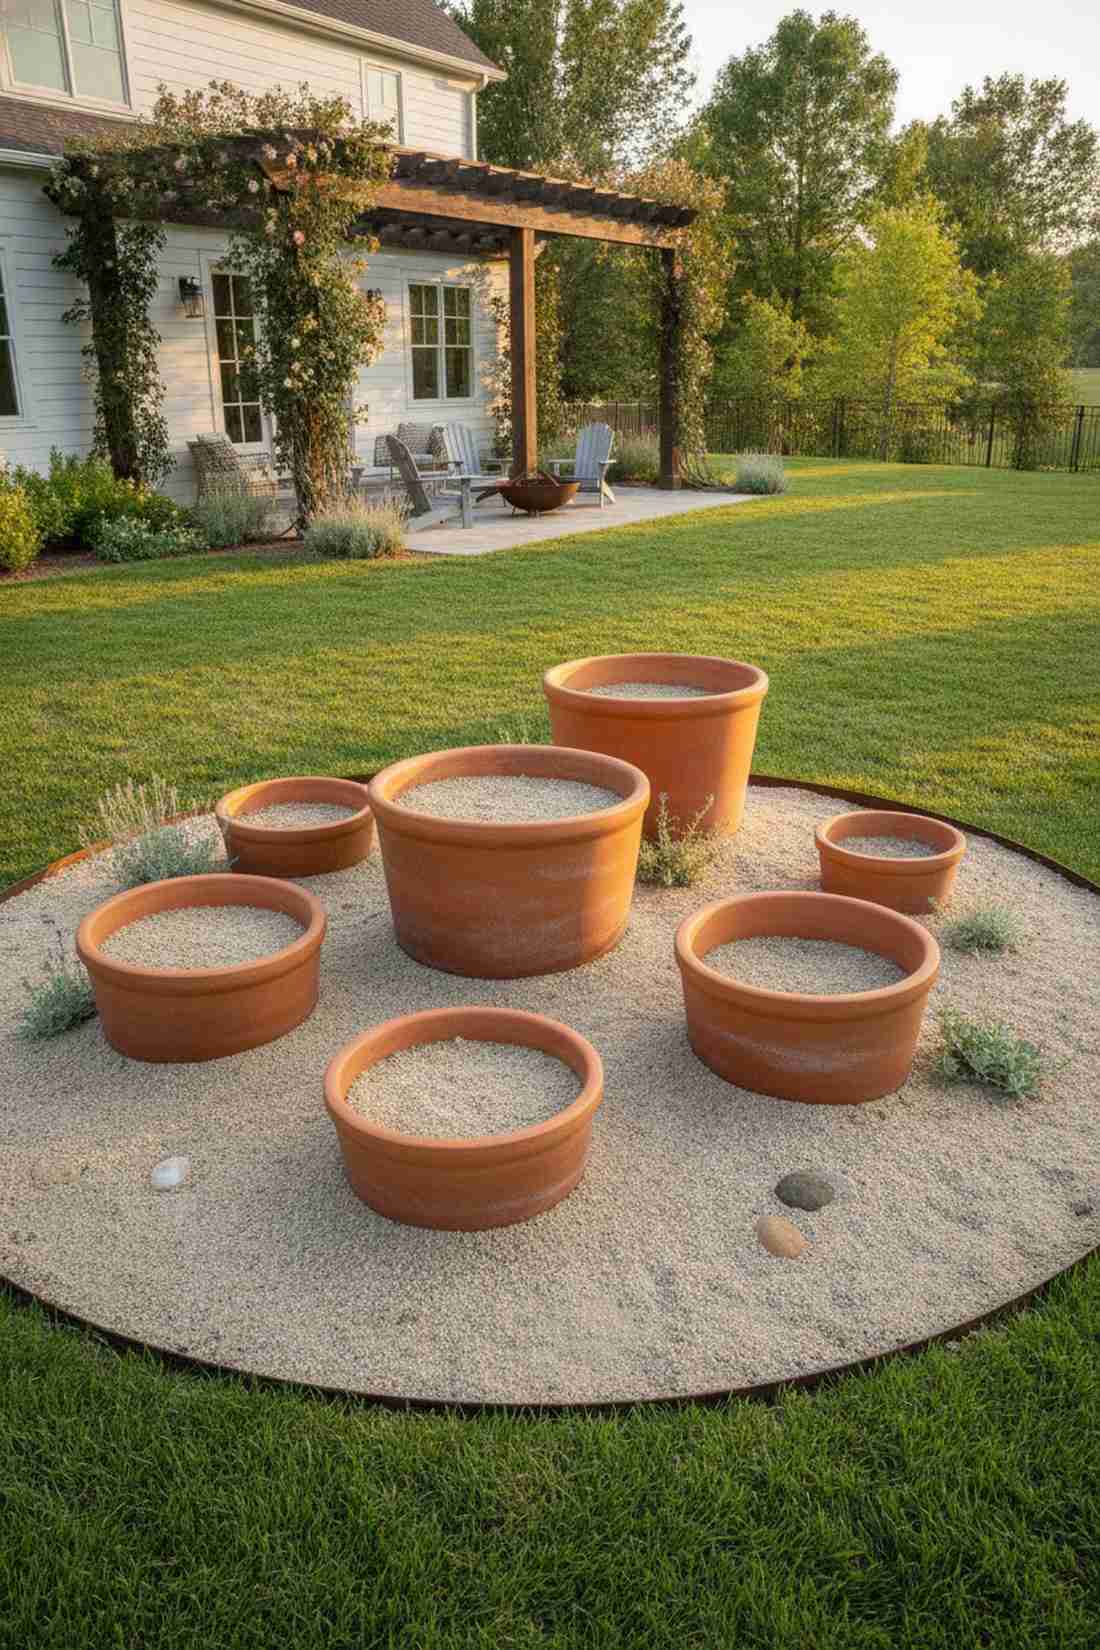
This half-buried archaeological look gives the distinct impression of ancient terracotta ruins slowly surfacing from the earth. It brings instant vertical complexity to flat, uninspired dirt terrains.
Using uniform pot heights is boring; burying them at aggressive, staggered depths creates an expensive, customized topographical map. This strategy keeps root zones incredibly cool during scorching summer afternoons.
You can stagger a cluster of 5 pots for around $40. It is highly recommended for adding cheap texture.
- Key Materials: Identical clay pots buried at varying levels
- Vibe / Style: Excavated desert ruin
- Difficulty: Measured excavation
- Budget Breakdown: Pots: $25 | Base sand: $15.
- Creator’s Tip: Pack wet sand tightly around the half-exposed rims to prevent them from shifting during heavy watering.
- Smart Sourcing: thick-walled terracotta cylinder pots and bulk decomposed granite bags.
13. Color-Blocked Container Zones
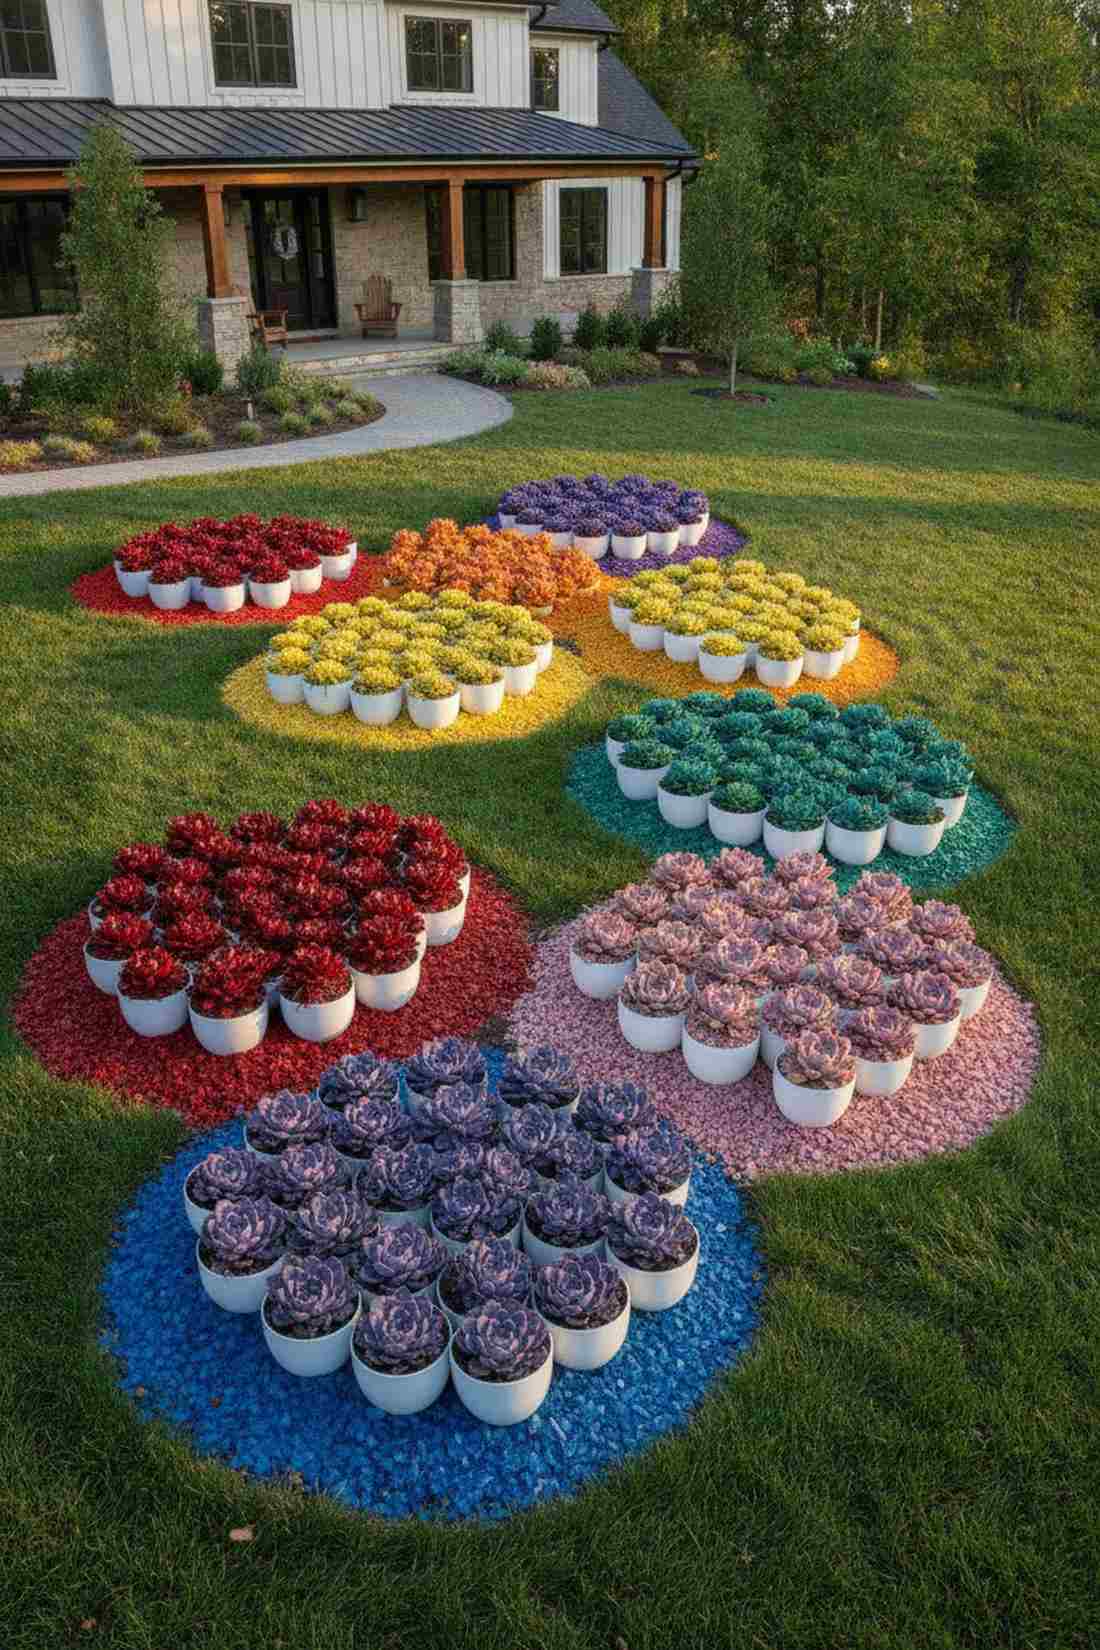
This vibrant mass-planting strategy hits the eye like a bold, impressionist landscape painting. It is an absolute game-changer for large commercial fronts or sprawling suburban yard edges.
Mixing a hundred colors creates visual chaos; grouping clusters of identical hues makes an aggressive, expensive-looking statement. Integrating terrarium accessories or colored glass mulch atop these blocks locks in the modern art vibe.
A solid color-blocked zone of 7 pots runs about $60. Save this idea for a high-impact curb appeal boost.
- Key Materials: Multiple identical pots, single-color plant cultivars
- Vibe / Style: Bold modern art
- Difficulty: Requires strict discipline
- Budget Breakdown: Pot clusters: $35 | Colored top-dress: $25.
- Creator’s Tip: Arrange the sunken pots in organic, kidney-bean shapes rather than harsh squares to keep it feeling natural.
- Smart Sourcing: pre-sorted color succulent starter kits and vibrant tempered glass mulch (bulk pack).
Before you spend $300 on custom pavers, look at how this next layout replaces hardscaping completely…
14. Stepping Stone Pot Integration
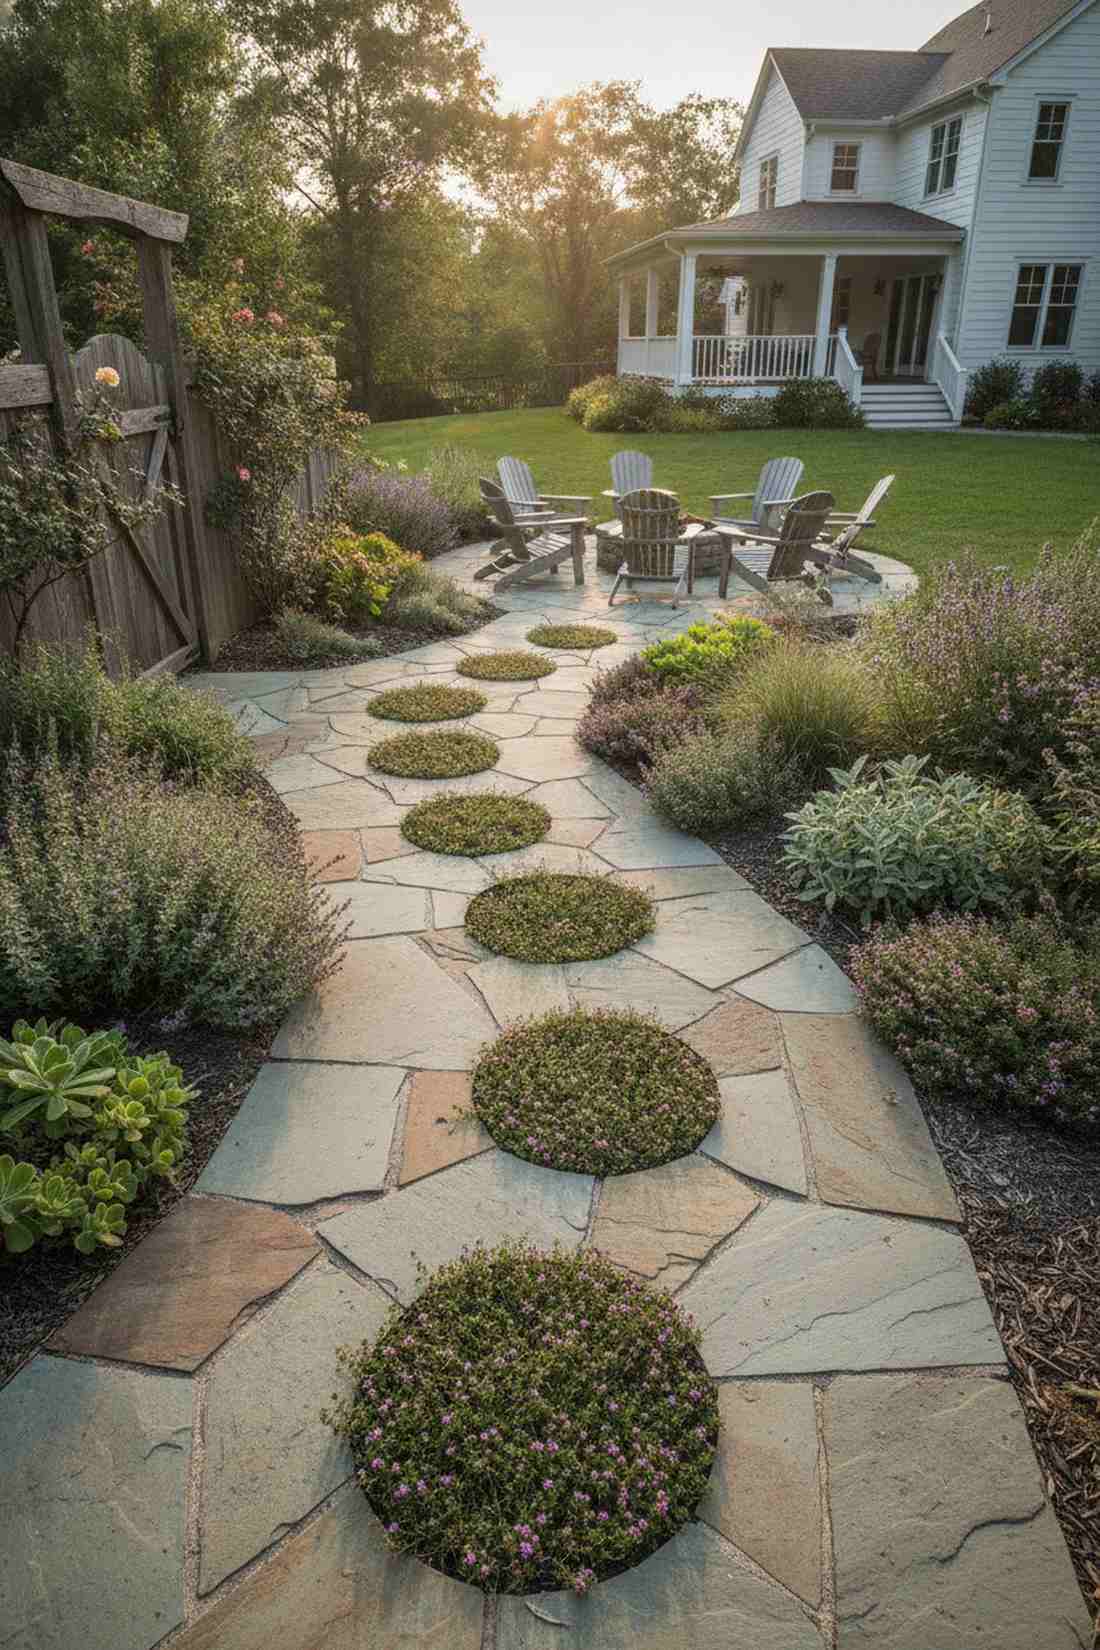
This living pathway design feels like skipping through an enchanted, aromatic fairy tale garden. It elegantly solves the problem of connecting side yard gates to back patios.
Solid concrete paths look sterile; alternating flat pavers with sunken herbal pots softens the entire hardscape brilliantly. Choosing tough, walkable creepers ensures the path smells amazing every time your foot brushes past.
Installing this living walkway costs around $80 for a short path. Pin this for a weekend pathway overhaul!
- Key Materials: Flat flagstone treads, tough groundcover plants
- Vibe / Style: Enchanted cottage xeric
- Difficulty: Precise leveling
- Budget Breakdown: Flagstones: $50 | Creeping plants: $30.
- Creator’s Tip: Ensure the rim of the sunken pot is exactly 1/2 inch below the stone height to prevent tripping hazards.
- Smart Sourcing: walkable creeping thyme seed mats and heavy-duty rubber stepping stone bases.
15. Raised Bed Perimeter Pots
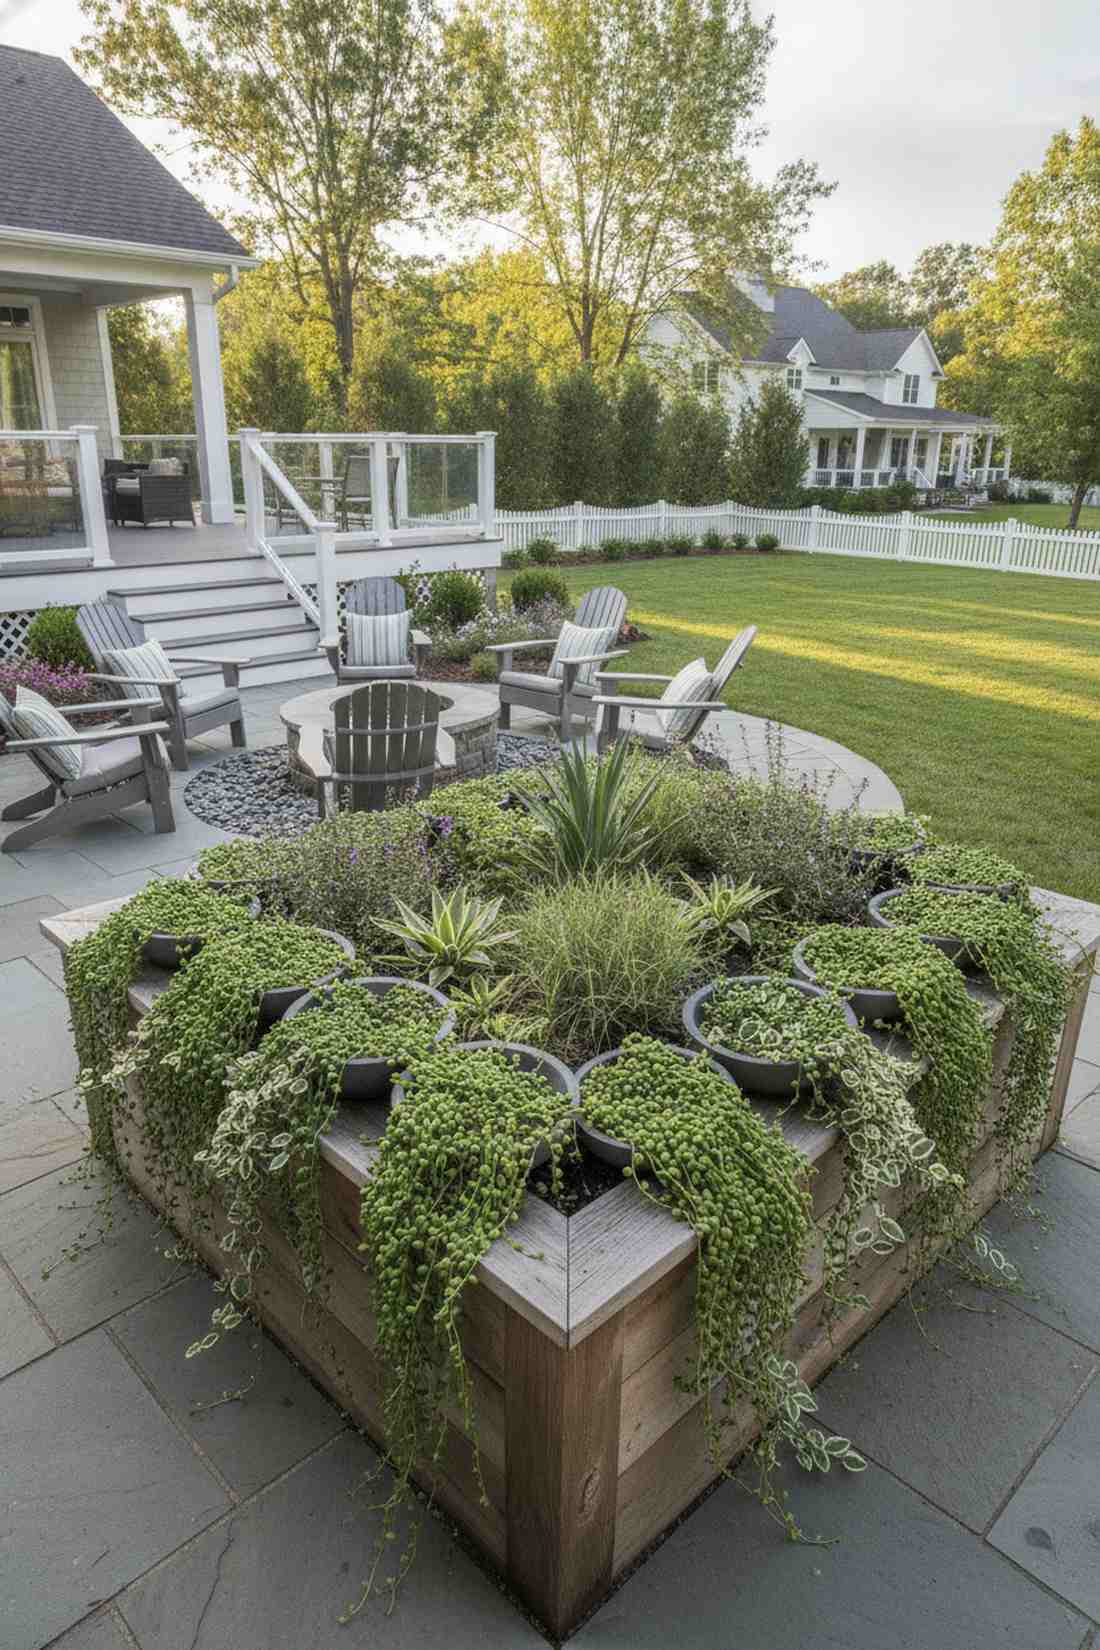
This cascading border frame lines your garden like a thick, living picture frame. It is the ultimate trick for softening the harsh wooden or brick edges of standard retaining walls.
Most raised beds look boxy and boring; hugging the exterior with low, wide bowls visually anchors the structure to the earth. This allows you to grow thirsty ornamentals on the outside while keeping the inside strictly drought-tolerant.
Adding a perimeter of bowls costs roughly $15 per container. A fast way to multiply your planting space.
- Key Materials: Low bowl planters, draping groundcovers
- Vibe / Style: Lush overlapping abundance
- Difficulty: Easy placement
- Budget Breakdown: Bowls: $45 | Trailing foliage: $20.
- Creator’s Tip: Plant aggressive ‘String of Pearls’ here so they can drape beautifully without choking out your main bed plants.
- Smart Sourcing: shallow resin planter bowls (multi-pack) and premium moisture-control potting soil.
Vertical Arrangements for Slope Gardens
16. Stair-Step Container Terracing

This dramatic hillside cascade gives your yard the sweeping, majestic feel of a Mediterranean vineyard. It entirely rescues steep, eroding backyard slopes that are otherwise impossible to mow.
Building massive timber retaining walls costs thousands; carving small level steps for heavy pots delivers a premium terrace effect for a fraction of the price. The reverse height graduation ensures water runoff feeds the lower tiers perfectly.
Creating a 3-tier step system runs about $90. Save this incredibly smart engineering hack to your DIY board.
- Key Materials: Heavy square planters, crushed gravel base
- Vibe / Style: Sweeping architectural terraces
- Difficulty: Hard manual labor
- Budget Breakdown: Planters: $60 | Leveling gravel: $30.
- Creator’s Tip: Always backfill the uphill side of the pot with compacted gravel to stop mudslides from knocking them over.
- Smart Sourcing: heavy-duty square concrete-resin planters and geo-grid slope stabilization mats.
17. Retaining Wall Shelf Pots
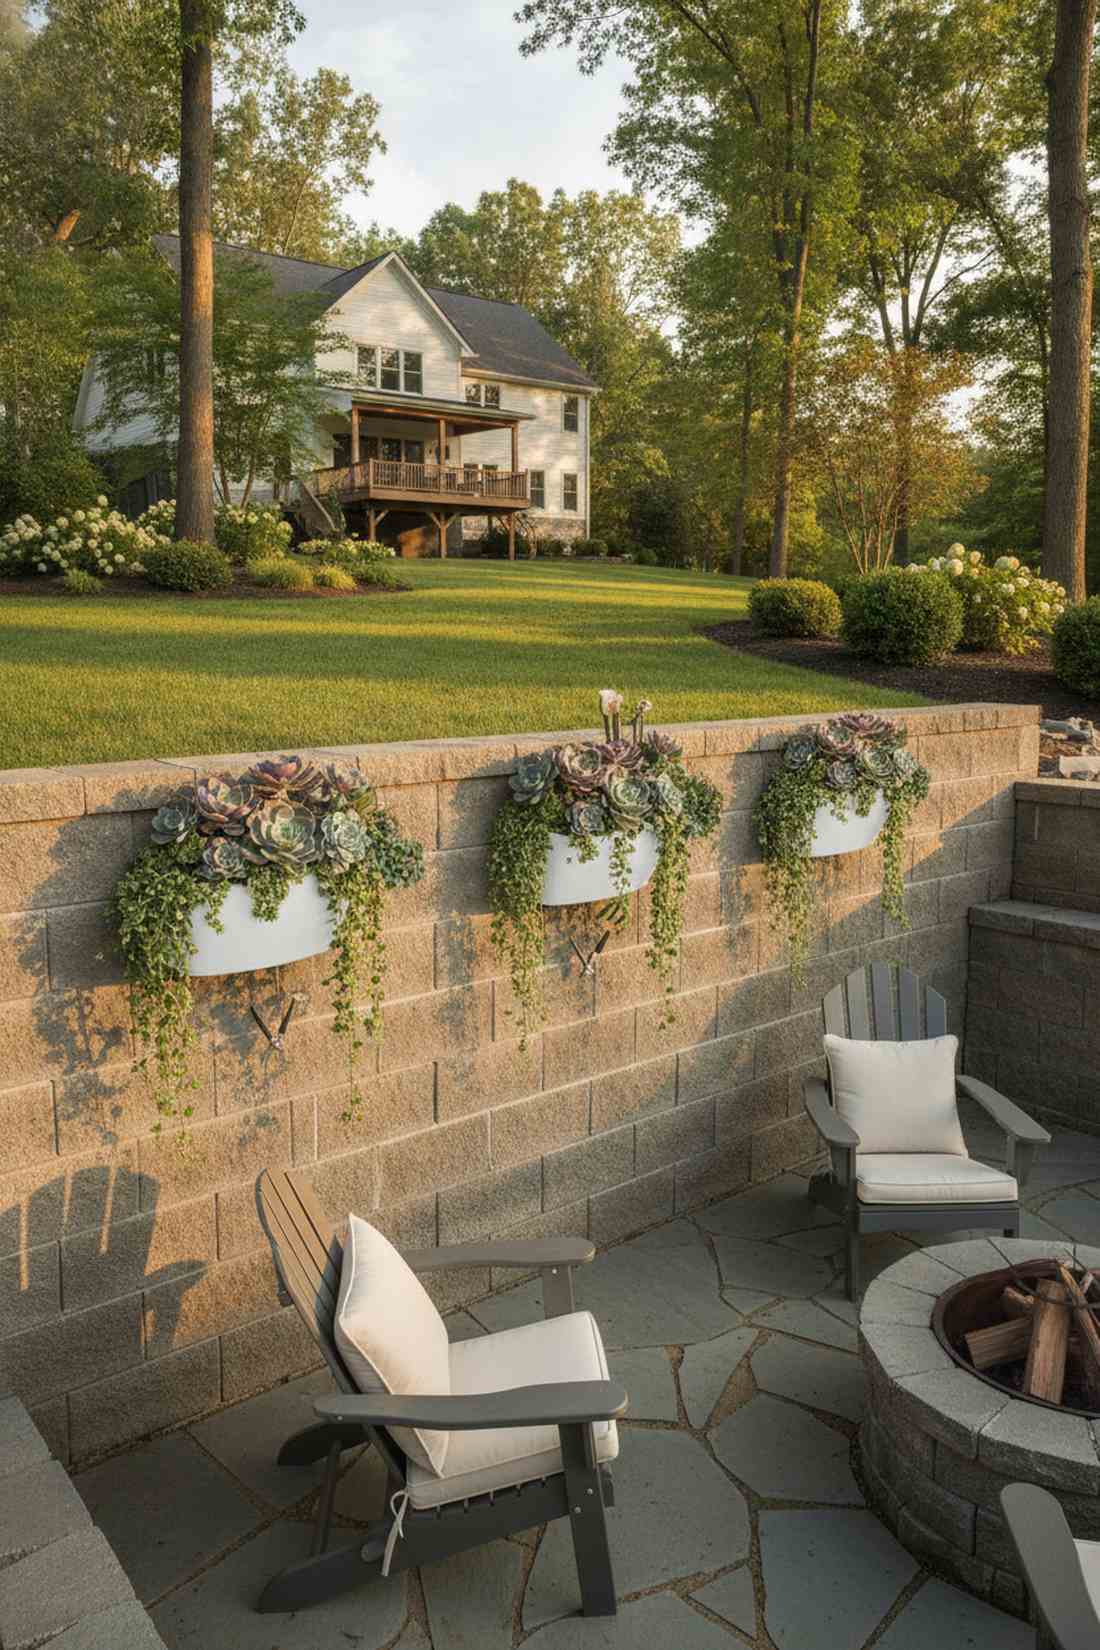
This floating cliffside garden softens harsh concrete blocks into a lush, cascading botanical wall. It effortlessly cures the aesthetic nightmare of towering, ugly cinderblock property dividers.
Don’t just paint a boring wall; mounting flat-backed half-pots completely breaks up the brutalist masonry. Slipping some miniature garden supplies into these elevated pockets creates a delightful surprise at eye level.
A set of three mounted wall planters costs about $55. Highly recommended to break up visual monotony.
- Key Materials: Flat-back wall planters, heavy-duty masonry anchors
- Vibe / Style: Hanging Babylon gardens
- Difficulty: Advanced drill mounting
- Budget Breakdown: Wall pots: $40 | Anchors: $15.
- Creator’s Tip: Use heat-loving Echeverias here, as the brick wall will radiate intense baked heat during the evening.
- Smart Sourcing: flat-back resin wall planters (3-pack) and rust-proof masonry anchor kits.
18. Anchored Pot Slope Stabilization
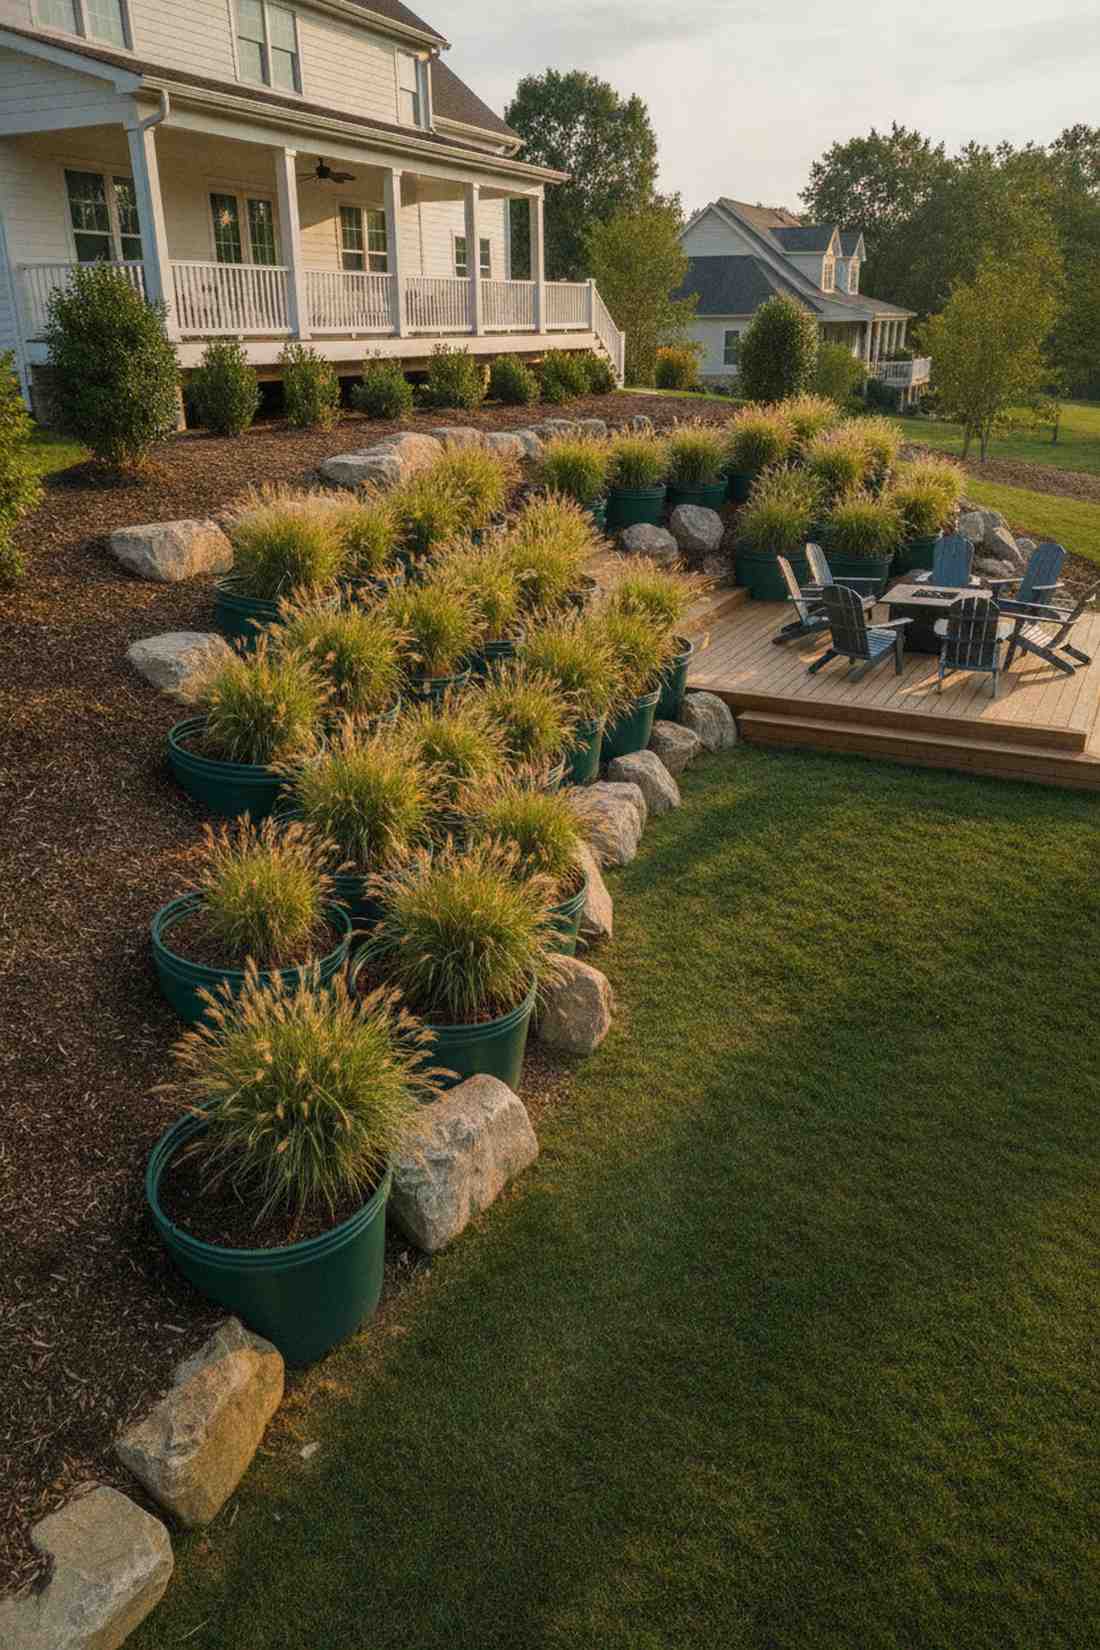
This rugged erosion-blocker design looks like a tactical survivalist garden built to withstand the elements. It functions as a brilliant, functional barrier for slip-prone dirt hillsides.
Traditional netting looks terrible; burying massive, rock-weighted pots creates a living root network that physically pins the hill together. Over time, these anchored vessels become permanent, immovable bastions against heavy rain flow.
Establishing these anchor points costs around $100 for heavy-duty supplies. Pin this if you battle yard erosion!
- Key Materials: 18+ inch deep planters, deep-rooting ornamental grasses
- Vibe / Style: Rugged functional armor
- Difficulty: Strenuous digging
- Budget Breakdown: Massive tubs: $70 | Rooting plants: $30.
- Creator’s Tip: Cut the bottom entirely out of the pot so the deep taproots can plunge straight into the hillside bedrock.
- Smart Sourcing: extra-large commercial nursery tubs and deep-rooting native grass seed blends.
Material Guide: Cheap vs. Premium Aesthetic
Knowing exactly where to save and where to spend makes all the difference in achieving that “looks expensive but isn’t” vibe.
- Standard vs. UV-Resistant/Premium: Cheap plastic fades to a chalky gray in one summer. Spending 10% more on UV-coated resin mimics real stone forever without cracking in the winter.
- Pre-made Kits vs. Sourcing Locally: Buying specialized soil by the scoop at a nursery is wildly expensive. Buying bulk pre-mixed commercial cactus starter kits saves up to 40% on large multi-pot projects.
19. Cascading Pot Water Feature Illusion
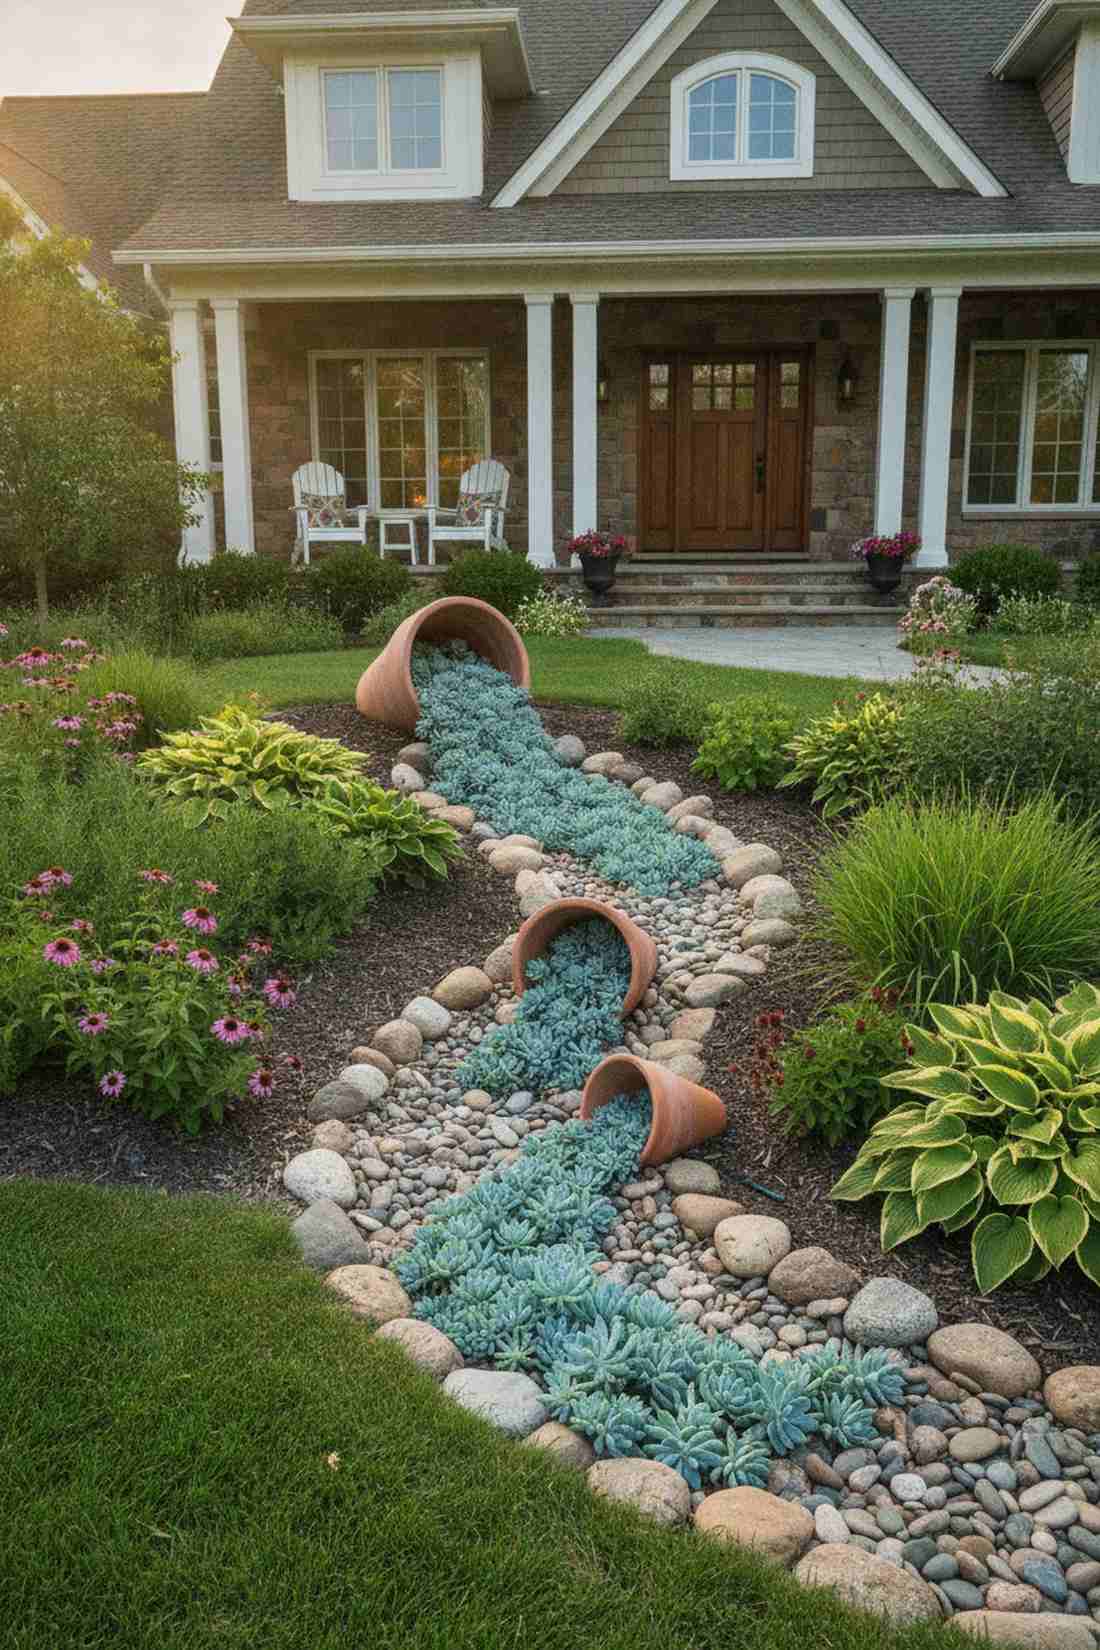
This frozen botanical river creates the stunning visual motion of a spilled water jug without a drop of plumbing. It is a jaw-dropping focal point for sloped front entrance gardens.
Fake dry creeks often look staged, but burying tipped pots so trailing blue succulents pour out of them looks incredibly dynamic. Using graduated pot sizes amplifies the forced perspective, making the hill look longer and grander.
You can execute this dry water illusion for under $45. Save this brilliant optical trick for your curb appeal project.
- Key Materials: 3 tipped terracotta pots, blue trailing succulents
- Vibe / Style: Whimsical flowing motion
- Difficulty: Easy visual trickery
- Budget Breakdown: Pots: $20 | Spilling plants: $25.
- Creator’s Tip: Pin the trailing vines to the dirt with landscaping staples so wind doesn’t ruin the “spilled liquid” effect.
- Smart Sourcing: shatterproof tilted landscape pots and blue chalk sticks live plant bundles.
Stop risking your expensive plants. The zone strategy coming up next guarantees zero dead succulents…
Xeriscape Container Groupings
20. Hydrozoned Pot Clusters
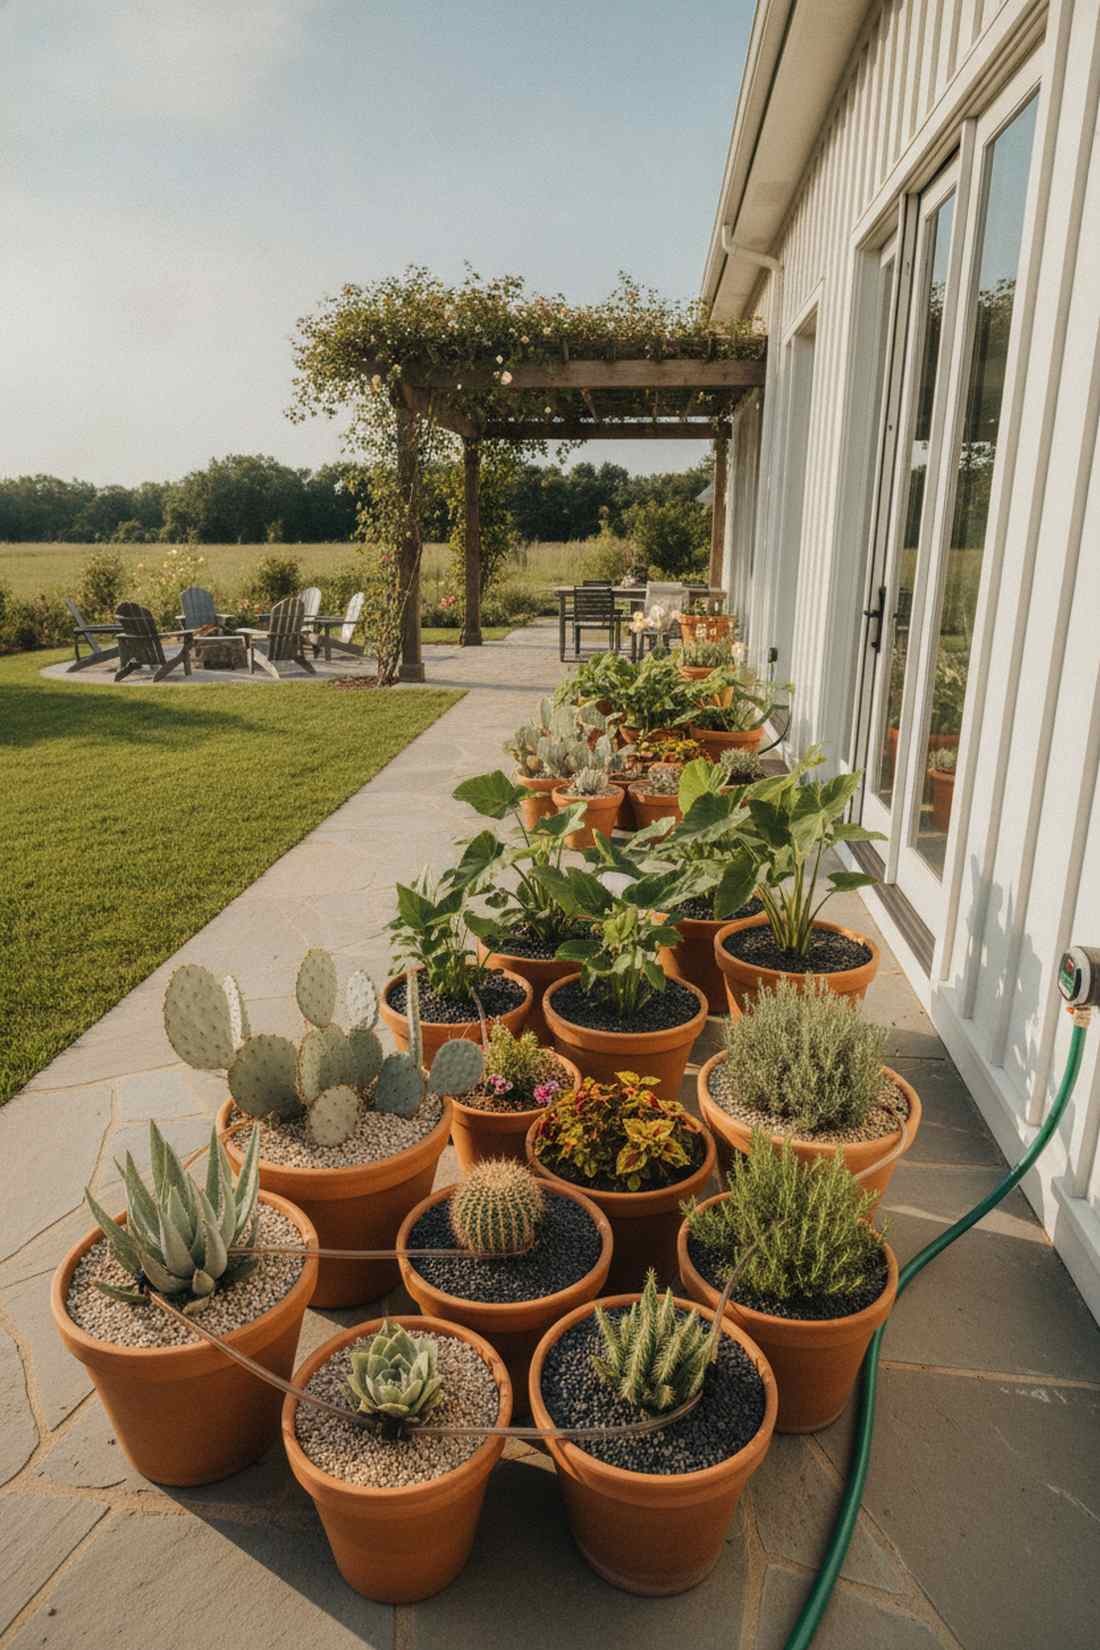
This climate-smart grouping brings lush, varying vitality into otherwise harsh, dry environments. It effortlessly solves the headache of mixed climate zones on large wrap-around patios.
Mixing thirsty plants with cacti is a death sentence; visually separating them into highly intentional moisture zones looks organized and saves water. Setting up a micro-drip line allows you to sustain premium leafy greens right next to desert natives.
Setting up a basic 3-zone system costs roughly $60. It completely changes how you manage yard maintenance.
- Key Materials: Drip irrigation tubing, varying plant types
- Vibe / Style: Organized botanical diversity
- Difficulty: Plumbing logistics
- Budget Breakdown: Tubing kit: $25 | Plants: $35.
- Creator’s Tip: Use different colored gravel top-dressings to visually code your watering zones (white for dry, black for wet).
- Smart Sourcing: micro-drip patio irrigation starter kits and programmable hose timers.
21. Seasonal Rotation Display Stations

This rotating gallery plinth makes your yard feel like a constantly curated high-end botanical garden exhibit. It keeps high-visibility areas like porch steps fresh all 365 days a year.
Planting permanently in the ground limits your seasonal colors; swapping hidden drop-in pots means your garden never looks dead in winter. This guarantees your display is always peaking without tearing up the landscape.
Creating these permanent drop zones costs about $30 initially. Pin this genius hack for year-round curb appeal!
- Key Materials: Large permanent outer sleeves, cheap inner nursery pots
- Vibe / Style: Ever-changing perfection
- Difficulty: Ongoing maintenance
- Budget Breakdown: Outer sleeves: $25 | Drop-in pots: $5.
- Creator’s Tip: Put a brick at the bottom of the outer sleeve so the seasonal drop-in pot always sits perfectly flush with the rim.
- Smart Sourcing: heavy-duty drop-in planter sleeves and bulk seasonal faux flowers.
22. Textural Contrast Trios

This tactile sensory cluster is so visually dense it practically begs you to reach out and touch it. It acts as an incredible conversation starter for cozy backyard seating corners.
Matching textures is a massive beginner mistake; clashing spiky agaves against fuzzy Lamb’s Ear creates aggressive, dramatic shadows. Maintaining a strict silver-green color palette keeps the chaos looking incredibly intentional and expensive.
A premium textured trio setup runs about $55. Highly recommended for close-up viewing areas.
- Key Materials: Agaves, fuzzy foliage, smooth succulents
- Vibe / Style: High-contrast sensory
- Difficulty: Beginner styling
- Budget Breakdown: Plants: $35 | Simple pots: $20.
- Creator’s Tip: Put the sharp, spiky plants strictly in the back so guests don’t get poked brushing past.
- Smart Sourcing: sensory garden succulent variety packs and matte black modern planter trios.
23. Monochromatic Foliage Progression
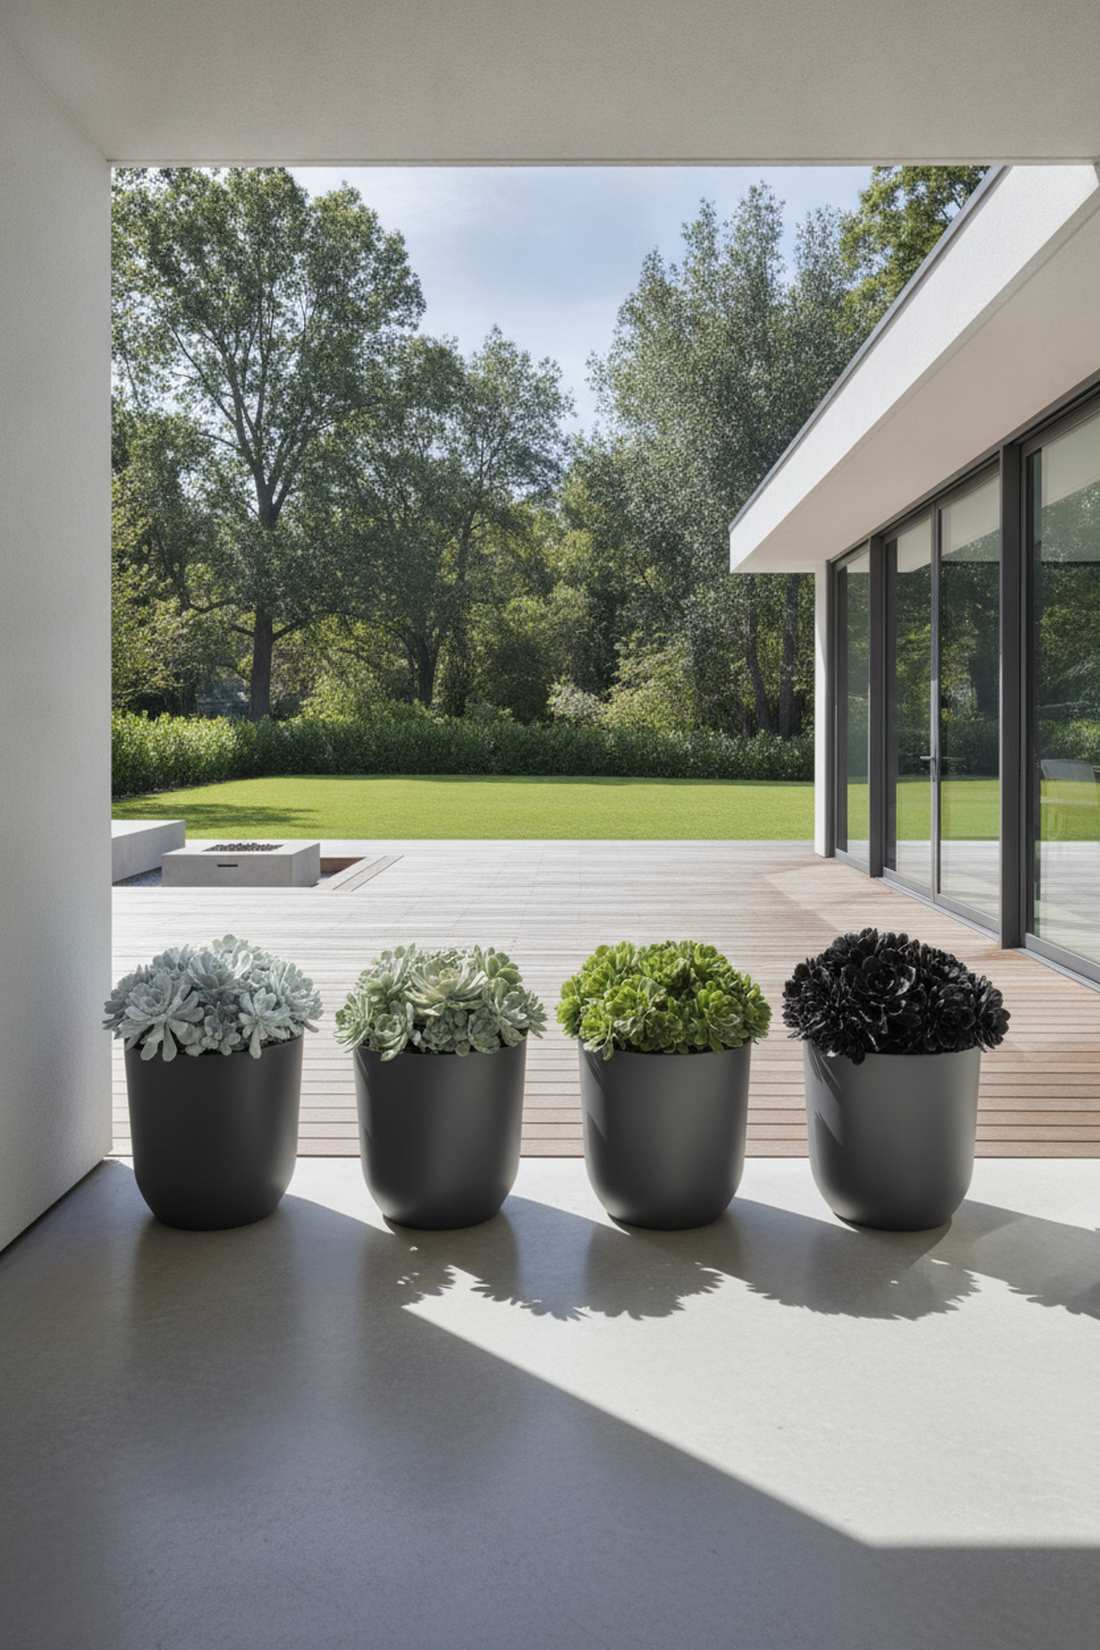
This cinematic color gradient delivers the soothing, calculated perfection of modern architectural homes. It completely elevates minimalist concrete patios with subtle, shifting visual heat.
Random color blasts look messy; organizing pots in a strict fade from pale silver to deep forest green looks like a custom designer installation. This smooth gradient trick forces the eye to track across the entire space.
Curating this specific color progression costs roughly $65. Save this to your modern outdoor aesthetics board!
- Key Materials: 4-5 pots, color-graded succulents
- Vibe / Style: Sleek designer gradient
- Difficulty: Plant sourcing challenge
- Budget Breakdown: Pots: $35 | Cultivars: $30.
- Creator’s Tip: Place the lightest silver plants in the shadiest corner to brighten the dark spots naturally.
- Smart Sourcing: color-graded echeveria bulk packs and matching sleek cylinder pots.
24. Pollinator Pot Stations
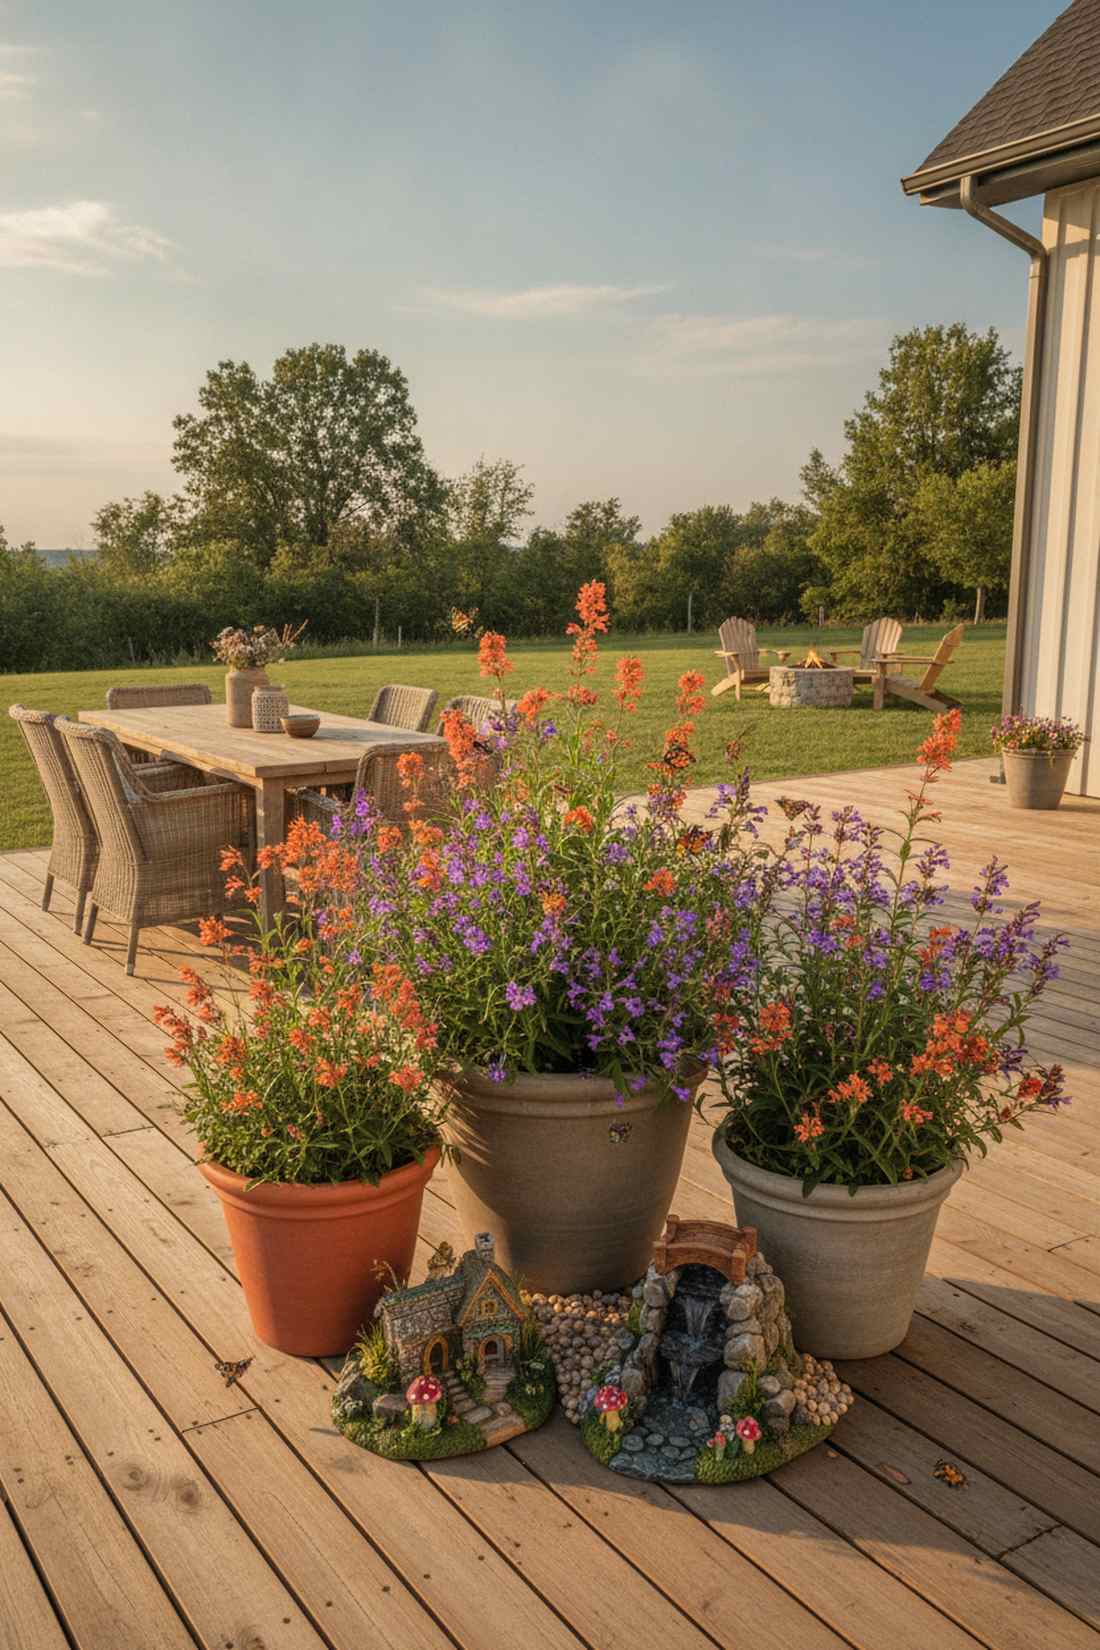
This buzzing floral oasis brings aggressive life and movement into a normally static dry rock setting. It operates beautifully near outdoor dining tables where you can watch butterflies work.
People think xeric means dead and dry; loading pots with native Salvias proves water-wise gardens can explode with vibrant ecology. Tucking some fairy garden kits at the base adds charm while the towering flowers feed the local bees.
A thriving pollinator pot will cost about $40 to establish. It’s a fantastic, eco-friendly weekend win.
- Key Materials: Deep pots, Penstemons, Agastache
- Vibe / Style: Lively ecological meadow
- Difficulty: Easy growing
- Budget Breakdown: Deep pots: $25 | Native seeds/starts: $15.
- Creator’s Tip: Deadhead the blooms aggressively in early summer to force a massive second wave of flowers in the fall.
- Smart Sourcing: drought-tolerant pollinator seed mixes and deep-root resin nursery pots.
Wait until you see how this next lighting trick turns your garden into a midnight luxury lounge…
25. Sculptural Form Collection
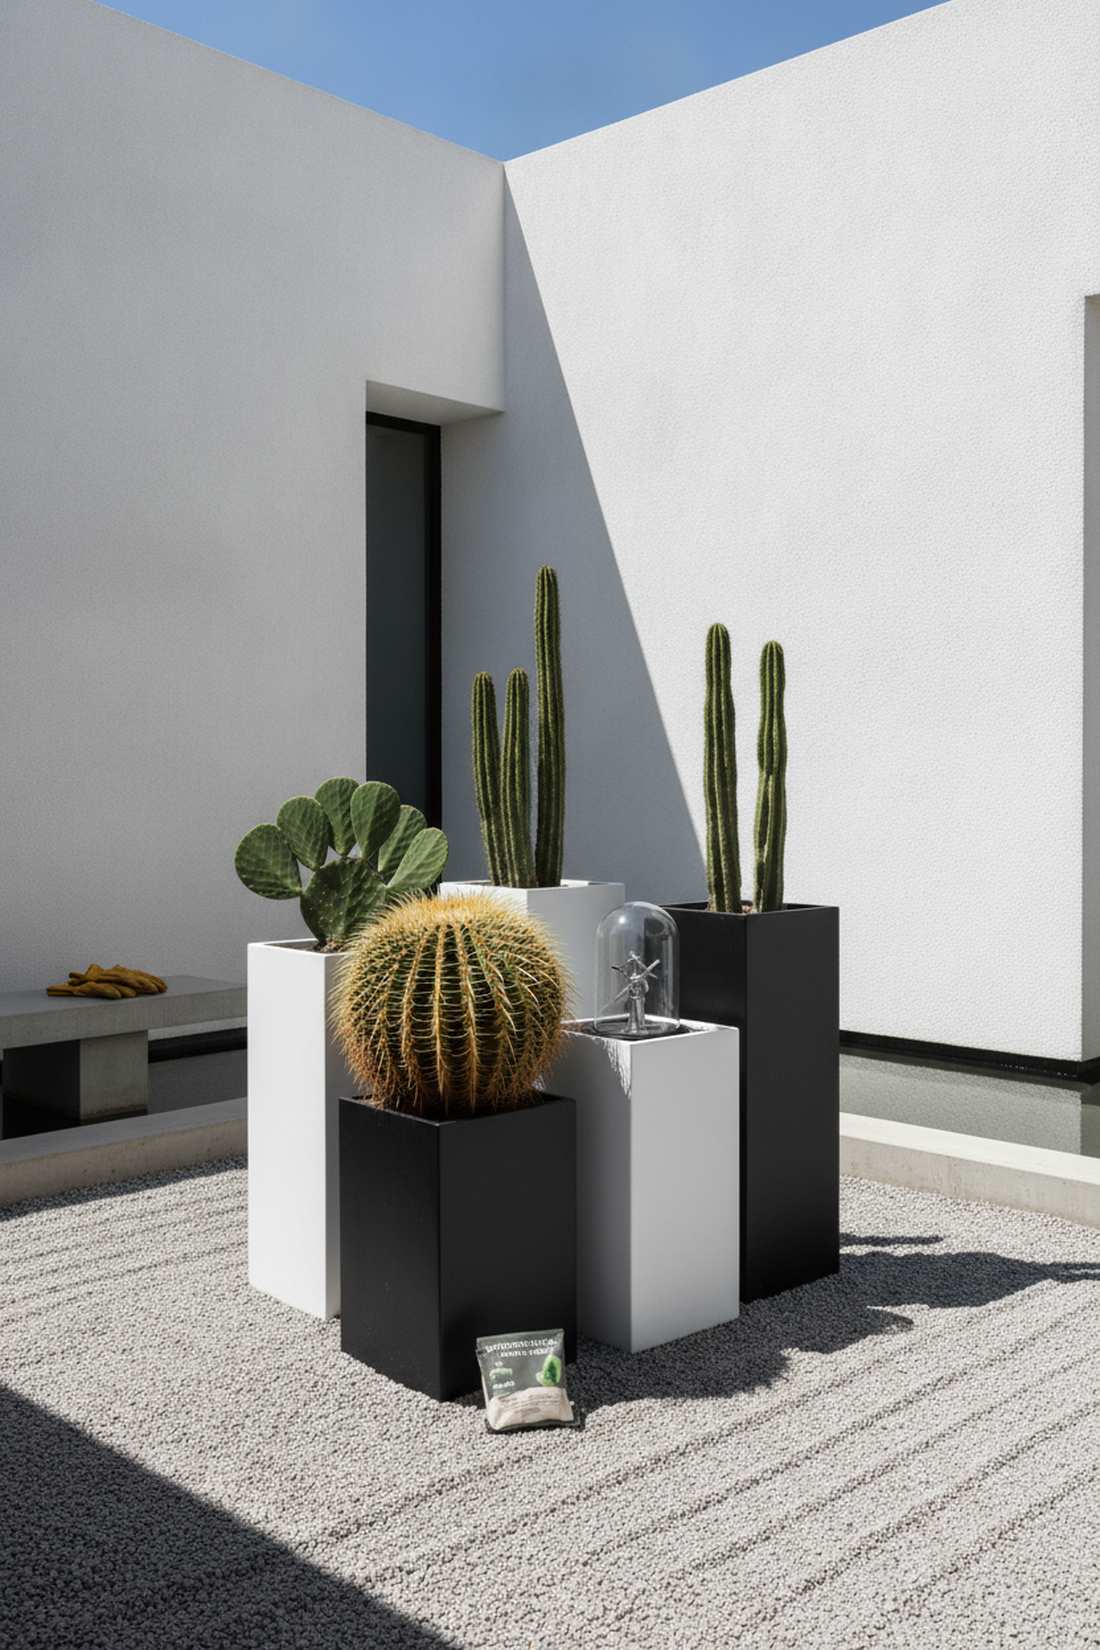
This geometric botanical museum stands as bold and defined as modern art gallery pedestals. It perfectly complements sharp, minimalist gravel courtyards and stark modern home exteriors.
Relying on flowers for interest fails in winter; focusing strictly on bizarre plant shapes (globes, columns, fans) guarantees year-round structural impact. Using terrarium accessories sparingly inside the pots highlights the sheer weirdness of the plant geometry.
Sourcing these unique architectural plants costs around $85. Pin this if you hate messy, overgrown gardens!
- Key Materials: Golden barrel cactus, Cereus columns
- Vibe / Style: Sharp architectural modernism
- Difficulty: Careful handling required
- Budget Breakdown: Specimen plants: $55 | Plain pots: $30.
- Creator’s Tip: Stick to plain white or black pots; busy patterned pots will distract from the sculptural plant shapes.
- Smart Sourcing: architectural cactus starter kits and heavy-duty puncture-proof gardening gloves.
26. Night Garden Container Showcase
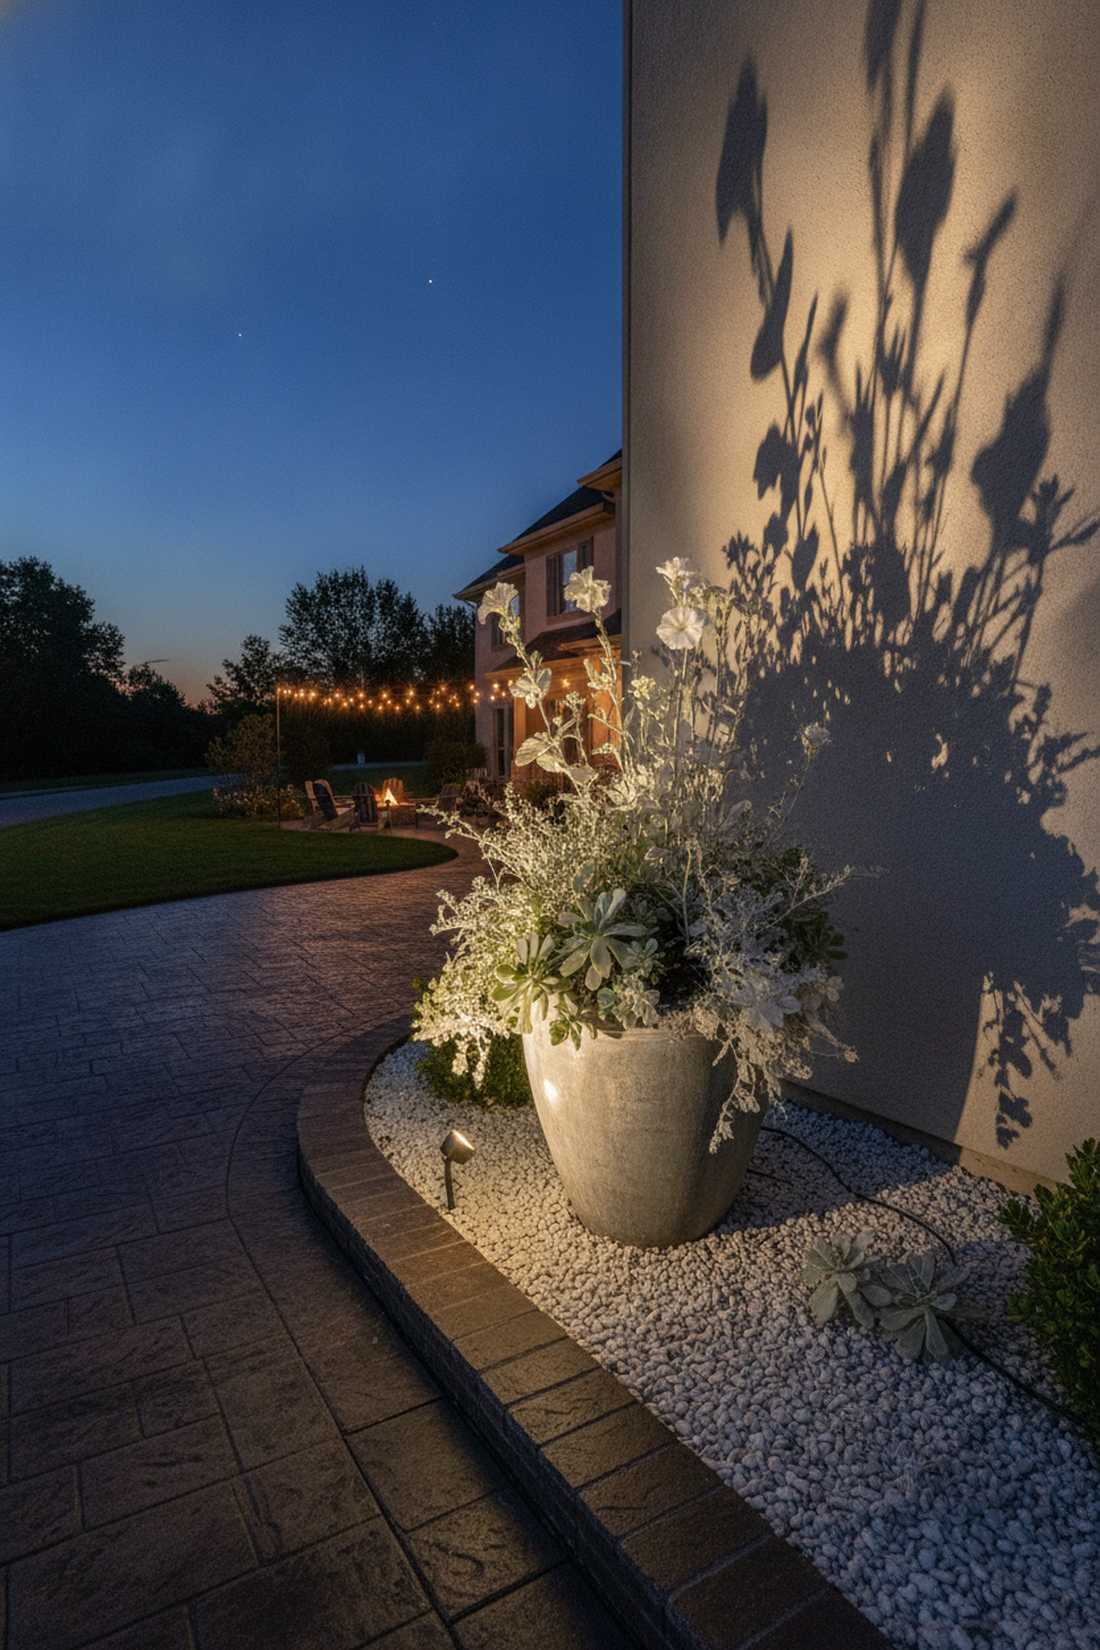
This glowing lunar sanctuary looks absolutely mystical when the sun goes down and the uplighting kicks in. It turns boring driveway borders into premium evening entertainment zones.
Dark green plants vanish at night; strategically planting powdery white and silver foliage catches ambient light, making the garden physically glow. Placing a hidden LED spotlight right behind the pot casts massive, dramatic shadows on your house walls.
Adding solar lights to a silver-plant pot costs barely $45. Save this for epic night-time curb appeal.
- Key Materials: Silver succulents, warm-white solar uplights
- Vibe / Style: Ethereal midnight lounge
- Difficulty: Light placement testing
- Budget Breakdown: Silver plants: $20 | Solar spots: $25.
- Creator’s Tip: Use cool-toned white gravel as a top-dress—it acts like a reflector dish to bounce the light upward into the leaves.
- Smart Sourcing: high-lumen solar landscape spotlights (4-pack) and white marble top-dressing stones.
27. Edible Xeriscape Pot Garden
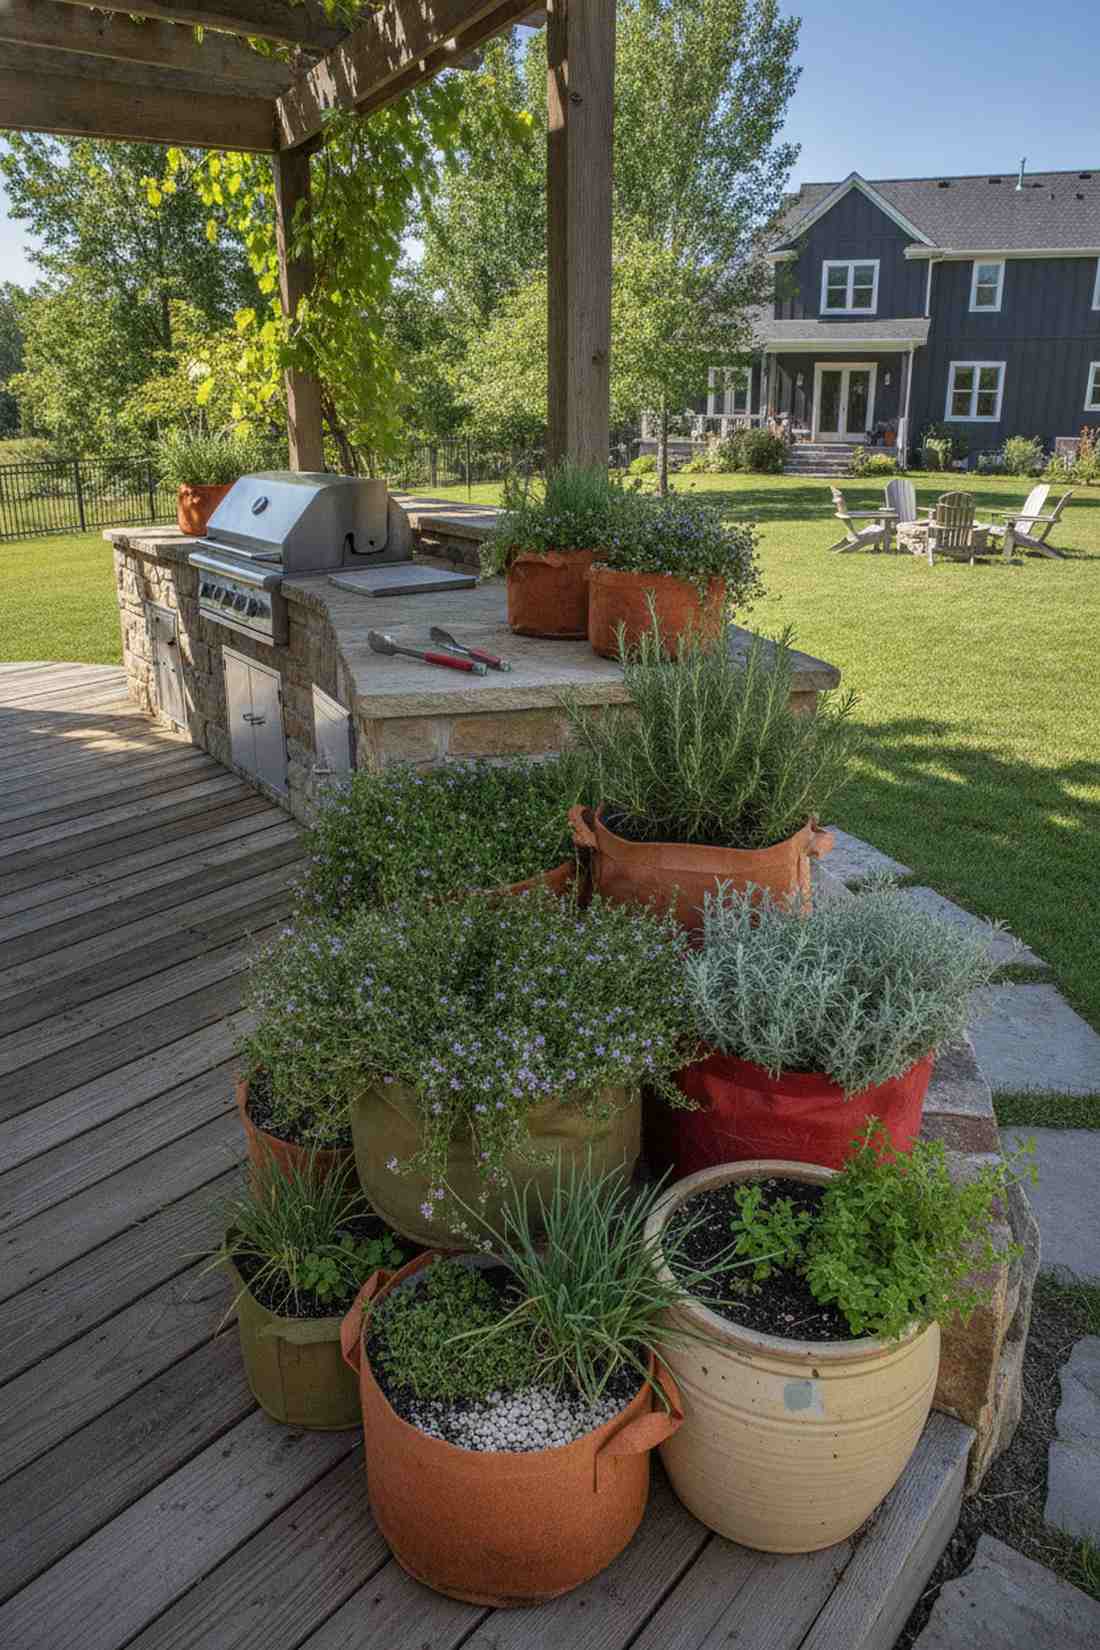
This culinary desert setup feels like you transported a rustic Tuscan chef’s garden into your dry backyard. It perfectly lines outdoor kitchen perimeters with intense, usable aromatics.
Who says rock gardens can’t feed you? Swapping useless ornamentals for creeping thyme and tough rosemary delivers both beauty and practical flavor. Frequent harvesting actually prunes them into incredibly dense, expensive-looking mounds.
Starting an edible xeric pot cluster costs just $30. A highly practical upgrade for grill masters.
- Key Materials: Food-safe pots, drought-tolerant herbs
- Vibe / Style: Rustic culinary cottage
- Difficulty: Easy maintenance
- Budget Breakdown: Herb starts: $15 | Food-safe pots: $15.
- Creator’s Tip: Keep these pots strictly chemical-free, relying only on natural pumice and organic compost since you’ll be eating from them.
- Smart Sourcing: organic drought-tolerant herb seed vaults and BPA-free outdoor fabric grow bags.
Transform Your Landscape with Strategic Container Placement
Integrating these exactly 27 rock garden with potted plants designs merges xeriscape sustainability with elite design flexibility, allowing you to build premium landscapes for pennies on the dollar. The container systems outlined here bypass expensive hardscaping, letting you use high-end sourcing blueprints—like bulk materials and smart kits—to achieve that custom architectural look. Start with a small-scale 3-pot installation to test out your UV-resistant materials and drainage setups, then scale up your favorite layouts to completely overhaul your yard into a zero-maintenance, high-impact aesthetic masterpiece.
Frequently Asked Questions
What size containers work best for rock garden with potted plants?
For a premium aesthetic that won’t dry out instantly, skip the tiny 4-inch nursery cups and invest in containers at least 12 inches in diameter. Larger setups using bulk pack oversized resin planters retain critical moisture longer, drastically cutting down your watering chores in dry xeric layouts. Match the depth to the root style—use 6-inch shallow bowls for spreading sedums, but go 18+ inches deep for architectural grasses. Heavier, wider bases also prevent wind toppling, which is why commercial landscapers prefer them over cheap lightweight plastics.
How do I prevent containers from overheating in full-sun rock gardens?
The secret to keeping roots alive in baking sun is ditching dark, heat-absorbing pots and using light-colored, UV-coated reflective containers. If you absolutely love the look of a dark pot, use the “double-potting” method: drop a cheap nursery pot inside a larger decorative shell to create a brilliant insulating pocket of dead air. Furthermore, top-dressing your pots with a thick layer of light-colored pumice or white marble chips reflects the brutal radiant heat away from the sensitive topsoil.
Can I leave potted plants in rock gardens year-round?
Absolutely, provided you stop using standard clay that shatters in the frost. Upgrade to frost-proof high-fired stoneware or reinforced concrete-resin planters that can handle brutal freeze-thaw cycles without cracking. The biggest trick is elevating your pots slightly using specialized invisible risers; this breaks direct contact with the freezing ground and ensures winter rain drains instantly rather than turning into expanding ice inside the root ball.
What soil mix should I use for xeriscape containers in rock gardens?
Never use standard black potting soil—it retains too much water and will rot your expensive succulents. You need a fast-draining blend, easily achieved by mixing a commercial-grade cactus soil starter kit with 25% coarse pumice and 25% crushed granite. This exact gritty ratio mimics native desert earth, forcing roots to grow strong without ever sitting in stagnant mud. Always finish with a heavy top-dressing of gravel to match the surrounding yard and lock the aesthetic together.
How often should I water potted plants in rock gardens?
Even though they are xeric plants, container life dries them out faster than in-ground planting. Drench established pots every 7-14 days during peak spring/fall growth, but push that to 14-21 days during the blistering summer when many succulents naturally go dormant to survive. To eliminate the guesswork entirely, install a micro-drip patio irrigation starter kit connected to a smart timer. Always stick your finger two inches deep—if you feel any moisture at all, walk away and do not water!
How do I arrange multiple containers to look natural in rock gardens?
Throw away the idea of straight, perfectly spaced lines—that looks like a retail nursery, not a custom landscape. Group your pots strictly in odd numbers (3, 5, or 7) and arrange them in tight, overlapping triangles of varying heights. Maintain a unified, expensive look by buying matching modern planter trios but varying the plant textures inside them. Always tuck them slightly behind or to the side of existing boulders rather than dead center, creating that highly sought-after organic, wild-grown illusion.