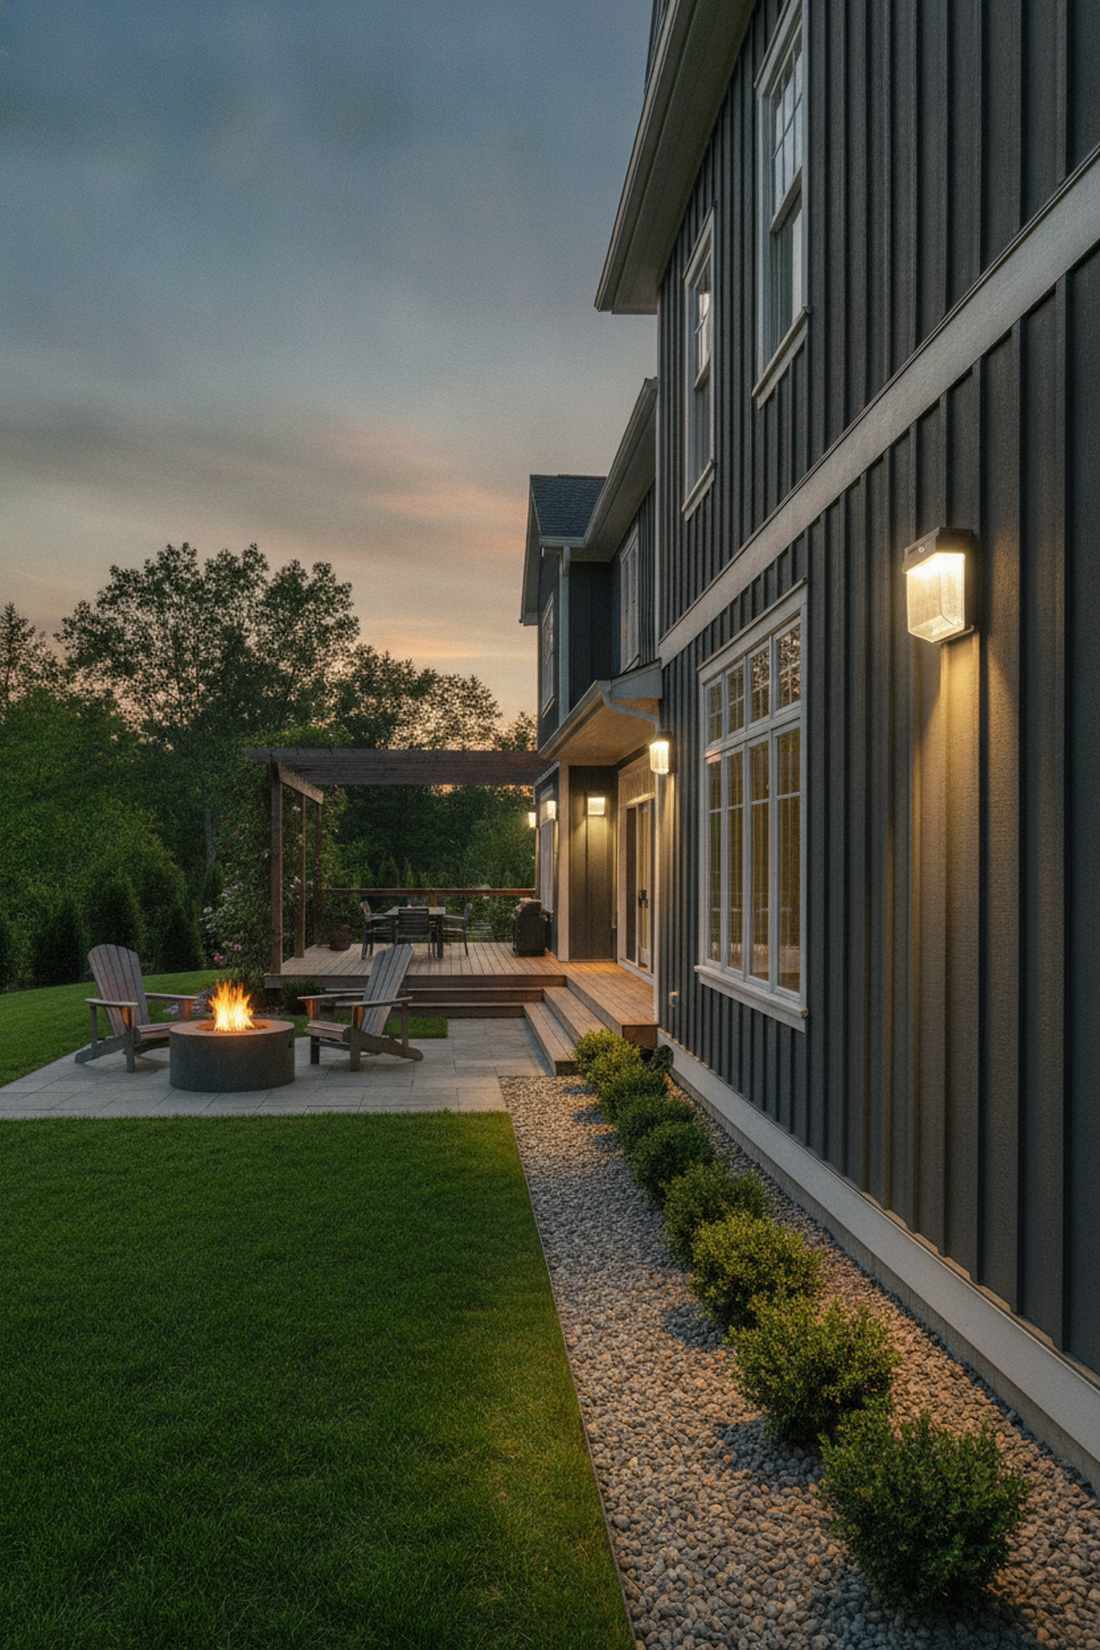
Strategic outdoor lighting wall setups instantly elevate basic exteriors. Commercial-grade aesthetics are possible without contractor pricing using wet-rated fixtures. Premium nighttime architecture relies entirely on smart sourcing.
Design SnapshotKey Principles
- Distance Controls Effect: Fixtures placed 12-24 inches from walls create dramatic texture emphasis, while 2-3 feet produces smooth ambient washes
- Beam Angle Matters: Adjustable shutters and beam controls allow single fixtures to create multiple visual effects on the same surface
- Layering Creates Depth: Combining wall-mounted sconces with ground-level uplights produces three-dimensional shadow play and architectural definition
- Weather Rating Requirements: All outdoor wall fixtures require wet-location rating (IP65 or higher) to withstand direct rain and humidity exposure
Architectural Wall Washing Techniques
1. Uniform Stucco Wall Illumination
Feels like a high-end resort you accidentally stumbled into. Ambient stucco wash lighting creates a flawless modern backdrop. Exceptional for a large bare backyard fence line or privacy boundary.
Designers guard this secret because it delivers a surprisingly premium look with minimal effort. Spacing wide-beam, wet-rated commercial LED units correctly eliminates dark patches completely. Grab a multi-pack of adjustable landscape floods to save cash while securing pro-level coverage across wide flat areas.
Expect to spend $150–$300 total depending on your perimeter size. Save this to your DIY weekend garden board!
- Key Materials: Wet-rated LED landscape wash fixtures
- Vibe / Style: Modern luxury exterior
- Difficulty: Intermediate weekend wiring
- Budget Breakdown: Fixtures: $120 | Wire & Transformer: $80.
- Creator’s Tip: Use glare shields on the bulb housings to prevent blinding light spill into neighboring yards.
- Smart Sourcing: low-voltage 60-degree LED washes (bulk pack) and heavy-duty 12V landscape transformers.
2. Colored Wall Wash for Mood Lighting
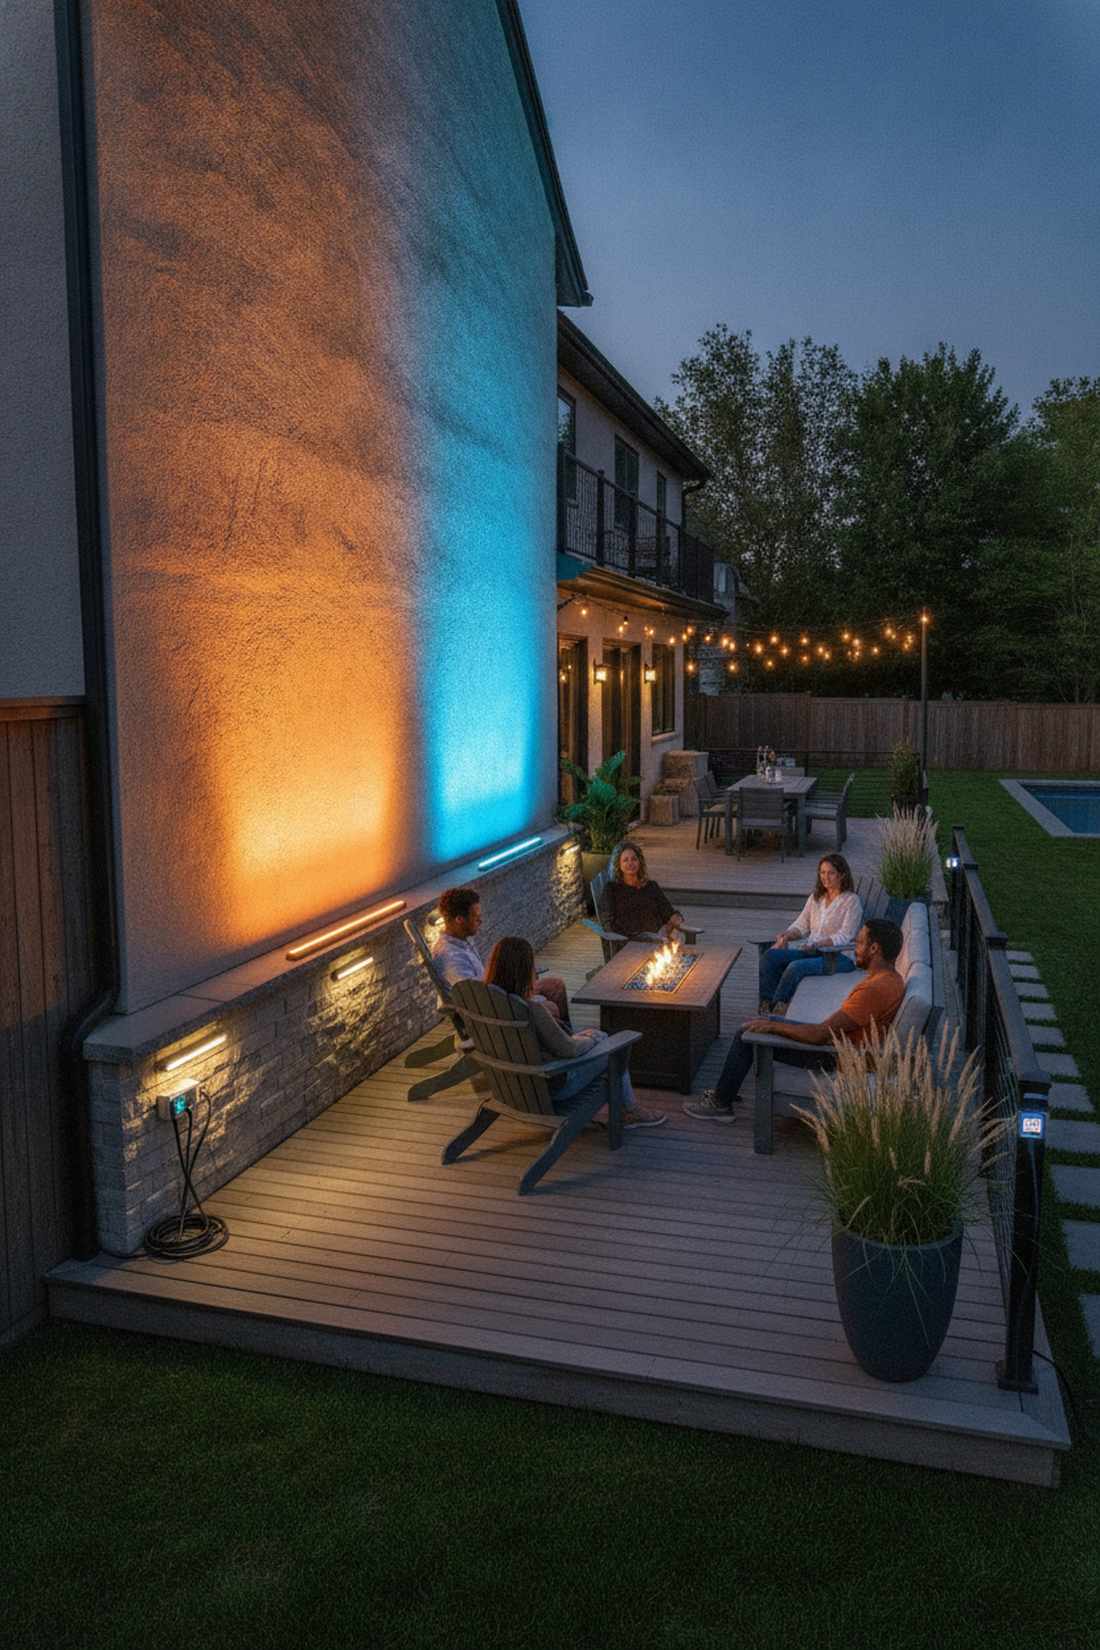
Radiates a vivid, cinematic energy that completely alters the vibe. Smart RGB exterior lighting turns static vertical boundaries into dynamic canvases. Ideal for an outdoor entertainment zone or patio dining area.
Standard white bulbs are completely outdated when smart-controlled fixtures yield infinitely more versatility. Using weather-sealed, Wi-Fi-enabled wash bars lets you shift aesthetics from warm sunset amber to icy modern blue via a phone app. A durable aluminum housing ensures these high-lumen units survive harsh winters without fading.
You can usually set this up for around $80–$140.
- Key Materials: RGB smart wall wash bars
- Vibe / Style: Vibrant party atmosphere
- Difficulty: Plug-and-play simple
- Budget Breakdown: Smart Wash Bars: $90 | Outdoor Extension Cords: $20.
- Creator’s Tip: Program gradual color-fade settings that mimic sunset tones as evening approaches.
- Smart Sourcing: IP65 Wi-Fi enabled RGB flood kits and weatherproof outdoor smart plugs.
3. Retaining Wall Accent Lighting
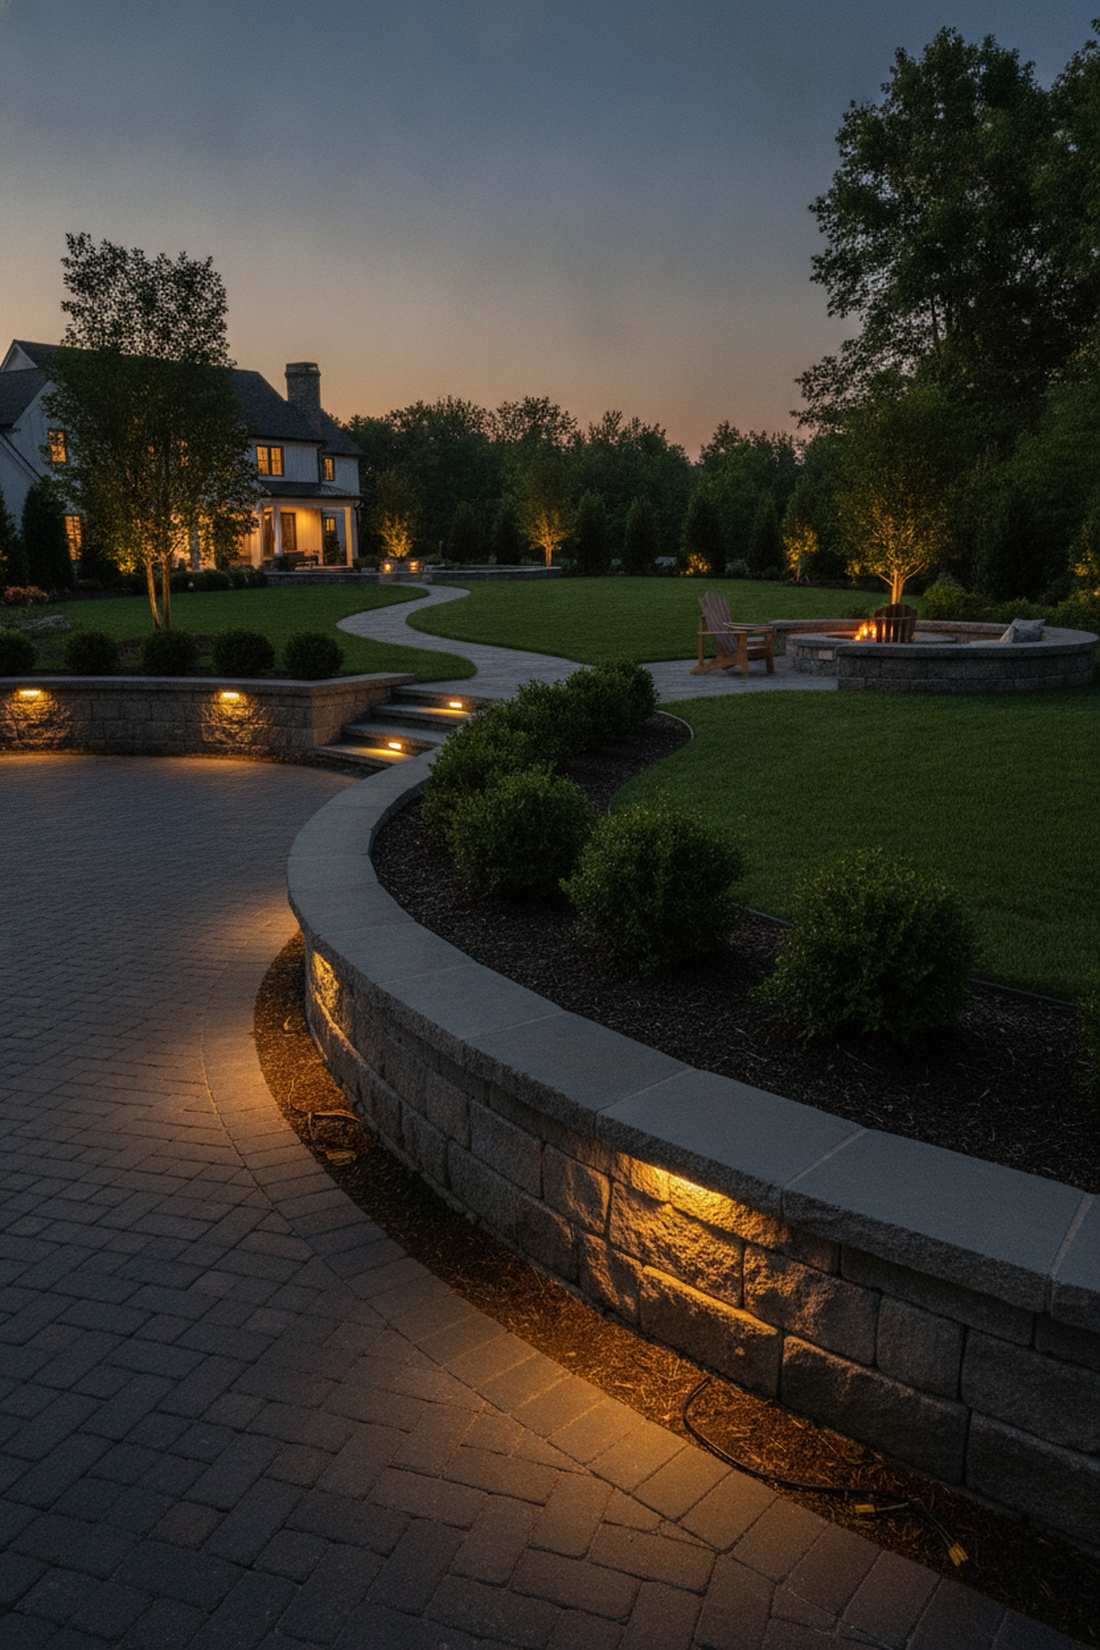
Gives off an incredibly grounded, architectural estate feeling. Recessed hardscape uplighting highlights stone textures beautifully. Perfect for defining outdoor room boundaries alongside driveway drops.
Most basic yards miss the mark, but this layout looks far more expensive than it actually is. Recessing compact, narrow-beam brass uplights directly into the adjacent soil forces light to graze the vertical blocks. Snag commercial-grade miniature garden supplies to ensure the tiny lenses don’t fog up after the first heavy rain.
This layout runs about $45 per fixture. Pin this if you’re planning a hardscape upgrade soon!
- Key Materials: Compact brass LED uplights
- Vibe / Style: Structured estate garden
- Difficulty: Intermediate trenching
- Budget Breakdown: Brass Fixtures: $180 | Connectors: $15.
- Creator’s Tip: Choose 15-20 degree narrow beam angles so the light doesn’t bleed into the grass.
- Smart Sourcing: solid brass 15-degree uplight units and silicone-filled waterproof wire nuts.
4. Privacy Fence Backlighting
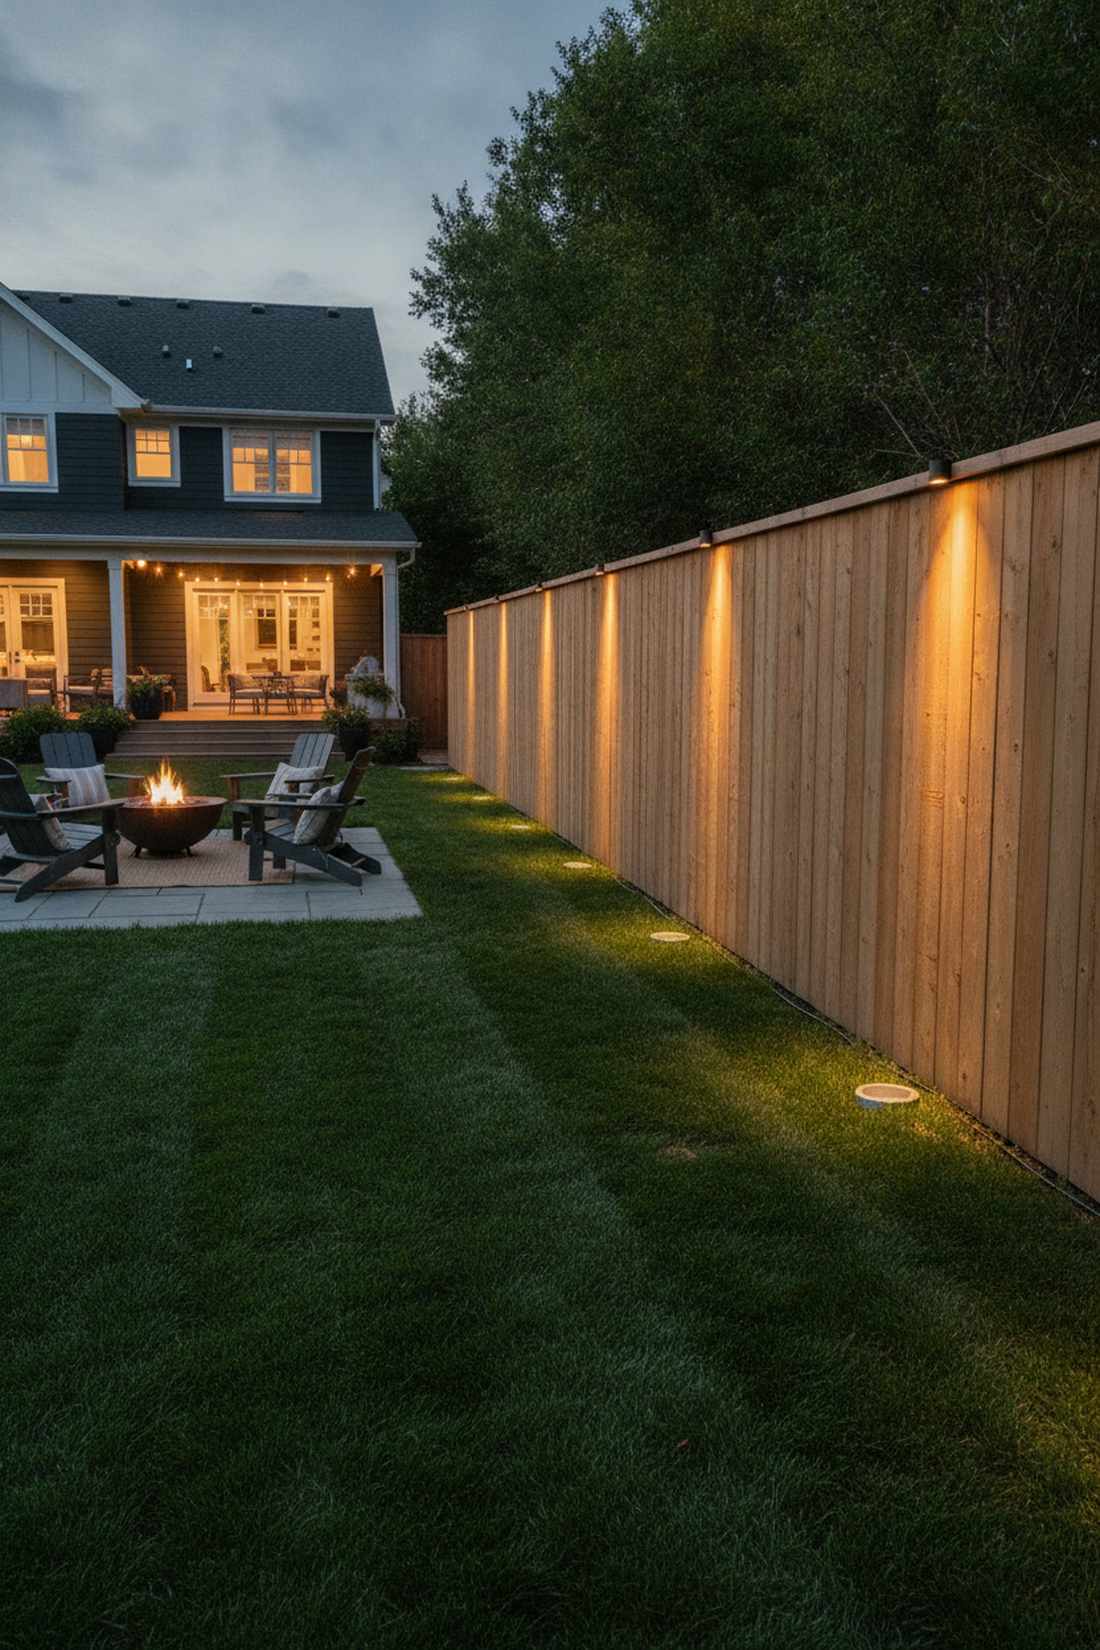
Looks like a high-end architectural rendering brought to life. Vertical timber well lighting casts rhythmic shadows upward. Incredible for turning boring wooden perimeter barriers into absolute focal points.
Don’t settle for harsh top-down floodlights when ground-level concealment gives a designer-level finish. Mounting low-profile well lights flush with the grade shoots a warm amber glow up the natural cedar boards. Upgrading to impact-resistant polycarbonate covers protects your hardware from aggressive lawnmowers and foot traffic.
You can easily pull this off for around $120. Highly recommended for a quick weekend win.
- Key Materials: In-ground LED well lights
- Vibe / Style: Cozy contemporary backyard
- Difficulty: Easy to intermediate
- Budget Breakdown: Well Lights: $85 | Low Voltage Wire: $35.
- Creator’s Tip: Space them out exactly beneath the main fence posts for symmetrical shadow lines.
- Smart Sourcing: flush-mount LED well kits (6-pack) and UV-coated burial landscape wire.
This next setup completely breaks the rules but looks like a $500 custom display you’d see in an architectural magazine…
Decorative Outdoor Lighting Sconces
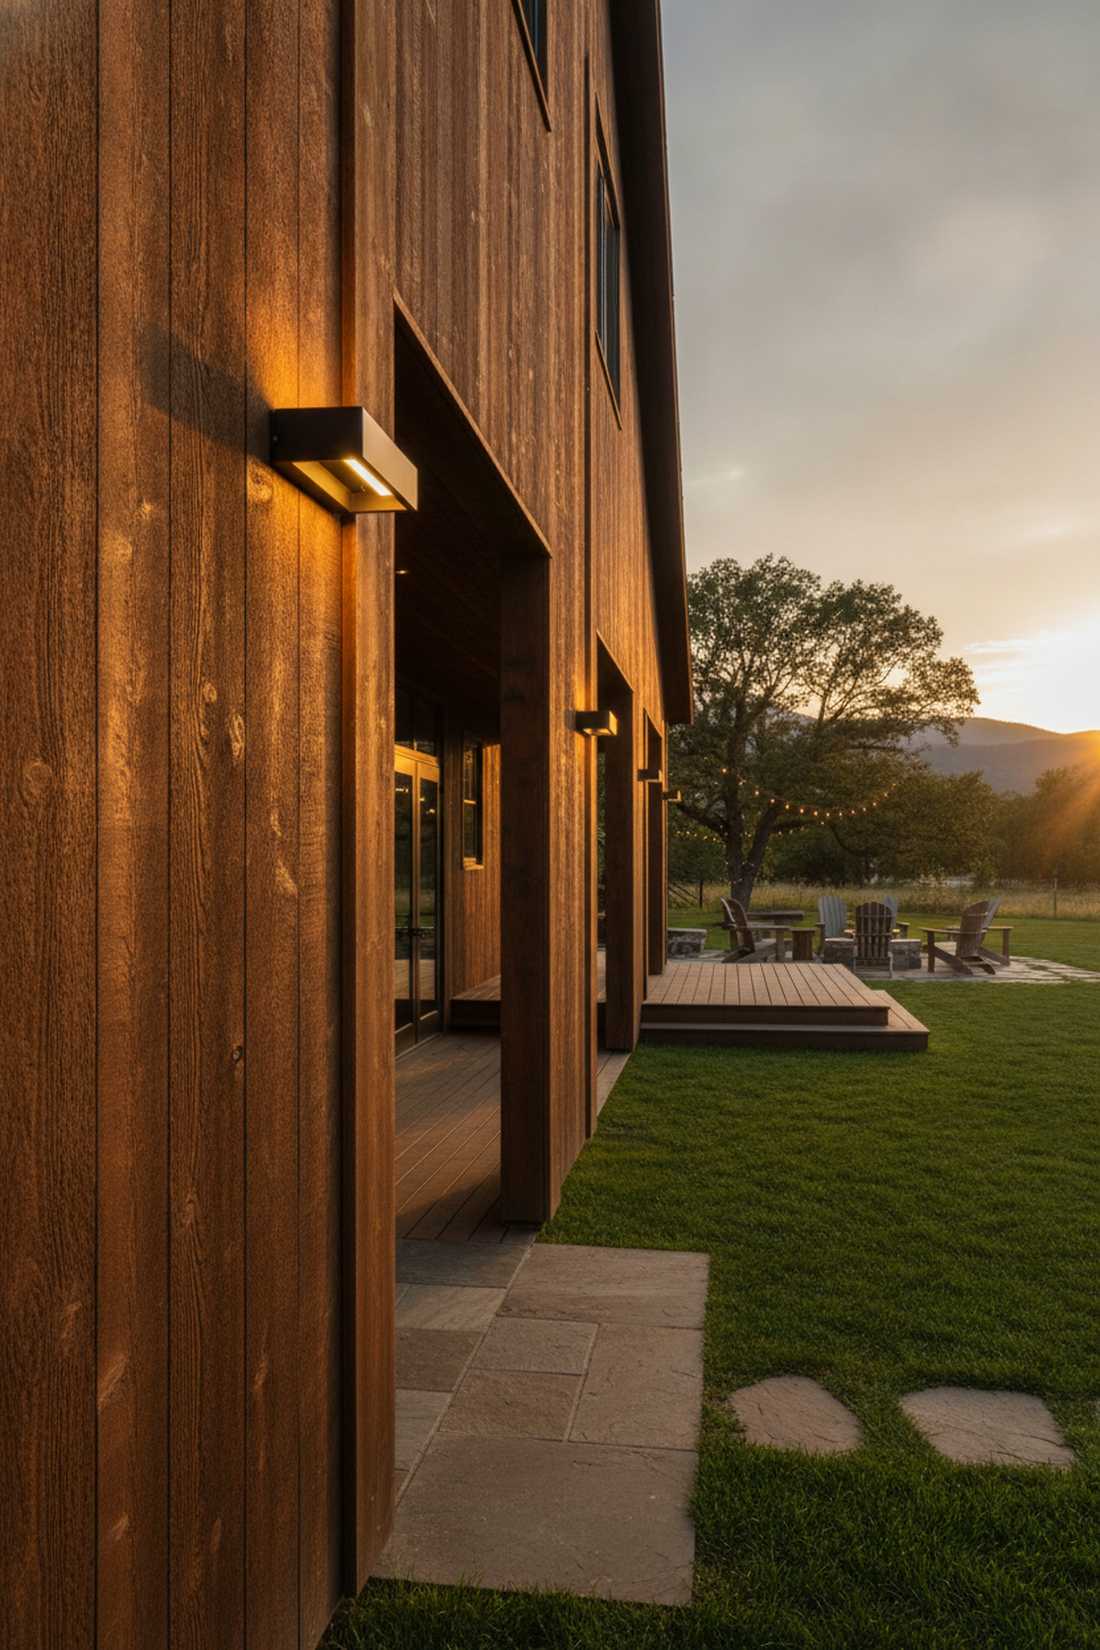
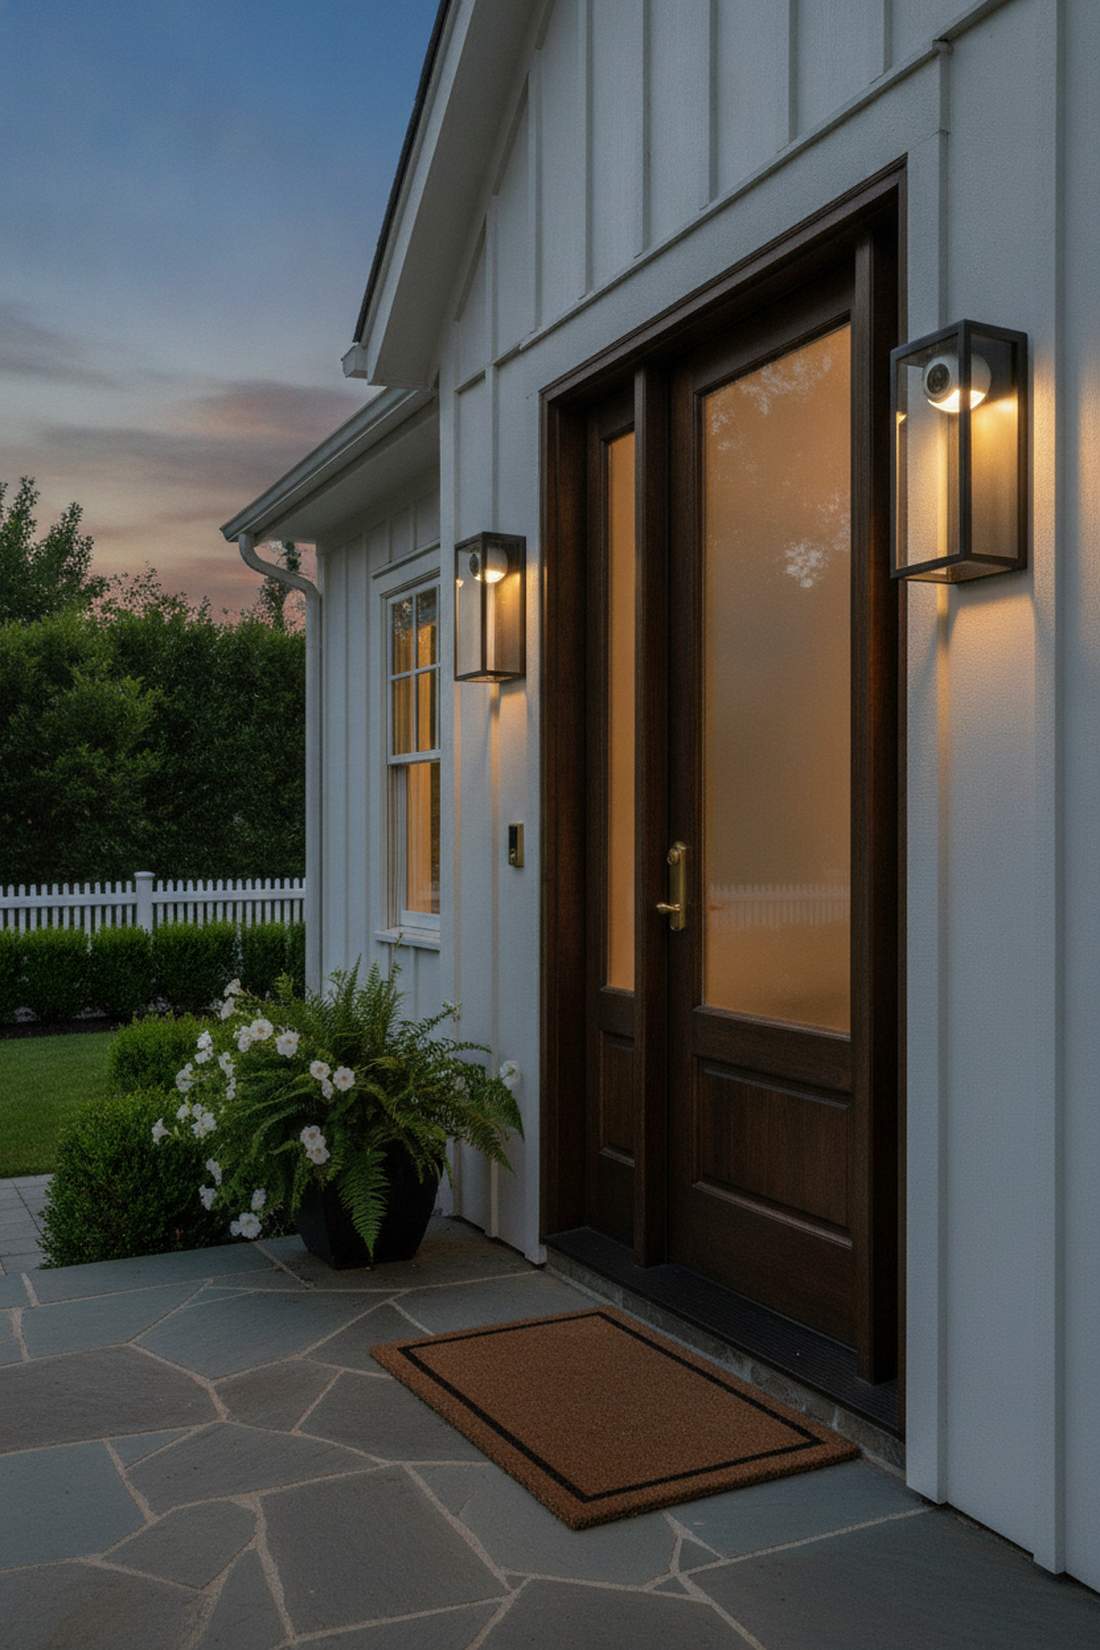
5. Up-Down Contemporary Sconces
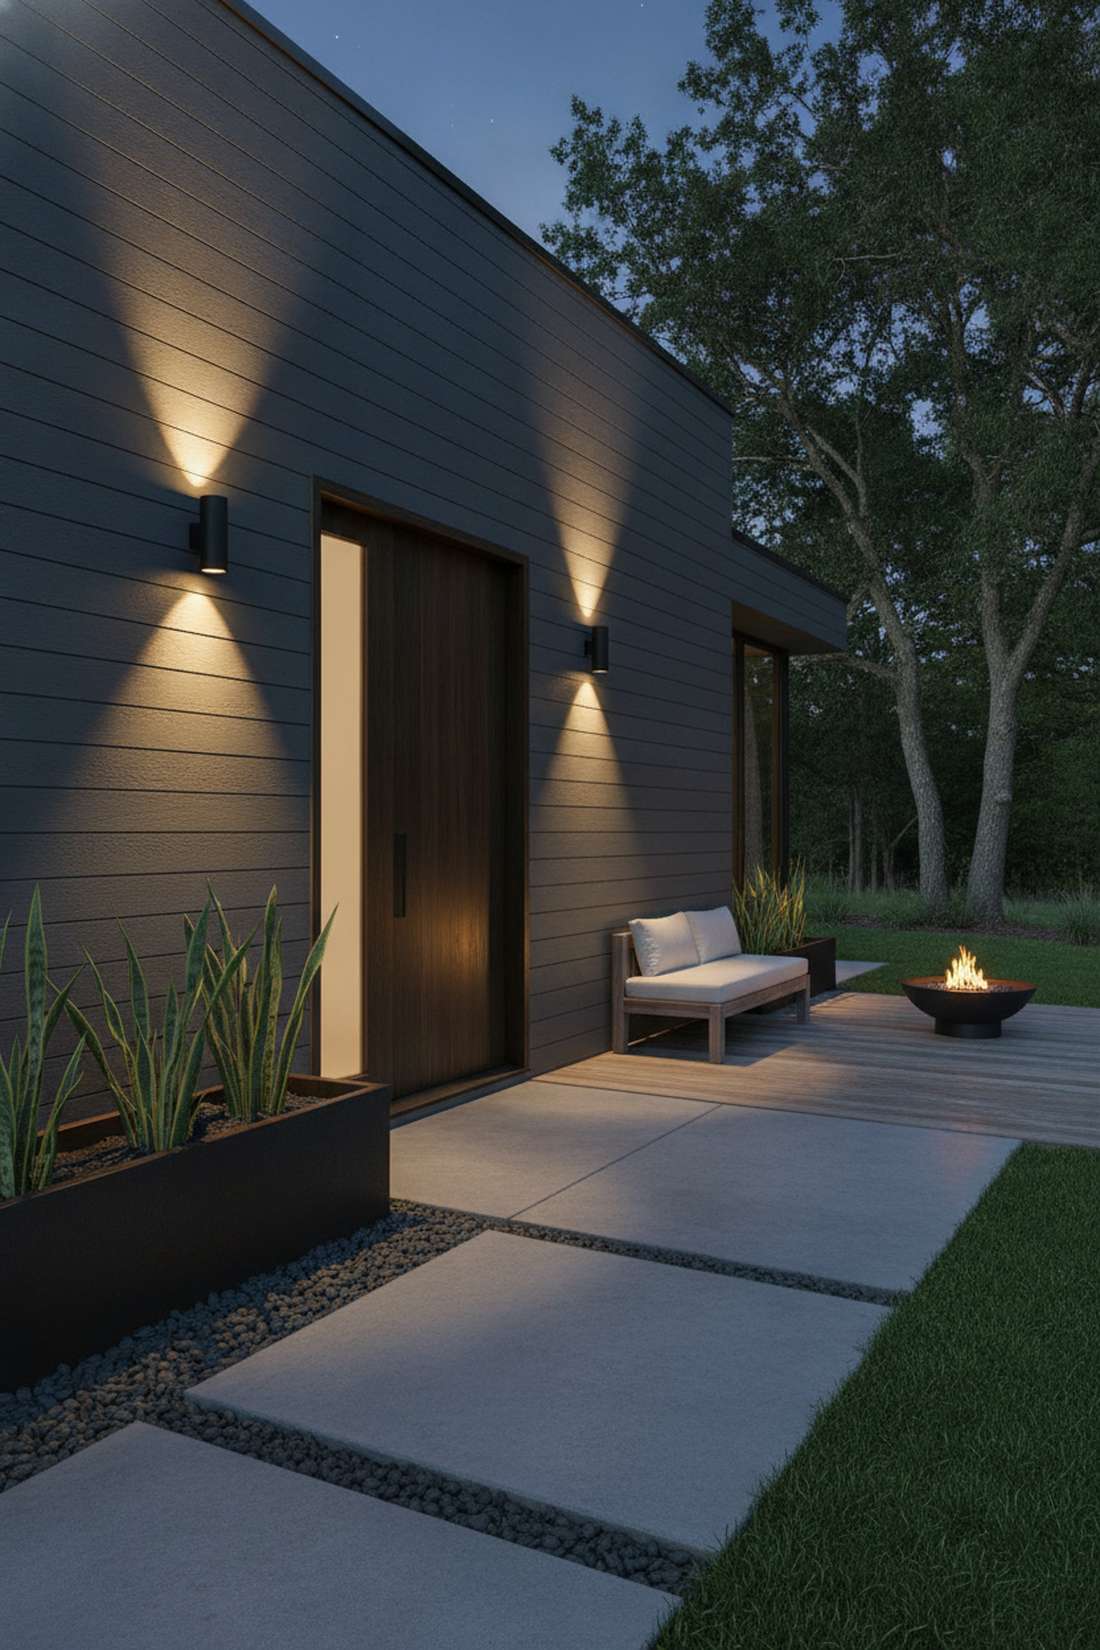
Feels like approaching an exclusive modern art gallery. Dual-direction cylinder sconces cast dramatic light bands vertically. Flawless for framing a minimalist front entry door.
Skipping standard single-bulb units for dual-beam architectural hardware completely elevates standard materials like plain siding. Sourcing an outdoor lighting wall mount with integrated LED diodes ensures razor-sharp shadow cutoffs above and below. Buying heavy cast-aluminum housings guarantees the sleek matte finish survives coastal humidity or winter frost.
A pair of these will set you back about $80–$130. Save this for your front porch makeover!
- Key Materials: Matte black up/down cylinder lights
- Vibe / Style: Ultra-modern minimalist
- Difficulty: Basic electrical swap
- Budget Breakdown: Twin Sconces: $90 | Wall Anchors: $10.
- Creator’s Tip: Mount them exactly 66 inches above the floor for the best eye-level visual geometry.
- Smart Sourcing: cast-aluminum up-down sconces (2-pack) and universal exterior junction boxes.
6. Traditional Carriage Lanterns
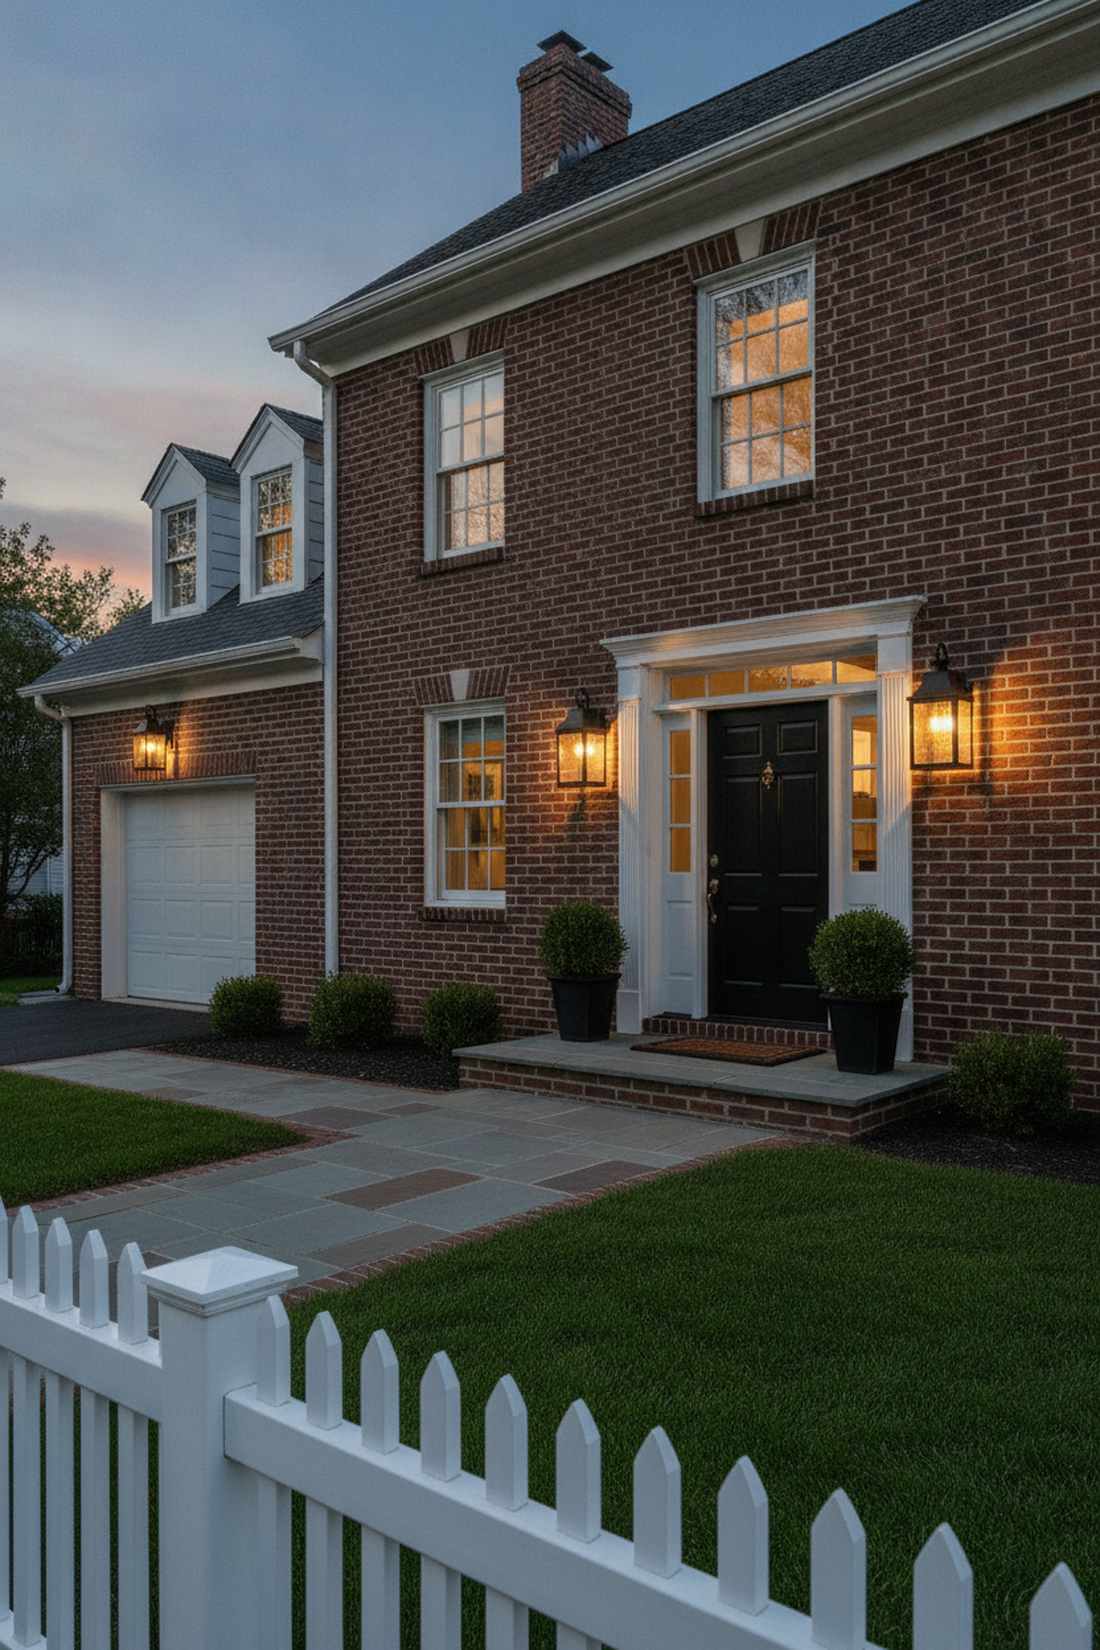
Oozes historic charm straight out of a classic novel. Seeded glass carriage lights provide an inviting, diffused warm glow. Works exceptionally well for traditional colonial home entries.
The secret to keeping this look authentic without the maintenance headache is utilizing modern rust-proof tech. Opting for high-end outdoor lighting sconces constructed from weather-resistant composites stops the inevitable corrosion that ruins cheap metal. Pairing them with flickering LED filament bulbs mimics real firelight while cutting energy costs.
Cost averages $50–$90 per lantern depending on the glass quality.
- Key Materials: Composite lantern fixtures, LED filament bulbs
- Vibe / Style: Classic heritage colonial
- Difficulty: Beginner-friendly
- Budget Breakdown: Lantern: $65 | Vintage LED Bulbs: $15.
- Creator’s Tip: Use 18-inch tall lanterns for main doors and scale down to 12-inch versions for the garage.
- Smart Sourcing: rust-proof composite carriage lanterns and dusk-to-dawn LED filament bulbs.
7. Industrial Barn Light Fixtures
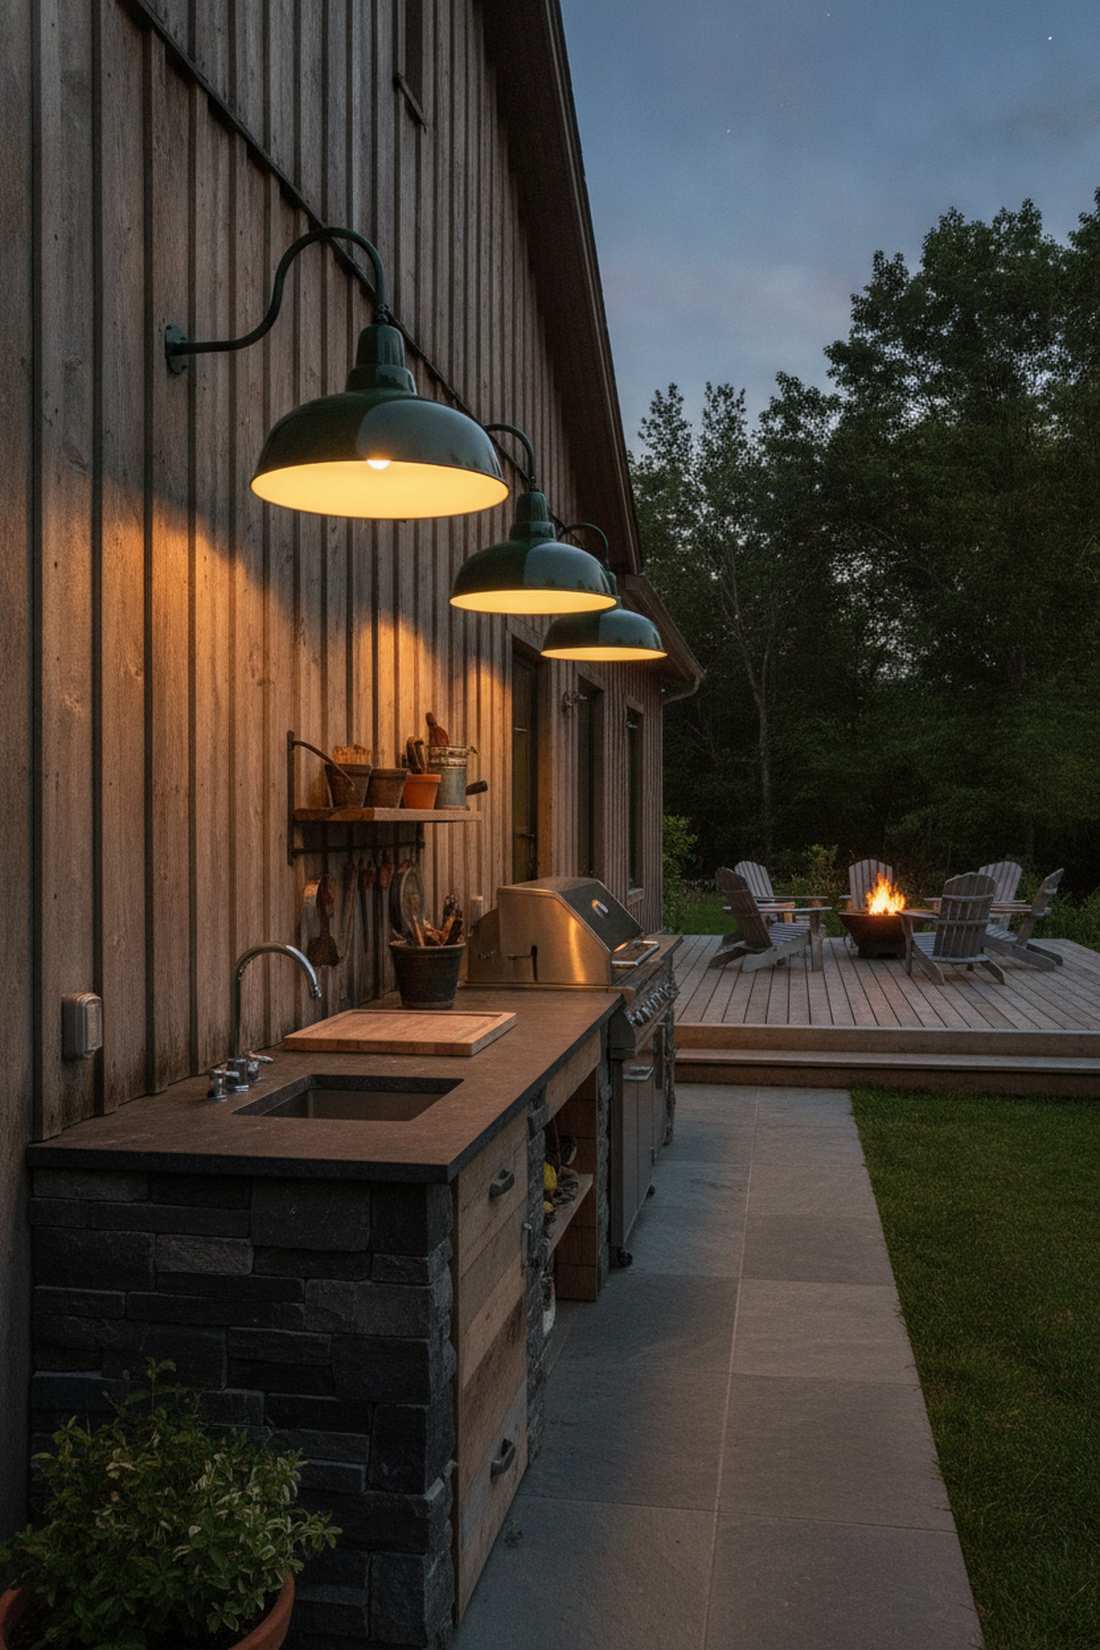
Brings a rugged, farmhouse-chic attitude that feels incredibly authentic. Gooseneck metal barn lights direct intense pools of light downward. The absolute best choice for illuminating an outdoor kitchen or potting bench.
Ditch flimsy generic patio lights because this heavy-duty industrial aesthetic guarantees massive visual impact. Utilizing oversized galvanized steel shades on projecting arms ensures the bulb clears the wall face completely. Picking models with porcelain enamel coatings prevents the paint from peeling off after a harsh summer.
Expect to invest $70–$110 per fixture. Pin this to your outdoor kitchen inspiration board!
- Key Materials: Gooseneck barn shades
- Vibe / Style: Modern farmhouse utility
- Difficulty: Basic hardwiring
- Budget Breakdown: Gooseneck Fixture: $85 | Weatherproof Sealant: $5.
- Creator’s Tip: Ensure the arm extends at least 14 inches so the light doesn’t cast awkward shadows right below it.
- Smart Sourcing: enamel-coated gooseneck barn lights and clear exterior silicone caulk.
8. Frosted Glass Diffuser Sconces
Creates a soft, intimate glow that feels like a cozy living room outdoors. Opal glass ambient sconces erase harsh shadows entirely. Brilliant for illuminating tight, covered seating nooks without blinding guests.
Using exposed bulbs in conversation areas is a massive mistake; this diffused approach is vastly superior. Installing an outdoor lighting wall mount with thick frosted acrylic or opal glass provides seamless light distribution. Sourcing UV-stabilized diffusers stops the white panels from yellowing after months of sun exposure.
A pair costs roughly $60–$100. It’s a fast upgrade that completely changes the patio vibe.
- Key Materials: Frosted geometric sconces
- Vibe / Style: Soft lounge ambiance
- Difficulty: Quick fixture swap
- Budget Breakdown: Sconce Kit: $75 | Warm White Bulbs: $10.
- Creator’s Tip: Use 2700K temperature bulbs to ensure the light feels warm and welcoming, never clinical.
- Smart Sourcing: UV-coated frosted acrylic sconces and dimmable 2700K LED bulbs.
9. Coastal Nautical Wall Lights
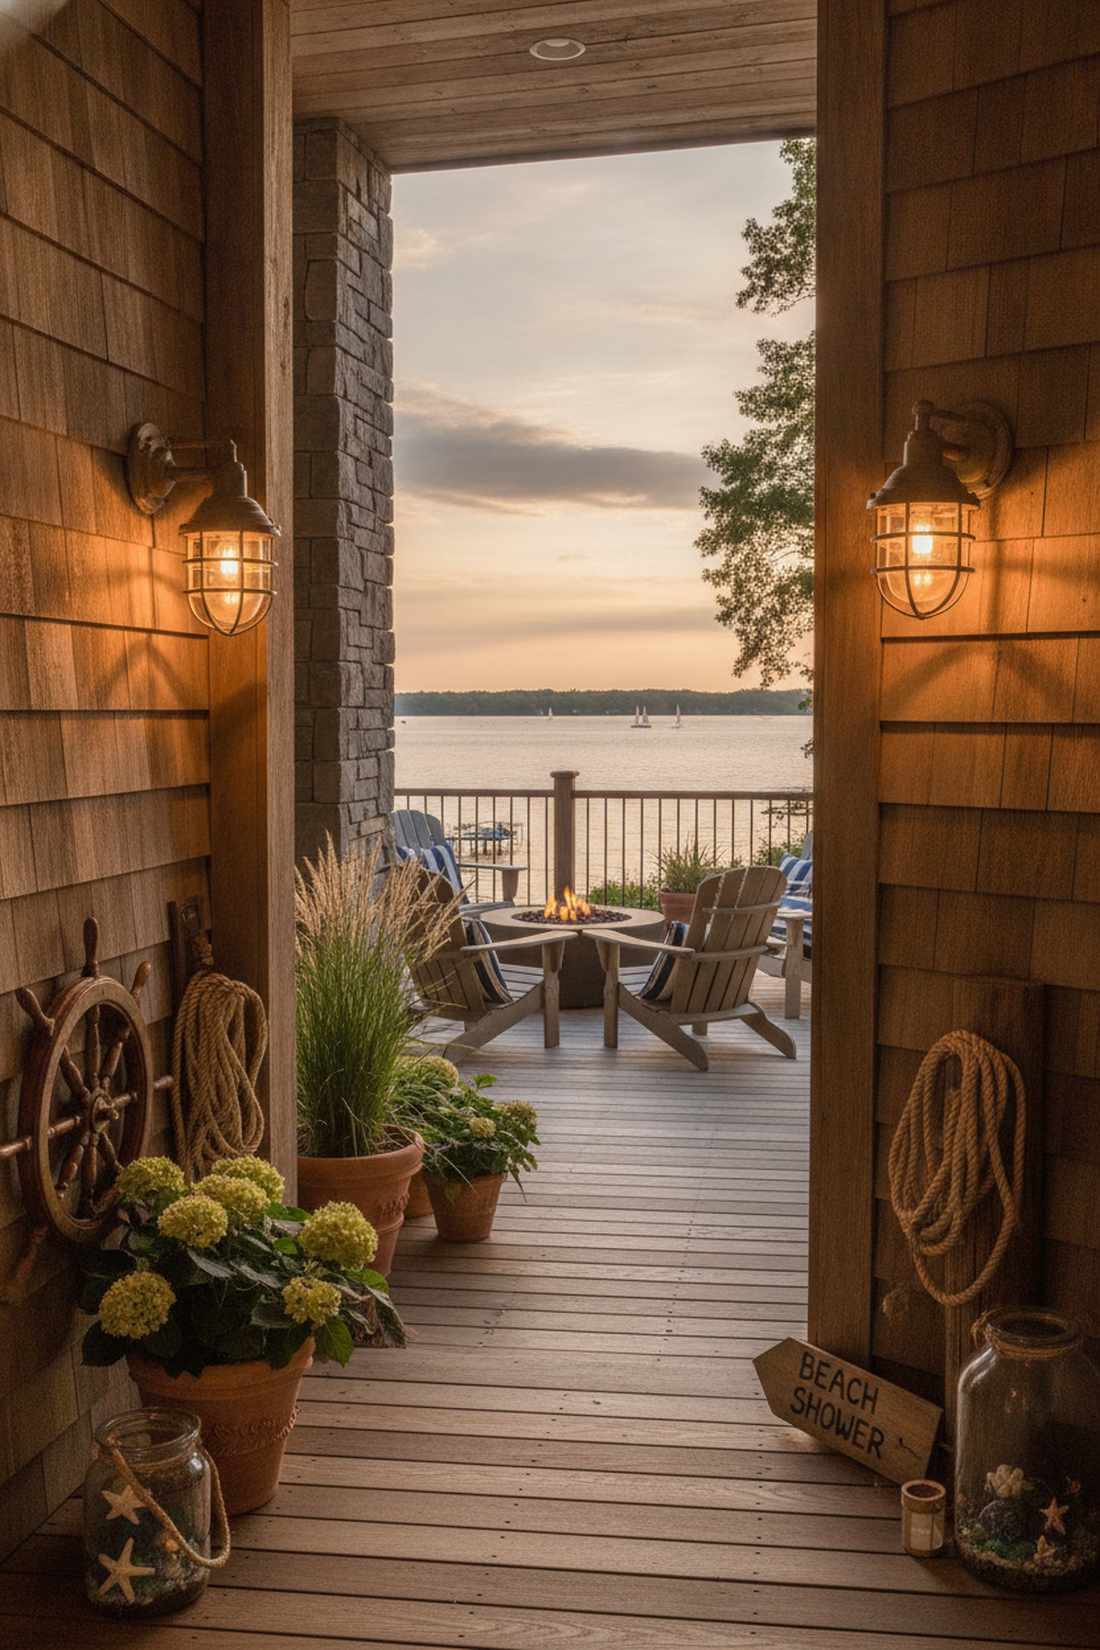
Instantly teleports you to a breezy seaside cottage. Caged brass bulkhead lights cast amazing geometric shadow patterns. The perfect thematic touch for a lakehouse deck or beachfront shower.
This layout effortlessly bridges the gap between rugged utility and high-end coastal design. Choosing solid marine-grade brass or heavily coated stainless steel means the salt air won’t destroy your investment in a year. Grabbing genuine marine-inspired fairy garden kits and authentic nautical accessories helps blend the fixtures into the surrounding decor.
This premium hardware runs $90–$150 per unit.
- Key Materials: Brass caged bulkhead fixtures
- Vibe / Style: Rugged coastal maritime
- Difficulty: Standard installation
- Budget Breakdown: Marine Fixture: $110 | Mounting Hardware: $10.
- Creator’s Tip: Let raw brass fixtures patina naturally over time for an authentic, weathered maritime look.
- Smart Sourcing: marine-grade brass bulkhead lights and stainless steel mounting hardware.
💡 Must-Have Supplies for High-End Setups
To build these setups faster and ensure they last, skip the generic craft aisles and invest in the right foundational kits.
- Base & Support: commercial-grade 12V landscape transformers
- Setup Tools: waterproof wire connector starter kits
- Weather/Durability Protection: marine-grade exterior silicone sealants
Wait until you see how the next technique manipulates shadows… it’s an absolute game-changer for boring exterior walls.
Textured Surface Grazing Methods
10. Stacked Stone Grazing
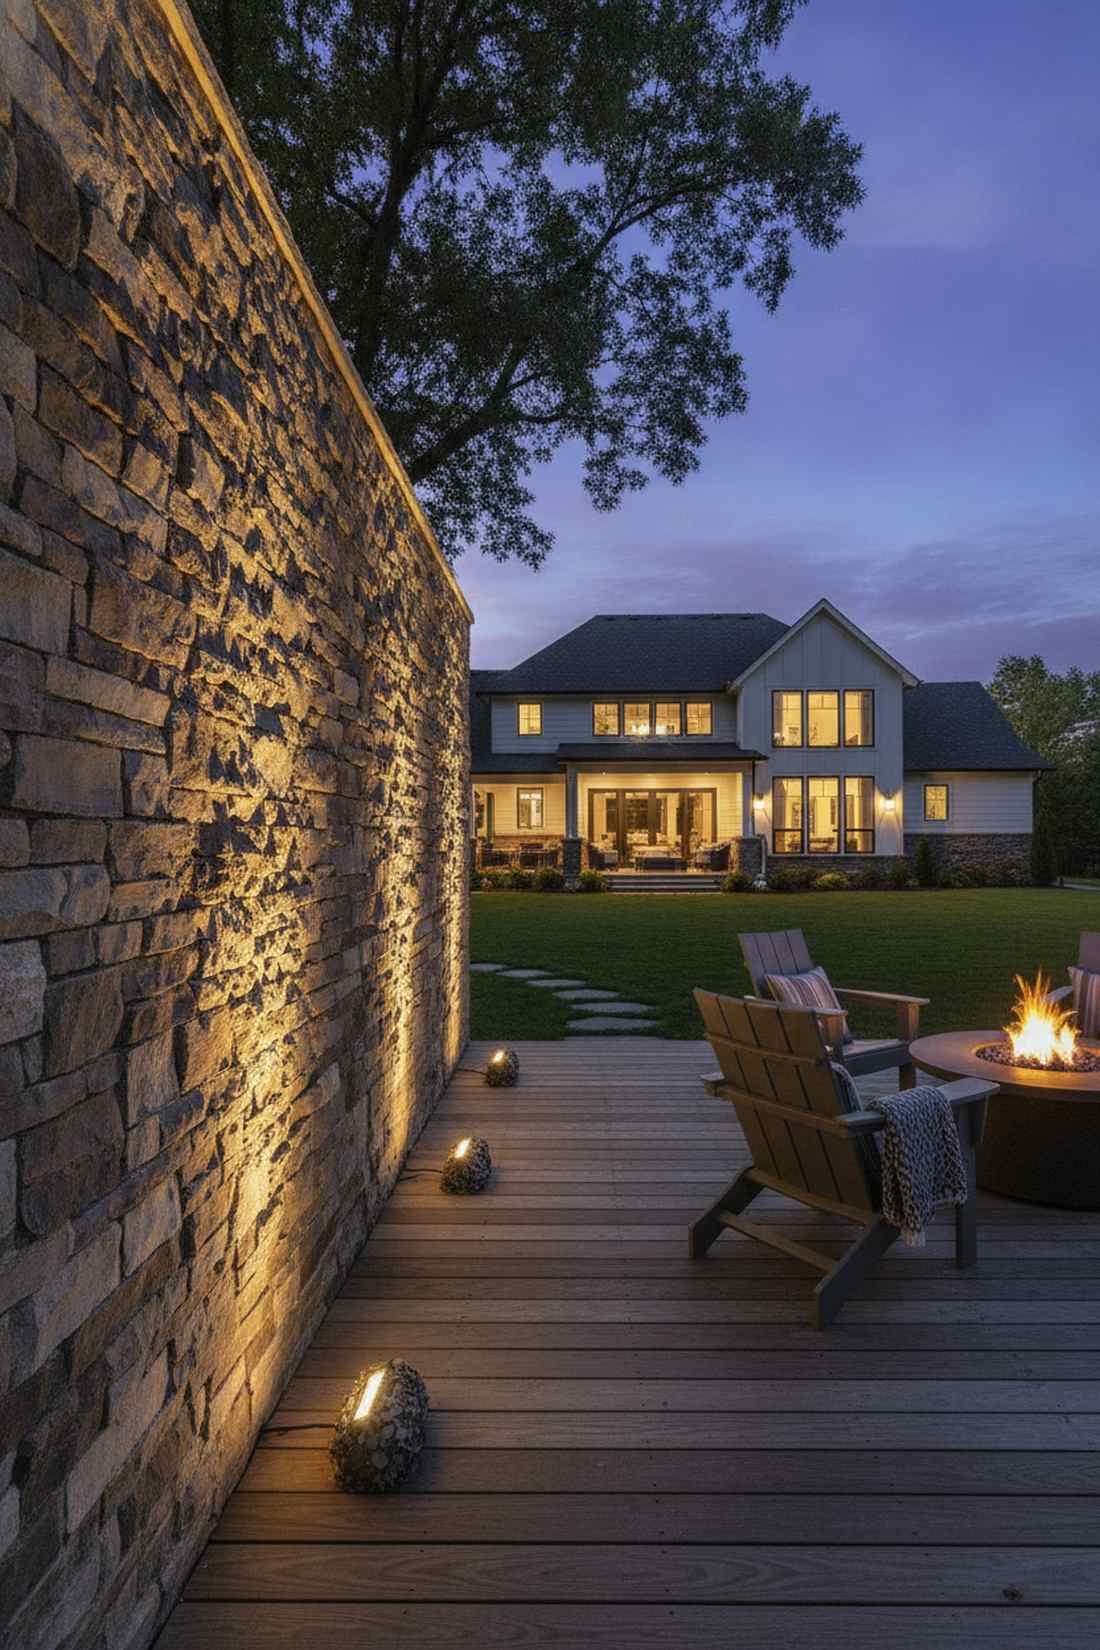
Feels like an ancient, dramatic monument glowing in the dark. Close-proximity stone uplighting exaggerates every single ridge. Unbeatable for turning a standard rock veneer wall into a luxury feature.
Most homeowners wash stone flat, but extreme grazing makes the texture explode with visual depth. Placing compact linear LED strips or mini spots a mere 6 inches from the base creates razor-sharp, contrasting shadows. Utilize commercial-grade low voltage kits to daisy-chain the entire wall seamlessly without massive junction boxes.
Total cost usually lands between $100–$200 for a medium wall. Pin this layout to remember the exact distance!
- Key Materials: Linear LED grazers
- Vibe / Style: Dramatic architectural luxury
- Difficulty: Precision placement needed
- Budget Breakdown: Grazing Kits: $140 | Cable Concealers: $20.
- Creator’s Tip: Aim the fixtures at a shallow 15-degree angle rather than pointing them dead straight up.
- Smart Sourcing: linear LED grazing bars (starter kits) and heavy-duty rock camouflage wire covers.
11. Brick Texture Highlighting
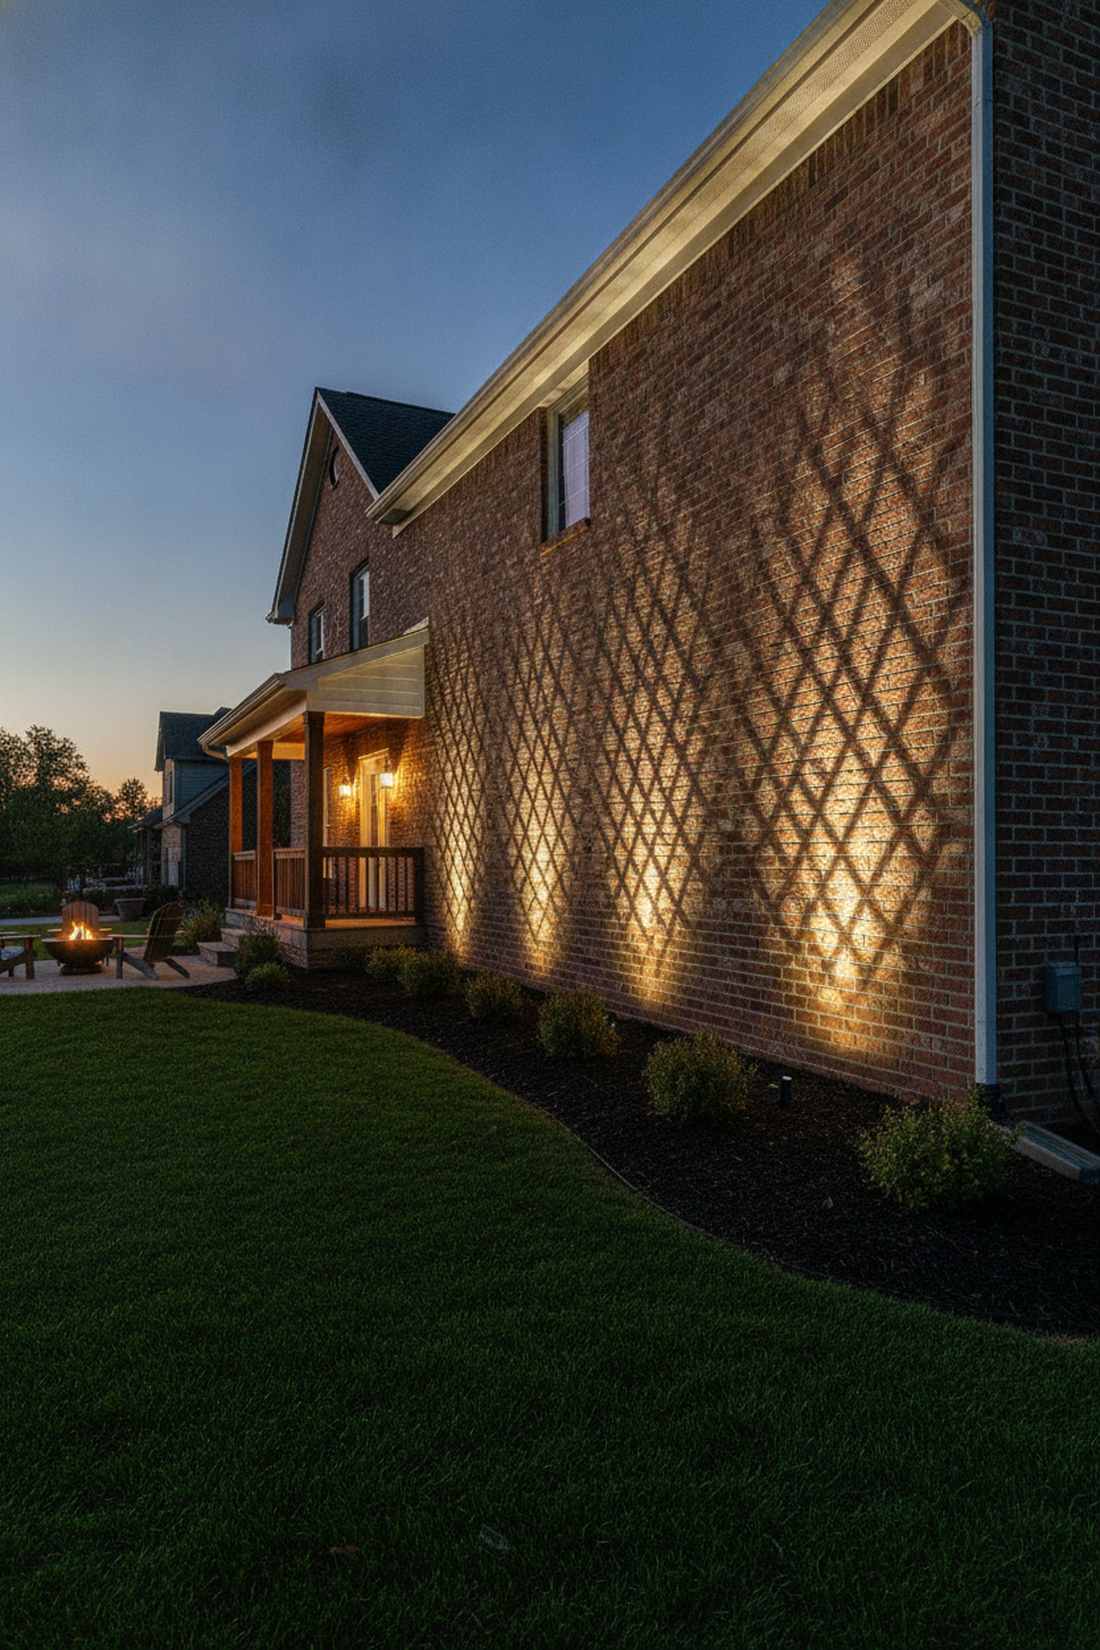
Carries an edgy, historic loft aesthetic into the backyard. Sharp-angle brick lighting highlights the deep mortar joints. Essential for making flat suburban brick homes look incredibly custom.
This lighting hack forces even plain running-bond masonry to display complex, captivating grids. Setting durable in-ground units practically touching the baseboard maximizes the shadow effect across the rough clay. Opting for IP67-rated sealed housings prevents the inevitable dirt and mulch from destroying the sensitive LED diodes.
You can execute this for roughly $35 per fixture.
- Key Materials: Flush-mount IP67 spotlights
- Vibe / Style: Urban industrial loft
- Difficulty: Beginner trenching
- Budget Breakdown: Spotlights: $110 | Digging Tools: $15.
- Creator’s Tip: Space them out widely so the shadows cross over each other for a woven light effect.
- Smart Sourcing: IP67 sealed landscape spotlights (multi-pack) and direct-burial splice kits.
12. Rough-Sawn Timber Accents
Emanates a warm, rustic cabin atmosphere that invites you right in. Cross-grain timber grazing brings out every saw mark. Flawless for modern barn houses or custom wooden sheds.
Shooting light directly at wood flattens it, but side-lighting perpendicular to the grain unlocks gorgeous organic character. Installing sleek micro-fixtures along the vertical edges casts light horizontally across the rough-sawn boards. Using premium miniature garden supplies allows you to hide the actual light source completely within the wood framing.
A hardware package for this runs about $80–$120. Save this idea if you have a wooden outbuilding!
- Key Materials: Micro-LED side casters
- Vibe / Style: Elevated rustic cabin
- Difficulty: Requires precise angles
- Budget Breakdown: Micro LEDs: $75 | Wiring Concealer: $15.
- Creator’s Tip: Paint the tiny fixture housings to exactly match your timber stain so they vanish during the day.
- Smart Sourcing: micro-LED surface grazers (bulk pack) and custom-match wood exterior stain.
13. Decorative Concrete Panels
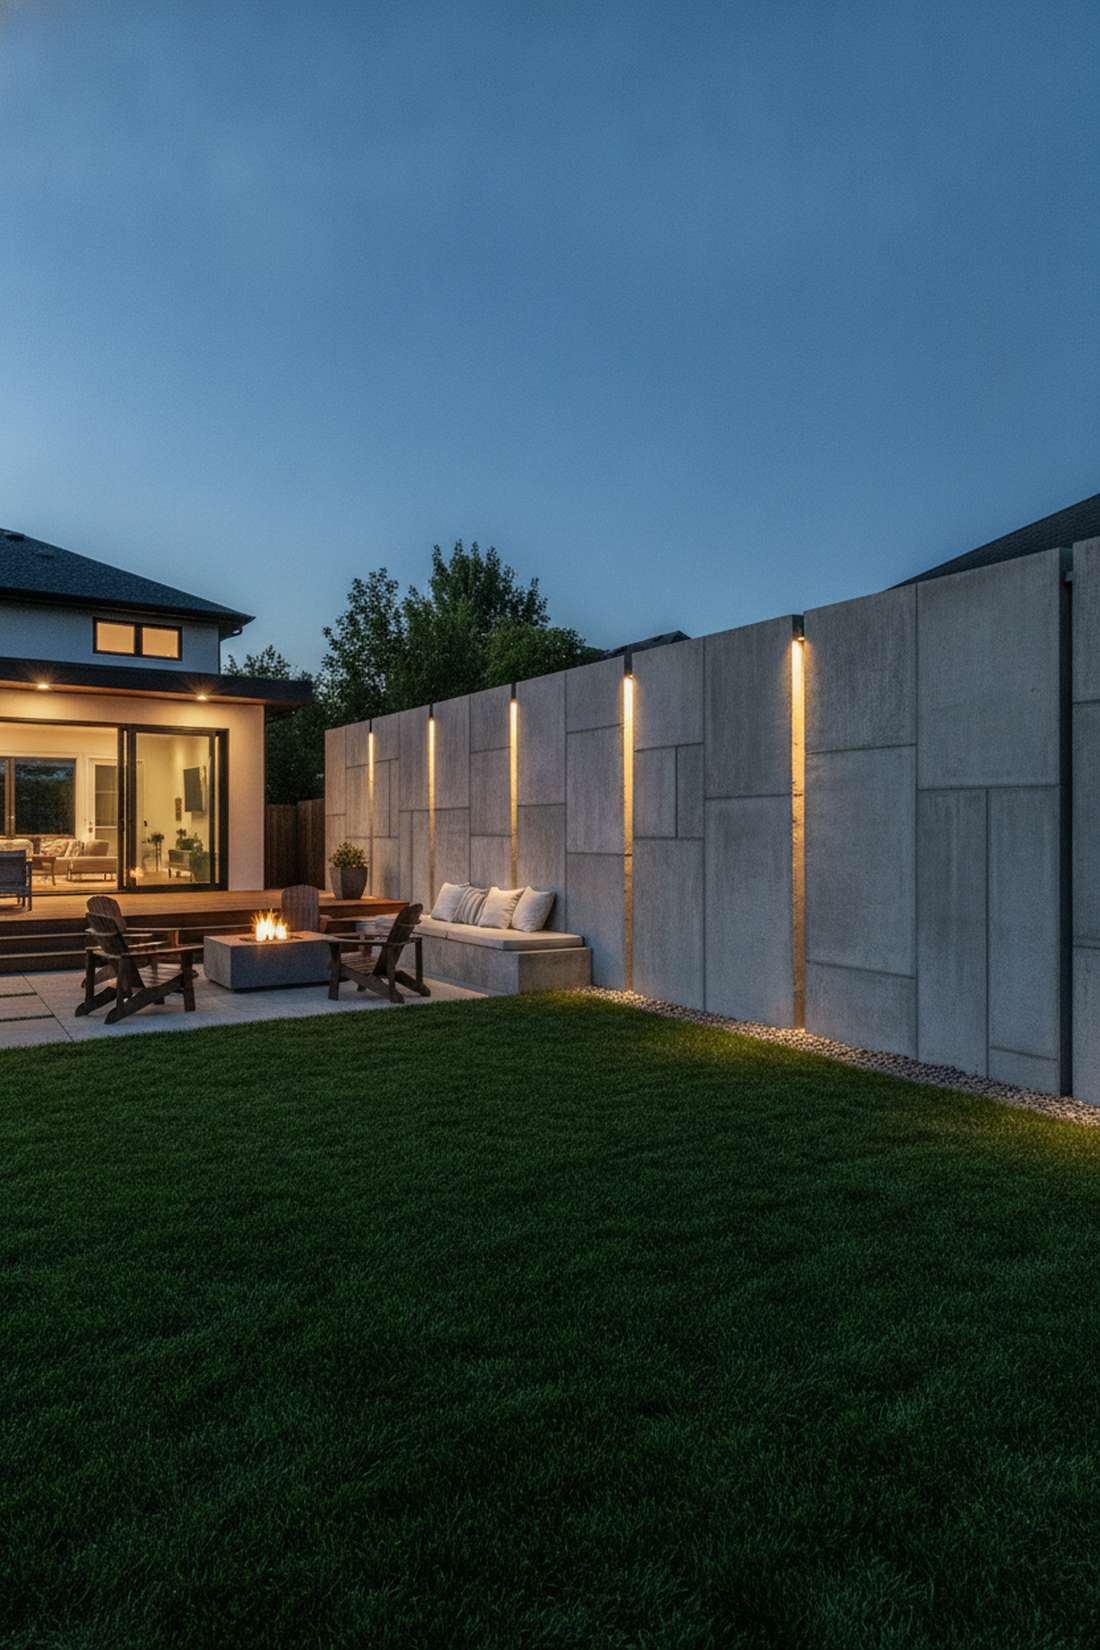
Gives off an ultra-modern, brutalist museum vibe. Panel-edge concrete uplighting turns industrial materials into sculptural art. The ultimate move for contemporary privacy walls.
This layout absolutely transforms cold grey slabs by highlighting the intentional relief patterns and reveal joints. Placing one high-intensity uplight precisely at the edge of each modular panel emphasizes the structural rhythm perfectly. Sourcing impact-resistant commercial drive-over lights ensures they survive if installed near a driveway or walkway.
Expect around $60 per commercial-grade light. It’s a striking transformation for brutalist designs.
- Key Materials: Heavy-duty drive-over uplights
- Vibe / Style: Sculptural brutalist chic
- Difficulty: Intermediate masonry work
- Budget Breakdown: Commercial Fixtures: $180 | Concrete Drill Bits: $25.
- Creator’s Tip: Center the lights exactly on the seams between panels to make the vertical gaps glow.
- Smart Sourcing: stainless steel drive-over LED well lights and masonry core drill bit kits.
Most beginners skip this next application, entirely missing out on the absolute easiest way to make a property look expensive after dark…
Wall Mount Security Applications
14. Motion-Activated Flood Lights
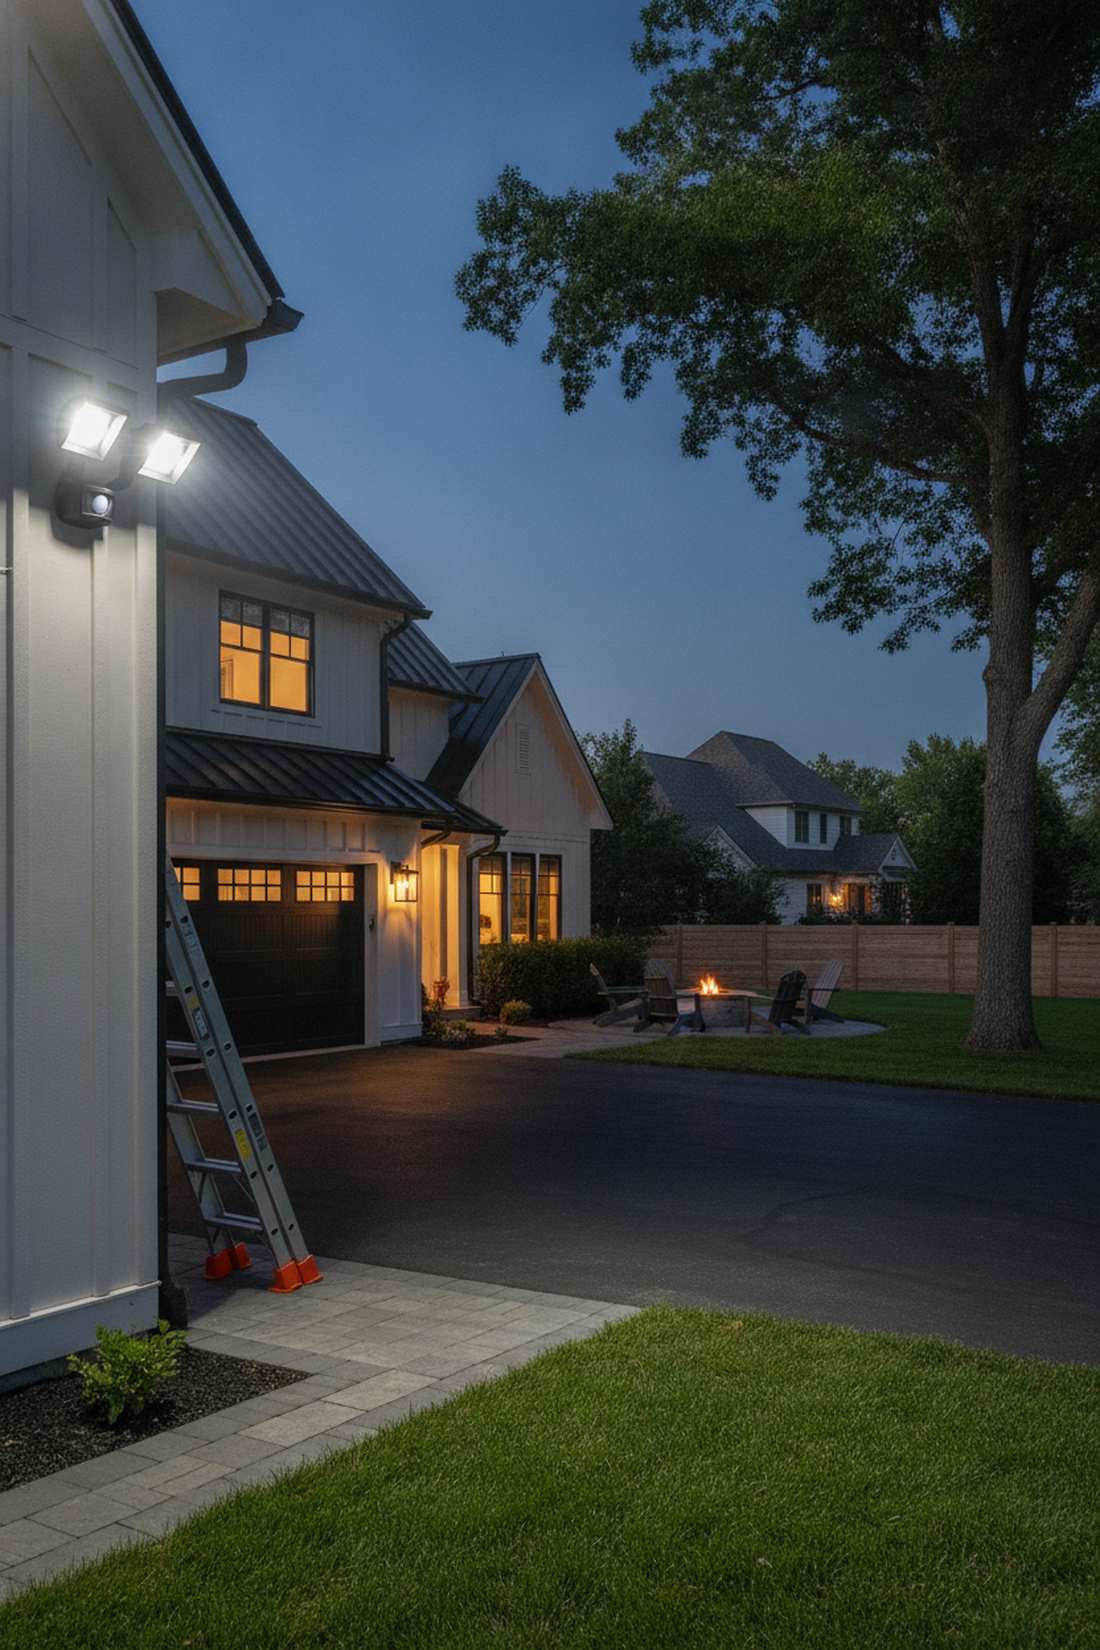
Feels like having an invisible security guard with impeccable timing. Dual-head motion LED floods bathe massive areas in bright light instantly. Necessary for blind-spot driveways and dark garage corners.
Security lighting doesn’t have to look like ugly industrial warehouse equipment anymore. Choosing a modern outdoor lighting wall mount with sleek, adjustable twin heads provides massive lumen output without ruining your architecture. Snagging models with customizable passive infrared (PIR) sensors stops annoying false triggers from neighborhood cats.
Premium models cost around $60–$90. Pin this to upgrade your home defense aesthetically!
- Key Materials: Modern PIR motion floods
- Vibe / Style: High-tech functional safety
- Difficulty: Basic ladder work
- Budget Breakdown: Motion Floodlight: $75 | Exterior Box: $10.
- Creator’s Tip: Mount them 8-10 feet high to get the widest beam spread while keeping them out of reach.
- Smart Sourcing: adjustable dual-head LED motion floods and heavy-duty ladder stabilizers.
15. Dusk-to-Dawn Perimeter Lights
Delivers incredible peace of mind without flipping a single switch. Photocell-driven wall packs keep an ambient safety ring active all night. Brilliant for illuminating dark side yards automatically.
Relying on manual timers is archaic when built-in light sensors handle the workload perfectly. Installing sleek LED wall packs ensures continuous 3000-lumen coverage that instantly turns off at sunrise. Buying commercial-grade poly-carbonate fixtures guarantees the lenses won’t shatter if hit by flying storm debris.
Setup costs roughly $50–$80 per unit. A solid investment for effortless property security.
- Key Materials: Photocell LED wall packs
- Vibe / Style: Commercial-grade perimeter security
- Difficulty: Simple hardwire connection
- Budget Breakdown: Wall Pack: $65 | Wire Nuts: $5.
- Creator’s Tip: Make sure no other porch lights shine directly onto the photocell, or it will turn off by accident.
- Smart Sourcing: dusk-to-dawn LED wall packs (bulk pack) and silicone weatherproof wire nuts.
16. Smart Camera-Integrated Fixtures
Radiates cutting-edge, smart-home supremacy right at the front door. Camera-equipped security sconces record and illuminate simultaneously. The absolute smartest upgrade for high-traffic main entrances.
Bolting ugly plastic cameras next to beautiful outdoor lighting sconces ruins your curb appeal instantly. Utilizing all-in-one fixtures hides the 1080p lens inside a stylish modern lantern, connecting directly to your Wi-Fi for live alerts. Investing in premium hardwired models means you never have to drag out a ladder to recharge dead batteries.
These integrated units average $150–$250. Save this idea for a massive tech upgrade!
- Key Materials: Wi-Fi camera lantern units
- Vibe / Style: Covert modern surveillance
- Difficulty: Intermediate wiring & app setup
- Budget Breakdown: Smart Fixture: $190 | Router Extender: $40.
- Creator’s Tip: Angle the lens slightly downward to prioritize facial recognition of anyone standing on the porch.
- Smart Sourcing: hardwired smart camera outdoor sconces and mesh Wi-Fi range extenders.
Material Guide: Cheap vs. Premium Aesthetic
Knowing exactly where to save and where to spend makes all the difference in achieving that “looks expensive but isn’t” vibe.
- Standard vs. UV-Resistant/Premium: Upgrading to UV-coated acrylics and marine-grade brass stops your hardware from turning yellow or rusting out after just one summer season.
- Pre-made Kits vs. Sourcing Locally: Buying commercial-grade low-voltage starter kits online is significantly cheaper than purchasing individual plastic fixtures from big-box hardware stores.
17. Solar-Powered Security Lights
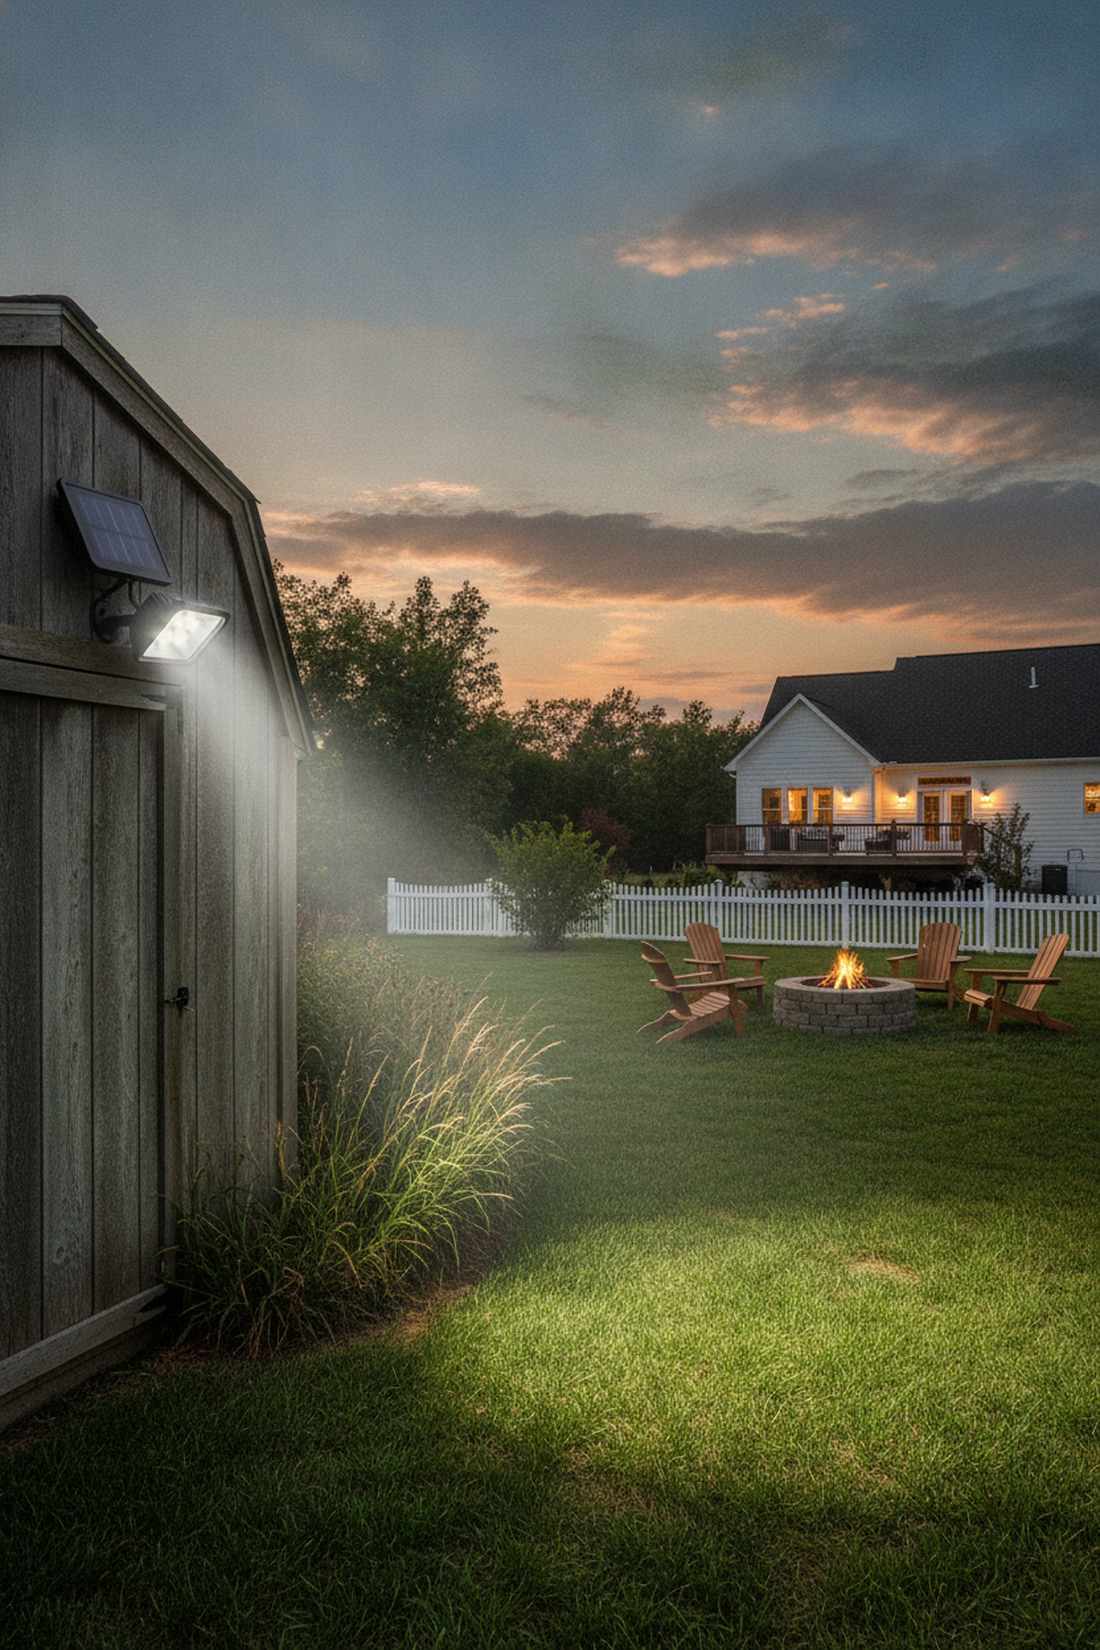
Feels like an off-grid survival hack that actually looks amazing. Photovoltaic motion lights bring bright safety to totally isolated areas. Indispensable for lighting up detached sheds or far-off fence corners.
Trenching 100 feet of electrical wire destroys your lawn, but solar completely bypasses that nightmare. Mounting self-contained solar flood units delivers serious illumination powered entirely by an integrated top-mounted panel. Securing UV-resistant high-capacity battery models ensures the light still triggers flawlessly even after three days of heavy clouds.
You can equip a shed for around $30–$60.
- Key Materials: Solar-powered LED floods
- Vibe / Style: Off-grid utility
- Difficulty: No wiring required (Easiest)
- Budget Breakdown: Solar Unit: $45 | Screws: $5.
- Creator’s Tip: Install the fixture on a south-facing wall to guarantee the panel gets 4-6 hours of direct sun.
- Smart Sourcing: high-lumen solar motion lights (2-pack) and heavy-duty exterior mounting tape.
Don’t stop reading yet—the upcoming lighting strategy is shockingly cheap but completely overhauls the atmosphere of any standard backyard…
Specialty Vertical Lighting
18. Recessed Step and Riser Lights
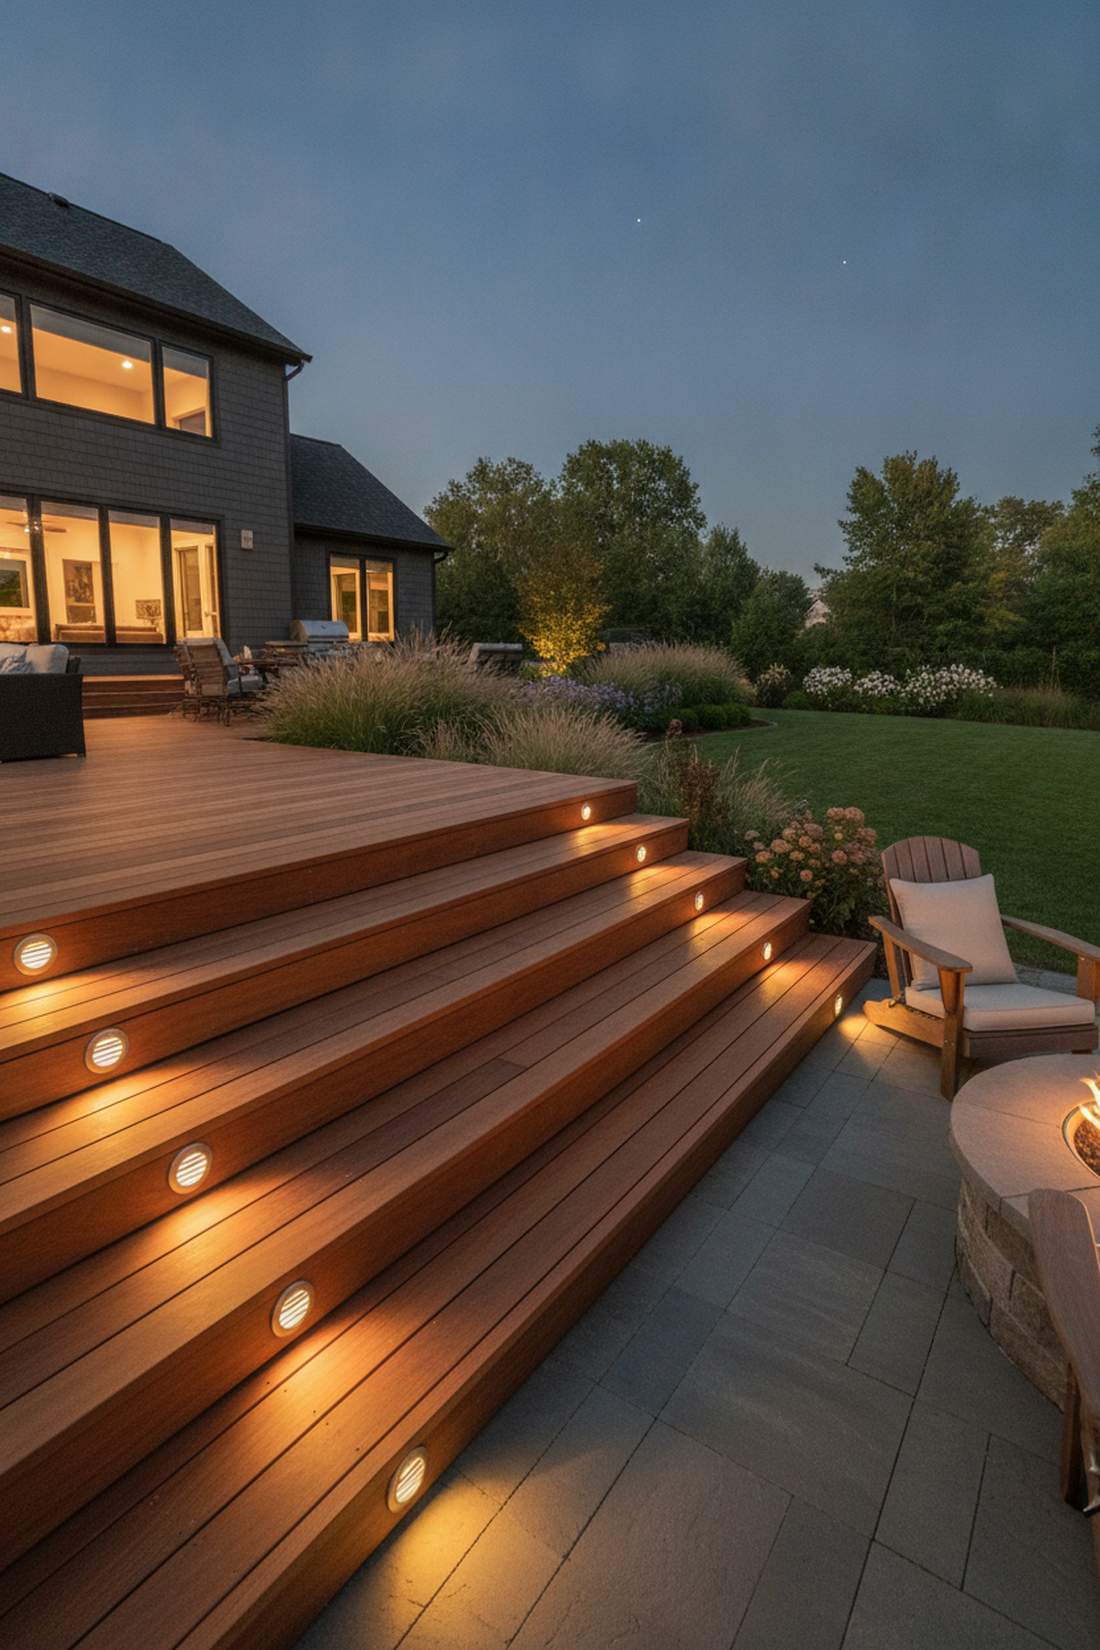
Looks like a luxurious VIP pathway guiding your steps. Low-profile louvered riser lights wash treads with safe, glare-free light. Phenomenal for modernizing steep deck stairs or concrete entry steps.
Slapping bulky lights on the sides of stairs is a massive tripping hazard; flush integration is vastly superior. Coring out the vertical riser and inserting an outdoor lighting wall mount with downward-facing louvers hides the bulb entirely. Opting for miniature garden supplies and sealed LED pucks creates an invisible, seamless architectural integration.
Each step costs about $25–$40 to outfit. Pin this for your next deck renovation!
- Key Materials: Recessed louvered LED pucks
- Vibe / Style: Sleek resort safety
- Difficulty: Advanced carpentry/cutting
- Budget Breakdown: Recessed Lights: $120 | Forstner Bit: $15.
- Creator’s Tip: Mount them exactly 2 inches above the tread so the light spreads wide but stays low.
- Smart Sourcing: recessed LED stair lights (bulk pack) and precision wood hole saw kits.
19. Living Wall Uplighting
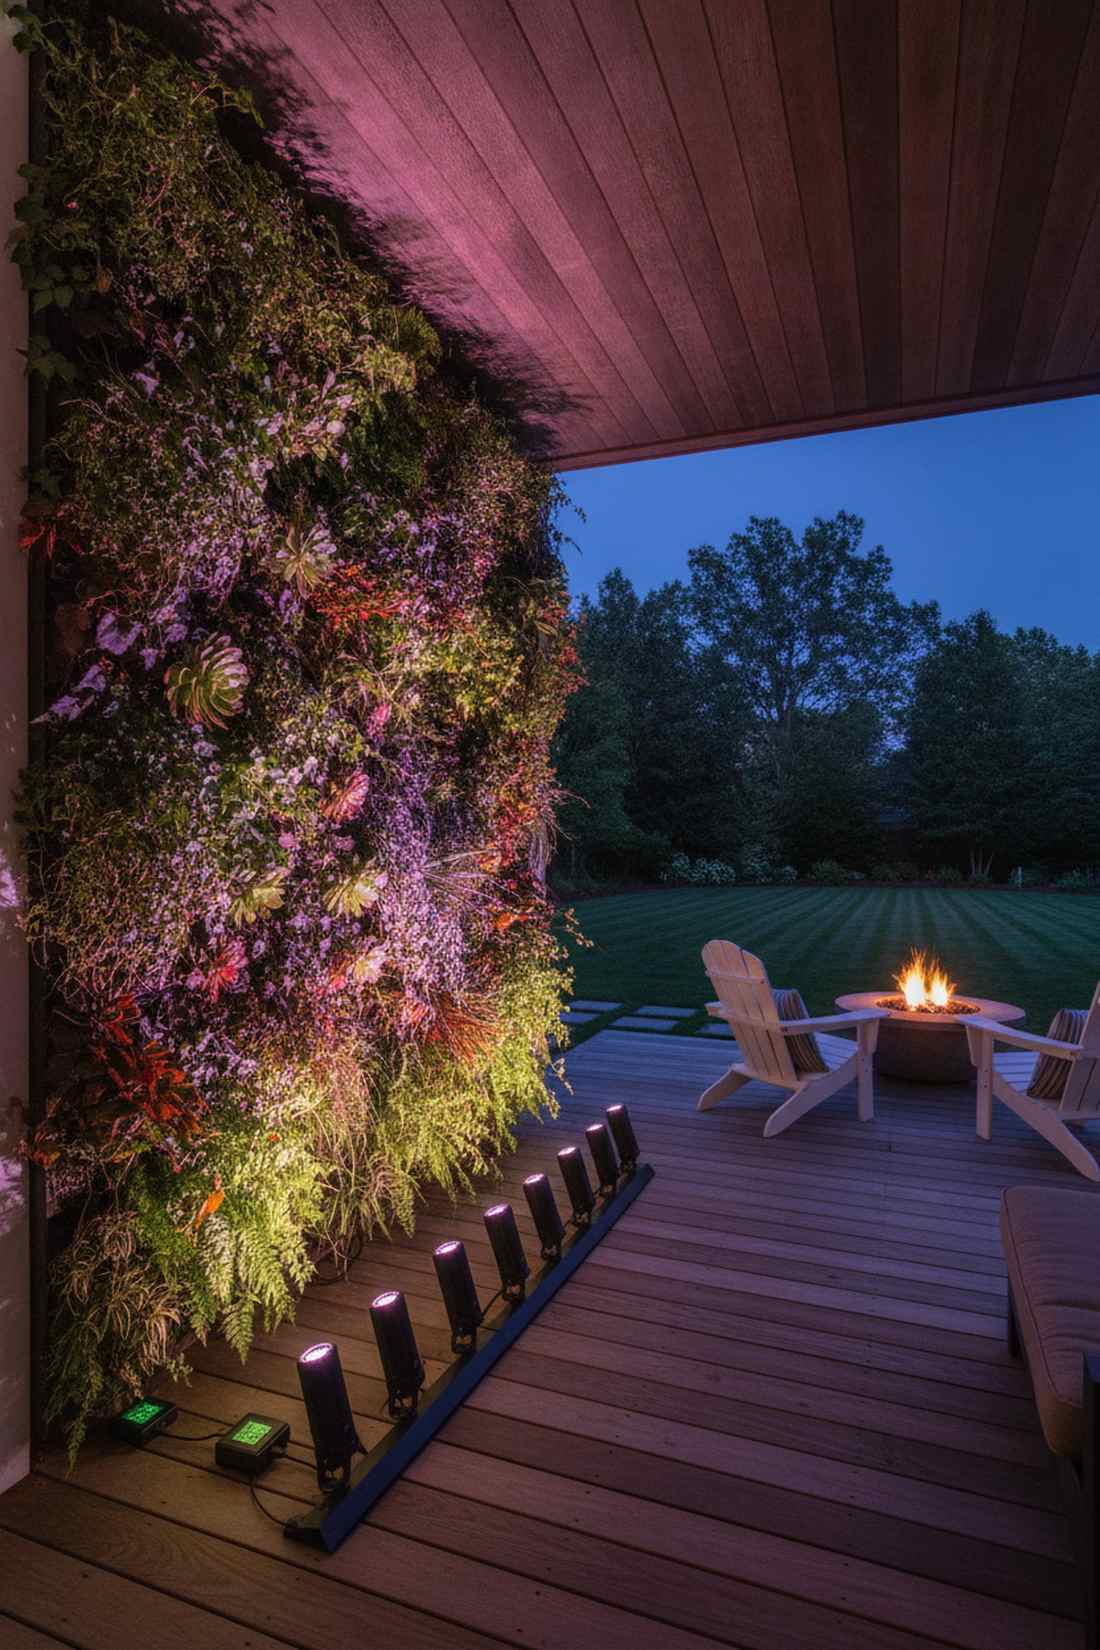
Emanates an enchanted, lush botanical garden aura. Full-spectrum vertical plant lighting makes foliage pop while keeping it alive. Brilliant for illuminating a dense ivy trellis or a modern succulent wall.
Standard white LEDs do absolutely nothing for plant health, which is why specialized lighting is a massive game-changer. Positioning IP-rated grow-light bars at the base fuels photosynthesis while acting as a stunning architectural wash. Grabbing terrarium accessories and specialized spectrum lenses ensures the greens look incredibly vibrant at night.
This specialty setup runs $90–$160 depending on the wall width.
- Key Materials: Outdoor LED grow washes
- Vibe / Style: Lush botanical sanctuary
- Difficulty: Easy placement
- Budget Breakdown: Spectrum Wash Bar: $110 | Timers: $20.
- Creator’s Tip: Angle the light upward slightly away from the wall to catch the overhanging leaves perfectly.
- Smart Sourcing: waterproof full-spectrum LED bars and outdoor digital smart timers.
20. Water Feature Wall Illumination
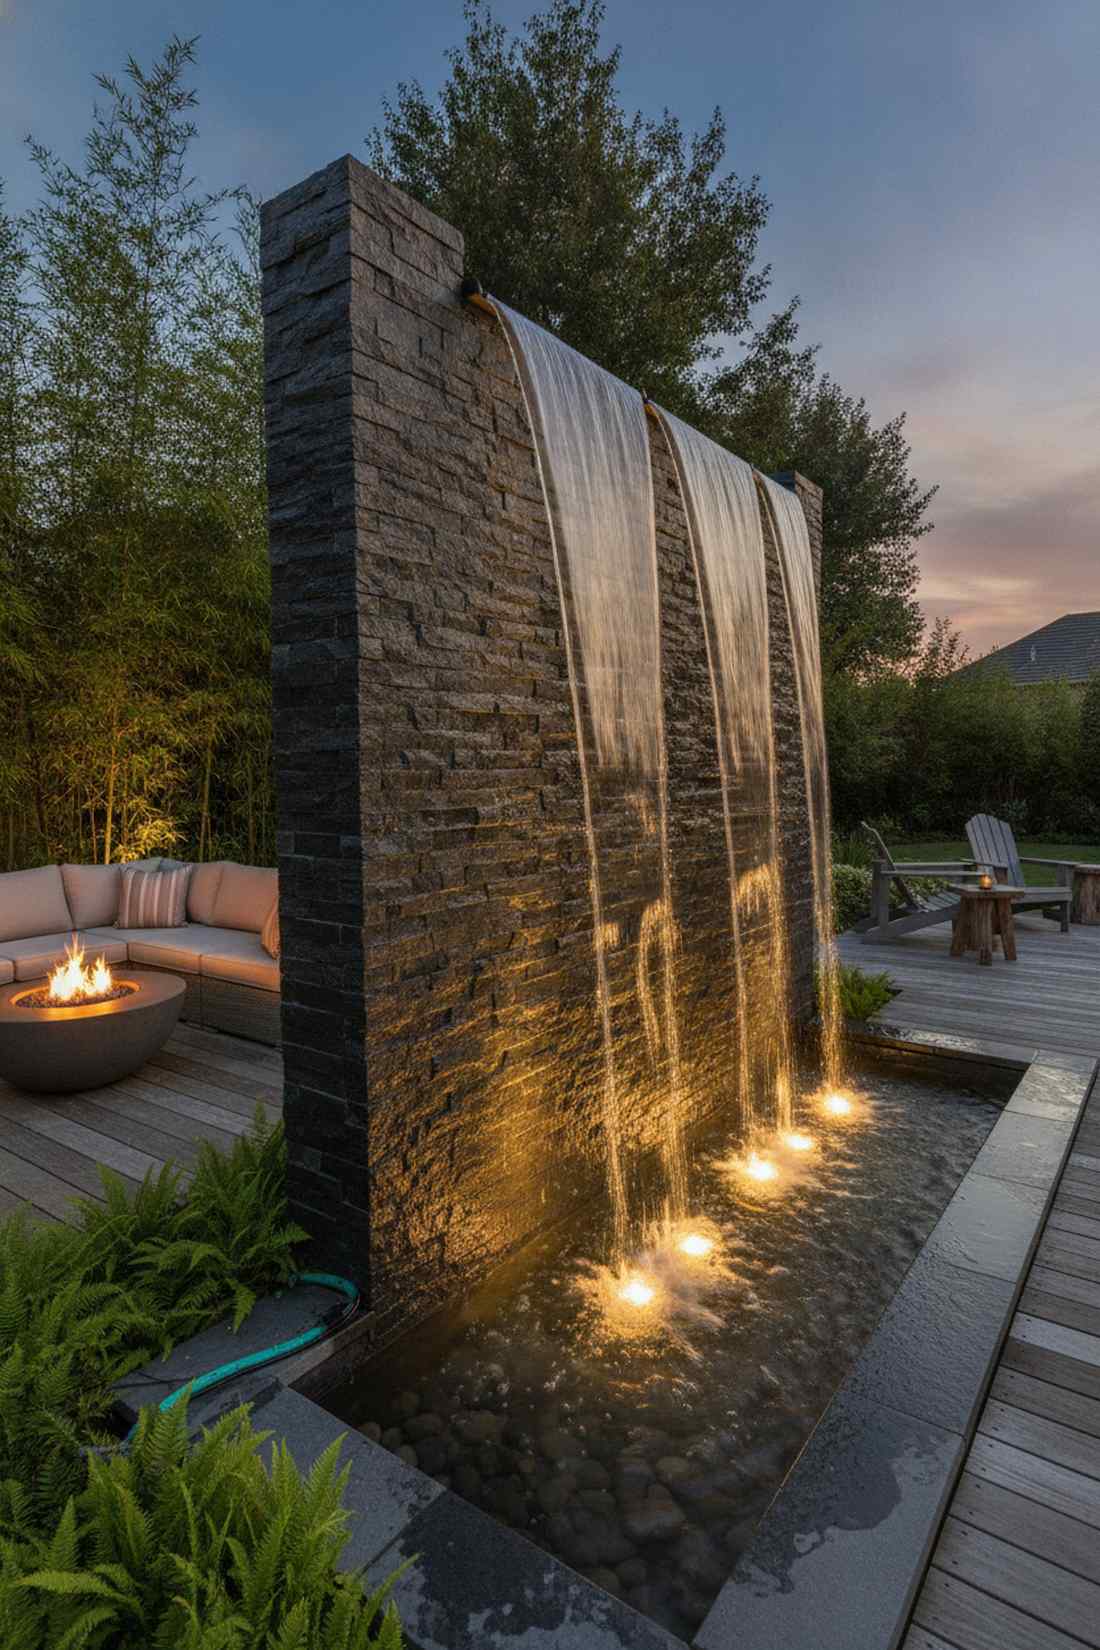
Creates a mesmerizing, hypnotic liquid light show. Submersible refractive uplighting catches every ripple and splash. An absolute must for a wall-mounted fountain or modern rain curtain.
Lighting water from the front makes it look dull, but backlighting or cross-lighting makes it sparkle like crystal. Securing fully submersible, resin-sealed LED nodes directly behind the falling water sheet refracts the beam dramatically. Utilizing fairy garden kits and tiny underwater spots allows you to hide the hardware in the smallest fountain basins.
Expect to spend $50–$85 for good waterproof nodes. Save this for a stunning water feature upgrade!
- Key Materials: IP68 submersible LED nodes
- Vibe / Style: High-end spa tranquility
- Difficulty: Intermediate waterproof wiring
- Budget Breakdown: Submersible Pucks: $55 | Marine Tape: $10.
- Creator’s Tip: Place the lights right where the water impacts the basin to illuminate the rising bubbles.
- Smart Sourcing: IP68 submersible LED puck lights and marine-grade waterproof electrical tape.
21. Trellis and Arbor Lighting
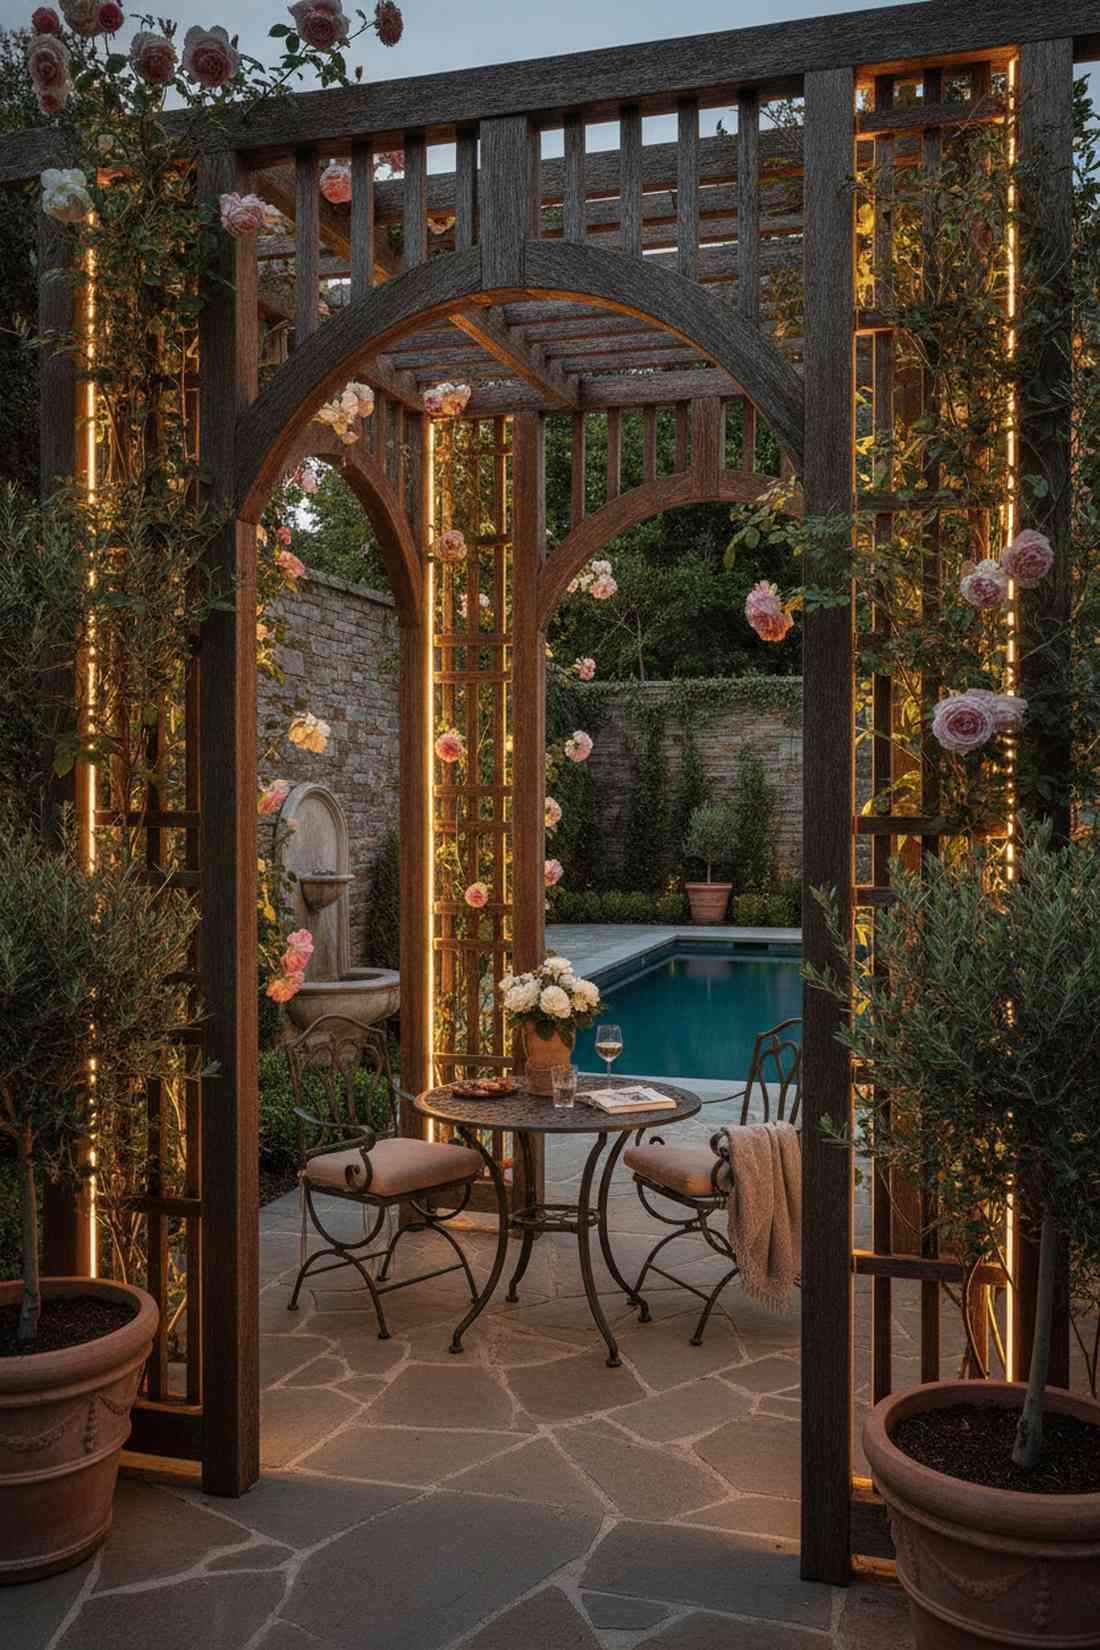
Feels like a romantic, hidden courtyard cafe in Europe. Woven linear strip lighting outlines the vertical wooden framework beautifully. Superb for highlighting climbing roses or a patio privacy screen.
String lights are overused; integrating hidden continuous light lines delivers a surprisingly premium look. Stapling ultra-thin, low-voltage silicone LED strips along the back of the trellis rails backlights the entire structure flawlessly. Snagging UV-coated protective channels guarantees the LED tape won’t peel off when the summer heat hits.
You can execute this magic for about $40–$70.
- Key Materials: Silicone outdoor LED tape
- Vibe / Style: Romantic courtyard geometry
- Difficulty: Easy weaving and stapling
- Budget Breakdown: LED Strip Kit: $45 | Cable Staples: $5.
- Creator’s Tip: As the climbing plants grow, they will naturally diffuse the light for an organic, dappled effect.
- Smart Sourcing: waterproof silicone LED strip kits and heavy-duty insulated cable staples.
22. House Number Illumination

Projects sharp, undeniable curb appeal that delivery drivers will love. Targeted address downlighting makes your digits impossible to miss. The smartest micro-upgrade for an entryway column or porch wall.
Relying on massive porch lights to illuminate tiny numbers washes out the contrast completely. Installing a dedicated micro-hood or tiny outdoor lighting sconces directly over the plaque directs an intense beam straight down. Buying pre-cut metallic numbers paired with a focused mini-spot creates crisp, high-contrast shadows.
This quick weekend detail costs a mere $30–$50. Pin this to boost your home’s exterior functionality!
- Key Materials: Mini directional downlight, floating numbers
- Vibe / Style: Crisp modern utility
- Difficulty: Quick drill and mount
- Budget Breakdown: Mini Light: $25 | Floating Numbers: $20.
- Creator’s Tip: Use floating house numbers on standoffs to create dramatic back-shadows against the light.
- Smart Sourcing: modern floating house number kits and low-voltage miniature downlights.
This final technique is so simple yet so dramatic, you’ll wonder why it took you this long to try it…
23. Architectural Alcove Lighting
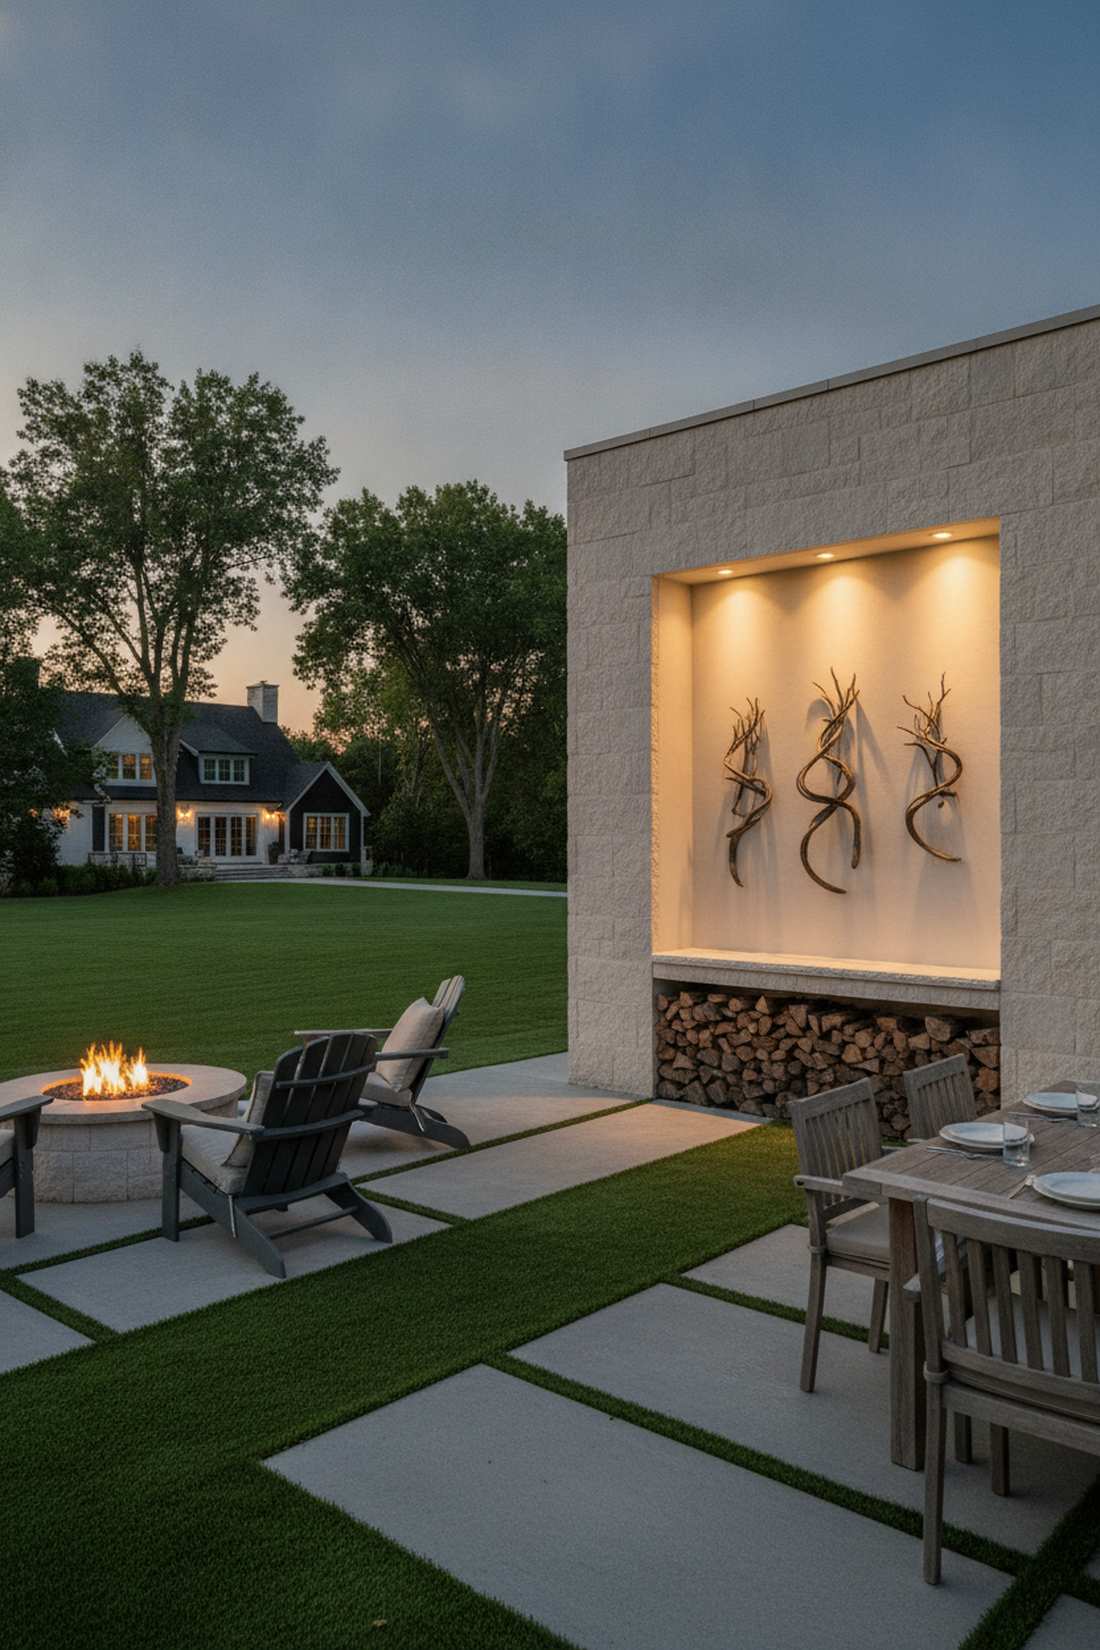
Radiates a mystical, sourceless glow that draws the eye immediately. Concealed niche wash lighting turns empty wall voids into gallery displays. Flawless for showing off patio sculptures or built-in firewood storage.
Blasting light straight into a recessed alcove ruins the depth; hiding the source inside the lip is the professional trick. Tucking pre-wired miniature garden supplies or micro-pucks into the upper inside ceiling of the niche creates a glowing waterfall effect. Using an outdoor lighting wall mount with a tight 30-degree beam keeps the light trapped beautifully inside the recess.
You can build this premium look for around $35–$60.
- Key Materials: Micro LED puck lights
- Vibe / Style: Custom gallery showcase
- Difficulty: Easy hidden placement
- Budget Breakdown: Puck Kits: $40 | Adhesive: $5.
- Creator’s Tip: Point the tiny pucks toward the back wall to bounce the light outward for a softer glow.
- Smart Sourcing: pre-wired waterproof LED pucks (bulk pack) and industrial exterior mounting tape.
Conclusion
Professional outdoor lighting wall installations transform passive boundaries into striking architectural statements. These 23 setups prove that strategic sourcing of premium commercial-grade LED kits and exact beam positioning matter more than massive budgets. Stop settling for cheap hardware store plastics. Invest in heavy-duty wet-rated fixtures, experiment with diverse beam angles, and watch your standard exteriors become high-end nighttime destinations.
Frequently Asked Questions
What is the difference between wall washing and wall grazing?
Wall washing positions high-lumen commercial LED fixtures 2-3 feet from the wall to create smooth, uniform illumination, while wall grazing places linear grazing kits within 6-12 inches of textured walls. Washing minimizes texture visibility for a clean look, whereas grazing maximizes it by causing light to hit the surface at acute angles, producing pronounced premium shadows.
How high should outdoor wall sconces be mounted?
Standard mounting height for decorative outdoor lighting sconces is 66-72 inches above finished grade when flanking entry doors. Adjust this height based on fixture scale—larger hardware may require higher placement, while smaller fixtures with premium anti-glare frosted shades can mount at 60-65 inches for intimate seating areas.
What weather rating do outdoor wall lights need?
Any outdoor lighting wall mount exposed to direct rain requires a strict wet-location rating (IP65 certified or higher). While fixtures safely tucked under deep porch eaves can survive with damp-location ratings (IP44), sourcing IP65 certified bulk packs ensures ultimate protection against corrosion and moisture failure across all applications.
How far apart should wall wash fixtures be spaced?
Space commercial-grade low-voltage starter kits 6-8 feet apart along the wall base to achieve overlapping, uniform coverage without dark zones. You can increase spacing to 10-12 feet when using wide-beam landscape floods on shorter fences, ensuring your layout remains budget-friendly without sacrificing brightness.
Can LED outdoor wall lights be dimmed?
Yes, provided you purchase specific dimmable fixtures paired with smart Wi-Fi dimmable modules. You must verify dimming compatibility in the specs and utilize LED-specific smart switches, as older incandescent dimmers will cause severe flickering and damage your premium LED hardware.