Upgrading an outdoor living room with fireplace instantly turns an ordinary patio into a high-end designer escape. Discover exact material blueprints and smart sourcing secrets that keep costs low while delivering a premium architectural finish.
Design Snapshot Key Principles
- Placement Strategy: Position fireplaces to anchor seating zones while maintaining clear sightlines and smoke flow
- Material Selection: Choose weather-resistant stone, brick, or metal that complements your home’s architecture and withstands seasonal changes
- Scale and Proportion: Match fireplace dimensions to patio size—linear designs for modern spaces, traditional chimneys for rustic settings
- Fuel Type: Wood-burning delivers authentic crackle, gas offers convenience, electric provides flexibility for covered areas
Modern Minimalist Fireplace Designs
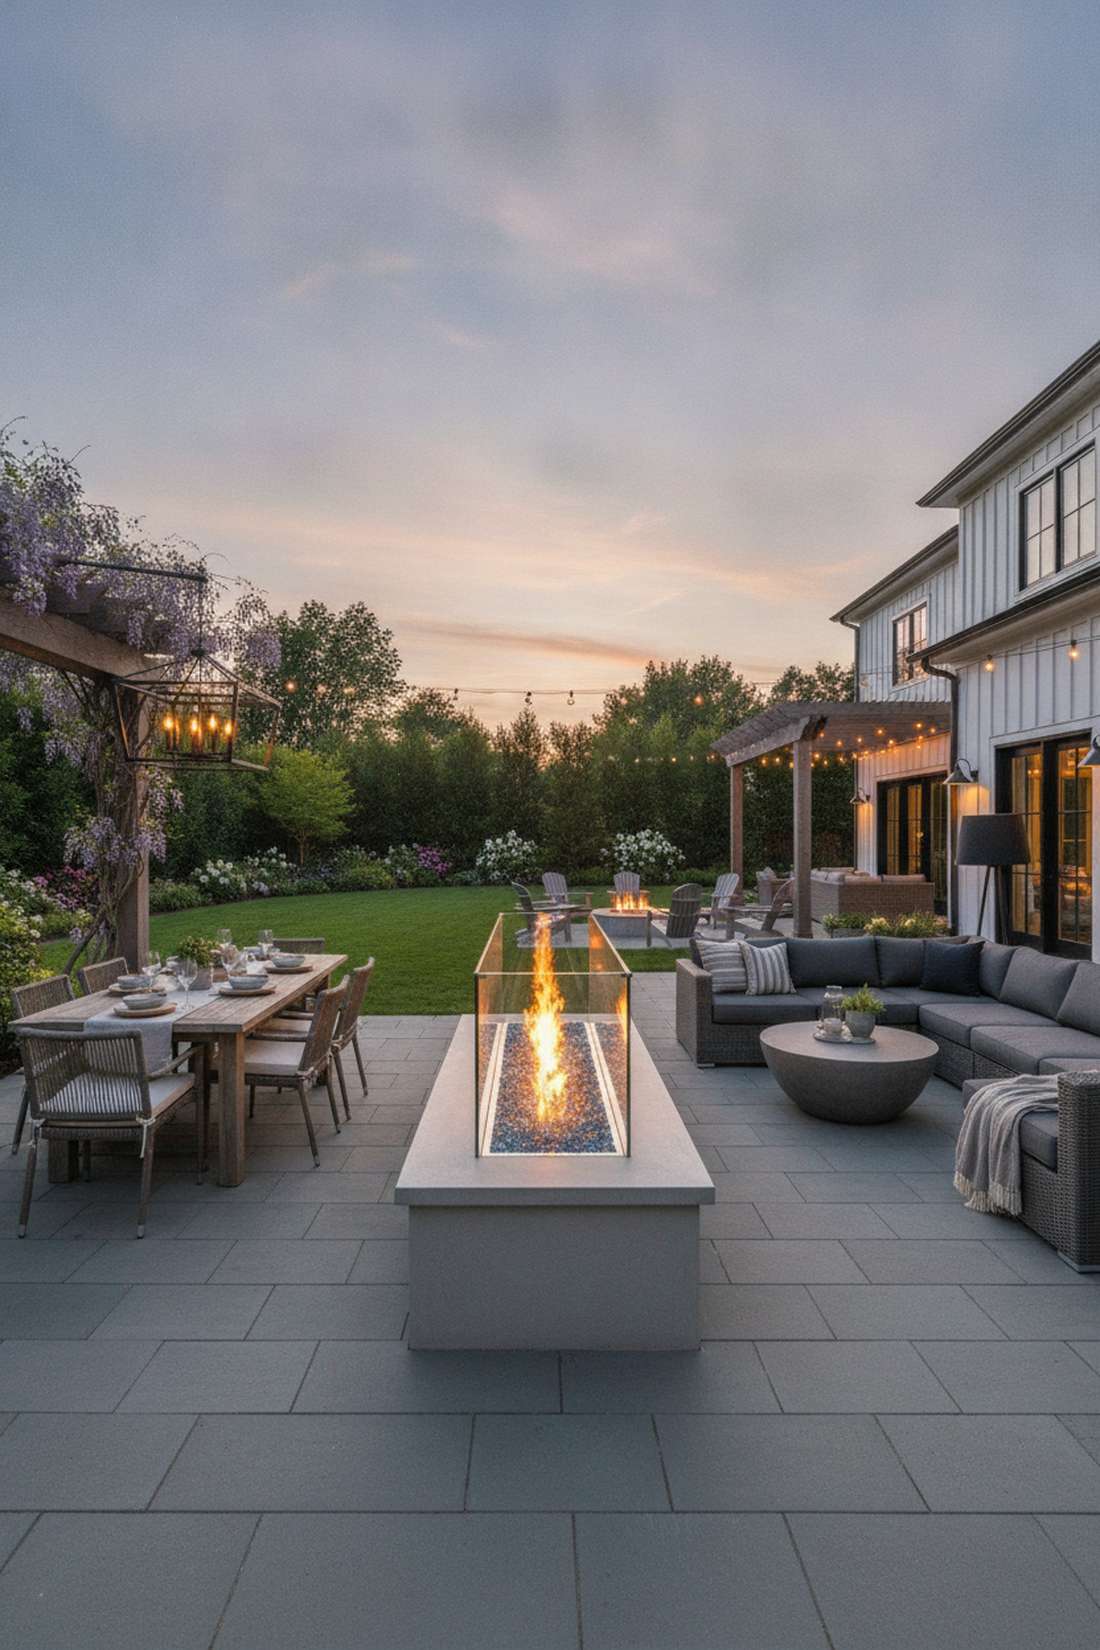
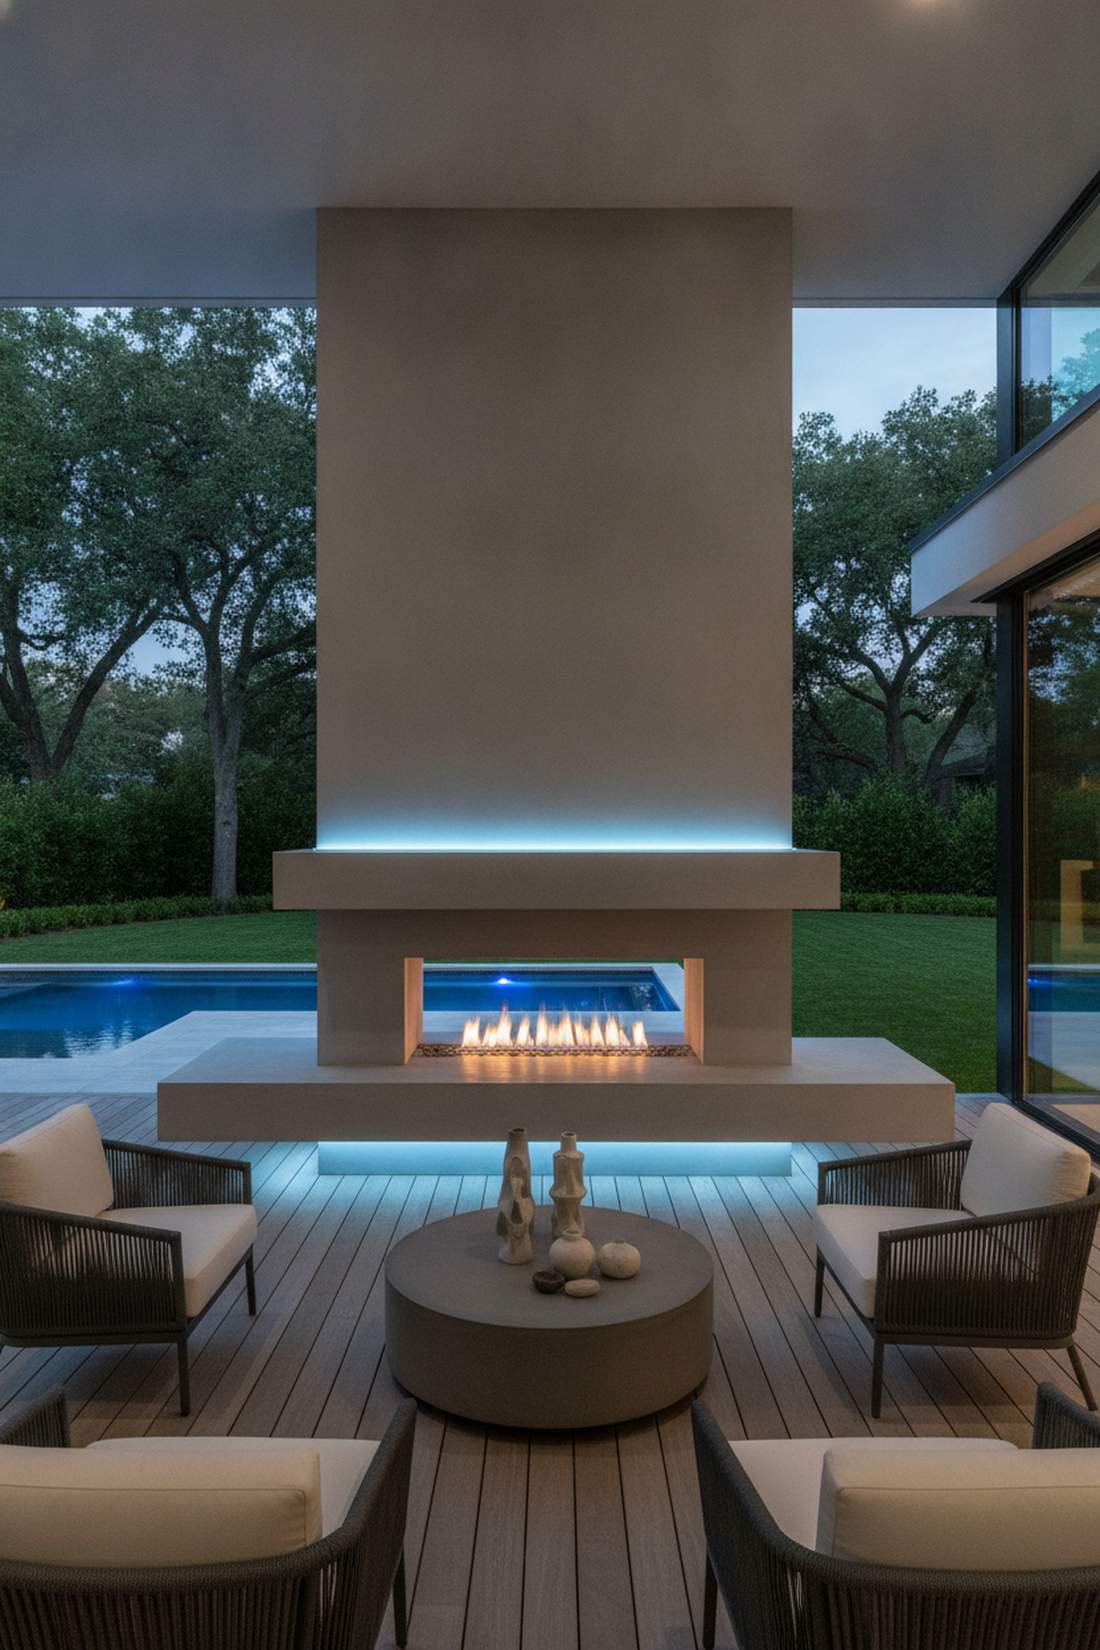
1. Horizontal Linear Fireplace With Smooth Concrete Surround

This modern outdoor seating decor feels like a sleek luxury resort you never want to leave. Works exceptionally well for contemporary patios that need a sharp, defining focal point without visual clutter.
Skip the expensive mason because this layout delivers a surprisingly premium look using drop-in linear gas inserts. By utilizing weather-sealed poured concrete alongside high-efficiency gas burner kits, the clean lines maximize perceived space effortlessly.
You can easily pull this architectural look off for around $800–$1,500 depending on the insert size. Save this to your modern backyard upgrade board!
- Key Materials: Linear drop-in gas burner, rapid-set concrete mix
- Vibe / Style: Ultra-modern minimalist lounge
- Difficulty: Intermediate DIY weekend build
- Budget Breakdown: Gas Insert: $400 | Concrete & Forms: $150.
- Creator’s Tip: Seal the concrete twice to prevent soot stains from accumulating near the flame ribbon.
- Smart Sourcing: stainless steel linear fire pit drop-in pans, UV-resistant concrete sealant (gallon jug).
2. Glass-Enclosed Frameless Fireplace
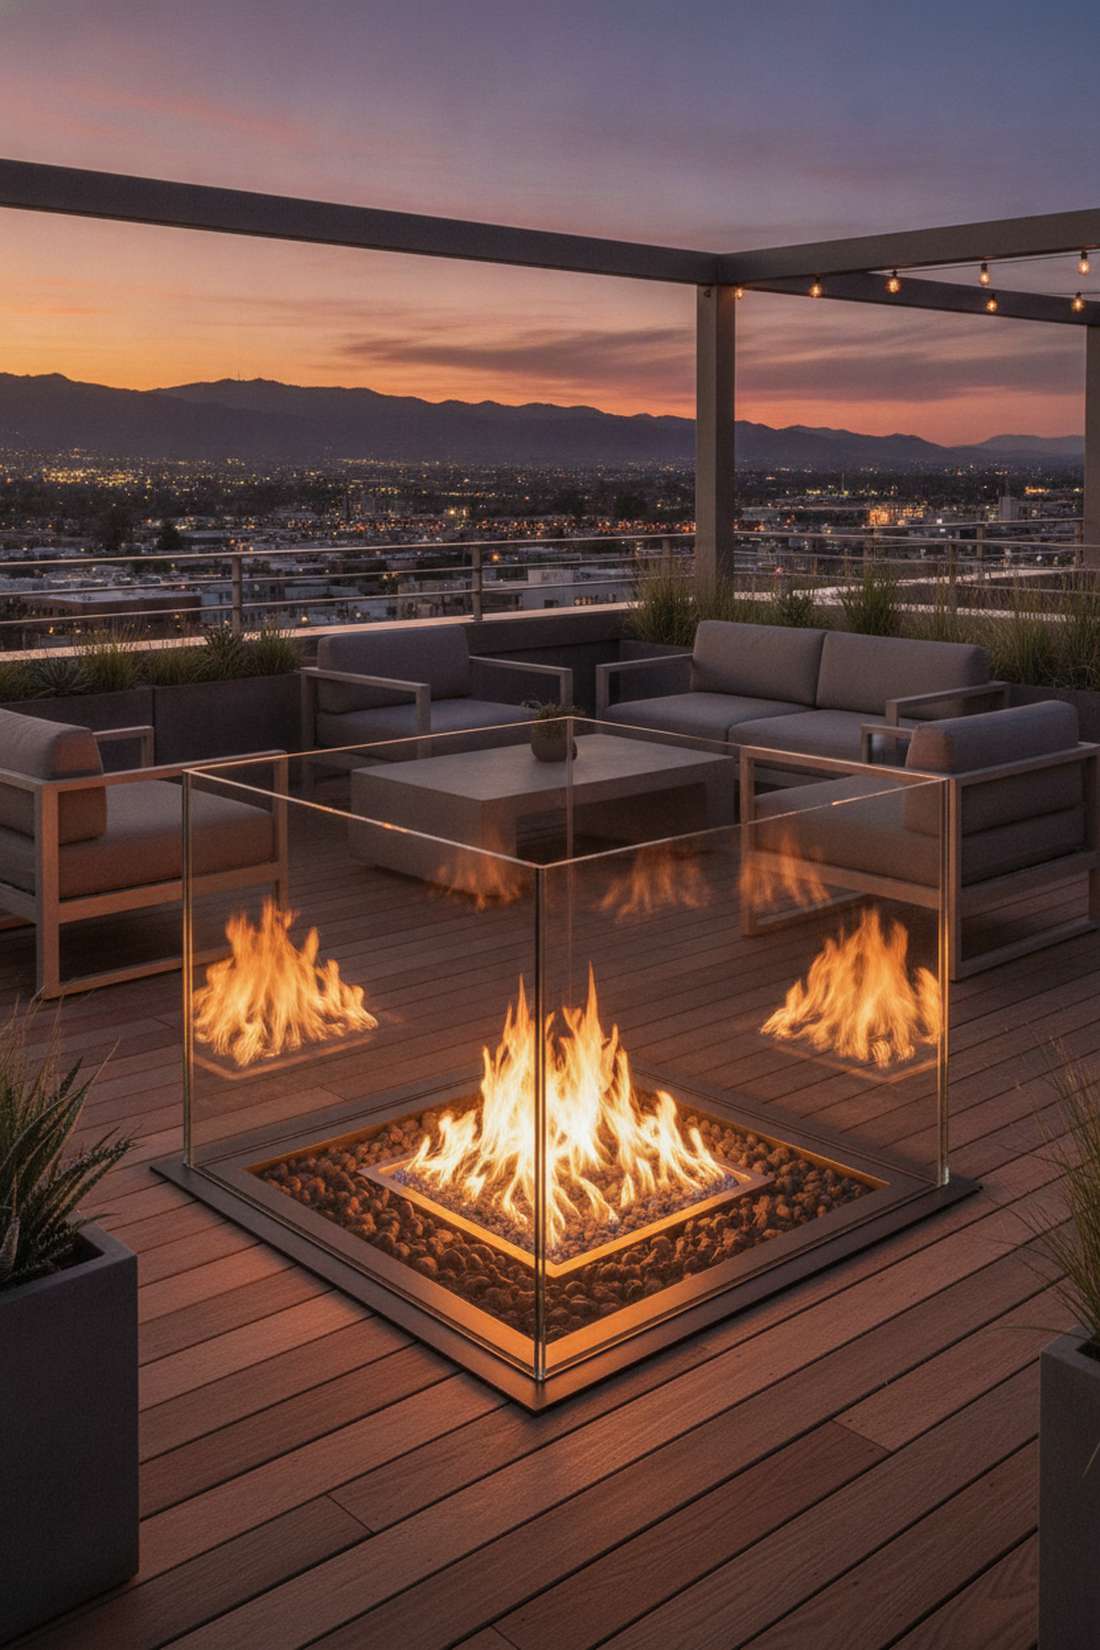
A transparent patio fire feature feels like a magical floating flame right out of a high-end architectural magazine. Perfect for hillside terraces or rooftop decks where you absolutely cannot sacrifice the scenic views.
This approach completely changes the aesthetic, making the entire setup look far more expensive than it is. Integrating tempered glass wind guards over a recessed firebox keeps the wind out while letting the ambiance shine uninterrupted.
Expect to spend about $300–$600 for quality glass and mounting hardware. It is a fast upgrade that completely changes the vibe.
- Key Materials: Heat-resistant tempered glass panels, aluminum base track
- Vibe / Style: Airy, unobstructed luxury
- Difficulty: Easy glass mounting setup
- Budget Breakdown: Glass Panels: $250 | Base Track/Hardware: $80.
- Creator’s Tip: Clean the glass with a specialized soot-repellent spray to maintain crystal clarity year-round.
- Smart Sourcing: tempered glass wind guard kits, heavy-duty aluminum mounting brackets.
3. Black Steel Fire Ribbon Wall
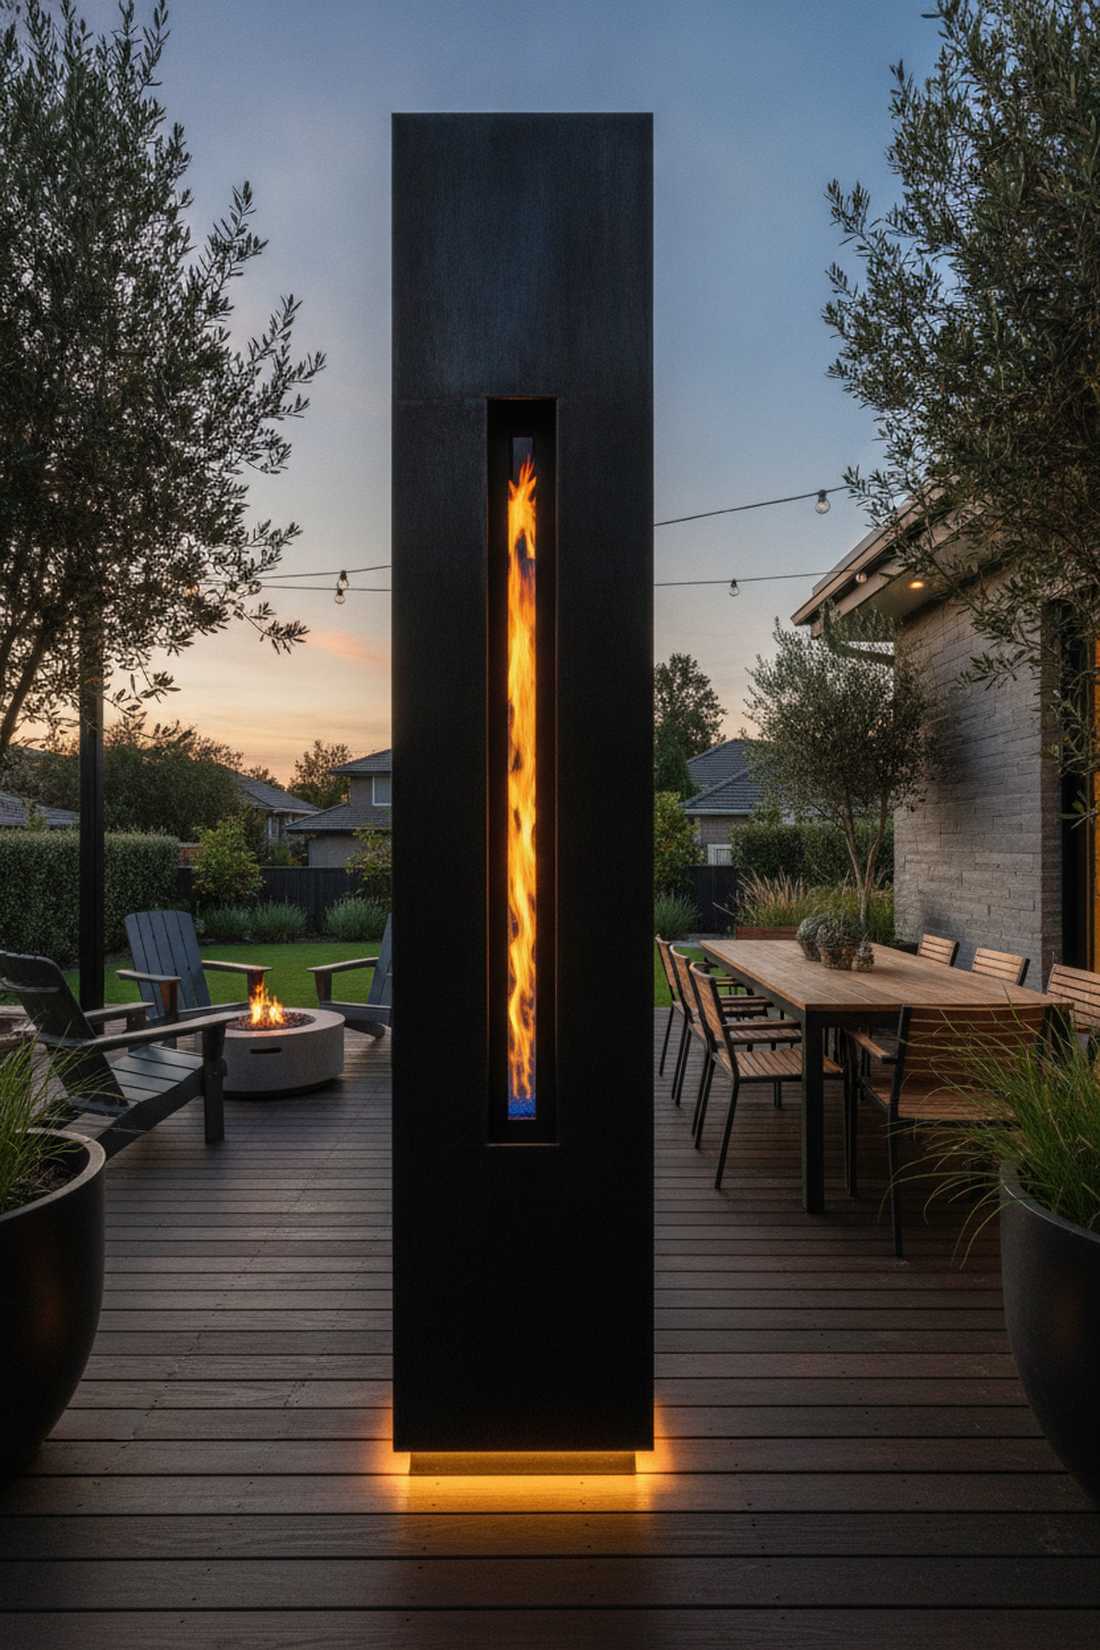
This industrial narrow patio fireplace feels like a chic downtown rooftop lounge. Ideally suited for tight side yards or as an edgy room divider between dining and conversational zones.
Most standard fireplaces eat up too much space, but this vertical orientation gives a designer-level finish while saving square footage. Incorporating raw steel sheets treated with high-heat rust inhibitors turns a functional flame into a striking art piece.
This bold metal setup typically runs between $400 and $900. Pin this if you are planning a small space upgrade with serious edge.
- Key Materials: Corten or cold-rolled steel panels, vertical burner tube
- Vibe / Style: Moody industrial chic
- Difficulty: Advanced metalworking/assembly
- Budget Breakdown: Steel Panels: $300 | Burner Kit: $150.
- Creator’s Tip: Add an LED strip at the bottom of the steel frame to make the metal texture pop when the fire is off.
- Smart Sourcing: high-heat matte black rust block spray, continuous flame gas burner strips.
4. Minimalist Concrete Block Fireplace With Floating Bench
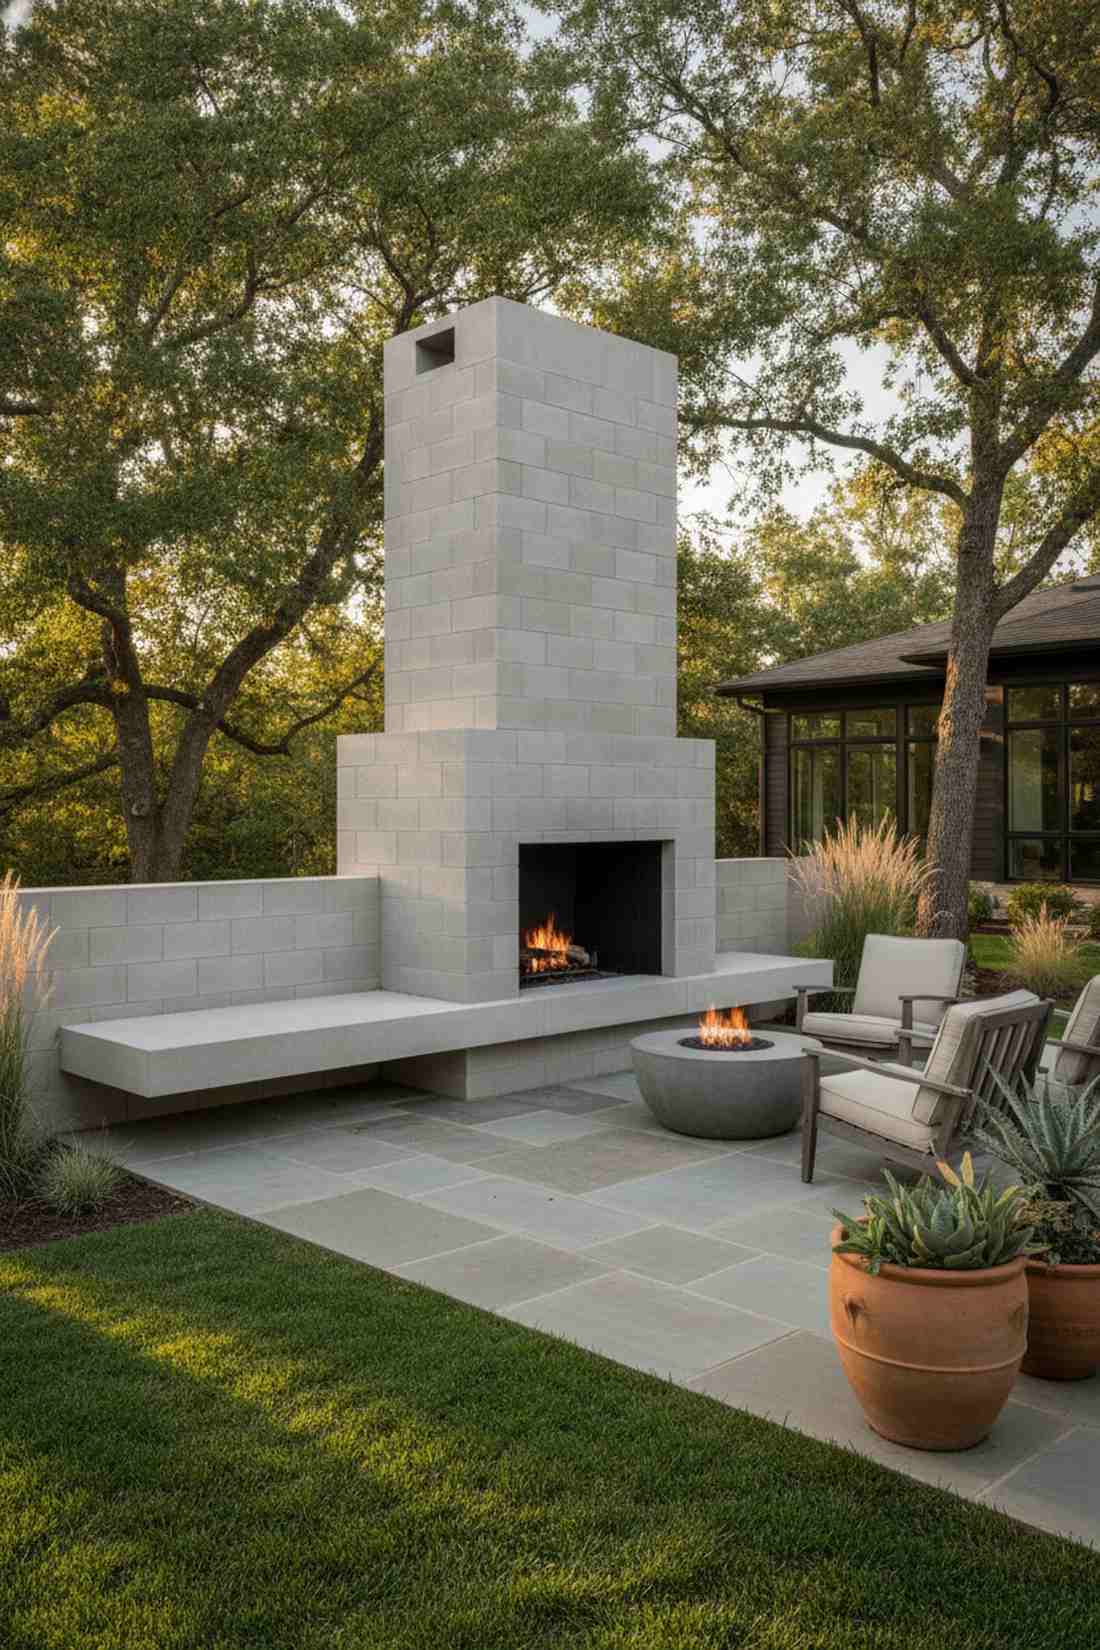
A geometric concrete patio anchor feels like a modern sculpture that just happens to keep you warm. Works brilliantly as a windbreak and seating combo for exposed, breezy backyard corners.
You can achieve a monolithic, high-end resort vibe without custom pouring by utilizing smooth-faced cinder blocks. Hiding structural masonry adhesives and capstones within the build makes it incredibly sturdy and visually seamless.
You can execute this block build for roughly $200–$400 in materials. Highly recommended for a satisfying weekend masonry win.
- Key Materials: Smooth concrete blocks, landscape block adhesive
- Vibe / Style: Brutalist yet cozy contemporary
- Difficulty: Beginner-friendly stacking
- Budget Breakdown: Concrete Blocks: $120 | Adhesive & Capstones: $90.
- Creator’s Tip: Paint the interior firebox with specialized high-heat black paint to hide soot and add depth.
- Smart Sourcing: commercial-grade masonry adhesive (bulk pack), high-temperature flat black firebox paint.
Most people get their outdoor layouts completely wrong… until they try the exact layout coming up next. It instantly doubles the usability of any patio.
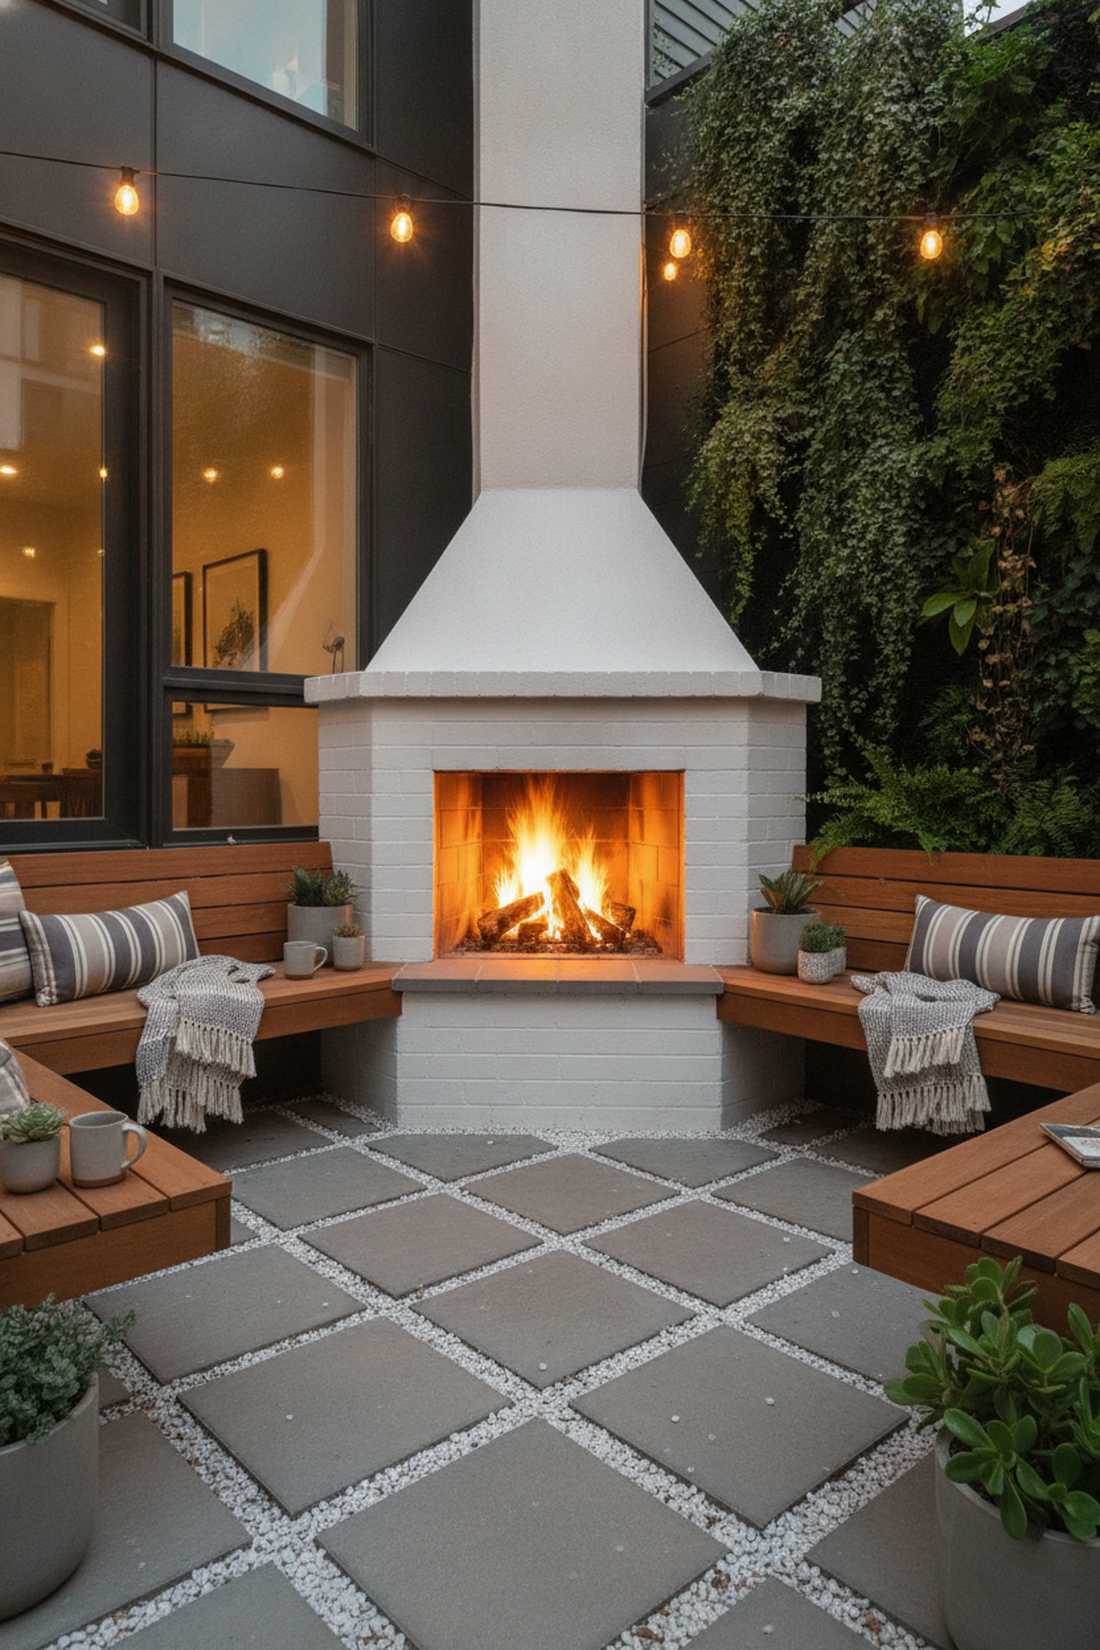
5. White Stucco Fireplace With Integrated Wood Storage
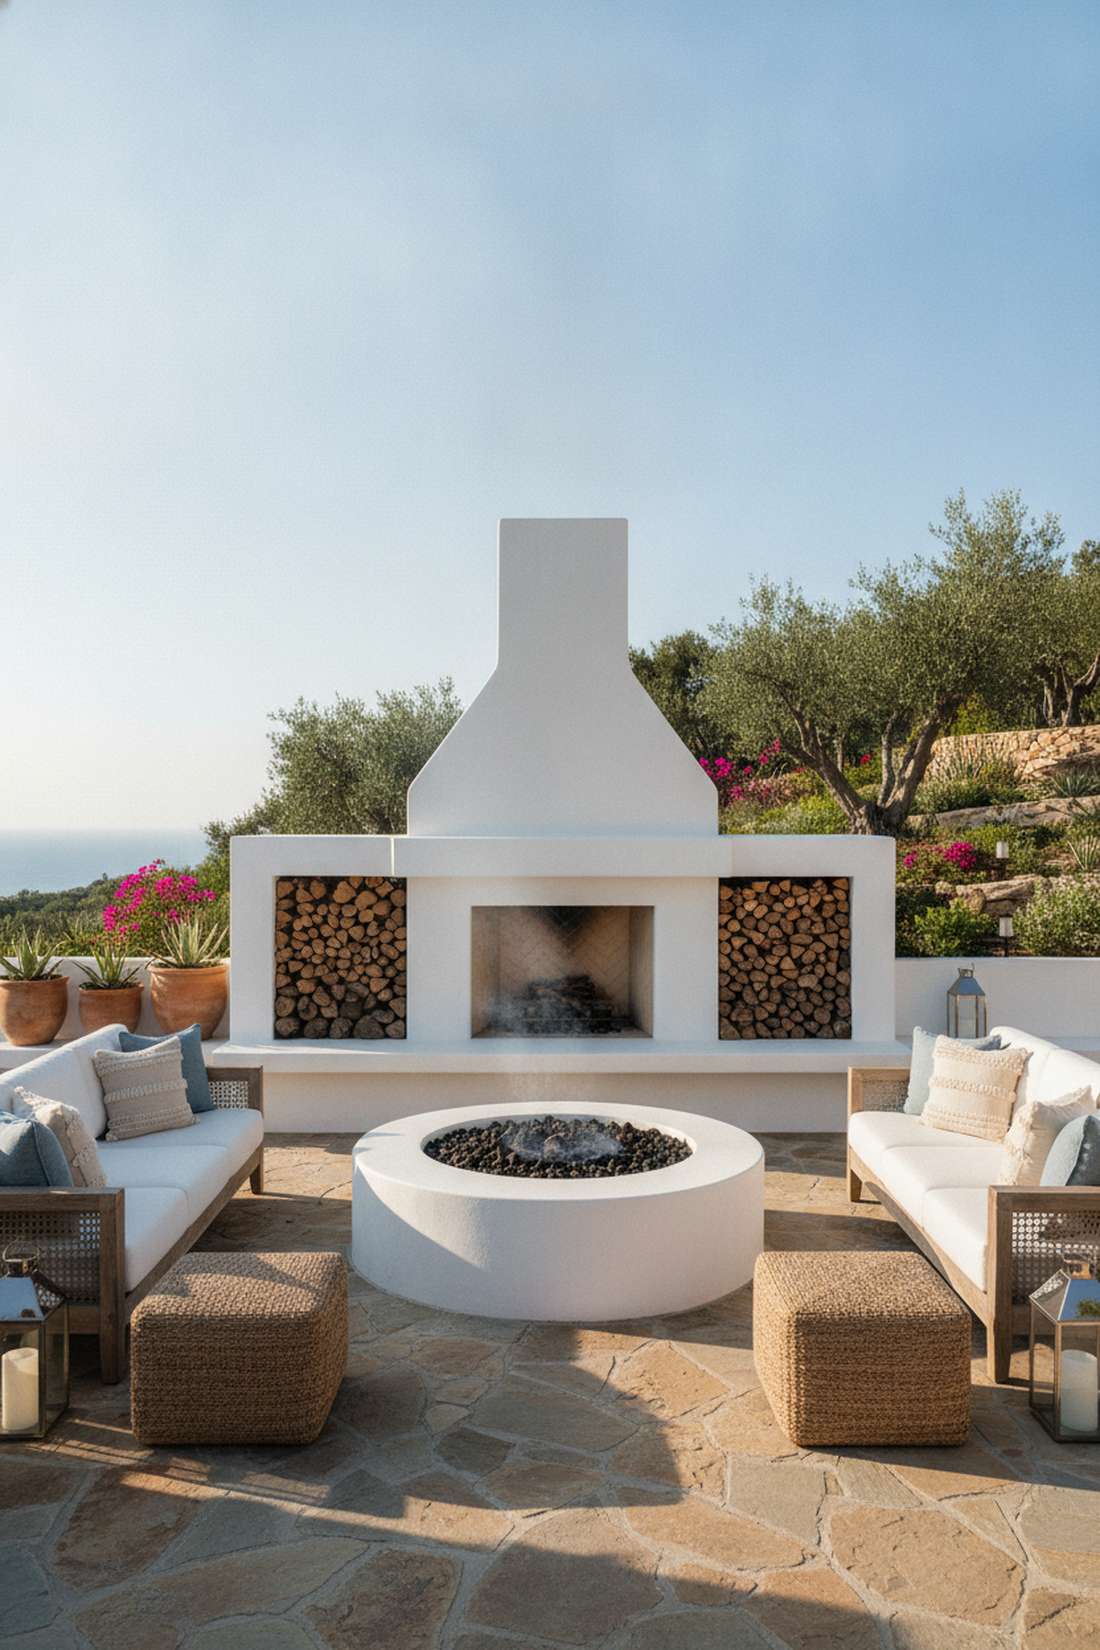
This Mediterranean inspired outdoor hearth feels like a sunny retreat on the coast of Greece. The ultimate solution for breaking up dark landscaping while keeping your firewood beautifully organized and bone-dry.
Combining raw wood textures against stark white walls is a foolproof formula that looks shockingly custom. Applying a waterproof stucco mix over a basic cinder block frame ensures the brilliant white finish survives harsh weather without crumbling.
Budget around $350–$600 to complete the block and stucco work. Save this to your dream patio mood board!
- Key Materials: Scratch coat mortar, white outdoor stucco finish
- Vibe / Style: Clean, organic coastal modern
- Difficulty: Intermediate plastering
- Budget Breakdown: Stucco Supplies: $150 | Base Blocks: $100.
- Creator’s Tip: Use a sponge float during the final stucco layer to create a soft, uniform texture that hides imperfections.
- Smart Sourcing: pre-mixed white acrylic stucco (5-gallon bucket), heavy-duty steel masonry trowel sets.
Rustic Stone and Brick Fireplaces
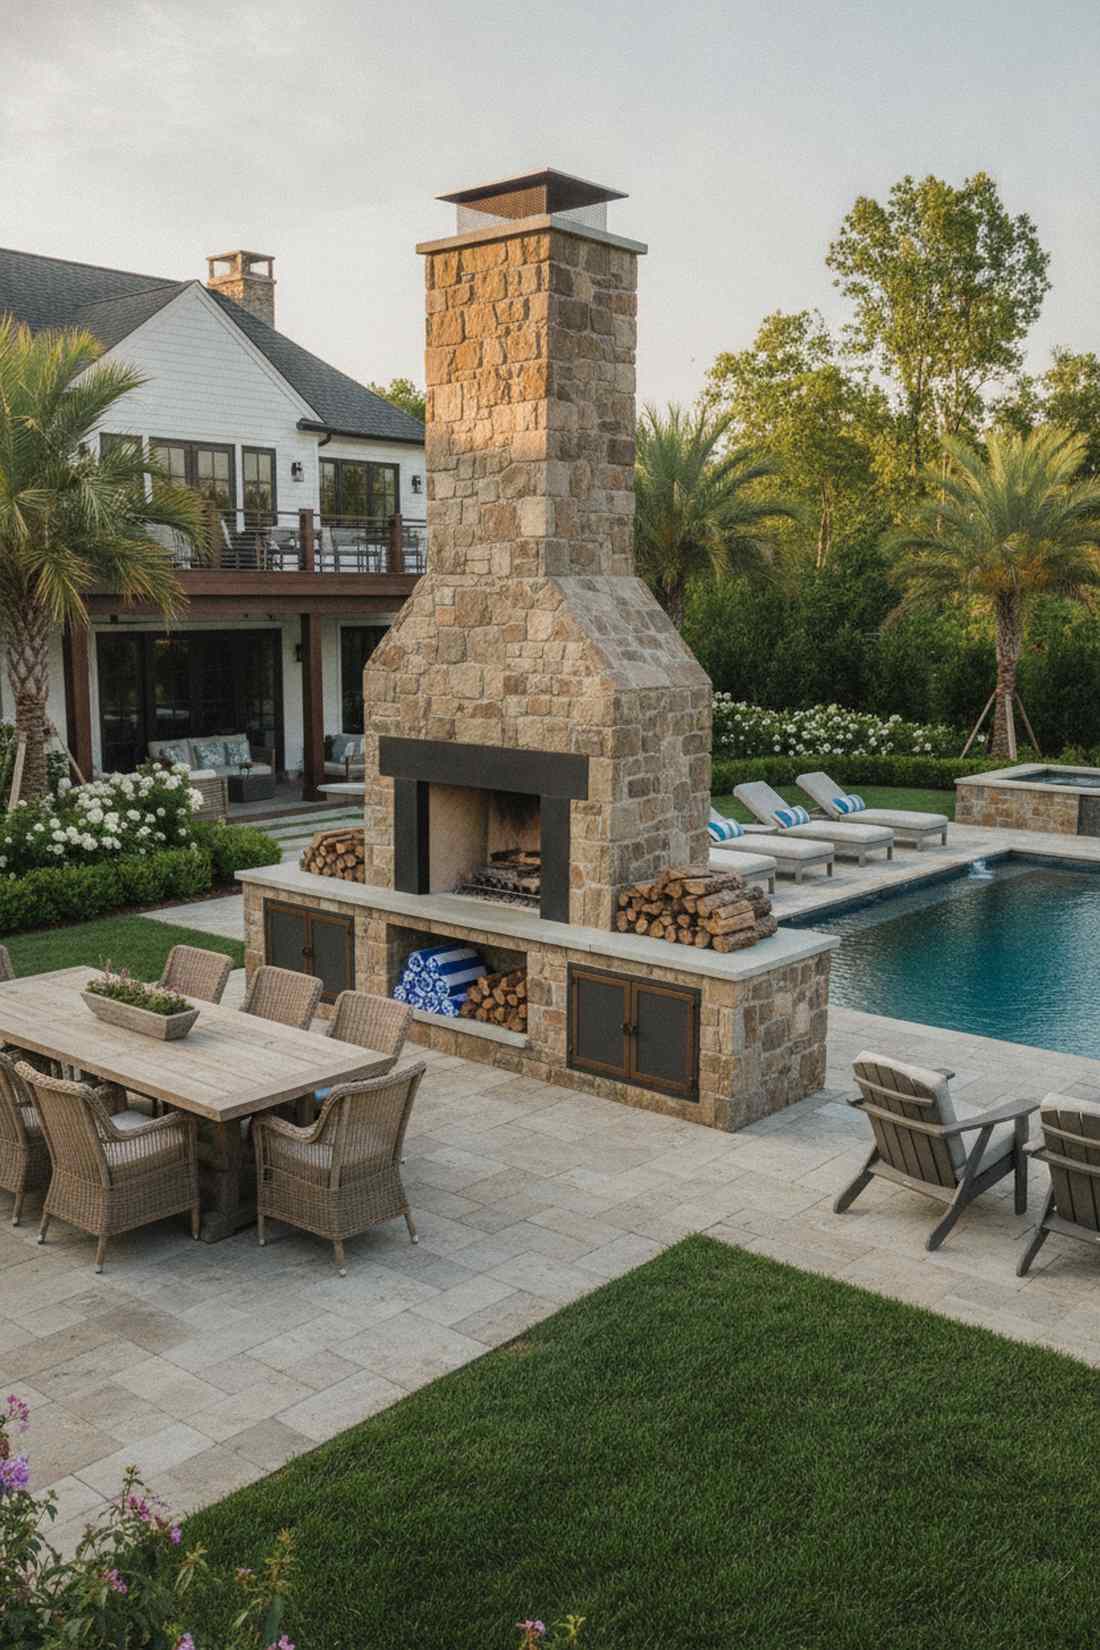
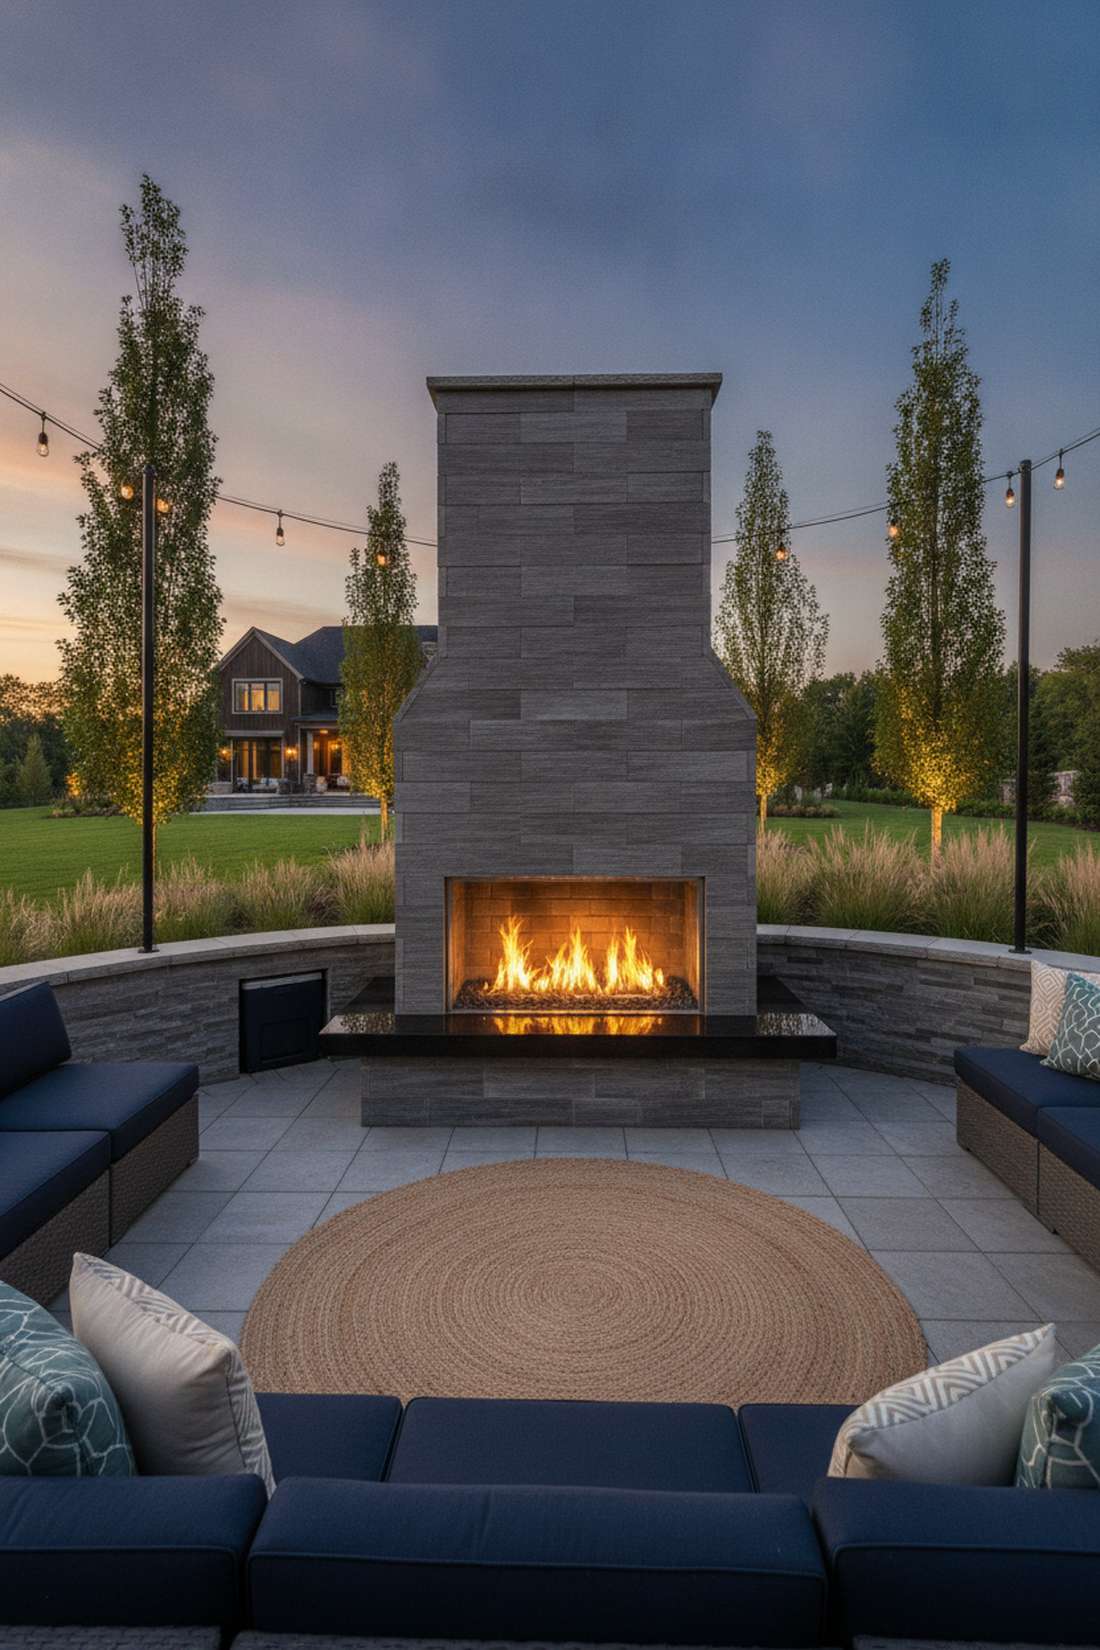
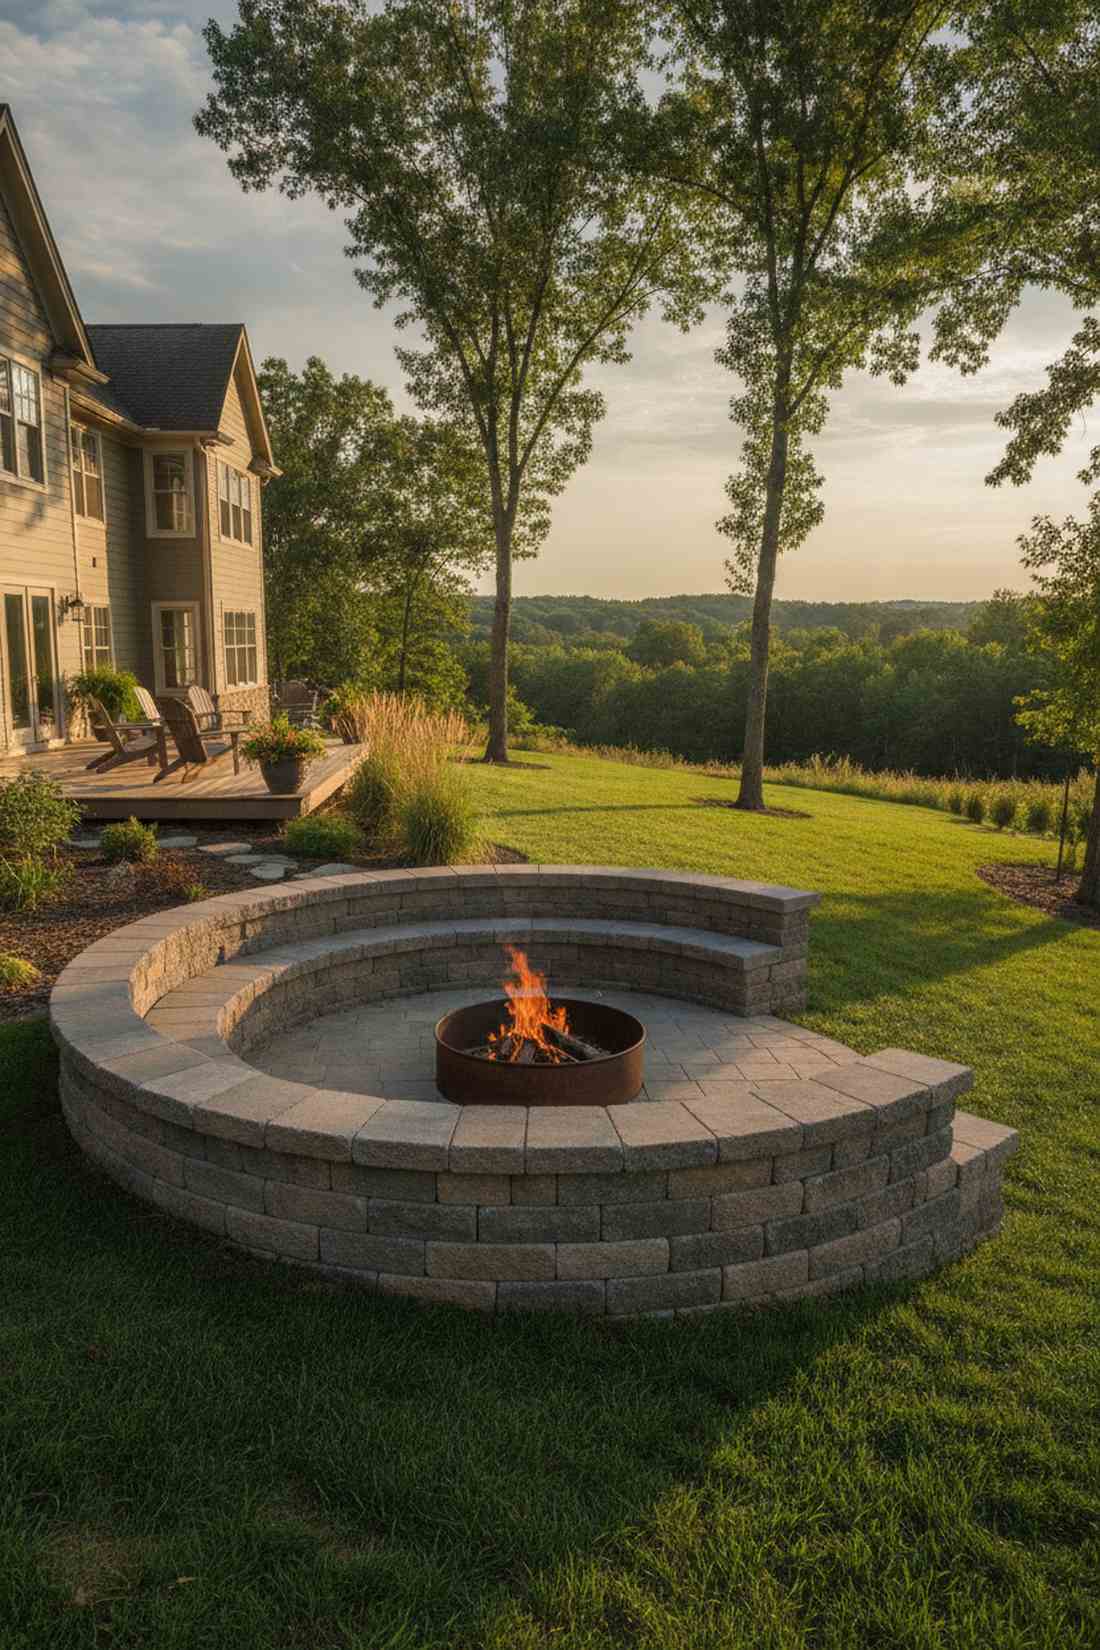
6. Stacked Stone Veneer Fireplace With Chimney
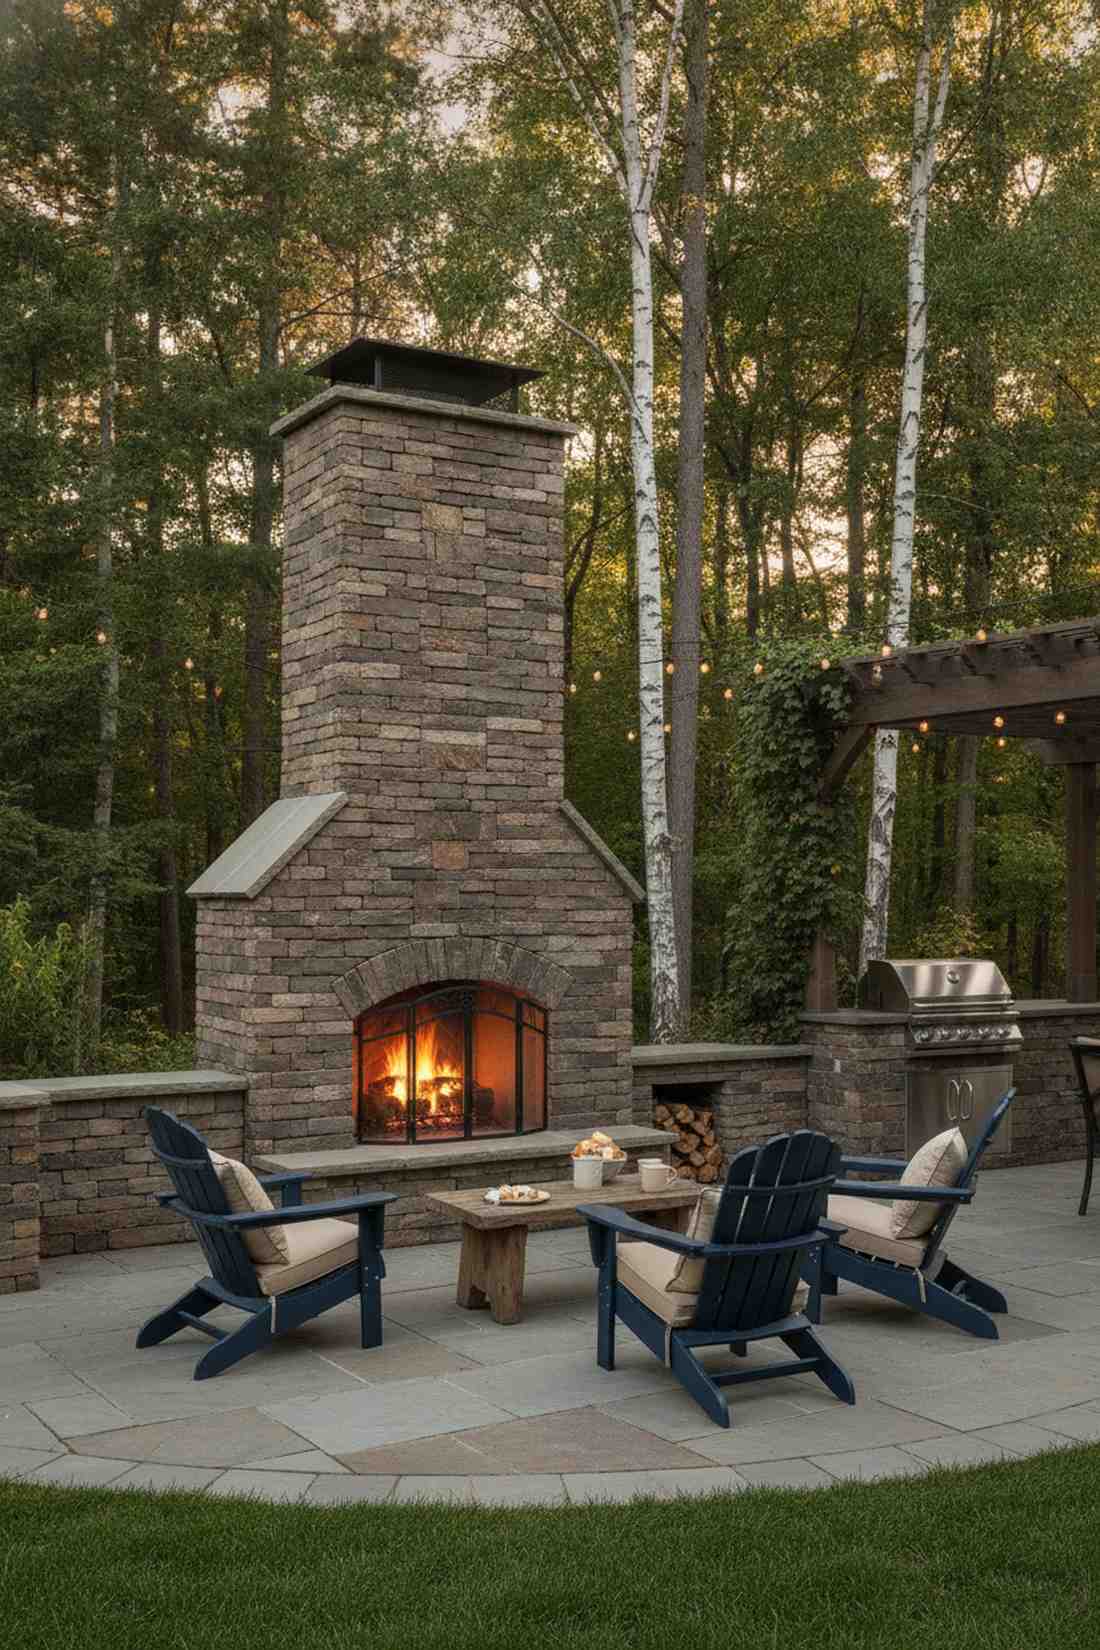
This traditional backyard stone chimney feels like a cozy mountain cabin right in your own garden. Perfect for anchoring large suburban patios and directing annoying smoke high above your guests’ heads.
Real masonry is expensive, but using panelized stone creates an identical rustic aesthetic at a fraction of the weight and cost. Wrapping a basic frame with pre-cut stacked stone veneer kits ensures a flawless, gap-free facade.
Expect to spend around $600–$1,200 depending on the chimney height. Pin this if you love timeless, rugged architecture.
- Key Materials: Panelized stone veneer, high-heat refractory mortar
- Vibe / Style: Classic woodland lodge
- Difficulty: Intermediate DIY tiling
- Budget Breakdown: Veneer Panels: $500 | Refractory Cement & Backer: $150.
- Creator’s Tip: Stagger the veneer panel joints like stair steps so the seams disappear completely into the texture.
- Smart Sourcing: pre-cut stacked stone veneer kits, heat-resistant refractory cement (bulk bucket).
7. Reclaimed Brick Fireplace With Arched Firebox
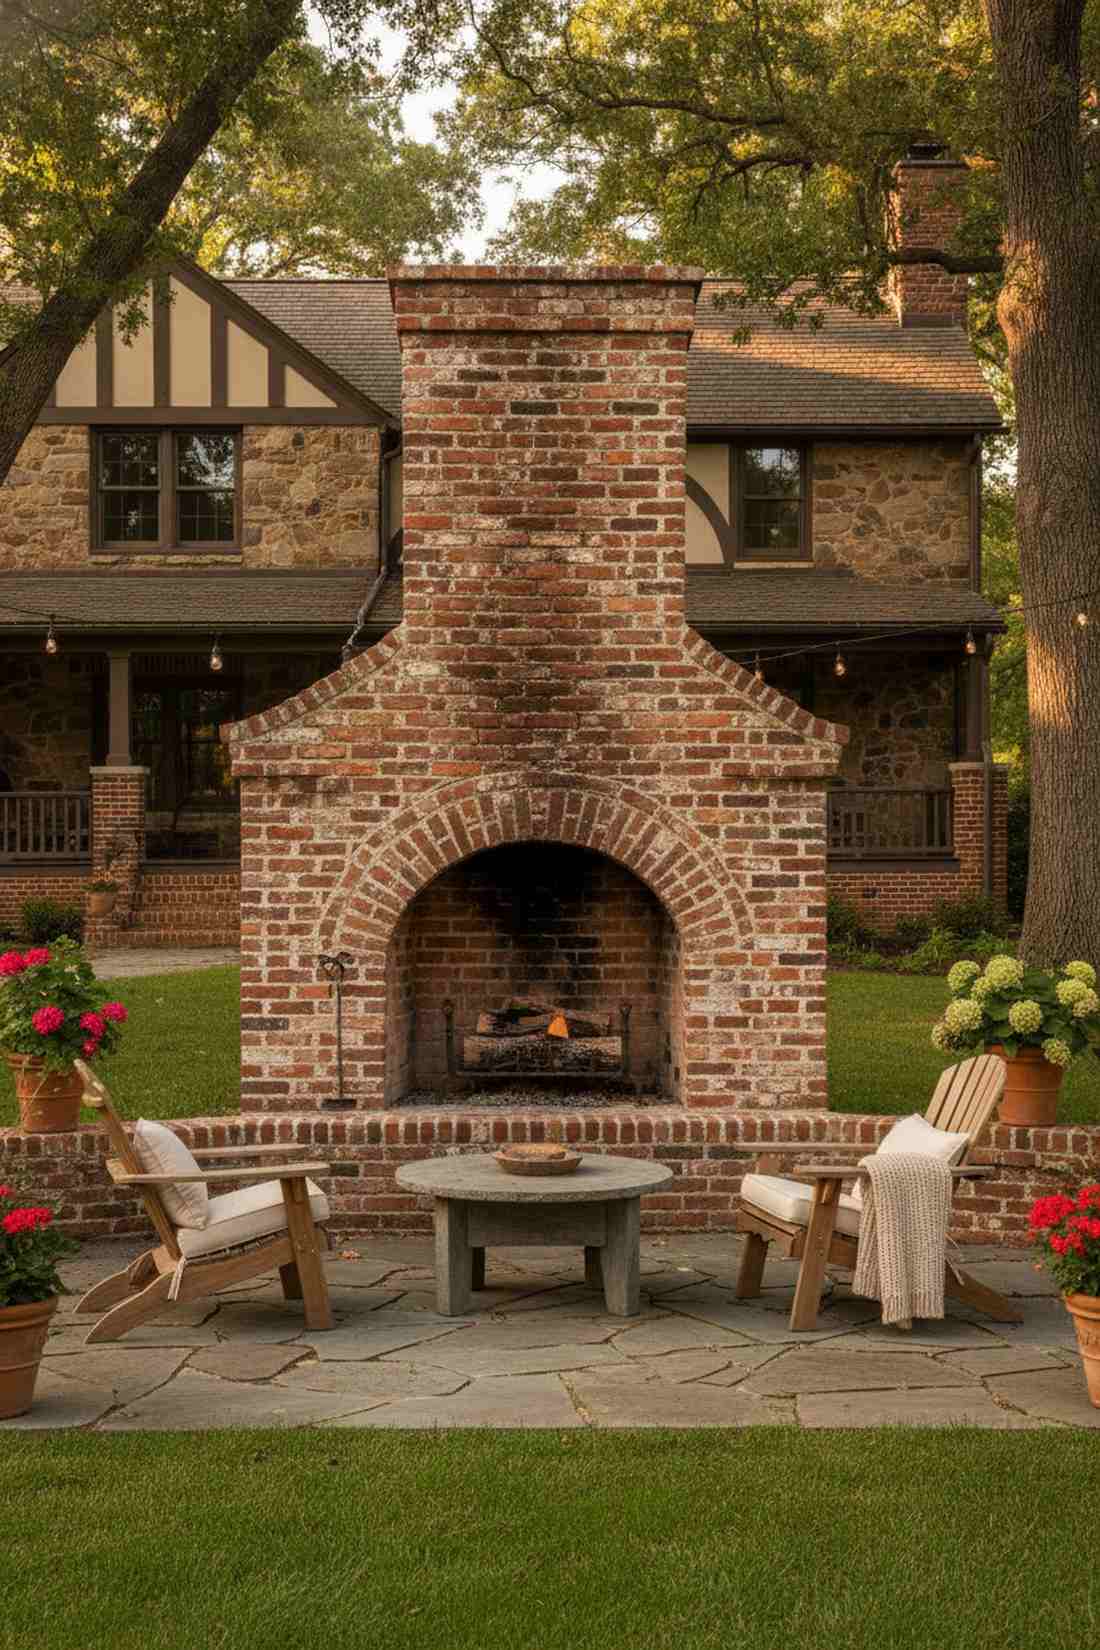
A vintage brick outdoor fireplace feels like a historic courtyard you accidentally stumbled into. Excellent for properties with older homes looking to seamlessly extend their historical charm outdoors.
You can bypass the generic big-box store look entirely by sourcing salvaged bricks for your build. Crafting a simple plywood arch template allows you to achieve that highly sought-after architectural curve without needing decades of masonry experience.
This nostalgic project usually costs around $400–$800. It is a weekend endeavor that adds massive property value.
- Key Materials: Reclaimed brick pallets, traditional masonry mortar
- Vibe / Style: Old-world nostalgic charm
- Difficulty: Advanced bricklaying
- Budget Breakdown: Salvaged Bricks: $300 | Mortar/Tools: $100.
- Creator’s Tip: Soak the reclaimed bricks in water before laying them so they don’t suck the moisture out of your fresh mortar too quickly.
- Smart Sourcing: masonry arch template forms, commercial-grade brick jointer tools.
8. Limestone and Granite Contemporary Stone Fireplace
This smooth cut stone patio hearth feels like a luxurious VIP lounge at a five-star hotel. Fits beautifully into transitional backyard designs that want natural stone without the overly rugged, bumpy texture.
This layout effortlessly bridges the gap between modern and traditional, delivering a premium look without the fuss. Securing a thick granite slab as a capstone acts as a natural spark arrestor while elevating the entire structure’s elegance.
You can source these materials for roughly $800–$1,500. Save this for your high-end landscape inspiration!
- Key Materials: Cut limestone blocks, custom granite capstone
- Vibe / Style: Refined transitional elegance
- Difficulty: Intermediate structural assembly
- Budget Breakdown: Limestone Blocks: $600 | Granite Cap: $250.
- Creator’s Tip: Seal the porous limestone immediately after construction to prevent irreversible staining from stray soot or red wine spills.
- Smart Sourcing: heavy-duty natural stone penetrating sealer, diamond blade masonry saw attachments.
9. River Rock Fireplace With Boulder Accents
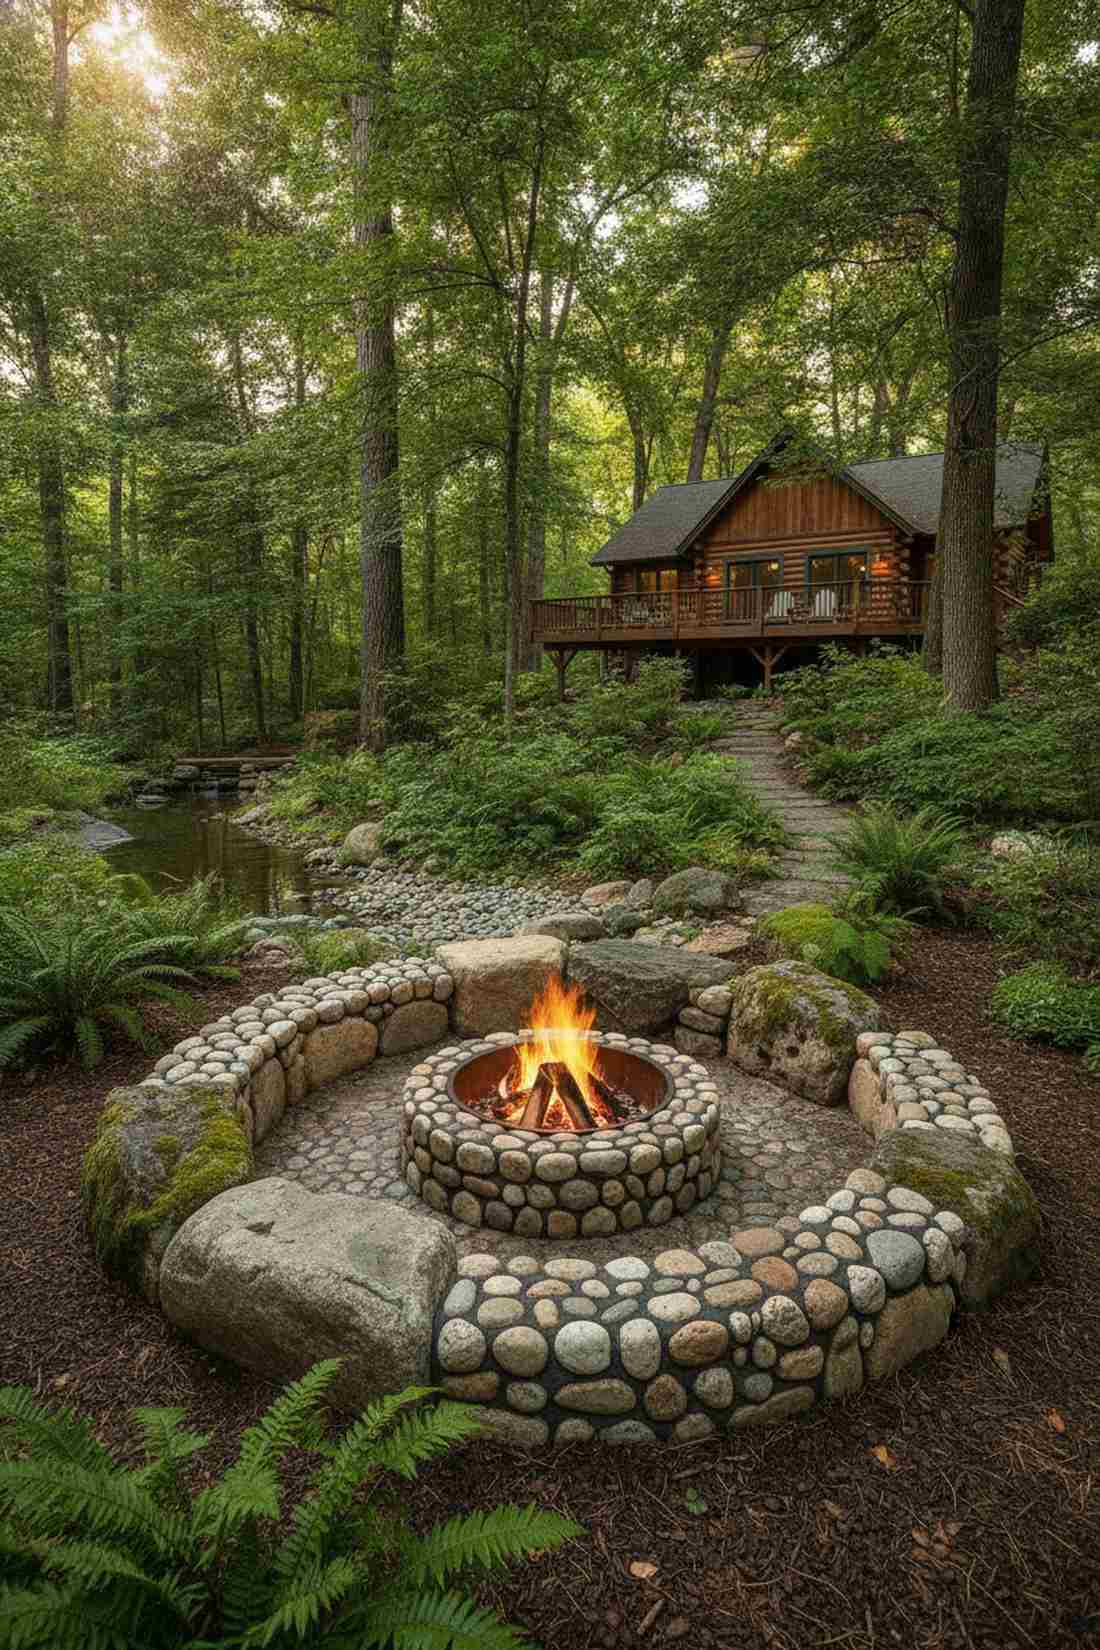
A natural woodland fire feature feels right out of a storybook enchanted forest. Absolutely incredible for waterside properties, cabins, or lush gardens needing organic textures to match the surrounding flora.
Don’t settle for blocky corners when this rounded, organic approach looks infinitely more natural and inviting. Incorporating large landscaping boulders into the base of the river rock surround provides beautiful, informal perch seating for guests.
This earthy setup usually runs between $350 and $700. Pin this to your cozy outdoor oasis board.
- Key Materials: Assorted river rocks, landscape accent boulders
- Vibe / Style: Organic, earthy woodland
- Difficulty: Advanced mortar shaping
- Budget Breakdown: River Rock: $200 | Boulders & Mortar: $150.
- Creator’s Tip: Mix a darker pigment into your mortar so it recedes visually, letting the smooth, colorful stones take center stage.
- Smart Sourcing: bagged assorted river pebbles (bulk pack), liquid masonry mortar dye.
💡 Must-Have Supplies for High-End Setups
To build these setups faster and ensure they last, skip the generic craft aisles and invest in the right foundational kits.
- Base & Support: heavy-duty galvanized steel fireplace frame kits
- Setup Tools: professional masonry trowel starter kits
- Weather/Durability Protection: UV-coated clear masonry waterproofing sealants
10. Mixed Material Brick and Stone Combination

This layered textured patio fireplace feels like a beautifully aged English countryside estate. Perfect for tying together existing brick retaining walls with new stone patio pavers.
Why choose one material when blending them gives a designer-level finish packed with visual depth? Using fire-rated firebox brick for the extreme heat zones and rough stone for the cooler exterior ensures safety without compromising style.
This hybrid build typically costs around $500–$900. It is a fantastic way to utilize leftover hardscaping materials!
- Key Materials: Fireclay bricks, natural stone veneer chunks
- Vibe / Style: Rustic English cottage
- Difficulty: Intermediate multi-material masonry
- Budget Breakdown: Fire Brick: $180 | Stone & Mortar: $220.
- Creator’s Tip: Use a chunky, over-grouted mortar technique on the stone to emphasize the old-world cottage aesthetic.
- Smart Sourcing: high-temp fireclay bricks (bulk pack), pre-mixed Type S structural mortar.
This next setup completely ignores traditional building rules and delivers a ridiculously cheap but custom-looking display…
11. Dry-Stacked Stone Fireplace Without Mortar
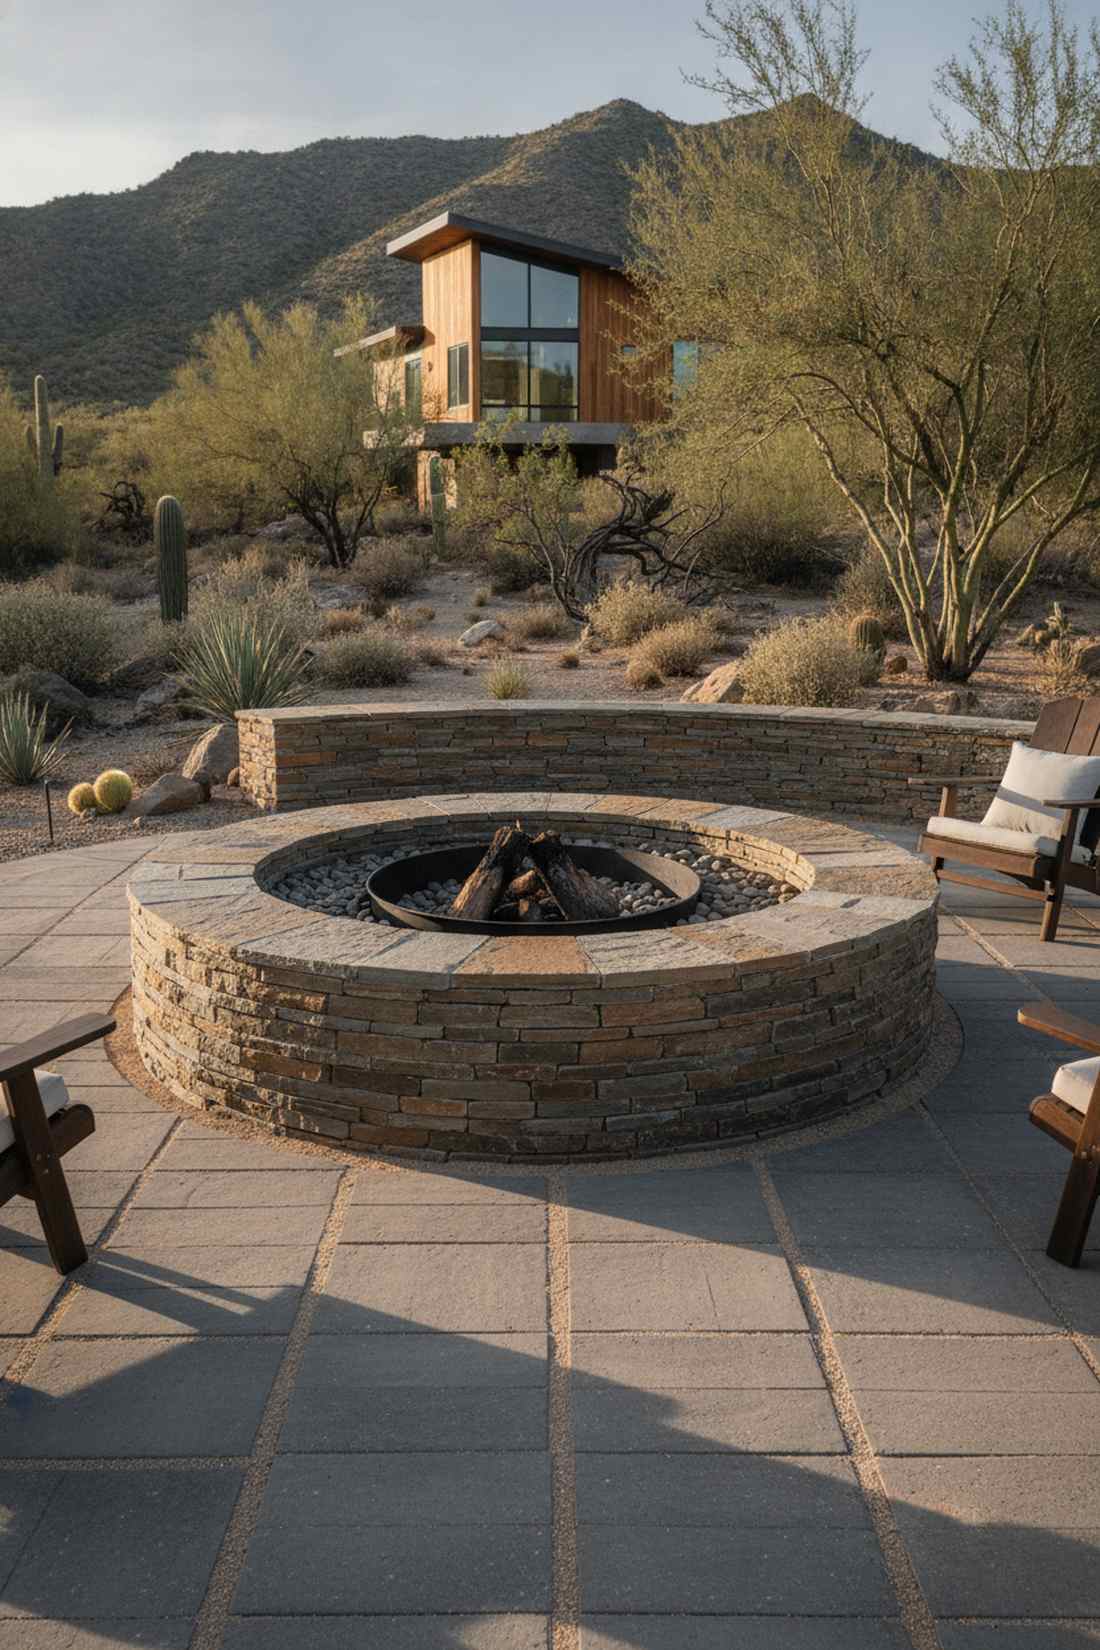
A mortarless landscape fire pit feels like an ancient, zen-like garden retreat. Ideal for desert landscapes or contemporary mountain properties where raw, horizontal lines rule the design.
You can entirely skip the messy cement mixing with this layout that relies on gravity and precision. Selecting extremely flat, uniform flagstone pieces allows you to stack a stable, stunning surround that drains water perfectly.
Expect to invest about $250–$500 mostly in high-quality stone. Save this if you want a striking fireplace without dealing with mortar.
- Key Materials: Flat palletized flagstone, steel inner fire ring
- Vibe / Style: Raw, architectural zen
- Difficulty: Patient puzzle-piece stacking
- Budget Breakdown: Flat Stone: $300 | Inner Steel Ring: $80.
- Creator’s Tip: Always use a heavy-duty steel fire ring in the center so the extreme heat doesn’t cause your dry-stacked stones to crack and shift.
- Smart Sourcing: heavy-duty steel fire pit rim inserts, polymeric landscape stone leveling sand.
Covered Patio Fireplace Layouts
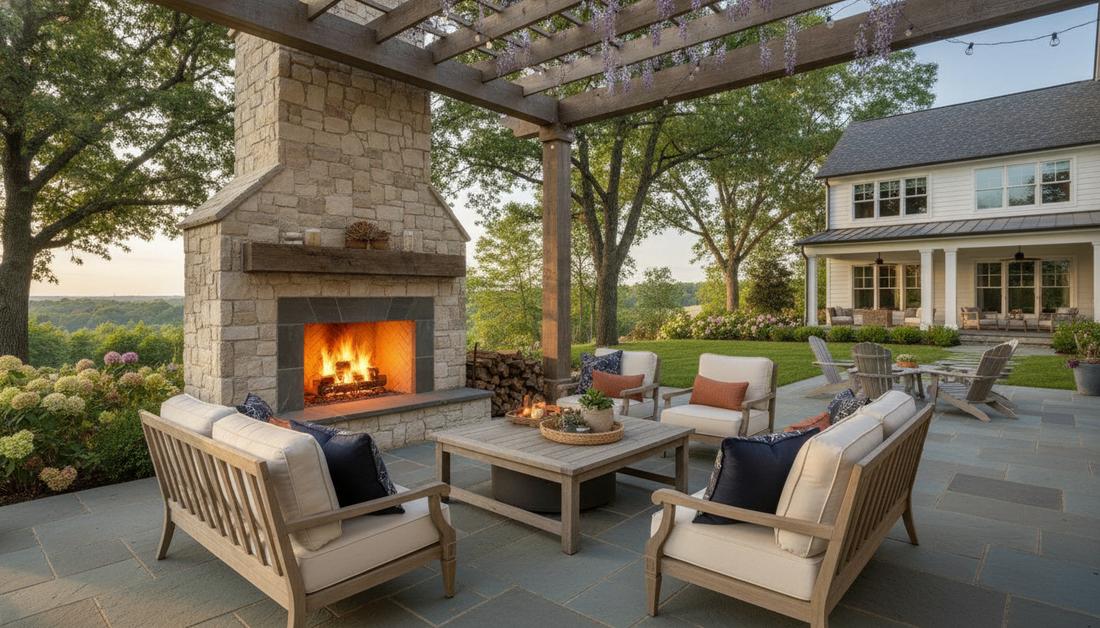
12. Fireplace Under Timber Frame Pergola
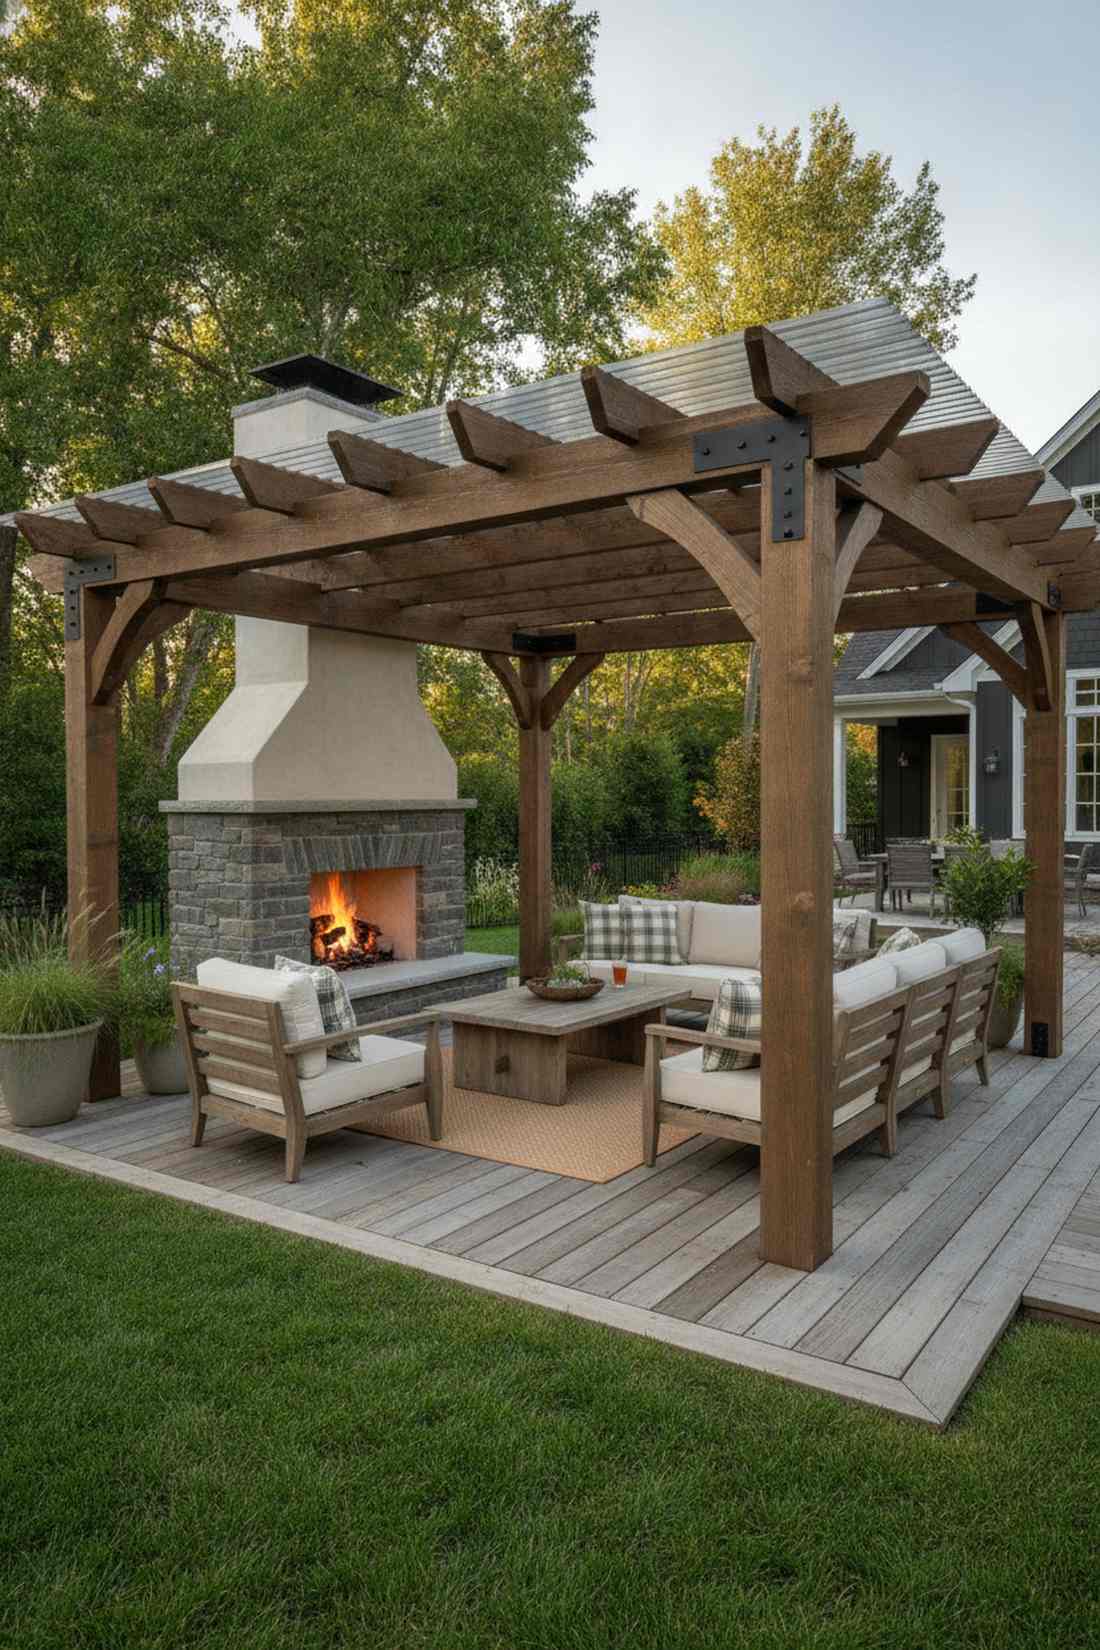
This sheltered wooden patio lounge feels like a secluded VIP cabana in the woods. Works beautifully for creating a true “outdoor room” that protects your family from harsh sun and light drizzle.
Pairing heavy timber framing with a solid fireplace delivers a surprisingly premium look that anchors the yard. Installing the firebox perpendicular to prevailing winds ensures your pergola doesn’t turn into a smoke trap during breezy evenings.
The fireplace portion usually costs $500–$1,000. Pin this to your ultimate backyard renovation board!
- Key Materials: Heavy cedar timber, stucco or stone base
- Vibe / Style: Rugged, sheltered luxury
- Difficulty: Advanced carpentry and masonry
- Budget Breakdown: Timber Framing: $400 | Fireplace Structure: $450.
- Creator’s Tip: Extend the chimney flue at least two feet above the highest pergola beam to guarantee proper upward draft.
- Smart Sourcing: galvanized pergola bracket hardware kits, weatherproof outdoor timber stain.
13. Enclosed Three-Season Room With Corner Fireplace

A cozy sunroom corner fire feature feels like a warm winter sanctuary wrapped in glass. The perfect solution for regions with brutal winters where you want to enjoy nature without freezing.
Tucking the unit into the corner saves massive amounts of floor space while looking far more expensive than a standard wall placement. Utilizing electric fireplace inserts eliminates the need for complex roof venting while providing localized, adjustable heat.
This smart indoor-outdoor hack runs around $300–$700. Highly recommended for making small enclosed patios usable year-round.
- Key Materials: Electric fireplace insert, corner framing lumber
- Vibe / Style: Intimate, all-weather comfort
- Difficulty: Beginner-friendly framing
- Budget Breakdown: Electric Insert: $350 | Lumber & Trim: $100.
- Creator’s Tip: Build a hollow mantel above the unit to completely hide all electrical cords and power strips.
- Smart Sourcing: wall-mounted electric fireplace inserts (with heater), pre-primed MDF corner mantel shelves.
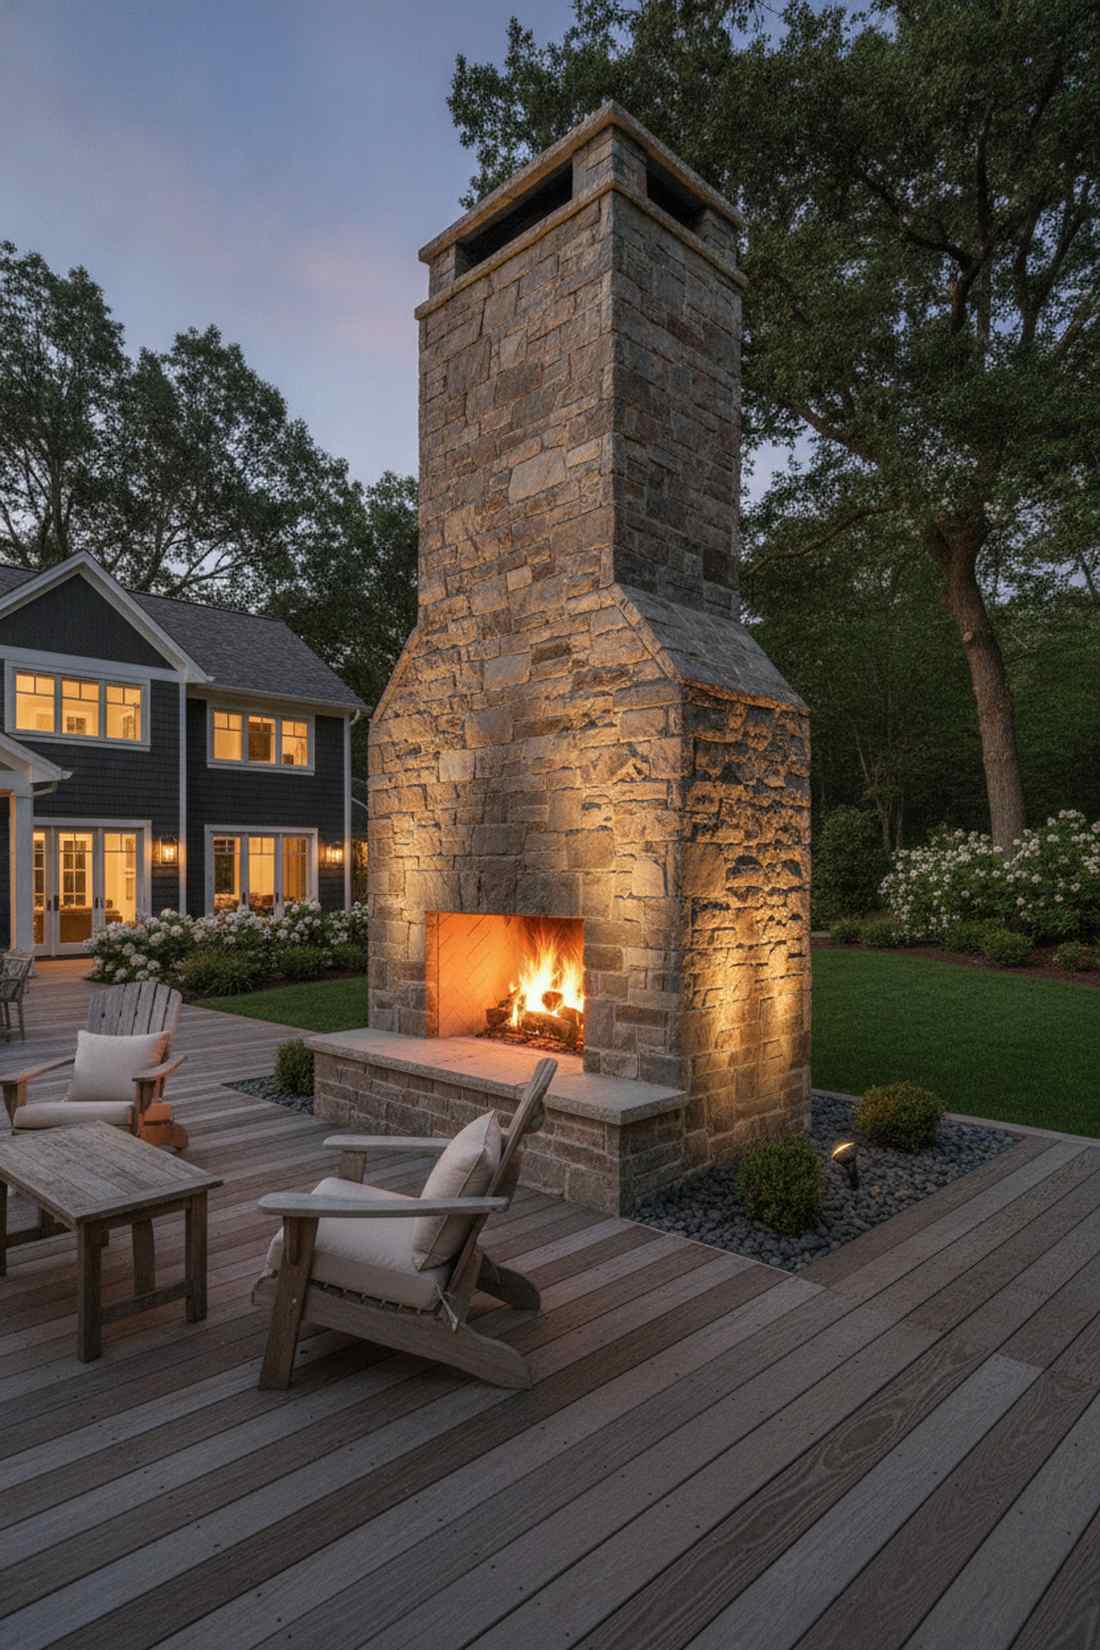
14. Pavilion Fireplace With Vaulted Ceiling
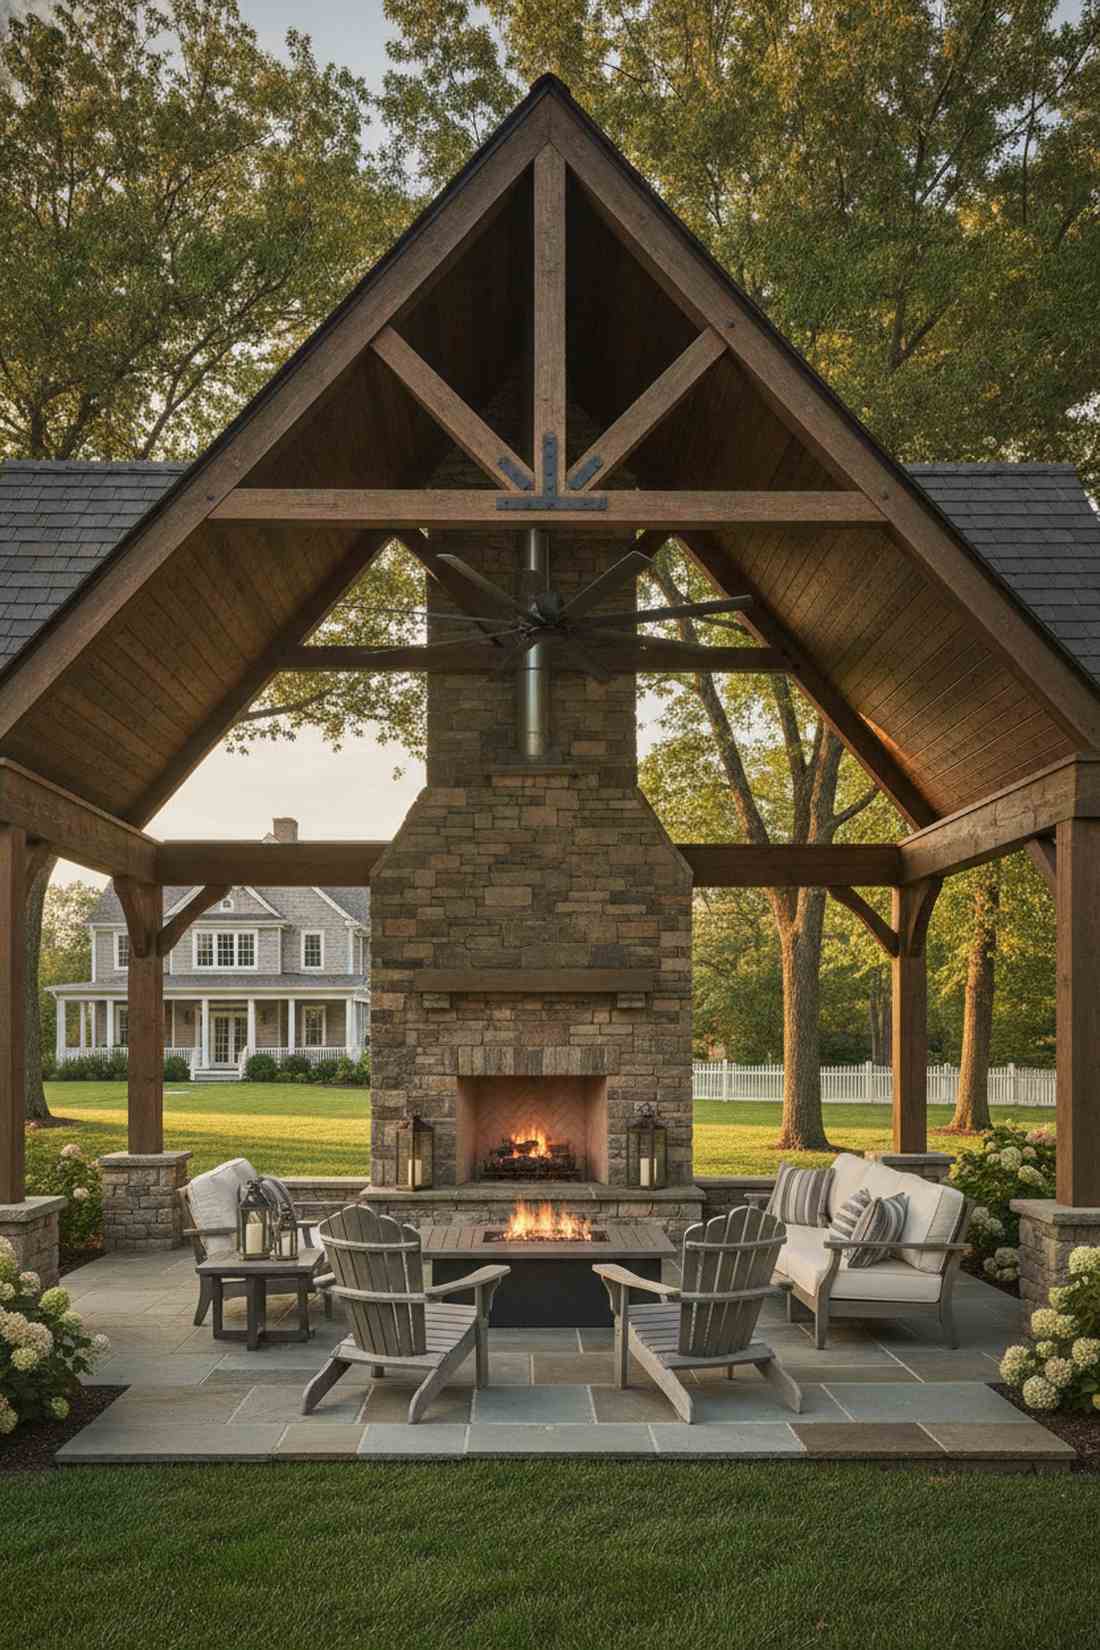
This grand vaulted outdoor sanctuary feels like a majestic lodge hidden at the edge of your property. Incredible for creating a dedicated destination retreat separate from the main house.
The sheer vertical volume of this layout gives a designer-level finish that demands attention. Running a tall, dramatic stone chimney all the way up to the roof peak emphasizes the height and safely exhausts smoke.
Expect to spend $1,500–$3,000 for this grand scale feature. Save this if you are planning a massive architectural statement!
- Key Materials: Truss framing, full-height stone chimney materials
- Vibe / Style: Majestic, vaulted grandeur
- Difficulty: Professional level construction
- Budget Breakdown: Roof Trusses: $800 | Chimney Stone: $900.
- Creator’s Tip: Install an outdoor-rated ceiling fan at the apex of the vault to push rising warm air back down toward the seating area.
- Smart Sourcing: wet-rated outdoor ceiling fans, high-grade galvanized chimney vent pipes.
Most backyard setups ignore the ceiling space completely. This next design uses it to create an unforgettable visual trap.
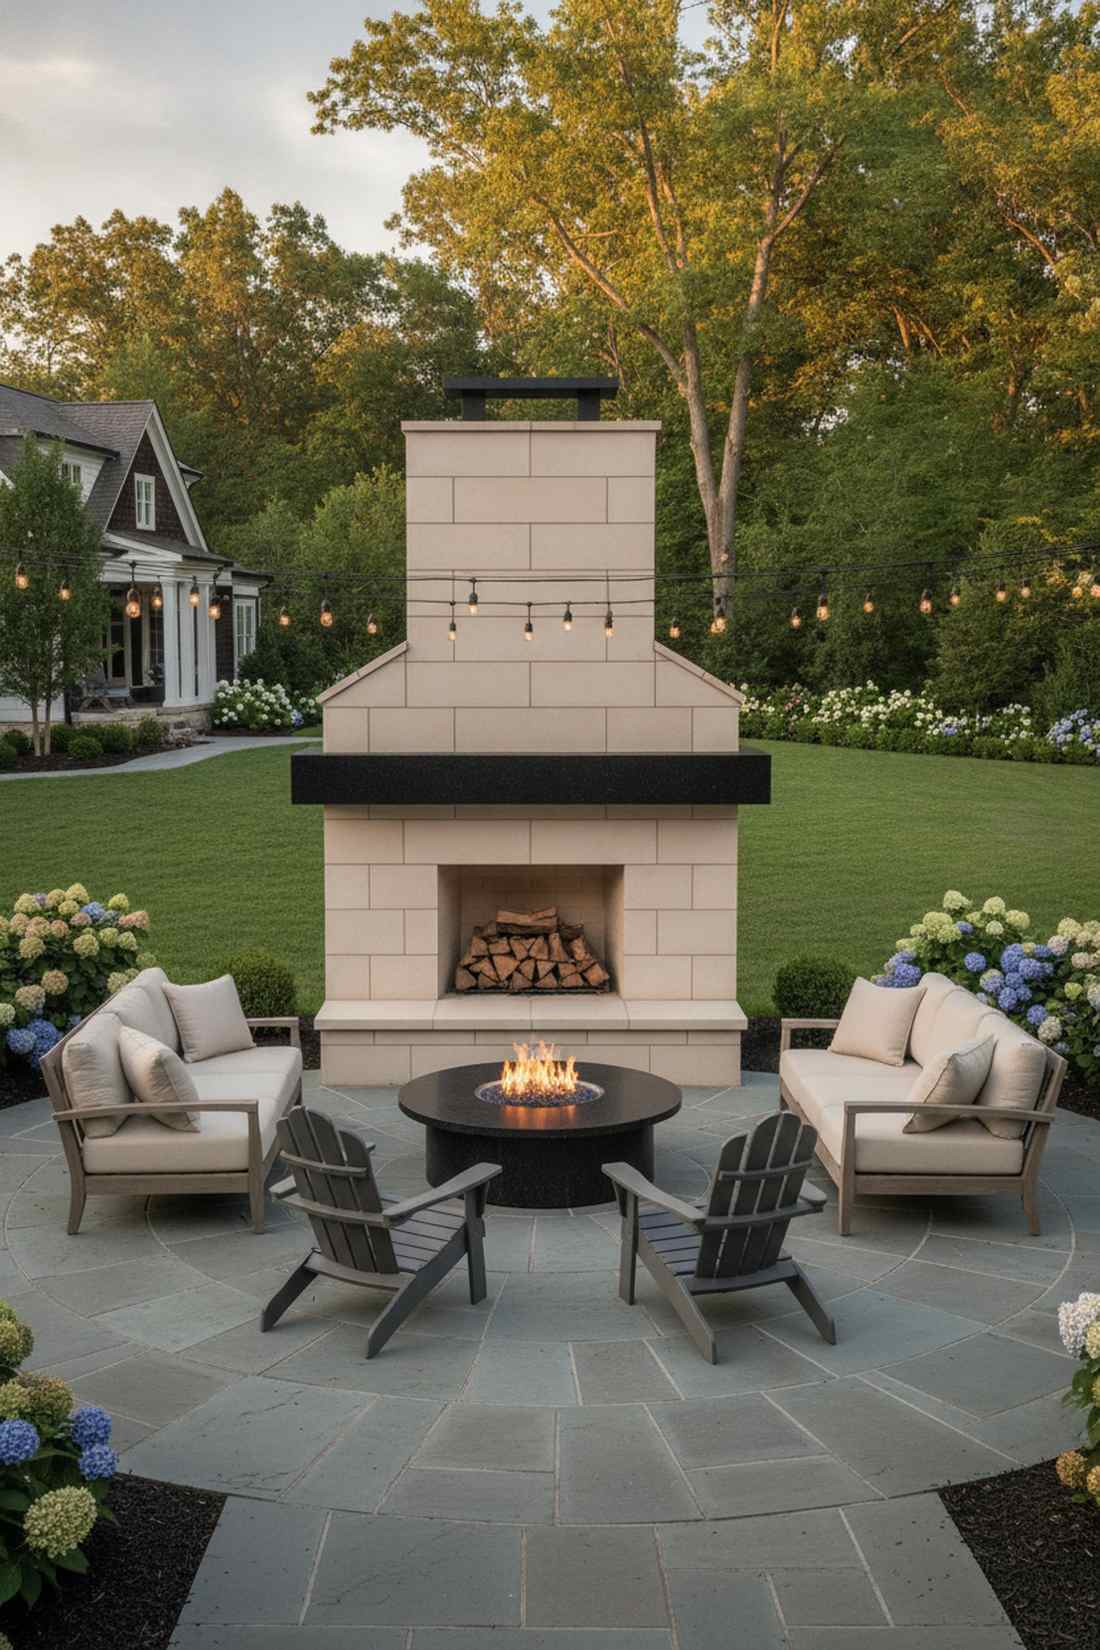
15. Covered Patio With White Pillars and Central Fireplace
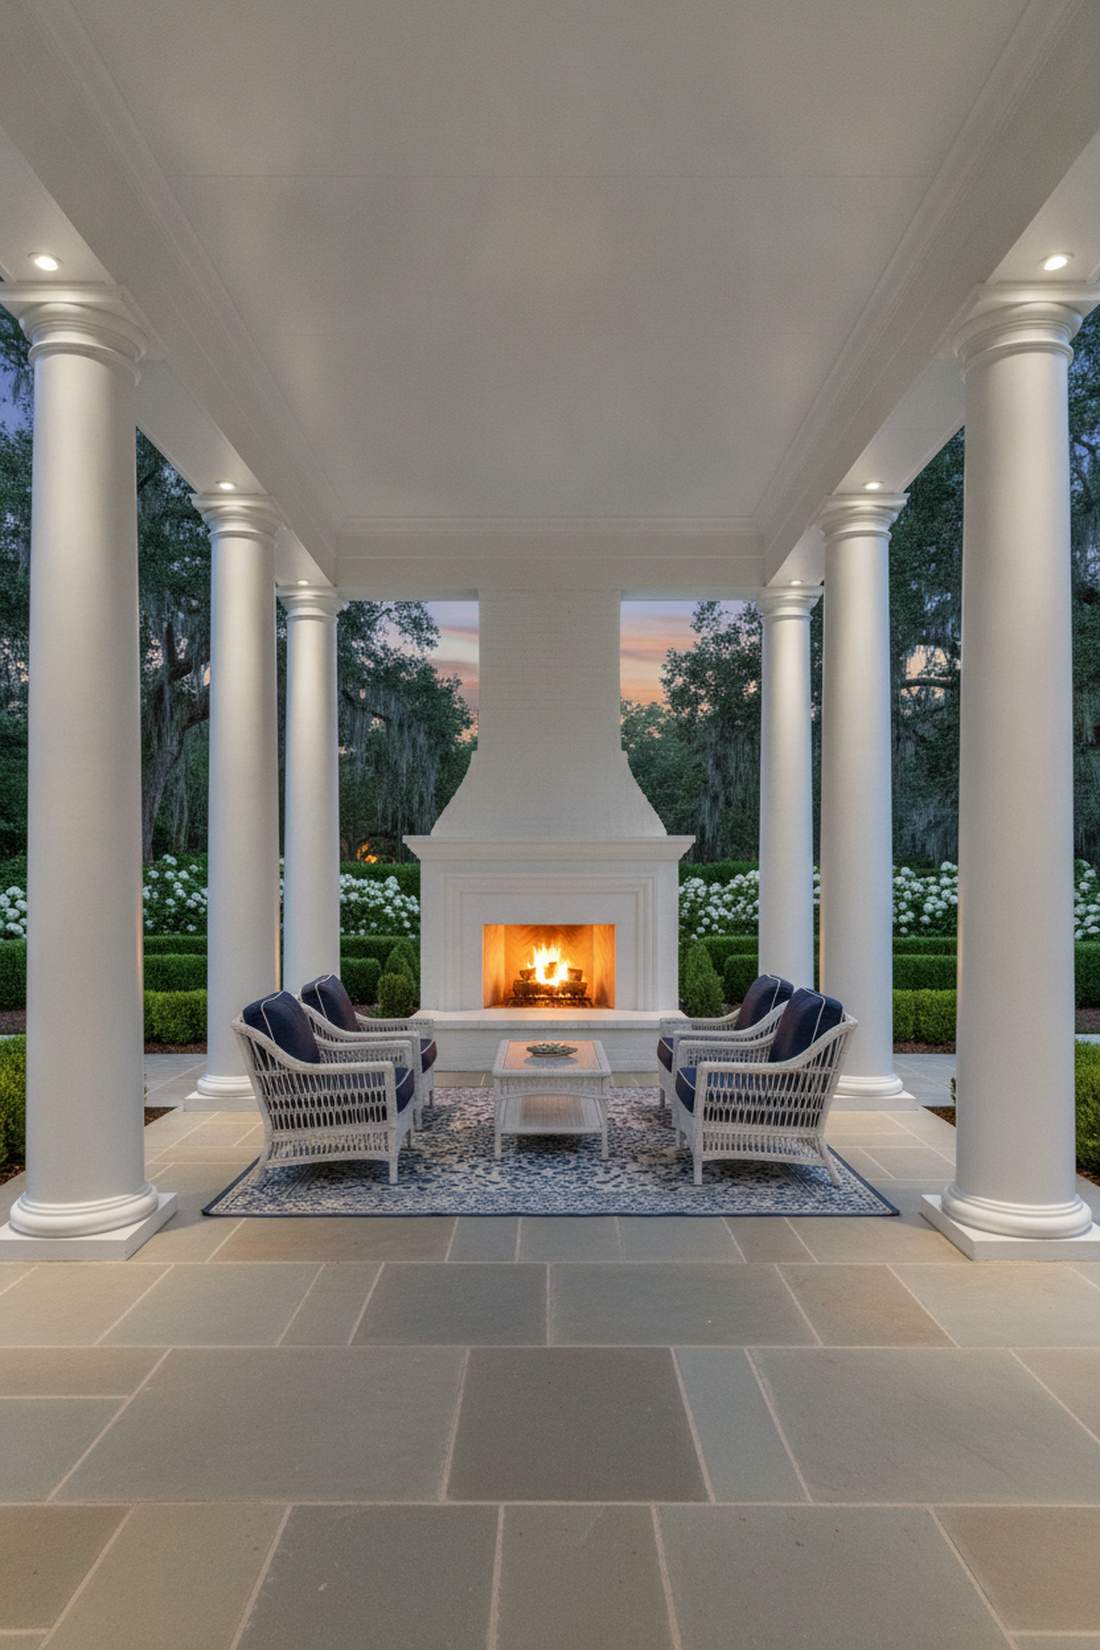
A formal colonnade patio hearth feels like a breezy southern estate verenda. Perfectly suited for extending classical home architecture seamlessly out into the garden space.
Symmetry is the secret weapon here, making the entire setup look incredibly regal and high-budget. Flanking a clean white fireplace with matching structural pillars creates a formal, perfectly framed view of the fire.
This elegant structural build typically costs $1,000–$2,000. Pin this to your formal landscape and exterior styling board.
- Key Materials: Fiberglass structural columns, white masonry paint
- Vibe / Style: Classic southern elegance
- Difficulty: Advanced structural integration
- Budget Breakdown: Columns: $400 | Fireplace Materials: $600.
- Creator’s Tip: Add low-voltage uplighting at the base of each pillar to wash the white columns in light and frame the fire at night.
- Smart Sourcing: weatherproof fiberglass architectural columns, low-voltage LED landscape uplight kits.
16. Slat Roof Pergola With Modern Fireplace Wall
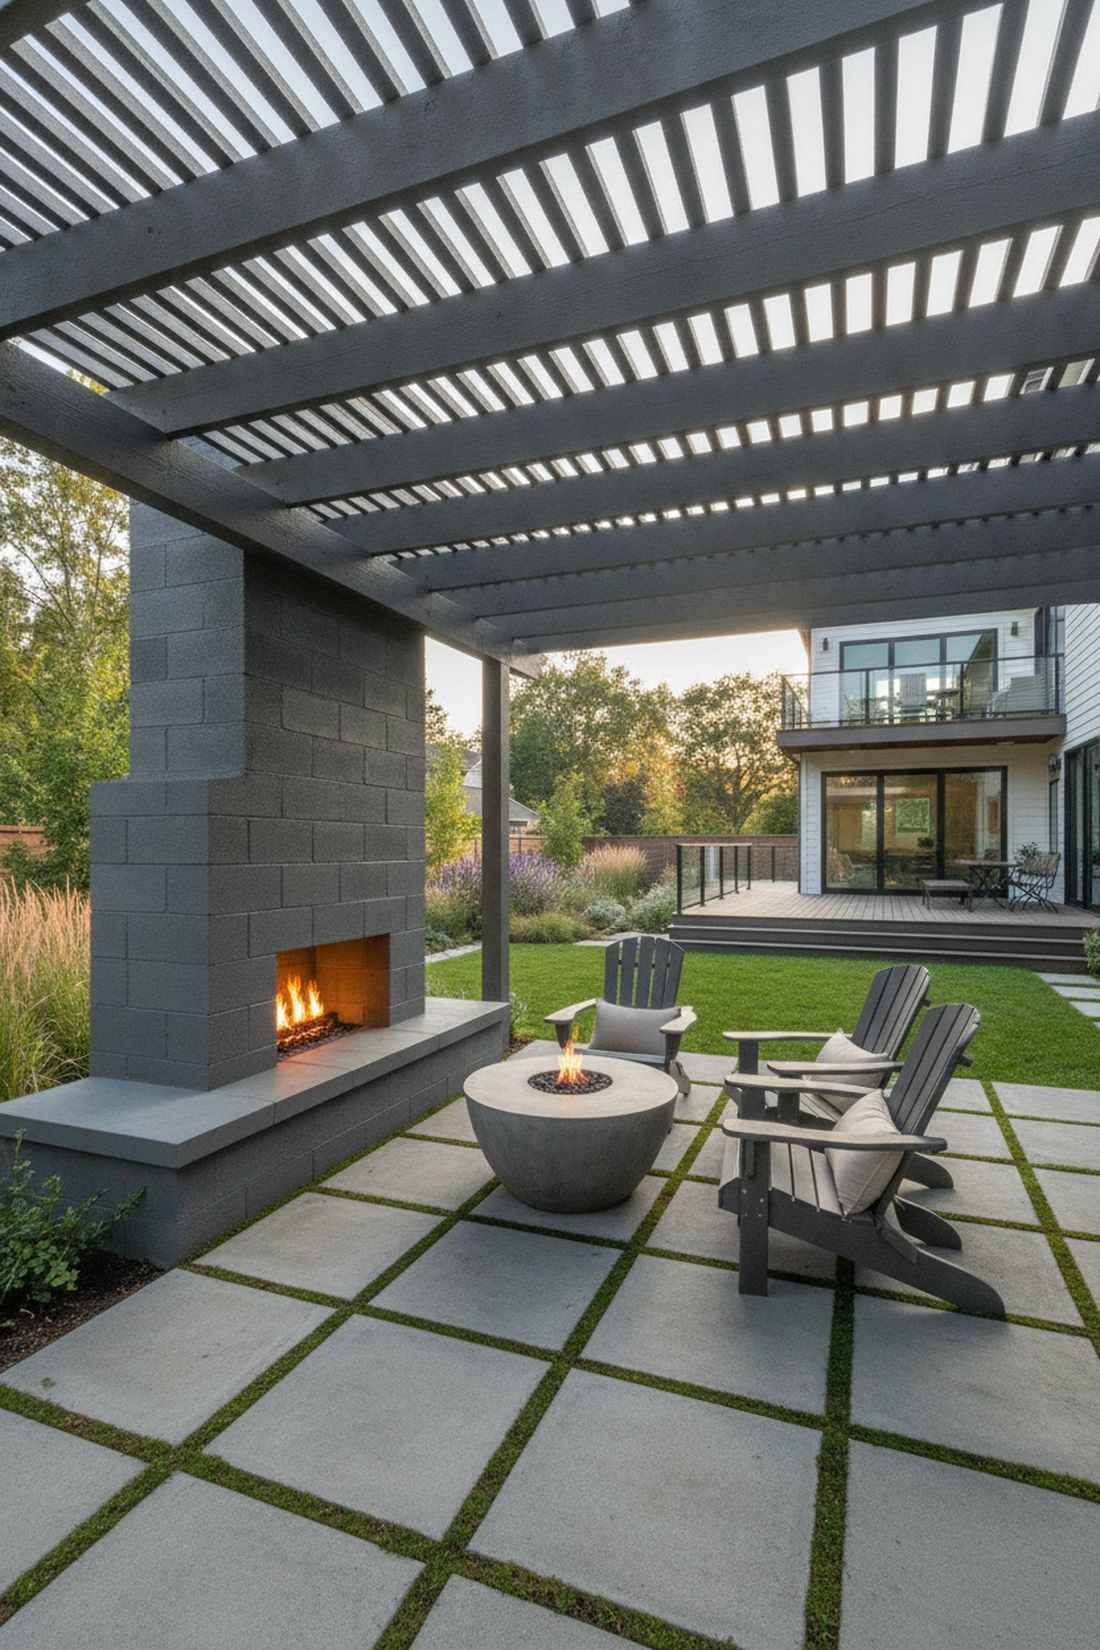
This filtered light modern patio wall feels like a breezy mid-century modern oasis. The absolute best layout for balancing dappled summer shade with a cozy heat source for the evenings.
You can ditch the heavy solid roofs because this slatted approach delivers a surprisingly premium look with fantastic natural ventilation. Painting the wood slats and the fireplace structure in matching monochromatic tones unifies the space beautifully.
Budget around $600–$1,100 for the lumber and masonry block. It is a brilliant way to define an outdoor room without blocking the sky.
- Key Materials: Treated pine slats, cinder block wall base
- Vibe / Style: Airy, mid-century modern
- Difficulty: Intermediate carpentry
- Budget Breakdown: Slat Lumber: $350 | Block Wall: $250.
- Creator’s Tip: Angle the overhead slats at 45 degrees to block the harsh afternoon sun while still allowing smoke to easily escape.
- Smart Sourcing: UV-blocking exterior wood paint, heavy-duty pergola shade sail kits (alternative).
Double-Sided and See-Through Fireplaces
17. See-Through Fireplace Between Dining and Lounge Areas
A dual-zone transparent fire wall feels like a multi-million dollar resort lobby. Incredibly effective for dividing a large, echoing patio into intimate dining and lounging sectors without building solid walls.
This setup solves the open-concept problem effortlessly, giving a designer-level finish that heats two spaces at once. Integrating thick tempered glass on both sides ensures safety from sparks while keeping the mesmerizing visual connection intact.
A dual-sided gas unit runs about $1,200–$2,500. Save this if you love clever, multi-functional outdoor architecture!
- Key Materials: Double-sided gas insert, fireproof drywall
- Vibe / Style: Upscale, transparent luxury
- Difficulty: Advanced gas & framing
- Budget Breakdown: 2-Sided Insert: $1,500 | Framing/Finishing: $300.
- Creator’s Tip: Use crushed reflective fire glass instead of fake logs to maximize the light passing through the transparent firebox.
- Smart Sourcing: reflective tempered fire glass (bulk pack), double-sided outdoor gas fireplace kits.
18. Back-to-Back Fireplace Serving Patio and Pool Deck
This shared chimney dual fire feature feels like the ultimate entertainer’s dream house. Perfect for homes where the main dining patio sits right next to the swimming pool deck.
Instead of buying two separate heaters, this unified structure looks far more expensive than it is while cutting your masonry costs in half. Utilizing one central chimney to vent two back-to-back fireboxes is an absolute masterclass in hardscape efficiency.
Building this massive dual structure costs around $1,500–$3,000. Pin this to your ultimate pool deck ideas board.
- Key Materials: Dual firebox frames, shared flue pipe system
- Vibe / Style: Grand, highly functional resort
- Difficulty: Professional masonry required
- Budget Breakdown: Masonry Materials: $1,200 | Dual Flue Hardware: $400.
- Creator’s Tip: Build inset storage cubbies into the sides of the shared wall to hold fresh pool towels on one side and firewood on the other.
- Smart Sourcing: dual-flue stainless chimney caps, waterproof outdoor masonry storage doors.
19. Peninsula Fireplace With Three-Sided Viewing
A three-sided panoramic fire feature feels like a dramatic theatrical stage for your backyard gatherings. Brilliant for capping off the end of a long retaining wall or extending out into a U-shaped seating arrangement.
This striking layout demands attention, delivering a surprisingly premium look by making the fire visible from nearly every angle. Wrapping the peninsula base in high-end tile or stone transforms a standard gas burner into a modern masterpiece.
Expect to spend $900–$1,800 on this multi-angle marvel. It is a fantastic way to maximize a single heat source!
- Key Materials: 3-sided gas or electric insert, premium surround tile
- Vibe / Style: Ultra-modern panoramic chic
- Difficulty: Advanced structural support
- Budget Breakdown: Peninsula Insert: $1,100 | Tile & Mortar: $250.
- Creator’s Tip: Use a floating hearth edge on the three exposed sides to create a visual illusion that the firebox is hovering.
- Smart Sourcing: 3-sided panoramic electric outdoor inserts, heat-resistant porcelain ledger panels.
Stop shoving your furniture against the wall. The upcoming layout destroys spatial boundaries and creates an indoor-outdoor flow most people think requires a massive renovation budget.
20. Indoor-Outdoor Double-Sided Fireplace
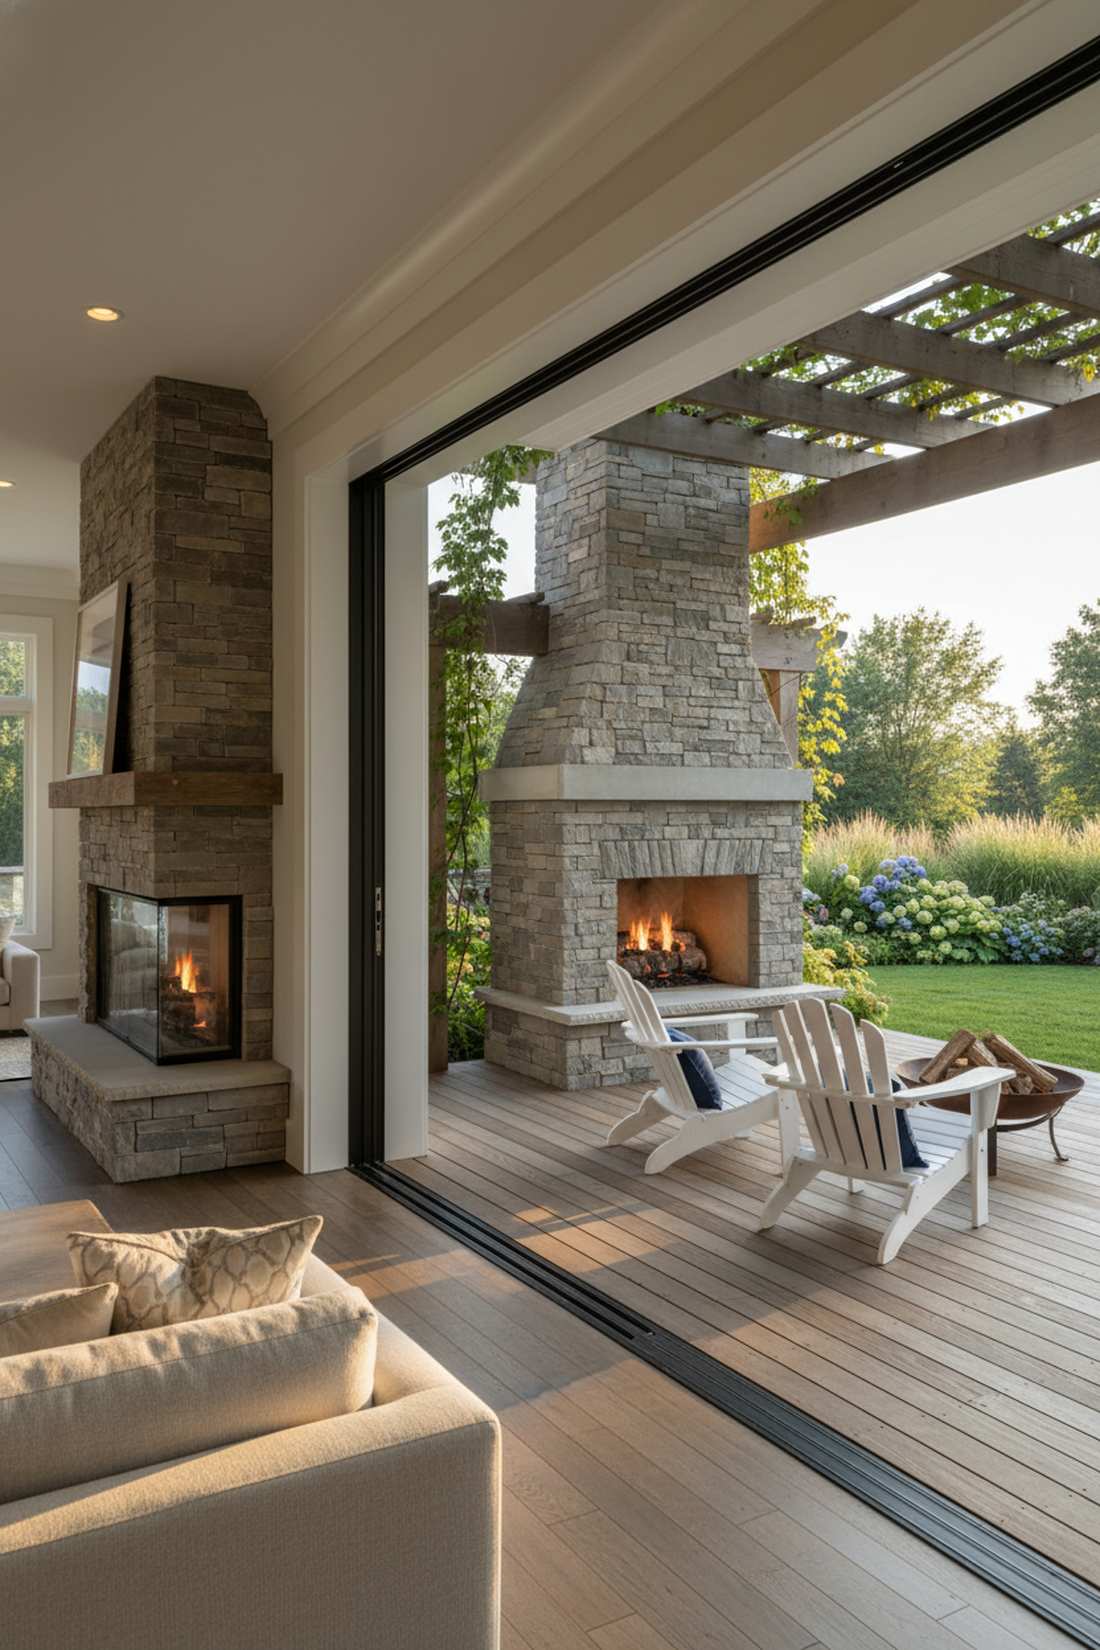
Building an outdoor living space with fireplace that connects straight through the exterior wall feels like architectural magic. The ultimate flex for blending your interior living room directly with your patio deck.
This layout blurs boundaries effortlessly, making the entire property look completely custom and wildly expensive. Coordinating the stone finish on the outside to match the interior mantel guarantees a seamless, unbroken visual flow.
A through-wall installation is an investment, usually $3,000–$5,000. Save this for your major home remodel blueprints!
- Key Materials: Indoor/outdoor certified dual fireplace, weatherproofing flashing
- Vibe / Style: Seamless architectural integration
- Difficulty: Professional contractor required
- Budget Breakdown: Certified Insert: $2,500 | Wall Modification: $1,000.
- Creator’s Tip: Ensure the unit has a high-quality thermal glass barrier so you don’t lose all your home’s air conditioning to the outside.
- Smart Sourcing: indoor/outdoor sealed gas fireplace kits, professional-grade exterior weather flashing.
Corner and Space-Saving Designs
21. Corner Fireplace For Small Patio
This diagonal compact patio hearth feels like a brilliant spatial cheat code for tiny backyards. A lifesaver for urban balconies or cramped townhouse patios that can’t sacrifice central walking space.
You can reclaim your floor plan immediately because this tucked-away layout gives a designer-level finish without the bulky footprint. Radiating heat diagonally across the space is actually far more efficient for warming an entire seating group.
A corner-specific build usually costs $300–$700. Pin this to your small space hack board!
- Key Materials: Corner-angled firebox frame, light reflective pavers
- Vibe / Style: Smart, cozy, efficient
- Difficulty: Beginner-friendly angles
- Budget Breakdown: Framing & Board: $150 | Finish Materials: $200.
- Creator’s Tip: Build custom L-shaped wooden benches emerging straight out of the fireplace sides to maximize seating in a tiny footprint.
- Smart Sourcing: pre-fabricated corner fireplace framing kits, heat-reflective bright white masonry paint.
22. Wall-Mounted Fireplace On Privacy Screen
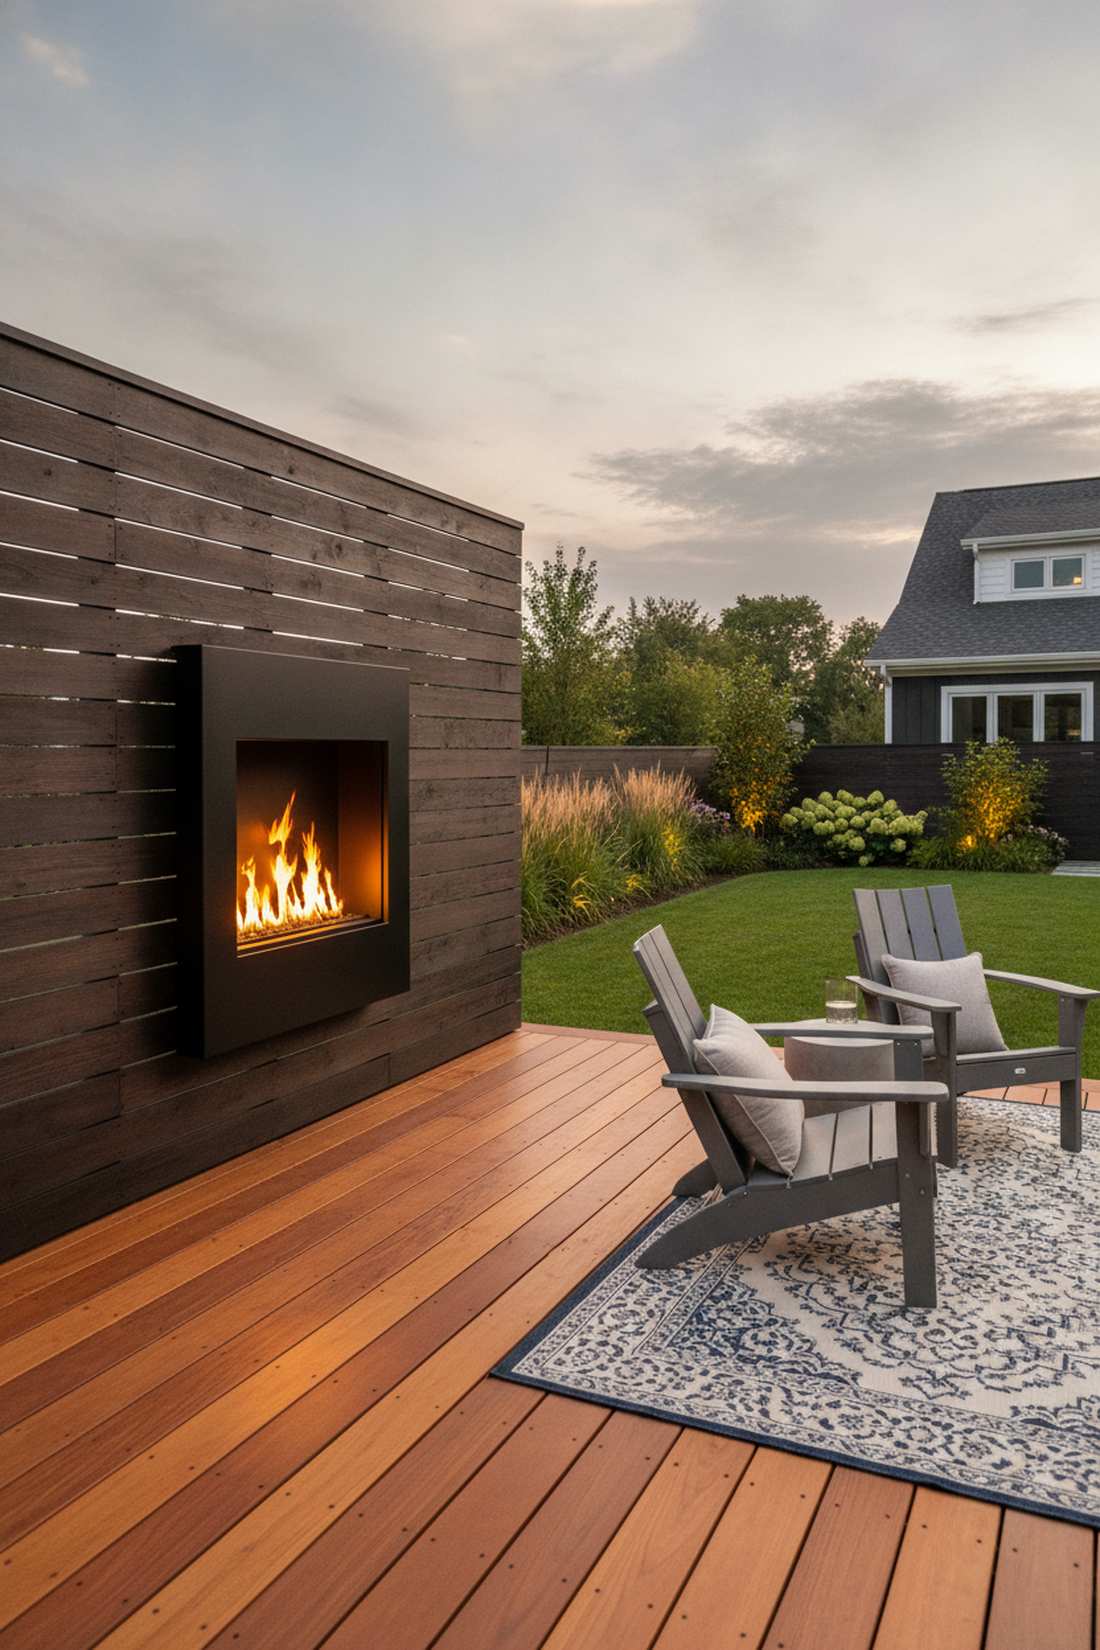
A floating vertical fire panel feels like a futuristic piece of functional wall art. Exceptional for tight wooden decks where blocking out nosy neighbors is just as important as staying warm.
Most traditional fire pits take up the whole deck, but this mounted layout looks far more expensive while keeping the floor completely clear. Bolting an outdoor-rated electric or gel fuel unit to a slatted privacy wall solves two backyard problems at once.
You can throw this together for $250–$500 in a single afternoon. Highly recommended for a fast weekend win.
- Key Materials: Wall-mounted outdoor fireplace, sturdy wooden privacy screen
- Vibe / Style: Sleek, modern space-saver
- Difficulty: Easy drill-and-mount
- Budget Breakdown: Wall Fireplace: $200 | Privacy Screen Wood: $120.
- Creator’s Tip: Use bio-ethanol fuel inserts if you don’t want to deal with running outdoor electrical wires up the privacy screen.
- Smart Sourcing: wall-mounted bio-ethanol fireplace units, outdoor-rated heavy-duty lag bolts.
23. Narrow Linear Fireplace Along Retaining Wall
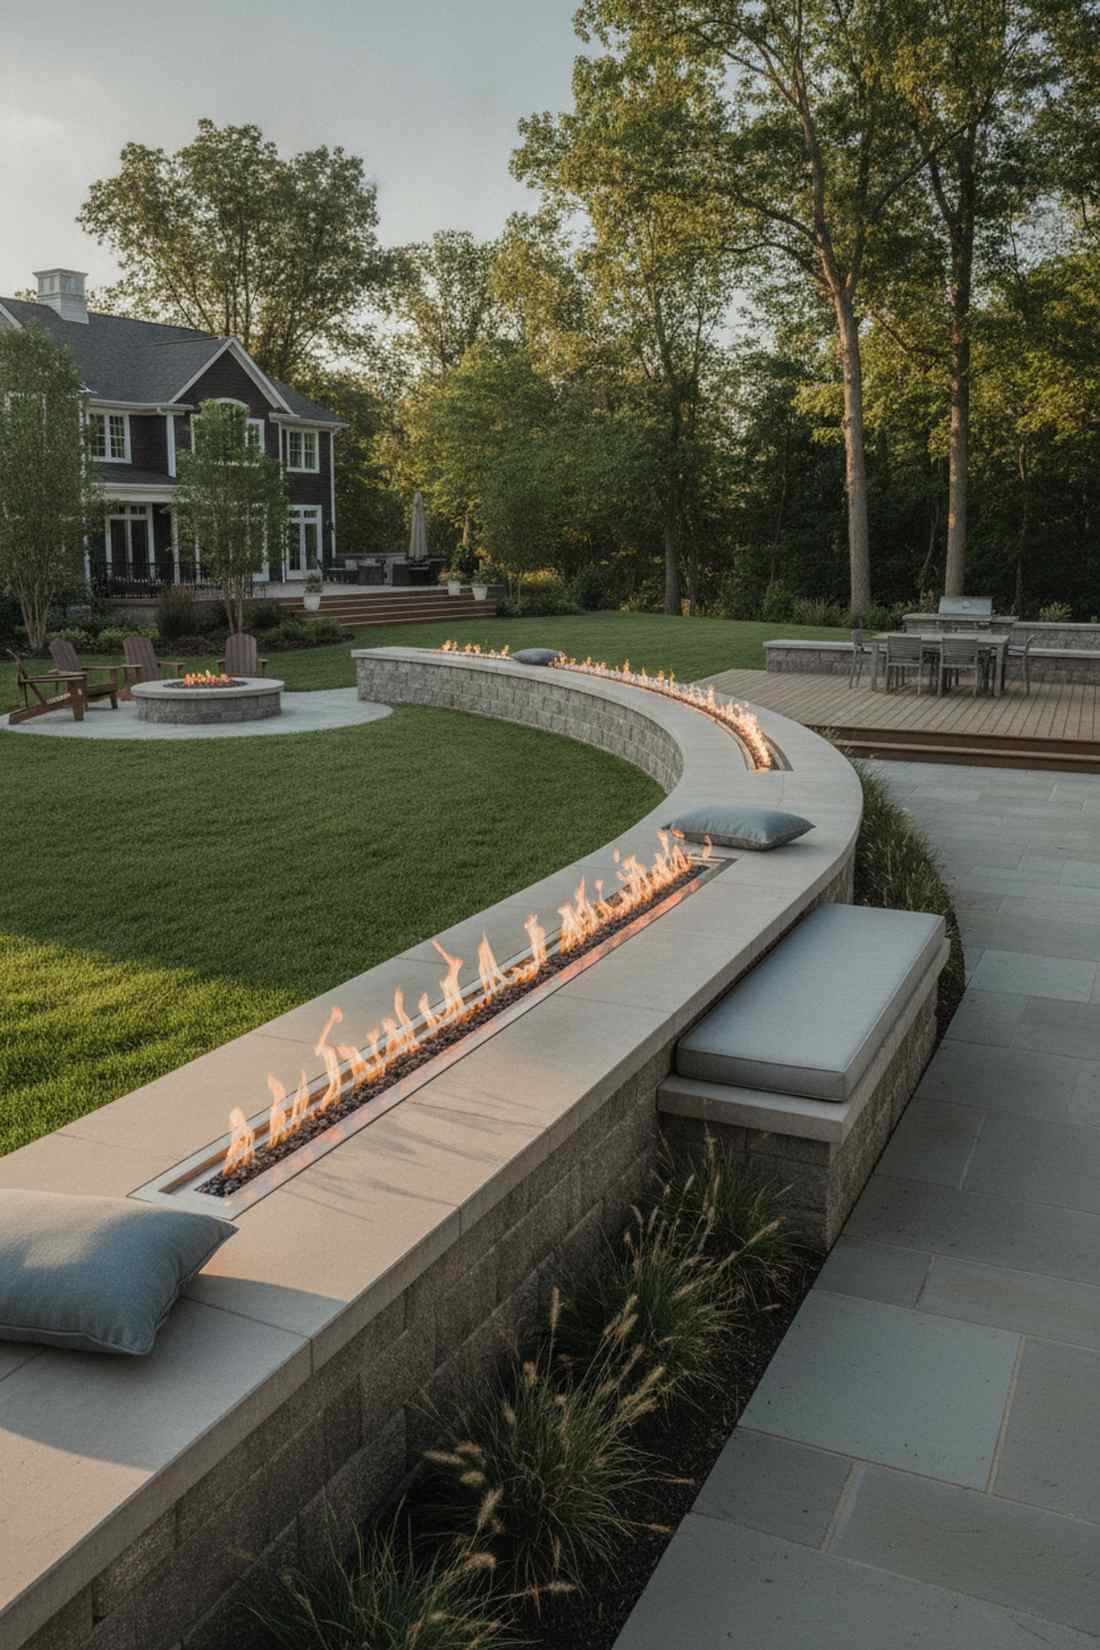
This integrated landscape fire ribbon feels like a luxurious custom country club feature. The absolute best way to utilize dead space along sloped yards where retaining walls are already required.
This setup brilliantly disguises functional hardscaping, delivering a surprisingly premium look by embedding flames right into the wall. Topping the retaining wall with a wide, smooth ledge instantly turns the entire structure into a heated perimeter bench.
Retrofitting a wall runs about $400–$900. Save this if you are planning a sloped yard renovation!
- Key Materials: Narrow drop-in gas burner pan, smooth capstones
- Vibe / Style: Integrated, sprawling luxury
- Difficulty: Intermediate hardscape modification
- Budget Breakdown: Burner Pan: $250 | Capstones/Adhesive: $150.
- Creator’s Tip: Leave small weep holes at the bottom of the retaining wall firebox trench so rainwater drains out instead of flooding the burner.
- Smart Sourcing: ultra-narrow linear stainless fire pans, concrete retaining wall capstones (bulk pack).
24. Compact Chiminea-Style Metal Fireplace
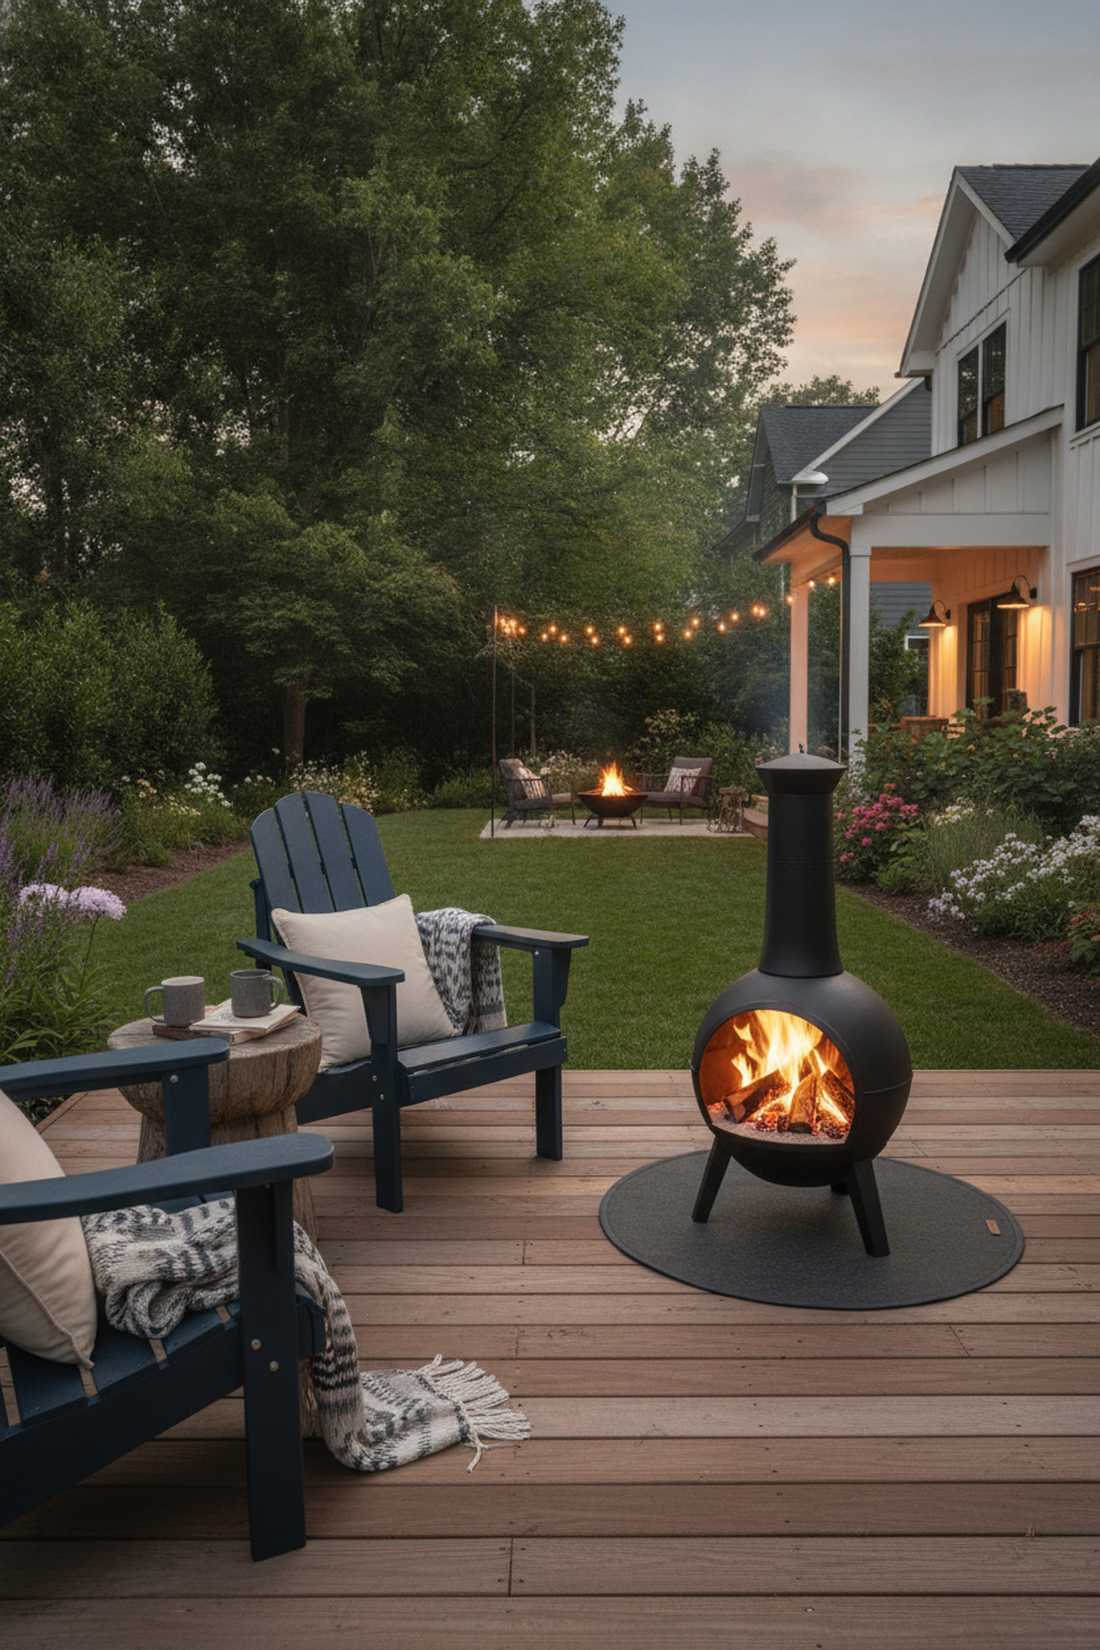
A freestanding modern metal chiminea feels like a stylish, nomadic campfire you can place anywhere. Perfect for renters or indecisive decorators who want real wood-burning warmth without pouring permanent concrete.
You can skip the expensive permits and contractors with this movable layout that looks effortlessly chic. Opting for a sleek matte black steel or weathered bronze design elevates the humble chiminea into a piece of modern sculptural art.
These units range from $150–$400 online. Pin this to your budget-friendly patio board!
- Key Materials: Cast iron or steel chiminea, fireproof deck pad
- Vibe / Style: Boho-chic, adaptable warmth
- Difficulty: Zero setup (Unbox & place)
- Budget Breakdown: Metal Chiminea: $200 | Fireproof Pad: $40.
- Creator’s Tip: Put a layer of play sand in the belly of the chiminea before your first fire to protect the metal bottom from burning out.
- Smart Sourcing: modern cast iron chiminea kits, heat-resistant outdoor deck protector mats.
Most tiny patios suffer from too much clunky furniture. This upcoming fold-away trick reclaims your space the second the fire goes out.
25. Built-In Fireplace With Fold-Down Hearth Table
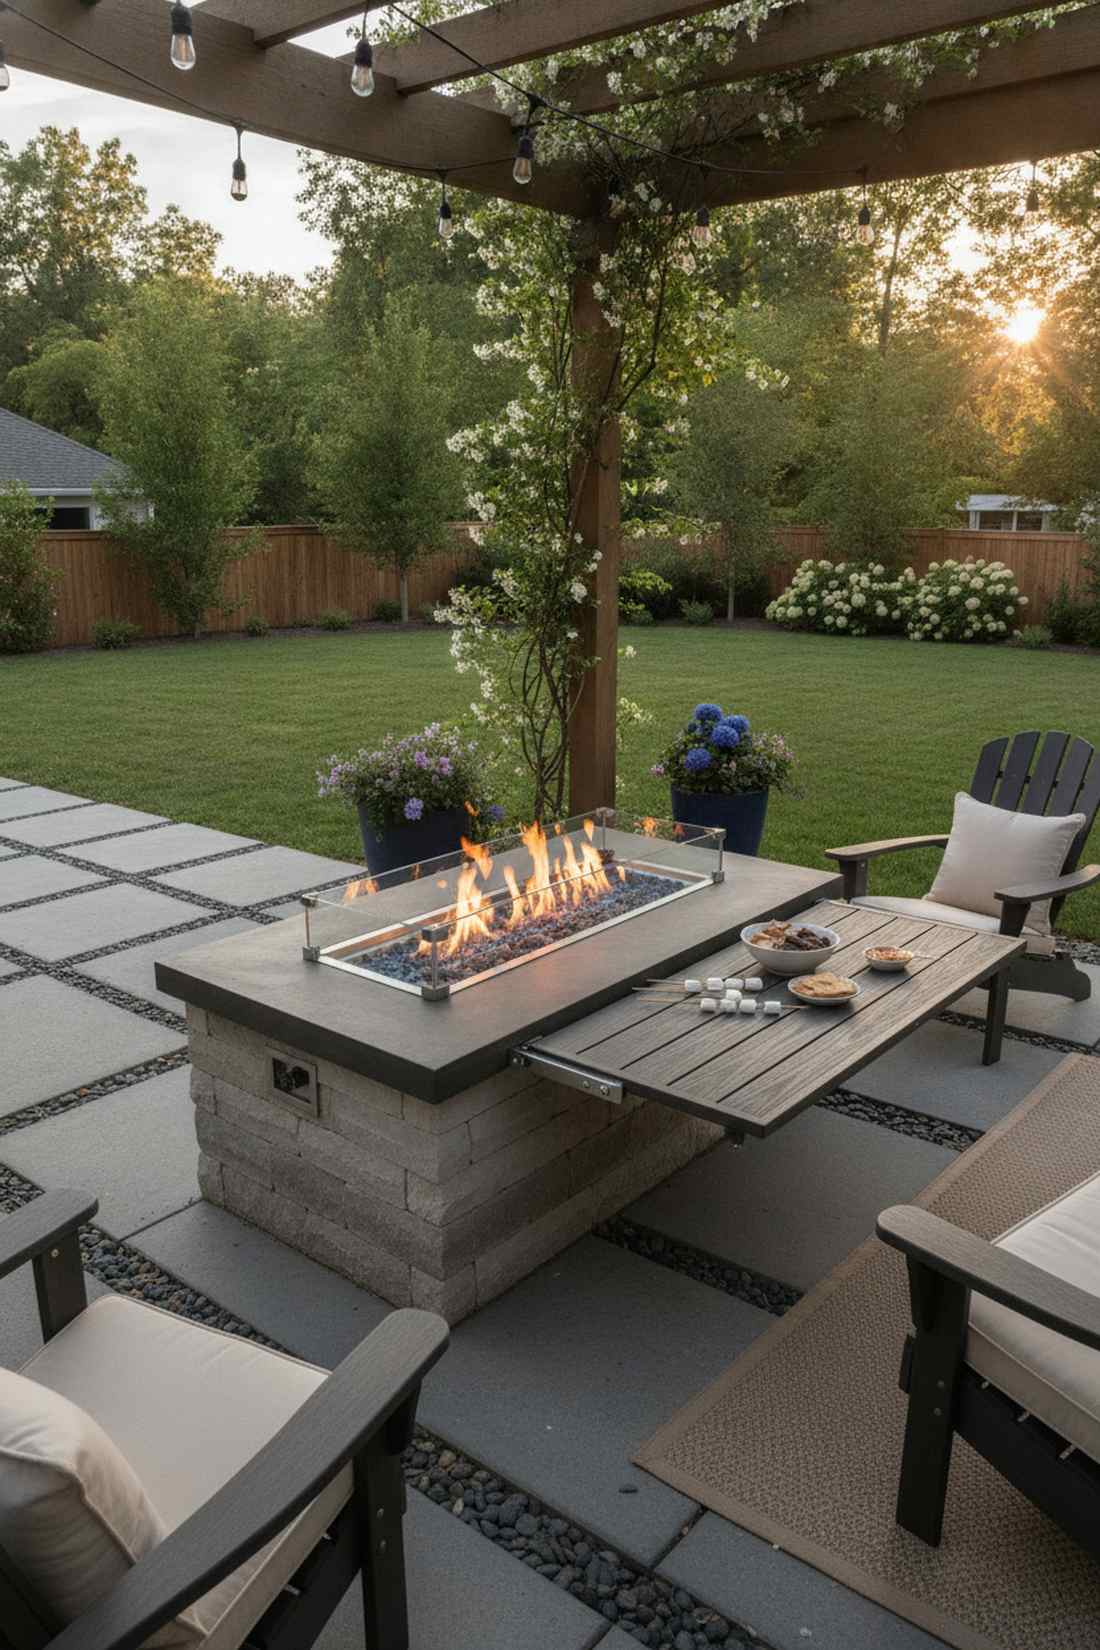
This convertible fire table hearth feels like a genius tiny-home hack applied to your backyard. Incredible for multi-purpose patios that need to transform from a dining area into a cozy fireside lounge in seconds.
This space-saving mechanism delivers a surprisingly premium look while hiding a massive functional upgrade. Attaching a heat-resistant folding shelf to the front of the firebox gives you an instant s’mores prep station that drops flush when not needed.
Adding this custom hinge setup costs just $50–$150 in hardware. Highly recommended for optimizing tight footprints.
- Key Materials: Heavy-duty locking folding hinges, stone or metal shelf top
- Vibe / Style: Clever, utilitarian modern
- Difficulty: Intermediate hardware installation
- Budget Breakdown: Locking Hinges: $40 | Finished Shelf Board: $60.
- Creator’s Tip: Ensure your hinges are marine-grade stainless steel so they don’t rust shut after one rainy season.
- Smart Sourcing: marine-grade folding shelf brackets (heavy duty), heat-resistant composite decking boards.
Outdoor Living Space With Fireplace and Kitchen
26. Fireplace Integrated Into Outdoor Kitchen Island
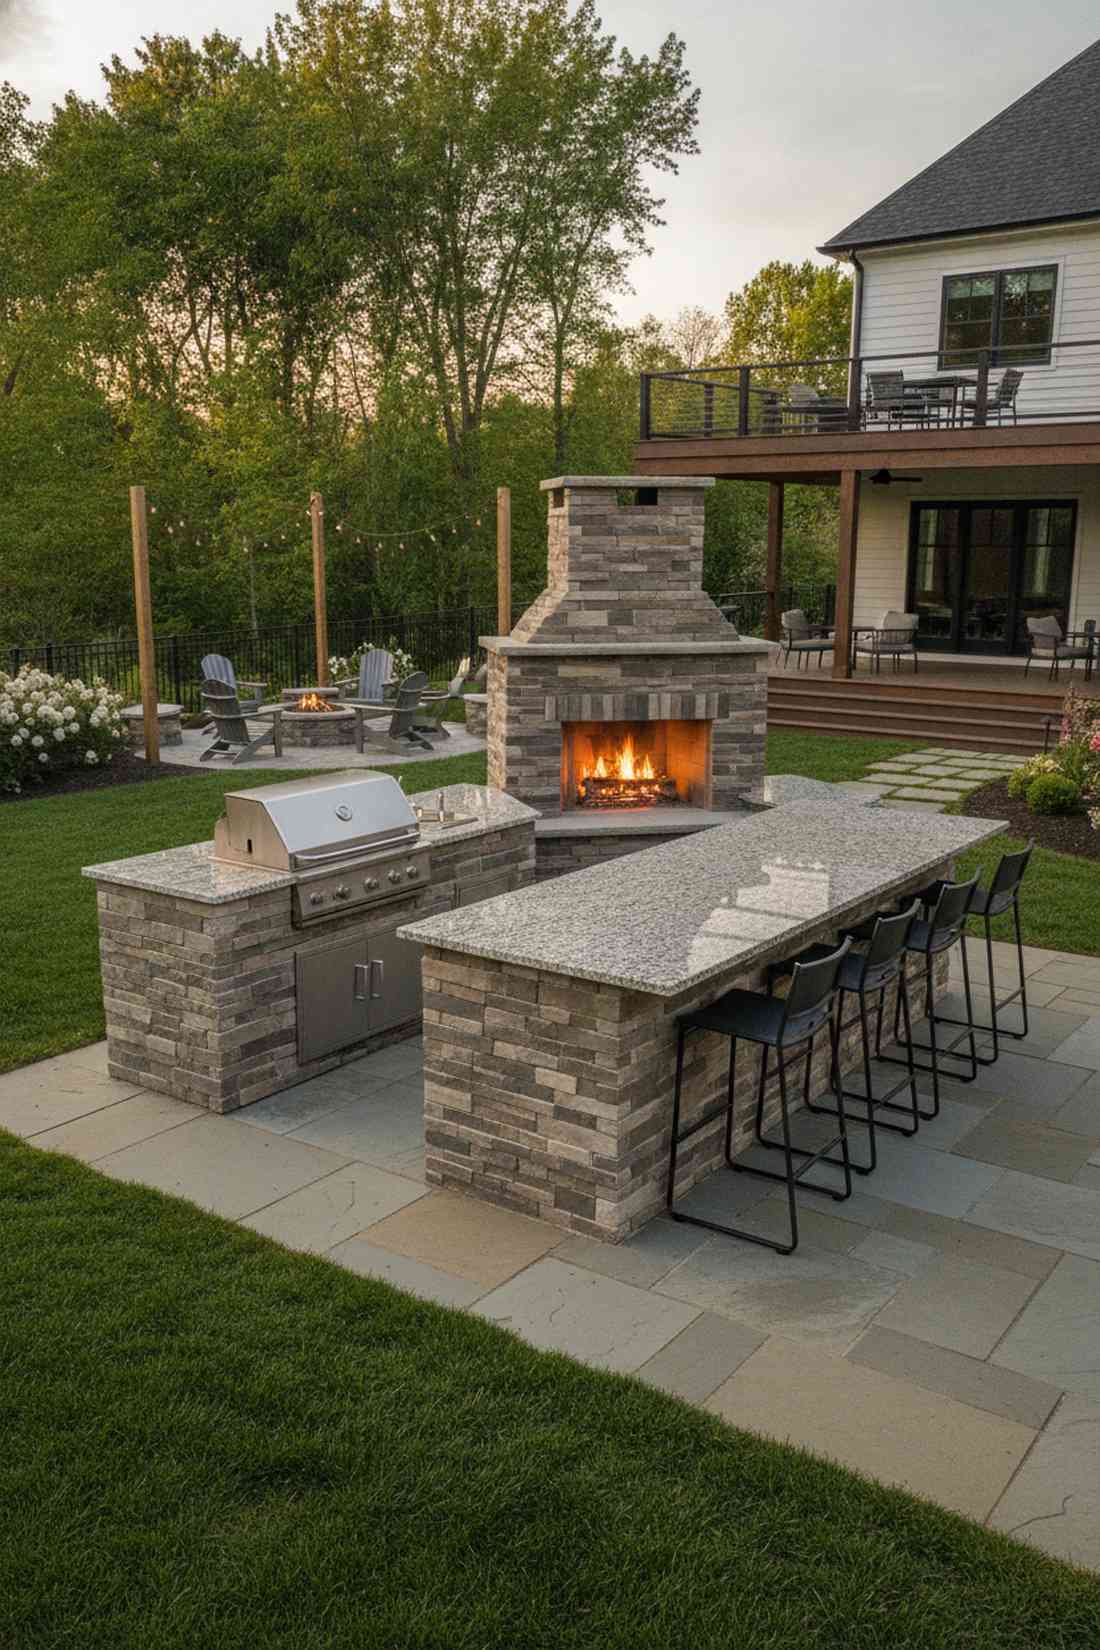
A unified cooking and heating island feels like a master chef’s ultimate playground. The absolute best way to keep the cook involved in the party instead of isolated in a dark corner of the yard.
Combining these two massive features into one continuous island gives a designer-level finish that streamlines your hardscaping. Wrapping the entire block—from the grill drop-in to the firebox—in the exact same stacked stone unifies the sprawling structure.
This massive combo build usually starts around $2,000–$4,000. Save this to your ultimate outdoor kitchen inspiration board!
- Key Materials: Concrete block framing, cohesive stone veneer wrap
- Vibe / Style: All-inclusive luxury entertaining
- Difficulty: Advanced framing & finishing
- Budget Breakdown: Framing & Board: $400 | Veneer & Countertops: $1,200.
- Creator’s Tip: Add an overhang on the back side of the island so guests can sit on barstools and face both the chef and the fire.
- Smart Sourcing: pre-cut granite outdoor countertop slabs, outdoor kitchen stainless steel access doors.
27. Pizza Oven and Fireplace Combination Wall
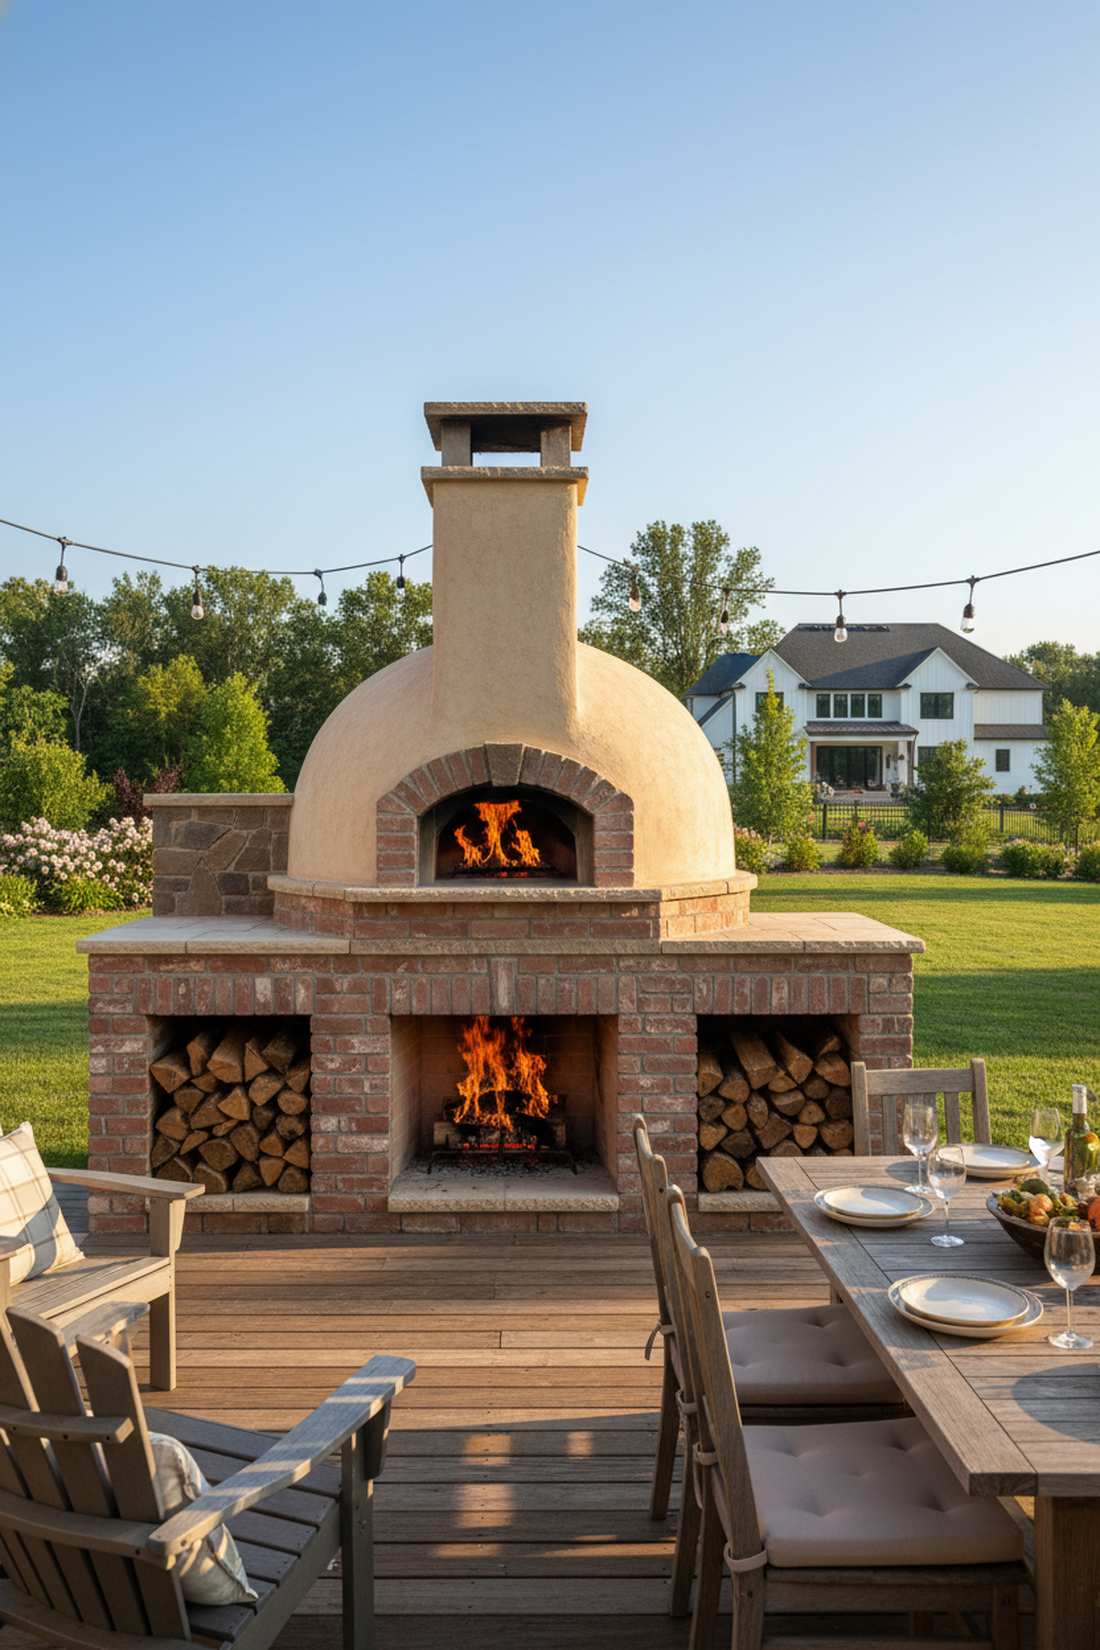
This wood-fired artisan cooking hearth feels like a rustic Italian trattoria right on your patio. A must-have for serious foodies who want the authentic flavor of live fire alongside ambient warmth.
Why build two chimneys when this stacked layout looks far more expensive and saves massive amounts of vertical space? Integrating the dome of a pizza oven directly above the main firebox allows both chambers to vent efficiently through a single shared flue.
This dual-purpose masonry masterpiece runs about $1,500–$3,500. Pin this if you love authentic outdoor cooking.
- Key Materials: Refractory pizza dome kit, high-heat fire bricks
- Vibe / Style: Authentic Tuscan culinary center
- Difficulty: Professional masonry required
- Budget Breakdown: Oven Dome Kit: $800 | Bricks & Mortar: $600.
- Creator’s Tip: Build a deep, recessed cubby underneath the main firebox dedicated solely to keeping a massive stack of oak wood dry.
- Smart Sourcing: DIY refractory concrete pizza oven kits, ceramic fiber insulation blankets (high temp).
28. L-Shaped Kitchen With Fireplace Focal Wall
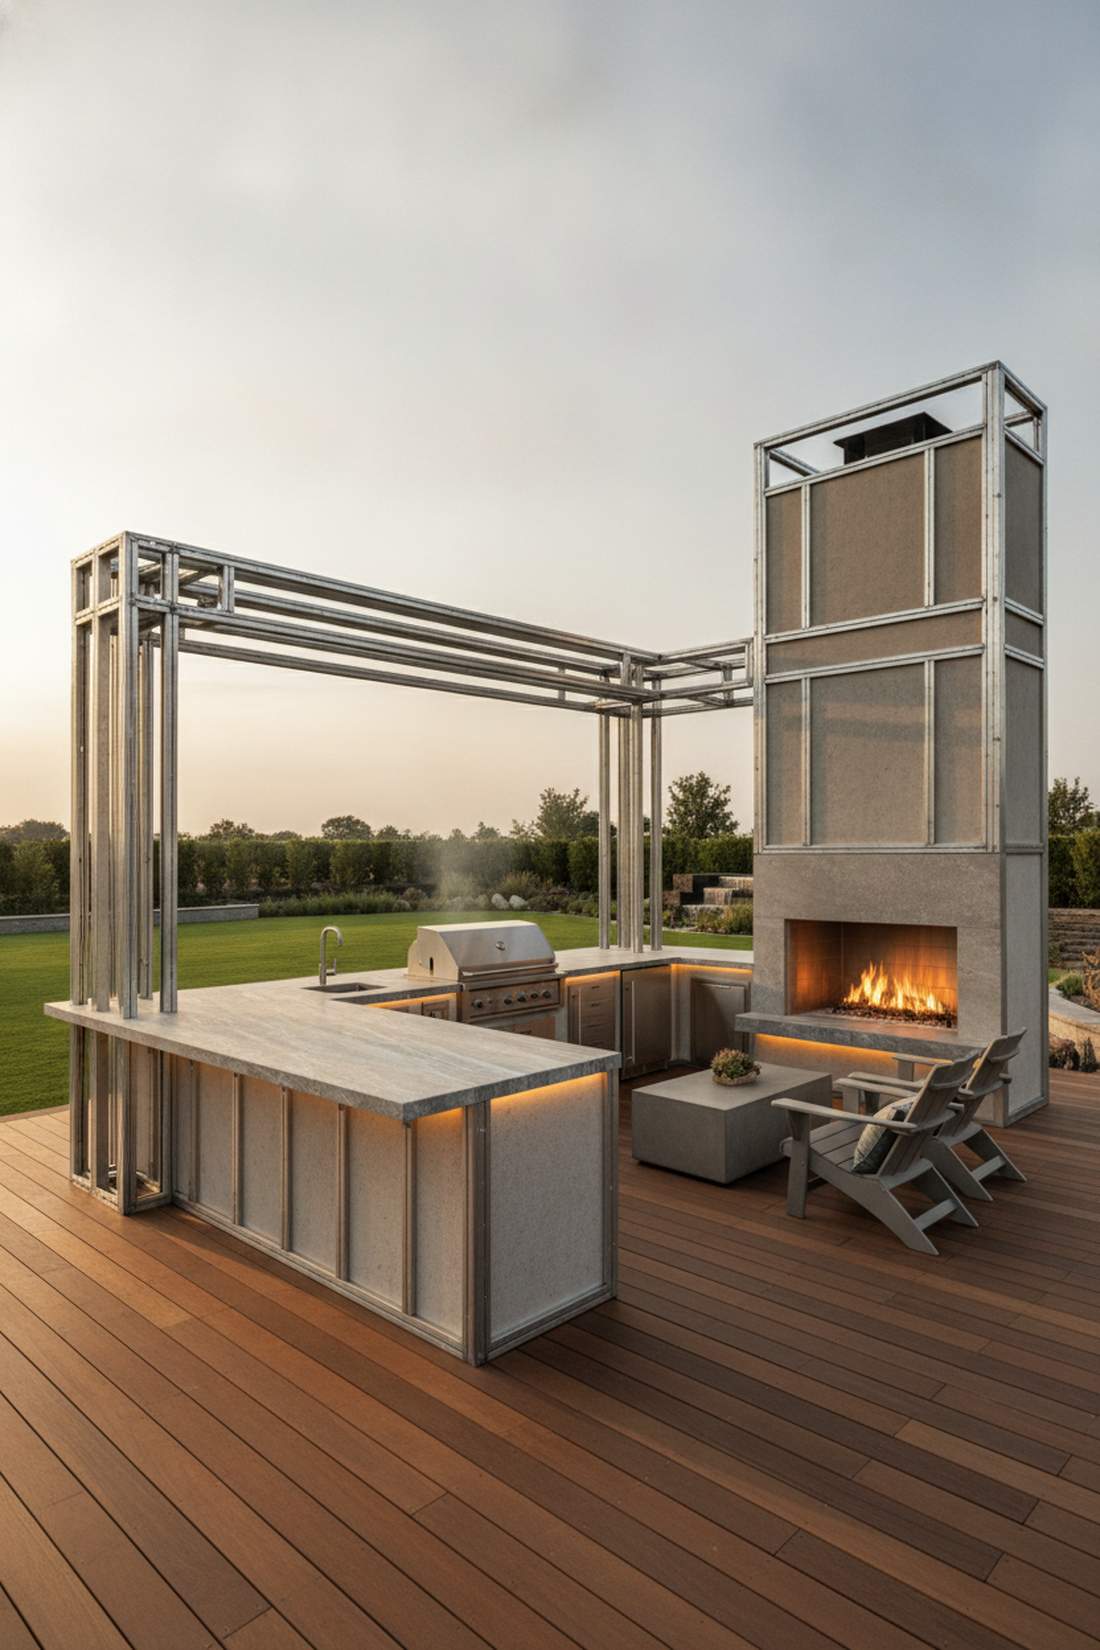
An angled culinary and lounge layout feels like a perfectly zoned upscale penthouse deck. Brilliant for corner property lines where you want to naturally block wind while defining a massive outdoor room.
This setup organizes the chaos, delivering a surprisingly premium look by giving cooking and lounging their own distinct territories. Capping the short end of the “L” with a towering fireplace anchors the sightlines and keeps smoke away from the food prep.
Framing this angled setup costs roughly $1,000–$2,500. It is a highly efficient way to route your gas and electrical lines!
- Key Materials: Galvanized steel framing tracks, outdoor cement board
- Vibe / Style: Structured, zoned perfection
- Difficulty: Advanced multi-zone planning
- Budget Breakdown: Steel Framing: $500 | Cement Board/Screws: $300.
- Creator’s Tip: Install dedicated task lighting under the kitchen counter lip, and soft amber ambient lighting near the firebox to separate the moods.
- Smart Sourcing: galvanized steel outdoor kitchen framing kits, waterproof cement backer board (bulk pack).
29. Fireplace With Warming Drawers and Beverage Cooler
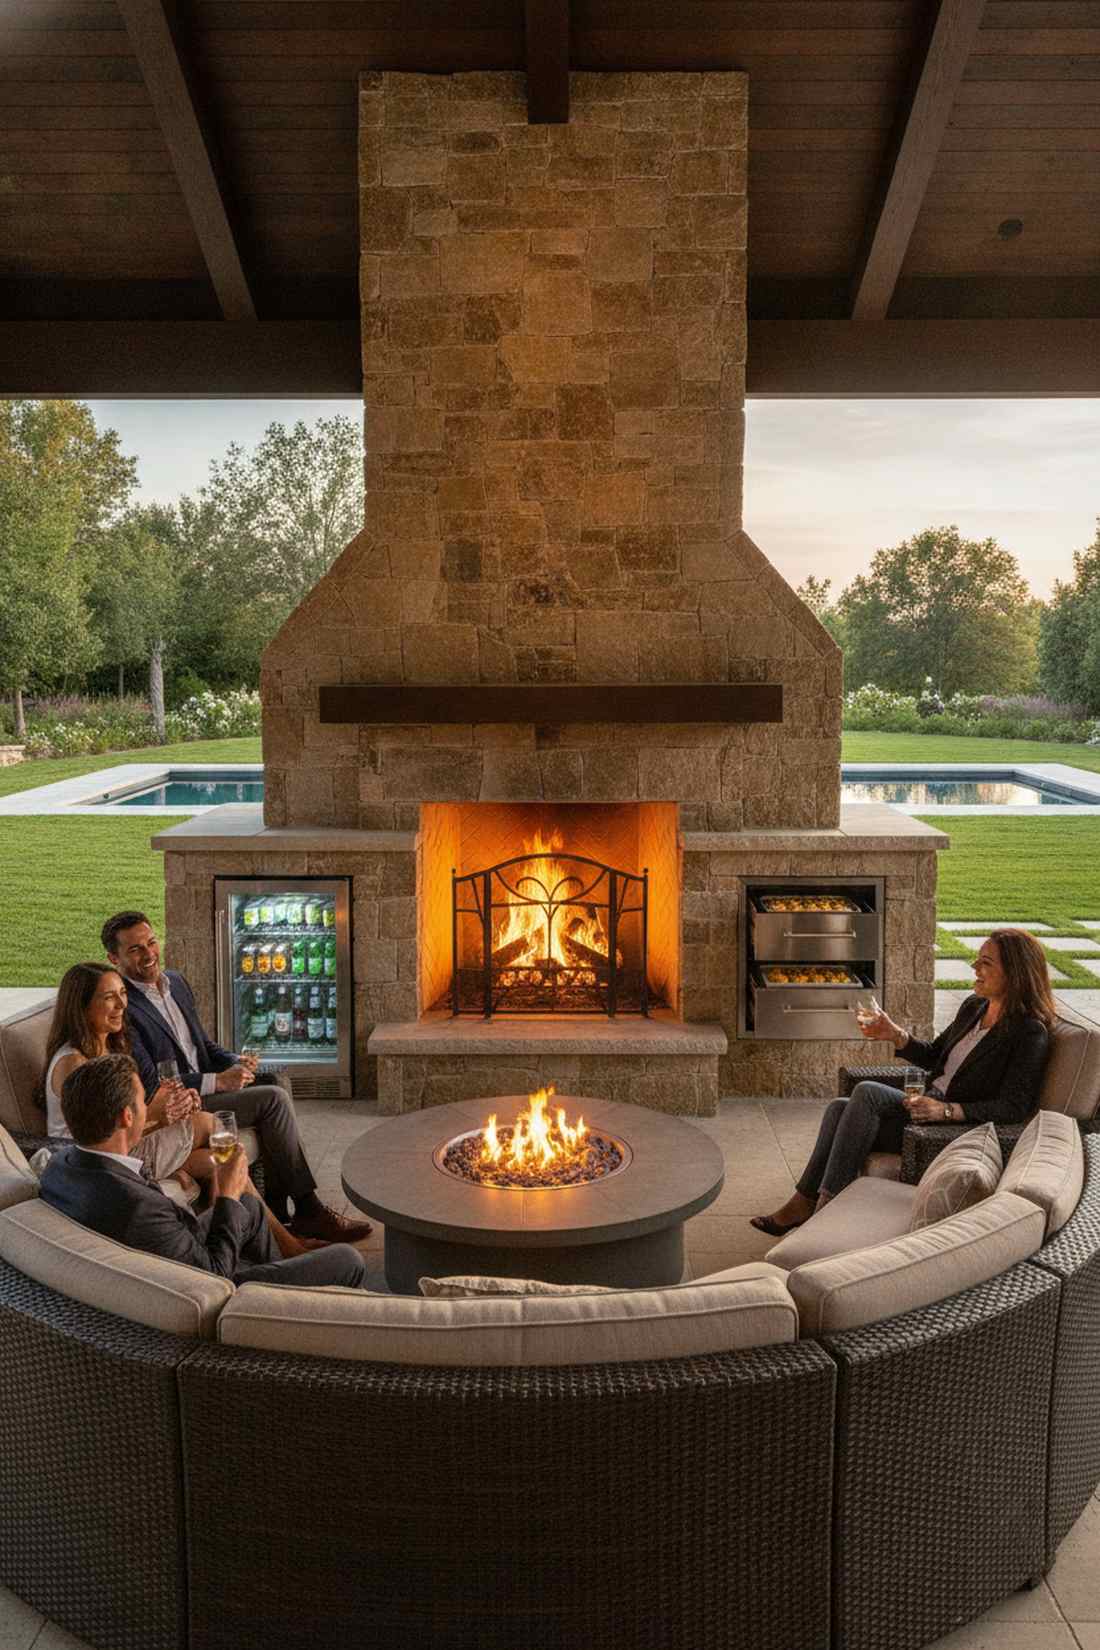
This ultimate hosting fireplace wall feels like a fully staffed catering station. The smartest upgrade for hosts who hate running back and forth into the house for cold drinks or hot appetizers.
Integrating appliances directly into the masonry surround makes the entire setup look incredibly custom and high-budget. Flanking the firebox with a stainless fridge on the left and warming drawers on the right ensures your guests never have to leave the fire.
Adding the appliance cutouts and wiring adds about $800–$1,500 to the build. Save this to your luxury backyard wish list!
- Key Materials: Outdoor-rated mini fridge, stainless warming drawers
- Vibe / Style: High-end VIP hosting
- Difficulty: Advanced appliance/electrical integration
- Budget Breakdown: Outdoor Fridge: $400 | Warming Drawer: $300.
- Creator’s Tip: Ensure the appliances have extreme weather stripping and are completely isolated from the firebox heat through insulated masonry walls.
- Smart Sourcing: outdoor-rated stainless beverage coolers, weatherproof GFCI outdoor electrical outlet kits.
Most outdoor kitchens look messy and cluttered. The layout below solves the visual chaos by lowering the profile completely.
30. Grill Station With Adjacent Fire Table
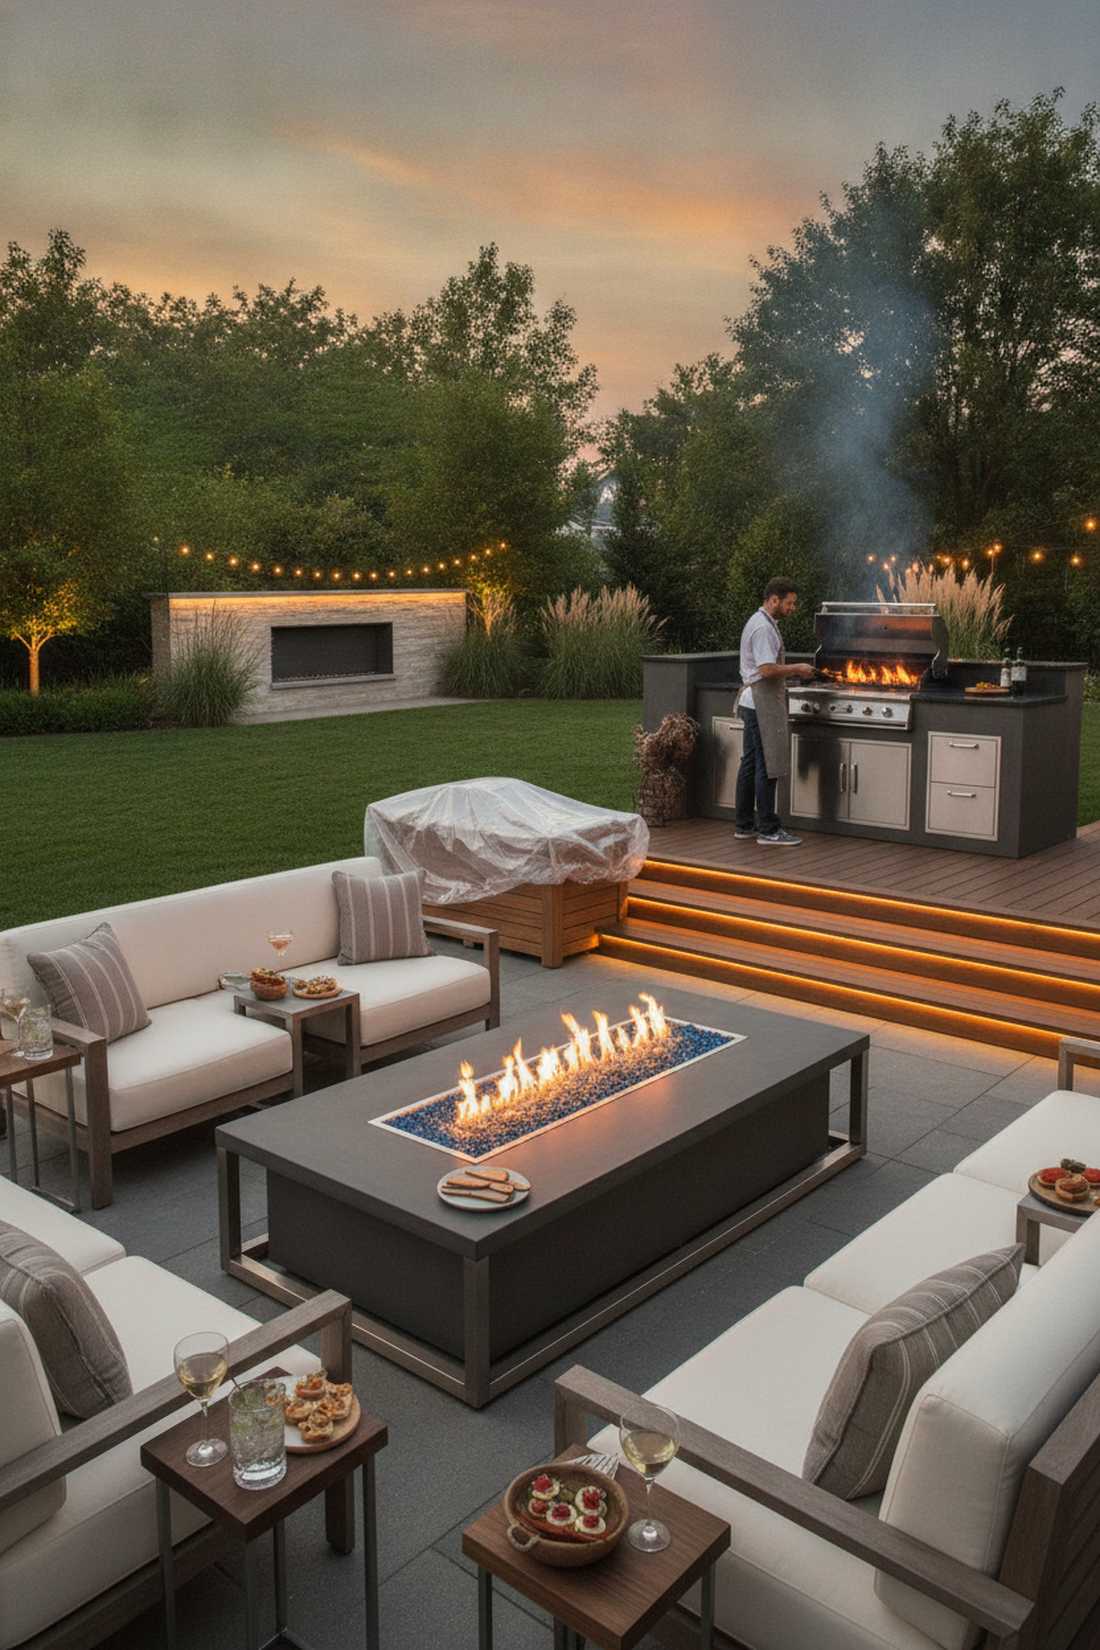
A split-level cooking and lounging zone feels like a trendy, casual tapas bar. Perfect for folks who prefer low-profile, conversational seating over staring at a towering brick chimney.
You can keep your sightlines completely open because this layout delivers a surprisingly premium look by separating the tasks. A sleek, low gas fire table gives guests a place to rest their drinks and warm their hands while you manage the heavy-duty grilling nearby.
A quality fire table addition runs about $300–$800. Highly recommended for a fast, visually clean upgrade.
- Key Materials: Freestanding gas fire table, decorative fire glass
- Vibe / Style: Casual, open-air socializing
- Difficulty: Easy placement & gas hookup
- Budget Breakdown: Gas Fire Table: $400 | Fire Glass/Accessories: $80.
- Creator’s Tip: Swap out the generic lava rocks that come with the table for vibrant, reflective fire glass to instantly elevate the aesthetic.
- Smart Sourcing: crushed reflective fire glass (10lb bulk pack), weatherproof fire table canvas covers.
Creative Architectural Fireplace Features
31. Suspended Hanging Fireplace
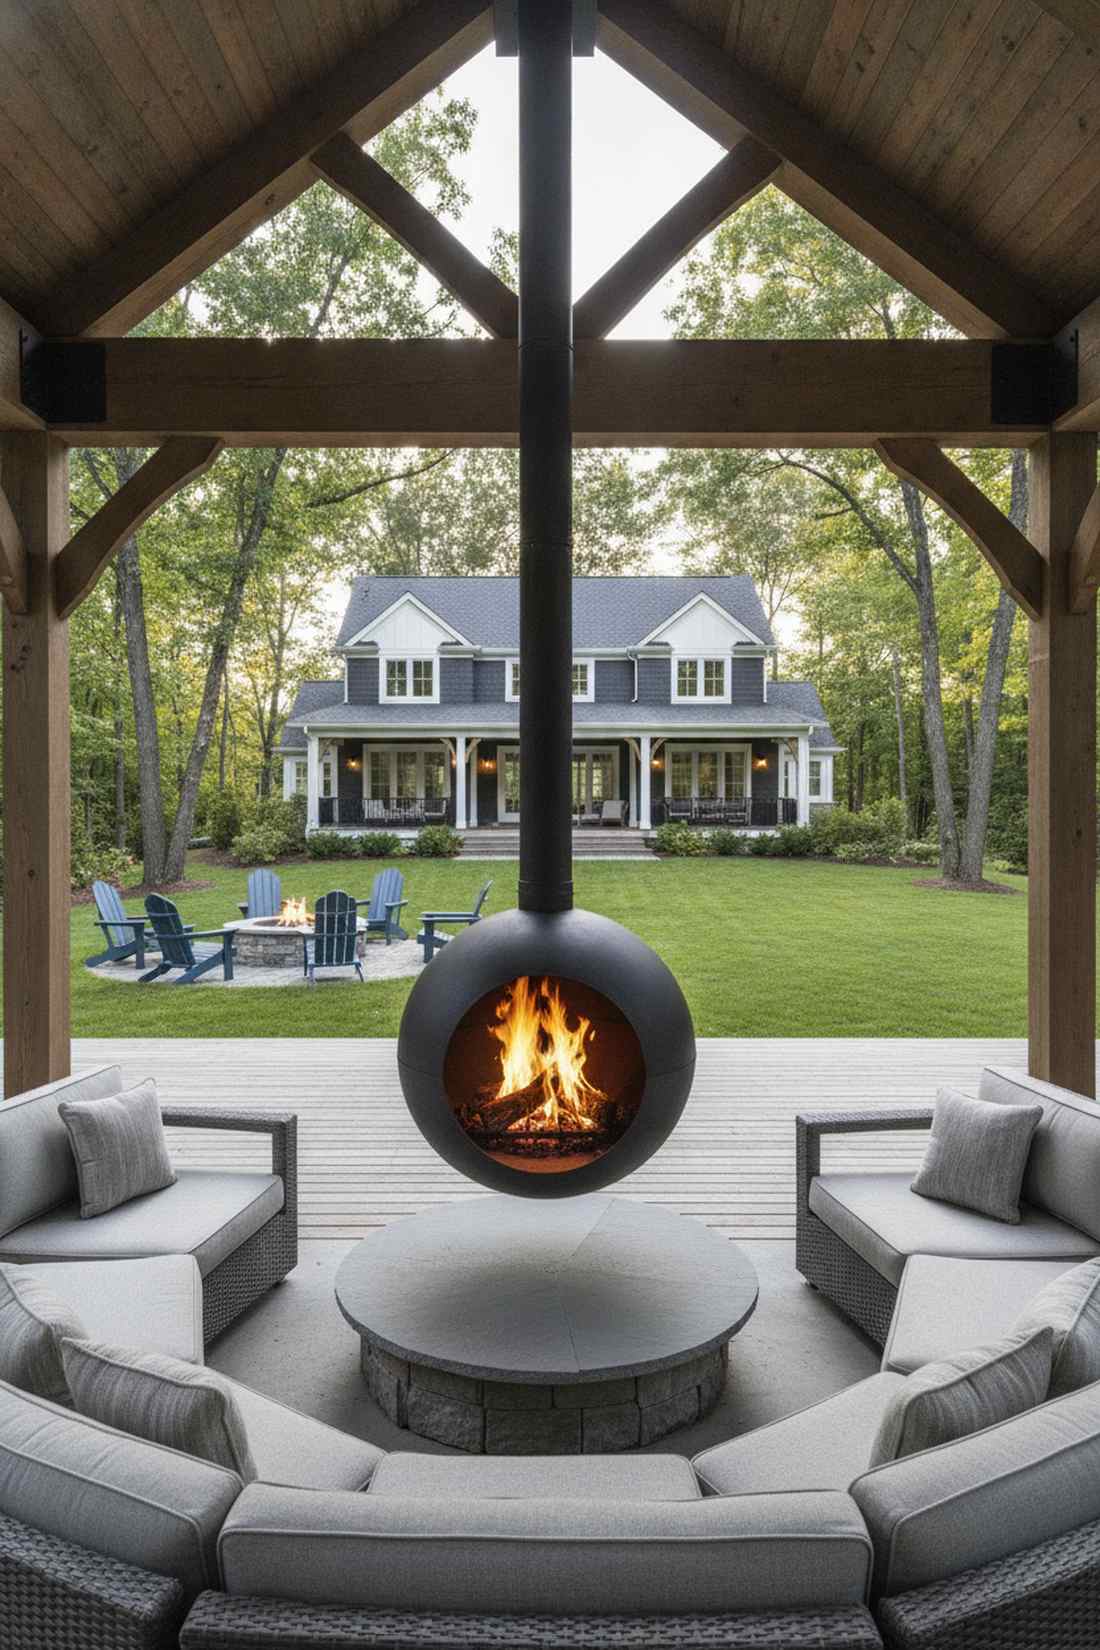
This floating metal fire orb feels like a piece of retro-futuristic art hovering in mid-air. An absolute showstopper for covered pergolas or sturdy pavilions where you want 360-degree heat radiation.
Most traditional builds anchor to the ground, but this suspended approach completely changes the aesthetic and saves your floor plan. Hanging a spun-steel firebox from a reinforced structural beam creates a mesmerizing, sculptural focal point that sparks endless conversation.
Suspended units and heavy mounting run $1,000–$2,500. Pin this if you want an unforgettable, dramatic architectural feature!
- Key Materials: Suspended steel firebox unit, heavy-duty ceiling bracket
- Vibe / Style: Retro-futuristic sculptural drama
- Difficulty: Professional structural engineering
- Budget Breakdown: Suspended Unit: $1,200 | Mounting Hardware: $150.
- Creator’s Tip: You must ensure the overhead beam is structurally engineered to carry a dynamic swinging load, not just static weight.
- Smart Sourcing: heavy-duty structural ceiling mounting brackets, high-heat matte black stove paint.
32. Waterfall and Fireplace Combination Feature
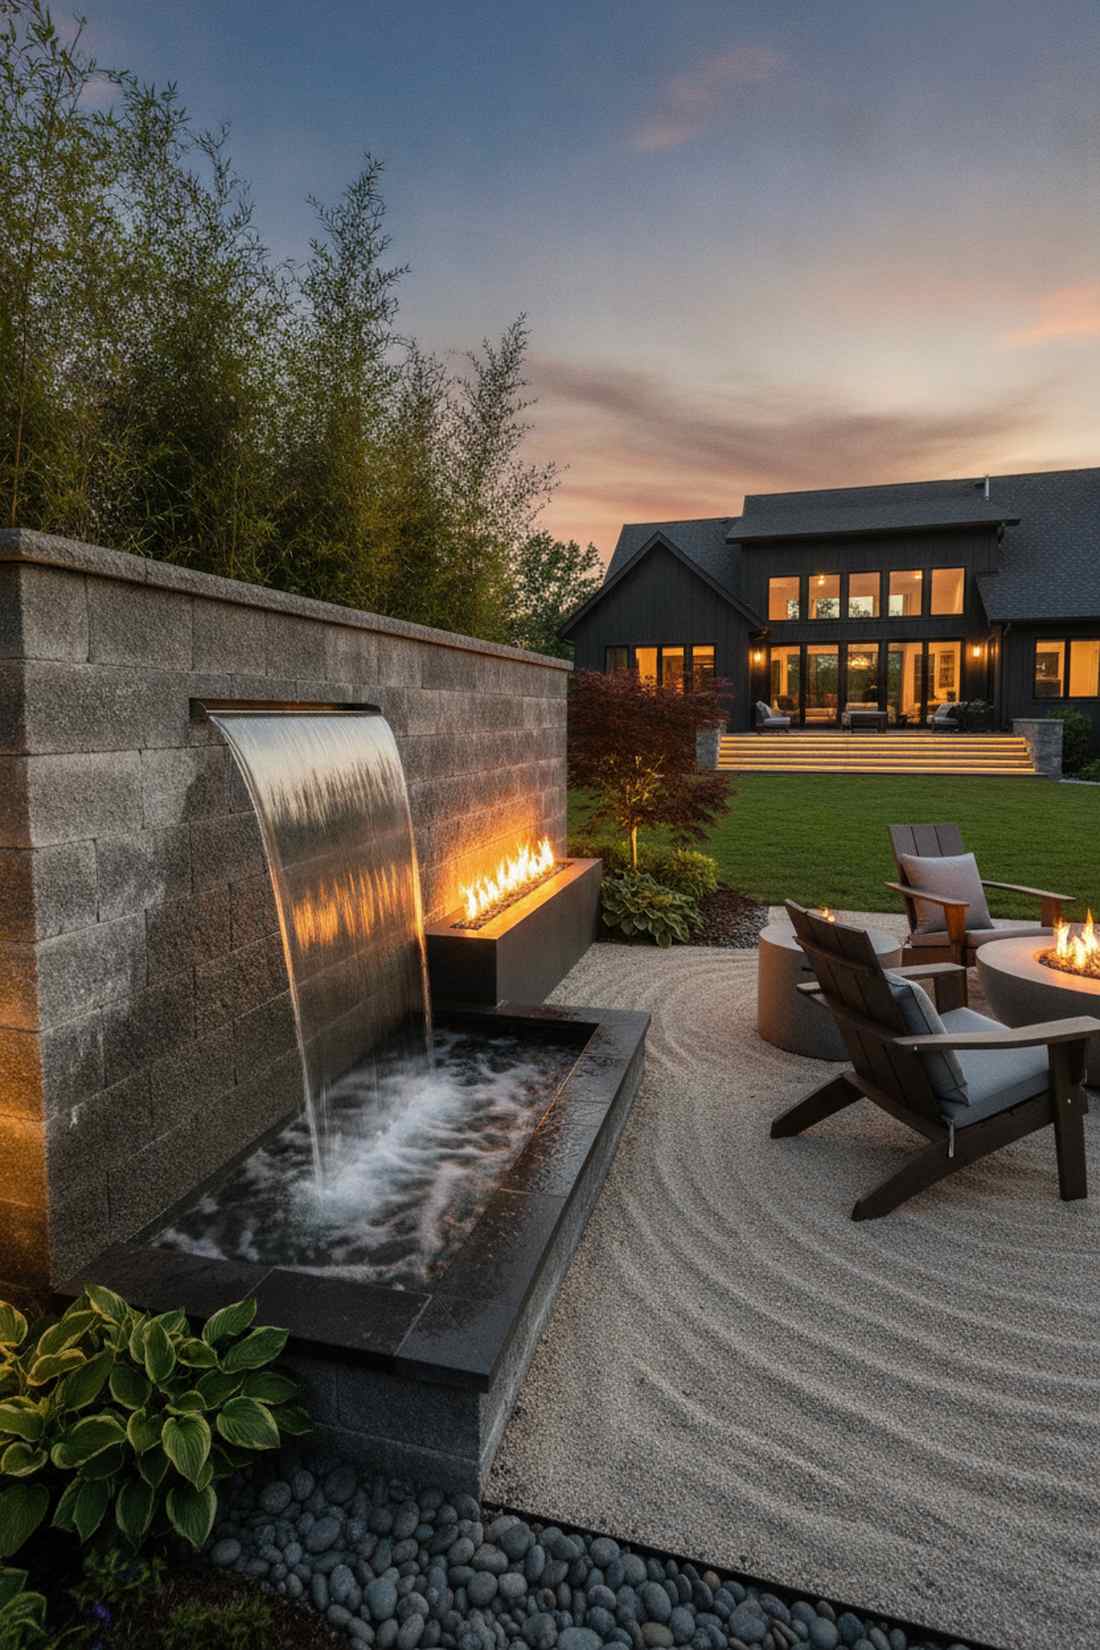
A fire and water contrast wall feels like an elemental masterpiece from a luxury spa. Incredible for drowning out annoying street traffic noise while providing a mesmerizing visual anchor.
Pairing conflicting elements together gives a designer-level finish that looks far more expensive than standard block walls. Positioning a sleek cascade blade right next to a linear fire ribbon creates a sensory overload of crackling flames and soothing water sounds.
This elemental combo typically costs $1,500–$3,000. Save this to your ultimate zen garden mood board!
- Key Materials: Stainless steel water spillway, submersible pump kit
- Vibe / Style: High-end elemental zen
- Difficulty: Advanced plumbing & gas integration
- Budget Breakdown: Spillway Kit: $300 | Fire Pan: $250 | Masonry: $400.
- Creator’s Tip: Keep the water feature upwind from the firebox so the mist doesn’t continuously blow into and extinguish your flames.
- Smart Sourcing: stainless steel waterfall spillway blades, quiet submersible pond pump kits.
33. Sculptural Metal Fire Tower

This geometric steel fire obelisk feels like a modern art installation in a high-end botanical garden. Perfect for placing at the end of a long garden path to draw the eye outward.
You can bypass standard masonry completely because this layout looks shockingly custom just by using custom-cut steel. Allowing corten steel to develop its natural, vibrant rust patina turns a simple vertical burner into a weatherproof, evolving piece of art.
A custom metal tower runs about $600–$1,200. Highly recommended for bold, contemporary landscapes.
- Key Materials: Laser-cut Corten steel panels, vertical gas burner
- Vibe / Style: Bold, artistic modernism
- Difficulty: Intermediate assembly
- Budget Breakdown: Steel Panels: $500 | Burner System: $200.
- Creator’s Tip: If using Corten steel, place it on a gravel bed—the rust runoff will permanently stain concrete or light stone pavers during the first year.
- Smart Sourcing: laser-cut metal privacy/fire panels, vertical brass gas fire jets.
34. Sunken Conversation Pit With Central Fire
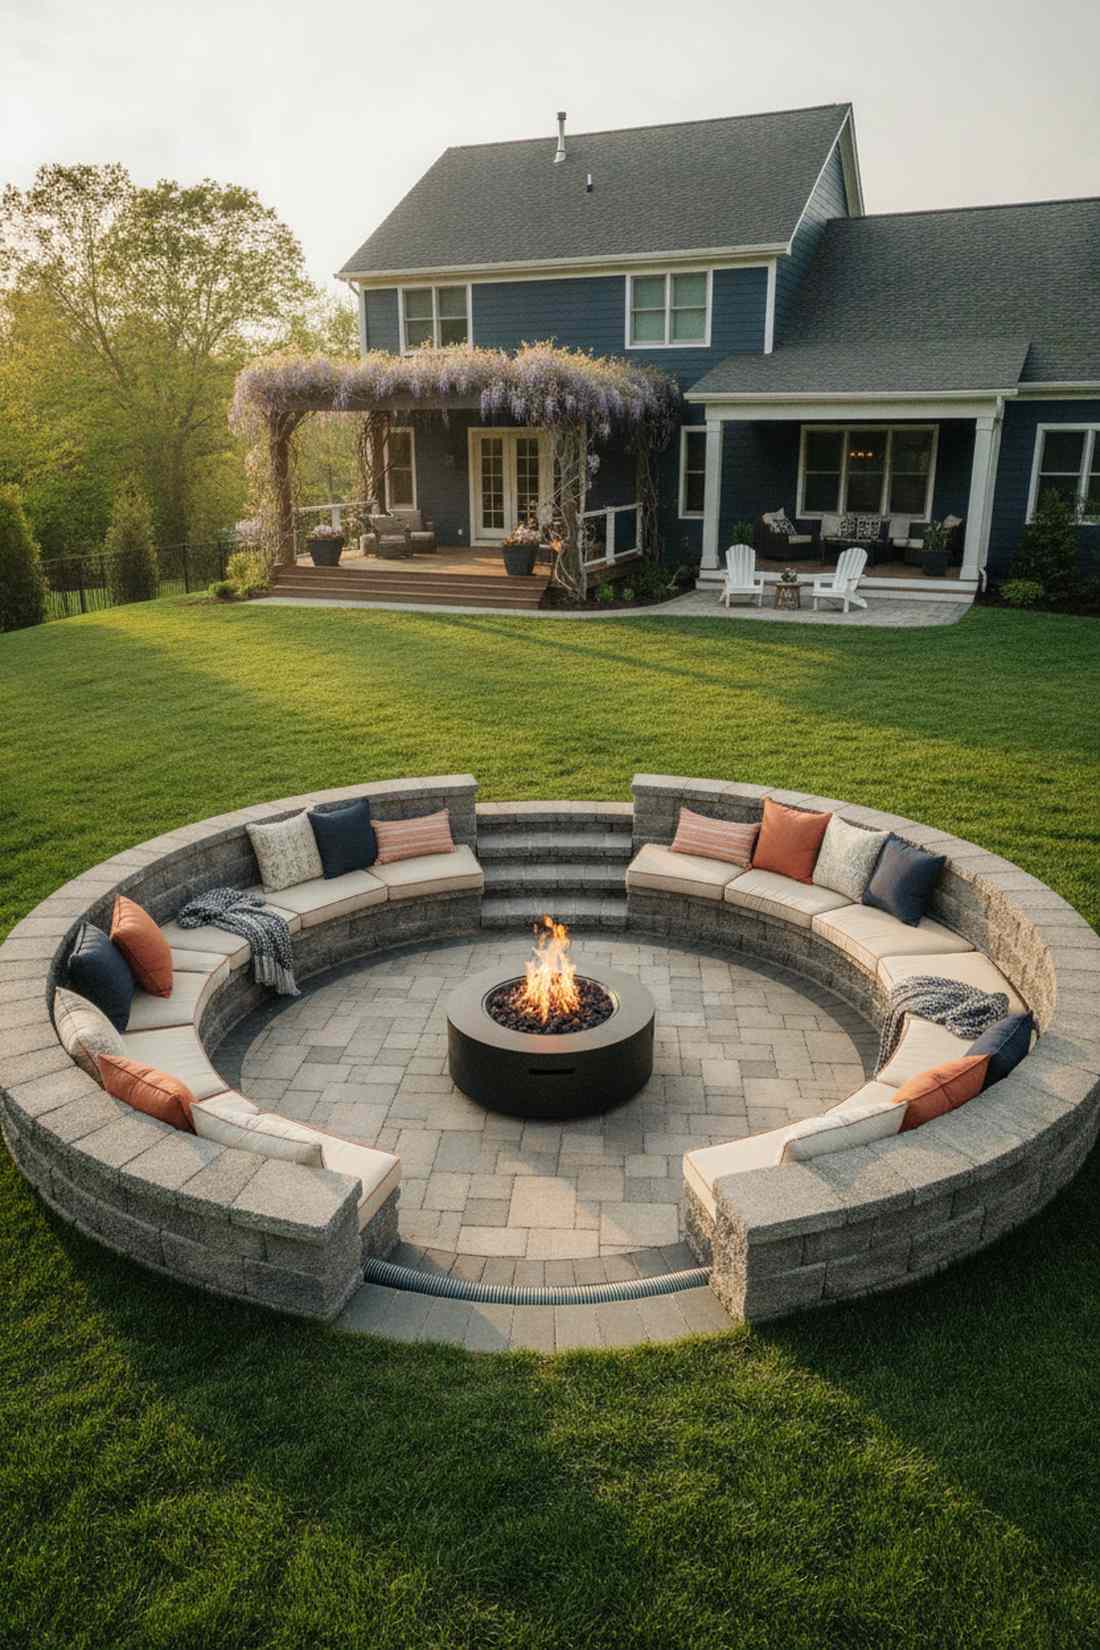
A recessed patio lounge area feels like an exclusive, intimate VIP club right in your backyard. The ultimate solution for flat yards that desperately need some vertical dimension and wind protection.
Stepping down into the space makes the entire setup look incredibly custom and high-budget. Surrounding a sleek central fire pit with built-in retaining wall benches creates a cozy, contained zone where large groups can gather without needing dozens of chairs.
Excavation and retaining walls push this build to $2,000–$4,000. Pin this to your dream backyard architecture board!
- Key Materials: Retaining wall blocks, central fire pit kit
- Vibe / Style: Intimate, structured retro-lounge
- Difficulty: Heavy excavation & structural building
- Budget Breakdown: Wall Blocks: $800 | Pavers: $600 | Fire Pit: $250.
- Creator’s Tip: You absolutely must install a French drain at the lowest point of the pit, or it will turn into a swimming pool during the first rainstorm.
- Smart Sourcing: corrugated French drain pipe kits, interlocking retaining wall block systems.
Most outdoor TVs get ruined in one season. The following setup shows you exactly how to build an entertainment wall that survives everything.
35. Fireplace With Built-In Entertainment System

This outdoor multimedia fire wall feels like a luxury sports bar combined with a cozy living room. A mandatory upgrade for homeowners who refuse to miss the big game just because they are outside.
Integrating screens outdoors is risky, but this setup delivers a surprisingly premium look that protects your tech. Recessing a weatherproof TV enclosure deep into the masonry above the mantel shields the screen from glare, rain, and rising heat.
Adding the tech protection costs around $400–$900 above the fireplace build. Save this for your ultimate game-day patio!
- Key Materials: Weatherproof TV enclosure, heavy-duty articulating mount
- Vibe / Style: High-tech entertainment hub
- Difficulty: Advanced framing & wiring
- Budget Breakdown: TV Enclosure: $300 | Articulating Mount: $80.
- Creator’s Tip: Run all your HDMI and power cables through hidden PVC conduit pipes inside the wall before the masonry goes up for a wire-free look.
- Smart Sourcing: weatherproof outdoor TV enclosure cabinets, heavy-duty full motion TV mounts.
Material Guide: Cheap vs. Premium Aesthetic
Knowing exactly where to save and where to spend makes all the difference in achieving that “looks expensive but isn’t” vibe.
- Standard vs. UV-Resistant/Premium: Standard paints and sealants peel and yellow within months outside. Upgrading to UV-coated masonry sealers ensures your concrete or stone retains its rich color against harsh sun exposure.
- Pre-made Kits vs. Sourcing Locally: While buying loose brick seems cheaper, pre-fabricated steel framing kits and pre-cut stone veneer guarantee perfect alignment and save you dozens of hours of frustrating labor.
36. Circular Stone Fireplace With Radial Seating
A 360-degree radial patio hearth feels like a modern re-imagining of an ancient tribal gathering space. Incredible for large, open clearings where you want the fire to act as the undeniable gravitational center.
Most patios use rigid squares, but this circular geometry gives a designer-level finish that encourages inclusive conversation. Using concentric circles of pavers radiating outward from the central low-profile fire bowl creates a mesmerizing, hypnotic floor pattern.
This geometric paver setup costs about $800–$1,600. Pin this to your landscape design and geometry board.
- Key Materials: Radial paver stone kits, circular fire ring insert
- Vibe / Style: Symmetrical, inclusive elegance
- Difficulty: Intermediate paver cutting
- Budget Breakdown: Radial Pavers: $600 | Fire Bowl Insert: $150.
- Creator’s Tip: Buy a pre-designed “circle paver kit” rather than trying to hand-cut hundreds of rectangular bricks into perfect wedges.
- Smart Sourcing: pre-cut circular patio paver kits, heavy-duty steel fire bowl inserts.
37. Fireplace Wall With Arched Niches and Display Shelves
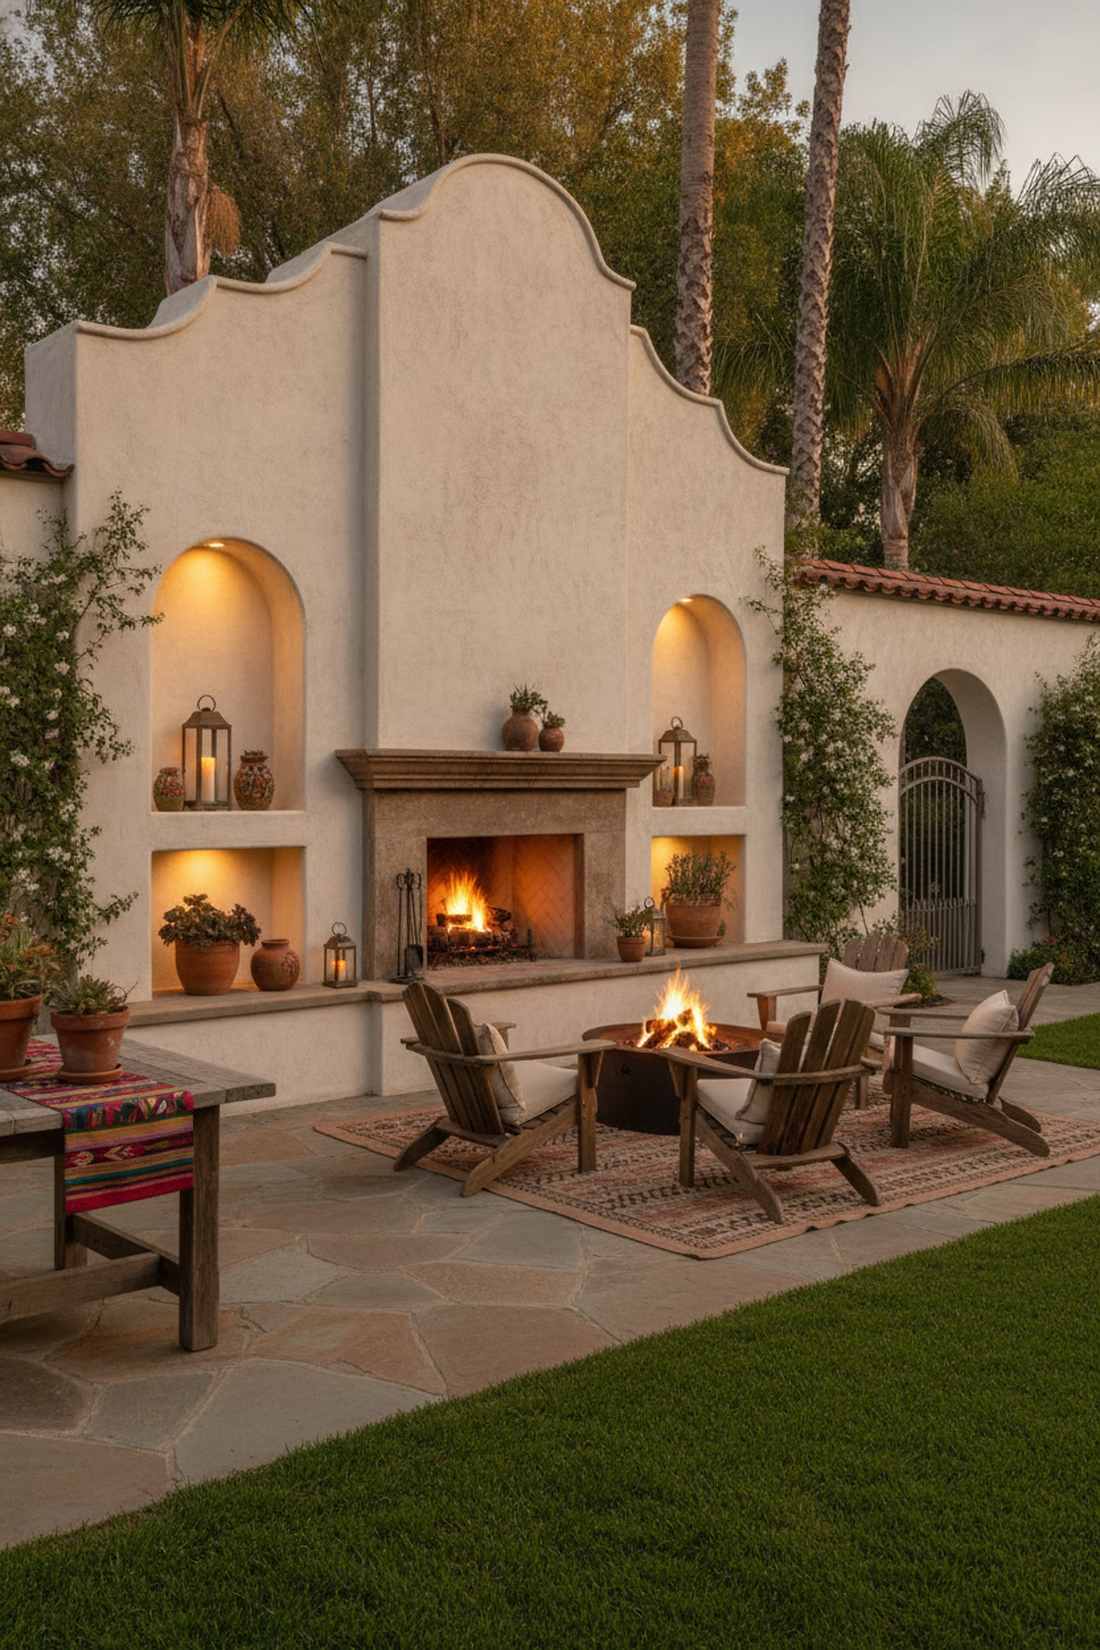
This sculpted stucco display wall feels like a romantic hacienda courtyard bathed in candlelight. Perfect for expansive, blank property walls that need architectural depth and a place to showcase potted succulents.
You can turn a boring flat wall into a masterpiece because this layout looks far more expensive than it is by simply carving out voids. Framing arched niches into the sides of the fireplace surround gives you built-in, illuminated shelves for art and lanterns.
Framing and stuccoing these details runs about $400–$800. It is a fantastic way to add immense character to a plain boundary wall!
- Key Materials: Flexible arch framing track, outdoor stucco finish
- Vibe / Style: Romantic Spanish colonial
- Difficulty: Advanced framing and plastering
- Budget Breakdown: Arch Tracks: $100 | Stucco/Mesh: $150.
- Creator’s Tip: Hide a tiny, waterproof LED puck light at the top inside of each arch to wash your displayed items in dramatic downlighting.
- Smart Sourcing: flexible steel arch framing tracks, waterproof LED puck light kits.
38. Fire and Ice Combination With Fire Glass
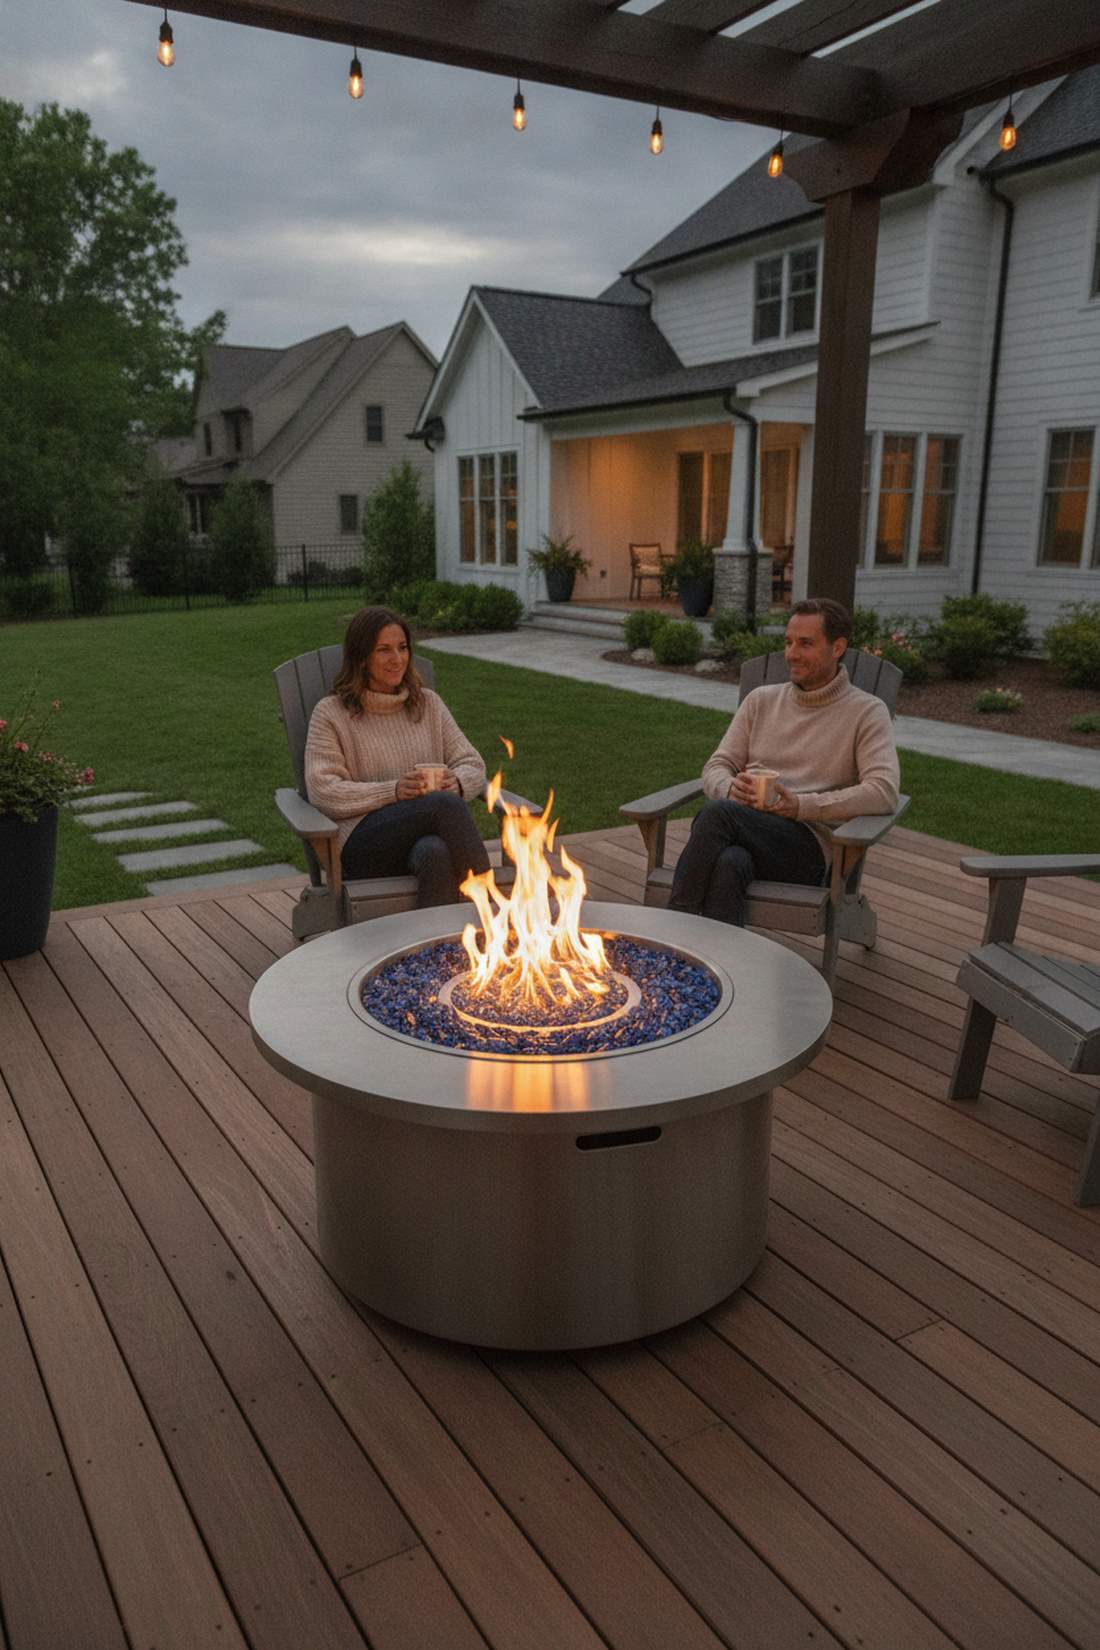
A crushed glass reflective burner feels like a brilliant jewelry box exploding with light. The absolute fastest way to modernize an old, boring gas fire pit that currently has dusty fake logs.
Ditching the fake wood delivers a surprisingly premium look and instantly upgrades the entire aesthetic. Filling the burner pan with cobalt blue or copper reflective tempered glass creates a mesmerizing “fire and ice” contrast that dazzles even when unlit.
Swapping to premium glass costs just $50–$120. Highly recommended for a massive visual impact on a tiny budget.
- Key Materials: Reflective tempered fire glass, stainless steel burner pan
- Vibe / Style: Glitzy, modern pop
- Difficulty: Zero setup (just pour)
- Budget Breakdown: 20lbs Fire Glass: $60 | Burner Cleaning: $0.
- Creator’s Tip: Put a layer of cheap lava rock at the very bottom of the deep pan, and only use the expensive glass for the top two visible inches.
- Smart Sourcing: premium reflective tempered fire glass (bulk pack), stainless steel gas burner cleaning brushes.
39. Fireplace With Integrated Planters and Green Wall
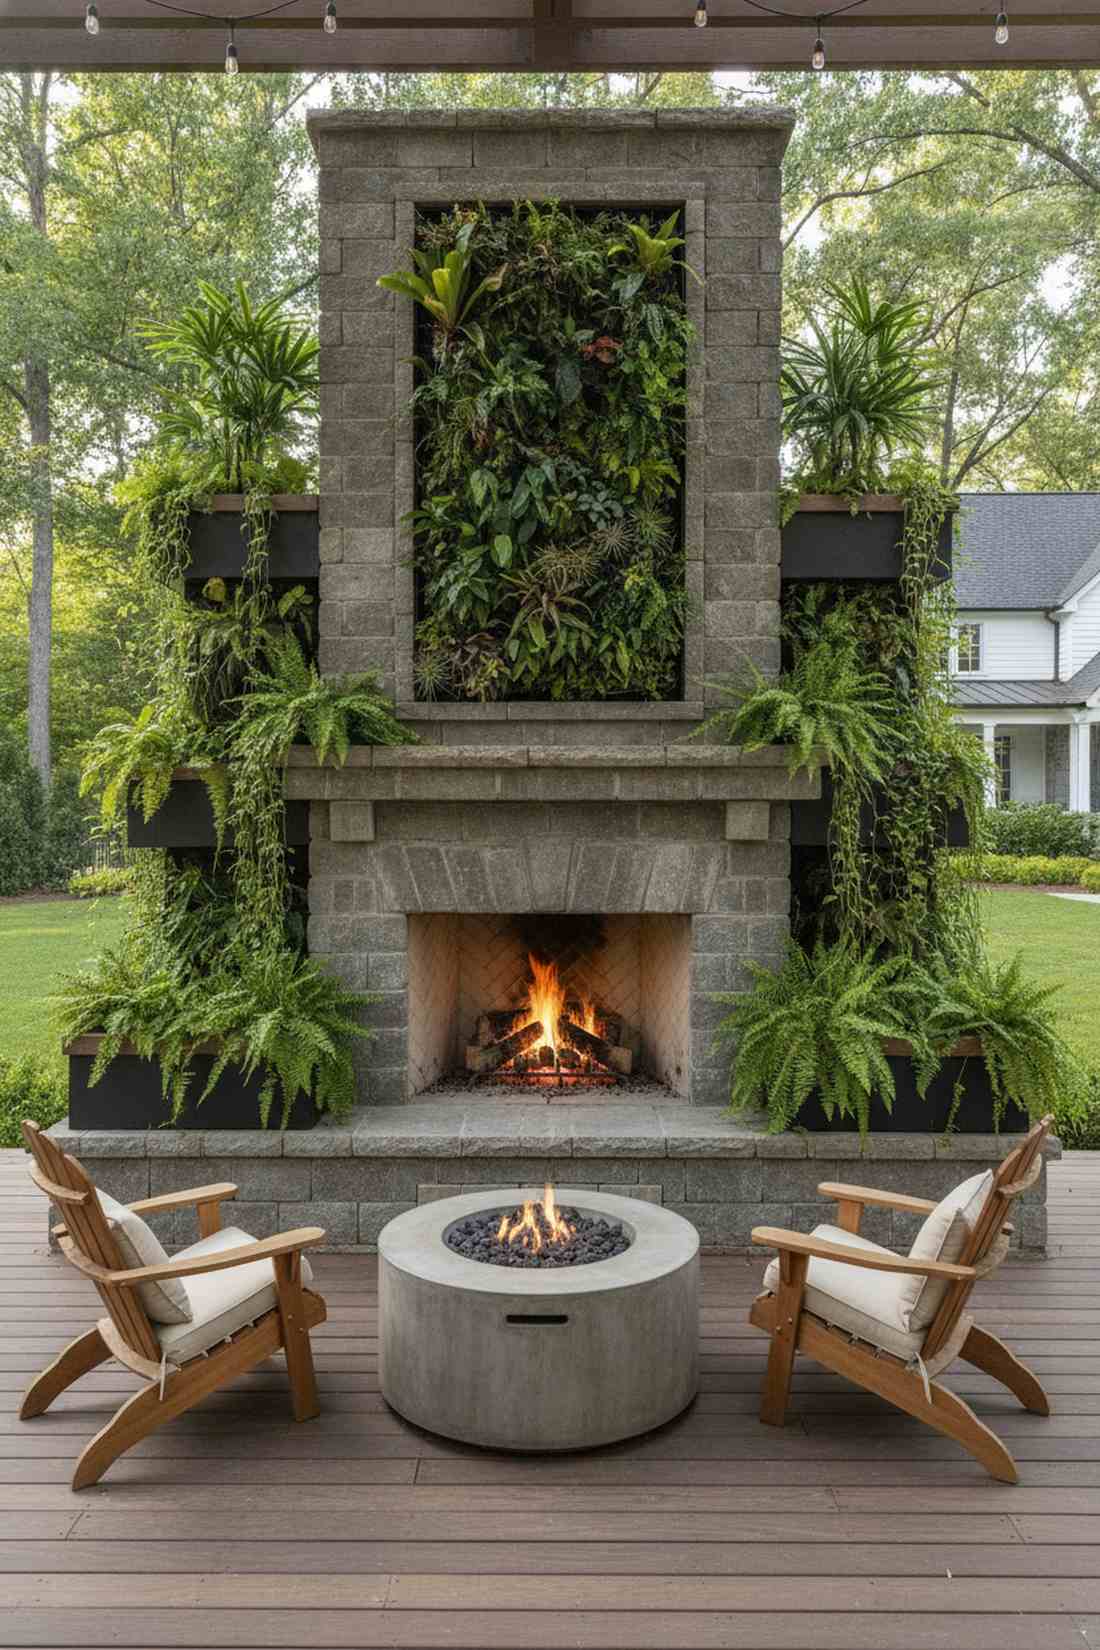
This living green fire structure feels like an ancient ruin reclaimed by a lush tropical jungle. Exceptional for softening hard masonry lines and bringing vibrant, living color directly into your heat source.
Most stone blocks look cold, but this layout makes the entire setup look incredibly custom by fusing nature with architecture. Building deep, waterproofed planter boxes into the stepped sides of the chimney allows trailing vines to cascade beautifully down the stone.
Adding built-in planters costs around $200–$400 in materials. Pin this if you love blending botany with hardscaping!
- Key Materials: Rubberized waterproofing membrane, cascading greenery
- Vibe / Style: Lush, overgrown modern ruin
- Difficulty: Intermediate masonry & waterproofing
- Budget Breakdown: Waterproofing Paint: $50 | Soil & Trailing Plants: $100.
- Creator’s Tip: You must coat the inside of the masonry planters with a thick liquid rubber membrane before adding soil to stop moisture from rotting the wall.
- Smart Sourcing: liquid rubber waterproofing sealant (gallon), automatic micro-drip irrigation kits.
Most flat patios feel boring because they lack elevation. The next layout fixes that by stacking functionality into layers.
40. Multi-Level Fireplace With Tiered Hearths
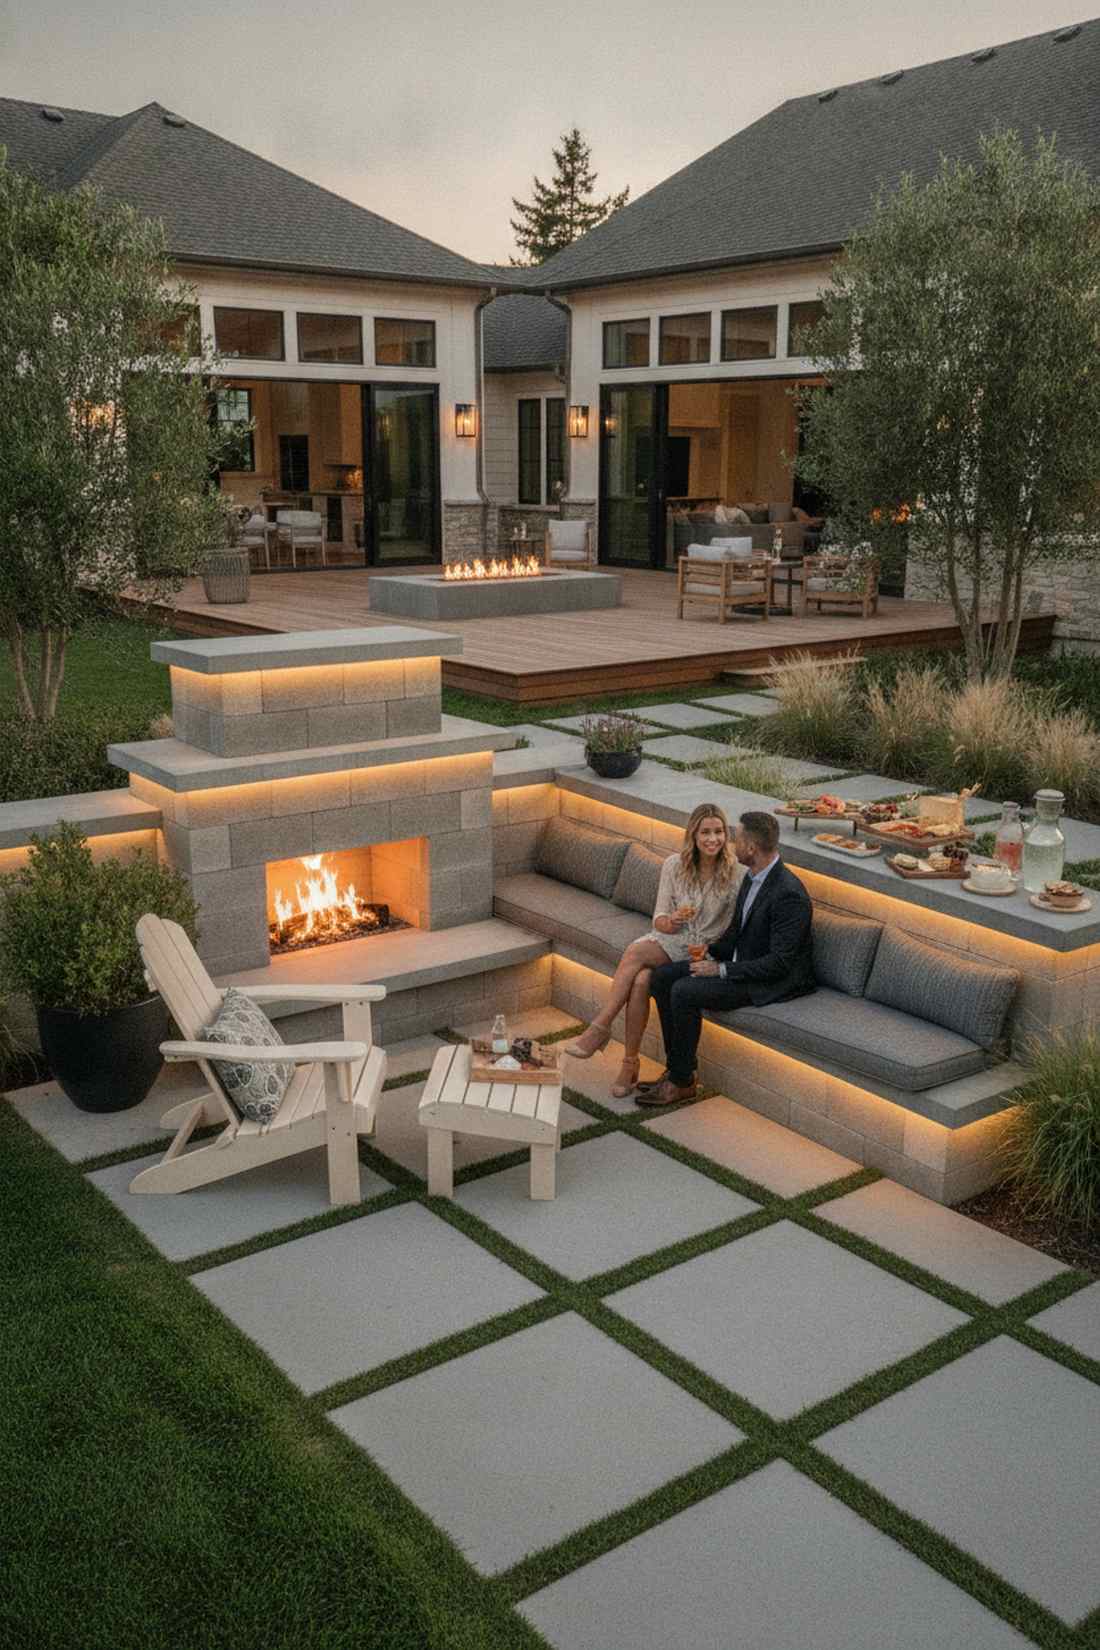
A stepped multi-level patio hearth feels like a beautifully terraced modern amphitheater. Brilliant for accommodating large, chaotic gatherings where people need different heights to sit, stand, and rest their drinks.
This approach solves seating shortages, giving a designer-level finish by utilizing cascading asymmetrical block steps. The lowest tier acts as a footrest, the middle as a warm bench, and the highest ledge becomes a stylish buffet for evening appetizers.
Building out these extra tiers adds about $300–$600. Save this for your large-scale entertaining blueprints!
- Key Materials: Cinder blocks, smooth concrete capstones
- Vibe / Style: Dynamic, multi-functional modernism
- Difficulty: Intermediate block stacking
- Budget Breakdown: Extra Blocks: $150 | Capstones & Mortar: $200.
- Creator’s Tip: Run a continuous strip of waterproof LED tape light under the lip of every single tier for an insane glowing staircase effect at night.
- Smart Sourcing: smooth pre-cast concrete capstones (bulk pack), outdoor waterproof LED strip light kits.
41. Rustic Fire Ring With Stone Bench Wall
This curved stone campfire bench feels like a permanent, upscale version of your favorite national park fire pit. Ideal for sloped backyards where the seating wall can actually double as a vital dirt-retaining structure.
You can ditch the flimsy lawn chairs because this unified construction looks far more expensive while permanently solving your seating issues. Wrapping a semi-circle of heavy landscape blocks around a central ring creates a cohesive, indestructible gathering zone.
This heavy block build typically runs $500–$1,000. Pin this to your durable outdoor landscape board.
- Key Materials: Trapezoidal landscape blocks, steel fire ring
- Vibe / Style: Rugged, permanent campout
- Difficulty: Heavy lifting, beginner stacking
- Budget Breakdown: Wall Blocks: $400 | Steel Ring: $80.
- Creator’s Tip: Ensure the seating wall is exactly 18 inches high—this is the universal ergonomic sweet spot for comfortable patio seating without cushions.
- Smart Sourcing: trapezoidal retaining wall blocks (pallet), heavy-duty steel fire pit rim inserts.
42. Modern Fireplace With Water Basin Surround
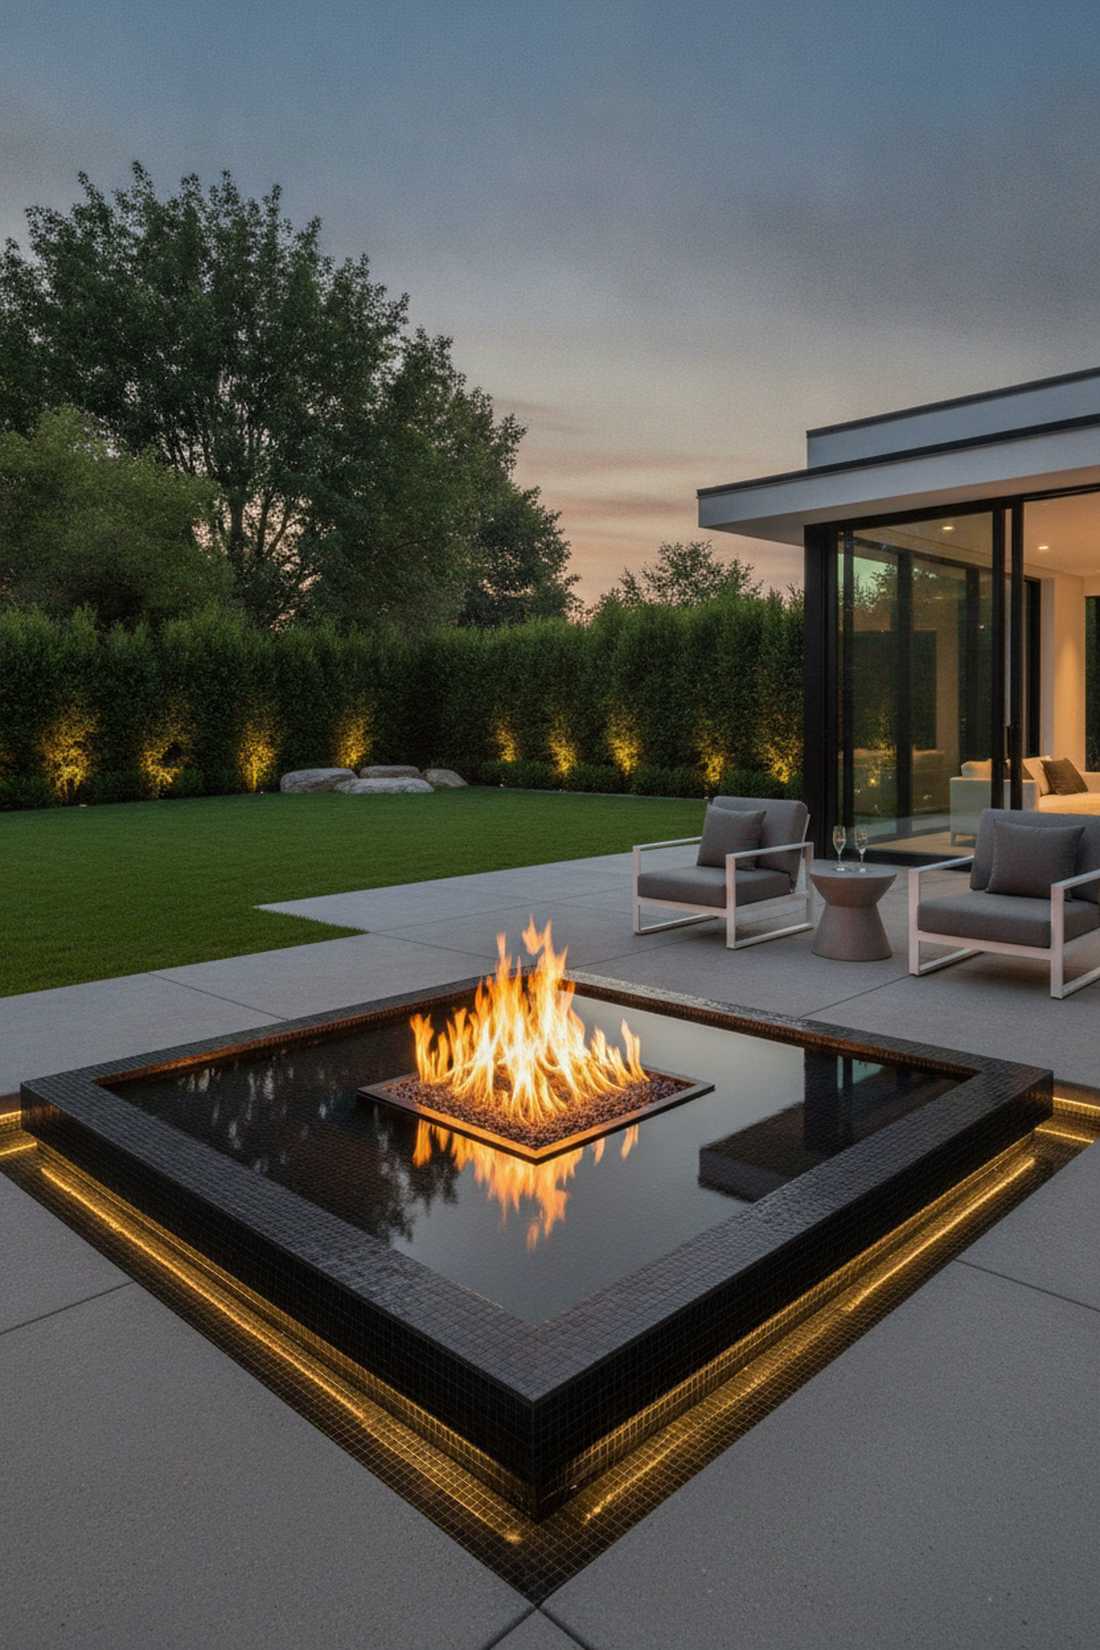
A floating fire pit moat feels like an ultra-luxurious reflecting pool at a modern art museum. The absolute pinnacle of high-concept design for contemporary homes that want to leave guests speechless.
This layout demands precision, delivering a surprisingly premium look by forcing the fire to “float” inside a shallow pool of dark water. The black basin creates a perfect mirror, reflecting the flickering flames downward and doubling the ambient light.
Creating this waterproof basin setup costs $1,000–$2,500. Save this if you are chasing uncompromising modern luxury!
- Key Materials: Pond liner membrane, dark basin tile, central gas burner
- Vibe / Style: High-concept architectural luxury
- Difficulty: Professional waterproofing required
- Budget Breakdown: Waterproofing: $300 | Dark Tile: $400 | Burner: $300.
- Creator’s Tip: Tile the inside of the water basin in matte black to hide debris and create a flawless, highly reflective mirror surface.
- Smart Sourcing: flexible rubber pond liner membranes, matte black porcelain mosaic tiles.
Lighting and Ambiance Enhancements
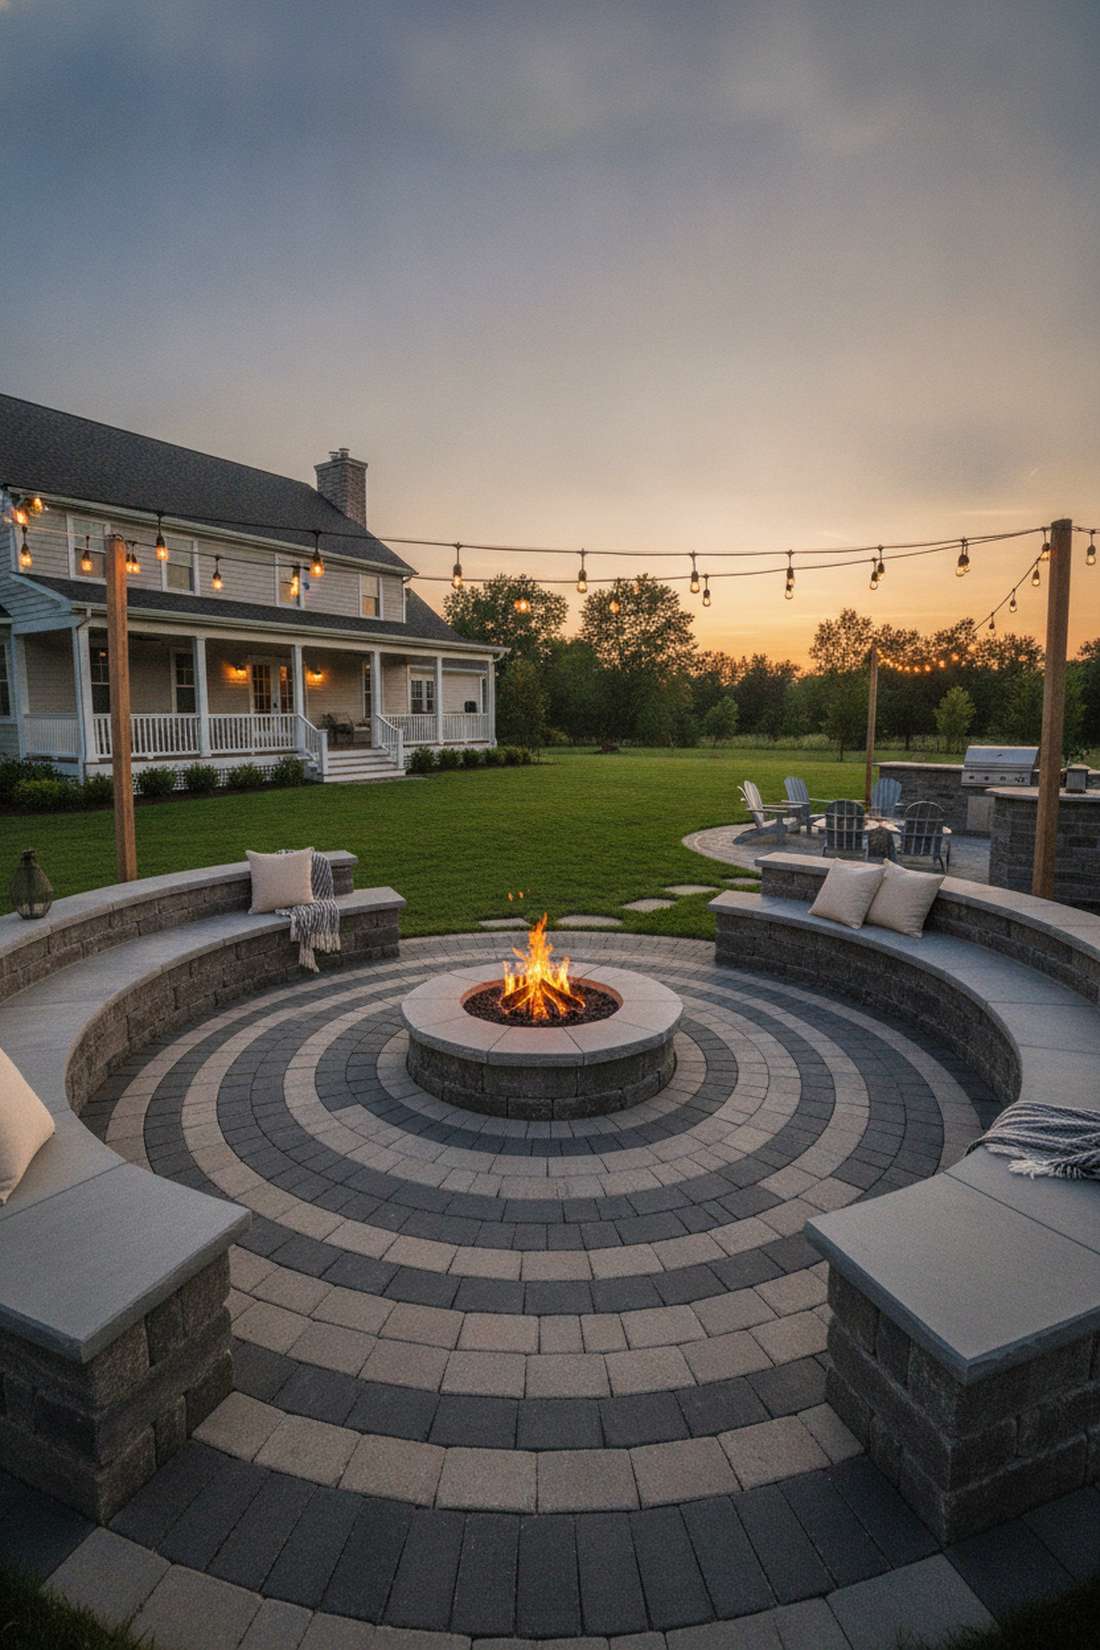
43. String Lights Overhead With Fireplace Focal Point
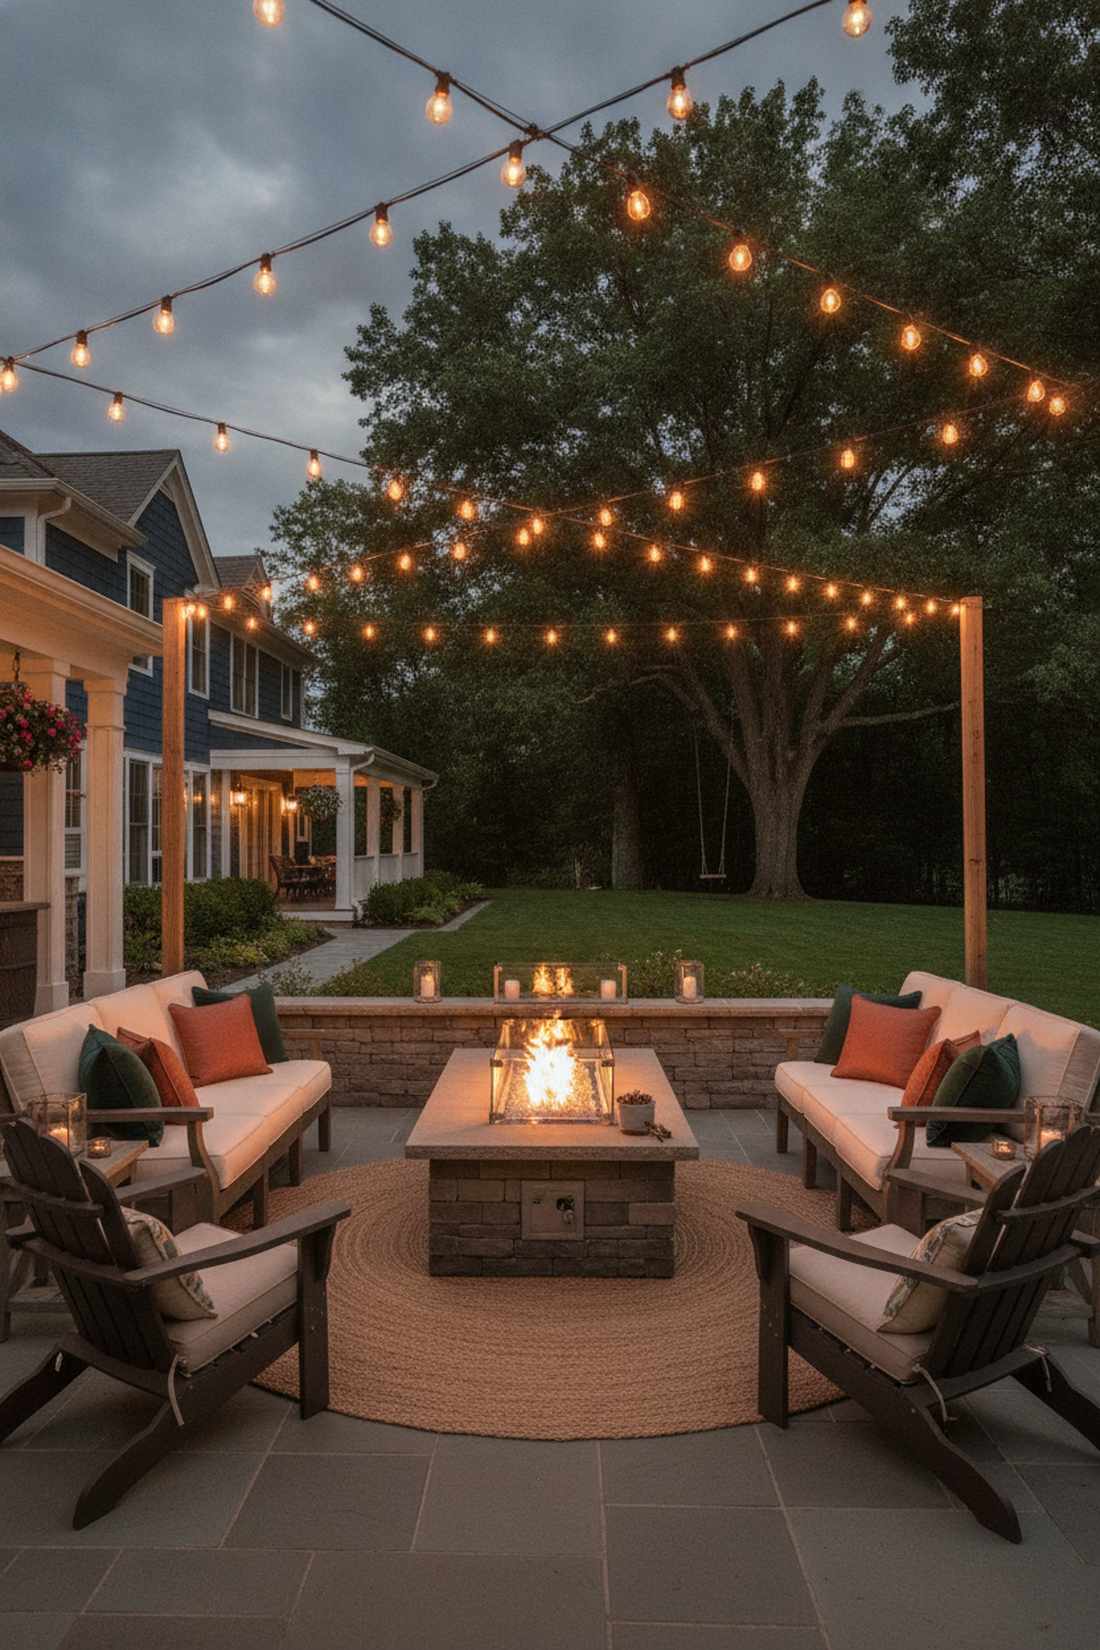
This glowing overhead patio canopy feels like a romantic European bistro at twilight. The easiest and most effective way to eliminate harsh shadows and create a cozy ceiling over an open-air fire pit.
You don’t need a physical roof because this layout gives a designer-level finish by creating a perceived ceiling out of pure light. Stringing commercial-grade Edison bulbs in a zig-zag pattern above the fireplace bathes the entire seating area in a soft, flattering amber glow.
You can achieve this magical atmosphere for just $50–$150. Highly recommended for an instant vibe upgrade.
- Key Materials: Commercial-grade outdoor string lights, mounting hooks
- Vibe / Style: Romantic, festive bistro
- Difficulty: Easy aerial hanging
- Budget Breakdown: String Lights: $60 | Hardware/Poles: $40.
- Creator’s Tip: Plug the string lights into a smart outdoor dimmer switch so you can lower the brightness to perfectly match the intensity of the fire.
- Smart Sourcing: shatterproof LED outdoor string lights (bulk length), weatherproof outdoor smart dimmer plugs.
44. Uplighting To Highlight Fireplace Architecture
A dramatic architectural wash lighting feels like a professionally staged movie set. Absolutely critical for making sure your expensive masonry work still looks impressive long after the sun goes down.
Most yards go completely dark, but this lighting trick makes the entire setup look incredibly custom and imposing. Placing low-voltage LED spotlights at the base of the chimney and aiming them upward grazes the stone, creating massive, dramatic shadows along the texture.
Adding a few spotlights costs around $80–$200. Pin this to your landscape lighting inspiration board!
- Key Materials: Low-voltage LED spotlights, landscape wiring
- Vibe / Style: Imposing, dramatic staging
- Difficulty: Beginner-friendly wiring
- Budget Breakdown: Spotlight Kit: $120 | Transformer: $40.
- Creator’s Tip: Use a warm 2700K color temperature bulb for your uplights so the beam perfectly matches the warm, orange hue of the fire.
- Smart Sourcing: low-voltage brass landscape spotlight kits, outdoor lighting transformers with timers.
You’ve built the structure, but a cold patio still feels unwelcoming. This final layer of detail turns a nice fireplace into a magazine-worthy sanctuary.
45. Lanterns and Candles For Layered Fire Glow
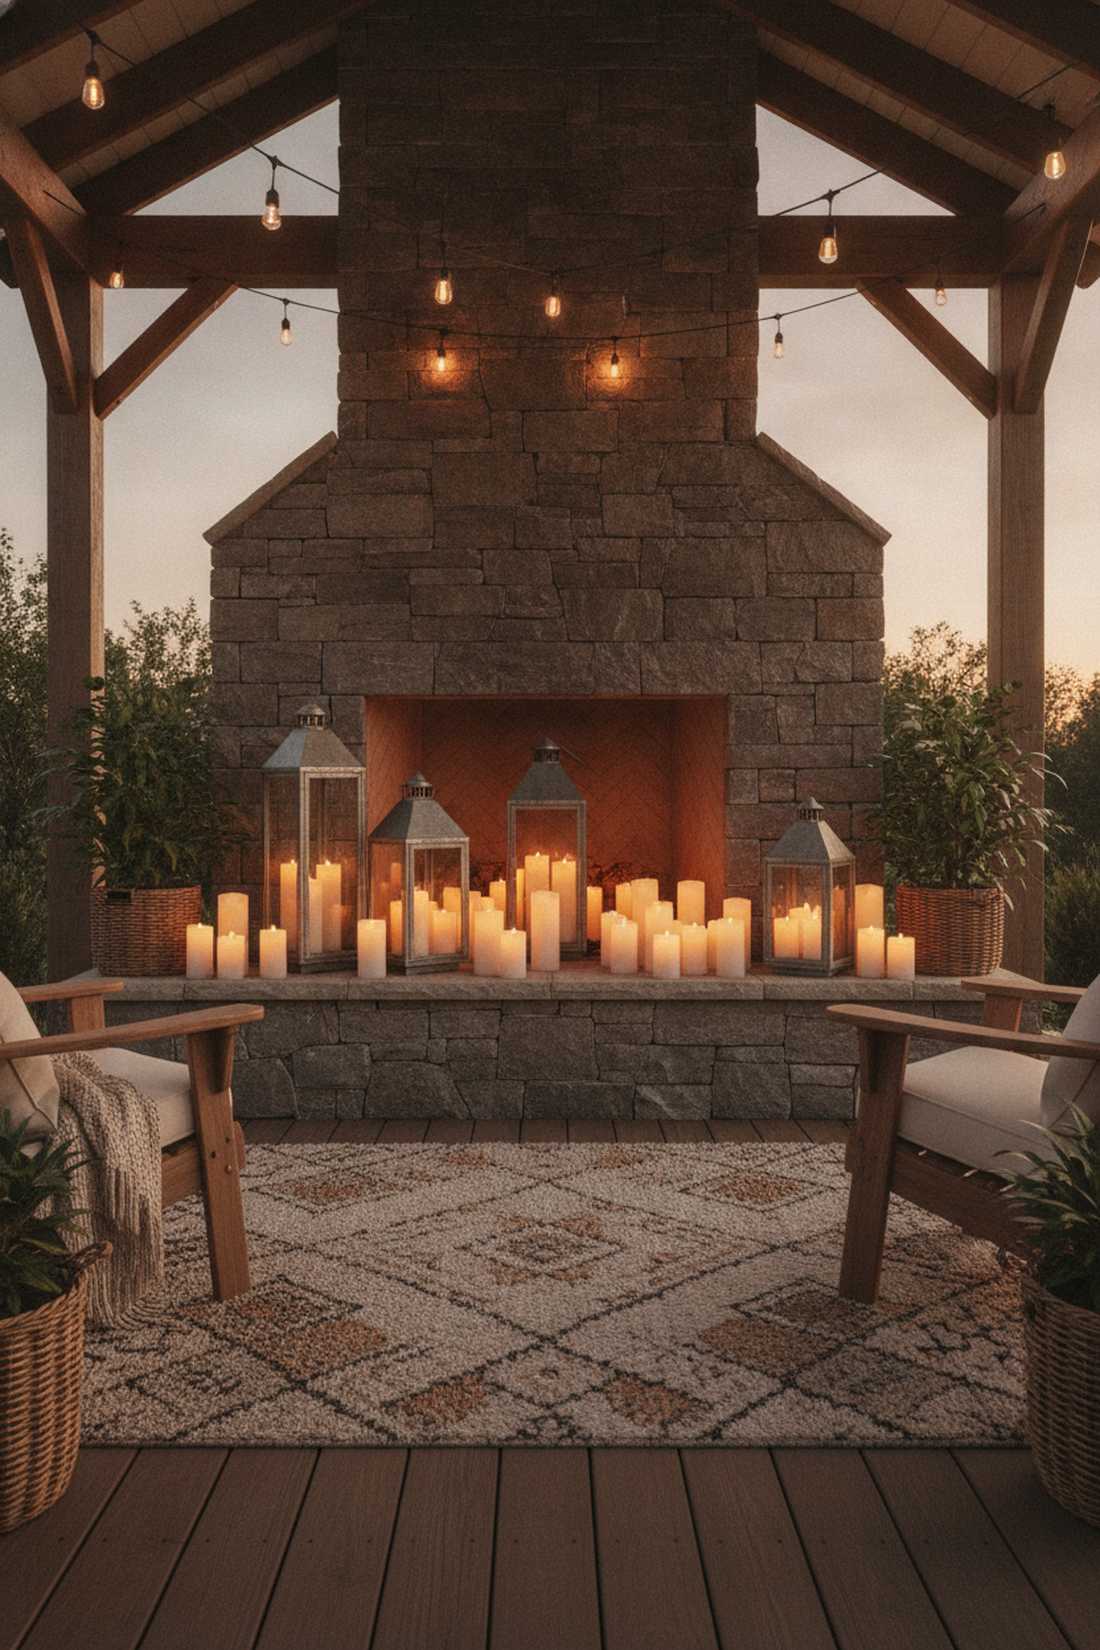
This multi-layered flickering hearth display feels like a cozy, bohemian sanctuary. Perfect for filling up the empty floor space around the hearth and adding visual warmth even when you don’t want to light a massive fire.
This simple styling trick delivers a surprisingly premium look by clustering different light sources together. Grouping varying heights of metal lanterns with waterproof battery-operated candles creates an effortless, romantic depth that softens the hard masonry edges.
You can style the entire hearth for about $60–$120. Save this for your final outdoor styling touches!
- Key Materials: Assorted metal lanterns, waterproof flameless candles
- Vibe / Style: Cozy, layered boho-chic
- Difficulty: Zero setup (just style)
- Budget Breakdown: Lantern Trio: $70 | Flameless Candles: $30.
- Creator’s Tip: Always group lanterns in odd numbers (3 or 5) and vary the heights drastically for the most natural, designer-approved aesthetic.
- Smart Sourcing: waterproof outdoor flameless candle sets (with remote), decorative galvanized outdoor lanterns (bulk pack).
46. Integrated LED Strips In Fireplace Surround
A hidden glowing mantel edge feels like a sleek, high-tech modern lounge. The absolute best way to add a crisp, futuristic outline to contemporary concrete or smooth stone fireplaces without visible, ugly bulbs.
You can ditch the bulky fixtures because this hidden approach gives a designer-level finish that looks like it belongs in a luxury hotel. Tucking waterproof LED tape lights under the mantel lip or hearth overhang provides a seamless, indirect neon glow.
Adding this hidden tech glow costs just $40–$100. Pin this to your modern outdoor tech board!
- Key Materials: IP67 waterproof LED strip lights, aluminum diffuser channels
- Vibe / Style: Crisp, futuristic luxury
- Difficulty: Easy peel-and-stick wiring
- Budget Breakdown: Waterproof Strip: $40 | Aluminum Channels: $30.
- Creator’s Tip: Always install the LED strips inside an aluminum channel with a frosted cover—this eliminates individual dot reflections on glossy patio surfaces.
- Smart Sourcing: IP67 waterproof outdoor LED strip kits, aluminum LED diffuser channel packs.
47. Pathway Lighting Leading To Fireplace Retreat
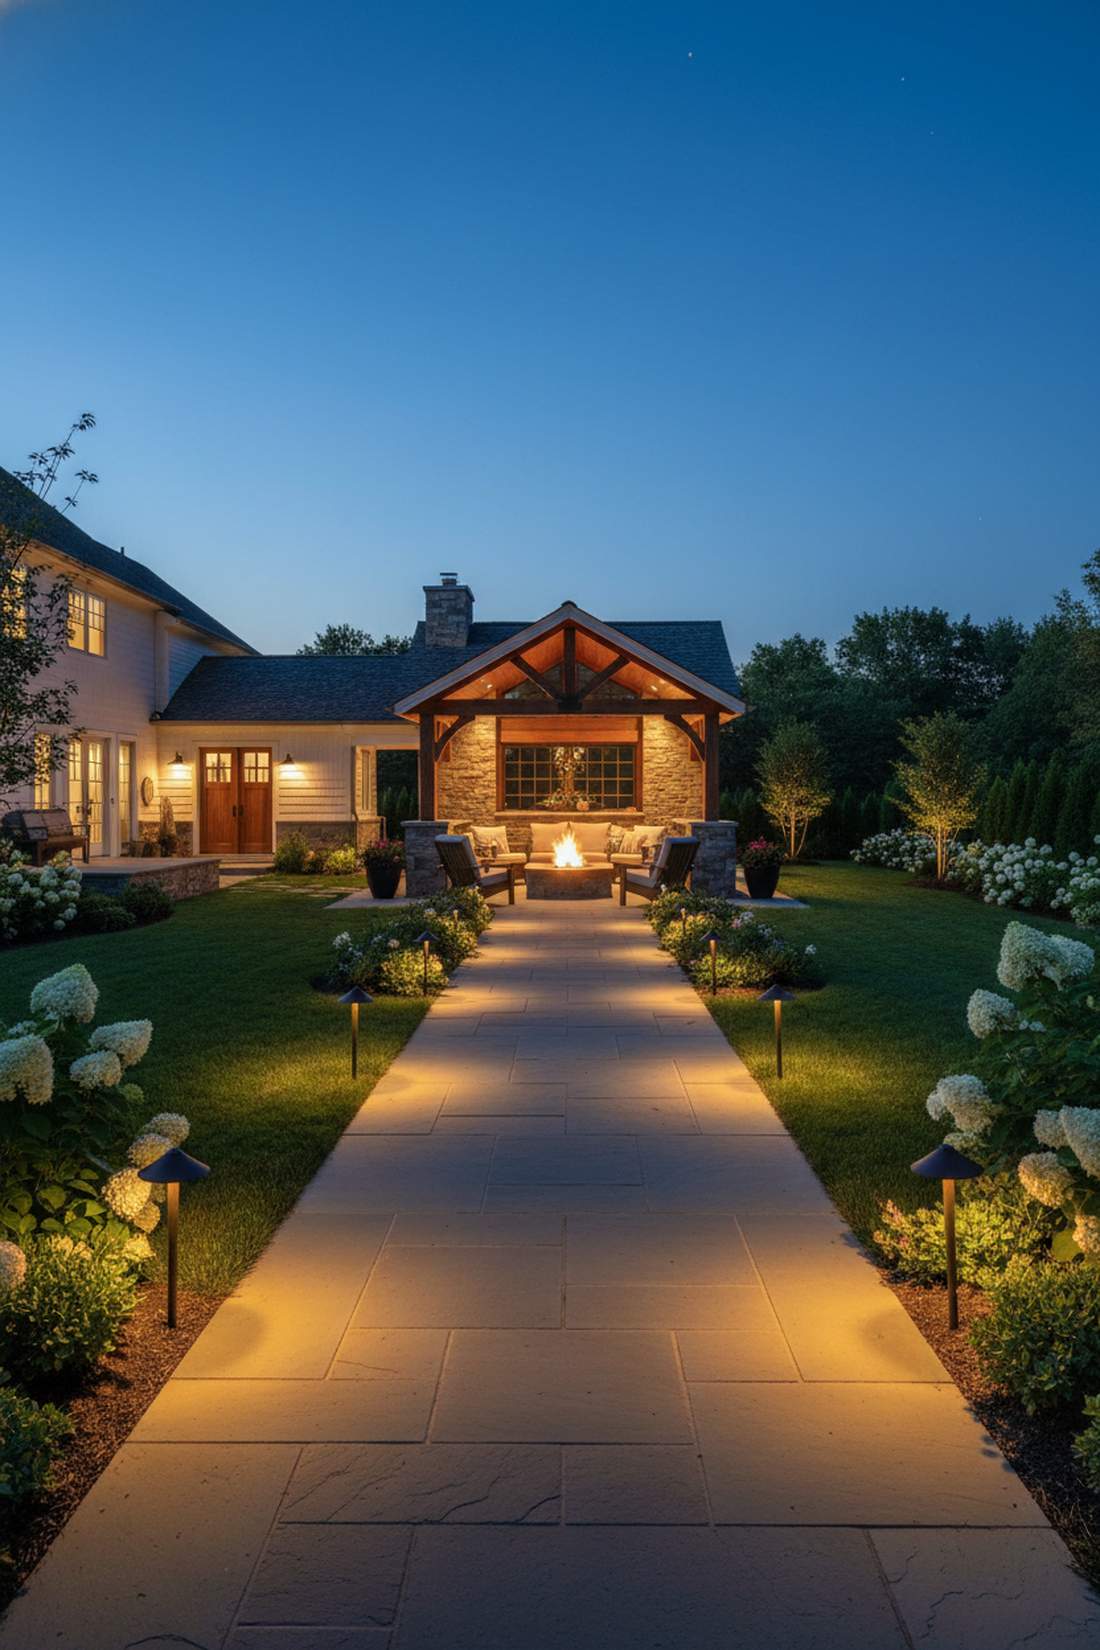
This illuminated garden approach path feels like a red carpet leading to your personal sanctuary. Essential for safely guiding guests from the dark back door all the way out to your pavilion fire feature.
Most backyards neglect the journey, but this lighting setup looks far more expensive and builds massive anticipation. Staggering low-level path lights along the walkway frames the distant fireplace as the ultimate glowing destination at the end of the tunnel.
Path lighting kits run about $100–$250. Highly recommended for completing the total backyard experience.
- Key Materials: Solar or low-voltage path lights, ground stakes
- Vibe / Style: Welcoming, guided elegance
- Difficulty: Easy ground staking
- Budget Breakdown: 8-Pack Path Lights: $120 | Wire/Transformer: $60.
- Creator’s Tip: Stagger the lights in a zig-zag pattern on alternating sides of the path rather than lining them up perfectly like an airport runway.
- Smart Sourcing: heavy-duty brass low-voltage path lights (bulk pack), commercial-grade solar landscape stakes.
Bringing Your Premium Outdoor Vision to Life
An outdoor living room with fireplace setup transforms average backyards into high-end, year-round destinations where comfort meets luxury. Whether you choose exact material blueprints for modern linear gas setups, budget-friendly chimineas, or premium stacked stone pavilions, executing these exact 47 layouts guarantees your outdoor space will look remarkably expensive. Start by assessing your patio size, grab the smart sourcing materials listed, and build a lasting architectural centerpiece that will dramatically elevate your property value.
Frequently Asked Questions
What type of fireplace works best for small outdoor living rooms?
For tight footprints, utilize corner fireplace kits and wall-mounted electric units to maximize warmth without eating up valuable floor space. Linear gas drop-in burners deliver a contemporary style with ultra-narrow profiles, while chiminea starter kits offer nomadic flexibility. For the absolute smallest spaces, always use vertical architectural layouts that draw the eye upward, combined with multi-purpose fold-down hearth ledges.
How much does an outdoor living room with fireplace cost to install?
You can hack the budget by using pre-cut stacked stone veneer and DIY modular fireplace kits, bringing the cost down to $1,500–$3,000 for materials. Custom brickwork with full chimneys and premium hardscape integration can push $10,000 to $20,000. To keep costs low and aesthetic high, focus your budget on premium sealants and bulk-pack masonry supplies rather than expensive manual labor.
Should I choose wood-burning, gas, or electric for my outdoor fireplace?
Wood-burning offers authentic crackle but requires heavy-duty refractory cement. High-efficiency gas burner kits offer instant ignition, zero smoke, and minimal maintenance, making them ideal for high-end modern patios. Bio-ethanol tabletop inserts and outdoor-rated electric wall-mounts are the absolute best choice for covered, three-season rooms where traditional smoke ventilation is impossible.
What materials are most durable for outdoor fireplaces?
Skip standard interior materials and invest heavily in UV-resistant concrete sealants and high-temp fireclay brick bulk packs. Natural cut limestone, granite capstones, and Corten steel withstand decades of weather exposure effortlessly. If using block and stucco, always utilize premium acrylic waterproof mixtures to prevent cracking during brutal winter freeze-thaw cycles.
How do I maintain proper clearance and safety around outdoor fireplaces?
Always maintain a minimum 10-foot clearance from structural overhangs and utilize tempered glass wind guards for added spark protection. Ensure furniture is placed at least 3 feet from the firebox opening, and always use heat-resistant patio protector mats under freestanding fire pits. Upgrading to spark-arresting chimney caps is mandatory for wood-burning safety.
Can outdoor fireplaces be used in all climates and weather conditions?
Yes, provided you use the right commercial-grade weatherproofing. In heavy rainfall regions, apply heavy-duty liquid rubber membranes inside planters and use waterproof outdoor canvas covers when the unit is off. Gas fireplaces require weatherproof stainless steel access doors and proper winterization of electronic ignition valves to survive freezing northern climates without cracking.