Building a high-yield raised beds kitchen garden doesn’t require a massive landscaping budget. Strategic layout blueprints and smart material sourcing create stunning, professional-grade culinary hubs for less. Upgrade your outdoor space instantly with these high-end setups.
Design Snapshot: Key Principles
- Access Pathways: Maintain 24-30 inches between beds for comfortable harvest access; widen to 36-48 inches for wheelbarrow and cart movement
- Bed Dimensions: Keep width at 3-4 feet maximum for reach from both sides; length can extend to 10 feet before structural support becomes critical
- Height Strategy: Use 12-18 inch beds for root vegetables and culinary herbs; elevate to 24-30 inches for accessibility and intensive salad production
- Vertical Integration: Incorporate trellises, arches, and tiered structures to triple productive capacity within the same footprint
Classic Geometric Layouts for Production Kitchens
These foundational configurations establish the framework professional kitchens and serious home cooks depend on. Each layout addresses specific spatial constraints while optimizing harvest accessibility and crop rotation planning.
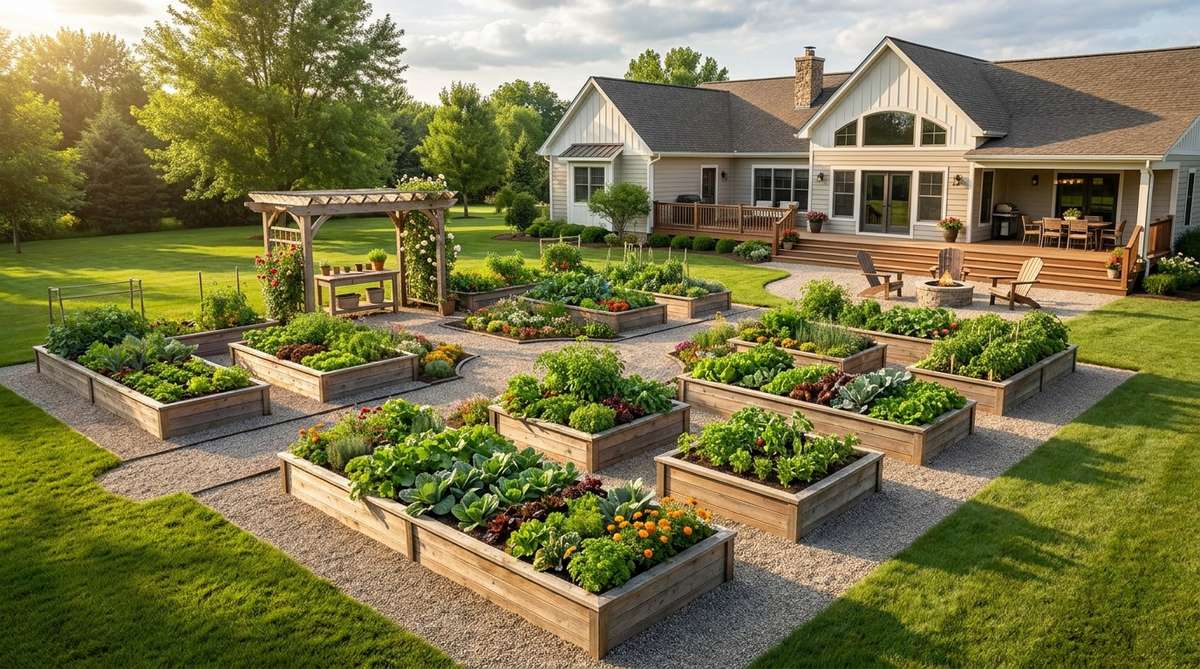
1. Four-Garden Classic
Feels exactly like strolling through a private European estate right in your backyard. This classic potager garden layout creates an incredibly organized, highly visual hub that works exceptionally well as a sunny courtyard centerpiece.
Many novice gardeners waste money on flimsy lumber, but framing these quadrants with thick, rot-resistant wood delivers a surprisingly premium look. By utilizing heavy-duty structural hardware, the visual weight of the beds rivals expensive custom landscaping installations.
You can effortlessly pull this foundational setup off for around $150–$250 depending on your timber choice. Pin this to your DIY weekend garden board to lock in the blueprint!
- Key Materials: Thick timber boards, steel brackets, pea gravel
- Vibe / Style: Estate culinary elegance
- Difficulty: Moderate weekend build
- Budget Breakdown: Materials: $180 | Hardware: $40
- Creator’s Tip: Lay down thick cardboard before dumping soil to instantly suffocate weeds and feed the earthworms.
- Smart Sourcing: Pre-cut cedar raised bed kits (bulk pack) and powder-coated steel corner brackets.
2. Twin Garden Parallel Beds
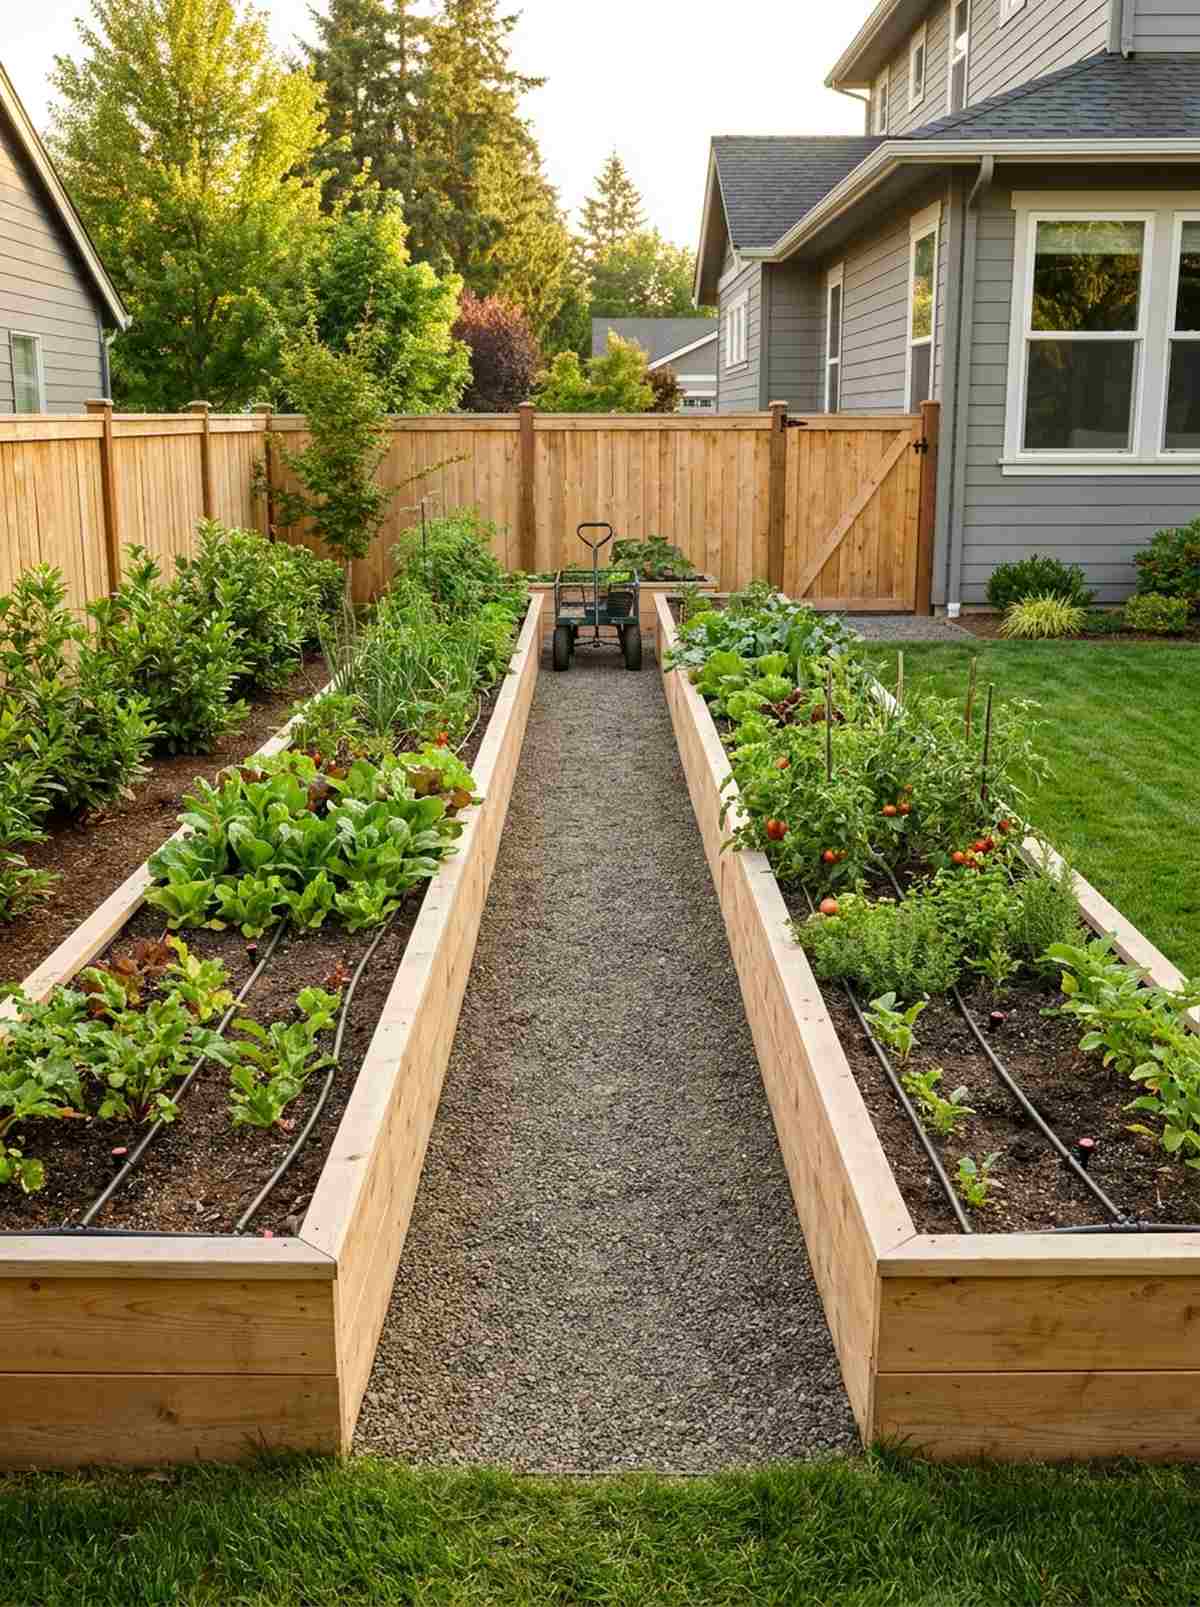
Screams sleek, farm-to-table restaurant aesthetic with clean, sweeping lines. These linear culinary pathways provide a minimalist, highly functional growing zone perfectly suited for narrow side yards or tight rectangular spaces.
Dumping cheap dirt into basic boxes looks messy, but edging these parallel runs precisely gives a designer-level finish. Integrating high-quality irrigation elements directly into the build transforms it from a hobby plot to a serious agricultural engine.
Expect to spend around $80–$120 to establish these sleek twin lanes. It’s a fast upgrade that completely changes the vibe of previously unused side property.
- Key Materials: Linear planks, irrigation lines, weed barrier
- Vibe / Style: Modern farm-to-table
- Difficulty: Easy beginner setup
- Budget Breakdown: Wood: $75 | Irrigation: $35
- Creator’s Tip: Keep the center pathway exactly 36 inches wide to allow seamless garden cart maneuvering.
- Smart Sourcing: UV-resistant drip line spools (bulk) and heavy-duty landscape staples.
3. Border Garden Perimeter Design
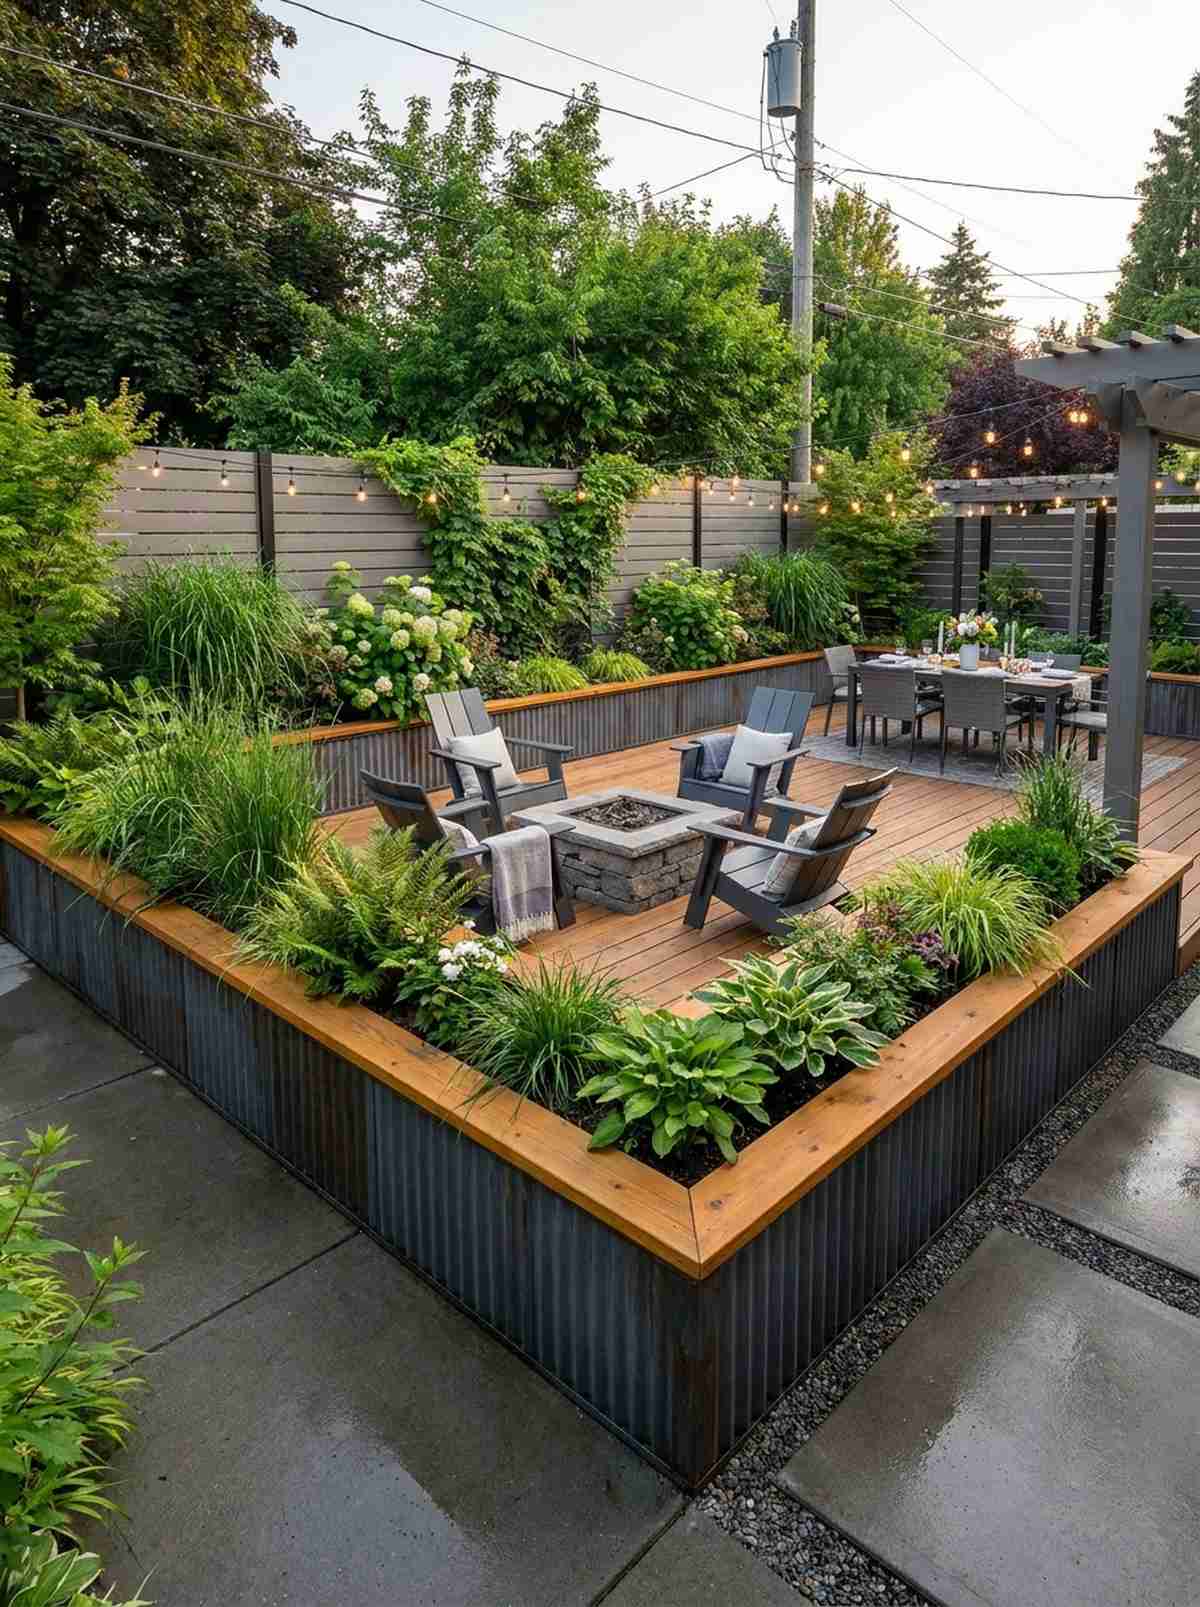
Feels like a lush, secret garden enclosure wrapping around your outdoor living space. Installing wrap-around patio planters beautifully defines property edges, making it ideal for urban patios needing natural fencing.
Using standard wood against fences rots quickly, but building this layout with corrugated materials looks far more expensive than it is. The contrast between industrial textures and soft greens brings a highly curated, contemporary architecture feel.
You can execute this wrap-around border for roughly $150–$300 depending on total linear footage. Save this to your patio upgrade board if you want to frame your yard with food!
- Key Materials: Corrugated metal sheets, capping rails
- Vibe / Style: Contemporary urban oasis
- Difficulty: Moderate cutting required
- Budget Breakdown: Panels: $150 | Top Caps: $60
- Creator’s Tip: Cap the metal edges with smooth wood to prevent cuts and offer a comfortable resting spot for tools.
- Smart Sourcing: Modular metal planter panels and weather-treated capping lumber kits.
4. Garden Trio Linear Arrangement
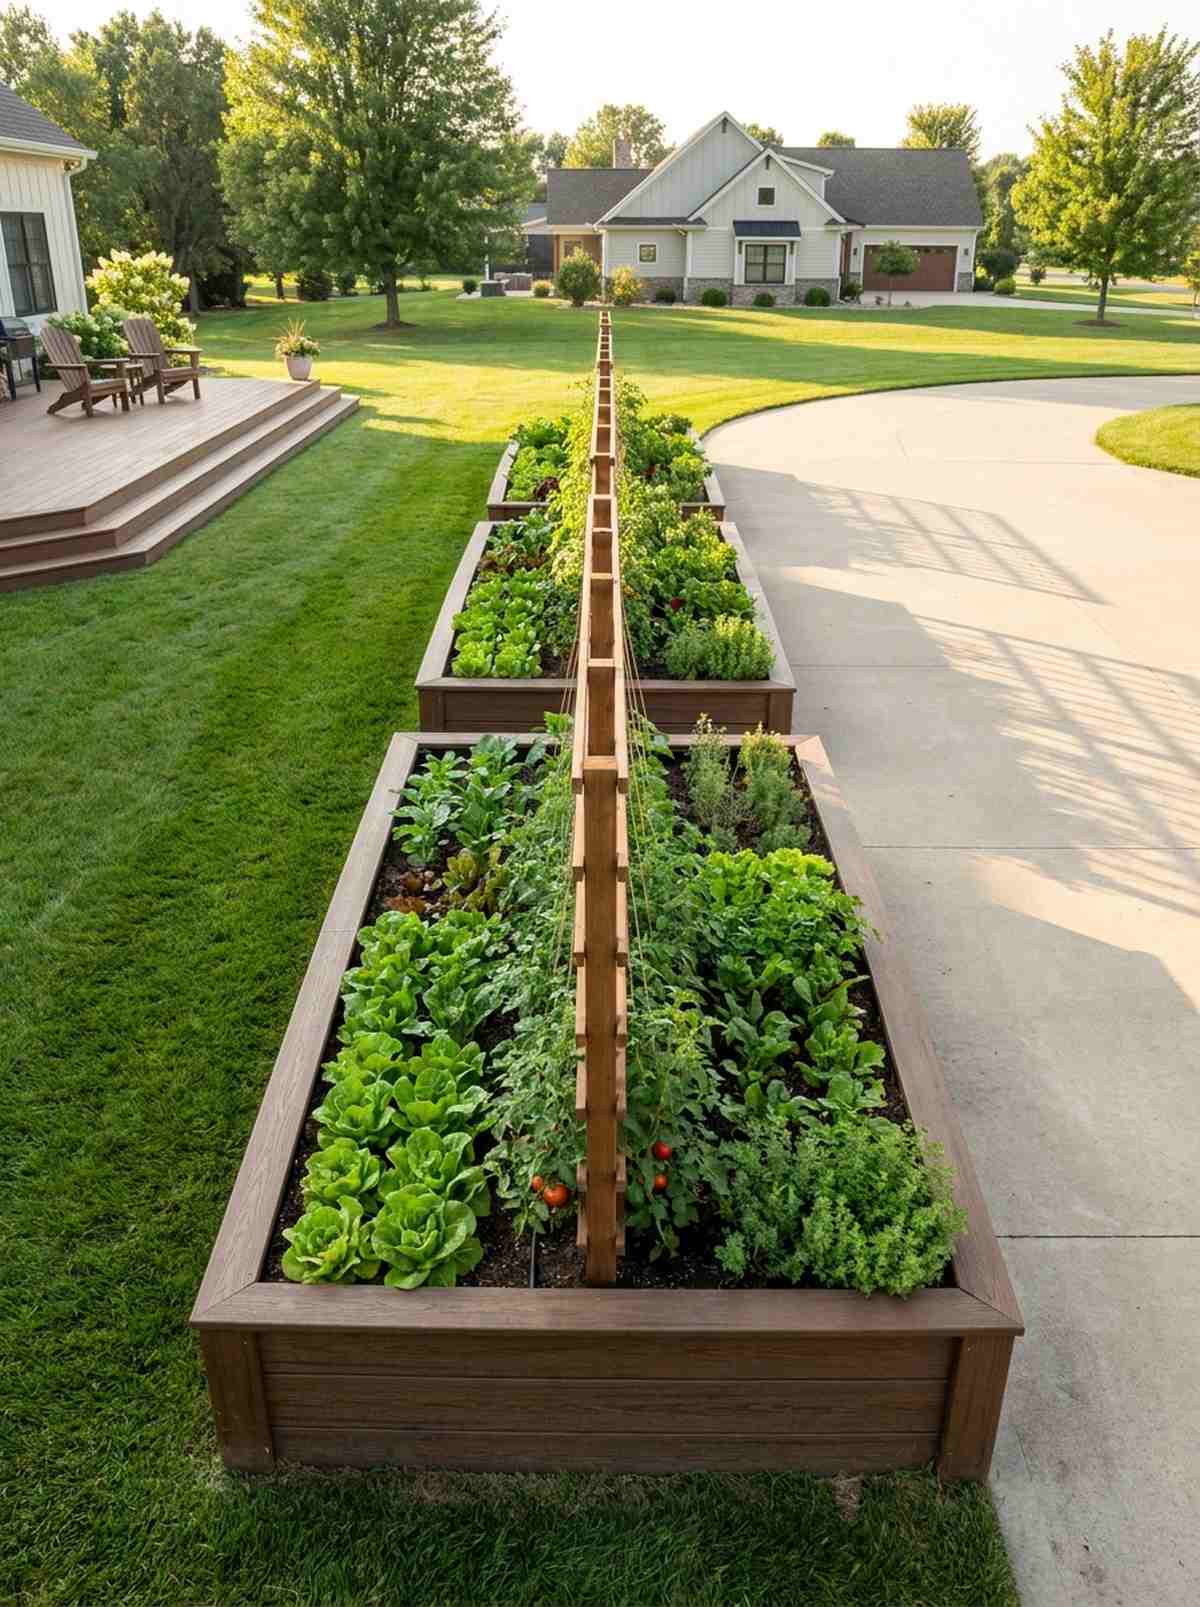
Gives off an incredibly organized, professional greenhouse energy. This succession planting layout segments crops perfectly, working beautifully alongside a bright driveway or sweeping lawn edge.
Most people jam all plant families into one box, but establishing dedicated trio zones stops pest cross-contamination while instantly elevating the yard’s geometry. Adding uniform trellising down the line ties the whole aesthetic together.
Setting up a matching trio runs about $200–$250 in total. Highly recommended for a quick weekend win that streamlines your entire planting schedule.
- Key Materials: Standard bed boards, uniform trellising
- Vibe / Style: Professional crop grid
- Difficulty: Straightforward assembly
- Budget Breakdown: Frame materials: $180 | Hardware: $45
- Creator’s Tip: Paint or stain all three beds the exact same dark hue to make the green foliage pop aggressively.
- Smart Sourcing: Pre-drilled composite wood bed kits and organic garden soil blocks.
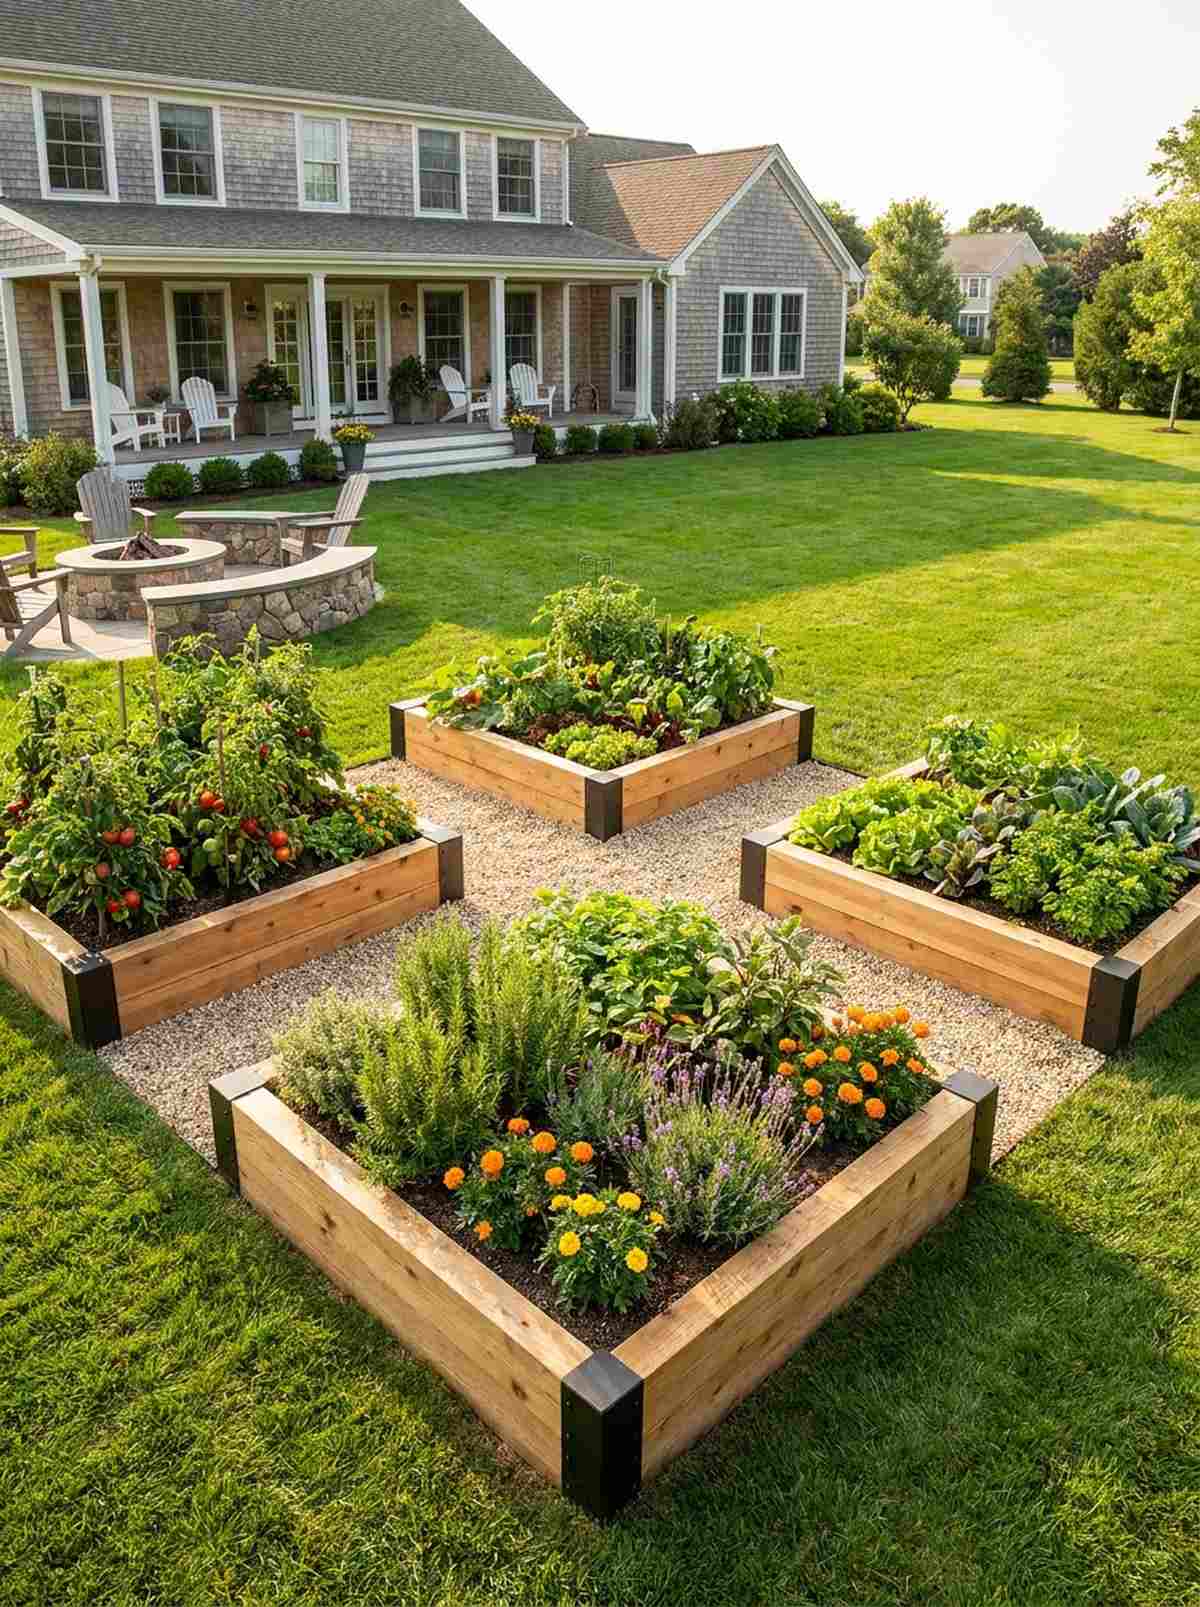
5. Formal Potager Quadrants
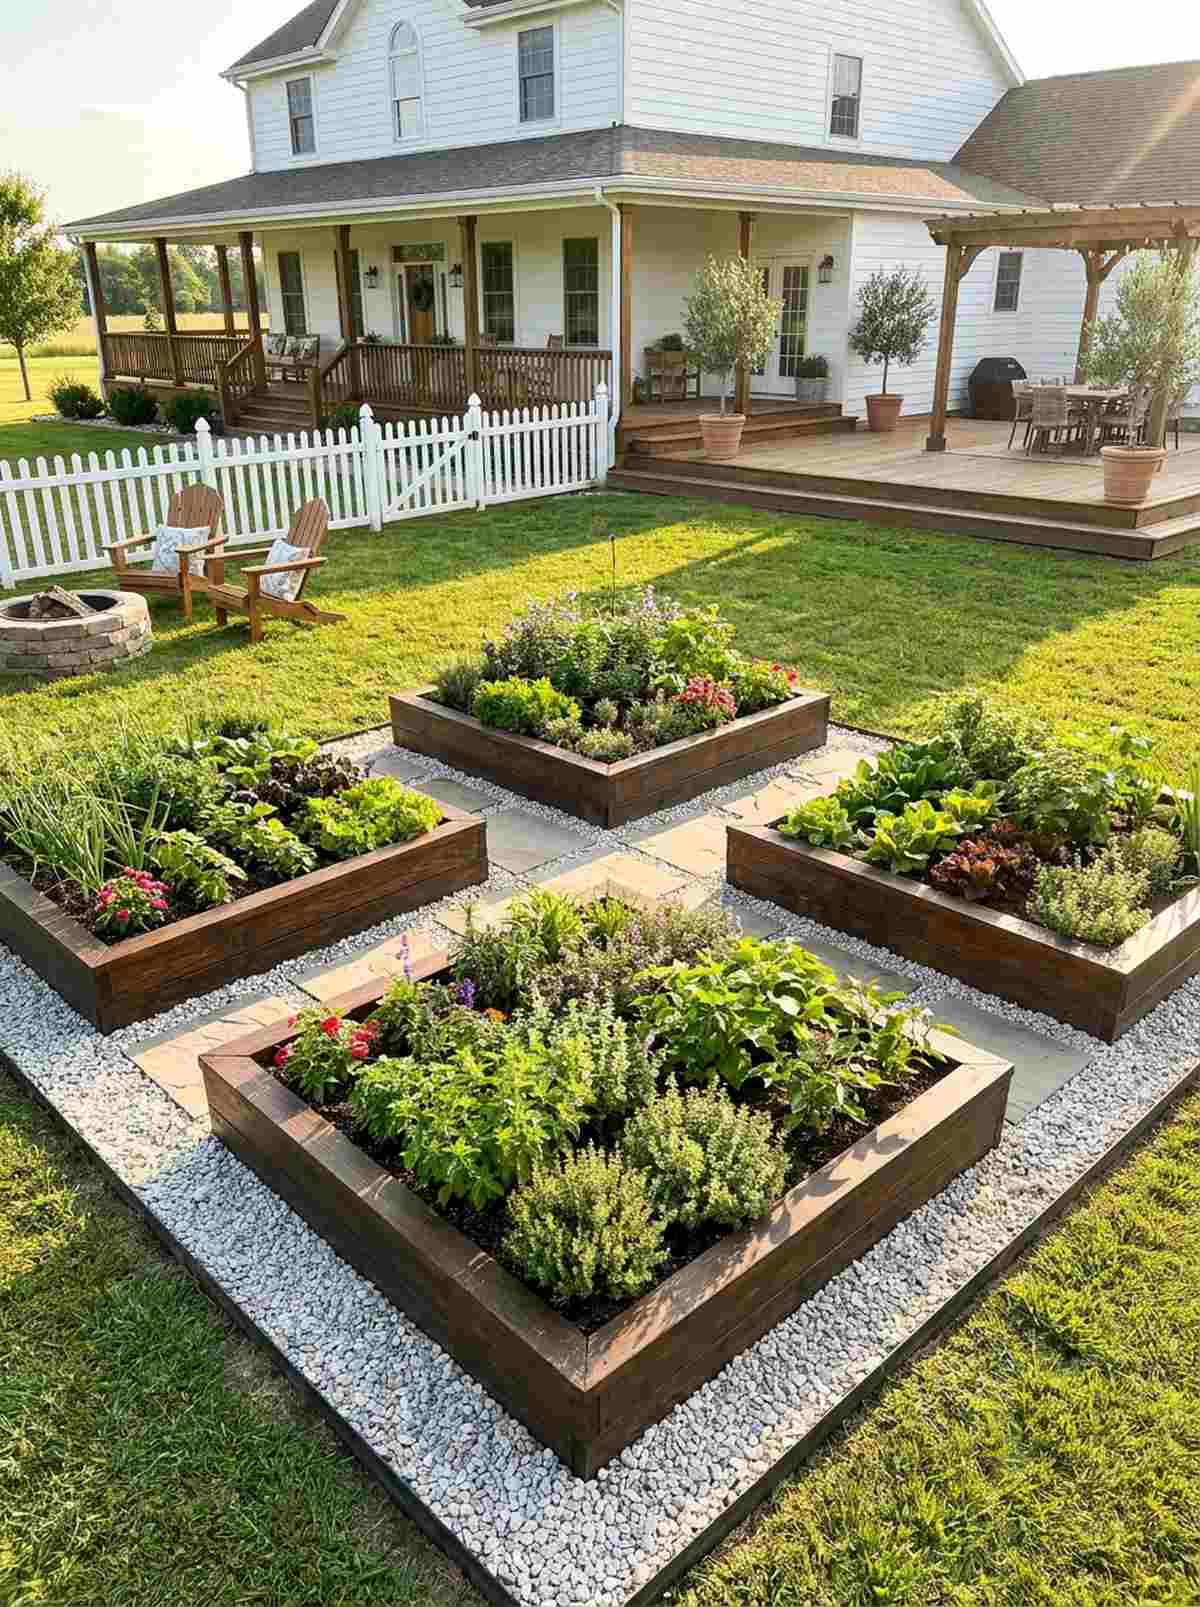
Straight out of a luxury French countryside magazine feature. These geometric herb and veggie squares balance immense beauty with heavy production, perfectly tailored for high-visibility front yard installations.
Leaving the ground bare between boxes looks unfinished, but upgrading pathways with stark, contrasting stones provides a magazine-worthy, designer-level finish. The crisp architectural lines mask the wildness of heavy vegetable production.
This layout usually costs around $300–$450, heavily influenced by your choice of pathway stones. Pin this if you’re planning a front-yard lawn replacement!
- Key Materials: Premium framing wood, decorative gravel, pavers
- Vibe / Style: French formal garden
- Difficulty: Detail-oriented execution
- Budget Breakdown: Beds: $200 | Stone Pathways: $150
- Creator’s Tip: Install deep edging barriers before pouring the pathway stone to prevent creeping weeds from ruining the clean lines.
- Smart Sourcing: Commercial-grade landscape fabric (bulk roll) and premium steel edging strips.
Most people get this completely wrong… until they try the exact layout coming up next.
6. L-Shaped Corner Beds
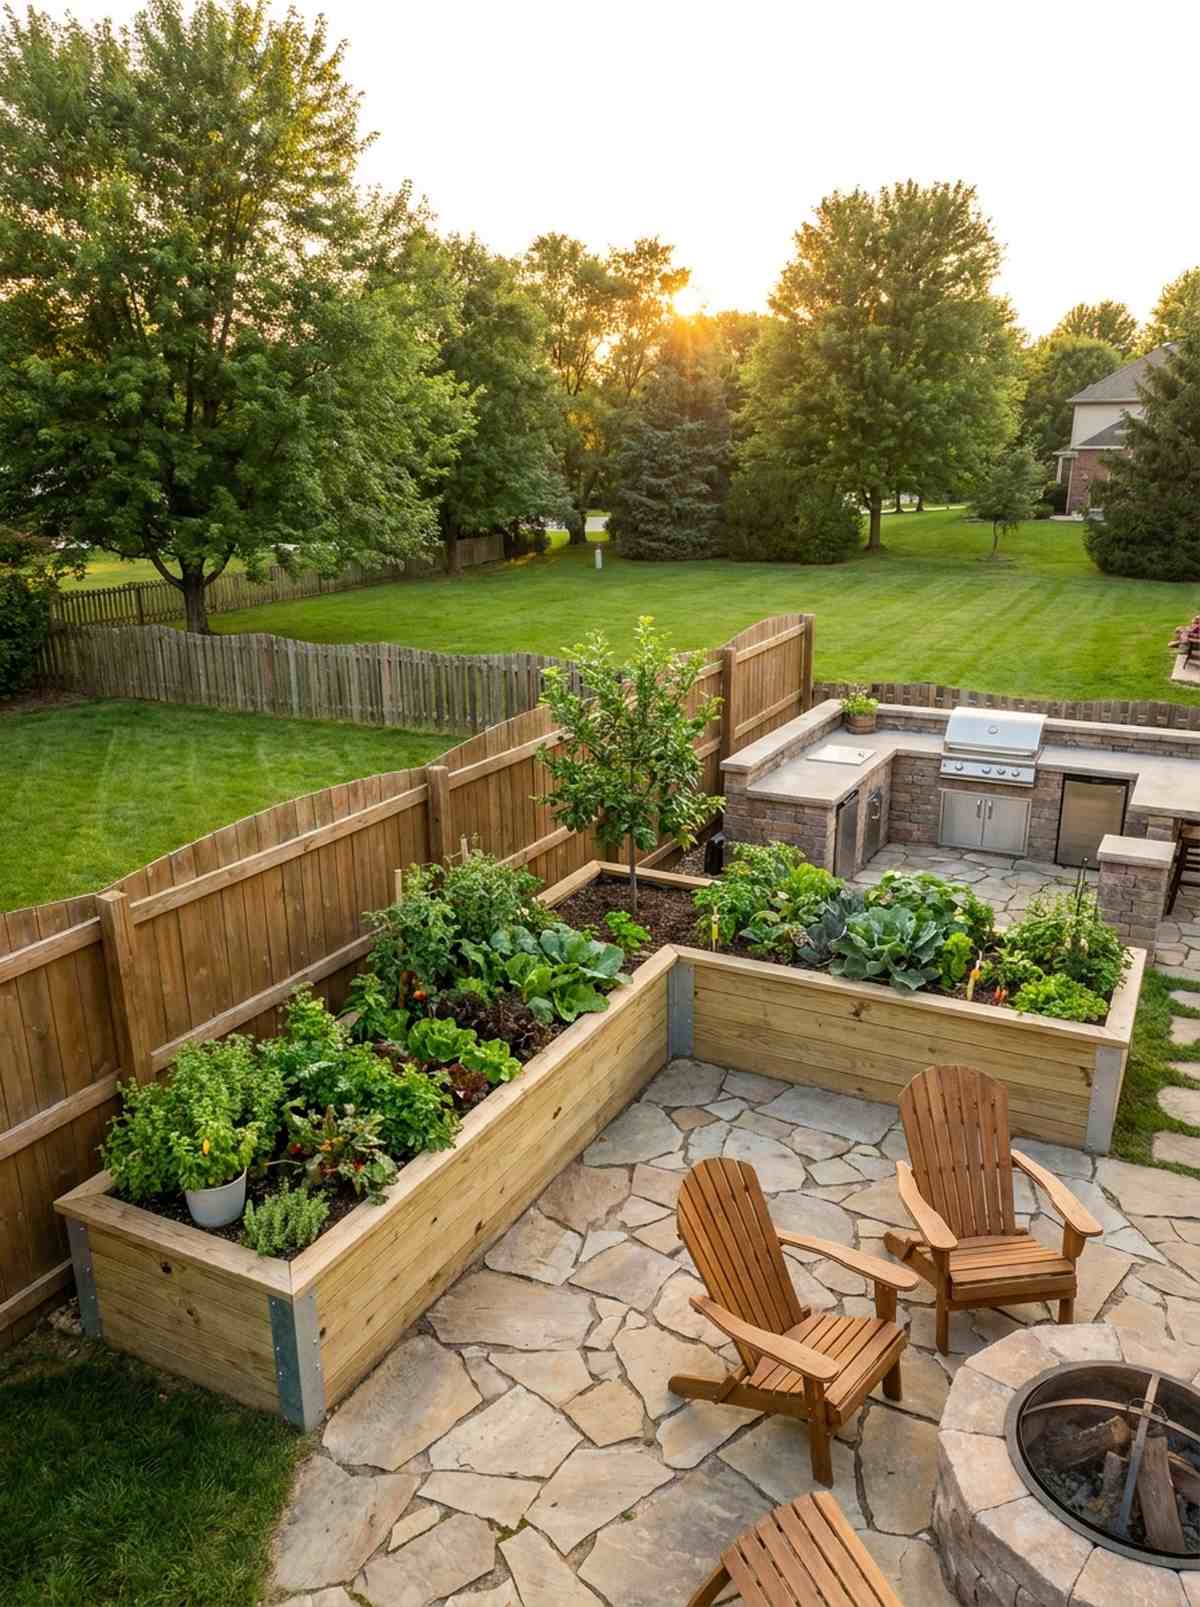
Creates an incredibly cozy, immersive outdoor cooking nook that surrounds you in greenery. This corner vegetable sanctuary maximizes dead boundary space, making it a stellar solution for fenced-in suburban yards.
Throwing standard rectangle boxes into corners wastes massive square footage, but custom-framing L-shapes seamlessly hugs the architecture and delivers a surprisingly premium look. The wraparound accessibility makes daily harvesting an absolute joy.
Crafting these angular structures typically runs $120–$180 per corner. Save this to your space-saving layout board!
- Key Materials: Angle-cut lumber, heavy corner brackets
- Vibe / Style: Bespoke courtyard
- Difficulty: Requires miter cuts
- Budget Breakdown: Wood: $100 | Hardware: $40
- Creator’s Tip: Place a dwarf fruit tree right in the inner elbow of the L-shape to anchor the visual weight of the space.
- Smart Sourcing: Weather-treated pine boards (bulk pack) and heavy-duty galvanized miter plates.
Vertical & Intensive Systems
These configurations multiply productive capacity by building upward and layering planting zones. Vertical systems prove essential for urban properties and high-density culinary operations where ground space limits traditional expansion.
7. Three-Tier Stepped Beds
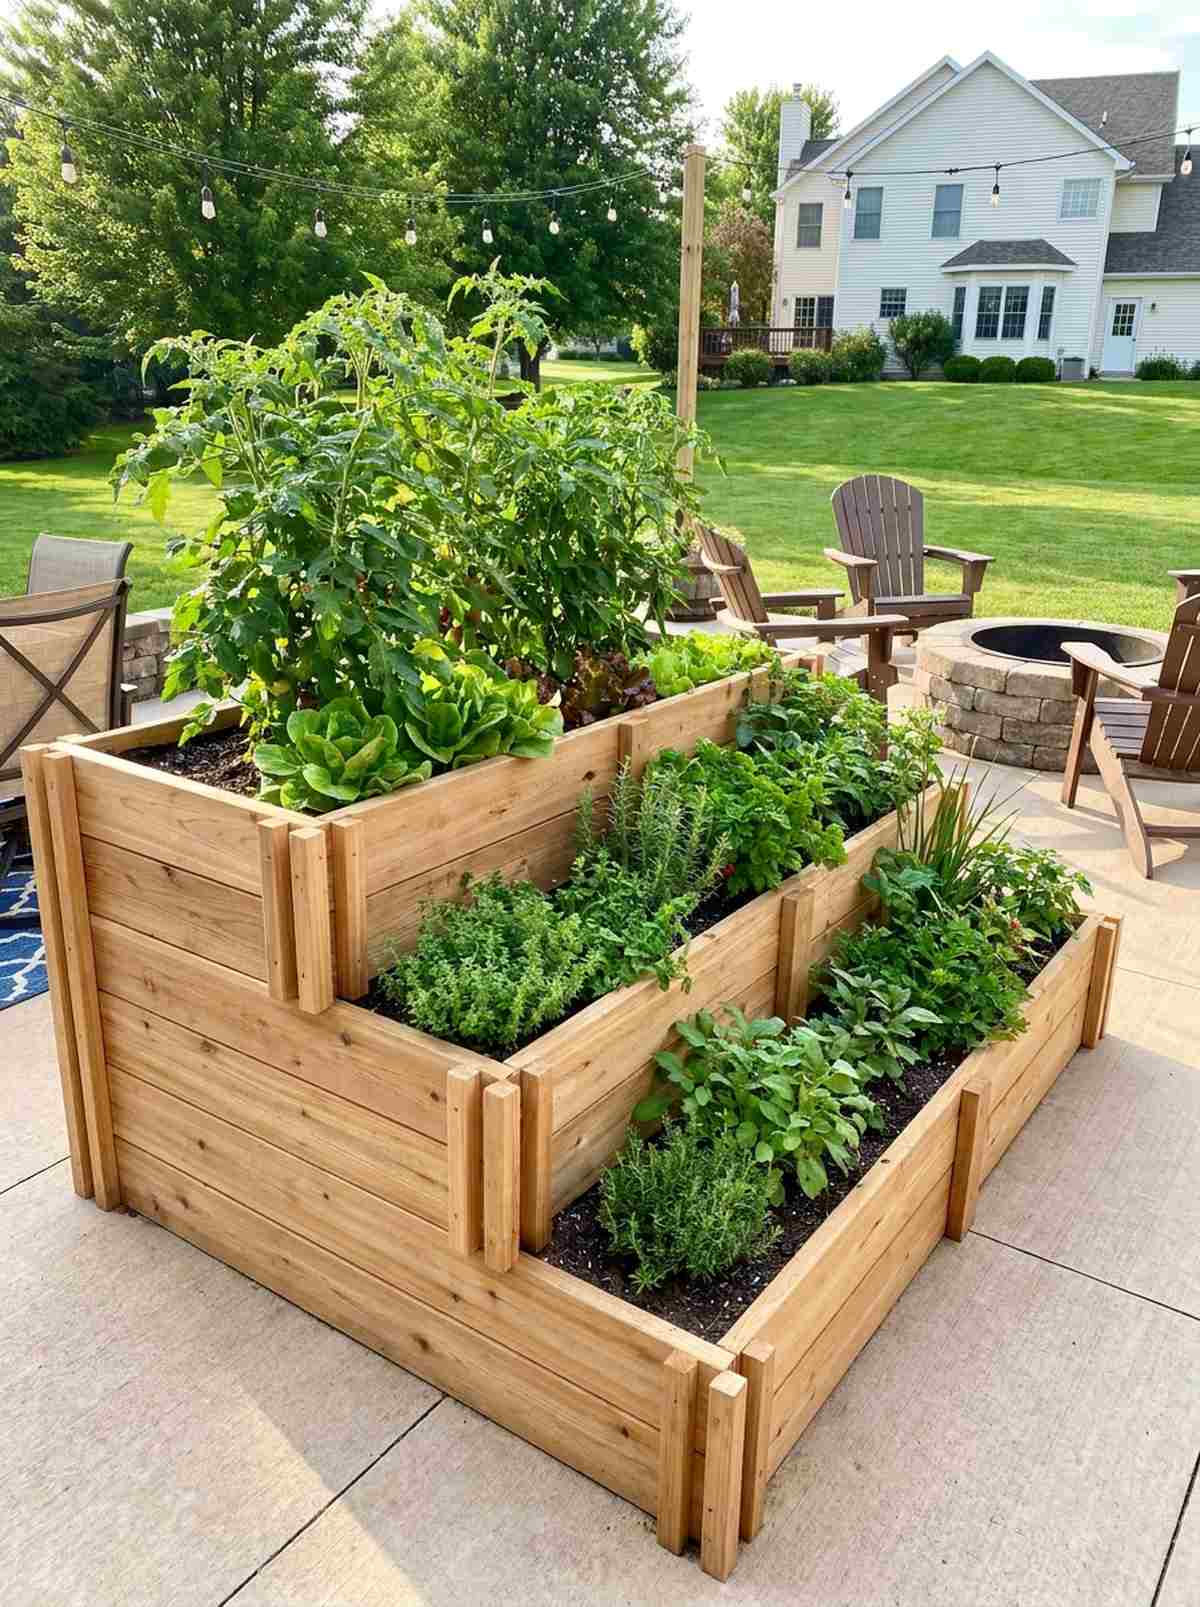
Looks like a stunning cascading waterfall of edible greens and vibrant herbs. This multi-level tiered planter arrangement visually dominates a space, acting as a brilliant divider for outdoor patio seating.
Flat gardens can feel one-dimensional, but stepping the soil heights upward instantly elevates the yard’s profile and looks far more expensive than it is. It naturally builds microclimates, letting you shade sensitive lettuces under towering tomatoes.
You can easily build a solid tiered system for around $90–$130. It’s a fantastic weekend project that drastically multiplies your cubic growing volume.
- Key Materials: Tiered planks, vertical support stakes
- Vibe / Style: Architectural cascade
- Difficulty: Moderate building skills
- Budget Breakdown: Boards: $85 | Soil: $40
- Creator’s Tip: Ensure the bottom tier has extra drainage material, as water will heavily cascade down from the top levels.
- Smart Sourcing: Stackable cedar planter blocks (starter kit) and organic water-retaining coco coir.
8. Vertical Tower Garden
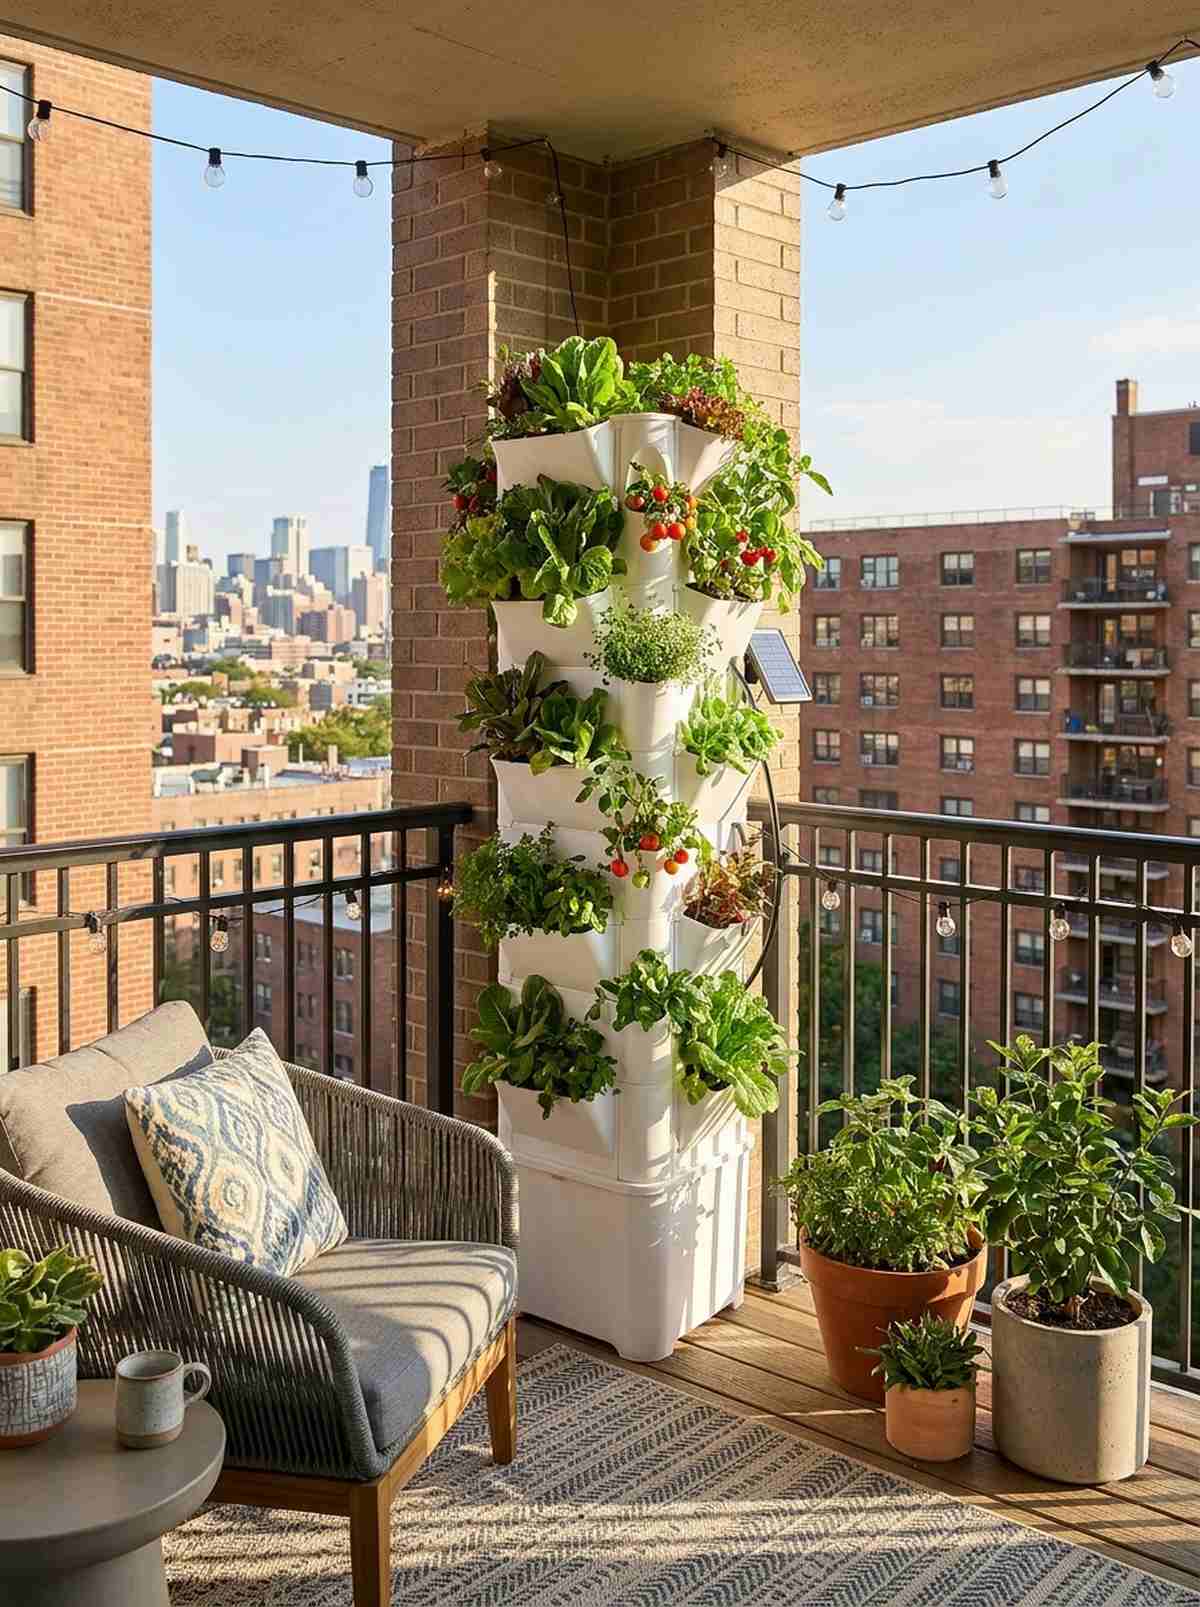
Radiates a futuristic, hyper-efficient urban oasis aesthetic. A freestanding vertical farm setup is an absolute lifesaver for tiny apartment balconies or heavily paved courtyards.
While DIY PVC pipes can look cheap and messy, utilizing proper modular towers gives a designer-level finish that guests will immediately ask about. Sneaking in high-tech hydroponic accessories guarantees rapid, massive yields in zero ground space.
Setting up a premium tower usually runs $100–$250 depending on the internal pump system. Pin this if you’re trying to grow massive food on a tiny balcony!
- Key Materials: Tower modules, internal irrigation pump
- Vibe / Style: High-tech urban agriculture
- Difficulty: Plug-and-play easy
- Budget Breakdown: Tower structure: $150 | Pump system: $40
- Creator’s Tip: Rotate the tower 90 degrees every few days to ensure all sides get even sunlight exposure.
- Smart Sourcing: UV-coated PVC tower garden kits and submersible hydroponic pump starters.
9. Trellis Arches for Climbing Vegetables
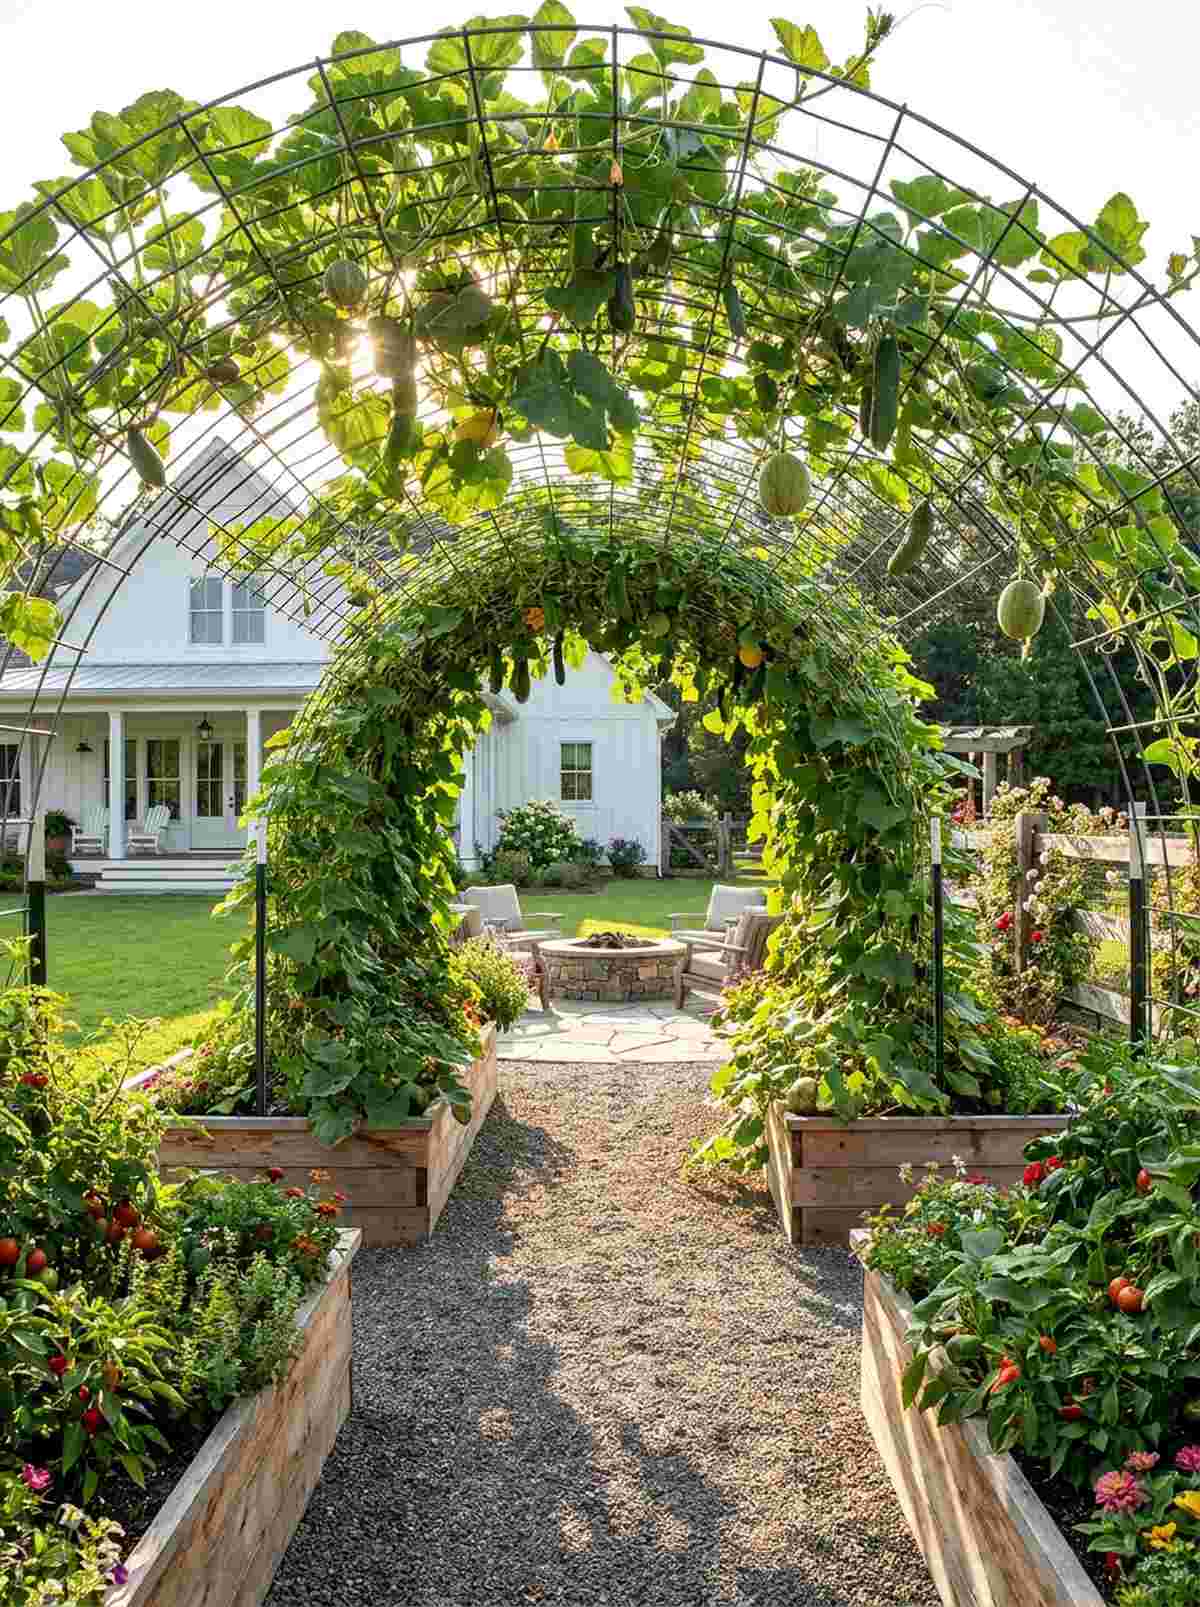
Feels exactly like stepping into a magical, shaded green tunnel out of a storybook. Implementing an arched vine canopy turns boring walkways into massive vertical yields, perfect for bridging two standard raised beds.
Wood trellises rot and snap under the weight of heavy melons, but bending industrial panels over the pathways delivers a surprisingly premium look that lasts decades. This structural trick creates a beautiful, shaded microclimate for delicate summer crops beneath.
You can construct a massive, heavy-duty arch for roughly $40–$60. Save this to your dream garden aesthetic board!
- Key Materials: Cattle panels, heavy T-posts
- Vibe / Style: Enchanted harvest tunnel
- Difficulty: Requires two people to bend
- Budget Breakdown: Metal panels: $35 | Support posts: $20
- Creator’s Tip: Drive the support stakes extremely deep and zip-tie the panels tightly; full mature vines get incredibly heavy in high winds.
- Smart Sourcing: Vinyl-coated heavy-duty trellis netting and UV-resistant industrial zip ties (bulk pack).
This next setup is ridiculously cheap but looks like a $1,000 custom garden display…
💡 Must-Have Supplies for High-End Setups
To build these setups faster and ensure they last, skip the generic craft aisles and invest in the right foundational kits.
- Base & Support: Pre-drilled cedar framing bundles
- Setup Tools: Heavy-duty laser-cut corner bracket starter kits
- Weather/Durability Protection: UV-coated clear wood sealants
10. A-Frame Trellis Beds
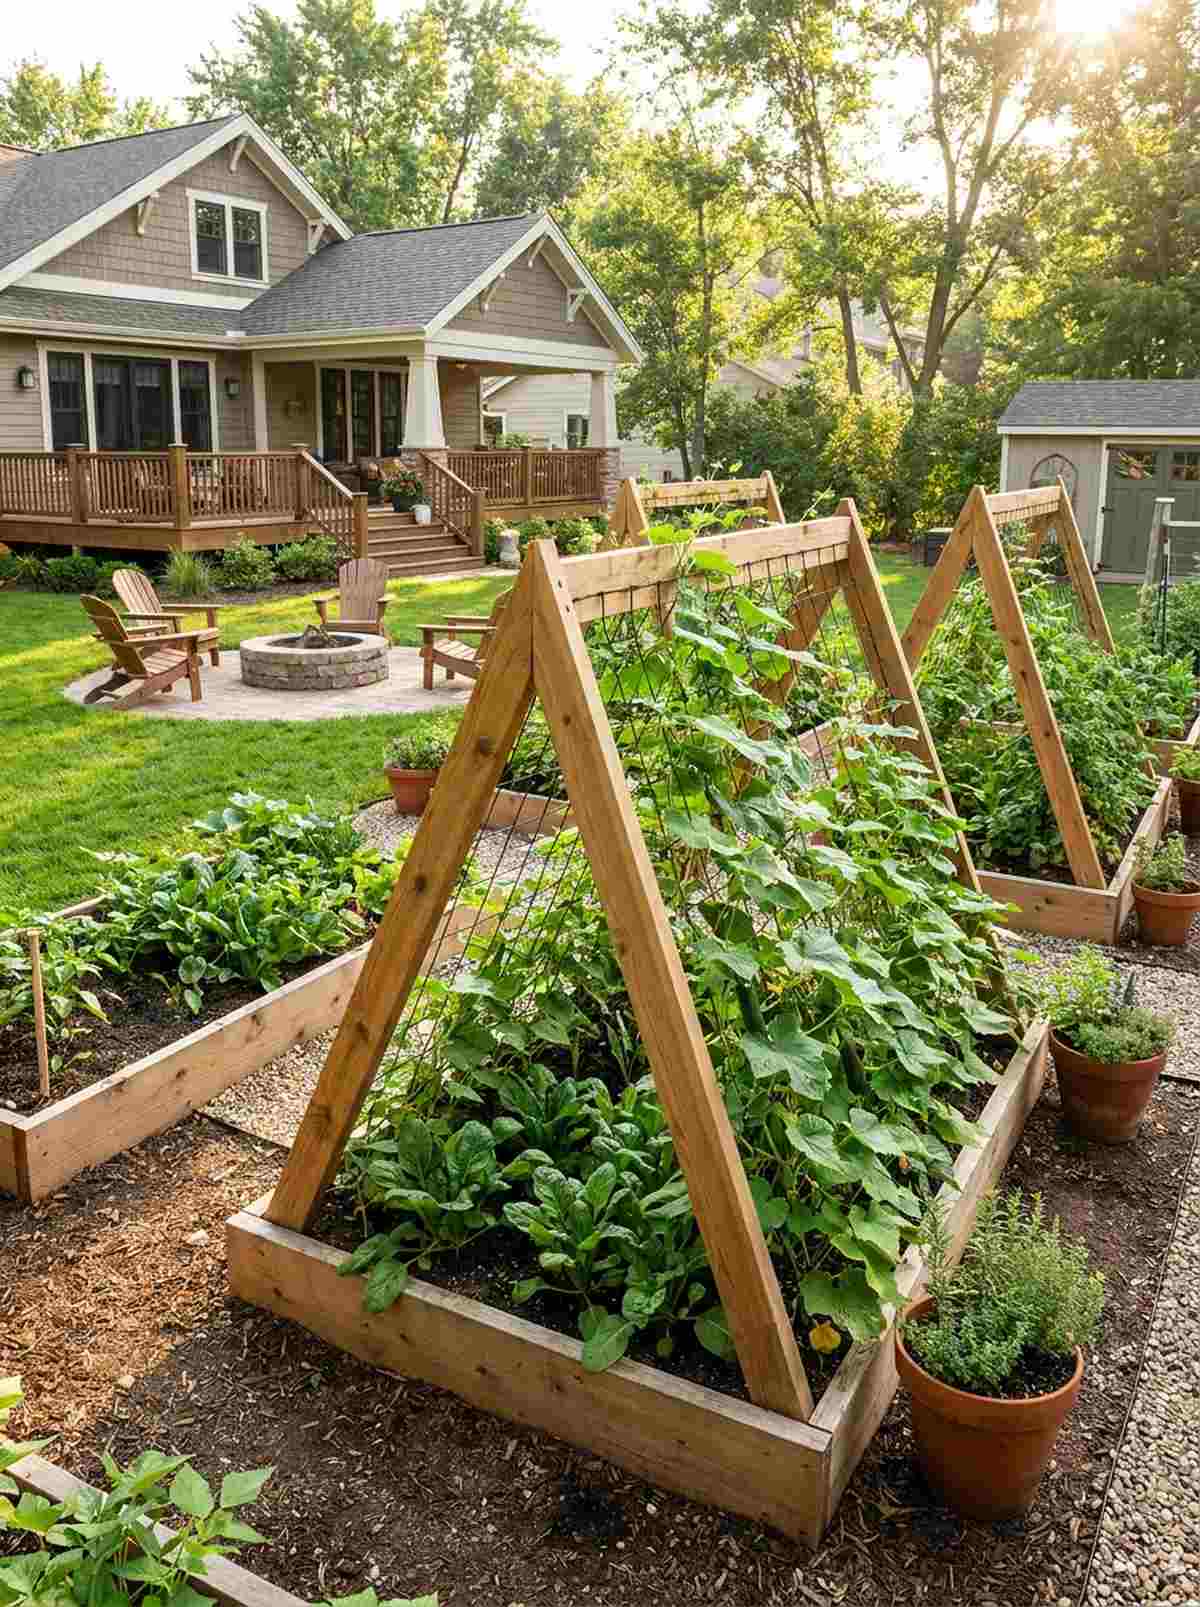
Brings a rugged, charming homestead aesthetic directly to your backyard space. These slanted vine supports are incredibly robust, making them ideal for high-wind areas where flat trellises get blown down.
Using flimsy bamboo poles guarantees a collapse mid-season, but framing a solid A-structure looks far more expensive than it is and doubles your climbing surface area. It naturally shades the interior, creating the perfect cool-weather sanctuary for spinach.
Building a solid A-frame addition over an existing bed costs just $30–$50. Highly recommended for heavy-yielding cucumber and bean growers.
- Key Materials: Sturdy timber beams, climbing mesh
- Vibe / Style: Robust farm architecture
- Difficulty: Easy angle cutting
- Budget Breakdown: Wood frame: $25 | Mesh netting: $15
- Creator’s Tip: Hinge the top peak of the A-frame so you can fold it flat and store it in the shed during winter.
- Smart Sourcing: Pre-cut cedar framing timber and heavy-duty nylon climbing mesh (bulk roll).
11. Espalier Wall Gardens

Projects an ancient, historical castle courtyard energy that is utterly captivating. These flat-trained fruit walls turn ugly masonry boundaries into living, breathing works of highly productive art.
Allowing trees to bush out randomly wastes space, but pinning them meticulously flat gives a designer-level finish that screams high-end botanical mastery. Integrating premium wire tension systems makes the training process flawless and highly structured.
Hardware for a beautiful espalier setup is surprisingly cheap, around $40–$60. Pin this to your luxury landscape ideas board!
- Key Materials: Masonry anchors, tension wire, turnbuckles
- Vibe / Style: Historical European estate
- Difficulty: Patient, long-term training
- Budget Breakdown: Wire kits: $35 | Tree stock: $50+
- Creator’s Tip: Install the wire grids at exactly 12-inch intervals before planting the tree to guarantee perfect horizontal branch alignment.
- Smart Sourcing: Heavy-duty espalier wire tension kits and soft silicone plant training ties.
Herb-Focused Configurations
These specialized layouts address the unique requirements of culinary herb production. Professional chefs demand consistent availability of fresh herbs year-round, making these configurations essential for serious kitchen gardens.
12. Herb Spiral Raised Structure
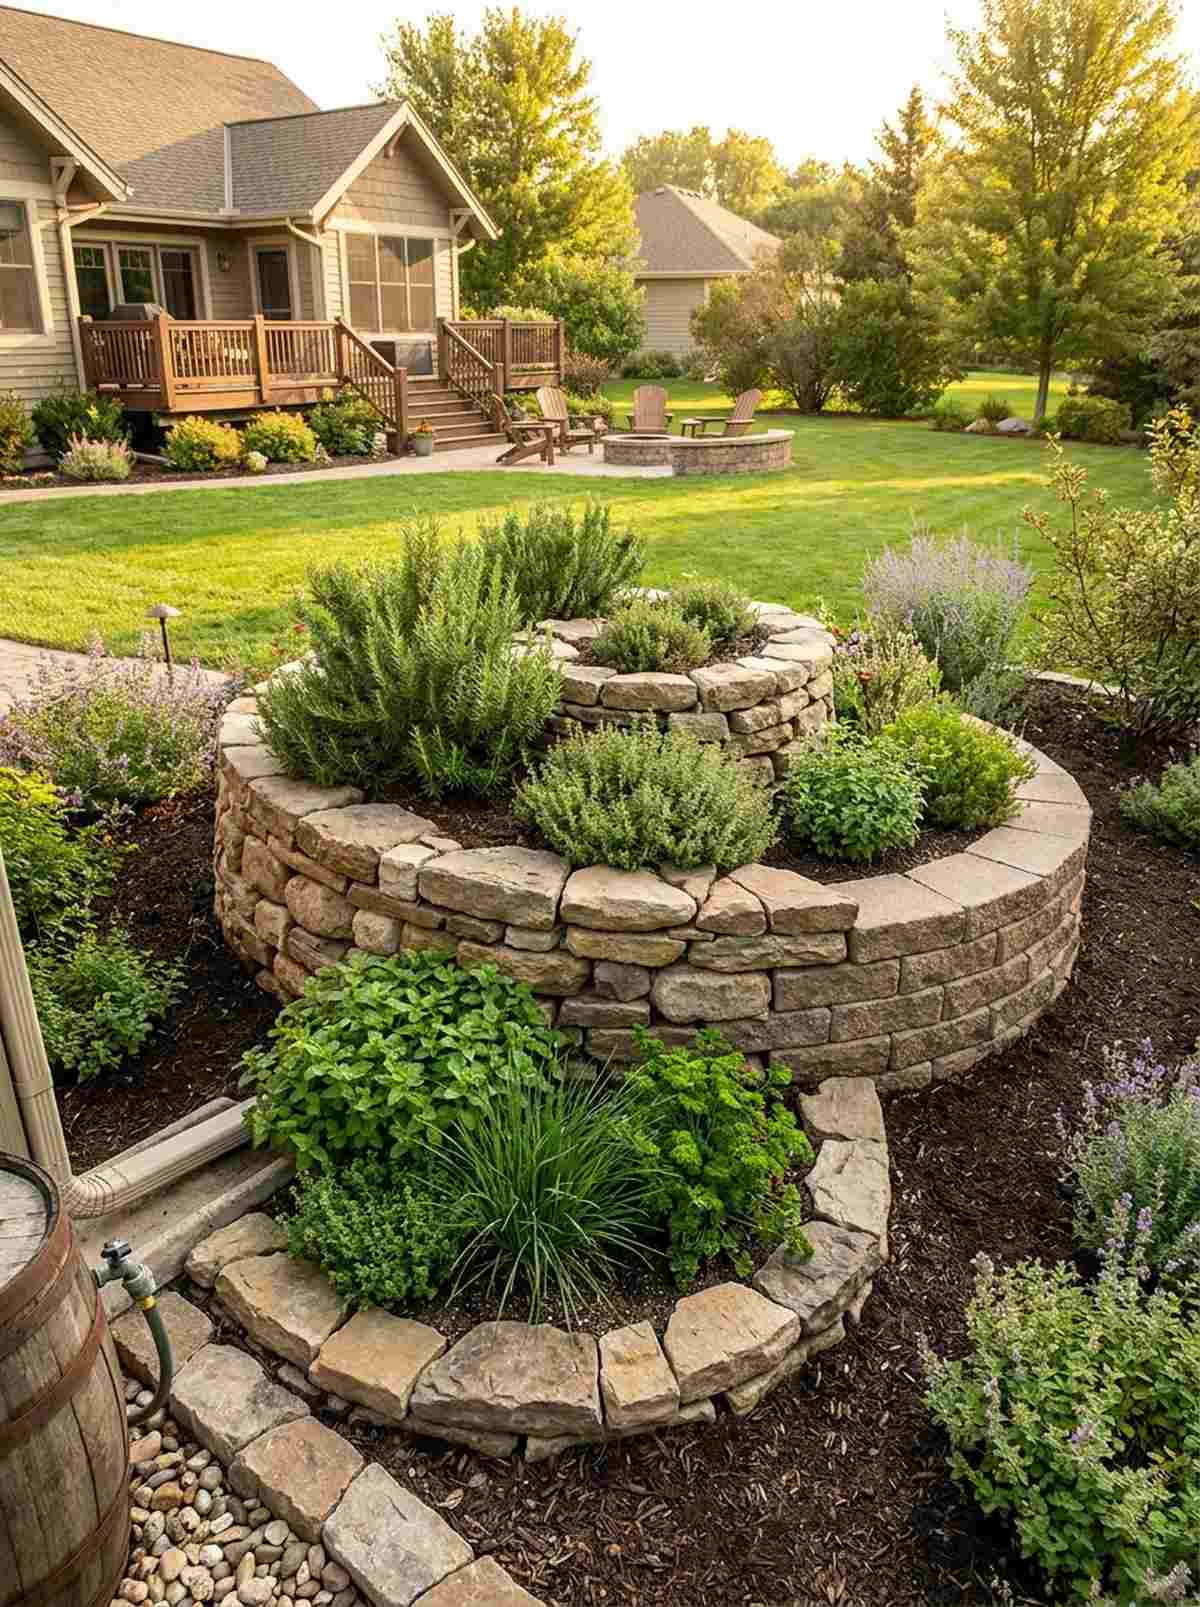
Stands as a whimsical, earthy permaculture centerpiece that completely transforms a garden’s flow. These specialized raised beds for herbs use vertical wrapping to create multiple distinct microclimates in one tiny footprint.
Stacking random bricks looks chaotic, but carefully curving natural stone or uniform blocks delivers a surprisingly premium look that draws the eye instantly. It effortlessly houses drought-loving rosemary at the peak and moisture-craving mint at the base.
If you forage local stones, this costs $0; buying fresh blocks runs about $80–$120. Save this if you want maximum flavor in minimum square footage!
- Key Materials: Landscaping stones, rich compost
- Vibe / Style: Earthy permaculture magic
- Difficulty: Moderate heavy lifting
- Budget Breakdown: Stones: $90 | Soil: $30
- Creator’s Tip: Build the spiral so the lowest, wettest point sits near a downspout or hose bib to capture free runoff.
- Smart Sourcing: Pre-cut dry stack retaining wall blocks and organic herb garden soil boosters.
13. Wagon Wheel Herb Garden
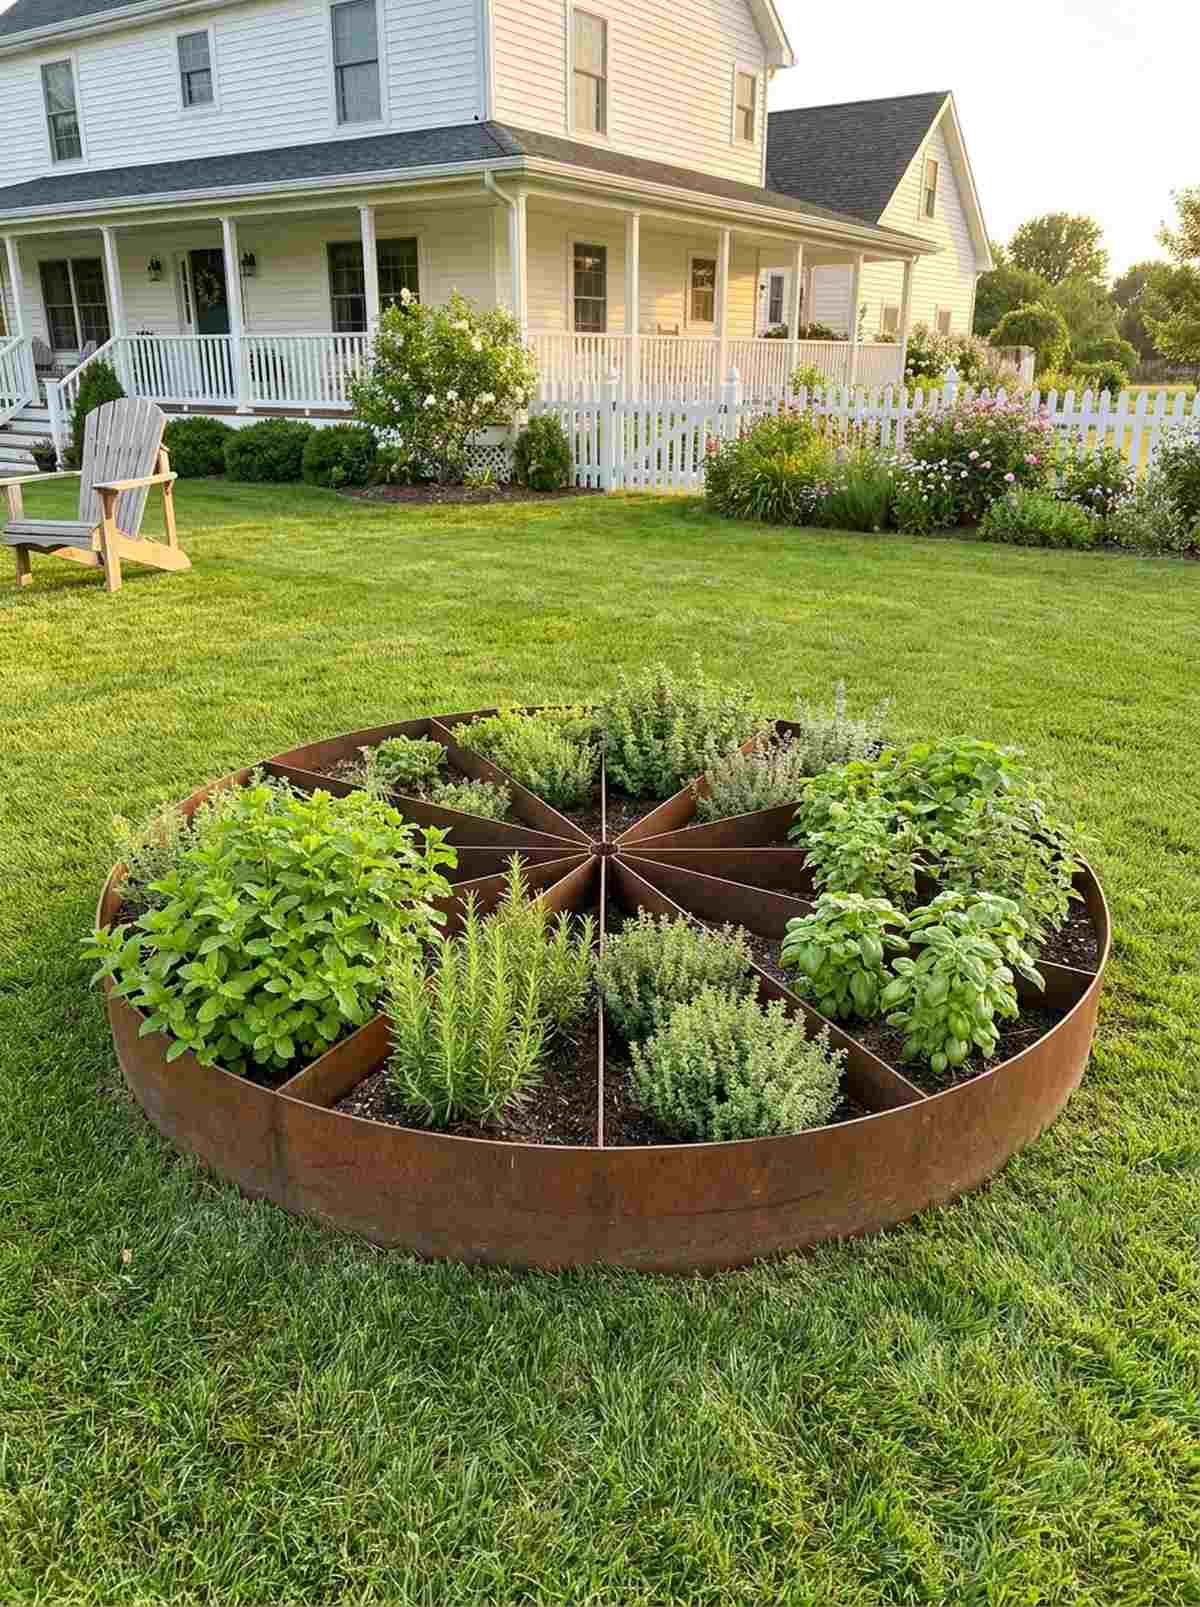
Exudes extreme charming country cottage focus and intricate detailing. This circular divided planter serves as a spectacular visual anchor, perfect for sitting squarely in the middle of a manicured lawn.
Planting mint near delicate herbs always ends in a tangled disaster, but installing rigid steel dividers looks far more expensive than it is while keeping aggressive root systems isolated. The segmented “pizza slice” aesthetic makes harvesting hyper-organized.
Creating this rigid wheel runs about $50–$80 for good edging. It’s a gorgeous weekend upgrade that defines your entire culinary space.
- Key Materials: Circular borders, rigid dividers
- Vibe / Style: Organized cottage core
- Difficulty: Easy geometry layout
- Budget Breakdown: Outer ring: $40 | Internal dividers: $35
- Creator’s Tip: Bury the dividers at least 6 inches deep to ensure invasive herbs can’t tunnel under the barriers.
- Smart Sourcing: Flexible steel landscape edging (bulk pack) and rust-resistant edging stakes.
14. Tiered Herb Cascade

Looks exactly like a lush living wall of flavor right outside your kitchen window. Implementing vertical garden herbs in descending wooden boxes brings high-end restaurant practicality instantly to your back door.
Hanging cheap plastic pots fades terribly in the sun, but utilizing solid, stained cedar tiers gives a designer-level finish that warms up any blank patio wall. The tiered drip-down watering effect saves time while keeping foliage impeccably vibrant.
You can assemble a beautiful cascading unit for about $40–$60. Pin this if you love cooking with fresh ingredients daily!
- Key Materials: Cedar window boxes, sturdy wall mounts
- Vibe / Style: Culinary chef’s balcony
- Difficulty: Simple drill mounting
- Budget Breakdown: Planter boxes: $45 | Heavy mounts: $15
- Creator’s Tip: Line the bottom of each wooden box with heavy plastic (punctured for drainage) to double the lifespan of the wood.
- Smart Sourcing: Pre-built tiered herb box kits and heavy-duty masonry wall anchors.
Wait until you see this next brilliant shortcut—it takes literally 30 minutes to assemble.
15. Raised Beds for HerbsWindowbox Style
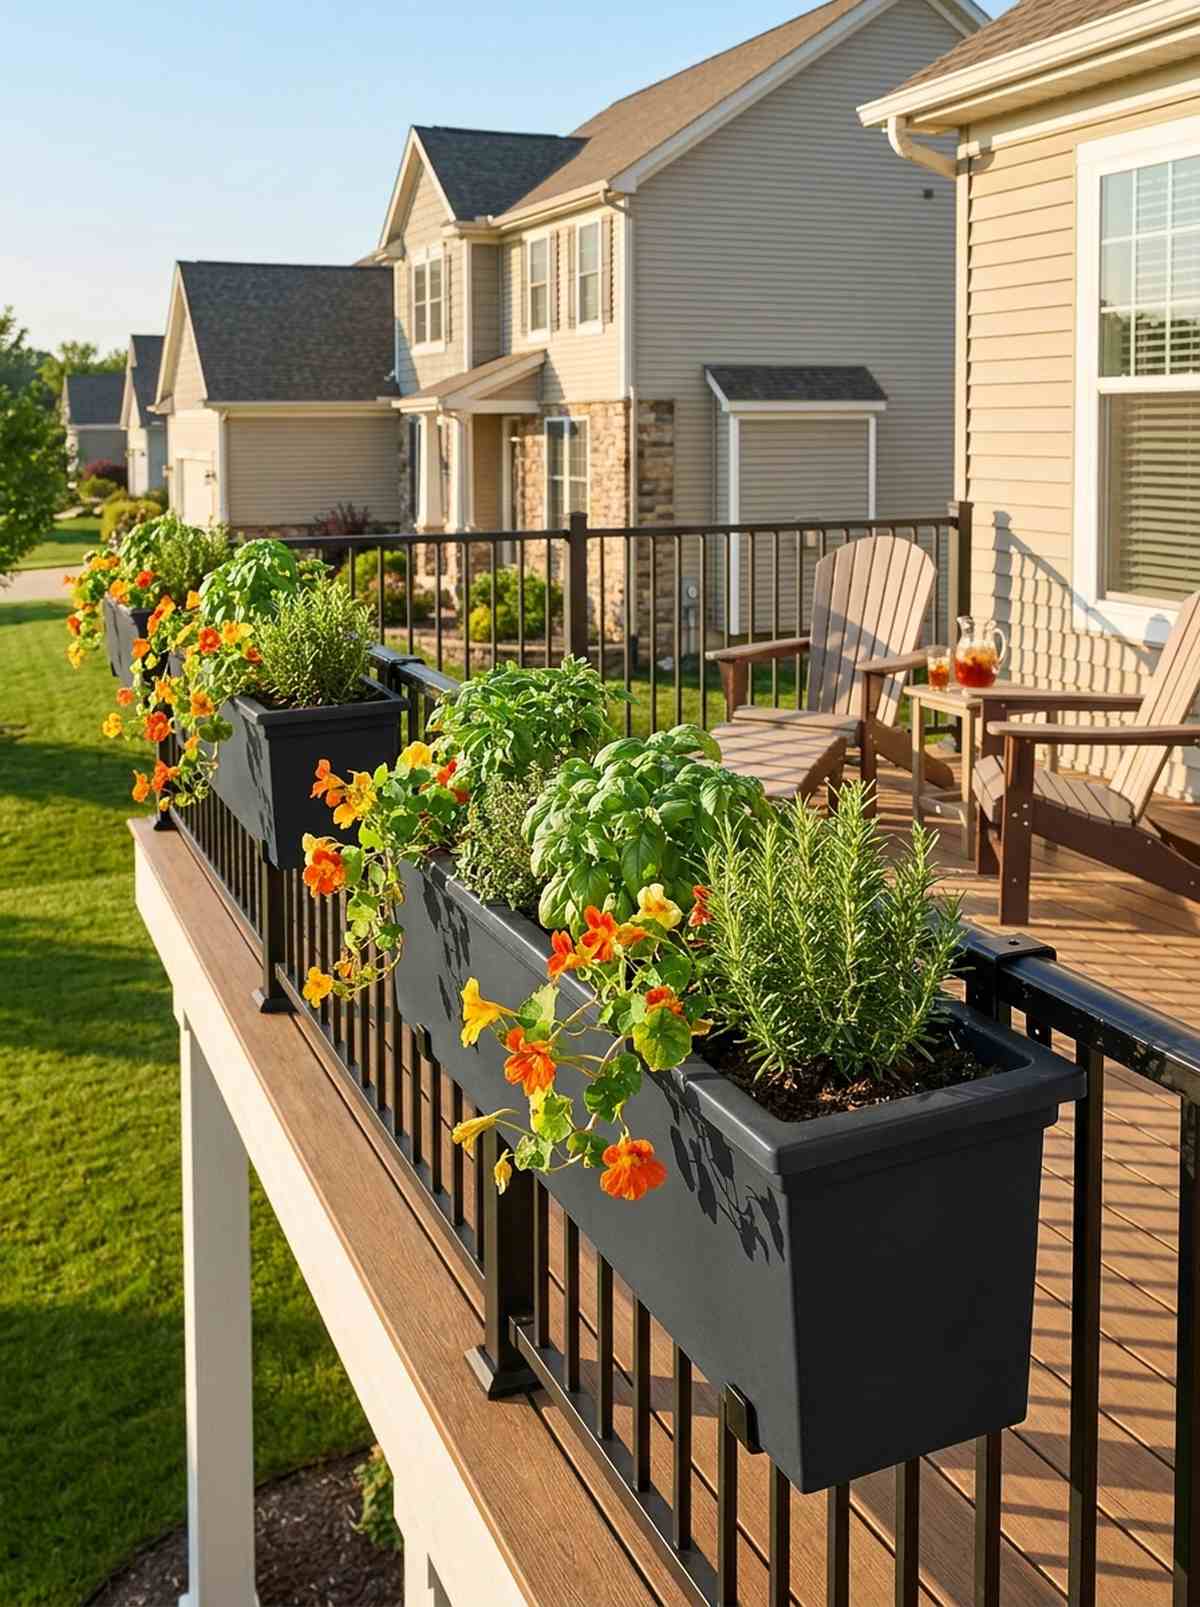
Captures the ultimate romantic Parisian apartment window aesthetic effortlessly. Mounting these balcony rail herb boxes floats your greenery perfectly at arm’s length, making it the supreme choice for tight railing constraints.
Using flimsy wire brackets usually results in sagging plants, but anchoring them with architectural-grade steel hardware delivers a surprisingly premium look that defies gravity. It immediately dresses up a bare exterior while keeping your basil bug-free.
Outfitting a window or rail generally costs $30–$50. Highly recommended for renters looking to add massive curb appeal without permanent changes.
- Key Materials: Long shallow boxes, rail brackets
- Vibe / Style: Classic European facade
- Difficulty: Very easy mounting
- Budget Breakdown: High-end boxes: $30 | Brackets: $20
- Creator’s Tip: Mix in edible trailing flowers like nasturtiums to spill over the edge and soften the rigid box lines.
- Smart Sourcing: Heavy-duty adjustable rail brackets and UV-coated fiberglass window boxes.
16. Perennial Herb Border Beds
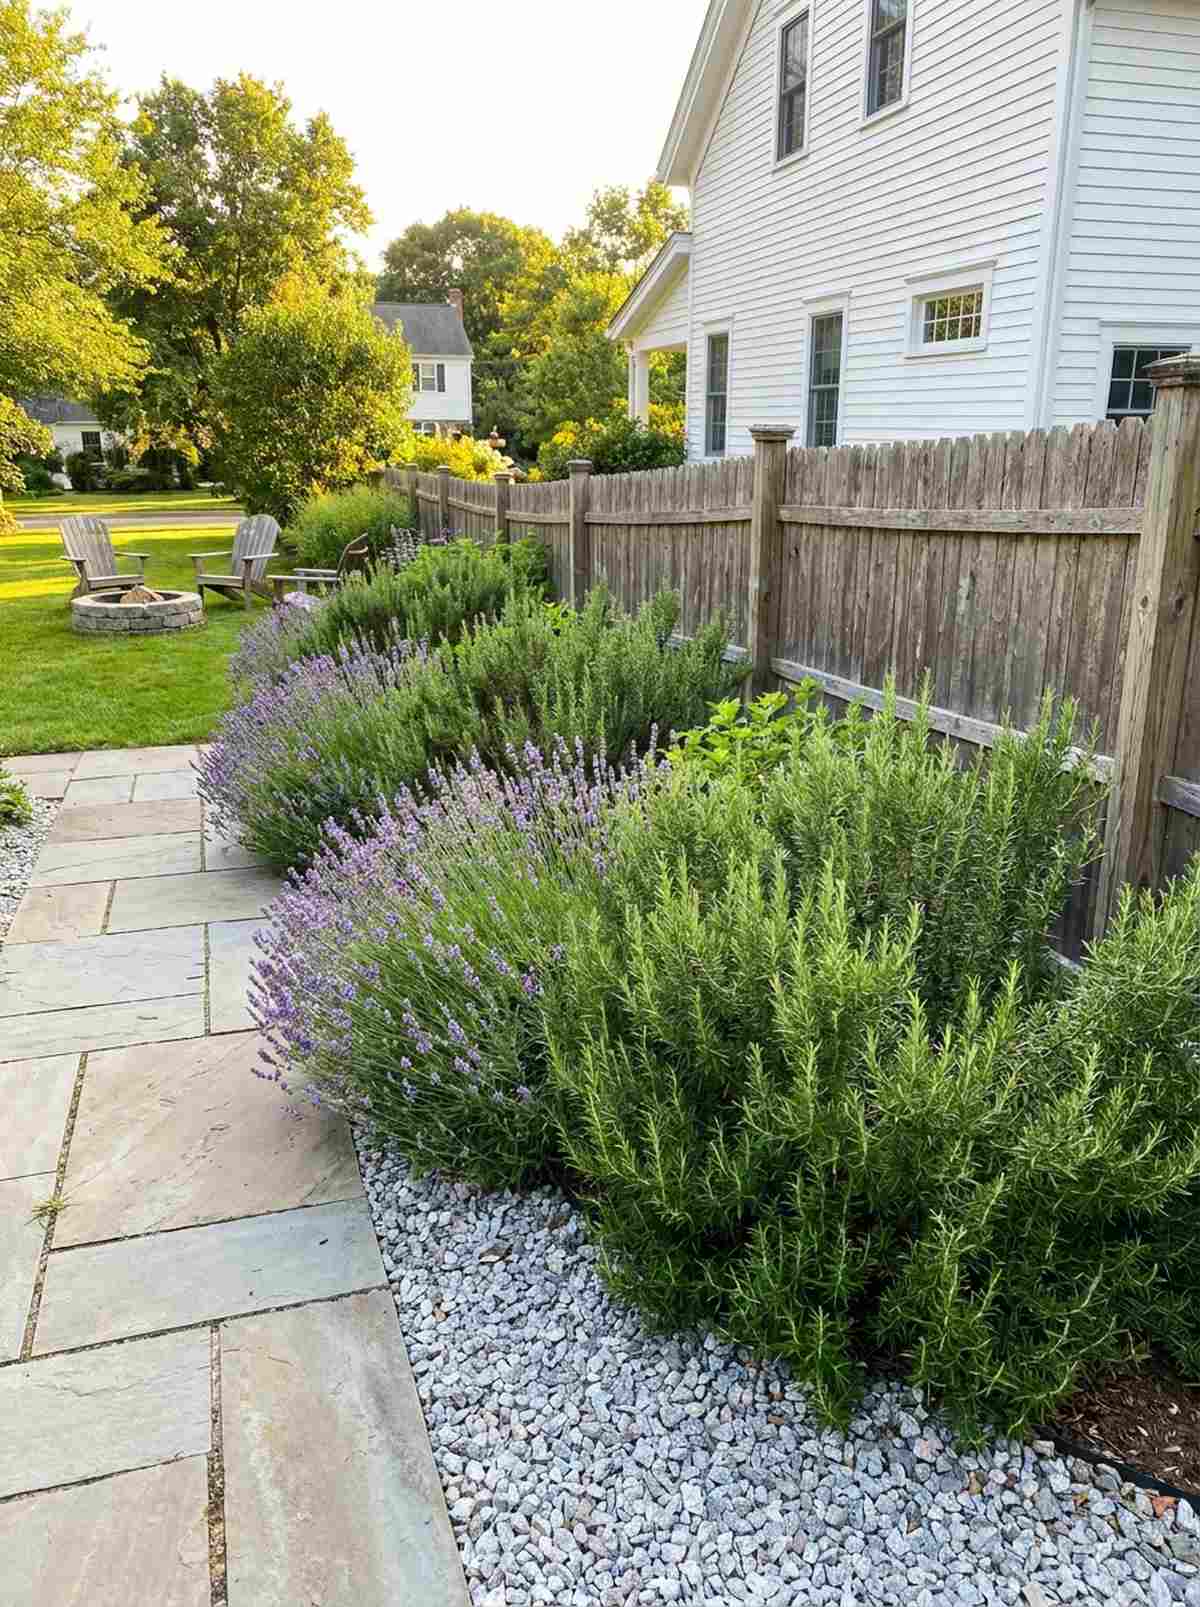
Transforms your yard into a lush English botanical pathway that smells incredible every time you brush past. Creating permanent woody herb boundaries establishes a mature, legacy garden aesthetic along sidewalks and fences.
Most beginners tear up their beds every winter, but establishing permanent woody herbs like rosemary and lavender looks far more expensive than it is, providing evergreen structure year-round. It cuts your yearly planting labor down to almost zero.
Investing in mature starter shrubs costs roughly $60–$90 to fill a border. Save this if you want a garden that thrives on neglect!
- Key Materials: Soil amendments, gravel mulch
- Vibe / Style: Evergreen estate borders
- Difficulty: Digging and amending
- Budget Breakdown: Plants: $70 | Gravel mulch: $20
- Creator’s Tip: Mulch perennial herbs with crushed gravel instead of woodchips to reflect heat and prevent root rot during wet winters.
- Smart Sourcing: Organic slow-release fertilizer (bulk bucket) and premium root-stimulating mycorrhizae powders.
17. Vertical Wall-Mounted Herb Pockets
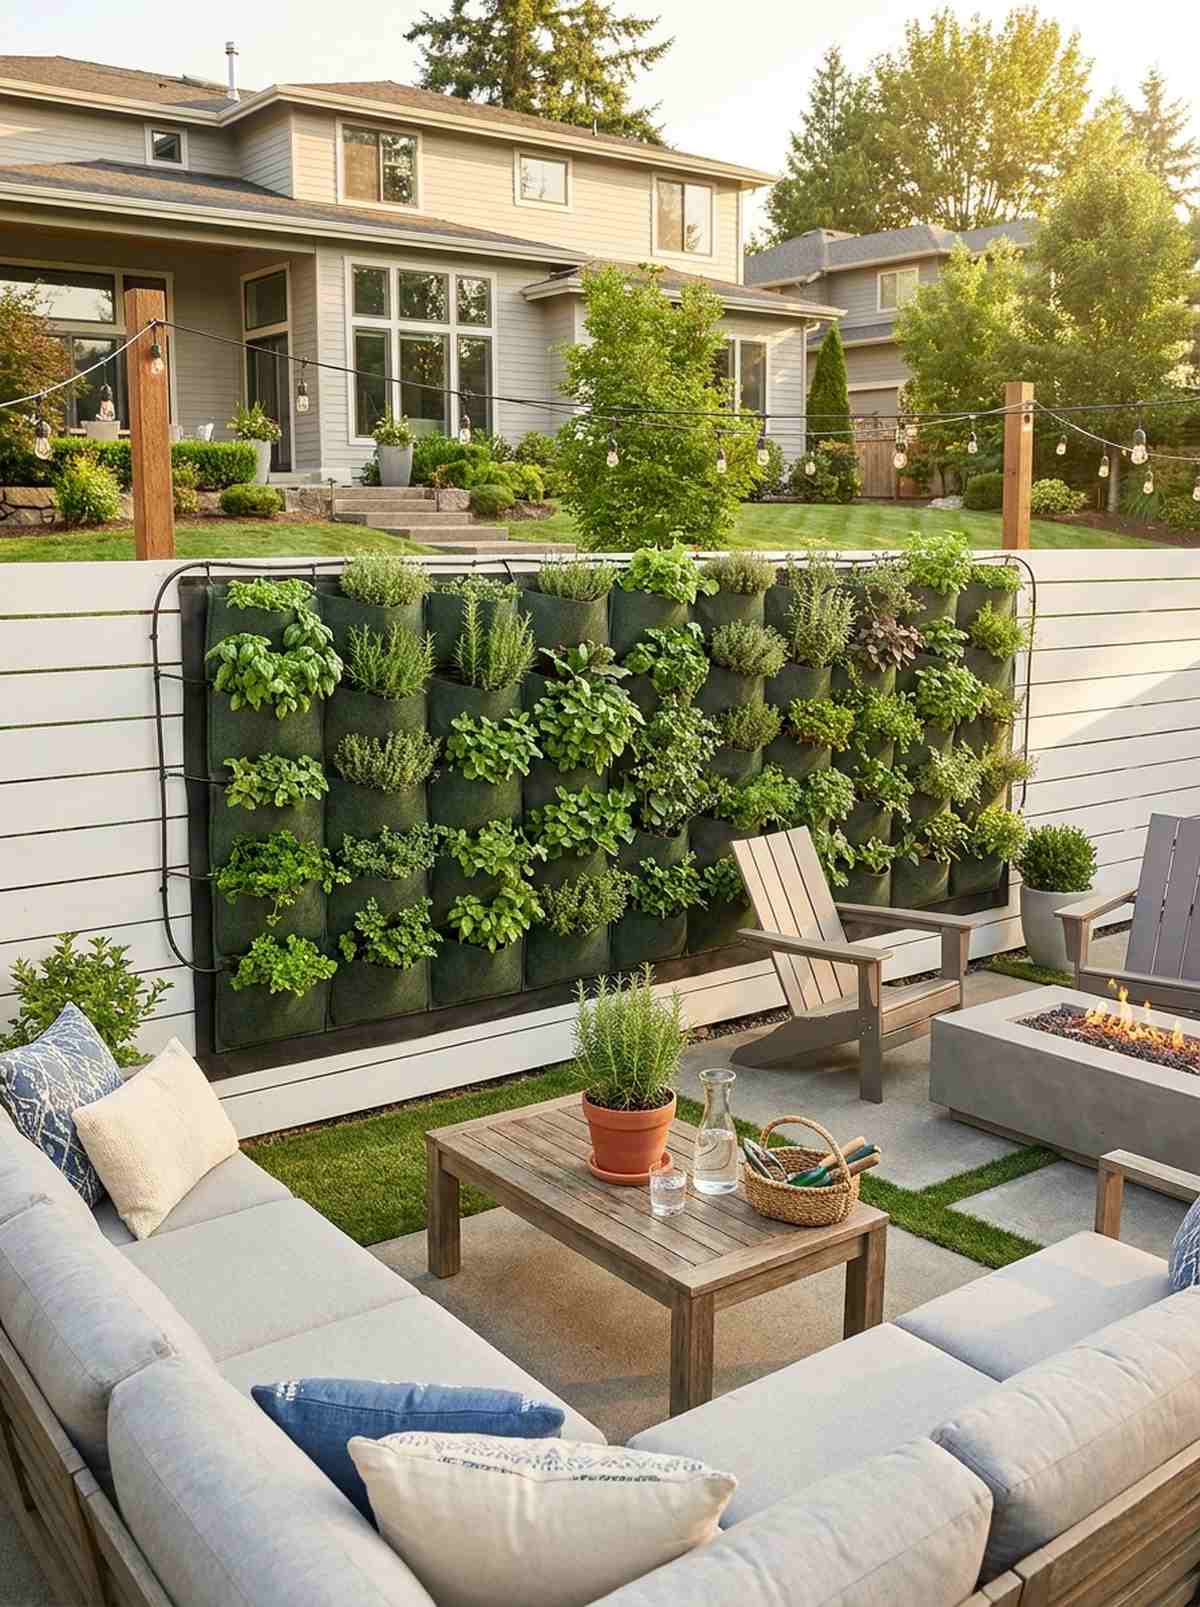
Creates a shockingly modern living tapestry right on your outdoor walls. Using fabric wall planters is an incredibly fast hack to turn a stark, blindingly white fence into a lush wall of deep green textures.
While hard plastic wall pods can crack and look cheap, utilizing breathable, UV-resistant felt gives a designer-level finish that allows superior root aeration. This modular system can be expanded infinitely as your culinary skills grow.
You can easily cover a large wall section for under $35. Pin this if your patio feels like a concrete box!
- Key Materials: Heavy-duty felt pockets, waterproof backing
- Vibe / Style: Modern living wall
- Difficulty: Fast stapling/screwing
- Budget Breakdown: Pocket panels: $25 | Hardware: $10
- Creator’s Tip: Ensure a waterproof plastic membrane sits between the felt pockets and your home’s siding to prevent moisture damage.
- Smart Sourcing: UV-resistant felt pocket planters (starter kit) and automatic drip line manifold kits.
18. Salad Table Raised Bed
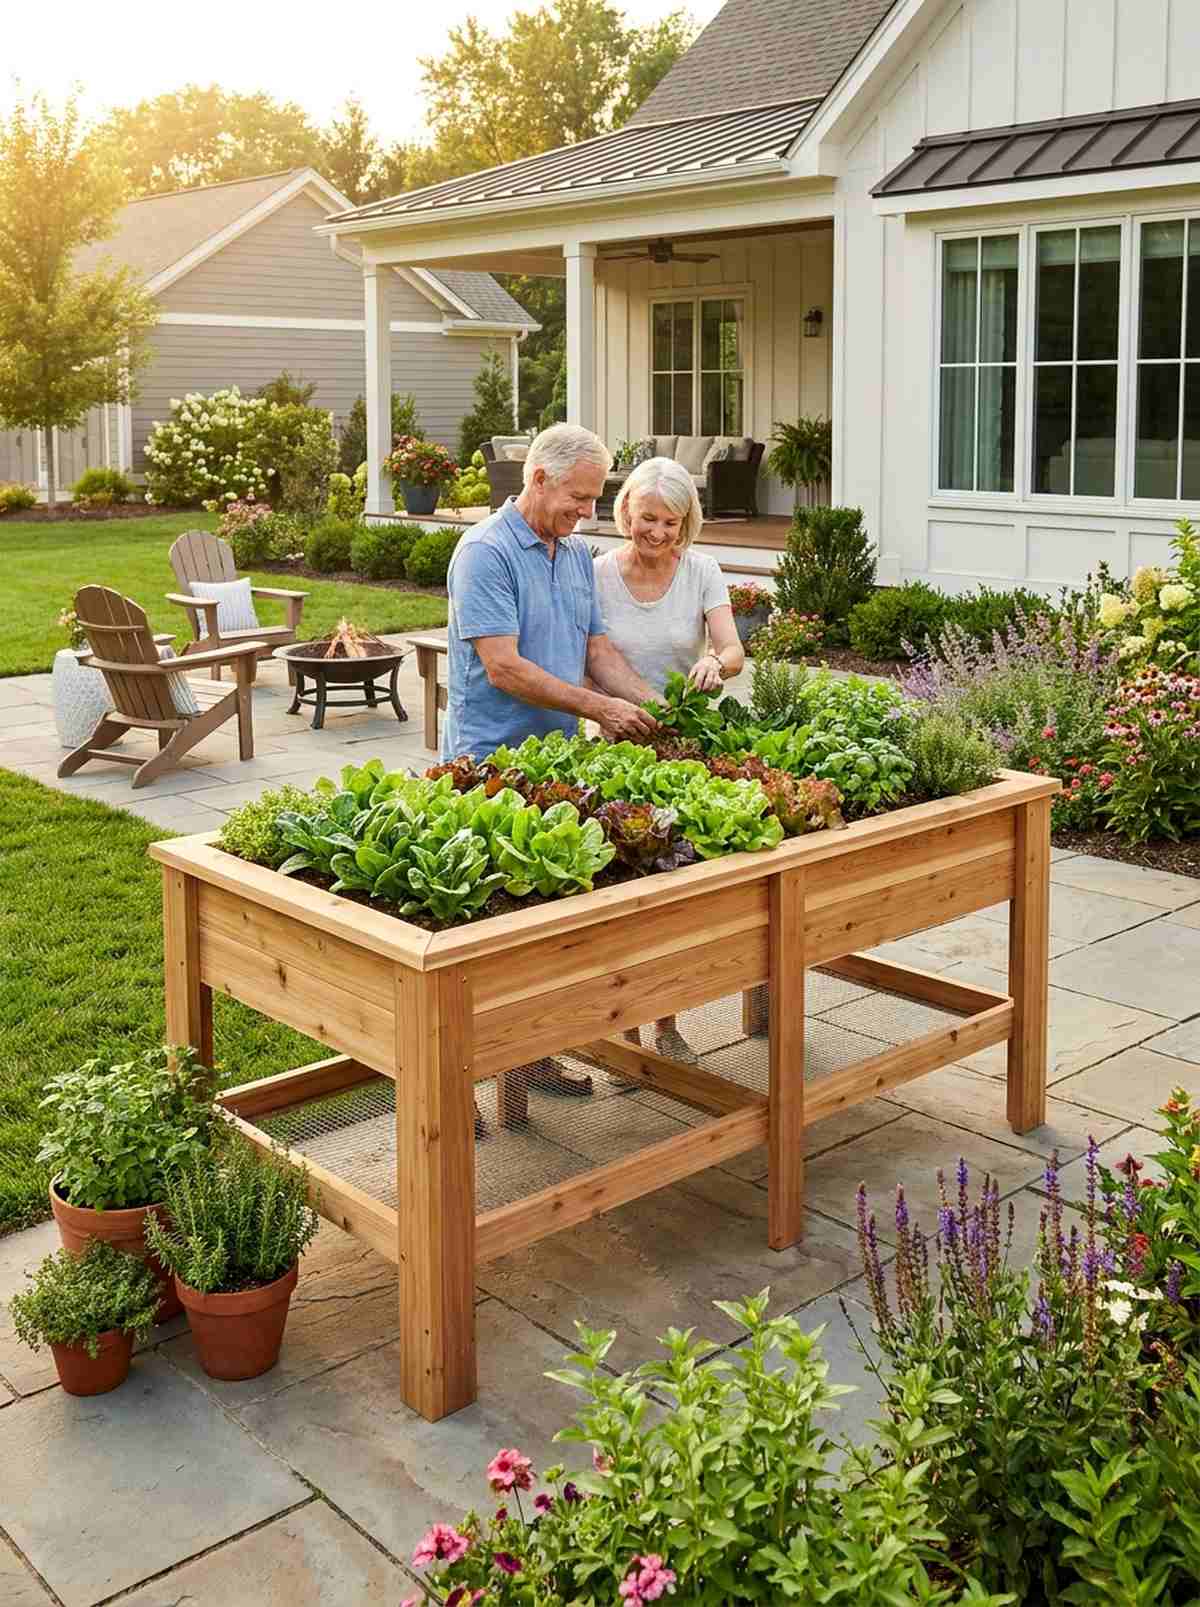
Brings ergonomic, waist-high luxury to your daily harvesting routine. An elevated salad bar setup means absolutely zero bending, making it the perfect focal point for a senior-friendly or accessibility-first patio.
Standard ground beds leave delicate greens vulnerable to rabbits and slugs, but lifting the soil profile on sleek cedar legs looks far more expensive than it is. The shallow depth forces frequent watering, resulting in the crispest, sweetest lettuce possible.
Building a sturdy elevated table runs about $60–$100. It’s a fast upgrade that completely changes the comfort of daily gardening.
- Key Materials: Leg timbers, shallow box frame, mesh bottom
- Vibe / Style: Ergonomic luxury patio
- Difficulty: Moderate woodworking
- Budget Breakdown: Wood frame: $70 | Wire mesh base: $15
- Creator’s Tip: Staple heavy hardware cloth to the bottom instead of solid wood to guarantee perfect drainage and prevent the heavy box from rotting.
- Smart Sourcing: Pre-drilled elevated planter kits and galvanized hardware cloth (bulk roll).
If you’ve struggled with messy gardens, the upcoming layout changes everything…
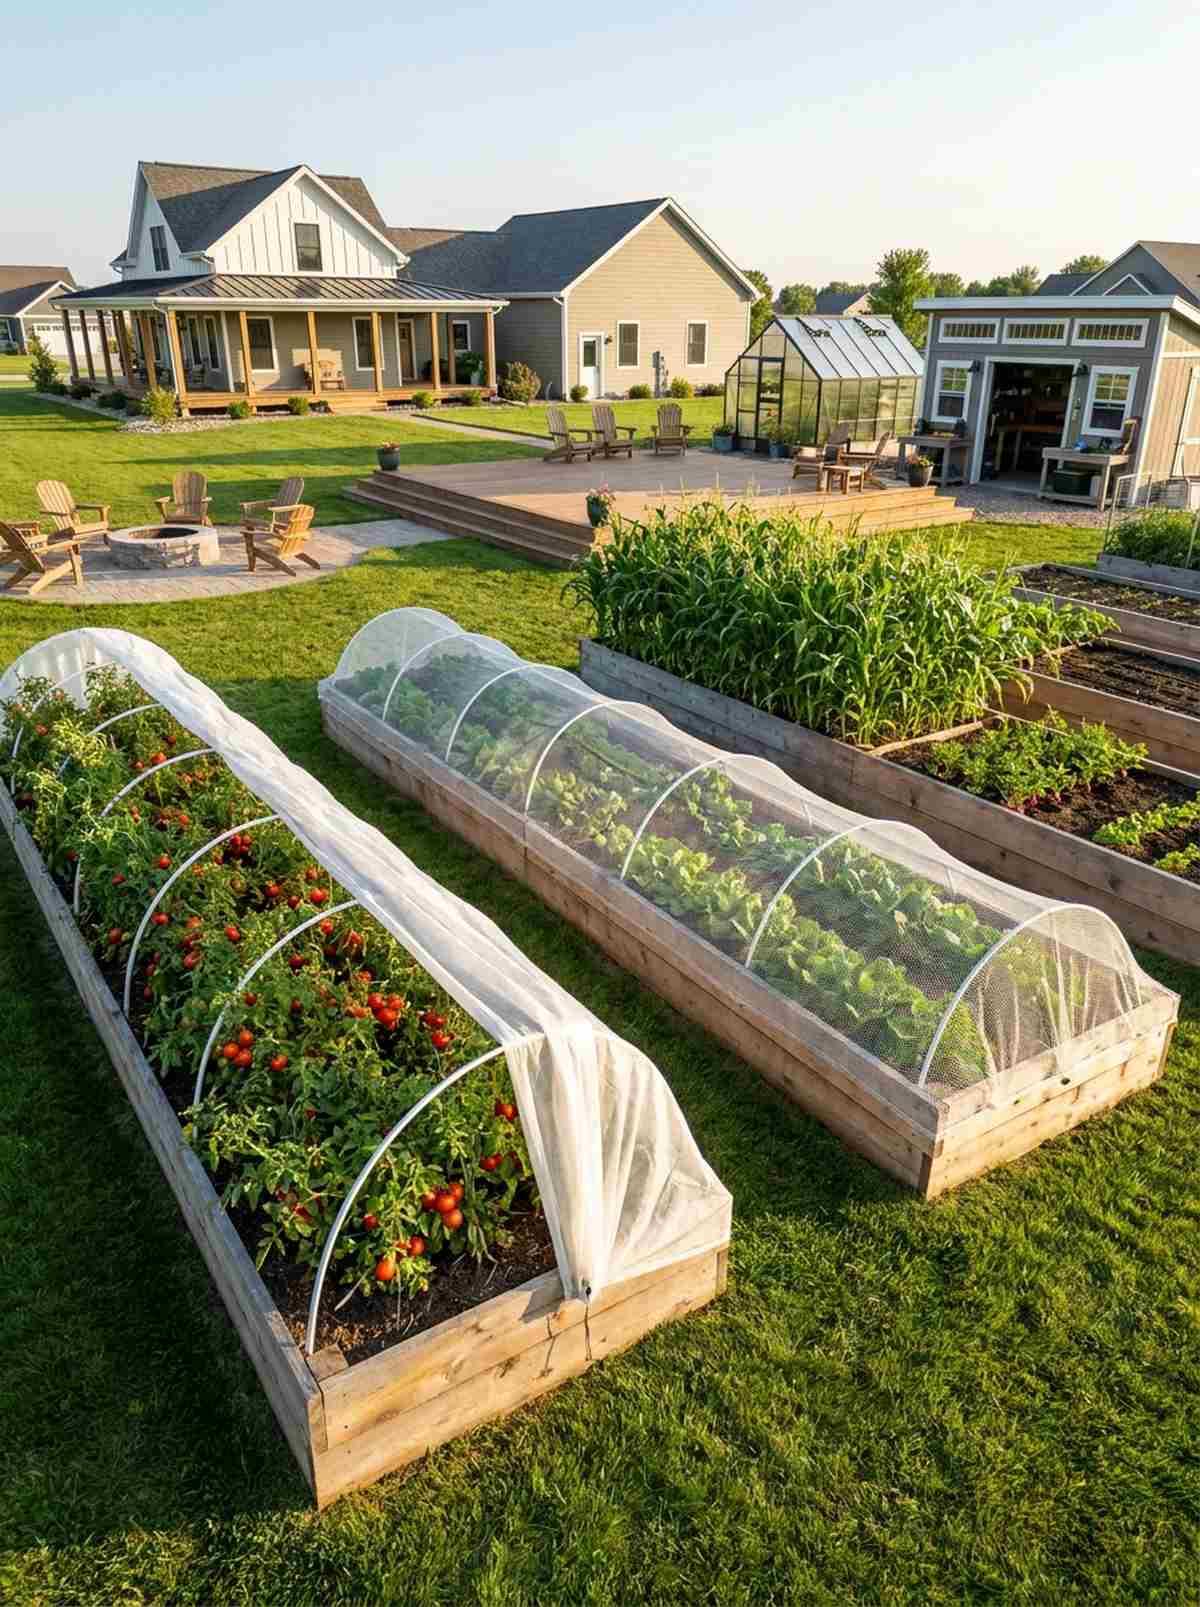
19. Tomato Production Zone
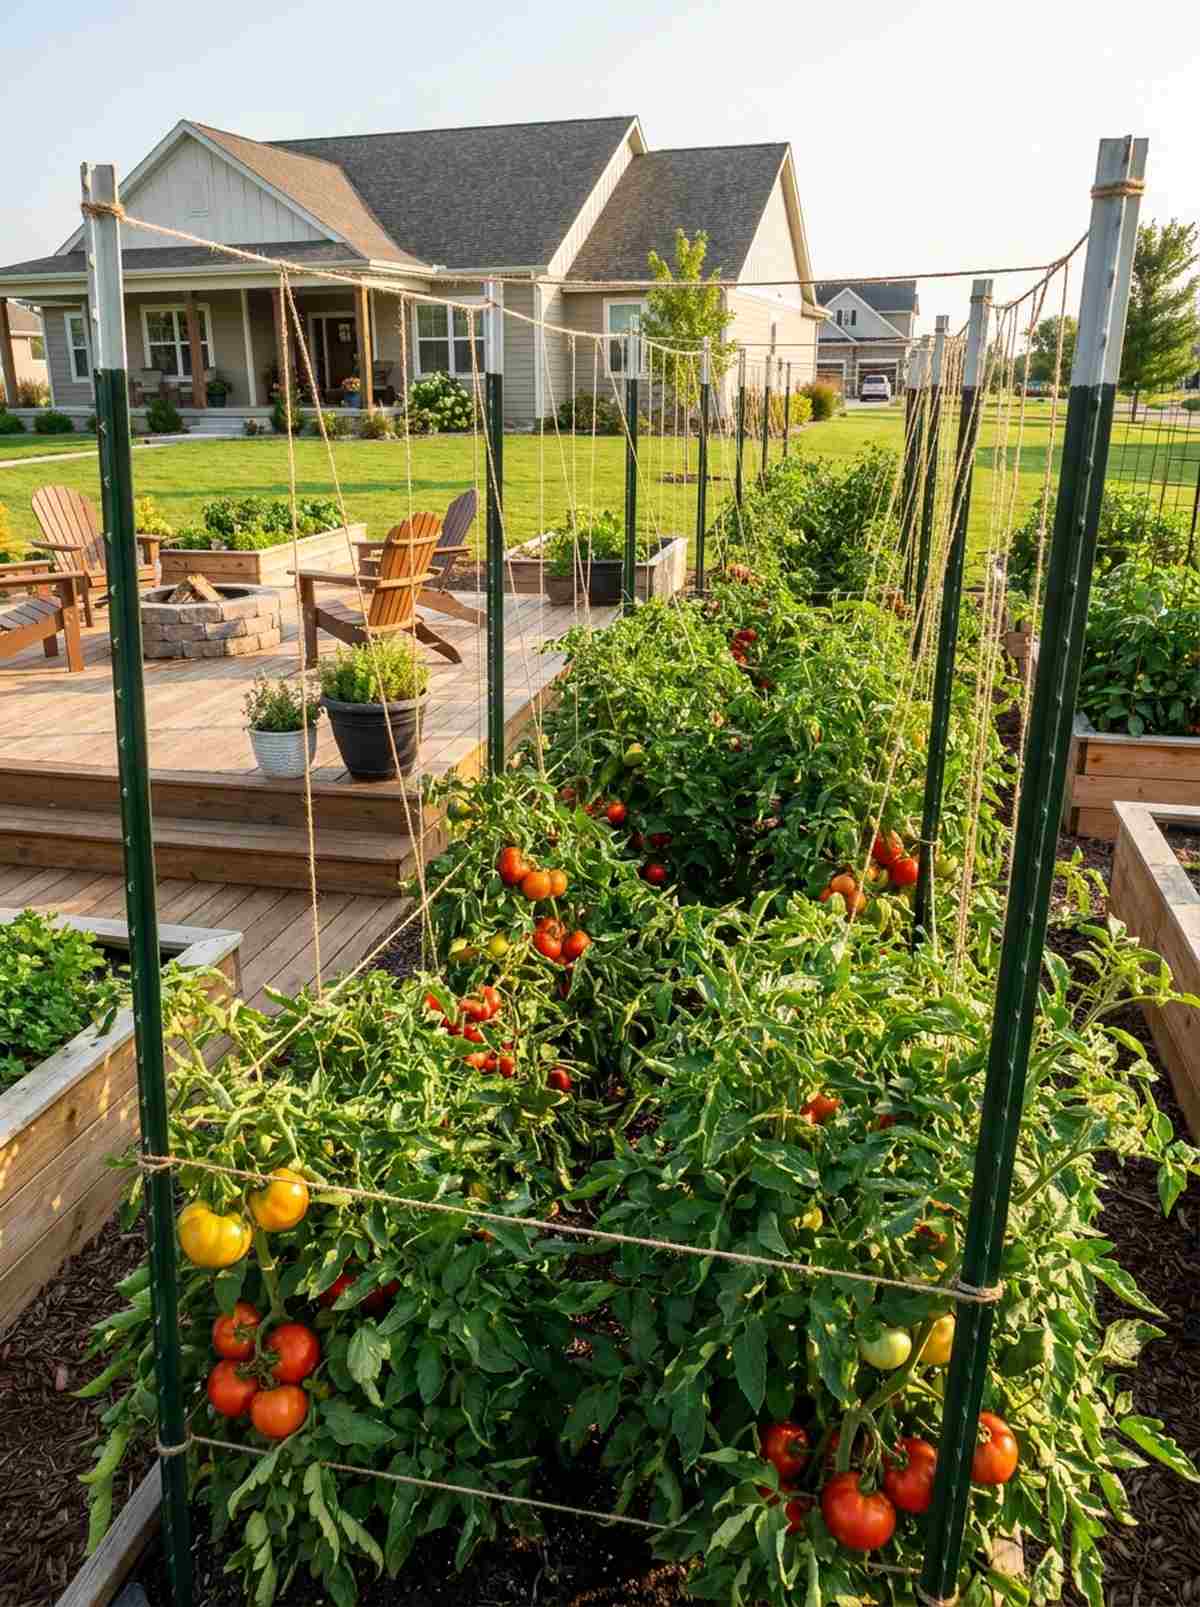
Emulates a dense, hyper-productive Italian villa harvest zone. Building dedicated high-yield nightshade rows tames the wildest plants, perfect for the gardener looking to can and preserve huge weekend batches.
Flimsy wire cages turn into a tangled, collapsing mess by August, but installing industrial-strength steel weaving systems gives a designer-level finish that commands respect. The robust architecture keeps airflow high and blight diseases absolutely minimal.
Constructing an immovable tomato fortress costs about $50–$80. Pin this to your heavy-harvest homesteading board!
- Key Materials: Steel T-posts, heavy baling twine
- Vibe / Style: Serious agricultural intent
- Difficulty: Heavy post driving
- Budget Breakdown: Posts: $40 | Twine: $15
- Creator’s Tip: Bury tomato transplants all the way up to their top leaves—the buried stem will blast out massive extra roots for stability.
- Smart Sourcing: Heavy-duty steel tomato spirals (bulk pack) and UV-coated horticultural twine.
20. Root Vegetable Deep Bed
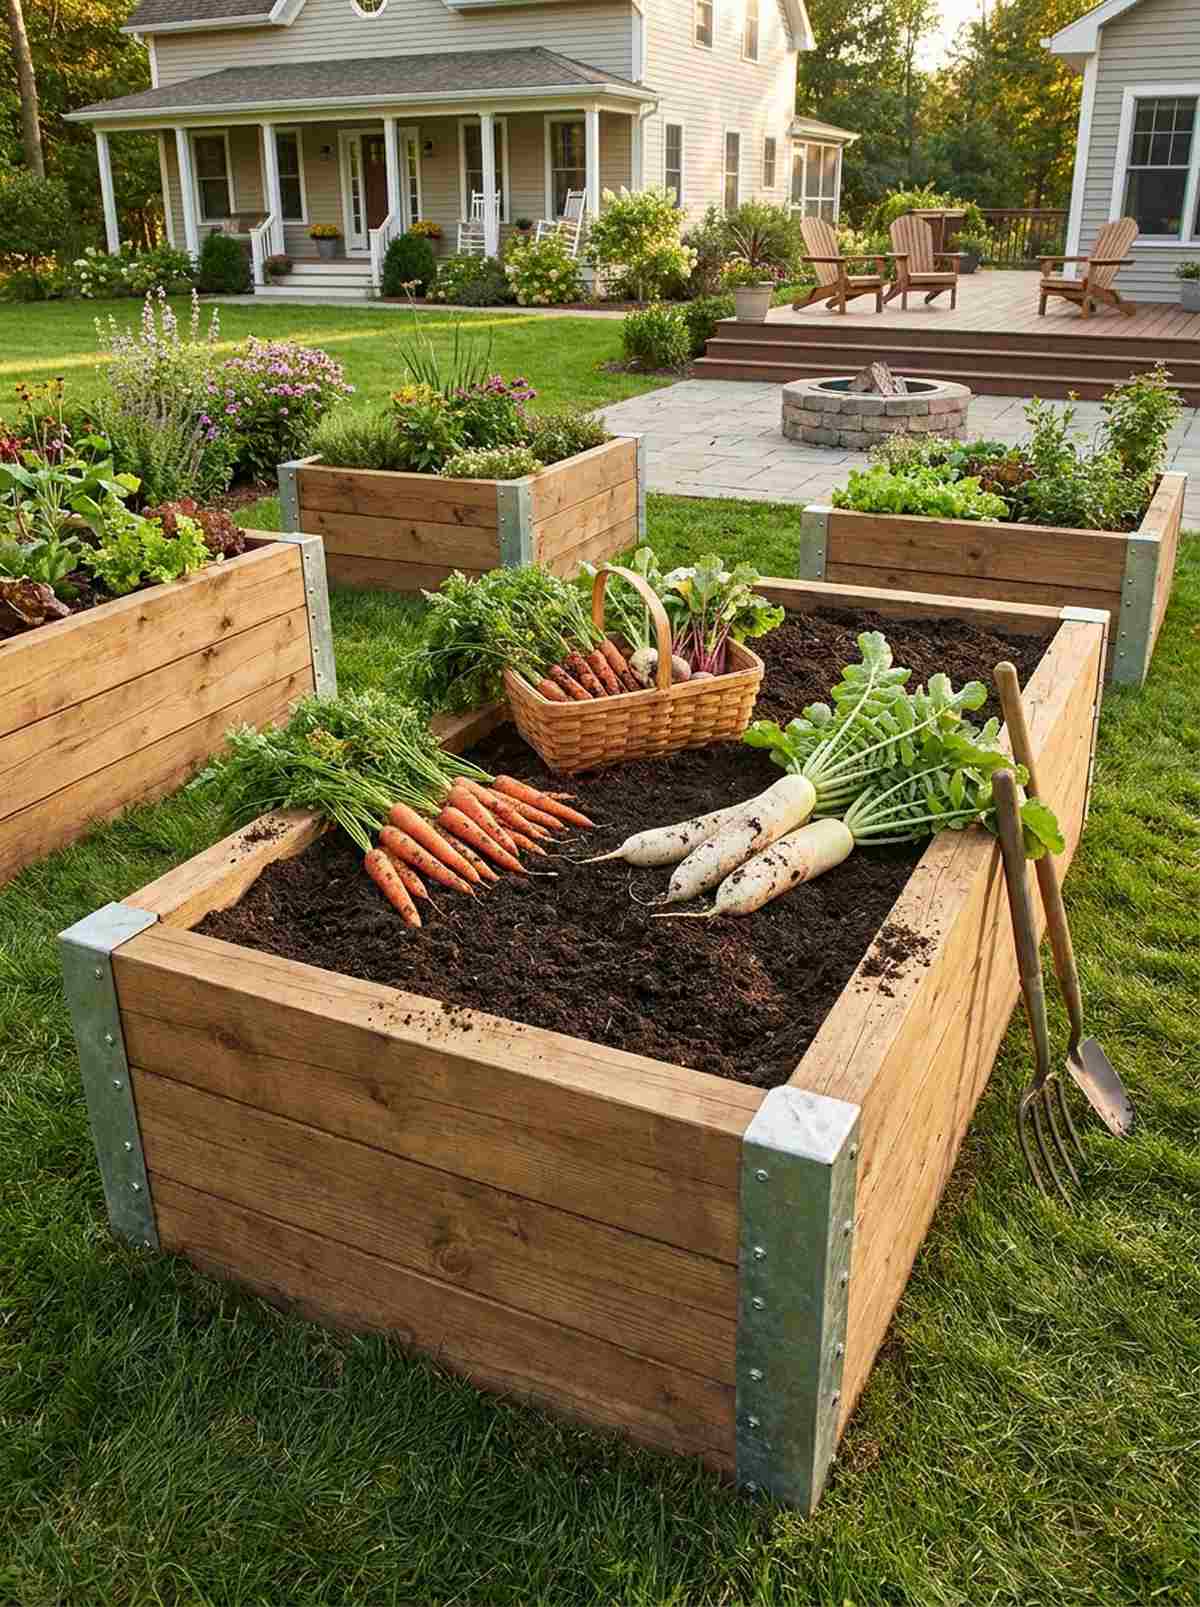
Radiates deep, earthy abundance and serious soil mastery. Constructing extra-deep harvest boxes is the absolute secret weapon for pulling out perfectly straight, award-winning carrots and massive daikon radishes.
Trying to grow long roots in standard 8-inch boxes results in stunted, curled vegetables, but stacking timber to 24 inches delivers a surprisingly premium look with incredible underground volume. Avoiding foot traffic entirely means the soil stays fluffy like a sponge.
Due to the massive soil volume needed, expect to spend $120–$180. It’s an essential build for any serious root-cellar prepper.
- Key Materials: Thick stacking timber, high-volume fluffy soil
- Vibe / Style: Deep homestead prep
- Difficulty: High soil moving effort
- Budget Breakdown: Tall frame: $80 | Premium soil: $80
- Creator’s Tip: Mix 30% coarse sand into your soil blend to guarantee the loose, rock-free texture that root vegetables crave.
- Smart Sourcing: Premium organic raised bed soil blend (bulk) and heavy-duty galvanized corner brackets.
Material Guide: Cheap vs. Premium Aesthetic
Knowing exactly where to save and where to spend makes all the difference in achieving that “looks expensive but isn’t” vibe.
- Standard vs. UV-Resistant/Premium: Generic plastics crack and fade after one summer. Upgrading to UV-coated components stops brittleness and keeps colors rich and designer-quality for years.
- Pre-made Kits vs. Sourcing Locally: While buying raw lumber seems cheaper, premium pre-cut starter kits often save both time and money by eliminating waste, avoiding expensive tool purchases, and offering engineered structural integrity.
21. Cut Flower & Culinary Bed
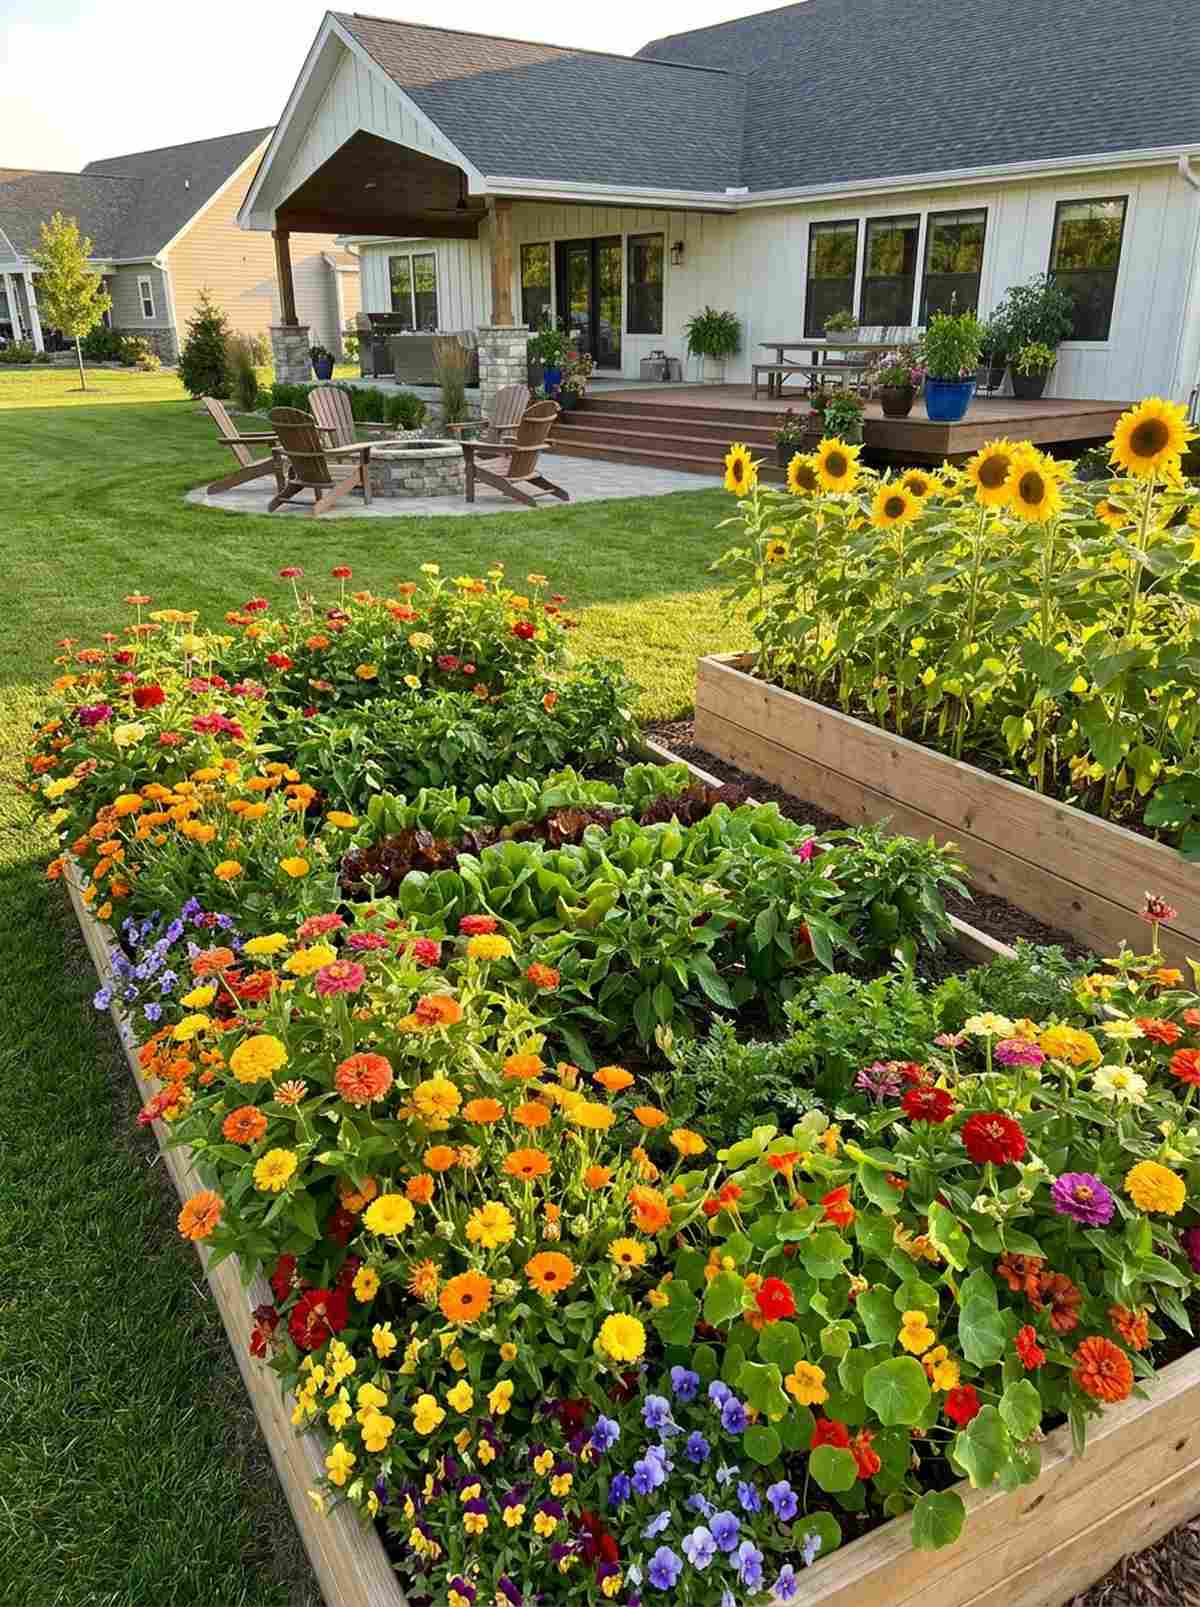
Looks like a vibrant pollinator paradise bursting with explosive colors. Interspersing mixed edible bloom borders into your food beds bridges the gap between high-end landscaping and practical agriculture flawlessly.
Vegetable gardens can sometimes look dull and utilitarian, but weaving bright zinnia and calendula borders looks far more expensive than it is, mimicking elite botanical garden styling. The blooms act as a massive magnet for beneficial insects that naturally assassinate pests.
You can achieve this explosion of color for less than $20 in seeds. Pin this if you want your veggie garden to look like a floral boutique!
- Key Materials: Assorted heirloom seeds, fine topsoil
- Vibe / Style: Elite botanical showcase
- Difficulty: Extremely easy sowing
- Budget Breakdown: Seed packets: $15 | Compost: $10
- Creator’s Tip: Plant towering sunflowers on the northern edge of the bed so they don’t cast shadows on your sun-loving peppers.
- Smart Sourcing: Heirloom edible flower seed vaults and organic bloom-boosting fertilizers.
22. Preservation Crop Beds
Exudes bountiful homesteader grid vibes and serious survival intent. Dedicating massive bulk harvest stations to single crops is the ultimate flex for gardeners who intend to stock their pantries for winter.
Scattering crops randomly makes bulk harvesting a nightmare, but locking down a massive single-crop footprint gives a designer-level finish of sheer agricultural scale. It heavily streamlines your pest-control netting and automated watering setups.
Setting up massive monopod beds runs around $100–$150 each. Highly recommended for the serious canning and fermentation enthusiast.
- Key Materials: Wide framing boards, bulk row covers
- Vibe / Style: Commercial micro-farm
- Difficulty: Easy layout, high maintenance
- Budget Breakdown: Bed frame: $80 | Row covers: $40
- Creator’s Tip: Install PVC hoops over the entire length immediately at planting so you can throw shade cloth or frost blankets over the bed in 60 seconds.
- Smart Sourcing: Heavy-duty row cover netting (bulk roll) and flexible fiberglass support hoops.
23. U-Shaped Accessible Garden
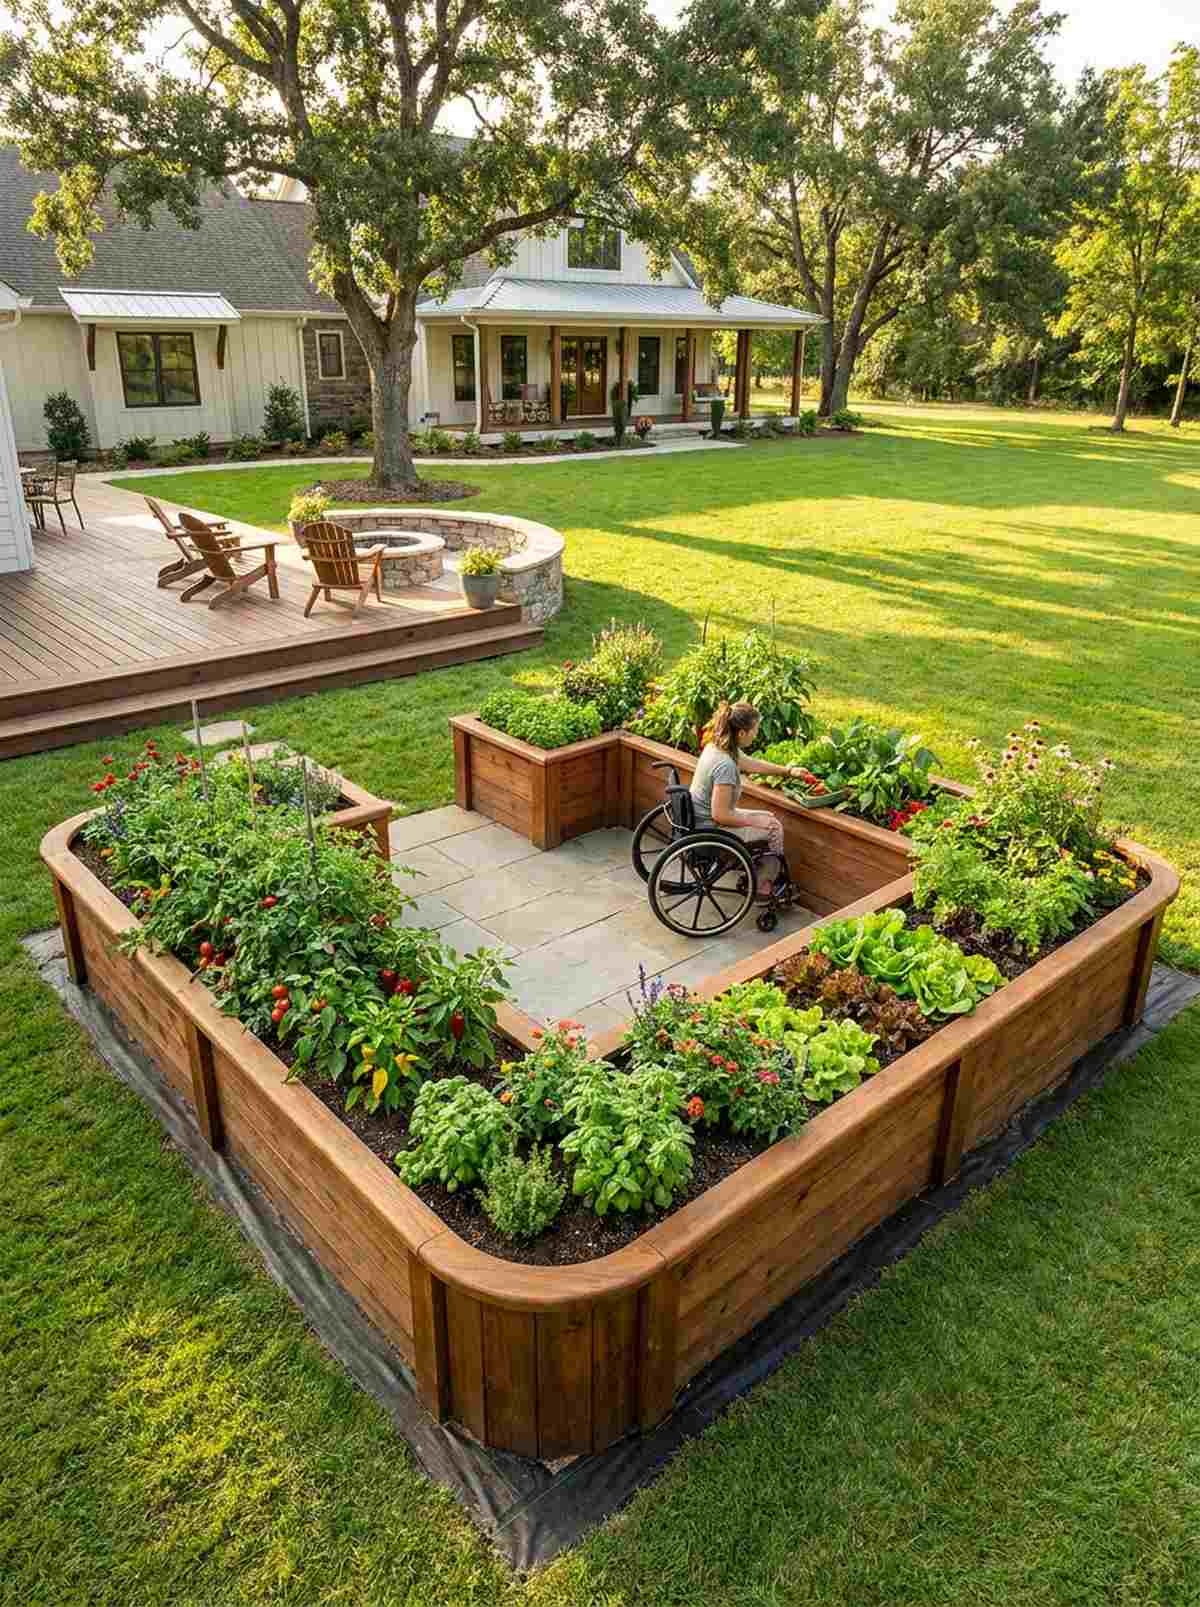
Feels like an inclusive, wraparound sanctuary where the food literally surrounds you. Building wheelchair-friendly garden hubs guarantees that mobility limitations never stop the joy of daily dirt therapy.
Standard sharp-cornered boxes create frustrating bottlenecks, but curving a seamless U-shape delivers a surprisingly premium look that flows beautifully with natural body mechanics. You stay perfectly pivoted in the center while reaching every single square inch.
Constructing this immersive bay costs roughly $200–$350. Save this to your therapeutic garden ideas board!
- Key Materials: Curved corner joints, smooth capping rails
- Vibe / Style: Immersive therapeutic bay
- Difficulty: Moderate framing precision
- Budget Breakdown: Timbers: $180 | Custom joints: $60
- Creator’s Tip: Leave a minimum of 48 inches of completely flat, paved turning radius inside the “U” for effortless wheelchair or heavy garden cart rotation.
- Smart Sourcing: Composite curved planter sections and heavy-duty wide-path weed barriers.
The final few designs are absolute game-changers for serious year-round growers…
24. Season Extension Cold Frame Beds

Radiates crisp winter greenhouse magic while the rest of the neighborhood’s yards are dead. Implementing glass-topped overwintering beds is the ultimate cheat code for harvesting fresh salads while snow is falling.
Throwing cheap plastic tarps over plants looks messy and fails in high wind, but attaching rigid, hinged lids looks far more expensive than it is and creates a bulletproof micro-climate. It traps solar heat aggressively, fast-forwarding your spring planting by a full month.
Adding cold frame lids costs about $60–$120. Pin this if you refuse to stop growing in November!
- Key Materials: Polycarbonate panels, heavy hinges, auto-vents
- Vibe / Style: Winter survivalist chic
- Difficulty: Moderate hardware mounting
- Budget Breakdown: Panels: $80 | Hinges/Hardware: $25
- Creator’s Tip: Install automatic thermal vent openers—they expand when the sun gets too hot and pop the lid open, saving your plants from accidentally cooking.
- Smart Sourcing: UV-coated twin-wall polycarbonate sheets and temperature-sensitive automatic vent openers.
25. Integrated Compost Production Bed
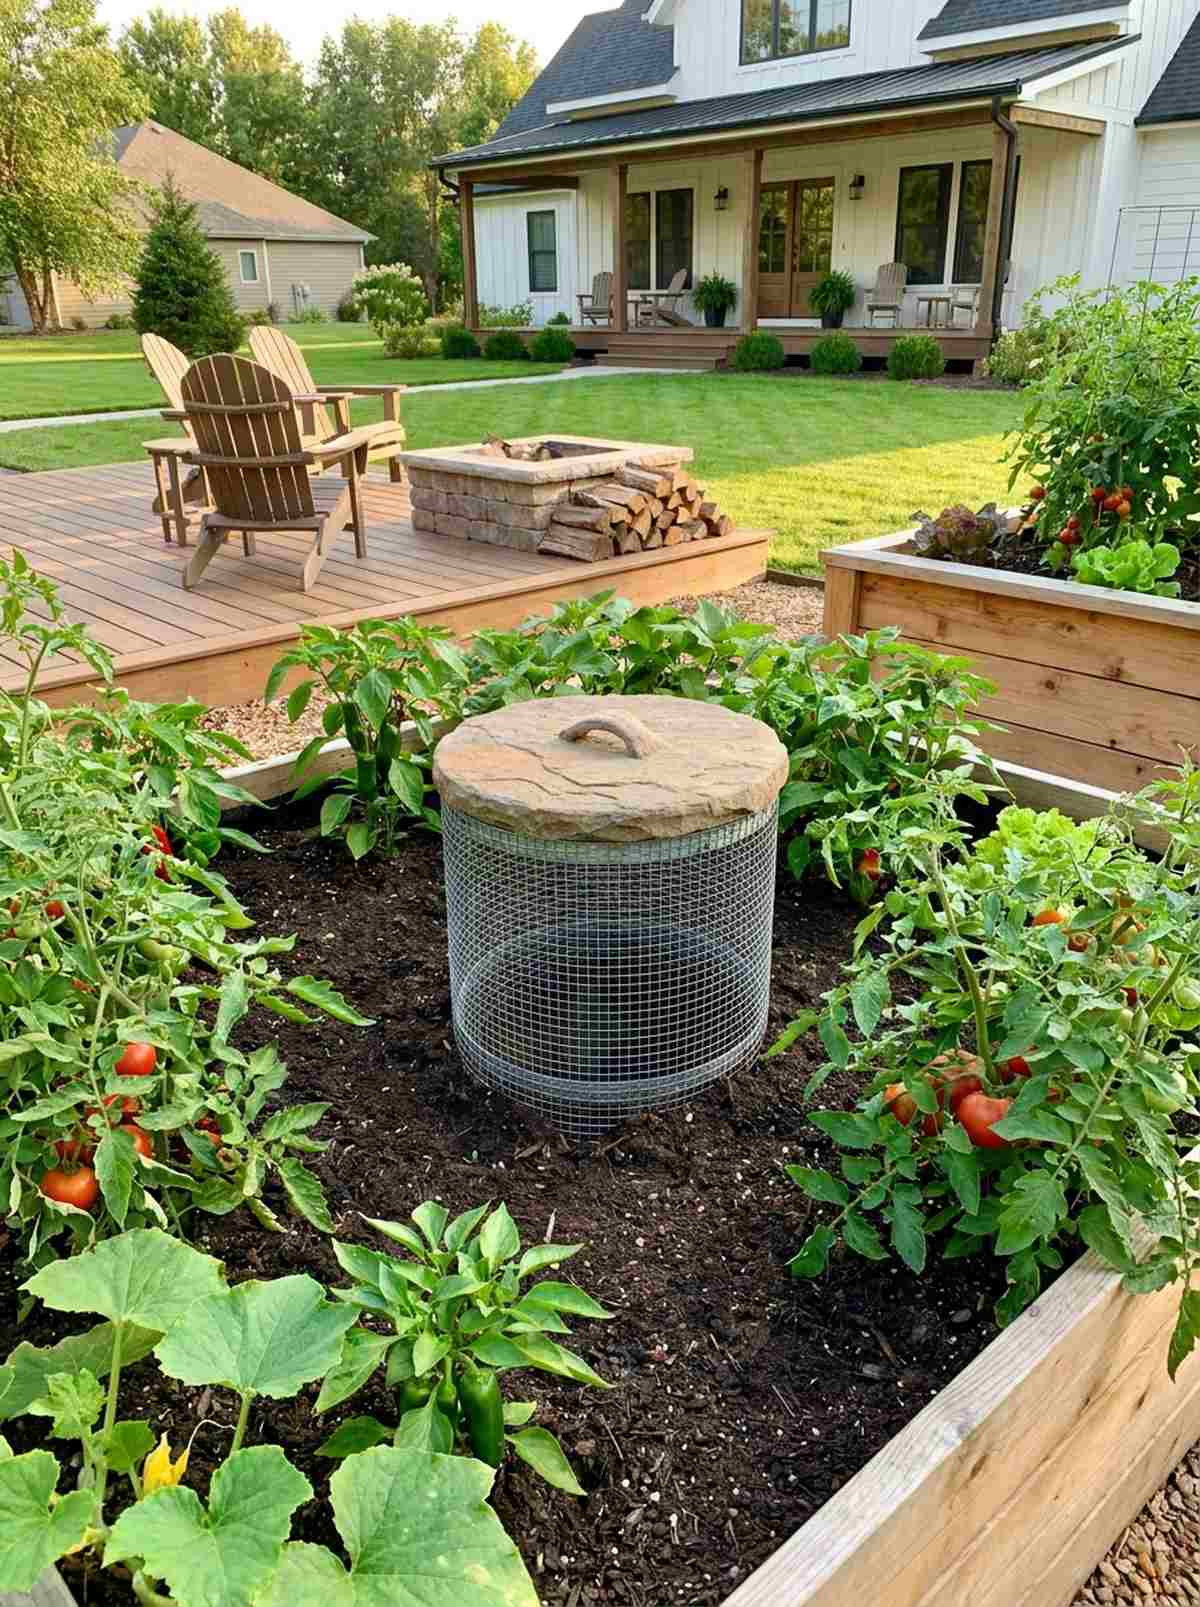
Functions as a brilliant eco-loop oasis right in the center of your veggies. Sinking in-bed nutrient towers directly into the soil creates a closed-loop engine that feeds your plants completely on autopilot.
Keeping a separate, ugly compost pile in the corner of the yard attracts pests, but burying a sleek wire tube mid-bed gives a designer-level finish while hiding the decomposition. As the worms break down kitchen scraps, the nutrient tea leaches directly into the surrounding tomato roots.
You can fabricate this hidden engine for under $20. Highly recommended for permaculture fans wanting hyper-organic yields.
- Key Materials: Hardware cloth, zip ties
- Vibe / Style: Stealth permaculture loop
- Difficulty: Very easy wire shaping
- Budget Breakdown: Wire mesh: $15 | Fasteners: $5
- Creator’s Tip: Keep a decorative paver stone on top of the wire tube opening to lock in moisture and keep curious raccoons out.
- Smart Sourcing: Galvanized hardware cloth (bulk roll) and organic compost starter enzymes.
26. Keyhole Garden Bed
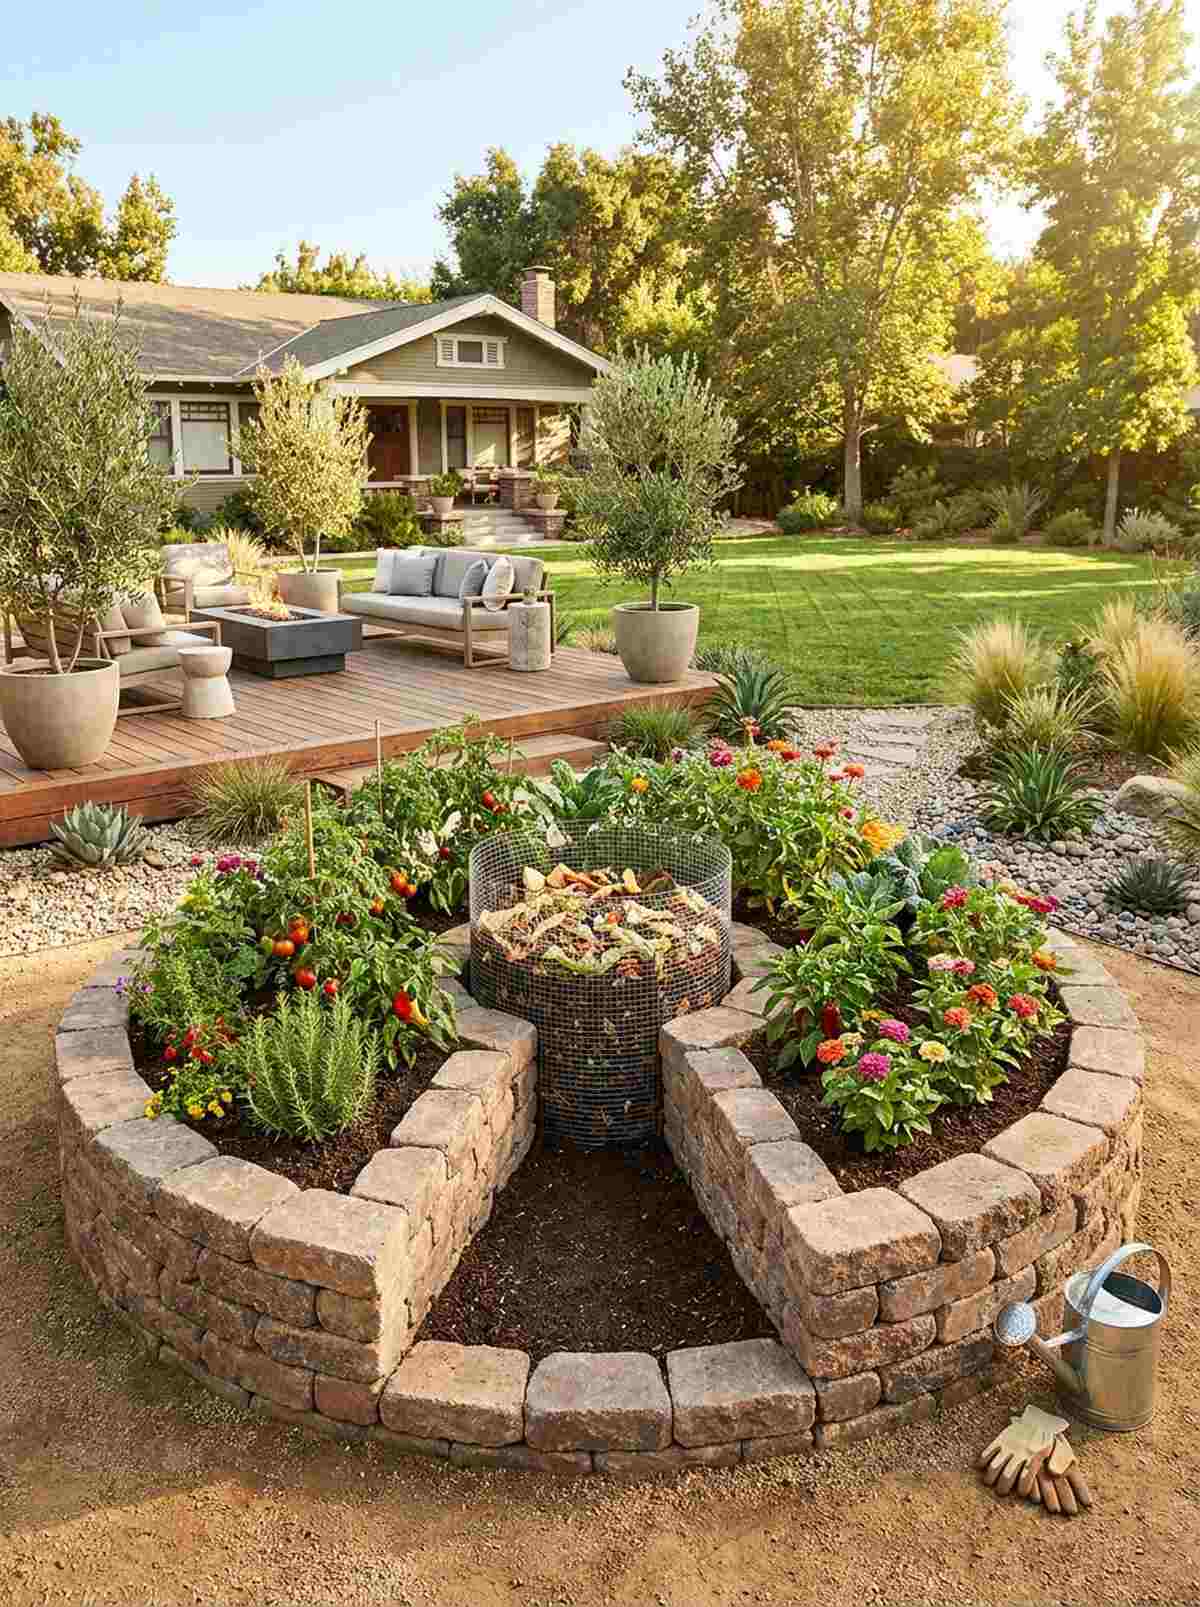
Stands as an ancient drought-proof miracle engineered for brutal summer climates. The circular permaculture keyhole layout acts as a giant sponge, perfect for areas with strict watering restrictions.
Standard flat beds bake dry in hours, but this African-origin design naturally funnels moisture and compost tea from the center basket outward, and looks incredibly bespoke. The pie-slice cutout gives you absolute harvesting dominance without ever compressing the soil.
Building this striking circular mound costs roughly $80–$150. Save this if you’re trying to grow food in the blazing desert!
- Key Materials: Retaining wall blocks, central wire basket
- Vibe / Style: Arid-climate survival master
- Difficulty: Heavy block stacking
- Budget Breakdown: Wall blocks: $110 | Center mesh: $20
- Creator’s Tip: Line the entire bottom of the bed with rotten logs and thick cardboard (hügelkultur style) to turn the foundation into a massive water reservoir.
- Smart Sourcing: Woven wire mesh compost baskets and moisture-retaining biochar blends.
27. Greenhouse-Integrated Beds
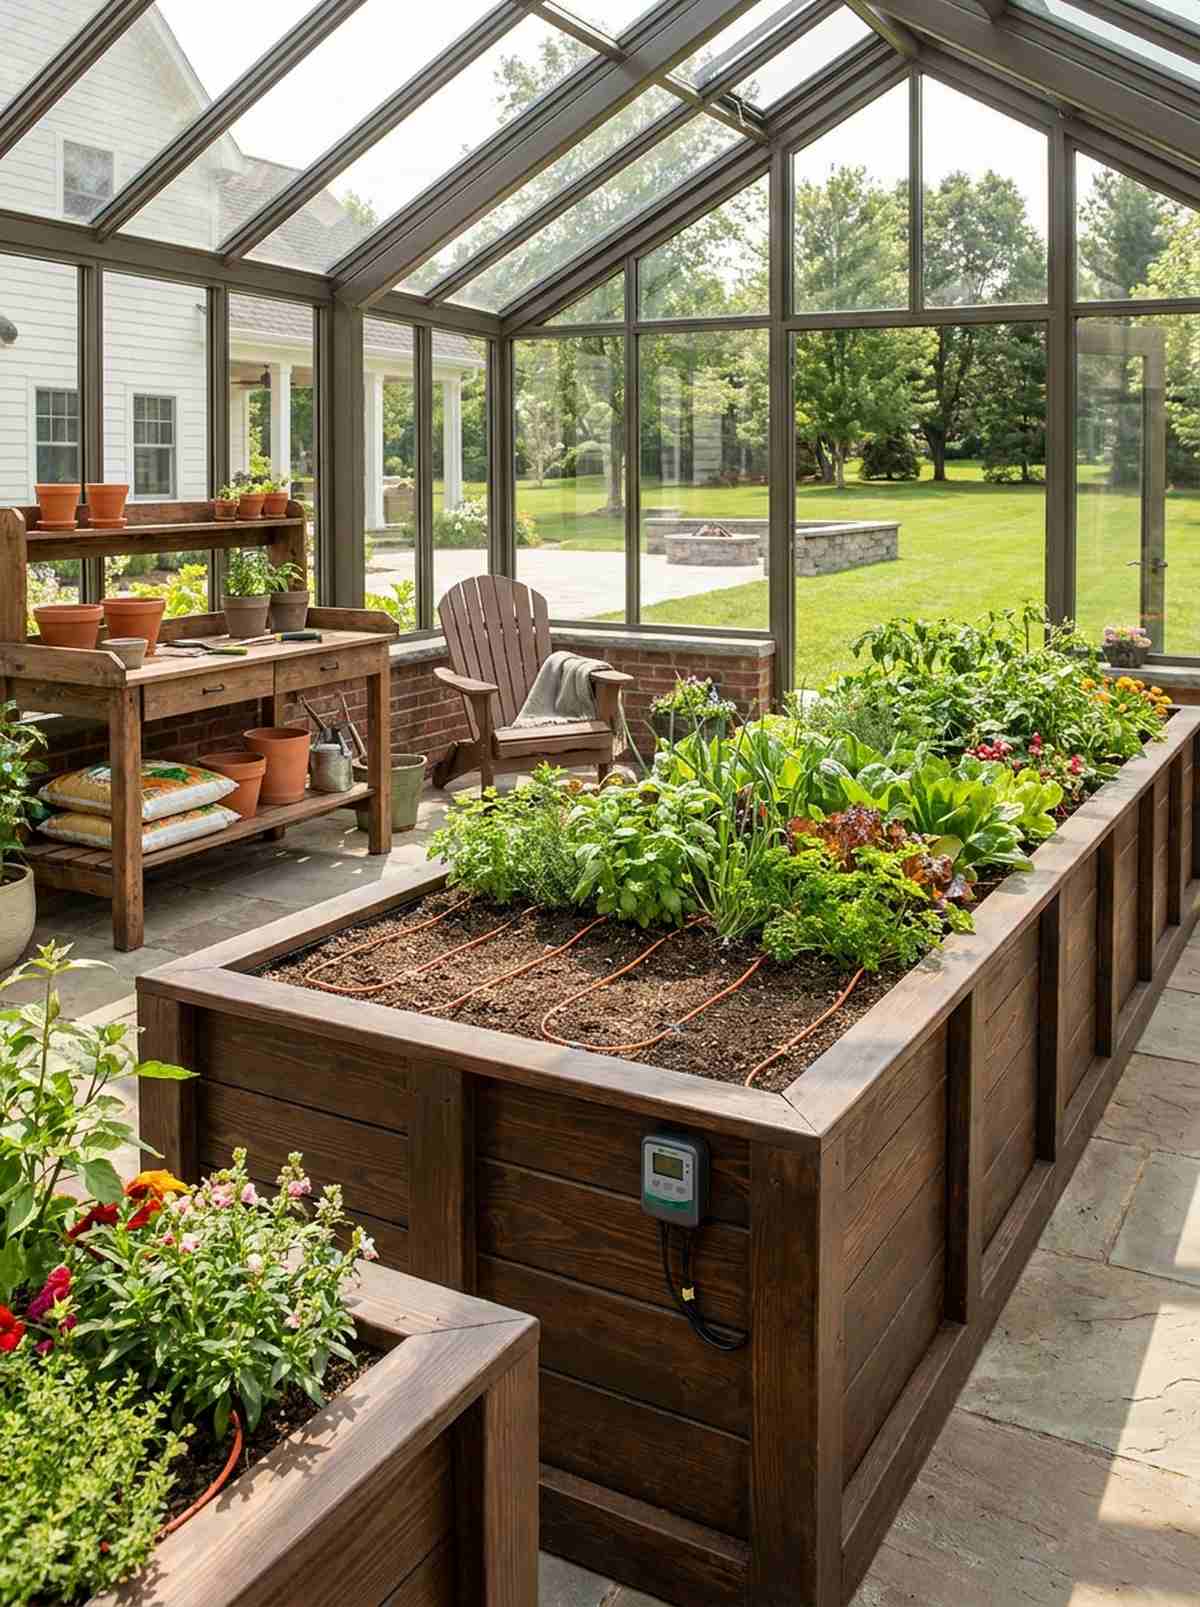
Represents the absolute ultimate year-round sanctuary for the obsessed grower. Pouring permanent indoor climate-controlled beds fuses high-end architecture with unstoppable, weather-proof food production.
Using flimsy grow bags inside a greenhouse wastes the structure’s potential, but building solid, permanent timber runs gives a designer-level finish that rivals commercial nurseries. Injecting soil-heating cables extends your growing season into a 365-day operation.
Adding premium beds to an existing structure runs $200+. Pin this to your ultimate dream homesteading board!
- Key Materials: Heavy ground-contact timber, soil heating cables
- Vibe / Style: Commercial luxury nursery
- Difficulty: Precise interior framing
- Budget Breakdown: Premium wood: $150 | Heating tech: $80
- Creator’s Tip: Leave a slight gap between the wooden bed frame and the greenhouse glass to prevent condensation from rotting the lumber prematurely.
- Smart Sourcing: Soil heating cable starter kits and digital waterproof thermostat controllers.
28. Aquaponic Raised Bed System
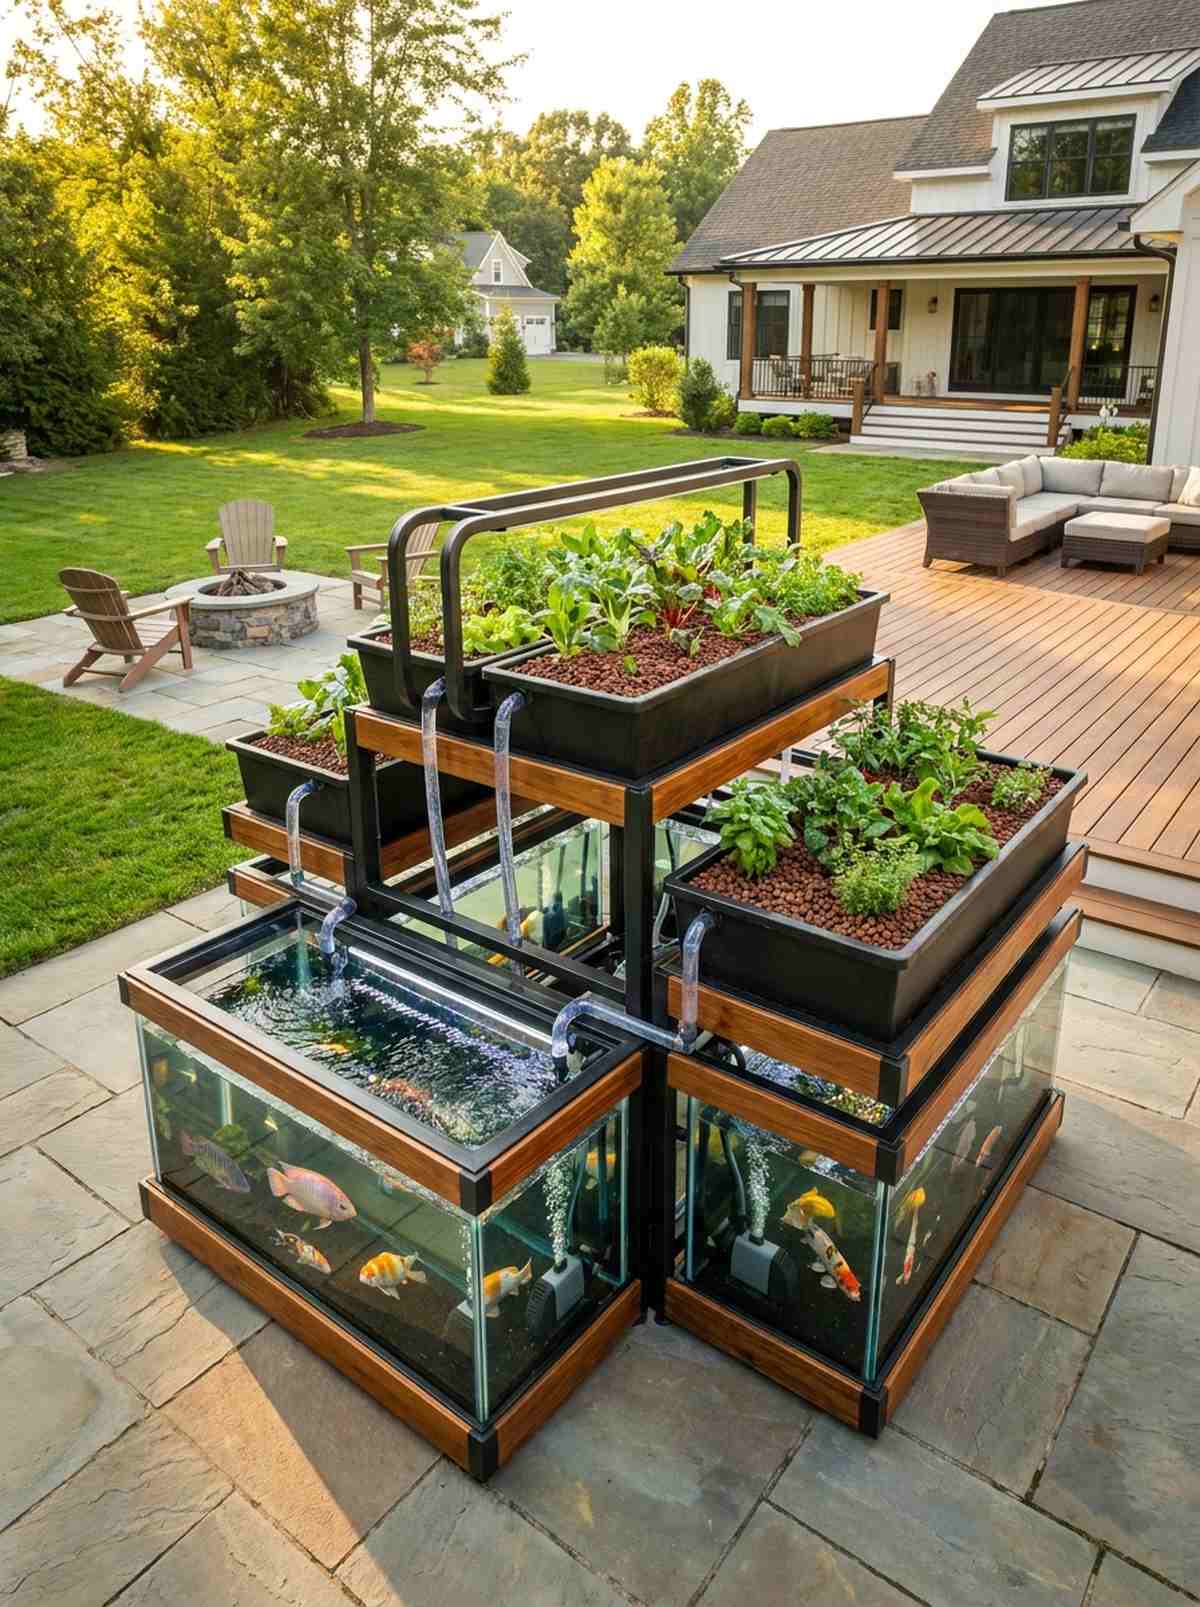
Emanates a hyper-modern symbiotic loop that feels straight out of a sci-fi colony. Utilizing water-pumped grow media beds stacked above fish tanks turns your backyard into a zero-waste protein and vegetable factory.
Traditional soil gardening depletes nutrients constantly, but integrating live aquaculture looks far more expensive than it is and completely eliminates the need for store-bought fertilizers. The constant rush of water through the clay pebbles oxygenates roots for explosive, unnatural growth rates.
A starter aquaponic loop costs roughly $250–$500 to dial in perfectly. It’s a wildly impressive upgrade that completely redefines home farming.
- Key Materials: Waterproof tub liners, water pumps, clay pebbles
- Vibe / Style: Futuristic closed-loop bio-dome
- Difficulty: Advanced plumbing logic
- Budget Breakdown: Clay media: $120 | Pumps/Plumbing: $150
- Creator’s Tip: Cycle the water system without plants or fish for two weeks first to allow the beneficial ammonia-converting bacteria to fully establish in the pipes.
- Smart Sourcing: Expanded clay pebbles (bulk bags) and submersible high-flow pond pumps.
Conclusion
Strategic layout blueprints and high-end material sourcing transform random backyard plots into a visually stunning, hyper-efficient culinary engine. Mastering these exact 28 raised beds kitchen garden layouts allows you to bypass expensive professional landscaping fees while securing maximum organic yields. Whether you start with a budget-friendly twin parallel setup or invest in premium UV-coated tower kits, prioritizing smart access pathways and vertical integration guarantees a designer-level finish that pays for itself in a single harvest season.
Frequently Asked Questions
What is the ideal width for raised beds in a kitchen garden?
The golden rule for high-end aesthetic and function is 3-4 feet wide. This allows you to harvest without ever compacting the premium organic soil with your boots. If you are placing pre-cut raised bed kits against a fence, lock the width at 2 feet max. Using modular metal planter panels can help you customize odd widths effortlessly without wasting expensive lumber.
How much space should I leave between raised garden beds?
A professional designer-level finish requires 24-30 inches of breathing room between frames. If you plan to haul heavy compost starter kits or bulk mulch using a wheelbarrow, immediately widen pathways to 36-48 inches. Laying down commercial-grade landscape fabric beneath these paths stops weeds and keeps the visual geometry crisp and expensive-looking.
What height works best for culinary production in raised beds?
Standard kits hit the sweet spot at 12-18 inches, which perfectly houses root zones while keeping bulk soil costs shockingly low. However, stacking up to 24-30 inches with heavy-duty galvanized corner brackets delivers an ergonomic, premium layout that saves your back. Shallow 8-inch depths are perfectly fine if you’re solely utilizing raised beds for herbs.
How do I incorporate vertical growing in raised bed layouts?
To massively skyrocket your yield per square foot, attach heavy-duty climbing mesh or UV-coated PVC tower garden kits directly to the northern edge of your beds. Sourcing premium espalier wire kits or spanning a cattle panel arch between two beds triples your cubic volume, instantly turning a flat garden into an immersive, high-yield architectural canopy.
Which layout maximizes production in small urban spaces?
When ground space is zero, go vertical. Wall-mounted felt pocket planters, tiered cascading boxes, and freestanding hydroponic towers deliver shocking density in a 4-foot footprint. The African keyhole design also dominates tight urban spots by fusing a high-volume soil base with a central woven wire mesh compost basket, effectively halving your watering and feeding chores.
How many raised beds do I need for a family kitchen garden?
A serious homesteader aiming for year-round culinary production should start with 4-6 bulk-pack pre-cut cedar frames (usually 4×8 feet each). Layer in 1-2 dedicated vertical garden herbs stations near the back door for quick chef access. If you are deeply invested in canning and preserving, scaling up to 8-12 dedicated preservation crop beds will completely secure your winter pantry.