
Maximizing compact outdoor spaces requires strategic small garden decking ideas. Discover exact material breakdowns and layout blueprints to achieve a premium aesthetic. These clever configurations define distinct, high-end seating zones effortlessly.
Design Snapshot: Key Principles
- Zoning Through Levels: Multi-height decking creates natural boundaries between dining, lounging, and circulation areas without physical barriers
- Built-In Efficiency: Integrated seating and storage eliminate furniture footprints while providing dual-purpose functionality
- Vertical Layering: Pergolas, trellises, and wall-mounted planters add depth and greenery without consuming floor space
- Material Psychology: Light-toned composite decking reflects brightness to visually expand tight areas, while darker tones add intimacy
Compact Layouts That Work
Strategic deck shapes and configurations establish clear seating zones while maintaining flow in gardens where every square foot counts. Professional designers optimize layouts by analyzing sight lines, access points, and functional requirements before installation begins.
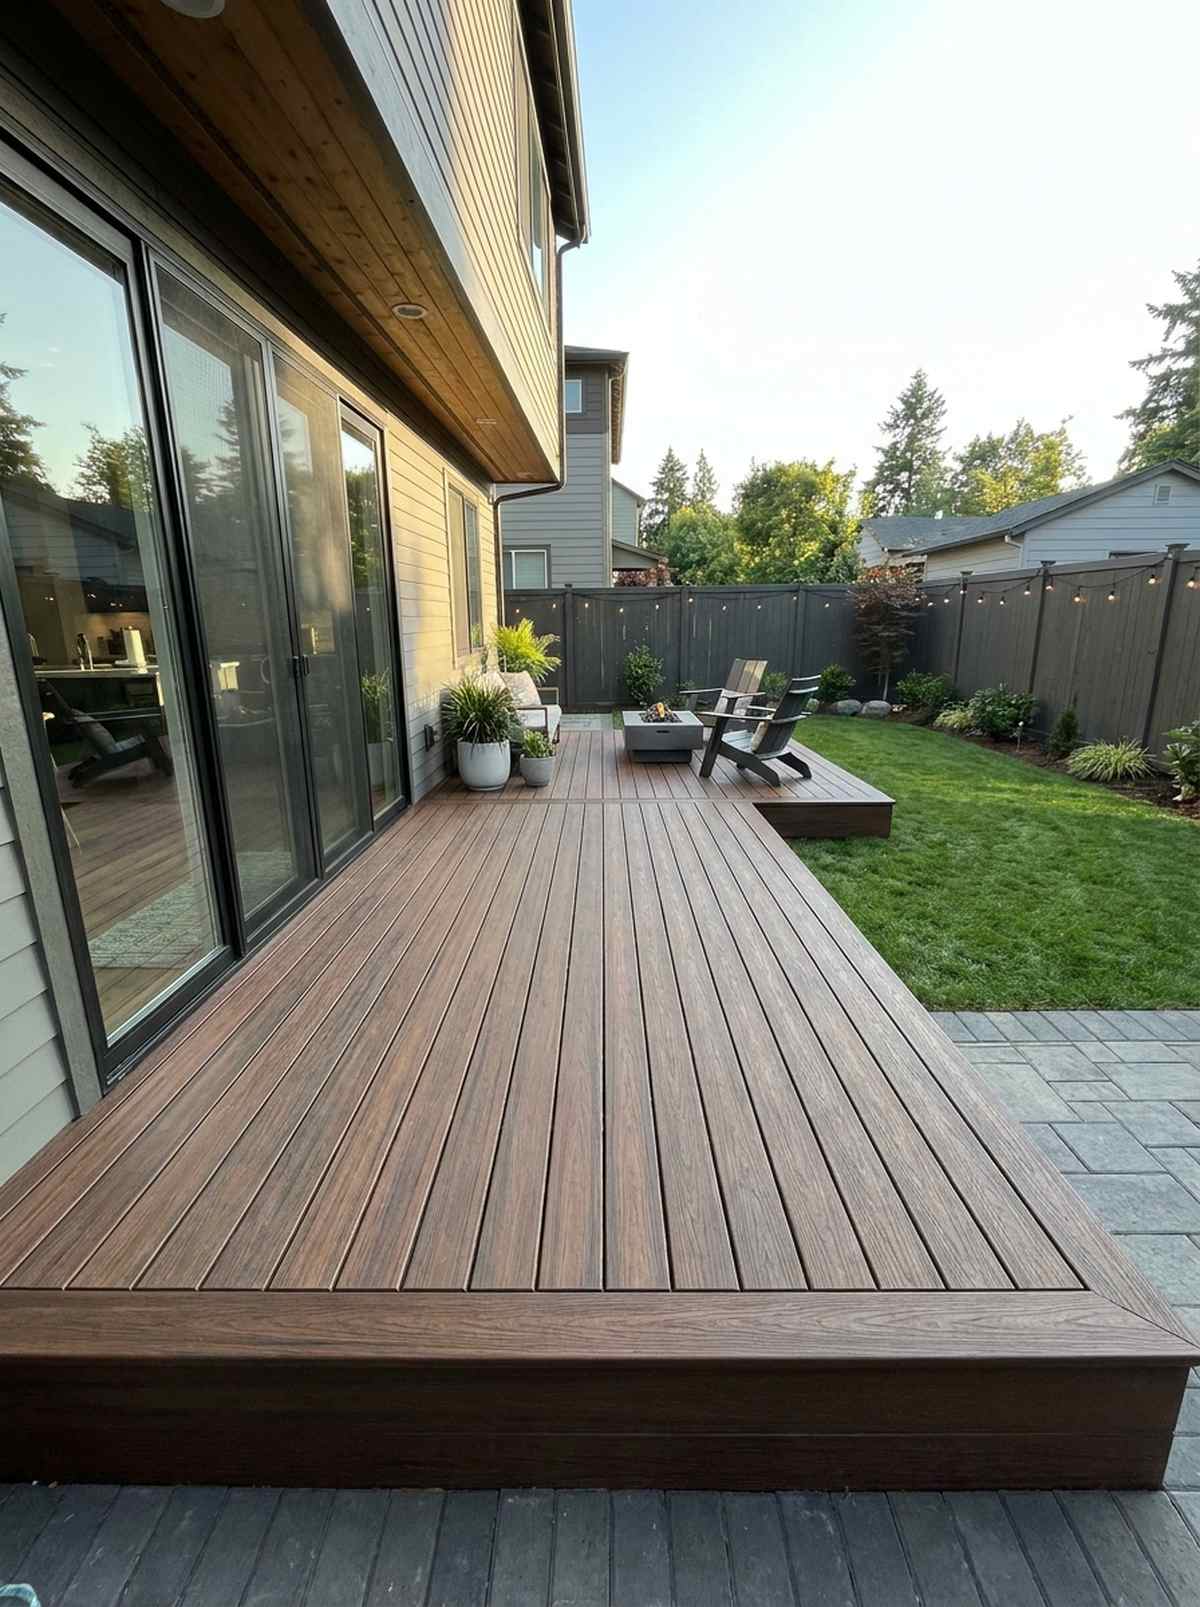
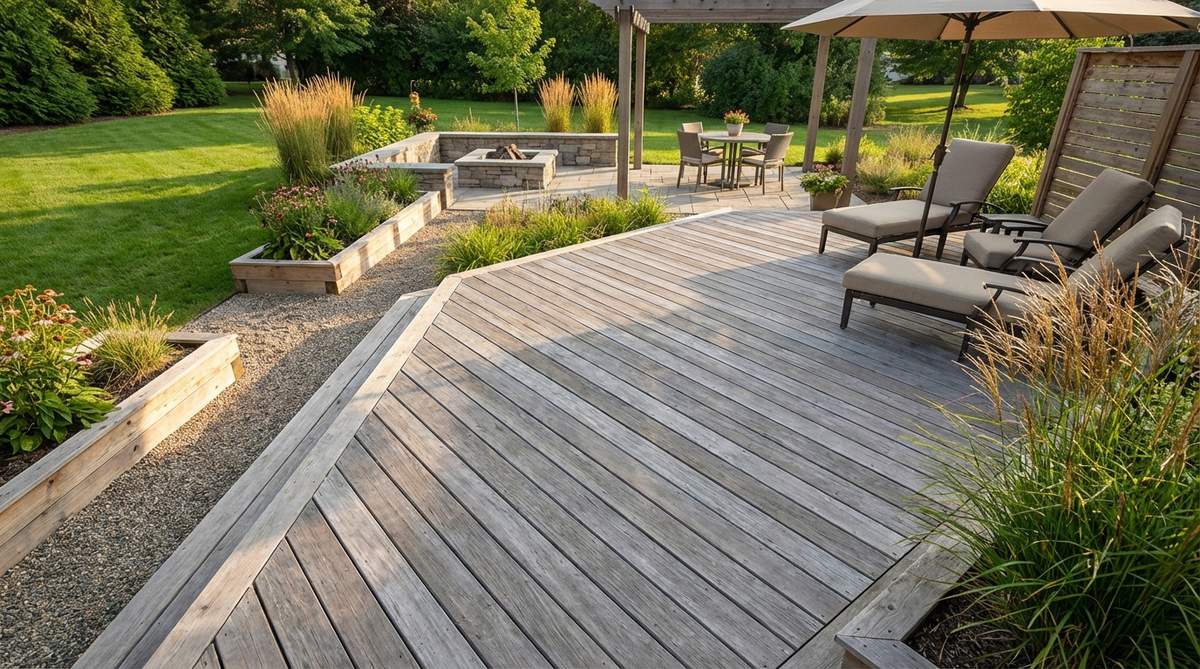
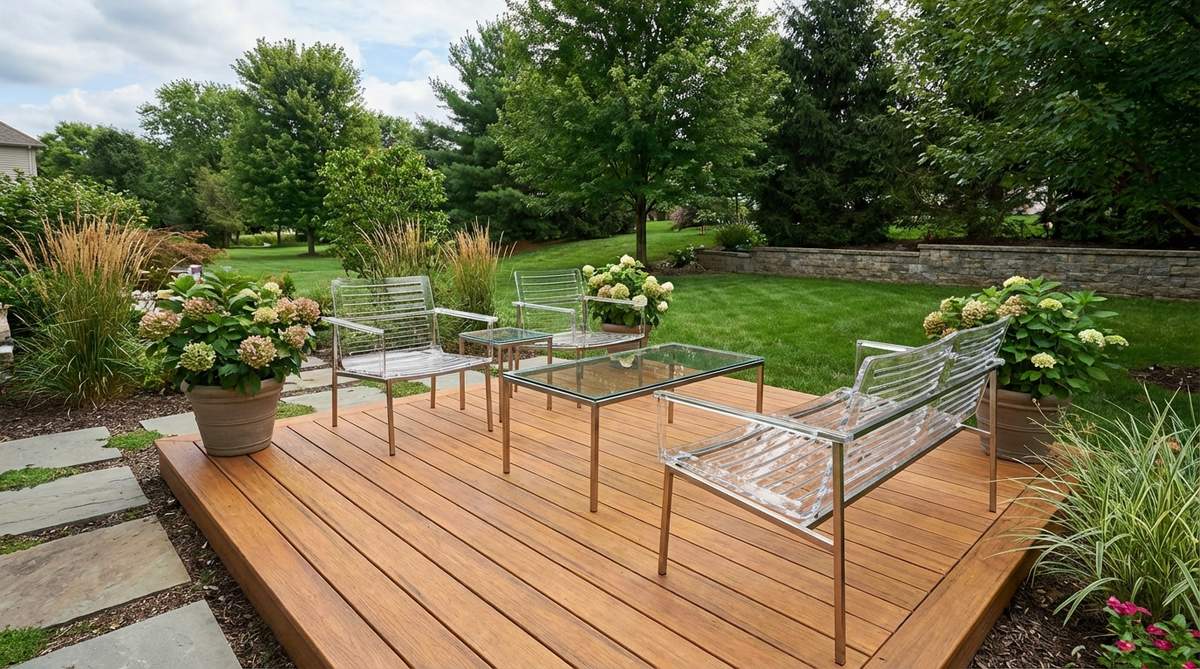
1. Corner Platform Deck
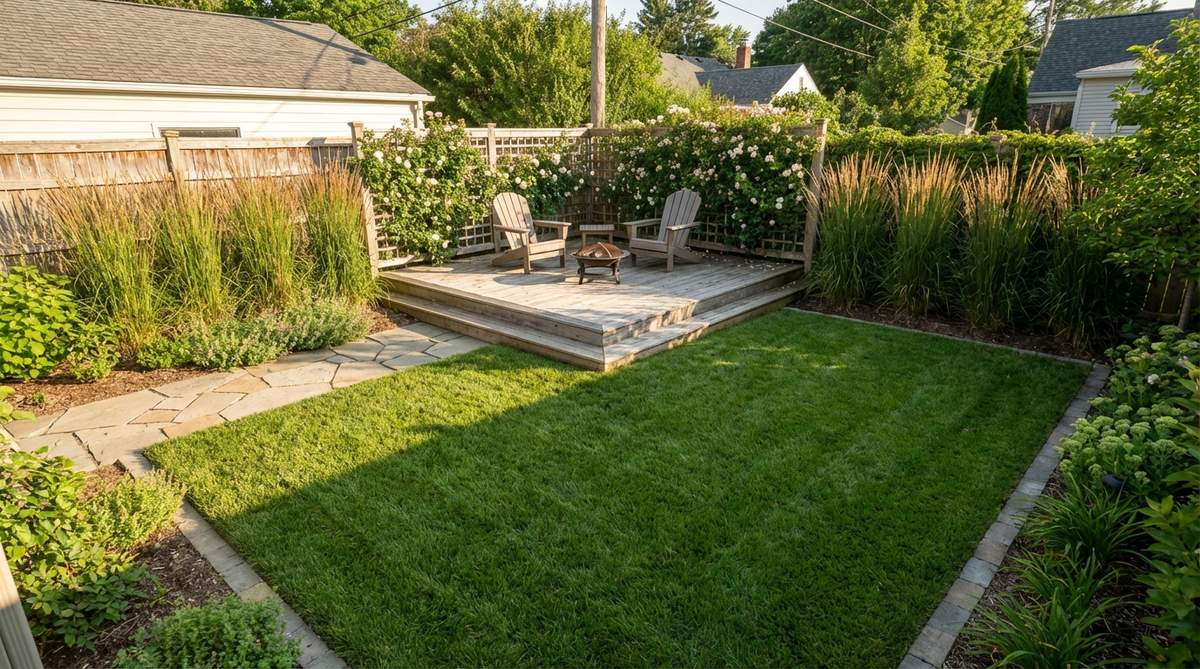
Feels like a secluded VIP lounge you accidentally discovered. This elevated corner decking zone works exceptionally well for rectangular gardens where the far edges sit empty.
People often center their patios, but tucking it away gives a designer-level finish. Utilizing durable composite starter kits ensures it survives extreme weather while looking incredibly sleek.
You can easily build this layout for roughly $150–$300 depending on the exact dimensions. Save this to your DIY weekend garden board so you don’t lose the inspiration!
- Key Materials: Pre-cut composite deck boards, concrete anchor blocks
- Vibe / Style: Intimate boutique hideaway
- Difficulty: Beginner-friendly weekend project
- Budget Breakdown: Materials: $180 | Hardware: $40
- Creator’s Tip: Keep the platform low to avoid needing expensive railing permits.
- Smart Sourcing: Pre-cut UV-coated composite boards and heavy-duty adjustable deck pedestals (bulk pack).
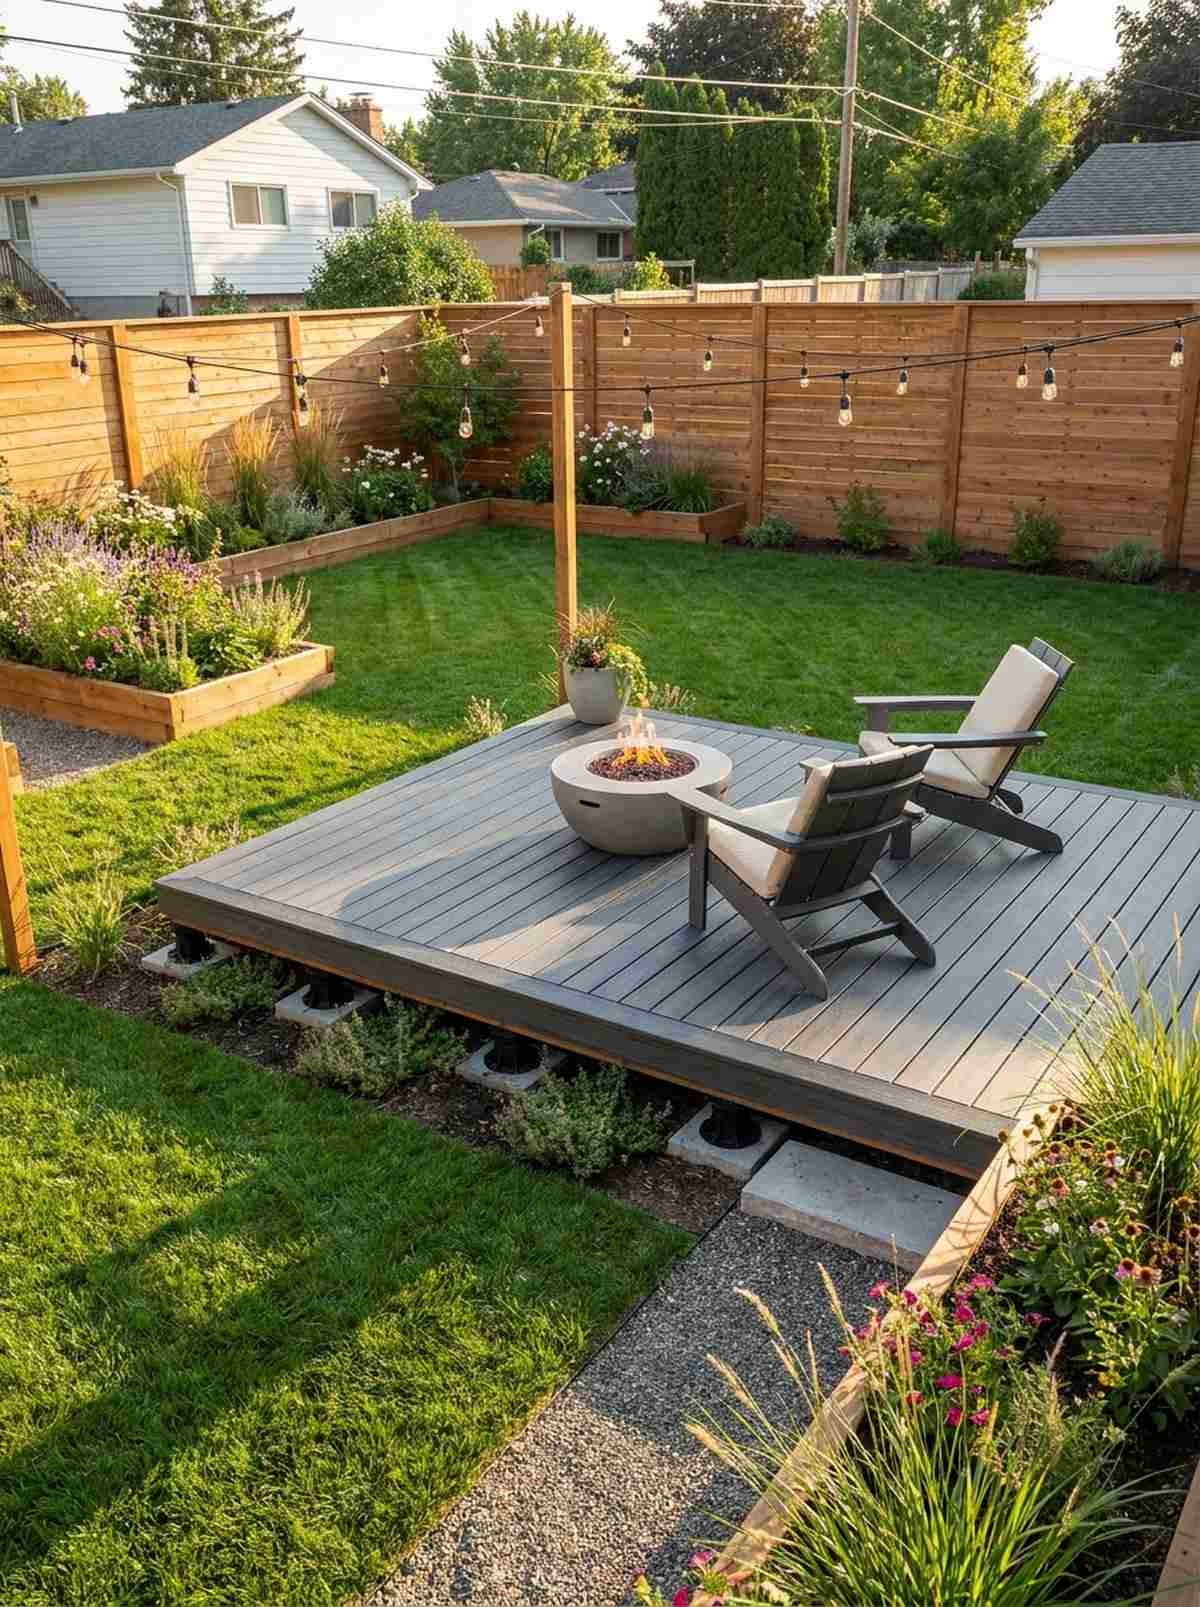
2. Floating Deck Island
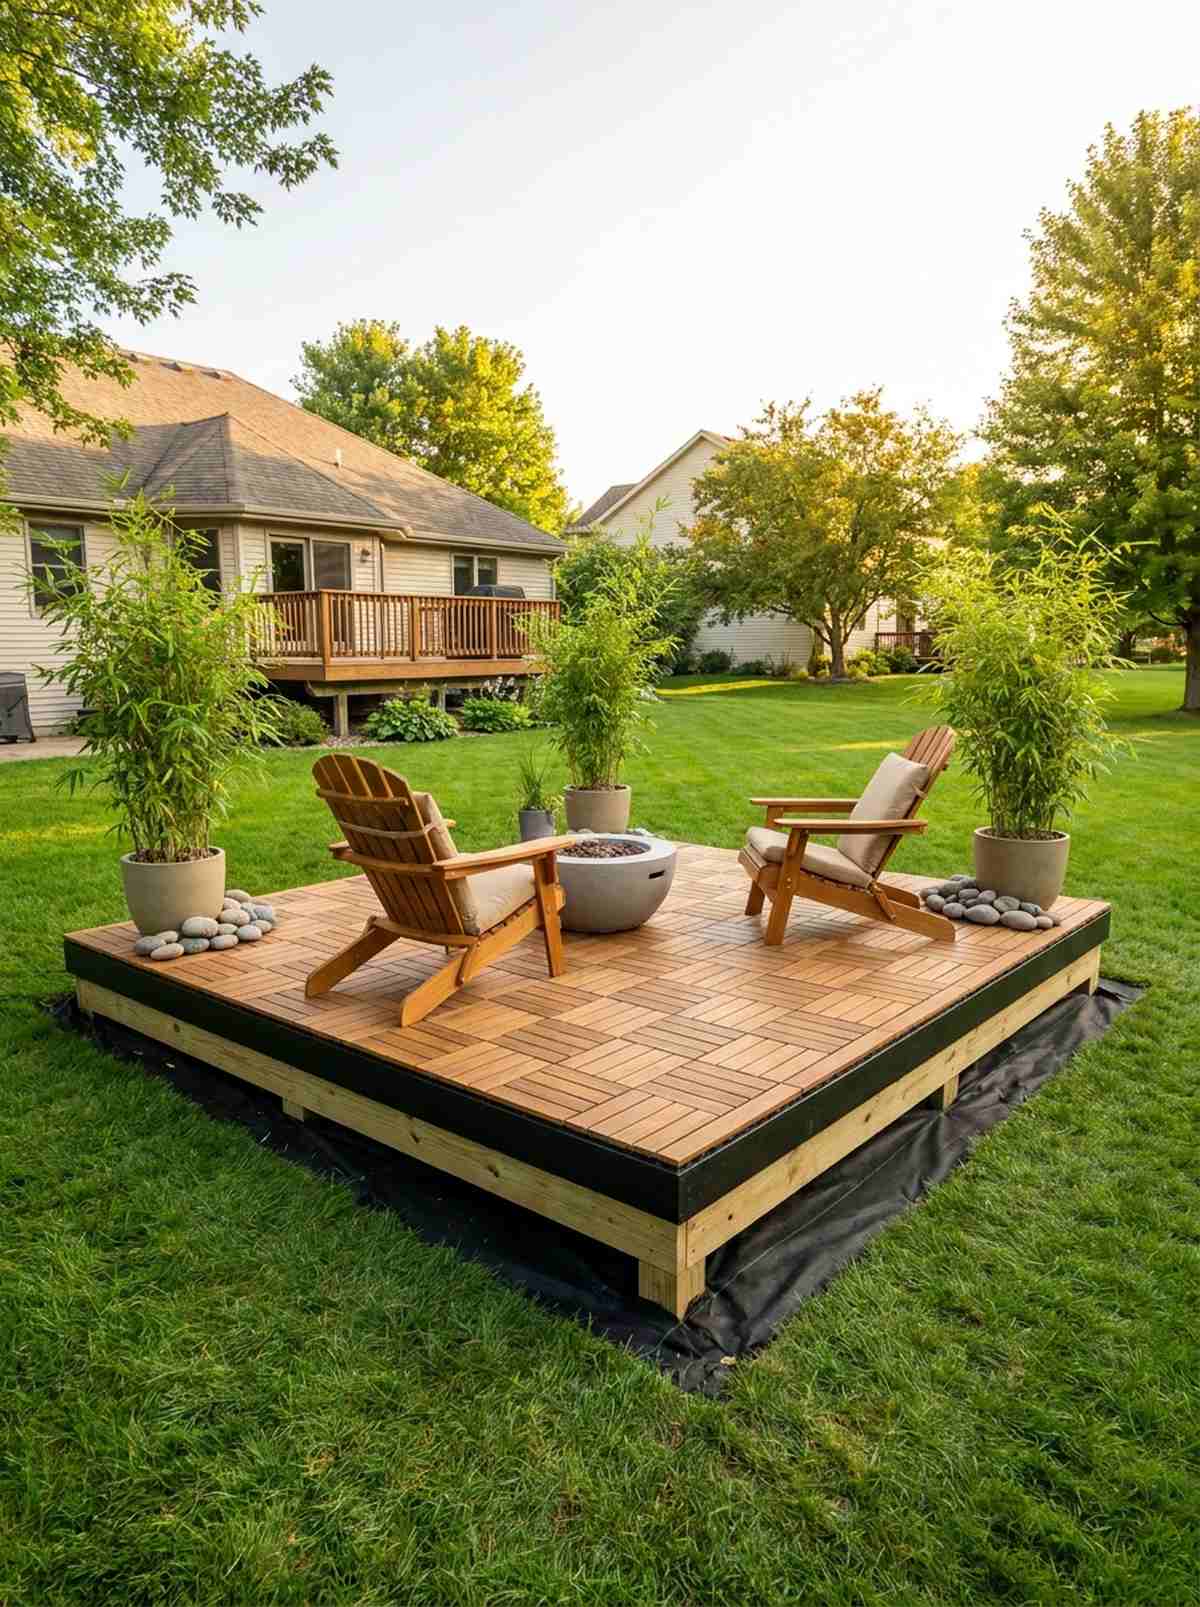
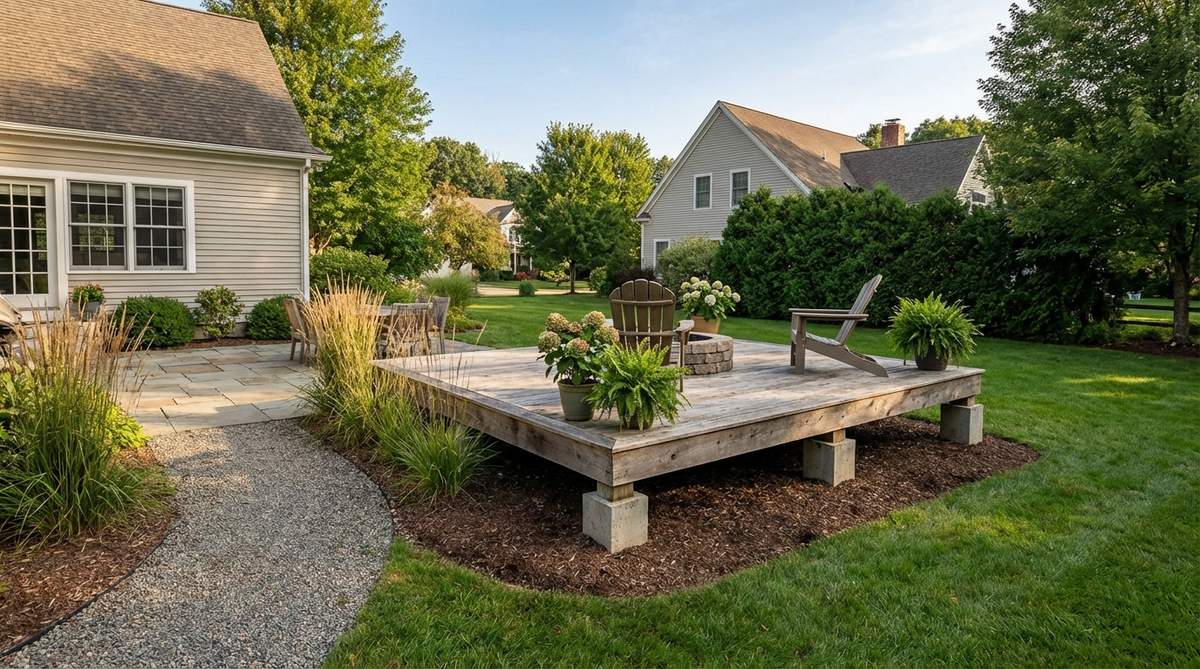
Straight out of an architectural digest magazine. A freestanding floating patio platform is perfect for separating a quiet reading nook from a noisy house.
This layout looks far more expensive than it is because the shadow gap creates a modern illusion. Grab some modular decking tiles and weather-resistant joist tape to make the foundation practically immortal.
A basic 8×8 island sets you back about $200 if you source smart.
- Key Materials: Ground-contact treated lumber, weed barrier fabric
- Vibe / Style: Modern zen retreat
- Difficulty: Intermediate measuring required
- Budget Breakdown: Frame: $90 | Decking: $110
- Creator’s Tip: Use black landscaping fabric underneath to emphasize the floating shadow effect.
- Smart Sourcing: Interlocking modular deck tiles (starter kit) and professional-grade joist tape rolls.
3. L-Shaped Wrap Around

Wraps around your exterior like a warm, custom-built hug. The L-shaped patio extension is the ultimate solution for tight urban courtyards.
Most completely ignore the sides of their homes, but extending the boards delivers a surprisingly premium look. Incorporating hidden fastening systems removes ugly screw lines to mimic high-end hardwood.
Expect to spend around $350 for the extended framing and boards. Pin this if you have an awkward side yard you need to fix!
- Key Materials: Concealed deck clips, fascia trims
- Vibe / Style: Seamless indoor-outdoor flow
- Difficulty: Moderate cutting involved
- Budget Breakdown: Lumber: $150 | Connectors: $60
- Creator’s Tip: Run the board grain parallel to the longest wall to stretch the space visually.
- Smart Sourcing: Hidden deck fastener clips (bulk pack) and weatherproof composite edge trim.
4. Narrow Side Access Strip
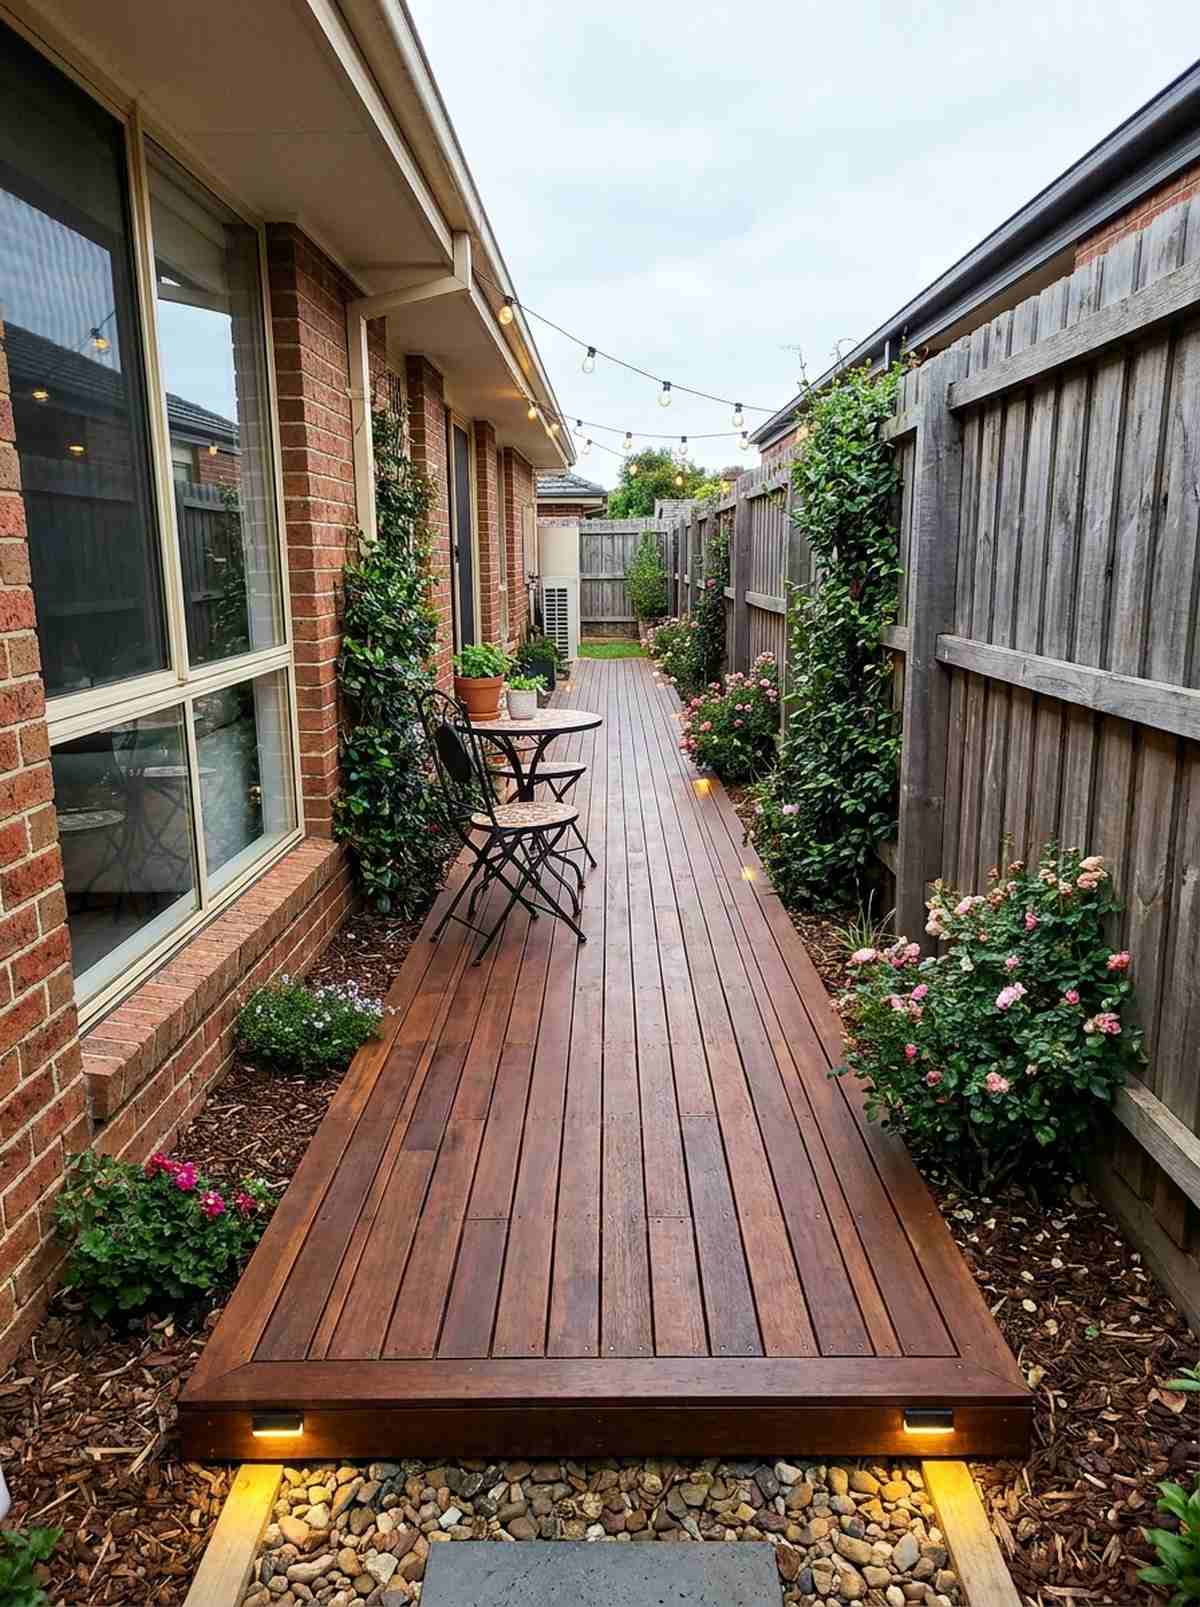
Feels like a secret Parisian alleyway cafe right outside your window. Creating a slender timber side-walkway easily transforms dead dirt paths into functional seating corridors.
Ignoring side access is a huge missed opportunity; decking it transforms trash-can storage into prime real estate. You’ll want marine-grade wood sealants here since narrow spaces hold onto moisture longer.
It’s a fast upgrade that completely changes the vibe for under $100.
- Key Materials: Narrow plank boards, step lights
- Vibe / Style: Cozy alley cafe
- Difficulty: Very straightforward
- Budget Breakdown: Planks: $75 | Sealer: $25
- Creator’s Tip: Stagger the board joints to avoid a bowling-alley aesthetic.
- Smart Sourcing: Marine-grade waterproof deck sealant and solar LED deck path lights (multi-pack).
This next setup is ridiculously cheap but looks like a $1,500 custom landscape designer installed it…
5. Modular Square Sections

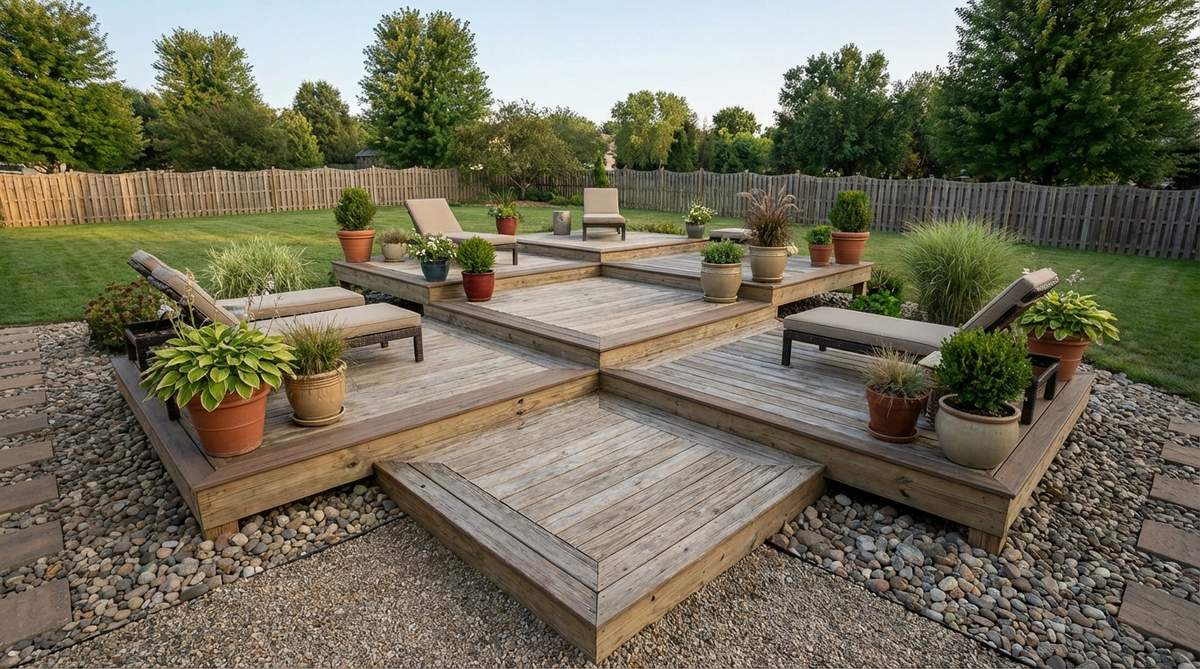
Gives the illusion of stepping stones over a tranquil pond. These staggered modular wood platforms are brilliant for yards with uneven ground or patchy grass.
Instead of one massive, expensive pour, breaking it into modules sneaks in a luxury spa aesthetic. Use pre-assembled deck pallets to cut the installation time from a weekend to an afternoon.
A set of three mini-platforms usually costs around $120. Save this idea if you want to avoid heavy construction!
- Key Materials: Pre-assembled square panels, gravel base
- Vibe / Style: Geometric contemporary
- Difficulty: Easy puzzle-piece assembly
- Budget Breakdown: Panels: $90 | Base gravel: $30
- Creator’s Tip: Leave a 4-inch gap between squares and fill with decorative white river rock.
- Smart Sourcing: Pre-built acacia wood deck squares (snap-on kit) and heavy-duty landscaping weed barrier.
6. Curved Edge Softening
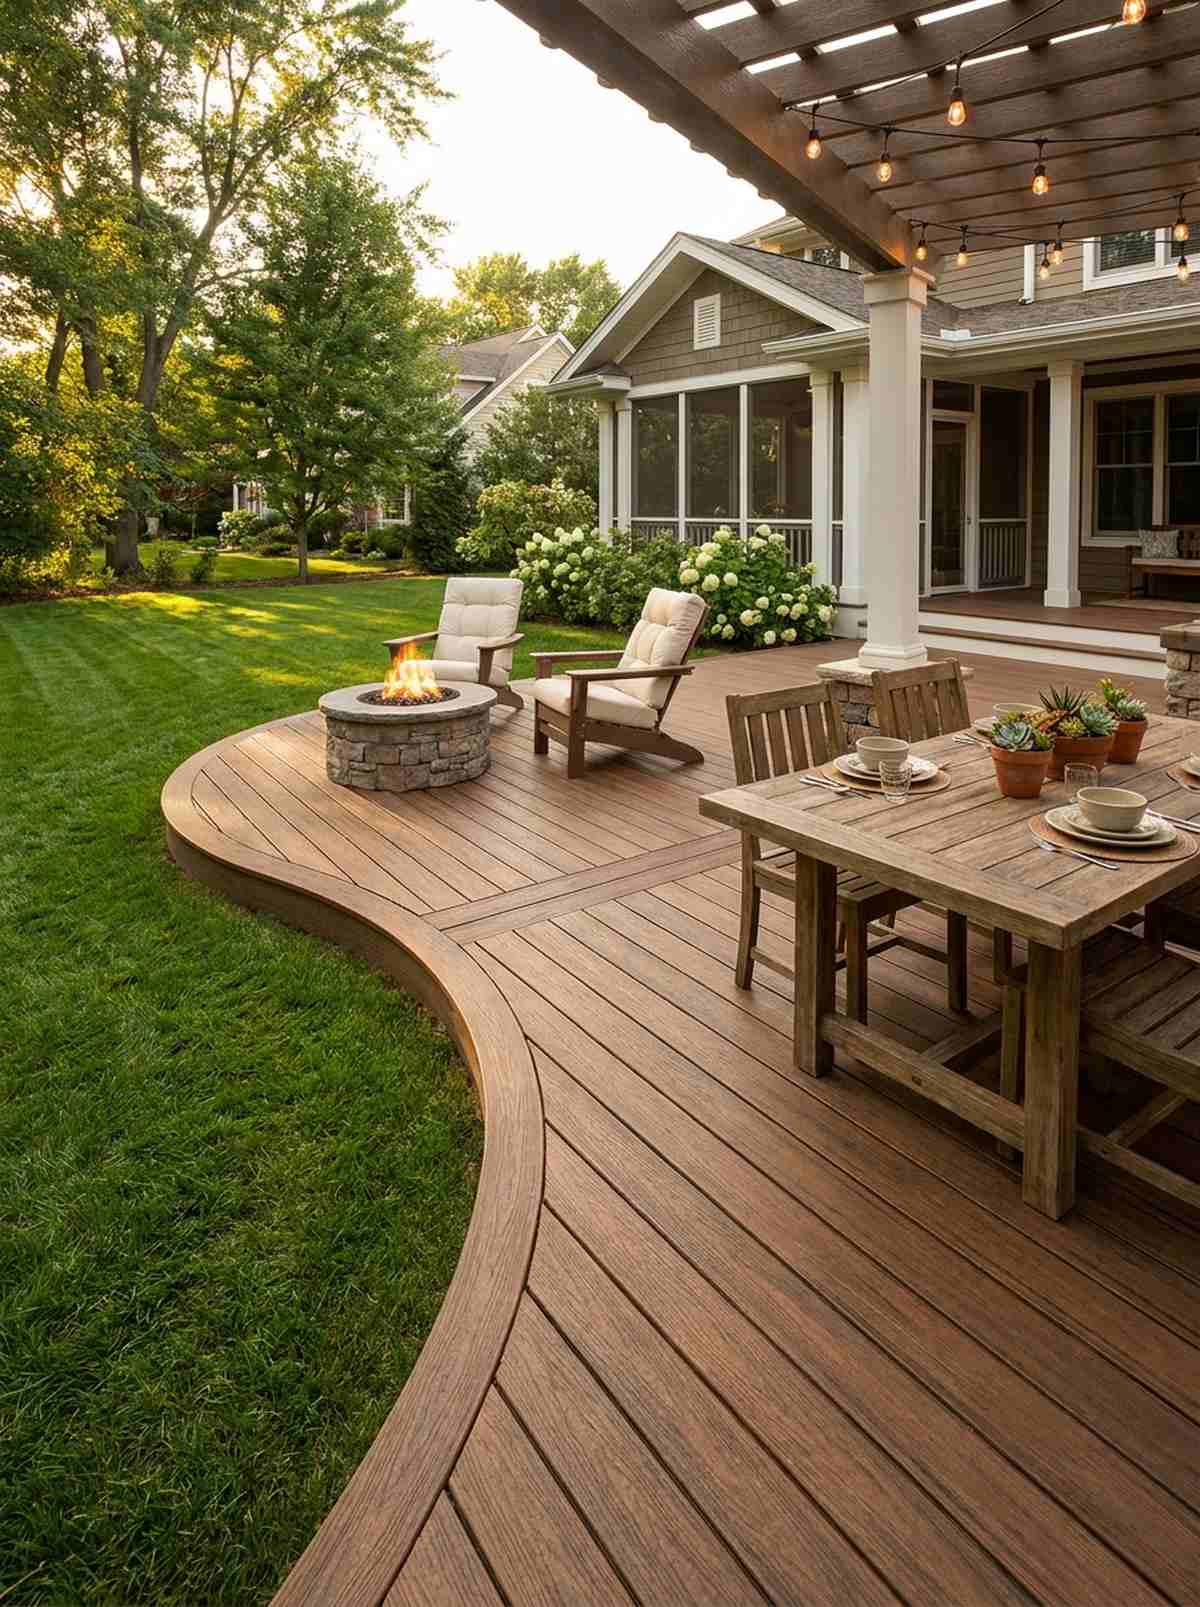
Flows like a natural river bend right up to your lawn. Implementing a curved perimeter deck layout works wonders for softening harsh blocky property lines.
Building straight boxes is what everyone does, but adding a curve immediately signals a bespoke architectural build. Flexible composite edging boards are an absolute game-changer for bending the frame without snapping it.
The extra framing requires slightly more budget, pushing it to roughly $250, but the result is stunning.
- Key Materials: Bendable composite boards, extra joist blocking
- Vibe / Style: Organic landscape oasis
- Difficulty: Advanced framing skills needed
- Budget Breakdown: Custom Trim: $100 | Framing: $150
- Creator’s Tip: Soak flexible boards in warm sunlight before bending them into shape.
- Smart Sourcing: Heat-bendable composite decking trim and heavy-gauge corner brackets (bulk pack).
Built-In Solutions for Maximum Efficiency
Integrated features eliminate the need for standalone furniture, freeing up floor area while creating cohesive design elements that define seating zones clearly. Built-in solutions deliver dual functionality without visual clutter.
7. Perimeter Bench Seating
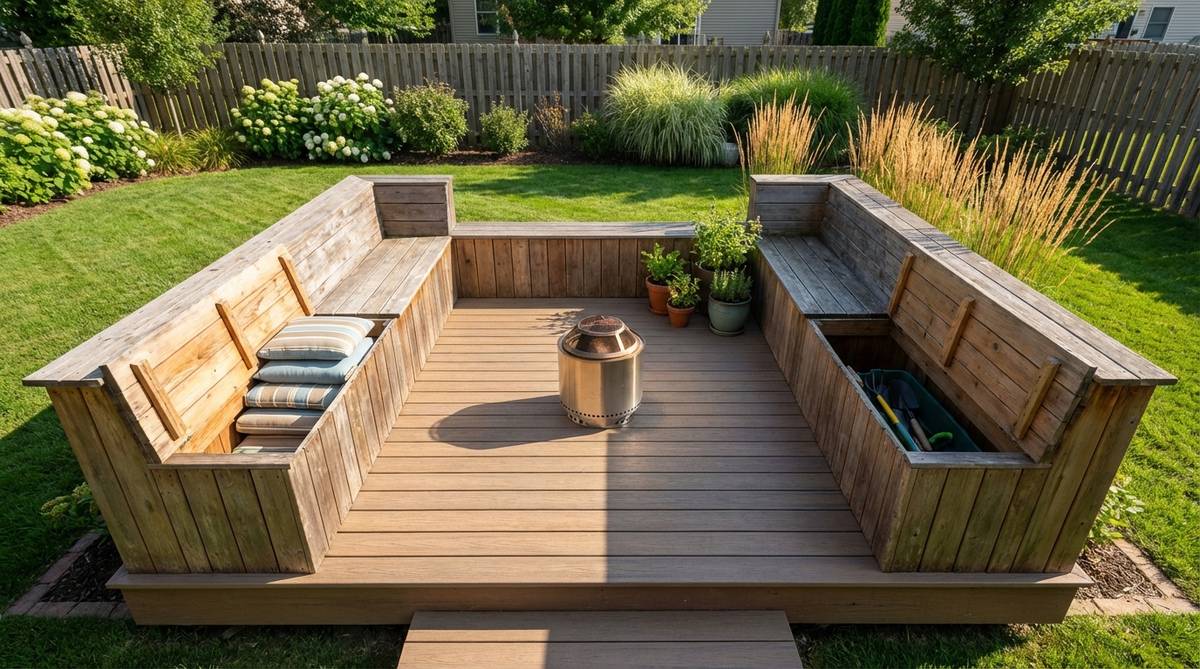
Feels like a built-in stadium for hosting twilight dinner parties. Constructing an integrated border bench system is the ultimate hack for tiny patios needing mass seating.
Bulky outdoor chairs ruin the flow of a tiny yard, whereas edge seating completely opens up the middle. Invest in high-density foam cushions and fade-resistant outdoor upholstery to give it a custom couch feel.
You can frame out a basic bench structure using leftover lumber for as little as $80.
- Key Materials: Structural 4×4 posts, 2×4 framing lumber
- Vibe / Style: Streamlined party hub
- Difficulty: Moderate DIY
- Budget Breakdown: Frame: $50 | Top Boards: $30
- Creator’s Tip: Angle the backrest slightly at 15 degrees for actual ergonomic comfort.
- Smart Sourcing: High-density outdoor foam inserts (pre-cut) and UV-resistant waterproof fabric covers.
8. Corner Bench with Table
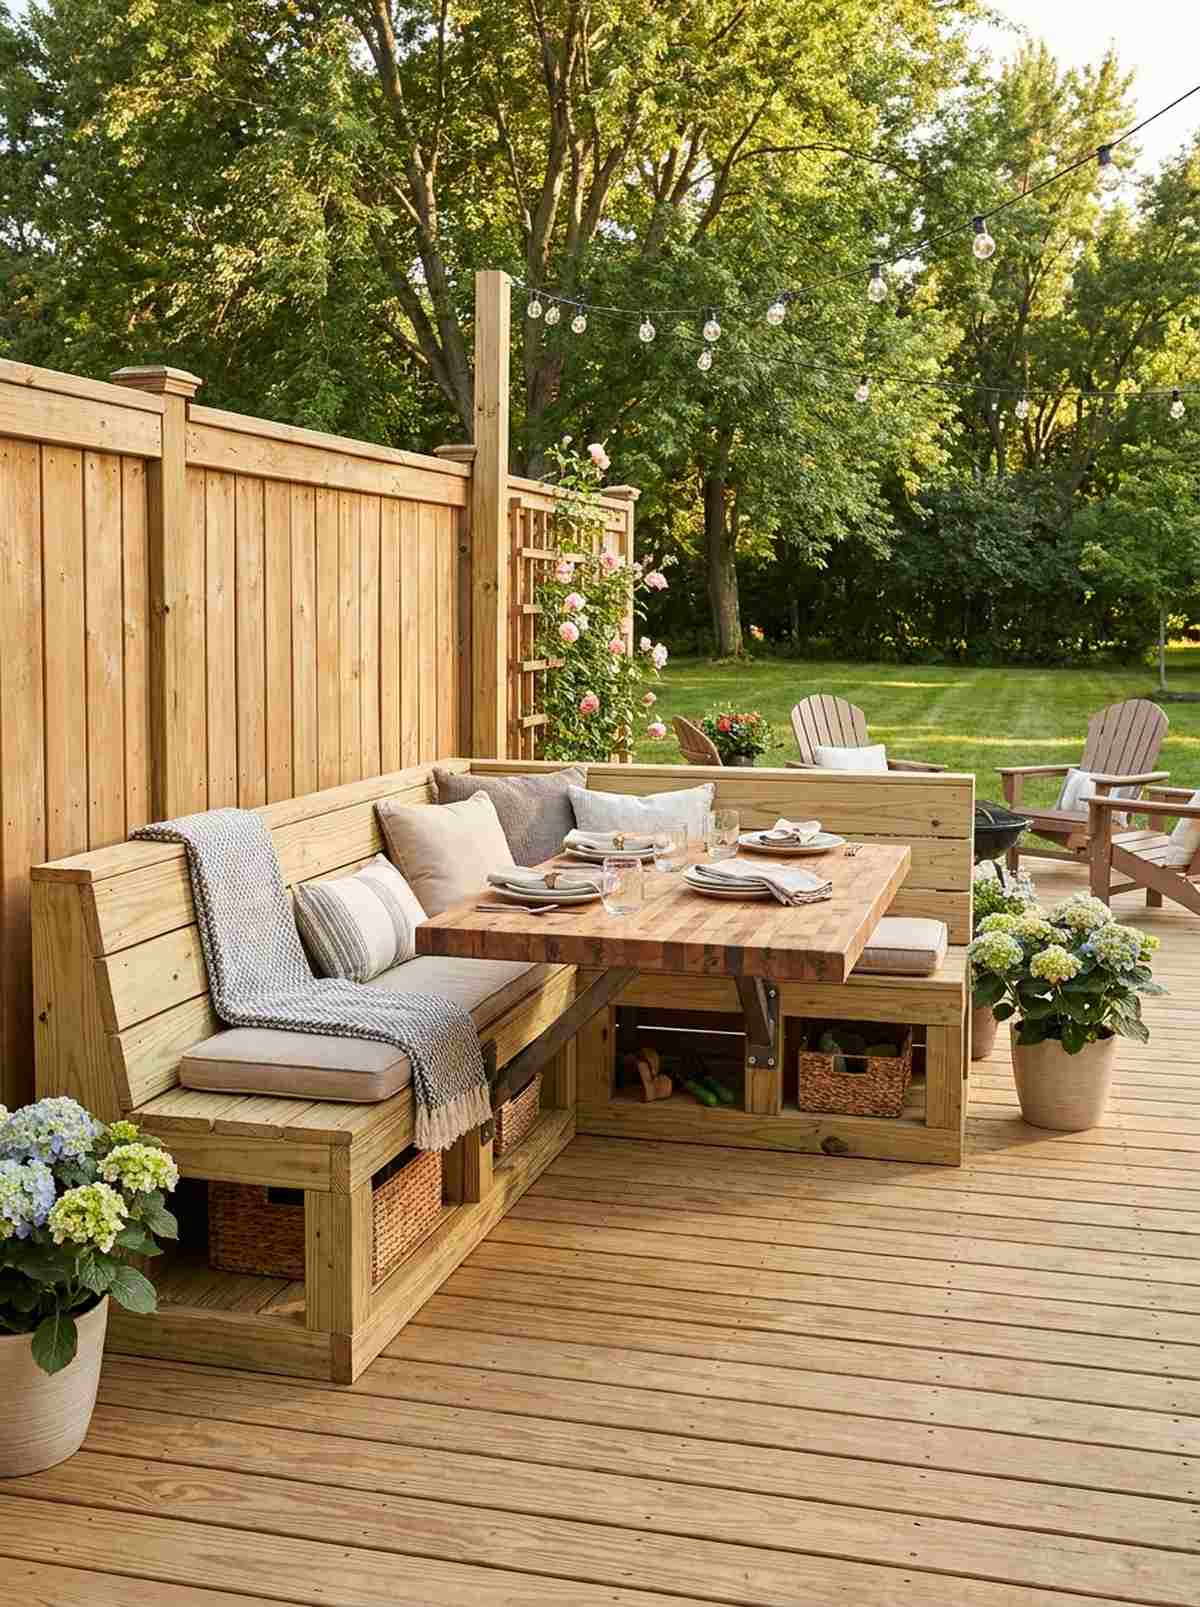
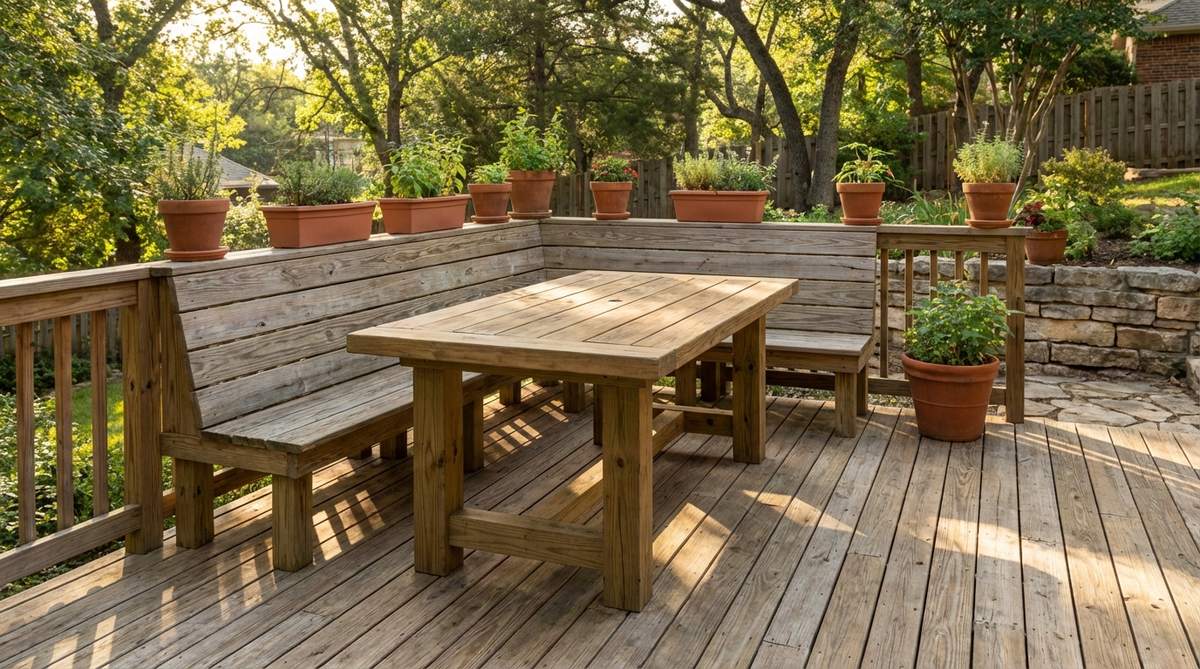
Packs the coziness of a trendy restaurant booth right into your backyard. A built-in corner dining nook perfectly capitalizes on dead 90-degree fence angles.
Standalone dining sets swallow up entire patios, but pushing the footprint to the absolute edges reclaims your space. Use heavy-duty corner brackets to keep the table securely anchored without wobbly legs.
Expect to invest around $200 for sturdy table materials and bench supports. Pin this for your next outdoor dining upgrade!
- Key Materials: Corner brackets, thick butcher block or treated top
- Vibe / Style: Bistro booth
- Difficulty: Intermediate carpentry
- Budget Breakdown: Brackets: $40 | Lumber: $160
- Creator’s Tip: Leave the space under the benches open to store shoes or small garden tools.
- Smart Sourcing: Heavy-duty steel L-brackets (industrial pack) and weatherproof wood sealant spray.
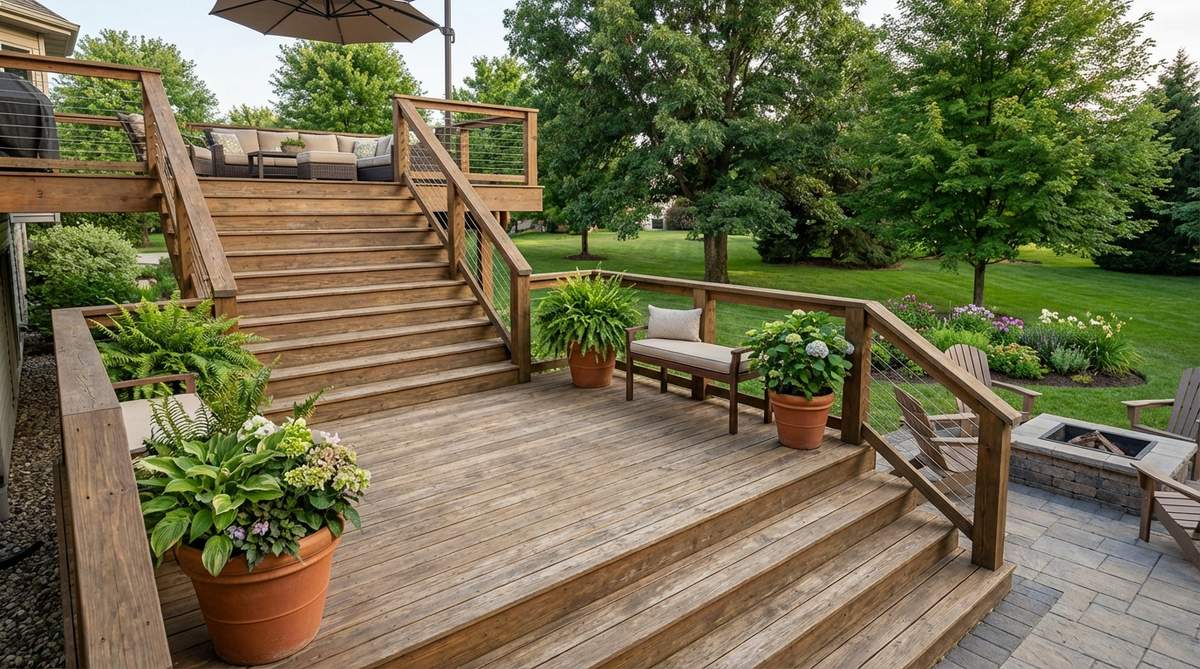
9. Stair-Integrated Seating
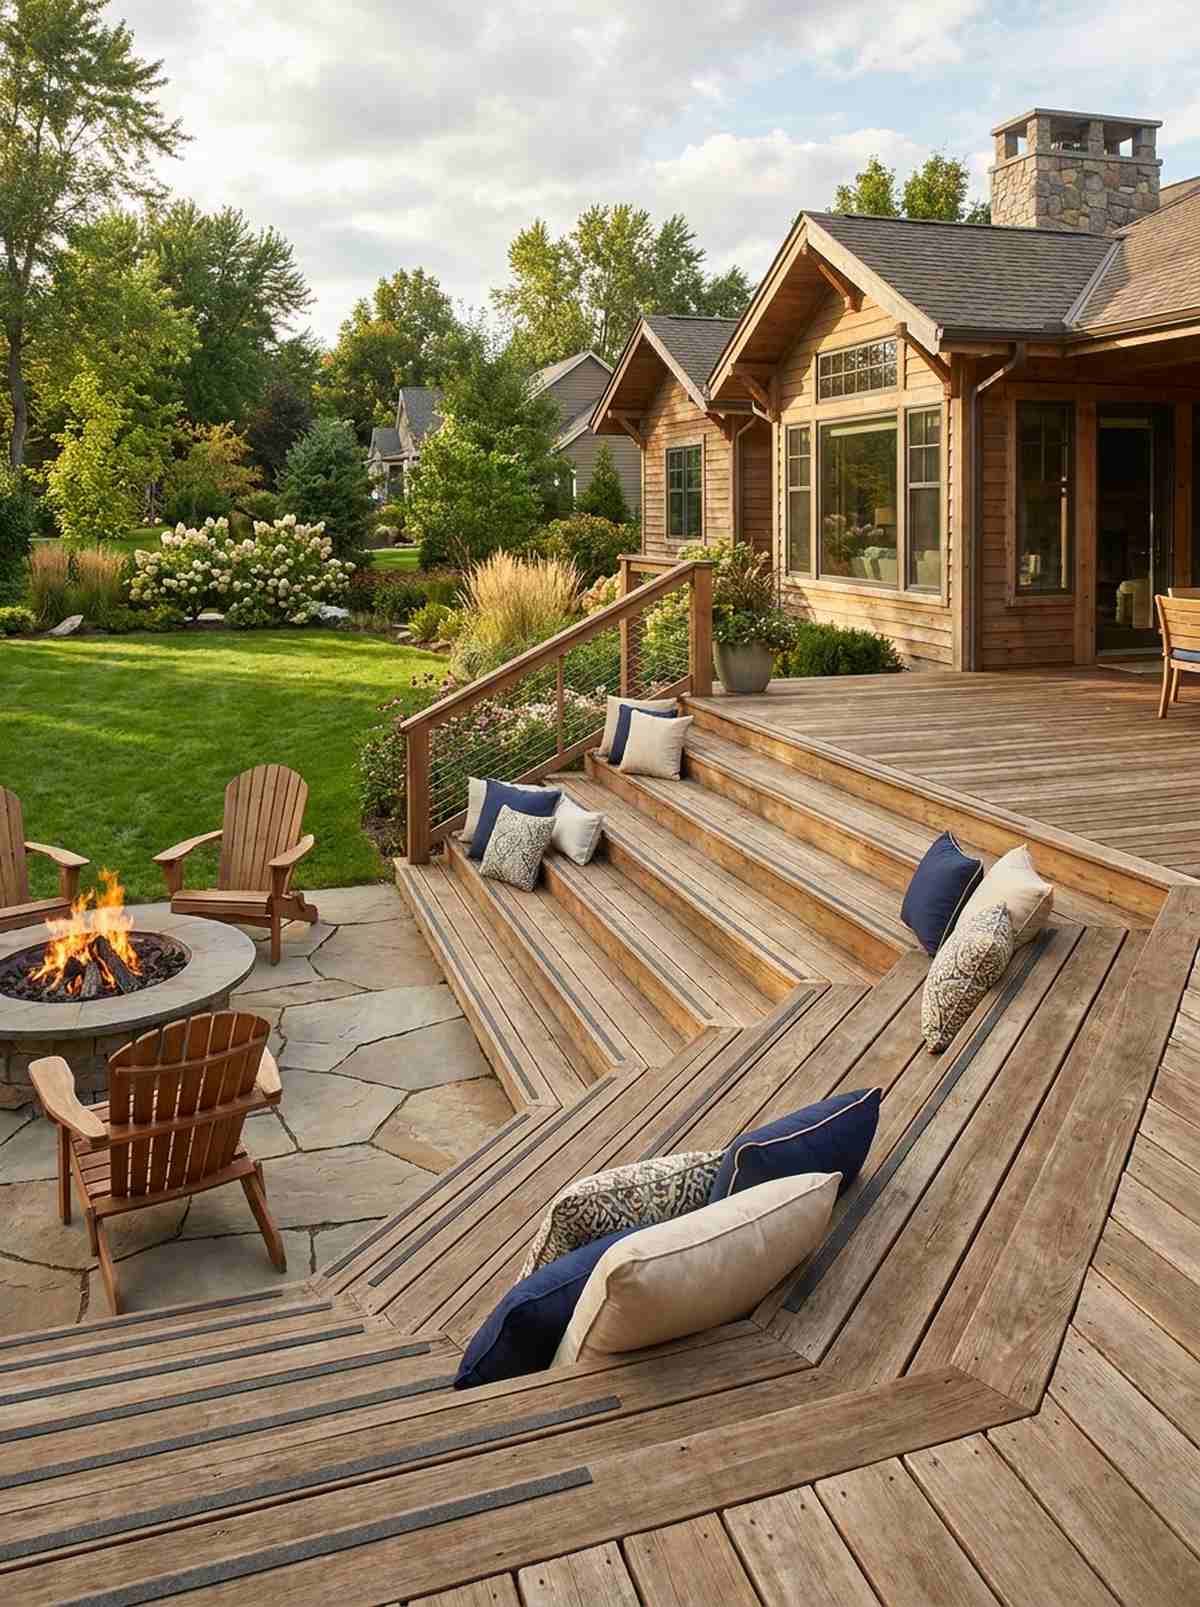
Feels like an amphitheater crafted just for your morning coffee. Using oversized wooden step tiers acts as dual-purpose stairs and casual bleacher seating.
Standard narrow stairs are a total waste of potential lounging real estate. Upgrading to extra-deep treads allows you to toss down weather-proof scatter cushions for instant party capacity.
Extending the framing only costs about $50 extra in materials compared to standard stairs.
- Key Materials: Wide stair stringers, double-width deck boards
- Vibe / Style: Casual bleacher hangout
- Difficulty: Moderate math and cuts
- Budget Breakdown: Stringers: $30 | Decking: $20
- Creator’s Tip: Make the treads at least 14 inches deep if you actually want people to sit comfortably.
- Smart Sourcing: Pre-cut heavy-duty stair stringers and anti-slip outdoor stair tread strips.
Most DIYers completely ruin their decks by skipping this next vital commercial upgrade…
💡 Must-Have Supplies for High-End Setups
To build these setups faster and ensure they last, skip the generic craft aisles and invest in the right foundational kits.
- Base & Support: Adjustable heavy-duty deck pedestal risers (bulk pack)
- Setup Tools: Hidden fastener installation starter kit
- Weather/Durability Protection: Commercial-grade UV-resistant deck sealant
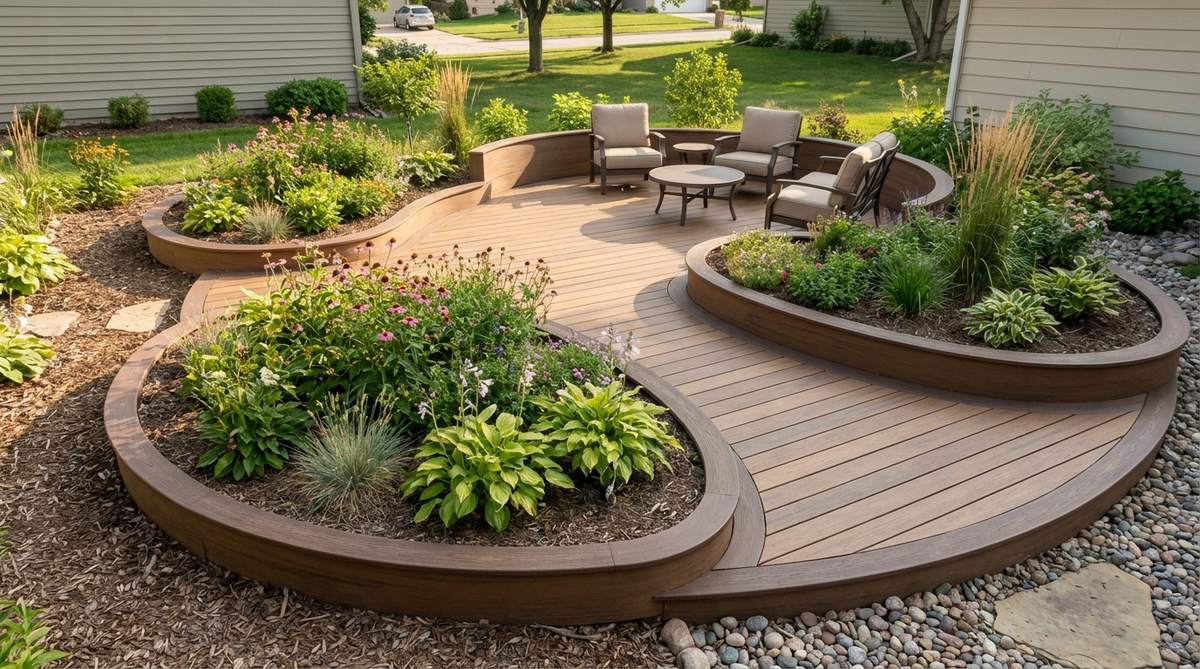
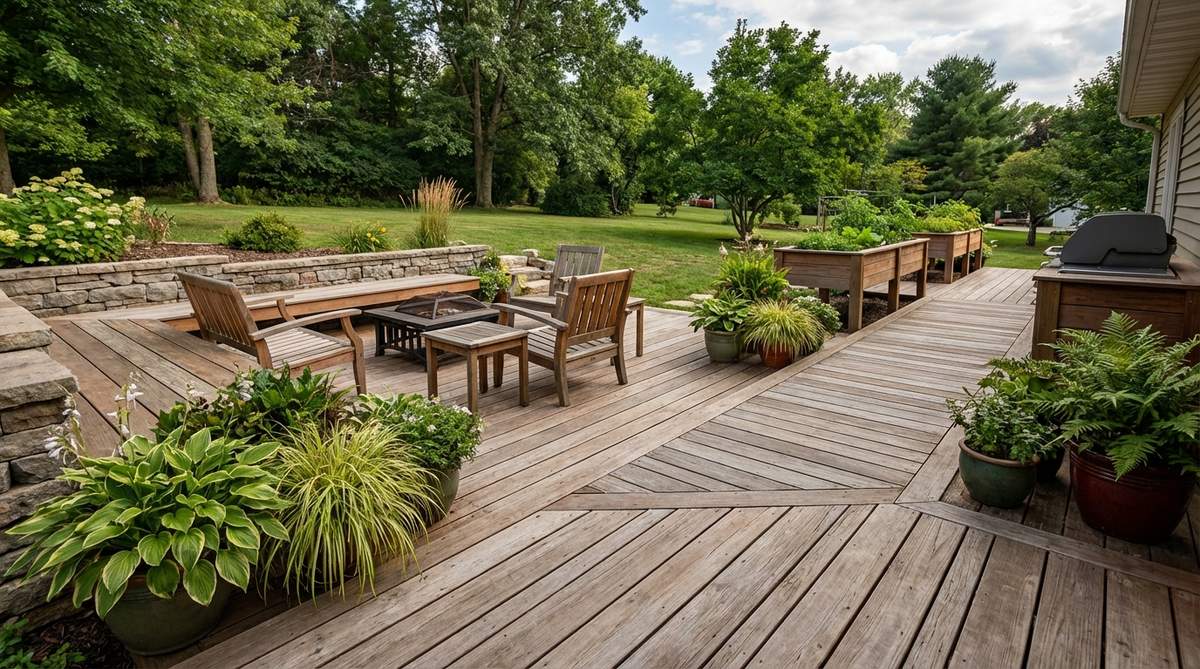
10. Built-In Planter Dividers
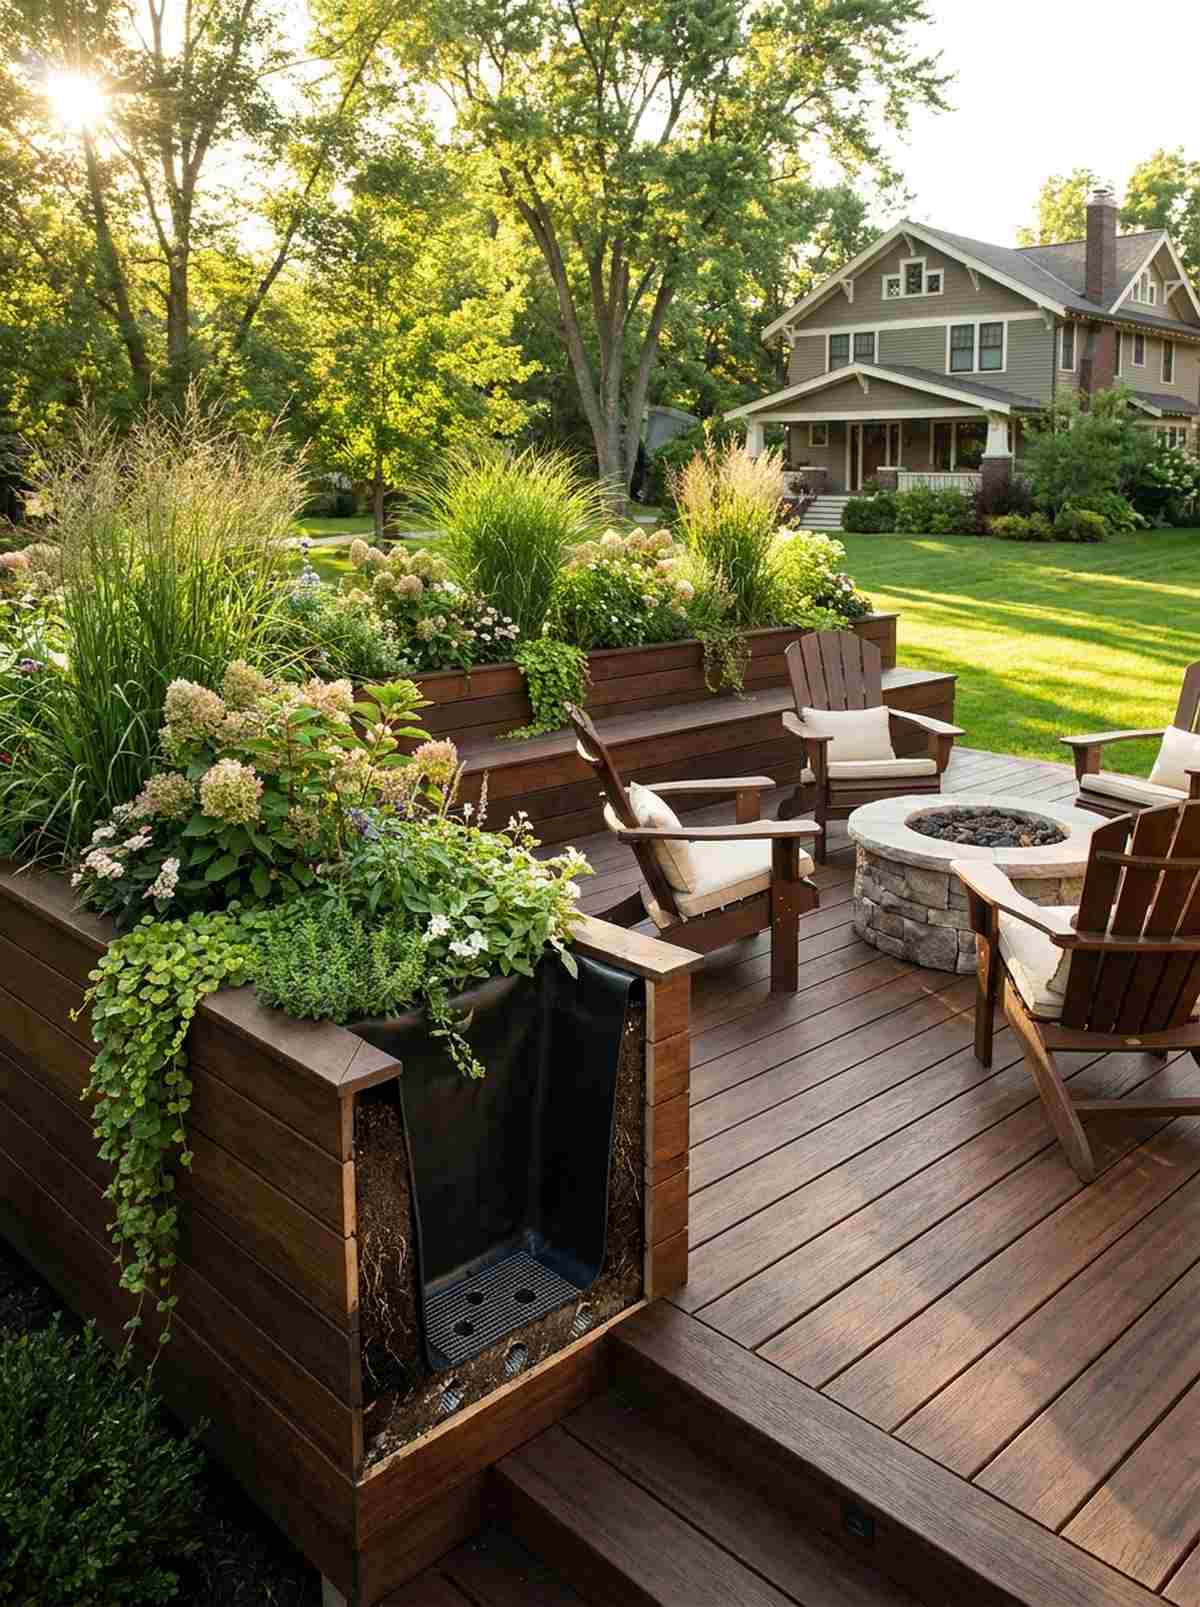
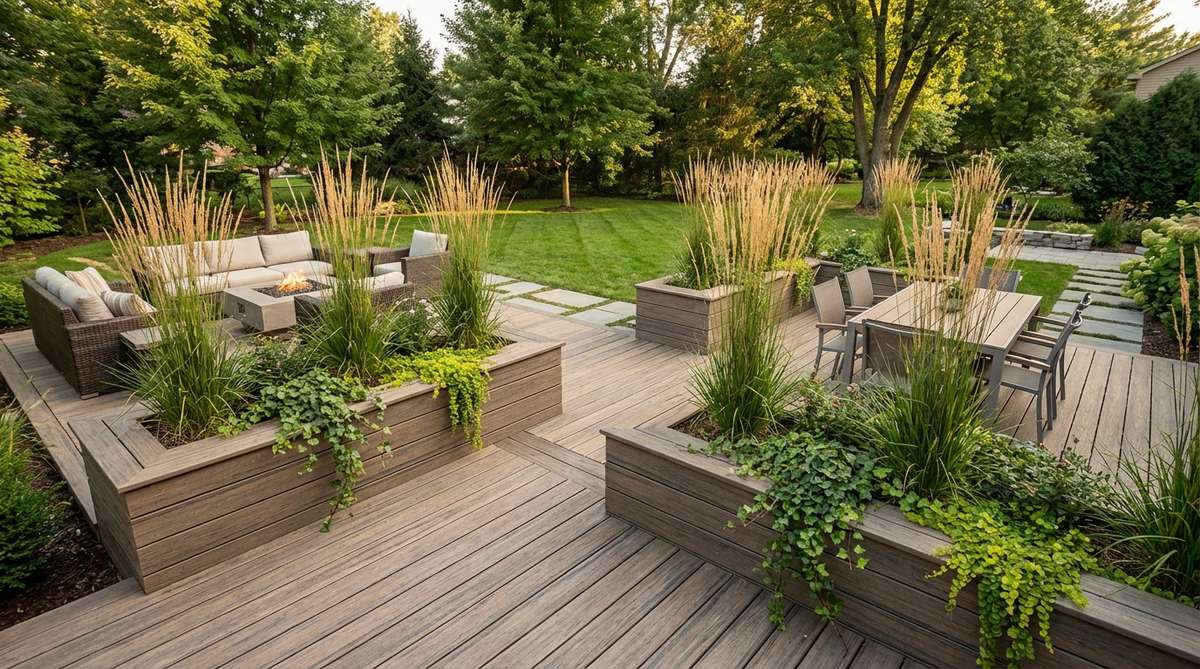
Brings a lush, botanical garden vibe directly into your seating arrangement. Installing integrated timber planter boxes creates natural privacy walls without building claustrophobic fences.
Throwing plastic pots everywhere looks incredibly cheap, but wrapping them in matching deck materials delivers a high-end unified aesthetic. Lining the inside with thick pond liner prevents wet soil from rotting your structural frame.
These integrated boxes generally add $60-$90 to your build budget.
- Key Materials: Deck offcuts, heavy plastic lining
- Vibe / Style: Lush architectural oasis
- Difficulty: Easy add-on project
- Budget Breakdown: Wood: $40 | Liner: $20
- Creator’s Tip: Drill ample drainage holes at the base and cover them with mesh to prevent soil loss.
- Smart Sourcing: Heavy-duty waterproof pond liner (pre-cut roll) and drainage mesh screens (bulk pack).
11. Storage Bench Dual Purpose
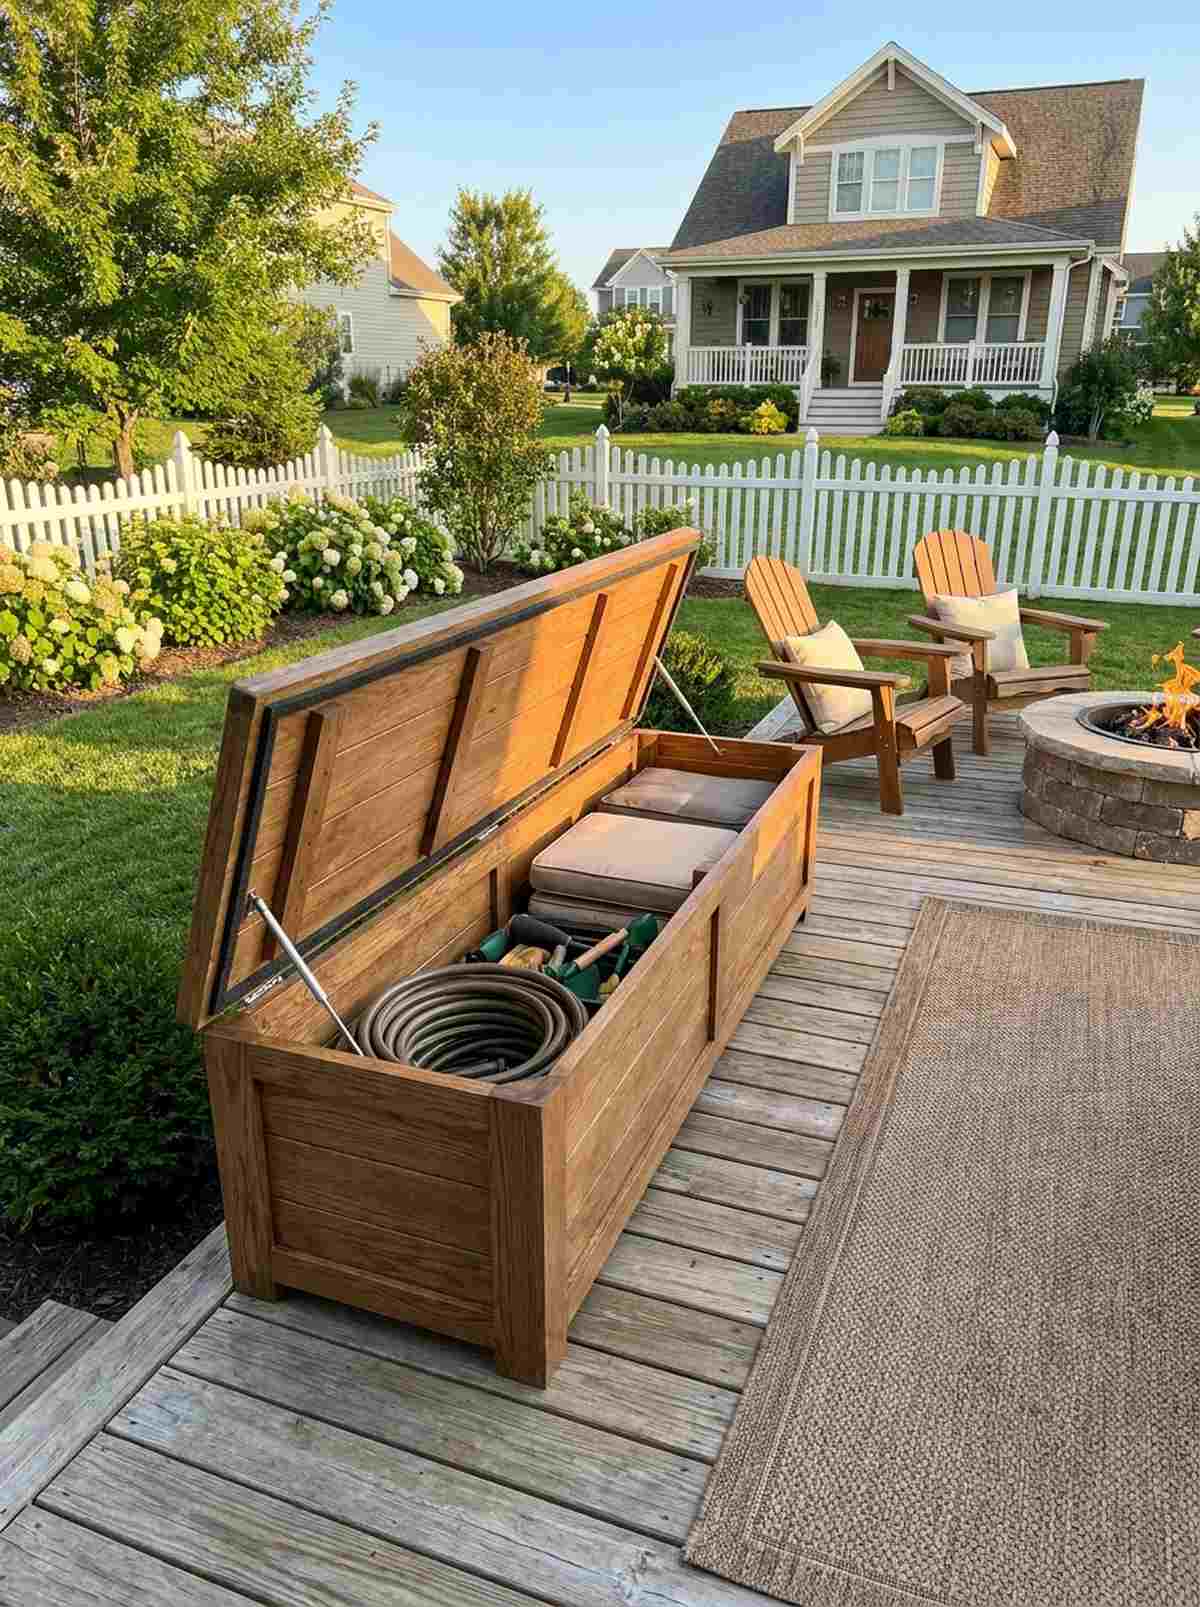

Like a magic trick for keeping your patio flawlessly clean. The hinged lid wooden storage bench hides ugly hoses and cushions right where you sit.
Sheds take up too much premium yard space; hiding everything inside your seating is the smartest layout hack possible. Install gas-strut lid stays so the heavy wooden top doesn’t slam down on your fingers.
Building a watertight compartment runs about $110. Save this functional idea to your backyard planning board!
- Key Materials: Heavy-duty hinges, gas struts, waterproof caulk
- Vibe / Style: Minimalist and tidy
- Difficulty: Intermediate
- Budget Breakdown: Hardware: $60 | Wood: $50
- Creator’s Tip: Add a strip of weatherstripping foam around the lid lip to keep spiders and rain out.
- Smart Sourcing: Soft-close gas strut hinges (heavy duty) and marine-grade weatherstripping tape.
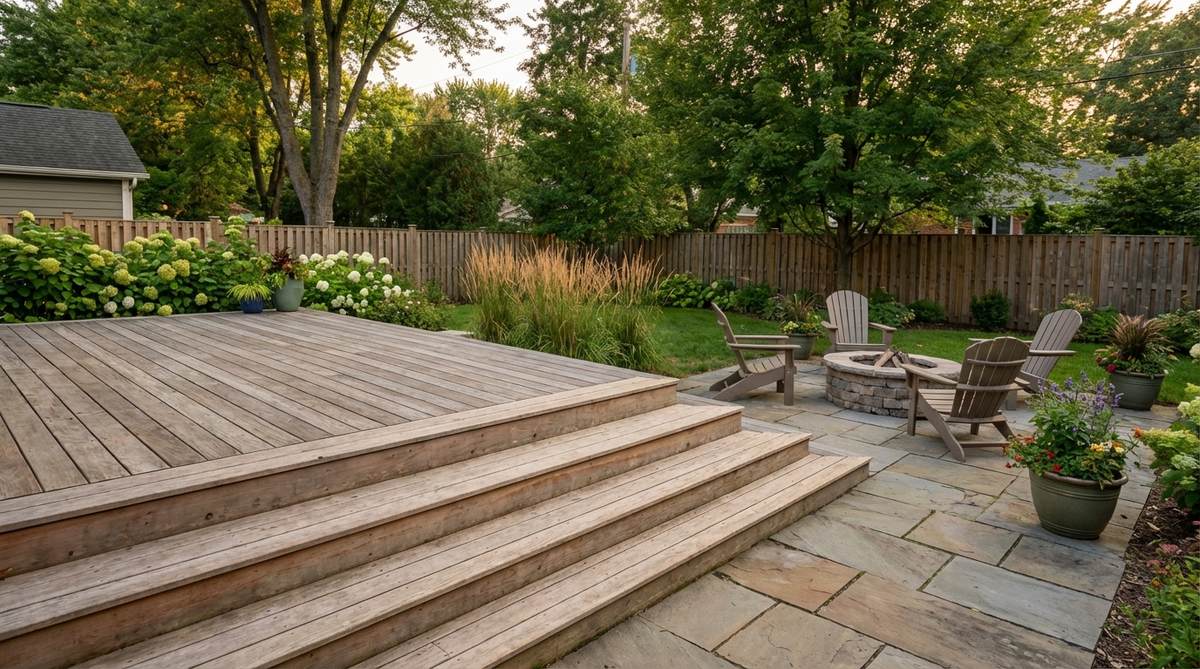
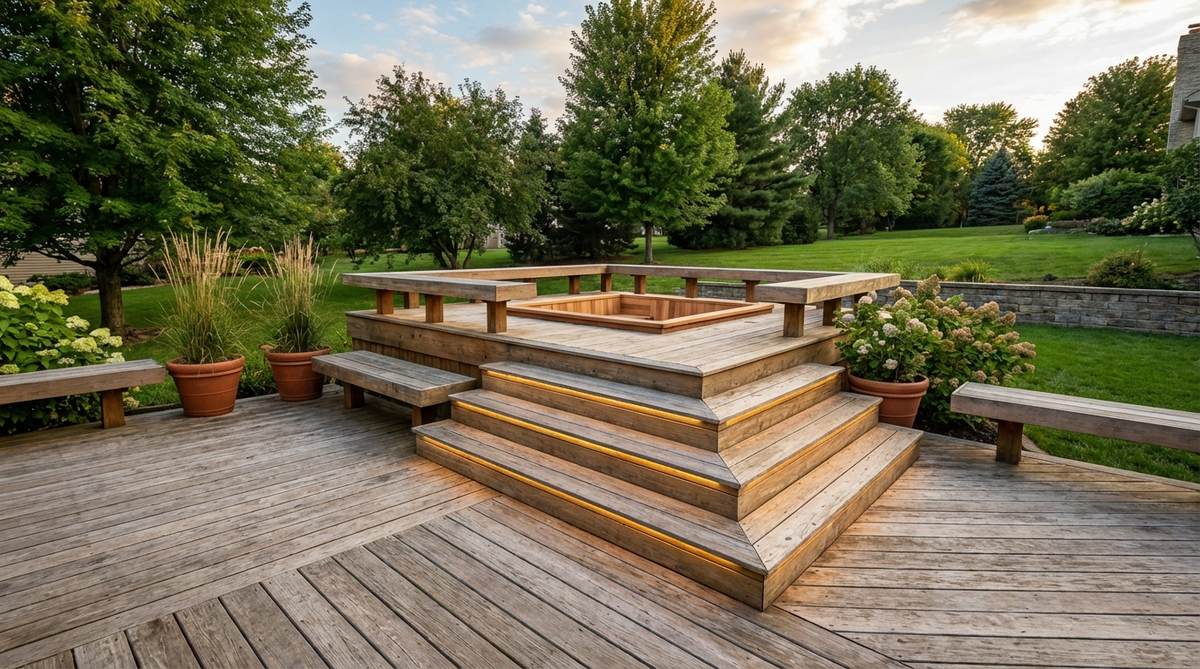
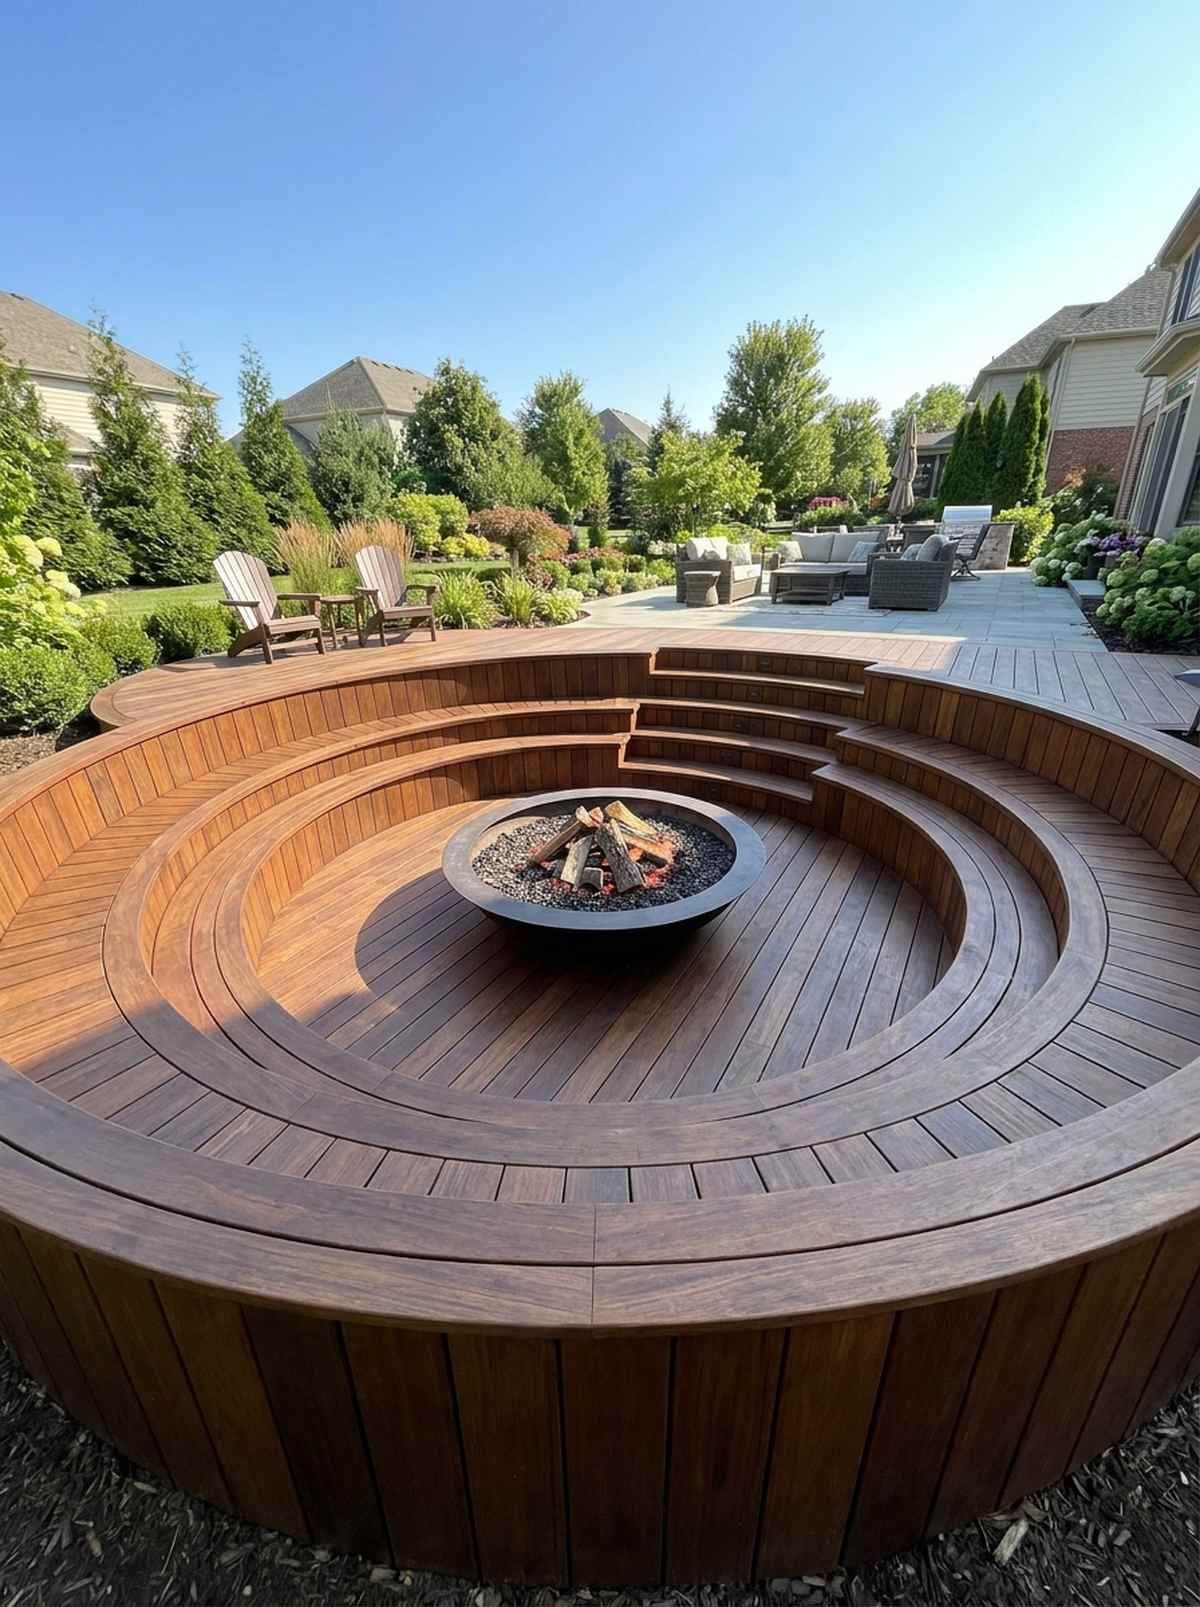
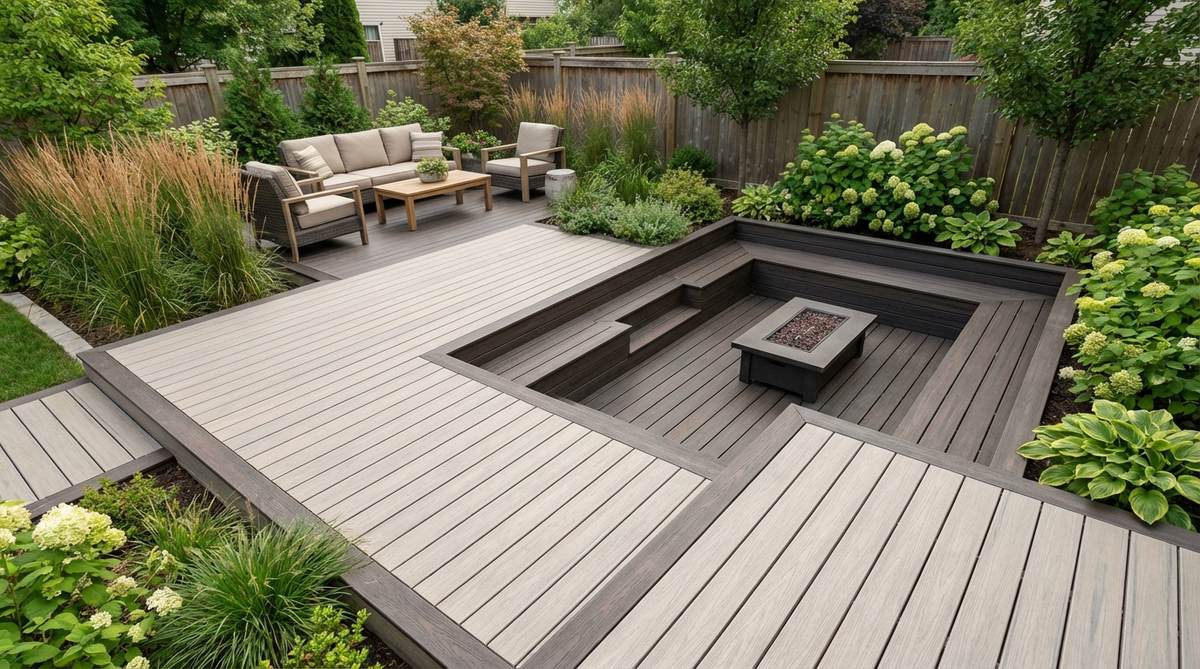
12. Sunken Seating Pit
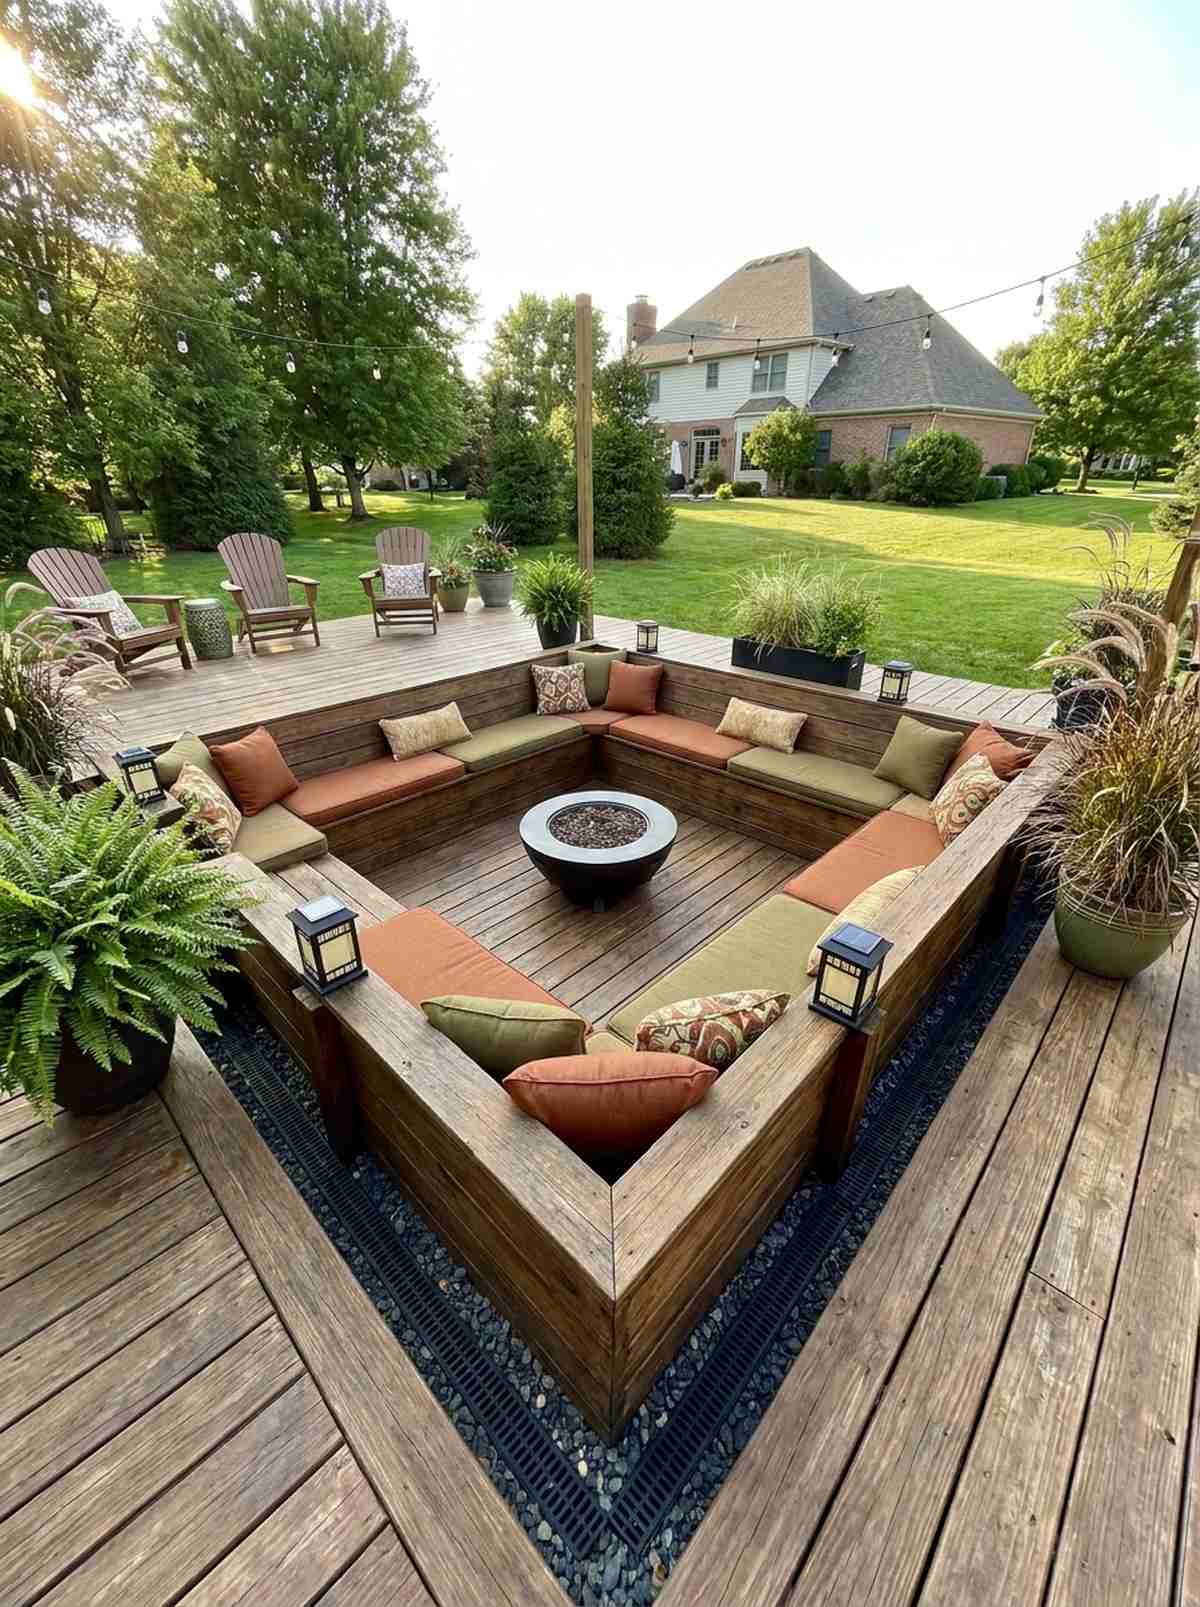
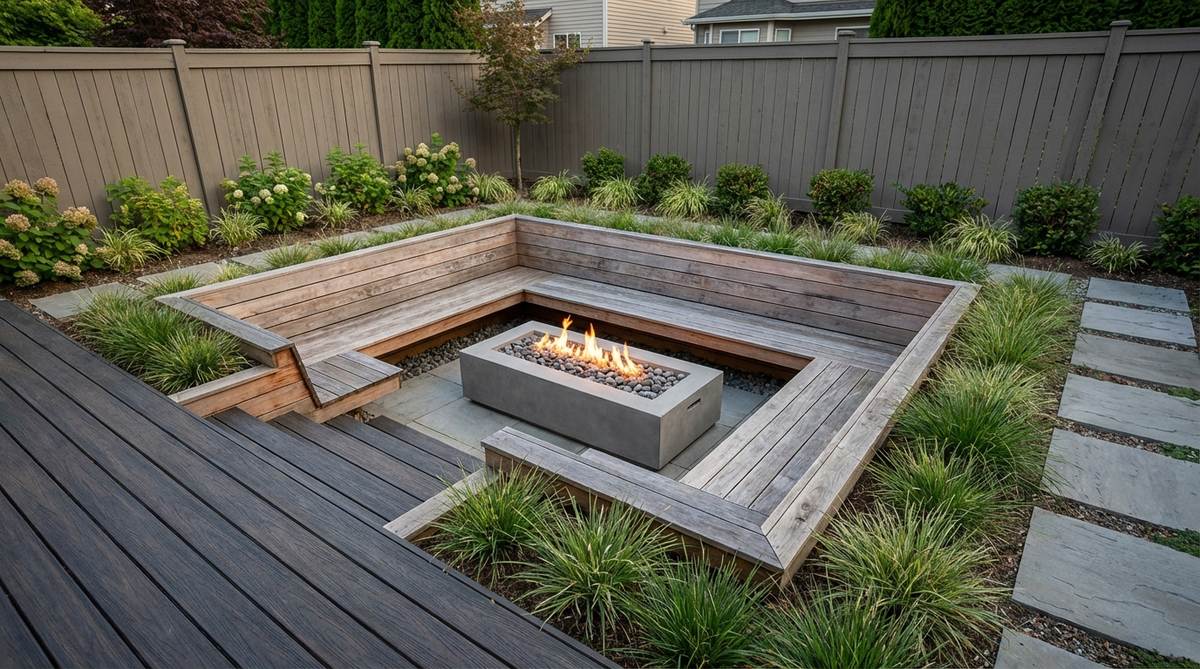
Delivers that retro, luxury 1970s conversation pit energy. Carving out a lowered deck lounge area instantly establishes a distinct VIP zone without raising fence heights.
Most try to build upwards, but digging down gives a surprisingly premium look of custom excavation. You will absolutely need to install commercial-grade drainage membranes below the pit to avoid a flooded swamp.
This is a pricier upgrade at $400+, but the architectural impact is massive.
- Key Materials: Retaining wood, gravel drainage system
- Vibe / Style: Retro luxury lounge
- Difficulty: Advanced digging & framing
- Budget Breakdown: Excavation/Gravel: $150 | Framing: $250
- Creator’s Tip: Always install a central drain connecting to a French drain system before laying the joists.
- Smart Sourcing: Pop-up yard drainage emitter kit and heavy-duty weed barrier landscape fabric.
Multi-Level Designs for Natural Zoning
Elevated and lowered deck sections create automatic boundaries between functional areas without requiring furniture placement or screening. Height variations add architectural interest while accommodating sloped sites efficiently.
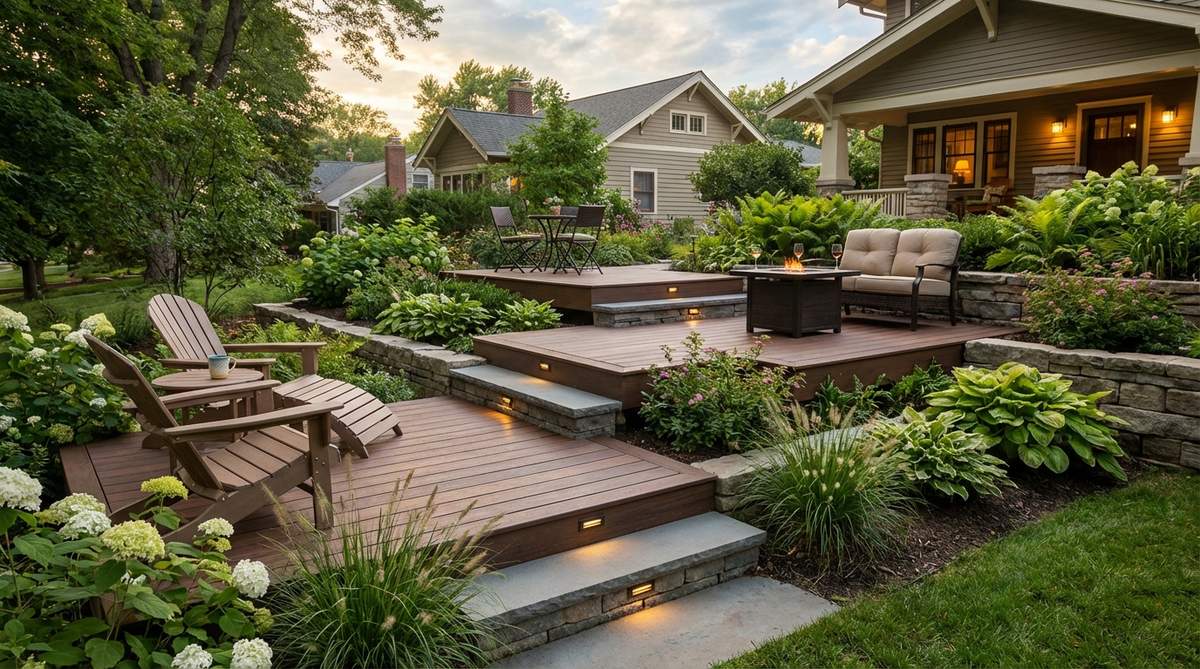
13. Two-Tier Dining and Lounging
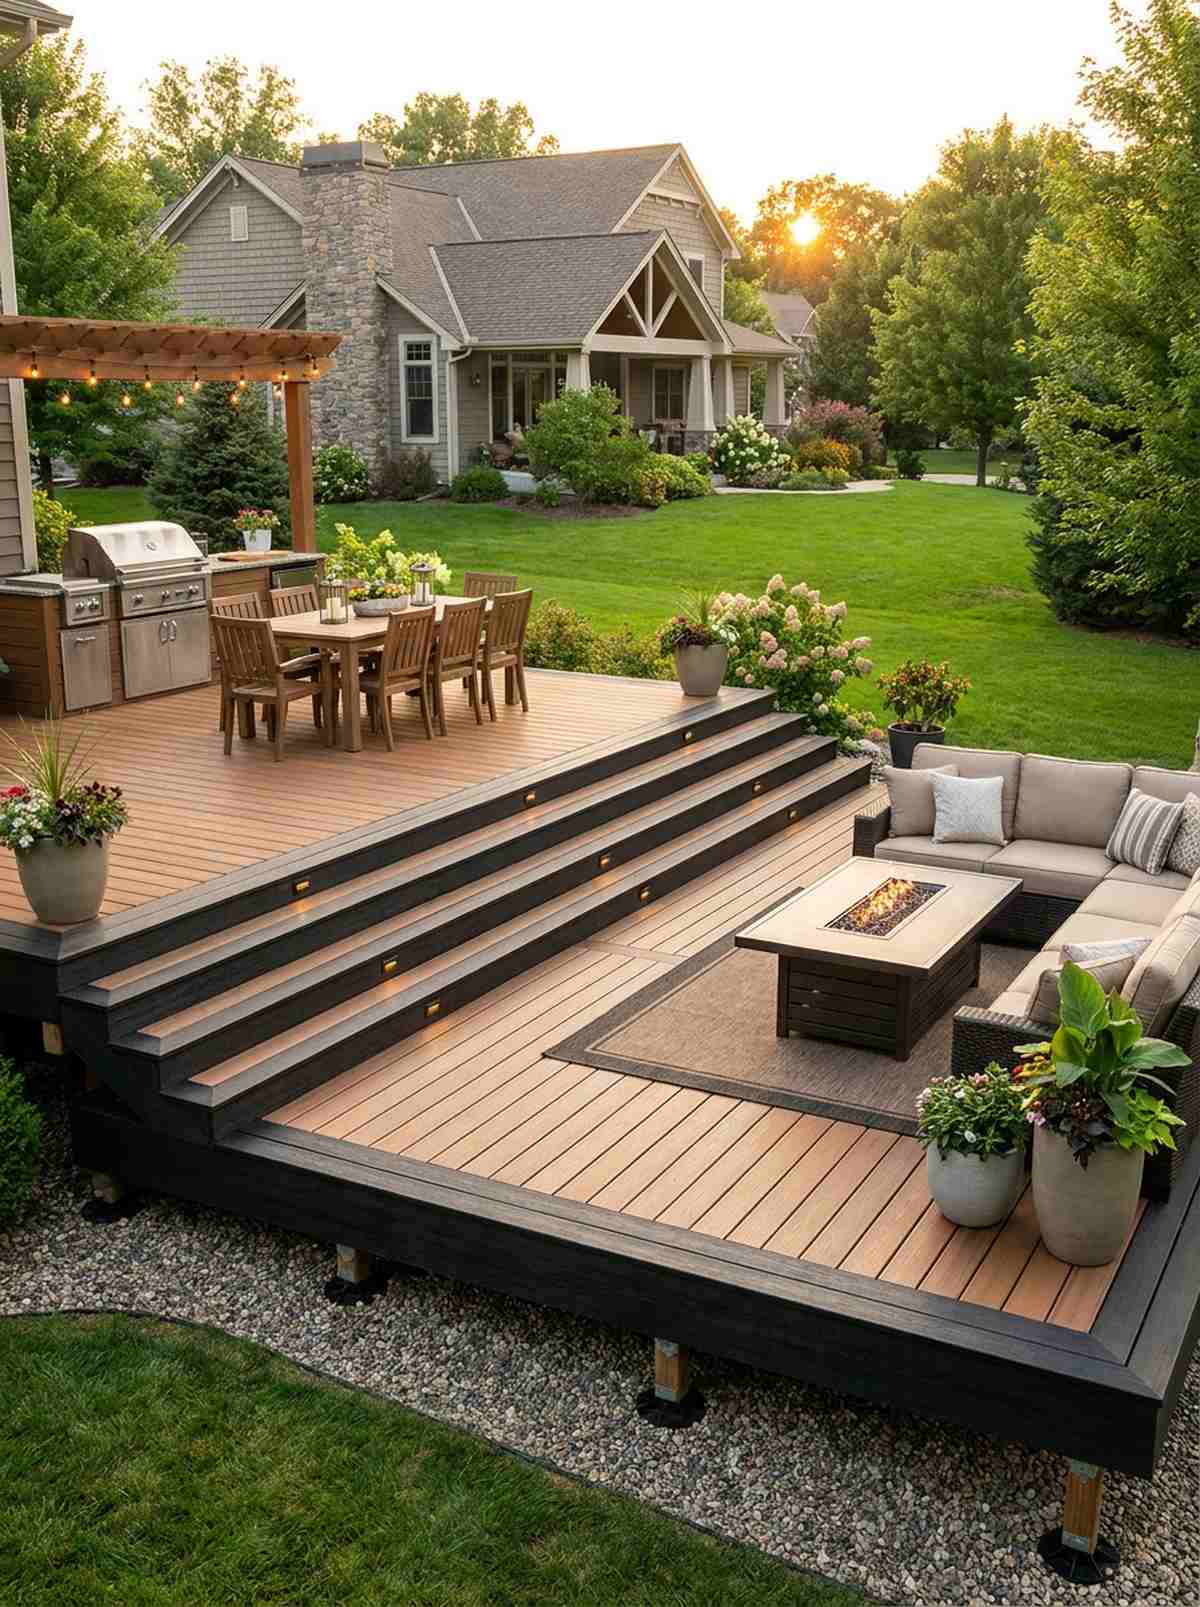
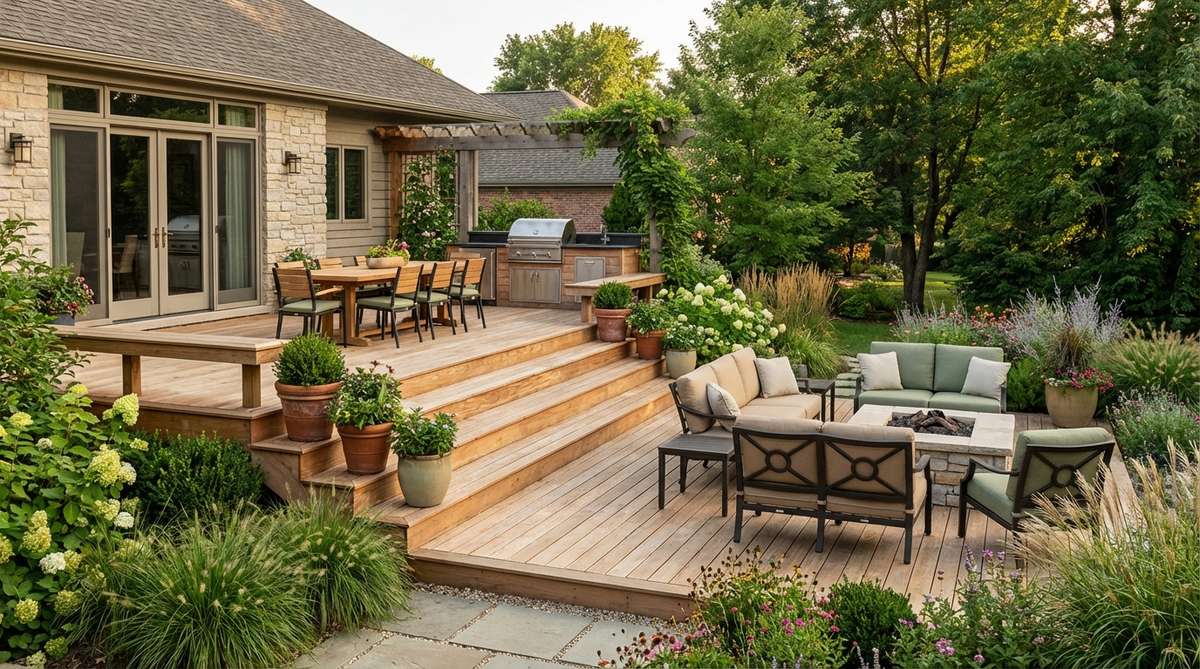
Feels like moving from the restaurant straight to the VIP after-party. A split-level patio design flawlessly separates the messy BBQ space from the pristine lounging sofa.
A single flat deck gets visually boring fast; stepping down breaks the monotony and looks far more expensive than it is. Grab a set of adjustable deck risers to perfectly level the lower tier over uneven dirt.
Adding a step-down tier usually costs around $250 in extra base materials. Pin this if you love hosting multiple groups!
- Key Materials: Step stringers, adjustable risers
- Vibe / Style: Dynamic entertainment hub
- Difficulty: Moderate framing
- Budget Breakdown: Risers: $100 | Step lumber: $150
- Creator’s Tip: Use contrasting board colors on the stair edge to prevent tripping hazards at night.
- Smart Sourcing: Adjustable outdoor deck leveling feet (bulk pack) and high-contrast composite fascia boards.
14. Stepped Terraces for Slopes
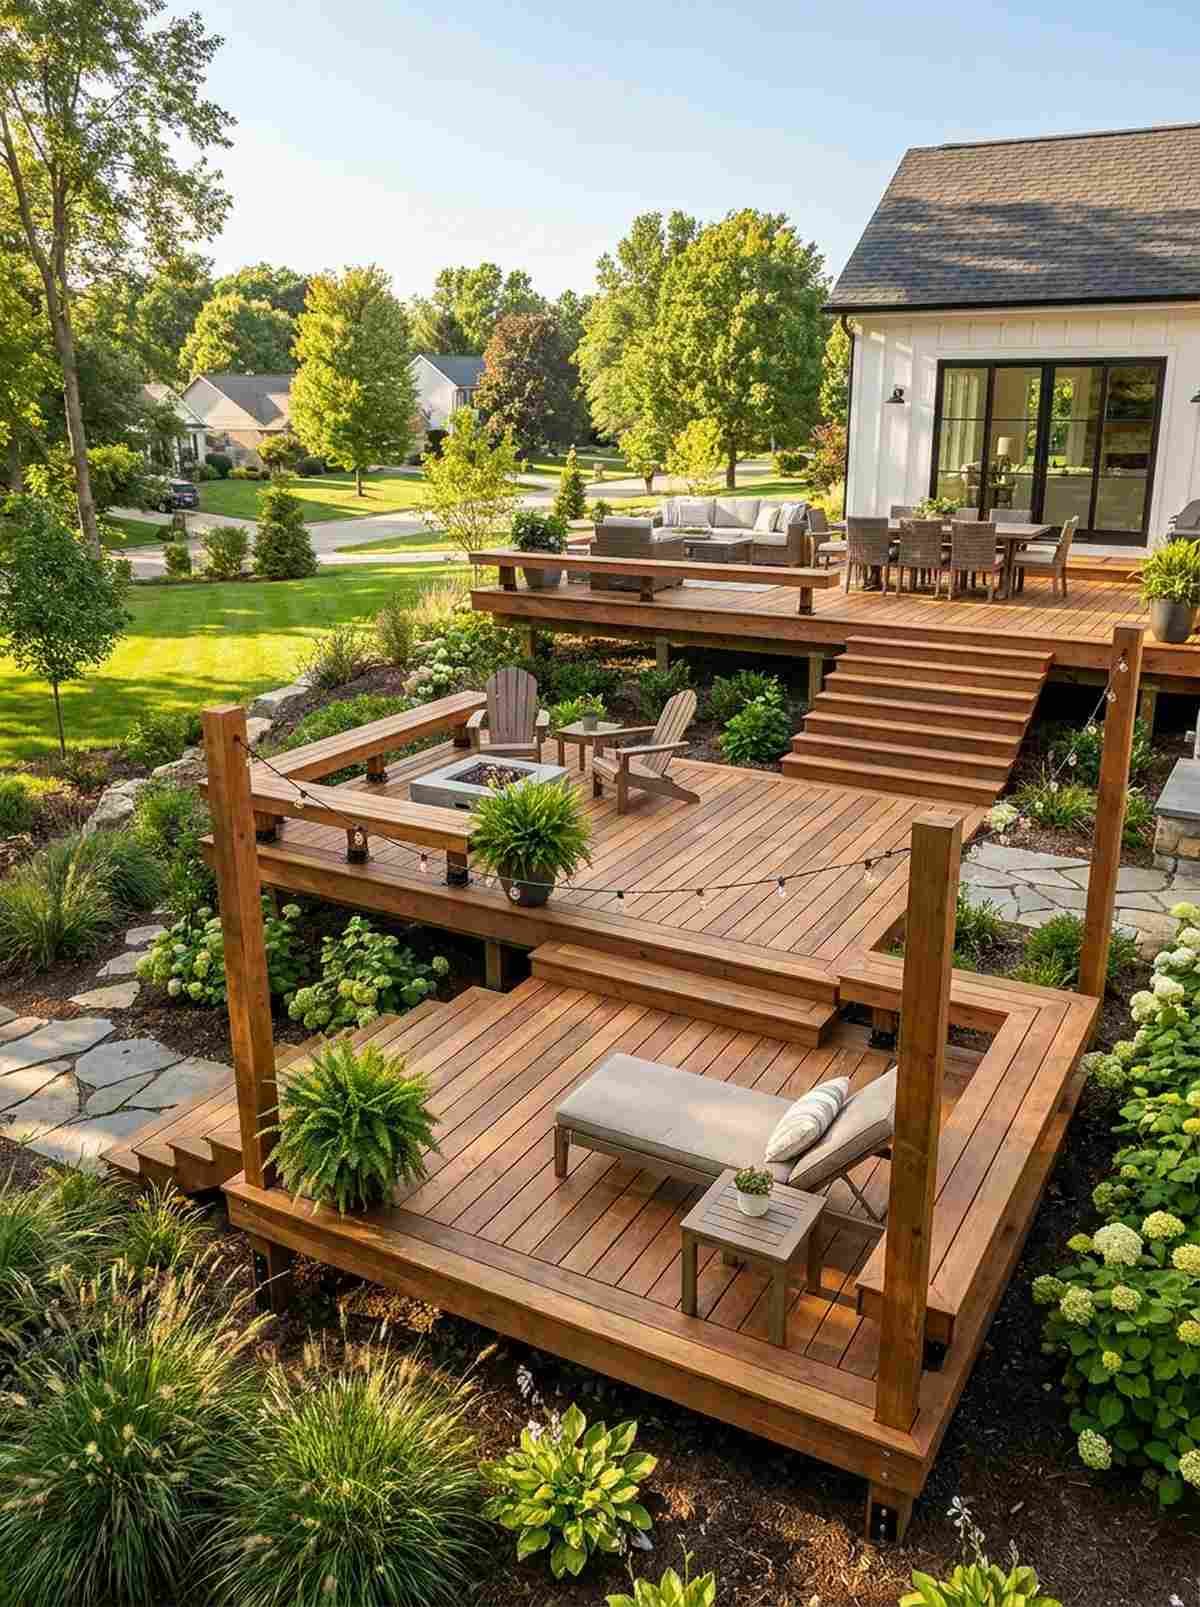
Transforms a frustrating, unusable hill into a cascading hillside resort. Multi-level terraced wooden platforms tame steep inclines perfectly without requiring massive concrete retaining walls.
Most homeowners waste thousands trying to flatten a sloped yard instead of working with the natural gradient. Utilizing heavy-duty ground spikes and structural timber ensures your cascading steps won’t slide downhill after heavy rain.
This layout can save you over $1,000 compared to professional leveling and concrete work.
- Key Materials: Structural posts, ground anchors
- Vibe / Style: Cascading hillside resort
- Difficulty: Advanced engineering required
- Budget Breakdown: Anchors: $120 | Heavy timber: $300
- Creator’s Tip: Keep each tier deep enough for at least a standard lounge chair (about 6 feet).
- Smart Sourcing: Heavy-duty steel ground anchor spikes and structural post base brackets (anti-rot).
If you think your yard is too tiny for anything impressive, wait until you see this next optical illusion…
15. Raised Platform Focal Point
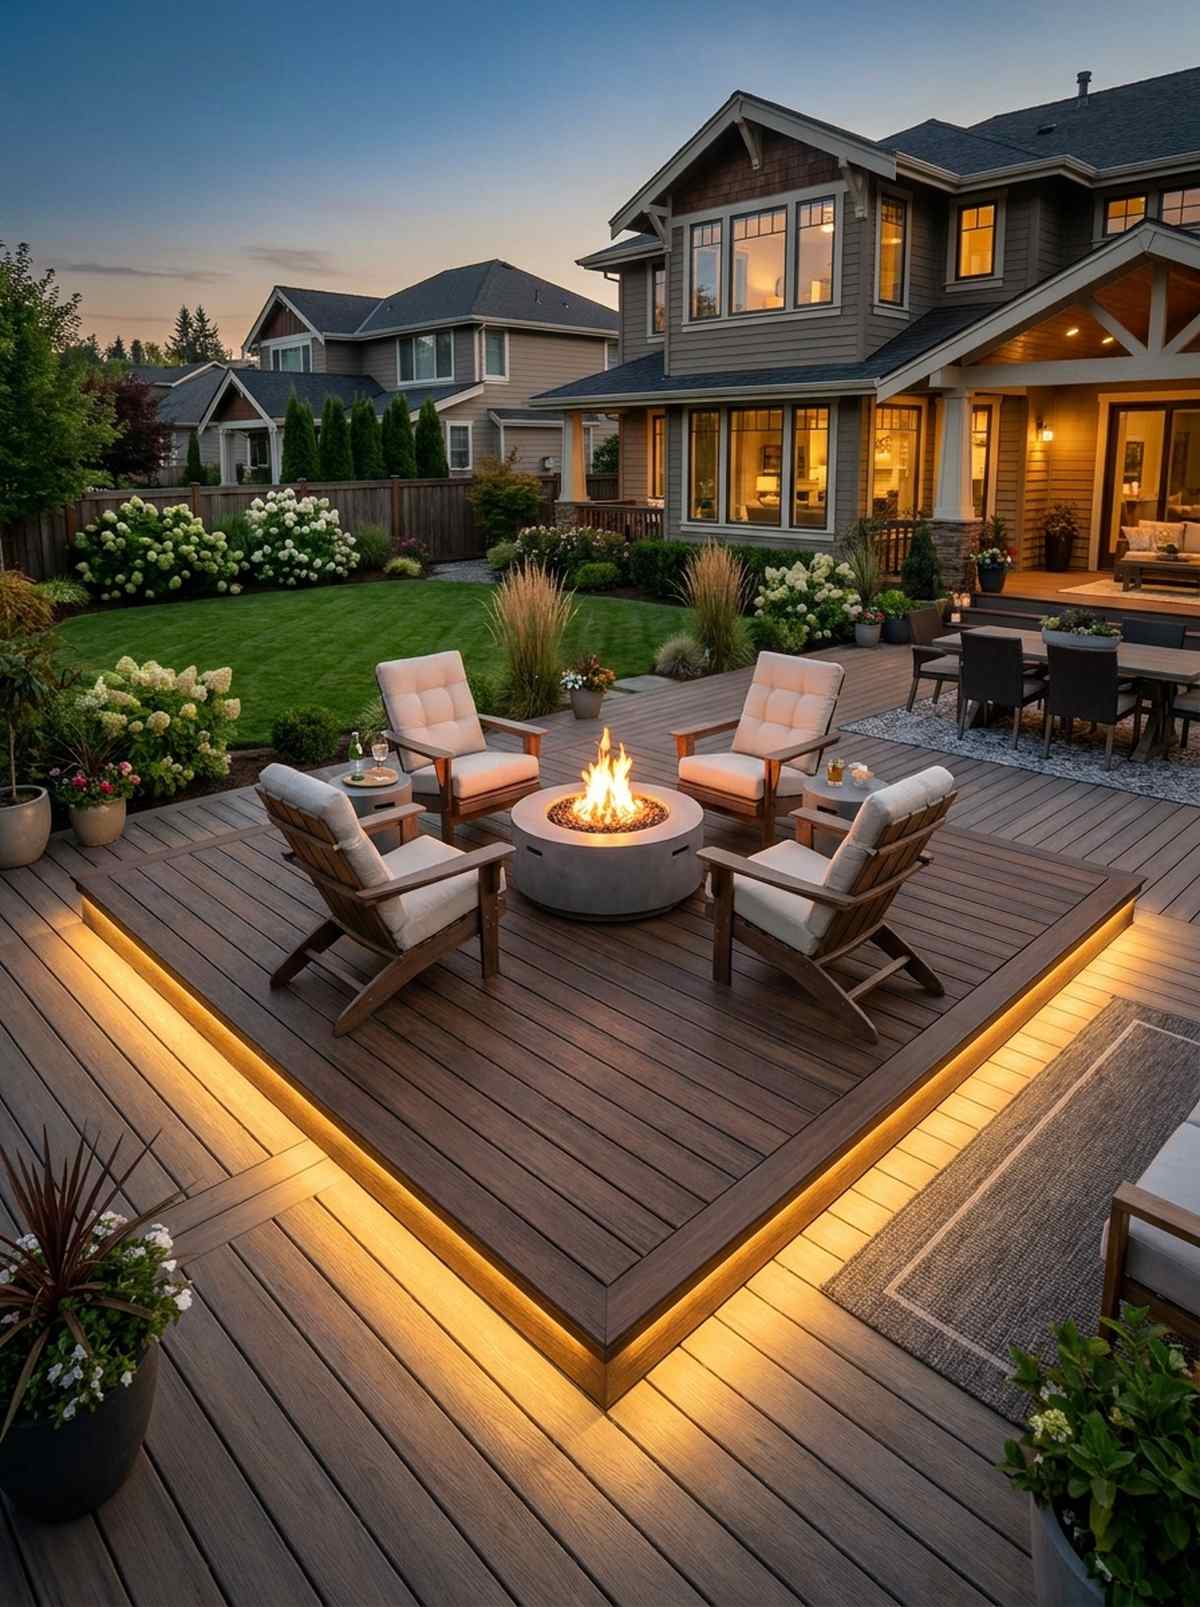
Draws the eye like a majestic stage setup in a lush park. Creating an elevated center-stage deck zone forces attention toward your favorite feature, like a fire pit or spa.
Flat patios lack hierarchy, but simply lifting one section 10 inches gives a designer-level finish. Integrate premium low-voltage LED strip lights under the overhang to create a stunning floating glow at night.
A simple raised box frame costs about $150 to add on top of an existing deck.
- Key Materials: 2×6 framing, LED strip lighting
- Vibe / Style: High-end luxury showcase
- Difficulty: Easy intermediate framing
- Budget Breakdown: Frame: $80 | Lights: $70
- Creator’s Tip: Leave a 1-inch overhang on the top boards to hide the LED light strips perfectly.
- Smart Sourcing: Waterproof outdoor LED strip light kits and aluminum LED channel diffusers.
16. Split-Level with Landing
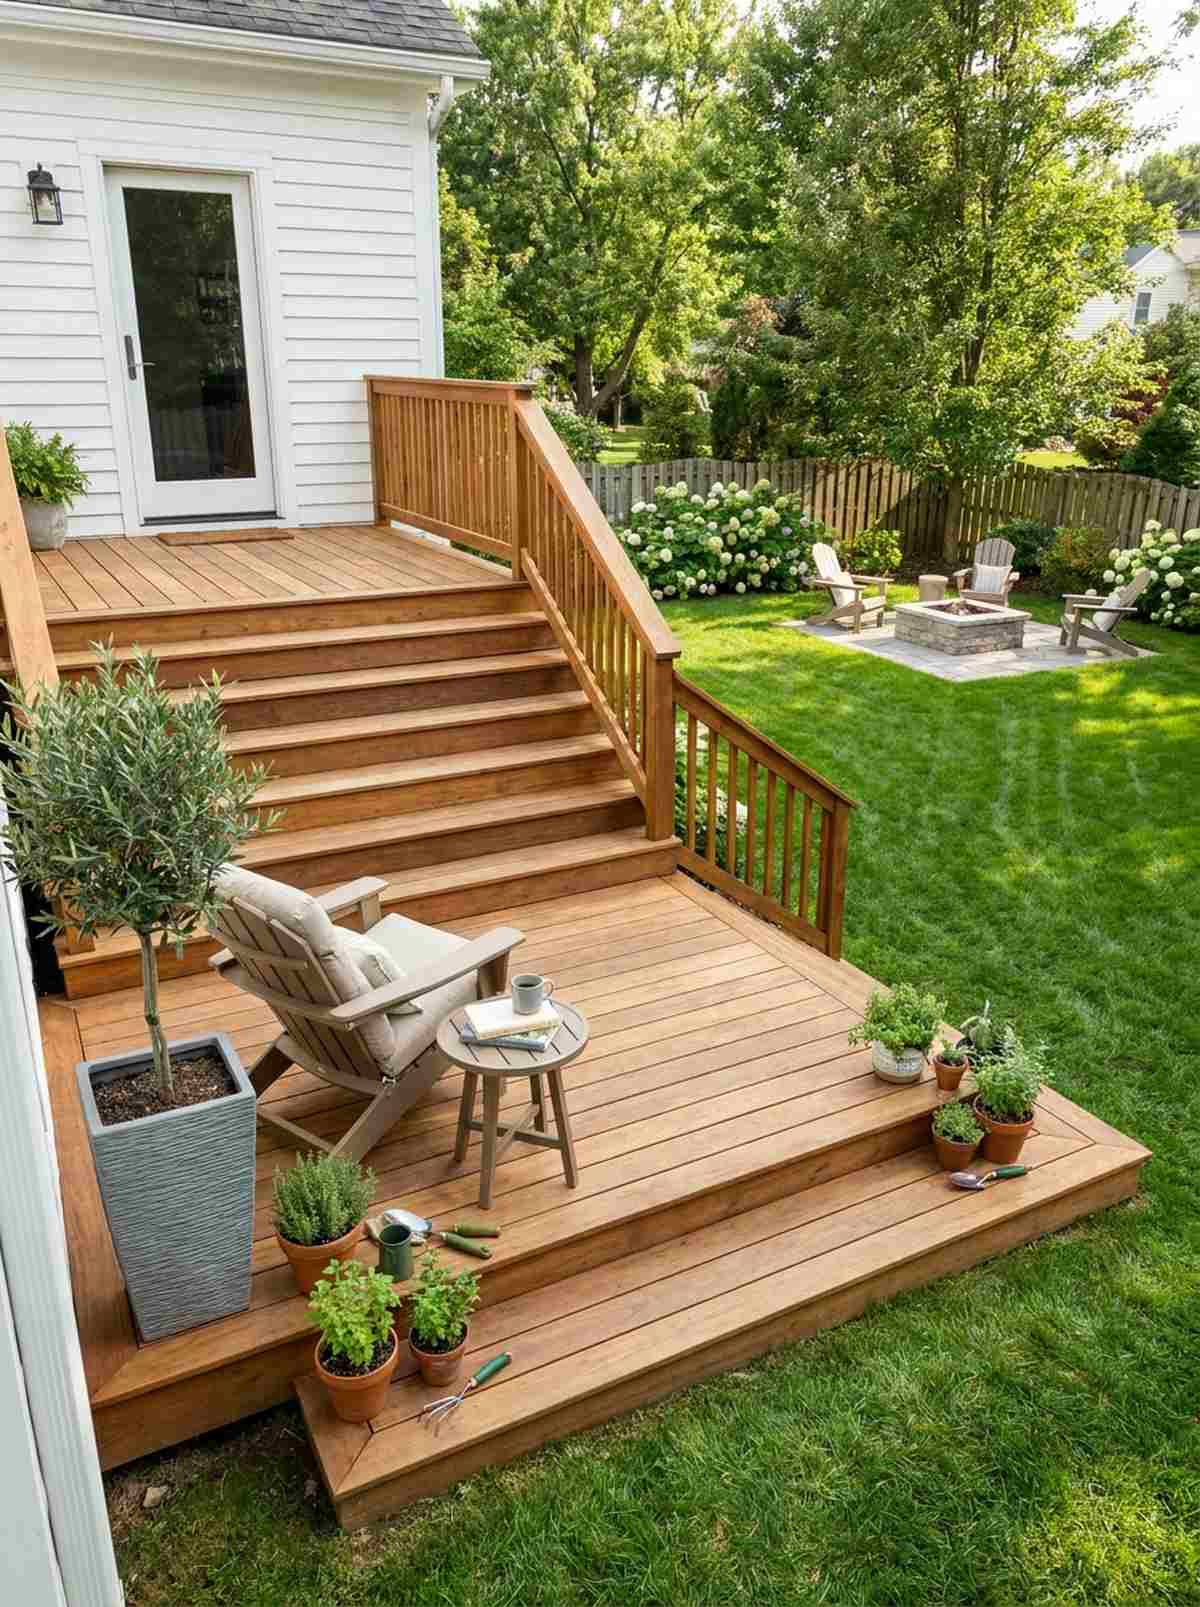
Acts like a peaceful pause button between your back door and the garden. Inserting a midway timber landing pad breaks up an intimidating staircase into a usable micro-patio.
Long staircases eat up yard space; stretching a step into a 4×4 platform turns transit space into a chic reading nook. Use miniature garden supplies to decorate the landing edges without cluttering the walking path.
Extending a landing costs roughly $90 in extra materials. Save this idea if you have a high back door!
- Key Materials: Extended joists, extra decking
- Vibe / Style: Transitional micro-oasis
- Difficulty: Moderate stair building
- Budget Breakdown: Joists: $40 | Planks: $50
- Creator’s Tip: Place a tall, narrow potted plant in the corner of the landing to soften the hard edges.
- Smart Sourcing: Tall outdoor resin planters (lightweight) and pre-cut stair stringer brackets.
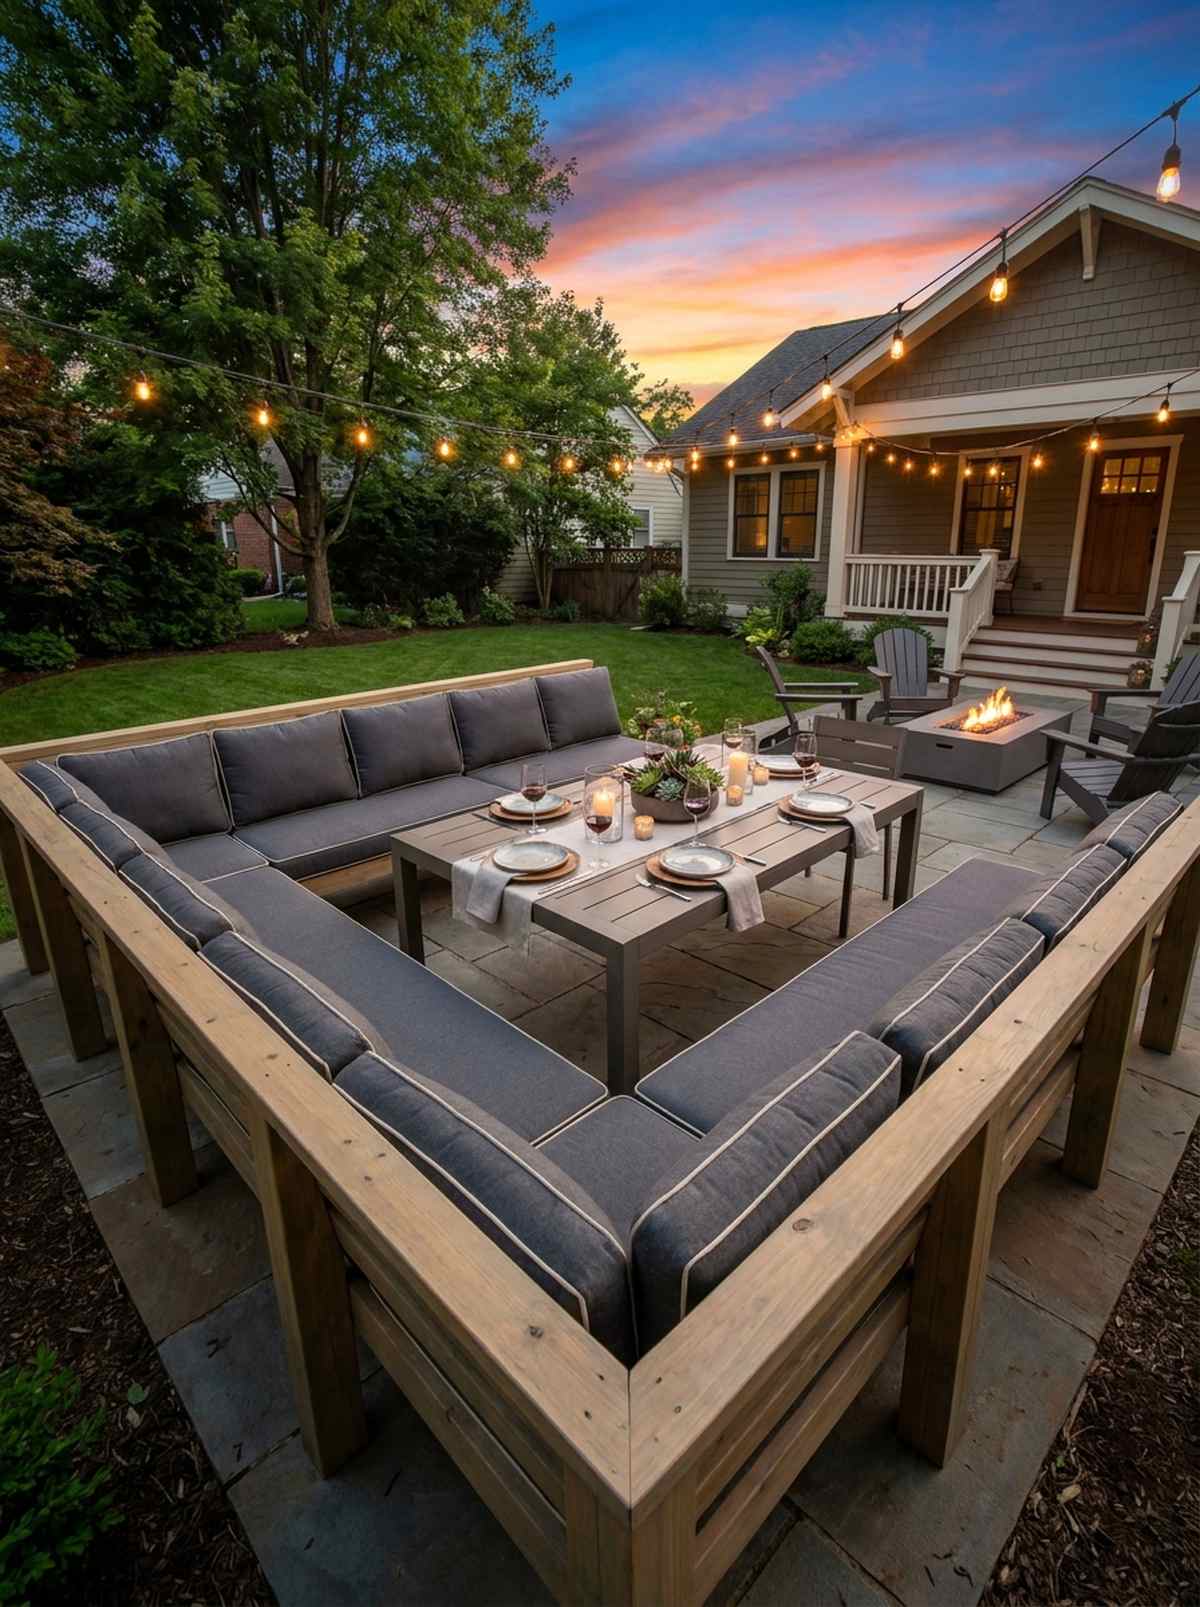
17. Wraparound Tiered Perimeter
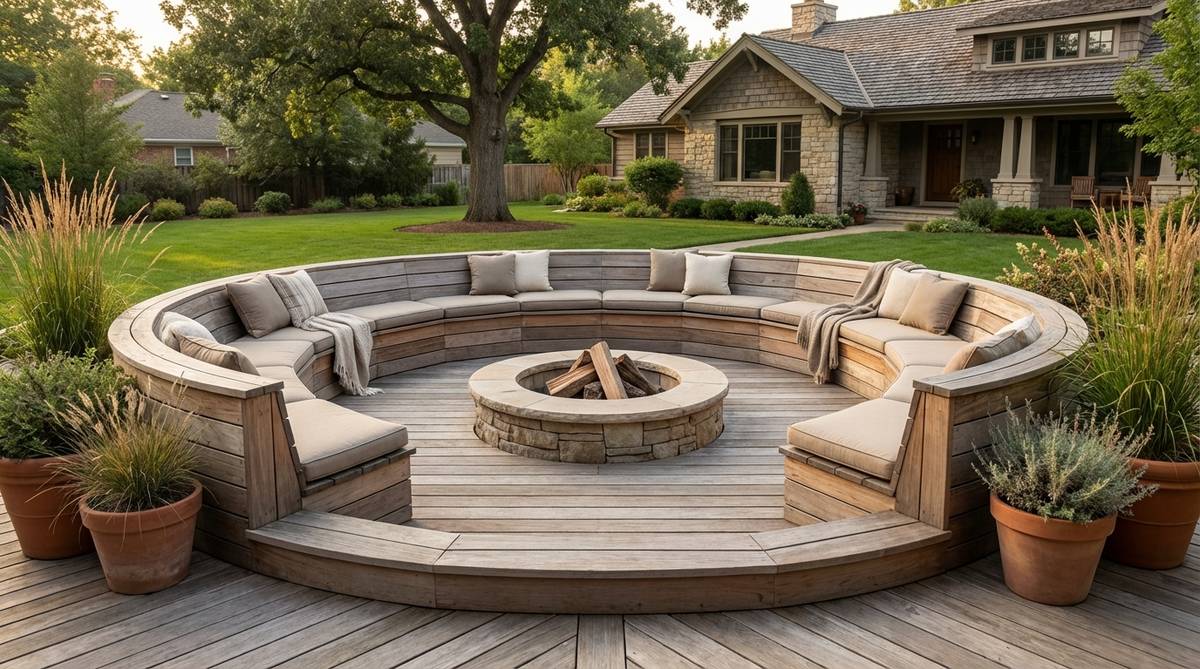
Feels like sitting around an ancient stone hearth, but elevated with sleek wood. A concentric stepped seating bowl circles your main focal point to guarantee everyone gets a prime view.
Standard linear designs leave people isolated, but this wraparound layout delivers a surprisingly premium look of an outdoor theater. Pre-drilling your fascia boards here prevents splitting when forcing them around tight corner angles.
This elaborate framing will run around $300+, but acts as seating for over 15 people.
- Key Materials: Extensive framing connectors, bendable fascia
- Vibe / Style: Modern coliseum hangout
- Difficulty: Advanced carpentry
- Budget Breakdown: Hardware: $100 | Framing: $200
- Creator’s Tip: Use a router to round the edges of the seating tiers so they don’t dig into legs.
- Smart Sourcing: Premium wood router bit starter kit and structural framing corner ties (bulk pack).
Material and Pattern Strategies
Board arrangement patterns and material choices influence perceived space dimensions and define zones through visual texture changes. Strategic pattern placement guides the eye and establishes boundaries without physical structures.
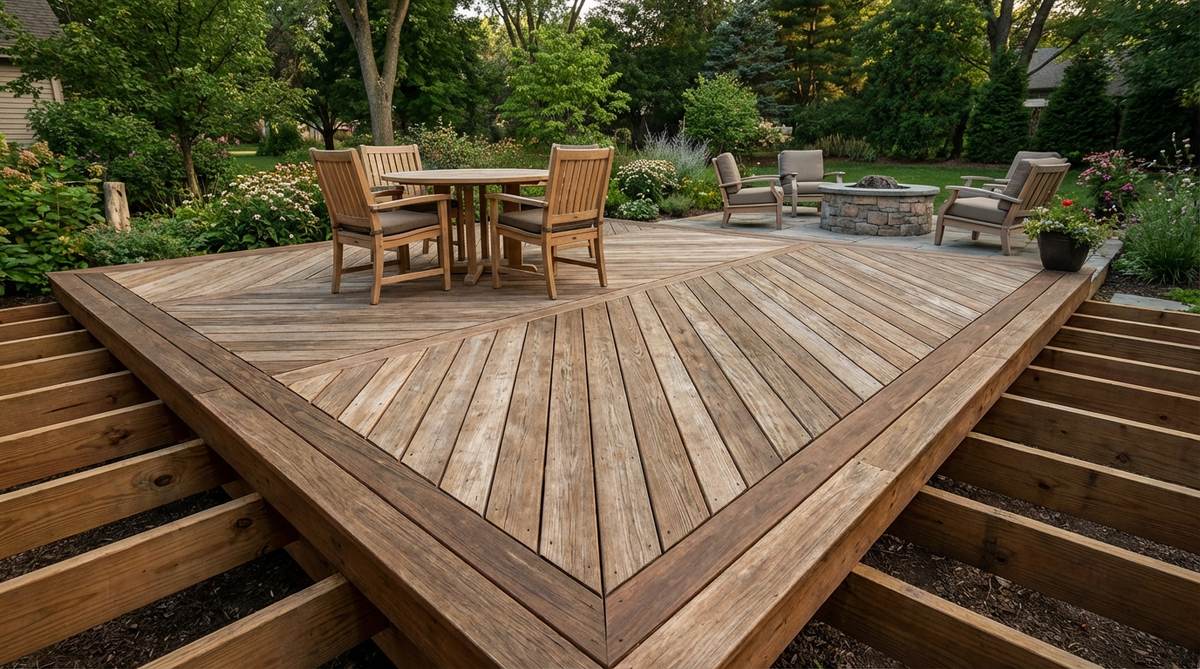
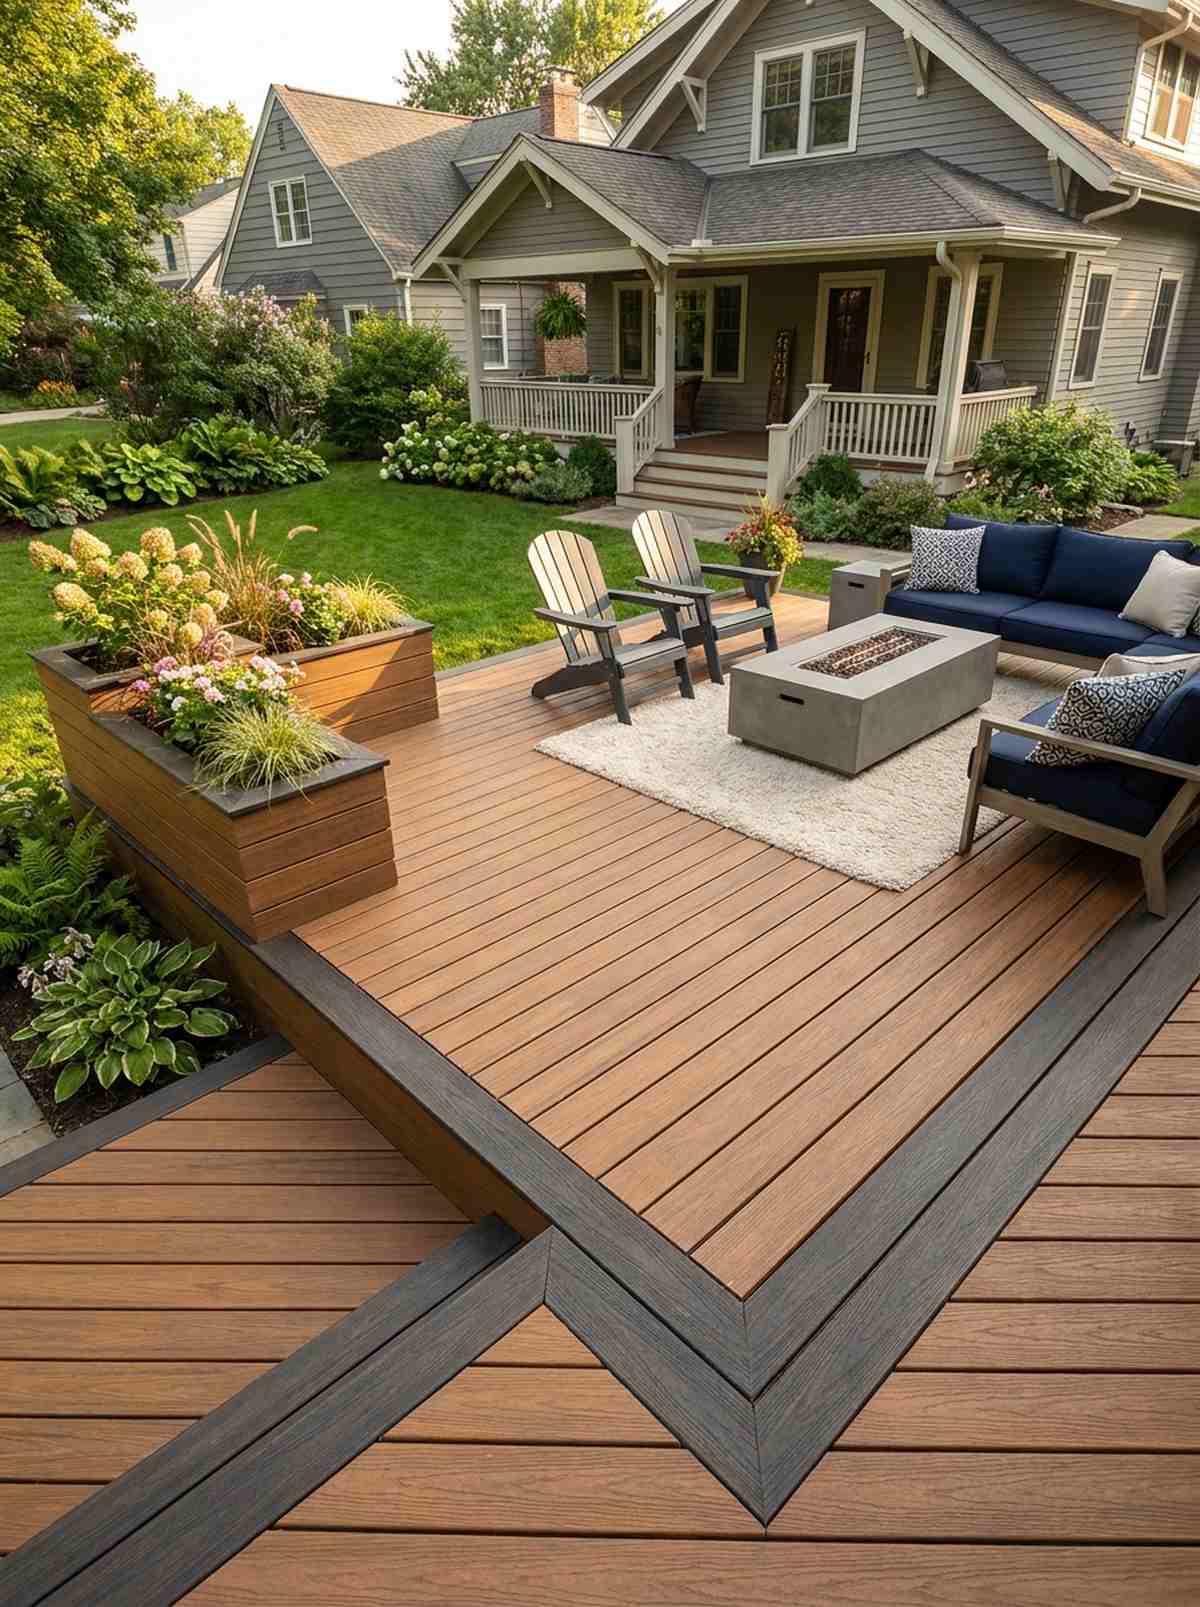
18. Diagonal Board Layout
Tricks the eye into thinking a cramped balcony is a sprawling luxury deck. Laying boards in a 45-degree angle pattern stretches the perceived width and depth of tight areas.
Straight lines emphasize how small a space is, but diagonal lines look far more expensive and custom-built. You’ll need an extra 15% in material waste for the angled cuts, but it’s wildly worth it.
Expect to spend about $50 extra on the overage. Pin this if your yard is long but incredibly narrow!
- Key Materials: Speed square, extra decking boards
- Vibe / Style: Dynamic and expansive
- Difficulty: Moderate cutting accuracy
- Budget Breakdown: Extra Material Overage: $50
- Creator’s Tip: Install joists at 12-inch centers instead of 16-inch to properly support the diagonal span.
- Smart Sourcing: Heavy-duty aluminum rafter squares and premium deck screw starter kits.
19. Herringbone Feature Zone
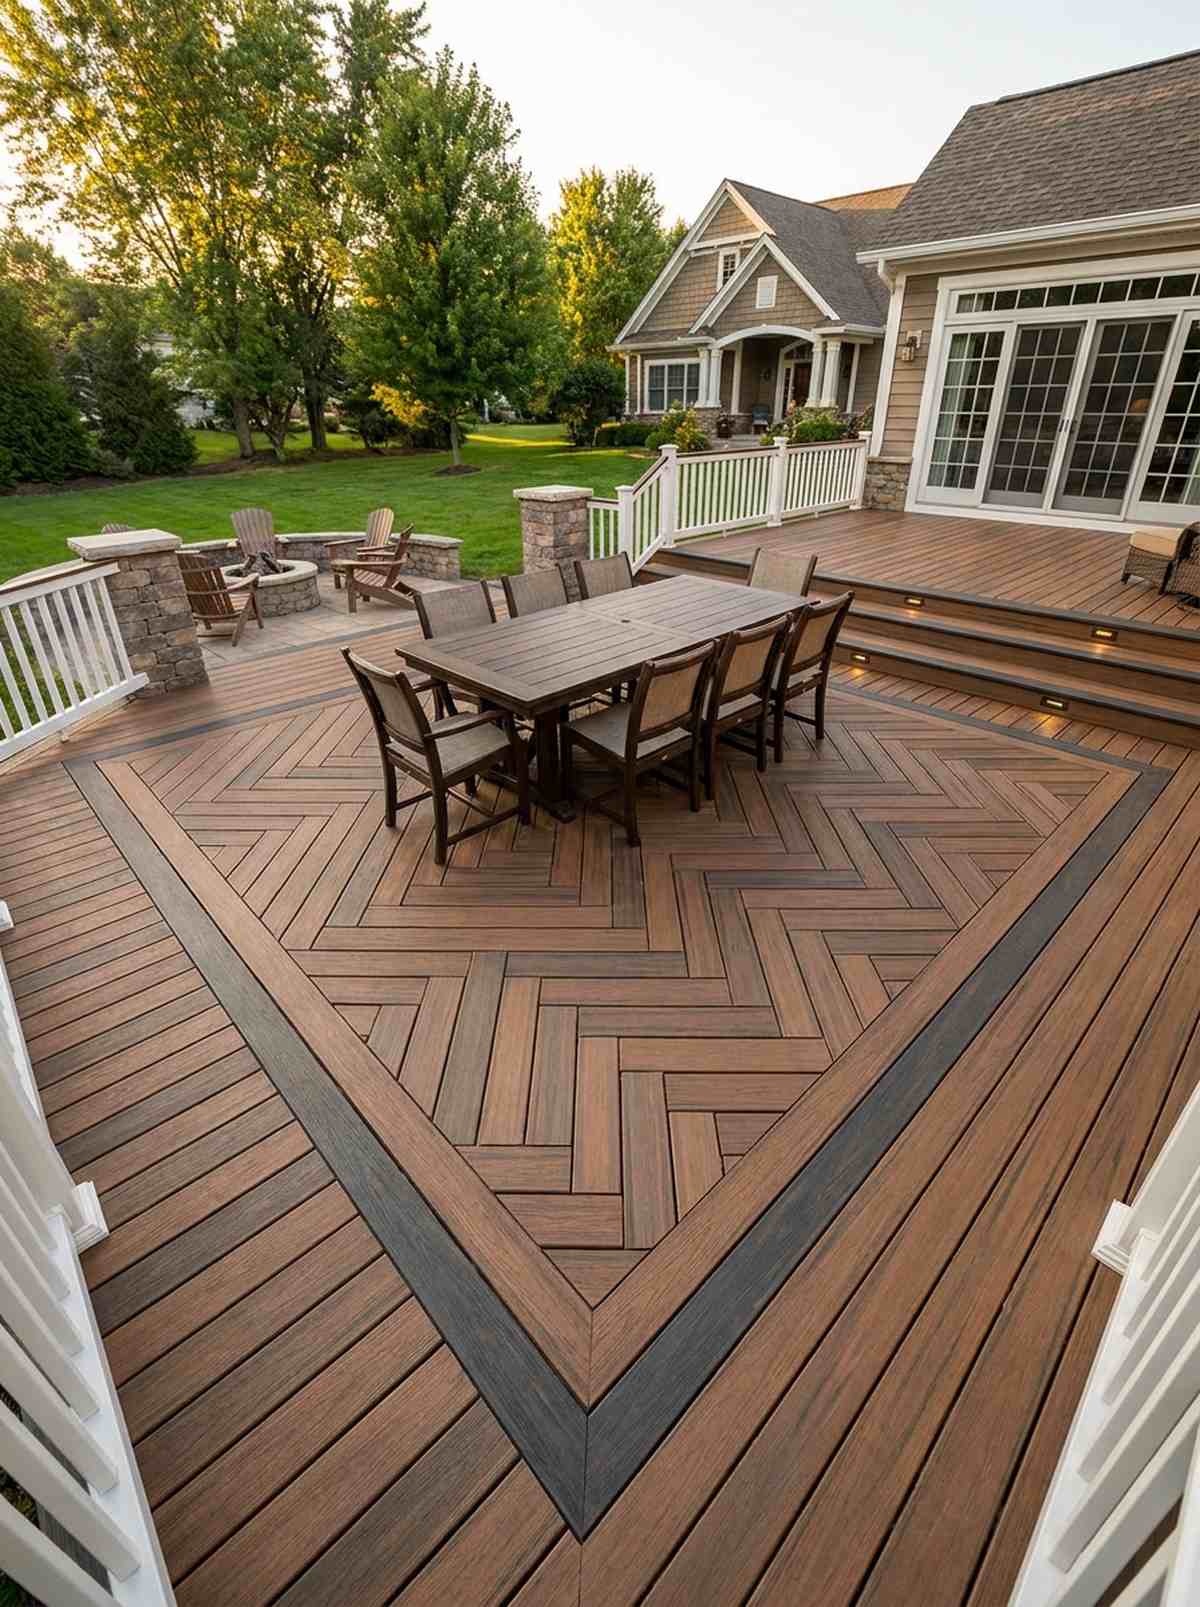
Radiates the elegance of a historic French chateau’s parquet floor. A custom herringbone deck inlay instantly establishes a luxurious dining zone without needing walls.
Running standard planks everywhere is boring; weaving a pattern creates a masterpiece. You’ll want to use composite decking samples first to ensure the colors pop when laid in opposing directions.
The extra blocking and cuts make this an advanced visual upgrade costing $100 in extra framing support.
- Key Materials: Double joists, precise miter saw
- Vibe / Style: High-end European estate
- Difficulty: Advanced measuring and cuts
- Budget Breakdown: Extra Framing Joists: $60 | Hardware: $40
- Creator’s Tip: Always start your herringbone pattern from the center line and work your way outward.
- Smart Sourcing: Laser-guided miter saw kits and concealed deck clip fasteners (bulk pack).
Most people completely ignore material aesthetics, which is why their DIY projects end up looking like cheap pallets…
20. Mixed-Width Planking

Gives the rugged, authentic feel of a reclaimed vintage sailing ship. Alternating a multi-width timber deck layout breaks up the monotonous factory-made look.
Using uniform boards looks highly commercial, but mixing widths delivers a surprisingly premium look of bespoke artisan carpentry. Secure everything with color-matched deck screws so the fasteners disappear into the varied grain.
This layout trick costs exactly the same as a standard deck, just requires better math!
- Key Materials: 4-inch and 6-inch width boards
- Vibe / Style: Reclaimed artisan rustic
- Difficulty: Moderate layout planning
- Budget Breakdown: Materials cost remains standard
- Creator’s Tip: Map out the repeating width pattern on paper first so you don’t end up with awkward edge slivers.
- Smart Sourcing: Color-matching composite deck screws and deck board spacing spacer tools.
21. Contrasting Color Blocks
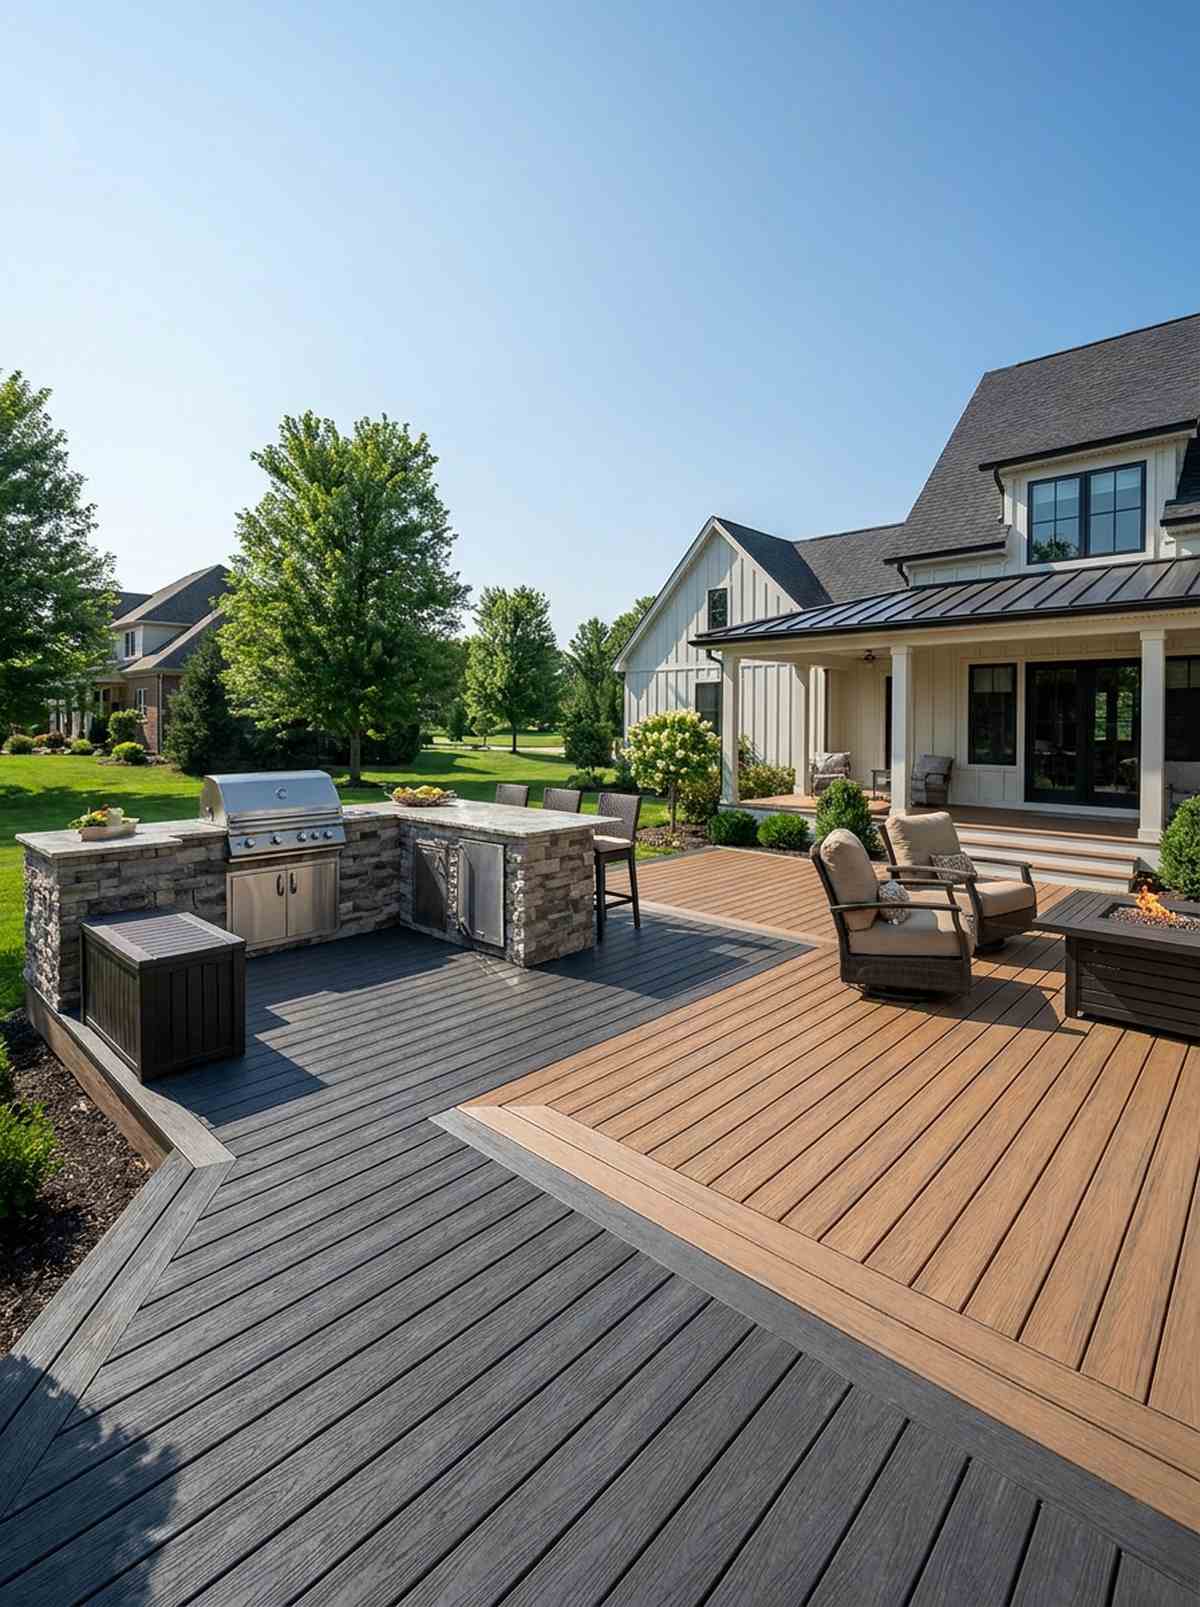
Acts like a massive, permanent outdoor area rug made of wood. Using two-tone composite block zoning flawlessly separates the barbecue station from the lounge chairs.
Many struggle to divide open plans; changing the actual floor color forces an immediate psychological boundary. Invest in UV-coated composite boards so the dark border doesn’t turn chalky gray after one summer.
You can easily pull this off for just the cost of mixing your material orders. Save this brilliant zoning trick!
- Key Materials: Two different composite color lines
- Vibe / Style: Ultra-modern and distinct
- Difficulty: Easy beginner layout
- Budget Breakdown: Mixed material cost (No extra fee)
- Creator’s Tip: Keep the darker color on the perimeter to anchor the space and hide dirt runoff.
- Smart Sourcing: UV-resistant composite deck boards (pre-cut) and composite deck cleaner solution.
22. Picture Frame Borders
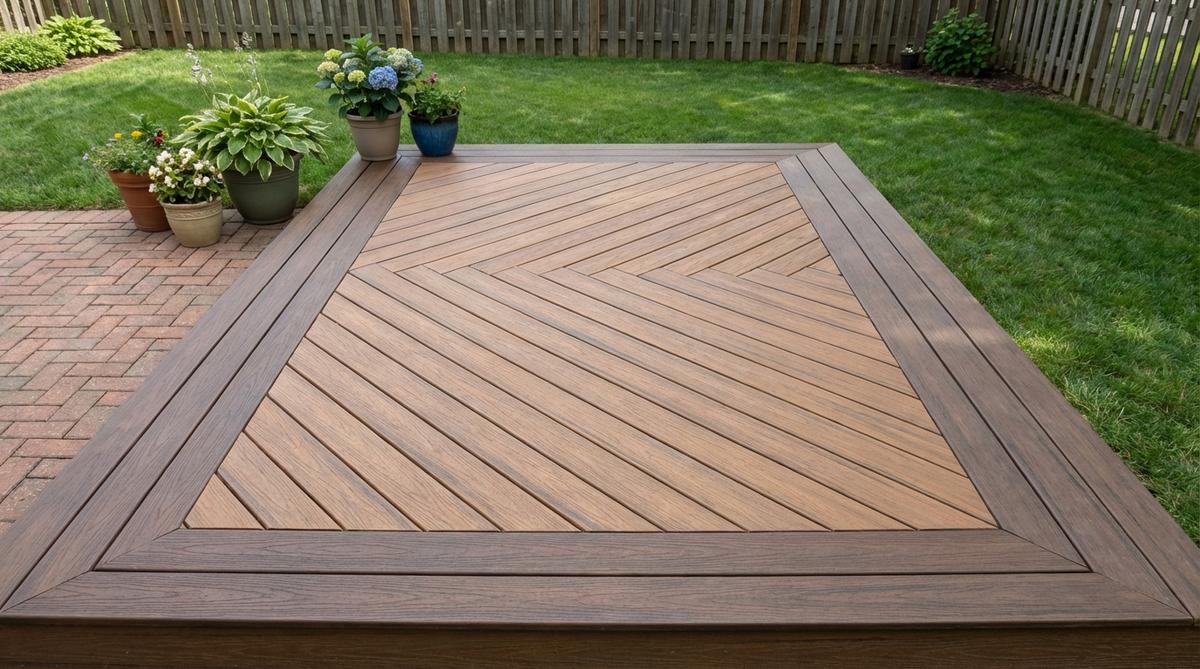
Puts a sharp, tailored tuxedo onto your otherwise basic patio. A contrasting perimeter deck border hides ugly cut ends and frames the seating space perfectly.
Leaving raw wood ends exposed looks amateurish, but wrapping it gives a designer-level finish. You’ll need to install flat blocking between the outer joists to support the perpendicular edge boards.
Adding a picture frame edge costs about $50 in extra framing blocks. Highly recommended for a quick weekend win.
- Key Materials: Accent border boards, framing blocking
- Vibe / Style: Tailored and polished
- Difficulty: Intermediate framing
- Budget Breakdown: Framing blocks: $20 | Accent board: $30
- Creator’s Tip: Miter the corners at exactly 45 degrees for a seamless, professional picture-frame joint.
- Smart Sourcing: Premium structural wood screws (bulk box) and waterproof end-grain wood sealer.
23. Chevron Pattern Centerpiece
Creates a dramatic arrow pointing directly to your yard’s best feature. A central chevron deck inlay acts as an aggressive visual anchor that commands attention.
Herringbone is classic, but the sharp V-shape of a chevron looks far more expensive and modern. Utilize heavy-duty construction adhesive along with hidden clips to keep those sharp points from curling up over time.
This is a high-waste premium pattern, expect about $150 extra for overage. Pin this if you want absolute luxury!
- Key Materials: Extra boards for 20% waste, construction adhesive
- Vibe / Style: High-impact modern luxury
- Difficulty: Advanced precision cutting
- Budget Breakdown: Overage: $120 | Adhesive: $30
- Creator’s Tip: Snap a chalk line directly down the center joist to keep every V-point perfectly aligned.
- Smart Sourcing: Heavy-duty outdoor construction adhesive and high-visibility marking chalk lines.
24. Corner Pergola Canopy
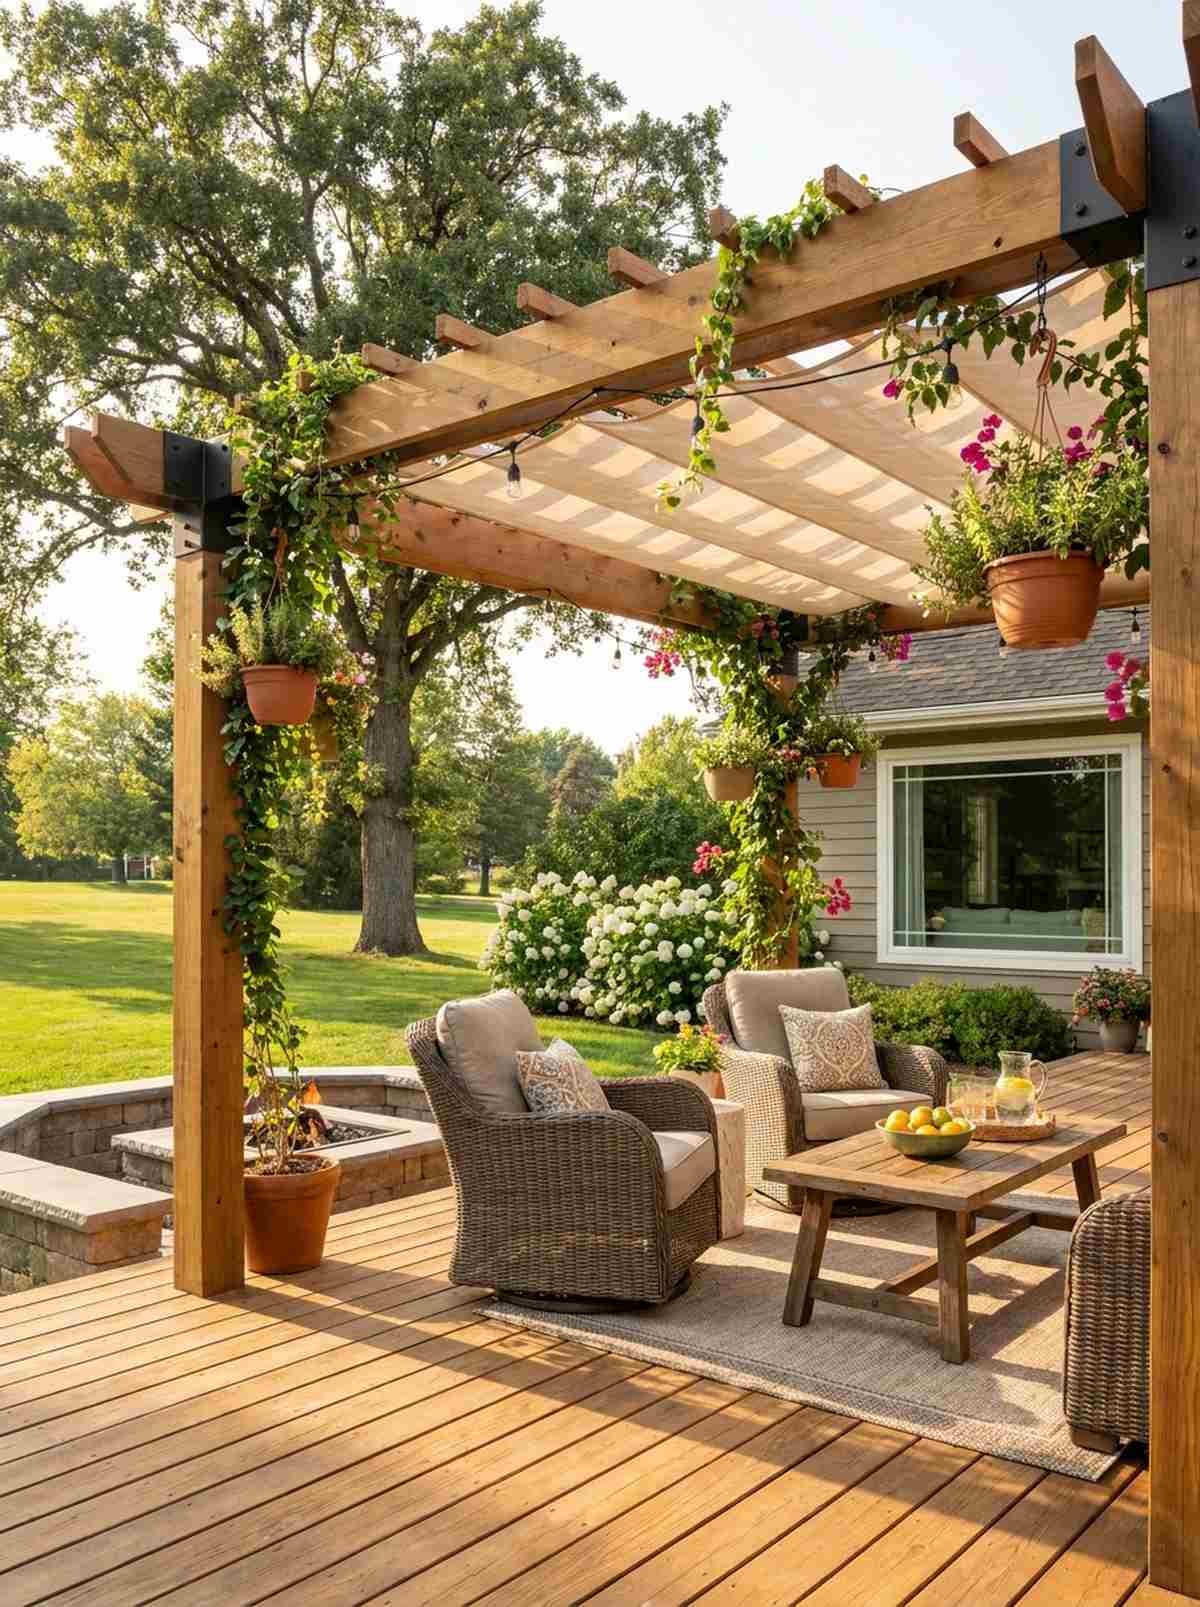

Transforms a scorching hot deck into a shady, breezy Mediterranean escape. Anchoring a wooden corner pergola frame over the lounge creates an instant vertical living room.
Leaving a deck totally exposed makes it unusable at noon, but overhead beams provide structural fairy garden kits vibes with hanging vines. Grab pre-cut timber framing kits to avoid the nightmare of notching heavy beams yourself.
A basic DIY corner pergola runs about $250. Save this idea if your yard bakes in the afternoon sun!
- Key Materials: 4×4 posts, 2×6 cross beams, post brackets
- Vibe / Style: Shaded Mediterranean retreat
- Difficulty: Heavy lifting intermediate
- Budget Breakdown: Lumber: $180 | Brackets: $70
- Creator’s Tip: Mount the posts directly to the deck’s substructure frame, not just to the surface boards.
- Smart Sourcing: Pre-fabricated steel pergola corner brackets (kit) and sun-blocking outdoor canopy shades.
Before you spend another dime on decorations, you must understand the difference between cheap hardware and premium foundations…
Material Guide: Cheap vs. Premium Aesthetic
Knowing exactly where to save and where to spend makes all the difference in achieving that “looks expensive but isn’t” vibe.
- Standard Wood vs. UV-Resistant Composite: Standard wood saves money upfront but rots and splinters. UV-coated composite boards stop fading, prevent water damage, and look high-end for decades.
- DIY Fasteners vs. Hidden Clip Kits: Screwing through the top of the board is cheap but leaves ugly metal dots everywhere. Hidden fastener starter kits give that seamless indoor hardwood floor look.
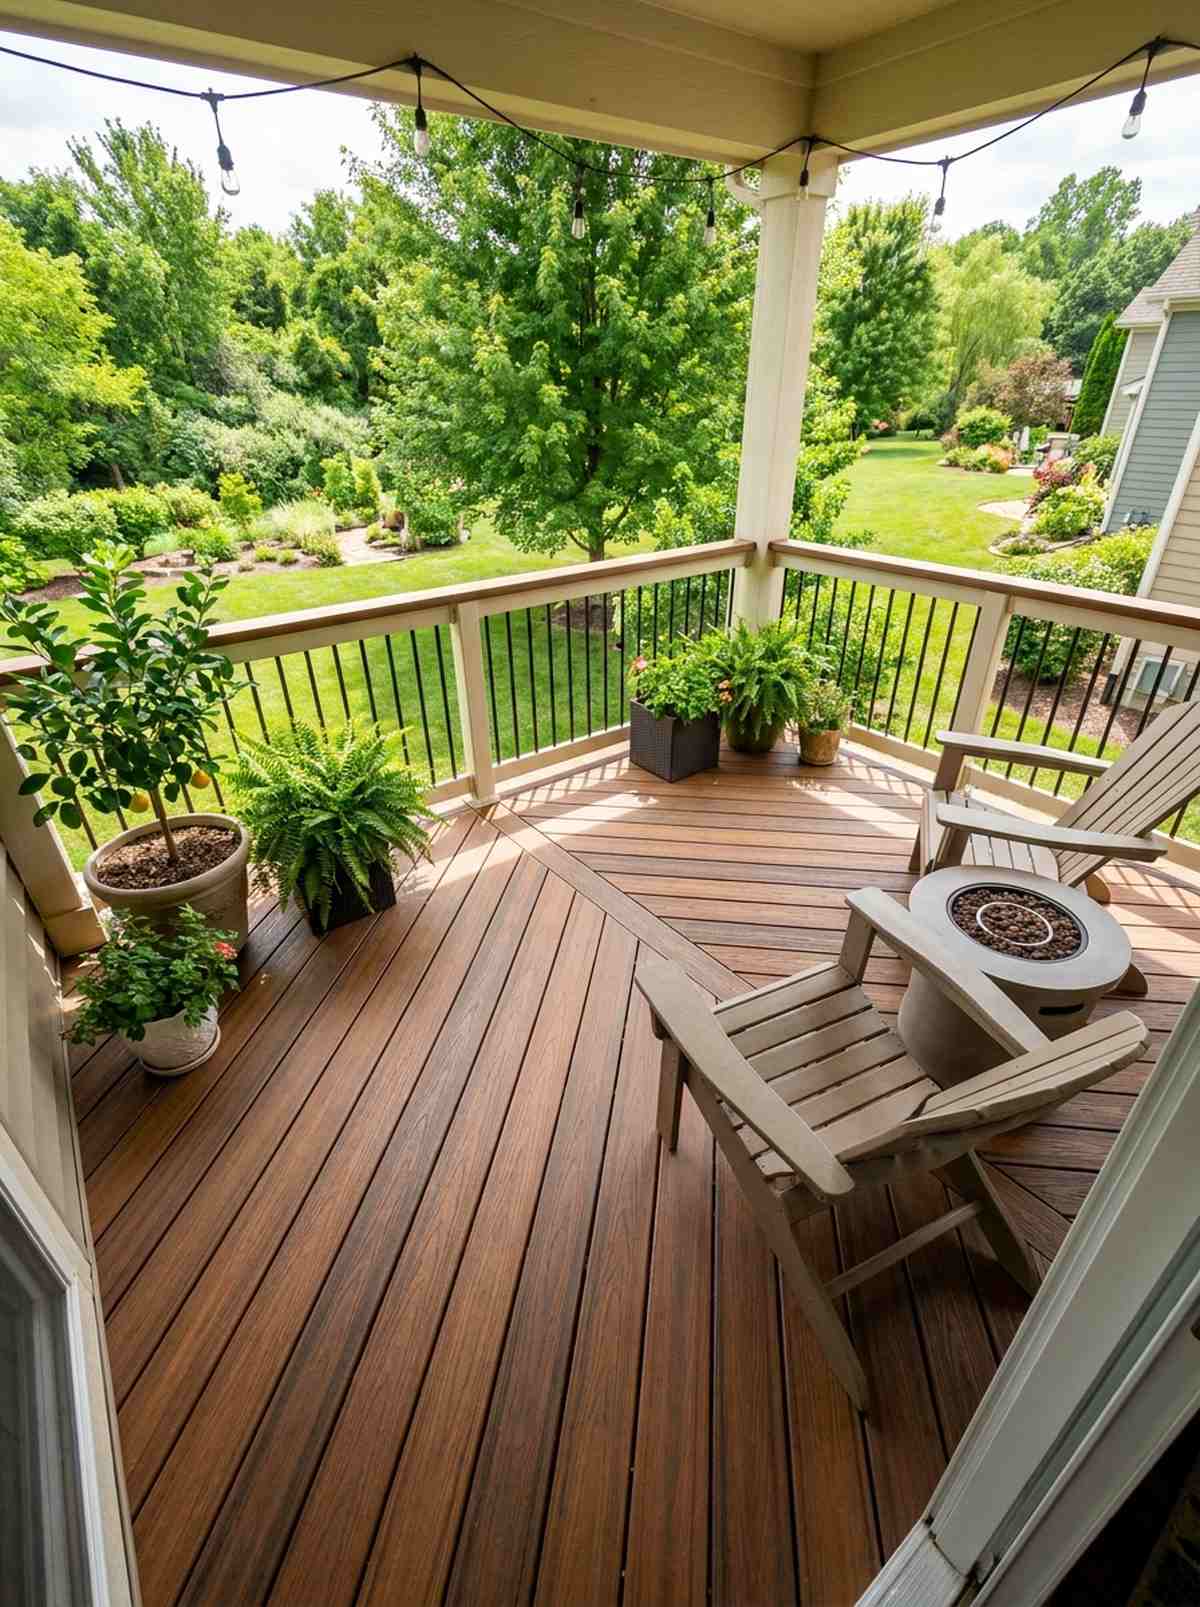
Vertical Elements to Expand Space
Overhead structures and wall-mounted features add height dimension that expands perceived space without consuming precious floor area. Vertical elements define seating zones through shadow patterns and visual containment.
25. Trellis Privacy Wall
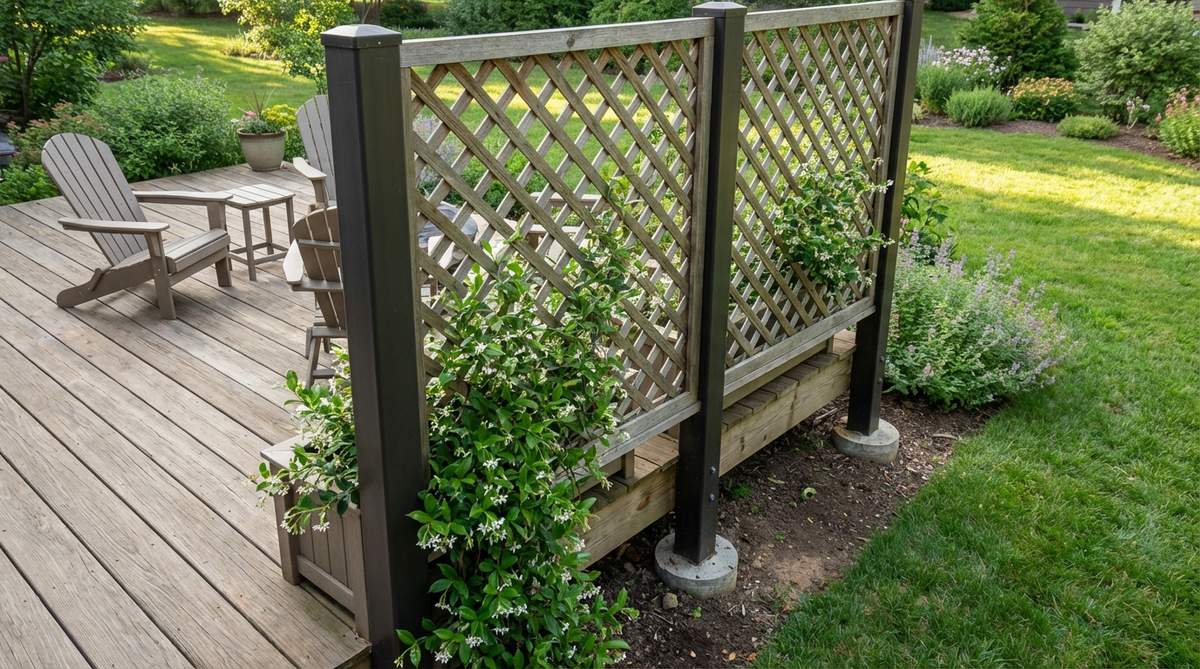
Feels like a secret botanical hideout shielded from nosy neighbors. Erecting a slatted timber privacy screen immediately blocks out ugly fence lines and creates intimacy.
Staring at your neighbor’s siding is depressing, but a vertical screen delivers a surprisingly premium look of an exclusive cabana. Use terrarium accessories or hanging pots hooked right into the slats for extra greenery.
You can frame a beautiful horizontal slat wall for under $100.
- Key Materials: 1×2 furring strips, exterior wood stain
- Vibe / Style: Modern secluded cabana
- Difficulty: Easy beginner build
- Budget Breakdown: Slats: $60 | Stain: $40
- Creator’s Tip: Use a scrap piece of 1-inch wood as a spacer block to keep the gaps perfectly even.
- Smart Sourcing: Premium weather-resistant wood stain and hanging vertical garden plant hooks (bulk).
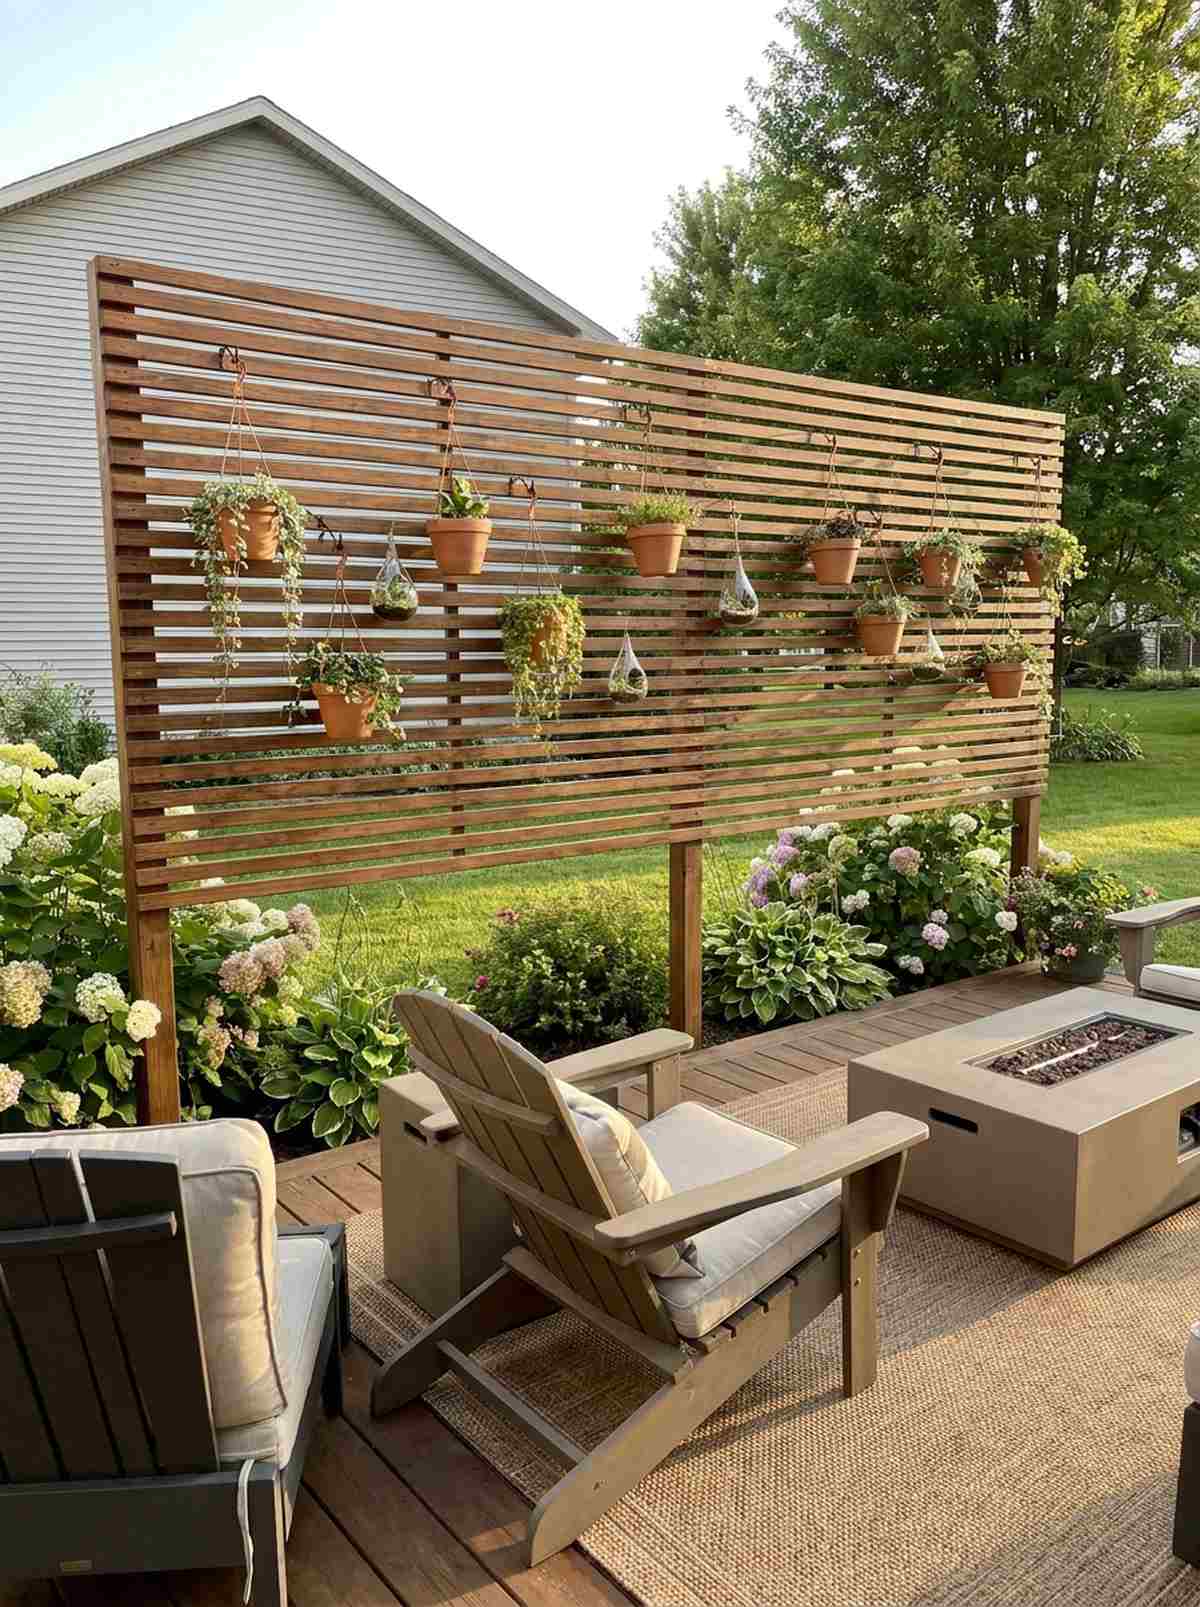
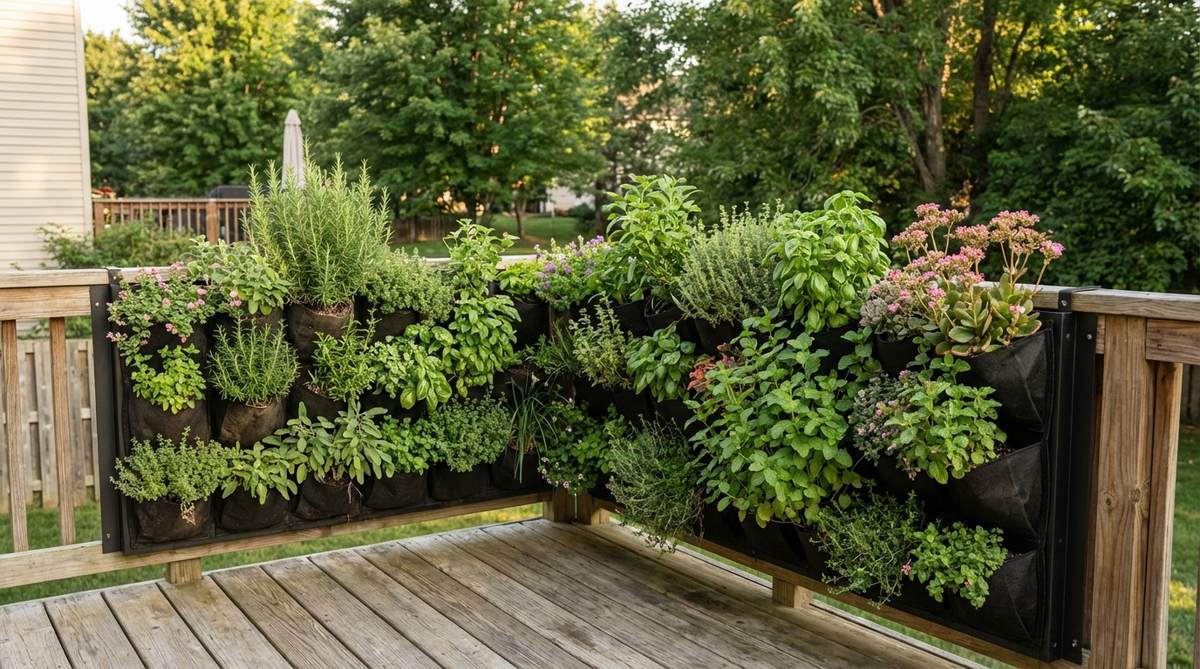
26. Wall-Mounted Planters
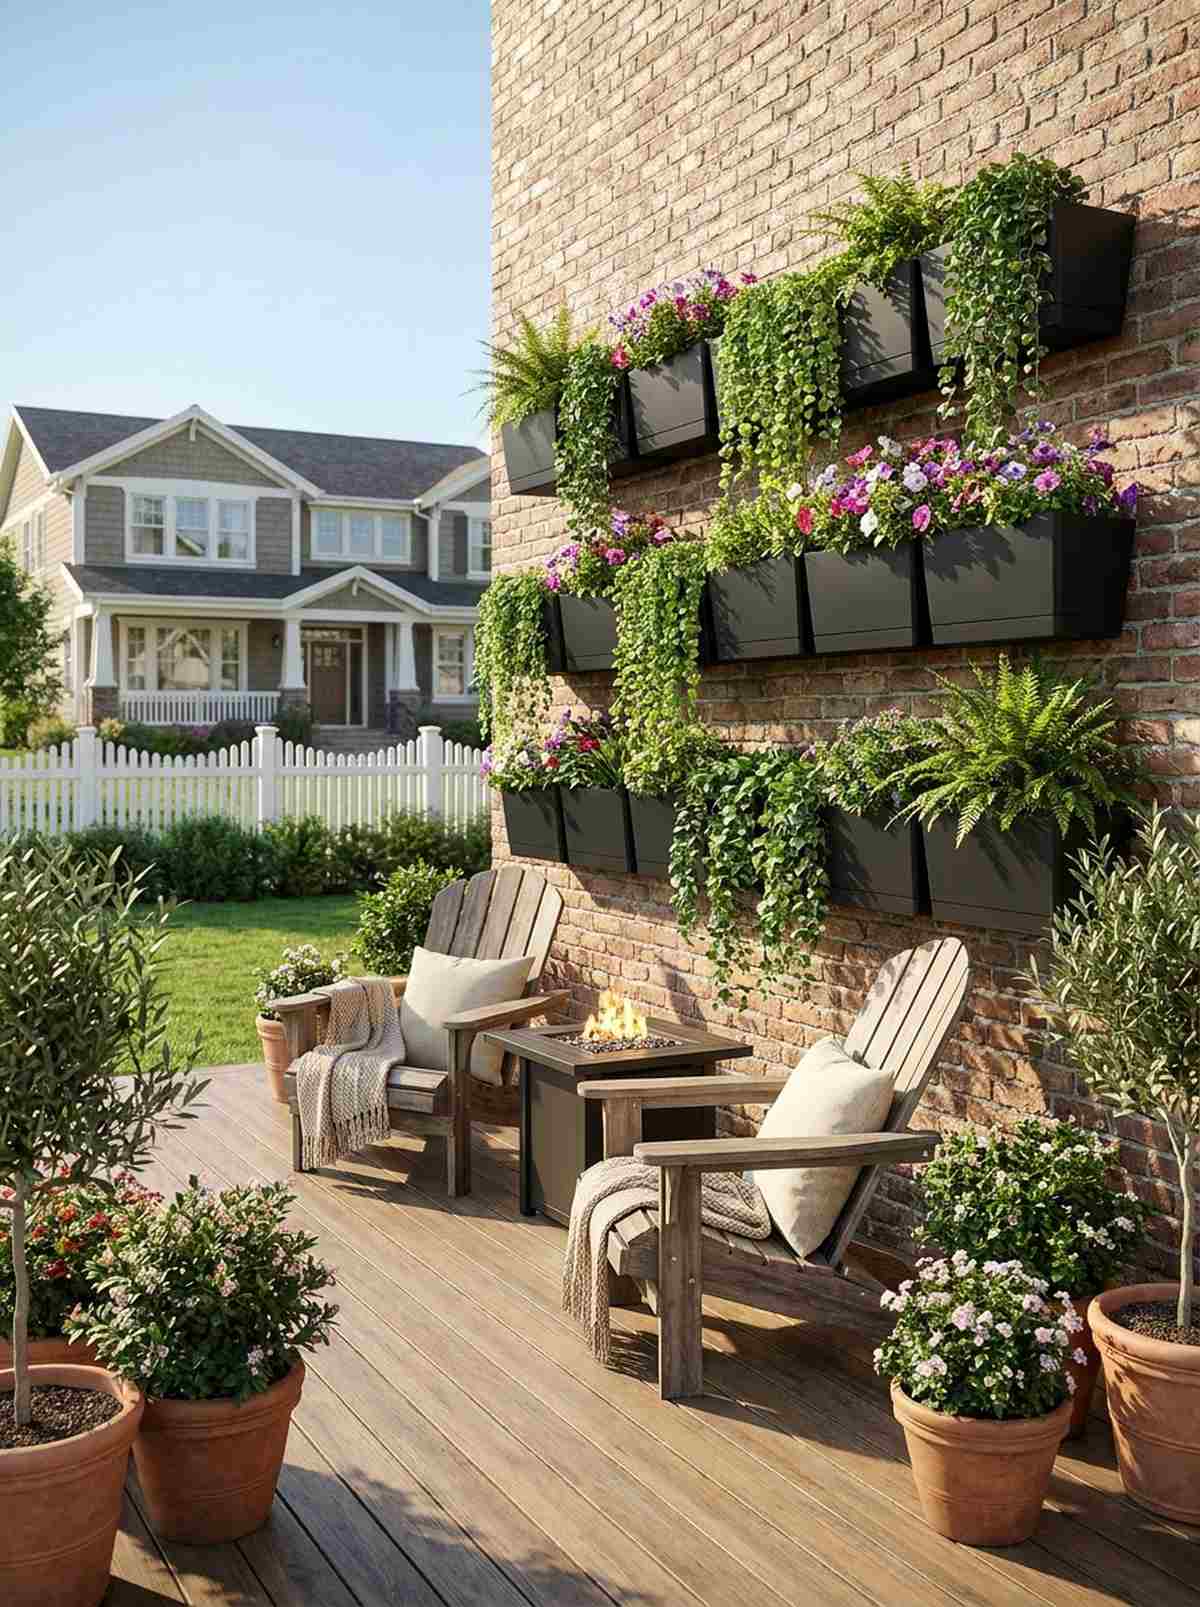
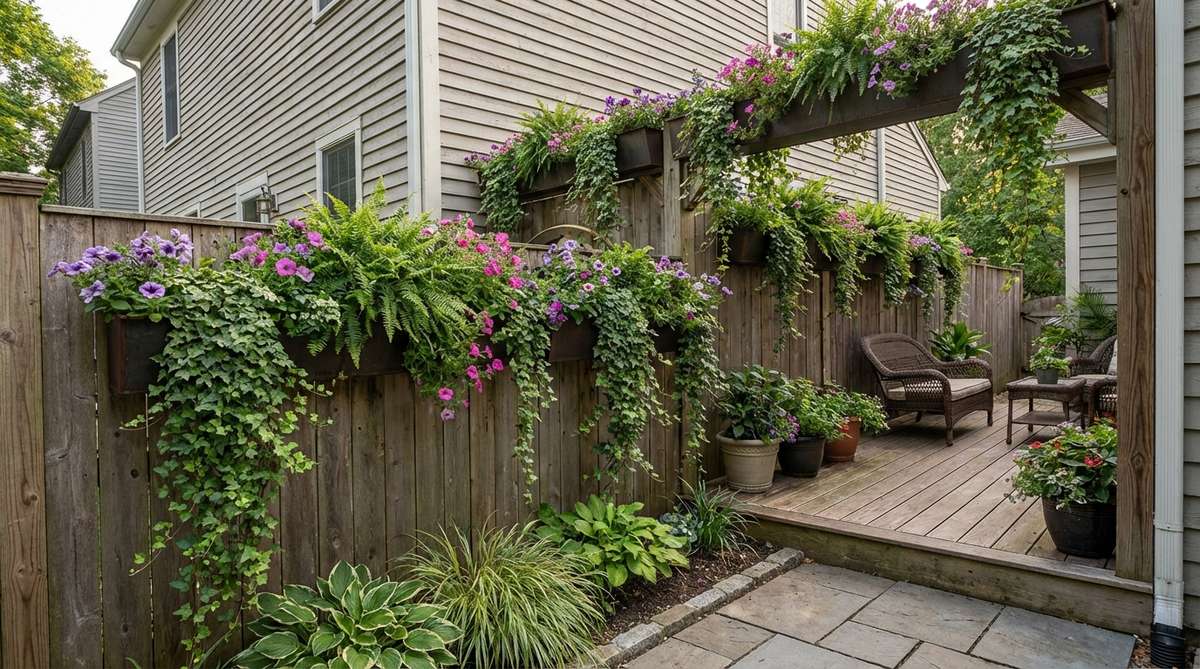
Turns a barren brick wall into a cascading jungle of vibrant color. Utilizing hanging modular planter boxes brings the garden right up to eye level.
Heavy clay pots devour precious deck space, but moving plants vertical looks far more expensive than it is. Invest in self-watering wall planters so you don’t accidentally rot your walls with runoff water.
A set of three modern wall planters costs about $45. Save this for a fast balcony upgrade!
- Key Materials: Wall-mounted pots, trailing vines
- Vibe / Style: Urban jungle aesthetic
- Difficulty: Very easy mounting
- Budget Breakdown: Planters: $45 | Soil/Plants: $30
- Creator’s Tip: Plant trailing vines like creeping jenny on the bottom row to create a waterfall of leaves.
- Smart Sourcing: Self-watering vertical planter kits and heavy-duty masonry wall anchors.
27. Retractable Shade Canopy
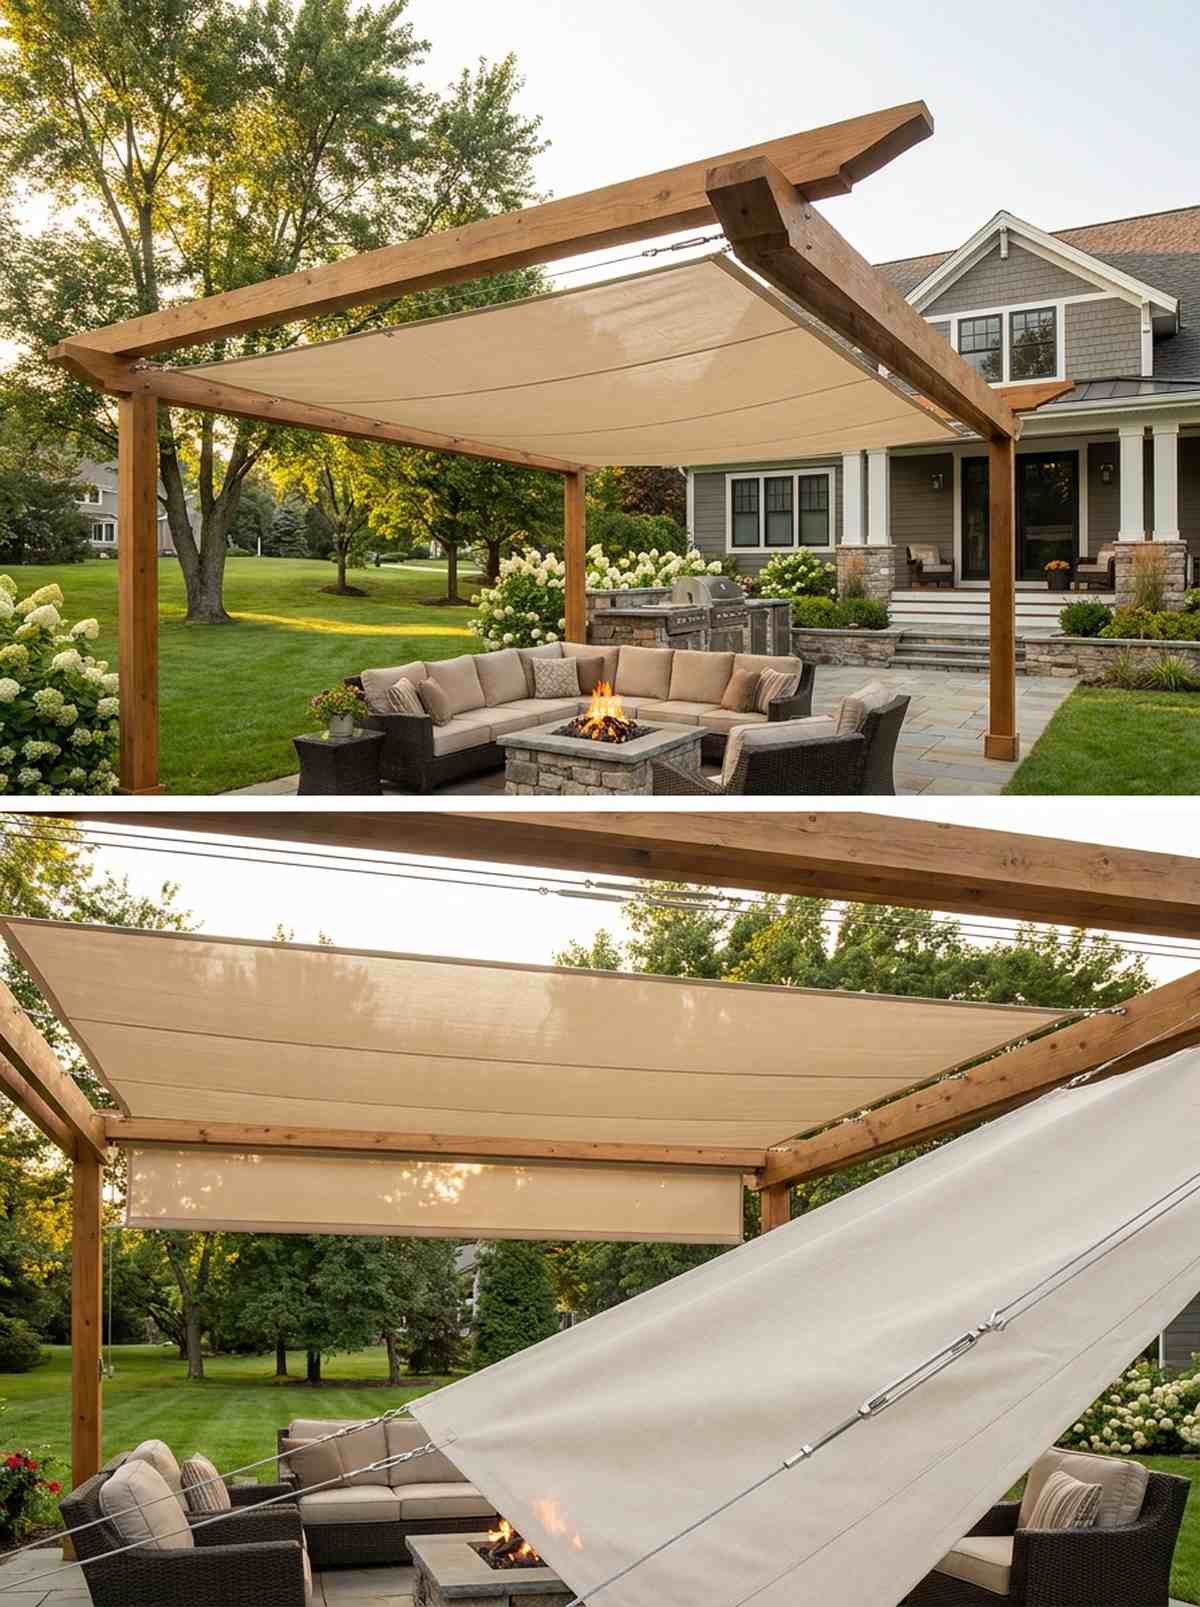
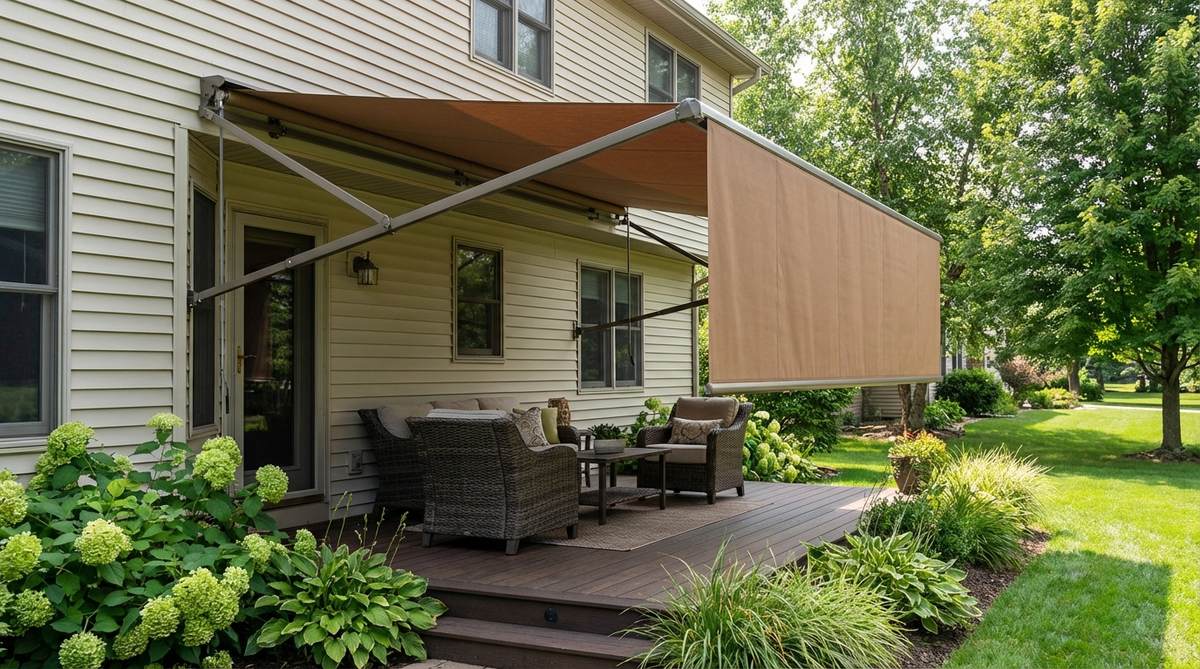
Brings the resort-style luxury of an adjustable cabana straight to your backyard. Installing a sliding fabric canopy system over the seating zone provides shade on demand.
Permanent roofs darken the house windows, but a retractable sail gives a designer-level finish with total flexibility. Ensure you purchase UV-resistant waterproof fabrics so the canopy doesn’t shred during the first heavy windstorm.
A quality wire-slide canopy kit runs around $150–$200.
- Key Materials: Wire rope kit, outdoor sun shade fabric
- Vibe / Style: Adaptable luxury resort
- Difficulty: Intermediate hardware installation
- Budget Breakdown: Shade fabric: $80 | Hardware kit: $70
- Creator’s Tip: Pitch the canopy wires at a slight 10-degree angle so rain water runs off instead of pooling.
- Smart Sourcing: UV-resistant slide-on wire canopy kits and stainless steel turnbuckle tensioners (bulk pack).
28. String Light Ceiling
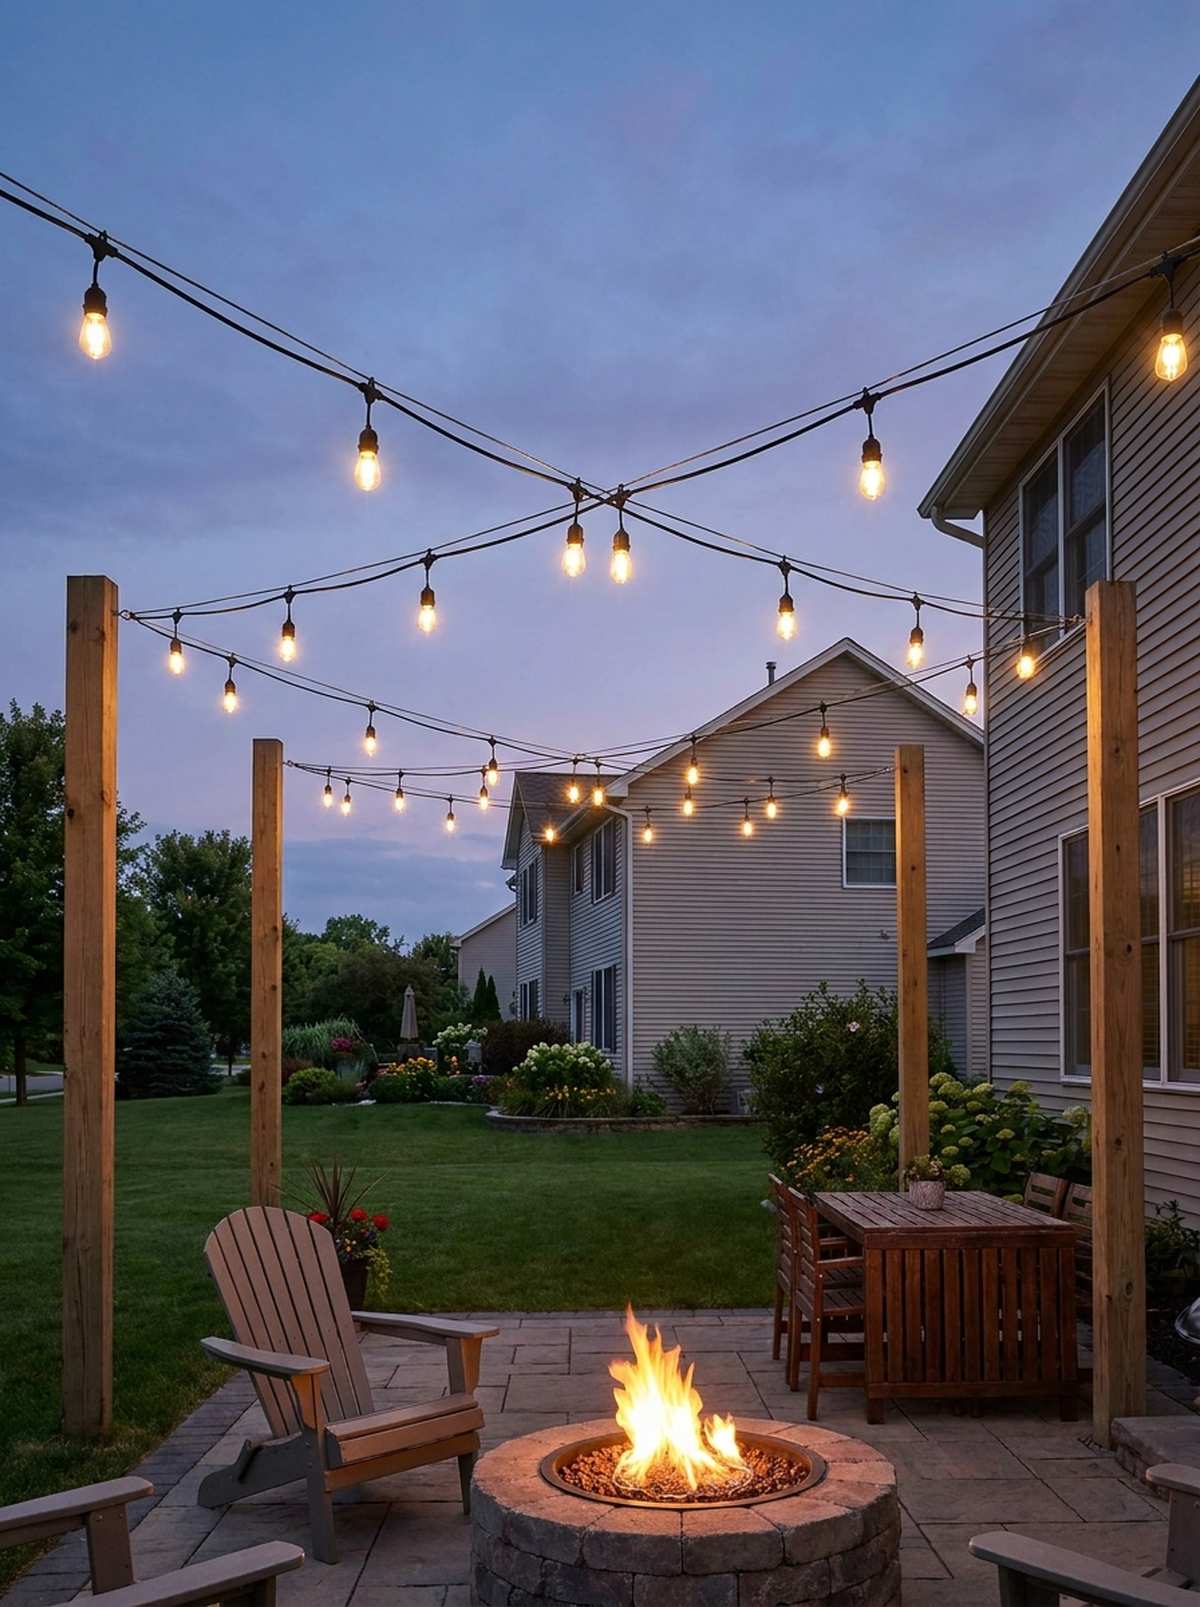
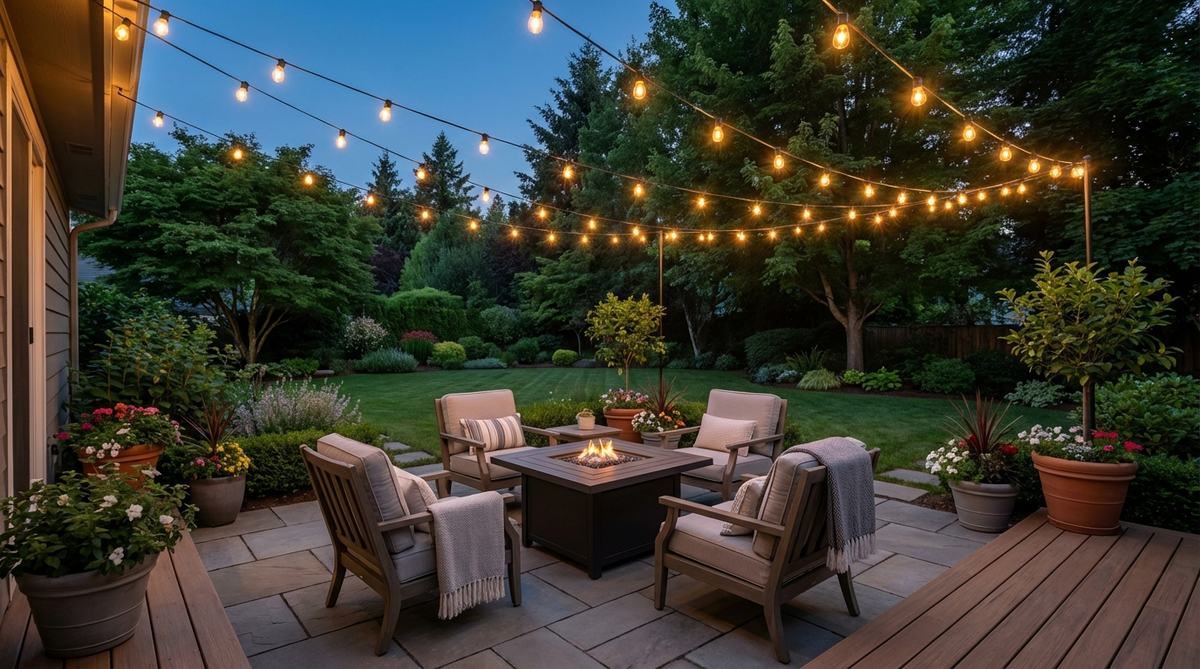
Feels like sitting under a canopy of fireflies on a warm summer night. Stringing a criss-cross outdoor lighting grid overhead acts as an invisible ceiling that defines the space.
Single harsh porch lights ruin the ambiance, but an illuminated grid delivers a surprisingly premium look of a professional event space. Swap cheap glass bulbs for shatterproof commercial-grade LEDs so they survive winter storms.
You can wire up a stunning lighting canopy for around $60. Pin this to your evening garden board!
- Key Materials: Suspension wire, shatterproof LED cafe lights
- Vibe / Style: Magical twilight cafe
- Difficulty: Easy beginner project
- Budget Breakdown: Light string: $40 | Guide wire: $20
- Creator’s Tip: Always hang a steel guide wire first, then zip-tie the light cord to it to prevent sagging.
- Smart Sourcing: Commercial-grade shatterproof LED outdoor lights and outdoor string light suspension kits.
29. Vertical Garden Wall
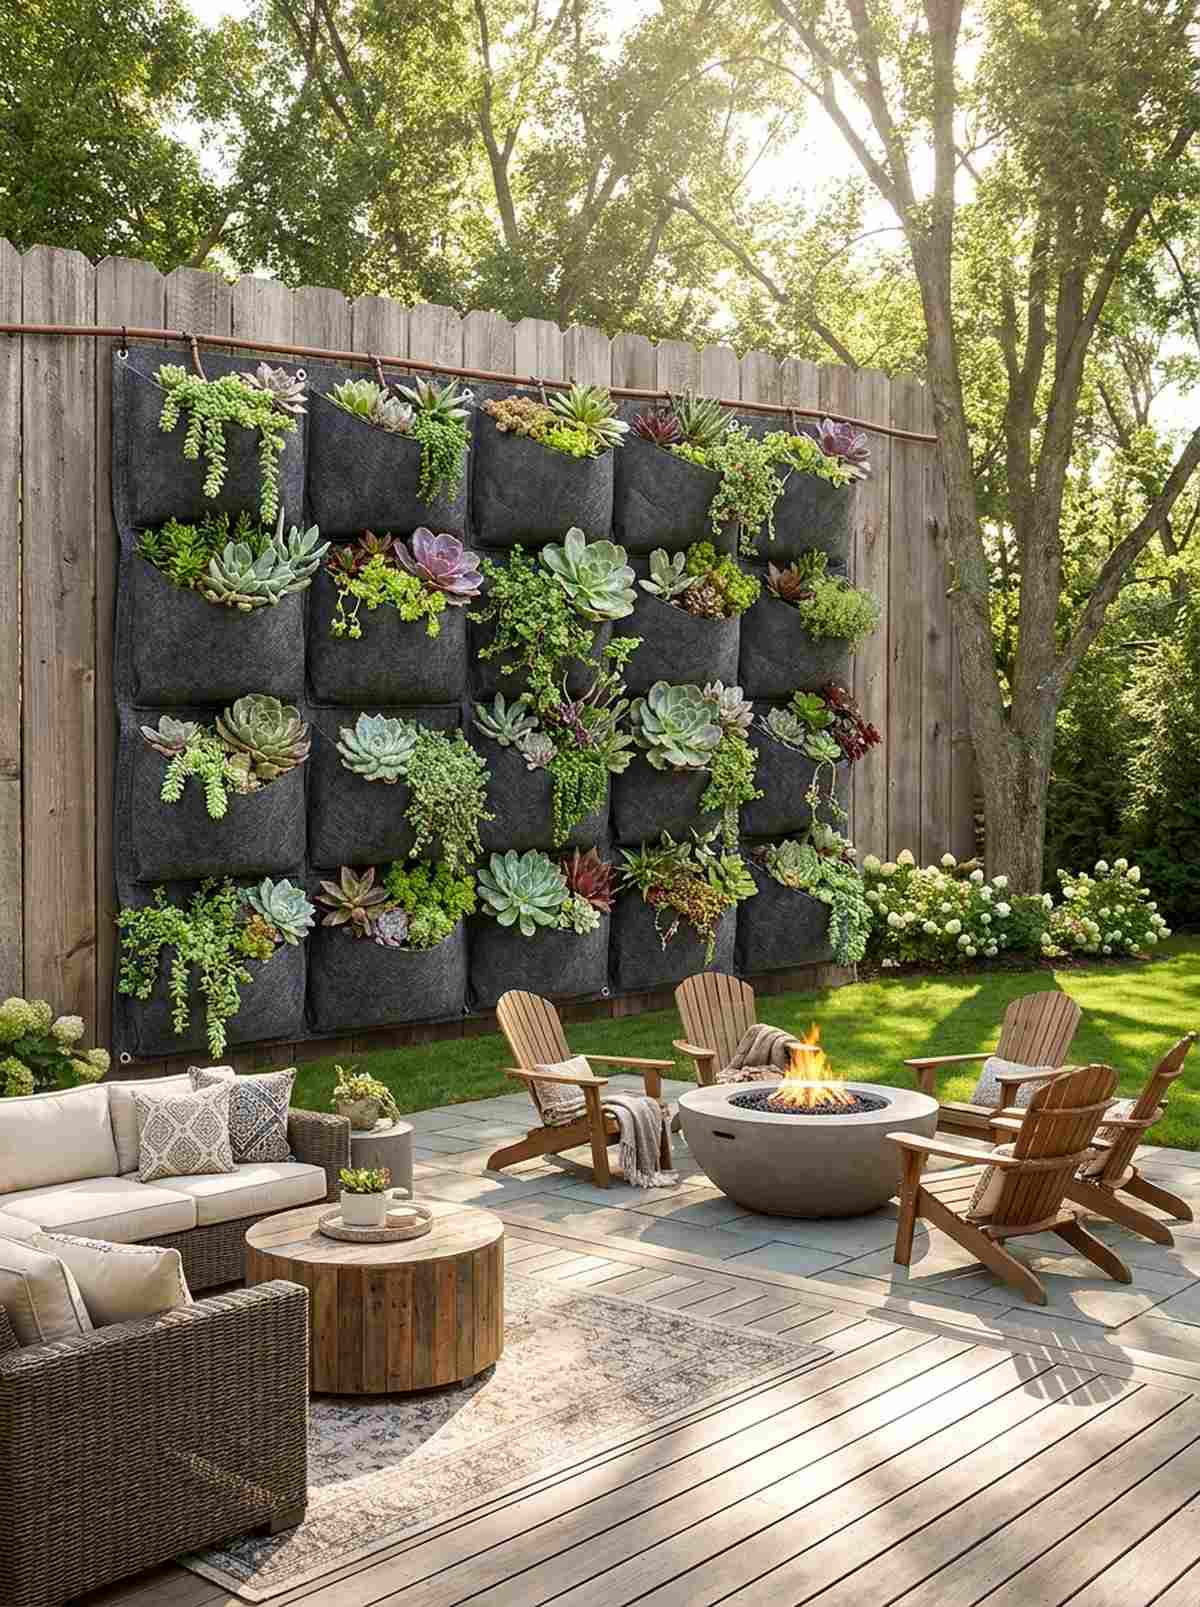
Breathes literal life into your patio with a massive wall of living texture. Snapping together a modular living green wall absorbs urban noise while screening out the neighbors.
Most fake hedges look incredibly tacky, but using genuine miniature garden supplies and succulents looks wildly expensive. Grab a pocketed felt growing system to hold the soil securely against the fence without making a muddy mess.
A full 4×4 living wall setup costs roughly $130 before plants.
- Key Materials: Felt pocket planters, waterproof backing
- Vibe / Style: Eco-chic modern gallery
- Difficulty: Easy assembly, high maintenance
- Budget Breakdown: Wall pockets: $50 | Waterproof backer: $80
- Creator’s Tip: Install a simple drip irrigation tube at the top row; gravity will water the rest perfectly.
- Smart Sourcing: Heavy-duty felt vertical garden pockets (multi-pack) and micro-drip irrigation starter kits.
We are down to the finishing touches. This next hack takes 5 minutes but changes the entire psychological feel of the deck…
Furniture and Finishing Touches
Strategic furniture selection and placement enhance defined seating zones through scale, function, and visual weight. Finishing elements reinforce boundaries and add comfort without cluttering limited space.
30. Transparent Furniture Selection
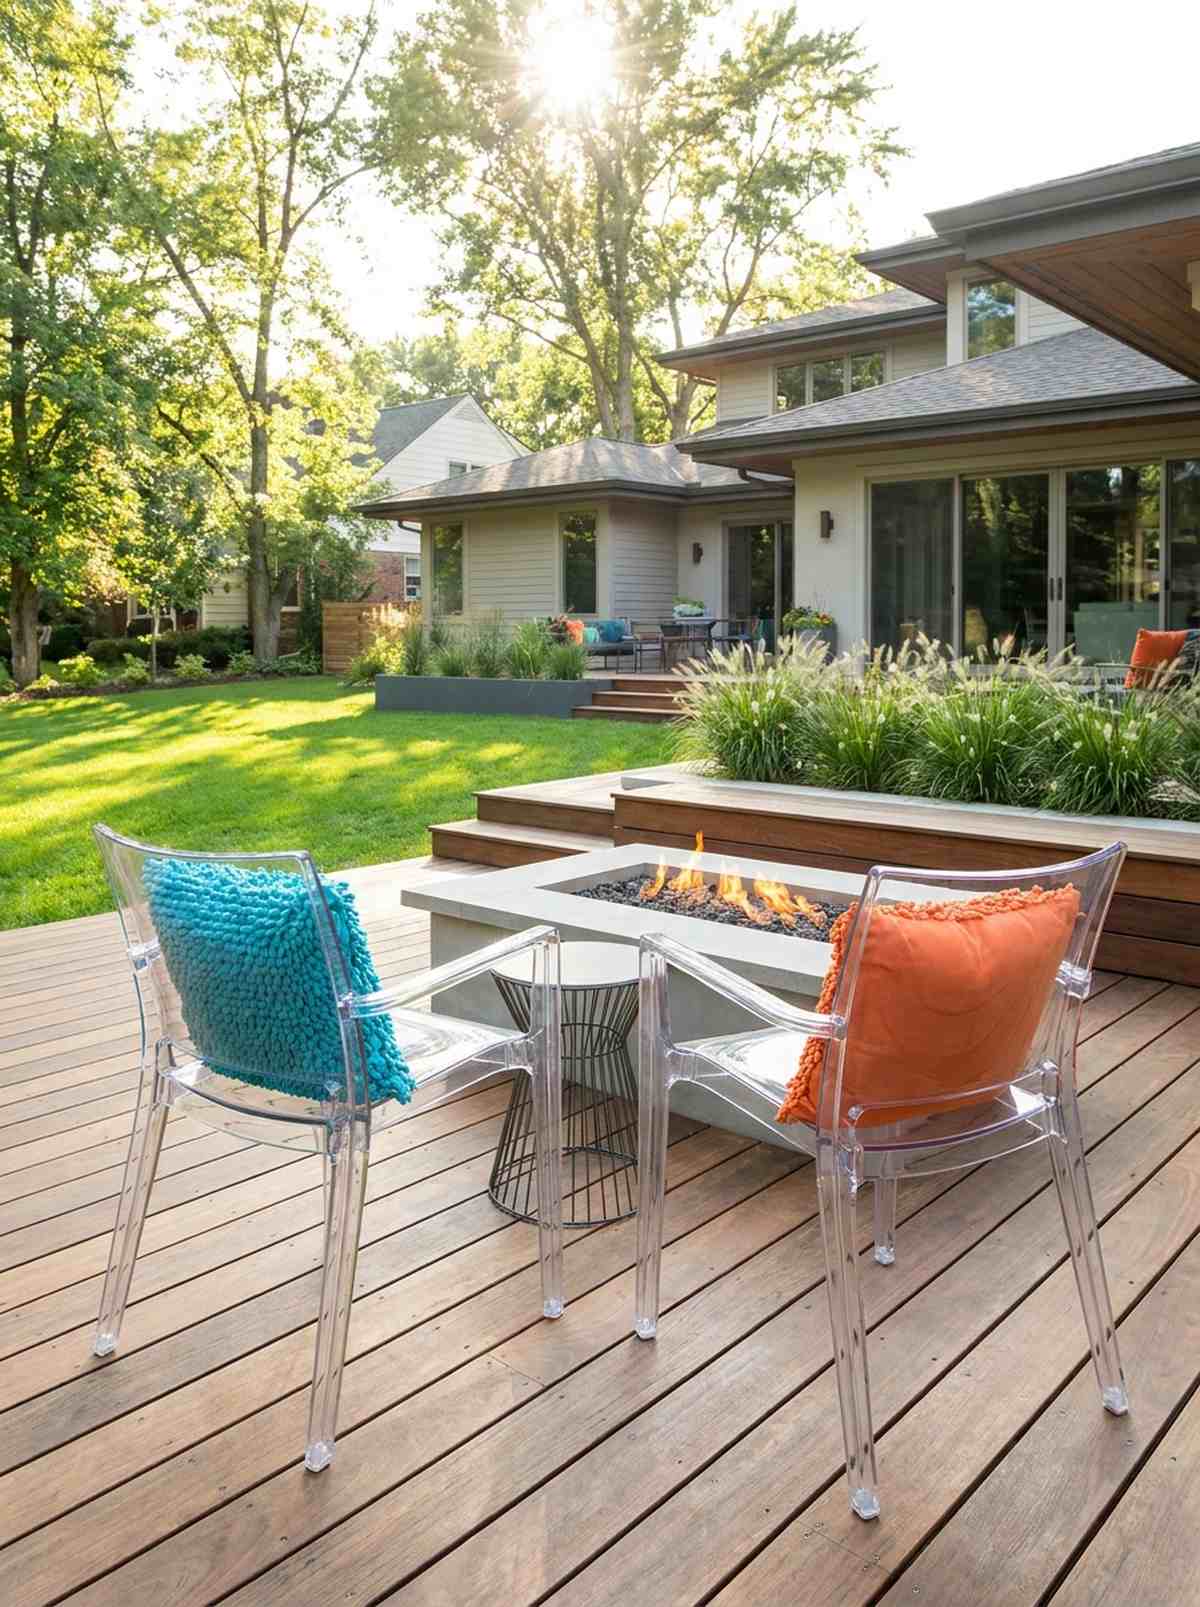
Keeps the space feeling wide open and airy, like a chic modern art museum. Utilizing acrylic or open-slatted patio chairs stops furniture from visually blocking your beautiful new deck.
Chunky rattan sofas suffocate a tiny patio, but transparent profiles look far more expensive than they are by letting light pass through. Hunt down UV-coated acrylic pieces so they don’t turn hazy yellow under the sun.
A pair of modern ghost chairs will run about $150.
- Key Materials: Acrylic chairs, wire-frame tables
- Vibe / Style: Ultra-modern minimalist
- Difficulty: Ready to use
- Budget Breakdown: Chairs: $150
- Creator’s Tip: Pair clear furniture with highly textured, brightly colored throw pillows to anchor them visually.
- Smart Sourcing: UV-coated clear acrylic outdoor chairs (set) and waterproof outdoor throw pillow covers.
31. Folding Bistro Set
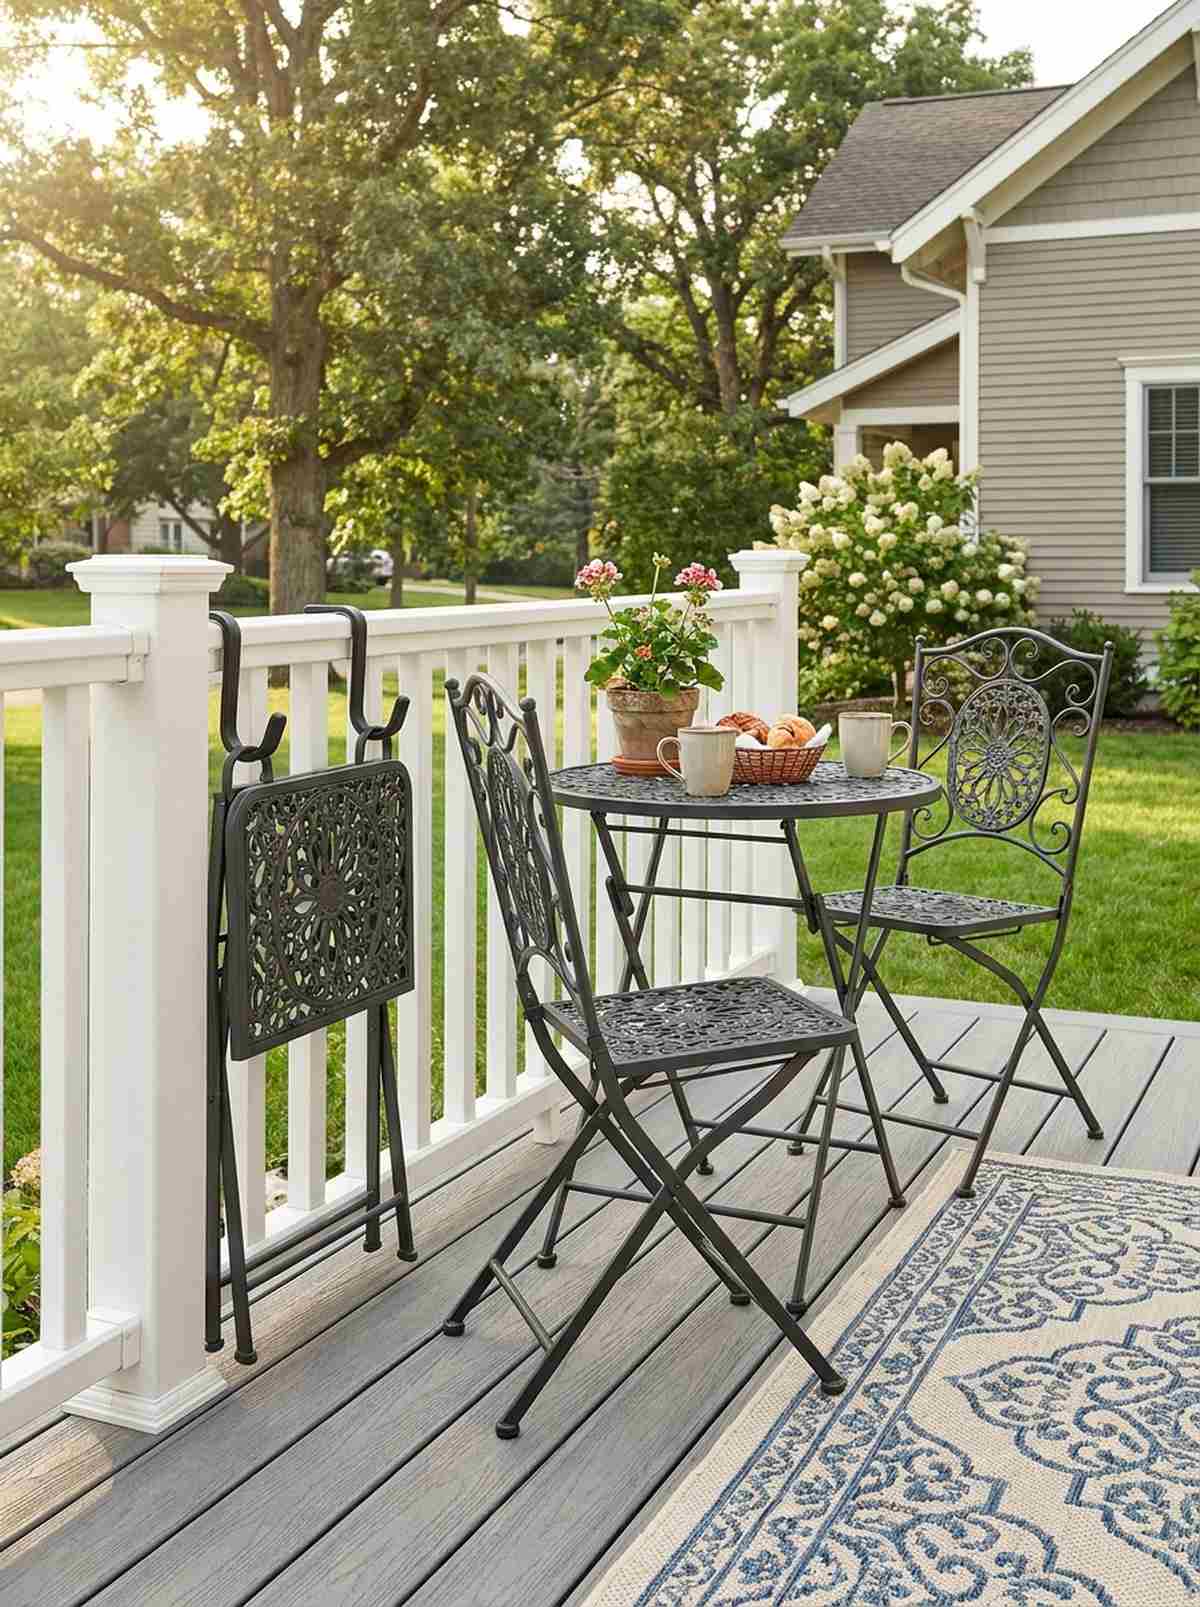
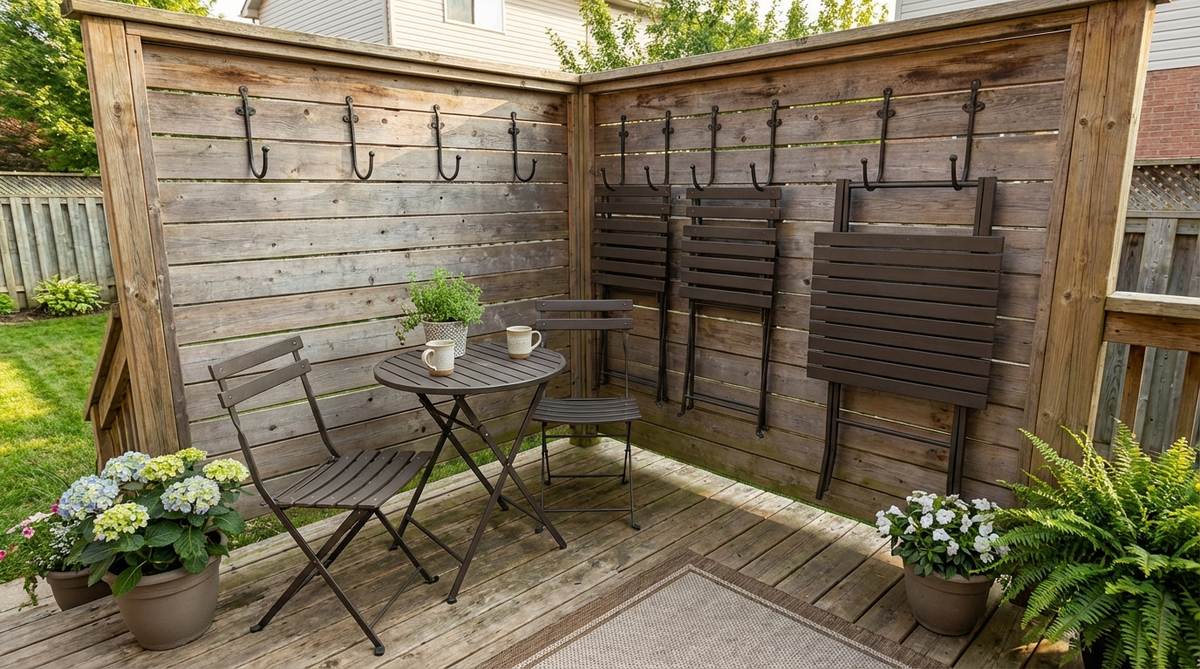
Captures the romantic, space-saving charm of a tiny Roman balcony. Setting up a compact foldable metal dining set gives you function that completely vanishes when needed.
Permanent tables eat up 70% of a small deck, but a folding bistro setup delivers a surprisingly premium look of versatility. Buy sets with powder-coated steel to prevent rust stains from bleeding onto your new composite boards.
You can grab a durable metal set for as little as $80. Pin this if you have a micro-balcony!
- Key Materials: Powder-coated steel, wall-mounting hooks
- Vibe / Style: Romantic European balcony
- Difficulty: No assembly required
- Budget Breakdown: Bistro Set: $80 | Wall Hooks: $15
- Creator’s Tip: Install heavy-duty garage hooks on the fence to hang the folded chairs completely off the floor.
- Smart Sourcing: Powder-coated folding outdoor bistro sets and heavy-duty rubber-coated wall hooks (bulk).
32. Outdoor Rug Definition
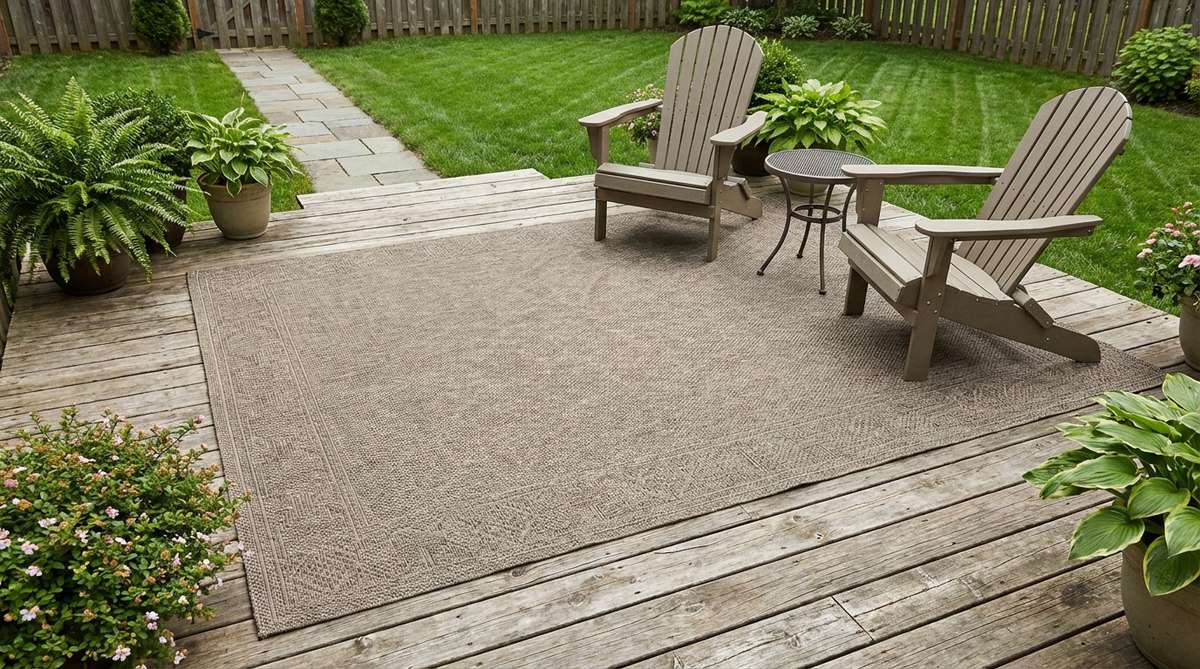
Instantly ties the chaotic outdoor elements into one cozy, unified living room. Throwing down a weatherproof woven outdoor rug is the ultimate cheat code for defining a seating zone.
Scattered chairs look messy, but anchoring them on a rug gives a designer-level finish instantly. Look for fully recycled plastic fiber mats; they wash off with a garden hose and dry in minutes.
An 8×10 premium outdoor rug only costs around $60–$100.
- Key Materials: Polypropylene rug, outdoor carpet tape
- Vibe / Style: Cozy interior-style lounge
- Difficulty: Unroll and place
- Budget Breakdown: Rug: $75 | Tape: $15
- Creator’s Tip: Use double-sided outdoor tape on the corners to keep the rug from blowing away in storms.
- Smart Sourcing: Waterproof reversible plastic outdoor rugs and heavy-duty double-sided carpet tape.
33. Riser Lighting Installation
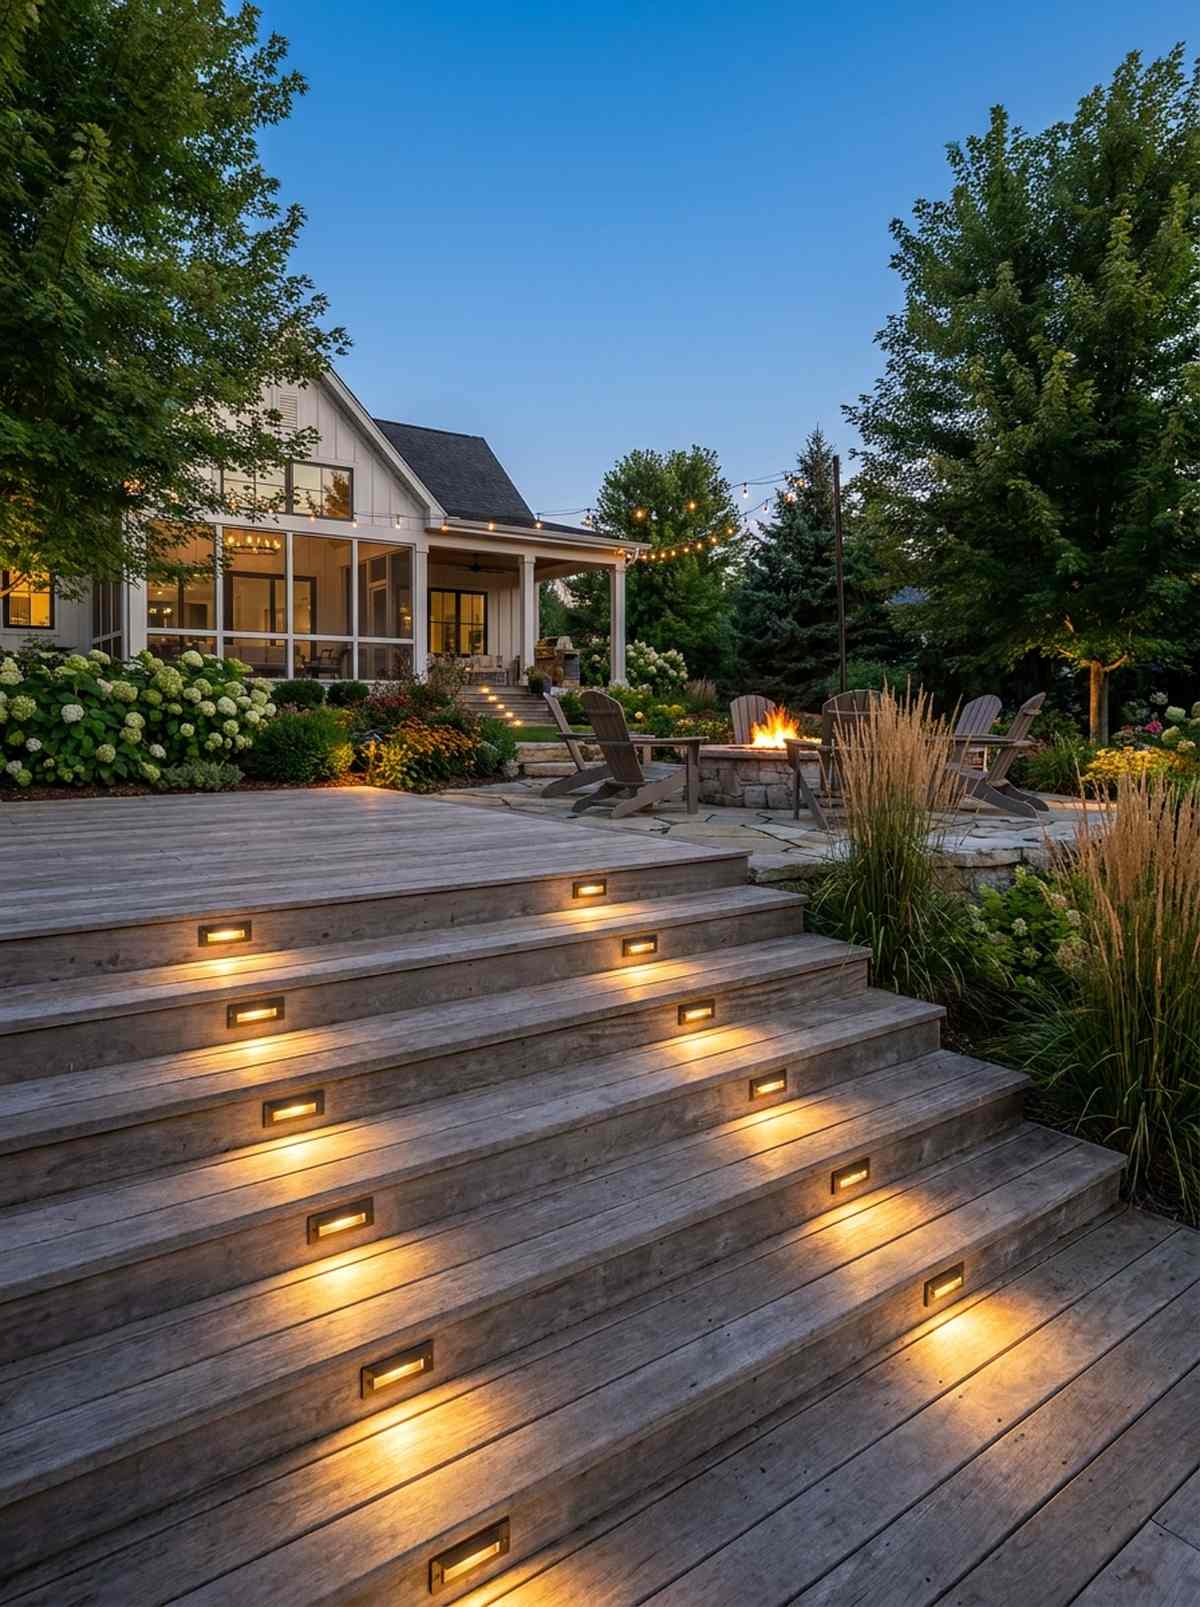

Casts a luxurious, cinematic glow across your patio stairs like a high-end theater. Flush-mounting recessed LED step riser lights provides massive safety while looking incredibly sleek.
Solar stake lights get kicked and broken constantly, but integrated step lighting looks far more expensive than it is. Opt for low-voltage daisy-chain systems so you only have to plug one wire into the outdoor outlet.
A 6-pack of riser lights usually costs around $45. Save this brilliant safety hack!
- Key Materials: Low-voltage LED pucks, hole saw bit
- Vibe / Style: High-end cinematic safety
- Difficulty: Intermediate drilling and wiring
- Budget Breakdown: Light Kit: $45 | Drill Bit: $15
- Creator’s Tip: Mount the lights slightly off-center on the steps to avoid blinding people walking directly up them.
- Smart Sourcing: Low-voltage recessed deck stair lights (starter kit) and premium wood hole saw drill bits.
34. Fire Feature Focal Point
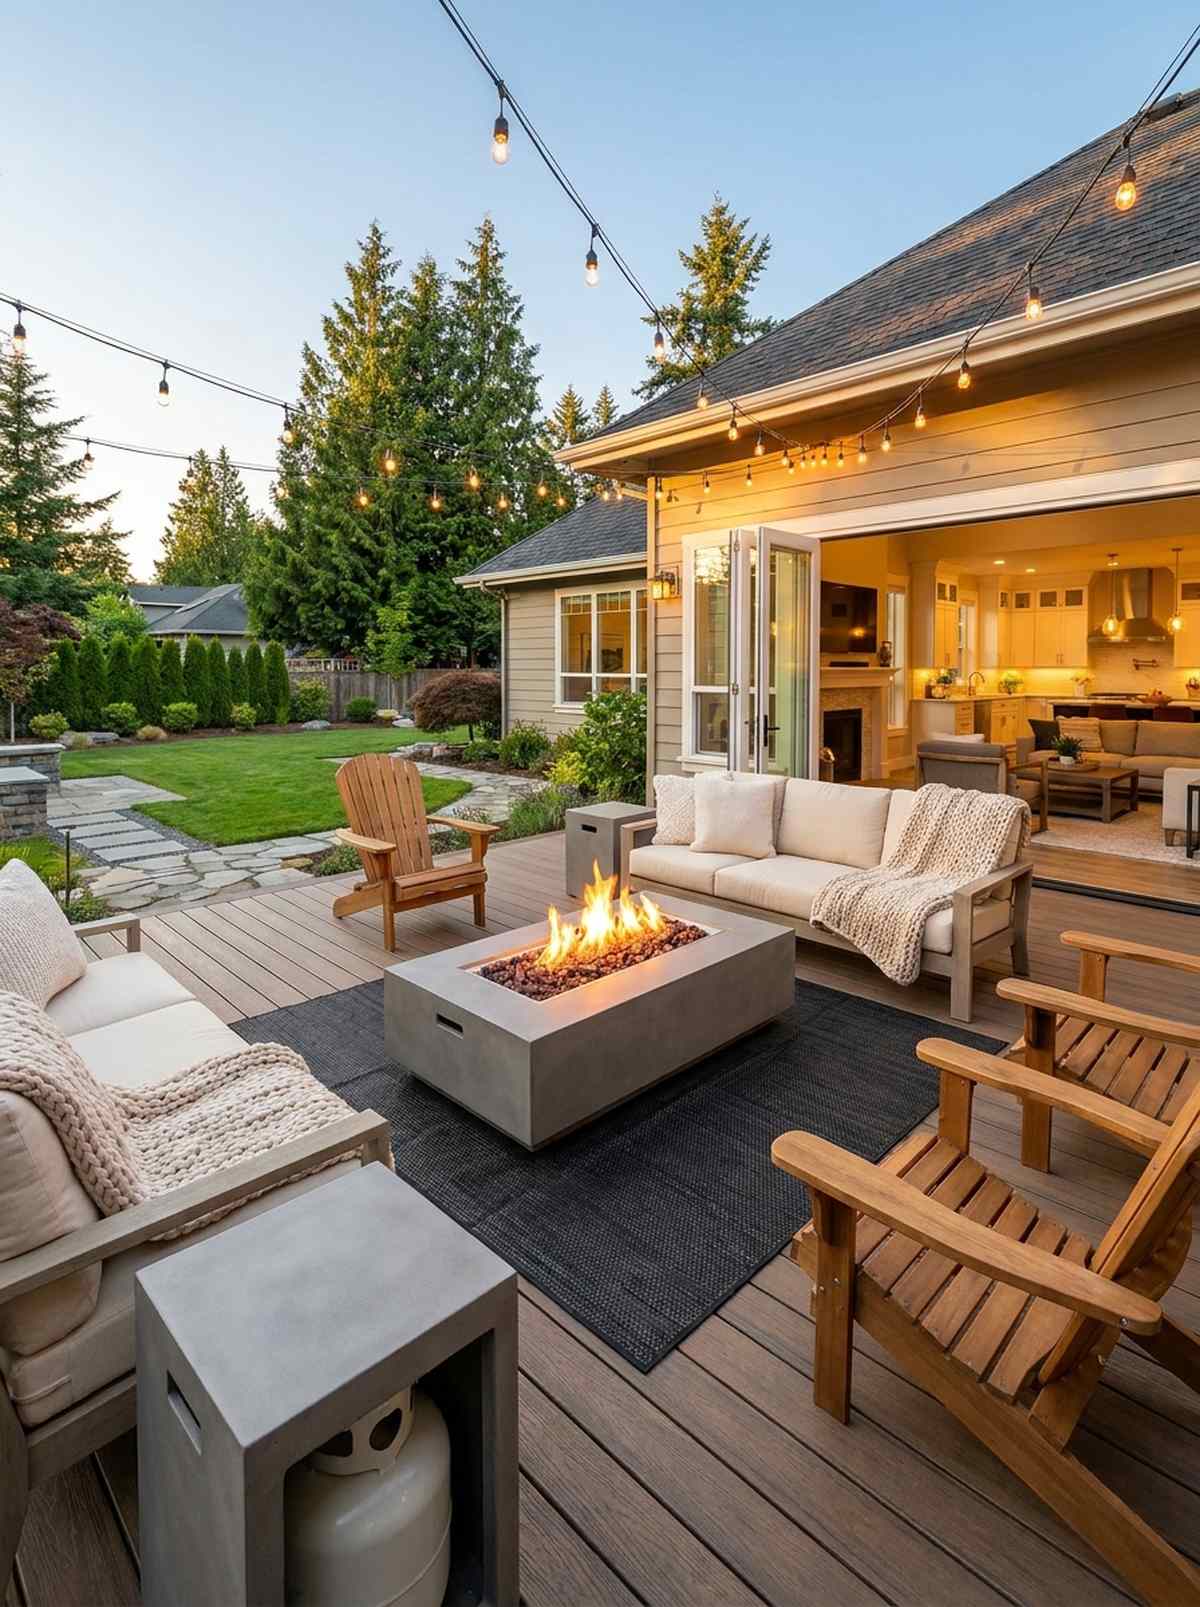
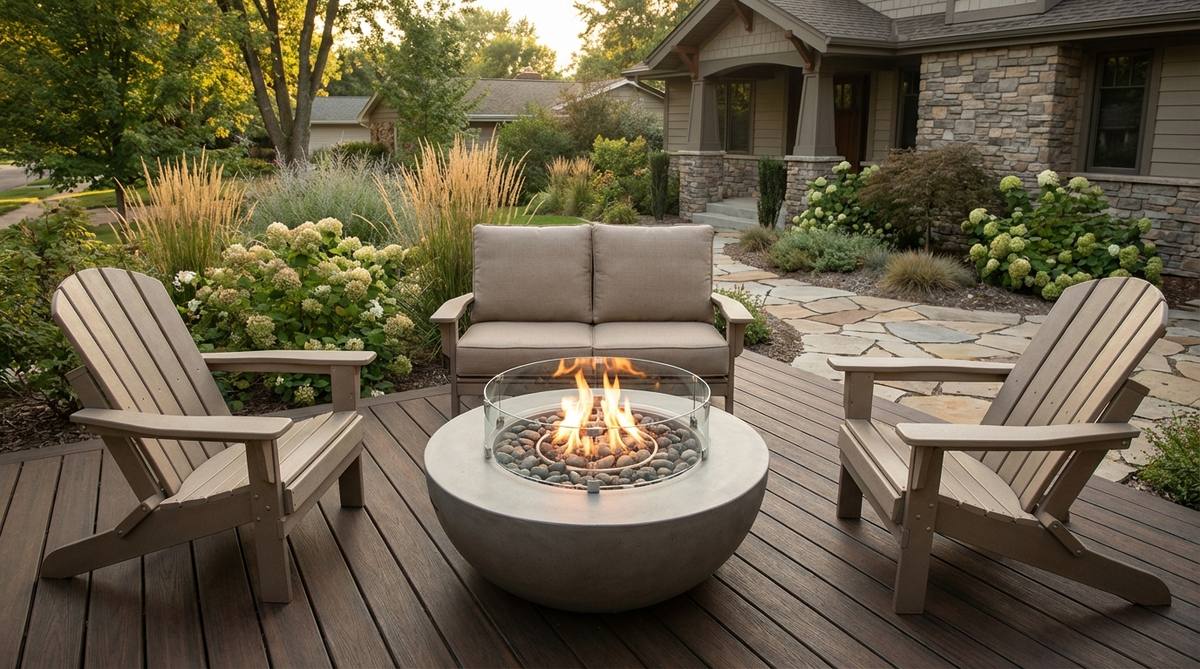
Radiates the hypnotic warmth of a luxury ski lodge right on your patio. Dropping a smokeless propane fire bowl in the center turns a basic deck into a 4-season gathering hub.
Wood fires leave ash everywhere and choke your guests, but propane delivers a surprisingly premium look with zero mess. Just make sure to put a heat-resistant protective mat underneath so you don’t melt your composite decking.
You can easily pick up a sleek concrete-style fire pit for under $150 to complete the yard.
- Key Materials: Propane fire pit, heat-shield mat
- Vibe / Style: Cozy winter lodge
- Difficulty: Plug and play
- Budget Breakdown: Fire Pit: $140 | Heat Mat: $30
- Creator’s Tip: Hide the ugly propane tank by buying a matching side table that acts as a tank cover.
- Smart Sourcing: Smokeless tabletop propane fire bowls and fireproof deck protector mats (pre-cut).
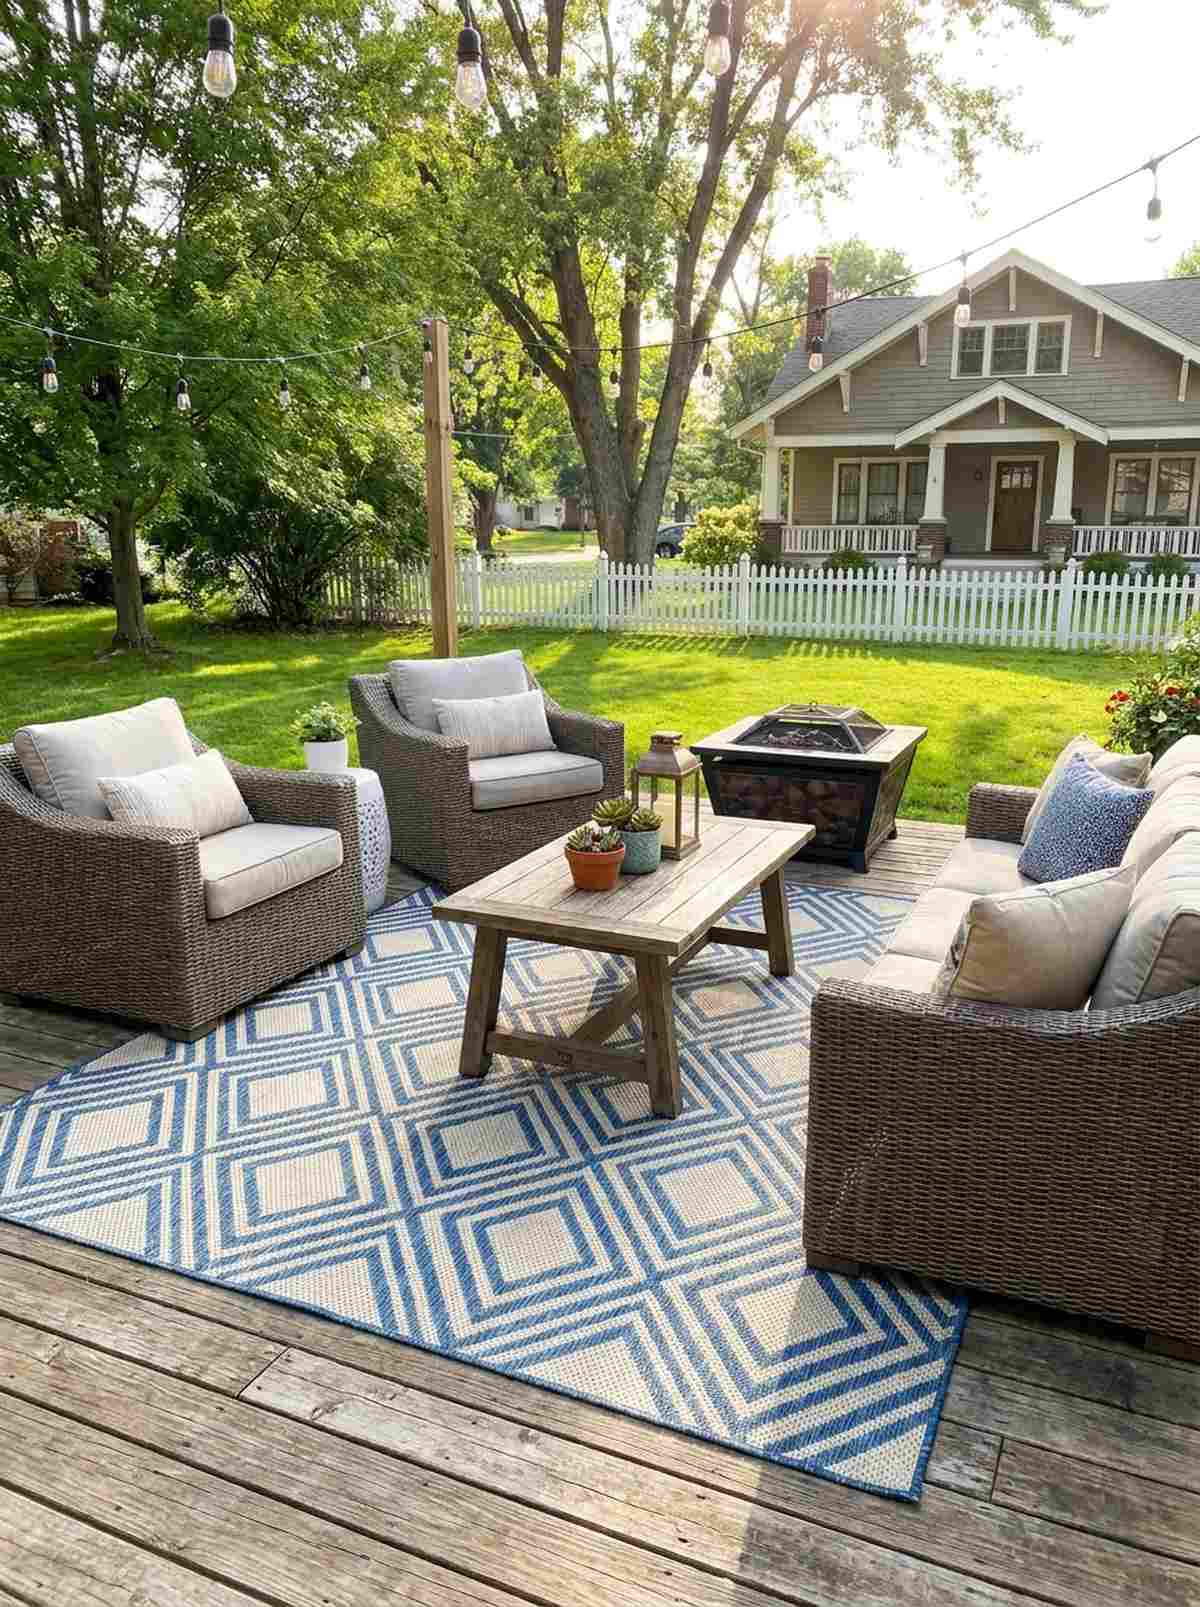
Bringing Your Seating Zones to Life
Effective small garden decking ideas combine strategic layouts, integrated features, and vertical elements to create distinct seating zones that maximize function and style within limited square footage. By applying these exactly 34 layout hacks and investing in smart, productized foundations, you avoid cheap-looking DIY disasters. Measure carefully, plan thoroughly, and focus on premium composite kits that deliver durability alongside a high-end aesthetic for an outdoor living space that serves your household for years to come.
Frequently Asked Questions
What is the minimum deck size needed to create separate seating zones?
A deck measuring at least 10×12 feet can accommodate two distinct zones with one dedicated to dining and another to lounging. Smaller decks of 8×10 feet can still establish single defined seating areas using high-end outdoor furniture starter sets and built-in benches. Multi-level designs create effective zoning in spaces as small as 8×8 feet by using adjustable deck risers to separate functions through elevation.
How do built-in benches save space compared to portable furniture?
Built-in benches eliminate the clearance space required behind freestanding furniture, typically saving 18 to 24 inches per side. A perimeter bench seating six people occupies only a 16-inch depth, whereas bulky individual chairs ruin the flow of compact areas. Building these with UV-coated composite boards gives a premium integrated look that saves massive square footage.
What deck material works best for small gardens?
Light-colored composite decking in shades of gray or tan reflects more light and makes small spaces feel larger than dark wood tones. Investing in premium composite deck kits requires less maintenance than natural wood, keeping narrow decks rot-free without frequent sealing. Choose boards with minimal texture variation to create visual continuity that helps small spaces appear expansive.
How much height difference should exist between deck levels?
Effective level changes range from 6 to 12 inches, providing clear zone definition without requiring handrails. Single steps of 7 to 8 inches work best for casual transitions, easily achievable using heavy-duty adjustable deck pedestals. Maintain consistent riser heights throughout multi-level designs to ensure safe navigation and a professional architectural look.
Can decking patterns really make small spaces feel larger?
Yes, diagonal board layouts create visual movement that draws attention away from constrained dimensions and makes narrow decks appear wider. Adding contrasting picture-frame borders using pre-cut composite fascia boards defines edges clearly, creating the psychological impression of intentional space. These premium patterns add depth perception that generates the illusion of larger square footage.