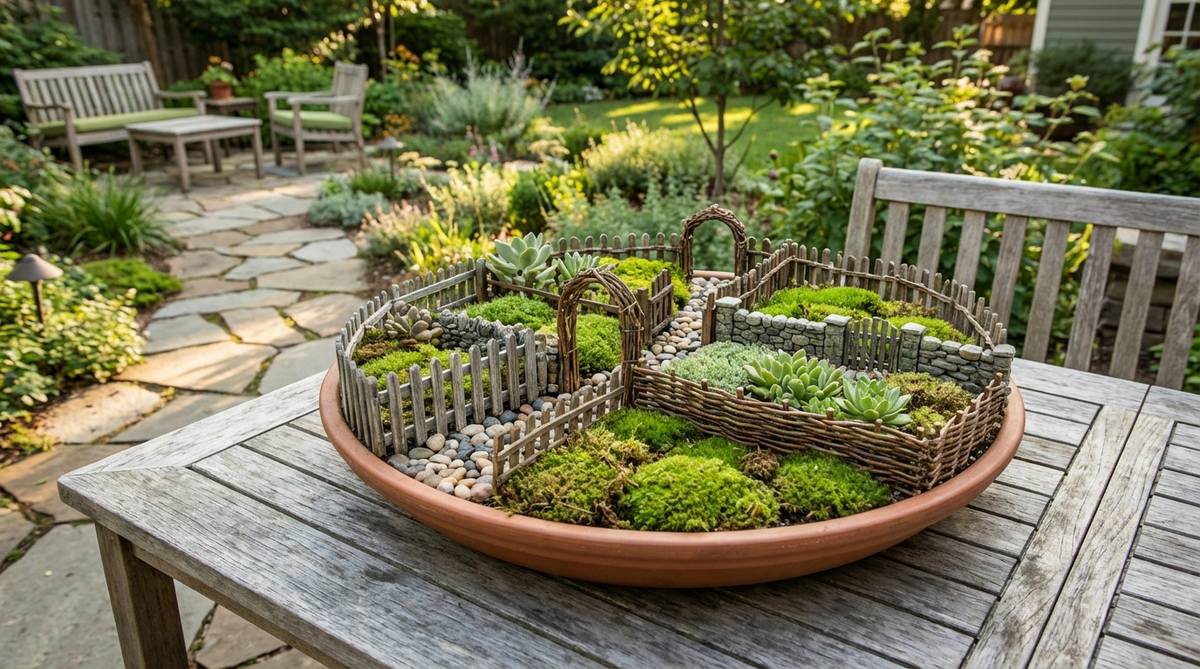
A properly styled mini garden fence transforms basic terrariums into premium miniature landscapes. These budget blueprints and exact material sourcing tips guarantee a designer-level finish. Build high-end aesthetic boundaries without wasting money on flimsy craft supplies.
Design SnapshotKey Principles
- Scale Accuracy: Fence height should range from 1-3 inches to maintain proper proportion with miniature plants and accessories
- Material Selection: Choose moisture-resistant materials like treated wood, plastic, resin, or metal to withstand terrarium humidity
- Flexibility: Bendable fences with wire bases allow you to create curves and circles that follow organic planting patterns
- Installation Method: Look for designs with ground stakes or flat bases that anchor securely in substrate without disturbing root systems
Traditional Wooden Styles That Create Classic Garden Charm
1. White Picket Fence Sections
Classic cottage garden setups feel like a nostalgic storybook scene you accidentally discovered. Works exceptionally well for front-facing terrarium focal points that demand immediate attention.
Most beginners mistakenly use untreated wood that rots within weeks, but sourcing a premium UV-coated resin picket completely changes the game. It delivers a surprisingly premium look while perfectly containing vibrant mosses and miniature garden supplies without degrading.
You can easily pull this off for around $12–$25. Save this to your DIY weekend garden board so you don’t lose the inspiration!
- Key Materials: Pre-cut UV-coated resin pickets, stainless steel anchoring pins
- Vibe / Style: Clean suburban fairy tale
- Difficulty: Easy beginner setup
- Budget Breakdown: Materials: $15 | Base Sealant: $5.
- Creator’s Tip: Push the stakes into dry substrate before adding your top-layer moss to prevent sinking.
- Smart Sourcing: pre-painted resin miniature fencing (bulk pack) or weatherproof fairy garden starter kits.
2. Split Rail Fence Miniatures
Woodland fairy boundaries bring a rustic, grounded energy that feels like a tiny hidden forest. Perfect for wide, shallow glass bowls featuring cascading trailing vines and natural bark.
Attempting to glue random yard twigs often looks sloppy, so upgrading to properly scaled miniature fencing instantly fixes the visual proportions. This specific layout gives a designer-level finish while blending naturally with high-end terrarium accessories.
Expect to spend roughly $15 to $30 for a complete boundary kit. Highly recommended for a quick weekend win that totally shifts the vibe.
- Key Materials: Treated miniature cedar logs, non-toxic wood binding glue
- Vibe / Style: Rustic woodland cabin
- Difficulty: Intermediate shaping required
- Budget Breakdown: Treated logs: $18 | Adhesives: $7.
- Creator’s Tip: Weather the wood slightly with diluted black acrylic paint to make it look authentically aged.
- Smart Sourcing: treated cedar micro-logs (pre-cut) or waterproof botanical terrarium kits.
3. Lattice Panel Miniatures

Semi-transparent backdrop panels offer an architectural elegance that feels beautifully secretive and refined. Ideal for creating layered background depth in tall, vertical display jars.
Standard solid dividers block too much light, yet this crisscross grid strategy allows ambient grow-light glow to penetrate perfectly. It looks far more expensive than it is and creates the ultimate climbing trellis for creeping micro-vines.
A custom-cut layout runs about $18 to $35 depending on the material. Pin this if you’re planning a small space upgrade for your office desk!
- Key Materials: Laser-cut acrylic lattice grids, micro climbing vines
- Vibe / Style: Victorian botanical greenhouse
- Difficulty: Easy drop-in installation
- Budget Breakdown: Lattice sections: $20 | Vine clips: $5.
- Creator’s Tip: Lean it slightly against the back glass rather than burying it deep to save horizontal planting space.
- Smart Sourcing: laser-cut acrylic lattice grids (UV-resistant) or preserved climbing micro-ivy.
4. Post and Board Fencing
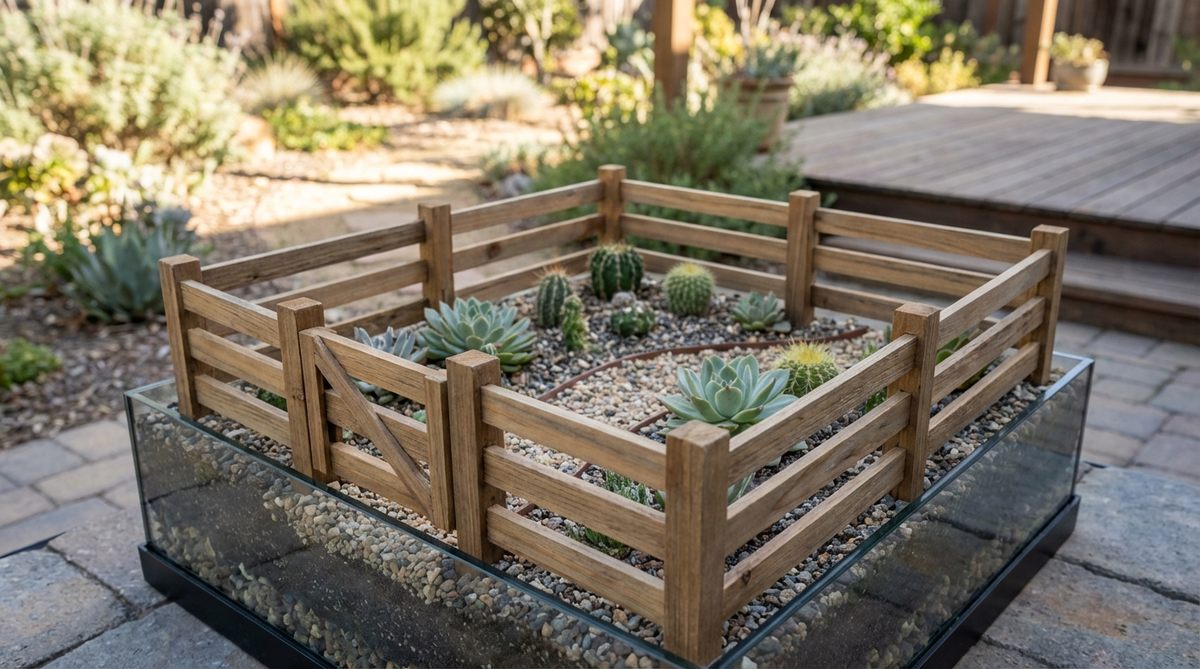
Desert succulent zoning establishes clean, hard lines that give off a sweeping, arid ranch atmosphere. Exceptional for defining rigid soil breaks in multi-substrate arid enclosures.
Using weak cardboard boundaries usually results in a collapsed mess, but anchoring rigid acrylic-backed boards ensures permanent soil stability. The solid construction sneaks a premium aesthetic into a highly functional terrarium layout.
Budget around $20 for durable, moisture-resistant sections. It’s a fast visual upgrade that completely locks down messy gravel layers.
- Key Materials: Sealed balsa wood planks, hidden acrylic retaining stakes
- Vibe / Style: Arid western ranch
- Difficulty: Moderate alignment needed
- Budget Breakdown: Wood planks: $12 | Acrylic stakes: $8.
- Creator’s Tip: Bury the bottom board completely beneath the topsoil layer to hide the structural supports.
- Smart Sourcing: sealed balsa wood strips (bulk pack) or acrylic miniature retaining stakes.
This next setup is ridiculously cheap but looks like a $100 custom gallery display…
5. Bamboo Stake Fencing
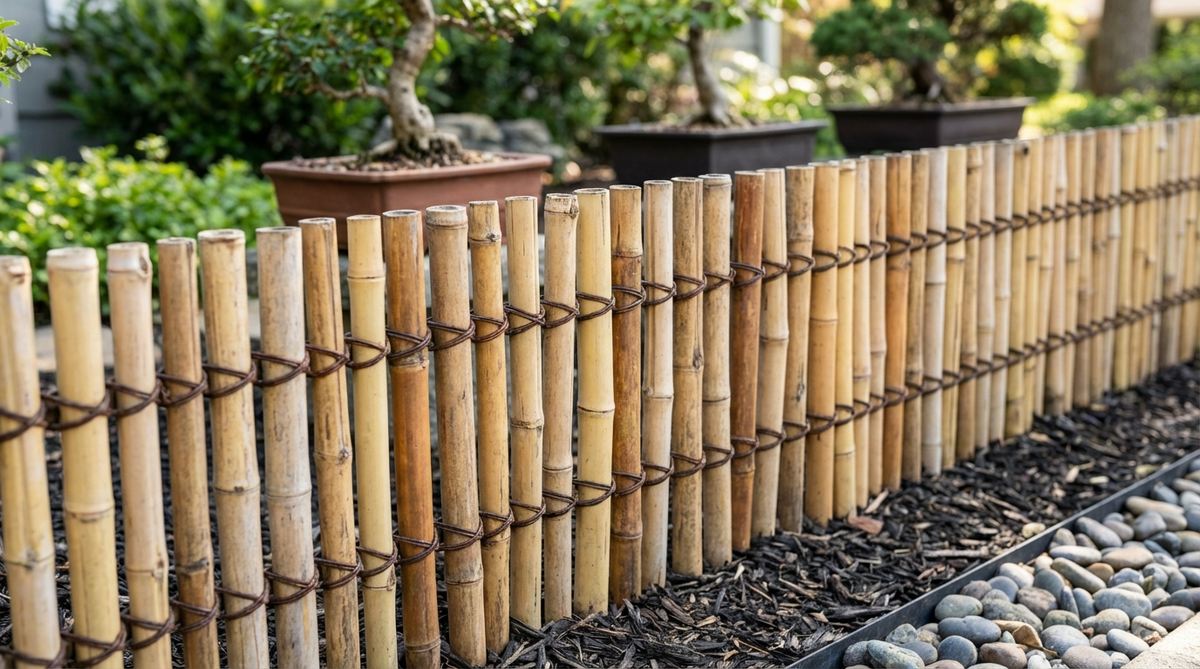
Zen botanical dividers channel a calming, structured sanctuary that breathes tranquility into tight spaces. Stunning when placed directly behind a manicured bonsai or a central meditation stone.
Synthetic plastic replicas often look glaringly fake, whereas authentic bound stakes weather gracefully in high-humidity setups. This clever arrangement provides incredible airflow while demanding top-tier visual respect in premium tropical enclosures.
You can build this serene escape for under $25. Save this exact layout for your upcoming botanical weekend project.
- Key Materials: Carbonized mini bamboo shoots, synthetic black binding cord
- Vibe / Style: Peaceful Japanese rock garden
- Difficulty: Easy spacing technique
- Budget Breakdown: Carbonized bamboo: $15 | Binding cord: $6.
- Creator’s Tip: Use synthetic nylon cord instead of cotton string so it doesn’t rot in the humid soil.
- Smart Sourcing: carbonized mini bamboo shoots (mold-resistant) or synthetic bonsai binding wire.
Modern Minimal Designs For Contemporary Terrariums
6. Horizontal Slat Panels
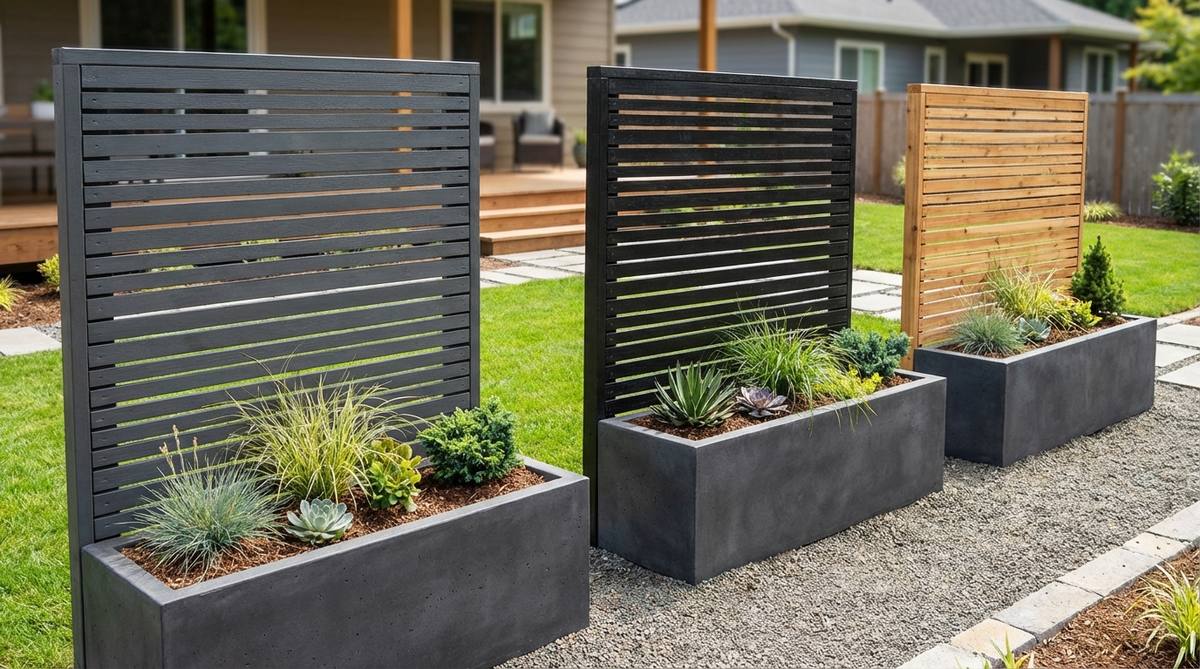
Modern geometric borders create an ultra-sleek, industrial edge that feels straight out of an upscale architectural magazine. Flawless for minimalist plant presentations in rectangular glass boxes.
Overcomplicating modern designs ruins the sleekness, which is why strict parallel spacing is the absolute secret weapon here. It delivers a high-end, contemporary finish while acting as a perfect negative-space backdrop for bold specimen plants.
This architectural addition will cost between $20 and $40. A brilliant trick to instantly modernize an outdated plant collection.
- Key Materials: Matte black composite slats, precision spacing blocks
- Vibe / Style: Urban minimalist loft
- Difficulty: Requires precision measuring
- Budget Breakdown: Slats: $25 | Spacers: $5.
- Creator’s Tip: Use a tiny dab of superglue gel on the back of the posts to keep the slats perfectly horizontal.
- Smart Sourcing: matte black composite strips (pre-cut) or precision model making clamps.
7. Wire Grid Boundaries
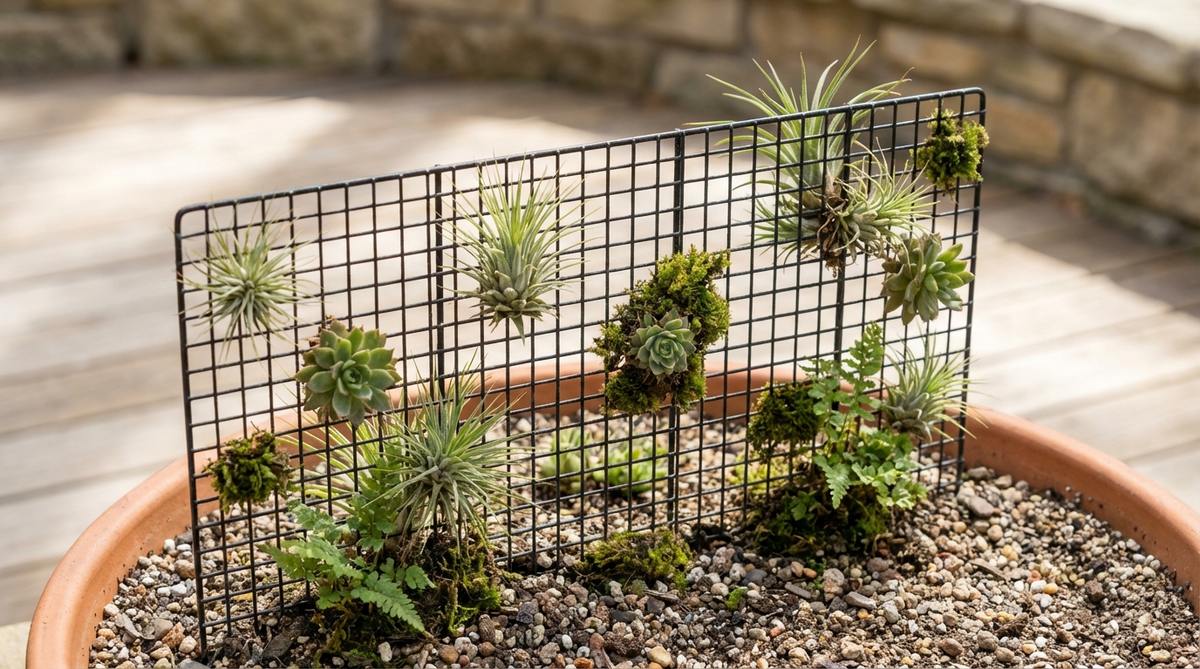
Industrial wire partitions radiate a chic, urban energy that feels effortlessly cool and incredibly modern. Highly effective for anchoring delicate air plants directly onto a vertical grid structure.
Flimsy chicken wire rusts almost immediately in damp soil, so investing in powder-coated miniature fencing is absolutely non-negotiable. This transparent structure adds immense structural integrity without choking the visual space of tiny containers.
Set aside $15 to $25 for quality coated materials. Pin this idea immediately if you want a zero-maintenance living wall effect!
- Key Materials: Powder-coated steel mesh, micro zip-ties
- Vibe / Style: Industrial living wall
- Difficulty: Easy shaping and bending
- Budget Breakdown: Coated mesh: $15 | Micro fasteners: $5.
- Creator’s Tip: Use matte black wire—it creates an optical illusion that makes the metal practically disappear against dark soil.
- Smart Sourcing: powder-coated steel mesh panels (rust-proof) or micro terrarium mounting ties.
8. Acrylic Divider Strips
Invisible substrate separators offer a floating, magical illusion where different colored sands never bleed together. The absolute best choice when you need aggressive root containment without any visual clutter.
People often try to use cheap plastic wrap that tears, but rigid frosted acrylic holds back heavy wet soil with ease. It effortlessly conceals the mechanics of your build while highlighting the premium miniature garden supplies.
Professional-grade acrylic strips cost around $10 to $20. An absolute essential blueprint for anyone building complex, multi-layered soils.
- Key Materials: Frosted acrylic sheets, glass-safe silicone adhesive
- Vibe / Style: Invisible structural modernism
- Difficulty: Advanced measuring required
- Budget Breakdown: Acrylic strips: $14 | Silicone: $6.
- Creator’s Tip: Have your local hardware store cut the acrylic to the exact inner width of your glass tank for a watertight seal.
- Smart Sourcing: frosted acrylic terrarium dividers (pre-cut) or glass-safe botanical silicone.
Most people get this completely wrong… until they try the exact layout coming up next.
💡 Must-Have Supplies for High-End Setups
To build these setups faster and ensure they last, skip the generic craft aisles and invest in the right foundational kits.
- Base & Support: waterproof acrylic terrarium stakes (bulk pack)
- Setup Tools: precision miniature garden aquascaping tool kits
- Weather/Durability Protection: marine-grade clear matte UV sealants
9. Metal Rod Fencing
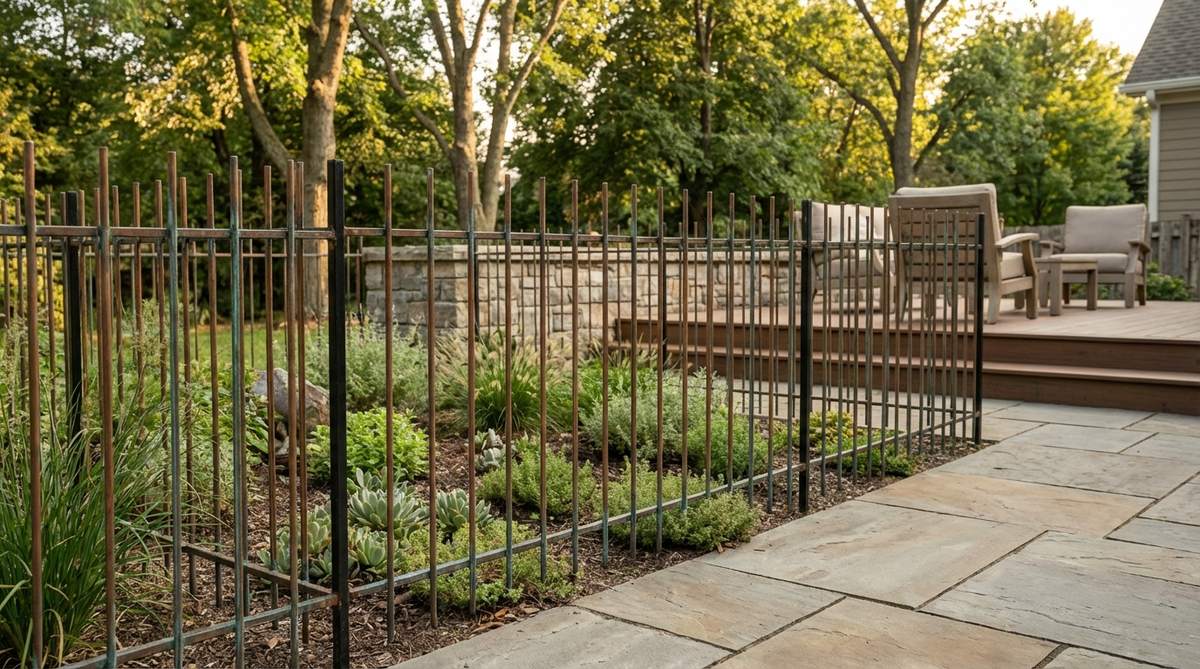
Minimalist brass borders cast subtle, striking reflections that feel like hidden jewelry within the soil. Exquisite for framing low-profile succulents where vertical contrast is desperately needed.
Using hollow aluminum tubes usually leads to bending, but solid copper or brass rods push effortlessly into hard clay bases. This metallic upgrade naturally develops a stunning patina, completely outclassing standard fairy garden kits over time.
Expect a materials cost of $25 to $45 for real brass. Save this to your luxury decor board for future reference!
- Key Materials: Solid brass or copper micro-rods, wire cutters
- Vibe / Style: High-end botanical jewelry
- Difficulty: Moderate cutting effort
- Budget Breakdown: Brass rods: $30 | Cutting tools: $15.
- Creator’s Tip: Space them unevenly for a more organic, artistic gallery look rather than a rigid prison-bar aesthetic.
- Smart Sourcing: solid brass micro-rods (tarnish-ready) or heavy-duty miniature wire cutters.
10. Corrugated Metal Panels
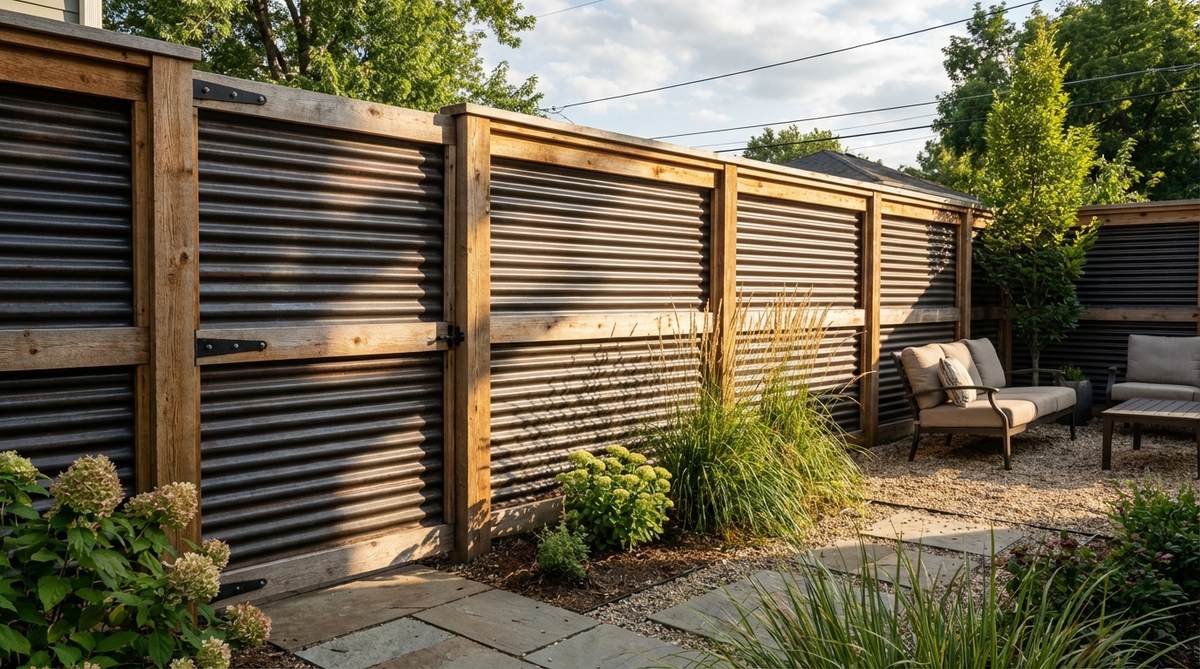
Urban farmhouse edges deliver a rugged, weathered charm that feels grounded and authentically vintage. Brilliant for creating hard visual stops between soft carpet moss and harsh gravel pathways.
Cardboard painted silver always warps from humidity, so stepping up to genuine galvanized miniature sheets guarantees zero structural degradation. The textured wave pattern forces extreme visual interest into otherwise flat, boring substrate designs.
You can easily pull this off for around $15–$30. It’s an unexpectedly bold choice that always gets compliments from guests.
- Key Materials: Galvanized miniature roofing tin, metal shears
- Vibe / Style: Weathered industrial farm
- Difficulty: Careful handling required
- Budget Breakdown: Metal sheets: $20 | Safety gloves: $5.
- Creator’s Tip: Dip the edges in saltwater for a few days before installing to force a gorgeous, authentic rust line.
- Smart Sourcing: galvanized miniature corrugated sheets (rust-proof) or protective hobbyist gloves.
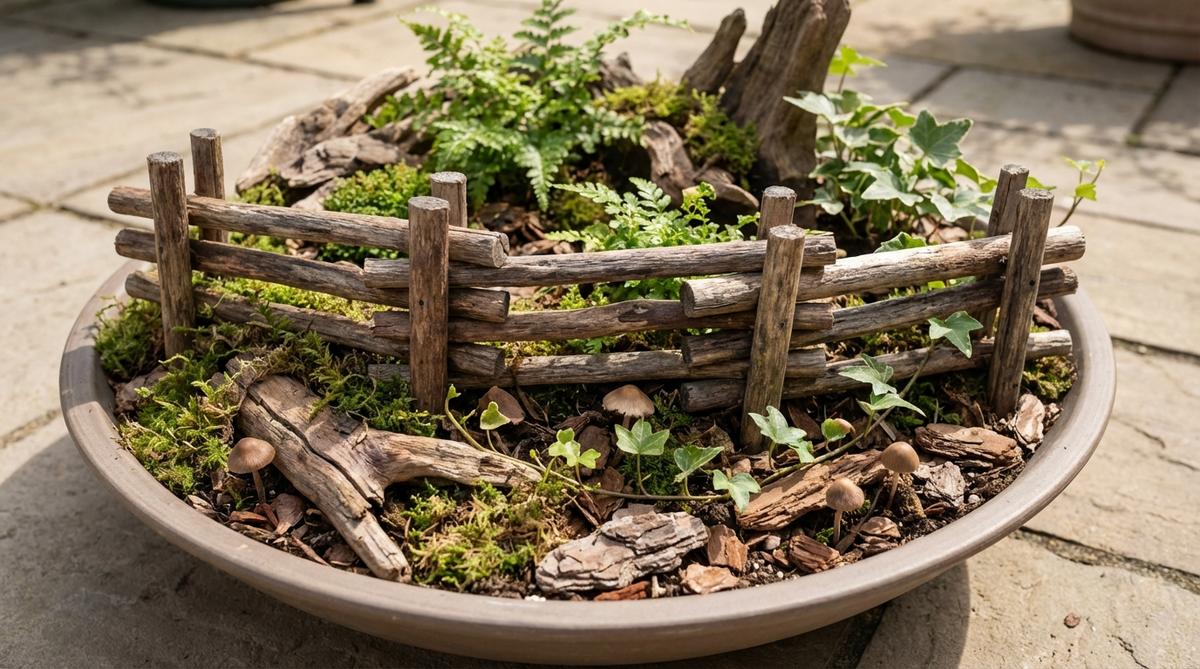
Rustic Natural Materials For Organic Aesthetics
11. Twig Bundle Fencing
Wild thicket barriers radiate a cozy, untamed wilderness aesthetic that feels incredibly organic and ancient. A brilliant match for dark, earthy mushroom enclosures or dense woodland terrarium layouts.
Foraging random yard sticks can introduce nasty soil pests, so buying pre-sterilized botanical bundles keeps your ecosystem incredibly safe. It effortlessly bridges the gap between hardscape and living plants without looking forced, plastic, or artificial.
This natural approach costs a mere $10 to $15. Pin this directly to your naturalistic terrarium inspiration board!
- Key Materials: Sterilized birch twigs, natural jute twine
- Vibe / Style: Untamed forest floor
- Difficulty: Easy beginner project
- Budget Breakdown: Birch twigs: $10 | Twine: $4.
- Creator’s Tip: Leave the tops uneven and jagged to maximize the wild, overgrown aesthetic.
- Smart Sourcing: sterilized terrarium birch twigs (bulk pack) or organic miniature jute twine.
12. Bark Strip Borders

Cork bark retaining walls blend so flawlessly into the background they feel like natural roots breaching the surface. The ultimate boundary for housing moisture-loving amphibians or delicate creeping micro-ferns.
Standard pine bark decays rapidly in closed jars, making waterproof cork flats the absolute smartest investment for longevity. It looks remarkably high-end while actively supporting beneficial moss growth along its deeply porous edges.
Expect to spend $18 to $35 for premium cork slabs. Truly a foolproof method for adding rich, organic textures safely.
- Key Materials: Natural cork bark flats, substrate anchoring pins
- Vibe / Style: Ancient overgrown jungle
- Difficulty: Very easy installation
- Budget Breakdown: Cork flats: $25 | Anchors: $5.
- Creator’s Tip: Snap the bark by hand rather than cutting it with a saw to keep the edges looking completely natural.
- Smart Sourcing: natural cork bark flats (terrarium-safe) or stainless substrate anchoring pins.
If you’ve been struggling to keep your moss alive, the boundary trick below changes everything.
13. Pebble Stacked Walls
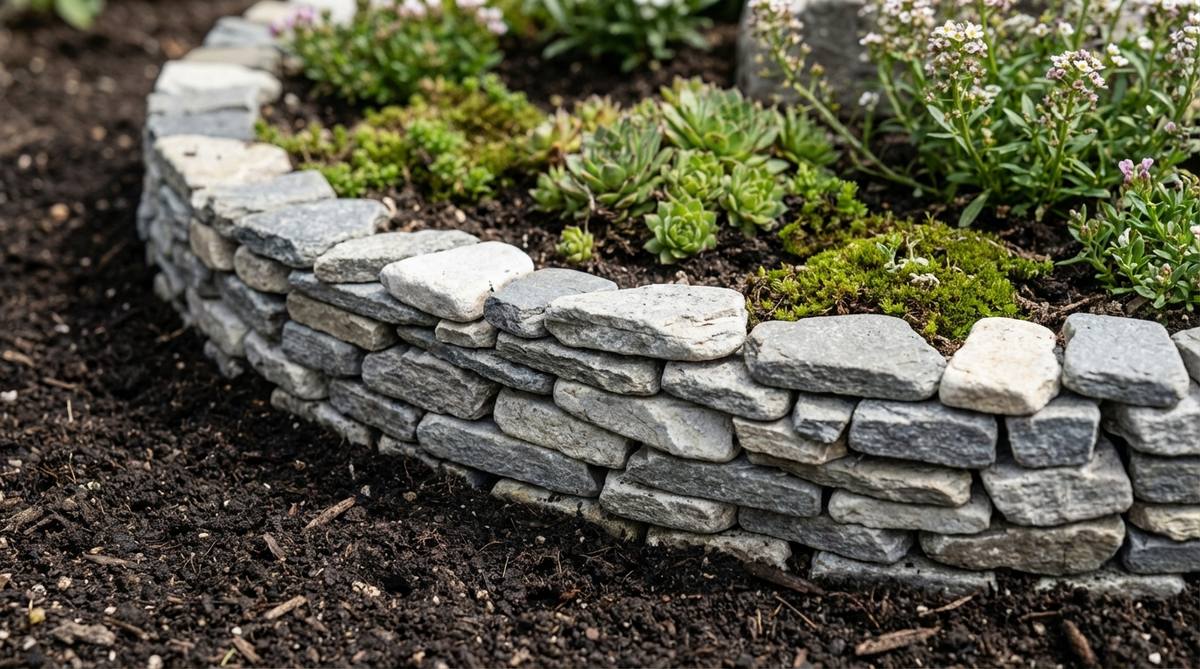
Miniature stone masonry projects a heavy, historical dominance that feels like exploring ancient castle ruins. Extremely effective for holding back aggressive soil slopes in deep, bowl-style desktop terrariums.
Using weak craft glue turns this into a frustrating collapse hazard, whereas dry-stacking flat river stones creates permanent, locking stability. The sheer physical weight of this border firmly grounds the entire visual composition while looking wildly expensive.
A bag of proper stacking stones runs about $12 to $20. Save this idea if you love the look of ancient garden architecture!
- Key Materials: Flat black river pebbles, aquarium-safe cyanoacrylate glue
- Vibe / Style: Ancient stone fortress
- Difficulty: Patience required for stacking
- Budget Breakdown: Stacking stones: $15 | Glue: $5.
- Creator’s Tip: Only glue the backside of the stones where it touches the soil so no shiny adhesive is visible from the front.
- Smart Sourcing: flat black river stacking stones (pre-washed) or aquarium-safe cyanoacrylate gel.
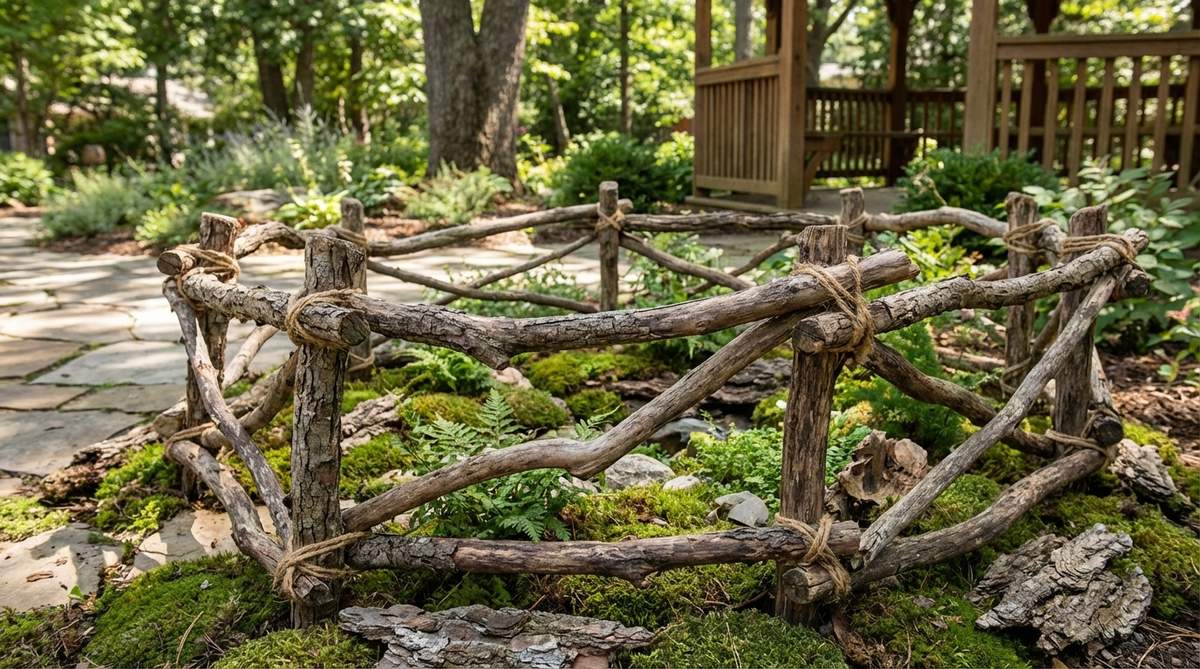
14. Moss-Covered Branch Rails
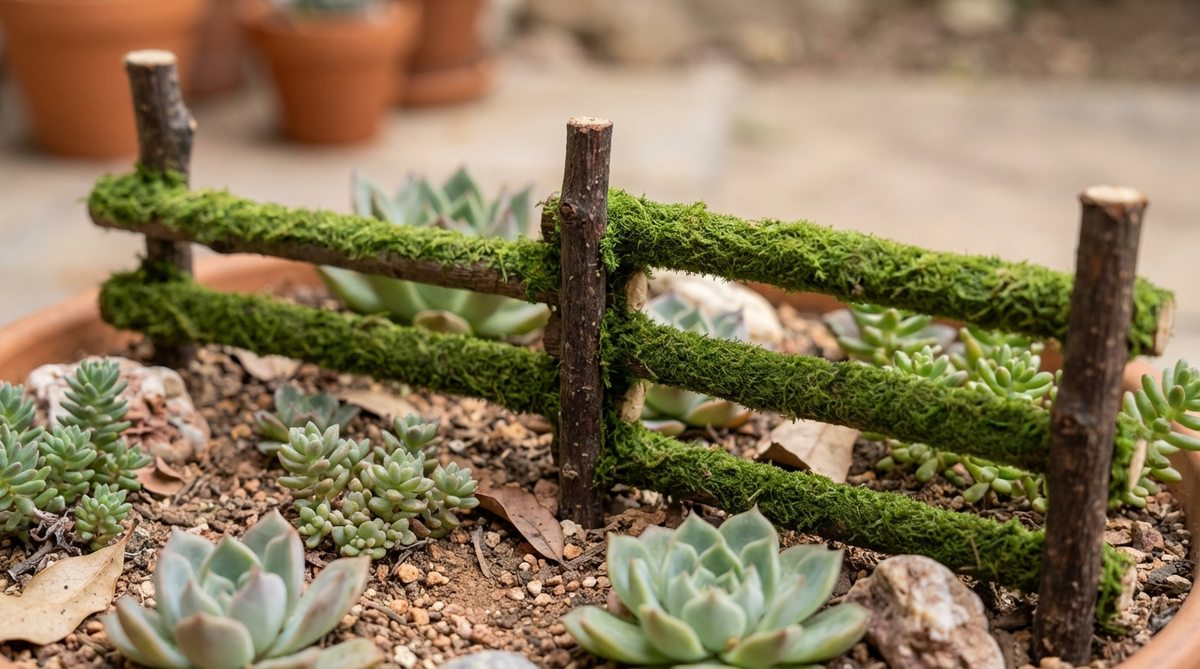
Living woodland perimeters blur the line between decor and plant, feeling like an overgrown, abandoned pathway. Stunning when used to softly frame a central water feature or a glowing resin river.
Keeping live moss alive on elevated wood is a nightmare, but wrapping preserved decorative moss solves the humidity problem instantly. This setup delivers a shockingly vibrant pop of green that refuses to turn brown, solving a huge terrarium pain point.
You can achieve this lush look for under $25. A fantastic way to inject bold color into an otherwise dry setup.
- Key Materials: Preserved reindeer moss, thin wooden dowels
- Vibe / Style: Enchanted mossy pathway
- Difficulty: Messy but easy assembly
- Budget Breakdown: Preserved moss: $16 | Dowels & Glue: $8.
- Creator’s Tip: Use dark green floral wire to bind the moss tightly to the branch before gluing for extra security.
- Smart Sourcing: preserved reindeer moss (color-fast bulk pack) or dark green floral binding wire.
15. Driftwood Section Dividers
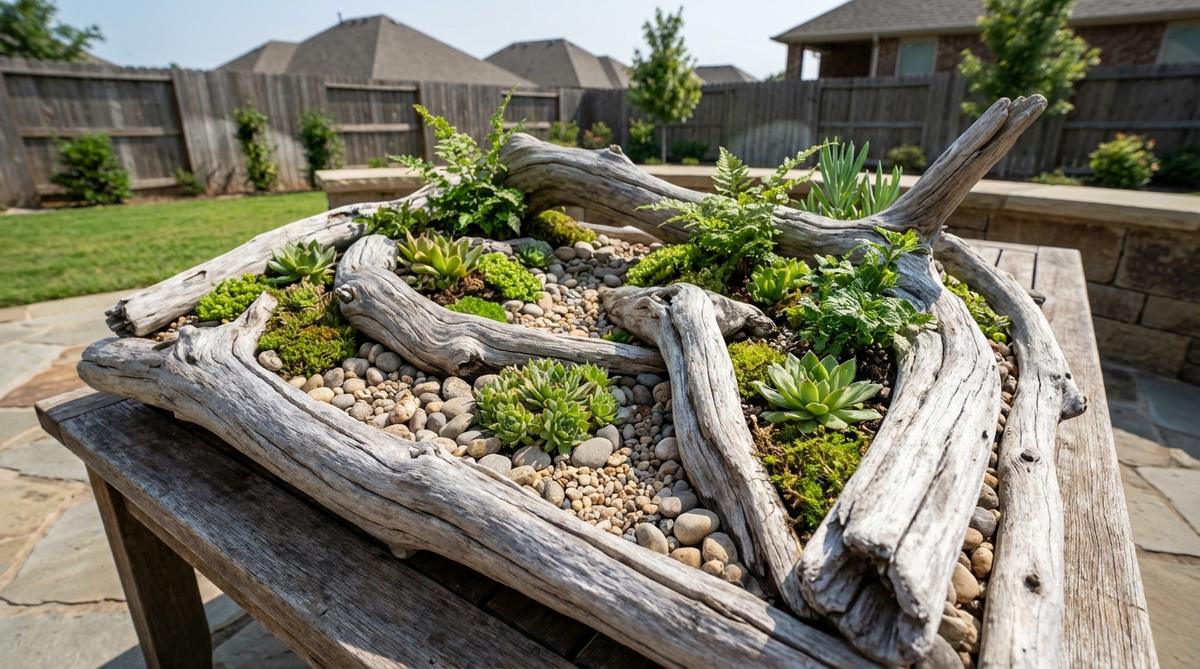
Sculptural shoreline barriers bring sweeping, wind-swept curves that feel like a pristine private beach. Ideal for strictly separating bright white silica sand from dark, nutrient-rich planting soil.
Using fresh beach wood creates aggressive mold blooms, making pre-bleached aquarium driftwood the only logical choice for closed systems. It functions as a dramatic centerpiece while effortlessly performing essential soil separation duties without decaying.
Sourcing choice driftwood pieces costs around $20 to $40. Pin this to your coastal decor board for your next glass build!
- Key Materials: Spider wood or bleached driftwood, fine sand
- Vibe / Style: Sweeping coastal tide pool
- Difficulty: Relies on finding the right wood shape
- Budget Breakdown: Premium driftwood: $30 | Silica sand: $8.
- Creator’s Tip: Boil the driftwood for 2 hours before placing it in the tank to prevent water discoloration and kill leftover tannins.
- Smart Sourcing: pre-bleached aquarium spider wood or ultra-fine white silica terrarium sand.
Ornate Decorative Options For Fantasy Themes
16. Wrought Iron Style Fencing
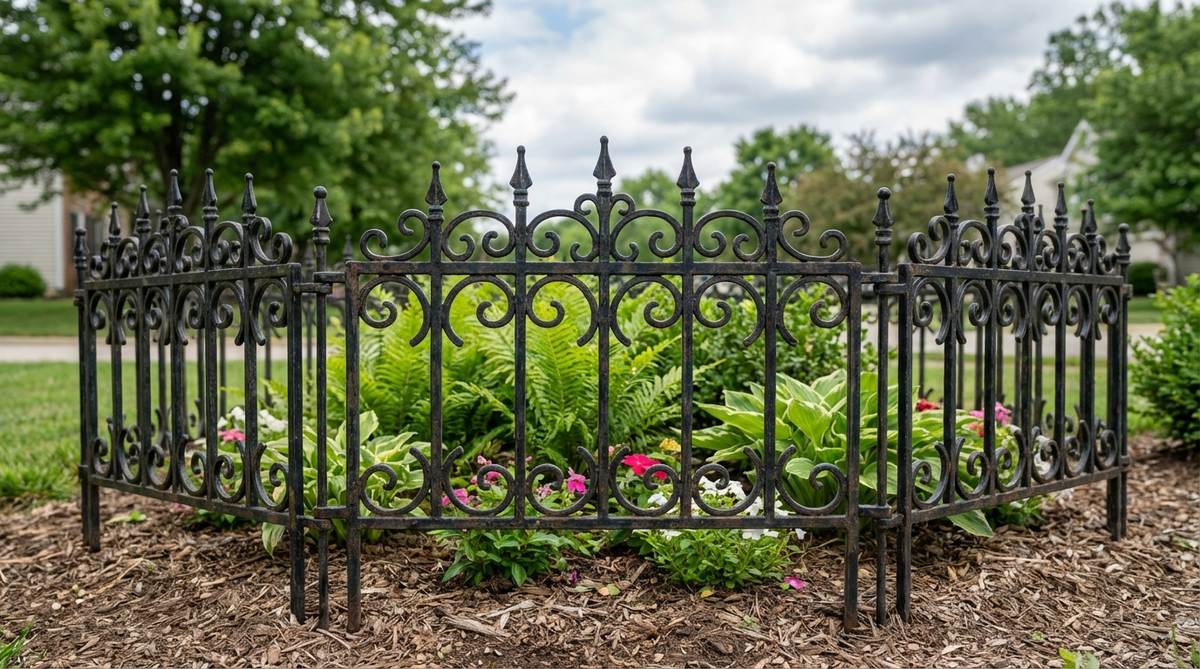
Victorian estate perimeters exude a dark, romantic elegance that feels ripped right from a gothic romance novel. Flawlessly frames miniature resin manors or highly detailed fantasy garden centerpieces.
Cheap plastic ironwork bends and snaps easily, but sourcing solid cast metal pieces ensures the intricate gates never warp. This ornate miniature garden supply immediately upgrades a basic glass bowl into a luxury, conversation-starting showcase piece.
Budget approximately $25 to $50 for heavy metal kits. Save this if you are obsessed with dark, moody botanical aesthetics!
- Key Materials: Cast iron miniature gate sets, anti-rust clear coat
- Vibe / Style: Gothic Victorian manor
- Difficulty: Very easy placement
- Budget Breakdown: Metal fencing kit: $35 | Clear coat spray: $10.
- Creator’s Tip: Spray the metal with a matte clear coat before planting to completely prevent rusting from misting routines.
- Smart Sourcing: heavy-cast miniature wrought iron kits or matte clear anti-rust sealant spray.
Stop buying expensive plant pots. This next boundary hack is cheaper and looks 10x better.
17. Gothic Pointed Arch Panels
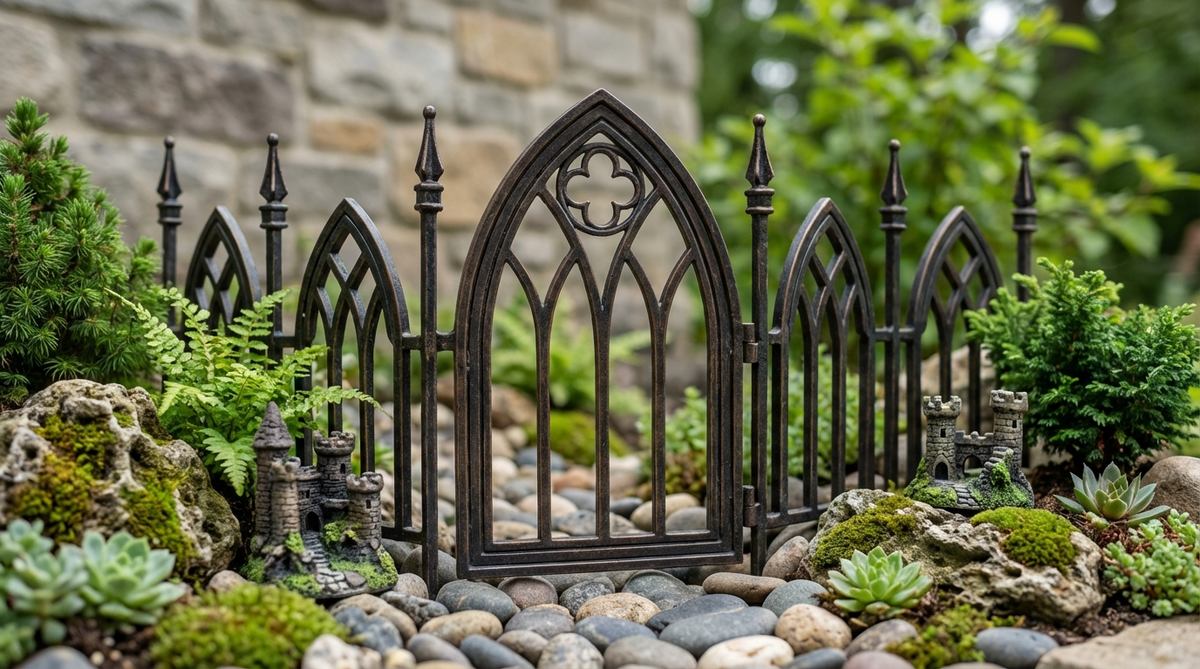
Medieval castle courtyards cast striking, dramatic shadows that feel beautifully imposing and grand. The perfect structural backdrop for deep green cushion mosses and miniature stone gargoyle figures.
Plain flat fences often get lost behind tall plants, yet these sharp, vertical peaks intentionally pierce through the foliage. The intricate repeating arches trick the eye into perceiving much deeper space than actually exists inside the jar.
You can install these dramatic borders for around $20 to $35. Highly recommended for injecting an instant storytelling element into your build.
- Key Materials: Resin arched fencing panels, dark wash paint
- Vibe / Style: Dark academia ruins
- Difficulty: Easy modular linking
- Budget Breakdown: Resin arches: $22 | Dark wash: $6.
- Creator’s Tip: Apply a watery black paint wash over the panels to settle into the grooves and make the details pop aggressively.
- Smart Sourcing: resin gothic arch fairy garden kits or model miniature detailing wash.
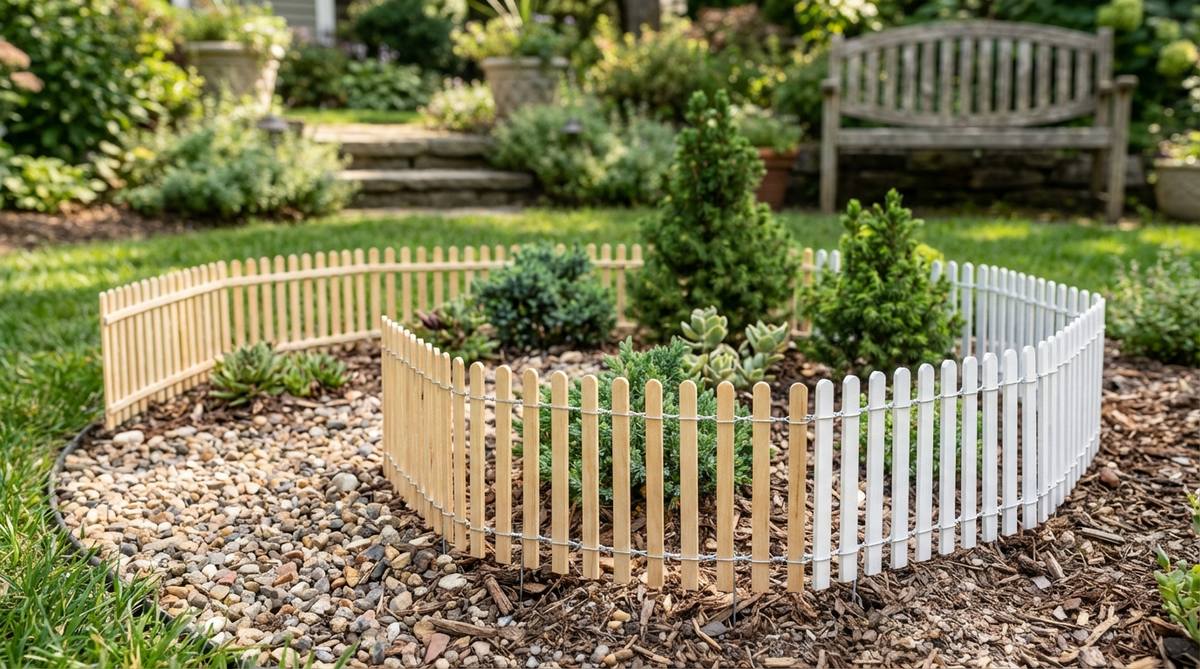
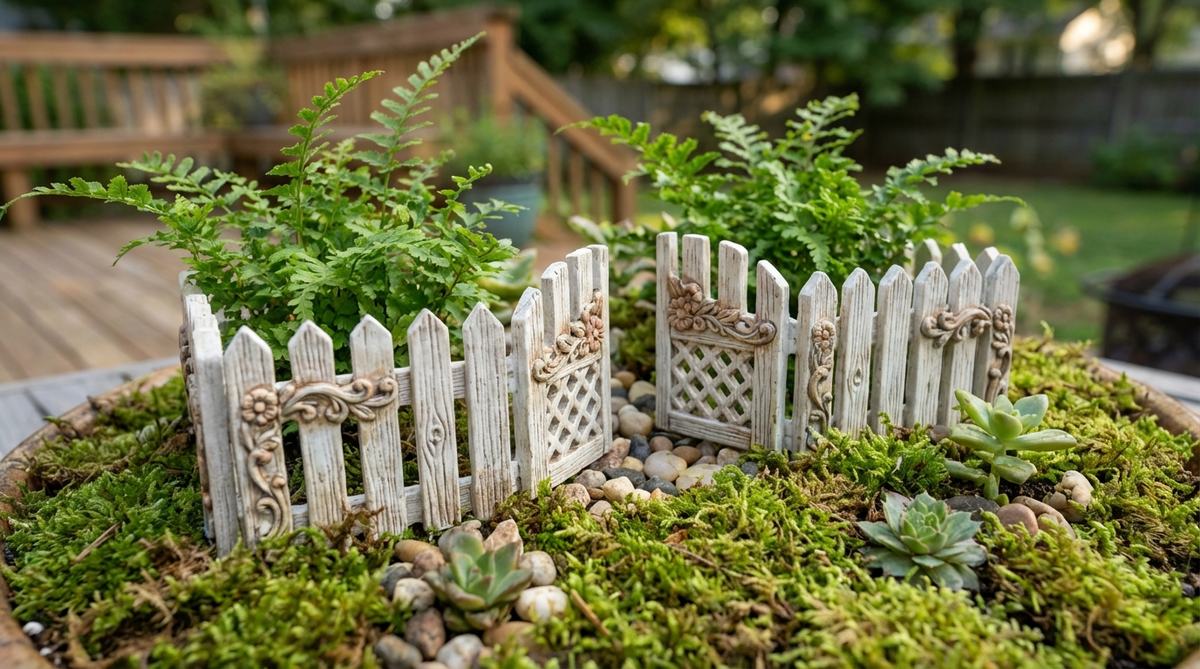
18. Colored Painted Picket Fences

Pastel cottage boundaries explode with cheerful energy that feels like a nostalgic springtime memory. Exceptionally charming when paired with bright pink nerve plants or blooming miniature African violets.
Slapping standard house paint on wood creates toxic fumes in closed jars, so opting for pre-sealed, non-toxic acrylic kits is absolutely essential. The distressed, weathered finish adds instant history without requiring years of actual environmental aging.
These vibrant additions cost roughly $15 to $25. Pin this idea to bring a massive pop of color to a gloomy office corner!
- Key Materials: Pre-painted distressed wood pickets, non-toxic sealant
- Vibe / Style: Vibrant spring cottage
- Difficulty: Quick out-of-box setup
- Budget Breakdown: Painted pickets: $18 | Base anchors: $5.
- Creator’s Tip: Choose a fence color that perfectly matches the secondary color of your focal plant’s leaves for ultimate cohesion.
- Smart Sourcing: pre-painted distressed miniature pickets (UV-coated) or terrarium-safe acrylic sealants.
19. Stone Wall Texture Fencing
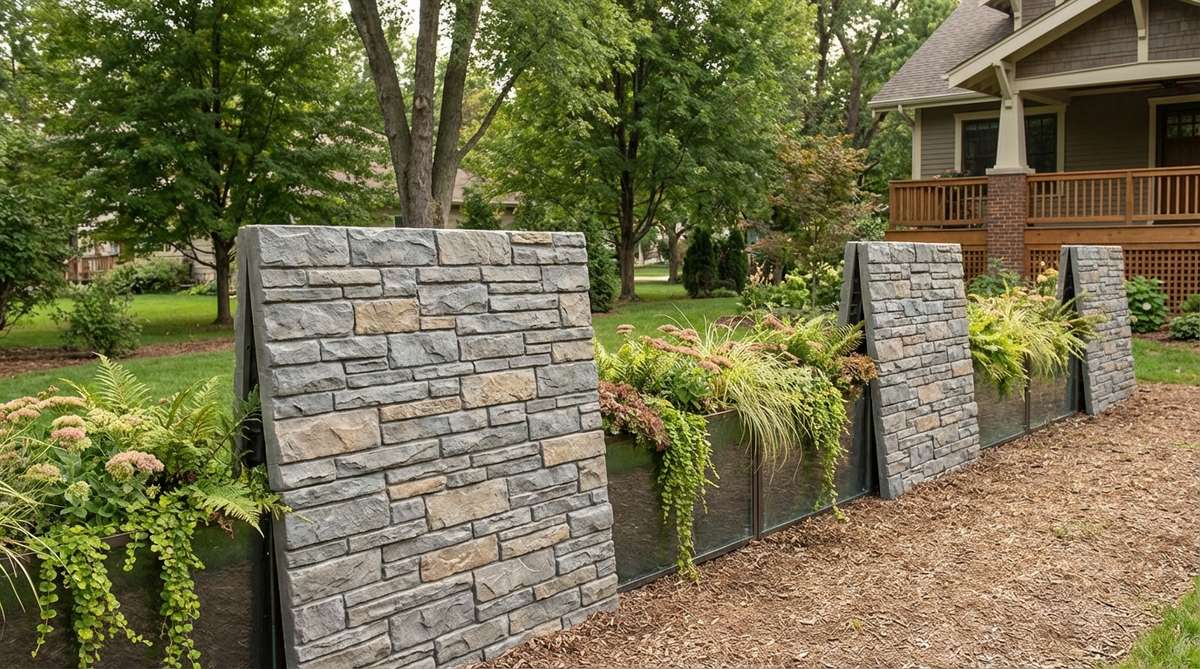
Faux masonry dividers offer the heavyweight look of granite but feel remarkably light and easy to manage. Brilliant for lining the extreme edges of a glass tank where real heavy rocks would risk cracking the base.
Real stone steals precious soil volume from tiny containers, whereas these molded resin strips provide maximum aesthetic with a minimal physical footprint. It beautifully mimics the rugged texture of an English garden wall while keeping shipping weights incredibly low.
Premium textured resin walls run about $18 to $30. An absolute lifesaver blueprint for weight-sensitive floating shelves.
- Key Materials: Molded resin stone strips, blending soil
- Vibe / Style: English countryside estate
- Difficulty: Simple soil-banking setup
- Budget Breakdown: Resin walls: $24 | Blending soil: $5.
- Creator’s Tip: Pack substrate slightly over the bottom edge of the resin strip to hide the perfectly flat manufactured seam.
- Smart Sourcing: molded resin faux stone boundaries (lightweight) or premium terrarium base soils.
20. Vine-Wrapped Trellis Fencing
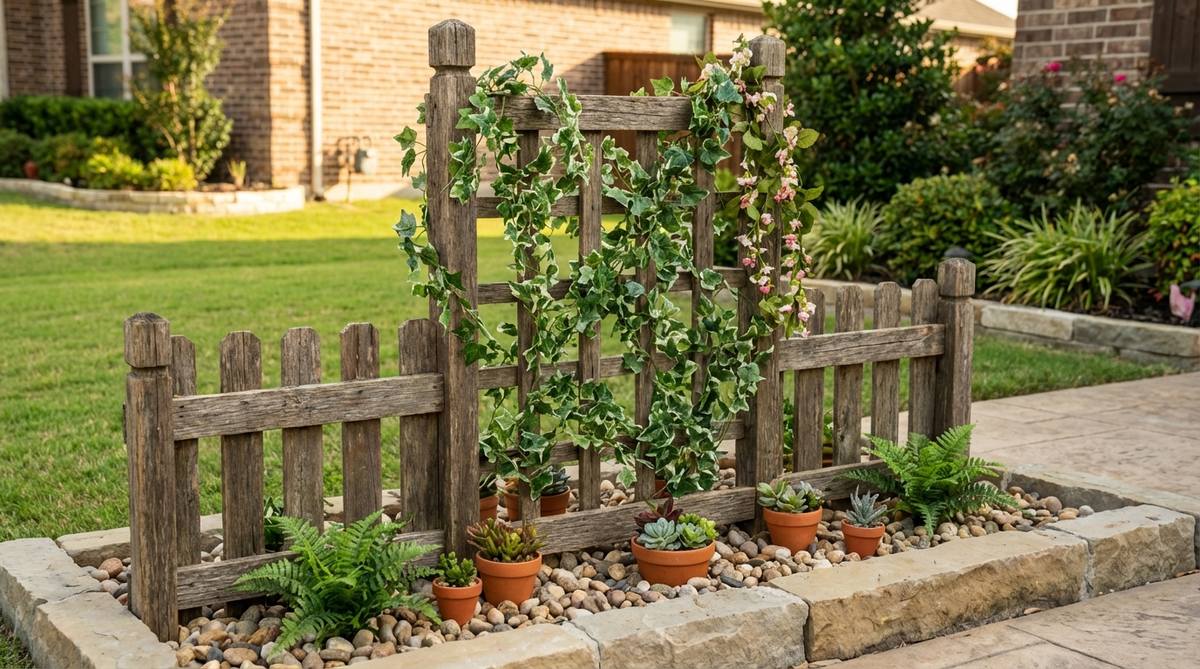
Overgrown botanical screens weave a dense, secret garden magic that feels completely swallowed by nature. The absolute best trick for hiding ugly terrarium hardware, misting tubes, or temperature probes.
Trying to force real climbing vines onto tiny sticks takes months of waiting, but utilizing pre-woven artificial micro-ivy gives instant visual gratification. This clever hack introduces intense vertical greenery that demands absolutely zero pruning or light requirements.
Expect to spend around $15 for high-quality faux ivy trellises. Save this blueprint for when you need a perfectly manicured backdrop instantly!
- Key Materials: Miniature wooden trellis, waterproof faux micro-ivy
- Vibe / Style: Secret garden hideaway
- Difficulty: Easy backdrop placement
- Budget Breakdown: Trellis base: $8 | Faux micro-ivy: $7.
- Creator’s Tip: Trim the plastic stems off the faux ivy and glue the leaves directly to the wood for a flush, realistic growth pattern.
- Smart Sourcing: waterproof faux micro-ivy vines (bulk pack) or miniature wooden backdrop trellises.
The craziest part about this next material? You probably already have it sitting in your kitchen…
Material Guide: Cheap vs. Premium Aesthetic
Knowing exactly where to save and where to spend makes all the difference in achieving that “looks expensive but isn’t” vibe without ruining your soil ecosystem.
- Standard vs. UV-Resistant/Premium: Standard craft wood acts like a sponge, absorbing water and growing toxic white mold in days. Upgrading to UV-resistant resin or sealed cedar stops fading, prevents rot, and keeps the enclosure sterile.
- Pre-made Kits vs. Sourcing Locally: While finding sticks outside is free, pre-made starter kits come sterilized and properly scaled. Buying purpose-built miniature garden supplies saves hours of frustrating repair work when cheap glues inevitably fail.
DIY Craft Approaches For Custom Boundaries
21. Popsicle Stick Construction
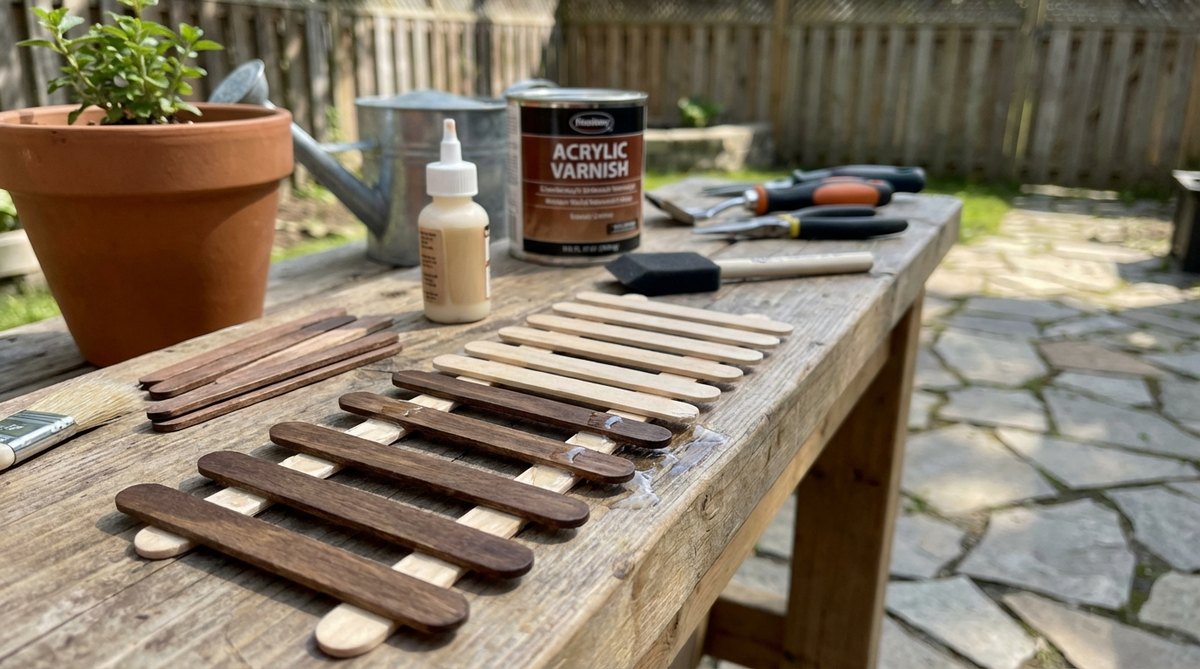
Custom crafted palisades bring a deeply personal, bespoke charm that feels entirely unique to your hands. Perfect for tight, awkwardly shaped jars where store-bought straight fences absolutely refuse to fit the curves.
Skipping the waterproofing step guarantees a moldy disaster, so hitting these raw sticks with a marine sealant is the ultimate pro move. It completely eliminates the cheap craft-store vibe, resulting in a shockingly professional terrarium accessory.
You can practically build this for under $10 in raw materials. Pin this directly to your budget-friendly DIY hacks board!
- Key Materials: Wooden craft sticks, marine-grade wood sealant
- Vibe / Style: Hand-built pioneer fort
- Difficulty: Moderate crafting and gluing
- Budget Breakdown: Craft sticks: $4 | Marine sealant: $6.
- Creator’s Tip: Soak the sticks in boiling water for 15 minutes before building—they will bend easily to form perfect circular barriers.
- Smart Sourcing: premium wooden craft sticks (bulk pack) or marine-grade wood clear sealant.
22. Matchstick Picket Fencing
Micro-scale borders boast an incredibly delicate precision that feels impossibly tiny and intricate. A phenomenal solution for extreme micro-terrariums built strictly inside lightbulbs or small glass holiday ornaments.
Thicker woods completely shatter the illusion of scale, making these ultra-thin profiles the only acceptable choice for microscopic worlds. Binding them with flexible craft wire allows you to snake the fence around tight, organic planting curves effortlessly.
This ultra-cheap setup costs less than $5 overall. A truly brilliant trick that tests your patience but rewards heavily with absolute perfection.
- Key Materials: Headless wooden matchsticks, ultra-thin copper wire
- Vibe / Style: Impossible micro-world
- Difficulty: Requires steady tweezers
- Budget Breakdown: Matchsticks: $2 | Copper wire: $3.
- Creator’s Tip: Use fine-tipped modeling tweezers to place the glued sticks; human fingers are simply too bulky for this scale.
- Smart Sourcing: headless wooden craft matchsticks or ultra-thin flexible copper wire.
23. Wire and Bead Fencing
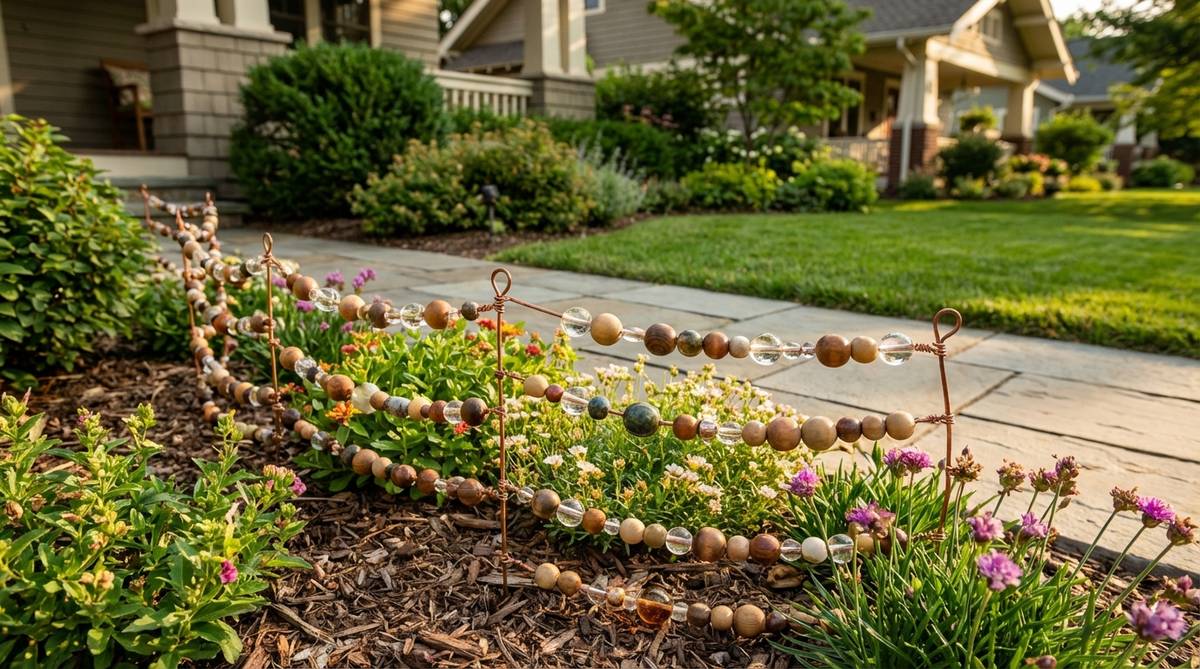
Jeweled crystal barricades catch ambient light in a way that feels utterly magical and enchanted. Absolutely stunning when illuminated by a small LED desk lamp or direct morning sunlight.
Opaque borders create dark soil shadows, but threading translucent glass beads along thin wire lets the light cascade through perfectly. It’s an insanely creative layout that looks like a high-end gallery installation rather than a basic plant boundary.
Sourcing nice glass beads and wire costs around $15 to $25. Save this to your fairy garden inspiration board immediately!
- Key Materials: Translucent glass craft beads, stiff galvanized wire
- Vibe / Style: Enchanted crystal kingdom
- Difficulty: Easy threading assembly
- Budget Breakdown: Glass beads: $12 | Wire structure: $8.
- Creator’s Tip: Use irregular, faceted glass beads rather than perfect spheres to mimic the look of raw, unpolished gemstones.
- Smart Sourcing: translucent glass craft beads (bulk pack) or stiff galvanized craft wire.
24. Polymer Clay Custom Fencing
Hand-sculpted clay barriers unleash total creative freedom that feels like holding a piece of original art. The ultimate flex for matching the exact custom color palette of a rare, exotic succulent.
Using basic air-dry clay in a humid tank turns it back into mud, which is why properly baked polymer is strictly mandatory. The completely waterproof finish acts as an impenetrable retaining wall while brilliantly showing off your custom sculpting skills.
A block of premium clay and glaze runs about $15 to $20. Highly recommended for creators who refuse to use mass-produced items.
- Key Materials: Oven-bake polymer clay, glossy waterproof glaze
- Vibe / Style: Bespoke artisan gallery
- Difficulty: Advanced sculpting required
- Budget Breakdown: Polymer clay: $12 | Glaze: $8.
- Creator’s Tip: Bake a thick, flat base plate onto the bottom of your fence so it stands upright in loose soil without needing stakes.
- Smart Sourcing: oven-bake polymer clay starter kits or glossy waterproof clay glaze.
Forget everything you know about seasonal decor. This next strategy is pure genius for year-round setups.
25. Fabric and Cardboard Fencing
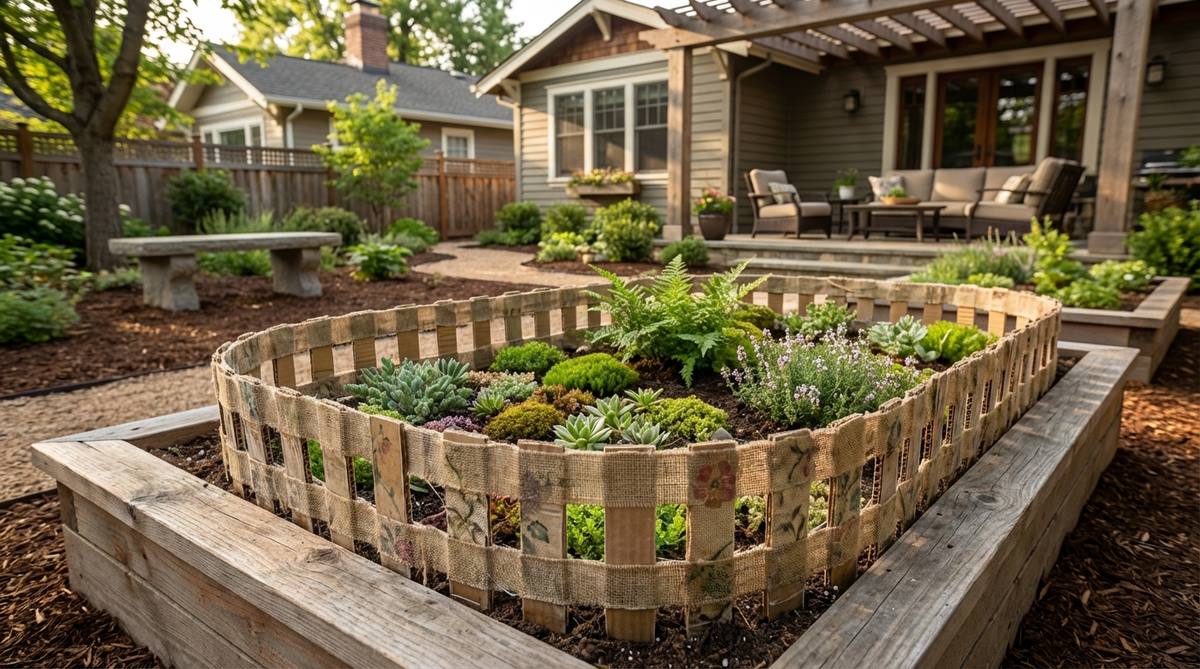
Textured burlap borders wrap your tiny landscape in a warm, rustic hug that feels exceptionally cozy and inviting. A fantastic temporary staging trick for photographing dry succulent arrangements before committing to a final build.
Leaving raw cardboard exposed in damp soil is a beginner’s death sentence, so heavily sealing it with clear acrylic spray is completely non-negotiable. This lightweight mockup technique lets you test wild ideas without burning expensive materials on a bad layout.
You can mock this up for literally $0 if you have scrap materials. Pin this clever staging hack for your next design session!
- Key Materials: Upcycled cardboard, natural burlap wrap, heavy sealant
- Vibe / Style: Cozy harvest festival
- Difficulty: Quick cutting and folding
- Budget Breakdown: Scrap materials: $0 | Heavy sealant: $8.
- Creator’s Tip: Use this strictly in open, dry-desert terrariums—even with heavy sealant, closed tropical jars will eventually eat the cardboard.
- Smart Sourcing: natural woven burlap wrap (pre-cut) or heavy-duty clear acrylic spray.
Specialty Theme Fences For Unique Concepts
26. Beach Driftwood Post Fencing
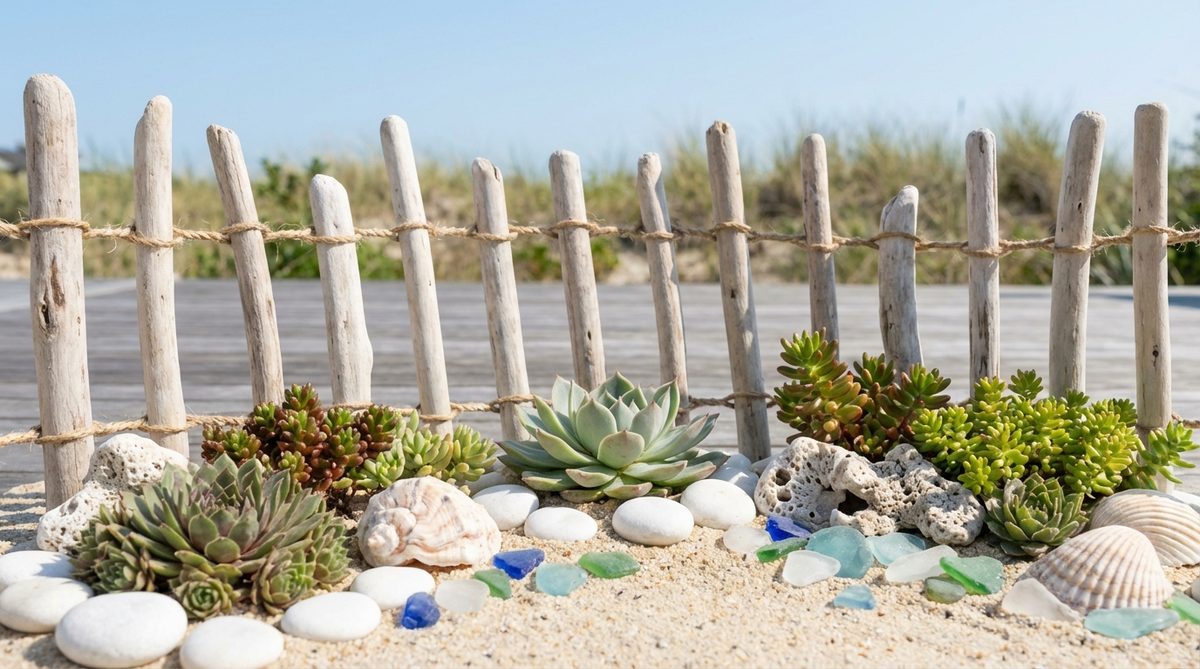
Coastal boardwalk barricades smell like salt air and feel like a breezy summer vacation captured beautifully in glass. Incredibly effective for framing bright green air plants and scattered sea glass fragments.
Standard string rots instantly when wet, so lashing the posts together with synthetic nylon twine ensures your boardwalk survives the humidity. This brilliant upgrade completely nails the nautical aesthetic without bringing rotting organic matter into your delicate ecosystem.
Sourcing clean posts and twine costs roughly $15 to $30. Save this idea if you’re building a beach-themed memory jar!
- Key Materials: Micro driftwood posts, synthetic nylon twine
- Vibe / Style: Breezy coastal shoreline
- Difficulty: Intermediate knot tying
- Budget Breakdown: Driftwood posts: $20 | Nylon twine: $5.
- Creator’s Tip: Bury the posts at aggressively random angles to mimic the look of pylons battered by years of ocean storms.
- Smart Sourcing: micro driftwood posts (aquarium safe) or rot-proof synthetic nylon twine.
27. Seasonal Holiday Fencing
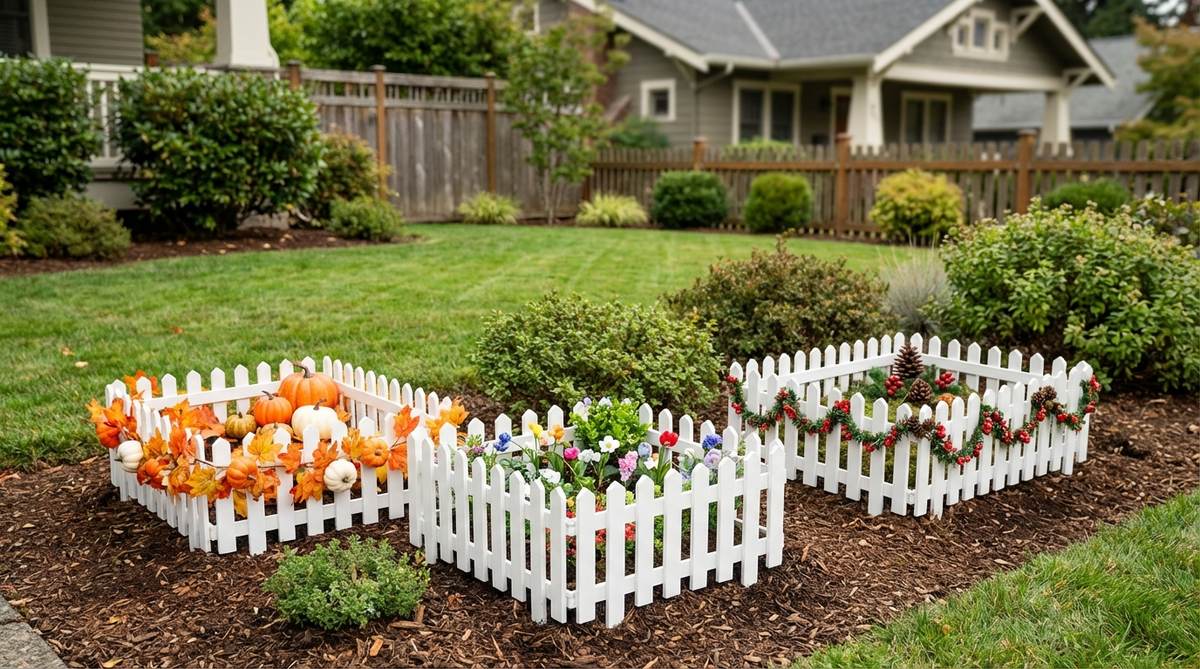
Interchangeable festive borders inject a thrilling dose of holiday spirit that feels wonderfully celebratory and fresh. The absolute smartest way to keep a permanent office plant looking incredibly relevant all year long.
Gluing decorations permanently ruins the fence for next month, so using micro-magnets to swap out tiny pumpkins for winter wreaths is a masterclass in modular design. This dynamic strategy keeps your premium terrarium kits endlessly entertaining without ripping up delicate root systems.
Building a modular base with accessory packs costs about $30 to $50. An absolute must-have blueprint for anyone who loves rotating seasonal decor.
- Key Materials: Steel-backed base fence, magnetic seasonal micro-charms
- Vibe / Style: Ever-changing holiday magic
- Difficulty: Easy modular swapping
- Budget Breakdown: Base fence: $20 | Magnetic charms: $20.
- Creator’s Tip: Superglue tiny rare-earth magnets to the back of standard dollhouse accessories to instantly make them swappable.
- Smart Sourcing: magnetic seasonal miniature charms or rare-earth micro craft magnets.
28. Glow-in-the-Dark Fencing
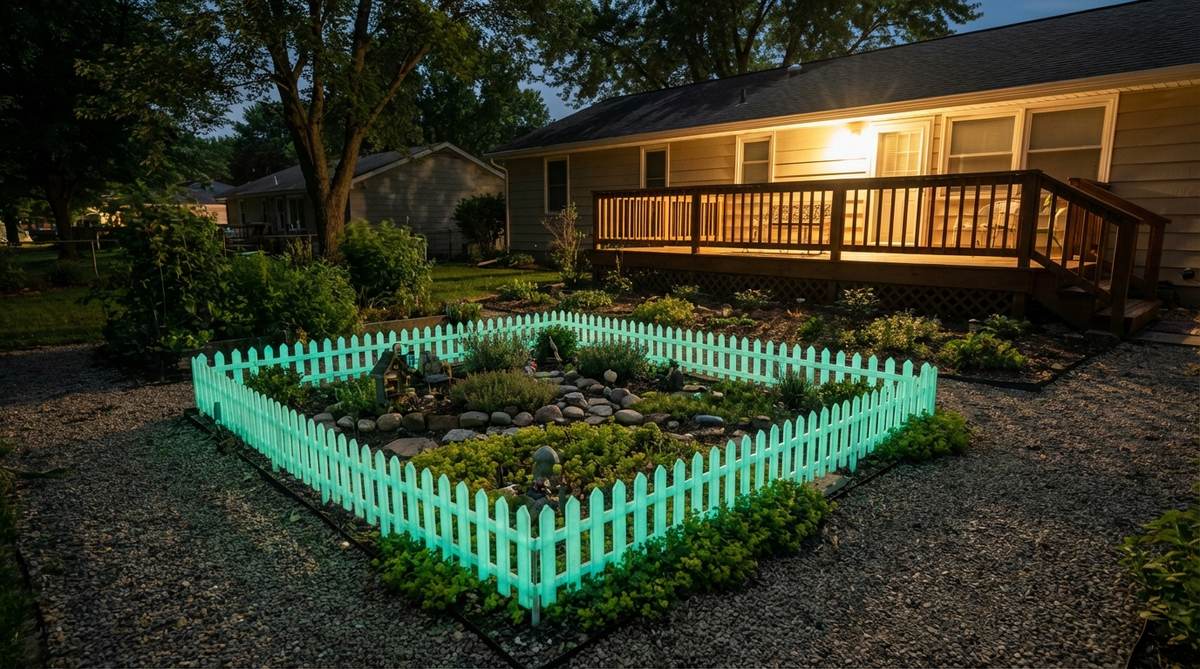
Luminescent night boundaries emit an otherworldly, radioactive neon glow that feels like a sci-fi alien landscape. Completely mesmerizing as a natural nightlight for a child’s room or a dark gaming desk.
Weak glow stickers peel off and fade fast, making fences molded entirely from phosphorescent resin the true premium upgrade here. It actively absorbs UV rays all day and violently punches through the dark without needing a single battery or annoying wire.
Premium glowing miniature fences run about $18 to $25. Pin this instantly if you want your setup to look insanely cool at midnight!
- Key Materials: Phosphorescent cast resin fencing, UV grow light
- Vibe / Style: Bioluminescent alien world
- Difficulty: Requires charging light source
- Budget Breakdown: Glowing resin fence: $22 | UV flashlight: $10.
- Creator’s Tip: Hit the fence with a strong UV blacklight for 30 seconds right before bed to supercharge the brightness level.
- Smart Sourcing: phosphorescent cast resin fairy fences or UV charging terrarium lights.
Conclusion
Selecting the right mini garden fence completely transforms a basic plant pot into a highly lucrative, high-end visual masterpiece. By following these 28+ specific blueprints, you now know exactly how to scale your materials, prevent rot with UV-coated resins, and utilize smart bulk sourcing to keep costs shockingly low. Whether you build a sleek modern acrylic boundary or an intricate cast-iron gothic gate, using premium miniature garden supplies ensures your terrarium remains a durable, designer-level showpiece for years to come. Stop guessing with cheap craft materials, grab one of the recommended starter kits, and elevate your miniature landscape today.
Frequently Asked Questions
What height should mini garden fences be for terrariums?
Fence heights between 1 and 3 inches are the absolute gold standard for achieving a premium aesthetic without choking the visual space. If you’re building in a shallow bowl, stick to 1-inch pre-cut resin borders to maintain perfect scale. For massive 12-inch tanks, utilizing 3-inch wrought iron kits adds deep, expensive-looking structural presence. Always ensure the boundary never exceeds one-third of the total glass height to keep the final design looking professionally balanced.
What materials work best for mini fences in humid terrarium environments?
High-humidity environments will instantly destroy raw wood and paper, so investing in UV-coated resin, acrylic, and powder-coated wire is your smartest move. Premium terrarium kits specifically use treated bamboo and sealed ceramics because they actively resist aggressive mold blooms. If you absolutely must use natural craft sticks for your layout, coating them heavily with a marine-grade clear sealant is non-negotiable to prevent a rotting disaster.
How do you install mini fences in terrarium substrate without damaging plant roots?
The secret is utilizing miniature fencing with ultra-thin wire stakes rather than thick, bulky posts that crush root systems. The safest blueprint is to drop your fences in during the initial hardscaping phase before a single plant goes in. If you are retrofitting an older setup, slide the boundary flat against the glass wall where there are fewer roots, and use the glass itself as a natural, invisible structural support.
Can you create curved boundaries with mini garden fencing?
Absolutely, and curved layouts naturally look much more expensive than rigid boxes. You should strictly source flexible fencing kits built on bendable copper or galvanized wire backing. This allows you to snake the pickets into fluid, organic circles around hero plants without snapping the materials. Alternatively, utilizing single-post resin stakes lets you plot an exact custom curve simply by adjusting where you punch them into the soil.
Where should fences be positioned in terrarium designs?
Proper placement is the defining difference between a cheap-looking craft project and a premium miniature garden supply showcase. Use rigid borders heavily in the mid-ground to sharply divide white display sand from dark, messy planting soil. Placing taller gothic or lattice panels flush against the extreme back glass instantly forces an optical illusion of massive depth, making your small container feel like a vast, sprawling landscape.