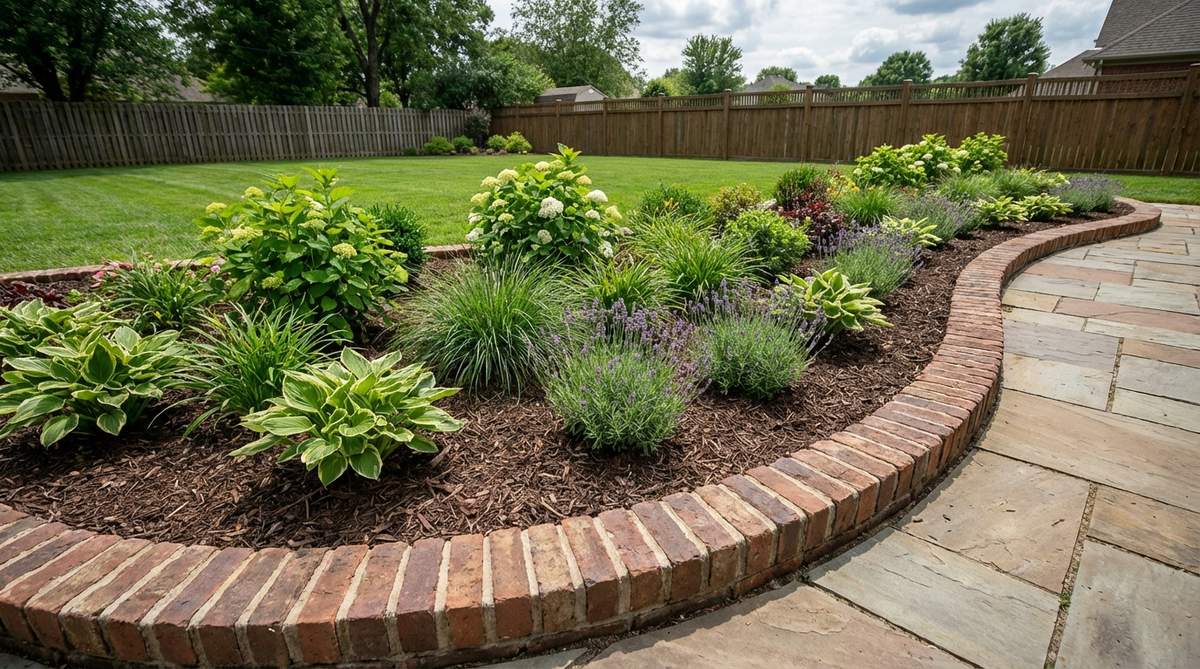
A well-executed garden design border transforms ordinary landscapes into structured, cohesive outdoor spaces that define planting beds and control mulch migration. Whether you prefer traditional mortar-set installations or contemporary dry-lay patterns, the combination of durable brick materials and strategic plant placement creates functional beauty that withstands seasons and foot traffic. Fresh Garden Ideas brings you proven techniques that landscape architects use to elevate residential gardens across America.
Design SnapshotKey Principles
- Foundation Depth: Excavate trenches 3-4 inches deep with compacted gravel base for stability and drainage
- Material Selection: Use severe-weather-rated clay pavers or reclaimed bricks for authentic patina development
- Joint Treatment: Choose polymeric sand for tight spacing or swept sand for natural drainage in dry-lay applications
- Plant Integration: Position low-growing perennials along brick edges to soften hardscape and create visual flow
Traditional Brick Laying Methods
These time-tested techniques provide structural integrity and clean lines. Mortar-set borders deliver permanent solutions for formal landscapes, while dry-lay methods offer flexibility for evolving garden designs.
1. Mortar-Set Flat Brick Border
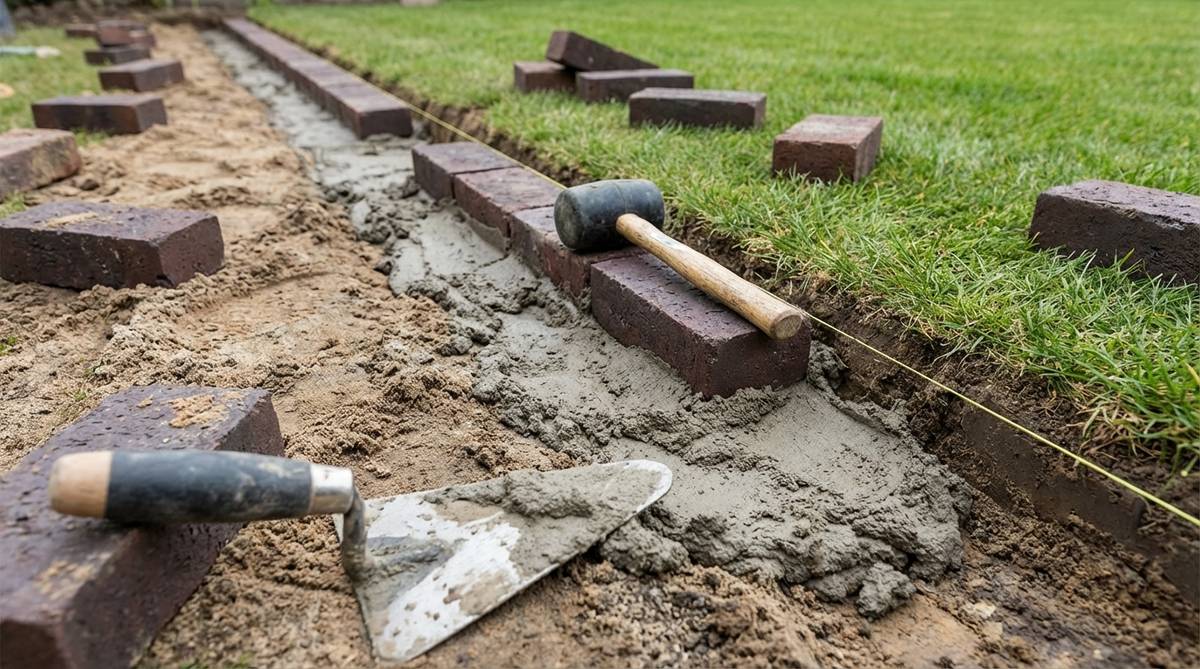
This technique positions clay pavers horizontally along a prepared trench, bonded with a 4:1 sand-cement mixture. The mortar creates a permanent edge that prevents shifting during freeze-thaw cycles common in northern climates.
Spread mortar in small sections to prevent premature drying. Press each brick firmly into the mixture and tap with a rubber mallet to achieve consistent height alignment along the lawn perimeter.
The finished border sits flush with grass height, allowing mower blades to pass directly over the edge. Backfill both sides with native soil once the mortar cures for 48 hours to lock the installation in place.
2. Dry-Lay Horizontal Edging
This approach eliminates mortar by relying on compacted base materials and polymeric sand joints. Excavate a trench with vertical sides, then add 2-3 inches of crushed stone topped with a 1-inch layer of stone dust.
Set bricks end-to-end along the prepared base, tapping each into position with a mallet. Sweep polymeric sand across the surface, working it into joints before misting with water to activate the binding agents.
The flexible installation adapts to seasonal ground movement without cracking. Repositioning individual bricks takes minutes when garden bed dimensions change or plant growth requires adjustment.
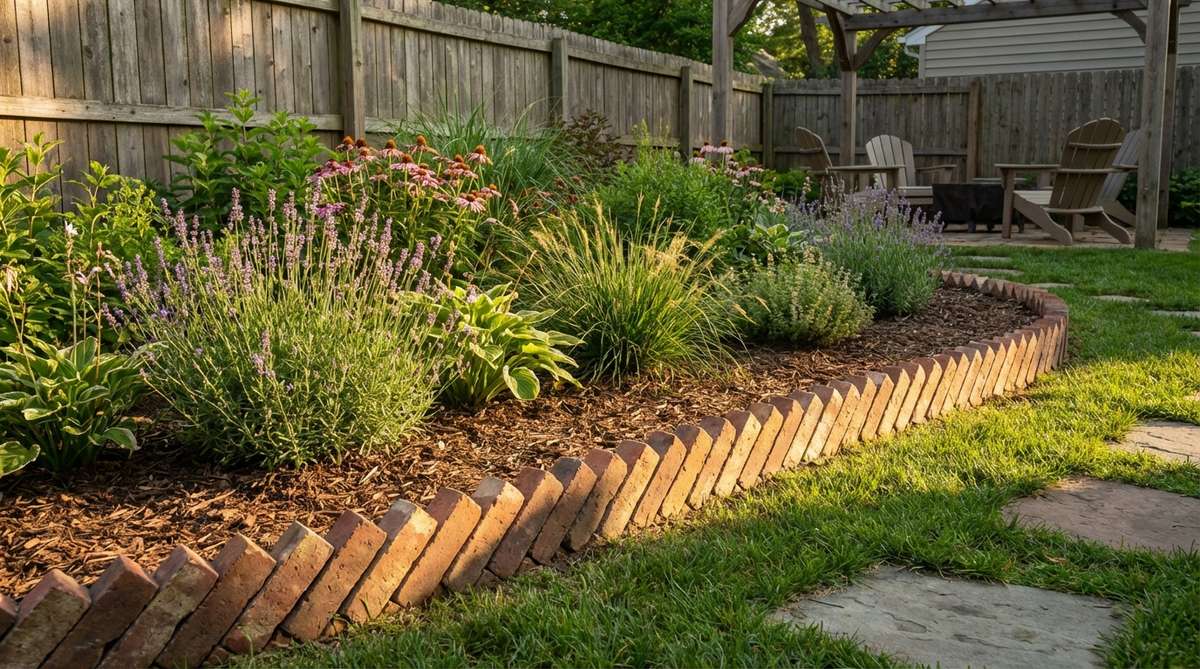
3. Half-Brick Soldier Course
This European-style method stands bricks vertically on their narrow edge, creating a taller profile than horizontal installations. The soldier course adds 3-4 inches of visual height between lawn and planting beds.
Position each brick in a mortar bed, ensuring vertical alignment with a level. The narrow footprint conserves space along tight pathways while delivering architectural presence.
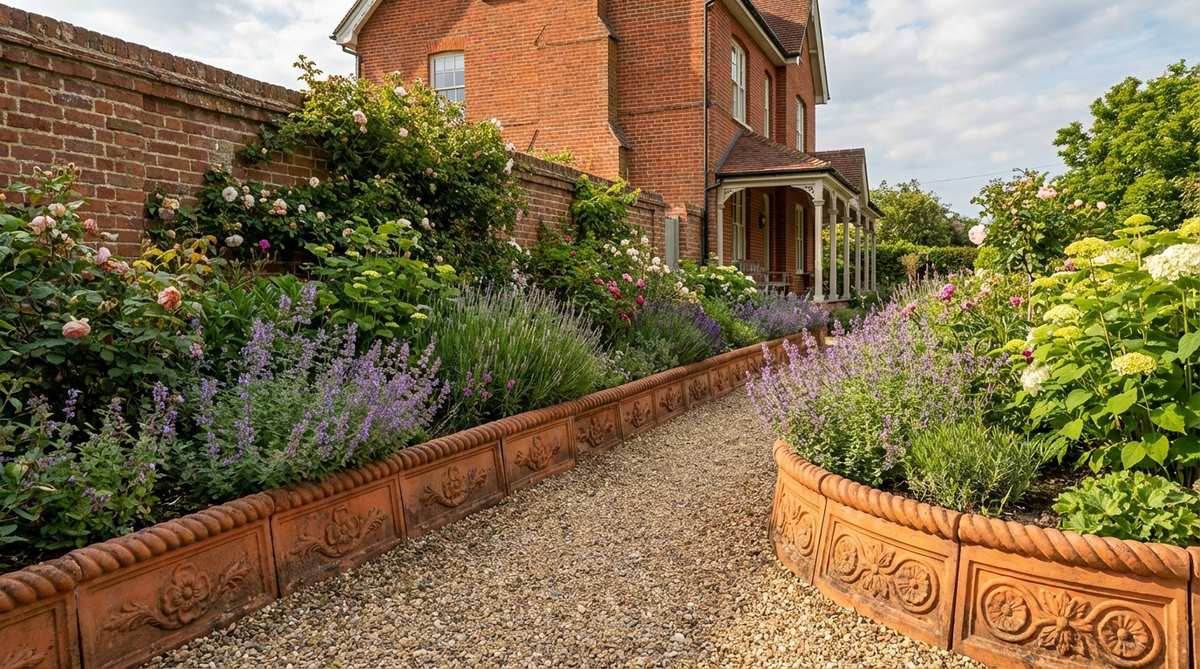
Moisture-absorbing clay develops attractive patina over time, particularly when using reclaimed “Old Chicago” style bricks. Creeping plants like ajuga cascade over the top edge to soften the formal appearance.
4. Concrete Paver Curved Edge
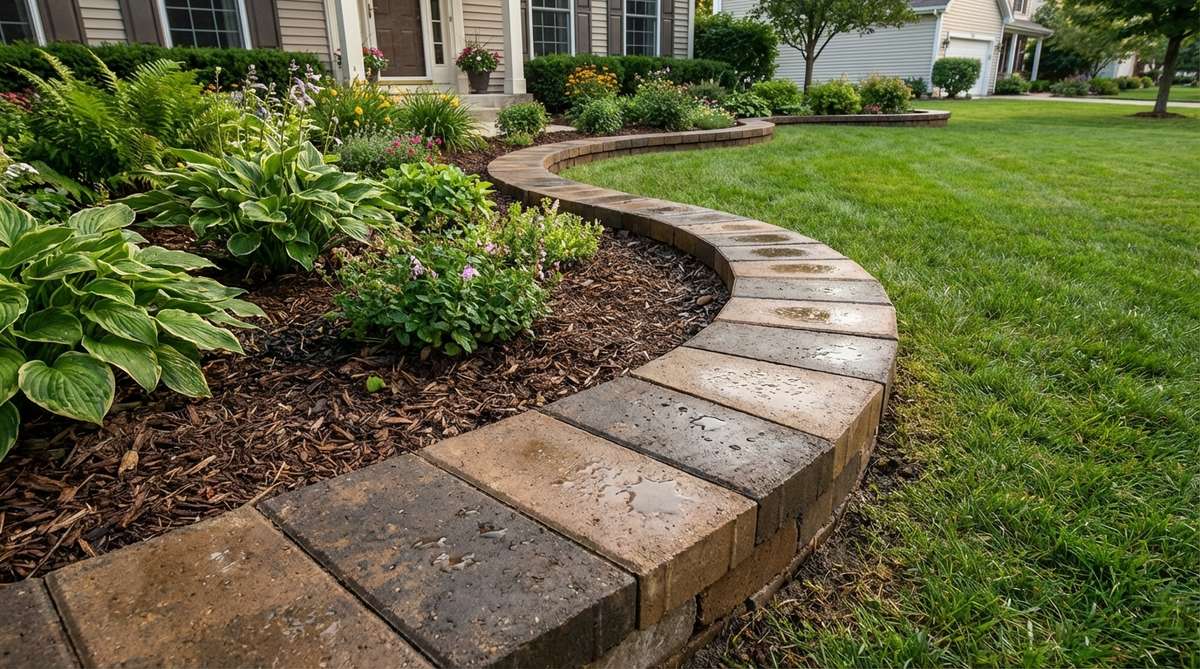
Standard 4×8-inch concrete pavers offer greater size than clay bricks, creating substantial borders along curved flower beds. The larger format reduces installation time while maintaining traditional brick aesthetics.
Mark curves with garden hoses or rope before excavation. Cut pavers with a circular saw fitted with a diamond blade to follow tight radius turns without gaps.
Mix existing and new pavers to blend color variations naturally. The concrete composition resists moisture absorption better than clay, preventing efflorescence in humid climates.
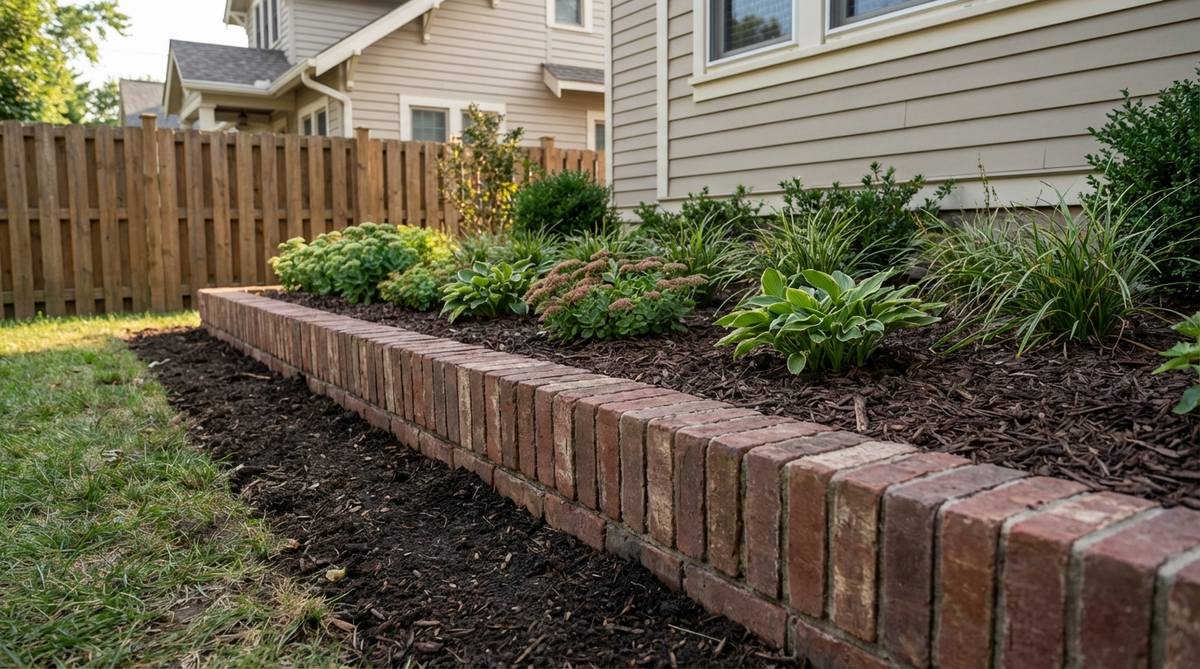
5. Reclaimed Brick Potager Edging
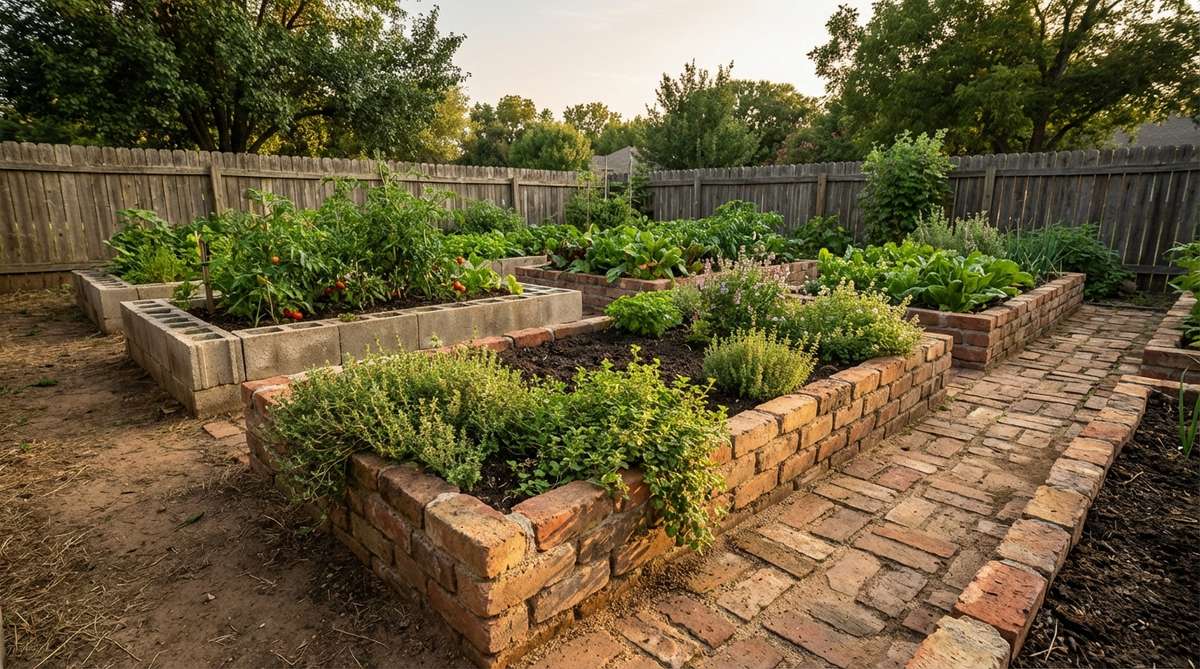
French kitchen gardens employ reclaimed top sections from concrete masonry walls to frame vegetable beds. These 2x12x6-inch pieces create substantial borders with instant aged character.
Set bricks directly on native soil without disturbing root zones of established plants. Sweep sand between joints to allow water infiltration rather than runoff.
The permeable installation maintains soil ecology while providing clear separation between herbs, vegetables, and cutting flowers. Thyme and oregano planted along edges benefit from heat reflection off brick surfaces.
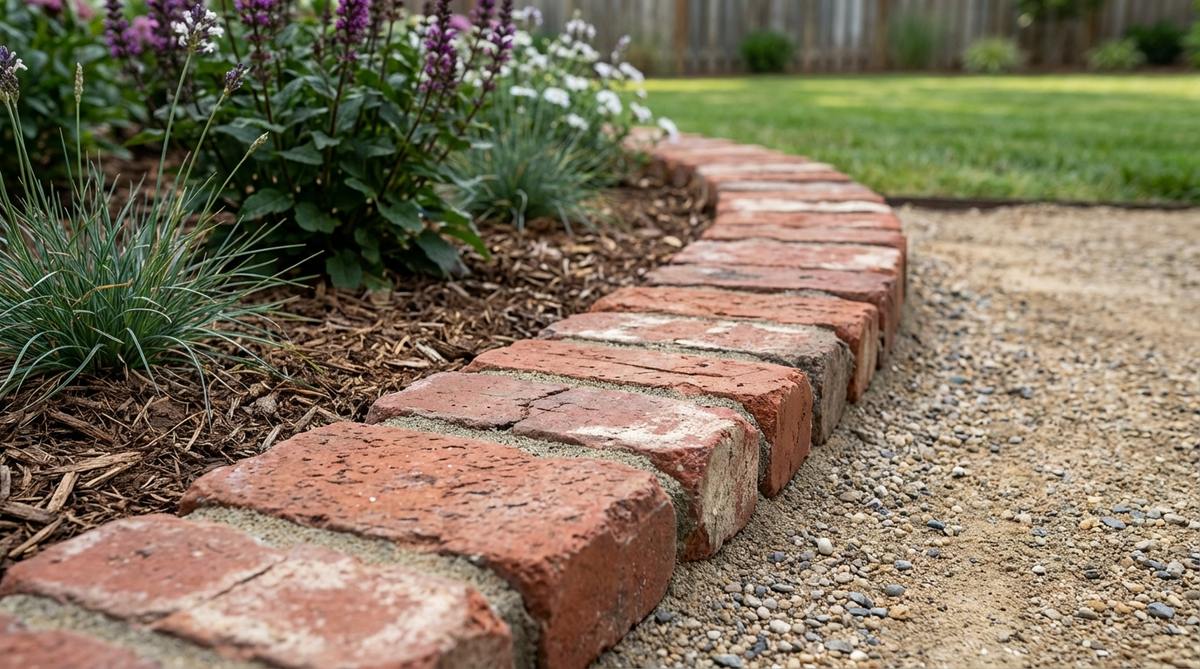
6. Sand-Swept Pathway Border
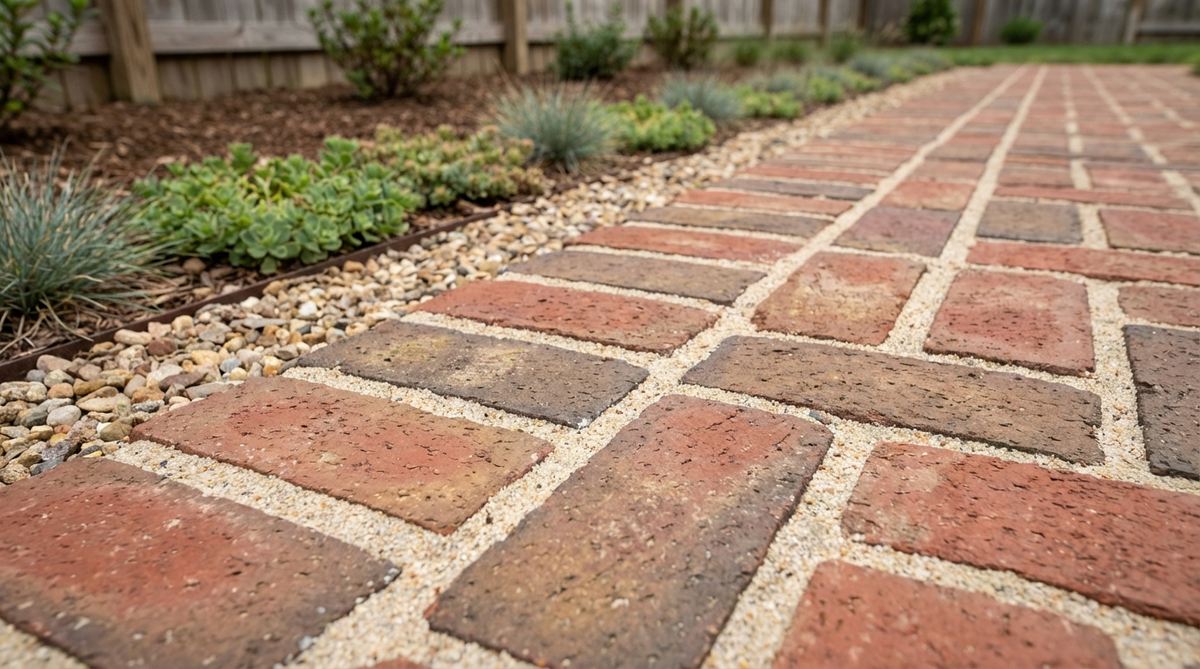
This drainage-focused technique uses coarse sand to fill joints between bricks set along garden paths. Water moves freely through the border rather than pooling against impermeable mortar.
Lay bricks on a 3-inch gravel base covered with landscape fabric to prevent weed growth. Pour sand across the finished surface and sweep diagonally to pack joints completely.
The installation drains rapidly after rainstorms, preventing erosion along sloped pathways. Replenish sand annually as settling occurs and ants excavate material.
Creative Pattern Installations
Distinctive brick arrangements transform functional borders into landscape features. These patterns add visual interest through geometric precision and rhythm along garden perimeters.
7. Herringbone Diagonal Border
Alternating brick angles create a classic woven pattern that draws the eye along pathways. The diagonal orientation adds movement to static borders and complements European garden styles.
Start at one corner with a 45-degree brick placement, then alternate each subsequent brick perpendicular to its neighbor. Heavy mortar joints between rustic bricks enhance the textural contrast.
The interlocking pattern distributes weight more evenly than straight-run borders. This structural advantage prevents individual brick movement in high-traffic areas.
8. Saw-Tooth Angled Edge
This cottage-style border stands bricks at 45-degree angles to form continuous triangular peaks along the garden perimeter. The zigzag profile creates playful dimension that suits informal planting schemes.
Dig a narrow trench and press each brick into soil at a consistent angle, using a string line to maintain uniform peak height. Pack native soil tightly around each brick to prevent tipping.
The angled faces catch afternoon light, creating shadow patterns that enhance visual texture. Cement the base for permanent installations or leave dry-lay for seasonal adjustments.
9. Basket-Weave Pattern

Pairs of horizontal bricks alternate with vertical pairs to create a woven textile appearance. This pattern works best with 4-6 inch border widths where both orientations display clearly.
Lay two bricks horizontally, then position two vertically beside them, repeating the sequence along the entire border length. The pattern requires precise cutting at corners to maintain rhythm.
The traditional design complements Colonial and Victorian architecture. Pair with boxwood hedges or lavender rows for historically accurate garden styling.
10. Running Bond Offset
Each brick overlaps the joint of the bricks below by half its length, mimicking classic wall construction. This staggered pattern creates strong visual lines that guide circulation through the landscape.
Begin with a full brick, then start the second row with a half brick to establish the offset. Continue alternating for the entire border length, cutting end pieces as needed.
The overlapping joints distribute stress more effectively than aligned joints. This construction principle applies to both single-width borders and multi-course raised edges.
11. Radial Circular Pattern
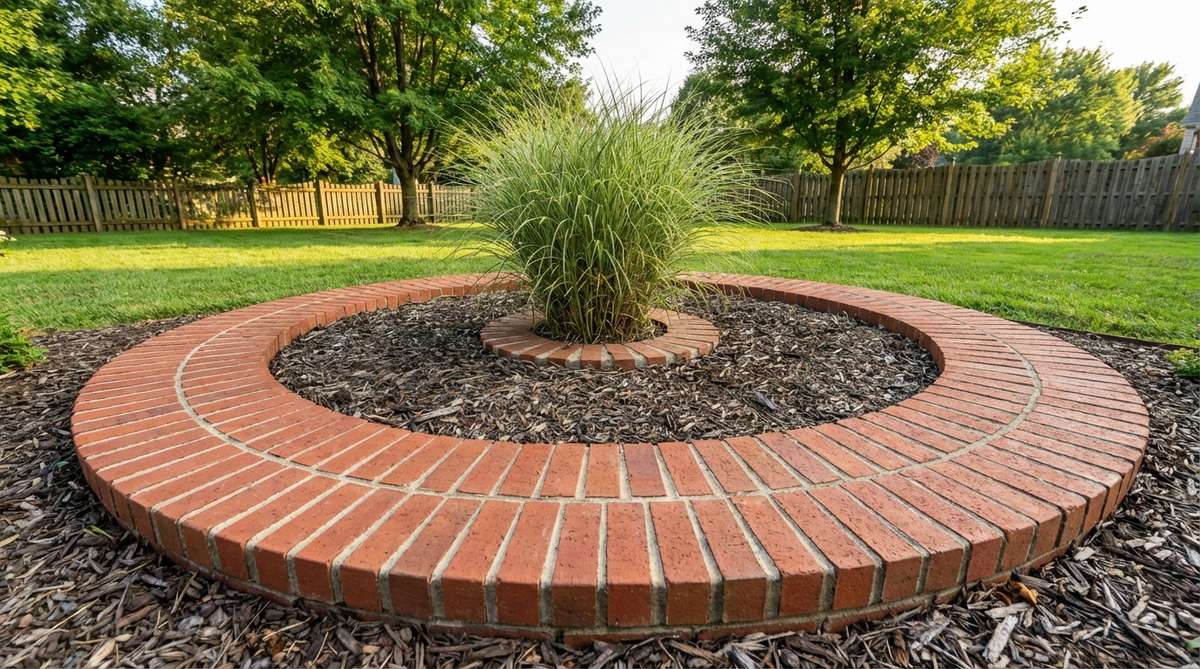
Bricks radiate from a central point to form circular or curved borders around focal plants or garden features. Each brick angles slightly to maintain consistent joint width along the arc.
Mark the circle perimeter with spray paint or a rope anchored at the center point. Cut bricks into wedge shapes so the inner edge sits tighter than the outer edge, maintaining 10mm joints.
The geometric precision creates formal focal points in cottage gardens. Plant ornamental grasses or specimen shrubs at the center to emphasize the radiating design.
12. Stacked Double-Row
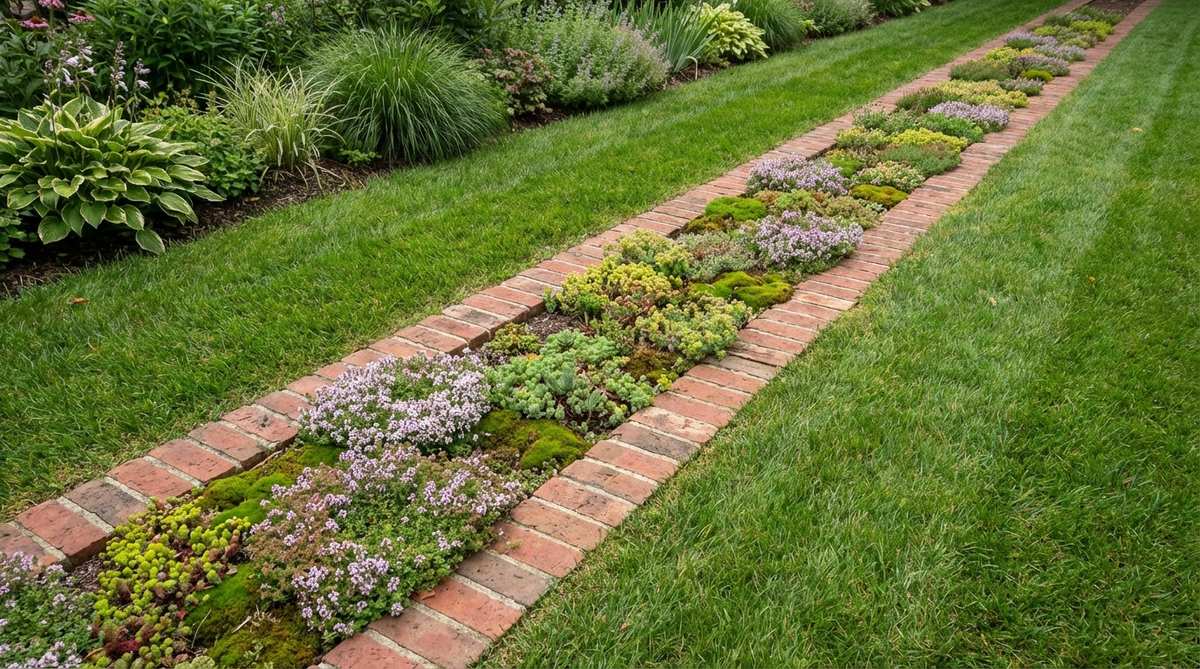
Two parallel brick rows create a planted channel between lawn and garden beds. Fill the gap with creeping thyme, sedum, or moss for a living detail that softens the hardscape.
Space rows 2-4 inches apart and set at identical heights to frame the planting strip evenly. Use level mortar beds to prevent settling that would create drainage channels.
The technique doubles visual impact while controlling aggressive grass runners. The planted gap requires minimal maintenance once established and tolerates foot traffic between rows.
Vertical & Stacked Borders
Multi-layer brick installations create raised edges that retain soil and provide planting depth for beds. These techniques suit sloped properties and terraced garden designs.
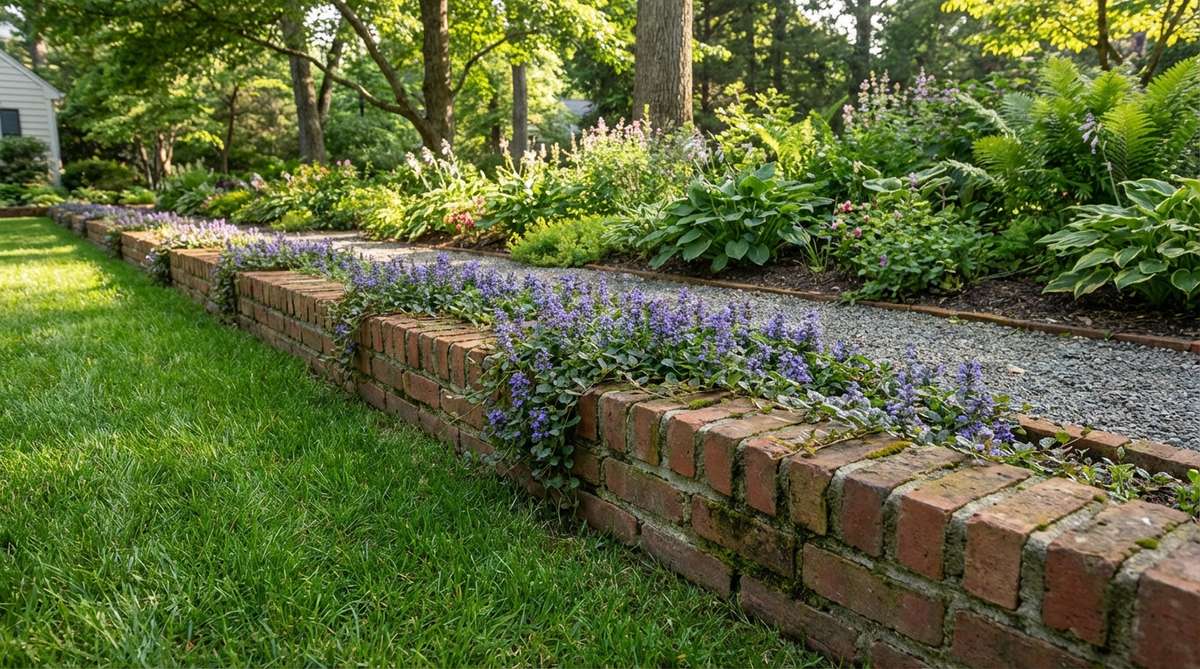
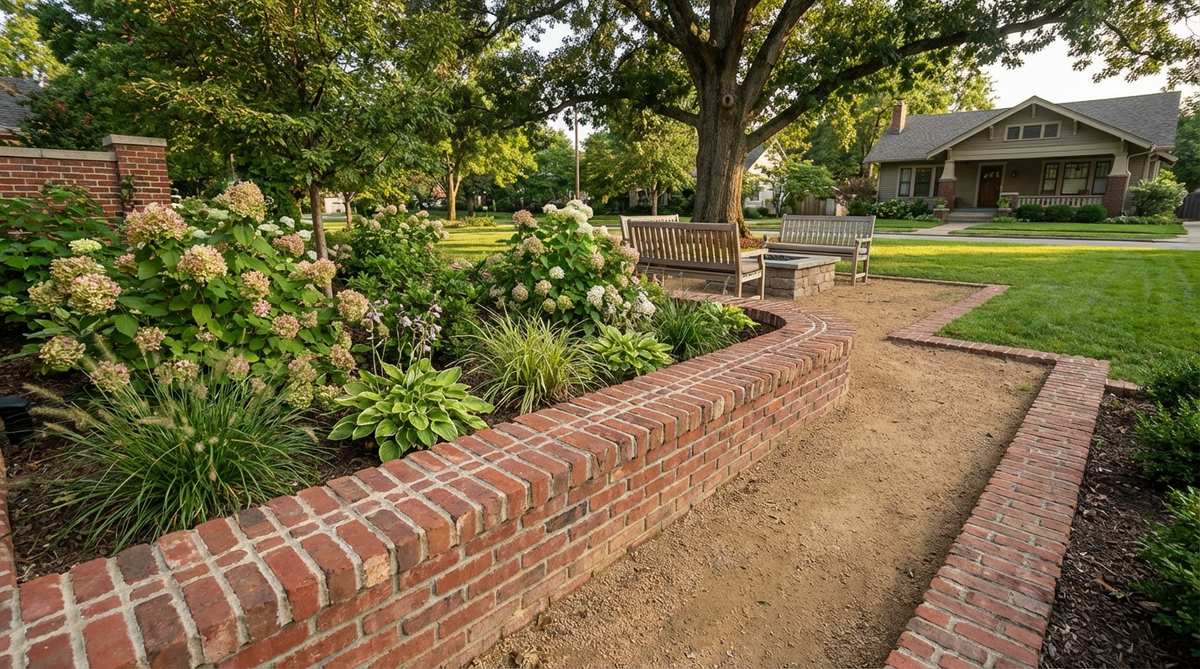
13. Traditional Raised Bed
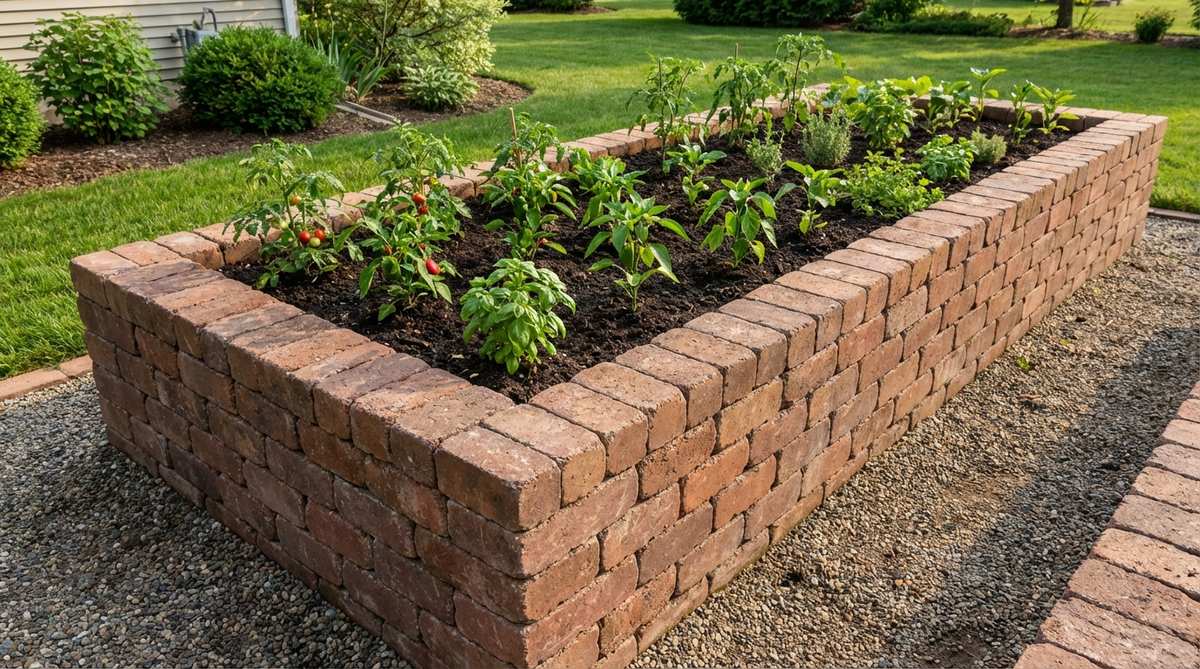
Stacking bricks two to four courses high builds raised planting beds that improve drainage and extend the growing season. The elevated soil warms faster in spring and maintains better structure than ground-level beds.
Construct on a concrete footing that extends below the frost line to prevent settling. Stagger vertical joints using running bond pattern and fill cavities with mortar for structural integrity.
Raised beds reduce bending during planting and maintenance, offering accessibility advantages for all gardeners. The brick thermal mass moderates soil temperature fluctuations throughout the day.
14. Vertically Stacked Soldier Wall
Standing bricks on end and stacking them two or three units high creates a narrow-profile wall that conserves space. This vertical orientation provides 8-12 inches of soil retention with a 4-inch footprint.
Bond each course with mortar and reinforce tall installations with rebar driven through the brick cores into the ground. The slender profile suits narrow side yards and urban gardens.
The tall edge prevents mulch migration during heavy rains. Plant low-growing perennials along the base to conceal the foundation and integrate the wall with surrounding plantings.
15. Random Stacked Chaos Border
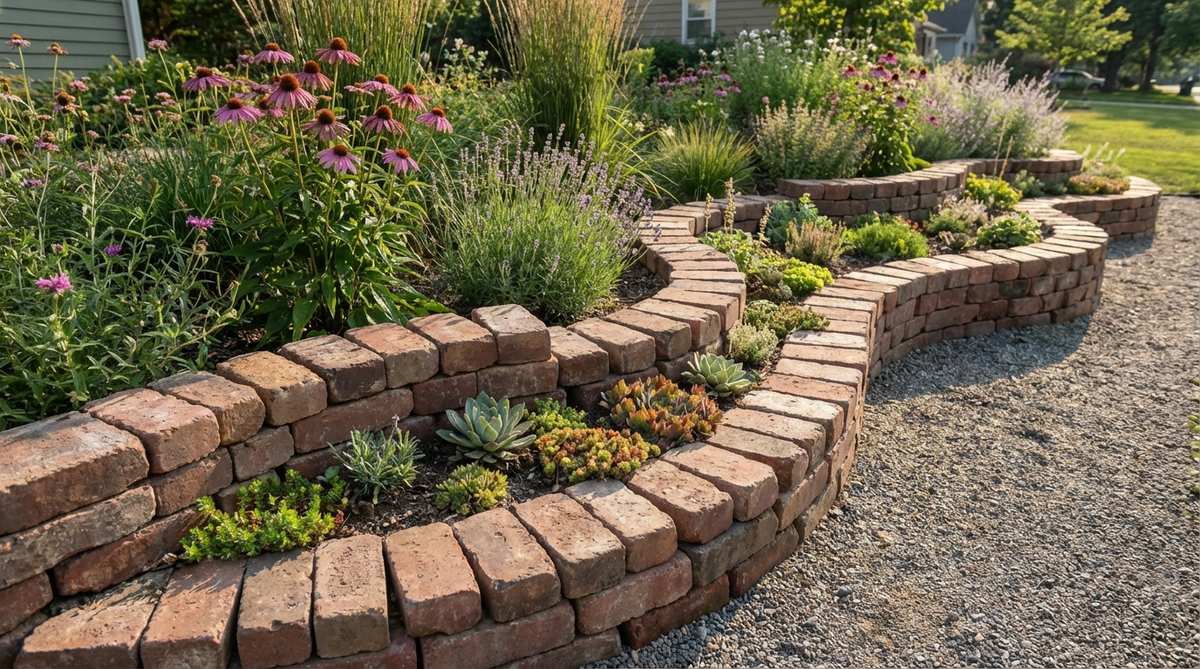
This contemporary approach layers bricks in irregular patterns without mortar, creating organic edges that complement naturalistic planting schemes. The random arrangement suits cottage gardens and prairie-style landscapes.
Stack bricks two to five courses high with intentional variations in height along the border length. Offset joints randomly rather than following traditional masonry patterns.
The loose-stacked construction allows water to drain through multiple gaps. Tuck alpine plants and succulents into crevices to enhance the naturalistic appearance.
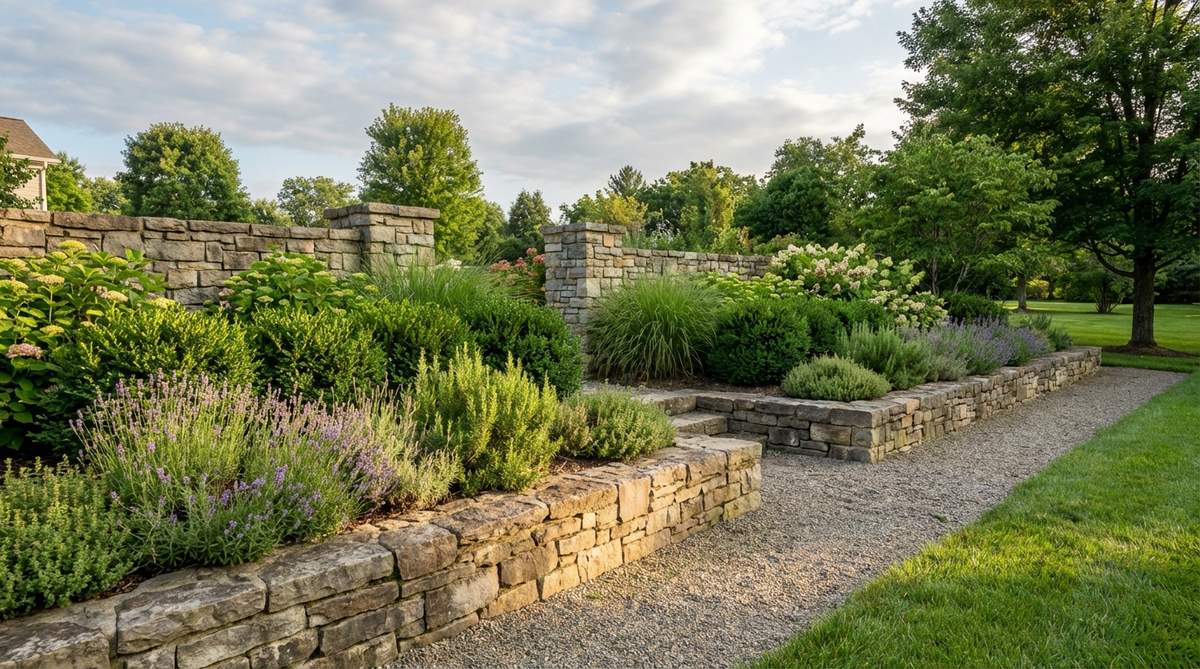
16. Terraced Slope Retention
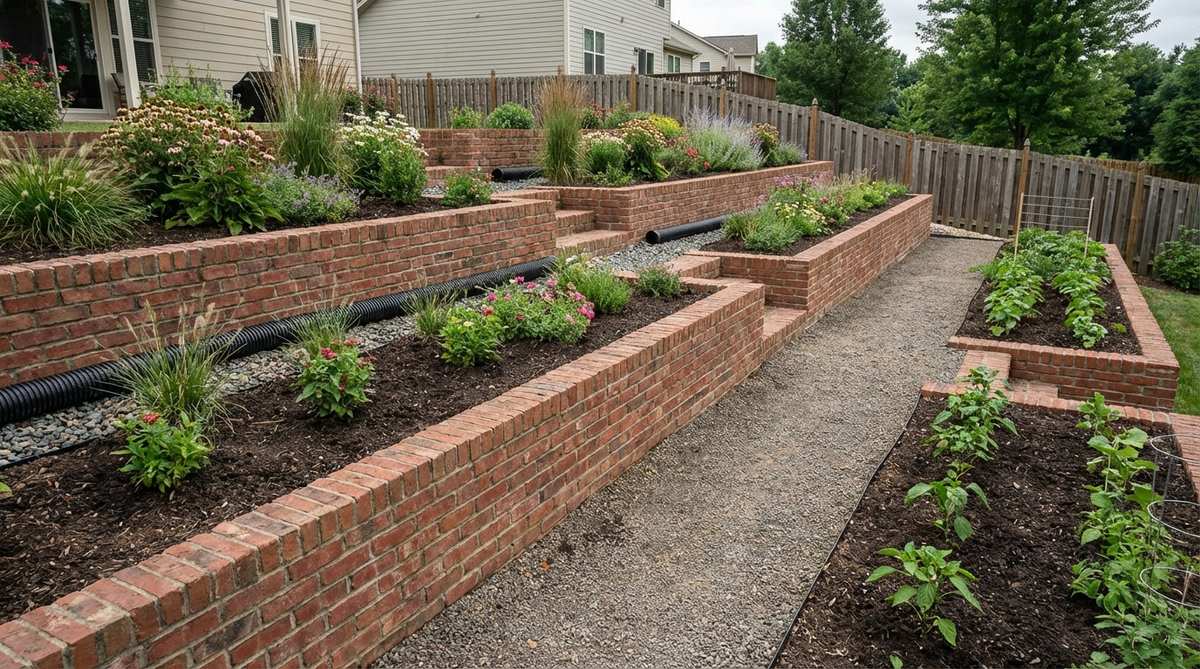
Multiple brick walls step down slopes to create level planting terraces on hillside properties. Each wall holds 12-18 inches of soil, transforming unusable grade into productive garden space.
Build walls perpendicular to the slope with a slight backward lean for stability. Install drainage pipes behind each wall to prevent hydrostatic pressure buildup.
The terraced design reduces erosion while increasing usable planting area. Space walls 3-4 feet apart to accommodate paths between tiers for maintenance access.
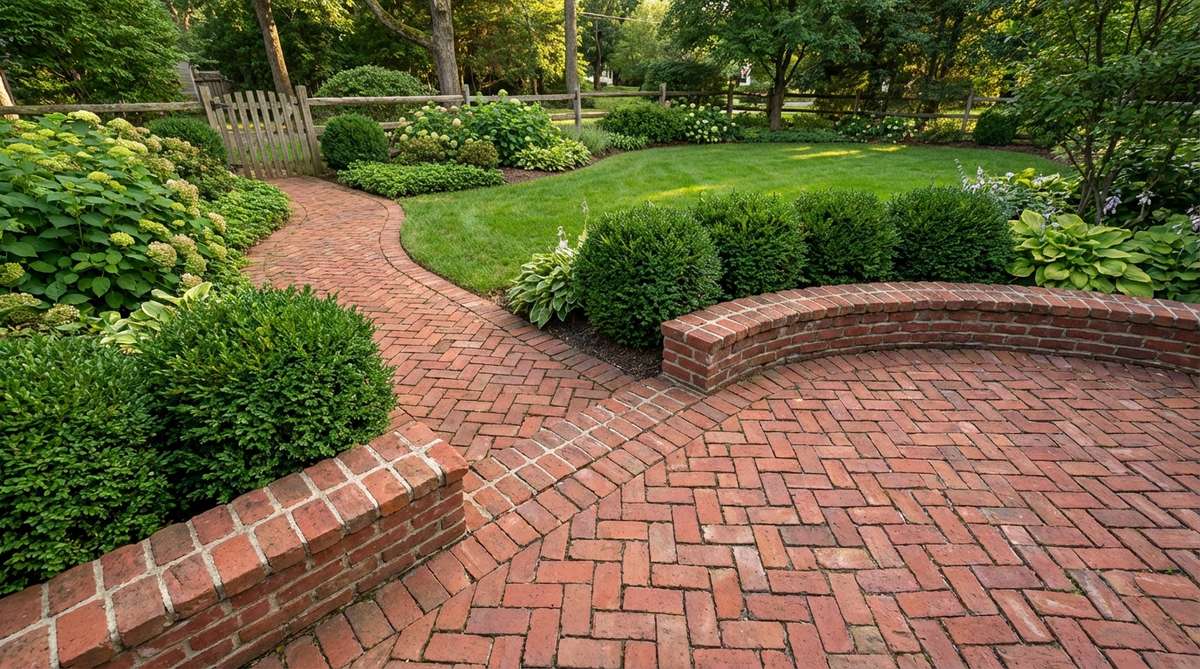
17. Capped Wall Border
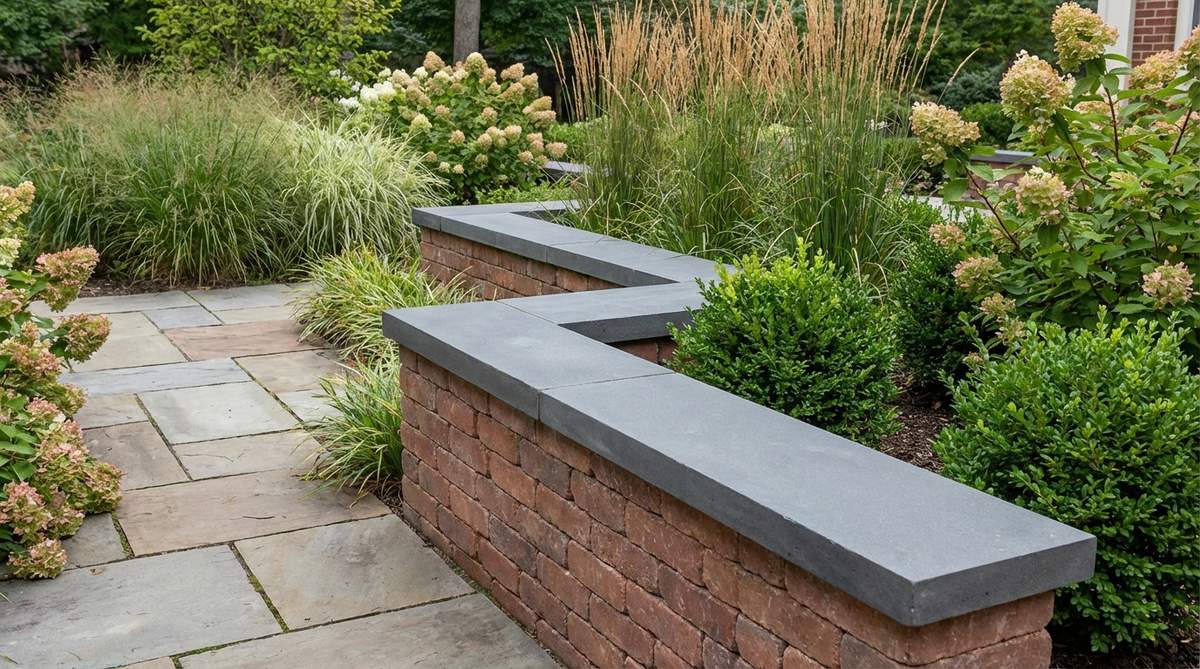
Finishing stacked brick walls with cap units creates a polished edge that protects the masonry from weather damage. Caps overhang the wall face by 1-2 inches, directing water away from joints.
Bond cap bricks with mortar and slope them slightly to shed water. Use contrasting brick colors or materials like bluestone for architectural emphasis.
The capped detail provides a clean sitting edge for casual garden seating. The overhanging lip prevents soil and mulch from washing over the wall face during storms.
18. Stepped Height Variation
Varying wall heights along a border creates rhythm and accommodates different soil depths for diverse plants. Transition from two courses to four courses within a single border run.
Plan height changes to align with plant groupings, providing shallow sections for herbs and deeper zones for shrubs. Step heights gradually over 6-8 feet to maintain visual continuity.
The varied topography adds dimension to flat properties. The technique mimics natural terrain variations, creating more engaging visual interest than uniform heights.
Plant & Brick Combinations
Strategic plant selection enhances brick borders through color contrast, textural variation, and seasonal interest. These combinations balance hardscape formality with organic softness.
19. Lavender Hedge Brick Base
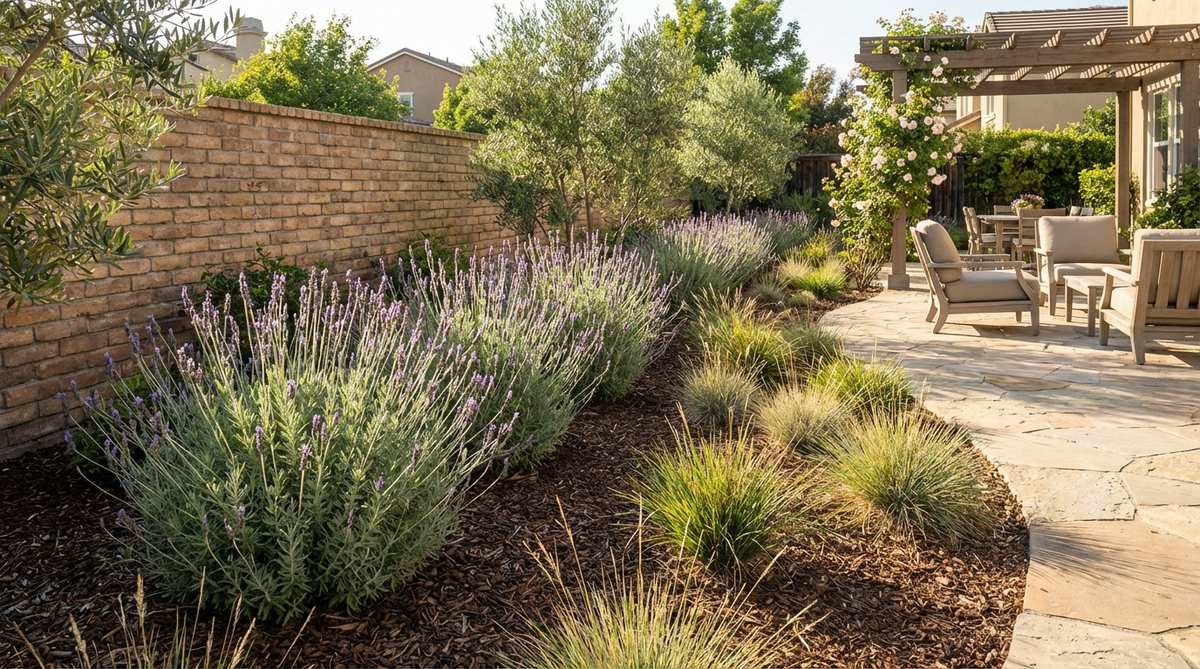
Planting lavender along brick borders combines aromatic foliage with drought-tolerant toughness. The silvery-green leaves contrast beautifully with red and orange brick tones throughout the growing season.
Space plants 12-18 inches apart along the border exterior, allowing them to billow over the brick edge. The brick thermal mass warms root zones and reflects heat during summer, enhancing essential oil production.
Shear lavender annually after flowering to maintain compact form. The combination suits Mediterranean-style gardens and provides habitat for pollinators from early summer through fall.
20. Creeping Thyme Mortar Joints
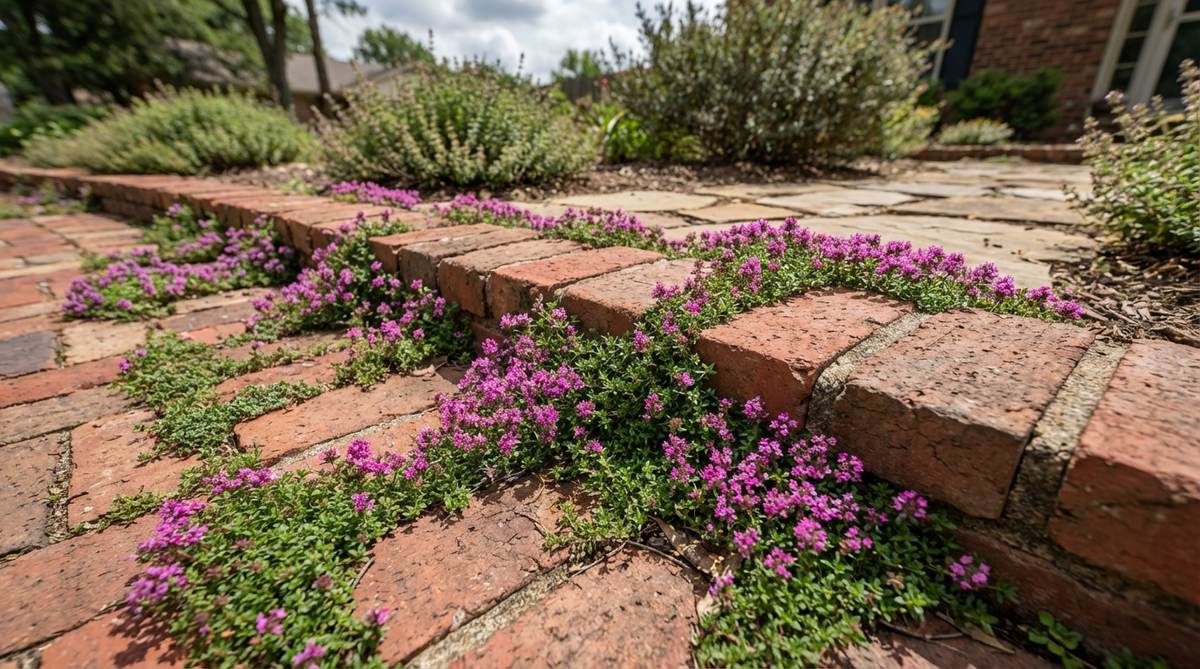
Planting low-growing thyme varieties directly in border joints creates a fragrant, living mortar alternative. The plants tolerate foot traffic and release scent when brushed.
Skip traditional mortar and fill wide joints with sandy soil amended with compost. Tuck small thyme plugs into joints at 6-inch intervals, watering regularly until established.
The planted joints soften rigid brick lines while controlling weed growth. Red creeping thyme adds magenta blooms in June, transforming the border into a floral ribbon.
21. Boxwood Formal Edging
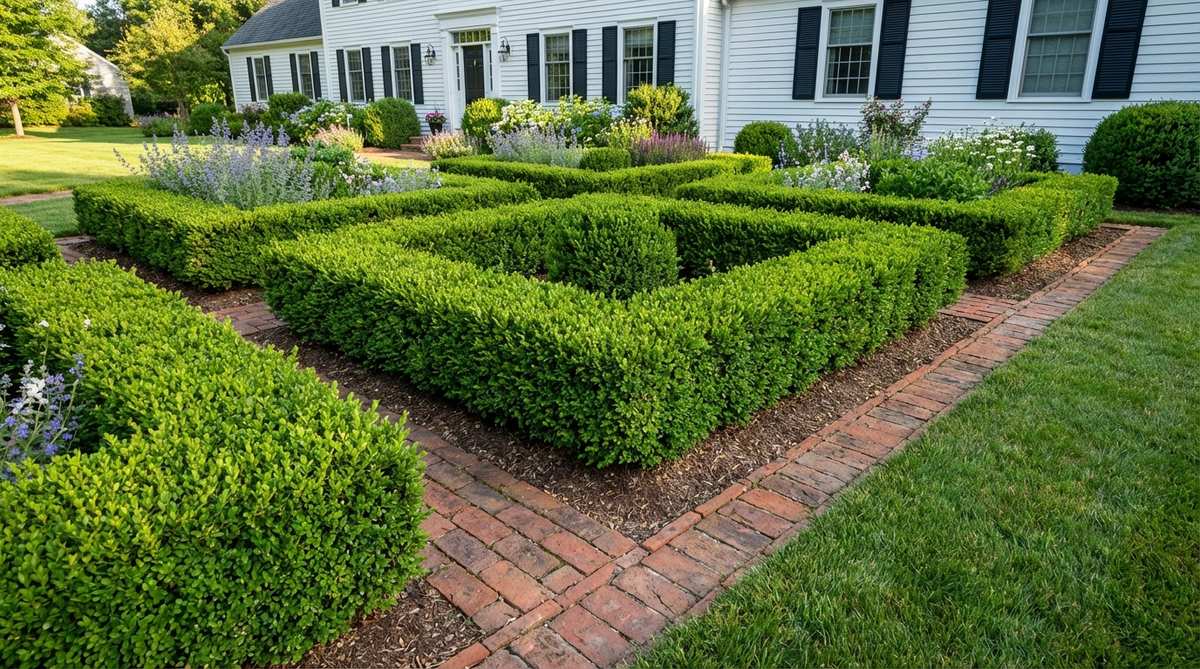
Pairing clipped boxwood hedges with brick borders creates traditional parterre-style gardens. The evergreen shrubs provide year-round structure that complements brick geometry.
Plant boxwood 12 inches behind the brick edge to allow shearing access. The brick defines the outer boundary while boxwood frames the interior planting beds.
The double-edging system controls aggressive perennials and prevents soil migration. Boxwood requires minimal irrigation once established, thriving in the well-drained conditions brick borders provide.
22. Ornamental Grass Overflow
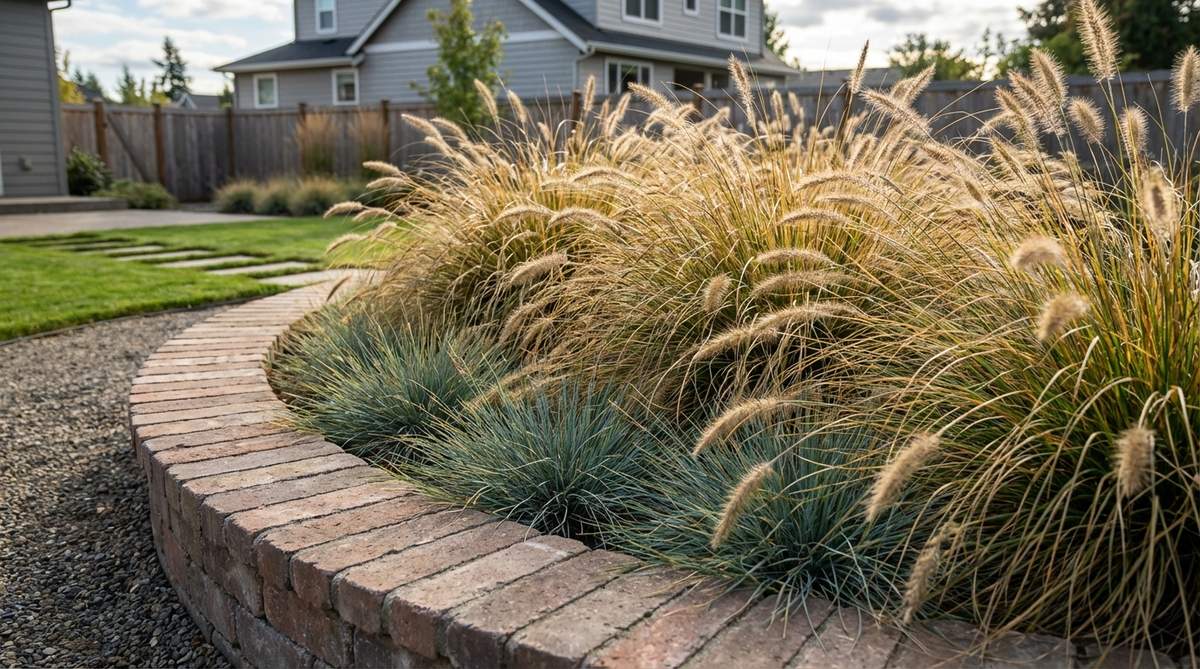
Fountain grasses and low-growing sedges cascade over brick borders, creating dynamic movement contrasts. The fine-textured foliage softens angular brick profiles while maintaining the defined edge.
Plant grasses 6-8 inches behind the border, allowing arching stems to drape forward. The brick prevents grass from flopping onto lawns while displaying the natural growth habit.
The combination thrives in contemporary landscapes where textural contrast drives design. Ornamental grasses develop attractive seed heads that persist through winter, extending seasonal interest.
23. Sedum Brick Carpet
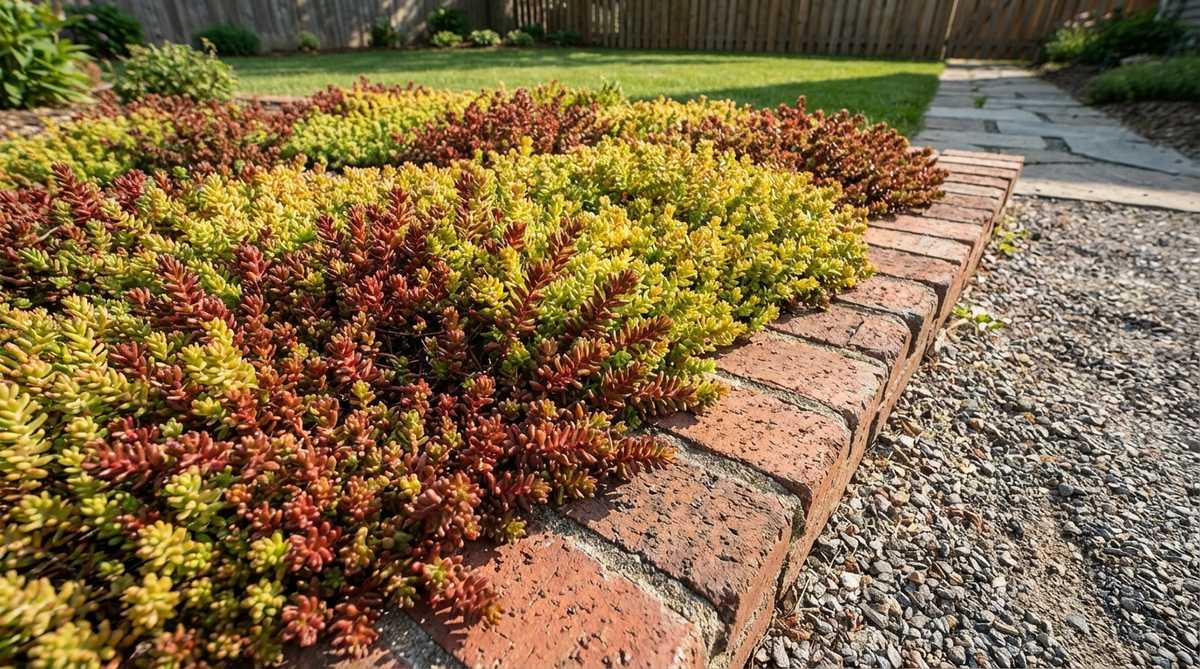
Low-growing sedum varieties planted along brick borders create succulent mats that tolerate drought and require minimal maintenance. The fleshy leaves provide textural contrast against hard masonry surfaces.
Select spreading varieties like ‘Dragon’s Blood’ or ‘Angelina’ that root as they grow, forming dense carpets. Plant in well-drained soil along the border exterior where overflow enhances the edge.
Sedums change color seasonally, offering burgundy fall tones and bright spring growth. The combination suits xeric gardens and slopes where irrigation access proves difficult.
24. Creeping Fig Wall Climber
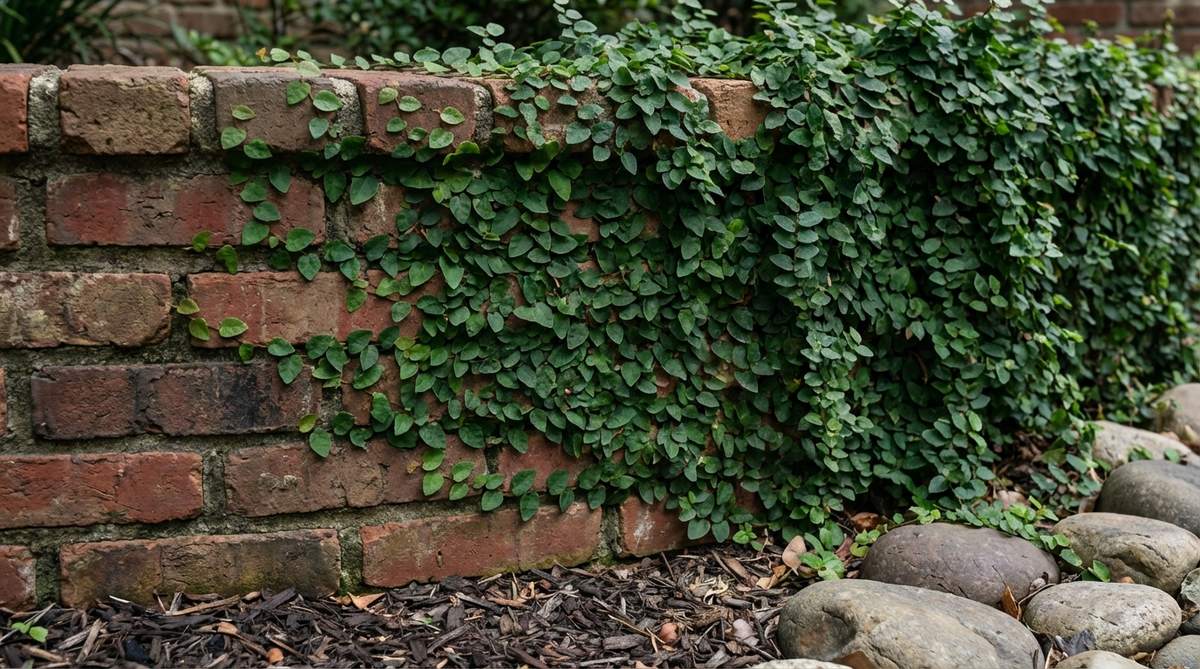
Training creeping fig along stacked brick walls creates evergreen tapestry that transforms vertical surfaces. The small-leaved vine adheres naturally to brick through aerial rootlets.
Plant specimens at 3-foot intervals along the wall base in shade or partial sun conditions. The vine tolerates low light and produces dense coverage within two growing seasons.
Shear annually to maintain the desired thickness and prevent excessive weight buildup. The evergreen coverage conceals aging brick while adding lush texture to shaded garden areas.
25. Alyssum Fragrance Strip
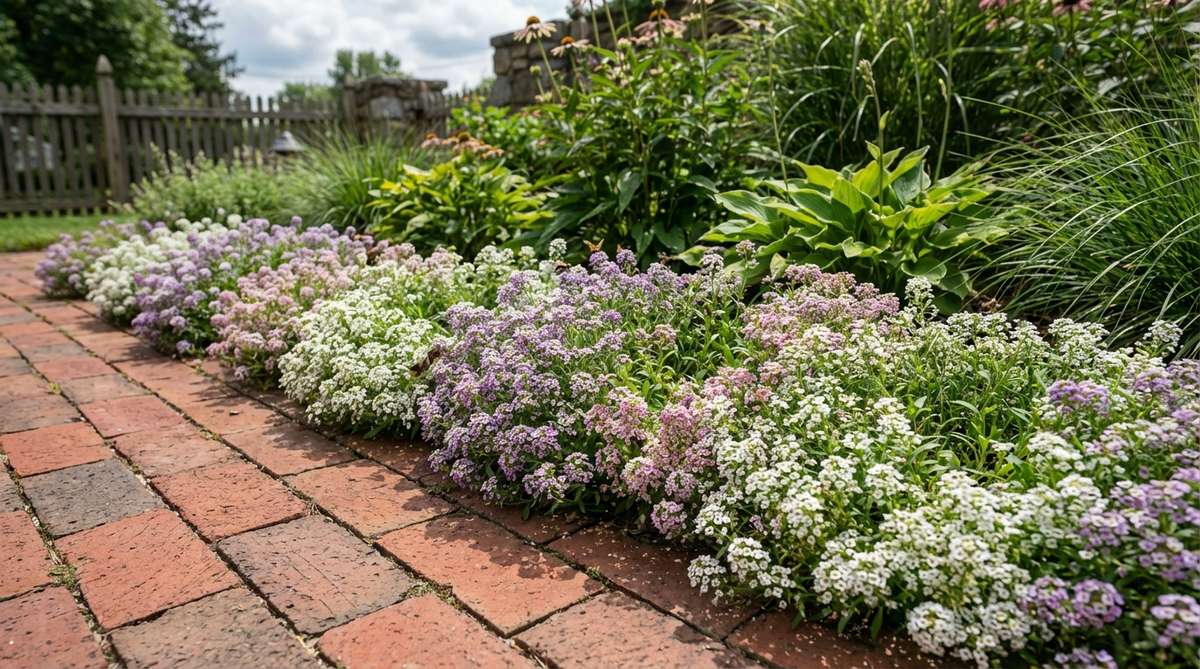
Annual sweet alyssum planted along brick borders provides continuous honey-scented blooms from spring through frost. The low-growing plants hug brick edges without obscuring the border definition.
Direct-seed along the border exterior after last frost or transplant cell packs at 6-inch spacing. Alyssum self-sows reliably, returning annually without replanting.
The white, purple, or pink blooms attract beneficial insects while filling gaps between perennials. Shear lightly after the first flush to promote rebloom through fall.
26. Hostas Shade Border

Shade-tolerant hostas planted behind brick borders provide bold foliage contrast in woodland gardens. The large leaves create visual weight that balances brick structural elements.
Select compact varieties for narrow borders or large specimens for substantial beds. The brick edge prevents hosta crowns from spreading onto lawns while defining the planting zone.
Hostas emerge in spring after bulbs finish, providing seasonal succession. The brick thermal mass moderates soil temperature, protecting emerging shoots from late frosts.
27. Dianthus Cottage Pink
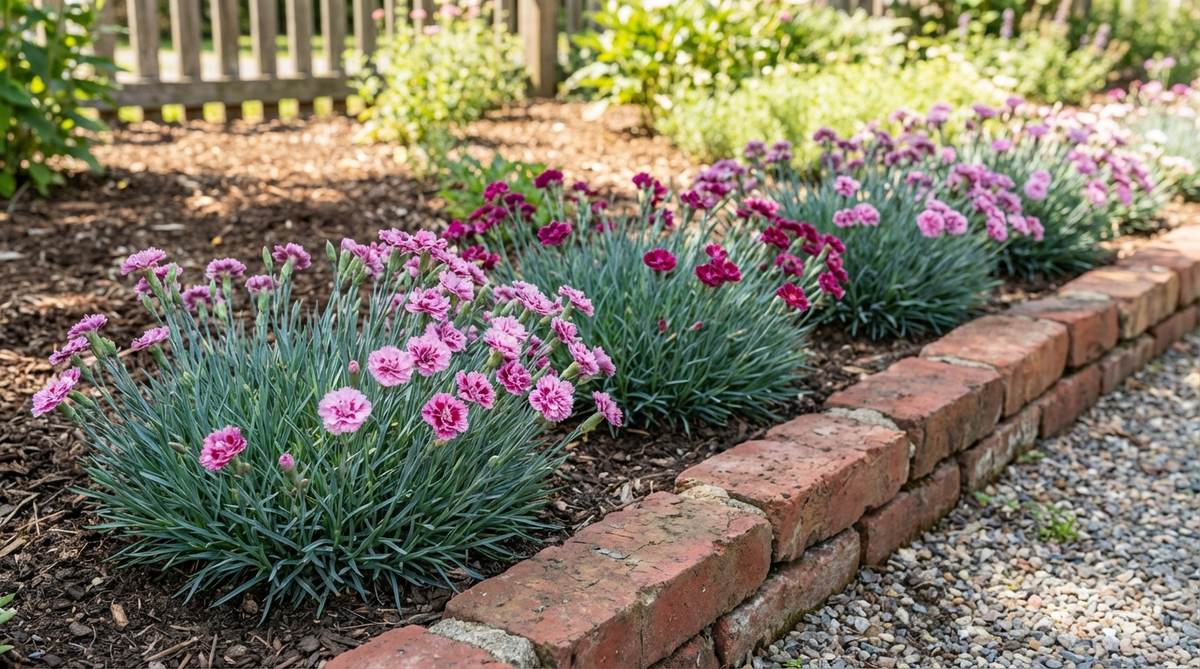
Cottage pinks planted along brick borders deliver spicy-scented blooms and blue-gray evergreen foliage. The compact plants form tidy mounds that respect border boundaries throughout the year.
Space plants 10-12 inches apart in full sun locations with excellent drainage. The brick edge elevates soil temperature, extending the bloom period in spring and fall.
Deadhead spent flowers to encourage rebloom. The combination creates classic cottage garden aesthetics with minimal maintenance requirements.
Specialized Applications
These advanced techniques address specific landscape challenges through creative brick applications. Each method solves practical problems while maintaining aesthetic cohesion.
28. Permeable Brick Ribbon
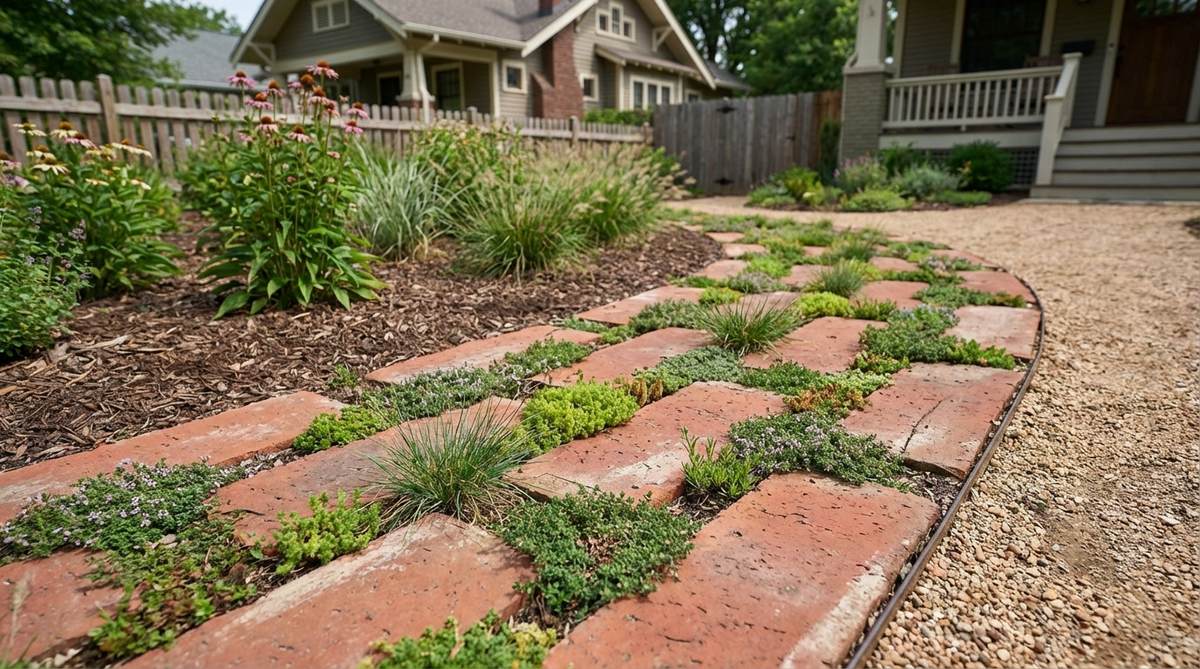
Wide-set bricks with planted gaps create permeable borders that manage stormwater runoff. The technique alternates bricks with 2-3 inch soil gaps planted with low groundcovers.
Set bricks on a gravel base without mortar, leaving consistent spacing throughout. Fill gaps with sandy loam and plant creeping varieties that tolerate periodic inundation.
The permeable design filters runoff before it enters storm drains, reducing pollution. The technique satisfies green infrastructure requirements in environmentally sensitive developments.
29. Mowing Strip Integration
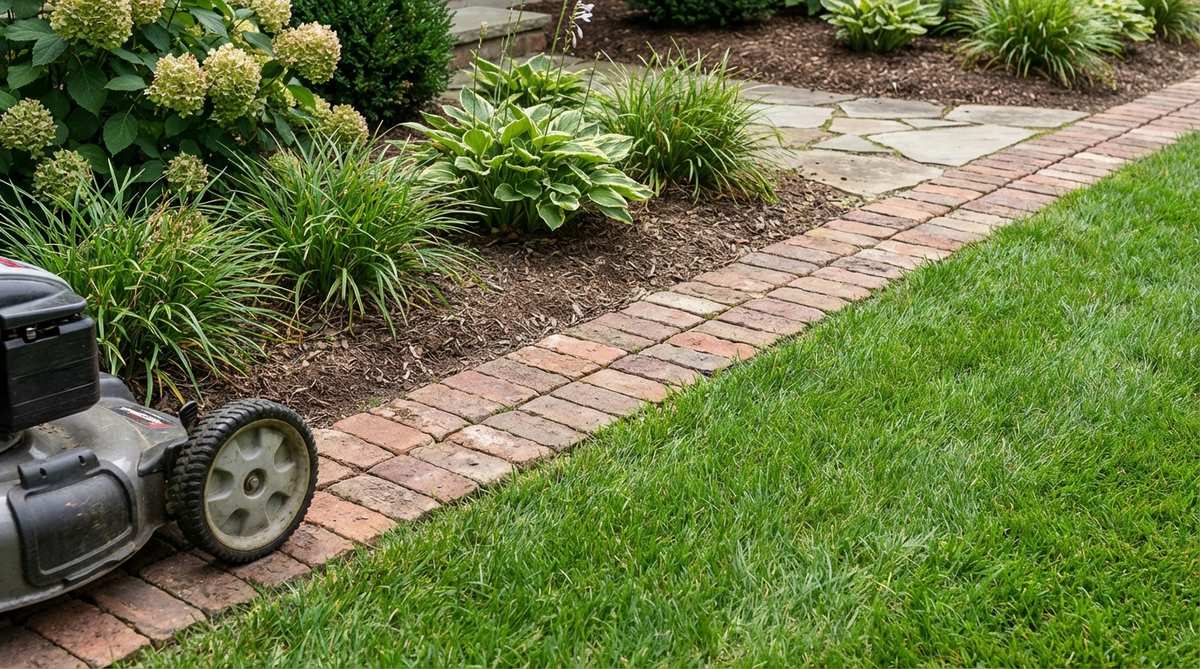
Installing brick borders flush with lawn grade creates a mowing strip that eliminates trimming. The brick width accommodates mower wheels, allowing blades to reach grass edges.
Set bricks 1/2 inch below grass height to prevent scalping during mowing. The border width should match the mower deck overhang, typically 4-8 inches.
The design reduces maintenance time by eliminating string trimmer work. Edge bricks remain visible enough to guide equipment while supporting wheel weight without settling.
30. Victorian Rope Edge
Decorative rope-patterned terracotta edging recreates Victorian garden styling with modern durability. The molded patterns add ornamental detail that complements period architecture.
Interlock sections for seamless installation along curved or straight borders. The warm terracotta tones harmonize with traditional brick construction and cottage plantings.
The decorative edge suits heritage gardens and restoration projects. Modern manufacturing creates frost-resistant alternatives to authentic Victorian terracotta that cracked in freeze-thaw cycles.
31. Tree Ring Brick Circle
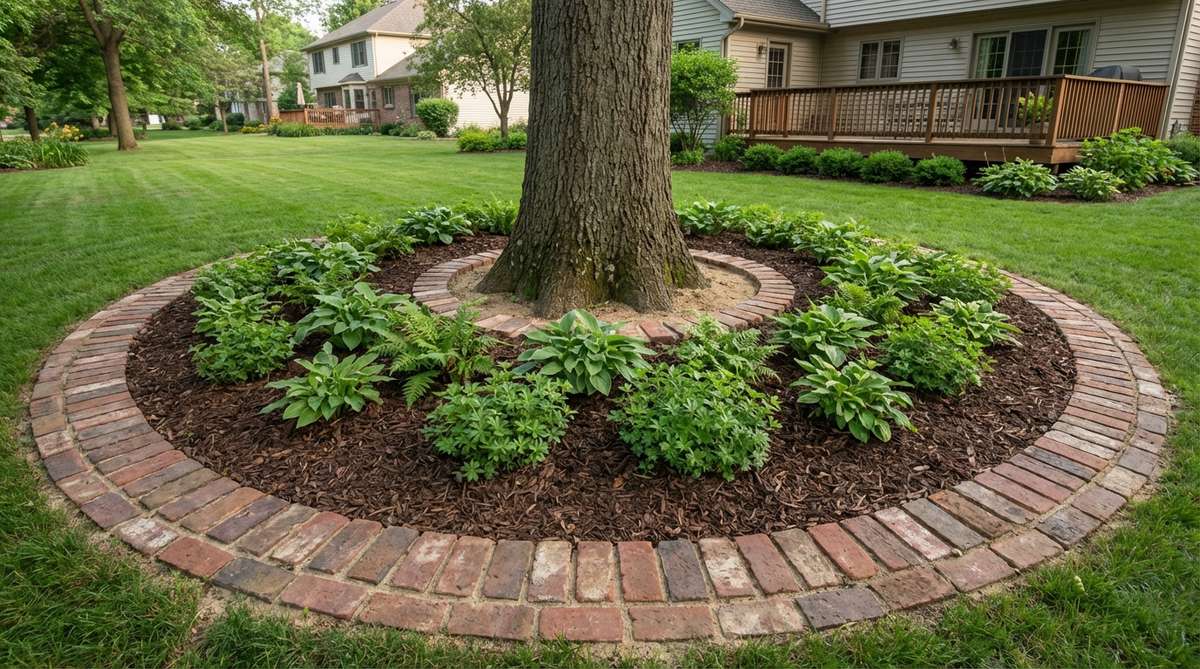
Circular brick borders around established trees protect root zones from mower damage while defining mulch areas. The ring diameter extends to the tree’s drip line to cover the entire root zone.
Set bricks in sand without mortar to allow gas exchange and water infiltration to roots. Leave a 6-12 inch gap between the trunk and brick border to prevent bark damage.
The defined circle simplifies mulching and prevents soil compaction from foot traffic. Underplant shade-tolerant groundcovers within the ring to complete the design.
Conclusion
Mastering garden design border techniques with bricks and plants creates landscape definition that endures for decades. The methods presented here balance structural permanence with organic softness, addressing both aesthetic goals and practical functions like erosion control and maintenance reduction. Select techniques that complement your regional climate, architectural style, and maintenance capacity, then execute installations with attention to proper foundation preparation and material selection. The investment in well-constructed brick borders pays continuous dividends through reduced upkeep and timeless visual appeal that anchors your garden design.
Frequently Asked Questions
What type of brick works best for garden borders?
Severe-weather-rated clay pavers perform best in garden borders, as they resist moisture absorption that causes freeze-thaw cracking in northern climates. Standard concrete pavers offer comparable durability at lower cost, while reclaimed bricks provide instant aged character but require inspection for structural integrity before installation.
How deep should I dig a trench for brick edging?
Excavate trenches 3-4 inches deep for standard brick borders, ensuring sufficient depth for a 2-inch gravel base plus 1 inch of setting sand or mortar. Deeper trenches of 6-8 inches become necessary for raised or stacked installations that require concrete footings below the frost line.
Can I install brick borders without mortar?
Dry-lay brick borders perform reliably when installed on properly compacted gravel bases with polymeric sand joints. This method offers flexibility for seasonal adjustments and adapts to ground movement better than mortared installations, though it requires periodic joint sand replenishment.
What plants grow best along brick garden borders?
Low-growing perennials like creeping thyme, sedum, dianthus, and alyssum thrive along brick borders where reflected heat and excellent drainage create ideal conditions. For shaded borders, hostas, creeping fig, and ajuga tolerate lower light while softening the brick edge with contrasting foliage textures.
How do I prevent grass from growing over brick edging?
Install bricks flush with or slightly below lawn grade to allow mower blades to pass over the edge, cutting grass before it can spread across the border. Apply pre-emergent herbicide along the brick-lawn interface in early spring to prevent grass seed germination in joints.
Should brick borders slope for drainage?
Brick borders should slope away from structures at a minimum 2% grade to direct water toward planting beds or drainage channels. For level installations, ensure joints or gaps allow water infiltration rather than creating impermeable barriers that channel runoff.