This contemporary garden shed blueprint reveals the exact material sourcing needed for a stunning backyard retreat. You will discover budget-friendly DIY setups and smart layout hacks that bypass expensive architect fees. Elevate your property value effortlessly overnight.
Design Snapshot Key Principles
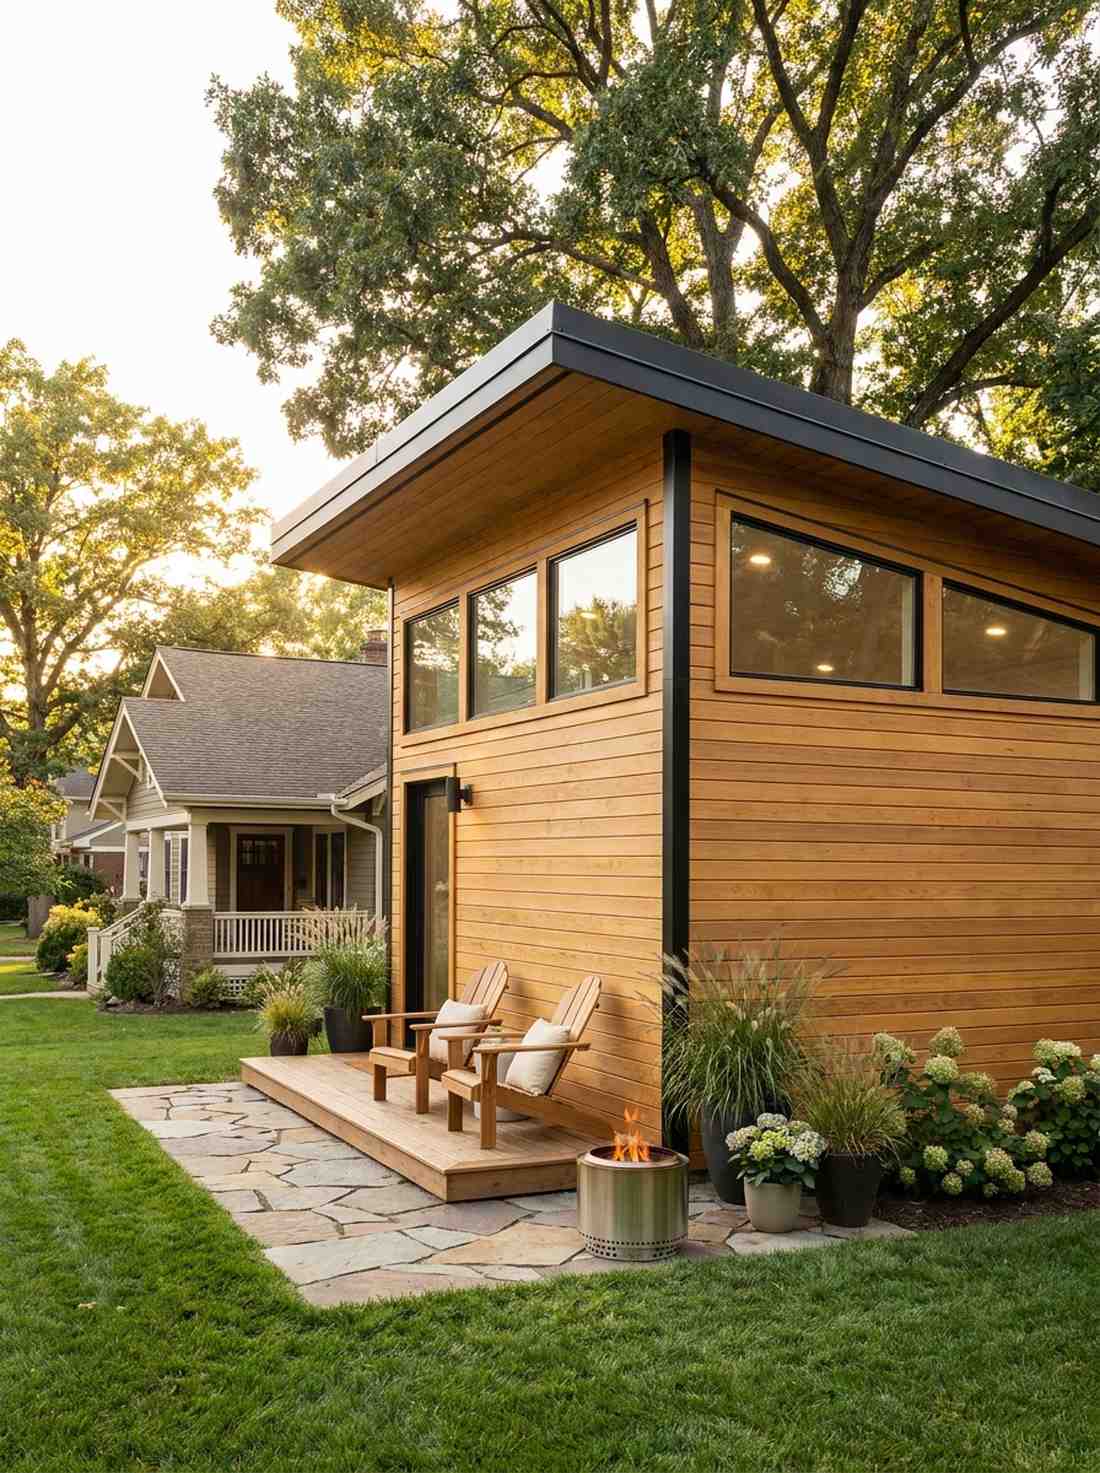
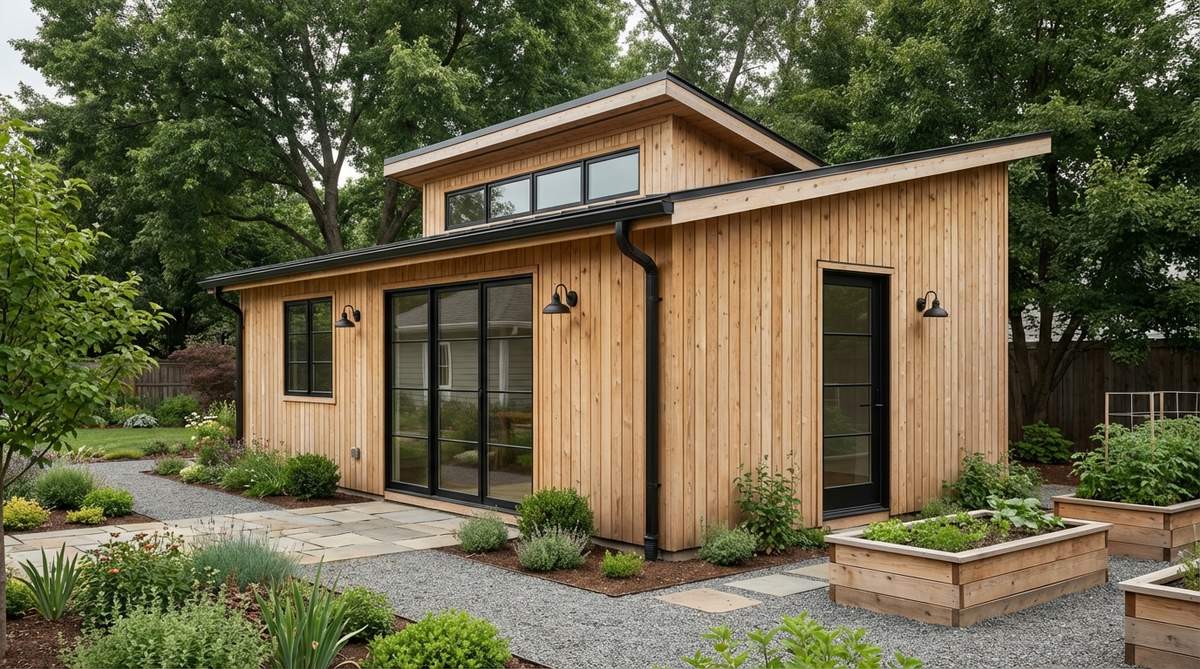
- Clean Lines & Minimalism: Contemporary sheds feature flat or single-slope roofs, unadorned facades, and geometric precision that complement modern architecture
- Material Contrast: Combining natural wood with steel, glass, or black cladding creates visual tension while ensuring durability and low maintenance
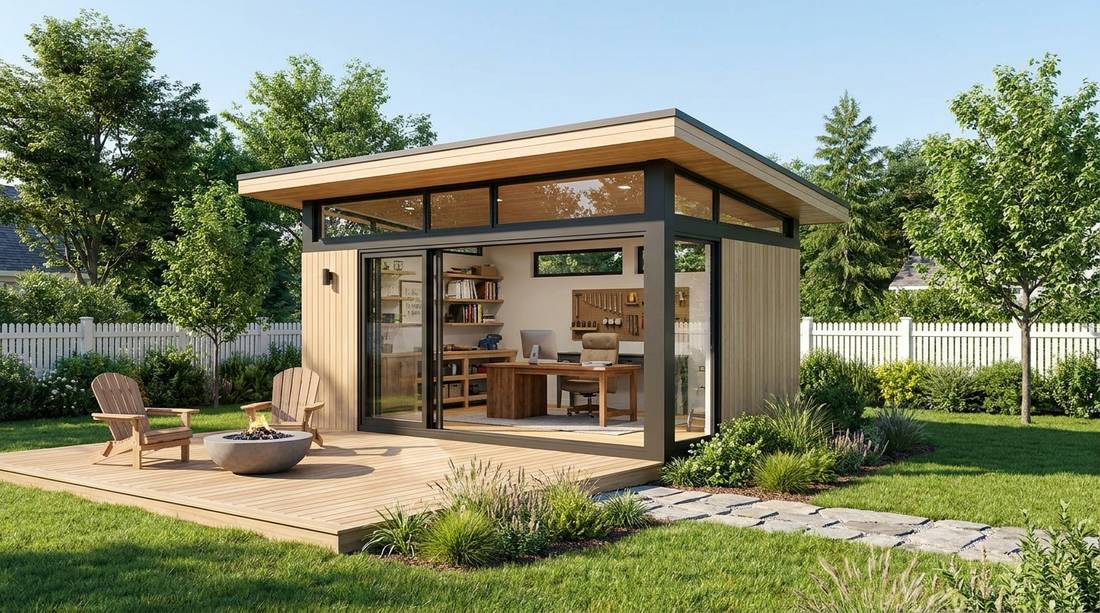
- Light Integration: Floor-to-ceiling windows, transom glazing, and skylights flood interiors with natural light, reducing energy consumption while expanding perceived space
- Multi-Functionality: Structures designed to adapt from home office during weekdays to entertainment space on weekends, maximizing return on investment
Minimalist Architectural Statements
Contemporary garden sheds embrace the less-is-more philosophy, where every element serves both aesthetic and functional purposes. These designs strip away ornamentation to reveal honest materials and precise craftsmanship.
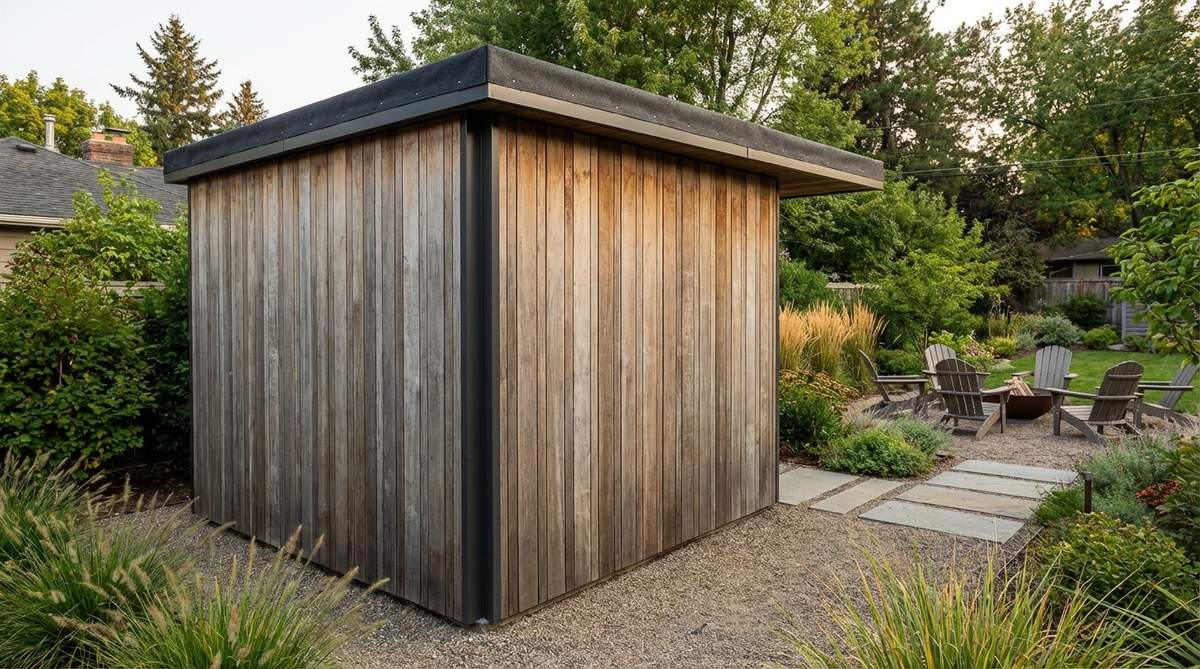
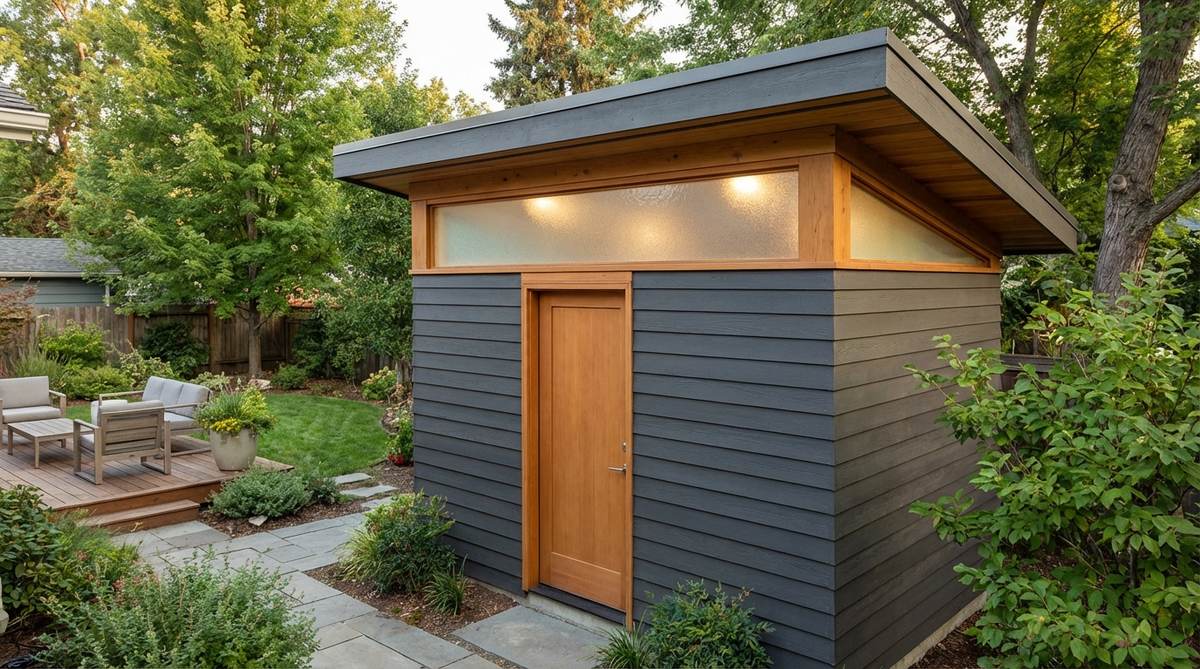
1. Single-Slope Scandinavian Studio
This layout feels like a secluded creative sanctuary hidden right behind your house. Utilizing modern backyard studio kits, this asymmetric roof structure works exceptionally well for a shaded corner where you need maximum interior volume without a massive footprint.
Most standard sheds feel dark and cramped, but pairing horizontal pine cladding with a sweeping monopitch roof delivers a surprisingly premium look. By securing quality modern shed plans, you can easily install elevated framing that allows north-facing windows to wash the entire space in shadow-free illumination.
You can expect framing and basic siding materials to range from $1,200 to $2,500 depending on lumber grades. Save this to your DIY weekend garden board if you’re planning a minimalist workspace.
- Key Materials: Pre-cut horizontal pine boards, black steel corner trim
- Vibe / Style: Nordic architectural retreat
- Difficulty: Intermediate construction
- Budget Breakdown: Lumber: $800 | Roofing membrane: $300 | Premium trim: $150.
- Creator’s Tip: Seal the pine cladding with a matte UV-resistant topcoat before installation to prevent premature silvering.
- Smart Sourcing: pre-cut horizontal pine planks (bulk pack) and heavy-duty single-slope roof brackets.
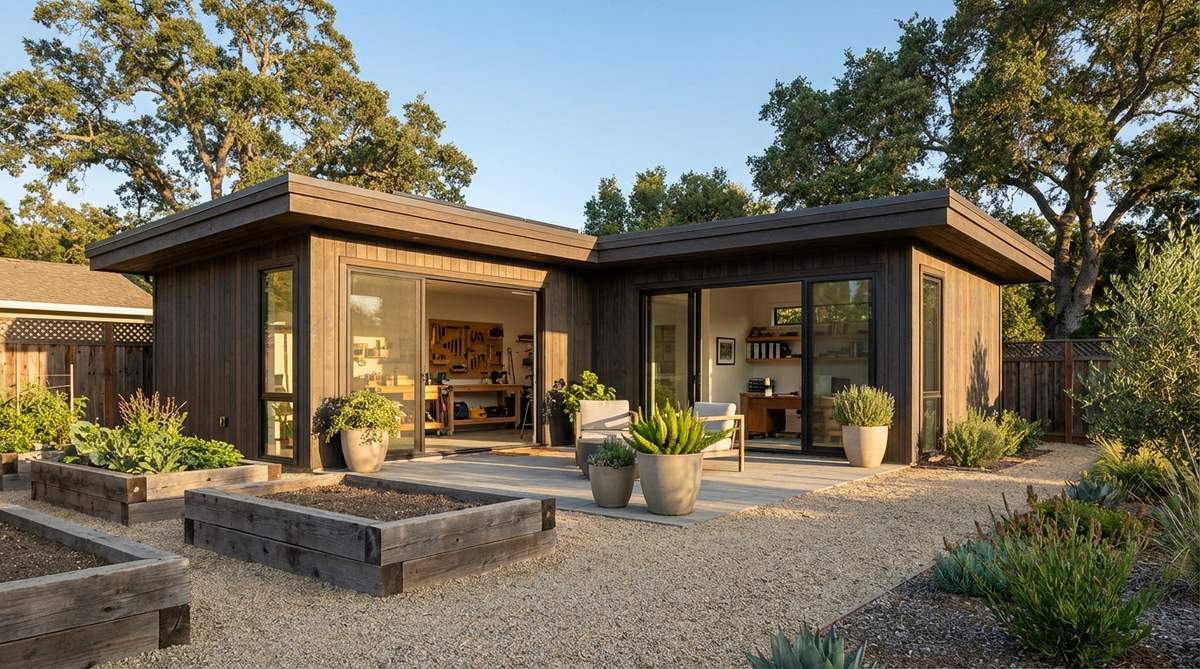
2. Flat-Roof Urban Cube
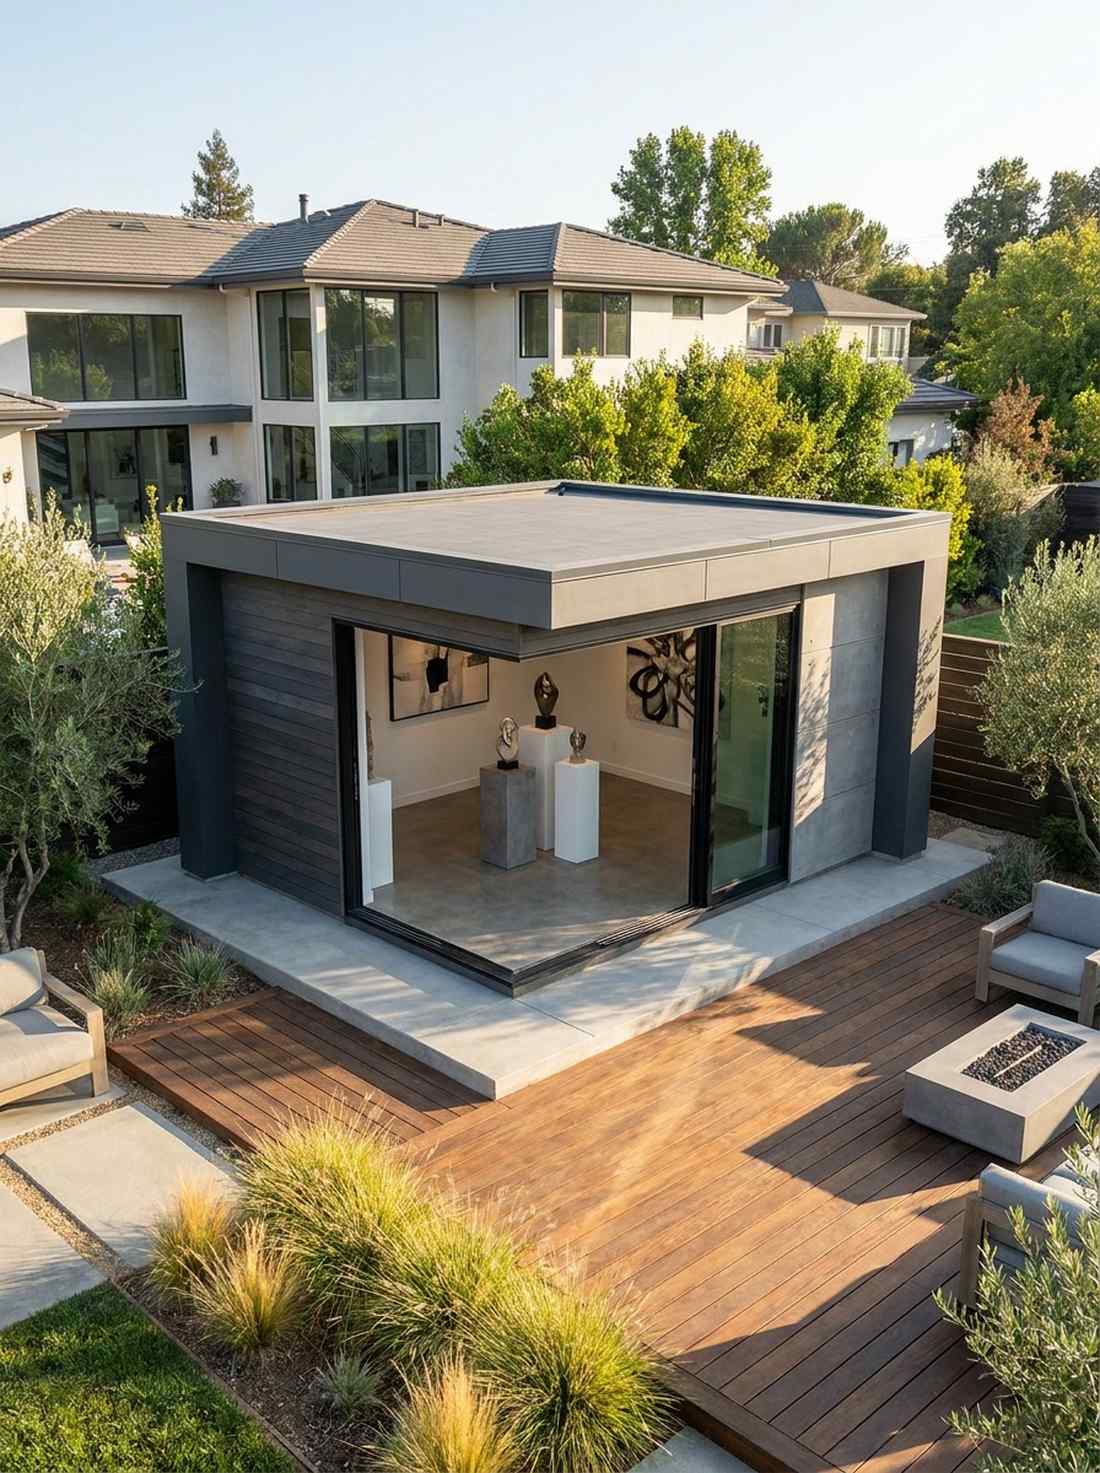
Stepping inside this geometric marvel feels like entering a high-end downtown art gallery. The minimalist flat-roof shed aesthetic acts as a pure visual anchor, perfect for urban backyards where traditional peaked roofs would clash with the surrounding architecture.
Ditching standard pitched roofs is a bold move that instantly gives a designer-level finish to an ordinary storage space. Upgrading to a high-performance membrane system rather than cheap asphalt shingles ensures the flat profile stands up to heavy rain and snow without leaking.
This sleek upgrade will generally cost between $2,000 and $3,500 for a fully weather-tight exterior shell. Highly recommended for a quick weekend win if you want maximum ceiling height.
- Key Materials: EPDM rubber roofing membrane, steel-reinforced framing
- Vibe / Style: Modern urban loft
- Difficulty: Advanced roofing skills required
- Budget Breakdown: Structure: $1,200 | Membrane system: $600 | Foundation: $400.
- Creator’s Tip: Always incorporate a 1-degree micro-slope hidden behind the fascia board to guarantee proper water runoff.
- Smart Sourcing: commercial-grade EPDM rubber roofing kits and pre-primed geometric fascia boards.
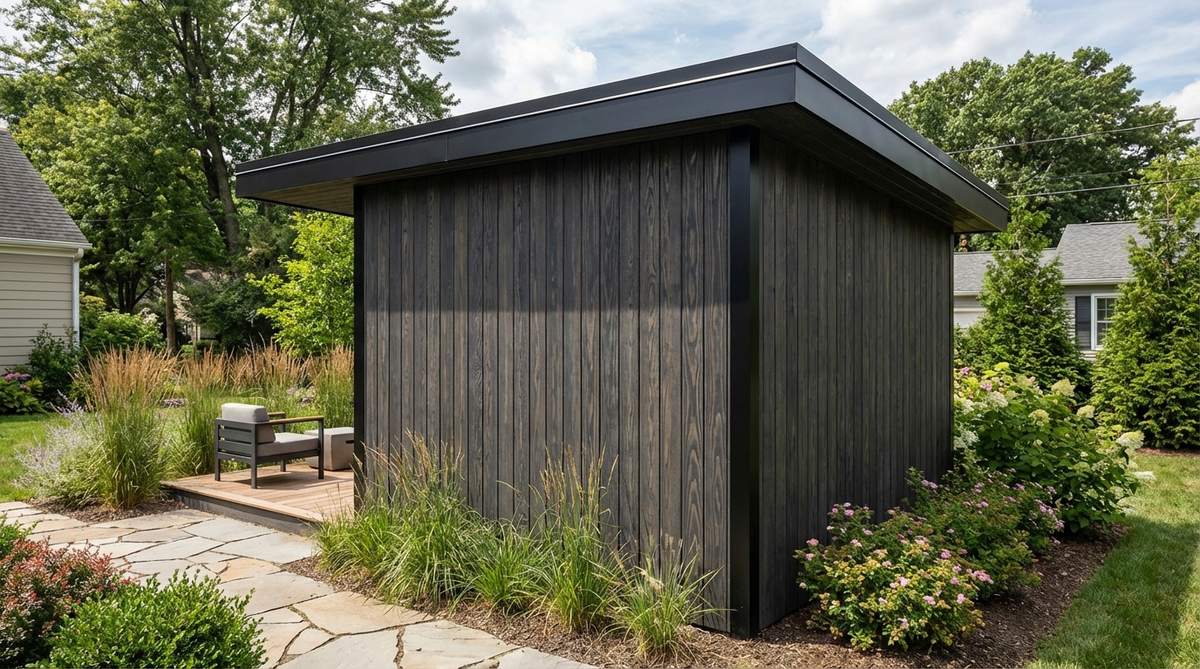
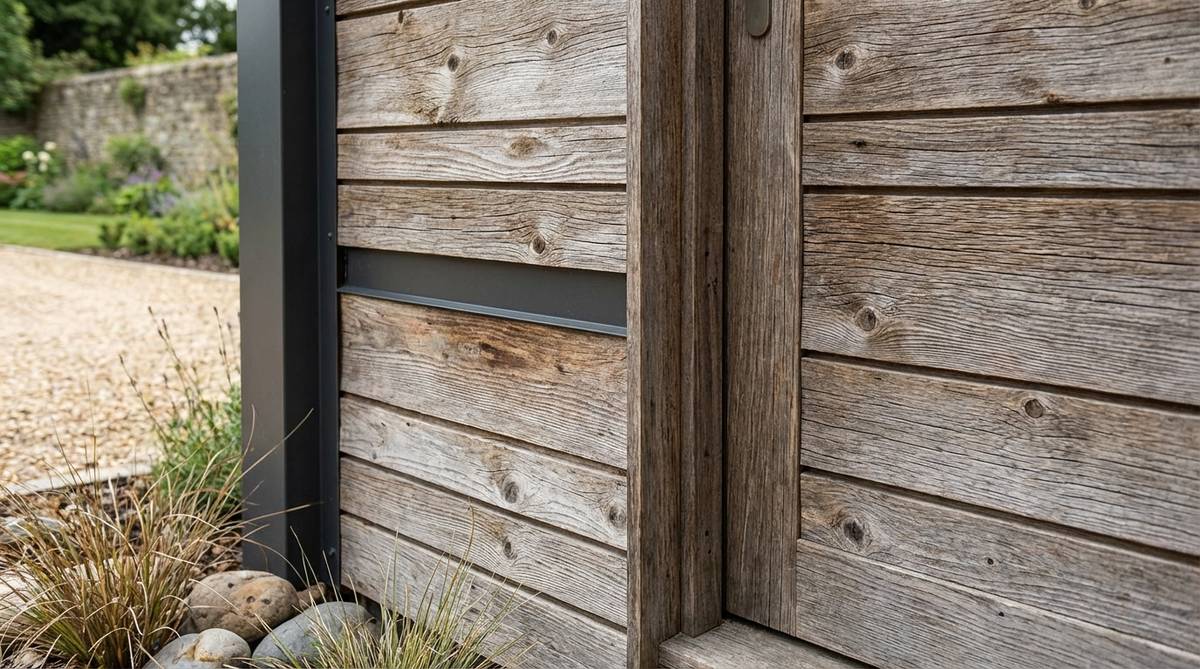
3. Vertical Cladding Modern Shed
The soaring lines on this facade make it feel like an upscale cabin nestled in a forest clearing. Opting for vertical timber shed siding is a visual hack that works exceptionally well for compact 8×8 spaces, drawing the eye upward to fake extra square footage.
People often default to horizontal lap siding, completely missing how vertical tongue-and-groove boards create a far more expensive architectural silhouette. Applying a deep charcoal wood stain to basic fifth-grade timber entirely masks imperfections while providing heavy-duty weatherproofing.
You can execute this facade transformation for around $400–$700 over standard plywood sheathing. Pin this if you’re trying to make a tiny footprint look incredibly spacious.
- Key Materials: 1×4 vertical tongue-and-groove pine, premium charcoal wood stain
- Vibe / Style: Tall architectural statement
- Difficulty: Easy beginner setup
- Budget Breakdown: Siding boards: $350 | Dark stain/sealer: $100 | Fasteners: $40.
- Creator’s Tip: Use a physical spacer block during installation to ensure perfectly uniform expansion gaps between every single vertical board.
- Smart Sourcing: vertical tongue-and-groove cedar packs and UV-blocking charcoal stain (1-gallon bucket).
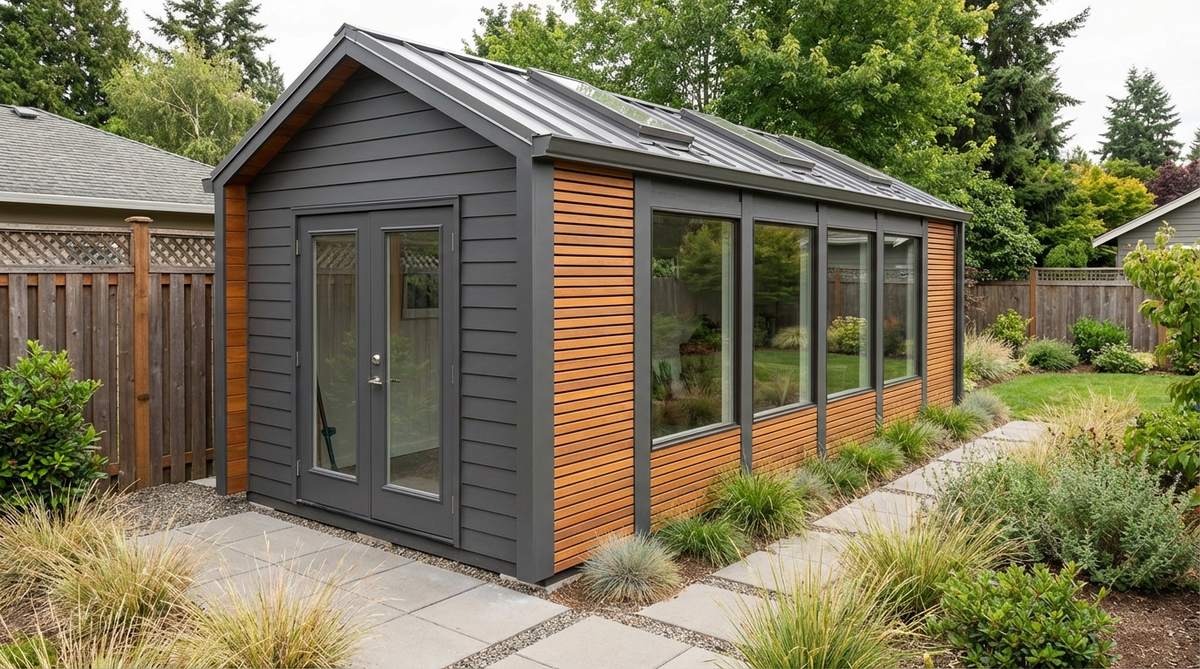
4. Cedar and Steel Hybrid
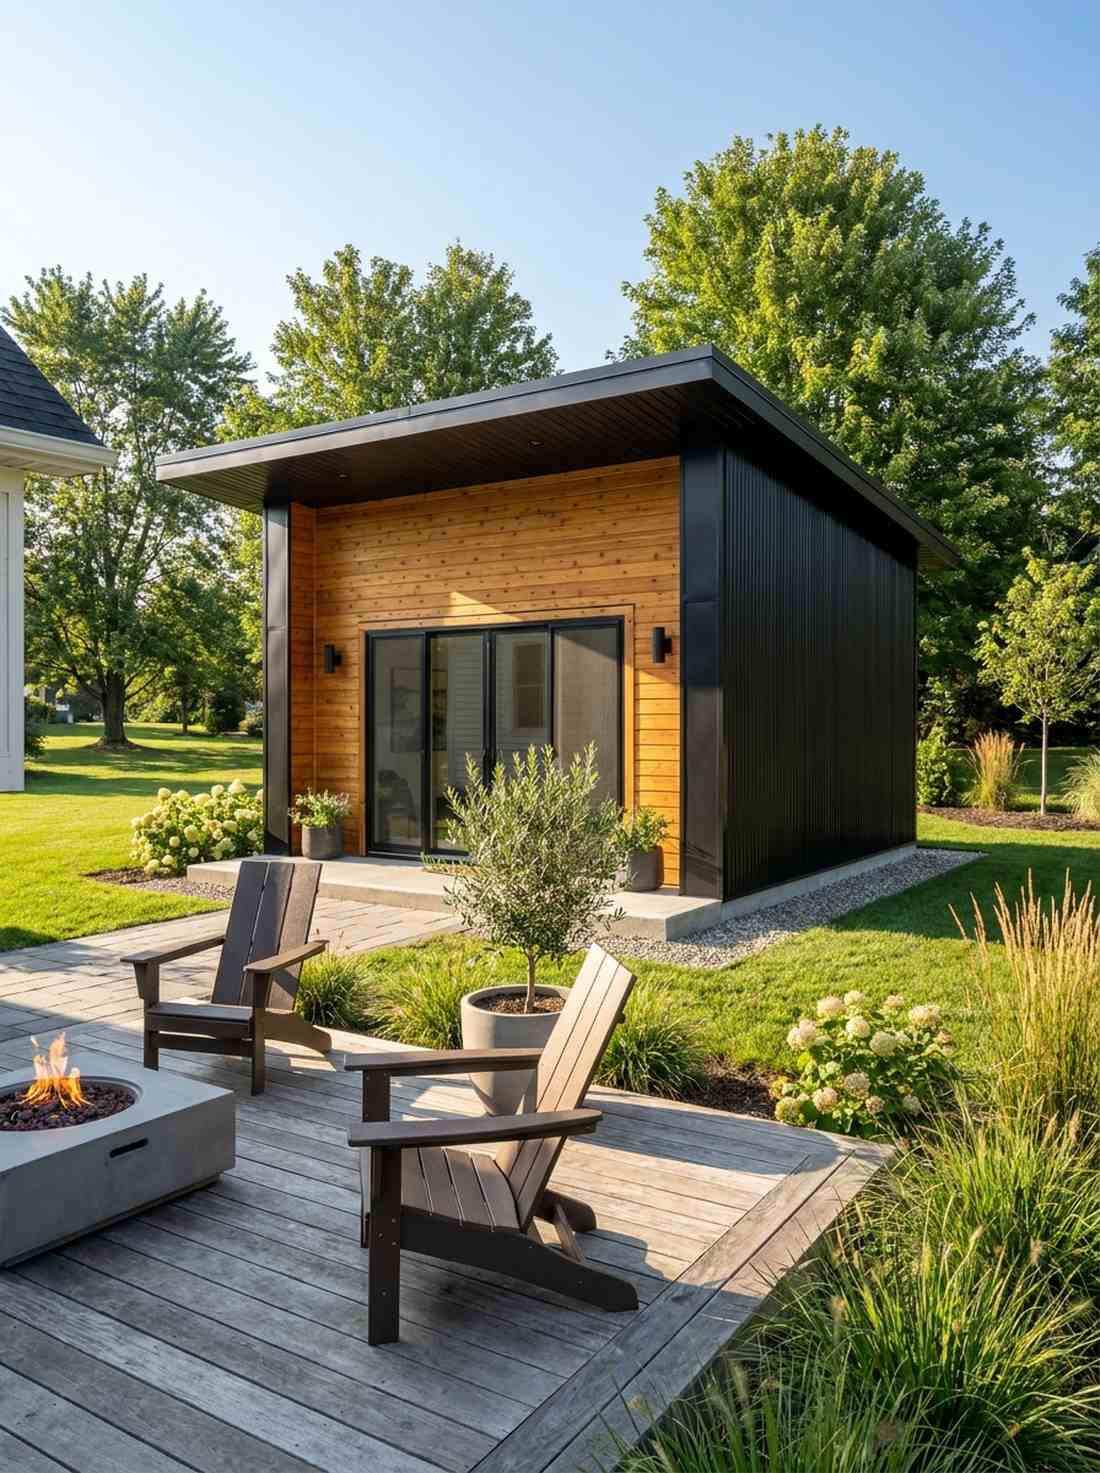
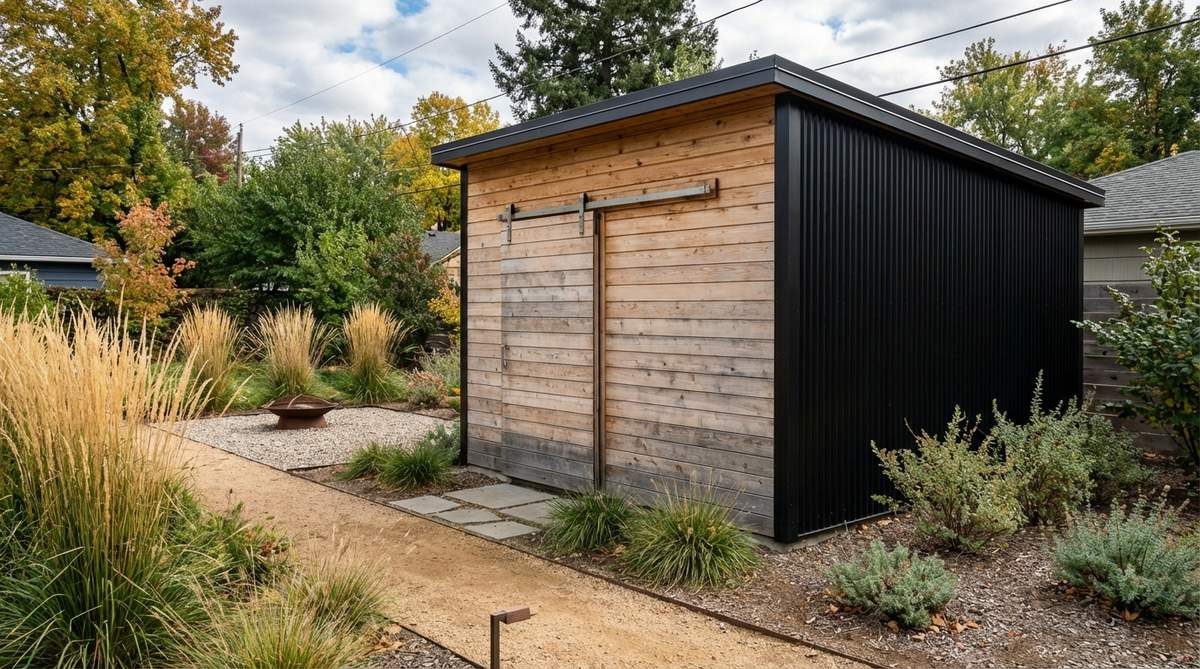
This striking combination feels like a modern industrial studio straight out of a glossy design magazine. Integrating a mixed-material shed facade with warm cedar and cold metal is the ultimate play for highly visible yard placements where curb appeal matters.
Wrapping all four sides in expensive wood is a rookie mistake; framing the front in tight-knot cedar while hiding the sides in jet-black corrugated steel looks infinitely more sophisticated. This clever hybrid approach slashes maintenance time in half while leveraging premium prefab backyard studio techniques.
Material costs typically land between $1,800 and $3,000 for this dual-finish approach. It’s a brilliant way to stretch your budget while keeping the luxury aesthetic intact.
- Key Materials: Tight-knot cedar boards, jet-black corrugated metal panels
- Vibe / Style: Warm industrial fusion
- Difficulty: Intermediate (requires metal cutting)
- Budget Breakdown: Cedar frontage: $600 | Steel side panels: $500 | Metal trim/flashing: $200.
- Creator’s Tip: Use specialized foam closure strips under the corrugated steel edges to keep insects and moisture from penetrating the side walls.
- Smart Sourcing: pre-painted corrugated steel panels (bulk pack) and weather-resistant cedar plank kits.
Most people get this completely wrong… until they see the genius glass layouts coming up next that transform a dark shed into a brilliant oasis.
Glass and Light-Forward Designs
Maximizing natural light transforms sheds from dark storage boxes into inspiring spaces suitable for creative work. These designs prioritize transparency and connection to the surrounding garden.
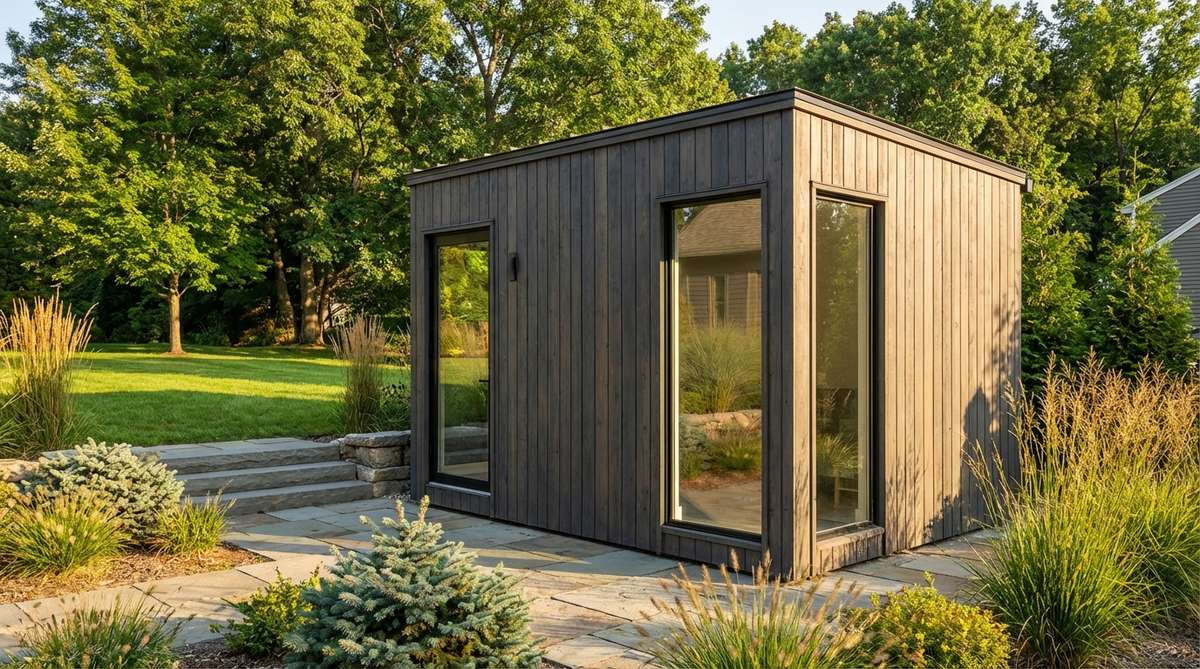
5. Full-Glass Front Studio
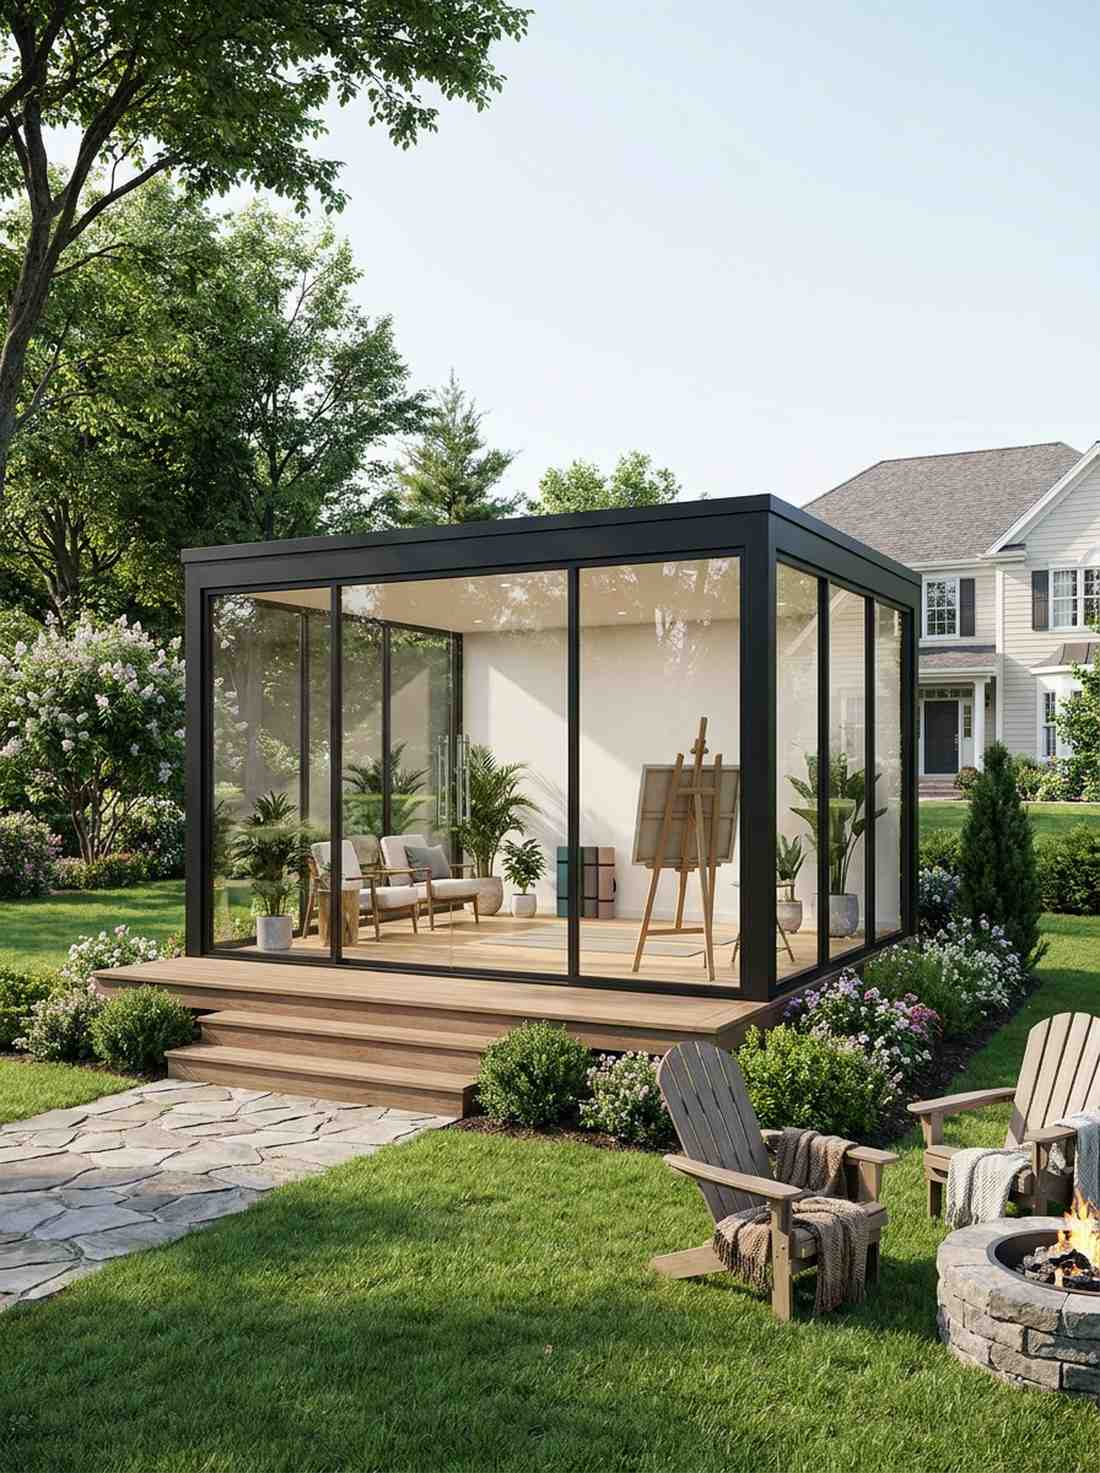
Waking up and walking into this space feels like stepping inside a glowing luxury greenhouse. Utilizing a glass-front garden room design completely dissolves the barrier between indoors and outdoors, making it the absolute best choice for a backyard yoga or art studio.
Solid front doors instantly make small spaces feel like closets, but full floor-to-ceiling toughened glazing elevates the entire yard’s aesthetic. Incorporating insulated 4mm architectural glass resists extreme weather impacts while effortlessly acting as a passive solar heater during the cooler months.
Expect to invest around $2,500 to $4,000 for the commercial-grade glass and framing alone. Save this layout to your dream studio board if you crave boundless natural light.
- Key Materials: 4mm toughened glass panels, heavy-duty aluminum framing
- Vibe / Style: Transparent modern oasis
- Difficulty: Professional installation recommended
- Budget Breakdown: Custom glazing: $2,000 | Frame system: $800 | Hidden hinges/locks: $150.
- Creator’s Tip: Orient the glass facade strictly north to enjoy brilliant, consistent lighting without turning the space into an unlivable sauna during July afternoons.
- Smart Sourcing: shatterproof acrylic shed windows and heavy-duty glass door pivot hinges.
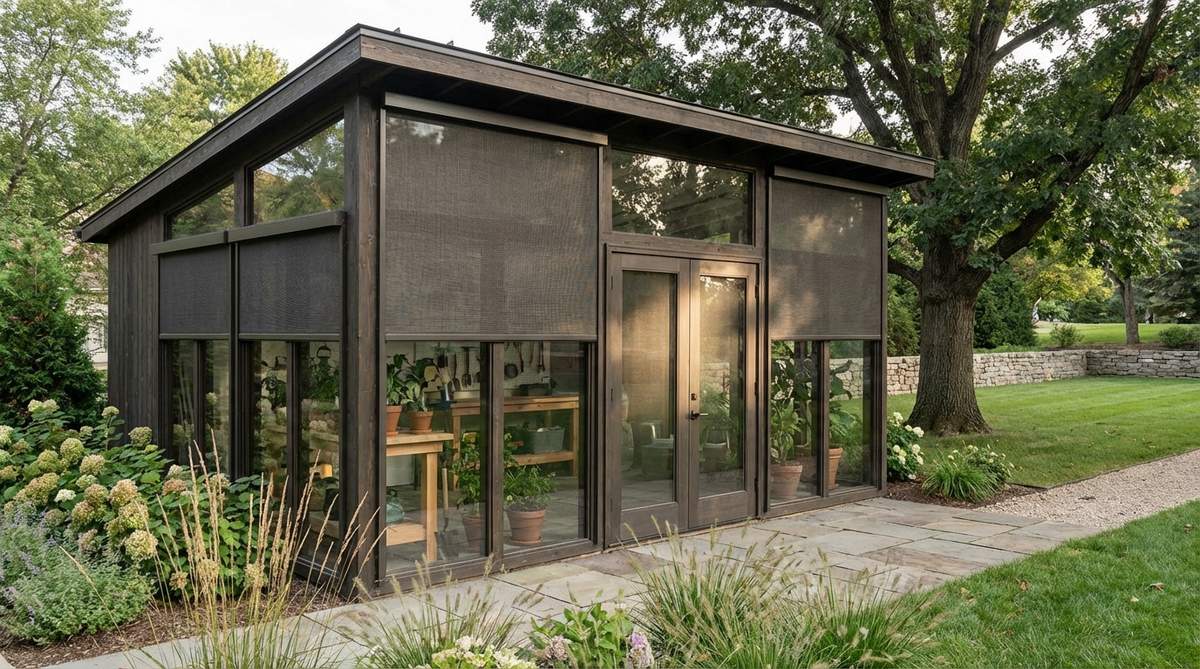
6. Transom Window Configuration
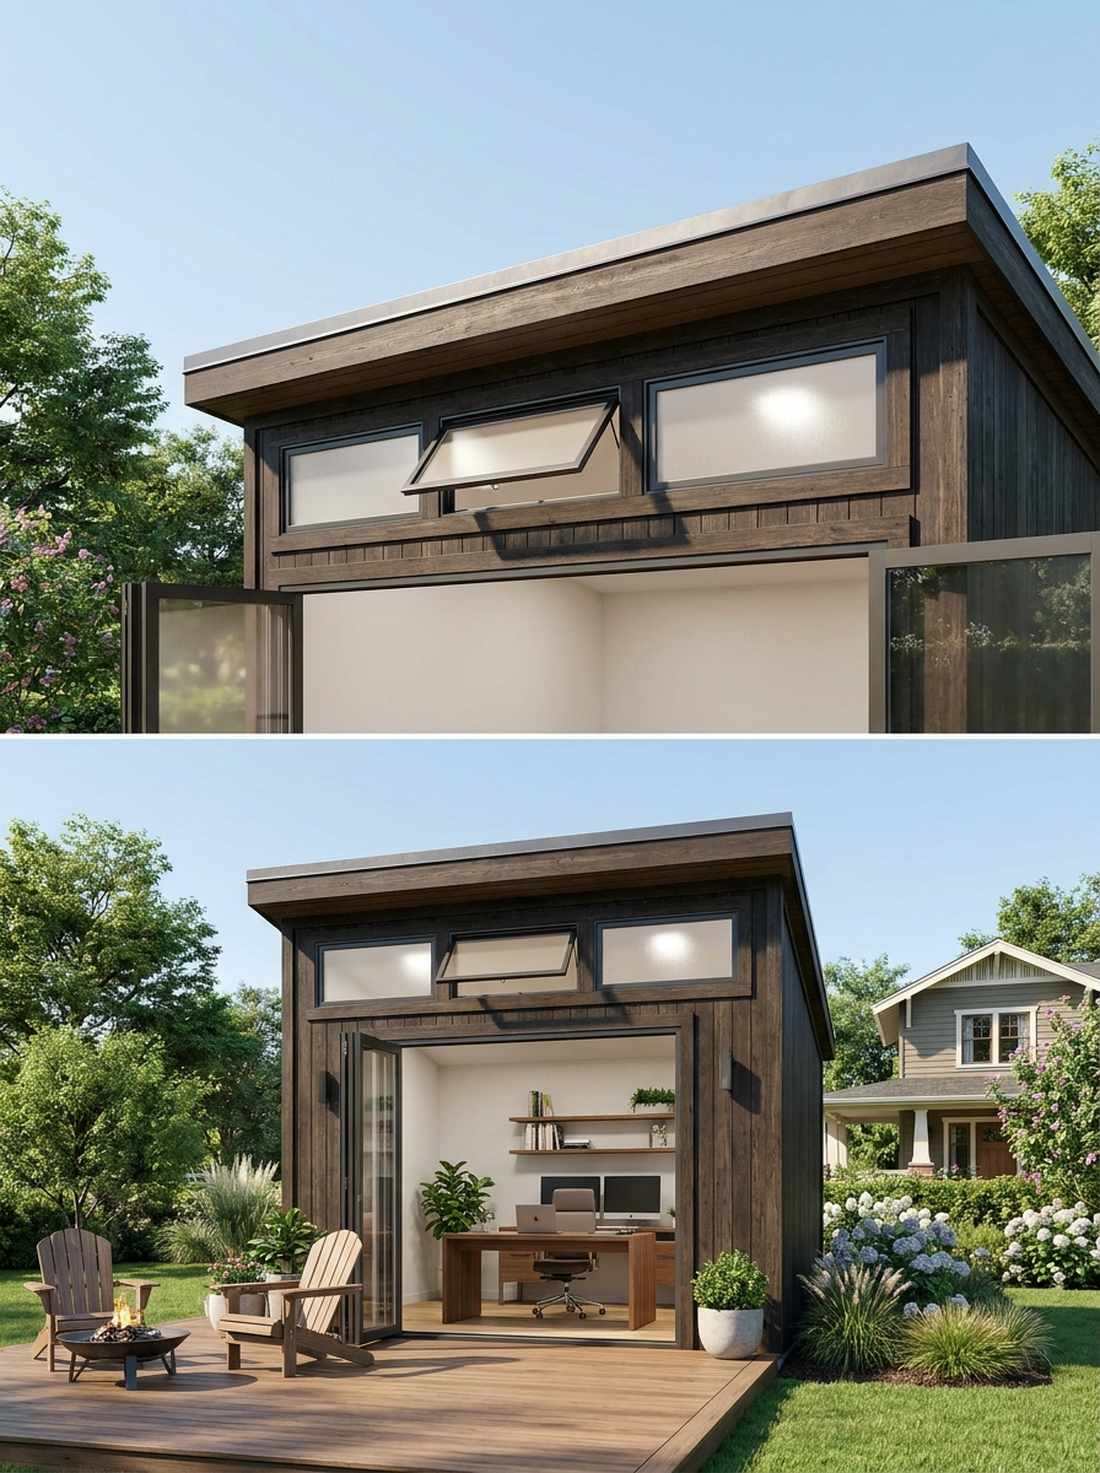
This elevated lighting trick feels like a brilliant architectural secret that maximizes both sunshine and focus. Installing horizontal transom shed windows just beneath the roofline is perfect for a full-time home office where screen glare is your worst enemy.
Slapping standard low windows into an office shed kills wall space, but lifting frosted glass high above eye level delivers a remarkably sleek, uninterrupted interior. This strategic placement floods the room with diffused light, blocks nosy neighbors, and secures the perimeter against easy break-ins.
You can seamlessly add standard transom units for about $150–$300 per window during framing. It’s a fast upgrade that completely changes the daily work vibe.
- Key Materials: Pre-framed frosted transom windows, waterproof exterior flashing
- Vibe / Style: High-focus executive cabin
- Difficulty: Easy if planned during initial framing
- Budget Breakdown: 3 Transom units: $450 | Flashing tape: $30 | Caulking: $15.
- Creator’s Tip: Choose operable awning-style transoms rather than fixed glass so you can vent trapped hot air trapped at the ceiling peak.
- Smart Sourcing: frosted horizontal transom window kits and premium exterior window flashing tape.
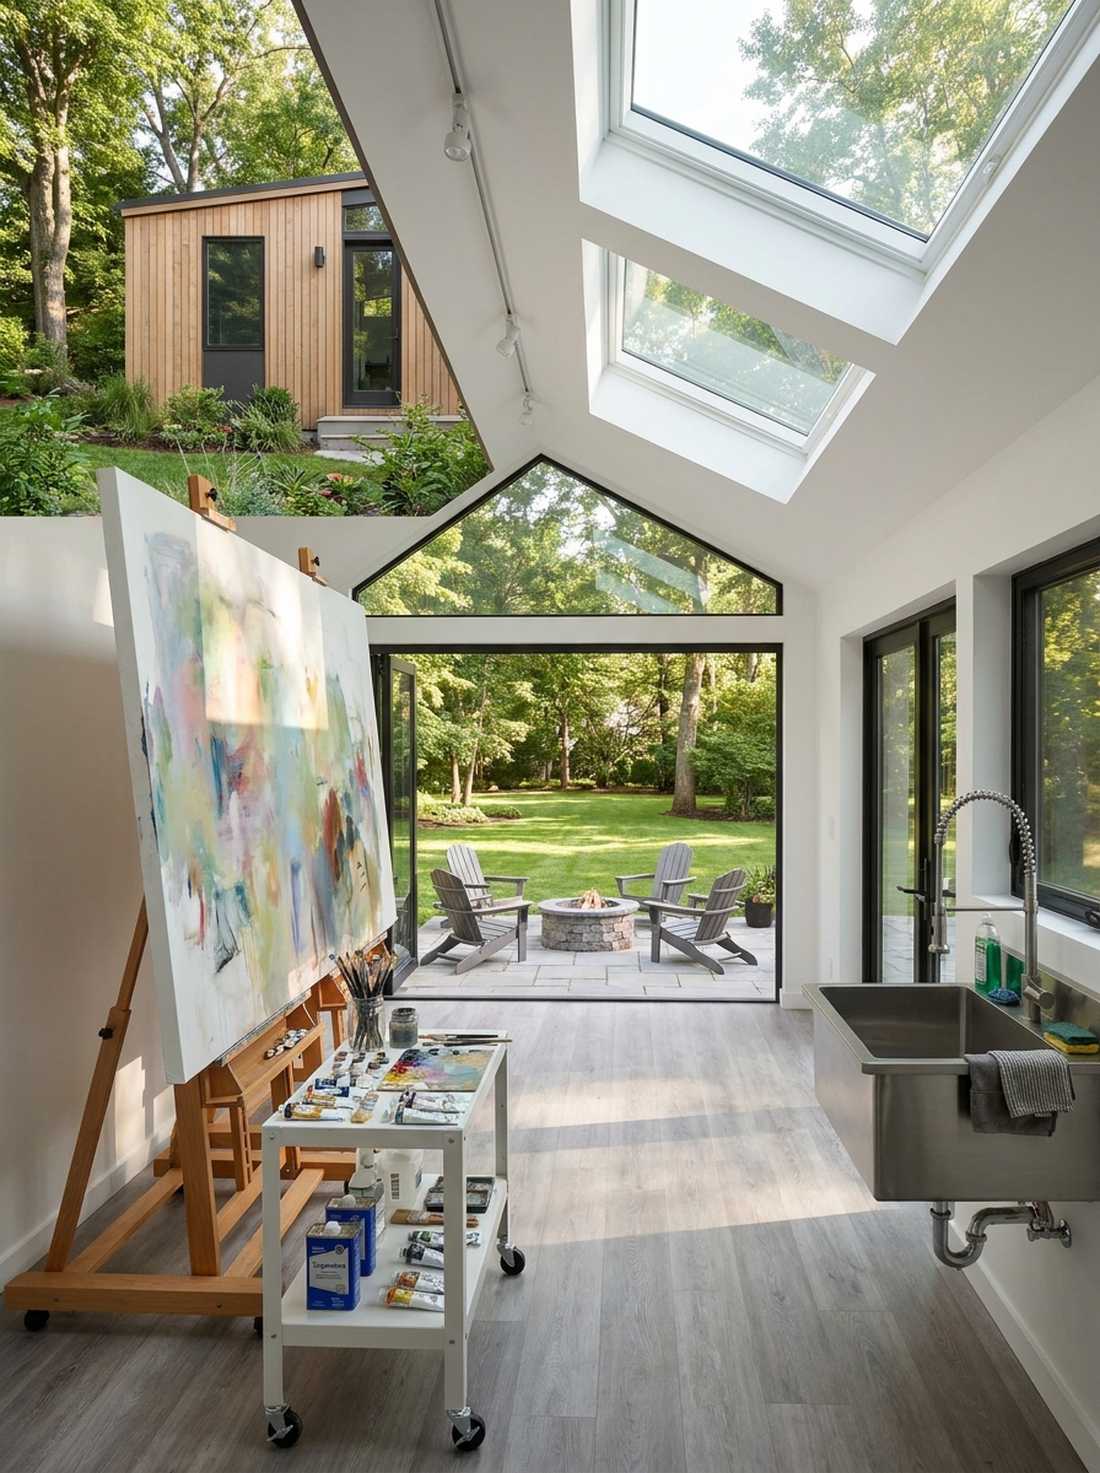
7. Skylight Vaulted Ceiling
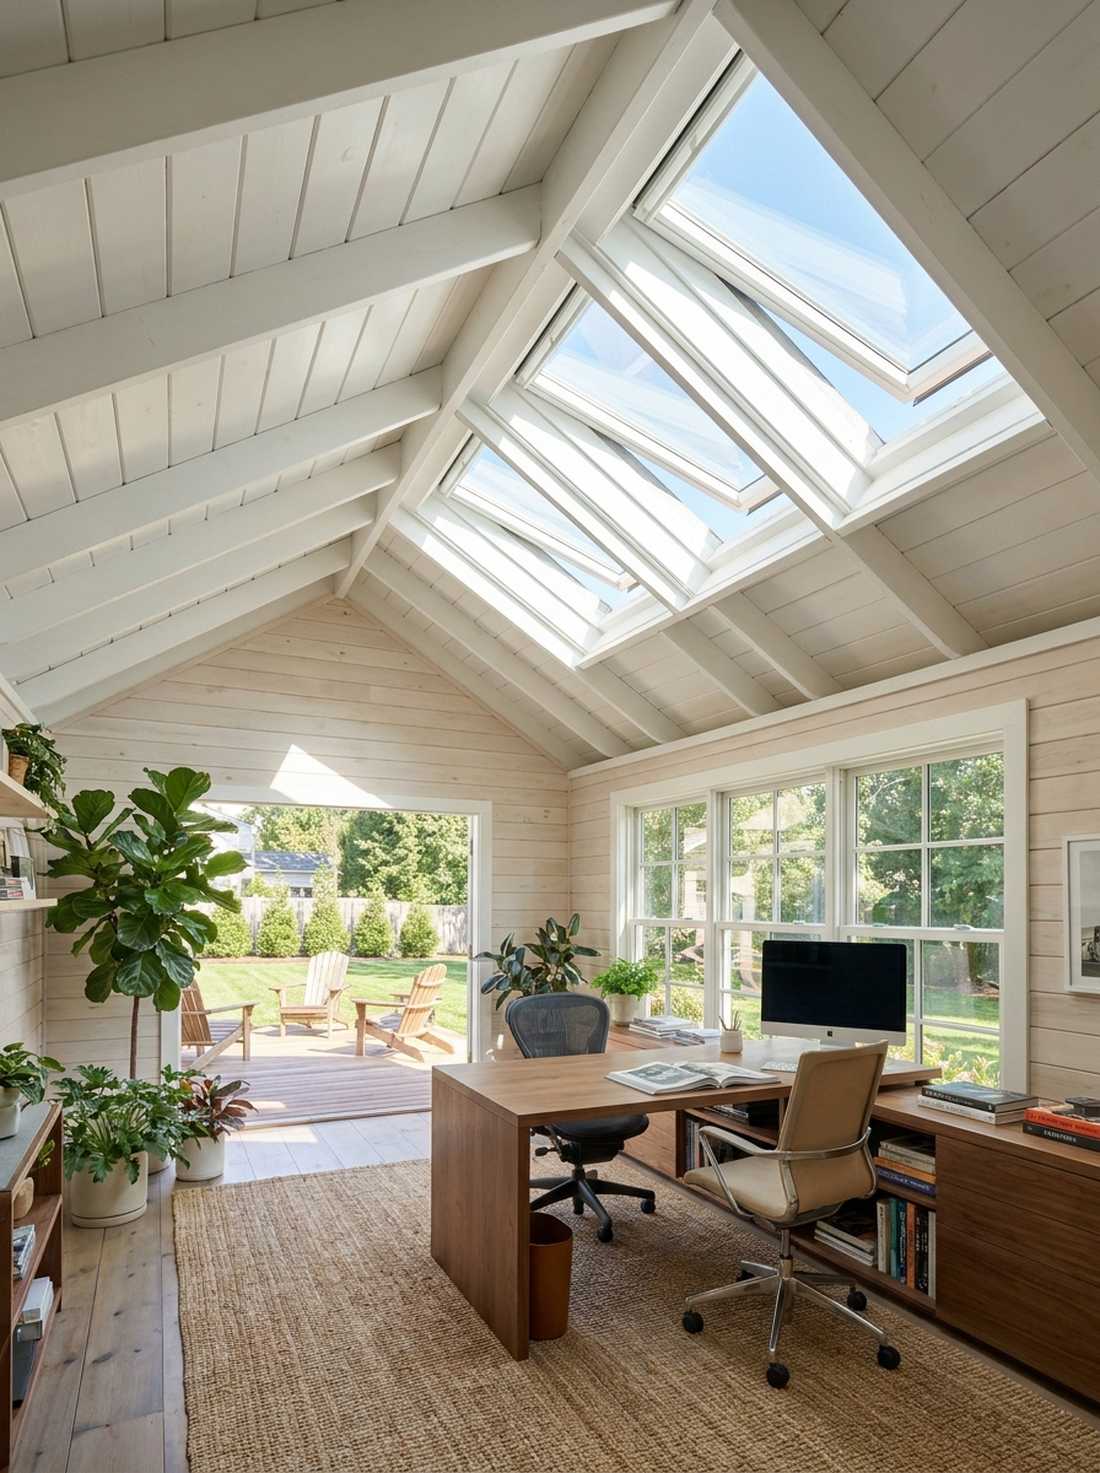
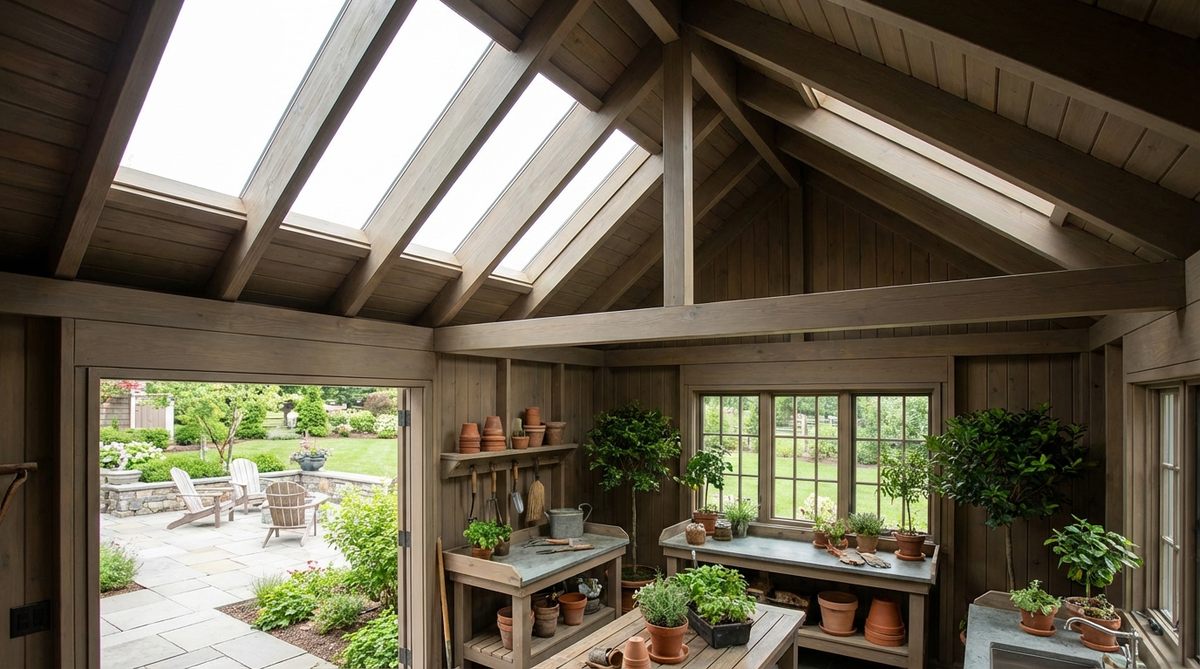
Looking up from your desk feels like sitting directly under the open sky. Incorporating a vaulted shed roof with skylights dramatically increases the interior headroom, making it a stellar solution for cramped properties strictly limited by footprint regulations.
Flat ceilings in outbuildings always feel oppressive, but exposing the rafters and punching through the roof membrane tricks the brain into perceiving double the square footage. Utilizing self-flashing overhead glazing drastically cuts artificial lighting reliance while capturing unique morning and late-afternoon sun angles.
Skylight additions usually run $300 to $800 each depending on whether they are fixed or venting. Pin this if you want a massive airy feel without expanding the foundation.
- Key Materials: Operable deck-mounted skylights, light-reflective interior paint
- Vibe / Style: Airy, voluminous loft
- Difficulty: Advanced (requires precise roof flashing)
- Budget Breakdown: 2 Skylight units: $700 | Vaulted lumber upgrade: $250 | Step flashing kit: $50.
- Creator’s Tip: Paint the vaulted ceiling in an ultra-matte, pure white finish to bounce and multiply the overhead light throughout the entire workspace.
- Smart Sourcing: self-flashing operable shed skylights and leak-proof roof sealant (commercial grade).
8. Sliding Glass Wall Pavilion

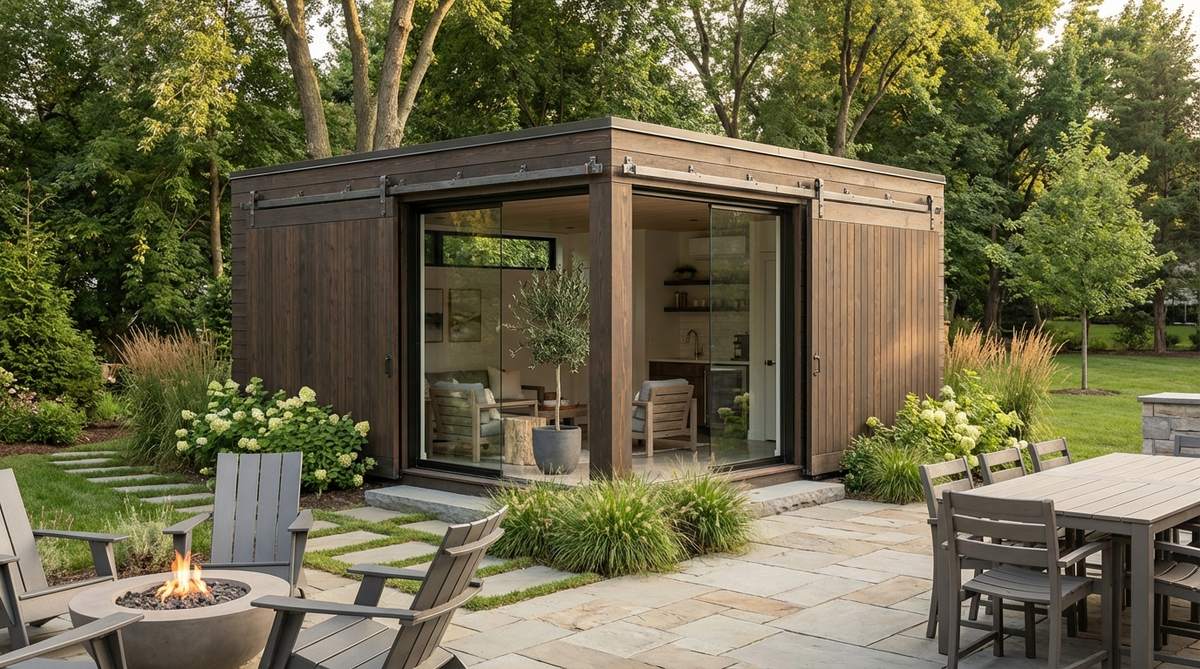
This convertible setup gives major luxury resort cabana vibes in your own backyard. Designing a sliding wall outdoor pavilion creates an adaptable entertainment space that effortlessly handles everything from winter isolation to breezy summer dinner parties.
Static walls are severely limiting, but installing heavy-duty barn tracks that peel back the wooden facade to reveal floor-to-ceiling glass looks insanely expensive. This dual-wall barrier gives you ultimate climate control and transforms a basic shed into a high-end multi-season lounge.
The specialized track hardware and secondary glass wall system can add $3,000–$5,000 to the build. This is the ultimate investment piece for frequent outdoor entertainers.
- Key Materials: Industrial-grade sliding track system, exterior Douglas fir wall panels
- Vibe / Style: Elite multi-season lounge
- Difficulty: Expert level engineering
- Budget Breakdown: Heavy-duty tracks: $400 | Outer wooden panels: $600 | Inner glass slider system: $2,500.
- Creator’s Tip: Ensure the foundation slab is poured with a perfect micro-level tolerance, otherwise the heavy sliding walls will constantly stick and grind on the tracks.
- Smart Sourcing: industrial exterior sliding door track hardware and weather-sealed glass patio door kits.
9. Corner Window Wrap
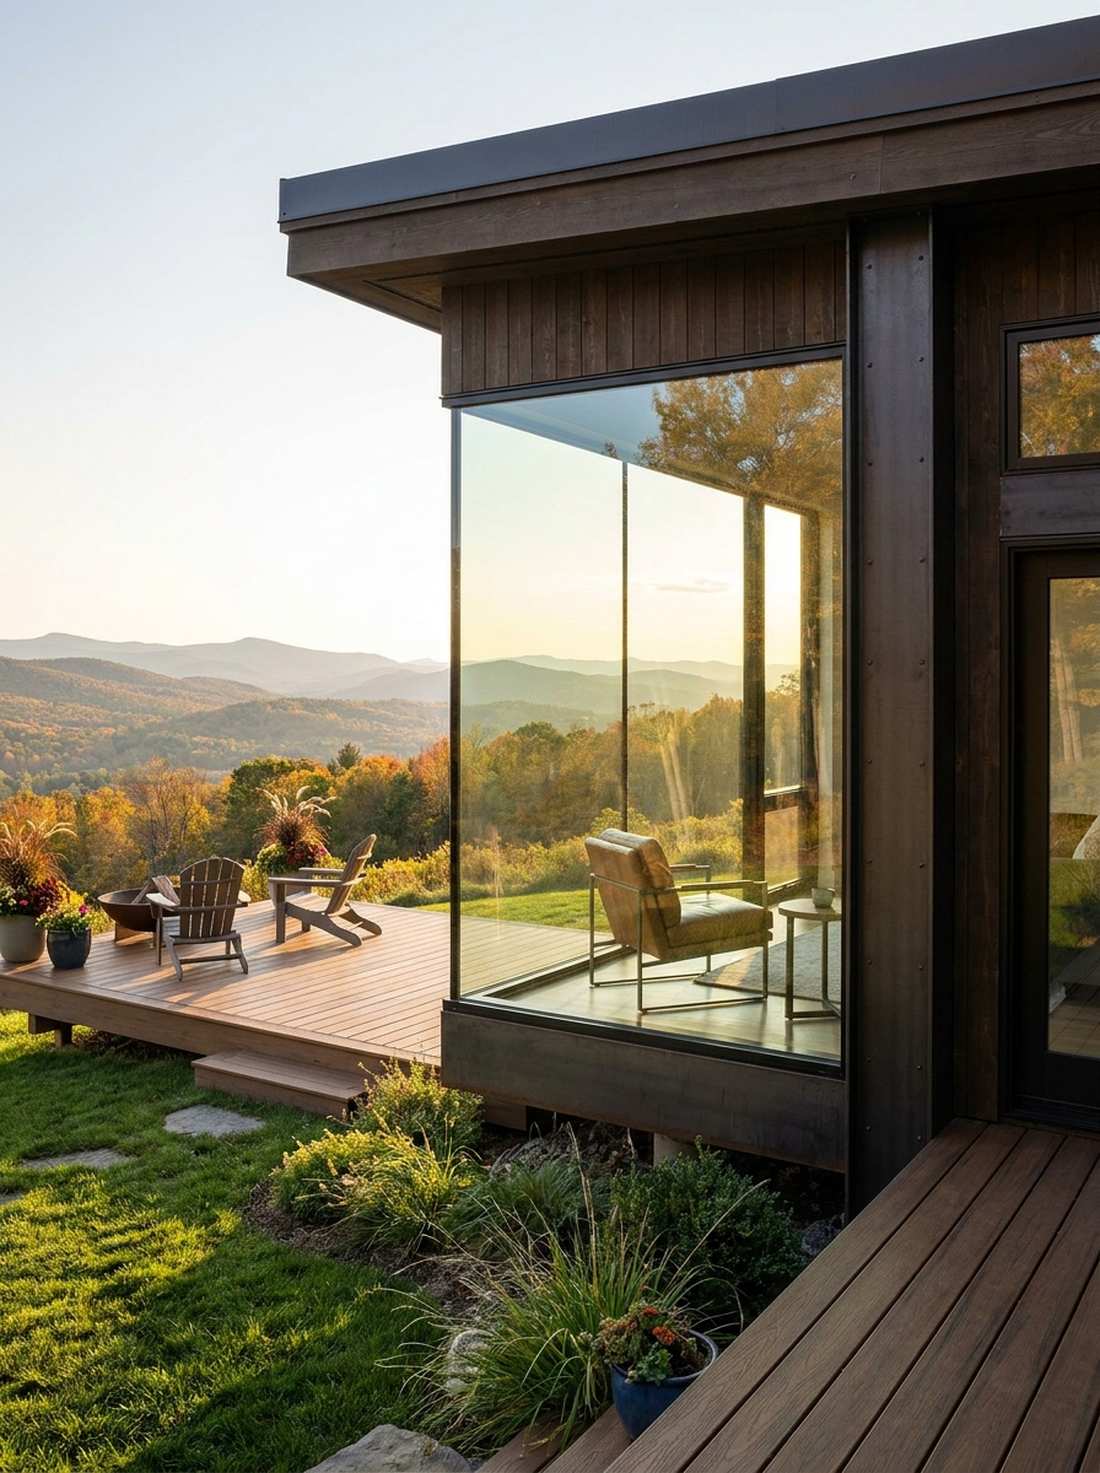

This seamless glass edge feels like peering out from a modern observation deck. Utilizing a post-less corner window design erases harsh visual barriers, making it the perfect upgrade for sheds situated on high-elevation lots with sweeping panoramic views.
Standard window placement interrupts the landscape, but engineering a structural header that allows glass to meet perfectly at the corner delivers a jaw-dropping architectural flex. This panoramic wrap entirely redefines the spatial boundary, pulling the outside environment deep into the room.
The structural reinforcement and custom glass meeting point will cost an additional $800 to $1,500. Save this for your dream home board if you have scenery worth framing.
- Key Materials: Engineered lumber headers (LVL), silicone butt-glazed window panels
- Vibe / Style: Panoramic observation box
- Difficulty: Advanced structural framing
- Budget Breakdown: LVL header beams: $150 | Corner glazing panels: $900 | Structural brackets: $80.
- Creator’s Tip: Use clear architectural silicone instead of bulky corner trim where the glass panes meet to maintain an invisible, floating aesthetic.
- Smart Sourcing: heavy-duty engineered LVL headers and architectural-grade clear silicone sealant.
This next dark-aesthetic setup is ridiculously cheap to pull off but looks like a custom $20,000 build commissioned by a luxury architect…
Black Exterior Bold Contrast
Black exteriors create striking visual statements while making surrounding greenery appear more vibrant. The dark palette also conceals dirt and weathering better than light colors.
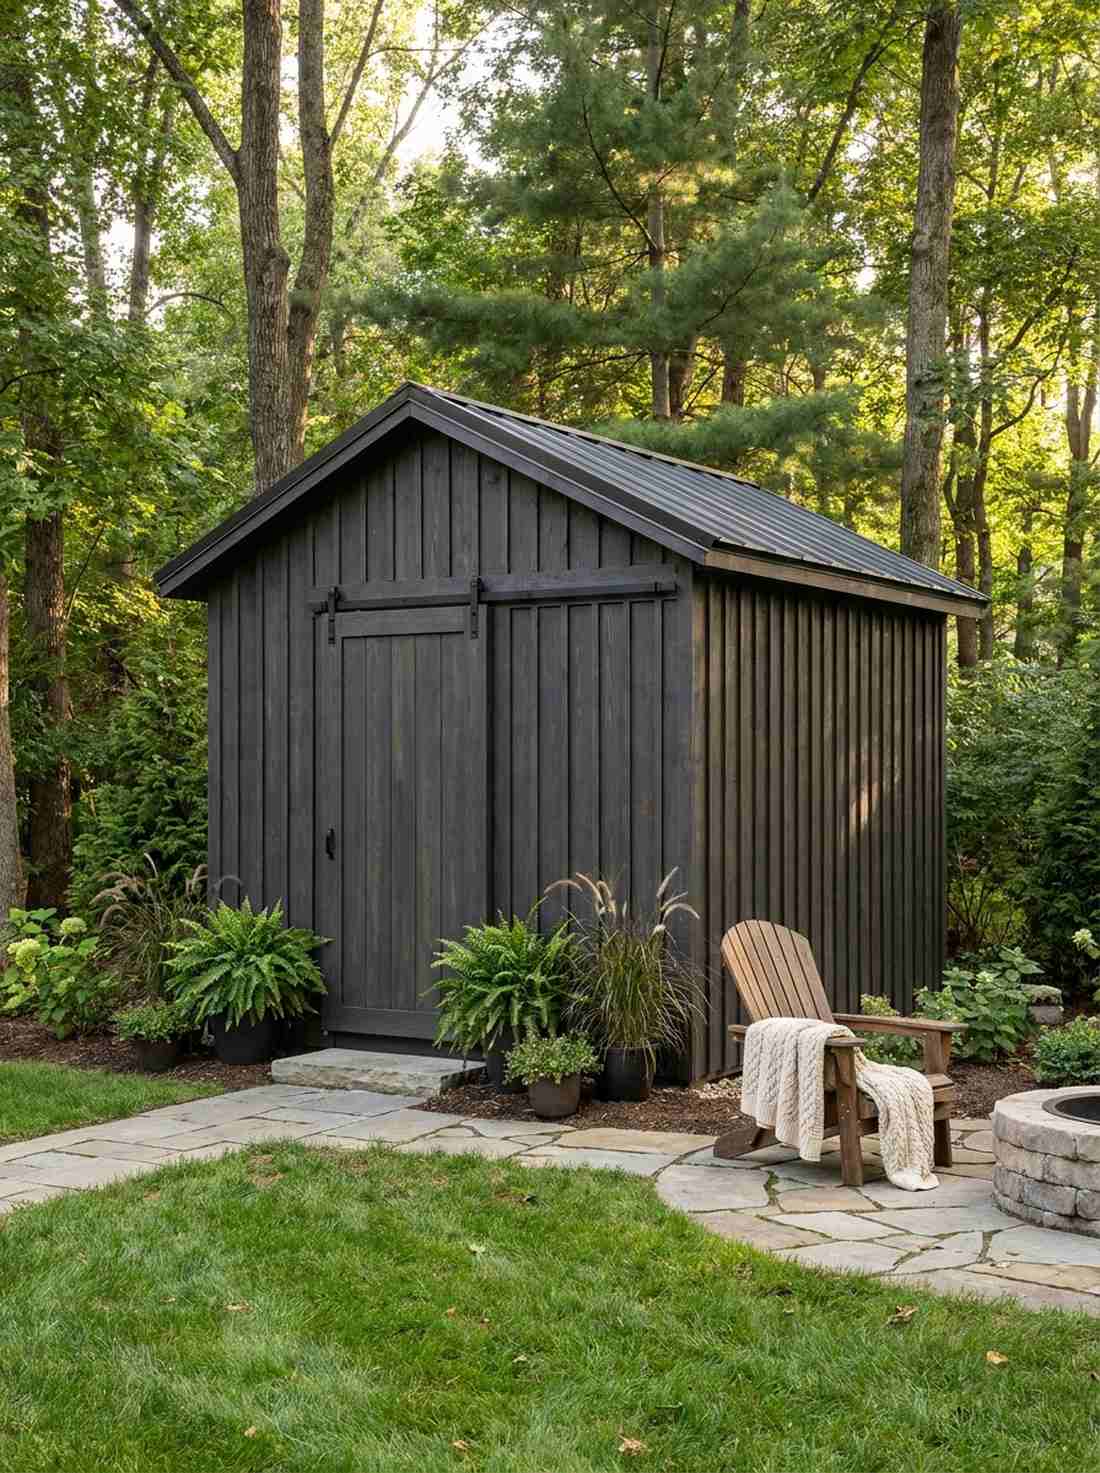
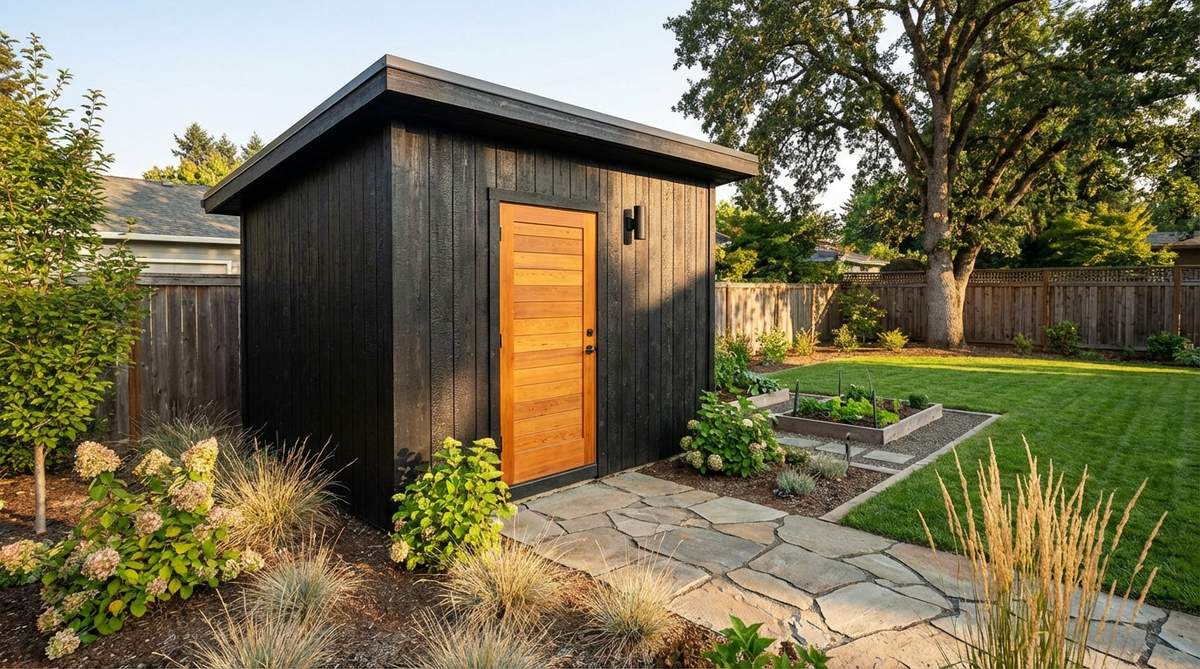
10. Matte Black Shiplap
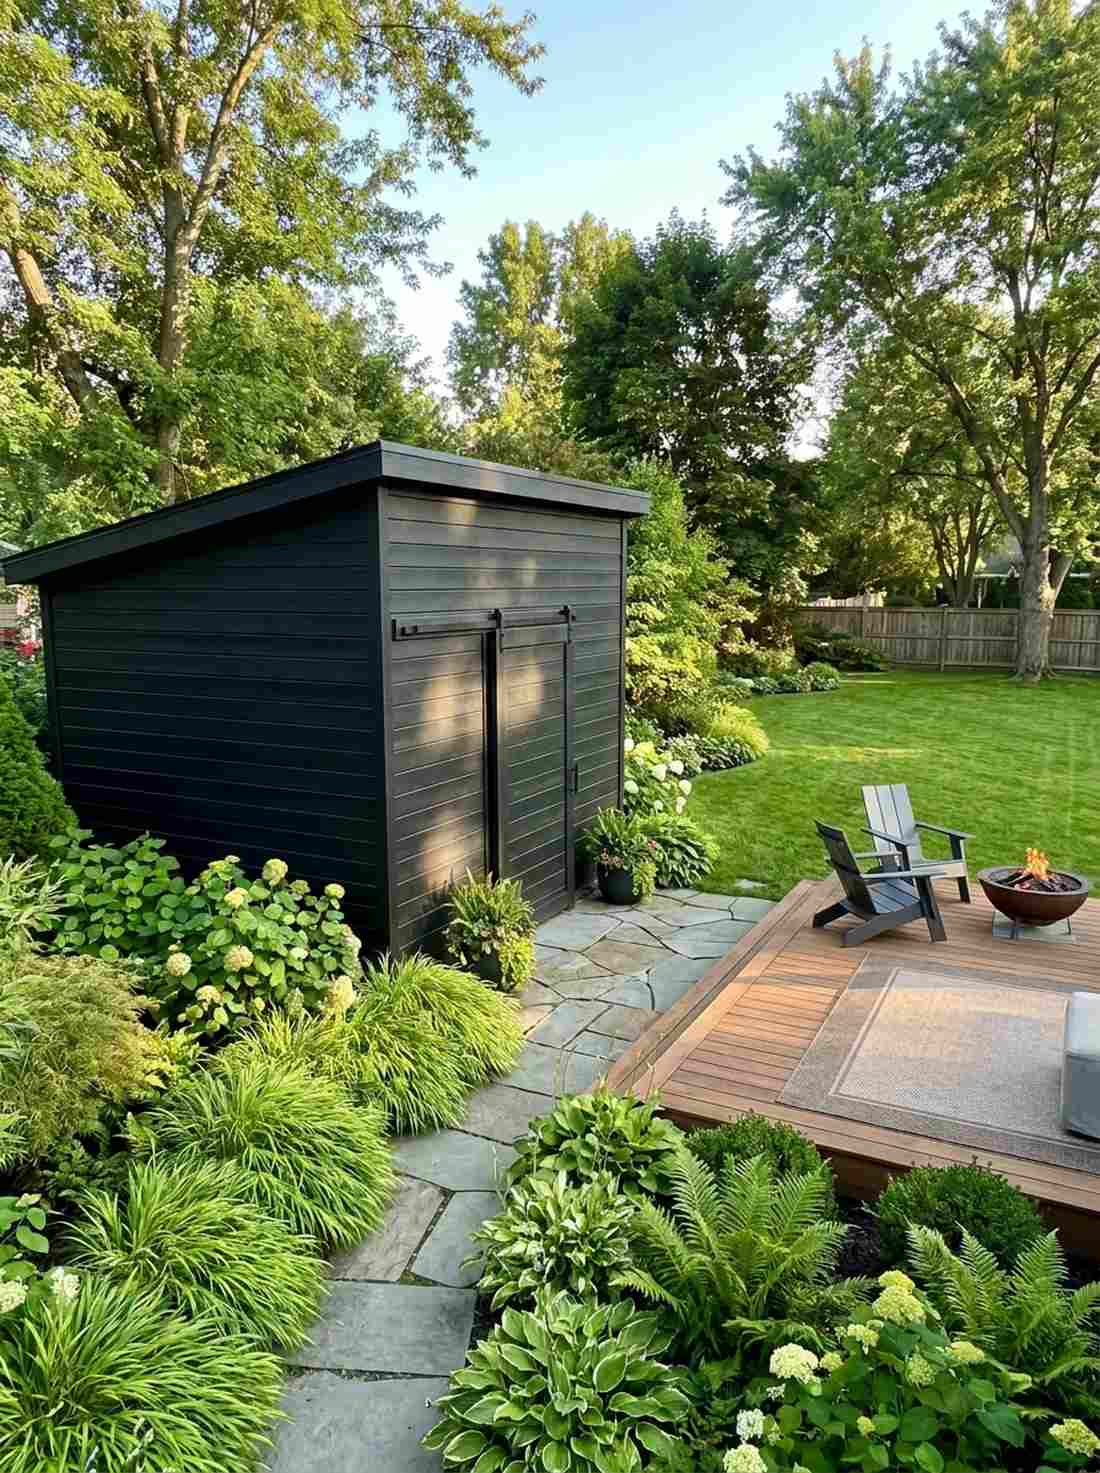
Standing next to this moody structure feels like discovering a hidden contemporary fortress. Applying matte black shed siding forces the structure to recede visually, making it ideal for lush gardens where you want the vibrant green foliage to take center stage.
Glossy exterior paint always looks cheap, but drenching premium 1×12 shiplap in a deeply saturated, non-reflective black beauty stain gives a stunning designer-level finish. The dark horizontal shadow lines create an intense visual gravity that perfectly anchors a sprawling lawn.
You can execute this dark transformation for roughly $150 in premium stain plus your siding cost. Highly recommended for an instant, dramatic weekend yard makeover.
- Key Materials: 1×12 wood shiplap boards, UV-resistant matte black wood finish
- Vibe / Style: Stealthy architectural fortress
- Difficulty: Easy painting project
- Budget Breakdown: Shiplap siding: $500 | Matte stain/sealer: $120 | Pre-stain conditioner: $40.
- Creator’s Tip: Always apply a high-quality wood conditioner before staining; otherwise, pine shiplap will absorb the black dye unevenly and look splotchy.
- Smart Sourcing: UV-resistant matte black exterior stain (1 gallon) and pre-milled shiplap siding bundles.
💡 Must-Have Supplies for High-End Setups
To build these setups faster and ensure they last, skip the generic craft aisles and invest in the right foundational kits.
- Base & Support: Heavy-duty concrete pier foundational kits
- Setup Tools: Professional framing nailer starter kits
- Weather/Durability Protection: Commercial-grade moisture barrier wrap rolls
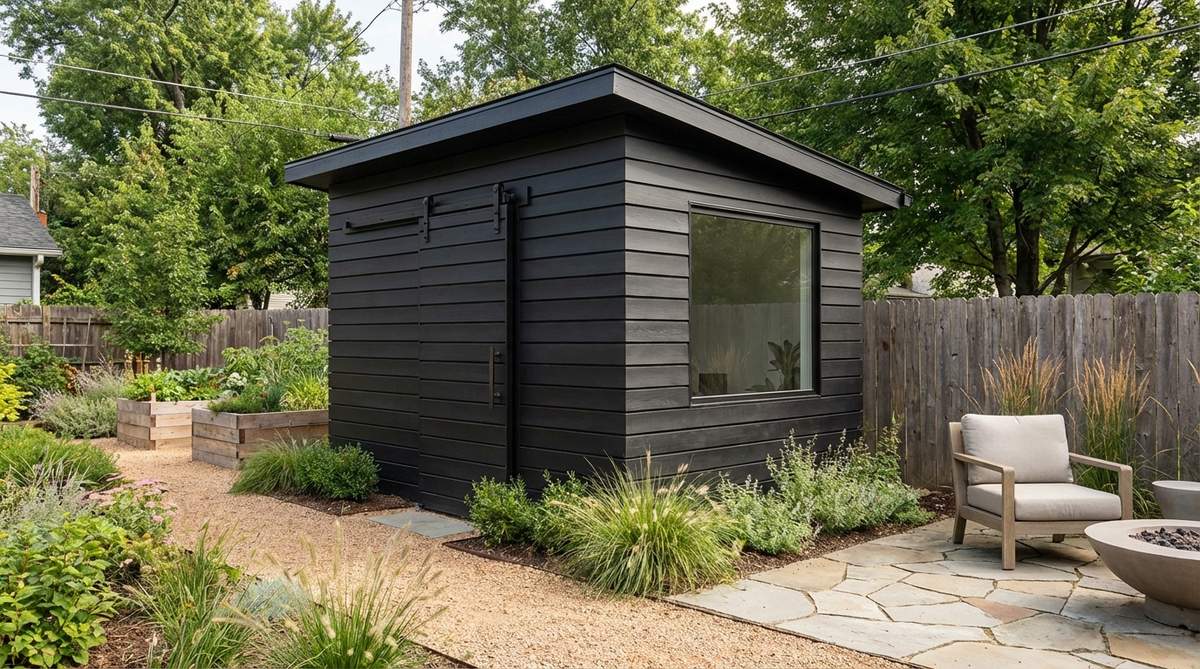
11. Jet Black Corrugated Steel
This impenetrable metal shell feels rugged, masculine, and totally indestructible. Choosing black corrugated steel cladding provides heavy-duty commercial durability, making it an absolute necessity for regions hammered by severe hail, high winds, or extreme snow loads.
Wood requires endless upkeep, but wrapping a frame in deeply ribbed, jet-black metal siding creates a striking, maintenance-free monolith that lasts a lifetime. The ribbed vertical texture beautifully manipulates sunlight and shadows, ensuring the dark surface never looks flat or boring.
Expect to pay around $4 to $7 per square foot for premium colored metal paneling. Pin this if you absolutely despise painting and want a permanent, bulletproof exterior.
- Key Materials: Jet-black corrugated steel siding, color-matched hex screws
- Vibe / Style: Indestructible industrial monolith
- Difficulty: Intermediate (requires precise panel lapping)
- Budget Breakdown: Steel panels: $800 | J-channel trim: $120 | Neoprene-washer screws: $45.
- Creator’s Tip: Only cut metal panels using a specialized nibbler tool; using abrasive saw blades burns the protective black coating and guarantees premature rusting.
- Smart Sourcing: pre-painted black corrugated metal panels (bulk) and color-matched roofing screw kits.
12. Black Cube with Natural Wood Door
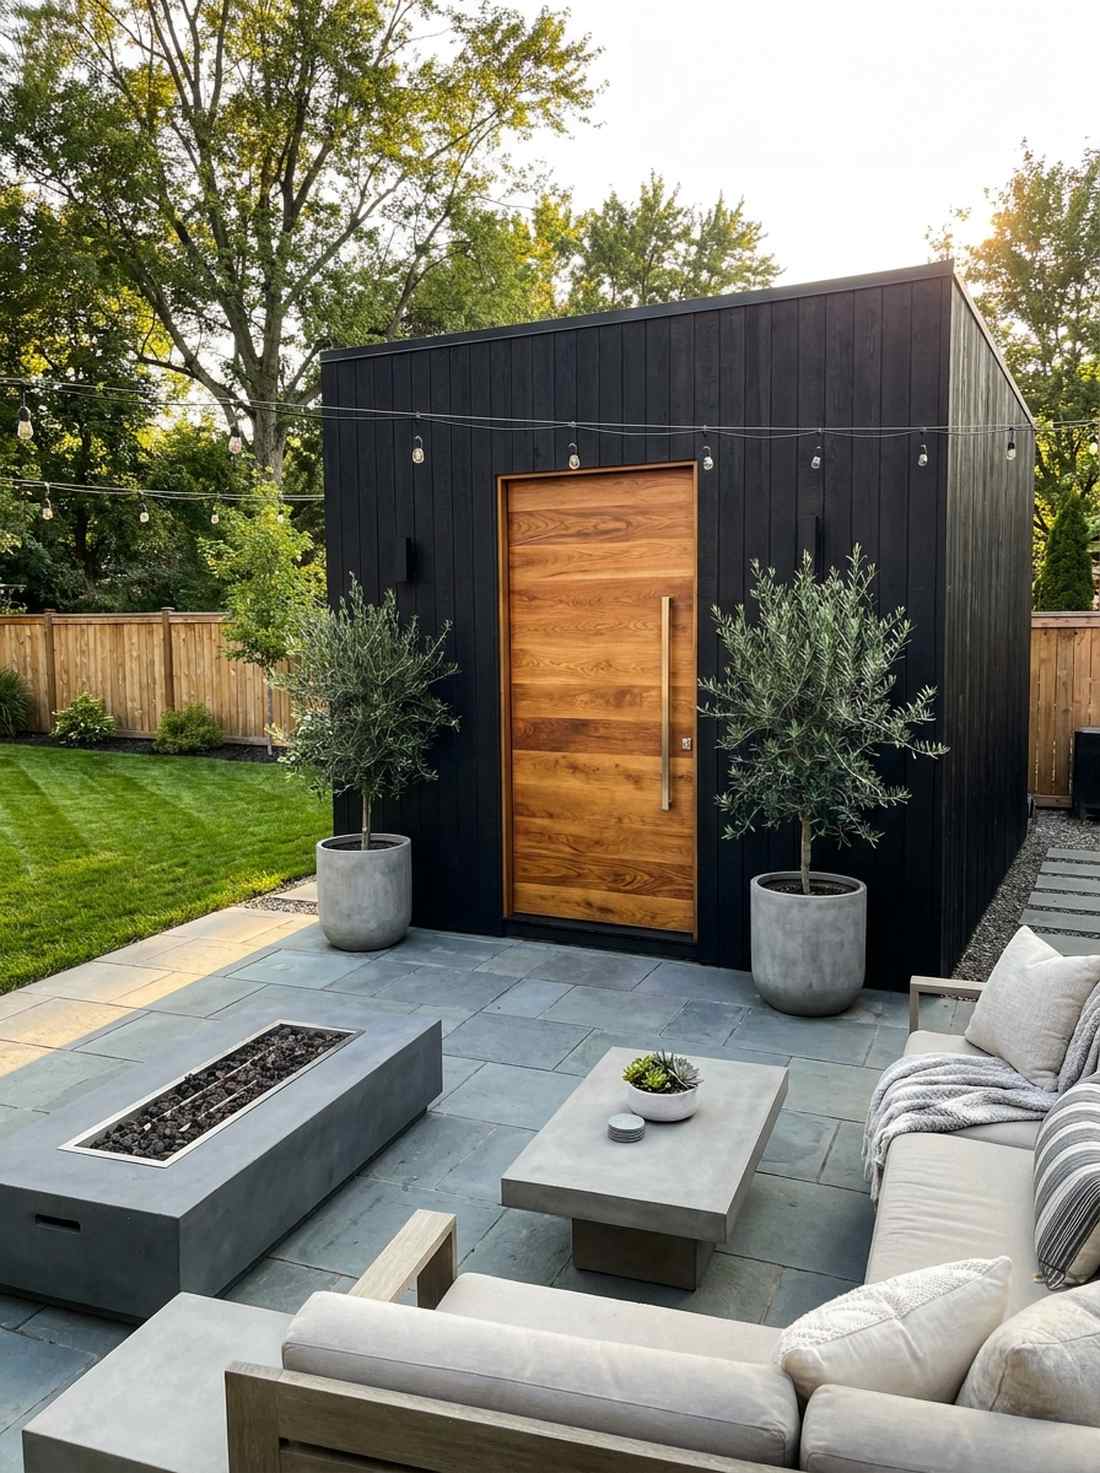
Approaching this entryway feels incredibly warm and inviting despite the dark exterior shell. Installing a natural wood focal door against a blackened structure works brilliantly as a compositional centerpiece for patios or highly trafficked backyard entryways.
A completely black box can look like a sinister shipping container, but breaking the monochromatic facade with a clear-coated white oak door instantly injects biological warmth. This extreme material contrast highlights the rich, natural wood grain and transforms a simple box into premium real estate.
A custom wood slab door paired with black siding will run about $500 to $900 total. It’s a high-impact design choice that completely anchors the structure’s aesthetic.
- Key Materials: Solid white oak or cedar slab door, clear protective marine varnish
- Vibe / Style: Inviting modern gallery
- Difficulty: Easy aesthetic upgrade
- Budget Breakdown: Solid wood door: $450 | Marine-grade clear coat: $60 | Modern stainless hardware: $100.
- Creator’s Tip: Treat the raw wood door with a marine-grade spar urethane to protect the blonde tones from yellowing under harsh UV sunlight.
- Smart Sourcing: solid core natural wood slab doors and marine-grade clear wood sealant.
13. Charcoal Vertical Boards
This subtly textured facade feels like a cozy, sophisticated off-grid cabin. Utilizing a charcoal-stained wood exterior offers a brilliant softer alternative to harsh pure black, making it ideal for sun-drenched yards where pure black would dangerously overheat.
Solid black paint completely murders natural texture, but a deep charcoal semi-transparent stain allows the gorgeous wood grain to push through the dark barrier. Pairing these dark vertical lines with crisp black aluminum fascia delivers incredible color-blocking without looking overly severe.
You can achieve this designer look for just $60 in specialized stain over standard cladding. Save this to your exterior design board if you want a moody, organic finish.
- Key Materials: Vertical tongue-and-groove pine, semi-transparent charcoal stain
- Vibe / Style: Softened organic modernism
- Difficulty: Easy beginner staining project
- Budget Breakdown: Wood siding: $400 | Charcoal stain: $75 | Black aluminum trim: $150.
- Creator’s Tip: Brush the stain directly into the vertical grooves before rolling the flat surfaces to prevent bright, unstained wood from showing when the boards inevitably contract in winter.
- Smart Sourcing: semi-transparent charcoal wood stain (1 gallon) and black aluminum fascia trim kits.
14. FSC-Certified Timber Structure
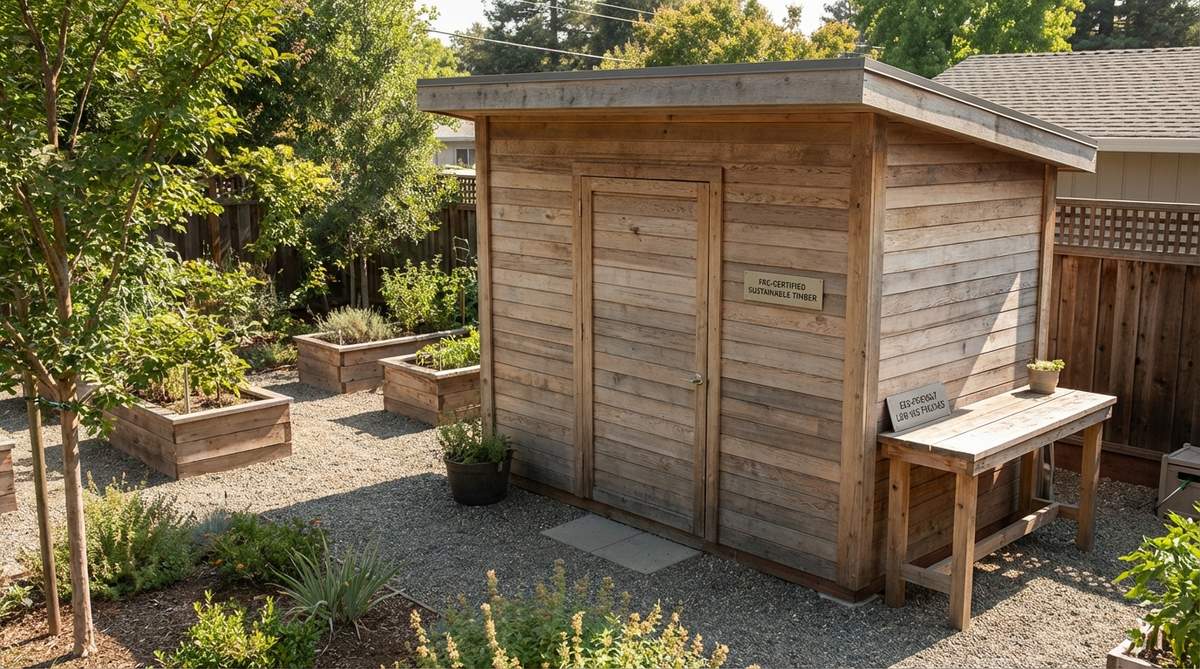
Breathing the air inside this eco-studio feels incredibly crisp, clean, and purely natural. Sourcing eco-friendly shed materials like FSC-certified timber is critical for enclosed workshops or home offices where you’ll be spending eight uninterrupted hours a day.
Most cheap lumber is treated with harsh, invisible chemicals, but insisting on verified sustainable Douglas fir or cedar ensures your indoor air quality remains totally untainted. Combining this ethical lumber with low-VOC finishes creates a non-toxic sanctuary that performs exactly like conventional builds but respects the surrounding ecosystem.
Opting for ethical FSC lumber typically only adds a 5–10% cost premium to your framing budget. It’s a no-brainer upgrade for health-conscious DIYers.
- Key Materials: FSC-certified Douglas fir framing, low-VOC clear sealants
- Vibe / Style: Pure eco-conscious sanctuary
- Difficulty: Standard framing skills
- Budget Breakdown: FSC framing lumber: $700 | Low-VOC sealer: $80 | Hardware: $100.
- Creator’s Tip: Keep the stamped FSC tags and chain-of-custody receipts; this documentation can actually become a selling point that boosts property value for eco-minded buyers.
- Smart Sourcing: eco-friendly low-VOC wood sealant (1 gallon) and heavy-duty structural framing connectors.
Wait until you see how this next eco-hack cuts energy costs in half while making the exterior look undeniably luxurious…
Eco-Conscious Sustainable Builds
Sustainable construction methods reduce environmental impact while often improving indoor air quality and long-term durability. These approaches use renewable materials and energy-efficient systems.
15. Reclaimed Timber Cladding
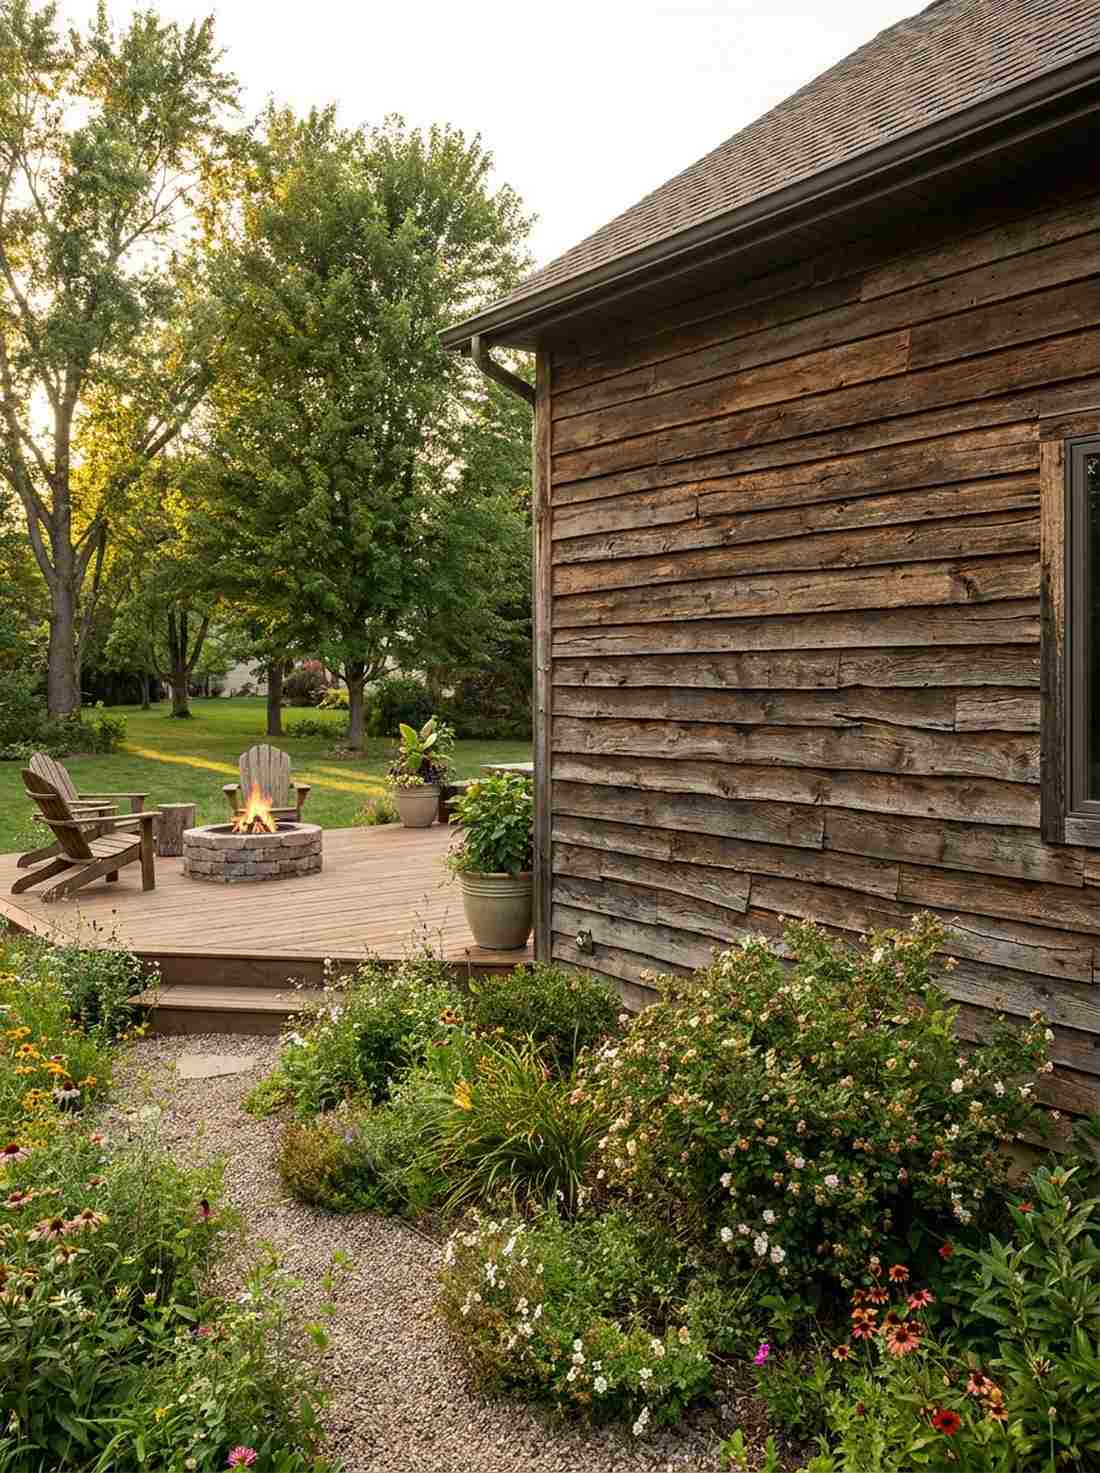
Running your hands across this textured wall feels like touching a piece of living history. Applying salvaged wood shed siding instantly injects decades of rustic character, perfectly complementing a wild, untamed cottage-style garden space.
Buying pre-distressed faux wood from big box stores always looks tacky, but sourcing authentic deconstructed barn wood delivers an irreplaceable, weathered patina. While it requires tedious de-nailing and careful milling, this zero-waste approach builds a completely unique, story-rich facade that modern materials simply cannot replicate.
Sourcing reclaimed wood can range from totally free (pallet salvaging) to $8+ per square foot for premium heritage barn wood. Pin this to your sustainable building board!
- Key Materials: Salvaged barn wood or industrial pallets, clear matte weatherproofing
- Vibe / Style: Heritage rustic revival
- Difficulty: Labor-intensive preparation
- Budget Breakdown: Salvaged wood: $0 – $600 | Milling tools: $150 | Weather sealer: $90.
- Creator’s Tip: Run a high-quality metal detector wand over every single salvaged board before feeding it through a thickness planer to avoid destroying expensive blades.
- Smart Sourcing: heavy-duty wood metal detector wands and premium clear matte wood waterproofing.
16. Living Green Roof
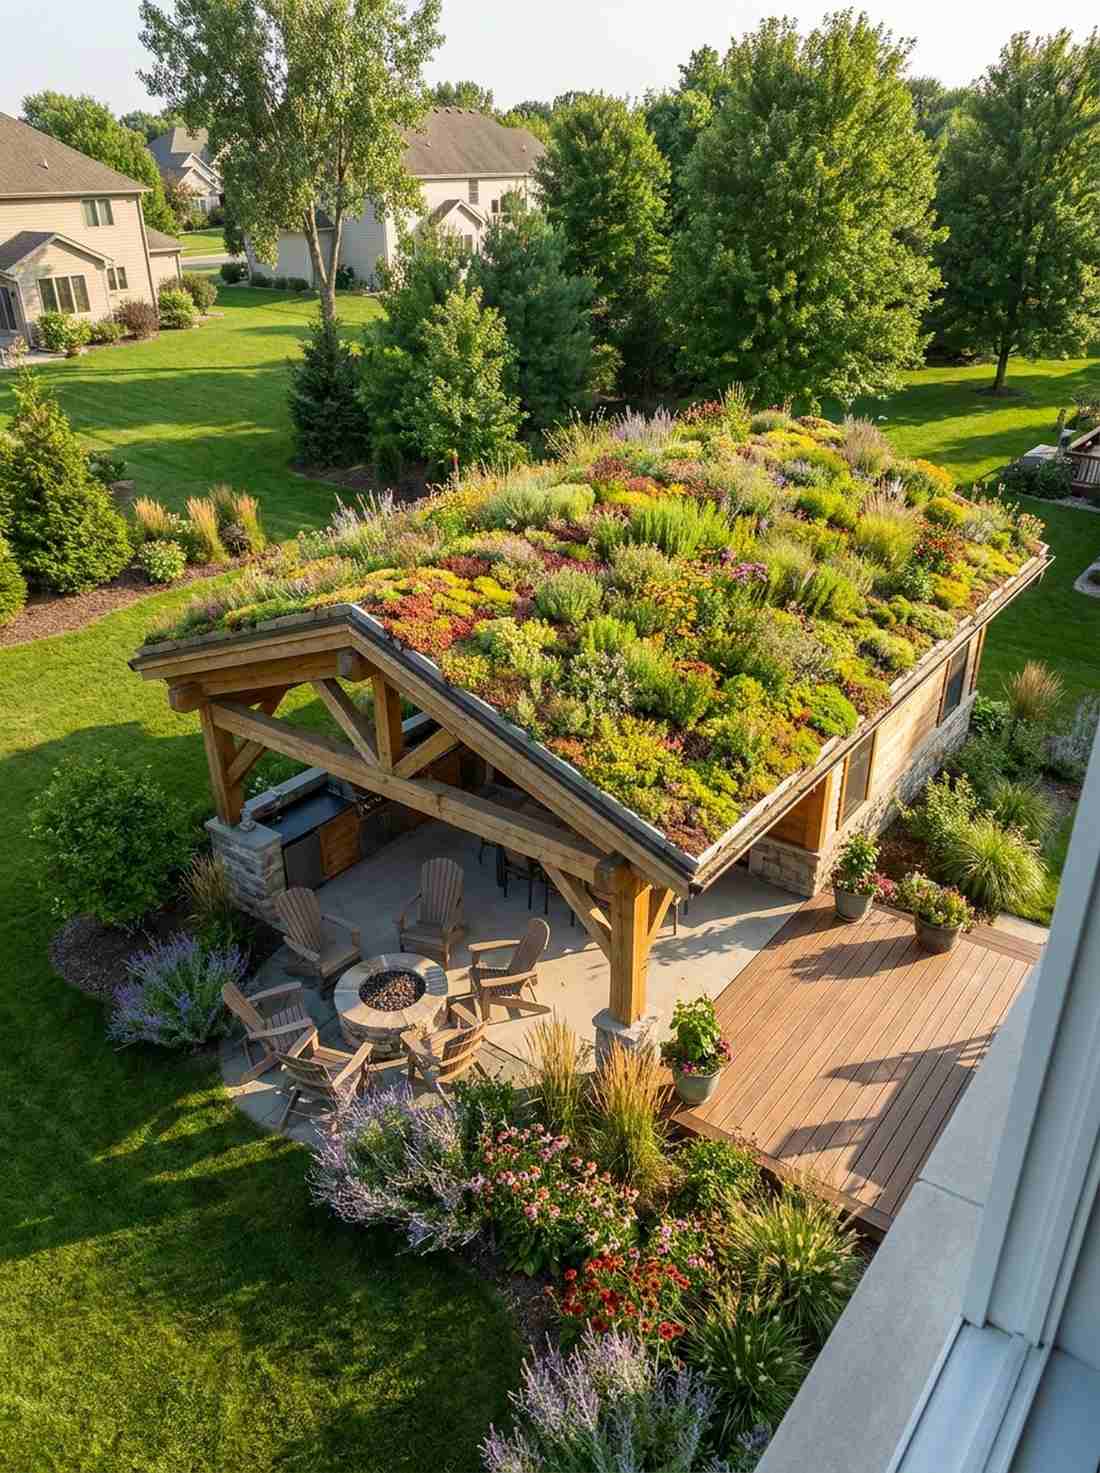

Looking down at this structure from an upper window feels like viewing a floating patch of wild meadow. Installing a sedum green roof system completely disguises the building from above, making it an ingenious hack for neighborhood developments with strict aesthetic zoning rules.
A hot asphalt roof turns your yard into a heat island, but a thick layer of living native grasses naturally insulates the space, slashing interior summer cooling demands by up to 40%. You must dramatically over-engineer the roof joists to handle the crushing weight of saturated soil, but the thermal payoff is massive.
A fully waterproofed living roof system will run you about $15 to $25 per square foot. Highly recommended if you want to actively support local pollinators.
- Key Materials: Heavy-duty EPDM waterproof membrane, shallow-root sedum trays
- Vibe / Style: Camouflaged organic architecture
- Difficulty: Advanced structural engineering
- Budget Breakdown: Upgraded joists: $300 | Waterproofing barrier: $400 | Sedum planting trays: $500.
- Creator’s Tip: Keep the roof pitch strictly under a 4:12 slope; anything steeper will cause massive, messy soil avalanches during heavy summer downpours.
- Smart Sourcing: pre-seeded sedum green roof trays (bulk pack) and heavy-duty root-barrier roof membranes.
17. Sheep Wool Insulation
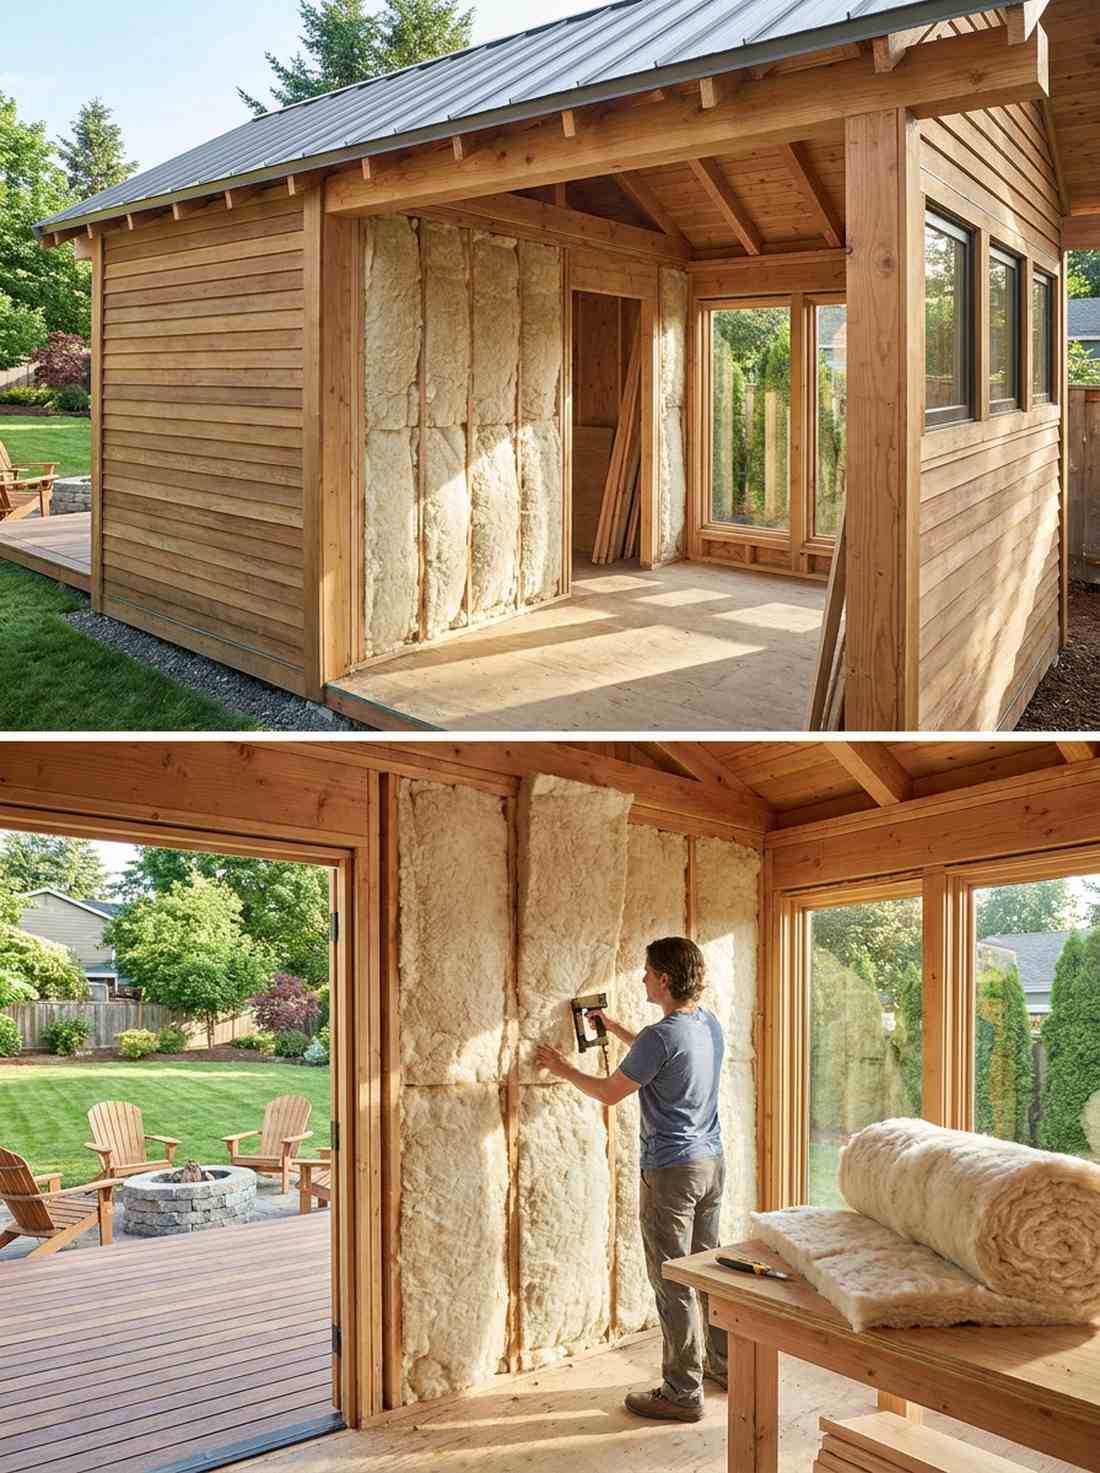

Working in this insulated space feels like being wrapped in a quiet, temperature-controlled blanket. Packing your walls with natural sheep wool insulation is a game-changing comfort upgrade for a full-time garden studio where synthetic chemical off-gassing is a major concern.
Traditional pink fiberglass batts require toxic resins and cause severe skin irritation, but biodegradable sheep wool naturally manages humidity by absorbing and releasing moisture without ever degrading. This organic thermal barrier actively purifies the air and provides serious passive fire safety without relying on nasty chemical retardants.
Wool batts will generally cost about 20–30% more than standard fiberglass per square foot. It is a fantastic hidden upgrade that changes how the room physically feels.
- Key Materials: 100% natural sheep wool batts, staple gun
- Vibe / Style: Ultra-cozy breathable cabin
- Difficulty: Very easy, itch-free installation
- Budget Breakdown: Wool batts (per 100 sq ft): $180 | Vapor barrier: $50 | Staples: $10.
- Creator’s Tip: Unlike fiberglass, wool requires zero protective hazmat suits to install—you can easily tear it by hand to fit perfectly around tricky electrical boxes.
- Smart Sourcing: natural sheep wool insulation rolls (bulk pack) and heavy-duty construction staple guns.
18. Solar Panel Integration

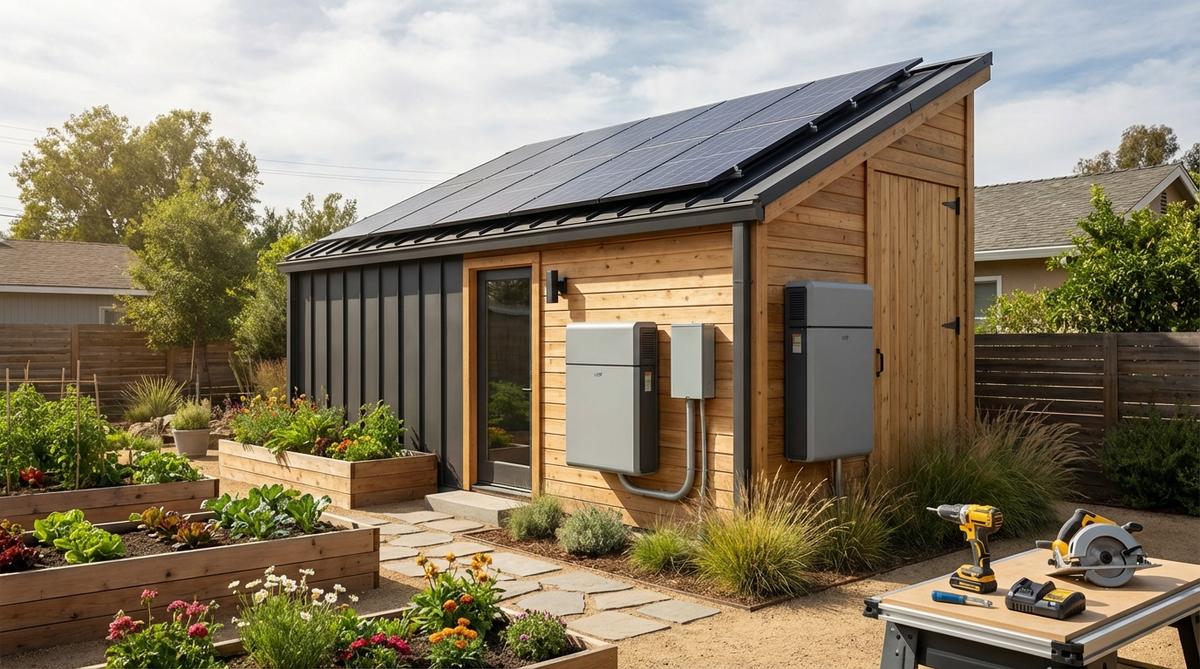
Flipping the switch in this shed feels like ultimate off-grid independence. Integrating a shed roof solar panel system severs your reliance on the main house, making it the perfect remote power solution for deep-property builds where trenching an electrical line would destroy the landscaping.
Paying an electrician $3,000 just to dig a trench across your yard is a terrible investment when a sleek roof-mounted photovoltaic array can completely power your laptops, LED lights, and small shop tools. Adding a smart battery bank ensures you have reliable, silent power even during late-night weekend projects.
A capable 2kW solar kit with basic battery storage will cost between $1,500 and $2,500. Pin this to your off-grid survival board if you want total energy autonomy.
- Key Materials: 300W solar panels, smart charge controller, deep-cycle batteries
- Vibe / Style: Self-sufficient tech bunker
- Difficulty: Intermediate electrical knowledge
- Budget Breakdown: Solar panels: $800 | Battery bank: $1,000 | Charge controller/inverter: $300.
- Creator’s Tip: Ensure your south-facing roof is completely clear of overhanging tree branches; even a 10% shade shadow can drop solar generation efficiency by over 50%.
- Smart Sourcing: off-grid solar panel starter kits and deep-cycle solar battery banks.
Material Guide: Cheap vs. Premium Aesthetic
Knowing exactly where to save and where to spend makes all the difference in achieving that “looks expensive but isn’t” vibe.
- Standard vs. UV-Resistant/Premium: Standard exterior stains quickly crack and peel, forcing annual sanding. Upgrading to UV-coated commercial sealants completely stops fading, turning a cheap pine facade into a lasting premium surface.
- Pre-made Kits vs. Sourcing Locally: Scavenging hardware locally often leads to mismatched brackets and compromised structural integrity. Investing in engineered, heavy-duty starter kits guarantees a flawless architectural finish while saving weeks of frustrating trial and error.
These upcoming compact layouts are absolute game-changers for messy hobbies where function usually destroys aesthetics…
Workshop and Maker Spaces
Dedicated workshops require specific design considerations including electrical capacity, ventilation, and structural reinforcement for heavy equipment. These sheds prioritize function over decorative elements.
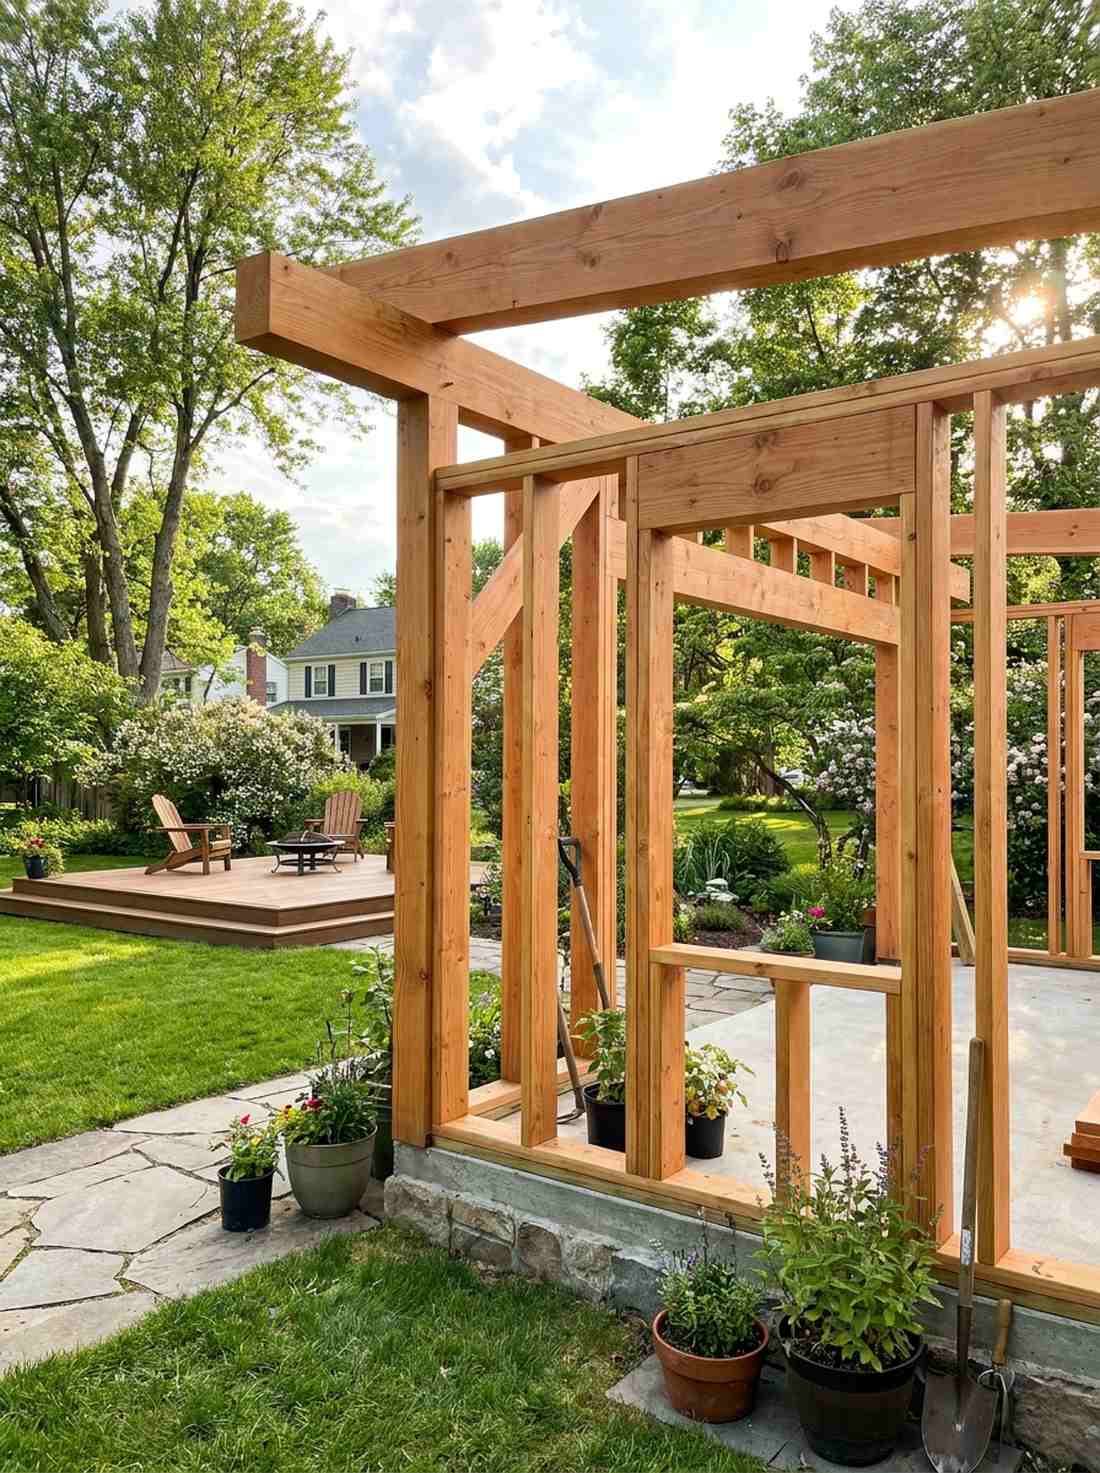
19. Woodworking Workshop Shed
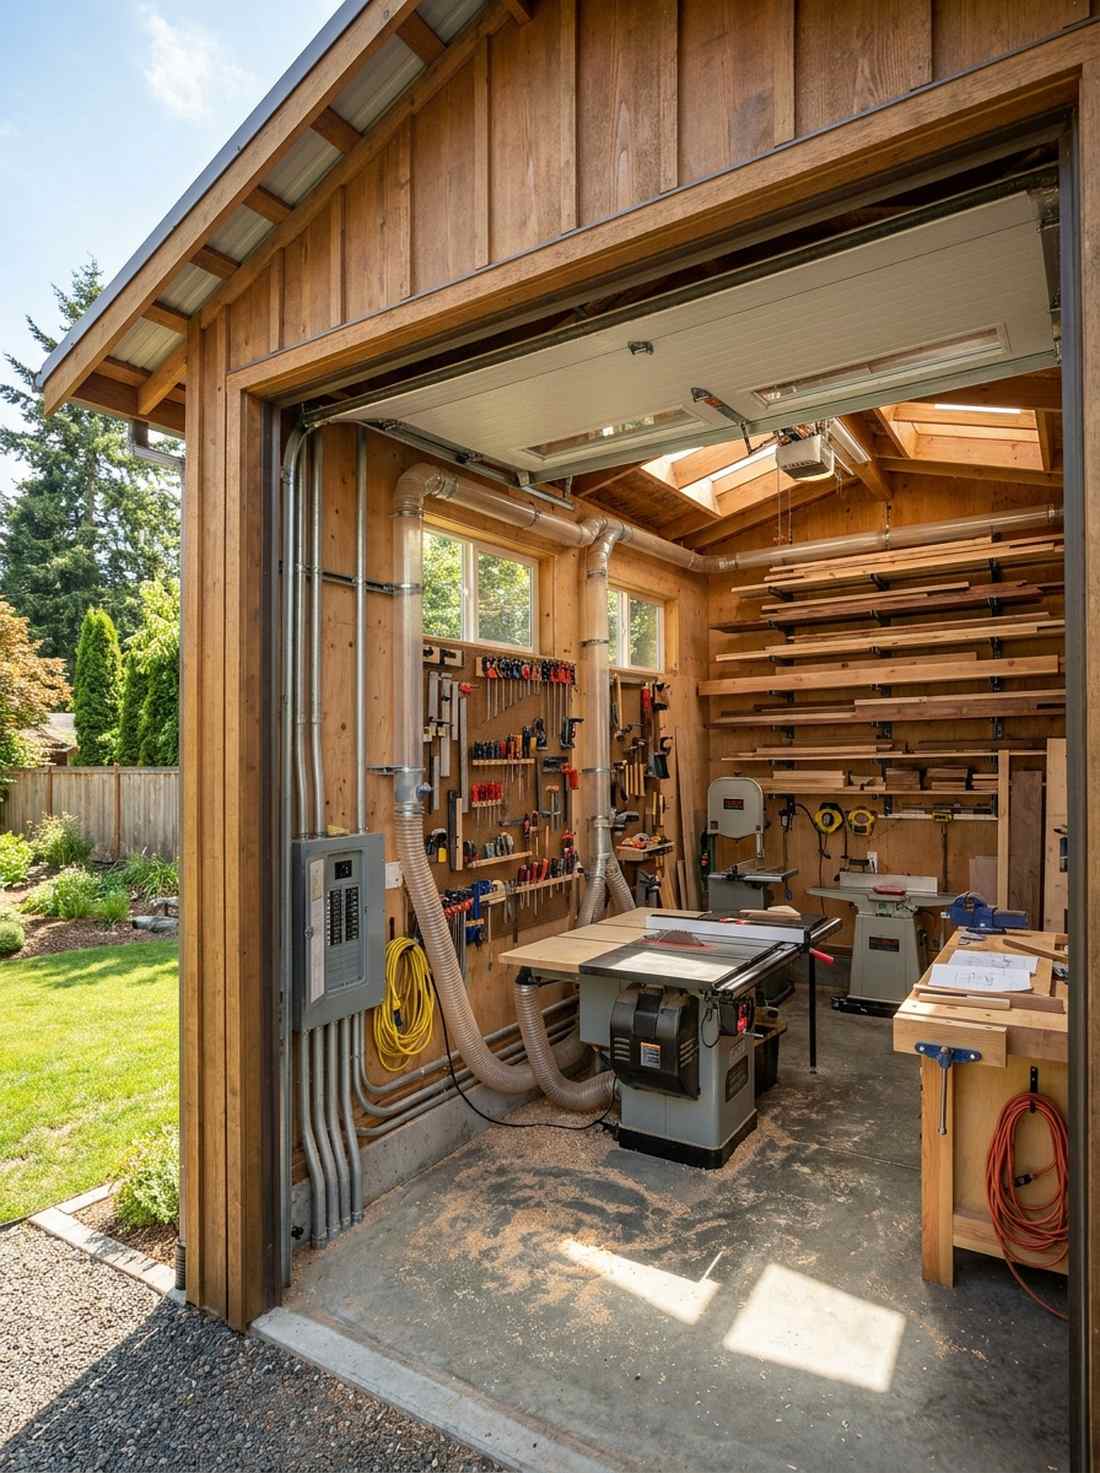
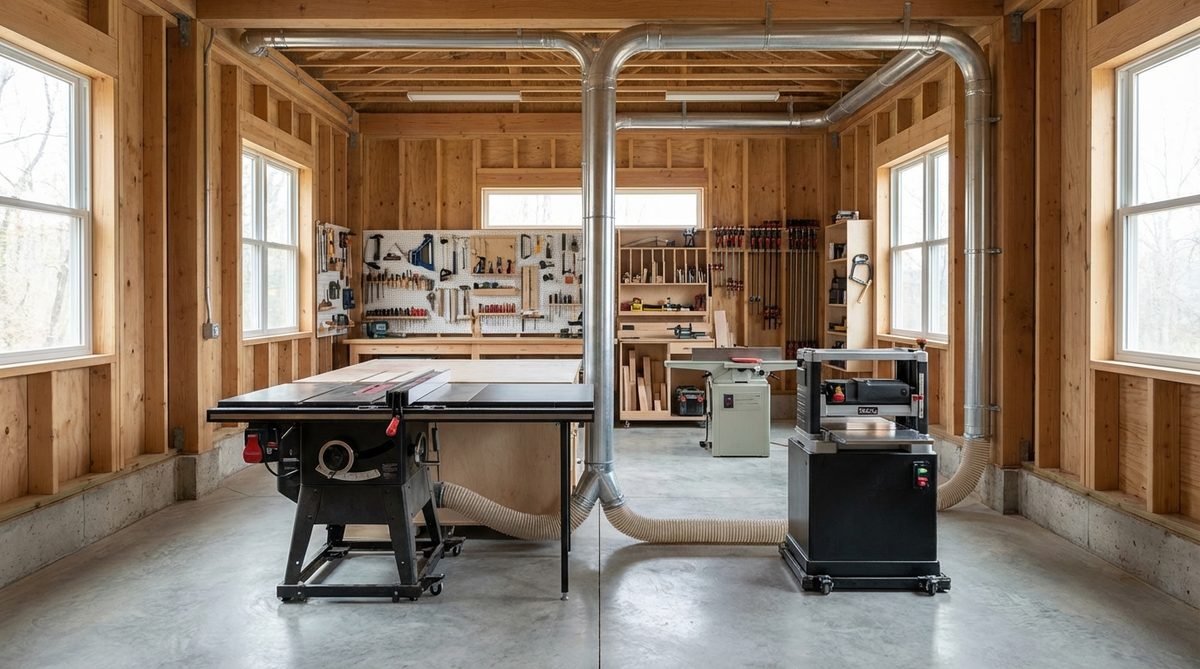
Stepping into this sawdust-scented room feels like entering a master craftsman’s personal domain. Designing a heavy-duty woodworking shed requires intense structural planning, making it the ultimate setup for serious builders who need dedicated 220-volt lines for massive table saws.
Throwing heavy machinery onto a bouncy wooden floor will ruin your precision cuts; a thick, sealed concrete slab foundation absorbs intense vibrations and makes sweeping up wood chips incredibly fast. Beefing up the wall framing to 16-inch on-center gaps guarantees you can hang hundreds of pounds of lumber on wall-mounted racks without structural bowing.
Upgrading the electrical panel and pouring a slab foundation will easily add $2,000 to the build. This is a non-negotiable setup for any serious maker.
- Key Materials: Concrete slab foundation, 220-volt electrical subpanel
- Vibe / Style: Professional industrial shop
- Difficulty: Advanced foundation and electrical work
- Budget Breakdown: Concrete pour: $1,200 | Electrical panel/wiring: $800 | Wall pegboards: $150.
- Creator’s Tip: Pre-plan and install a built-in PVC dust collection vacuum system inside the wall cavities before putting up the drywall to keep the floor completely hose-free.
- Smart Sourcing: heavy-duty wall mounted lumber racks and industrial concrete floor sealant (1 gallon).
20. Metalworking Studio
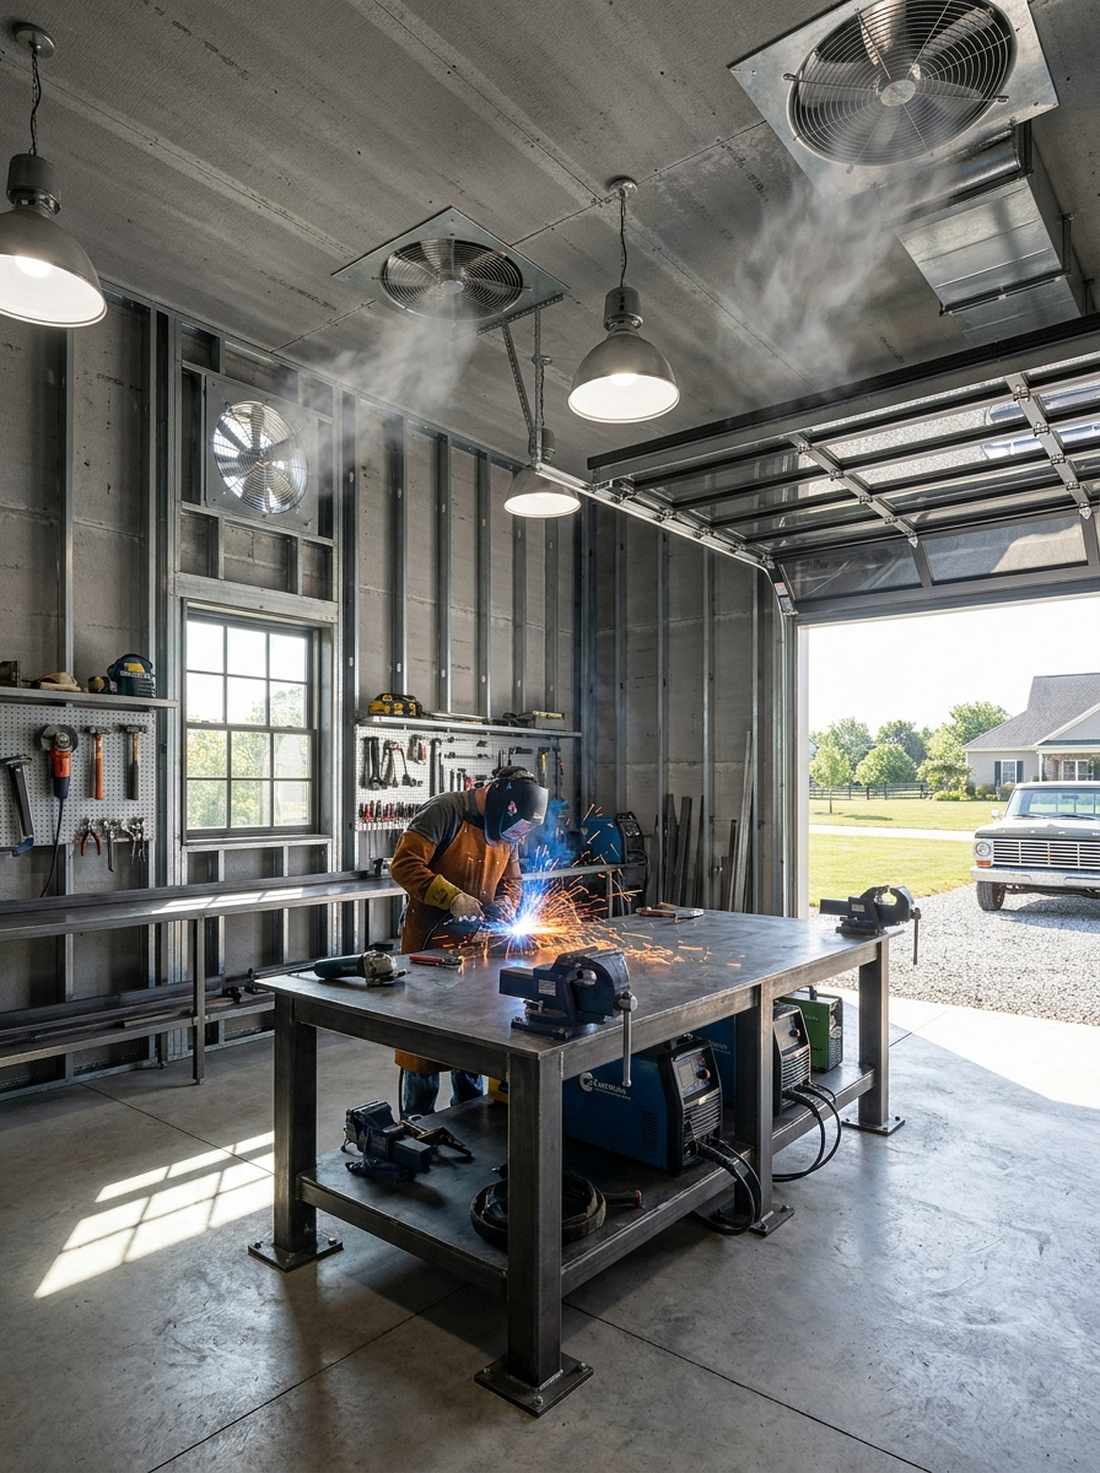
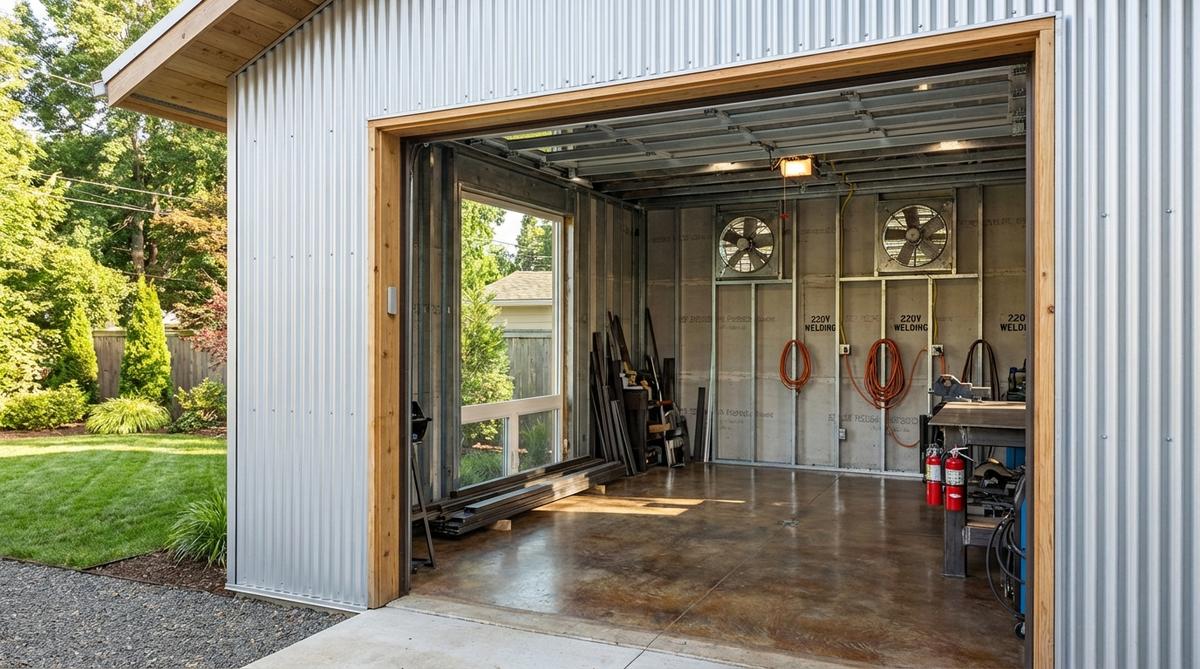
Sparks flying inside this room feel safely contained within an absolute fortress. Converting a space into a fireproof metal fabrication shed demands non-combustible materials, creating a hardcore environment perfect for intense welding and plasma cutting operations.
Using standard drywall or wood paneling near a welder is asking for a catastrophic fire, but utilizing steel stud framing wrapped in heavy cement board sheathing creates an impenetrable, fire-resistant shell. Adding high-velocity industrial exhaust fans prevents toxic, heavy welding fumes from accumulating near the ceiling and poisoning the air.
The specialized steel framing and fireproof boards will cost around $1,500 to $2,500. Save this to your heavy-duty workshop board if you work with intense heat.
- Key Materials: Steel framing studs, fire-rated cement boards, commercial exhaust fan
- Vibe / Style: Bulletproof fabrication bunker
- Difficulty: Advanced (specialized steel construction)
- Budget Breakdown: Steel framing: $800 | Cement boards: $500 | Industrial ventilation: $400.
- Creator’s Tip: Never install wooden workbenches; weld heavy steel plate tables and anchor them directly into the sealed concrete floor to prevent any stray sparks from smoldering in hidden gaps.
- Smart Sourcing: fire-rated cement board screws (bulk pack) and industrial wall-mounted exhaust fans.
21. Artist Painting Studio
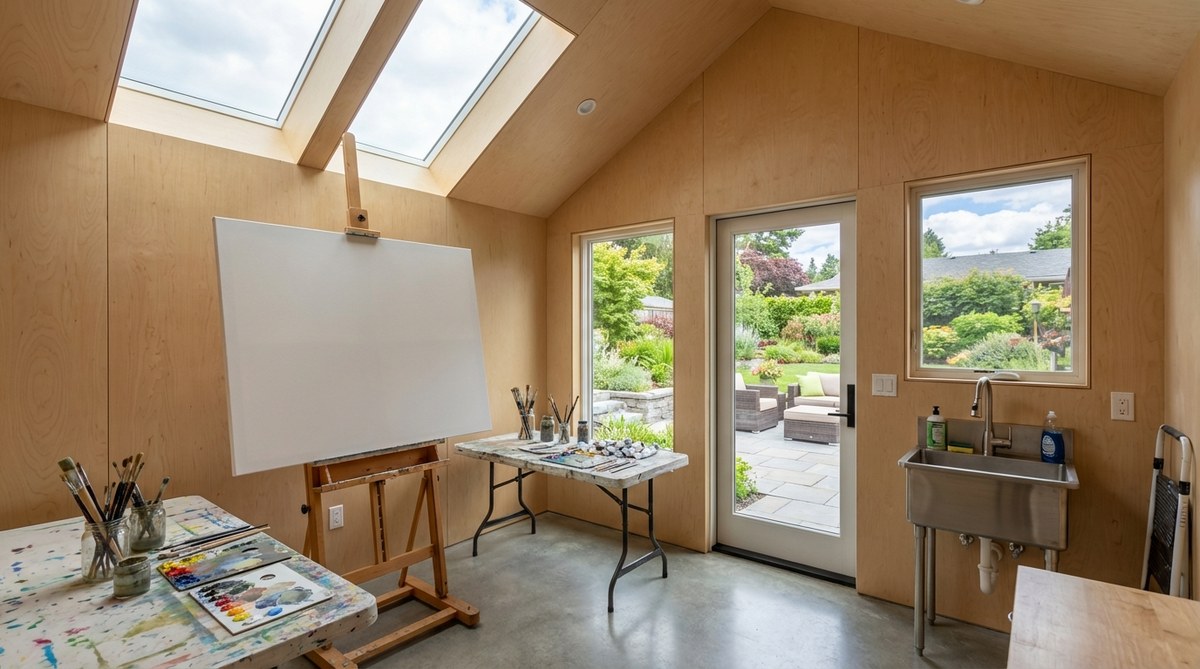
Standing in this bright, airy room feels like a blank canvas waiting for inspiration to strike. Setting up a backyard artist studio requires immense vertical clearance, easily accommodating massive 10-foot canvases without the claustrophobia of a standard shed ceiling.
Busy wood grain interiors visually compete with your art, but wrapping the interior in ultra-smooth, bright white painted drywall creates a neutral, gallery-like void. Strategically positioning skylights purely on the north side ensures you receive the hyper-consistent, indirect daylight that professional painters demand for perfect color mixing.
Drywalling and painting the interior to a level-5 smooth finish will cost about $600 to $900. It is the perfect clean-slate environment for uninhibited creativity.
- Key Materials: Smooth drywall finishes, commercial vinyl flooring, deep utility sink
- Vibe / Style: Pristine creative gallery
- Difficulty: Intermediate interior finishing
- Budget Breakdown: Drywall/mud: $350 | Vinyl flooring: $250 | Utility plumbing: $300.
- Creator’s Tip: Install commercial-grade, solvent-resistant vinyl flooring so you can freely splash turpentine, oil paints, and thinners without permanently staining the ground.
- Smart Sourcing: solvent-resistant commercial vinyl planks and deep heavy-duty utility sink kits.
22. Music Recording Studio
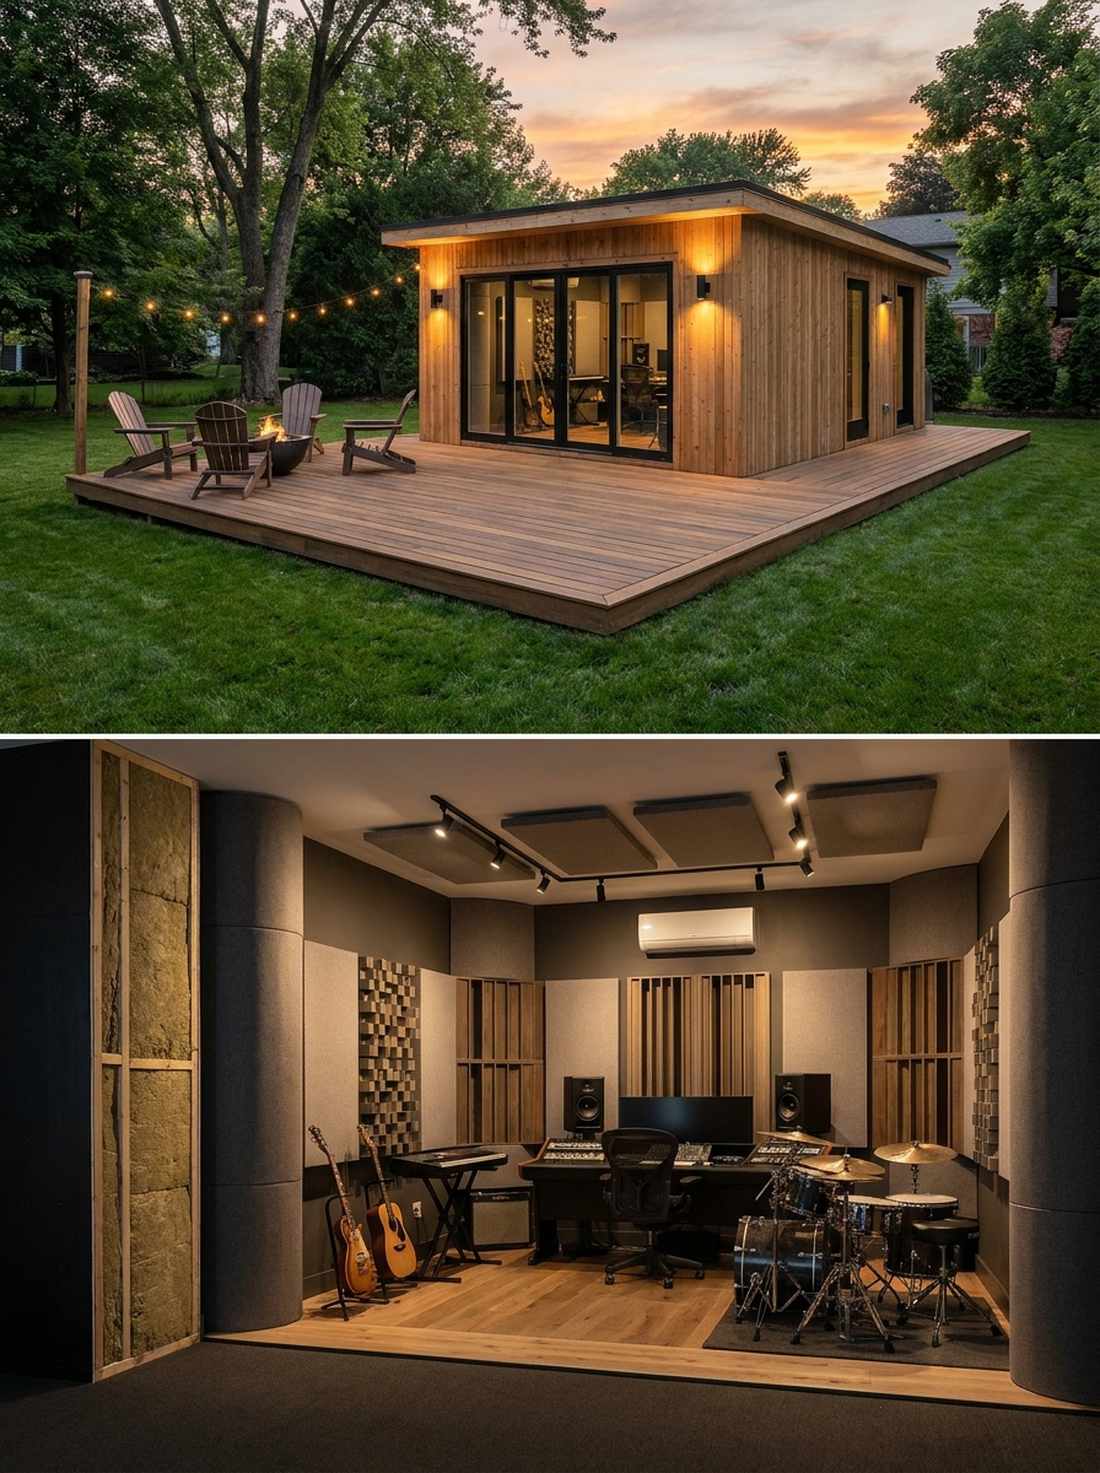
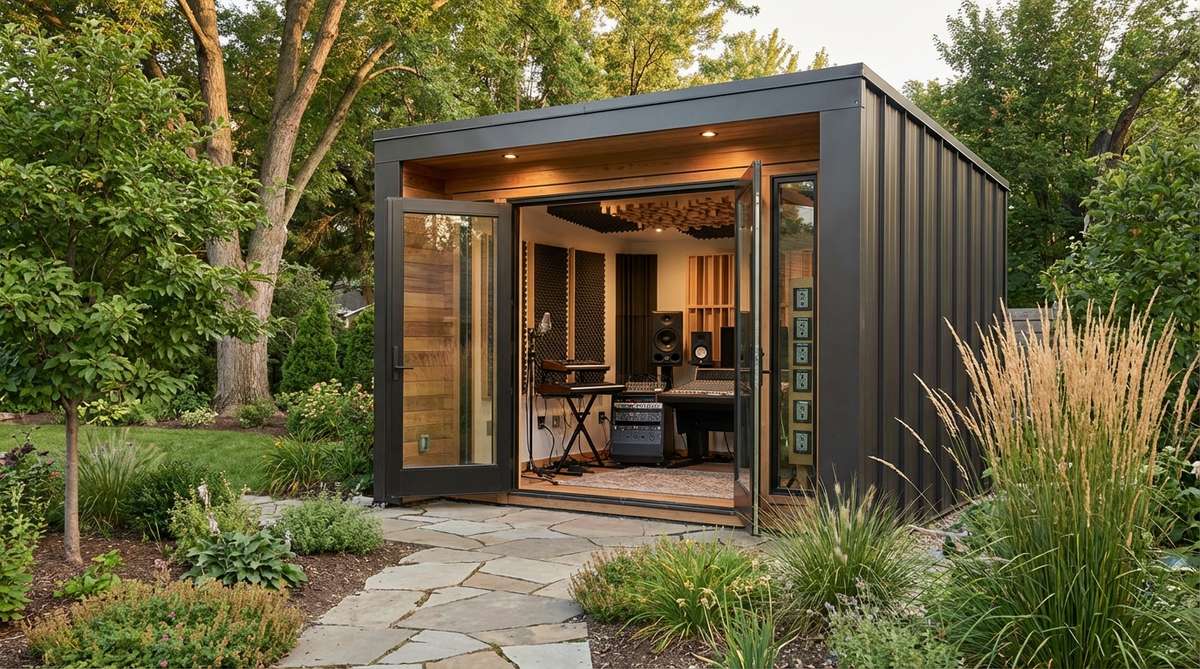
Closing the door behind you feels like stepping into a perfectly silent, pressure-sealed vault. Engineering a soundproof backyard music studio is an intense technical challenge, perfect for musicians who need to blast drums at 2 AM without catching a noise complaint from neighbors.
Slapping foam on the walls does absolutely nothing to stop bass frequencies; you must construct a staggered-stud double wall filled with dense mineral wool to physically decouple the interior from the exterior. Wrapping the room in massive acoustic bass traps creates a neutral, deadened sonic environment that produces exceptionally clean mixdowns.
Proper acoustic isolation materials will easily double your framing and insulation budget, adding $2,000 to $4,000. Pin this layout if you need absolute, uninterrupted silence.
- Key Materials: Staggered framing studs, mass loaded vinyl (MLV), mineral wool insulation
- Vibe / Style: Hyper-focused acoustic vault
- Difficulty: Expert level acoustic engineering
- Budget Breakdown: Mineral wool: $600 | Mass loaded vinyl: $800 | Acoustic panels: $400.
- Creator’s Tip: Install a specialized mini-split HVAC system with ultra-low fan noise, and separate it on an isolated ground circuit to eliminate that annoying electrical hum in your studio monitors.
- Smart Sourcing: mass loaded vinyl soundproofing rolls (bulk pack) and professional acoustic bass trap kits.
Most people think you need massive yard space for a studio… until they see how these ultra-compact micro-designs maximize every single inch coming up next.
Compact Efficiency Designs
Small footprints demand intelligent spatial planning where every square foot serves multiple functions. These designs prove that contemporary style doesn’t require expansive floor areas.
23. Micro Shed 8×8 Office
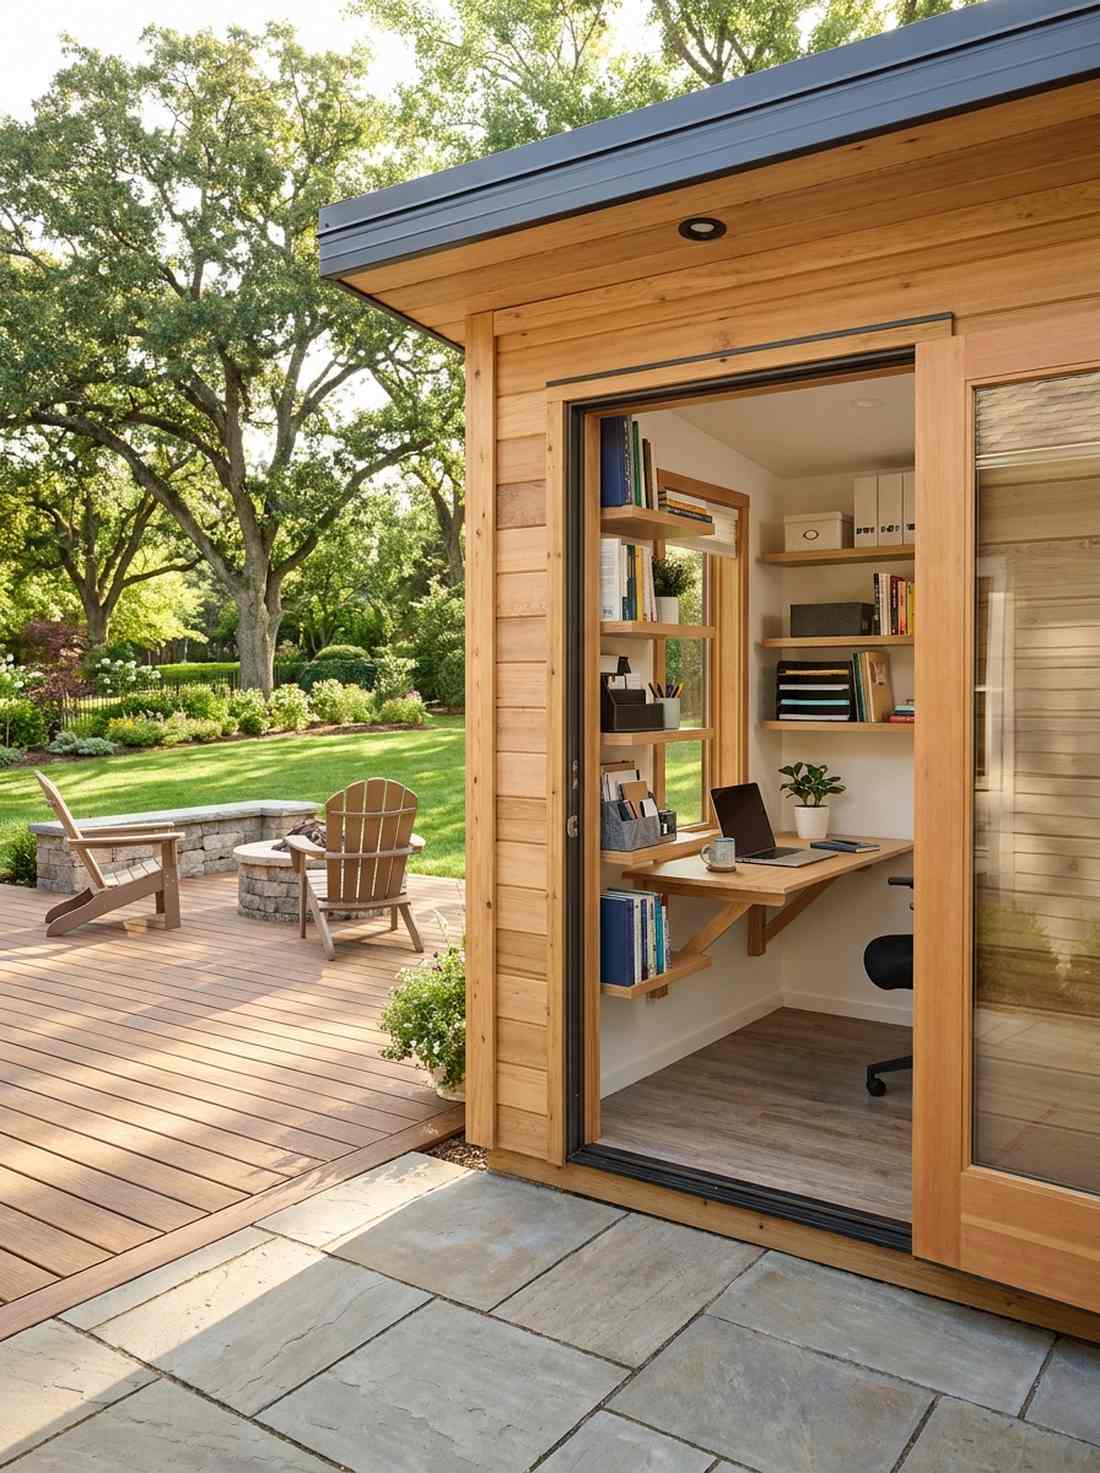
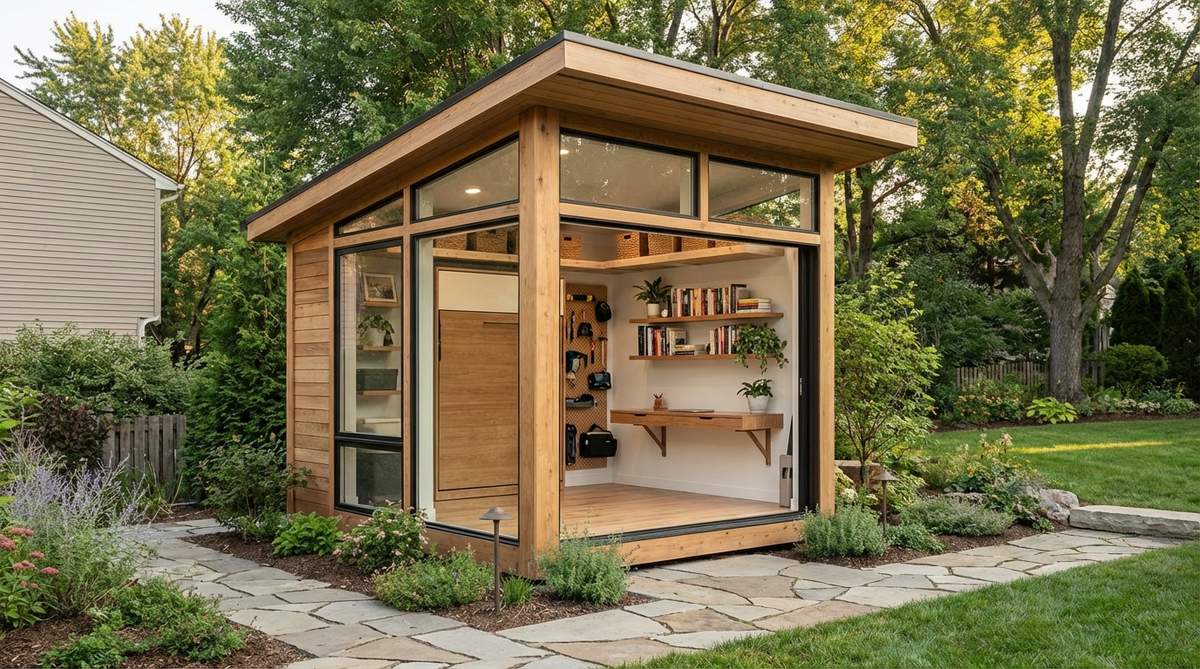
Sitting in this tiny productivity pod feels surprisingly expansive and intimately focused. Building a micro 8×8 backyard office is the ultimate life-hack for remote workers needing extreme separation from house noise without eating up precious lawn space.
A 64-square-foot box sounds suffocating, but installing a clever Murphy-style fold-down desk reclaims massive floor area the second you log off. Leveraging soaring vertical wall storage and avoiding bulky freestanding furniture makes this tiny footprint feel like an upscale executive suite rather than a closet.
You can construct a barebones micro-shed shell for right around $1,500. Save this to your small space hacks board if you need a fast, permit-free home office solution.
- Key Materials: Fold-down wall desk hardware, vertical floating shelf brackets
- Vibe / Style: Hyper-efficient productivity pod
- Difficulty: Easy beginner build
- Budget Breakdown: Lumber shell: $800 | Desk hardware: $150 | Wall organizers: $100.
- Creator’s Tip: Keep the structure just under 100 square feet; in almost every jurisdiction, this completely bypasses the nightmare of pulling expensive residential building permits.
- Smart Sourcing: heavy-duty fold-down wall desk brackets and floating wall shelf hardware kits.
24. Narrow Profile Side Yard Shed
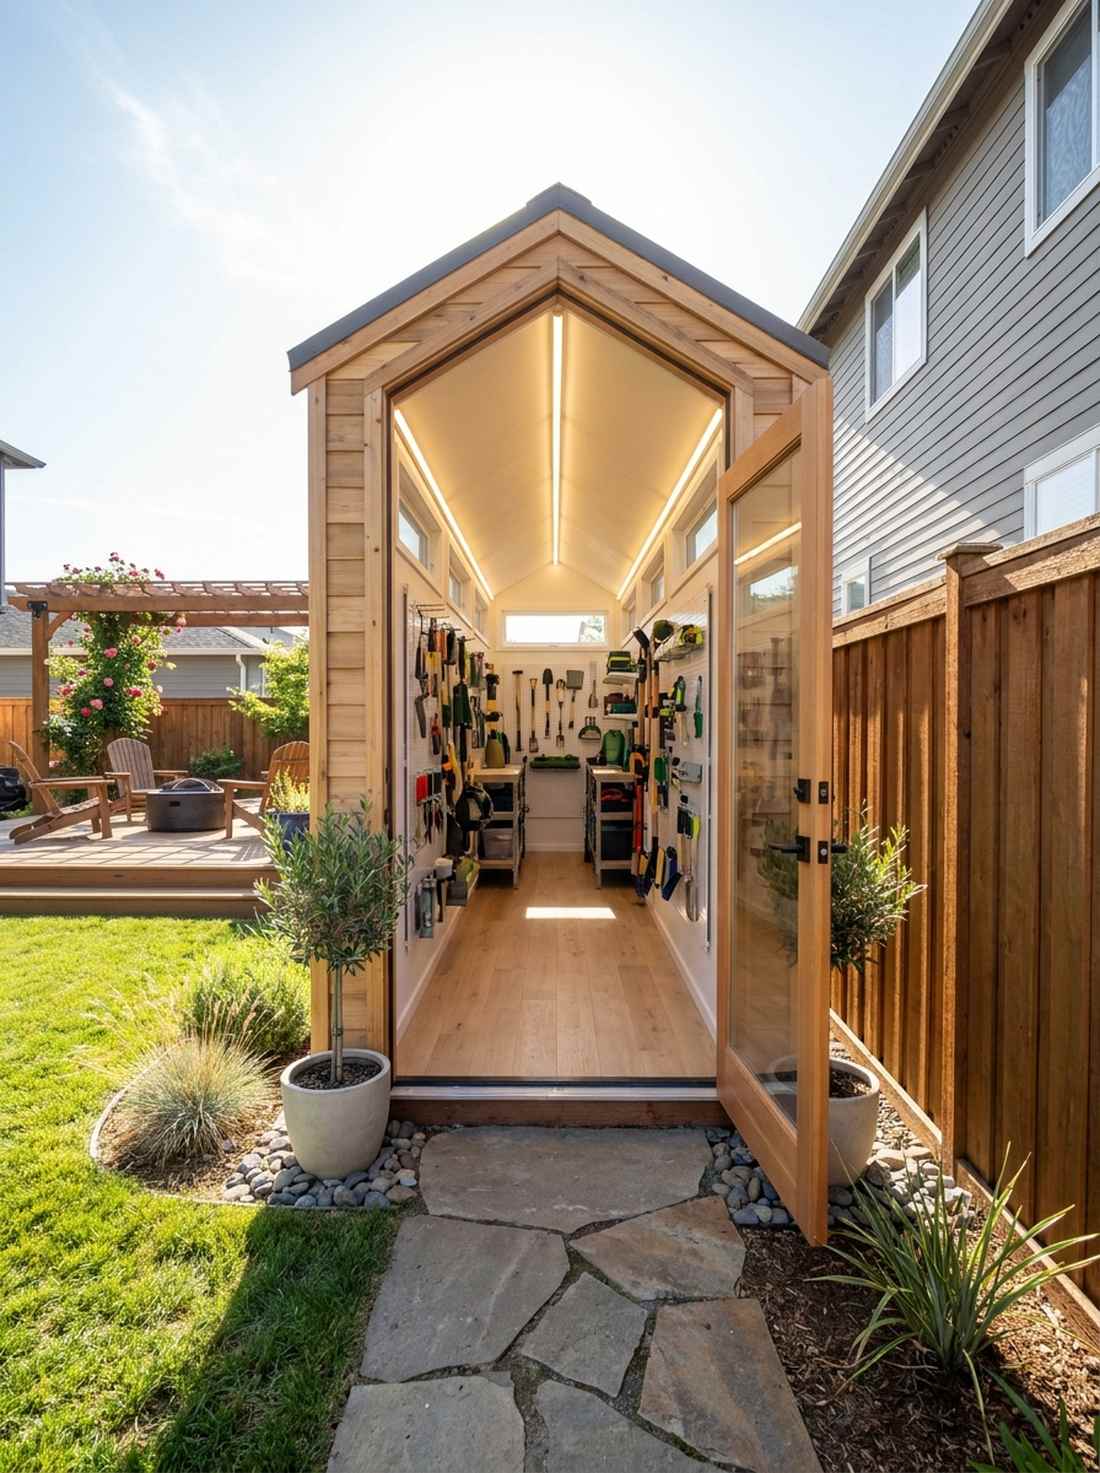
Walking through this slender space feels like navigating a chic, modern hallway galley. Customizing a narrow side-yard shed design reclaims that awkward, wasted dead zone between your fence line and the house, turning it into 96 square feet of brilliant storage.
Building a 6-foot-wide tunnel usually creates a terrifying, claustrophobic corridor, but wrapping both long walls in high transom windows completely eliminates the bowling-alley effect. Placing the main entry door on the short end maximizes the long interior walls for uninterrupted pegboard and tool rack setups.
This customized narrow footprint generally costs about $1,800 to $2,500 in materials. Highly recommended for urban lots where every square inch of property is priceless.
- Key Materials: Narrow truss system, continuous LED strip lighting
- Vibe / Style: Sleek utility corridor
- Difficulty: Intermediate framing
- Budget Breakdown: Base framing: $700 | Siding: $500 | Linear lighting: $150.
- Creator’s Tip: Install bright, continuous LED strip lights across the entire apex of the ceiling to wash the narrow walls evenly and kill any dark, scary corners.
- Smart Sourcing: ultra-bright continuous LED shop light strips and heavy-duty narrow wall shelving racks.
25. Vertical Expansion Loft Design
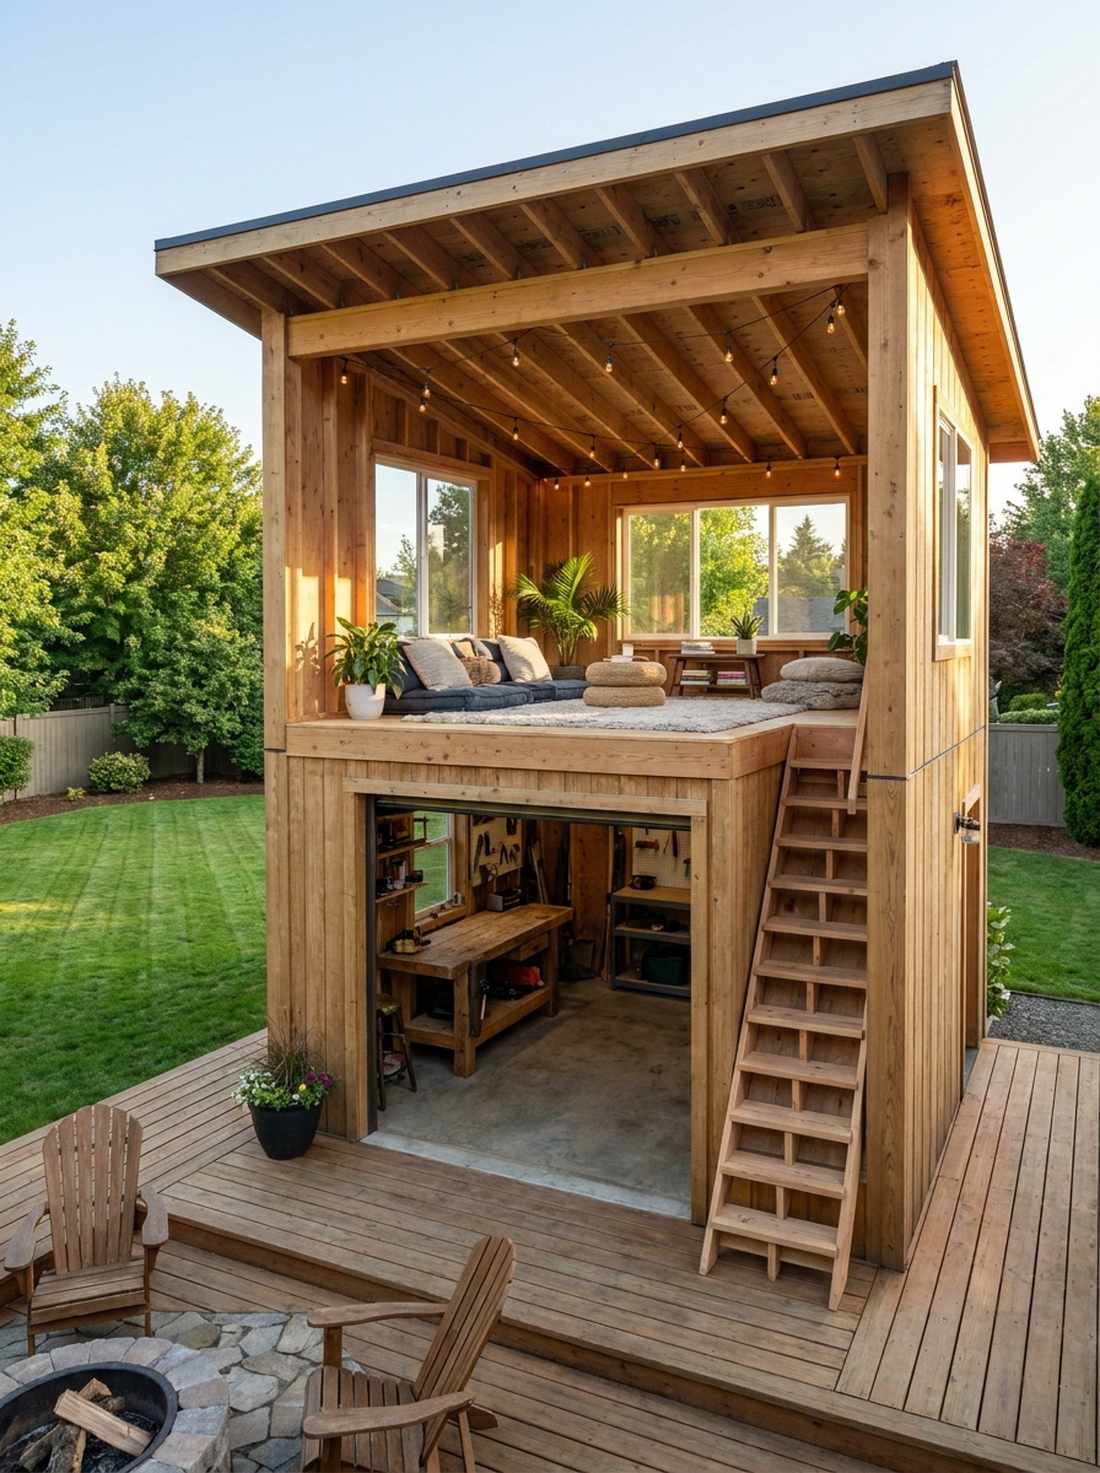
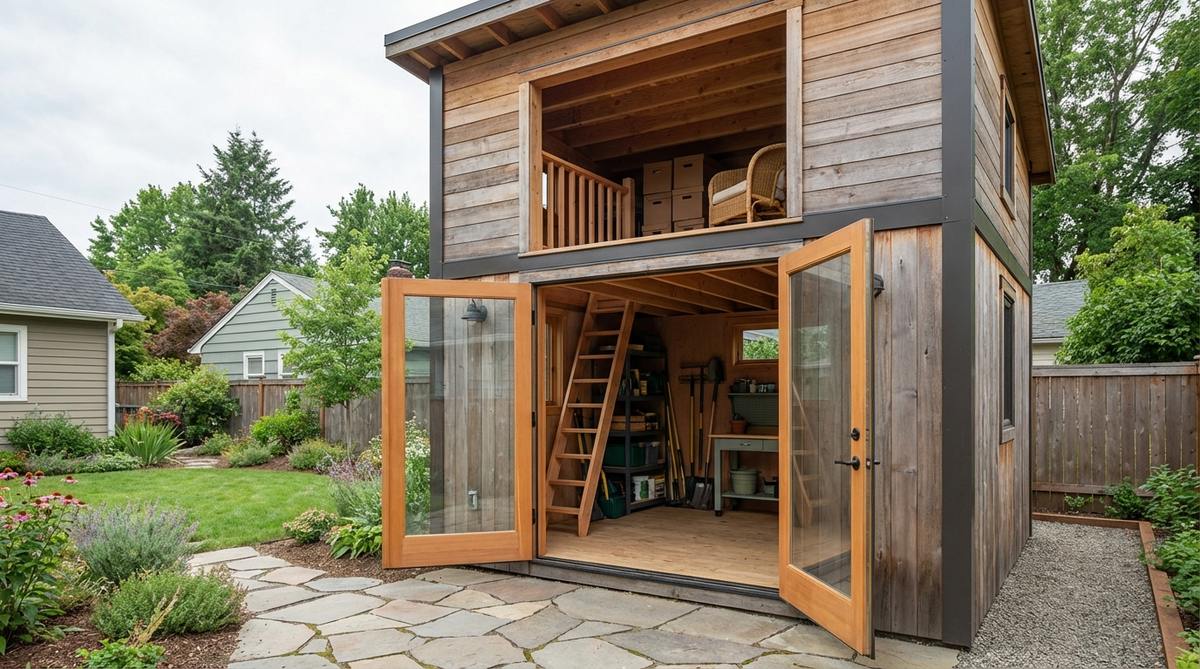
Climbing the ladder into this space feels like discovering a hidden treehouse inside a modern cabin. Integrating a shed loft mezzanine effectively doubles your usable interior footprint, making it the perfect two-in-one setup for a ground-floor workspace and overhead relaxation zone.
Settling for a standard 8-foot ceiling wastes a massive amount of potential volume, but pushing the walls to 12 feet creates a brilliant secondary tier. By engineering heavy floor joists and using alternating-tread space-saving stairs, you unlock an entire upper level without increasing your taxed foundation footprint.
Expanding vertically adds roughly $800 to $1,200 for the extra lumber and structural loft decking. Pin this if you are battling strict lot coverage limits but still need massive storage!
- Key Materials: 2×8 floor joists, heavy-duty plywood decking, alternating-tread stair kit
- Vibe / Style: Multi-level modern treehouse
- Difficulty: Advanced structural load planning
- Budget Breakdown: Taller wall framing: $300 | Loft joists/decking: $400 | Compact ladder/stairs: $250.
- Creator’s Tip: Ensure the lower level maintains at least a 7-foot clearance to prevent constant head-bumping, and pad the upper loft floor with thick rugs to dampen footstep noise.
- Smart Sourcing: heavy-duty loft joist hangers (bulk pack) and compact alternating-tread stair kits.
26. Corner Lot Dual-Access
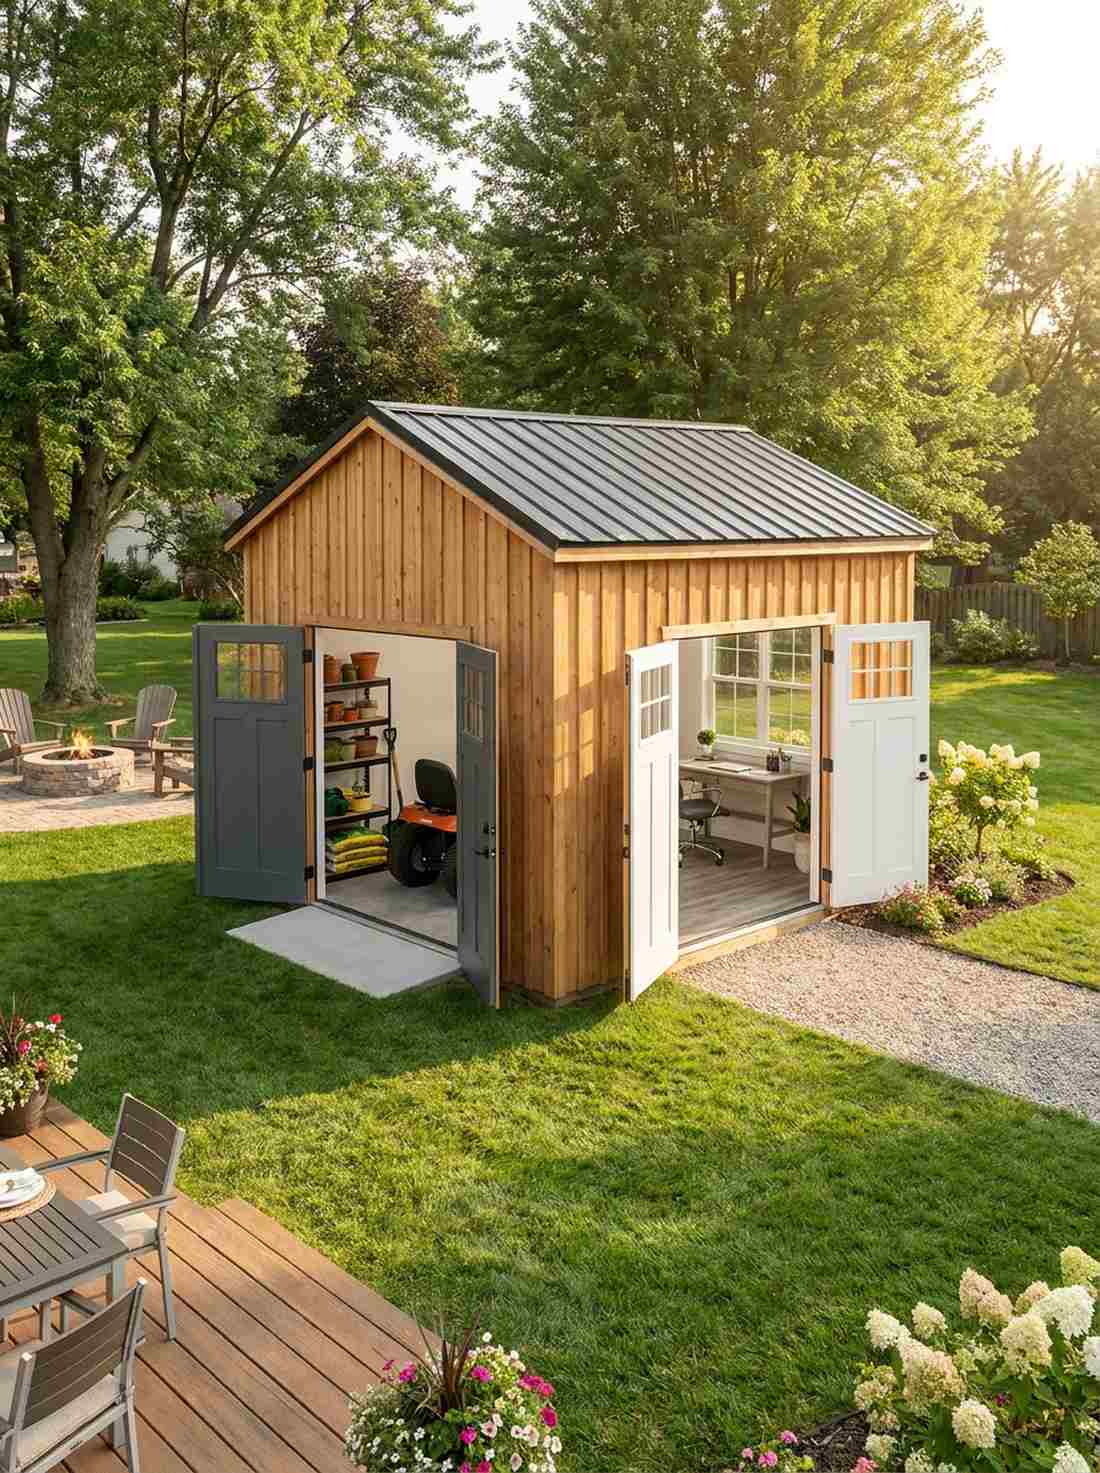
Moving through this dual-entry building feels incredibly fluid and fiercely practical. Utilizing a two-door corner shed layout allows for brilliant cross-circulation, an absolute must-have if you use half the space for filthy gardening and the other half as a pristine clean office.
A single door creates a frustrating bottleneck where clean and dirty tasks inevitably collide, but placing heavy-duty access doors on two adjacent walls fixes this instantly. Throwing open both doors during a hot summer afternoon generates a massive cross-breeze tunnel that rapidly cools the interior without running an AC unit.
Adding a secondary reinforced door and framing will bump your costs up by about $350. It’s a wildly functional layout upgrade that makes moving large equipment totally painless.
- Key Materials: Two exterior entry doors, heavy-duty security hinges, dual-zone flooring
- Vibe / Style: High-flow utility hub
- Difficulty: Intermediate (requires framing two headers)
- Budget Breakdown: Second door/frame: $250 | Extra structural headers: $40 | Heavy-duty latches: $60.
- Creator’s Tip: Split the interior flooring visually; pour concrete near the dirty double-doors for heavy mowers, and snap down luxury vinyl planks on the office side to delineate the clean zone.
- Smart Sourcing: heavy-duty exterior door security hinge kits and snap-together luxury vinyl floor planks (bulk pack).
Building Your Contemporary Garden Shed Vision
The contemporary garden shed represents a massive opportunity to skyrocket your property value with premium backyard studios. Whether you lean heavily into sustainable smart material sourcing, aggressive matte black visual concepts, or panoramic glass fronts, these exactly 26 distinct designs prove that DIY blueprints can deliver staggering high-end results. By skipping standard outbuildings and investing in clever multi-functional setups, you secure an architectural asset that pays dividends in both daily lifestyle utility and long-term real estate equity.
Frequently Asked Questions
Do contemporary garden sheds require building permits?
Most jurisdictions legally require permits for heavy-duty setups exceeding 100-120 square feet. However, keeping your modern shed plans under this threshold often qualifies you for rapid permit exemptions, saving you massive headaches. Always verify setback requirements, as relying on smart DIY starter kits and staying under the radar doesn’t exempt you from property line rules. Unpermitted massive structures can completely torpedo future property sales or void insurance coverage.
How much does a contemporary garden shed studio cost to build?
Budget breakdowns vary wildly: sourcing premium prefab backyard studios usually runs $15,000–$35,000 for a completely turnkey 200-square-foot oasis. However, leveraging clever material sourcing and DIY blueprints with heavy-duty starter kits slashes that cost by 50%. While custom high-end setups command $150–$300 per square foot, you can build a stunning, functional base shell yourself for under $5,000 if you know exactly where to source bulk materials.
What is the best foundation for a contemporary garden shed?
A thick, level concrete slab foundation is the undisputed champion for premium backyard setups, especially if you plan on housing vibrating heavy machinery or laying down commercial luxury vinyl planks. For budget-friendly or sloped lot solutions, heavy-duty concrete pier kits paired with pressure-treated joists offer incredible lifting stability. Cheap gravel pads are a massive mistake for expensive contemporary designs; always invest heavily in a rigid, permanent foundational base.
Can I use a garden shed as a full-time home office?
Absolutely, utilizing a shed as a high-focus productivity pod is a top-tier investment. To pull this off year-round, you must upgrade to premium R-13 natural sheep wool insulation and install commercial-grade vapor barrier wrap rolls to stop drafts completely. Pairing this tight thermal envelope with an ultra-quiet mini-split AC creates a climate-controlled executive suite that aggressively separates your loud home life from your pristine work environment.
How do I prevent moisture problems in a contemporary garden shed?
Moisture control is the critical difference between a cheap box and a luxury build. You must install continuous ridge vents paired with strategic soffit airflow to actively exhaust damp, stale air before it destroys your interior drywall. Always apply commercial-grade moisture barrier wrap rolls underneath the exterior siding, and ensure your heavy-duty concrete foundation sits slightly above grade to aggressively direct standing rainwater away from your expensive base plates.