
Contemporary garden beds transform outdoor spaces through clean geometry, intentional material choices, and architectural planting frameworks that deliver year-round visual impact. Fresh Garden Ideas brings you expert design concepts that merge form with function, creating structured landscapes that balance modern aesthetics with practical growing environments.
Design SnapshotKey Principles
- Material Honesty: Expose raw textures like weathered steel, poured concrete, or natural stone without decorative concealment
- Geometric Clarity: Employ rectangular modules, linear runs, or precise circular forms that create visual order
- Layered Heights: Combine beds at multiple elevations to establish spatial hierarchy and improve drainage
- Intentional Repetition: Repeat plant forms, bed dimensions, or material finishes to reinforce design cohesion
Industrial Materials for Lasting Impact
Raw industrial finishes anchor contemporary landscapes with textural depth and minimal maintenance demands. These materials age gracefully while providing structural permanence that wood alternatives cannot match.
1. Corten Steel Linear Planters
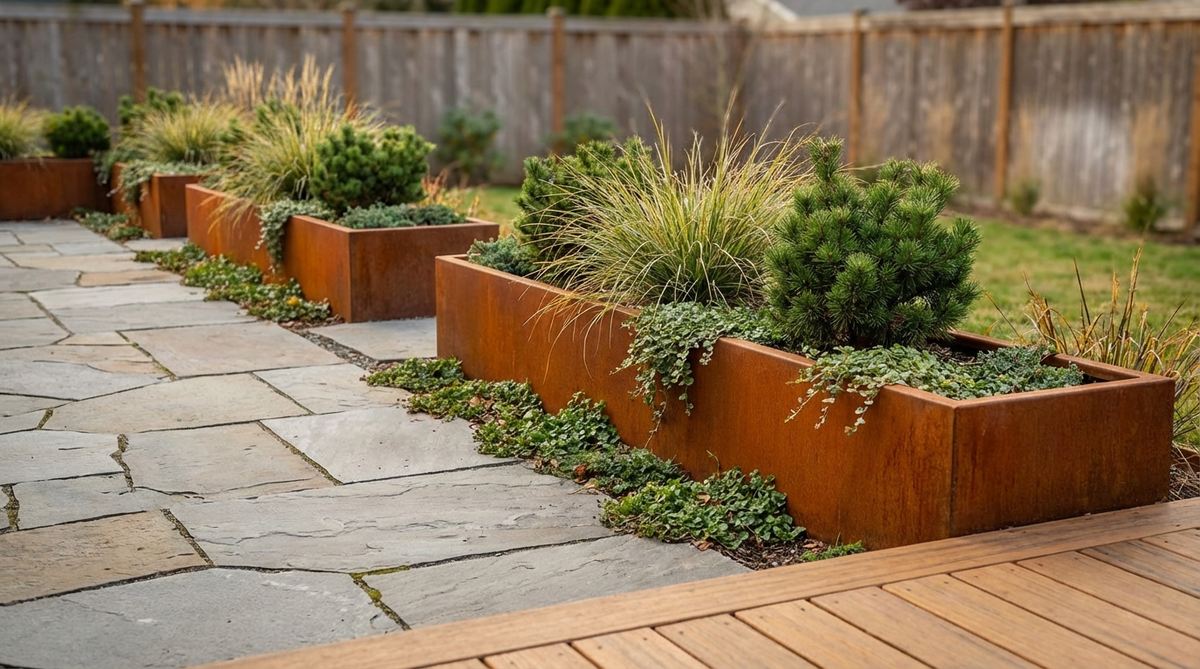
The rust patina develops over twelve to eighteen months, stabilizing into a protective layer that prevents further corrosion. Fabricate panels from 3mm thick steel, welding corners for rigidity and drilling drainage holes every eight inches along the base.
Position these beds along property lines or deck perimeters to establish clear spatial boundaries. The warm orange-brown finish complements evergreen foliage and contrasts effectively with gray stone paving.
Architects specify corten for rooftop gardens where weight restrictions limit concrete usage. The material tolerates freeze-thaw cycles in USDA zones 3 through 10 without cracking or warping.
2. Poured Concrete Monolithic Beds
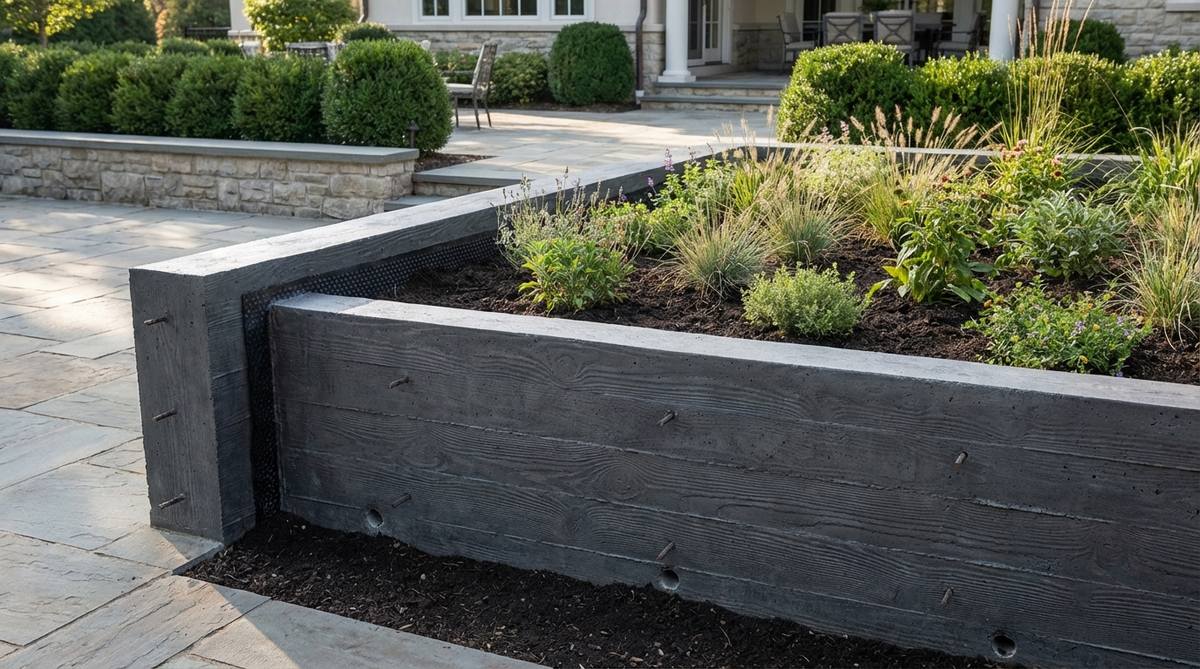
Cast beds in place using 4-inch-thick walls reinforced with rebar on 12-inch centers. Board-formed concrete reveals wood grain texture, adding tactile interest to otherwise stark surfaces.
Integrate weep holes at the base to prevent water accumulation and root rot. Seal interior surfaces with waterproofing membrane before backfilling with soil to extend the structure’s lifespan.
These permanent installations suit formal courtyards where immovable elements anchor the design composition. Mix pigments into wet concrete to achieve charcoal, ochre, or terra cotta tones that coordinate with building facades.
3. Stacked Concrete Block Systems
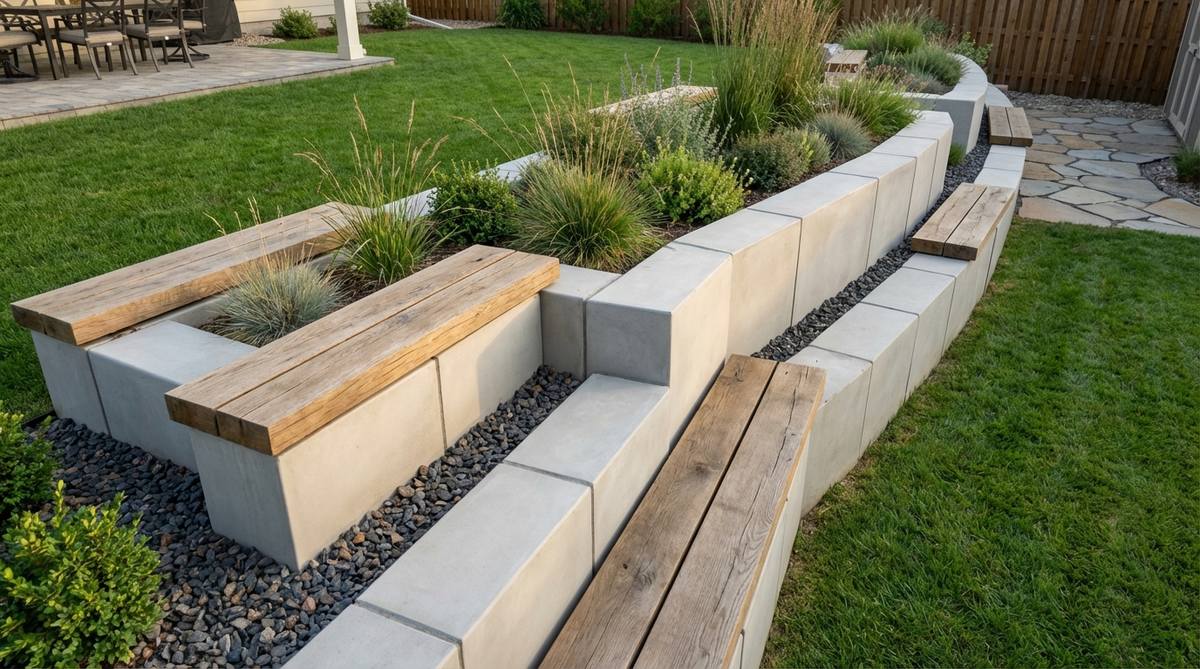
Medium-density concrete blocks measuring 450mm x 215mm x 100mm stack without mortar for modular assembly. Cap the top course with timber sleepers to create integrated bench seating that doubles as planting space.
Render exterior faces with a 10mm coat blending sharp sand, building sand, and mortar in a 2:2:1 ratio. This smooth finish modernizes the raw block appearance while protecting joints from weather infiltration.
Fill cores with gravel for improved drainage and structural stability on sloped sites. The thermal mass of concrete moderates soil temperature fluctuations, benefiting root development during seasonal transitions.
4. Galvanized Metal Trough Beds
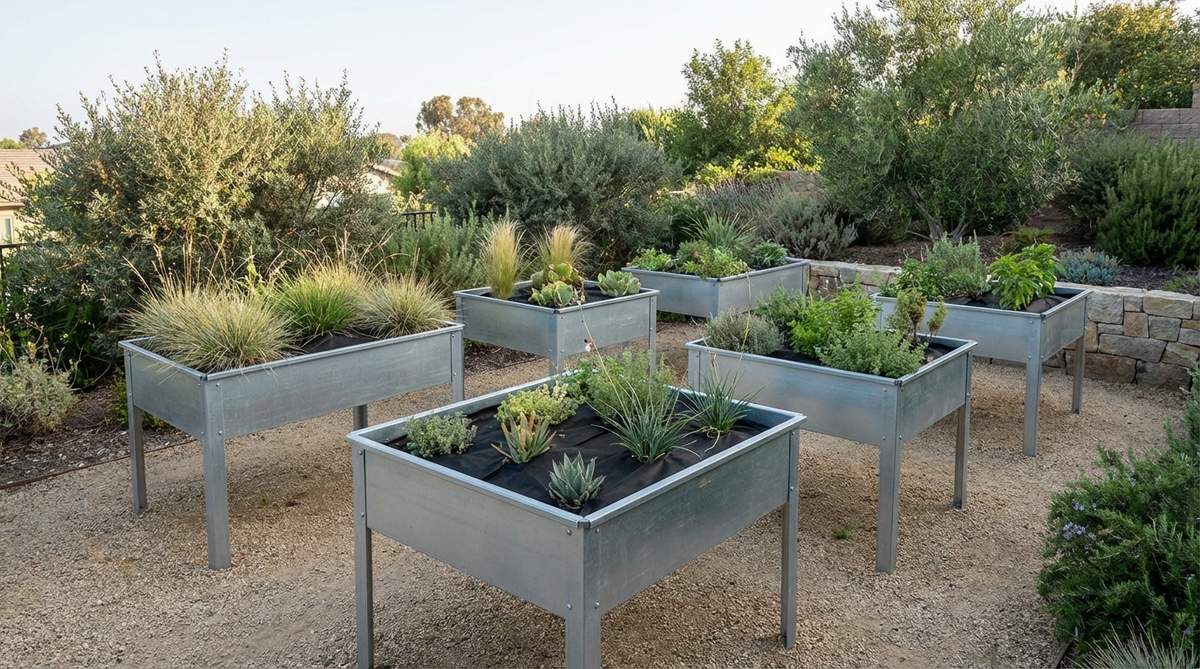
Stock tanks and agricultural troughs provide ready-made contemporary vessels with drainage pre-drilled. The zinc coating reflects heat, making these beds suitable for sun-exposed locations where soil dries rapidly.
Elevate troughs on steel legs or concrete blocks to create waist-height planting zones that reduce back strain. Group three to five units in staggered arrangements rather than symmetrical rows for dynamic visual rhythm.
Line interiors with landscape fabric to prevent soil contact with metal, extending the galvanized finish’s effectiveness. The silver-gray patina that develops over time complements both warm and cool color palettes.
5. Powder-Coated Aluminum Frames

Lightweight aluminum construction enables rooftop and balcony installations where load-bearing capacity limits material choices. Factory-applied powder coating resists UV degradation and salt spray in coastal environments.
Specify matte black or charcoal finishes to recede visually, directing focus toward plantings rather than structural elements. Corner joints use concealed fasteners that maintain clean sightlines without visible hardware.
Aluminum conducts temperature rapidly, requiring insulation layers between metal and soil in extreme climates. Install rigid foam panels along interior walls to buffer roots from summer heat and winter cold.
Geometric Configurations That Define Space
Precise shapes and deliberate arrangements transform garden beds from functional containers into spatial organizers. Geometric planning establishes visual order while optimizing growing conditions and circulation patterns.
6. U-Shaped Accessibility Beds
Three connected sides create enclosed planting zones accessible from all interior angles without stepping on soil. Dimension each leg at 4 feet wide by 8 feet long with 3-foot-wide openings for wheelchair or cart access.
This configuration maximizes edge-to-center reach while preventing soil compaction from foot traffic. Central open areas accommodate kneeling pads or rolling garden seats during maintenance tasks.
Frame corners with 45-degree mitered joints rather than perpendicular connections to soften the transition between planes. Plant tall crops along the back wall and low-growing species at front edges to maintain sightlines across the bed.
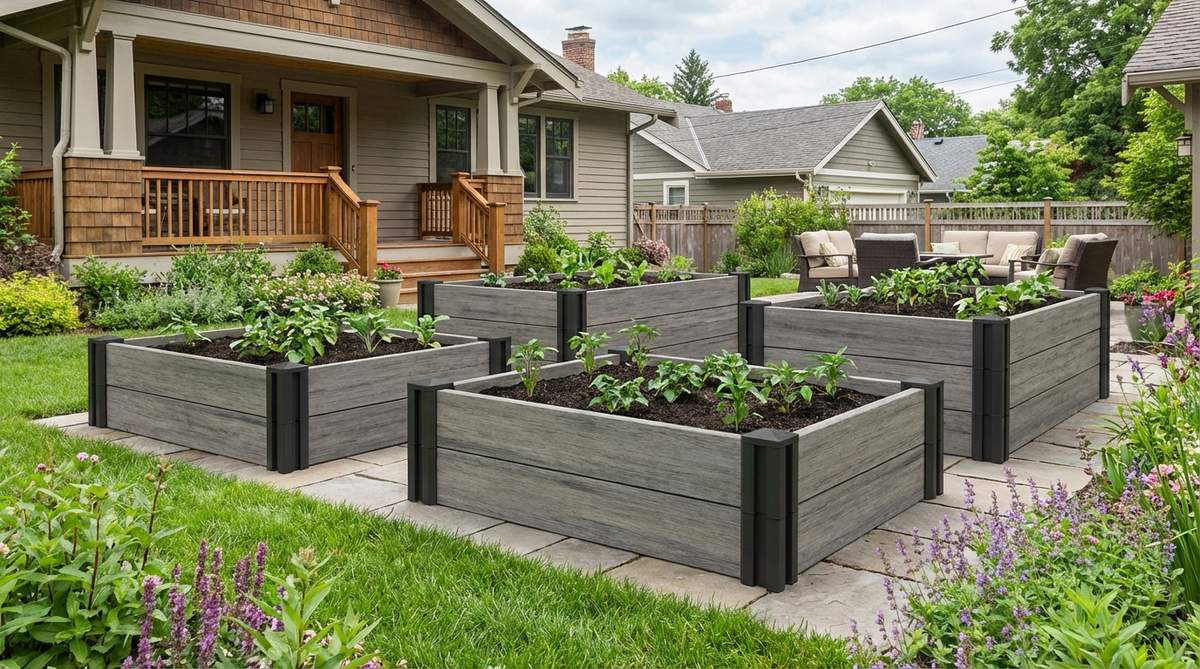
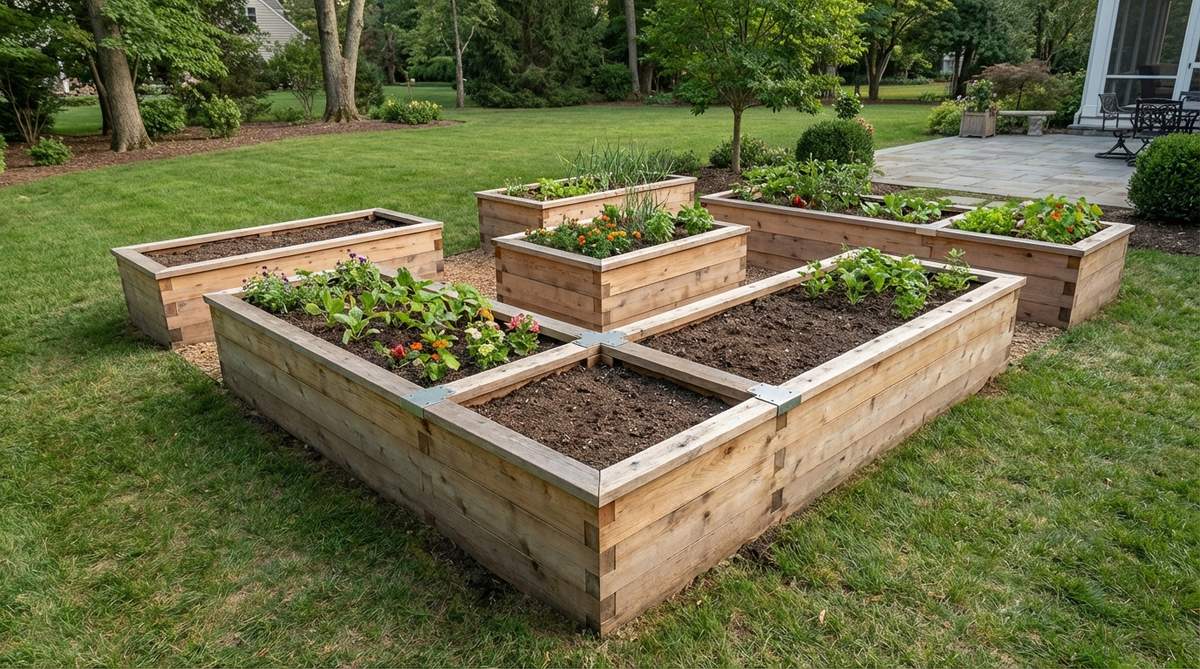
7. Rectangular Grid Modules
Repeat 4×8-foot units in grid formation with 2-foot-wide pathways running between each bed. Gravel or decomposed granite paths provide permeable surfaces that drain effectively while maintaining clean edges.
Uniform bed sizing simplifies crop rotation planning and soil amendment calculations across the growing area. Install drip irrigation on individual valves for each module, enabling customized watering schedules for different plant families.
Rotate annual vegetables through the grid systematically, moving nightshades, brassicas, and legumes to fresh beds each season. The modular approach scales easily from four beds to twenty without redesigning the overall layout.
8. Circular Focal Point Beds
Central circular beds measuring 6 to 10 feet in diameter anchor courtyard gardens and lawn centers. Flexible metal edging bends to smooth curves without the faceted appearance of straight segments joined at angles.
Radial planting schemes position specimen plants at the center with concentric rings of decreasing height toward edges. This bull’s-eye arrangement provides 350-degree viewing from all approach angles.
Circle beds interrupt rectangular paving patterns, creating visual relief in otherwise orthogonal landscapes. Surround perimeters with groundcover that softens the transition between raised soil and adjacent hardscape.
9. L-Shaped Corner Maximizers

Two perpendicular runs joined at 90 degrees fit neatly into property corners and patio alcoves. Each leg extends 6 to 12 feet, creating substantial planting area within compact footprints.
Position taller plants at the inside corner where vertical growth doesn’t block views of shorter specimens. The configuration naturally separates sun-loving and shade-tolerant species by orienting legs toward different exposures.
Install the longer leg parallel to the primary sightline with the shorter leg receding into peripheral space. This arrangement emphasizes depth and draws the eye through the composition rather than stopping at boundaries.
10. Staggered Offset Arrays
Shift alternate beds forward and backward by half their length to create dynamic zigzag arrangements. This pattern generates interstitial spaces for pathway branching and varied viewing angles.
Staggering breaks up the monotony of parallel rows while maintaining organized circulation routes. Plant complementary species in adjacent offset beds to encourage beneficial insect movement between flowering periods.
The technique works particularly well on sloped terrain where each bed terraces at a different elevation. Offset placement reduces erosion risk by interrupting water flow patterns across the gradient.
Vertical Structures for Dimensional Planting
Upward growth expands planting capacity without increasing ground-level footprint. Vertical elements introduce architectural interest while supporting vining crops and climbing ornamentals.
11. Integrated Trellis Backwalls

Bolt 6-foot-tall trellis panels directly to raised bed rear walls using lag screws into embedded blocking. Welded wire mesh, metal tubing grids, or wood lattice provide climbing surfaces for peas, beans, cucumbers, and clematis.
Orient beds along north-south axes to prevent trellis structures from shading adjacent planting areas. Vertical crops capture sunlight efficiently while ground-level spaces beneath accommodate shade-tolerant lettuces and herbs.
Powder-coated steel frames withstand vine weight better than wood alternatives, which sag under heavy fruit loads. Space vertical members at 6-inch intervals for adequate stem support as plants mature.
12. Tiered Cascade Planters
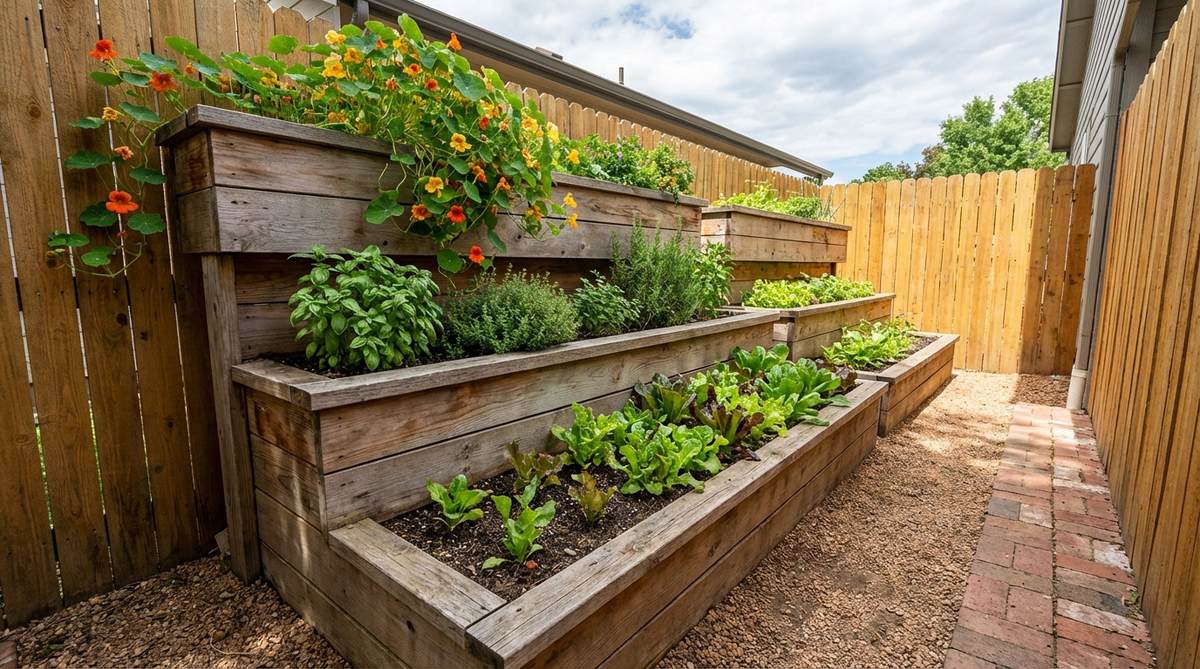
Stack three or four beds at descending heights from 32 inches down to 12 inches in 6-inch increments. Each level steps back 8 to 12 inches, creating terraced faces that maximize sun exposure for every tier.
Plant trailing species like nasturtiums or sweet potato vine at upper levels to cascade downward, softening hard edges. Reserve lower tiers for compact herbs and salad greens that tolerate partial shade from overhead plantings.
Tiered systems excel in narrow side yards where horizontal expansion is limited. The vertical stacking multiplies growing area while maintaining a slim 2-foot overall depth.
13. Arbor-Covered Walkthrough Beds
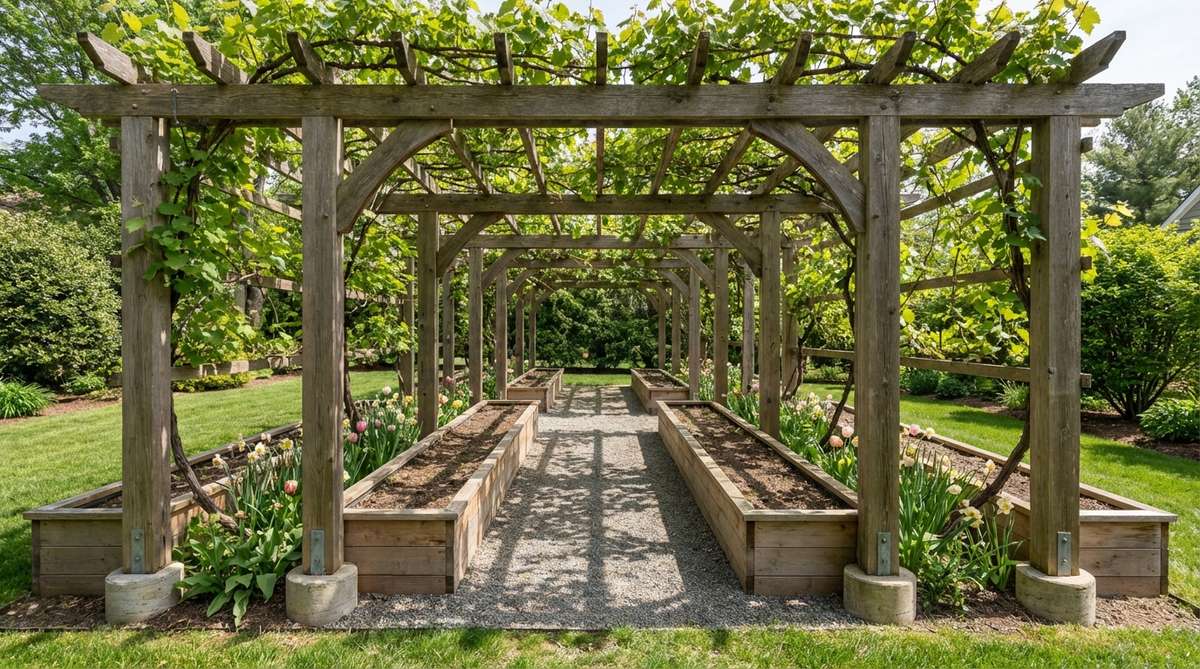
Flank both sides of a 4-foot-wide path with raised beds topped by connected overhead arbors. Grape vines, kiwi, or climbing roses trained across the structure create shaded garden tunnels.
Set posts in concrete footings outside bed perimeters to avoid root zone compaction. Cross beams span 8 to 10 feet, supporting lateral wires spaced 12 inches apart for vine attachment.
The dual-purpose design produces crops at ground and overhead levels while defining circulation through the garden. Underplant arbor beds with spring bulbs that finish before summer shade intensifies.
14. Obelisk-Centered Beds
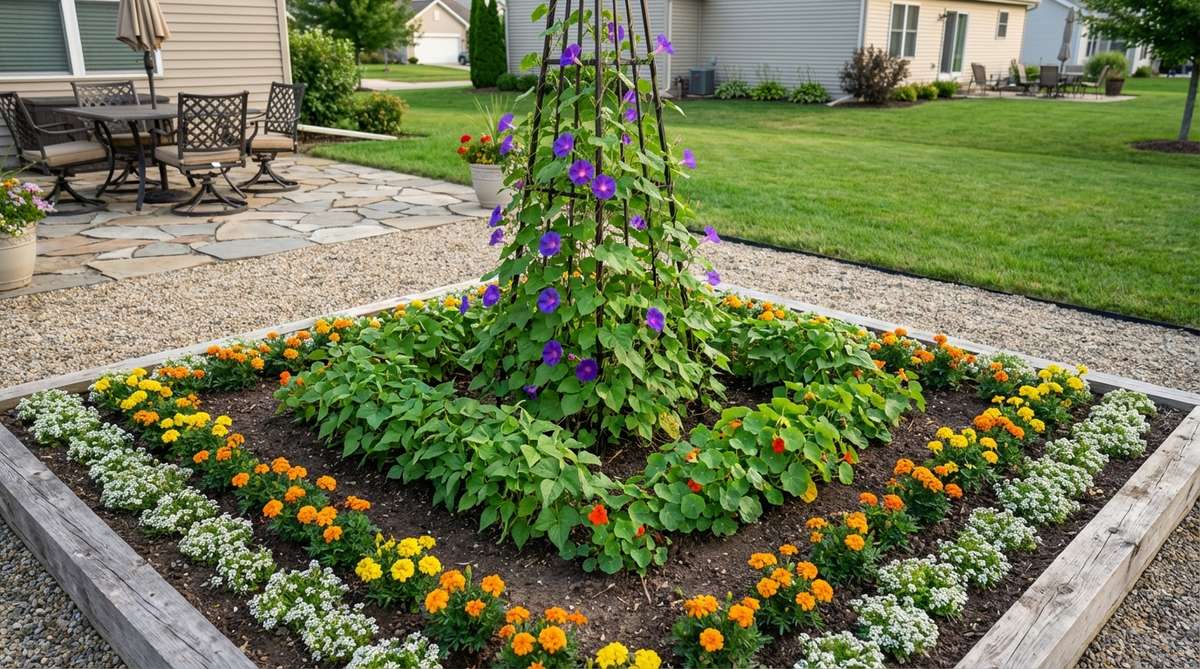
Install prefabricated metal or wood obelisks at the center of 4×4-foot square beds, providing vertical focal points visible from multiple directions. Four-sided pyramid structures measure 6 to 8 feet tall with 18-inch-square bases.
Train pole beans, morning glories, or hyacinth vine up obelisk frames for living sculpture effects. The vertical element draws the eye upward, balancing the horizontal expanse of adjacent lawn or paving.
Space companion plants in concentric squares around the obelisk base, with shortest species at outer edges. This arrangement ensures all plants receive adequate light despite the central vertical obstruction.
15. Espalier Wall Integration
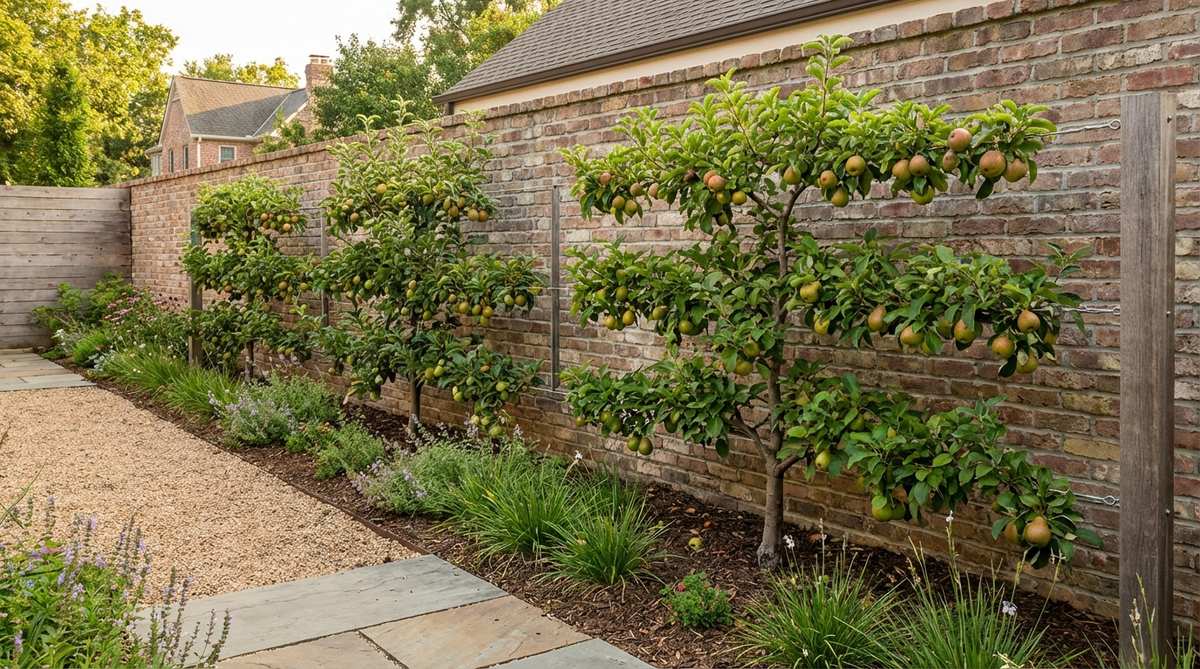
Position narrow beds 18 to 24 inches wide directly against walls or fences for training fruit trees in flat two-dimensional planes. Horizontal wire supports mounted every 12 inches guide branch development parallel to the vertical surface.
Apples, pears, and stone fruits adapt well to espalier training, producing substantial yields within compact spaces. Prune aggressively during the growing season to maintain defined branch patterns and prevent forward growth.
The technique transforms blank walls into productive growing surfaces while providing architectural interest during dormant months. Underplant with bulbs and perennials that tolerate root competition from established trees.
Integrated Seating and Functional Edges
Multi-functional bed caps serve dual purposes, transforming planting infrastructure into usable furniture. Strategic edge treatments enhance comfort while maintaining structural integrity.
16. Wide Cap Bench Tops
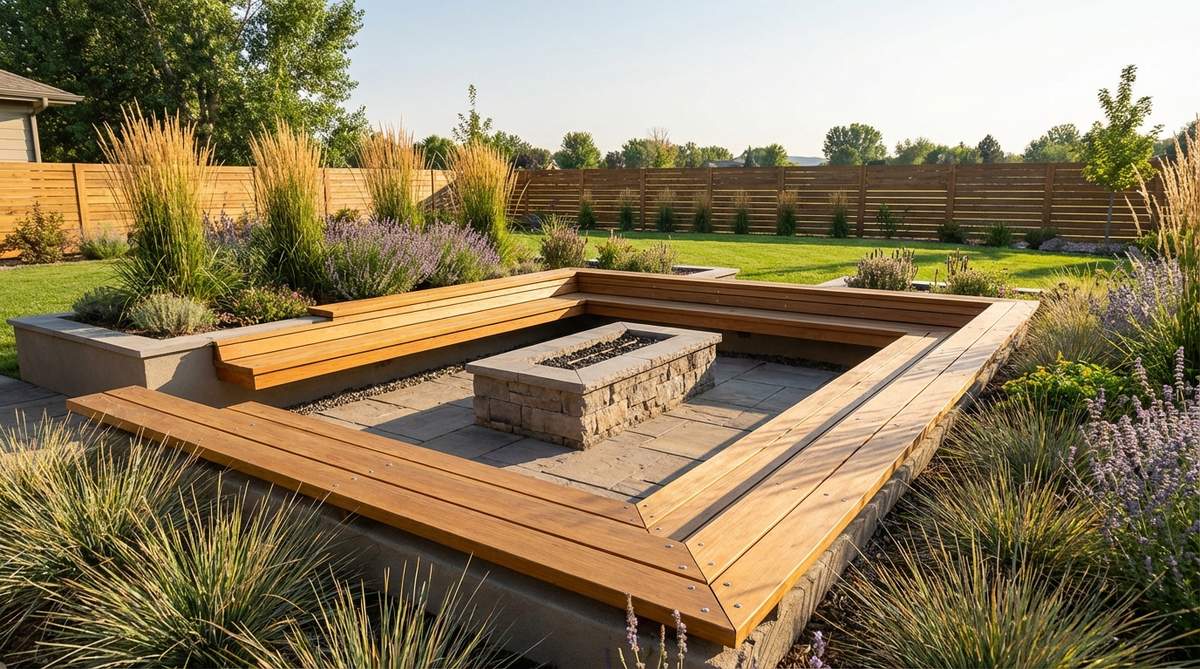
Mill 2×12-inch cedar or composite boards to cap 16-inch-tall bed walls, creating continuous perch seating around garden perimeters. Overhang caps 2 inches beyond interior and exterior faces for visual weight and drip edge protection.
Secure caps with stainless steel screws countersunk and plugged for weather protection and clean appearance. Sand edges to 1/8-inch radius to prevent splinters while maintaining contemporary crispness.
Position bench-topped beds along patio edges or near fire pits to provide casual seating without dedicating space to standalone furniture. The dual-purpose design maximizes utility in compact urban gardens.
17. Cantilevered Shelf Extensions
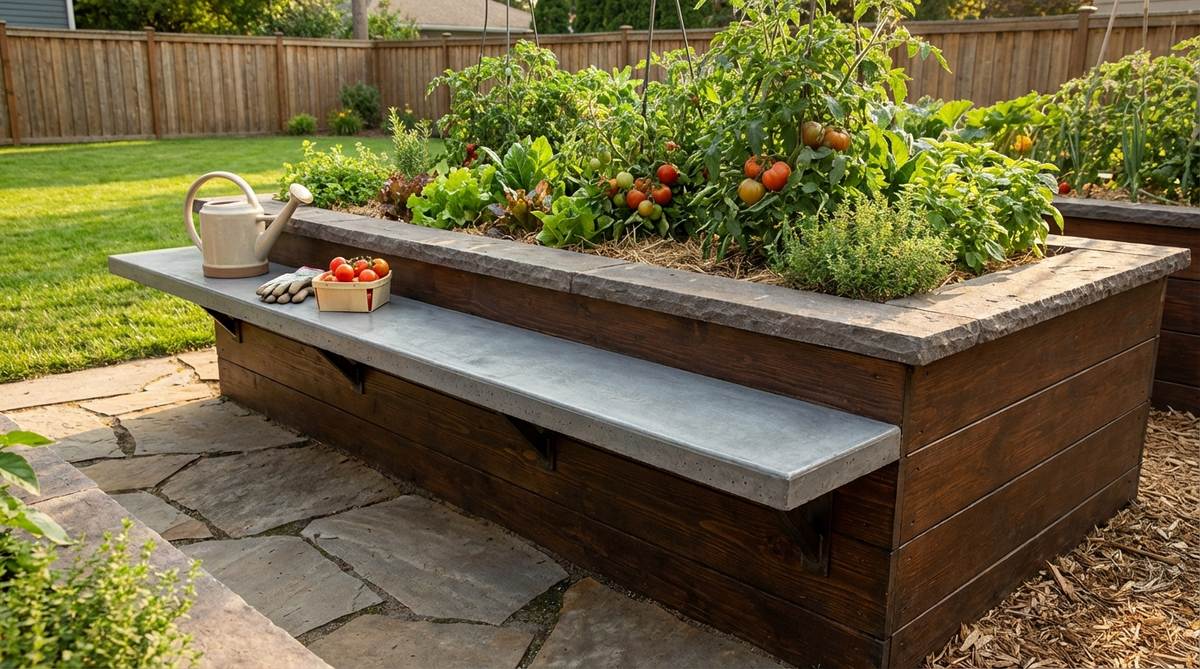
Extend bed caps 8 to 12 inches beyond one long side, creating shelves for setting tools, drinks, or harvested produce. Reinforce extended sections with hidden steel brackets lag-bolted to the bed frame below.
Cantilevers eliminate the need to enter planting areas during maintenance tasks. Gardeners can prepare seedlings, organize supplies, or temporarily stage containers without compacting soil.
Apply exterior-grade finish to cantilevered surfaces that receive more direct water exposure than protected cap sections. The horizontal plane requires more frequent refinishing than vertical walls.
18. Built-In Tool Storage Compartments

Frame waterproof boxes into bed corners or along end walls, accessible via hinged lids flush with cap surfaces. Dimension compartments 16 inches wide by 20 inches deep to store hand trowels, pruners, gloves, and twine.
Line storage boxes with marine-grade plywood and seal all joints with silicone caulk. Install hydraulic lid stays to prevent sudden closure during access.
Integrated storage keeps frequently used tools immediately available without cluttering sheds or garages. The hidden compartments maintain the bed’s clean modern aesthetic when lids close.
19. LED Strip Lighting Channels
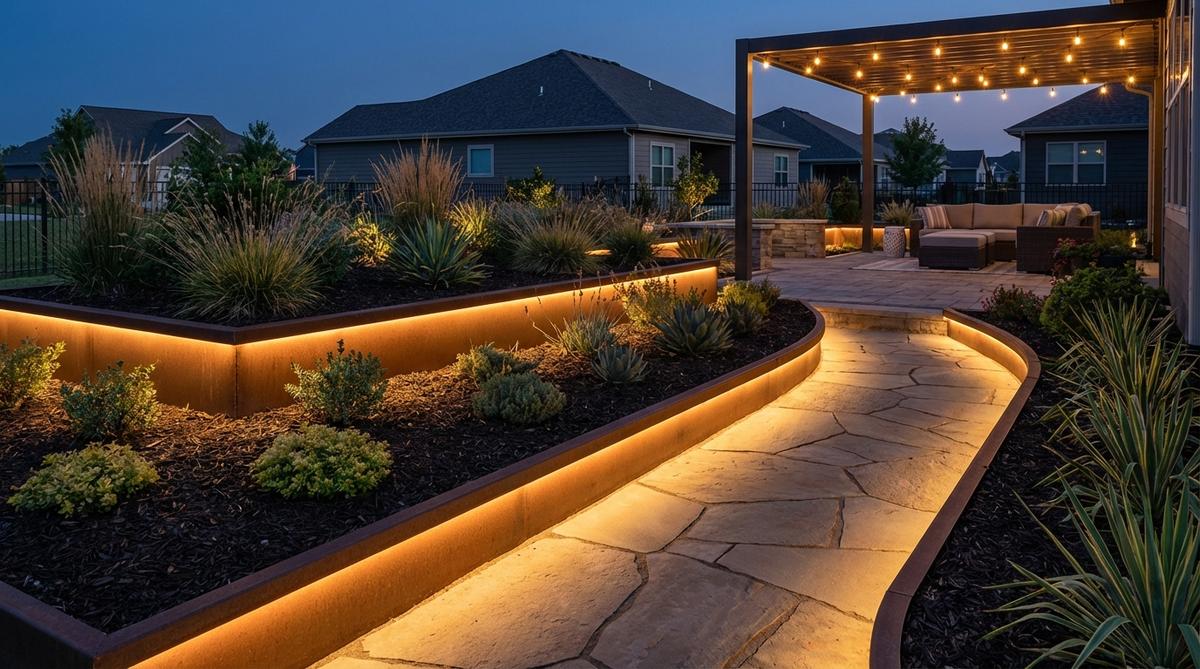
Route aluminum channels along exterior bed faces just below cap overhangs, housing low-voltage LED tape lights. The recessed placement conceals fixtures while washing bed faces with ambient illumination after dark.
Connect multiple beds to a single transformer and timer for coordinated evening lighting effects. Warm white LEDs highlight plantings without harsh glare, extending garden visibility into evening hours.
Lighting transforms garden beds into landscape features that contribute to outdoor room ambiance beyond daylight hours. The subtle glow defines circulation paths and prevents trip hazards along bed edges.
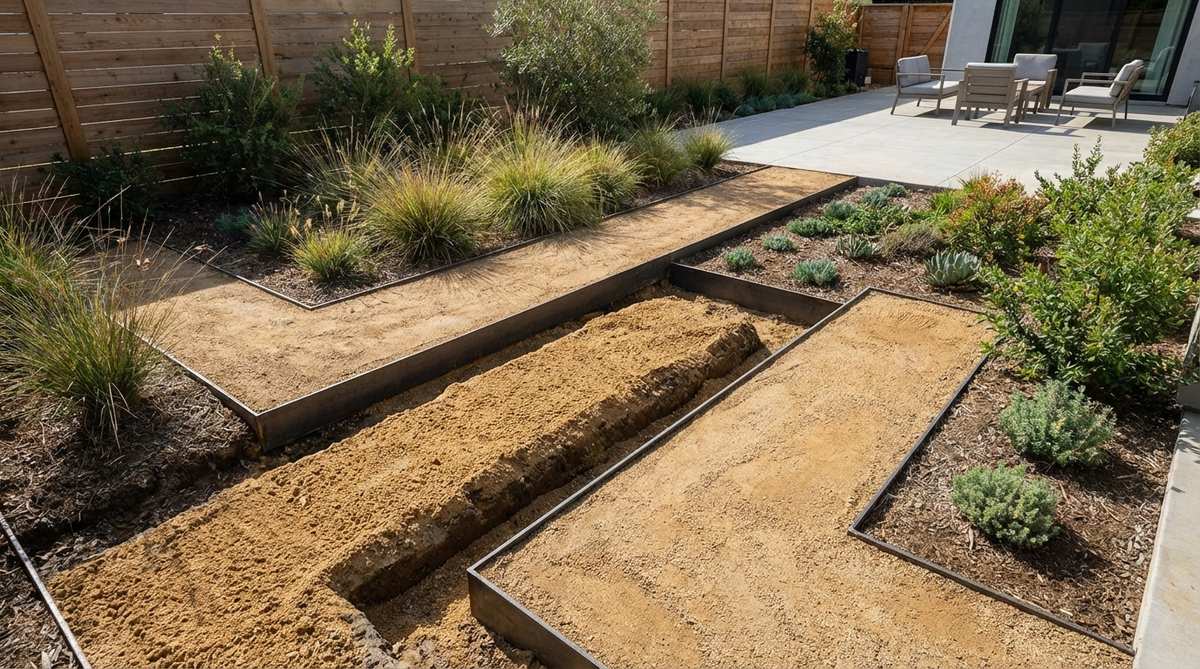
Modular Systems for Flexible Layouts
Standardized components enable garden expansion and reconfiguration as needs evolve. Modular approaches reduce waste while supporting phased installation schedules.
20. Snap-Lock Connector Panels
Interlocking corner brackets join flat panels without tools or fasteners, enabling assembly in minutes. Panels typically measure 4 feet long by 12 or 16 inches tall, stacking to desired heights.
Add or remove panels seasonally to accommodate changing planting schemes or spatial requirements. The tool-free system suits renters and temporary installations where permanent construction isn’t feasible.
Composite materials resist decay and insect damage while maintaining consistent color without painting. UV-stabilized formulations prevent the chalking and fading that affect untreated plastics.
21. Expandable Cedar Kit Systems
Purchase base units measuring 4×8 feet, then connect expansion modules to create L-shapes, U-configurations, or extended linear runs. Dado joints at panel ends accept connecting plates that align and secure additional sections.
Natural cedar resists rot for ten to fifteen years without chemical treatment. The wood’s aromatic oils deter many insect pests while adding pleasant fragrance during warm weather.
Kit systems ship flat for economical transport and require no special tools beyond a rubber mallet for joint assembly. The modular approach spreads costs across multiple growing seasons as budgets allow.
22. Hexagonal Cluster Arrangements
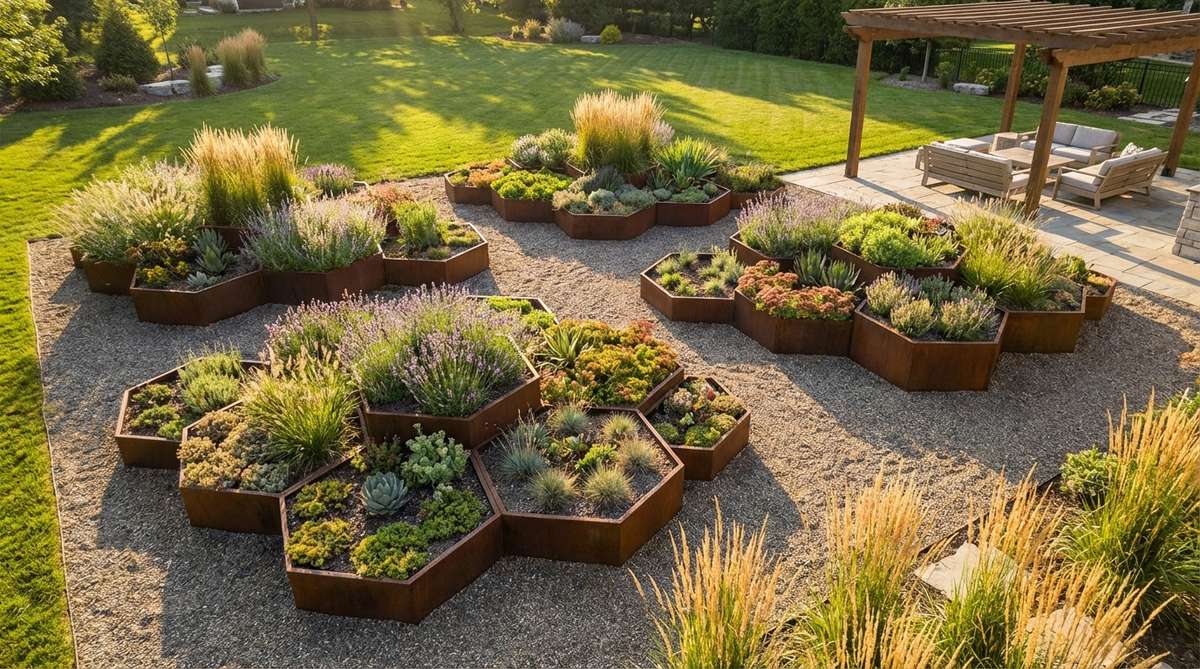
Six-sided beds measuring 4 feet across nest together in honeycomb patterns, eliminating wasted interstitial space. Each hexagon shares edges with six neighbors, creating continuous planting zones.
Fabricate hexagons from flexible metal edging bent to shape and staked at each corner. The unconventional geometry generates visual interest while maintaining organized structure.
Group three to seven hexagons in asymmetrical clusters rather than uniform grids for organic contemporary appeal. Vary bed heights within each cluster to introduce subtle elevation changes.
23. Rolling Mobile Planter Beds
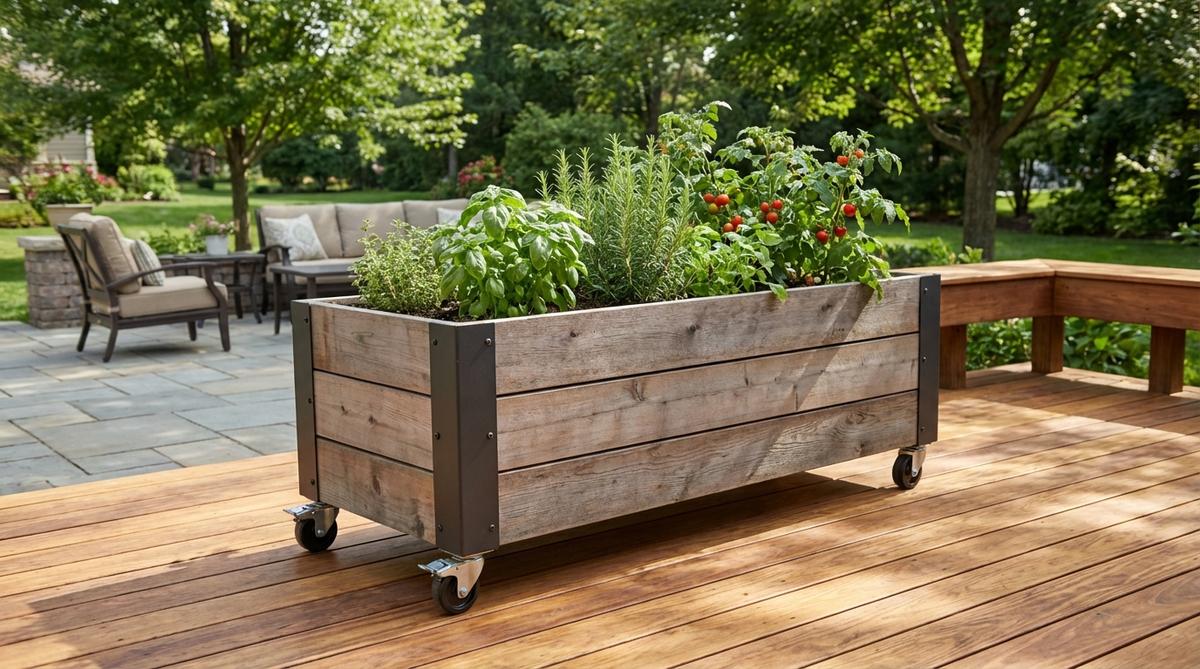
Mount shallow beds measuring 3×4 feet on locking caster wheels rated for outdoor use. Polyurethane wheels protect deck and patio surfaces from scratches while enabling repositioning.
Track sun patterns across decks and balconies, rolling beds to maintain optimal exposure throughout the day or season. Mobile units accommodate renters who need portable gardens for relocation.
Limit soil depth to 8 inches and use lightweight growing mixes to keep loaded weight under 150 pounds. Heavier beds become difficult to maneuver and may damage wheel assemblies.
Perimeter Strategies and Border Control
Edge treatments define boundaries while managing grass encroachment and material migration. Clean perimeter details separate garden beds from surrounding landscapes with architectural precision.
24. Flush-Grade Steel Edging
Install 1/4-inch-thick steel strips vertically with top edges flush to surrounding grade. The concealed border prevents lawn mower damage to bed walls while maintaining uninterrupted sightlines.
Pound steel edging 6 inches into soil and backfill both sides to hold position without staking. The heavy-gauge material resists bending from frost heave or lateral soil pressure.
Flush edging creates seamless transitions between beds and adjacent lawns or groundcovers. Mower wheels roll directly onto bed caps without encountering protruding edges that scalp turf.
25. Poured Concrete Mow Strips
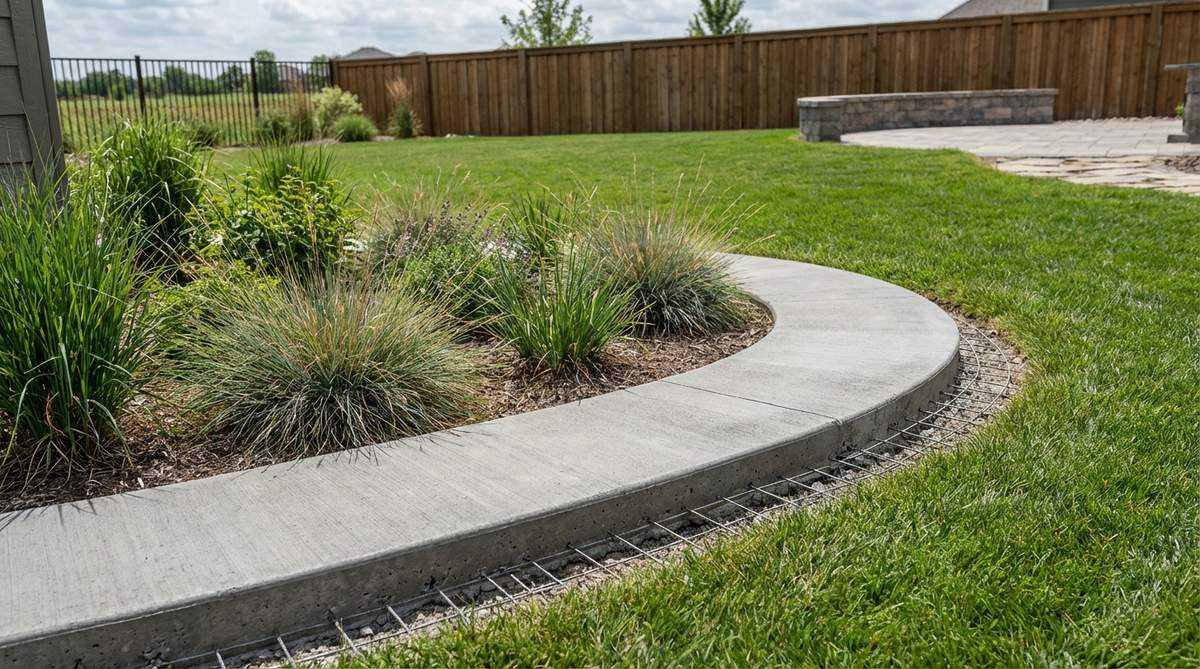
Cast 12-inch-wide concrete bands at grade around bed perimeters, providing stable mowing surfaces. Form strips 4 inches thick with wire mesh reinforcement to prevent cracking.
Slope mow strips away from beds at 1 percent grade to direct water runoff toward lawn areas. Broom-finish wet concrete for slip resistance and texture that complements modern aesthetics.
The permanent installation eliminates edge trimming along bed faces, reducing maintenance time significantly. Concrete strips tolerate mower wheel traffic without rutting or erosion.
26. Raised Perimeter Curbing
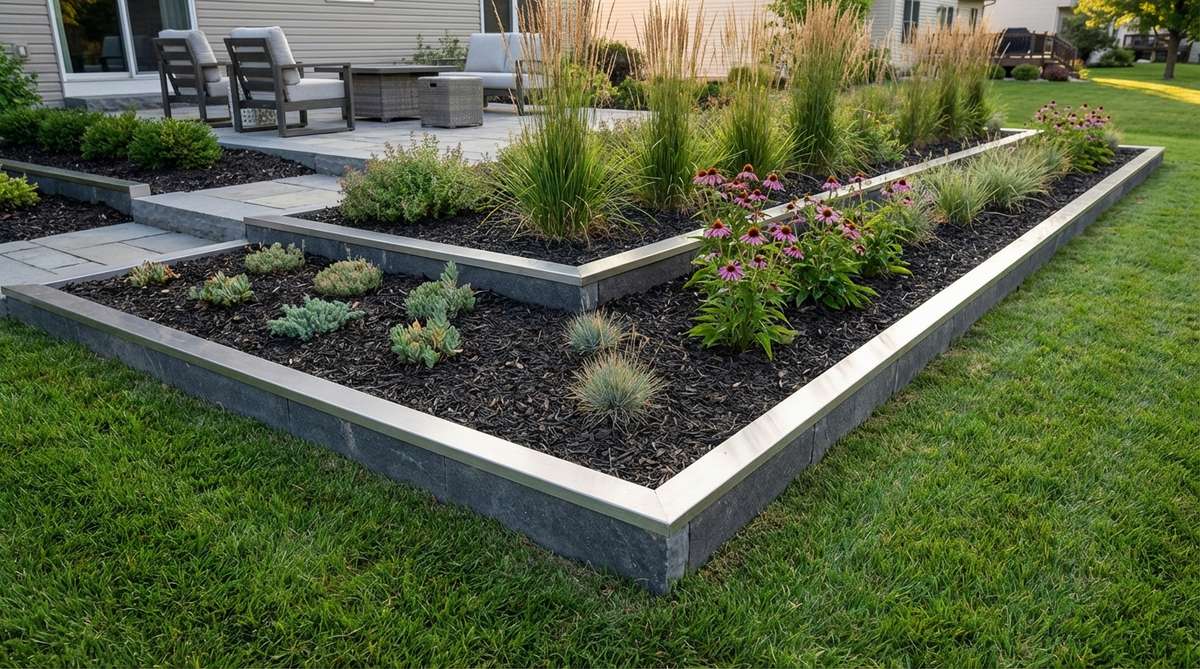
Extend bed walls 2 to 3 inches above grade to create defined borders that contain mulch and prevent soil washout. The raised lip also deters rabbits and reduces slug access from adjacent turf.
Cap raised curbs with contrasting materials like stone or metal to emphasize the boundary line. The height variation adds dimensional interest without significantly impacting overall bed profile.
Raised edges suit beds adjacent to crushed stone or gravel paths where materials tend to migrate without physical barriers. The lip keeps planting soil and decorative stone in designated zones.
27. Living Edge Groundcover Buffers
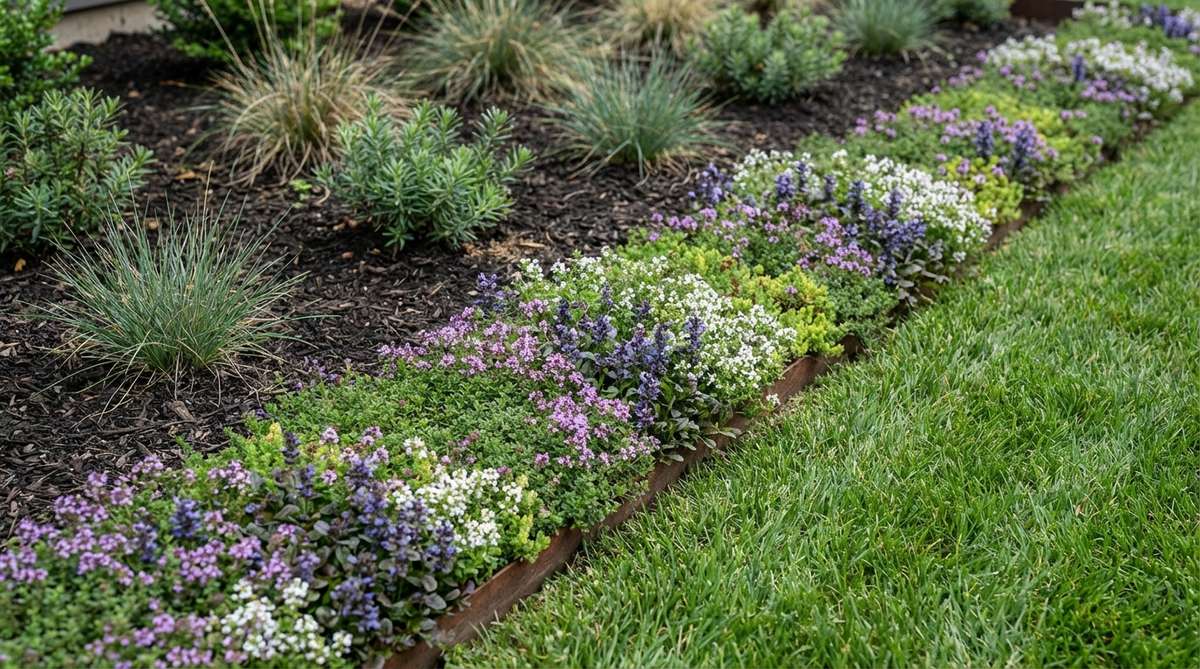
Plant 12-inch-wide bands of low creeping thyme, sedum, or ajuga between bed faces and surrounding lawn. The living buffer softens hard edges while providing weed suppression.
Select groundcovers with mature heights under 4 inches that tolerate foot traffic and occasional mowing. Herbaceous buffers blend contemporary bed structures into naturalistic landscapes.
Living edges require establishment periods of six to twelve months before achieving full coverage. Mulch groundcover zones during initial growth to suppress competing weeds.
28. Decomposed Granite Perimeter Bands
Excavate 6-inch-deep trenches around bed perimeters and fill with compacted decomposed granite. The permeable material drains effectively while creating stable walking surfaces.
Edge granite bands with steel or aluminum trim to prevent material spread into adjacent planting areas. The neutral tan or gray tones coordinate with most contemporary material palettes.
Granite perimeters provide clean access for maintenance without tracking mud onto adjacent hardscape. The compacted surface supports wheelbarrow traffic better than loose gravel or bark.
Conclusion
Strategic selection of contemporary garden beds establishes the architectural framework that defines successful modern landscapes. Material choices, geometric planning, and functional detailing work together to create structured planting environments that perform across multiple seasons. Whether implementing industrial metal systems, modular expansion kits, or integrated seating solutions, each approach contributes to gardens that balance aesthetic discipline with horticultural productivity. Apply these principles systematically, adapting configurations to site-specific conditions while maintaining the clean lines and intentional organization that characterize contemporary design.
Frequently Asked Questions
What materials work best for contemporary garden beds in cold climates?
Corten steel and aluminum perform reliably through freeze-thaw cycles without cracking or warping, making them superior choices for USDA zones 3 through 6. Concrete beds require proper reinforcement with rebar and waterproof membrane treatments to prevent frost damage, while cedar naturally resists decay for ten to fifteen years even in regions with heavy snow loads and spring thaw conditions.
How deep should contemporary raised beds be for vegetable production?
Most vegetable crops thrive in beds with 12 to 16 inches of soil depth, providing adequate root zone volume for tomatoes, peppers, and brassicas. Shallow-rooted crops like lettuce and herbs perform adequately in 8-inch-deep beds, while root vegetables such as carrots and parsnips benefit from 18 to 24 inches of loose, uncompacted growing medium.
What is the optimal width for accessibility in raised garden beds?
Designers specify 4-foot maximum width for beds accessible from one side, allowing comfortable reach to the center without stepping on soil. Beds accessible from both sides can extend to 8 feet wide, maintaining 2-foot reach zones from each edge. U-shaped configurations require 3-foot-wide interior openings to accommodate wheelchairs and garden carts.
How can I prevent grass from invading contemporary garden beds?
Install vertical steel or aluminum edging buried 6 inches below grade with top edges flush to surrounding lawn level, creating physical barriers that block rhizome spread. Alternatively, pour 12-inch-wide concrete mow strips at grade around bed perimeters, providing stable surfaces for mower wheels while preventing grass encroachment through regular cutting maintenance.
Do metal garden beds overheat soil in summer climates?
Metal conducts temperature rapidly, requiring insulation strategies in regions with sustained temperatures above 90°F. Install rigid foam panels along interior metal surfaces or position beds where afternoon shade moderates heat absorption. Aluminum heats less intensely than darker steel finishes, and painting exteriors with light colors reflects solar radiation to reduce thermal transfer into root zones.