Properly planned outdoor lighting for party setups instantly upgrade backyards into luxury nighttime destinations. These precise fixture blueprints and clever material sourcing tactics deliver premium aesthetic results. Create an unforgettable ambiance your guests will love.
Design Snapshot Key Principles
- Layer Your Light Sources: Combine overhead, mid-level, and ground lighting to create depth and eliminate harsh shadows
- Warm Temperature Wins: Bulbs between 2700K-3000K produce a flattering glow that encourages relaxation and conversation
- Power Planning: Map electrical outlets early or invest in solar and battery options to avoid extension cord hazards
- Dimmable Flexibility: Install controls that adjust intensity as natural light fades and party energy shifts
Overhead Ambient Lighting That Sets the Mood
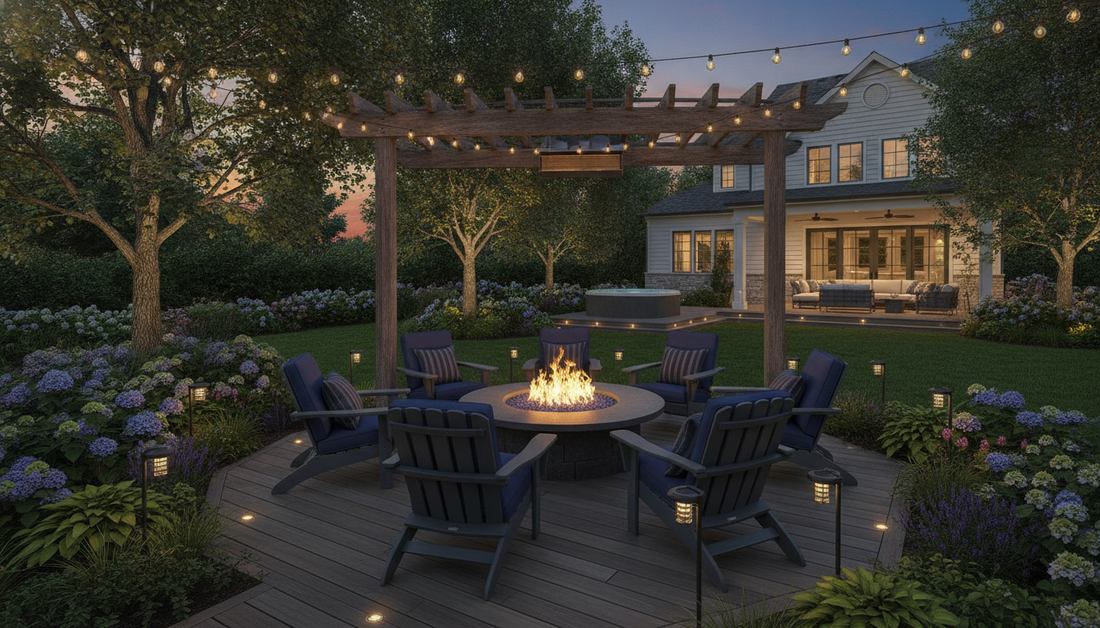
1. Cafe String Light Canopy
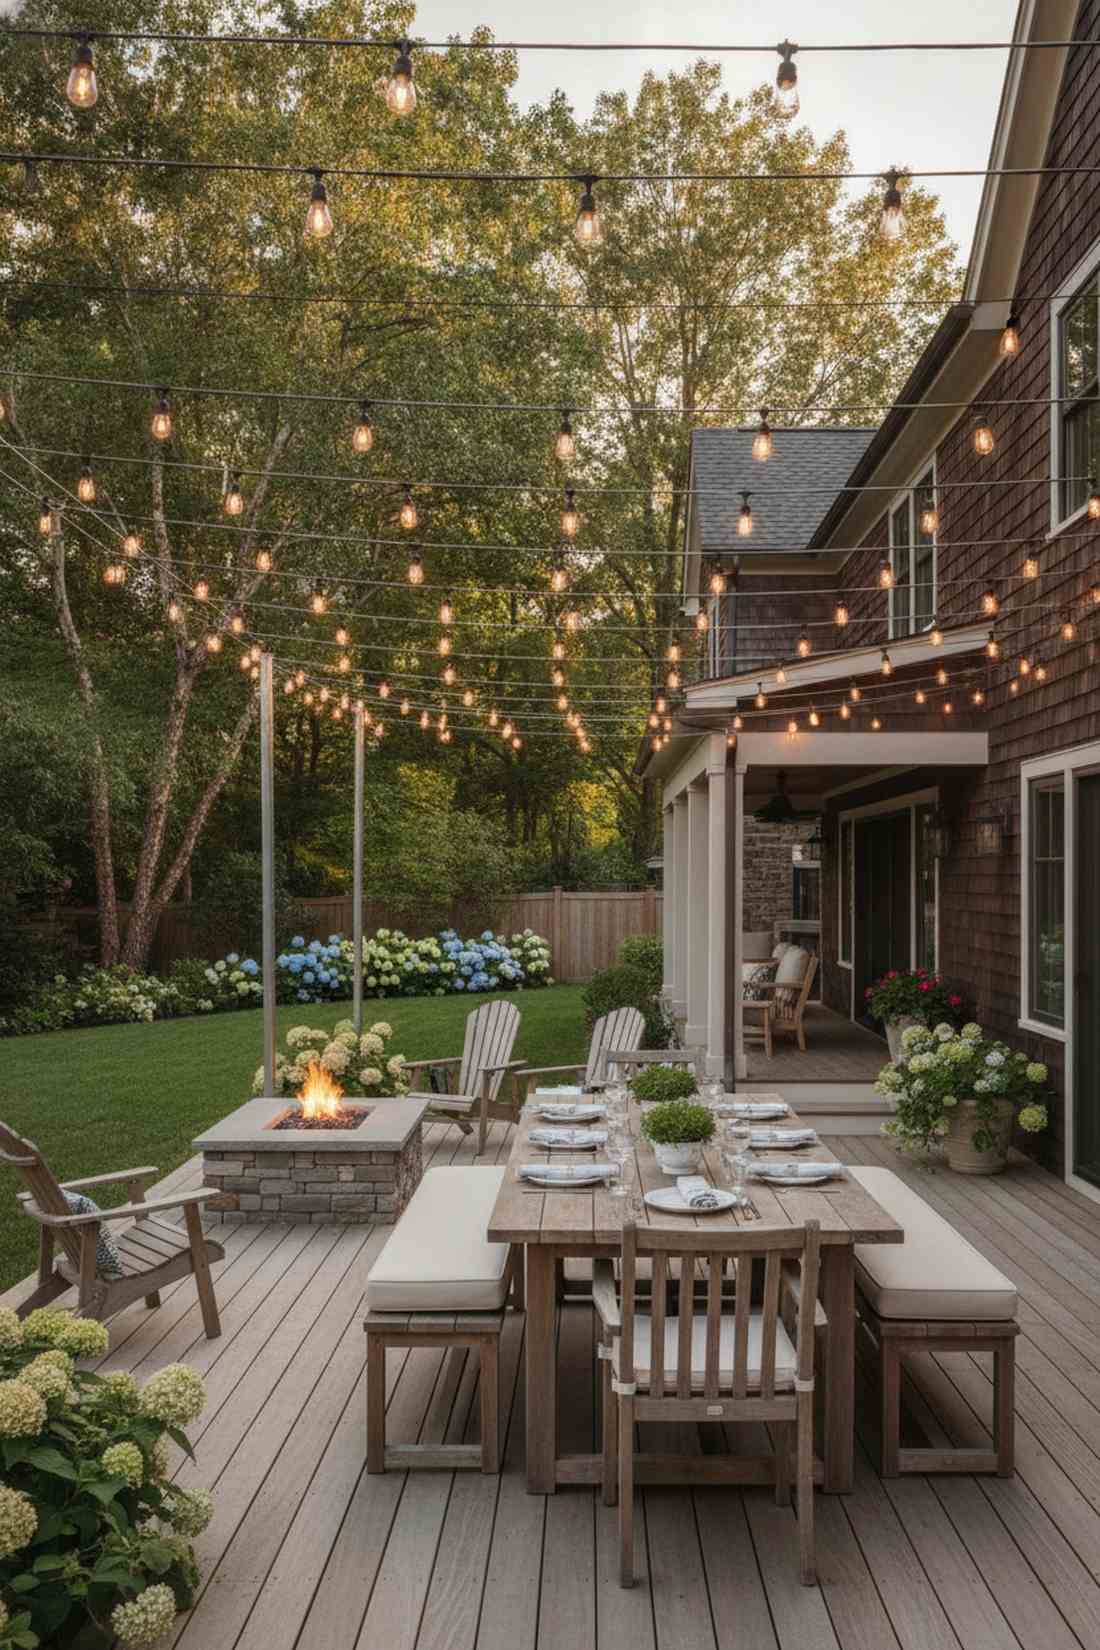
This layout feels like a romantic European street cafe you accidentally discovered. Utilizing a commercial patio overhead layout, it serves as the ultimate mood-setter perfectly tailored for open-air dining areas.
Hanging bare bulbs directly from branches almost always looks messy and temporary. Instead, suspending them across tension cables delivers a remarkably high-end architectural finish. Utilizing heavy-duty commercial stringers prevents wire sag while providing unmatched durability.
You can easily pull this off for around $40–$75 depending on your square footage. Pin this to your weekend backyard makeover board!
- Key Materials: Heavy-duty tension wire, shatterproof LED bulbs
- Vibe / Style: Upscale bistro dining
- Difficulty: Moderate afternoon project
- Budget Breakdown: Cables/Hooks: $20 | Lighting: $55
- Creator’s Tip: Keep the wire slightly taut but leave an inch of slack to account for temperature expansion.
- Smart Sourcing: shatterproof cafe stringers (bulk pack) and a stainless steel suspension starter kit.
2. Pergola Integrated Lighting
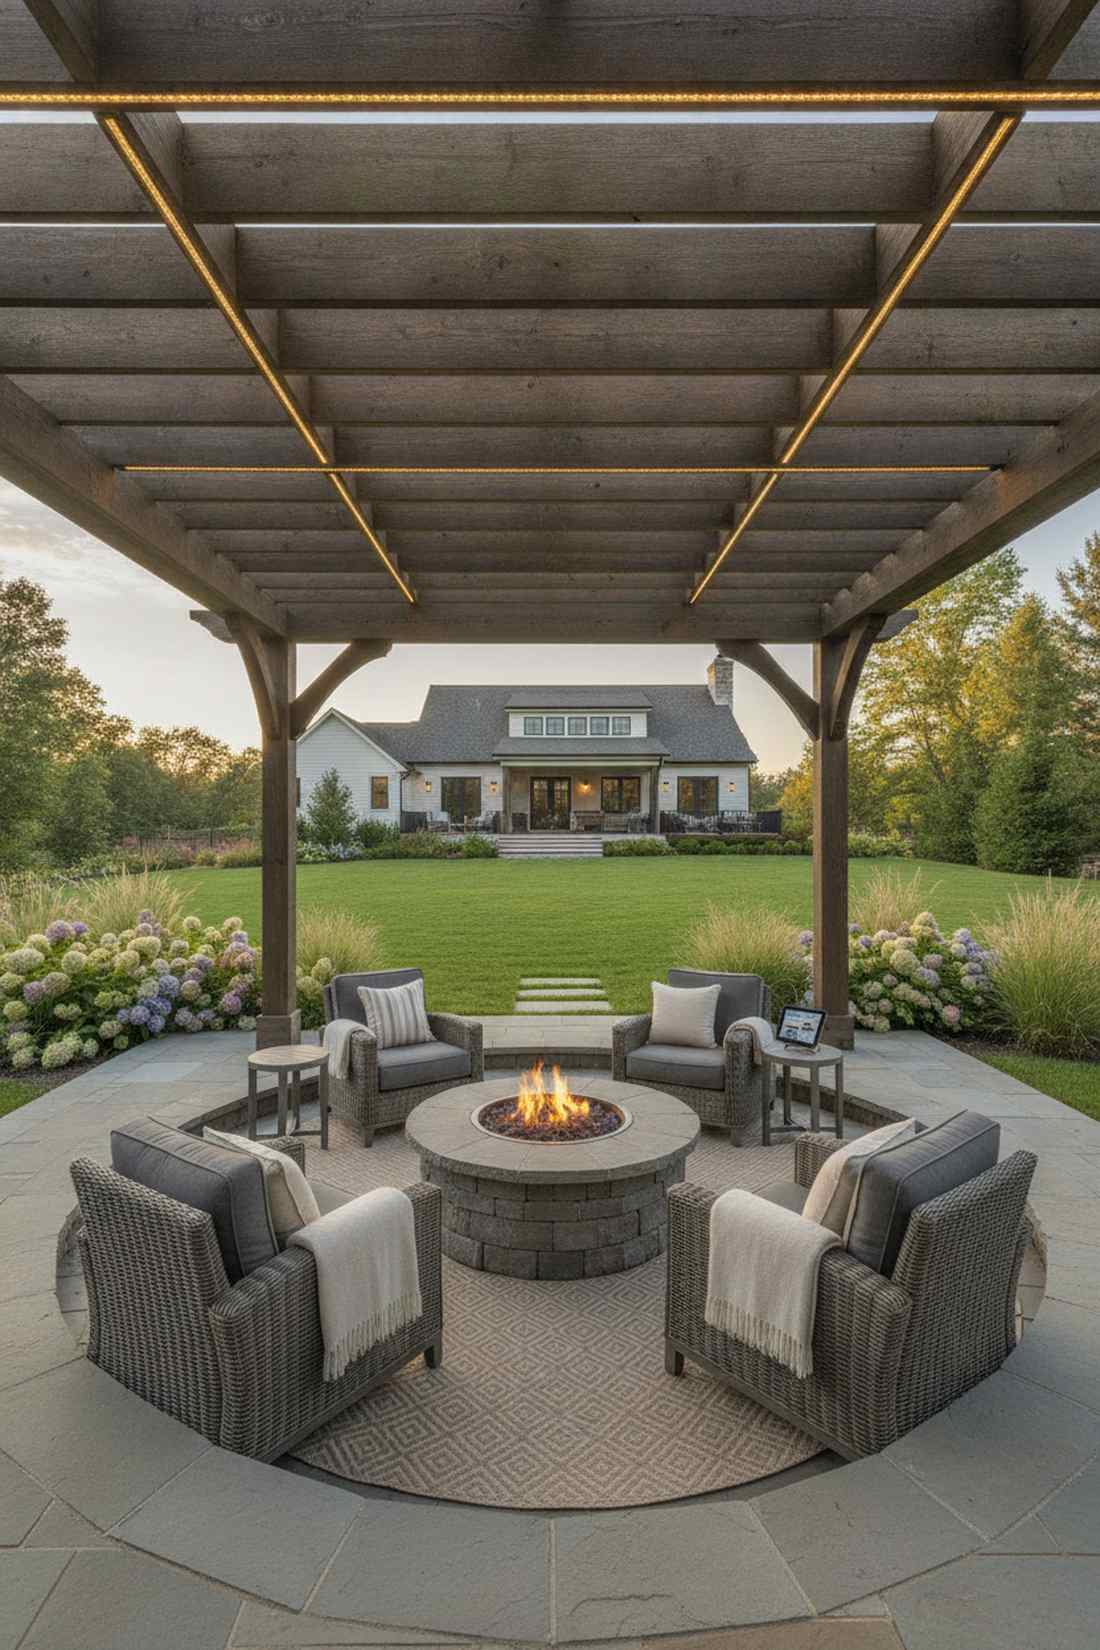
Tucking illumination directly into your wooden structures feels like stepping into an exclusive resort cabana. This integrated overhead glow works flawlessly for defining conversation pits beneath wooden beams.
Most beginners just wrap cords tightly around posts, which looks chaotic during daylight. Hiding low-profile wiring above the top slats yields a seamless designer-level execution that hides the ugly mechanics. Sneak in smart controllers to adjust the mood instantly from your phone.
Expect to spend about $30–$50 for the lighting channels and strips. It is a rapid upgrade that dramatically shifts the entire patio vibe.
- Key Materials: Aluminum channels, smart LED ribbons
- Vibe / Style: Modern luxury cabana
- Difficulty: Easy beginner setup
- Budget Breakdown: Track covers: $15 | Lights: $35
- Creator’s Tip: Point the lights slightly upward to bounce off the wood for a softer ambient glow.
- Smart Sourcing: UV-coated silicone LED strips inside pre-cut aluminum diffuser tracks.
3. Gazebo Chandelier Lighting
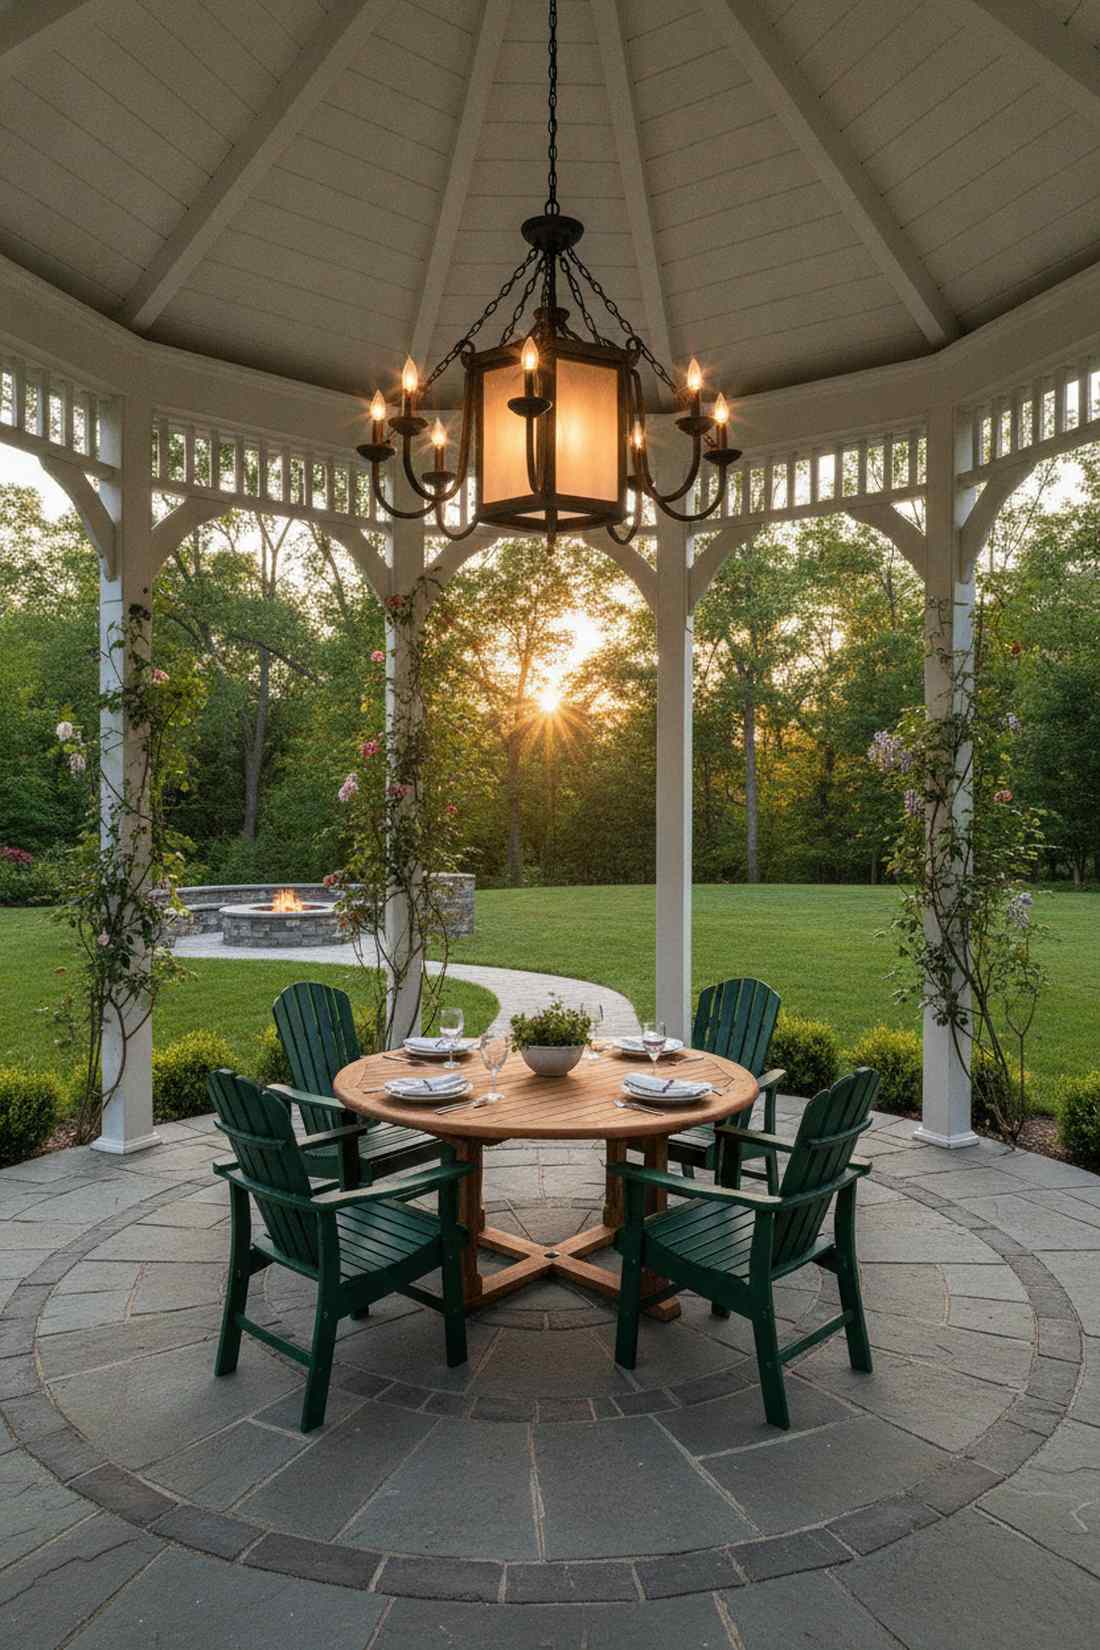
Suspended elegance that feels straight out of a grand storybook garden. A central outdoor chandelier acts as a magnetic focal point designed specifically for covered gazebos or large structural tents.
Ditching the typical battery-operated plastic domes for an ornate, weather-sealed fixture instantly commands attention. Even without hardwiring, modern remote-controlled solar pendants offer massive luminary impact without the complex electrical headache.
You can usually source a beautiful focal piece for $60–$90. Save this for your next big garden gala planning session!
- Key Materials: Weatherproof pendant, heavy-gauge suspension chain
- Vibe / Style: Classic botanical elegance
- Difficulty: Simple drop-in install
- Budget Breakdown: Fixture: $70 | Mounting hardware: $10
- Creator’s Tip: Hang it exactly 36 inches above the center table to maximize intimacy.
- Smart Sourcing: rust-proof outdoor pendant fixtures and a heavy-duty ceiling canopy kit.
4. Market Umbrella Lights

Radiating a cozy, intimate glow that feels like a private VIP table. Adding hidden canopy illumination creates the perfect reading or drinking nook right underneath your standard patio umbrella.
Forget those glaring clip-on bulbs that blind your guests across the table. Installing micro-LEDs along the internal ribs produces a brilliant, diffused downlight that makes everyone’s skin look flawless. This tactic is an instant crowd-pleaser that requires zero tools.
A quick modification that typically costs less than $25 total. Highly recommended for a quick Saturday afternoon win.
- Key Materials: Rechargeable battery pack, micro-ribbon LEDs
- Vibe / Style: Cozy VIP lounge
- Difficulty: Extremely simple
- Budget Breakdown: LED kit: $15 | Power bank: $10
- Creator’s Tip: Secure the wires with tiny black zip ties so they become completely invisible against dark umbrella poles.
- Smart Sourcing: flexible umbrella rib LED starter kits and high-capacity rechargeable battery banks.
This next configuration completely flips traditional backyard rules and looks incredibly expensive…
5. Tree Canopy Uplighting
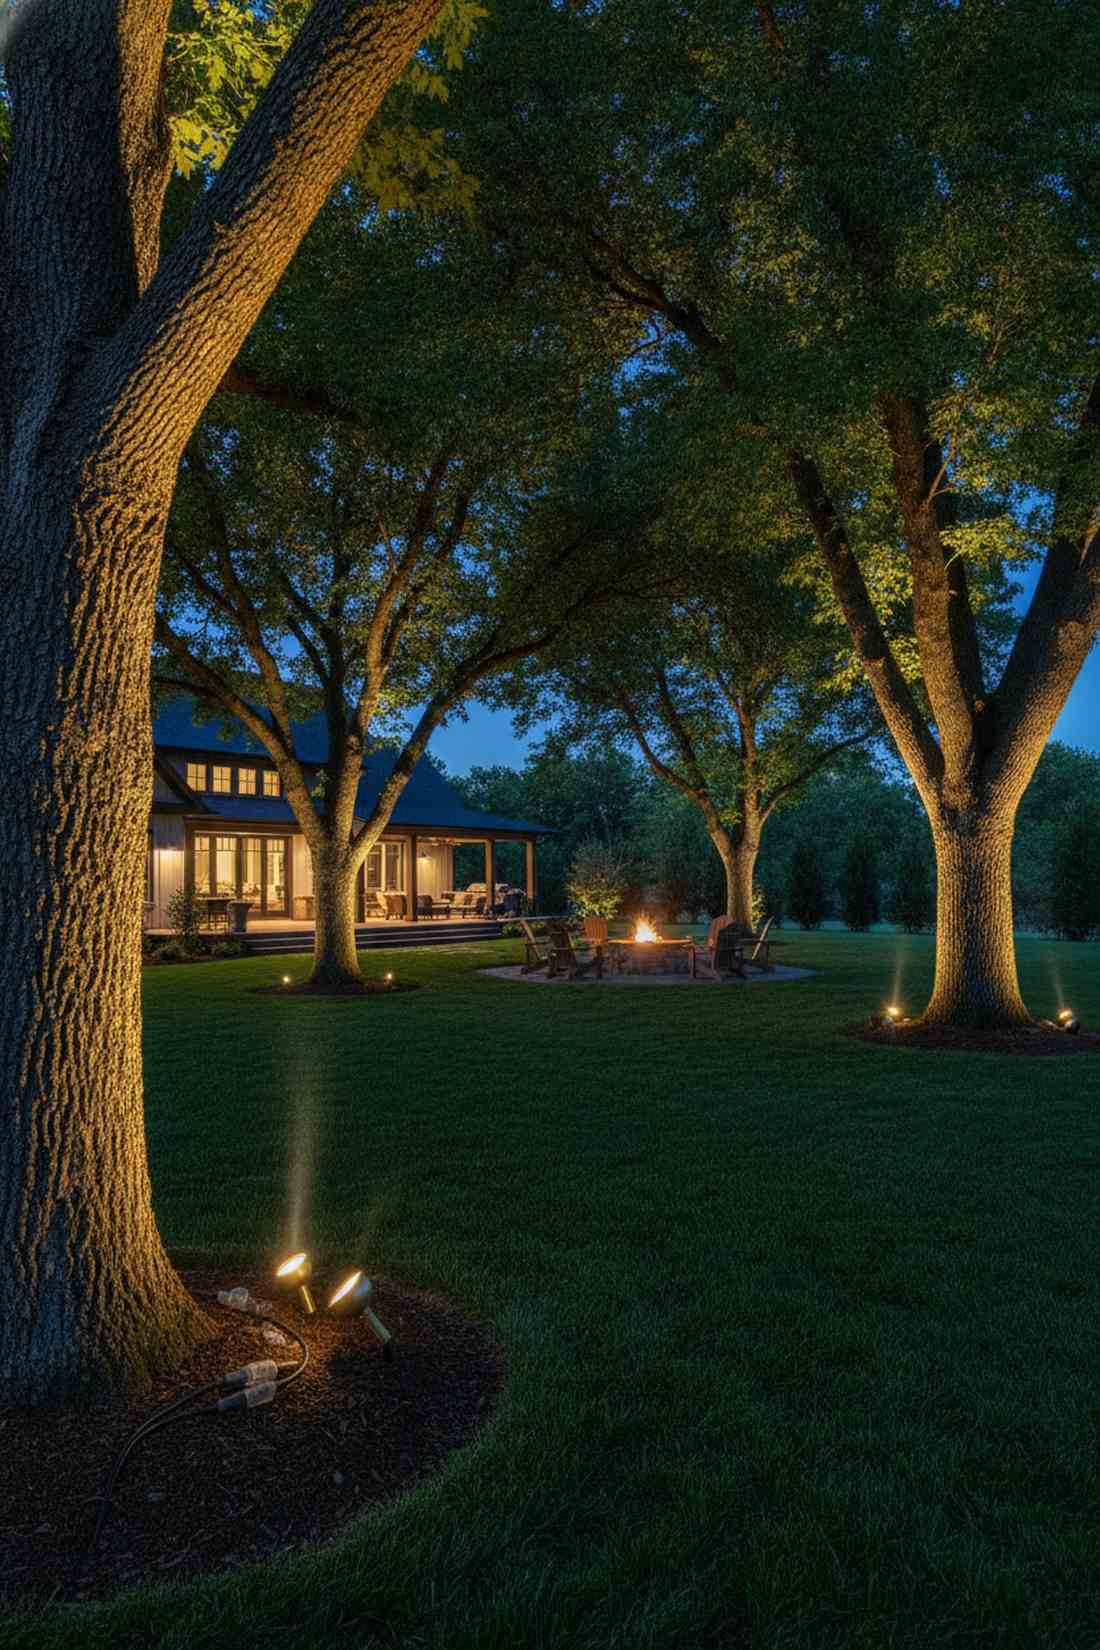
Casting shadows that feel like a mystical enchanted forest in your own yard. Using directional landscape spotlights directly at the base of mature trees completely transforms ordinary foliage into dramatic living art.
Many homeowners aim lights down from the branches, completely washing out the texture. Shooting narrow-beam spots upward from the root base captures the intricate bark details and delivers a high-end country club aesthetic. Grab premium cast-brass housings so they survive weed wackers and heavy rain.
This professional touch runs about $40 per tree, but the impact is massive. Pin this if you have large oak or maple trees!
- Key Materials: Cast-brass bullet spotlights, waterproof connectors
- Vibe / Style: Grand estate landscaping
- Difficulty: Moderate trenching required
- Budget Breakdown: Fixture: $30 | Wiring/Stakes: $10
- Creator’s Tip: Use a 2700K warm bulb to make green leaves pop without looking artificial.
- Smart Sourcing: cast-brass low-voltage spotlight kits and waterproof gel-filled wire connectors.
Entertaining Zones & Bar Lighting
6. Under-Counter LED Strips
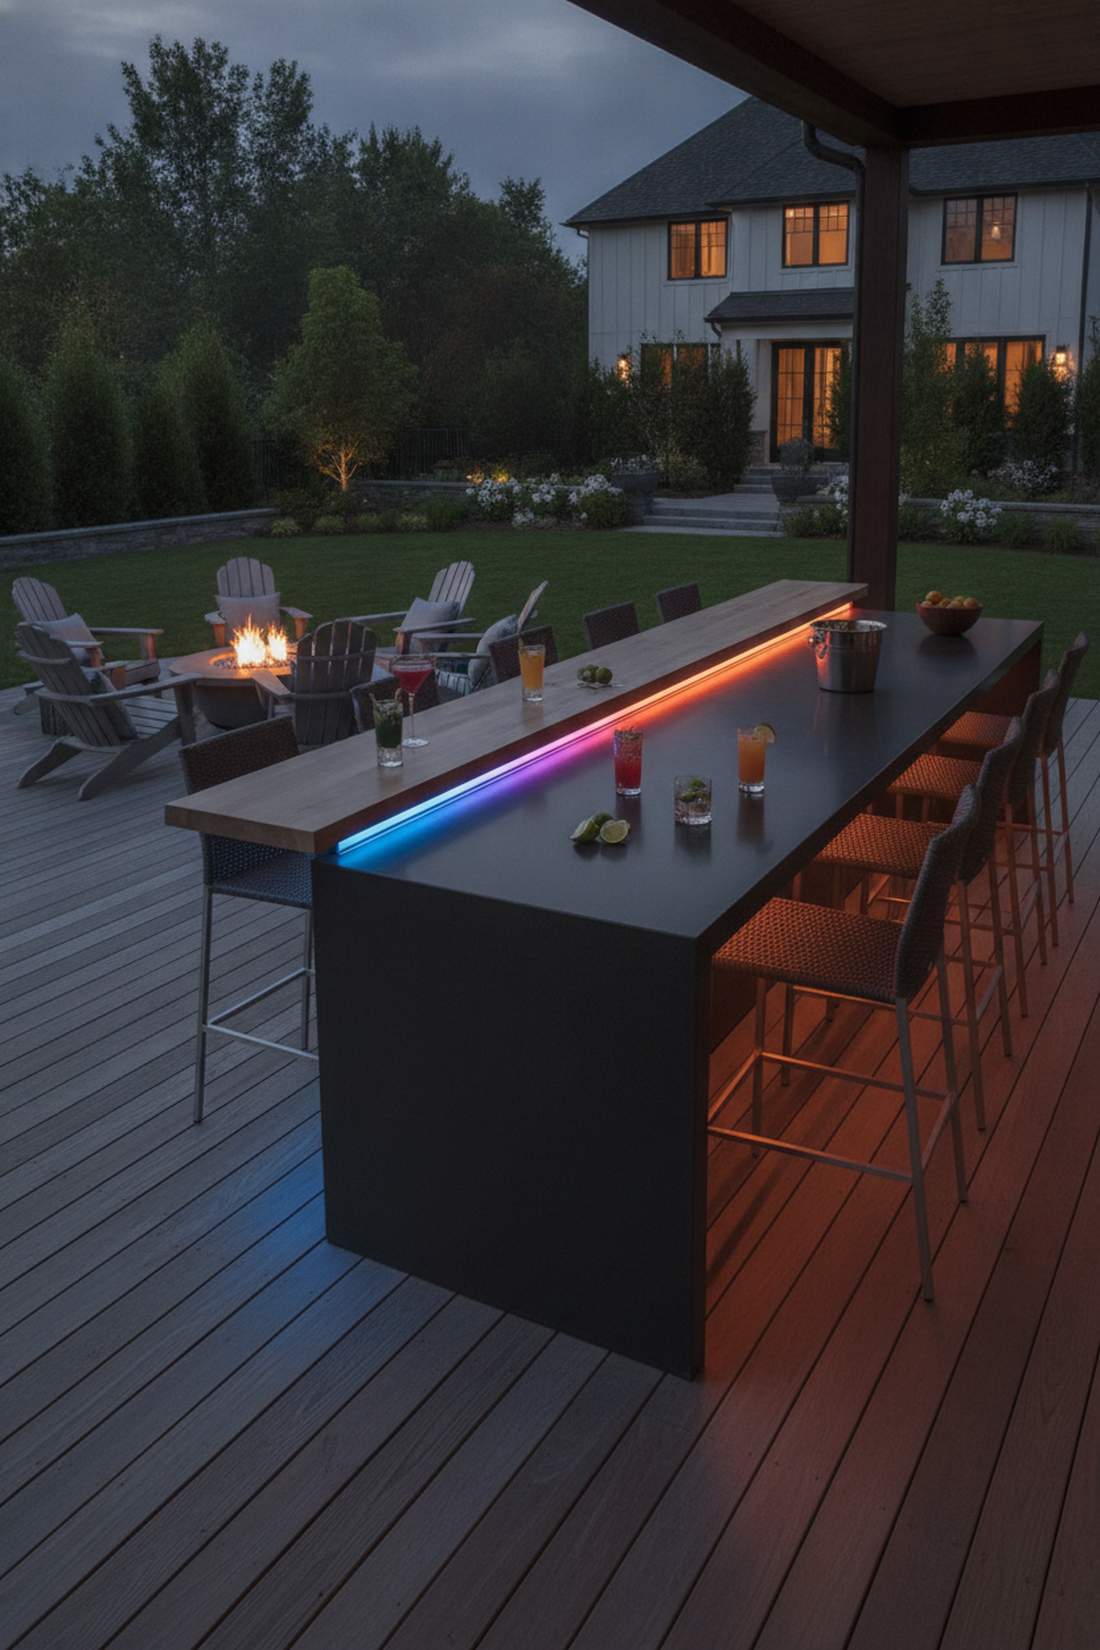
Floating neon visuals that feel like an exclusive downtown speakeasy. This hidden outdoor lighting bar layout is an absolute necessity for keeping the drinks flowing smoothly while maintaining a sultry mood.
Slapping exposed light strips under a counter creates tacky hotspots reflecting off the barstools. Embedding the ribbon inside a frosted track completely diffuses the diodes, achieving that buttery-smooth wash of color you see in high-end venues. Make sure you select silicone-sealed options to withstand spilled margaritas.
You can execute this luxury bar hack for as little as $30. It drastically upgrades any basic serving station!
- Key Materials: Frosted diffuser tracks, RGBW silicone strips
- Vibe / Style: Chic cocktail lounge
- Difficulty: Easy peel-and-stick
- Budget Breakdown: Waterproof lights: $20 | Aluminum channel: $10
- Creator’s Tip: Mount the track at a 45-degree angle pointing inward to eliminate glare completely.
- Smart Sourcing: IP65 waterproof RGBW strips and pre-cut corner extrusion channels.
7. Backlit Bar Shelving
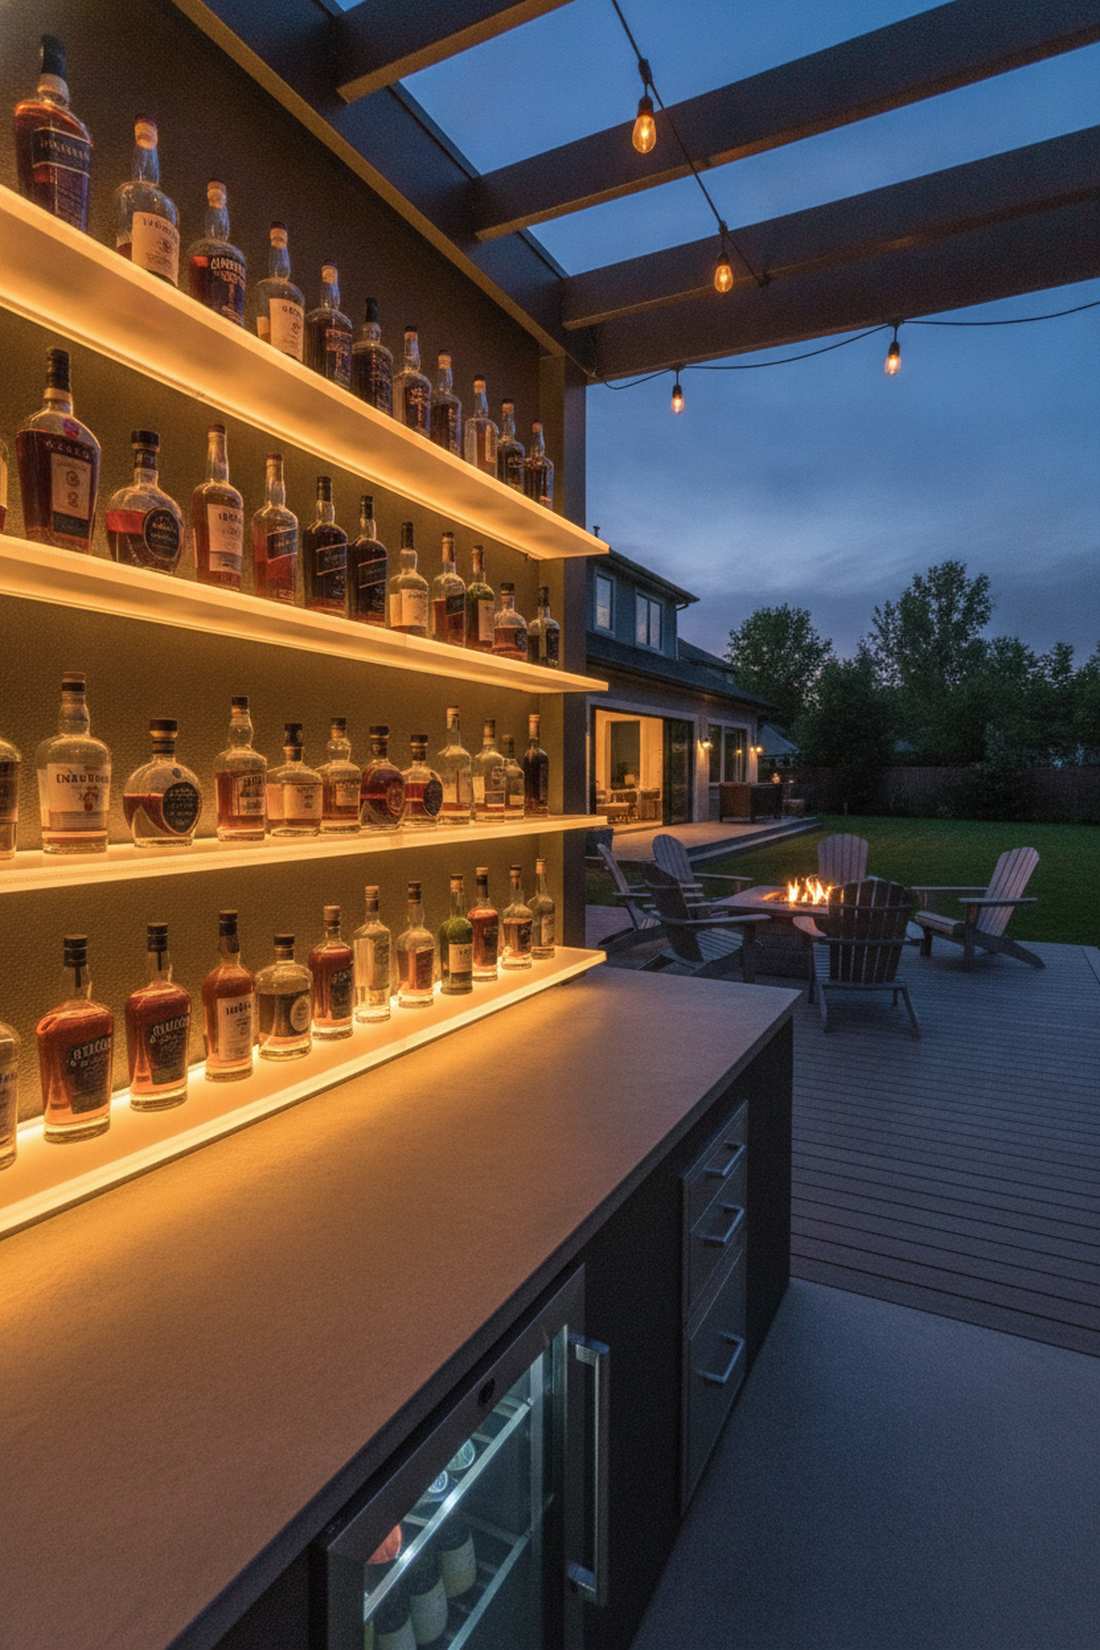
Showcasing your bottles so they glow like a curated museum exhibit. Utilizing acrylic illuminated shelving immediately positions your drink station as the undeniable centerpiece of the party.
Standard overhead cans cast harsh shadows that make reading labels impossible. Placing an ultra-thin light panel directly behind translucent acrylic shelves produces a rich, luminous backdrop that commands attention from across the yard. This completely eliminates the need for bulky table lamps.
This premium display strategy will cost around $45–$60 per shelf tier. Save this to your ultimate outdoor kitchen board!
- Key Materials: Frosted acrylic sheets, edge-lit LED panels
- Vibe / Style: Modern high-end club
- Difficulty: Intermediate custom fit
- Budget Breakdown: Acrylic shelf: $25 | Light panel: $30
- Creator’s Tip: Use amber lighting to make whiskey and dark spirits look incredibly rich and expensive.
- Smart Sourcing: custom-cut frosted acrylic panels and ultra-thin LED backlight sheets.
8. Pendant Lights Over Bar Counter
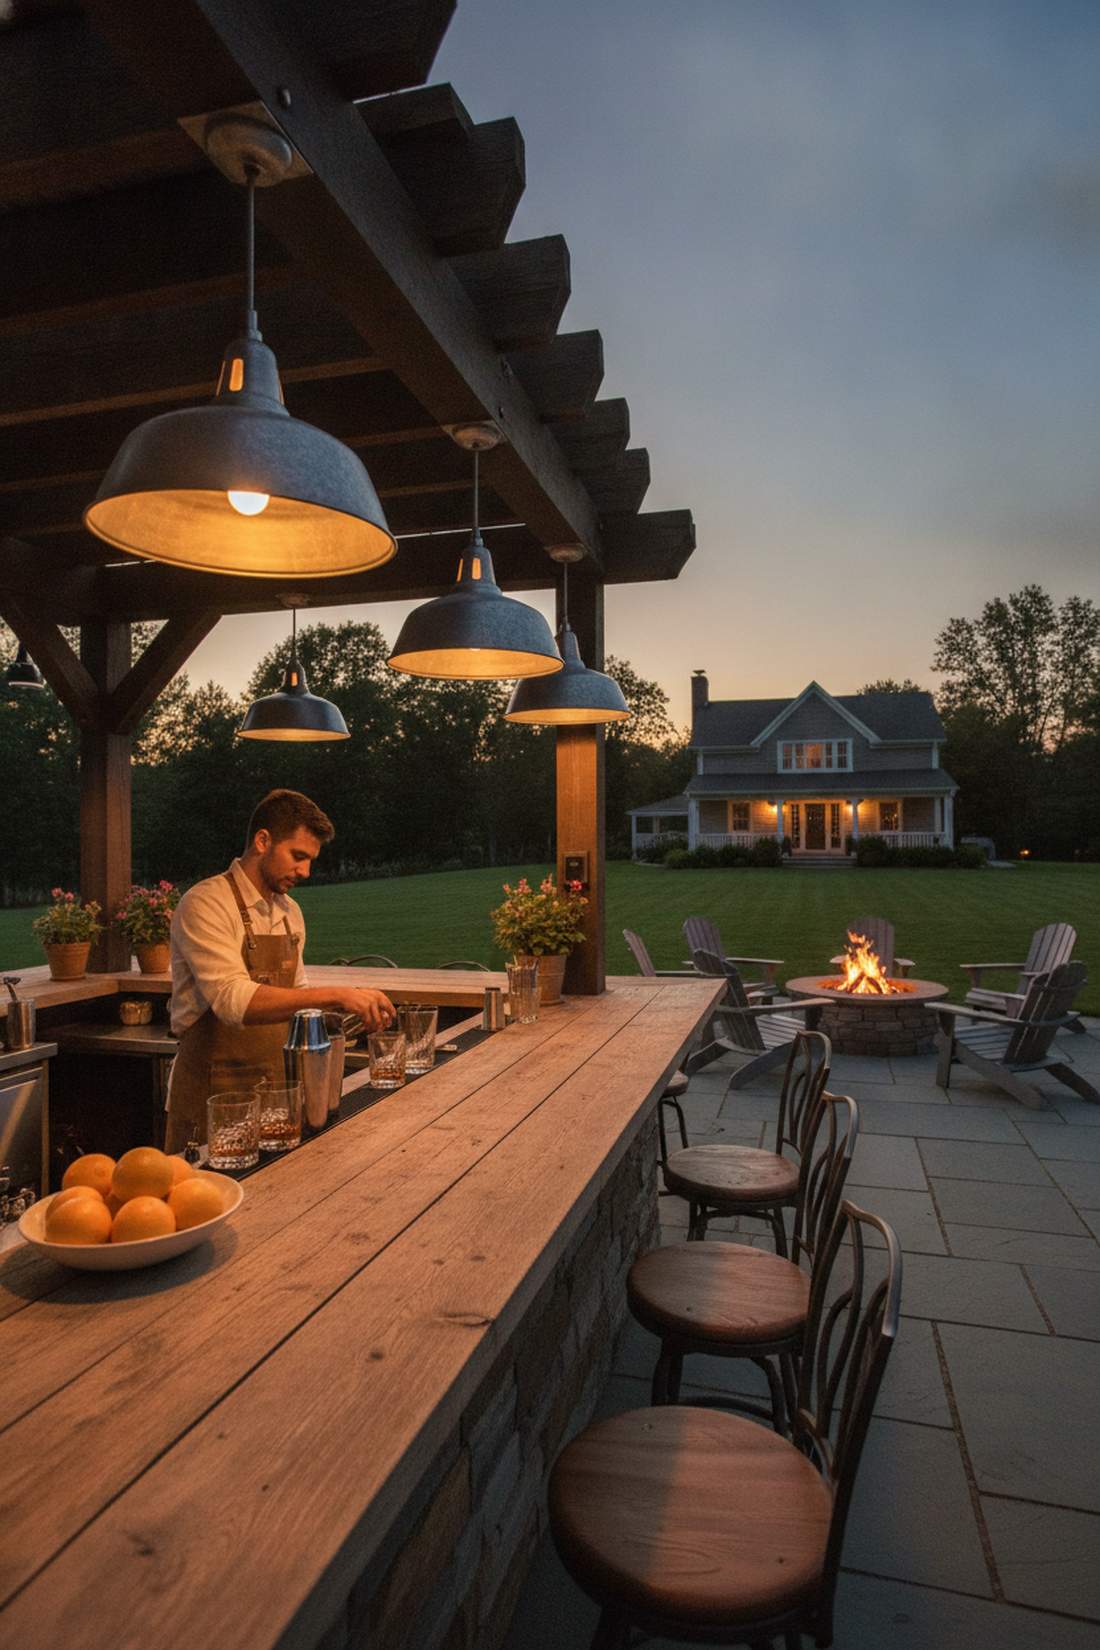
Industrial charm that makes pouring a drink feel like an art form. Dropping a trio of vintage barn-style pendants offers brilliant task lighting while anchoring your serving space.
Relying solely on floodlights ruins the intimate atmosphere of a good conversation. A cluster of deeply hooded pendants focuses the brightness strictly on the countertop, leaving the surrounding faces bathed in flattering, indirect warmth. This specific zoning trick is a favorite among luxury landscape architects.
A set of three quality fixtures usually runs around $100–$150. A fantastic investment for serious backyard bartenders.
- Key Materials: Galvanized metal domes, weatherproof mounting plates
- Vibe / Style: Rustic industrial tavern
- Difficulty: Requires basic electrical knowledge
- Budget Breakdown: 3 Pendants: $120 | Wire/Conduit: $30
- Creator’s Tip: Install a dimmer switch specifically for these so you can lower the intensity as the night gets later.
- Smart Sourcing: weather-sealed industrial pendant kits and heavy-duty outdoor dimmer switches.
9. Illuminated Bar Base
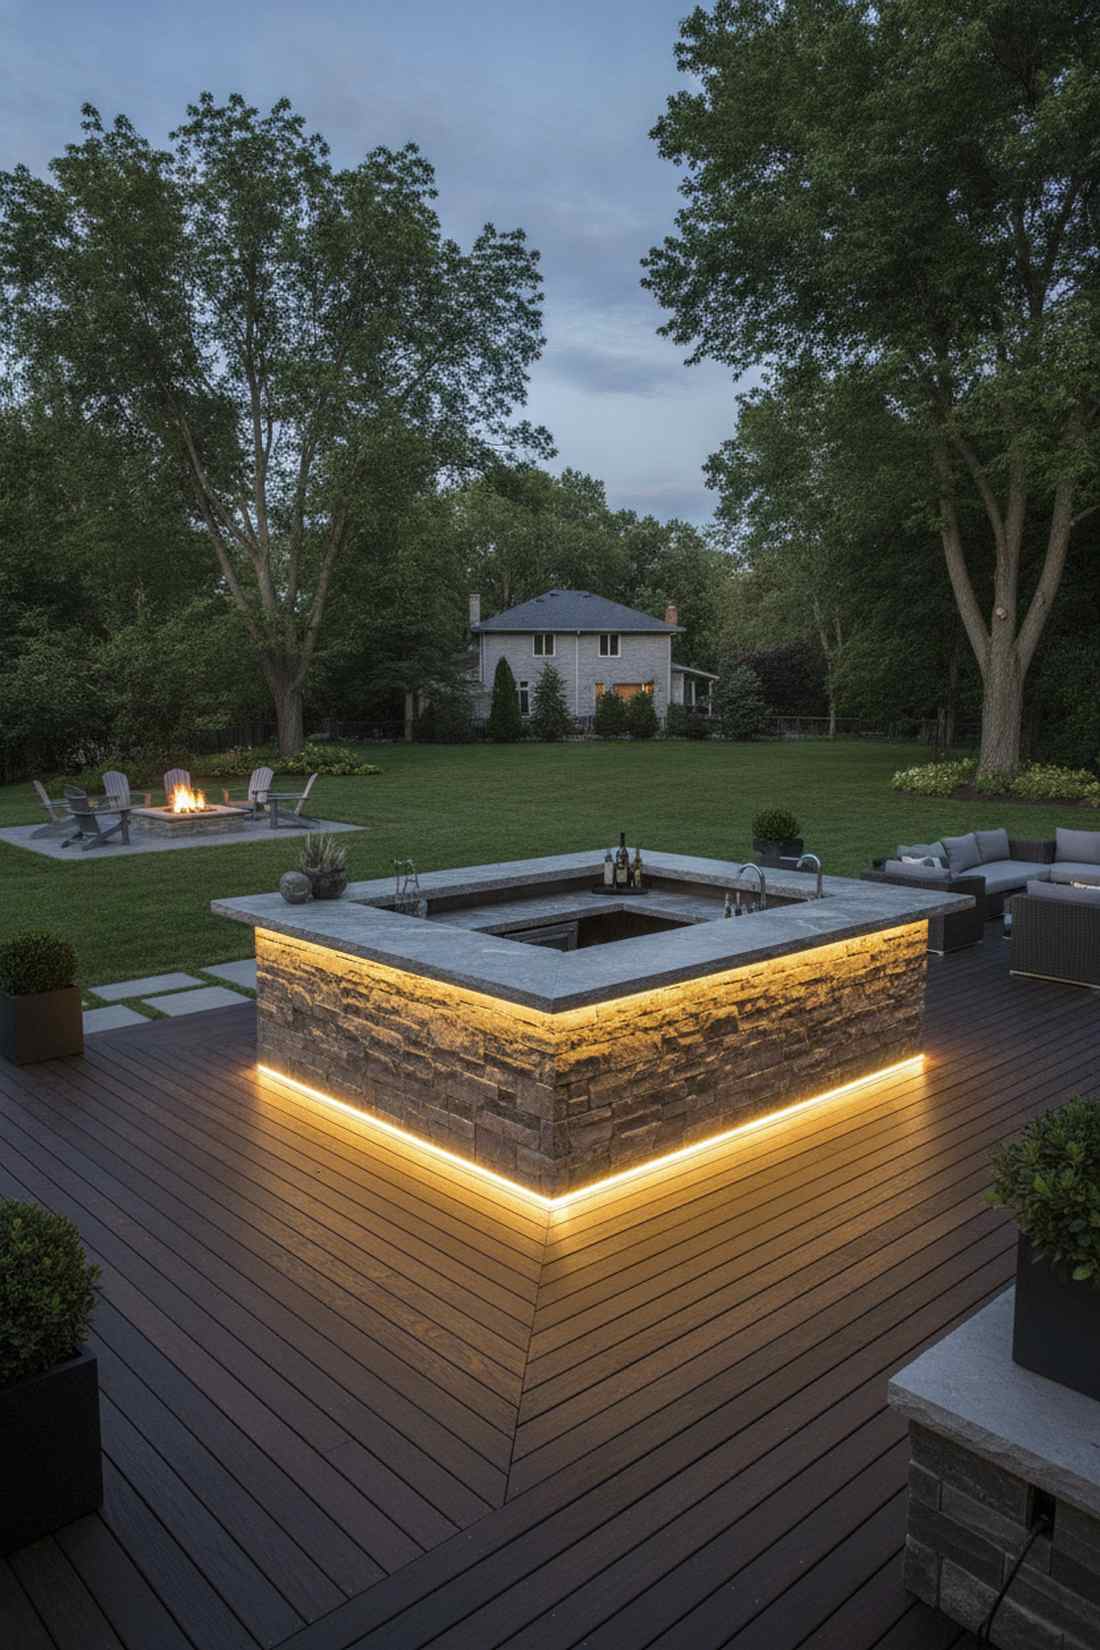
Creating an optical illusion that makes your heavy masonry look weightless. Utilizing a perimeter ground wash creates a dramatic floating effect that also subtly prevents guests from kicking the stone.
Most DIYers completely ignore the floor level, making the bar look like a dark, heavy void at night. Running a continuous glowing perimeter exactly where the kick-plate meets the deck gives a designer-level finish that looks hyper-modern. Ensure you use heavy-duty protective housing so accidental shoe scuffs don’t ruin the diodes.
This brilliant architectural trick only sets you back about $35. Pin this idea to instantly elevate your patio game!
- Key Materials: Reinforced light ropes, masonry clips
- Vibe / Style: Ultra-modern floating architecture
- Difficulty: Quick baseboard installation
- Budget Breakdown: Rope light: $25 | Mounting clips: $10
- Creator’s Tip: Hide the power cord inside a faux stone or paint it to match the patio pavers exactly.
- Smart Sourcing: heavy-duty neon LED rope lights and masonry-grade mounting brackets.
💡 Must-Have Supplies for High-End Setups
To build these setups faster and ensure they last, skip the generic craft aisles and invest in the right foundational kits.
- Base & Support: heavy-gauge suspension cables (bulk pack)
- Setup Tools: weatherproof gel-connector starter kits
- Weather/Durability Protection: industrial clear silicone sealant tubes
10. String Lights Behind Bar Area
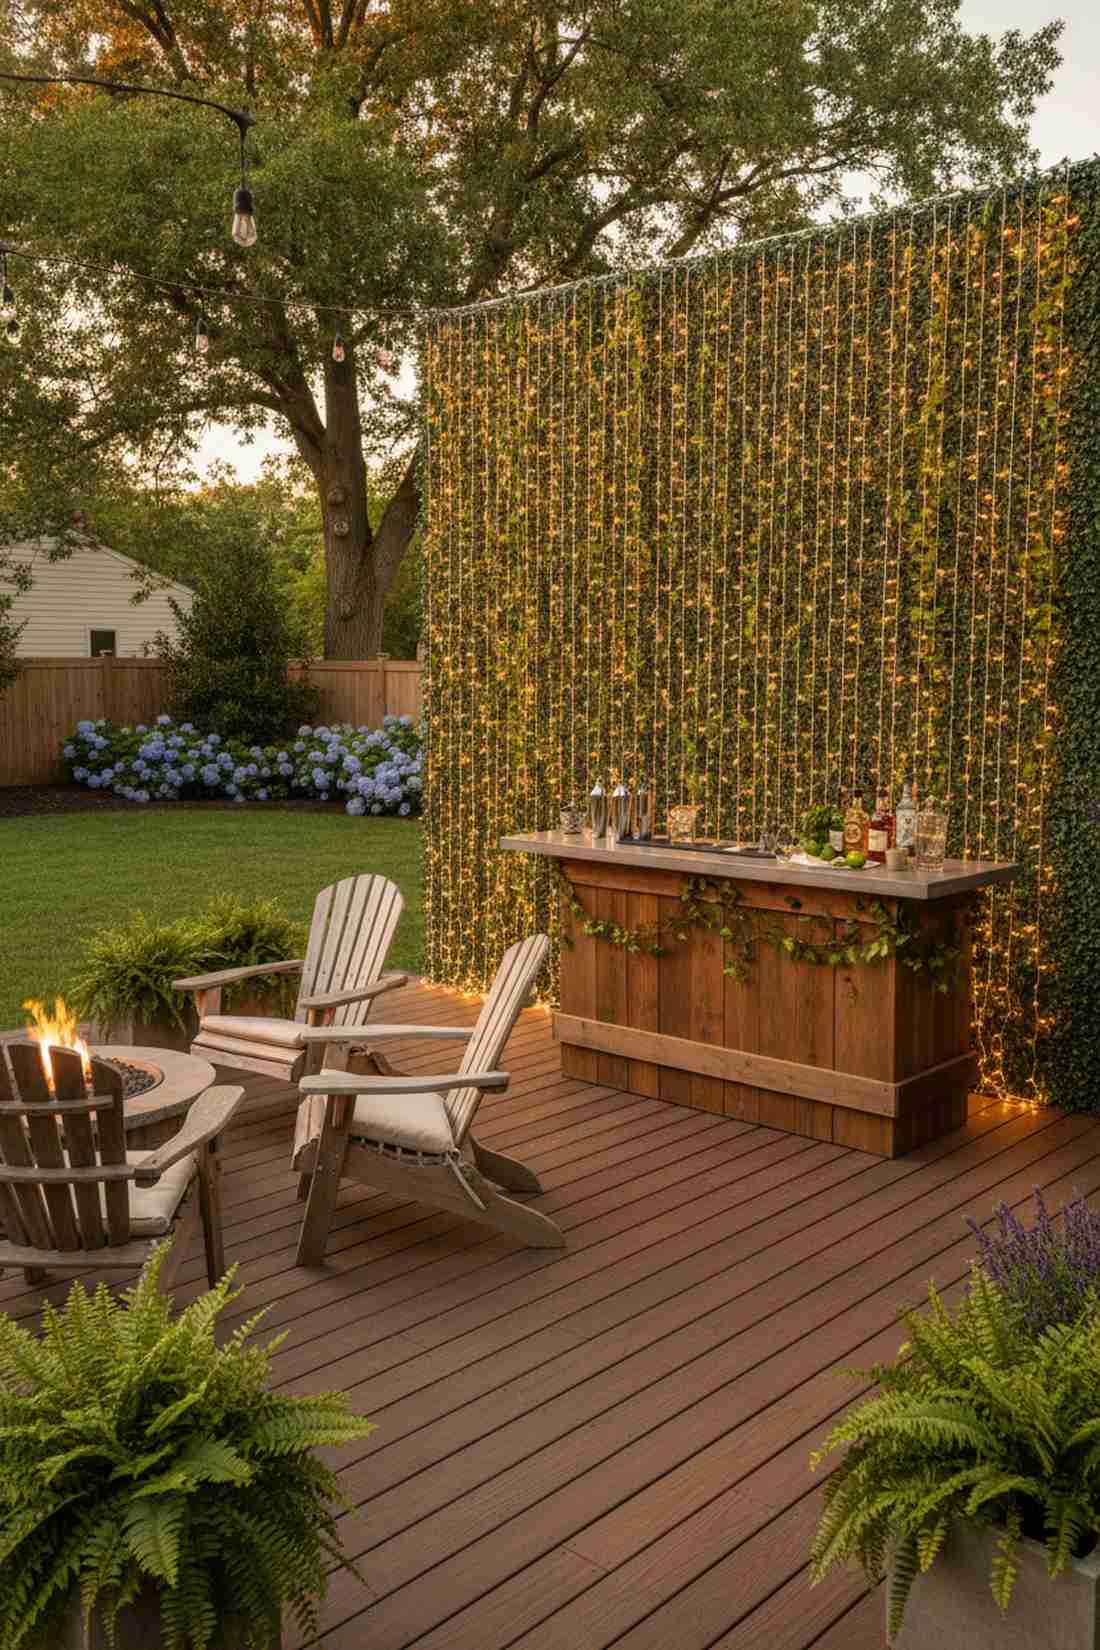
A cascading waterfall of warmth that feels incredibly inviting and nostalgic. Setting up a vertical fairy light curtain right behind the mixing station adds instant visual depth to plain fences.
Hanging a single strand straight across the wall is notoriously boring. Looping them tightly to form a dense, glowing backdrop creates a stunning photographic moment that guests absolutely love. Weaving artificial ivy or privacy screening through the wires completely conceals the empty spaces during the daytime.
You can throw this magical backdrop together for just $20–$40. It makes any amateur setup look highly professional.
- Key Materials: Curtain light matrix, clear zip ties
- Vibe / Style: Whimsical cocktail corner
- Difficulty: Fast hook-and-loop setup
- Budget Breakdown: Light matrix: $25 | Hooks: $5
- Creator’s Tip: Opt for warm white (2700K) to ensure the glow compliments skin tones beautifully in photos.
- Smart Sourcing: outdoor-rated LED curtain arrays and UV-resistant clear cable ties.
Pathway & Safety Lighting for Guest Navigation
11. Solar Pathway Stakes
Guiding your friends through the garden like a starlit runway. Using modern geometric solar path markers perfectly outlines meandering walkways while keeping everyone safe from tripping.
Cheap plastic stakes from the dollar store turn yellow and snap within weeks. Upgrading to sleek, powder-coated metal housings provides a surprisingly premium look that handles accidental lawnmower bumps with ease. Modern lithium-ion solar panels finally mean these will actually stay bright until the last guest leaves.
A quality set of six stakes costs around $45, saving you hours of wiring. Pin this to your practical landscaping board!
- Key Materials: Metal solar spikes, high-capacity batteries
- Vibe / Style: Minimalist modern garden
- Difficulty: Just push into the dirt
- Budget Breakdown: 6-pack stakes: $45
- Creator’s Tip: Wipe the top panels with a damp cloth once a month to keep the charging efficiency at 100%.
- Smart Sourcing: powder-coated metal solar stakes (bulk pack) and replacement lithium solar batteries.
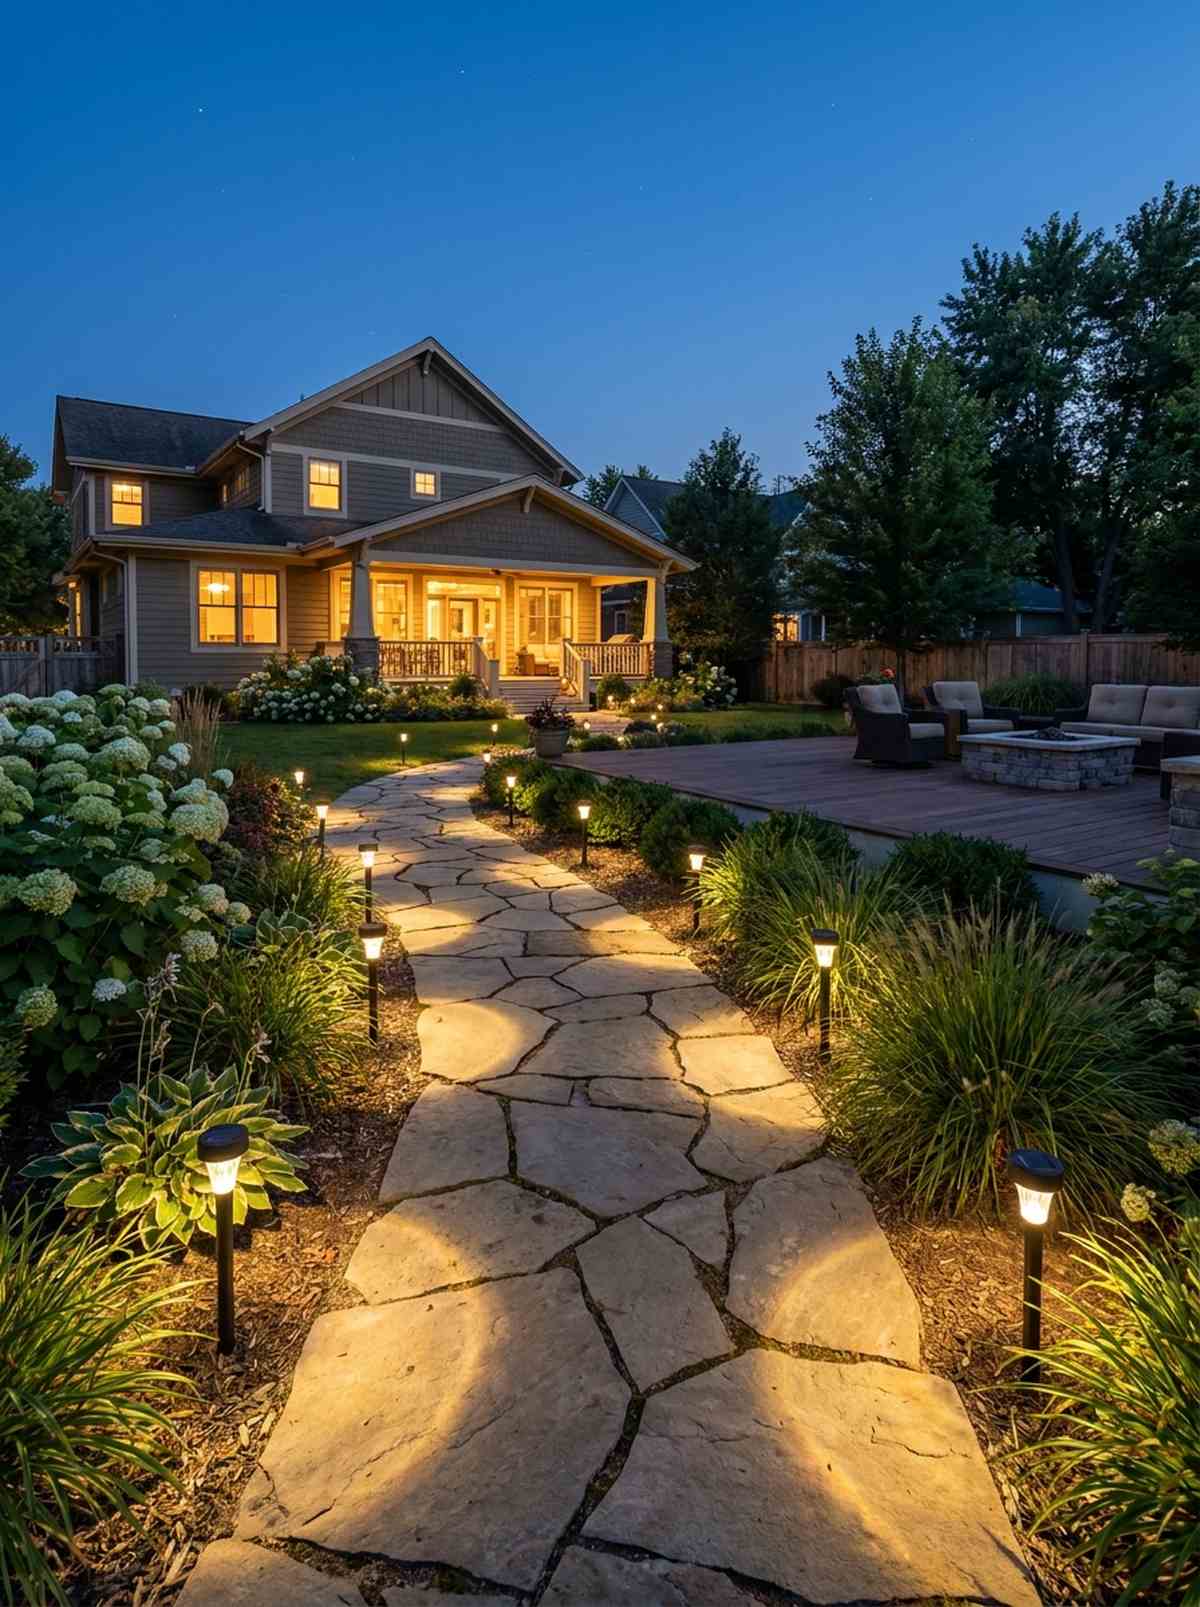
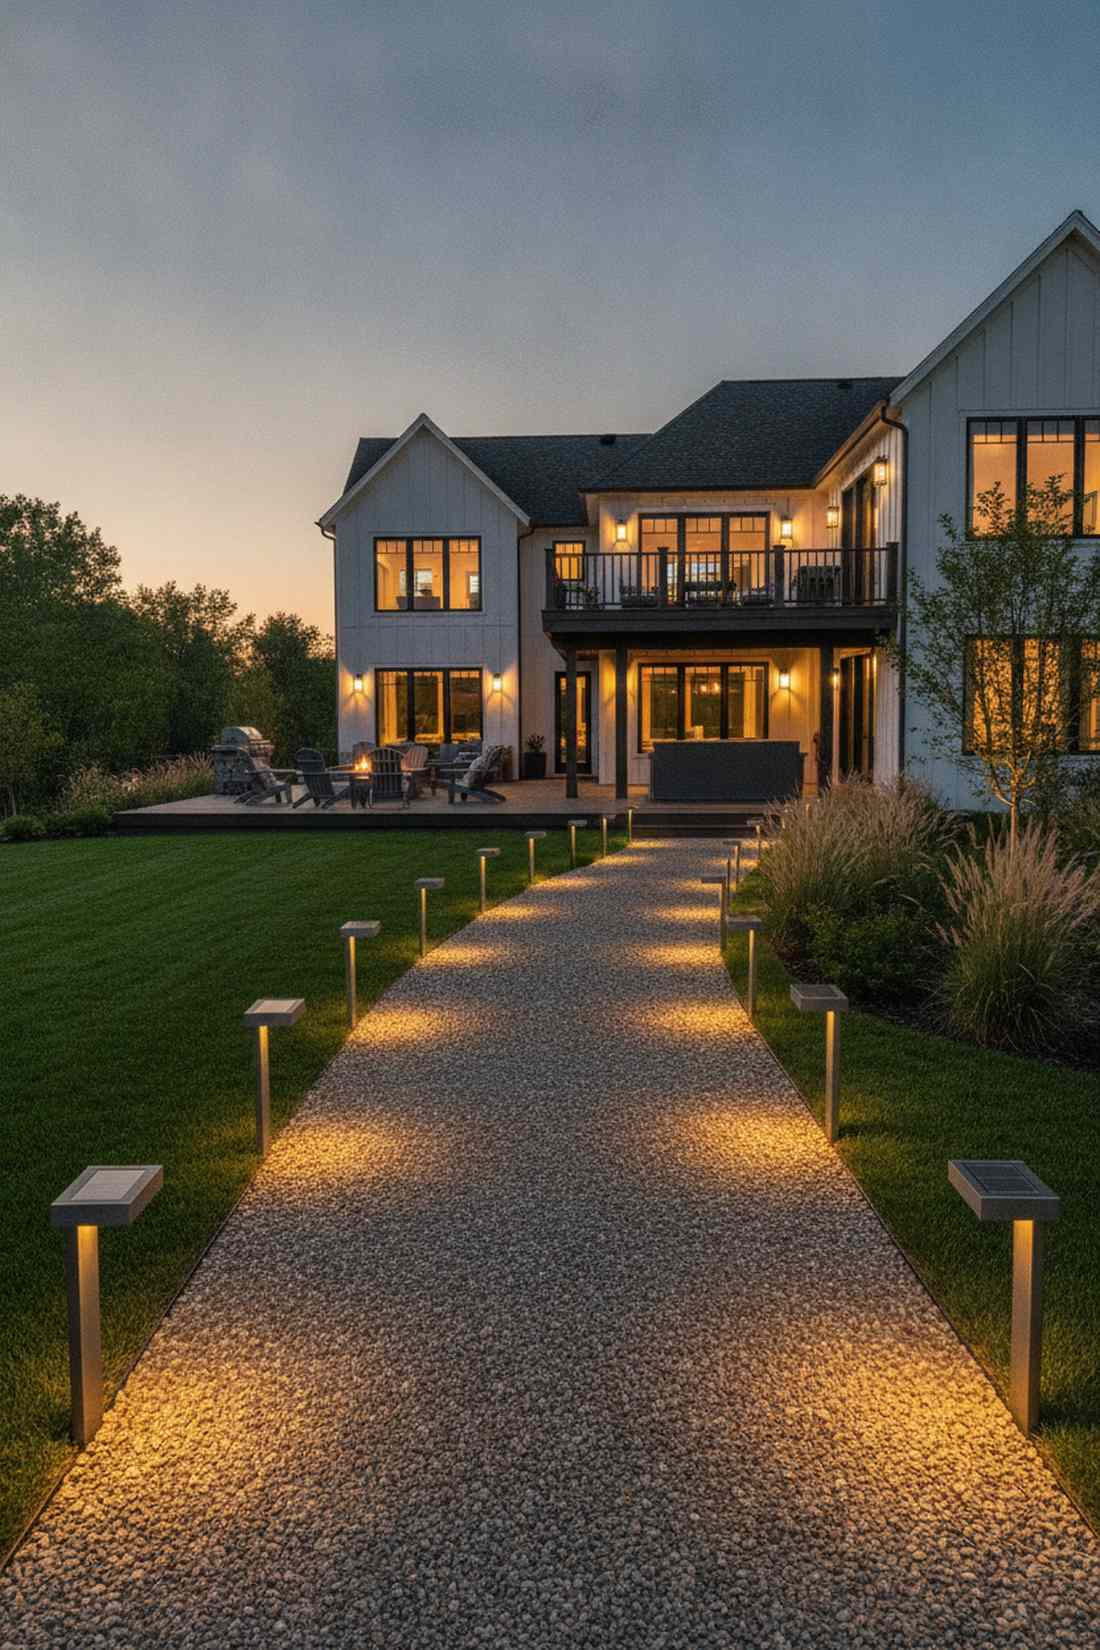
12. Low-Voltage Path Lighting
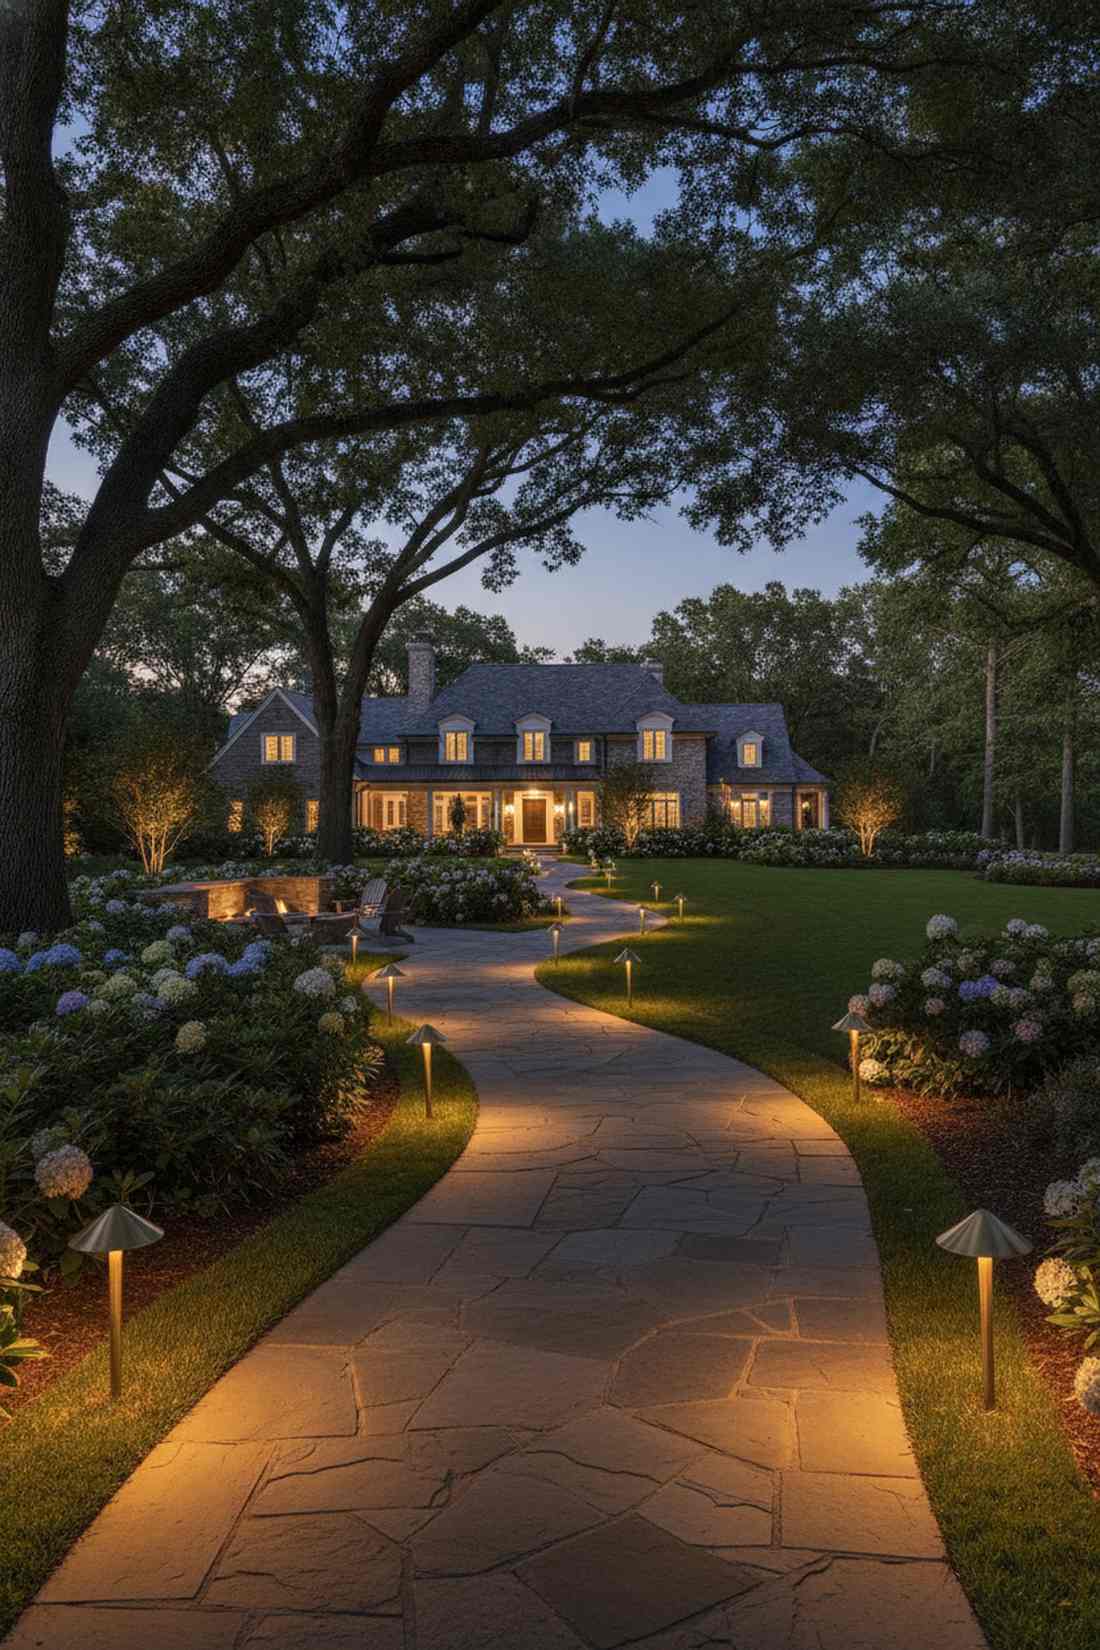
The hallmark of a high-net-worth estate pathway. Installing a hardwired brass low-voltage navigation system ensures absolute reliability and uniform brightness through every season.
Solar is great, but relying on it under heavy shade trees is a rookie mistake. Running buried 12V lines from a central transformer delivers a consistent, designer-level finish that never dims on cloudy days. Utilizing smart timers ensures the property lights up beautifully before you even step outside.
Starter bundles begin around $150–$200 for a completely professional layout. It is the ultimate permanent property upgrade.
- Key Materials: Brass top-hat fixtures, 14-gauge burial wire
- Vibe / Style: Luxury estate grounds
- Difficulty: Weekend trenching project
- Budget Breakdown: Transformer kit: $80 | Fixtures/Wire: $100
- Creator’s Tip: Stagger the lights in a zigzag pattern rather than a straight runway line for a more natural look.
- Smart Sourcing: complete 12V landscape starter kits and heavy-duty direct burial landscape wire.
13. Luminous Stepping Stones
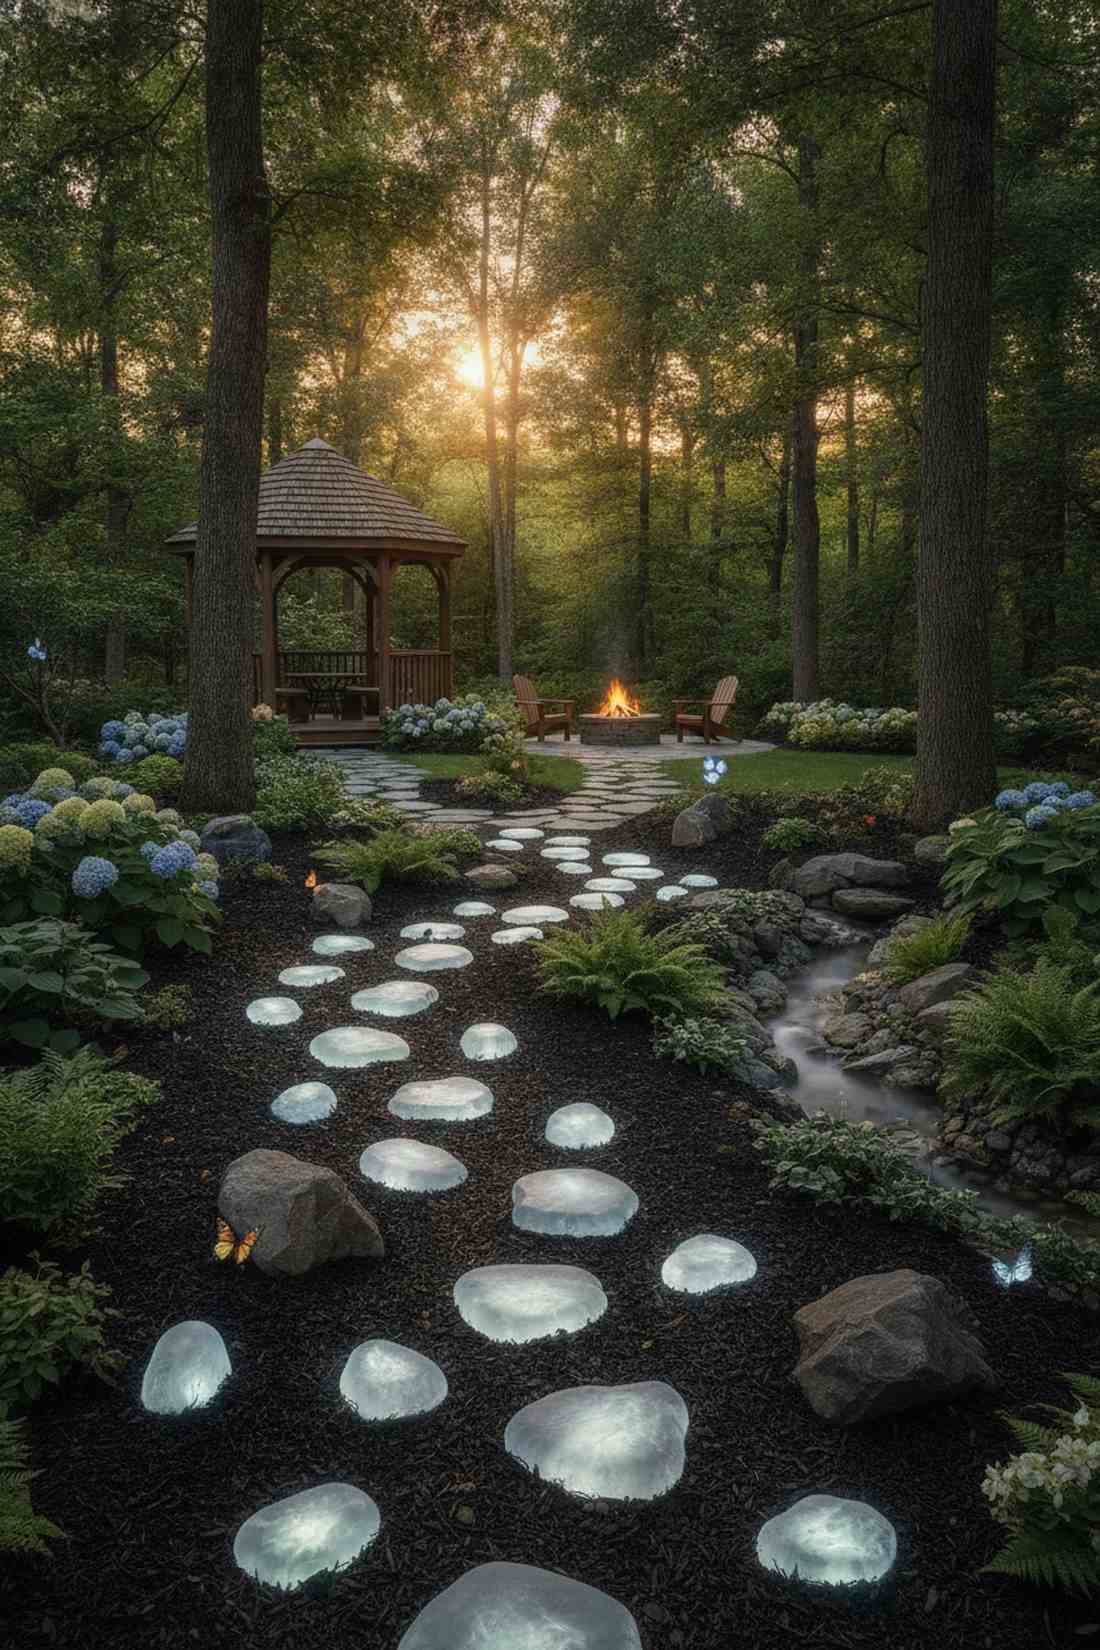
Feels exactly like walking on actual glowing moon rocks. Integrating embedded resin light pavers directly into your mulch beds adds a brilliant touch of whimsy and wonder.
Standard paver lights often look like clunky plastic boxes interrupting the earth. Pouring translucent resin discs filled with solar micro-LEDs creates a magical, organic appearance that looks far more expensive than it is. They blend flawlessly into gravel or moss pathways without screaming “hardware store.”
You can snag a set of these glowing stones for roughly $30–$50. Save this idea if you love hidden magical details!
- Key Materials: Solar frosted resin stones
- Vibe / Style: Enchanted woodland trail
- Difficulty: Drop and arrange
- Budget Breakdown: 4-pack stones: $40
- Creator’s Tip: Nestle them slightly beneath the mulch line so they look like natural glowing geodes pushing through the soil.
- Smart Sourcing: heavy-duty solar resin stepping stones and decorative dark river rock.
14. Stair Riser Lighting
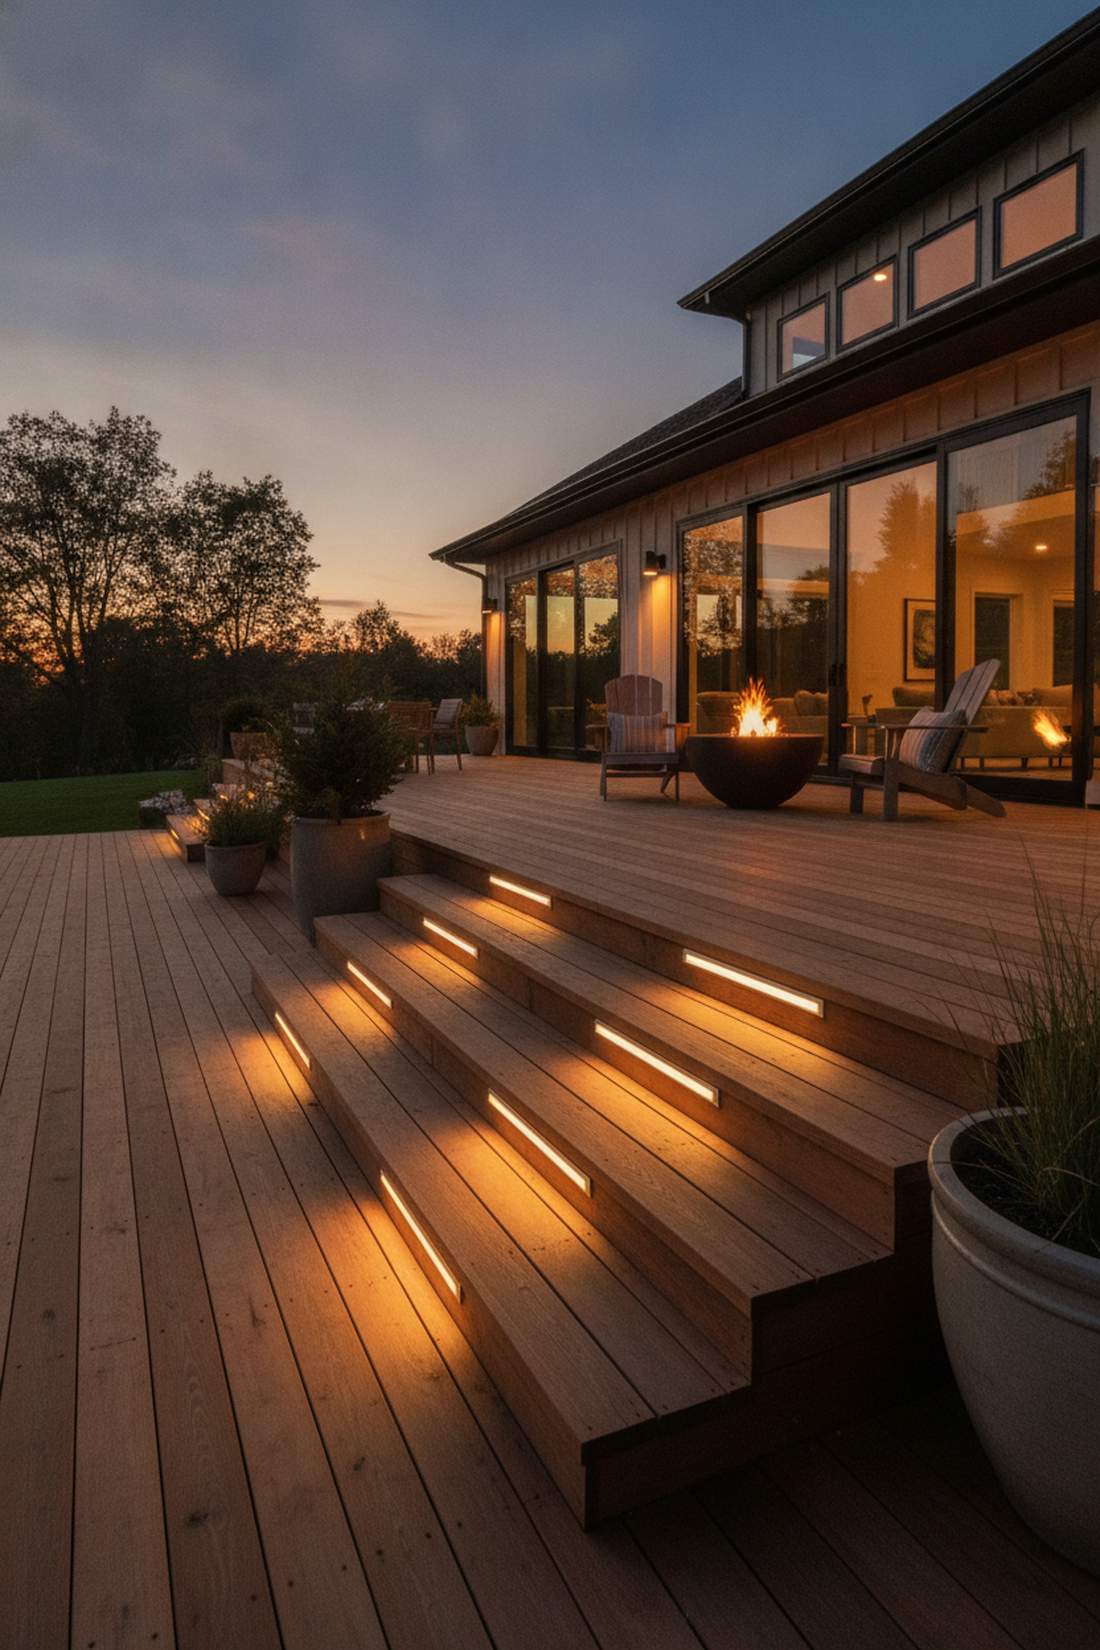
Crisp, sharp illumination that makes deck steps look like a boutique hotel entrance. Adding hidden under-tread light bars is the ultimate safety feature that doubles as dramatic architecture.
Pointing glaring spotlights at your stairs blinds people as they walk up. Tucking a slim aluminum light bar directly under the lip of each step casts a gorgeous downward wash that looks exceptionally premium and sleek. This single layout change completely modernizes old, tired wooden decks.
Wiring four steps typically runs around $40–$60 in materials. Highly recommended for any multi-level outdoor space.
- Key Materials: Deck stair pucks or strip kits, hole saw
- Vibe / Style: Sleek contemporary deck
- Difficulty: Moderate drilling required
- Budget Breakdown: Riser light kit: $45 | Forstner drill bit: $10
- Creator’s Tip: Keep the wattage extremely low; you want a soft guiding glow, not an airport runway.
- Smart Sourcing: low-voltage deck stair light kits and marine-grade wire splicing connectors.
Wait until you see the genius placement hack in this upcoming layout…
15. Rope Light Edging
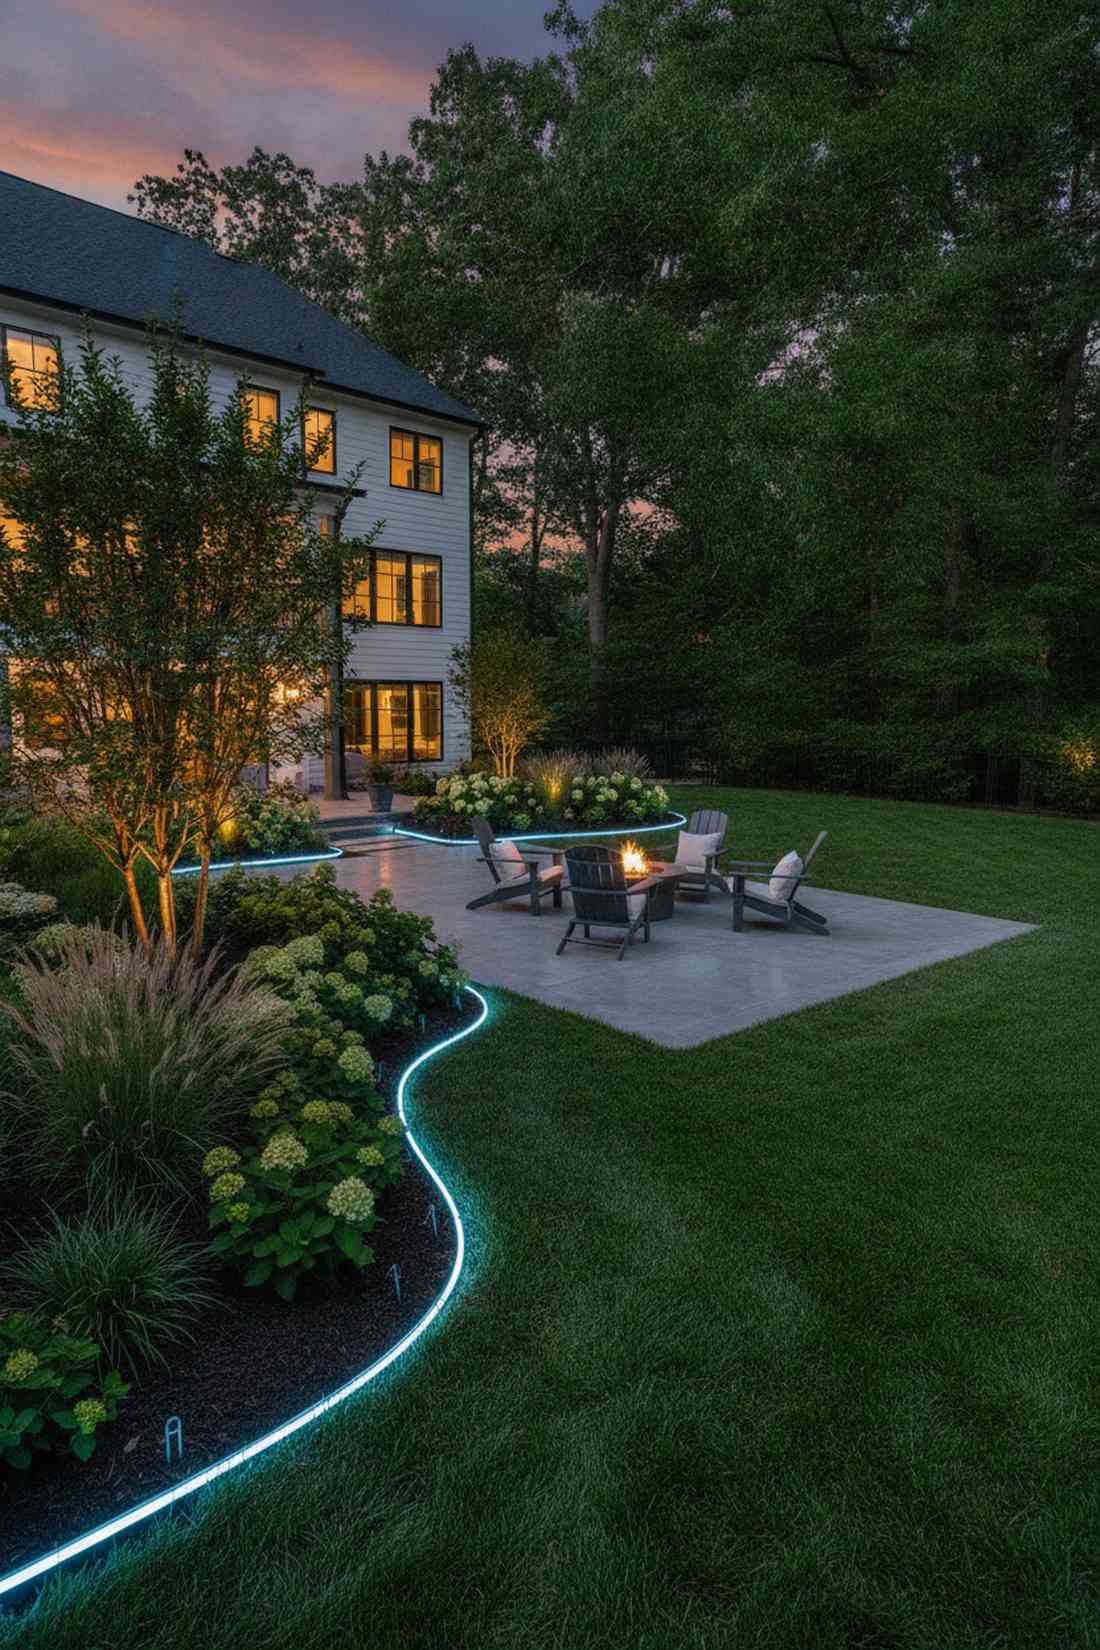
Drawing glowing boundary lines that beautifully frame your fresh landscaping. Snaking a continuous neon flex rope light along garden borders strictly defines where the party ends and the flower beds begin.
Older LED ropes had those ugly, visible dots that looked incredibly cheap. Utilizing modern neon-style silicone flex tubing delivers a surprisingly premium look with a completely unbroken line of pure light. Burying the very bottom edge of the tube hides the clips and makes the garden bed look like it’s hovering.
You can border a massive 50-foot garden run for just $45. Pin this if you want sharp, clean yard lines!
- Key Materials: Continuous neon-flex rope, ground stakes
- Vibe / Style: Sharp, vibrant modernism
- Difficulty: Fast roll-out
- Budget Breakdown: 50ft neon rope: $35 | Landscape staples: $10
- Creator’s Tip: Use steel landscape staples instead of plastic clips so they sink invisibly into the dirt.
- Smart Sourcing: seamless silicone neon rope lights and galvanized steel landscape staples (bulk pack).
Decorative & Accent Lighting Elements
16. Mason Jar Lanterns

Capturing fireflies in a jar to create the ultimate rustic centerpiece. Clustering battery-operated fairy light jars acts as the perfect, movable tabletop glow for casual backyard barbecues.
Buying pre-made jar lights at a boutique costs a fortune for no reason. Creating your own using thick heritage glass and ultra-fine copper wire gives a designer-level finish for literal pennies. You can hang them from shepherd’s hooks to create a whimsical, floating light garden.
A cluster of five stunning jars easily comes together for under $15. Save this to your budget DIY craft board!
- Key Materials: Wide-mouth glass jars, copper wire fairy lights
- Vibe / Style: Cozy farmhouse charm
- Difficulty: Fun beginner craft
- Budget Breakdown: Jars: $5 | Fairy lights: $10
- Creator’s Tip: Spray the inside of the jar with a light coat of frosted glass spray to diffuse the little bulbs beautifully.
- Smart Sourcing: bulk pack wide-mouth mason jars and waterproof copper fairy light strands.
17. Paper Lantern Clusters
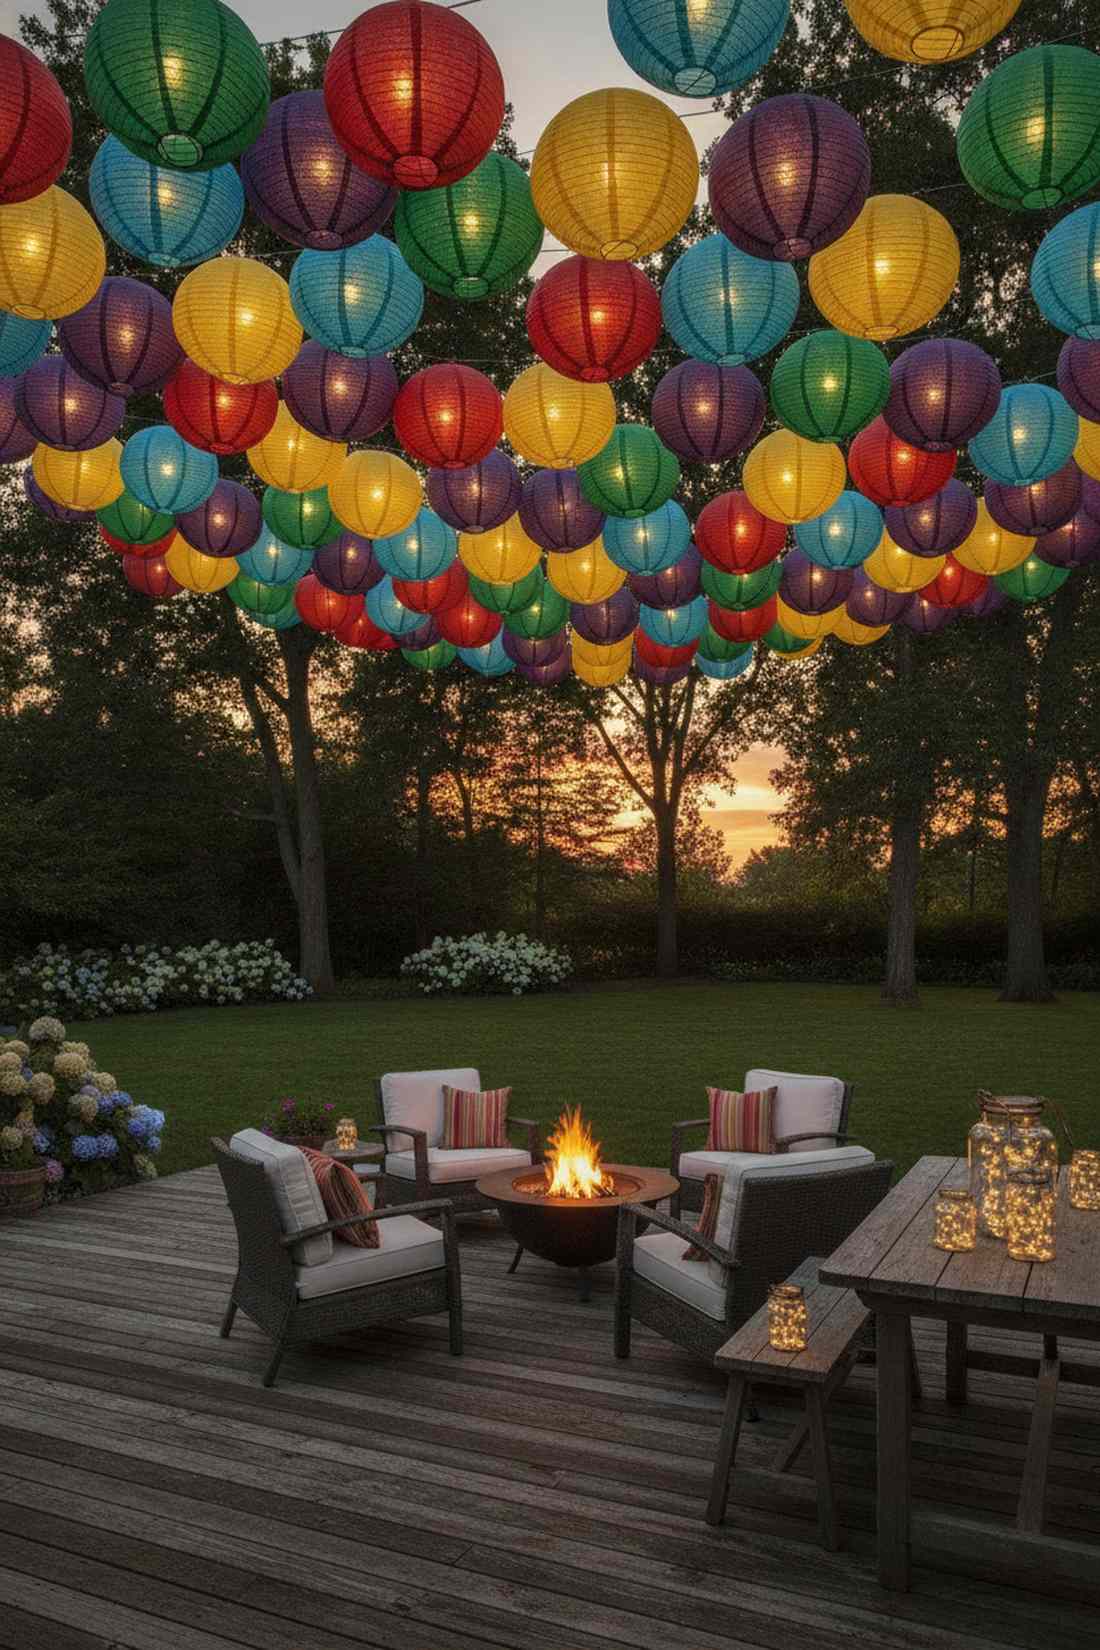
Floating orbs that feel like a vibrant festival right in your backyard. Hanging grouped nylon colored globe lanterns injects massive volume and playful color into the air space above your seating.
Authentic paper dissolves the second a rogue raindrop hits it. Swapping traditional paper for UV-resistant woven nylon looks far more expensive than it is and survives brutal summer storms. Dropping remote-controlled puck lights inside means you don’t have to string ugly power cords everywhere.
You can create a massive canopy of 10 globes for roughly $30. It completely transforms a boring sky!
- Key Materials: Weatherproof nylon orbs, LED drop-in pucks
- Vibe / Style: Energetic festival energy
- Difficulty: Easy tying and hanging
- Budget Breakdown: Nylon lanterns: $15 | Puck lights: $15
- Creator’s Tip: Hang them at drastically different heights (some very low, some high) to create a 3D cloud effect.
- Smart Sourcing: weather-resistant nylon lantern kits and remote-controlled battery puck lights.
18. Moroccan Metal Lanterns
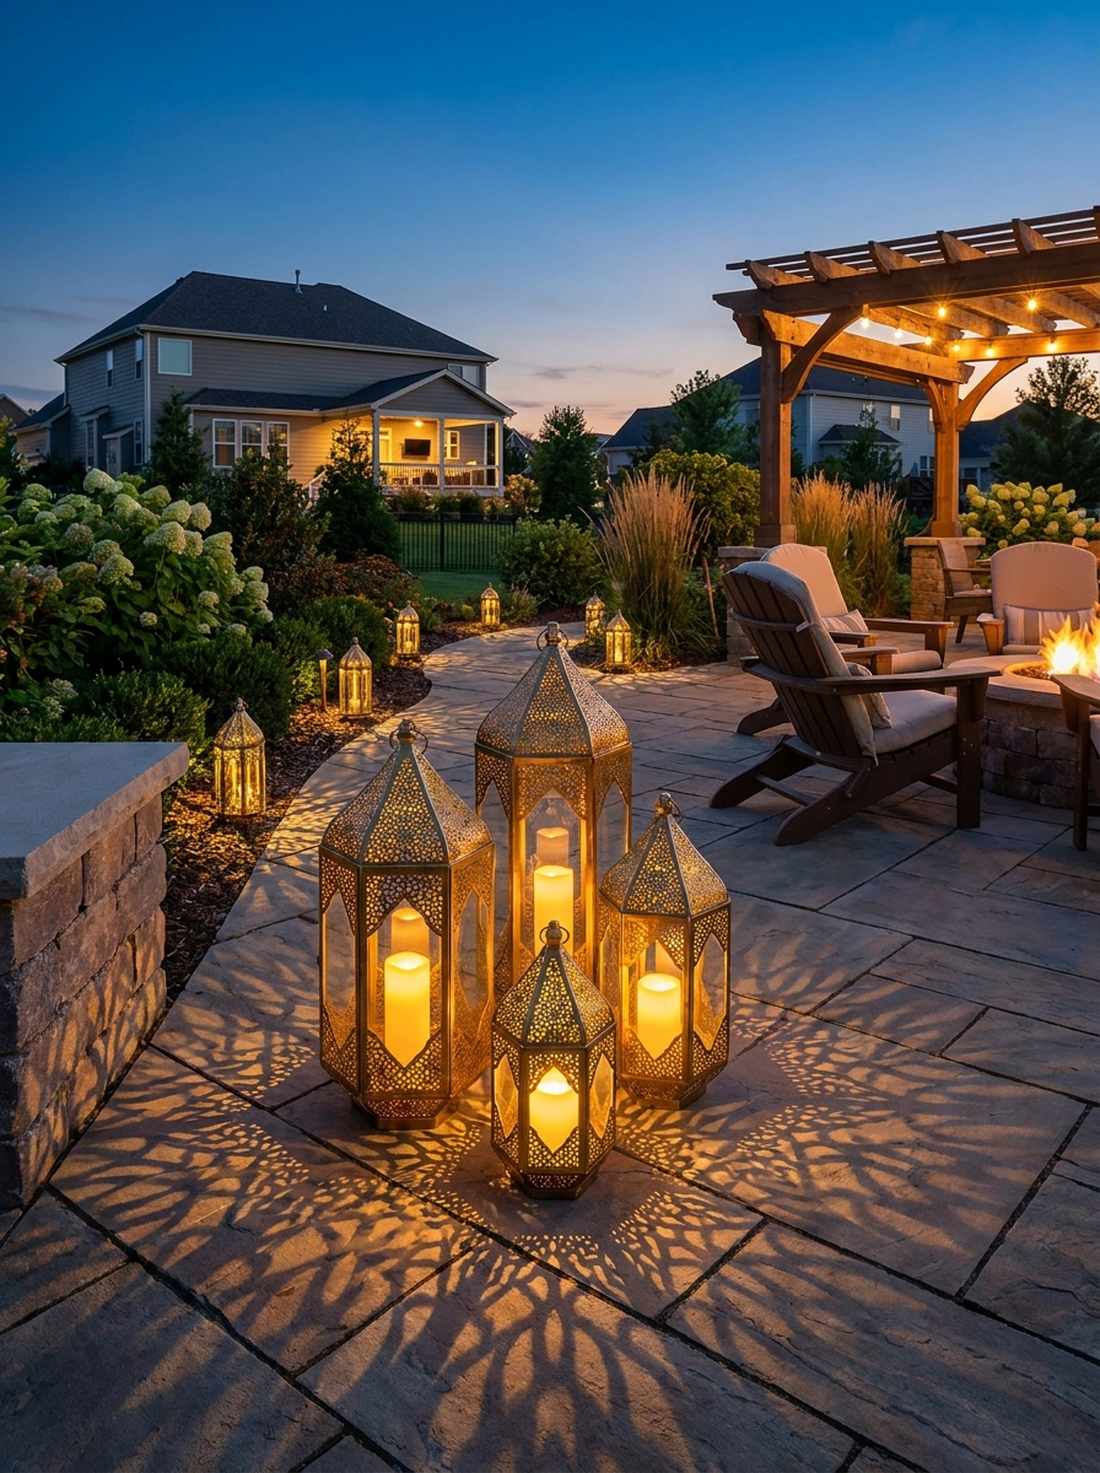
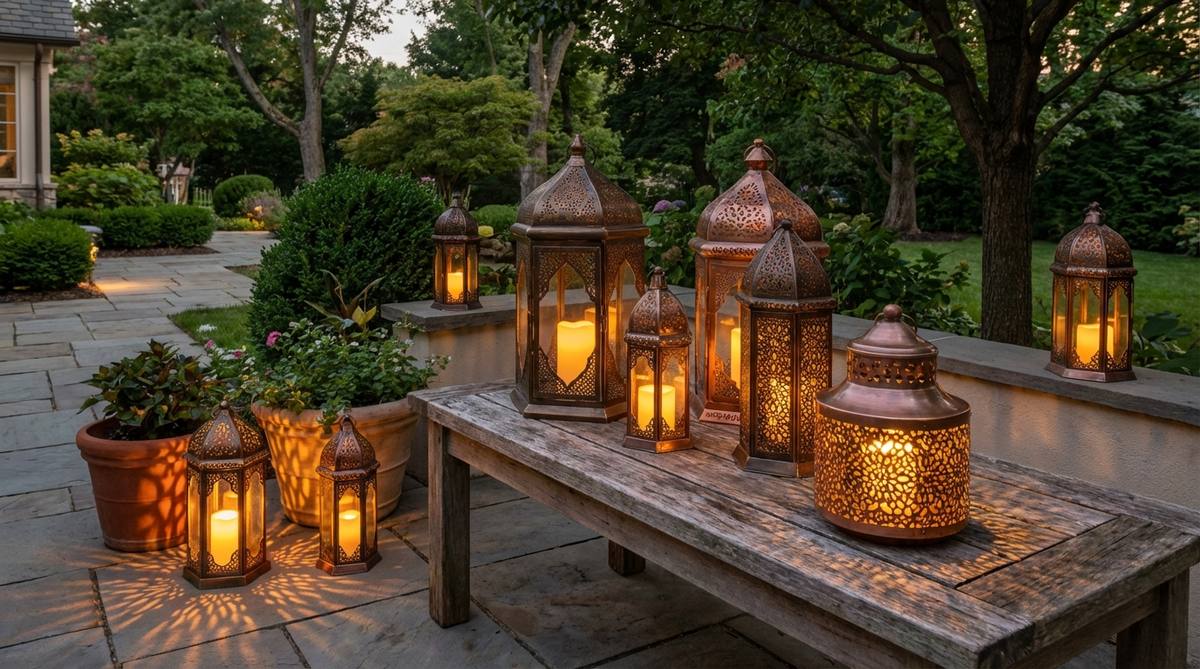
Throwing intricate, exotic shadows that make your patio floor look like an expensive tapestry. Strategically placing pierced brass floor lanterns injects an undeniable bohemian luxury into empty corners.
Using real pillar candles inside these creates a massive fire hazard when the wind kicks up. Dropping in heavily weighted, waterproof LED resin candles delivers a surprisingly premium look with a hyper-realistic flicker. The heavier the metal base, the better they perform as permanent deck decor.
These statement pieces range from $30 to $60 each depending on the size. Pin this for ultimate boho-chic inspiration!
- Key Materials: Pierced metal housing, resin LED candles
- Vibe / Style: Exotic bohemian lounge
- Difficulty: Ready straight out of the box
- Budget Breakdown: Large lantern: $45 | LED candle: $10
- Creator’s Tip: Place them slightly elevated on side tables so the shadow patterns stretch out further across the floor.
- Smart Sourcing: rust-resistant Moroccan lanterns and melt-proof outdoor LED pillar candles.
19. Uplighting for Garden Features
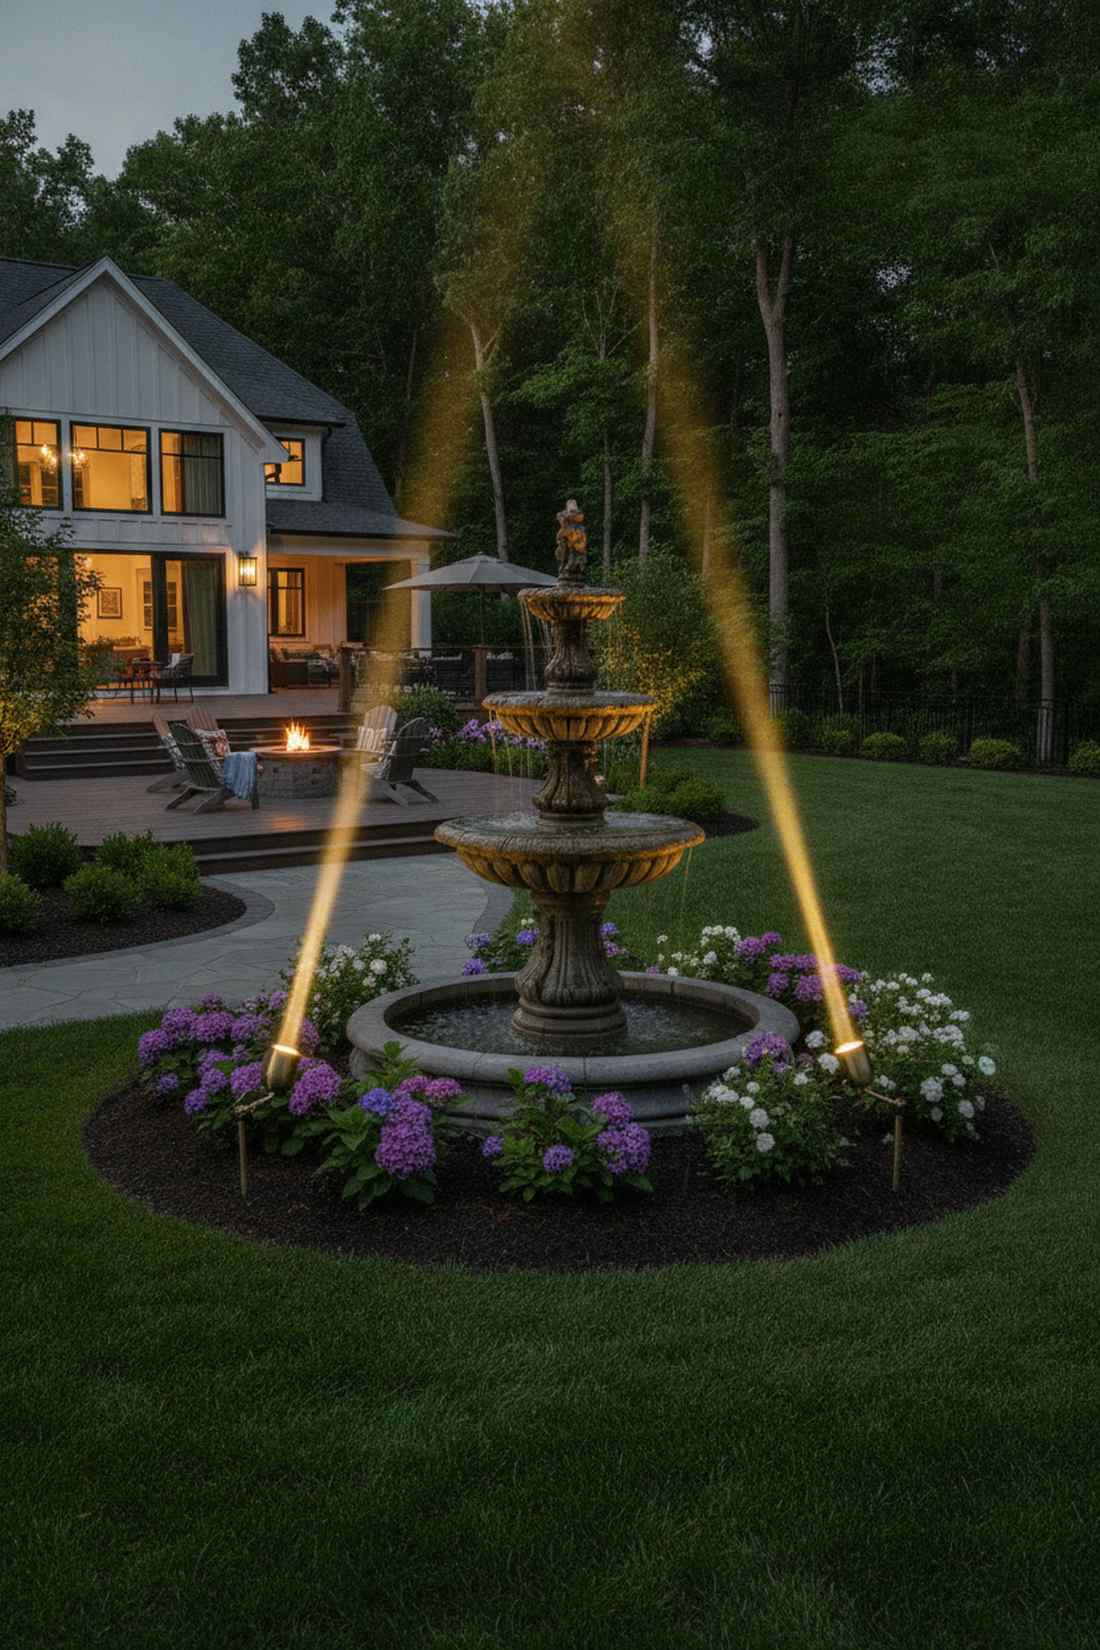
Making your statues and fountains look like they belong in a royal courtyard. Employing precise focal point accent spots draws your guests’ eyes exactly where you want them after sunset.
Most people blast their expensive fountains with a cheap, wide floodlight. Utilizing a narrow 15-degree beam angle right at the base of the feature gives a designer-level finish that carves out stunning silhouettes. This is the exact secret trick landscape architects use to justify massive price tags.
A high-quality directional spot kit costs about $35 per feature. It is the fastest way to make cheap statues look expensive.
- Key Materials: Narrow-beam LED spots, pivoting ground stakes
- Vibe / Style: Sculptural gallery elegance
- Difficulty: Easy positioning tweak
- Budget Breakdown: Spotlight kit: $35
- Creator’s Tip: Cross-light a statue from two different angles to completely eliminate scary, harsh facial shadows.
- Smart Sourcing: narrow-beam low voltage brass spotlights and adjustable landscape mounting stakes.
Most DIYers skip this next step, but it’s the exact secret to a $500-level ambiance…
20. Floating Pool Lights
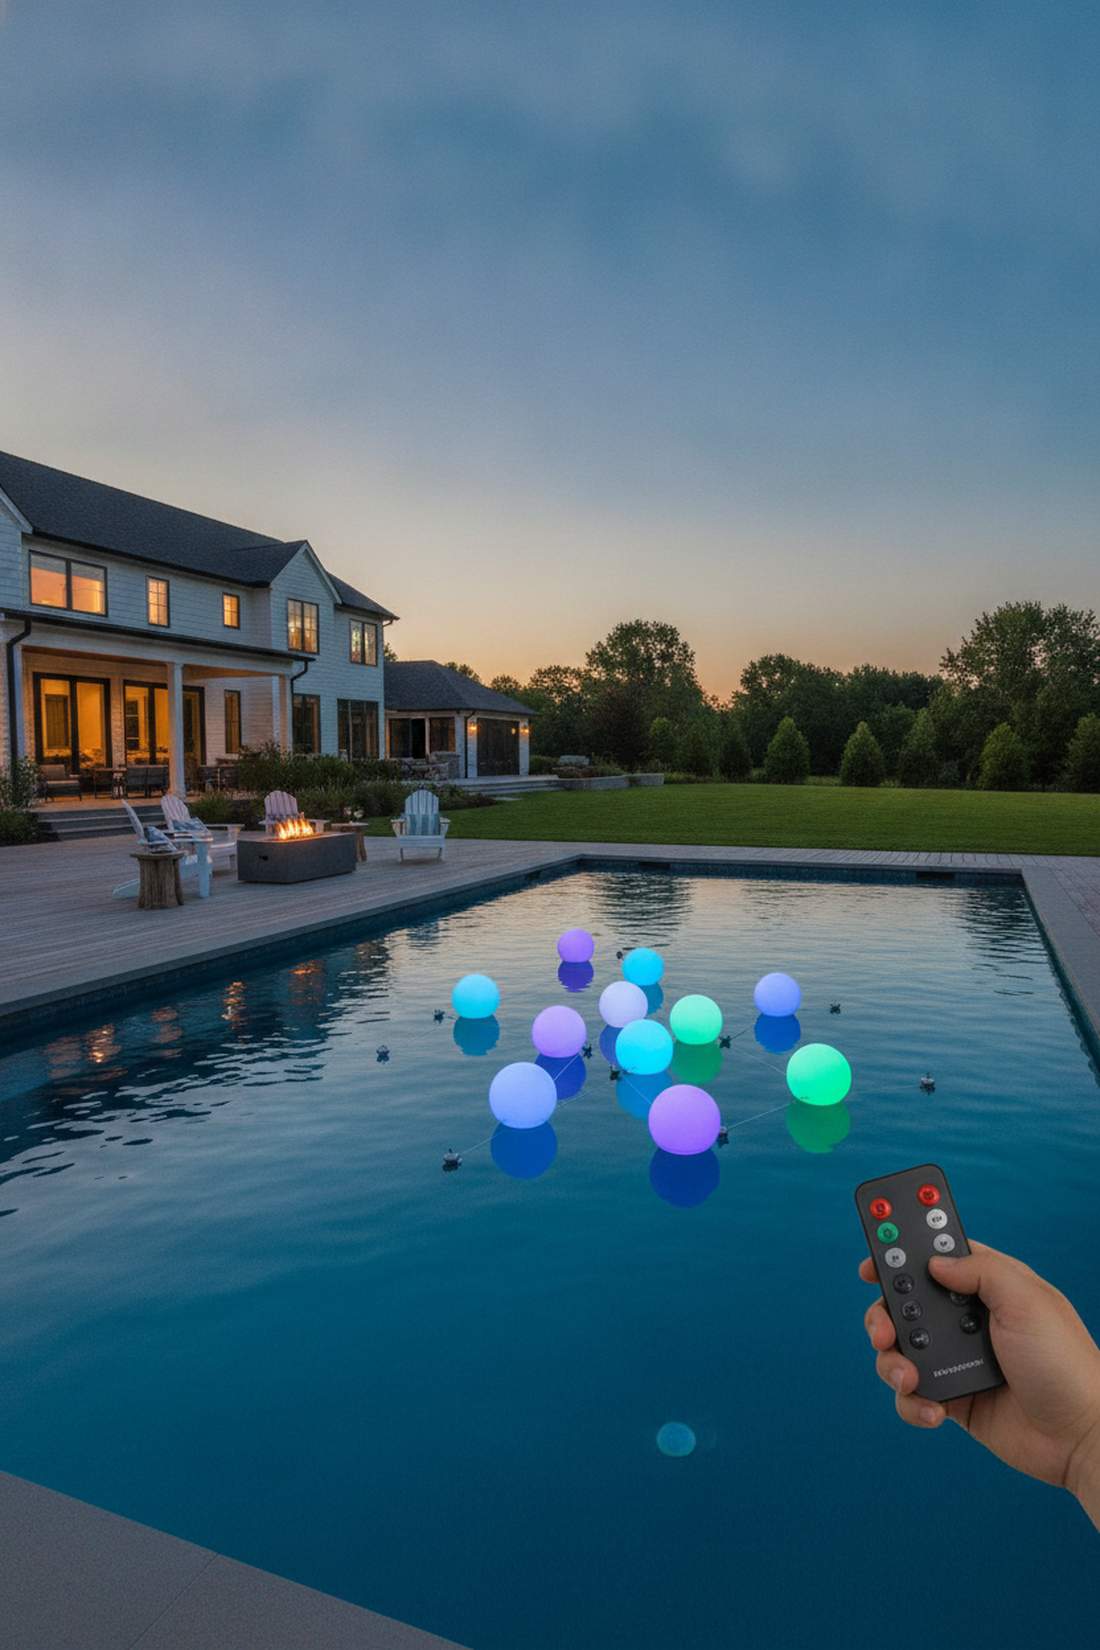
Turning a dark, intimidating body of water into an inviting glowing oasis. Tossing in a dozen waterproof LED floating spheres perfectly bridges the gap between deep-end safety and resort-style aesthetics.
Leaving the massive, blinding pool floodlight on ruins the cozy vibe of the patio. Utilizing softly glowing, free-floating orbs looks far more expensive than it is and creates mesmerizing reflections as the water ripples. Upgrading to RF-remote models means you can change the pool color from the kitchen.
A pack of 6 glowing pool orbs runs about $40–$50. Pin this immediately if you have a pool or large pond!
- Key Materials: IP68 waterproof spheres, RF remote control
- Vibe / Style: Luxury resort swimming
- Difficulty: Just toss them in
- Budget Breakdown: 6-pack orbs: $45
- Creator’s Tip: Tether a few of them to a small fishing weight with clear line so they stay perfectly clustered in the center.
- Smart Sourcing: IP68 waterproof floating pool lights (bulk pack) and clear monofilament tethering line.
Material Guide: Cheap vs. Premium Aesthetic
Knowing exactly where to save and where to spend makes all the difference in achieving that “looks expensive but isn’t” vibe.
- Standard vs. UV-Resistant/Premium: Standard plastic housings yellow and crack within a month. Upgrading to UV-coated acrylics or powder-coated metals ensures your layout survives years of brutal sun without looking trashy.
- Pre-made Kits vs. Sourcing Locally: Scavenging separate pieces from the craft aisle usually leads to mismatched voltages. Buying comprehensive starter kits often saves both time and money, ensuring every wire fits perfectly out of the box.
21. Illuminated Planters
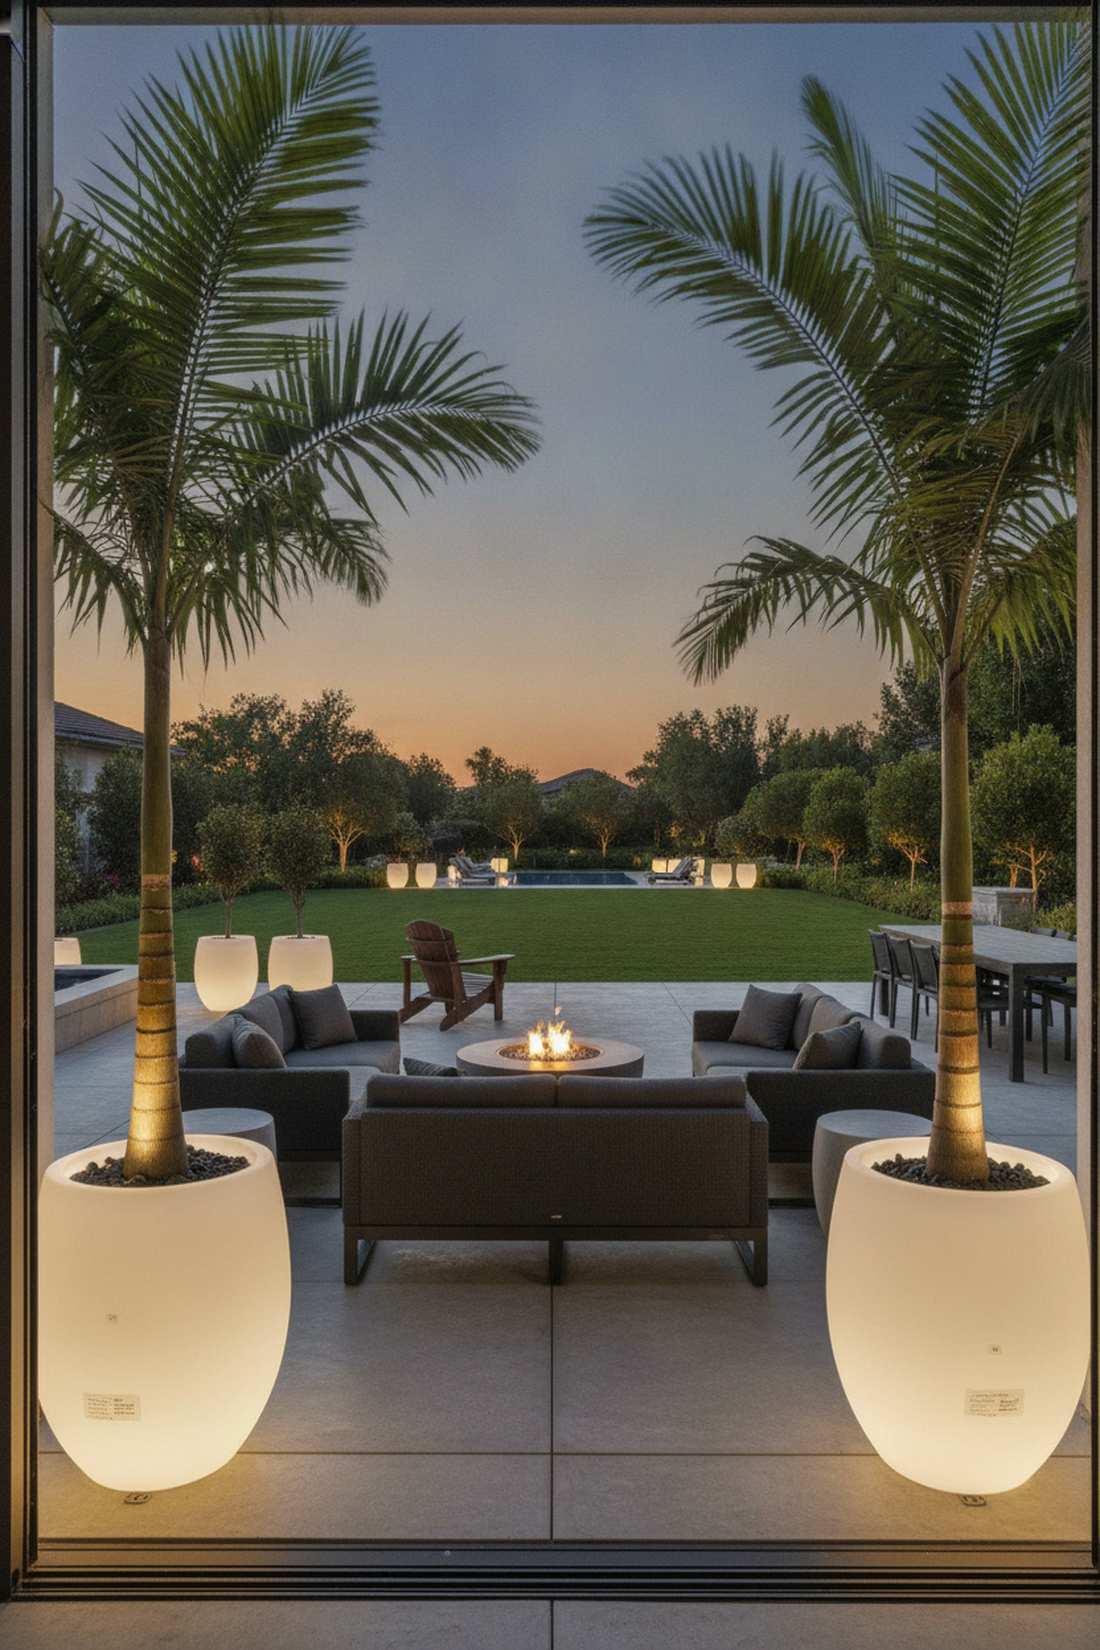
Making your potted palms double as glowing architectural beacons. Integrating translucent glowing resin pots frames doorways and patio corners with a soft, ultra-modern structural light.
Shining a spotlight at a dirty terracotta pot just highlights the water stains. Swapping out standard containers for internally lit rotomolded planters gives a designer-level finish that makes your greenery look like living art. They act as massive, sturdy navigation markers that guests naturally gather around.
These statement pieces are an investment at $80–$150 each, but they completely anchor the space. Save this to your modern outdoor decor board!
- Key Materials: Rotomolded light-up pots, internal drainage system
- Vibe / Style: High-end hotel terrace
- Difficulty: Requires repotting plants
- Budget Breakdown: Medium planter: $90 | Potting soil: $10
- Creator’s Tip: Keep the plant inside a slightly smaller black nursery pot inside the glowing one so soil doesn’t muddy the translucent sides.
- Smart Sourcing: LED illuminated resin planters and heavy-duty plastic nursery drop-in pots.
Themed Celebration 4th of July Outdoor Lighting
22. Patriotic String Lights
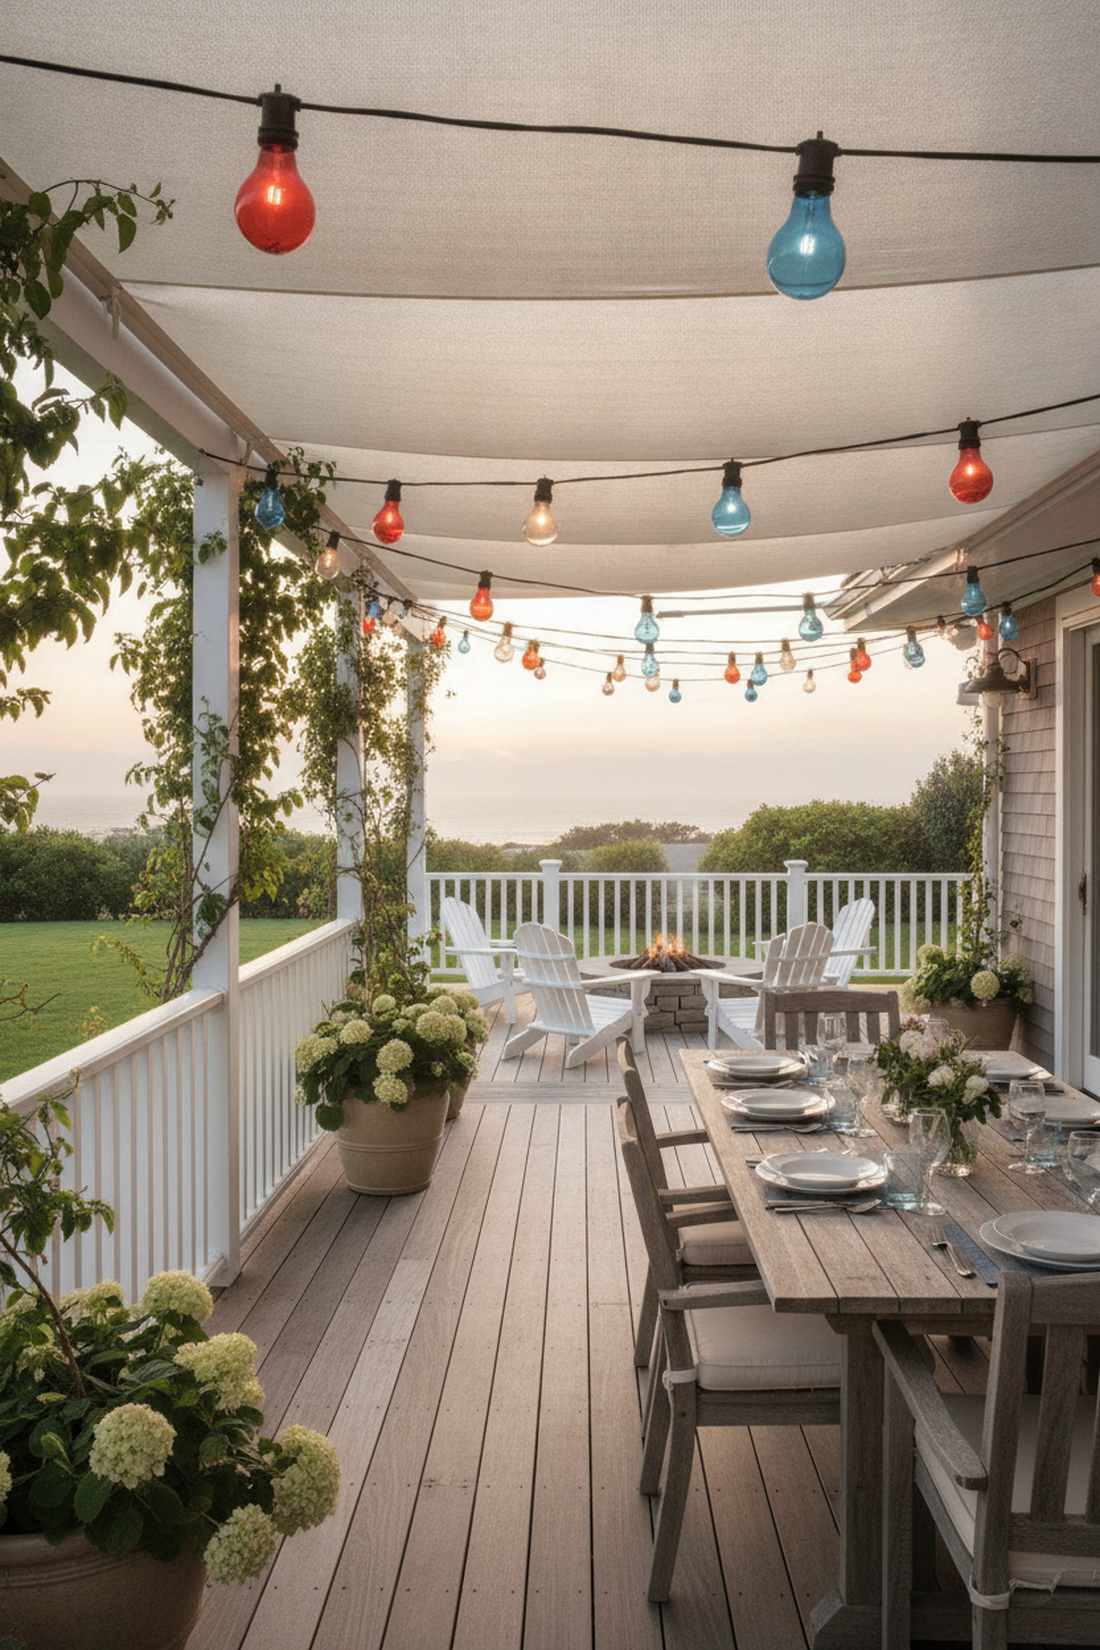
This 4th of july outdoor lighting concept feels like an upscale coastal resort celebrating the summer. Draping red, white, and blue facade stringers perfectly sets the holiday tone across deck railings and awnings.
Cheap novelty lights with plastic flag covers look incredibly tacky and break after one use. Utilizing heavy-duty commercial strands with custom-colored glass bulbs delivers a surprisingly premium look that honors the theme without sacrificing class. It proves you can be festive without looking like a discount aisle.
A gorgeous 25-foot holiday strand will cost around $35. Pin this for your summer BBQ planning!
- Key Materials: Heavy-gauge stringers, colored Edison bulbs
- Vibe / Style: Classic Americana party
- Difficulty: Quick clip-on installation
- Budget Breakdown: Stringer cord: $20 | Colored bulbs: $15
- Creator’s Tip: Mix two white bulbs for every one colored bulb to keep the area bright enough for eating.
- Smart Sourcing: commercial-grade outdoor stringer base kits and shatterproof colored replacement bulbs.
23. Star-Shaped Pathway Markers
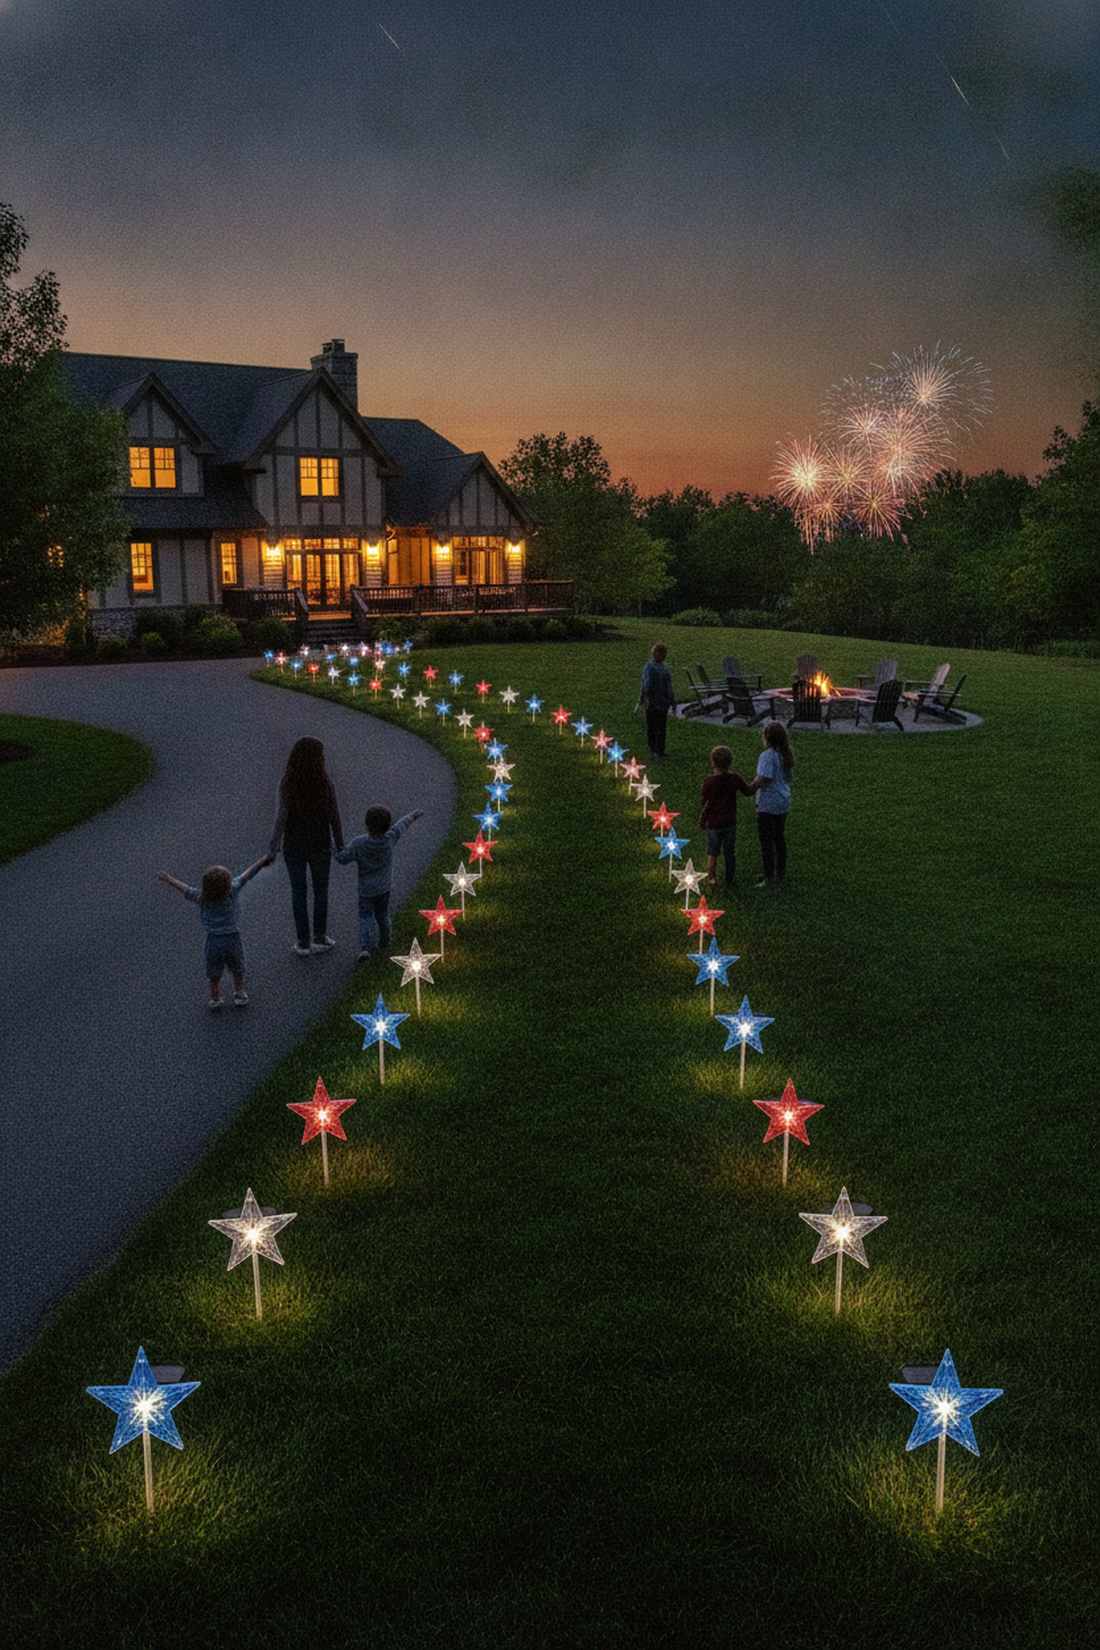
Lining the driveway with a playful, welcoming glow for the fireworks crowd. Popping in acrylic star garden stakes keeps the kids safely on the grass and off the dark pavement.
Tossing glow sticks on the ground is a massive waste of money that fades in hours. Upgrading to solar-powered acrylic silhouettes looks far more expensive than it is and automatically triggers right as the sun sets for the fireworks. They pack flat perfectly for storage until next summer.
You can line a whole walkway for about $25. A fun, cheap upgrade that makes a huge impact!
- Key Materials: Solar star acrylic kits
- Vibe / Style: Festive summer fun
- Difficulty: Just stake them in
- Budget Breakdown: 8-pack star stakes: $25
- Creator’s Tip: Space them exactly 4 feet apart to create a perfect, symmetrical runway effect toward the backyard.
- Smart Sourcing: solar acrylic star pathway markers (bulk pack).
24. Flag Pattern Projection Lights
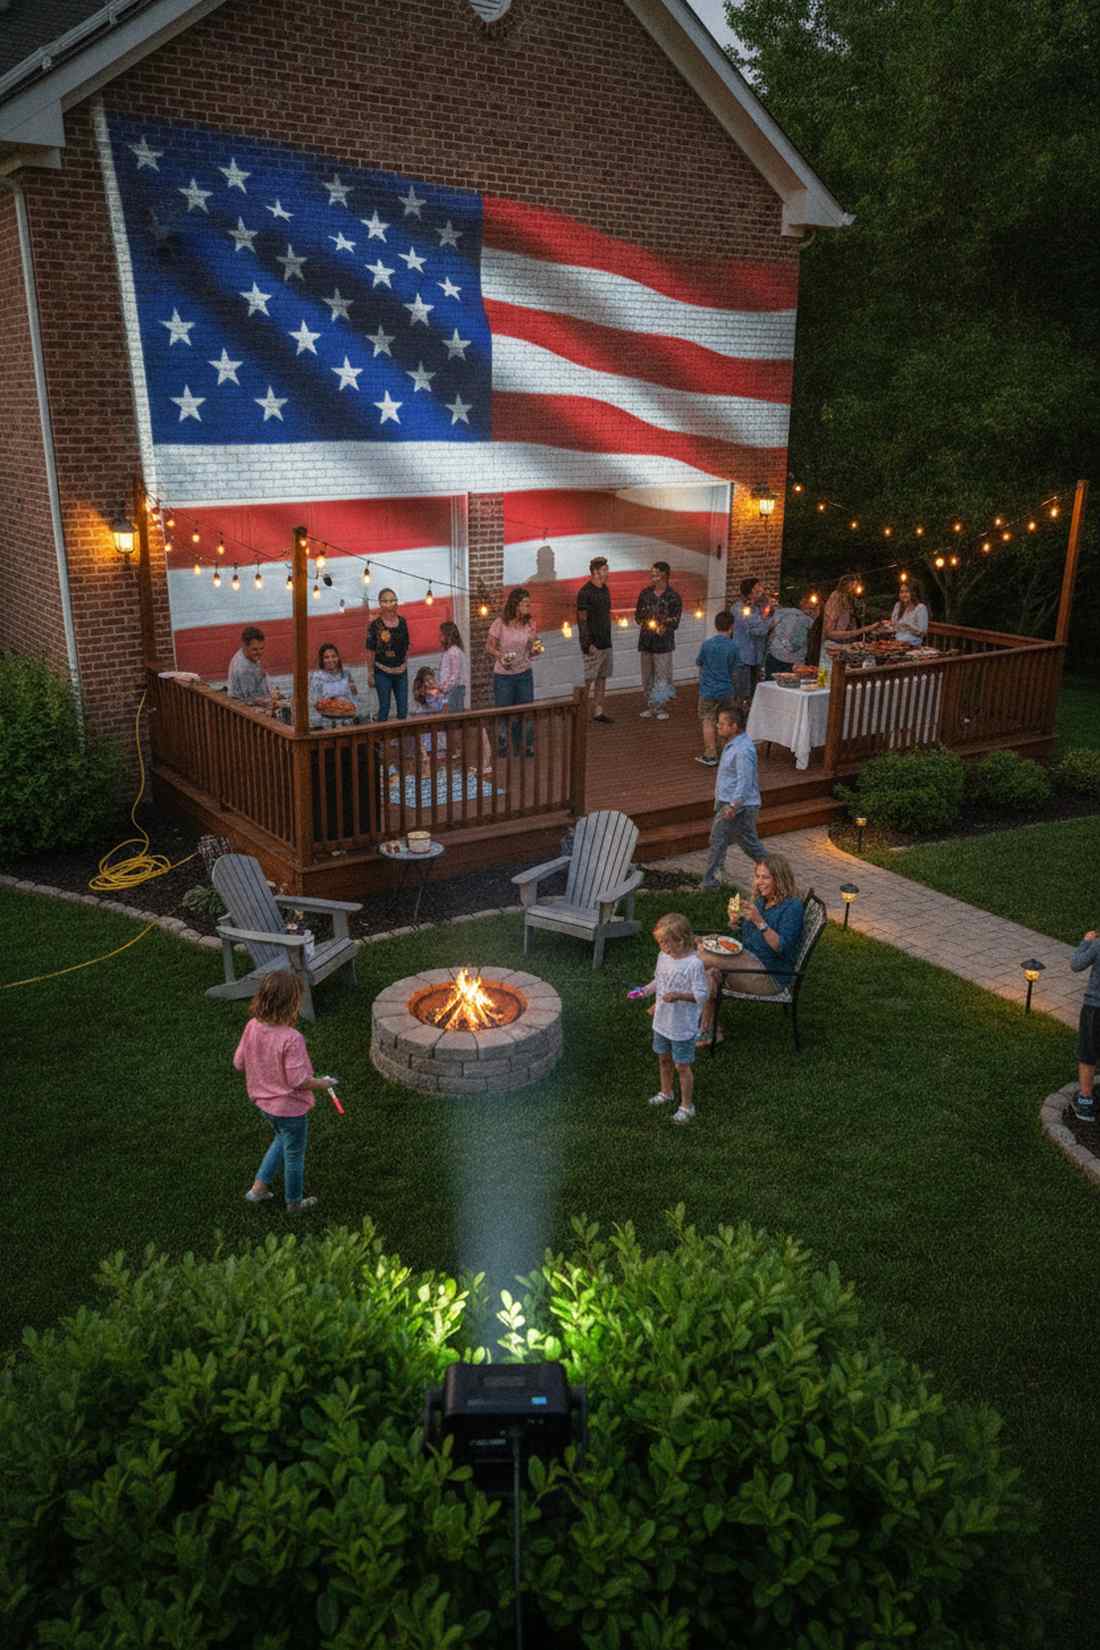
Painting your entire garage door with a massive, vibrant tribute without using a drop of paint. Setting up a high-lumen thematic projector serves as the ultimate backdrop for neighborhood block parties.
Flimsy indoor projectors get ruined by humidity and project blurry, washed-out messes. Investing in an IP65-rated outdoor gobo projector gives a designer-level finish, casting crisp, sharp flag waves across huge brick walls. It is a completely zero-damage way to cover massive square footage in seconds.
A solid outdoor holiday projector runs about $40–$60. Save this genius trick for massive holiday impact!
- Key Materials: Waterproof LED projector, ground spike
- Vibe / Style: Massive block party energy
- Difficulty: Plug-and-play
- Budget Breakdown: Outdoor projector: $50
- Creator’s Tip: Angle the projector upward from the bushes to hide the hardware while stretching the image dramatically.
- Smart Sourcing: IP65 outdoor holiday projection kits and heavy-duty outdoor extension cords.
The next trick is an absolute lifesaver if you are hosting a massive crowd with kids…
25. Colored LED Uplighting
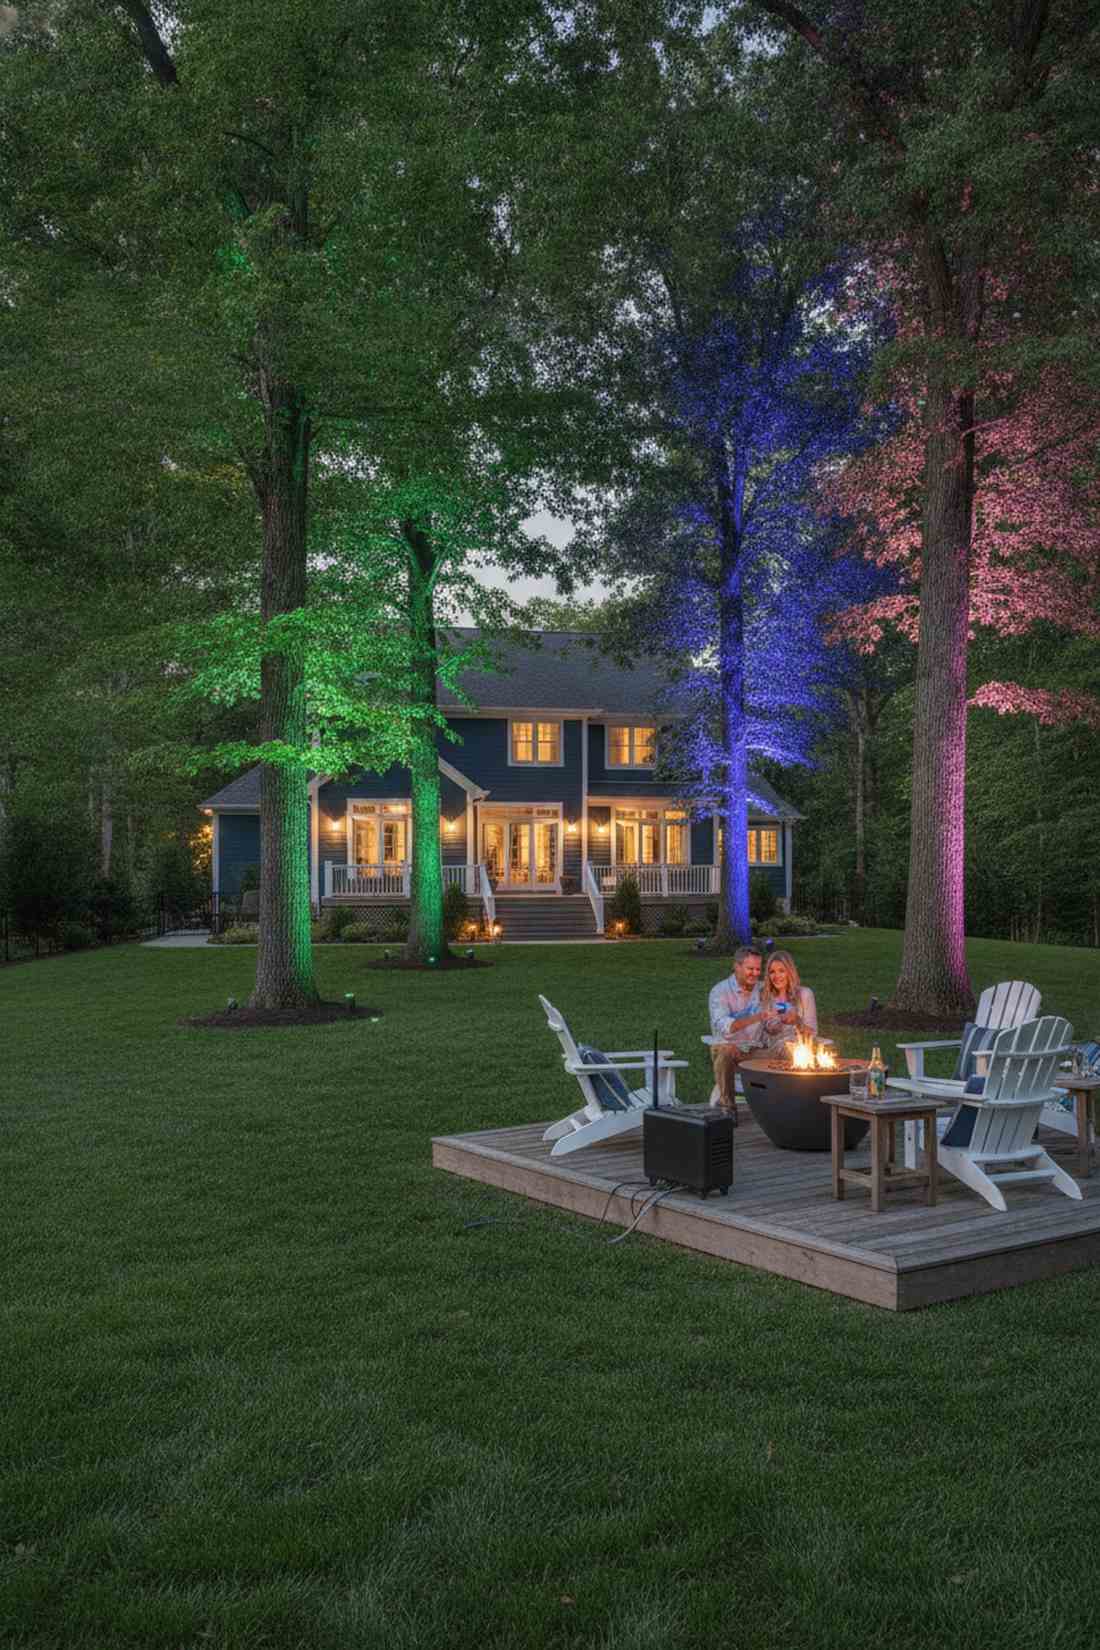
Bathing your mature trees in rich, shifting colors for an unforgettable backdrop. Using smart RGB base floods allows you to instantly swap your landscape from everyday warm-white to full holiday mode.
Manually swapping out colored glass lenses is an outdated, frustrating chore. Syncing Bluetooth-enabled RGB cast-aluminum floods delivers a remarkably high-end architectural finish that you control from the grill with your phone. You can literally transition from subtle greens to pulsing party colors with one tap.
Smart lighting hubs start around $60 for two floods, but they are useful 365 days a year.
- Key Materials: Bluetooth RGB floods, smart landscape hub
- Vibe / Style: High-tech dynamic landscape
- Difficulty: App pairing required
- Budget Breakdown: 2-pack smart floods: $60
- Creator’s Tip: Create a preset scene on your app so the lights automatically switch to party mode at 8:00 PM.
- Smart Sourcing: Bluetooth smart landscape spotlight kits and waterproof hub controller boxes.
26. Sparkler Station Lighting
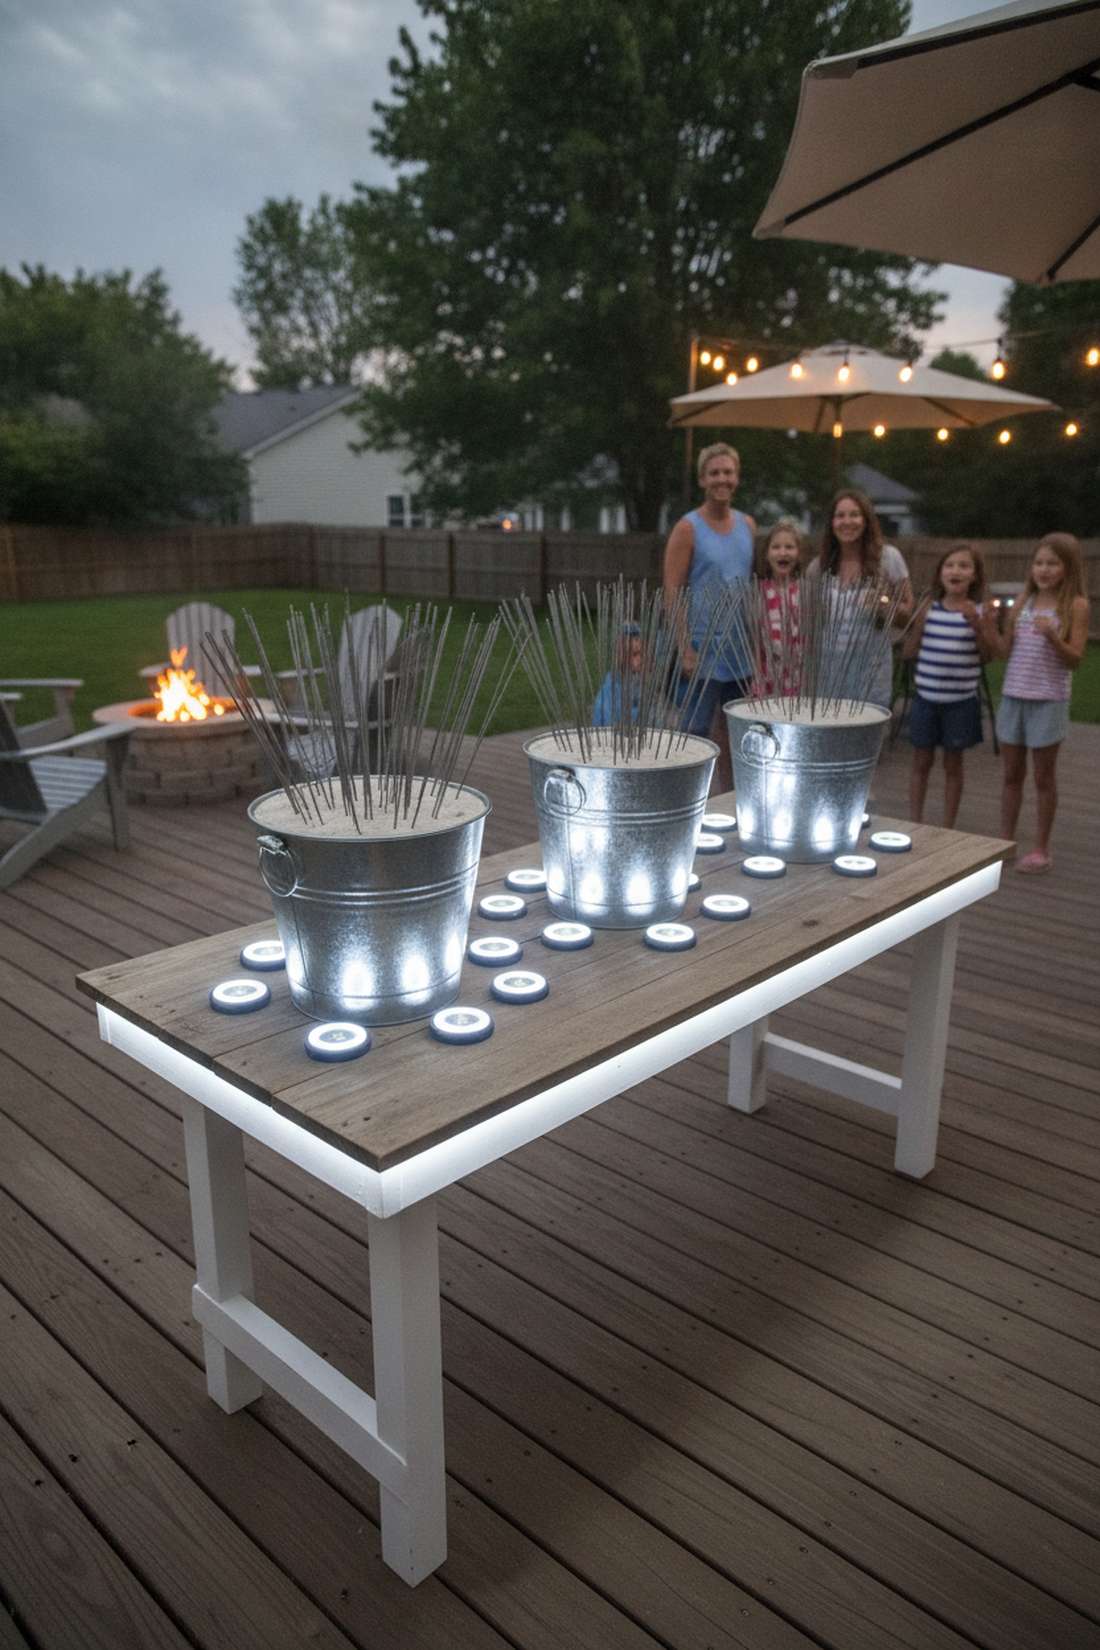
Creating a brightly lit, designated safe zone that keeps the fire hazards organized. Building a custom illuminated sparkler bucket table ensures kids can clearly see what they are grabbing.
Letting people fumble around with lighters in the dark is a recipe for disaster. Surrounding the galvanized buckets with a dense perimeter of bright, white task lighting looks incredibly professional and prioritizes safety above all else. Use cold-white LEDs here for maximum visibility.
Setting up this dedicated safety station costs under $20 in lights. Pin this strictly for holiday safety planning!
- Key Materials: Battery task pucks, galvanized metal buckets
- Vibe / Style: Organized event safety
- Difficulty: Fast tabletop arrangement
- Budget Breakdown: Buckets: $10 | Puck lights: $10
- Creator’s Tip: Fill the bottom half of the bucket with sand—it holds the sparklers upright and gives a safe place to dump hot wires.
- Smart Sourcing: galvanized party buckets (bulk pack) and ultra-bright battery task pucks.
27. Lantern Release Area Lighting
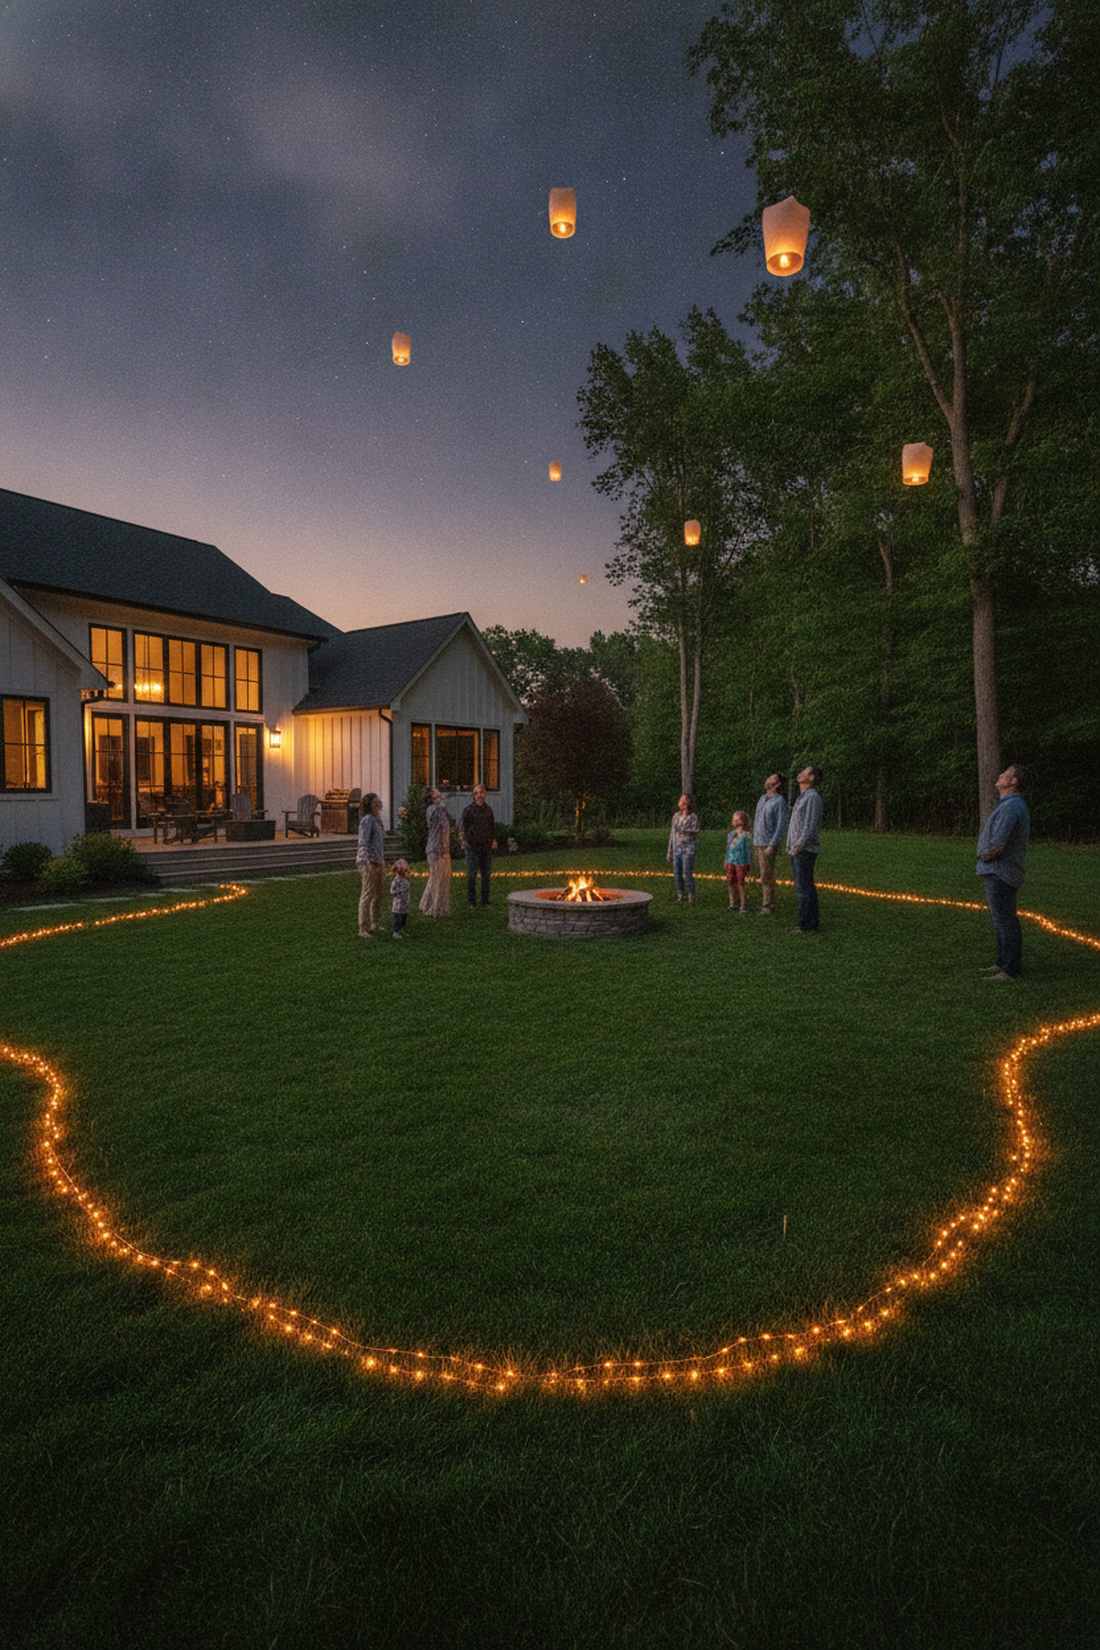
Carving out a soft, low-glare perimeter to watch your wishes float into the sky. Setting up an amber ground-level boundary marks the clear zone without washing out the view of the stars.
Using bright white floodlights for a sky-watching event completely ruins everyone’s night vision. Sticking to deep amber or red micro-LEDs on the grass gives a designer-level finish that provides a safe walking boundary while protecting the cinematic overhead view. It keeps the magic entirely focused upward.
A simple spool of amber boundary wire costs just $15. It is the perfect subtle end to a massive evening.
- Key Materials: Amber copper wire spools, low-profile ground tacks
- Vibe / Style: Cinematic twilight farewell
- Difficulty: Simple perimeter unroll
- Budget Breakdown: Amber wire: $15
- Creator’s Tip: Unroll the lights directly on the grass line to create a natural “do not cross” barrier away from trees.
- Smart Sourcing: amber micro-LED copper spools and low-profile landscape tacks.
Bringing Your Outdoor Party Lighting Together
Successful execution of these 27 premium outdoor lighting blueprints requires blending aesthetics with smart, high-quality sourcing. Stop relying on cheap craft-store stringers that fail after one rainstorm. By investing in UV-coated materials, smart starter kits, and heavy-duty commercial components, you guarantee that your backyard transforms into a high-end luxury venue every single night. Test all of your specific setups—from the ambient overhead canopies to the sleek bar accents—before the guests arrive. Master these strategic lighting blueprints, and you will forever elevate your outdoor entertaining game without blowing a massive landscape architecture budget.
Frequently Asked Questions
How many lumens do I need for outdoor party lighting?
If you want a high-end look, ditch the single glaring floodlight. Ambient lounging spaces require 100-200 lumens per fixture for a flattering glow, while task areas like an outdoor lighting bar need 300-500 lumens. For safety, pathway stakes only need 50-100 lumens. Always layer your setup by buying multi-pack dimmable LED starter kits to achieve that expensive, layered depth.
What color temperature works best for outdoor parties?
Warm white bulbs (2700K-3000K) are the absolute secret to making your backyard look like a luxury resort. This specific temperature mimics candlelight, making food look appetizing and skin tones look flawless. Avoid cool white (4000K+) as it feels like a sterile hospital. To easily control this, invest in smart Bluetooth landscape bulb packs to tune the perfect warmth from your phone.
How can I power outdoor party lights without visible extension cords?
Visible orange extension cords instantly ruin a premium aesthetic. For a clean finish, grab a high-capacity solar stake starter kit for pathways, and utilize rechargeable lithium battery packs for table decor. For a permanent, designer-level finish, you must bury a 12V low-voltage direct burial wire exactly 6-8 inches deep to hide all mechanics completely.
What’s the safest way to hang string lights over outdoor spaces?
Never rely on the actual electrical wire to hold the tension—they will snap and cause a hazard. You must use a commercial suspension cable starter kit. Install stainless steel eye bolts into your posts, run the heavy-duty tension wire, and then attach your shatterproof cafe stringers using UV-resistant zip ties. This is the only way to get a professional, non-sagging canopy.
How do I prevent bugs from swarming outdoor party lights?
Bugs are completely blind to warmer colors. Swapping out your main bulbs for amber LED bug lights drastically reduces the swarm. Keep the ultra-bright task lights far away from the seating areas. Combine this smart lighting tactic with a strategically hidden outdoor citronella perimeter kit to keep the luxury vibe intact without the annoyance of mosquitoes.
Can I leave outdoor party lights up year-round?
Only if you stop buying the cheap seasonal ones. If you want a year-round setup, you must invest in heavy-duty commercial-grade stringers featuring thick wire insulation, IP65 ratings, and shatterproof acrylic bulbs. For decorative paper or fabric lanterns, always take them down after the party, or upgrade to UV-coated weather-resistant nylon lantern kits to survive the elements.