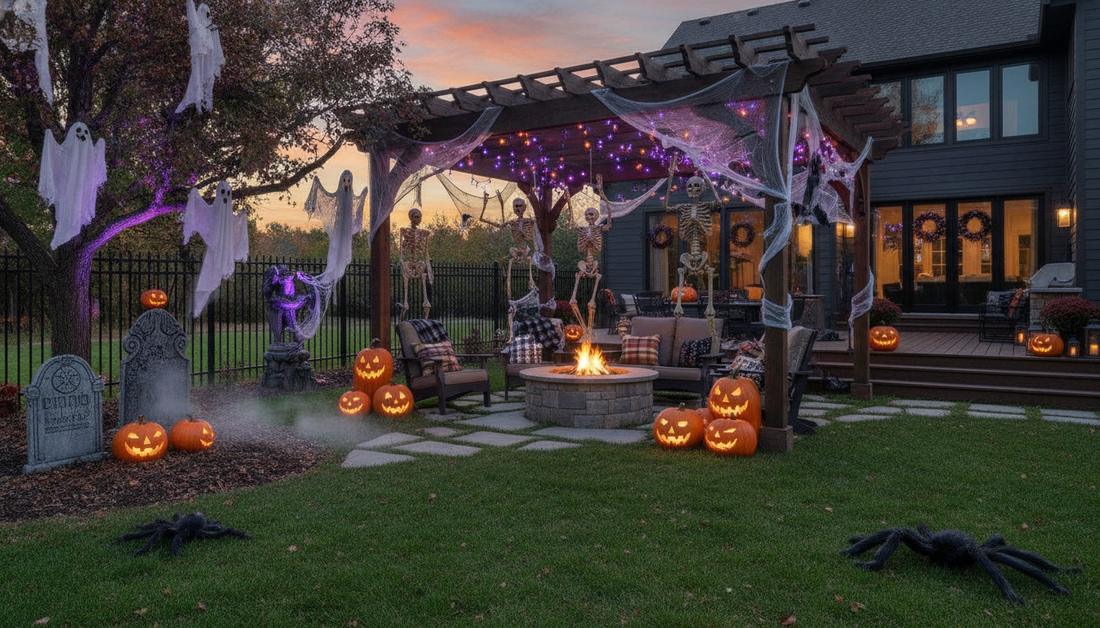
Nailing the perfect halloween backyard decor requires strategic commercial-grade prop placement rather than just scattering cheap plastic skeletons. Skip the generic craft aisles and master these exact layout formulas to achieve a premium, weather-resistant haunting zone on a realistic budget.
Design Snapshot Key Principles
- Layering Creates Depth: Combine ground-level props with hanging elements and vertical features to build dimensional displays
- Lighting Drives Atmosphere: Strategic uplighting, colored floods, and pathway illumination establish mood more effectively than props alone
- Color Anchors Theme: Classic orange-black signals traditional Halloween while deep plum-charcoal transitions toward harvest elegance
- Scale Matters: Mix oversized statement pieces with smaller supporting details to create visual hierarchy and guide viewer attention
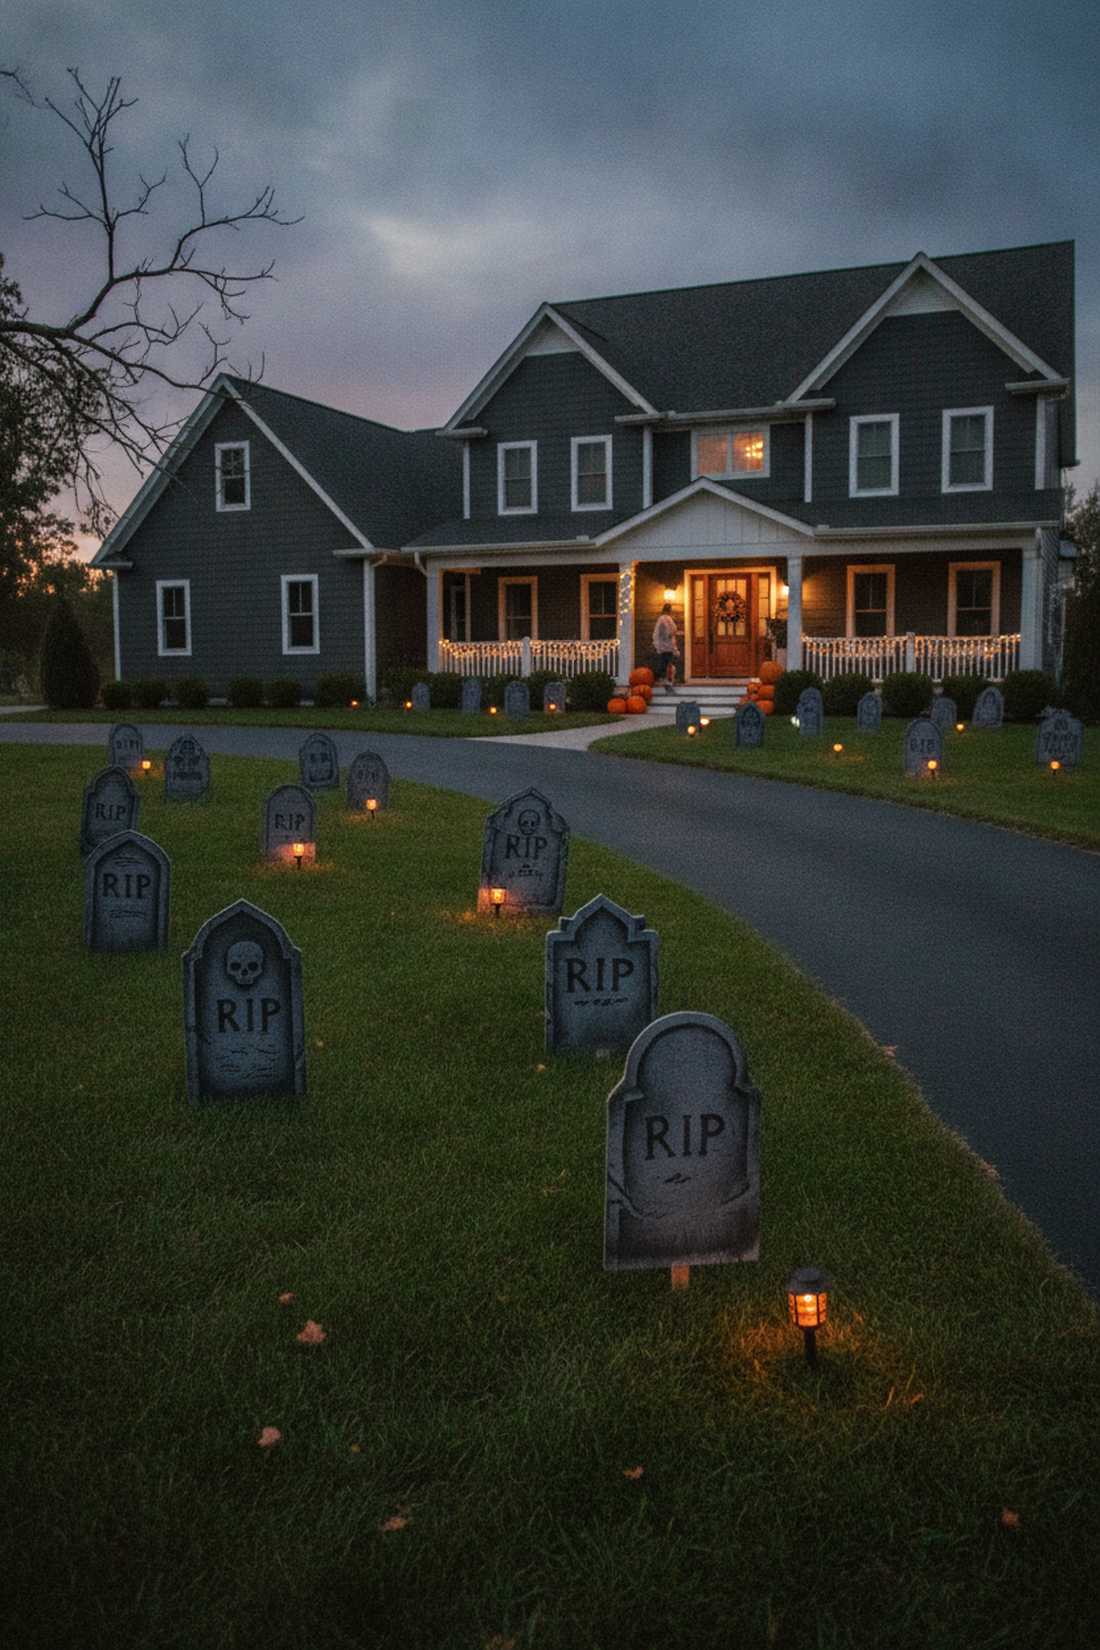
Graveyard & Cemetery Scenes
Graveyard displays anchor traditional Halloween aesthetics with their instantly recognizable iconography. Designers layer foam tombstones, skeletal figures, and ground fog to recreate authentic cemetery atmospheres that resonate with visitors of all ages.
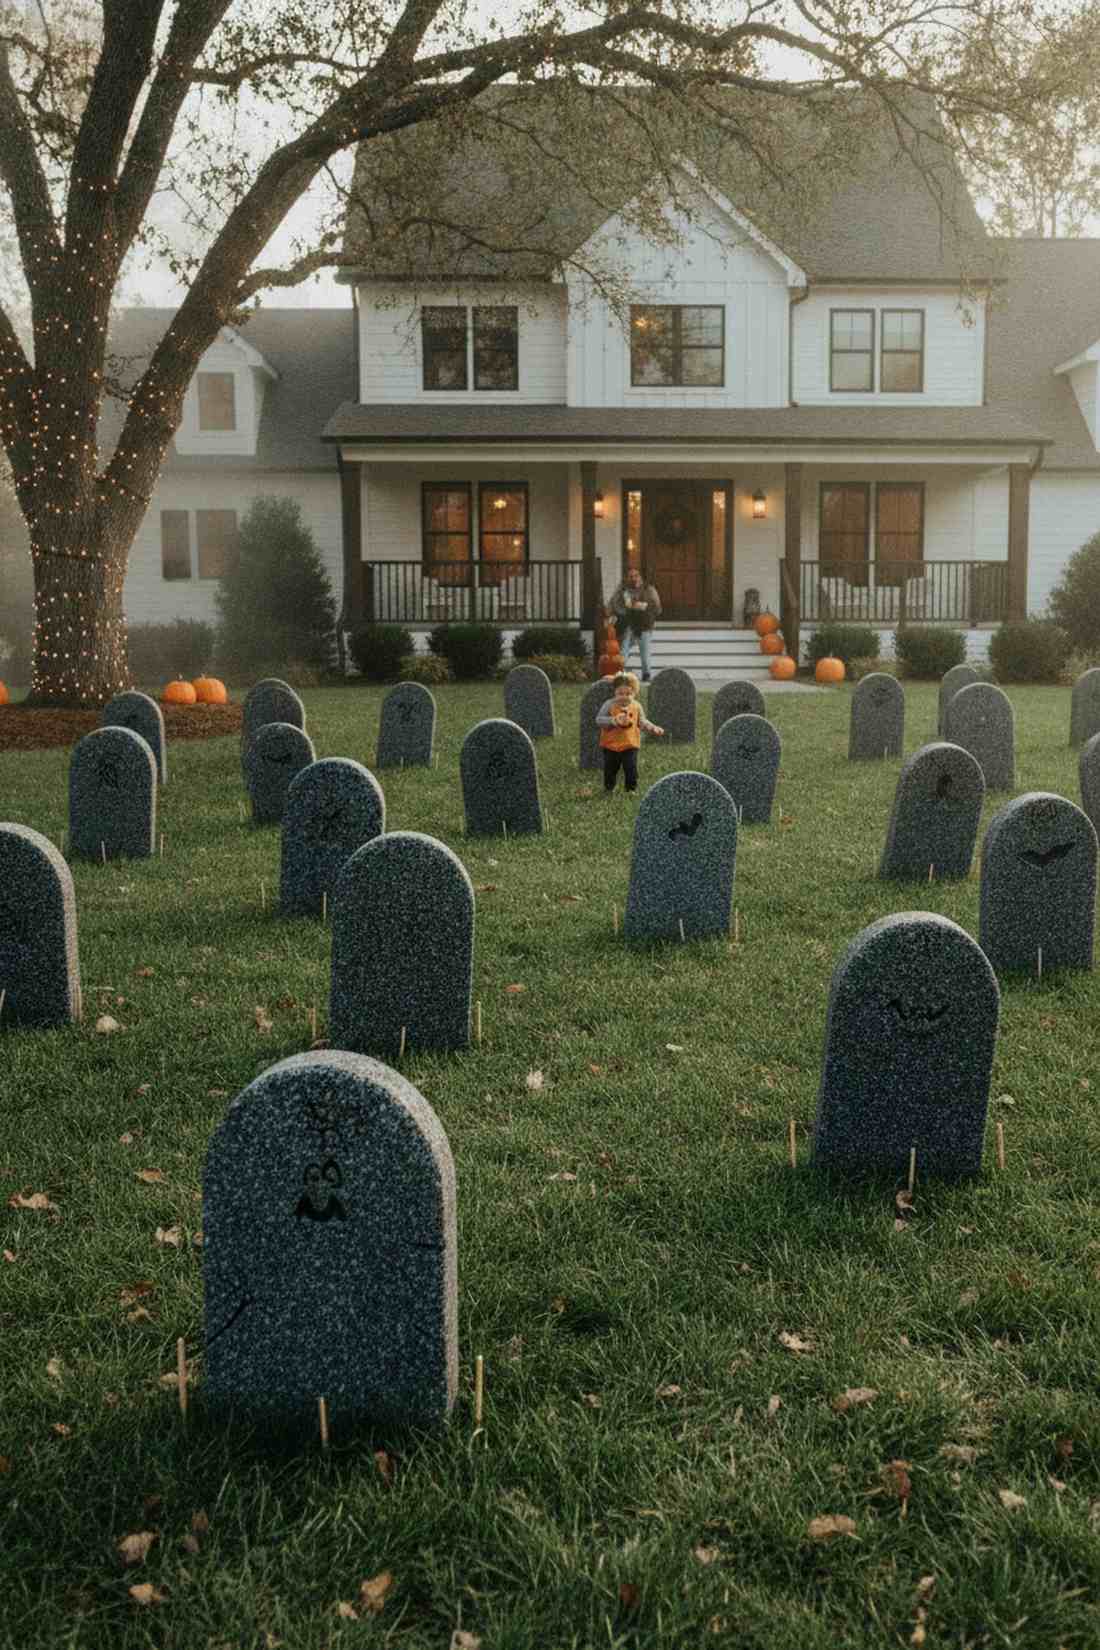
1. Rising Skeleton Graveyard
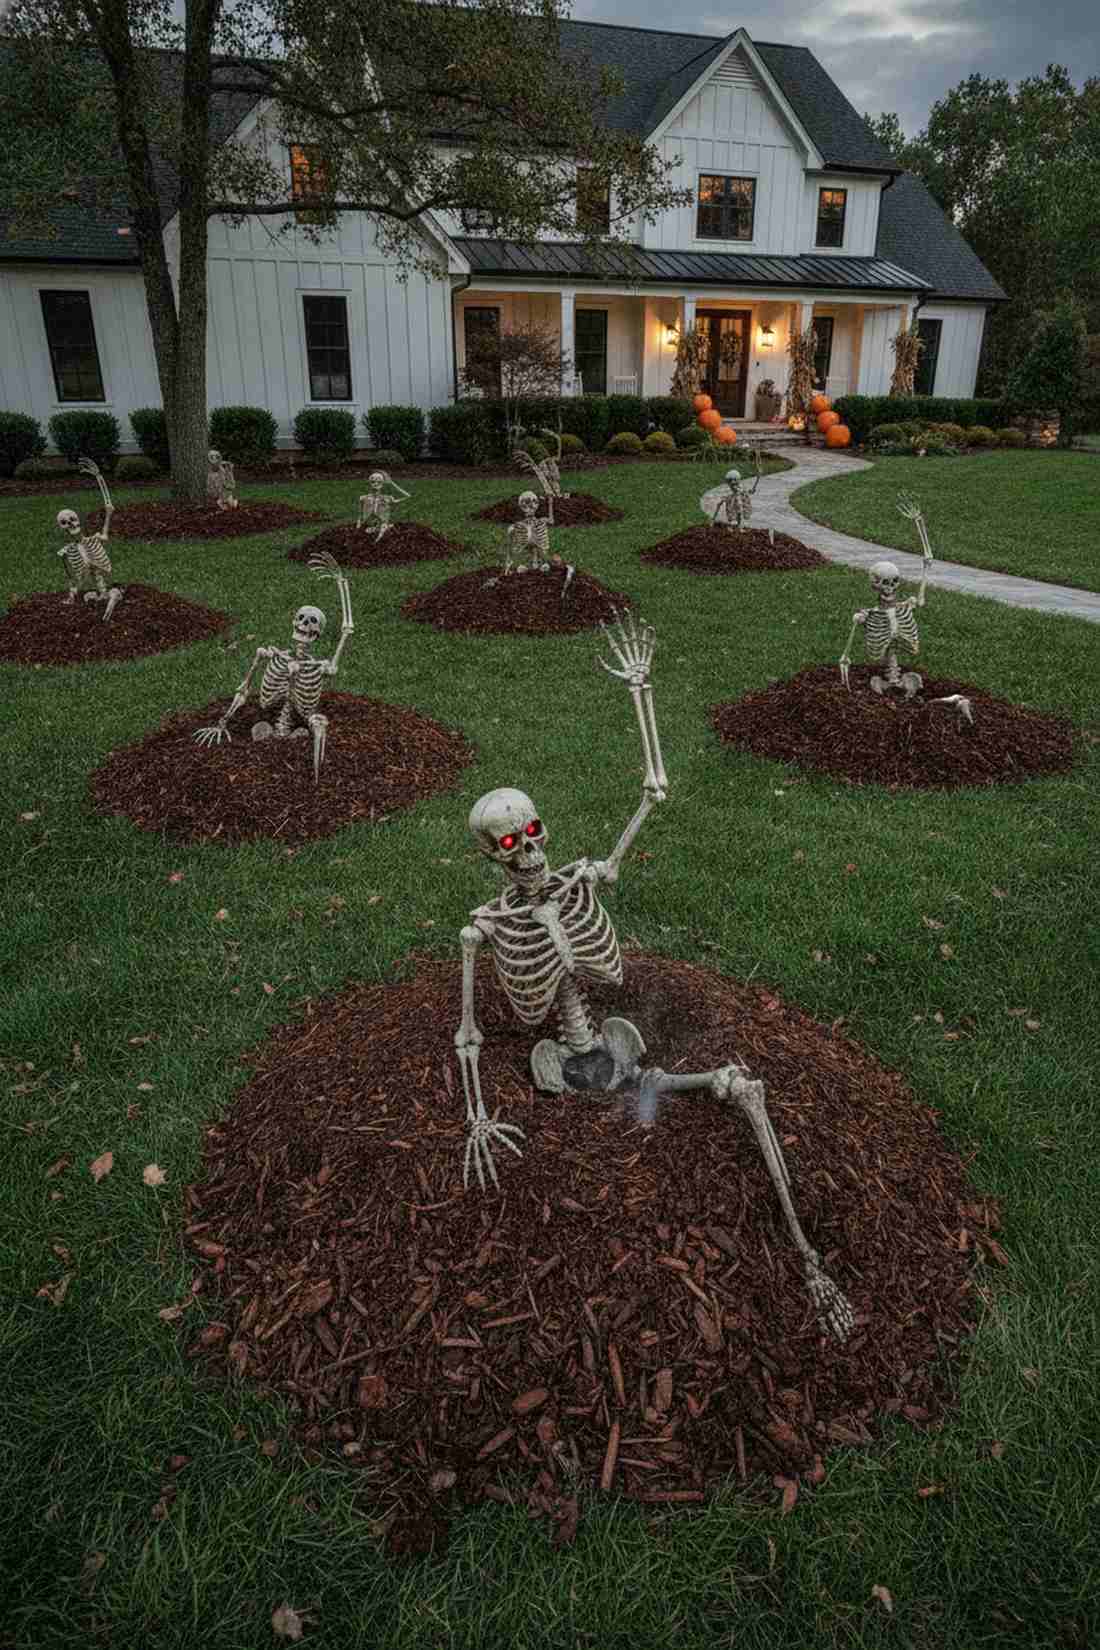
Feels like a forgotten horror scene you accidentally stumbled upon in the dead of night. This outdoor cemetery layout works exceptionally well for large, open front lawns requiring a massive visual impact.
Too often, decorators just lay bones flat on the grass, but deliberately breaking the soil plane delivers a surprisingly premium look. By staking these figures at sharp angles and piling thick dark mulch, you bypass the cheap plastic aesthetic entirely. Sneak in some waterproof graveyard animatronics for maximum terror value.
You can easily pull this off for around $40–$60 per burial mound. Save this to your extreme DIY haunt board on Pinterest!
- Key Materials: Posable skeletal figures, thick hardwood mulch, ground stakes
- Vibe / Style: Cinematic undead horror
- Difficulty: Moderate weekend setup
- Budget Breakdown: Skeleton Props: $35 | Base/Mulch: $15.
- Creator’s Tip: Drive thick rebar deep into the ground and zip-tie the spine to prevent wind from knocking them over.
- Smart Sourcing: UV-coated posable skeleton bulk pack and heavy-duty outdoor landscape stakes.
2. Gothic Tombstone Garden
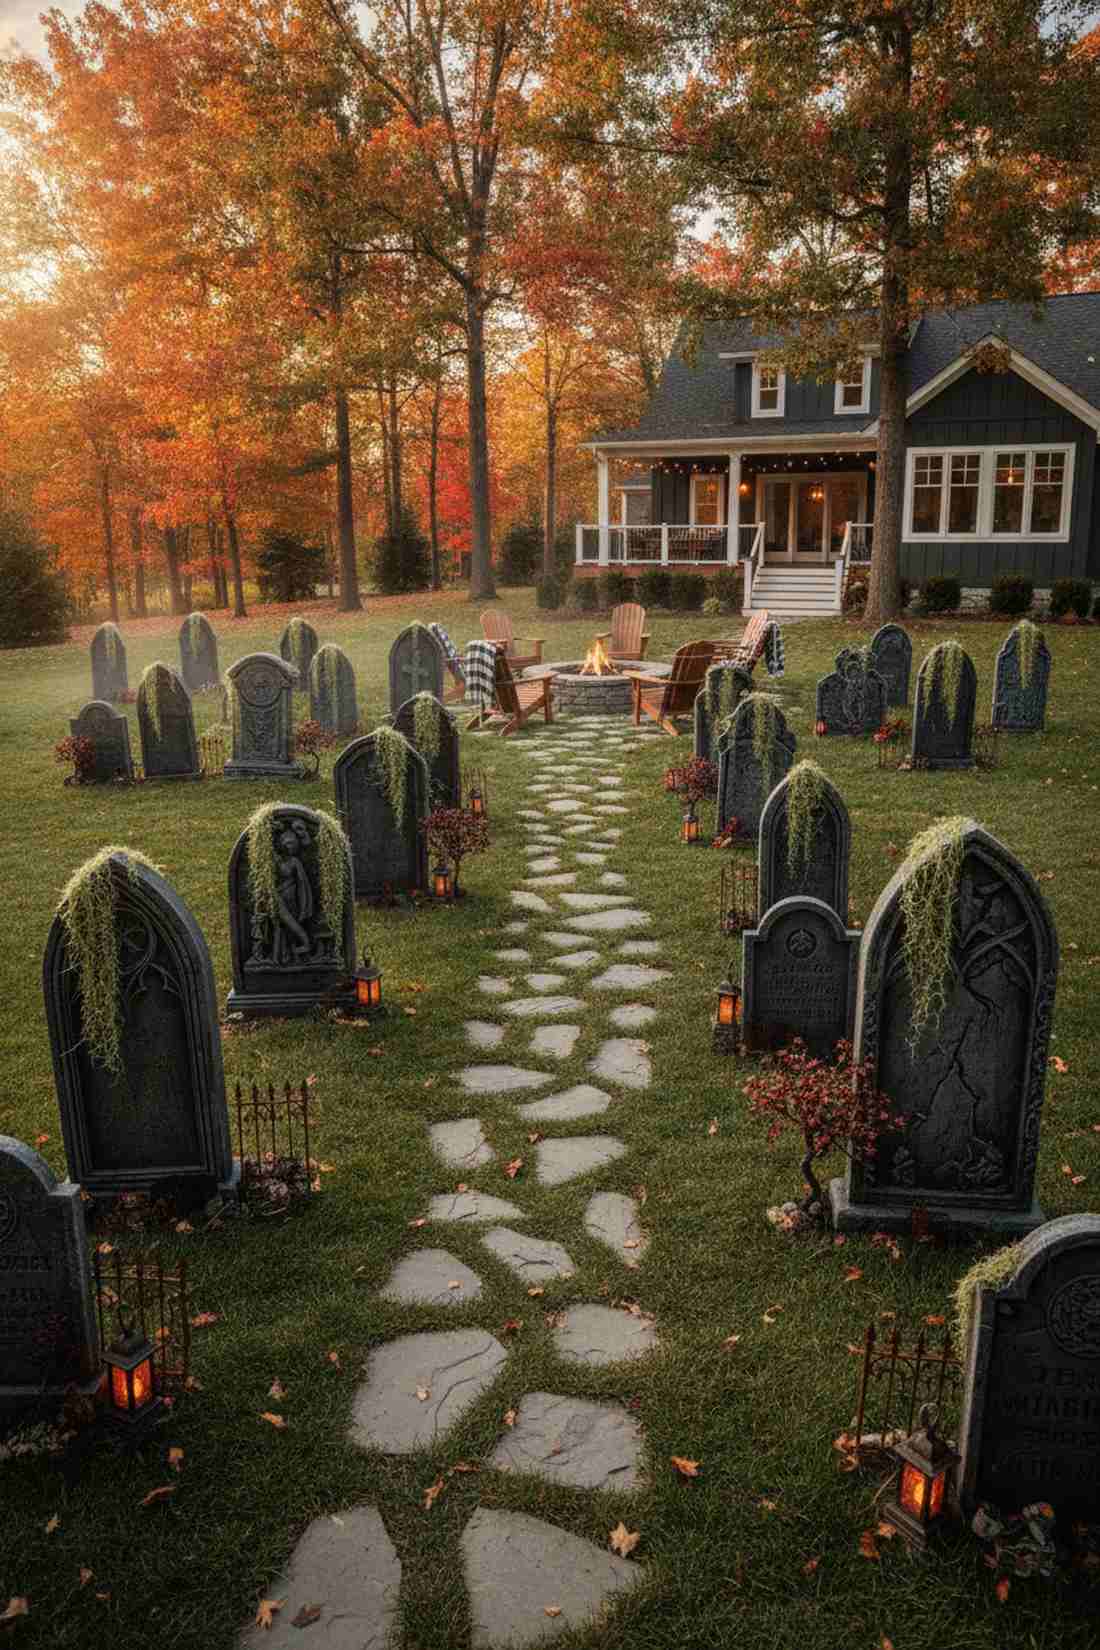
Evokes the chilling, historic mood of an ancient Victorian churchyard. This ornate headstone display is a brilliant solution for framing walkways or filling in barren garden beds during autumn.
Spacing everything in perfect rows is a rookie mistake; scattering them irregularly tricks the eye into seeing a high-end theme park setup. Adding faux moss and weathered dry-brushing creates a designer-level finish that transforms basic foam into ancient stone. Seamlessly blending in premium miniature garden supplies around the base adds incredible micro-detail.
Expect to invest about $20–$40 per customized stone grouping. It’s a fast upgrade that completely changes the vibe of your yard.
- Key Materials: High-density foam tombstones, acrylic weathering paint, faux Spanish moss
- Vibe / Style: Ancient gothic mystery
- Difficulty: Easy beginner crafting
- Budget Breakdown: Tombstone Base: $25 | Weathering Details: $10.
- Creator’s Tip: Use a clear matte UV sealant spray over your paint job to stop rain from washing away the aging effects.
- Smart Sourcing: pre-cut high-density foam slabs and weather-resistant faux moss bundles.
3. Haunted Graveyard with Weeping Angels
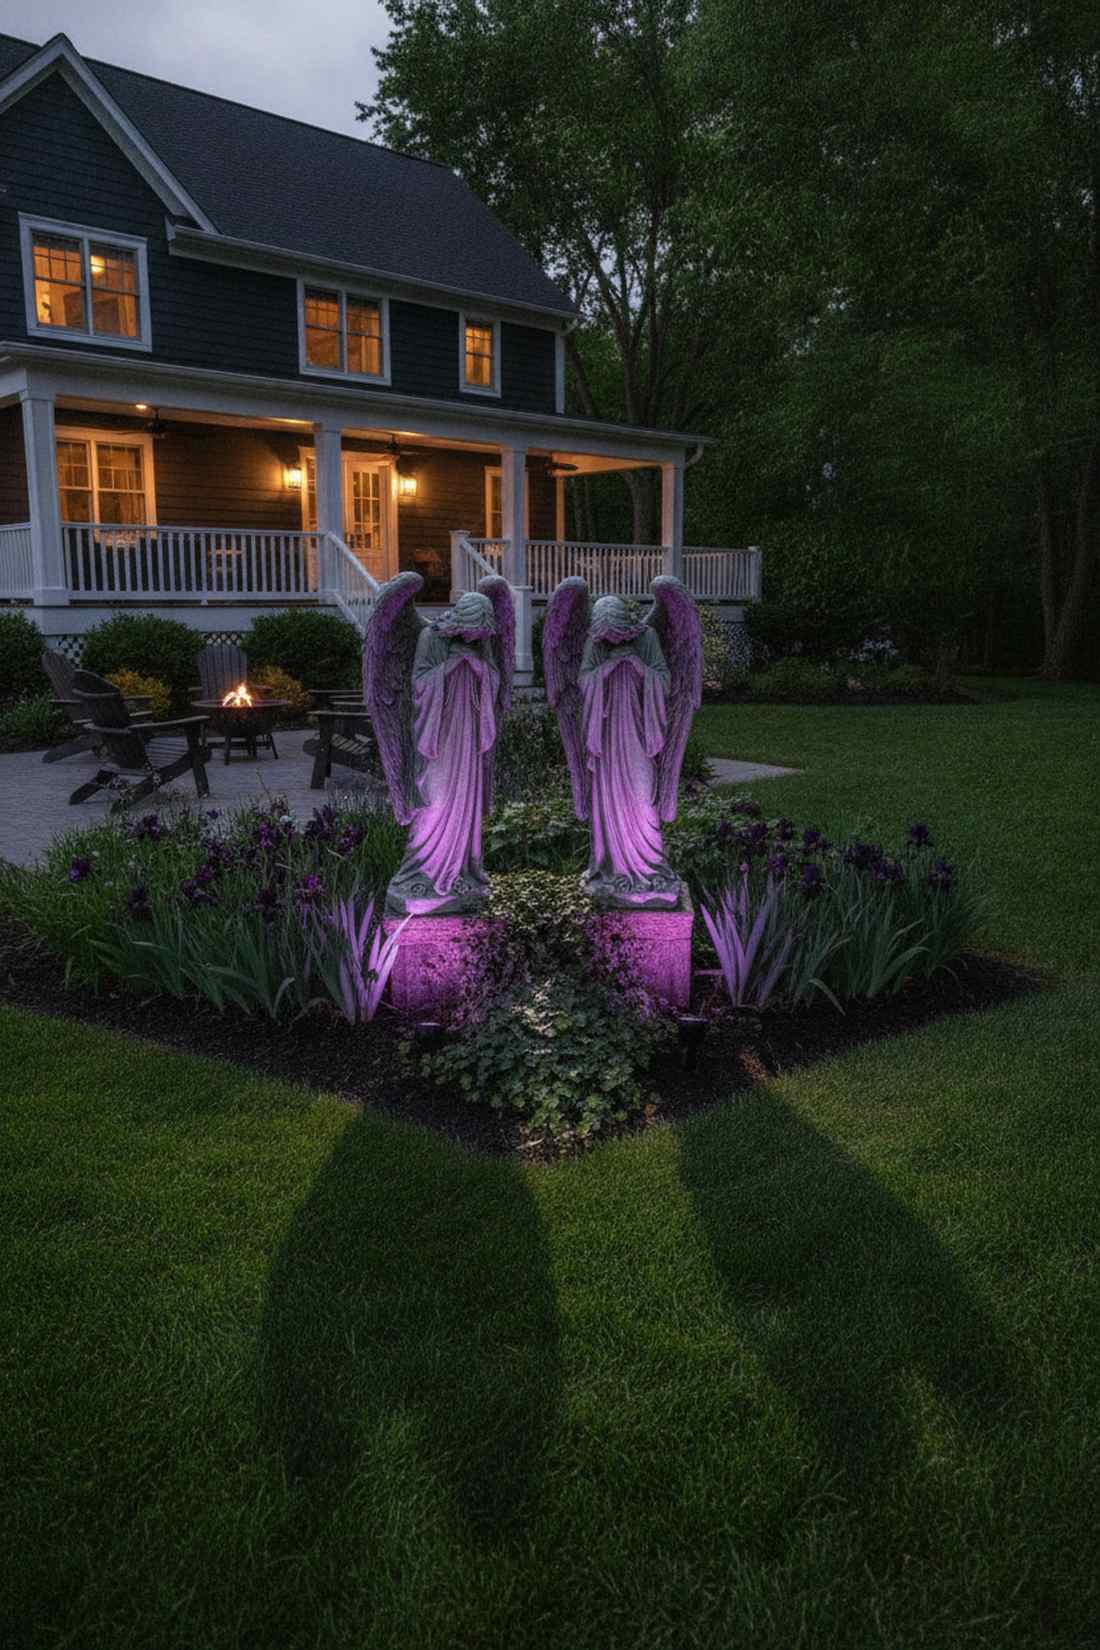
Captures an eerie, sorrowful elegance that instantly commands attention. Incorporating a weeping angel focal point works flawlessly for corner garden beds or elevated porch planters.
While standard plastic ghouls look cheap, utilizing heavy-set statuary aesthetics adds massive visual weight without draining the wallet. Elevating these figures on faux stone pedestals and hitting them with subtle violet uplighting forces neighbors to stop and stare. Integrating commercial-grade outdoor lighting fixtures ensures the shadows stretch dramatically across your lawn.
Setting up one stunning angel vignette costs roughly $50–$80. Pin this if you’re aiming for a sophisticated scare aesthetic!
- Key Materials: Resin angel statuary, faux stone pedestals, violet LED uplights
- Vibe / Style: Mournful classical horror
- Difficulty: Intermediate lighting placement
- Budget Breakdown: Angel Prop: $45 | Lighting: $25.
- Creator’s Tip: Paint cheap plastic statues with a mix of grey primer and sand to create a realistic, heavy concrete texture.
- Smart Sourcing: hollow resin angel prop kits and waterproof smart LED spot floods.
4. Old Caretaker Scene
Radiates a deeply unsettling storytelling element that brings your cemetery to life. This life-sized figure scene is ideal for placing near a front gate or positioned hauntingly behind an old oak tree.
A static mannequin can look stiff, but dressing the frame in legitimately aged, oversized clothing immediately establishes a dominant focal point. Giving the figure an authentic flickering LED lantern elevates standard props into cinematic moments. Investing in a commercial-grade fog machine nearby wraps the character in an unforgettable misty aura.
You can execute this character build for about $45–$70. Highly recommended for creating a viral neighborhood landmark.
- Key Materials: PVC pipe frame, thrifted heavy coats, battery-operated vintage lantern
- Vibe / Style: Vintage spooky storytelling
- Difficulty: Moderate DIY construction
- Budget Breakdown: PVC Frame: $15 | Wardrobe/Lantern: $40.
- Creator’s Tip: Use chicken wire around the PVC torso to bulk out the shoulders so the coat drapes naturally in the wind.
- Smart Sourcing: pre-cut PVC armature kits and flickering LED storm lantern (shatterproof).
This next setup is ridiculously cheap but looks like a $100 custom display when the sun goes down…
5. Cardboard Tombstone Collection
Feels like a playful yet spooky patch of forgotten history right on your grass. This budget yard marker setup is perfect for lining long driveway edges where volume matters more than heavy detailing.
Spending a fortune on individual store-bought stones adds up fast, but mass-producing these corrugated markers looks far more expensive than it is. Applying a thick textured spray paint over the cardboard hides the seams and gives a designer-level finish to bulk materials. Pair these with waterproof pathway accessories to elevate the entire visual footprint.
You can create a dozen of these for under $20. Save this to your extreme budget Halloween board!
- Key Materials: Corrugated cardboard, textured stone spray paint, wooden backing stakes
- Vibe / Style: Classic trick-or-treat fun
- Difficulty: Very easy family project
- Budget Breakdown: Cardboard/Stakes: $5 | Textured Paint: $15.
- Creator’s Tip: Always coat the finished cardboard in a heavy layer of clear Flex Seal or acrylic spray so autumn rain doesn’t melt your graveyard.
- Smart Sourcing: heavy-duty corrugated plastic sheets (bulk pack) and textured stone spray paint kits.
Atmospheric Lighting Displays
Lighting transforms ordinary decorations into immersive environments by manipulating shadow, color temperature, and illumination patterns. Professional designers prioritize lighting infrastructure before adding physical props to establish foundational atmosphere.
6. Colored Spotlight Shadows
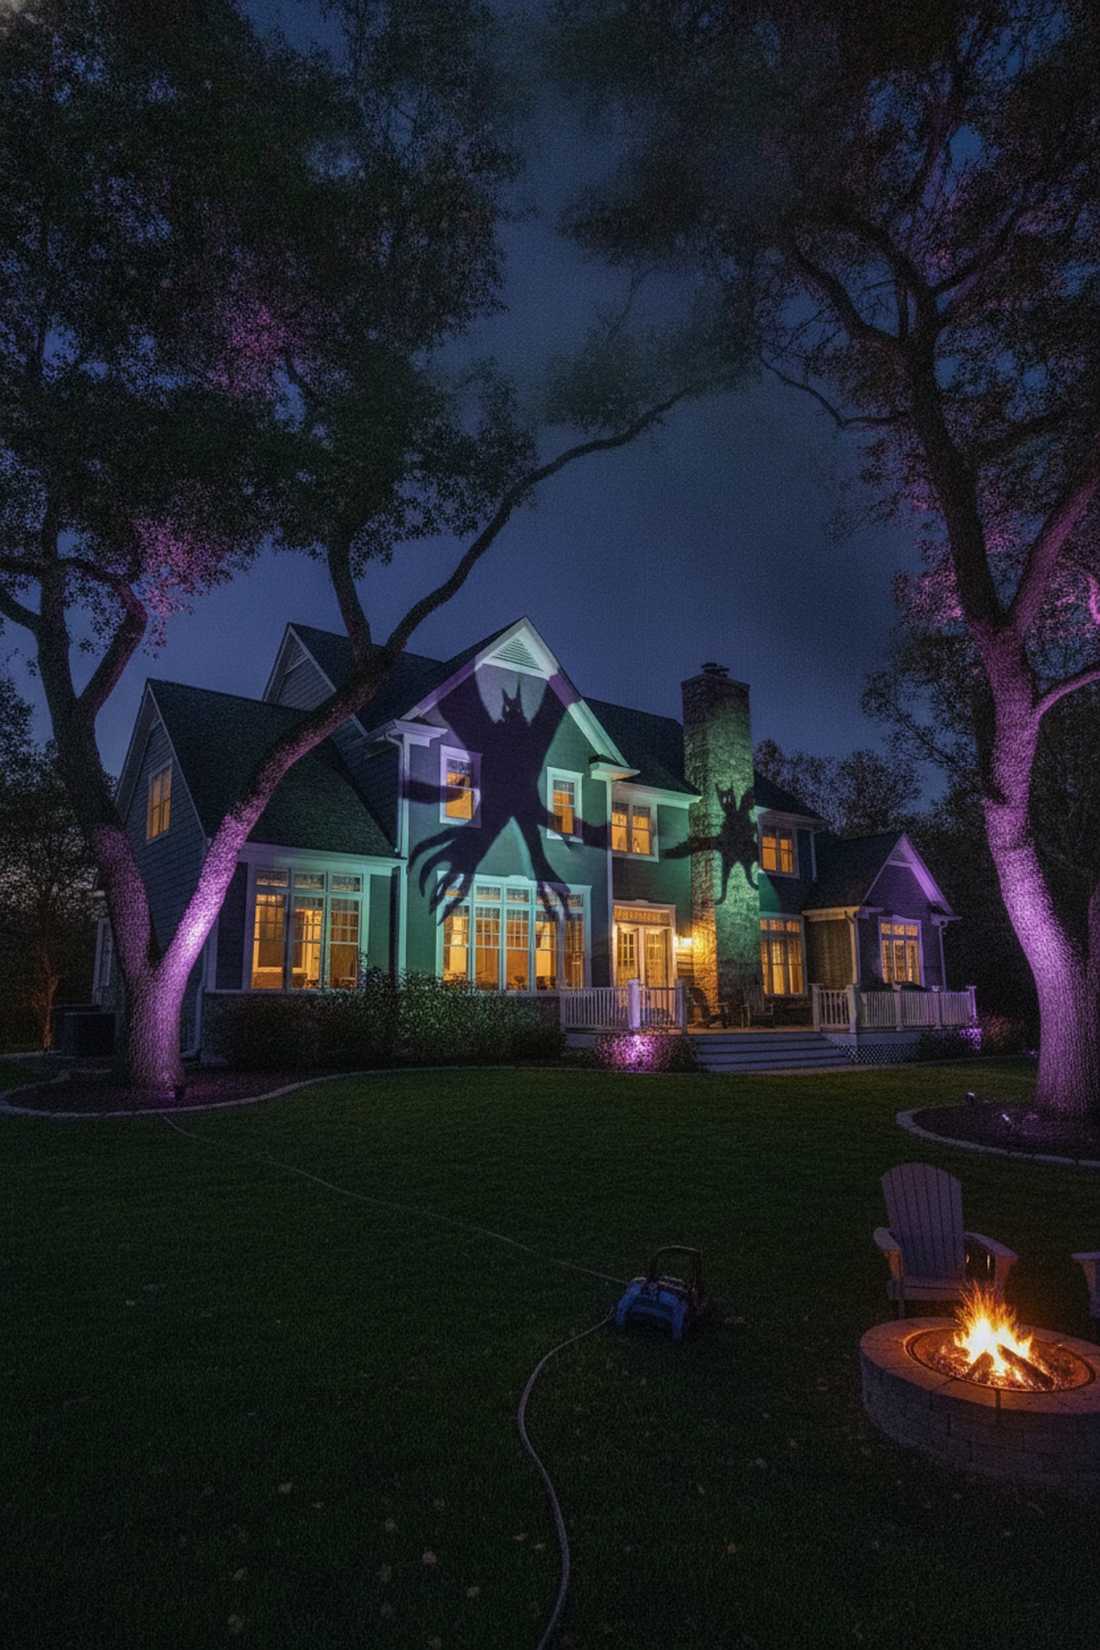
Paints your entire property in a toxic, supernatural glow that screams high-budget haunting. This dramatic shadow casting works magic when pointed at large architectural features or gnarly tree branches.
Relying solely on overhead porch lights flattens your yard, but washing the ground in deep purples and greens delivers a surprisingly premium look. Angling fixtures properly from below creates massive, distorted creature silhouettes that bypass that cheap plastic aesthetic entirely. Securing reliable outdoor holiday lighting systems ensures your colors stay vivid all season.
A solid foundational lighting sweep will cost around $60–$90. Pin this if you want to be the standout house on the block.
- Key Materials: LED landscape spotlights, colored gel filters, outdoor extension cords
- Vibe / Style: Immersive theme park glow
- Difficulty: Easy plug-and-play
- Budget Breakdown: Smart Floods: $50 | Cabling: $20.
- Creator’s Tip: Stake the lights at a strict 45-degree upward angle positioned 3 feet away from your main props for the sharpest shadow distortion.
- Smart Sourcing: waterproof smart LED floodlights (multi-pack) and heavy-duty outdoor timer hubs.
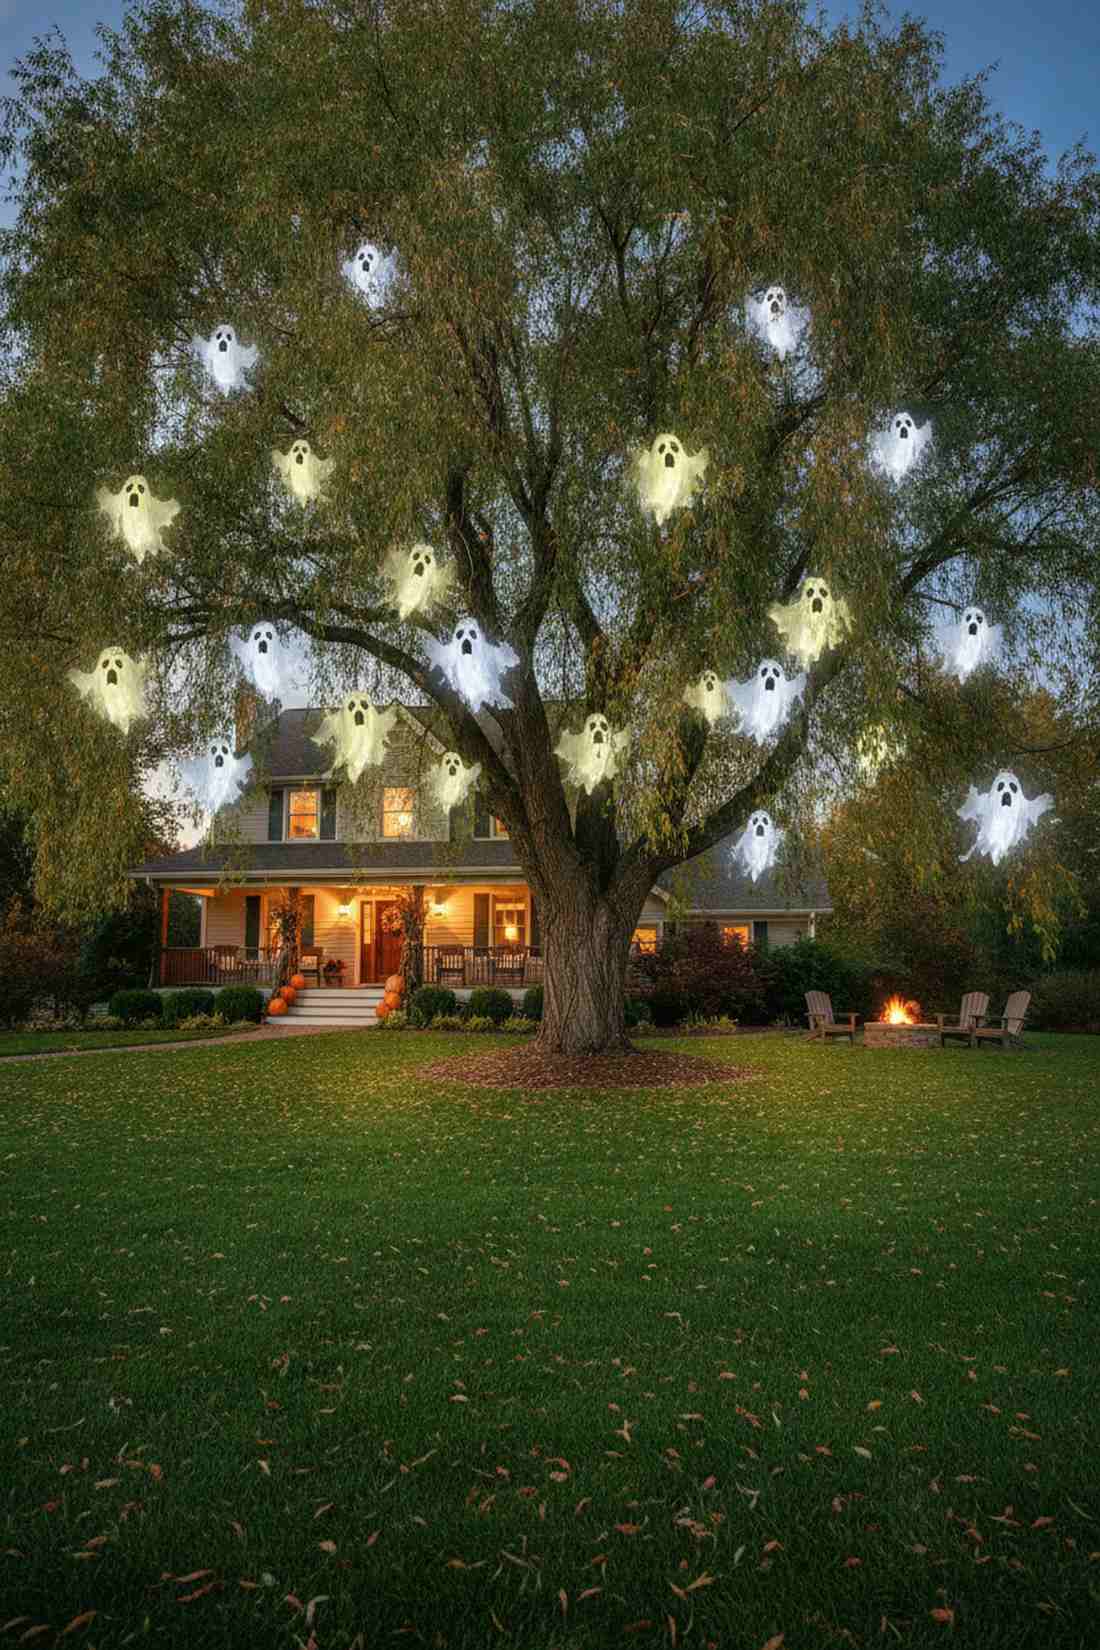
7. Haunted Tree Wrapping
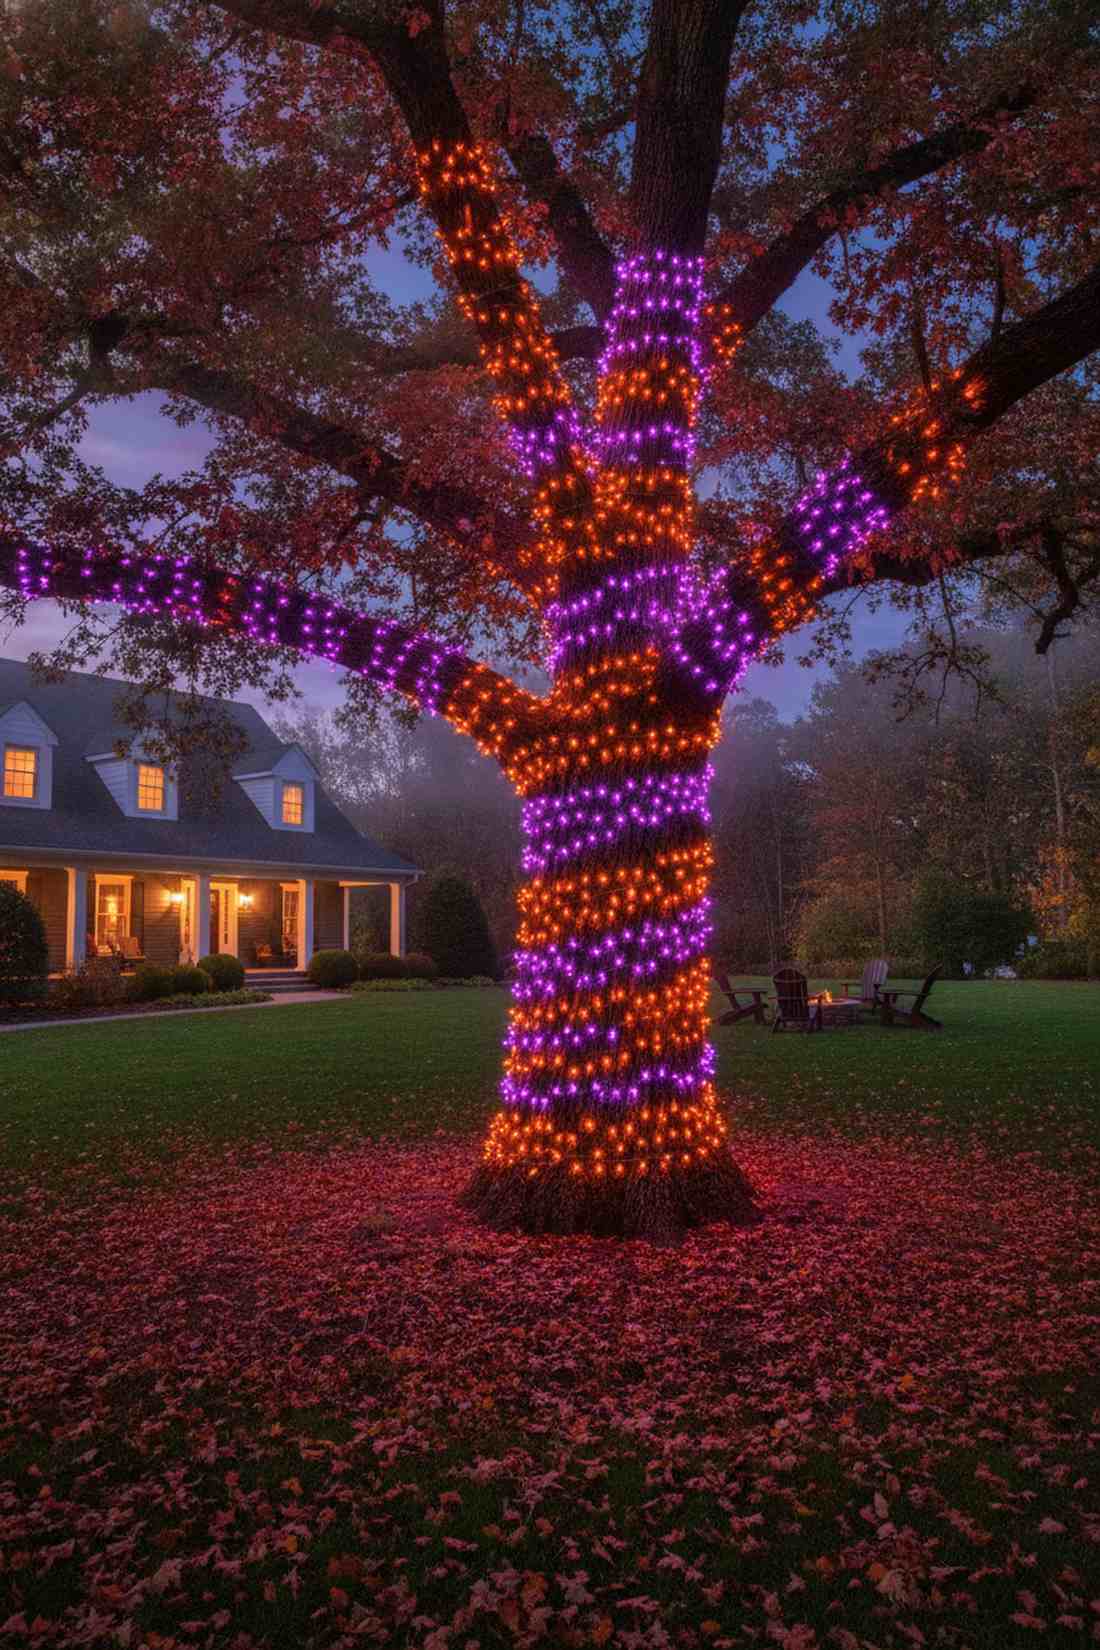
Looks like glowing supernatural veins pulsing right through your landscaping. This trunk illumination strategy is perfect for front yards boasting mature oaks, maples, or thick columns.
Most string light setups look sloppy and rushed, but a tight, methodical spiral wrap transforms a basic corner into a professional-grade set. Alternating between harsh orange and neon purple bulbs forces neighbors to stop and stare at the vibrant contrast. Integrating heavy-duty commercial string lights prevents weather outages mid-October.
Plan to spend about $30–$50 per large tree. It holds up beautifully against harsh autumn winds.
- Key Materials: Outdoor-rated LED string lights, dark zip ties, ladder
- Vibe / Style: Enchanted forest energy
- Difficulty: Moderate physical effort
- Budget Breakdown: High-density light strings: $40 | Fasteners: $5.
- Creator’s Tip: Use dark green or black wire string lights so the cords completely disappear against the tree bark during the daytime.
- Smart Sourcing: commercial-grade LED string lights (bulk spool) and tree-safe outdoor mounting clips.
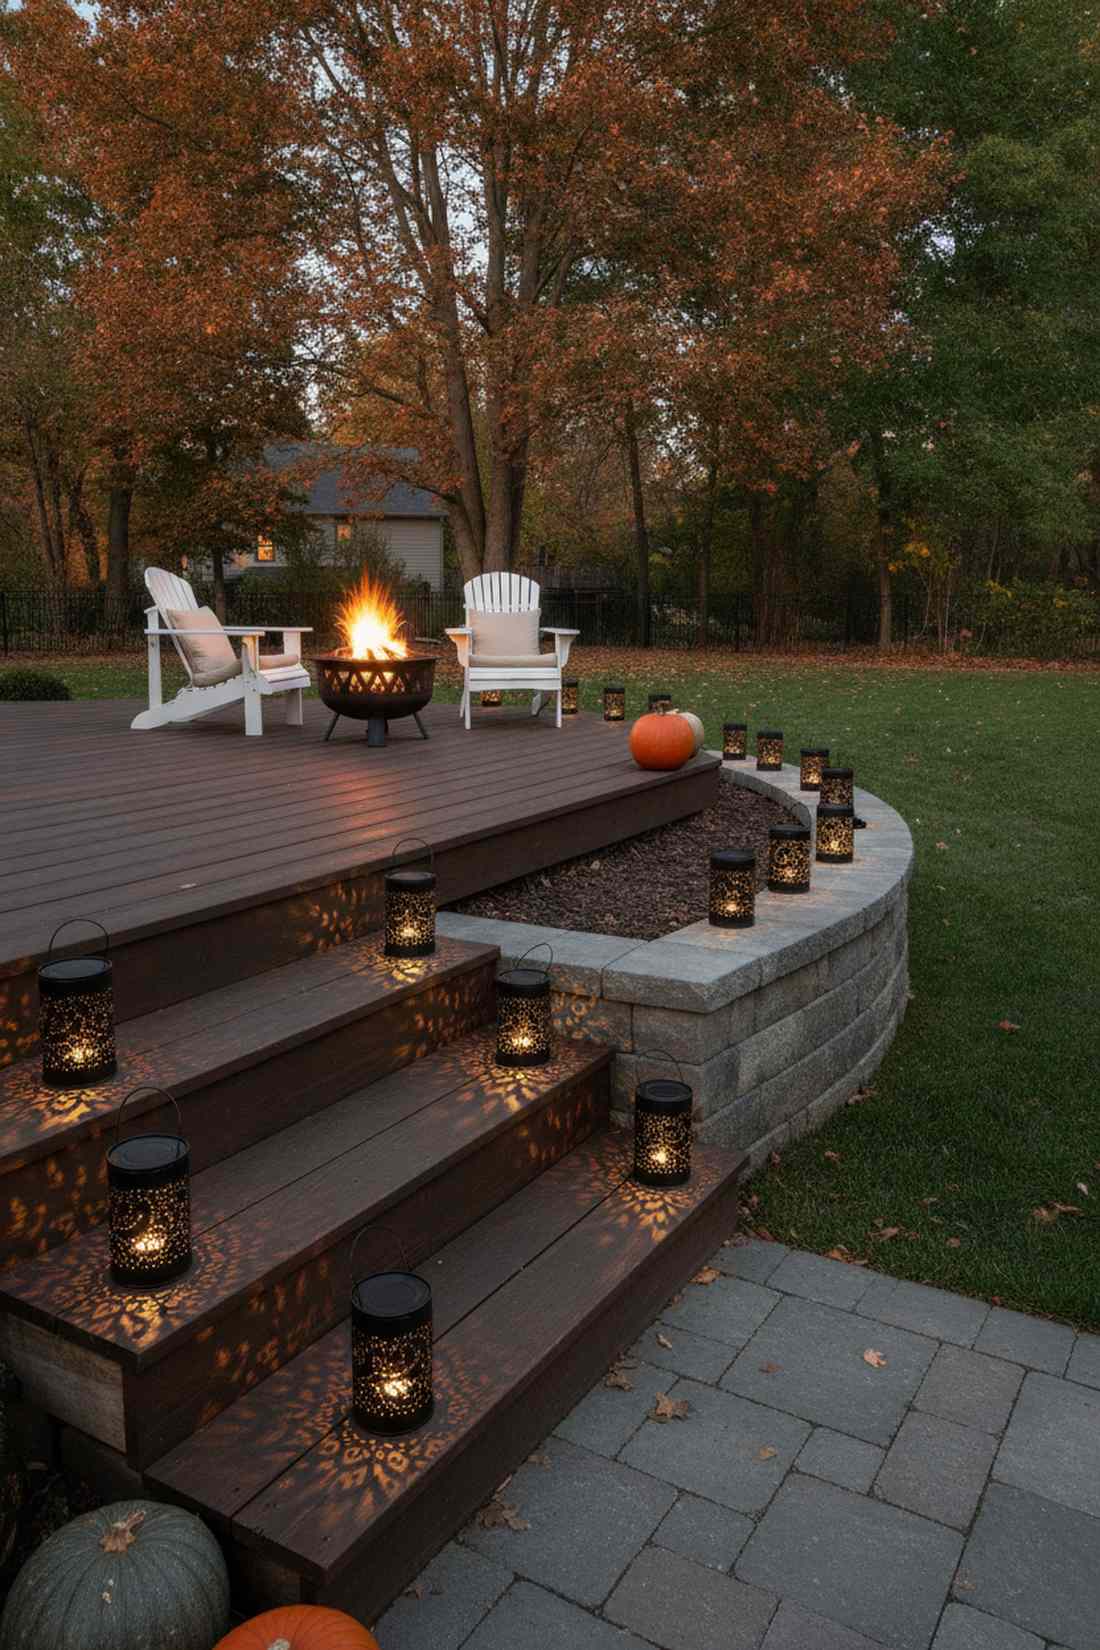
8. Pathway Luminaries
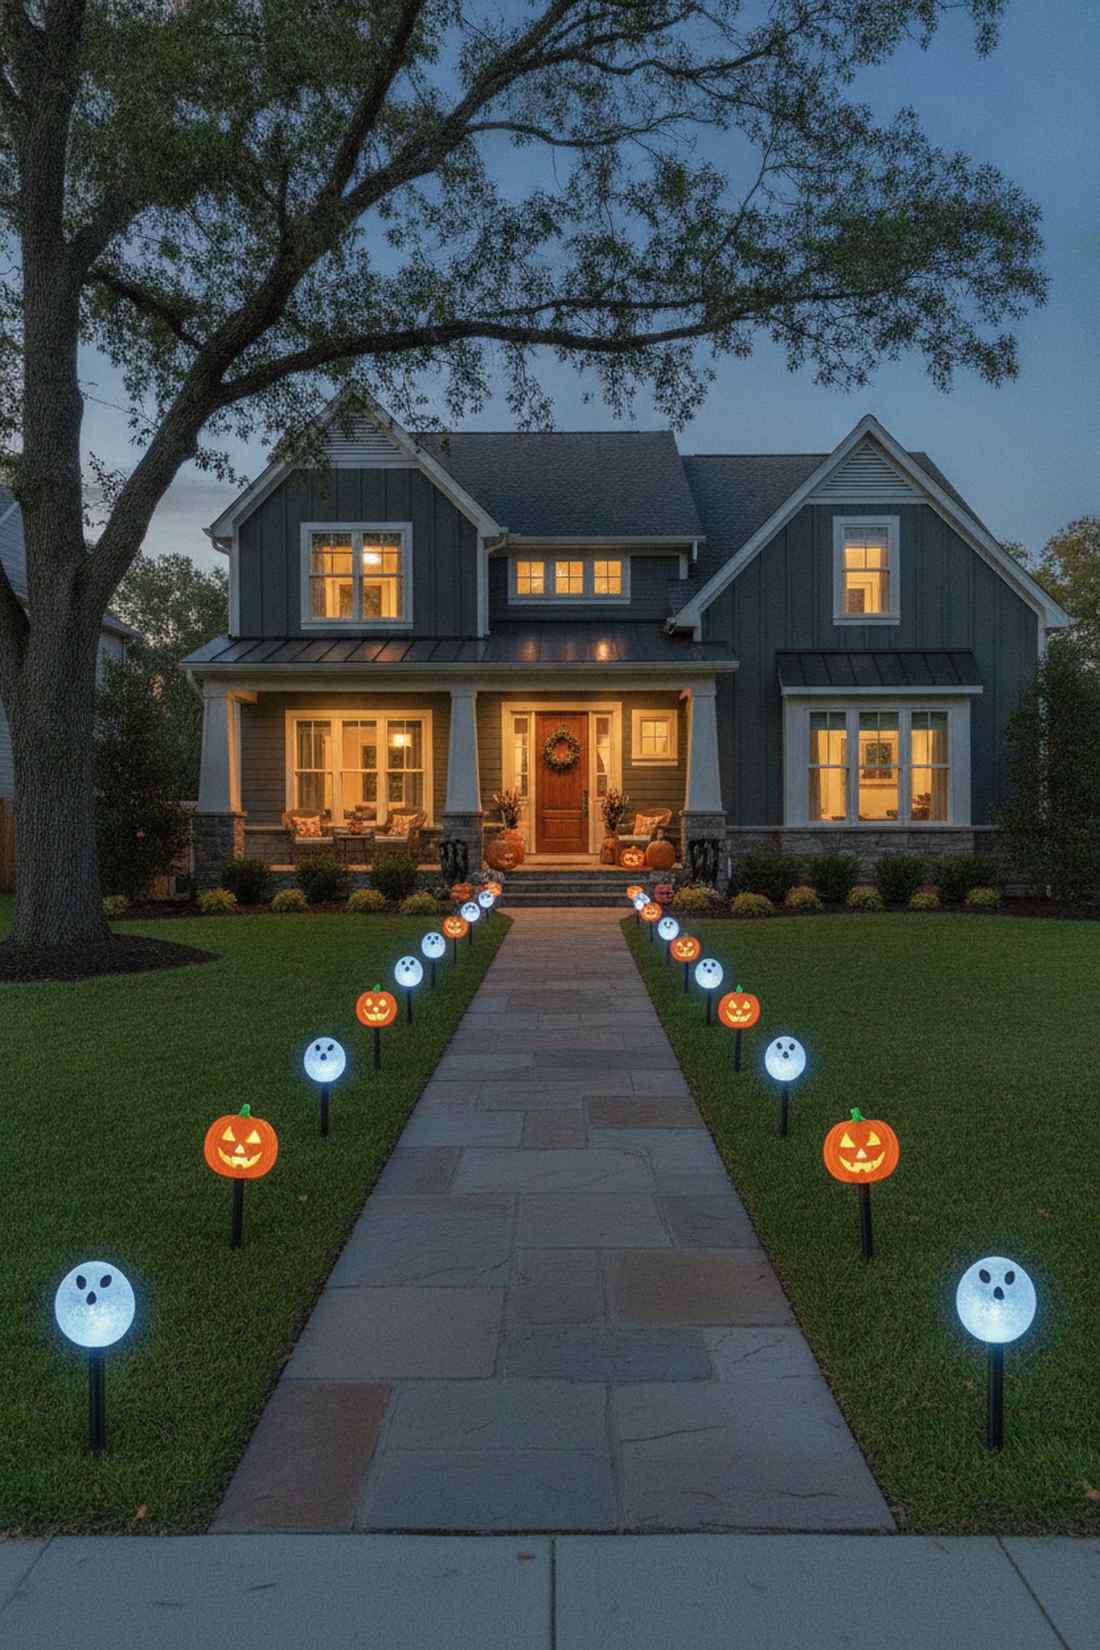
Casts a welcoming yet mysterious glow that acts as a runway for neighborhood trick-or-treaters. Implementing these solar pathway markers is crucial for safely guiding foot traffic past your darker lawn hazards.
Flimsy paper bags blow away instantly, but securing solid, weather-rated ground fixtures looks far more expensive than it is. Alternating shapes—like a pumpkin followed by a ghostly orb—tricks the eye into seeing a high-end theme park setup. Dropping high-quality outdoor solar lighting accessories into the mix means zero wire management.
You can line a standard walkway beautifully for $30–$50. Save this idea to your practical outdoor decor board!
- Key Materials: Solar-powered themed stakes, adhesive concrete mounts (optional)
- Vibe / Style: Guiding spooky warmth
- Difficulty: Extremely easy push-in setup
- Budget Breakdown: Solar Stakes (Pack of 8): $35 | Base securing: $5.
- Creator’s Tip: If placing them on concrete driveways instead of soil, use heavy-duty double-sided exterior tape on a flat base rather than trying to drill.
- Smart Sourcing: dusk-to-dawn solar skull markers (starter kit) and UV-coated pathway stakes.
Most people get this completely wrong… until they try the exact layout coming up next.
9. Milk Jug Ghost Lanterns
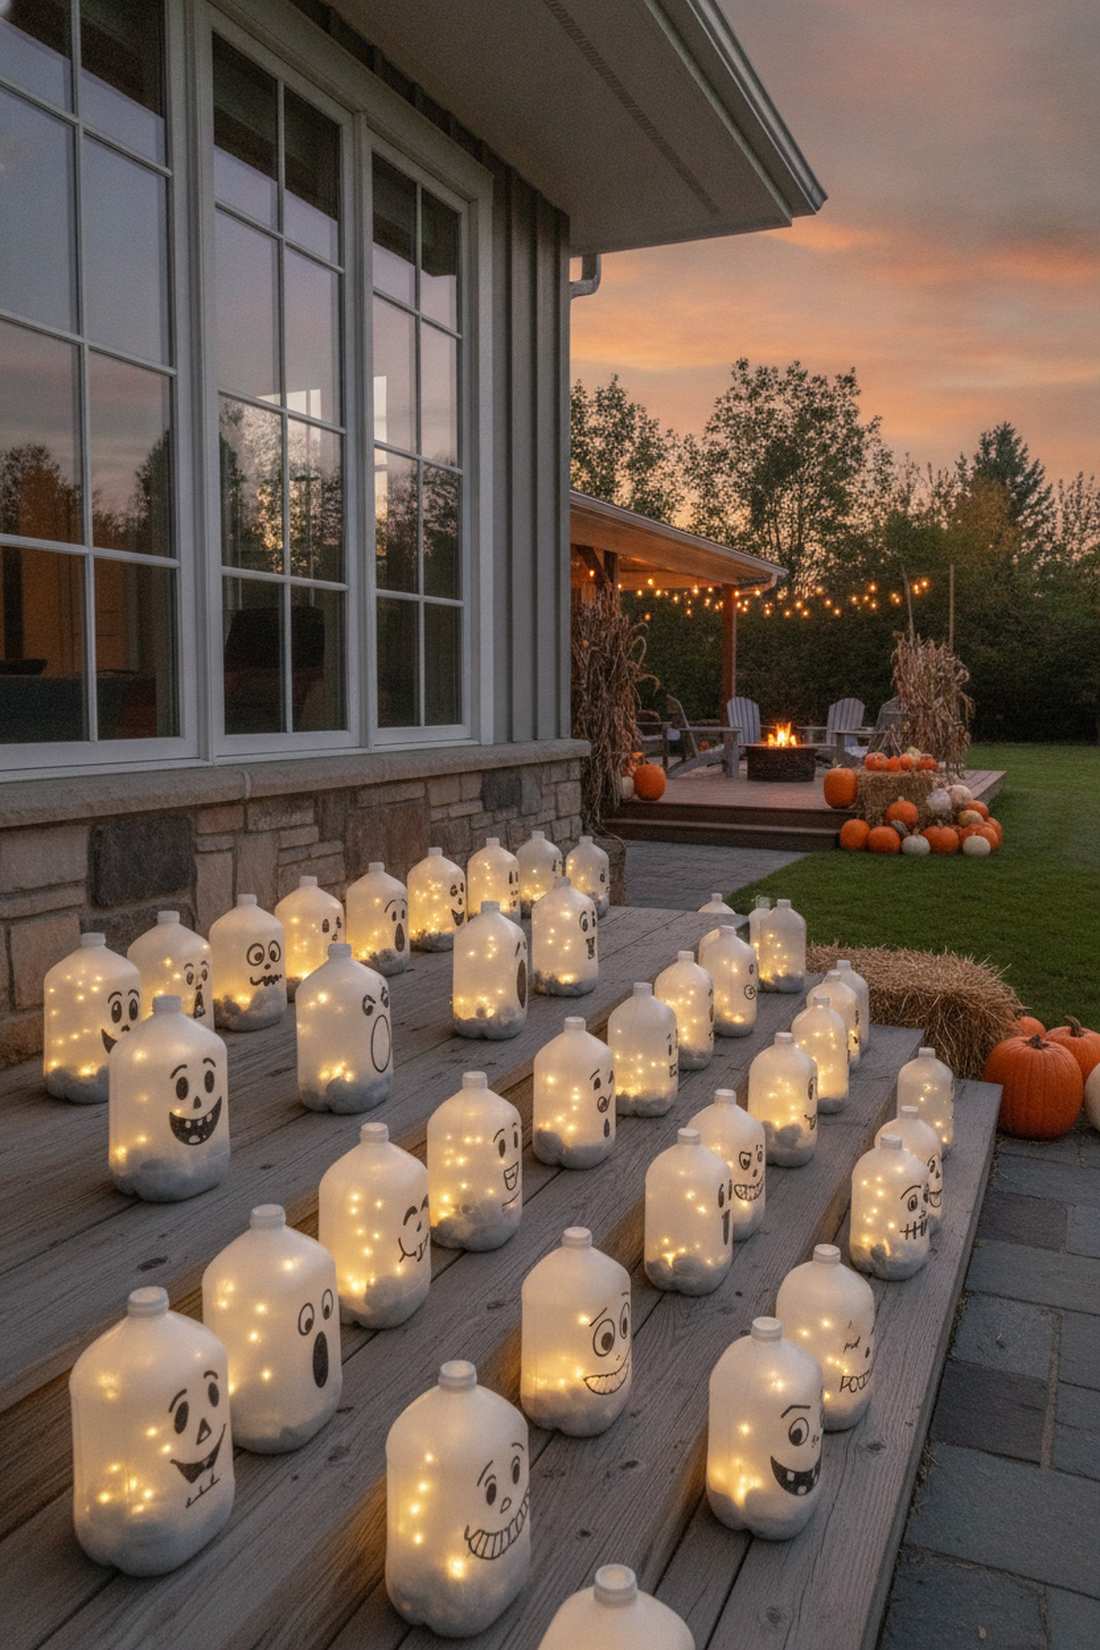
Feels like a crowd of friendly little spirits glowing softly in the dark. This upcycled luminary collection fits exceptionally well lining rustic porch steps or clustered under a large front window.
Throwing away recyclables is a missed opportunity; grouping these illuminated jugs immediately establishes a dominant focal point for pennies. Drawing highly expressive, varied faces on the translucent plastic elevates standard waste into cinematic moments of joy. Stuffing them with premium battery-operated fairy lights gives that sharp, clean internal glow.
You can craft a glowing ghost army for practically $10–$15. Such a low-effort way to boost curb appeal!
- Key Materials: Clean gallon plastic jugs, permanent markers, battery-operated string lights
- Vibe / Style: Family-friendly whimsical glow
- Difficulty: Fun kid-friendly craft
- Budget Breakdown: Jugs: Free | Fairy Lights: $15.
- Creator’s Tip: Weigh the bottom of the empty jugs down with a handful of gravel or sand before putting the lights in so they don’t blow away.
- Smart Sourcing: waterproof LED fairy lights (bulk pack) and industrial thick permanent markers.
💡 Must-Have Supplies for High-End Setups
To build these setups faster and ensure they last, skip the generic craft aisles and invest in the right foundational kits.
- Base & Support: Commercial-grade outdoor landscape staples (bulk box)
- Setup Tools: Weatherproof heavy-duty zip tie starter kits
- Weather/Durability Protection: UV-resistant clear acrylic protective spray
10. Fog Machine Atmosphere
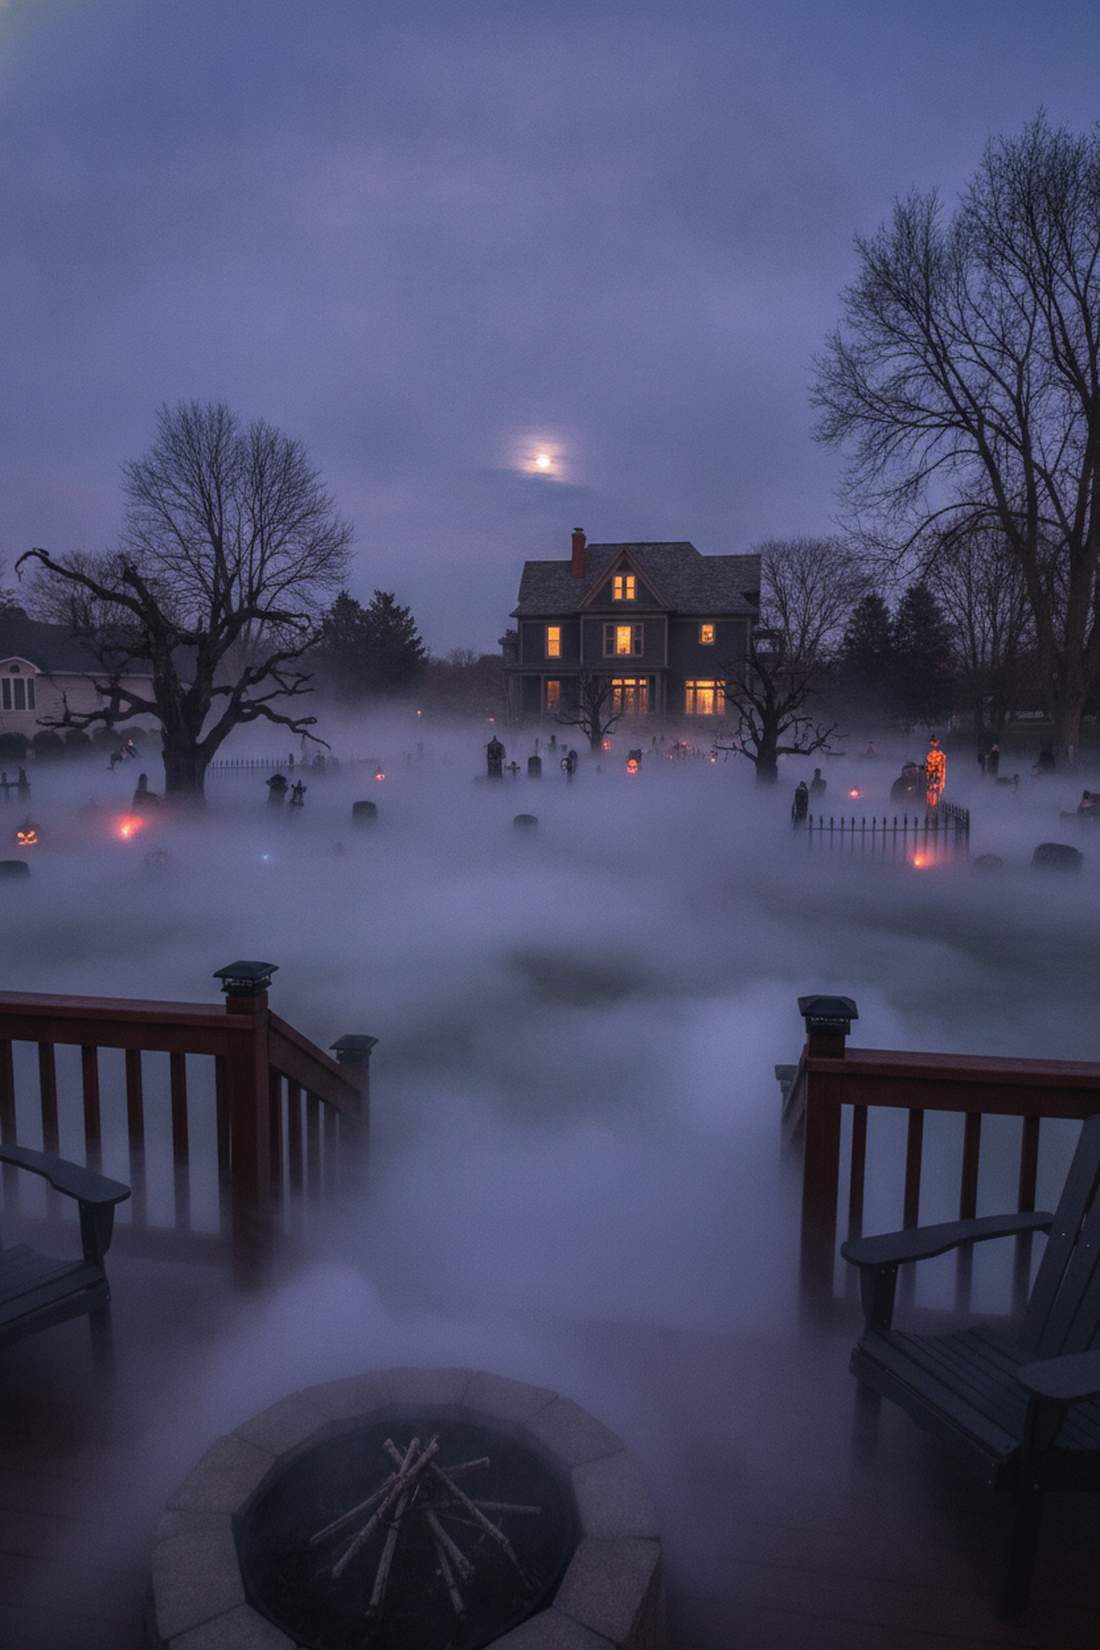
Wraps your entire yard in an oppressive, cinematic mist that hides all your wires and mounts. Deploying a low-lying fog system is the absolute best way to connect disjointed props into one unified horror scene.
Shooting thin mist directly into the wind dissipates instantly, but building a DIY chilling box delivers a surprisingly premium look. Pushing the smoke through ice forces it to hug the ground, bypassing that cheap plastic aesthetic entirely. Pairing this with professional-grade fog fluid makes the cloud hang thick and heavy in the cool night air.
A reliable machine and chilling setup will run you $50–$80. Pin this trick if you want professional haunted house effects!
- Key Materials: Outdoor-rated fog machine, fog fluid, DIY ice cooler chiller
- Vibe / Style: Hollywood-level mystery
- Difficulty: Intermediate technical setup
- Budget Breakdown: Fogger Unit: $50 | High-density Fluid: $20.
- Creator’s Tip: Never run the machine continuously; set it on a timer for 30-second bursts every 5 minutes to maintain atmosphere without burning the motor.
- Smart Sourcing: commercial-grade ground fogger machines and high-density outdoor fog juice.
Harvest & Farmhouse Elegance
Harvest themes balance Halloween whimsy with autumnal sophistication through natural materials and warm color palettes. This approach transitions seamlessly from September through Thanksgiving while maintaining October relevance.
11. Hay Bale Seating Displays
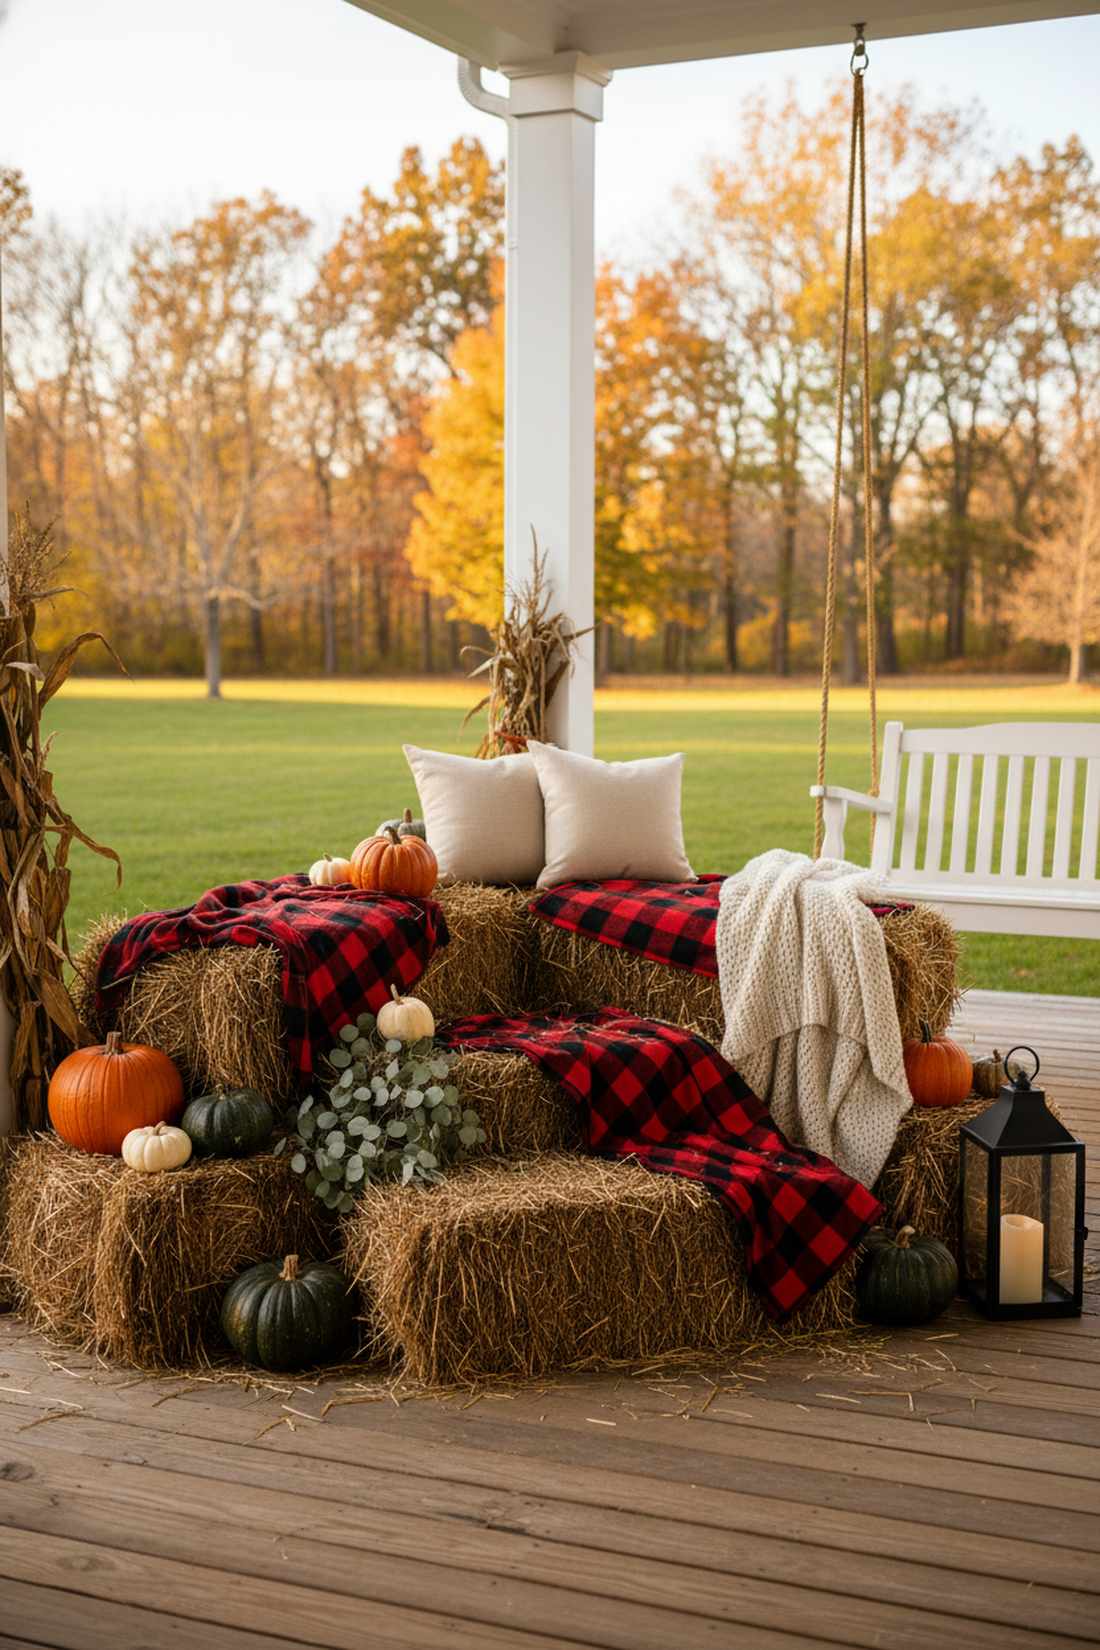
Radiates a cozy, affluent countryside energy that invites guests to sit and take photos. This rustic autumn staging is the ultimate anchor for large front porches or open patio gathering spaces.
Leaving raw hay exposed can look messy, but draping the tiers in rich buffalo check textiles gives a designer-level finish to agricultural supplies. Stacking them to create deliberate vertical levels transforms a basic corner into a professional-grade set. Throwing in high-end autumnal decor accessories bridges the gap between a working farm and a luxury estate.
You can build an elaborate seating block for about $40–$60. Save this to your cozy fall aesthetic Pinterest board!
- Key Materials: Standard square hay bales, plaid outdoor blankets, decorative gourds
- Vibe / Style: Upscale farmhouse warmth
- Difficulty: Easy but requires heavy lifting
- Budget Breakdown: Hay Bales: $25 | Textiles/Pumpkins: $30.
- Creator’s Tip: Spray the bales heavily with a fire-retardant fabric spray if you plan on placing any hot outdoor lighting nearby.
- Smart Sourcing: waterproof buffalo check outdoor blankets and pre-treated decorative hay bales.
12. Corn Stalk Bundles
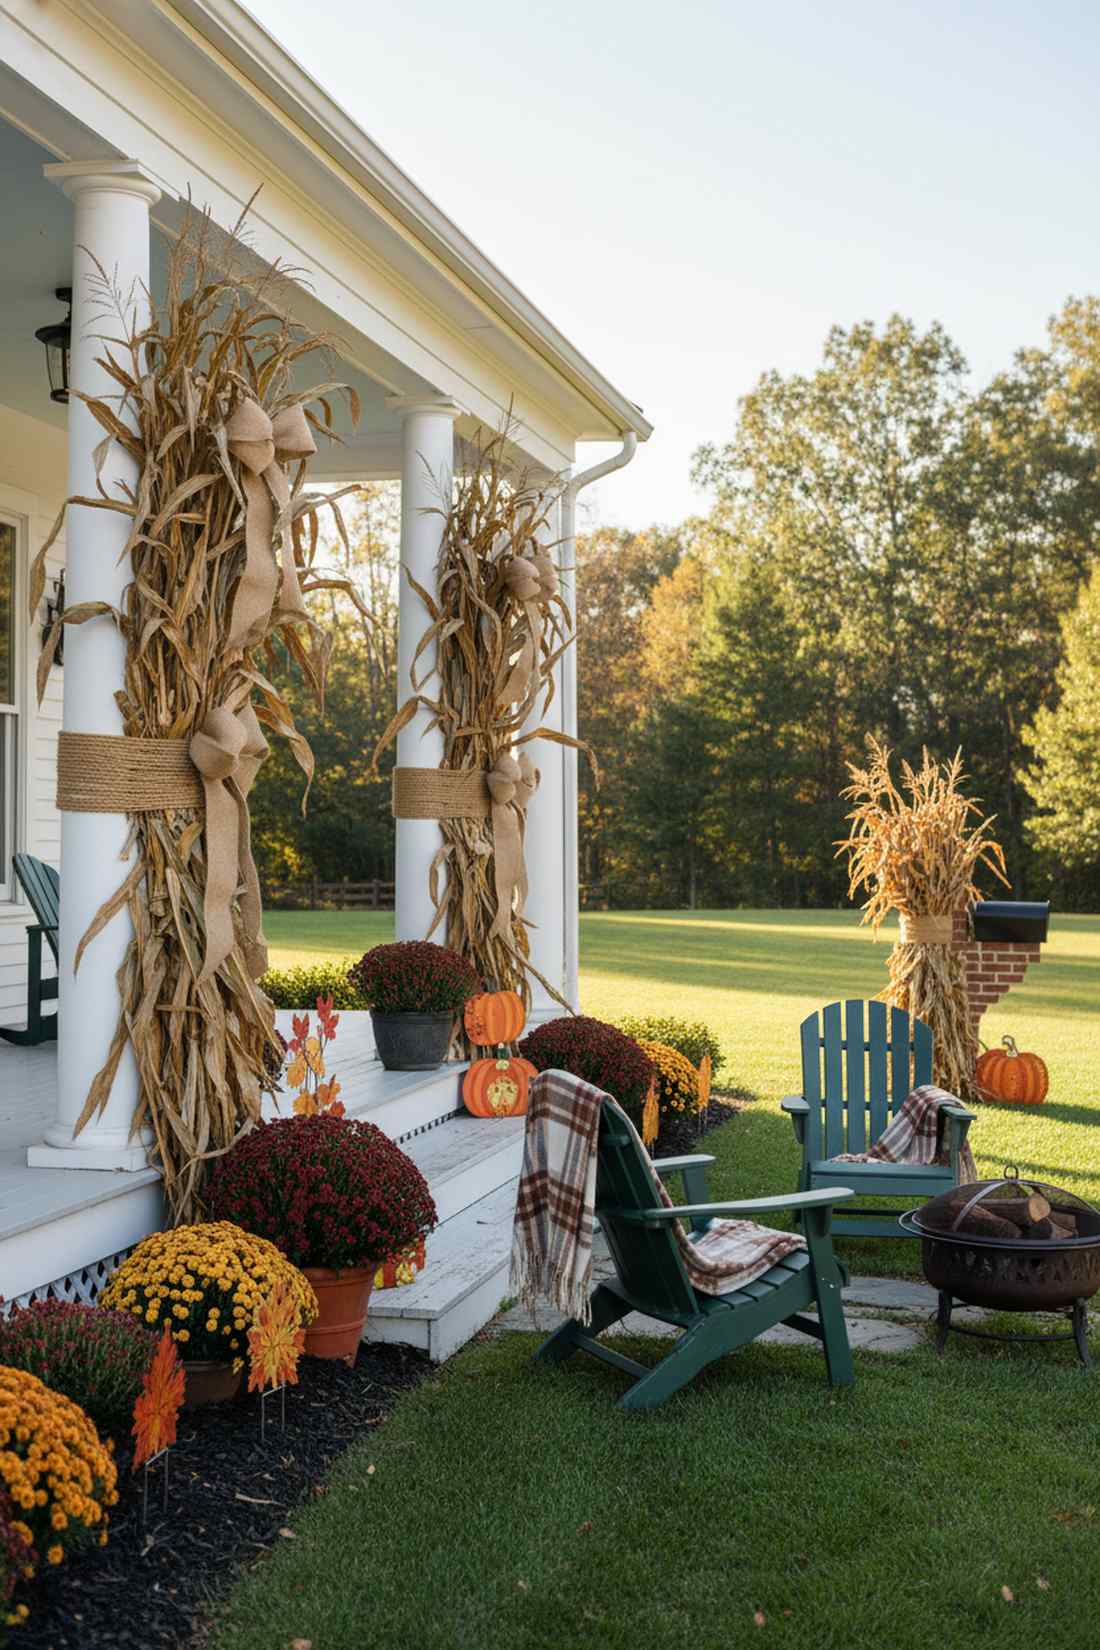
Brings a towering, textural warmth that visually frames your home’s architecture perfectly. Utilizing these dried harvest columns works phenomenally when tied flush against stark white porch pillars or brick mailbox posts.
Tying up two flimsy stalks looks pathetic, but densely packing a dozen thick stalks adds massive visual weight without draining the wallet. Securing them with natural, thick jute rope instead of plastic zip ties tricks the eye into seeing a high-end theme park setup. Merging these with premium autumn yard stakes at the base grounds the entire installation.
A set of towering entryway bundles costs just $15–$30. It’s a fast upgrade that completely changes the vibe.
- Key Materials: Dried corn stalks, heavy natural twine, wide burlap ribbon
- Vibe / Style: Authentic autumn harvest
- Difficulty: Quick 10-minute install
- Budget Breakdown: Stalk Bundles: $20 | Twine/Ribbon: $5.
- Creator’s Tip: Soak the twine in water before tying; as it dries, it naturally shrinks and binds the stalks incredibly tight to the pillar.
- Smart Sourcing: premium dried corn stalk bundles (bulk) and heavy-duty natural jute twine rolls.
If you skip this upcoming lighting trick, you’re missing out on the easiest curb appeal boost of the season…
13. Galvanized Bucket Arrangements
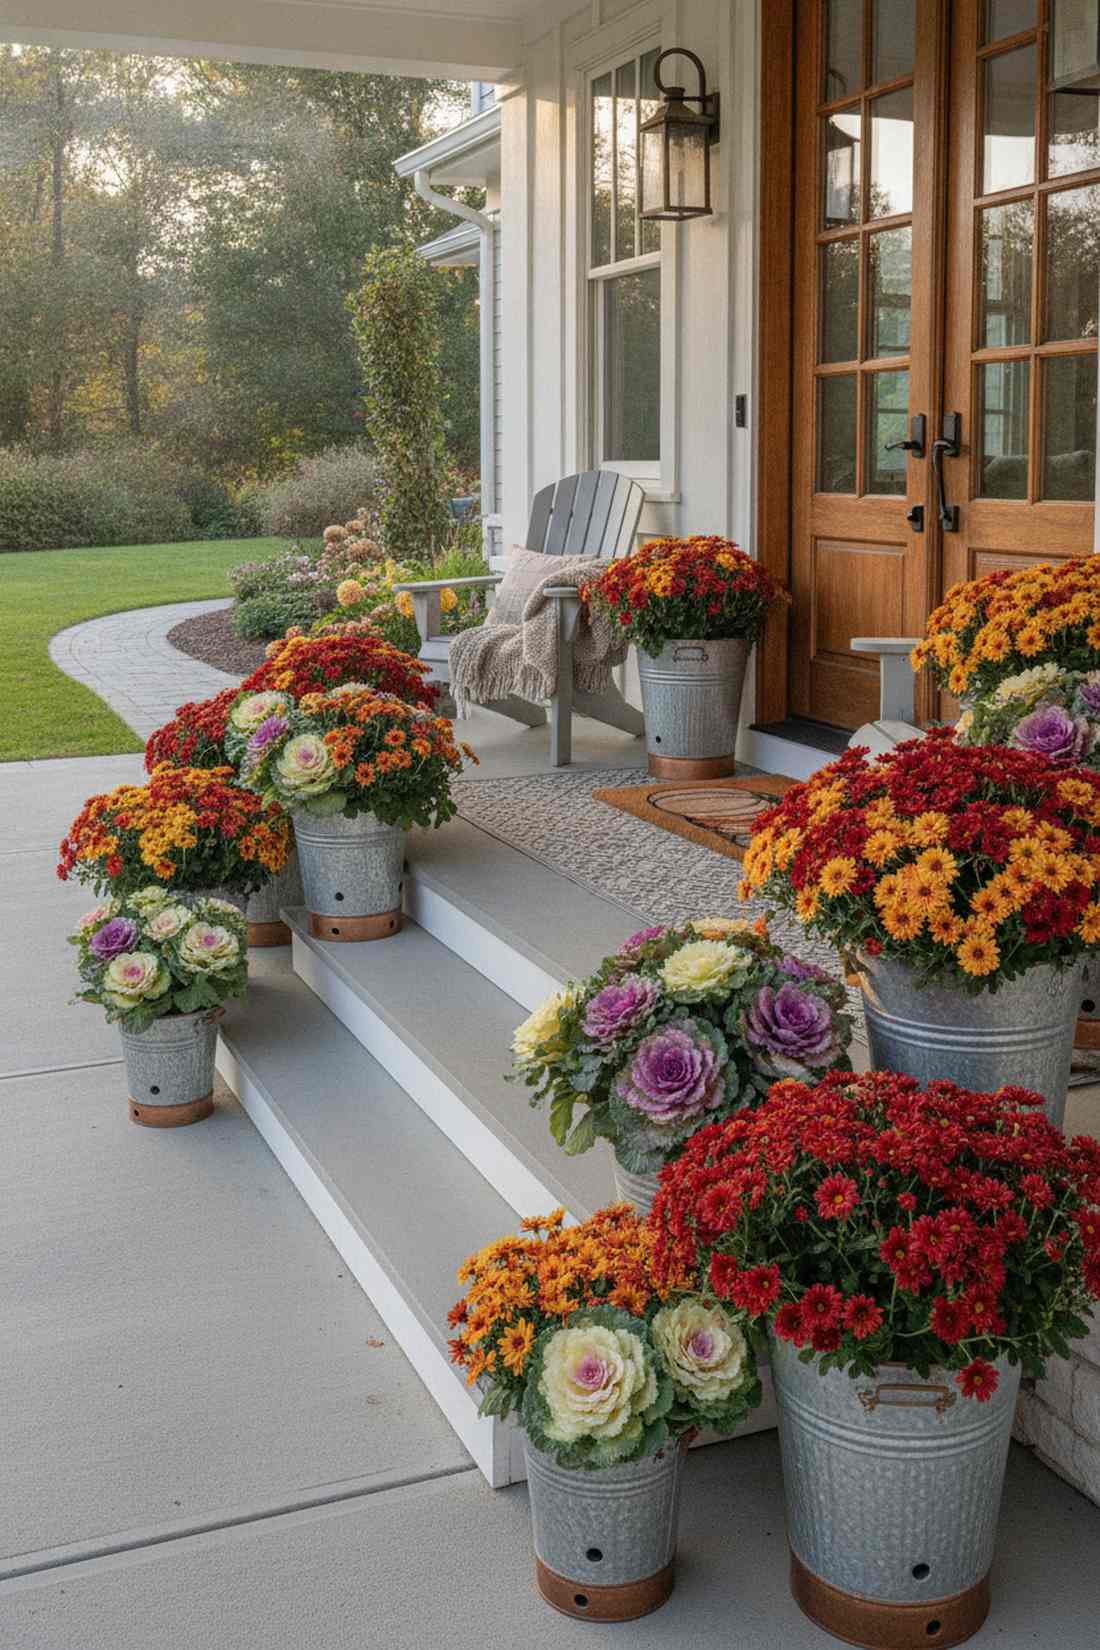
Feels exactly like a curated spread from a premium home and garden magazine. Dropping metal floral planters into your display is perfect for flanking front doors or layering the bottom steps of a staircase.
Cheap plastic pots ruin the harvest illusion, but utilizing weathered zinc and copper finishes looks far more expensive than it is. Stuffing them densely with oversized ornamental kale and vibrant mums elevates standard props into cinematic moments. Utilizing UV-resistant artificial autumn stems guarantees your display won’t wilt by late October.
You can execute these gorgeous metallic clusters for roughly $35–$55. Highly recommended for a quick weekend win.
- Key Materials: Varied galvanized buckets, large autumn mums, potting soil
- Vibe / Style: Chic vintage agriculture
- Difficulty: Standard container gardening
- Budget Breakdown: Metal Buckets: $25 | Florals/Soil: $25.
- Creator’s Tip: Drill three holes in the bottom of each metal bucket so heavy autumn rains don’t drown the root systems of your live plants.
- Smart Sourcing: vintage galvanized bucket sets (3-pack) and UV-coated faux autumn mums.
14. Etched Pumpkin Displays
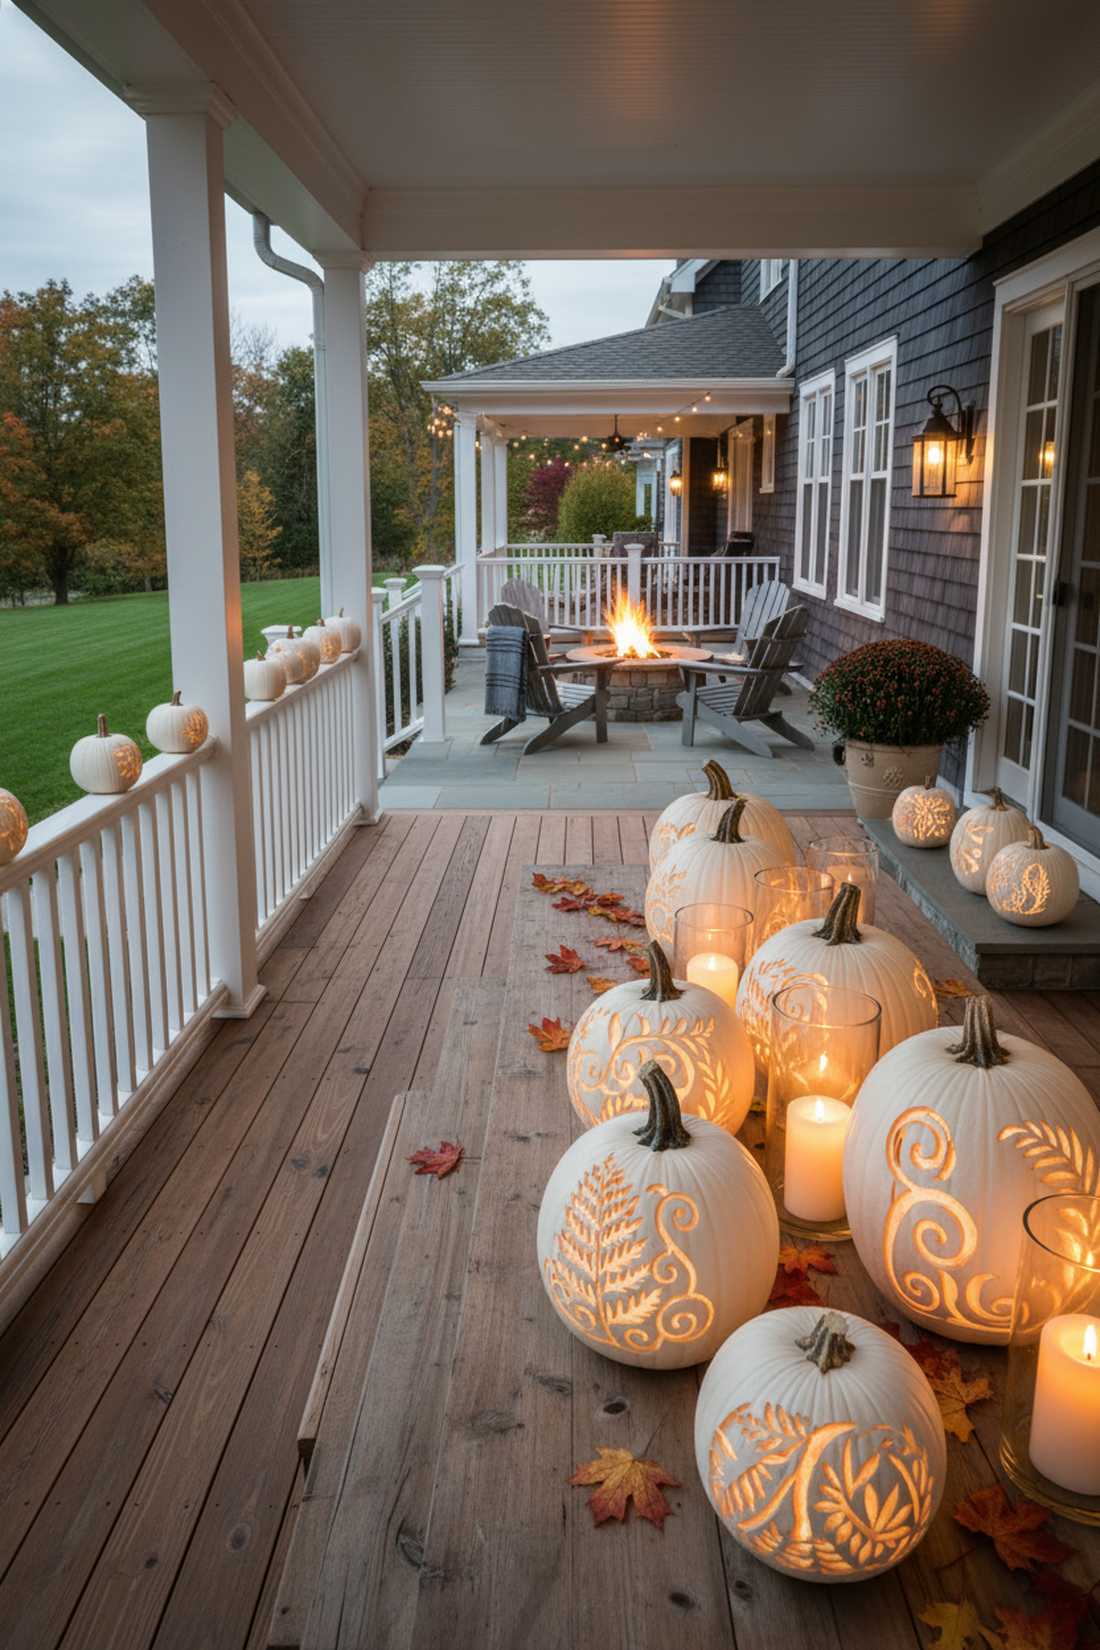
Exudes a sophisticated, gallery-quality artistry that puts standard jagged jack-o-lanterns to shame. This surface-carved botanical setup looks stunning as a dining patio centerpiece or lining an upscale porch railing.
Cutting all the way through a pumpkin causes it to rot in days, but gently shaving just the outer rind delivers a surprisingly premium look. Carving elegant ferns and intricate vines into white-painted gourds bypasses that cheap plastic aesthetic entirely. Implementing sharp, high-quality carving chisels ensures those crisp, professional lines stay intact.
This high-end artistic touch costs a mere $15–$25 in supplies. Pin this if you want a classy, rot-resistant pumpkin display!
- Key Materials: Smooth white pumpkins, linoleum carving tools, white acrylic paint
- Vibe / Style: Elegant botanical harvest
- Difficulty: Requires a steady hand and patience
- Budget Breakdown: Pumpkins: $15 | Carving Tools: $10.
- Creator’s Tip: Rub petroleum jelly or spray clear acrylic over the exposed etched areas to seal in moisture and prevent premature shriveling.
- Smart Sourcing: professional linoleum carving tool kits and matte white protective acrylic spray.
15. Wire Basket Pumpkin Stacks

Delivers incredible vertical volume without sacrificing your precious walking space. Building an industrial wire tier is the smartest solution for cramped apartment balconies or narrow front stoops.
Simply piling gourds on the floor looks chaotic, but containing them in structured, black iron meshes transforms a basic corner into a professional-grade set. Mixing deep greens, whites, and classic orange mini-pumpkins inside the cages forces neighbors to stop and stare at the texture. Sourcing high-grade metal organizational baskets ensures the tower won’t collapse under the weight.
A towering three-tier setup usually runs between $30–$50. Save this layout for your small space autumn upgrade!
- Key Materials: Stacking wire storage baskets, mixed mini pumpkins/gourds, black zip ties
- Vibe / Style: Modern industrial farmhouse
- Difficulty: Very easy assembly
- Budget Breakdown: Wire Baskets: $25 | Mini Gourds: $20.
- Creator’s Tip: Secure the baskets together using hidden black zip ties at the back joints so playful outdoor animals don’t knock the tower over.
- Smart Sourcing: stacking wire basket tiers (industrial grade) and bulk packs of assorted faux mini gourds.
16. Decorative Cabbage and Kale Plantings

Adds a lush, ruffled burst of rich purple and cream that perfectly offsets the dominant orange of the season. Layering these ornamental cool-weather crops is ideal for filling out large empty flower beds once the summer blooms die off.
Most yards look barren by October, but packing these oversized rosettes tightly together gives a designer-level finish to standard landscaping. The deep violet tones mimic massive alien roses, which seamlessly sneaks a spooky yet elegant vibe into your garden design. Utilizing premium gardening fertilizers keeps the colors incredibly vibrant through the first frost.
A dense planting arrangement costs roughly $25–$45. It holds up beautifully against harsh autumn winds.
- Key Materials: Live ornamental cabbage/kale, rich potting soil, vintage wooden crates
- Vibe / Style: Lush botanical opulence
- Difficulty: Basic seasonal planting
- Budget Breakdown: Live Plants: $30 | Crates/Soil: $15.
- Creator’s Tip: These plants actually get more colorful when the temperature drops; don’t panic if they look a bit pale in September!
- Smart Sourcing: weather-treated vintage wooden crates and high-yield autumn bloom fertilizers.
Warning: The next blueprint might actually cause traffic jams in your neighborhood…
Creature Invasion Themes
Creature displays focus on single monster types overtaking the property through repetition and strategic placement. The concentrated approach creates memorable impact through thematic consistency rather than mixed prop collections.
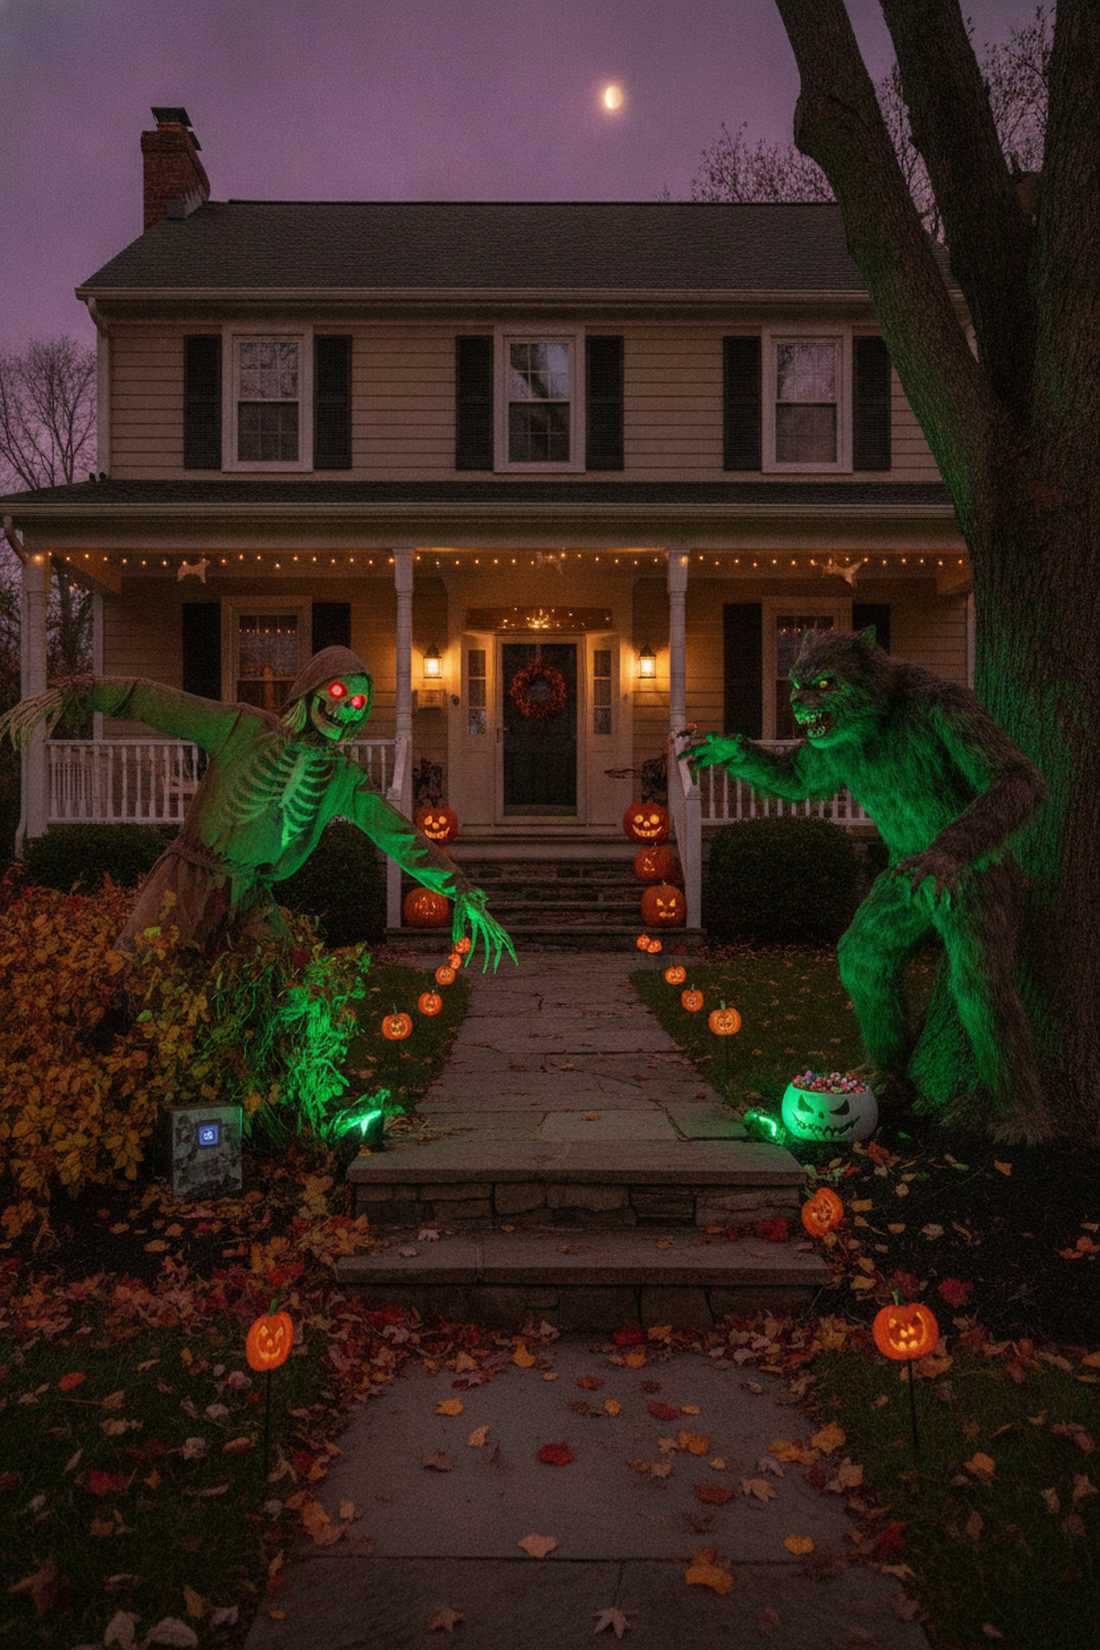
17. Giant Spider Invasion
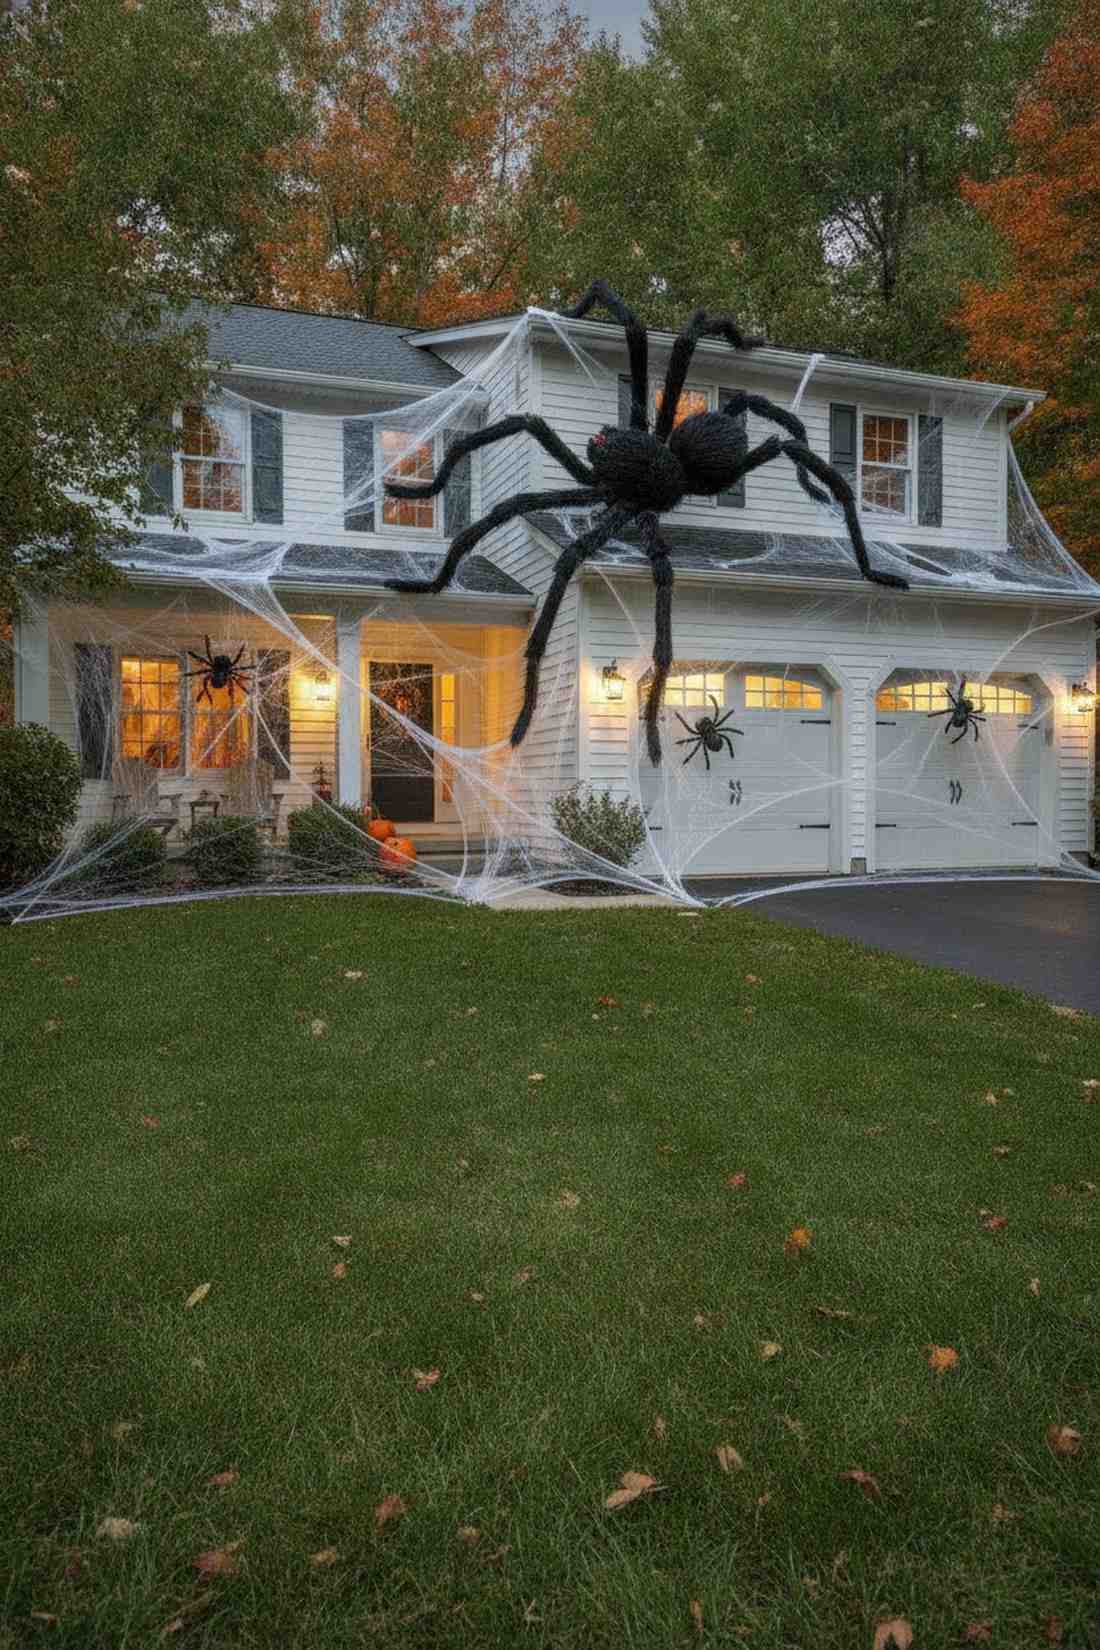
Creates a heart-stopping phobic reaction that is impossible to ignore from the street. Staging a massive arachnid climb looks incredibly aggressive stretched across a brightly lit garage door or two-story facade.
A single small bug in a bush goes unnoticed, but slapping a massive 6-foot hairy creature onto the siding immediately establishes a dominant focal point. Stretching industrial-grade webbing heavily around the anchor points tricks the eye into seeing a high-end theme park setup. Upgrading to oversized posable Halloween props means the legs can grip the gutters realistically.
This massive exterior scare costs surprisingly little, around $35–$60. Pin this if you want maximum impact with minimal props!
- Key Materials: Oversized posable spider props, stretch webbing, exterior command hooks
- Vibe / Style: B-movie monster terror
- Difficulty: Requires ladder and reaching
- Budget Breakdown: Giant Spider: $30 | Webbing/Hooks: $15.
- Creator’s Tip: Bend the joints so the spider looks like it is actively crawling upward, rather than just pinning it flat like a star.
- Smart Sourcing: giant 6-foot posable spider props and heavy-duty outdoor adhesive hooks.
18. Bat Swarm Display
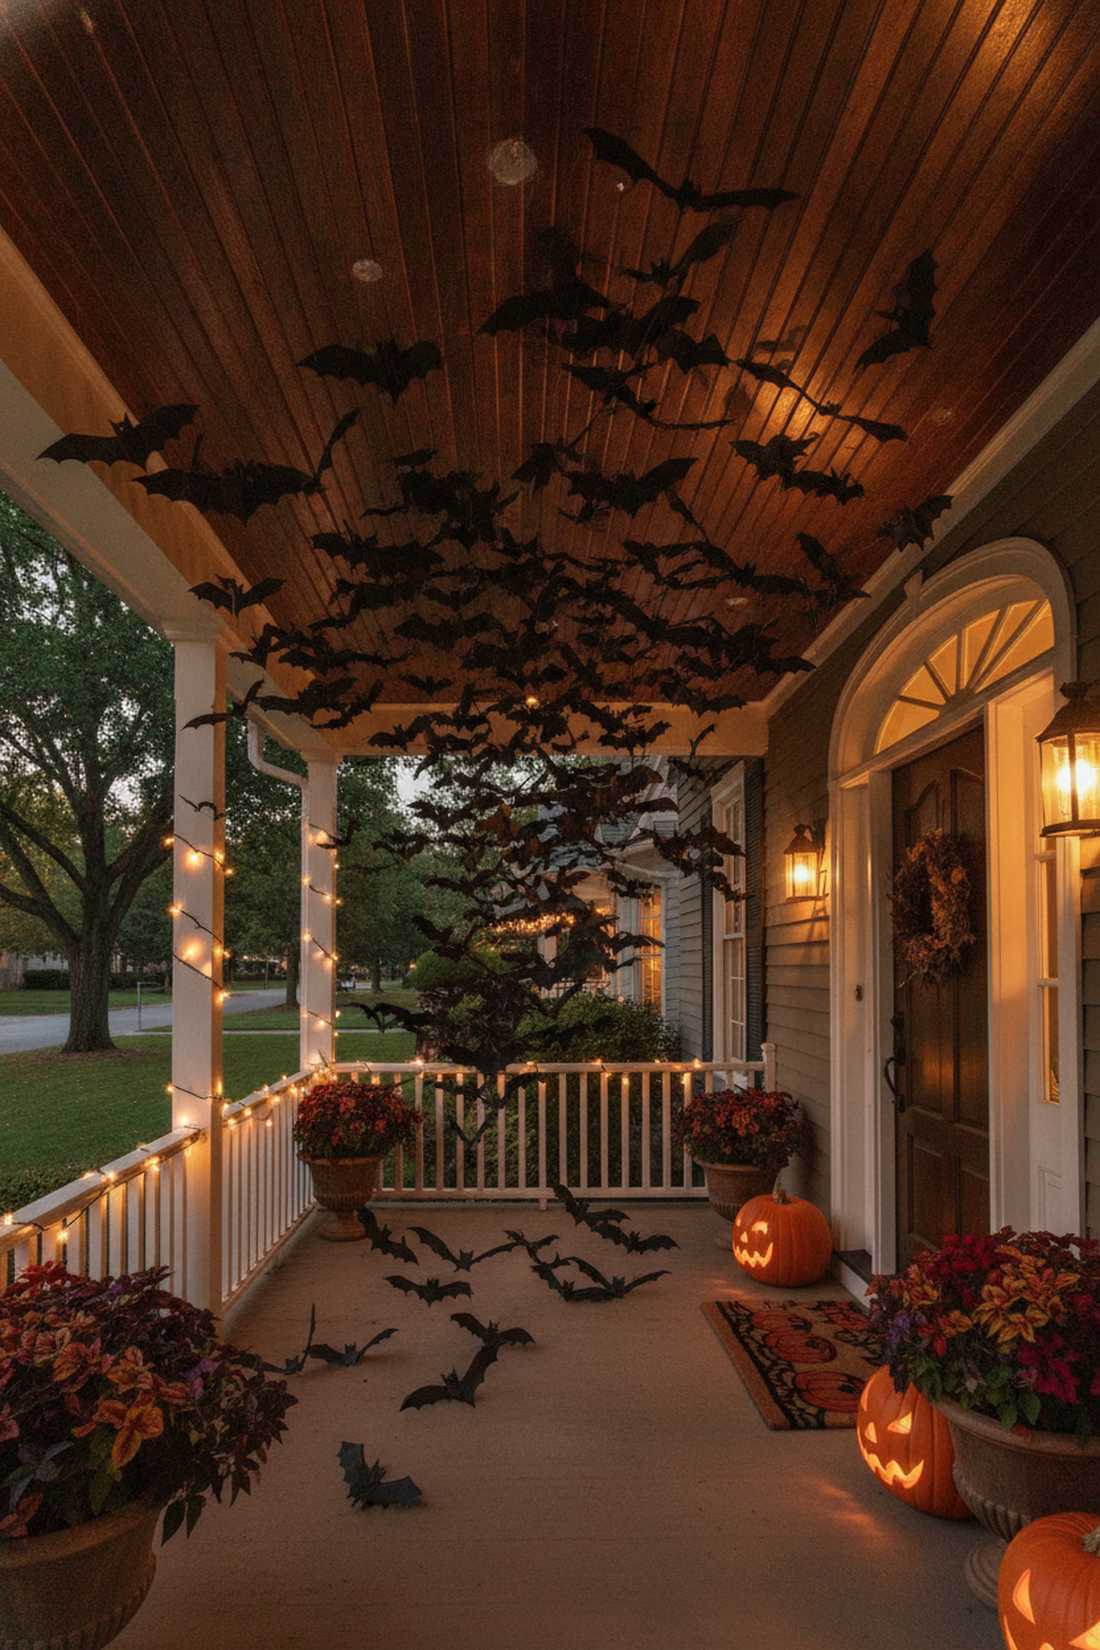
Generates an incredibly dynamic sense of frantic motion right above your guests’ heads. Stringing up a suspended bat flock works best when clustered tightly near front porch ceilings or swooping out of an attic vent.
Taping a few flat cutouts to a door is boring, but hanging dozens on invisible lines looks far more expensive than it is. Staggering the heights and varying the wingspans bypasses that cheap plastic aesthetic entirely by creating forced perspective. Incorporating heavy-duty waterproof craft plastics prevents the wings from drooping in the morning dew.
You can create a massive overhead swarm for just $15–$25. Such a low-effort way to boost curb appeal.
- Key Materials: Black weather-resistant craft plastic, fishing line, clear thumbtacks
- Vibe / Style: Frenzied gothic motion
- Difficulty: Tedious but simple
- Budget Breakdown: Plastic Sheets: $15 | Line/Tacks: $5.
- Creator’s Tip: Fold the wings slightly inward at the base before hanging them to give a 3D illusion of flapping flight.
- Smart Sourcing: pre-cut 3D weather-resistant bat silhouettes and high-tension invisible fishing line.
19. Skeleton Party Scene
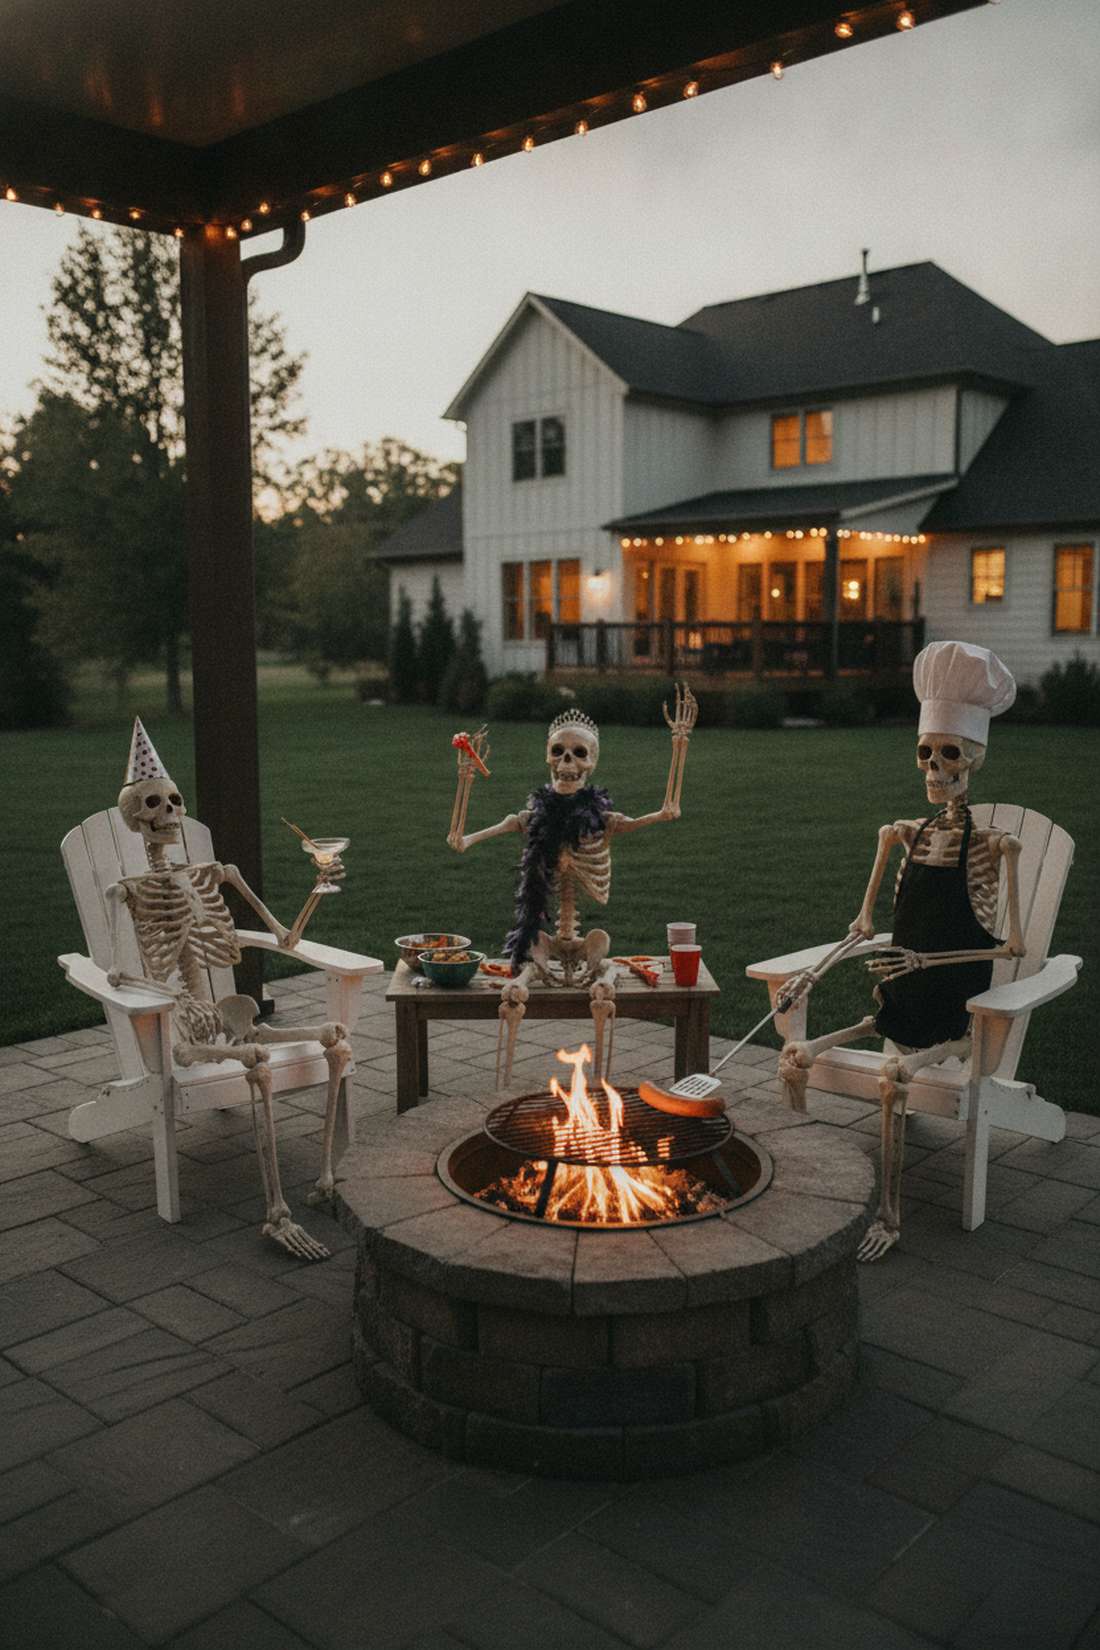
Injects a massive dose of dark humor that breaks up the terrifying elements of the neighborhood. This humorous bone vignette fits perfectly lounging in adirondack lawn chairs or gathered around a patio fire pit.
Just standing skeletons up straight gets boring fast; manipulating them into highly expressive, human-like poses elevates standard props into cinematic moments. Dressing them in cheap party hats and giving them props forces neighbors to stop and stare at the ridiculous details. Utilizing top-tier posable animatronic joint figures ensures they won’t snap when you bend them.
A fun three-character hangout scene runs about $90–$130. Save this to your funny Halloween outdoor ideas board!
- Key Materials: Fully posable life-size skeletons, zip ties, thrifted party props
- Vibe / Style: Darkly comedic neighborhood hit
- Difficulty: Fun and creative positioning
- Budget Breakdown: Skeleton Trio: $100 | Props/Ties: $15.
- Creator’s Tip: Use transparent zip ties at the knees and elbows to lock the joints into place so they don’t slump over after a few days.
- Smart Sourcing: life-size posable skeleton bundle packs and heavy-duty transparent zip ties.
20. Ghost Congregation

Conjures a deeply ethereal, floating dread that shifts and dances with the wind. Forming a translucent phantom circle is incredible for populating the deep, shadowy corners of a large backyard.
Throwing a sheet over a stick looks lazy, but shaping rigid under-frames wrapped in sheer, flowing fabrics gives a designer-level finish to a classic concept. Placing upward-facing waterproof LEDs beneath them tricks the eye into seeing a high-end theme park setup. Slipping in some commercial outdoor lighting systems ensures their internal glow stays sharp all night.
A coven of floating spirits costs roughly $40–$70 to execute perfectly. No advanced crafting skills required to pull this off.
- Key Materials: Chicken wire forms, sheer white cheesecloth, battery-operated LED candles
- Vibe / Style: Classic floating spectral dread
- Difficulty: Moderate wire sculpting
- Budget Breakdown: Wire/Fabric: $30 | Internal Lights: $20.
- Creator’s Tip: Spray the cheesecloth with a mixture of water and liquid starch, then drape it over the wire to dry so it holds a haunting, rigid shape.
- Smart Sourcing: bulk rolls of outdoor-rated cheesecloth and waterproof LED puck lights (remote controlled).
Don’t buy another plastic prop until you see the genius spacing strategy coming up below.
21. Black Cat Silhouettes
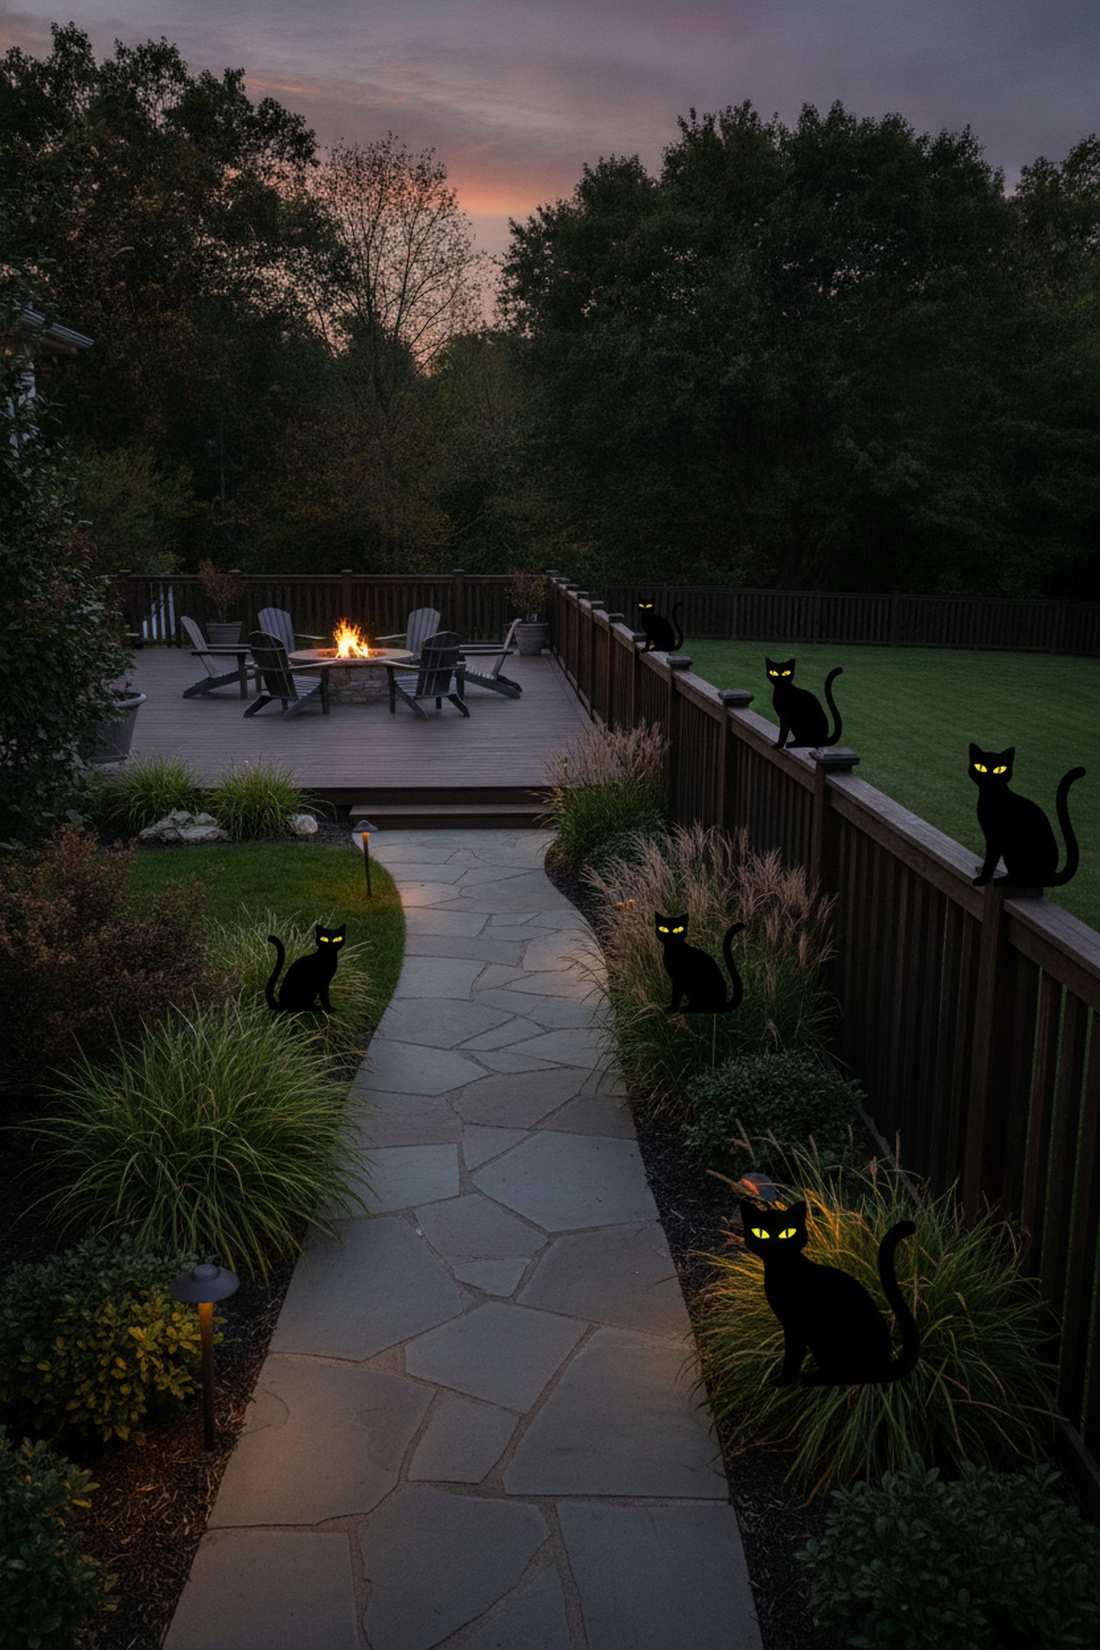
Creates a sleek, menacing border guard that glares directly at anyone walking up the path. Installing these feline profile markers is brilliant for capping the tops of wooden fences or hiding in tall ornamental grasses.
A flat piece of painted wood is forgettable, but adding highly reflective, glowing eyes adds massive visual weight without draining the wallet. Grouping them in stalking packs of three or five delivers a surprisingly premium look that feels intentional and predatory. Investing in waterproof yard sign stakes keeps them firmly planted during heavy storms.
You can line your perimeter with these guardians for $20–$35. Pin this for a sleek, minimalist Halloween edge!
- Key Materials: Corrugated black plastic, reflective yellow tape, metal ground stakes
- Vibe / Style: Sleek minimalist superstition
- Difficulty: Very easy cutting and staking
- Budget Breakdown: Plastic Boards: $15 | Reflective Tape/Stakes: $10.
- Creator’s Tip: Angle the cats slightly inward toward the walkway so approaching headlights or flashlights catch the reflective eyes immediately.
- Smart Sourcing: pre-cut black corrugated plastic sheets and high-visibility reflective yellow tape.
Mystical Witch Setups
Witch-themed displays evoke mysterious forest clearings where supernatural gatherings occur. These setups benefit from layered lighting, smoke effects, and potion-making accessories that suggest active enchantment work.
22. Bubbling Cauldron Centerpiece
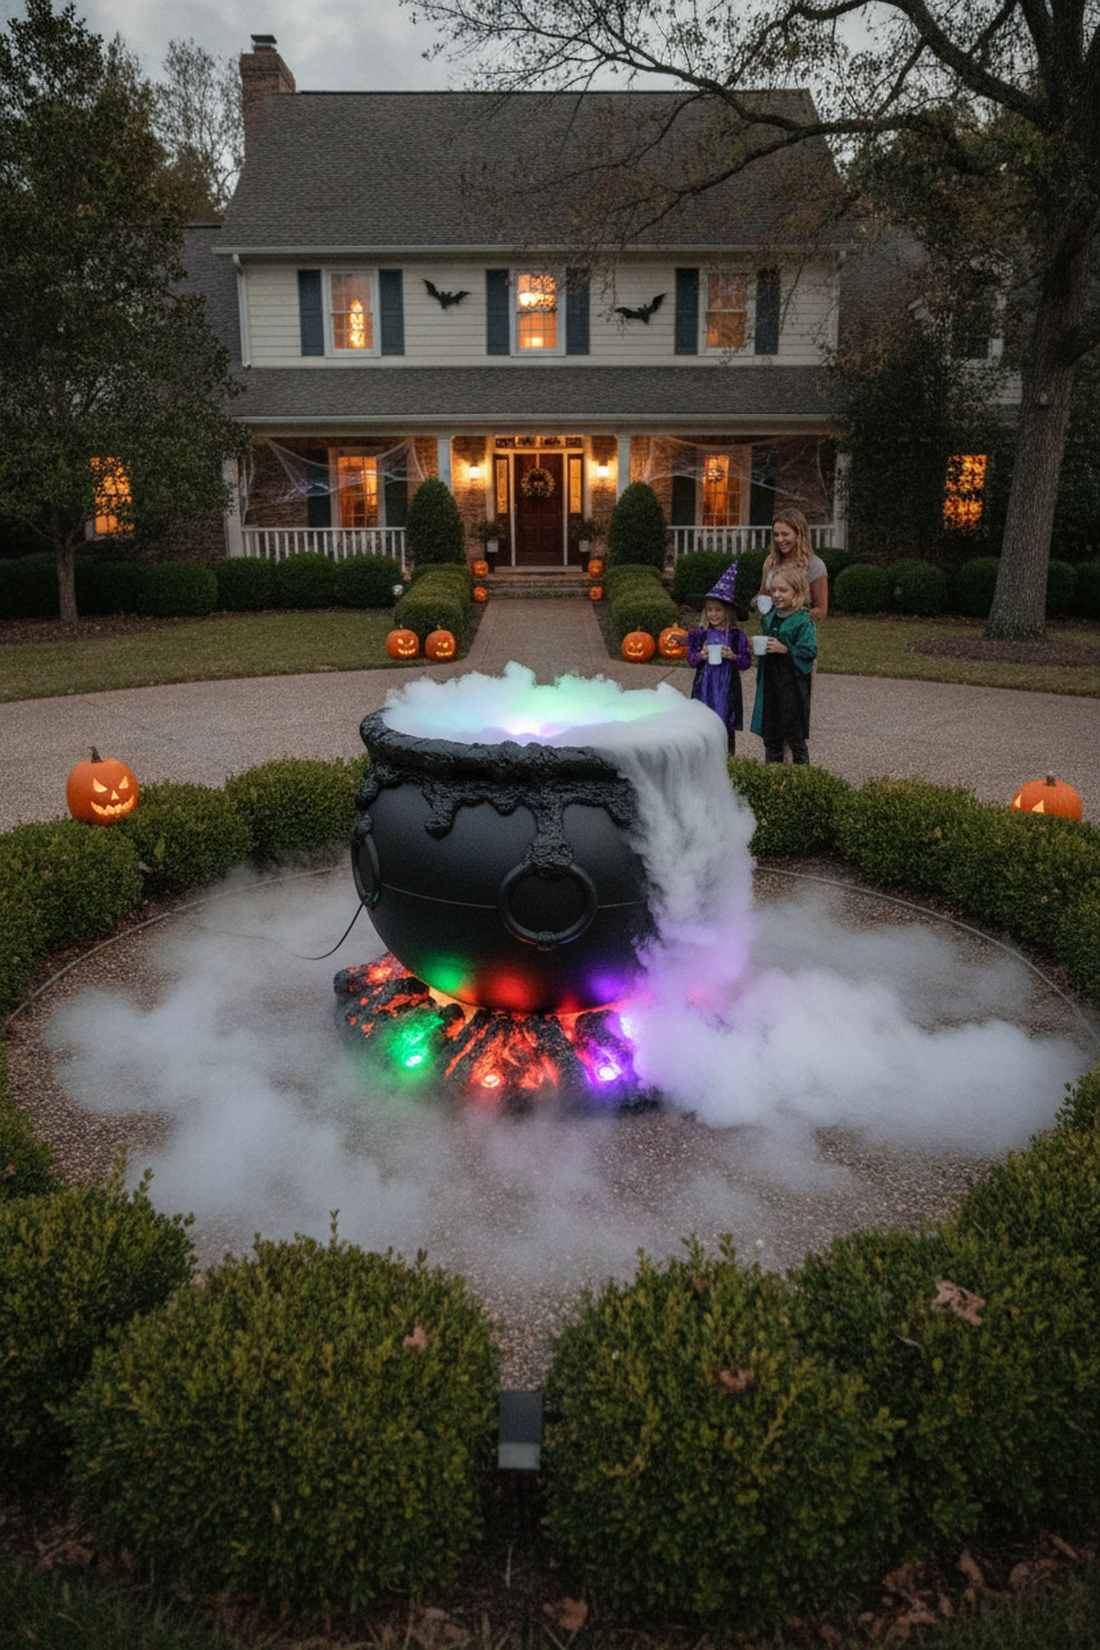
Acts as the mesmerizing, glowing heart of any magical yard display. This smoke-spewing potion pot works brilliantly positioned right in the center of a circular driveway or heavily trafficked front walkway.
A dry plastic pot looks pathetic, but building a faux fire base underneath it looks far more expensive than it is. Adding dry ice and waterproof color-changing LEDs immediately establishes a dominant focal point that kids go crazy for. Hooking up a miniature fog machine accessory directly into the pot guarantees a relentless flow of heavy mist.
This premium Hollywood-style centerpiece costs about $50–$85 to build. Save this layout for your ultimate witchy yard project!
- Key Materials: Oversized black plastic cauldron, dry ice/fog machine, waterproof color-changing LEDs
- Vibe / Style: Magical theatrical spell-casting
- Difficulty: Intermediate special effects
- Budget Breakdown: Cauldron: $30 | Fog/Lights: $40.
- Creator’s Tip: Use expanding spray foam painted black around the rim to make it look like the toxic glowing potion is permanently bubbling over the edges.
- Smart Sourcing: commercial-grade oversized plastic cauldrons and submersible color-changing LED pucks.
23. Witch Hat Floating Display
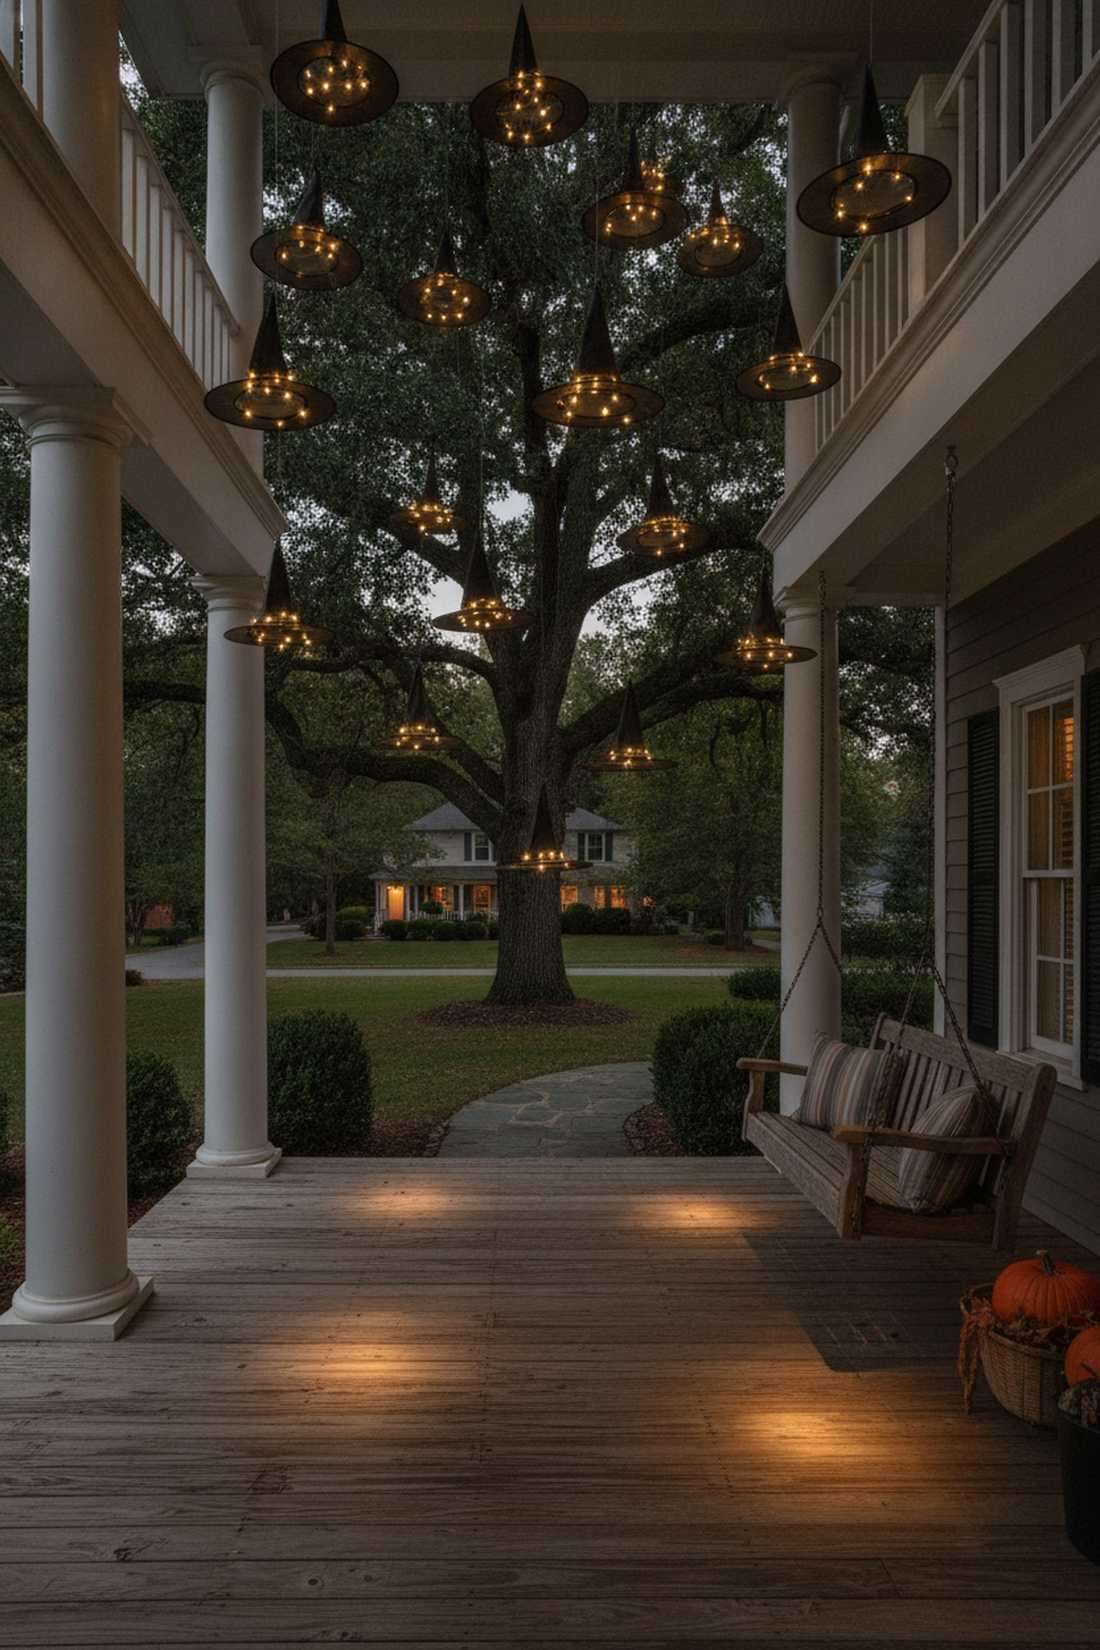
Creates an absolutely enchanting optical illusion that dominates the vertical space above your porch. Hanging this suspended magical hat canopy is perfect for framing large overhangs or thick tree branches bordering the sidewalk.
Most decorators just leave the hats dark, but threading internal fairy lights transforms a basic corner into a professional-grade set. Suspending them at wildly different heights using invisible tension wire bypasses that cheap plastic aesthetic entirely. Utilizing pre-lit waterproof hanging props saves you hours of frustrating wire splicing.
A canopy of a dozen glowing hats will run you $35–$50. It’s a fast upgrade that completely changes the vibe.
- Key Materials: Black nylon witch hats, fishing line, battery-operated LED string lights
- Vibe / Style: Whimsical floating enchantment
- Difficulty: Simple stringing and tying
- Budget Breakdown: Hats (Dozen): $20 | String Lights: $20.
- Creator’s Tip: Put a safety pin through the very peak of the inside of the hat to tie your fishing line to—it prevents the nylon from ripping in the wind.
- Smart Sourcing: pre-threaded LED floating witch hats (bulk pack) and heavy-duty invisible hanging wire.
24. Broomstick Parking Area
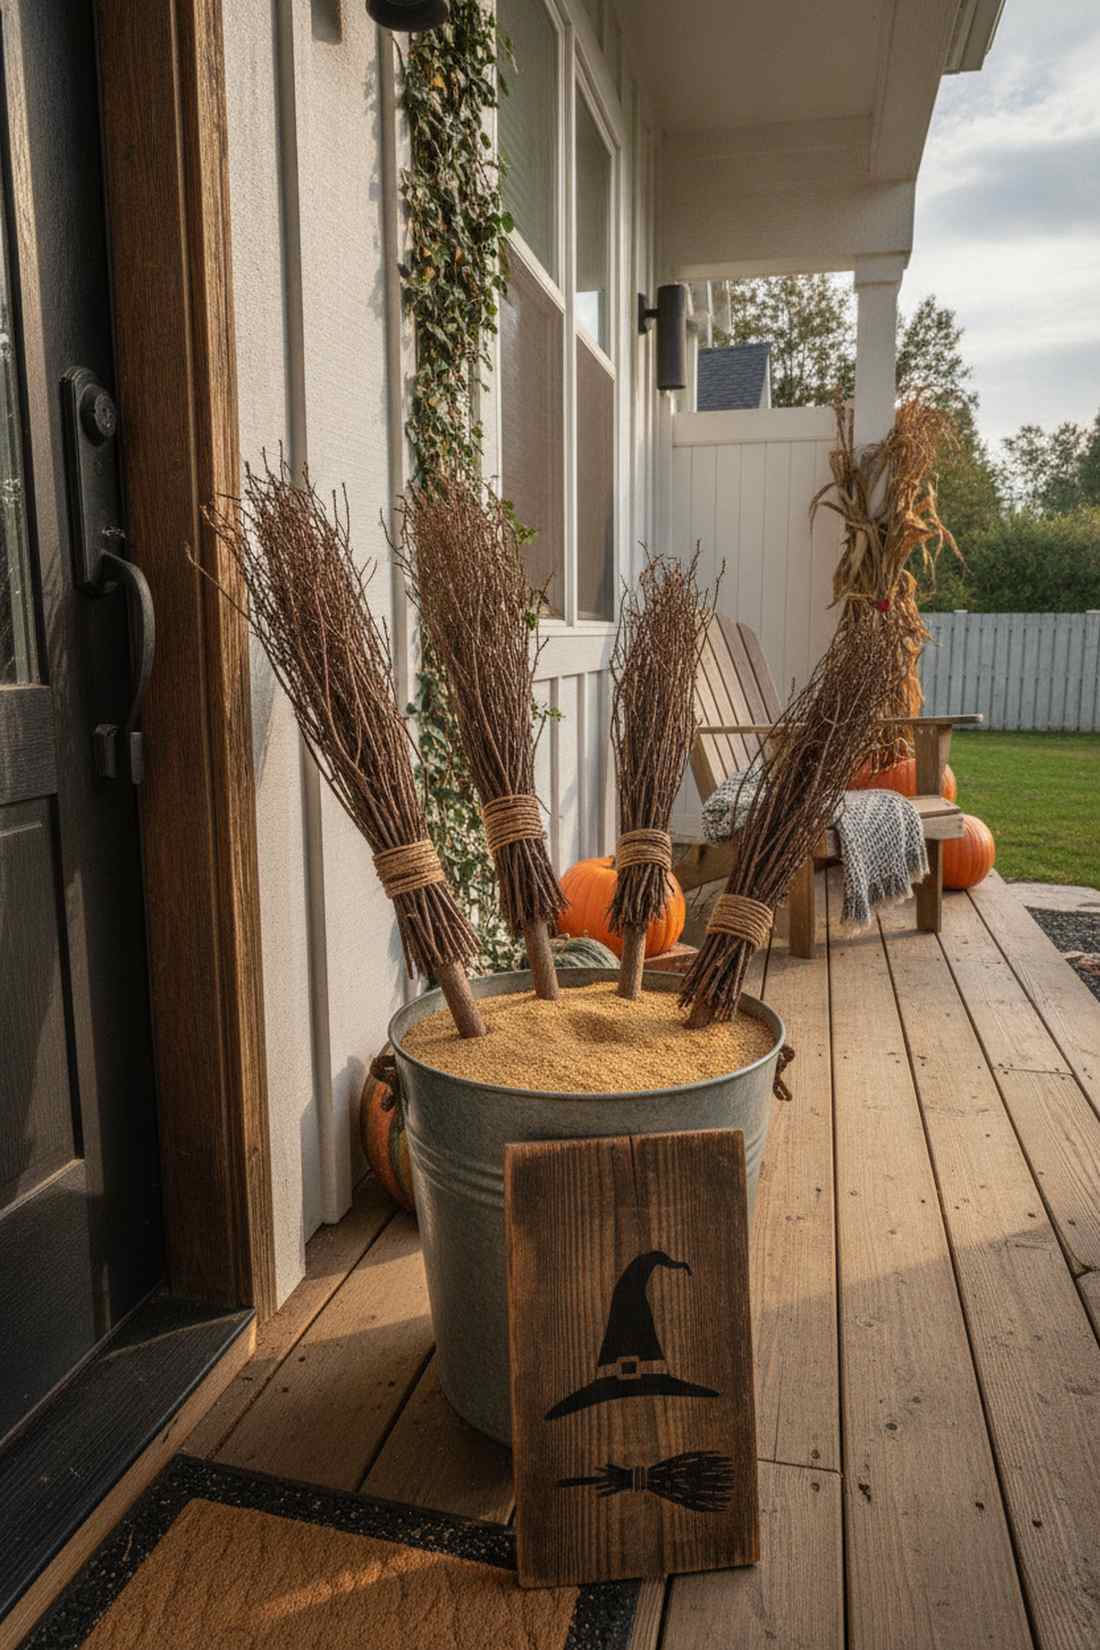
Adds a clever, highly photogenic interactive corner that begs for social media snaps. Setting up a rustic broom stand fits beautifully beside the front door or leaning against a wooden fence post.
Leaning a standard plastic house broom is a total fail, but bundling real gnarly twigs around thick branches gives a designer-level finish to a simple joke. Anchoring them in a heavy galvanized bucket filled with sand elevates standard props into cinematic moments. Blending in some premium rustic yard signage completes the exact aesthetic.
This cheeky entryway prop costs practically nothing, maybe $15–$25. Highly recommended for a quick weekend win.
- Key Materials: Natural stick brooms, galvanized bucket, play sand, handmade wooden sign
- Vibe / Style: Playful magical rest stop
- Difficulty: Very easy assembly
- Budget Breakdown: Brooms/Bucket: $20 | Sand/Signage: $5.
- Creator’s Tip: For authenticity, use a blowtorch lightly on the bottom of the broom bristles to make them look scorched from “re-entry.”
- Smart Sourcing: authentic cinnamon-scented twig brooms and weatherproof rustic wooden sign blanks.
This following technique is heavily guarded by professional haunted house designers…
Material Guide: Cheap vs. Premium Aesthetic
Knowing exactly where to save and where to spend makes all the difference in achieving that “looks expensive but isn’t” vibe while minimizing weather damage.
- Standard Plastics vs. UV-Resistant Resin: Basic store-bought skeletons become brittle and yellow under October sun. Upgrading to commercial-grade, UV-coated resin props stops fading and ensures your investment lasts for a decade.
- Pre-wired Kits vs. Local Hardware Sourcing: Attempting to splice your own outdoor LED systems often leads to blown fuses. Investing in UL-listed waterproof starter kits saves massive installation time and eliminates moisture failure.
25. Potion Bottle Collection
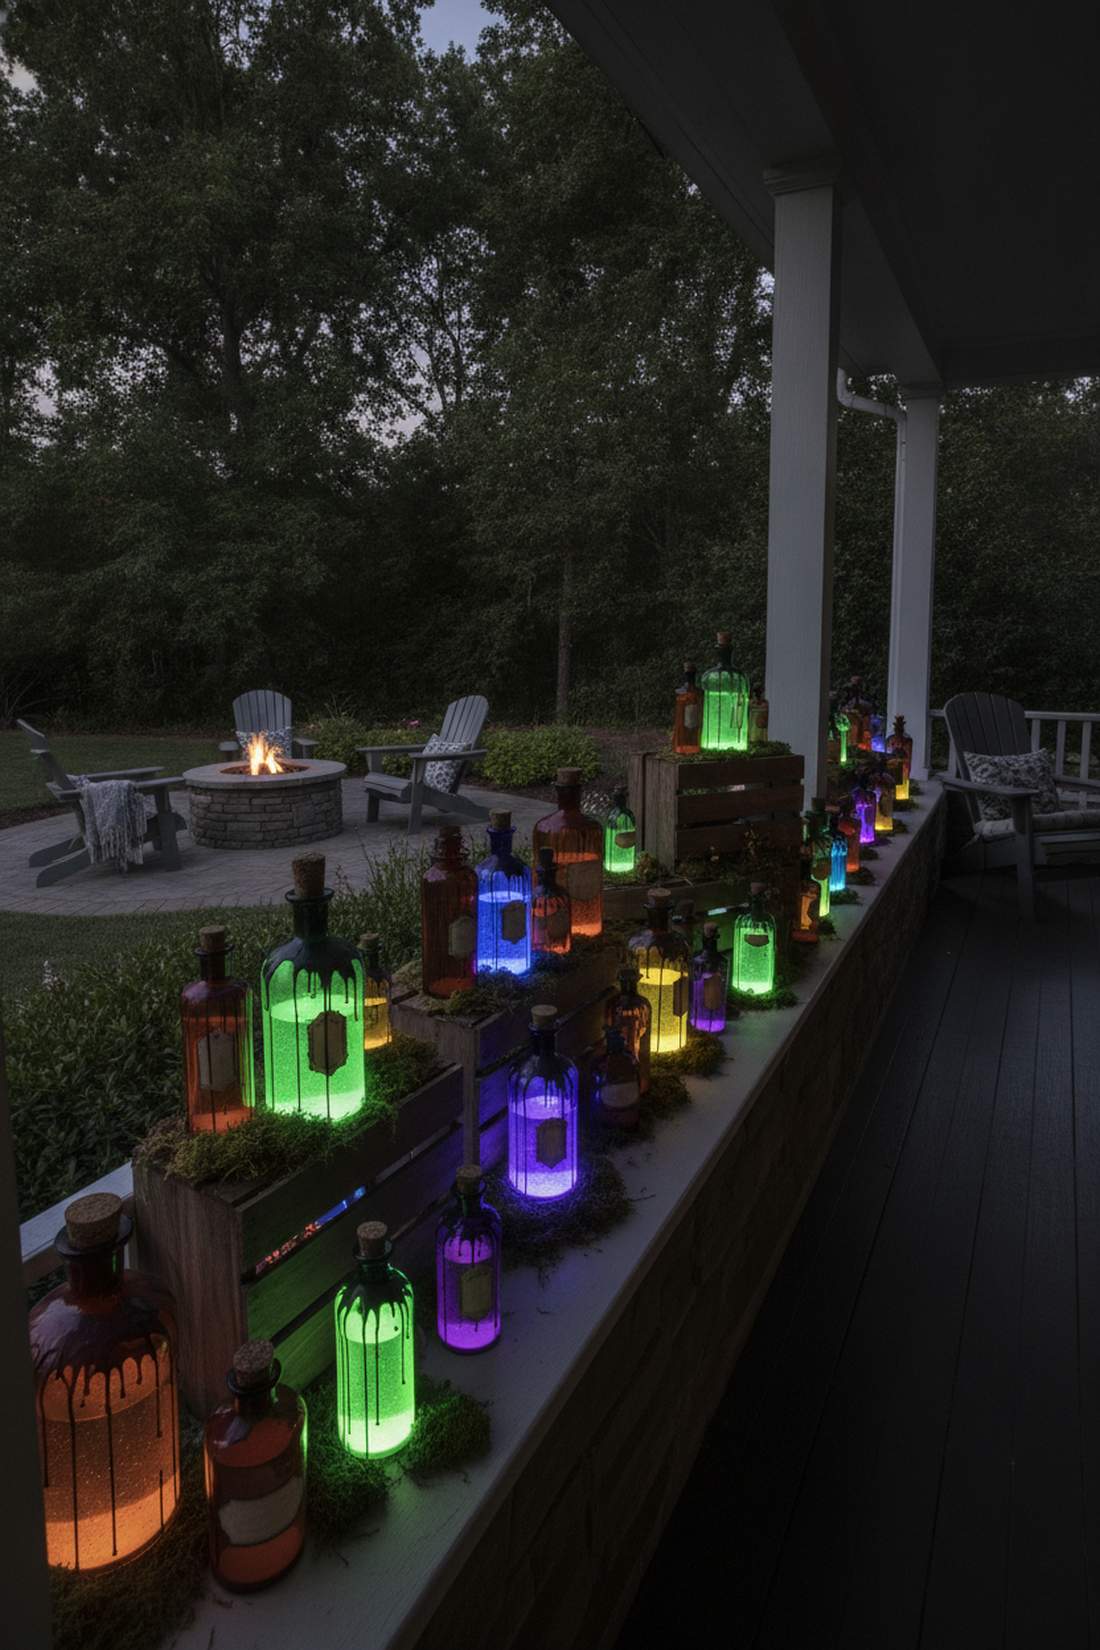
Fills the dark, empty ledges of your porch with tiny, mysterious glowing details. Curating an illuminated apothecary spread works exceptionally well stacked on vintage crates or wide windowsill ledges.
Just leaving empty bottles out looks like trash, but filling them with vibrant, backlit liquids forces neighbors to stop and stare. Burning the edges of custom labels and sealing the corks with real dripping wax delivers a surprisingly premium look. Leveraging premium miniature garden supplies like faux moss under the bottles grounds the whole setup perfectly.
A sprawling, glowing bottle collection costs roughly $20–$30 to curate. Save this to your spooky detailing board!
- Key Materials: Assorted glass bottles, food coloring, corks, LED backlighting
- Vibe / Style: Detailed dark academia apothecary
- Difficulty: Fun detail-oriented crafting
- Budget Breakdown: Thrifted Bottles: $15 | Lights/Wax: $10.
- Creator’s Tip: Drop a broken-open highlighter pen into the water bottles instead of food dye; under a cheap blacklight, the liquids will glow radioactive neon.
- Smart Sourcing: vintage amber glass apothecary bottle sets and waterproof UV blacklight flood strips.
26. Witch Silhouette Against Moon
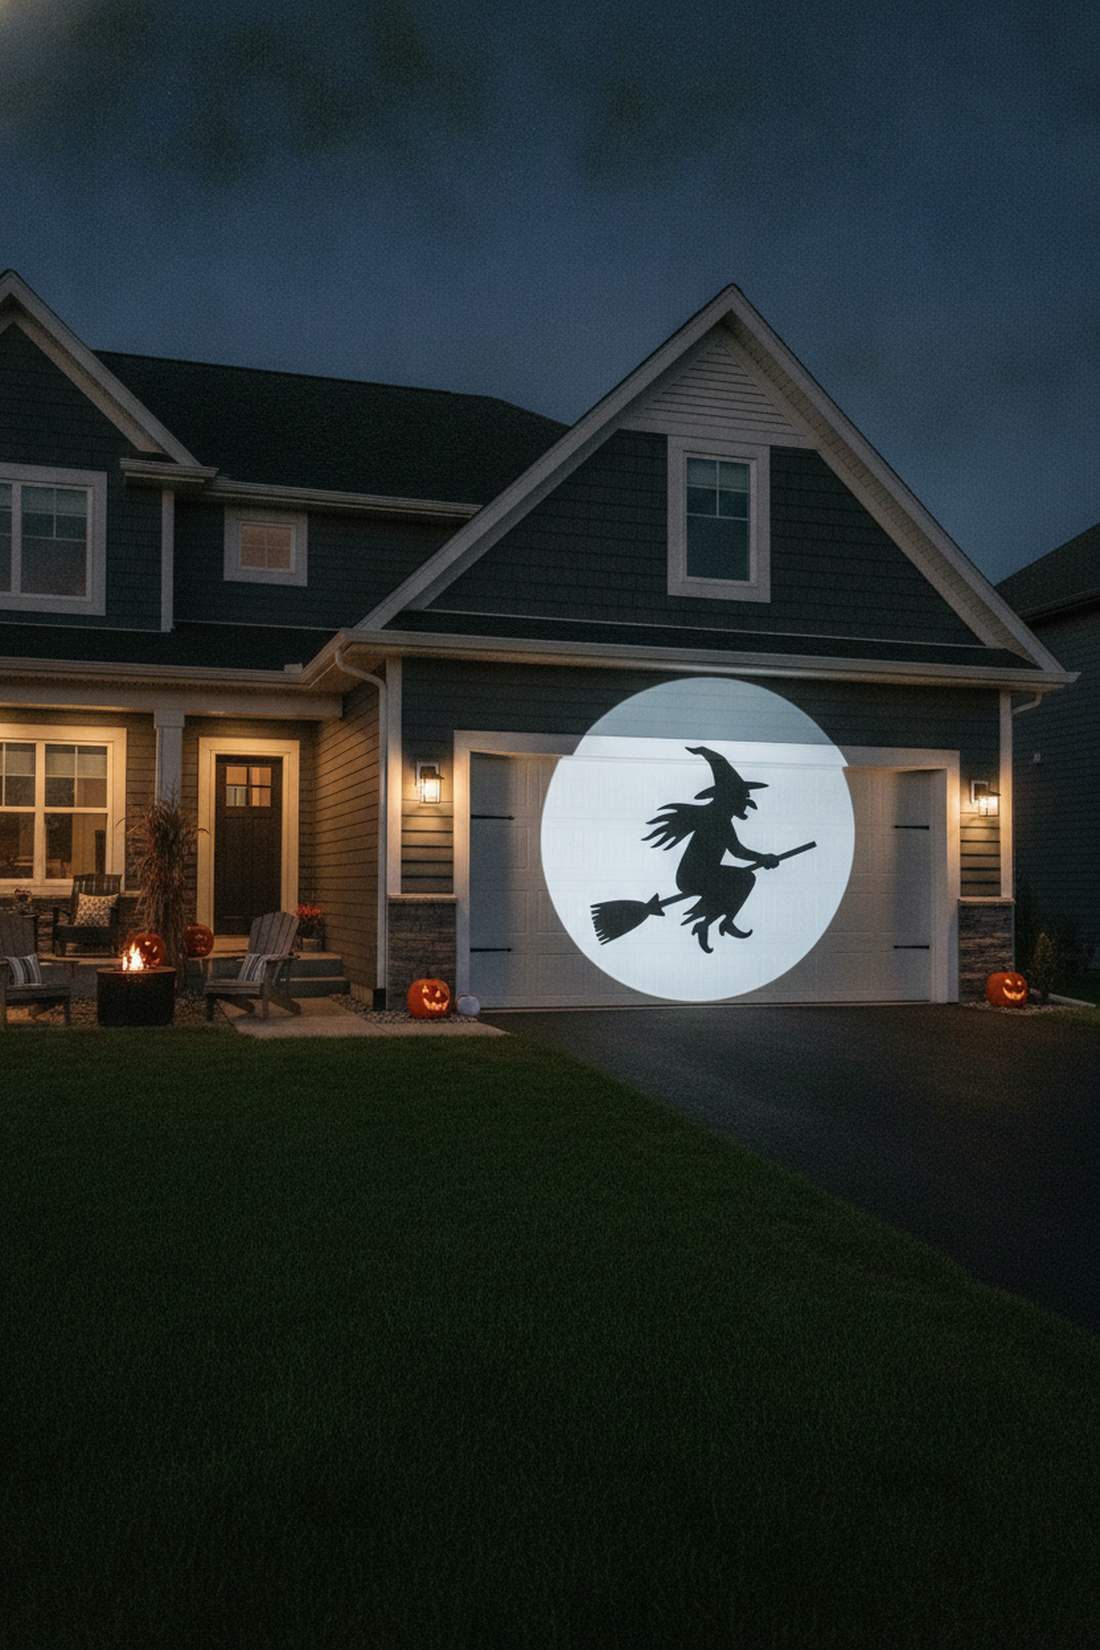
Paints a massive, unmistakable shadow graphic right onto your property’s exterior. This high-contrast backlight projection is the ultimate solution for large, blank garage doors or flat two-story walls.
Using cheap paper cutouts warps immediately, but carving a sharp profile out of rigid foam board looks far more expensive than it is. Backlighting a massive white circular screen with a pure white floodlight tricks the eye into seeing a high-end theme park setup. Utilizing weather-resistant projector fabrics ensures the “moon” stays taut and bright.
This massive architectural shadow box costs about $40–$60. Such an incredible way to utilize dead wall space!
- Key Materials: Rigid black foam board, white projection fabric, high-lumen white spotlight
- Vibe / Style: Bold graphic storybook icon
- Difficulty: Intermediate mounting
- Budget Breakdown: Foam Board/Fabric: $30 | Spotlight: $25.
- Creator’s Tip: Mount the black silhouette exactly 4 inches away from the white fabric screen to give the shadow intense, 3D pop.
- Smart Sourcing: weatherproof outdoor projection screen material and heavy-duty black PVC foam boards.
27. Trash Bag Spider Webs
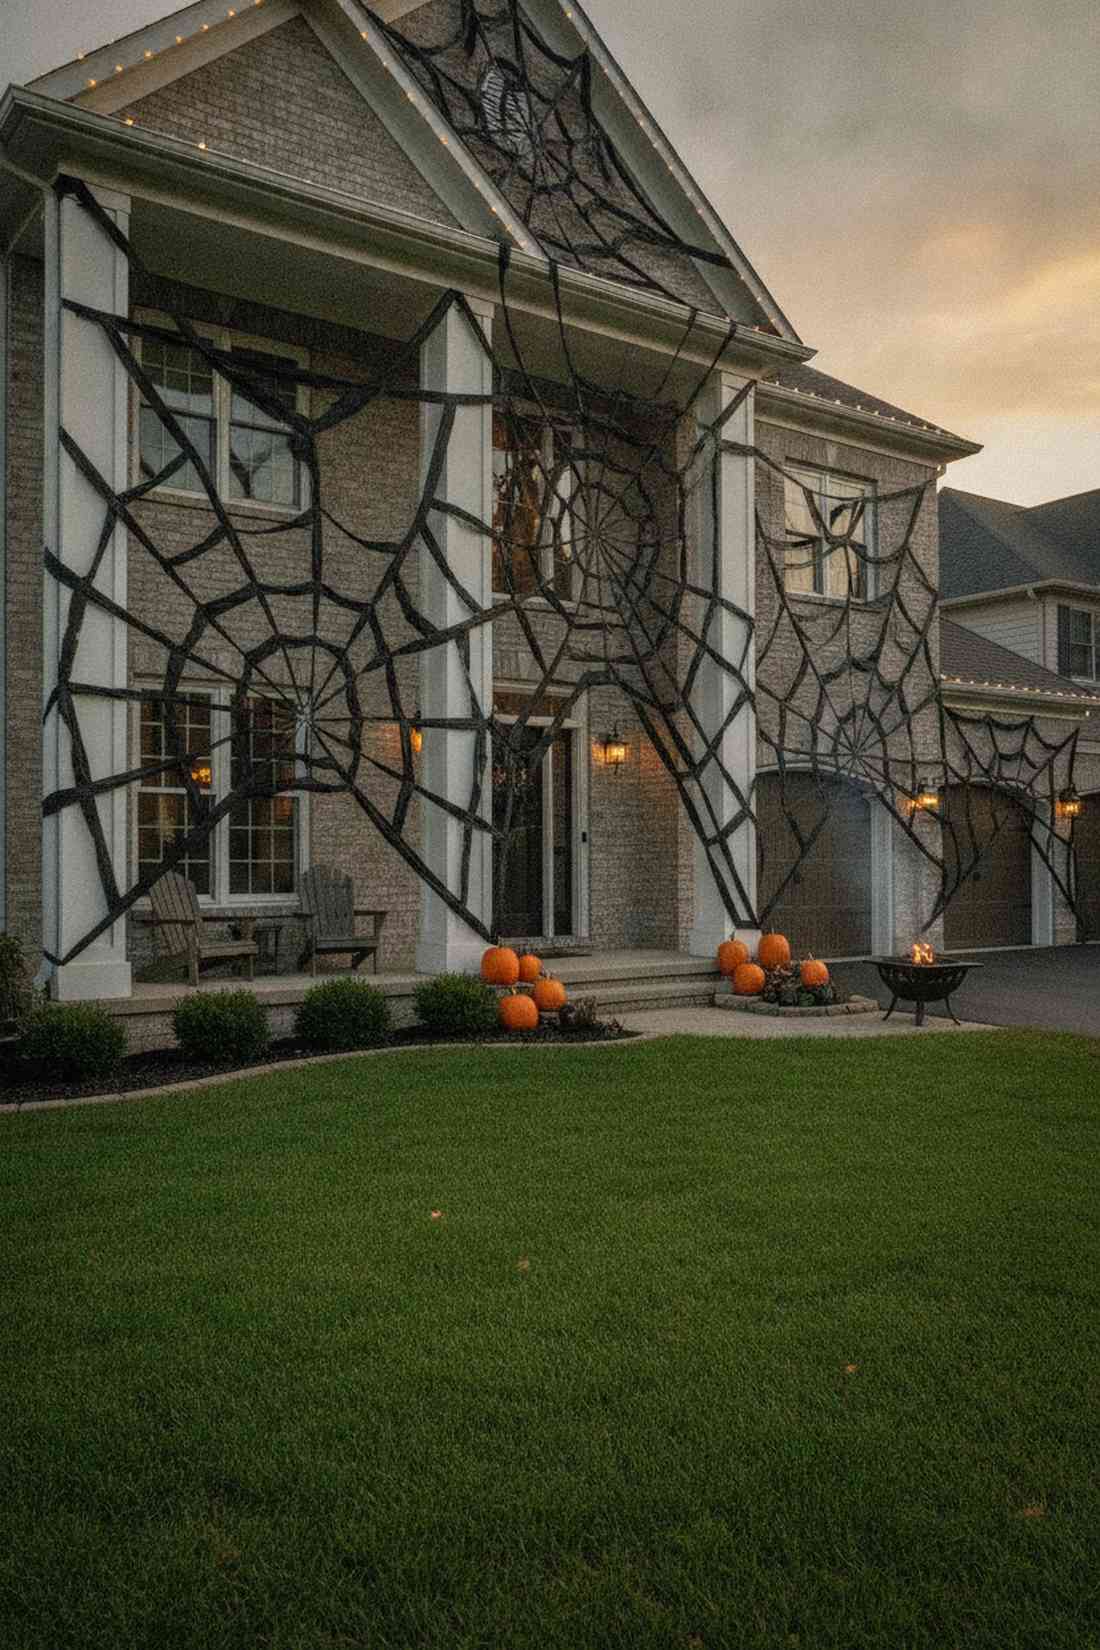
Brings a heavy, ragged gothic texture that covers massive amounts of square footage for pennies. Stretching these giant DIY cobwebs is perfect for wrapping massive porch columns or draping across wide garage frames.
Using that stringy cotton fluff gets stuck in brick and looks messy, but cutting geometric patterns into thick black plastic bypasses that cheap plastic aesthetic entirely. Stretching them tightly creates a bold, architectural contrast that immediately establishes a dominant focal point. Picking up heavy-duty contractor bags ensures they won’t tear in heavy winds.
You can blanket your entire house in these webs for under $10. Pin this if you need a huge impact on a zero budget!
- Key Materials: Heavy-duty black trash bags, scissors, clear outdoor tape
- Vibe / Style: Bold oversized gothic geometry
- Difficulty: Easy cutting and stretching
- Budget Breakdown: Contractor Bags: $8 | Tape/Tacks: $2.
- Creator’s Tip: Use a white chalk marker to draw the web pattern on the folded triangle before you start cutting to ensure perfect symmetry.
- Smart Sourcing: extra-thick black contractor trash bags (bulk) and heavy-duty outdoor mounting tape.
Wait until you see how affordable this next high-end transformation actually is…
28. Tin Can Luminaries
Throws mesmerizing, pin-pricked light patterns all across your pathways and stairs. Setting up a row of punched metal lanterns looks absolutely gorgeous lining wooden porch steps or concrete retaining walls.
Leaving the cans silver looks like raw recycling, but coating them in matte black spray paint gives a designer-level finish to a free material. Hammering intricate, swirling constellations rather than basic faces elevates standard props into cinematic moments. Utilizing premium waterproof LED tea lights guarantees they won’t short out during an autumn drizzle.
Crafting a dozen of these custom lanterns costs just $15–$20. It holds up beautifully against harsh autumn winds.
- Key Materials: Cleaned tin cans, hammer and nails, matte black spray paint, LED tea lights
- Vibe / Style: Rustic patterned starlight
- Difficulty: Requires some muscle and care
- Budget Breakdown: Cans: Free | Paint/Lights: $20.
- Creator’s Tip: Fill the cans with water and freeze them solid before hammering your design; the ice prevents the thin metal from denting inward.
- Smart Sourcing: waterproof remote-controlled LED tea lights (bulk) and matte black rust-oleum protective enamel.
29. Pool Noodle Tombstones
Creates a surprisingly plump, cartoonish graveyard aesthetic perfect for families with toddlers. These lightweight foam markers are brilliant for scattering safely across a dense front lawn without ruining the grass.
Bright neon colors ruin the spooky vibe, but locking in a heavy coat of dark grey, stone-textured paint looks far more expensive than it is. Slicing them lengthwise provides a flat back, which tricks the eye into seeing a high-end theme park setup from the street. Integrating heavy-duty landscape stakes keeps them pinned tight to the earth.
A dozen rounded tombstones will only set you back $15–$25. Save this to your kid-friendly Halloween DIY board!
- Key Materials: Foam pool noodles, serrated knife, stone texture paint, wooden skewers
- Vibe / Style: Cartoonish family-friendly graveyard
- Difficulty: Fast and extremely easy
- Budget Breakdown: Foam Noodles: $10 | Texture Paint/Stakes: $15.
- Creator’s Tip: Standard spray paint will melt the foam; you must use an acrylic brush-on base coat first before applying any aerosol textures.
- Smart Sourcing: thick foam pool noodles (bulk pack) and water-based acrylic grey primer kits.
30. Newspaper Ghost Lanterns
Casts a warm, fragile glow that flutters violently in the October breeze. Suspending these tissue-paper spirit lights works flawlessly hanging tightly from the low branches of a front yard weeping willow.
Leaving them as plain white blobs is boring, but drawing frantic, screaming expressions forces neighbors to stop and stare. Layering waterproof mod-podge over the delicate paper delivers a surprisingly premium look that defies the cheap materials. Investing in premium miniature outdoor lighting inside makes the heads glow like tiny radioactive bulbs.
You can populate a whole tree for under $15. Highly recommended for a quick weekend win.
- Key Materials: White tissue paper, inverted plastic bottles, black markers, battery lights
- Vibe / Style: Frantic glowing apparitions
- Difficulty: Quick assembly line craft
- Budget Breakdown: Paper/Bottles: $5 | Sealer/Lights: $10.
- Creator’s Tip: Cut the bottom of the plastic bottle off so you can easily reach inside to turn the LED puck on and off each night.
- Smart Sourcing: outdoor-grade clear mod podge sealer and ultra-bright LED balloon light inserts.
31. Painted Rock Markers
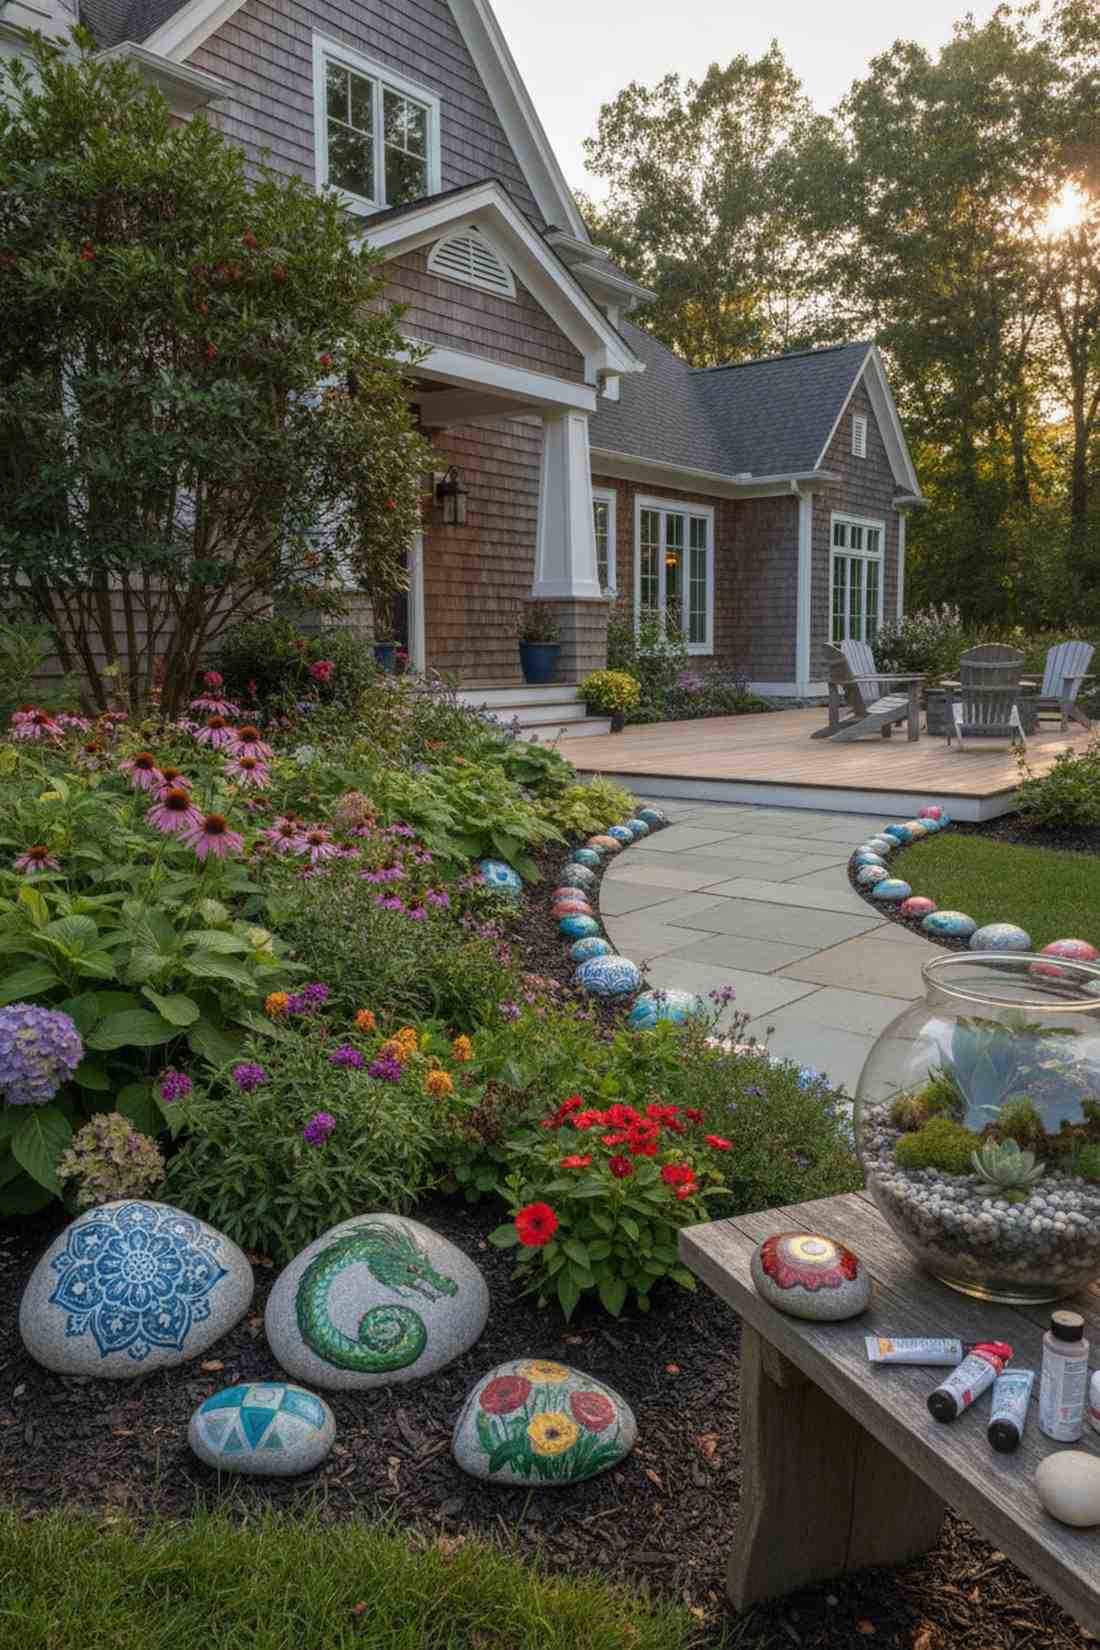
Injects tiny, hidden bursts of artistry right into the dirt where people least expect it. Dropping these custom painted stone markers into your existing flower beds or lining your entryway walkway is incredibly subtle but effective.
Scattering cheap plastic knick-knacks clutters the yard, but utilizing smooth, heavy river rocks bypasses that cheap plastic aesthetic entirely. Sealing the sharp acrylic paint jobs against the rain gives a designer-level finish that lasts for years. Blending them alongside premium terrarium accessories elevates the ground level of your display.
This nearly free artistic touch costs about $10 for the paint. Such a low-effort way to boost curb appeal.
- Key Materials: Smooth river rocks, acrylic craft paints, clear glossy outdoor sealant
- Vibe / Style: Subtle artisan garden secrets
- Difficulty: Relaxing sit-down painting
- Budget Breakdown: Rocks: Free | Paint/Sealer: $10.
- Creator’s Tip: Paint a trail of glowing yellow “eyes” on dark rocks and tuck them deep into the shadows of your bushes for a creepy hidden surprise.
- Smart Sourcing: smooth natural river rocks (bulk bag) and UV-resistant clear glossy enamel spray.
32. Motion Sensor Activation
Turns a static, boring yard into a highly interactive jump-scare zone. Installing a trigger-based animatronic network is the absolute best way to protect your candy bowl or guard the main porch stairs.
Running wires across the sidewalk is a massive tripping hazard, but utilizing battery-operated wireless triggers looks far more expensive than it is. Hiding the sensors deep in the foliage immediately establishes a dominant focal point when a prop suddenly lunges forward. Purchasing heavy-duty commercial outdoor sensors ensures a stray leaf won’t accidentally trigger the motor.
A solid motion-scare setup runs around $60–$100. Pin this if you love making teenagers scream!
- Key Materials: Motion-activated props, hidden wireless sensors, battery packs
- Vibe / Style: Interactive haunted house shocker
- Difficulty: Intermediate tech placement
- Budget Breakdown: Animatronic Prop: $70 | Sensor/Batteries: $20.
- Creator’s Tip: Place the sensor exactly at knee height about 6 feet before the prop; this accounts for the mechanical delay so the scare hits them perfectly face-to-face.
- Smart Sourcing: wireless motion sensor animatronic trigger kits and high-capacity rechargeable outdoor batteries.
33. Projection Mapping Effects
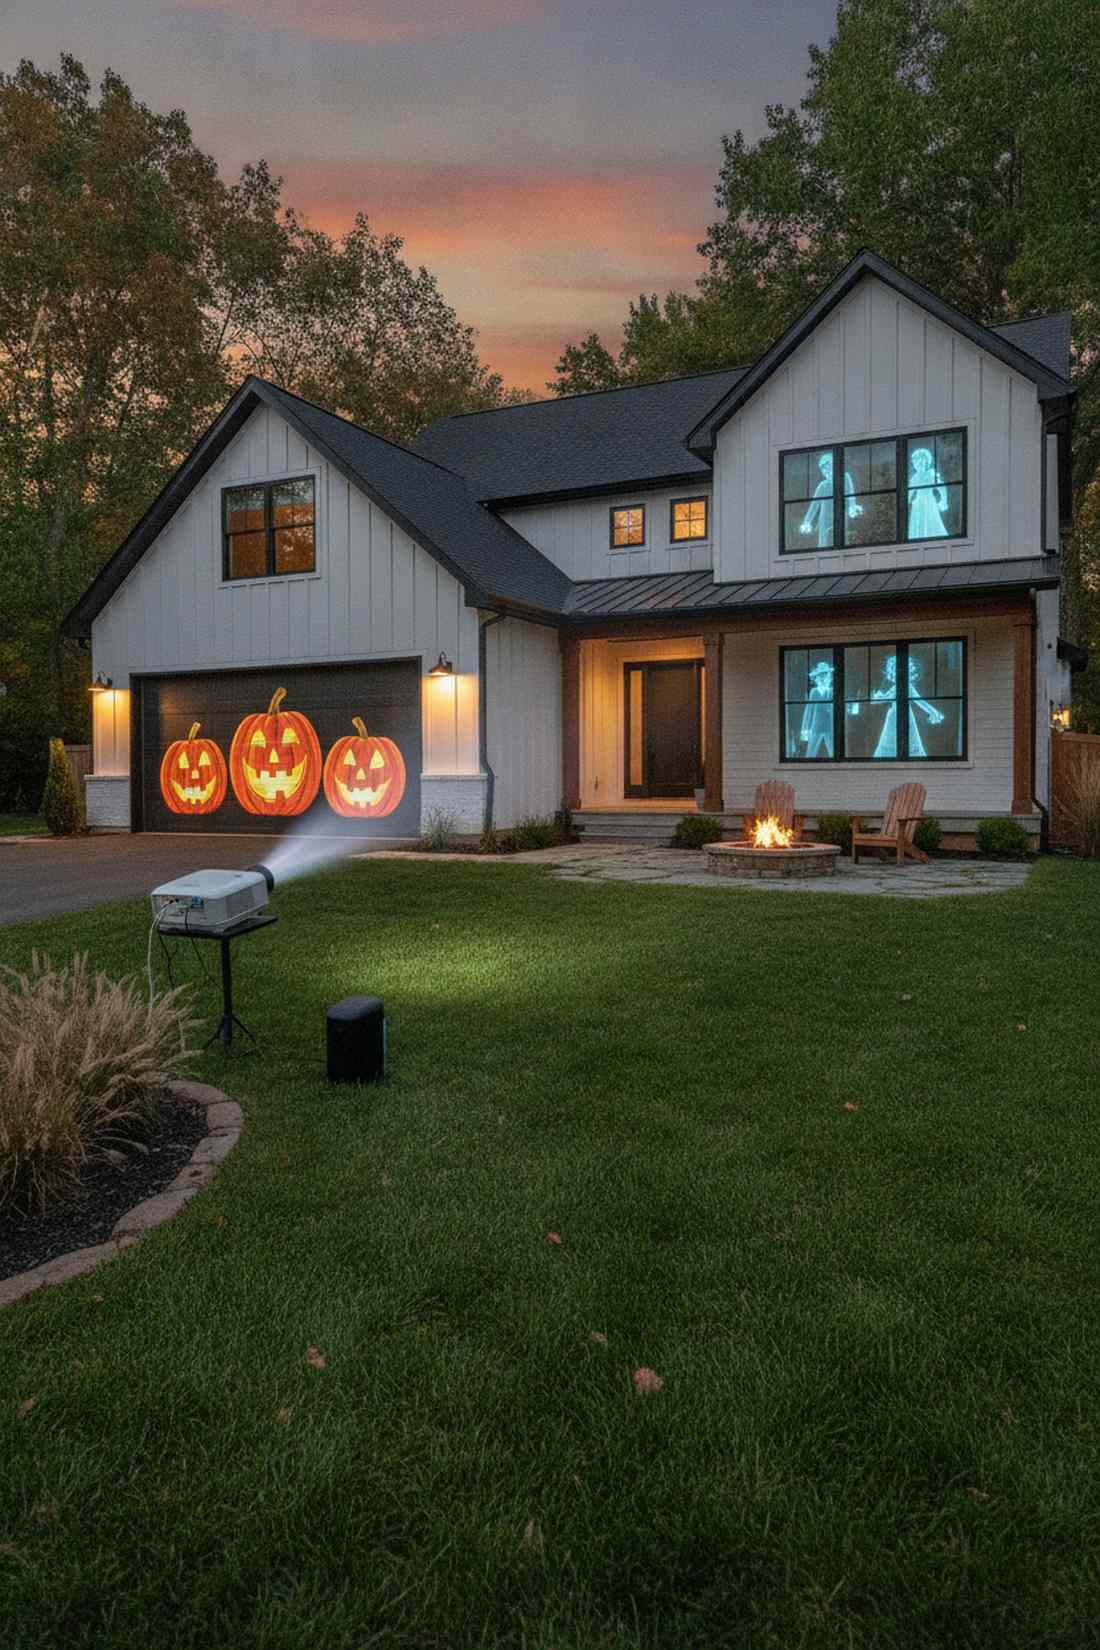
Casts breathtaking, fluid digital animations that make your actual house look alive. Setting up a digital light show mapping works phenomenally on large flat garage doors or second-story window panes.
Using cheap laser dots looks outdated and tacky, but projecting fully animated singing pumpkins or ghostly pacing figures tricks the eye into seeing a high-end theme park setup. Syncing a waterproof bluetooth speaker to the visuals elevates standard props into cinematic moments of absolute awe. Investing in high-lumen commercial outdoor projectors is non-negotiable for crisp images.
A premium digital illusion setup costs around $150–$300. Save this for your ultimate tech-heavy yard upgrade!
- Key Materials: High-lumen outdoor projector, digital Halloween mapping files, frosted window material
- Vibe / Style: Modern digital theme park
- Difficulty: Advanced tech and angling
- Budget Breakdown: Projector: $200 | Digital Files/Screen: $50.
- Creator’s Tip: If projecting onto a window, stretch cheap frosted shower liner tight across the inside of the glass—it captures the light perfectly so it looks like a ghost is trapped inside.
- Smart Sourcing: high-lumen commercial outdoor projectors and pre-loaded digital Halloween projection USBs.
34. Wind-Activated Props
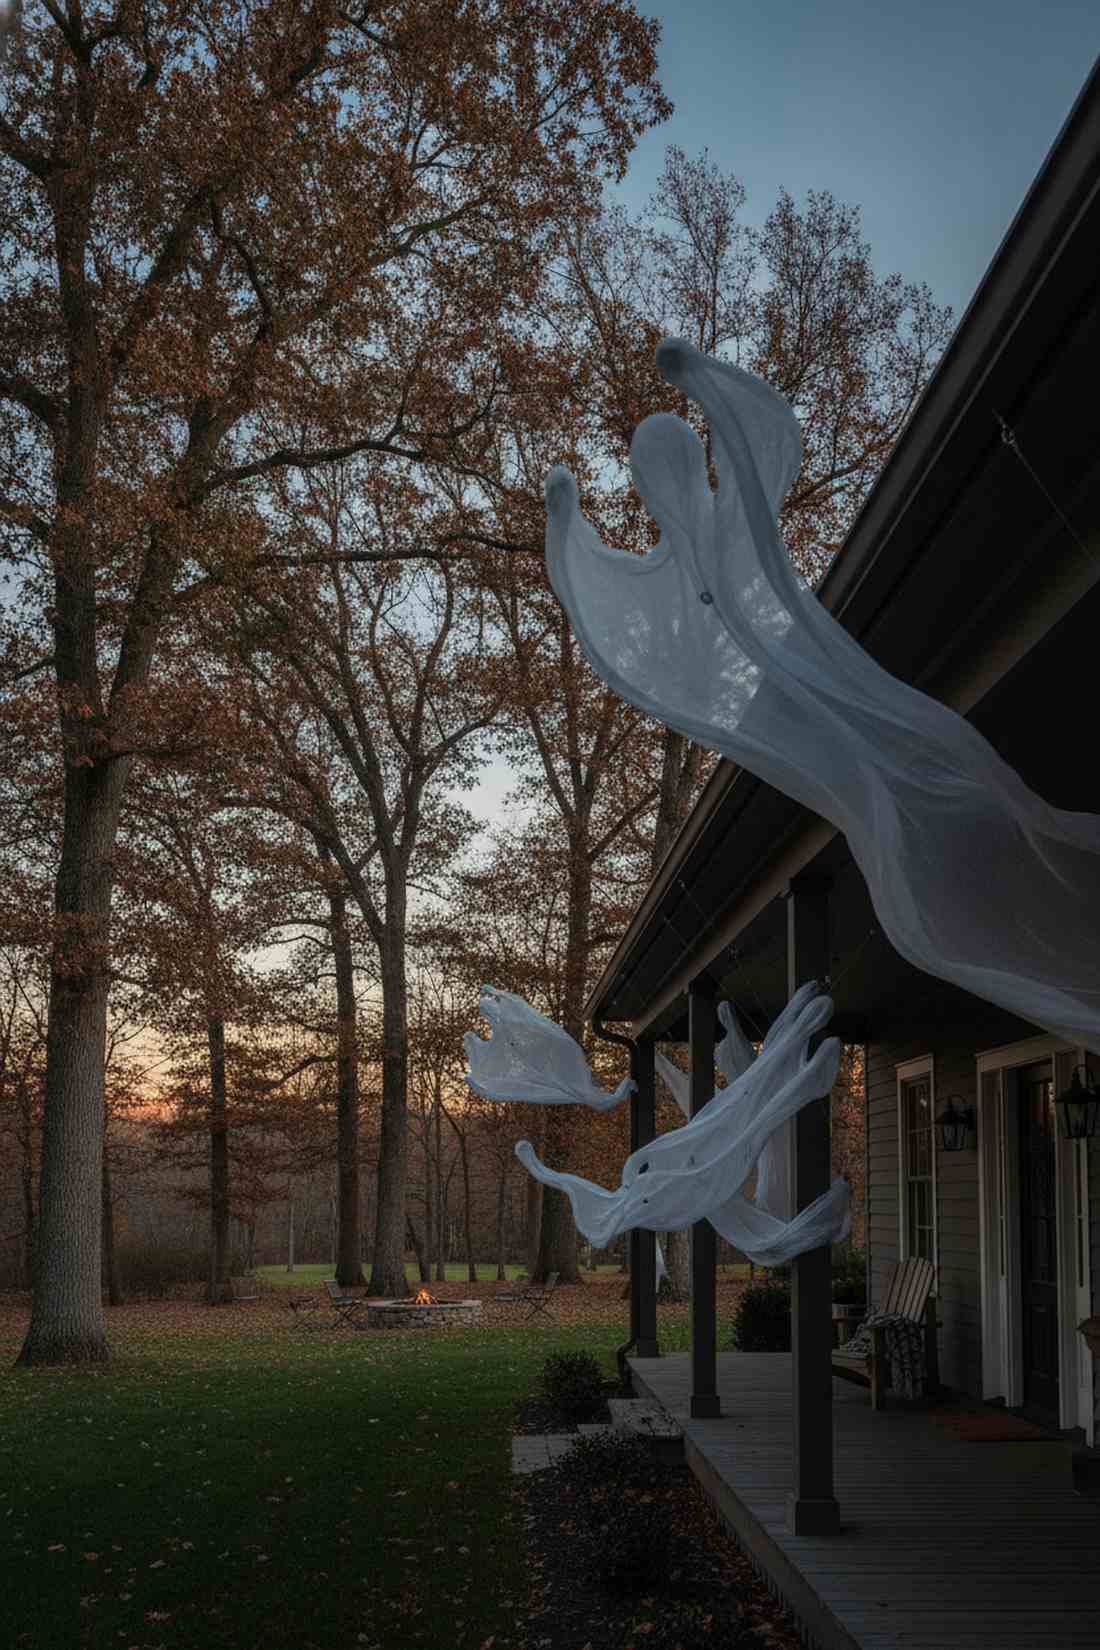
Brings an unsettling, ghostly movement that feels completely unpredictable. Incorporating kinetic yard decorations is ideal for properties with tall mature trees or wraparound porches prone to heavy drafts.
Relying purely on mechanical motors often looks stiff, but leveraging natural breeze gives a designer-level finish to your creepy setup. Utilizing lightweight, weather-treated fabrics suspended from transparent lines creates an organic swaying effect that forces neighbors to stop and stare. It’s an old-school haunted house trick that bypasses the cheap plastic aesthetic entirely.
Expect to spend a breezy $15–$25 for high-quality suspended fabric props. It holds up beautifully against harsh autumn winds without racking up your electric bill.
- Key Materials: Ultra-lightweight sheer fabrics, heavy-duty swivels, transparent fishing line
- Vibe / Style: Unpredictable kinetic haunting
- Difficulty: Easy hanging setup
- Budget Breakdown: Fabric/Props: $15 | Swivels/Line: $10.
- Creator’s Tip: Attach a ball-bearing fishing swivel to the top of the prop before hanging it; this prevents the wind from twisting the line until it snaps.
- Smart Sourcing: heavy-duty ball-bearing fishing swivels and ultra-lightweight UV-treated spooky fabric bundles.
Bringing Your Halloween Vision to Life
Successful halloween backyard decor stems from selecting premium materials that align with your architectural layout and weather constraints. Start with a foundational commercial-grade lighting strategy, then meticulously layer all 34 of these blueprints progressively to build toward a high-end, weather-resistant vision. Test your UV-coated setups during daylight and your smart-timer lighting during evening hours, adjusting placement for maximum visual impact. By upgrading from cheap craft supplies to productized, heavy-duty kits, your outdoor space becomes an unforgettable, professional-grade October destination that dominates the neighborhood.
Frequently Asked Questions
When should I start setting up Halloween backyard decorations?
Start planning your outdoor architecture by late September. Weather-sensitive props like fabric ghosts should wait, but installing your commercial outdoor lighting timers and heavy-duty landscape stakes early ensures you aren’t rushing. Sourcing your bulk material kits now avoids the October premium price hikes and inventory shortages.
How do I secure outdoor Halloween decorations during windy weather?
Never rely on standard plastic pegs. Upgrade to heavy-duty sandbag weights and commercial-grade landscape staples to anchor lightweight props. For inflatables, use a reinforced tether system and carabiners. Investing in a heavy-duty weatherproofing starter kit ensures your display survives high wind warnings without becoming neighborhood debris.
What lighting colors work best for different Halloween themes?
Orange and purple are family-friendly, but if you want that premium high-CPC aesthetic, use commercial-grade LED spotlights in toxic green or cold blue. High-lumen waterproof smart floods allow you to cycle colors via an app, instantly swapping between a classic harvest glow and a high-end haunted attraction vibe with the push of a button.
Can I mix spooky and harvest Halloween decorations together?
Absolutely, but you need a cohesive color bridge. Use deep plum and charcoal styling rather than harsh black and bright orange. Anchor the base with UV-protected artificial pumpkins, then layer in elegant gothic elements. Buying a pre-curated outdoor harvest decor bundle guarantees your tones match perfectly without looking cluttered.
How much should I budget for backyard Halloween decorations?
A beginner setup using budget-friendly DIY blueprints runs $50–$150. However, for a premium ceiling-RPM look, allocating $300–$500 toward commercial outdoor smart lighting and heavy-duty resin props is a smarter long-term investment. Buy your foundational elements as bundled bulk packs to cut retail costs in half while getting a professional result that lasts for years.