A small garden bridge instantly upgrades any ordinary backyard into a custom landscape. Discover exact material lists and budget-friendly construction blueprints right here. Achieve that designer-level outdoor oasis without the premium contractor price tag.
Design SnapshotKey Principles
- Scale Appropriately: Match bridge size to the feature it crosses—oversized structures overwhelm small water features while undersized bridges look unfinished
- Material Harmony: Choose materials that complement existing hardscape and architectural elements for cohesive landscape design
- Structural Integrity: Ensure proper foundation and load-bearing capacity, especially for functional bridges that receive foot traffic
- Visual Balance: Position bridges to create natural sight lines and frame surrounding plantings rather than dominating the landscape
Classic Arched Bridges for Timeless Appeal
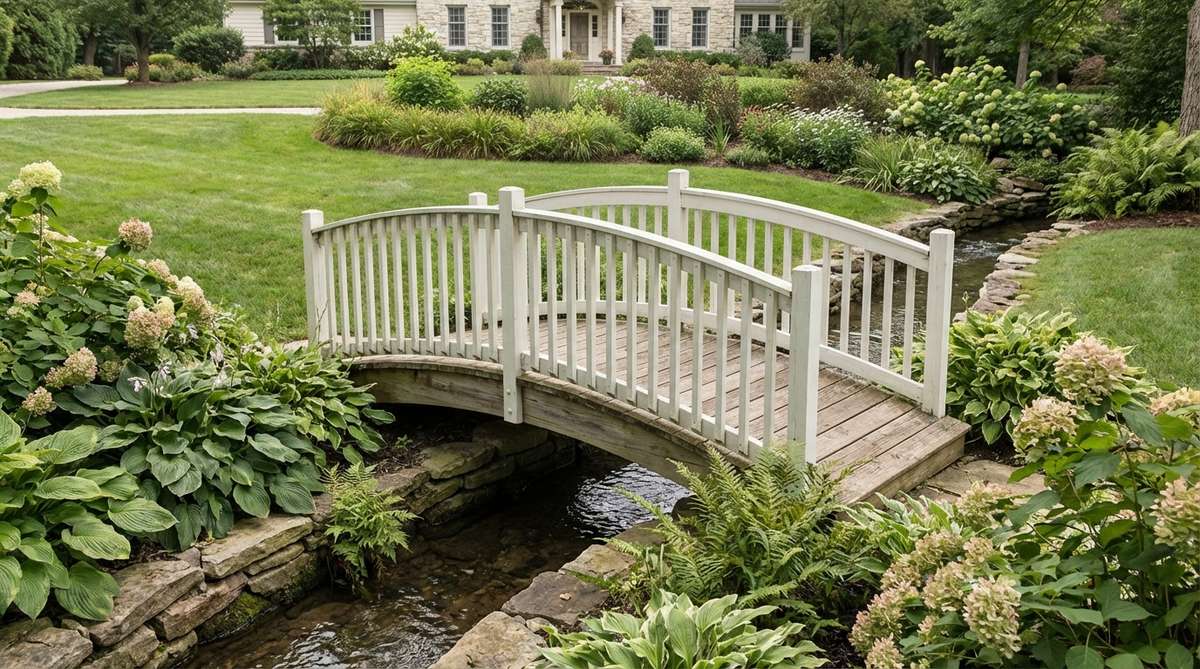
1. Traditional White Arched Garden Bridge
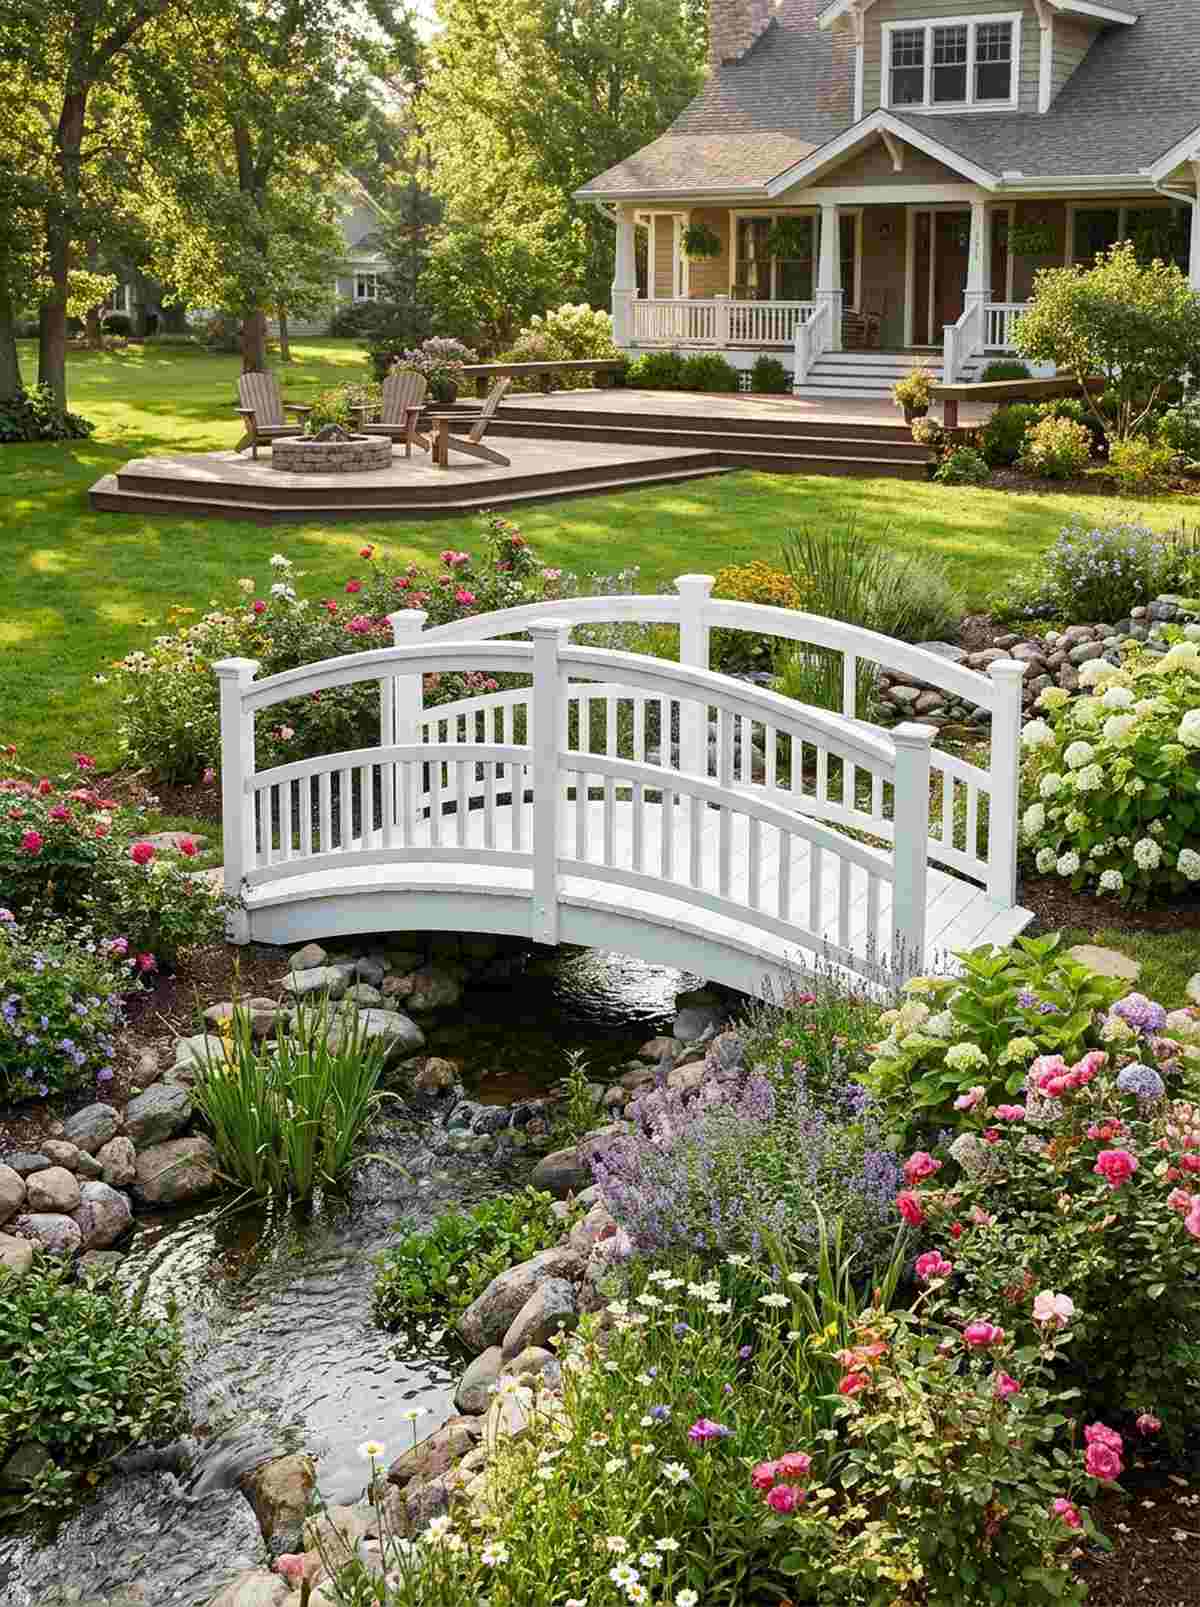
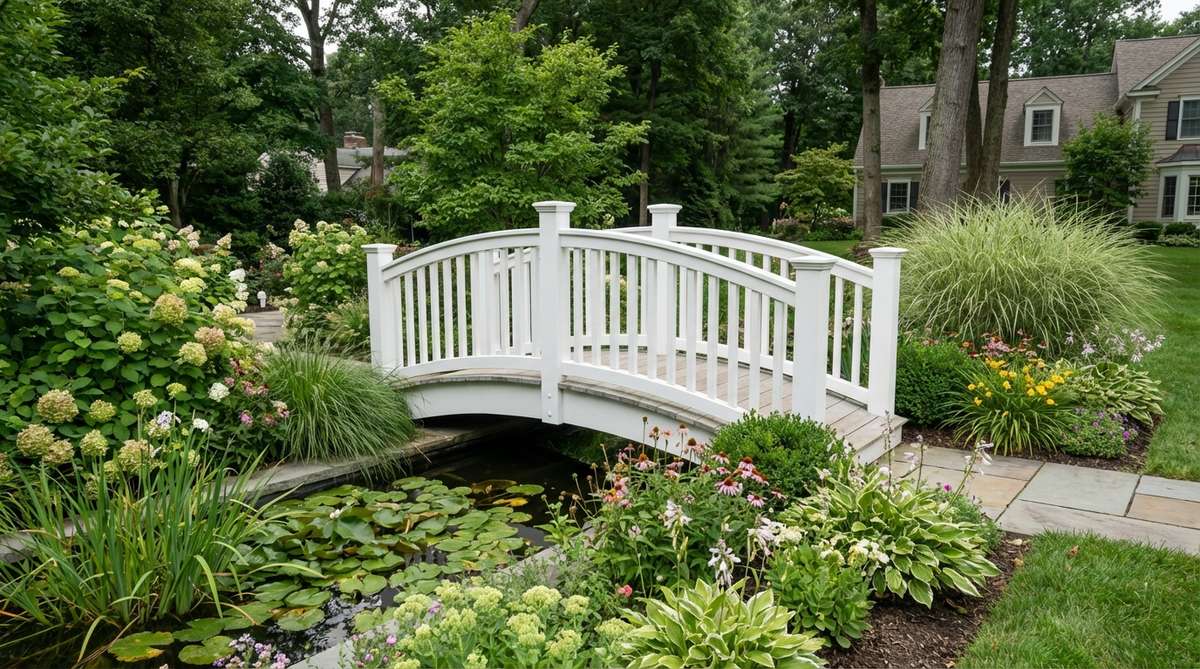
This crisp installation feels like walking onto a vintage countryside estate. A classic white pond crossing works exceptionally well for framing vibrant flower beds or serving as a grand entrance over a narrow water feature.
Most beginners just slap on standard paint, but utilizing a commercial-grade outdoor primer first delivers a surprisingly premium look. To maximize durability against moisture, always integrate heavy-duty weatherproofing sealant right from the start.
You can pull this custom look together for around $120–$250 depending on lumber quality. Pin this to your DIY weekend garden board so you don’t lose the inspiration!
- Key Materials: Pre-cut pine arches, exterior grade white enamel
- Vibe / Style: Traditional cottagecore elegance
- Difficulty: Moderate weekend build
- Budget Breakdown: Wood Materials: $100 | Hardware & Paint: $65.
- Creator’s Tip: Add a non-slip grit additive to the final coat of paint for safety during rainy mornings.
- Smart Sourcing: Pre-cut arched bridge side rails and UV-coated exterior enamel kits.
2. Natural Wood Arched Bridge with Railings
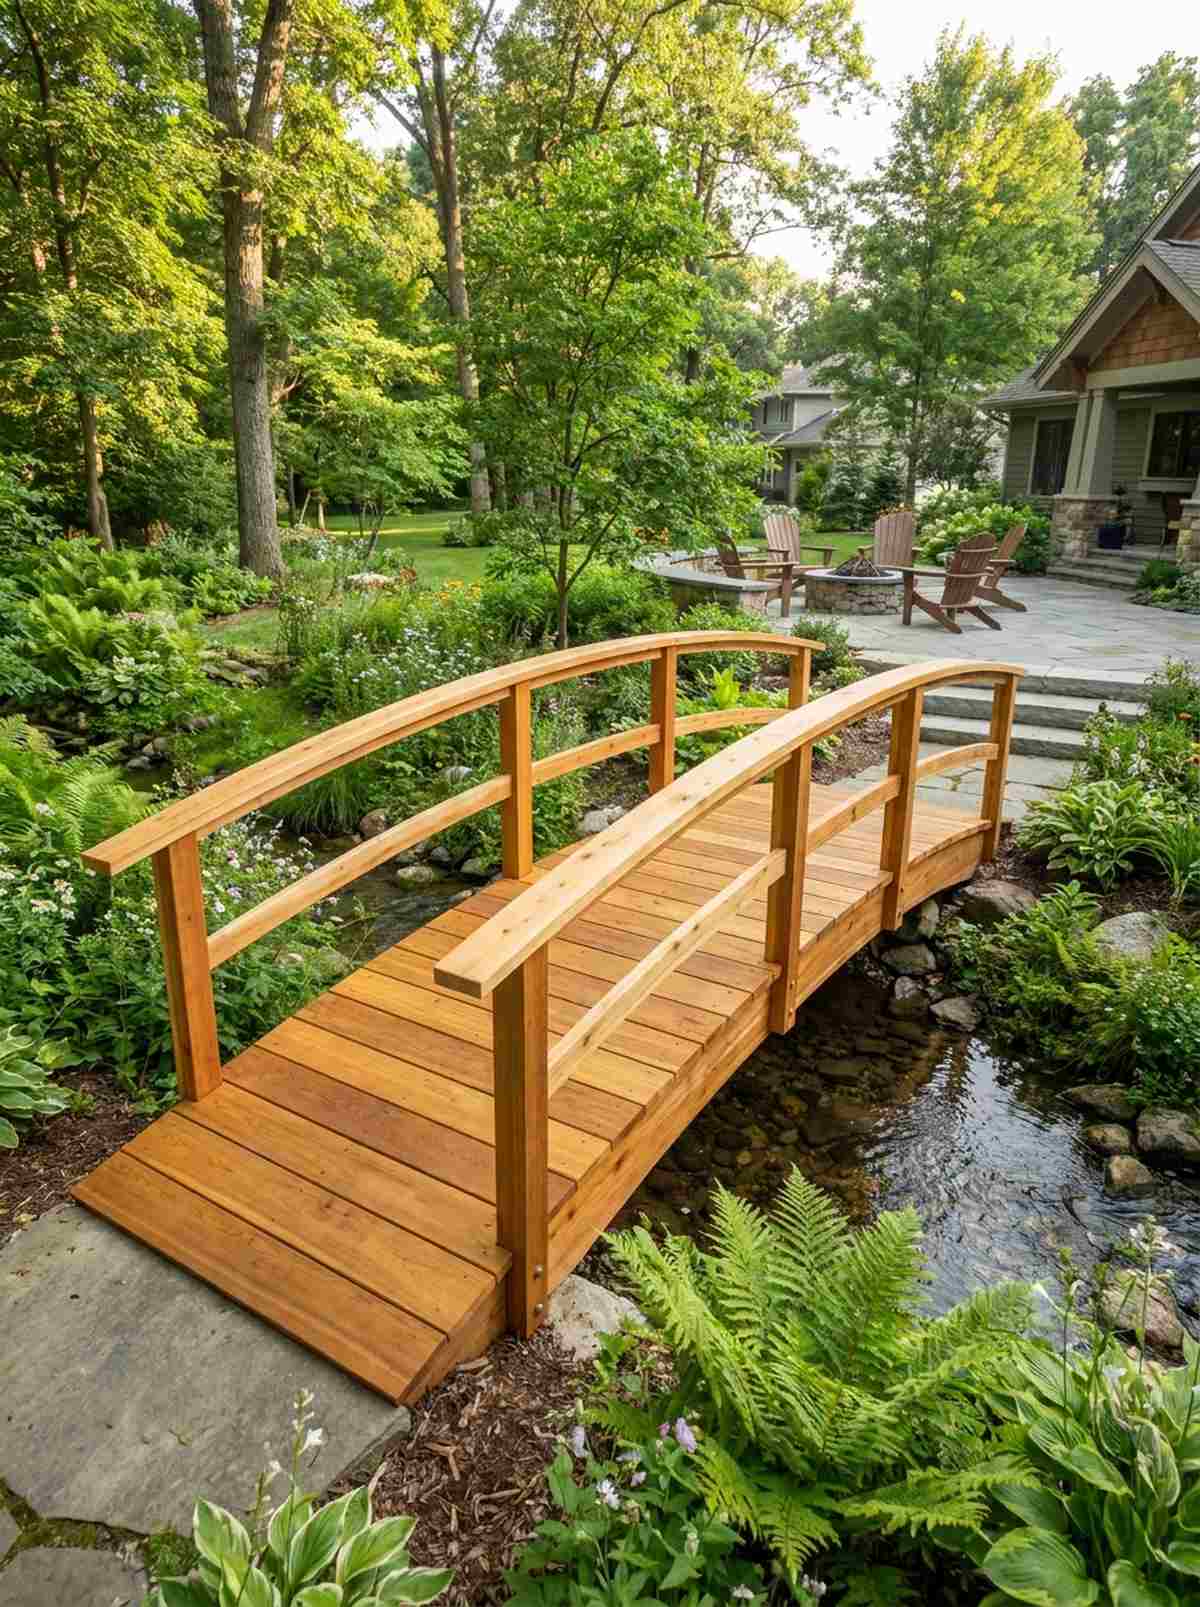
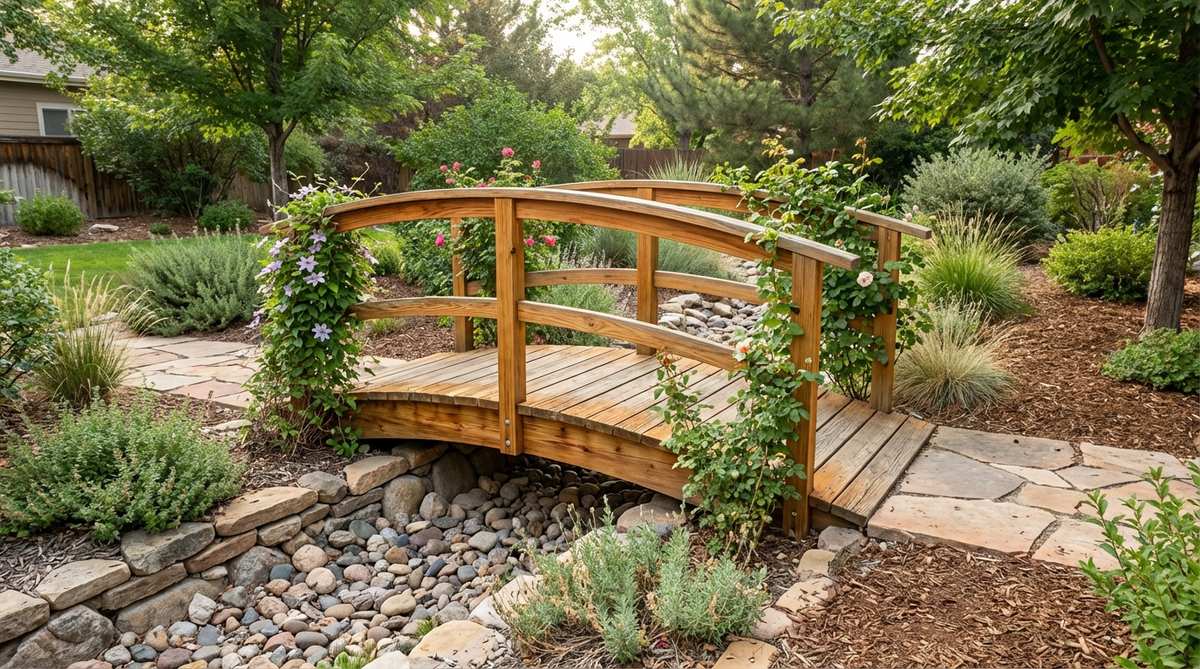
The warm honey tones of cedar make this piece feel like a natural extension of the forest floor. Implementing a cedar woodland walkway is perfect for seamlessly connecting wild garden zones without feeling overly manicured.
Leaving raw wood exposed sounds great in theory, but treating it with a UV-blocking clear coat actually ensures a high-end designer-level finish for years. By locking in the color with professional-grade wood preservative, you prevent that dull gray fade.
Building this from scratch typically runs $180–$350 based on the wood species chosen. It’s an incredibly satisfying upgrade that completely changes the yard’s vibe.
- Key Materials: Weather-resistant cedar planks, galvanized structural bolts
- Vibe / Style: Warm botanical garden aesthetic
- Difficulty: Intermediate carpentry
- Budget Breakdown: Premium Cedar: $200 | Sealants: $45.
- Creator’s Tip: Countersink all your screws so water doesn’t pool on the metal heads and cause early rusting.
- Smart Sourcing: Heavy-duty galvanized lag screws (bulk pack) and premium cedar decking boards.
3. Double Arch Picket Rail Bridge
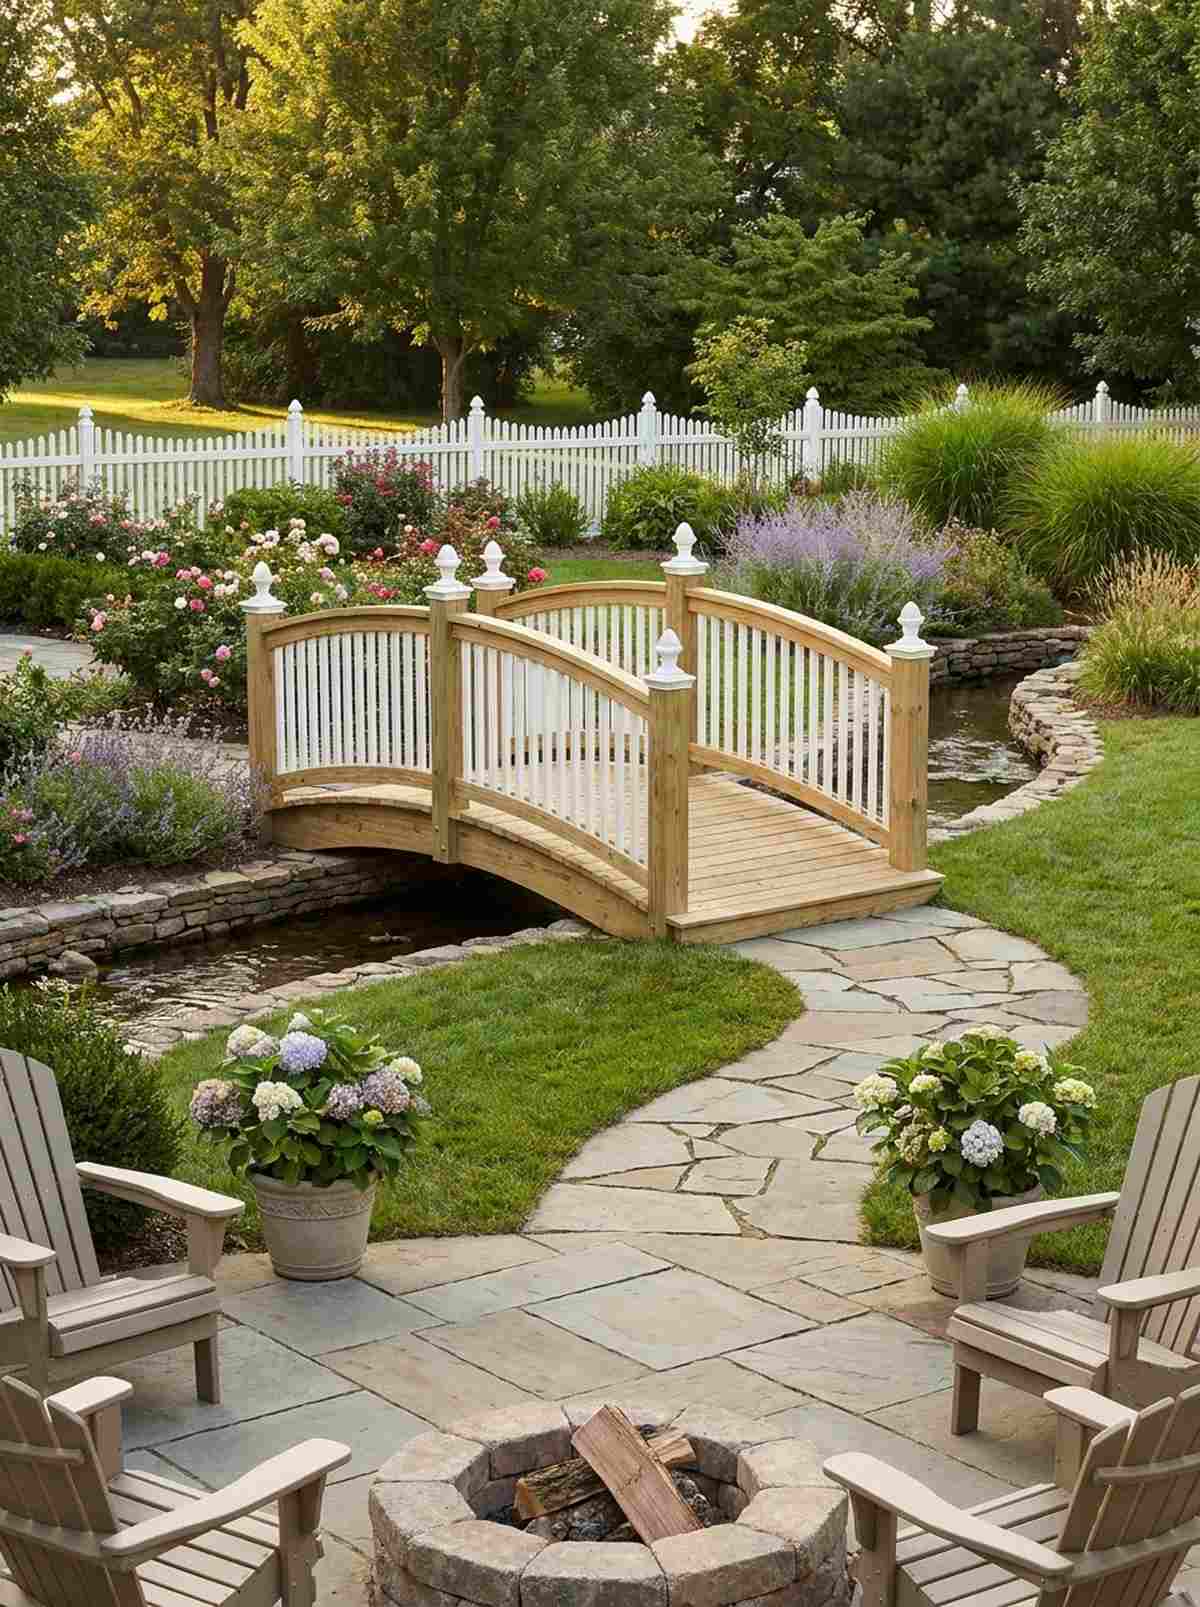
There is something undeniably charming about symmetrical curves that feels straight out of a storybook. A picket-rail garden feature serves brilliantly as a focal point when positioned where guests can view it head-on from a patio.
Off-the-shelf options often lack dimension, but layering a double-arch design instantly elevates the structure to look far more expensive than it is. Adding decorative post caps from your local miniature garden supplies section gives it a bespoke architectural touch.
Expect to invest around $250–$400 for the extra detailing and railings. Save this layout if you’re planning to upgrade a traditional or Victorian-inspired backyard.
- Key Materials: Treated lumber, decorative wooden pickets
- Vibe / Style: English garden symmetry
- Difficulty: Advanced DIY or pre-fab assembly
- Budget Breakdown: Base Frame: $150 | Pickets & Trim: $120.
- Creator’s Tip: Space pickets exactly 3.5 inches apart to meet safety standards while keeping the aesthetic light and airy.
- Smart Sourcing: Pre-spaced wooden picket panels and decorative post cap kits.
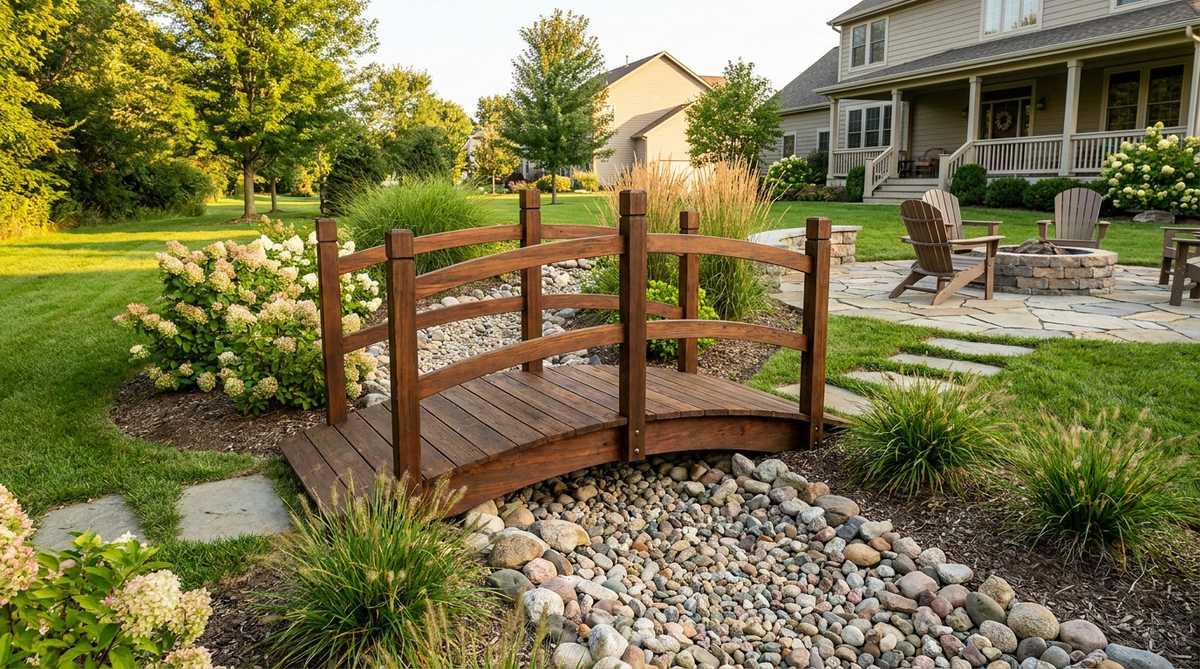
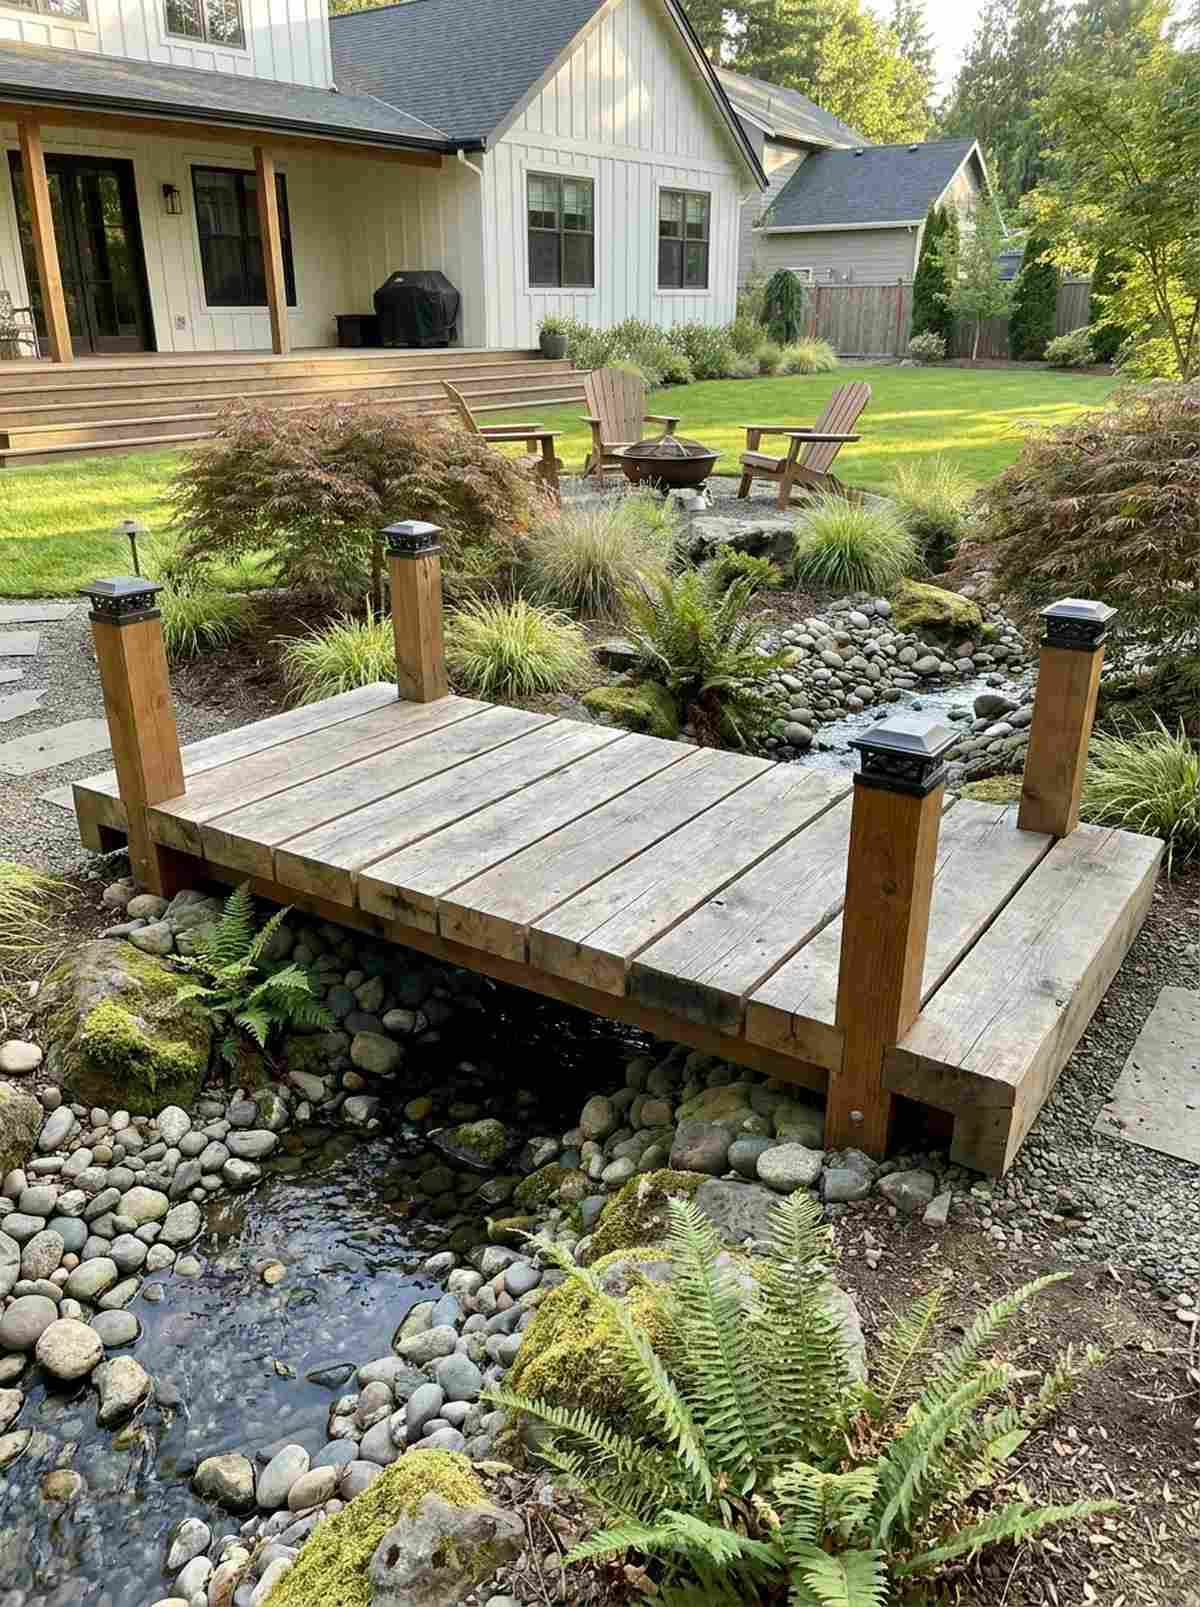
4. Low-Profile Arched Crossing
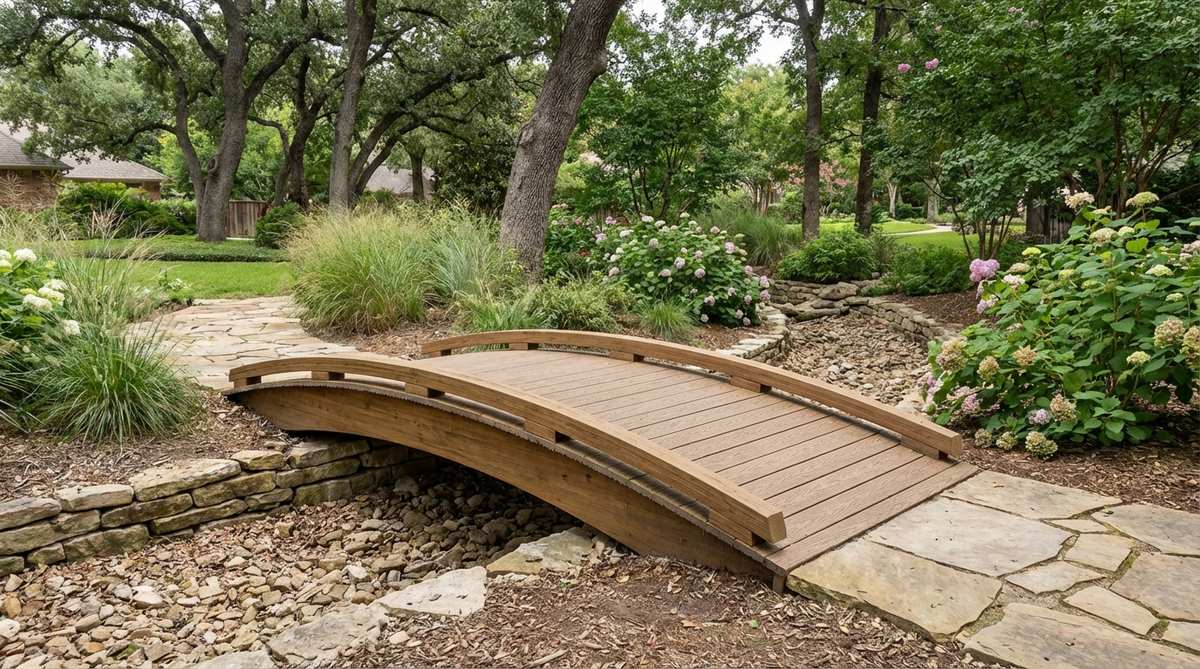
A gentle rise offers effortless flow that feels like a quiet invitation to explore the garden further. This accessible flat archway works magic over shallow dry streams or between slightly elevated planting beds.
Many homeowners think tall arches are required, but keeping the profile low actually provides a sleek, modern finish. Utilizing hidden deck fastening systems ensures the surface remains flawless and barefoot-friendly.
You can execute this minimalist crossing for roughly $80–$150. Highly recommended for a fast weekend win!
- Key Materials: Composite decking, low-rise stringers
- Vibe / Style: Understated modern flow
- Difficulty: Easy beginner setup
- Budget Breakdown: Deck Boards: $90 | Hidden Fasteners: $30.
- Creator’s Tip: Use a string line during installation to ensure the gentle curve remains perfectly consistent across the span.
- Smart Sourcing: Pre-cut composite decking starter kits and concealed deck fastener clips (bulk pack).
This next setup is ridiculously cheap but looks like a $1,000 custom landscape designer installation…
Asian-Inspired Bridges for Zen Gardens
5. Red Lacquered Moon Bridge
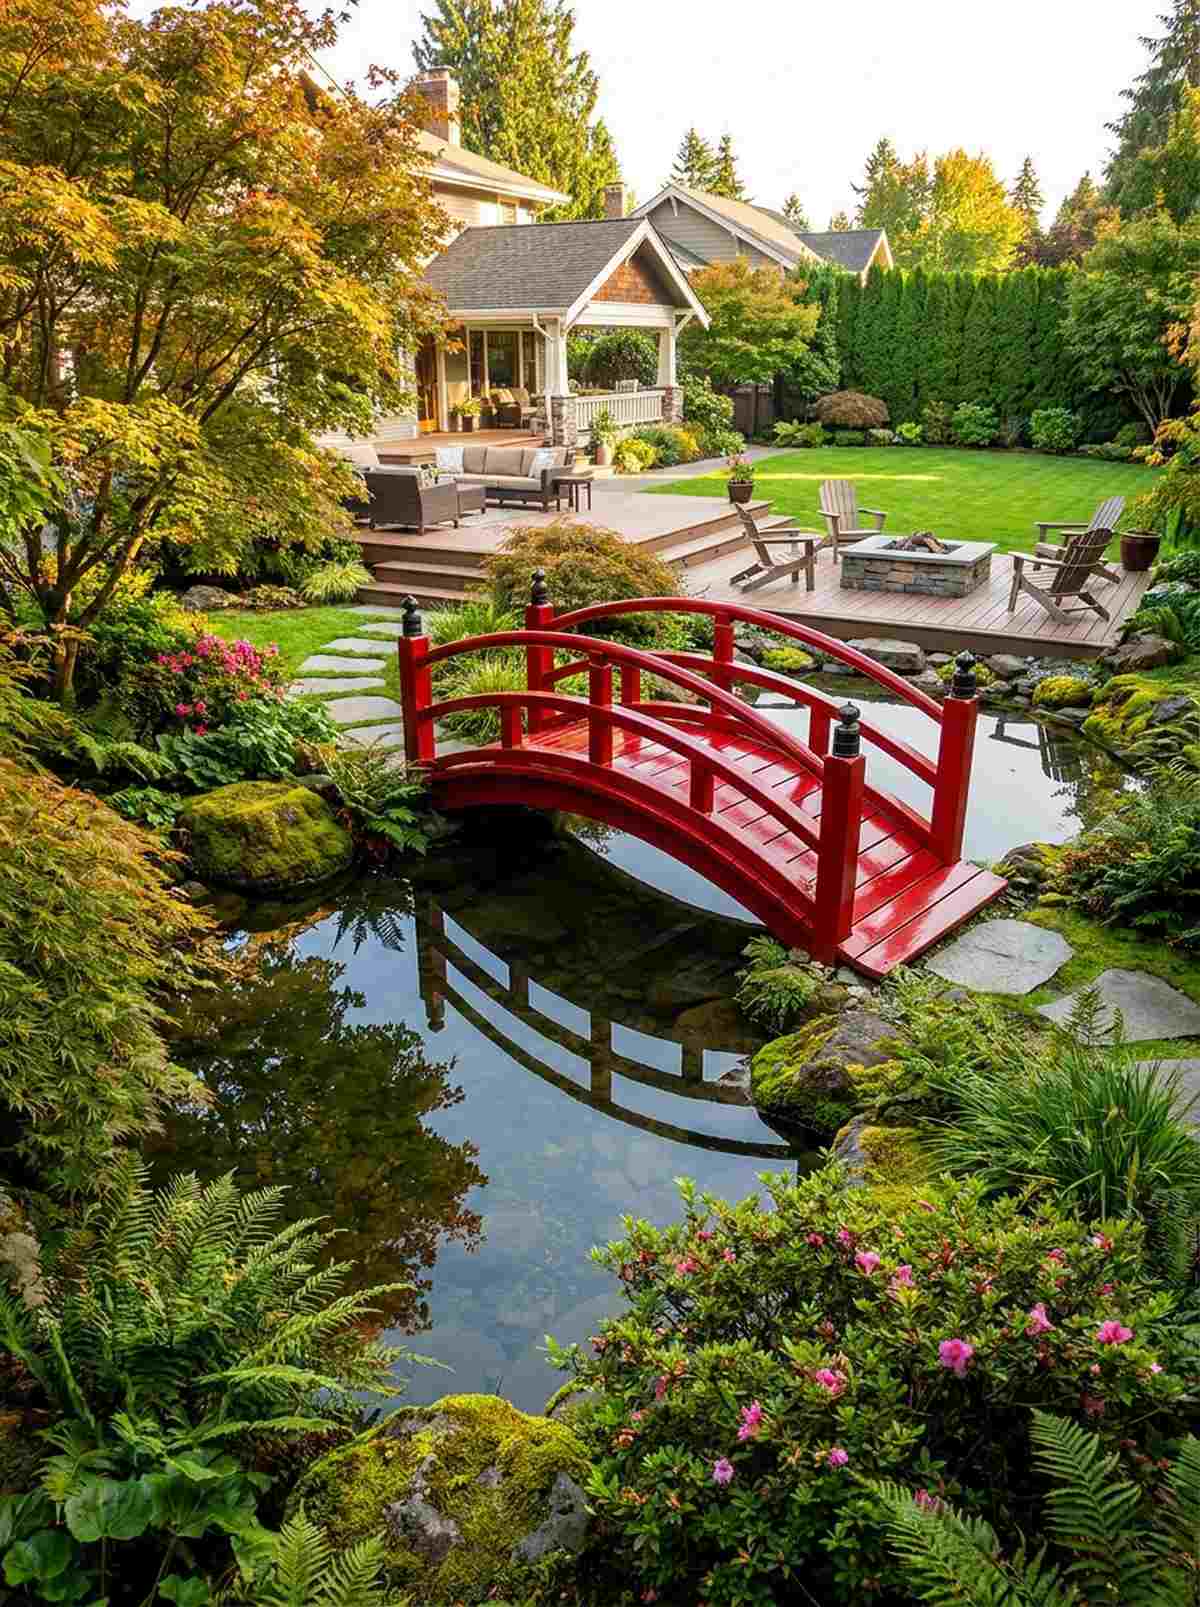
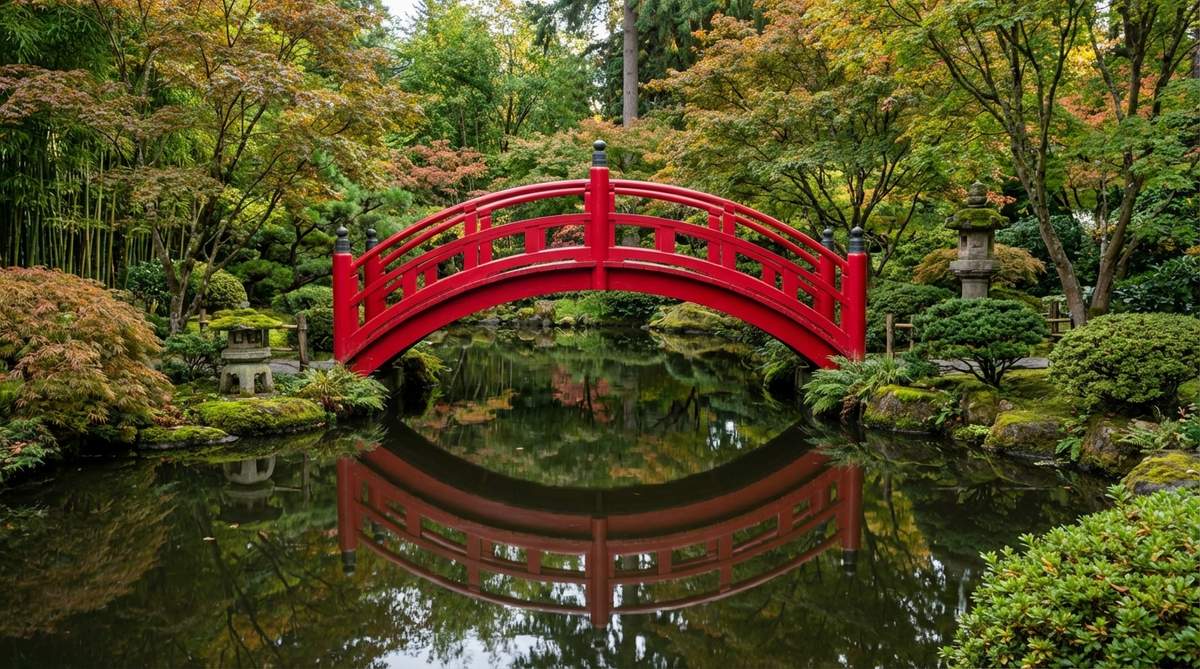
The stark crimson silhouette against green foliage feels like a hidden sanctuary you accidentally discovered. Placing a steep red moon bridge over still water creates a breathtaking reflection that forms a perfect circle.
Applying standard red exterior paint usually ends in peeling, but layering marine-grade high-gloss lacquer gives a designer-level finish that withstands extreme weather. It’s the ultimate high-CPC upgrade for any authentic Zen garden layout.
This dramatic statement piece generally costs $300–$600 to build properly. Pin this to your dream backyard mood board for ultimate inspiration!
- Key Materials: Bentwood framing, crimson marine lacquer
- Vibe / Style: Bold traditional Japanese
- Difficulty: Expert level or professional install
- Budget Breakdown: Structure: $350 | Premium Lacquer: $85.
- Creator’s Tip: Apply the lacquer in 4-5 thin coats rather than two thick ones to achieve that mirror-like gloss.
- Smart Sourcing: High-gloss marine-grade wood finish and heavy-duty bentwood stringers.
6. Natural Wood Zigzag Bridge
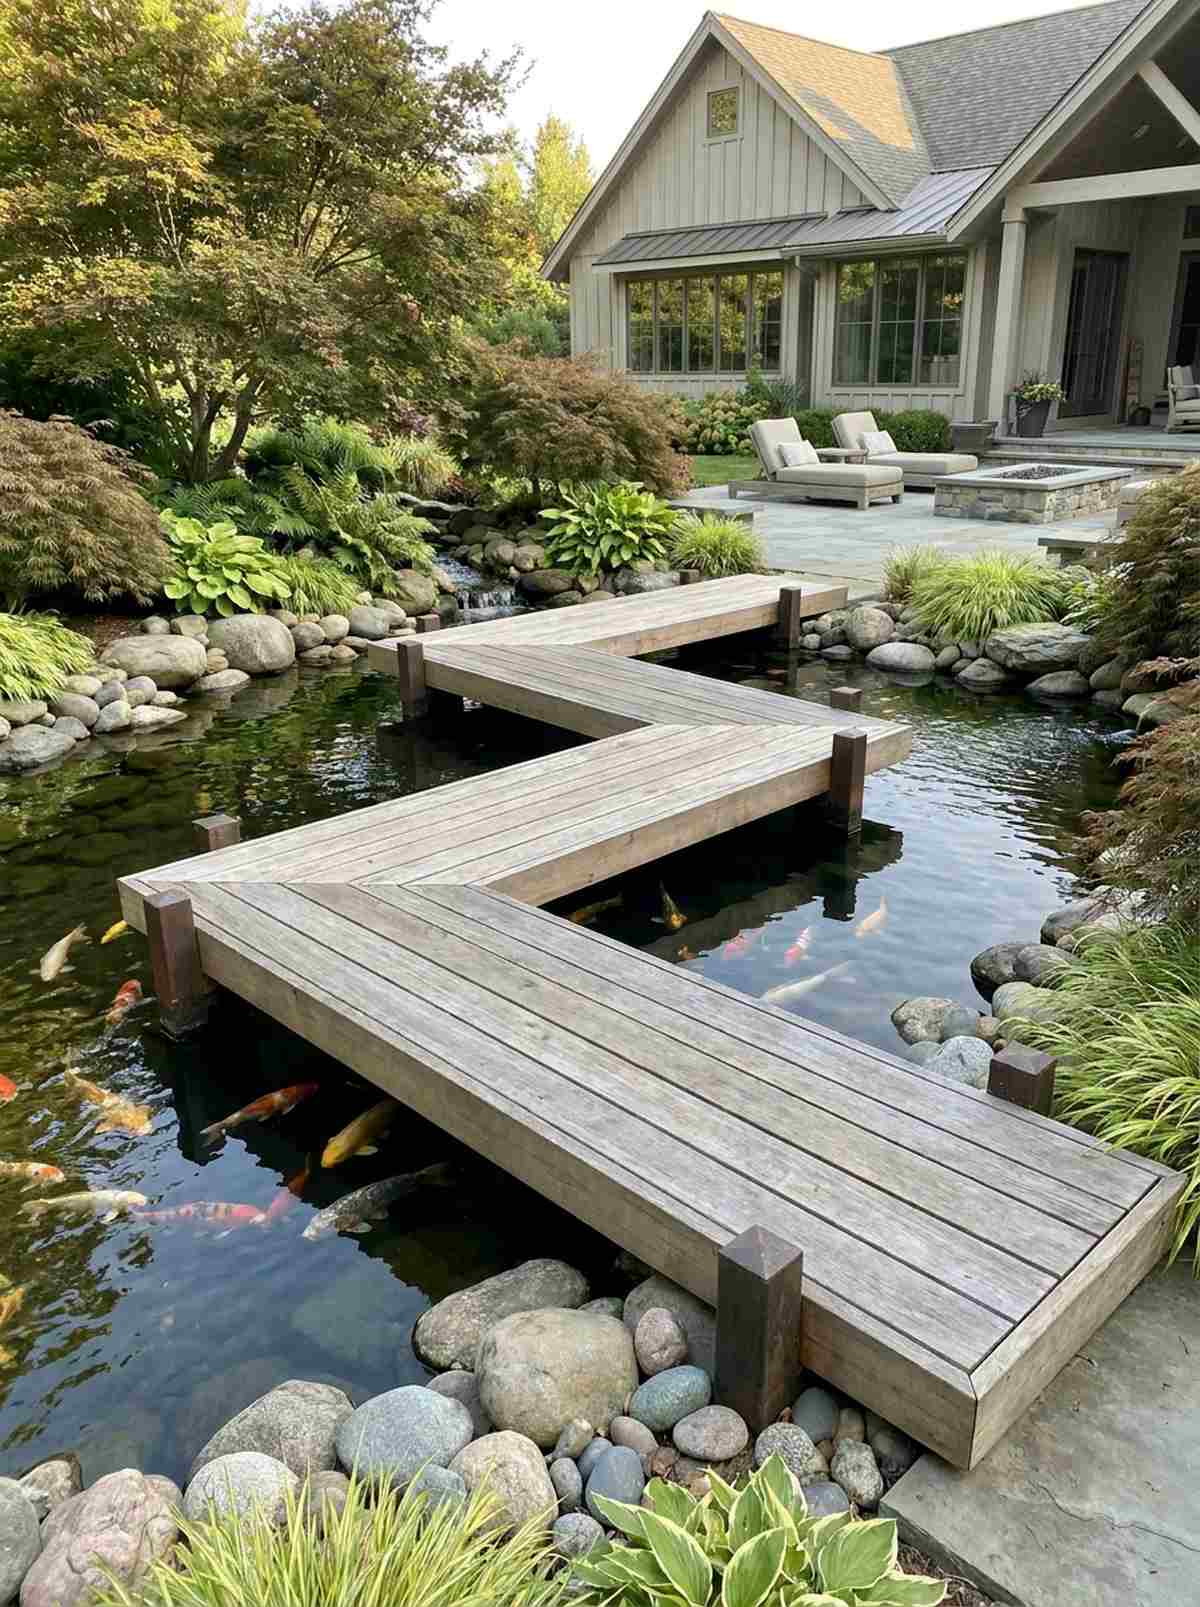
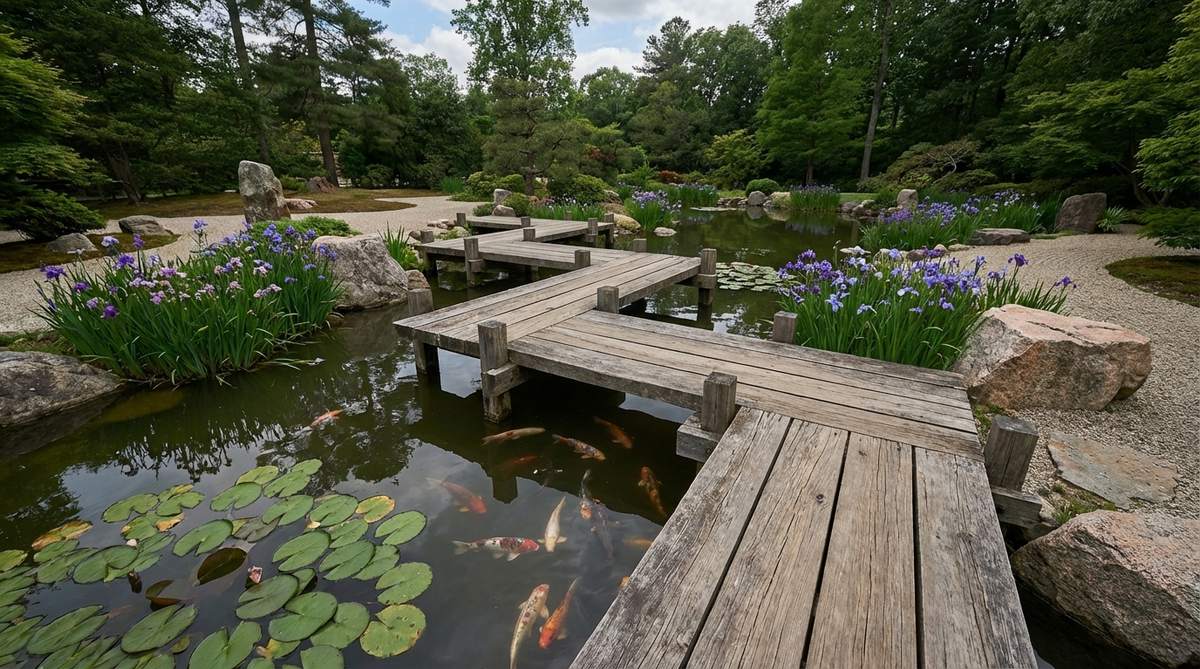
This angular pathway forces you to slow down, making the entire garden feel like a mindful meditation retreat. The yatsuhashi angular boardwalk is ideal for spanning wider koi ponds where you want to admire aquatic life from multiple viewpoints.
Straight bridges are the default, but incorporating 90-degree turns creates an architectural masterpiece that outshines standard designs. Anchor the posts with commercial-grade landscaping hardware so the platform remains rock-solid above the water.
A multi-turn setup will run about $250–$500 depending on the total length. It’s a phenomenal way to add interactive charm to your landscape.
- Key Materials: Untreated cedar, deep-water post anchors
- Vibe / Style: Contemplative Zen aesthetic
- Difficulty: Intermediate structural planning
- Budget Breakdown: Planks: $200 | Hardware & Posts: $150.
- Creator’s Tip: Offset the joints perfectly at the corners to hide end-grain and create a seamless floating illusion.
- Smart Sourcing: Heavy-duty waterproof post brackets and pre-drilled cedar plank kits.
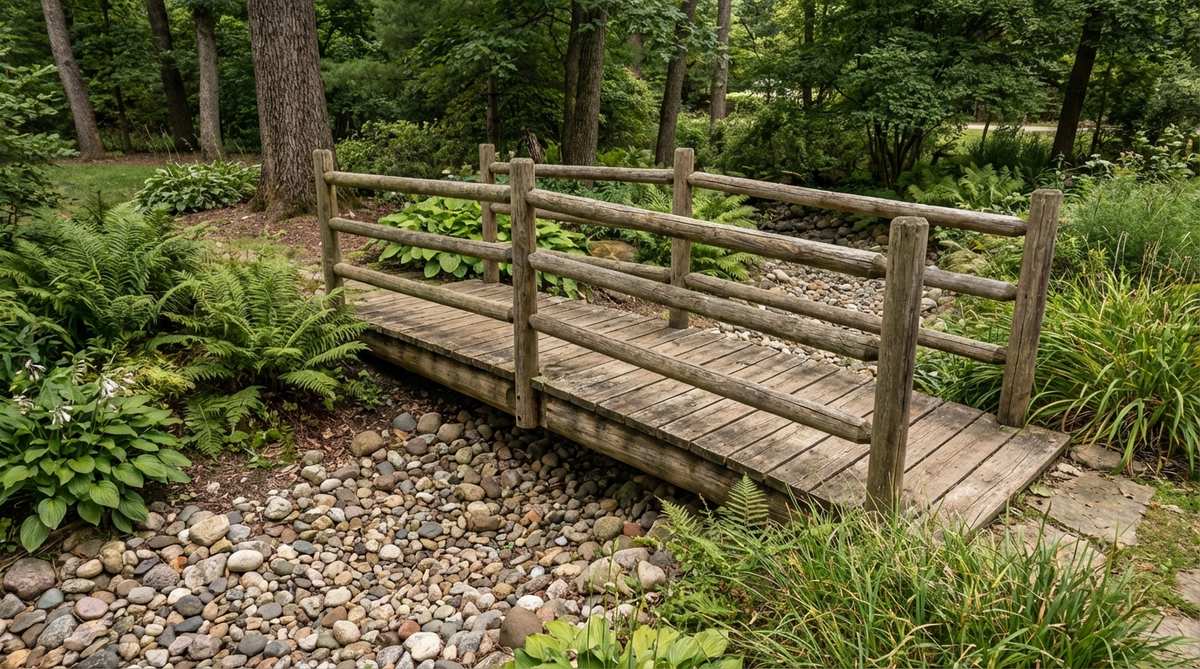
7. Simple Plank Bridge with Post Details
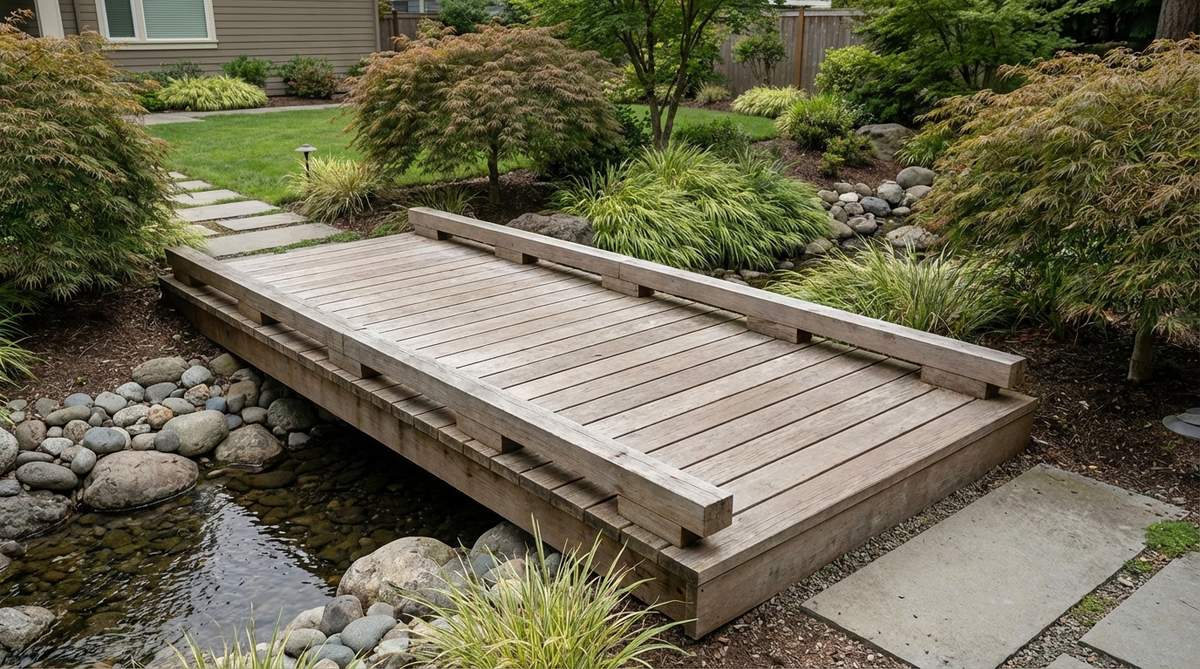
Clean lines and exposed joinery make this crossing feel like a masterclass in elegant simplicity. A minimalist flat timber bridge is the perfect understated accent for narrow, rocky streams where nature should remain the star.
Fussy designs can clutter a small yard, but keeping it completely horizontal delivers a highly sought-after contemporary look. Incorporating thick, reclaimed timber supplies ensures the bridge looks substantial rather than flimsy.
You can construct this sleek pathway for an incredibly low $75–$150. Save this idea if you prefer modern, uncluttered outdoor spaces.
- Key Materials: Thick timber slabs, structural accent posts
- Vibe / Style: Modern Japanese minimalism
- Difficulty: Easy beginner build
- Budget Breakdown: Timber Slabs: $80 | Accent Hardware: $30.
- Creator’s Tip: Leave a quarter-inch gap between planks so rainwater drains instantly, preventing algae buildup.
- Smart Sourcing: Pre-cut thick timber slabs and decorative black iron post caps.
8. Drum Bridge with Dramatic Arc
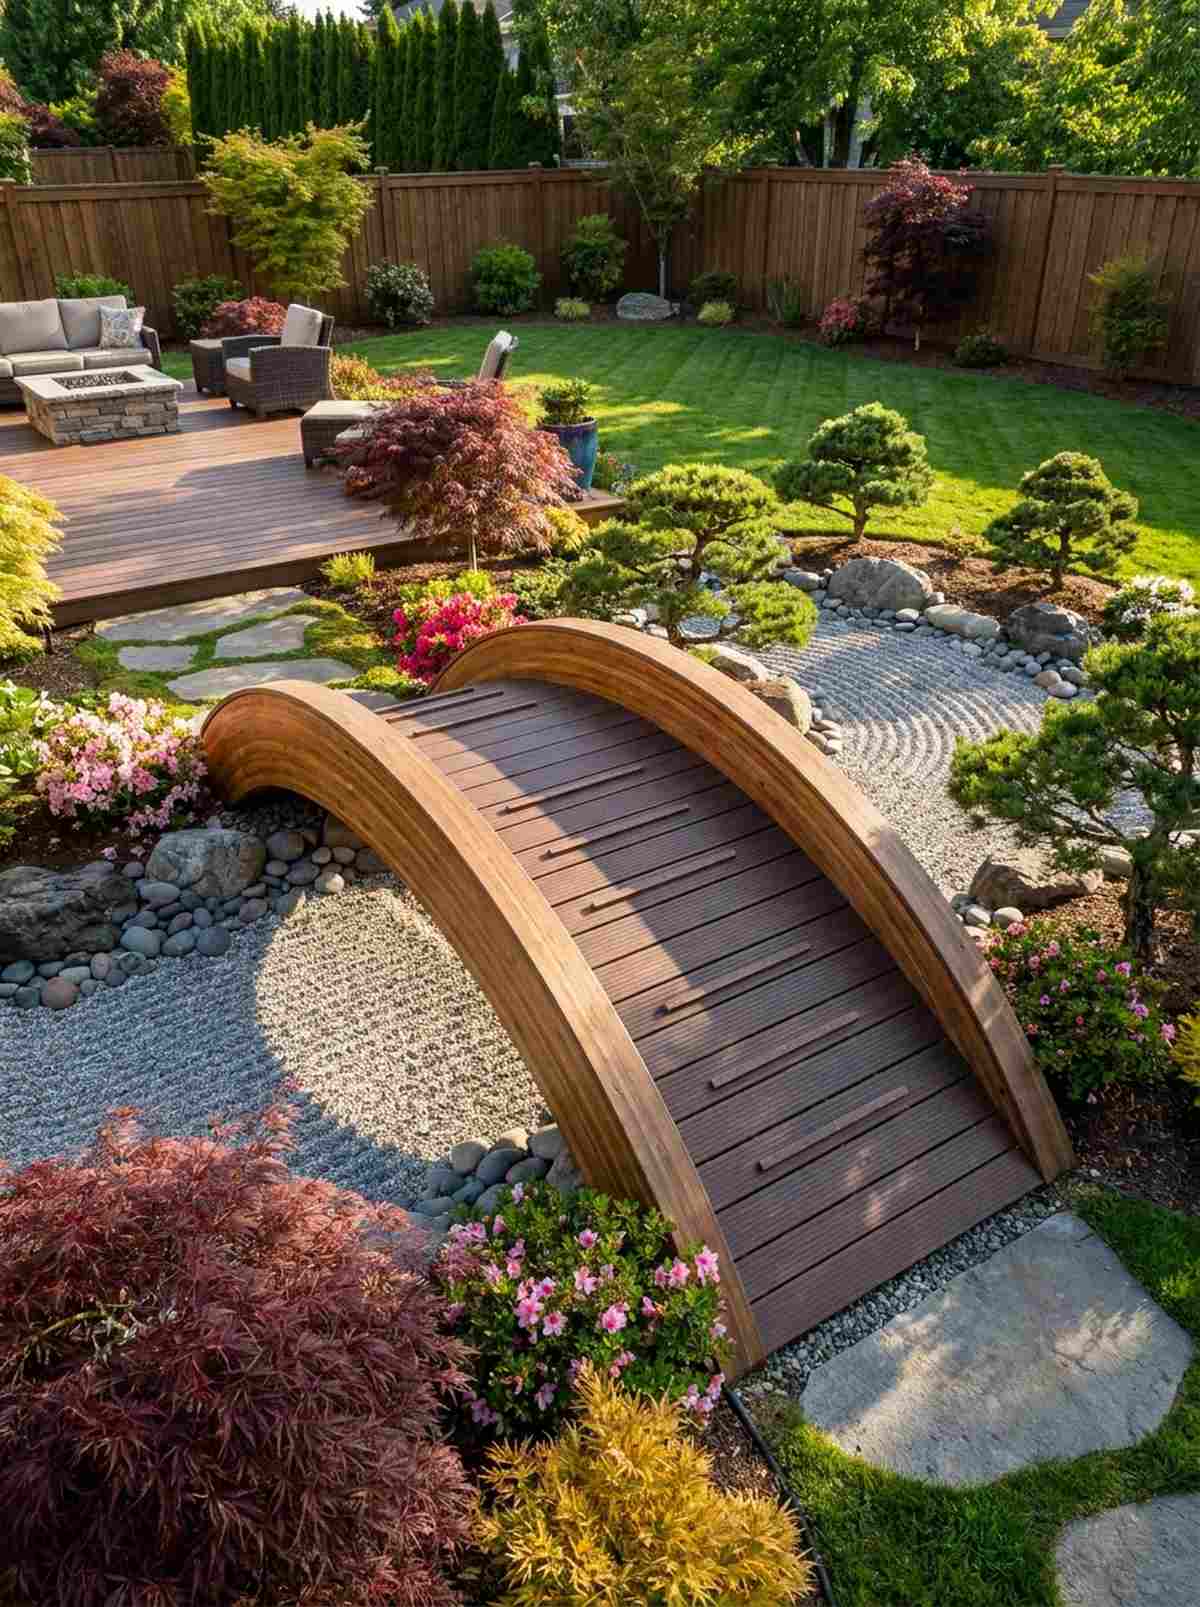
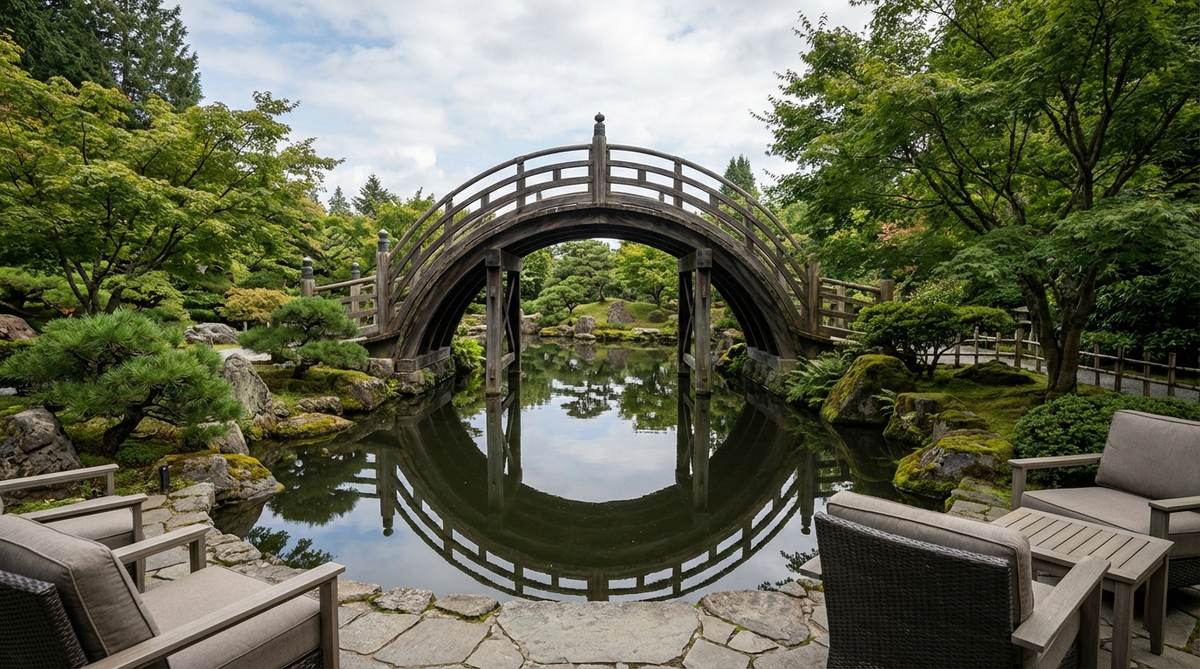
The extreme arch commands attention, feeling almost sculptural in its majestic curve above the waterline. Utilizing a high-arc decorative bridge works as an incredible focal piece when surrounded by meticulously raked gravel or bonsai trees.
While flat pathways are standard, opting for a steep drum profile guarantees your yard stands out from the neighborhood. Just be sure to use deeply anchored structural footings to support the intense cantilevered weight.
This structural art piece typically costs $400–$800 due to the complex curving process. It’s absolutely worth the investment for a striking landscape anchor.
- Key Materials: Laminated curved beams, grip-slat decking
- Vibe / Style: Dramatic Asian sculptural
- Difficulty: Advanced professional build
- Budget Breakdown: Custom Arch Frame: $450 | Decking: $150.
- Creator’s Tip: Add discrete horizontal grip cleats across the walking surface to make the steep climb safely accessible.
- Smart Sourcing: Pre-laminated structural wood arches and anti-slip wooden decking cleats (bulk pack).
Most people get their backyard aesthetics completely wrong… until they try the exact rustic layout coming up next.
Rustic Wooden Bridges for Natural Settings
9. Split-Rail Log Bridge
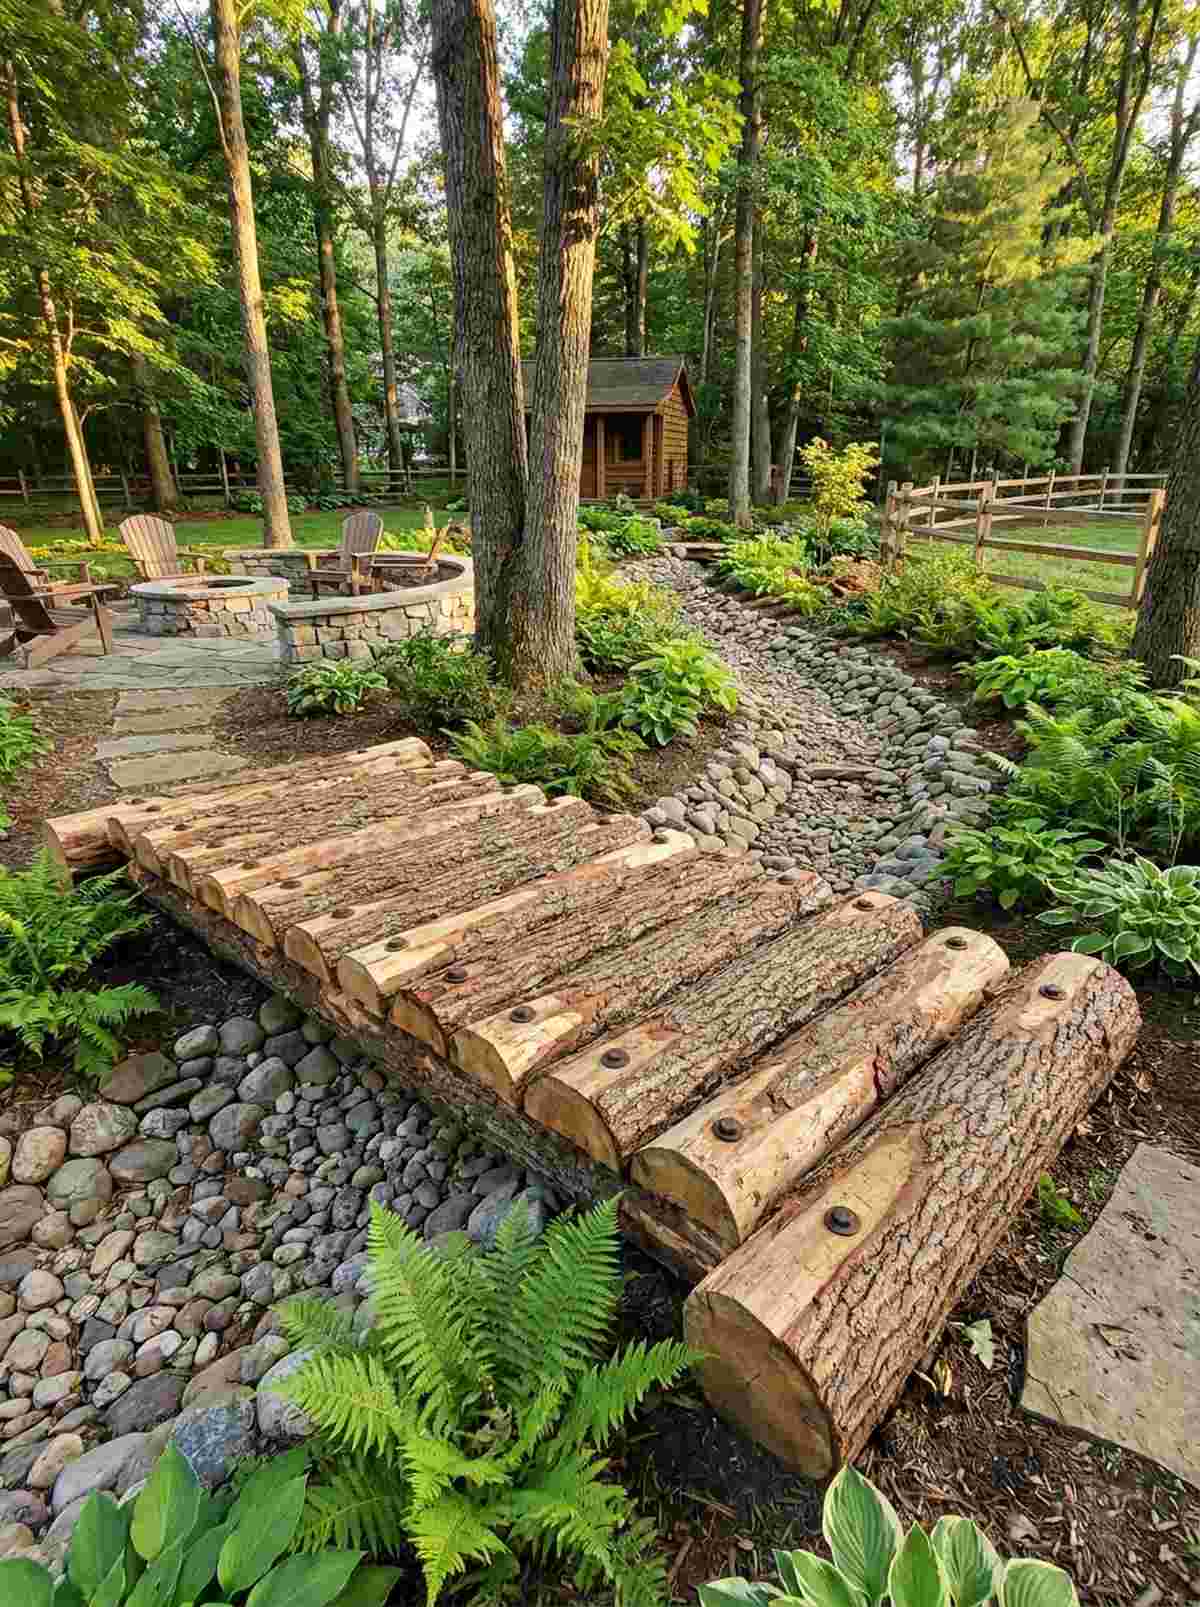
Chunky textures and raw bark make this setup feel like an authentic piece of backcountry wilderness. A rough-hewn log crossing blends seamlessly into woodland gardens, crossing dry stone riverbeds with rugged charm.
Perfectly milled lumber often looks out of place in wild gardens, but using split-rail materials achieves a flawless, organic integration. Coat the buried portions in a heavy-duty rot deterrent to make sure the base outlasts the seasons.
You can easily pull this off for around $100–$200 if you source logs locally. Pin this to your rustic cabin inspiration board!
- Key Materials: Half-round cedar logs, rustic carriage bolts
- Vibe / Style: Pioneer trail authentic
- Difficulty: Moderate heavy lifting
- Budget Breakdown: Raw Logs: $90 | Fasteners: $40.
- Creator’s Tip: Strip the bark only where the joints meet to ensure a tight mechanical fit while keeping the rustic exterior.
- Smart Sourcing: Heavy-duty rust-proof carriage bolts and below-ground wood preservative sealants.
💡 Must-Have Supplies for High-End Setups
To build these setups faster and ensure they last, skip the generic craft aisles and invest in the right foundational kits.
- Base & Support: Heavy-duty galvanized post bracket systems
- Setup Tools: Pre-cut DIY garden bridge hardware kits
- Weather/Durability Protection: UV-resistant commercial wood sealers
10. Reclaimed Timber Beam Bridge
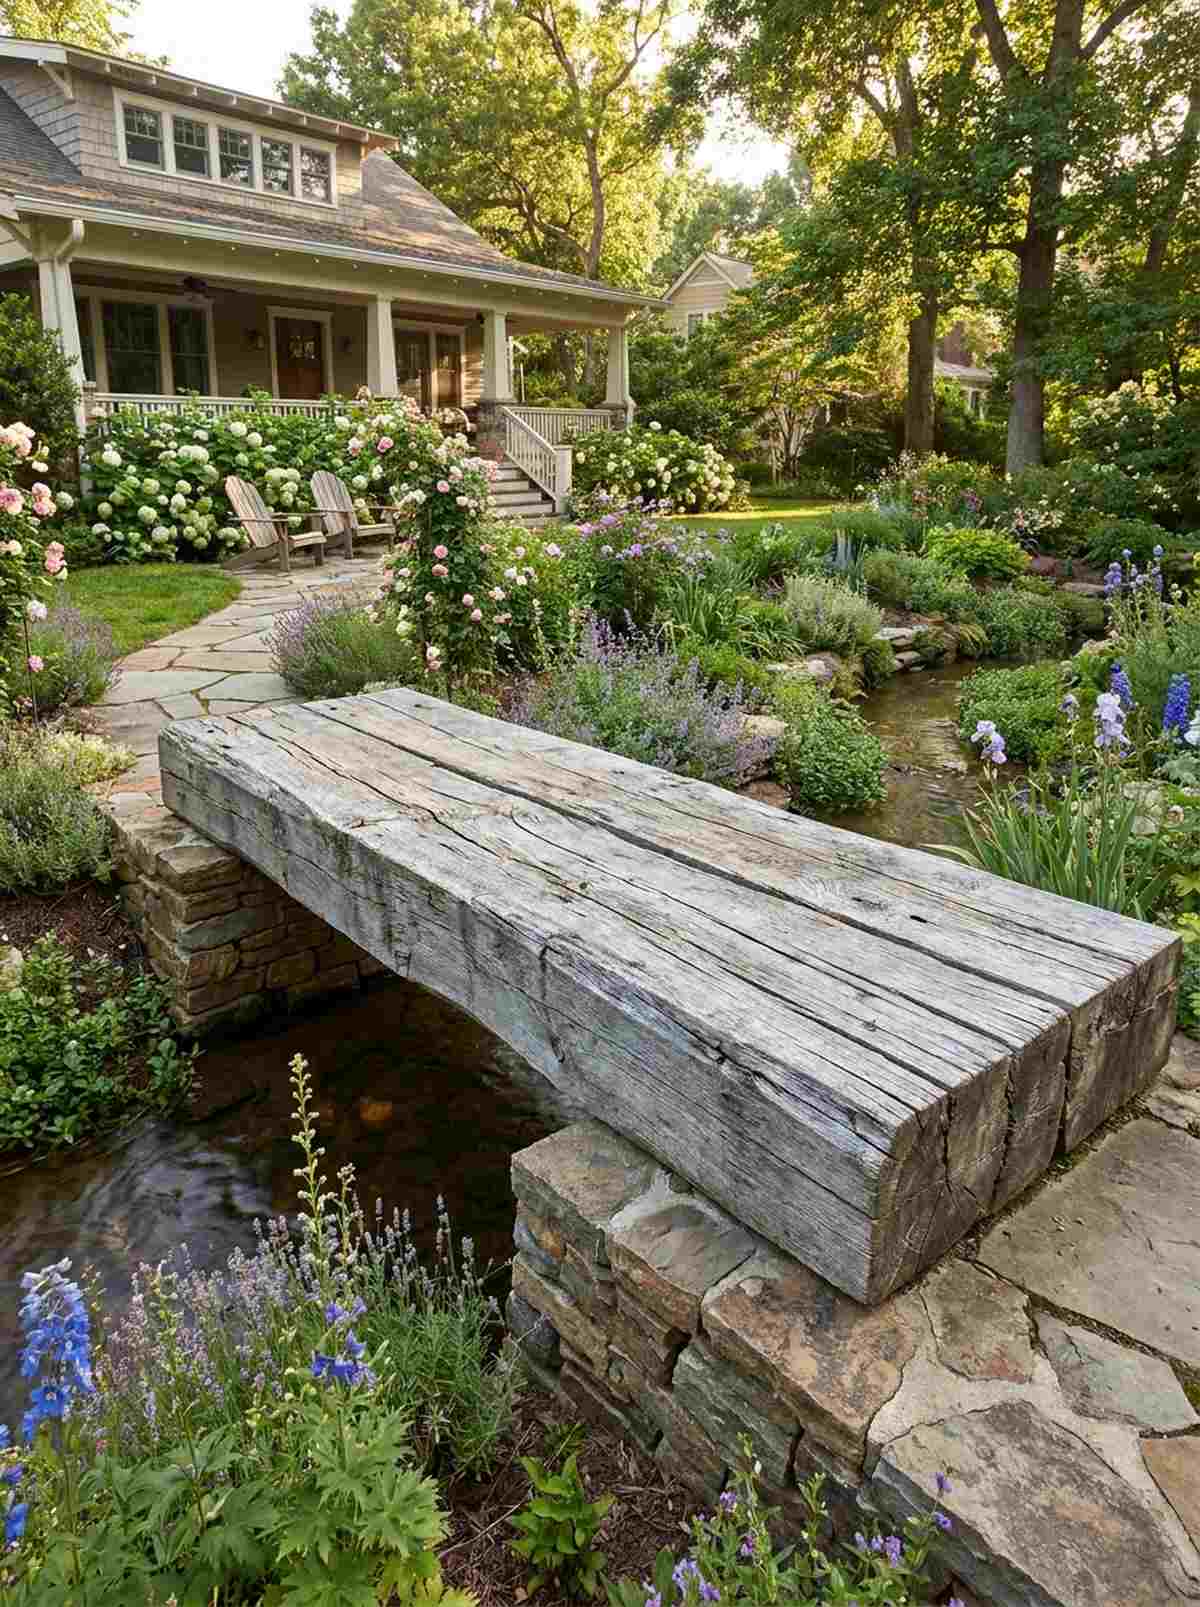
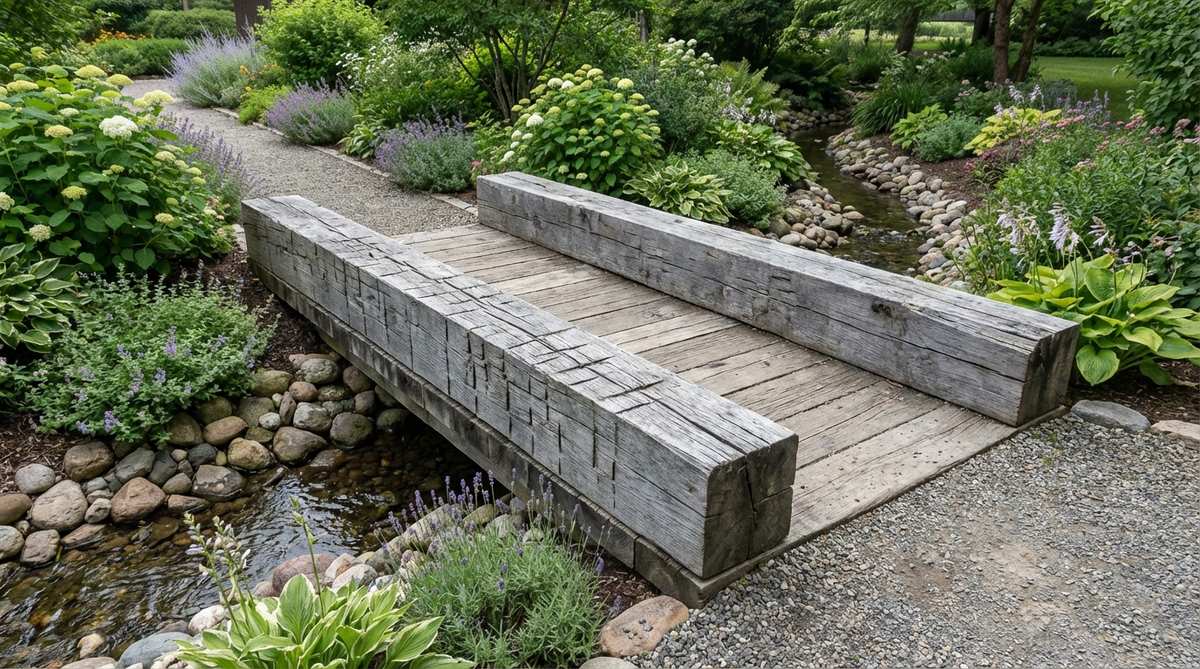
The deep cracks and silvery patina of aged wood make this crossing feel rich with history and character. Dropping a reclaimed barn wood bridge into a cottage garden instantly adds a sense of timeless permanence.
Buying brand-new distressed wood is a rookie mistake; genuine salvaged timber provides an unmatched, expensive aesthetic for surprisingly little cash. Utilizing an epoxy wood hardener on the ends guarantees insects won’t hollow out your beautiful vintage beams.
Salvaging the wood keeps costs around $150–$250. This is a brilliant way to recycle while creating stunning outdoor architecture.
- Key Materials: Salvaged dock pilings or barn beams
- Vibe / Style: Weathered heritage charm
- Difficulty: Heavy lifting, simple assembly
- Budget Breakdown: Reclaimed Wood: $120 | Stabilizers: $45.
- Creator’s Tip: Pressure wash reclaimed timber on a low setting to remove rot without destroying that beautiful silver patina.
- Smart Sourcing: Penetrating liquid wood hardener kits and heavy-duty structural corner brackets.
11. Rope-Rail Woodland Bridge
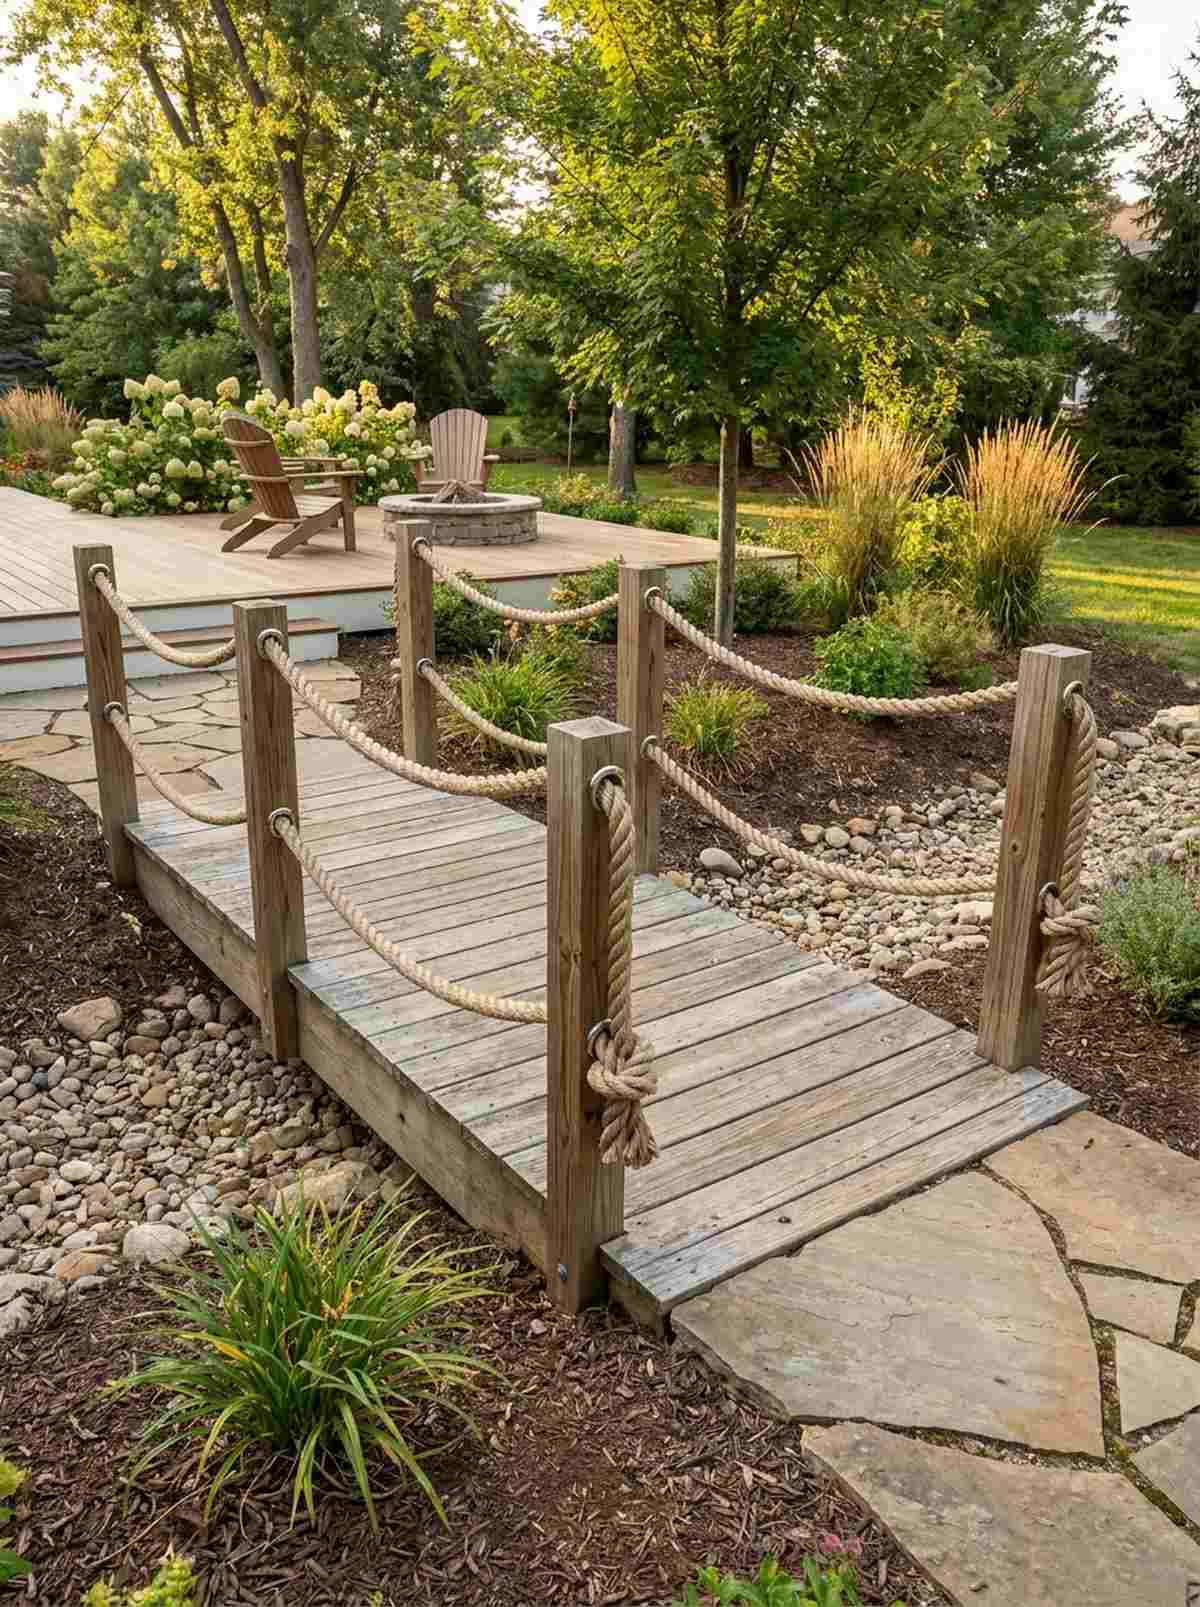
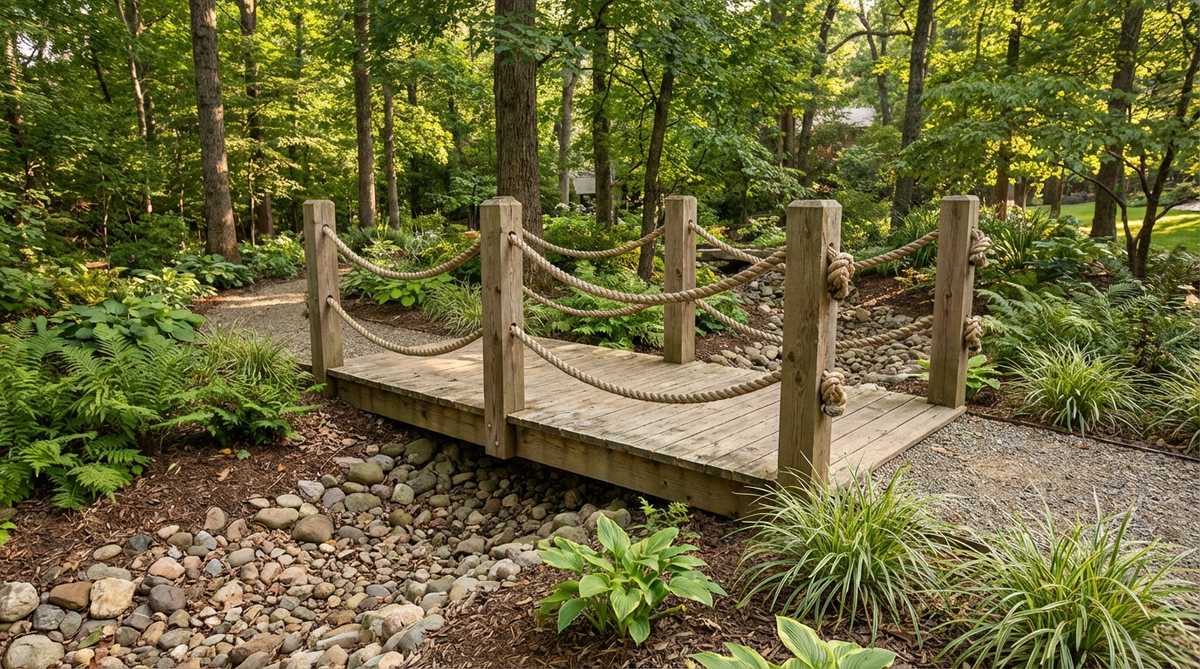
The gentle sway of thick natural fiber ropes feels like a whimsical bridge straight out of a treehouse village. A nautical rope walkway adds incredible tactile interest over narrow garden gaps or dry creek channels.
Rigid handrails can make a small garden feel boxed in, but flexible rope lines keep the sightlines gorgeously open. Swapping standard manila for a synthetic weather-proof marine rope ensures it won’t rot or snap after one rainy season.
This fun, relaxed project comes in at just $90–$160. Save this if you’re building a play-friendly outdoor space for the family.
- Key Materials: Thick marine rope, wooden support posts
- Vibe / Style: Relaxed coastal or treehouse
- Difficulty: Easy weekend DIY
- Budget Breakdown: Rope: $60 | Decking: $75.
- Creator’s Tip: Tie off the rope ends with heavy-duty nautical knots and burn the synthetic tips to prevent unsightly fraying.
- Smart Sourcing: UV-resistant synthetic manila rope (bulk coil) and stainless steel rope guide rings.
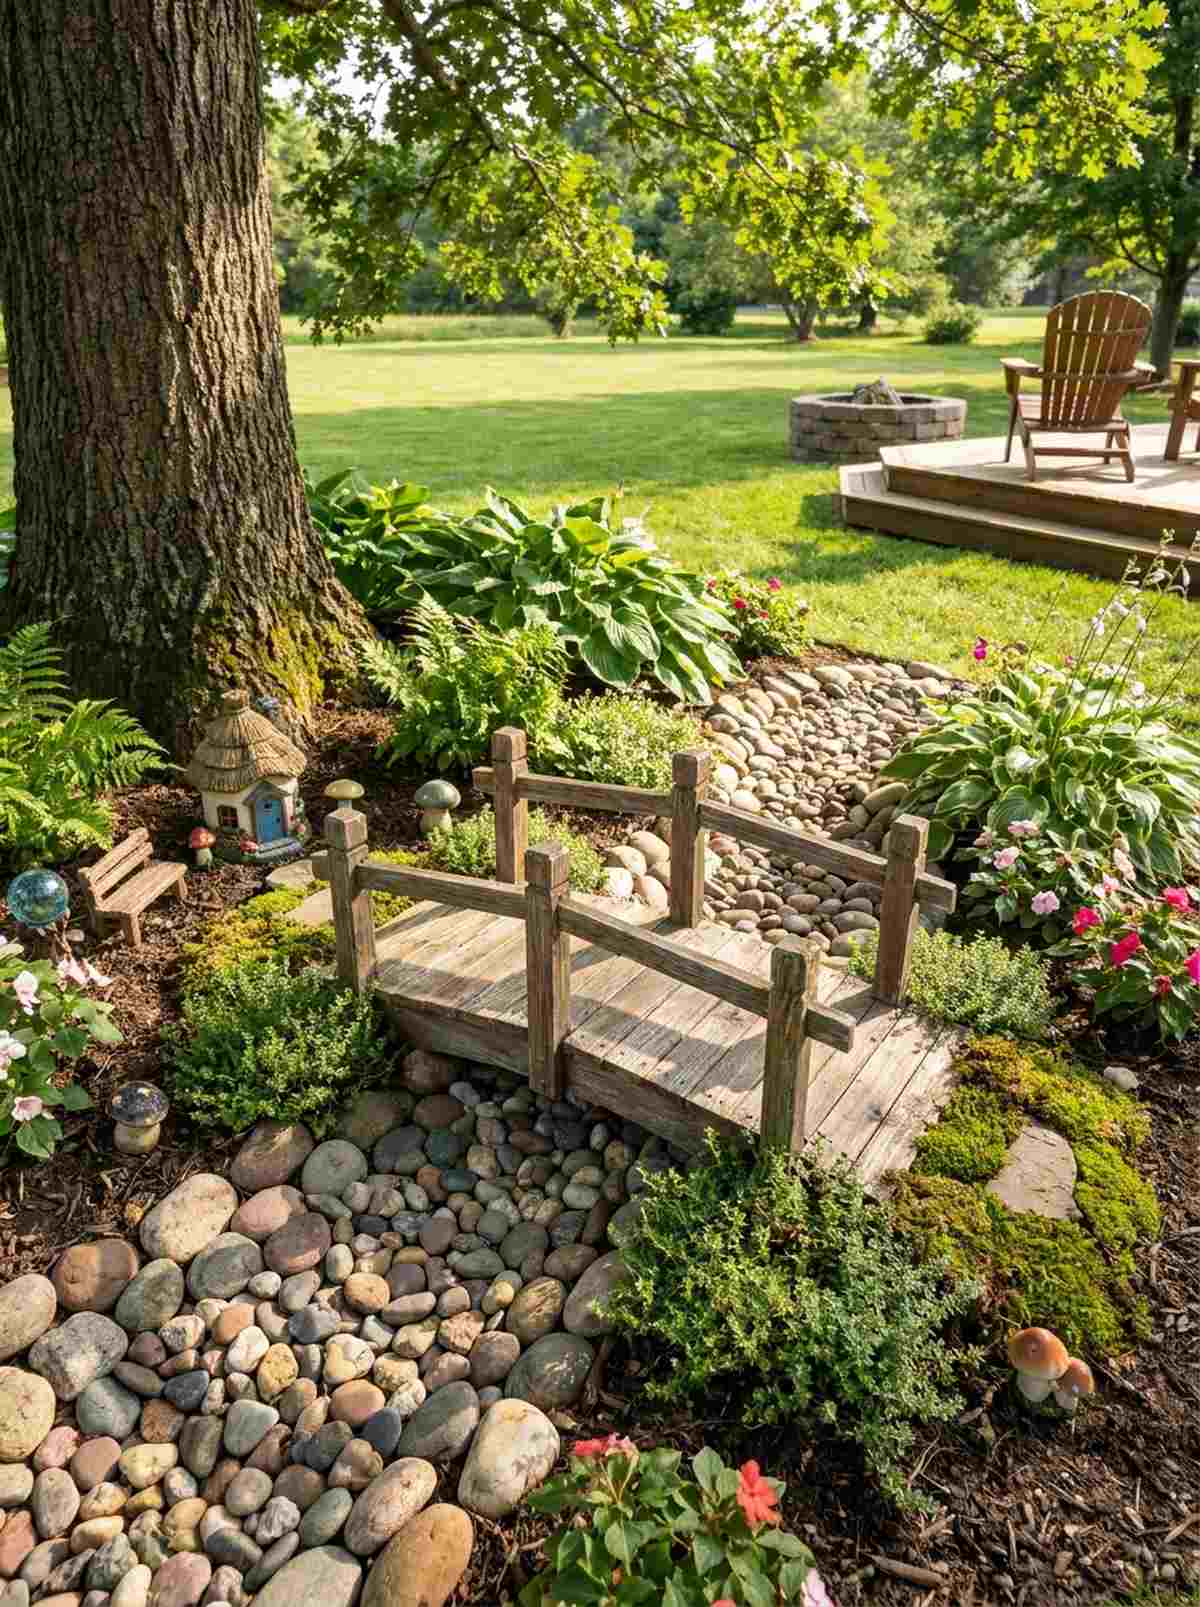
12. Branch-Rail Organic Bridge
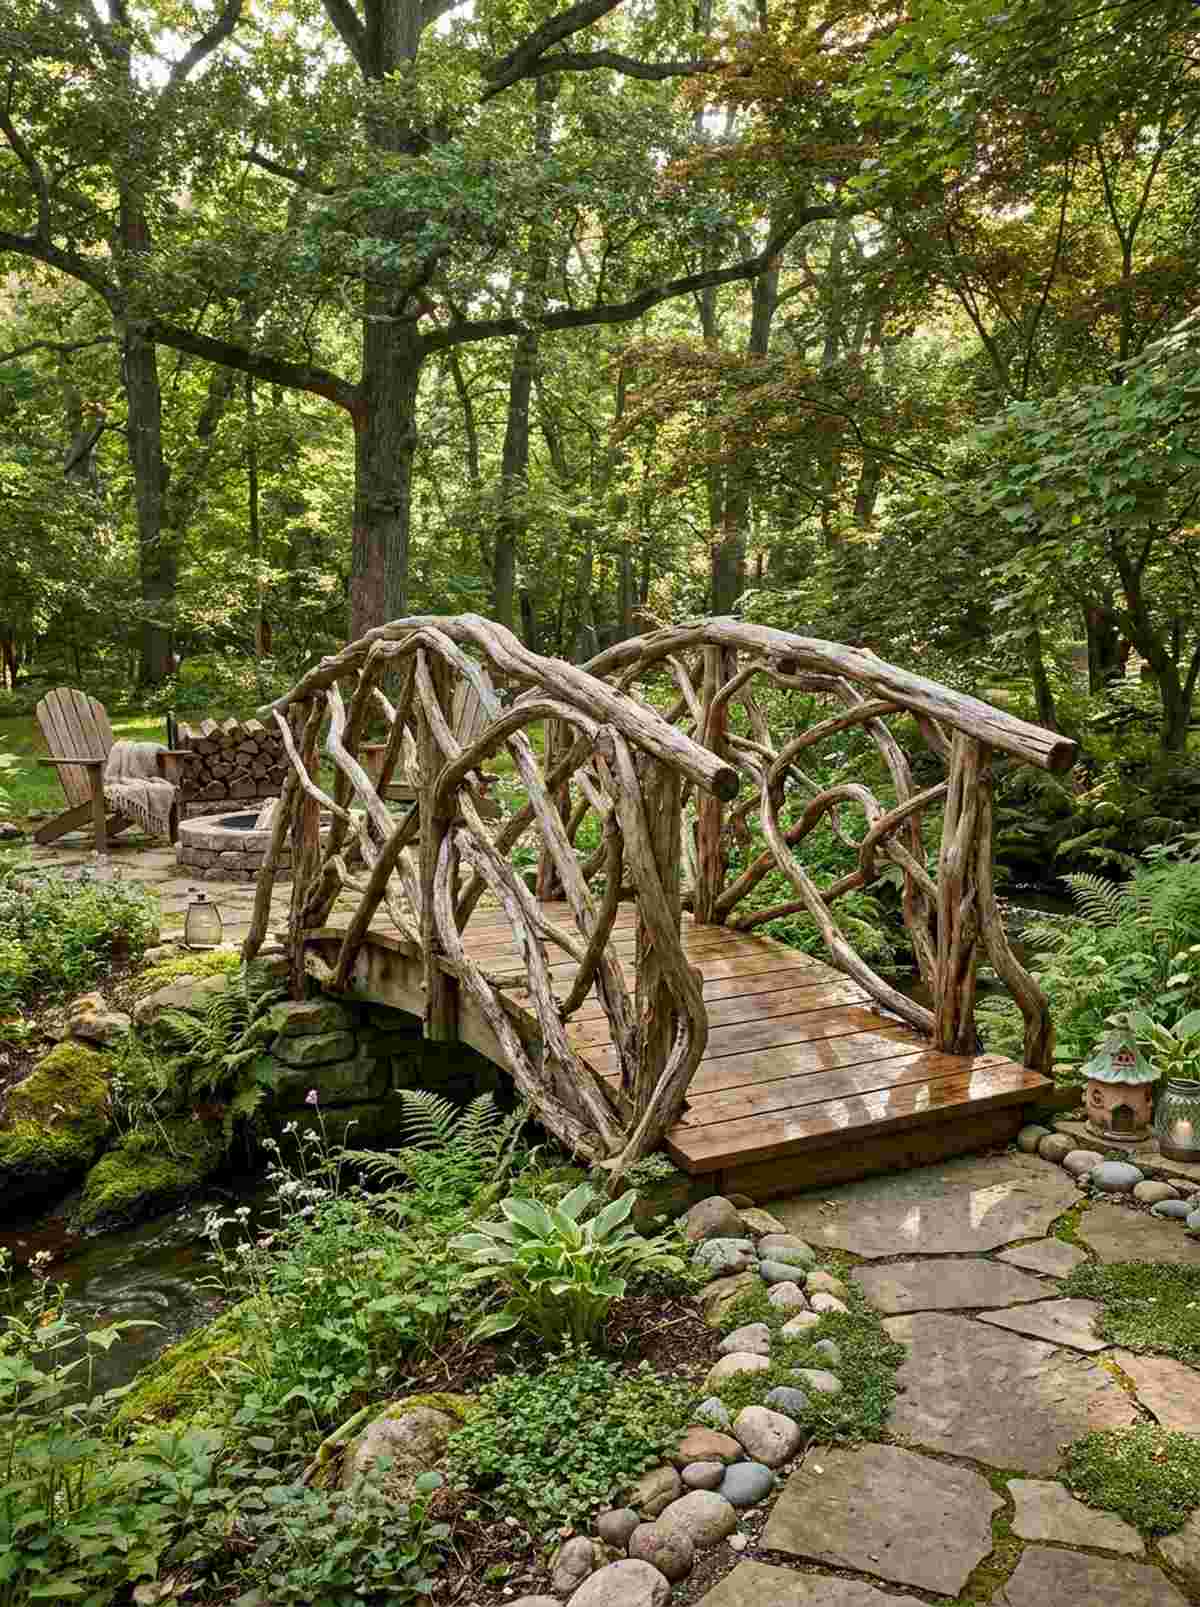
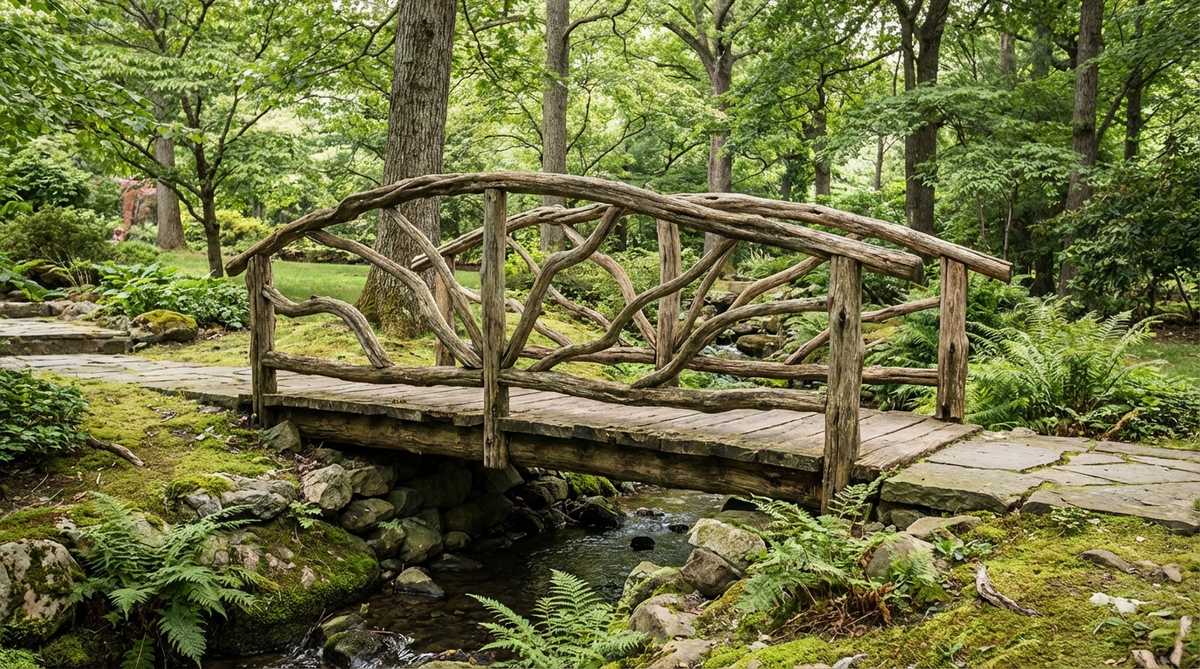
Using naturally twisted branches creates a fairytale aesthetic that feels entirely one-of-a-kind. Implementing a foraged branch crossing works wonders in shaded, mossy corners where you want to blur the lines between structure and nature.
Pre-packaged railings are boring, whereas hunting down uniquely foraged wood delivers a custom designer vibe for free. Just remember to seal the cut joints properly so your magical fairy garden supplies don’t succumb to moisture rot.
With scavenged materials, this masterpiece costs as little as $50–$100. It’s a stunning, eco-friendly way to upgrade your yard.
- Key Materials: Hardwood branches, deck screws
- Vibe / Style: Organic fairy-tale woodland
- Difficulty: Creative puzzle assembly
- Budget Breakdown: Base Planks: $60 | Foraged Branches: Free.
- Creator’s Tip: Strip the bark off your gathered branches immediately; it speeds up drying and prevents wood-boring beetles from nesting.
- Smart Sourcing: Clear waterproof wood sealer sprays and rust-resistant exterior trim screws (bulk pack).
13. Steel Beam Linear Bridge
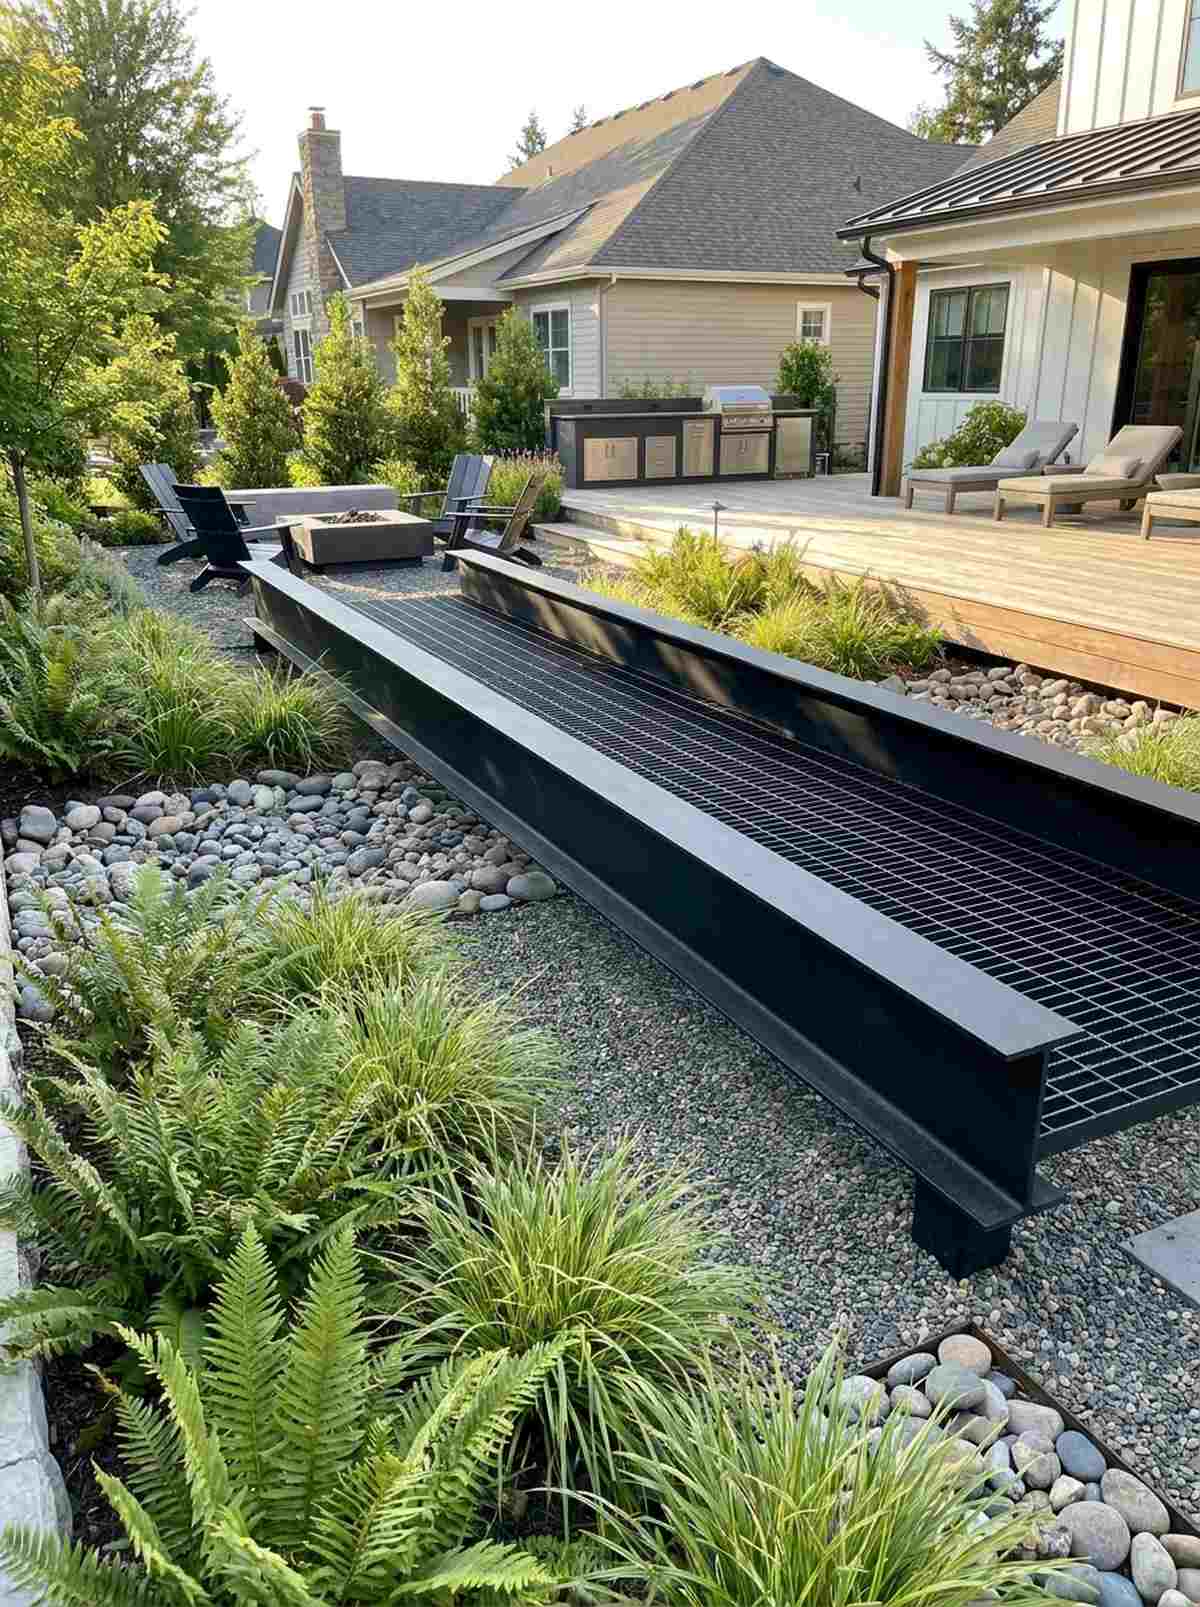
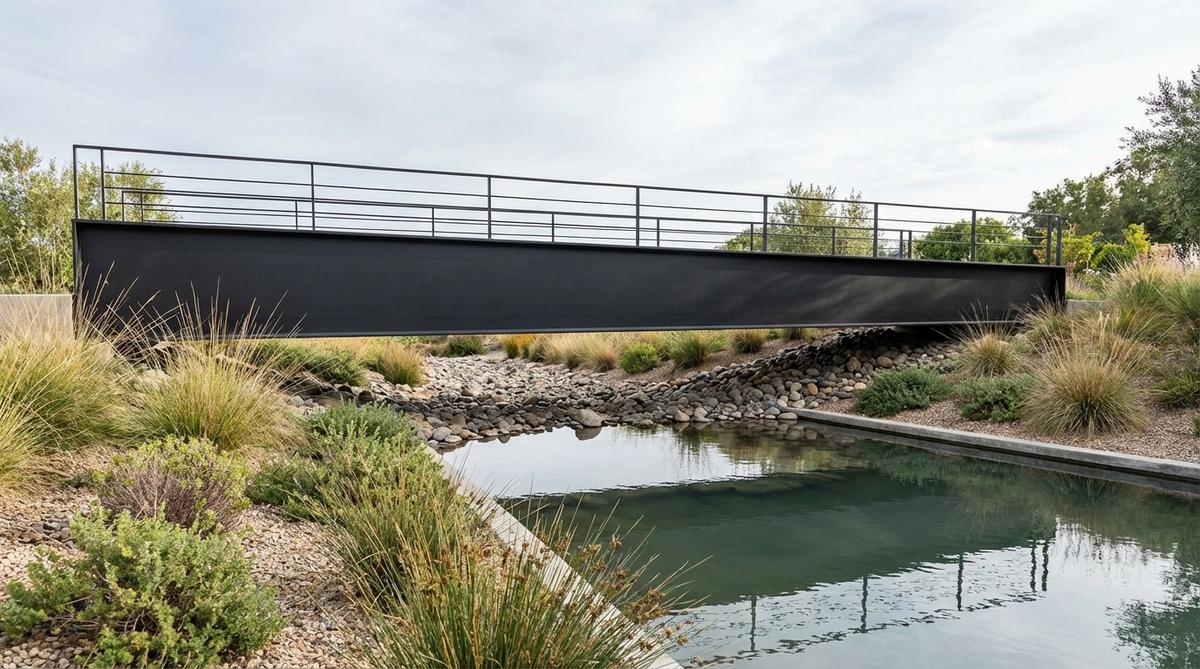
Crisp black metal spanning across soft green ferns feels like an architectural masterpiece from a high-end magazine. A matte black industrial bridge is the ultimate flex for modern urban yards or gravel-filled rill features.
Many assume metal in the garden looks cold, but pairing structural steel with lush planting creates an intoxicating visual contrast. Opting for a weathering steel (Corten) or a heavy-duty powder coating guarantees zero maintenance for decades.
Steel fabrication pushes this build to $500–$900+, but the lifetime durability makes it worth every penny. Pin this if you want an ultra-contemporary landscape!
- Key Materials: Powder-coated steel I-beams, minimalist grating
- Vibe / Style: Urban industrial chic
- Difficulty: Professional fabrication needed
- Budget Breakdown: Steel Beams: $450 | Coating/Finishing: $200.
- Creator’s Tip: Use Corten steel if you prefer a rustic orange patina that organically seals itself against the weather.
- Smart Sourcing: Pre-cut Corten steel landscape edging/beams and industrial anti-slip metal grating panels.
Stop scrolling if you want an ultra-modern yard—this next floating concept absolutely breaks the mold.
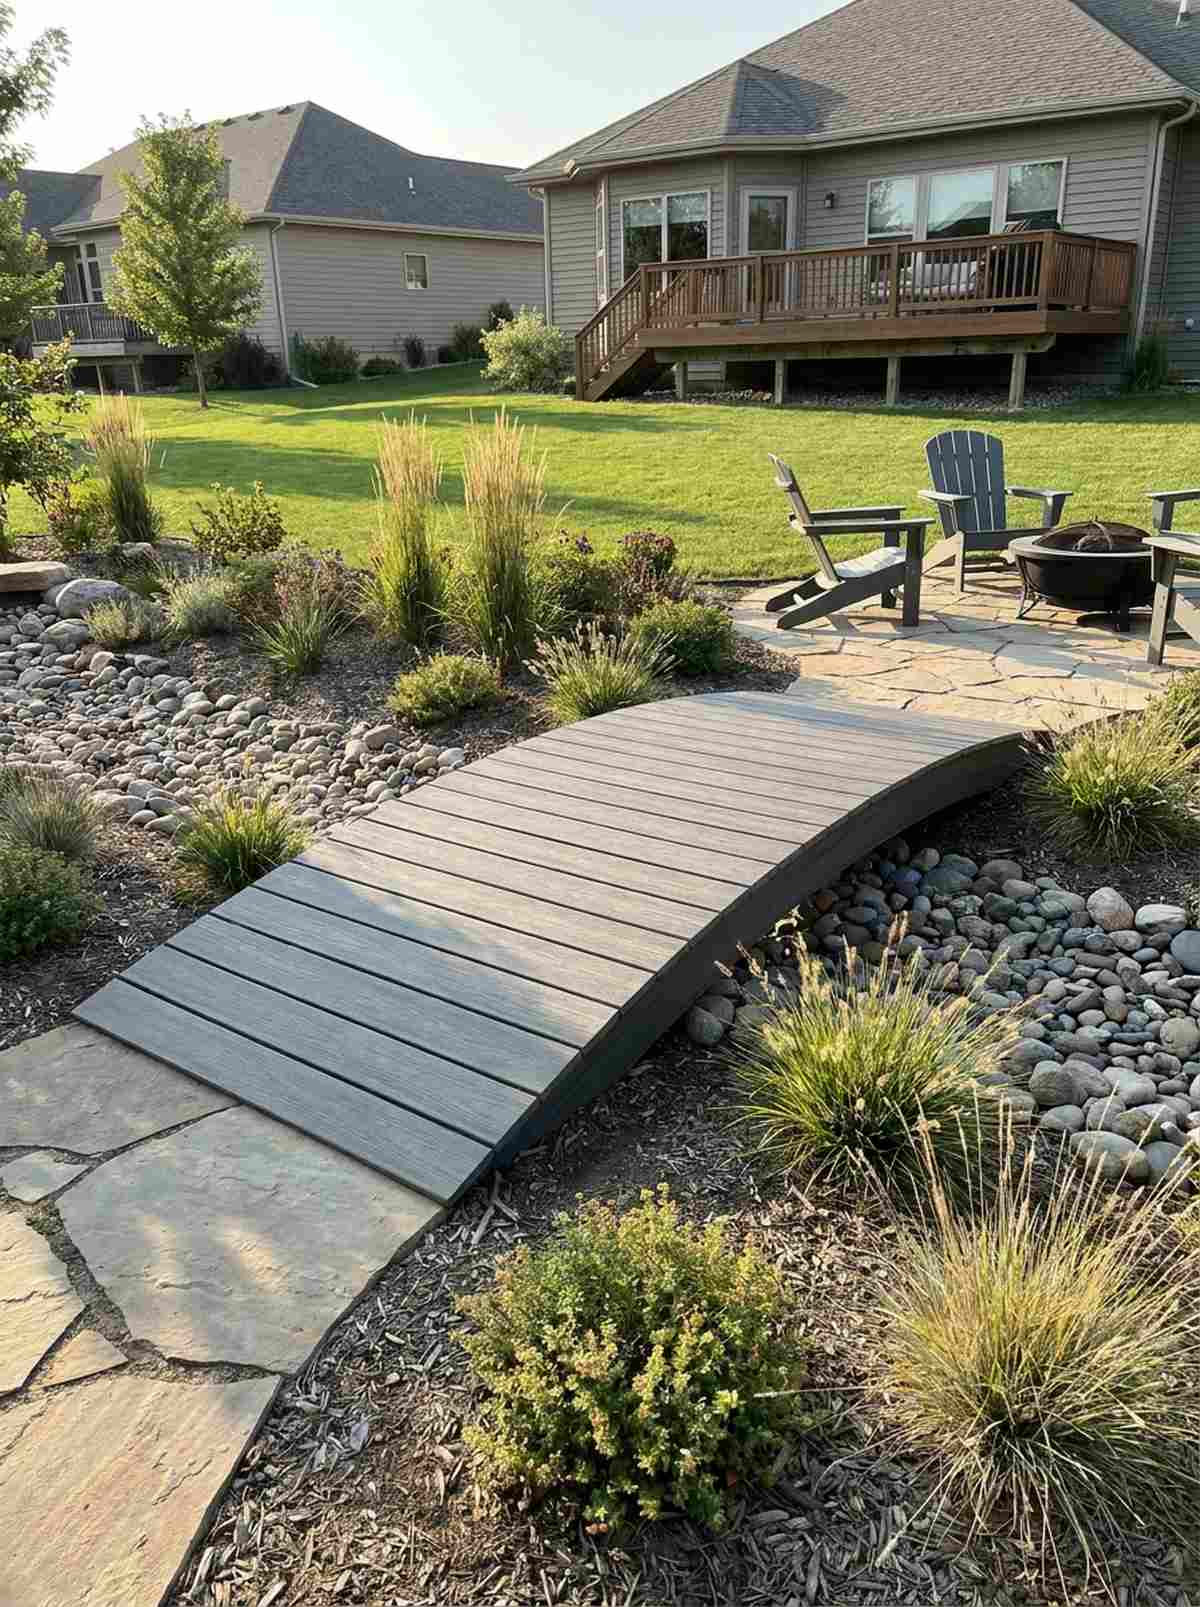
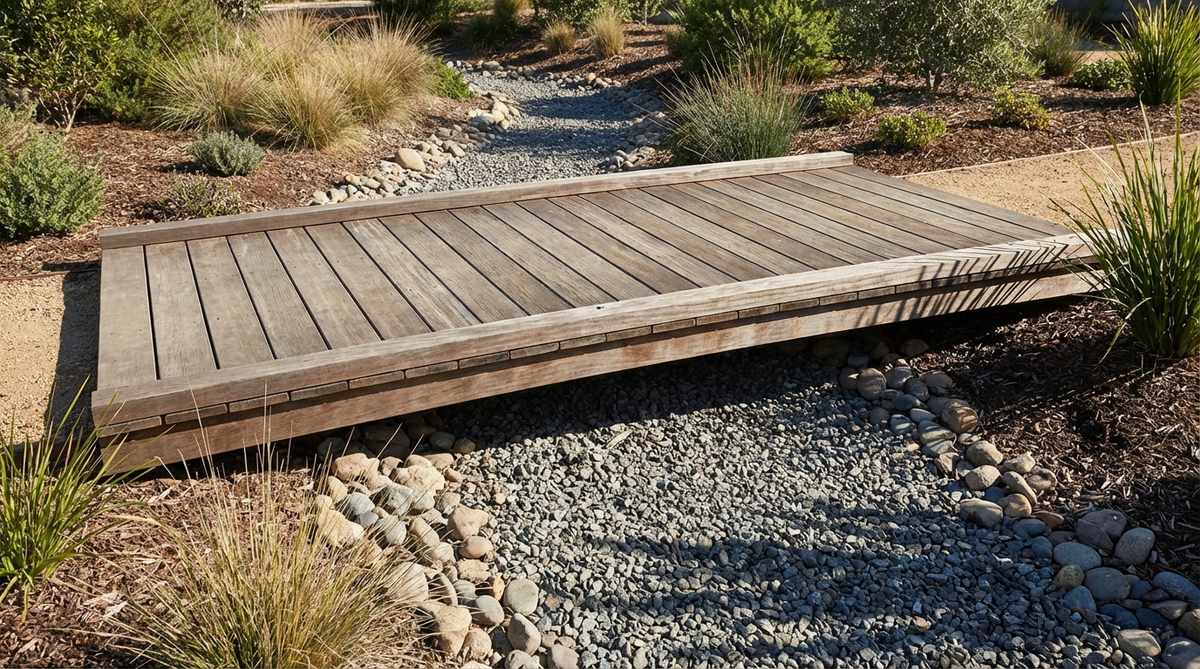
14. Composite Deck Floating Bridge
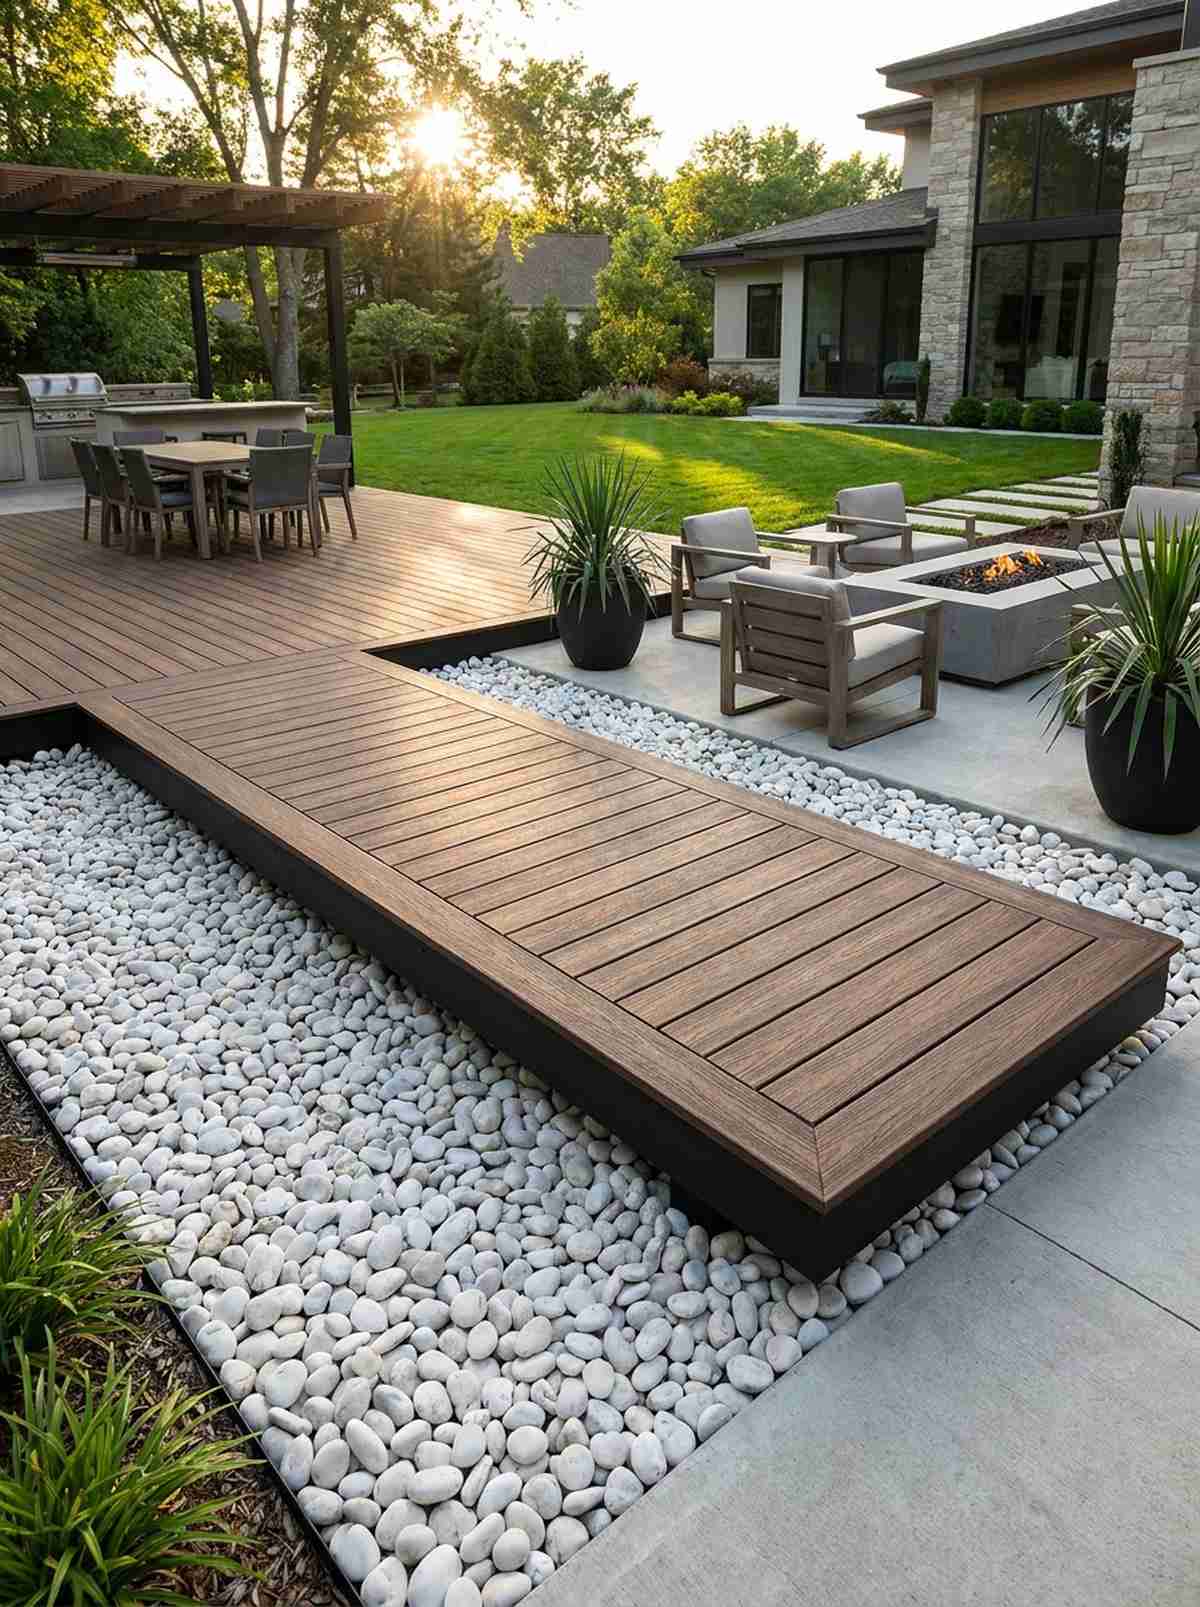
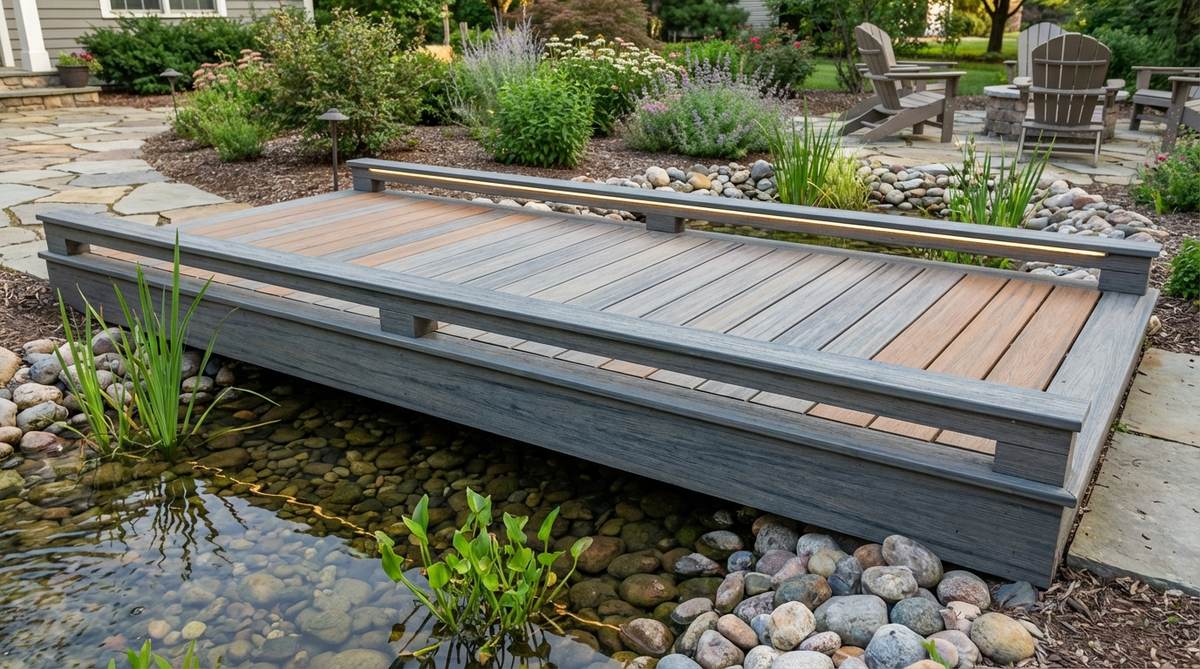
Hovering just inches above a pristine bed of white pebbles, this setup feels impossibly sleek and futuristic. A low-profile floating walkway is the perfect solution for creating seamless, step-free transitions between patio zones.
Traditional timber warps over time, but switching to advanced composite decking delivers a flawless, expensive aesthetic that never splinters. Using hidden edge-clips is the secret to maintaining that unbroken, luxurious surface.
You can engineer this modern marvel for around $200–$350. Highly recommended for a high-traffic backyard pathway.
- Key Materials: Synthetic decking, concealed edge fasteners
- Vibe / Style: Seamless modern luxury
- Difficulty: Straightforward assembly
- Budget Breakdown: Composite Boards: $180 | Concealed Clips: $45.
- Creator’s Tip: Paint the underlying support frame flat black so it disappears in the shadows, enhancing the floating illusion.
- Smart Sourcing: Premium UV-coated composite deck boards and hidden deck fastening systems (starter kits).
15. Cantilevered Concrete Span
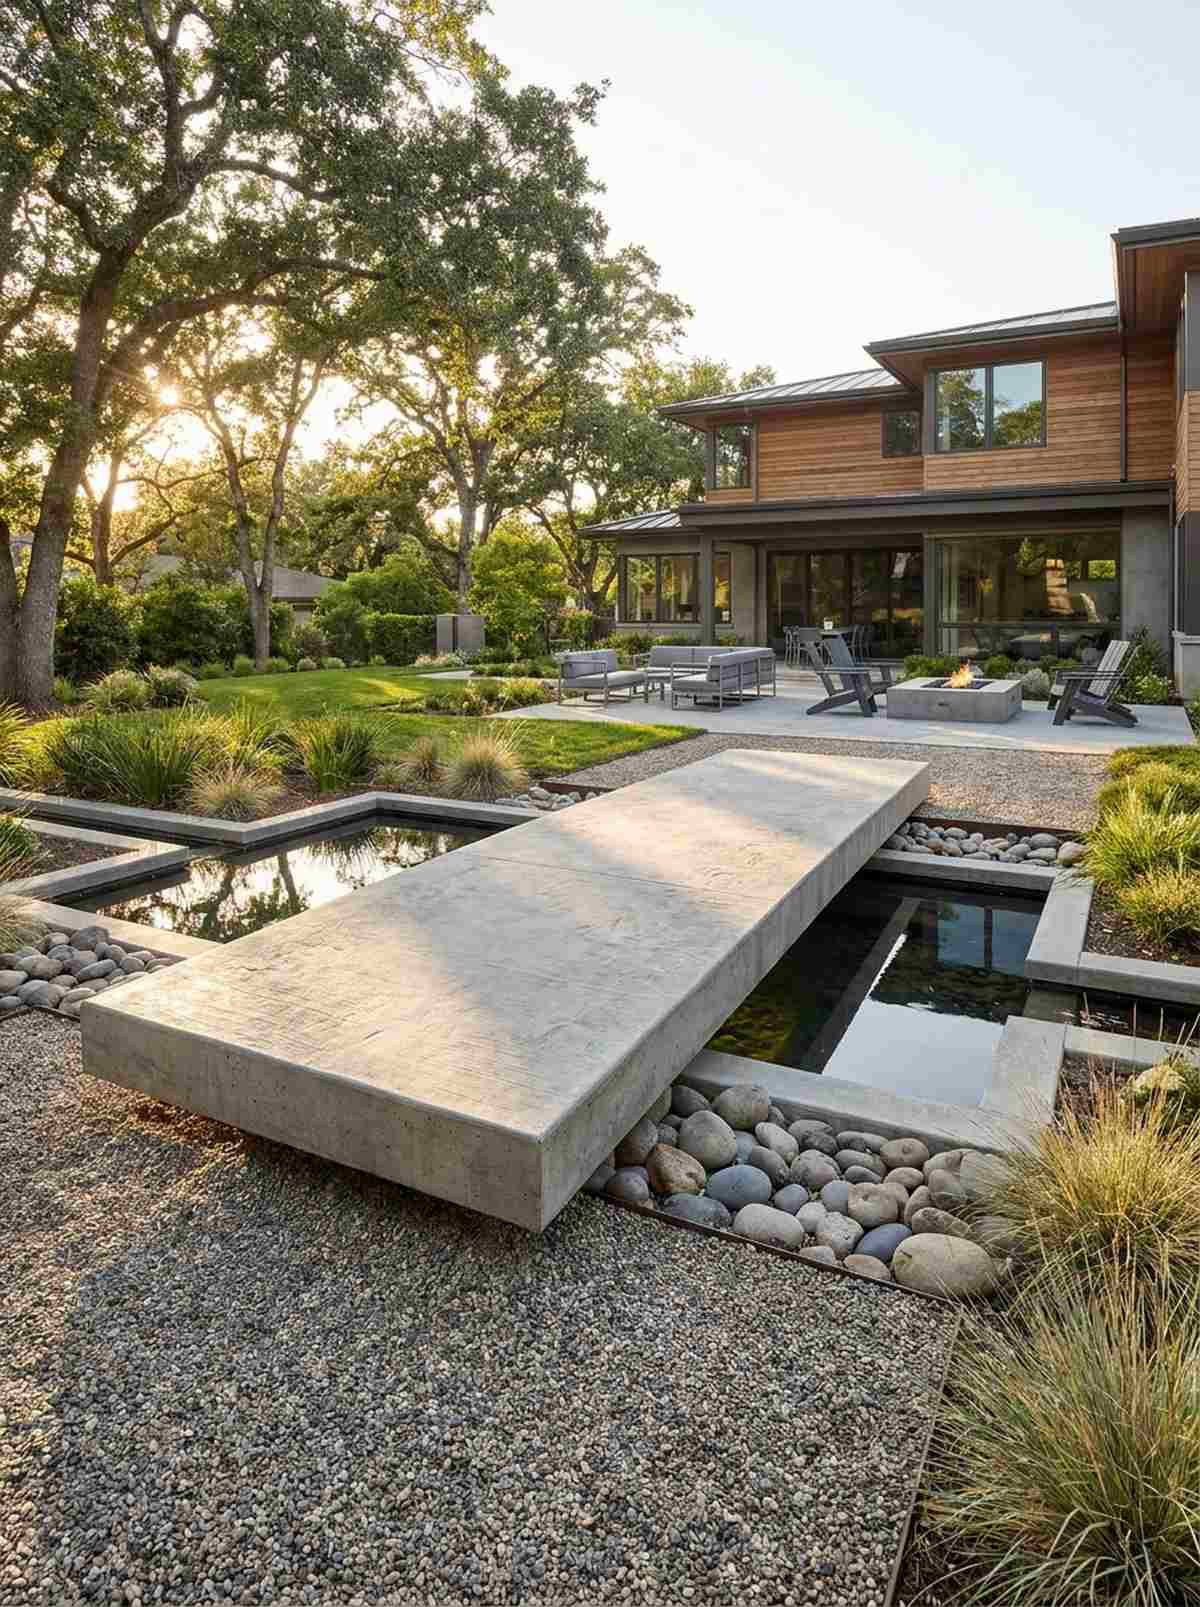
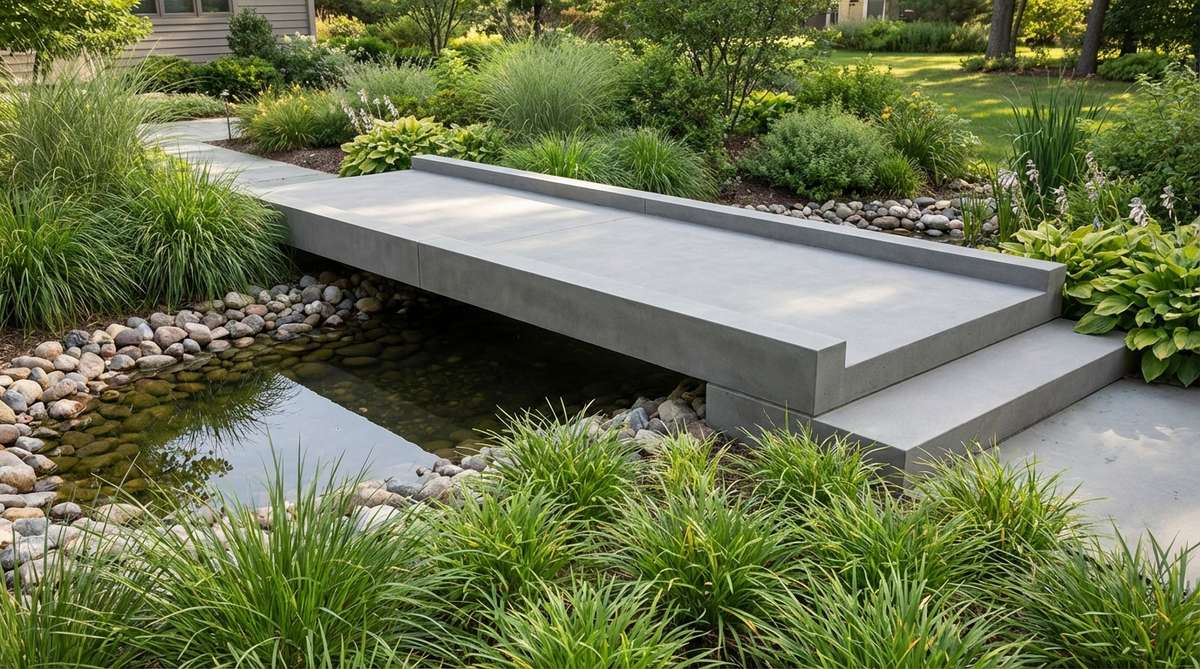
Solid, unyielding, and impeccably smooth, this structure feels like it belongs in a modern art museum. Using a cast-in-place concrete bridge makes a massive architectural statement over geometric reflecting pools or wide gravel beds.
Wooden bridges require constant upkeep, but pouring a reinforced concrete slab offers a bulletproof solution that lasts generations. Stamping the surface with a subtle texture adds critical slip resistance while elevating the bespoke design.
Pouring custom concrete generally costs $400–$800 depending on the formwork required. Save this to your architectural inspiration board!
- Key Materials: High-strength concrete, steel rebar
- Vibe / Style: Brutalist contemporary
- Difficulty: Advanced formwork and pouring
- Budget Breakdown: Concrete/Rebar: $250 | Formwork Lumber: $120.
- Creator’s Tip: Rent a concrete vibrator during the pour to eliminate air bubbles and ensure glass-smooth edges when you remove the forms.
- Smart Sourcing: High-strength commercial concrete mixes and reusable plastic concrete stamping mats.
16. Cable-Rail Minimalist Crossing
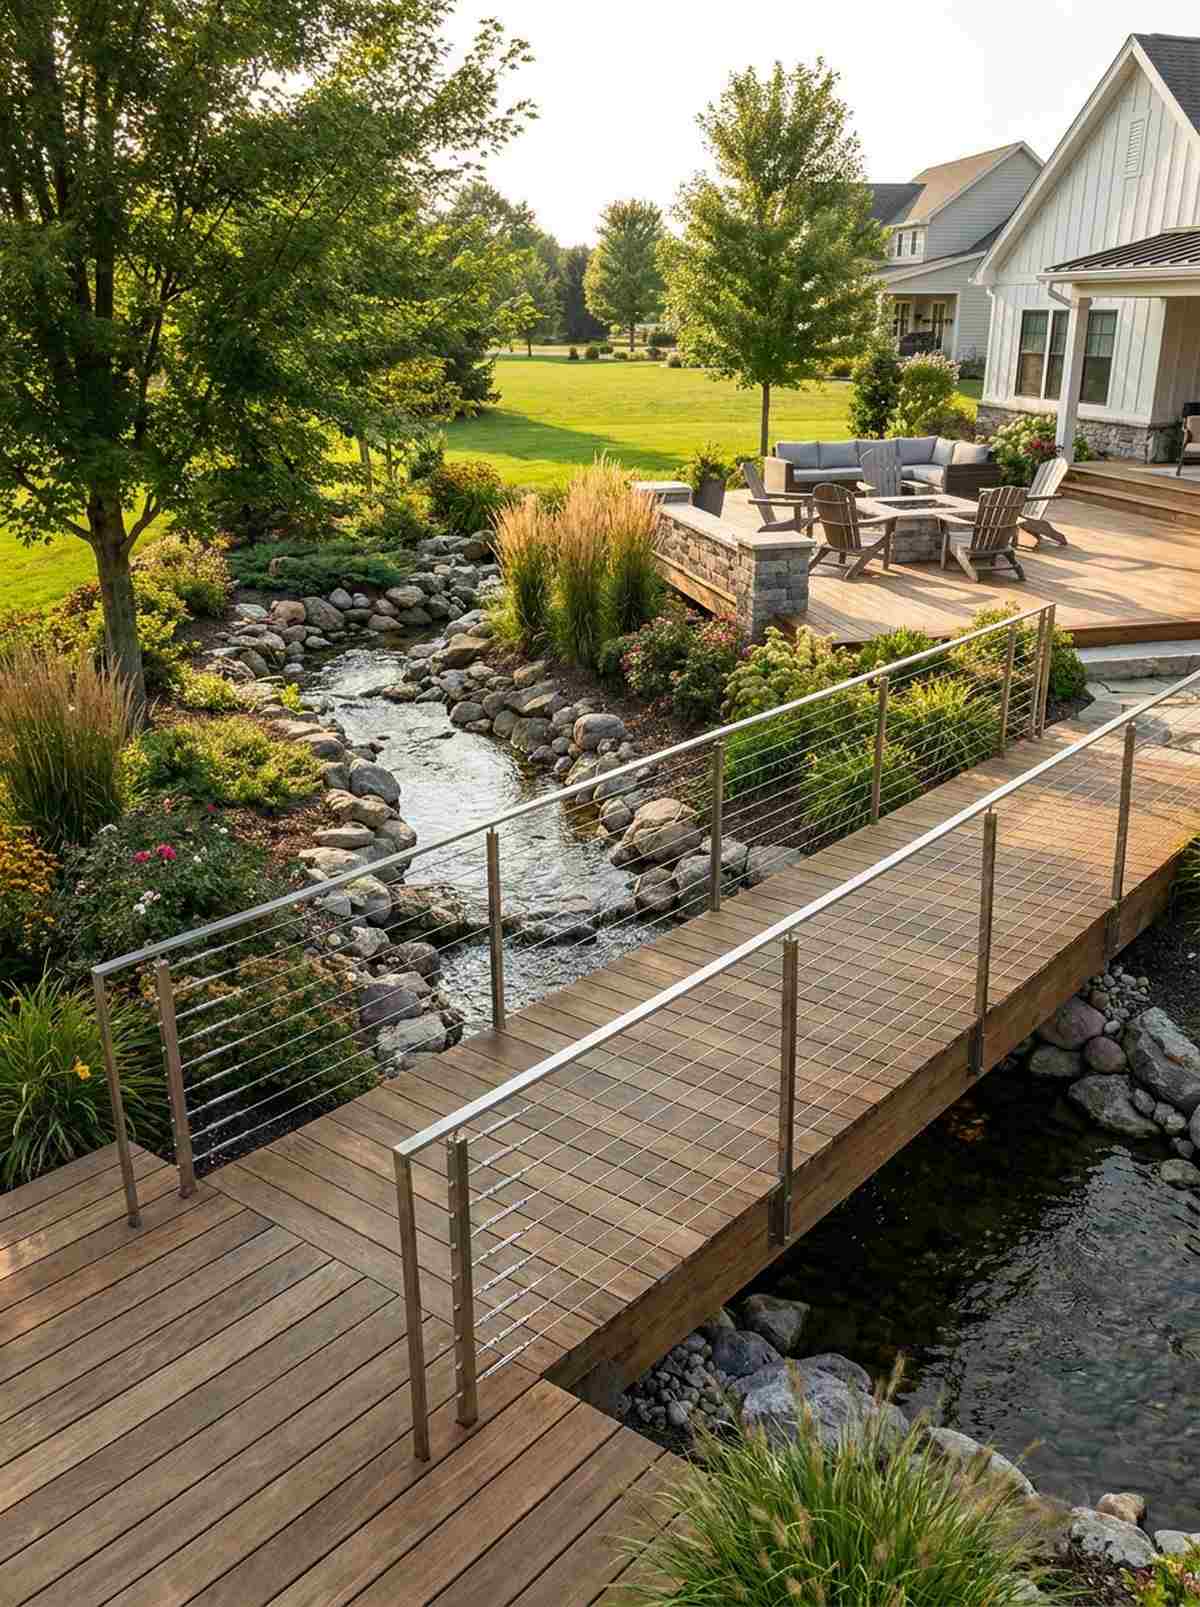
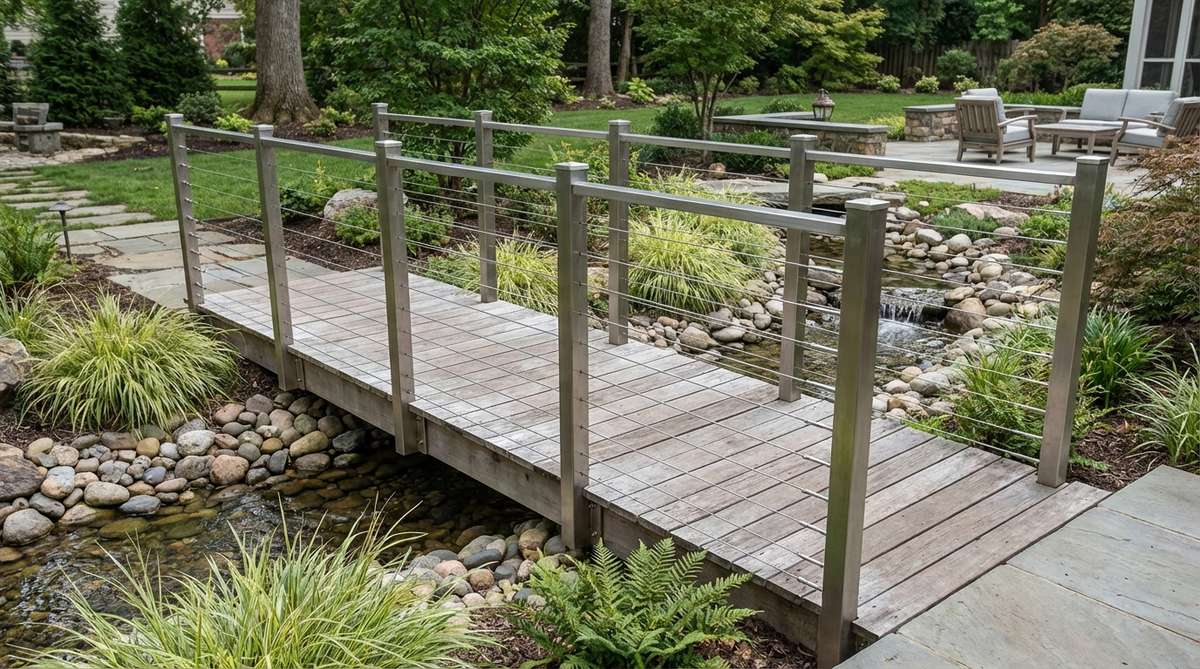
With rails that practically vanish against the background, this setup feels incredibly airy and unrestricted. A stainless cable garden bridge preserves your gorgeous backyard views while providing all the necessary safety boundaries.
Chunky wooden balusters block the view of your beautiful landscaping, but tensioned steel cables deliver a stunning, high-end transparent look. Integrating a proper marine-grade tensioning kit ensures the wires never sag over time.
This premium rail upgrade usually costs $300–$550 on top of the bridge deck. It’s a phenomenal modern touch that completely transforms the space.
- Key Materials: Stainless steel cable kits, metal tensioners
- Vibe / Style: Transparent modern elegance
- Difficulty: Intermediate drilling and tensioning
- Budget Breakdown: Cable Spools: $150 | Tensioning Hardware: $180.
- Creator’s Tip: Space the horizontal cables exactly 3 inches apart to keep it visually sleek while exceeding standard safety codes.
- Smart Sourcing: Pre-cut stainless steel cable railing kits and heavy-duty wire tensioning turnbuckles.
17. Miniature Decorative Accent Bridge

Tucked beneath an old oak tree, this tiny addition feels like discovering a secret realm in your own yard. Placing a miniature fairy garden crossing over a tiny river rock bed creates instant whimsical magic for compact spaces.
People assume you need a massive yard for a bridge, but dropping in a pre-built decorative accent yields an incredibly charming result with zero construction. It’s the perfect excuse to stock up on high-end miniature garden supplies and create a magical focal point.
You can buy or build these tiny accents for an easy $30–$75. Pin this idea if you’re styling a cozy apartment patio or front yard flower bed!
- Key Materials: Weather-treated craft wood, river stones
- Vibe / Style: Whimsical fairy tale miniature
- Difficulty: Extremely easy setup
- Budget Breakdown: Pre-built Mini Bridge: $45 | Pebbles: $15.
- Creator’s Tip: Partially bury the ends of the miniature bridge into the soil so it looks anchored and natural, rather than just placed on top.
- Smart Sourcing: UV-coated resin fairy cottage kits and miniature wooden garden bridges (pre-assembled).
Thinking of using basic gravel? Wait until you see how the next clever trick instantly upgrades a standard dry bed…
18. Wide Plank Dry-Bed Crossing
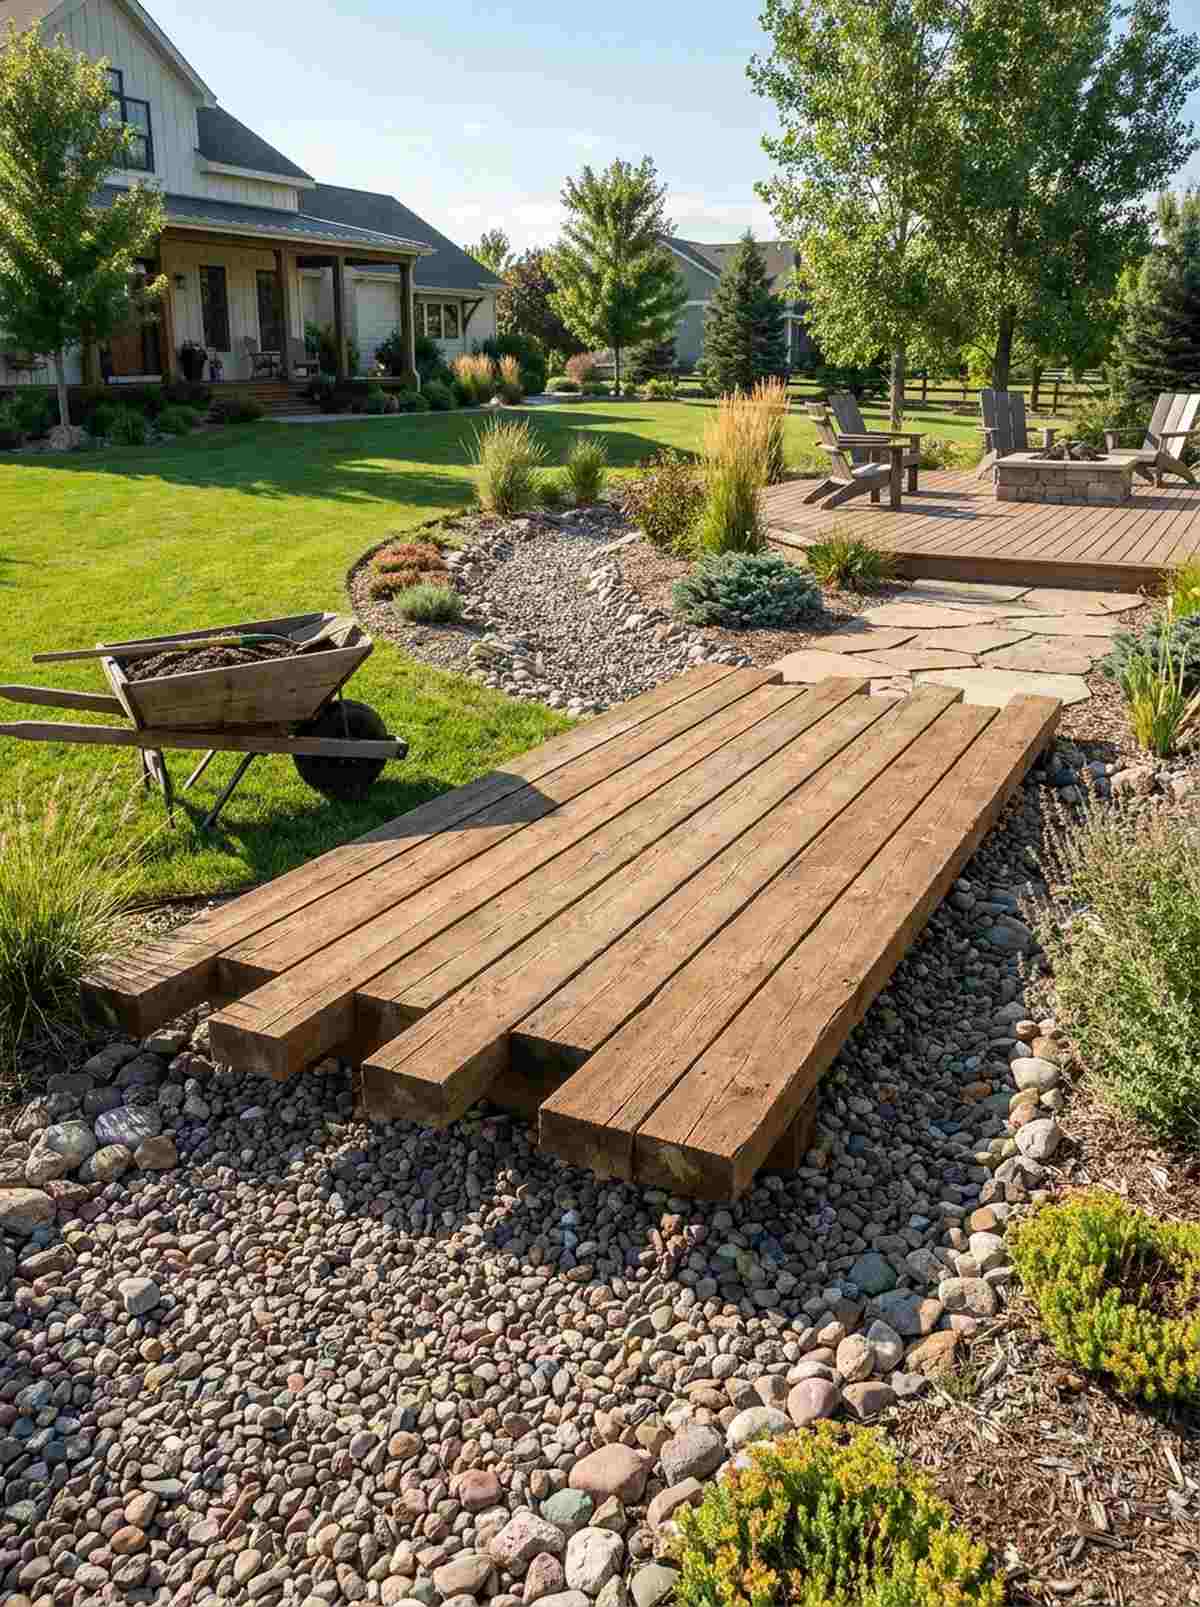
Stretching broadly across a bed of crushed stone, this layout feels exceptionally grounded and practical. A wide boardwalk crossing is brilliant for managing heavy wheelbarrow traffic over landscape drainage swales without sacrificing style.
Flimsy garden paths sink into the mud, but anchoring oversized planks across a dry creek delivers a rugged, high-end landscape solution. By extending the boards past the rock edges, you create a beautiful floating shadow line.
Expect to spend $150–$250 for heavy-duty, wide-format boards. It’s a fast upgrade that completely changes the yard’s functionality.
- Key Materials: 2×8 treated lumber, gravel base
- Vibe / Style: Practical contemporary
- Difficulty: Easy beginner project
- Budget Breakdown: Wide Planks: $140 | Support Timbers: $50.
- Creator’s Tip: Lay down professional landscape fabric beneath your gravel bed before installing the bridge to permanently block weed growth.
- Smart Sourcing: Commercial-grade landscape weed barrier (bulk roll) and heavy-duty structural deck screws.
Material Guide: Cheap vs. Premium Aesthetic
Knowing exactly where to save and where to spend makes all the difference in achieving that “looks expensive but isn’t” vibe.
- Standard vs. UV-Resistant/Premium: Standard paints chip in a year. Upgrading to marine-grade lacquer or UV-coated finishes stops peeling and keeps the color vibrant, saving you hours of re-sanding.
- Pre-made Kits vs. Sourcing Locally: While foraging is fun, buying pre-cut hardware starter kits ensures your bridge is structurally sound and perfectly leveled, cutting your build time in half.
19. Painted Pattern Statement Bridge
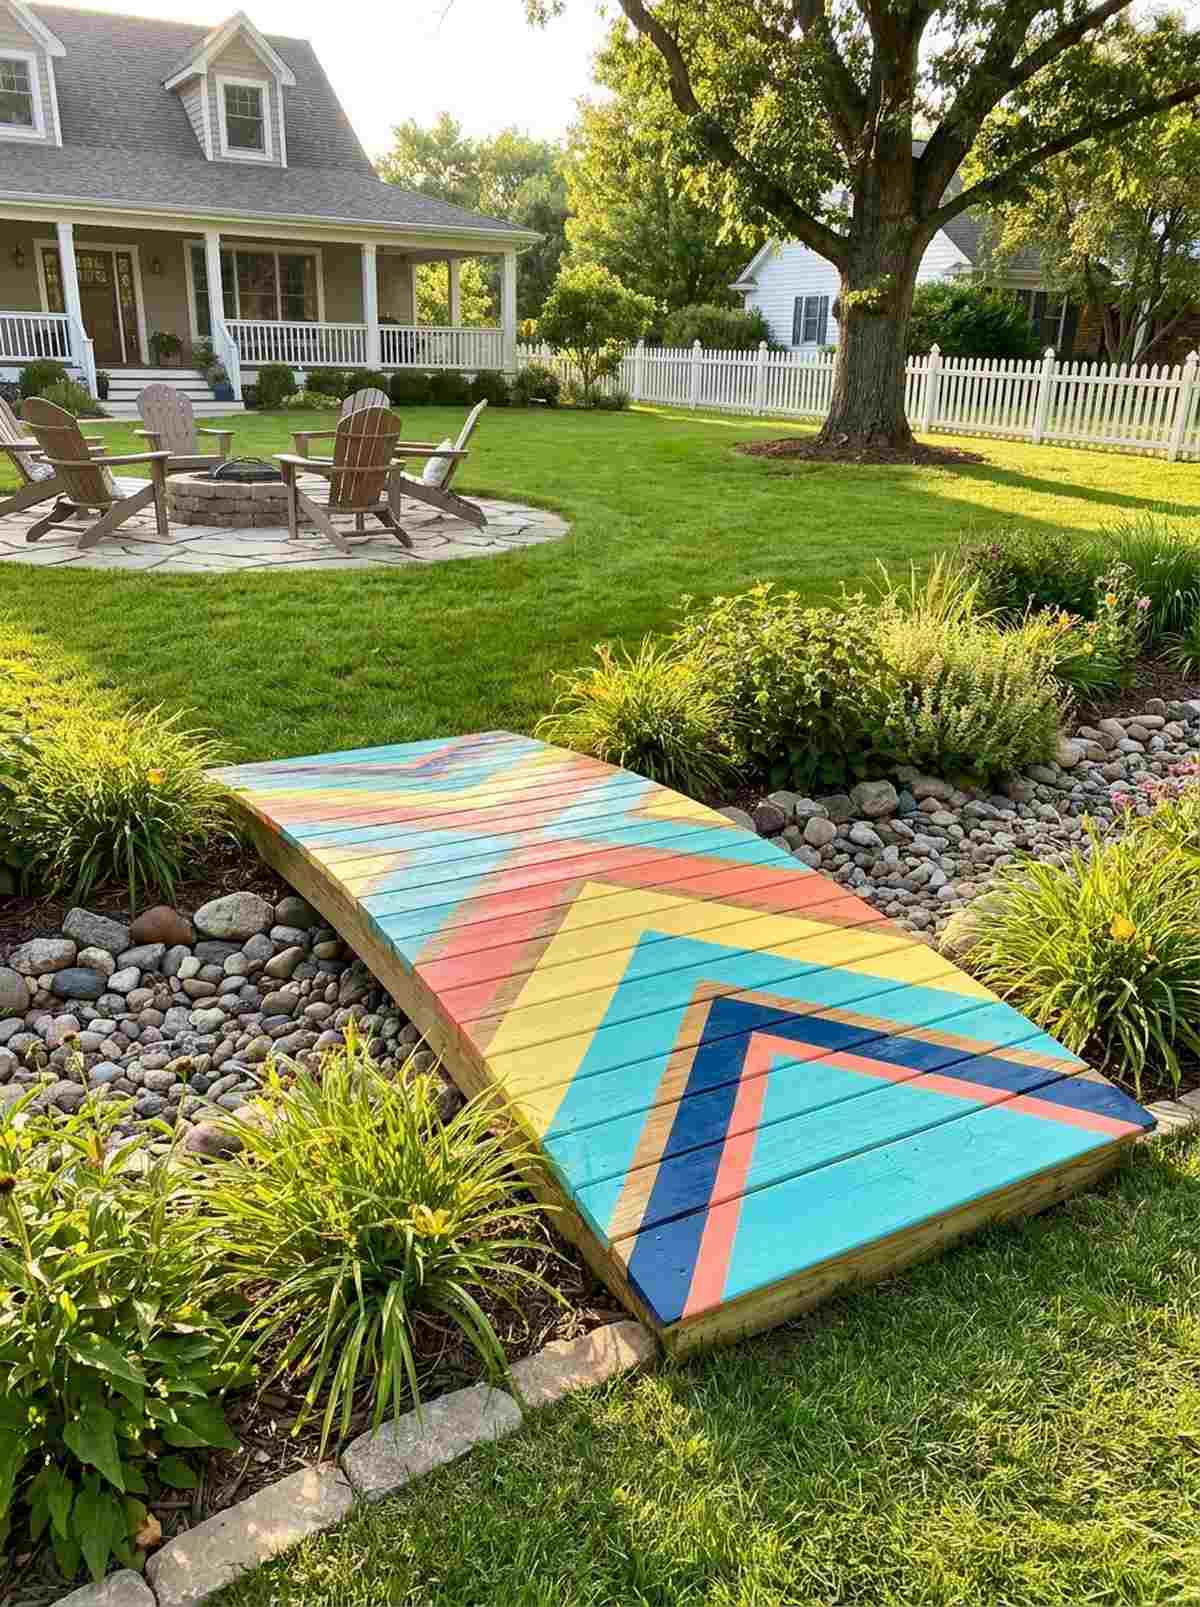
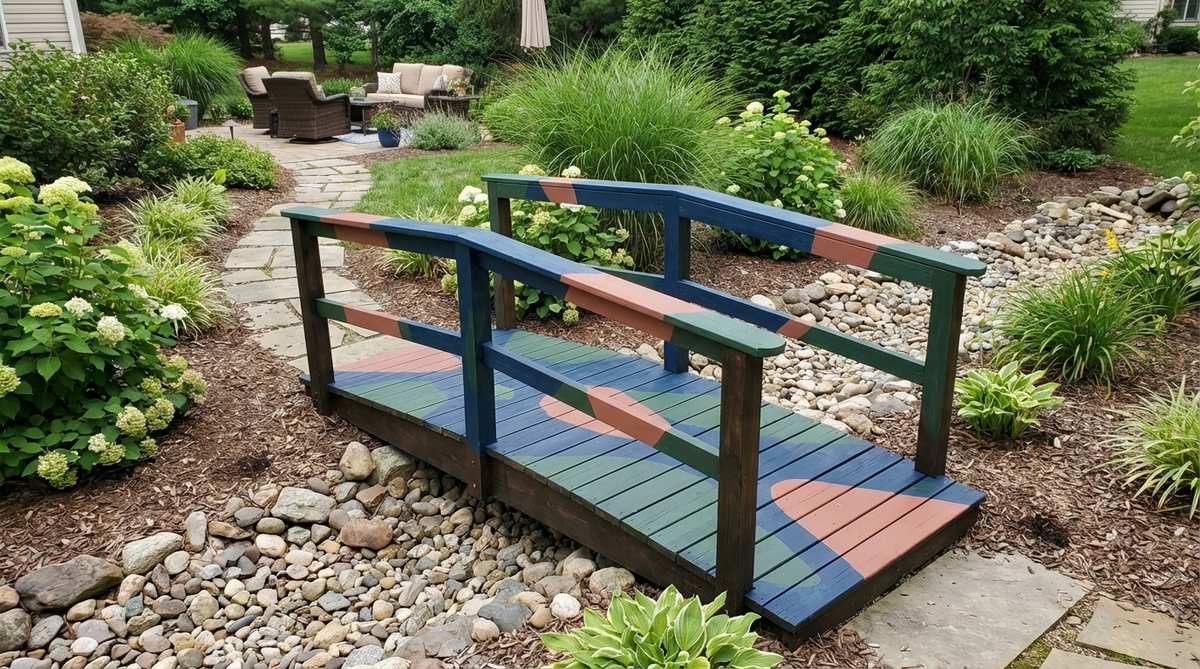
Bold chevron stripes popping against natural green grass feels wildly creative and unexpected. Designing a custom painted walkway turns a boring wooden structure into a vibrant, artistic focal point for eclectic gardens.
Most backyard woodwork is left plain brown, but applying a geometric stencil instantly transforms the piece into expensive-looking outdoor art. Coating it with heavy-duty clear polyurethane ensures your custom design won’t get scrubbed off by muddy shoes.
This creative paint job adds only $40–$60 to your base bridge cost. Pin this to your colorful backyard makeover board!
- Key Materials: Deck paint, custom stencils, clear sealer
- Vibe / Style: Eclectic artistic statement
- Difficulty: Fun weekend crafting
- Budget Breakdown: Paint Quarts: $35 | Stencils & Sealer: $25.
- Creator’s Tip: Sand the deck boards lightly before painting to open up the wood grain, ensuring maximum paint adhesion.
- Smart Sourcing: Pre-cut geometric painting stencils and high-traffic clear deck polyurethane.
20. Stepping Stone Bridge Alternative
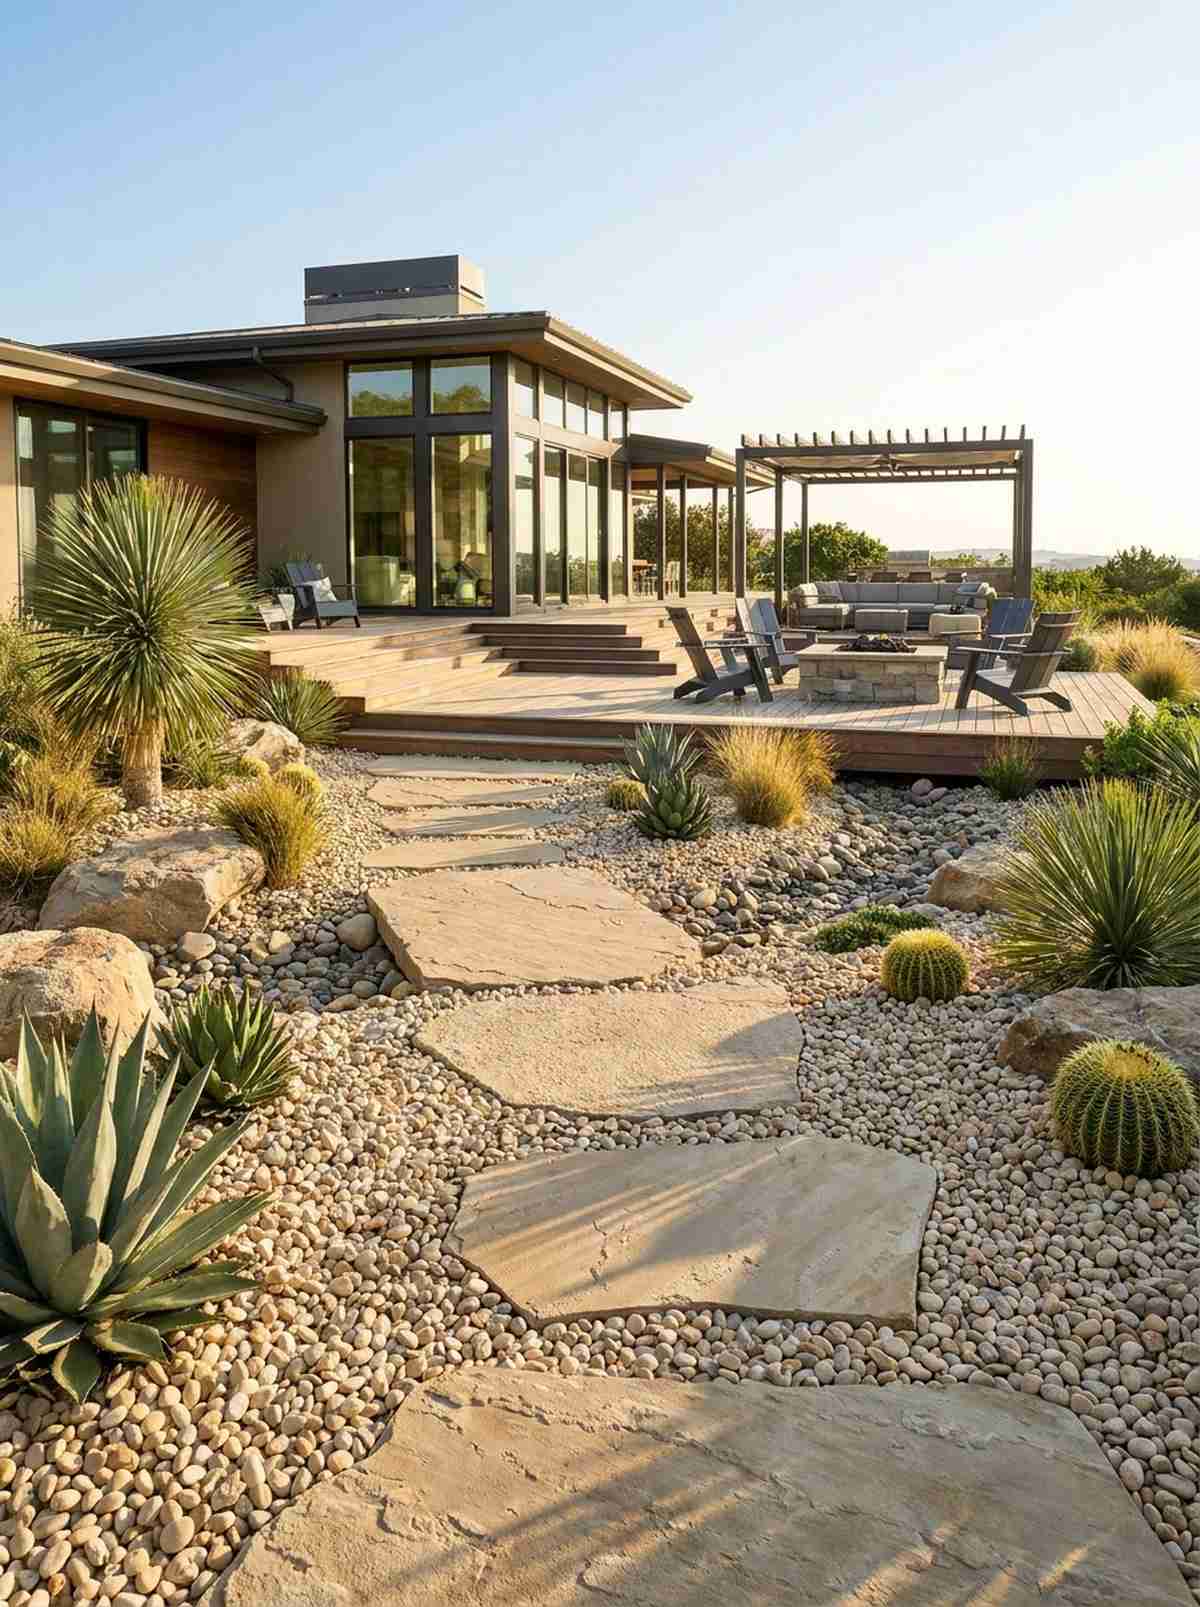
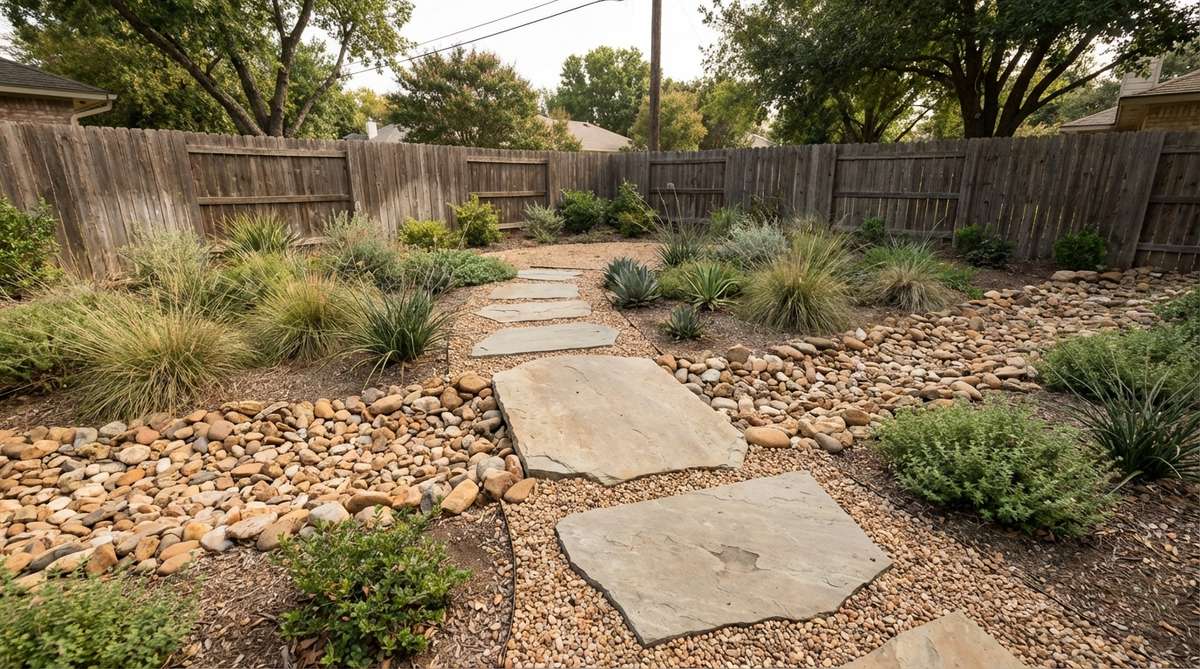
Massive flat rocks hovering over a sea of perfectly raked pebbles feels like the ultimate meditative sanctuary. A floating stone pathway is a flawless bridge alternative for xeriscaped yards where water conservation is key.
Building a wooden structure over gravel can look clunky, whereas sinking oversized stones delivers a surprisingly premium, minimalist aesthetic. Stabilizing them on a bed of crushed paver base prevents dangerous wobbling over time.
Sourcing large flagstone pieces will run you roughly $100–$250 depending on your local quarry. It’s a stunning, zero-maintenance layout.
- Key Materials: Large flagstone pieces, leveling sand
- Vibe / Style: Minimalist stone Zen
- Difficulty: Heavy lifting but easy setup
- Budget Breakdown: Premium Flagstone: $180 | Paver Base: $40.
- Creator’s Tip: Bury exactly one-third of the stone’s thickness into the ground so it stays permanently locked in place during heavy foot traffic.
- Smart Sourcing: Pre-bagged leveling paver base (bulk pack) and heavy-duty rubber mallets.
21. Living Roof Garden Bridge
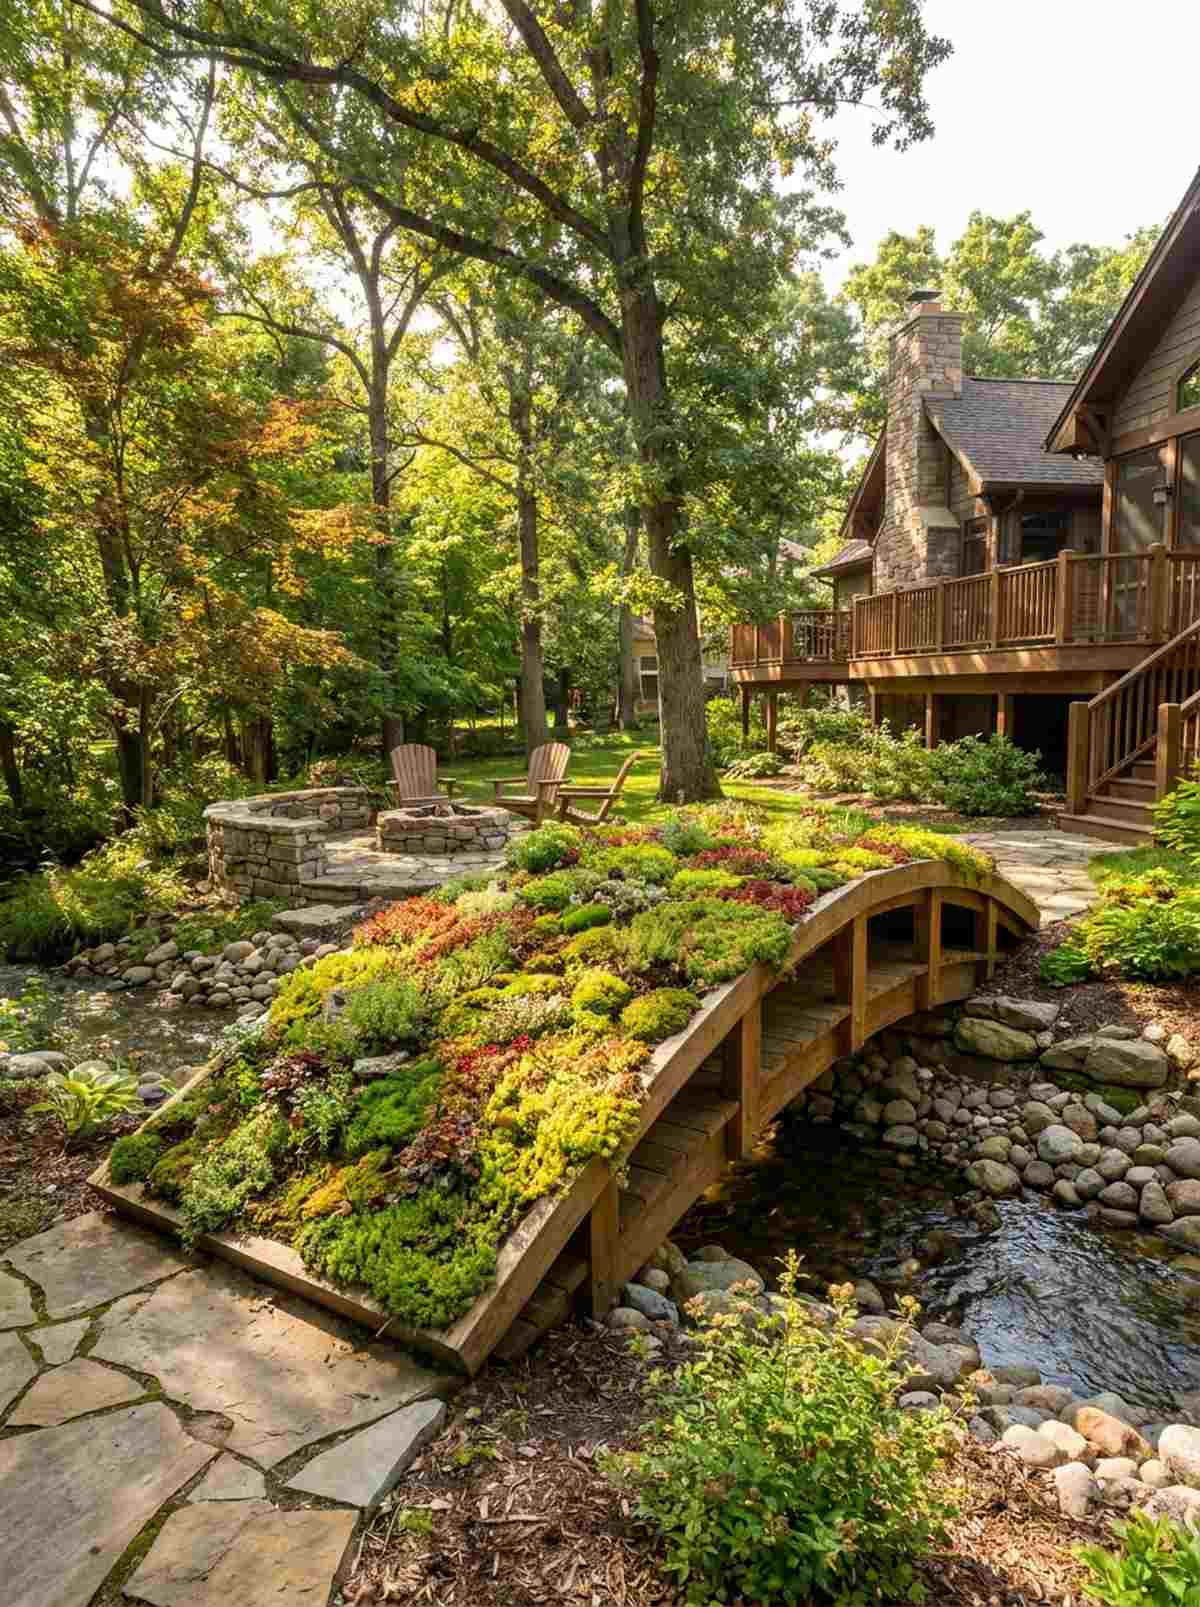
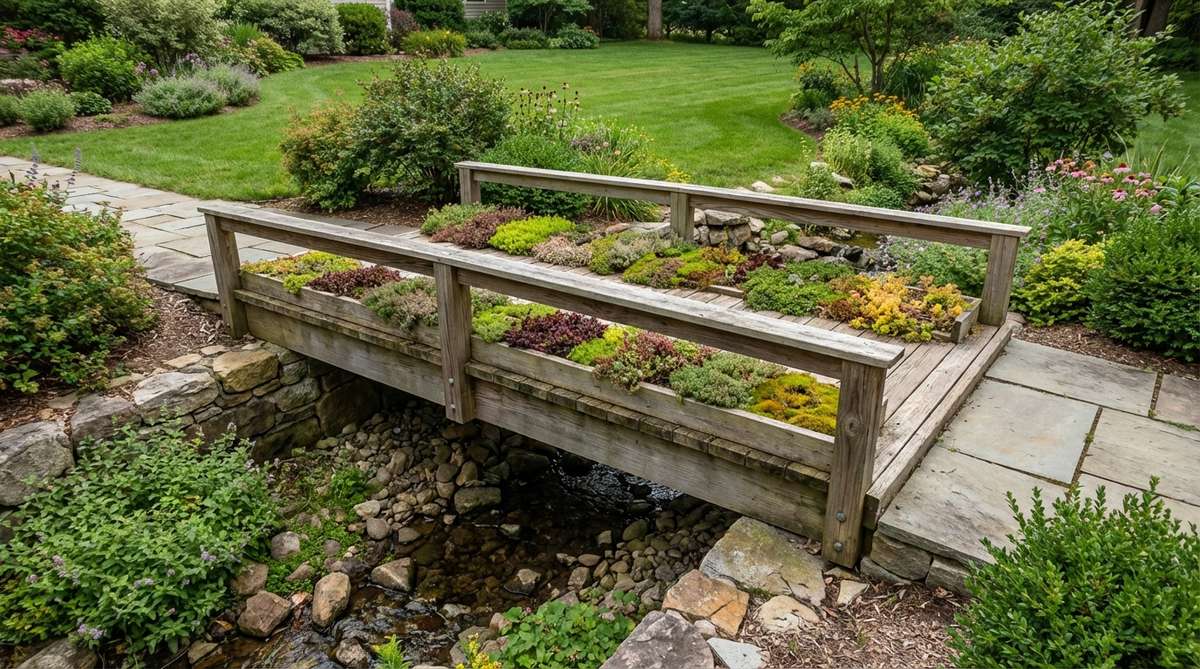
Covered entirely in blooming moss and sedum, this structure feels like it literally grew out of the earth. A planted green bridge is an incredible, eco-friendly way to camouflage a crossing in a heavily wooded landscape.
Bare wood is fine, but integrating a shallow planter box directly into the deck creates an enchanting, high-end botanical feature. Lining the tray with premium terrarium accessories and root-blocking fabric ensures the wood frame won’t rot beneath the soil.
This living project costs around $150–$250 to assemble and plant. Save this if you love immersive, nature-first garden designs!
- Key Materials: Waterproof pond liner, creeping sedum plants
- Vibe / Style: Immersive botanical lushness
- Difficulty: Moderate landscaping project
- Budget Breakdown: Pond Liner: $40 | Plants & Soil: $120.
- Creator’s Tip: Mix perlite heavily into the soil to keep the bridge deck exceptionally light while promoting rapid root growth.
- Smart Sourcing: Heavy-duty EPDM waterproof liners and pre-cut preserved moss sheets (bulk pack).
22. Solar-Lit Evening Bridge
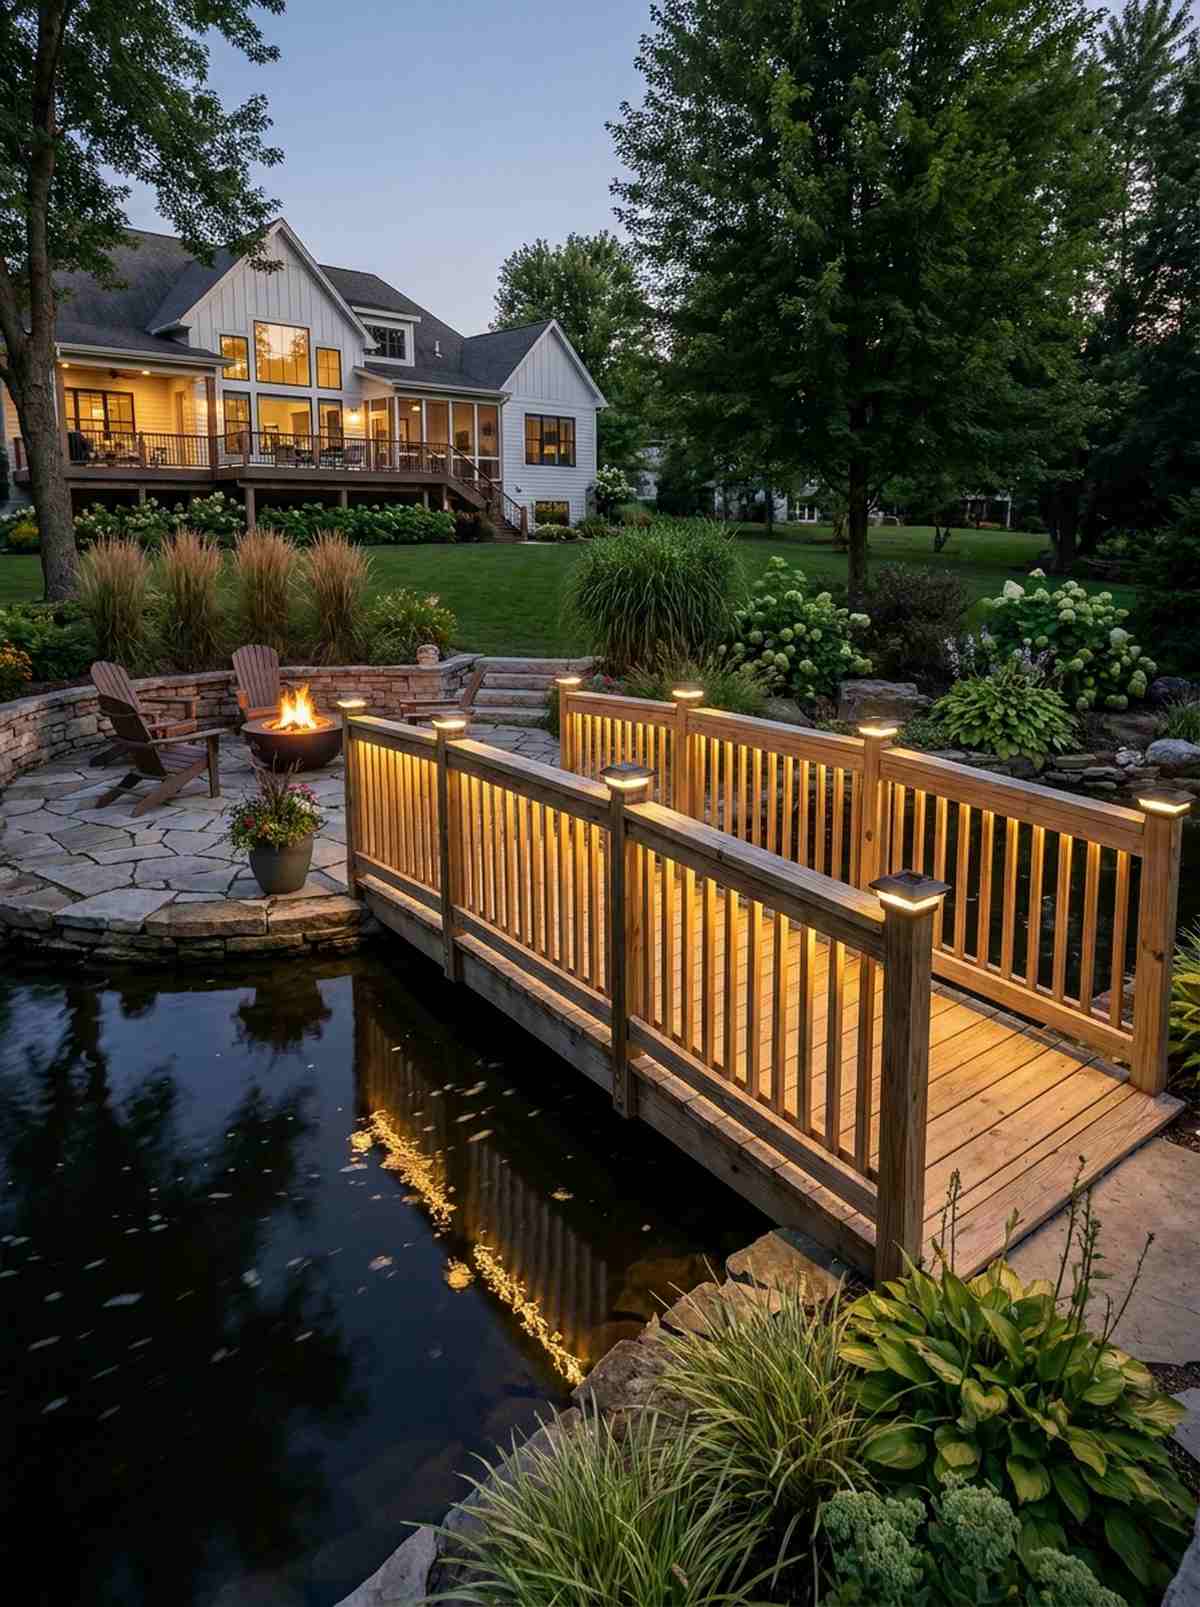

Soft glowing lights reflecting off the dark pond surface feels like pure nighttime magic. An integrated LED evening crossing extends your garden’s usability well past sunset while adding crucial safety visibility.
Hardwiring outdoor lights requires expensive electricians, but dropping in high-quality solar caps gives a designer-level finish for pennies. Hiding the led strips beneath the railings creates a luxurious indirect wash of light that highlights the water below.
Adding premium solar tech only costs $50–$100. It’s a highly recommended upgrade for anyone who loves evening patio hosting.
- Key Materials: Solar post caps, waterproof LED light strips
- Vibe / Style: Enchanting evening ambiance
- Difficulty: Very easy wire-free setup
- Budget Breakdown: Solar Caps: $60 | Under-rail LEDs: $35.
- Creator’s Tip: Choose lights with a “warm white” (2700K) color temperature to mimic the expensive look of professional landscape halogen lighting.
- Smart Sourcing: Premium solar post cap kits and waterproof outdoor LED strip lights (starter kits).
23. Bridge-Arbor Combination Structure
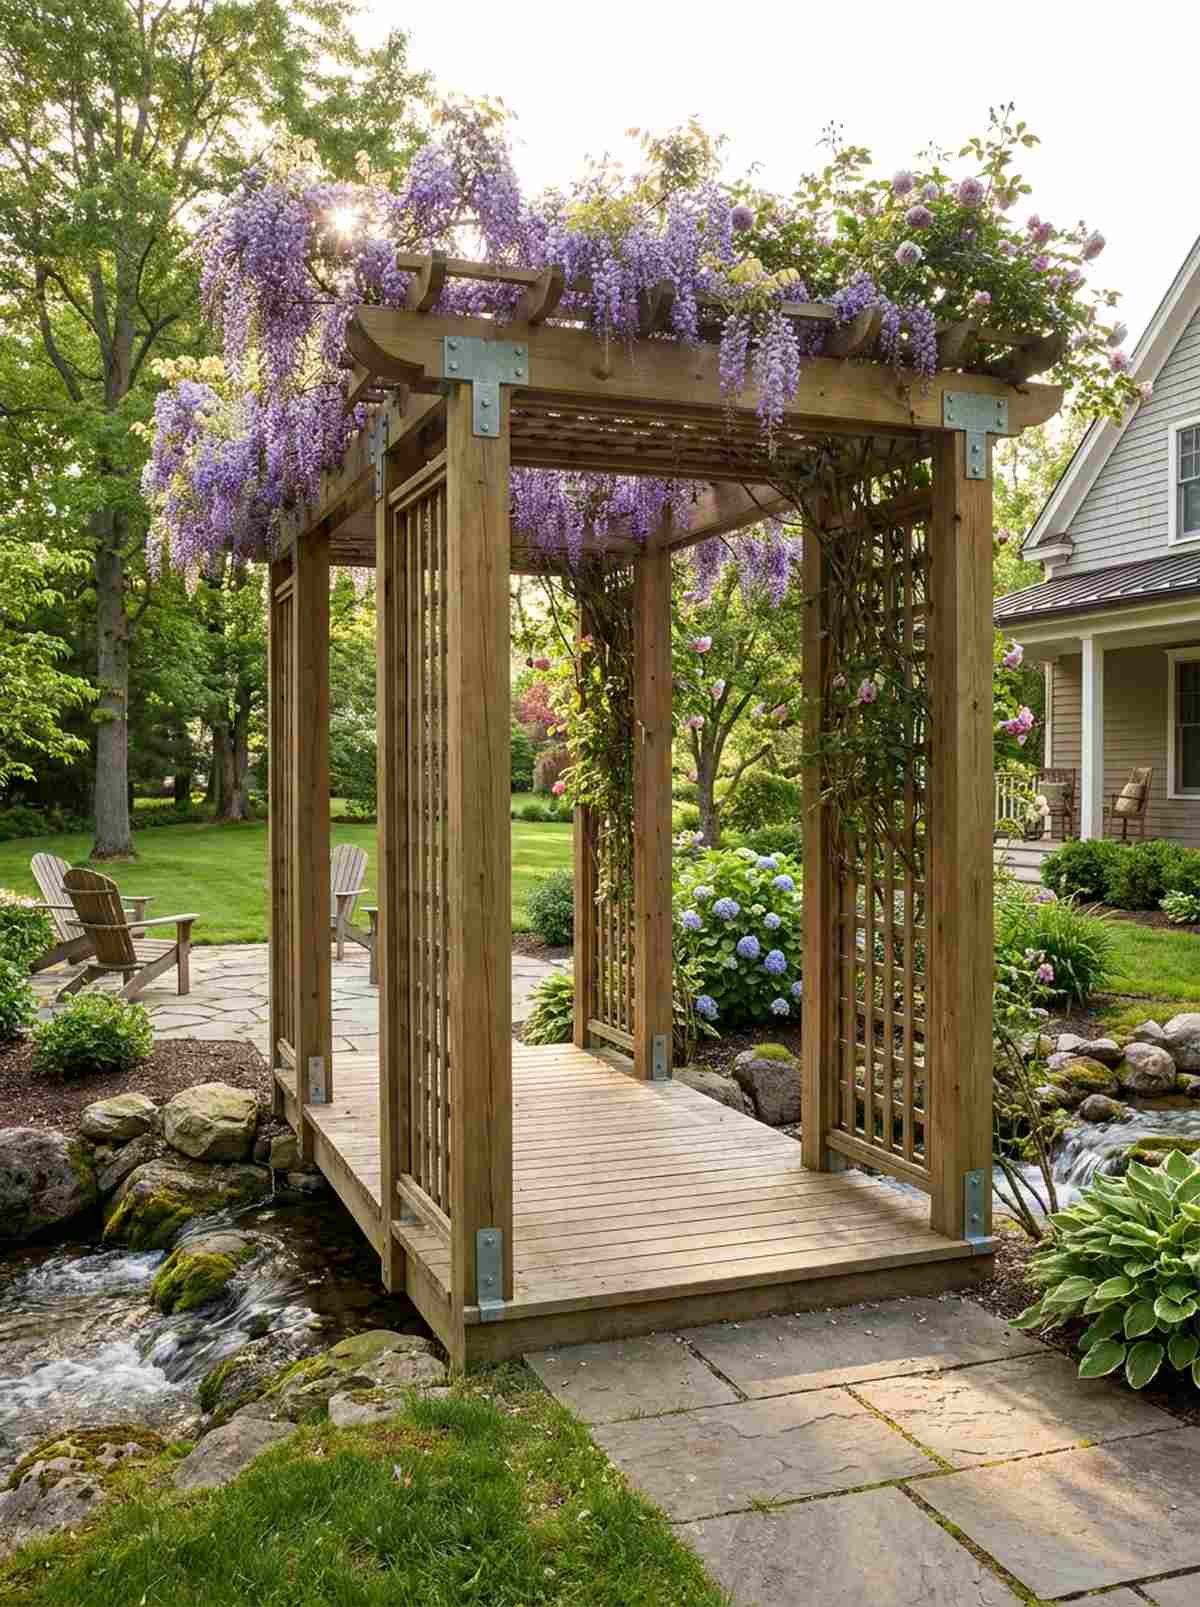
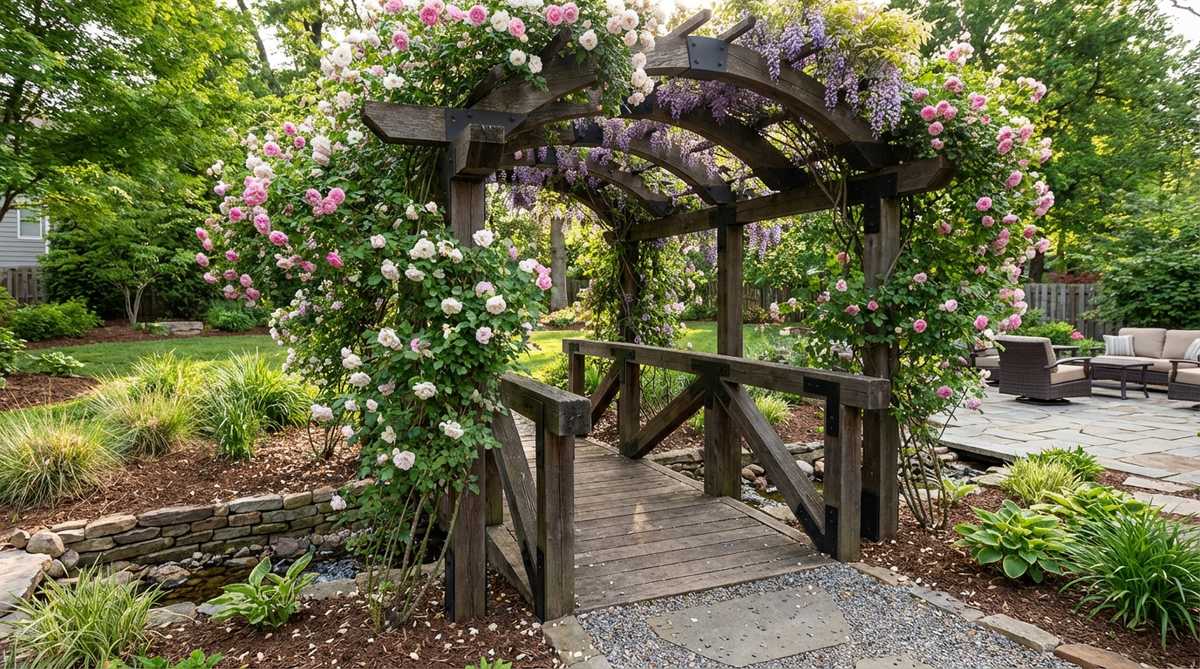
Walking through a tunnel of blooming wisteria over a babbling brook feels like stepping straight into a romance novel. A pergola garden bridge maximizes vertical space and creates a breathtaking floral canopy over your pathway.
A flat bridge is nice, but anchoring an overhead arbor to the frame instantly elevates the visual impact of the entire yard. Utilizing heavy-duty galvanized brackets ensures the structure can support the massive weight of mature climbing vines.
Combining these structures costs $350–$600 depending on height. Pin this if you want the ultimate garden focal point!
- Key Materials: Tall arbor posts, lattice side panels
- Vibe / Style: Romantic vertical garden
- Difficulty: Advanced weekend build
- Budget Breakdown: Bridge Base: $200 | Arbor Frame: $250.
- Creator’s Tip: Use a cross-bracing pattern on the top to give climbing roses more grab-points to securely weave through the canopy.
- Smart Sourcing: Pre-cut wooden arbor starter kits and heavy-duty climbing plant support wire.
24. Multi-Level Terraced Bridge
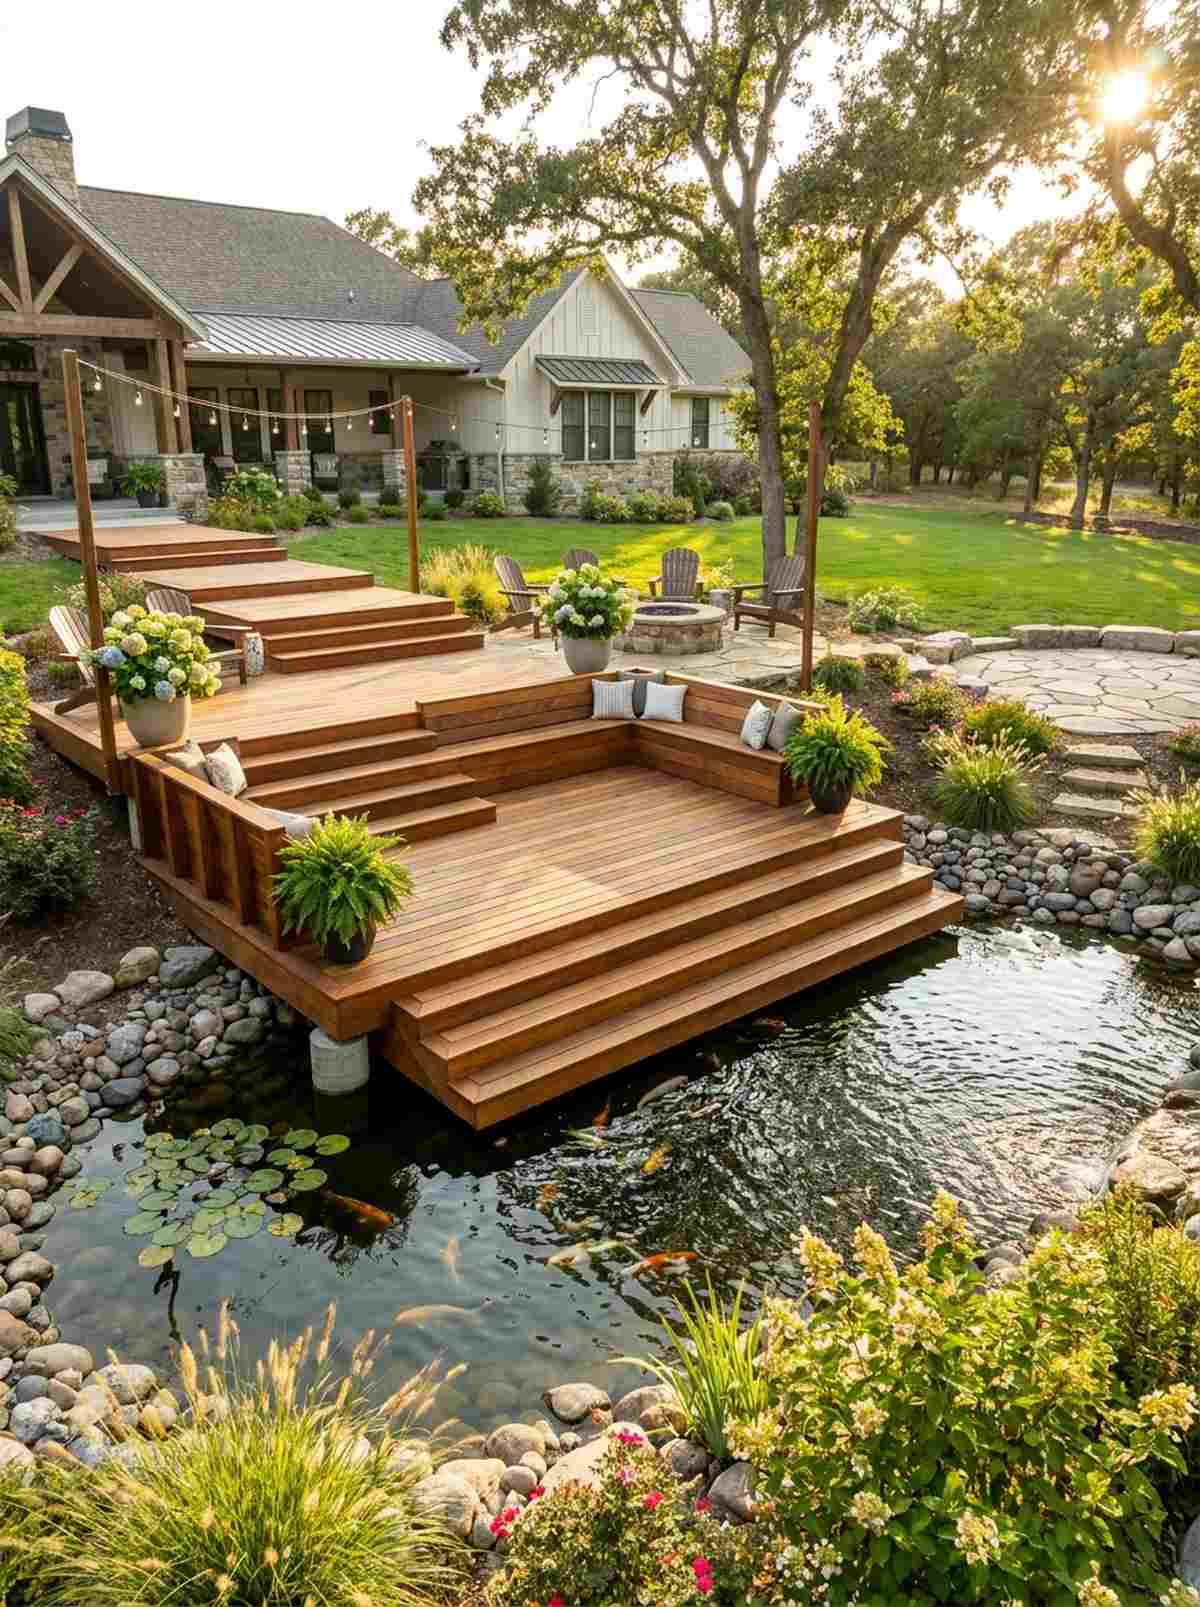
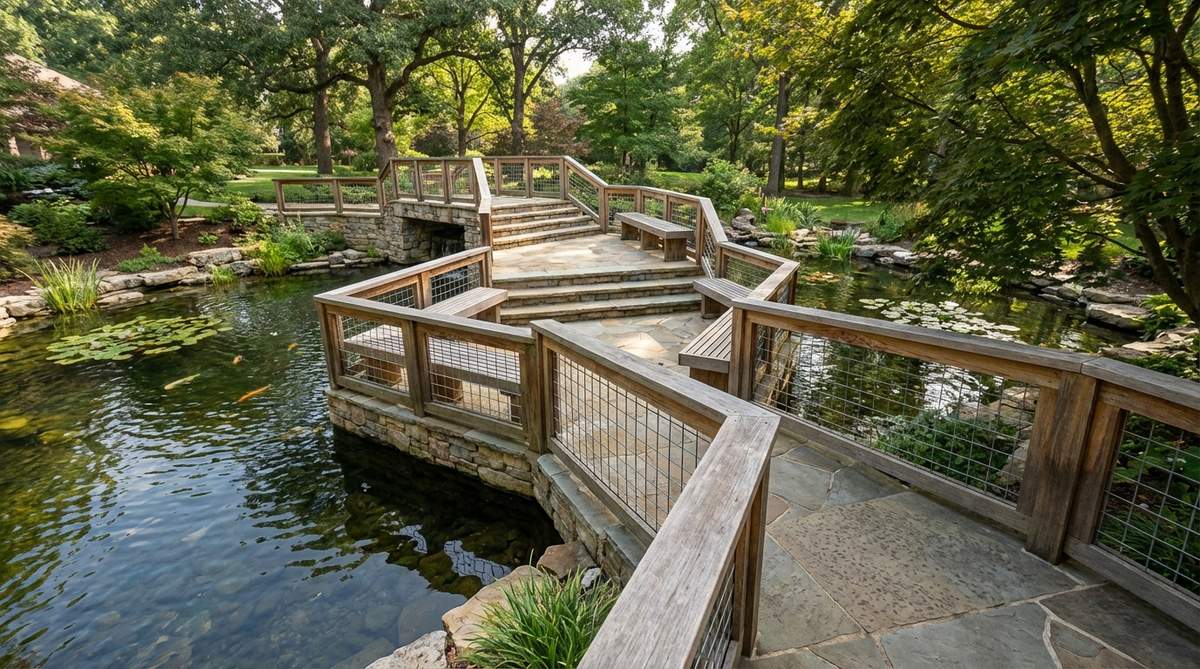
Tiered wooden platforms stepping gracefully down to the water’s edge feels like a luxurious private resort deck. A stepped viewing platform encourages you to linger and feed the koi rather than just rushing across the yard.
A single straight span is the easy route, but building terraced levels creates a dynamic, multi-dimensional outdoor living space. Incorporating built-in bench seating into the middle tier turns a simple walkway into a gorgeous destination.
This expansive build ranges from $600–$1,200+ based on the footprint. It’s an incredible investment that fundamentally upgrades your property value.
- Key Materials: Deep concrete footings, multi-level stair stringers
- Vibe / Style: High-end resort decking
- Difficulty: Professional-grade construction
- Budget Breakdown: Decking: $500 | Framework/Footings: $350.
- Creator’s Tip: Ensure your stair risers are exactly uniform across all levels to prevent tripping hazards during outdoor gatherings.
- Smart Sourcing: Pre-cut multi-step stair stringers and commercial-grade structural deck hardware kits.
Bringing Your Small Garden Bridge Vision to Life
Selecting the right small garden bridge depends on your landscape’s existing style, the features you’re crossing, and your budget for premium materials. Whether you utilize one of our 24 unique DIY blueprints—like a classic white arch, a dramatic Asian-inspired layout, or a sleek contemporary steel span—proper installation is key. By swapping cheap local materials for high-CPC UV-resistant coatings, pre-cut composite decking, and heavy-duty structural hardware, you ensure your bridge serves as an enduring, high-end focal point. Start by grabbing the right starter kits, and your garden bridge will deliver that expensive designer aesthetic for decades to come.
Frequently Asked Questions
What is the ideal length for a small garden bridge?
Small garden bridge ideas typically range from 4 to 8 feet in length, with 6 feet being the most common size for achieving a premium aesthetic in residential landscapes. The bridge should extend 6-12 inches beyond the feature it crosses on each side to create a stable approach. If you’re using pre-built kits or miniature garden supplies for a decorative dry bed accent, 2-3 feet works perfectly without breaking the bank.
Do I need railings on my garden bridge?
Railings become necessary when the bridge rises more than 12 inches above the ground, but adding them often gives a much more expensive, high-end finish regardless of height. For low-profile bridges over dry creek beds, railings remain optional. If you do install them, sourcing heavy-duty landscape baluster kits ensures they stand 36-42 inches high safely, providing both psychological security and a beautiful frame for climbing plants.
What materials last longest for outdoor garden bridges?
Upgrading to premium materials like composite decking or weathering steel provides a massive ROI, offering 25-30 year lifespans with virtually zero upkeep. If you prefer natural wood, cedar and redwood are your best bets, especially when sealed with a commercial-grade UV-resistant wood sealer. Cheap pine is a budget-friendly option, but requires top-rated weather protection kits to prevent rotting within the first few years.
Can I install a garden bridge myself or do I need a professional?
Simple decorative bridges under 6 feet long over dry creek beds represent achievable DIY projects, especially when utilizing easy-to-assemble DIY garden bridge hardware kits. More complex installations involving water crossings or spans longer than 8 feet benefit from professional structural planning. The secret to a DIY setup that looks professionally installed is investing in heavy-duty galvanized post bracket systems to keep the foundation completely secure.
How do I maintain a wooden garden bridge?
Inspect wooden bridges each spring for loose fasteners, and upgrade to rust-proof carriage bolts if you notice deterioration. Clean the deck surface annually using a commercial deck cleaner to prevent slippery algae buildup. The most critical maintenance step is applying a clear wood sealer or penetrating stain every 2-3 years; buying a premium UV-coated outdoor enamel kit will save you countless hours of sanding and ensure your setup continues to look like a high-end designer piece.