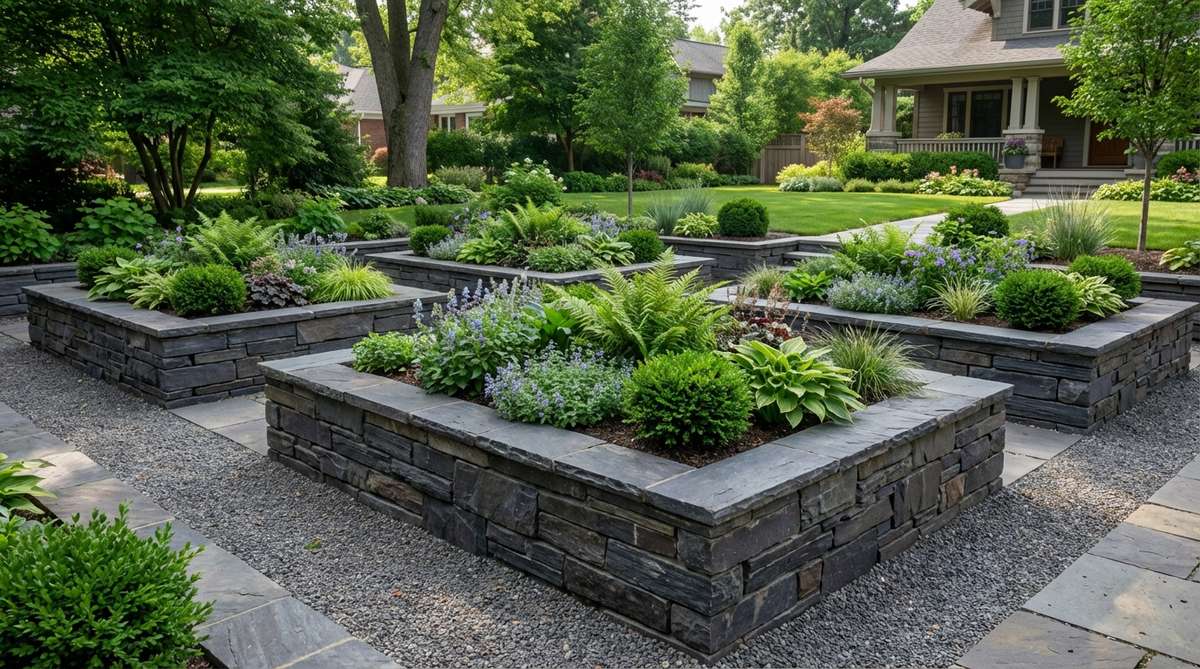
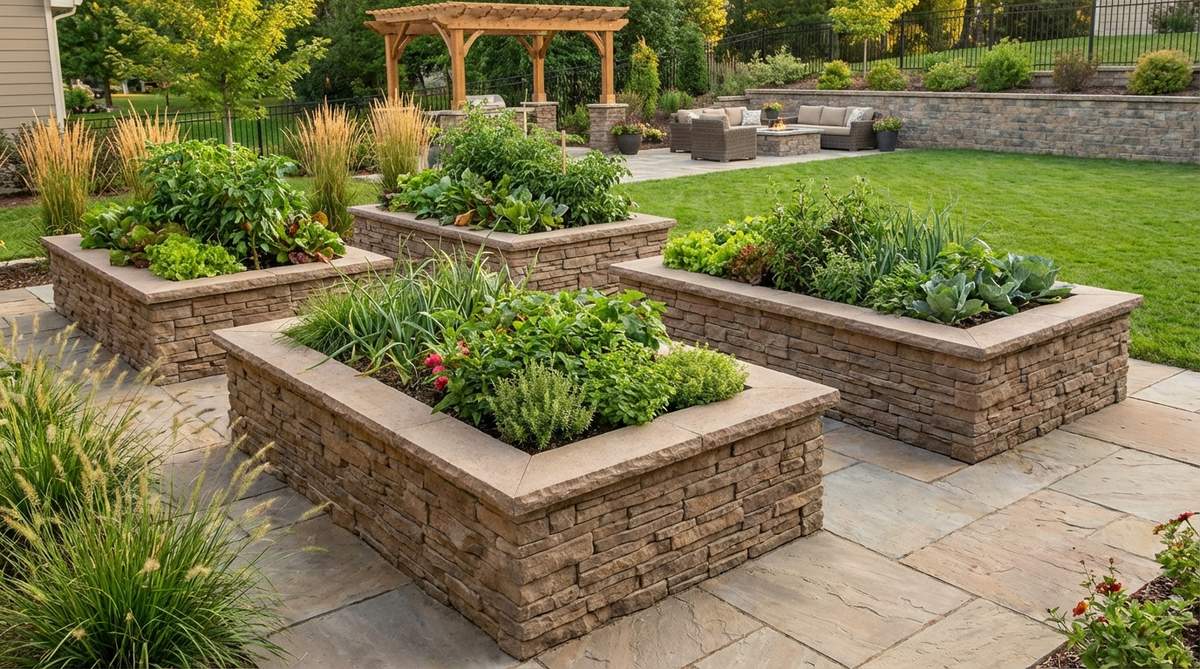
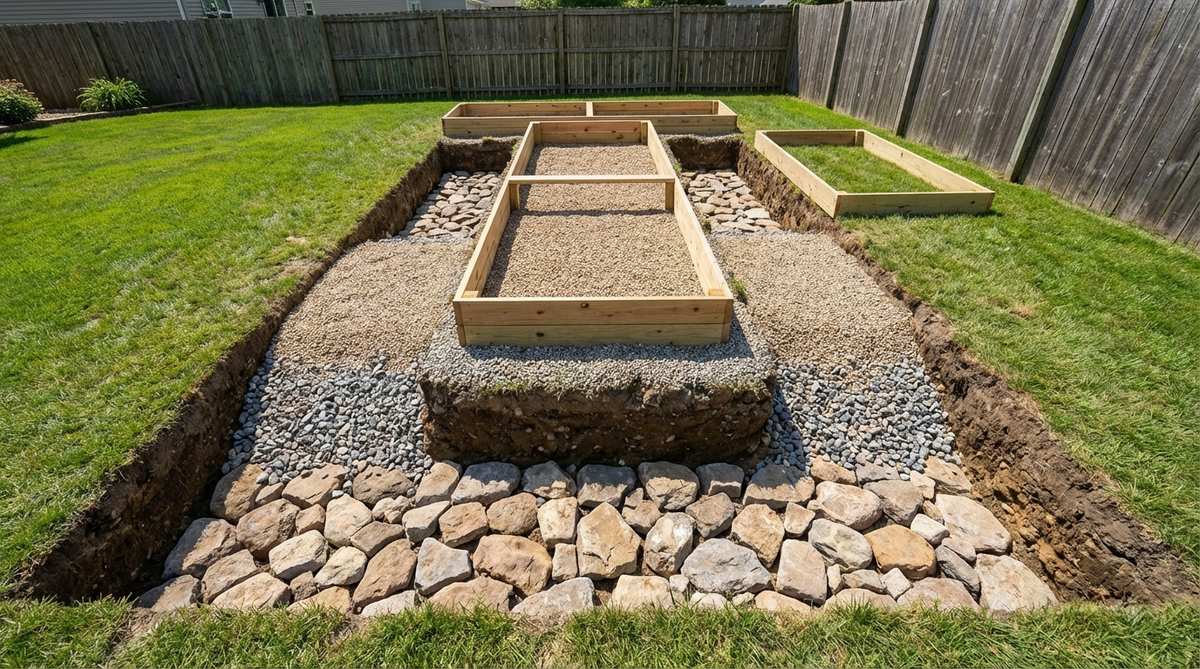
Upgrading your yard with a raised bed garden stone layout delivers instant curb appeal. These heavy-duty blueprints reveal exact budget breakdowns and smart material sourcing tricks. Achieve a premium estate aesthetic without the luxury landscaping price tag.
Design SnapshotKey Principles
- Foundation Stability: All stone beds require 4-6 inches of compacted gravel base with 2 inches of leveling sand for long-term structural integrity.
- Drainage Planning: Proper drainage prevents soil saturation and structural failure, particularly critical in mortared constructions.
- Stone Selection: Match stone type to your climate and aesthetic—flagstone for stacked walls, fieldstone for rustic charm, limestone for formal gardens.
- Construction Method: Choose between dry-stacked walls (better drainage, old-world appeal) or mortared construction (maximum stability, clean lines).
Traditional Stone Constructions
Ditch the rotting timber and upgrade to permanent fixtures. These foundational techniques leverage natural masonry to create stone garden planters that genuinely look like custom architectural installations.
1. Dry-Stacked Fieldstone Walls
Feels straight out of a storybook cottage you accidentally discovered. This rustic natural rock border works exceptionally well for a shaded front yard or cozy pathway edge.
Most homeowners overcomplicate masonry, but dry-stacking actually delivers a surprisingly premium look with zero cement. Using interlocking tension and heavy-duty landscape fabric behind the rocks ensures soil stays put while moisture drains freely.
You can easily pull this off for around $40–$80 depending on local rock availability. Save this to your DIY weekend garden board for your spring yard overhaul.
- Key Materials: Natural fieldstones, heavy-duty weed barrier fabric
- Vibe / Style: Enchanted English cottage
- Difficulty: Beginner friendly lifting
- Budget Breakdown: Rocks: $50 | Fabric: $15
- Creator’s Tip: Angle the stones slightly inward toward the soil to prevent outward blowouts over time.
- Smart Sourcing: bulk pack commercial geotextile fabric, heavy-duty landscaping gloves
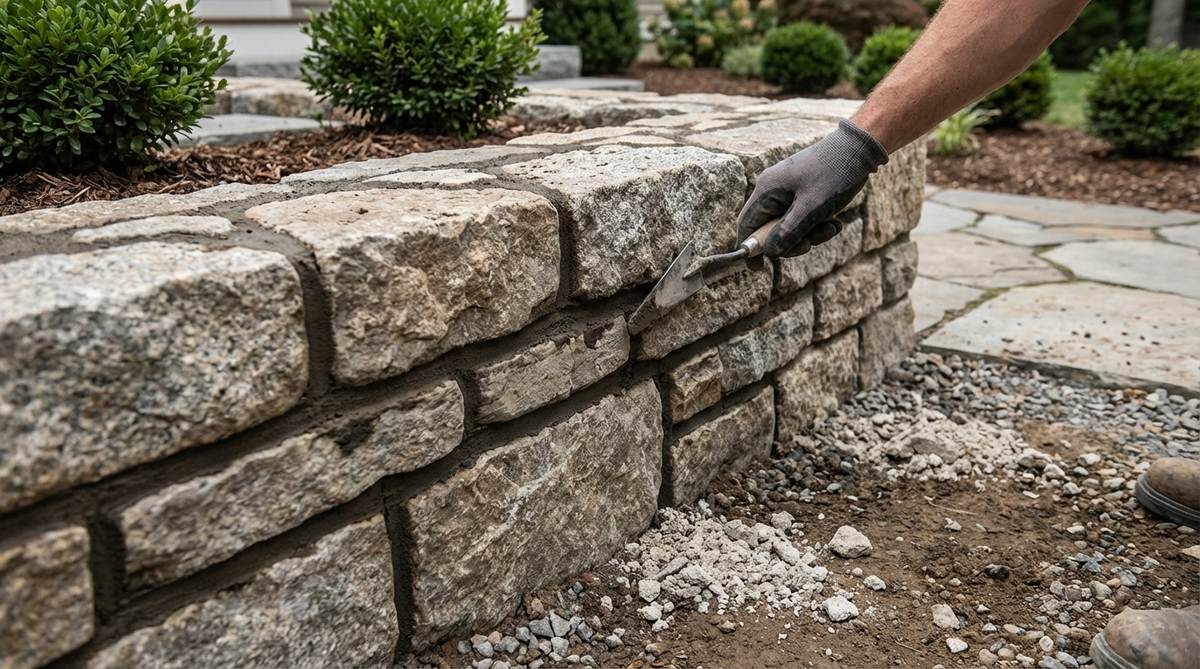
2. Mortared Flagstone Perimeters
Radiates old-world European courtyard energy. This sharp linear masonry setup is an absolute game-changer for formal patios and elevated vegetable stations.
People waste thousands on custom masons when pre-mixing your own bonding agents gives a designer-level finish for pennies. Slipping hidden drainage pipes through the bottom joints ensures the structure survives freezing winters without cracking.
Expect to spend around $100–$150 on proper bonding materials. It’s a fast upgrade that completely changes the vibe of any standard patio.
- Key Materials: Flat flagstone slabs, outdoor masonry mix
- Vibe / Style: Tuscan villa elegance
- Difficulty: Intermediate masonry
- Budget Breakdown: Stone: $90 | Mortar: $25
- Creator’s Tip: Use a wet sponge to wipe away excess mortar before it cures for a flawless, pro-level joint.
- Smart Sourcing: pre-mixed high-strength outdoor mortar, professional masonry trowel kits
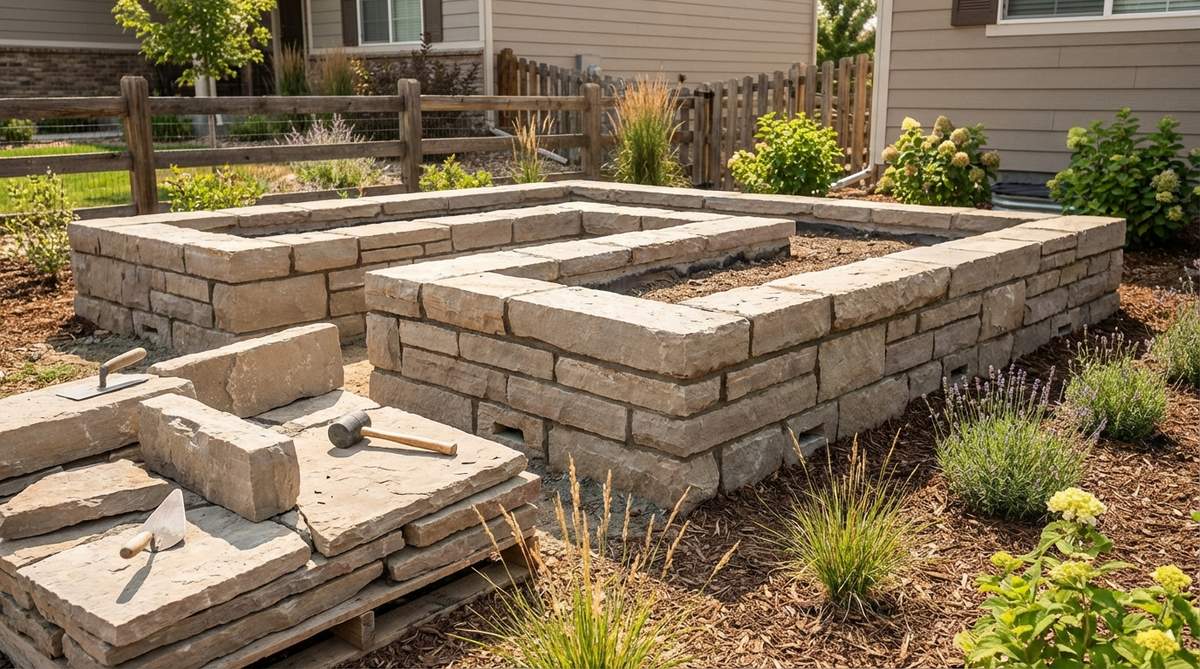
3. Limestone Block Raised Beds
Gives off serious billionaire backyard energy. This bright limestone structural planter acts as a massive focal point perfectly suited for sun-drenched pool decks.
Forget flimsy plastic borders; stacking cut limestone creates an immovable, high-end geometric aesthetic. Staggering the block joints forces the structure to bear heavy soil loads while deflecting extreme summer heat away from delicate roots.
Material costs hover around $120–$200 for a standard rectangular bed. Pin this if you’re planning a modern, clean-lined landscape upgrade.
- Key Materials: Cut limestone blocks, structural gravel base
- Vibe / Style: Ultra-modern minimalist
- Difficulty: Moderate heavy lifting
- Budget Breakdown: Blocks: $150 | Gravel base: $30
- Creator’s Tip: Always invest in a tamper tool to pack the gravel base so your heavy blocks never sink.
- Smart Sourcing: commercial-grade steel hand tampers, pre-cut limestone capstones
4. Granite Retaining Bed Walls
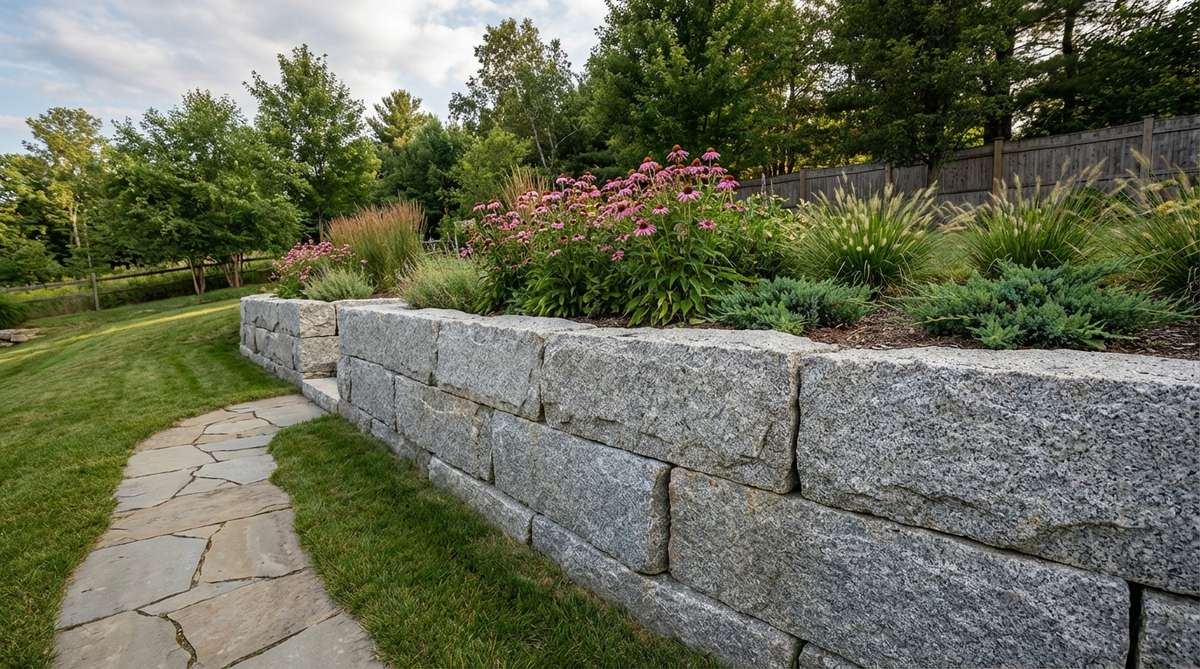
Brings a rugged, mountainous calm to your property. This heavy granite retaining layout is the ultimate flex for properties dealing with aggressive slopes or hillside erosion.
It’s shocking how many designers ignore the sheer indestructible nature of raw granite. Leveraging specialized interlocking adhesives rather than just gravity transforms a basic wall into a permanent fortress for premium plant collections.
This layout requires an investment of $250–$400 but adds literal permanent square footage to hillsides. Highly recommended for properties struggling with washouts.
- Key Materials: Raw granite chunks, extreme-weather construction adhesive
- Vibe / Style: Pacific Northwest lodge
- Difficulty: Advanced planning
- Budget Breakdown: Granite: $300 | Adhesive: $45
- Creator’s Tip: Sort your stones by size before starting so you aren’t hunting for the perfect capstone at the end.
- Smart Sourcing: UV-resistant extreme masonry adhesive, heavy-duty lifting straps
This next setup is ridiculously cheap but instantly mimics a $500 custom courtyard display…
5. Slate Tiered Planting Walls
Has that moody dark academia vibe. This layered slate terrace setup looks stunning holding creeping vines against a bland garage wall.
While most assume slate is too fragile, layering thin courses creates a surprisingly bulletproof retaining structure that looks incredibly sophisticated. The dark aesthetic holds radiant heat, creating microclimates perfect for extending the growing season of exotic botanicals.
You can execute this dark, sleek look for just $60–$110. Save this to your small space transformation board immediately.
- Key Materials: Dark slate tiles, leveling sand
- Vibe / Style: Moody modern courtyard
- Difficulty: Easy precision work
- Budget Breakdown: Slate: $75 | Sand: $15
- Creator’s Tip: Break larger slate pieces with a rubber mallet for organic, jagged edges that lock together seamlessly.
- Smart Sourcing: bulk pack leveling sand, non-marring rubber mallet sets
6. River Rock Decorative Borders
Feels like a serene Japanese zen garden. This smooth pebble containment system is magical for wrapping around standalone trees or delicate ornamental grasses.
Using basic craft materials often fails outdoors, but binding river rocks with an invisible structural resin gives a designer-level finish that weed-whackers can’t destroy. It completely stops mulch from washing onto your pristine sidewalks.
It’s an insanely cheap upgrade, usually coming in under $30 for a massive bag of stones. A massive weekend win for curb appeal.
- Key Materials: Smooth river rocks, invisible landscape binder
- Vibe / Style: Zen garden retreat
- Difficulty: Ultimate beginner
- Budget Breakdown: Rocks: $20 | Binder: $10
- Creator’s Tip: Dig a shallow two-inch trench to sink the bottom row of rocks, anchoring the whole border.
- Smart Sourcing: UV-coated clear rock binding resin, bulk pack polished river pebbles
Modern Engineered Approaches
Skip the backbreaking labor. These engineered solutions blend the authentic aesthetic of stone garden beds with cutting-edge composite technology for fast, flawless installations.
7. Polystone Composite Planters
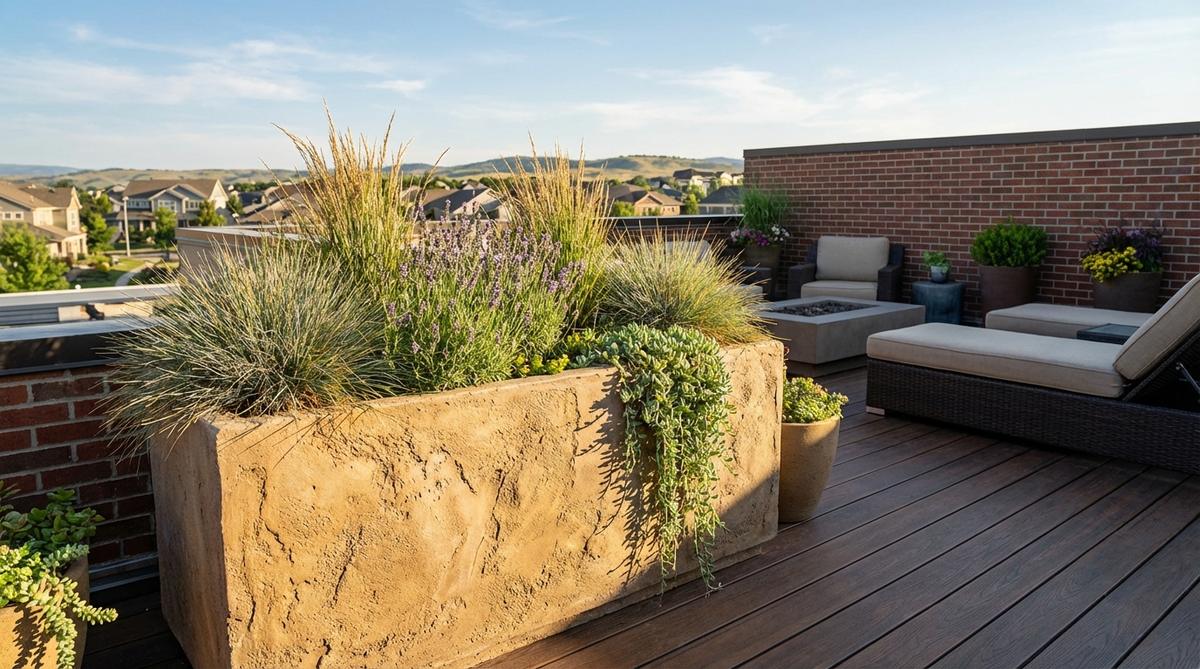
Looks like a heavy museum artifact but weighs nothing. This faux-stone modular box is specifically engineered for luxury apartment balconies and rooftop retreats.
The biggest landscaping lie is that real stone is always better; modern resins completely mimic quarried textures without collapsing your deck. Dropping these lightweight shells over hidden plastic drainage bases ensures root health while keeping the pristine exterior stain-free.
A high-end composite setup will run you $80–$150. Pin this if you need lightweight luxury for a high-rise space.
- Key Materials: Polystone resin molds, hidden drainage trays
- Vibe / Style: Penthouse chic
- Difficulty: Zero construction
- Budget Breakdown: Planter: $110 | Trays: $20
- Creator’s Tip: Fill the bottom 1/3 with empty plastic bottles before adding soil to reduce weight even further.
- Smart Sourcing: premium weather-resistant polystone planters, self-watering insert kits
8. GFRC Concrete Stone Veneer
Screams high-end commercial resort living. This fiber-reinforced stone facing wraps ugly wooden frames, turning them into architectural masterpieces.
Tearing out old structures is a waste of time when wrapping them in high-tech veneer delivers a surprisingly premium look in a single afternoon. The micro-fibers inside the concrete prevent winter spider-cracking, keeping the aesthetic flawless for decades.
Transforming an old bed costs about $150–$250 in veneer panels. It’s the ultimate hack for low-budget luxury makeovers.
- Key Materials: GFRC panel sheets, exterior construction adhesive
- Vibe / Style: Five-star resort
- Difficulty: Intermediate DIY
- Budget Breakdown: Veneer: $180 | Adhesive: $30
- Creator’s Tip: Paint the underlying wood black before attaching panels so no light wood shows through the joints.
- Smart Sourcing: pre-cut GFRC veneer panels (bulk pack), waterproof exterior panel adhesive
9. Terrazzo Speckled Raised Beds
Feels vividly retro yet incredibly modern. This speckled artisan planter pops brilliantly against dark fences or stark white siding.
Most standard concrete looks dreary, but mixing stone chips into the pour looks far more expensive than it is. Polishing the outer face slightly exposes the hidden colors, creating a permanent piece of landscape art that laughs at frost heave.
Casting your own terrazzo bed runs about $90–$140. Save this directly to your unique yard art board.
- Key Materials: Concrete mix, colored stone aggregate, concrete sealer
- Vibe / Style: Mid-century modern
- Difficulty: Advanced casting
- Budget Breakdown: Concrete: $60 | Chips & Seal: $40
- Creator’s Tip: Use an orbital sander with diamond pads on the cured surface to make the stone colors pop perfectly.
- Smart Sourcing: premium terrazzo stone chip blends, UV-blocking wet-look concrete sealer
💡 Must-Have Supplies for High-End Setups
To build these setups faster and ensure they last, skip the generic craft aisles and invest in the right foundational kits.
- Base & Support: heavy-duty woven landscape fabric rolls
- Setup Tools: professional dead-blow hammer starter kits
- Weather/Durability Protection: commercial-grade clear masonry sealant
Most people get modern edging completely wrong… until they try the exact blueprint coming up next.
10. Fiberstone Reinforced Construction
Captures that sleek ultra-modern aesthetic seamlessly. This reinforced structural housing is ideal for massive privacy bamboo screens on a tight patio.
Relying on standard pots always leads to cracking, but fiber-reinforced mesh gives a designer-level finish that flexes without breaking. It holds incredible volumes of wet soil without bowing, maintaining dead-straight architectural lines.
These engineered beds average $130–$200 to construct. Highly recommended for fast, durable privacy screens.
- Key Materials: Fiberstone boards, stainless steel corner brackets
- Vibe / Style: Urban minimalist
- Difficulty: Easy assembly
- Budget Breakdown: Boards: $150 | Hardware: $30
- Creator’s Tip: Always use stainless steel hardware; cheap zinc screws will rust and bleed stains down your pristine faux stone.
- Smart Sourcing: rust-proof stainless steel bracket kits, pre-drilled fiberstone corner assemblies
11. Interlocking Stone Block Systems
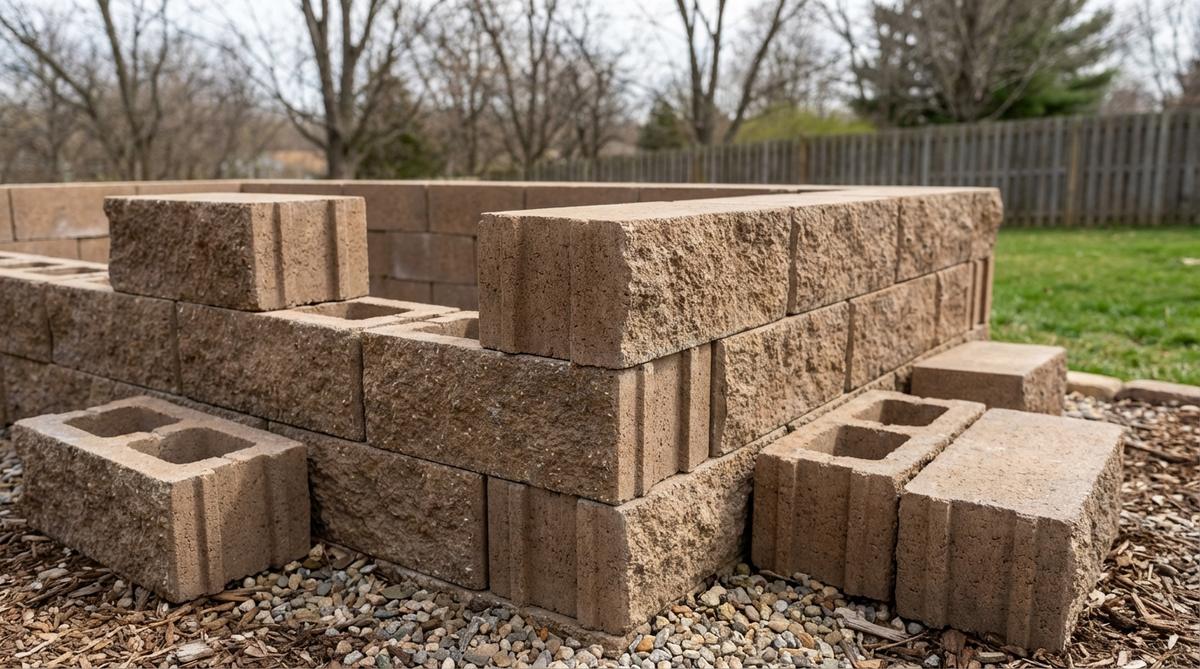
Looks like a professionally engineered fortress. This snap-together masonry wall is the best solution for wrapping around sloped driveways.
Hiring machinery is expensive, but using blocks with built-in rear lips automatically steps the wall back for perfect structural retention. Dropping rebar down the hollow cores and filling with gravel locks the entire system together like Lego.
You can build a formidable retaining system for $200–$350. Pin this if you need serious soil control on a budget.
- Key Materials: Interlocking retaining blocks, gravel backfill
- Vibe / Style: Suburban estate
- Difficulty: Moderate repetition
- Budget Breakdown: Blocks: $250 | Gravel: $50
- Creator’s Tip: The first row dictates the whole wall. Spend 80% of your time perfectly leveling the base trench.
- Smart Sourcing: heavy-duty aluminum torpedo levels, bulk pack 3/4 inch drainage gravel
Specialty Stone Techniques
Break the mold with advanced layouts. These highly specific stone garden planter techniques turn generic boundaries into spectacular environmental centerpieces.
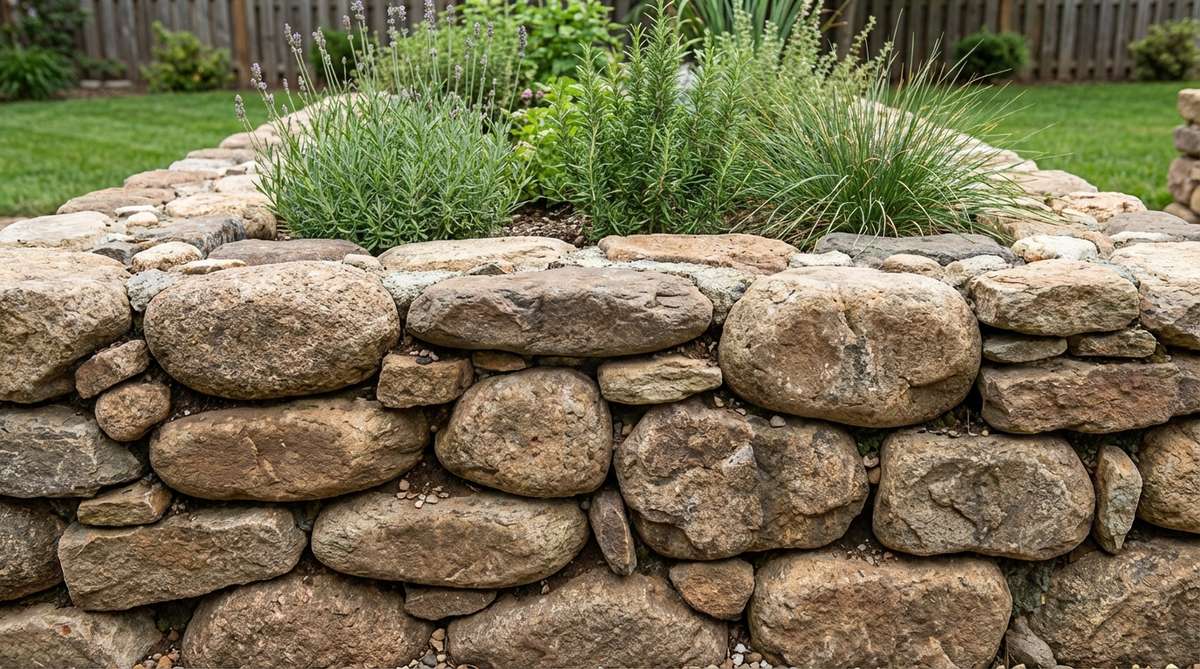
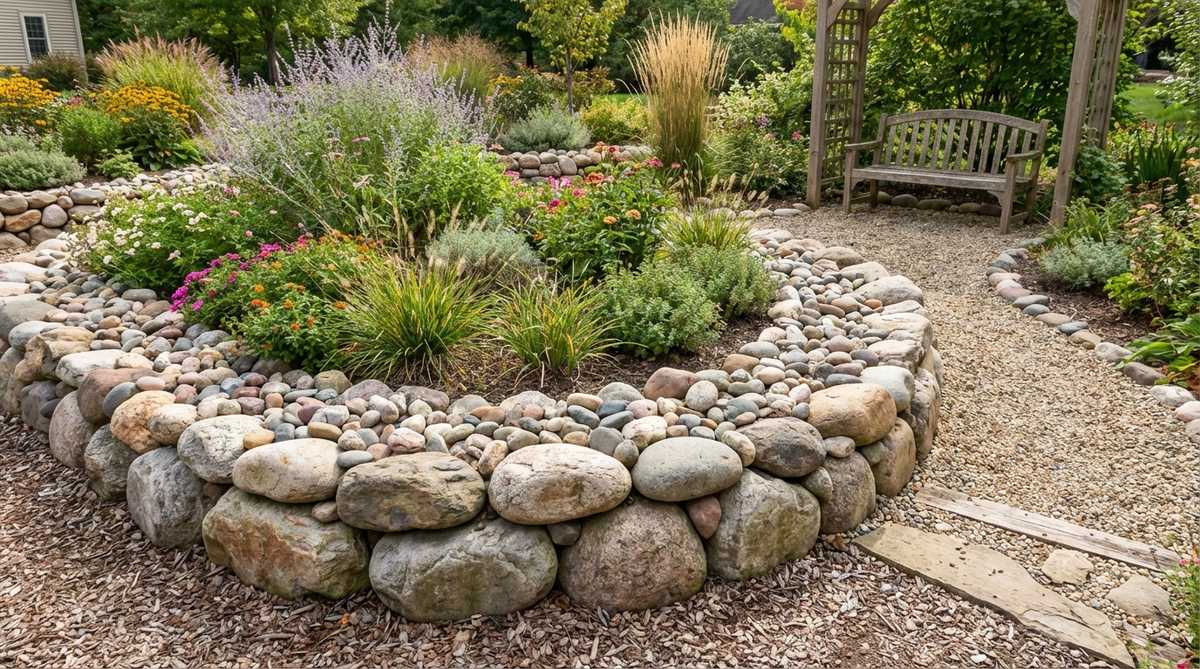
12. Boulder-Integrated Natural Beds
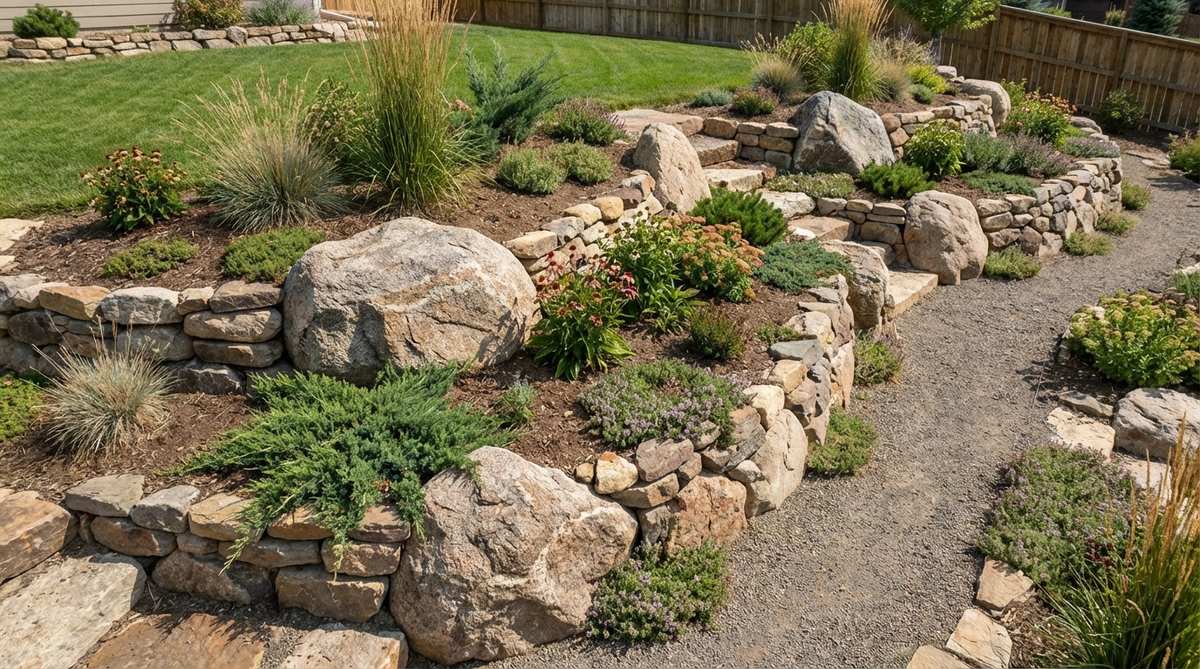
Feels like an enchanted woodland path you’d see in a national park. This massive embedded rock formation bridges the gap between wild nature and tamed gardens.
Standard borders look artificial, but sinking giant boulders halfway into the earth delivers a surprisingly premium look that anchors the whole yard. Blending smaller stones into the gaps of the giant anchors prevents soil wash while looking effortlessly organic.
Sourcing local boulders can keep this wild look under $100. Save this for your ultimate backyard wild-scaping project.
- Key Materials: Large anchor boulders, smaller filler rocks
- Vibe / Style: Wild forest edge
- Difficulty: Extreme heavy lifting
- Budget Breakdown: Boulders: $80 | Filler: $20
- Creator’s Tip: Always bury the widest part of the boulder; if it looks like it’s sitting *on* the dirt, it looks fake.
- Smart Sourcing: heavy-duty steel digging bars, premium miniature garden supplies
13. Gabion Basket Stone Walls
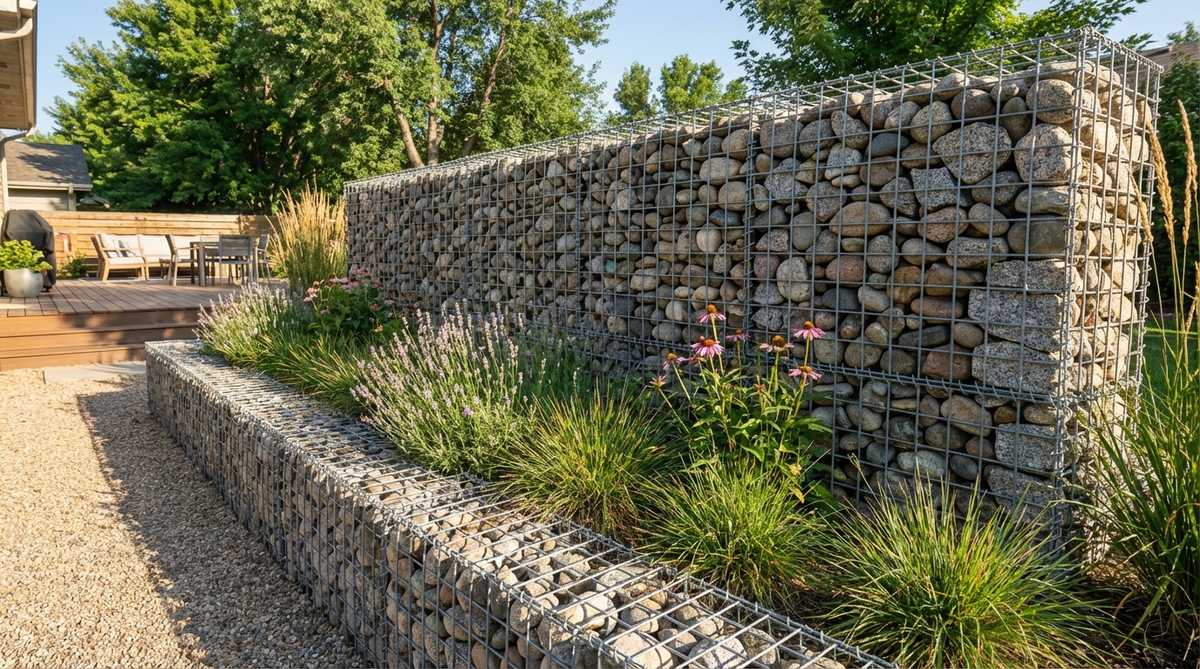
Radiates raw, industrial warehouse energy. This wire-mesh containment grid makes a massive statement when used as a tall backdrop for delicate bright flowers.
Traditional stacking takes patience, but dumping loose rocks into galvanized cages looks far more expensive than it is and requires zero masonry skills. The absolute drainage freedom means you’ll never deal with hydrostatic pressure blowing out your wall after heavy storms.
Baskets and bulk rock will cost around $150–$300. It’s a striking focal point that stops traffic.
- Key Materials: Galvanized gabion cages, bulk rough stone
- Vibe / Style: Industrial modern
- Difficulty: Easy filling
- Budget Breakdown: Cages: $100 | Stone: $150
- Creator’s Tip: Hand-place the flat sides of the rocks against the front wire mesh for a clean, professional finish, then dump the rest behind.
- Smart Sourcing: rust-proof galvanized gabion basket kits, heavy-duty wire snips
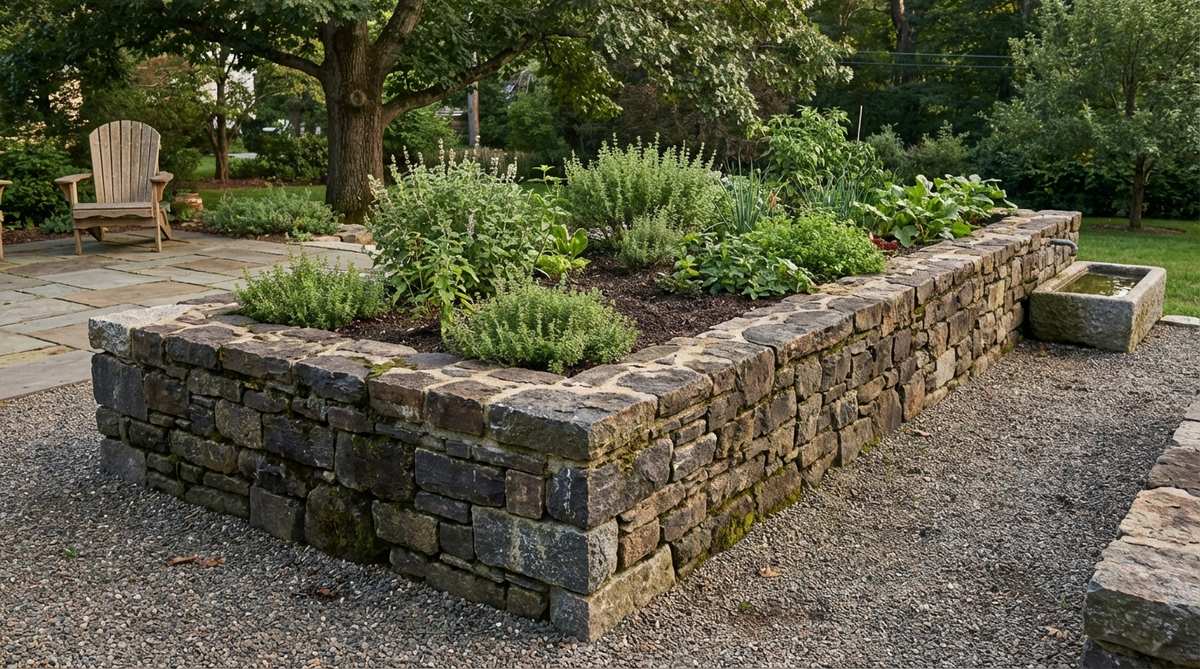
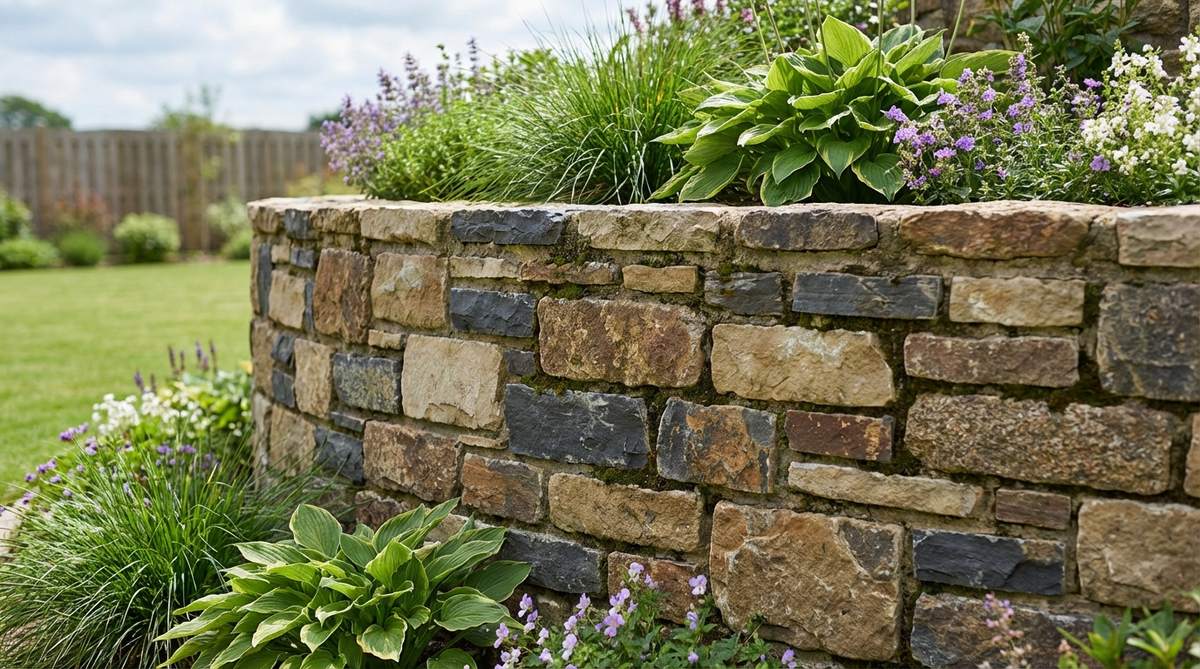
14. Dry-Laid Pennsylvania Fieldstone
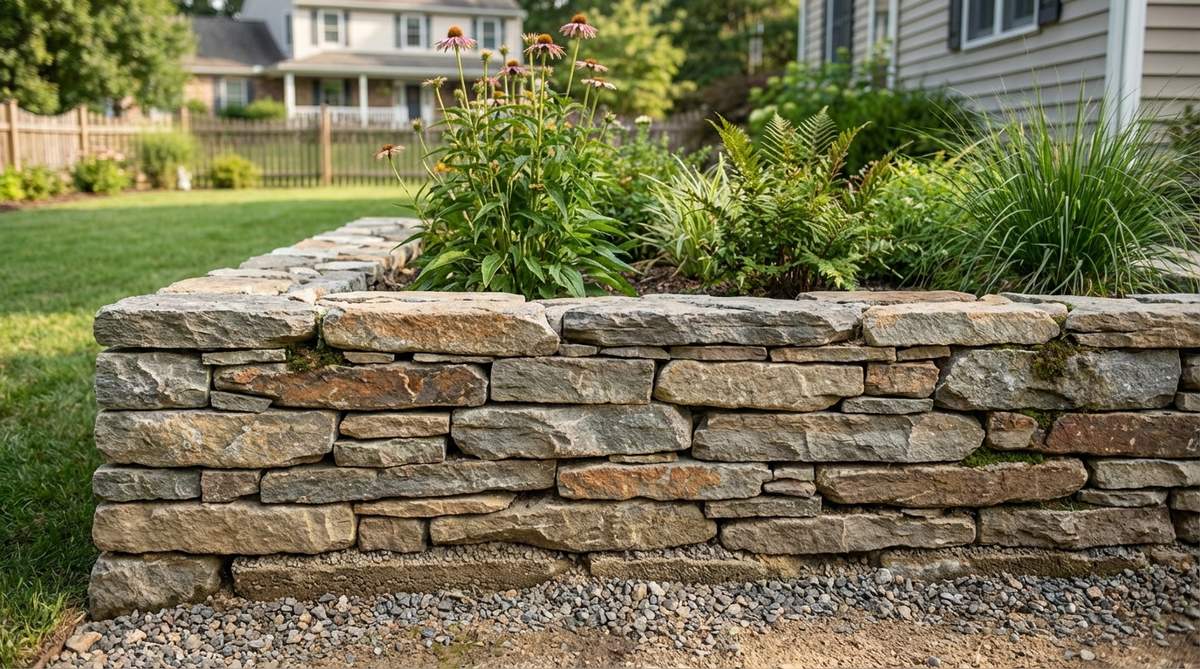
Brings a historic colonial charm to any modern home. This flat-stacked heritage border creates incredibly stable knee-high herb gardens.
Slapping cement everywhere ruins the aesthetic, but utilizing compacted sand friction gives a designer-level finish that shifts safely during winter freezes. Tightly wedging stone splinters into the gaps creates a locked, immovable matrix.
This classic technique requires about $100–$200 in premium flat stones. Pin this if you love authentic historic landscaping.
- Key Materials: Flat fieldstone, angular binding sand
- Vibe / Style: Colonial heritage
- Difficulty: Advanced puzzle-fitting
- Budget Breakdown: Stone: $160 | Sand: $25
- Creator’s Tip: Never stack vertical joints directly over each other (called a running joint)—always span a single stone over the seam below it.
- Smart Sourcing: polymeric binding sand (bulk pack), professional stonemason chisels
Stop wasting money on flimsy wood. The following engineered approach will literally outlast your house.
15. Deadman Stone Anchoring
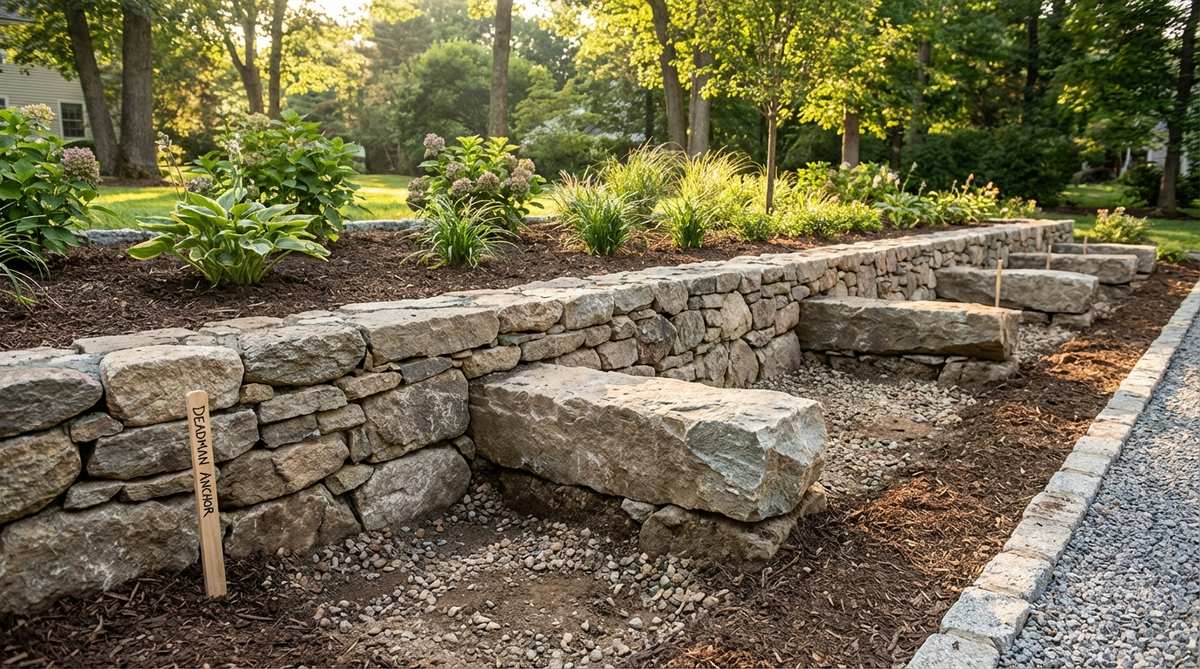
Looks like an impenetrable fortress wall. This deep-anchored structural block setup is mandatory if you want to build beds taller than two feet without them bowing.
Amateurs always build straight up and fail, but turning occasional long stones sideways into the soil delivers a surprisingly premium look of permanence. The weight of the internal dirt locks these “deadmen” in place, physically pulling the wall backward against gravity.
Expect to spend around $200–$350 for the extra deep stones. Essential blueprint for massive raised garden construction.
- Key Materials: Standard facing stones, elongated anchor stones
- Vibe / Style: Medieval courtyard
- Difficulty: Strategic engineering
- Budget Breakdown: Face stones: $200 | Anchors: $100
- Creator’s Tip: Ensure the anchor stones slope slightly down into the hill so water doesn’t channel out through the wall face.
- Smart Sourcing: heavy-duty perforated drainage pipe rolls, commercial-grade filter fabric
16. Rubble Trench Foundation System
Feels incredibly smart and structurally sound. This hidden subterranean gravel matrix is the secret weapon for preventing beautiful walls from sinking into mud.
Pouring expensive concrete footings is overkill, whereas an engineered rubble trench looks far more expensive than it is in performance longevity. Capillary breaks formed by the jagged stones stop frost-heave dead in its tracks.
Creating this base costs merely $30–$60 in crushed rock. Save this invisible trick to guarantee your hard work survives the winter.
- Key Materials: Graded crushed stone, pea gravel, trenching shovel
- Vibe / Style: Invisible engineering
- Difficulty: Heavy digging
- Budget Breakdown: Crushed stone: $40 | Hand tools: $20
- Creator’s Tip: Line the dirt trench with landscape fabric before dumping rock to stop mud from clogging your perfect drainage system over the years.
- Smart Sourcing: pre-cut geotextile trench liners, ergonomic steel trenching spades
17. Stone Veneer Facing Systems

Screams absolute luxury custom home. This thin-cut facade layer glues directly onto cheap cinderblocks, creating an illusion of solid masonry wealth.
Buying solid cut rock bankrupts projects, but wrapping cheap cores in veneer gives a designer-level finish for a fraction of the weight and cost. Using high-tack polymer adhesives means you don’t even need to be good at mixing mortar.
You can fake a millionaire retaining wall for about $200–$400. Pin this if you want to cheat the system for a luxury look.
- Key Materials: Natural stone veneer flats, cinderblock core, polymer adhesive
- Vibe / Style: High-end custom estate
- Difficulty: Moderate DIY
- Budget Breakdown: Veneer: $250 | Blocks/Glue: $80
- Creator’s Tip: Buy 90-degree corner veneer pieces first; they sell the illusion perfectly so nobody sees the fake edges.
- Smart Sourcing: pre-cut stone corner veneer pieces, all-weather structural polymer glue
Tiered and Terraced Systems
Verticality changes everything. These layered raised bed garden stone blueprints conquer gravity, maximizing growing space while injecting dynamic architecture into flat spaces.
18. Cascading Three-Tier Planters

Feels like a lush botanical amphitheater. This stair-stepped floral display creates absolute magic on boring flat patios.
Flat gardens lack visual depth, but stepping narrow walls backward delivers a surprisingly premium look that maximizes sun exposure for different plant types. The back of the lower wall secretly acts as the underground foundation for the tier above it.
Building three levels runs roughly $150–$250. Save this to your weekend patio upgrade board.
- Key Materials: Dimensional block, good draining soil
- Vibe / Style: Botanical showcase
- Difficulty: Intermediate planning
- Budget Breakdown: Blocks: $180 | Soil: $40
- Creator’s Tip: Put your drought-tolerant plants on the top tier and moisture lovers on the bottom, as water naturally seeps downward.
- Smart Sourcing: premium terrarium accessories, bulk pack organic raised bed soil
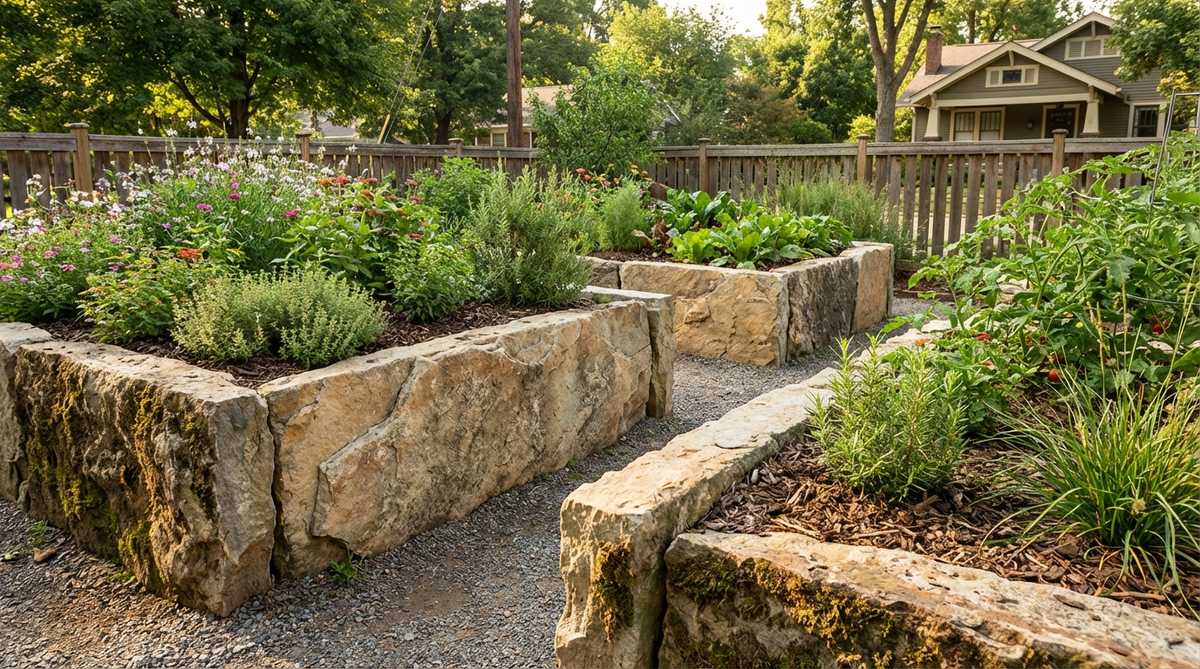
19. Hillside Terraced Vegetable Beds
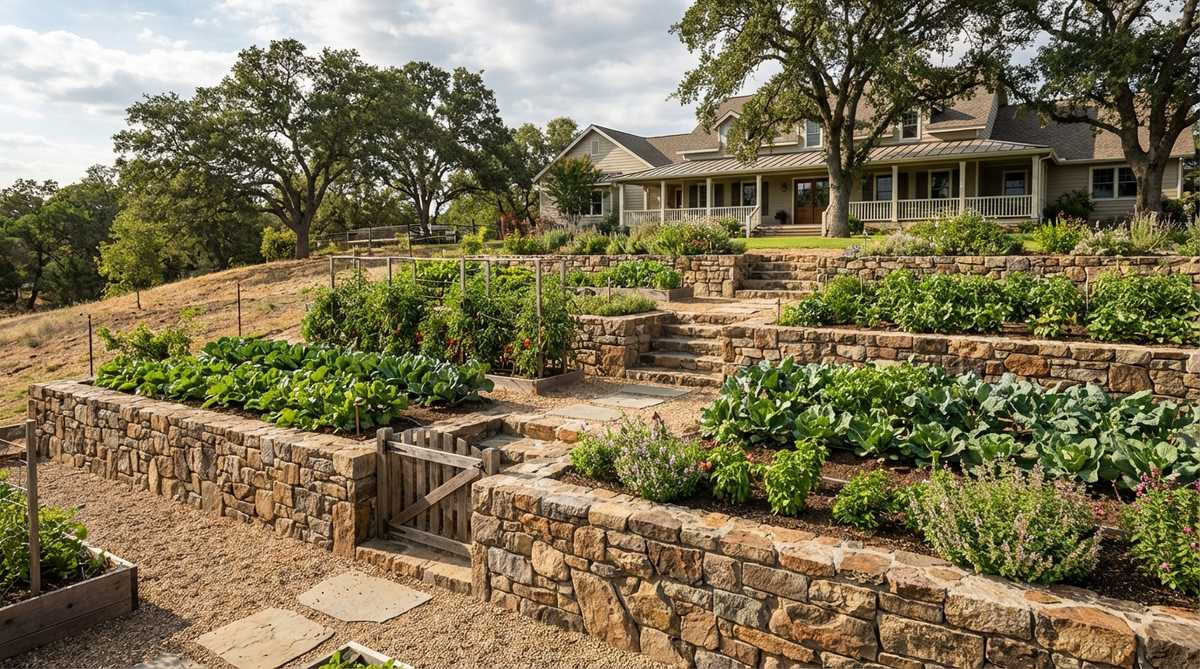
Gives off highly productive eco-farm energy. This carved mountain step system completely rescues unusable, dangerous backyard slopes.
Fighting erosion with grass is a nightmare, but carving flat harvest zones looks far more expensive than it is while saving your back during weeding season. Sinking perforated drain pipes behind every level ensures mudslides become a thing of the past.
A massive terrace project costs $300–$600 but reclaims dead real estate. A must-do for sloped property owners.
- Key Materials: Heavy retaining stone, corrugated drain pipe
- Vibe / Style: Alpine harvest
- Difficulty: Advanced landscaping
- Budget Breakdown: Stone: $400 | Drainage: $80
- Creator’s Tip: Over-dig the hillside slightly backward so the new dirt settles evenly against the slope rather than pushing the wall out.
- Smart Sourcing: heavy-duty perforated pipe sleeves, pre-cut landscape filter sheets
If you’re dealing with awkward slopes, this upcoming tier hack is an absolute game-changer.
20. Stepped Herb Garden Walls
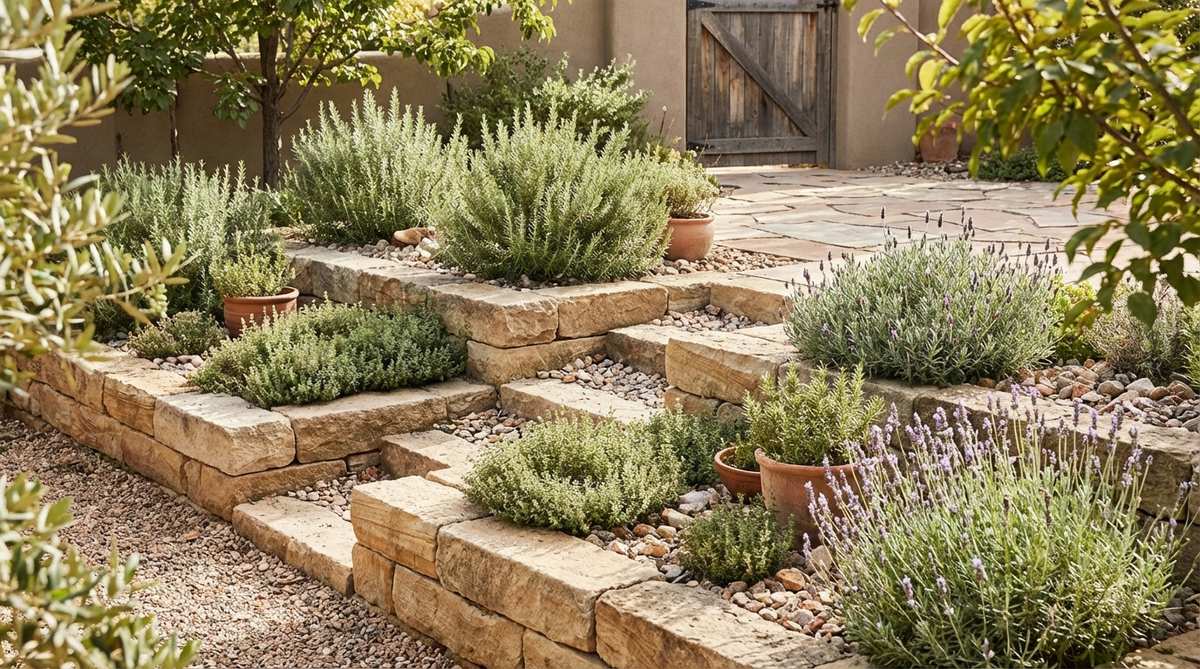
Feels like a sun-baked Mediterranean villa. This miniature heat-retaining step layout sits beautifully right outside a kitchen door.
Standard deep planters rot sensitive roots, but shallow stone steps give a designer-level finish that bakes the soil perfectly for rosemary and thyme. The rocks absorb daytime UV rays and radiate heat all night, tricking plants into thriving.
You can easily build this chef’s dream for $50–$90. Pin this to your outdoor kitchen inspiration board.
- Key Materials: Small paving stones, sandy herb soil mix
- Vibe / Style: Tuscan kitchen garden
- Difficulty: Quick beginner build
- Budget Breakdown: Stones: $60 | Soil: $15
- Creator’s Tip: Mix 30% perlite or construction sand into your dirt so the herbs never sit in soggy mud.
- Smart Sourcing: bulk pack horticultural perlite, UV-resistant plant marker kits
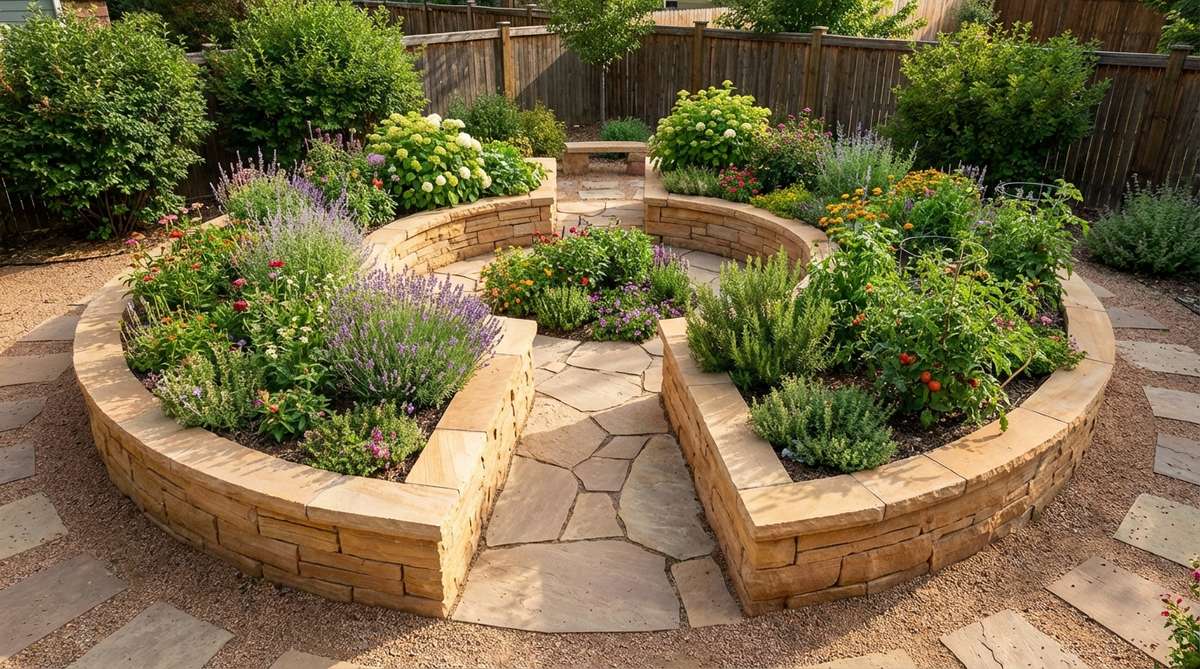
21. Amphitheater Curved Terraces
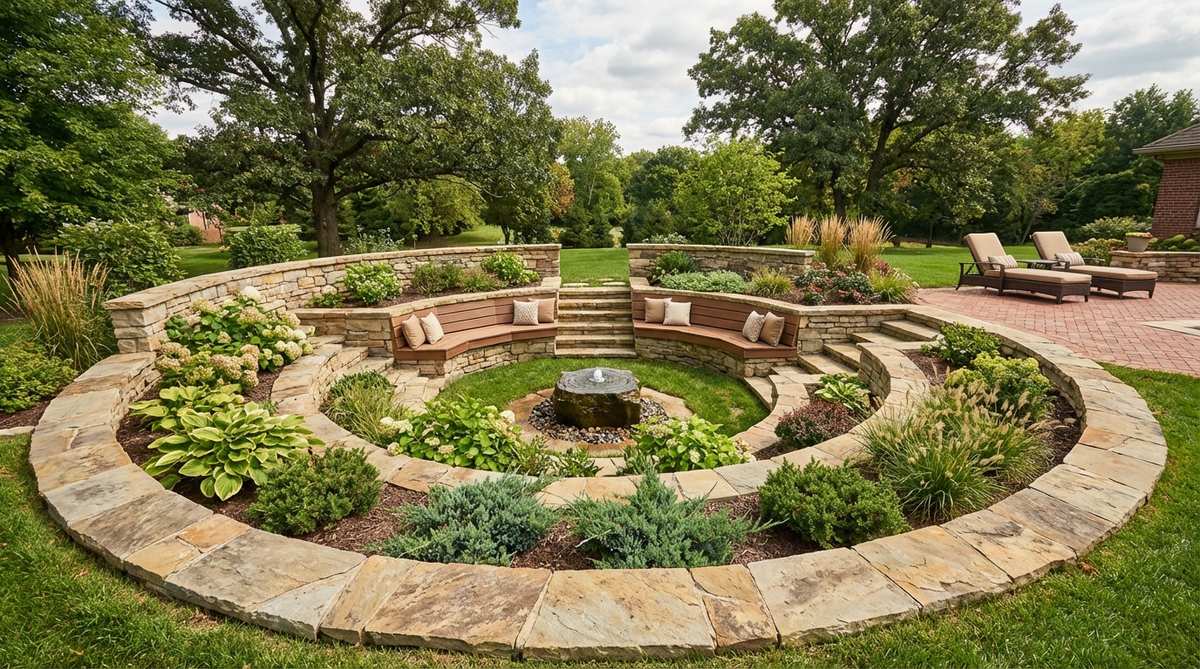
Captures the drama of ancient Roman ruins. This sweeping semi-circular focal point dominates a yard, drawing the eye directly to premium water features or fire pits.
Straight lines are boring, but using a simple string-compass trick delivers a surprisingly premium look with flawless, sweeping geometry. Trapping heat within the curved walls creates an insane microclimate for giant tropical specimens.
Curved blocks will run you $200–$400. Highly recommended to anchor a massive empty lawn.
- Key Materials: Tapered retaining blocks, marking paint
- Vibe / Style: Grand architectural centerpiece
- Difficulty: Moderate geometric layout
- Budget Breakdown: Blocks: $280 | Tools: $20
- Creator’s Tip: Drive a stake, attach a string, and spray paint your exact perfect curve onto the grass before ever lifting a shovel.
- Smart Sourcing: high-visibility inverted marking paint, commercial-grade fiberglass measuring tapes
22. Keyhole Access Terraced Beds
Feels like a secret permaculture fortress. This circular indented harvest station is the smartest way to maximize yield in a tight corner.
People waste space on wide pathways, but wrapping the bed entirely around you gives a designer-level finish while eliminating back strain. The central notch lets you reach every single inch of soil without ever stepping on and compacting the dirt.
This layout costs about $150–$250 in basic blocks. Save this if you are obsessed with high-yield homesteading.
- Key Materials: Basic retaining bricks, central compost tube
- Vibe / Style: Eco-futurist homestead
- Difficulty: Easy geometry
- Budget Breakdown: Bricks: $160 | Center tube: $30
- Creator’s Tip: Put a wire mesh tube in the very center to throw kitchen scraps into, naturally fertilizing the whole bed from the inside out.
- Smart Sourcing: heavy-duty galvanized hardware cloth rolls, pre-cut compost aeration tubes
Hybrid Stone Combinations
Mixing materials creates magic. These hybrid blueprints cross-pollinate raw rocks with industrial metal and thick timber for a uniquely textured garden aesthetic.
23. Stone and Timber Frame Beds
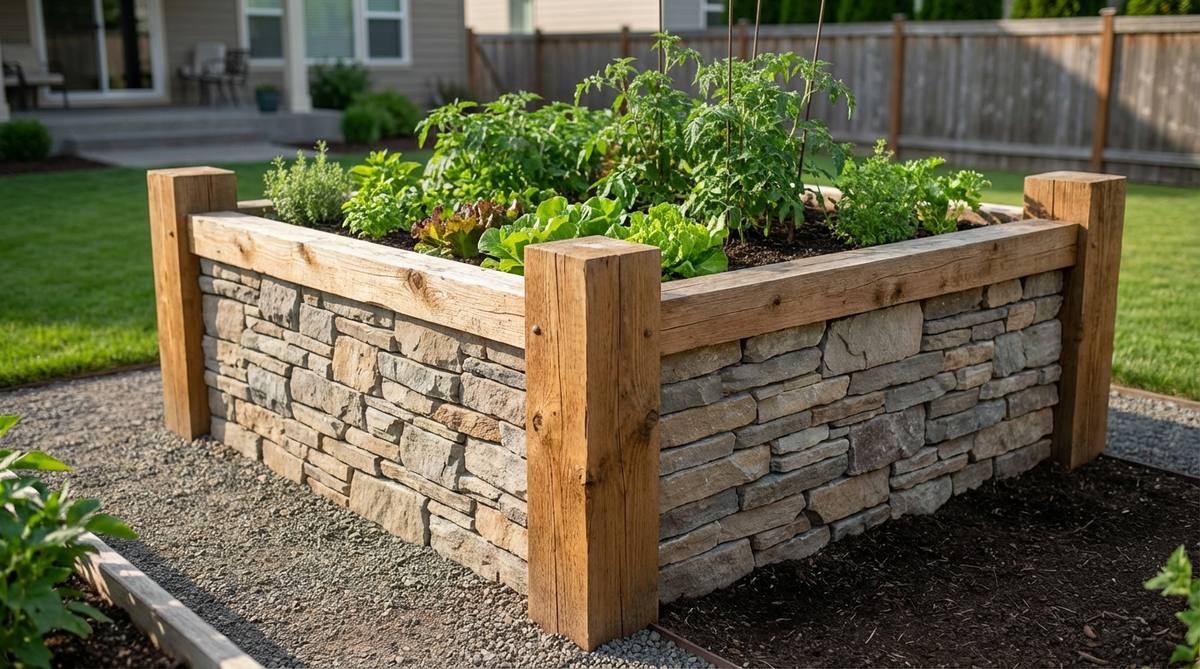
Radiates heavy modern-mountain lodge vibes. This chunky wood and rock matrix instantly upgrades standard raised vegetable gardens into art pieces.
Pure stone walls can look overwhelming, but framing jagged rocks between thick cedar posts delivers a surprisingly premium look that cuts material costs in half. The wood acts as an unyielding skeleton while the loose rock provides unbeatable drainage.
Mixing these materials costs around $120–$200. Pin this to your ultimate backyard DIY board.
- Key Materials: 6×6 Cedar posts, rubble rock fill, structural screws
- Vibe / Style: Modern lumberjack
- Difficulty: Intermediate carpentry
- Budget Breakdown: Timber: $80 | Rock: $60
- Creator’s Tip: Coat the underground portion of the timber posts with liquid rubber to guarantee they won’t rot out for 20 years.
- Smart Sourcing: liquid rubber wood sealant (bulk pack), extreme-duty structural timber screws
24. Concrete Core Stone Face
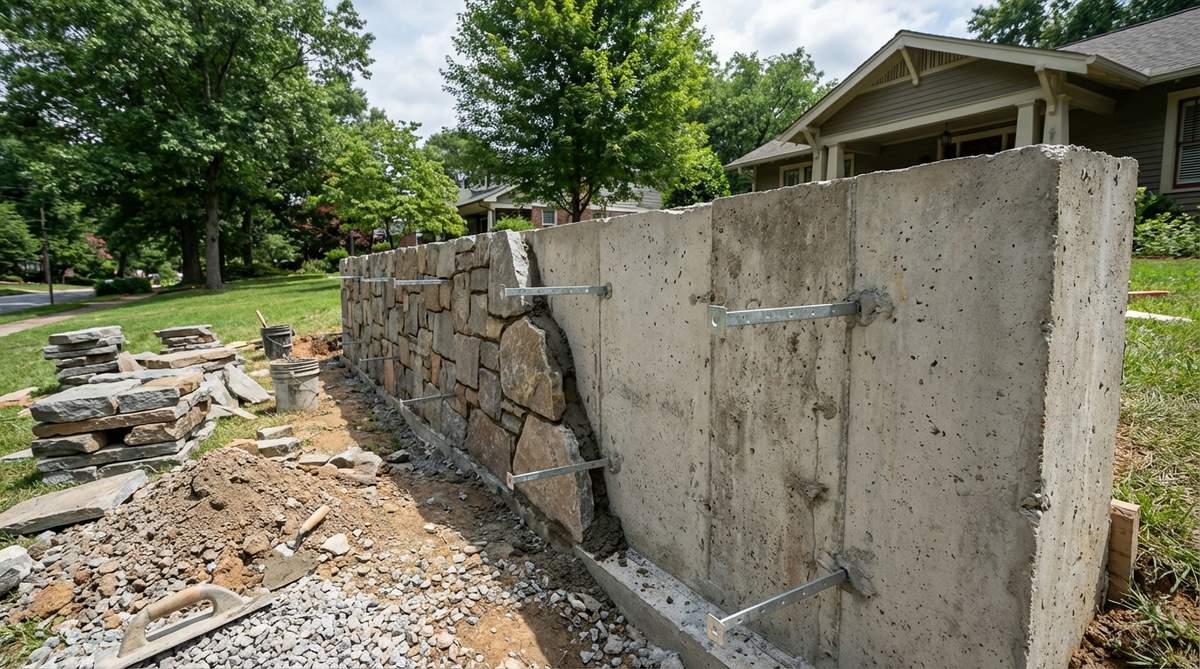
Looks like a multi-million dollar civic installation. This reinforced structural facade is mandatory for massive commercial-grade retaining drops.
Most DIY walls over three feet collapse, but pouring a rebar-laced core first looks far more expensive than it is once the gorgeous thin-stone is glued to the front. You get the unstoppable liability-proof strength of a bunker with the beauty of an estate.
Heavy duty hybrid builds run $300–$600. Perfect for huge grade changes near patios.
- Key Materials: Concrete blocks, rebar, thin-stone flats
- Vibe / Style: Civic luxury
- Difficulty: Advanced masonry
- Budget Breakdown: Core: $150 | Face stone: $250
- Creator’s Tip: Fill the block cores solidly with wet concrete to lock the vertical rebar into an immovable internal skeleton.
- Smart Sourcing: pre-cut epoxy-coated rebar rods, premium commercial stone veneer kits
Wait until you see how mixing cheap timber with raw rock creates a shocking designer aesthetic below.
25. Metal Edge Stone Fill Systems
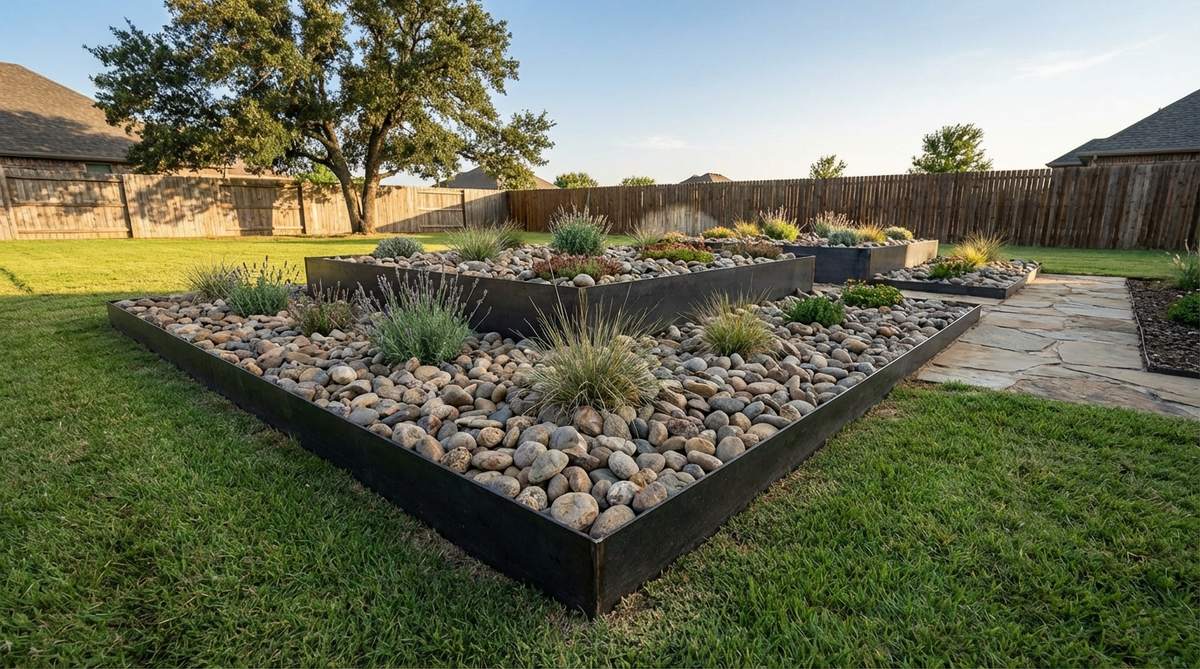
Screams high-end architectural digest feature. This crisp corten steel and gravel trough brings insane modern lines to messy outdoor areas.
Thick masonry blocks eat up patio space, but using thin steel ribbons to contain jagged stones gives a designer-level finish with a fraction of the footprint. The metal holds the perfect geometric line while the stone texture stops it from feeling cold.
Steel and rock combinations run $100–$180. Save this if you crave laser-straight modern lines.
- Key Materials: Corten steel edging strips, decorative crushed rock
- Vibe / Style: Architectural modern
- Difficulty: Easy quick-install
- Budget Breakdown: Steel edge: $80 | Rock: $40
- Creator’s Tip: Overlap the metal strips by at least 4 inches at the seams so expanding ice doesn’t pop the joints open.
- Smart Sourcing: weathering corten steel garden edging kits, heavy-duty metal landscape stakes
Material Guide: Cheap vs. Premium Aesthetic
Knowing exactly where to save and where to spend makes all the difference in achieving that “looks expensive but isn’t” vibe.
- Standard vs. UV-Resistant/Premium: Upgrading to UV-coated sealants stops your expensive composite beds from chalking, fading, or cracking under harsh summer sun.
- Pre-made Kits vs. Sourcing Locally: While local rock yards save money on bulk stone, using pre-cut starter kits for things like veneer or stainless hardware actually saves hours of frustrating labor.
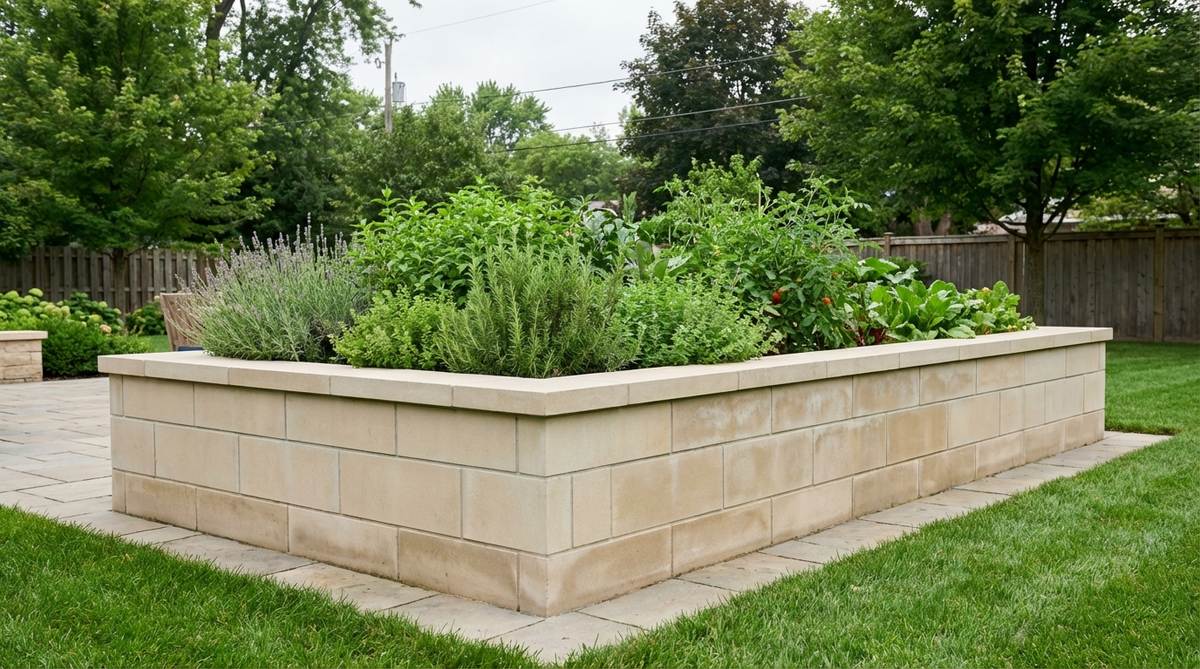
26. Brick Base Stone Cap Walls
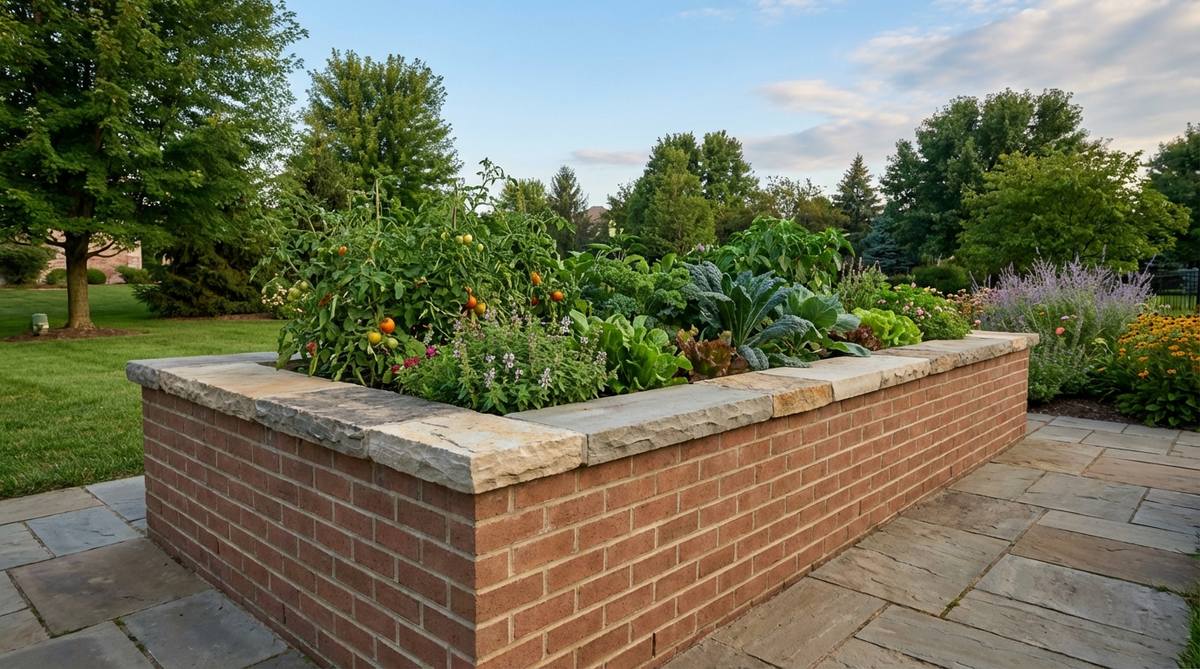
Feels like a classic Ivy League campus courtyard. This two-tone classic brick and slab layout makes ordinary flower beds look incredibly established.
Using solid stone for the whole wall gets pricey quickly, but capping cheap brick bases with premium limestone delivers a surprisingly premium look where the eye naturally falls. The overhanging rock ledge creates sharp shadow lines while physically protecting the lower brick joints from rain.
This classic combo costs roughly $150–$250. It’s a fast upgrade that completely changes the vibe of your home.
- Key Materials: Red clay bricks, thick limestone cap slabs
- Vibe / Style: Traditional collegiate
- Difficulty: Intermediate leveling
- Budget Breakdown: Bricks: $90 | Caps: $120
- Creator’s Tip: Ensure your stone cap overhangs the brick face by exactly 1.5 inches to properly shed water and look professionally proportioned.
- Smart Sourcing: pre-cut limestone wall caps, professional masonry line blocks
27. Stone and Planted Wall Pockets
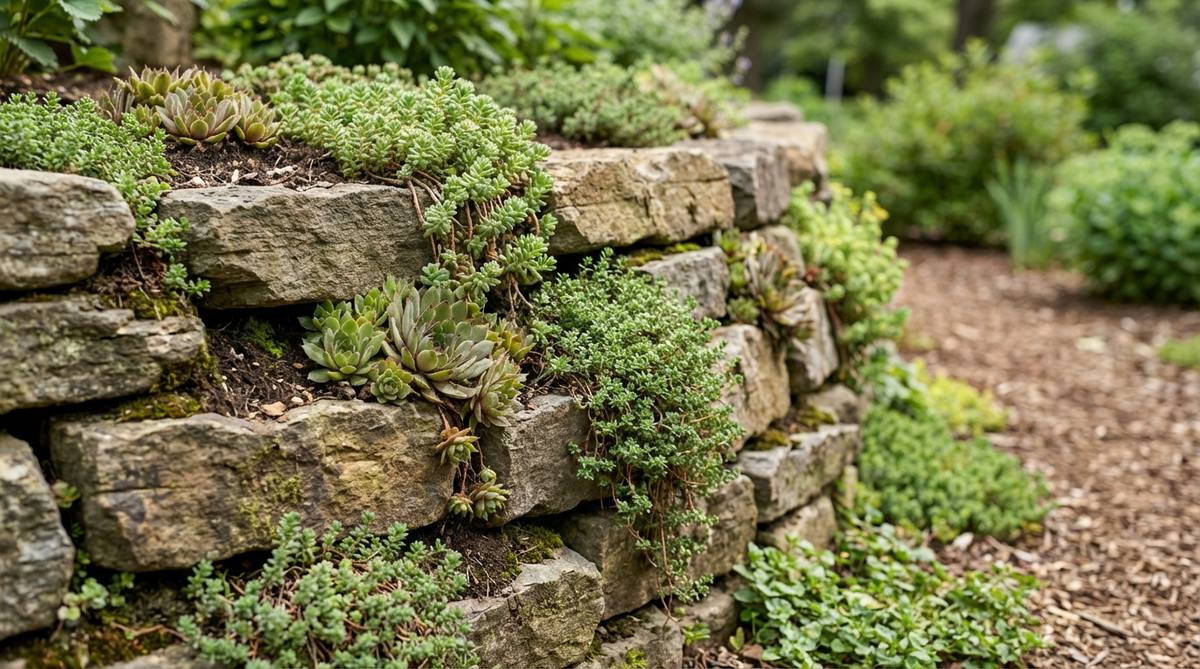
Feels like an ancient ruin reclaimed by nature. This living masonry tapestry turns a boring structural wall into a vertical succulent garden.
Most people strive for perfectly tight joints, but intentionally leaving dirt-filled gaps looks far more expensive than it is when trailing plants cascade down the face. Slipping sedums and miniature garden supplies into the cracks creates a breathtaking hybrid of hardscape and softscape.
Pocket planting only adds about $30–$50 to your build. Pin this if you love the overgrown romantic aesthetic.
- Key Materials: Large stacking stones, creeping thyme, succulent plugs
- Vibe / Style: Romantic ruin
- Difficulty: Moderate patient stacking
- Budget Breakdown: Stone: $100 | Plant plugs: $40
- Creator’s Tip: Pack the pockets with high-quality compost *as* you build the wall up, not by trying to shove dirt into holes later.
- Smart Sourcing: bulk pack trailing succulent plugs, premium fairy garden kits
Decorative Finishing Methods
The details define the luxury. These stone garden planter finishing techniques elevate basic block builds into highly polished landscape architecture.
28. Fully Dressed Flagstone Caps
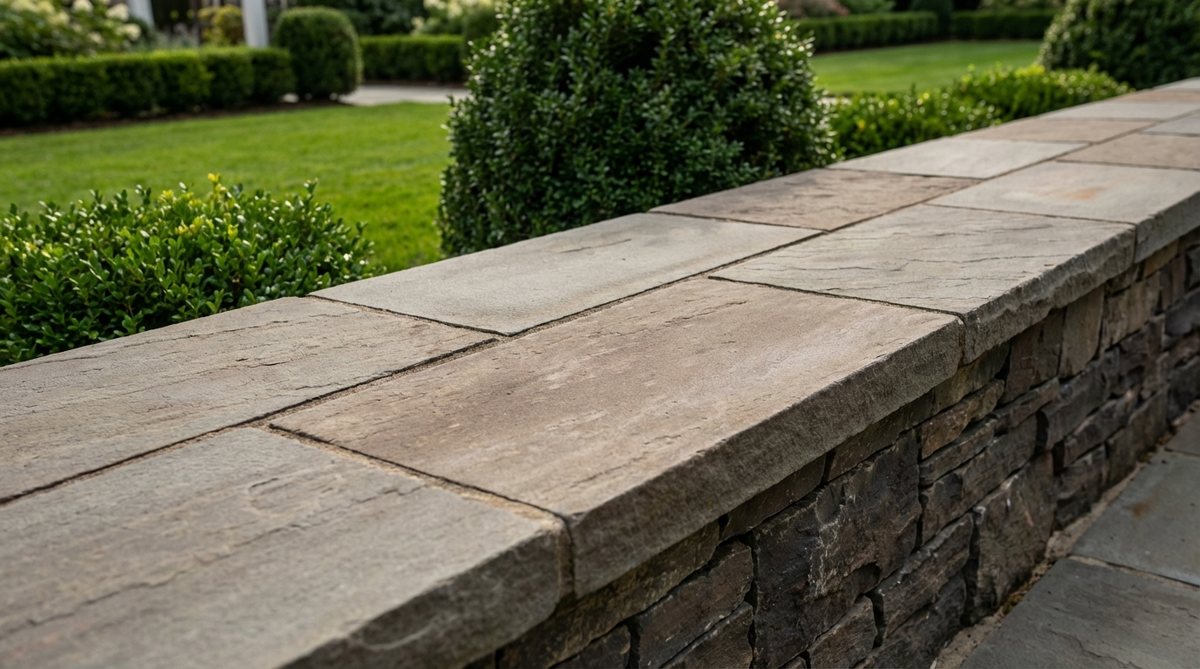
Screams perfectly manicured country club. This diamond-cut seamless top edge turns a simple planter into a high-end seating wall for massive parties.
Rough edges look messy and snag clothing, but investing in smooth, saw-cut geometry gives a designer-level finish that encourages guests to actually interact with the garden. Sealing the flat top blocks water infiltration, doubling the lifespan of the entire structure beneath.
Polished caps cost around $100–$180. Save this if you want your yard to look professionally groomed.
- Key Materials: Diamond-cut flat stones, wet-look sealer
- Vibe / Style: Polished estate
- Difficulty: Advanced wet-sawing
- Budget Breakdown: Cut caps: $140 | Sealer: $30
- Creator’s Tip: Rent a proper wet saw for $50 a day instead of trying to chip edges with a hammer; the laser-straight lines are worth it.
- Smart Sourcing: premium diamond masonry saw blades, UV-blocking glossy stone sealer
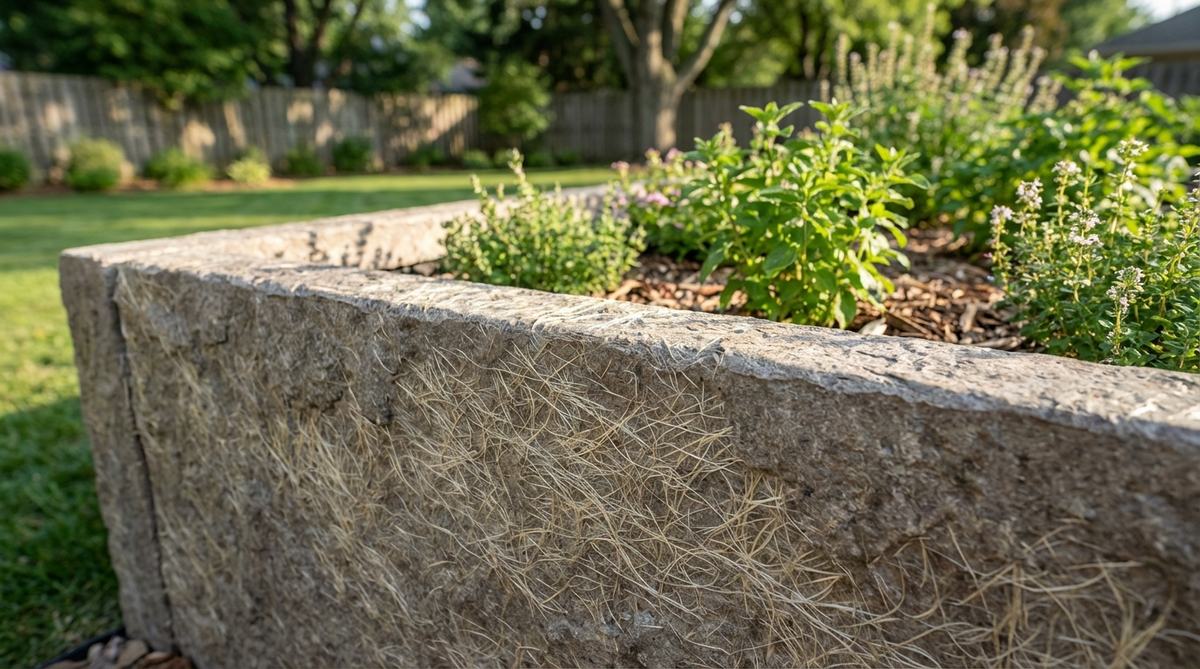
29. Rough Cut Rustic Finishes
Feels like a cozy cabin in the deep woods. This jagged quarried texture border completely embraces the raw, unpolished beauty of the earth.
Over-processing stone removes its soul, whereas letting the natural cleavage planes show delivers a surprisingly premium look that hides mud and weathering perfectly. The uneven ledges create tiny micro-shadows that look spectacular during golden hour sunsets.
Leaving it raw keeps costs incredibly low, around $50–$90. A massive weekend win for natural yards.
- Key Materials: Unfinished quarry rock, hidden dirt backing
- Vibe / Style: Earthy organic
- Difficulty: Easy stacking
- Budget Breakdown: Raw stone: $70 | Backing fabric: $15
- Creator’s Tip: Always place the ugliest, flattest side of the rock face-down to ensure maximum stability without sacrificing the beautiful rough front.
- Smart Sourcing: heavy-duty rubber-coated landscaping gloves, bulk pack organic compost
The final three setups use optical illusions that make tiny yards look massively expensive…
30. Tuckpointing Mortar Detailing
Gives off serious historic mansion vibes. This contrasting joint profile technique makes every individual block pop with insane 3D definition.
Smearing sloppy gray cement ruins beautiful brickwork, but carving deep, colored mortar grooves looks far more expensive than it is and shows insane craftsmanship. The recessed shadow lines hide slight imperfections while dramatically boosting the structural waterproof rating.
Detail tools run about $20–$40 but double the perceived value. Pin this for the ultimate masonry flex.
- Key Materials: Colored mortar dye, slicking tools
- Vibe / Style: Master craftsman
- Difficulty: Tedious precision
- Budget Breakdown: Mortar: $20 | Tools/Dye: $25
- Creator’s Tip: Let the mortar dry until it feels like wet sand before tooling it; if it’s too wet, it will smear everywhere and stain the rocks.
- Smart Sourcing: professional masonry tuckpointing tool kits, premium iron-oxide mortar dye
31. Mosaic Mixed Stone Patterns
Feels like a piece of custom Mediterranean art. This multi-colored geometric layout completely shatters the boring monotone gray wall stereotype.
Using one type of rock is safe but boring, whereas weaving bands of black slate into light limestone gives a designer-level finish that acts as a standalone art installation. Blending miniature garden supplies into the nooks creates a wildly complex, expensive visual texture.
Mixing specialty stones costs about $150–$250. Save this if you want your yard to look like a gallery.
- Key Materials: Contrasting color stones, mapping chalk
- Vibe / Style: Artistic eclectic
- Difficulty: Advanced design planning
- Budget Breakdown: Base stone: $120 | Accent stone: $80
- Creator’s Tip: Lay your entire pattern out flat on the grass first to balance the colors before committing with permanent adhesive.
- Smart Sourcing: pre-cut polished accent stones (bulk pack), waterproof construction layout chalk
32. Integrated Lighting Systems
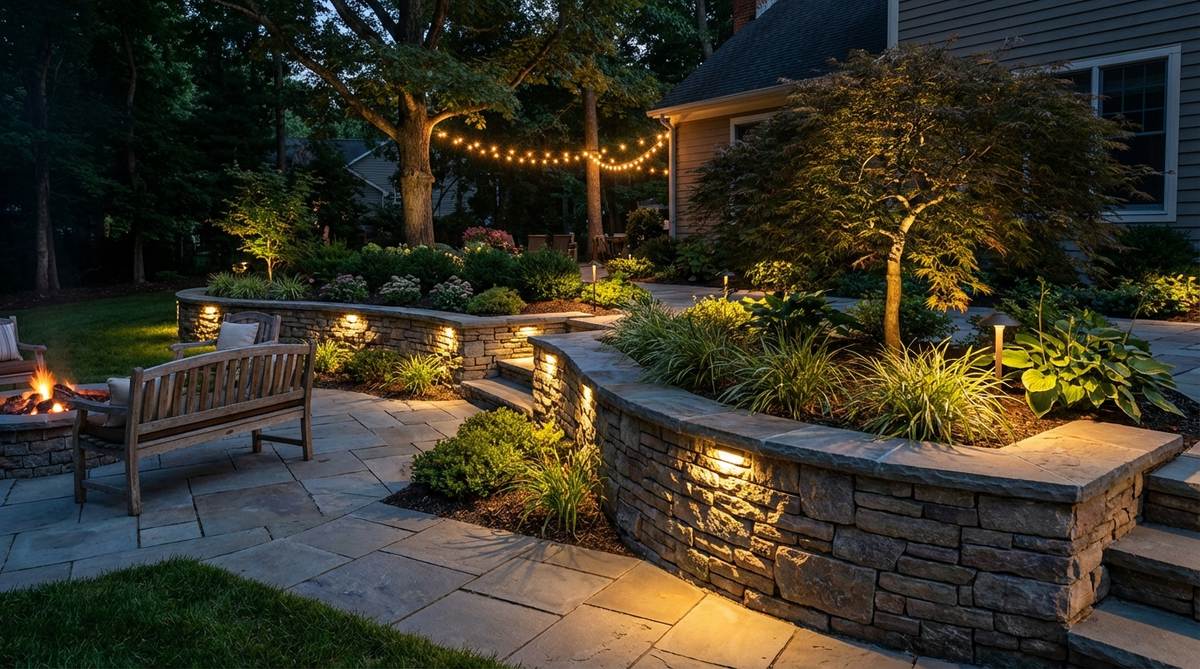
Radiates high-end Hollywood hills resort energy. This hidden LED architectural glow completely transforms your garden beds into nighttime entertainment hubs.
Most solar lights look cheap and flimsy, but embedding low-voltage wires directly under the stone caps delivers a surprisingly premium look that casts dramatic shadows down the rock face. It creates a warm, expensive ambiance that extends your yard’s usability far past sunset.
Wiring up your wall costs $80–$150. Highly recommended for a quick weekend aesthetic explosion.
- Key Materials: Flat LED strip lighting, low-voltage transformer
- Vibe / Style: Luxury nightscape
- Difficulty: Intermediate wiring
- Budget Breakdown: Lights: $60 | Transformer: $40
- Creator’s Tip: Leave a hollow plastic conduit pipe running through the back of the wall during construction so you can easily replace wires later.
- Smart Sourcing: UV-coated waterproof LED hardscape light kits, outdoor-rated low voltage transformers
33. Water Feature Integrated Beds
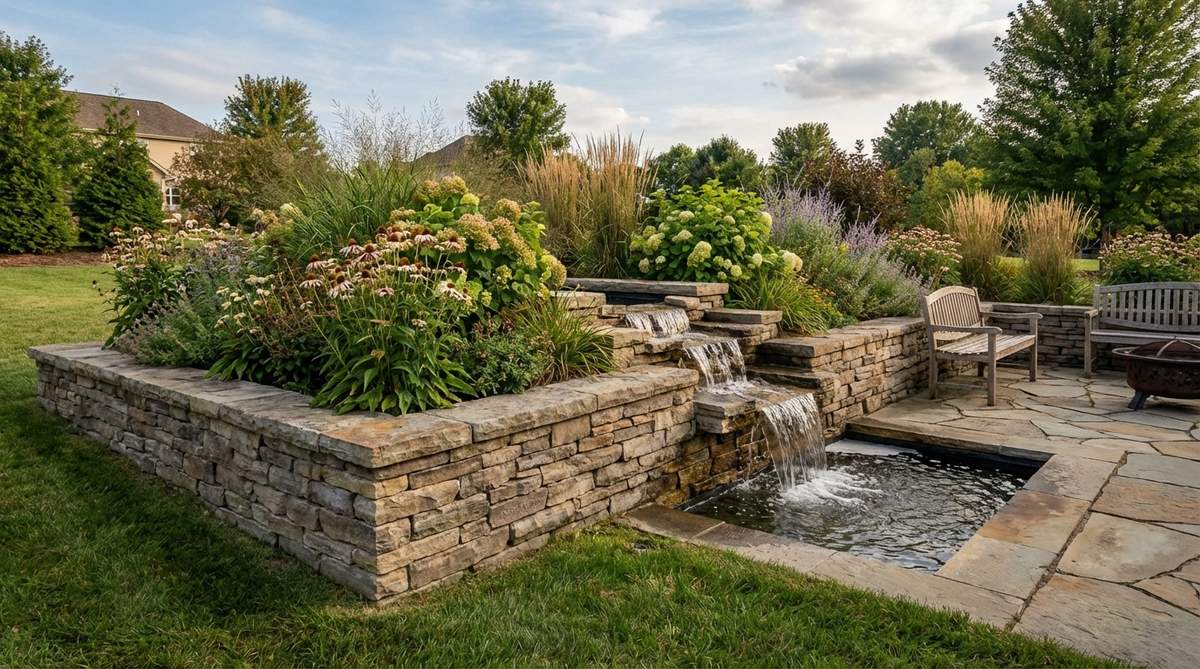
Feels like an elite sanctuary retreat. This cascading aquatic masonry setup combines the raw permanence of stone with the soothing acoustic magic of flowing water.
Standard birdbaths are boring, but building a hidden waterfall spillway directly out of the planter face looks far more expensive than it is. Concealing the waterproof membrane behind the heavy front stones merges the vibrant plant life directly into the aquatic ecosystem.
An integrated fountain setup runs $200–$400. Pin this if you want the absolute pinnacle of landscape luxury.
- Key Materials: Submersible pump, EPDM rubber liner, spillway sheer
- Vibe / Style: Elite sanctuary
- Difficulty: Advanced plumbing
- Budget Breakdown: Pump/Liner: $150 | Stone: $150
- Creator’s Tip: Always install a pump that is rated for twice the water volume you think you need; you can always dial it down, but you can’t force it to pump harder.
- Smart Sourcing: pre-cut heavy duty EPDM pond liners, commercial-grade submersible waterfall pumps
Conclusion
Upgrading to a raised bed garden stone configuration guarantees unparalleled longevity and a wildly premium aesthetic. By leveraging these exact 33 high-end blueprints, from smart engineered veneers to integrated water features, you completely bypass the cheap look of rotting wood and rusting metal. Securing the right starter kits and bulk materials ensures your structural investment survives decades of harsh weather while radiating pure landscape luxury.
Frequently Asked Questions
How long do stone raised garden beds last compared to wood or metal?
When properly built with commercial-grade sealant and heavy-duty landscape fabric, a raised bed garden stone setup will easily last 50-100 years. Unlike cheap lumber that rots in a decade or thin metal that bends and rusts, premium stone layouts offer a one-and-done permanent luxury solution that aggressively boosts property value.
What’s the difference between dry-stacked and mortared stone beds?
Dry-stacked uses natural gravity and friction, making it an excellent budget-friendly choice that allows water to drain naturally, perfect for pairing with miniature garden supplies. Mortared construction utilizes high-strength outdoor bonding kits to lock stones permanently, creating a pristine architectural finish required for walls taller than two feet.
Which stone type works best for raised garden beds?
Flat flagstone is the top-rated choice for easy stacking, while heavy limestone blocks provide a clean, modern aesthetic. If you’re building in freezing climates, investing in bulk pack granite or high-end polystone composite planters ensures your raised bed garden stone won’t fracture during brutal winter thaws.
Do stone raised beds need a foundation?
Absolutely. Skipping the foundation guarantees your premium wall will sink into the mud. You must dig an 8-inch trench and use bulk pack leveling sand and crushed gravel to create a stable base, preventing expensive frost heave damage and keeping those designer lines laser-straight.
Can I build stone raised beds on slopes?
Yes, stone is the ultimate solution for hillside erosion control. By utilizing a terraced step design with heavy-duty perforated drainage pipe rolls hidden behind the walls, you instantly transform dangerous, unusable slopes into highly productive, multi-level luxury garden real estate.
How much does stone for raised beds cost compared to other materials?
While the initial cost is higher (around $200-$500 per ton), using smart sourcing like pre-cut stone veneer starter kits or DIY concrete casting can slash your budget. Over a 20-year span, stone is vastly cheaper because you never have to pay to replace rotting wood or collapsed plastic borders.