
Nailing that perfect outdoor decor halloween vibe requires smart material sourcing, not a massive budget. This guide reveals professional DIY blueprints and high-end visual tricks. Prepare for neighborhood-stopping curb appeal that outshines everyone else.
Design Snapshot: High-RPM Frameworks that Work
- Layered storytelling: Build a clear theme first, then add props, plants, and lighting that all support that narrative.
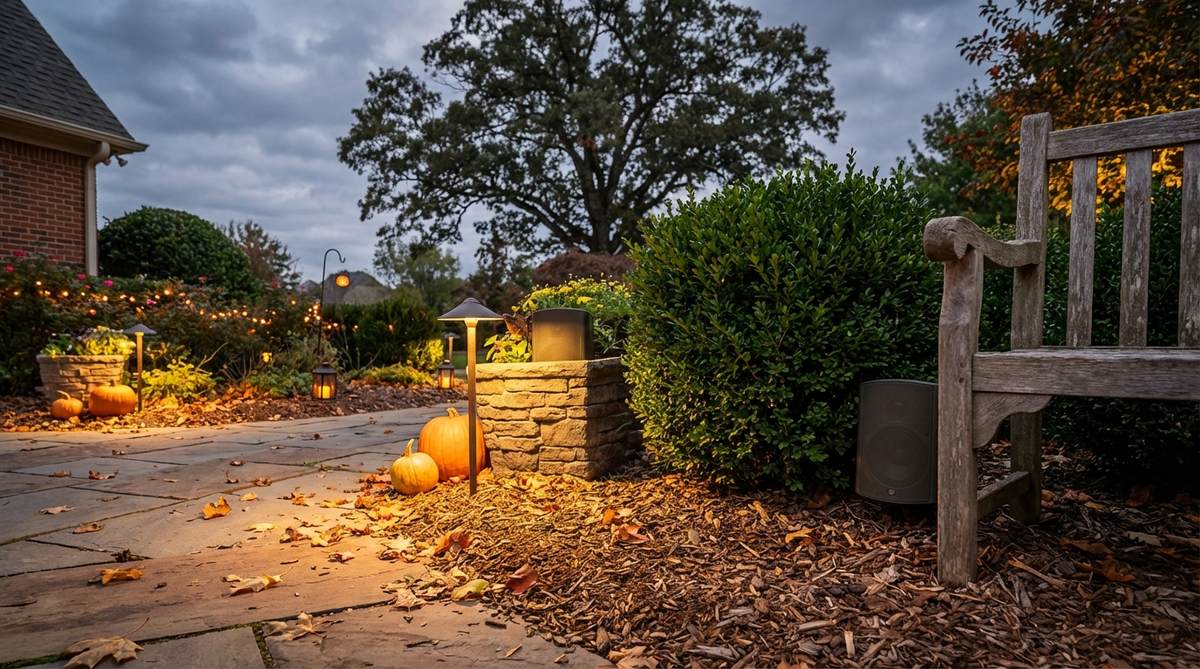
- Safe illumination: Use outdoor-rated LED lights, avoid tripping hazards, and rely on battery candles in pumpkins and lanterns for fire safety.
- Scale and sightlines: Place taller elements near the house and lower elements along paths so the whole scene reads well from the street.
- Weather resilience: Anchor decor against wind, choose materials that handle rain, and favor faux pieces where freeze–thaw cycles are harsh.
Spine-Tingling outdoor decor halloween ideas for Your Front Yard
Front yards set the tone for your entire Halloween experience. Stop throwing random plastic in the grass. This group focuses on high-impact, heavily structured scenes that read clearly from the sidewalk and force cars to slow down.
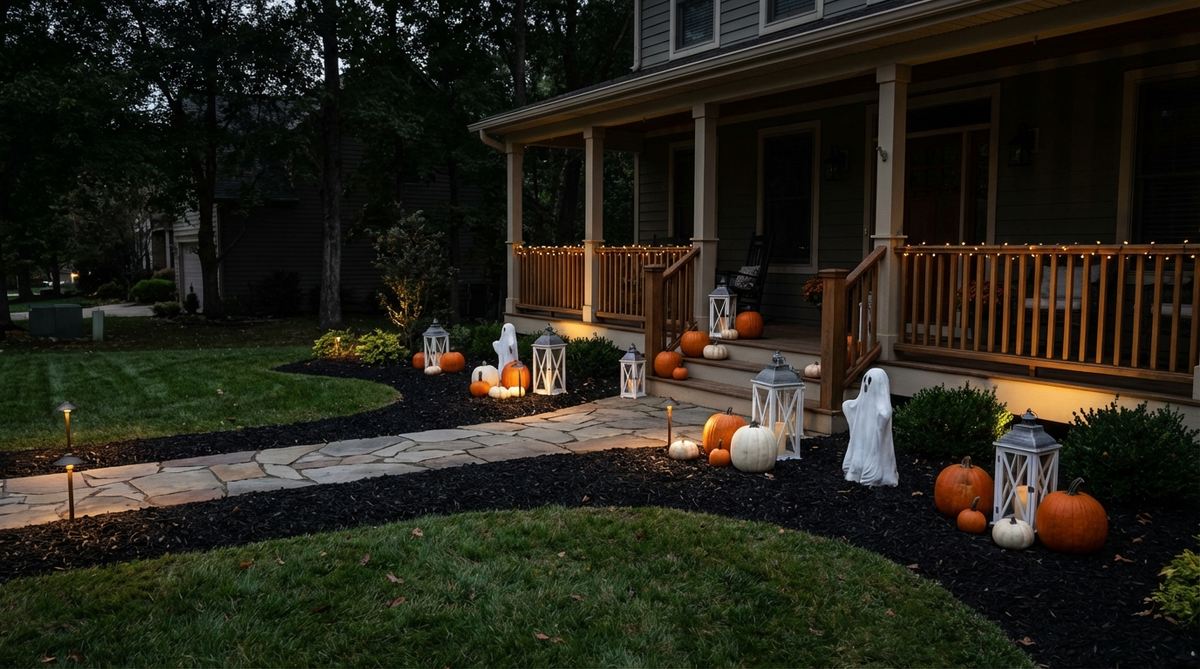
1. Haunted Front Porch with Layered Pumpkins
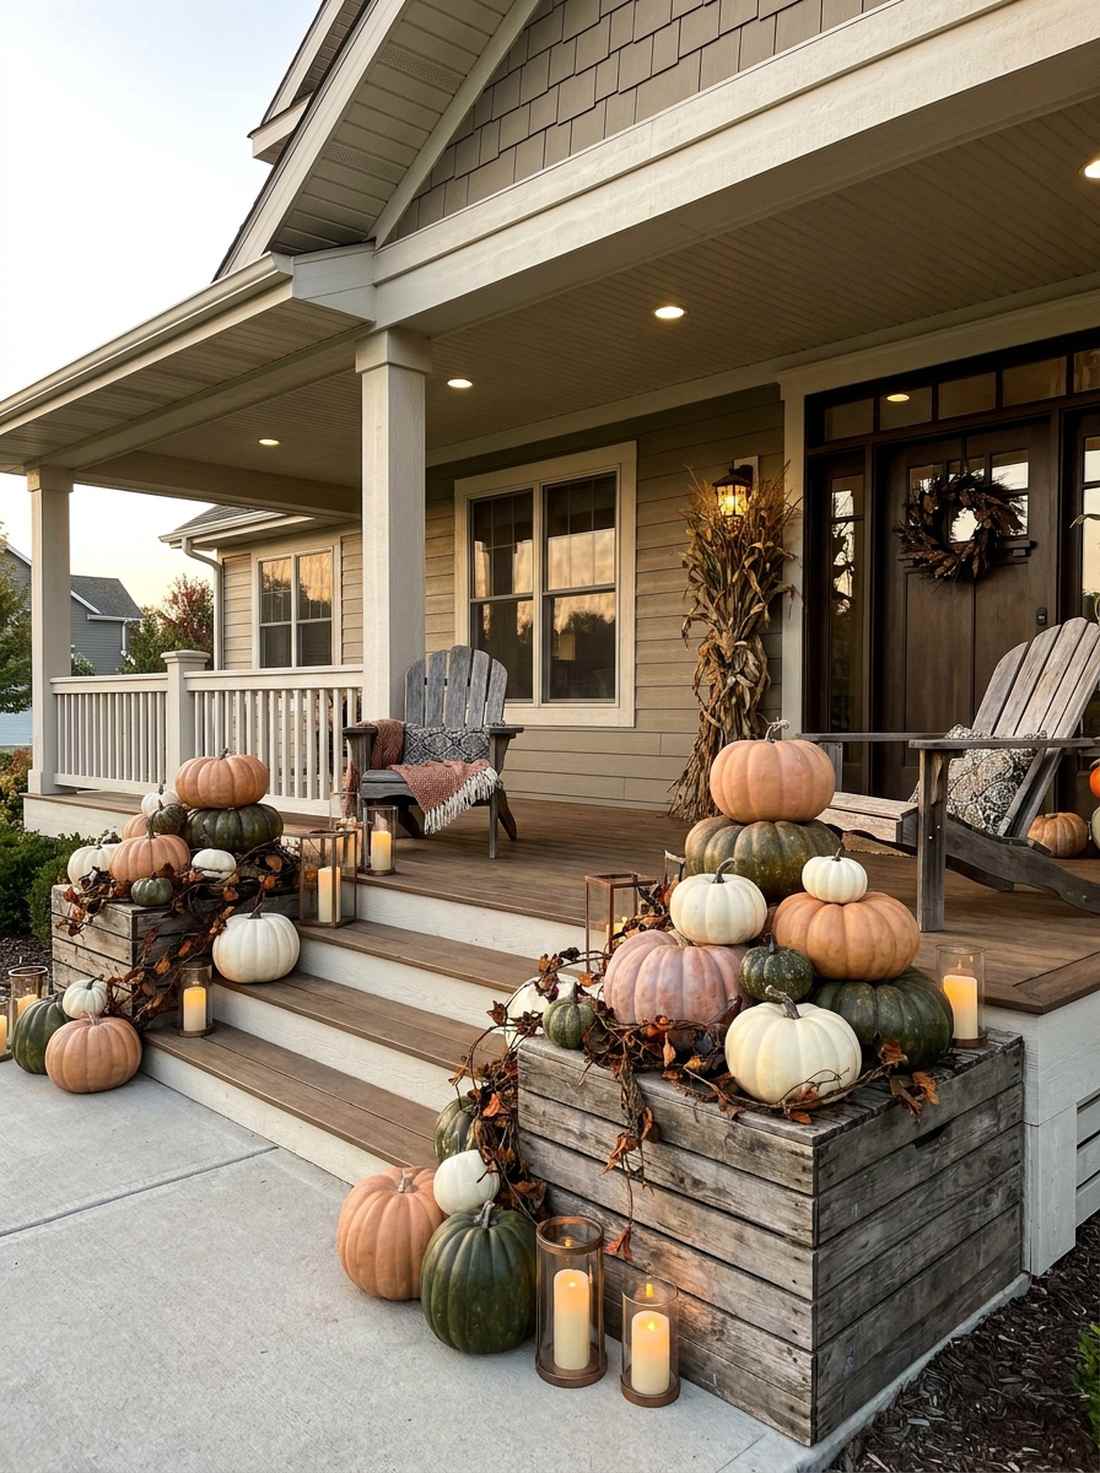
This layout gives the sensation of an abandoned harvest mansion. A layered pumpkin porch decor setup works exceptionally well for wide residential stoops.
Amateurs usually throw random gourds on the steps, but meticulously stacking them delivers a surprisingly premium look. Seamlessly weaving in weather-resistant LED pillar candles and faux vines elevates the entire visual narrative.
You can easily pull this off for around $40–$75 depending on faux gourd ratios. Save this to your seasonal porch makeover board!
- Key Materials: UV-coated faux pumpkins, weatherproof LED candles
- Vibe / Style: Elevated harvest haunting
- Difficulty: Beginner-friendly assembly
- Budget Breakdown: Faux gourds: $30 | Lighting: $15 | Greenery: $10.
- Creator’s Tip: Use a hidden wooden crate under the main stack to create instant height without buying more pumpkins.
- Smart Sourcing: bulk pack pre-lit faux pumpkins and heavy-duty outdoor LED pillar candles.
2. Giant Skeleton Welcome Squad
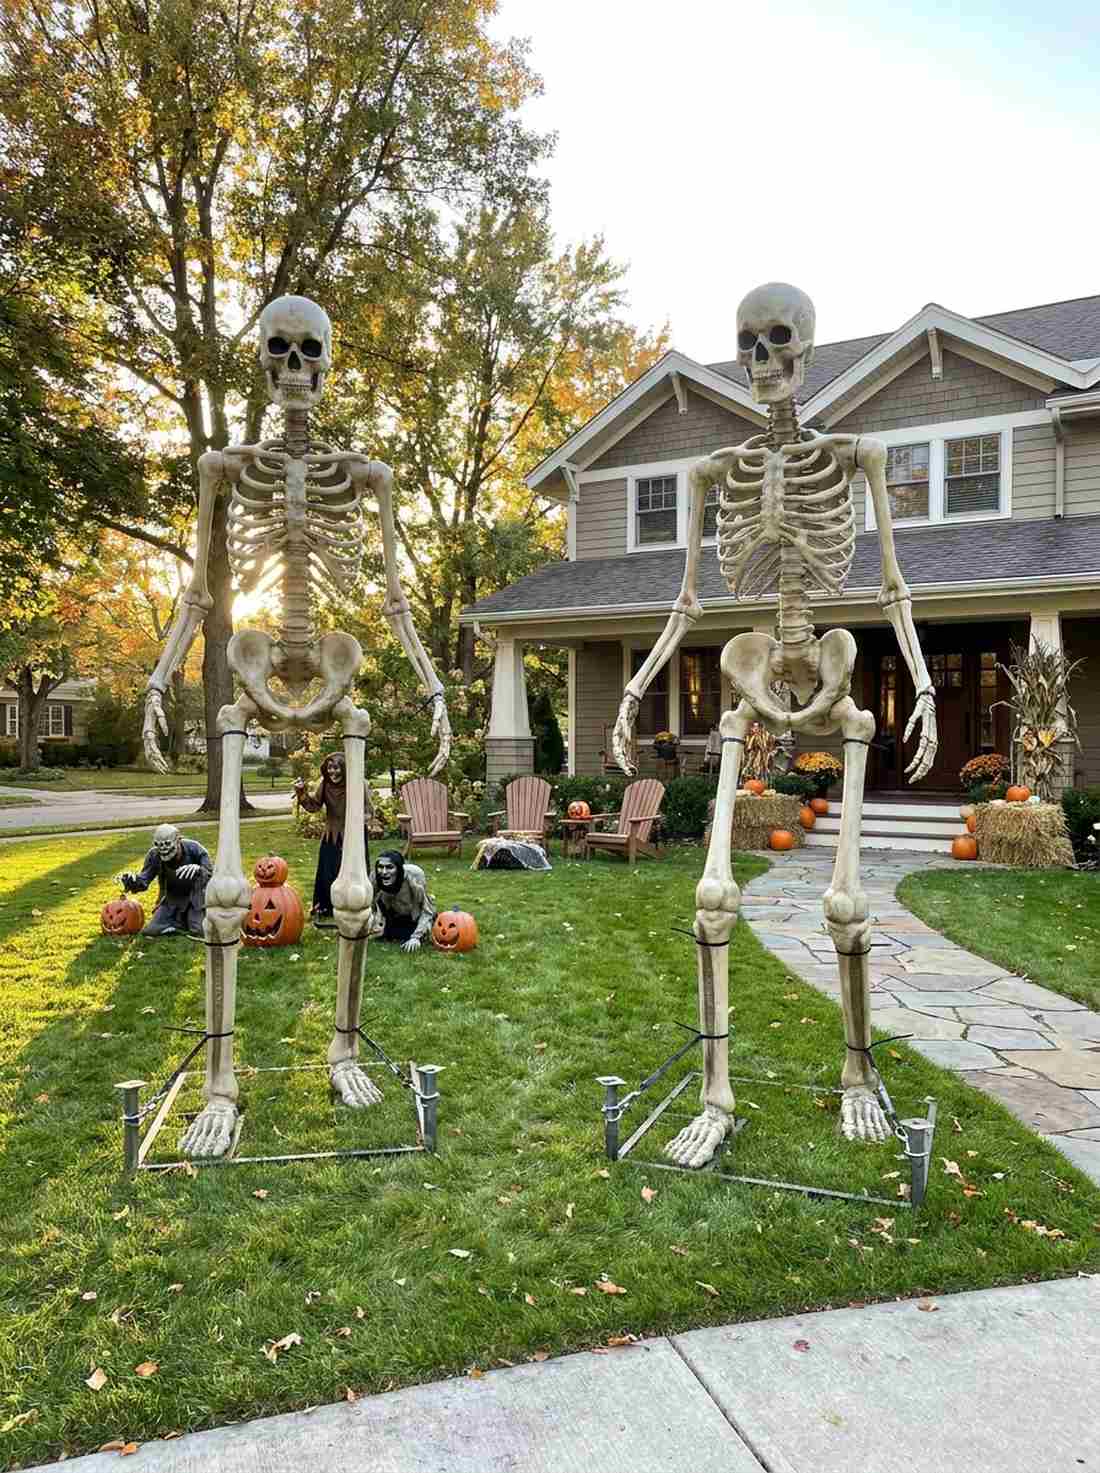
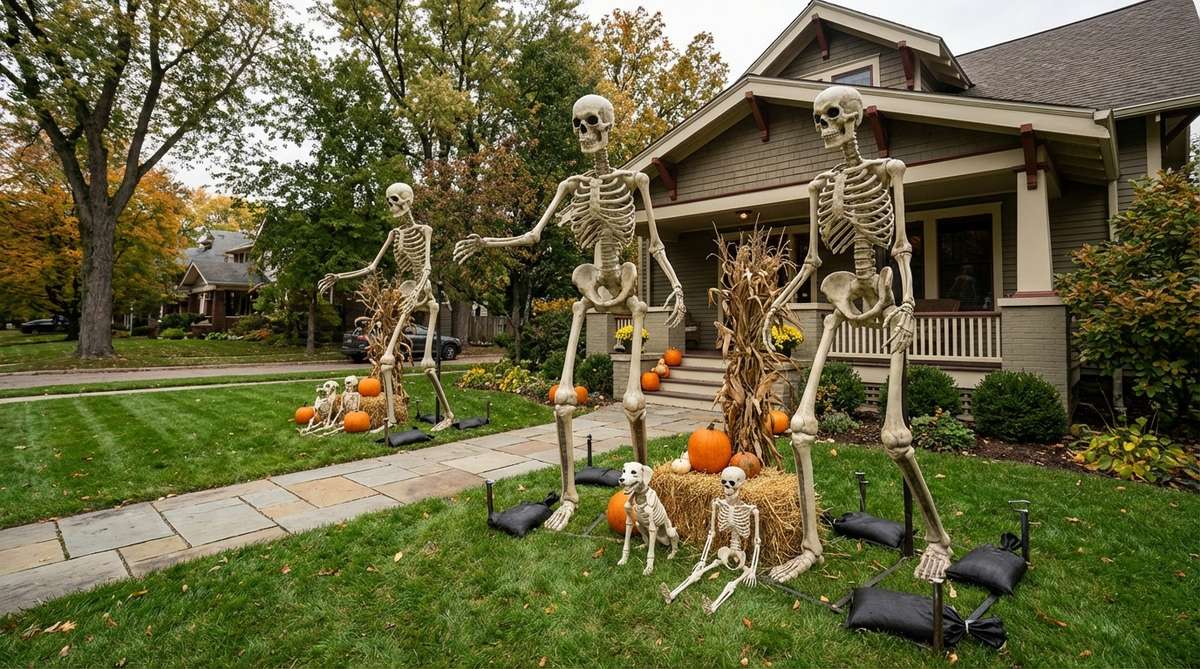
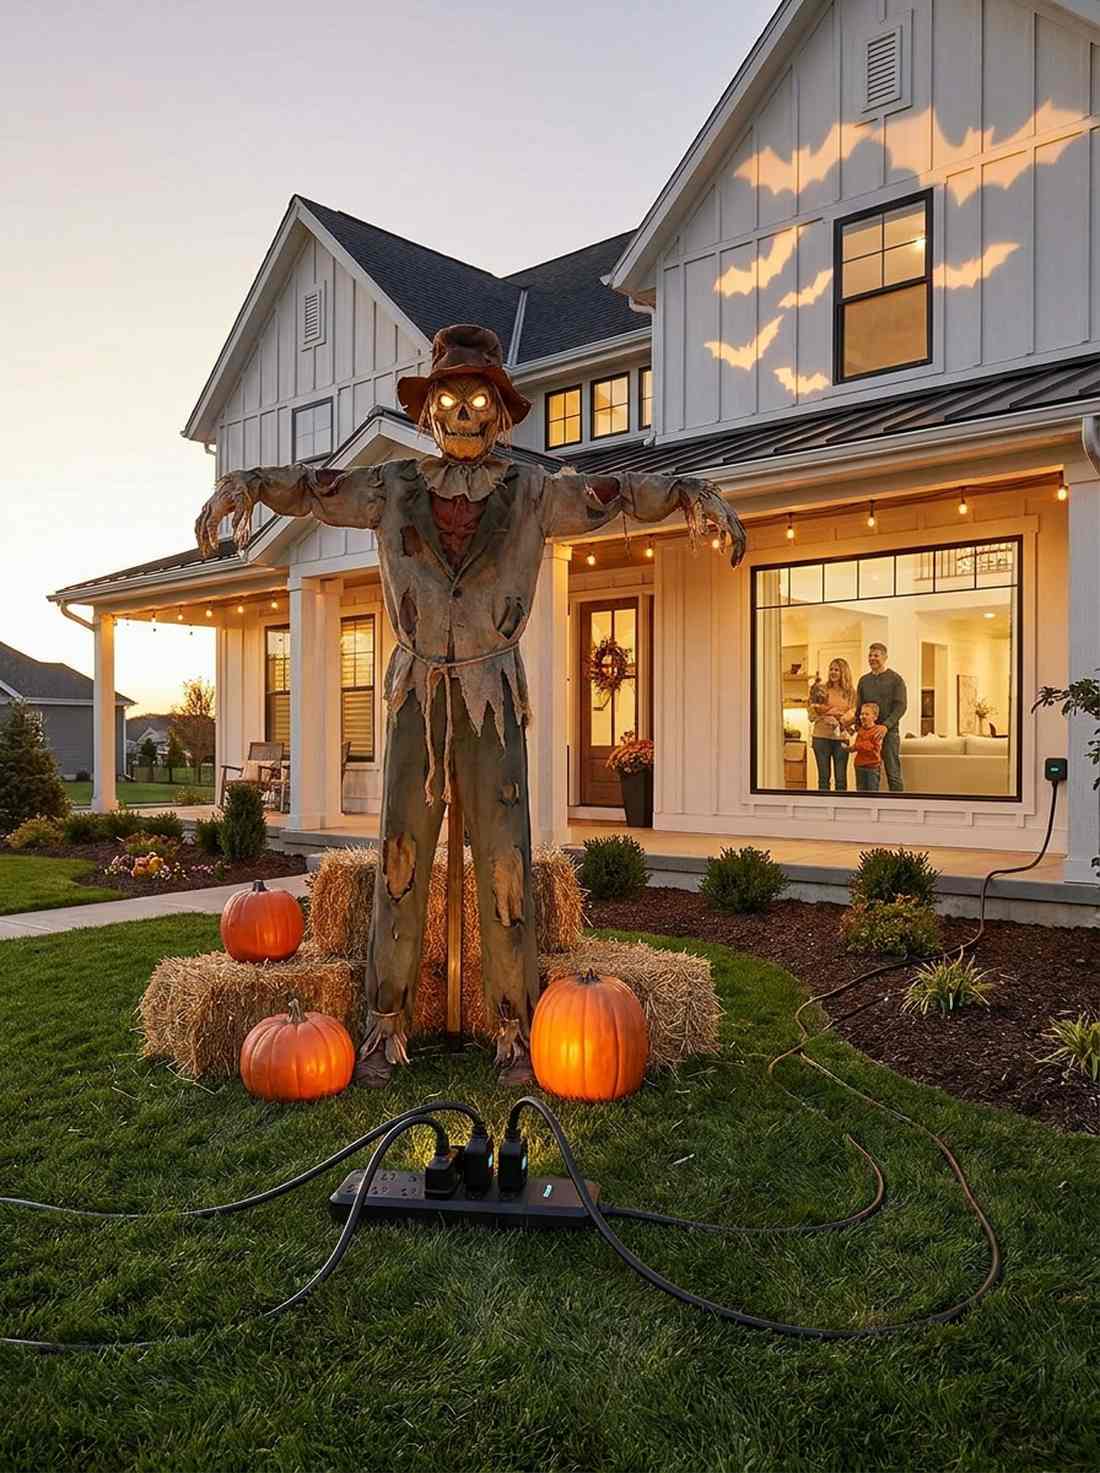
Projects an aura of a neighborhood landmark that kids will talk about all year. These oversized yard skeleton displays are ideal for open suburban lawns with clear street visibility.
Relying on flimsy factory stands is a massive mistake that ends in broken props; upgrading to commercial-grade ground anchors gives a designer-level finish. Integrating high-CPC Halloween animatronic accessories around the base forces a dramatic shift in scale.
Expect an investment of around $250–$350 for premium structural pieces.
- Key Materials: 12-foot skeletons, heavy-duty steel ground stakes
- Vibe / Style: Theatrical block-buster
- Difficulty: Requires two people
- Budget Breakdown: Skeleton frame: $250 | Anchors: $30 | Lighting: $20.
- Creator’s Tip: Zip-tie the joints with industrial black ties so the arms do not snap during heavy October wind gusts.
- Smart Sourcing: commercial-grade steel ground anchors and heavy-duty black zip ties (bulk pack).
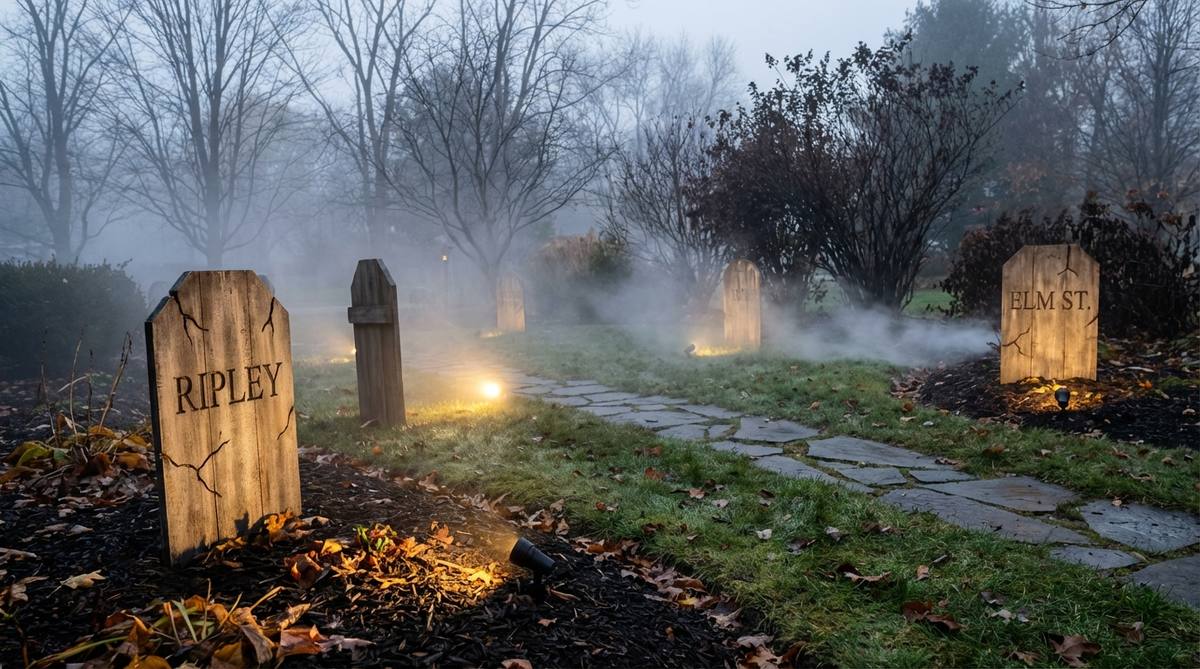
3. DIY Graveyard with Weathered Tombstones
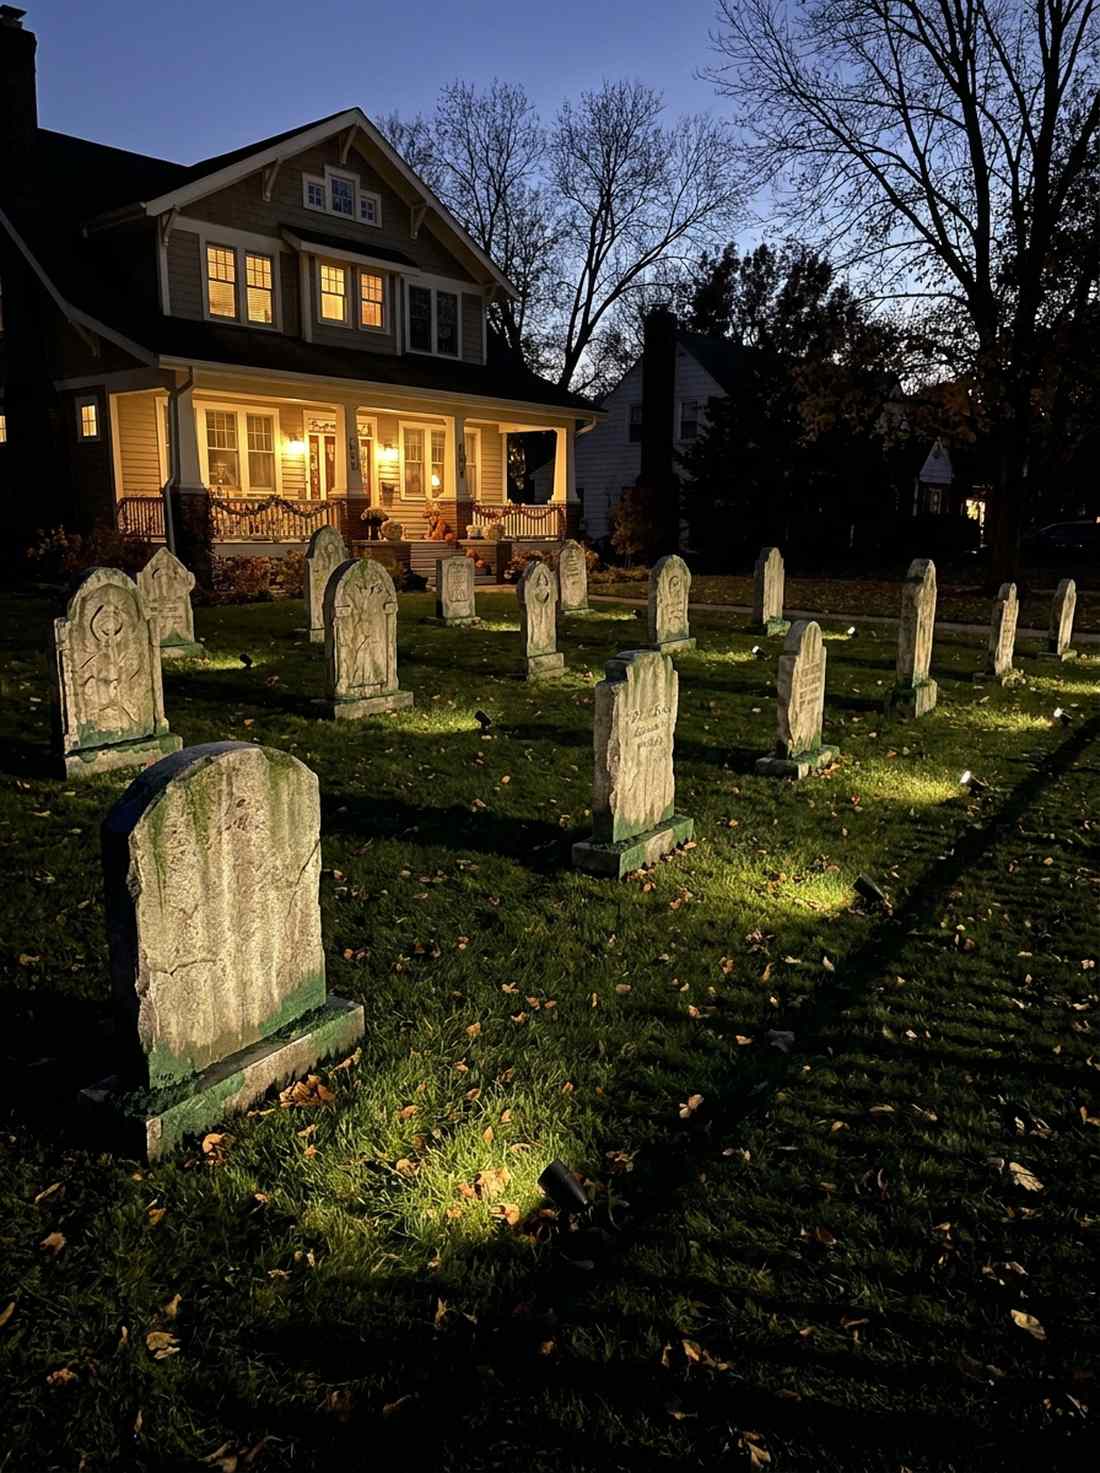
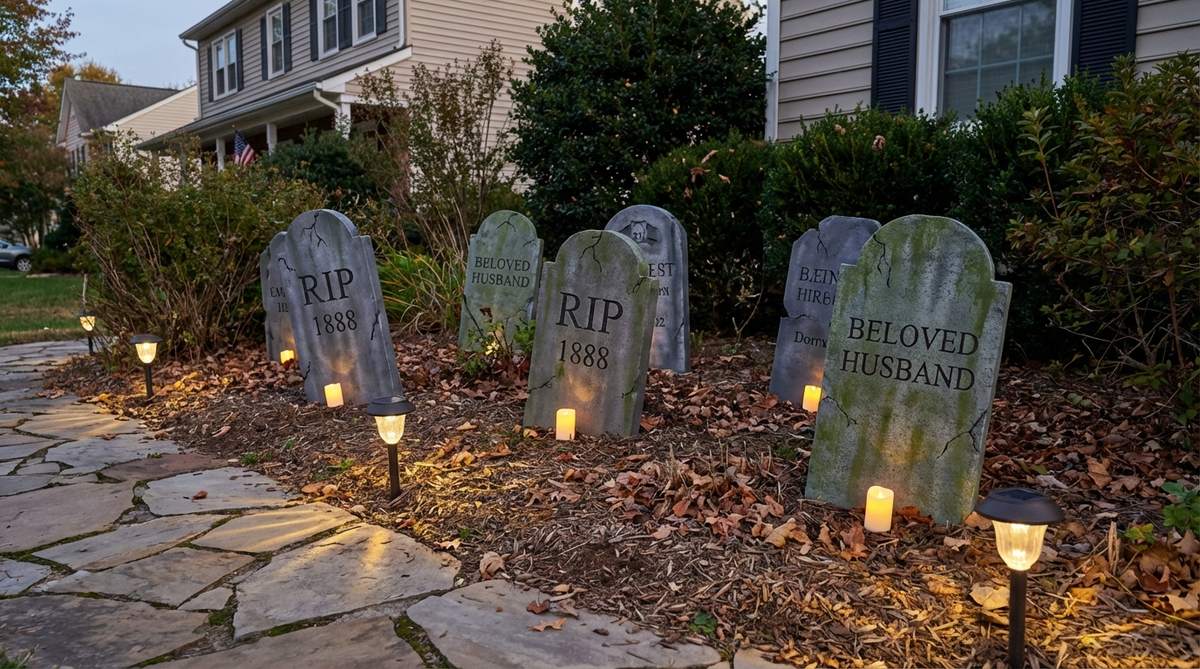
Feels like a centuries-old cemetery you accidentally uncovered. A weathered foam tombstone layout is perfect for framing long, rectangular front lawns.
Placing cheap tombstones in a perfect grid ruins the illusion instantly; staggering them with varied moss textures looks far more expensive than it is. Utilizing specialized outdoor landscape spotlights guarantees the shadows stretch menacingly across the grass.
This high-impact build generally costs between $50–$90 to complete. Pin this if you want a classic yard setup!
- Key Materials: Carved insulation foam, waterproof stone spray paint
- Vibe / Style: Gothic graveyard
- Difficulty: Moderate DIY painting
- Budget Breakdown: Foam boards: $20 | Stone paint: $15 | Spotlights: $25.
- Creator’s Tip: Dry-brush dark green acrylic paint along the base of each stone to simulate rising dampness and moss.
- Smart Sourcing: waterproof stone texture spray paint and low-voltage LED landscape spotlights.
4. Ghosts Floating from Tree Branches
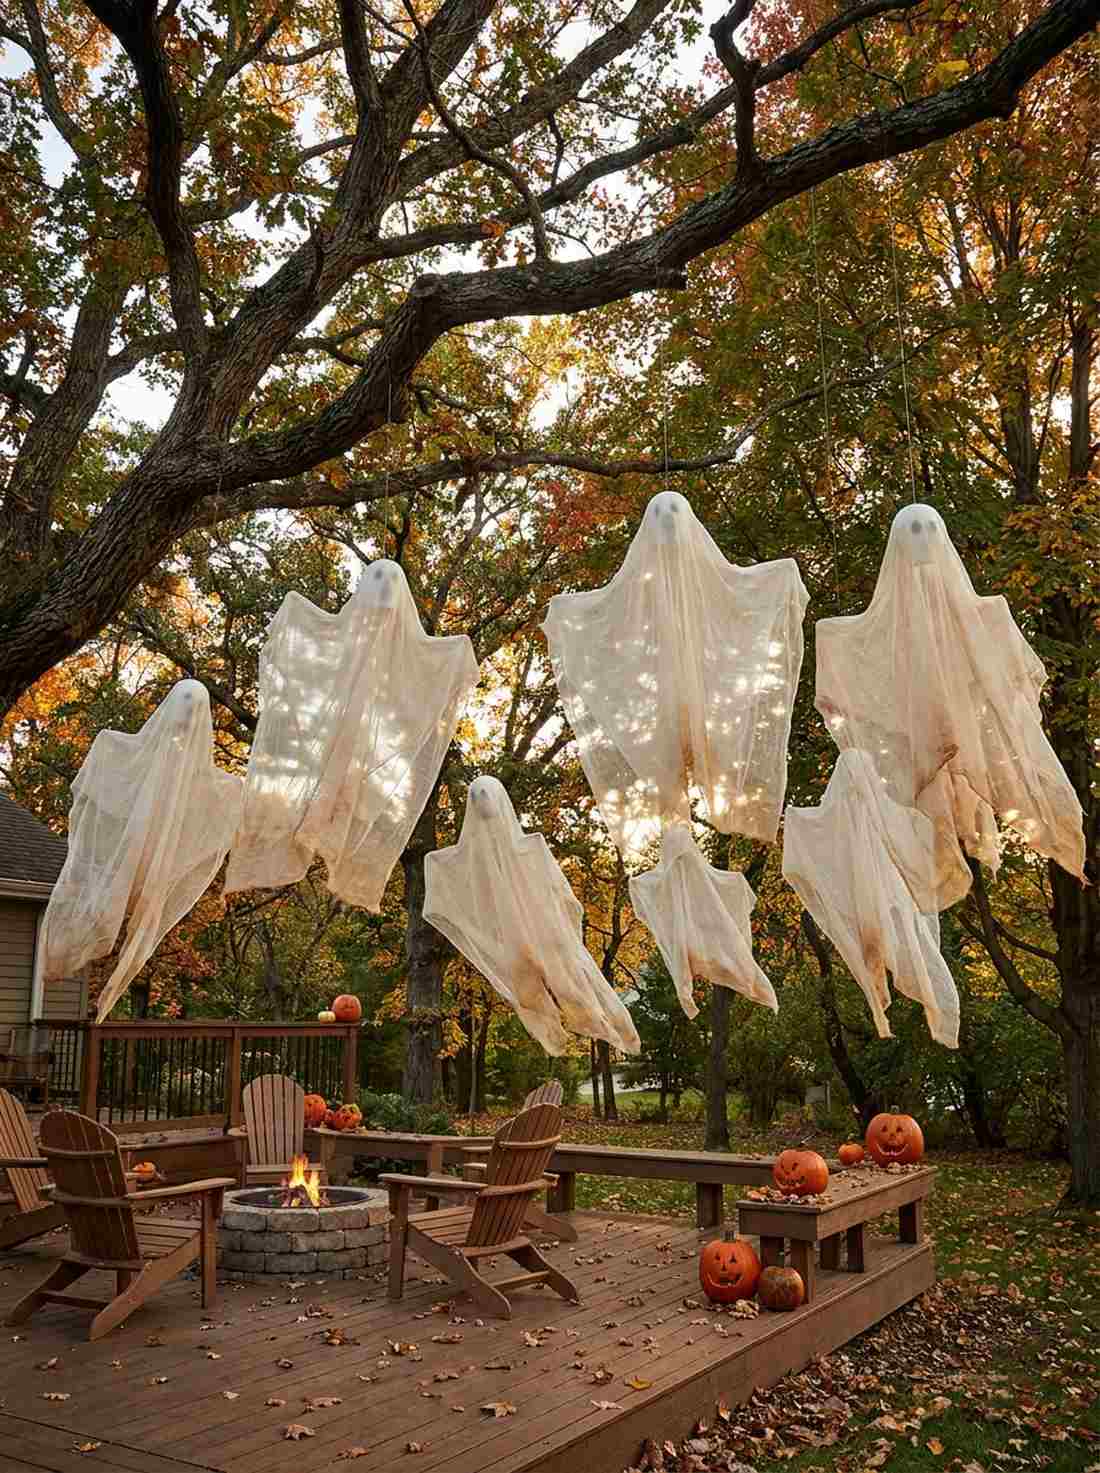
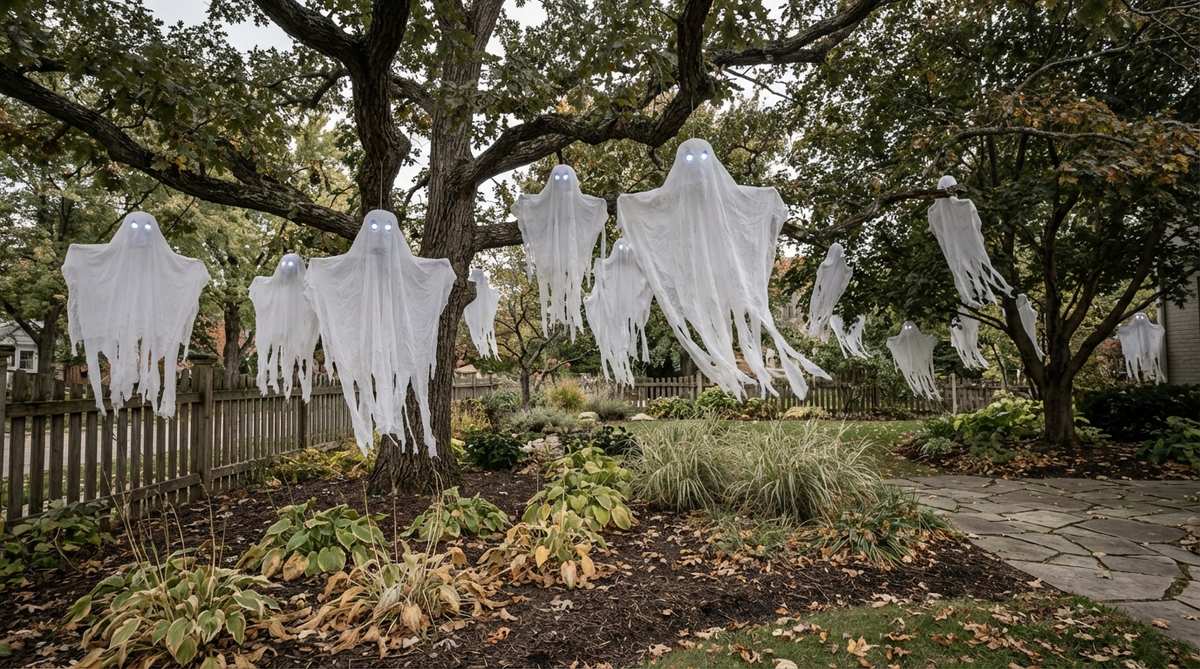
Creates the eerie feeling of restless spirits swirling overhead. This suspended ghost canopy design is a brilliant fit for mature yards with heavy oak or maple branches.
Tying figures with thick white string screams amateur; using invisible high-test fishing line makes the magic feel shockingly real. Wrapping UV-resistant sheer fabric over lightweight foam mannequin heads ensures they sway gracefully instead of dragging.
You can execute this canopy effect for a budget-friendly $25–$45.
- Key Materials: Styrofoam wig heads, sheer cheesecloth
- Vibe / Style: Eerie woodland
- Difficulty: Simple but requires a ladder
- Budget Breakdown: Foam heads: $15 | Fabric: $10 | Line: $5.
- Creator’s Tip: Soak the bottom edges of the fabric in a weak tea solution to give them an aged, dirty hemline.
- Smart Sourcing: bulk styrofoam mannequin heads and clear heavy-duty fluorocarbon fishing line.
Most people stop scrolling here and settle for a boring lawn, but the next entry arch setup is what actually makes the neighborhood obsessed…
5. Cobweb-Covered Entry Arch
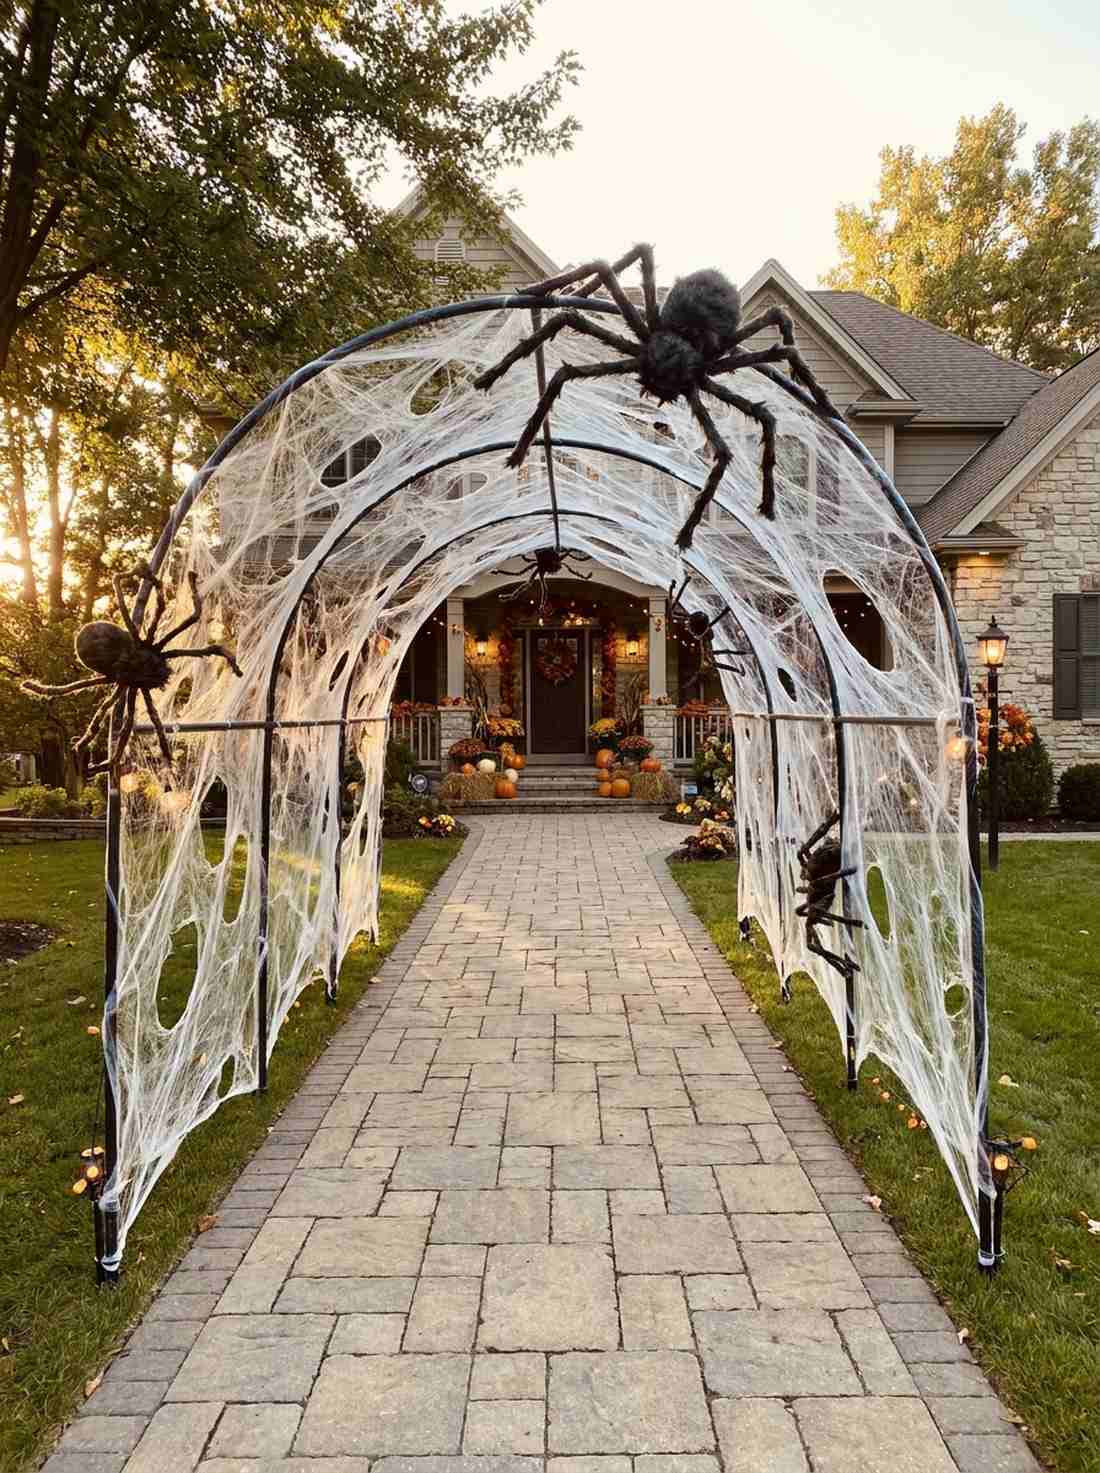
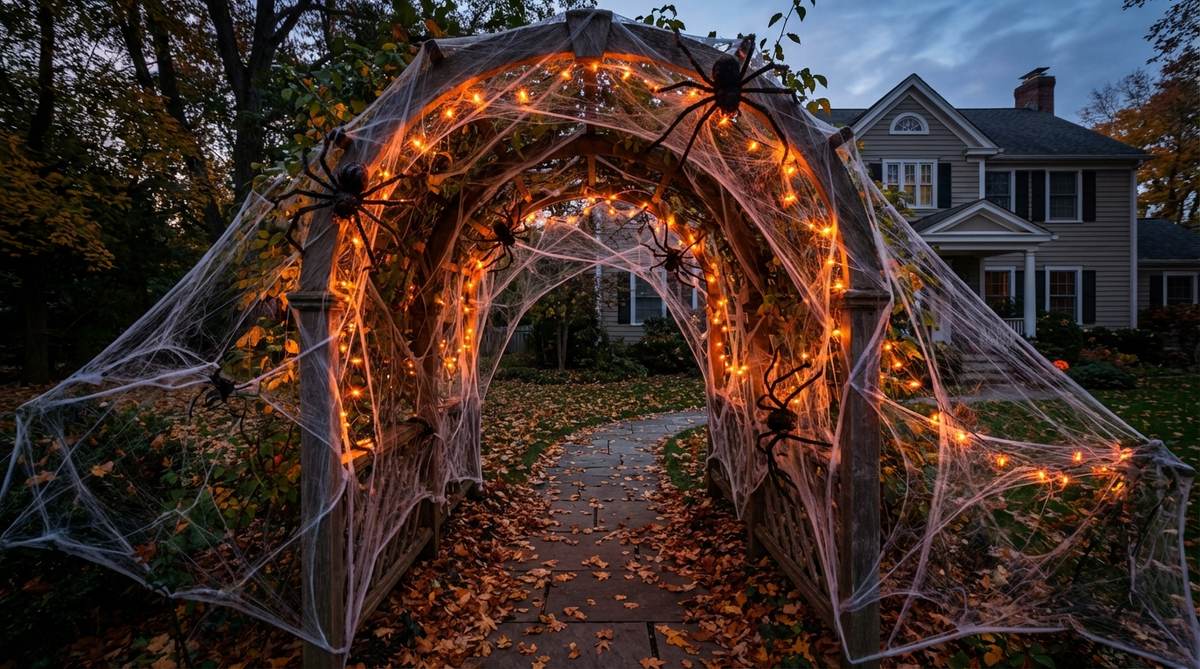
Feels like stepping directly into a spider’s forgotten lair. Creating a cobweb tunnel entrance is the ultimate use-case for long paved walkways leading to the front door.
Slapping clumpy cotton webs out of a bag is a tragic mistake; stretching commercial spider webbing incredibly thin delivers a spine-tingling, professional aesthetic. Adding oversized, weather-treated arachnid props at the apex immediately draws the eye upward.
A completely immersive archway setup will run you about $40–$60.
- Key Materials: PVC arch frame, commercial stretch webbing
- Vibe / Style: Arachnid infestation
- Difficulty: Medium tension-building
- Budget Breakdown: PVC pipes: $20 | Pro Webbing: $15 | Spiders: $15.
- Creator’s Tip: Cut the webbing with sharp scissors to create realistic jagged holes where “prey” might have escaped.
- Smart Sourcing: commercial-grade stretch spider webbing and weatherproof giant furry spiders.
6. Witches’ Cauldron Fire Pit
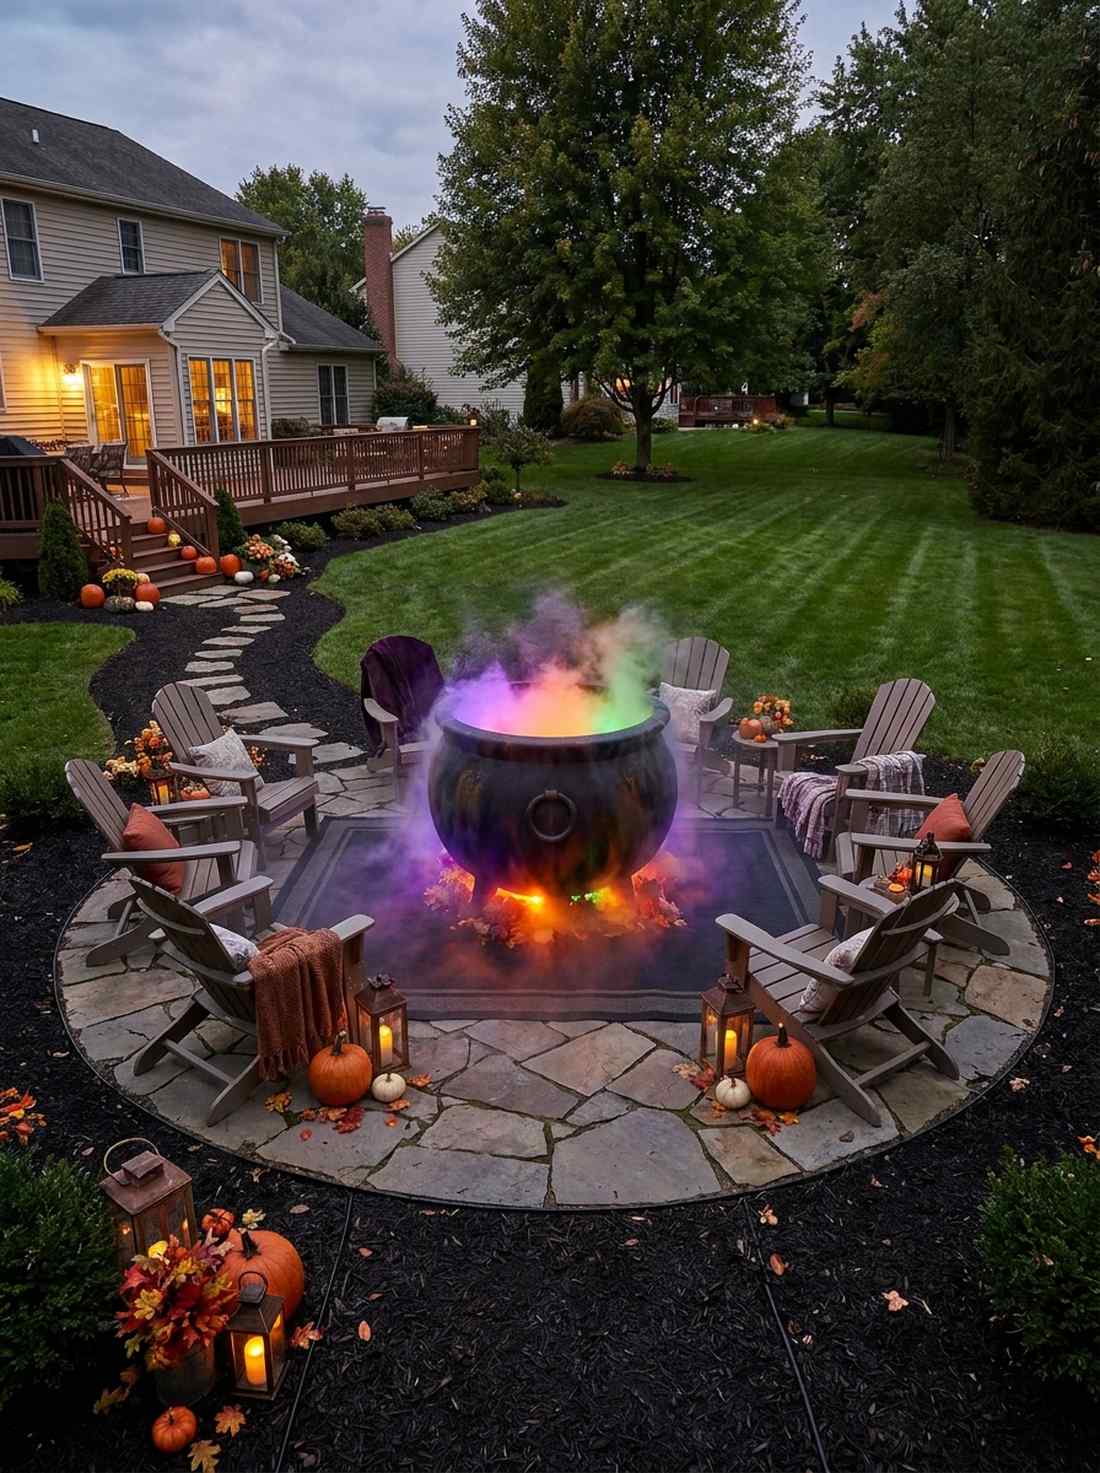

Looks straight out of a dark fairytale gathering in the woods. A glowing witches cauldron display is a spectacular addition to existing circular driveways or front patio seating.
Instead of relying on basic orange bulbs, utilizing ultrasonic foggers mixed with colored LED waterproof lights completely transforms the visual depth. The dramatic contrast between the heavy cast-iron look and the floating mist creates high-end theatrical magic.
This mystical focal point can be yours for approximately $60–$85. Save this for your upcoming Halloween party layout!
- Key Materials: Large plastic cauldron barrel, ultrasonic mist maker
- Vibe / Style: Magical gathering
- Difficulty: Easy plug-and-play
- Budget Breakdown: Cauldron: $30 | Fogger kit: $25 | Lights: $15.
- Creator’s Tip: Hide the power cords under an outdoor rug or dark mulch so the magical illusion isn’t broken by neon orange cables.
- Smart Sourcing: waterproof ultrasonic mist maker kits and submersible color-changing LED pucks.
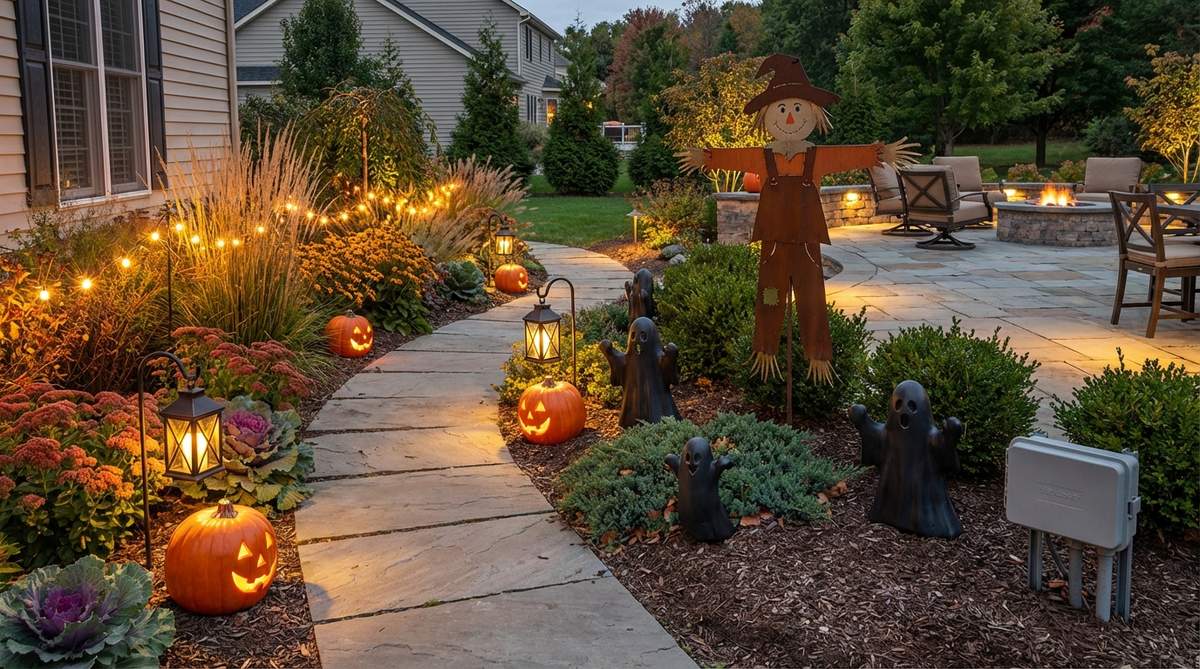
7. Eerie Pathway of Lantern Skulls
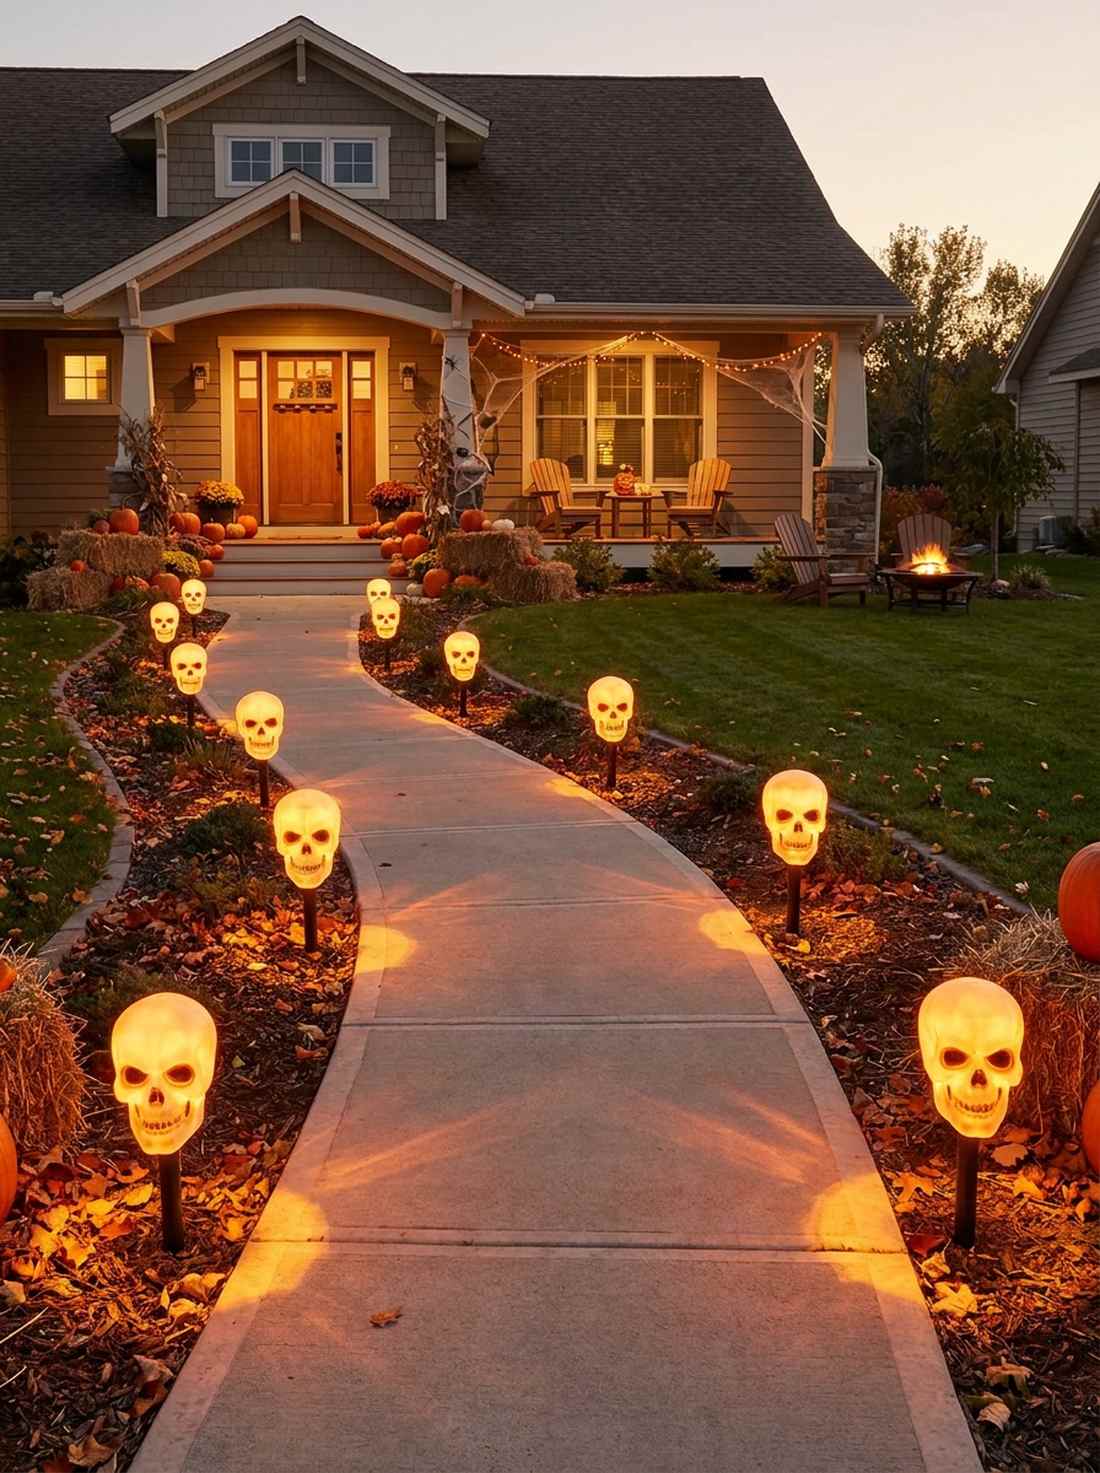
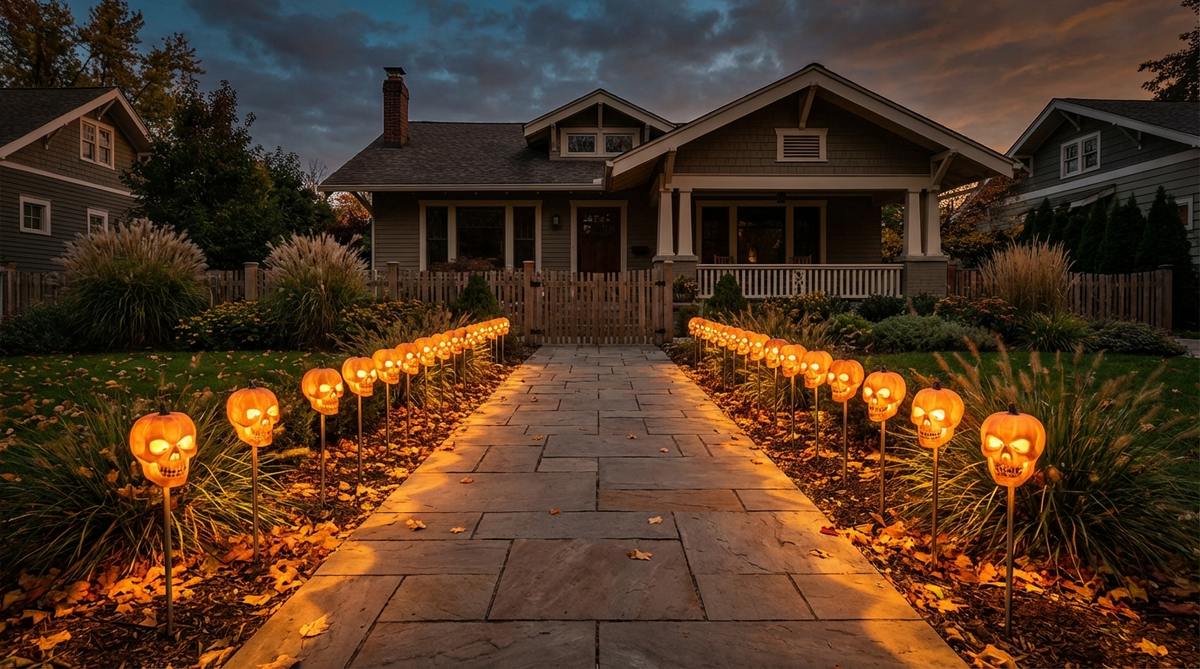
Projects an intensely cinematic runway guiding victims to your door. This skull pathway lighting layout works flawlessly for illuminating narrow concrete paths or garden edges.
Standard solar lights often lack impact, but retrofitting them with translucent skull covers gives a designer-level finish that dominates the night. Sourcing specialized premium pathway marker kits guarantees your walkway stays safely lit while looking incredibly sinister.
Upgrading your standard path lights will cost around $35–$50.
- Key Materials: Solar pathway stakes, plastic hollow skulls
- Vibe / Style: Haunted runway
- Difficulty: Beginner swap-out
- Budget Breakdown: Solar bases: $20 | Skull covers: $15 | Stakes: $5.
- Creator’s Tip: Use a dremel tool to widen the base of the plastic skulls so they sit flush and secure against the solar light housing.
- Smart Sourcing: high-lumen solar pathway light kits and bulk hollow plastic skull props.
8. Pumpkin Patch Front Yard
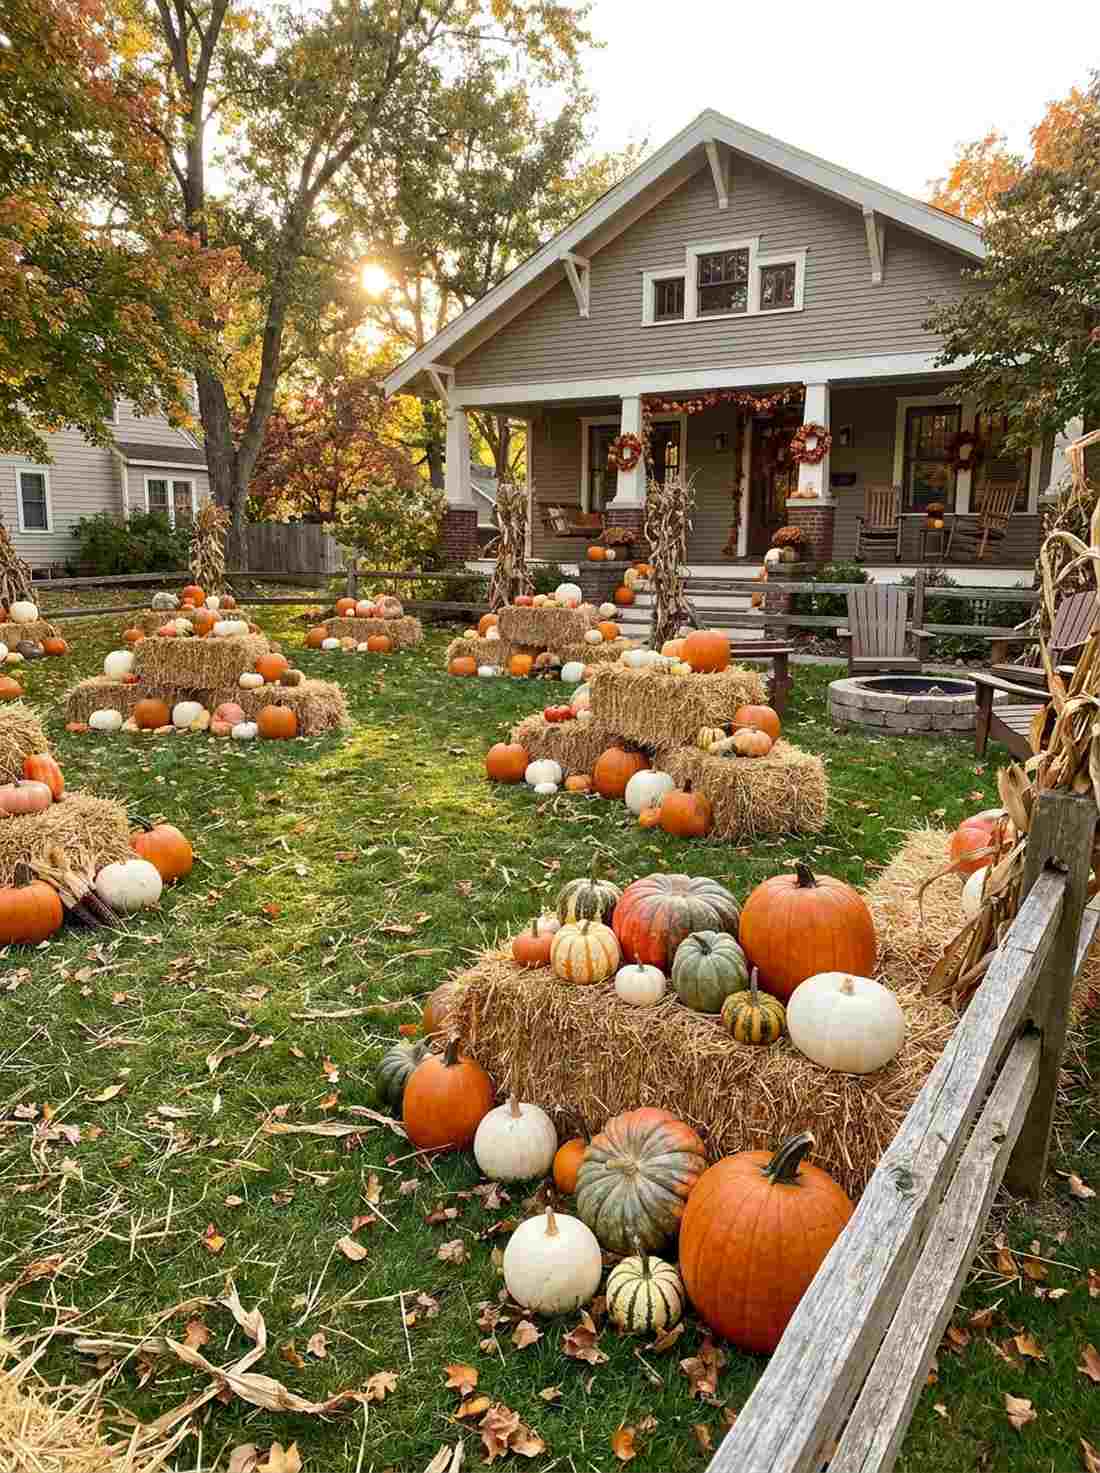
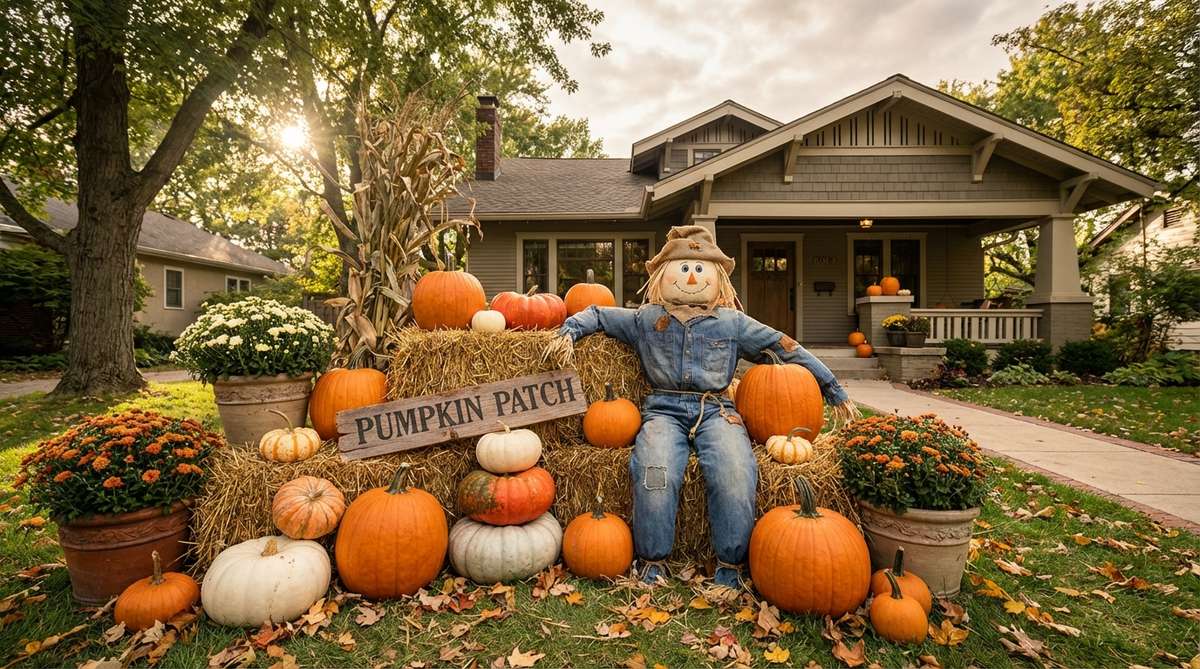
Evokes the nostalgic joy of an autumn harvest farm right in the suburbs. Establishing a faux pumpkin patch scene is the perfect use-case for massive, empty front lawns.
Lining up identical pumpkins looks like a grocery store aisle; staggering asymmetrical gourds on staggered hay bales completely changes the vibe. Blending real agricultural straw with high-quality foam pumpkins creates an illusion so strong, people will want to take family photos.
You can curate this harvest aesthetic for roughly $70–$100.
- Key Materials: Natural straw bales, mixed faux gourds
- Vibe / Style: Farmhouse autumn
- Difficulty: Heavy lifting for bales
- Budget Breakdown: Bales: $30 | Faux Pumpkins: $40 | Signage: $10.
- Creator’s Tip: Coat real pumpkins with a thin layer of floor wax to prevent them from rotting too quickly on the damp grass.
- Smart Sourcing: UV-protected assorted artificial gourds and rustic wooden directional signs.
9. Motion-Activated Jump-Scare Corner
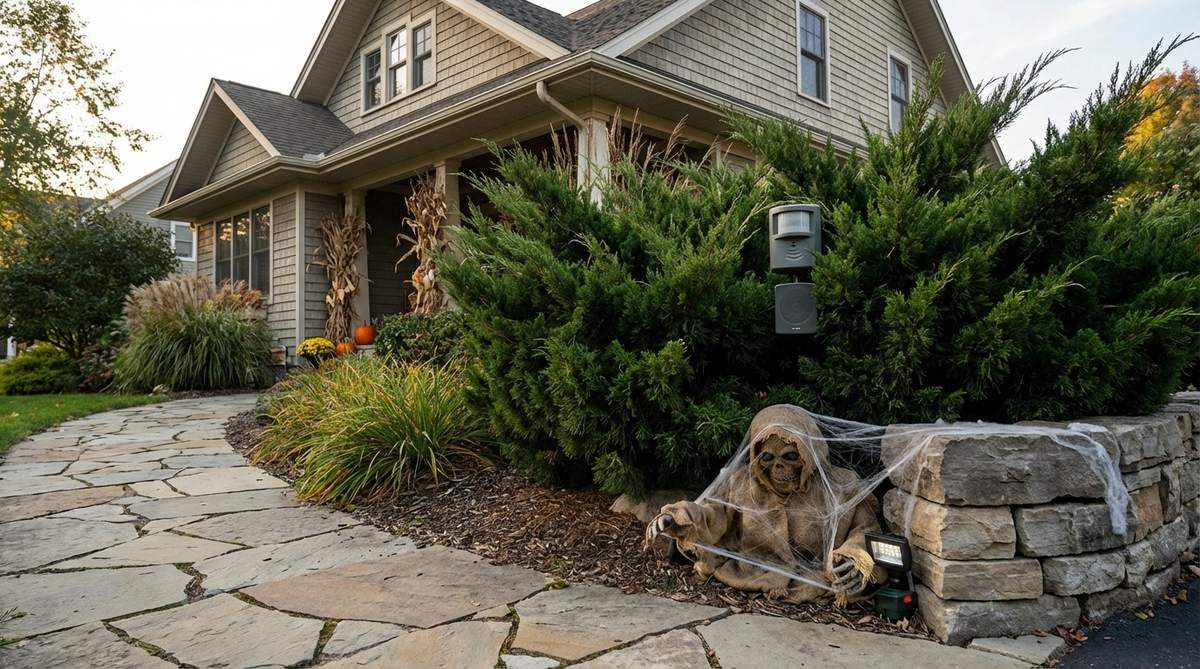
Triggers a heart-pounding adrenaline rush for unsuspecting trick-or-treaters. Designing a hidden animatronic scare zone is incredibly effective when tucked behind large foundation shrubs or porch pillars.
Leaving expensive animatronics fully exposed ruins the surprise; partially obscuring them with dark landscape netting is a trick that looks far more expensive than it is. Properly calibrating the motion sensor range ensures the scare hits precisely when the victim is closest.
Setting up a reliable scare zone runs between $100–$200. Pin this to your advanced haunt mechanics board!
- Key Materials: Weatherproof animatronic prop, camouflage netting
- Vibe / Style: High-thrill haunted house
- Difficulty: Advanced calibration
- Budget Breakdown: Animatronic: $120 | Netting: $15 | Cords: $10.
- Creator’s Tip: Angle the motion sensor slightly downward so it isn’t triggered prematurely by cars driving past your house.
- Smart Sourcing: weather-resistant motion-sensor animatronics and black tactical camouflage netting.
💡 Must-Have Supplies for High-End Setups
To build these setups faster and ensure they last, skip the generic craft aisles and invest in the right foundational kits.
- Base & Support: commercial-grade ground rebar stakes
- Setup Tools: industrial black zip-tie starter kits
- Weather/Durability Protection: UV-resistant clear acrylic sealant sprays
Do not click away—the lighting secret in this next cemetery setup is what truly separates basic yards from viral neighborhood legends…
10. Foggy Cemetery with Ground-Level Lights
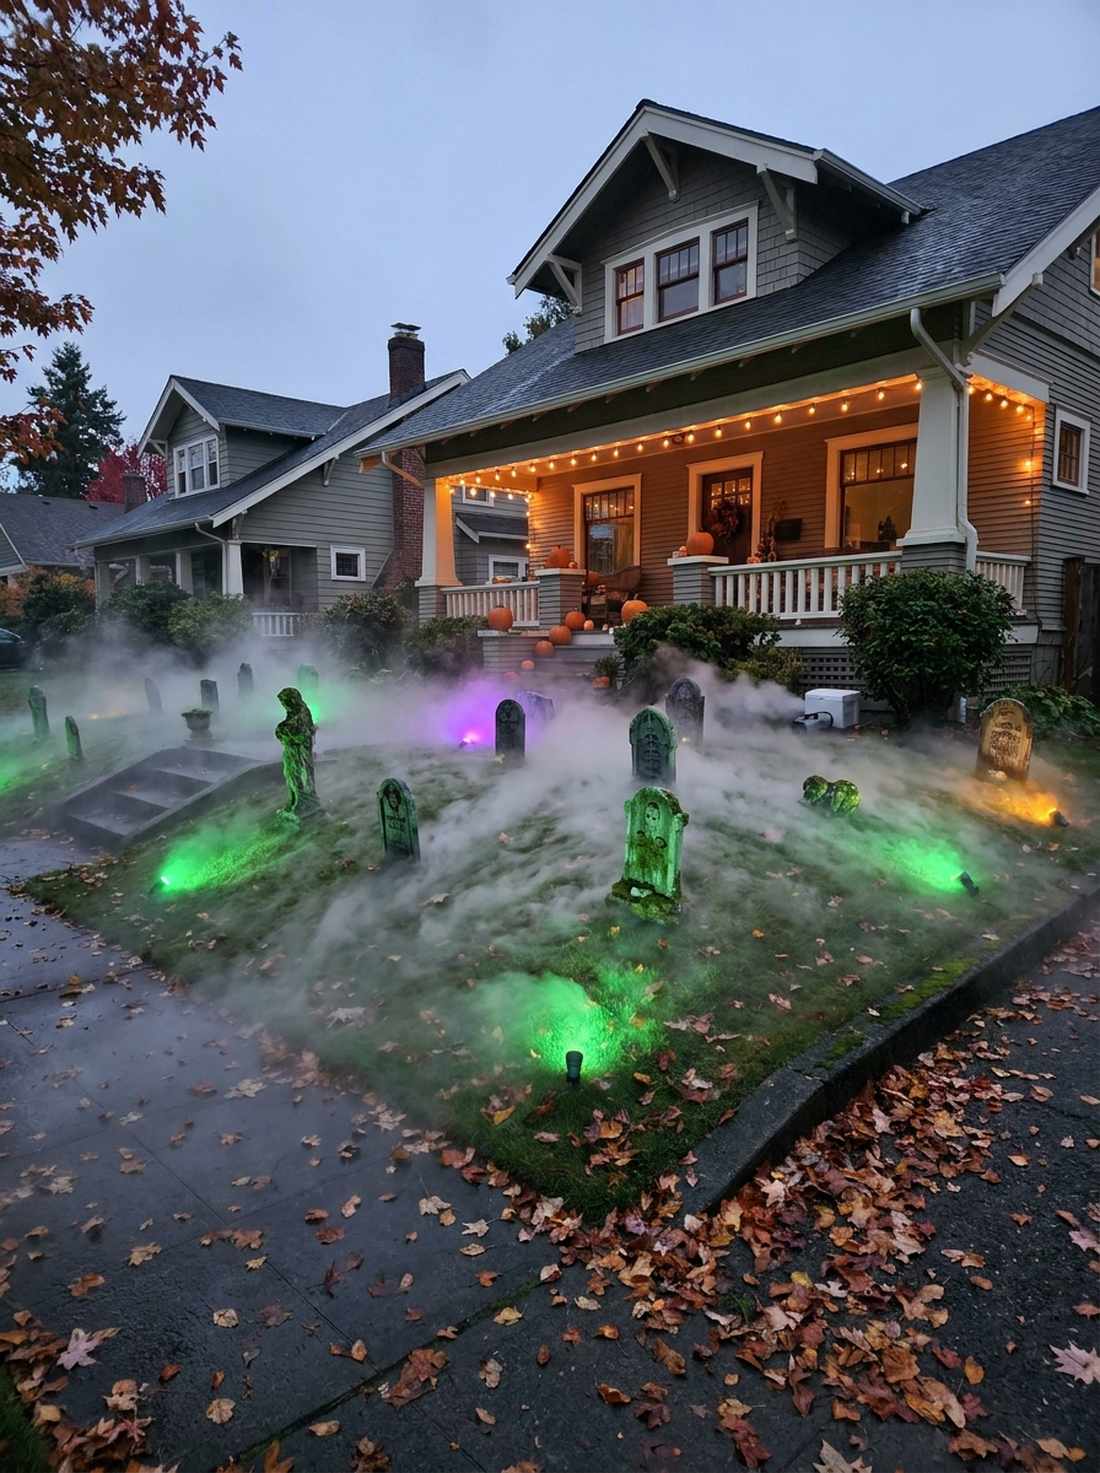
Feels exactly like a chilling scene out of an 80s horror masterpiece. Utilizing a low-lying fog machine display is the ultimate power move for a sloping front lawn.
Blowing fog aimlessly into the wind is a rookie error; chilling the smoke so it hugs the turf while backlighting it with colored LEDs completely changes the vibe. It requires specific miniature garden supplies and waterproof spotlights to make the graveyard truly come alive.
This theatrical fog effect will cost around $80–$130 to maintain.
- Key Materials: Outdoor fog machine, fog chiller box
- Vibe / Style: Atmospheric horror
- Difficulty: Moderate fluid management
- Budget Breakdown: Machine: $60 | Chiller cooler: $20 | Fluid: $15.
- Creator’s Tip: Build a DIY fog chiller using a styrofoam cooler packed with ice—it forces the warm fog to condense and crawl along the ground.
- Smart Sourcing: high-output outdoor fog machines and dense-crawling fog fluid juice.
11. Bats Swarming the Gable
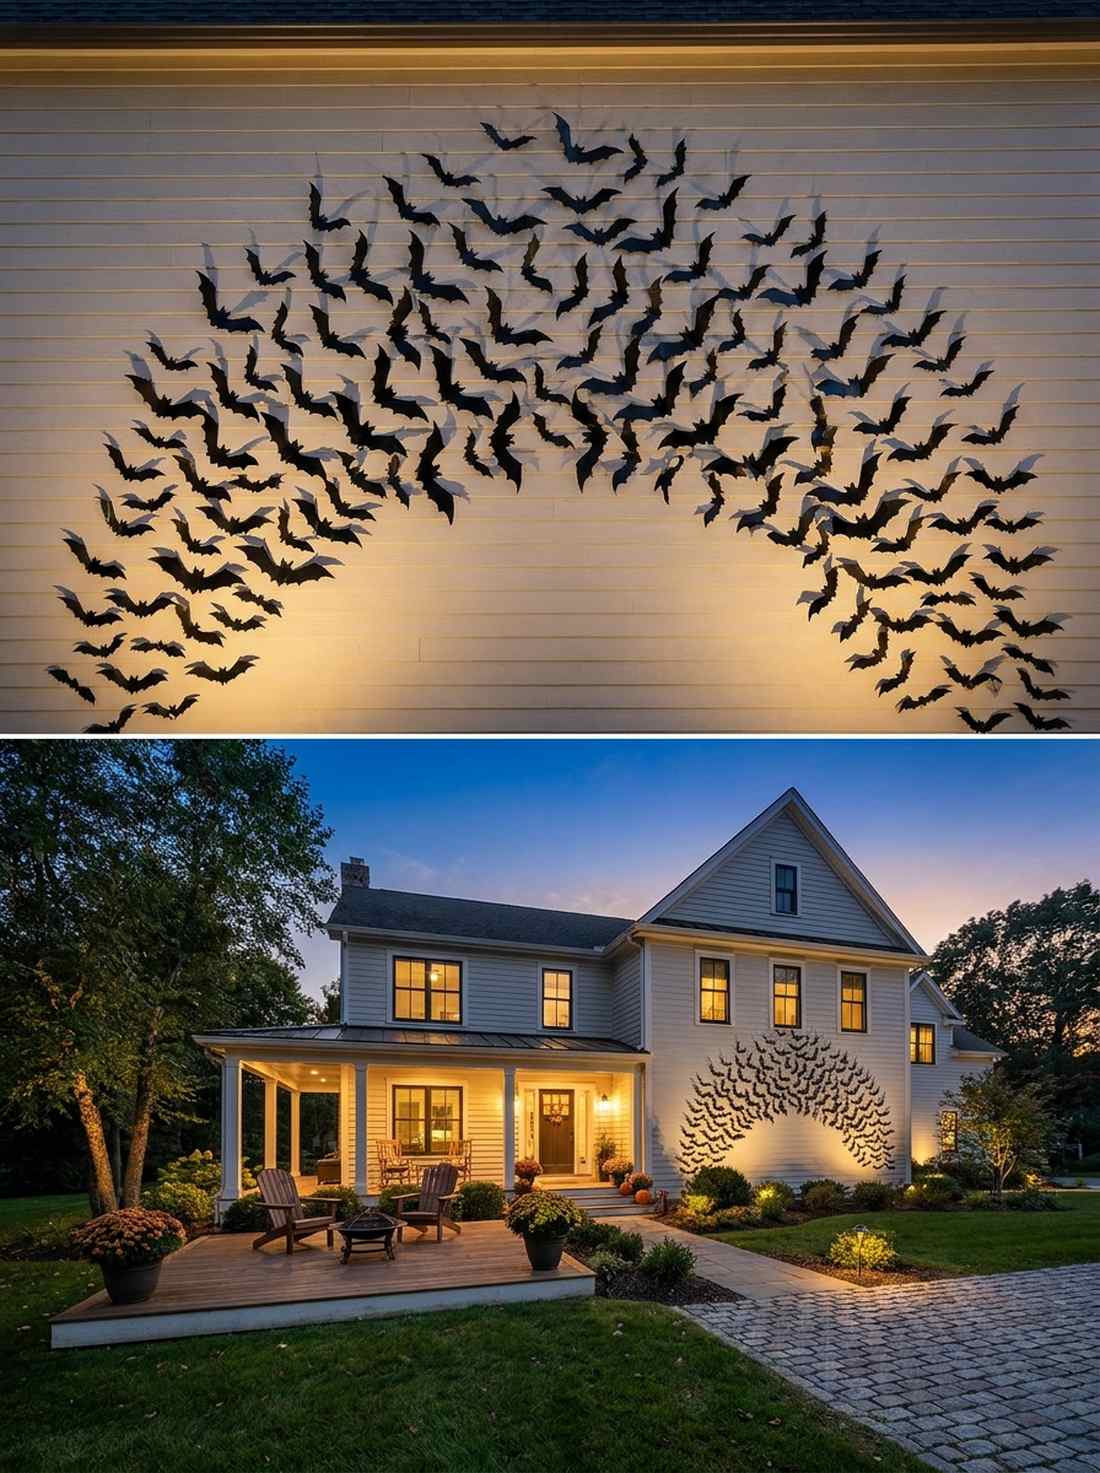
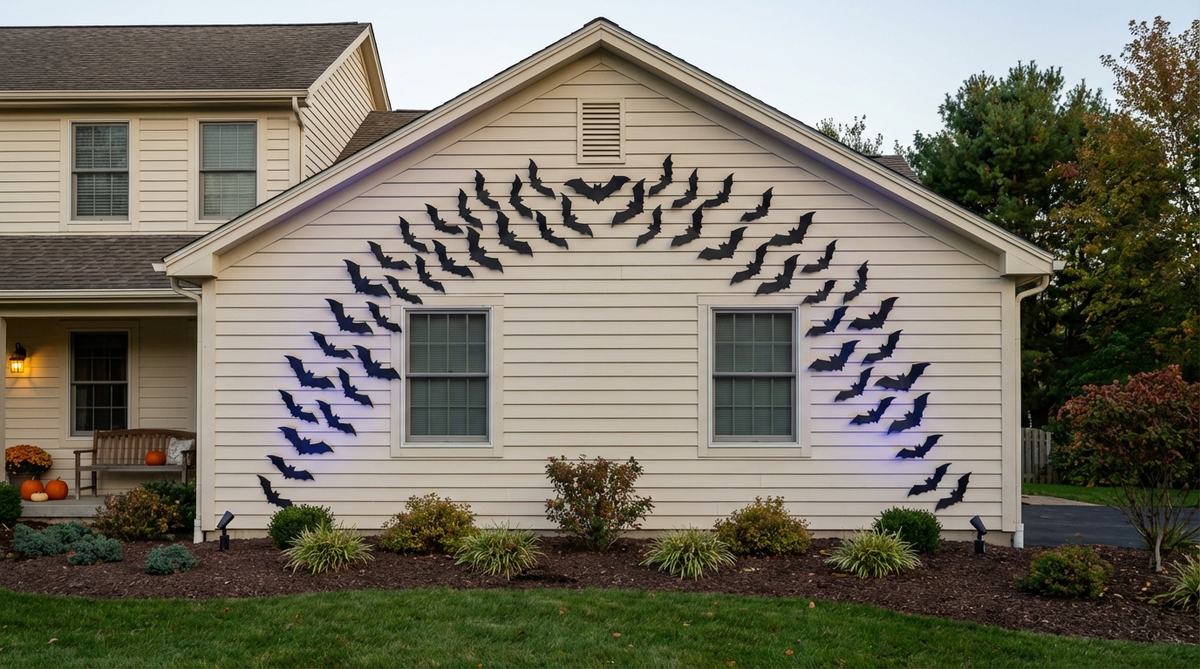
Creates a striking silhouette that looks incredible against the twilight sky. A flying bat wall swarm is highly recommended for dominating large expanses of light-colored house siding.
Sticking cheap paper cutouts outside will disintegrate after one rainstorm; investing in rigid weather-proof PVC silhouettes gives a designer-level finish that lasts for years. Arranging them in a tight, sweeping arc rather than random dots makes the swarm look aggressive and dynamic.
Achieving this architectural statement piece costs a minimal $20–$35. Save this for a fast, high-impact weekend win!
- Key Materials: Weather-resistant plastic bats, outdoor mounting tape
- Vibe / Style: Gothic architectural
- Difficulty: Requires tall ladder access
- Budget Breakdown: PVC Bats: $25 | Heavy-duty tape: $10.
- Creator’s Tip: Bend the wings of the PVC bats at varying angles so they cast complex, overlapping shadows when hit by uplighting.
- Smart Sourcing: 3D waterproof PVC bat decals (bulk pack) and heavy-duty outdoor mounting squares.
12. Grim Reaper Gate Guardians
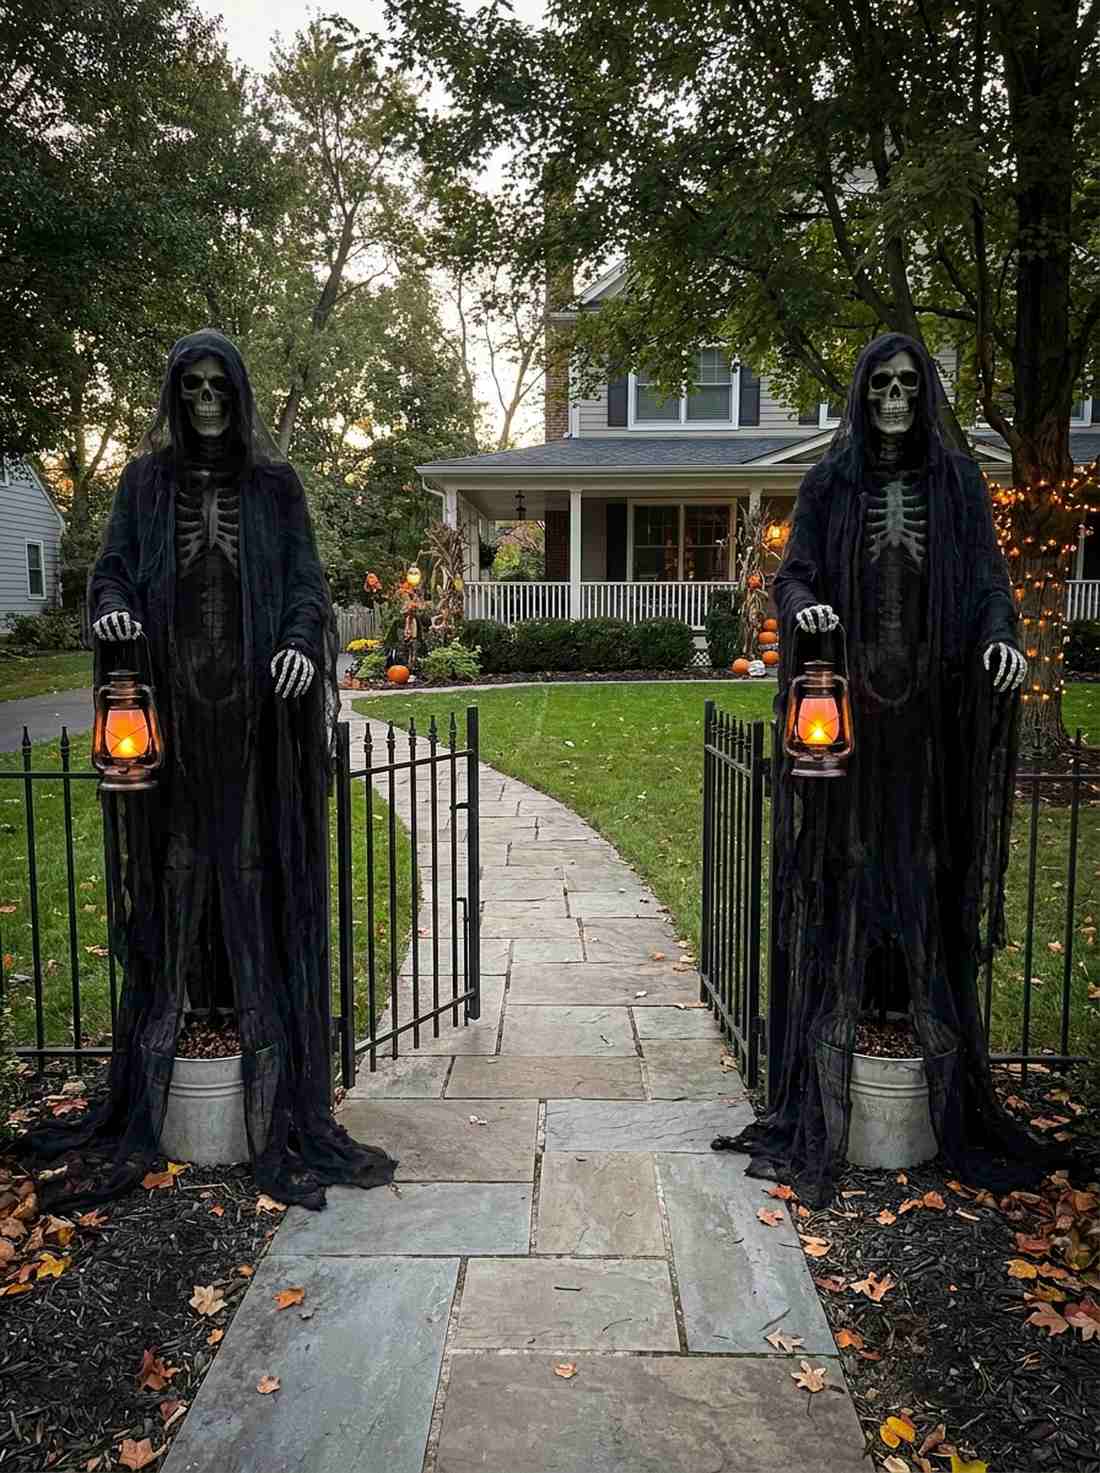
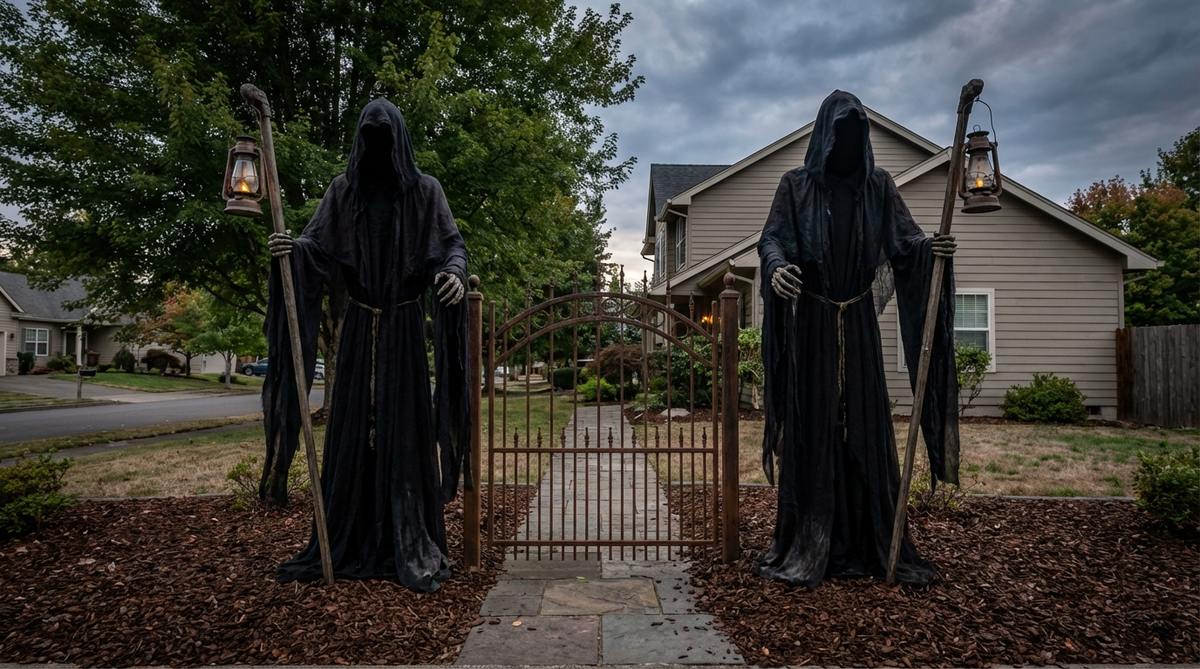
Projects absolute authority and dread the second guests approach your property line. Symmetrical tall reaper gate entryways are the perfect framing technique for front walkway fences.
Most people lean props loosely against a fence where they fall over, but building a rigid custom PVC skeleton frame looks far more expensive than it is. Draping them in dark, tattered cheesecloth ensures they command attention without blocking pedestrian traffic.
Constructing dual gate guardians runs approximately $75–$120.
- Key Materials: PVC piping, tattered black cloaks
- Vibe / Style: Imposing underworld
- Difficulty: Intermediate structural build
- Budget Breakdown: PVC pipes: $30 | Masks/Cloaks: $40 | Lanterns: $20.
- Creator’s Tip: Fill the base buckets with quick-set concrete and sink the PVC pipes in for a wind-proof foundation.
- Smart Sourcing: black tattered gauze draping fabric and battery-operated prop lanterns.
13. Spooky Tree Uplighting
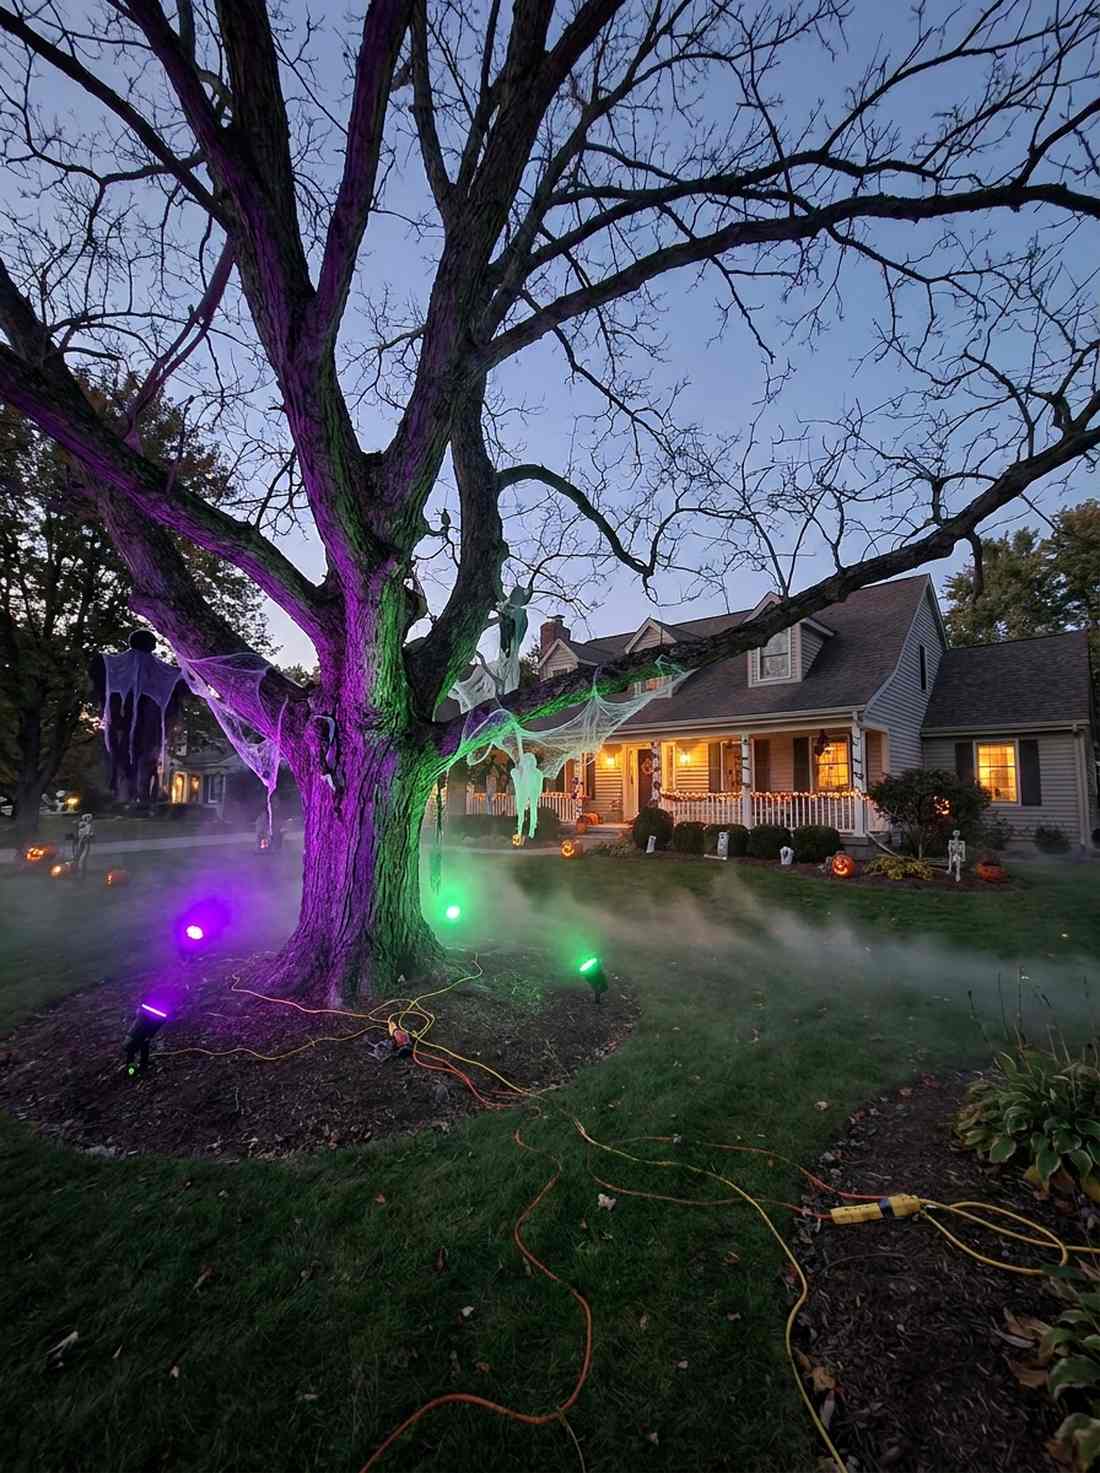
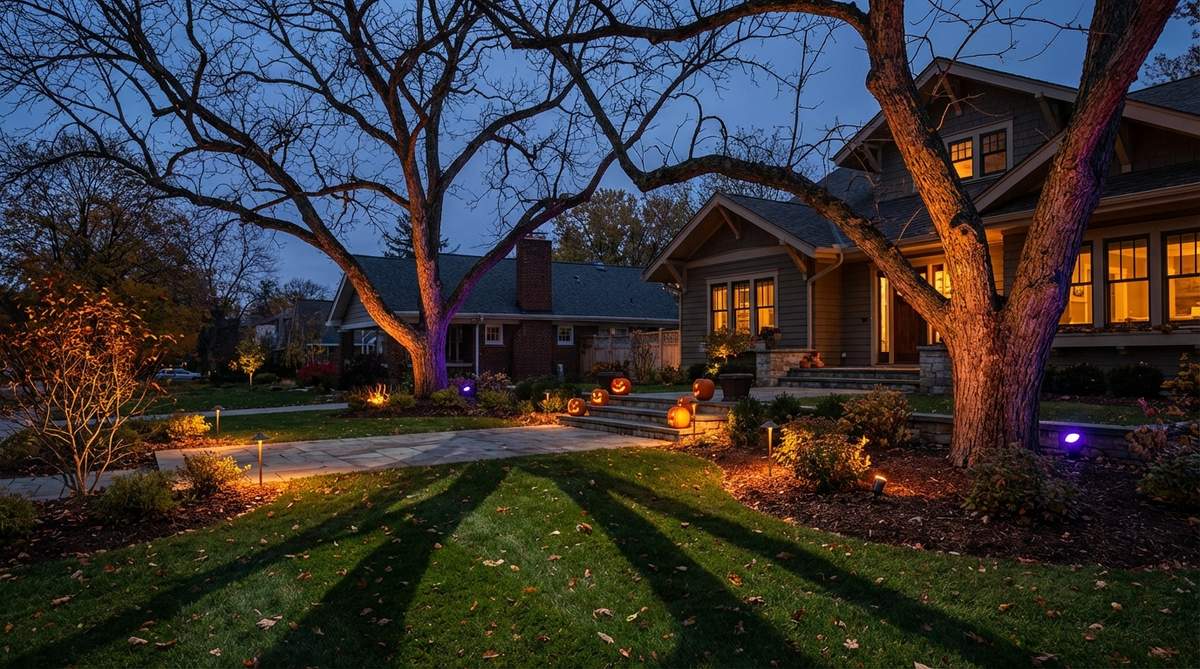
Instantly transforms barren autumn branches into skeletal reaching claws. Implementing an outdoor landscape color wash is the absolute best use-case for highlighting mature oak or weeping willow trees.
Relying on weak solar spots fails to penetrate the canopy; utilizing wired high-lumen colored LED fixtures completely transforms the visual depth. Hitting the trunk with deep purple or toxic green light delivers a high-end commercial haunt aesthetic for pennies.
You can wire up a professional lighting scheme for $40–$80.
- Key Materials: High-lumen colored spotlights, heavy-duty outdoor extension cords
- Vibe / Style: Luminous nightmare
- Difficulty: Easy cable management
- Budget Breakdown: LED spotlights: $45 | Cords: $20.
- Creator’s Tip: Place the lights as close to the trunk as possible, aiming straight up to exaggerate the texture of the bark.
- Smart Sourcing: weatherproof RGB landscape uplighting kits and heavy-duty green outdoor extension cords.
14. Shadow Silhouettes in the Garden
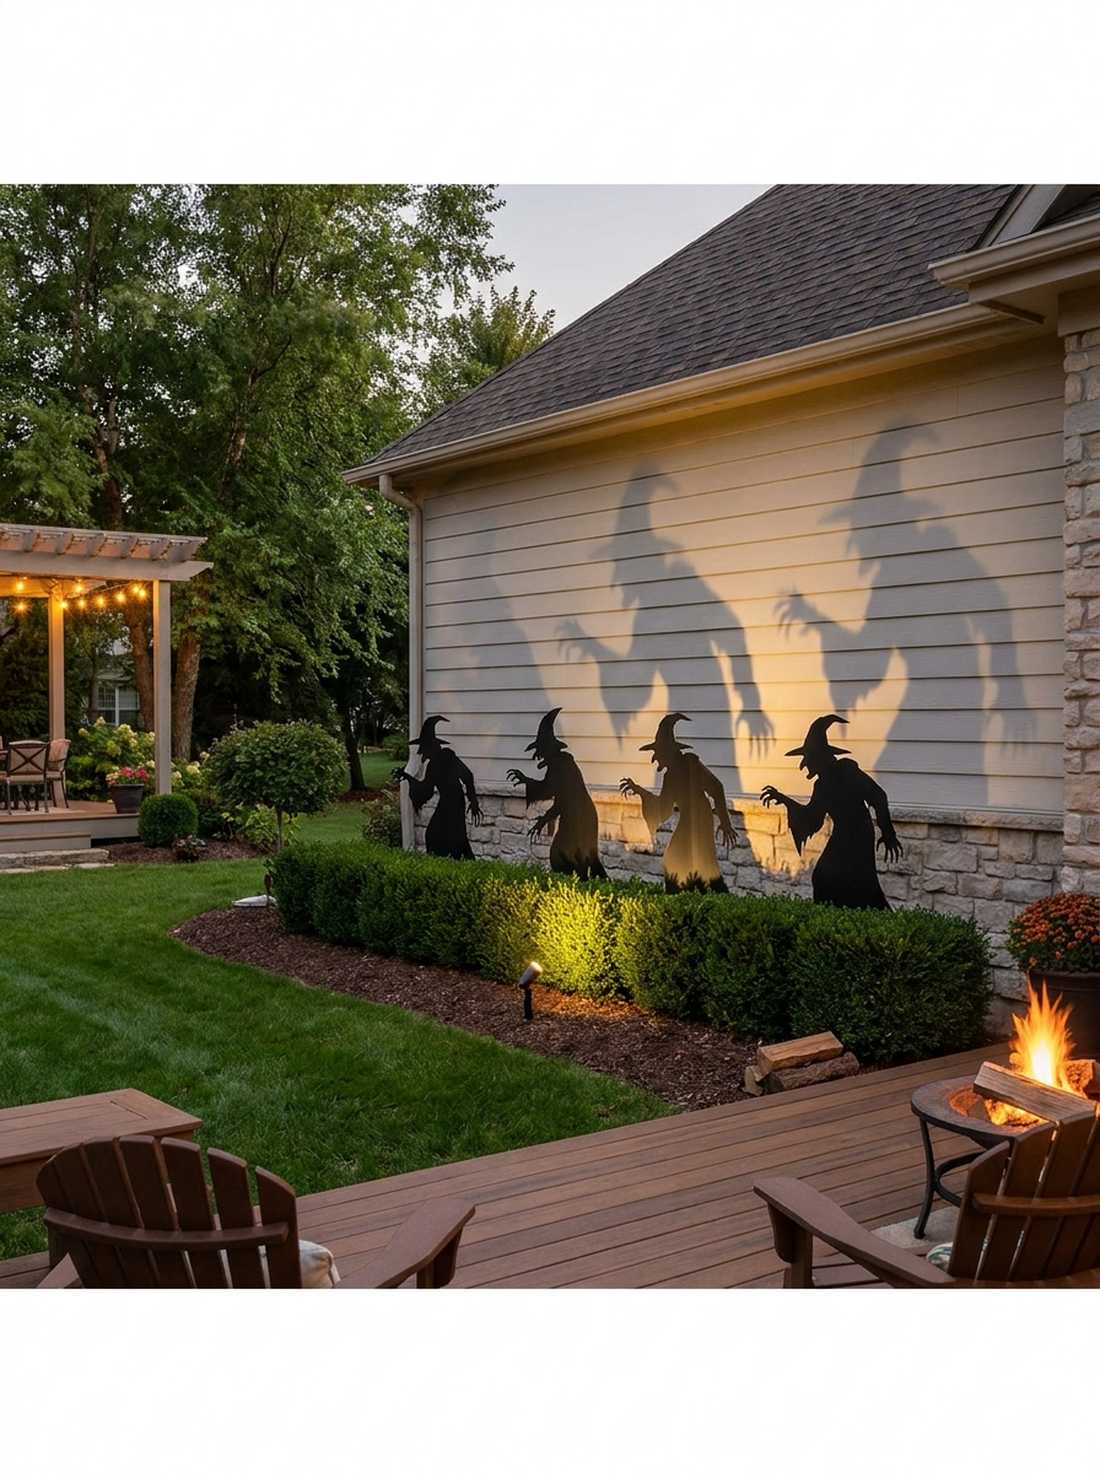
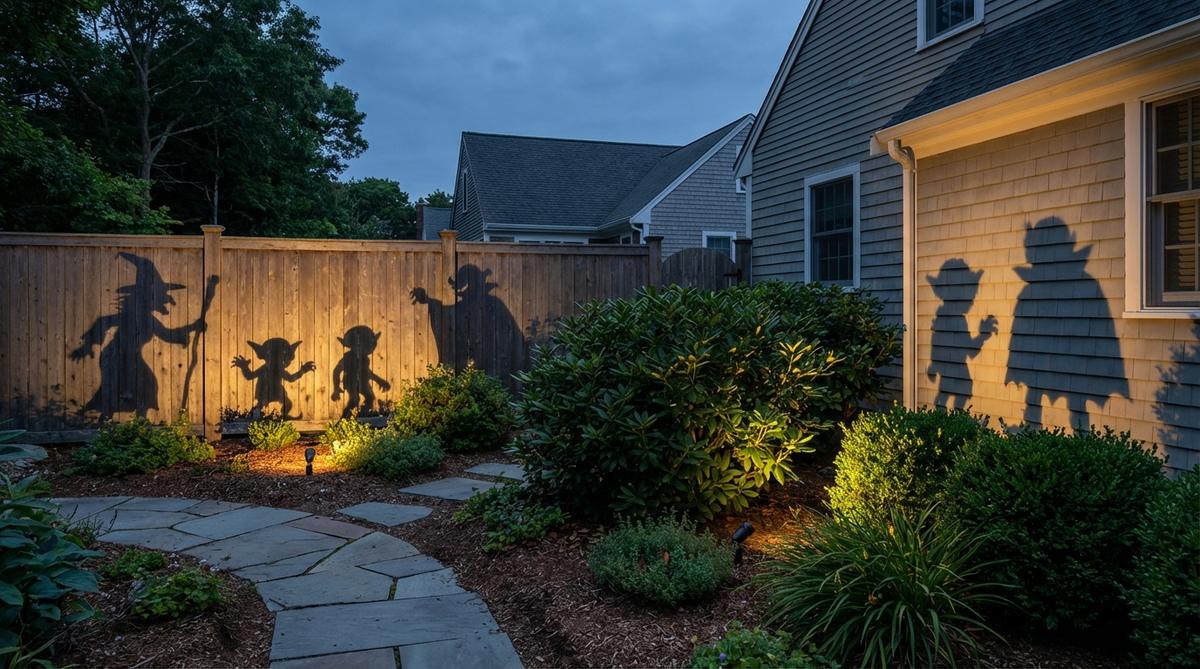
Feels like unseen figures are constantly stalking the perimeter of your yard. Crafting hidden bush shadow cutouts works flawlessly when tucked behind low-profile evergreen hedges.
Using flimsy cardboard guarantees they will warp overnight; cutting figures from rigid corrugated plastic gives a designer-level finish that withstands the elements. Angling a single warm spotlight across the bed casts massive, unsettling projections against your house walls.
This clever optical illusion costs roughly $25–$45 to pull off. Pin this trick for maximum visual impact!
- Key Materials: Black corrugated plastic sheets, landscape stakes
- Vibe / Style: Subtle psychological horror
- Difficulty: Simple cutting and staking
- Budget Breakdown: Plastic boards: $20 | Stakes: $10 | Spotlight: $15.
- Creator’s Tip: Paint the stakes matte black so the figures appear to float independently above the mulch bed.
- Smart Sourcing: rigid black corrugated plastic sheets (bulk) and heavy-duty metal landscape stakes.
If you think normal decorations are fun, wait until you see the completely unhinged carnival aesthetic coming up next…
15. Creepy Clown Carnival Zone
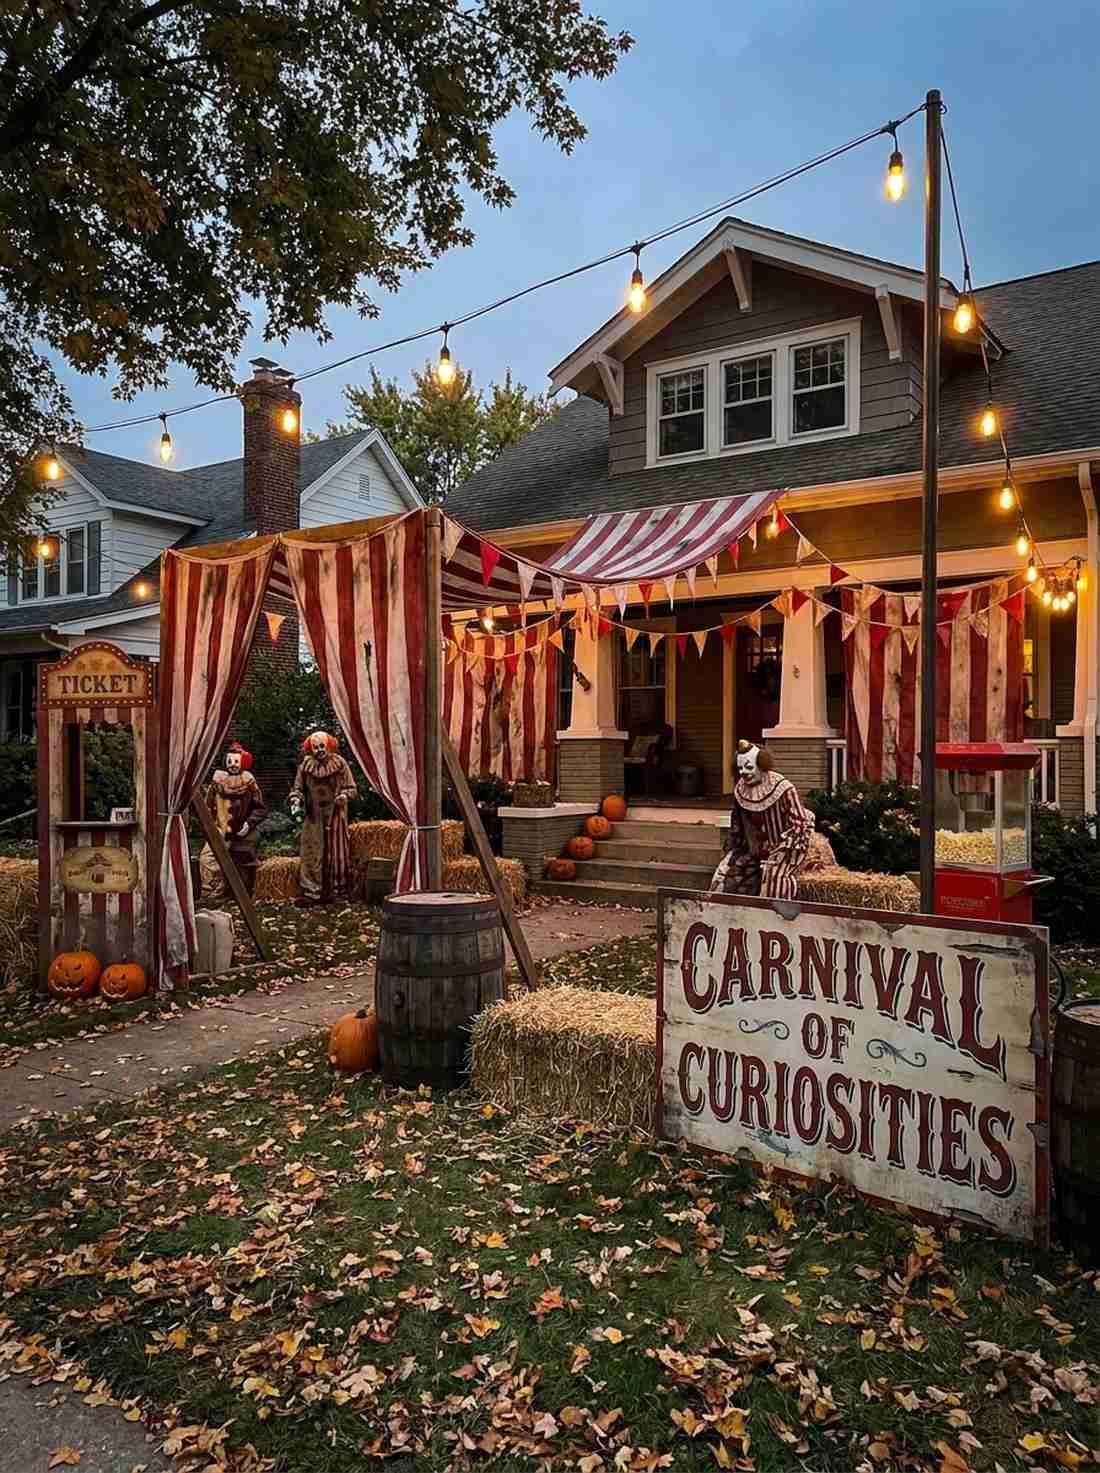
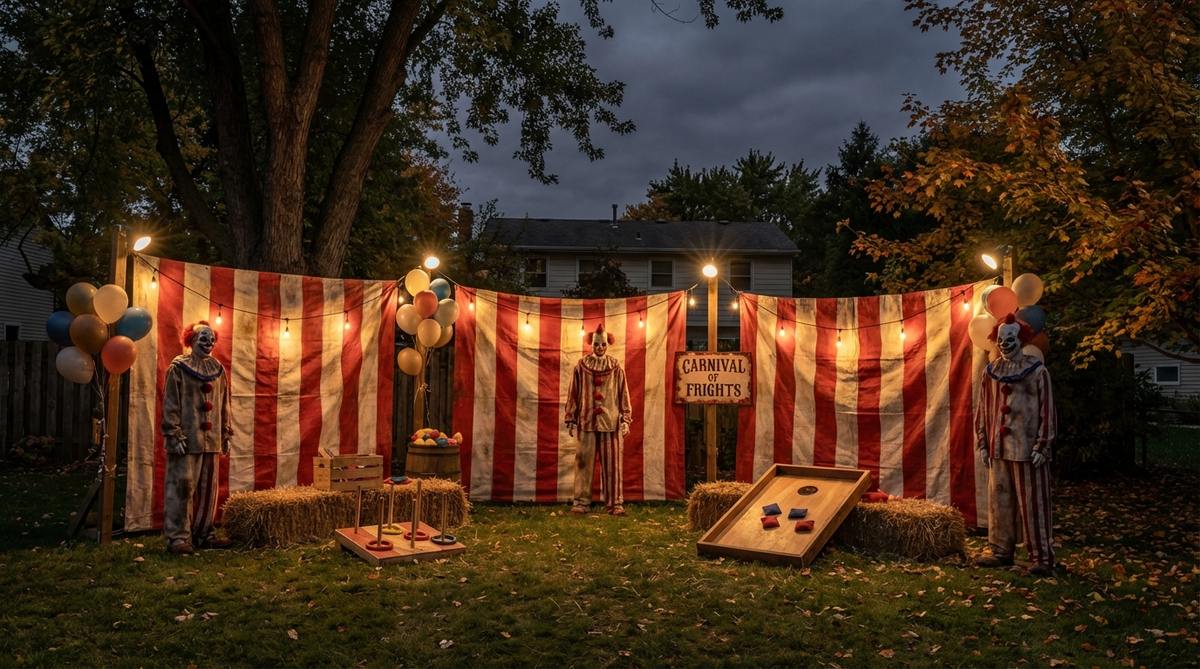
Looks like a neon nightmare ripped straight from a forgotten funfair. Designing a distressed circus yard display is brilliant for a contained corner of your front lawn.
Mixing traditional ghosts with clowns turns your yard into a chaotic mess; dedicating a strict zone with red-and-white striped backdrops looks far more expensive than it is. Utilizing specialized commercial-grade string lights overhead cements the midway aesthetic while keeping it bright.
Building out a standalone carnival zone averages $90–$150.
- Key Materials: Striped fabric panels, vintage bulb string lights
- Vibe / Style: Twisted funhouse
- Difficulty: High-effort staging
- Budget Breakdown: Fabric/wood: $50 | Props: $60 | Lighting: $30.
- Creator’s Tip: Weather the striped fabric by misting it with heavily diluted black and brown spray paint for a grimy, abandoned look.
- Smart Sourcing: shatterproof vintage LED string lights and red and white striped carnival bunting.
16. Pirate Ship Ruins on the Lawn
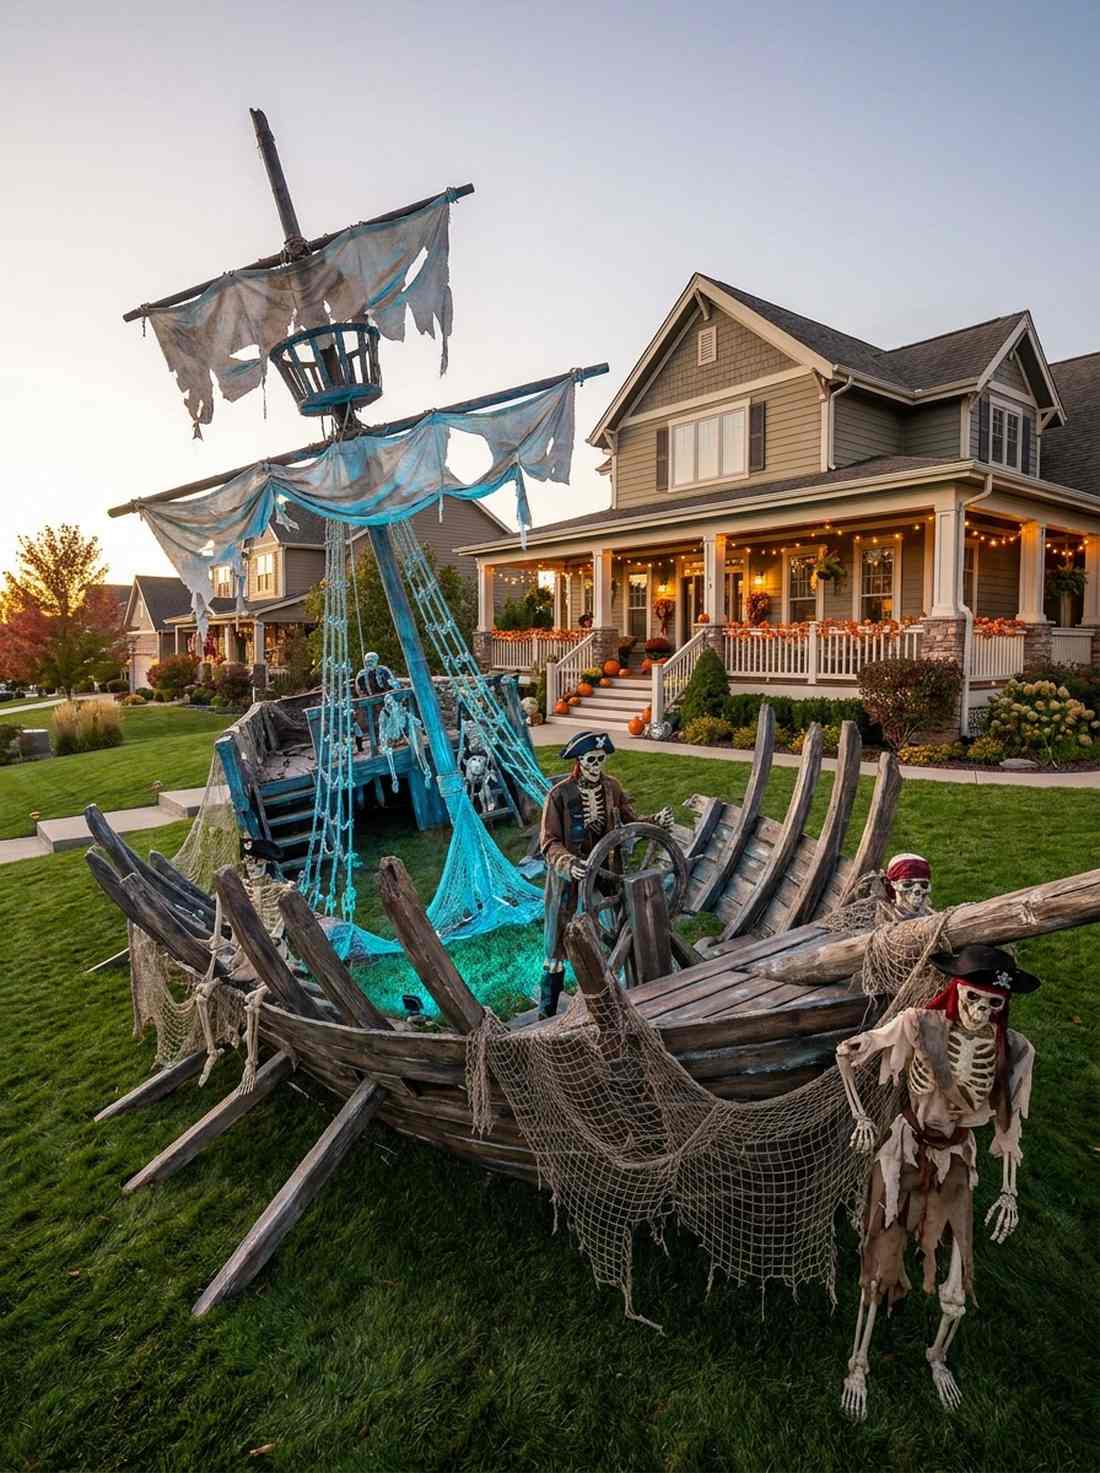
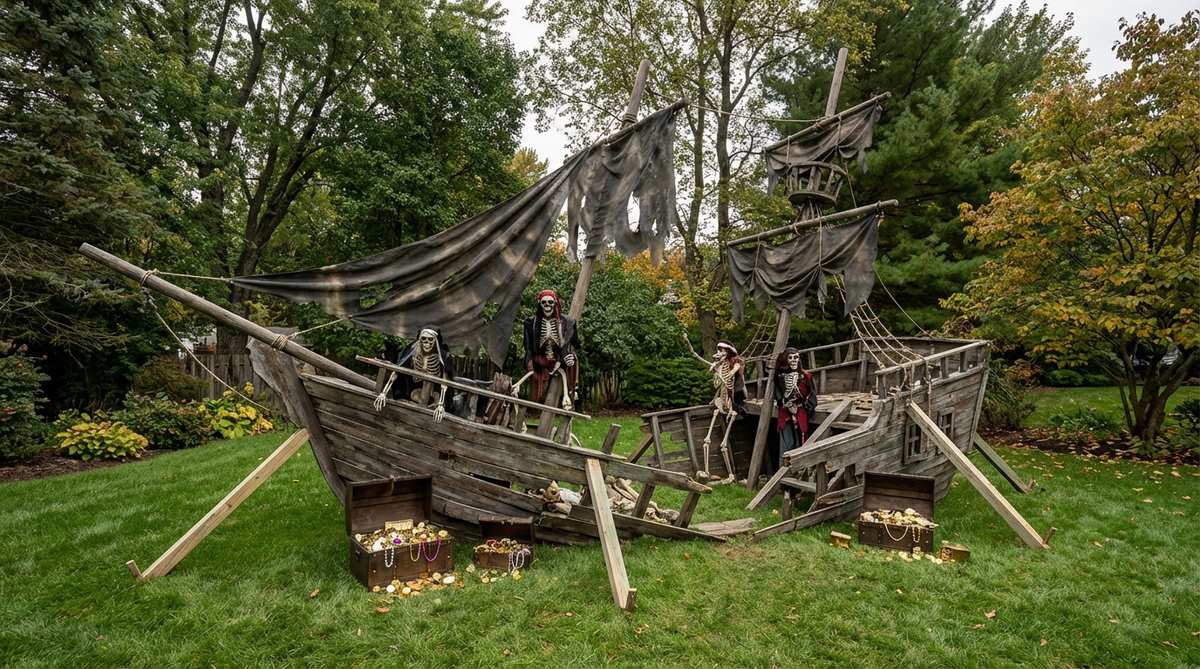
Gives the sensation that a spectral galleon has literally crashed through your turf. Constructing a ghost ship yard wreck is the ultimate use-case for homes with deep, sloping front yards.
Tossing a fake steering wheel on the grass is incredibly lazy; building actual wooden ribs bursting from the soil completely changes the vibe. Sourcing high-CPC pirate skeletal accessories and tattered sails creates a cinematic set piece that dominates the neighborhood.
This massive structural centerpiece typically costs $150–$250 to execute.
- Key Materials: Weather-treated lumber, tattered canvas sails
- Vibe / Style: Spectral high seas
- Difficulty: Advanced carpentry required
- Budget Breakdown: Lumber: $80 | Canvas: $40 | Skeleton crew: $100.
- Creator’s Tip: Uplight the tattered sails with a slow-fading blue or aqua LED to mimic bioluminescent ocean water.
- Smart Sourcing: weatherproof skeletal pirate props and distressed decorative netting.
Porch & Patio outdoor decor halloween ideas with Character
Porches and patios invite guests to linger, requiring detail-oriented decor at eye level. These setups maximize coziness and terror without creating tripping hazards in tight spaces.
17. Cozy Fall Porch with Subtle Spooks
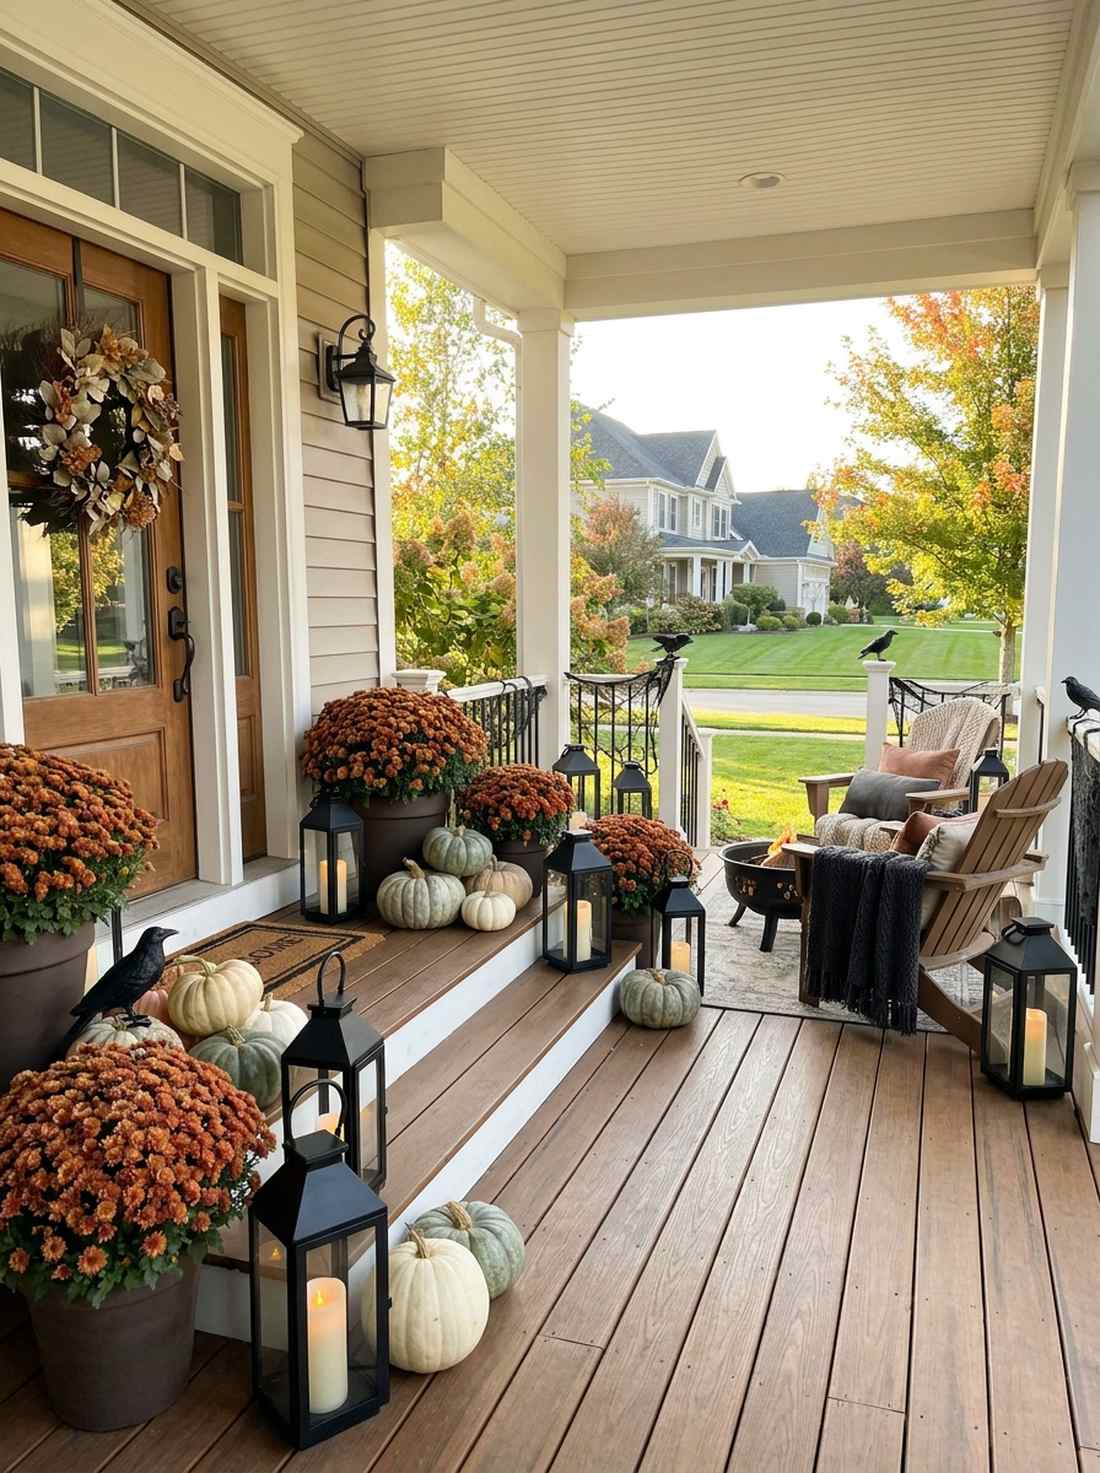
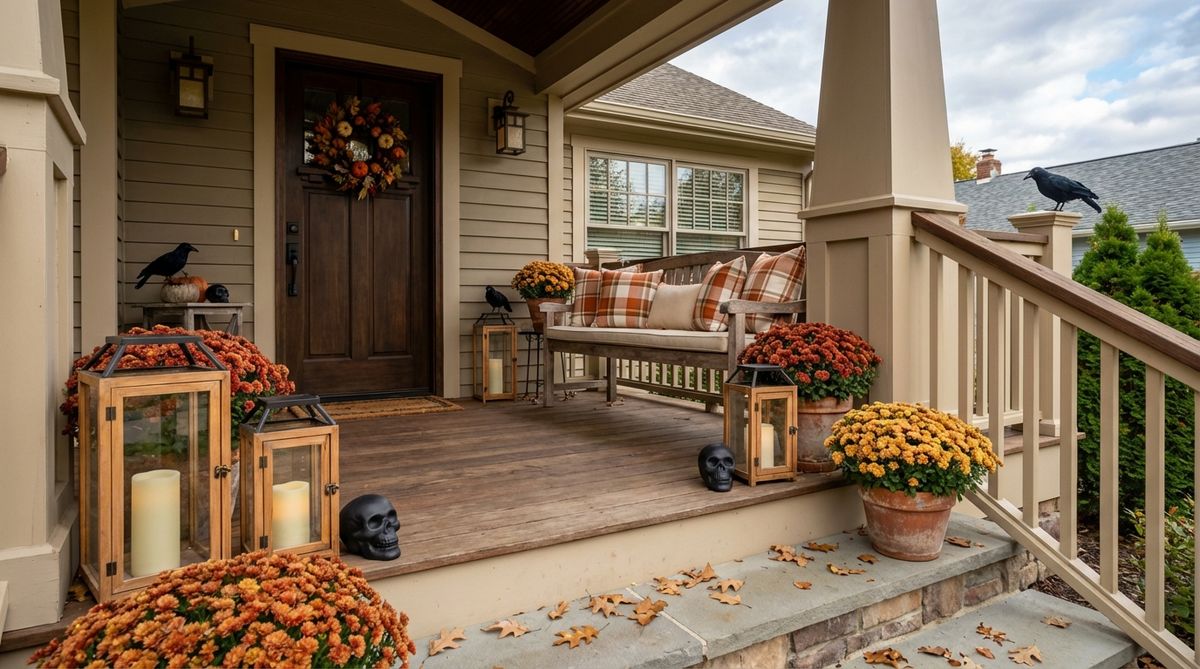
Feels like a chic autumn catalog with a deeply sinister undertone. A transitional autumn to halloween porch works exceptionally well for covered suburban entryways.
Overloading a small porch with cheap plastic monsters looks incredibly tacky; weaving black metallic accents into a base of rich harvest mums gives a designer-level finish. It is a brilliant strategy for utilizing high-end miniature garden supplies that transition smoothly through November.
You can upgrade your existing fall porch for just $30–$50. Pin this for a classy seasonal overlap!
- Key Materials: Rust-colored mums, black metallic lanterns
- Vibe / Style: Sophisticated harvest
- Difficulty: Minimal styling effort
- Budget Breakdown: Real mums: $30 | Black accents: $20.
- Creator’s Tip: Swap out bright orange pumpkins for heirloom varieties in muted greens and whites to instantly elevate the aesthetic.
- Smart Sourcing: matte black decorative outdoor lanterns and premium artificial heirloom pumpkins.
18. Porch Swing Draped in Halloween Throws
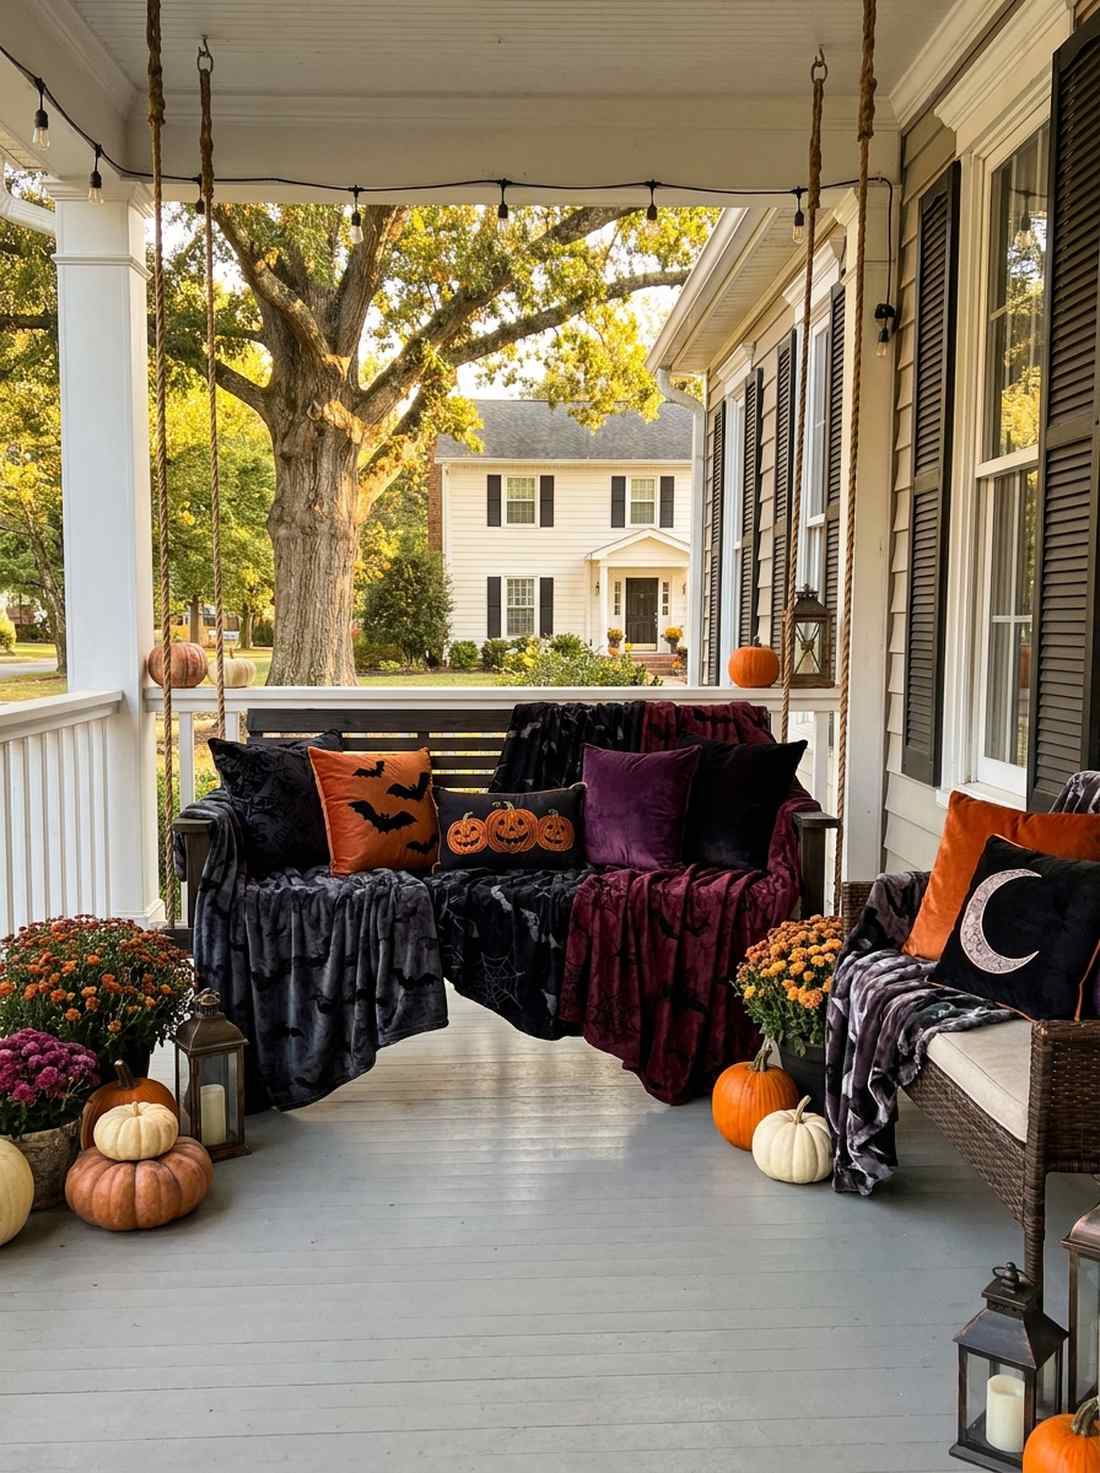
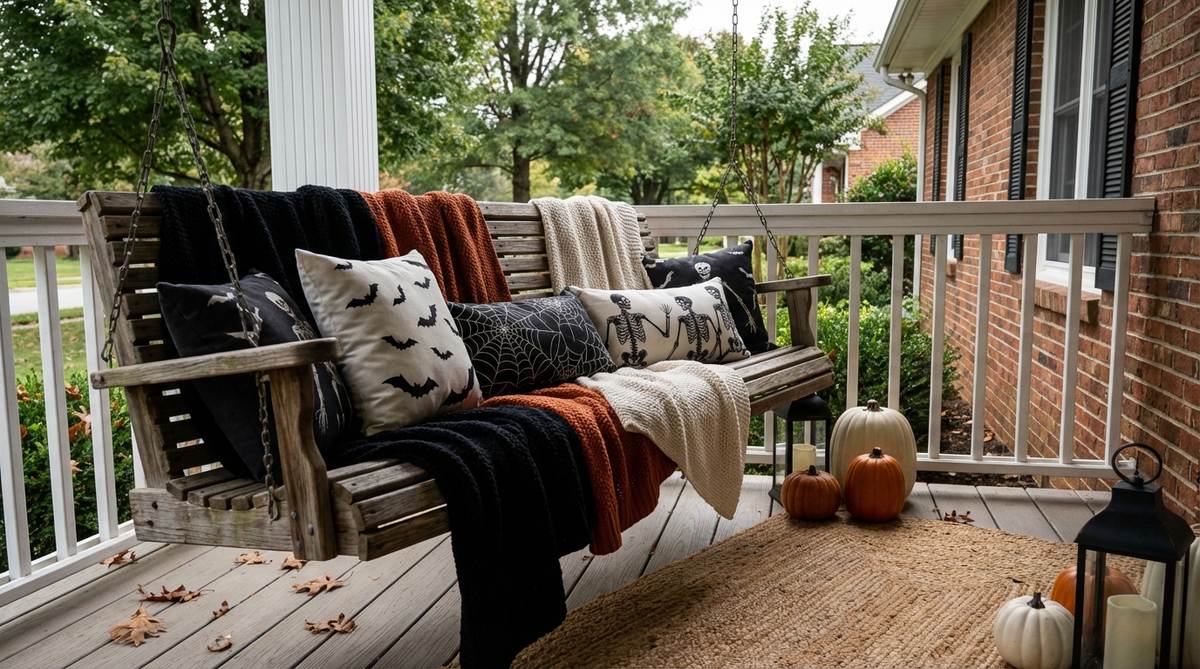
Looks like the perfect, cozy reading nook for a stylish witch. Creating a spooky textile lounge area is the absolute best way to utilize an empty porch swing or bench.
Leaving bare furniture out in the cold makes a porch feel dead; layering weather-resistant gothic throws and plush velvet pillows completely changes the vibe. Securing the fabrics with hidden upholstery clips ensures your styling survives harsh October winds.
This cozy textile upgrade generally costs $45–$70.
- Key Materials: Outdoor-rated dark throws, Halloween motif pillows
- Vibe / Style: Gothic comfort
- Difficulty: Very easy
- Budget Breakdown: Outdoor pillows: $40 | Blankets: $25.
- Creator’s Tip: Spray your decorative pillows with a water-repellent fabric guard so they do not absorb morning dew or accidental spills.
- Smart Sourcing: water-resistant Halloween throw pillows and heavy-duty upholstery fabric clips.
19. Black-and-White Pumpkin Staircase
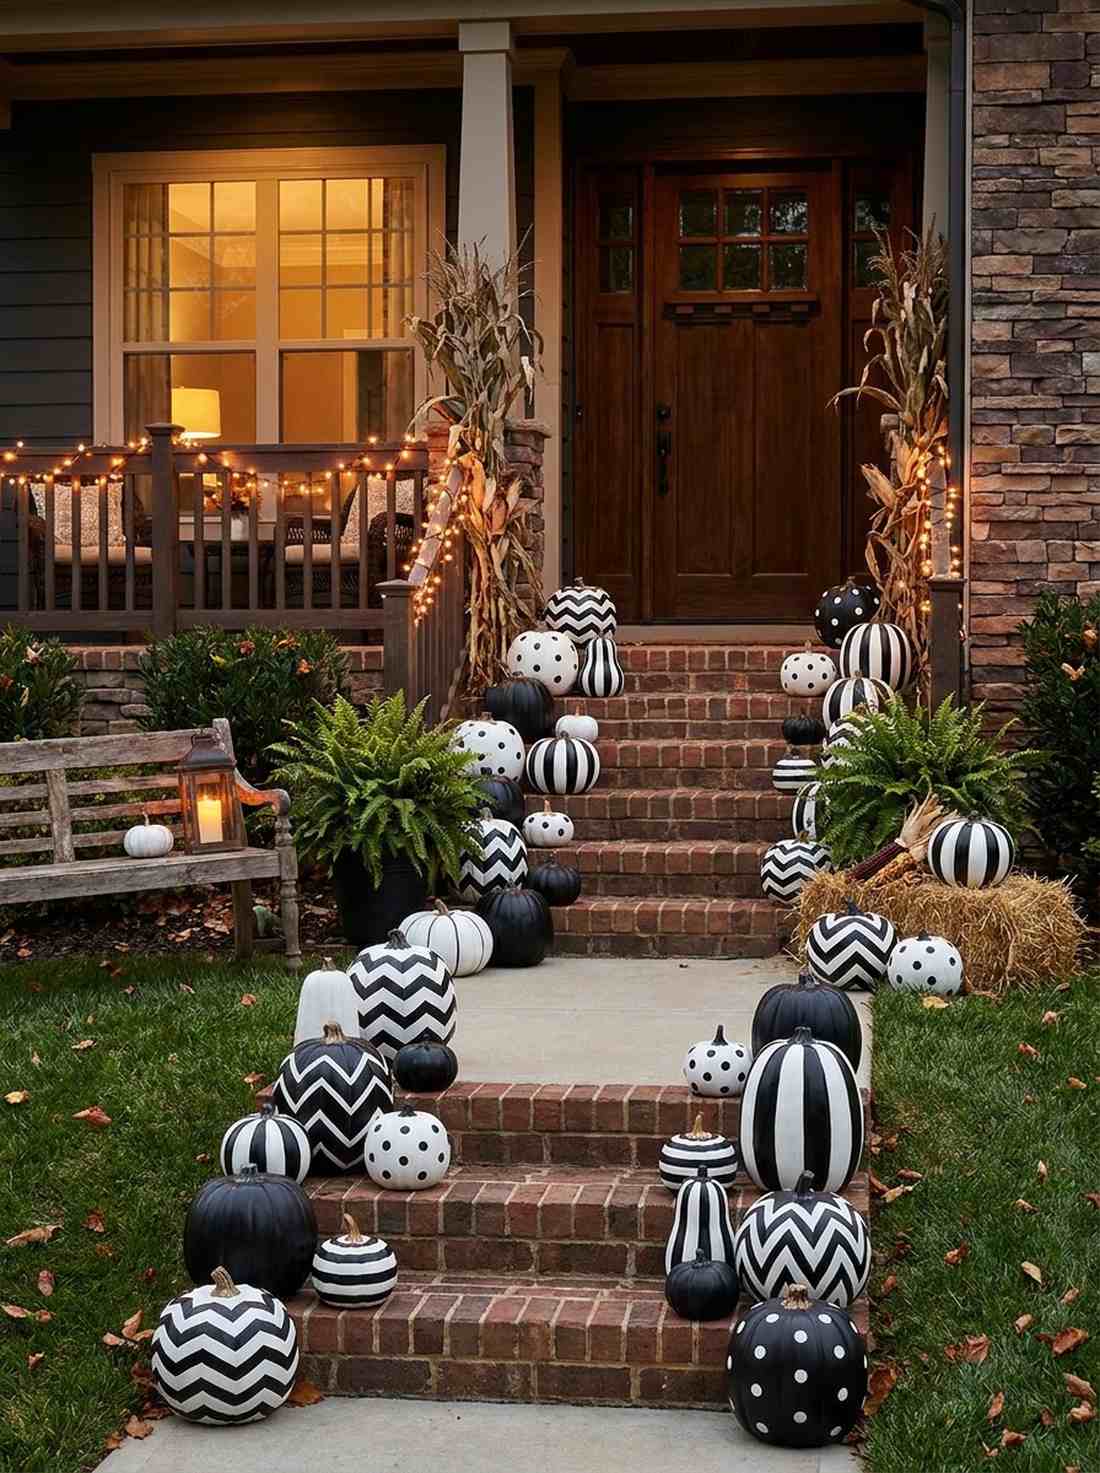
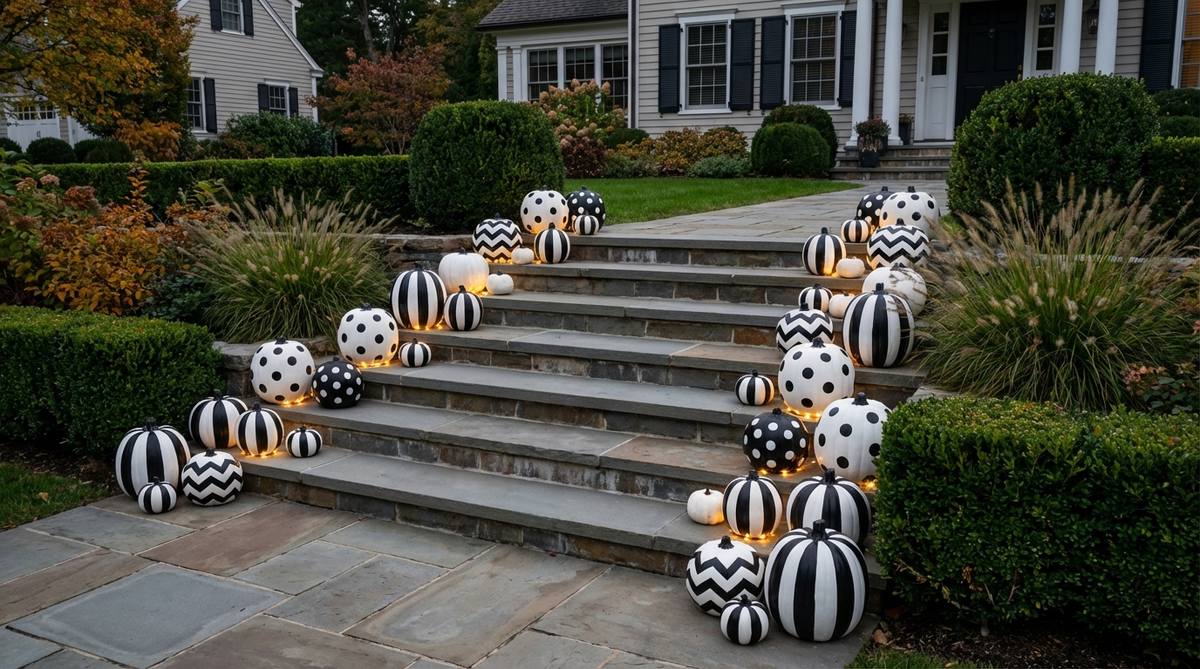
Projects an incredibly chic, modern art-gallery aesthetic right on your front steps. A monochrome painted gourd display is ideal for narrow, ascending brick or wooden staircases.
Carving intricate faces often leads to rotting messes in days; painting bold, geometric black-and-white patterns on faux gourds looks far more expensive than it is. The high-contrast palette pops brilliantly in low-light environments without needing complicated wiring.
Curating this modern monochrome look costs around $35–$60. Save this to your modern decor inspiration board!
- Key Materials: Faux craft pumpkins, premium exterior acrylic paint
- Vibe / Style: Modern minimalist macabre
- Difficulty: Easy weekend craft
- Budget Breakdown: Craft pumpkins: $40 | Paint & Brushes: $15.
- Creator’s Tip: Apply a clear UV-resistant topcoat spray over the painted pumpkins to stop the black paint from peeling in the rain.
- Smart Sourcing: paintable foam craft pumpkins (bulk) and UV-resistant clear acrylic sealant sprays.
Most people struggle with porch clutter, but this next skeleton seating trick actually saves space while looking completely custom…
20. Skeletons Lounging on Adirondack Chairs
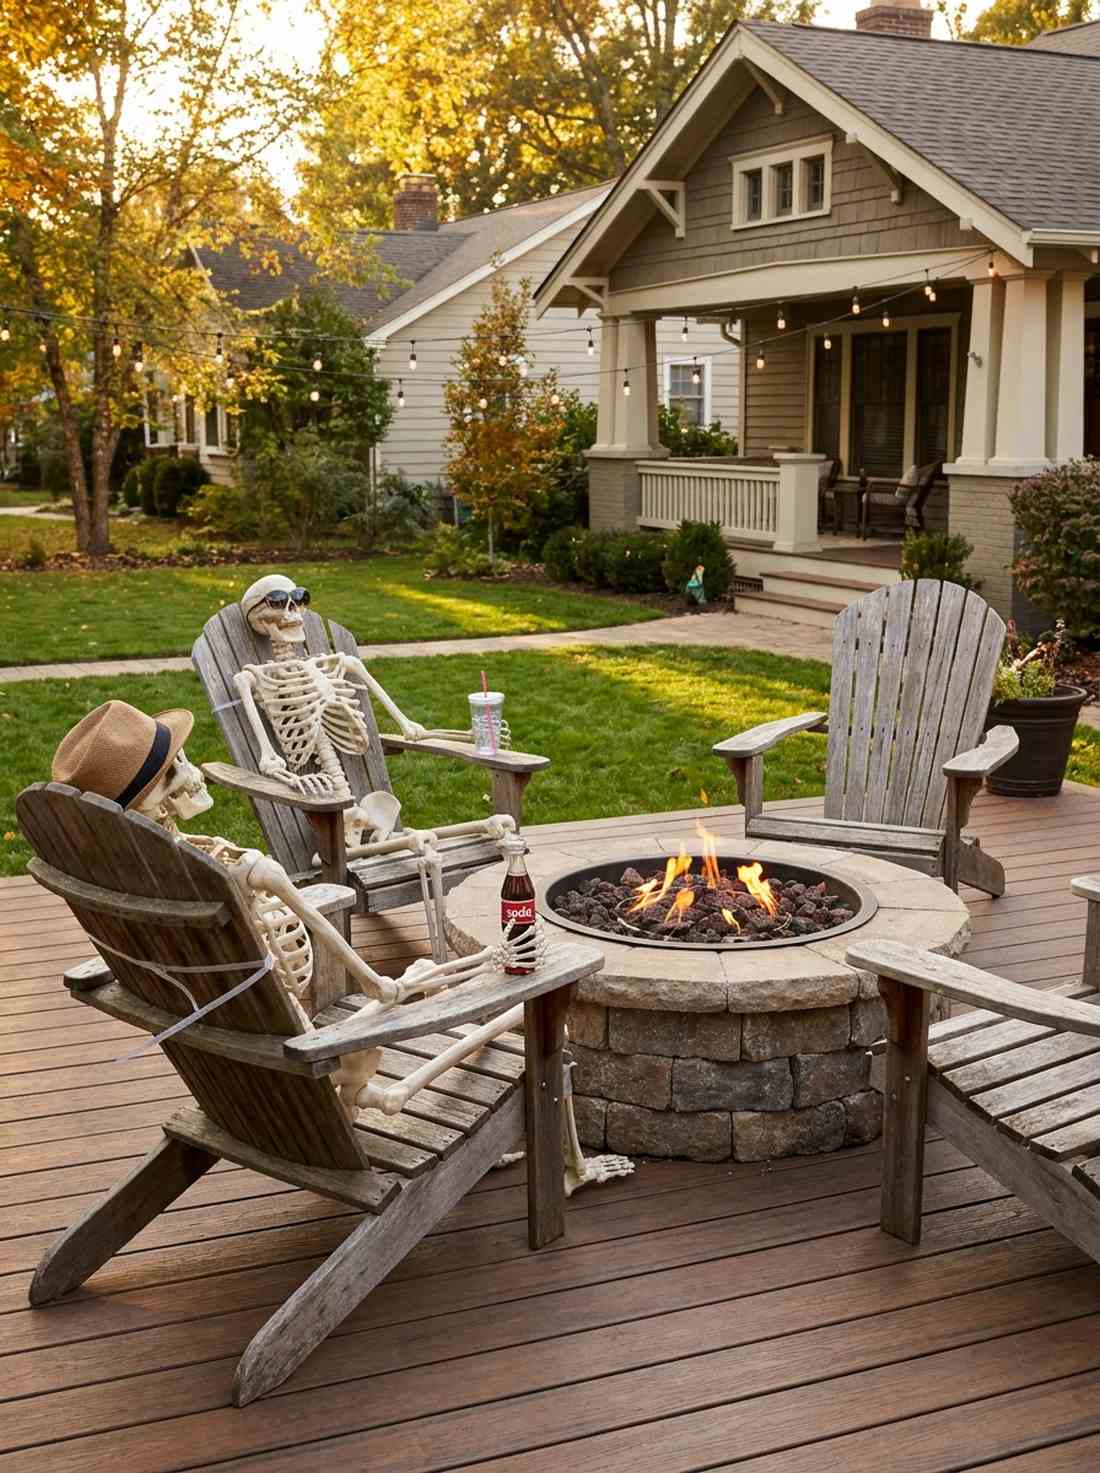
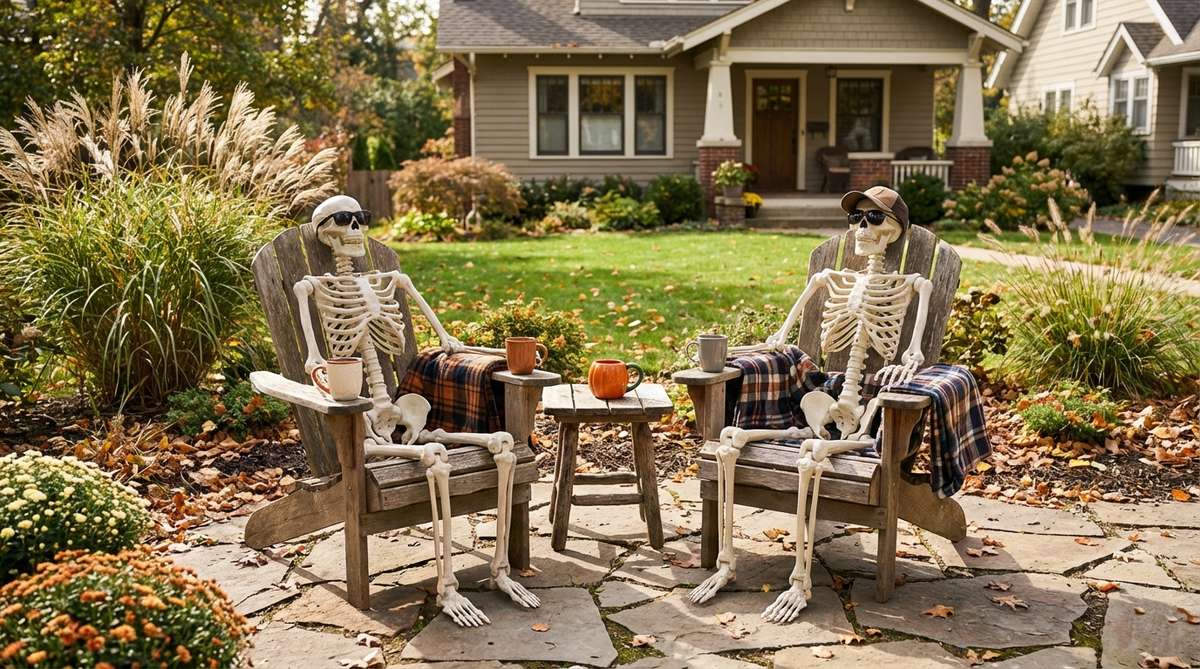
Feels like the afterlife decided to crash your weekend barbecue. Posing a casual skeleton seating arrangement is brilliant for large, empty patio chairs or fire pit lounges.
Leaving props slumped over looks depressing; securing their spines rigidly to the chair backs with clear heavy-duty zip ties gives a designer-level finish. Adding humorous accessories like sunglasses or faux drinks creates an instant viral photo op for trick-or-treaters.
This humorous setup will only cost you the price of the skeletons, roughly $40–$80.
- Key Materials: Poseable life-size skeletons, clear zip ties
- Vibe / Style: Humorous macabre
- Difficulty: Quick pose & secure
- Budget Breakdown: Skeletons: $70 | Zip ties: $5.
- Creator’s Tip: Use a heat gun to gently warm and bend the plastic joints so they sit naturally flushed against the contours of the chair.
- Smart Sourcing: life-size fully poseable skeletons and clear heavy-duty outdoor zip ties.
21. Candy Station Styled as Haunted Market Cart
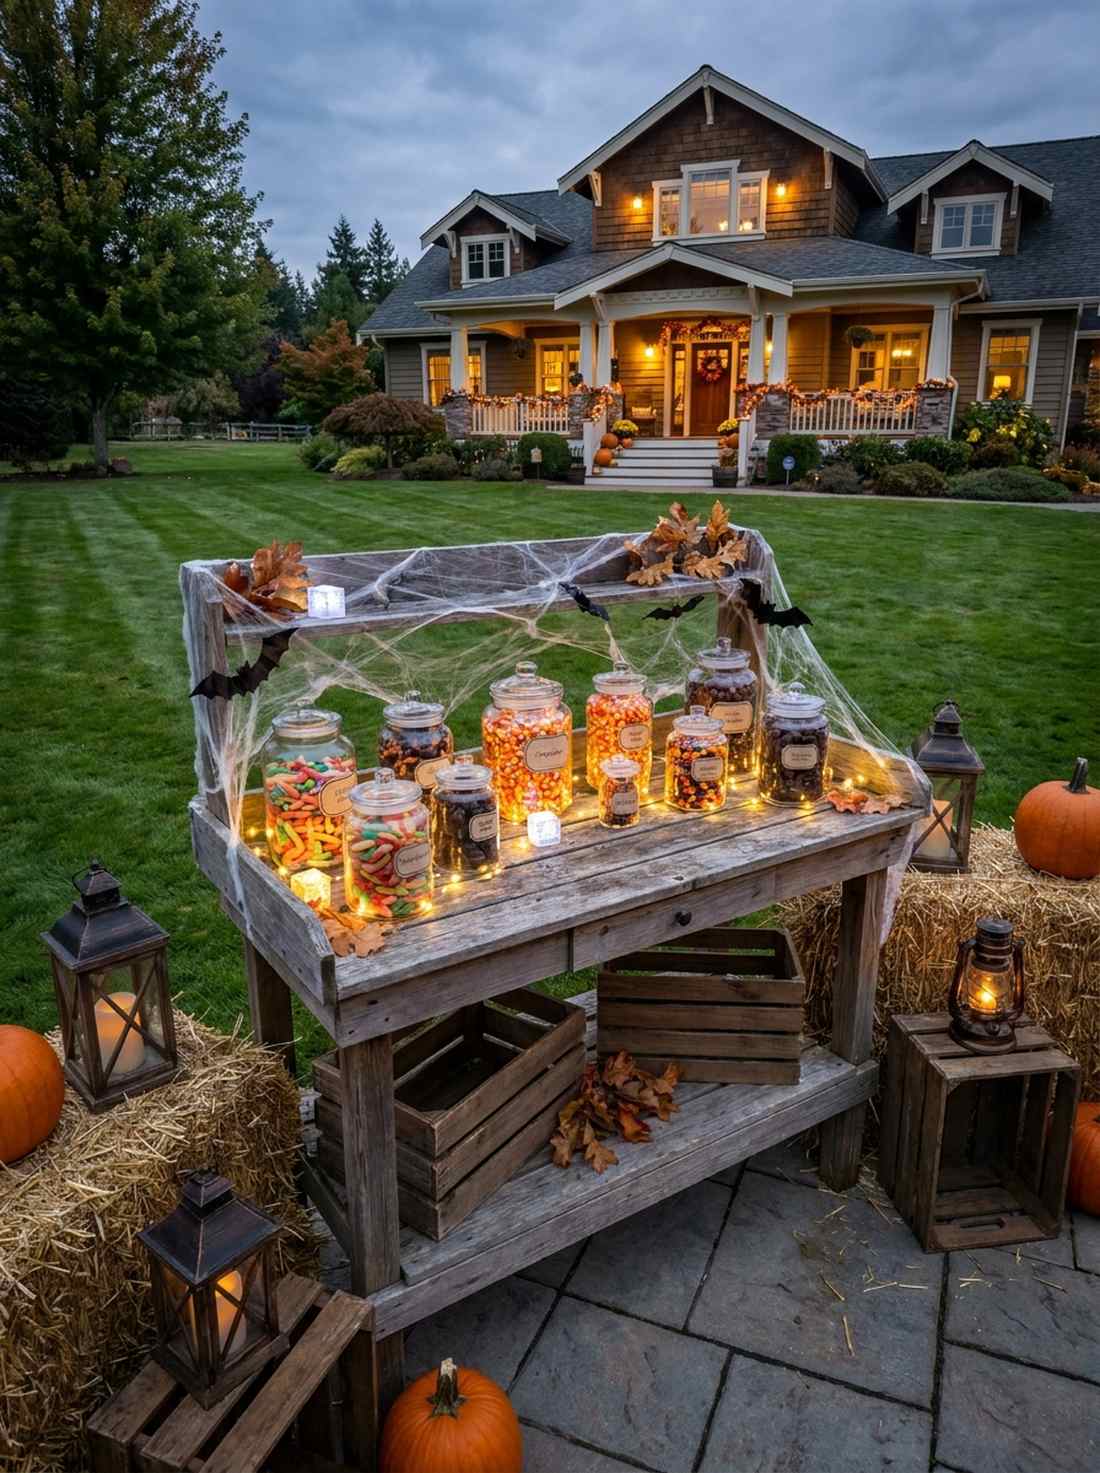
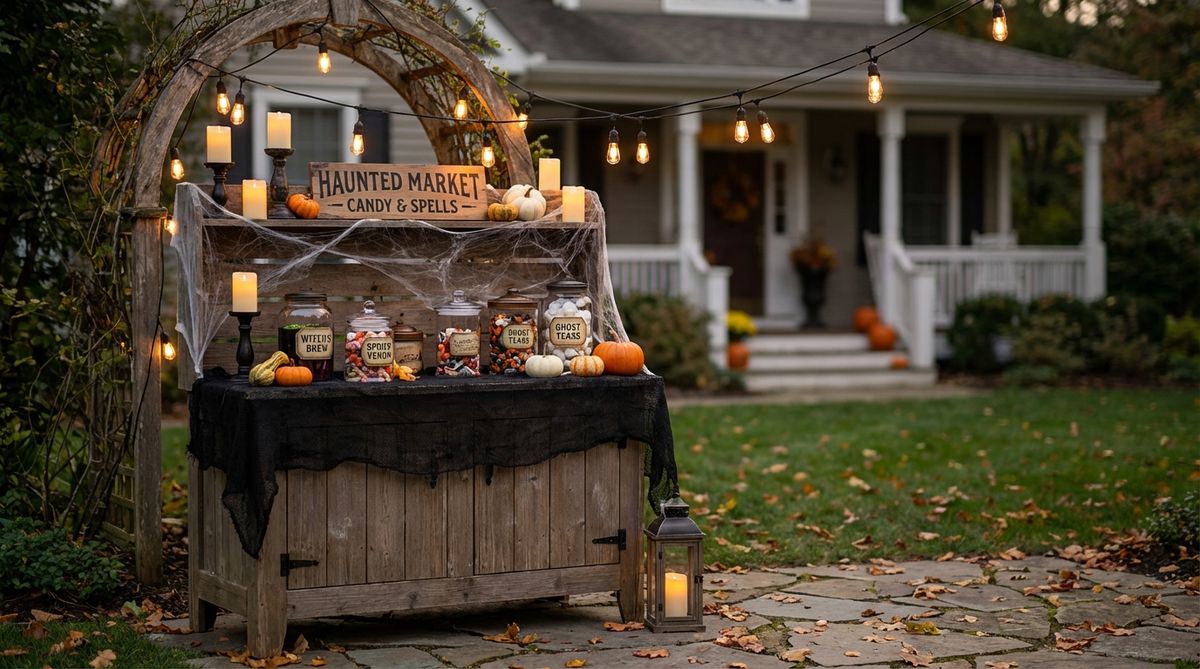
Looks exactly like a cursed apothecary offering dark potions. Transforming a potting bench candy bar is the ultimate use-case for managing massive trick-or-treater crowds without opening your front door.
Dumping candy in a plastic bowl is incredibly boring; styling glass apothecary jars with custom poison labels completely changes the vibe. Utilizing battery-powered fairy lights to illuminate the jars creates a magnetic focal point that keeps kids safely off your porch steps.
Converting a cart costs about $50–$80 in jars and decor.
- Key Materials: Rolling cart or bench, glass apothecary jars
- Vibe / Style: Vintage apothecary
- Difficulty: Fun styling project
- Budget Breakdown: Glass jars: $40 | Fairy lights: $15 | Labels: $10.
- Creator’s Tip: Put a cheap LED glow cube inside the candy jars before filling them to make the sweets glow from within.
- Smart Sourcing: shatterproof acrylic apothecary jar sets and waterproof LED fairy string lights.
22. Hanging Witch Hat Chandelier
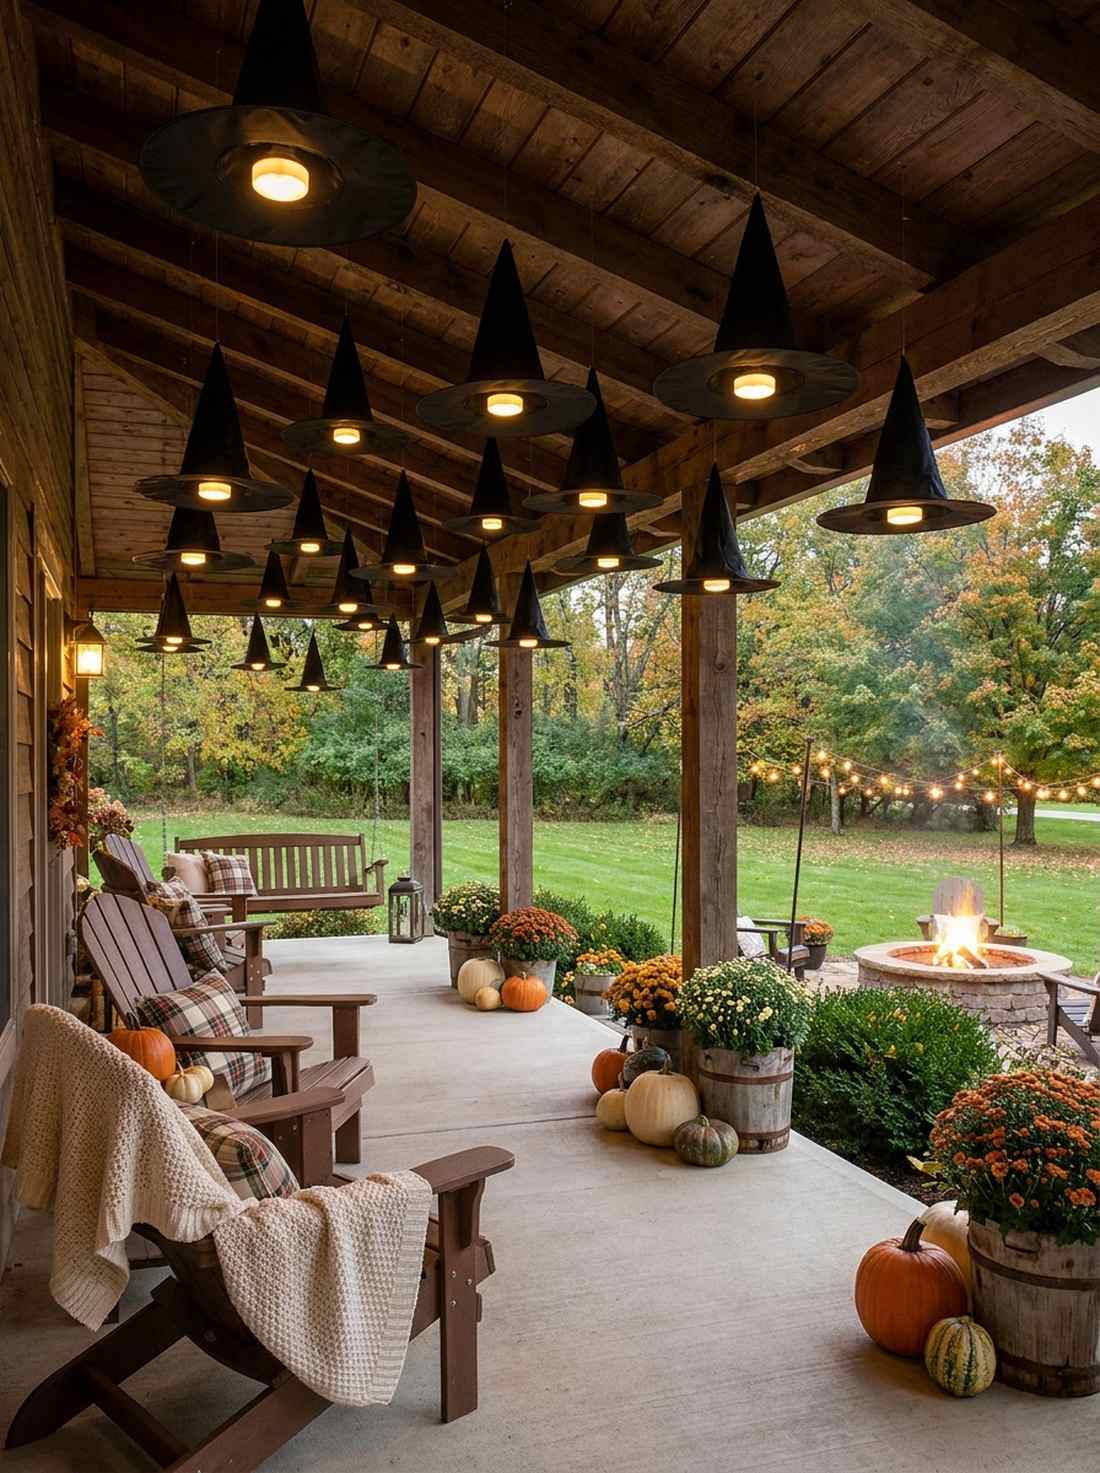
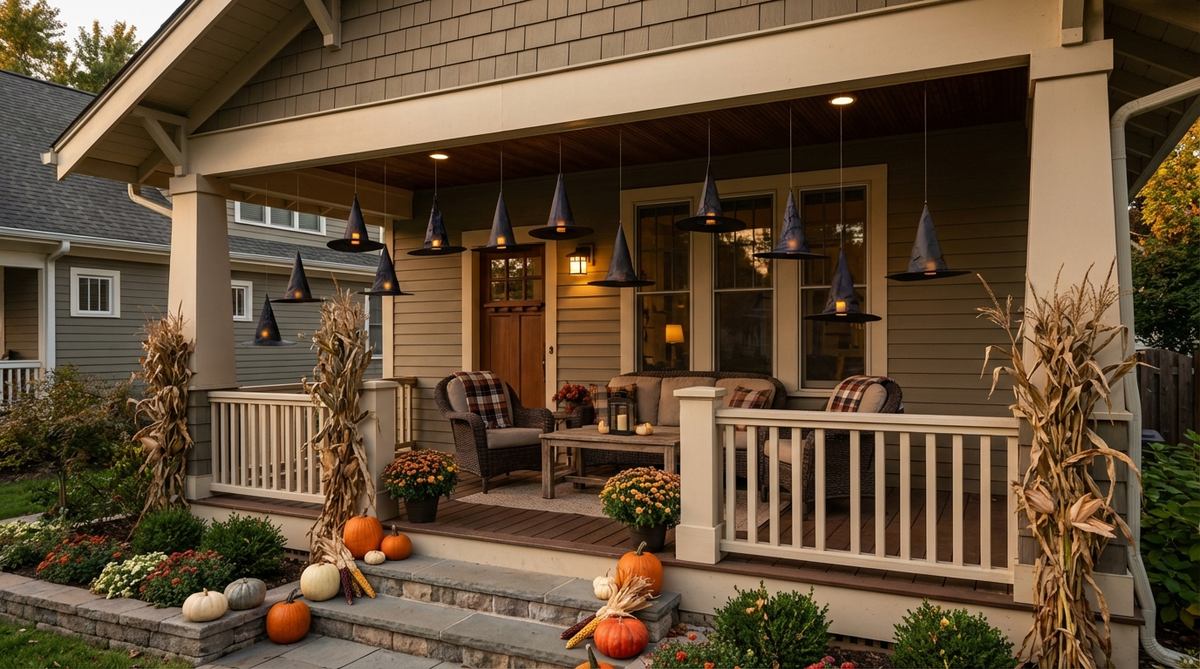
Creates a whimsical, floating ceiling that sways gently in the autumn breeze. A floating witch hat canopy is a show-stopping upgrade for deep covered porches or pergolas.
Hanging heavy props from the ceiling risks tearing out your hardware; suspending lightweight nylon hats using tension rods looks far more expensive than it is. Slipping remote-controlled LED puck lights inside the cones turns the entire installation into a glowing masterpiece.
This viral Pinterest staple can be achieved for a mere $25–$40. Pin this if you love floating magical effects!
- Key Materials: Black nylon witch hats, clear fishing line
- Vibe / Style: Enchanted floating magic
- Difficulty: Requires overhead ladder work
- Budget Breakdown: Hat bulk pack: $15 | LED pucks: $20.
- Creator’s Tip: Thread the fishing line through the absolute tip of the hat and tie a large knot inside so the fabric doesn’t tear over time.
- Smart Sourcing: bulk pack nylon witch hats and remote-controlled battery LED puck lights.
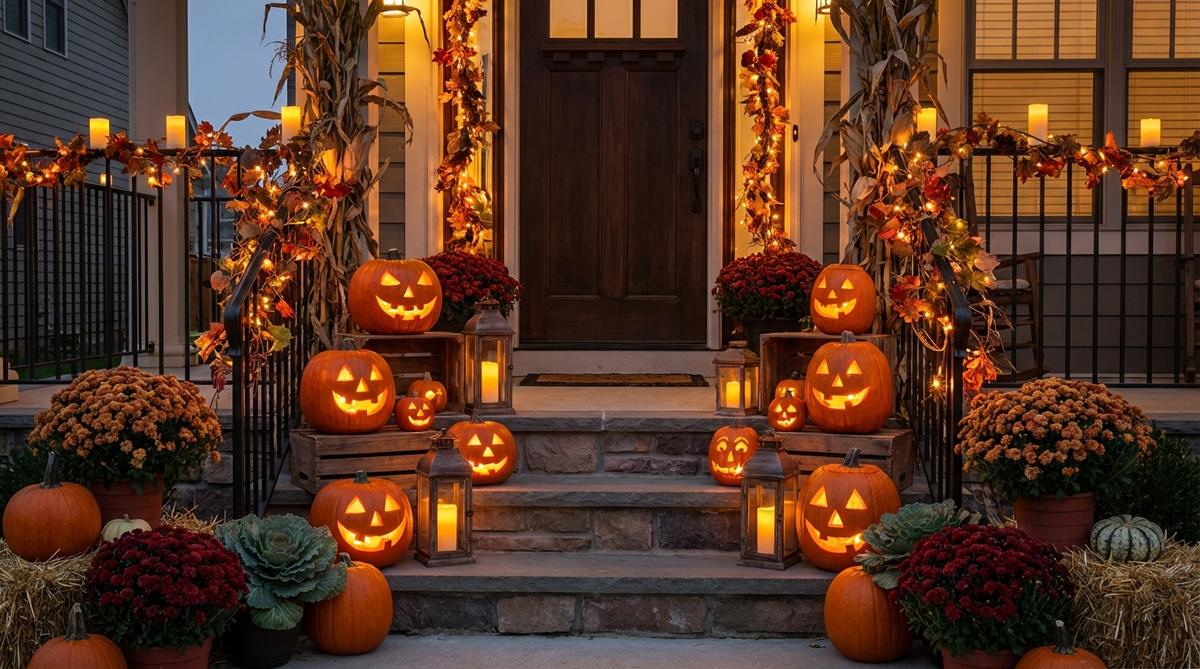
23. Jack-o’-Lantern Cluster with LED Candles
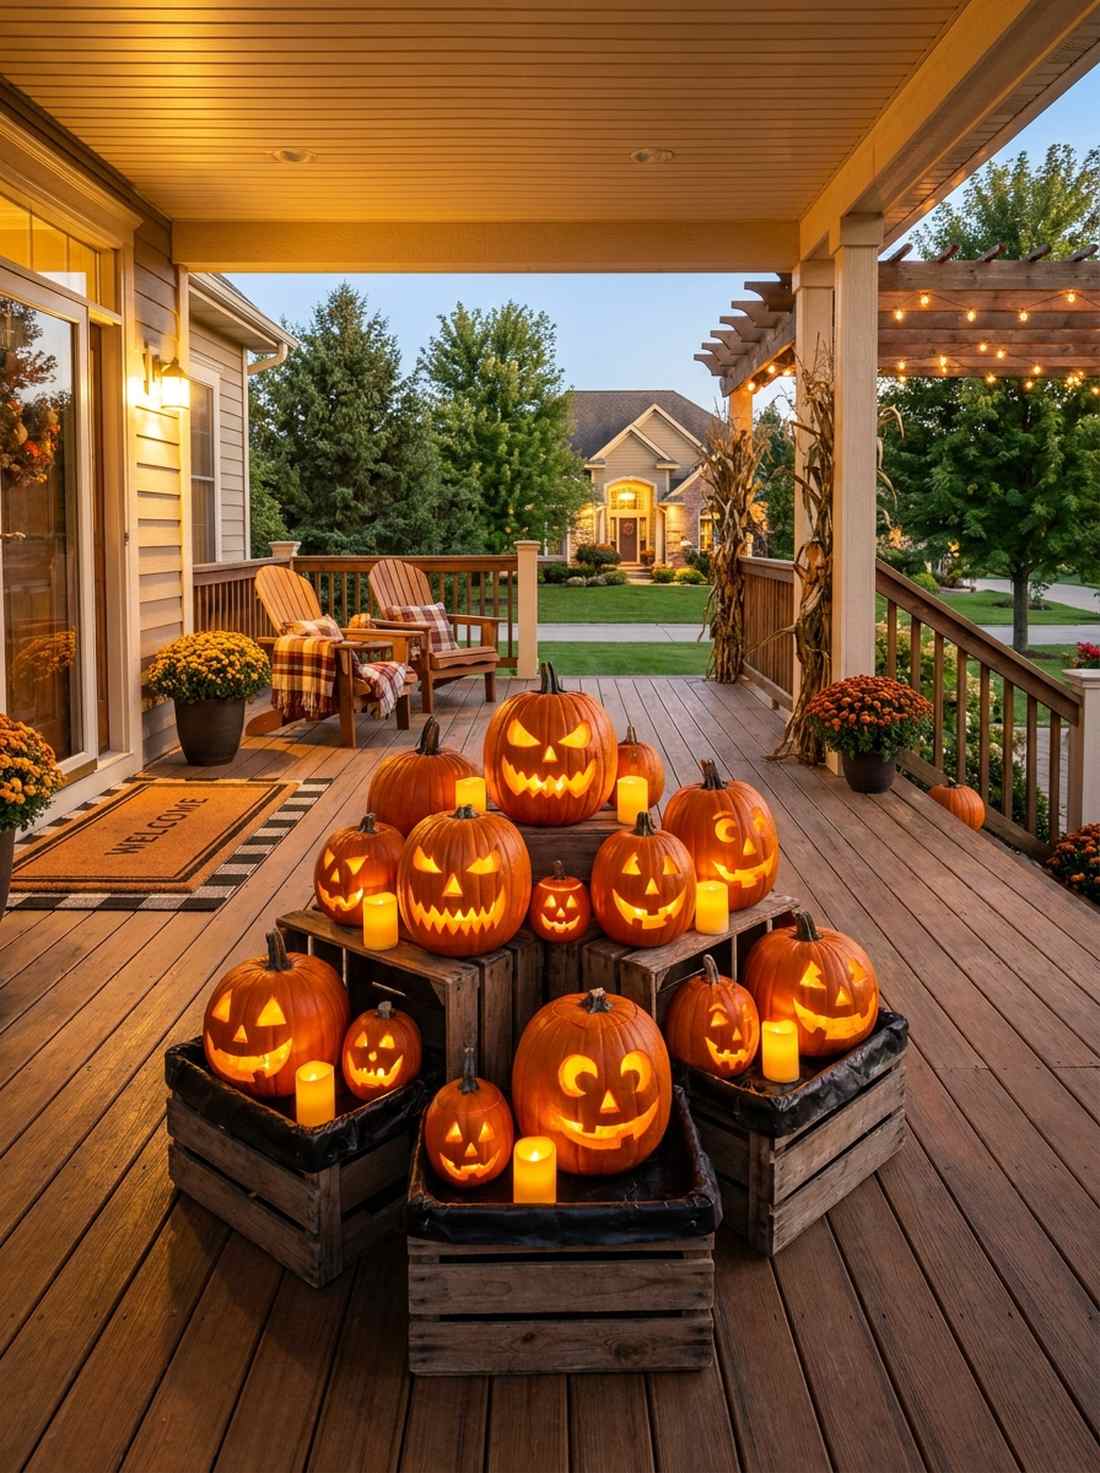
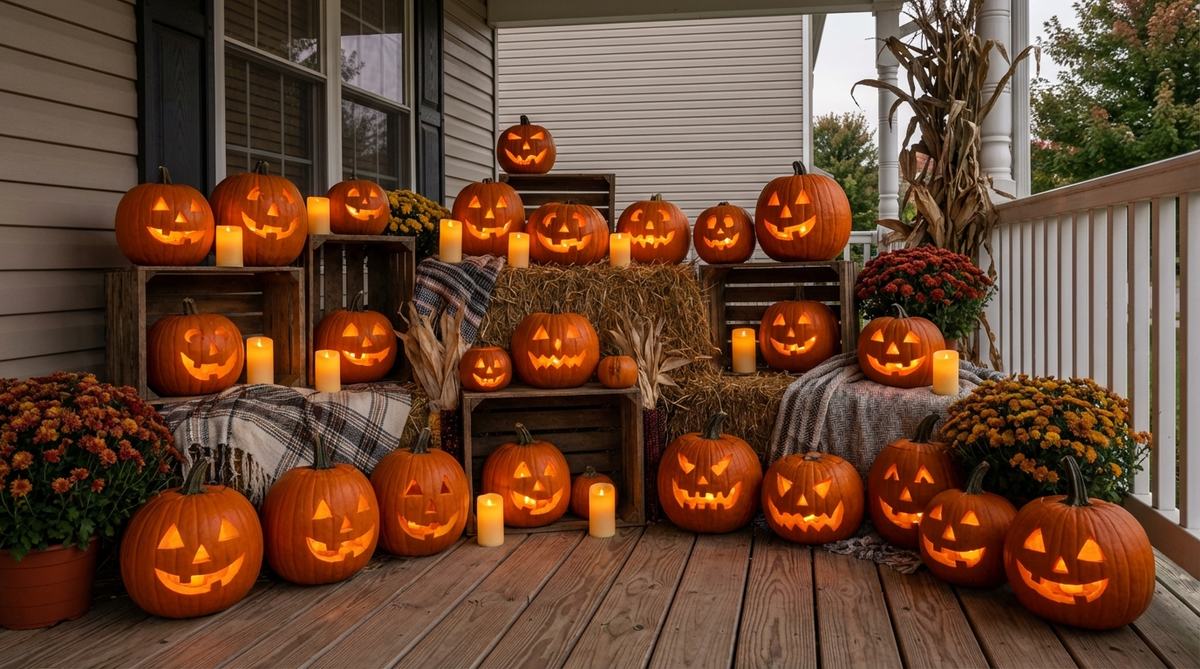
Feels like an intensely glowing bonfire of carved faces right at your entryway. Building a dense jack-o-lantern corner block is perfect for drawing the eye without blocking foot traffic.
Scattering pumpkins randomly dilutes their lighting impact; tightly clustering varying sizes on tiered wooden crates delivers a high-end commercial haunt aesthetic. Incorporating specialized high-CPC waterproof flameless candles ensures a brilliant, flickering glow that lasts safely all night.
This glowing focal point requires a budget of roughly $35–$60.
- Key Materials: Wooden apple crates, waterproof LED candles
- Vibe / Style: Classic dense glow
- Difficulty: Easy stacking
- Budget Breakdown: Crates: $30 | LED Candles: $25.
- Creator’s Tip: Line the wooden crates with heavy duty trash bags before stacking real carved pumpkins to prevent acidic rot from ruining the wood.
- Smart Sourcing: rustic wooden nesting crates and waterproof outdoor flickering LED candles.
24. Window Silhouettes with Backlighting
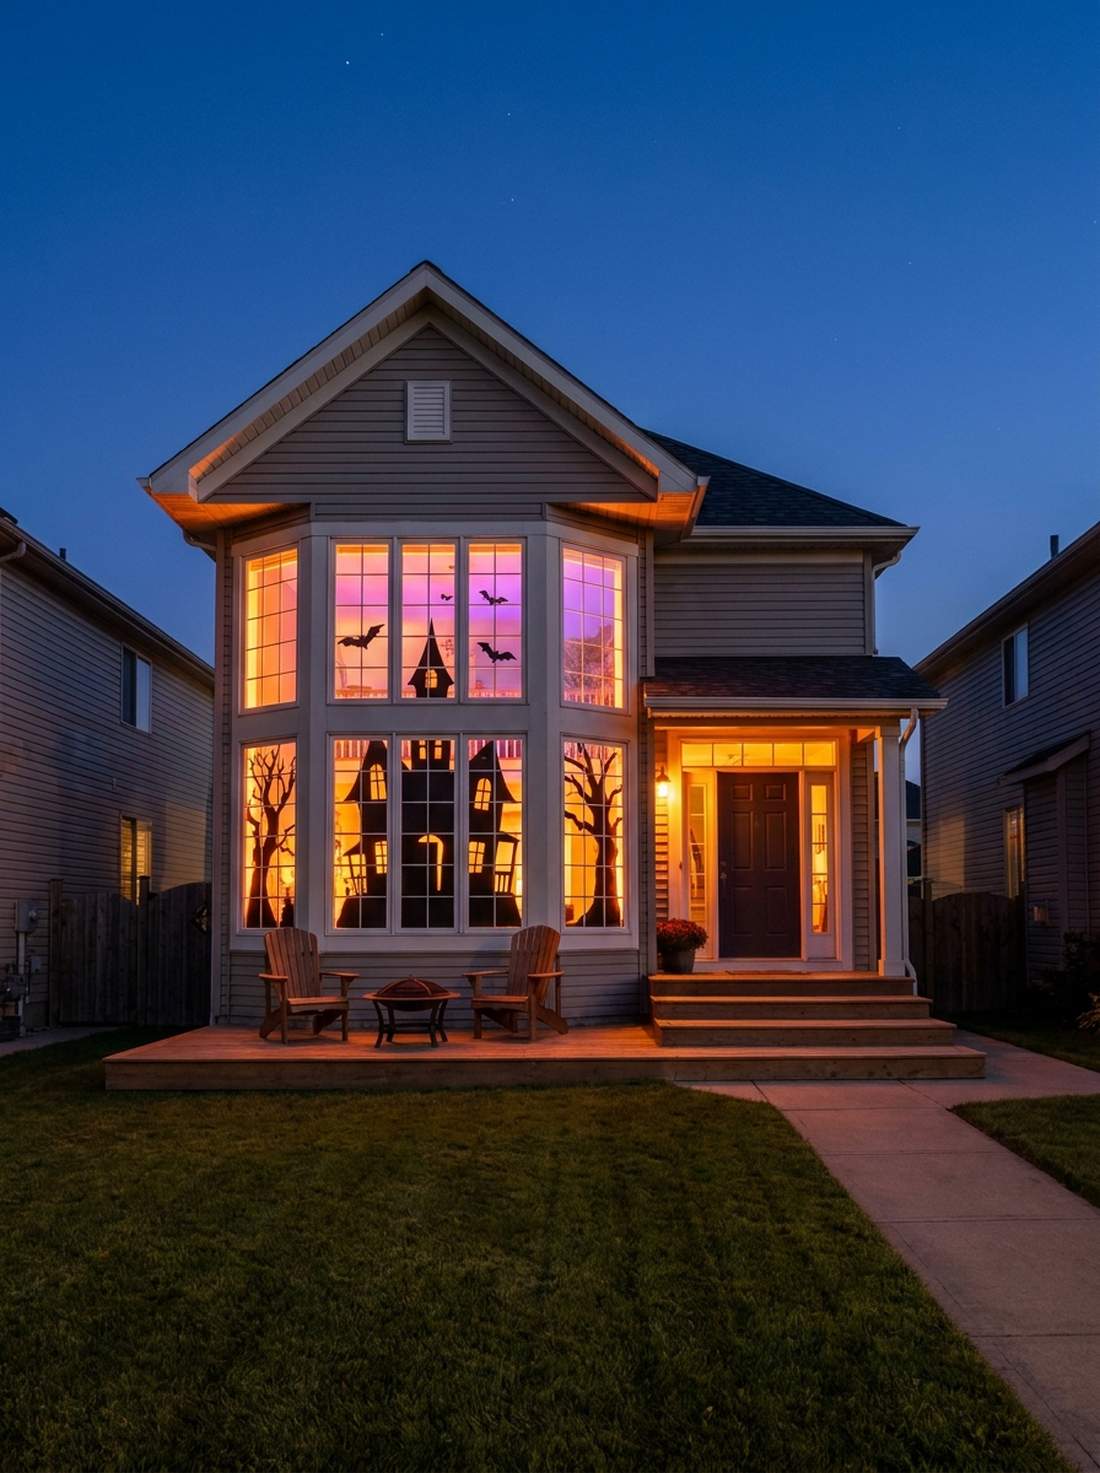
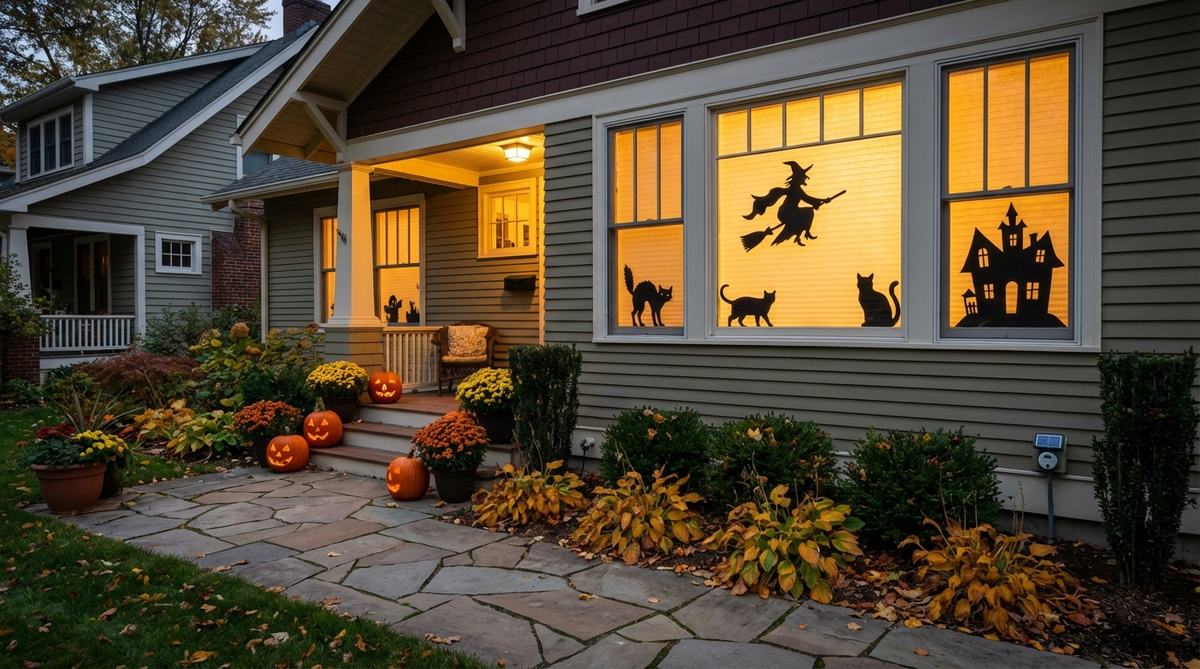
Projects massive, terrifying shadows that dominate the entire block. Utilizing interior backlit window silhouettes is an incredibly cheap use-case for highlighting large front-facing bay windows.
Taping small decals to the glass is barely noticeable; cutting massive, floor-to-ceiling scenes from black poster board completely changes the vibe. Blasting the cutouts from behind with smart color-changing bulbs turns your house into a glowing cinematic screen.
You can execute this massive visual upgrade for just $15–$30. Highly recommended for a quick weekend win!
- Key Materials: Black poster board, smart LED bulbs
- Vibe / Style: Shadow theater
- Difficulty: Simple tracing and cutting
- Budget Breakdown: Poster boards: $10 | Smart bulb: $15.
- Creator’s Tip: Tape white tissue paper tight against the window pane behind the black cutout to perfectly diffuse the interior light into a solid glowing panel.
- Smart Sourcing: bulk black poster board sheets and smart WiFi color-changing LED bulbs.
Most people ruin their front doors with tacky plastic wrap. The next garland blueprint shows you how to add luxury for practically nothing…
25. Front Door Garland of Bats and Maple Leaves
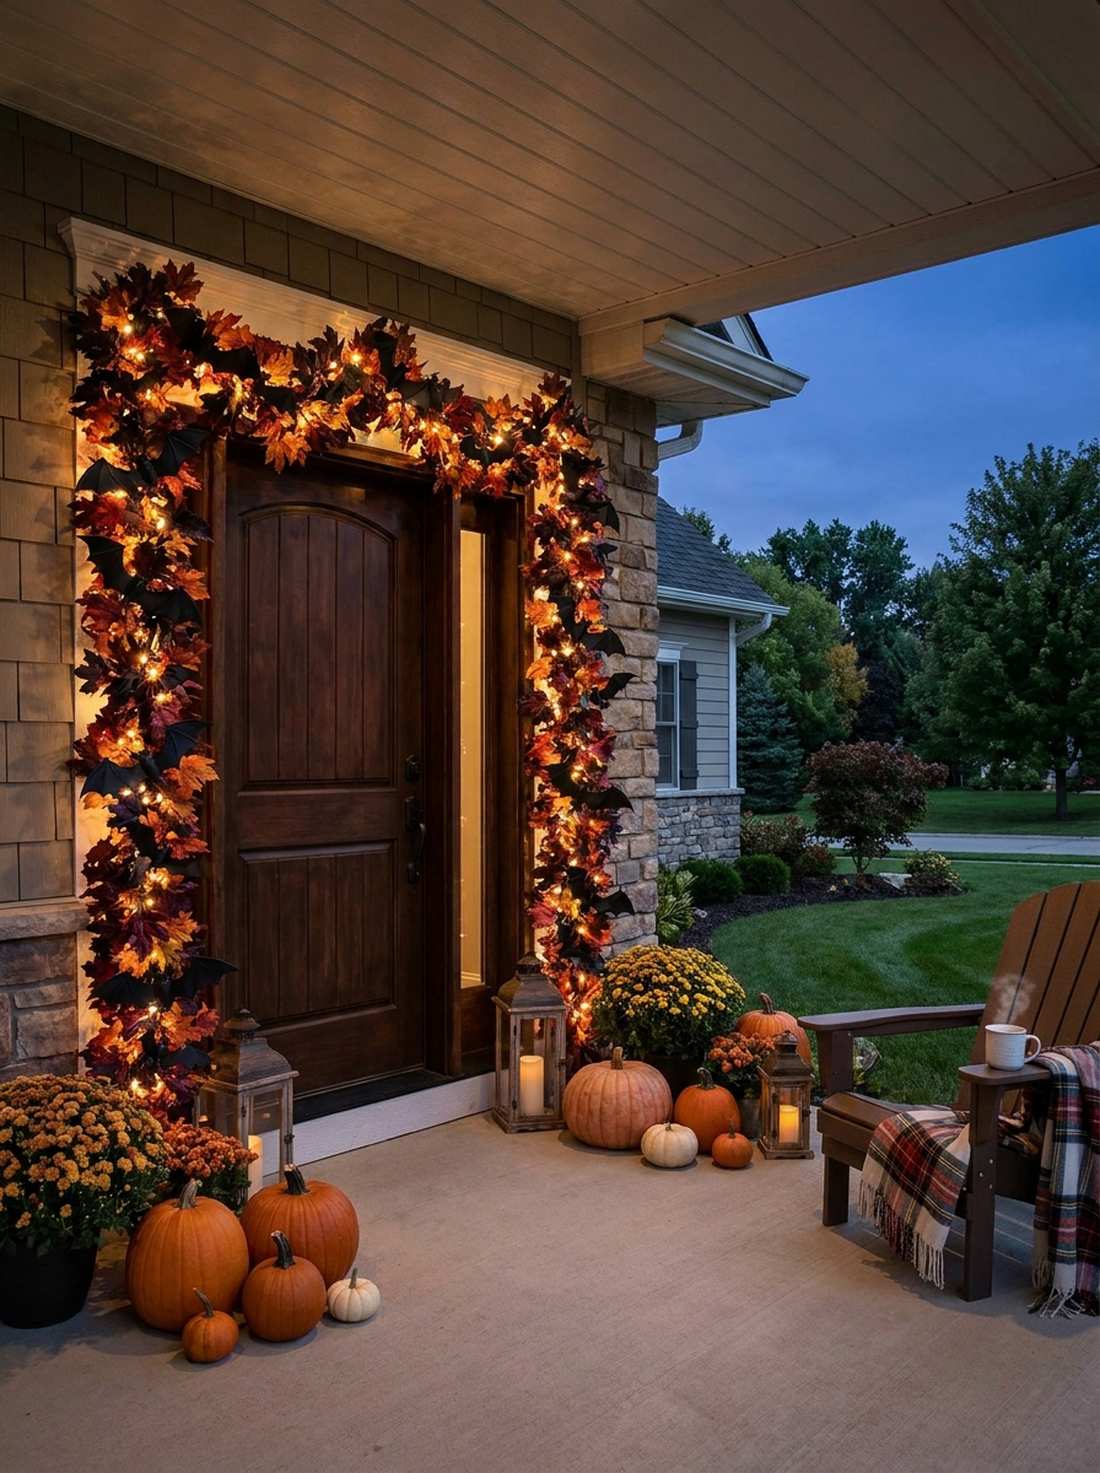
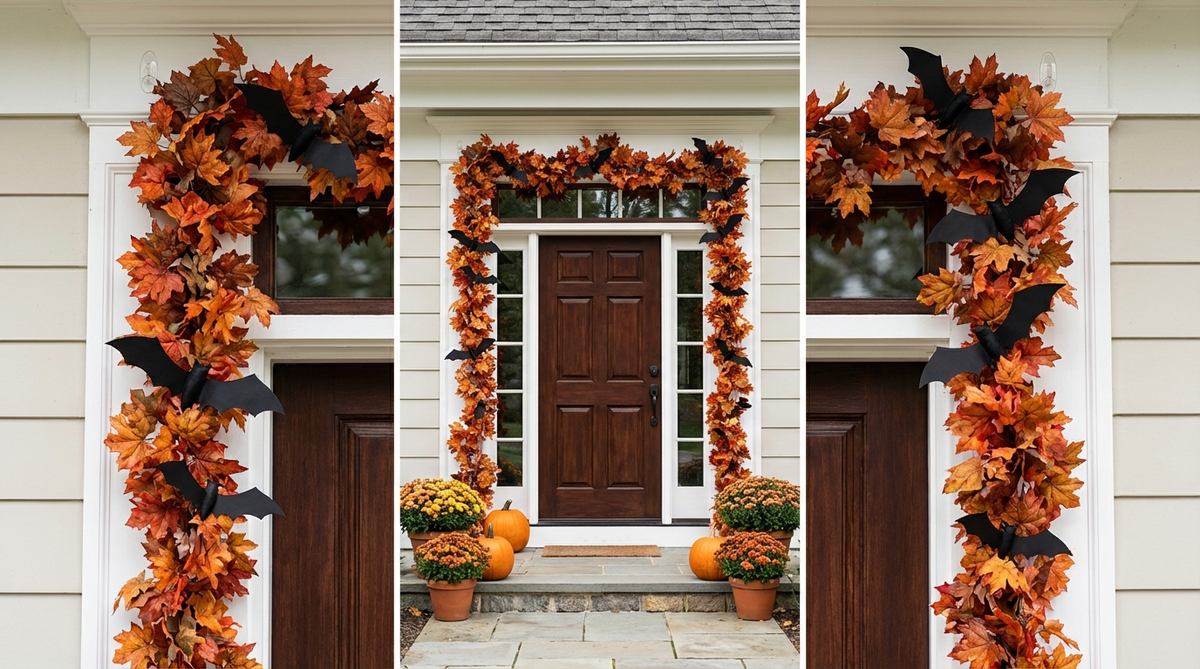
Looks like a dark, enchanted forest has started creeping into your home. A layered autumn bat garland is a spectacular frame for high-traffic front entry doors.
Using bare plastic vines feels incredibly cheap; weaving 3D plastic bats directly into premium faux maple foliage looks far more expensive than it is. Securing the heavy garland with damage-free outdoor adhesive hooks ensures your expensive trim stays perfectly intact.
This thick, luxurious door frame will cost around $40–$65.
- Key Materials: Thick faux autumn garland, 3D plastic bats
- Vibe / Style: Enchanted overgrowth
- Difficulty: Easy hanging
- Budget Breakdown: Premium Garland: $40 | Bats: $10 | Hooks: $10.
- Creator’s Tip: Double up two thinner, cheap garlands by twisting them together to create a massive, ultra-thick luxury base.
- Smart Sourcing: premium pre-lit faux maple garlands and heavy-duty outdoor command hooks.
26. Cornstalk Columns with String Lights
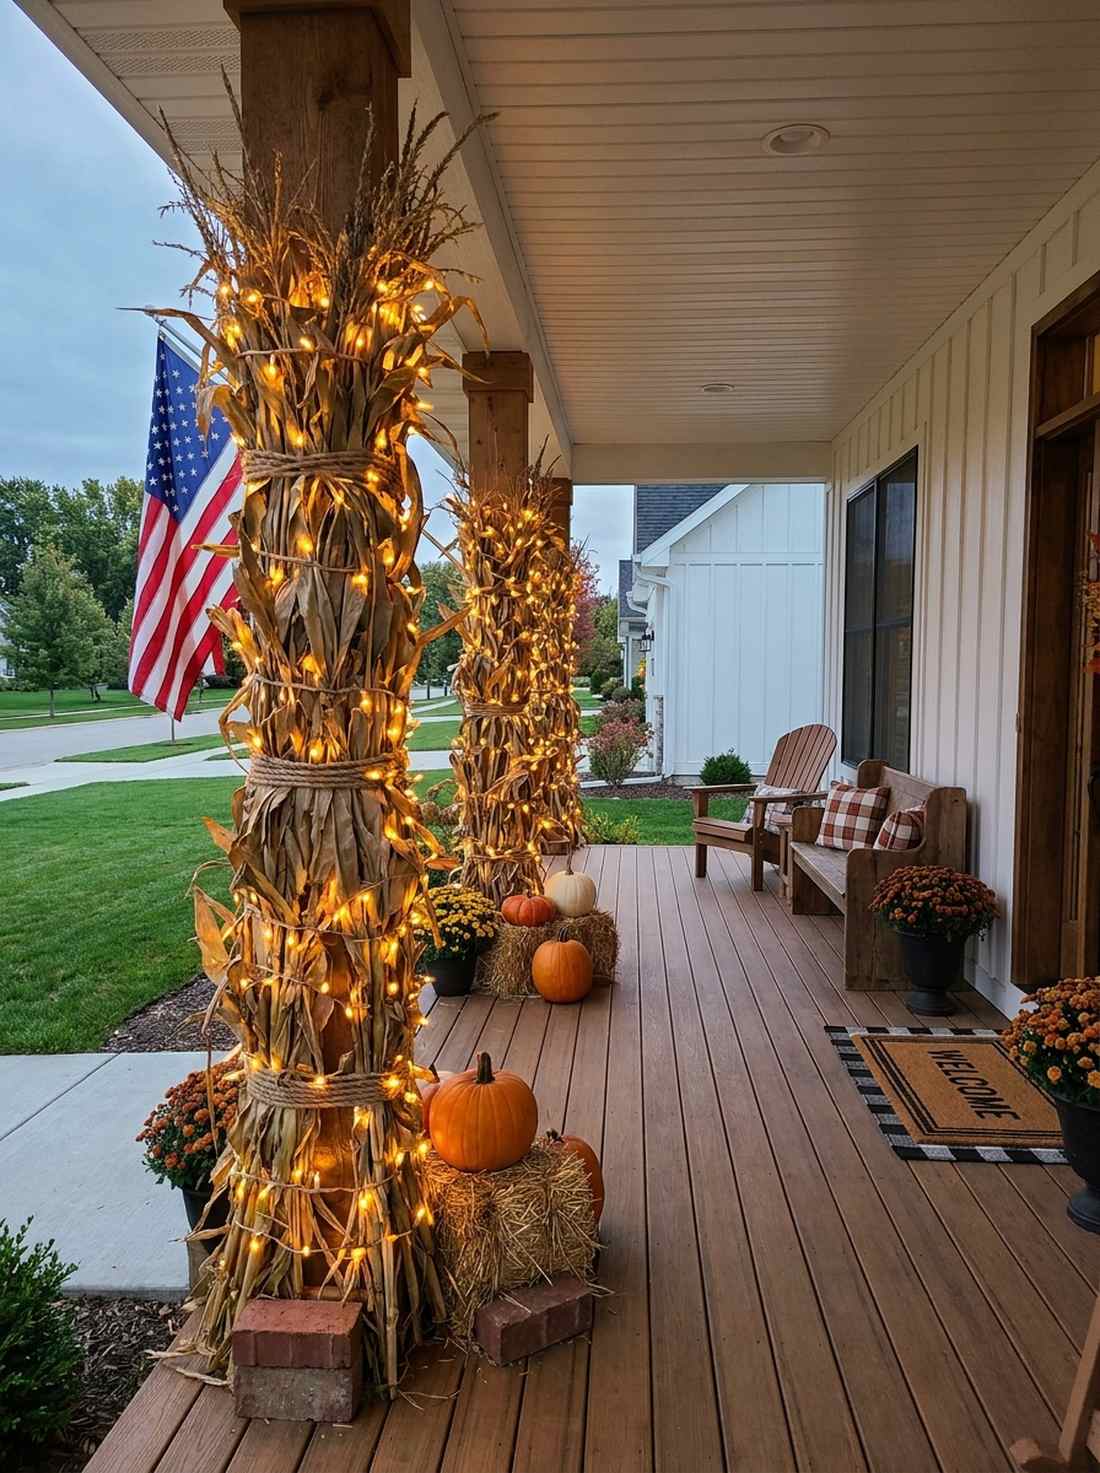
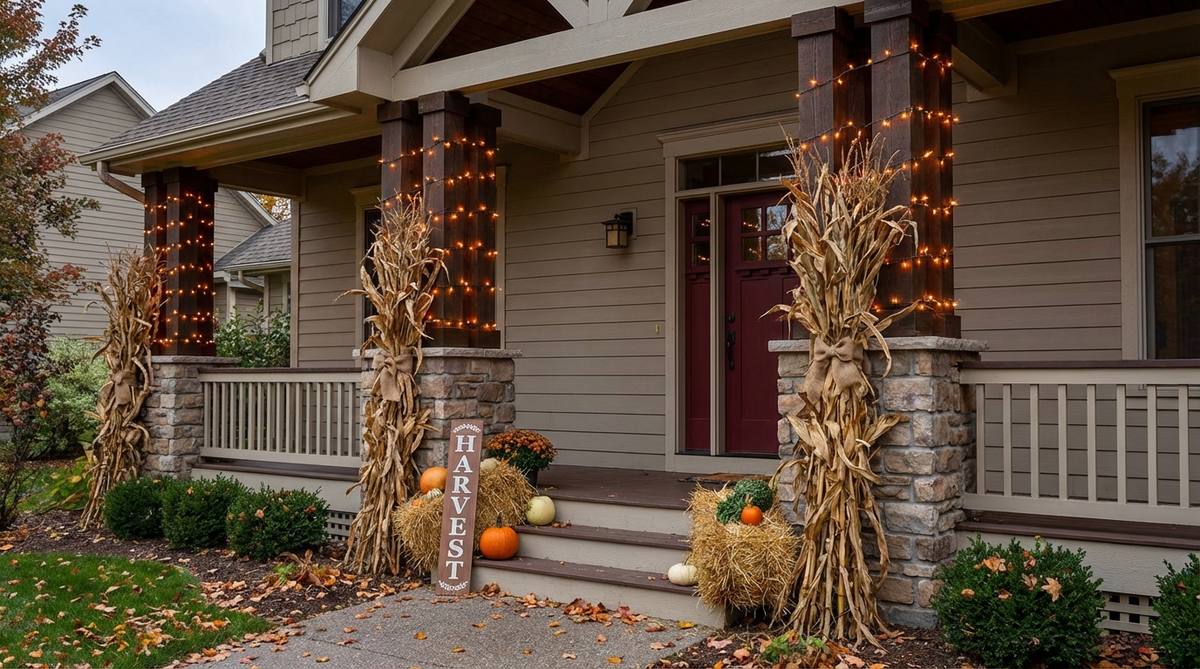
Feels like a rustic farmhouse harvest celebration right on your porch. Wrapping illuminated cornstalk bundles is the ultimate styling trick for boring vertical support columns.
Tying the stalks loosely causes them to collapse in the wind; cinching them tight with ratchet straps and wrapping them in warm amber string lights delivers a high-end commercial haunt aesthetic. It brings massive height and texture without sacrificing any usable floor space.
Sourcing local stalks and lighting them will run you about $30–$50.
- Key Materials: Dried cornstalk bundles, amber LED string lights
- Vibe / Style: Rustic glowing harvest
- Difficulty: Requires tight binding
- Budget Breakdown: Stalks: $20 | String lights: $20.
- Creator’s Tip: Hide a small, heavy brick at the base inside the stalk bundle to keep the center of gravity low and prevent tipping.
- Smart Sourcing: shatterproof amber outdoor string lights and heavy-duty natural jute twine.
27. Minimalist Monochrome Porch in Black
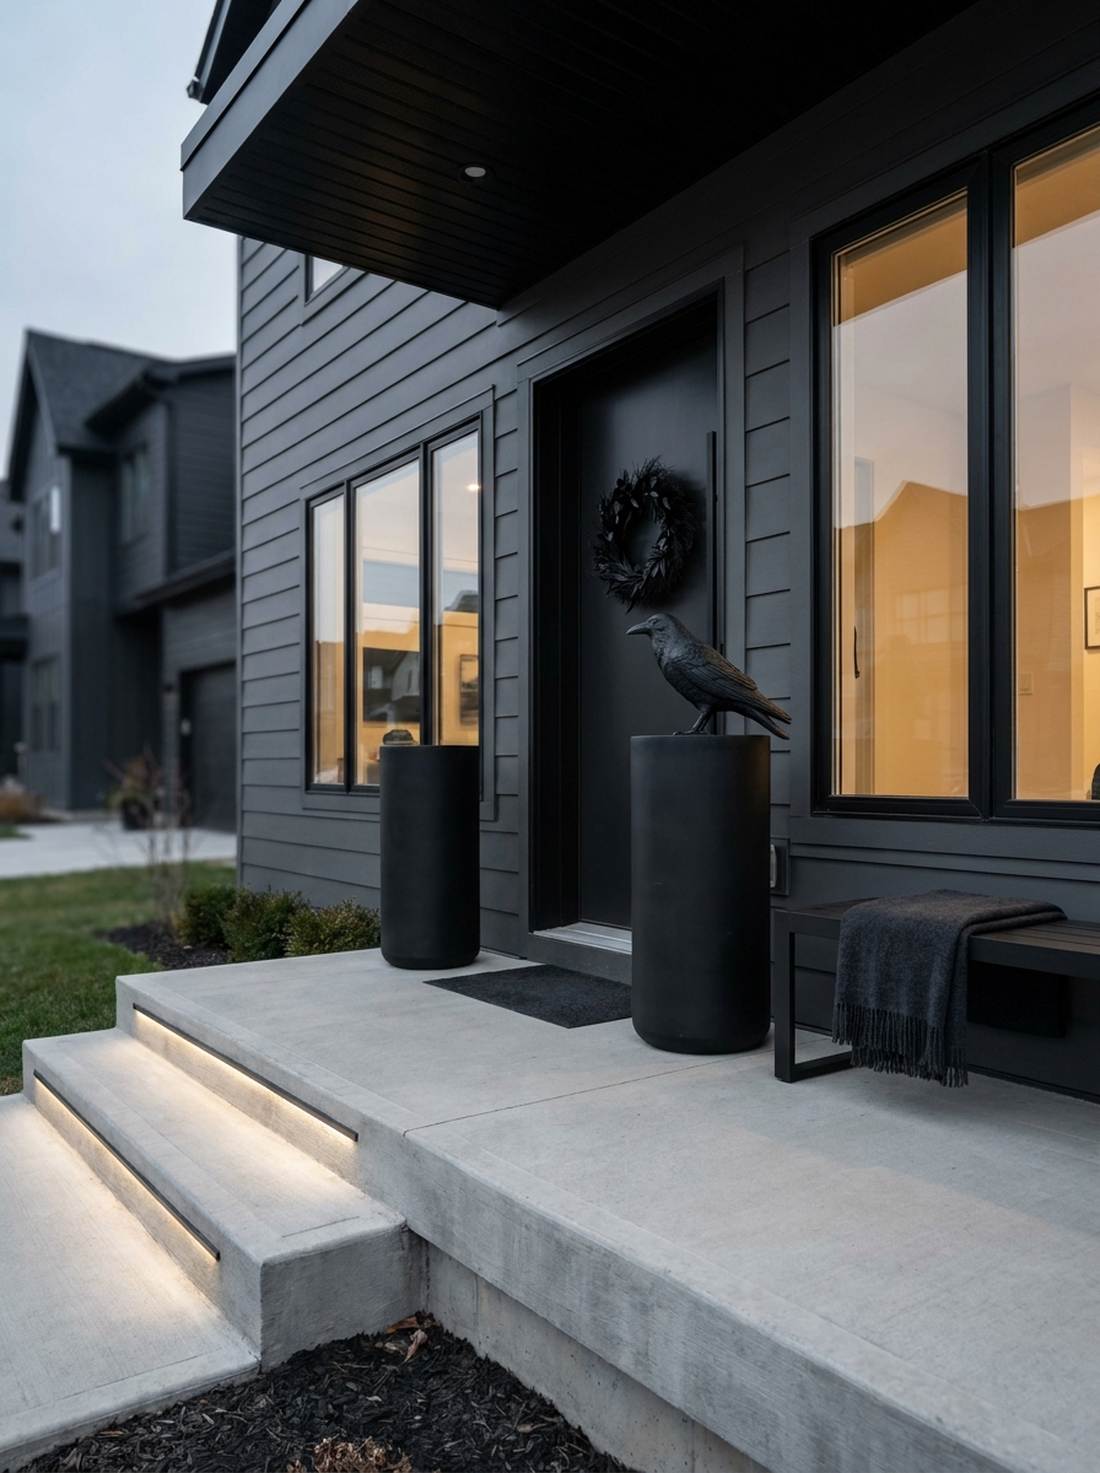
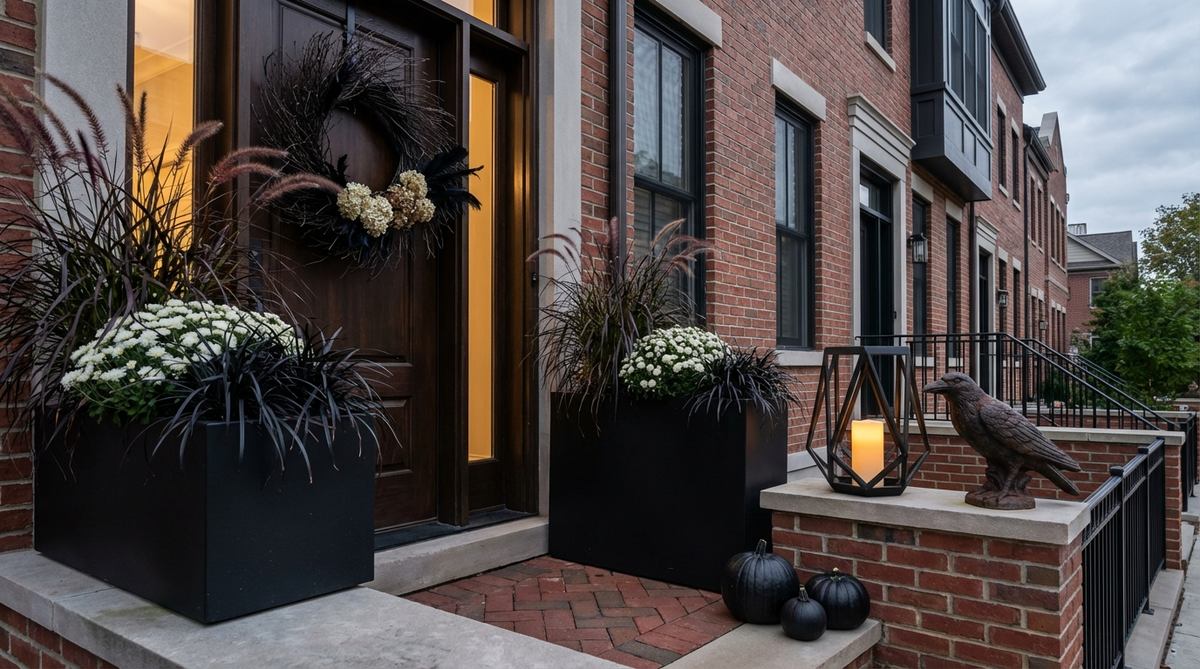
Projects an ultra-modern, high-fashion aesthetic that completely ignores traditional orange cliches. A matte black minimalist entry works flawlessly for sleek city stoops or contemporary architecture.
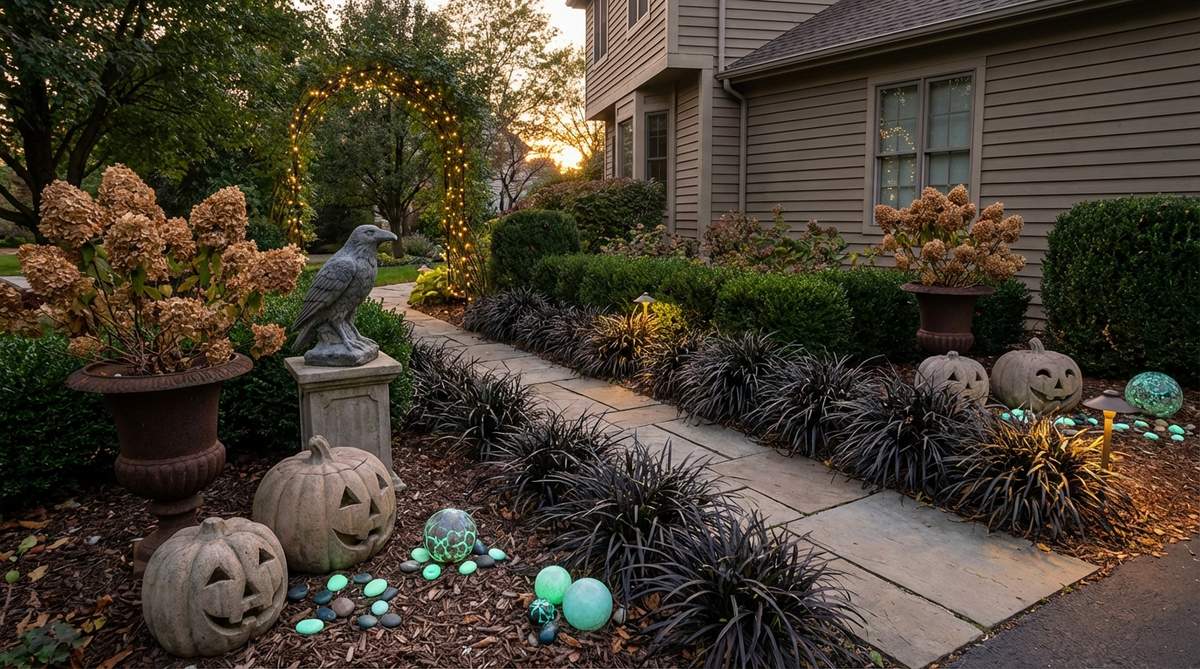
Cluttering the space with colorful props ruins the sleek vibe; strictly limiting the palette to dark planters and a single oversized raven statue completely changes the vibe. Investing in premium black urns creates a sophisticated base that easily transitions into winter decor.
This highly curated modern look costs roughly $60–$100. Pin this to your chic modern decor boards!
- Key Materials: Matte black tall planters, modern gothic wreath
- Vibe / Style: Chic modern macabre
- Difficulty: Minimalist restraint
- Budget Breakdown: Black urns: $60 | Raven prop: $20.
- Creator’s Tip: Spray paint standard terracotta pots with flat black primer to achieve the high-end urn look for a fraction of the cost.
- Smart Sourcing: matte black modern tall outdoor planters and realistic large faux raven props.
28. Spider Web Corner with Oversized Spider
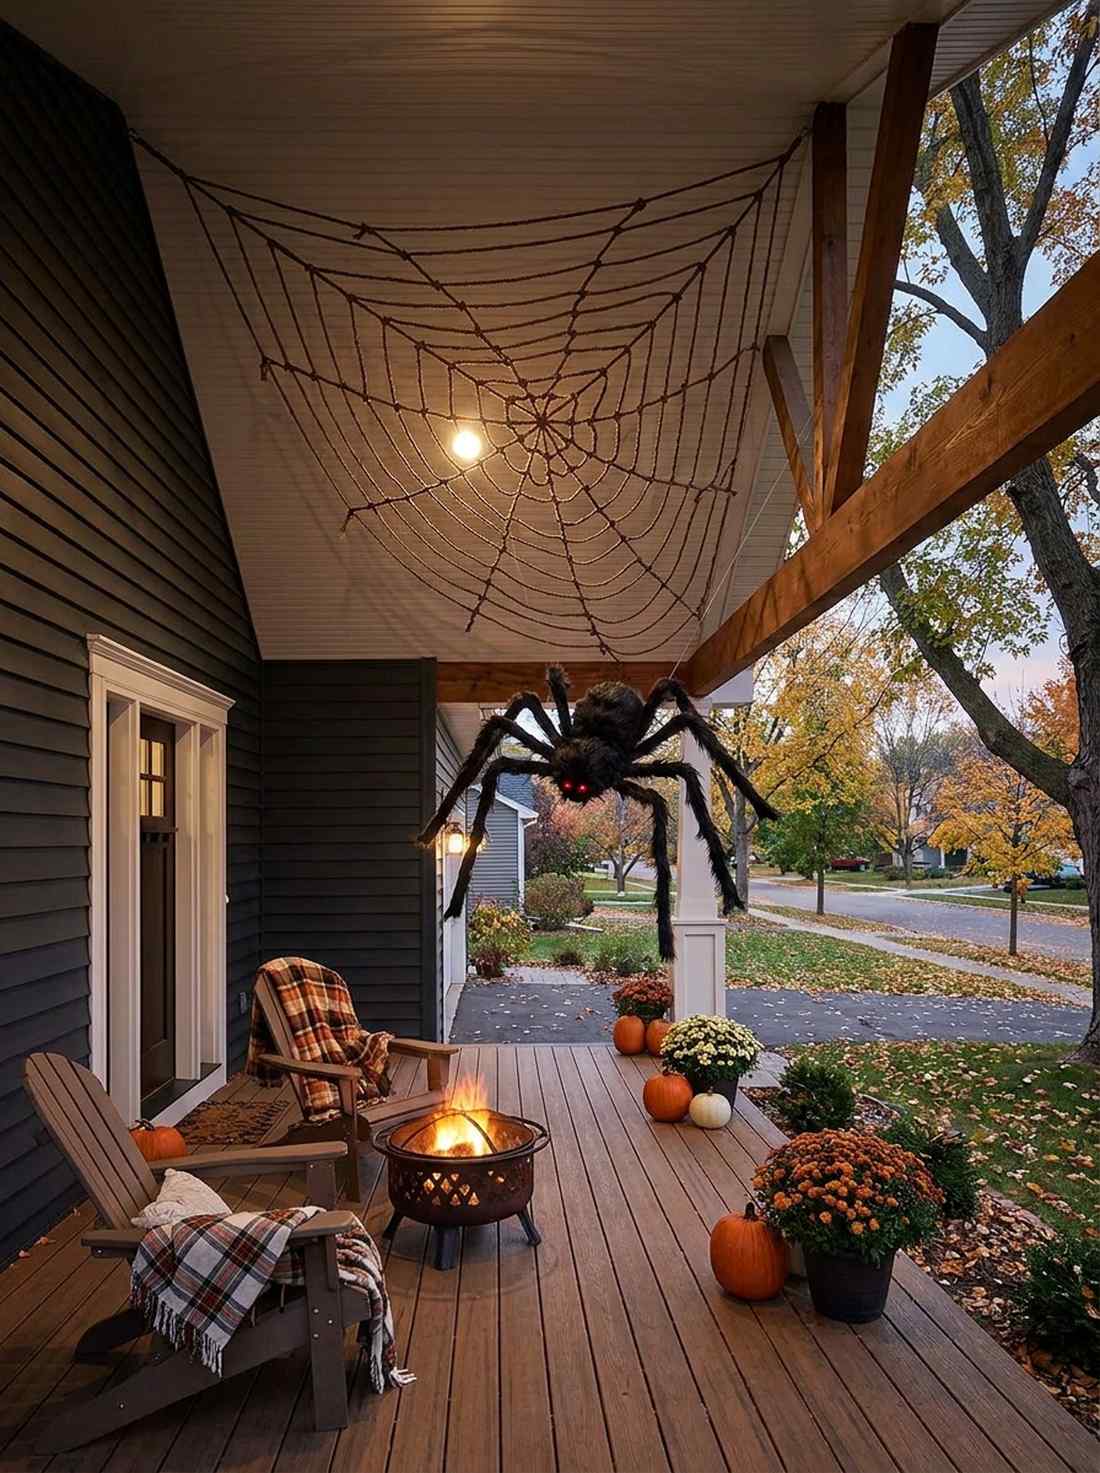
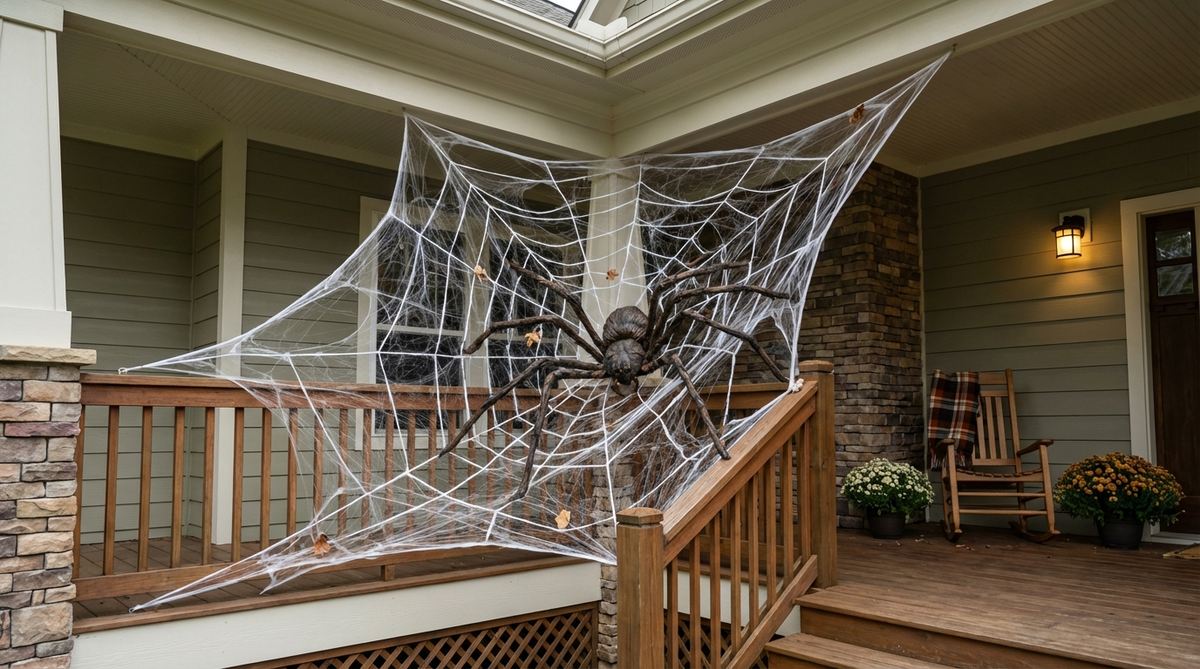
Feels like a terrifying ambush waiting in the shadows of your porch ceiling. Stretching a giant corner spider web is a brilliant use-case for filling awkward, dead airspace.
Using standard cotton webbing from a tiny bag looks stringy and pathetic; installing a massive, pre-woven triangular rope web looks far more expensive than it is. Anchoring a 5-foot poseable furry spider dead in the center guarantees a massive visual impact from the street.
This enormous structural focal point only costs around $30–$50.
- Key Materials: Giant triangular rope web, 5-foot poseable spider
- Vibe / Style: Arachnophobia extreme
- Difficulty: Requires tying off high anchors
- Budget Breakdown: Rope web kit: $20 | Giant spider: $25.
- Creator’s Tip: Run a line of clear fishing string from the spider’s back to a tree branch so it appears to be actively dropping down.
- Smart Sourcing: giant triangular outdoor rope spider web kits and 5-foot poseable furry giant spiders.
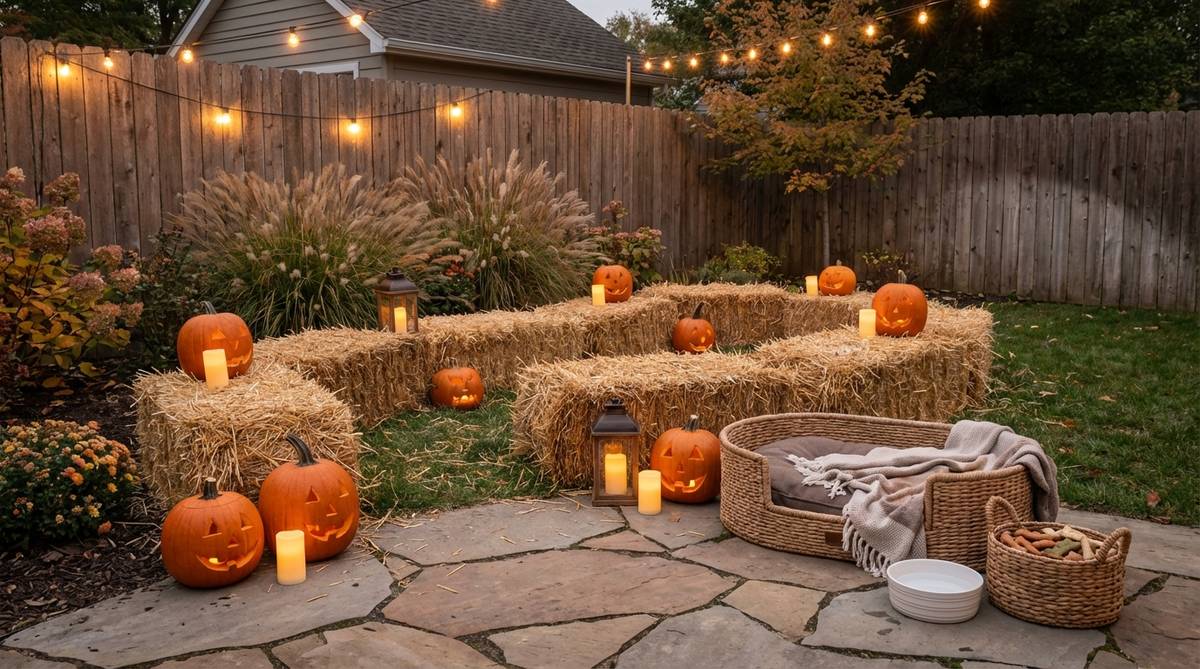
29. Rustic Hay Bale Seating Nook
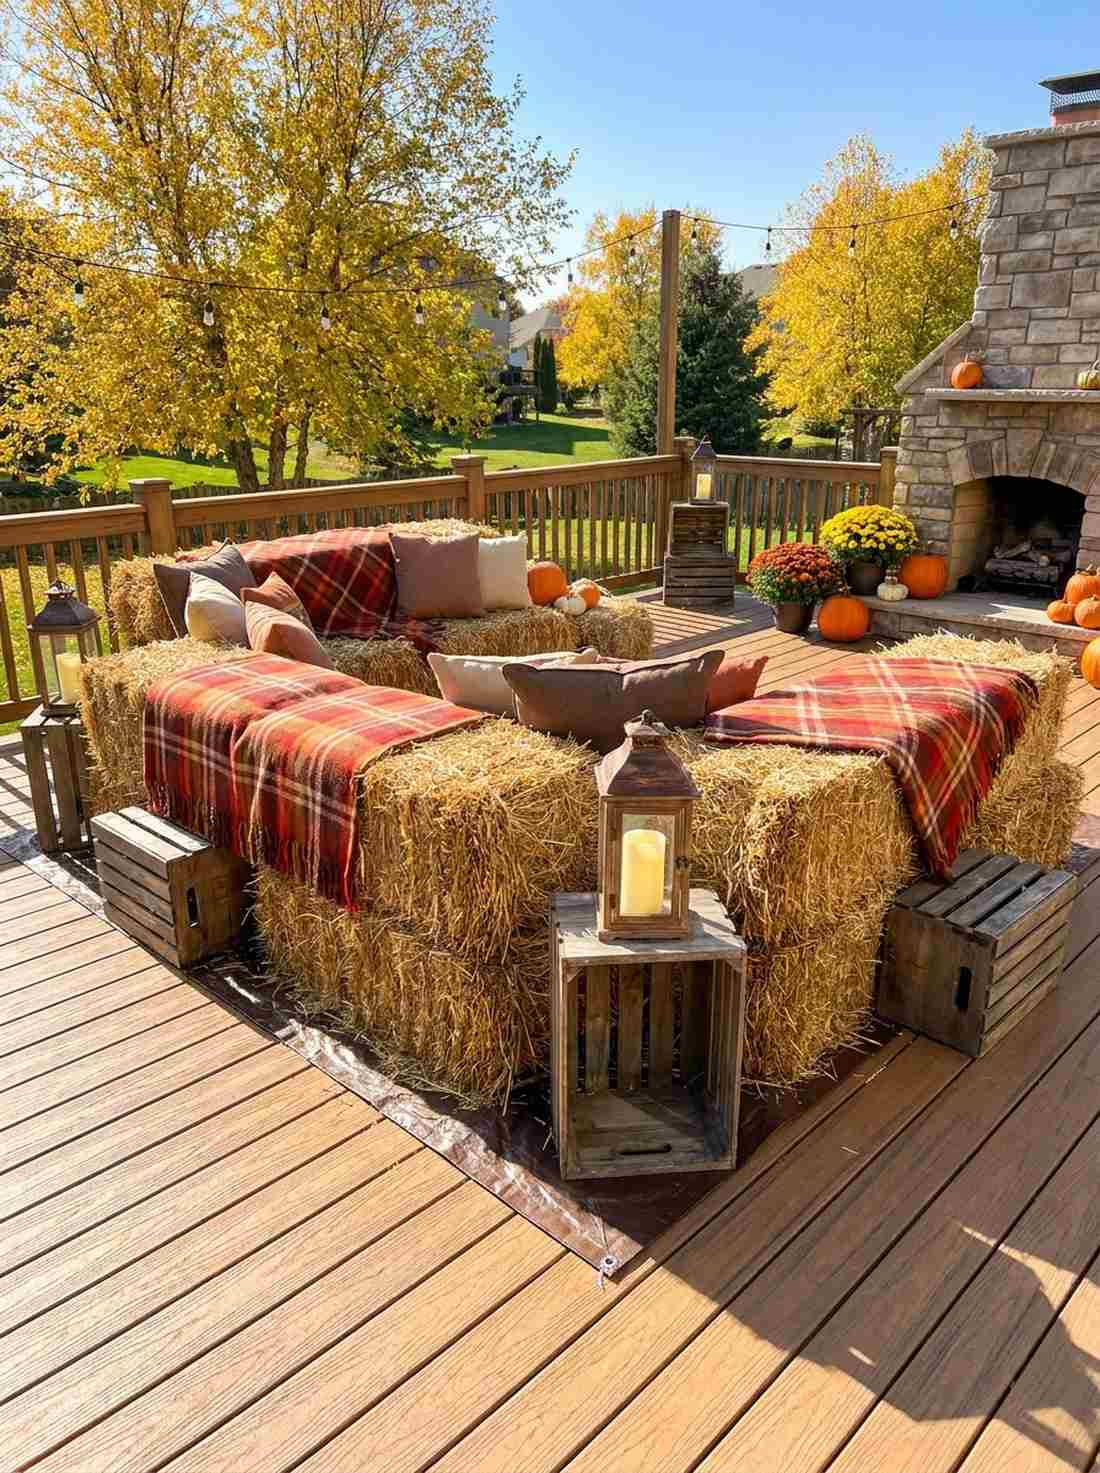
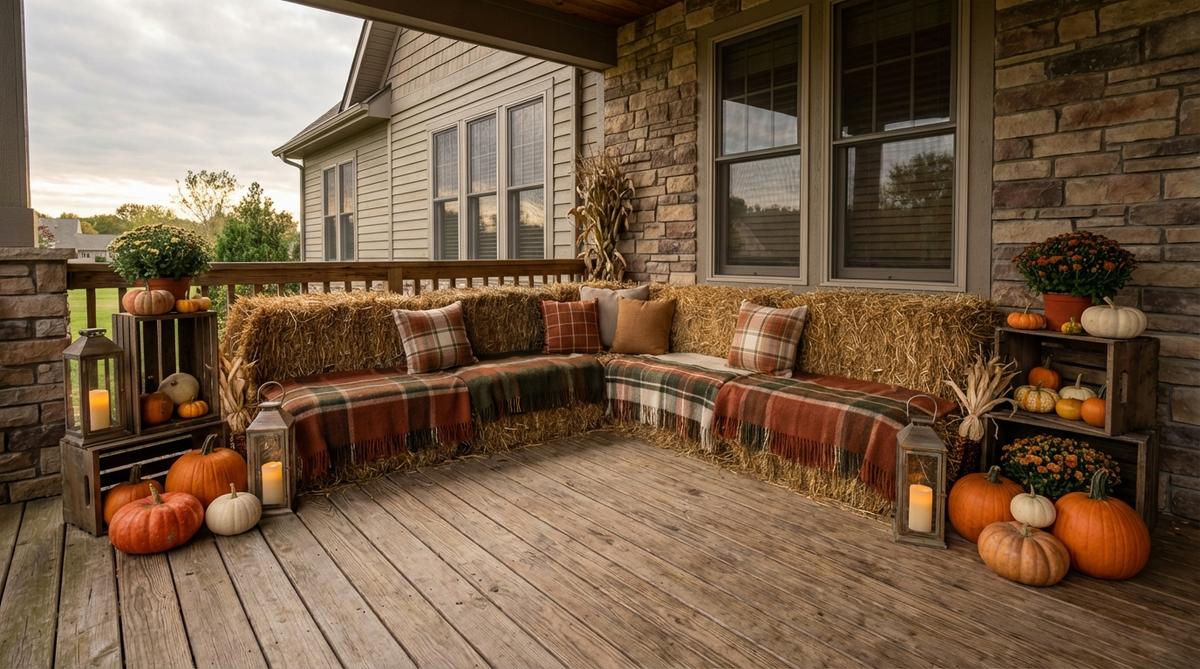
Looks exactly like a professional photo studio backdrop for autumn family pictures. Designing a hay bale lounge corner is incredibly effective for wide patio spaces.
Leaving rough hay bales completely exposed is a recipe for itchy guests; layering them with thick plaid blankets and custom cushions delivers a high-end commercial haunt aesthetic. Surrounding the base with varying heights of wooden crates and lanterns completes the rustic illusion.
Building this cozy photography corner costs roughly $50–$85.
- Key Materials: Full-size hay bales, washable plaid outdoor blankets
- Vibe / Style: Professional harvest photo-op
- Difficulty: Heavy lifting
- Budget Breakdown: Bales: $40 | Blankets: $25 | Lanterns: $20.
- Creator’s Tip: Lay down a heavy-duty plastic tarp underneath the bales to prevent moisture rot and make sweeping up the loose straw a breeze.
- Smart Sourcing: washable outdoor plaid picnic blankets and rustic decorative wooden nesting crates.
You can buy a hundred cheap plastic props, or you can build this next vertical crate display and make your porch look like a $500 installation…
30. Recycled Crate Display for Potted Mums
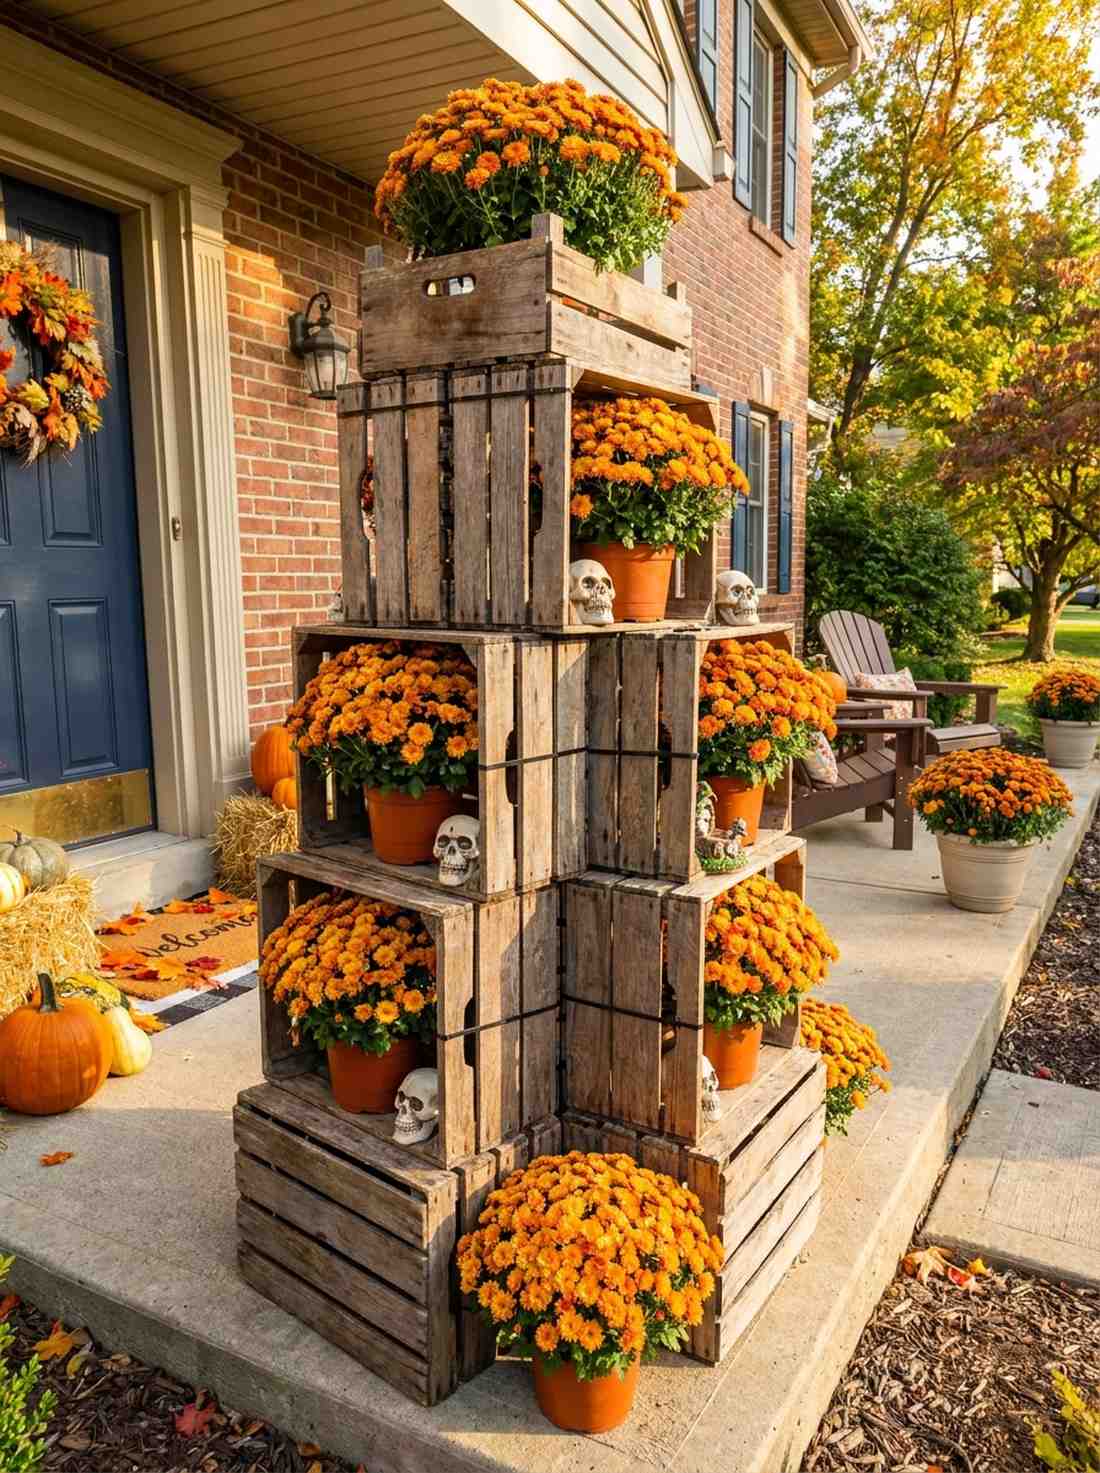
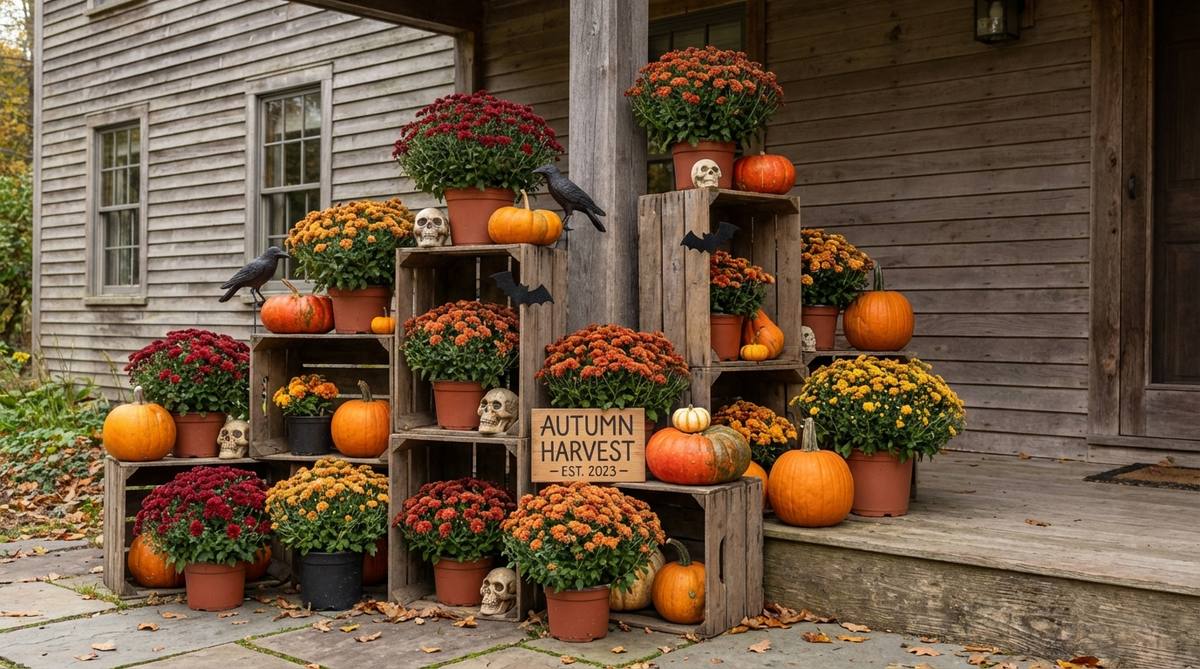
Creates a towering wall of autumn color that draws the eye directly to your front door. A vertical stacked crate display is the absolute best solution for narrow, space-limited stoops.
Placing pots flat on the ground wastes massive amounts of vertical space; securing wooden crates together into a staggered tower completely changes the vibe. Tucking high-CPC fairy garden accessories and miniature skulls between the bright orange mums creates a stunning juxtaposition of life and death.
This towering floral focal point will run you about $60–$90.
- Key Materials: Wooden nesting crates, live potted mums
- Vibe / Style: Vertical harvest tower
- Difficulty: Stacking and securing
- Budget Breakdown: Crates: $40 | Flowers: $30 | Skulls: $10.
- Creator’s Tip: Zip-tie the back slats of the wooden crates together so the entire tower doesn’t topple over when guests brush past it.
- Smart Sourcing: heavy-duty rustic wooden crate sets and bulk mini plastic skull props.
31. Child-Friendly Not-Too-Scary Porch Scene
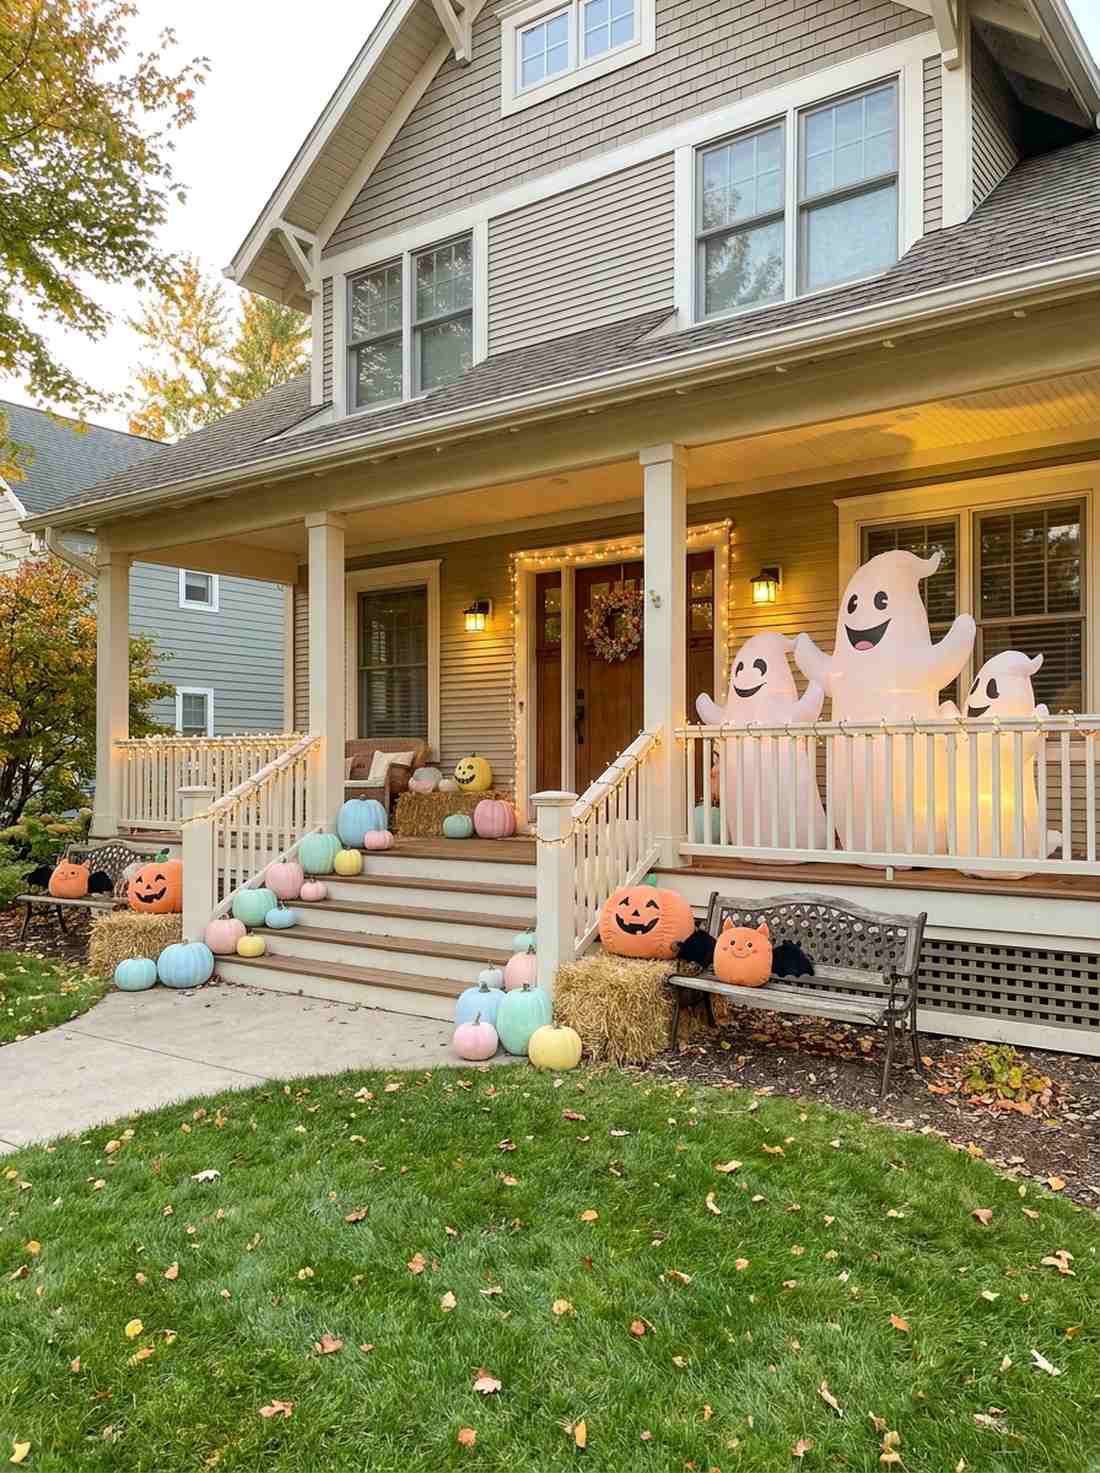
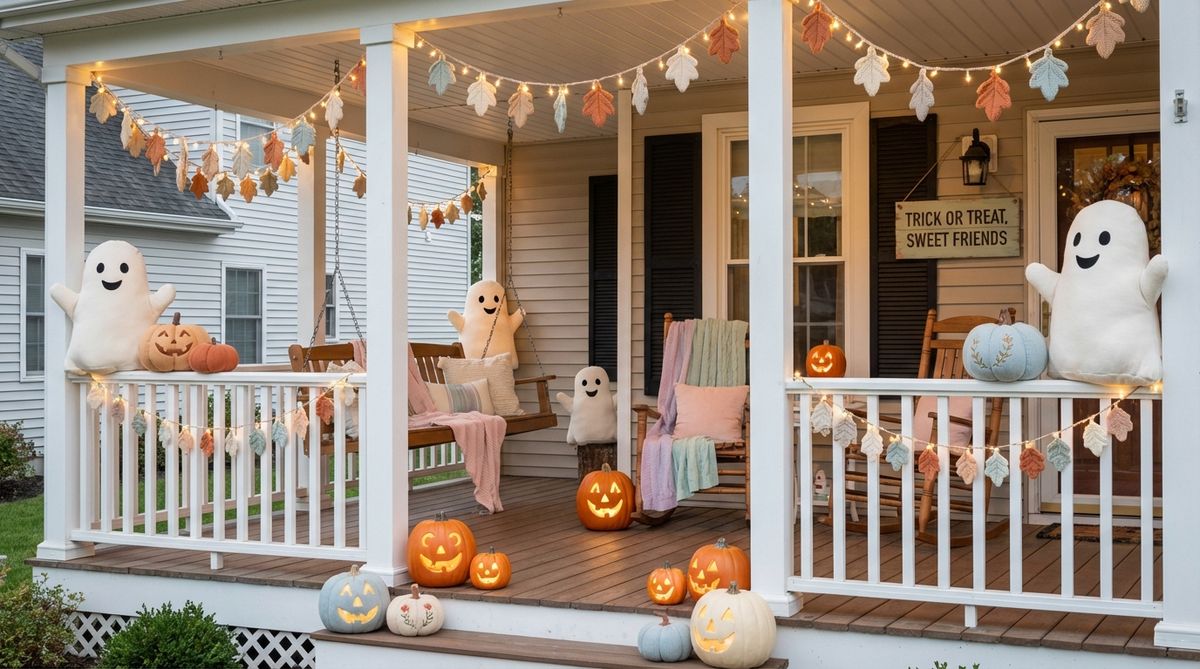
Feels like stepping into a gentle, animated storybook that toddlers will absolutely adore. Designing a whimsical pastel halloween porch is highly recommended for neighborhoods with lots of strollers.
Relying on grotesque gore drives away young families; utilizing smiling inflatables, soft plush decor, and pastel-painted pumpkins gives a designer-level finish that feels incredibly welcoming. Swapping harsh strobes for soft, warm-white fairy lights ensures the pathway is safe and inviting.
You can curate this gentle aesthetic for roughly $40–$75. Save this for a family-friendly layout!
- Key Materials: Pastel paint, friendly ghost inflatables
- Vibe / Style: Gentle storybook charm
- Difficulty: Very easy
- Budget Breakdown: Inflatables: $40 | Paint/Props: $25.
- Creator’s Tip: Use a warm yellow spotlight instead of harsh blue or red to keep the shadows soft and prevent the inflatables from looking menacing.
- Smart Sourcing: friendly ghost outdoor inflatable decor and warm-white outdoor fairy light strands.
32. Pet-Friendly Outdoor Halloween Zone
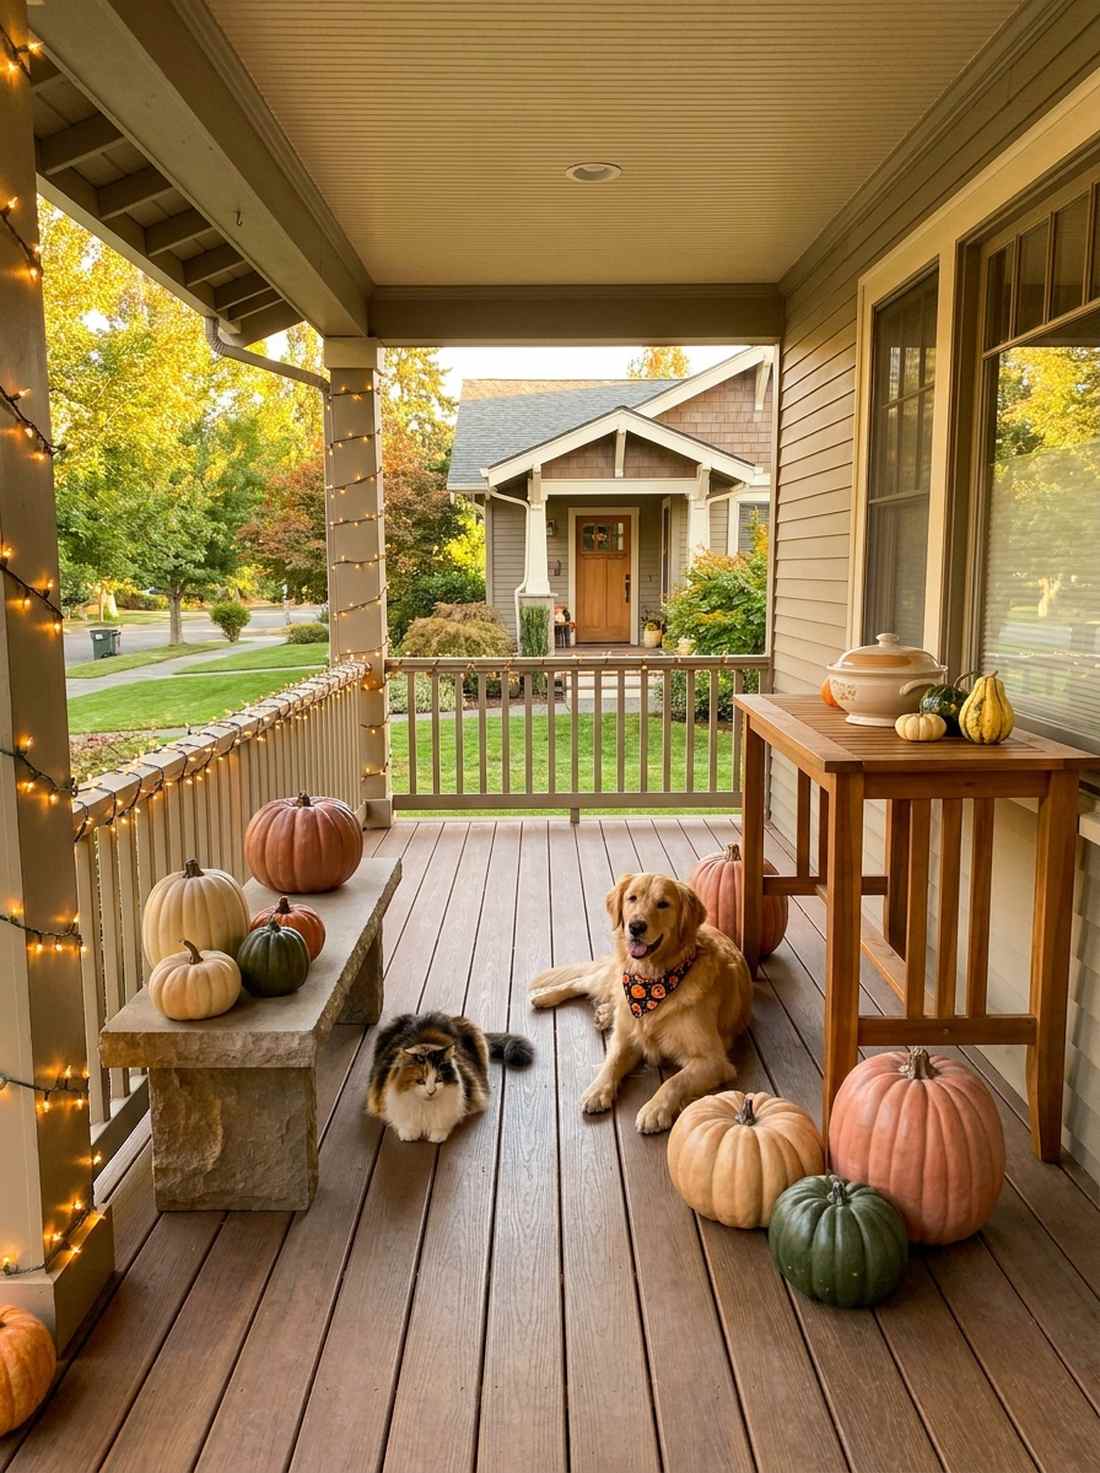
Ensures your furry friends stay safe while still projecting a festive neighborhood vibe. A pet-safe minimalist porch is the ultimate use-case for homeowners with curious dogs or outdoor cats.
Using stringy cobwebs and toxic plants is a massive hazard; elevating non-toxic decor and locking away motion-sensor jump scares completely changes the vibe. Investing in heavy, un-tippable resin props guarantees your displays survive wagging tails and sudden zoomies.
Creating a bulletproof, pet-safe zone costs about $40–$60.
- Key Materials: Heavy resin pumpkins, shatterproof lighting
- Vibe / Style: Safe and sturdy festive
- Difficulty: Requires careful placement
- Budget Breakdown: Resin props: $40 | Shatterproof lights: $20.
- Creator’s Tip: Keep all chocolate bowls and small choking hazards on a high, unstable-free table completely out of snout reach.
- Smart Sourcing: heavy-duty solid resin faux pumpkins and shatterproof outdoor LED string lights.
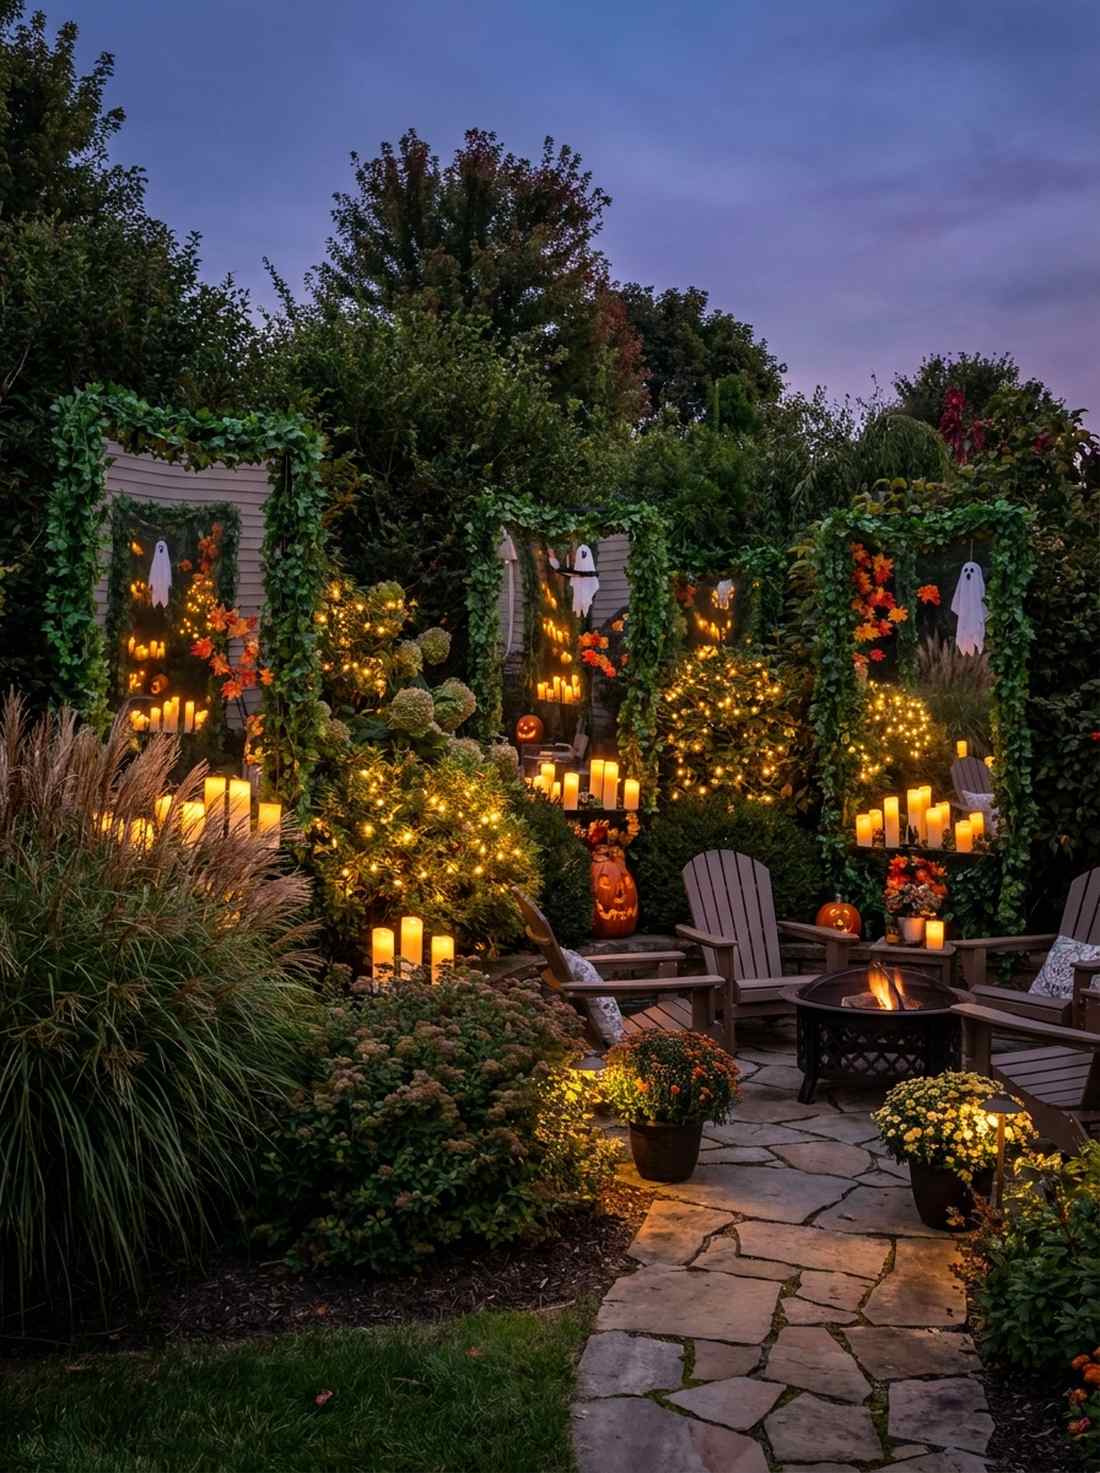
33. Moody Garden Path with Glass Hurricanes
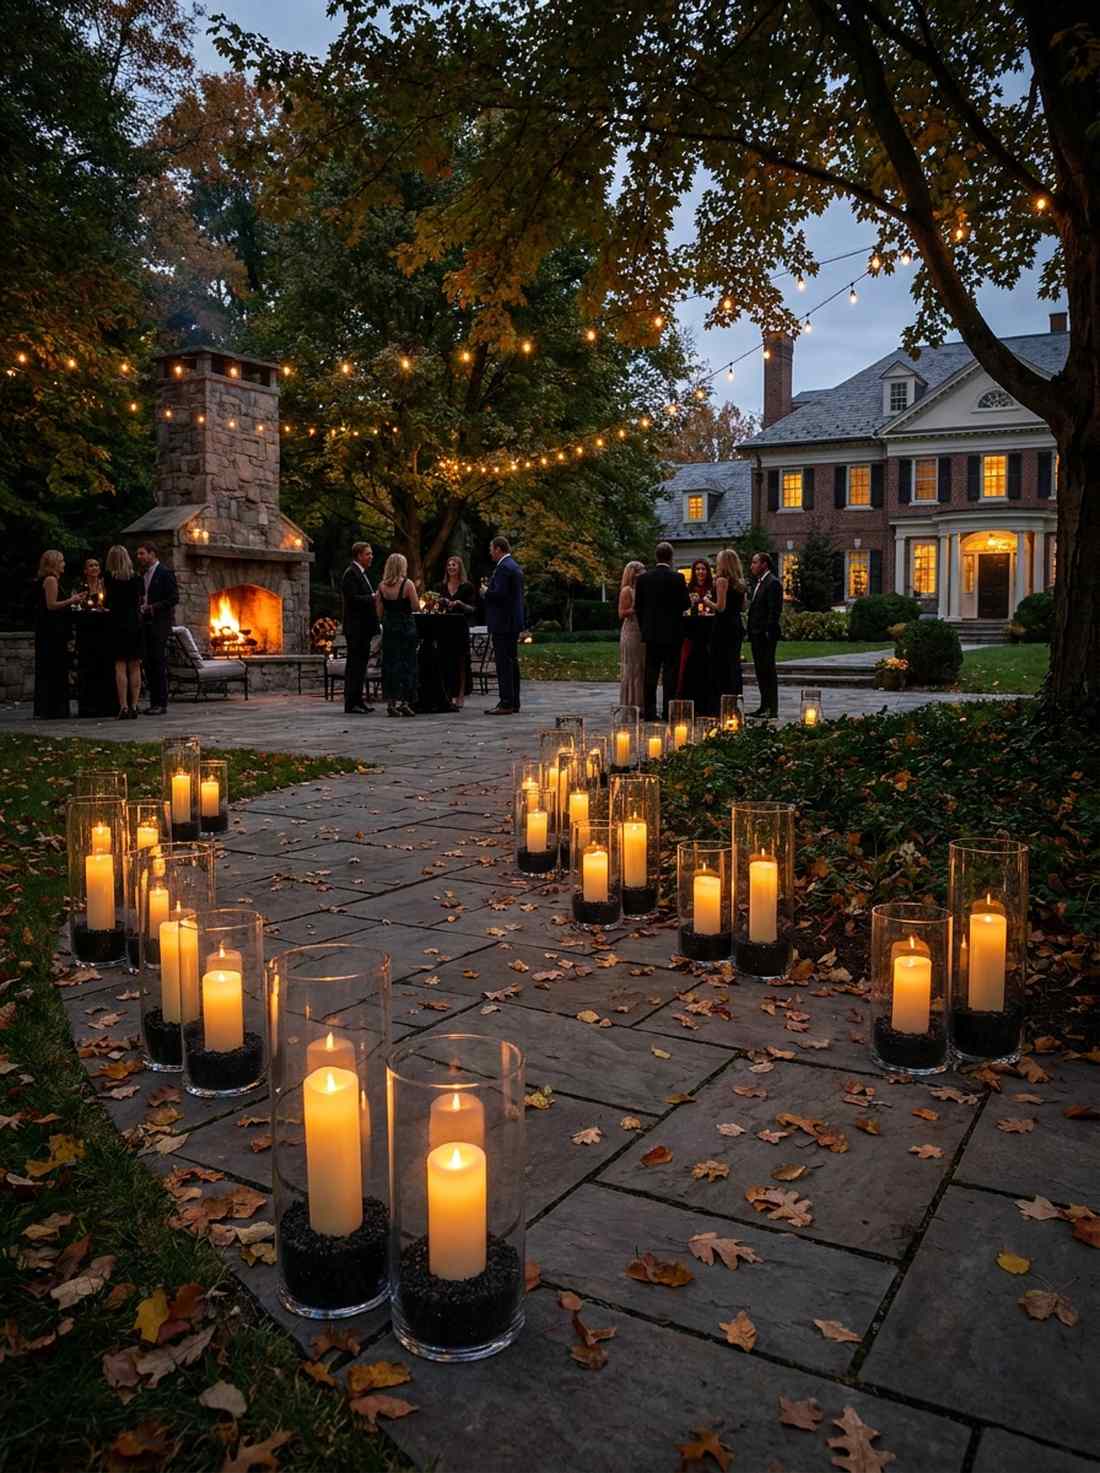
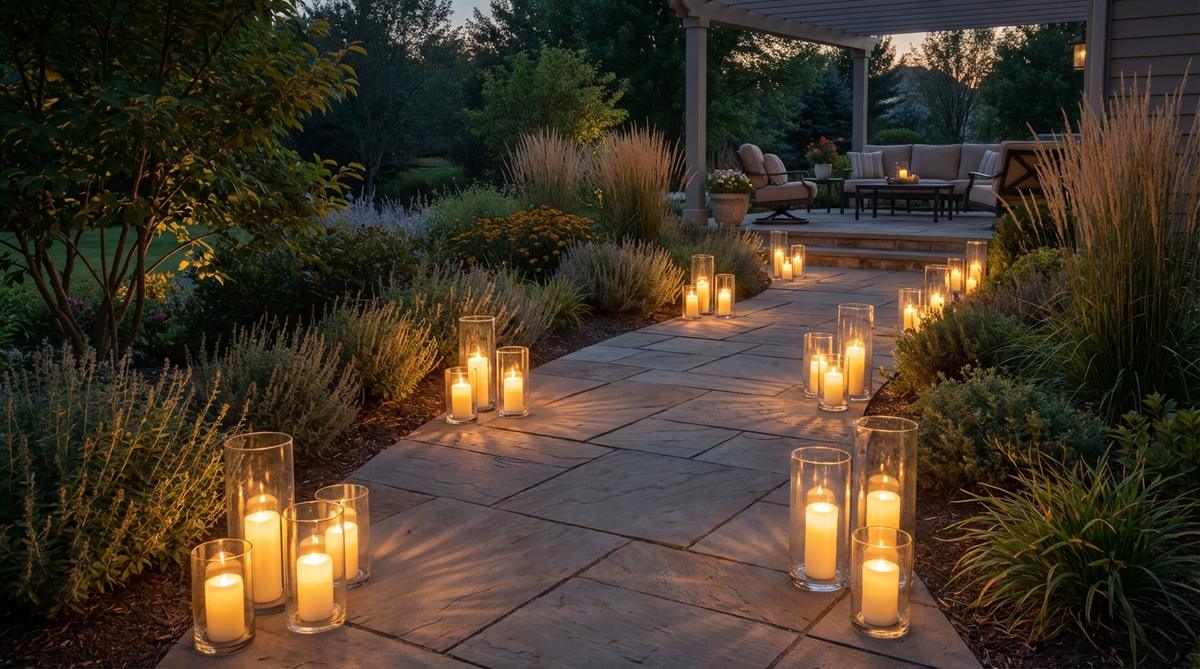
Looks like a highly exclusive, atmospheric dark garden party. Lining your walkways with a glass hurricane candle path is perfect for upscale evening entertaining.
Using open flames near dry autumn leaves is incredibly dangerous; sealing flickering LED pillars inside heavy glass hurricane vases looks far more expensive than it is. Staggering them randomly rather than in a perfect line mimics the natural, unsettling glow of swamp fireflies.
This premium ambient lighting setup averages $70–$120. Pin this if you want an expensive-looking estate vibe!
- Key Materials: Thick glass hurricane vases, premium LED pillars
- Vibe / Style: High-end gothic estate
- Difficulty: Easy but fragile
- Budget Breakdown: Glass vases: $60 | LED Pillars: $40.
- Creator’s Tip: Pour two inches of black aquarium gravel into the bottom of each vase to weigh them down against the wind and hide the plastic candle bases.
- Smart Sourcing: heavy-duty glass hurricane vase bulk packs and flickering waterproof LED pillar candles.
34. All-White Ghostly Garden Scheme
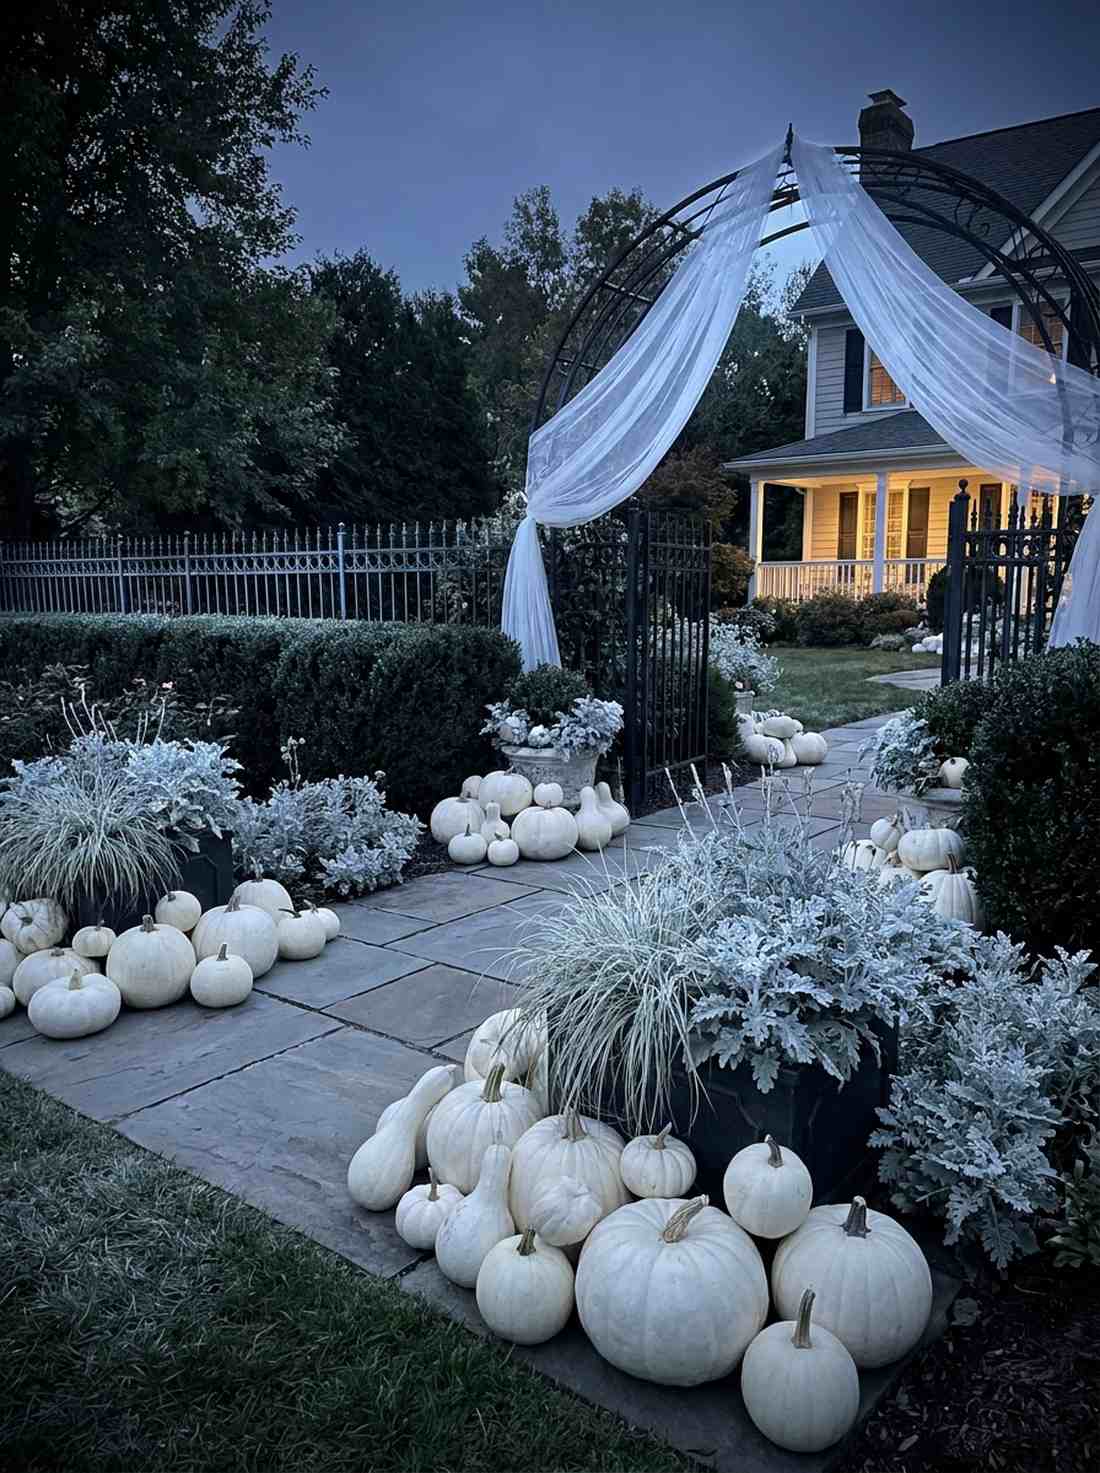
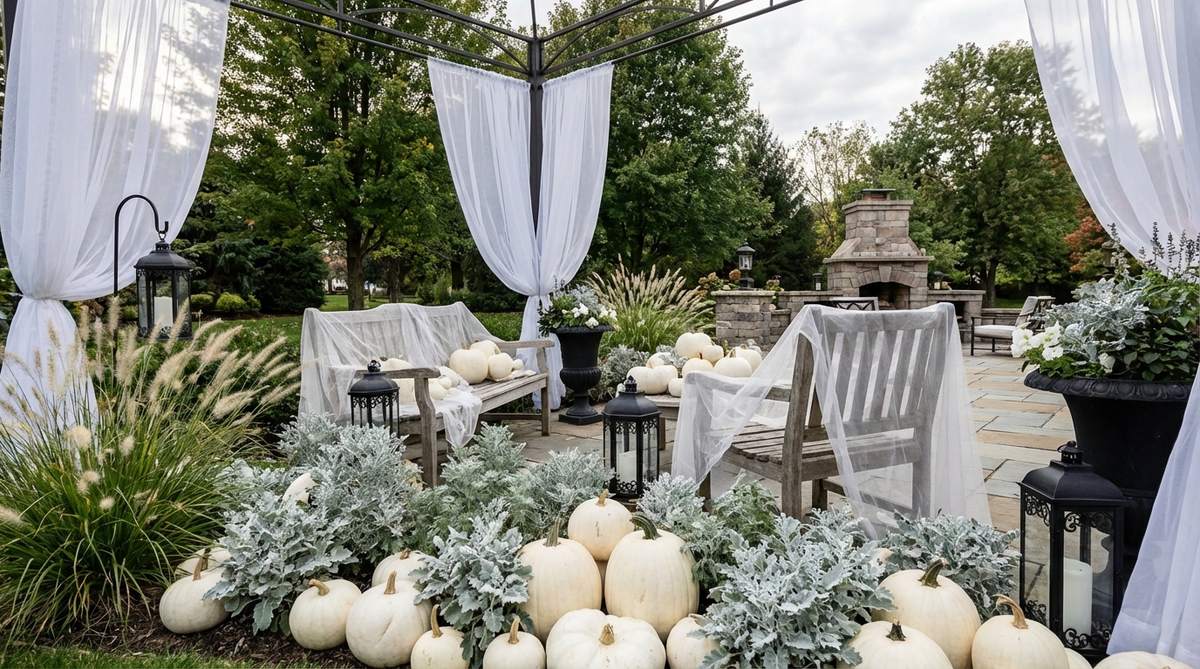
Projects an ethereal, dream-like quality that feels like wandering through a frozen twilight. An all-white monochrome garden is brilliant for highlighting existing dark greenery or wrought-iron fences.
Mixing in standard orange pumpkins shatters the ghostly illusion; strictly committing to silver foliage, white gourds, and pale ornamental grasses delivers a high-end commercial haunt aesthetic. Draping sheer white tulle over arbors catches the moonlight perfectly without looking like cheap trash bags.
Curating this ghostly gallery aesthetic costs around $50–$85.
- Key Materials: White heirloom pumpkins, sheer white tulle
- Vibe / Style: Ethereal twilight gallery
- Difficulty: Requires strict color discipline
- Budget Breakdown: White gourds: $40 | Tulle fabric: $20 | Plants: $20.
- Creator’s Tip: Plant dusty miller or silver ragwort in your pots—the bright silver leaves look absolutely glowing when hit by moonlight.
- Smart Sourcing: artificial white heirloom pumpkins (bulk) and sheer white outdoor draping tulle.
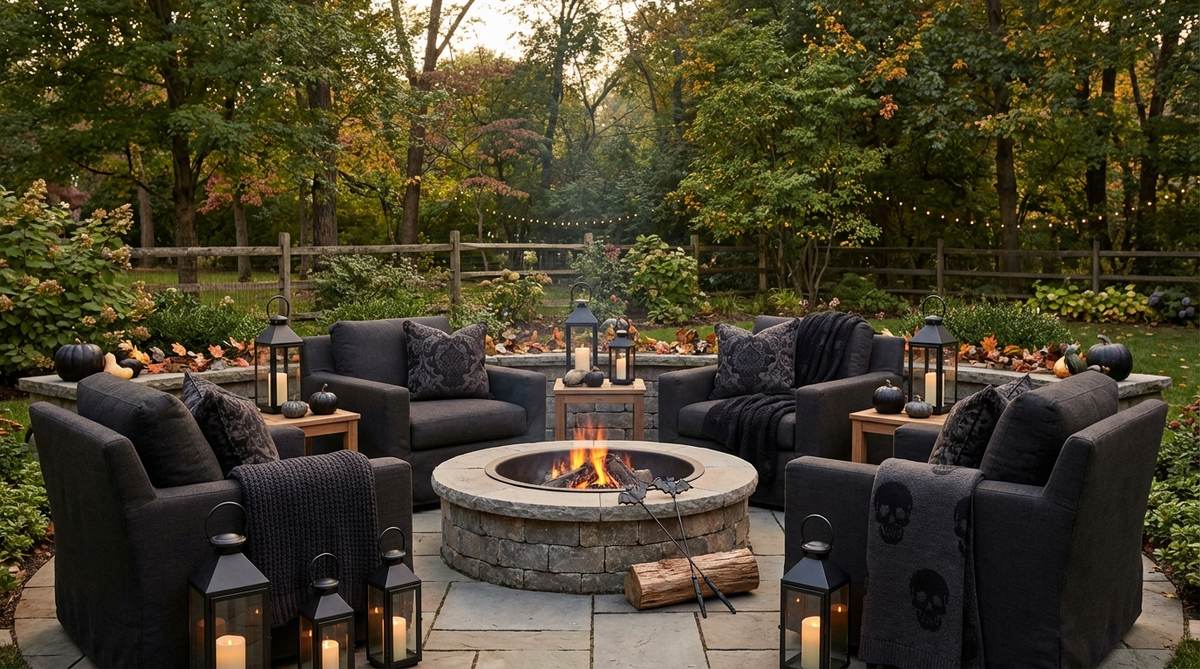
35. Gothic Courtyard with Iron Lanterns
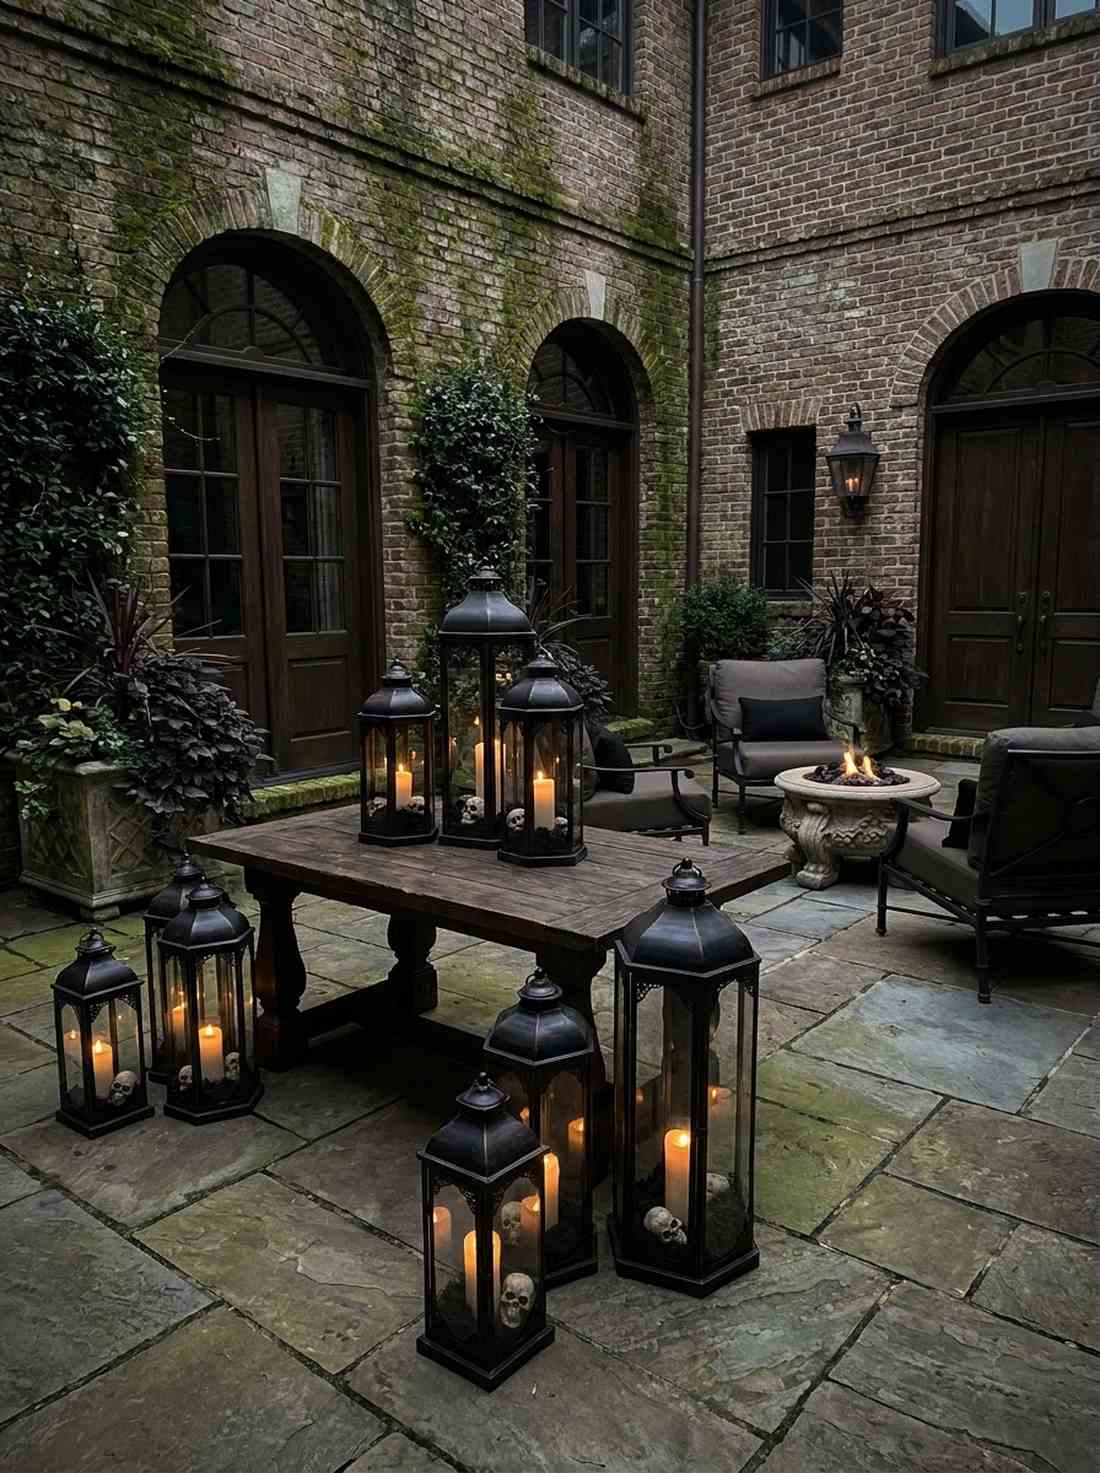
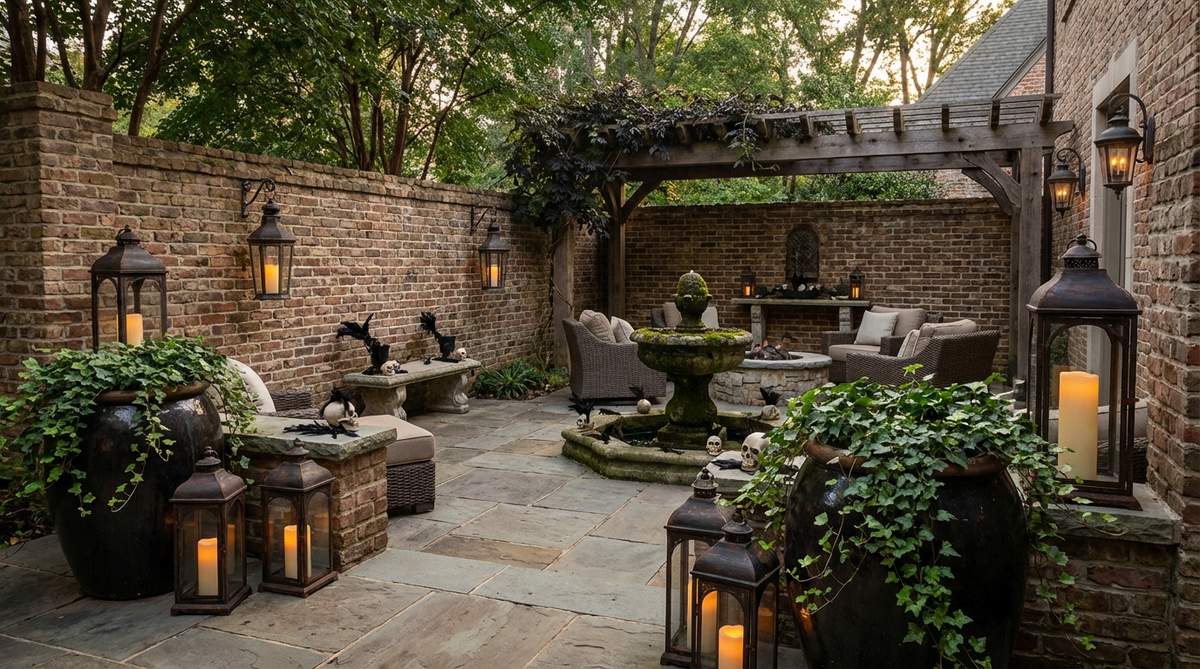
Feels like the brooding inner sanctum of a vampire’s castle. A gothic iron lantern courtyard is the absolute best use-case for enclosed patios or brick-walled seating areas.
Scattering cheap plastic lanterns ruins the heavy architectural feel; clustering massive, faux-iron metal lanterns completely changes the vibe. Stuffing the bases with high-CPC terrarium accessories like preserved black moss and miniature skulls adds incredible macro-level detail for guests sitting nearby.
This heavy, architectural setup requires an investment of roughly $100–$150.
- Key Materials: Tall metal lanterns, preserved dark moss
- Vibe / Style: Vampire estate courtyard
- Difficulty: Simple clustering
- Budget Breakdown: Lantern sets: $90 | Moss/Skulls: $30.
- Creator’s Tip: Buy lanterns with varying heights (12″, 18″, 24″) and cluster them in tight groups of three for maximum visual weight.
- Smart Sourcing: tall outdoor metal lantern sets and pre-cut preserved black moss (bulk pack).
Material Guide: Cheap vs. Premium Aesthetic
Knowing exactly where to save and where to spend makes all the difference in achieving that “looks expensive but isn’t” vibe.
- Standard vs. UV-Resistant/Premium: Cheap plastic pumpkins fade to a sickly pink in the sun; investing in UV-coated props ensures they look museum-quality for a decade.
- Pre-made Kits vs. Sourcing Locally: Buying commercial-grade spider webbing kits saves hours of frustration compared to stretching tiny, tearing cotton bags from the dollar store.
36. Harvest-to-Halloween Transition Planters
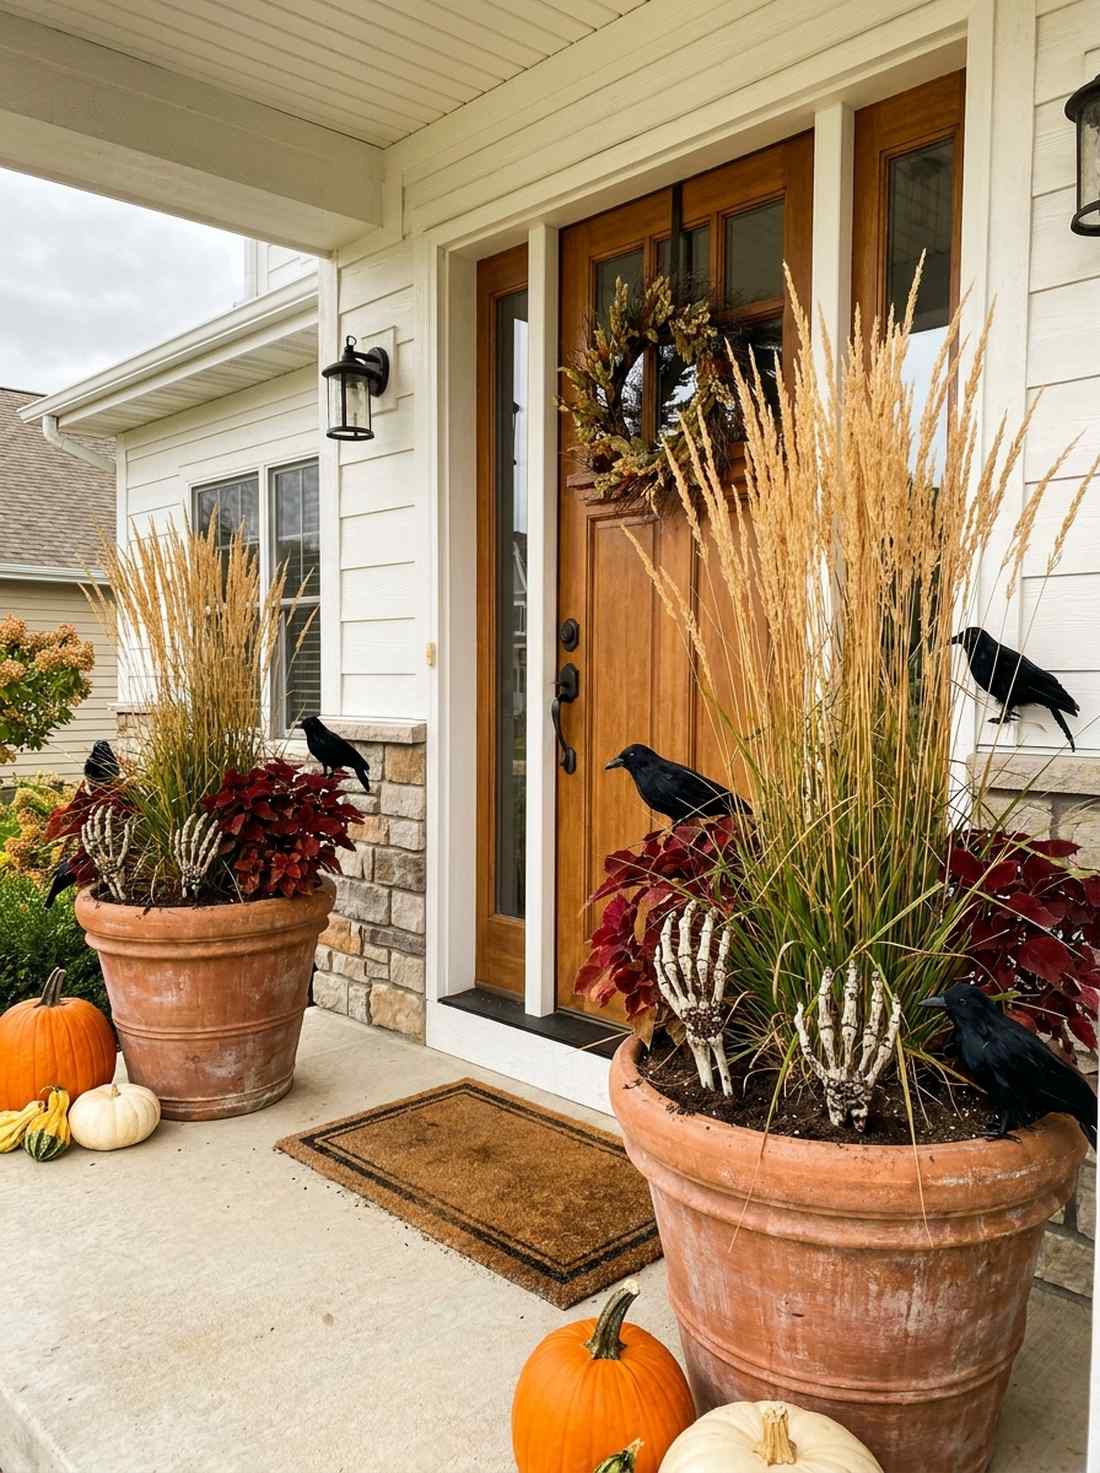
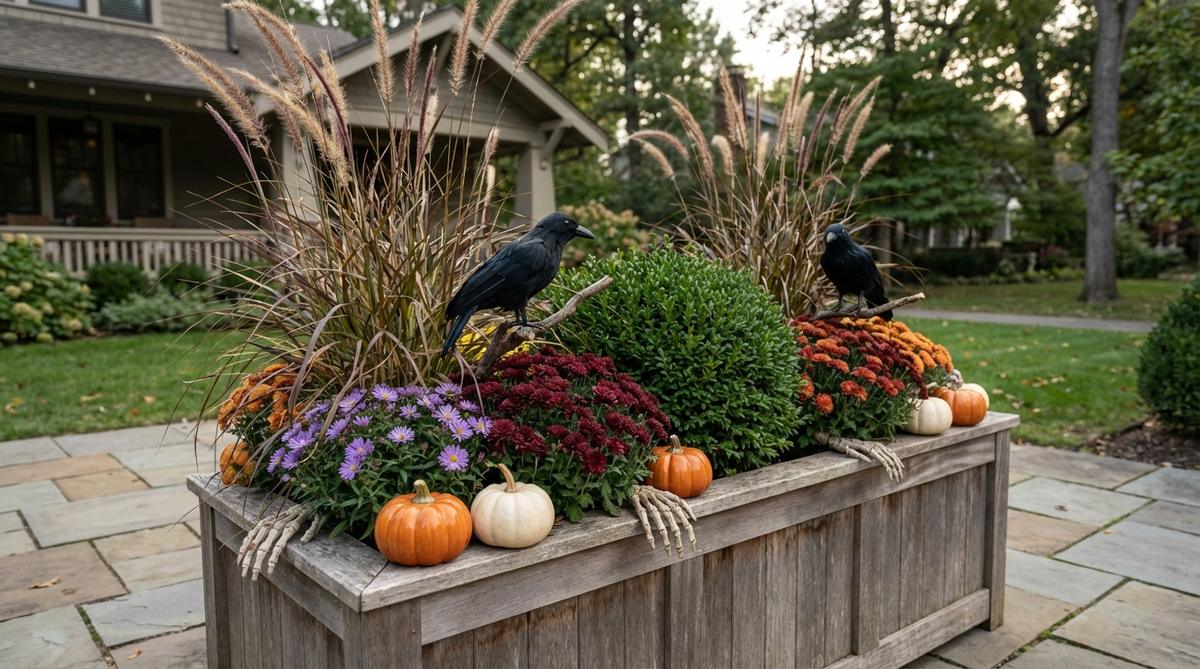
Looks like a high-end landscaping firm curates your front step daily. Designing transitional autumn structural planters is incredibly effective for busy homeowners who hate redecorating.
Ripping out your September plants is a huge waste of money; tucking skeletal hands and black ravens directly into existing tall grasses looks far more expensive than it is. Sourcing premium weather-resistant plant stakes allows you to pivot from harvest to horror in under five minutes.
This smart transitional trick costs merely $15–$30 to upgrade existing pots. Pin this for a massive time-saver!
- Key Materials: Existing tall grass planters, plastic skeletal hand stakes
- Vibe / Style: Stealthy creeping horror
- Difficulty: Five-minute upgrade
- Budget Breakdown: Skeletal stakes: $15 | Raven clips: $10.
- Creator’s Tip: Push the skeletal hands deep into the soil so it looks like zombies are physically clawing their way out of the roots.
- Smart Sourcing: plastic skeletal hand yard stakes and clip-on realistic raven props.
37. Twilight Dining Area with Black Tableware
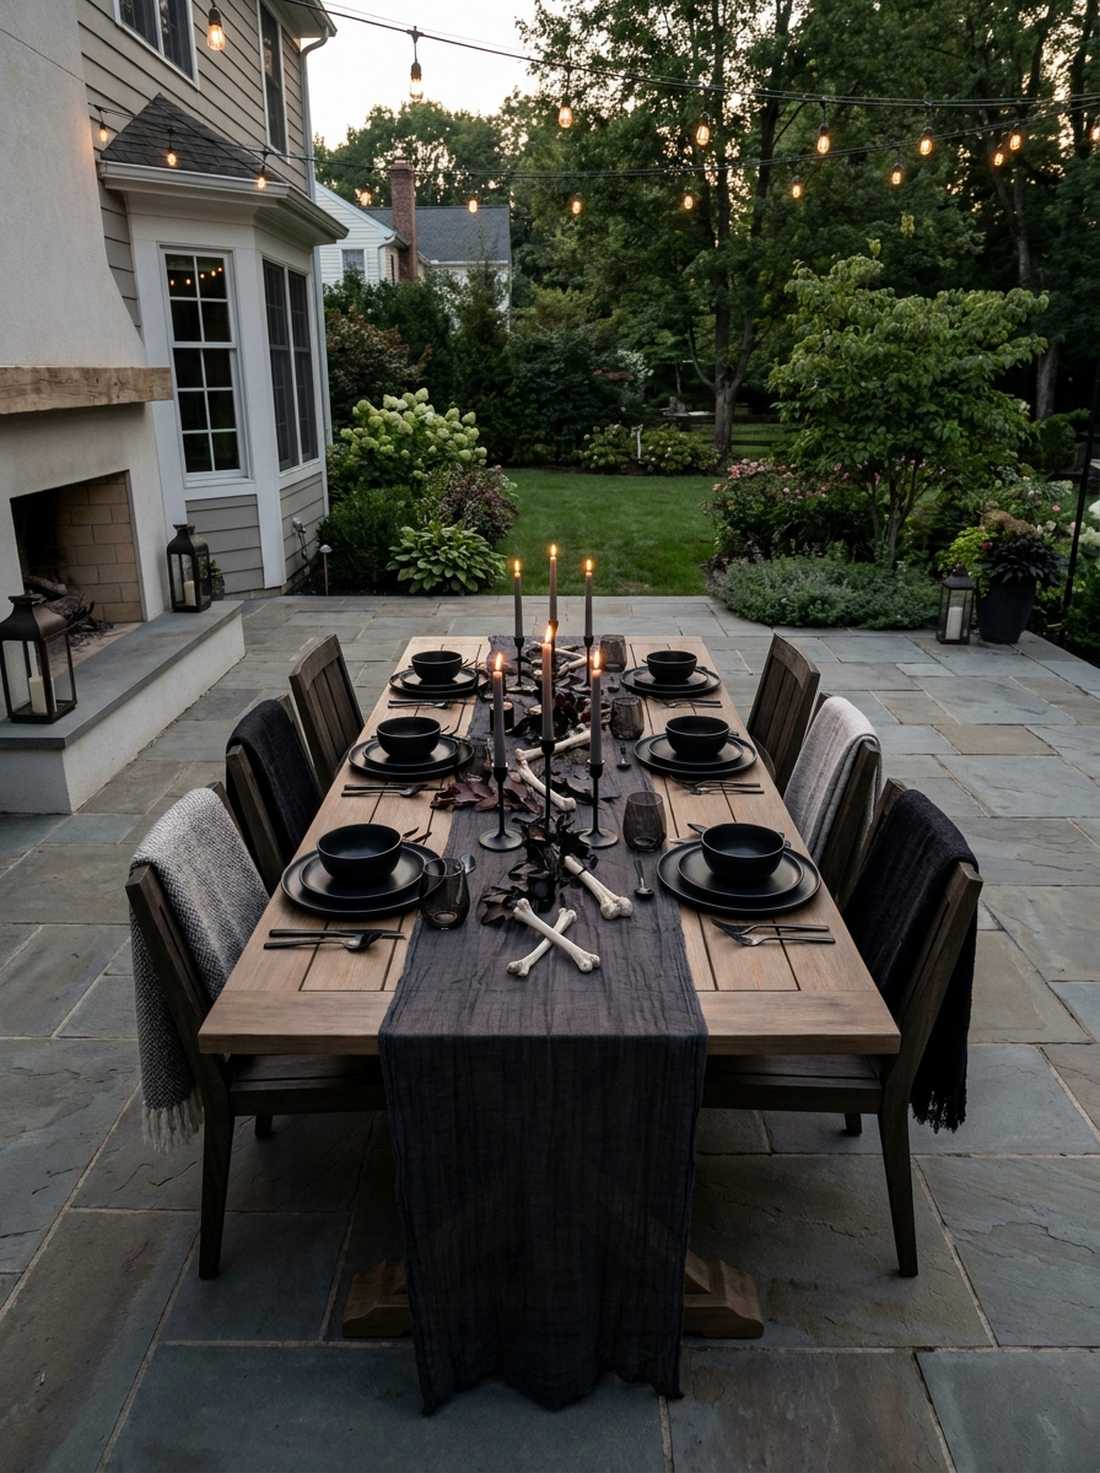
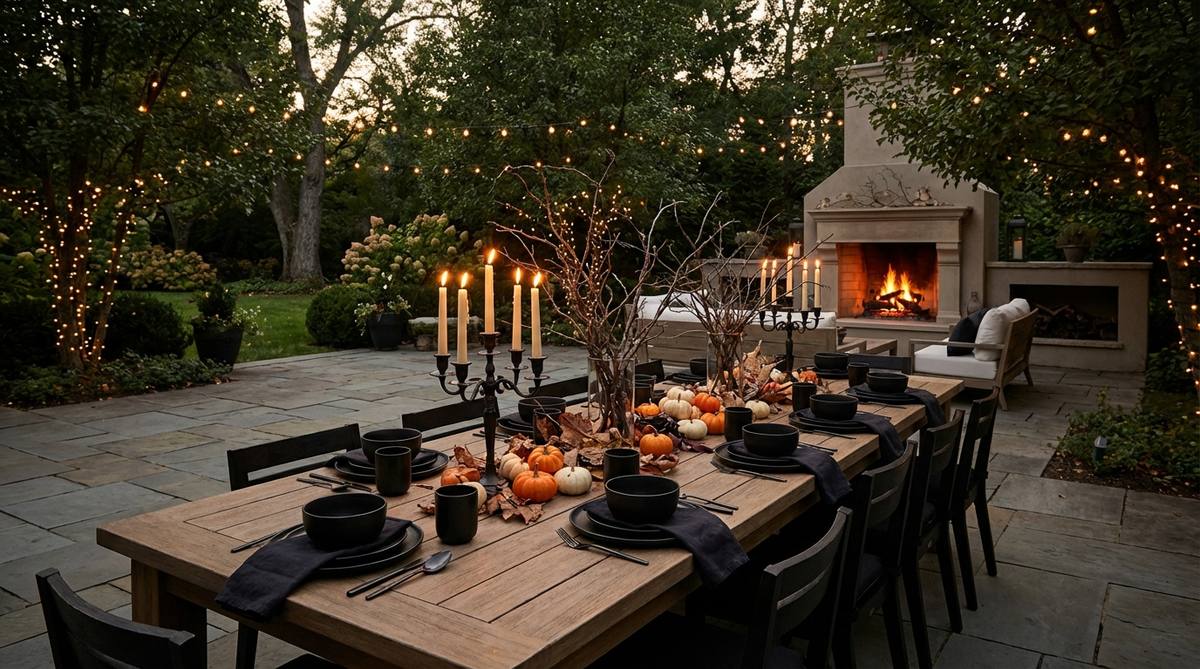
Creates the sensation of a cursed aristocratic dinner party under the stars. A gothic outdoor dining table setup is the ultimate use-case for large backyard entertaining.
Throwing a plastic orange tablecloth down feels incredibly cheap; utilizing matte black plates, charcoal linens, and low-profile candelabras completely changes the vibe. Incorporating subtle high-CPC miniature garden supplies like scattered bone fragments down the center runner makes it look highly curated.
Setting this theatrical dining table runs roughly $70–$120.
- Key Materials: Matte black tableware, charcoal linen runner
- Vibe / Style: Aristocratic twilight feast
- Difficulty: Detailed table-scaping
- Budget Breakdown: Black plates/linens: $60 | Candelabras: $40.
- Creator’s Tip: Keep all centerpieces below eye level so guests can easily converse across the table without staring through a massive pumpkin.
- Smart Sourcing: matte black outdoor dining plate sets and charcoal gauze table runners.
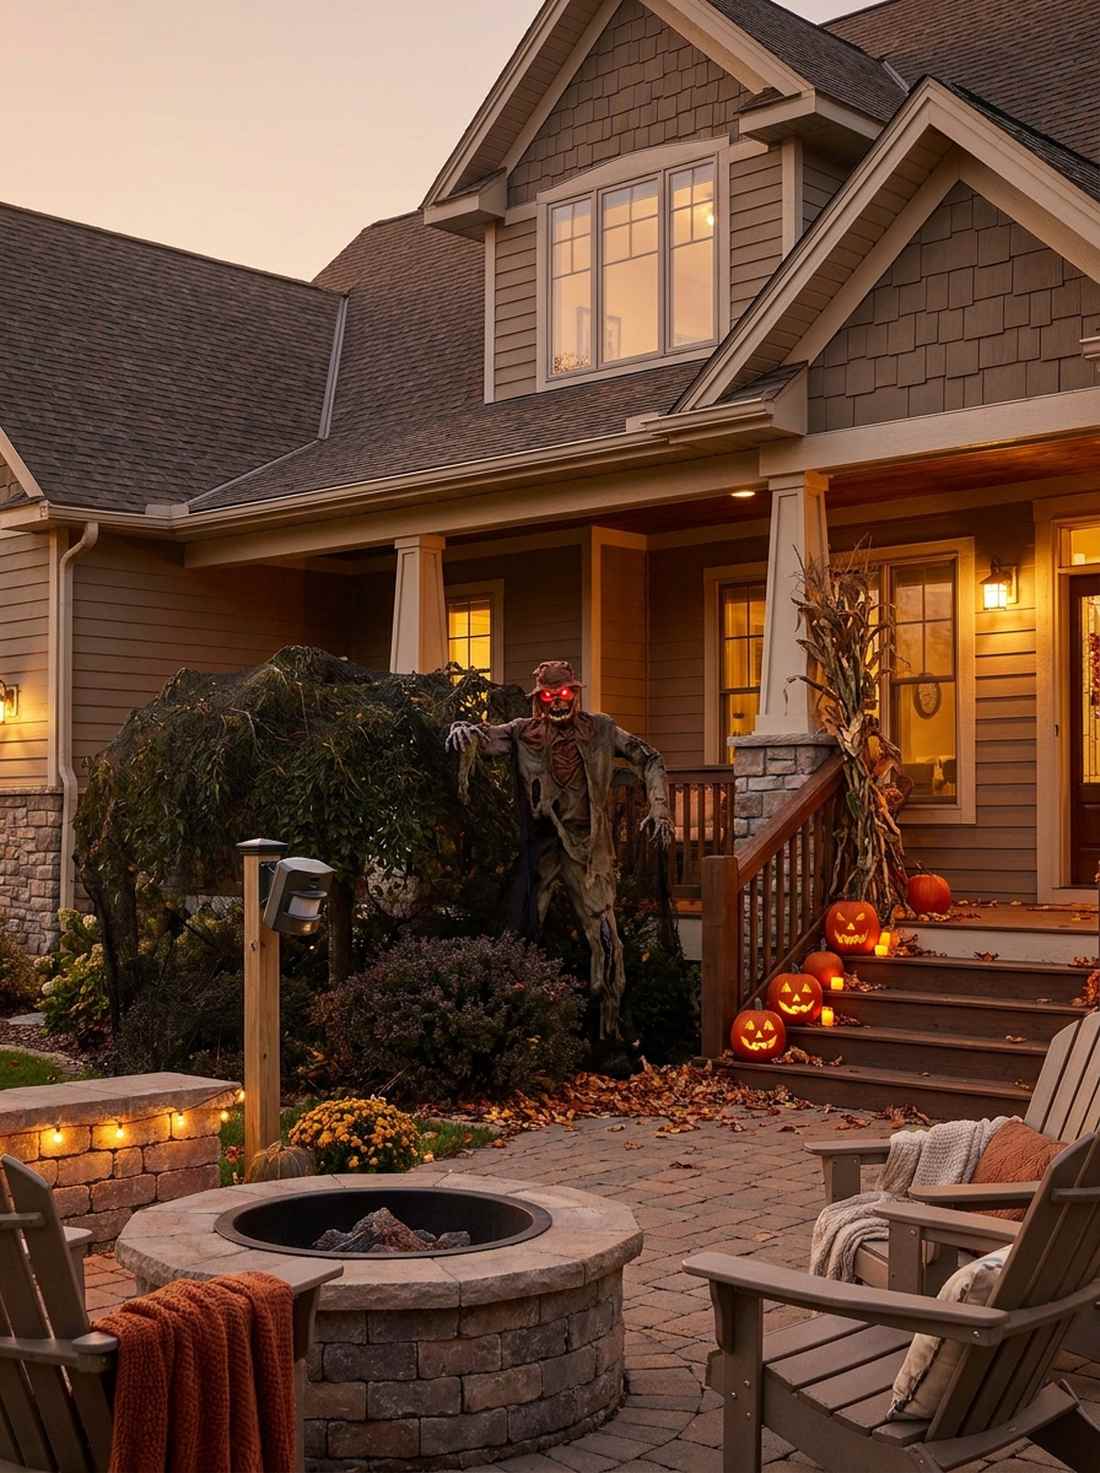
38. Fire Pit Lounge with Subtle Halloween Accents
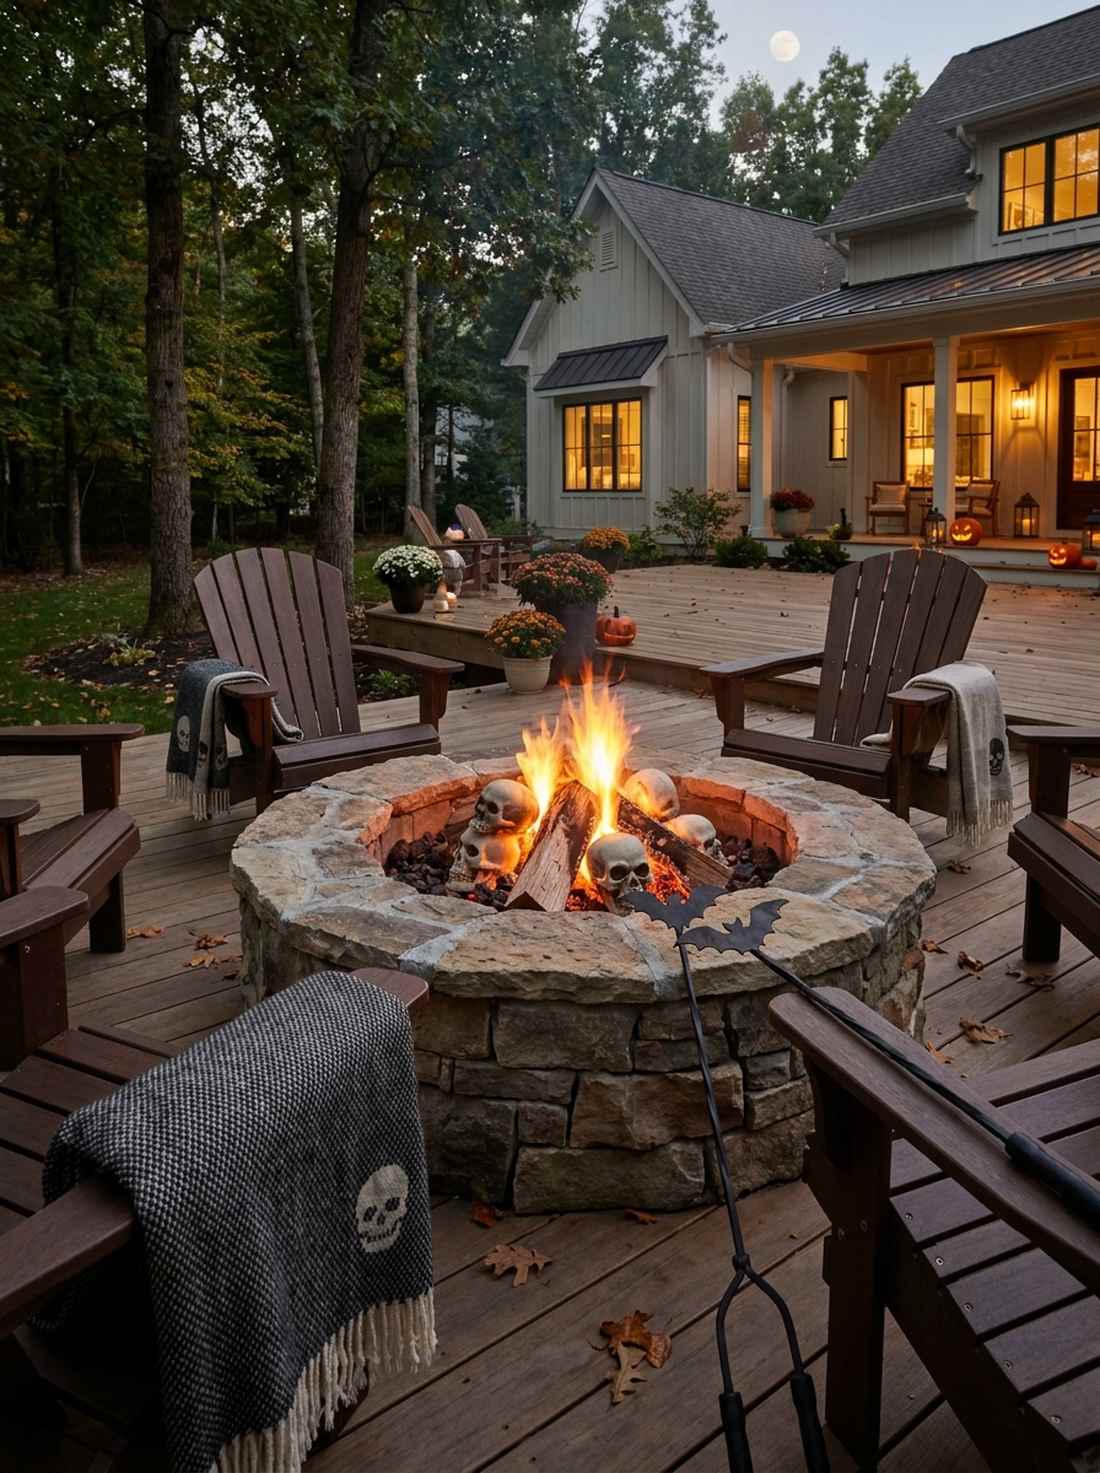
Feels like a cozy midnight ghost-story circle in the woods. Upgrading to a spooky fire pit lounge is brilliant for retaining the warmth of autumn while injecting targeted terror.
Overcrowding the fire zone with melting plastic decorations is a massive safety hazard; swapping in skull-patterned heavy throws and iron bat marshmallow skewers delivers a high-end commercial haunt aesthetic safely. It keeps the area highly functional while looking effortlessly festive.
These subtle hardware and textile upgrades cost around $40–$65.
- Key Materials: Skull-motif woven blankets, themed roasting sticks
- Vibe / Style: Cozy woodland horror
- Difficulty: Very simple swap
- Budget Breakdown: Themed throws: $35 | Skewers: $20.
- Creator’s Tip: Swap your normal fire pit rocks out for a few fireproof ceramic human skulls designed specifically for gas or wood fires.
- Smart Sourcing: fireproof ceramic skull fire pit logs and heavy-duty woven skull throw blankets.
39. Elegant Raven-Themed Entry
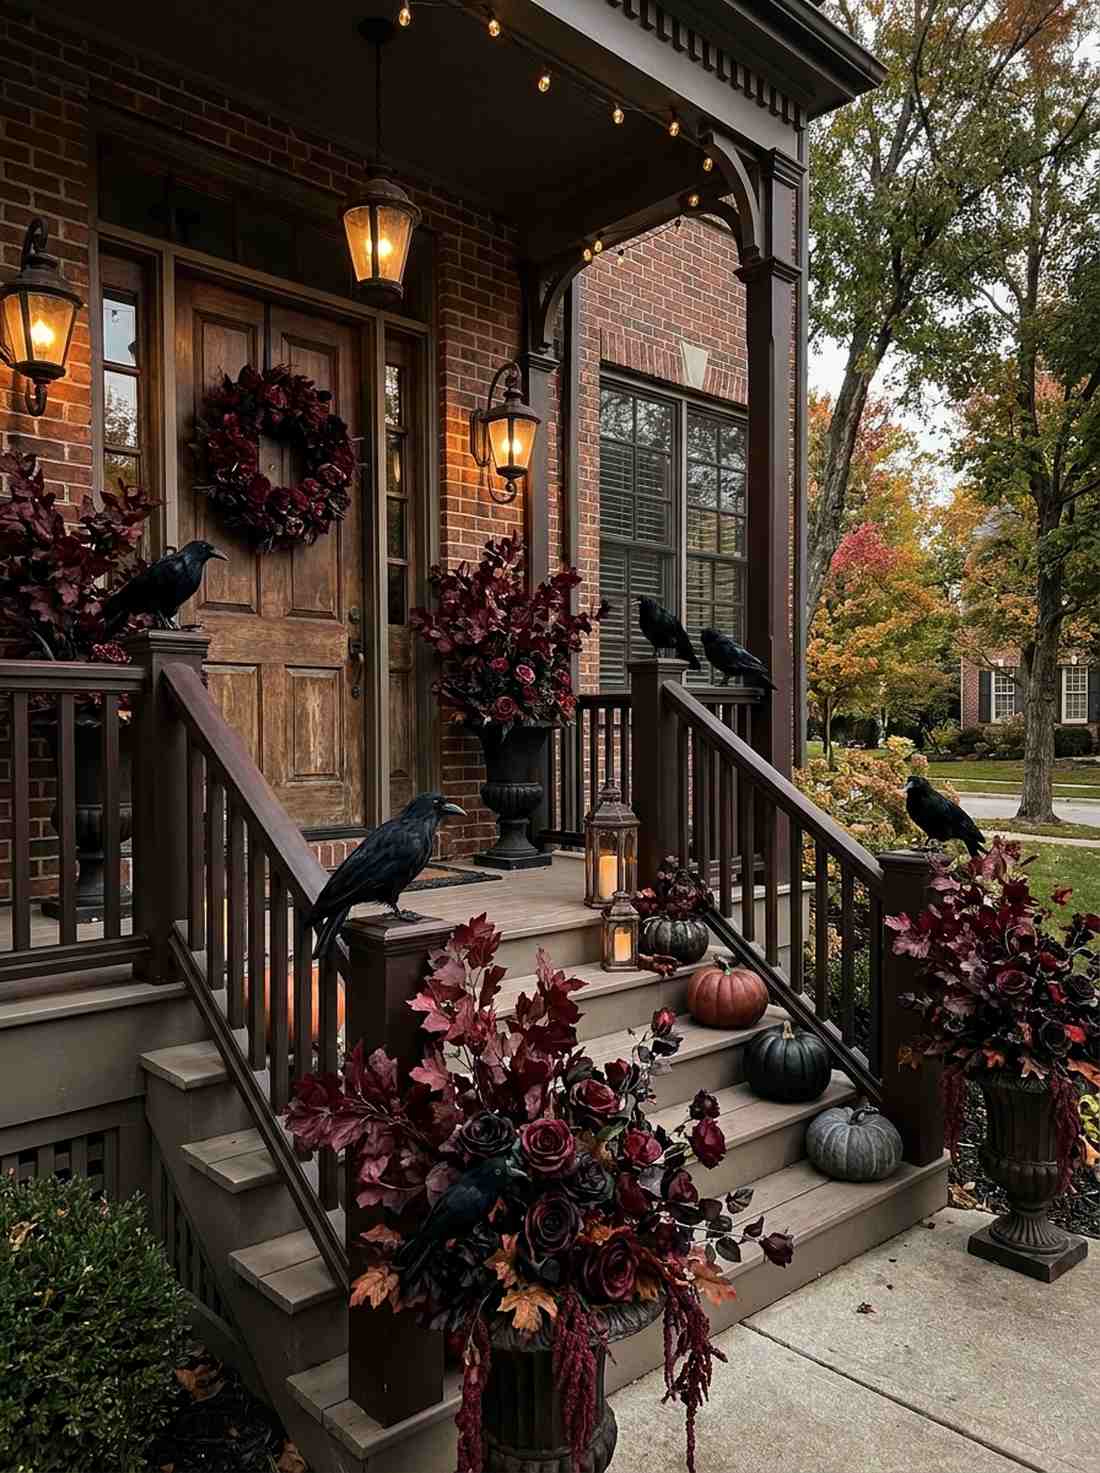
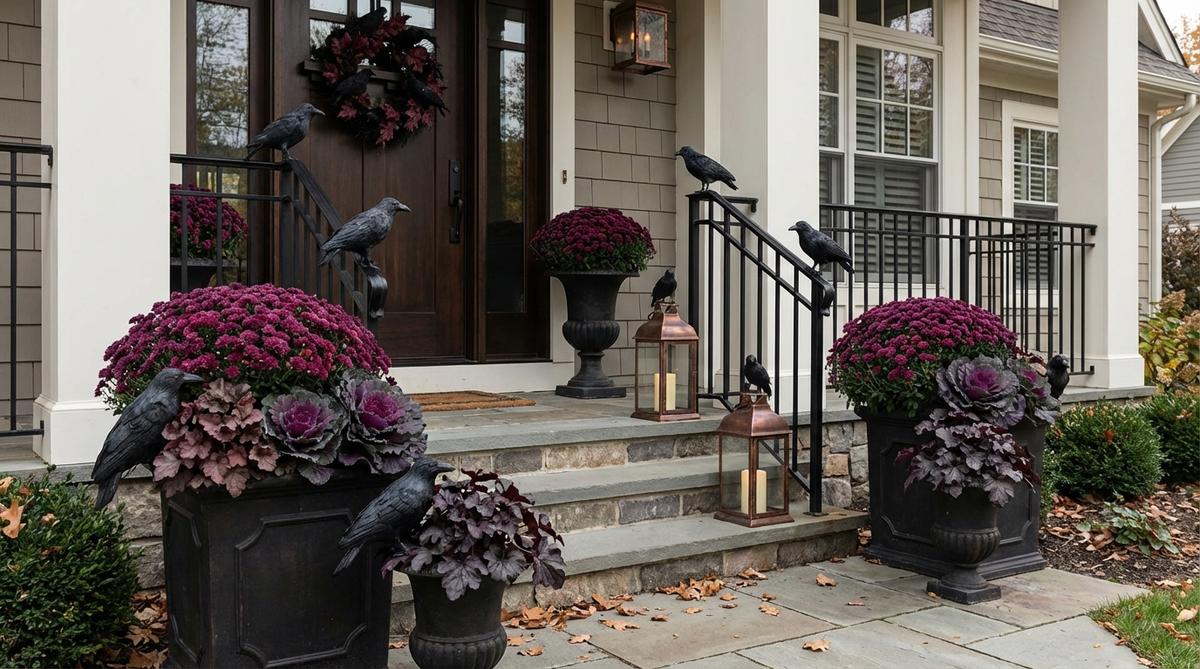
Projects a dark, literary sophistication that feels straight out of an Edgar Allan Poe novel. An elegant raven motif doorway works flawlessly for historic homes or classic brick facades.
Sticking cheap paper birds to the wall looks completely flat; wiring 3D feathered ravens to the porch railings and wreaths looks far more expensive than it is. Pairing them exclusively with deep burgundy foliage elevates the entire palette into a rich, moody masterpiece.
This refined literary look will cost roughly $35–$55. Save this if you hate bright orange decor!
- Key Materials: Realistic feathered ravens, deep burgundy faux florals
- Vibe / Style: Literary gothic elegance
- Difficulty: Easy wire attachment
- Budget Breakdown: Raven multi-pack: $25 | Burgundy florals: $20.
- Creator’s Tip: Use thin, black floral wire to tightly secure the bird’s feet to handrails so they don’t blow away in heavy storms.
- Smart Sourcing: realistic feathered raven props (bulk) and black floral binding wire.
You can spend hours setting up complex displays, but the curated lantern trick coming up next makes your yard look like a luxury hotel in 5 minutes…
40. Vintage-Inspired Lantern Collection
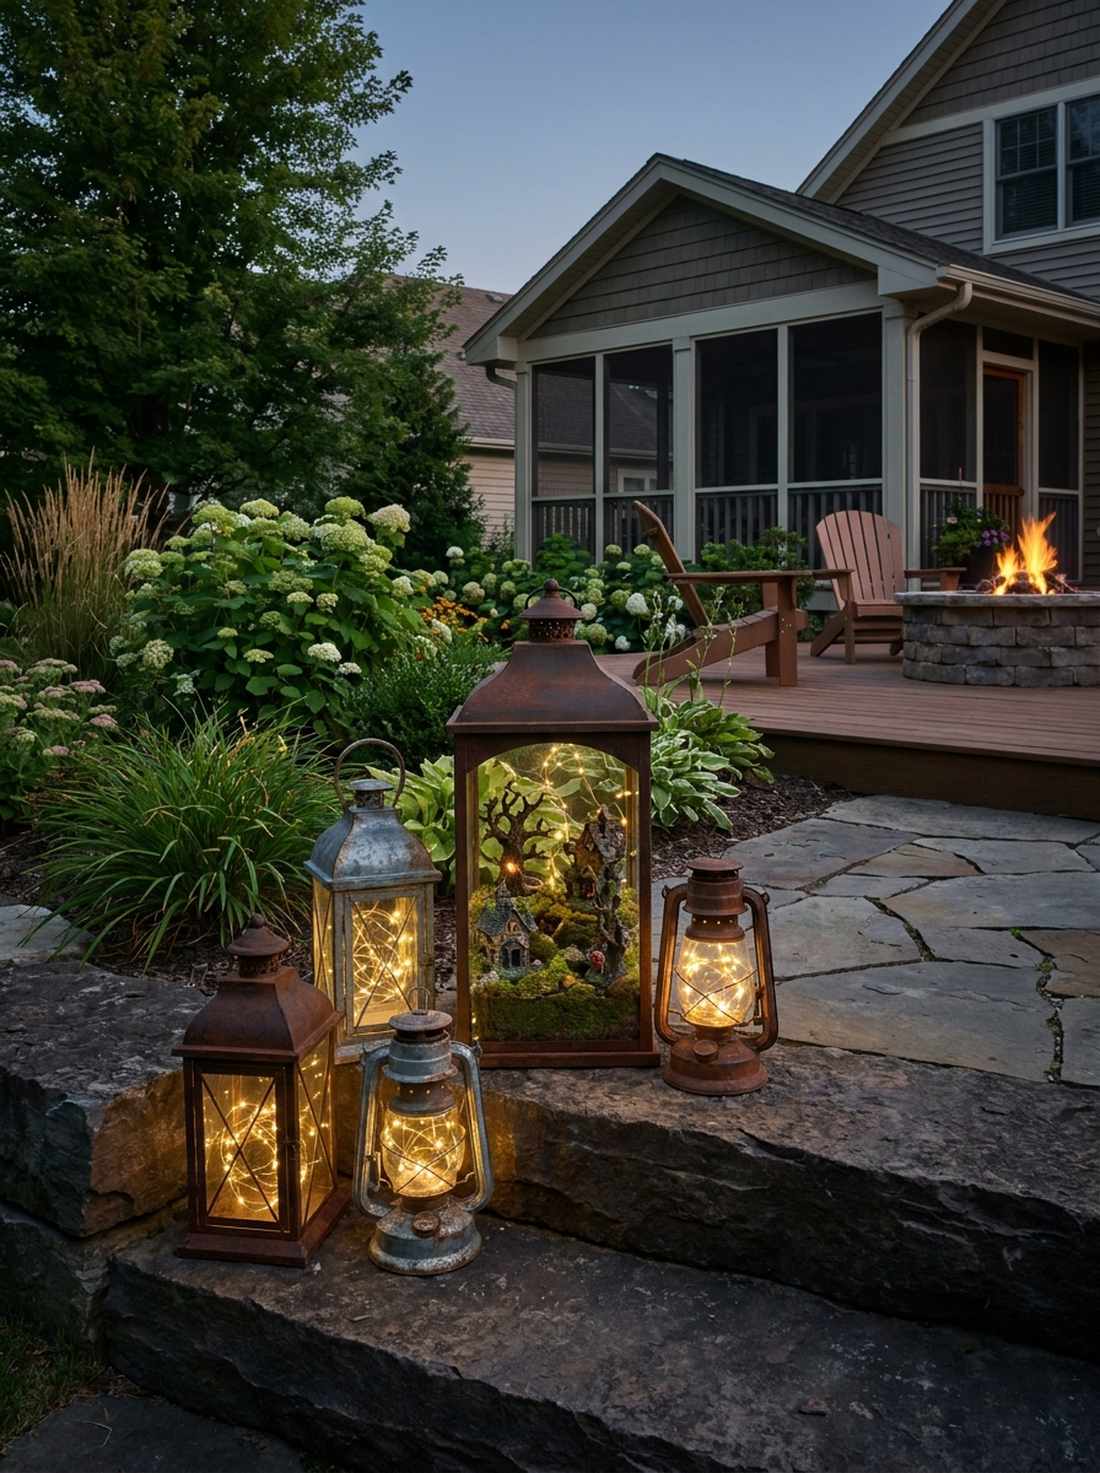

Looks exactly like a curated antique collection gathered over decades. Grouping a vintage outdoor lantern cluster is the absolute best solution for illuminating dark stone steps.
Buying perfectly matching new lanterns looks generic and boring; hunting down varied sizes in similar rusted finishes completely changes the vibe. Utilizing high-CPC fairy garden kits to build tiny, terrifying scenes inside the larger lanterns gives guests an incredible macro-view experience.
Curating this vintage lighting collection averages $80–$140 depending on size.
- Key Materials: Assorted vintage-style lanterns, micro LED fairy lights
- Vibe / Style: Curated antique haunting
- Difficulty: Moderate sourcing required
- Budget Breakdown: Lanterns: $90 | Lights/Props: $30.
- Creator’s Tip: Group the lanterns strictly in odd numbers (3, 5, or 7) to create a naturally balanced visual composition.
- Smart Sourcing: assorted vintage metal outdoor lanterns and micro LED waterproof fairy light strands.
41. Dramatic Purple and Orange Lighting Design
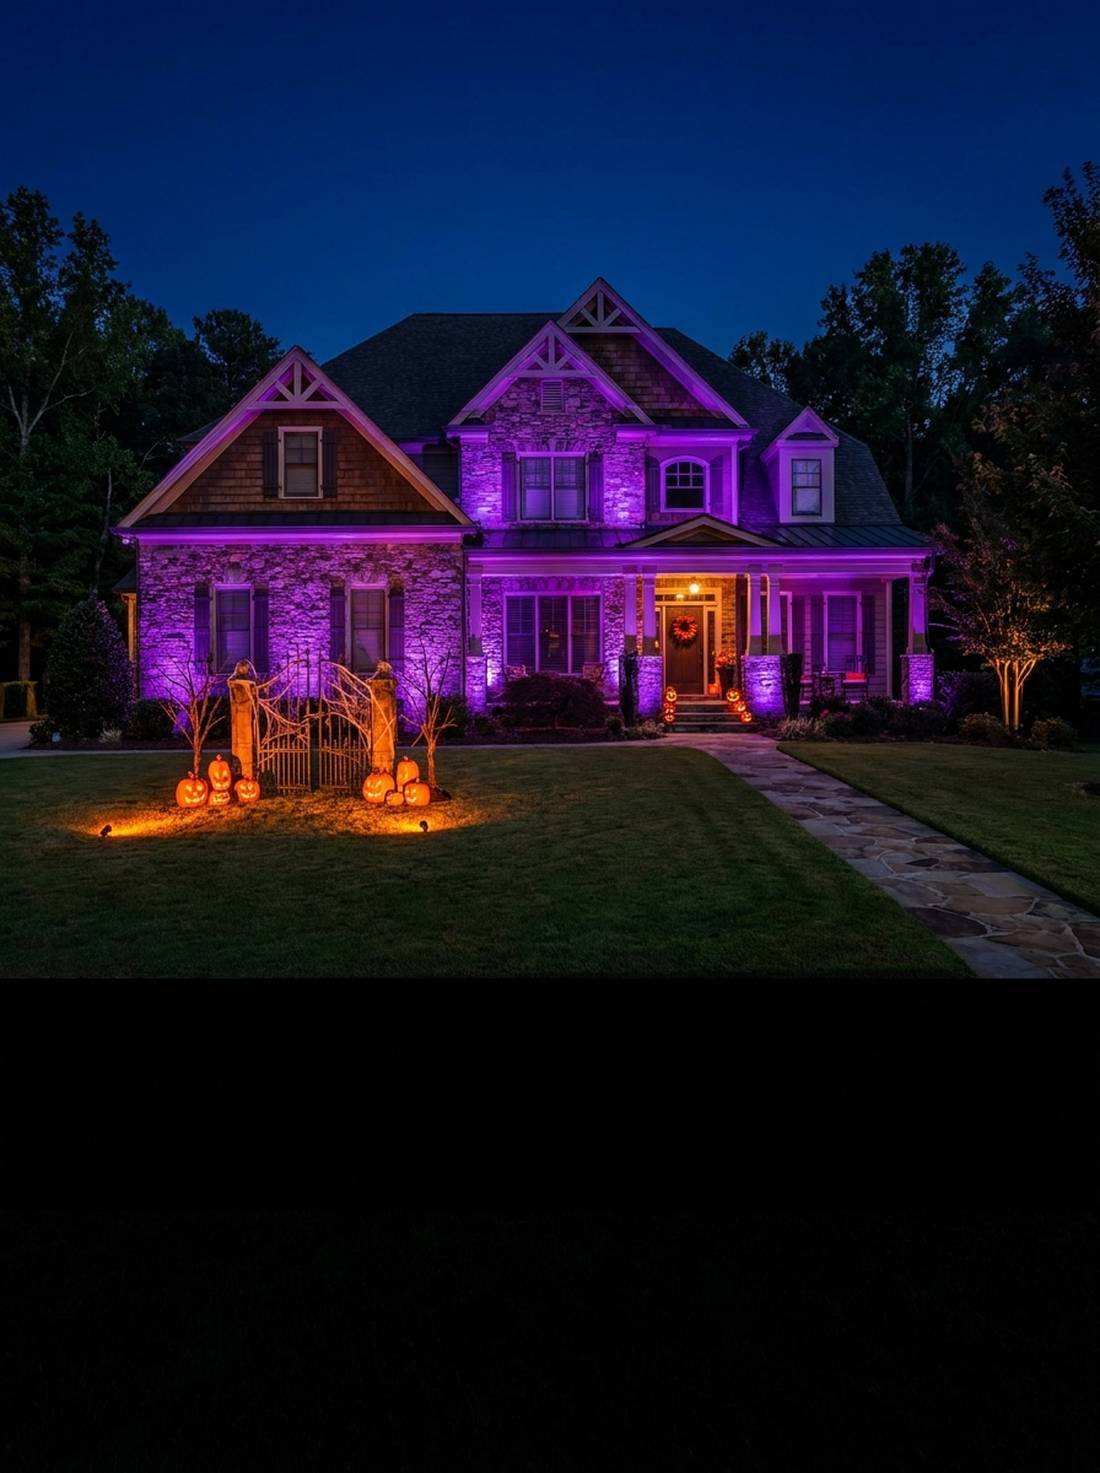
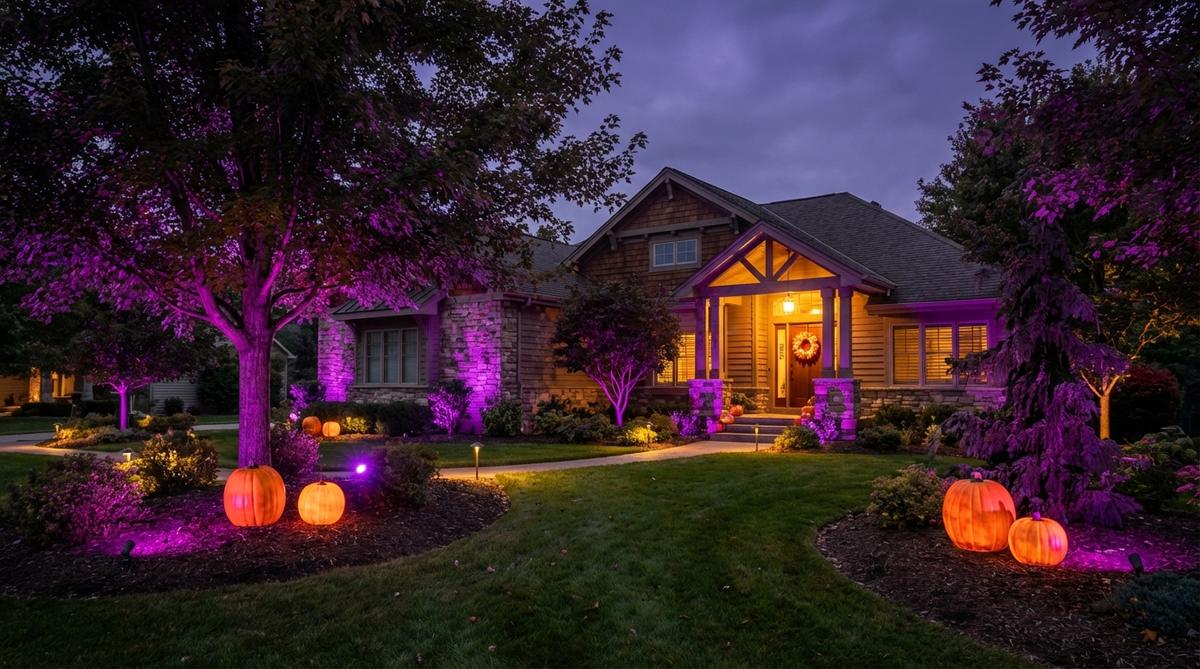
Transforms the entire architecture of your home into a glowing theatrical stage. A dual-color outdoor lighting wash is incredibly effective for massive two-story houses.
Mixing green, red, blue, and orange lights turns your yard into muddy soup; strictly isolating deep purple and stark orange delivers a high-end commercial haunt aesthetic. Deploying professional outdoor LED uplighting kits ensures the colors remain piercing and distinct.
This architectural lighting upgrade costs around $60–$120. Pin this for the ultimate curb appeal hack!
- Key Materials: High-output LED color spotlights, weatherproof extension cables
- Vibe / Style: Professional theatrical glow
- Difficulty: Requires testing angles at night
- Budget Breakdown: Spotlights: $80 | Cabling: $25.
- Creator’s Tip: Wash the main house siding in purple, and strictly use orange only to spotlight the physical props on the lawn for massive contrast.
- Smart Sourcing: weatherproof RGB landscape uplighting kits and heavy-duty outdoor extension cords.
42. Black Garden Bed Mulch for Halloween Contrast

Creates an incredibly stark, high-contrast canvas that makes every single prop pop. Laying down fresh black contrast mulch is a brilliant use-case for small front foundation beds.
Leaving pale, faded summer mulch exposed makes orange pumpkins look completely washed out; top-dressing with jet-black dyed mulch looks far more expensive than it is. The dark background absorbs stray light, making white skulls and glowing lanterns look like they are floating in an abyss.
This fundamental landscaping trick costs roughly $30–$50.
- Key Materials: Black dyed landscape mulch, white accent props
- Vibe / Style: Crisp high-contrast foundation
- Difficulty: Heavy yard work
- Budget Breakdown: Bagged mulch: $35 | White props: $15.
- Creator’s Tip: Only apply a thin 1-inch top layer over your existing beds just for the color—you don’t need to dig up the old mulch.
- Smart Sourcing: premium black dyed landscape mulch and white resin skull props.
43. Mirrors and Reflections for Infinite Spooks
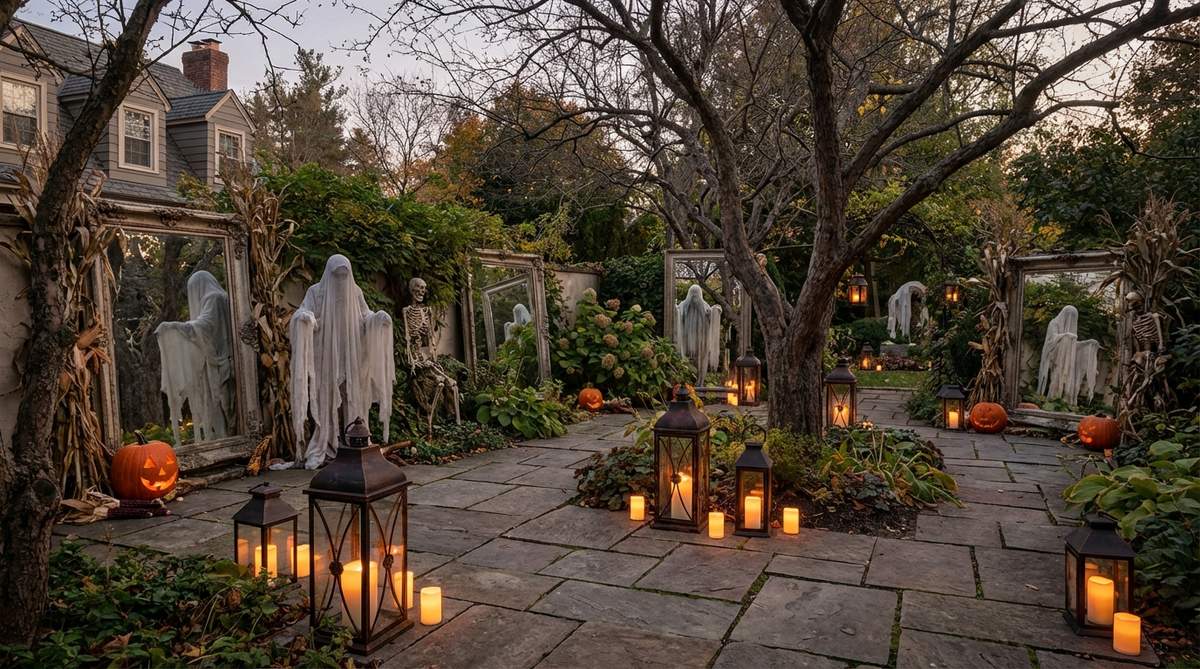
Feels like your yard is expanding into a terrifying, infinite dimension. Hiding outdoor reflective mirrors works flawlessly for dense, enclosed garden corners.
Placing mirrors directly facing the street causes blinding glare for drivers; angling them slightly to reflect hidden candle clusters completely changes the vibe. Wrapping the mirror edges with thick faux ivy makes it look like a seamless, magical portal in the bushes.
This mind-bending optical illusion will cost you around $40–$70.
- Key Materials: Shatterproof acrylic mirrors, faux ivy garland
- Vibe / Style: Mind-bending optical illusion
- Difficulty: Requires precise angling
- Budget Breakdown: Acrylic mirrors: $45 | Vines: $15.
- Creator’s Tip: Always use acrylic mirror sheets outside, never real glass, to prevent shattering and dangerous shards in your grass.
- Smart Sourcing: shatterproof acrylic mirror sheets and thick realistic faux ivy garlands.
44. Soundscaped Garden with Hidden-Speakers
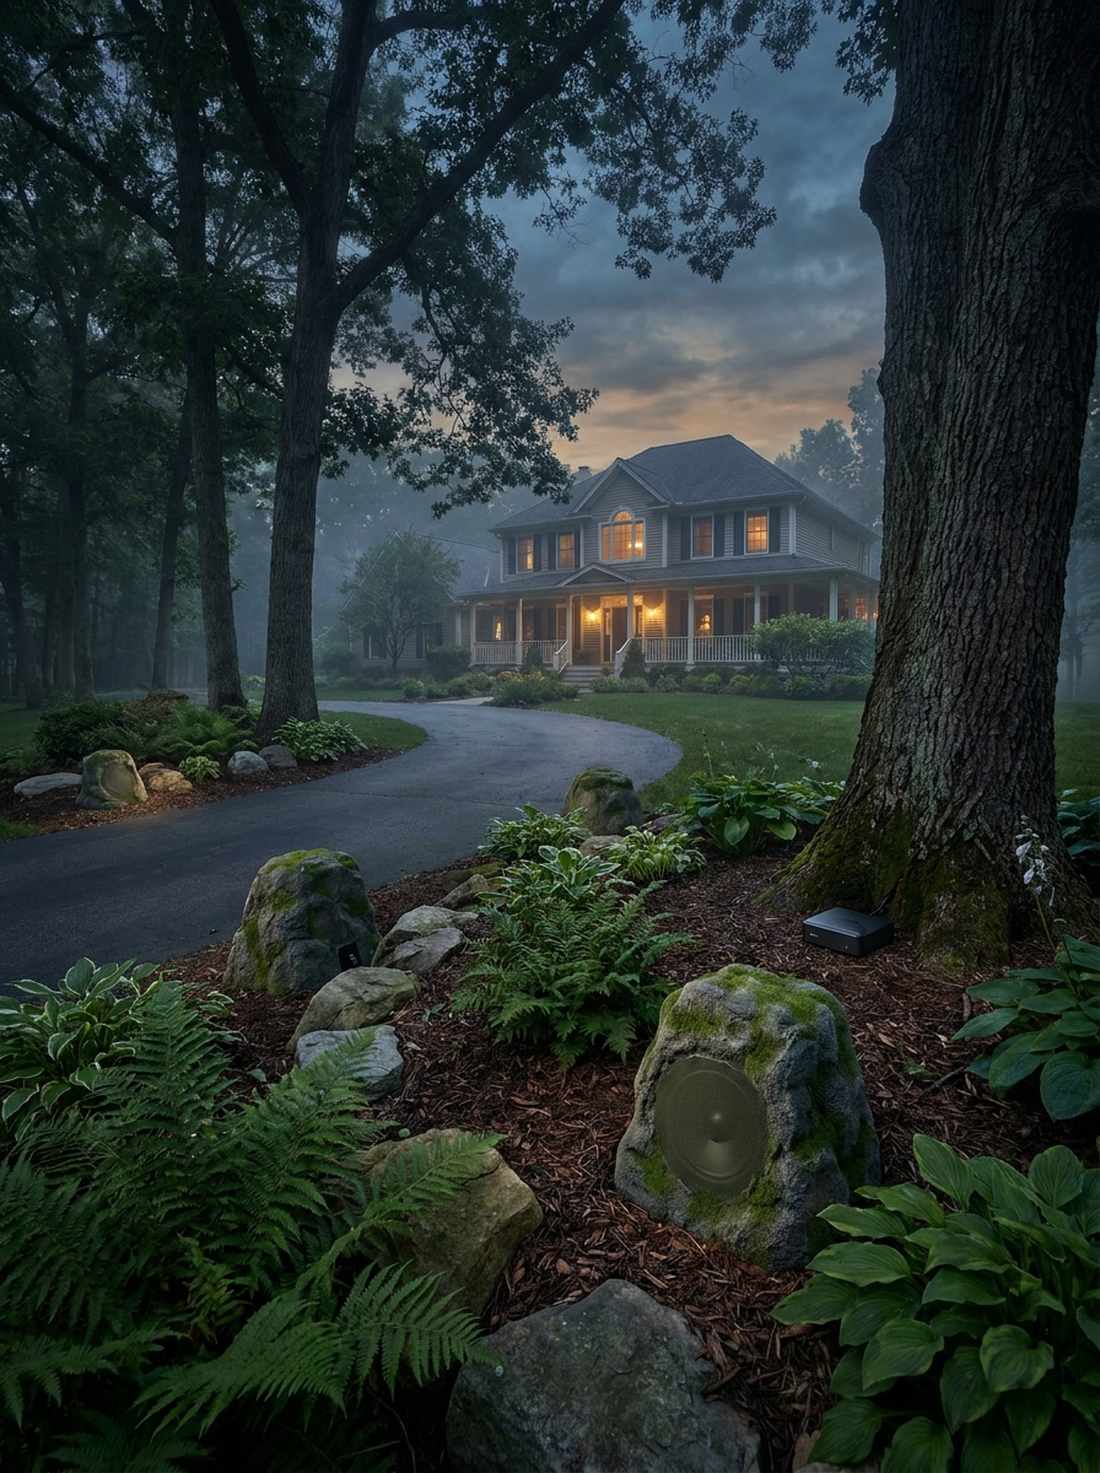
Creates an inescapable atmosphere of dread before guests even see a single decoration. Installing a hidden garden soundscape system is highly recommended for long winding driveways or dense tree lines.
Blasting loud, cheesy monster mashes from your porch window is obnoxious; hiding specialized waterproof bluetooth speakers deep in the landscaping delivers a high-end commercial haunt aesthetic. Playing low-frequency rumbles, distant ravens, or snapping twigs makes the hair on their arms stand up.
Adding this invisible layer of terror costs around $50–$90.
- Key Materials: Waterproof outdoor rock speakers, bluetooth receiver
- Vibe / Style: Immersive psychological dread
- Difficulty: Easy bluetooth setup
- Budget Breakdown: Rock speakers: $60 | Premium audio loop: $10.
- Creator’s Tip: Keep the volume so low that people aren’t sure if they are actually hearing it or if it’s just the wind.
- Smart Sourcing: waterproof bluetooth rock speakers and outdoor-rated audio extension cables.
You can buy more plastic, or you can use this next projection technique to cover your entire house in ghosts instantly…
45. Projection Mapping on House Facade
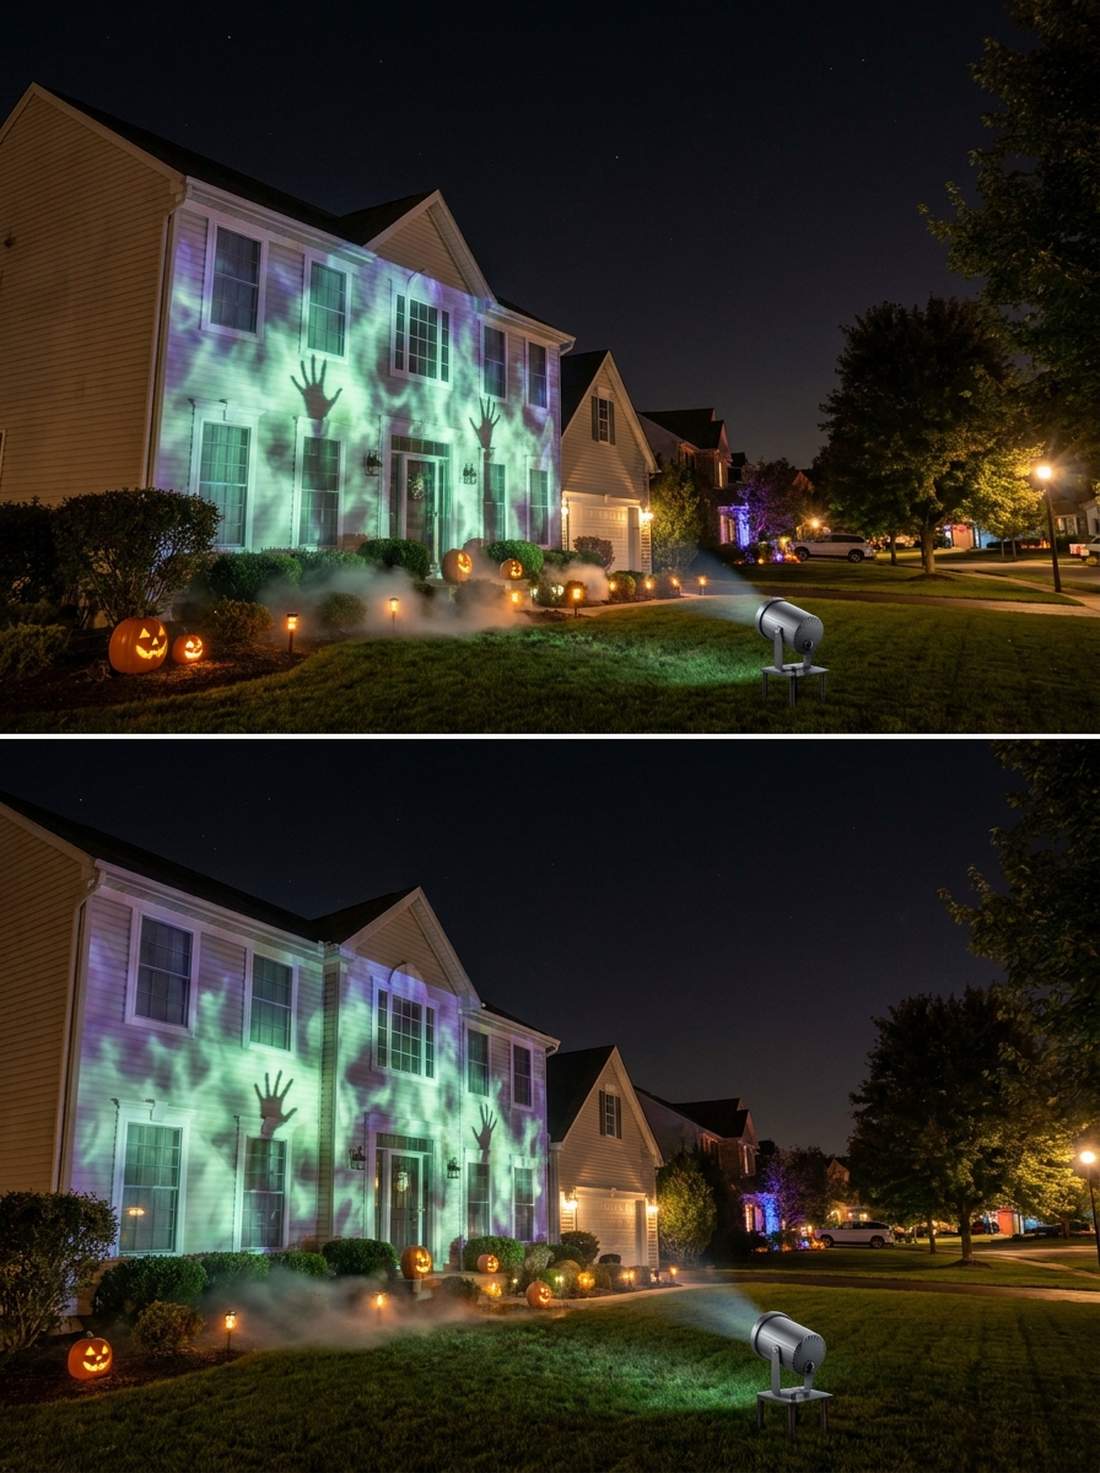
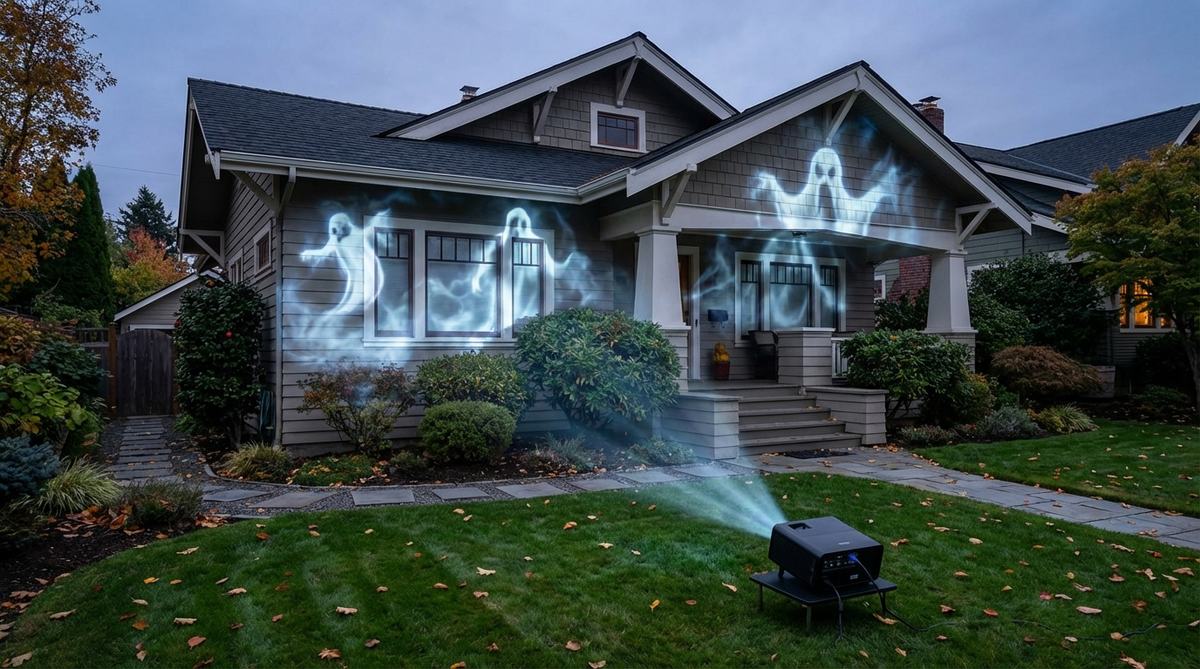
Looks like a massive, big-budget theme park installation right on your street. Utilizing digital facade projection mapping is the ultimate use-case for massive, flat-front homes with minimal windows.
Aiming a cheap projector at a brick wall makes the image incredibly blurry; projecting high-definition swirling fog or skeletal hands onto light siding looks far more expensive than it is. Sourcing high-lumen waterproof projectors completely eliminates the need to climb ladders and hang physical props.
This digital-first setup requires a larger initial investment of $150–$300. Pin this for the easiest setup ever!
- Key Materials: High-lumen outdoor projector, Halloween digital looping files
- Vibe / Style: Digital theme-park display
- Difficulty: Tech-heavy calibration
- Budget Breakdown: Projector: $200 | Digital files: $30.
- Creator’s Tip: Ensure your streetlights don’t wash out the image; you need a projector with at least 3,000 lumens to compete with ambient neighborhood light.
- Smart Sourcing: high-lumen weatherproof outdoor projectors and digital Halloween video projection loops.
46. Day-to-Night Switchable Decor Layout
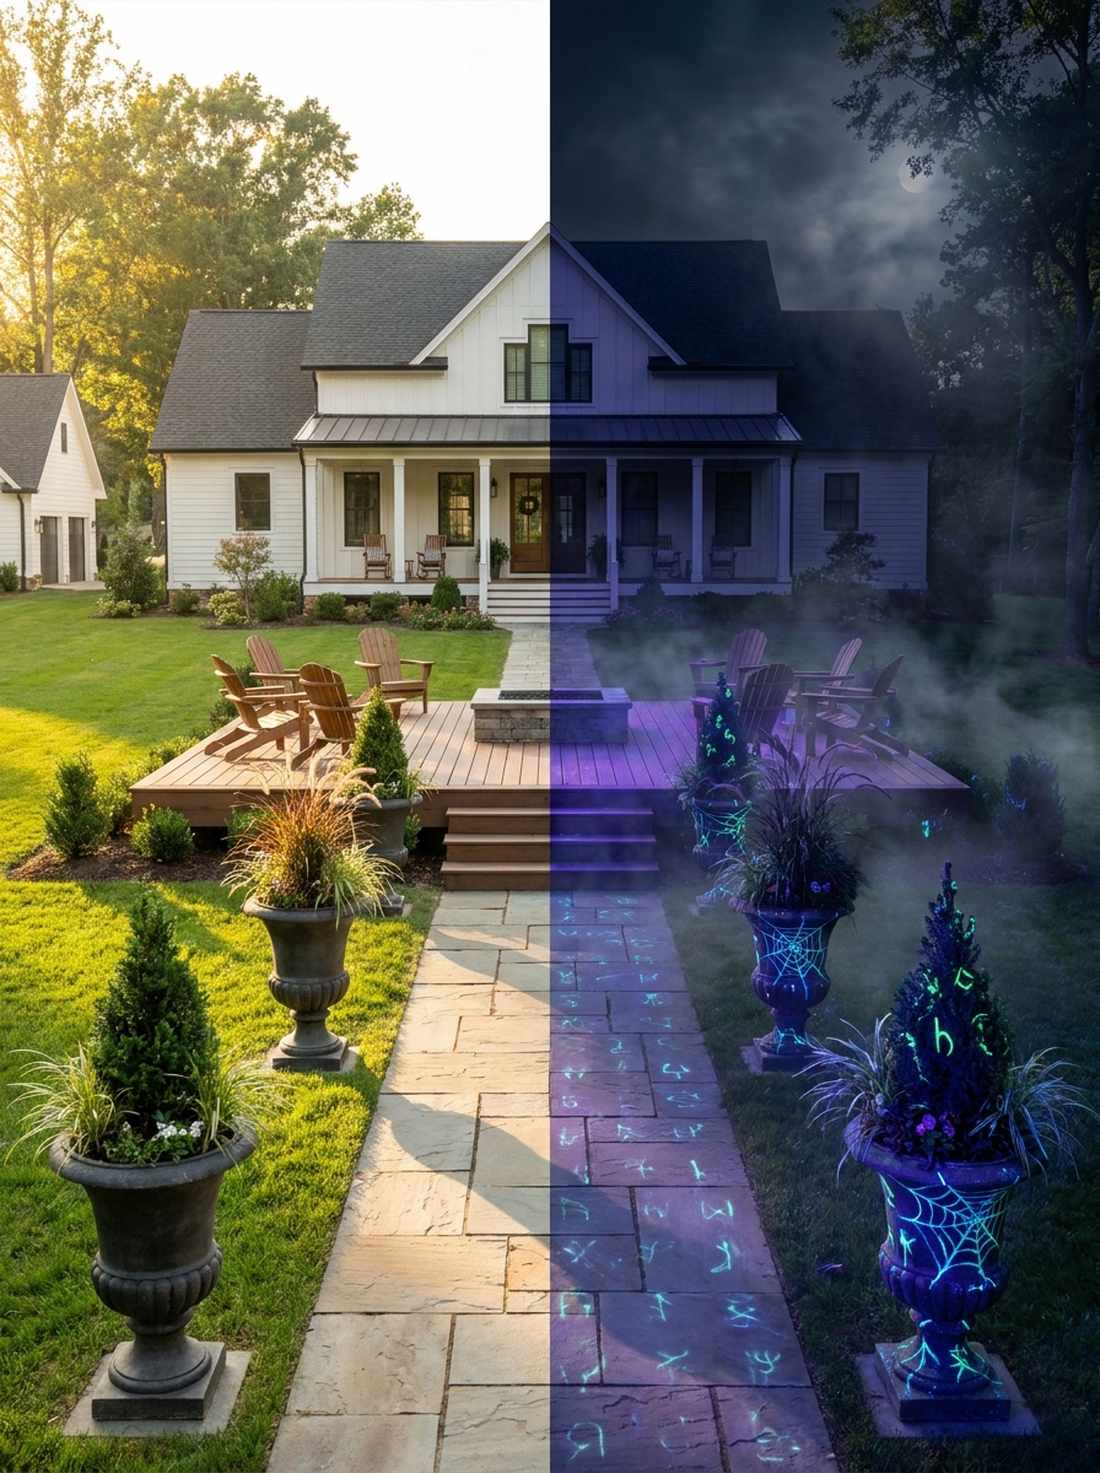
Ensures your yard looks like a curated magazine shoot at noon and a terrifying nightmare at midnight. A dual-phase day-to-night layout is perfect for homes in strict HOAs that require neatness during sunlight.
Relying solely on glow-in-the-dark paint looks terrible during the day; emphasizing heavy architectural urns and structural plants that look beautiful in the sun completely changes the vibe. Utilizing hidden UV-blacklights that automatically trigger at dusk reveals the hidden horror elements flawlessly.
Mastering this dual aesthetic costs around $60–$100.
- Key Materials: Structural yard urns, hidden UV blacklights
- Vibe / Style: Stealthy transforming landscape
- Difficulty: Requires meticulous planning
- Budget Breakdown: UV Lights: $40 | Structural planters: $50.
- Creator’s Tip: Paint hidden runes or spider webs on your concrete paths using clear UV-reactive paint that is 100% invisible until the blacklights kick on.
- Smart Sourcing: high-power outdoor LED UV blacklights and clear UV-reactive outdoor spray paint.
47. Low-Maintenance Halloween Garden for Busy Hosts
Looks totally cohesive and festive but takes less than twenty minutes to deploy. A low-touch smart halloween setup is highly recommended for exhausted parents or busy professionals.
Fiddling with fifty different extension cords every night is maddening; plugging everything into a heavy-duty outdoor smart timer delivers a high-end commercial haunt aesthetic without lifting a finger. Leaning on one massive, durable centerpiece rather than scattering tiny pieces saves hours of clean-up.
This automated convenience setup costs roughly $45–$80.
- Key Materials: Heavy-duty smart outdoor plugs, one massive durable prop
- Vibe / Style: Streamlined automation
- Difficulty: Set it and forget it
- Budget Breakdown: Smart plugs: $30 | Giant prop: $50.
- Creator’s Tip: Sync your outdoor smart plugs to your phone so you can trigger the lights and animatronics exactly as trick-or-treaters walk up.
- Smart Sourcing: weatherproof WiFi outdoor smart plugs and heavy-duty multi-outlet outdoor stakes.
48. Sustainable DIY Halloween Decor from Yard Waste
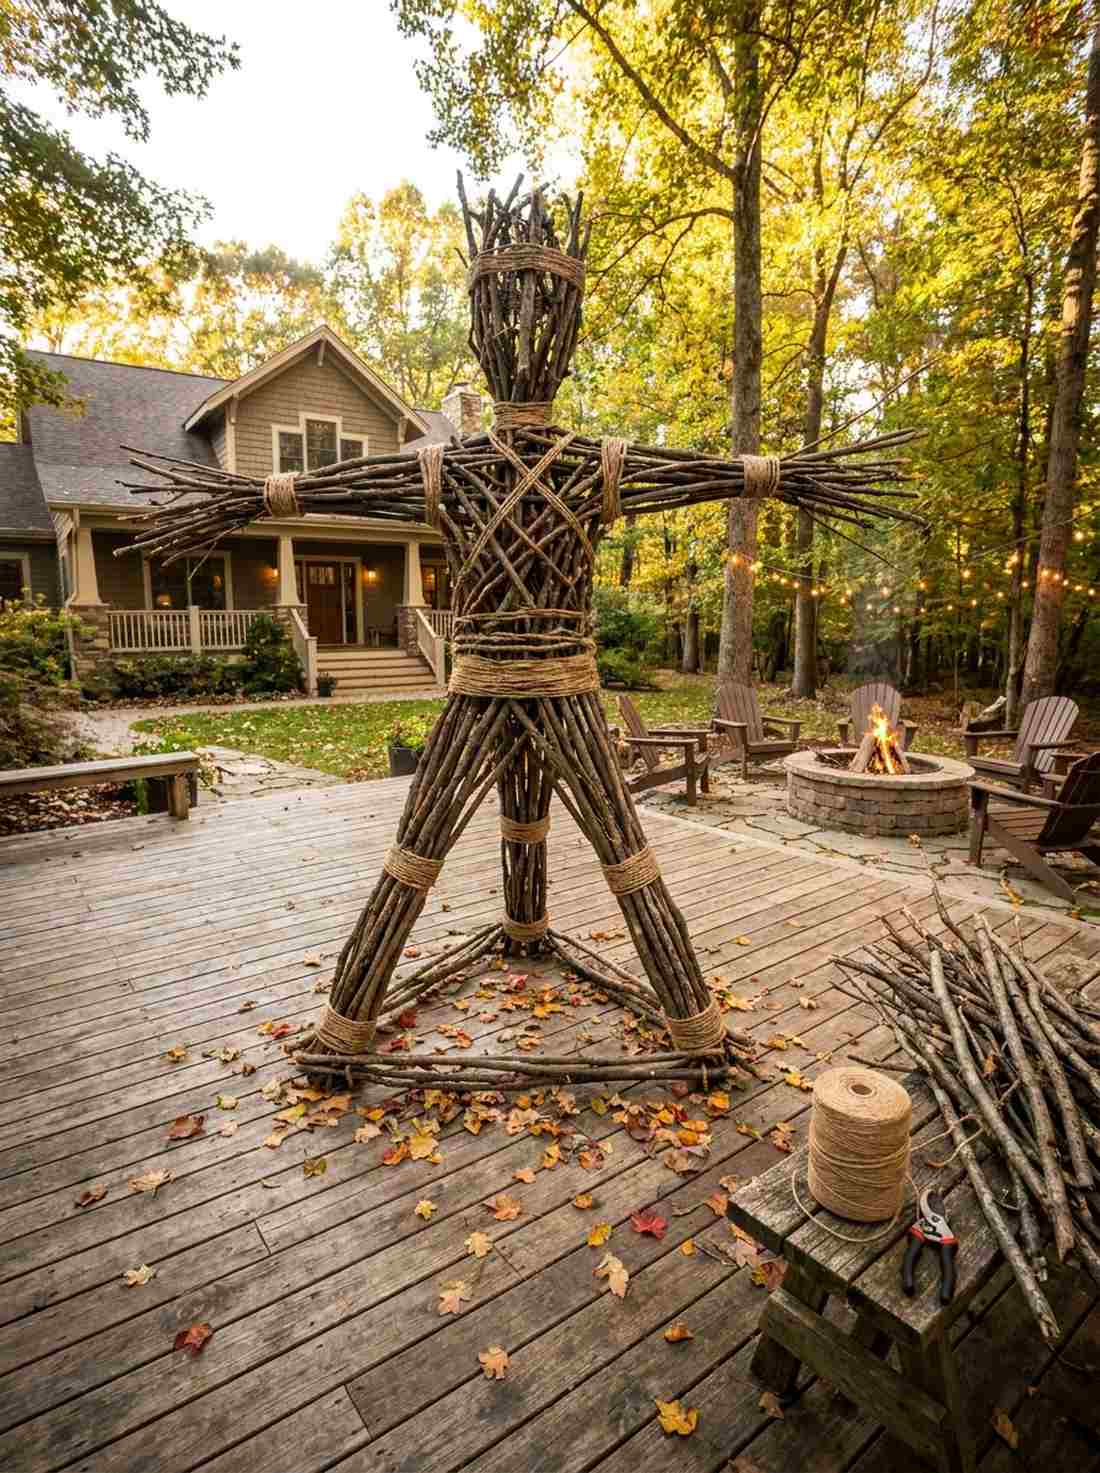
Feels deeply rooted in ancient pagan harvest traditions rather than cheap plastic consumerism. Utilizing sustainable yard waste decor is the absolute best use-case for heavily wooded properties.
Stuffing plastic bags full of leaves looks like literal garbage; weaving fallen branches into massive, rustic Blair-Witch style stick figures looks far more expensive than it is. Sourcing premium natural jute twine to bind the structures ensures the entire piece can simply be composted in November.
This incredibly eco-friendly build costs almost nothing, around $10–$20.
- Key Materials: Fallen branches, heavy jute twine
- Vibe / Style: Ancient folk-horror
- Difficulty: Intensive branch weaving
- Budget Breakdown: Twine: $10 | Yard waste: Free.
- Creator’s Tip: Build the stick figures in triangles for structural integrity so they can stand up independently without needing to be staked into the ground.
- Smart Sourcing: heavy-duty natural jute twine (bulk) and heavy-duty branch pruning shears.
Bringing Your outdoor decor halloween Vision to Life
Whether you lean toward a terrifying graveyard or a sophisticated gothic courtyard, deploying these 48 exact premium blueprints guarantees your outdoor decor halloween setup looks expensive without draining your wallet. Skip the cheap plastic aisles, invest in the heavy-duty commercial kits we highlighted, and watch your house become the most viral, photographed property in the neighborhood.
Frequently Asked Questions
How early should I put up outdoor Halloween decorations?
To maximize the ROI on your premium setups, start laying down your weather-resistant baseline (like outdoor LED uplighting and giant skeletal anchors) in late September. If you are using UV-coated props and heavy-duty zip ties, your display will easily survive the weather, meaning you should have the full visual experience running by the first week of October.
How do I keep outdoor Halloween decorations safe and weather-resistant?
Never rely on indoor-rated cables or flimsy factory stands. You must invest in heavy-duty outdoor extension cords, commercial-grade ground anchors, and UV-resistant clear acrylic sealant sprays. Swap all open flames for high-lumen waterproof LED pillar candles, and secure lightweight props with industrial black zip ties so your expensive investment survives heavy wind and rain.