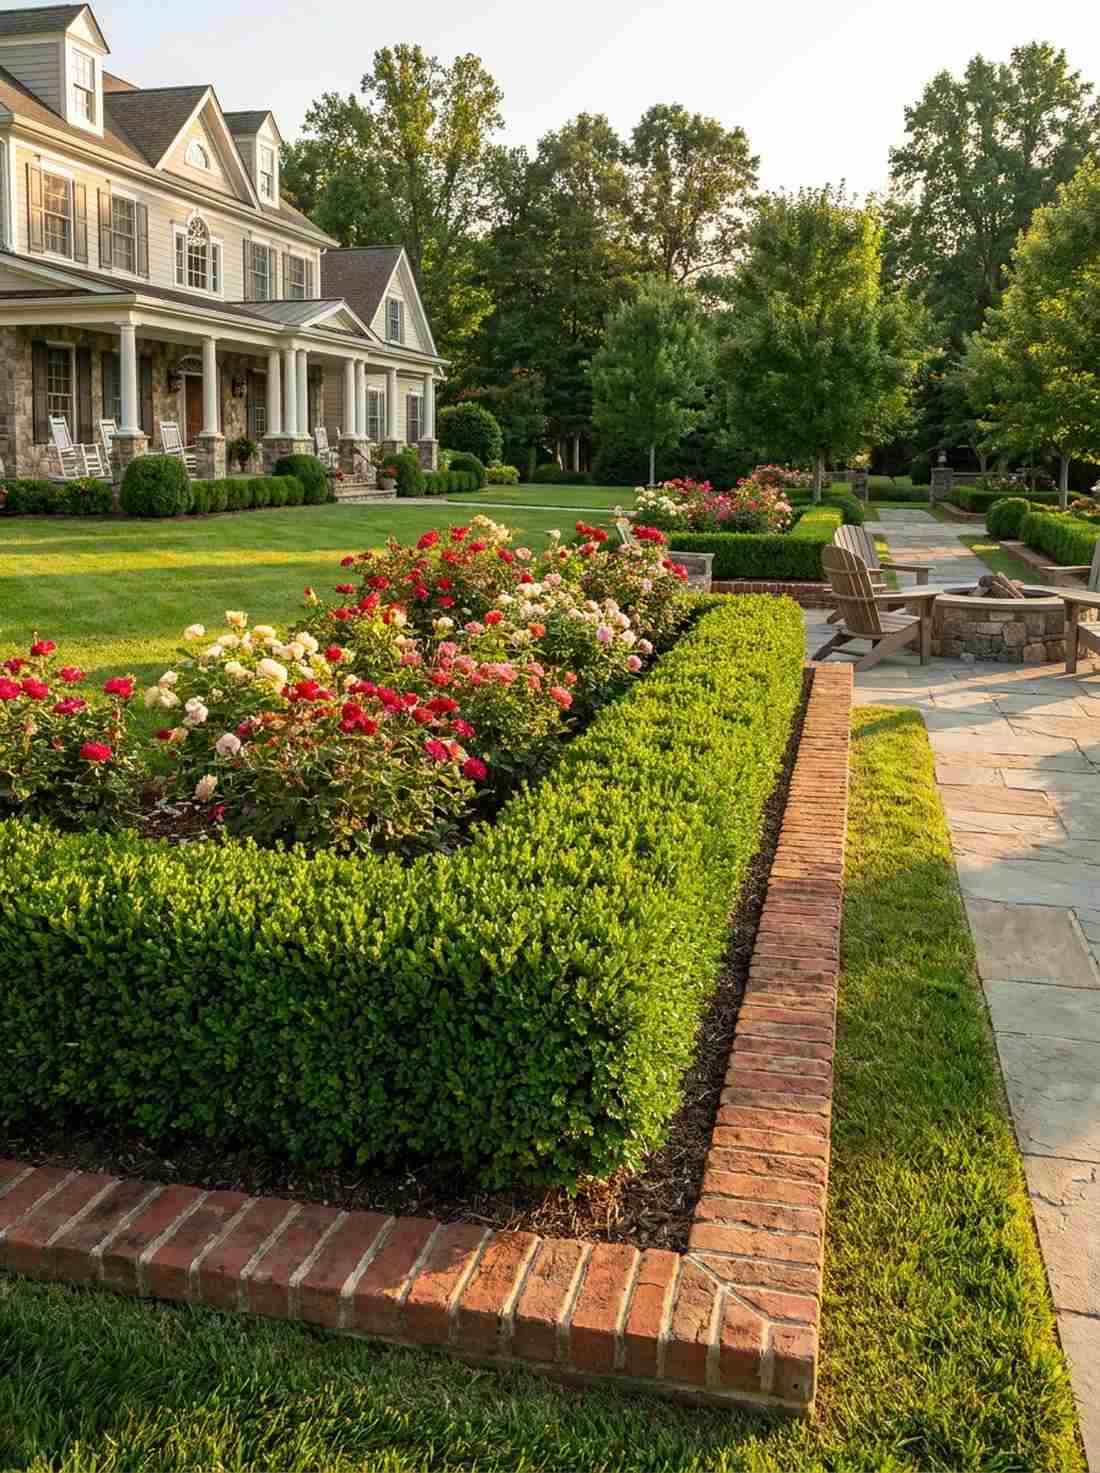
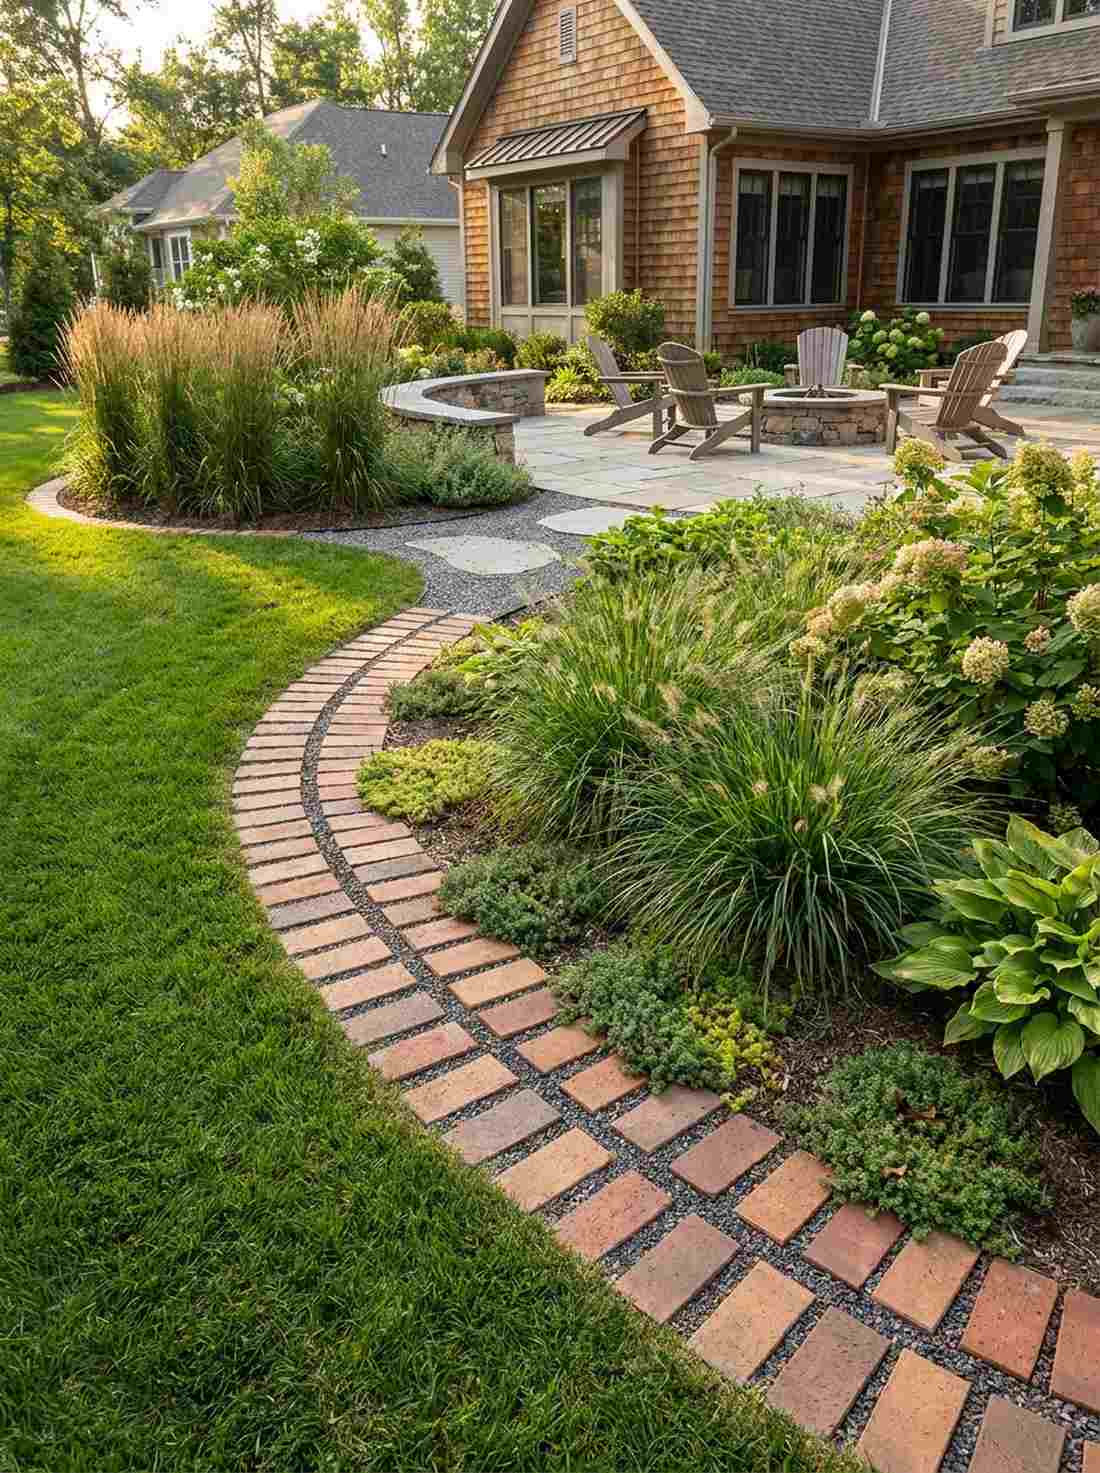
A masterfully planned garden design border instantly elevates outdoor spaces from messy to architectural. High-end brick setups redefine landscape boundaries while completely preventing mulch washout. Master these exact DIY layouts for designer-level polish on a weekend budget.
Design SnapshotKey Principles
- Foundation Depth: Excavate trenches 3-4 inches deep with compacted gravel base for stability and drainage
- Material Selection: Use severe-weather-rated clay pavers or reclaimed bricks for authentic patina development
- Joint Treatment: Choose polymeric sand for tight spacing or swept sand for natural drainage in dry-lay applications
- Plant Integration: Position low-growing perennials along brick edges to soften hardscape and create visual flow
Traditional Brick Laying Methods
These time-tested techniques provide structural integrity and clean lines. Mortar-set borders deliver permanent solutions for formal landscapes, while dry-lay methods offer flexibility for evolving garden designs.
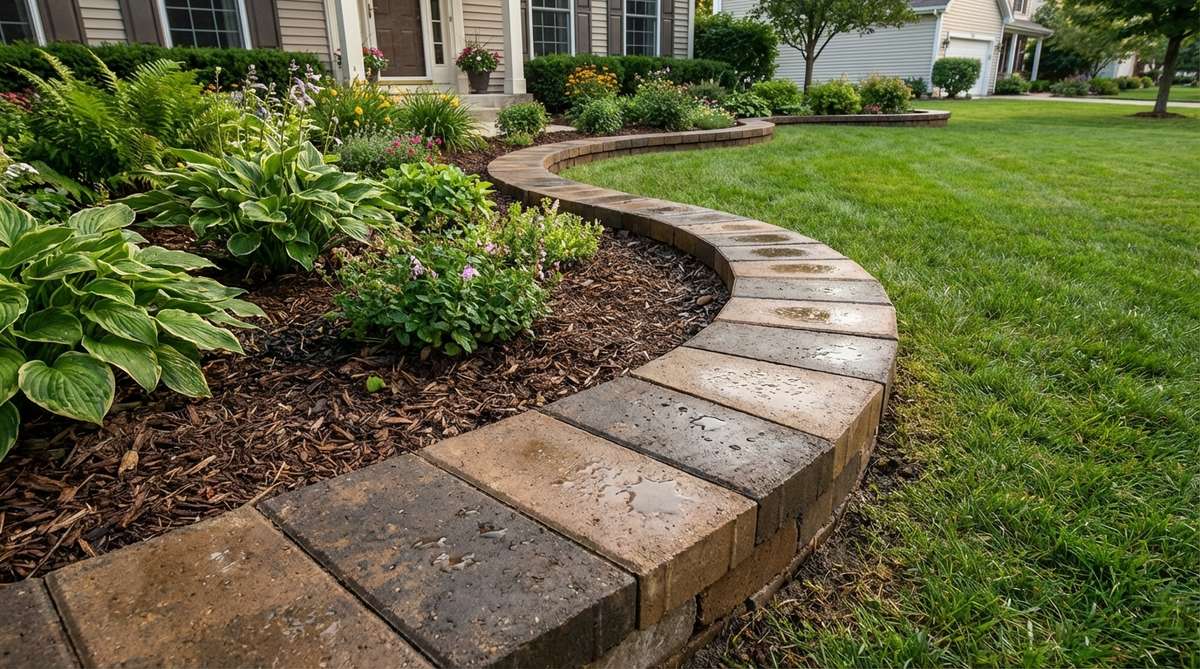
1. Mortar-Set Flat Brick Border
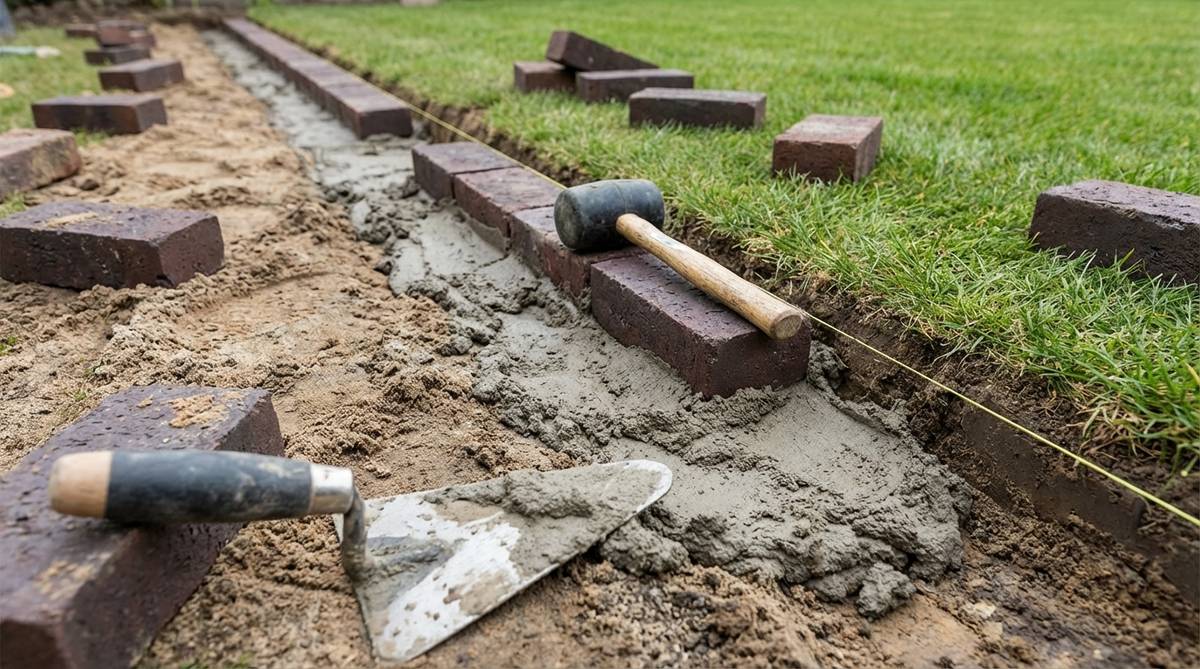
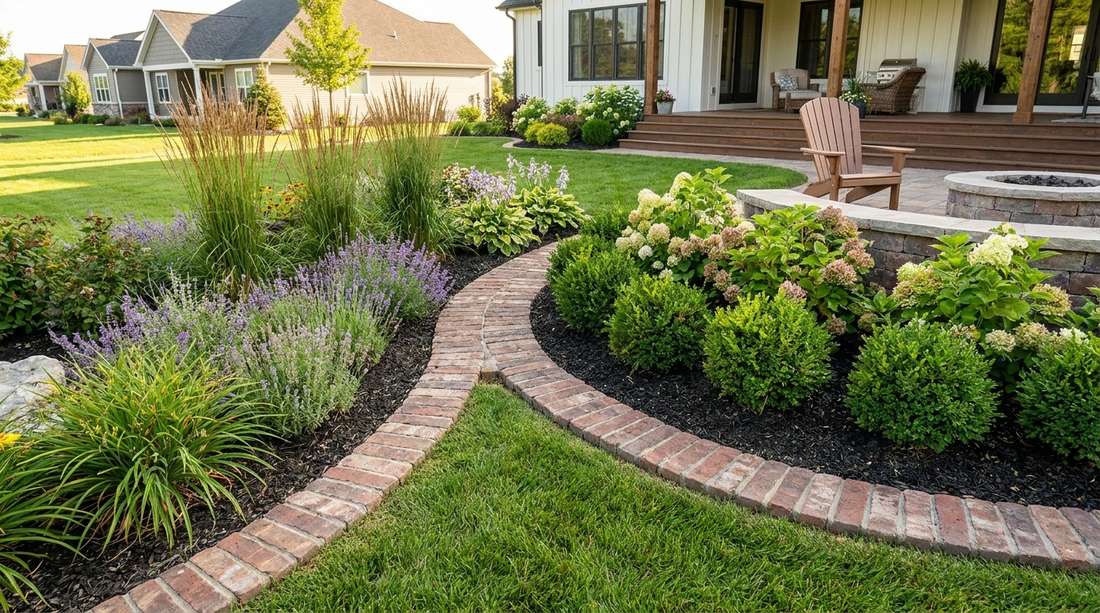
Creates a deeply satisfying architectural boundary. Formal garden border design concepts like this feel like stepping onto a historic estate grounds. Perfectly executed for front yard perimeters demanding sharp geometry.
Most DIYers skip the wet-set phase, entirely ruining their edge stability. Locking severe-weather pavers into a sand-cement mix delivers a surprisingly premium look that shrugs off aggressive lawnmowers.
You can easily pull this off for around $40–$75 depending on paver volume. Save this to your DIY weekend garden board.
- Key Materials: Severe-weather rated clay pavers, quick-set mortar
- Vibe / Style: Historic estate polish
- Difficulty: Moderate weekend effort
- Budget Breakdown: Materials: $40 | Base: $15.
- Creator’s Tip: Tap flush with turf for zero-trim mowing functionality.
- Smart Sourcing: Pre-mixed commercial-grade mortar (bulk pack) and a heavy-duty rubber masonry mallet.
2. Dry-Lay Horizontal Edging
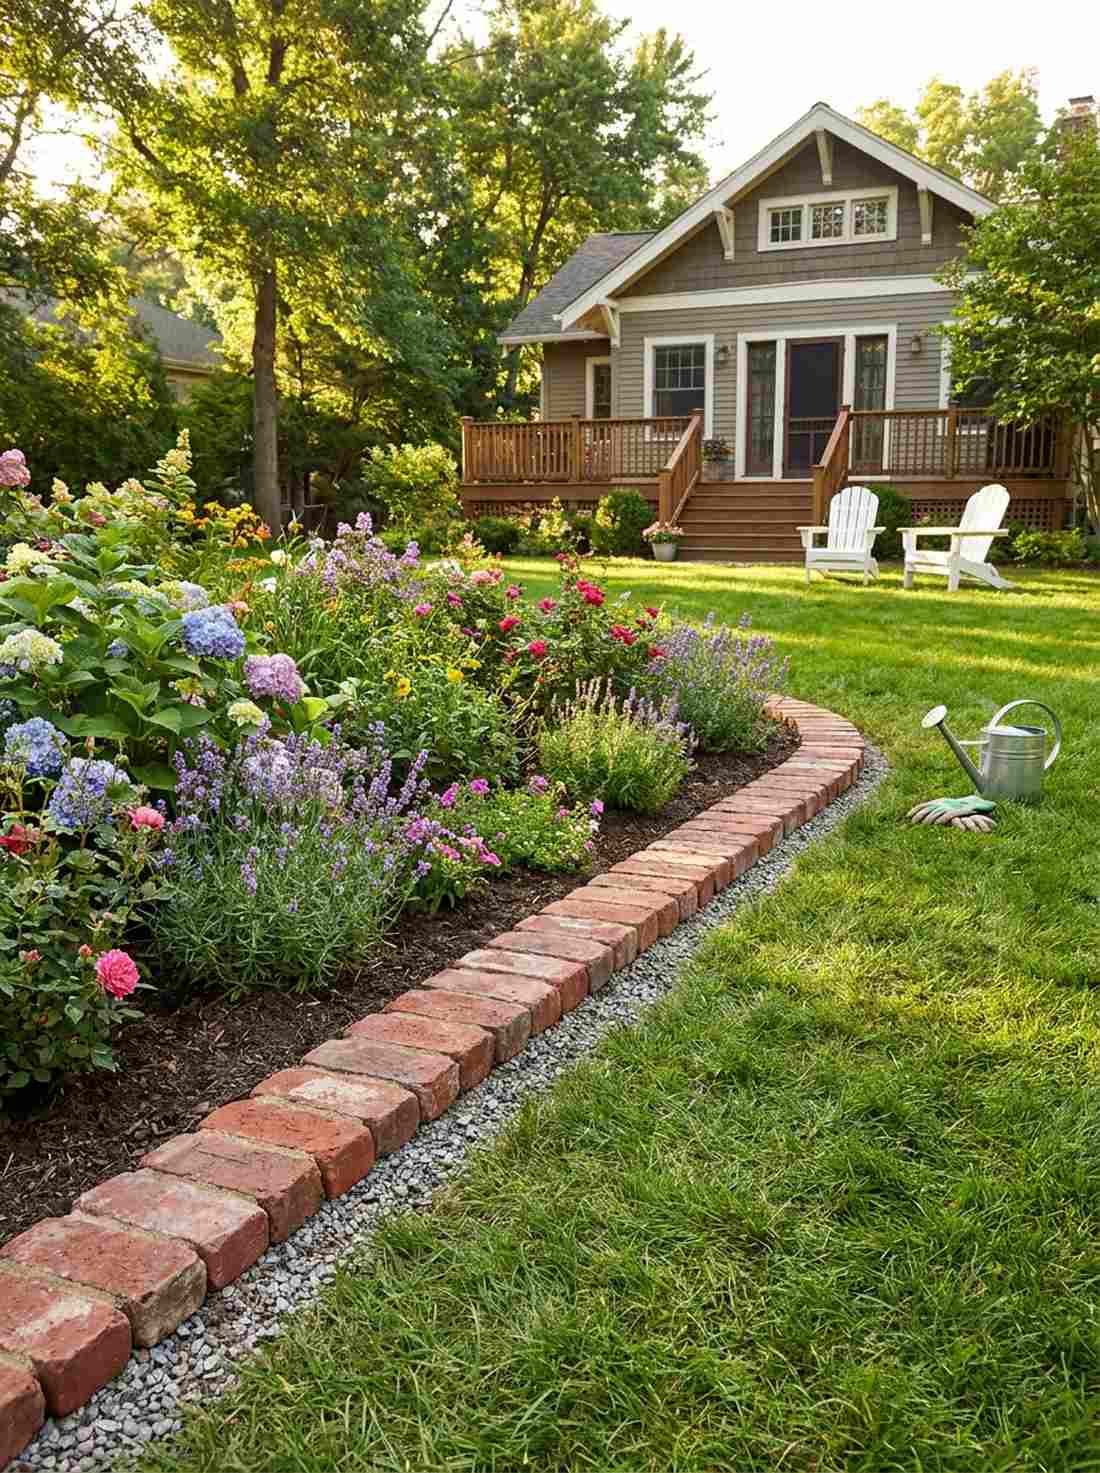
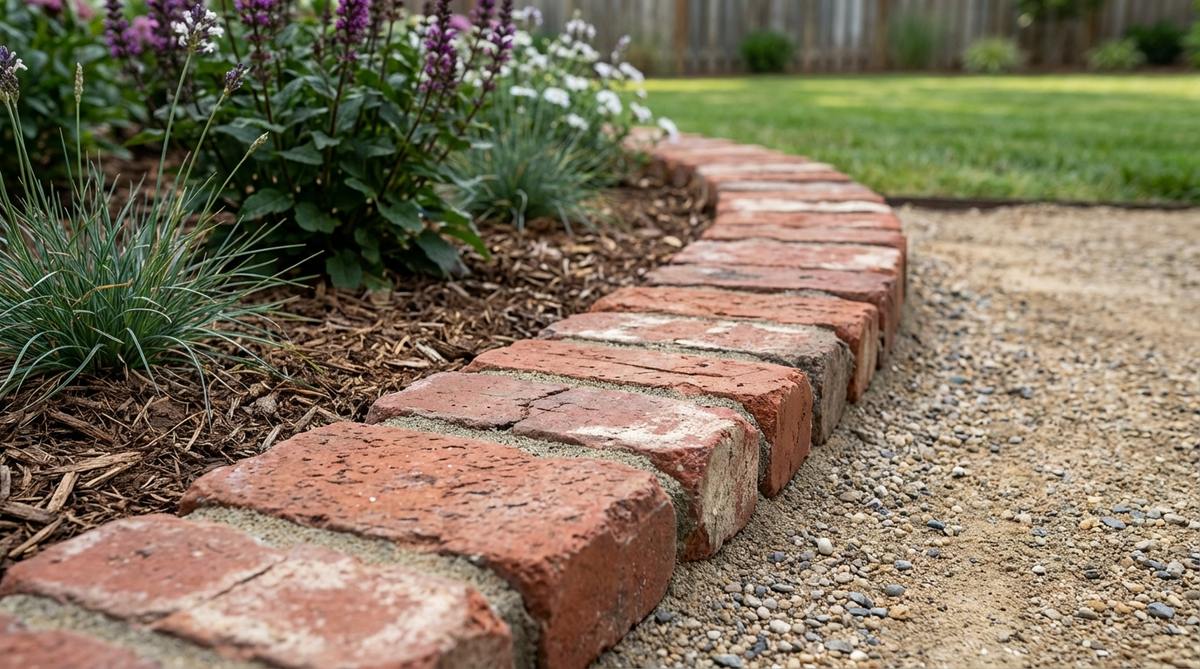
Brings a beautifully grounded structure without permanent commitment. Garden flower border design foundations like this feel like a classic English countryside. Exceptional for backyard flower beds that change seasonally.
Amateurs often skip the stone dust layer, causing their edges to sink within months. Compacting crushed stone beneath pavers guarantees an ultra-stable foundation while still allowing you to pop bricks out when garden dimensions shift.
Expect to spend roughly $25–$50 for a standard garden bed perimeter.
- Key Materials: Standard bricks, crushed stone base, polymeric sand
- Vibe / Style: Classic cottage flexibility
- Difficulty: Easy beginner setup
- Budget Breakdown: Pavers: $25 | Base Stone: $15.
- Creator’s Tip: Mist the polymeric sand lightly; soaking it washes away the binding agents.
- Smart Sourcing: UV-resistant polymeric jointing sand (large bucket) and pre-cut landscape fabric rolls.
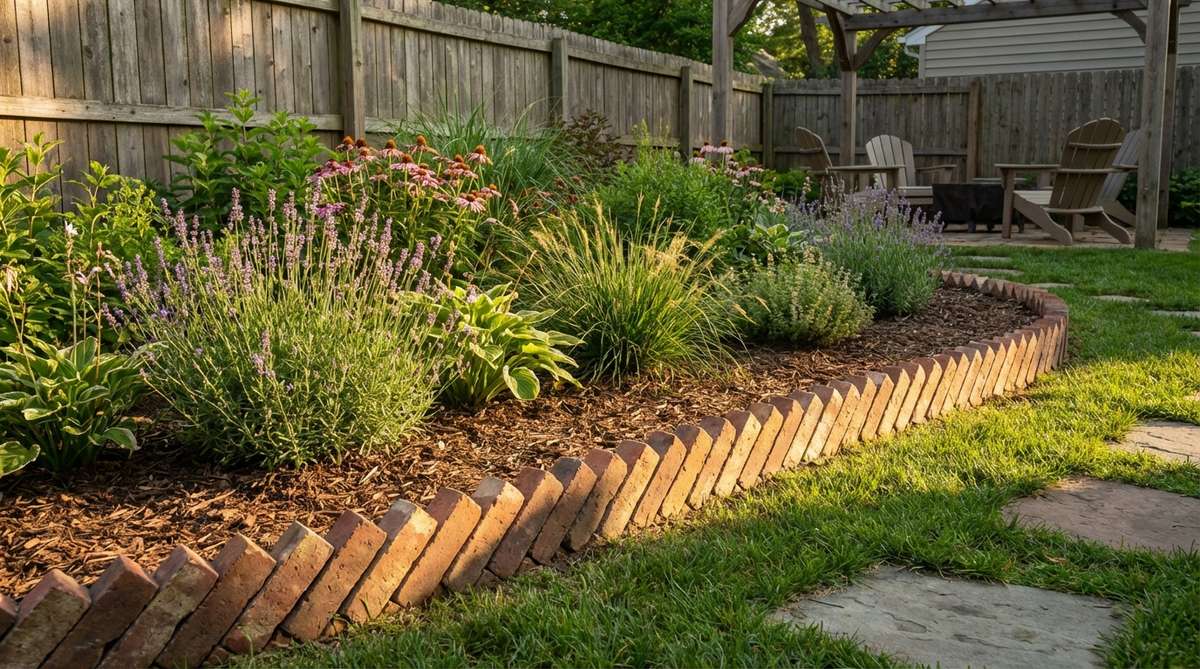
3. Half-Brick Soldier Course
Delivers dramatic visual height that instantly catches the eye. Narrow garden border design layouts utilizing this technique feel lifted straight out of a European villa. Brilliant for tightly constrained pathways where horizontal spread isn’t possible.
Laying bricks flat is common, but standing them vertically creates a barrier that forces a high-end designer finish. This profile stops mulch from washing away during heavy downpours while framing creeping perennials perfectly.
A fast upgrade that completely changes the vibe for around $60.
- Key Materials: Old Chicago style reclaimed bricks, mortar bed
- Vibe / Style: European architectural presence
- Difficulty: Intermediate alignment
- Budget Breakdown: Reclaimed Bricks: $45 | Base: $15.
- Creator’s Tip: Always use a string line; vertical alignment errors are glaringly obvious.
- Smart Sourcing: Weather-sealed reclaimed brick packs and high-tension masonry string lines.
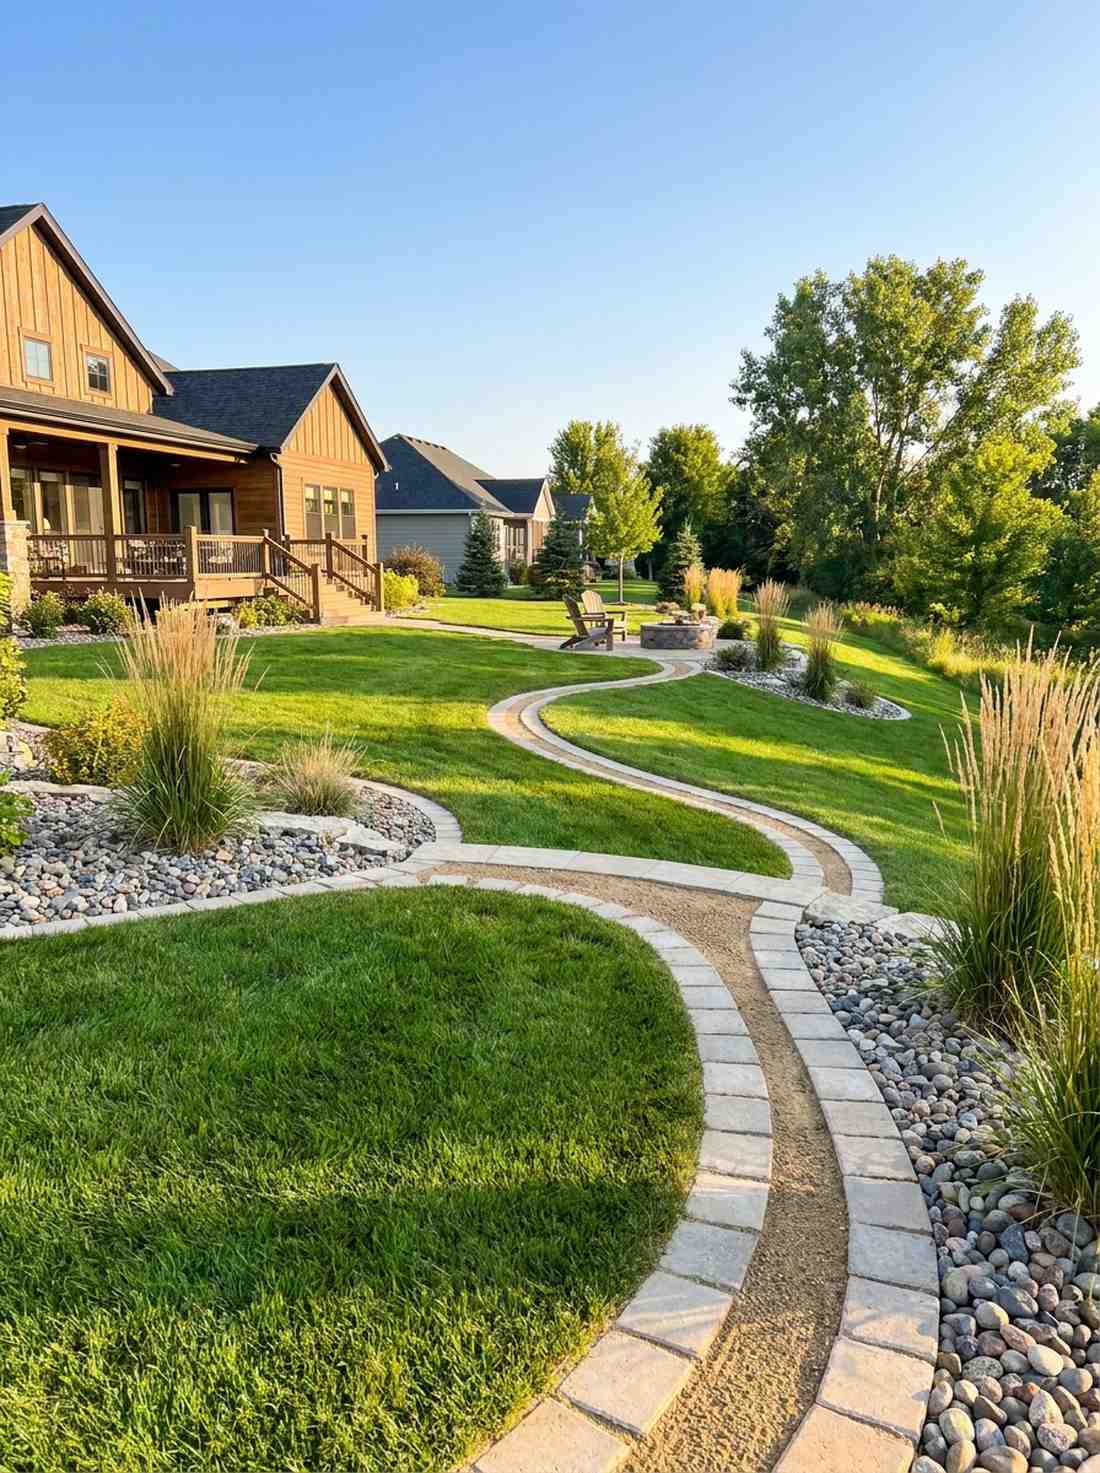
4. Concrete Paver Curved Edge
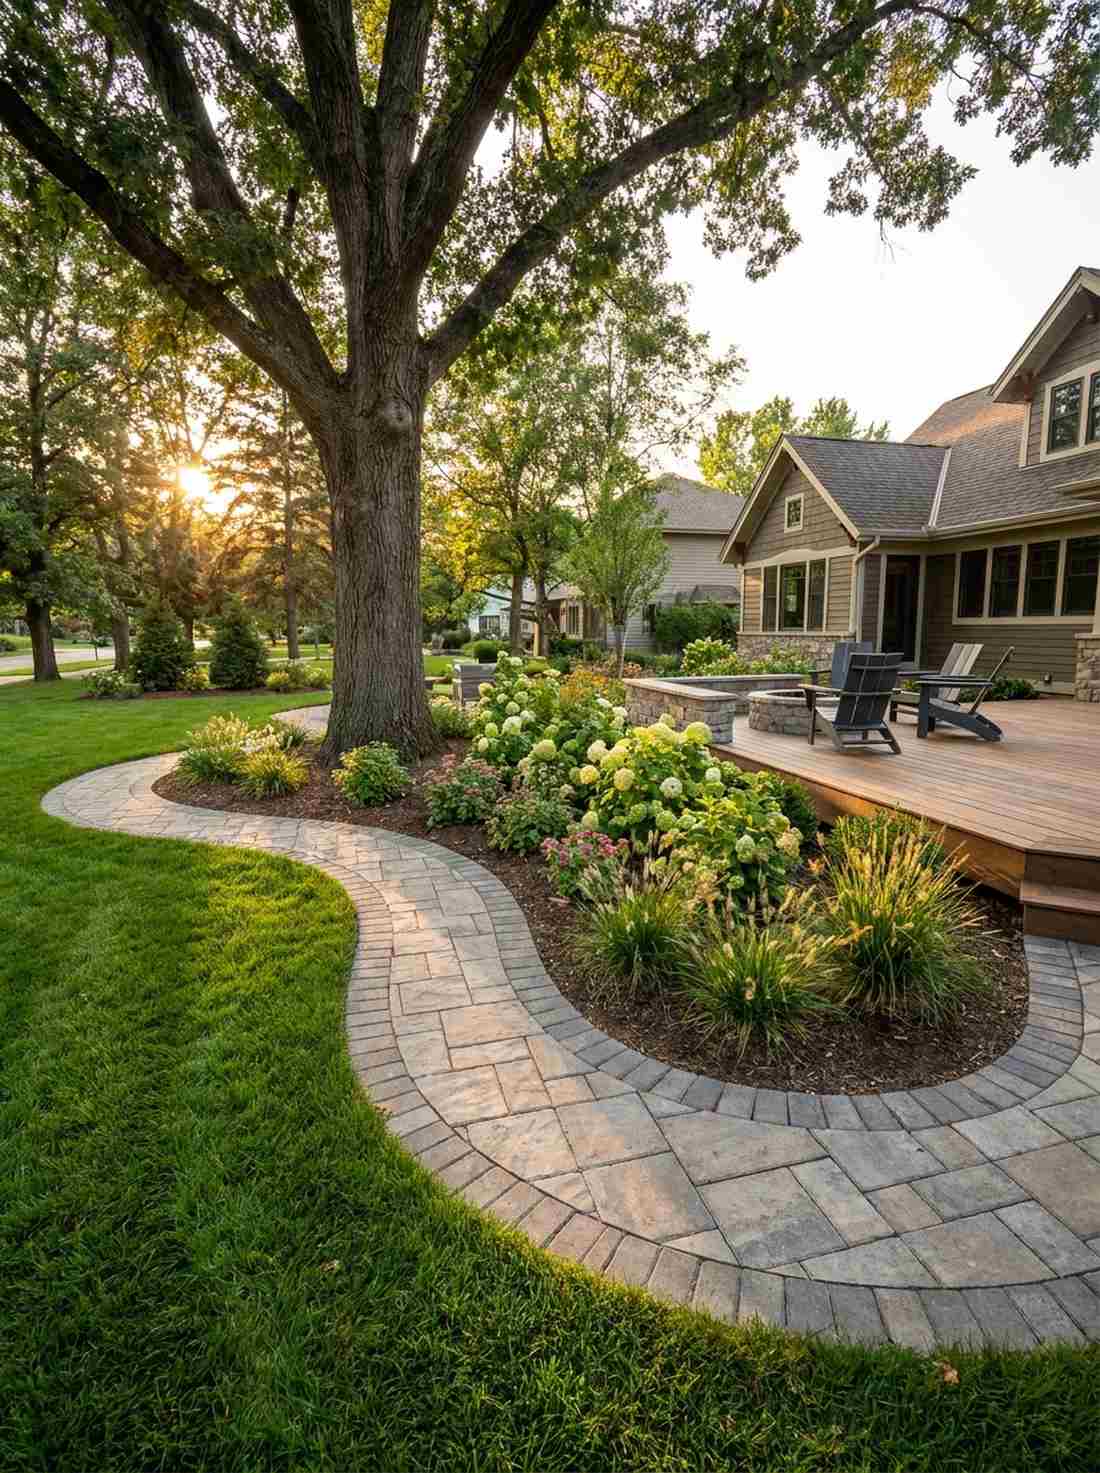
Offers sweeping, organic lines that guide the eye naturally. Curved garden border design aesthetics feel like a professionally manicured botanical park. Works exceptionally well for wrapping around large corner oak trees.
People assume cutting concrete is too hard, leaving them with rigid, boring straight lines. Scoring oversized concrete pavers with a diamond blade achieves an upscale aesthetic that smoothly navigates tight radius turns.
Your material cost lands right around $30–$60. Pin this if you’re planning a large backyard overhaul.
- Key Materials: 4×8-inch concrete pavers, marking rope
- Vibe / Style: Sweeping modern park
- Difficulty: Requires power tools
- Budget Breakdown: Pavers: $30 | Saw Blade Rental: $15.
- Creator’s Tip: Blend new and weathered pavers together to mimic natural stone variation.
- Smart Sourcing: Diamond-tipped circular saw blades (universal fit) and flexible garden marking hoses.
Most people get this completely wrong… until they try the exact layout coming up next.
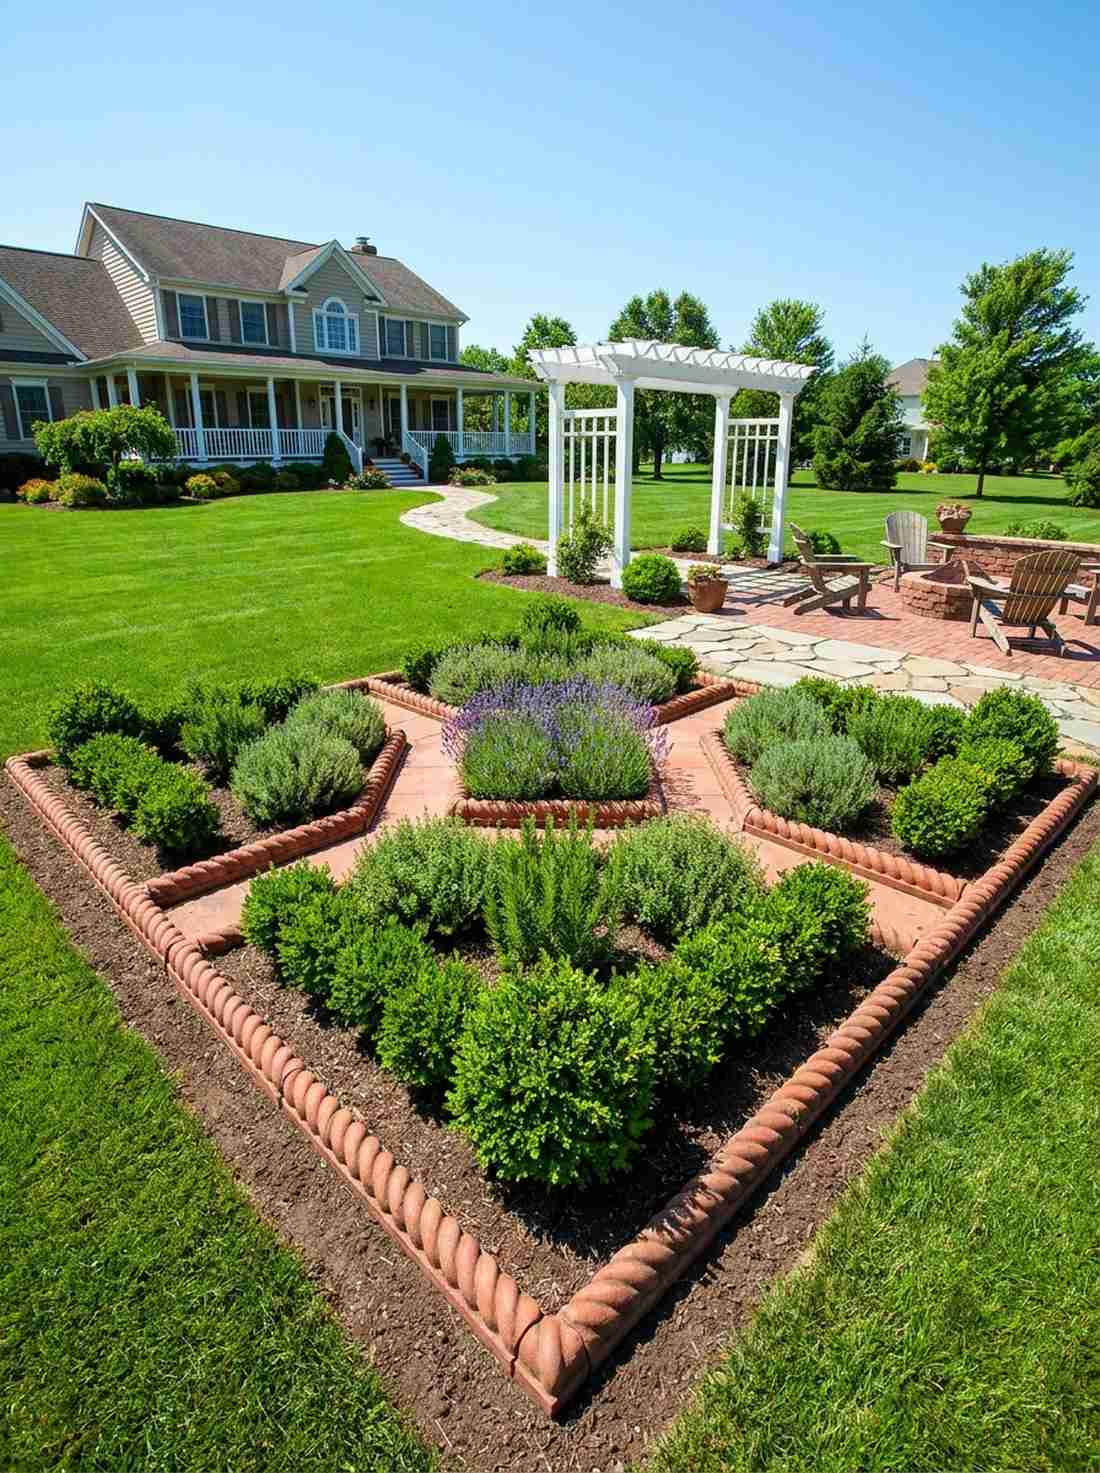
5. Reclaimed Brick Potager Edging
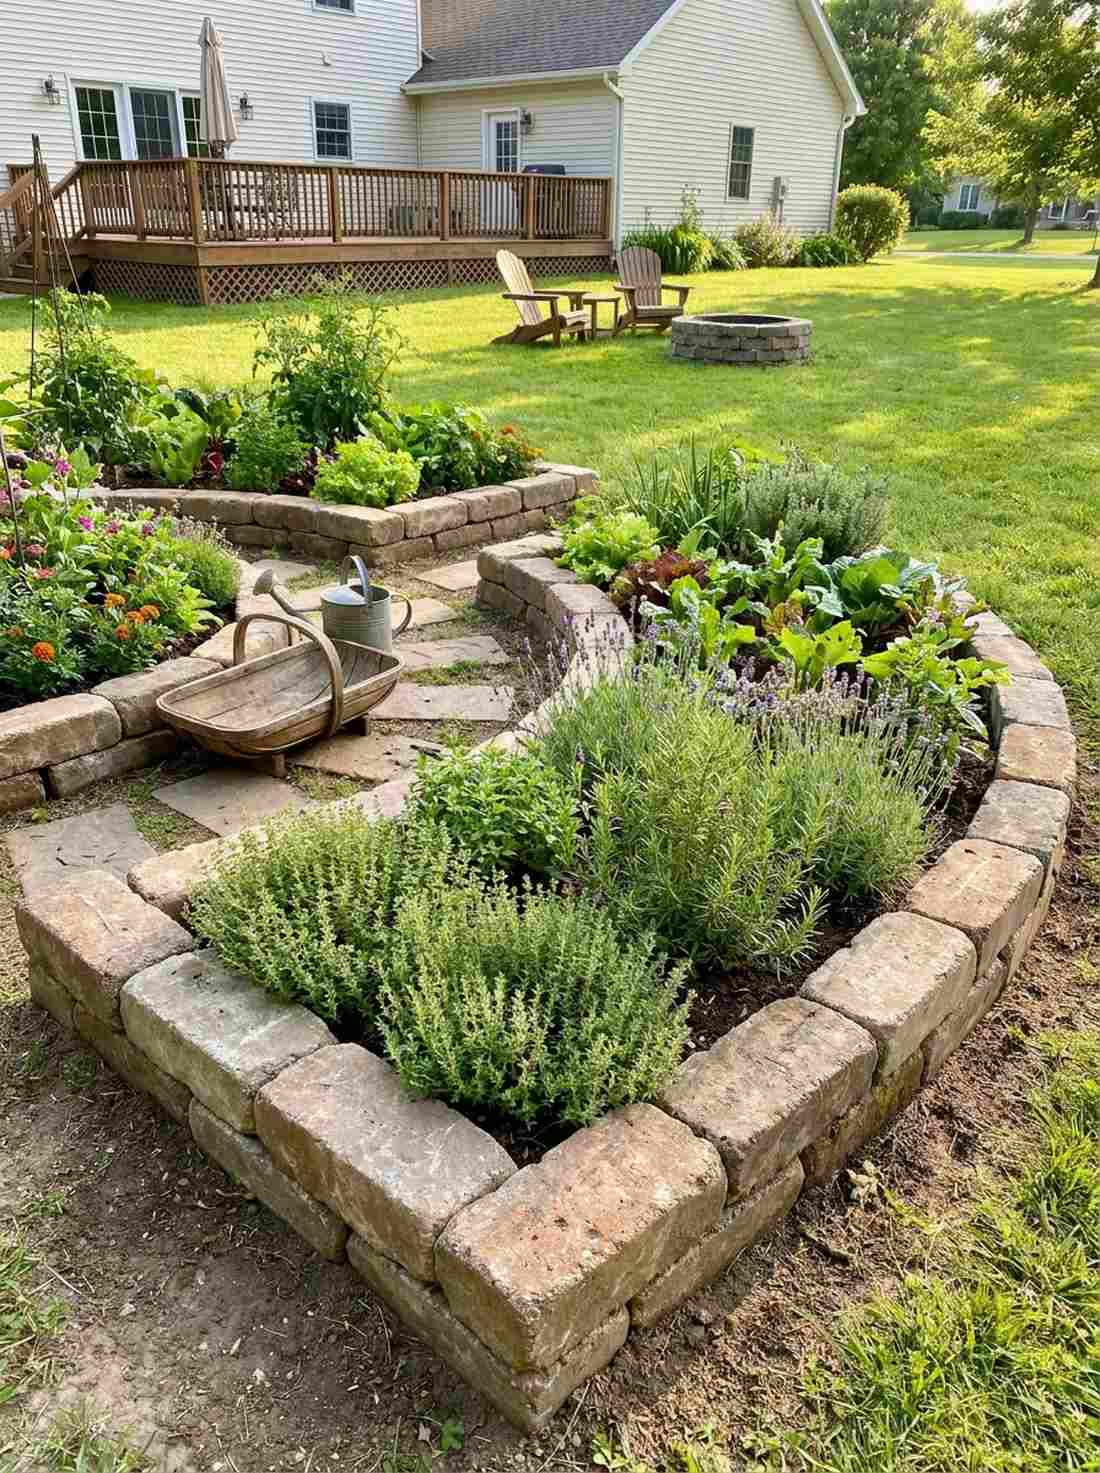
Projects an instantly weathered, rustic charm. Cottage garden border design setups like this feel like a generations-old French kitchen garden. Ideal for framing distinct herb and vegetable zones.
Tearing up the root zones of established vegetables is a rookie mistake. Resting chunky reclaimed masonry directly on native soil bypasses the cheap plastic look while protecting the intricate underground ecology of your potager.
Often completely free if you source demolished wall sections, otherwise roughly $20.
- Key Materials: 2x12x6-inch concrete masonry tops, sand
- Vibe / Style: Rustic French kitchen garden
- Difficulty: Minimal excavation
- Budget Breakdown: Reclaimed Masonry: $0-$20 | Sand: $5.
- Creator’s Tip: Plant heat-loving herbs directly against the brick to utilize thermal reflection.
- Smart Sourcing: Permeable joint sweeping sand (bagged) and bulk organic thyme seeds.
6. Sand-Swept Pathway Border
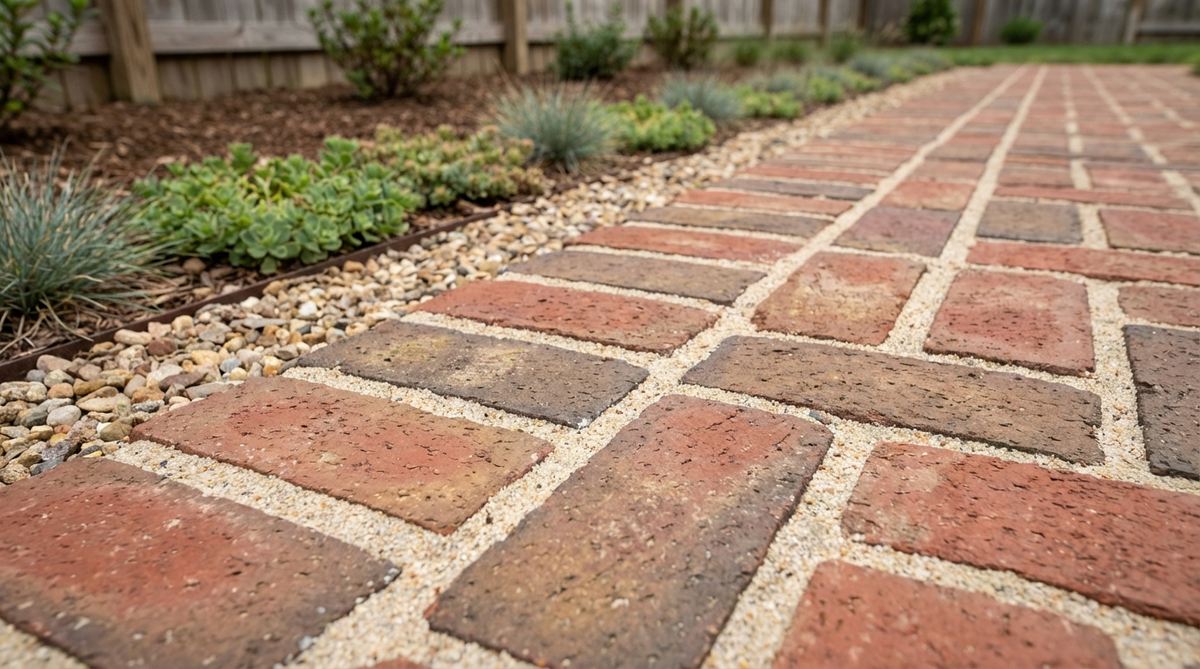
Solves pooling water issues with effortless grace. Modern garden border design integrations like this feel like an intentional zen garden feature. Perfect for sloping side-yards that suffer from heavy runoff.
Cementing bricks on a slope just creates a dam that floods your walkways. Using coarse sand to pack the joints ensures rapid drainage, proving that functional hardscaping looks far more expensive than it actually is.
An easy weekend fix that runs about $35 total.
- Key Materials: Standard pavers, coarse drainage sand, landscape fabric
- Vibe / Style: Clean drainage-focused modernism
- Difficulty: Easy beginner project
- Budget Breakdown: Bricks: $20 | Coarse Sand: $15.
- Creator’s Tip: Sweep the sand diagonally across the joints to pack them without digging the material back out.
- Smart Sourcing: Heavy-duty weed barrier fabric (commercial grade) and stiff-bristle outdoor push brooms.
Creative Pattern Installations
Distinctive brick arrangements transform functional borders into landscape features. These patterns add visual interest through geometric precision and rhythm along garden perimeters.
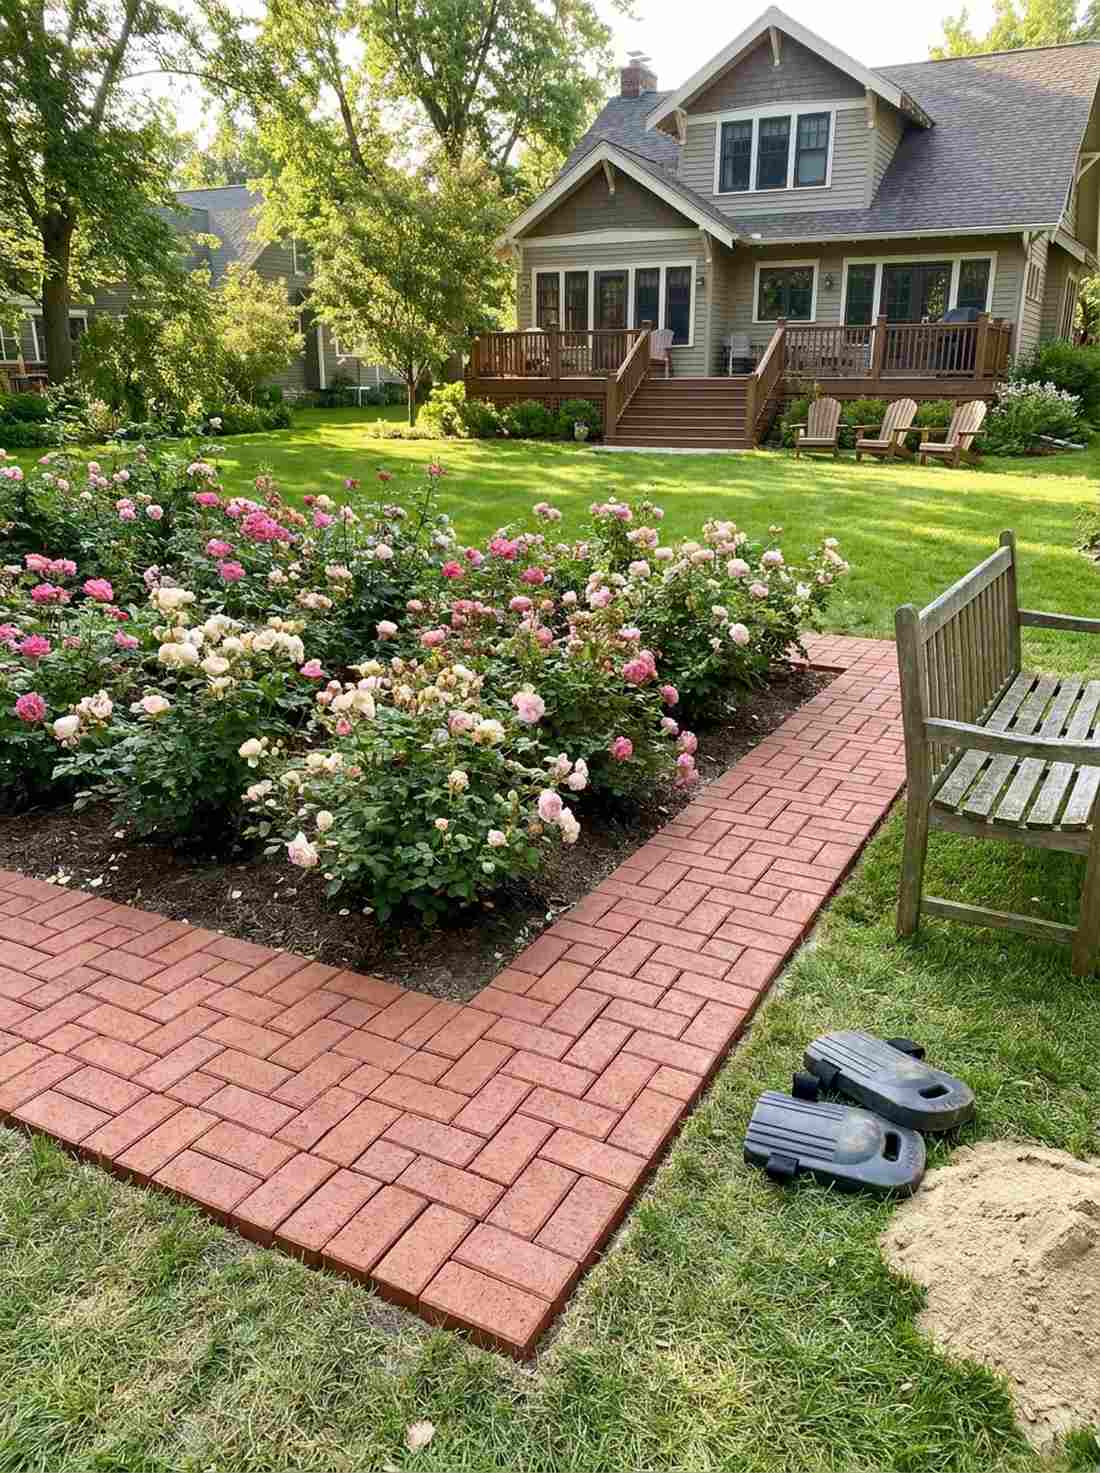
7. Herringbone Diagonal Border
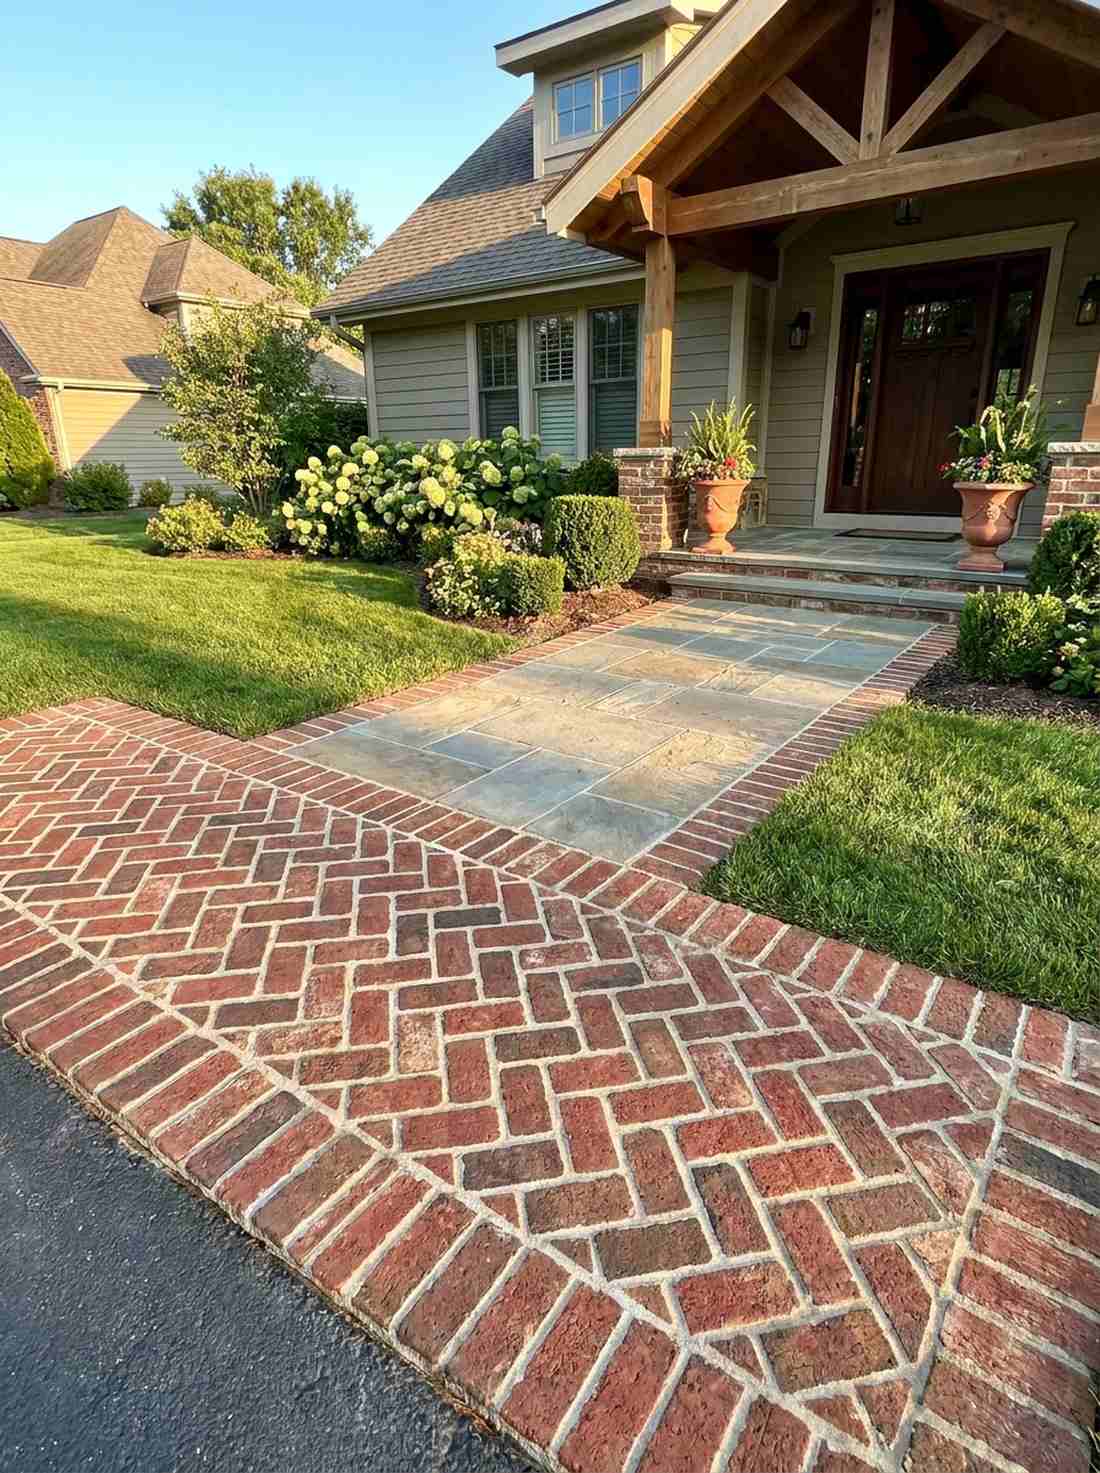
Introduces a sophisticated woven rhythm to any walkway. Garden border design plans utilizing herringbone feel like a historic courtyard in Rome. Stunning when applied to the main entryway of a residential home.
Many homeowners settle for straight lines because they fear angles. Interlocking 45-degree brick placements distributes weight perfectly, creating a high-traffic boundary that never shifts or sinks.
This premium pattern usually costs between $50–$90. Save this pattern for your front yard mood board.
- Key Materials: High-contrast rustic bricks, mortar
- Vibe / Style: Classic Roman courtyard
- Difficulty: Advanced angle cutting
- Budget Breakdown: Bricks: $60 | Base/Mortar: $25.
- Creator’s Tip: Start the pattern exactly at a corner to ensure perfect symmetry down the entire path.
- Smart Sourcing: Pre-marked angle measuring squares and heavy-duty masonry chisels (pro set).
8. Saw-Tooth Angled Edge
Adds a playful, zigzagging dimension to flat landscapes. Mixed border garden design ideas like this feel straight out of a whimsical storybook. Fantastic for keeping aggressive turf out of informal perennial beds.
Laying flat borders is standard, but tilting them at a 45-degree angle catches afternoon shadows brilliantly. This serrated profile traps soil perfectly and creates a massive visual impact from generic hardware store bricks.
You can execute this jagged look for roughly $30. Highly recommended for a quick weekend win.
- Key Materials: Standard clay bricks, native soil
- Vibe / Style: Whimsical cottage zigzag
- Difficulty: Easy alignment
- Budget Breakdown: Bricks: $30 | Base: $0 (uses native soil).
- Creator’s Tip: Pack heavy clay or cement at the very base of the “teeth” to prevent tipping.
- Smart Sourcing: Fast-setting concrete mix (small bags) and high-visibility leveling string.
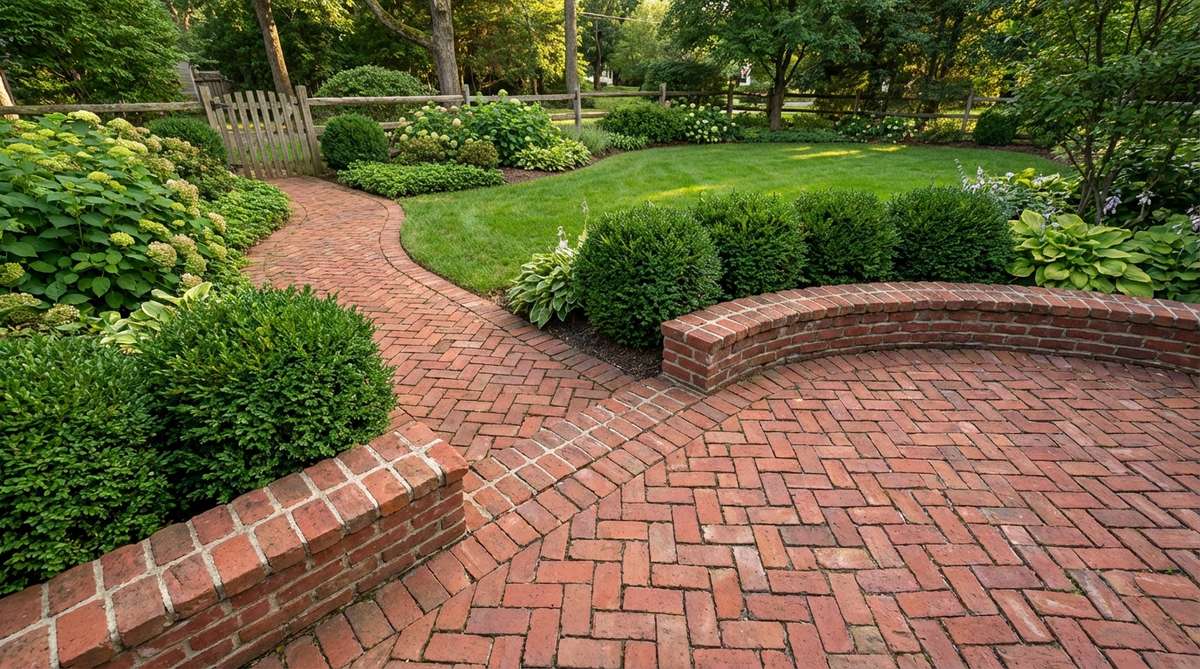
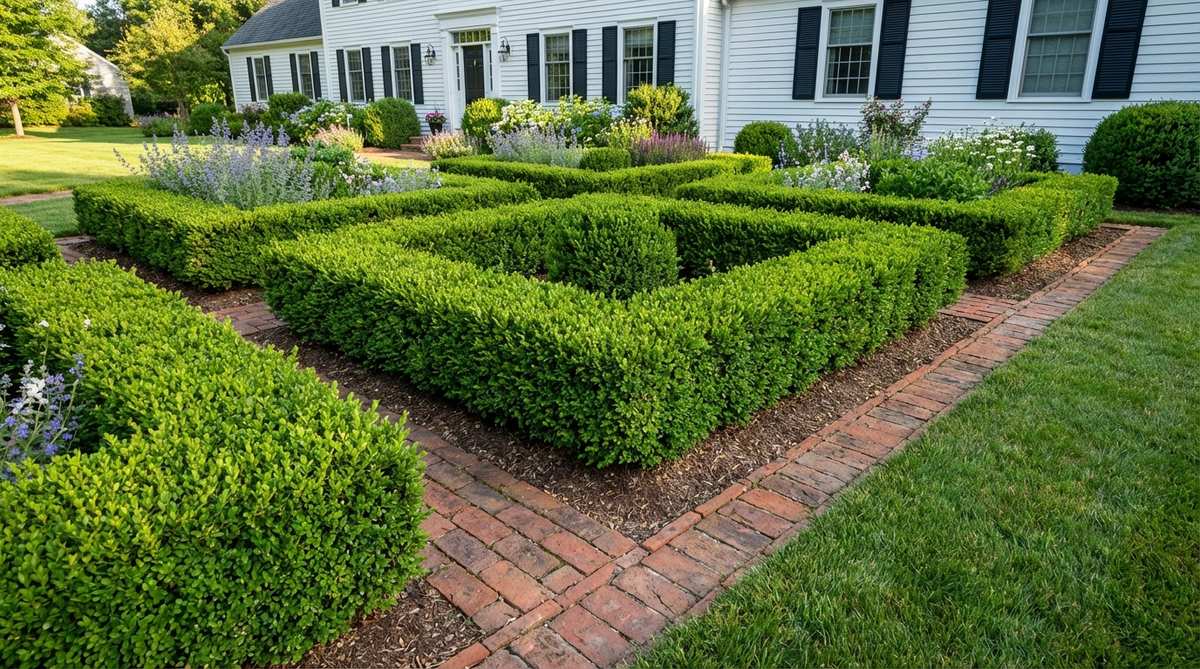
9. Basket-Weave Pattern

Mimics the texture of woven textiles in hardscape form. Large garden border design implementations using this feel incredibly rich and historic. Beautifully suited for wide, 6-inch borders framing heritage rose beds.
Narrow borders often look skimpy and cheap against large homes. Pairing horizontal and vertical brick pairs together yields a substantial, chunky frame that elevates the perceived value of your entire property.
Expect to invest around $60–$100 for this wider footprint.
- Key Materials: Uniform clay pavers, leveling sand
- Vibe / Style: Victorian tapestry
- Difficulty: Moderate patterning
- Budget Breakdown: Pavers: $75 | Sand: $15.
- Creator’s Tip: Use perfectly square-edged pavers; tumbled bricks ruin the crisp woven illusion.
- Smart Sourcing: Precision leveling sand (bulk bags) and heavy-duty rubber knee pads.
This next setup is ridiculously cheap but looks like a $150 custom hardscape display…
💡 Must-Have Supplies for High-End Setups
To build these setups faster and ensure they last, skip the generic craft aisles and invest in the right foundational kits.
- Base & Support: Pre-cut weed barrier commercial rolls
- Setup Tools: Pro-grade masonry starter kits
- Weather/Durability Protection: UV-resistant clear masonry sealants
10. Running Bond Offset
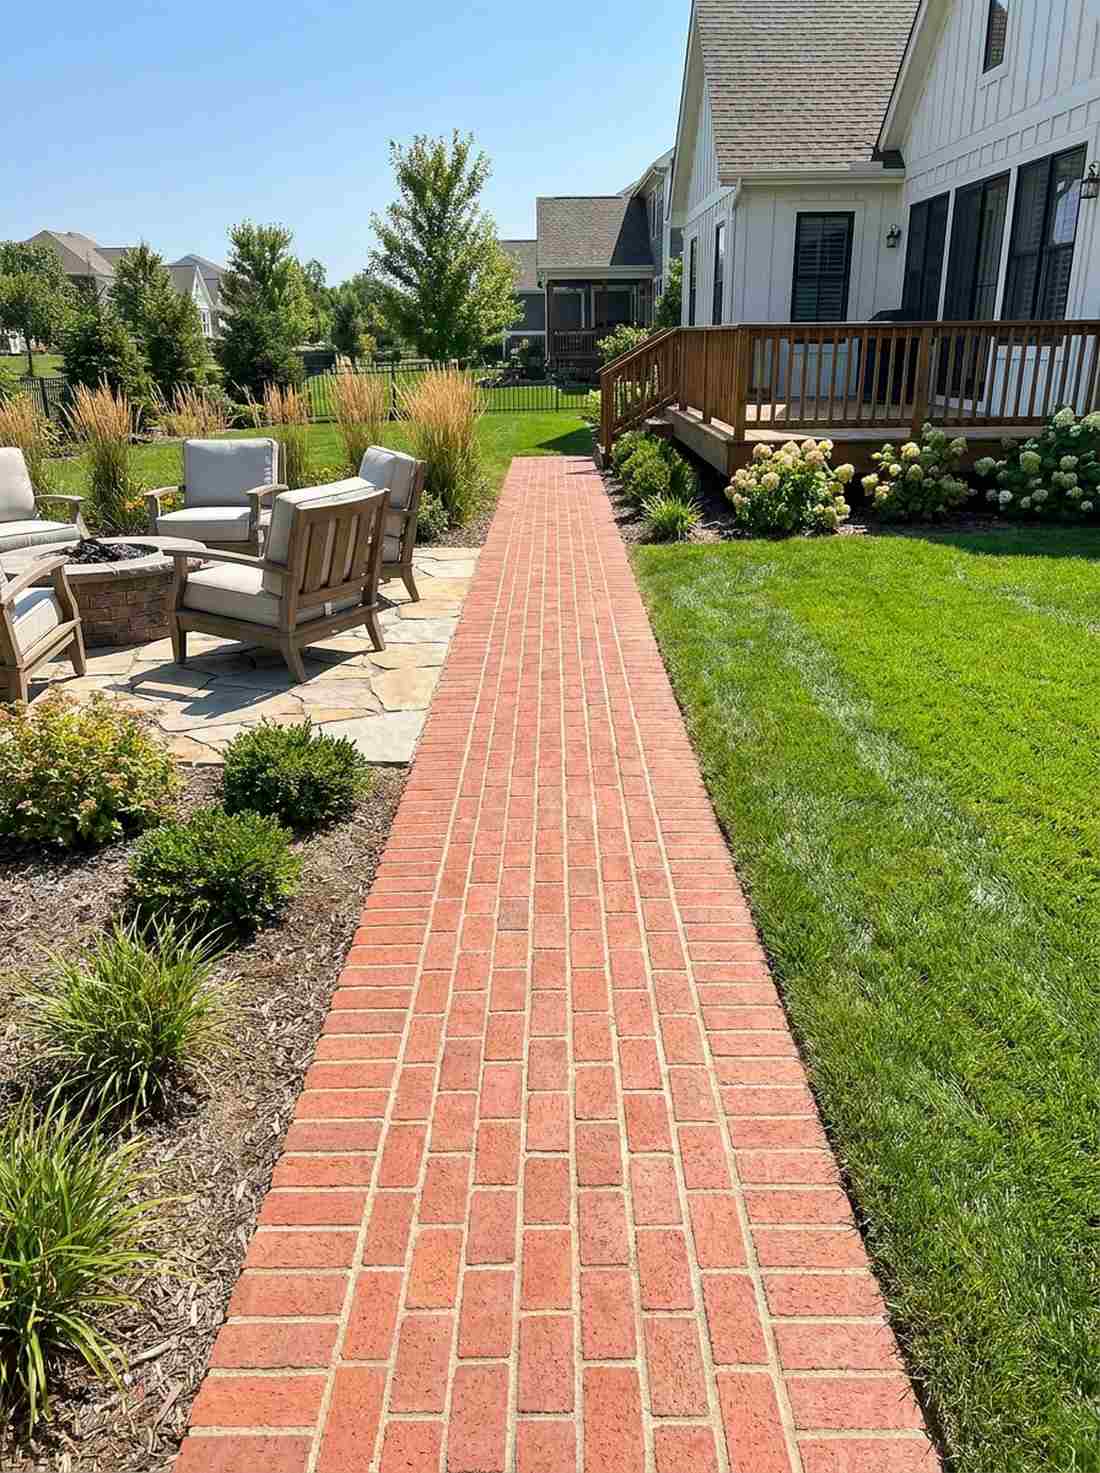
Generates strong, guiding lines that pull you through the space. Modern garden border design aesthetics using running bonds feel like a curated architectural walkway. Excellent for transitioning between patios and raw lawn spaces.
Stacking joints directly on top of each other invites immediate cracking. Overlapping each brick by exactly half its length distributes stress perfectly, providing structural dominance while mimicking classic high-end wall masonry.
A foolproof project that costs around $40. Save this layout for highly trafficked transition zones.
- Key Materials: Standard bricks, concrete adhesive (optional)
- Vibe / Style: Clean architectural guidance
- Difficulty: Easy beginner friendly
- Budget Breakdown: Bricks: $30 | Adhesive: $10.
- Creator’s Tip: Start every second row with a perfectly cut half-brick to establish the staggered lock.
- Smart Sourcing: Professional-grade masonry construction adhesive and diamond-grit hand files.
11. Radial Circular Pattern
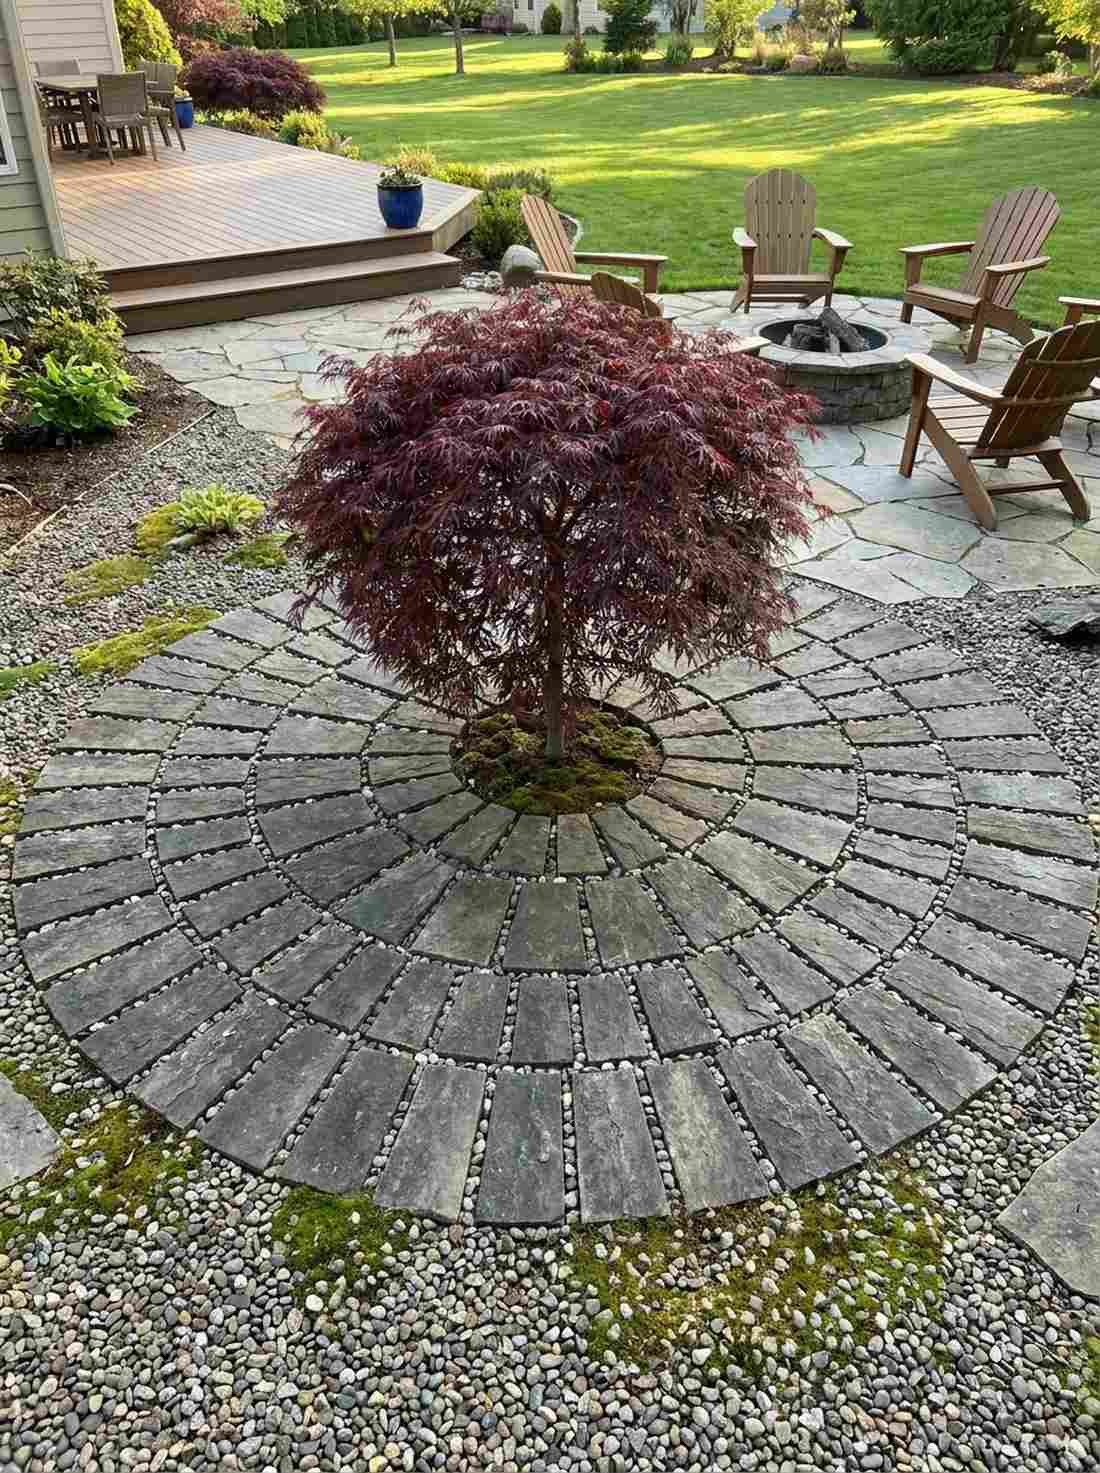
Creates an anchoring focal point that commands attention. Japanese garden border design influences utilizing radial circles feel like a serene meditation space. Perfectly deployed around specimen Japanese Maples or central water features.
Most DIYers try to force square blocks into a circle, leaving ugly, gaping joints. Deliberately wedging the inner edges maintains a tight 10mm gap throughout the arc, forcing a customized, professional landscape aesthetic.
You can create this custom geometry for about $45–$70.
- Key Materials: Wedge-cut bricks, center anchor stake
- Vibe / Style: Focused serene geometry
- Difficulty: Advanced cutting required
- Budget Breakdown: Bricks: $50 | Staking tools: $10.
- Creator’s Tip: Anchor a rope to the absolute center point to trace a flawless outer perimeter before digging.
- Smart Sourcing: Pre-cut wedge pavers (starter kits) and fluorescent landscape marking paint.
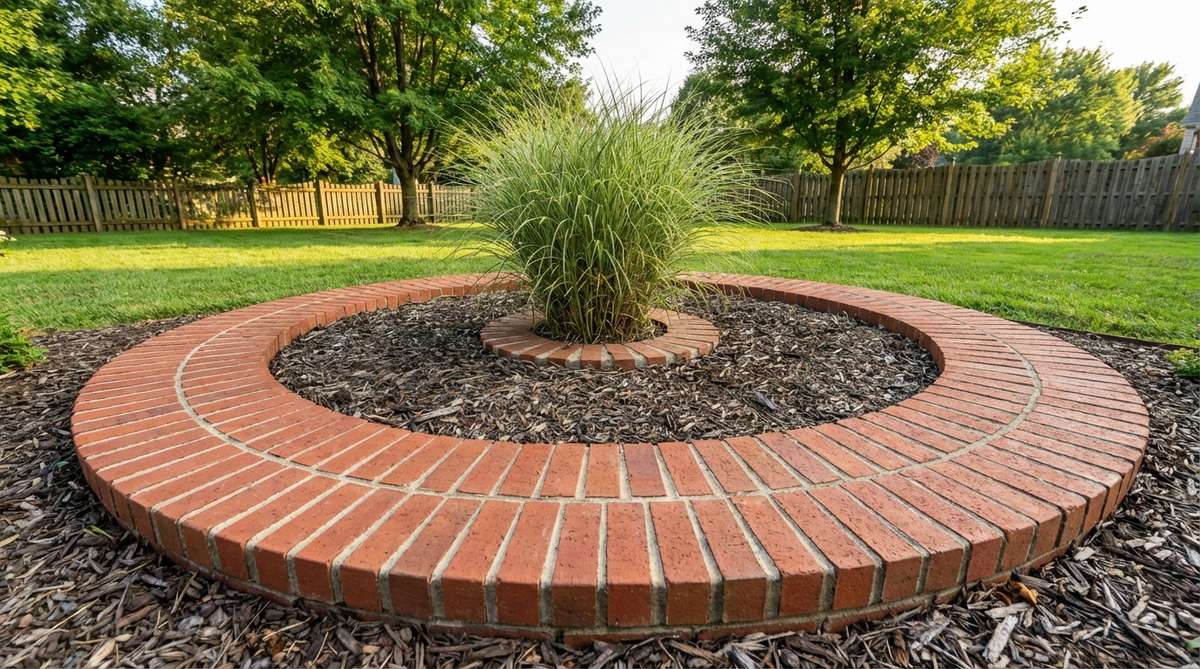
12. Stacked Double-Row
Embeds a living ribbon directly into the hardscape. Perennial border garden design methods like this feel incredibly lush and secret. Ideal for running along a driveway where you want a pop of green without the height.
A single line of bricks often gets lost against massive lawns. Spacing two parallel rows and stuffing the gap with creeping thyme bypasses the sterile look of solid concrete and prevents aggressive runners from infiltrating.
This double-impact layout typically runs around $70–$90.
- Key Materials: Double brick volume, creeping groundcovers
- Vibe / Style: Lush embedded ribbon
- Difficulty: Moderate leveling
- Budget Breakdown: Bricks: $60 | Plugs: $20.
- Creator’s Tip: Ensure both brick channels are set at the exact same elevation to prevent water pooling on one side.
- Smart Sourcing: Live moss starter plug trays and organic moisture-control potting soil.
Vertical & Stacked Borders
Multi-layer brick installations create raised edges that retain soil and provide planting depth for beds. These techniques suit sloped properties and terraced garden designs.
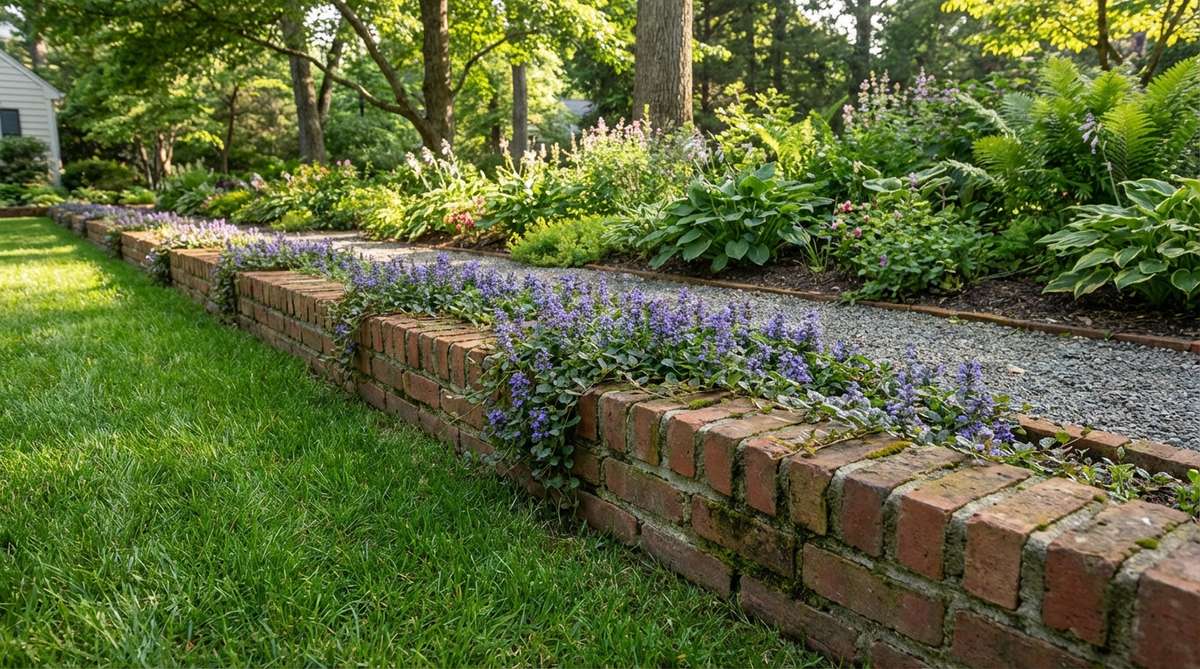
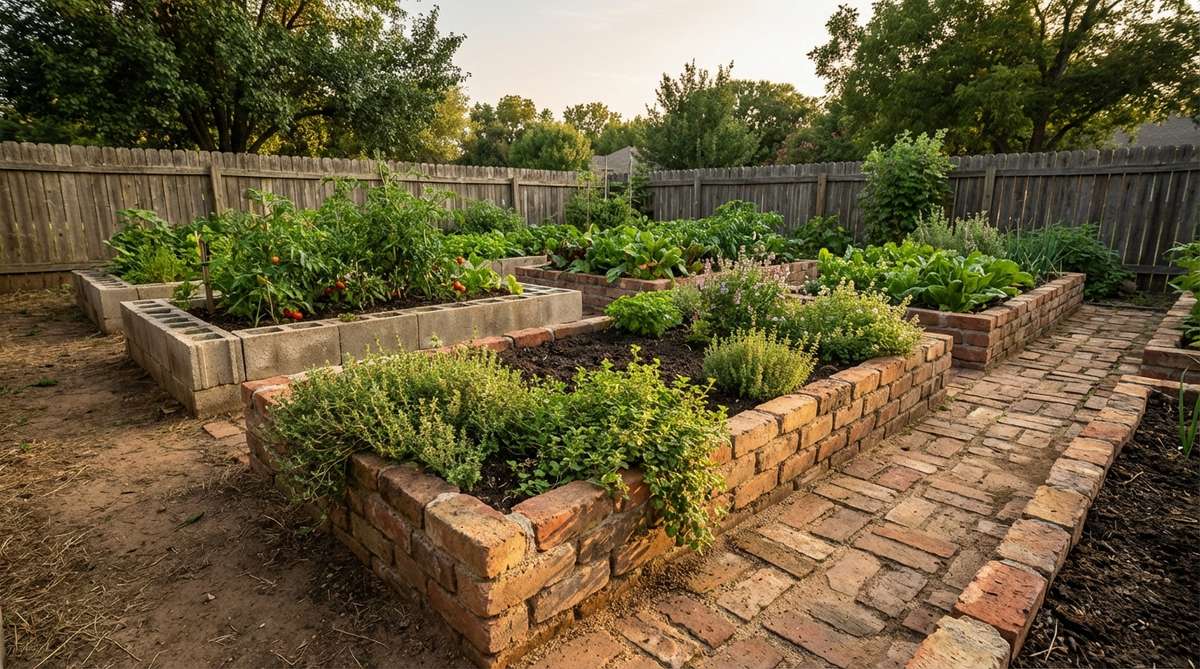
13. Traditional Raised Bed
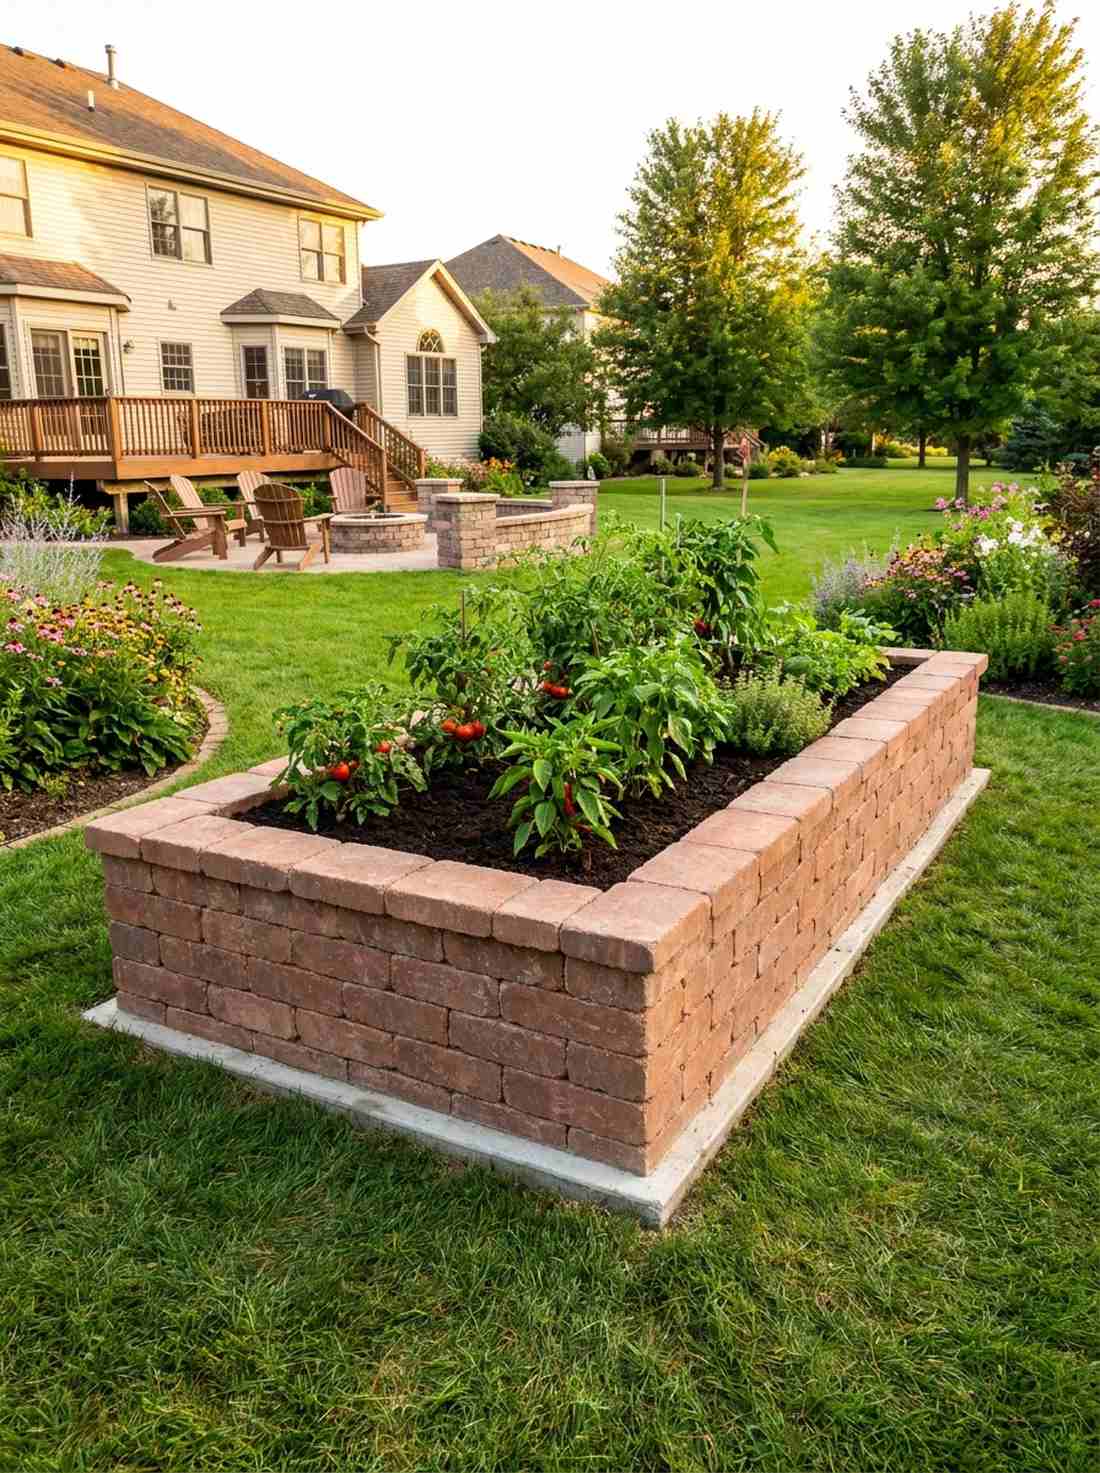
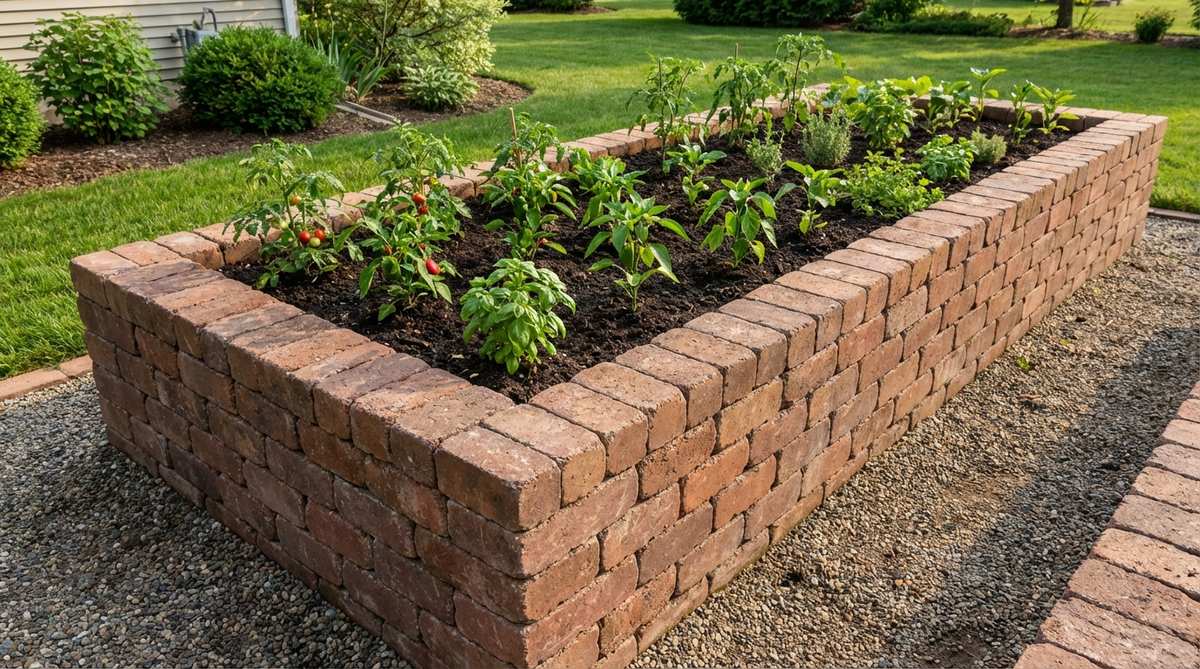
Elevates the planting plane to save your back and boost drainage. Garden design border plans incorporating raised walls feel like a premium botanical conservatory. The ultimate fix for yards cursed with heavily compacted clay soil.
Cheap timber rots out in three years, leaving a mess of dirt. Building a multi-course brick wall on a proper footing delivers a permanent, heat-retaining structure that warms up soil weeks earlier in the spring.
A permanent structural upgrade that starts around $150. Pin this if you’re serious about long-term growing.
- Key Materials: Large paver bricks, rebar, concrete footing
- Vibe / Style: Premium permanent conservatory
- Difficulty: Advanced masonry
- Budget Breakdown: Bricks: $100 | Footing/Rebar: $50.
- Creator’s Tip: Always stagger the vertical joints using a running bond to ensure the wall doesn’t blow out from soil pressure.
- Smart Sourcing: Pre-cut heavy-duty steel rebar pins and fast-setting concrete base mix.
14. Vertically Stacked Soldier Wall
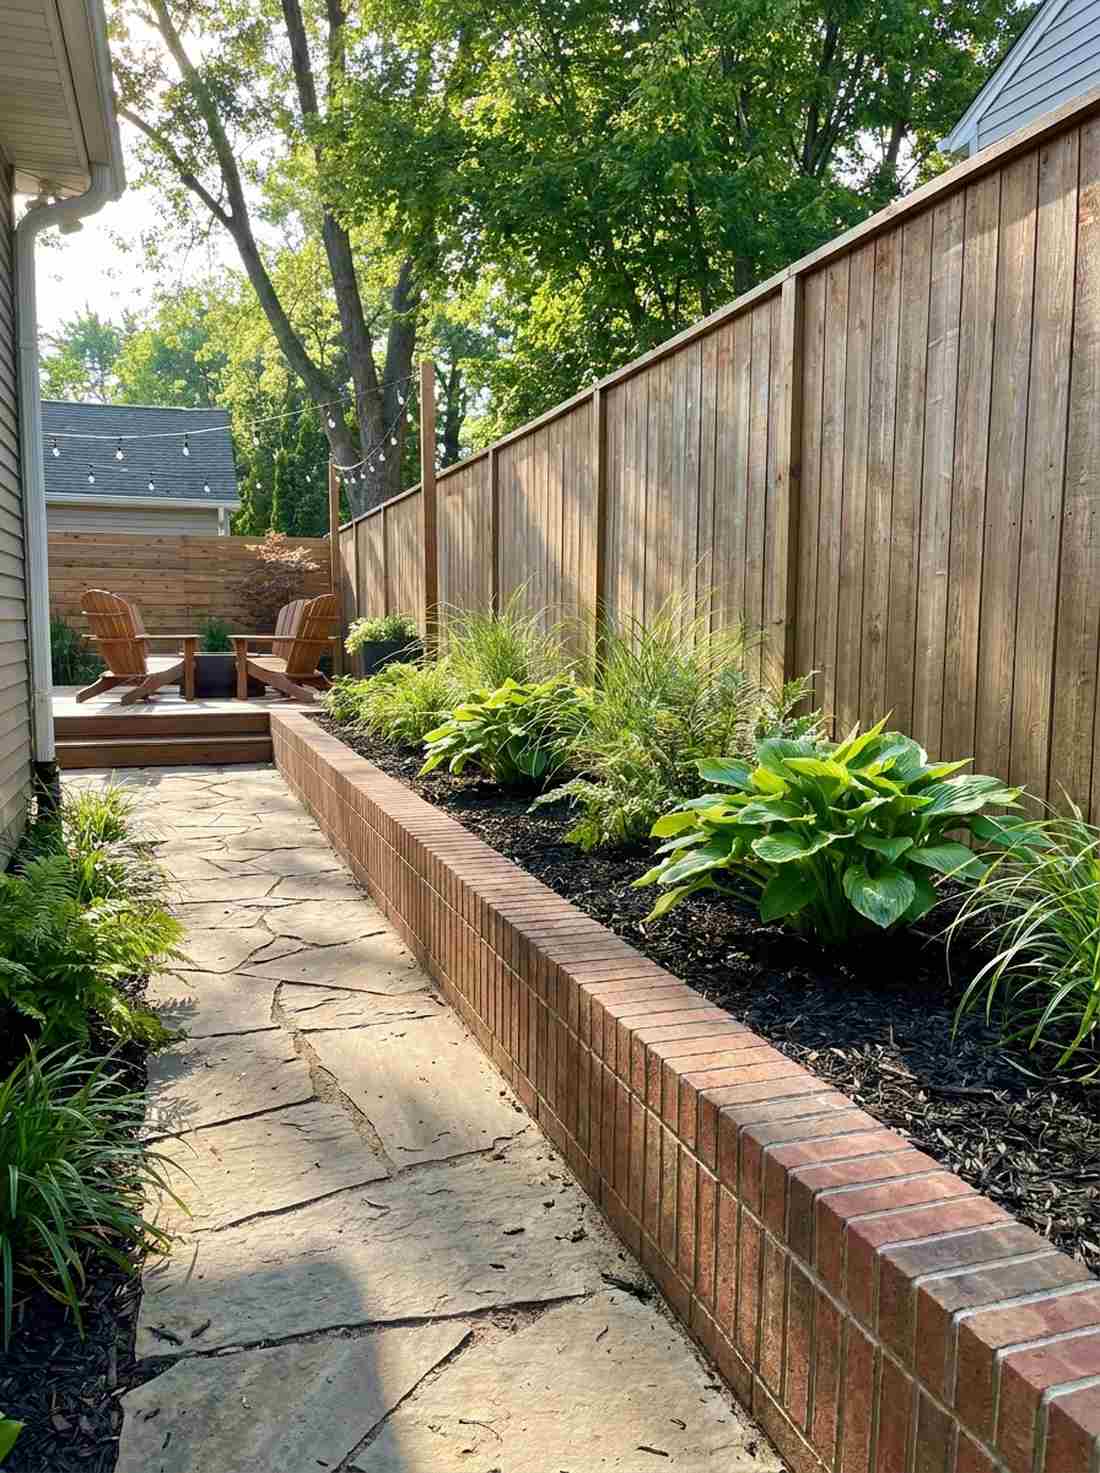
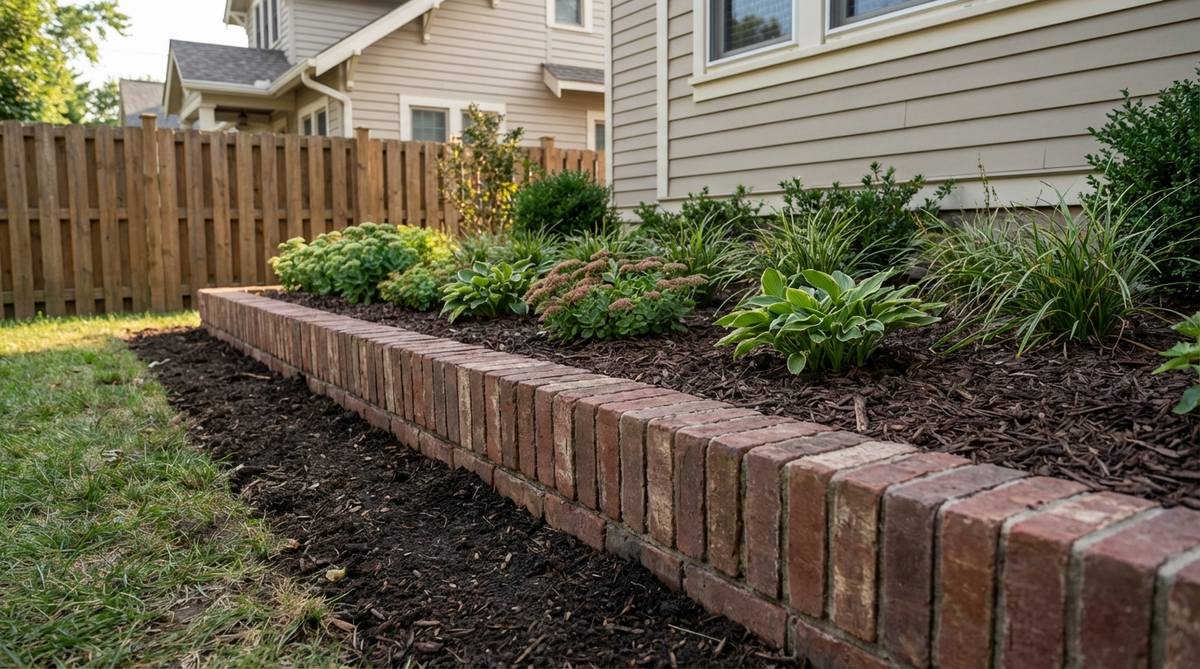
Maximizes soil retention without eating up valuable square footage. Narrow garden border design strategies like this feel incredibly sleek and urban. Brilliant for tight side-yard walkways where standard retaining walls won’t fit.
Sloping soil against a fence inevitably rots the wood. Stacking vertical bricks two units high creates a slender 4-inch footprint that aggressively holds back mulch while looking wildly expensive and modern.
This space-saving barrier costs roughly $80 for a 10-foot stretch.
- Key Materials: Standard bricks, structural mortar
- Vibe / Style: Sleek urban profile
- Difficulty: Moderate vertical alignment
- Budget Breakdown: Bricks: $60 | Mortar: $20.
- Creator’s Tip: Drive rebar through the cores of the bottom bricks directly into the earth for hidden stability.
- Smart Sourcing: Structural-grade masonry epoxy (bulk pack) and precision bubble levels.
Most people ignore elevation changes entirely… until they see how this transforms a basic slope.
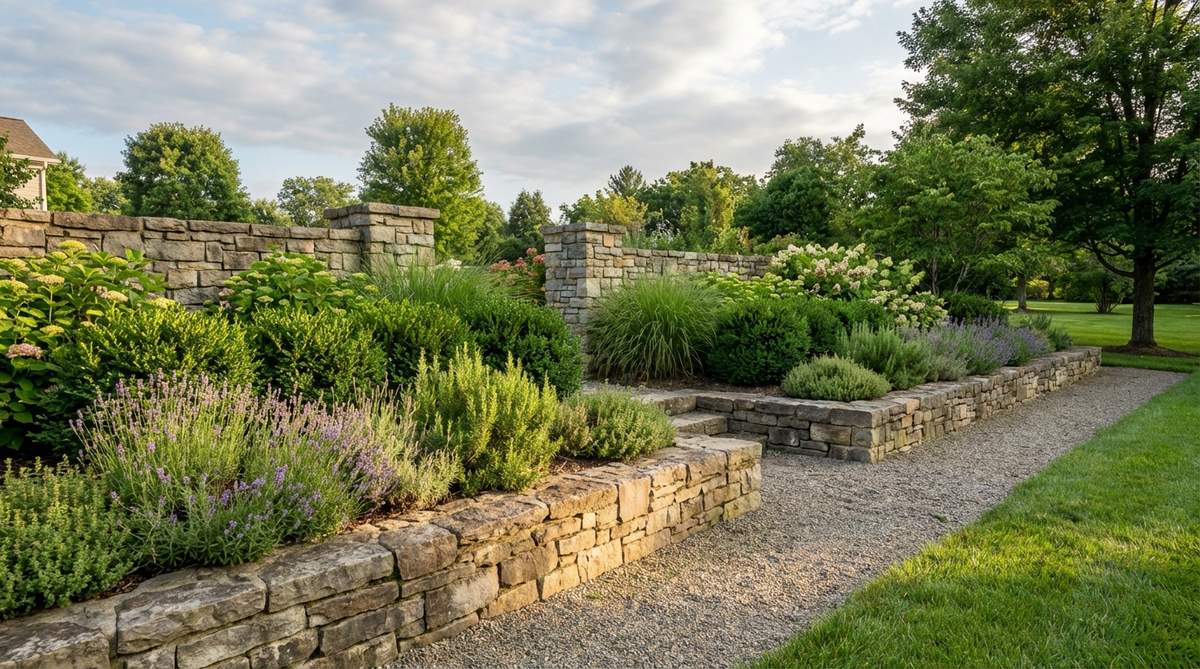
15. Random Stacked Chaos Border
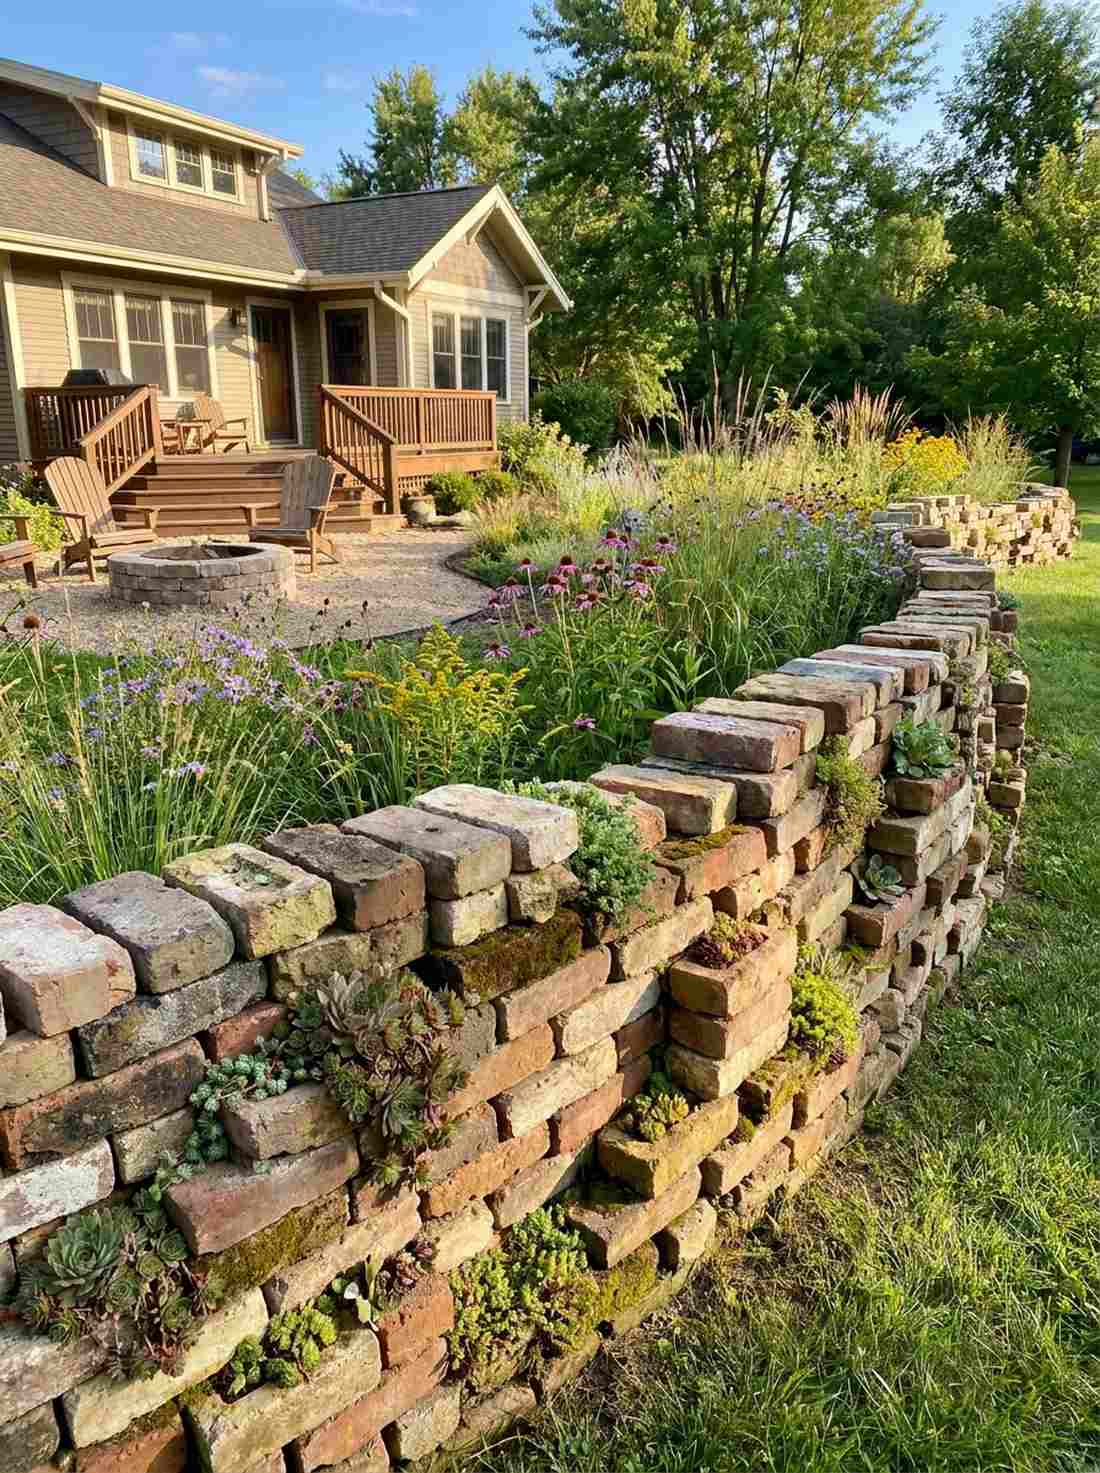
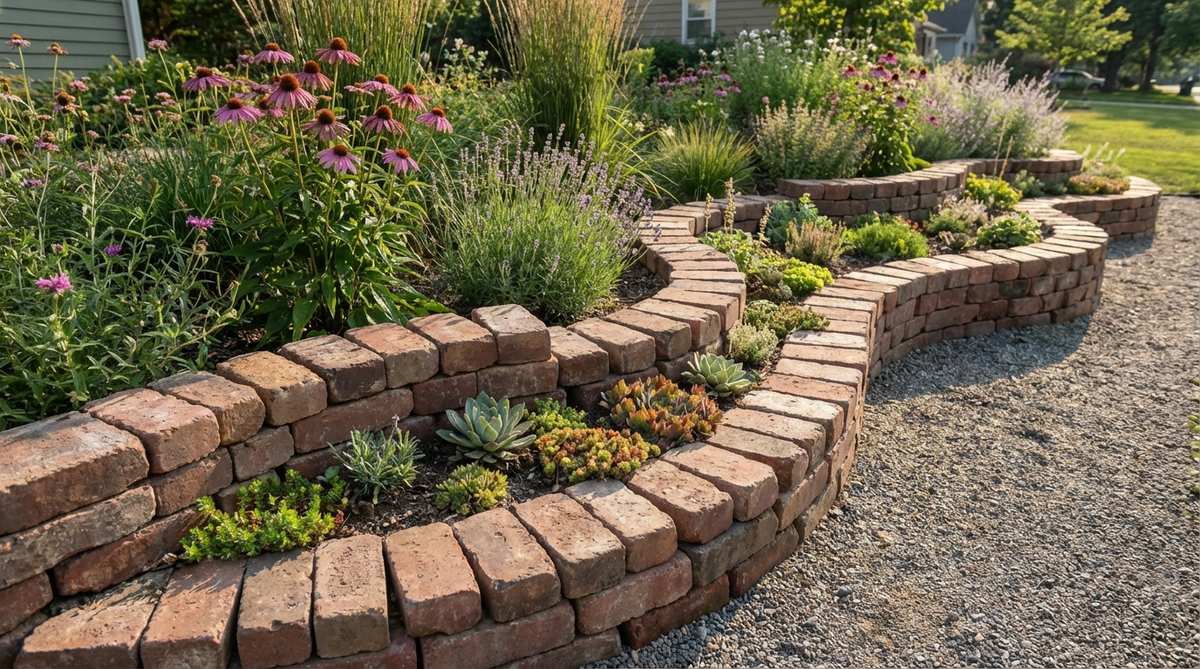
Embraces organic imperfections for a highly textured finish. Cottage garden border design layouts using dry-stacked chaos feel like a forgotten ruin reclaimed by nature. Stunning when paired with sprawling native prairie plantings.
Obsessing over perfect mortar lines completely destroys the naturalistic vibe. Intentionally staggering heights and leaving varying gaps allows water to weep through naturally, creating perfect micro-habitats for succulents and alpine plants.
A zero-mortar project you can finish for under $50.
- Key Materials: Mixed recycled bricks, native soil
- Vibe / Style: Organic reclaimed ruin
- Difficulty: Easy creative stacking
- Budget Breakdown: Recycled Bricks: $30 | Rock fillers: $20.
- Creator’s Tip: Wedge small stones into the back of the wider gaps to keep the wall tilted slightly backward into the hill.
- Smart Sourcing: Live succulent starter kits (bulk trays) and miniature garden supplies.
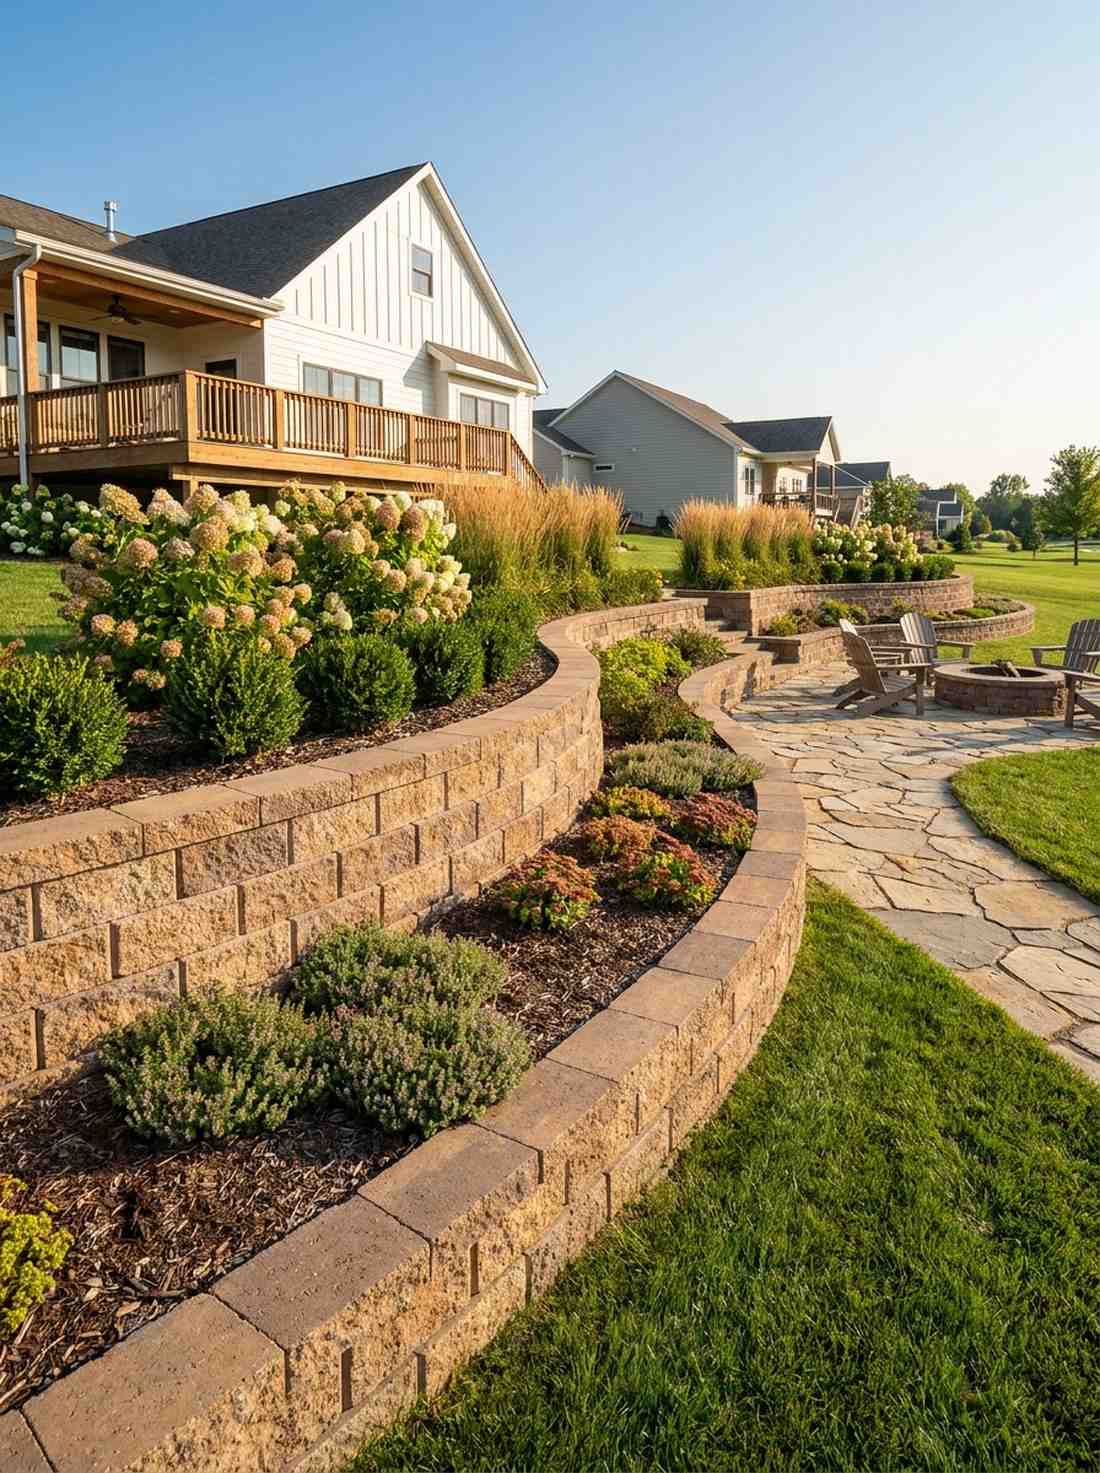
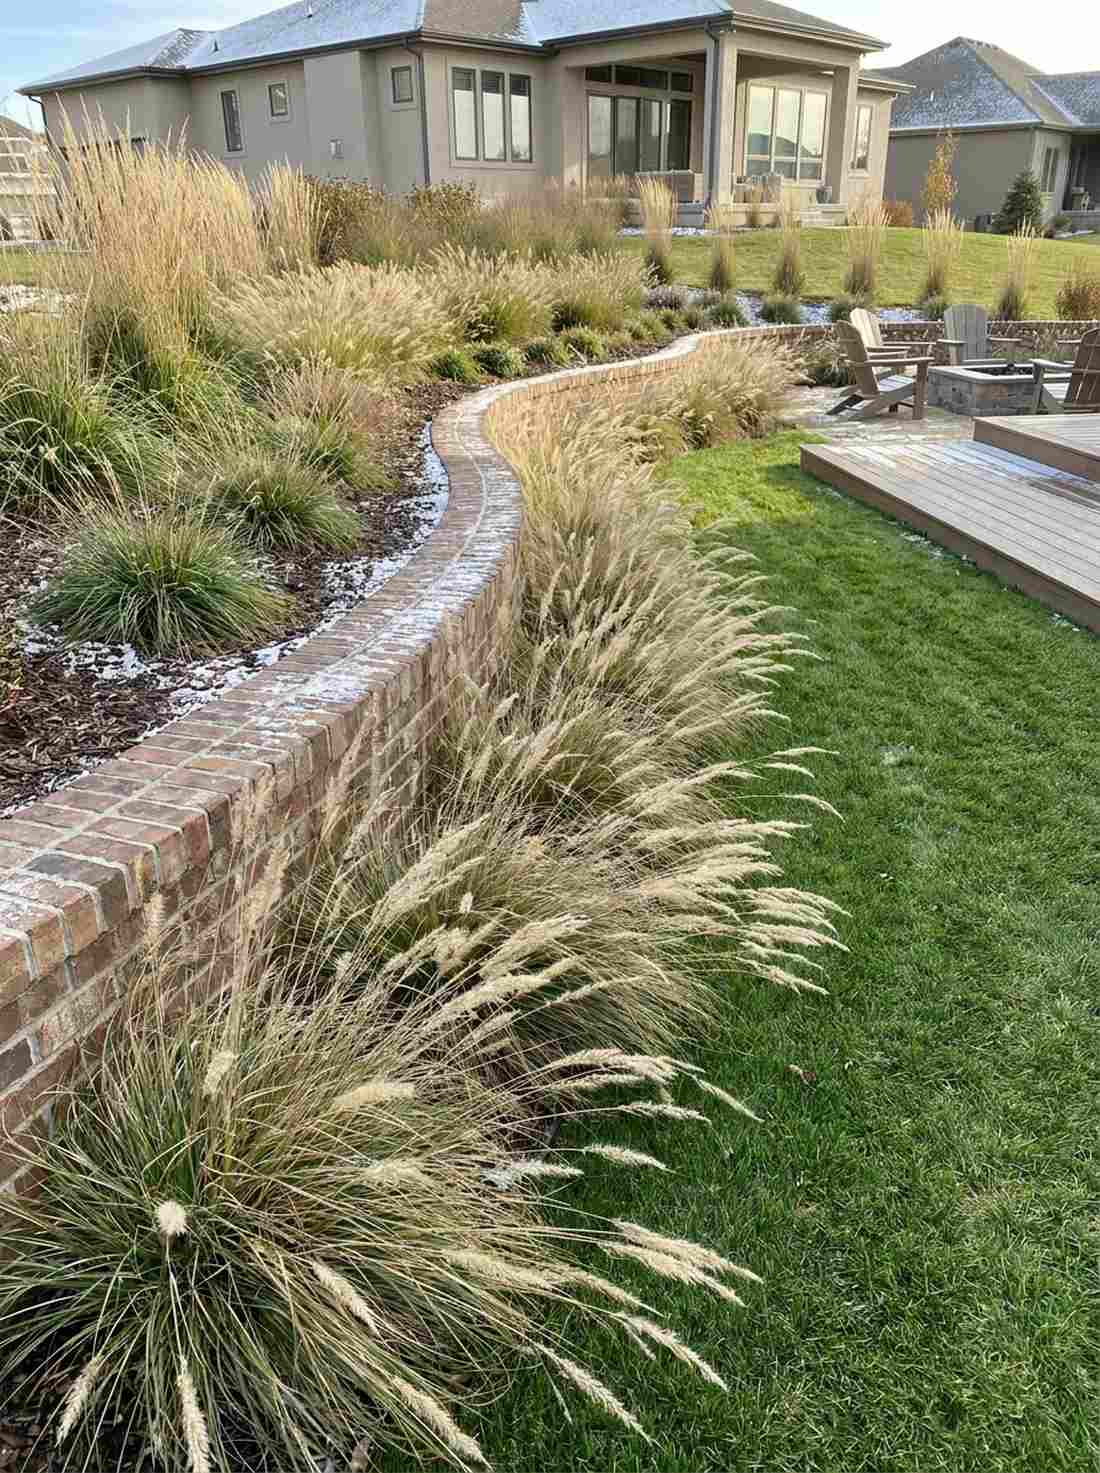
16. Terraced Slope Retention
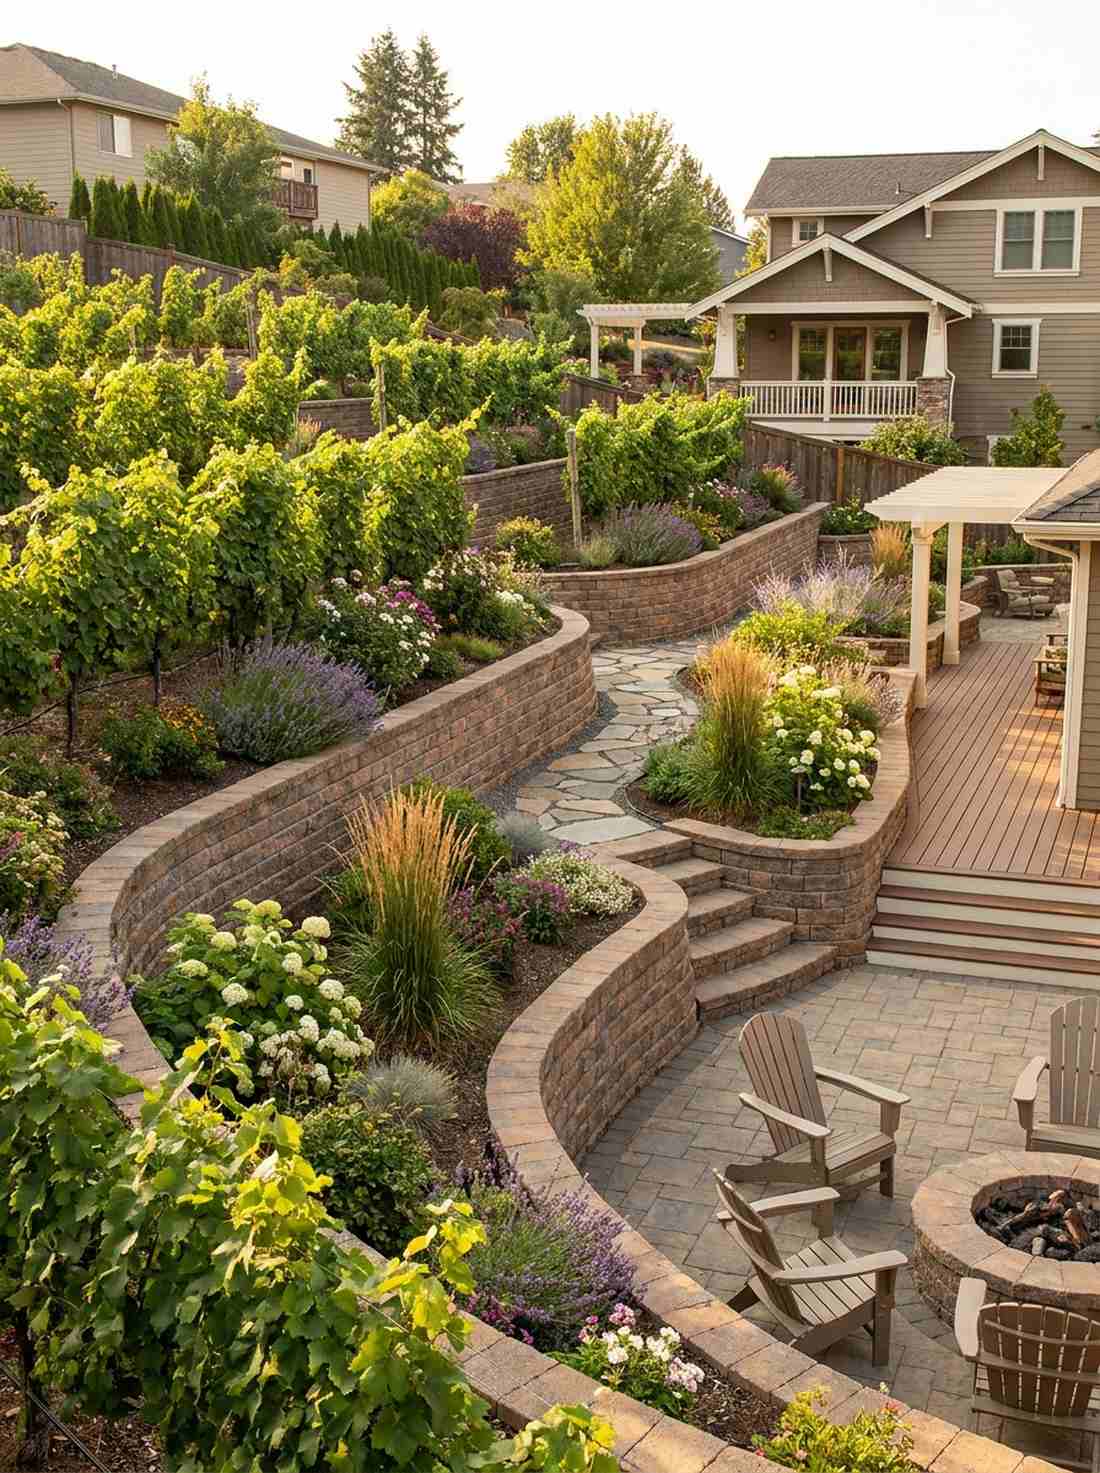
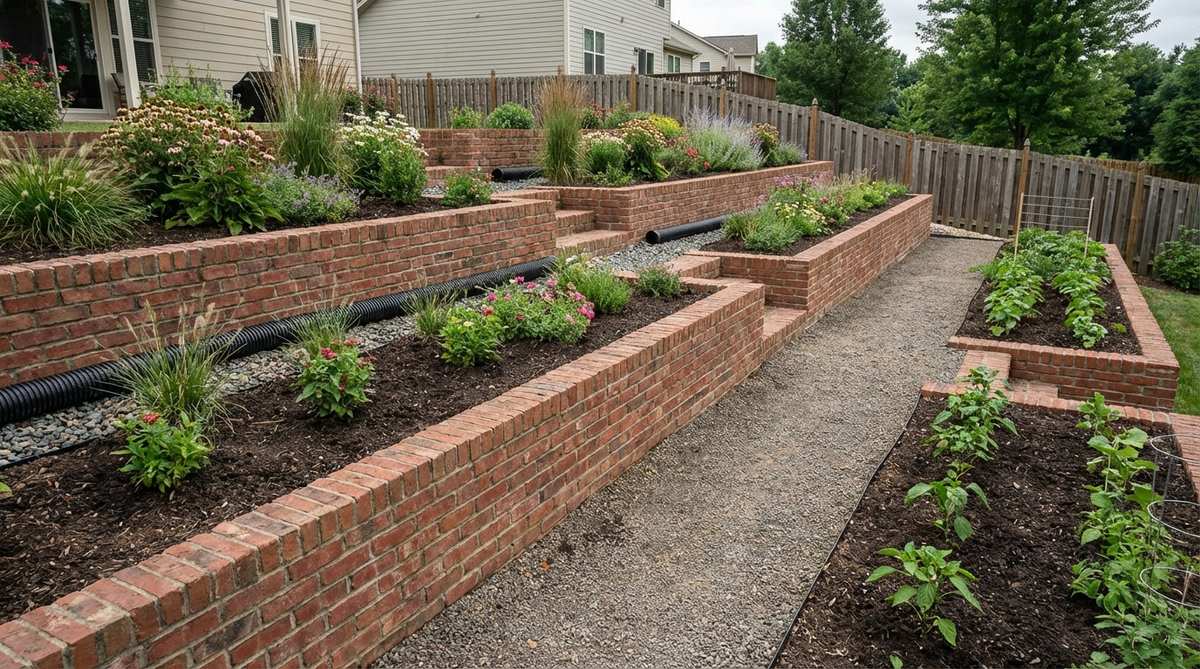
Converts useless, steep grades into highly productive planting zones. Large garden border design terracing feels like an upscale vineyard estate. Mandatory for backyards that wash away in heavy rainstorms.
Trying to plant on a sharp incline guarantees topsoil loss. Stepping multiple brick walls down the hill breaks the hydraulic pressure and creates flat, usable tiers that totally transform the usable footprint of your property.
A heavier investment ranging from $200–$400, but increases home value significantly.
- Key Materials: Retaining bricks, gravel backfill, drainage pipe
- Vibe / Style: Upscale vineyard tiers
- Difficulty: Advanced engineering
- Budget Breakdown: Blocks: $250 | Drainage: $50.
- Creator’s Tip: Install perforated drainage pipes directly behind the first course to stop hydrostatic pressure from blowing the wall out.
- Smart Sourcing: Pre-cut perforated drainage sleeves and heavy-duty landscape filter fabric.
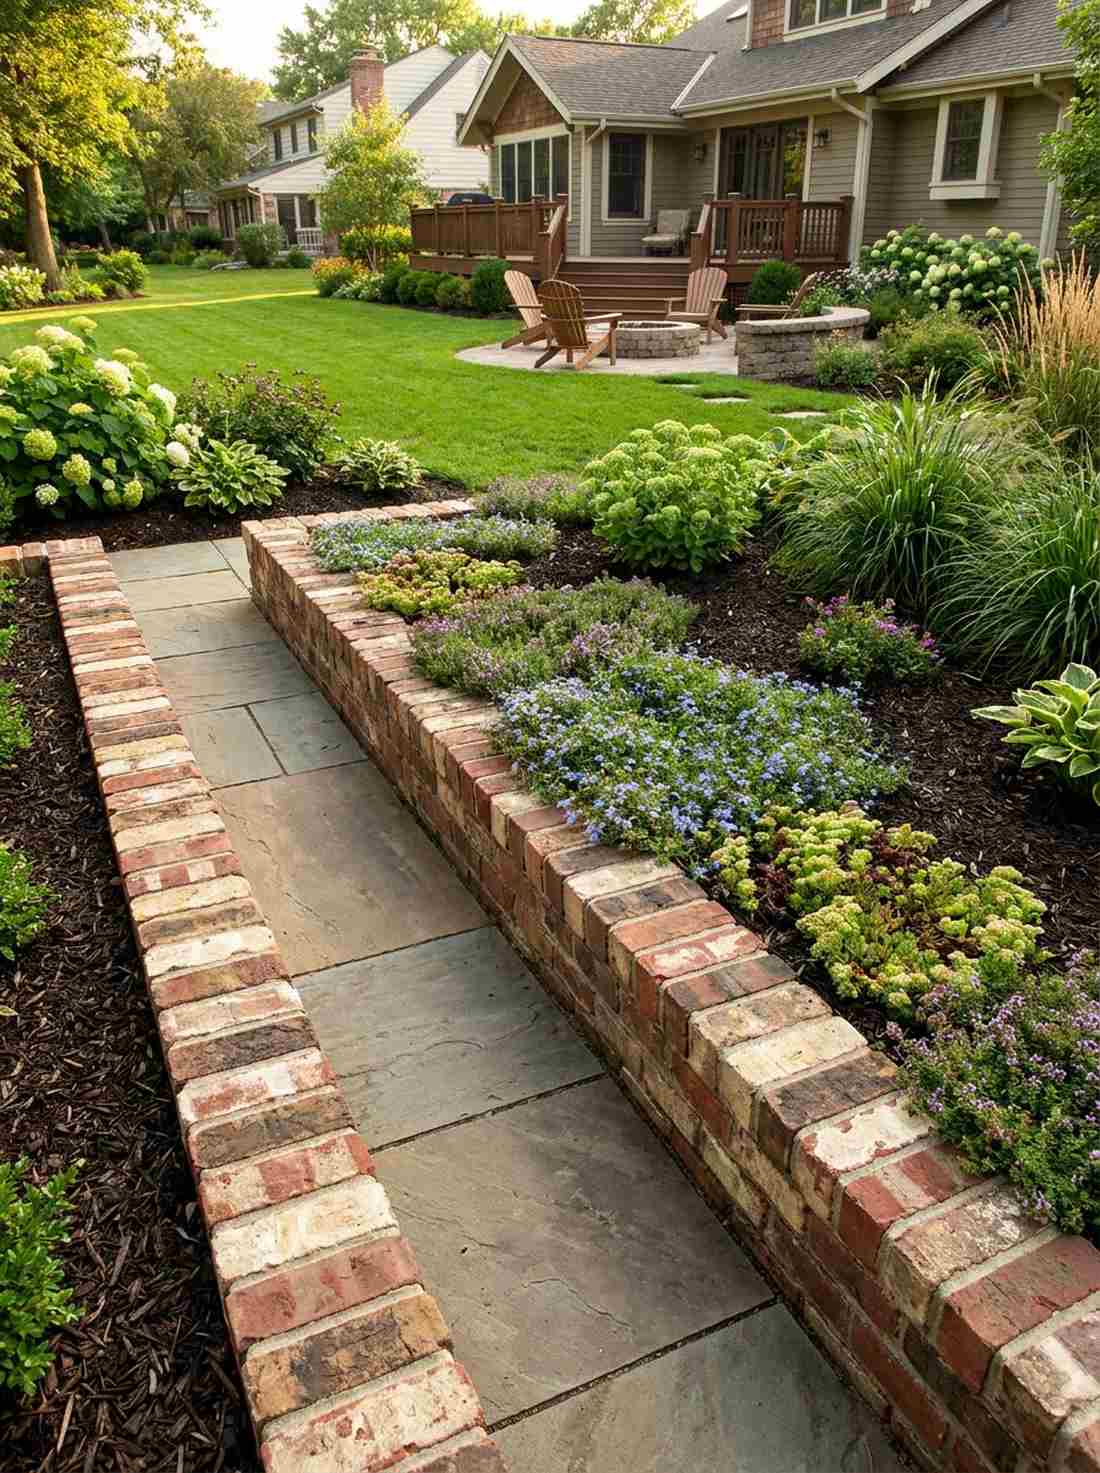
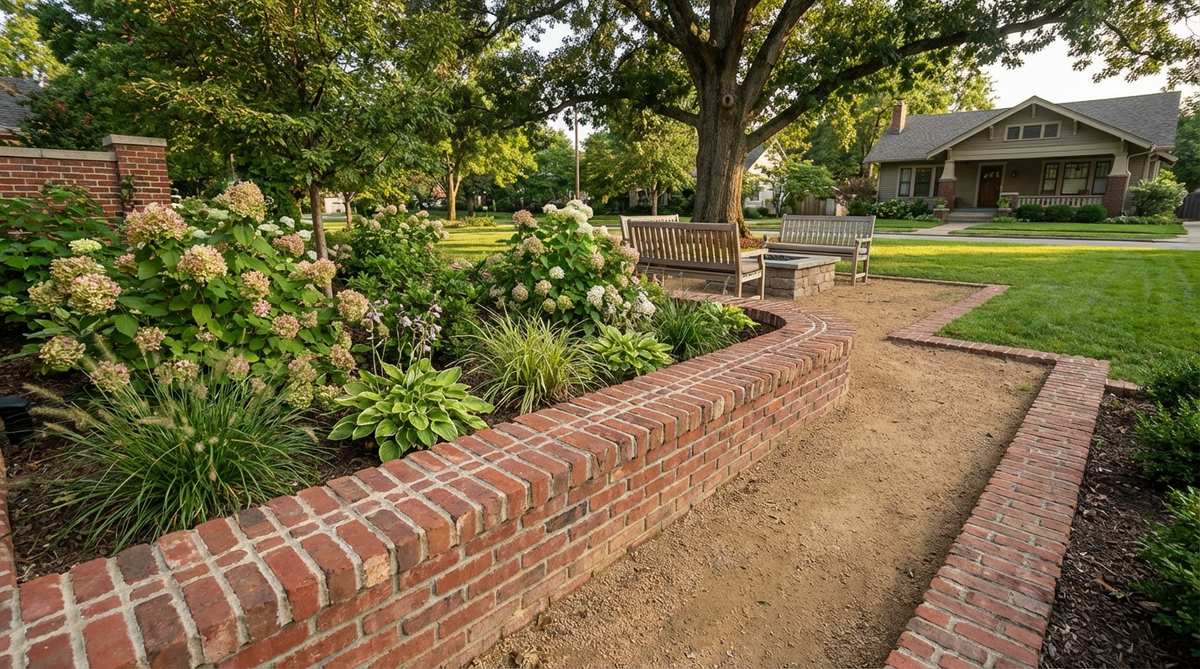
17. Capped Wall Border
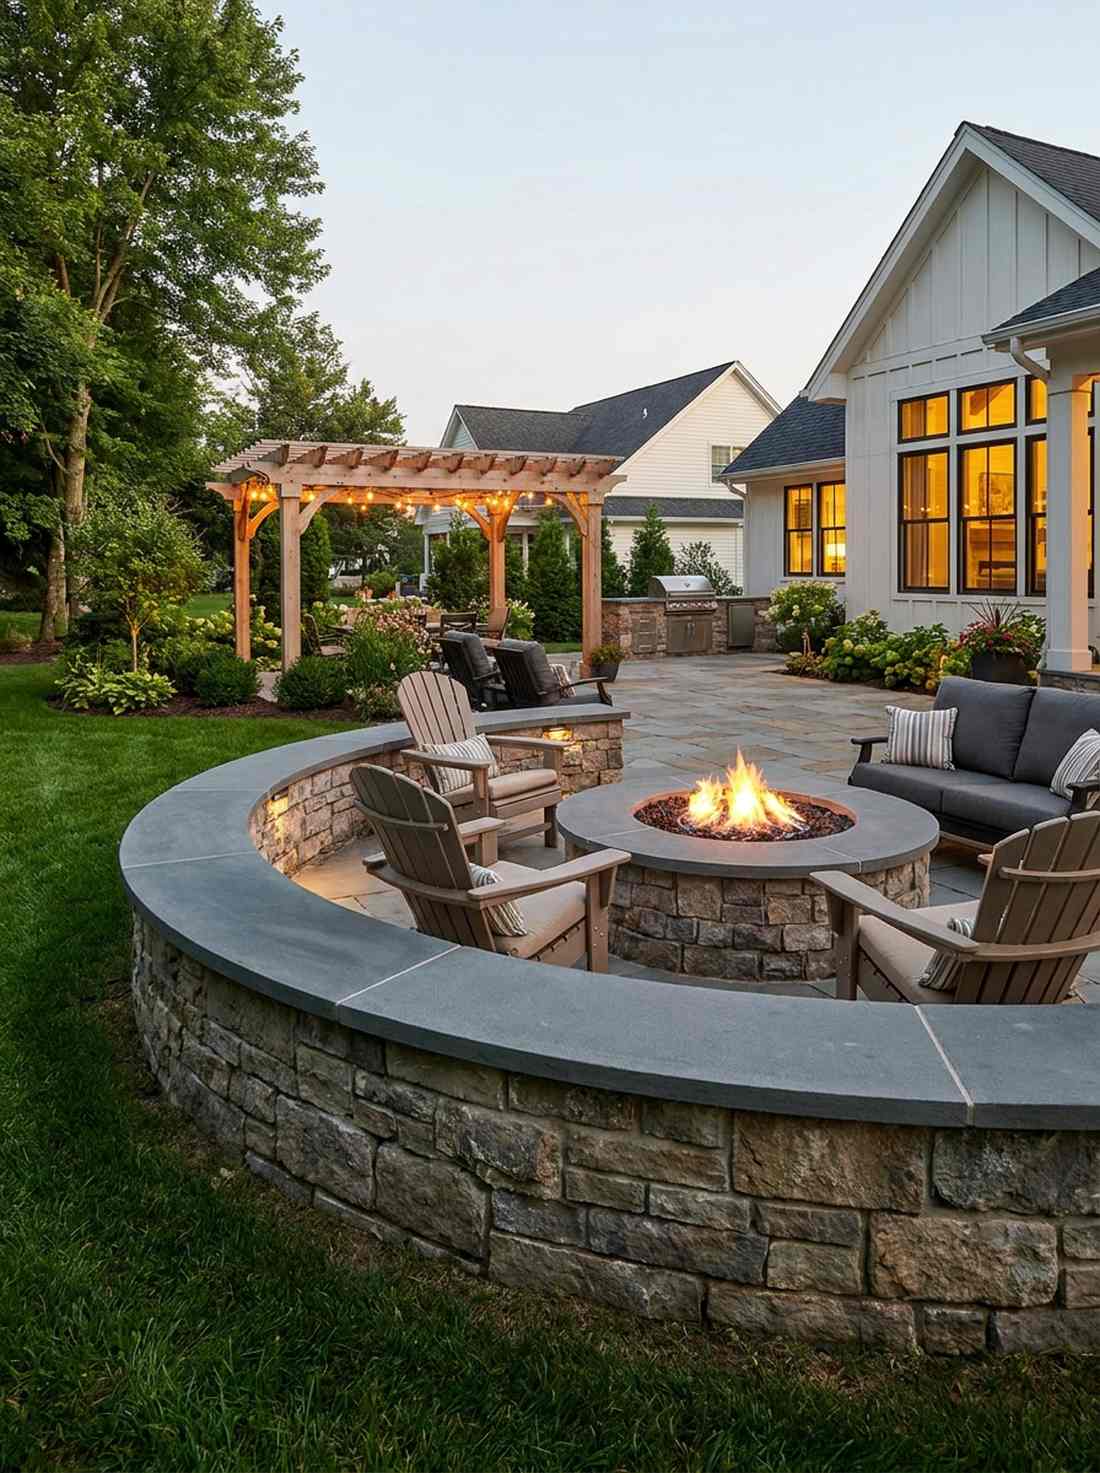
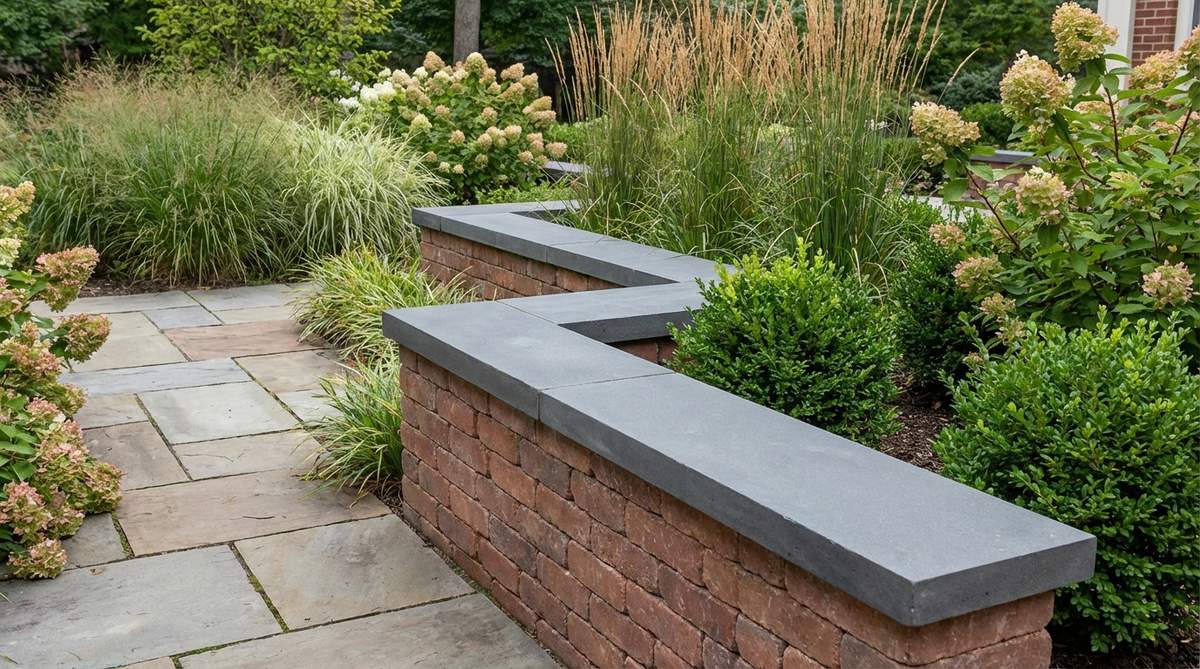
Finishes rough masonry with a crisp, tailored sitting edge. Formal garden border design elements like capped walls feel like a luxury resort patio. Incredibly useful around fire pits where extra casual seating is always needed.
Leaving the top course exposed invites water damage and looks unfinished. Mortaring a contrasting bluestone or overhanging cap brick sheds water away from the joints while delivering a high-end designer finish.
Cap upgrades usually add $80–$120 to your total wall budget. Save this if you love hosting outdoor parties.
- Key Materials: Wall cap units or bluestone treads, mortar
- Vibe / Style: Luxury resort polish
- Difficulty: Moderate finishing
- Budget Breakdown: Cap Units: $90 | Mortar: $15.
- Creator’s Tip: Allow a strict 1-inch overhang on the front edge to create a protective drip line.
- Smart Sourcing: Pre-cut natural bluestone cap kits and weather-resistant masonry sealer.
18. Stepped Height Variation
Adds sweeping topographical rhythm to dead-flat properties. Mixed border garden design profiles using stepped walls feel like rolling natural hills. Excellent for transitioning between deep shrub zones and shallow groundcover areas.
Building a uniform-height wall across an entire yard looks like a fortress barricade. Gradually dropping the course count from four bricks down to two accommodates varying plant root depths while breaking up visual monotony.
This dynamic adjustment costs roughly $100 depending on length.
- Key Materials: Interlocking wall bricks, leveling sand
- Vibe / Style: Dynamic rolling terrain
- Difficulty: Moderate planning
- Budget Breakdown: Bricks: $80 | Sand: $20.
- Creator’s Tip: Plan the tier drops to align exactly with large specimen plant locations.
- Smart Sourcing: Interlocking retaining wall block palettes and heavy-duty tamper tools.
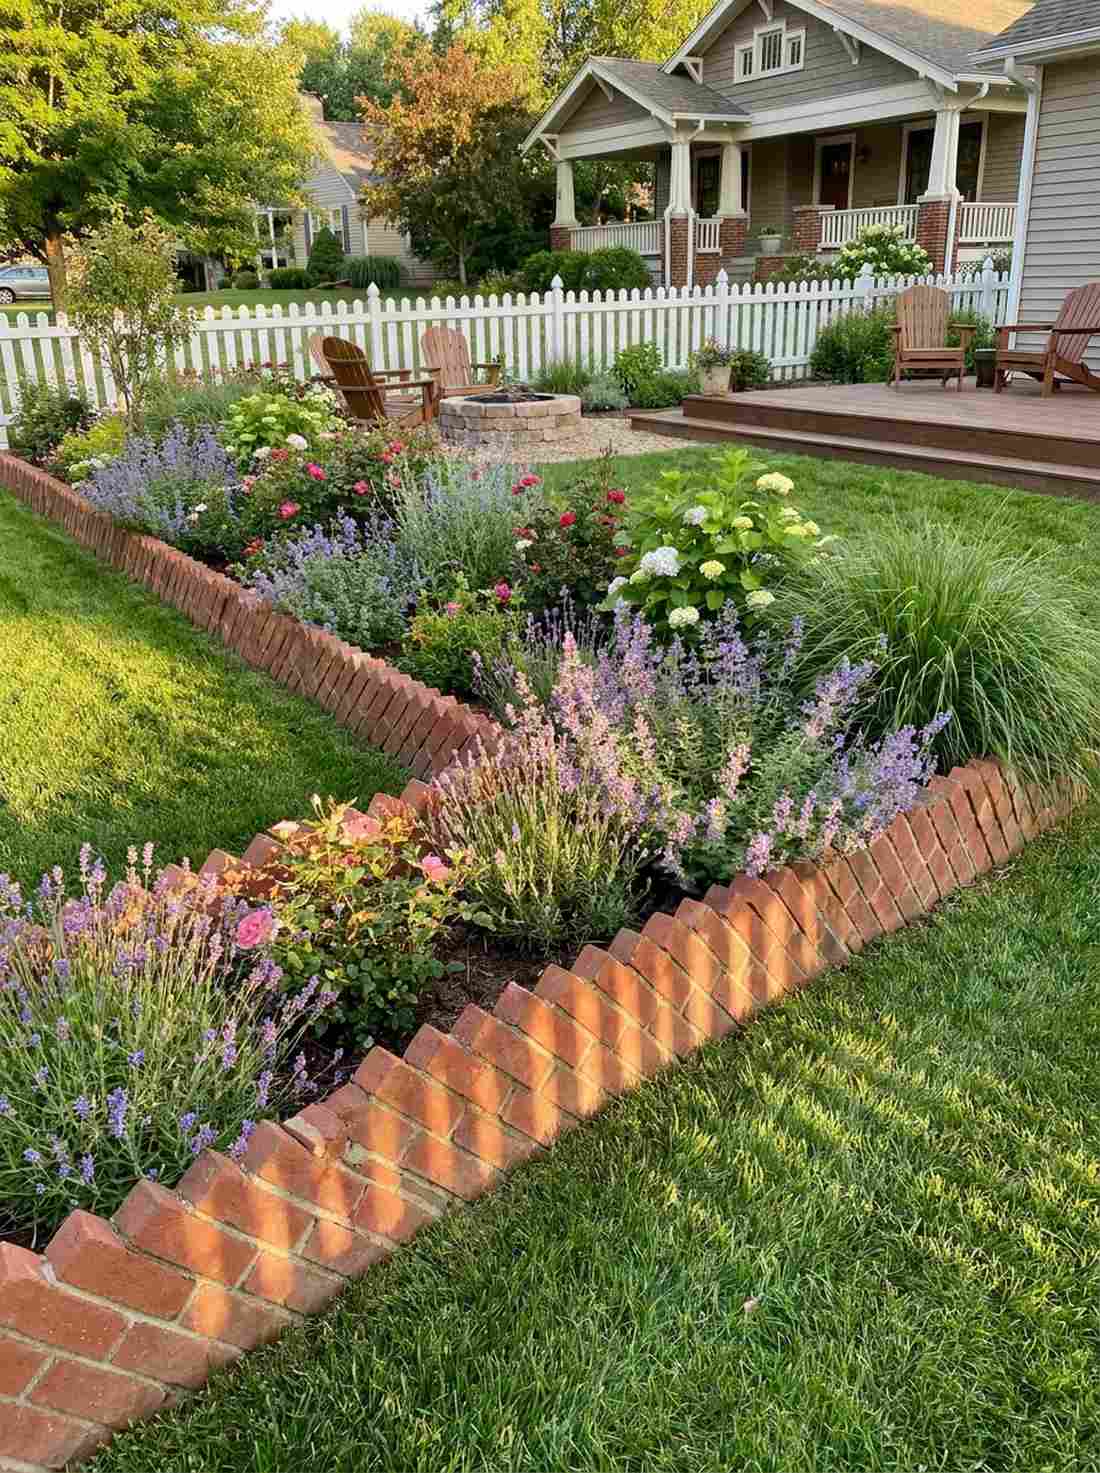
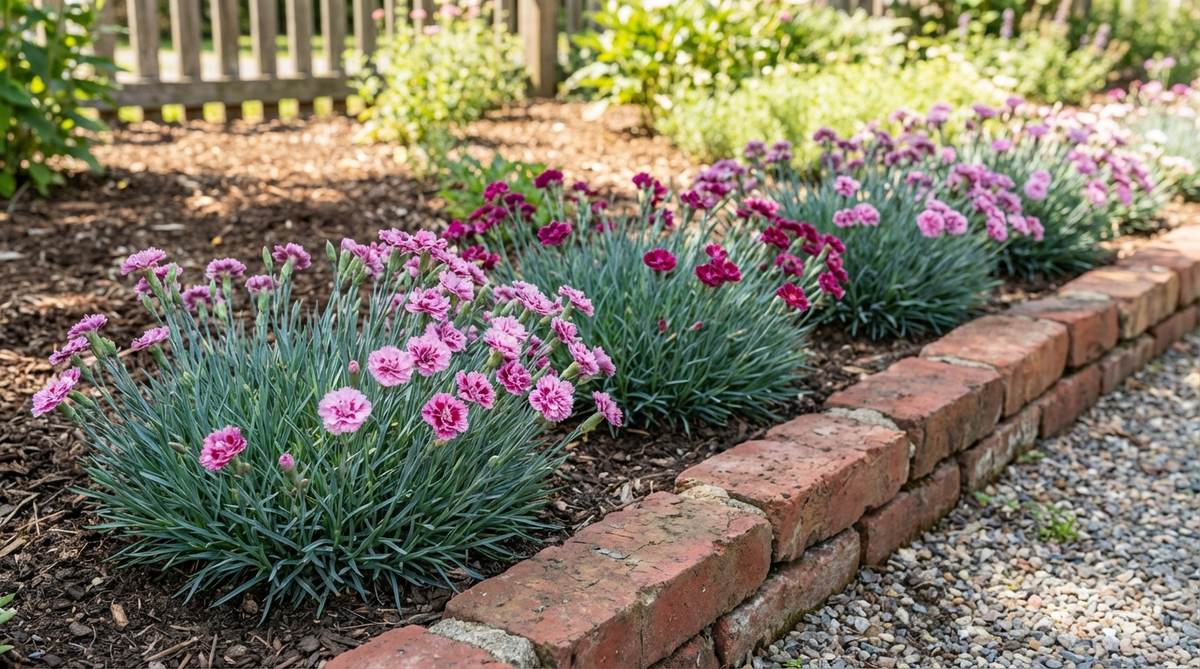
19. Lavender Hedge Brick Base
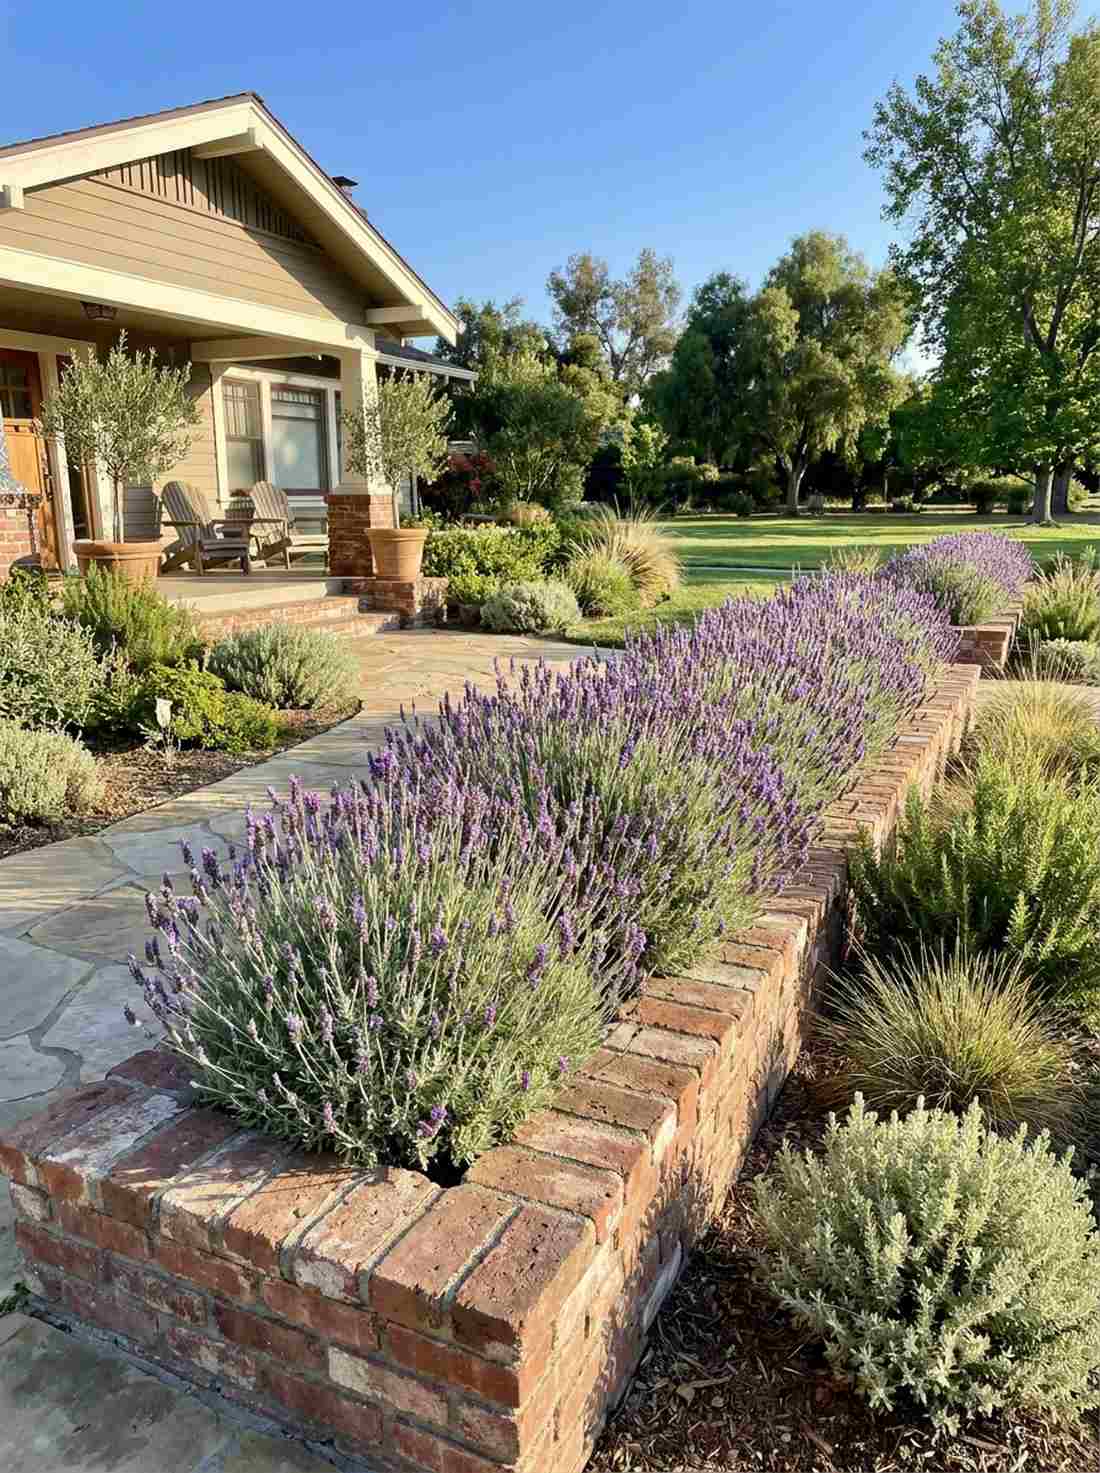
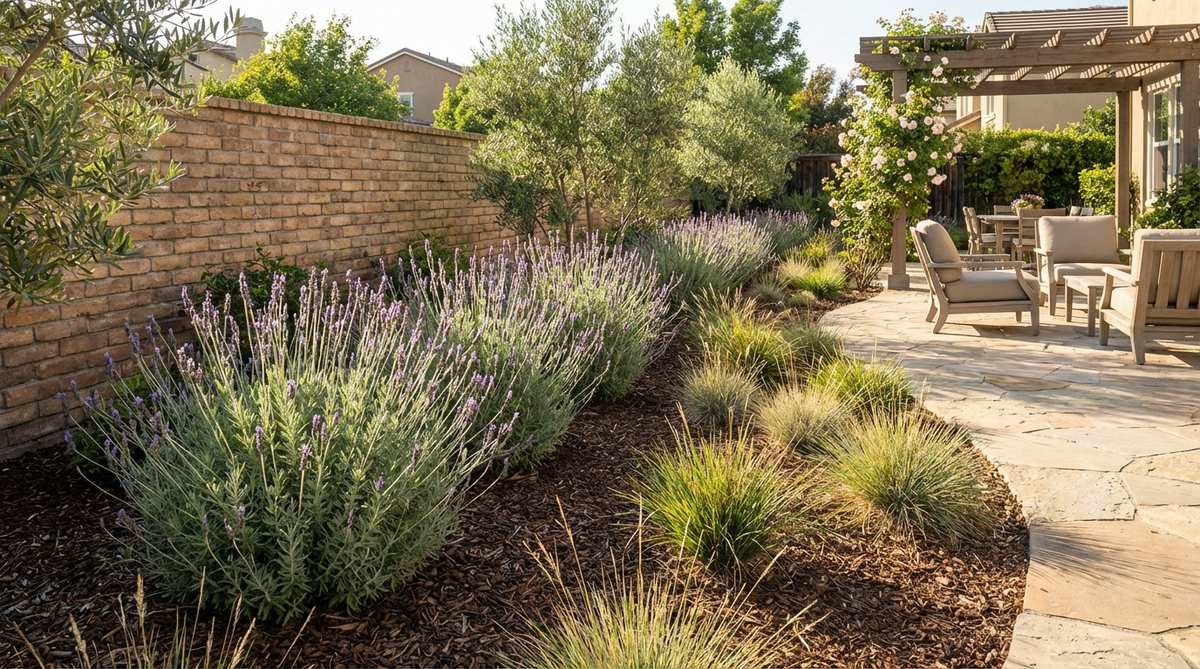
Combines raw masonry heat with billowing, aromatic foliage. Garden flower border design pairings like this feel like a sun-drenched Mediterranean villa. Flawless for outlining hot, southern-facing front walkways.
Planting lavender in cold, wet dirt guarantees root rot. Snugging them right up against the thermal mass of a brick border reflects heat back into the canopy, boosting essential oil production and mimicking their native dry conditions.
A sensory upgrade you can plant for around $40–$60.
- Key Materials: Established lavender plants, brick edge
- Vibe / Style: Mediterranean sensory garden
- Difficulty: Easy planting
- Budget Breakdown: Plants: $45 | Base: $10.
- Creator’s Tip: Shear the lavender strictly once a year after flowering to keep the mounds from getting woody and splitting.
- Smart Sourcing: Drought-tolerant lavender starter bundles and coarse horticultural pumice (bulk).
This next living hardscape trick is ridiculously cheap but looks wildly expensive…
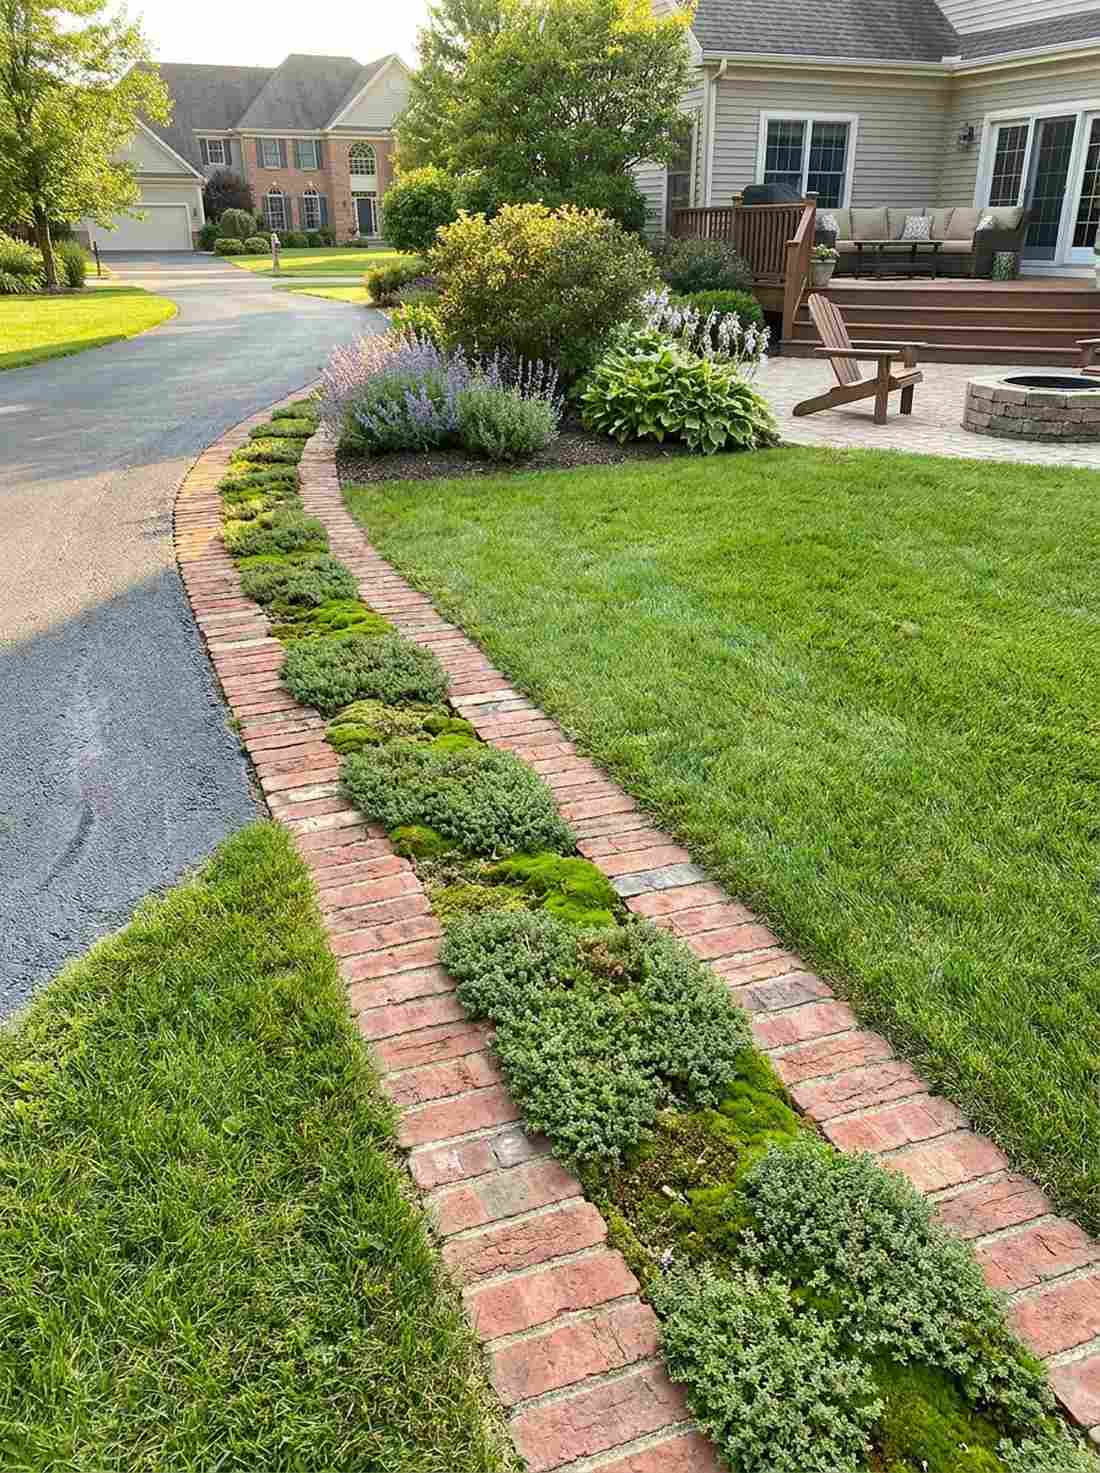
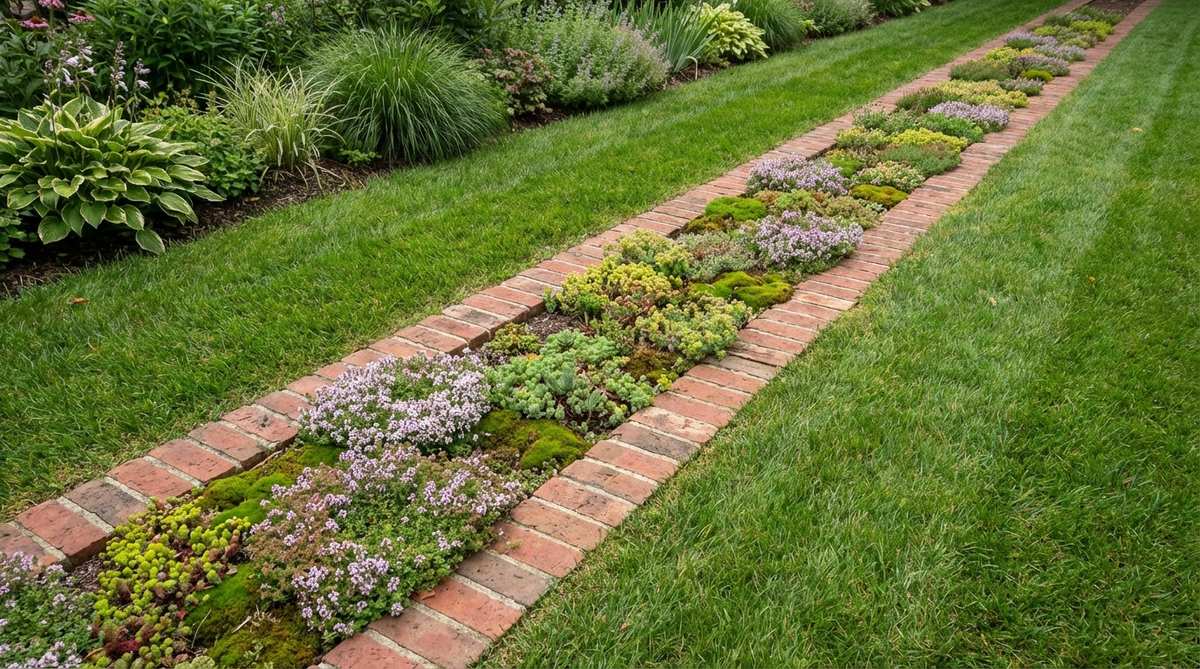
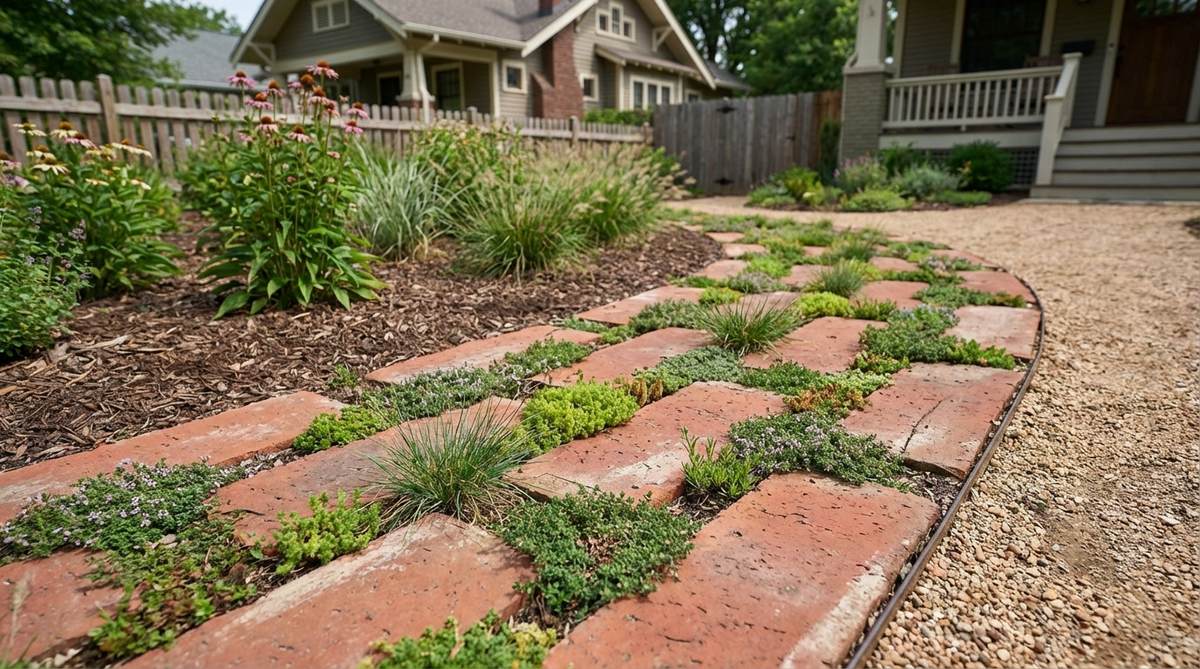
20. Creeping Thyme Mortar Joints
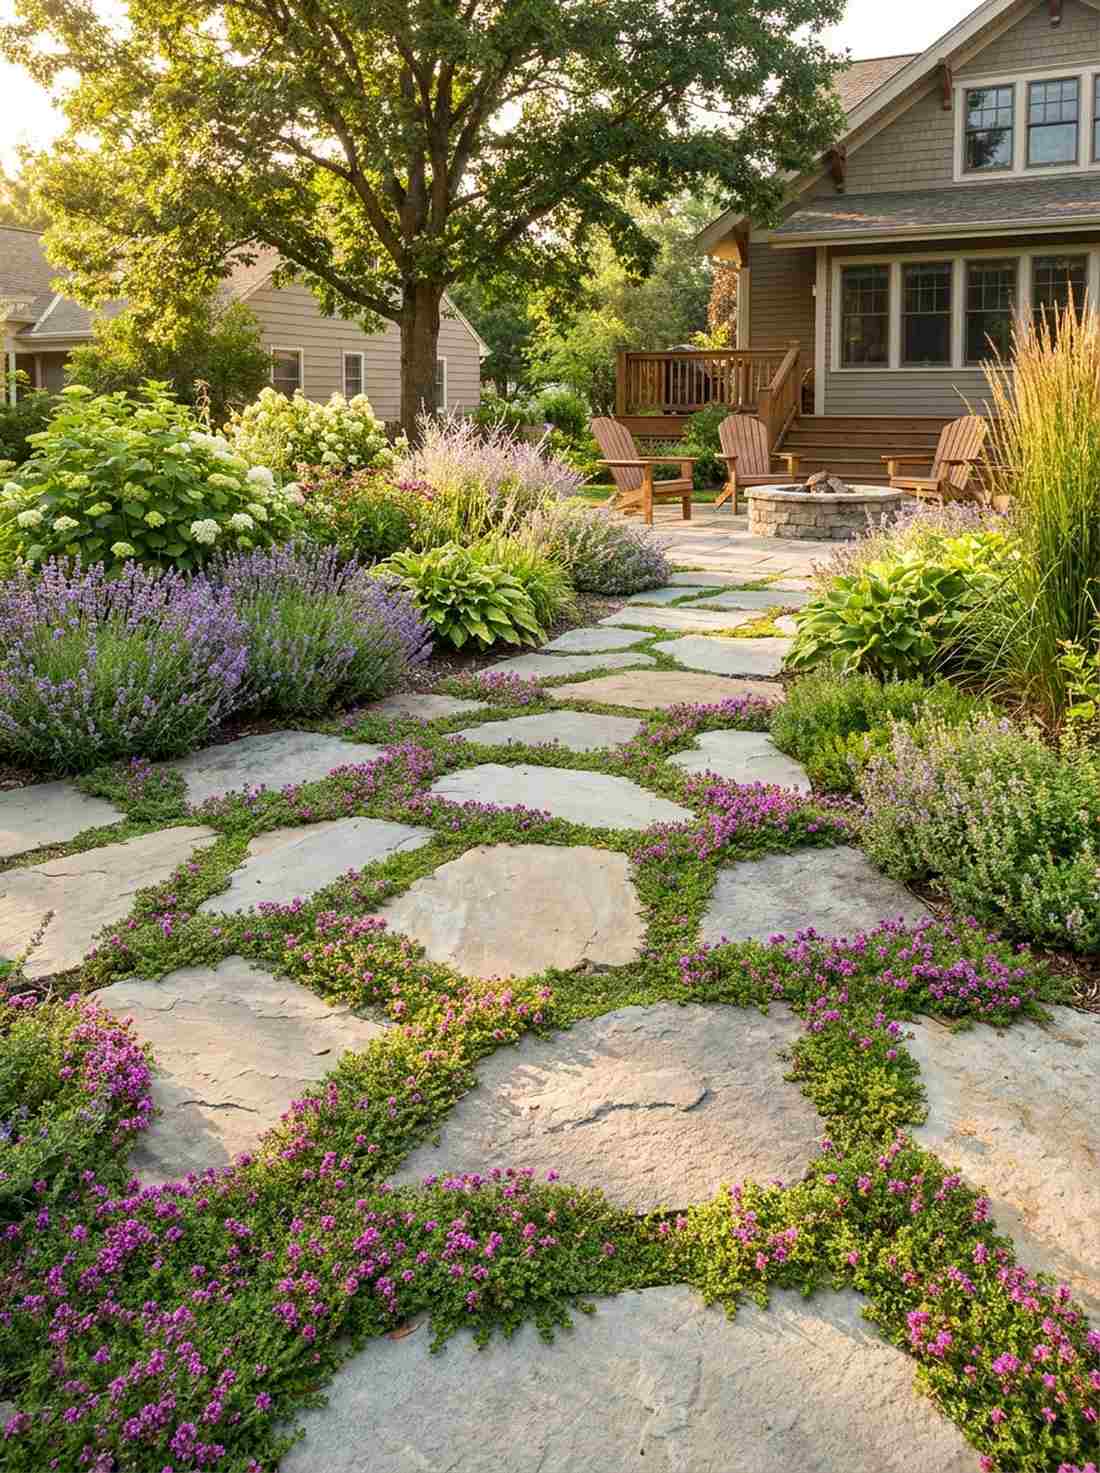
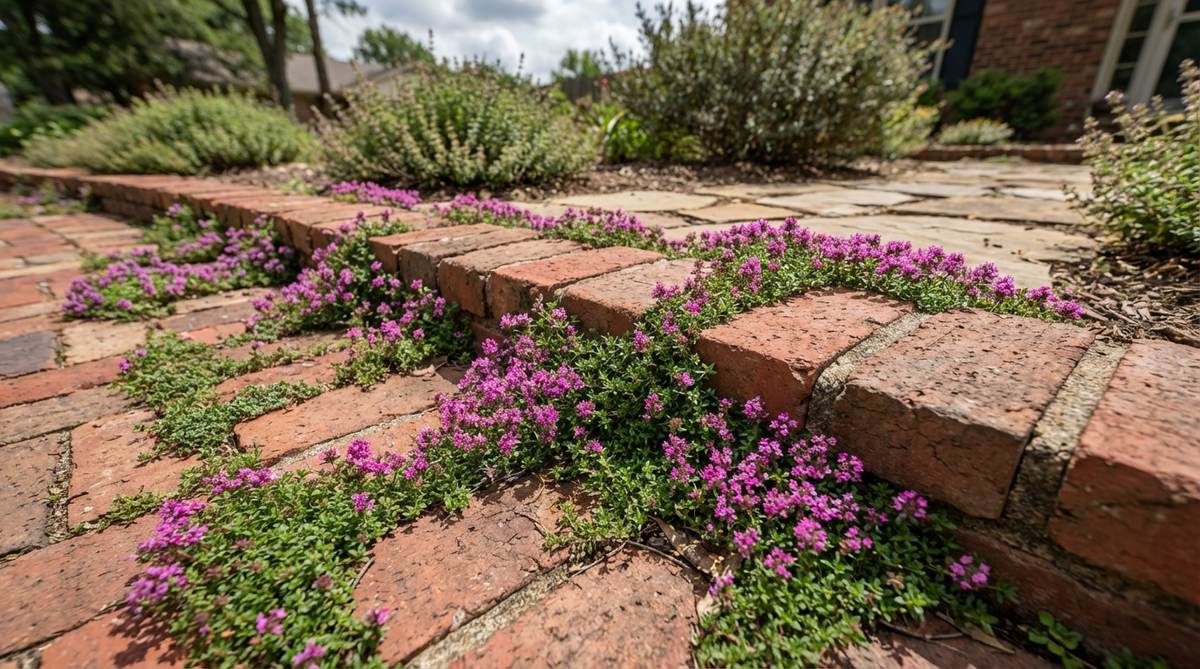
Transforms rigid concrete into a lush, fragrant ribbon. Perennial border garden design ideas like living joints feel like a tiny hidden forest. Perfect for softening the harsh edges of a large patio.
Pouring concrete between wide pavers ruins drainage and cracks over time. Packing the gaps with compost and thyme plugs bypasses the cheap plastic look, giving you an edge that blooms magenta in June and releases scent when stepped on.
You can create this living mortar for about $30.
- Key Materials: Creeping thyme plugs, compost mix
- Vibe / Style: Fragrant hidden cottage
- Difficulty: Easy botanical
- Budget Breakdown: Plugs: $20 | Soil: $10.
- Creator’s Tip: Use red creeping thyme; it tolerates heavy foot traffic better than other varieties.
- Smart Sourcing: Live creeping thyme plug trays (bulk pack) and fairy garden kits for whimsical styling.
21. Boxwood Formal Edging
Locks in year-round structure against rigid masonry geometry. Formal garden border design pairings feel like an elite parterre garden in Paris. Mandatory for framing high-end rose collections.
Relying solely on plants for a border often results in messy, sprawling edges by August. The double-edging system of brick backing up clipped boxwood strictly controls aggressive perennials while forcing a high-end designer finish.
A classic investment that costs roughly $80–$150. Pin this to your dream estate board.
- Key Materials: Boxwood shrubs, brick boundary
- Vibe / Style: Elite Parisian estate
- Difficulty: Moderate maintenance
- Budget Breakdown: Shrubs: $100 | Fertilizer: $20.
- Creator’s Tip: Plant the boxwoods exactly 12 inches behind the brick to allow your shears to drop in cleanly.
- Smart Sourcing: Dwarf English boxwood starter kits and professional precision hedge shears.
22. Ornamental Grass Overflow
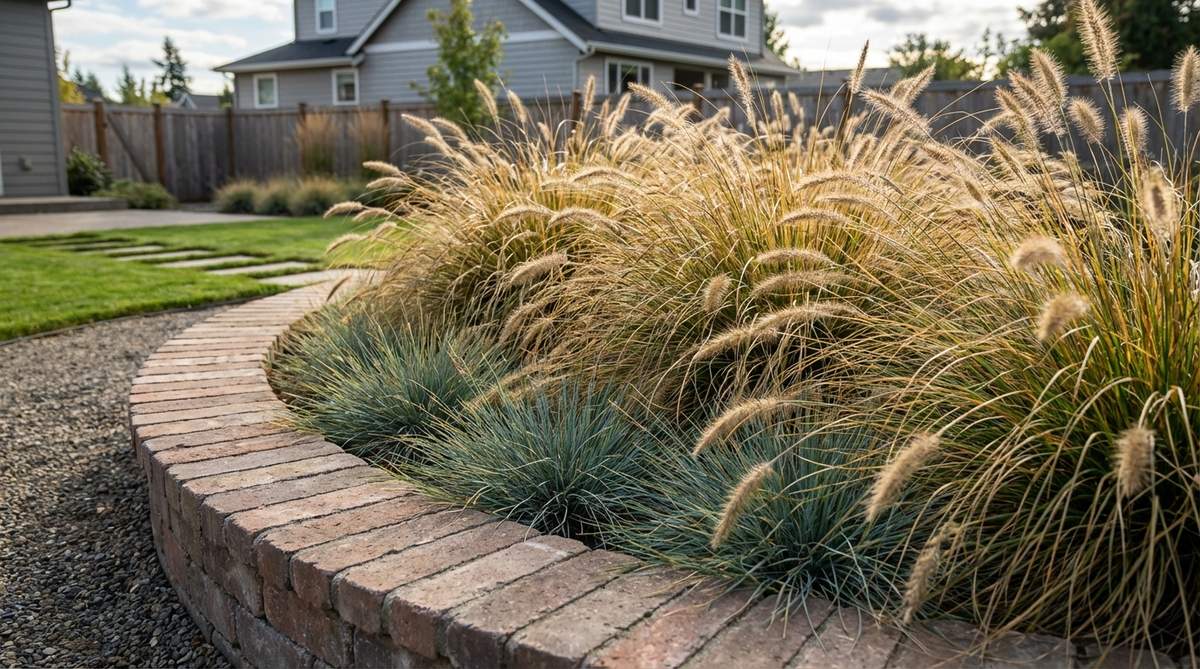
Introduces dynamic, sweeping movement against static hardscapes. Modern garden border design contrast feels like a breezy coastal contemporary home. Unbeatable for softening harsh, newly built retaining walls.
Stiff shrubs next to stiff brick looks heavy and boring. Letting fine-textured fountain grasses drape directly over the masonry edge captures the wind beautifully while keeping the grass crowns completely off your pristine lawn.
A high-texture contrast that costs around $40–$60.
- Key Materials: Fountain grass or sedge, brick retaining edge
- Vibe / Style: Coastal contemporary breeze
- Difficulty: Easy installation
- Budget Breakdown: Grasses: $40 | Mulch: $10.
- Creator’s Tip: Leave the seed heads up all winter; the snow catches on them beautifully against the brick.
- Smart Sourcing: Ornamental fountain grass multi-packs and slow-release ornamental fertilizer.
23. Sedum Brick Carpet
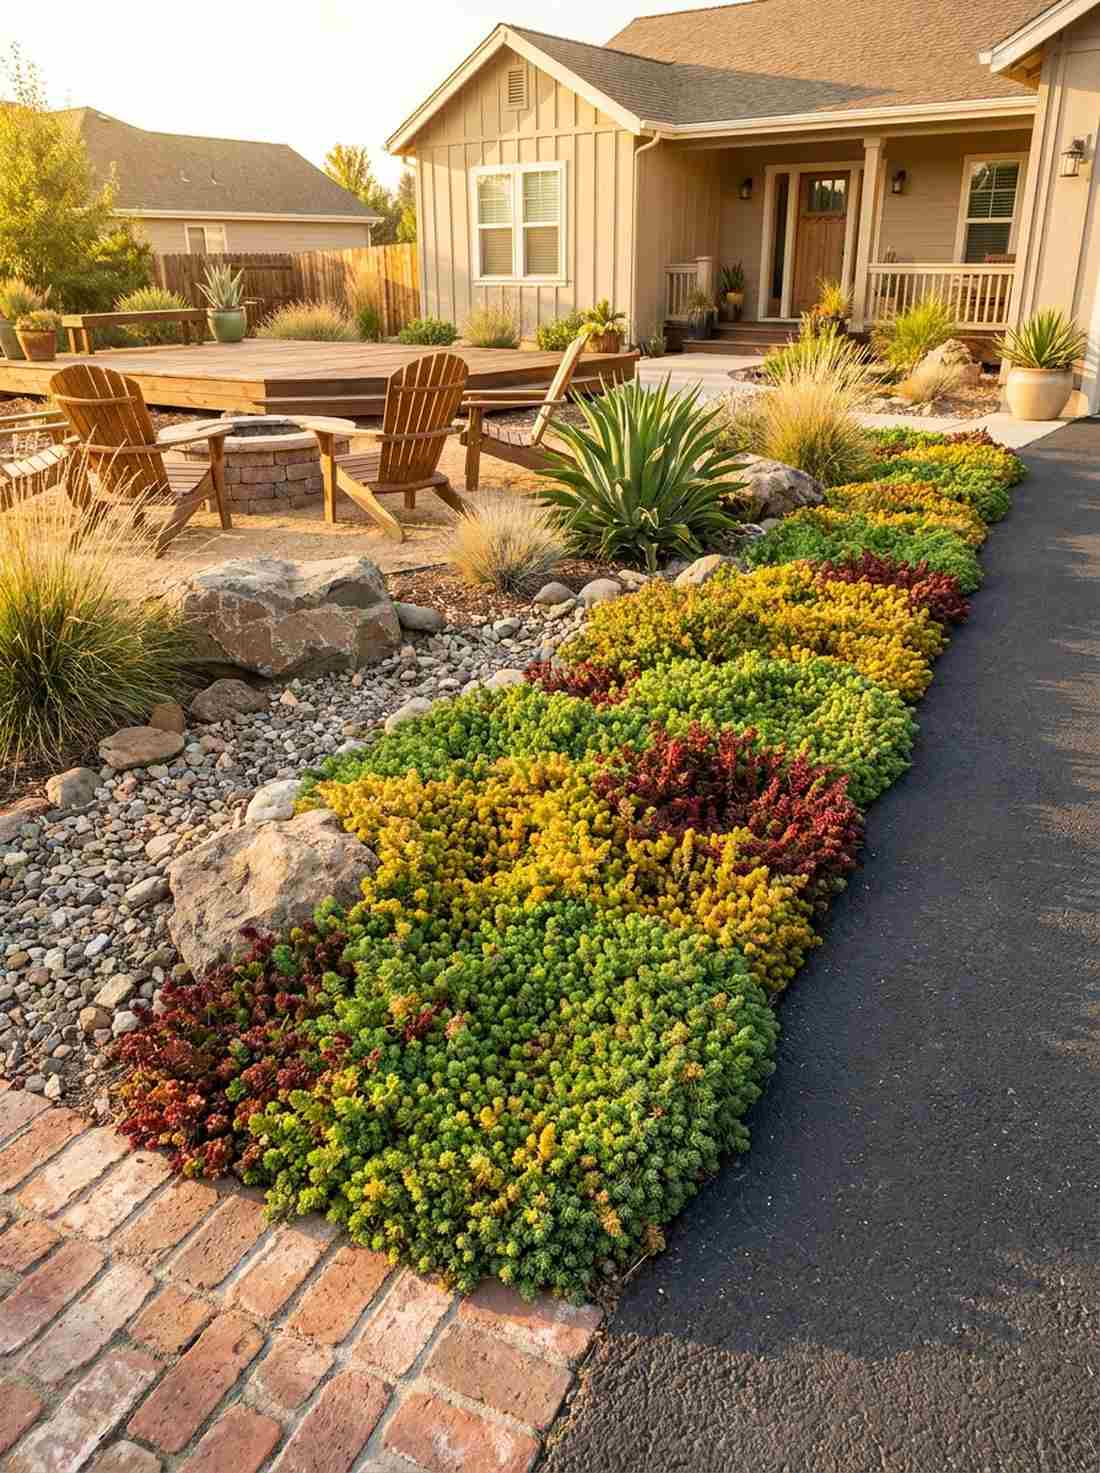
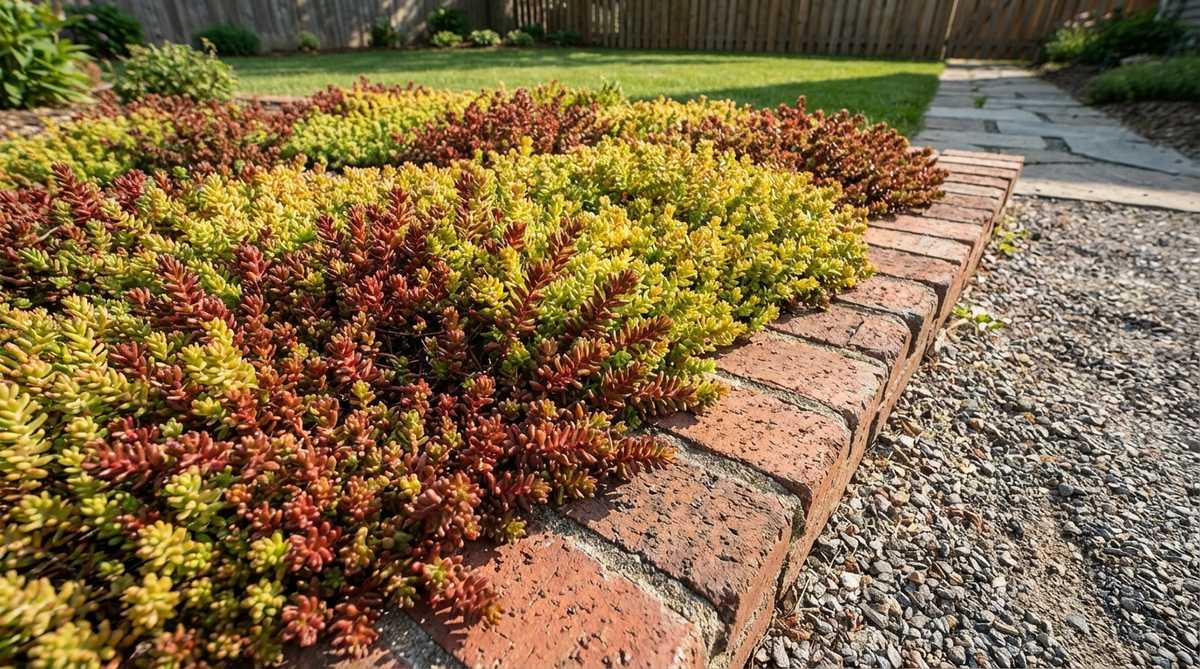
Creates a dense, fleshy mat that ignores extreme droughts. Mixed border garden design additions like this feel like an intentional desert oasis. Incredible for hell-strip plantings next to sun-baked asphalt driveways.
Fighting to keep thirsty annuals alive next to hot brick is a losing battle. Planting spreading succulents like ‘Angelina’ right on the border edge thrives on the radiant heat, turning vibrant burgundy in the fall.
An indestructible living edge for under $25.
- Key Materials: Spreading sedum varieties, well-draining soil
- Vibe / Style: Drought-proof desert oasis
- Difficulty: Zero-maintenance easy
- Budget Breakdown: Sedum: $15 | Gravel mix: $10.
- Creator’s Tip: Mix crushed gravel directly into the planting soil to guarantee rapid drainage.
- Smart Sourcing: Pre-rooted sedum tile mats (bulk) and terrarium accessories for miniature details.
24. Creeping Fig Wall Climber
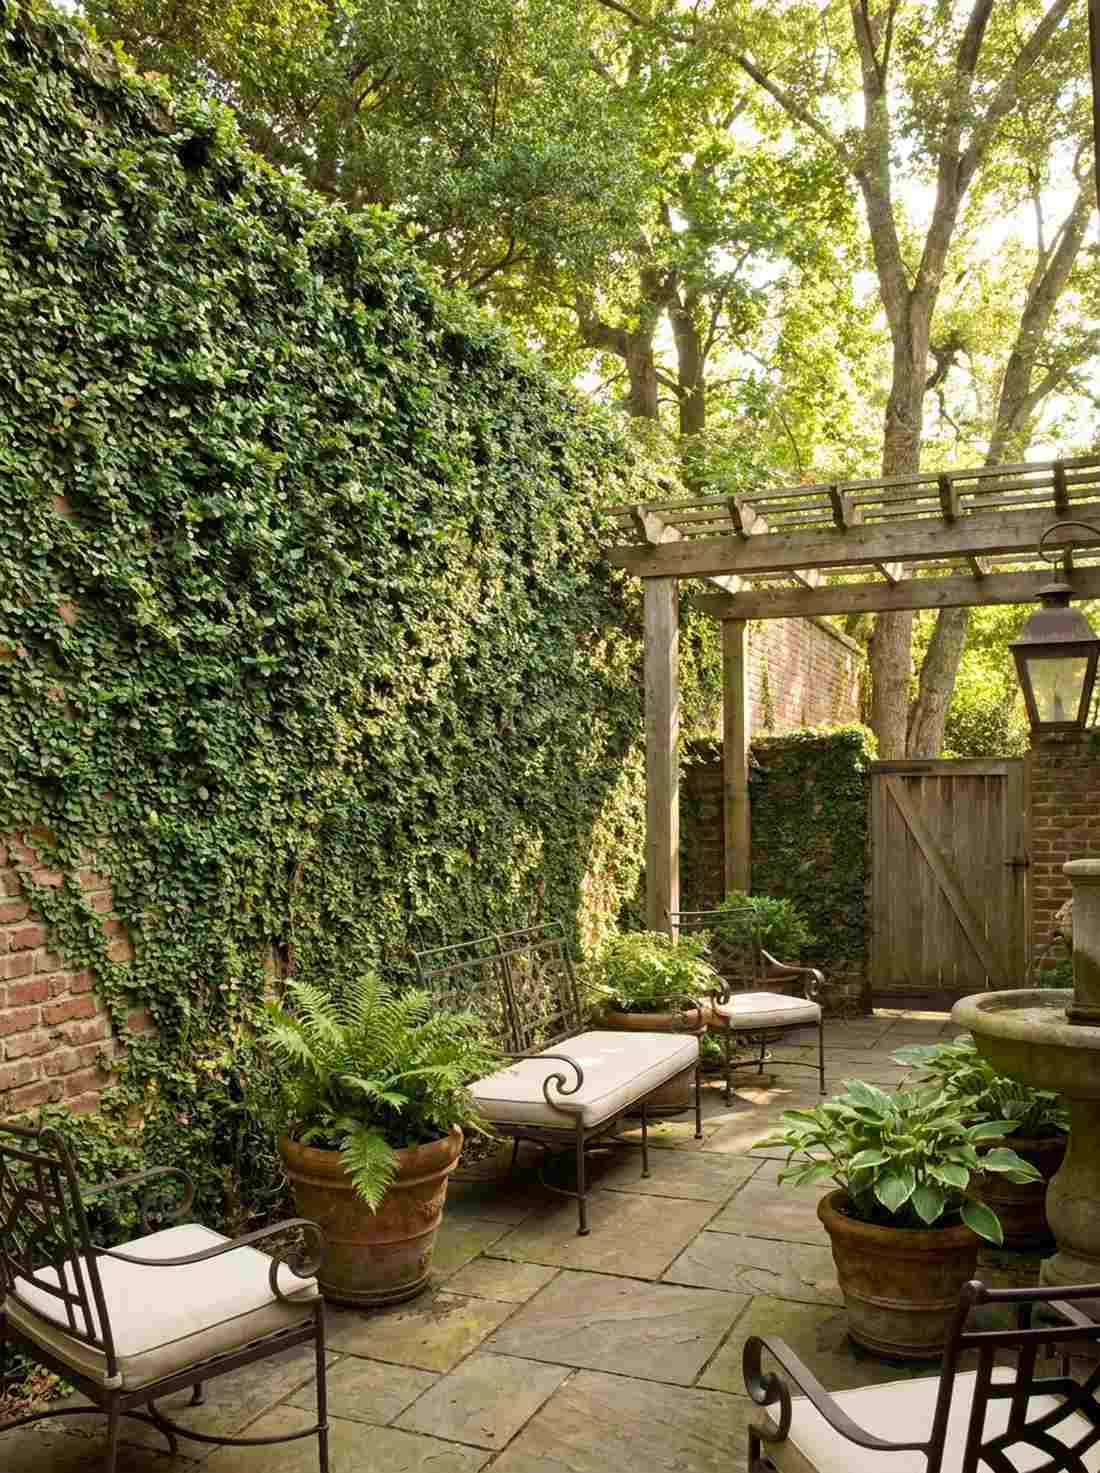
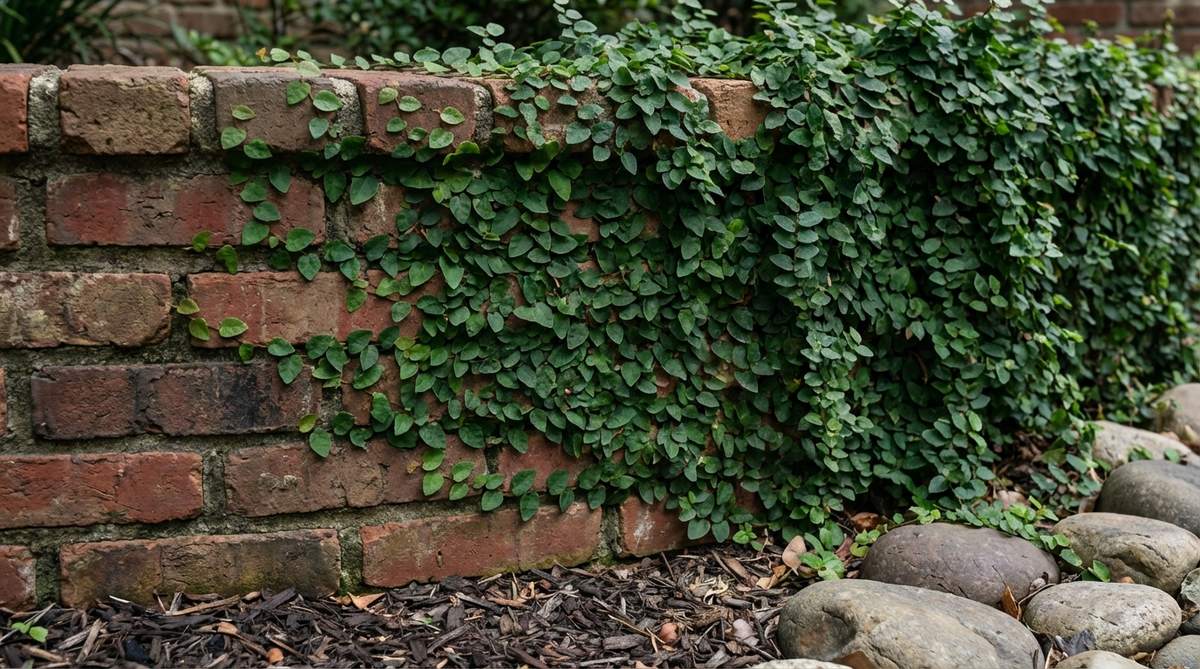
Wraps sterile walls in a lush, evergreen tapestry. Shade border garden design verticality feels like discovering a secret antique courtyard. The absolute best way to hide ugly, aging retaining bricks.
Painting old, stained brick is a nightmare that peels in a year. Letting creeping fig adhere via its natural aerial rootlets achieves an upscale aesthetic that completely camouflages the masonry underneath in just two seasons.
Transform a massive wall for around $30 in starters. Save this if you hate your current hardscape.
- Key Materials: Creeping fig vines, shaded brick wall
- Vibe / Style: Secret antique courtyard
- Difficulty: Requires annual shearing
- Budget Breakdown: Vines: $30 | Wall anchors: $0 (self-clinging).
- Creator’s Tip: Shear it tight to the wall annually; if left wild, the heavy top-growth can pull the vine right off the brick.
- Smart Sourcing: Live creeping fig starter pots and heavy-duty bypass pruners.
Before moving to the next setup, knowing how to choose your supplies completely alters the final look.
Material Guide: Cheap vs. Premium Aesthetic
Knowing exactly where to save and where to spend makes all the difference in achieving that “looks expensive but isn’t” vibe.
- Standard vs. UV-Resistant/Premium: Sealing your bricks with a UV-coated masonry spray stops the rich red colors from fading to a chalky pink after one summer.
- Pre-made Kits vs. Sourcing Locally: Using heavy-duty starter kits for polymeric sand and base layers often saves time and prevents total structural failure in winter freezes.
25. Alyssum Fragrance Strip
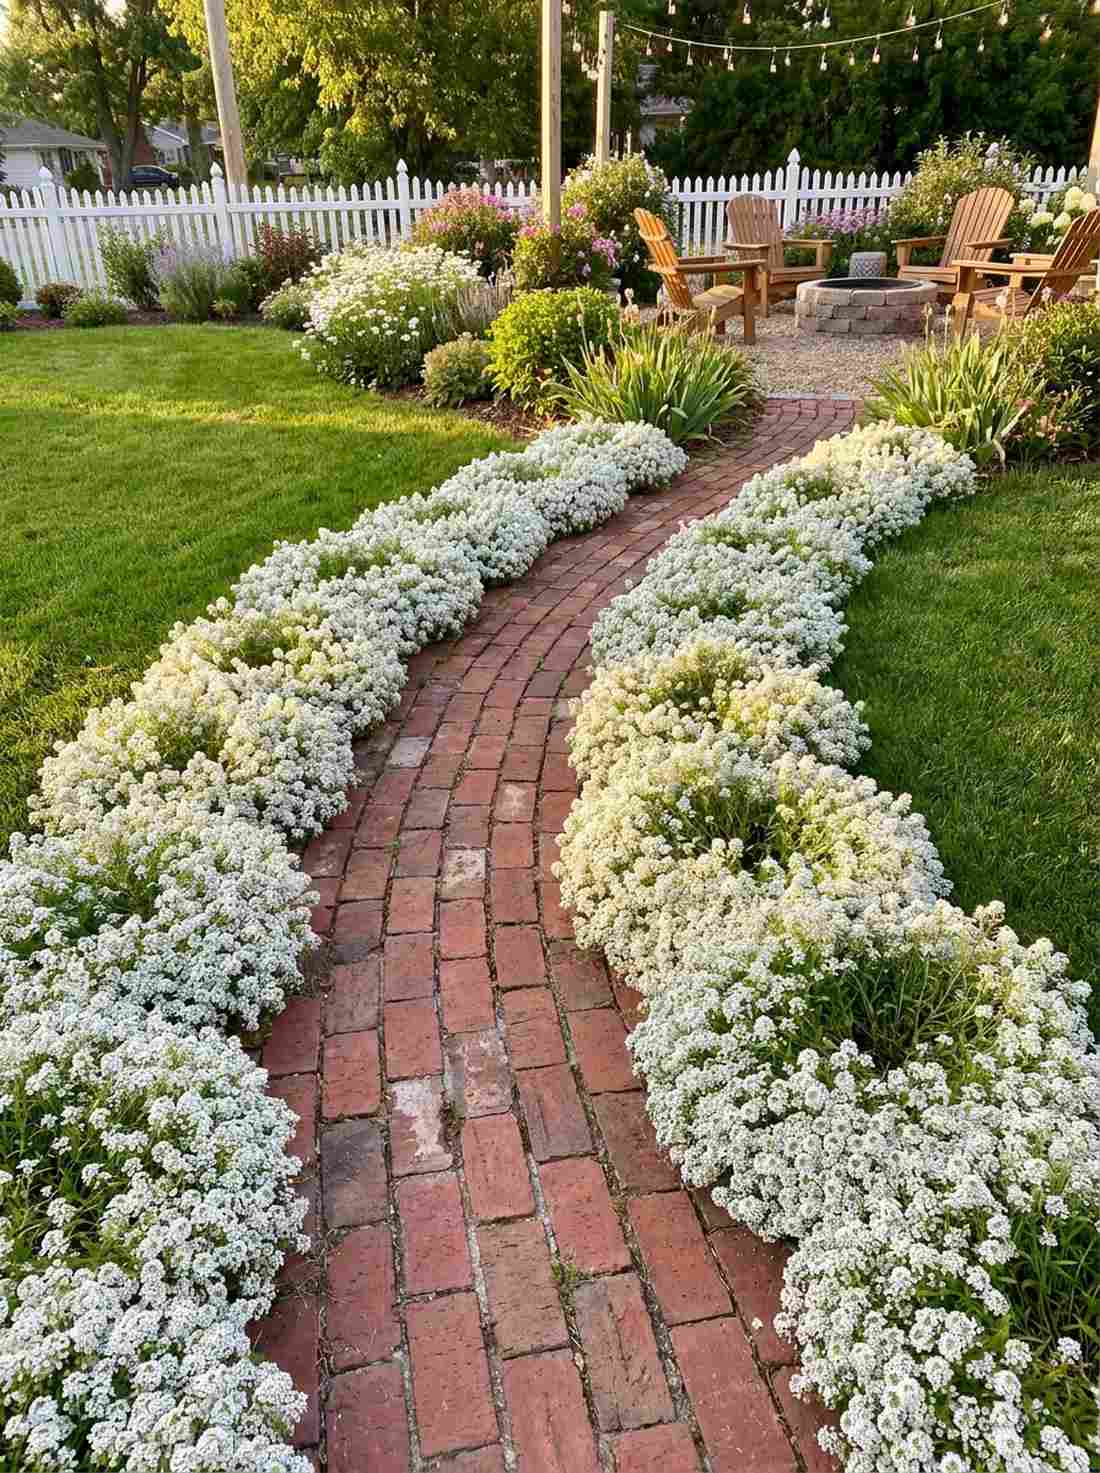
Pumps continuous, honey-scented blooms right at your feet. Garden flower border design strips feel like a fluffy white cloud hugging your pathway. Excellent for filling the awkward gaps between perennial blooms.
Leaving raw soil right against the brick invites aggressive weed takeovers. Direct-seeding cheap sweet alyssum hugs the edge perfectly without obscuring the brickwork, dropping heavy seed to return completely free next year.
You can execute this floral ribbon for literally $5.
- Key Materials: Alyssum seed packets, bare border soil
- Vibe / Style: Soft cloud-like ribbon
- Difficulty: Scatter and water
- Budget Breakdown: Seeds: $5 | Labor: 5 minutes.
- Creator’s Tip: Shear the alyssum in mid-summer when it gets leggy to force a massive second bloom flush for fall.
- Smart Sourcing: Bulk sweet alyssum seeds (1/4 lb bags) and miniature garden supplies to nestle inside.
26. Hostas Shade Border
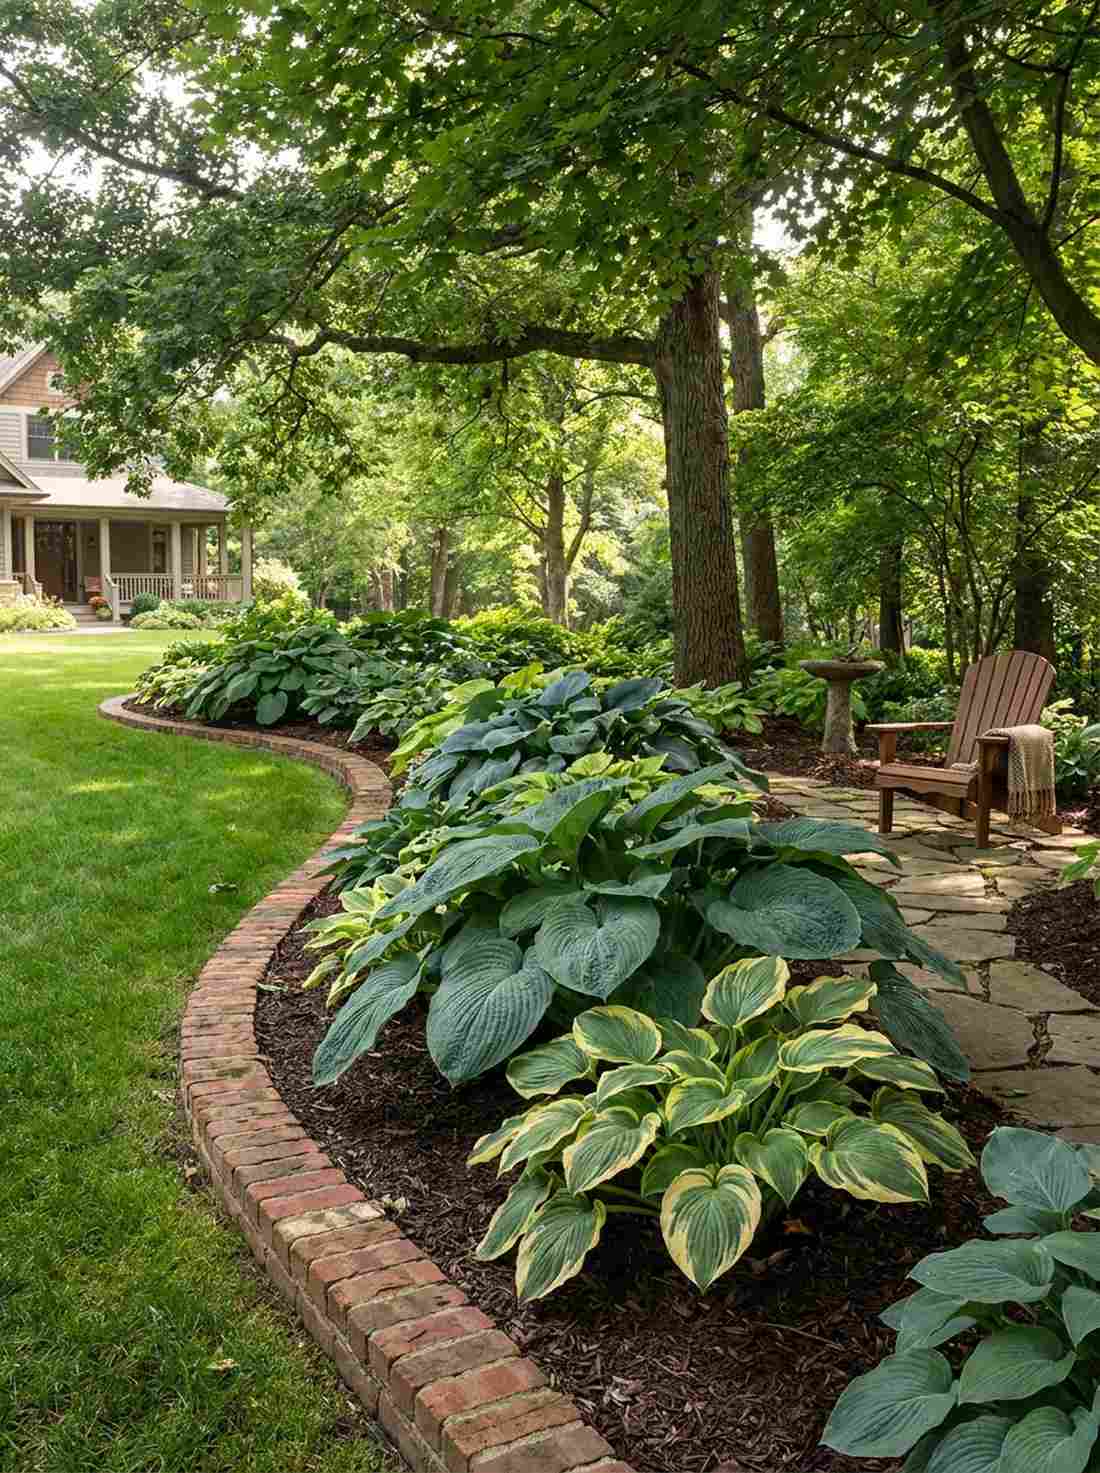

Anchors dark corners with massive, bold foliage. Shade border garden design layouts feel like a deeply relaxing woodland retreat. The perfect solution for edges running directly under heavy tree canopies.
Most blooming edge plants die instantly in heavy shade. Planting giant hosta varieties directly behind a rigid brick line stops the massive crowns from suffocating your lawn while balancing the heavy visual weight of the masonry.
A premium foliage layout that runs around $50–$80.
- Key Materials: Large bare-root hostas, brick containment
- Vibe / Style: Bold woodland retreat
- Difficulty: Easy digging
- Budget Breakdown: Bare-roots: $60 | Soil prep: $15.
- Creator’s Tip: The brick actually protects emerging hosta shoots in early spring by radiating captured daytime heat overnight.
- Smart Sourcing: Premium bare-root hosta collections (bulk pack) and organic slug-repellent copper tape.
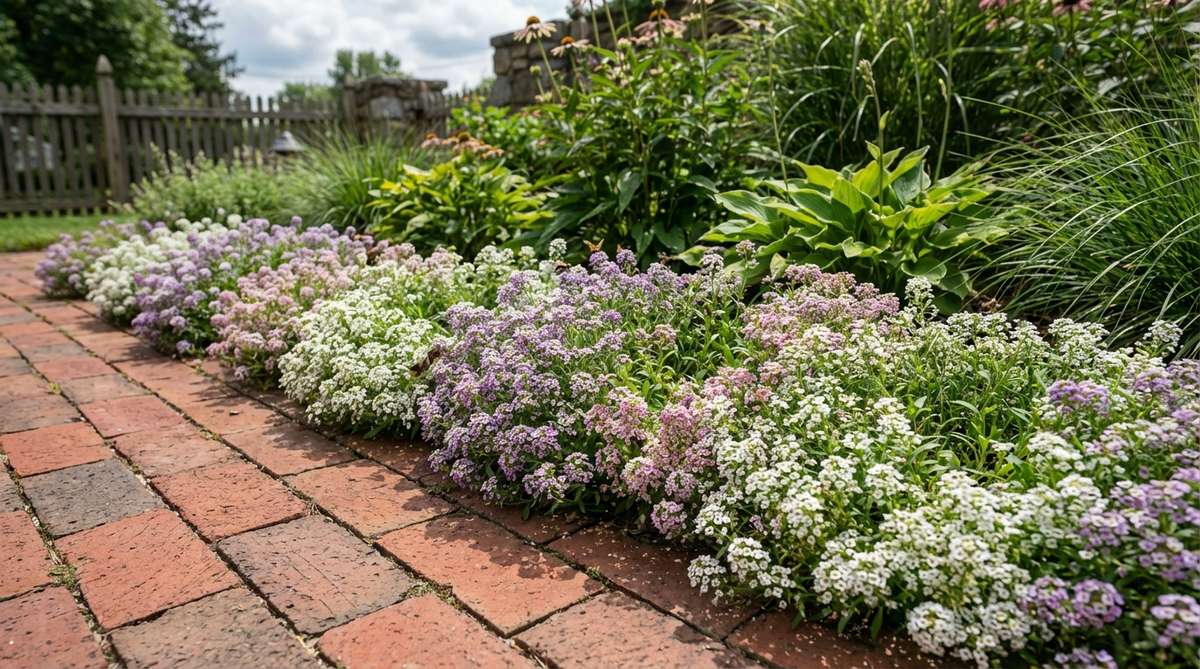
27. Dianthus Cottage Pink

Serves up spicy-scented blooms on tidy, blue-gray evergreen mounds. Cottage garden border design accents like this feel like an authentic English heirloom garden. Beautifully suited for hot, full-sun pathway edges.
Relying on messy sprawl plants ruins the clean line of your hardscape. Dianthus forms tight, disciplined mounds that respect the border boundaries year-round, bypassing the cheap plastic look of fake edge guards.
You can establish this classic look for roughly $30. Pin this for your next spring planting spree.
- Key Materials: Dianthus starts, well-drained edge soil
- Vibe / Style: English heirloom precision
- Difficulty: Easy planting
- Budget Breakdown: Starts: $25 | Fertilizer: $5.
- Creator’s Tip: Deadhead the first flush aggressively to guarantee spicy blooms straight through autumn.
- Smart Sourcing: Pre-grown dianthus quart pots (multi-pack) and slow-release bloom booster.
Specialized Applications
These advanced techniques address specific landscape challenges through creative brick applications. Each method solves practical problems while maintaining aesthetic cohesion.
28. Permeable Brick Ribbon
Elegantly manages heavy stormwater runoff without looking industrial. Garden design border plans using permeable gaps feel incredibly eco-conscious and modern. Mandatory for properties facing strict green-infrastructure zoning laws.
Solid concrete channels water straight into overwhelmed storm drains. Alternating bricks with 2-inch planted gaps captures and filters runoff directly into the subsoil, proving that functional drainage looks wildly expensive when done right.
An eco-upgrade that costs roughly $40 for materials.
- Key Materials: Spaced pavers, gravel base, creeping plants
- Vibe / Style: Eco-conscious modernism
- Difficulty: Moderate spacing
- Budget Breakdown: Pavers: $25 | Gravel/Sand: $15.
- Creator’s Tip: Use a perfectly cut 2-inch wood block as a spacer to ensure the entire ribbon looks mathematically flawless.
- Smart Sourcing: Permeable jointing gravel (bagged) and pre-cut measuring blocks.
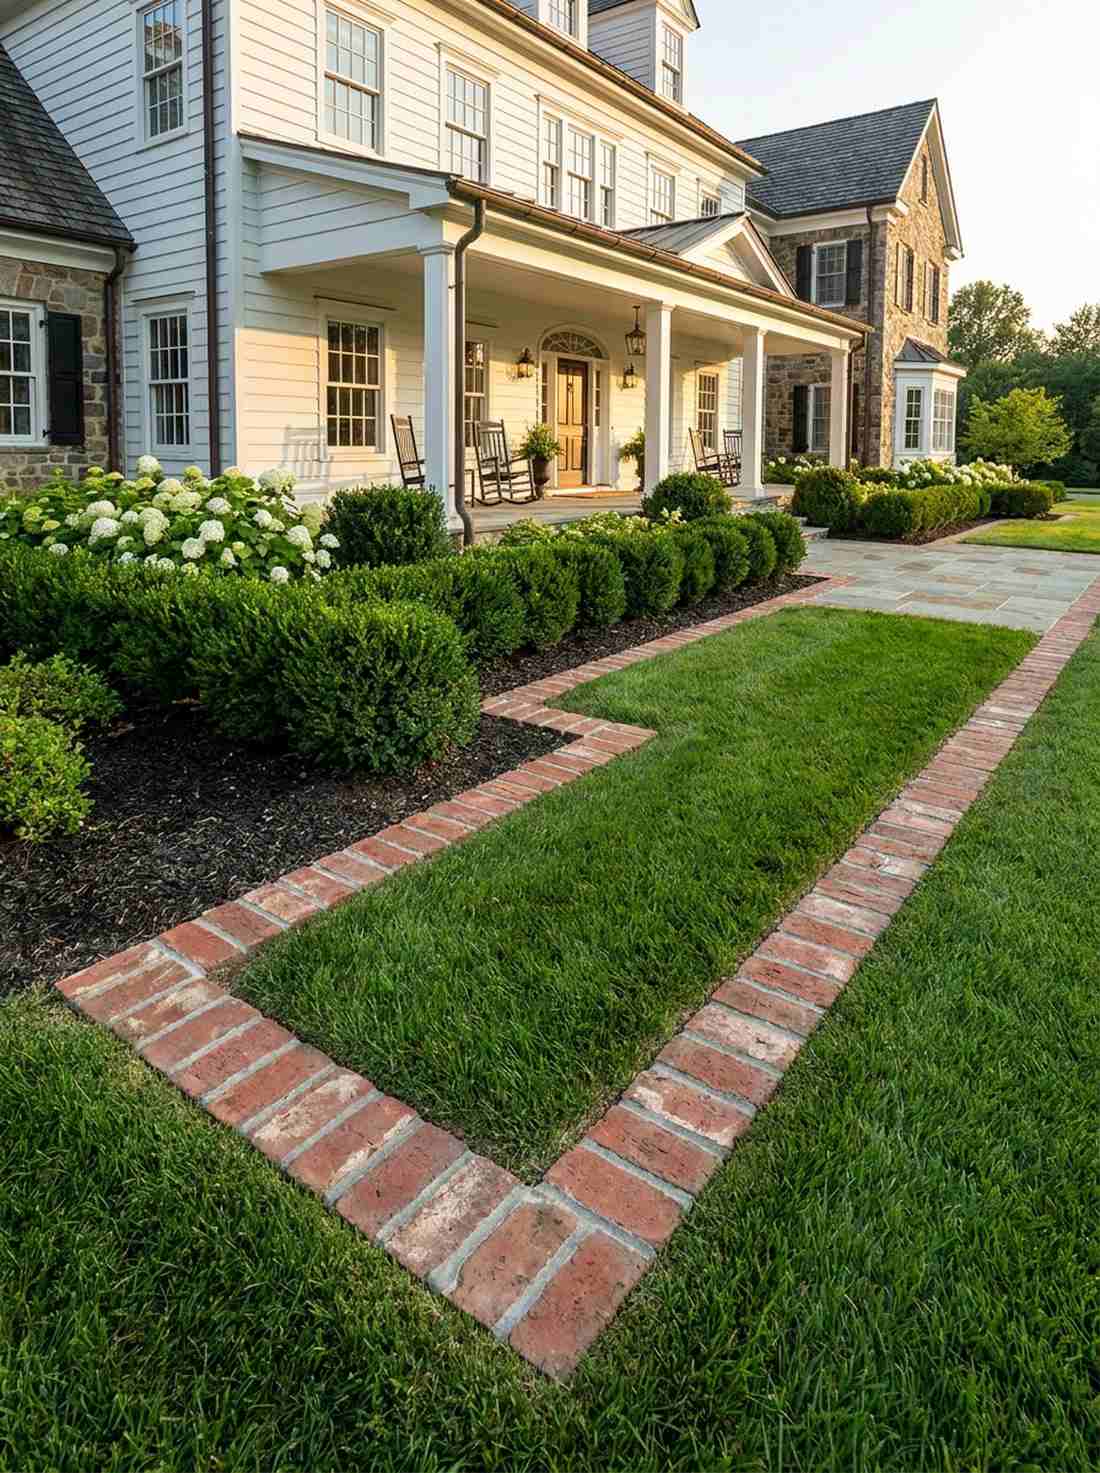
29. Mowing Strip Integration
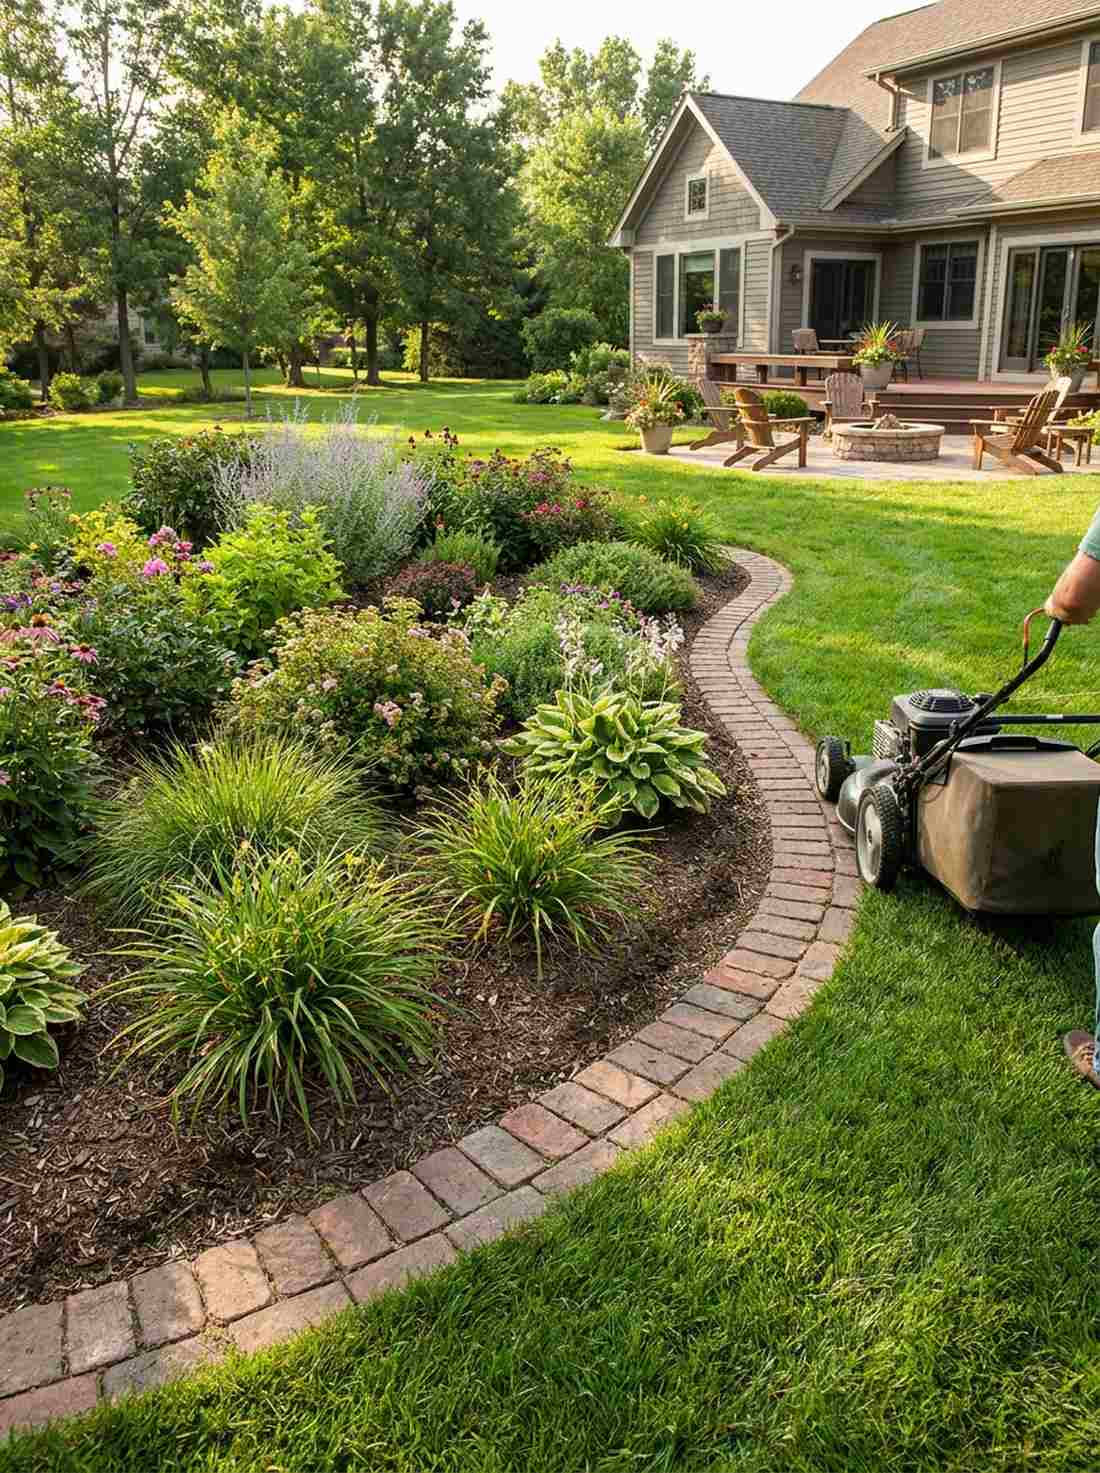
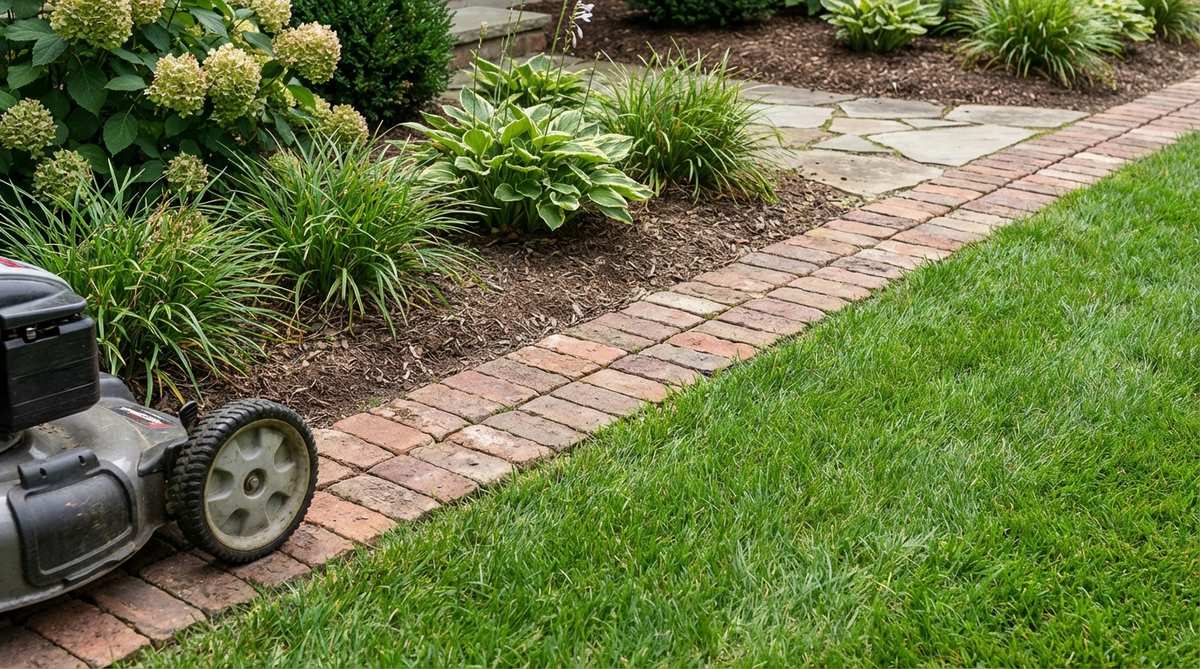
Obliterates the need for a weed whacker entirely. Large garden border design utility strips feel like a massive relief for weekend chores. The ultimate timesaver for yards with endless winding bed lines.
Raising borders above the grass guarantees you’ll be string-trimming every Saturday forever. Sinking the bricks completely flush allows the mower wheels to ride directly on the stone, cutting the grass perfectly over the edge in one pass.
This massive labor-saver costs about $50 to implement. Pin this if you hate yard maintenance.
- Key Materials: Flat bricks, deep trenching, leveling sand
- Vibe / Style: Invisible utility line
- Difficulty: Precision leveling
- Budget Breakdown: Bricks: $40 | Sand: $10.
- Creator’s Tip: Sink the brick exactly 1/2 inch below the soil line to ensure mower blades never catch the masonry.
- Smart Sourcing: Heavy-duty flat turf tampers and commercial-grade leveling sand (bulk).
You won’t believe how an inexpensive molded edge can replicate centuries of history…
30. Victorian Rope Edge
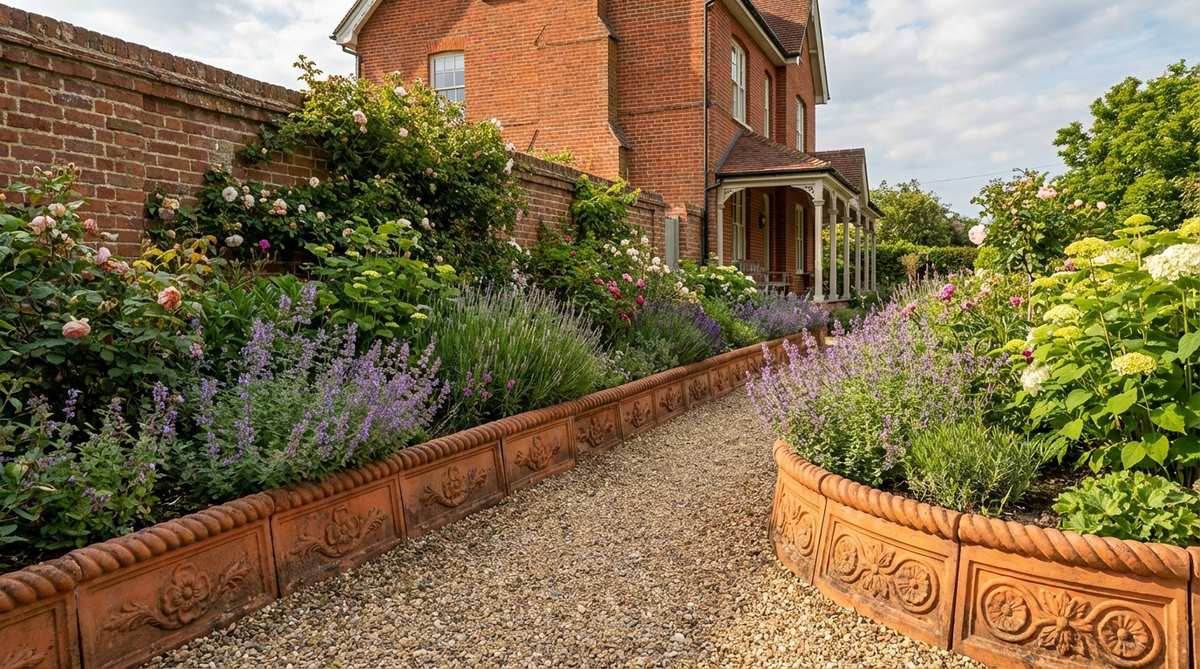
Recreates historic grandeur with modern frost resistance. Formal garden border design accents using rope molds feel like a wealthy 19th-century botanical garden. Stunning when wrapping around formal herb knot gardens.
Authentic antique terracotta shatters to pieces after one rough winter. Sourcing modern, molded terracotta alternatives bypasses the cheap plastic look entirely while delivering that intricate ornamental detail that survives sub-zero freezes.
A heritage aesthetic that runs around $80–$120 for a small perimeter.
- Key Materials: Rope-patterned terracotta sections, native soil trench
- Vibe / Style: 19th-Century grandeur
- Difficulty: Easy interlocking
- Budget Breakdown: Edging sections: $100 | Prep: $0.
- Creator’s Tip: Dig the trench slightly deeper than necessary and backfill with sand to perfectly level these rigid interlocking pieces.
- Smart Sourcing: Frost-resistant terracotta rope edging (starter kits) and heavy-duty rubber mallets.
31. Tree Ring Brick Circle
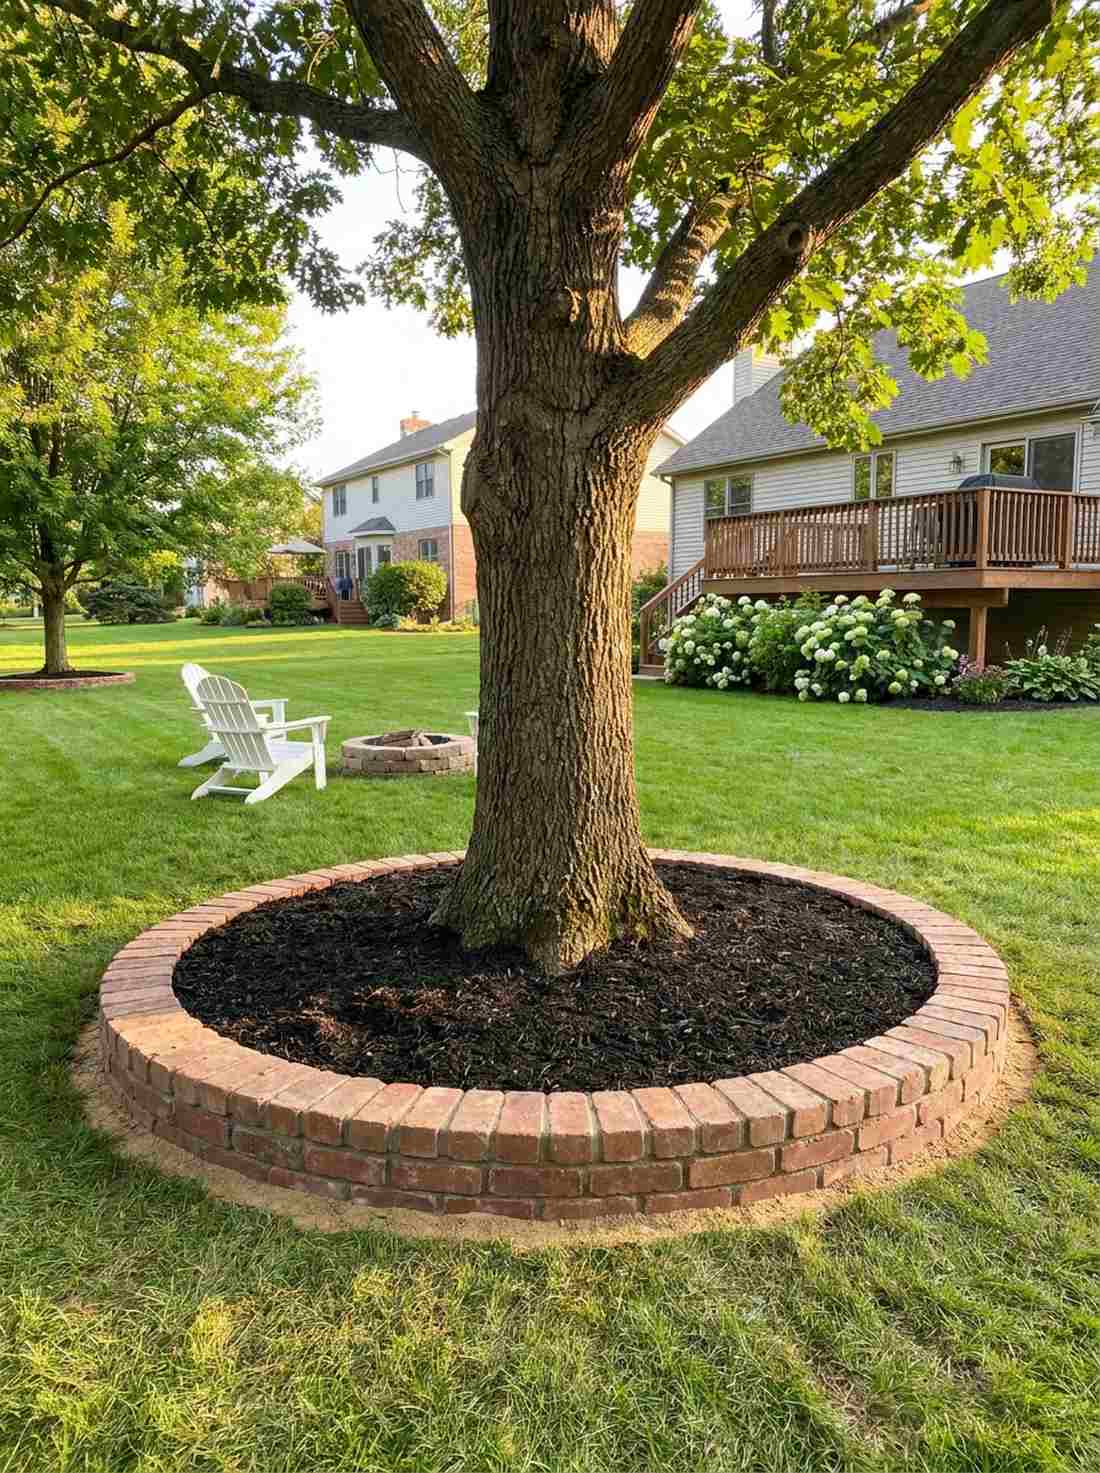
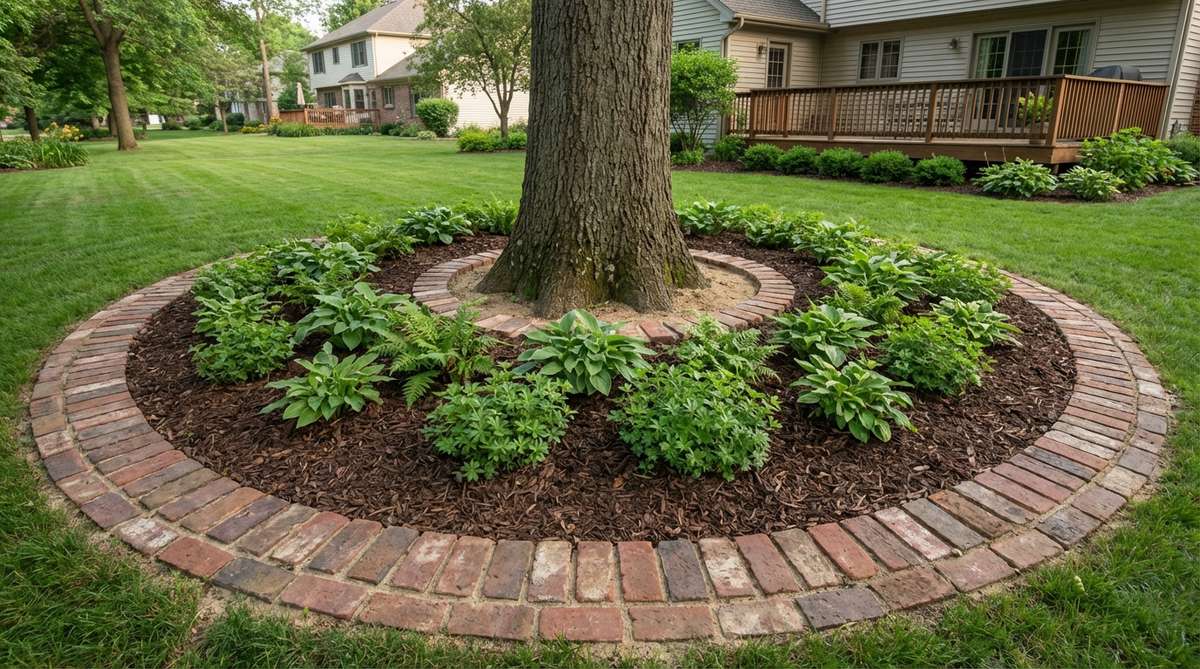
Provides a clean, sharp halo that protects massive root systems. Garden design borders hugging heritage trees feel incredibly manicured and intentional. Essential for stopping lawnmowers from chewing up exposed bark.
Piling mulch into a “volcano” against the trunk rots the tree in a few years. Building a wide, dry-laid brick ring pushed out to the drip line retains a healthy, flat mulch layer while allowing crucial gas exchange to the roots.
Protect your expensive trees for roughly $40.
- Key Materials: Standard bricks, sand base, organic mulch
- Vibe / Style: Manicured estate halo
- Difficulty: Easy radius layout
- Budget Breakdown: Bricks: $30 | Sand: $10.
- Creator’s Tip: Never use mortar around trees; roots need to breathe, and the tree’s growth will eventually crack a solid concrete ring anyway.
- Smart Sourcing: Pre-cut flexible measuring tapes and premium organic hardwood mulch (bulk bags).
Conclusion
Mastering these 31 exact garden design border setups completely redefines your property’s value. These high-end blueprints bypass the cheap plastic look, delivering premium brick and plant integrations that drastically cut down weekend maintenance. Whether you are laying down a quick permeable ribbon or investing in professional-grade starter kits for a raised soldier wall, the right foundational materials ensure your aesthetic lasts for decades. Lock in your favorite blueprint, grab the right bulk supplies, and transform your chaotic beds into a designer-level landscape.
Frequently Asked Questions
What type of brick works best for garden borders?
Severe-weather-rated clay pavers are absolutely crucial if you want to avoid freeze-thaw cracking. While cheap standard bricks crumble in a few years, investing in pre-sealed commercial pavers (bulk pack) guarantees a premium aesthetic that easily survives harsh winters. Reclaimed bricks work beautifully too, provided you treat them with a UV-resistant masonry sealant.
How deep should I dig a trench for brick edging?
For a setup that looks wildly expensive and doesn’t sink, excavate exactly 3-4 inches deep. This allows room for a solid 2-inch gravel base and leveling sand. If you’re building raised walls, you must go 6-8 inches down to establish a frost-proof footing. Skipping this step is why most cheap DIY borders fail by spring.
Can I install brick borders without mortar?
Absolutely, and it’s often preferred for shifting landscapes. Dry-lay systems achieve an upscale aesthetic when locked in with UV-resistant polymeric jointing sand. This productized material hardens like concrete to stop weeds but remains flexible enough to prevent the catastrophic cracking you see in cheap wet-mortar jobs.
What plants grow best along brick garden borders?
Low-growing, heat-loving perennials thrive against the thermal mass of masonry. Grabbing creeping thyme plug trays or spreading sedum creates a lush, premium contrast. For shaded areas, tucking in miniature garden supplies alongside large hostas or creeping fig completely softens the rigid edge.
How do I prevent grass from growing over brick edging?
The smartest layout is a sunken mowing strip. By dropping the bricks 1/2 inch below the turf line, your mower wheels ride the stone and cut the runners instantly. Pair this layout with a heavy-duty commercial weed barrier fabric underneath the base to stop deep-rooted weeds from infiltrating the joints.
Should brick borders slope for drainage?
Yes, retaining water against masonry causes ugly efflorescence (white staining) and structural rot. Always angle your base trench at a 2% slope away from your primary walkways. Utilizing coarse drainage sand or permeable jointing gravel kits ensures rapid water infiltration, completely bypassing the flooding issues common in amateur hardscapes.